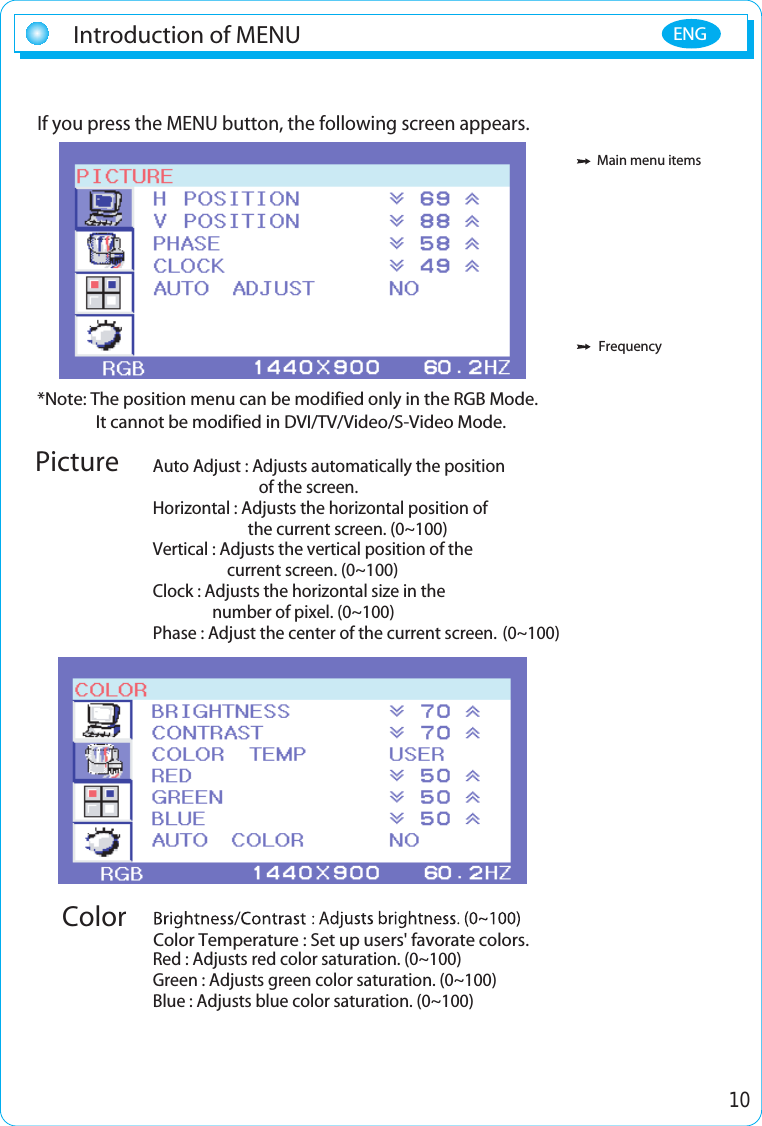
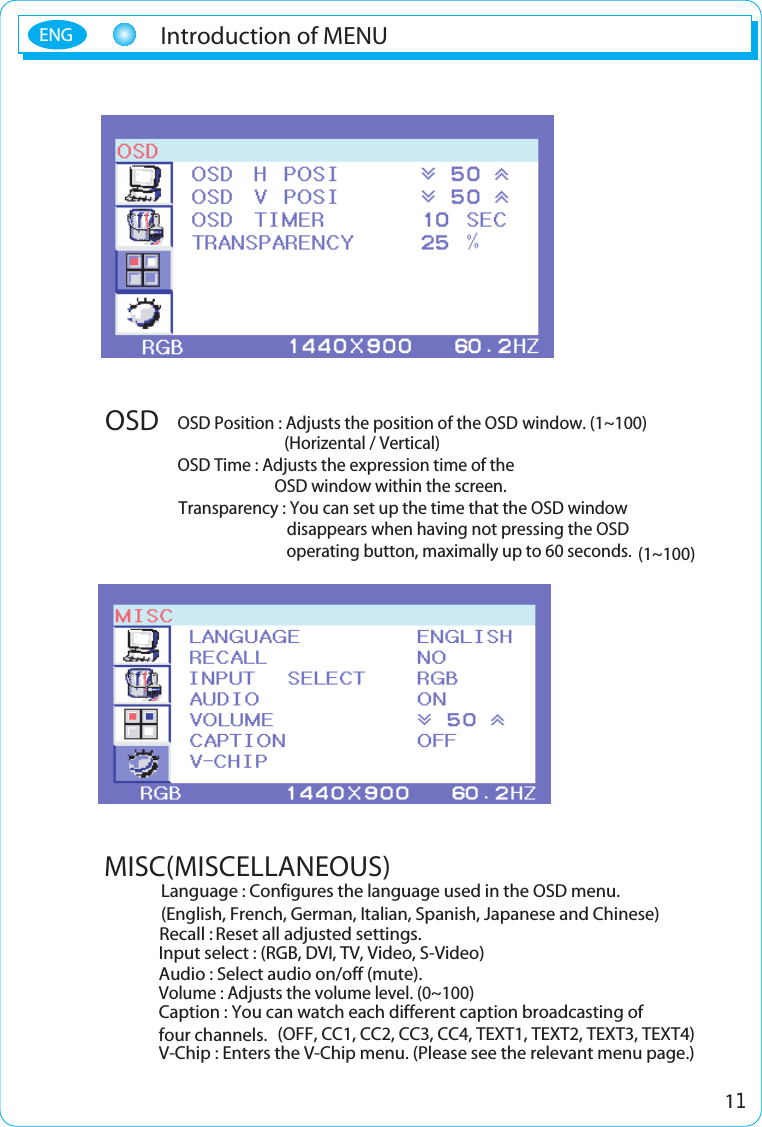
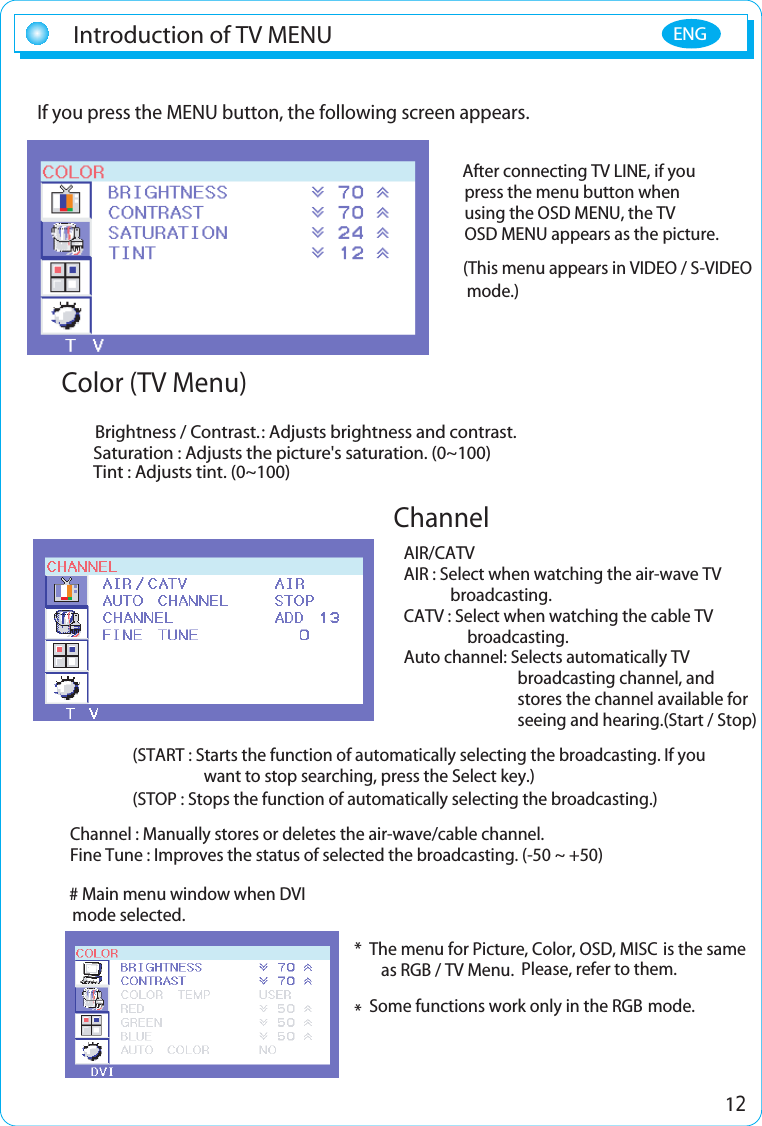
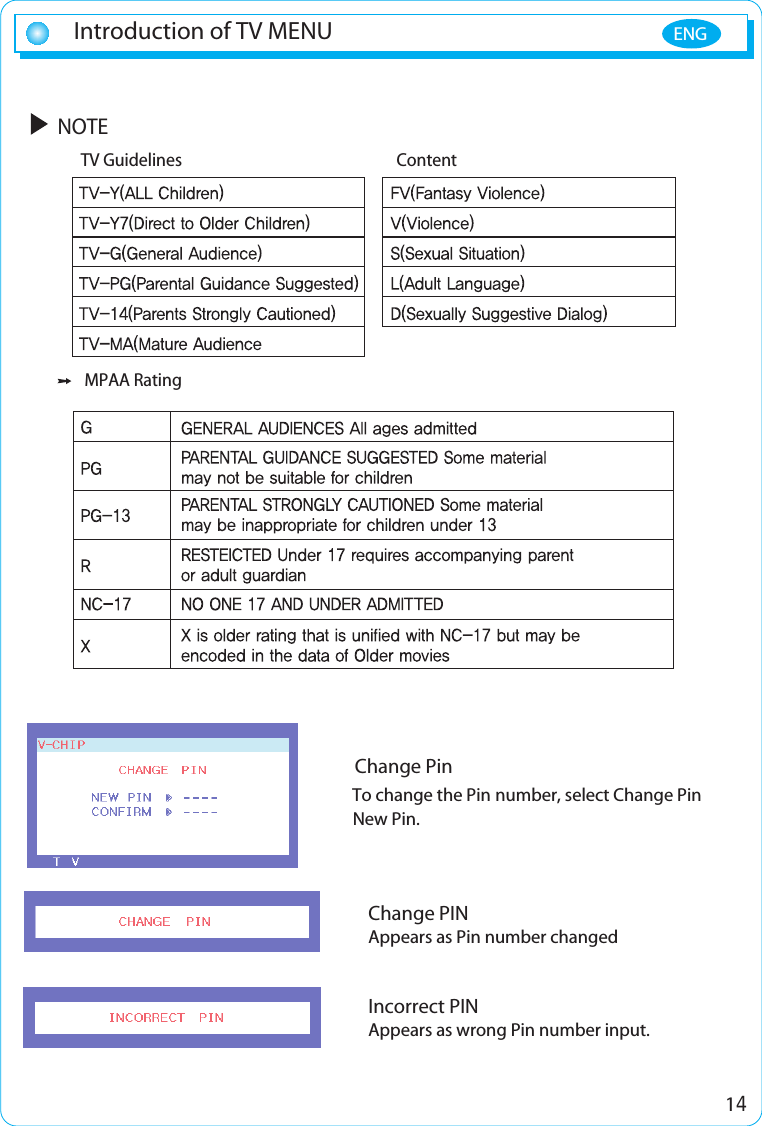
Megavision MV192T TFT LCD MONITOR & TV User Manual 0707 MV190T eng
Megavision co., Ltd. TFT LCD MONITOR & TV 0707 MV190T eng
UserManual.wiki
>
Megavision
>
MV192T User Manual
USERS MANUAL
Navigation menu
Upload a User Manual
Namespaces
Wiki Guide
HTML
PDF
Info
Views
User Manual
Discussion / Help
Navigation


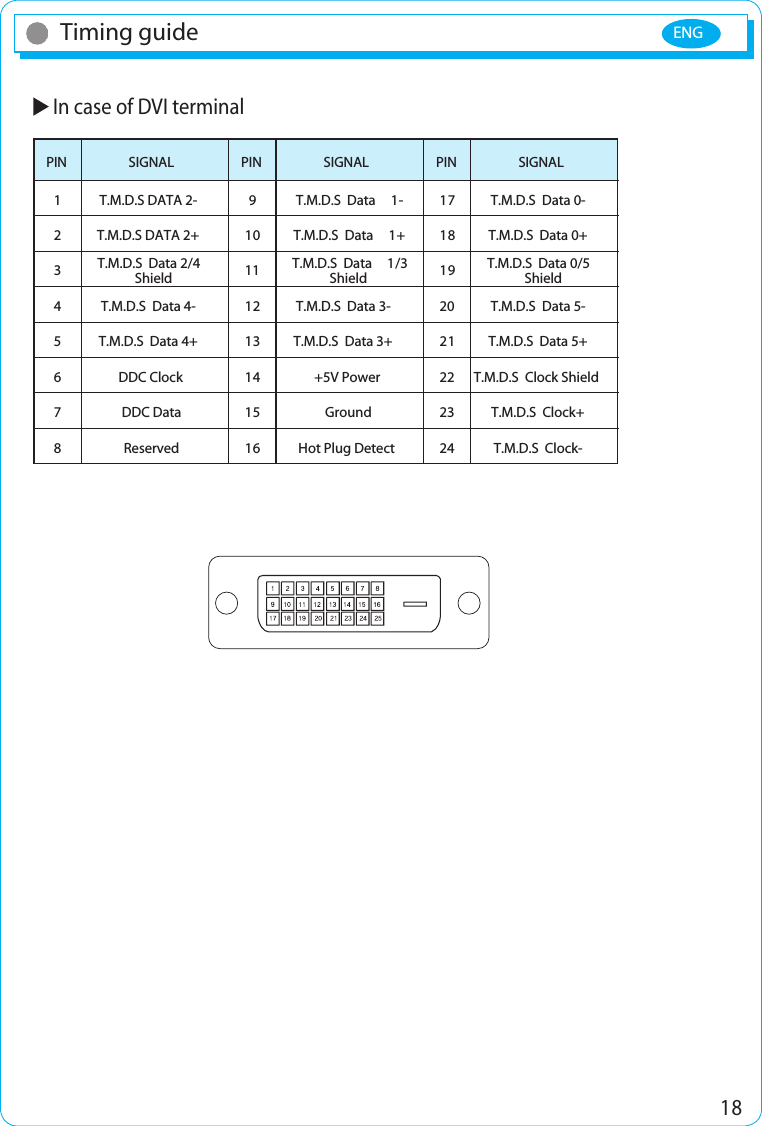
![17Timing guideENGTiming guideThis product is a multi-frequency monitor.It functions in horizontal frequencies from 30 kHz to 80 kHz and verticalfrequencies from 56 Hz to 75 Hz. Due to its design based onmicroprocessor, it offers the functions of automatic synchronization andautomatic size. This monitor is equipped with 10 programmed configurationsthat are shown in the timing table. The followings are the ten configurations.Signal connectionThis signal input terminal is a D-SUB connector. Connect the signal cable tothe signal input of the computer.PresetResolutionHorizontalVESAVertical Horizontal VerticalFrequencyClock [MHz] Polarity(H/V)M1M2M3M4M5M6M7M8M9M10MAC72064064080080010241024128012808324004804806006007687681024102462431.5KHz31.5KHz37.5KHz37.9KHz46.9KHz48.4KHz60.0KHz64.0KHz80.0KHz49.7KHz70Hz60Hz75Hz60Hz75Hz60Hz75Hz60Hz75Hz75Hz28.32225.17531.50040.00049.50065.00078.750108.000135.00057.284- / +- / -- / -+ / ++ / +- / -+ / ++ / ++ / +- / -VGAPin number123456789101112131415RedGreenBlueNo connectionGroundRed groundGreen groundBlue groundNo connectionGroundGroundSDAHorizontal - SyncVertical - SyncSCLDescription DescriptionPin number105 115 16NoteDisconnect the power connected to the monitor before connecting thesignal output of the system.](https://usermanual.wiki/Megavision/MV192T/User-Guide-731199-Page-19.png)
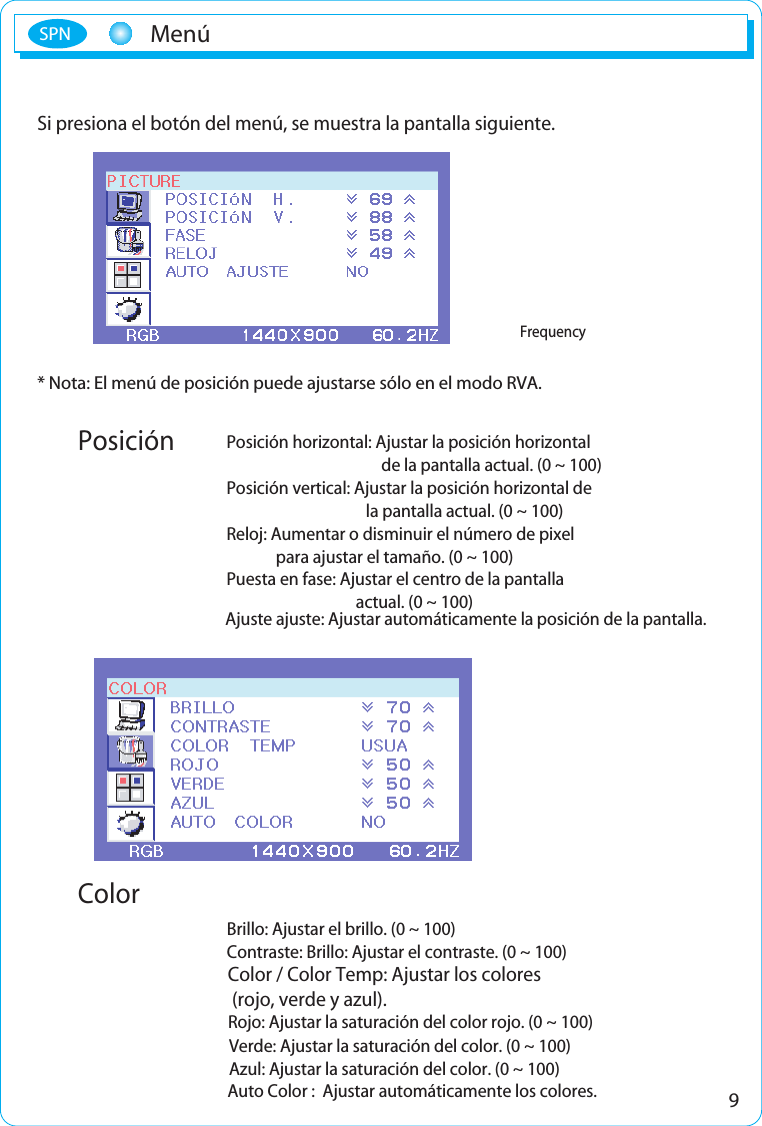
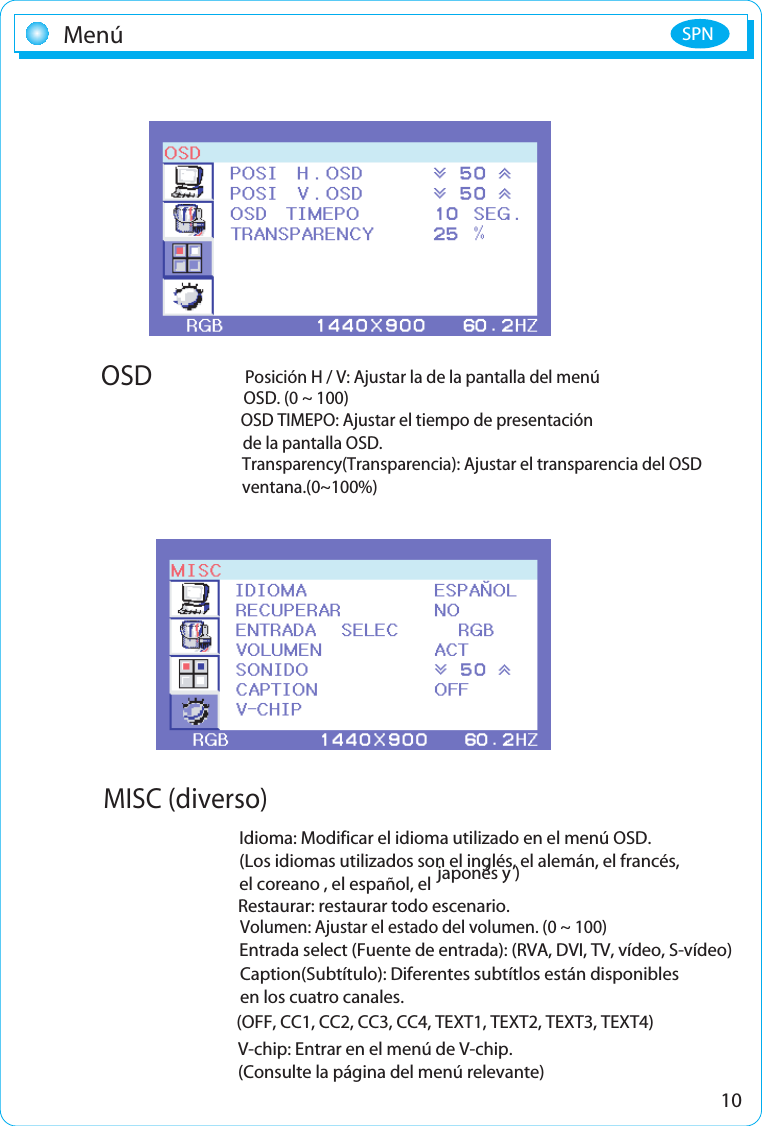
![3IntroducciónGracias por comprar nuestro monitor LCD-TFT.Nuestro monitor es un monitor de alta resolución que dispone de lascaracterísticas del aislamiento de ondas electromagnéticas, la reducción delconsumo de electricidad, y la utilización eficiente del espacio.Considerando que este manual del usuario está preparado para ayudarle autilizar adecuadamente el producto, es recomendable leer el manual delusuario antes de utilizar el producto.Características del producto1) Este producto tiene una sperfice plana de 19 pulgadas (Color Active Matrix TFT LCD) con un tamaño de pixel de 0.2835 mm (H) x 0.2835 mm (V) para presentar el imagen de alta resolución de ultra-precisión.2) Este producto utiliza el panel LCD TFT (Thin Film Transistor [Transistor de Película Delgada]) y soporta un máximo de 1440 x 900.3) Este producto es un monitor cuya frecuencia de desviación se transforma automáticamente hasta 30 - 80 kHz horizontalmente y hasta 56 - 75 Hz verticalmente.4) Este producto es compatible con IBM PC y Apple MacIntosh (un diferente adaptador es necesario en caso de utilizar Apple MacIntosh).5) Este producto tiene la función de ahorro de energía menos de 45 W en el modo ON (activado), menos de 2 W en el modo de pausa y menos de 1 W en el modo OFF (desactivado) en comparacion con otros monitores.6) Este producto soporta DDC y permite utilizar 'Plug & Play'.Características del productoEn algunos requerimientos del sistema puede que no seacompatible con Plug & Play.Registro de aparato adecuado de ondas electromagnéticas (Clase B)Este producto es registrado como aparato adecuado ondas electromagnéticas ypuede utilizarse en todos los lugares incluyendo en la casa.NotaSPN](https://usermanual.wiki/Megavision/MV192T/User-Guide-731199-Page-27.png)
![3IntroducciónGracias por comprar nuestro monitor LCD-TFT.Nuestro monitor es un monitor de alta resolución que dispone de lascaracterísticas del aislamiento de ondas electromagnéticas, la reducción delconsumo de electricidad, y la utilización eficiente del espacio.Considerando que este manual del usuario está preparado para ayudarle autilizar adecuadamente el producto, es recomendable leer el manual delusuario antes de utilizar el producto.Características del producto1) Este producto tiene una sperfice plana de 19 pulgadas (Color Active Matrix TFT LCD) con un tamaño de pixel de 0.2835 mm (H) x 0.2835 mm (V) para presentar el imagen de alta resolución de ultra-precisión.2) Este producto utiliza el panel LCD TFT (Thin Film Transistor [Transistor de Película Delgada]) y soporta un máximo de 1440 x 900.3) Este producto es un monitor cuya frecuencia de desviación se transforma automáticamente hasta 30 - 80 kHz horizontalmente y hasta 56 - 75 Hz verticalmente.4) Este producto es compatible con IBM PC y Apple MacIntosh (un diferente adaptador es necesario en caso de utilizar Apple MacIntosh).5) Este producto tiene la función de ahorro de energía menos de 40 W en el modo ON (activado), menos de 2 W en el modo de pausa y menos de 1 W en el modo OFF (desactivado) en comparacion con otros monitores.6) Este producto soporta DDC y permite utilizar 'Plug & Play'.Características del productoEn algunos requerimientos del sistema puede que no seacompatible con Plug & Play.Registro de aparato adecuado de ondas electromagnéticas (Clase B)Este producto es registrado como aparato adecuado ondas electromagnéticas ypuede utilizarse en todos los lugares incluyendo en la casa.NotaSPN](https://usermanual.wiki/Megavision/MV192T/User-Guide-731199-Page-28.png)


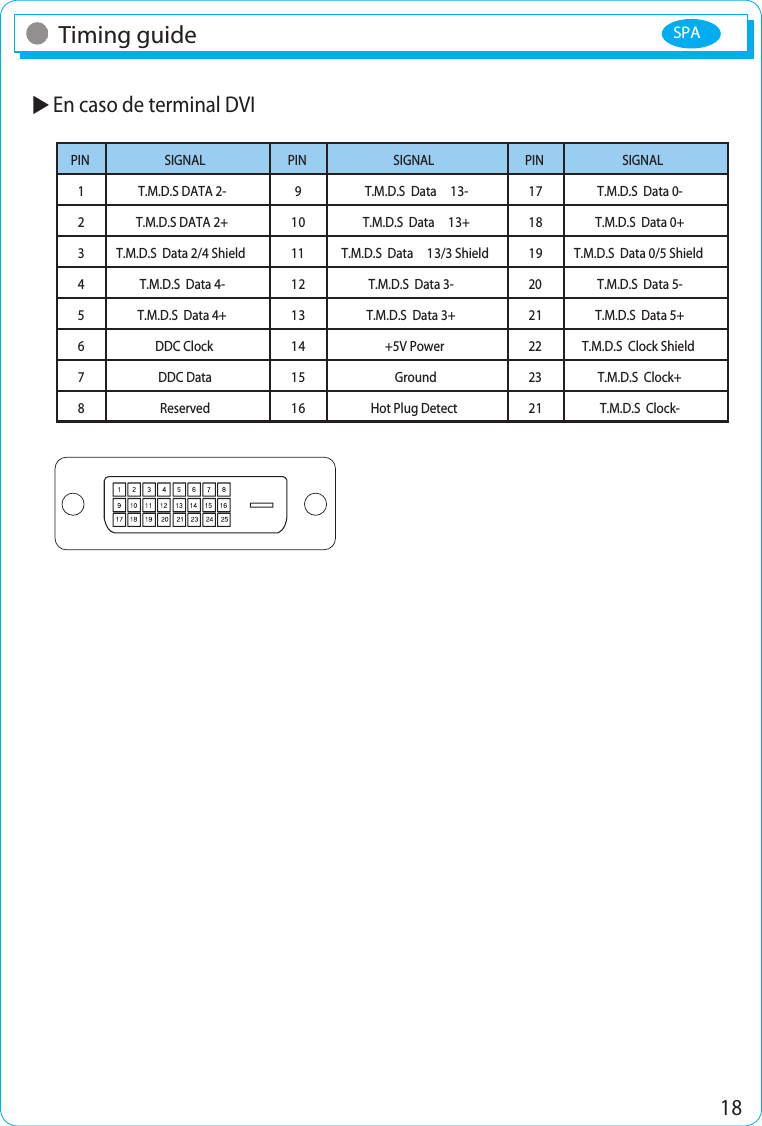
![Guía de temporizaciónEste monitor LCD es una presentación de multifrecuencia.Funciona en frecuencias horizontales desde 30 kHz hasta 80 kHz yfrecuencias verticales desde 56 Hz hasta 75 Hz. Debido a su diseño basadoen microprocesador, ofrece las funciones de sincronización automática ytamaño automático. Eeste monitor está provisto de 10 configuracionespreprogramadas que se muestran en la sigueinte tabla de temporización.Conexión de señalesEl terminal de entrada para este monitor es el conector D-SUB de 15clavijas. Conecte el cable de señal a la salida de señal de la computadora.Preestablecidos ResoluciónHorizontalVESAVertical Horizontal VerticalFrecuencia Reloj [MHz] Polaridad (H/V)M1M2M3M4M5M6M7M8M9M10MAC72064064080080010241024128012808324004804806006007687681024102462431.5KHz31.5KHz37.5KHz37.9KHz46.9KHz48.4KHz60.0KHz64.0KHz80.0KHz49.7KHz70Hz60Hz75Hz60Hz75Hz60Hz75Hz60Hz75Hz75Hz28.32225.17531.50040.00049.50065.00078.750108.000135.00057.284- / +- / -- / -+ / ++ / +- / -+ / ++ / ++ / +- / -VGANúmerode clavija123456789101112131415RojaVerdeAzulSin conexiónTierraRoja tierraVerde tierraAzul tierraSin conexiónTierraTierraSDASincronización horizontalSincronización verticalSCLDescripción DescripciónNúmerode clavija105 115 116AdvertenciaDesconecte la alimentación conectada al monitor antes de la conexión ala salida de señal del sistema.17Guía de temporización SPN](https://usermanual.wiki/Megavision/MV192T/User-Guide-731199-Page-42.png)