MEILOON FORTE active loudspeaker User Manual
Meiloon Industrial Co., Ltd. active loudspeaker
UserManual.wiki
>
MEILOON
>
FORTE User Manual
User Manual
Navigation menu
Upload a User Manual
Namespaces
Wiki Guide
HTML
PDF
Info
Views
User Manual
Discussion / Help
Navigation
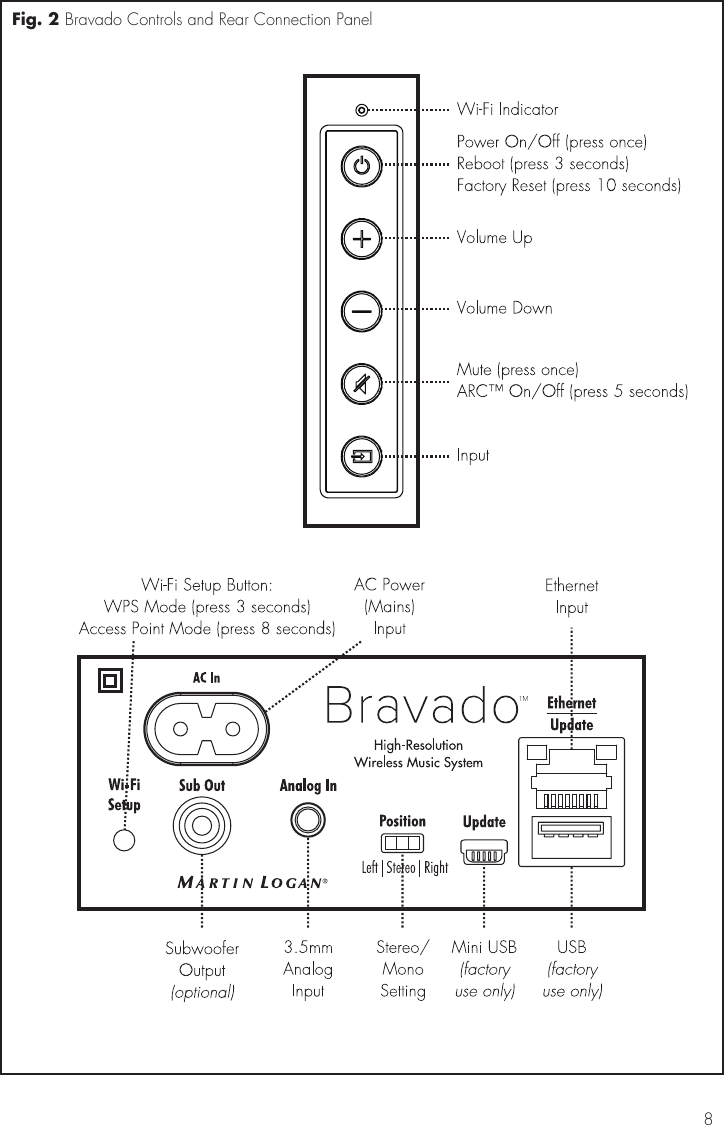
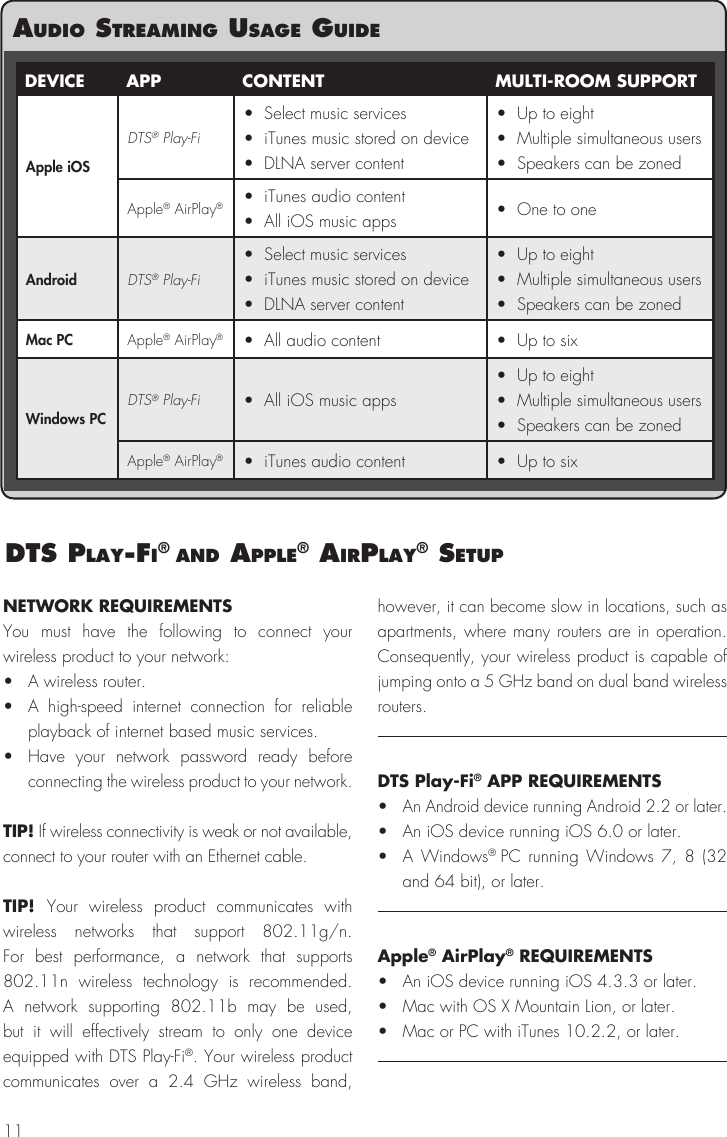
![10an overvIew oF connectIonSAnalog Left/Right RCA: [Forte amplifier] The analog input on the Forte amplifier can accept an analog stereo signal through a cable using RCA connectors. An ana-log RCA cable can only pass a single channel of audio information between a source component and audio output device. To achieve two-channels of audio (left/right), you will find that analog RCA cables come bundled as a stereo pair (two connectors on each end).Analog Left/Right 3.5mm Stereo “Headphone Style” Jack: [Bravado speaker] The analog input on the Bravado speaker can accept an analog stereo signal through a cable using a 3.5mm “headphone style” connector. Users may find source components such as digital media players and docks also utilize a 3.5mm ‘headphone style’ connector. These devices also have a “volume control” that increases or decreases the level of the output signal.Analog Left/Right RCA to Stereo 3.5mm: [Forte amplifier and Bravado speaker]. Users may find they need to connect an audio source with 3.5mm headphone style jack to the RCA inputs on the Forte amplifier, or connect an audio source with RCA outputs to the 3.5mm input on the Bravado speaker. To connect to these devices use a Left/Right RCA to stereo 3.5mm cable.Ethernet: This cable allows you to physically connect a device to a LAN (local area network). When connected to a LAN, audio information can be sent to this speaker using various protocols (such as DTS® Play-Fi, AirPlay®, or DLNA). If a wireless (Wi-Fi) connection is used to connect to a LAN, there is no need to use an Ethernet connection. However, in some installations, a ‘hard-wired’ Ethernet connection may prove more desirable than a wireless connection.Wi-Fi: This connection technology wirelessly connects a device to a LAN (local area network). When connected to a LAN, audio information can be sent to this speaker using various protocols ((such as DTS Play-Fi, AirPlay®, or DLNA). If an Ethernet connection is used to connect to a LAN, there is no need to use a Wi-Fi connection. In some installations a ‘hard-wired’ Ethernet connection may prove more desirable than a wireless connection.POSITION SWITCH (BRAVADO ONLY): The rear of the Bravado speaker features a switch that allows you to customize the output of the speak-er for specific applications. If the speaker is being used for stereo output, set this switch to “stereo”. If a stereo pair of the speakers are being used in a 2-channel application, set the switch to “left” or “right” depending on the speakers position.](https://usermanual.wiki/MEILOON/FORTE/User-Guide-2786727-Page-10.png)