Mekede Technology MKDB746 Car Mutilmedia System User Manual 15 MKD B746 UserMan
SHENZHEN MEKEDE TECHNOLOGY CO., LTD Car Mutilmedia System 15 MKD B746 UserMan
15_MKD-B746 UserMan

Android System
USER MANUAL
Thank you for buying this product. Please read through these instructions so you will
know how to operate this unit properly. After you have finished reading the instructions, keep
this document in a safe place for future reference.

Contents
Precaution ....................................................................................................... 2
Main Menu ..................................................................................................... 5
Radio .............................................................................................................. 7
Play DVD ....................................................................................................... 8
USB/SD .......................................................................................................... 9
AUX Input .................................................................................................... 10
Bluetooth ..................................... ................................................................ 11
Bluetooth Music ........................................................................................... 14
Screen Mirroring .......................................................................................... 14
Navigation .................................................................................................... 16
Connect to the Internet ............................................... ................................. 16
OBD2 ........................................................................................................... 17
DVR ............................................................................................................. 17
DAB+ (Optional) ......................................................................................... 18
Google Play Store ..................................... .................................................. 18
Settings ......................................................................................................... 19
Troubleshooting ......................................................................... ..................29
1

Precaution
Before installing this product
- Use this unit with a 12-volt battery and negative grounding only. Failure to do so
may result in a fire or malfunction.
- To avoid shorts in the electrical system, be sure to disconnect the (-) battery cable
before installation.
Important safety information
WARNING
- Do not attempt to install or service this product by yourself. Installation or servicing
of this product by persons without training and experience in electronic equipment
and automotive accessories may be dangerous and could expose you to the risk of
electric shock, injury or other hazards.
- Do not allow this product to come into contact with liquids. Electrical shock could
result. Also, damage to the product , smoke and overheating could result from
contact with liquids.
- If liquid or foreign matter should get inside this product, park your vehicle in a safe
place, turn the ignition switch off (ACC OFF) immediately and consult your dealer.
Do not use this product in this condition because doing so may result in a fire,
electric shock, or other failure.
- If you notice smoke, a strange noise or odor from this product, or any other
abnormal signs on the screen, turn off the power immediately and consult your
dealer. Using this product in this condition may result in permanent damage to the
system.
2

- Do not disassemble or modify this product, as there are high-voltage components
inside which may cause an electric shock. Be sure to consult your dealer for internal
inspection, adjustments or repairs.
Before using this product , be sure to read and fully understand the following
safety information:
- Do not operate this product, any applications, or the rear view camera option (if
purchased) if doing so will divert your attention in any way from the safe operation
of your vehicle. Always observe safe driving rules and follow all existing traffic
regulations. If you experience difficulty in operating this product or reading the
display, park your vehicle in a safe location and apply the parking brake before
making the necessary adjustments.
- Never set the volume of this product so high that you cannot hear outside traffic
and emergency vehicles.
- To promote safety, certain functions are disabled unless the vehicle is stopped
and/or the parking brake is applied.
- Keep this manual handy as a reference for operating procedures and safety
information.
- Do not install this product where it may (i) obstruct the driver’s vision, (ii) impair
the performance of any of the vehicle’s operating systems or safety features,
including air bags or hazard lamp buttons or (iii) impair the driver’s ability to safely
operate the vehicle.
- Please remember to fasten your seat belt at all times while operating your
vehicle. If you are ever in an accident, your injuries can be considerably more
severe if your seat belt is not properly buckled.
- Never use headphones while driving.
3

To ensure safe driving
WARNING
- LIGHT GREEN LEAD AT POWER CONNECTOR IS DESIGNED TO DETECT
PARKED
STATUS AND MUST BE CONNECTED TO THE POWER SUPPLY SIDE OF THE
PARKING BRAKE SWITCH. IMPROPER CONNECTION OR USE OF THIS LEAD
MAY
VIOLATE APPLICABLE LAW AND MAY RESULT IN SERIOUS INJURY OR
DAMAGE.
- Do not take any steps to tamper with or disable the parking brake interlock
system which is in place for your protection. Tampering with or disabling the
parking brake interlock system could result in serious injury or death.
- To avoid the risk of damage and injury and the potential violation of applicable
laws, this product is not for use with a video image that is visible to the driver.
- In some countries the viewing of video image on a display inside a vehicle even by
persons other than the driver may be illegal. Where such regulations apply, they be
obeyed.
If you attempt to watch video image while driving, the warning “Viewing of front
seat video source while driving is strictly prohibited.” will appear on the screen. To
watch video image on this display, stop the vehicle in a safe place and apply the
parking brake. Please keep the brake pedal pushed down before releasing the parking
brake.
To avoid battery exhaustion
Be sure to run the vehicle engine while using this product. Using this product without
running the engine can drain the battery.
WARNING
Do not install this product in a vehicle that does not have an ACC wire or circuitry available.
4
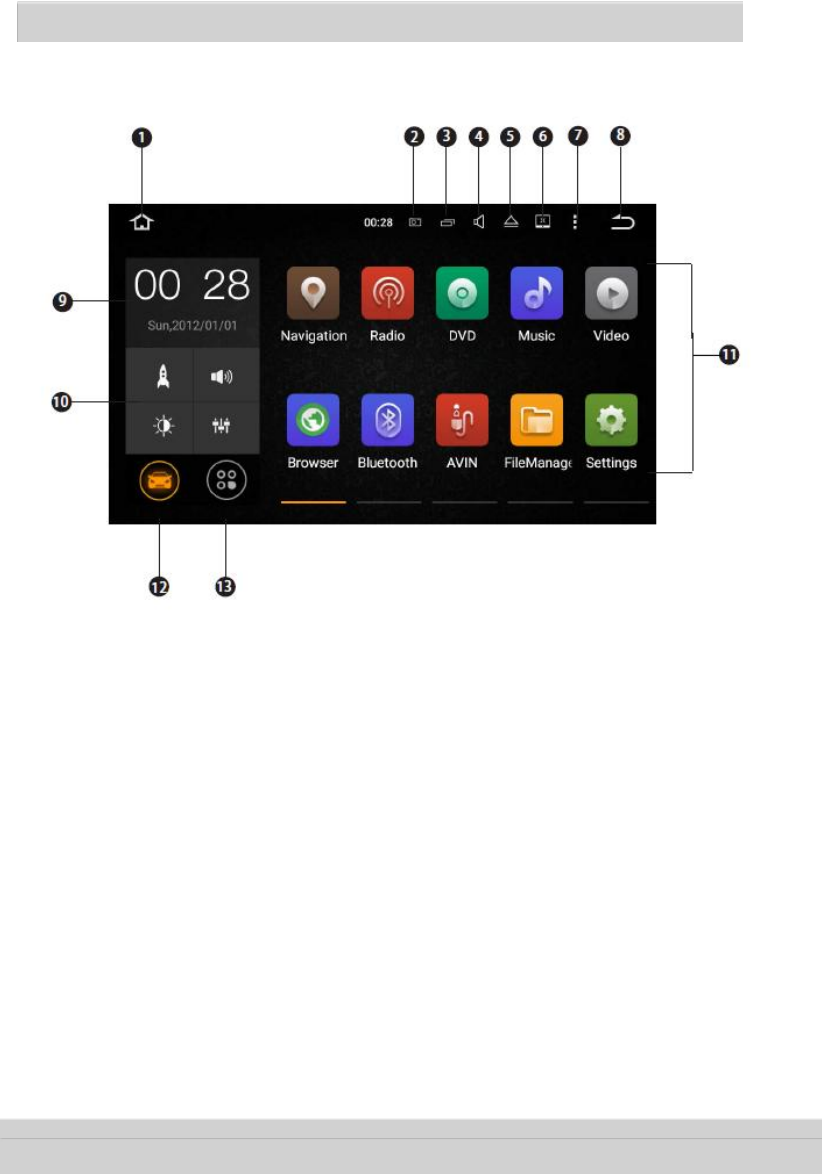
Main Menu
1. Return to the Home Screen
2. Screenshot
3. Recent Apps
4. Volume
5. Eject a Disc
6. Brightness
7. Shortcut to Go to Wallpaper/Manage Apps/System Settings
8. Return to the Previous Menu
9. Display Date and Time
10. Display Weather
11. Apps
12. Display the Home Screen Apps
13. Display All Apps
5
8
11

Use apps
Tap an app to open it.
Customize the unit
Arrange apps
Touch and hold any app on the Home screen, then drag the app around. Drag an
app to the edge of the screen to move it to a different Home screen. Swipe left or
right to see other screens.
Change the wallpaper
You can set an image or photo as wallpaper for the Home screen. You can choose
from the preset Live Wallpapers (dynamic) and Wallpapers (stills), or choose from
images or photos stored on a USB storage device or an SD memory card.
Change the wallpaper. Go to Settings > Display > Wallpaper, or touch and hold
the background on the Home screen, then the window Choose wallpaper from
will pop up, or tap
Wallpaper.
on the status bar on the Home screen, then tap
Adjust the screen brightness
Go to settings > Display > Brightness level, then drag the slider, or tag
the status bar, then drag the slider.
on
6
Radio
11
1. AF (Alternative Frequencies)
2. TA (Traffic Announcement)
3. PTY (Program Type)
4. Broadcast frequency slider
5. Perform manual tuning
6. Preset channel list
Select a frequency you like, then touch and hold any of preset frequency keys to
store it.
Up to 18 FM stations and 12 AM stations can be stored in memory.
7. Perform seek tuning or non-stop seek tuning
8. ST (mono/stereo switch)
9. LOC (Local seek tuning)
10. AM band (AM1 or AM2)
11. FM band (FM1, FM2 or FM3)
7
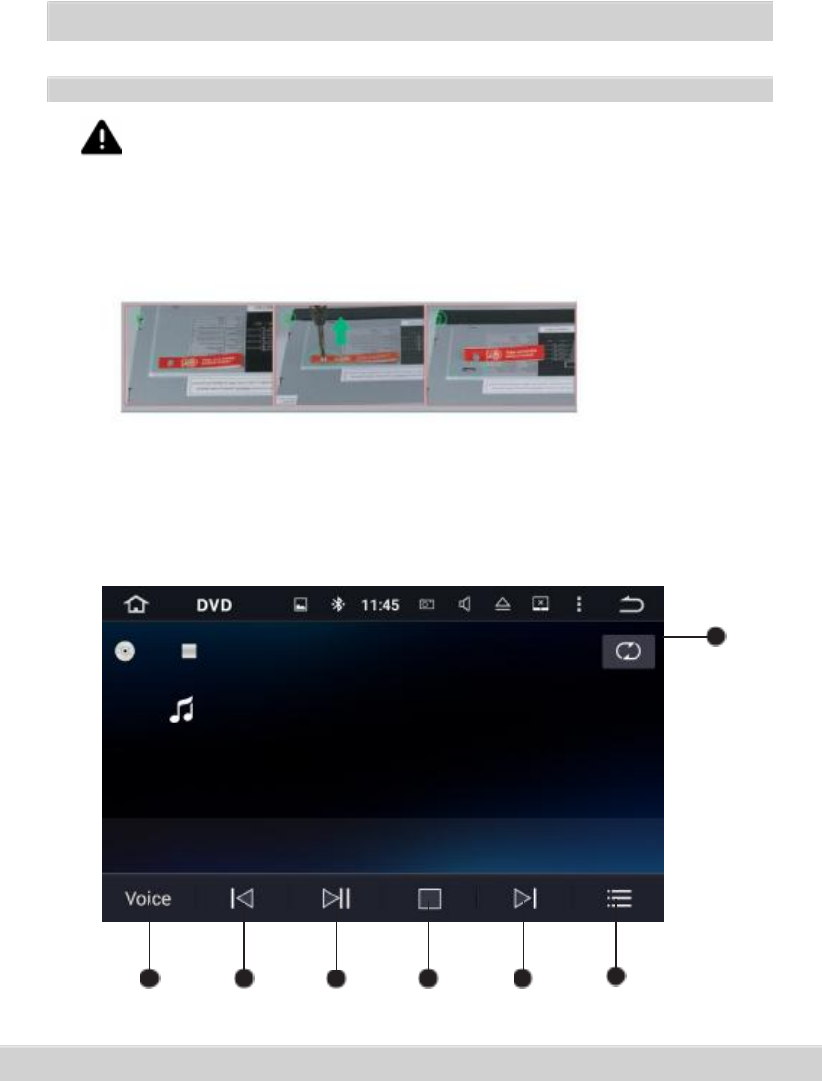
Play DVD
DVD Player
CAUTION
1. There are two screws on the top face of the unit to protect the disc drive
in transit. The screws need to be removed first. Otherwise it cannot accept
or play discs.
2. For safety reasons, video images cannot be viewed while your vehicle is
in motion. To view video images, stop in a safe place and apply the
parking brake.
7
6
8
1. Repeat play
Choose from repeat the current file, repeat all files and repeat off.
2. Equalizer adjustment
Choose from Rock, Pop, Jazz, Classic, Flat, Voice and Custom.
3. Previous file
4. Pause/Play
5. Stop
6. Next file
7. File menu
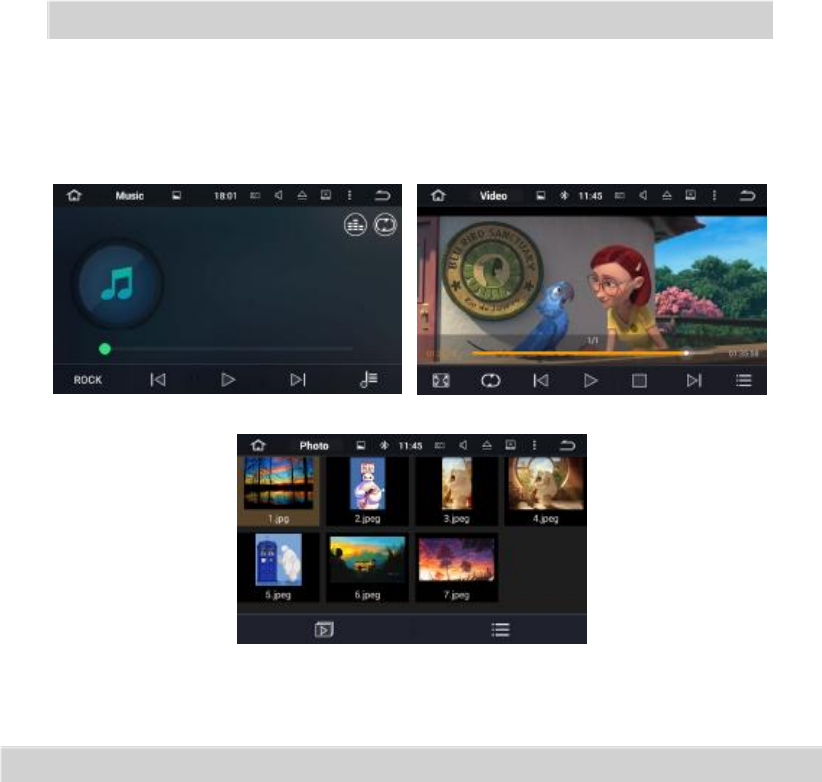
USB/SD
Plug a USB storage device or insert an SD memory card, then tap Music on the
Home screen to play music, tap Video to play the video files, or tap Photo to view
the images and photos.
9

1
6
AUX Input
You can display the video image output by the device connected to this unit.
CAUTION
For safety reasons, video images cannot be viewed while your vehicle is in
motion. To view video images, stop in a safe place and apply the parking
brake.
10
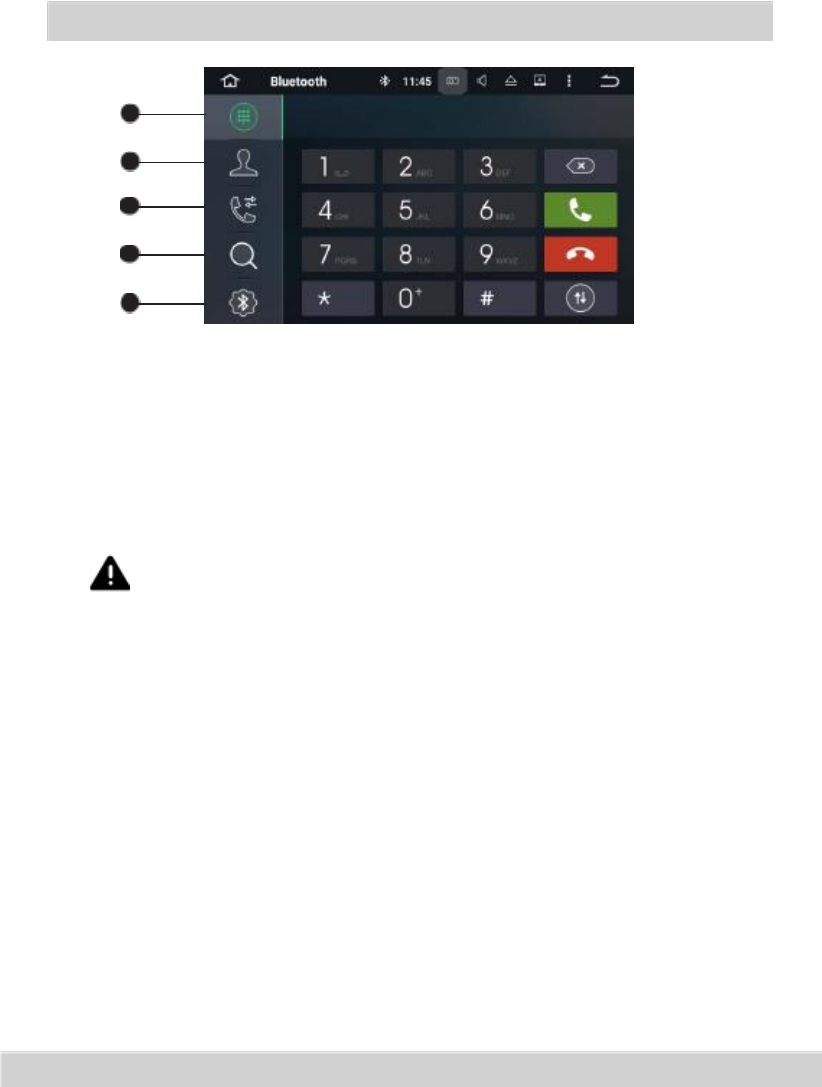
Bluetooth
1
2
3
4
5
1. Keypad
2. Phone book
3. Recent calls
4. Devices list
5. Bluetooth settings
Connect your mobile phone to this unit via Bluetooth and use an external
microphone to make and receive hands-free calls.
CAUTION
For your safety, avoid talking on the phone as much as possible while driving.
*Connect to a Bluetooth device
Connection (Bluetooth pairing)
a. The Bluetooth device must be within 1 meter of this unit. Turn on Bluetooth on
the device.
b. You can find this unit in the devices list of your Bluetooth device.
c. If your Bluetooth device supports SSP (Secure Simple Pairing), a four-digit
number password will be required. The default password is 0000.
11
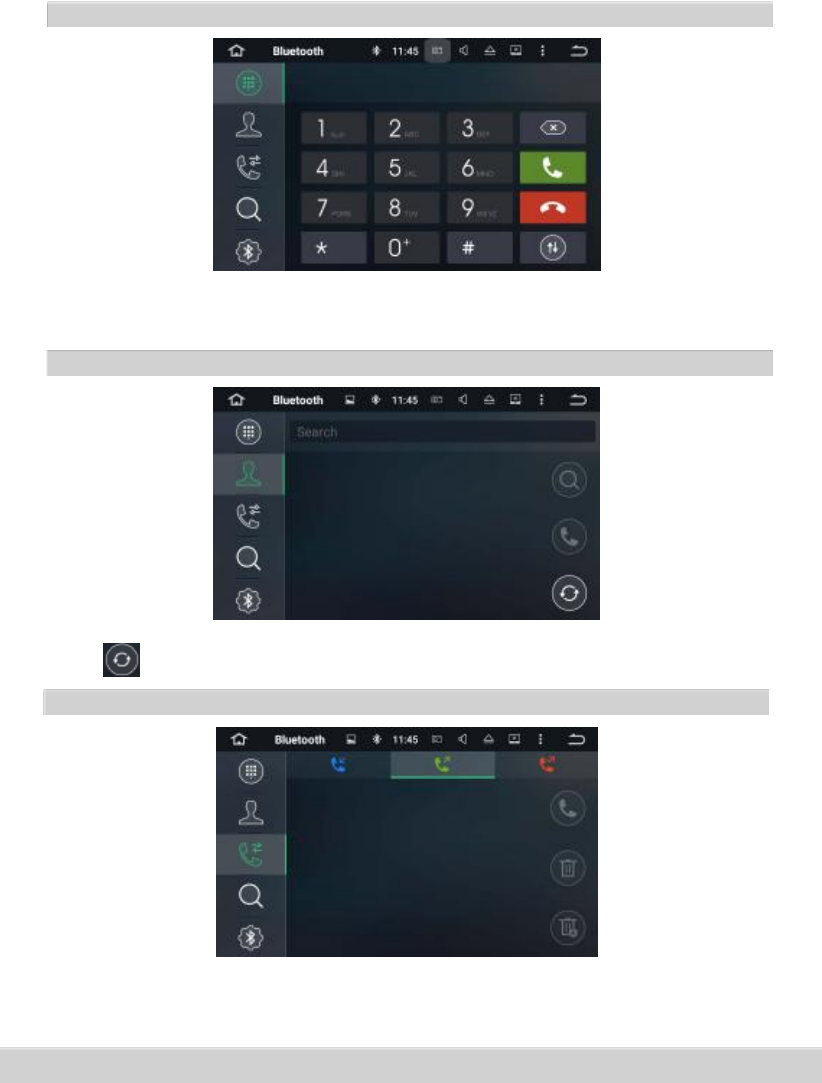
1. Phone calls
Enter the number to make a call. You can also choose a contact from the phone
book to make a call.
2. Phone book
to synchronize the contacts from your Bluetooth device.
3. Recent calls
View recent outgoing calls, incoming calls or missed calls.
12

4. Devices list
Tap a device on the Paired devices or on the Available devices list, then tap
to pair the device. Tap
5. Bluetooth settings
to unpair the device.
①You can change the Device Name of this unit. Tap CAR KIT to enter a different
name.
②You can change the PIN Number (Bluetooth pairing password). The default
password is 0000. Enter another four-digit number, then tap Done to set a
new password.
③You can turn AutoAnswer/AutoConnect on or off.
13
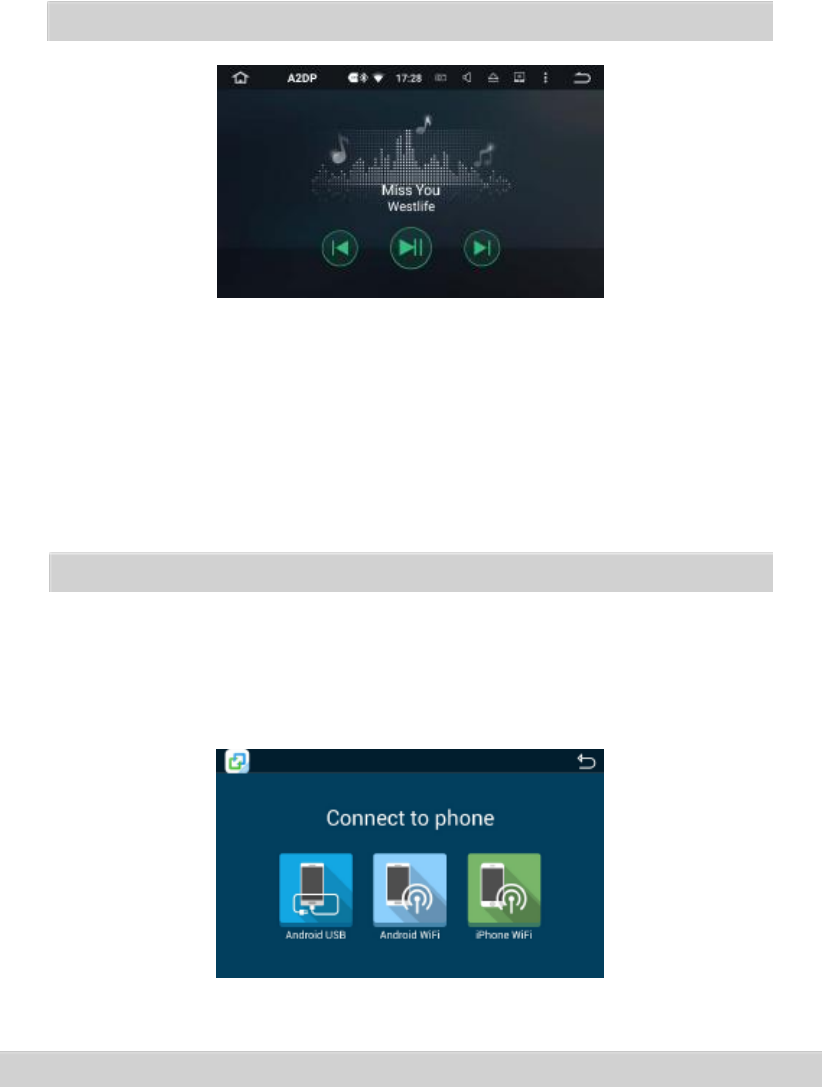
Bluetooth Music
After the Bluetooth connection is established, tap A2DP on the Home screen,
then you can play music stored in your Bluetooth device on this unit.
※ At first, you need to operate the music playback on your Bluetooth device.
Then you can operate the Bluetooth music on the unit.
※ Please note that the unit may not support the Bluetooth music function
when some mobile phones are not quite compatible with the unit.
Screen Mirroring
Tap Easy Connected on the apps menu screen to enter screen mirroring mode.
When you connect a mobile phone with compatible applications installed, you can
control the applications for the mobile phone directly from this unit.
14

For Android smart phone:
1. Connect via a USB cable
a. Go to Settings > About Device, then tap Build number 7 times to enable
Developer options. Turn on USB debugging. A message Allow USB debugging?
will pop up. Turn Always allow from this computer on, then tap OK.
b. Connect your Android smart phone to this unit via a USB cable.
2. Connect via Wi-Fi
a. Go to Settings > Wireless & networks > More > Tethering & portable hotspot,
then turn Portable Wi-Fi hotspot on or tap Set up Wi-Fi hotspot.
b. Tap Android WiFi, then select your Android device name from the hotspot
list. Enter the password when prompted.
※ Please note this function is only applicable for the smart phones
equipped with wireless mirroring function, and it only supports
Android version above 4.0. Audio streaming requires a Bluetooth
connection.
For iPhone:
a. Go to Settings > Personal Hotspot, then turn Personal Hotspot on.
b. Tap iPhone WiFi, then select your iPhone name from the hotspot list. Enter
the password when prompted.
c. Tap AirPlay in the Control Center on your iPhone. Select EC-Mirror and turn
Mirroring on.
※ On iPhone 4/4s, only photos can be streamed wireless to this unit.
On iPhone 5 and other later iPhone models, both music and photos can
be streamed wireless to this unit. Video streaming requires the
appropriate Apple cable or adapter.
15
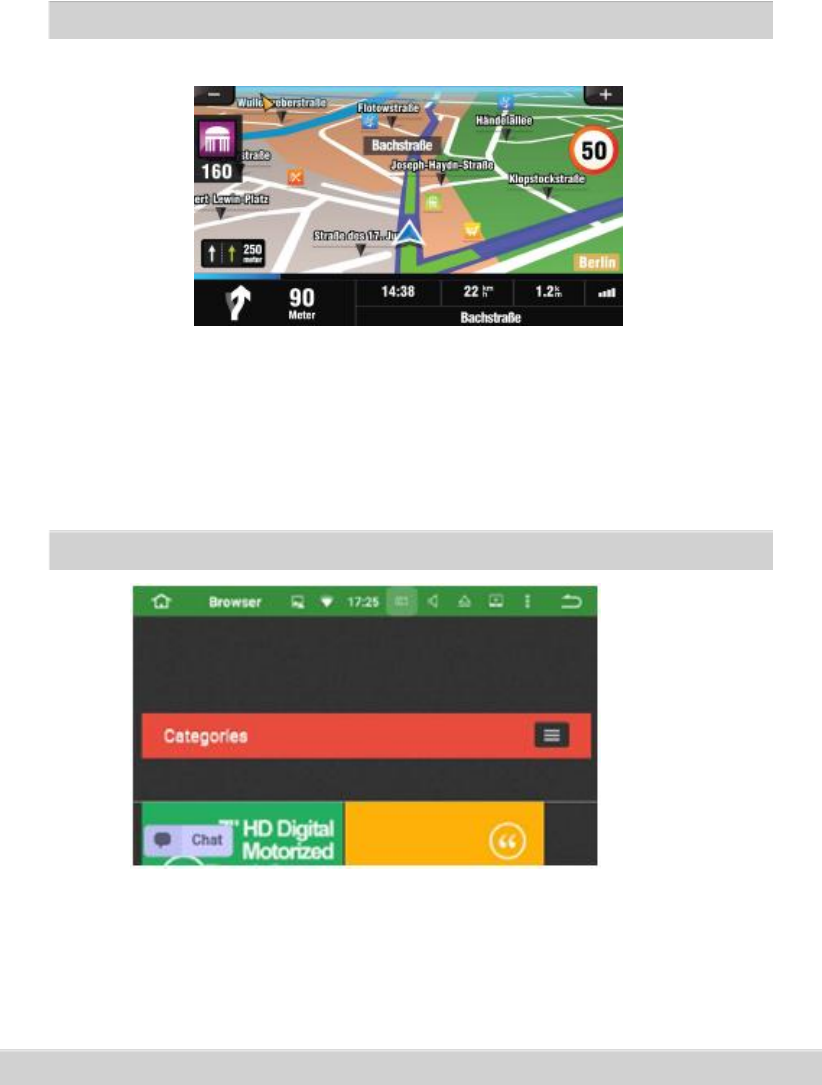
Navigation
Built-in navigation offers detailed, reliable route guidance information to help you
get where you want to go.
You can actually download a range of GPS Navigation apps via Google Play and
run them on the unit. You can download Sat Nav apps like TomTom, Navigon,
Route 66, Sygic, iGO, Google Maps and many more.
Connect to the Internet
You can connect the unit to the Internet whenever necessary, using a Wi-Fi
connection (if available) or 3G network (3G dongle is sold separately). You can
browse the web, download apps via Google Play, play online games, etc. The
possibilities are endless with the Internet in your car.
16
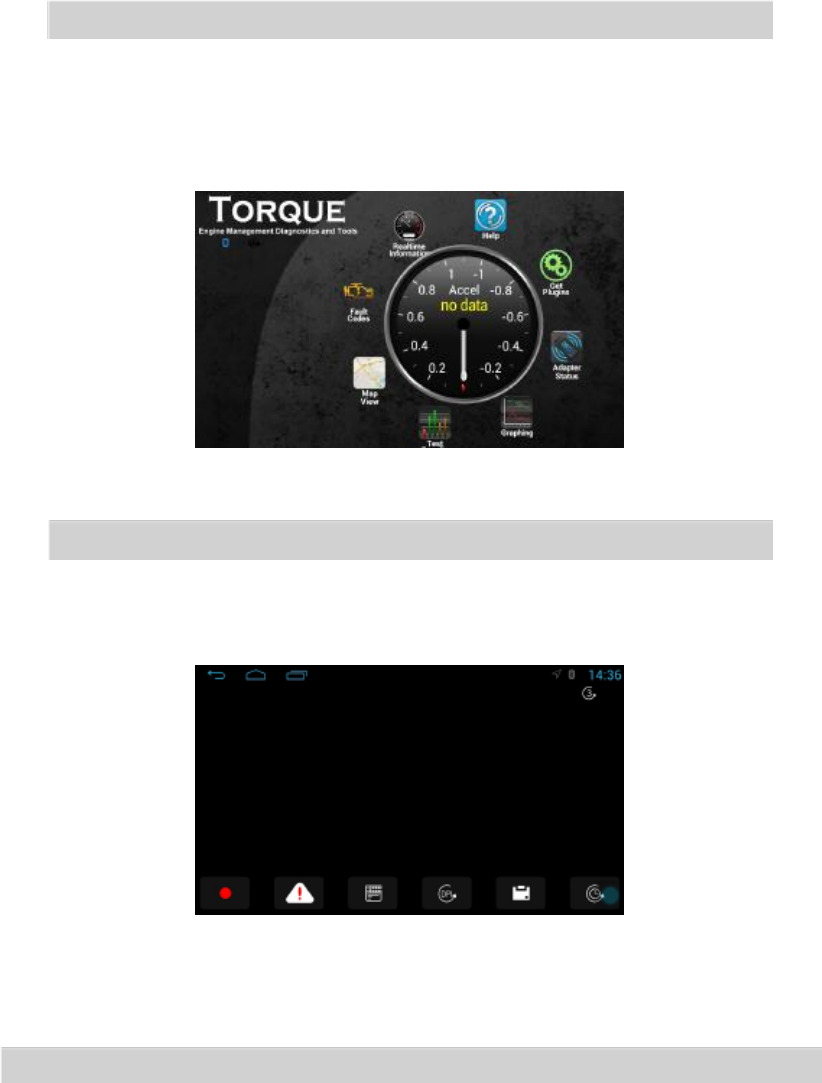
OBD2
The unit supports OBD2 (On-Board Diagnostics) car diagnostics. With OBD2
function available on this unit, you can retrieve real-time data and trouble codes
from your vehicle computer. All the data of your vehicle is displayed to you.
(OBD2 Bluetooth car diagnostic scanner tool is sold separately.)
DVR
You can control a car DVR camera (sold separately) on this unit and use it to record
all the events of a journey.
17
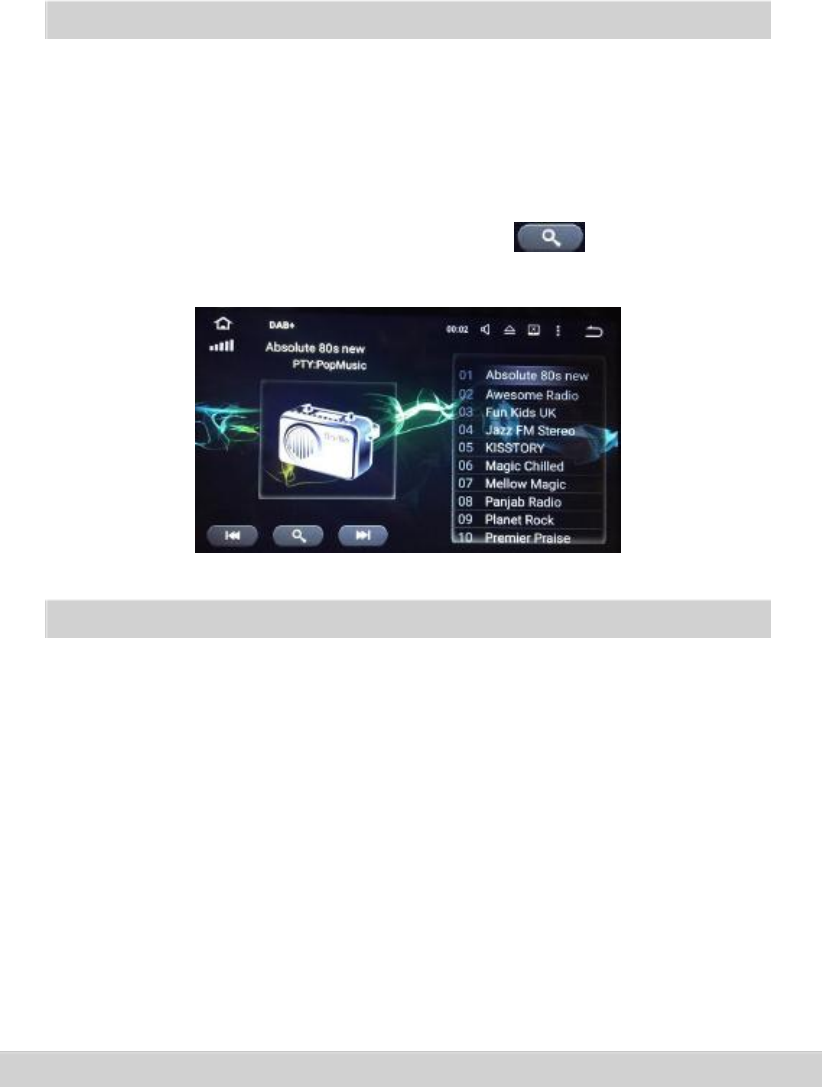
DAB+ (Optional)
With use of a DAB dongle (sold separately), DAB+ (Digital audio broadcasting)
tuner lets you enjoy the convenience of digital radio, while Auto DAB+ Tuning
makes sure there are less signal interruptions. DAB+ digital radio brings you high-
detail, digital-quality sound, lots of stations, program information and more.
DAB antenna (sold separately) needs to be positioned on the windscreen of your
vehicle. Tap DAB+ on the apps menu screen, then tap
available services automatically.
Google Play Store
to search all
Google Play brings together all your favorite movies, TV programs, books, music,
magazines, apps and more in one place.
If you purchased content on Google Play in the past, you will automatically have
access to this content on any Android device. Just make sure that you have signed
in using the same account that you used to purchased it.
18
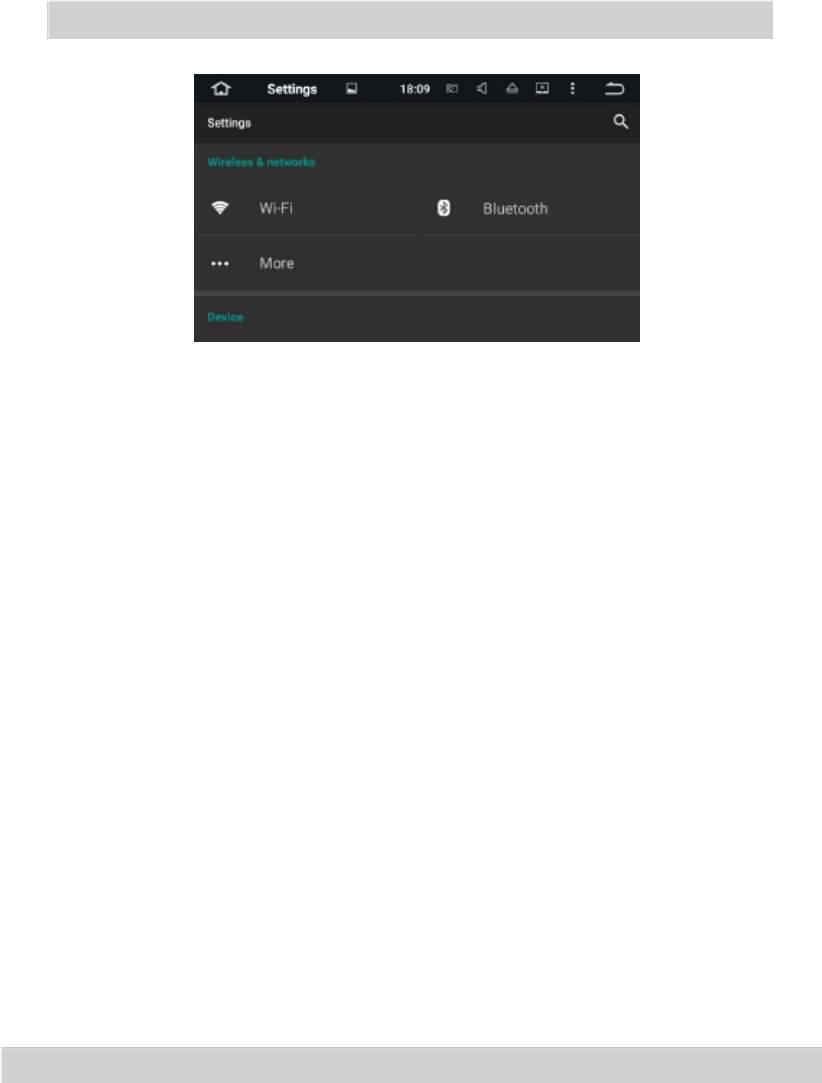
Settings
1. Wireless & networks
1.1 Wi-Fi
Turn Wi-Fi on or off.
Choose a network: Tap one of the listed networks, then enter the password, if
asked.
1.2 Bluetooth
You can change the Device Name or the PIN Number (Bluetooth pairing password)
of this unit.
You can turn Auto Answer/Auto Connect on or off.
Tap a device on the Paired devices or on the Available devices list to pair or unpair
it.
1.3 More
You can set up Portable Wi-Fi hotspot or VPN.
19
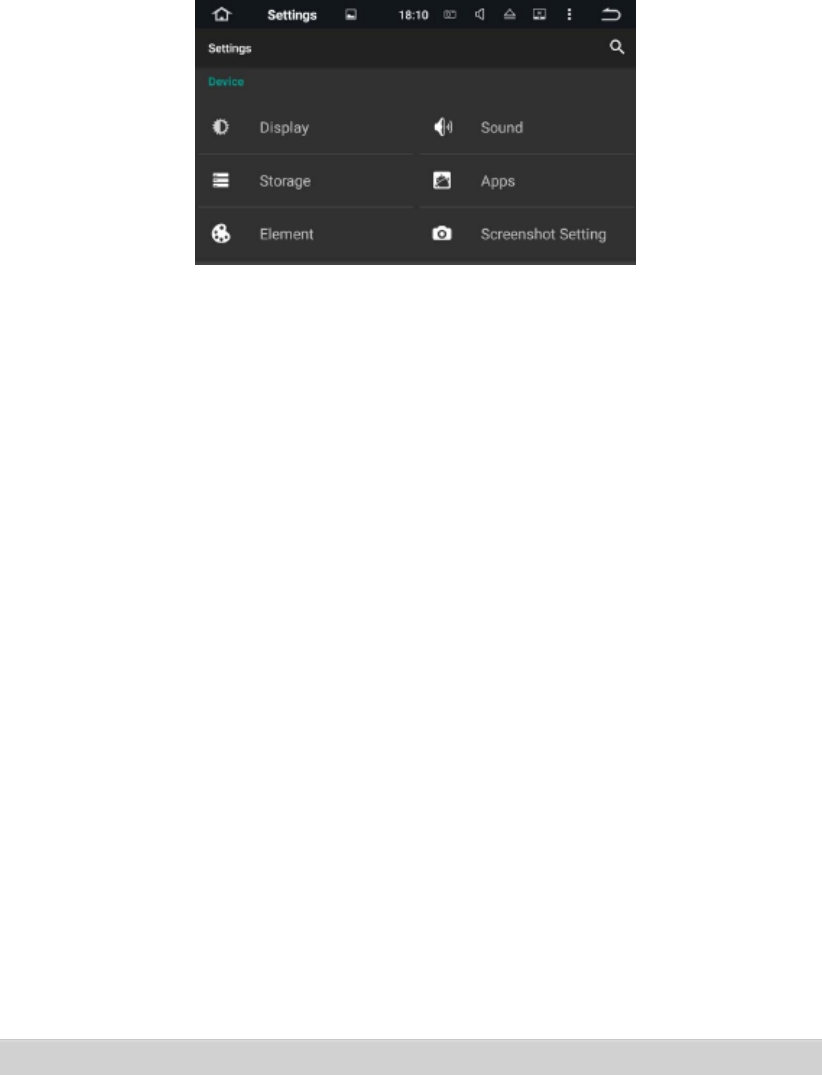
2. Device
2.1 Display
2.1.1 Brightness level
Drag the slider to adjust the screen brightness.
2.1.2 Wallpaper
Set an image or photo as wallpaper for the Home screen.
2.2 Sound
2.2.1 Key tone
Turn Key tone on or off.
2.2.2 Volumes
Drag the slider to adjust the volumes.
2.3 Storage
- Internal storage
- NAND flash
- GPS card
- SD card
- USB storage
2.4 Apps
Manage all the apps downloaded on the unit or on an SD memory card.
20

2.5 Element
This enables you to change the illumination color of the buttons to your personal
preference. You can choose from a wide variety of colors. Drag the color bars of red,
green and blue to create a favorite color.
※ Please note the multi-colored button illumination feature is not
supported on all models.
2.6 Screenshot settings
- Select delay time to capture the screen
Choose from 15 seconds, 30 seconds, 1 minute, 2 minutes, 3 minutes, 4 minutes,
and 5 minutes later.
- Set the location of screenshot storage
Choose from Nand Flash, GPS Card, SD Card, and USB Storage.
- Show the screenshot button in the status bar
Turn this on or off.
21

3. Personal
3.1 Security
- Device administrators
- Unknown sources
- Storage type
- Trusted credentials
- Install certificates from SD card
- Clear credentials
- Trust agents
- Apps with usage access
3.2 Accounts
Add account
Add a Google account or other accounts.
3.3 Language & input
3.3.1 Language
Set the language for the unit. Choose from English, French, German, Spanish, and
many more.
3.3.2 Spell checker
Turn Spell checker on or off.
3.3.3 Personal dictionary
Add words in the user dictionary.
3.3.4 Keyboard & input methods
The default input method is English (US) - Android Keyboard.
3.3.5 Voice input
Choose from Enhanced Google services and Basic Google recognition.
3.3.6 Text-to-speech output
The supported languages are English, French, German, Italian and Spanish.
22
3.3.7 Pointer speed
Drag the slider to adjust the pointer speed.
3.4 Backup & reset
- Back up my data
Back up app data, Wi-Fi passwords, and other settings to Google servers.
- Backup account
- Automatic restore
- Factory data rest
Erase all data on the unit.
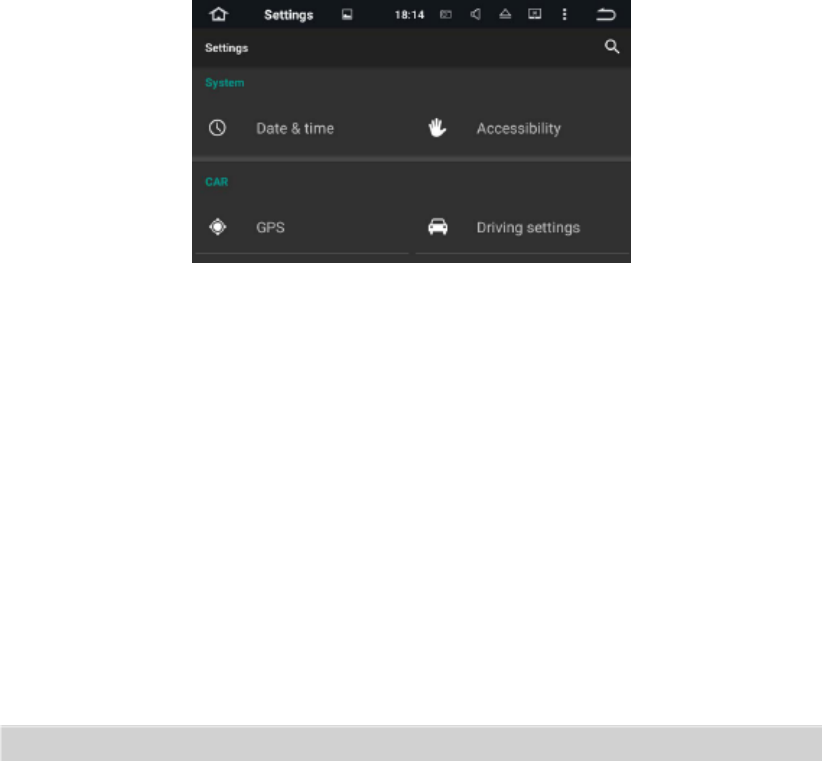
4. System
4.1 Date & time
Date & time settings include:
- GPS automatic update time
- Automatic date & time
- Automatic time zone
- Set date
- Set time
- Select time zone
- Use 24-hour format
23

4.2 Accessibility
- Captions
- Magnification gestures
- Large text
- High contrast text
- Auto-rotate screen
- Speak passwords
- Text-to-speech output
- Touch & hold delay
- Color inversion
- Color correction
5. Car
5.1 GPS
5.1.1 GPS application options
Choose which GPS application you want to use for the navigation.
5.1.2 GPS monitoring
Turn GPS monitoring on or off.
5.1.3 GPS sound mode
5.1.4 GPS mixing ratio
5.1.5 GPS monitor
24

5.1.6 Location
Turn Location on or off.
Location mode: Choose from High accuracy, Battery saving, and Device only.
5.2 Driving settings
5.2.1 Watching video
Turn this on to allow you to watch video while driving.
CAUTION
For safety reasons, video images cannot be viewed while your vehicle is in
motion. To view video images, stop in a safe place and apply the parking
brake.
5.2.2 Reversing X-mirror
If you connect a rear view camera (sold separately) to the unit, you can turn this on
to enter mirror imaging mode for rear parking, and turn this off to enter normal
imaging mode for rear parking.
5.2.3 Reversing volume
5.2.4 Rear view ruler
On: Displays the parking assist guidelines.
Off: Hides the parking assist guidelines.
5.3 Extra settings
5.3.1 Shutdown delay when ACC OFF
Choose from 30 seconds, 5 minutes, 10 minutes, 30 minutes, 1 hour, and 2 hours.
5.3.2 Playing music
Turn this on to allow the unit to play music automatically when you plug a USB
storage device or insert an SD memory card.
5.3.3 DVR storage locations
Choose from Nand Flash, GPS Card, SD Card, and USB Storage.
25
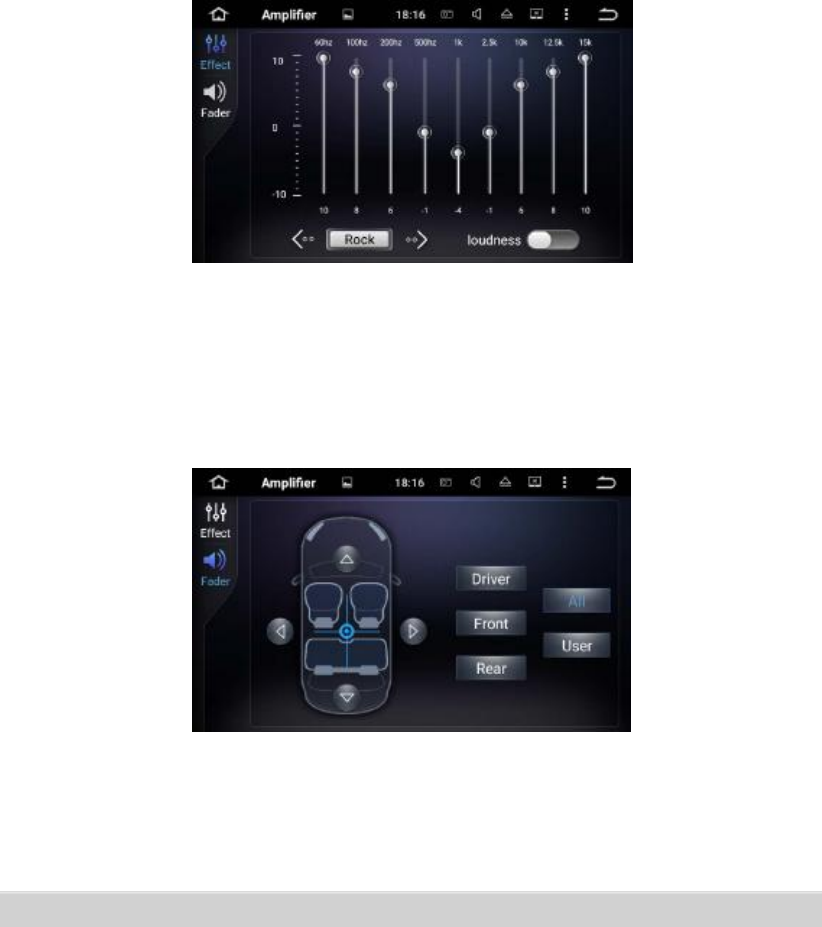
5.4 Amplifier
5.4.1 Equalizer adjustment
You can choose from Rock, Pop, Jazz, Classic, Flat, Voice, and Custom.
5.4.2 Fader/balance adjustment
You can select a listening position that you want to make as the center of the sound
effects.
Choose from Driver, User, Front, Rear, and All.
5.5 Steering wheel keys
This allows you to use the steering wheel control of your vehicle to control the unit.
26
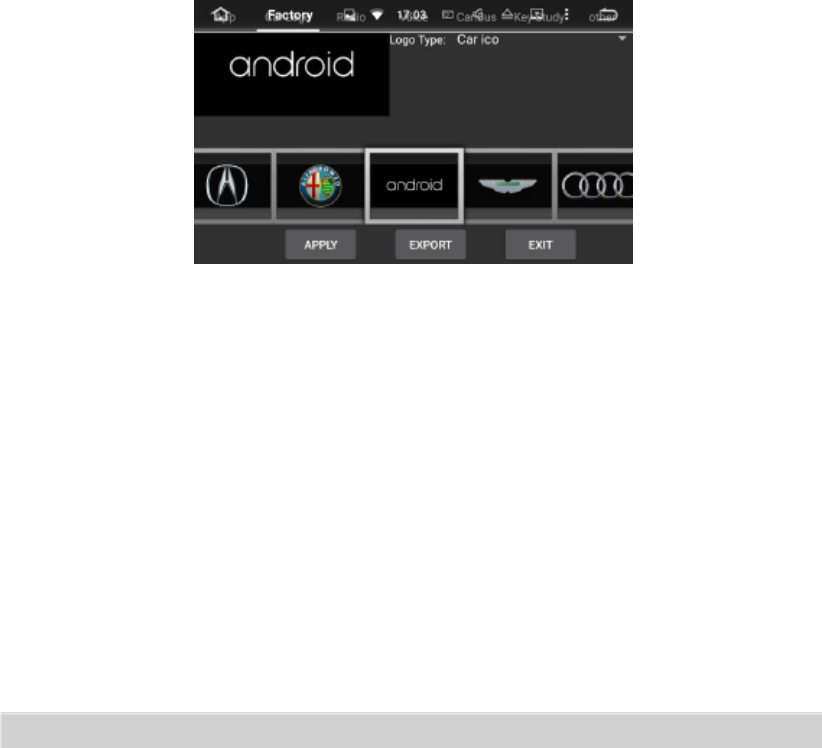
5.6 Factory settings
Enter the password 126 to go to Factory settings.
5.6.1 Application
Change the options for Bluetooth, DVD, TV, and iPod.
5.6.2 Car logo
Select one of the preinstalled car manufacturer logos as your start up screen. You
can also select images imported from an SD memory card. You need to insert the
SD memory card into the GPS card slot. The image size should be 800 pixels x 480
pixels and the image format should be JPEG.
5.6.3 Radio
Select an area for the radio.
5.6.4 Voice
Adjust the volumes of TV, DVD, iPod, System, AV Input, Radio, and Bluetooth modes.
5.6.5 CanBus
Change the options for Canbus.
5.6.6 Key study
- Panel key study
- Touch key study
27

5.6.7 Other
Change the options for RDS, Front Camera, Panel LED type and more.
5.7 About device
See information about the unit. The items you can view include:
- System updates
- Version info
- Model number
- S/N
- CPU
- Memory
28

Troubleshooting
If you have problems operating this product, refer to this section. The most common
problems are listed below, along with likely causes and solutions.
No power
- Car engine has not been started. Start the car engine.
- Incorrect wiring connection. Check the wiring.
- Fuse has been damaged. Replace fuse.
No sound
- Volume is too low. Adjust volume.
- Incorrect wiring connection. Check the wiring.
No image
- Parking brake wire connect is incorrect. Check the parking wiring.
Disc does not play
- The disc is inserted upside down. Insert the disc with the label upward.
- The disc is dirty. Clean the disc.
- The disc is cracked or otherwise damaged. Insert a normal, round disc.
- The files on the discs are in an irregular file format. Check the file format.
- The disc format cannot be played back. Replace the disc.
- The loaded disc is a type this product cannot play. Check what type of disc it is.
The screen is covered by a caution message and the video cannot be shown
- The parking brake lead is not connected or applied. Connect the parking brake
lead correctly, and apply the parking brake.
- The parking brake interlock is activated. Park your vehicle in a safe place and apply
the parking brake.
Image flashes or distorted
- Video DVD settings do not match with the DVD. Adjust video DVD settings.
- Video connection is incorrect.
29
Noise in broadcasts
- Signals are too weak. Select other stations with stronger signals.
- Check the connection of the vehicle antenna.
- Change broadcast from stereo to mono.
Preset station lost
- Battery cable is not correctly connected. Connect the battery cable to the terminal
that is always live.
The iPod/iPhone’s video image is disturbed
- Set the TV Signal settings (NTSC/PAL) of the iPod/iPhone correctly.
The paired mobile phone connects and disconnects constantly
- The Bluetooth reception is poor. Move the mobile phone closer to the product or
remove any obstacle between the mobile phone and the product.
- Some mobile phones may connect and disconnect constantly when you make or
end calls. This does not indicate any malfunction of the product.
- For some mobile phones, the Bluetooth connection may be deactivated
automatically as a power-saving feature. This does not indicate any malfunction of
the product.
FCC statement
This device complies with Part 15 of the FCC Rules: Operation is subject to the
following two conditions:
1. This device may not cause harmful interference and
2. This device must accept any interference that is received, including any interfer ence that
may cause undesired operation.
This device is acting as slave and operating in the 2.4 GHz (2412 ~2462 MHz) band.
RF exposure warning :
This equipment complies with FCC radiation exposure limits set forth for an uncontrolled
environment. This equipment shall be installed and operated with minimum distance 20cm between
the radiator & body.
NOTE: This equipment has been tested and found to comply with the limits for a Class
B digital device, pursuant to part 15 of the FCC Rules. These limits are designed to
provide reasonable protection against harmful interference in a residential installation.
This equipment generates uses and can radiate radio frequency energy and, if not
installed and used in accordance with the instructions, may cause harmful interference
to radio communications. However, there is no guarantee that interference will not
occur in a particular installation. If this equipment does cause harmful interference to
radio or television reception, which can be determined by turning the equipment off and
on, the user is encouraged to try to correct the interference by one or more of the
following measures:
- Reorient or relocate the receiving antenna.
- Increase the separation between the equipment and receiver.
-Connect the equipment into an outlet on a circuit different from that to which the
receiver is connected.
-Consult the dealer or an experienced radio/TV technician for help
Changes or modifications to this unit not expressly approved by the party responsible for
compliance could void the user's authority to operate the equipment.