Mellerware 26300B User Manual To The Ab97ed48 28c1 44ee 9154 5ac05226b821
User Manual: Mellerware 26300B to the manual
Open the PDF directly: View PDF ![]() .
.
Page Count: 4
R
e
g
i
s
t
e
r
o
n
l
i
n
e
N
e
v
e
r
l
o
s
e
y
o
u
r
r
e
c
e
i
p
t
e
N
e
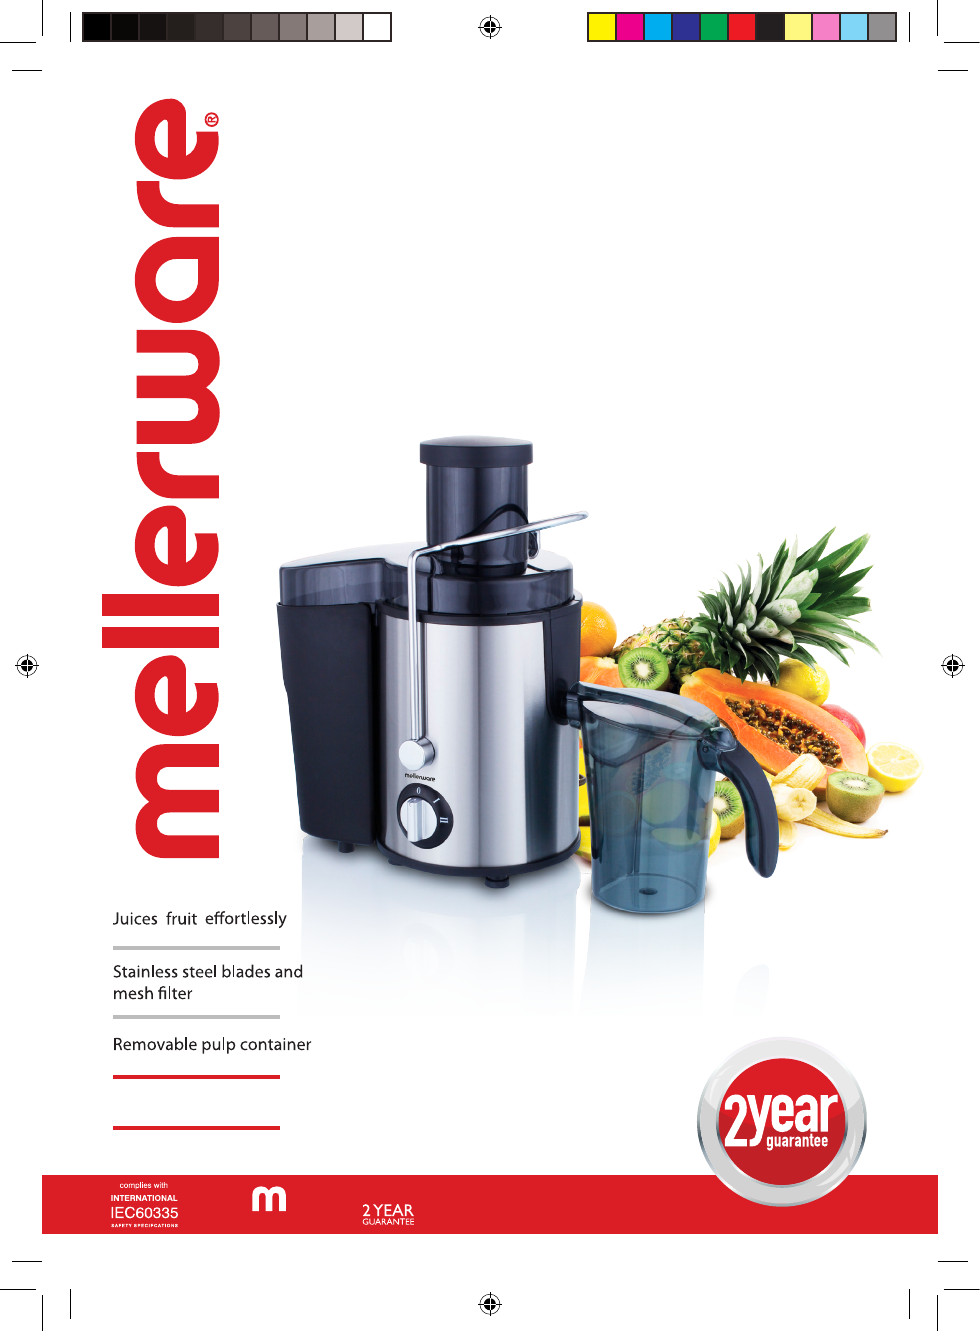
makes life easier
LIQUAFRESH
juice
extractor
Recip book included
Model:
26300B
600W
_IM.indd 1 2013/09/30 12:59:32 PM
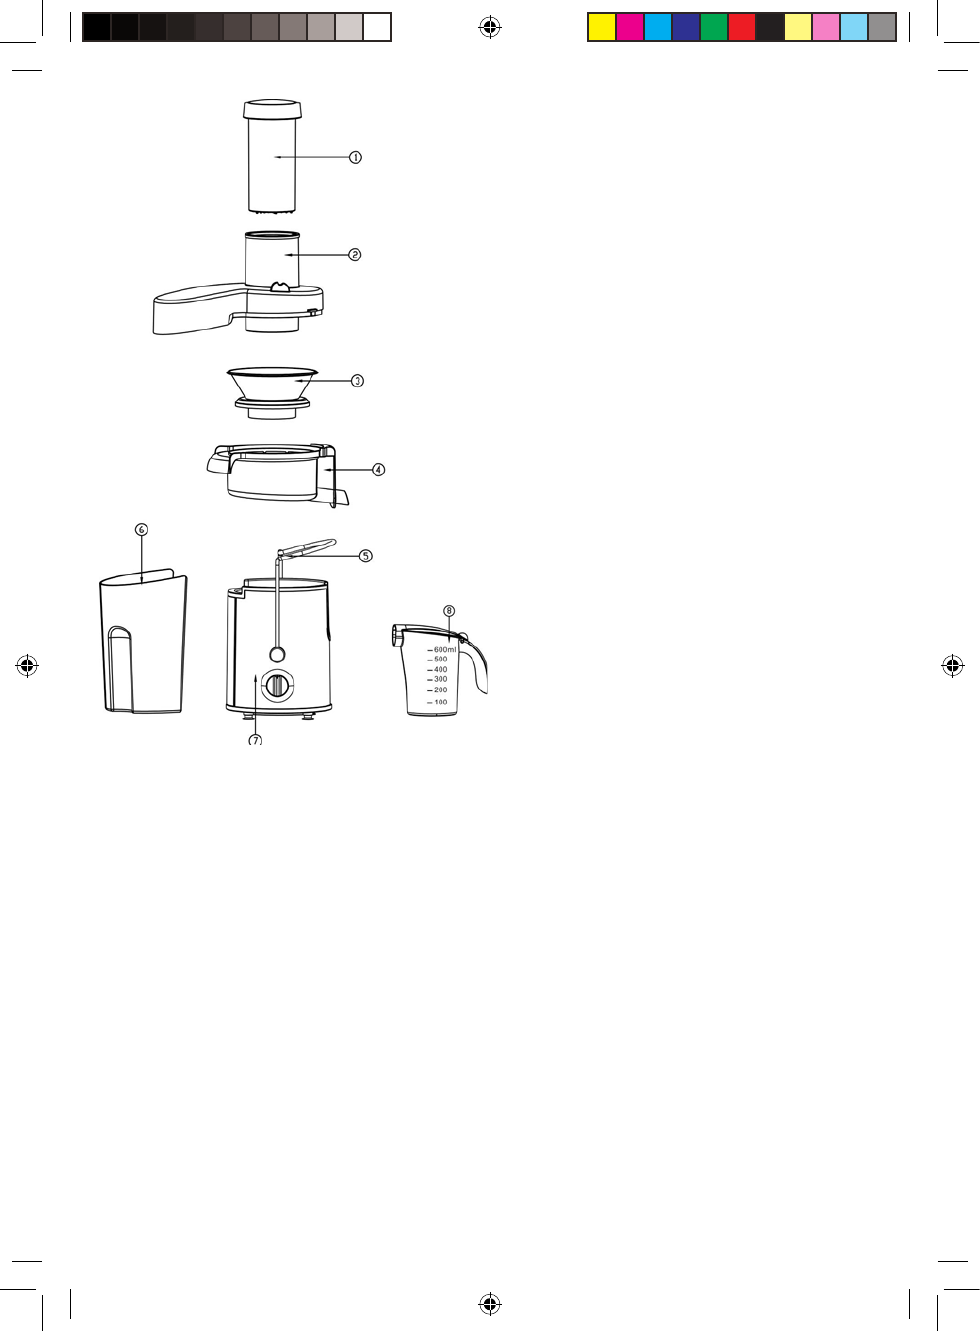
1. Pushing bar 5. Handle
2. Transparent cover 6. Residue barrel
3. Juicing net 7. Main machine
4. Middle ring 8. Juice receptable
- Read all these instructions carefully before
switching on the appliance and keep them for
future reference.
Failure to follow and observe these instructions
could lead to injury.
- Clean all the parts of the appliance that will
be in contact with food, as indicated in the
cleaning section, before use.
Use or working environment:
- The appliance must be used and placed on a
flat, stable surface.
Electrical safety:
- Do not use the appliance if the power cord or
plug is damaged.
- Ensure that the voltage indicated on the
rating label matches the mains voltage before
plugging in the appliance.
- Connect the appliance to a socket that can
supply a minimum of 10 amps.
- The appliance’s plug must fit into the wall
socket properly. Do not alter the plug. Do not
use plug adaptors.
- Do not use the appliance if it has fallen or if
there are visible signs of damage.
- Do not force the power cord. Never use the
power cord to lift up, carry or unplug the appli-
ance.
- Do not wrap the power cord around the ap-
pliance.
- Check the state of the power cord. Damaged
or tangled power cords increase the risk of
electric shock.
- If using the appliance outdoors, use a suit-
able cord extension.
- Do not touch the plug with wet hands.
Use and care:
- Fully unroll the appliance’s power cord before
each use.
- Do not use the appliance without its filter(s)
correctly in place.
- Do not use the appliance if the speed selec-
tion dial does not work.
- Do not move the appliance while in use.
- Do not turn the appliance over while it is in
use or while it is connected to the wall socket.
- Disconnect the appliance from the wall sock-
et when it is not in use and before undertaking
any cleaning task.
_
This appliance is for household use only, not
professional or industrial use.
- This appliance is intended for adult use.
Ensure that this product is not used by the
disabled or children.
- This appliance should be stored out of reach
of children and/or the disabled.
- To push out the food from the tube always
use the food pusher accessory, never use your
finger or other accessories.
- Any misuse or failure to follow the instructions
for use renders the guarantee and the manu-
facturer’s liability null and void.
Instructions for use:
Before use:
- Make sure that all the product’s packaging
_IM.indd 2 2013/09/30 12:59:32 PM

has been removed.
- Before using the product for the first time,
clean all the parts that will come into contact
with food in the manner described in the clean-
ing section.
Use:
- Unroll the power cord completely before
plugging it in.
- Connect the appliance to the wall socket.
- Place the juice receptacle at the juice delivery
tube.
- Start the appliance; turn the speed selection
dial to the desired speed.
ATTENTION: If the locking handle is not prop-
erly fitted the appliance will not start.
- Add the fruit or vegetables through the load-
ing tube.
- Gently push down the food pusher acces-
sory.
- The juice and residue will be separated au-
tomatically: the juice will go towards the juice
receptacle and the residue will go to the pulp
container.
- N.B. If you process a large quantity of fruit,
you must periodically clean the filter and re-
move the remains of the pulp.
Operating time:- after operating for 30 sec-
onds, stop for 1 minute, then use again. After
the above operation is performed three times,
stop use for 15 minutes. This way the service
life of the machine will be prolonged.
Once you have finished using the appliance:
- Leave the motor on for a few seconds allow-
ing the juice to be completely squeezed out.
- Stop the appliance, selecting position “0” on
the speed selection dial
- Unplug the appliance from the wall socket.
- Clean the appliance.
Cleaning:
- Unplug the appliance from the wall socket
and let it cool before starting any cleaning.
- Disassemble the appliance in accordance
with the following steps:
- Before opening the liquidiser, ensure that the
motor as been completely switched off.
- Lower the locking handle.
- Remove the food pusher and the protective
cover.
- Remove the filter and the filter body by pulling
on the filter body.
- Remove the pulp container.
- Clean the equipment with a damp cloth with a
few drops of washing-up liquid and then dry.
- Do not use solvents, or products with an acid
or base pH such as bleach, or abrasive prod-
ucts, for cleaning the appliance.
- Never submerge the appliance in water or
any other liquid or place it under running water.
- The following pieces may be washed in a
dishwasher, but should only be placed in the
top rack and should
not be squeezed into small spaces that may
cause the plastic to distort in shape:
- Food pusher
- Protective cover
- Removable filter
- Filter holder
- Pulp container
Anomalies and repair:
- Take the appliance to an authorised technical
support service if problems arise. Do not try to
dismantle or repair without assistance, as this
may be dangerous.
- If the connection to the mains has been
damaged, it must be replaced and you should
proceed as you would in the case of damage.
Ecology and recyclability of the product:
- The materials of which the packaging of this
appliance consists are included in a collection,
classification and recycling system. Should
you wish to dispose of them,
use the appropriate public containers for each
type of material.
- The product does not contain concentrations
of substances that could be considered harm-
ful to the environment.
- Should you wish to dispose of the product
once its working life has ended, take it to an
authorised waste agent for the selective col-
lection of waste from electric and electronic
_IM.indd 3 2013/09/30 12:59:32 PM
_IM.indd 4 2013/09/30 12:59:32 PM
