Memorex MX4350RF-1 Wireless Mouse User Manual users manual
Memorex Products, Inc. Wireless Mouse users manual
Memorex >
users manual
Additional and updated
information can be found
directly on our fully
interactive website
www.memorexlive.com 1
Cordless Optical Mouse
Index
Next
Other options
GB
Introduction Page 2
Hardware Installation Page 3
Driver Installation Page 5
Troubleshooting Page 6
Comfort Guidelines Page 8
Notices Page 10
Copyright Statements
This manual is copyright Memorex
Products Europe with all rights reserved.
Under the copyright laws, this manual cannot be
reproduced in any form without the prior written
permission of Memorex. No patent liability is assumed,
however, with respect to the information contained herein.
Disclaimer
This manual has been validated and reviewed for accuracy. The included sets
of instructions and descriptions were accurate at the time of this manual’s
production. However succeeding products and manuals are subject to change
without notification. Therefore, Memorex assumes no liability for damages
incurred directly or indirectly from errors, omissions or discrepancies
between the product and the manual.
MX4350RF
MX4350RFMX4350RF

Additional and updated
information can be found
directly on our fully
interactive website
www.memorexlive.com 2
Cordless Optical Mouse
Introduction
Next
Back
Other options
GB
Introduction
Congratulations on your decision to purchase the Memorex MX4350RF cordless optical
mouse. Please take the time to read the following instructions carefully. They will ensure you
get full use out of your mouse and keep it working reliably for many years.
The Memorex cordless optical mouse has a receiver with a PS/2 connector and also comes with a PS/2 to USB
adapter. Being IBM compatible, it can run on nearly all modern PCs. The key features of the mouse include the
combination of the latest cordless and optical technologies and an innovative, ergonomic design with the unique
Memorex MouseportTM desktop charger.
With cordless technology you can free your desktop from cables and enjoy the flexibility of being able to work where
it suits you. No more worries about how long your cable is or if it is getting tangled! As the Memorex cordless mouse
is moved, it transmits signals of electromagnetic energy to the receiver, providing a very precise cursor control. The
output power is low and harmless, but strong enough to have a good detection by the receiver. And with Memorex
360° technology, don’t worry which way your mouse is pointing, or if a cup or book is in the way. You’ll still get
trouble free performance every time.
Combined with optical technology, as soon as the mouse is moved, a light beam from within the mouse illuminates
the surface on which the mouse is resting. At the same time, an optical sensor tracks the movement of the mouse
across the surface. There’s no mouse ball and no internal rollers, so no cleaning is required and you don’t even need
a mousemat!
The mouse is perfect for both right and left-handed people. Using the supplied Memorex mouse software, you can
specify your own scroll and zoom function settings as well as configure the additional right and left mouse buttons
from a range of other predefined functions. These buttons allow you, for example, to scroll effortlessly while you’re
surfing the internet or working with a text editing program. You don’t need to use the scrollbar or the arrow keys. The
scrolling direction depends on the direction in which the mouse is moved and the way the scrolling function has
been configured. And of course, the usual Window settings such as cursor speed and mouse pointer display can still
be selected via the Control Panel and Mouse Properties menu.
MX4350RF
MX4350RFMX4350RF

Additional and updated
information can be found
directly on our fully
interactive website
www.memorexlive.com 3
Cordless Optical Mouse
Hardware Installation
Next
Back
Other options
GB
Getting Started
To use the Memorex cordless optical mouse with your PC, you will need to have a free USB port or PS2 mouse port.
The USB port or PS2 mouse port can be recognized on most modern computers by a symbol next to the
corresponding socket.
Note: Please note that the USB port is currently only supported by Windows 98, ME & 2000. If you are using
Windows 95 or NT 4.0, you will only be able to use the PS2 connection.
Hardware Installation
1. Connection to your PC
PS2 Connection
a. Shut down your PC and turn it off
b. Disconnect any existing mouse completely and then gently insert the PS2 connector of your Memorex
receiver cable directly into the mouse port of your PC
USB Connection
a. Connect the PS2 to USB adapter to the PS2 plug of the receiver
b. Disconnect any existing mouse completely and then gently insert the USB connector of your Memorex
receiver cable directly into the USB port of your PC
2. Connect the MouseportTM to the mains power supply using the supplied power cable and ensure the power is
turned on. The LED at the front of the MouseportTM should be on.
3. Open the battery compartment of the mouse and set the mouse ID with the channel switch to either “1” or “2”
4. Insert the 2 rechargeable AAA batteries into the battery compartment and close the cover. Take care to insert the
batteries correctly. Position the mouse onto the MouseportTM charging station so that it is in the charging position.
The first time you charge the mouse, to allow the batteries to charge completely you should allow it stand in the
MouseportTM for 8 hours. When you start charging, the MouseportTM LED will be on. As charging of the batteries
nears completion, the LED will start to flash with increasing speed until the batteries are fully charged, when the
LED will go off.
5. Locate the channel switch on the bottom of the receiver and set the receiver ID to be the same as selected for
the mouse in step 2 above. The default setting for both is channel 1.
MX4350RF
MX4350RFMX4350RF

Additional and updated
information can be found
directly on our fully
interactive website
www.memorexlive.com 4
Cordless Optical Mouse
Hardware Installation
Next
Back
Other options
GB
6. Now turn on your PC. The LED on the receiver should be lit. When you restart your PC, Windows may detect your
new mouse and ask if you want to configure it. Select No as you will configure the mouse after installing your
new mouse driver.
7. Locate the ID Link Button on the top of the receiver and press it. The LED on the receiver should begin to
flash slowly.
8. Locate the ID Link Button on the base of the mouse and press it. The LED on the receiver should now flash rapidly
while the communication frequency is set.
9. Once the frequency is set, the LED on the receiver will stop flashing and will stay on. However if the mouse is
moved, the LED will flash indicating the mouse and receiver are communicating successfully.
Note: When the mouse batteries need to be recharged, the scrolling wheel will remain illuminated. To recharge the
batteries, simply position the mouse onto the MouseportTM desktop charger, and charging will commence. A full
charge will take about 6-8 hours.
Note: The Memorex cordless optical mouse is designed to conserve battery life and will enter a power saving
‘Sleep’ move if it is inactive for 90 seconds. To ‘Wake’ the mouse, simply click any mouse button or move the
scrolling wheel.
Note: If you remove the batteries at any point, when re-inserting them you must always reset the ID as shown in
steps 6 to 8 above.
MX4350RF
MX4350RFMX4350RF

Additional and updated
information can be found
directly on our fully
interactive website
www.memorexlive.com 5
Cordless Optical Mouse
Driver Installation
Next
Back
Other options
GB
Driver Installation
Your Memorex mouse will function with most mouse drivers that you may already have installed on your PC.
However the existing drivers may not offer the same functionality as the Memorex software and might not, for
example, support the scrolling function. The Memorex mouse software supports Windows 9x, ME, 2000 & NT 4.0. A
driver for Windows XP will be available as a download from our website www.memorexlive.com after Windows XP
has been released.
1. To install the Memorex mouse software, you can simply click on the Install Software button from the main menu
of the Tool Kit CD and follow the on screen instructions. Alternatively:
a. Insert the Tool Kit CD into your CD-ROM drive and click on Start
b. Select Run and then click on Browse
c. Double click on your CD-ROM drive and again on the Software folder
d. Double click on the Setup.exe icon, click on the OK button and then follow the on-screen instructions
Note: Before installing any software under Windows NT 4.0, we recommend you create an Emergency Repair Disk
using the Repair Disk Utility provided by the system (RDISK.EXE).
2. If you wish to use the Memorex driver, you should first remove your existing mouse driver. To do this, click on the
"Uninstall" icon located in the folder of your existing mouse driver and follow the on-screen instructions.
Alternatively you can use Add/Remove Programs from within the Windows Control Panel.
3. At the last step of the "Uninstall" process you will be prompted to change your mouse driver. If you restart your
PC without changing the mouse driver, your PC will re-install your existing mouse driver as the default driver and
it will not be removed. To change to the Memorex mouse driver:
a. Click on Start, select Settings and then click on Control Panel
b. Double click on the Mouse icon and then click on General
c. Click on Change and then select the new Memorex mouse driver
4. Now restart your PC and the new Memorex driver will be activated. After your computer has successfully
restarted, the software will place a new symbol in the system tray at the lower right corner of your screen.
Double-clicking this icon will open the Mouse Control Panel for the mouse. Here you can select the following
setting options:
• Button assignment
• Speed and Zoom settings
Please note that any new mouse settings only take effect after you click on Apply or OK.
MX4350RF
MX4350RFMX4350RF

Additional and updated
information can be found
directly on our fully
interactive website
www.memorexlive.com 6
Cordless Optical Mouse
Troubleshooting
Next
Back
Other options
GB
Troubleshooting
Note: Your Memorex cordless mouse uses electromagnetic signals to communicate with the receiver. It’s
performance will be impaired if the mouse or the receiver is placed too near other sources of electromagnetic
radiation such as radios, TVs, fax machines, mobile phones and other RF products. Ideally the receiver should be a
few centimetres away from other electrical devices, including your computer monitor.
Symptom 1: No mouse movement
Solution:
• Make sure the software that you are using supports a mouse
• Ensure that mouse driver is installed on the system
• Ensure the receiver cable is connected correctly to your PC
• Ensure the ID setting is the same for both mouse and receiver (see Hardware Installation above)
• Check the batteries in the mouse are inserted correctly and that they are sufficiently charged
Symptom 2: The cursor remains in one spot or moves erratically
Solution:
• Check the receiver cable for any breaks or sharp twists. Examine it closely where the cable connects
to the receiver
• The mouse may be too far from the receiver or the batteries may be low on power
• This could be caused by interference from another electromagnetic source. Move the receiver away from any
such electrical equipment.
• If the problem persists, try another ID setting (see point 2 onwards in Hardware Installation above)
Symptom 3: After selecting Mouse Type and clicking on OK, the mouse became disabled
Solution:
• Use the keyboard to close the current window and wait for an instruction to restart your PC. After restarting,
the mouse should work normally.
Symptom 4: The Error Code 115 is displayed when installing the Memorex mouse
driver software
Solution:
• Shut down any virus protection software before installing the Memorex mouse software
MX4350RF
MX4350RFMX4350RF

Additional and updated
information can be found
directly on our fully
interactive website
www.memorexlive.com 7
Cordless Optical Mouse
Troubleshooting
Next
Back
Other options
GB
Symptom 5: Detection problems with PS2 pointing devices
Solution:
• If your mouse is connected to the mouse port and is not detected by the system, check the mouse port is
enabled through the Setup Menu (consult your PC documentation for further information).
• If the problem persists, please check for a possible computer BIOS ROM upgrade from your computer
manufacturer.
Some notebook systems have both an external mouse port and an integrated Pointing Device, which is connected to
the mouse port. If your mouse is having difficulty running on the mouse port of this type of system, you may need to
try connecting a serial mouse to the serial port instead.
Symptom 6: Conflicts with other devices
Solution:
• Some software provided by other manufacturers with mouse functions may conflict with this mouse. We
recommend you remove any existing mouse software before installing the Memorex mouse software.
Symptom 7: Problems operating the wheel
Solution:
• Check that the Memorex Browser Mouse or Memorex Mouse Control Panel application is installed properly. If
you do not find the Browser Mouse or Mouse Control Panel icon in the system tray, you need to reinstall the
Memorex mouse software.
• Some other applications with a mouse scrolling function may conflict with this mouse function. Remove these
applications before installing the Memorex mouse software
WARNING
• Do not attempt to change the frequency or power of the mouse or modify its function or characteristics or you
could face prosecution.
• It is not advisable to use the mouse on an aircraft as it may interfere with the aircraft's navigation equipment.
For further information please visit our website www.memorexlive.com
This high quality Memorex product is covered by a 2 year warranty from the date of purchase. Please keep your
receipt as a proof of purchase in case you need to make a claim under the warranty.
MX4350RF
MX4350RFMX4350RF
Additional and updated
information can be found
directly on our fully
interactive website
www.memorexlive.com 8
Cordless Optical Mouse
Comfort Guidelines
Next
Back
Other options
GB
Creating A Comfortable Computing Environment
Memorex mice and keyboards are designed to help you use your computer efficiently and comfortably. For work or
for play, for a few minutes or for the whole day, it is important to stay relaxed and comfortable each time you use
your computer
By creating a comfortable environment and exercising healthy computing habits, you can minimise fatigue and
discomfort and reduce the risk of the resulting strains which some experts believe can lead to physical injury to your
hands, wrists, arms, neck or back.
The following suggestions are designed to help you be as comfortable as possible when using your Memorex
products.
1. Arrange your desktop correctly
• Position your monitor so that it is directly in front of you and at comfortable
viewing distance, avoiding sources of glare and reflection.
• Have your keyboard placed directly in front of your monitor with your mouse
conveniently next to it, so that when using them, your arms and hands are in a
natural, comfortable and relaxed position.
• Position frequently used materials within easy reach and other items further
away, according to how often you need them.
• Adjust the height of your desk or chair to create a comfortable computing
position. When seated, your mouse and keyboard should be at or below the level
of your elbow, so that when you type, your shoulders will be relaxed and your
upper arms hang freely at your sides.
• If you are using a portable PC with a docking station, it may be more comfortable
to use a separate keyboard or mouse, rather than the integrated units.
2. Stay comfortable and relaxed
• To maintain a comfortable computing position, it is important that your arms,
wrists and shoulders should remain as relaxed as possible. Before you start using
your computer and occasionally through the day, relax your shoulders and let
your arms hang by your sides until you feel them loose and relaxed. Repeat this
exercise if you feel yourself becoming tense or strained as you work or play at
your computer.
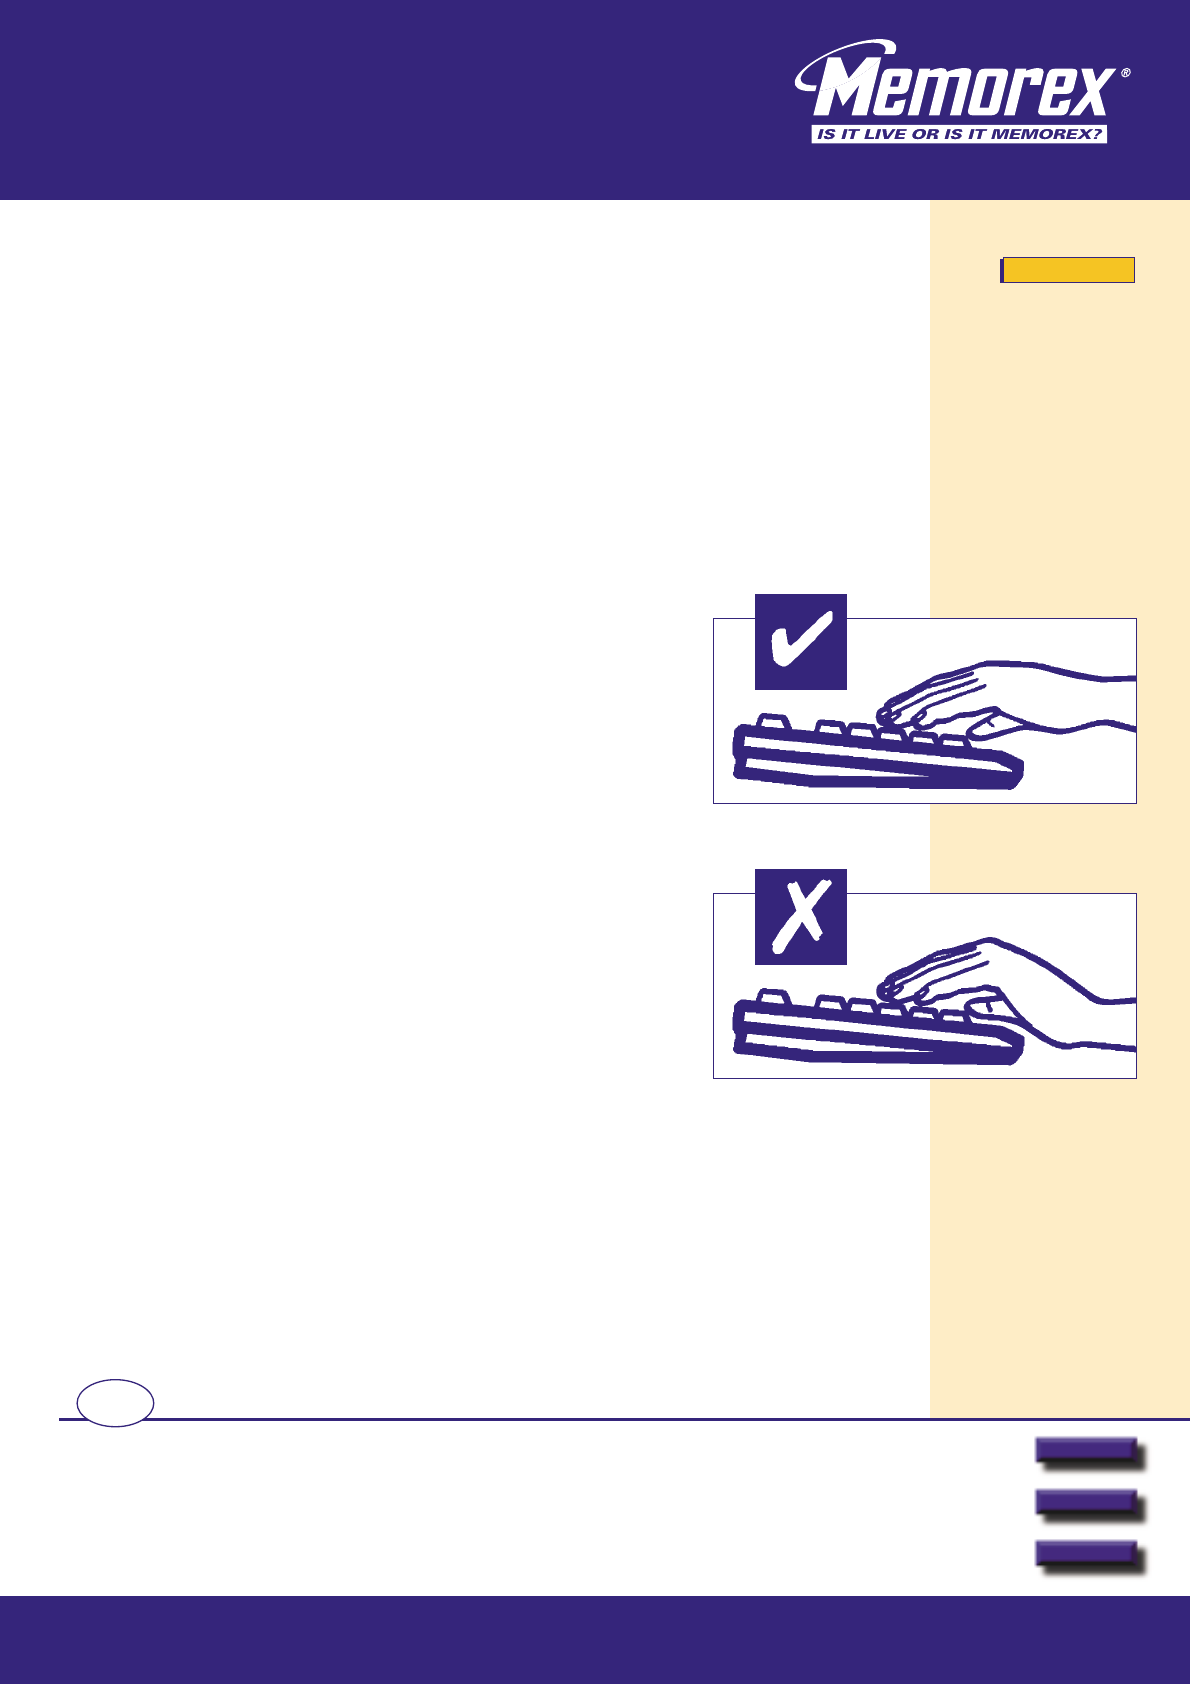
• Adjust the angle of tilt on your Memorex keyboard to maintain a comfortable typing position and use the wrist
rest to support your wrists as you rest between spells of typing. It is not designed to support your wrists while
you type.
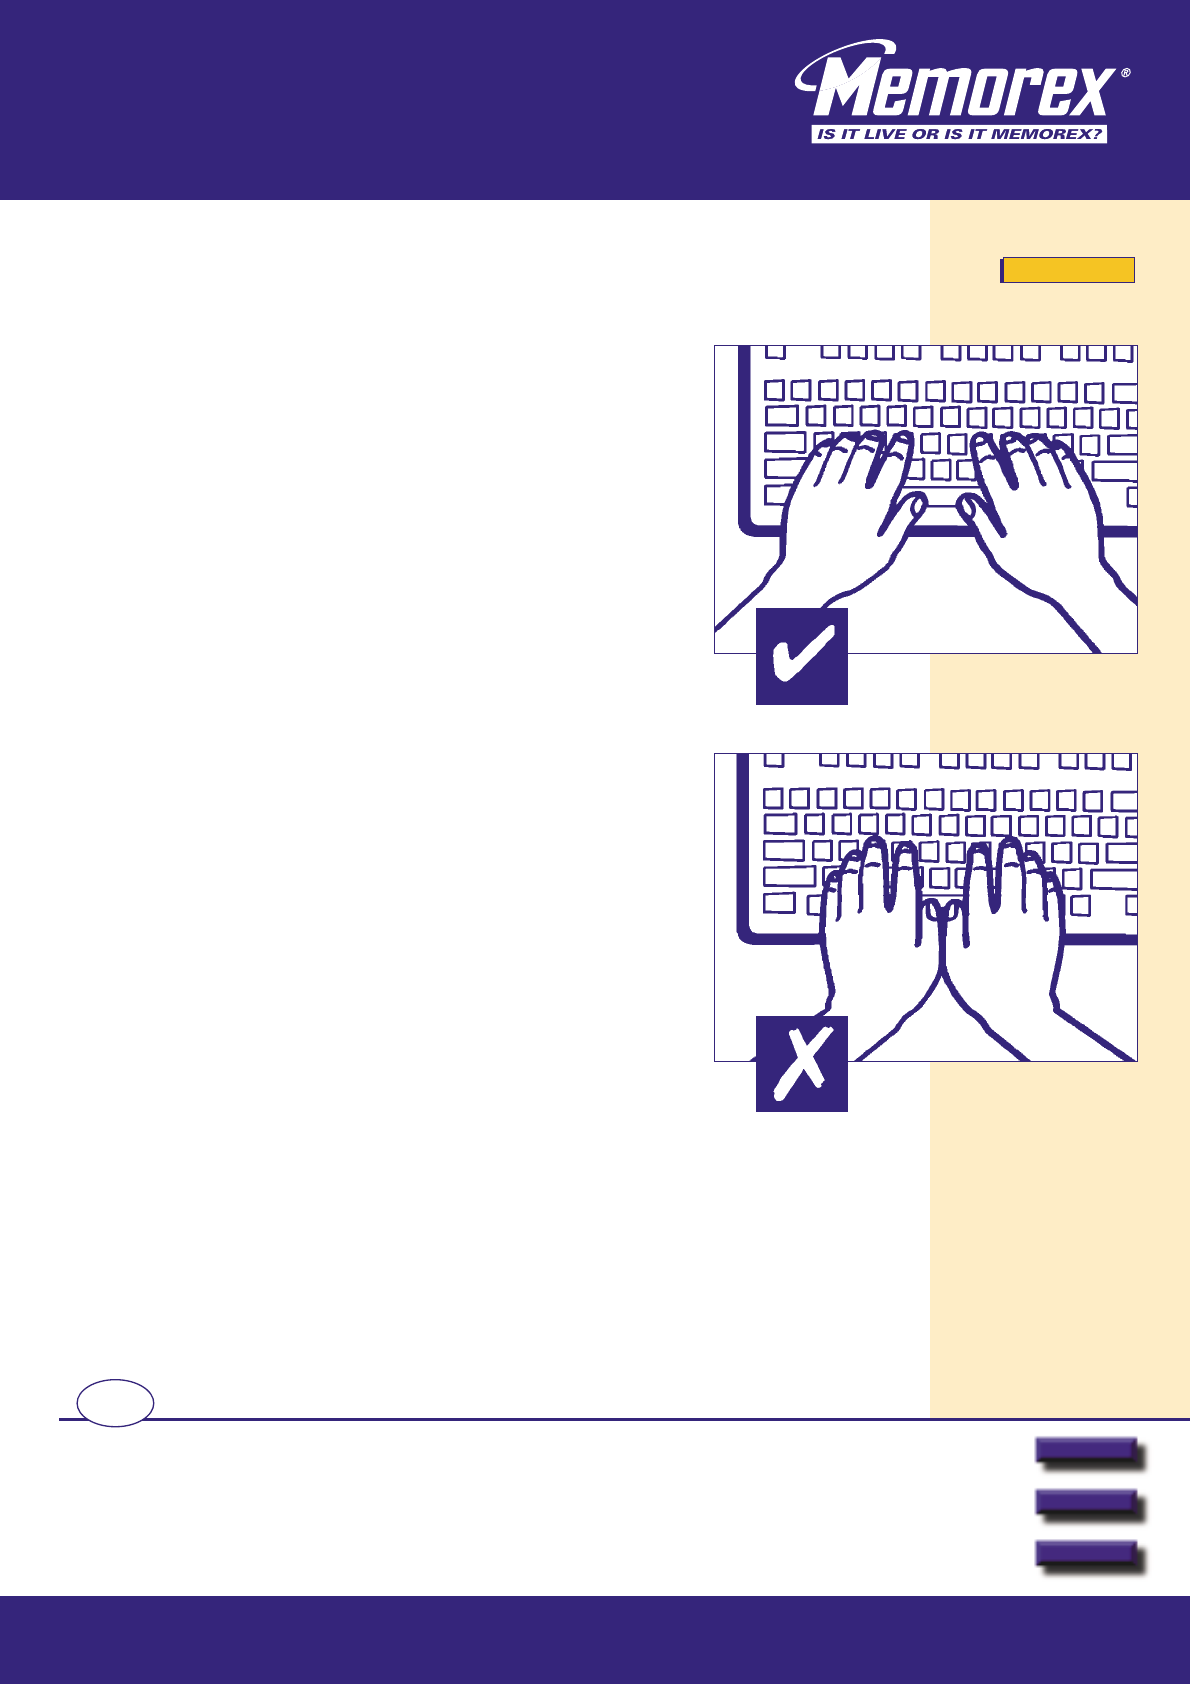
• When typing, do not try to support your wrist either on the edge or the flat surface of your desk. Your wrist
should be relaxed and straight. To enable this, you may need to adjust the height of your desk or chair as
mentioned above.
• If you need to constantly refer to another document while typing, place it close to the monitor so that you do
not have to keep turning your head to read it.
• Hold your mouse with a relaxed hand and use your whole arm to move the mouse, not just your wrist.
MX4350RF
MX4350RFMX4350RF
Additional and updated
information can be found
directly on our fully
interactive website
www.memorexlive.com 9
Cordless Optical Mouse
Comfort Guidelines
Next
Back
Other options
GB
• When typing, use a gentle action. Don’t hit the keys harder than necessary!
• Maintain a relaxed, upright posture and avoid slouching or leaning too far back.
Position the backrest of your chair so that your lower back is supported properly.
• Place your feet flat on the floor or use a footrest if your chair is too high.
3. Exercise healthy computing habits
• Take regular breaks and avoid staying at your computer for prolonged periods.
Short and frequent breaks may prove better than fewer, longer ones.
• Change your sitting posture frequently to reduce muscle fatigue
• Break up your routine and vary your activities during the day. Don’t sit in one
position performing the same task for too long.
• Try to sit at your computer in a relaxed and natural position. Avoid awkward
postures which may cause muscular discomfort.
These suggestions are intended to help maximise your comfort at your computer.
However only you can really determine the best environment and desktop arrangement
for your work or play.
Note: If you do experience pain, numbness or weakness which you believe could be as
a consequence of using your mouse or keyboard, please seek qualified attention from
a health care professional.
MX4350RF
MX4350RFMX4350RF

Additional and updated
information can be found
directly on our fully
interactive website
www.memorexlive.com 10
Cordless Optical Mouse
Safety
Back
Other options
GB
WARNING
This device complies with Part 15 of the FCC Rules. Operation is subject to the following two conditions: (1)
This device may not cause harmful interference, and (2) this device must accept any interference received, including
interference that may cause undesired operation.
NOTE
This equipment has been tested and found to comply with the limits for a Class B digital device, pursuant to Part 15
of the FCC Rules. These limits are designed to provide reasonable protection against harmful interference in a
residential installation. This equipment generates, uses and can radiate radio frequency energy and, if not installed
and used in accordance with the instructions, may cause harmful interference to radio communications. However,
there is no guarantee that interference will not occur in a particular installation. If this equipment does cause
harmful interference to radio or television reception, which can be determined by turning this equipment off and on,
the user is encouraged to try to correct the interference by one or more of the following measures:
• Reorient or relocate the receiving antenna.
• Increase the separation between the equipment and receiver.
• Connect the equipment into an outlet on a circuit different from that to which the receiver is connected.
• Consult the dealer or an experienced radio/TV technician for help.
FOR CANADA (ICES-003)
This class B digital apparatus meets all requirements of the Canadian Interference-Causing Equipment Regulations.
FOR EUROPE
The Memorex Cordless Optical Mouse is in conformity with the EMC directive and low-voltage directive.
IMPORTANT
Any change or modifications to the equipment by the user not expressly approved by the guarantee or manufacturer
could void the user's authority to operate such equipment.
MX4350RF
MX4350RFMX4350RF