Memorex MX4420RF WIRELESS OPTICAL MOUSE User Manual
Memorex Products, Inc. WIRELESS OPTICAL MOUSE Users Manual
Memorex >
Users Manual
6 Button Programmable Mouse
Wireless Office ScrollPro
GUIDE
user's
user's
Version 1.0
Optical Mouse
USB & PS/2RF- Wireless

A. Introduction
Congratulations on your purchase of the Wireless Office ScrollPro
Optical Mouse! This mouse uses optical technology instead of a
dust-collecting roller ball to track movements. Signals are sent to a
receiver by means of radio frequency (RF) in order to reduce inter-
ference from other wireless devices such as TV remote controls and
cordless phones. Please take time to read the following instructions
carefully. They will help you get full use of your mouse and keep it
working reliably for many years.
B. What’s in this package
• Wireless Office ScrollPro Optical Mouse (Part # 32022384)
• RF Wireless Receiver
•ScrollPro Mouse Series Driver CD
• 2 AAA Batteries
C. System Requirements
•IBM or compatible PC
• Available USB 1.1/2 or PS/2 port
•CD-ROM or DVD drive (for driver installation. Users without
an optical disc drive can download the drivers from the
Memorex website at www.Memorex.com)
•Microsoft Windows 98SE, Windows Me
Windows 2000, or Windows XP operating systems.
D. Preparing the Wireless Office ScrollPro Optical Mouse
Be sure to follow the installation steps in the correct order so that your
mouse works properly.
Step 1: Insert the batteries.
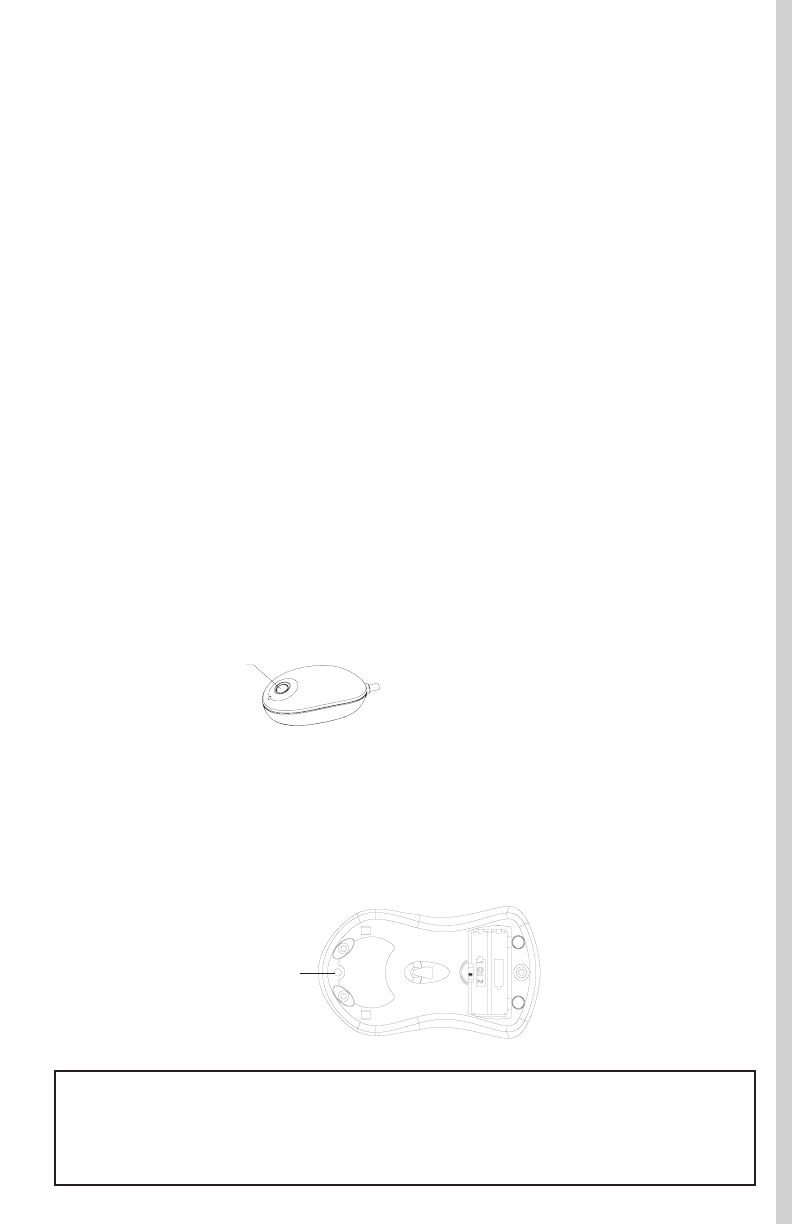
• Turn the mouse over to find the battery compartment. Lift the
cover by pressing in the thin plastic strip just below the half-circle
indentation and pulling up.
Bottom View of Mouse
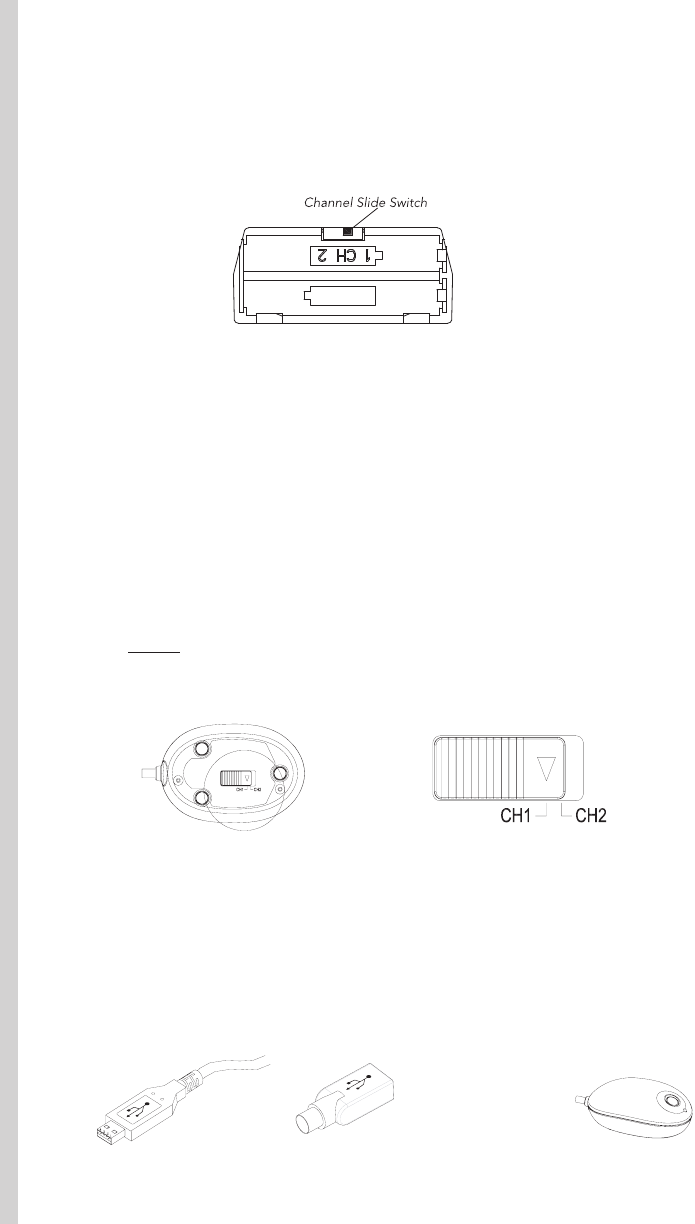
Channel Slide Switch
Battery
Compartment
• Use the slide switch located inside the battery compartment to
select either channel 1 or channel 2 for the RF transmission.
Remember which number you choose because you will set the
receiver switch to the same channel number later.
• Insert the two AAA batteries (included) into the compartment.
Follow the polarity signs (+ and -) in the battery compartment so the
batteries face the correct direction. Inserting the batteries in the
wrong direction may damage both the mouse and the batteries.
• Replace the battery compartment cover by first inserting the two
bottom tabs into their holes and lightly pressing down.
• Make sure your computer is turned off.
• Connect the receiver to the PC by plugging the green PS/2
connector at the end of the receiver to the mouse port of the
computer or remove the green PS/2 connector and use the USB
connector in an available USB port on the computer.
Bottom View of Receiver
Slide Switch Setting of Receiver
Step 2: Set up the Receiver
• Turn the receiver over and find the RF channel slide switch. Select
the same channel, either channel 1 or channel 2, that you selected
on the mouse before you inserted the batteries.
USB to PS/2
Adapter
Receiver
• Set the receiver flat on a surface and follow these guidelines:
o Leave a minimum of 8 inches of clearance between the receiver
and other electronic devices.
o Leave a minimum of 8 inches of clearance between the receiver
and the monitor.
o The mouse can operate at a range of up to 6 feet from the
receiver.
o The receiver should rest on a non-metallic surface for best
reception.
Step 3: Synchronizing the Receiver and the Mouse.
The receiver and the mouse each contain two channels, and each
channel contains 256 distinct ID codes that are randomly selected
when you press the ID button on the Receiver. This ID-recognition
function helps protect against interference from other wireless
devices in the same environment. After you have selected the same
channel on both the mouse and the receiver, the next step is to
match the IDs of the mouse and receiver through the synchronization
process so that they can communicate with each other.
• Turn the computer on.
• Press once on the ID button on the top of the receiver. The
green LED light below the button will start to blink slowly.
ID Button of Receiver
ID Button
• Turn the mouse over and find its ID button near the top. Press
the ID button with a blunt pointed object such as the tip of a
ballpoint pen or a bent paper clip and hold the button down
until the blinking light on the receiver stops blinking and
remains a steady green. This may take up to 20 seconds.
ID button of Mouse
IMPORTANT: If 30 seconds pass before you find and press the
mouse ID button, you must restart the process again by pressing the
ID button on the receiver until the light blinks and once again find
and hold down the ID button on the bottom of the mouse.

E. Using the Mouse
The Wireless Office Scroll Pro Optical Mouse uses light to sense
movement. Use the mouse on an opaque surface. The optical
mouse cannot work on a glass, translucent, or reflective surface
that deflects the light.
The mouse goes into a sleep or suspend mode after 10 minutes.
The blue light at the rear of the mouse turns off to indicate that
the mouse is in its sleep mode. Move the mouse or click the
scroll button (suggested) or one of its other buttons to wake it.
You may notice that the mouse moves the cursor on the screen twice
as fast as a standard mouse does. The mouse moves the cursor at 800
dots per inch (dpi) while a standard mouse moves the cursor at only
400 dpi. You can change the cursor movement speed by using the
mouse properties in the CONTROL PANEL under MY COMPUTER.
• Verify that the mouse and receiver are properly synchronized
by moving the mouse around on a flat surface and clicking a
button or two. If the green LED on the receiver blinks fast and
steadily with the movement of the mouse, the mouse and
receiver are properly communicating.
• If the receiver does not respond to movement of the mouse
and you have repeated the synchronization process, check to
see if the batteries are properly installed and that both the
mouse and the receiver are set to the same channel number,
then repeat the process again. If the mouse is still not working
properly, check the "Troubleshooting" section for tips on how
to solve your problem.
• If you find interference from other wireless products such as
other wireless mouse users nearby, try switching channels on
the mouse and receiver and synchronize again.
• You will need to resynchronize the mouse and the receiver if
you remove the batteries for replacement or cleaning. The
scroll wheel on the mouse will light up when the batteries are
low on power. Replace them right away.

Step 2: Install the new software
(Windows 98SE/Me/2000/XP)
• Insert the supplied installation CD into your CD-ROM drive.
• The software should automatically launch itself. If it does not-
a. Click the START button on the task bar.
b. Select RUN and click on BROWSER.
c. Select the letter of the CD-ROM drive into which you placed
the installation disc.
d. Double-click on the Memorex.exe file.
e. Click on the OK button to launch the program.
o Win 98 SE, Me: select the DEVICE MANAGER tab; look for the
MOUSE listing under the devices. Double-click on MOUSE,
then right-click on the device that is listed. Select REMOVE to
delete the driver. If there is more than one mouse device,
remove the drivers for each one in the same manner.
o Win 2000, XP: select the HARDWARE tab. Select DEVICE
MANAGER and look for the MOUSE listing. Double-click on
MOUSE, then double-click on the device that is listed. Click
the DRIVER tab and then select UNINSTALL. If there is more
than one mouse device, remove the drivers for each one in the
same manner.
o Reboot the computer. You are now ready to install the new
software.
F. Adding the Extra Mouse Features with the Included Software
At this point your Wireless Office ScrollPro Optical Mouse will work
well but will not be able to use the special features for altering the
scroll wheel settings, reprogramming the buttons, or getting short-
cuts to Office programs. These additional features require the
installation of the drivers on the ScrollPro Mouse Series Driver CD.
Follow the steps below to add these features.
Step 1: Remove Old Mouse Drivers
• In order to avoid conflicts with previously installed mouse drivers
and software, you will need to delete the following files by right-
clicking on the MY COMPUTER icon and then clicking on
PROPERTIES.
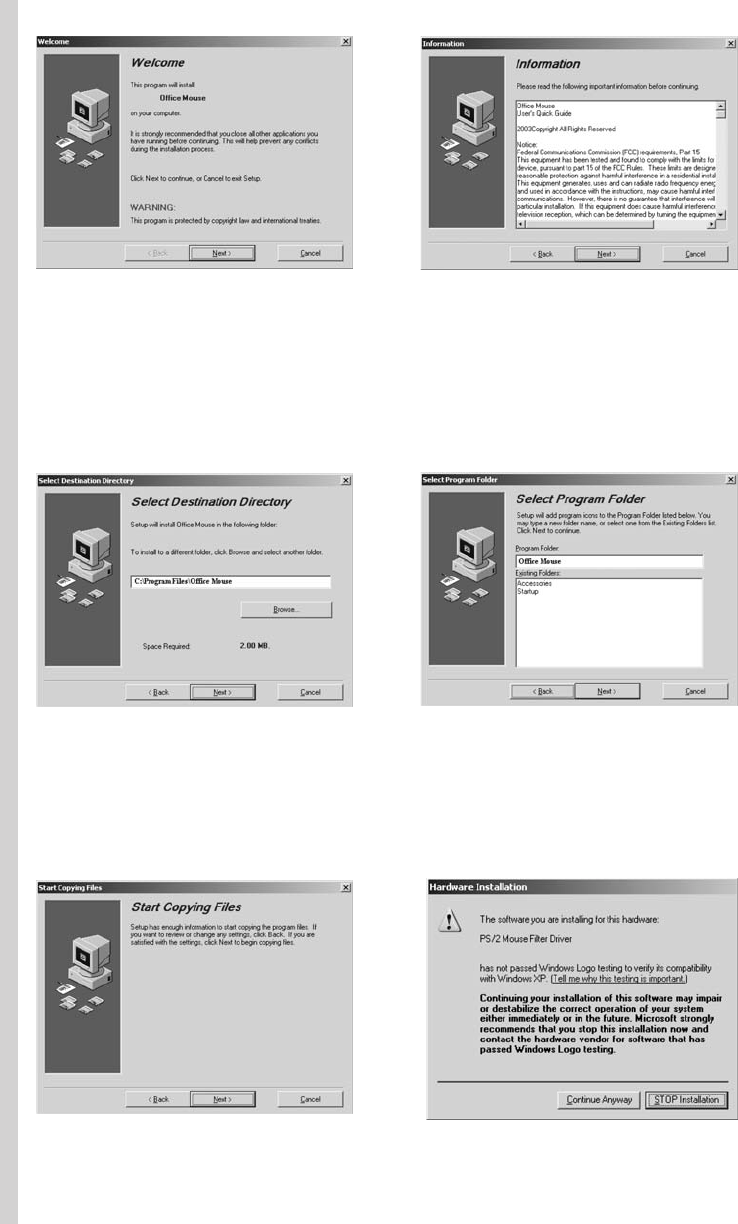
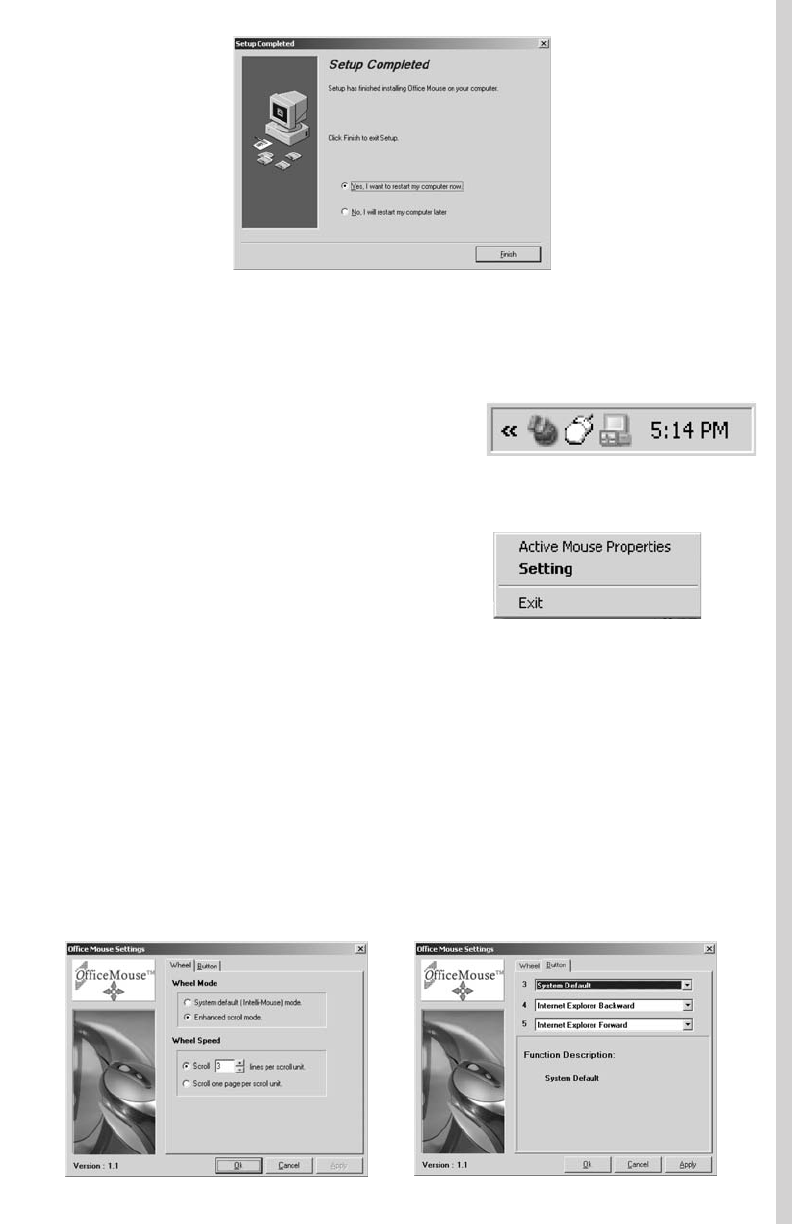
•The setup is complete. Remove the installation CD-ROM from
your drive and click FINISH to reboot your computer.
•A “Start Copying Files” notice pops up; click on NEXT. In
Windows XP a notice may pop up warning about Windows Logo
testing. The PS/2 Mouse Filter Driver will not affect Windows XP
and may have completed the testing process after this manual
was printed. Click on CONTINUE ANYWAY.
•Select NEXT. Information about the FCC requirements pops up.
Read the notice and then click NEXT again.
•Your first choice is the folder where the mouse files will be kept.
The default folder is "Programs," and this is typically the best
choice. Click on NEXT again to bring up the folder choice for the
icons. Click NEXT once more.
Step 3: Programming Your Mouse
After your computer has successfully rebooted, the software places a
white mouse icon in the lower right corner of your screen.
•Right-clicking on this icon will give you the following options:
•Click on SETTING to open the program for the Wireless Office
ScrollPro Optical Mouse. (You can get to the same area by
double-clicking on the mouse icon). You will get the Windows
Mouse Properties area if you click on the "Active Mouse
Properties" Selection.
•There are two programming options that appear: Wheel and
Button. The settings for the wheel options are the first choices
you will see, but you can click on the Button tab to open up the
options for programming the buttons in a way different from the
default settings.
Wheel
Choose the Wheel Mode you prefer--
o The System default (Intelli-Mouse) mode setting is standard
scrolling up and down with the scroll wheel.
o Enhanced scroll mode allows you to select different Wheel Speed
settings listed under the Wheel Speed settings.
• Wheel Speed allows you to select the number of lines per scroll unit.
Higher numbers mean faster speeds. The second choice will scroll
even faster- - pages instead of lines.
Button
•There are three buttons on the mouse that can be programmed
to issue different commands: button 3 (the scroll wheel that can be
pushed down as a button), button 4 (the left side button), and
button 5 (the right side button).
•Each button offers 57 choices of commands from which to choose.
Select the ones you want to use from the scroll down arrow.
•Button 6 accesses the Office shortcuts. Please see section G for
instructions to program this button
The programmed mouse settings you choose will only take effect after
clicking on “APPLY” and then “OK.”
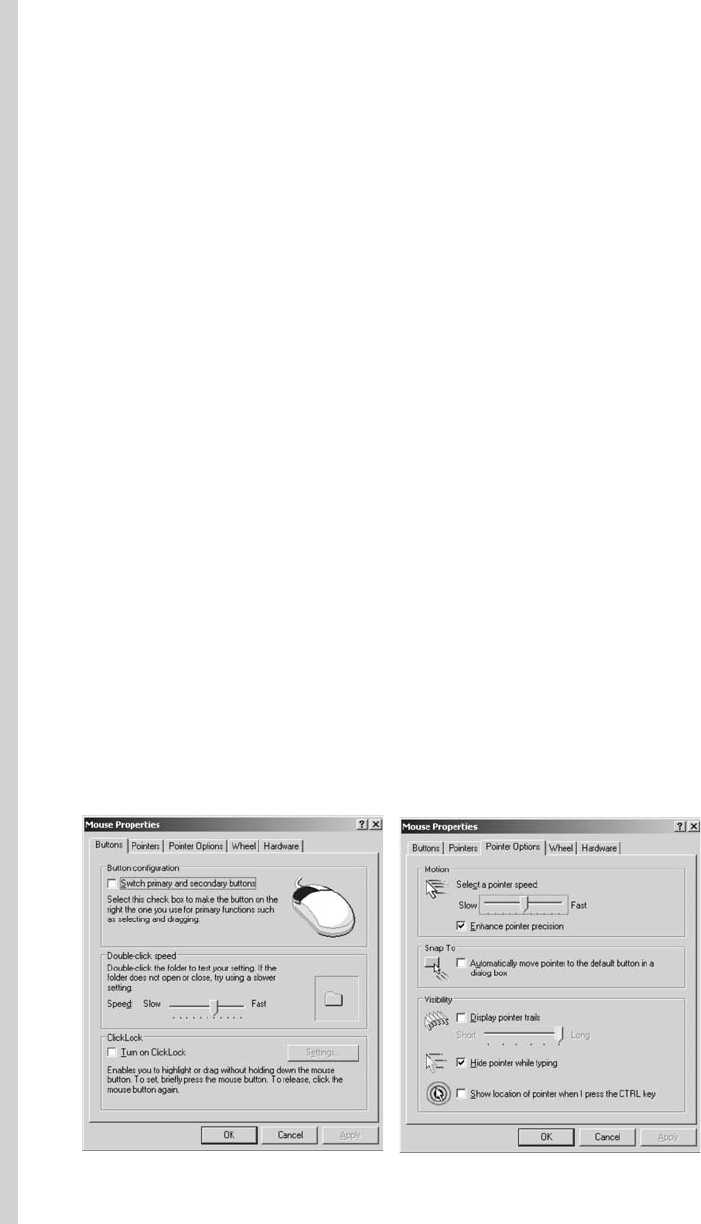
•OPTIONAL: Clicking on the Active Mouse Properties will bring up
options for the mouse buttons, pointers, pointer options, the scroll
wheel, and hardware information. You can customize the operation
of your mouse if you like or leave the settings as they are.
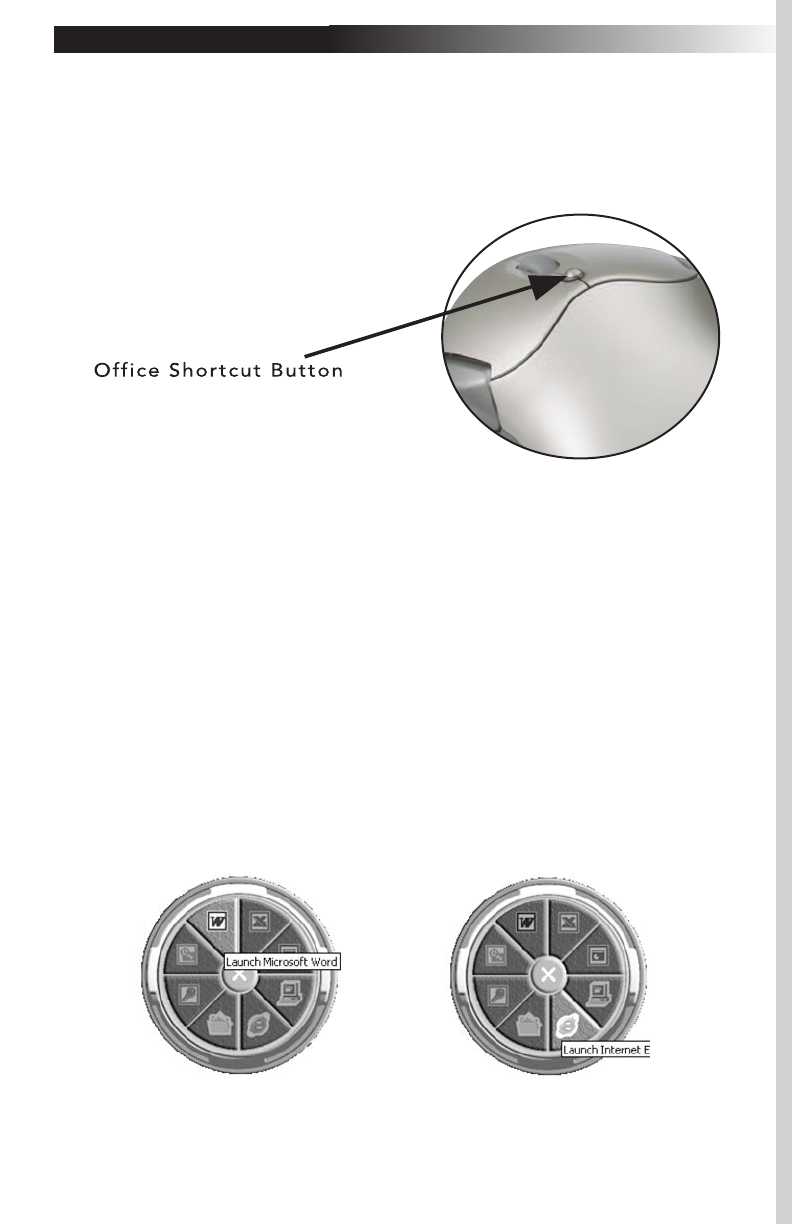
G. Using the Office Shortcut Feature
The Office Shortcut button is located just above the scroll wheel on
your mouse. Pressing the button brings a shortcut circle to the
screen that allows the mouse to click on a pie-shaped section to
quickly open up a Microsoft Office Application.
The Wireless Office ScrollPro Optical Mouse supports MS Office 2000 and XP. It
will also work in MS Office 97.
The applications are (starting from the top and moving clockwise):
1. Microsoft Excel
2. Microsoft PowerPoint
3. My Computer
4. Internet Explorer
5. My Documents
6. Microsoft Access
7. Microsoft Outlook
8. Microsoft Word
Pressing the red button in the center of the circle closes the Office
Shortcut.
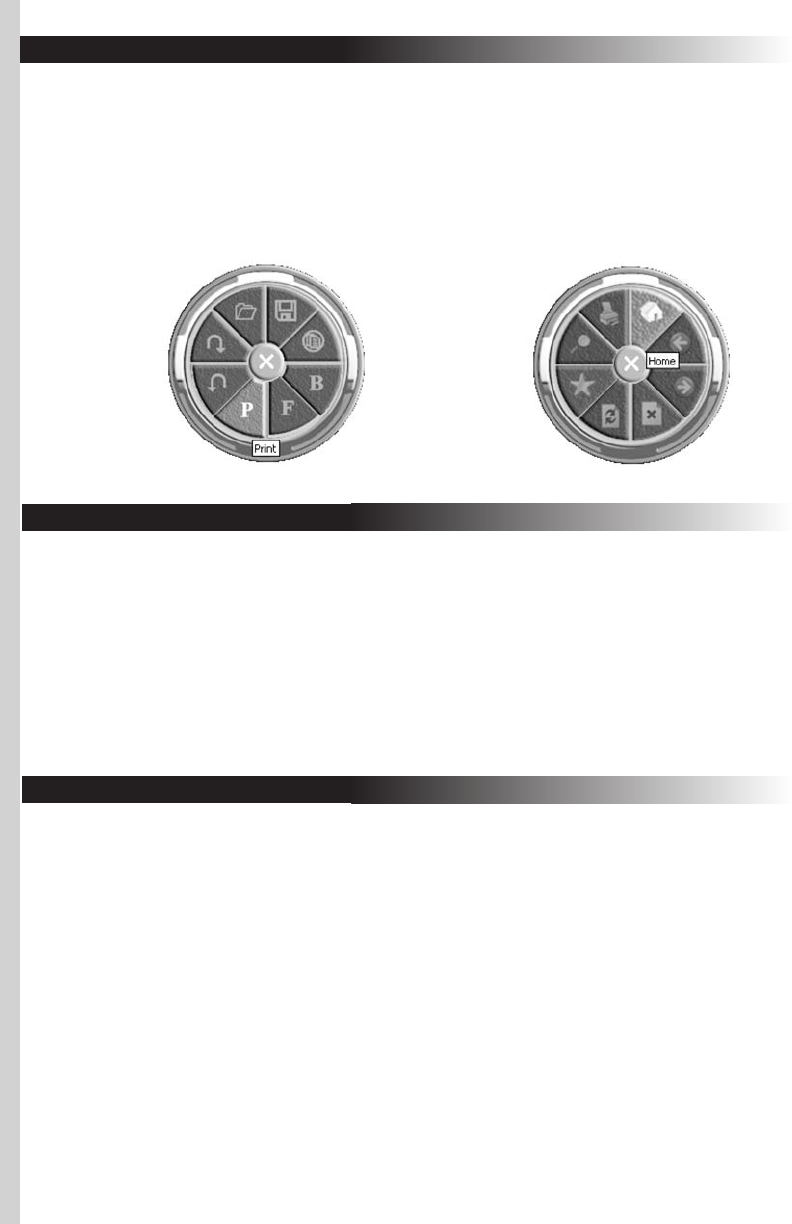
H. Using the Office Application Shortcut Feature
When a Microsoft Application is open, the Office shortcut button
adds different shortcut features that apply to the particular applica-
tion that is open. In Excel, PowerPoint, Access, Outlook, and Word,
the shortcuts appear in Example 1 below. In Internet Explorer the
shortcuts change to those in Example 2.
I. Uninstalling the Mouse Drivers
If you ever need to remove the mouse drivers from your computer,
click MY COMPUTER, then CONTROL PANEL, and select the
ADD/REMOVE PROGRAMS icon. Select OFFICE MOUSE and click
on the CHANGE/REMOVE button. The software will remove itself
completely from your computer. You can also remove the drivers by
clicking on the "Uninstall" application in the OFFICE MOUSE folder
created in the PROGRAMS folder or whichever folder you selected
when installing the Wireless Office ScrollPro Optical Mouse.
J. Troubleshooting
If you are experiencing problems with your mouse, please check the
following:
a. Make sure the mouse batteries are fresh and have not used up
their storage power. The first sign of low batteries is intermit-
tent operation of the mouse functions. Please check this first.
b. Remove the receiver connector and check the end for bent or
broken pins. If the plug appears normal, reinsert the plug into
its ports on the PC while your computer is off.
c. Make sure the receiver plug is inserted into the mouse port on
the PC. Compare the icon on the plug to that on the port if
necessary to be sure they match.
d. Check the batteries to be sure they are inserted correctly.
Make sure the polarity of the batteries (+/-) corresponds with
the polarity signs in the battery compartment.
Example 1 Example 2
1. Save
2. New file
3. Bold
4. Find
5. Print
6. Undo
7. Redo
8. Open file
1. Home
2. Back
3. Forward
4. Stop
5. Refresh
6. Favorites
7. Search
8. Print

e. Check the channel settings on the mouse and the receiver to
make sure they are set to the same channel, either CH 1 or CH
2. Try the alternate channel in case your first choice appears to
work improperly.
f. Other devices in the vicinity of the receiver may cause interfer
ence. It is strongly recommended to place the receiver at least
8 inches away from the monitor and other electronic devices in
order to prevent signal disturbances. Place the receiver on
nonmetallic surfaces for the best reception.
g. If your PC system's BIOS setup has options for the mouse,
make sure the options are set to the default settings. If you are
not familiar with the BIOS, refer to your PC's manual for more
information.
h. If you have problems using the special mouse features, make
sure you have installed the mouse driver correctly as described
in Section F, "Adding the Extra Mouse Features." Also check
that your computer system matches the hardware require-
ments listed in the manual.
i. Use the mouse only on a clean, flat surface in order to ensure
smooth and accurate action. Do not use the mouse on glass,
translucent, or reflective surfaces.
j. Keep all items away from direct sunlight, moisture, dirt,
extreme heat, and abrasive chemical cleaning solutions.
Technical Support:
If you have trouble with the installation and the instructions
above do not help you to resolve your issue, please contact
Memorex Technical Support via email at
techsupport@memorex.com, on-line at www.memorex.com, or
call our toll free technical support at 1-877-Is It Live...
(1-877-474-8548) between 9:00am and 6:00pm PST, M - F.
Product Registration:
To register your Wireless Office ScrollPro Optical Mouse (Part#
32022384) please visit us on-line at www.memorex.com or write to
us with your name, address, phone number, model name, model
number, date of purchase and place of purchase at: Memorex
Products, Inc., 17777 Center Court Dr., Suite 800, Cerritos, CA
90703.

Warranty Information:
Memorex Products One-Year Limited Warranty-Memorex Products
will replace this product free of charge if it is found to be defective in
materials or workmanship during normal usage conditions for a peri-
od of one year from the date of purchase (proof of purchase is
required). Other than product replacement (or refund if replacement
is not possible), Memorex Products will not be responsible for an
incidental or consequential damages arising from use of this product.
FCC Guidelines
This equipment has been tested and found to comply with the limits
of a Class B digital device, pursuant to Part 15 of the FCC Rules.
These limits are designed to provide reasonable protection against
harmful interference in a residential installation. This equipment gen-
erates, uses, and can radiate radio frequency energy and, if not
installed and used in accordance with the instructions, may cause
harmful interference to radio communications. However, there is no
guarantee that interference will not occur in a particular installation.
If this equipment does cause harmful interference to radio or televi-
sion reception, which can be determined by turning the equipment
off and on, the user is encouraged to try to correct the interference
by one or more of the following measures:
•Reorient or relocate the receiving antenna.
•Increase the separation between the equipment and receiver.
•Connect the equipment into an outlet on a circuit different from
that to which the receiver is connected.
•Consult the dealer or an experienced radio/TV technician for help.
The Class B digital apparatus meets all the requirements of the
Canadian Interference-Causing Equipment Regulation.
Cet appareil numerique de la class B respecte toutes les exigencies du
Reglement sur le materiel brouilleur du Canada.
Caution:
Any changes or modifications not expressly approved by the party
responsible for compliance could void the user's authority to operate
this equipment. Shielded interface cable, if any, must be used in order
to comply with emission limits.


©2004 Memorex Products, Inc. • Cerritos, CA 90703 • www.memorex.com
All other brand or product names are trademarks or registered trademarks of their respective owners.
5395 6835