Mercedes Benz 2012 E Class Command Manual Owners ZA COMAND NTG4.5 USA Edition B 2012, 1, En US
2015-09-08
: Mercedes-Benz Mercedes-Benz-2012-E-Class-Command-Manual-Owners-Manual-763397 mercedes-benz-2012-e-class-command-manual-owners-manual-763397 mercedes-benz pdf
Open the PDF directly: View PDF ![]() .
.
Page Count: 234 [warning: Documents this large are best viewed by clicking the View PDF Link!]
COMAND
Operating Instructions
Order no. 6515 6912 13 Part no. 204 584 61 82 Edition B 2012
É2045846182{ËÍ
2045846182
COMAND Operating Instructions

Publication details
Internet
Further information on Mercedes-Benz
vehicles and Daimler AG can be found on the
Internet at the following websites:
http://www.mercedes-benz.com
http://www.daimler.com
Editorial office
You are welcome to forward any queries or
suggestions you may have about the
Operator's Manual to the technical
documentation team at the following
address:
Daimler AG, HPC: R822, D-70546 Stuttgart,
Germany
Not to be reprinted, translated or otherwise
reproduced, in whole or in part, without
written permission from Daimler AG.
Symbols
$Warning
%Environmental note
!Possible damage to the vehicle
+Tip
XInstruction
YY Continuation symbol
(Ypage) Page reference
DisplayDisplay Display in the multifunction
display/COMAND
Registered trademarks:
RBluetooth®is a registered trademark of
Bluetooth SIG Inc.
RDTS is a registered trademark of DTS, Inc.
RDolby and MLP are registered trademarks
of Dolby Laboratories.
RiPod®and iTunes®are registered
trademarks of Apple Inc., registered in the
U.S.A. and in other countries.
RLogic 7®is a registered trademark of
Harman International Industries,
Incorporated.
RMicrosoft®is a registered trademark of the
Microsoft Corporation in the U.S.A. and in
other countries.
RSIRIUS and associated brands are
registered trademarks of SIRIUS XM Radio
Inc.
RHD Radio and associated brands are
registered trademarks of the iBiquity
Digital Corporation.
RWindows media®is a registered trademark
of the Microsoft Corporation in the U.S.A.
and in other countries.
RGracenote®is a registered trademark of
Gracenote, Inc.
RZagatSurvey®and associated brands are
registered trademarks of Zagat.
As at 16.02.2011

Welcome to the world of Mercedes-Benz
Before you drive off, familiarize yourself with
yourCOMAND control panel and read this
manual. This will help you to obtain the
maximum use from your COMAND control
panel and to avoid endangering yourselfand
others.
Depending on the model and equipment level,
the functions and equipment of your
COMAND control panel maydeviate from
certain descriptions and illustrations.
Mercedes-Benz is constantly updating its
systems to the state of the art and therefore
reserves the right to introduce changes in
design, equipment and technical features at
any time.
You cannot, therefore, base any claims on the
data, illustrations or descriptions in this
manual.
Consult an authorized Mercedes-BenzCenter
if you have further questions.
This manual is an integral part of the vehicle.
You should always keep it in the vehicle and
pass it on to the new owner if you sell the
vehicle.
The technical documentation team at
Daimler AG wishes you safe and pleasant
motoring.
2045846182 É2045846182{ËÍ


Index ....................................................... 4
Introduction ......................................... 11
At aglance ........................................... 15
System settings .................................. 39
Navigation ........................................... 49
Telephone .......................................... 113
Audio .................................................. 143
Video .................................................. 185
Weather services .............................. 195
Rear Seat Entertainment System .... 207
Contents 3

1, 2, 3 ...
911 emergency call .......................... 115
A
Active partition (USBdevices only)
Selecting ........................................ 163
Address book
Browsing........................................ 136
Calling up ....................................... 136
Changing an entry .......................... 138
Connecting acall ........................... 139
Creating an entry ........................... 137
Deleting an entry ........................... 137
Detailsabout an entry ................... 137
Importing contacts ........................ 141
Searching for an entry ................... 136
Starting route guidance ................. 139
Voice tag ....................................... 140
Address bookentry
Adopting as a home address ............ 94
Showing the details ....................... 138
Address entry (example) .................... 54
Address entry menu ............................ 54
Alternative route ................................. 82
Area
Avoiding ......................................... 105
Audio AUX jack .................................. 182
Audio CD/DVD or MP3 mode
Switching to ................................... 157
Switching to (Rear Seat
Entertainment System) .................. 217
Audio DVD
Pause function ............................... 219
Stop function ................................. 159
Audio format
Setting (audio DVD mode)............. 163
Autostore ........................................... 147
AUX jacks
CD/DVD drive ............................... 210
B
Back button ......................................... 19
Bird's-eye view .................................. 100
Bluetooth®
Activating/deactivating ................... 45
External authorization .................... 118
General information ......................... 44
Interface ........................................ 115
Settings ........................................... 44
Telephony ...................................... 115
Bluetooth®audio basic display ........ 176
Bluetooth®audio device
Connecting .................................... 172
Reconnecting ................................. 174
Bluetooth®audio mode
Switching on .................................. 175
Bluetooth®device list ....................... 173
Bluetooth®interface
Telephony ...................................... 114
Bluetooth®interface telephony
Conditions ..................................... 115
Bluetooth®telephone list ................. 116
Buttons on the COMAND
controller ............................................. 19
C
Call
Accepting .............................. 120, 121
Connecting .................................... 121
Rejecting ............................... 120, 121
Call lists ............................................. 129
Displaying details ........................... 130
Opening and selecting an entry ..... 129
Saving an entry in the address
book .............................................. 130
Storing an entry which has not yet
beenstored................................... 130
Car pool lanes ...................................... 53
Category
Satellite radio ................................ 150
Category list(music search) ............ 166
CD
Copyprotection ............................. 165
Data medium ................................. 165
General information ....................... 165
Multisession .................................. 164
Playback options ........................... 163
Selecting amedium ....................... 159
Selecting atrack ............................ 160
4Index

CD/DVD
Ejecting (DVD drive) .......................155
Ejecting (Rear Seat Entertainment
System) ......................................... 217
Inserting (DVD changer) ................ 154
Inserting (Rear Seat
Entertainment System) .................. 216
Changing direction
Announcement phase ...................... 78
Change of direction phase ............... 78
Preparation phase ............................ 78
Channel presets ................................ 146
Character entry ................................... 28
Characters
Entering ........................................... 31
City
Entering ........................................... 55
Clear button ......................................... 19
COMAND
Basicfunctions................................ 33
Components .................................... 16
Switching on/off .............................. 33
COMAND controller ............................. 18
COMAND control panel ....................... 17
COMAND display ................................. 20
Cleaning instructions ....................... 22
Setting ............................................. 40
Switching on/off .............................. 33
COMAND operating system ................ 16
Compass function ............................. 108
Connecting aUSB device ................. 157
Copy protection (CD/DVD) ............... 165
Crosshair position
Saving .............................................. 99
D
Data carrier
MUSIC REGISTER ........................... 168
Data medium
AudioDVD ..................................... 164
CD/DVD ........................................ 165
MP3 ............................................... 164
Date format
Setting ............................................. 41
Deleting
Call lists ......................................... 131
Destination
Adopting from the listofprevious
destinations ..................................... 96
Assigning a destination to an
address book entry .......................... 96
Destination entry ................................ 53
Address........................................... 54
Destination memory ........................ 60
Intermediate stop ............................ 62
Last destination ............................... 61
Map ................................................. 61
Point of interest ............................... 66
Using geo-coordinates ..................... 62
Destination information ..................... 83
Destination memory ........................... 94
Deleting an entry ............................. 97
My address ...................................... 94
Storing a destination ........................ 95
Destinations
Search &Send ................................. 76
Digital map
Updating ........................................ 109
Displaying the track and album ....... 162
Distance
see Navigation, route overview
DTMF tones
Sending ......................................... 124
DVD
Copyprotection ............................. 165
Data medium ................................. 165
Selecting atrack ............................ 160
DVD menu .......................................... 190
DVD playbackconditions ................. 187
DVD-Video
Picture settings .............................. 186
DVD-Video operation
Automatic picture shutoff .............. 186
Index 5

E
Entering characters
In navigation mode .......................... 28
In the address and the phone
book ................................................ 31
Using the numberpad ..................... 29
Entry
Deleting ........................................... 30
Saving .............................................. 32
Selecting ........................................ 127
Example display
Audio CD mode .............................. 158
MUSIC REGISTER ........................... 169
Example of operation .......................... 27
F
Favorites button .................................. 45
Favorites buttons ................................ 19
First listentry
Accepting ......................................... 30
Freeway information ......................... 103
Frequency input
Manual ...........................................146
Function restrictions
Telephone operation...................... 115
Video DVD mode ........................... 187
G
Google Maps®...................................... 76
Gracenote Media Database .............. 161
H
Hands-free microphone
Switching on/off ........................... 123
Harman/kardon®Logic 7®
Surround Sound system ..................... 35
Home address ...................................... 94
Entering and saving ......................... 57
Selecting from the destination
memory ........................................... 60
I
Incident (traffic report) ....................... 88
Indicator lamp
Remote control .............................. 211
Individualization
Activating/deactivating ................... 44
Intermediate stop
Deleting ........................................... 64
Entering ........................................... 62
iPod®
Alphabetical track selection .......... 181
Connecting to the Media
Interface ........................................ 178
Selecting a category/playlist......... 180
iTunes®............................................... 181
L
Lane recommendations ...................... 79
Explanation ...................................... 80
Presentation .................................... 80
Listas selection list
Calling up .........................................30
Load/eject button ............................. 154
Logic 7®
see harman/kardon®Logic 7®
Surround Sound system
M
Map
Arrival time/distance to
destination ..................................... 102
Calling up .........................................61
Citymodel ..................................... 103
Map settings .................................. 100
Moving ....................................... 61, 99
Showing geo-coordinates .............. 102
Showing road names ..................... 102
Showing the map data version ....... 108
Topographic map ........................... 103
Map information ................................ 102
Map orientation ................................. 100
Map scale
Adjusting ......................................... 98
Media Interface
Basicmenu .................................... 179
Connectionoptions....................... 178
iPod®............................................. 178
Mode ............................................. 178
Notes for the MP3 player............... 182
Selecting musicfiles ...................... 180
6Index

Switching to ................................... 179
USB mass storagedevice .............. 178
Media list ........................................... 159
Menu
Exiting .............................................. 36
Points of interest ............................. 66
Showing ........................................... 51
System settings ............................... 21
Menu item
Selecting .......................................... 27
Menu overview
COMAND ......................................... 21
Mobile phone
Authorizing .................................... 117
Connecting (Bluetooth®interface) .116
De-authorizing ............................... 119
External authorization .................... 118
Registering (authorizing) ................ 116
MP3
Bit/sampling rates ......................... 165
Copyright ....................................... 165
Data medium ................................. 164
File systems ................................... 164
Formats ......................................... 164
Selecting amedium ....................... 159
Multifunction display .......................... 23
Multifunction steering wheel ............. 22
Multisession CDs ............................... 164
Music files
Recording ...................................... 169
MUSIC REGISTER
Deleting allmusic files................... 170
Disk space information .................. 170
Playback options ........................... 171
Switching to ................................... 168
Music search ..................................... 165
My address
see Home address
N
Navigation (also see route
guidance)
Trafficreport .................................... 88
Navigation announcements
Switching off .............................. 33, 81
Navigation mode
Switching to ..................................... 51
North up orientation ......................... 100
O
Off-map ................................................ 87
Off-road ................................................ 87
Orientation in direction of travel ..... 100
P
Passcode
Entering ......................................... 117
Pause function ................................... 158
Personal pointofinterest
Selecting as the destination .............75
Personal points of interest
Displaying on the map ..................... 72
Managing categories ........................ 73
Saving .............................................. 74
Settings ........................................... 72
Visual information ............................ 73
Phone book
Adding a numberto an address
book entry..................................... 128
Calling up ....................................... 125
Creating anew entry ..................... 128
Deleting an entry ........................... 127
Icon overview ................................. 126
Phone bookentry
Searching ...................................... 126
Playback options ............................... 163
Point of interest
Category .......................................... 68
Defining the position for the point
of interest search .............................67
Entering ........................................... 66
Entering using the map .................... 71
ZAGAT®rating service ..................... 70
Point of interest icon
Setting ........................................... 101
Point of interest list ............................ 69
With character bar ........................... 71
Previous destinations ......................... 97
Index 7

R
Radio mode
Switching to ................................... 144
Radio station
Storing ........................................... 146
Read-aloud function ............................ 93
Read-aloud speed
Setting ............................................. 42
Real-time traffic reports ..................... 88
Rear-compartment screens .............. 209
Rear Seat Entertainment System
Adjusting sound settings ............... 214
Adjusting the brightness ................ 214
Adjusting the color ........................ 214
Adjusting the contrast ................... 214
AUX mode ...................................... 228
CD/DVD audio and MP3 mode ...... 216
Changing the batteries .................. 212
Changing the picture format .......... 215
Cordlessheadphones .................... 211
Multipleusers ................................ 214
Operating with the headphones ..... 213
System settings ............................. 215
Using the mainloudspeaker .......... 213
Video DVD mode ........................... 221
Recording the route
Viewing the route on the map .......... 86
Redial ..................................................122
Remote control
Rear Seat Entertainment System ... 209
Reset .................................................... 47
Route
Calculating ....................................... 57
Estimated time of arrival .................. 83
Recording ........................................ 85
Route overview ................................ 84
Route calculation
Starting ............................................ 57
Route display ....................................... 84
Route guidance ....................................77
Canceling......................................... 81
Continuing ....................................... 81
Destination reached ......................... 81
Lane recommendations ................... 79
Off-road ........................................... 87
Trafficreports .................................. 88
Route options
Setting ............................................. 52
Route overview .................................... 84
Route type
Setting ............................................. 52
S
Safety notes
Audio CD/DVD and MP3 mode ..... 154
Using the telephone ....................... 114
Video DVD mode ........................... 186
SatRadio ............................................. 148
Displaying information ................... 153
Registering .................................... 149
Selecting acategory...................... 150
Switching to ................................... 149
Screen
Selecting for remote operation ...... 210
SD memory card
Ejecting .......................................... 157
Inserting ........................................ 157
Search&Send ...................................... 76
SIRIUS weather display
5-day forecast ................................ 197
Daily forecast .................................197
Detail information .......................... 197
Information chart ........................... 196
Selecting the area for the weather
forecast ......................................... 197
Switching on/off ........................... 196
Weather map ................................. 200
Skipping back
CD/DVD mode .............................. 161
Skipping forwards
CD/DVD mode .............................. 161
SMS
Read aloud ..................................... 133
Sound
Switching on/off .............................. 33
Soundsettings .....................................34
Speed dial list
Storing a phone book entry in the
speed dial list ................................ 131
State/province
Selecting .......................................... 54
8Index

Station
Selecting ........................................146
Storing ........................................... 146
Station search ................................... 146
Storage options
Selecting .......................................... 96
Summer and standard time
Switching ......................................... 41
Surround sound ................................... 35
Systemlanguage
Setting ............................................. 45
T
Telephone
Ending an active call ...................... 123
Entering phone numbers ................ 121
Incoming call ................................. 120
Making acall ................................. 123
Making a call via speed dial........... 122
Outgoing call ................................. 121
Redialing ........................................ 122
Rejecting/accepting a waiting
call ................................................. 123
Sending DTMF tones ......................124
Single call ...................................... 122
Switching hands-free microphone
on/off ............................................ 123
Toggling ......................................... 124
Telephone basic menu
Bluetooth®interface ...................... 119
Telephone number
Entering ......................................... 121
Text messages (SMS)
Calling the sender.......................... 134
Deleting ......................................... 135
Inbox .............................................. 133
Information and requirements ....... 133
Reading .......................................... 133
Storing senderinaddress book ..... 135
Time
Setting the time ............................... 41
Time format
Setting ............................................. 41
Time zone
Setting ............................................. 41
Tone settings
Balance and fader............................ 34
Treble and bass............................... 34
Track
Selecting ........................................ 218
Track information .............................. 220
Traffic jam function .............................82
Traffic Program
Switching off .................................... 33
Traffic report read-aloud function ..... 93
Treble and bass
Adjusting ......................................... 34
U
Using the telephone .......................... 120
V
V-Cards
Receiving ....................................... 142
Video DVD
Fast forward/rewind ......................189
Operation ....................................... 186
Pause function ............................... 189
Selecting ........................................ 190
Selecting a film/title ......................189
Selecting a scene/chapter ............ 189
Showing/hiding the control menu .188
Stop function ................................. 189
Video DVD mode
Switching to ................................... 187
Voice Control System
Settings ........................................... 42
Volume
Adjusting ......................................... 33
Navigation announcements ............. 33
Phone calls...................................... 34
W
Waveband
Switching (radio)............................ 145
Waypoints
Accepting waypoints for the route ... 66
Editing .............................................. 65
Entering ........................................... 64
Index 9

Weather map (SIRIUS)
Calling up ....................................... 200
Legend ...........................................204
Moving ........................................... 200
Showing/hiding layers ................... 201
Showing/hiding the menu ............. 200
Time stamp .................................... 205
Weather memory (SIRIUS)
Selecting an area ........................... 199
Storing an area .............................. 199
Z
ZAGAT®rating service ........................ 70
10 Index

Operating safety
General notes
GWARNING
Any alterations of electronic components or
software can cause malfunctions.
Radio, satellite radio, amplifier, DVD changer,
navigation module, telephone and Voice
Control systems are interconnected.
Therefore, if one of the components is not
operational, or has not been removed/
replaced properly, the function of other
components could be impaired.
Such conditions might seriously impair the
operating safety of your vehicle.
We recommend having any service work on
electronic components carried out by an
authorized Mercedes-Benz Center.
GWARNING
In order to avoid distraction which could lead
to an accident, the driver should enter system
settings while the vehicle is at a standstill, and
operate the system only when permitted by
road, weather and traffic conditions.
Bear in mind that at a speed of just 30mph
(approximately 50km/h), your car covers a
distance of 44feet (approximately 14m) every
second.
COMAND supplies you with information to
help you select your route more easily and
guide you conveniently and safely to your
destination. For safety reasons, we
encourage the driver to stop the vehicle in a
safe place before answering or placing a call,
or consulting the COMAND screen to read
navigational maps, instructions, or
downloaded information.
GWARNING
While the navigation system provides
directional assistance, the driver must remain
focused on safe driving behavior, especially
attention to traffic and street signs, and
should utilize the system's audio cues while
driving.
The navigation system does not supply any
information on stop signs, yield signs, traffic
regulations or traffic safety rules. Their
observance always remains in the driver's
personal responsibility. DVD maps do not
cover all areas nor all routes within an area.
iCanada only: This device complies with
RSS-210 of Industry Canada. Operation is
subject to the following two conditions:
1. This device may not cause interference,
and
2. this device must accept any interference
received, including interference that may
cause undesired operation of the device.
Any unauthorized modification to this
device could void the user's authority to
operate the equipment.
iUSA only: This device complies with Part
15 of the FCC Rules. Operation is subject
to the following two conditions:
1. This device may not cause harmful
interference, and
2. this device must accept any interference
received, including interference that may
cause undesired operation.
Any unauthorized modification to this
device could void the user's authority to
operate the equipment.
GWARNING
Change or modification not expressly
approved by the party responsible for
compliance could void the user's authority to
operate this equipment.
!Note: This equipment has been tested
and found to comply with the limits for a
Class Adigital device, pursuantto Part 15
of the FCCRules. These limits are designed
to provide reasonable protection against
harmful interference when the equipment
is operated in a commercial environment.
This equipment generates, uses and can
Introduction 11
Z

radiate radio frequency energy and, if not
installed and used in accordance with the
instruction manual, may cause harmful
interference to radio communications.
GWARNING
This equipment complies with FCC radiation
exposure limits set forth for uncontrolled
equipment and meets the FCC radio
frequency (RF) Exposure Guidelines in
Supplement C to OET65.
This equipment has very low levels of RF
energy that is deemed to comply without
maximumpermissive exposure evaluation
(MPE). But it is desirable that it should be
installed and operated with at least 8inches
(20 cm) and more between the radiator and a
person's body (excluding extremities: hands,
wrists, feetand legs.)
Correctuse
Observe the following information when using
COMAND:
Rthe safety notes in this manual
Rall road traffic regulations
iImproper work on electronic components
or other systems (such as radio, DVD
changer) and their software may result in
malfunction or failure. Even systems that
have not been modified could be affected
because the electronic systems are
connected. Electronic malfunctions can
seriously jeopardize the operational safety
of your vehicle.
iRoof antenna functionality (telephone,
satellite radio, GPS) can be affected by the
use of roof carrier systems.
Retrofitting metalized plastic films to the
windows can affect radio reception and
lead to poorer reception of all other
antennas (e.g. emergency call antennas)
inside the vehicle.
iOnly have repairs or changes to electronic
components carried out at a qualified
specialist workshop which has the
necessary specialist knowledge and tools
to carry out the work required. Daimler
recommends that you use an authorized
Mercedes-Benz Center for this purpose. In
particular, work relevant to safety or on
safety-related systems must be carried out
at a qualified specialist workshop.
iProtection against theft: this device is
equipped with technical provisions to
protect it against theft. Further information
on protection against theft can be obtained
from an authorized Mercedes-Benz Center.
Information on copyright
Macrovision™
This product incorporates copyright
protection technology that is protected by
U.S. patents and other intellectual property
rights. Use of this copyright protection
technology must be authorized by Rovi
Corporation, and is intended for home and
other limited viewing uses only, unless
otherwise authorized by Rovi Corporation.
Reverse engineering or disassembly is
prohibited.
libjpeg
This software is based in part on the work of
the Independent JPEG Group.
Free Type
Portions of this software are copyright ©2005
The FreeType Project http://
www.freetype.org.
All rights reserved.
NetFront™
This product contains NetFront Browser
software of ACCESSCo., Ltd. Copyright ©
1996-2010 ACCESS Co., Ltd. All rights
reserved.
12 Introduction

The NetFront Browser software is based in
part on the work of the Independent JPEG
Group.
Camellia
Copyright ©2006, 2007 NTT (Nippon
Telegraph and Telephone Corporation).
All rights reserved.
The conditions and disclaimers in connection
with use of Camellia are available at http://
info.isl.ntt.co.jp/crypt/eng/index.html.
Flash®Lite™
This product contains Flash®Lite™
technology by Adobe Systems Incorporated.
This product contains Adobe®Flash®player
software under license from Adobe Systems
Incorporated, Copyright © 1995-2010 Adobe
Macromedia Software LLC. All rights
reserved. Adobe and Flash are registered
trademarks of Adobe Systems Incorporated
in the United States and/or other countries.
COMAND features
These Operating Instructions describe all
standard and optional equipment available
for your COMAND system at the time of
purchase. Country-specific deviations are
possible. Please note that your COMAND
system may not be equipped with all the
features described. This includes safety-
related systems and functions. Therefore, the
equipment on your COMAND system may
differ from that in the descriptions and
illustrations. The original purchase
agreement lists all systems installed in your
vehicle. Contact an authorized Mercedes-
Benz Center if you have any questions about
equipment or operation.
Function restrictions
For safety reasons, some COMAND functions
are restricted or unavailable while the vehicle
is in motion.You will notice this, for example,
because you will either not be able to select
certain menu items or because COMAND will
display a message to this effect.
Introduction 13
Z

14

COMAND operating system ............... 16
Multifunction steering wheel ............. 22
Operating COMAND ............................ 26
Basic functions of COMAND ............... 33
Climate control status display ........... 36
Rear view camera ............................... 37
15
At a glance

COMAND operating system
Overview
Example
Function Page
:COMAND display 20
;COMAND control panel
with DVD changer 17
=COMAND controller 18
Back button (left) 19
Clear button(right) 19
Favorites button (left) 19
Favorites button (right) 19
iDepending on the vehicle equipment, up
to two favorites buttons may be available
in the M-Class.
Components of COMAND
COMAND consists of:
Rthe COMAND display
Rthe COMAND control panel with DVD
changer
Rthe COMAND controller
Rthe back and clear buttons
Rdepending on the vehicle equipment, up to
two favorites buttons (e.g. M-Class)
You can use COMAND to operate the
following main functions:
Rthe navigation system
Rthe audio function with radio and satellite
radio modes, disc (CD/audio DVD and MP3
mode), memory card (MP3 mode), MUSIC
REGISTER, USB storage device, Media
Interface, Bluetooth®audio and audio AUX
Rthe telephone with text message function
and the address book
Rthe video function with video DVD and
video AUX modes
Rthe weather service SIRIUS Weather
Rthe system settings
You can call up the main functions:
Rusing the corresponding function buttons
Rusing the main function bar in the COMAND
display (Ypage 20)
iYou can transfer an audio or video source
selected in COMAND to the RearSeat
Entertainment System.
16 COMAND operating system
At a glance
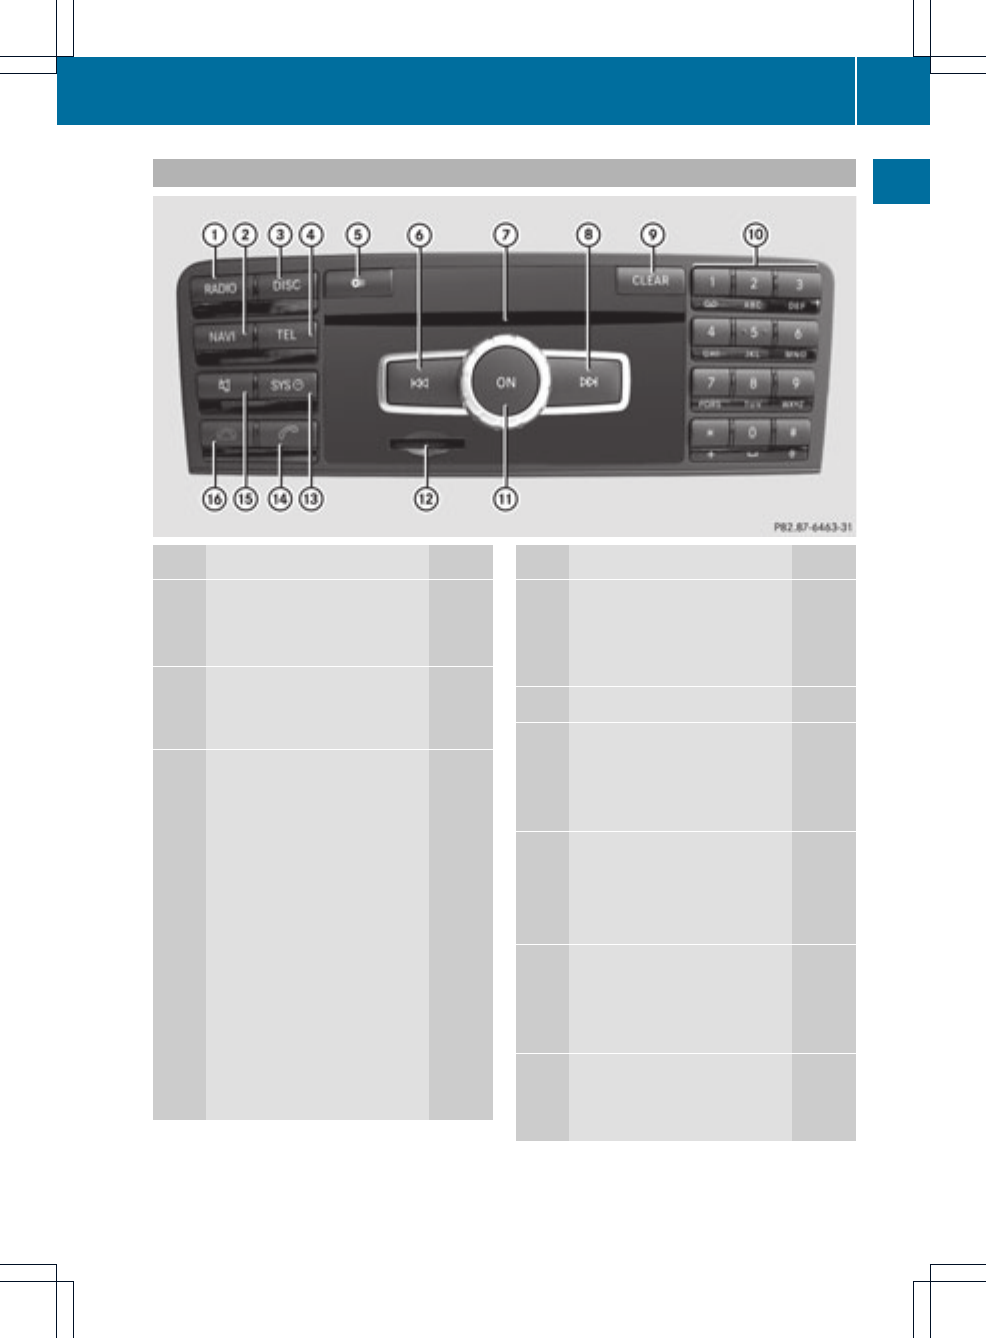
COMAND control panel
Function Page
:Switches to radio mode 144
Switches wavebands 145
Switches to satellite radio 149
;Switches to navigation
mode 51
Shows the menu system 51
=Press hrepeatedly
• Switches to audio CD,
audio DVDand MP3 mode
or DVD video mode 157
• Switches to memory card
mode 157
• Switches to MUSIC
REGISTER 168
• Switches to USB storage
device mode 157
• Switches to Media
Interface or audio AUX
mode 179
• Switches to Bluetooth®
audio mode 175
Function Page
?Calls up the telephone
basicmenu:
• Bluetooth®interface
telephony 119
AVLoad/eject button 154
BSelects a station using the
station search function 146
Rewind 161
Selects the previous track 160
CDisc slot
• Loads CDs/DVDs 154
• Ejects CDs/DVDs 155
• Updates the digital map 109
DSelects a station using the
station search function 146
Fast forwards 161
Selects the next track 160
EClear button
• Deletes characters 30
• Deletes an entry 30
COMAND operating system 17
At a glance
Function Page
FNumber pad
• Selects stations via the
stationpresets 146
• Stores stations manually 146
• Mobile phone
authorization 117
• Telephone number entry 121
• Sends DTMF tones 124
• Character entry 28
• Selects a location for the
weather forecast from the
memory 199
zDisplays the current
track being played 162
gSelects stations by
entering the frequency
manually 146
gSelects a track 160
GSwitches COMAND on/off 33
Adjusts the volume 33
Function Page
HSD memory card slot 157
ICalls up the system menu 27
JAccepts a call 121
Dials a number 121
Redials 122
Accepts a waiting call 123
KMute 33
Switches the hands-free
microphone on/off 123
Cancels the text message
read-aloud function 133
Switches off navigation
announcements 33
LRejects a call 121
Ends an active call 123
Rejects a waiting call 123
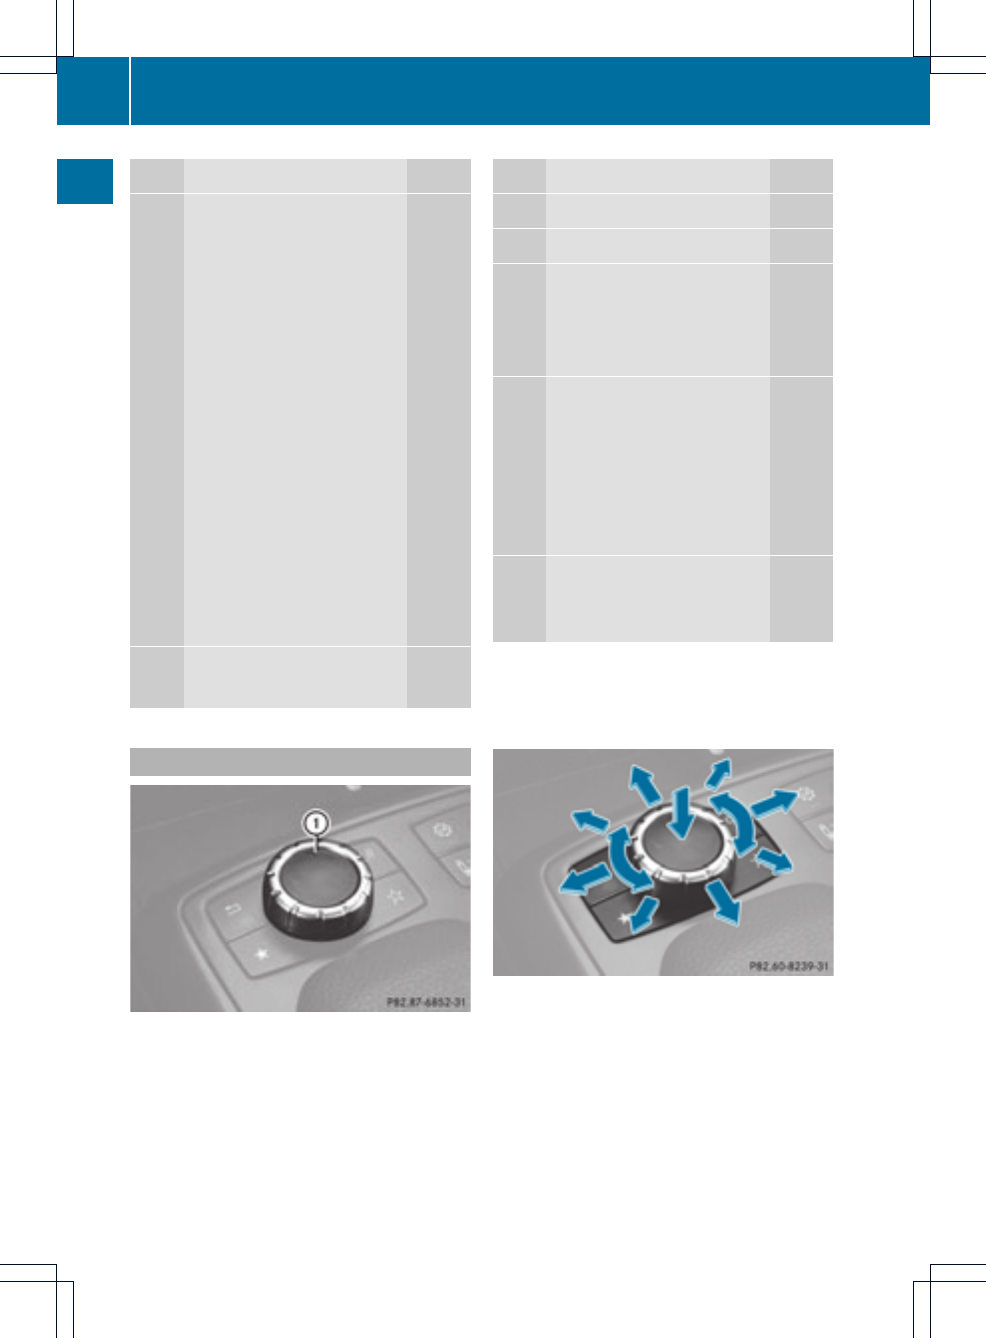
COMAND controller
Example:M-Class
:COMAND controller
You can use the COMAND controllerto select
the menu items in the COMAND display.
You can call up menus or lists, scroll through
menus or lists and exit menus or lists.
Operating the COMAND controller (example)
The COMAND controller can be:
Rpressed briefly or pressed and held W
Rturned clockwise or counter-clockwise
cVd
Rslid left or right XVY
Rslid forwards or back ZVÆ
Rslid diagonally aVb
18 COMAND operating system
At a glance
In the instructions, operating sequences are
described as follows:
XPress the $button.
Radio mode is activated.
XSelect Radio by sliding VÆand turning
cVd the COMAND controller and press
Wto confirm.
XConfirm Station List by pressing W.
The station list appears.
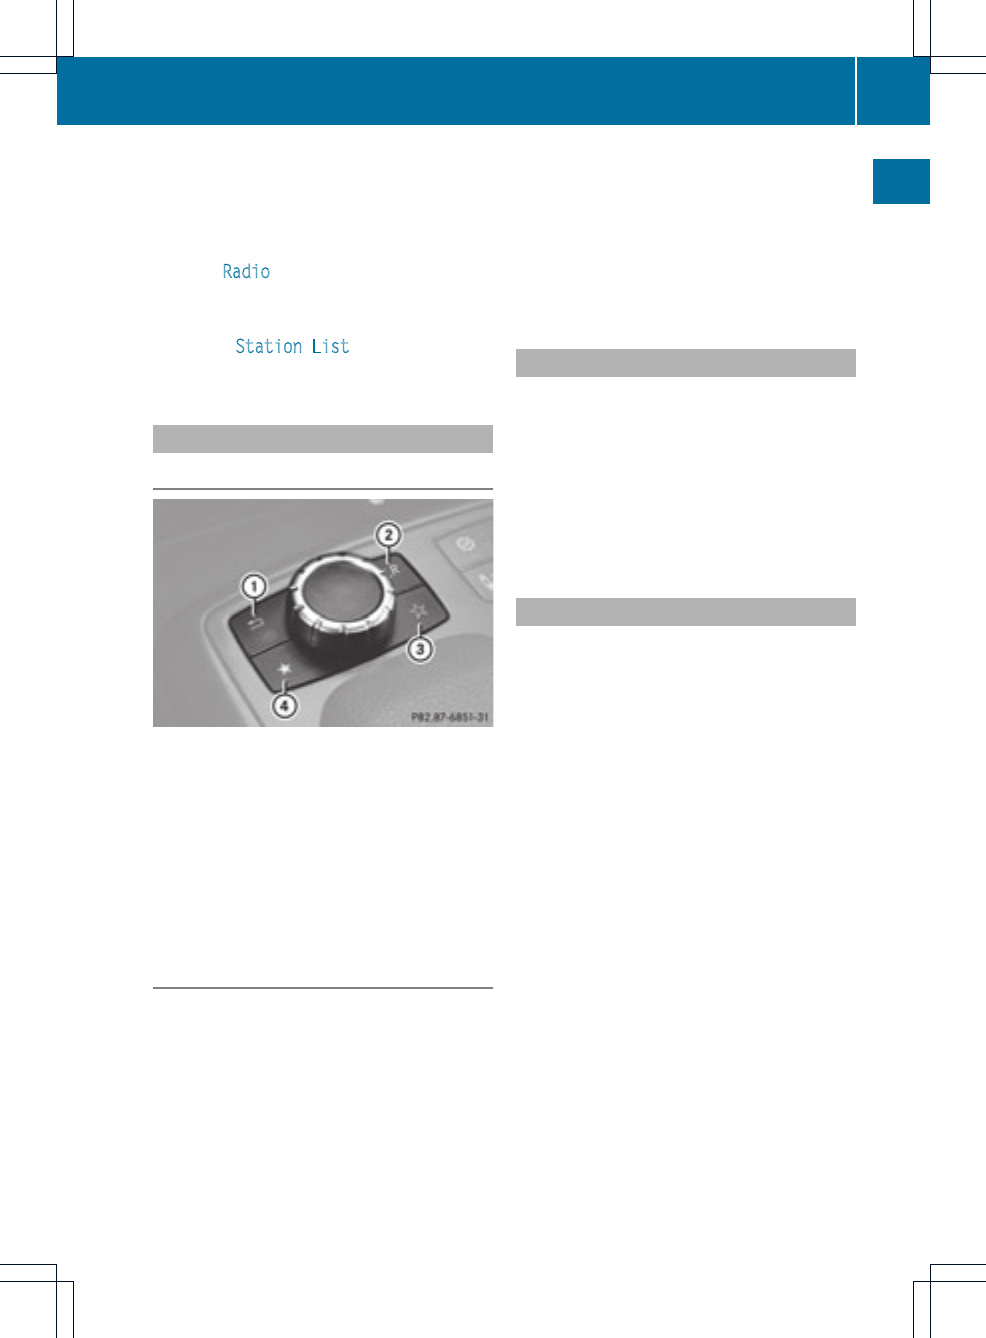
Buttons on the COMAND controller
Overview
Example: M-Class
:Back button
;Clear button
=Favorites button (if available)
?Favorites button
iDepending on the vehicle equipment, up
to two favorites buttons may be available
in the M-Class.
Back button
You can exit a menu or call up the basic
display of the current operating mode using
this button.
XTo exit the menu: press back button :
briefly.
COMAND changes to the next highermenu
level in the currentoperating mode.
iYou can also exit a menu by sliding XVY
or ZVÆthe COMAND controller.
XTo call up the basic display: press and
hold back button :.
COMAND changes to the basic display of
the currentoperating mode.
Clear button
You can delete individual characters or an
entire entry during character entry using this
button.
XTo delete individual characters: briefly
press clear button ;.
XTo delete an entire entry: press and hold
clear button ;.
Favorites buttons
Depending on the vehicle equipment, up to
two favorites buttons may be available in the
M-Class.
You can assign predefined functions to
favorites buttons =and ?and call them up
by pressing the button (Ypage 45).
COMAND operating system 19
At a glance
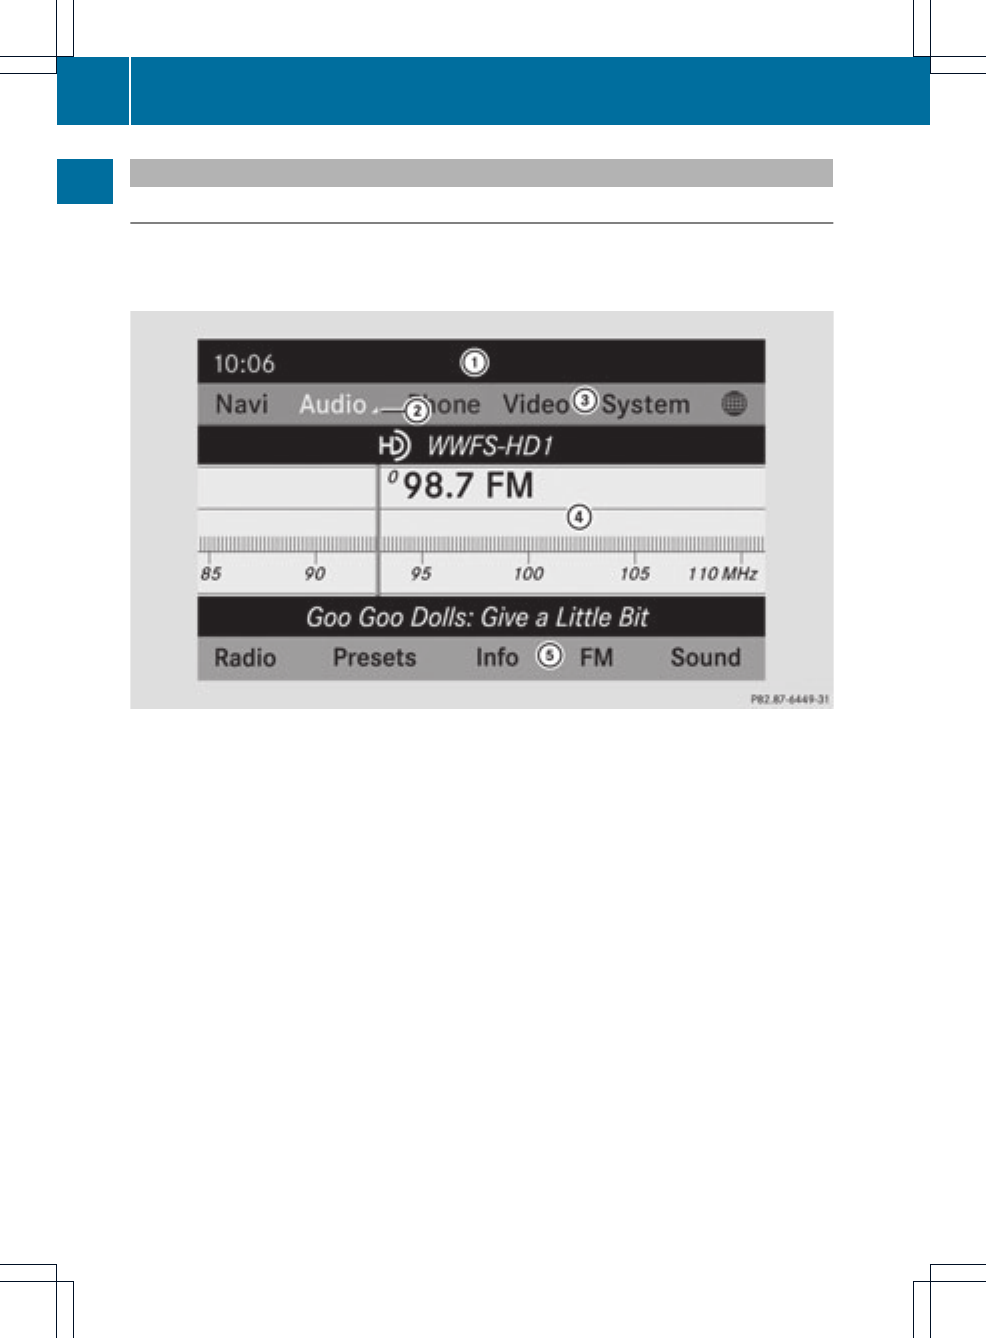
COMAND display
Display overview
The COMAND display shows the function currently selectedand its associated menus. The
COMAND display is divided into several areas.
The radio display is shown in the example.
:Status bar
;To call up the audio menu
=Main functionbar
?Display/selectionwindow
ARadio menu bar
Status bar :shows the time and the current settings for telephone operation.
The main functions –navigation, audio, telephone and video –feature additional menus. These
are indicated by triangle ;.The following table lists the available menu items.
Main function bar =allows you to call up the desired main function.
In the example, the audio main function is set to radio mode and display/selection
window ?is active.
Radio menu bar Aallows you to operate the radio functions.
20 COMAND operating system
At a glance

Menu overview
Navi Audio Telephon
e
Video System Symbol ®
Route settings FM/AM radio
(using HD
Radio™)
Telephone Video DVD Calling up
the system
menu
Calling up
the
weather
service
SIRIUS
Weather
Map settings Satellite radio Address
book
AUX
Personal points
of interest
Disc
OActivating/
deactivating road
name
announcement
Memory card
OAudio fadeout
on/off
MUSIC
REGISTER
OActivating/
deactivating the
alternative
routes function
Bluetooth®
audio
Avoiding an area Media
Interface
SIRIUS service Rear
Map version AUX
System menu overview
Settings Time Consumption Display off
Display settings Setting the time Calling up the fuel
consumption
display
Switching off
the display
Text reader speed Setting the format
Language Setting the time
zone
Voice-operated control
settings
COMAND operating system 21
At a glance
Settings Time Consumption Display off
Rear view camera
Activating/deactivating
Bluetooth®
Resetting COMAND
iDelete your personal data
using this function, for
example before selling your
vehicle.
If equipped with the rear view camera: if the function is activated and COMAND is
switched on, the image from the rear view camera is automatically shown in the COMAND
display when reverse gear is engaged.
Cleaning instructions
!Do not touch the COMAND display.The
display has a very sensitive high-gloss
surface; there is a risk of scratching. If you
have to clean the screen, however, use a
mild cleaning agent and a soft, lint-free
cloth.
The display must be switched off and cooled
down before you start cleaning. Cleanthe
display screen, when necessary, with a
commercially available microfiber cloth and
cleaning agent for TFT/LCD displays. Do not
apply pressure to the display surface when
cleaning it, as this could cause irreversible
damage. Then, dry the surface with a dry
microfiber cloth.
Avoid using alcoholic thinners, gasoline or
abrasive cleaning agents. These could
damage the display surface.
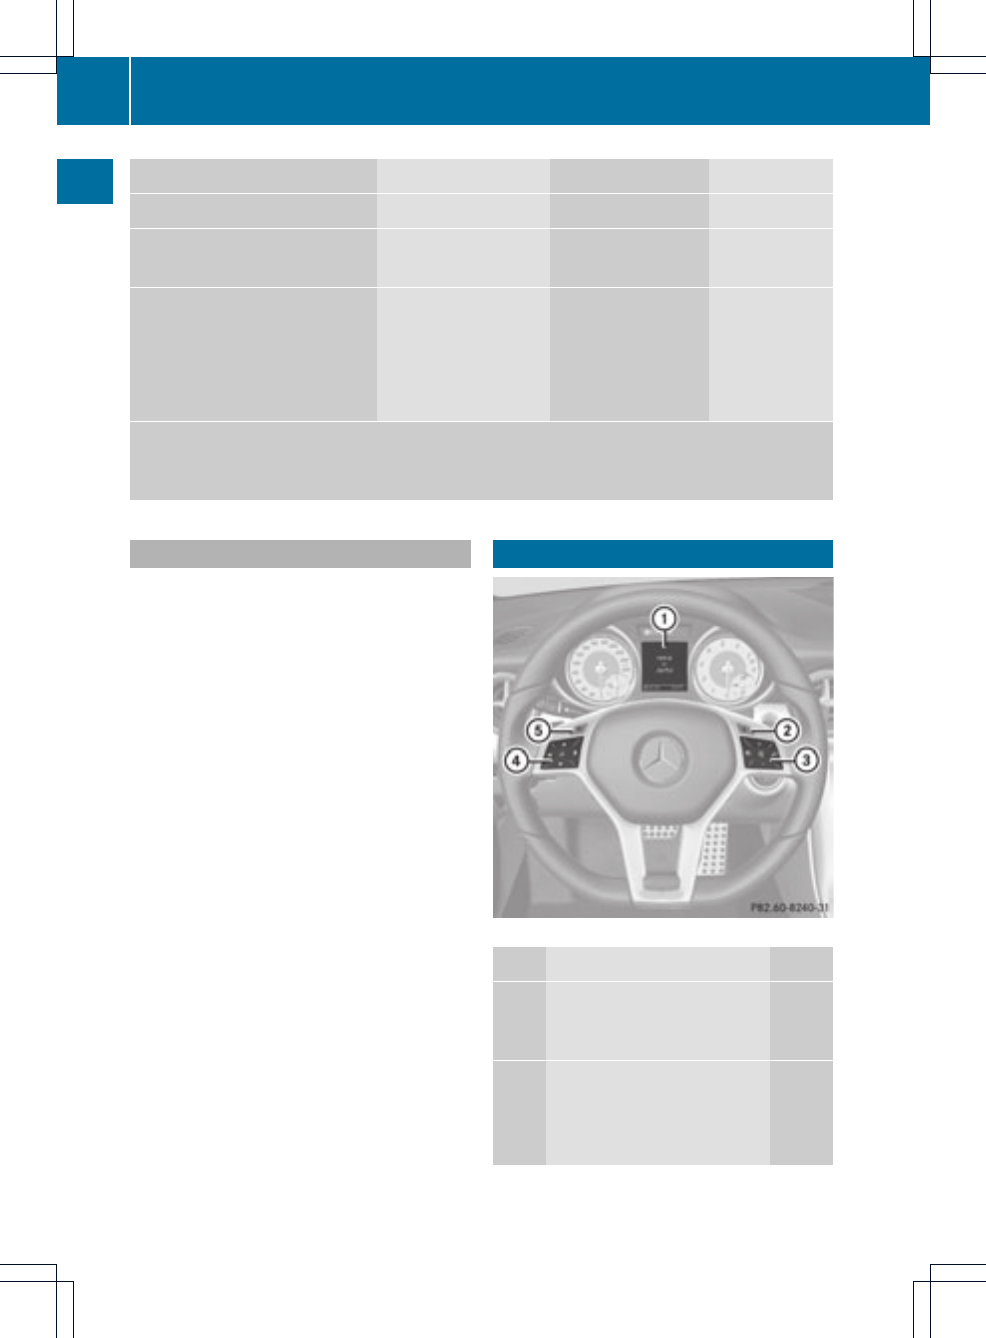
Multifunction steering wheel
Example: SLK
Function Page
:Multifunction display (see
the vehicle Operator's
Manual)
;?
Activates voice control (see
the separate operating
instructions)
22 Multifunction steering wheel
At a glance

Function Page
=~
Rejects or ends a call 120
6
Makes or accepts a call 121
Switches to the redial
memory 122
WX
Adjusts the volume 33
8
Mutes 33
?=;
Selects a menu 122
9:
Selects a submenu or
scrolls through lists 122
a
Confirms selections and
fades out messages 122
A%
Back or switches off voice
control (see the separate
operating instructions)
Operating the multifunction display
GWARNING
A driver's attention to the road must always
be his/her primary focus when driving.For
your safety and the safety of others, we
recommend that you pull over to a safe
location and stop before placing or taking a
telephone call. If you choose to use the
telephone while driving, please use the hands-
free device and only use the telephone when
weather, road and traffic conditions permit.
Some jurisdictions prohibit the driver from
using a mobile phone while driving a vehicle.
Bear in mind that at a speed of just 30 mph
(approximately 50 km/h), your vehicle is
covering a distance of 44 feet (approximately
14 m) every second.
XTo select amenu: press the =
or ;button.
XTo select a submenu or scroll through
the list: press the 9or :button.
XTo select the next menu up: press the
%button.
XTo call up standard displays: repeatedly
press the %button until the total
distance recorder and the trip meter
appear in the display.
or
XPress and hold the %button until the
total distance recorder and the trip meter
appear in the display.
XTo confirmyour selection: press the
abutton.
XTo confirmthe message: press the
aor %button.
Menus and submenus
The numberofmenus depends on the vehicle
equipment.
Menu Functions and submenus
Navigation Navigation system displays
Audio Selects a station
Operates the DVD changer,
SD memory card, MUSIC
REGISTER, USB device,
Bluetooth®audio and Media
Interface
Operates video DVD
Telephone Accepts/rejects a call
Makes/ends a call
Selects a phone book entry
Redials
Multifunction steering wheel 23
At a glance
Z
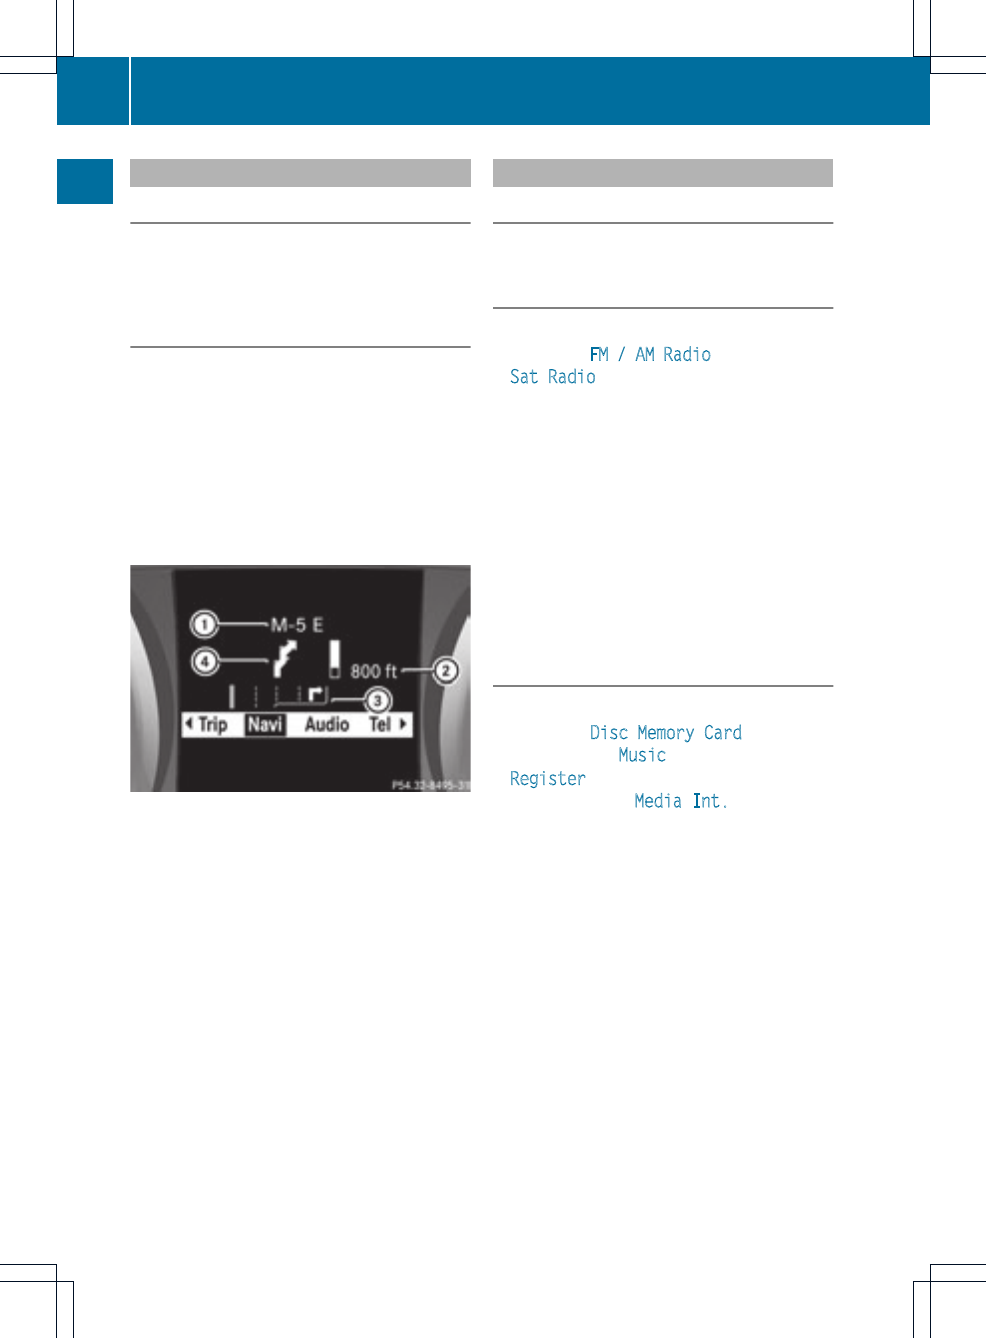
Navigation systemmenu
Route guidance inactive
The display shows the road on which the
vehicle is currently traveling, provided the
digital map contains it.
Route guidance active
The display shows:
Rthe distance to the destination
Rthe distance to the nextchange of direction
Rcurrent street
Rthe travel direction arrow
If a change of direction is imminent, the
display shows, for example, the following
information.
The route guidance display with the change of
direction (example)
:Road to which the change of direction
leads
;Distance to the change of direction and
distance graphic
=Lane recommendation
?Change of direction icon
On multilane roads, the system can display
lane recommendation =for the next change
of direction. During the change of direction,
additional lanes may be displayed.
Audio menu
Adjusting the volume
XPress the Wor Xbutton.
Setting the station/channel
XSwitch on COMAND (Ypage 33).
XSwitch on FM / AM Radio (Ypage 144) or
Sat Radio (Ypage 149).
XIn the multifunction display, select the
audio menu with the =or ;button.
XTo selectthe next/previous station/
channel from the memory: briefly press
the :or 9button.
XTo selectthe next/previous station/
channel: press and hold the :or
9button.
Operating the DVD changer/memory
card/USBdevice/MUSIC REGISTER/
Bluetooth®audio/Media Interface
XSwitch on COMAND (Ypage 33).
XSwitch on Disc,Memory Card
(Ypage 157), Music
Register(Ypage 168), Bluetooth®audio
(Ypage 172) or Media Int.
(Ypage 179).
XIn the multifunction display, selectthe
audio menu with the =or ;button.
XTo selectthe next/previous track:
briefly press the :or 9button.
XTo search for the next/previous track:
press and hold the :or 9button.
iWhen you play a CD/DVD with track
information, the track name and number
are showninthe multifunction display. The
track name is displayed when an MP3 CD
is being played.
24 Multifunction steering wheel
At a glance
Operating video DVD
XSwitch on COMAND (Ypage 33).
XSwitch on DVD-Video (Ypage 187).
XIn the multifunction display, select the
audio menu with the =or ;button.
XTo select the next/previous scene:
briefly press the :or 9button.
Telephone menu
GWARNING
A driver's attention to the road must always
be his/her primary focus when driving. For
your safety and the safety of others, we
recommend that you pull over to a safe
location and stop before placing or taking a
telephone call. If you choose to use the mobile
phone while driving, please use the handsfree
device and only use the mobile phone when
weather, road, and traffic conditions permit.
Some jurisdictions prohibit the driver from
using a cellular mobile phone while driving a
vehicle.
Bear in mind that at a speed of just 30 mph
(approximately 50 km/h), your vehicle is
covering a distance of 44 feet (approximately
14 m) every second.
Operating the telephone
XSwitch on COMAND (Ypage 33).
XCall up the telephone basic menu
(Ypage 119).
If the telephone has not yet been authorized,
the Bluetooth Ready message appears in
the multifunction display.
If the telephone is switched on and
authorized, the Phone Ready message
appears in the multifunction display.
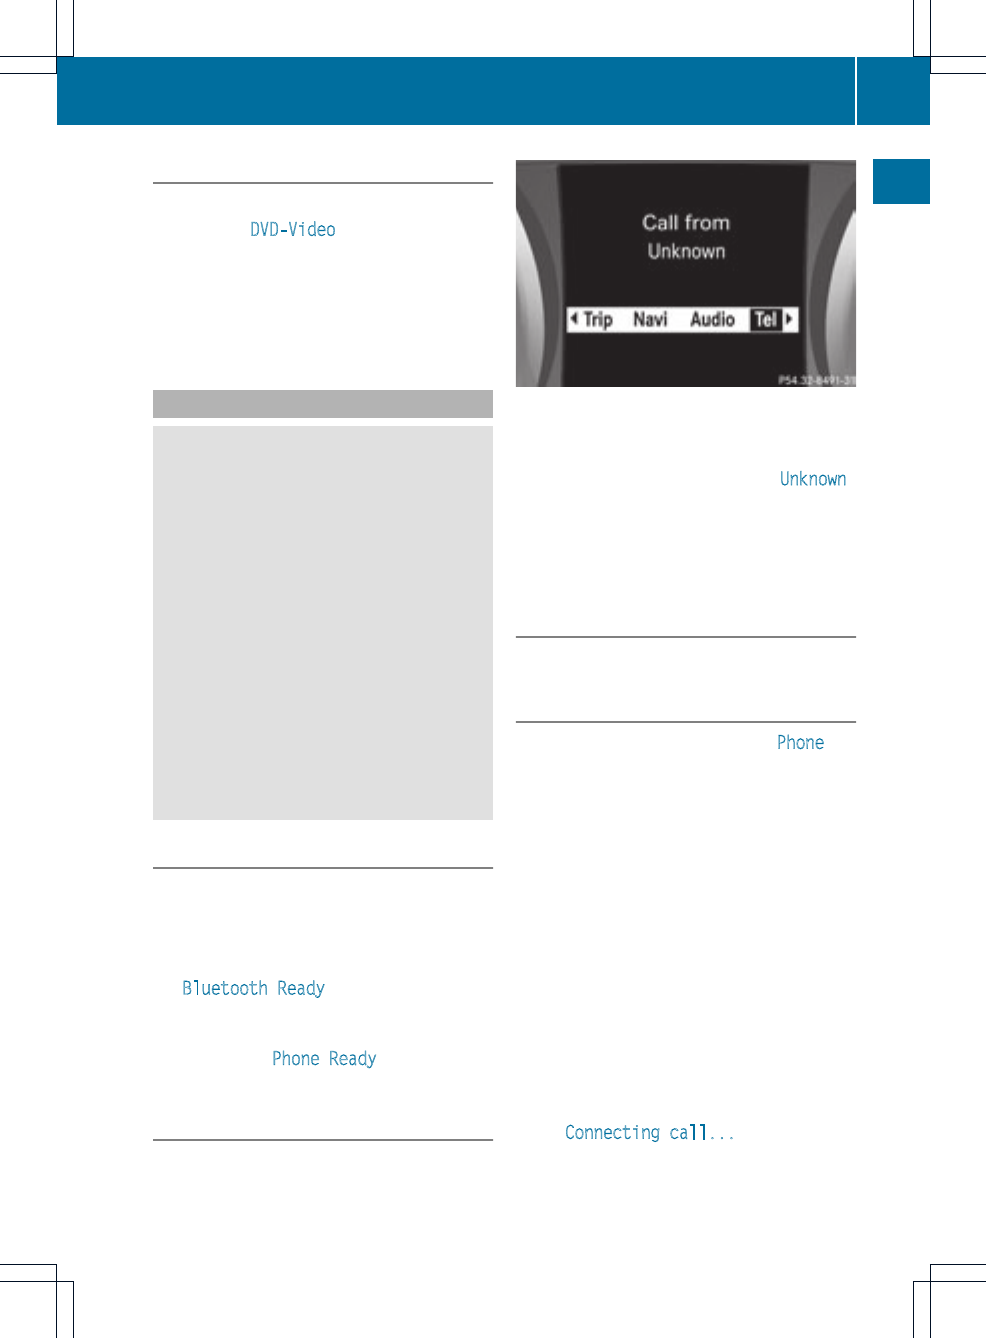
Accepting acall
XPress the 6button.
Multifunctiondisplay (example)
The display shows the phone numberorthe
name and phone number (if the entry is stored
in the address book) or shows the Unknown
(phone number withheld) message.
iYou can also accept the call by voice
command using the Voice Control System
(see the separate operating instructions).
Rejecting or ending acall
XPress the ~button.
Calling a number from the phone book
XUse =or ;to select the Phone
menu.
XPress :,9or 9to switch to the
phone book.
XPress :or 9to select the name you
want.
iThe saved names are displayed
alphabetically.
iIf you hold downthe :or 9button
for longer than one second, rapid scroll
begins. The multifunction display goes from
the seventh entry displayed to the first
entry under the following letter. Release
the button to stop.
XTo connect acall: press 6or 9on the
multifunctionsteering wheel.
The Connecting call... message
appears in the multifunctiondisplay along
with the number being dialed and the
name, if it is stored in the phone book.
Multifunction steering wheel 25
At a glance
Z
The number dialed is stored in the
corresponding call list.
iIf there are several numbers for this
name, you see a list of sub-entries.
XPress :or 9to select the
phone number you want.
XPress the 6or 9button again to
place the call.
Redialing
COMAND saves the last phone numbers or
names dialed.
XPress the =; buttons to select the
Phone menu.
XPress the ;button to open the list of
dialed numbers.
XPress the :9 buttons to select the
desired name or phone number.
XTo connectacall: press 6or 9on the
multifunctionsteering wheel.
Operating COMAND
Selecting amain function
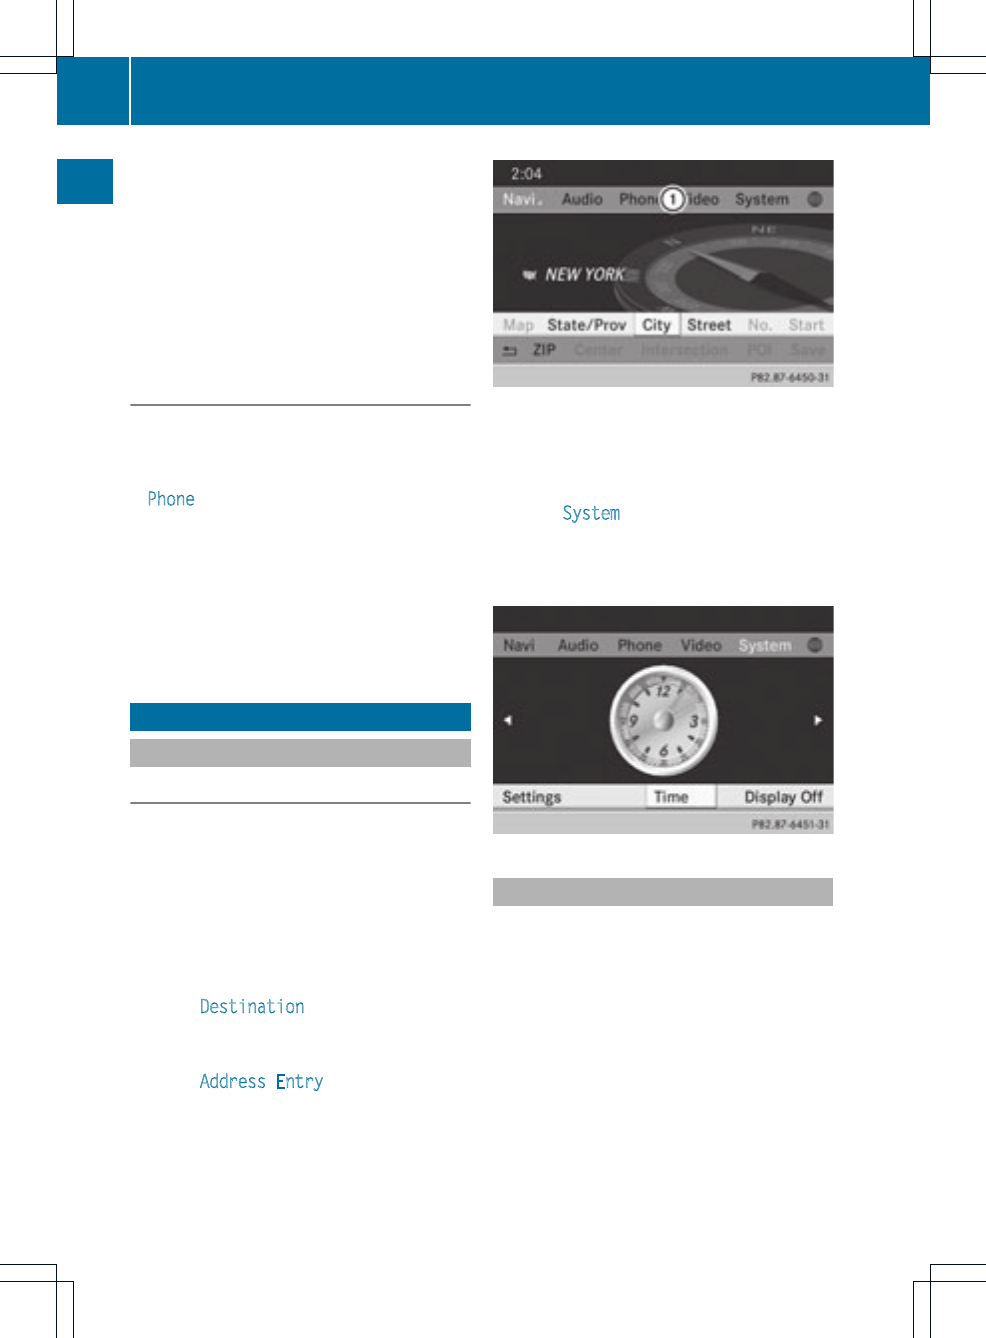
Initial situation
You would like to switch from navigation
mode (address entry menu) to the system
settings, for example.
XTo switch on navigation mode: press the
Øfunction button.
XTo show the menu: press Wthe COMAND
controller.
XSelect Destination by sliding VÆand
turning cVd the COMAND controller and
press Wto confirm.
XSelect Address Entry and press Wto
confirm.
The address entry menu appears.
Address entry menu
:Mainfunction bar
XSlide ZV the COMAND controller and
switch to main function bar :.
XSelect System in the main function bar by
turning cVd the COMAND controller and
press Wto confirm.
The system menu appears.
Calling up the menuofamain function
If one of the mainfunctions navigation, audio,
telephone or video is switched on,
triangle :appears next to the entry in the
main function bar. You can now select an
associated menu.
The example describes how to call up the
audio menu from audio CD mode (an audio
CD is playing).
26 Operating COMAND
At a glance
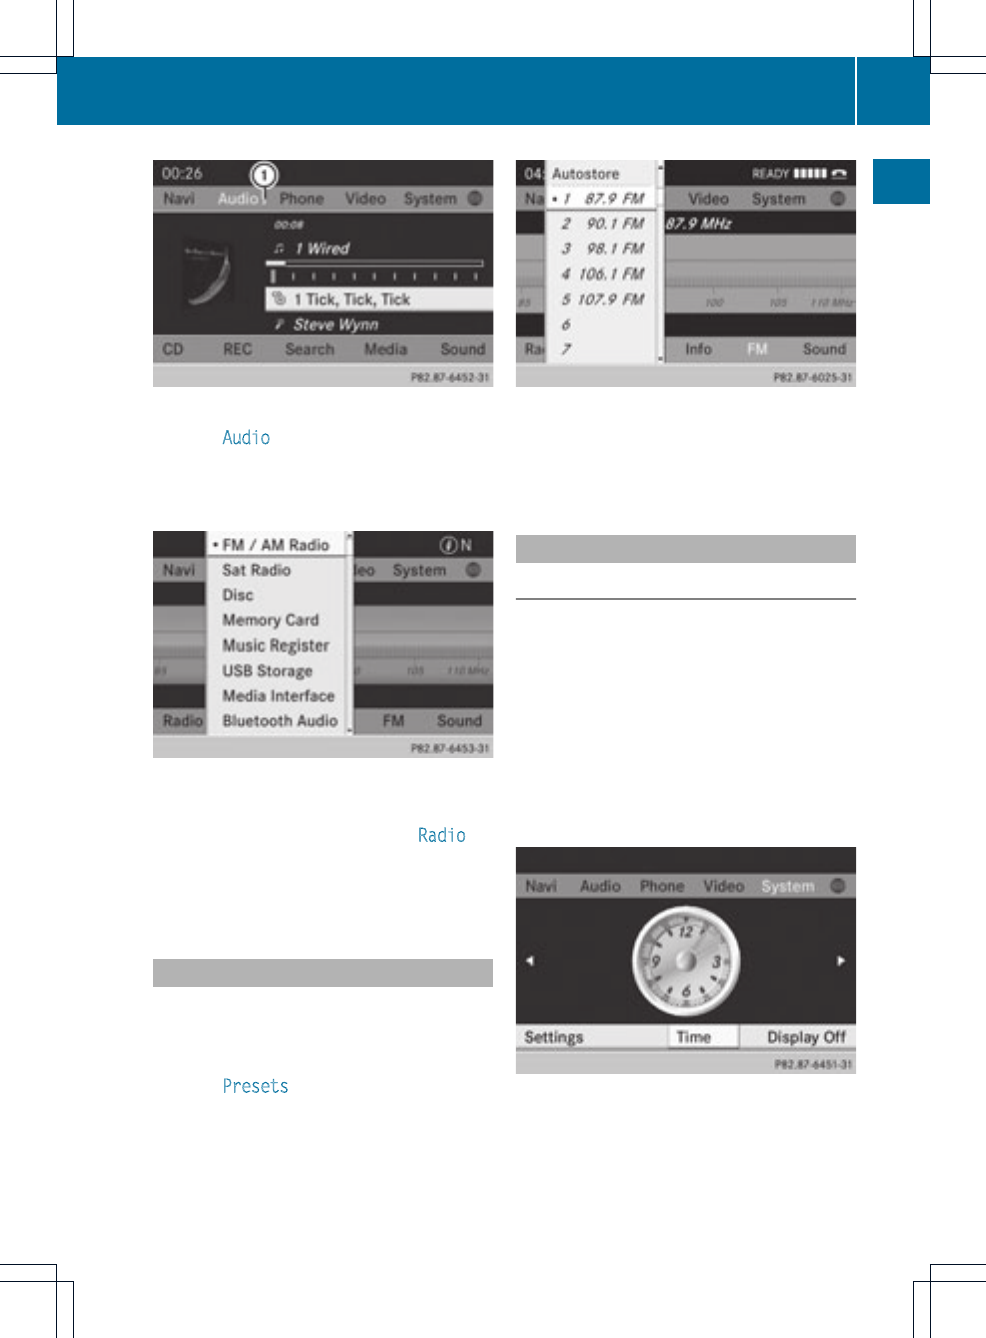
:To call up the audio menu
XSelect Audio in the main function bar by
sliding ZV the COMAND controller and
press Wto confirm.
The Audio menu appears.
Audio menu
The #dot indicates the currentaudio mode.
XSelectanotheraudio mode, e.g. Radio, by
turning cVd the COMAND controller and
press Wto confirm.
Radio mode is activated.
Selecting amenu item
The example describes how to selectastation
from the station presets in radio mode.
XPress the $function button.
XSelect Presets by sliding VÆand turning
cVd the COMAND controller and press
Wto confirm.
The station preset memory appears.
XSelect the station by turning cVd the
COMAND controller and press Wto
confirm.
The station is set.
Example of operation
Initial situation
You would like to switch from the system
function to radio mode and set a station, for
example.
The operating example describes how to:
Rcall up the current audio function
Rswitch on radio mode
Rset a station
XTo call up the system menu: press the
Wbutton.
System menu
Operating COMAND 27
At a glance
Z
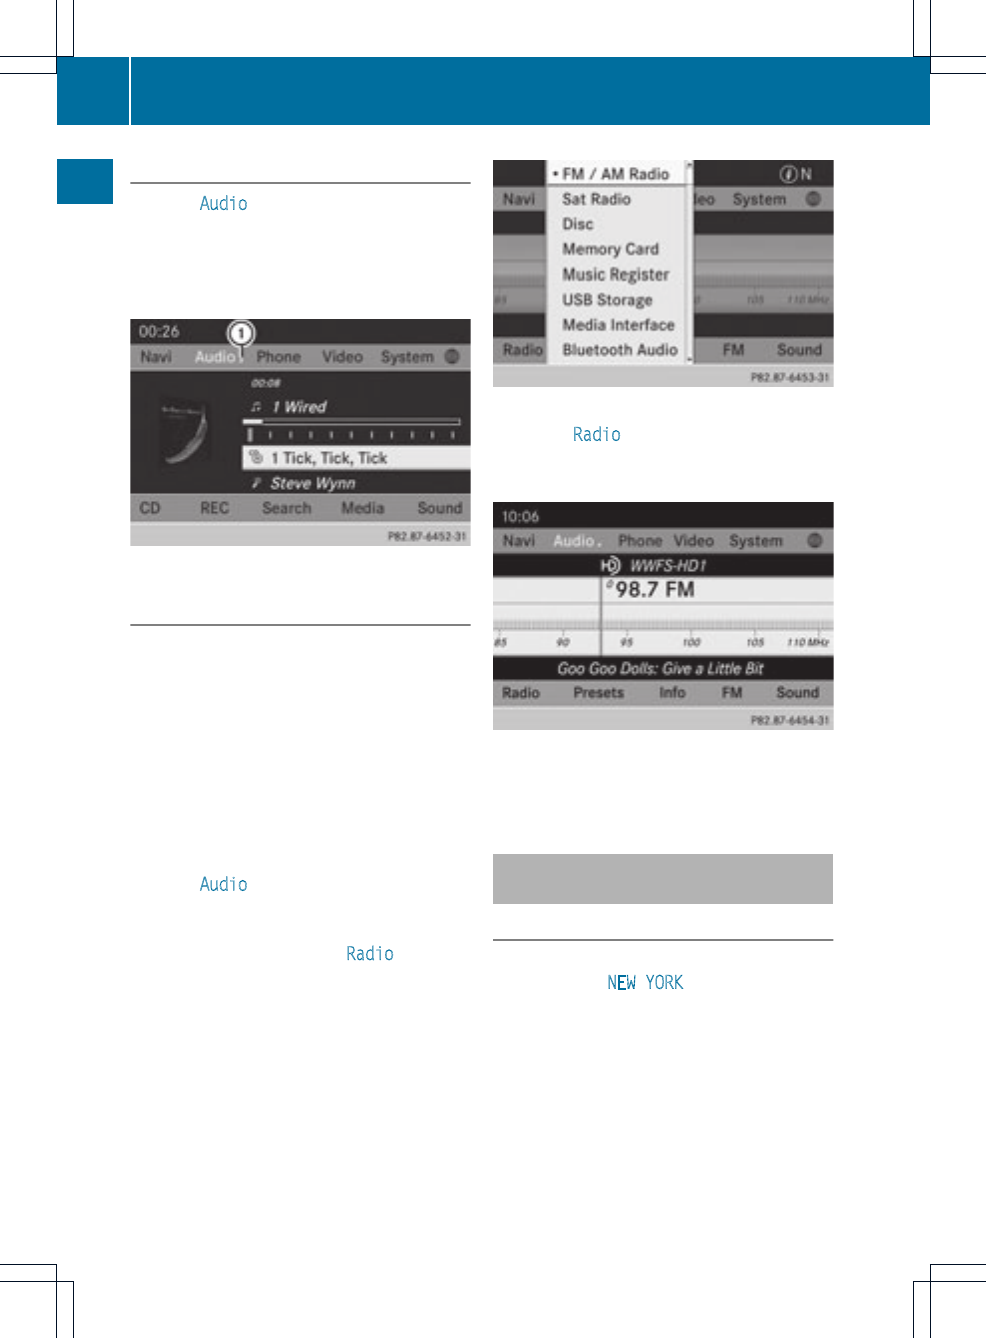
Calling up the current audio function
XSelect Audio in the main function bar by
sliding ZV and turning cVd the COMAND
controller and press Wto confirm.
The basic display of the currentaudio
function, e.g. audio CD mode, appears.
:To call up the audio menu
Switching to radio mode
Option 1
XPress the $function button.
The radio display appears.
iRepeatedly pressing this function button
switches between the FM, AM and WB
wavebands in that order and then calls up
SatRadio mode. Pressing the buttonagain
takes you back to FM radio mode.
Option 2
XSelect Audio again by sliding ZV the
COMAND controller and press Wto
confirm.
The Audio menu appears. Radio is
highlighted.
XPress Wthe COMAND controller and
confirm Radio.
The radio basic display appears with the
waveband last selected.
XTo set a station: turn cVd or slide XVY
the COMAND controller while the display/
selection window is active.
Entering characters in navigation
mode (entering acity)
General information
Character entry is explained in the following
sections using NEW YORK as an example for
entering a city.
If you want to use the address entry menu
(Ypage 54) to enter a city, a street or a
house number, for example, COMAND
provides either a list with a character bar
(option1) or a selection list (option 2).
You can enter the characters using either the
character bar or the number keypad. In the
28 Operating COMAND
At a glance
selection list, you select an entry to copy it to
the address entry menu.
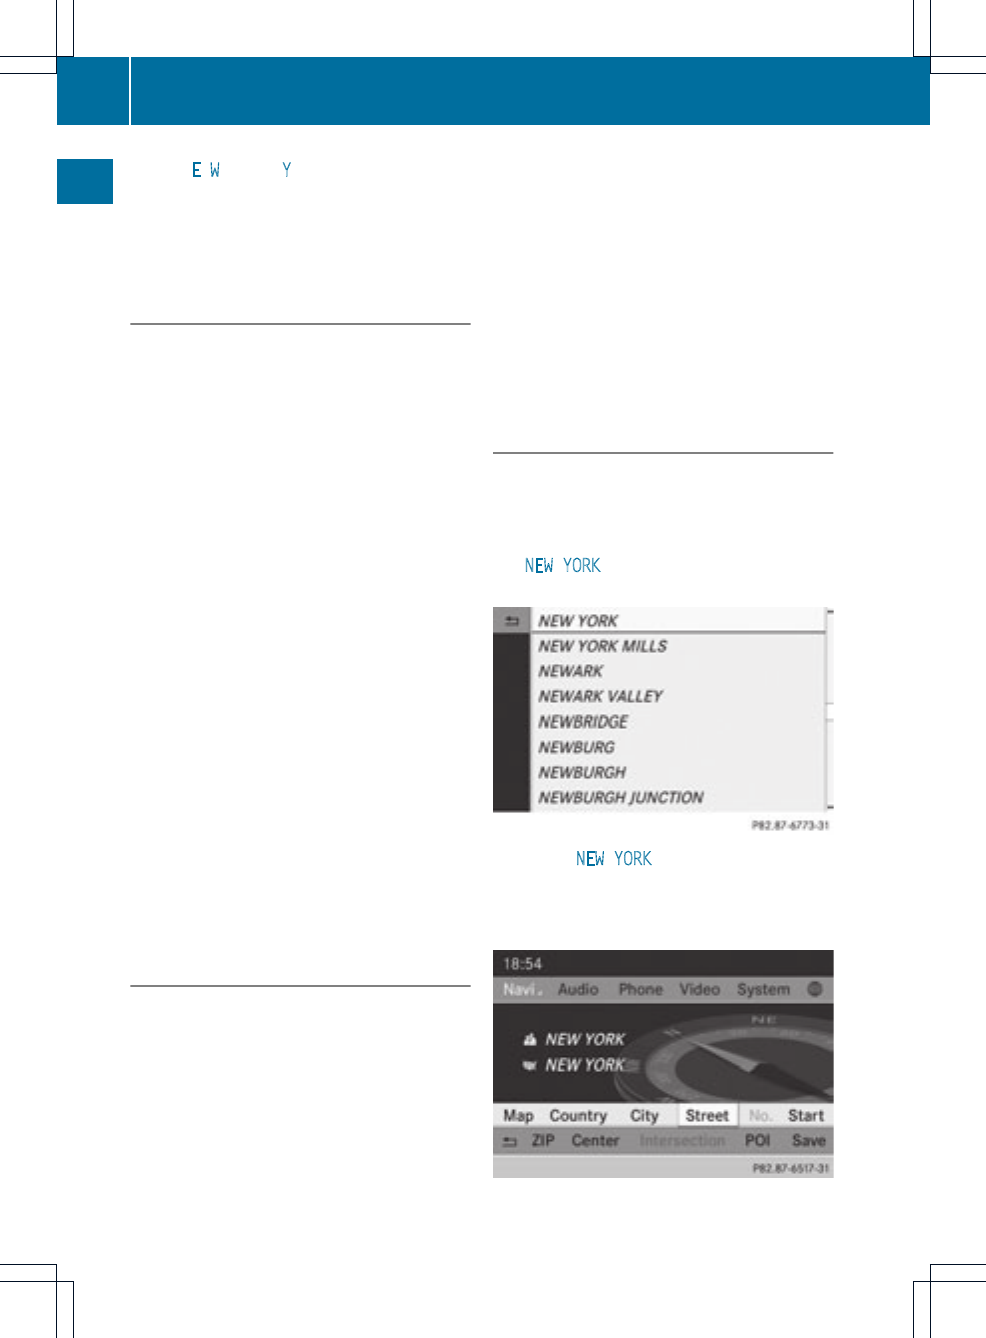
Option 1: city list/street list with
character bar
XCall up the city list with character bar
(Ypage 55).
The alphabetically sorted city list shows the
first available entries.
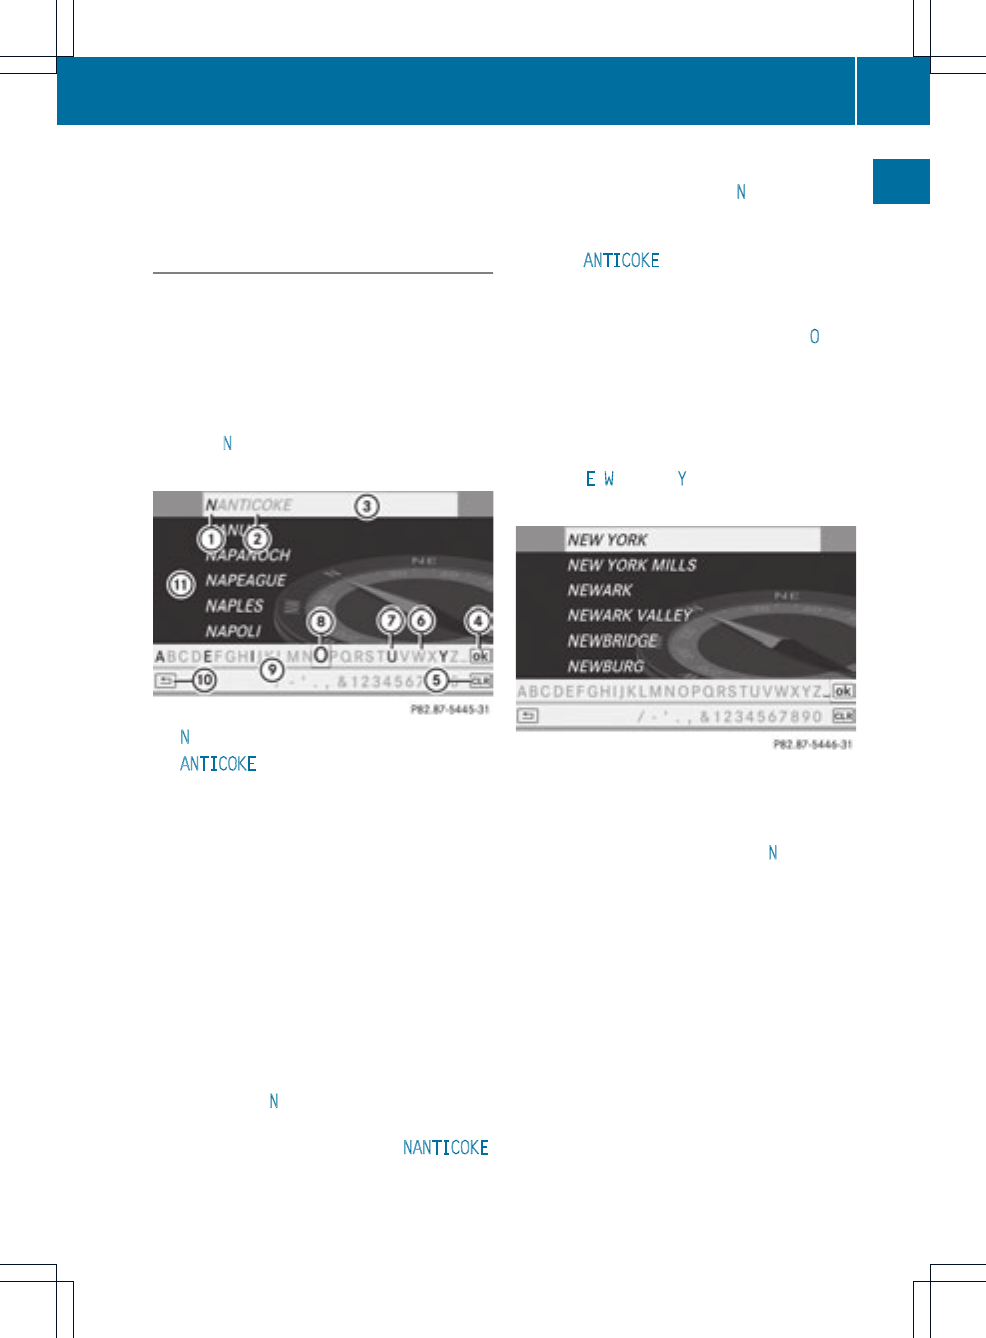
Entering characters using the character
bar
XSelect Nby turning COMAND controller
cVd and press Wto confirm.
:Ncharacter entered by user
;ANTICOKE characters automatically
added by COMAND
=List entry that most closely resembles the
current entry by the user
?To switch to the selection list
ATo delete an entry
BCharacters not currently available
CCharacters currently available
DCurrently selected character
ECharacter bar
FTo cancel an entry
GList
List Gshows all available city names
beginning with N.The list entry most closely
resembling user's current entry =is always
highlighted at the top of the list (NANTICOKE
in the example).
All characters that have been entered are
displayed in black, the letter Nin
example :.The letters that are added
automatically by COMAND are displayed in
gray ;,ANTICOKE in the example.
Character bar Eshows the letters still
available for selection in black C.These can
be selected; in the example, the letter Ois
highlighted D.Which characters remain
available depends on the characters already
entered by the user and on the data stored on
the digital map. Characters that are no longer
available are shown in gray B.
XSelect E,W, space, Yin order and confirm
each with W.
Entering characters using the number
keypad
XPress number key ptwice in quick
succession to select the letter N.
The character appears at the bottom of the
display when the key is pressed. The first
available letter is highlighted.
You see which characters you can enter with
that key. Each time the key is pressed, the
next character is selected.
Example: key p:
Rpress once = M
Rpress twice =N
R
press three times =O
XWait until the character display goes out.
The entries matching your input are shown
in the list.
Operating COMAND 29
At a glance
Z
XEnter E,W, space, Ywith the corresponding
keys.
iThe space is entered using numberkey
9.
Further functions in the list with
character bar
XTo delete characters: select 2by
sliding VÆand turning cVd the COMAND
controller and press Wto confirm.
or
XPress the 2button next to the
COMAND controller.
XTo delete an entry: select the 2icon
by sliding VÆand turning cVd the
COMAND controller, and then press Wand
hold until the entire entry is deleted.
or
XPress and hold the 2button next to the
COMAND controller until the entire entry is
deleted.
XTo cancel an entry: select the &icon in
the bottom left of the character bar and
press Wto confirm.
or
XPress the %back button.
The address entry menu appears.
XTo accept the first list entry: press Wand
hold the COMAND controller until the
address entry menu appears.
The accepted list entry is shown there.
Calling up the list as aselection list
Select the desired city from the selectionlist.
If there are several entries for a city or if
several cities of the same name are stored,
then ¬is highlighted in the character bar.
XPress Wthe COMAND controller.
It is also possible to switch the city list to the
selection list at any time during character
input.
XSlide ZV the COMAND controller
repeatedly until the city list appears as a
selection list.
or
XSelect ¬in the character bar by turning
cVd the COMAND controller and press
Wto confirm.
Option 2: city list as selection list
COMAND either shows the selection list
automatically or you can call up the selection
list from the list with character bar.
The example shows the selection list after the
city NEW YORK has been entered. The entry is
highlighted automatically.
XConfirm NEW YORK by pressing Wthe
COMAND controller.
The address entry menu appears. You can
now enter a street, for example.
30 Operating COMAND
At a glance

iYou will find further information in the
"Destination entry" section (Ypage 53).
Entering characters in the address
book and in the phone book
Introduction
The following section describes how to enter
characters in the phone book (Ypage 125)
and in the address book (Ypage 137) when
creating a new entry.
Creating anew entryinthe phone book
XCall up the inputmenu with data fields
(Ypage 128).
Phone book: input menu with data fields
Creating a new entry in the address
book
XCall up the input menu with data fields
(Ypage 137).
Input menu with data fields
:Selected data field with cursor
;Character bar
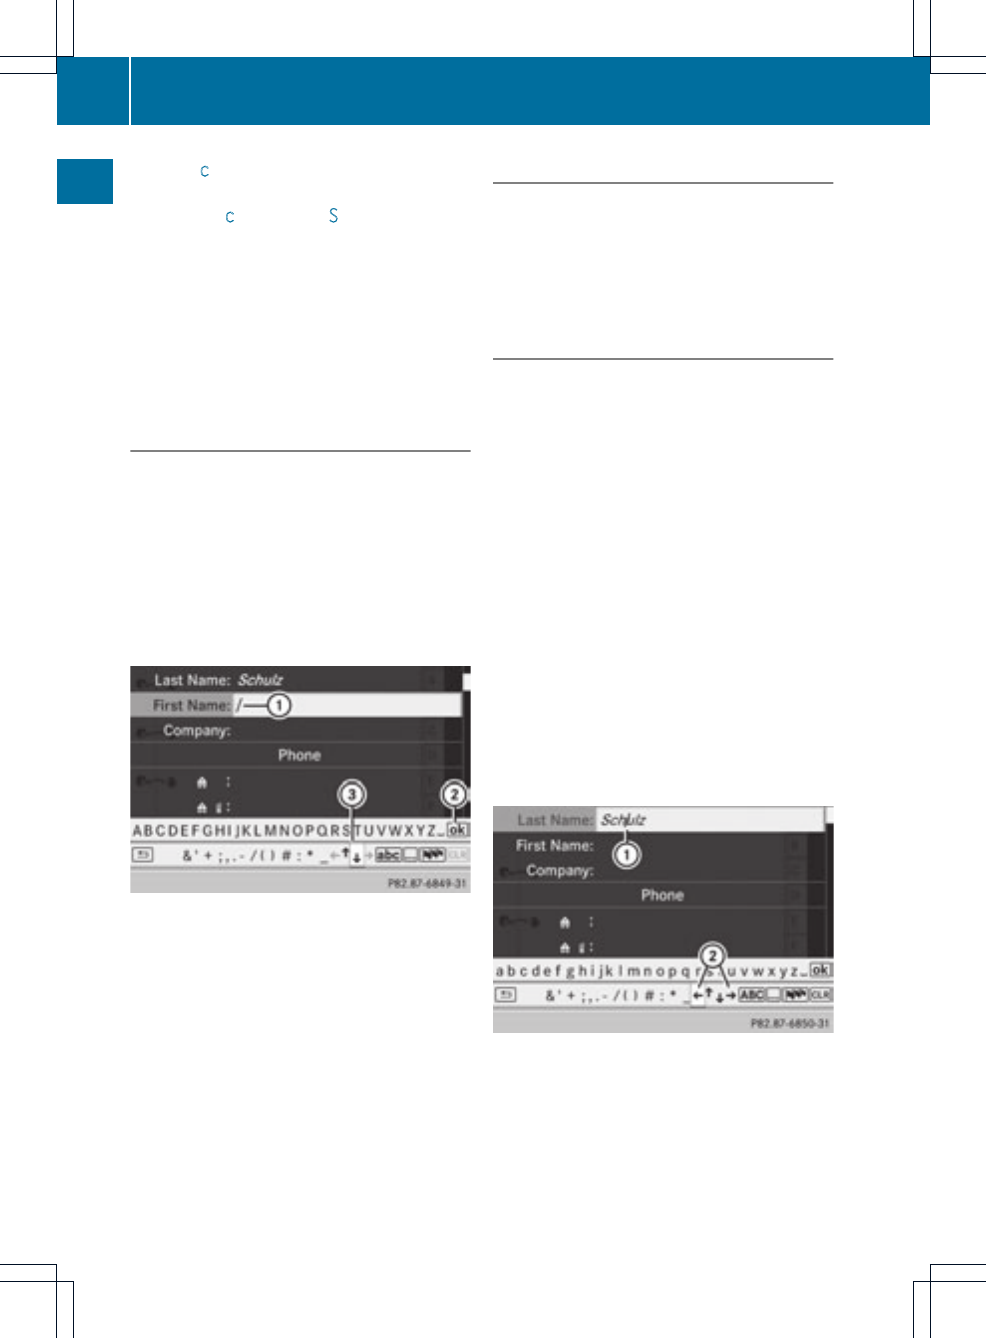
Entering characters
The example describes how to enter the
surname Schulz.
XSelect Sby turning cVd and sliding ZVÆ
the COMAND controller and press Wto
confirm.
Sis entered into the data field. All
characters are shown in black and can
always be selected in the character bar.
The character bar offers characters
corresponding to the respective data field
(letters or digits).
:To switch the character bar to
uppercase/lowercase letters
;To switch the character bar from
uppercase/lowercase letters to digits
=To change the language of the character
bar
?To delete a character/an entry
Operating COMAND 31
At a glance
Z
XSelect cand confirm by pressing Wthe
COMAND controller.
The letter cis added to Sin the data field.
XRepeat the process until the name has
been entered in full.
XTo enter a phone number: select the
digits one by one in the corresponding data
field by turning cVd and sliding ZVÆthe
COMAND controllerand press Wto
confirm.
Switching data fields
If you want to enterafirst name after you have
entered a surname, for example, proceed as
follows to switch between the data fields:
Option 1
XSelect the 4or 5icon in the character
bar and press Wto confirm.
The inputmenu shows the data field
selected.
:Cursor in the nextdata field
;To store an entry
=4and 5icons to selectadata field
Option 2
XSlide ZV the COMAND controller
repeatedly until the character bar
disappears.
XSelect the data field by sliding ZVÆand
press Wto confirm.
Storing an entry
XSelect ¬in the character bar by turning
cVd the COMAND controller and press
Wto confirm.
The entry is stored in the address book.
Further functions available in the
character bar
XTo switch the character bar to
uppercase/lowercase characters:
select *or Eand press Wto
confirm.
XTo switch the character set: select
pand press Wto confirm.
The character set switches between
uppercase/lowercase letters and digits.
XTo change the language of the
character bar: select Band press W
to confirm.
XSelect the language by turning cVd the
COMAND controller and press Wto
confirm.
XTo reposition the cursor within the data
field: select the 2or 3icon and press
Wto confirm.
:Cursor (repositioned)
;2and 3icon to reposition the cursor
XDelete the character/entry (Ypage 30).
32 Operating COMAND
At a glance
Basic functions of COMAND
Switching COMAND on/off
XPress the qcontrol knob.
Awarning message appears. COMAND
calls up the previously selected menu.
iIf you switch off COMAND, playbackof
the current audio or videosource will also
be switched off.
Switching the COMAND display on/
off
XPress the Wfunction button.
or
XSelect System in the main function bar by
sliding ZV and turning cVd the COMAND
controller and press Wto confirm.
In both cases, the system menu appears.
XTo switch off: select Display Off and
press Wto confirm.
XTo switch on: press one of the function
buttons, e.g. W,Øor the %back
button.
Mute
Sound from an audio/video source
XPress the 8button on COMAND or on
the multifunction steering wheel.
The sound from the respective audio or
video source is switched on or muted.
iWhen the sound is off, the system
displays the ,icon in the status line.
When you change the audio or video
source, or adjust the volume, sound
automatically switches on again.
iEven if the sound is switched off, you will
still hear navigation system
announcements.
Switching off all navigation
announcements
XNavigation announcements: press the
8button during the announcement.
Switching navigation announcements
back on
XPress 8again.
iThe navigation announcementsare
switched on again if you start a new route
guidance or if COMAND is switched off and
on with the qcontrol knob.
Adjusting the volume
Adjusting the volume for the audio or
video source
XTurn the qcontrol knob.
or
XPress the Wor Xbutton on the
multifunction steering wheel.
The volume of the currently selected audio
or video source changes.
You can also adjust the volume for the
following:
Rnavigation announcements
Rphone calls
Rvoice outputofthe Voice Control System
(see the separate operating instructions)
Adjusting the volume for navigation
announcements
During a navigation announcement:
XTurn qthe control knob.
or
XPress the Wor Xbutton on the
multifunction steering wheel.
Basic functions of COMAND 33
At a glance
Z

Adjusting the volume for phone calls
You can adjust the volume for hands-free
mode during a telephone call.
XTurn the qcontrol knob.
or
XPress the Wor Xbutton on the
multifunction steering wheel.
Adjusting the soundsettings
Calling up the sound menu
You can make various sound settings for the
differentaudio and video sources. This means
that it is possible to set more bass for radio
mode than for audio CD mode, for example.
You can call up the respective sound menu
from the menu of the desired mode.
The example describes how to call up the
sound menu in radio mode.
XPress the $function button.
The radio display appears. You will hear the
last station played on the last waveband.
XSelect Sound by sliding VÆand turning
cVd the COMAND controller and press
Wto confirm.
You can now set the treble and bass or the
balance and faderfor radio mode.
Adjusting treble and bass
XSelect Treble or Bass in the sound menu
by turning cVd the COMAND controller
and press Wto confirm.
An adjustmentscale appears.
Adjusting the bass (example)
XSelect a setting by turning cVd the
COMAND controllerand press Wto
confirm.
The setting is stored and you exitthe menu.
Adjusting balance and fader
With the balance function, you can control
whether the sound is louder on the driver's or
front-passenger side.
The fade function is used to control whether
the sound is louder in the front or the rear of
the vehicle.
XSelect Balance or Bal./Fad. (balance/
fader) in the sound menu by turning cVd
the COMAND controller and press Wto
confirm.
Example: balance and fader settings
34 Basic functions of COMAND
At a glance
XSelect a balance setting by sliding XVY the
COMAND controllerand press Wto
confirm.
XSelect a fadersetting by sliding ZVÆthe
COMAND controller and press Wto
confirm.
The setting is stored and you exit the menu.
Surround sound
General information
If your vehicle is equipped with the harman/
kardon®Logic7®surround sound system,
you can set the optimum surround sound in
the vehicle interior.
The harman/kardon®Logic7®surround
sound system is available for the following
operating modes:
Rradio (FM only)
Rsatellite radio
Raudio CD
Raudio DVD (MLP, dts, PCM and Dolby
Digital audio formats)
RMP3 (including SD memory card and USB
storage device)
RMedia Interface
RBluetooth®audio mode
Rvideo DVD (PCM, dts and Dolby Digital
audio formats)
RAUX
Because some DVDs contain both stereo and
multichannel audio formats, it may be
necessary to set the audio format
(Ypage 163).
iThe Logic7®On function creates a
surround sound experience for every
passenger when playing, for example,
stereo recordings. It enables optimum
playback of music and films on CD, audio
DVD or video DVD with multichannel audio
formats, such as MLP, dts or Dolby Digital.
This results in sound characteristics like
those intended by the sound engineer
when the original was recorded.
iIf you select Logic7®Off, all permissible
formats are played as stored on the
medium. Due to the design of the
passenger compartment, an optimum
audio experience cannot be guaranteed for
all passengers.
iDiscs which support the audio formats
mentioned have the following logos:
Dolby Digital
dts
MLP
Switching surround sound on/off
The example describes how to set the
surround sound for radio mode.
XPress the $function button.
The radio display appears. You will hear the
last station played on the last waveband.
Basic functions of COMAND 35
At a glance
Z
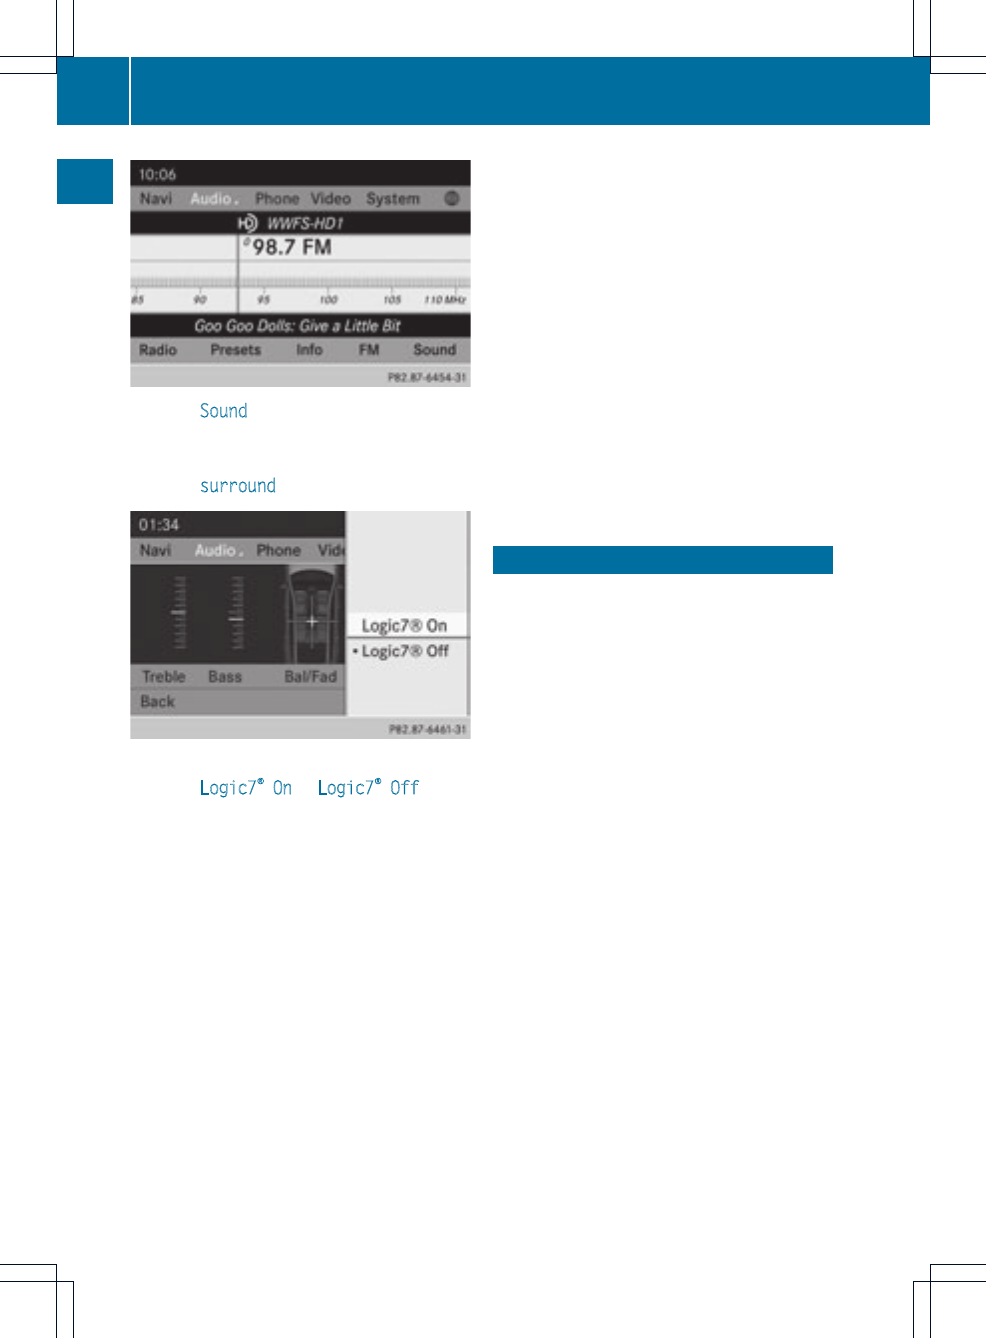
XSelect Sound by sliding VÆand turning
cVd the COMAND controller and press
Wto confirm.
XSelect surround and press Wto confirm.
Setting surround sound (example)
XSelect Logic7®On or Logic7®Off by
turning cVd the COMAND controller and
press Wto confirm.
Depending on your selection, surround
sound is switched on or off and the menu
is exited.
XTo exit the menu without saving: press
the %back button or slide XVY the
COMAND controller.
iPlease note the following: for the
optimum audio experience for all
passengers when Logic7®is switched on,
the balance and fader settings should be
set to the center of the vehicle interior.
You will achieve the best sound results by
playing high-quality audio and video DVDs.
MP3 tracks should have abit rate of at least
128 kbit/s.
Surround-sound playback does not
function for mono signal sources, such as
AM radio mode.
If radio receptionis poor, e.g. in a tunnel,
you should switch off Logic7®, as it may
otherwise switch between stereo and
mono and cause temporary sound
distortions.
On some stereo recordings, the sound
characteristics may differ from
conventional stereo playback.
Climate control status display
If you change the settings of the climate
control system (see the vehicle Operator's
Manual), the climate status display appears
for three seconds at the bottom of the screen
in the COMAND display. It displays the
current settings of the various climate control
functions.
The climate status display appears when:
XTurn one of the two temperature controls
and set the temperature for the left or
right1, 2 or turn the temperature control and
set the temperature3, 4.
or
XTurn the control to set the airflow3, 4.
or
XYou press one of the following buttons:
KIncreases air flow1, 2
IDecreases air flow1, 2
¿Switches climate control on/off1, 2, 3
áSwitches the ZONE function on/
off1, 2
1Available for 2-zone automatic climate control.
2Available for 3-zone automatic climate control.
3Available for the air-conditioning system.
4Available for Heatmatic.
36 Climate control status display
At a glance
ÃControls the climate control
automatically1, 2
ñSets the climate control style to
automatic mode (FOCUS/MEDIUM/
DIFFUSE)2
_Sets the air distribution1, 2
M,Por OSets the air
distribution3, 4.
¬Activates the defrost function1, 2, 3, 4
ÙSwitches on maximum cooling
iThe climate status display does not
appear when the image from the rear view
camera is displayed.
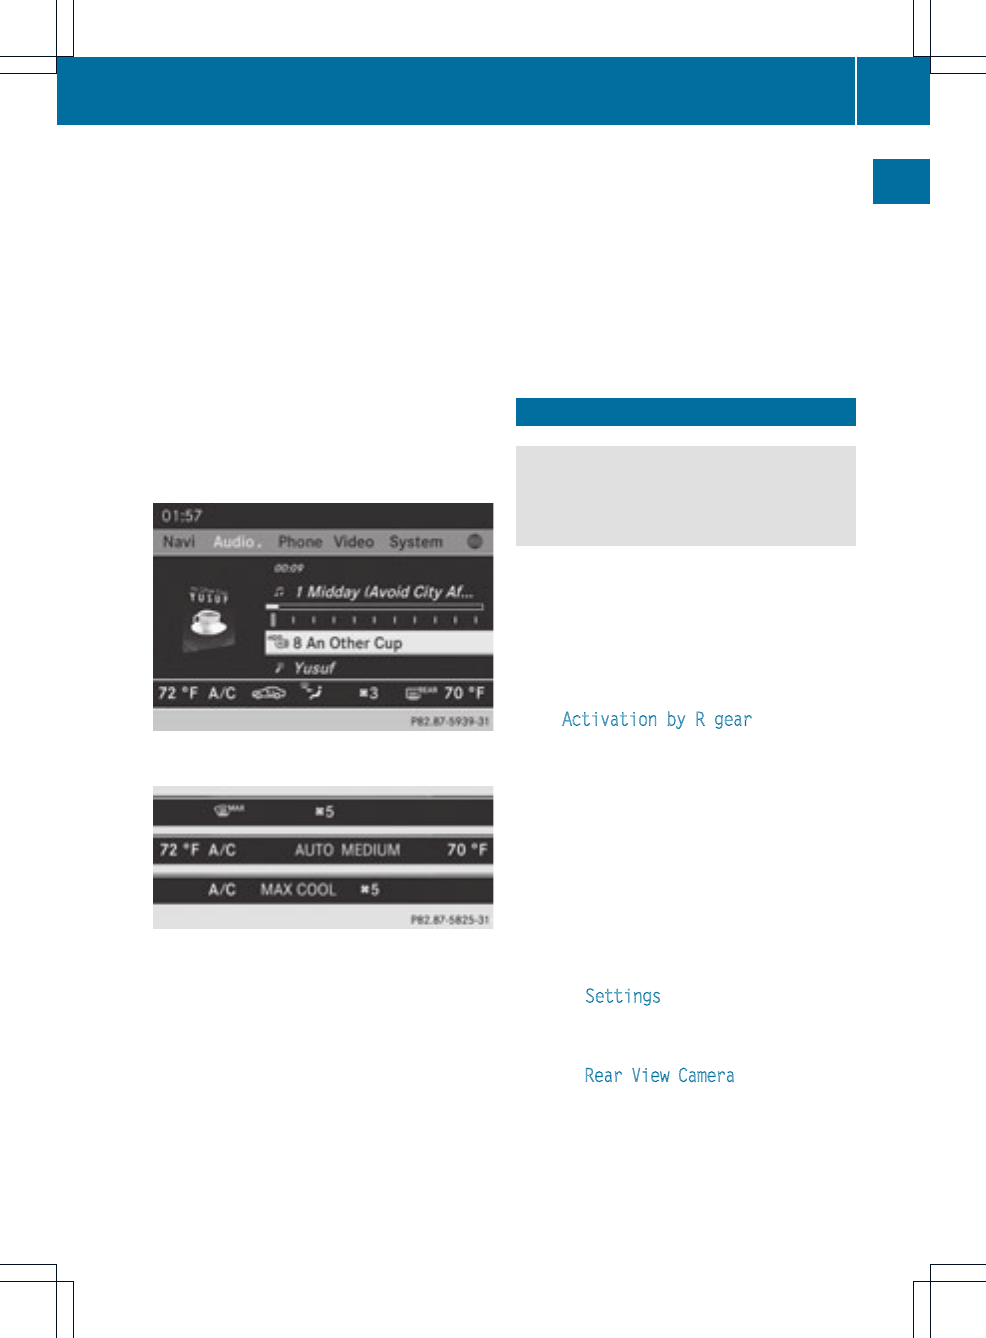
The climate status display in the COMAND display
(example)
The illustration shows an example of the
current settings for:
Rthe defroster function (top)
Rclimate mode in automatic mode (center)
Rmaximum cooling (bottom)
XTo hide the display: turn or press the
COMAND controller.
or
XPress one of the buttons on the COMAND
operating system.
iAdetailed description of the climate
control is available in the vehicle
Operator's Manual.
Rear view camera
GWARNING
The rear view camera is merely an aid.
Please observe the correspondingnotes in
your vehicle's Operator's Manual.
The image from the rear view camera is
shown in the COMAND display when reverse
gear is engaged, if:
Ryour vehicle is equipped with a rear view
camera.
RCOMAND is activated.
Rthe Activation by R gear function is
activated.
If the function is activated, the COMAND
display will automatically switch back to the
previously selected display as soon as you
shift out of reverse gear.
iFurther information on the rear view
camera driving system can be found in the
vehicle Operator's Manual.
XPress the Wfunction button.
The system menu appears.
XSelect Settings by turning cVd the
COMAND controller and press Wto
confirm.
XSelect Rear View Camera and press Wto
confirm.
1Available for 2-zone automatic climate control.
2Available for 3-zone automatic climate control.
3Available for the air-conditioning system.
4Available for Heatmatic.
Rear view camera 37
At a glance
Z

XSelect Activation by R gear and press
Wto confirm.
The function is switched on Oor off ª,
depending on the previous status.
iIf a side view camera is available, using
COMAND you can switch from the rearview
camera picture to the side view camera
picture, see the "System settings" section.
38 Rear view camera
At a glance

COMAND features ............................... 40
Display settings .................................. 40
Time settings ....................................... 40
Fuel consumption display .................. 41
ON&OFFROAD display ......................... 42
Text reader settings ............................ 42
Voice Control System settings .......... 42
Bluetooth®settings ............................ 44
Setting the system language ............. 45
Assigning the favorites button .......... 45
Importing/exporting data .................. 46
Reset function ..................................... 47
39
System settings
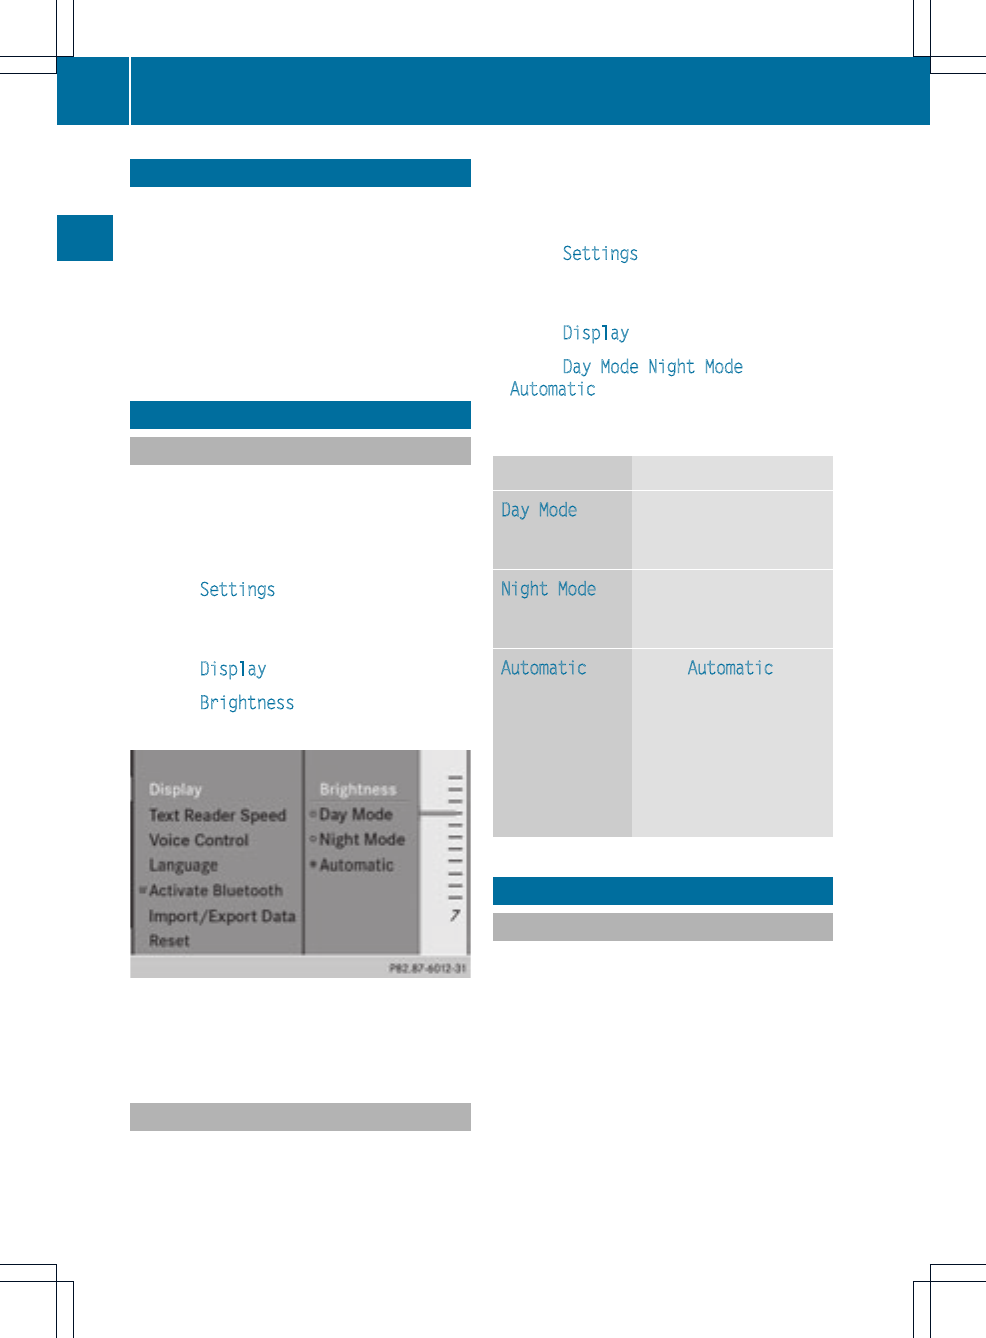
COMAND features
These Operating Instructions describe all
standard and optional equipmentavailable
for your COMAND system at the time of
purchase. Country-specificdeviations are
possible. Please note that your COMAND
system may not be equipped with all the
features described.
Display settings
Setting the brightness
The brightness detected by the display light
sensor affects the setting options for this
function.
XPress the Wbutton.
XSelect Settings by turning cVd the
COMAND controller and press Wto
confirm.
XSelect Display and press Wto confirm.
XSelect Brightness and press Wto
confirm.
XAdjust the brightness by turning cVd the
COMAND controller and press Wto
confirm.
Display design
Your COMAND display features optimized
designs for operation during the day and at
night.You can set the design by manually
selecting day or night design or opt for an
automatic setting.
XPress the Wbutton.
XSelect Settings by turning cVd the
COMAND controller and press Wto
confirm.
XSelect Display and press Wto confirm.
XSelect Day Mode,Night Mode or
Automatic by turning cVd the COMAND
controller and press Wto confirm.
A dot indicates the current setting.
Design Explanation
Day Mode The display is set
permanently to day
design.
Night Mode The display is set
permanently to night
design.
Automatic In the Automatic
setting, COMAND
evaluates the readings
from the automatic
vehicle light sensor and
switches between the
display designs
automatically.
Time settings
General information
If COMAND is equipped with a navigation
system and has GPS reception, COMAND
automatically sets the time and date. You can
also adjust the time yourself in 30-minute
increments, but the date cannot be changed.
iIf you set the time in 30-minute
increments, any time zone settings and
settings for changing between summer and
standard time are lost (Ypage 41).
40 Time settings
System settings
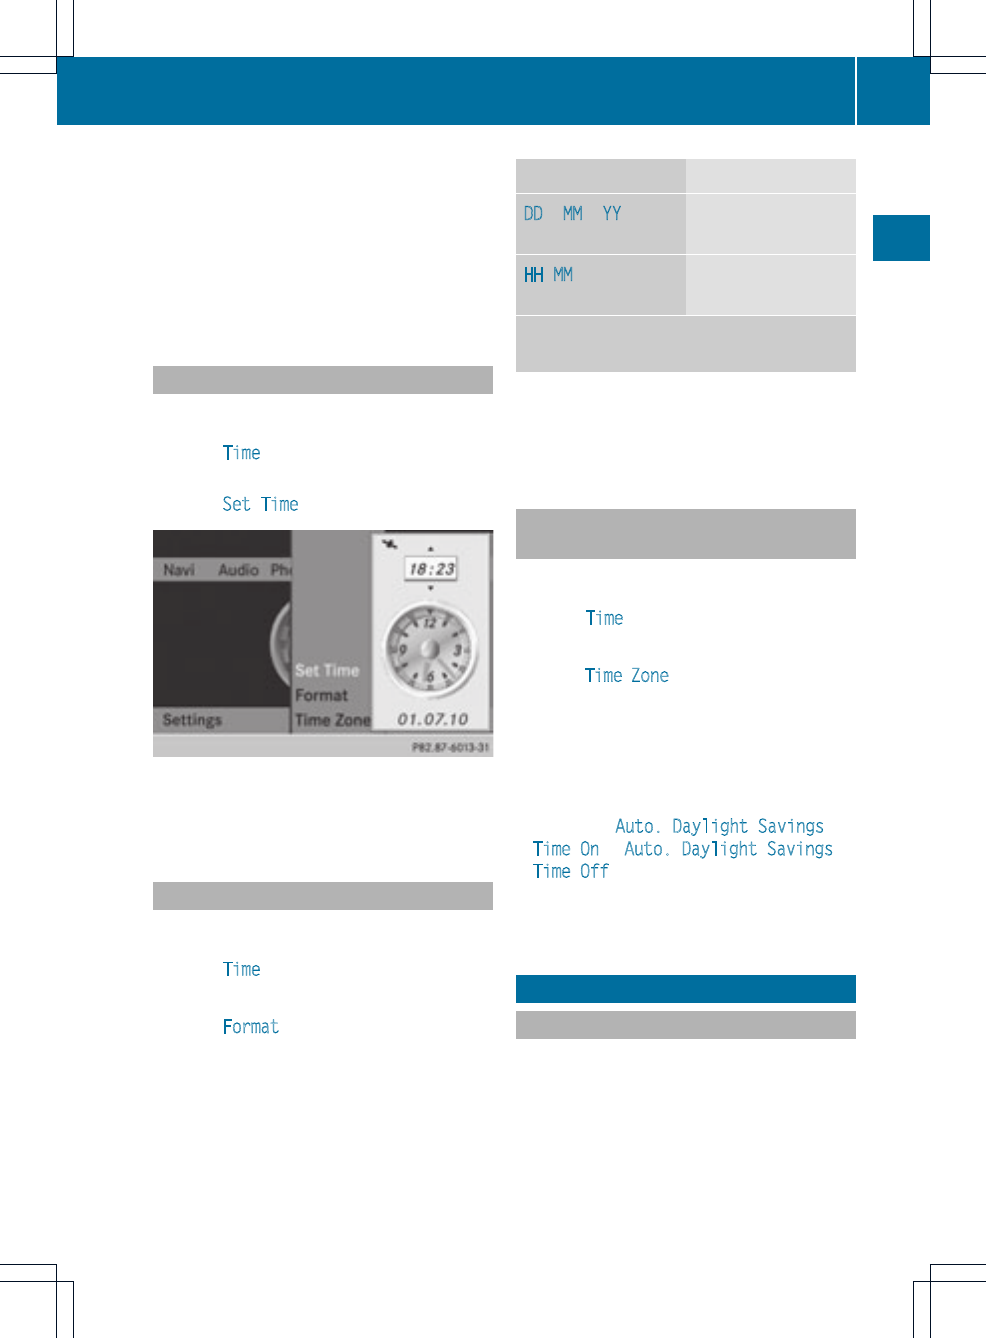
iThe following navigation system functions
require the time, time zone and summer/
standard time to be set correctly in order
to work properly:
Rroute guidance on routes with time-
dependent traffic guidance
Rcalculation of expected time of arrival
Setting the time
XPress the Wbutton.
XSelect Time by turning cVd the COMAND
controller and press Wto confirm.
XSelect Set Time and press Wto confirm.
XSet the time by turning cVd the COMAND
controller and press Wto confirm.
The time is accepted.
Setting the time/date format
XPress the Wbutton.
XSelect Time by turning cVd the COMAND
controller and press Wto confirm.
XSelect Format and press Wto confirm.
The #symbols show the currentsettings.
Abbreviation Meaning
DD /MM /YY Day/Month/Year
(date format)
HH/MM Hours/Minutes
(time format)
You can set the 24-hour or the AM/PM
format.
XSet the format by turning cVd the
COMAND controller and press Wto
confirm.
Setting the time zone and switching
between summer and standard time
XPress the Wbutton.
XSelect Time by turning cVd the COMAND
controller and press Wto confirm.
XSelect Time Zone and press Wto confirm.
You will see a list of time zones. The #dot
indicates the current setting.
XSelect the time zone and press Wto
confirm.
XTo switch automatic changeover on/
off: select Auto. Daylight Savings
Time On or Auto. Daylight Savings
Time Off by turning cVd the COMAND
controller and press Wto confirm.
The #dot indicates the current setting.
Fuel consumption display
Overview
Depending on the vehicle equipment, the
COMAND display shows fuel consumption.
If your vehicle is a dual energy vehicle and the
installed engine variant supports it, you can
call up other displays (see the separate
operating instructions).
Fuel consumption display 41
System settings

Calling up displays
XPress the Wbutton.
XIn the system menu, slide ZV the
COMAND controller up until the Full
Screen option is selected.
XPress Wthe COMAND controller.
The system display is shown as full screen
(without system menu).
XSlide XVY the COMAND controller
repeatedly until the fuel consumption
indicator appears.
The COMAND display shows the fuel
consumption for the last 15 minutes of the
journey.
Every bar of the graphdisplays the average
value for one minute.
The fuel consumption display may differ from
the display in the From Start trip computer
in the Trip menu; see the vehicle Operator's
Manual.
Exiting full screen view
XPress Wthe COMAND controller.
The system menu appears.
ON&OFFROAD display
Overview
The ON&OFFROAD display is available for the
M-Class.
The COMAND display can show the settings
and status of the ON&OFFROAD functions.
You can find more information about the
ON&OFFROAD functions and the display
itself in the vehicle Operator's Manual.
Calling up displays
XPress the Wbutton.
XIn the system menu, slide ZV the
COMAND controller up until the display/
selection window is selected.
XSlide XVY the COMAND controller until
the ON&OFFROAD display appears.
The COMAND display shows the settings
and status of the ON&OFFROAD functions.
Exiting the display
XSlide XVY the COMAND controller until
the desired display (clockorfuel
consumption) is shown.
Text reader settings
Setting the text reader speed
XPress the Wbutton.
XSelect Settings by turning cVd the
COMAND controller and press Wto
confirm.
XSelect Text Reader Speed and press W
to confirm.
Alist appears. The #dot indicates the
current setting.
XSelect a setting by turning cVd the
COMAND controller and press Wto
confirm.
Voice Control System settings
Opening/closing the help window
In additionto the audible instructions, the
help window will show you other information
42 Voice Control System settings
System settings

during voice control operation and the
individualization process.
XPress the Wbutton.
XSelect Settings by turning cVd the
COMAND controller and press Wto
confirm.
XSelect Voice Control and press Wto
confirm.
XSelect Help Window and press Wto
confirm.
You have switched the help window on
Oor off ª.
Individualization
Introduction
You can use the individualization function to
fine tune the Voice Control System to your
voice and therefore improve voice
recognition. This means that other users'
voices will not be recognized as easily, and
therefore this function can be deactivated
(Ypage 44).
Individualization comprises two parts and
takes approximately five minutes. It consists
of training the system to recognize a certain
number of digit sequences and voice
commands.
Starting new individualization
Individualization can only be started when the
vehicle is stationary. Before starting, switch
off all devices or functions which could
interfere, such as the radio or the navigation
system. After starting the session, the system
guides you through the training with spoken
instructions.
XPress the Wbutton.
XSelect Settings by turning cVd the
COMAND controller and press Wto
confirm.
XSelect Voice Control and press Wto
confirm.
XSelect Start New Individualization
and press Wto confirm.
You see and hear a prompt asking whether
you would like further information.
XSelect Yes or No and press Wto confirm.
If you select No, the first part of
individualization begins. You will be asked
whether you would like to train digits or
voice commands.
If you select Yes, you will see and hear
information on the individualization
process. The first part of individualization
then begins automatically.
XTo close the display: press Wthe
COMAND controller.
You will be asked whether you would like
to train digits or voice commands.
At the end of the first part, a prompt will
appear asking whether you wish to begin the
second part.
Voice Control System settings 43
System settings
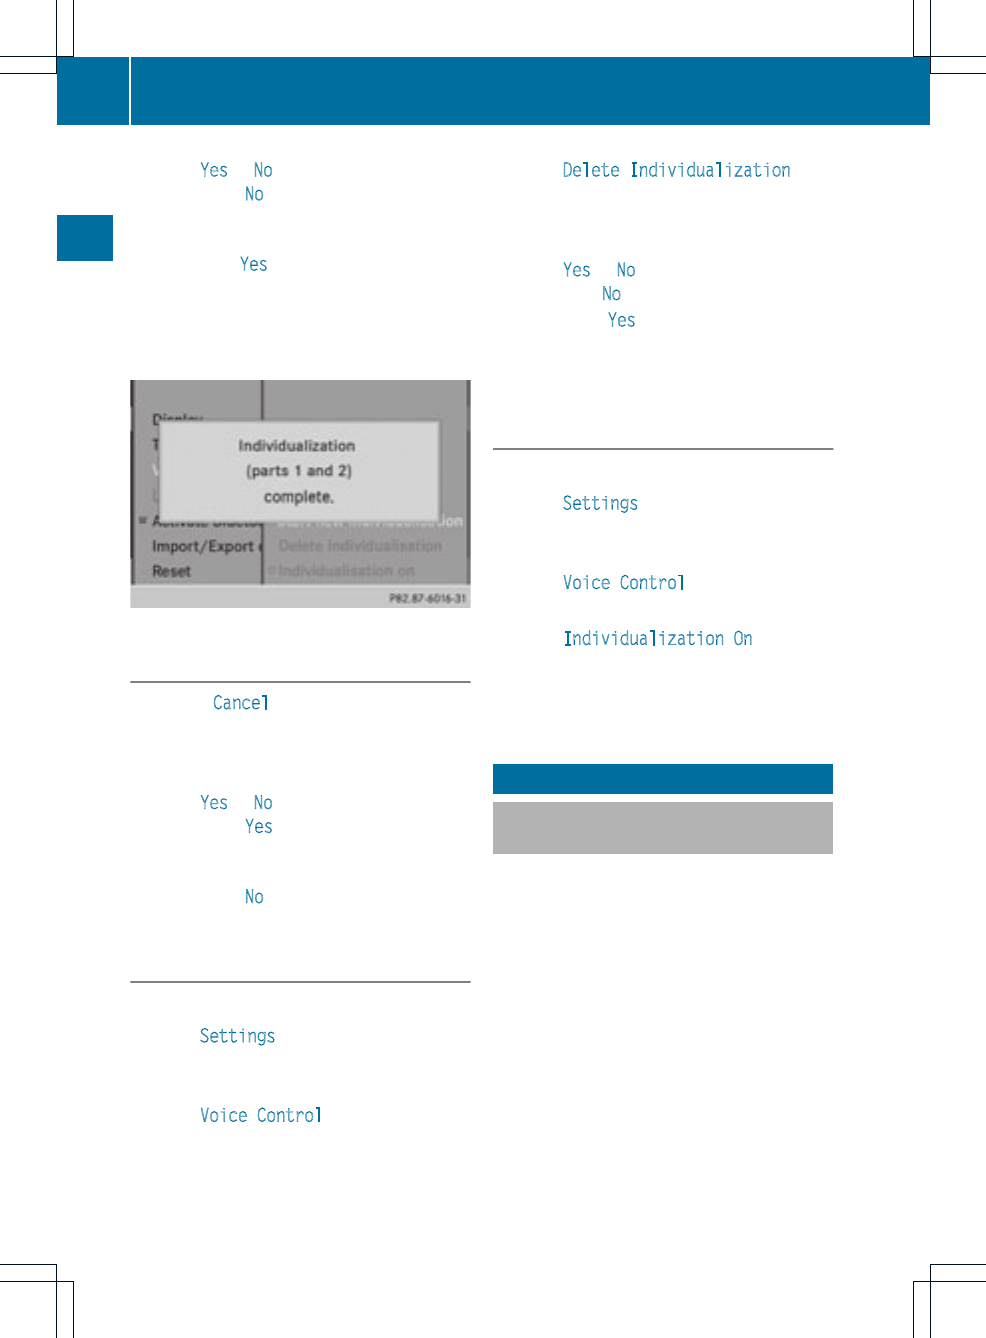
XSelect Yes or No and press Wto confirm.
If you select No, individualization will be
canceled. The data from the first part is
stored automatically.
If you select Yes, the second part will begin.
Individualization is completed at the end of
the second part. You will see a message to
this effect. The data from the second part is
stored automatically.
Canceling the firstorsecond part of
individualization
XConfirm Cancel by pressing Wthe
COMAND controller.
Aprompt appears asking whetheryou
really wish to cancel.
XSelect Yes or No and press Wto confirm.
If you select Yes, the voice training will be
canceled. The data from the part during
which you exited is not stored.
If you select No, the current part begins
again.
Deleting existing individualization data
XPress the Wbutton.
XSelect Settings by turning cVd the
COMAND controller and press Wto
confirm.
XSelect Voice Control and press Wto
confirm.
XSelect Delete Individualization and
press Wto confirm.
Aprompt appears asking whetheryou
really wish to delete.
XSelect Yes or No and press Wto confirm.
If you select No, the process will be aborted.
If you select Yes, the individualization is
deleted. You will see a message to this
effect.
Activating/deactivating
individualization
XPress the Wbutton.
XSelect Settings by turning cVd the
COMAND controller and press Wto
confirm.
XSelect Voice Control and press Wto
confirm.
XSelect Individualization On and press
Wto confirm.
Individualization is activated Oor
deactivated ª.
Bluetooth®settings
General information about
Bluetooth®
Bluetooth®-capable devices, e.g. mobile
phones, must comply with a certain profile in
order to be connected to COMAND. Every
Bluetooth®device has its own specific
Bluetooth®name.
Bluetooth®technology is the standard for
short-range wireless data transmission of up
to approximately 10 meters. Bluetooth®
allows, for example, the exchange of vCards.
Bluetooth®is a registered trademark of
Bluetooth Special Interest Group (SIG) Inc.
44 Bluetooth®settings
System settings
Activating/deactivating Bluetooth®
XPress the Wbutton.
The system menu appears.
XSelect Settings by turning cVd the
COMAND controller and press Wto
confirm.
XSelect Activate Bluetooth and press
Wto confirm.
This switches Bluetooth®on Oor off ª.
Setting the system language
This function allows you to determine the
language for the menu displays and the
navigation announcements.The navigation
announcements are not available in all
languages. If a language is not available, the
navigation announcements will be in English.
The selected language affects the characters
available for entry.
When you set the system language, the
language of the Voice Control System will
change accordingly. If the selected language
is not supported by the Voice Control System,
English will be selected.
XPress the Wbutton.
XSelect Settings by turning cVd the
COMAND controller and press Wto
confirm.
XSelect Language and press Wto confirm.
The list of languages appears. The #dot
indicates the current setting.
XSelect the language by turning cVd the
COMAND controller and press Wto
confirm.
COMAND loads the selected language and
sets it.
Assigning the favorites button
This function is available, e.g. for the M-Class.
Depending on the vehicle equipment, you can
assign one or two favorites buttons. They are
located on the left (one favorites button
installed) or on the left and right (two favorites
buttons installed) beside the COMAND
controller (Ypage 19).
You can select the following predefined
functions in a menu:
RDisplay On/Off: you can switch the
display off or on.
RFull Screen: 'Clock':you can show the
clock in full screen.
RFull Screen: 'Map':you can show the
map in full screen.
RSpoken Driving Tip:you can call up the
current driving recommendation.
RDisplay Traffic Messages:you can call
up traffic reports.
RNavigate Home: you can start route
guidance to your home address if you have
already entered and saved the address
(Ypage 57).
RDetour Menu:you can call up the Detour
menu and then avoid a section of the route
and recalculate the route (Ypage 82).
RCompass Screen:you can call up the
compass.
XTo assign afavorites button: press the
Wbutton.
XSelect Settings by sliding VÆand turning
cVd the COMAND controller and press
Wto confirm.
Assigning the favorites button 45
Systemsettings
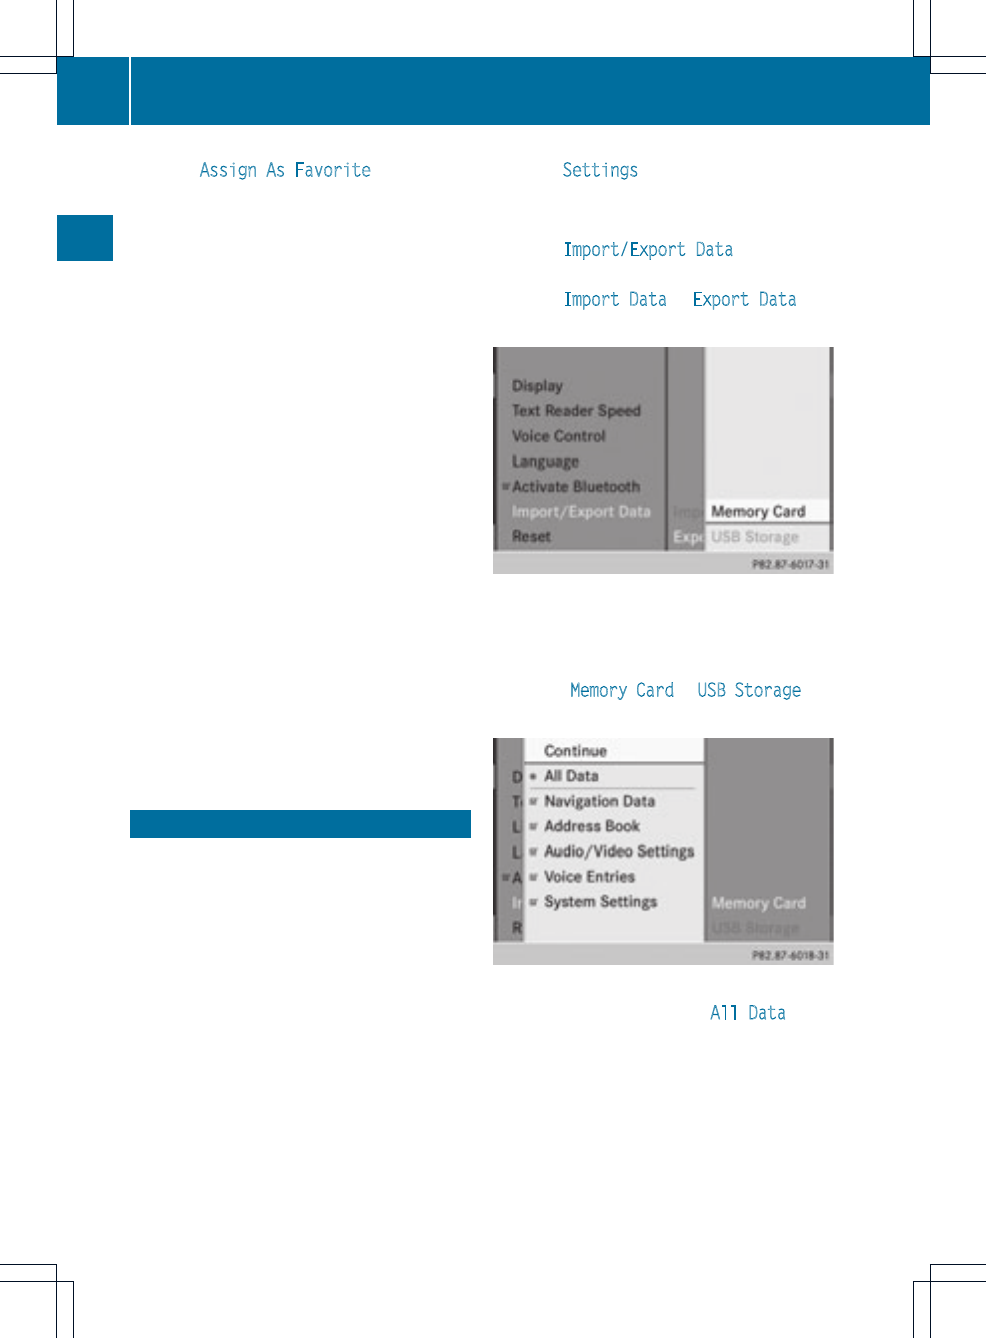
XSelect Assign As Favorite and press
Wto confirm.
The list of predefined functions appears.
If your vehicle is equipped with a favorites
button, the #dot indicates the currently
selected function.
If your vehicle is equipped with two
favorites buttons, two asterisks indicate
the currently selected function for the
respective favorites button.
XSelect the function by turning cVd the
COMAND controllerand press Wto
confirm.
If your vehicle is equipped with a favorites
button, it is assigned with the function
selected.
If your vehicle is equipped with two
favorites buttons, you will see a submenu.
XSelect the favorites button by turning
cVd and sliding ZVÆthe COMAND
controller and press Wto confirm.
The favorites button selectedis assigned
the predefined function.
XTo call up afavorite (example): press the
gfavorites button.
This calls up the predefined function.
Importing/exporting data
You can use this function to copy your
personal COMAND data from one system
(vehicle) to anothersystem (vehicle) or to
create a backup copy of your personal data
(exporting data) and importitagain
(importing data). You can either use an SD
memory card or a USB storage device (e.g. a
USB stick) as temporary storage.
iPersonal music files in the MUSIC
REGISTER cannot be saved and imported
again using this function.
XPress the Wbutton.
The system menu appears.
XSelect Settings by turning cVd the
COMAND controller and press Wto
confirm.
XSelect Import/Export Data and press
Wto confirm.
XSelect Import Data or Export Data and
press Wto confirm.
XTo selectastorage location: insert the
memory card (Ypage 157) or insert the
USB storage device (Ypage 157) into the
USB port.
XSelect Memory Card or USB Storage and
press Wto confirm.
Example: export data menu
XTo select all data: select All Data and
press Wto confirm.
This functionexports all the data to the
selected disc.
XSelect the data type and press Wto
confirm.
Depending on the previous entry, either
select the data type for the export Oor
not ª.
46 Importing/exporting data
System settings
!Never remove the stick or card when
writing data to the USB stick or the memory
card You may otherwise lose data.
Reset function
You can reset COMAND to the factory
settings. Among other things, this will delete
all personal COMAND data (e.g. station
presets, entries in the destination memory
and in the list of previous destinations in the
navigation system, address book entries).
Resetting is recommended before selling or
transferring ownership of your vehicle, for
example.
Data on the internal hard drive, e.g. music
files in the MUSIC REGISTER, will be deleted.
You can also delete music files from the
MUSIC REGISTER using the "Delete all music
files" (Ypage 170) function.
XPress the Wfunction button.
XSelect Settings by turning cVd the
COMAND controller and press Wto
confirm.
XSelect Reset and press Wto confirm.
Aprompt appears asking whetheryou wish
to reset.
XSelect Yes or No and press Wto confirm.
If you select No, the process will be aborted.
If you select Yes, a prompt will appear again
asking whether you really wish to reset.
XSelect Yes or No and press Wto confirm.
If you select Yes, a message will be shown.
COMAND is reset and restarted.
If you select No, the process will be aborted.
Reset function 47
System settings

48

COMAND features ............................... 50
Introduction ......................................... 50
Basic settings ...................................... 52
Destination entry ................................ 53
Entering apoint of interest ................ 66
Personal points of interest ................. 72
Search & Send ..................................... 76
Route guidance ................................... 77
Traffic reports ..................................... 88
Destination memory ........................... 94
Previous destinations ......................... 97
Map operation and settings ............... 98
Additional settings ........................... 105
Problems with the navigation sys-
tem ..................................................... 111
49
Navigation

COMAND features
These Operating Instructions describe all
standard and optional equipmentavailable
for your COMAND system at the time of
purchase. Country-specificdeviations are
possible. Please note that your COMAND
system may not be equipped with all the
features described.
Introduction
Safety notes
GWARNING
For safety reasons, only enter a destination
when the vehicle is stationary. When the
vehicle is in motion, apassenger should enter
the destination.Study manual and select
route before driving.
Bear in mind that at a speed of just 30 mph
(approximately 50 km/h), your vehicle is
covering a distance of 44 feet(approximately
14 m) every second.
COMAND calculates the routeto the
destination without taking account of the
following:
RTraffic lights
RStop and right-of-way-signs
RLane merging
RParking or stopping prohibited areas
ROther road and traffic rules and regulations
RNarrow bridges
GWARNING
COMAND may give incorrect navigation
commands if the data in the digital map does
not correspond with the actual road/traffic
situation. Digital maps do not cover all areas
nor all routes within an area. For example, if
the traffic routing has been changed or the
direction of a one-way road has been
reversed.
For this reason, you must always observe
applicable road and traffic rules and
regulations during your journey. Road and
traffic rules and regulations always have
priority over the navigation commands
generated by the system.
GWARNING
Navigation announcements are intended to
direct you while driving without diverting your
attention from the road and driving.
Please always use this feature instead of
consulting the map display for directions.
Consulting the symbols or map display for
directions may cause you to divert your
attention from driving and increase your risk
of an accident.
General notes
Operational readiness of the navigation
system
The navigation system must determine the
position of the vehicle before first use or
whenever operational status is restored.
Therefore, you may have to drive for a while
before precise route guidance is possible.
GPS reception
Correct functioning of the navigation system
depends, amongst other things, on GPS
reception.Incertain situations, GPS
reception may be impaired, there may be
interference or there may be no reception at
all, e.g. in tunnels or parking garages.
Entry restriction
On vehicles for certain countries, there is a
restriction on entering data.
The restriction is activeabove a vehicle speed
of about 3mph. The restriction is deactivated
as soon as the vehicle speed drops below
about 2mph.
When the restriction is active, certain entries
cannot be made. This will be indicated by the
50 Introduction
Navigation

fact that certain menu items are grayed out
and cannot be selected.
The following entries are not possible, for
example:
Rentering the destination city and street
Rentering a destination via the map
Rentering points of interest in the vicinity of
a city or via a name search
Rediting entries
Rusing the number keypad for direct entry
Other entries are possible, such as entering
points of interest in the vicinity of the
destination or current position.
Addresses can be entered via the Voice
Control System (see the separate Operating
Instructions) while the vehicle is in motion.
Switching to navigation mode
Option 1
XPress the Øfunction button.
The map is displayed with the menu either
shownorhidden.
Option 2
XSelect Navi in the main function bar by
sliding ZV and turning cVd the COMAND
controller and press Wto confirm.
The map is displayed with the menu shown.
Map showing the menu; routeguidance inactive
:Status bar
;Main function bar
=Current vehicle position
?Navigation menu bar
Map without the menu; routeguidance inactive
:Current vehicle position
;Map orientationselected
=Map scale selected
"Route guidance active" means that you have
entered a destination and that COMAND has
calculated the route. The display shows the
route, changes of direction and lane
recommendations. Navigation
announcements guide you to your
destination.
"Route guidance inactive" means that no
destination has been entered and that no
route has been calculated.
Showing/hiding the menu
XTo hide the menu: slide ZV the COMAND
controller and, when the Full Screen
menu item is shown, press Wto confirm.
or
XPress the %back button.
The map can be seen in the full-screen
display.
XTo show the menu: press Wthe COMAND
controller when the map is shown in full-
screen display.
Introduction 51
Navigation
Z
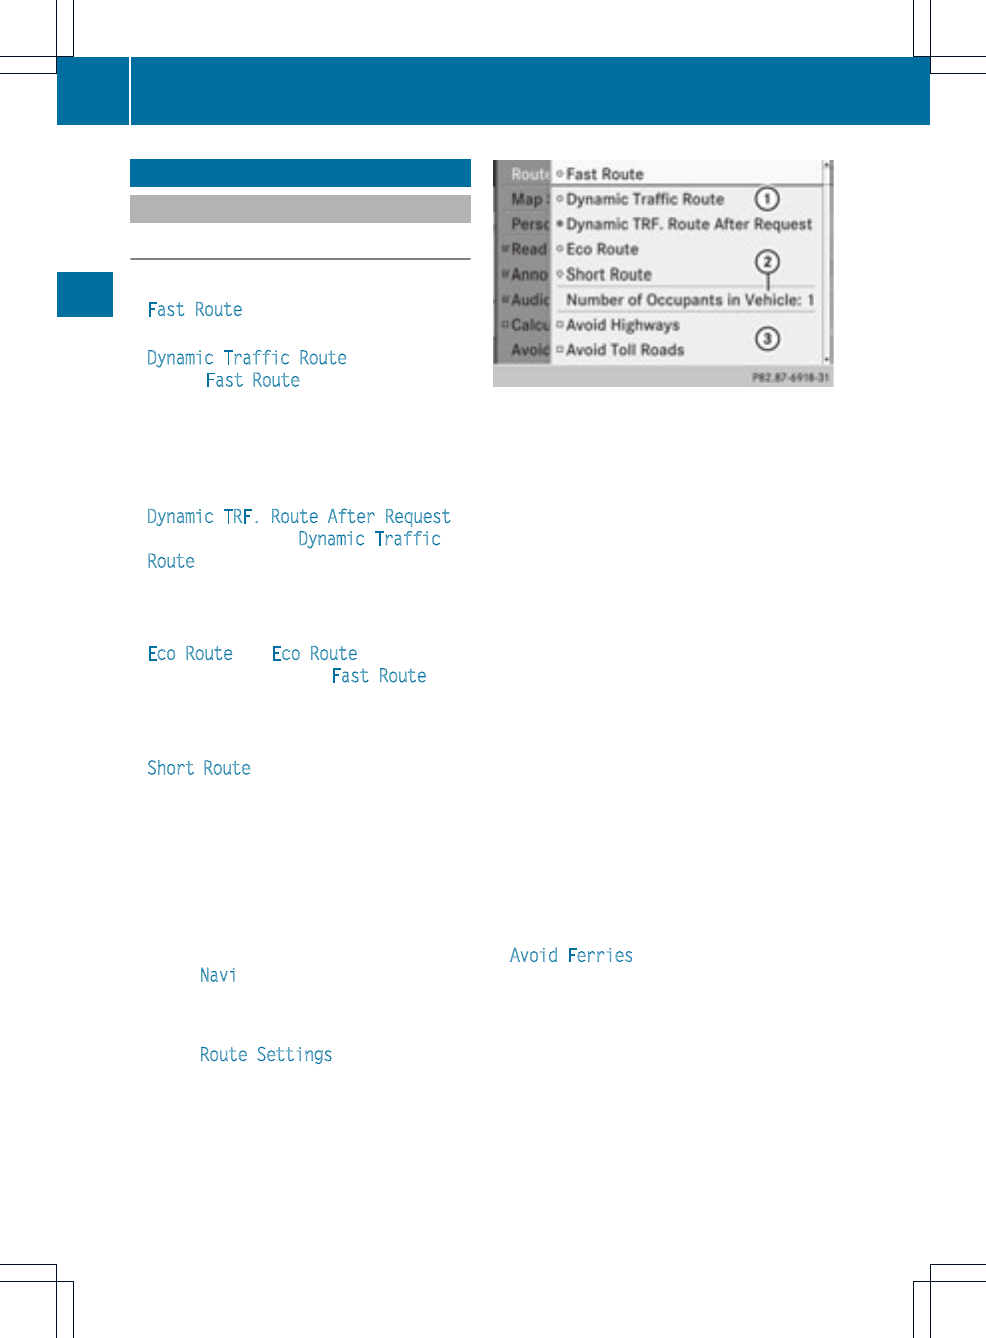
Basic settings
Route settings
Setting route type and route options
You can select the following route types:
RFast Route:COMAND calculates a route
with the shortest (minimized) journey time.
RDynamic Traffic Route: same route
type as Fast Route.Inaddition, COMAND
takes any traffic reports received with
regard to the route into account during
route guidance. The navigation system can
help you avoid a traffic jam, for example, by
recalculating the route.
RDynamic TRF. Route After Request:
same route type as Dynamic Traffic
Route. After recalculating the route,
COMAND asks you whether you wish to
adopt the new route or whether you would
prefer to continue along the original route.
REco Route: the Eco Route (economic
route) is a variant of the Fast Route route
type. COMAND will attempt to minimize the
journey distance at the expense of a slightly
increased journey time.
RShort Route:COMAND calculates a route
with the shortest possible (minimized)
route distance.
iOn very long routes, the "Eco Route" more
or less corresponds to the "Fast Route"
route type.
XTo call up the route settings menu: press
the Øfunction button.
XSelect Navi in the main function bar by
sliding ZV and turning cVd the COMAND
controller and press Wto confirm.
XSelect Route Settings and press Wto
confirm.
Route settings menu (start of menu)
:To select the route type
;To set the number of persons in the
vehicle for the use of carpool lanes
=To set route options
XSelect a route type and press Wto confirm.
Afilled circle indicates the current setting.
XSelectthe route option(s) and press Wto
confirm.
The route options are switched on Oor off
ª, depending on the previous status.
iIf you change the route type and/or the
route options while route guidance is active
(the route has been calculated), COMAND
will calculate a new route.
If you change the route type and/or the
route options while route guidance is
inactive (no destination has been entered
yet), COMAND uses the new setting for the
next route guidance.
iThe route calculated may, for example,
include ferry connections, even if the
Avoid Ferries route option is switched
on.
In some cases, e.g. when calculating
particularly long routes, COMAND may not
be able to take all the selected route
options into account.
XTo exit the menu: slide XVY the COMAND
controller.
52 Basic settings
Navigation
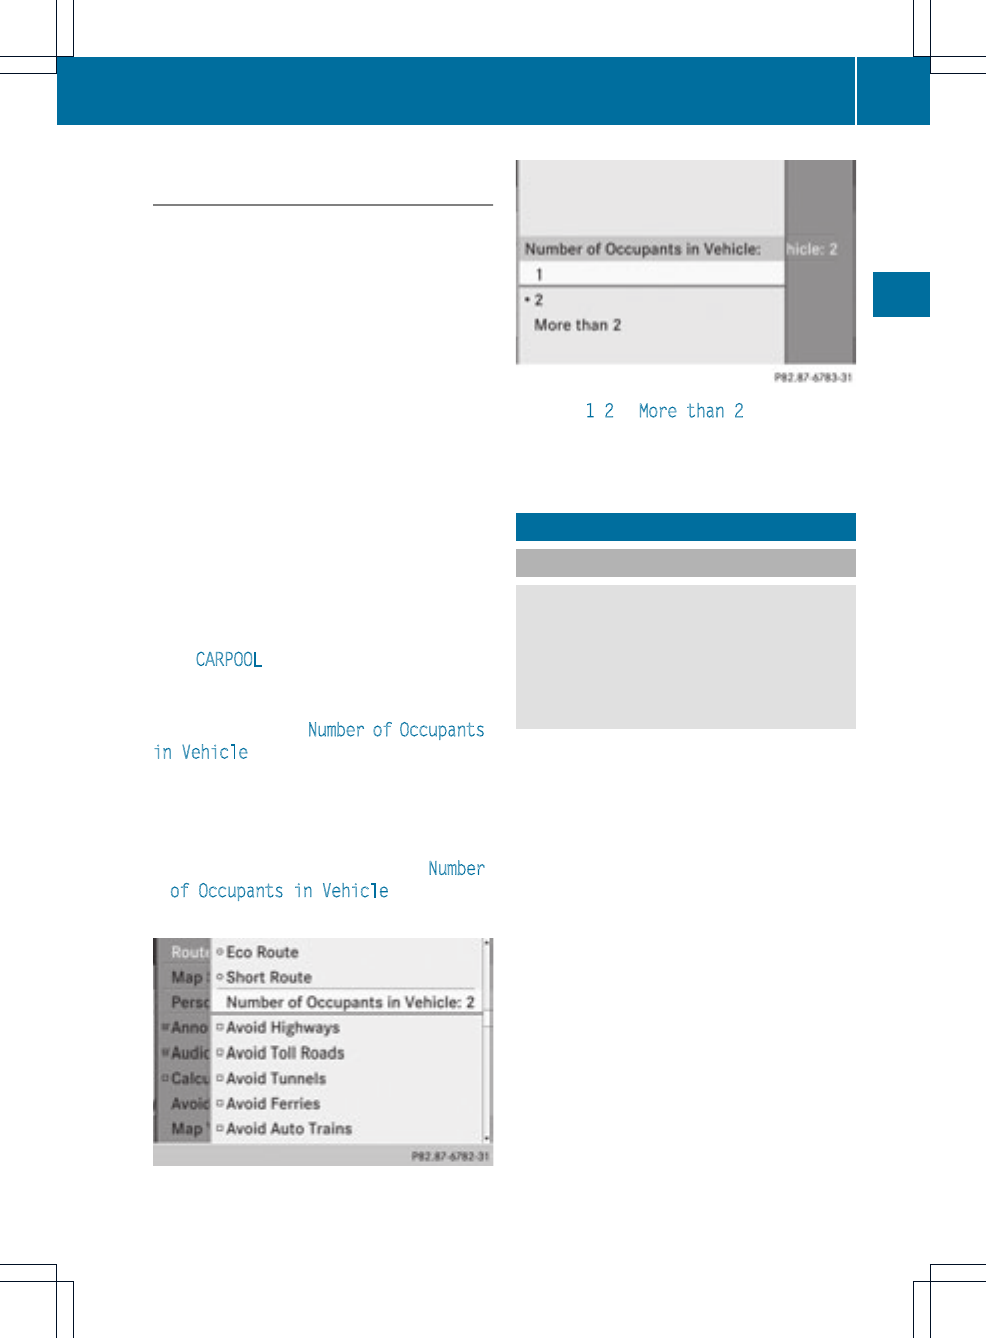
Setting the number of persons in the
vehicle for the use of carpool lanes
For route calculation, you can take HOV or
carpool lanes into account.
If you use HOV or carpool lanes, please
observe the applicable laws as well as the
local and time limitation conditions.
Carpool lanes may only be used under certain
conditions. Normally you can use these lanes
when two people are traveling in the vehicle.
However, there are lanes that can only be
used when three or four people (e.g. in New
York) travel in the vehicle. In California, lone
drivers can use a carpool lane if their vehicle's
emission level/fuel consumption is below a
fixed threshold.
Carpool lanes may be reserved for specific
times (e.g. during the peak period).
Carpool lanes are identified by HOV symbols
on special road signs and by markings on the
road. On the road signs, you may also see the
word CARPOOL.The lanes are arranged as a
separate lane next to the others or are built
as a physically separate lane.
Depending upon the Number of Occupants
in Vehicle setting, COMAND uses HOV or
carpool lanes when calculating a route.
COMAND then guides you with visual and
acoustic driving instructions onto or away
from HOV or carpool lanes.
XIn the Route Settings menu, select Number
of Occupants in Vehicle by turning
cVd the COMAND controller.
XPress Wthe COMAND controller.
XSelect 1,2or More than 2 by turning
cVd and confirm by pressing W.
The #dot indicates the current setting.
Destination entry
Introduction to destination entry
GWARNING
For safety reasons, only enter a new
destination when the vehicle is stationary.
You could otherwise be distracted from the
traffic conditions, cause an accident and
injure yourself and others.
The following destination entry options are
available:
Rentering a destination by address
Rentering a destination from the destination
memory
Rentering a destination from the list of last
destinations
Rentering a destination using the map
Rentering a destination using geo-
coordinates
Rentering an intermediate stop
Rentering waypoints
Rentering a point of interest
Rentering a personal point of interest
Rentering a destination using "Search &
Send"
Destination entry 53
Navigation
Z
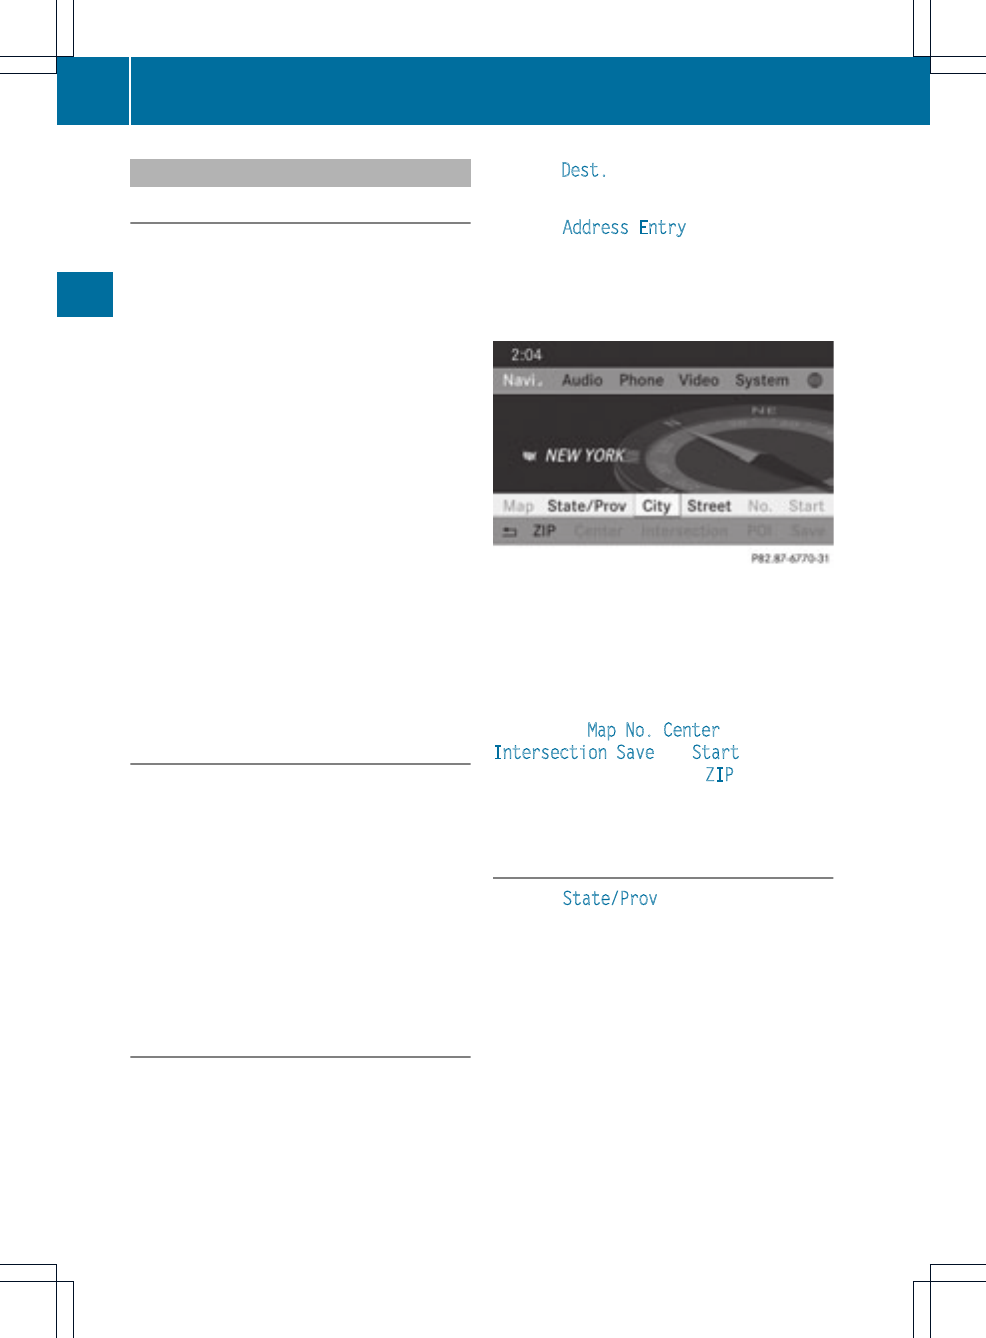
Entering adestination by address
Introduction
When entering an address as the destination,
you have the following options:
Rentering the state/province, city/ZIP code
and street
Rentering the state/province, city and
center
Rentering the state/province, city/zip code,
street and house number
Rentering the state/province, city/zip code,
street and intersection
Rentering the state/province, street, city
and house number
Rentering the state/province, street and
house number
Rentering the state/province, street and
intersection
iYou can only enter those cities, streets,
zip codes etc. that are stored in the digital
map. This means that for some countries,
you cannotenter zip codes, for example.
Example: entering an address
The following is a step-by-step example of
how to enteranaddress. The destination
address is as follows:
New York (state)
New York (city)
40 Broadway
Of course, you can freely enter information
like state/province, city, street and house
number, for example to enter your home
address.
Calling up the address entry menu
XTo switch on navigation mode: press the
Øfunction button.
XTo show the menu: press Wthe COMAND
controller.
XSelect Dest. by turning cVd the COMAND
controller and pressing Wto confirm.
XSelect Address Entry and press Wto
confirm.
The address entry menu appears. If you
have previously entered a destination, this
will be shown in the display.
Address entry menu
Depending on the sequence in which you
enter the address and on the data status of
the digital map, some menu items may not be
available at all or may not yet be available.
Example: after entering state/province, the
menu items Map,No.,Center,
Intersection,Save and Start are not
available; or the menu item ZIP is not
available if the digital map does not have any
zip codes.
Selecting astate/province
XSelect State/Prov in the address entry
menu by turning cVd the COMAND
controller and press Wto confirm.
Amenu with the available lists appears:
54 Destination entry
Navigation
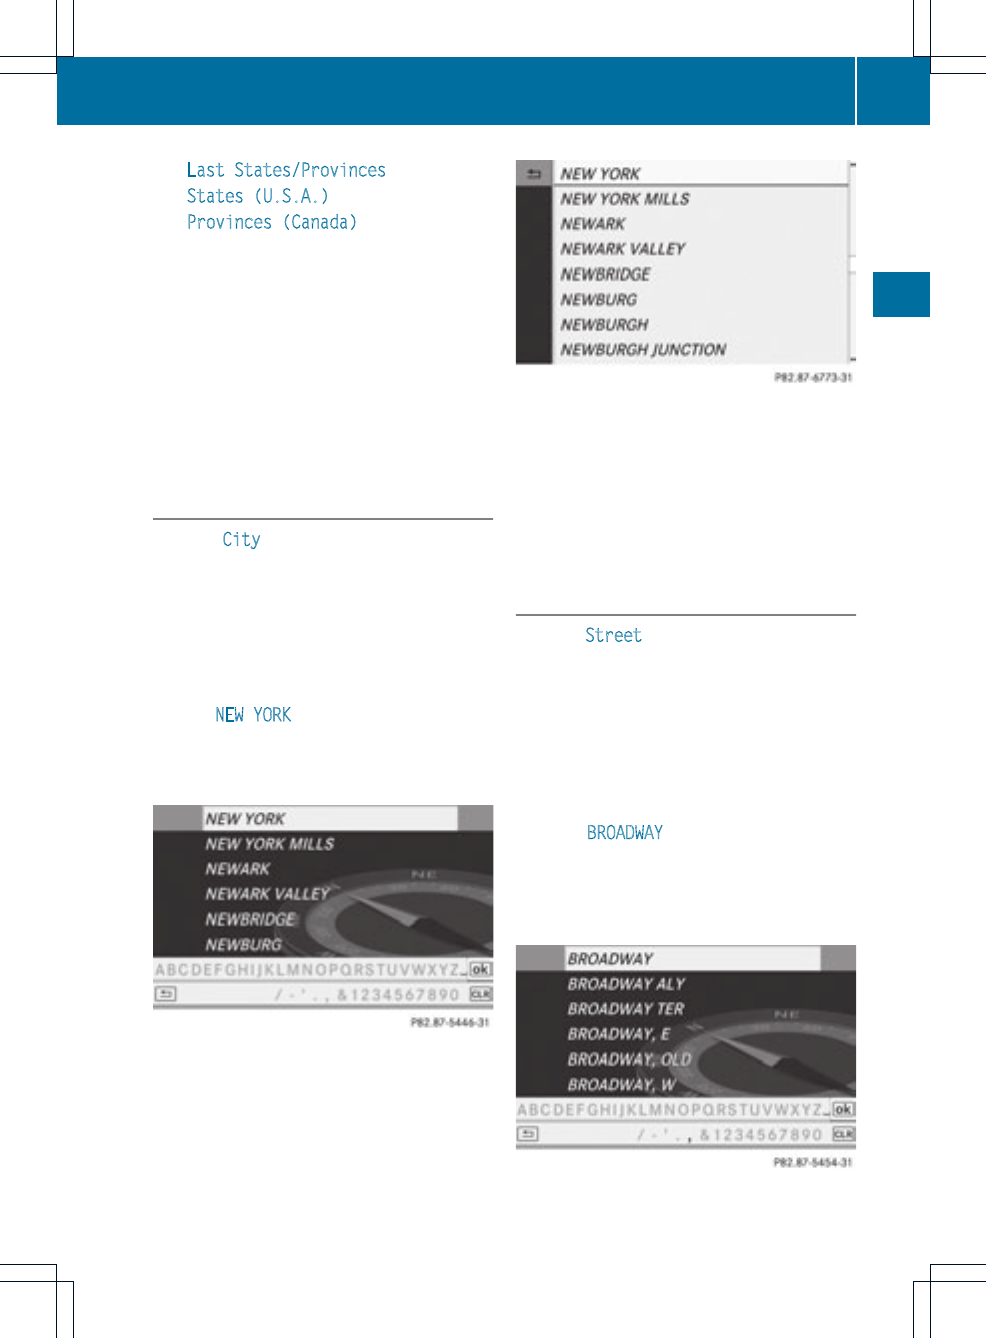
RLast States/Provinces
RStates (U.S.A.)
RProvinces (Canada)
XTo select alist: turn cVd the COMAND
controller and press Wto confirm.
The list of selected states/provinces
appears.
XTo select astate/province: turn cVd the
COMAND controller and press Wto
confirm.
The address entry menu appears again. The
state/province selected has now been
entered.
Entering the city
XSelect City in the address entry menu by
turning cVd the COMAND controller and
press Wto confirm.
You will see the city list either with the
character bar(option 1) or as a selection
list (option 2).
Option 1: city list with the character bar
XEnter NEW YORK. Instructions for entering
characters can be found in the "Entering
characters in navigation mode (entering a
city)" section (Ypage 28).
Option 2: city list as selection list
City list
XSelect an entry by turning cVd the
COMAND controller.
XIrrespective of the option, press Wto
confirm your selection.
The address entry menu appears again. The
city has now been entered.
Entering a street name
XSelect Street in the address entry menu
by turning cVd and sliding ZVÆthe
COMAND controller and press Wto
confirm.
You will see the street list either with the
character bar (option 1) or as a selection
list (option 2).
Option 1: street list with character bar
XEnter BROADWAY. Instructionsfor entering
characters using city input as an example
can be found in the "Entering characters in
navigation mode (entering acity)" section
(Ypage 28).
Option 2: street list as selection list
Destination entry 55
Navigation
Z
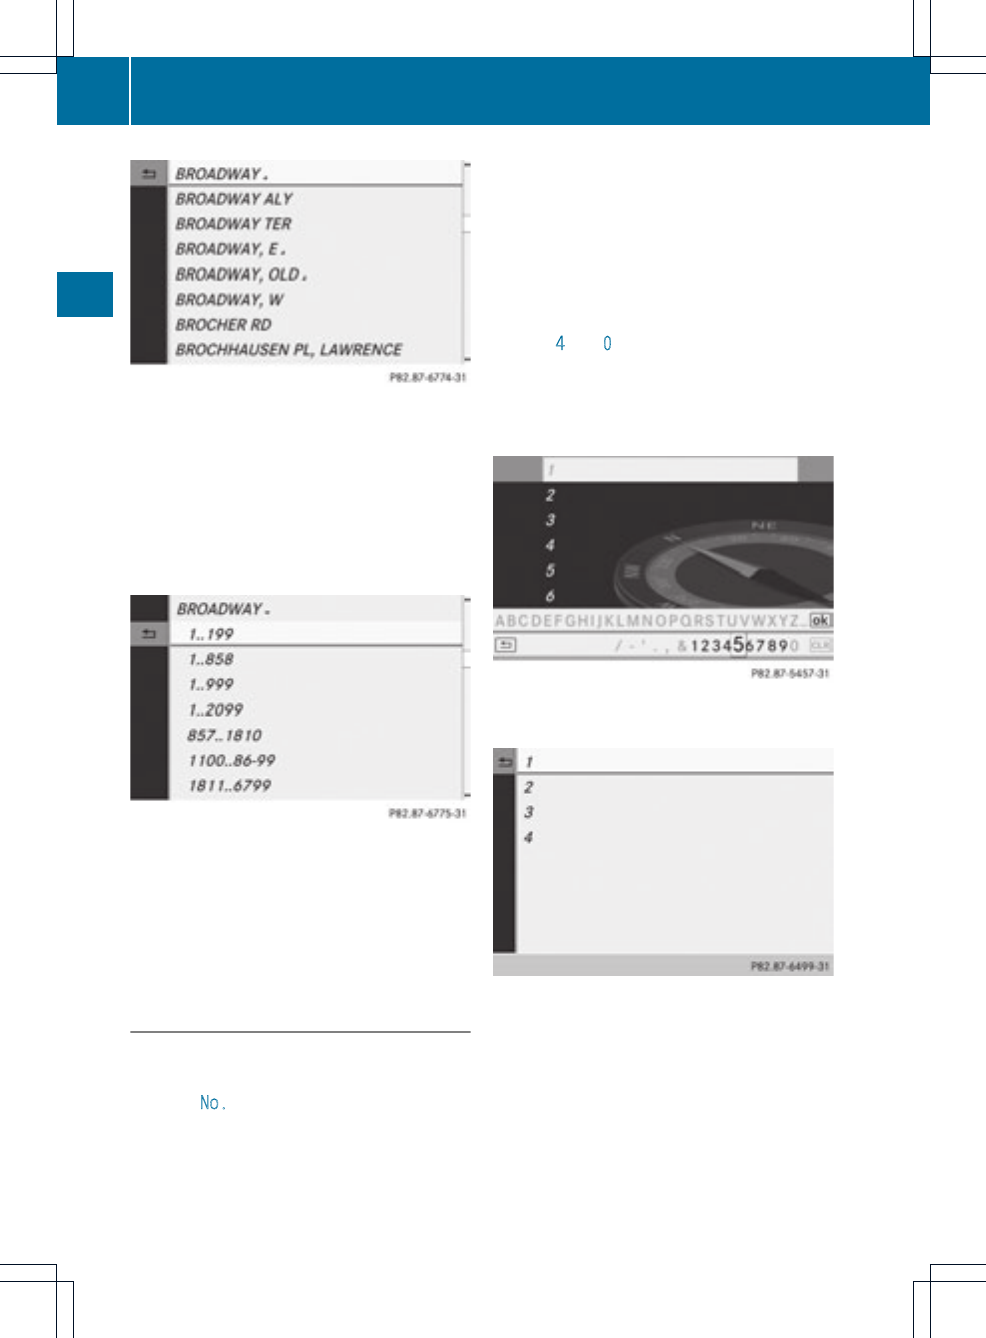
Street list
XSelect a street by turning cVd the
COMAND controllerand press Wto
confirm.
If an entry features the Gicon, it cannot
be uniquely assigned and a selection list
will open, allowing you to select the desired
entry.
XSelect an entry by turning cVd the
COMAND controller.
XIrrespective of the option, press Wto
confirm your selection.
The address entry menu appears again. The
street has now been entered.
Entering the house number
It is not possible to enterahouse number until
a street has been entered.
XSelect No. in the address entry menu by
turning cVd and sliding ZVÆthe
COMAND controller and press Wto
confirm.
You will see the house number list either
with the character bar (option 1) or as a
selection list (option 2).
Option 1: house number list with
character bar
XEnter 4and 0. Instructions for entering
characters using city input as an example
can be found in the "Entering characters in
navigation mode (entering acity)" section
(Ypage 28).
Option 2: house number list as selection
list
House number list
XSelect an entry by turning cVd the
COMAND controller.
XIrrespective of the option, press Wto
confirm your selection.
The address entry menu appears again. The
house number has now been entered.
56 Destination entry
Navigation
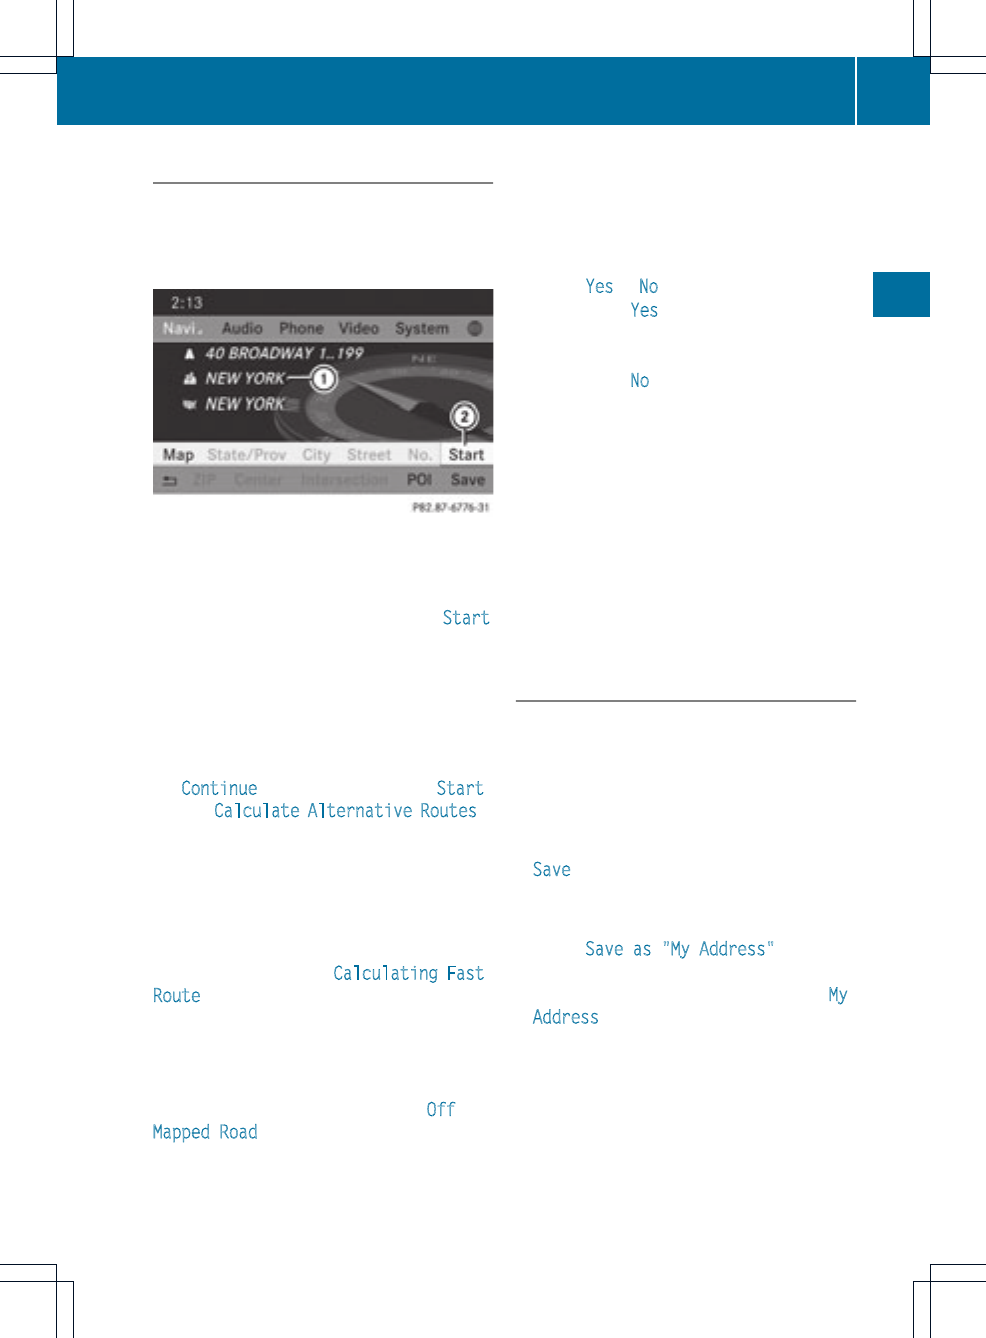
Starting route calculation
You can now have COMAND calculate the
route to the address entered or save the
address first, e.g. as your home address (My
address) (Ypage 57).
Address entry menu with destination address
:Destination address
;To start route calculation
XIn the address entry menu, confirm Start
by pressing W.
If no other route has been calculated, route
calculation starts immediately (Option 1). If
another route has already been calculated
(route guidance is active), a prompt
appears (option 2).
iContinue is displayed instead of Start
when Calculate Alternative Routes is
activated in the navigation menu
(Ypage 82), option 2.
Option 1 —no route guidance active: route
calculationstarts. While route calculationis
in progress, an arrow will indicate the
direction to your destination. Below this, you
will see a message, e.g. Calculating Fast
Route
Once the route has been calculated, route
guidance begins. If the vehicle is traveling on
a non-digitized road, the system displays the
linear distance to the destination, the
direction of the destination and the Off
Mapped Road message. The entries for the
estimated time of arrival and the distance to
the destination are, in this case, displayed in
gray.
Option 2 – route guidance is already
active: if route guidance is already active, a
prompt will appear asking whether you wish
to terminate the currently active route
guidance.
XSelect Yes or No and press Wto confirm.
If you select Yes, COMAND will stop route
guidance and start route calculation for the
new destination.
If you select No, COMAND will continue
with the active route guidance.
iRoute calculation takes a certain amount
of time. The time depends on the distance
fromthe destination, for example.
COMAND calculates the route using the
digital map data.
The calculated route can differ from the
ideal route, for example because of
incomplete map data. Please also refer to
the notes about the digital map
(Ypage 109).
Entering and saving your home address
You can either enter your home address for
the first time (option 1) or edit a previously
stored home address (option 2).
XOption 1: enter the address, e.g. a city,
street and house number (Ypage 55).
XOnce you have entered the address, select
Save in the address entry menu by turning
cVd and sliding ZVÆthe COMAND
controller and press Wto confirm.
XSelect Save as "My Address" and press
Wto confirm.
COMAND stores your home address as My
Address in the destination memory.
XOption 2: proceed as described under
"Option 1".
Aprompt appears asking whetherthe
current home address should be
overwritten.
Destination entry 57
Navigation
Z
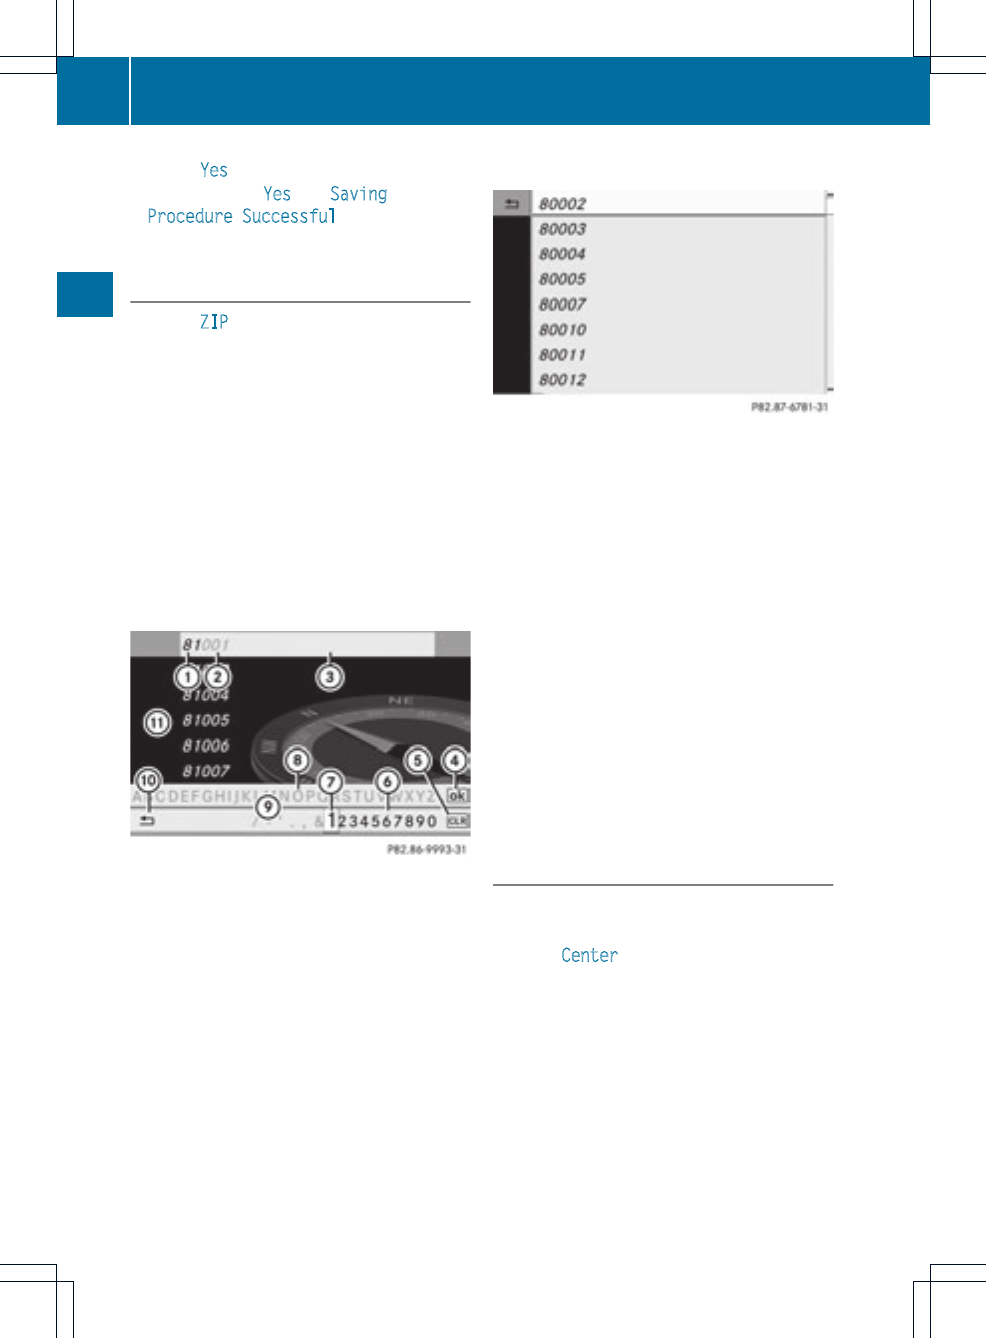
XSelect Yes and press Wto confirm.
After selecting Yes, the Saving
Procedure Successful message
appears.
Entering aZIP code
XSelect ZIP in the address entry menu by
turning cVd and sliding ZVÆthe
COMAND controller and press Wto
confirm.
You will see the zip code list either with the
characterbar (option 1) or as a selection
list (option 2).
Option 1: ZIP code list with character bar
XEnter a ZIP code. Instructions for entering
characters using city input as an example
can be found in the "Entering characters in
navigation mode (entering acity)" section
(Ypage 28).
:Digits entered by the user
;Digits automatically added by the system
=List entry most closely resembling the
characters entered so far
?To switch to the list without the character
bar
ATo delete the entire entry: press and hold;
to delete the last character: press briefly
BAvailable characters
CSelected character
DUnavailable characters
ECharacter bar
FTo cancel an entry
GList
Option 2: ZIP code list as selection list
ZIP code list
XSelectthe desired zip code by turning
cVd the COMAND controller.
XIrrespective of the option, press Wto
confirm your selection.
If COMAND is able to assign the ZIP code
unambiguously to a specific address, the
address entry menu appears again. The ZIP
code appears in place of the city's name.
If COMAND cannot assign the ZIP code
unambiguously to a specific address, the
address entry menu also appears again.
The ZIP code is automatically entered. You
can now enter the street for a more precise
location. Only streets in the area covered
by the entered ZIP code are available.
XStart route calculation (Ypage 57).
Entering acenter
Entering a centerwill, for example, delete a
previously entered street.
XSelect Center (center) in the address entry
menu by turning cVd and sliding ZVÆthe
COMAND controller and press Wto
confirm.
You will see the center list either with the
character bar (option 1) or as a selection
list (option 2).
Option 1: center list with character bar
XEnter a center. Instructions for entering
characters using city input as an example
can be found in the "Entering characters in
58 Destination entry
Navigation
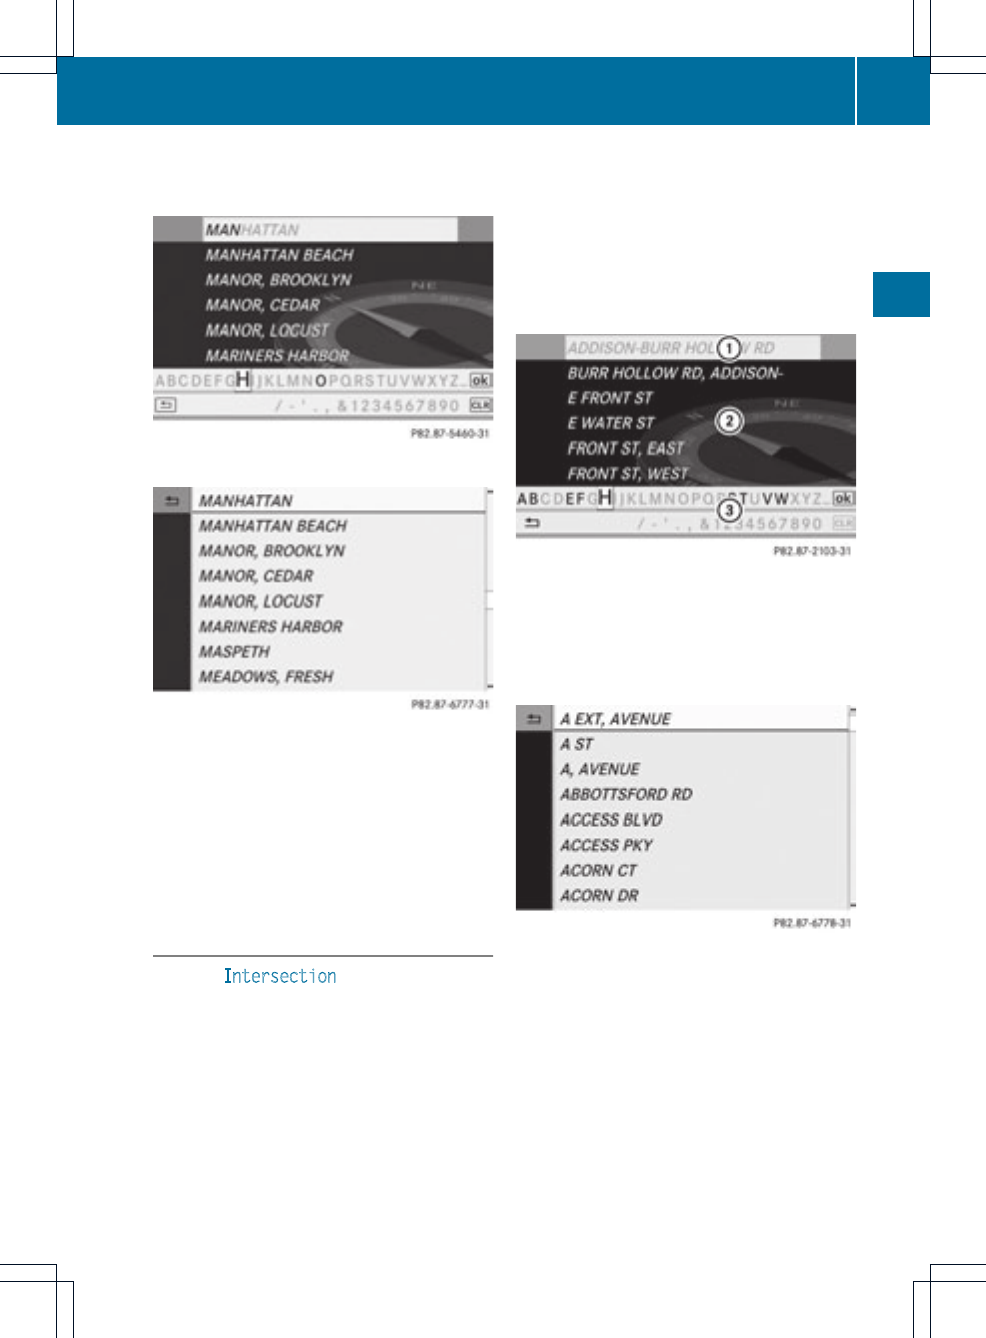
navigation mode (entering acity)" section
(Ypage 28).
Option 2: center list as selection list
XSelect a center by turning cVd the
COMAND controller.
XIrrespective of the option, press Wto
confirm your selection.
The address entry menu appears again. The
center selected has been entered.
XStart route calculation (Ypage 57).
Entering an intersection name
XSelect Intersection (intersection) in the
address entry menu by turning cVd and
sliding ZVÆthe COMAND controller and
press Wto confirm.
You will see the intersection list either with
the character bar (option 1) or as a
selection list (option 2).
Option 1: intersection list with character
bar
XEnter an intersection. Instructions for
entering characters using city input as an
example can be found in the "Entering
characters in navigation mode (entering a
city)" section (Ypage 28).
:List entry most closely resembling the
characters entered so far
;List
=Character bar
Option 2: intersection list as selection list
XSelect an intersection by turning cVd the
COMAND controller.
XIrrespective of the option, press Wto
confirm your selection.
The address entry menu appears again. The
intersection selected has been entered.
XStart route calculation (Ypage 57).
Destination entry 59
Navigation
Z
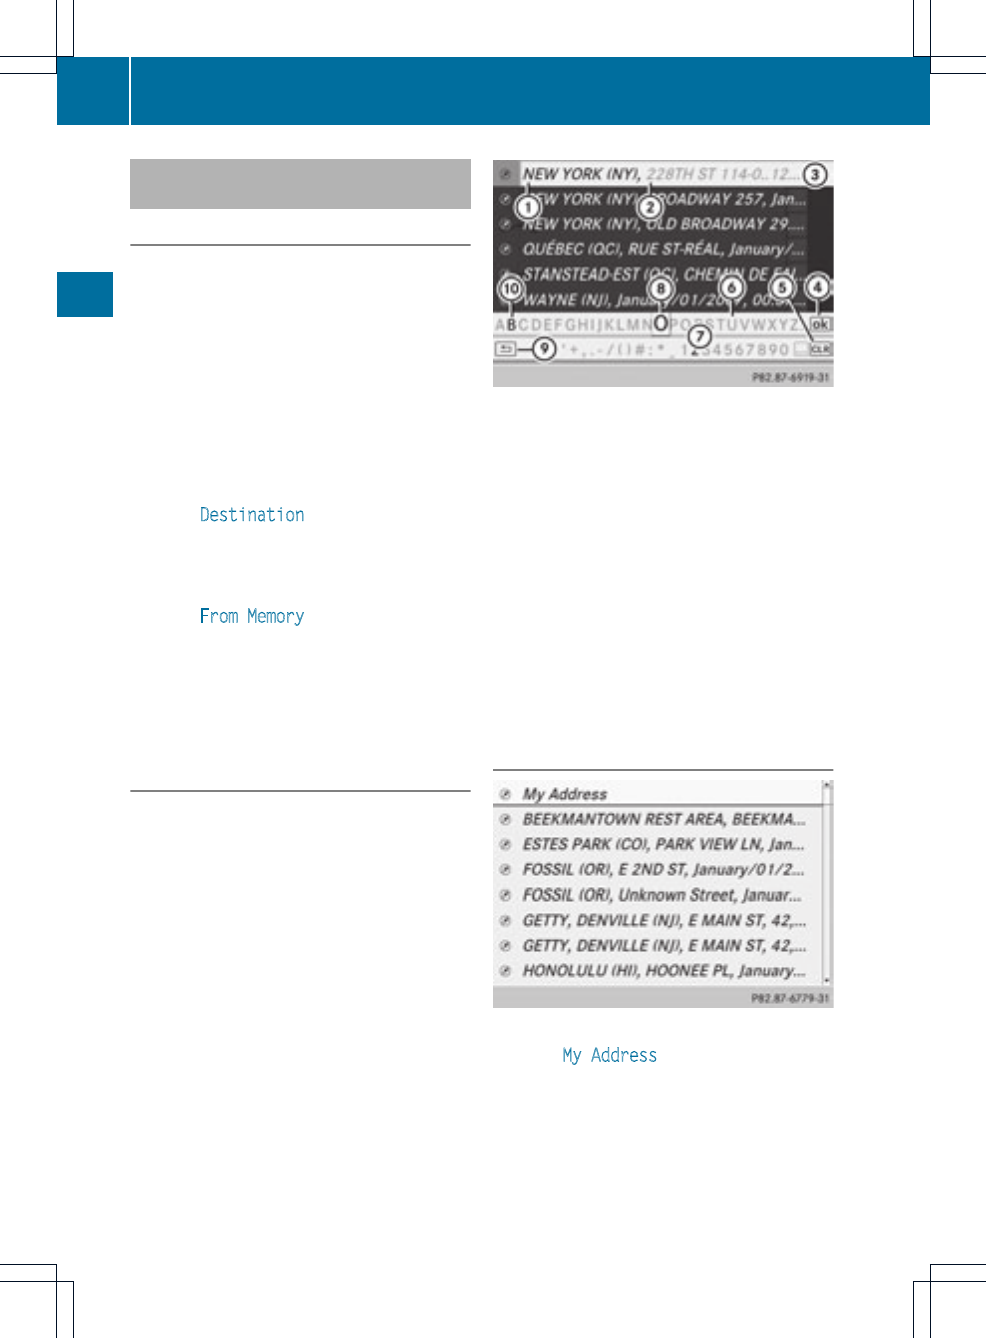
Selecting adestination from the
destination memory (e.g. My address)
Introduction
The destination memory always contains an
entry named "My address". You may wish to
assign your home address to this entry, for
example (Ypage 57), and select it for route
guidance. This entry is always located at the
top of the list in the destination memory.
XTo switch on navigation mode: press the
Øfunction button.
XTo show the menu: press Wthe COMAND
controller.
XSelect Destination in the navigation
system menu bar by turning cVd the
COMAND controller and pressing Wto
confirm.
XSelect From Memory and press Wto
confirm.
You will see the destination memory list
either with the character bar (option 1) or
as a selectionlist (option 2).
Option 1: destination memory list with
character bar
XEnteradestination, e.g. "My address".
Instructions for entering characters using
city input as an example can be found in the
"Entering characters in navigation mode
(entering a city)" section (Ypage 31).
:Character entered by the user
;Characters automatically added by the
system
=List entry most closely resembling the
characters entered so far
?To switch to the selection list
ATo delete an entry
BCharacters not currently available
CCharacter bar
DCurrently selected character
ETo cancel an entry
FCharacters currently available
Option 2: destination memory list as
selection list
Destination memory list
XSelect My Address by turning cVd the
COMAND controller.
XIrrespective of the option, press Wto
confirm your selection.
The address entry menu appears again.
"My address" has been entered.
60 Destination entry
Navigation

XTo start route calculation: select Start
and press Wto confirm.
Entering adestination from the list of
last destinations
XTo switch on navigation mode: press the
Øfunction button.
XTo show the menu: press Wthe COMAND
controller.
XSelect Destination in the navigation
system menu bar by turning cVd the
COMAND controller and pressing Wto
confirm.
XSelect From Last Destinations and
press Wto confirm.
XSelect the desired destination by turning
cVd the COMAND controller and pressing
Wto confirm.
The address entry menu appears again.The
destination address selected has been
entered.
XTo start route calculation: select Start
and press Wto confirm.
Once the route has been calculated, route
guidance begins (Ypage 77).
iFurther information on the "Last
destinations" memory can be found on
(Ypage 97).
Entering adestination usingthe map
Calling up the map
XTo switch on navigation mode: press the
Øfunction button.
XTo show the menu: press Wthe COMAND
controller.
XSelect Destination in the navigation
system menu bar by turning cVd the
COMAND controllerand pressing Wto
confirm.
XSelect Using Map and press Wto confirm.
You see the map with the crosshair.
:Current vehicle position
;Crosshair
=Details of the crosshair position
?Map scale selected
Display =depends on the settings selected
in "Map informationinthe display"
(Ypage 102). The current street name can
be shown, provided the digital map contains
the necessary data, or the coordinates of the
crosshair if the geo-coordinate display is
switched on and the GPS signal is strong
enough.
Moving the map and selecting the
destination
XTo scroll the map: slide XVY,ZVÆor
aVb the COMAND controller.
Destination entry 61
Navigation
Z
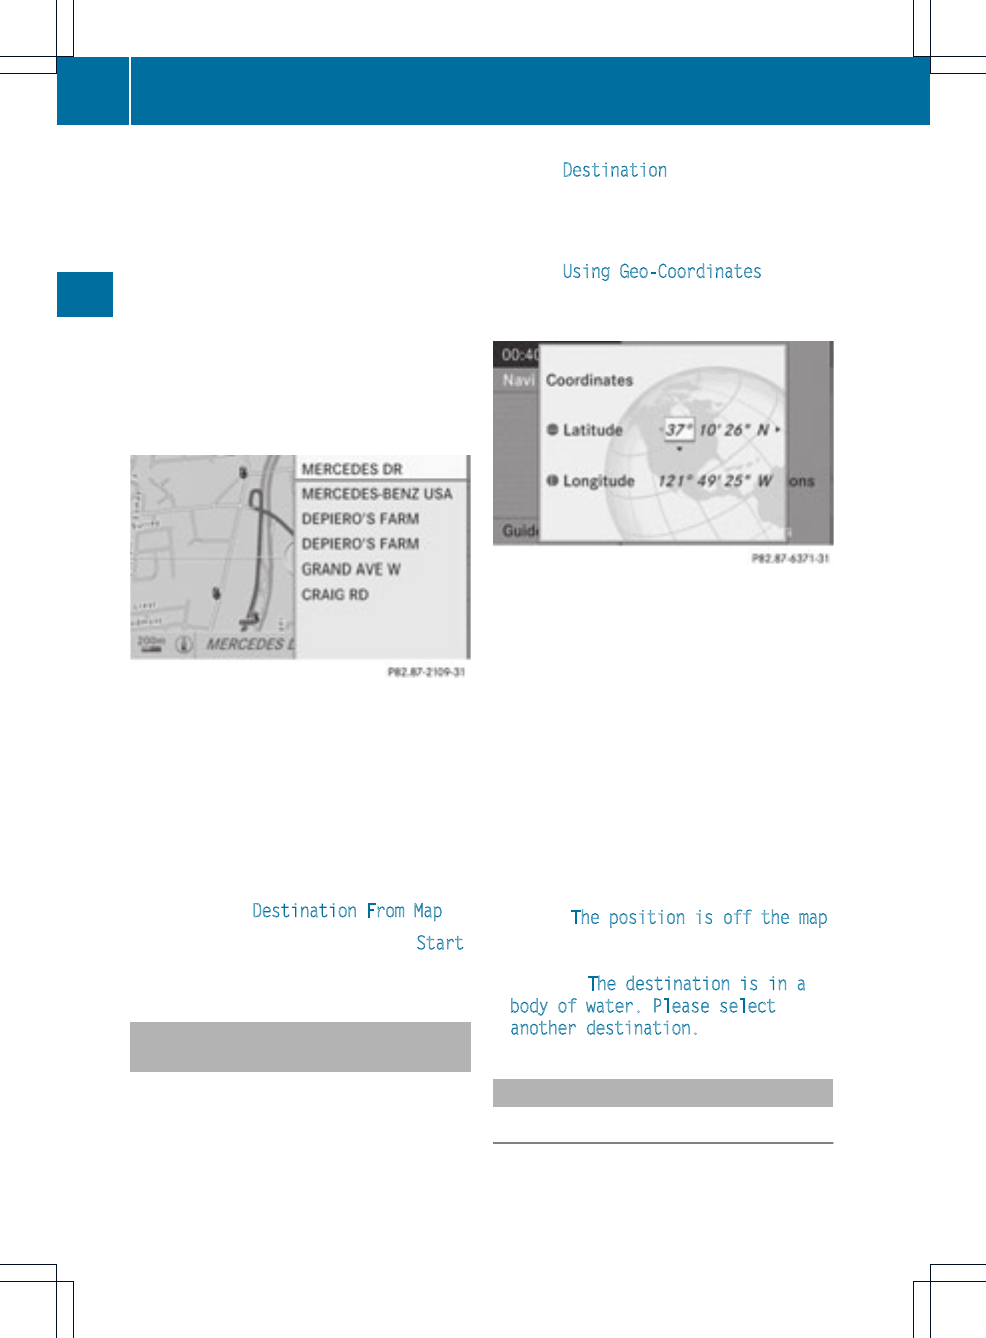
XTo setthe map scale: as soon as you turn
cVd the COMAND controller, the scale bar
appears.
XTurn cVd until the desired scale is set.
Turning clockwise zooms out from the map;
turning counter-clockwise zooms in.
XTo selectadestination: press Wthe
COMAND controller once or several times.
You will see either the address entry menu
with the destination address or, if COMAND
is unable to assign a unique address, a
selectionlist.
XSelectadestination by turning cVd the
COMAND controller and press Wto
confirm.
If the destination is within the limits of the
digital map, COMAND attempts to assign
the destination to the map.
If the destination can be assigned, you will
see the address entry menu with the
address of the destination. If not, you will
see the entry Destination From Map.
XTo start route calculation: select Start
and press Wto confirm.
Entering adestination usinggeo-
coordinates
XTo switch on navigation mode: press the
Øfunction button.
XTo show the menu: press Wthe COMAND
controller.
XSelect Destination in the navigation
system menu bar by turning cVd the
COMAND controller and pressing Wto
confirm.
XSelect Using Geo-Coordinates and
press Wto confirm.
An entry menu appears.
You can now enter the latitude and longitude
coordinates.
XTo change a value: turn cVd the
COMAND controller.
XTo move the mark within the line: slide
XVY the COMAND controller.
XTo move the mark between the lines:
slide ZVÆthe COMAND controller.
XTo confirm the value: press Wthe
COMAND controller.
iIf the selected position is outside the
digital map, COMAND uses thenearest
digitized road for route calculation.You will
see the The position is off the map
message. If the selected position is located
over a body of water, you will see the
message: The destination is in a
body of water. Please select
another destination.
Entering an intermediate stop
Introduction
You can use this function to enter an
intermediate stop while the vehicle is in
motion.COMAND provides aselection of
62 Destination entry
Navigation
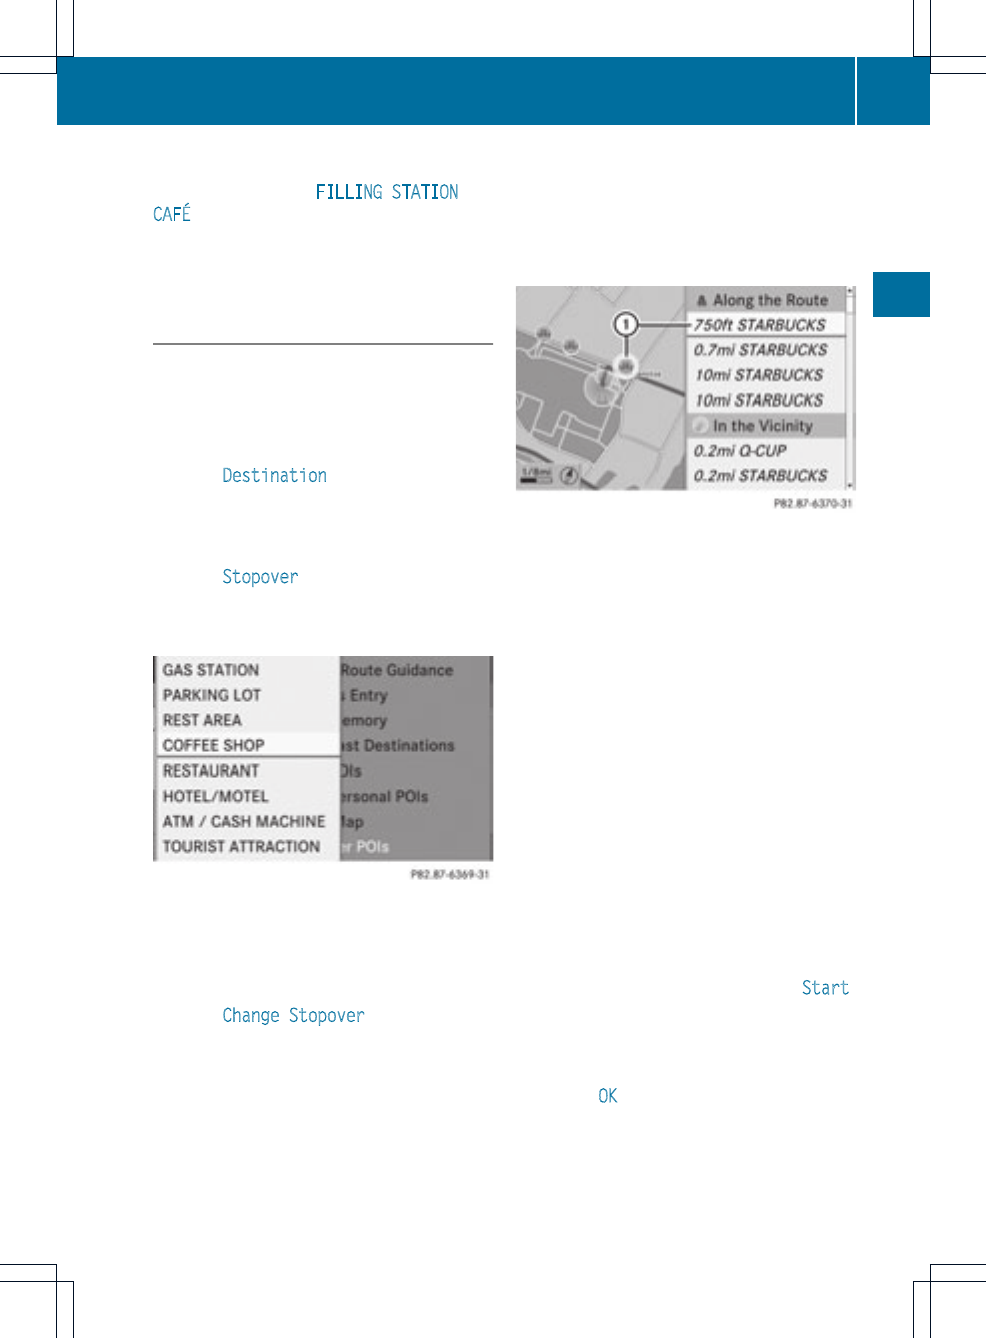
predefined destinations in eight categories
for this purpose, e.g. FILLING STATION or
CAFÉ.
When you have entered your intermediate
stop, COMAND automatically recalculates
the route to the main destination.
Entering predefined destinations
XTo switch on navigation mode: press the
Øfunction button.
XTo show the menu: press Wthe COMAND
controller.
XSelect Destination in the navigation
system menu bar by turning cVd the
COMAND controller and pressing Wto
confirm.
XSelect Stopover and press Wto confirm.
Option 1: the route does not have an
intermediate stop.
Intermediate stop categories
XSelect a category; see option 2.
Option 2: the route already has an
intermediate stop.
XSelect Change Stopover and press Wto
confirm.
XTo select acategory: select a category by
turning cVd the COMAND controller and
pressing Wto confirm.
COMAND first searches in the selected
category for destinations along the route.
COMAND then searches for destinations in
a radius of approximately 60 mi from the
current vehicle position.
If COMAND finds destinations, a list
appears on the right-hand side of the
display.
Search results for the chosen category COFFEE
SHOP (example)
:Highlighted intermediate stop, current
distance from the vehicle position and
name of the intermediate stop
The intermediate stops along the route are
displayed at the top of the list, sorted by
increasing distance from the vehicle's current
position. Below this, you will see the
intermediate stops that COMAND finds in the
vicinity of the vehicle's current position.
iFor intermediate stops that are not
located along the calculated route, the
linear distance is shown.
XSelect the intermediate stop by turning
cVd the COMAND controller and press
Wto confirm.
The address entry menu appears, showing
the destination address.
XTo start route calculation: select Start
and press Wto confirm.
If COMAND does not find any destinations,
you will see a message to this effect.
XConfirm OK by pressing W.
XSelect a different category.
Destination entry 63
Navigation
Z
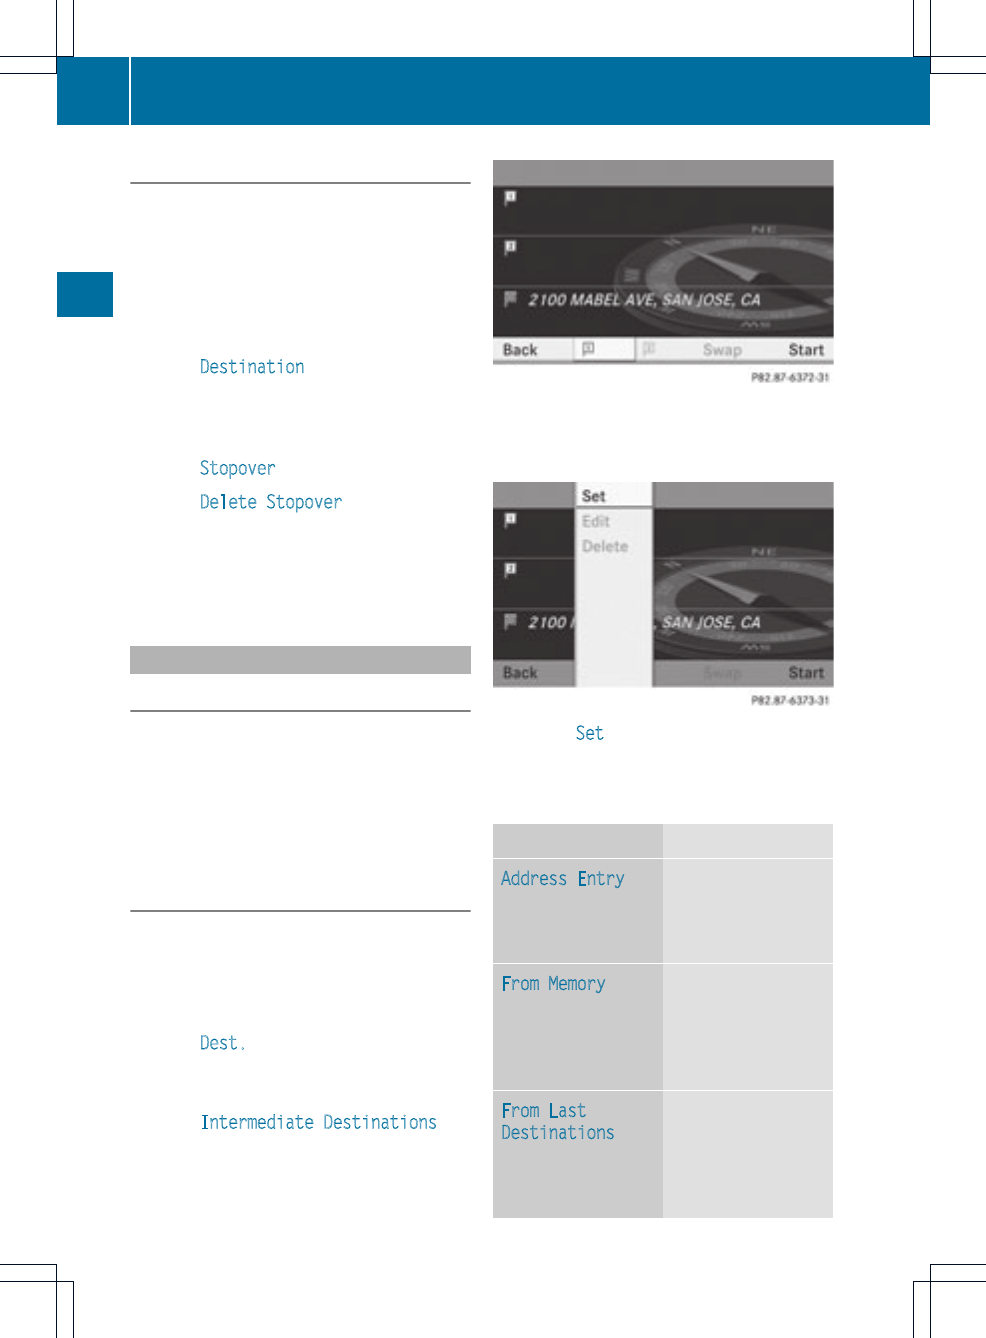
Deleting an intermediate stop
If an intermediate stop has already been
entered, you can delete it.
XTo switch on navigation mode: press the
Øfunction button.
XTo show the menu: press Wthe COMAND
controller.
XSelect Destination in the navigation
system menu bar by turning cVd the
COMANDcontroller and pressing Wto
confirm.
XSelect Stopover and press Wto confirm.
XSelect Delete Stopover and press Wto
confirm.
COMAND deletes the intermediate stop
and recalculates the route to the main
destination.
Entering waypoints
Introduction
You can map the route yourself by entering
up to two waypoints. The sequence of the
waypoints can be changed at any time.
iAn intermediate stop is always between
the current position of the vehicle and the
first waypoint.
Creating waypoints
XTo switch on navigation mode: press the
Øfunction button.
XTo show the menu: press Wthe COMAND
controller.
XSelect Dest. in the navigation system
menu bar by turning cVd the COMAND
controller and pressing Wto confirm.
XSelect Intermediate Destinations and
press Wto confirm.
The destination is entered in the menu.
Waypoint menu without waypoints
XConfirm the symbol for waypoint 1by
pressing Wthe COMAND controller.
XConfirm Set by pressing Wthe COMAND
controller.
XEnter the waypoint via one of the following
options.
Selection Step
Address Entry XEnter a
destination by
address
(Ypage 54).
From Memory XSelect a
destination from
the destination
memory
(Ypage 60).
From Last
Destinations
XSelect a
destination from
the list of last
destinations
(Ypage 61).
64 Destination entry
Navigation
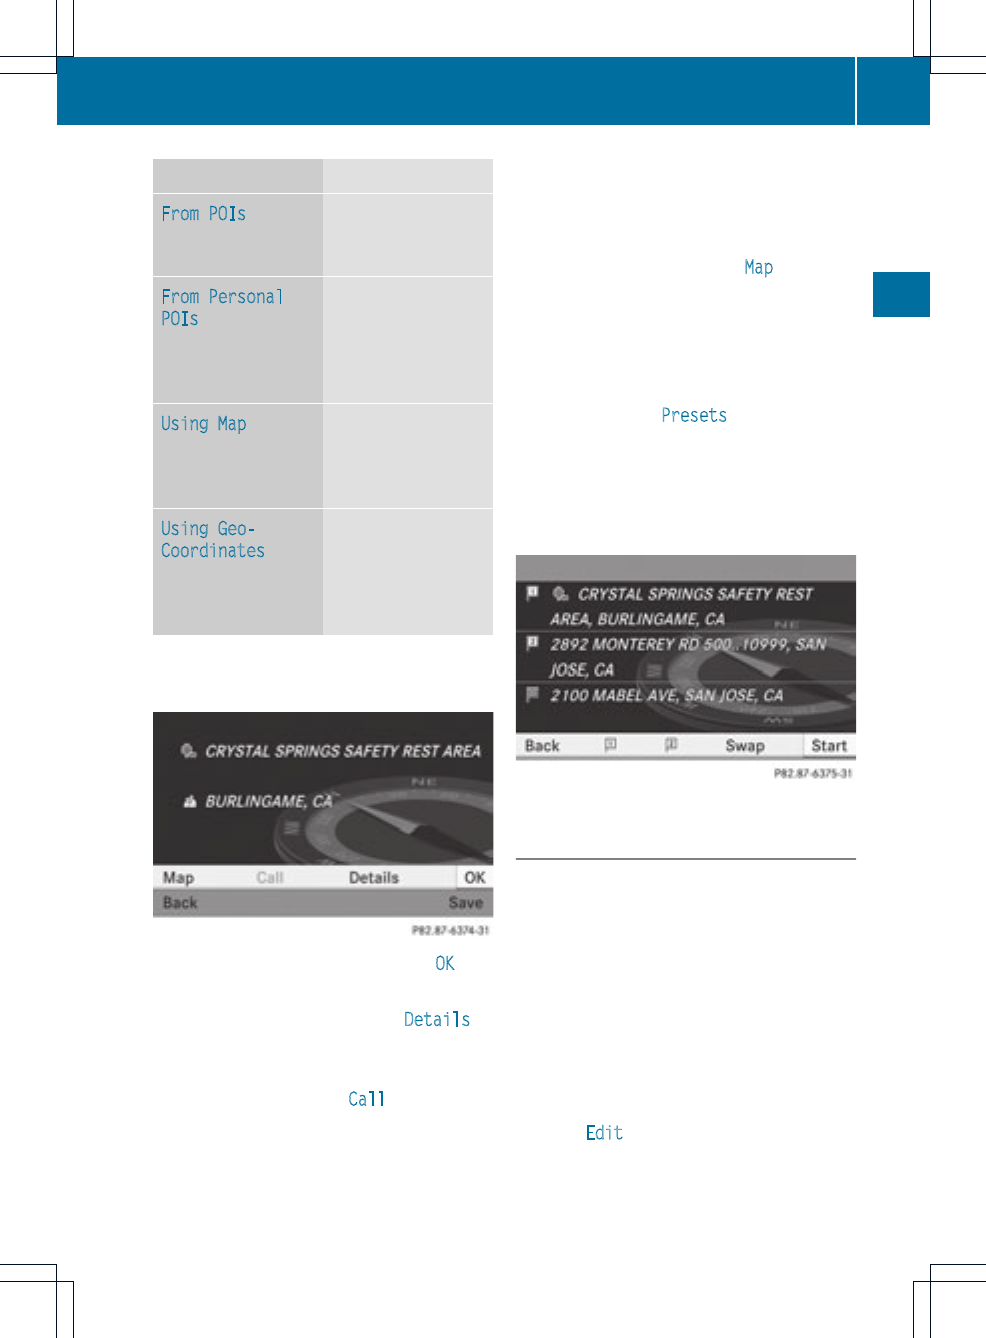
Selection Step
From POIs XEnter a point of
interest
(Ypage 66).
From Personal
POIs
XEnter a
destination from
the personal
points of interest
(Ypage 75).
Using Map XEnter a
destination using
the map
(Ypage 61).
Using Geo-
Coordinates
XEnter a
destination using
the geo-
coordinates
(Ypage 62).
When the entry is complete, the waypoint
appears.
XTo accept the waypoint: confirm OK by
pressing W.
XTo display the details: select Details by
turning cVd the COMAND controller and
press Wto confirm.
XTo make a call: select Call with the
COMAND controller and press Wto
confirm. COMAND switches to telephone
mode (Ypage 122).
iThis menu item is available if the waypoint
has a telephone number and a mobile
phone is connected to COMAND
(Ypage 116).
XTo call up the map: select Map with the
COMAND controller and press Wto
confirm.
XYou can move the map and select the
destination.
XTo store the waypoint in the destination
memory: select Presets with the
COMAND controller and press Wto
confirm.
When you have accepted the waypoint, it is
entered in the waypoint menu. The example
shows the menu with two entered waypoints.
Waypoint menu with two waypoints
Editing waypoints
You can:
Rchange waypoints
Rchange the sequence in the waypoint menu
Rdelete waypoints
To change the sequence, both waypoints
must be entered.
XTo change waypoints: select the symbol
for waypoint 1 or 2 in the waypoint menu
by turning cVd the COMAND controller
and press Wto confirm.
XSelect Edit and press Wto confirm.
XUse one of the destination entry options
offered.
Destination entry 65
Navigation
Z
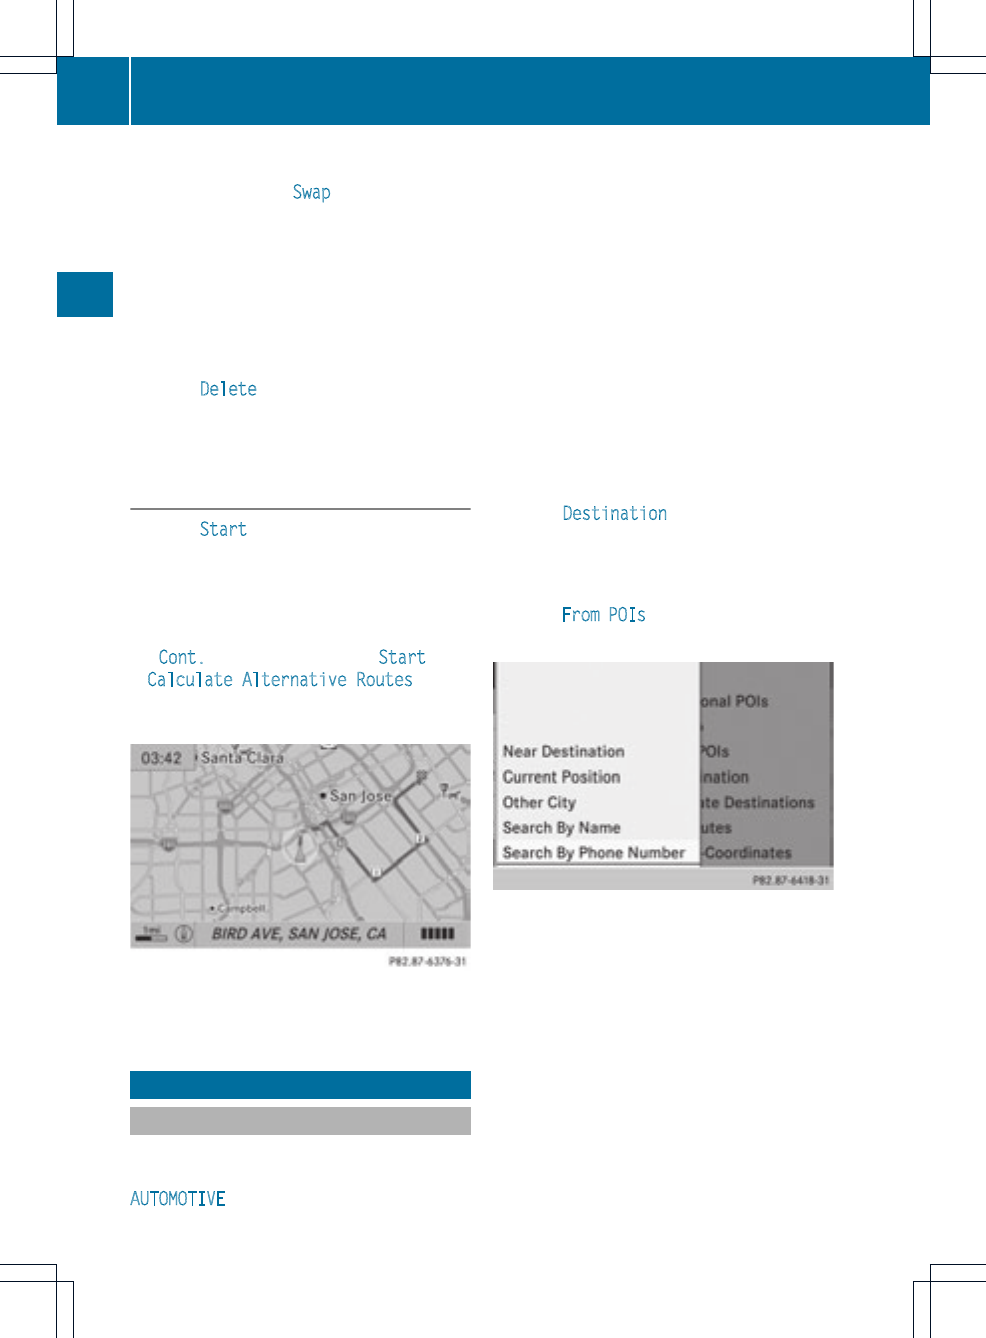
XTo change the sequence of the
waypoints: select Swap in the waypoint
menu by turning cVd the COMAND
controller and press Wto confirm.
The entries are swapped.
XTo delete waypoints: select the symbol
for waypoint 1 or 2 in the waypoint menu
by turning cVd the COMAND controller
and press Wto confirm.
XSelect Delete and press Wto confirm.
iYou can delete a waypoint directly after
entry using this menu item.
Accepting waypoints for the route
XSelect Start in the waypoint menu by
turning cVd the COMAND controller and
press Wto confirm.
The route is calculated with the entered
waypoints.
iCont. is displayed instead of Start when
Calculate Alternative Routes is
activated in the navigation menu
(Ypage 82), option2.
In the example, there are both waypoints 1
and 2.
Entering apoint of interest
Calling up the points of interestmenu
Points of interestare predefined destinations
withincategories, e.g.agas stationinthe
AUTOMOTIVE category.
You can look for points of interest:
Rin the vicinity of the destination
Rnear the current vehicle position
Rin the vicinity of another city
Rusing its name
Rusing a phone number
You can also select points of interest in the
map that are available on the map view
shown.
XTo switch on navigation mode: press the
Øfunction button.
XTo show the menu: press Wthe COMAND
controller.
XSelect Destination in the navigation
system menu bar by turning cVd the
COMAND controller and press Wto
confirm.
XSelect From POIs and press Wto confirm.
Amenu appears.
Points of interest menu ("Search by name"
selected)
66 Entering apoint of interest
Navigation
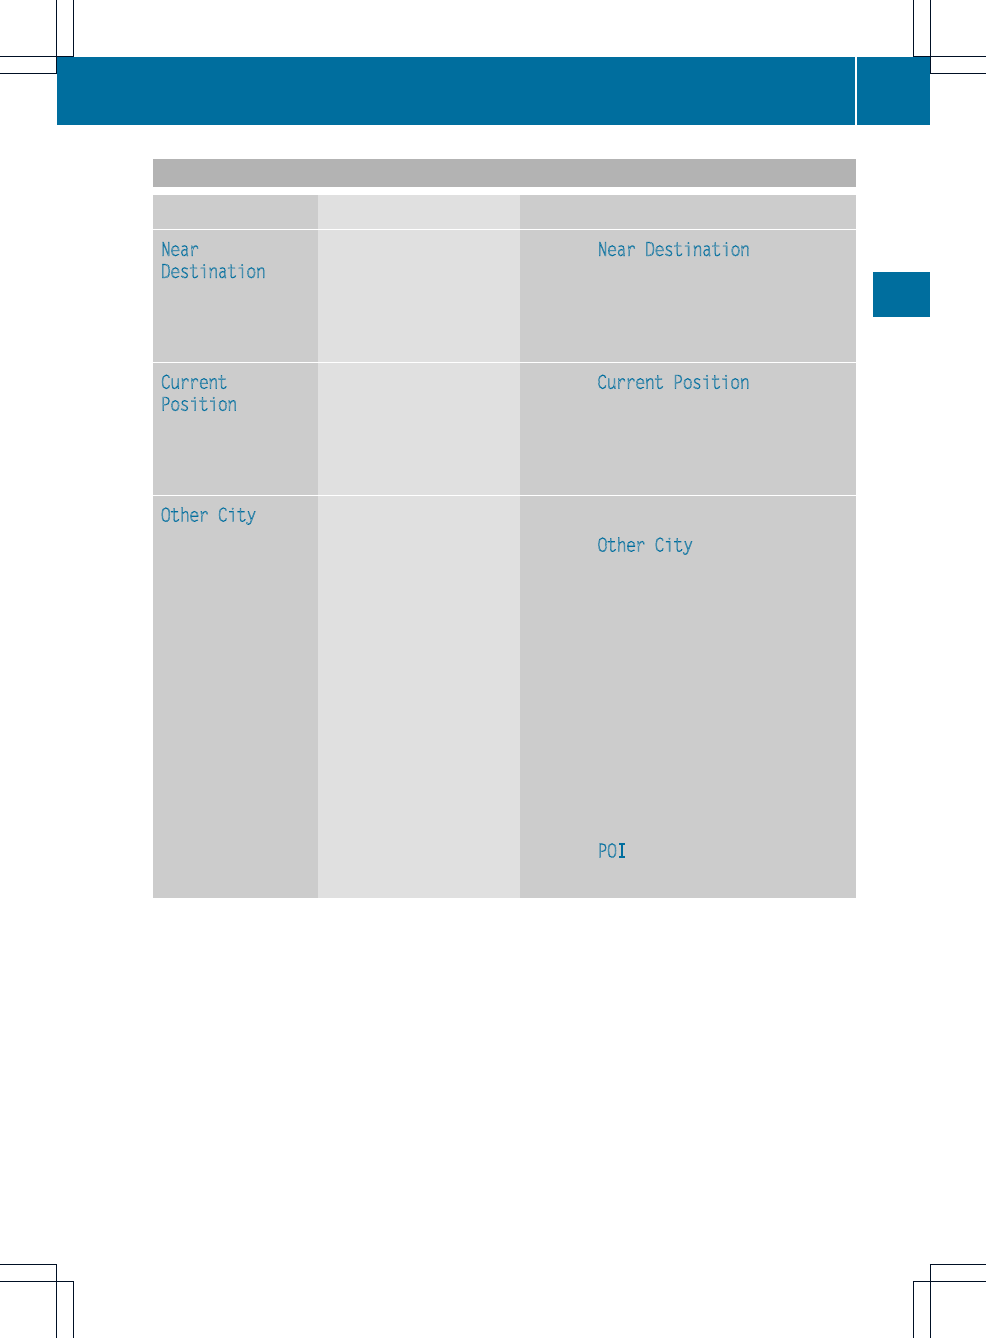
Defining the position for the point of interest search
Selection Characteristic Instructions
Near
Destination
Entry is only possible
when route guidance is
active.
XSelect Near Destination from the
points of interestmenu (Ypage 66) and
press Wto confirm.
XSelect a point of interest category
(Ypage 68).
Current
Position
The system looks for a
point of interest in the
vicinity of the current
vehicle position.
XSelect Current Position in the points
of interest menu and press Wto
confirm.
XSelect a point of interest category
(Ypage 68).
Other City After entering a city, the
system looks for the
point of interest within
the city.
Option 1
XSelect Other City in the points of
interest menu and press Wto confirm.
XIf desired, select the state/province
(Ypage 54).
XEnter the city. Proceed as described in
the "Entering a city" section
(Ypage 55).
XSelect a point of interest category
(Ypage 68).
Option 2
XEnter a city in the address entry menu
(Ypage 54).
XSelect POI and press Wto confirm.
XSelect a point of interest category.
Entering apoint of interest 67
Navigation
Z
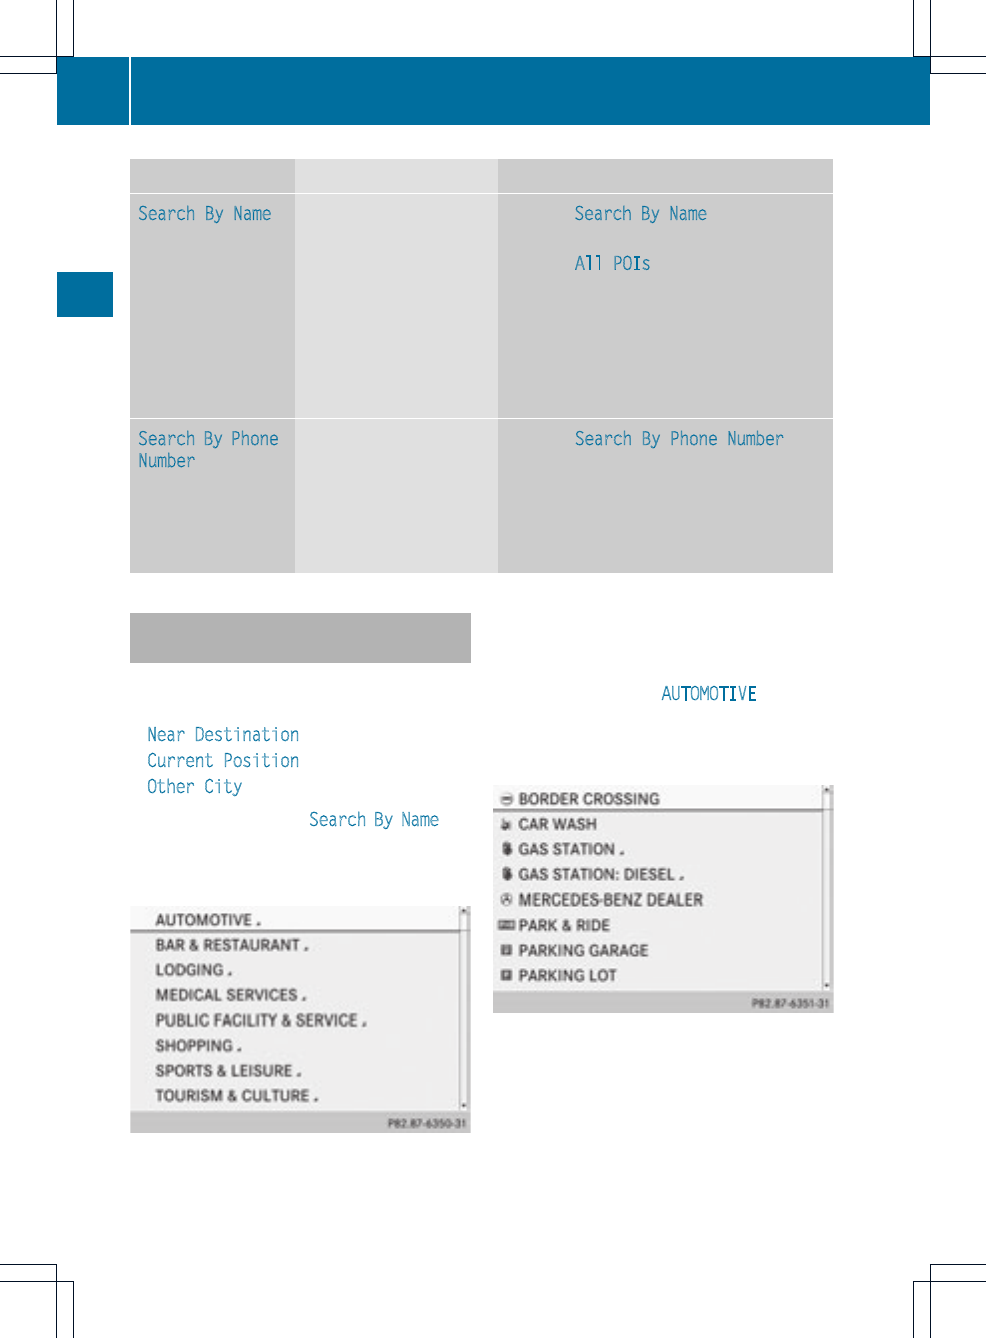
Selection Characteristic Instructions
Search By Name You can call up all the
points of interest in the
digital map or focus your
search on the three
previously selected
positions.
XSelect Search By Name in the points of
interest menu and press Wto confirm.
XSelect All POIs or one of the three
previously selected positions.
The point of interest list with character
bar appears.
XProceed as described in the "point of
interest list with character bar" section
(Ypage 71).
Search By Phone
Number
This function gives you
access to all points of
interest that have a
phone number.
XSelect Search By Phone Number and
press Wto confirm.
You will see a list of phone numbers.
XProceed as described in the "point of
interest list with character bar" section
(Ypage 71).
Searching by point of interest
category
After selecting the menu items, the point of
interest categories appear:
RNear Destination
RCurrent Position
ROther City (after entering a city)
iIf you have selected Search By Name and
then defined the position for the search,
the point of interest list with character bar
appears (Ypage 71).
XSelect a point of interest category by
turning cVd the COMAND controller and
press Wto confirm.
In the example, the AUTOMOTIVE category
has been selected. The Garrow behind an
entry shows that other categories are
available.
XSelect a category and press Wto confirm.
In the example, the Highway Rest Stop
category has been selected. The search for
points of interest begins in the vicinity of
the selected position.
68 Entering apoint of interest
Navigation
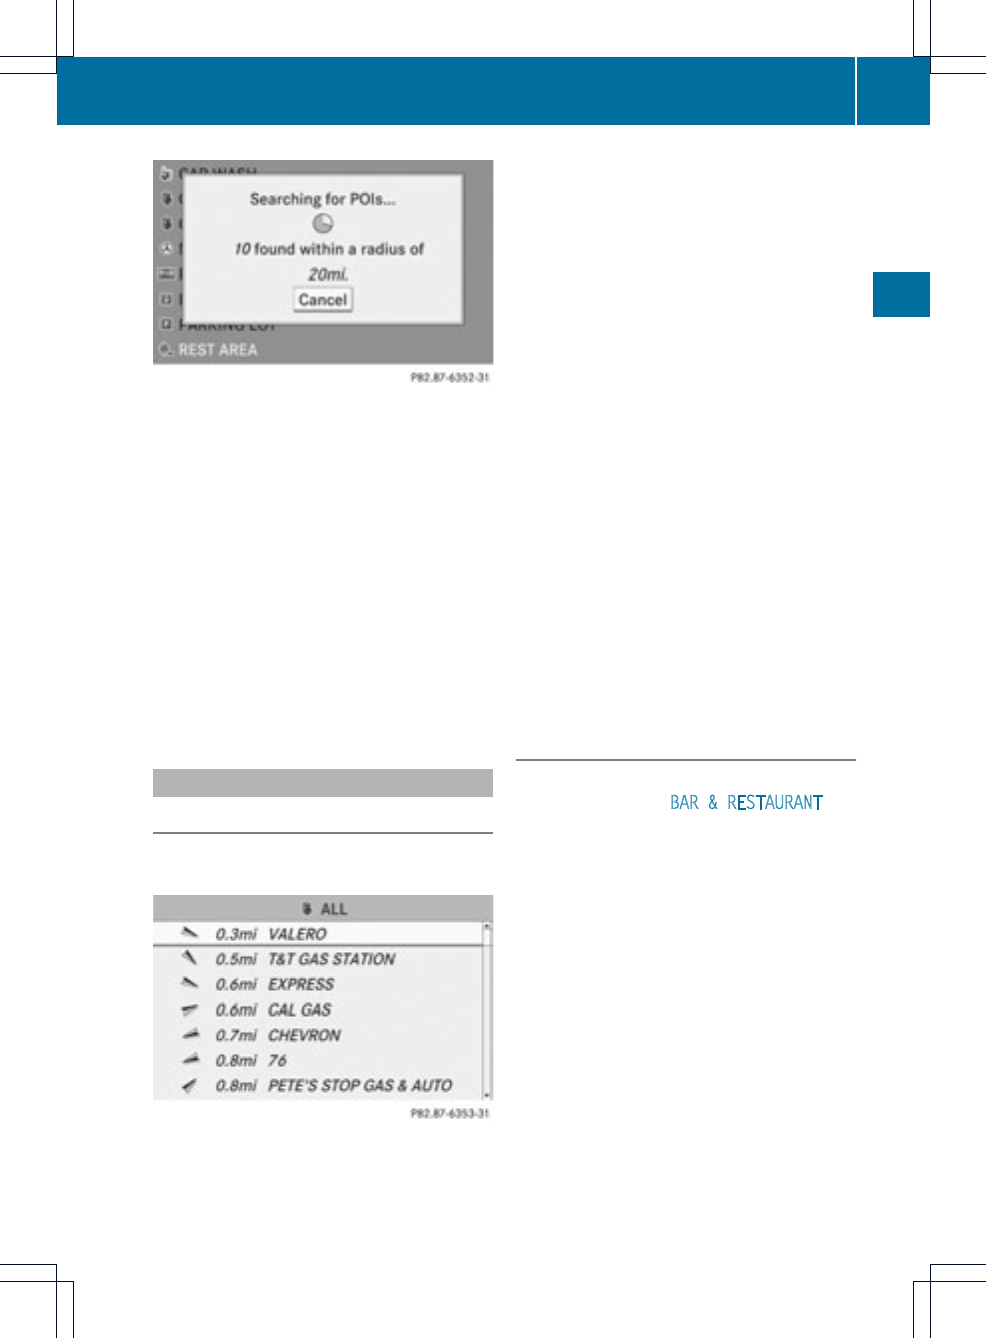
Point of interest search near the current position
(example)
iThe point of interest search is canceled
when 50 points of interest have been
found.
COMAND searches within a radius of
approximately 60 mi.
If COMAND fails to find a point of interest
within this radius, it extends its search
range to approximately 125 mi.
If COMAND finds one point of interest
within this radius, it finishes the search.
Once the search is completed, the point of
interest list is displayed.
Point of interest list
Introduction
The point of interest list displays the search
results for the selection made.
Point of interest list (example)
An entry contains the following information:
Ran arrow that shows the linear direction to
the point of interest
Rthe linear distance to the point of interest
Rthe name of the point of interest
iThe arrow and linear distance to the
destination are not visible if you have
entered a point of interest within a specific
city.
The arrow is also not shown when a point
of interest in the vicinity of the destination
has been entered.
Depending on the point of interest
selected, COMAND uses different
reference points in determining the linear
distance to the destination:
Rvicinity of current position: the linear
distance is the distance of the point of
interest from the current vehicle
position.
Rvicinity of destination: the linear distance
is the distance from the destination
entered to the point of interest.
Selecting apoint of interest
The example has been selected in the point
of interestcategory BAR & RESTAURANT.
XSelect the point of interest in the point of
interest list by turning cVd the COMAND
controller and press Wto confirm.
The complete address of the pointof
interest selected is shown.
Entering apoint of interest 69
Navigation
Z
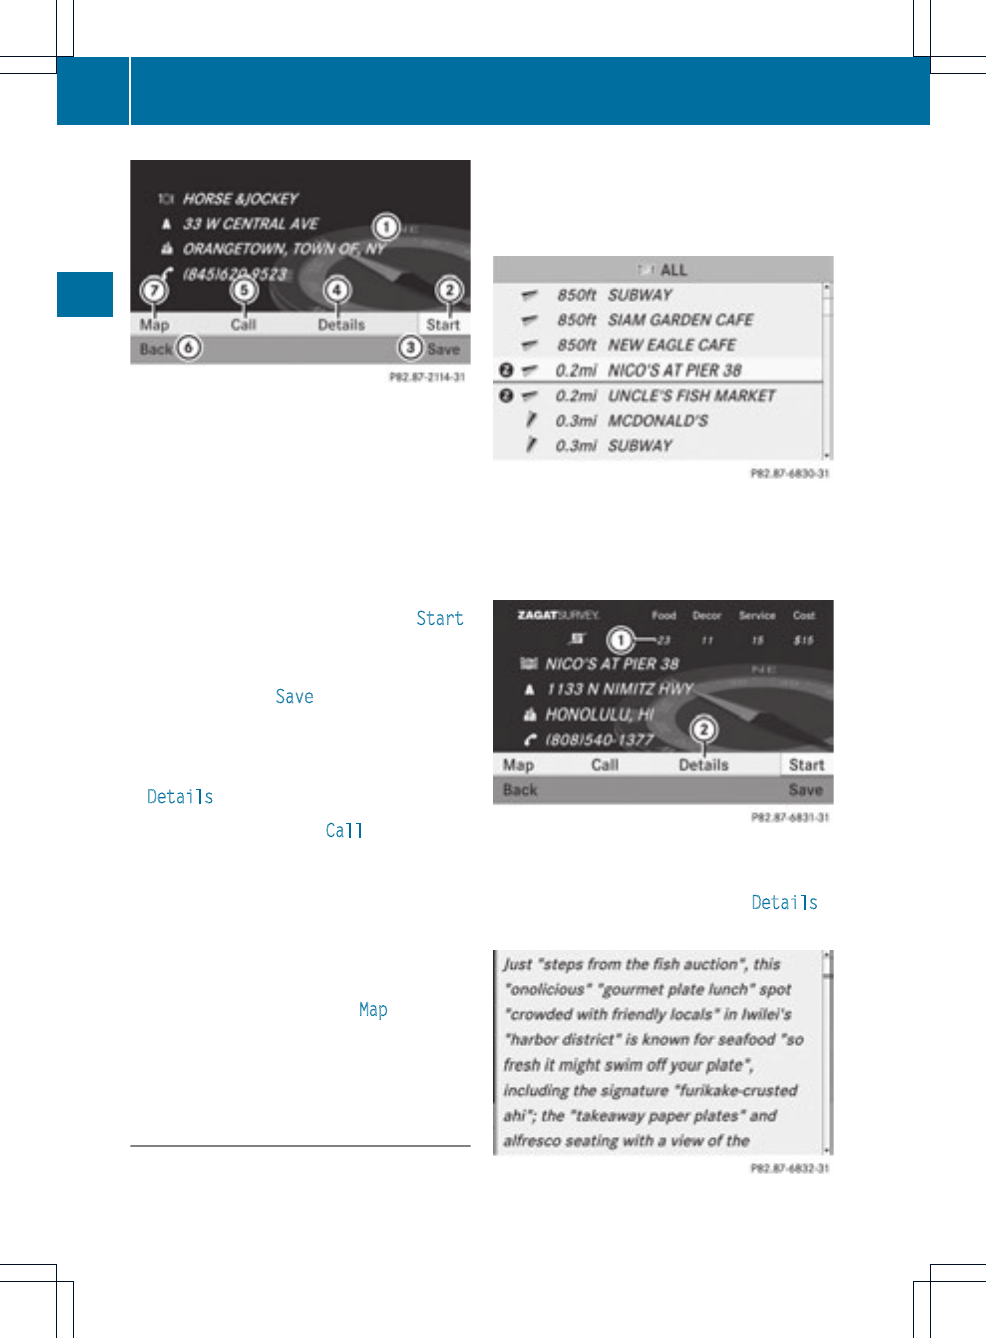
:Point of interest with address
;To start route calculation
=To store an address in the destination
memory
?To display details
ATo make a call (when available)
BTo cancel selection
CTo show an address on the map
XTo start route calculation: select Start
and press Wto confirm.
XTo store an address in the destination
memory: select Save and press Wto
confirm. You can now select storage
options (Ypage 96).
XTo show the detailed view: select
Details and press Wto confirm.
XTo make a call: select Call and press W
to confirm. COMAND switches to
telephone mode (Ypage 122).
iThis menu item is available if the point of
interest has a telephone number and a
mobile phone is connected to COMAND
(Ypage 116).
XTo call up the map: select Map and press
Wto confirm.
XYou can move the map and select the
destination (Ypage 61).
ZAGAT®survey service
Entries with the Z icon contain additional
ZAGAT information. ZAGAT rates restaurants,
for instance, in regard to the quality of the
food, furnishing, service, and provides an
average pricing level as well as a general
description.
XSelect the entry with the Z icon by turning
cVd the COMAND controller and press
Wto confirm.
The ZAGAT evaluations appear.
1ZAGAT ratings
2To display details
XTo show adescription: select Details
and press Wto confirm.
ZAGAT example description
70 Entering apoint of interest
Navigation
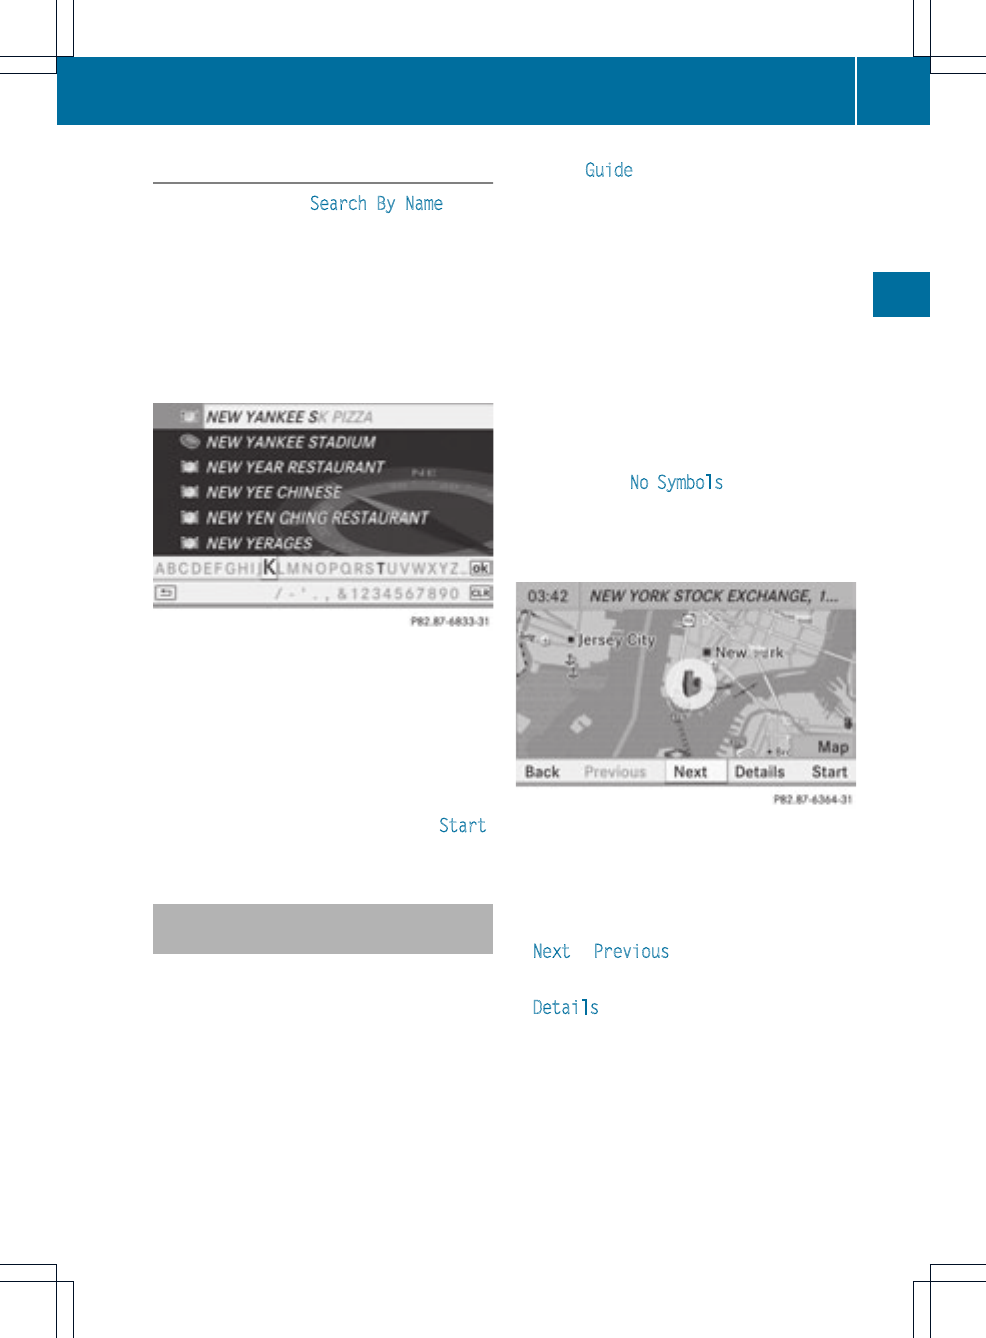
Point of interest list with character bar
If you have selected Search By Name in the
point of interest menu (Ypage 66) and then
defined the position for the search
(Ypage 67), the point of interest list with
character bar appears.
Depending on your selection, you can select
all available points of interest on the digital
map or the points of interest in the vicinity of
the selected position.
Search by name in the vicinity of the destination
(example)
Proceed as described in the "Searching for a
phone book entry" section (Ypage 126).
iIf COMAND can assign the characters
entered to one entry unambiguously, the
address entry appears automatically.
XTo start route calculation: select Start
and press Wto confirm.
Selecting apoint of interestusing the
map
You can select points of interest that are
available in the selected (visible) section of
the map.
XTo switch on navigation mode: press the
Øfunction button.
XTo show the menu: press Wthe COMAND
controller.
XSelect Guide in the navigation system
menu bar by turning cVd the COMAND
controller and press Wto confirm.
If points of interest are available:
Depending on the map scale selected,
point of interest icons appear on the map.
The scale at which the icons are displayed
on the map varies according to the icon.
You can select the icons that COMAND will
display (Ypage 101).
If no points of interest are available, you will
see a message to this effect.
iYou also see this message if you have
selected the No Symbols menu item under
"Map display" (Ypage 101).
XTo confirm the message: press Wthe
COMAND controller.
Point of interest on the map
The point of interest is highlighted on the
map; you will see information on the upper
edge of the display.
XTo select apoint of interest: select
Next or Previous and press Wto confirm.
XTo show details for the selection: select
Details and press Wto confirm.
XTo change to the map: slide ZV the
COMAND controller.
You can move the map and selectthe map
section.
Entering apoint of interest 71
Navigation
Z
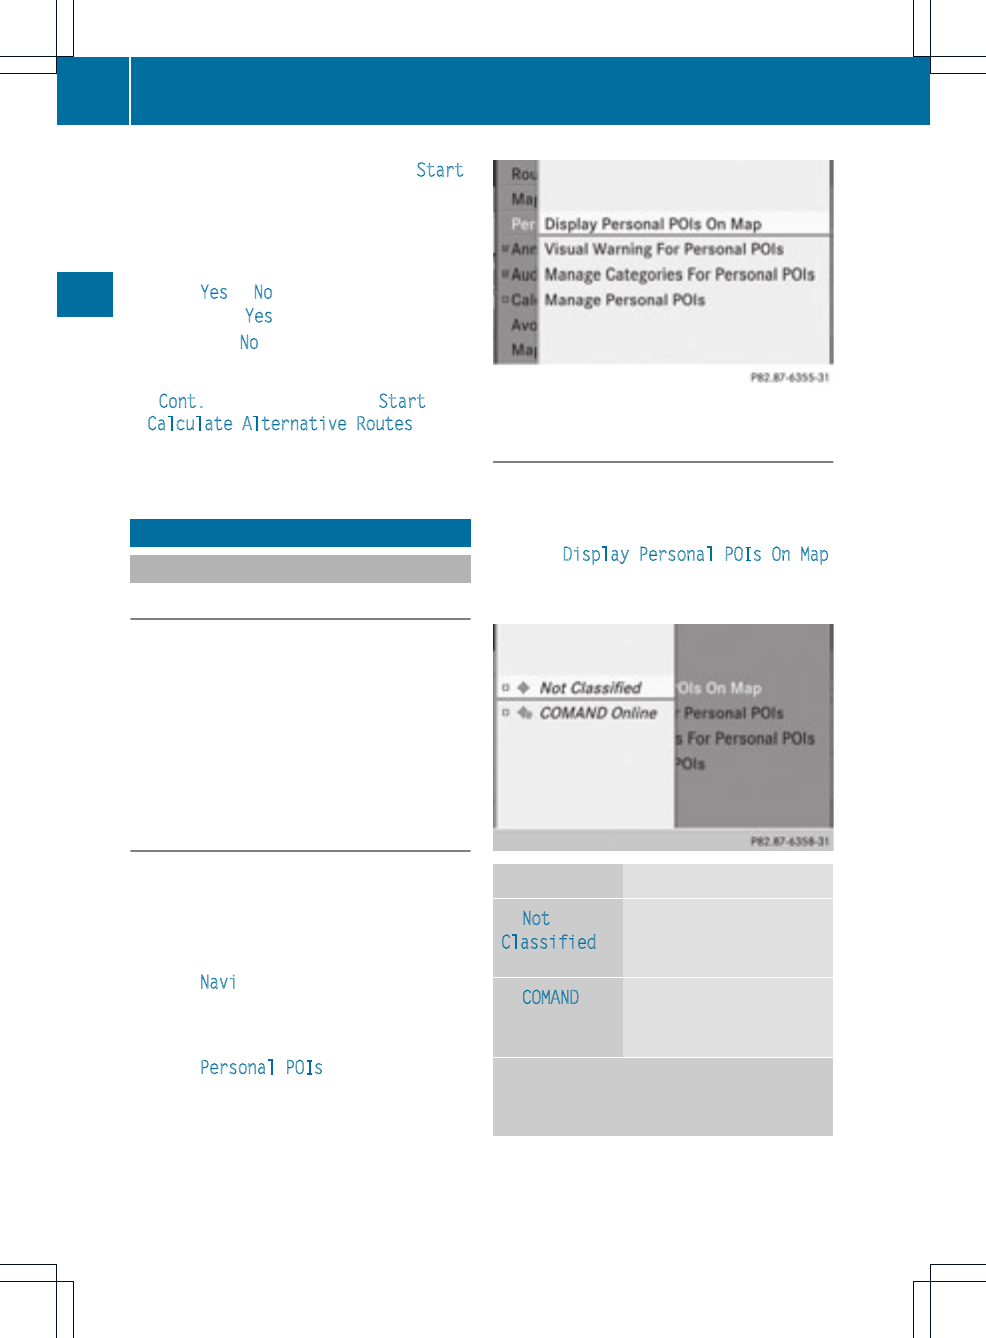
XTo start route calculation: select Start
and press Wto confirm.
Aprompt appears asking whetherthe point
of interest should be used as the
destination.
XSelect Yes or No and press Wto confirm.
If you select Yes, route guidance starts.
If you select No, you can choose a new point
of interest.
iCont. is displayed instead of Start when
Calculate Alternative Routes is
activated in the navigation menu
(Ypage 82), option 2.
Personal points of interest
Settings
Overview
Personal destinations can be:
Rdisplayed on the map
Rhighlighted on the map as you approach
them
Rmanaged in categories
Rmanaged
Calling up the "Personal points of
interest" menu
XTo switch on navigation mode: press the
Øfunction button.
XTo show the menu: press Wthe COMAND
controller.
XSelect Navi in the main function bar by
sliding ZV and turning cVd the COMAND
controller and press Wto confirm.
XSelect Personal POIs and press Wto
confirm.
Displaying personal points of interest
on the map
The personal points of interest are shown on
the map with an icon according to their
category.
XSelect Display Personal POIs On Map
in the menu and press Wto confirm.
You can select different categories.
Selection Explanation
ªNot
Classified
Standard entry for
personal points of
interest
ªCOMAND iThis function is not
available in the USA
and Canada.
If you have created your own categories
(e.g. "Fishing", "Hotels") (Ypage 73),
these will also be displayed.
72 Personal points of interest
Navigation
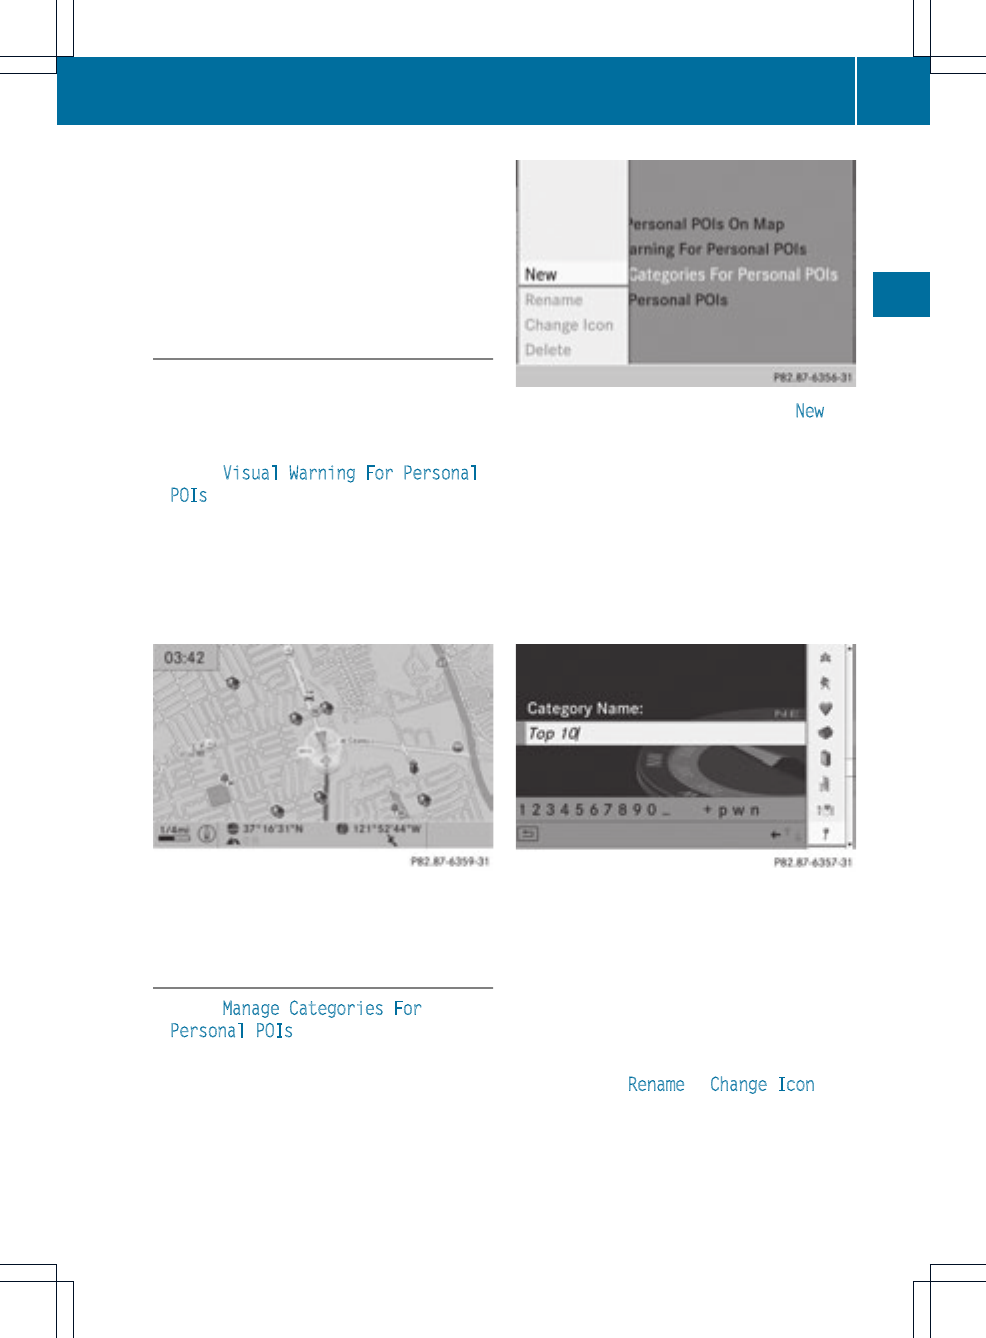
XSelect a category and press Wto confirm.
The icondisplay is switched on Oor off
ª, depending on the previous status.
iThe icons are displayed on the map at
scales of 1/16 mi, 1/8 mi and 1/4 mi.
Visual information for personal points
of interest
When the vehicle is approaching a personal
point of interest and the display of the
relevant category is switched on, it is
highlighted on the map.
XSelect Visual Warning For Personal
POIs in the menu and press Wto confirm.
XPress Wto confirm the entry.
This will switch the visual information for
the personal points of interest of this
category on Oor off ª, depending on the
previous setting.
Example: visual information for a personal point of
interest
Managing categories for personal
points of interest
XSelect Manage Categories For
Personal POIs in the menu and press W
to confirm.
XTo create anew category: select New and
press Wto confirm.
XEnter the name of the category. Proceed as
described under "Entering characters" in
the "Entering characters in the address and
phone books" section(Ypage 31).
XSelect the ¬icon and press Wto
confirm.
Alist with icons appears. You can assign an
icon to the category.
XSelect an icon by turning cVd the
COMAND controller and press Wto
confirm.
You have created a new category with a
name and icon.This category appears
when selecting the display on the map or
when selecting the destination.
XTo rename a category or to change an
icon: select Rename or Change Icon and
press Wto confirm.
XProceed as described under "To create a
new category".
Personal points of interest 73
Navigation
Z
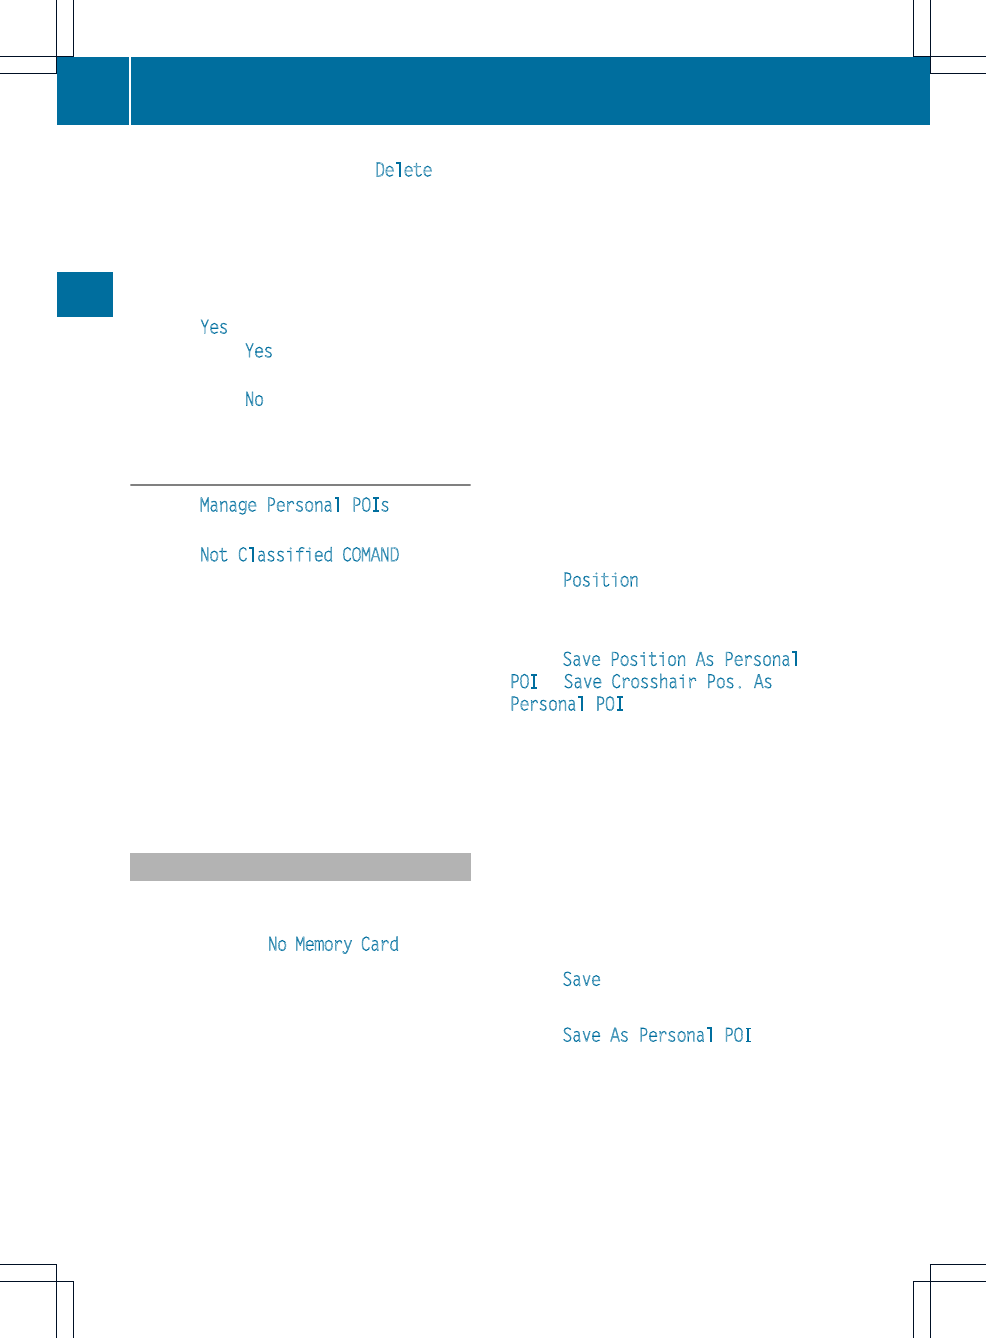
XTo delete a category: select Delete and
press Wto confirm.
Aprompt appears asking whetherthe
category should be deleted.
iIf you delete a category, all points of
interest of this category are also deleted.
XSelect Yes and press Wto confirm.
If you select Yes, the category will be
deleted.
If you select No, the process will be
canceled.
Managing personal points of interest
XSelect Manage Personal POIs in the
menu and press Wto confirm.
XSelect Not Classified,COMAND or your
own category and press Wto confirm.
XSelect a personal point of interest and
press Wto confirm.
The personal point of interest is displayed.
The following functions are described in the
"Select as destination" section
(Ypage 75):
Rrenaming
Rchanging the category
Rdeleting
Saving personal points of interest
There are three ways to save personal points
of interest. You must insert an SD memory
card to do so. The No Memory Card message
otherwise appears.
iPersonal points of interest and routes are
written to the memory card in a data format
based upon open format GPX (GPS
Exchange Format). Geodata is saved in this
format.
Option 1
XInsert the SD memory card (Ypage 157).
XHide the menu (Ypage 51) to display the
map in full screen mode.
XPress Wthe COMAND controller for longer
than two seconds.
The current position of the vehicle is saved
as a personal point of interest on the SD
memory card in the "Unclassified"
category.
iThe crosshair position is saved while
scrolling the map (Ypage 61).
Option 2
XInsert the SD memory card (Ypage 61).
XTo show the menu: press Wthe COMAND
controller.
XSelect Position in the navigation system
menu bar by turning cVd the COMAND
controller and press Wto confirm.
XSelect Save Position As Personal
POI or Save Crosshair Pos. As
Personal POI ("Move map" function
active) and press Wto confirm.
The list of personal categories appears.
XSelect a category and press Wto confirm.
XName for the personal point of interest.
Proceed as described under "Entering
characters" in the "Entering characters in
the address and phone books" section
(Ypage 31).
Option 3
XInsert the SD memory card (Ypage 157).
XSelect Save from the address entry menu
and press Wto confirm.
XSelect Save As Personal POI and press
Wto confirm.
XSelect a category.
XEnter the name.
The current address is saved as a personal
point of interest on the SD memory card.
74 Personal points of interest
Navigation
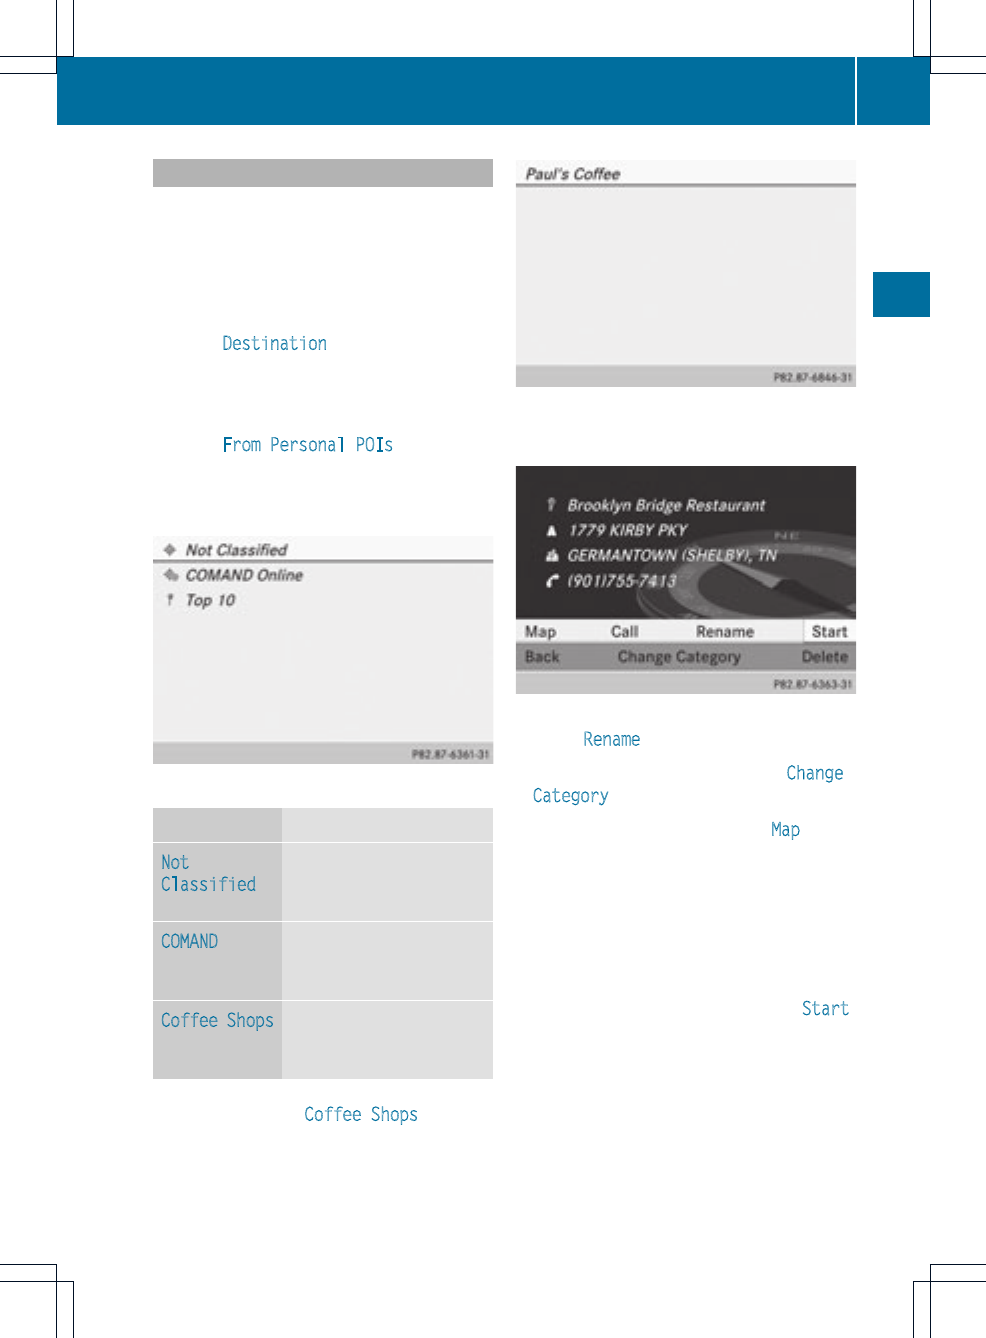
Selecting as the destination
XInsert the SD memory card (Ypage 157).
XTo switch on navigation mode: press the
Øfunction button.
XTo show the menu: press Wthe COMAND
controller.
XSelect Destination in the navigation
system menu bar by turning cVd the
COMAND controller and press Wto
confirm.
XSelect From Personal POIs and press
Wto confirm.
Alist with the categories for personal
points of interest appears.
XSelect an entry and press Wto confirm.
Selection Explanation
Not
Classified
Standard entry for
personal points of
interest.
COMAND This function is not
available in the USA and
Canada.
Coffee Shops Icon and category that
you have created yourself
(Ypage 73).
In the example, the Coffee Shops category
has been selected.
The personal points of interest for this
category are shown.
XSelectapersonal point of interest and
press Wto confirm.
XTo rename a personal point of interest:
select Rename and press Wto confirm.
XTo change the category: select Change
Category and press Wto confirm.
XTo change to the map: select Map and
press Wto confirm.
The position of the personal point of
interest is shown in the map.
iAn icon is displayed according to the
"Displaying personal points of interest on
the map" setting (Ypage 72).
XTo start route calculation: select Start
and press Wto confirm.
If route guidance has been activated, a
prompt will appear asking whether you
wish to accept the personal point of
interest as the destination.
Personal points of interest 75
Navigation
Z
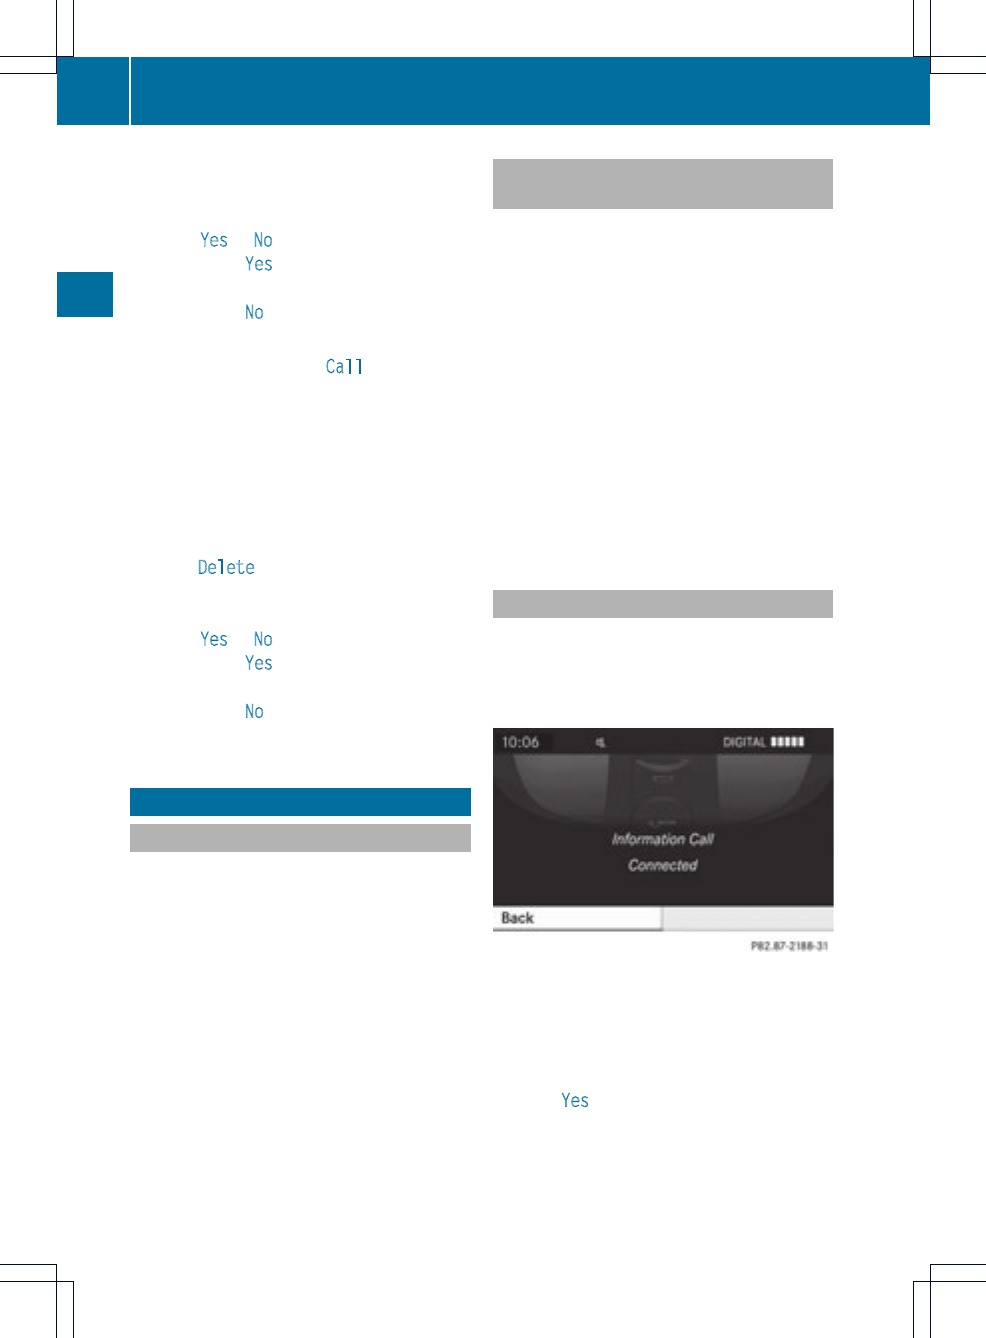
If route guidance has not been activated,
route calculation for the personal point of
interest will start immediately.
XSelect Yes or No and press Wto confirm.
If you select Yes, the personal point of
interest is accepted as the destination.
If you select No, the process will be
canceled.
XTo make a call: select Call and press W
to confirm. COMAND switches to
telephone mode (Ypage 122).
iThis menu item is available if the personal
point of interest has a telephone number
and if a mobile phone is connected to
COMAND (Ypage 116).
XTo delete a personal point of interest:
select Delete and press Wto confirm.
Aprompt appears asking whetheryou wish
to delete the point of interest.
XSelect Yes or No and press Wto confirm.
If you select Yes, the personal point of
interest is deleted.
If you select No, the process will be
canceled.
Search &Send
Notes
iTo use Search &Send, your vehicle needs
to be equipped with mbrace, a navigation
system and a valid mbrace subscription.
Search &Send is a service assisting you in
entering destinations for the navigation
system. This mbrace service can send a
destination address directly from the Google
Maps®website to the navigation system of
your vehicle.
Selecting and sending adestination
address
iPlease observe the notes on entering an
address on the maps.google.com
website.
XCall up the maps.google.com website and
destination address in the address entry
field.
XClick the corresponding button to send the
destination address to the e-mail address
registered with mbrace.
XEnterthe e-mail address you specified
when setting up your mbrace account into
the corresponding field in the "Send" dialog
window.
XClick "Send".
Calling up a destination address
XPress the ïmbrace information button
to start downloading the destination
address onto the navigation system of your
vehicle.
iIf you have sent more than one
destination address to your vehicle's
navigation system, you will need to call up
the information individually for every
address to be downloaded.
XSelect Yes when the prompt for starting the
navigation system is shown. The window
for starting the navigation system appears
(Ypage 57).
76 Search &Send
Navigation
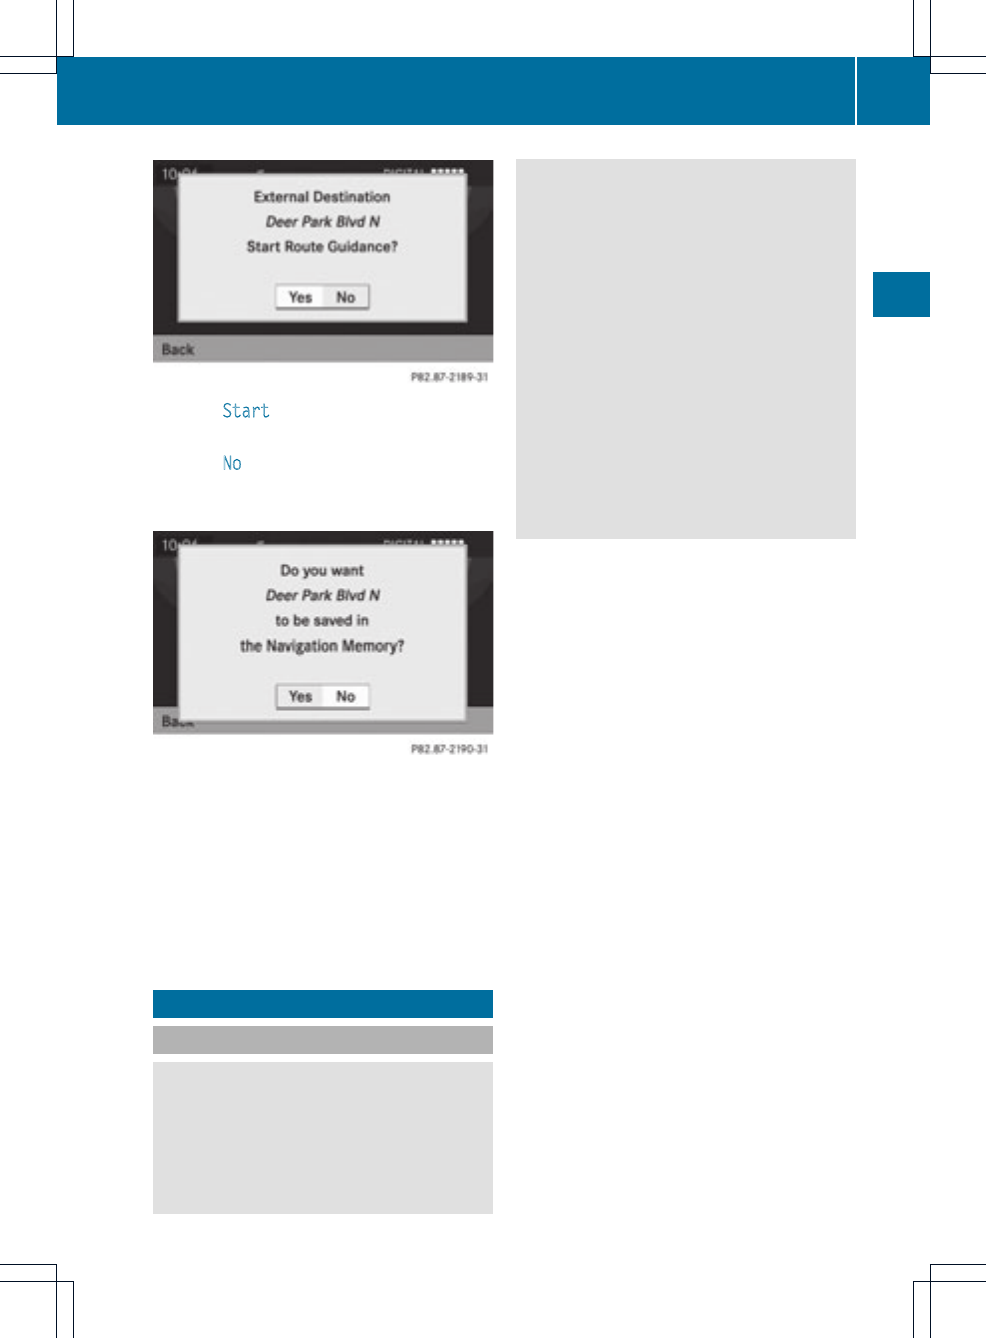
XSelect Start.
or
XSelect No to store the downloaded
destination in the destination memory for
later use.
iThe destination addresses are
downloaded in the same order as they are
sent. If you ownseveral Mercedes-Benz
vehicles equipped with an mbrace
subscriber account, each destination
address can be downloaded by each
vehicle associated with the e-mail address
registered for your mbrace account.
Route guidance
General information
GWARNING
COMAND calculates the route to the
destination without taking into account the
following, for example:
RTraffic lights
RStop and right-of-way signs
RLane merging
RParking or stopping prohibited areas
ROther road and traffic rules and regulations
RNarrow bridges
COMAND may give incorrect navigation
commands if the data in the digital map does
not correspond with the actual road/ traffic
situation. For example, if the traffic routing
has been changed or the direction of a one-
way road has been reversed.
For this reason, you must always observe
applicable road and traffic rules and
regulations during your journey. Road and
traffic rules and regulations always have
priority over the navigation commands
generated by the system.
Route guidance begins once aroute has been
calculated (Ypage 57).
COMAND guides you to your destination by
means of navigation commands in the form
of audible navigation announcements and
route guidance displays.
The route guidance displays can only be seen
if the display is switched to navigation mode.
If you do not follow the navigation
announcements or if you leave the calculated
route, COMAND automatically calculates a
new route to the destination.
If the digital map contains the corresponding
information, the following applies:
Rwhen selecting a route, COMAND tries to
avoid roads that only have limited access,
e.g. roads closed to through traffic and non-
residents.
Rroads that have time restrictions (e.g.
closed on Sundays and public holidays) are
considered for route guidance on days
when they are open. For this purpose, the
relevant times must be correctly stored in
the database.
Route guidance 77
Navigation
Z

Change of direction
Introduction
Changes of direction have three phases:
RPreparation phase
RAnnouncement phase
RChange-of-direction phase
Preparation phase
COMAND prepares you for the upcoming
change of direction.Based on the example
display below, the change of direction is
announced with the Prepare to turn
right message. You see the full-screenmap.
Example display: preparation phase
:Next road
;Pointatwhich the change of direction
takes place (light blue dot)
=Current vehicle position (the tip of the
triangle indicates the vehicle’s direction
of travel)
?Current road
Display ?depends on the setting selected
for "Information in map" (Ypage 102).
Announcement phase
COMAND announces the imminent change of
direction. Based on the example display
below, the change of direction is announced
with the Please turn right in 500 ft.
and follow the <road name> message.
The announced distance to the next change
of direction depends on the type of road and
its permissible speed limit.
The display is now split into two sectors. In
the left half, you see the normal map view.
The right half shows an enlarged section of
the area around the intersection (Crossing
Zoom) or a 3D image of the road's course with
the route indicating the next maneuver.
Example display:announcement phase
:Next road
;Change of direction (turn right here)
=Graphicrepresentation of the distance to
the next change of direction
?Distance to the next change of direction
ARoute (highlighted in blue, shown in both
the left and right displays)
BPoint at which the change of direction
takes place (light blue dot, shown in both
the left and right displays)
iThe filled-in section of visual display for
distance =gets shorter the nearer you get
to the announced change of direction.
Change-of-direction phase
COMAND announces the imminentchange of
direction. In the example, the Now turn
right announcement is made 150 ft. before
the change of direction.
The display is split into two halves, as in the
announcementphase.
78 Route guidance
Navigation

Example display:change-of-direction phase
:Current vehicle position (the tip of the
triangle indicates the vehicle’s direction
of travel)
;Graphic representation of the distance to
the next change of direction
=Distance to the next change of direction
Once the change of direction is completed,
COMAND automatically switches back to full-
screen display.
Example of adisplaywithout changes
of direction
:Route (highlighted in blue)
;Currentvehicle position
=Current road
?Map orientation selected
AMap scale selected
Lane recommendations
Overview
On multilane roads, COMAND can display
lane recommendations for the nextchange of
direction. The corresponding data must be
available in the digital map.
COMAND displays lane recommendations
Bbased on the next two changes of
direction. The number of lanes applies to the
point at which the next change of direction is
required.
Example display
:Point of the next change in direction (light
blue circle)
;Point of the change of direction after next
=Next change of direction (in this case, turn
off to the right)
?Graphic representation of the distance to
the next change of direction
ADistance to the next change of direction
BPossible lane (light blue)
CRecommended lane (dark blue)
DLane not recommended (gray)
ECurrent vehicle position: the tip of the
triangle indicates the vehicle’s direction
of travel
Route guidance 79
Navigation
Z
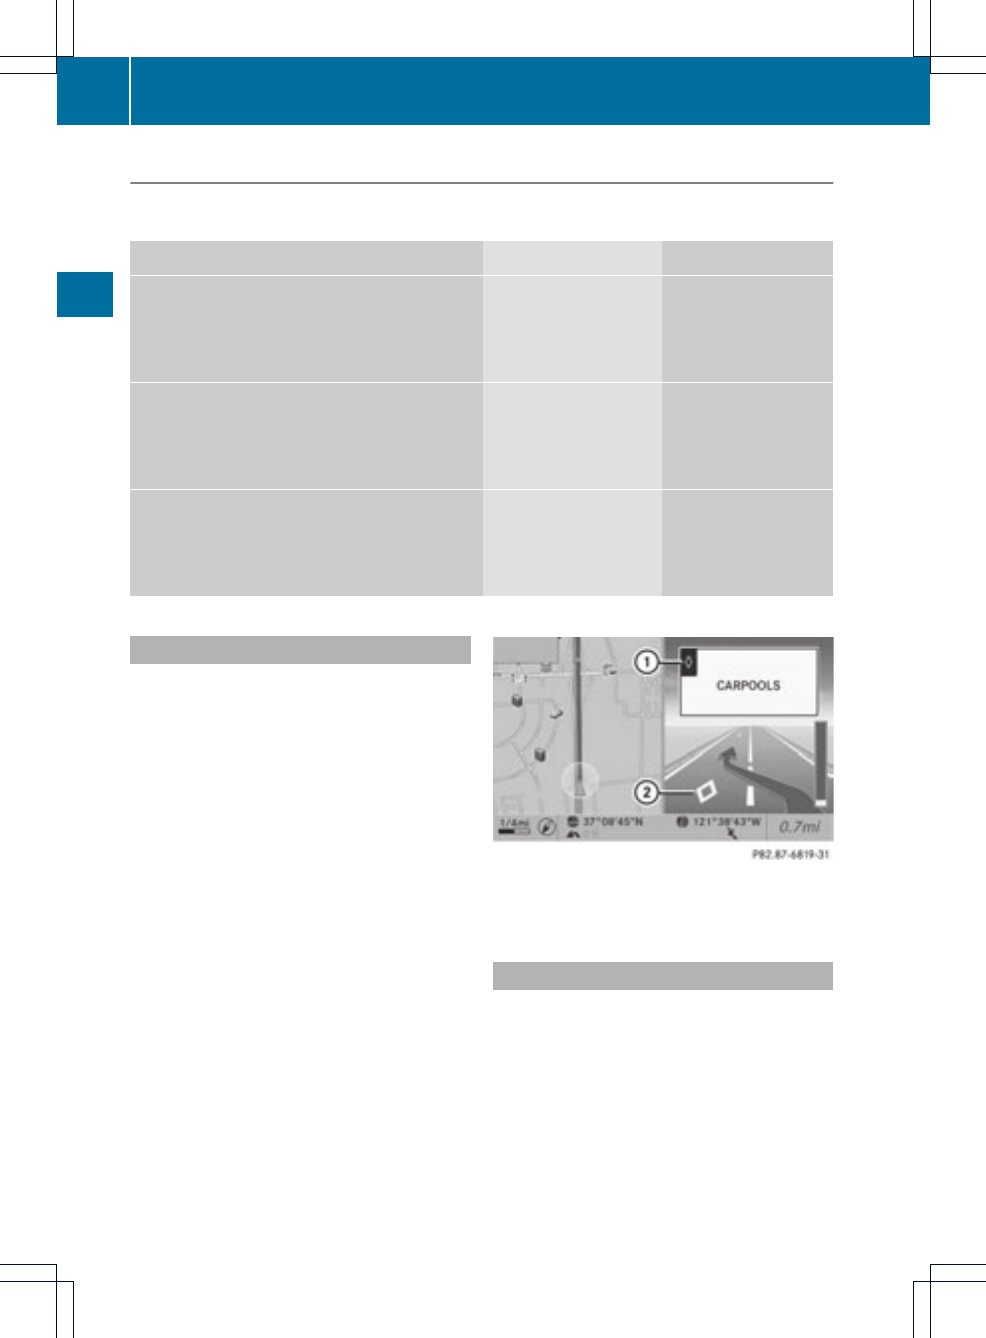
Display anddescription of lane recommendations
The colors used in the lane recommendationdisplay vary depending on whether day or night
design is switched on.
Lane Day design Nightdesign
Recommended lane C
In this lane, you will be able to complete the
nexttwo changes of directionwithout
changing lanes.
Darkblue Light blue
Possible lane B
In this lane, you will only be able to complete
the nextchange of direction without
changing lanes.
Light blue Dark blue
Lane not recommended D
In this lane, you will not be able to complete
the next change of direction without
changing lanes.
Gray Gray
HOV or carpool lanes
Aroute may be calculated taking the use of
HOV or carpool lanes into account. You can
use HOV or carpool lanes depending on the
number of persons in the vehicle as well as
the local and time limitation conditions.
iThis information is stored in the map data.
iYou can enter the number of persons in
the vehicle (Ypage 53). In this section, you
can also find more information on HOV or
carpool lanes.
When the system guides you onto or away
from HOV or carpool lanes, COMAND issues
visual and acoustic driving instructions.
:HOV symbol on the road sign
;HOV symbol on the car pool lane
Announcing street names
If the function is switched on, the name of the
street which you are turning into is
announced.
Announcements are not made in these
languages in all countries. They are made
when relevant street names for the selected
language are available in the database.
XTo switch on navigation mode: press the
Øfunction button.
80 Route guidance
Navigation

XTo show the menu: press Wthe COMAND
controller.
XSelect Navi in the main function bar by
sliding ZV the COMAND controller and
press Wto confirm.
XSelect Announce Street Names and press
Wto confirm.
Depending on the previous status, the
functionis switched on Oor off ª.
Canceling or continuing route
guidance
XTo switch on navigation mode: press the
Øfunction button.
XTo show the menu: press Wthe COMAND
controller.
XSelect Dest. in the navigation system
menu bar by turning cVd the COMAND
controller and pressing Wto confirm.
XTo cancel route guidance: select Cancel
Route Guidance and press Wto confirm.
or
XTo continue route guidance: select
Continue Route Guidance and press W
to confirm.
COMAND calculates the route.
Destination or area of destination
reached
When you reach your destination, COMAND
displays a checkered flag and route guidance
is automatically ended.
If the destination is not in close proximity to
a digitized street, the Area of
destination reached message appears
when the destination is reached.
Navigation announcements
Repeating navigation announcements
GWARNING
Navigation announcements are intended to
direct you while driving without diverting your
attention from the road and driving.
Please always use this feature instead of
consulting the map display for directions.
Consulting the symbols or map display for
directions may cause you to divert your
attention from driving and increase your risk
of an accident.
iAudible navigation announcements are
muted during a telephone call.
If you have missed an announcement, you can
call up the current announcement at any
time.
XTo show the menu: press Wthe COMAND
controller.
XSelect RPT in the navigation system menu
bar by turning cVd the COMAND
controller and pressing Wto confirm.
Switching navigation announcements
on/off
XTo switch off: press the 8button
during an announcement.
You will briefly see the message: The
driving instructions have been
muted.
XTo switch on: press Wthe COMAND
controller.
XSelect RPT in the navigation system menu
bar by turning cVd the COMAND
controller and pressing Wto confirm.
iCOMAND automatically switches the
navigation announcements back on when:
Ryou have a new route calculated.
Ryou switch COMAND back on againor
start the engine.
Route guidance 81
Navigation
Z
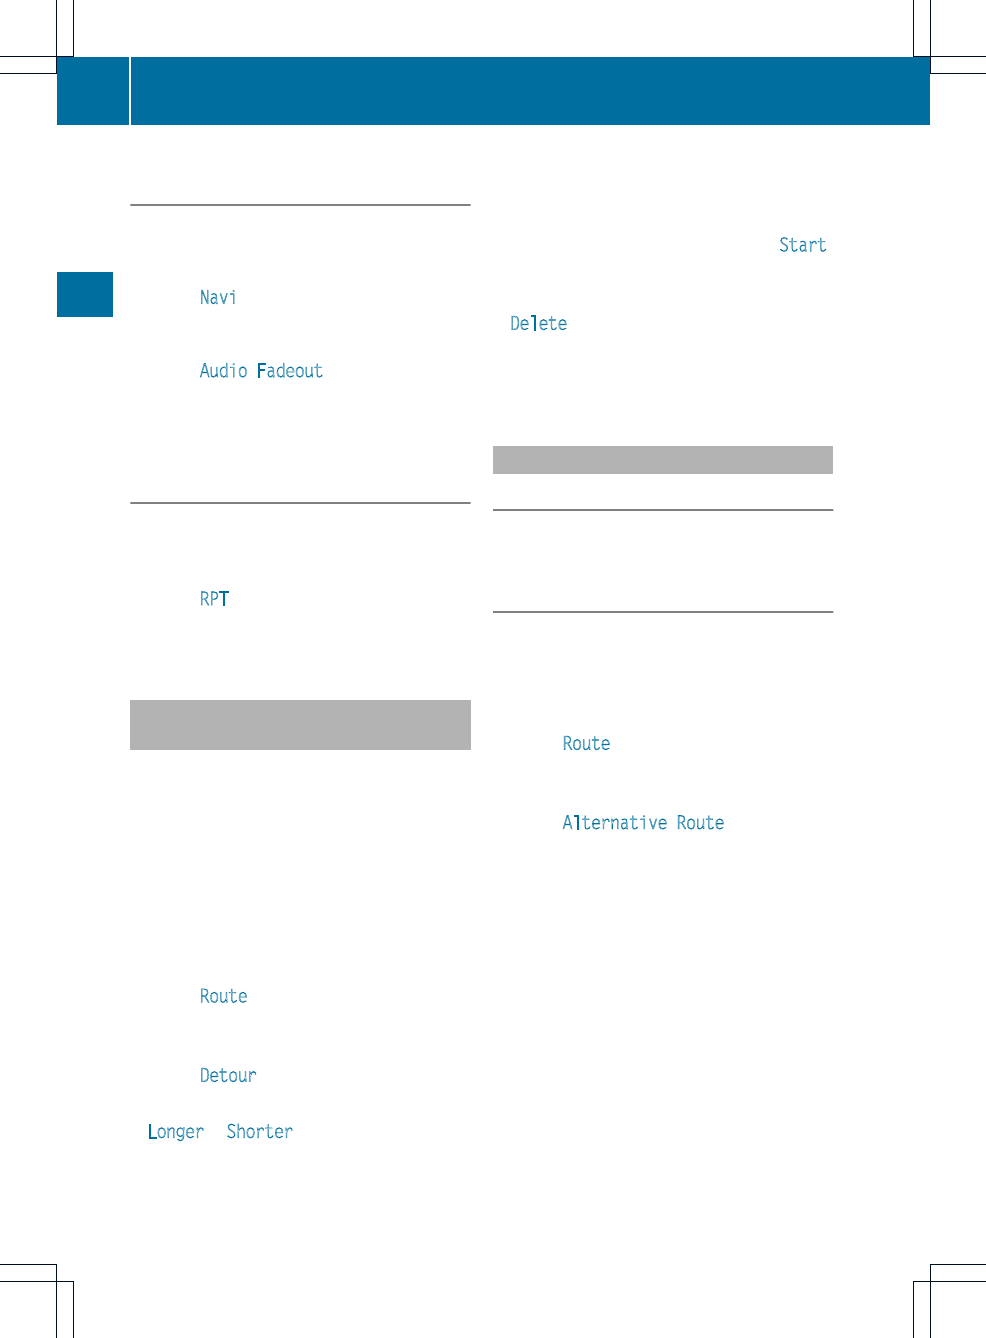
Reducing volume during anavigation
announcement
The volume of an active audio or video source
can be automatically reduced during a
navigation announcement.
XSelect Navi in the main function bar by
sliding ZV and turning cVd the COMAND
controller and press Wto confirm.
XSelect Audio Fadeout and press Wto
confirm.
Depending on the previous status, the
function is switched on Oor off ª.
Setting the volume manually
XAdjust the volume using the qcontrol
knob during a navigation announcement.
or
XSelect RPT on the map display whenthe
menu is shown, and set the volume with the
qcontrol knob.
Avoiding asection of the route
blocked by a traffic jam
This function blocks a sectionofthe route
ahead of you. You can set the length of the
blocked route section. If possible, COMAND
calculates a detour around the blocked
section of the route.
XTo switch on navigation mode: press the
Øfunction button.
XTo show the menu: press Wthe COMAND
controller.
XSelect Route in the navigation system
menu bar by turning cVd the COMAND
controller and press Wto confirm.
XSelect Detour and press Wto confirm.
XTo block a section of the route: select
Longer or Shorter repeatedly and confirm
using Wuntil the desired section has been
selected.
iThe total length of the section that can be
blocked is defined by the digital map. The
menu items are available accordingly.
XTo start route calculation: select Start
and press Wto confirm.
XTo delete the blockedsection: select
Delete while the message is shown and
press Wto confirm.
COMAND calculates the routewithout the
block.
Selecting an alternative route
Introduction
With the "Alternative route" function, routes
other than the original one can be calculated.
Option 1
XTo switch on navigation mode: press the
Øfunction button.
XTo show the menu: press Wthe COMAND
controller.
XSelect Route in the navigation system
menu bar by turning cVd the COMAND
controller and press Wto confirm.
XSelect Alternative Route and press W
to confirm.
On the right-hand side, you will see
information on the currently selected
alternative route, e.g. distance, estimated
remaining driving time and estimated time
of arrival. Route sections used (e.g.
freeways, tunnels) are displayed as
symbols.
82 Route guidance
Navigation
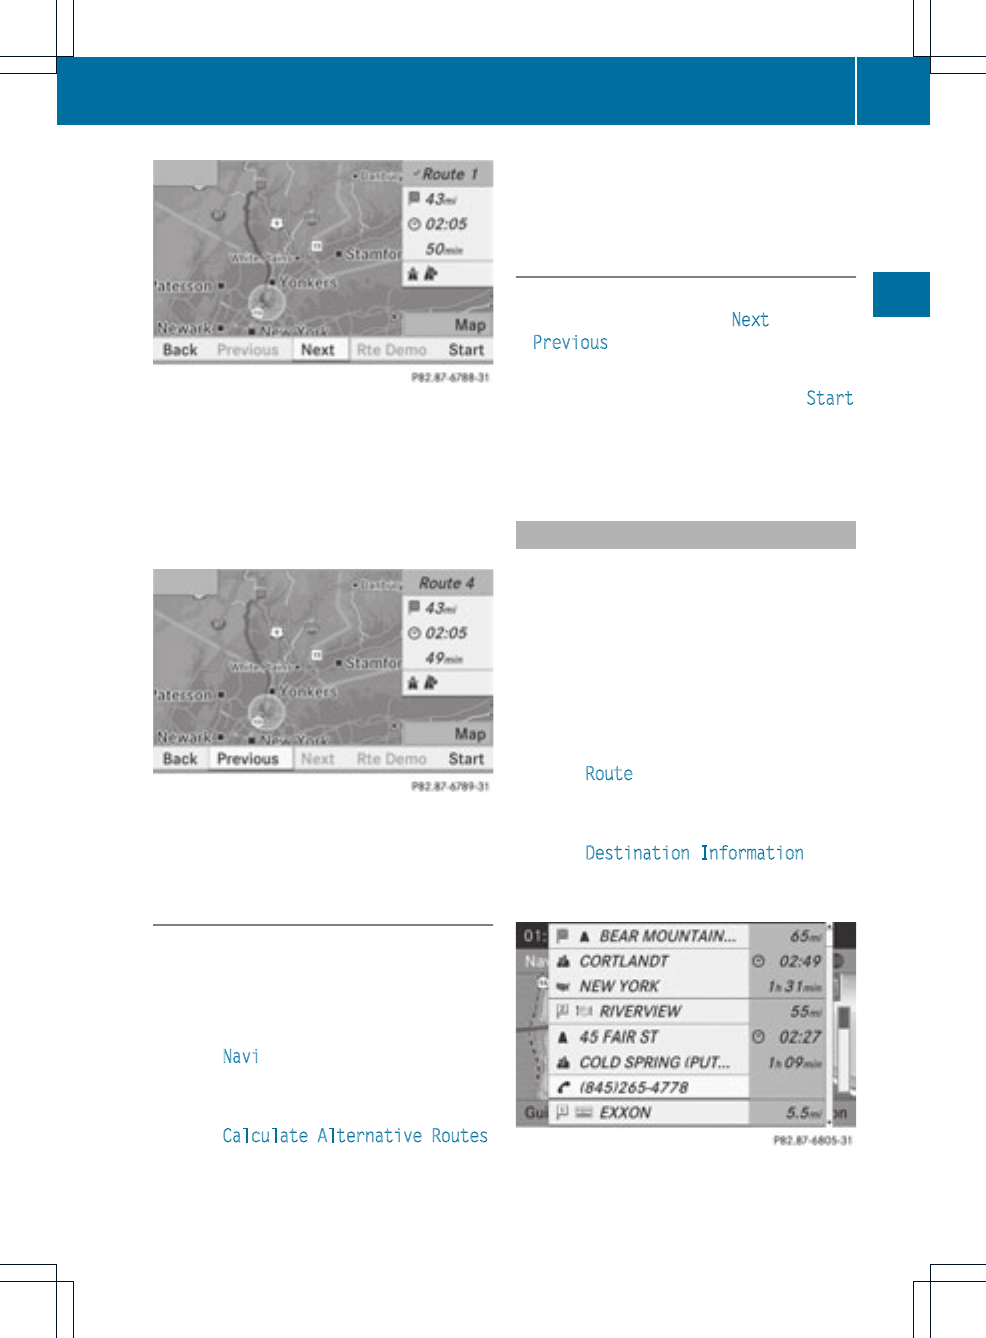
Example: route 1
The route is shown in the map with a dark blue
line.
Routes 1to3are calculated with the current
settings for the route type and route options
(Ypage 52). Route 4 is the economic route
(eco route).
Route 4(example: eco route)
The eco route is shown on the alternative
route map with a green line.
Option 2
XTo switch on navigation mode: press the
Øfunction button.
XTo show the menu: press Wthe COMAND
controller.
XSelect Navi in the main function bar by
sliding ZV the COMAND controller and
press Wto confirm.
XSelect Calculate Alternative Routes
and press Wto confirm.
Depending on the previous status, the
function is switched on Oor off ª.
Function is activated: alternative routes
are calculated directly after the destination
is entered.
Menu functions
XTo select the next or previous
alternative route: select Next or
Previous and press Wto confirm.
XTo start route guidance using the
selected alternative route: select Start
and press Wto confirm.
COMAND starts route guidance on the
chosen alternative route.
Displaying destination information
You can display destination information for
the destination, for both waypoints and for
the intermediate stop, if they are part of the
route.
XTo switch on navigation mode: press the
Øfunction button.
XTo show the menu: press Wthe COMAND
controller.
XSelect Route in the navigation system
menu bar by turning cVd the COMAND
controller and press Wto confirm.
XSelect Destination Information and
press Wto confirm.
Destination information is displayed.
Example: destination information
Route guidance 83
Navigation
Z
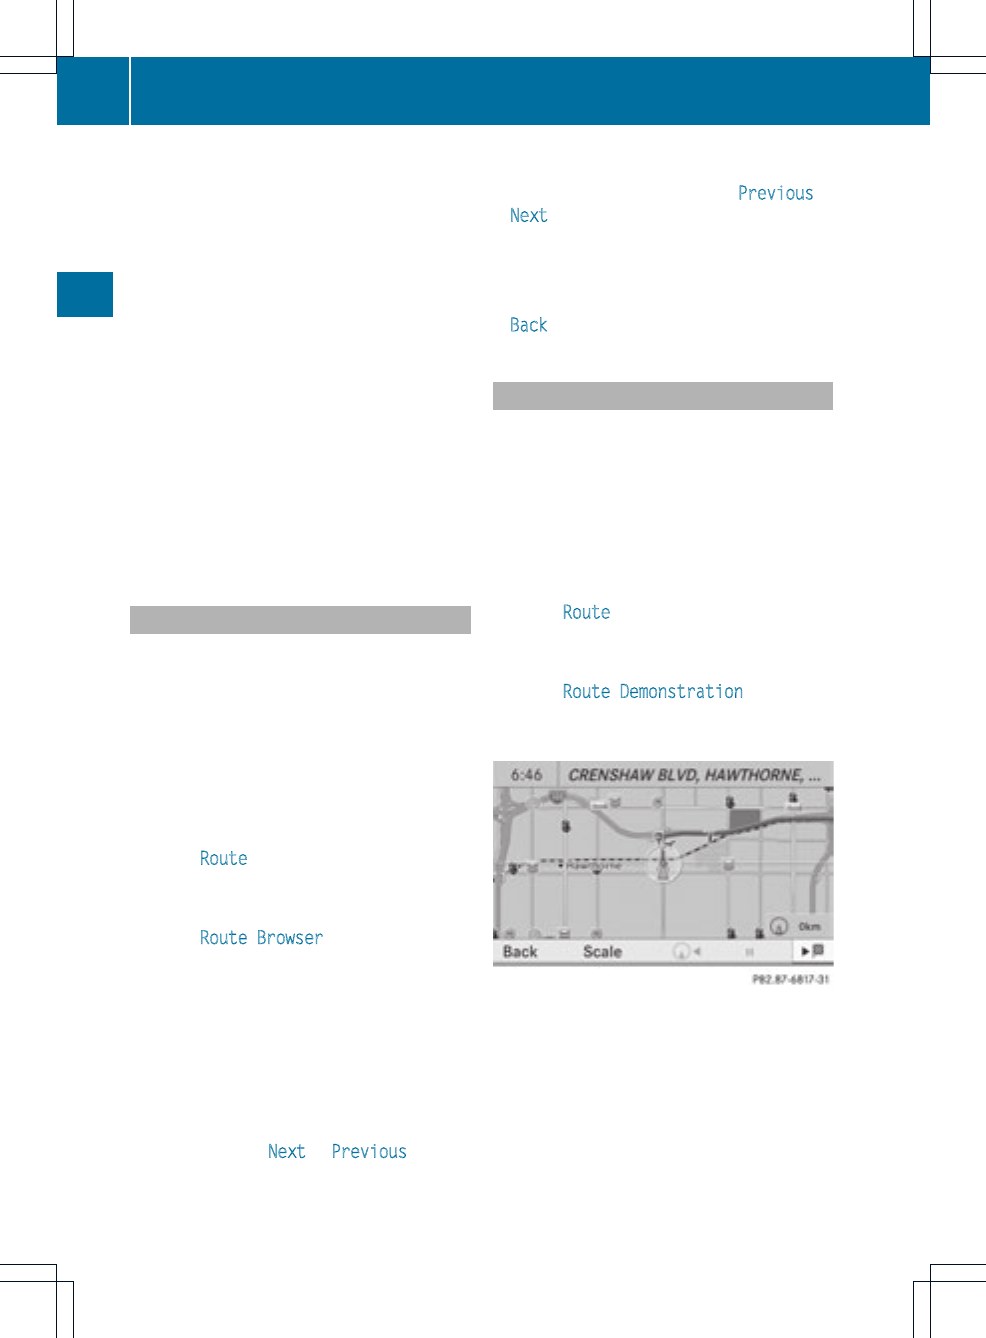
The example shows:
Rthe destination O
Rtwo waypoints
Rthe relevant information on distance,
estimated time of arrival and estimated
remaining driving time
iIf a mobile phone is connected to
COMAND (Ypage 116) and a phone
number is included in the destination
information, you can call it.
XTo call up further destination
information: turn cVd the COMAND
controller.
XTo close the destination information:
slide XVY the COMAND controller or press
the kbutton.
Route overview
You can use the route overview to move along
the active route section by section and view
information and details about each section of
the route.
XTo switch on navigation mode: press the
Øfunction button.
XTo show the menu: press Wthe COMAND
controller.
XSelect Route in the navigation system
menu bar by turning cVd the COMAND
controller and press Wto confirm.
XSelect Route Browser and press Wto
confirm.
At the top of the display, you will see
information about the highlighted route
section, for example the distance to be driven
on the road and road designation. The
highlighted route section is marked in white
with a red border on the map.
XTo view the next or previous route
section: select Next or Previous and
press Wto confirm.
iIf the first or last route section is
highlighted, you cannot select Previous or
Next.
XTo zoom in or out of the map: select N
or Mand press Wto confirm.
XTo close the route overview: select
Back and press Wto confirm.
Route display
You can see the route before starting your
journey. This function is only available when
the vehicle is stationary.
XTo switch on navigation mode: press the
Øfunction button.
XTo show the menu: press Wthe COMAND
controller.
XSelect Route in the navigation system
menu bar by turning cVd the COMAND
controller and press Wto confirm.
XSelect Route Demonstration and press
Wto confirm.
The map with the crosshair appears.
XTo get to the destination: press Wto
confirm the highlighted symbol.
XTo stop the route display: confirm the
Ësymbol by pressing W.
84 Route guidance
Navigation
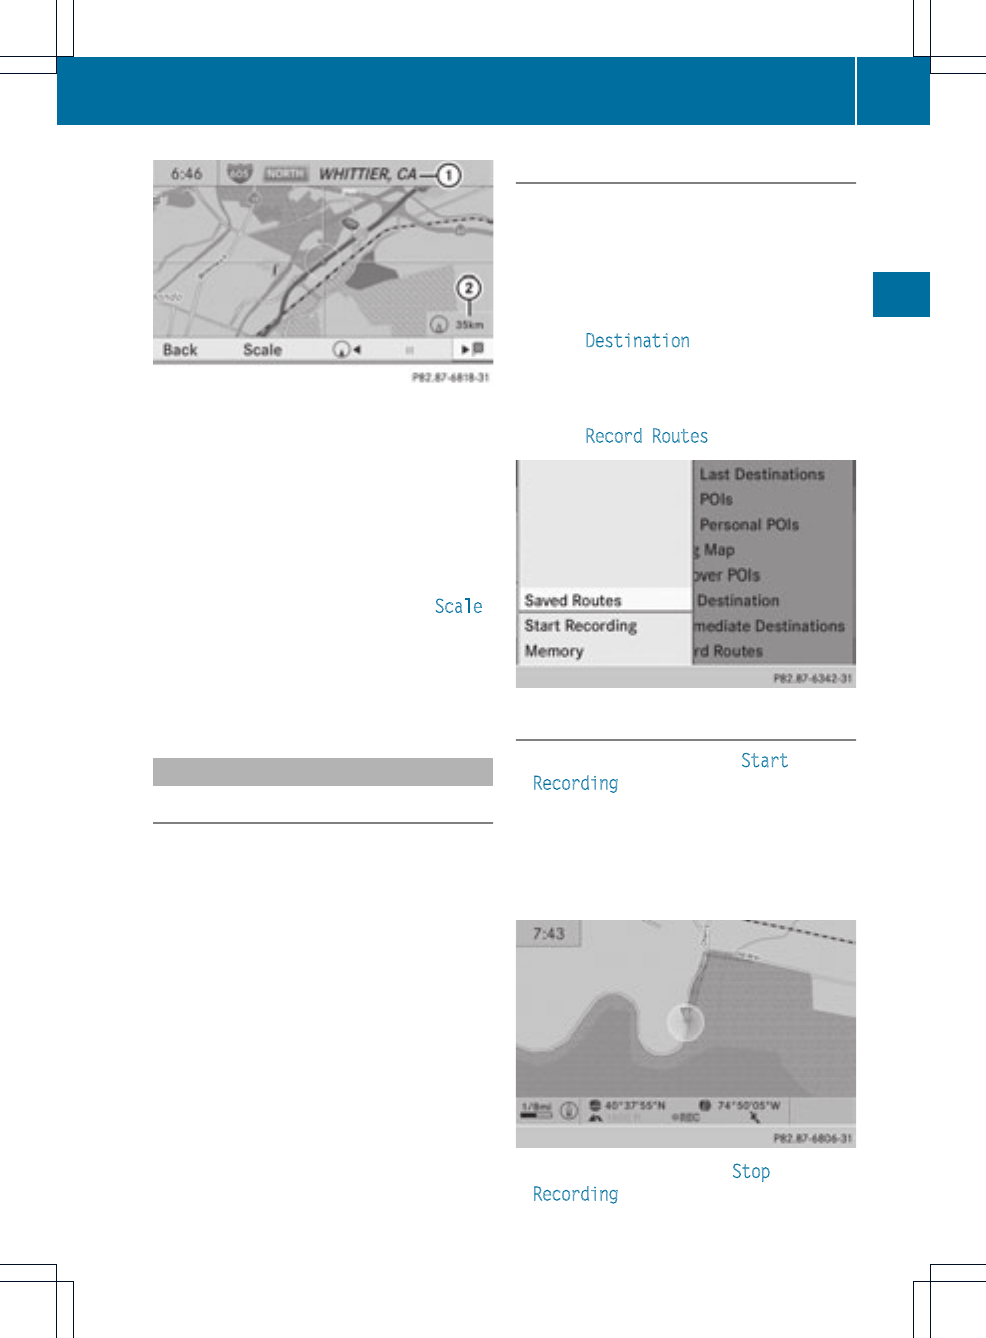
Example: route display stopped
:Road name and city display when route
display has been stopped
;Distance of the crosshair from current
vehicle position
XTo getto the current vehicle position:
press Wto confirm the symbol for the
currentvehicle position.
XTo change the map scale: select Scale
and press Wto confirm.
The scale bar appears.
XTurn cVd the COMAND controller and
press Wto confirm.
Recording the route
Notes
If you have activated COMAND and the SD
memory card has been inserted, you should
not take it out of the slot.
When you record a route, COMAND uses so-
called support points and displays the route
as a series of lines. If the route is then
calculated, COMAND attempts to align the
recorded route with the digital map.
The support points of the route may not be on
a digitized road.
This is often the case for routes that have
been calculated using map data from other
sources.
Calling up the Routes menu
XInsert the SD memory card (Ypage 157).
XTo switch on navigation mode: press the
Øfunction button.
XTo show the menu: press Wthe COMAND
controller.
XSelect Destination in the navigation
system menu bar by turning cVd the
COMAND controller and pressing Wto
confirm.
XSelect Record Routes.
Starting/ending recording
XTo start recording: select Start
Recording in the Routes menu by turning
cVd the COMAND controller and press
Wto confirm.
During the recording, the recorded route is
shown behind the currentvehicle position
with gray strokes (symbol for tire tracks).
XTo end recording: select Stop
Recording in the Routes menu by turning
Route guidance 85
Navigation
Z
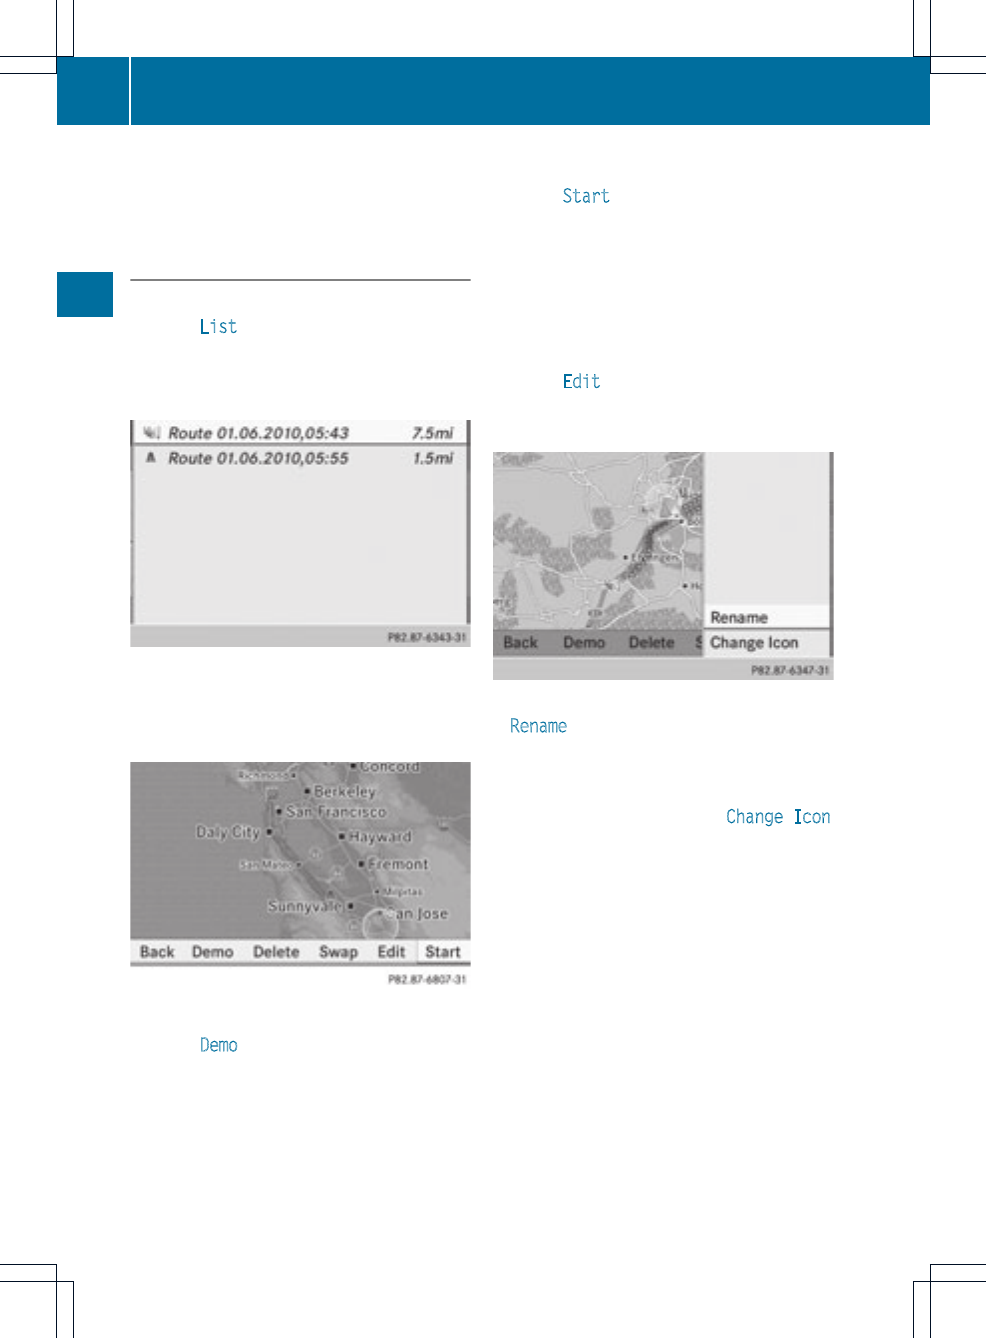
cVd the COMAND controller and press
Wto confirm.
Displaying and editing the recorded
route
XInsert the SD memory card (Ypage 157).
XSelect List in the Routes menu by turning
cVd the COMAND controller and press
Wto confirm.
Previously recorded routes are displayed.
XSelect a route and press Wto confirm.
The map appears with a menu. The
recorded route is shown in the map with a
blue dotted line.
Turning off from the route on the map
XSelect Demo by turning cVd the COMAND
controller and press Wto confirm.
The map with the crosshair appears.
XProceed as described in the "Route
demonstration" section (Ypage 84).
Starting route calculation
XSelect Start in the menu by turning cVd
the COMAND controller and press Wto
confirm.
COMAND attempts to alignthe recorded
route with the digital map.
Editing the route
You can change the route name and the icon.
XSelect Edit in the menu by turning cVd
the COMAND controller and press Wto
confirm.
XTo change the route name: select
Rename and press Wto confirm.
iThe name cannot be changed while the
vehicle is in motion.
XTo change the icon: select Change Icon
and press Wto confirm.
XAdescription for both entries can be found
in the "Personal POIs" section under
"Managing categories for personal POIs"
(Ypage 73).
Changing direction for route calculation
You can set the icon for the route to the
starting point or to the destination, thereby
changing the direction for route calculation.
iDuring route calculation, one-way streets
or turn restrictions, for example, are taken
into account. Therefore, the outward and
return routes may differ from each other.
86 Route guidance
Navigation
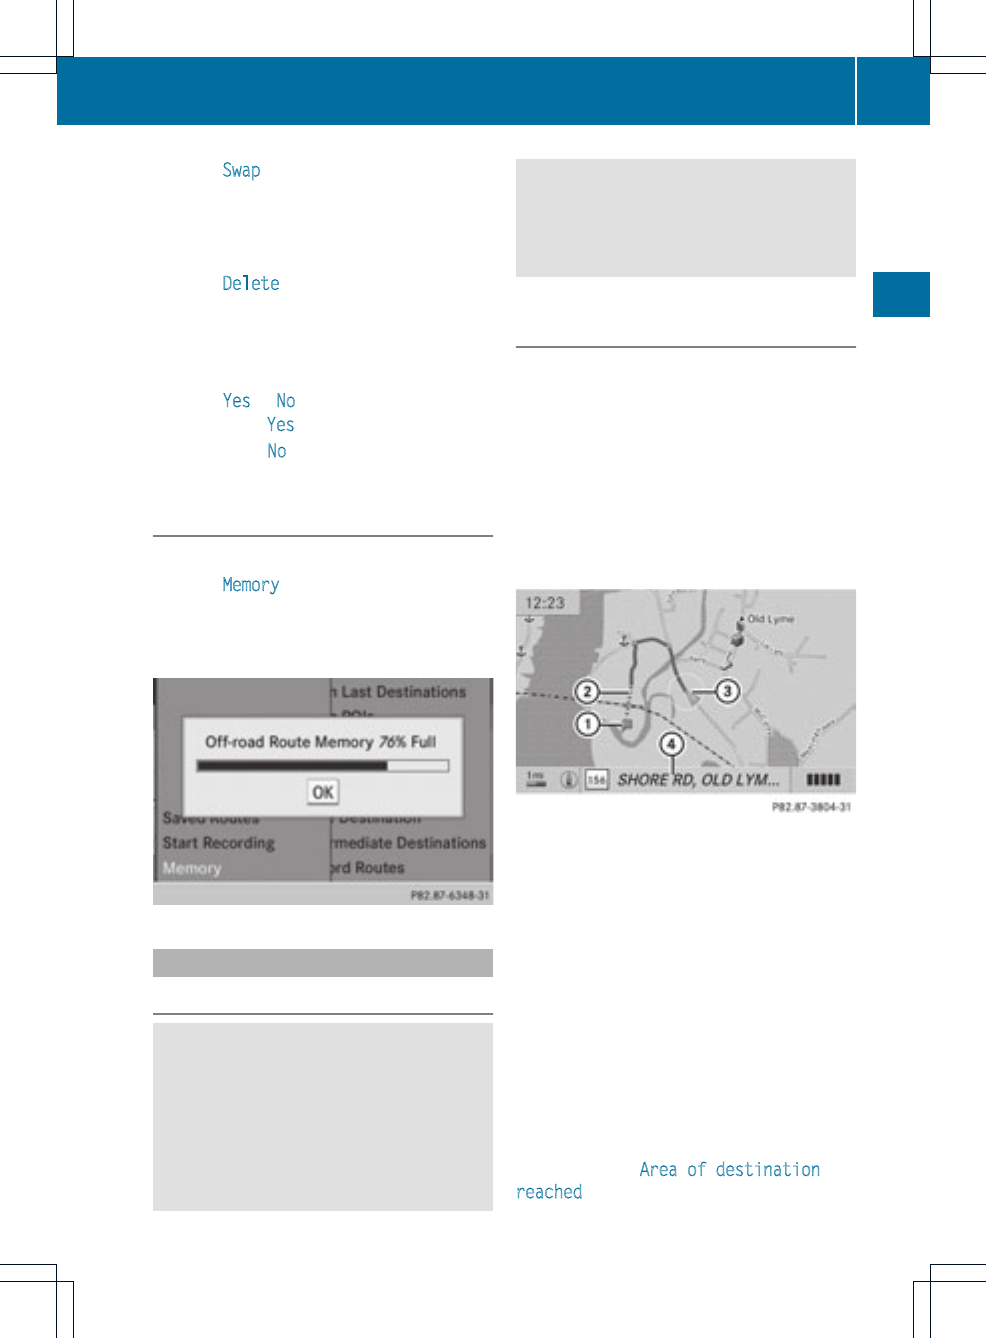
XSelect Swap in the menu by turning cVd
the COMAND controllerand press Wto
confirm.
Deleting the route
XSelect Delete in the menu by turning
cVd the COMAND controller and press
Wto confirm.
Aprompt appears asking whetherthe route
should be deleted.
XSelect Yes or No and press Wto confirm.
If you select Yes, the route will be deleted.
If you select No, the process will be
canceled.
Scanning the memory
The SD memory card is inserted.
XSelect Memory in the Routes menu
(Ypage 85) by turning cVd the COMAND
controller and press Wto confirm.
The route memory is displayed.
Off-road and off-map
Important safety note
GWARNING
The COMAND navigation system may direct
you to off-road routes that your vehicle may
not be capable of traversing through without
damaging your tires, wheels or vehicle. It is
the driver's sole responsibility to determine
the suitability of the route. Off-road routes
may be of varying conditions and their
appropriateness for use may be affected by
various factors such as time of day, time of
year and immediate weather conditions that
cannot be judged or taken into consideration
by the COMAND system.
Route guidance to a destination that is
not on a digitized road
COMAND can guide you to destinations
which are within the area covered by the
digital map, but which are not themselves
recorded on the map.
These destinations are known as off-road
destinations, which you can enter using the
map, for example. In these cases, COMAND
guides you for as long as possible with
navigation announcements and displays on
roads known to the system.
Example: route guidance to an off-road destination
:Off-road destination
;Off-road route section (dashed blue)
=Current vehicle position (the tip of the
triangle indicates the vehicle’s direction
of travel)
?Off-road (if available)
If the vehicle reaches an area which is not part
of the digital map, the display appears as a
split-screen view. On the right-hand side, an
arrow appears which points to off-road
destination :.You will hear the
announcement:"Please follow the arrow on
the display".As the vehicle approaches the
destination, the Area of destination
reached message appears.
Route guidance 87
Navigation
Z
Route guidance from an off-road
location to adestination
If the vehicle position is within the area
covered by the digital map, but the map does
not contain any information about that
location, the vehicle is in an off-road location.
COMAND is also able to guide you to a
destination even from an off-road location.
At the start of the route guidance, you will see
the Off Mapped Road message, an arrow
and the distance to thedestination. The arrow
shows the compass heading to the actual
destination.
The route is highlighted blue, starting from
the last recognized street the vehicle was on
before it left the map.
As soon as the vehicle is back on a road
known to the system, route guidance
continues in the usual way.
Route guidance from an off-map
location to adestination
If the vehicle position is outside the area
covered by the digital map, then the vehicle
is in an off-map location.COMAND is also
able to guide you to a destination even from
an off-map location.
At the start of the route guidance, you will see
the Off Mapped Road message, an arrow
and the distance to the destination. The
direction arrow shows the compass heading
to the destination.
The route is highlighted blue from the nearest
road known to the system.
As soon as the vehicle is back on a road
known to the system, route guidance
continues in the usual way.
Off-road during route guidance
Due to roadworks, for example, there may be
differences between the data on the digital
map and the actual course of the road.
In such cases, the system will temporarily be
unable to locate the vehicle position on the
digital map and thus considers the vehicle to
be in an off-road position.
In the display, you will see the Off Mapped
Road message, an arrow and the distance to
the destination. The direction arrow shows
the compass heading to the destination.
As soon as the system can assign the vehicle
position to the map again, route guidance
continues in the usual way.
Traffic reports
Conditions
To receive real-time traffic reports via
satellite radio, you require:
Roptionally available satellite radio
equipment
Ra subscription to SIRIUS XM Satellite Radio
Traffic Message Service
Further information on satellite radio is
available in the "Satellite radio" section
(Ypage 148).
COMAND can receive traffic reports via
satellite radio and take account of these for
route guidance in the navigation system.
Received traffic reports are displayed in the
map either as text or as icons.
Real-time traffic reports in the map
COMAND can show certain traffic incidents
on the map. Traffic reports are shown on the
map at scales of 0.05 mi to 20 mi.
XTo hide the menu: slide ZV the COMAND
controller and, when the Full Screen
menu item is shown, press Wto confirm.
The map can be seen in the full-screen
display.
XTurn cVd the COMAND controller until the
desired map scale is set.
88 Traffic reports
Navigation
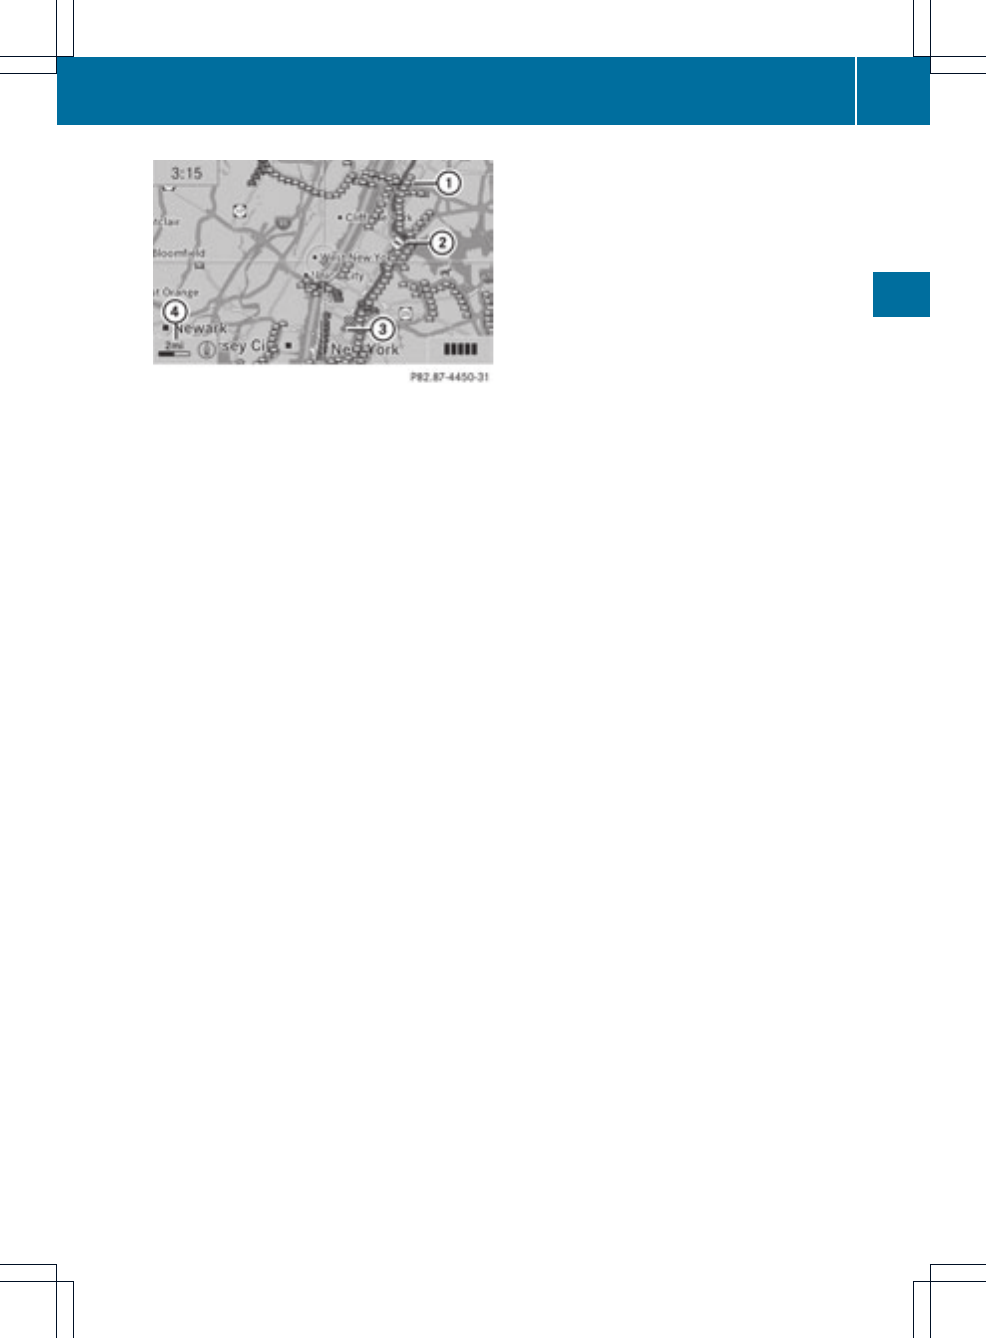
1Icon delimiting the section of the route
affected
2Icon indicating an incident on the route
(traffic flow)
3Destination
4Map scale
Traffic reports 89
Navigation
Z

Icon for real-time traffic reports
Icon Description Traffic reports in the map display List of
traffic
reports
Traffic
reports
Warning
(red)
This appears at the beginning of the
affected route section if route
guidance is active and the route leads
through an affected area.
Entry type:
warning
Entry
type:
warning
Traffic
incident
(yellow)
This appears at the beginning of the
affected route section if route
guidance is active and the route leads
through an area affected by a traffic
incident.
Entry type:
caution
Entry
type:
caution
Traffic jam
on route
(stop-and-go
traffic)
This appears at the beginning of a
traffic jam (average speed
25 – 45 mph) if route guidance is
active and the route leads through an
area of congested traffic.
Yellow car icons may appear in
conjunction with this icon.
Entry type:
traffic jam
on route
(stop-and-
go traffic)
Entry
type:
traffic jam
on route
(stop-and-
go traffic)
Traffic jam
on the route
This appears at the beginning of a
traffic jam (average speed
5–20mph) if route guidance is active
and the route leads through an area of
congested traffic.
Red car icons may appear in
conjunction with this icon.
Entry type:
traffic jam
on route
Entry
type:
traffic jam
on route
Blocked
route section
on the route
Appears at the beginning of a blocked
route section if route guidance is
active and the route leads through the
blocked section.
The XXXX icons may appear in
conjunction with this icon.
Entry type:
blocked
route
section
Entry
type:
blocked
route
section
Yellow
line with
arrows
Traffic
incidents
Possible delays (e.g. roadworks)
Appears on the side of the road
affected (direction of travel)
(Not
available)
(Not
available)
90 Traffic reports
Navigation
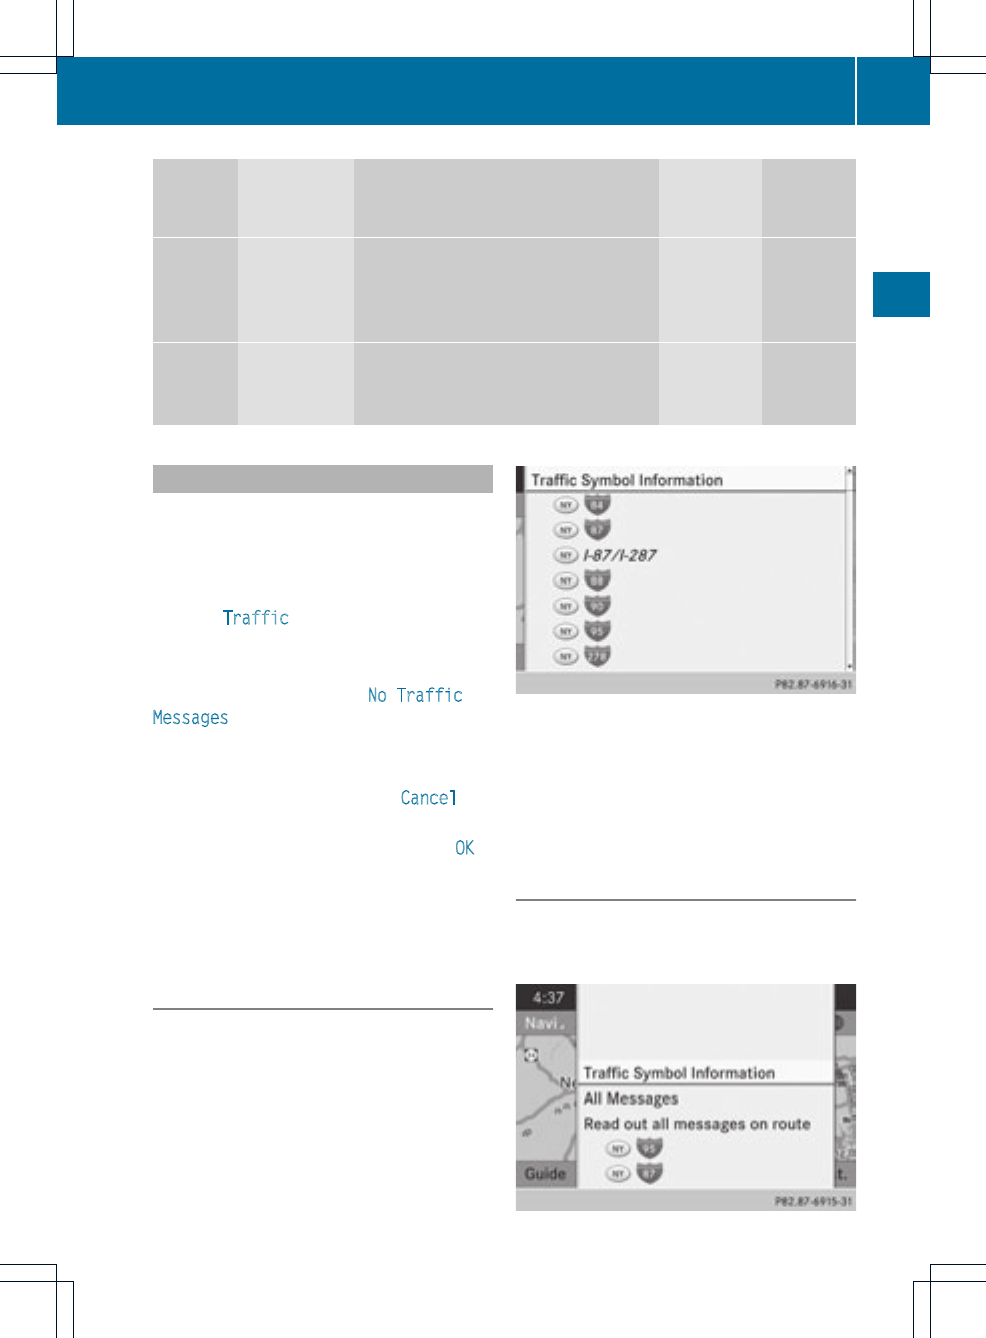
Icon Description Traffic reports in the map display List of
traffic
reports
Traffic
reports
Green
line with
arrows
Unimpeded
traffic flow
No delays
Only appears on the side of the road
(direction of travel) on which traffic
flow is unimpeded
(Not
available)
(Not
available)
Red line
with
arrows
Warning
message
Incident on road
Appears on the side of theroad
affected (direction of travel)
(Not
available)
(Not
available)
Displaying real-time traffic reports
XTo switch on navigation mode: press the
Øfunction button.
XTo show the menu: press Wthe COMAND
controller.
XSelect Traffic by turning cVd the
COMAND controller and press Wto
confirm.
If the dialog field shows the No Traffic
Messages message, this means that:
Rno traffic reports have been received yet.
Rno traffic reports are available.
XTo cancel the search: select Cancel and
press Wto confirm.
XTo close the report window: select OK
and press Wto confirm.
If traffic reports exist, a list is shown.
The content of the list varies depending on
whether route guidance is active or not.
List when route guidance is not active
The list shows all the roads, areas or regions
for which reports are available.
A traffic report may refer to an area or a
region, e.g. if visibility is impaired due to fog.
XTo read a traffic report: select a road,
area or region by turning cVd the
COMAND controller and press Wto
confirm.
List when route guidance is active
The first list shows the roads, areas and
regions that lie along the route and for which
traffic reports are available.
Traffic reports 91
Navigation
Z
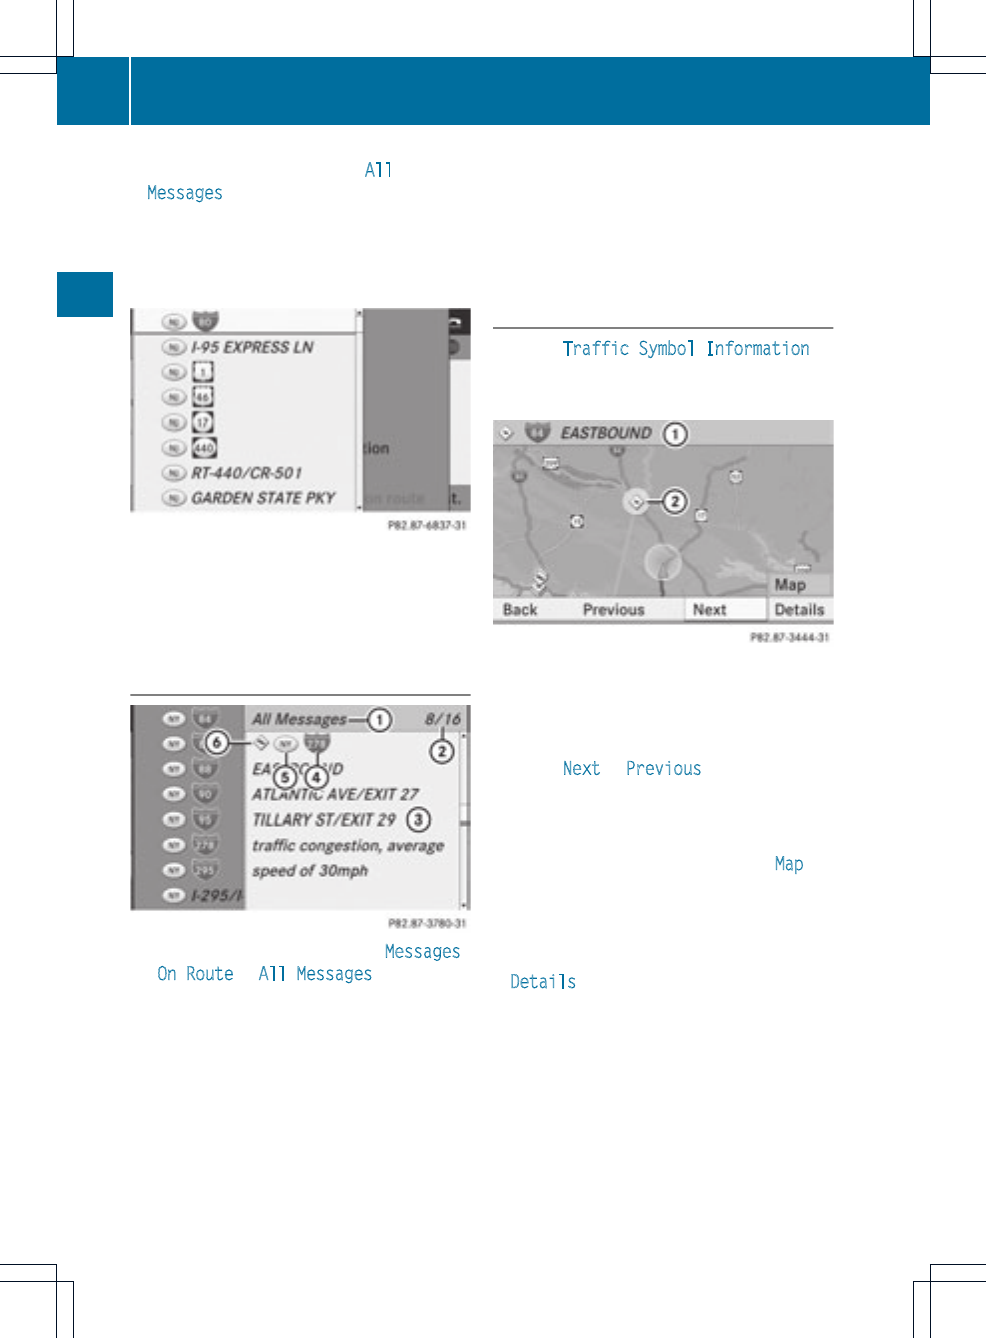
XShow all messages: select All
Messages by turning cVd the COMAND
controller and press Wto confirm.
You see a list of all roads, areas and regions
for which traffic reports are available, even
if the reports do not affect your route.
XTo show a traffic report: select a road,
area or region and press Wto confirm.
XTo close the list: slide XVY the COMAND
controller.
Example: traffic report
1Depending on your selection: Messages
On Route or All Messages
2Report 8 of 16 for the road affected
3Report text
4Road, area or region affected by traffic
reports
5Icon for state/province
6Icon for report type, e.g. traffic flow
message
XTo scroll within areportorto access
the next report: turn cVd the COMAND
controller.
XTo return to the report: slide XVY the
COMAND controller.
Displaying traffic reports on the map
XSelect Traffic Symbol Information by
turning cVd the COMAND controller and
press Wto confirm.
Traffic symbol informationonthe map (example)
:Affected roads with indication of direction
;Icon for report type, e.g. traffic flow
message
XSelect Next or Previous by turning cVd
the COMAND controller and press Wto
confirm in order to continue highlighting
traffic icons.
XTo change the map scale: select Map by
sliding ZV the COMAND controller and
press Wto confirm.
You can now zoom in or out of the map.
XTo show the detailed view: select
Details and press Wto confirm.
92 Traffic reports
Navigation

Details on trafficsymbolinformation (example)
XTo close the detailedview: slide XVY the
COMAND controller.
Reading out traffic reports on the
route
Introduction
The read-aloud function is only available while
route guidance is active. It reads out traffic
reports affecting the current route. You can
set the language (Ypage 45) and the text
reader speed (Ypage 42).
You can start the text reader function
manually or set it to automatic.
Starting the text reader function
manually
XTo switch on navigation mode: press the
Øfunction button.
XTo show the menu: press Wthe COMAND
controller.
XSelect TMC by turning cVd the COMAND
controller and press Wto confirm.
XSelect Read out all messages on
route and press Wto confirm.
COMANDreads out the reports in sequence.
iIf there are no reports for the route, the
Read out all messages on route menu
item is shown in gray and cannot be
selected.
XTo switch off the read-aloud function:
select Cancel Read-Aloud Function and
press Wto confirm or press the 8
button.
COMAND reads the currentreport aloud
and then exits the read-aloud function.
Automatic read-aloud function
XTo switch on navigation mode: press the
Øfunction button.
XTo show the menu: press Wthe COMAND
controller.
XSelect Navi by sliding ZV and turning
cVd the COMAND controller and press
Wto confirm.
XSelect Read Traffic Messages
Automatically and press Wto confirm.
Depending on the previous state, switch
the option on Oor off ª.
Recalculating the route dynamically
The route types Dynamic Route and
Dynamic Route Only After
Request(Ypage 52) take all relevant traffic
messages into accountwhen calculating a
route.
If you have set the route type Dynamic
Route, COMAND guides you on the updated
route to your destination.
If you have set the route type Dynamic
Route Only After Request, a prompt
appears. You can decide whether to accept
the route suggested by COMAND, or continue
with the original route.
Traffic reports 93
Navigation
Z
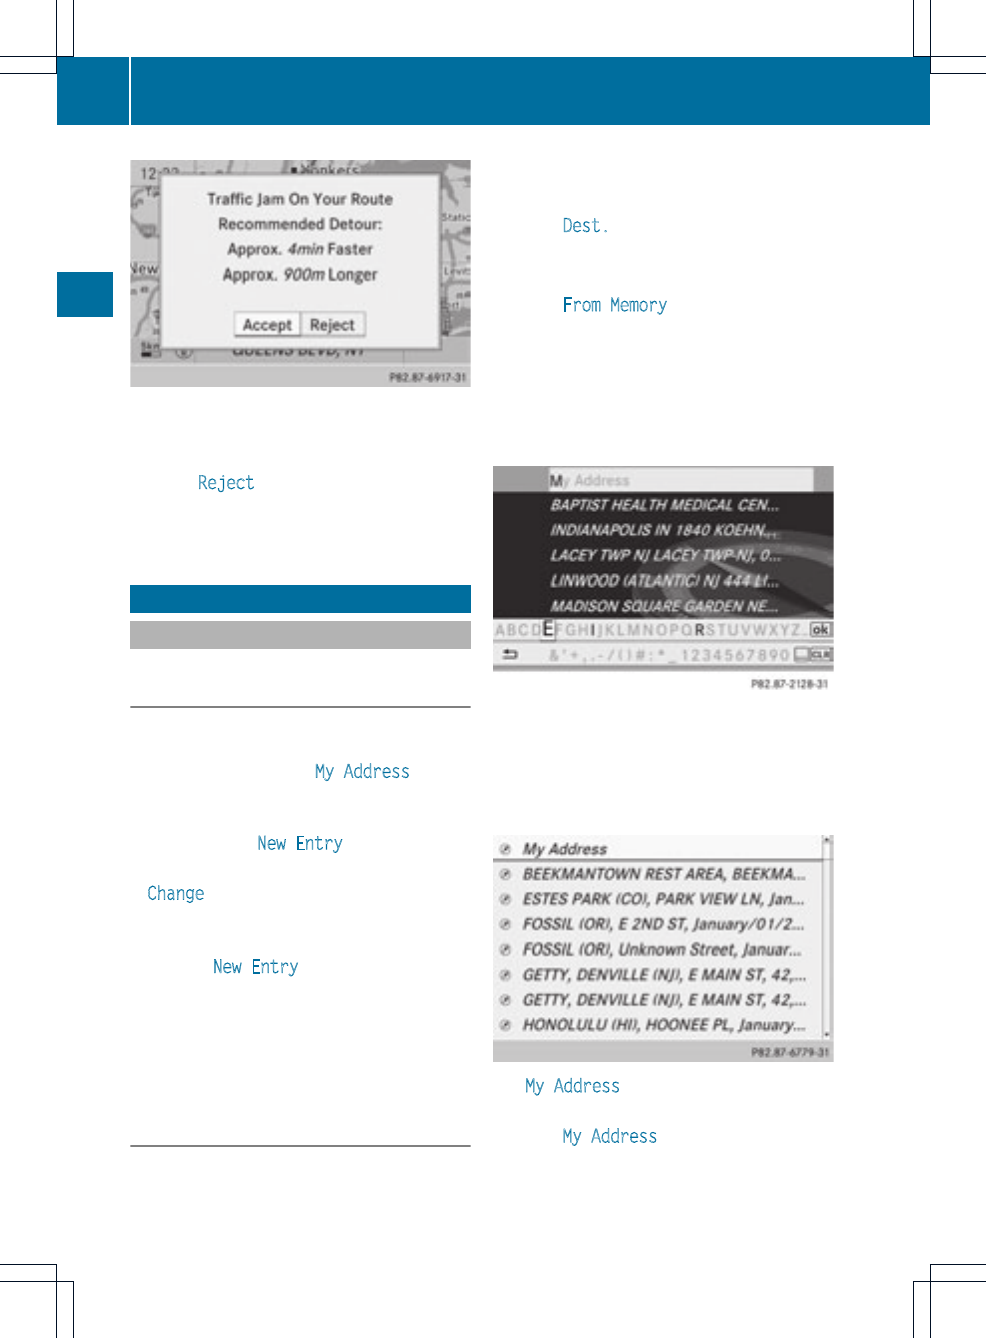
XTo accept the suggested route: press
Wthe COMAND controller.
XTo continue along the original route:
select Reject by turning cVd the
COMAND controller and press Wto
confirm.
Destination memory
Home address (My address)
Entering the home address via address
entry
XInitially proceed as describedinthe
"Adopting an address book entry as a home
address" and confirm My Address by
pressing W.
XTo enter the home address for the first
time: confirm New Entry by pressing W.
XTo change the home address: select
Change in the menu showing the home
address by turning cVd the COMAND
controller and press Wto confirm.
XConfirm New Entry by pressing W.
XIn both cases, enter the home address as a
destination, e.g. as a city, street and house
number (Ypage 54). Then, save the home
address (Ypage 57).
Adopting an address book entry as a
home address
XTo switch on navigation mode: press the
Øfunction button.
XTo show the menu: press Wthe COMAND
controller.
XSelect Dest. in the navigation system
menu bar by turning cVd the COMAND
controller and pressing Wto confirm.
XSelect From Memory and press Wto
confirm.
You will see the destination memory list
either with the character bar (option 1) or
as a selection list (option 2).
Option 1: destination memory list with
character bar
XSlide ZV the COMAND controller
repeatedly until the destination memory
list appears as a selection list.
Option 2: destination memory list as
selection list
The My Address entry is listed as the first
entry in the destination memory.
XSelect My Address by turning cVd the
COMAND controller and press Wto
confirm.
94 Destination memory
Navigation
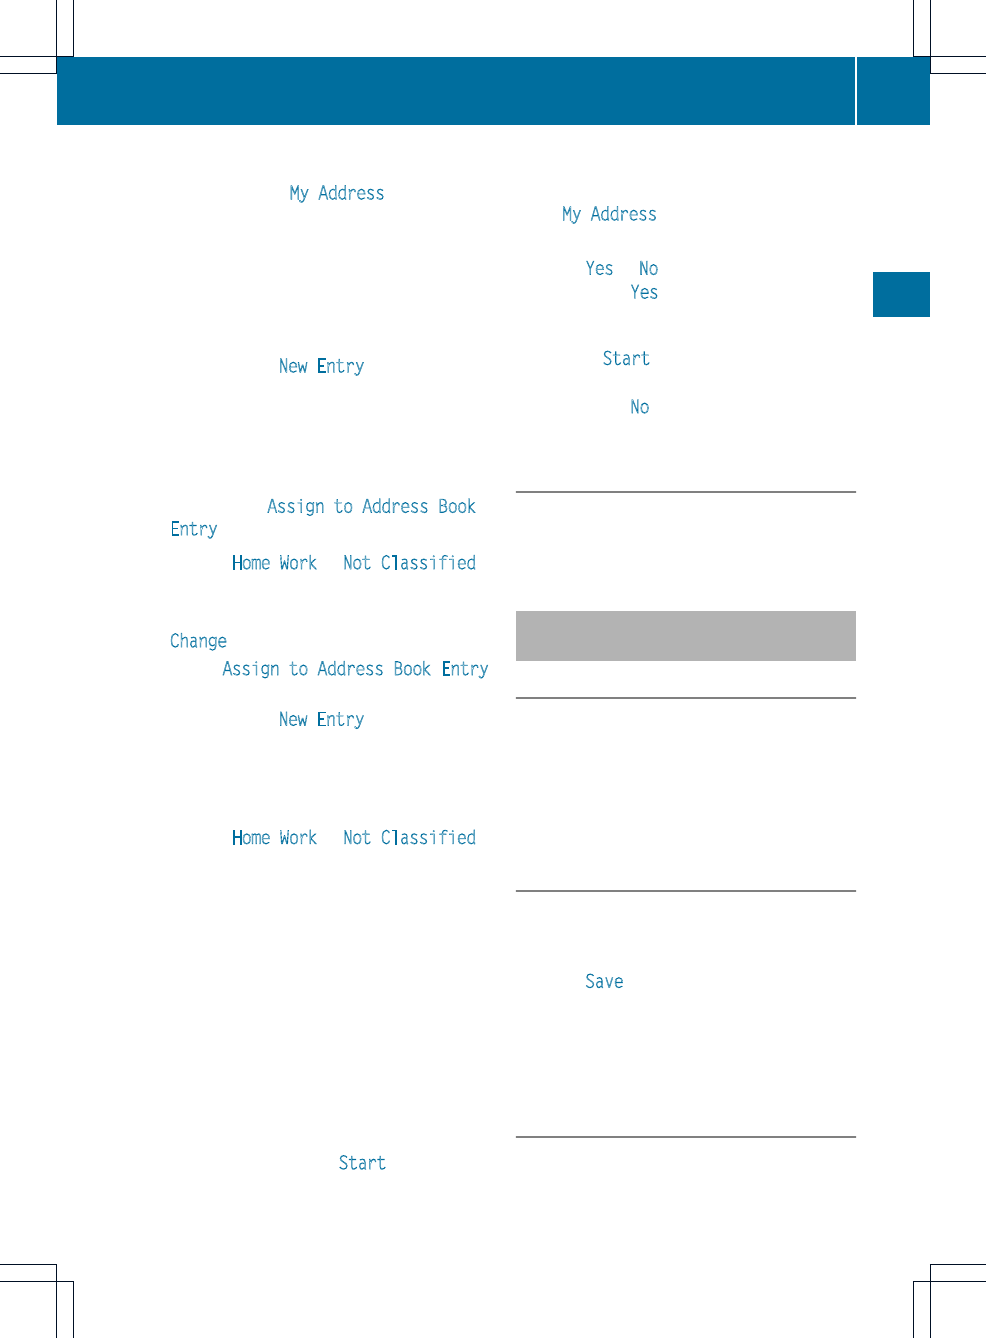
iIf you have not yet entered any
characters, the My Address entry is
automatically highlighted in the selection
list.
If no home address has been stored yet, you
can now assign an address book entry. If a
home address already exists, it is displayed
and you can alter it.
iIf you select New Entry, you are also
offered the option of entering the home
address for the first time. You can then
save the home address withouthaving to
start route guidance.
XTo enter thehome address for thefirst
time: select Assign to Address Book
Entry and press Wto confirm.
XChoose Home,Work or Not Classified
and press Wto confirm.
XTo change the home address: select
Change and press Wto confirm.
XSelect Assign to Address Book Entry
and press Wto confirm.
iIf you select New Entry, you are also
offered the optionofchanging the home
address by entering an address. You can
then save the home address without having
to start route guidance.
XChoose Home,Work or Not Classified
and press Wto confirm.
In both cases, you will see the address book
either with the character bar or as a
selection list.
XTo select an address book entry:
proceed as described in the "Searching for
an address book entry" section
(Ypage 136).
XTo confirm the selection: press Wthe
COMAND controller.
If no home address has been stored,
COMAND saves the entry. You will see a
message and then the address menu with
the selected address. Start is highlighted
automatically.
If a home address has already been stored,
you will see a prompt asking you whether
the My Address entry should be
overwritten.
XSelect Yes or No and press Wto confirm.
If you select Yes, COMAND overwrites the
destination. You will see a message and
then the address menu with the selected
address. Start is highlighted
automatically.
If you select No, the list will appearagain.
Selecting the home address for route
guidance
XProceed as described in the "Selecting a
destination from the destination memory"
section (Ypage 60).
Storing adestination in the
destination memory
Notes
This function also stores the destination in
the address book.
When the address book is full, no destinations
can be saved in the destination memory. You
must first delete address book entries
(Ypage 137).
After destination entry
XThe destination has been entered and is
shown in the address entry menu
(Ypage 57).
XSelect Save by sliding VÆand turning
cVd the COMAND controller and press
Wto confirm.
You can now selectstorage options
(Ypage 96).
During route guidance
XTo show the menu: press Wthe COMAND
controller.
Destination memory 95
Navigation
Z
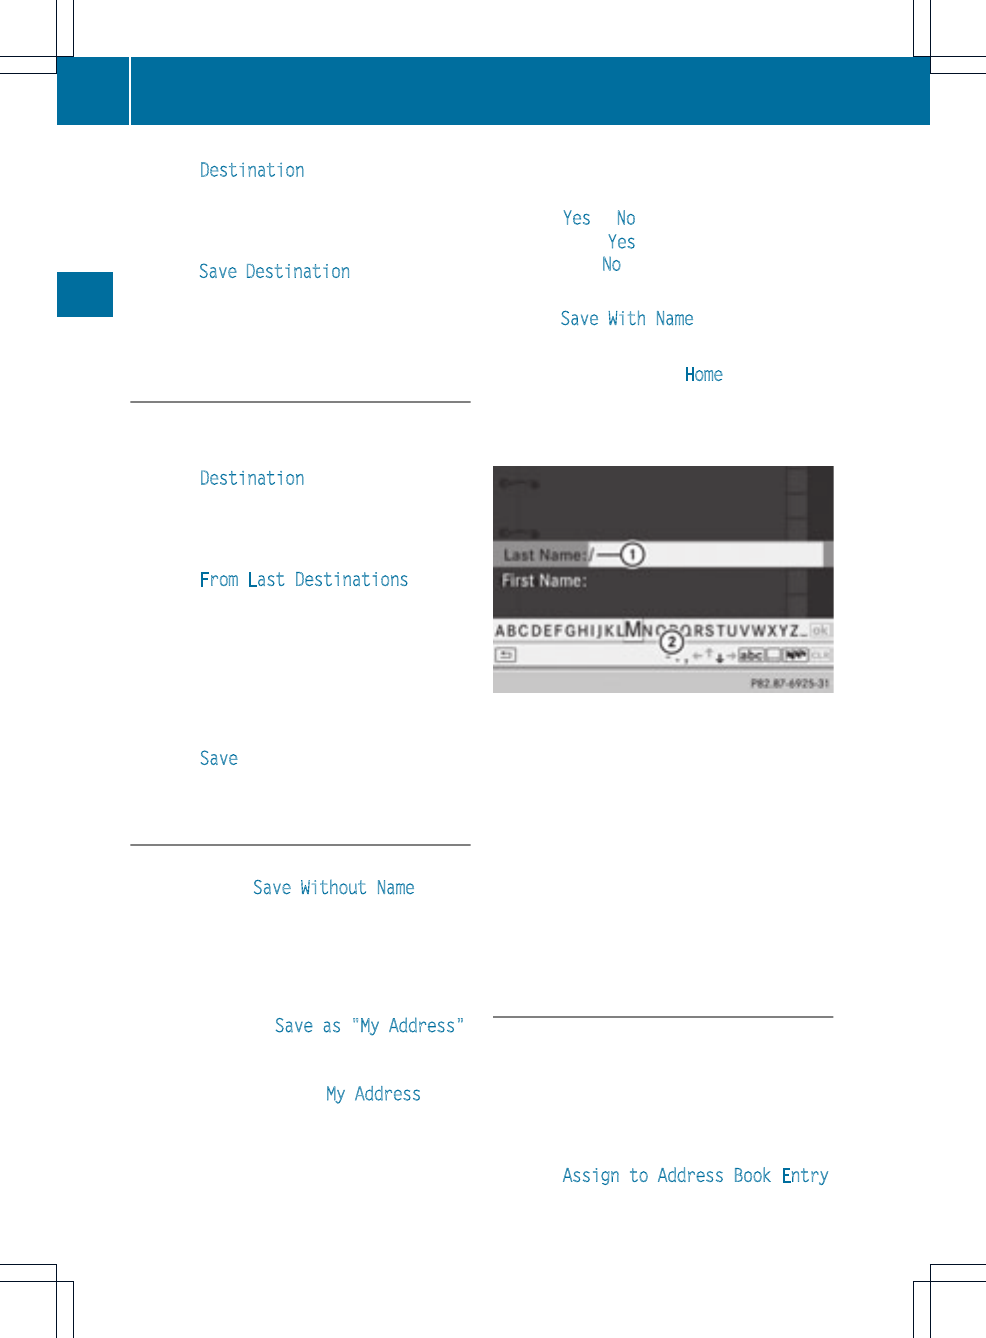
XSelect Destination in the navigation
system menu barby turning cVd the
COMAND controller and pressing Wto
confirm.
XSelect Save Destination and press Wto
confirm.
You can now select storage options
(Ypage 96).
Fromthe listofprevious destinations
XTo show the menu: press Wthe COMAND
controller.
XSelect Destination in the navigation
systemmenu bar by turning cVd the
COMAND controller and pressing Wto
confirm.
XSelect From Last Destinations and
press Wto confirm.
The list of last destinations appears.
XSelect a destination by turning cVd the
COMAND controller and press Wto
confirm.
The destination address is shown.
XSelect Save and press Wto confirm.
You can now select storage options.
Selecting storing options
XTo save the destination without a
name: select Save Without Name and
press Wto confirm.
COMAND stores the destination in the
destination memory and uses the address
as the destination name.
XTo save the destination as My
Address: select Save as "My Address"
and press Wto confirm.
COMAND stores the destination in the
destination memory as My Address. If the
selected address book entry already
contains address data that can be used for
navigation (Licon), a prompt will appear
asking whether you wish to overwrite the
existing data.
XSelect Yes or No and press Wto confirm.
If you select Yes, the entry is overwritten.
If you select No, the process will be aborted.
XTo save the destination with a name:
select Save With Name and press Wto
confirm.
XSelect a category, e.g. Home, and press W
to confirm.
The input menu appears with data fields
and the character bar.
Example: saving a destination with a name
:Selected data field with cursor
;Character bar
XProceed as described under "Entering
characters using the character bar" in the
"Entering characters in navigation mode
(entering a city)" section (Ypage 31).
XThen, select ¬and press Wto confirm.
COMAND stores the destination under the
name entered.
Assigning adestination to an address
book entry
An address with complete address data that
is suitable for navigation can be assigned to
a pre-existing address book entry. You can
then laterstartroute guidance to this address
straight from the address book
(Ypage 139).
XSelect Assign to Address Book Entry
and press Wto confirm.
96 Destination memory
Navigation
XSelect a category, e.g. Home, and press W
to confirm.
You will see the address bookeitherwith
the character bar or as a selection list.
XTo select an address book entry:
proceed as described in the "Searching for
an address book entry" section
(Ypage 136).
COMAND stores the data if the address
book entry selected does not yet contain
navigable address data.
If the selected address book entry already
contains navigable address data, a prompt
will appear asking whether you wish to
overwrite the existing data.
XSelect Yes or No and press Wto confirm.
If you select Yes, COMAND stores the data.
Deleting adestination or the home
address from thedestination memory
XTo switch on navigation mode: press the
Øfunction button.
XTo show the menu: press Wthe COMAND
controller.
XSelect Destination in the navigation
system menu bar by turning cVd the
COMAND controller and pressing Wto
confirm.
XSelect From Memory and press Wto
confirm.
You will see the destination memory list
either with the character bar (option 1) or
as a selectionlist (option 2).
XOption 1: destination memory list with
character bar: proceed as described in the
"Entering characters using the character
bar" section (Ypage 31).
XOption 2: destination memory list as
selection list: selectadestination by
turning cVd the COMAND controller and
press Wto confirm.
You see the address data of the selected
entry.
XSelect Delete and press Wto confirm.
Aprompt appears asking whetheryou wish
to delete the destination.
XSelect Yes or No and press Wto confirm.
If you select Yes, COMAND deletes the
destination.You will see amessage to this
effect.
If you select No, the process will be
canceled.
iIf the navigable address data for the
destination being deleted is also assigned
to an address book entry, COMAND will
also delete this data from there. If the
corresponding address book entry does
not contain any further data, such as
telephone numbers, COMAND deletes the
entire address book entry.
Previous destinations
Introduction
COMAND automatically stores the previous
destinations for which the route calculation
has been started. If the memory is full,
COMAND deletes the oldest destination. You
can also save a destination from the list of
previous destinations in the destination
memory. It will be stored there permanently.
Storing adestination permanently in
the destination memory
XProceed as described in the "From the list
of previous destinations" section
(Ypage 96).
Previous destinations 97
Navigation
Z
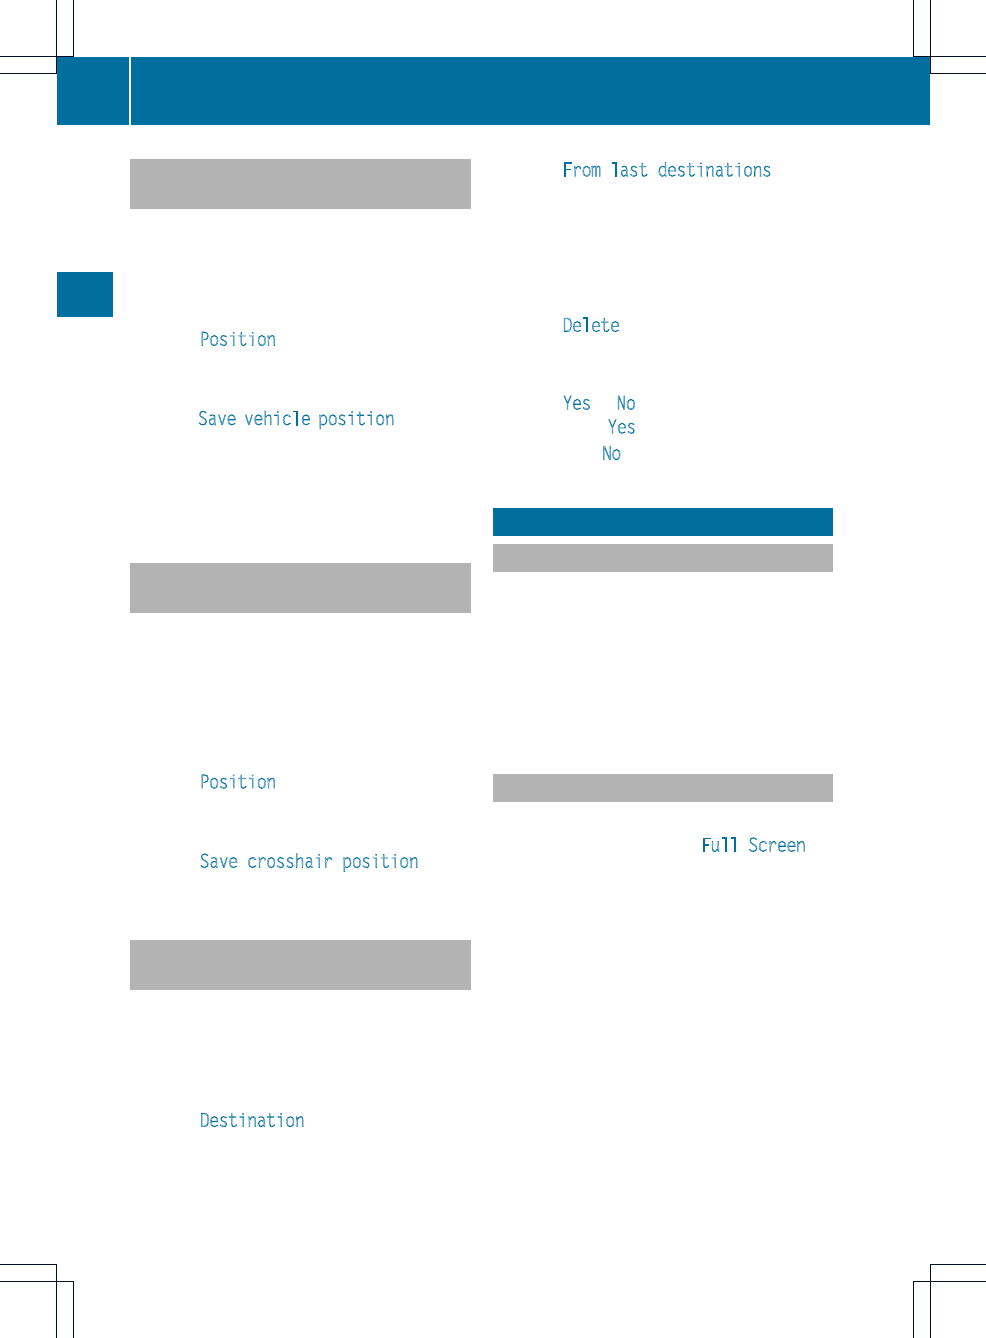
Storing the vehicle position in the list
of previous destinations
XTo switch on navigation mode: press the
Øfunction button.
XTo show the menu: press Wthe COMAND
controller.
XSelect Position in the navigation system
menu bar by turning cVd the COMAND
controller and press Wto confirm.
XSelect Save vehicle position and press
Wto confirm.
COMAND stores the current vehicle
position as a destination in the list of
previous destinations.
Storing the crosshair position in the
list of previous destinations
Acrosshair appears on the map if you have
moved the map manually.You can store the
crosshair position as a destination in the list
of previous destinations.
XTo show the menu: press Wthe COMAND
controller.
XSelect Position in the navigation system
menu bar by turning cVd the COMAND
controller and press Wto confirm.
XSelect Save crosshair position and
press Wto confirm.
Deleting one of the previous
destinations
XTo switch on navigation mode: press the
Øfunction button.
XTo show the menu: press Wthe COMAND
controller.
XSelect Destination in the navigation
system menu bar by turning cVd the
COMAND controller and pressing Wto
confirm.
XSelect From last destinations and
press Wto confirm.
The list of last destinationsappears.
XSelect the desired destination and press
Wto confirm.
The destination address appears.
XSelect Delete and press Wto confirm.
Aprompt appears asking whetherthe entry
should be deleted.
XSelect Yes or No and press Wto confirm.
If you select Yes, the entry is deleted.
If you select No, the process will be aborted.
Map operation and settings
Note
Company logos displayed on the map are
trademarks of the respective companies and
used solely for the purpose of indicating the
location of these companies. The use of such
logos on the map does not indicate approval
of, support of or advertising by these
companies for the navigation system itself.
Setting the map scale
XTo hide the menu: slide ZV the COMAND
controller and, when the Full Screen
menu item is shown, press W.
XTo call up the scale bar: as soon as you
turn cVd the COMAND controller, scale
bar =appears.
XTurn cVd until the desired scale is set.
98 Map operation and settings
Navigation
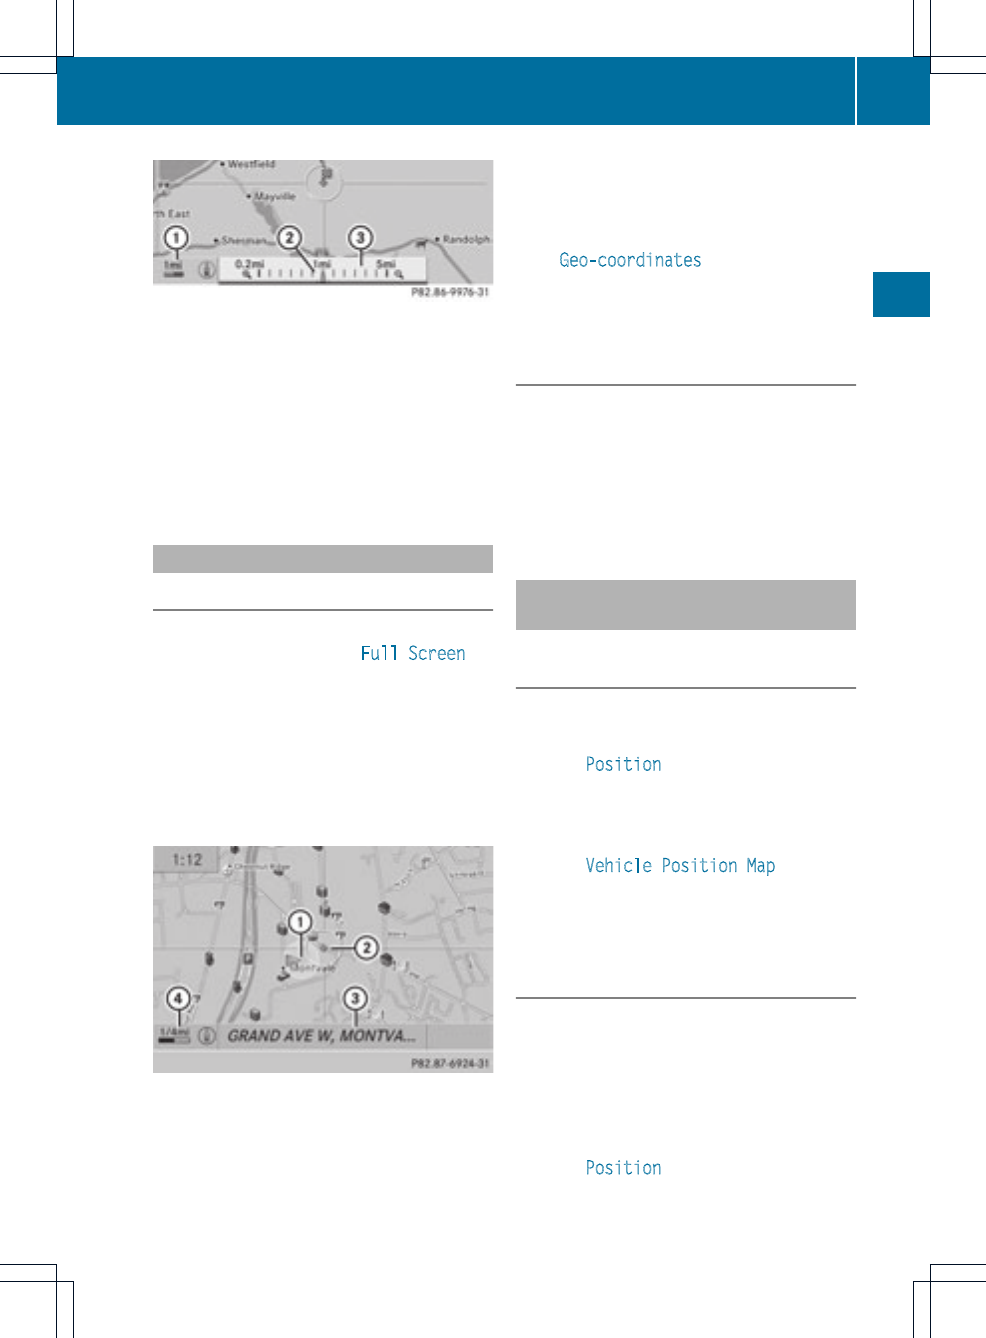
:Set map scale as a number with unit
;Currently set map scale as indicated by
the needle on the scale bar
=Map scale
Unit of measurement :in the COMAND
display depends on the selection made for the
instrument cluster (see the vehicle
Operator's Manual).
Moving the map
Showing the crosshair
XTo hide the menu: slide ZV the COMAND
controllerand, when the Full Screen
menu itemis shown, press W.
XTo scroll the map: slide XVY,ZVÆor
aVb the COMAND controller.
Acrosshair appears on the map. If you slide
it again, the map moves in the
corresponding direction under the
crosshair.
Map with crosshair
:Current vehicle position
;Crosshair
=Details of the crosshair position
?Map scale selected
Display =may be the name of a street, for
example, provided the digital map contains
the necessary data.Alternatively, it may show
the geo-coordinate position of the crosshair
if the Geo-coordinates display is switched
on (Ypage 102).
Hiding the crosshair and centering the
mapon the vehicle position or
destination
XPress the %back button twice.
The crosshair disappears and the map is
set to the vehicle position.
or
XSet the map to the vehicle position; see the
explanation below.
Centering the map on the vehicle or
destination position
Centering the map on the vehicle
position
XTo show the menu: press Wthe COMAND
controller.
XSelect Position in the navigation system
menu bar by sliding VÆand turning cVd
the COMAND controller and press Wto
confirm.
XSelect Vehicle Position Map and press
Wto confirm or, if the crosshair is shown,
press the %back button.
This hides the crosshair.
Centering on the destination
This function requires that a route to a
destination has been calculated. If the route
includes waypoints and an intermediate stop,
the map can also be set to these positions.
XTo show the menu: press Wthe COMAND
controller.
XSelect Position in the navigation system
menu bar by sliding VÆand turning cVd
Map operation and settings 99
Navigation
Z
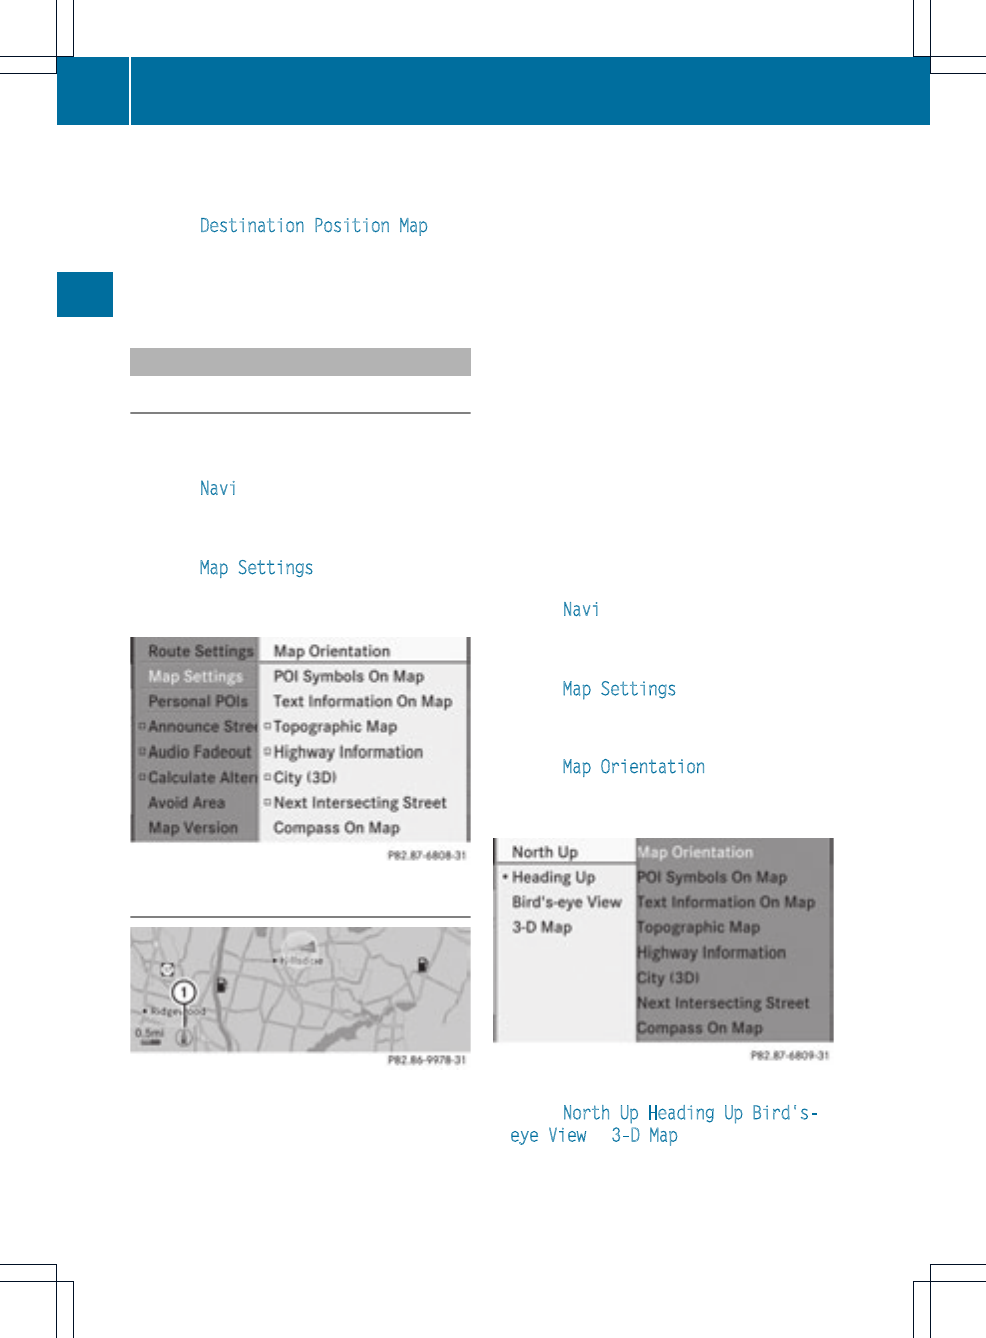
the COMAND controllerand press Wto
confirm.
XSelect Destination Position Map and
press Wto confirm.
The crosshair positionis set to the relevant
destination.
Map settings
Calling up the map settings menu
XTo show the menu: press Wthe COMAND
controller.
XSelect Navi in the main function bar by
sliding ZV and turning cVd the COMAND
controller and press Wto confirm.
XSelect Map Settings and press Wto
confirm.
The map settings menu appears.
Setting the map orientation
Map orientation
:Current map orientation
The following display modes are possible:
R0North orientation (the map view is
displayed so that north is always up).
R¤Orientation in the direction of travel (the
map is displayed so that the direction of
travel is always up; the orange point of the
icon points north).
R¤Bird's-eye view (the map is displayed so
that the direction of travel is always up; the
map projection reproduces the curvature
of the earth and the orange point of the icon
points north).
R¤3D map (the map is displayed so that
the heading is always up; from a scale of
1kmthe map displays elevation; the
orange point of the icon points north).
XTo show the menu: press Wthe COMAND
controller.
XSelect Navi in the main function bar by
sliding ZV and turning cVd the COMAND
controller and press Wto confirm.
XSelect Map Settings and press Wto
confirm.
The map settings menu appears.
XSelect Map Orientation and press Wto
confirm.
A#dot indicates the current setting.
Map orientation menu
XSelect North Up,Heading Up,Bird's-
eye View or 3-D Map by turning cVd the
100 Map operation and settings
Navigation
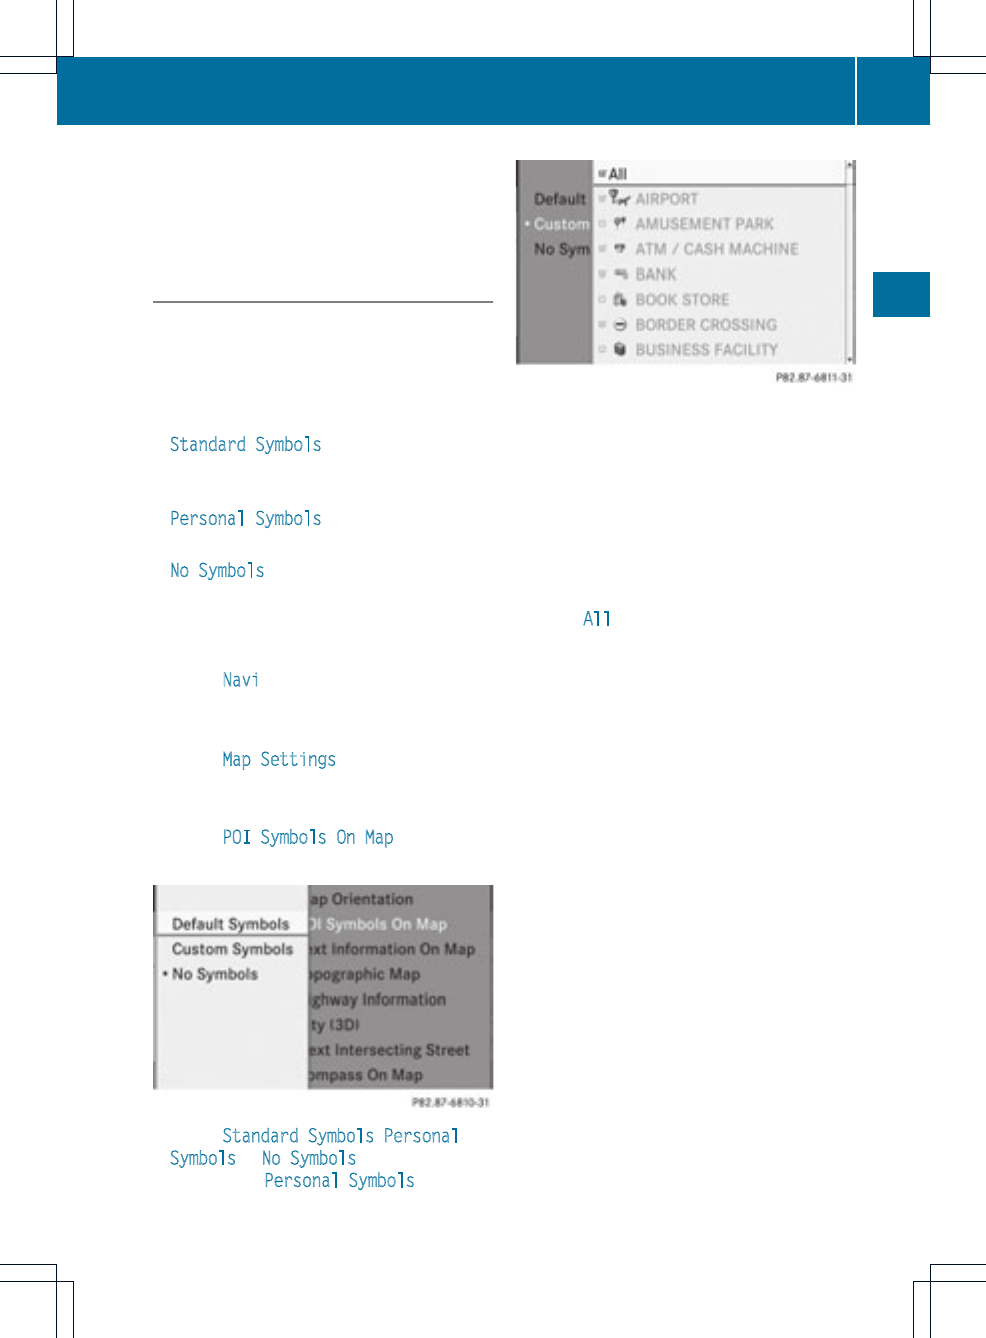
COMAND controller and press Wto
confirm.
A#dot indicates the new setting.
Setting the pointofinterest icons on the
map
You can set the points of interest you wish to
have displayed as symbols on the map. Points
of interest are, for example, gas stations,
hotels, cinemas and restaurants.
The following settings are possible:
RStandard Symbols
Symbol display determined by the factory
settings.
RPersonal Symbols
You can determine the symbols yourself.
RNo Symbols
The map does not show any symbols.
XTo show the menu: press Wthe COMAND
controller.
XSelect Navi in the main function bar by
sliding ZV and turning cVd the COMAND
controller and press Wto confirm.
XSelect Map Settings and press Wto
confirm.
The map settings menu appears.
XSelect POI Symbols On Map and press
Wto confirm.
XSelect Standard Symbols,Personal
Symbols or No Symbols.
If you select Personal Symbols, the list of
points of interest appears.
XTo switch the symbol display on/off:
select a point of interest by turning cVd
the COMAND controller and press Wto
confirm.
Depending on the previous state of the
symbols, they will either be shown Oor
hidden ª.You can switch on the symbol
displays for more than one point of interest.
XTo switch all personal symbols on/off:
select All and press Wto confirm.
Depending on the previous state of the
personal symbols, they will either be shown
Oor hidden ª.
If the function is switched on O, the
individual points of interestare grayed out
and the previously selected settings remain
unchanged.
If the function is switched off ª, you can
re-select the individual points of interest.
They show the most recently selected
settings.
iThe list shows all symbols that are
contained on the digital map across all
countries. However, not all points of
interest are available in all countries. As a
result, certain point of interest symbols
may not be displayed on the map, even if
the symbol display is switched on.
XTo exit the menu: press the %back
button.
Map operation and settings 101
Navigation
Z

Map information in the display
During route guidance, you can have map
information shownatthe bottom edge of the
display.
Showing text information
XTo show the menu: press Wthe COMAND
controller.
XSelect Navi in the main function bar by
sliding ZV and turning cVd the COMAND
controller and press Wto confirm.
XSelect Map Settings and press Wto
confirm.
The map settings menu appears.
XSelect Text Information On Map and
press Wto confirm.
A#dot indicates the current setting.
XSelect Arrival Time / Distance,
Current Street,Geo-coordinates or
None and press Wto confirm.
XTo exit the menu: slide XVY the COMAND
controller.
Arrival time/distance to the destination
Arrival time/distance display switched on
:Icon for destination
;Distance to the destination
=Icon for estimated time of arrival
?Estimated time of arrival
You can only see this display during route
guidance. While scrolling the map
(Ypage 61), you will see additional data, e.g.
road names, depending on the crosshair
position, if the digital map supports this data.
iDuring route calculation, or if the vehicle
is traveling on a non-digitized road, the
linear distance to the destination is shown.
In this case, the display will be grayed out.
Road display
Road display active
:Road names or numbers, e.g. for freeways
Geo-coordinate display
Geo-coordinate display active
:Current height above average sea level
(rounded)
;Current vehicle position: latitude
coordinates
=Current vehicle position: longitude
coordinates
?Number of GPS satellites currently being
used
There must be sufficient GPS reception for all
displays to be shown. If this is not the case,
the display will be grayed out. Height
display :may vary from the actual value,
because the navigation system uses the GPS
signals for the calculation.
102 Map operation and settings
Navigation
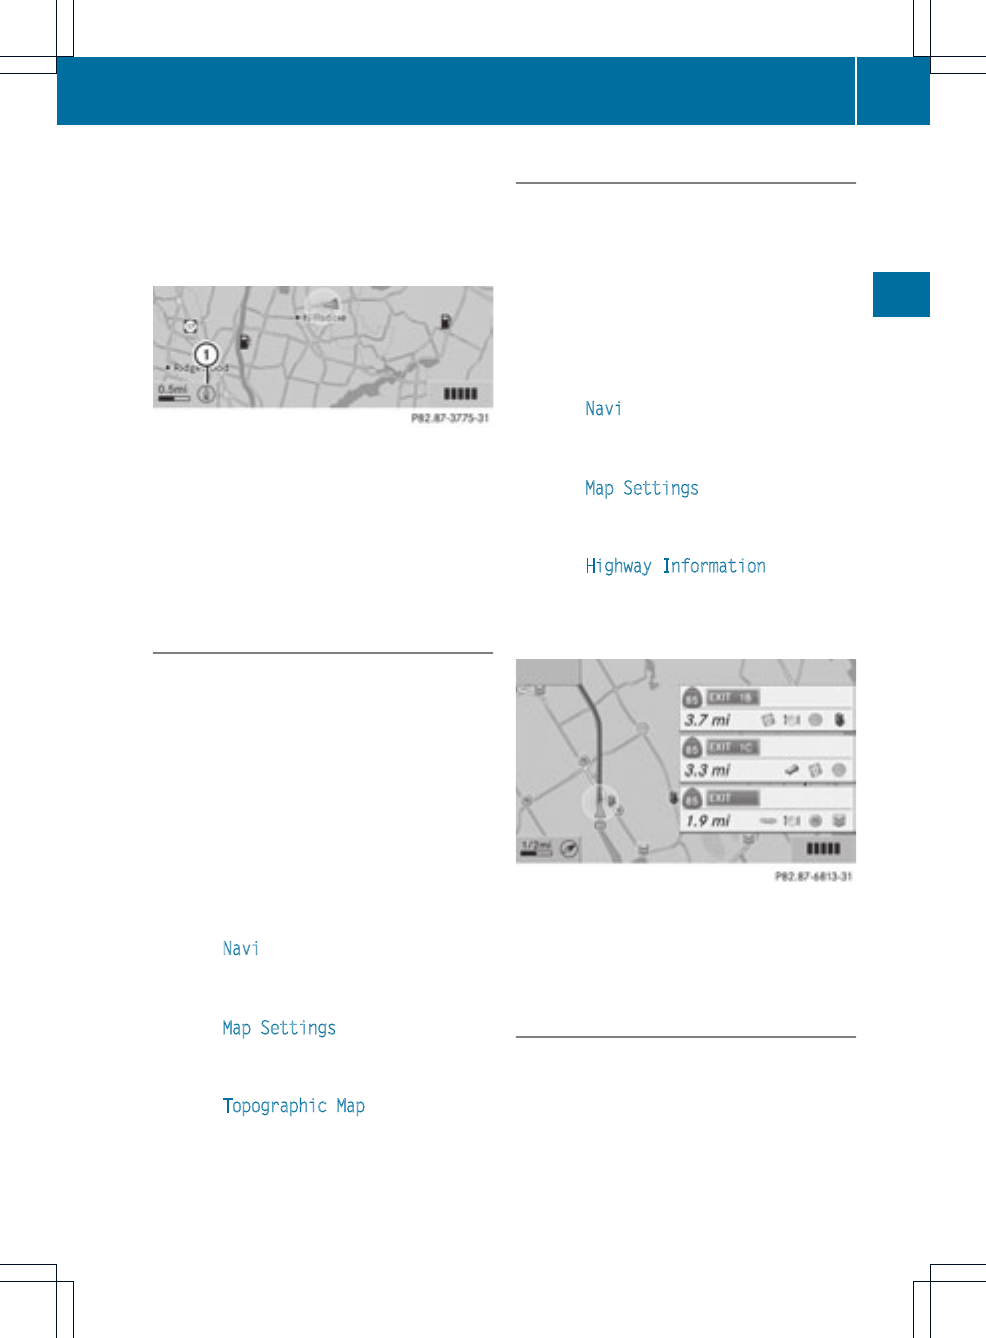
While scrolling the map (Ypage 61), you will
see the geo-coordinates of the crosshair
position.Height display :and number of
satellites used ?are not displayed.
"None" menu option
Display switched off
:Current map orientation
iDuring the "Move map" function you can
see additional information depending on
the position of the crosshair, such as a road
name, if the digital map supports this data.
Switching the topographical map on/
off
The topographical map uses differentcolors
to depict elevation. The color key generally
reflects the topography's dominant
vegetation or the ground's perceived color
when seen from the air, for example:
Rgreen (grass) for lowland
Ryellow, brown (woodland) for hills
Rgray (stone) and white (snow) for
mountains.
XTo show the menu: press Wthe COMAND
controller.
XSelect Navi in the main function bar by
sliding ZV and turning cVd the COMAND
controller and press Wto confirm.
XSelect Map Settings and press Wto
confirm.
The map settings menu appears.
XSelect Topographic Map and press Wto
confirm.
Depending on the previous state, switch
the option on Oor off ª.
Freeway information
When driving on freeways, you can have the
nearest gas stations, rest areas, etc., as well
as your current distance from them, shown
on the right-hand side of the display.
XTo switch on navigation mode: press the
Øfunction button.
XTo show the menu: press Wthe COMAND
controller.
XSelect Navi in the main function bar by
sliding ZV and turning cVd the COMAND
controller and press Wto confirm.
XSelect Map Settings and press Wto
confirm.
The map settings menu appears.
XSelect Highway Information and press
Wto confirm.
Depending on the previous state, switch
the option on Oor off ª.
Example: freeway information
The entries show the number of the freeway
and freeway exits as well as their distance
from the vehicle's current position.
Switching the city model on/off
When the city model is switched on, the map
shows buildings as 3D models.
iThe city model is only shown for "Bird's-
eye view" or "3D map".
It is available for map scales 50 mand
100 m.
Map operation and settings 103
Navigation
Z
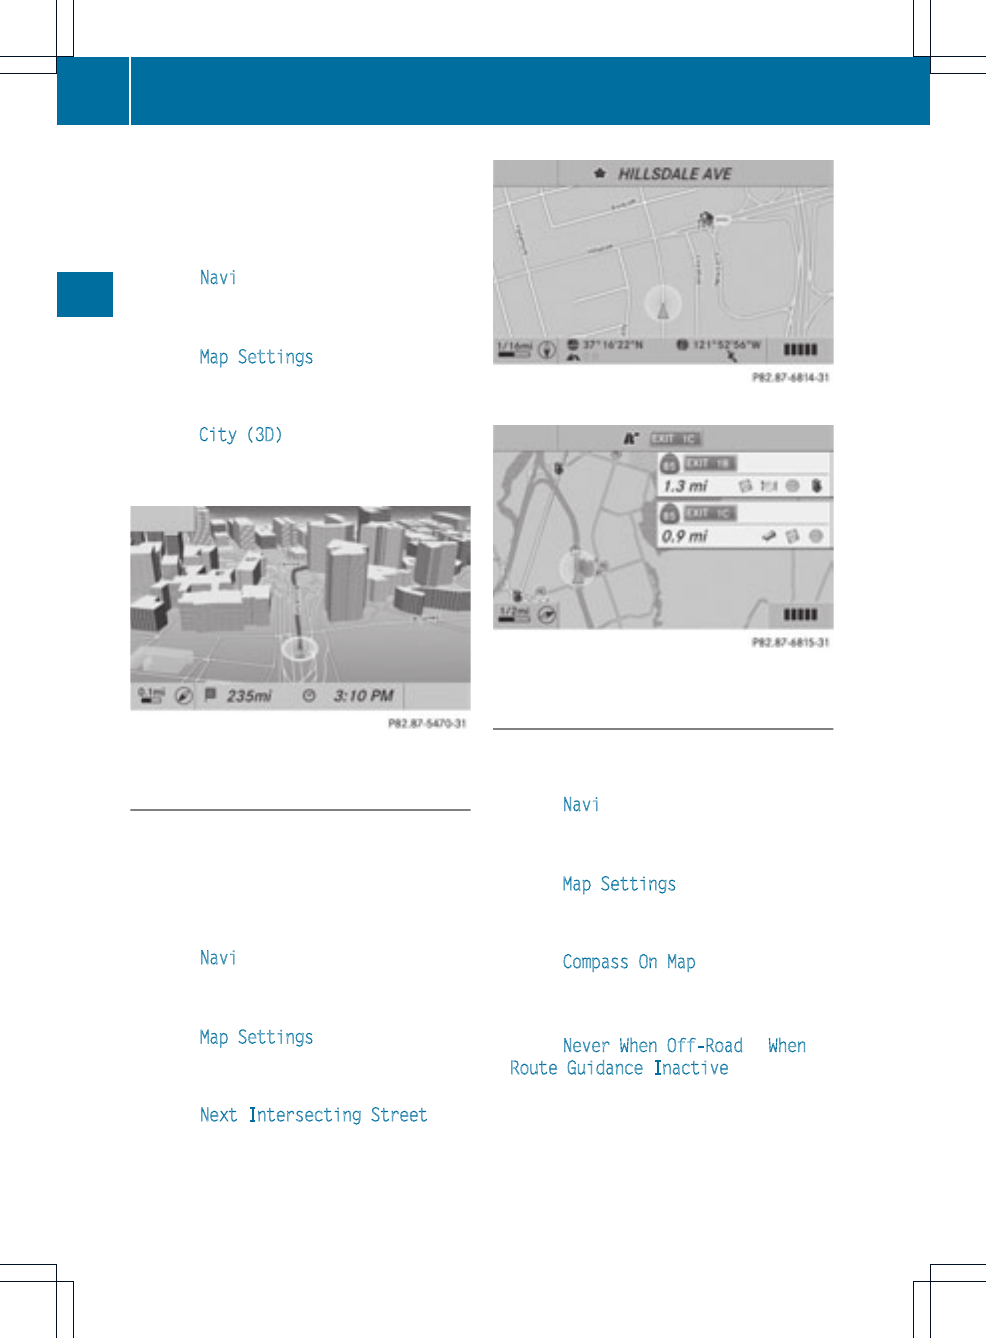
The data required for displaying buildings
is not available for all cities.
XTo show the menu: press Wthe COMAND
controller.
XSelect Navi in the main function bar by
sliding ZV and turning cVd the COMAND
controller and press Wto confirm.
XSelect Map Settings and press Wto
confirm.
The map settings menu appears.
XSelect City (3D) and press Wto confirm.
Depending on the previous state, switch
the option on Oor off ª.
Example: city model
Showing/hiding intersecting streets
If route guidance is inactive, intersecting
streets can be shown on the upper edge of
the display.
XTo show the menu: press Wthe COMAND
controller.
XSelect Navi in the main function bar by
sliding ZV and turning cVd the COMAND
controller and press Wto confirm.
XSelect Map Settings and press Wto
confirm.
The map settings menu appears.
XSelect Next Intersecting Street and
press Wto confirm.
Depending on the previous state, switch
the option on Oor off ª.
Intersecting street (example: city route)
Intersecting street (example: freeway route)
Coordinates on the map
XTo show the menu: press Wthe COMAND
controller.
XSelect Navi in the main function bar by
sliding ZV and turning cVd the COMAND
controller and press Wto confirm.
XSelect Map Settings and press Wto
confirm.
The map settings menu appears.
XSelect Compass On Map and press Wto
confirm.
Amenu appears.
XSelect Never,When Off-Road or When
Route Guidance Inactive and press W
to confirm.
The selected setting is accepted.
104 Map operation and settings
Navigation

Traffic information on the map
If you subscribe to the SIRIUS XM Satellite
Radio TrafficMessage Service, traffic
information can be displayed on the map. You
can select three categories for the display.
XTo switch the displays on/off: press W
the COMAND controller to show the menu.
XSelect Navi in the main function bar by
sliding ZV and turning cVd the COMAND
controller and press Wto confirm.
XSelect Traffic Information On Map and
press Wto confirm.
XSelect Incidents and/or Speed & Flow
and/or Free Flow and press Wto
confirm.
Depending on the previous state, switch
the option on Oor off ª.
Traffic information Display on the map
Traffic incidents Road sections are
illustrated with a
yellow line and
arrows =.
Speed &Flow Road sections are
illustrated with
yellow or red car
icons :.
Yellow car icons:
traffic jam; average
speed 25 – 45 mph
Red car icons: traffic
jam; average speed
5 – 20 mph
Free Flow Road sections are
illustrated with a
green line and
arrows ;.
:Speed &Flow
;Free Flow
=Traffic incidents
Additional settings
Avoiding an area
General information
COMAND makes it possible to avoid areas
you do not wish to drive through.
The calculated route may include an area to
be avoided if:
Ryour destination is located in such an area.
Rthe route uses roads that lead through an
area to be avoided.
iHighways within blocked areas are always
taken into consideration in the route
calculation.
XTo switch on navigation mode: press the
Øfunction button.
XTo show the menu: press Wthe COMAND
controller.
XSelect Navi in the main function bar by
sliding ZV and turning cVd the COMAND
controller and press Wto confirm.
XSelect Avoid Area and press Wto
confirm.
If you have not yet set an area to be
avoided, a menu appears (option 1).
If you have already set one or more areas
to be avoided, a list appears (option 2).
Additional settings 105
Navigation
Z
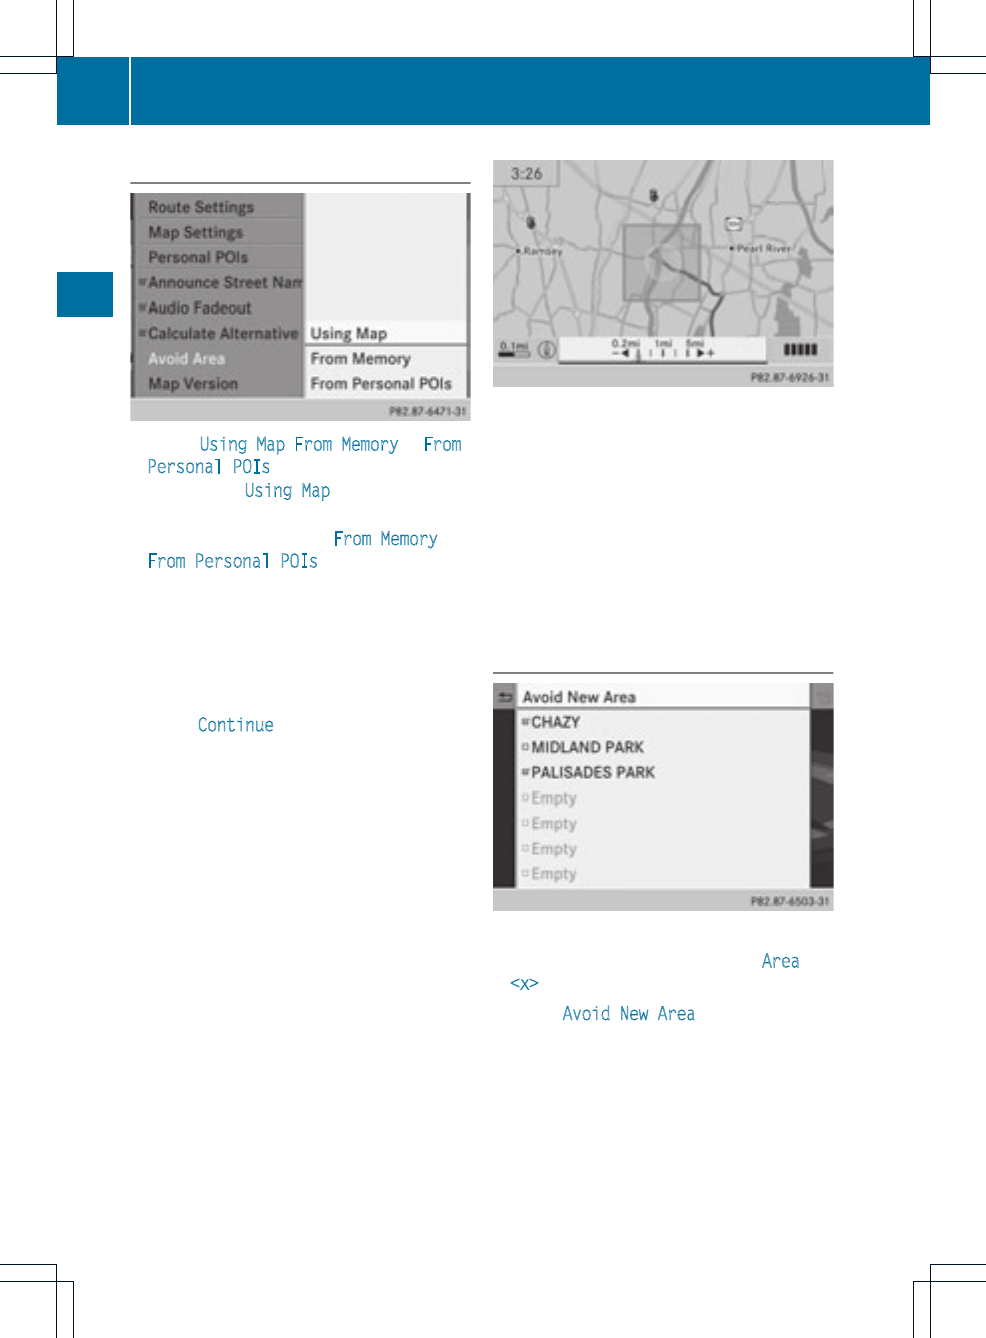
Option 1: the menu appears
XSelect Using Map,From Memory or From
Personal POIs and press Wto confirm.
If you select Using Map, the map with the
crosshair appears.
After choosing between From Memory or
From Personal POIs, either the
destination memory (Ypage 94) or the list
of categories for personal points of interest
appears (Ypage 75).
XChoose the destination or personal point of
interest and press Wto confirm.
XIf the destination address is displayed,
select Continue and press Wto confirm.
The map appears.
The crosshair marks the center of the area
that is to be avoided.
XTo move the map: slide XVY,ZVÆor
aVb the COMAND controller.
XTo set the map scale: as soon as you turn
cVd the COMAND controller, the scale bar
appears. Turning clockwise zooms out from
the map; turning counter-clockwise zooms
in.
XTurn cVd until the desired scale is set.
XTo apply a block: press Wthe COMAND
controller.
Ared square appears on the map.
XTo adjust the size of the square: turn
cVd the COMAND controller.
The square is enlarged or reduced.
XTo confirm the settings: press W.
The list appears. The previously selected
area to be avoided has been added and
activated.
XFollow the instructions listed under "Option
2: the list appears".
Option 2: the list appears
"Avoid area" list (example)
iAvailable list places are named Area
<x> and are shown in gray.
XSelect Avoid New Area by turning cVd
the COMAND controller and press Wto
confirm.
Amenu appears.
106 Additional settings
Navigation
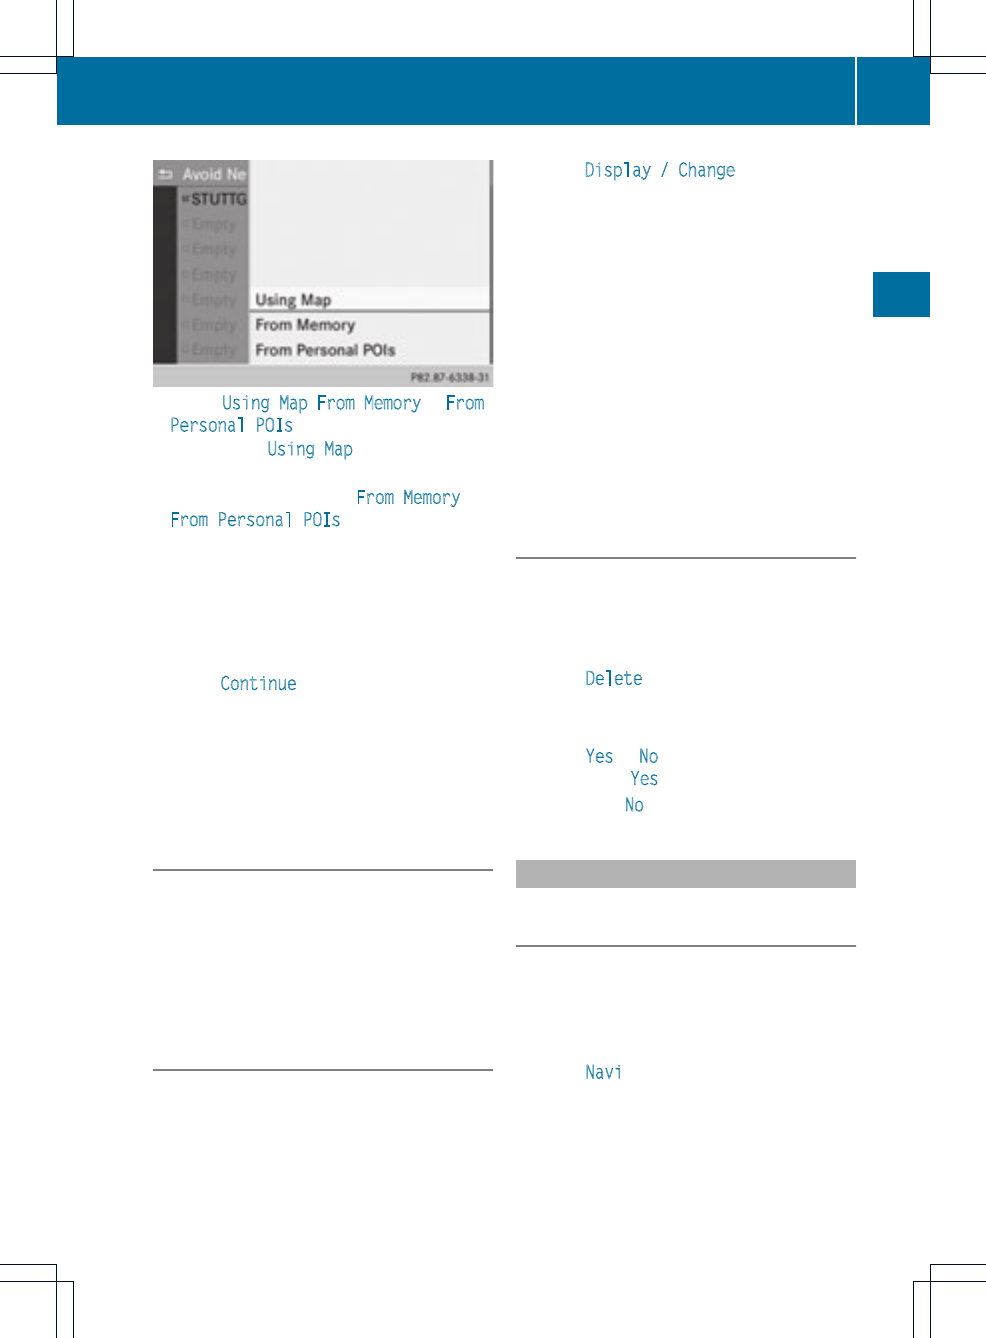
XSelect Using Map,From Memory or From
Personal POIs and press Wto confirm.
If you select Using Map, the map with the
crosshair appears.
After choosing between From Memory or
From Personal POIs either the
destination memory (Ypage 94) or the list
of categories for personal points of interest
appears (Ypage 75).
XChoose the destination or personal point of
interest and press Wto confirm.
XIf the destination address is displayed,
select Continue and press Wto confirm.
The map appears.
XProceed according to the instructions
under "Option 1: the menu appears" if you
wish to set a new area to be avoided in the
map.
Switching an avoidedarea on/off
XSelect an entry in the list by turning cVd
the COMAND controllerand press Wto
confirm.
The avoided area is switched on Oor off
ªdepending on the previous status.
Displaying and changing an avoided
area
XSelect an entry in the list by turning cVd
the COMAND controller.
XSelect by sliding VY the COMAND
controller and press Wto confirm.
XSelect Display / Change and press Wto
confirm.
The area to be avoided is indicated in the
map.
XTo change the location of the area: slide
the COMAND controller XVY,ZVÆor
aVb.
The area is moved on the map.
XTo adjust the size of the area: turn
cVd the COMAND controller.
The area is enlarged or reduced.
XTo confirm the change: press Wthe
COMAND controller.
The list appears and the change is entered.
Deleting aset area
XSelect an entry in the list by turning cVd
the COMAND controller.
XSelect by sliding VY the COMAND
controller and press Wto confirm.
XSelect Delete and press Wto confirm.
Aquery appears asking whether the entry
should be deleted.
XSelect Yes or No.
If you select Yes, the entry is deleted.
If you select No, the process will be aborted.
SIRIUS XM service
Displaying SIRIUS XM service
information
You can display the SIRIUS XM service
information.
XTo show the menu: press Wthe COMAND
controller.
XSelect Navi in the main function bar by
sliding ZV and turning cVd the COMAND
controller and press Wto confirm.
Additional settings 107
Navigation
Z
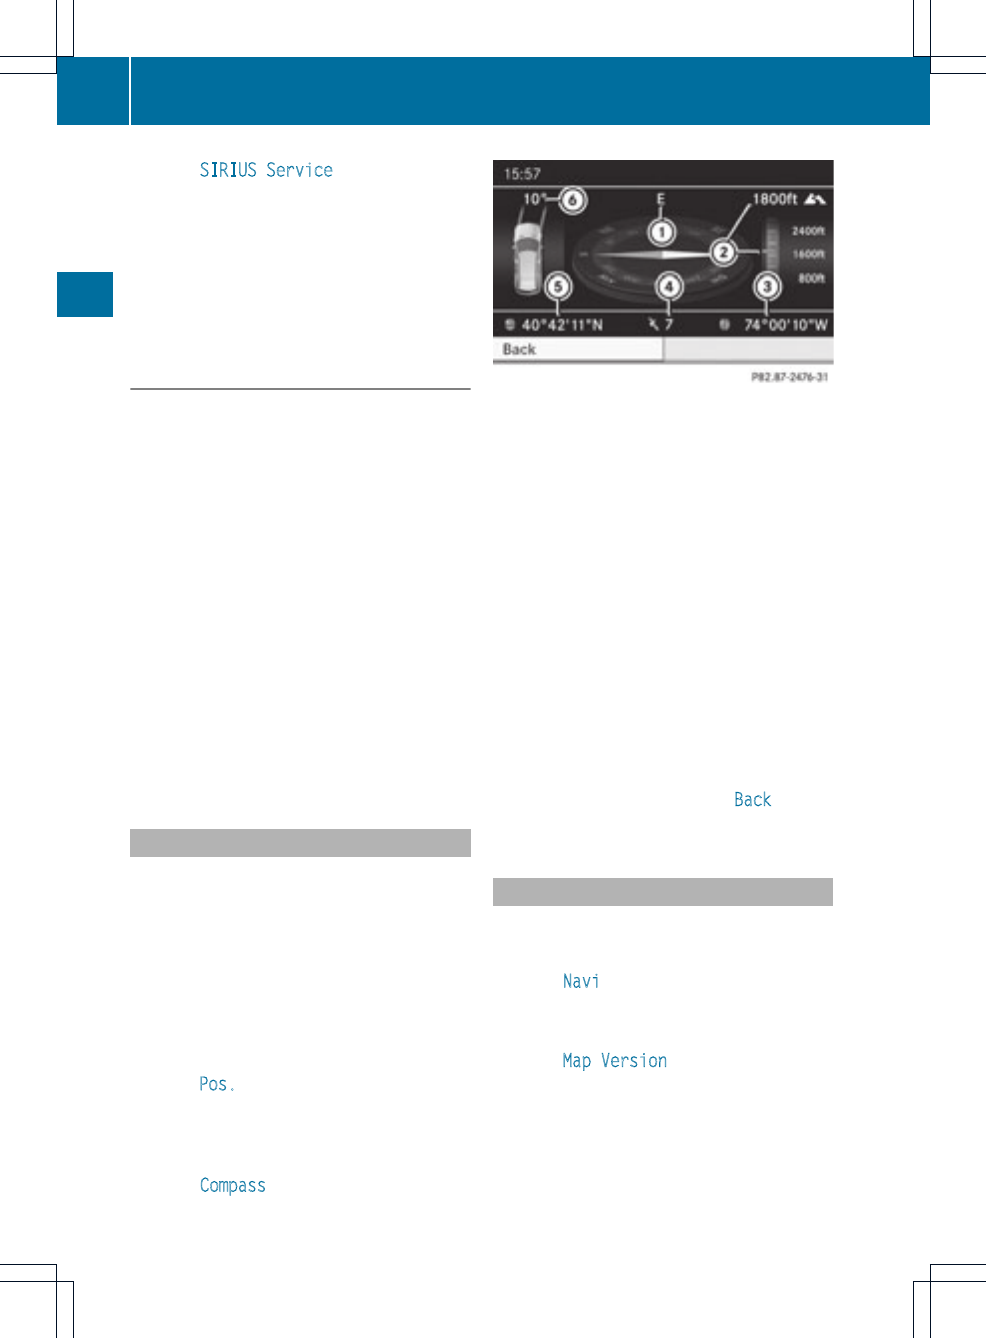
XSelect SIRIUS Service and press Wto
confirm.
The window on the right half of the display
shows the telephone number of the
provider (SIRIUS XM) and the serial number
of your service module for receiving traffic
messages.
Registering for the SIRIUS XM traffic
report service
XCall the traffic report provider's phone
number shown on the screen.
iYou can also have the satellite service
activated online.To do so, visit the SIRIUS
XM Radio website at
http://www.sirius.com (USA) or
http://www.siriuscanada.com
(Canada).
Once the connection has been established:
XFollow the instructions of the operator.
The activation process may take up to ten
minutes.
If registration is not included when
purchasing the system, your credit card
details will be required to activate your
account.
Compass function
In the compass view, you can see the current
direction of travel, the current height above
sea level and the coordinates of the vehicle
position, for example.
XTo switch on navigation mode: press the
Øfunction button.
XTo show the menu: press Wthe COMAND
controller.
XSelect Pos. in the navigation system menu
bar by sliding VÆand turning cVd the
COMAND controller and press Wto
confirm.
XSelect Compass and press Wto confirm.
Compass (example)
:Current direction of travel
;Current height above average sea level,
rounded
=Current vehicle position: longitude
coordinates
?Number of GPS satellites currently being
used
ACurrent vehicle position: latitude
coordinates
BCurrently set steering angle of the front
wheels
iTo display current height ;, the system
must be able to receive at least four
satellites. Steering angle Bcan be a
maximum of 35° in both directions.
XTo exit the display: confirm Back by
pressing Wor press the %button.
Showing the map data version
XTo show the menu: press Wthe COMAND
controller.
XSelect Navi in the main function bar by
sliding ZV and turning cVd the COMAND
controller and press Wto confirm.
XSelect Map Version and press Wto
confirm.
The map data version number is shown.
Information about new versions of the
digital map can be obtained from an
authorized Mercedes-Benz Center.
108 Additional settings
Navigation

Updating the digital map
Introduction
The digital maps generated by the map
software become outdated in the same way
as conventional road maps. Optimal route
guidance can only be provided by
the navigation system in conjunction with the
most up-to-date map software.
Information about new versions of the digital
map can be obtained from an authorized
Mercedes-Benz Center. You can have the
digital map updated there with a DVD, or you
can update it yourself.
iThe update process can takealong time
(over an hour), depending on the size of the
digital map. During this time, you will only
be able to switch on radio mode and to
accept incoming calls. The update will be
completed more quickly if the vehicle is
stationary.
If you carry out the update with the engine
switched off and the starter battery has
insufficient power, COMAND may
automatically switch off during the process
in order to protect the battery. If this
occurs, restart the update with the engine
running.
GWARNING
Neverleave the engine running in an enclosed
space. The exhaust gases contain carbon
monoxide. Inhaling exhaust gases constitutes
a health hazard and could lead to loss of
consciousness or even death.
Updating process
XInsert the DVD into the DVD changer
(Ypage 154).
COMAND checks whether the digital map
on the DVD is compatible with the
navigation system and system software.
Aprompt then appears asking if you want
to install the database. Versions of the
database currently installed and the
database that is to be installed are
displayed.
XSelect Yes or No and press Wto confirm.
After selecting Yes, an activation code
must be entered when installing a database
for the first time. You will receive the
activation code when you buy the
navigation DVD.
If you select No, the process will be aborted.
XEnter the activation code.
After entering the activation code
correctly, COMAND starts updating the
digital map. Once the update is finished,
you will see a message.
XTo confirm the message: press Wthe
COMAND controller.
XTake the DVD out of the slot.
While the update is running, you will see a
message to this effect and a progress bar. The
navigation system is not operational until the
update is complete.
iYou cannot eject the DVD during the
update. If you switch off COMAND during
the update, the update is interrupted. It
then continues from where it was
interrupted when the system is restarted.
COMAND may prompt you to change the DVD
during the update.
XPress the Vload/eject button.
XTake the DVD out of the slot.
Additional settings 109
Navigation
Z

XInsert the requested DVD.
Once the update has been successfully
completed, you will see a message to this
effect.
XTo confirm the message: press Wthe
COMAND controller.
XTake the DVD out of the slot.
The update is complete.
If the update is not successfully completed,
you will see a message that the map update
is not possible.
XTo confirm the message: press Wthe
COMAND controller.
XTake the DVD out of the slot.
110 Additional settings
Navigation
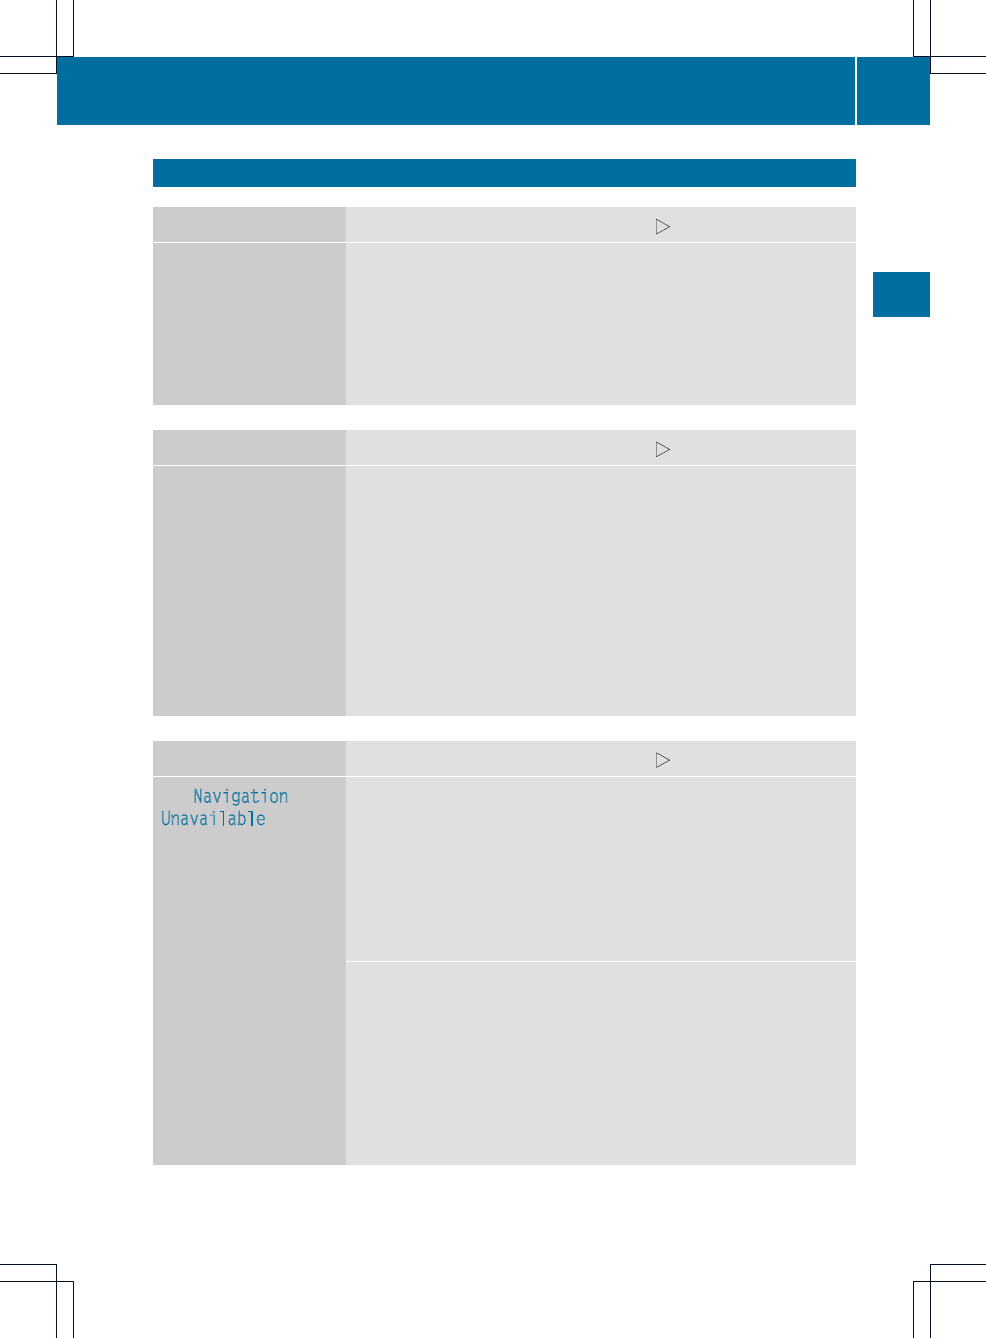
Problems with the navigation system
Problem Possible causes/consequences and MSolutions
COMAND is unable to
continue route
guidance after the
journey has been
interrupted.
Route guidance is canceled if you interrupt the journey for more
than two hours.
"Interrupting the journey" refers to stopping the vehicle.
"Continuing route guidance" refers to switching COMAND back on
and driving on.
XContinue route guidance (Ypage 81).
Problem Possible causes/consequences and MSolutions
COMAND is unable to
determine the vehicle's
position.
COMAND has to redetermine the position of the vehicle if the
vehicle has been transported (e.g. by ferry, by motorail or after
towing).
XStart the vehicle and pull away.
COMAND determines the vehicle's position. Depending on the
driving situation, this may take some time.
Route guidance may be restricted during the determination of
the vehicle's position.
When positioning is complete, route guidance is resumed with
navigation announcements and route guidance displays.
Problem Possible causes/consequences and MSolutions
The Navigation
Unavailable message
appears.
COMAND has an integrated hard drive on which the digital map is
stored.
To protect the integrated hard drive against damage, COMAND
deactivates it at very high and low temperatures. The navigation
system will then be temporarily unavailable.
XLet the vehicle and COMAND cool down.
XTo hide the message: switch COMAND off and then on again.
If an area of the hard drive has a malfunction, COMAND can no
longer access the map data in this area, for example when
calculating a route.
XTo hide the message: switch COMAND off and then on again.
The navigation system will be operational again until it has to
access the faulty area of the hard drive once more. The message
will then reappear.
XConsult an authorized Mercedes-Benz Center.
Problems with the navigation system 111
Navigation
Z

Problem Possible causes/consequences and MSolutions
You see a message
informing you that the
DVD containing the
digital map is
incompatible with the
system software.
The DVD containing the digital map cannot be used for the update.
XTo confirm the message: press Wthe COMAND controller.
XEject the DVD.
XHave the database checked at an authorized Mercedes-Benz
Center.
Problem Possible causes/consequences and MSolutions
The map software
update has failed.
The DVD is dirty.
XClean the DVD.
XRestart the update.
The DVD is scratched.
XConsult an authorized Mercedes-Benz Center.
There is overheating due to excessive temperatures in the vehicle
interior.
XWait until the vehicle interior has cooled down.
XRestart the update.
COMAND's integral hard drive is faulty.
XConsult an authorized Mercedes-Benz Center.
Problem Possible causes/consequences and MSolutions
COMAND asks for an
activation code during
the map update.
The digital map is secured with an activation code.
XConsult an authorized Mercedes-Benz Center.
112 Problems with the navigation system
Navigation

COMAND features ............................. 114
General information ......................... 114
Telephony via the Bluetooth®inter-
face .................................................... 115
Reception and transmission volume 120
Telephone operation ......................... 120
Using the phone book ...................... 125
Using call lists ................................... 129
Using the speed dial list ................... 131
Text message (SMS) ......................... 133
Using the address book ................... 135
113
Telephone

COMAND features
These Operating Instructions describe all
standard and optional equipmentavailable
for your COMAND system at the time of
purchase. Country-specificdeviations are
possible. Please note that your COMAND
system may not be equipped with all the
features described.
General information
Introduction
COMAND offers telephony via the
Bluetooth®interface.
When connecting a Bluetooth®-capable
mobile phone with PBAP (Phone Book Access
Profile), contacts are automatically
downloaded to COMAND.
With a suitable mobile phone, you can use the
hands-free system and receive vCards via the
Bluetooth®interface.
You can use the textmessage (SMS) function
(receiving and reading) if the mobile phone
supports the MAP (Message Access Profile)
Bluetooth®profile.
More detailed information on suitable mobile
phones and on connecting with Bluetooth®-
capable mobile phones with COMAND can be
found on the Internet at
http://www.mbusa-mobile.com. Or call
the Mercedes-BenzCustomerAssistance
Center on
1-800-FOR-MERCedes(1-800-367-6372) for
the USA or on 1-800-387-0100 for Canada.
Safety notes
GWARNING
A driver's attention to the road must always
be his/her primary focus when driving. For
your safety and the safety of others, we
recommend that you pull over to a safe
location and stop before placing or taking a
telephone call. If you choose to use the mobile
phone while driving, please use the handsfree
device and only use the mobile phone when
weather, road, and traffic conditions permit.
Some jurisdictions prohibit the driver from
using a cellularmobile phone while driving a
vehicle.
Bear in mind that at a speed of just 30 mph
(approximately 50 km/h), your vehicle is
covering a distance of 44 feet (approximately
14 m) every second.
GWARNING
Excessive electromagnetic radiation may
constitute a health hazard to yourself and
others.
There is scientific discussion surrounding the
possible health risks posed by
electromagnetic fields. You can reduce this
risk by using an exterior aerial.
Therefore, only use mobile communication
equipment if it is connected to the exterior
aerial of the vehicle.
Call disconnection while the vehicle is
in motion
Acall may be disconnected if:
Rthere is insufficient network coverage in
certain areas.
Ryou move from one transmitter/receiver
area (cell) into another and no channels are
free.
Ryou use a SIM card which is notcompatible
with the network available.
Operating options
You can operate the telephone by:
Rusing the COMAND controller:
turn cVd.
slide XVY or ZVÆ.
114 General information
Telephone
press W.
Rpressing the 6or ~button and
using the telephone keypad on COMAND
Rpressing the 6or ~button on the
multifunction steering wheel
Rusing the Voice Control (see the separate
Voice Control operating instructions)
Unless stated otherwise, the descriptions and
illustrations in this section refer to COMAND.
Function restrictions
The telephone is not ready for use in the
following situations:
Rthe telephone automatically tries to log on
to a network. If no network is available, you
may not be able to make a "911"
emergency call. If you attempt to make an
outgoing call, the No Service message will
appear for a short while.
911 emergency call
GWARNING
The 911 emergency call system is a public
service. Using it without due cause is a
criminal offense.
The following requirements must be fulfilled
for a 911 emergency call:
Rthe mobile phone must be switched on.
Ra network must be available.
Ra valid and operational SIM card must be
inserted in the mobile phone.
Rthe mobile phone is connected to COMAND
via Bluetooth®.
If you cannot make an emergency call, you
must arrange rescue measures yourself.
XEnter numbers on COMAND (Ypage 121).
XPress the 6button.
The telephone makes the connection.
XWait for the emergency call center to
respond and then describe the emergency.
Telephony via the Bluetooth®
interface
Conditions
On the mobile phone
For telephony via COMAND's Bluetooth®
interface, a Bluetooth®-capable mobile
phone is required.
iNot all mobile phones available on the
market are equally suitable. More detailed
information on suitable mobile phones and
on connecting Bluetooth®-capable mobile
phones with COMAND can be found on the
Internet at
http://www.mbusa-mobile.com.
Alternatively, call the Mercedes-Benz
Customer Assistance Centerat
1-800-FOR-MERCedes (1-800-367-6372)
(for USA) or Customer Relations at
1-800-387-0100 (for Canada).
The battery of the mobile phone should
always be kept sufficiently charged in order
to prevent malfunctions.
In preparation for telephoning via the
Bluetooth®interface, you should check the
following items on yourmobile phone (see the
mobile phone operating instructions):
RHands-Free Profile
The mobile phone must support Hands-
Free Profile 1.0 or above.
RBluetooth®visibility
On certain mobile phones, the device itself
must be made "visible" to other devices, as
well as activating the Bluetooth®function
(see the mobile phone operating
instructions).
RBluetooth®device name
Every Bluetooth®device has its own
Bluetooth®device name. This device name
is freely definable, but can be identical for
all devices from the same manufacturer. It
is therefore recommended that you change
this name so that you can easily recognize
Telephony via the Bluetooth®interface 115
Telephone
Z
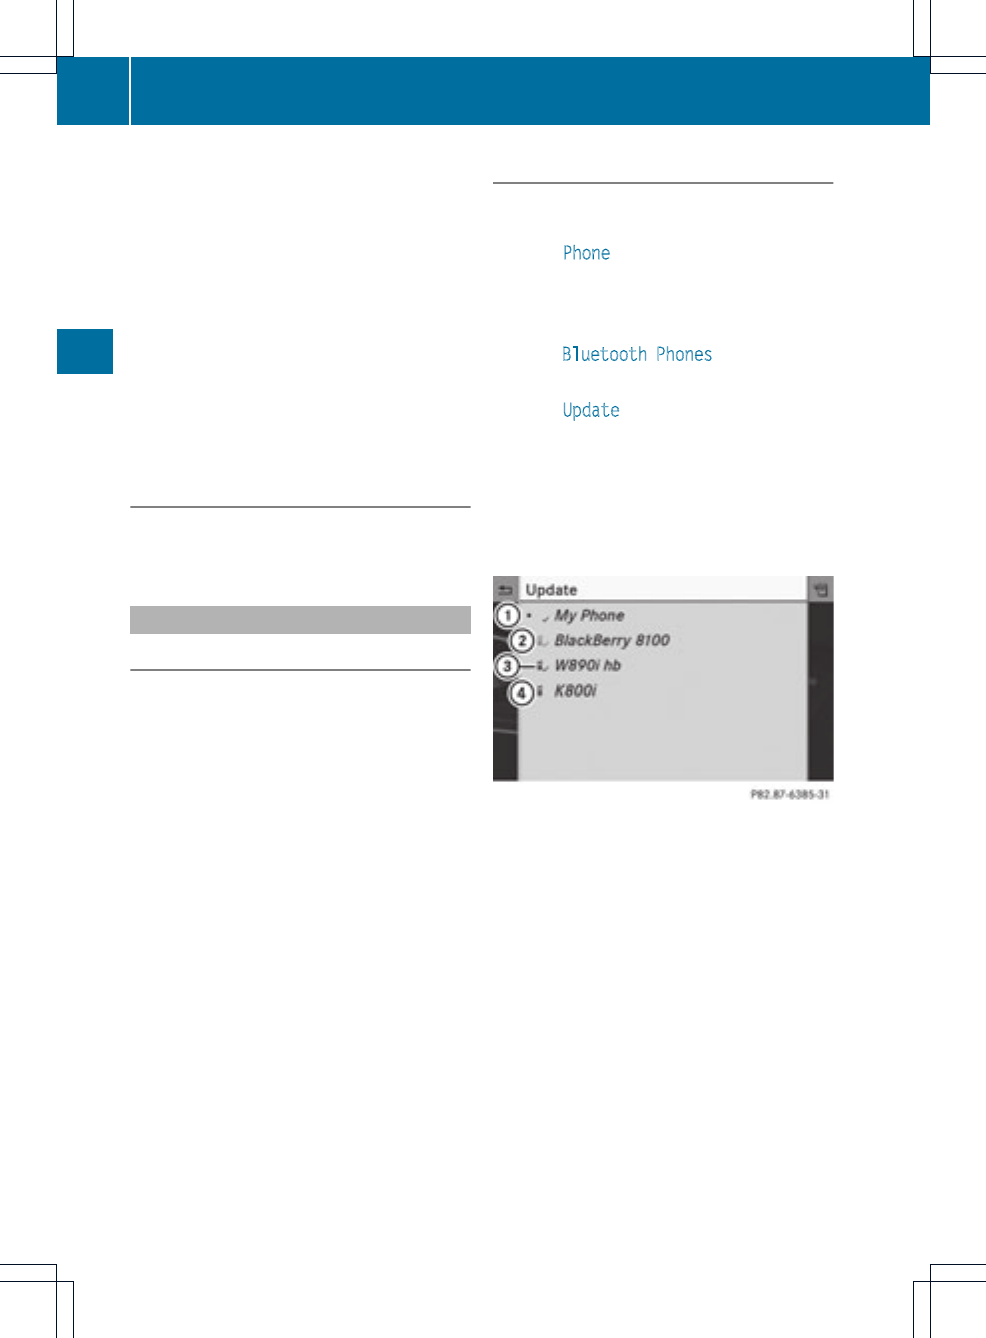
your mobile phone (see the mobile phone
operating instructions).
iSome displays (e.g. the signal strength)
depend on the supported versionofthe
Hands-Free Profile.
XSwitch on the mobile phone and enter the
PIN when prompted to do so (see the
mobile phone operating instructions).
XActivate Bluetooth®functions and, where
necessary, Bluetooth®visibility on the
mobile phone (see the mobile phone
operating instructions).
On COMAND
XActivate the Bluetooth®function in
COMAND (Ypage 45).
Connecting amobile phone
General information
Before using your mobile phone with
COMAND for the first time, you will need to
connect it.
When you authorize a new mobile phone, it is
connected automatically.
Connecting comprises:
Rsearching for a Bluetooth®-capable mobile
phone
Rsubsequently authorizing it
You can connectup to 15 mobile phones.
If the mobile phone supports the PBAP
(Phone Book Access Profile) and MAP
(Message Access Profile) profiles, the
following contacts and messages are
downloaded into COMAND when connecting:
Rphone book
Rcall lists
Rtextmessages
Information on both profiles can be found in
the "General notes" section (Ypage 114).
Searching for amobile phone
XPress the %function button on
COMAND.
XSelect Phone in the telephone basic menu
by sliding VÆand turning cVd the
COMAND controller and press Wto
confirm.
XSelect Bluetooth Phones and press Wto
confirm.
XSelect Update and press Wto confirm.
COMAND searches for Bluetooth®
telephones within range and adds them to
the Bluetooth®telephone list.
The duration of the search depends on the
number of Bluetooth®telephones within
range and their characteristics.
Example: Bluetooth®phone list
:Currently connected #and authorized
mobile phone Y
;Mobile phone notwithin rangebut
previously authorized (Lappears in gray)
=Mobile phone in range and authorized
(Lappears in black)
?Newly detected mobile phone within
range but notyet authorized (no Yicon
yet)
The Bluetooth®telephone list shows all
mobile phones within range and all previously
authorized mobile phones, whether or not
they are in range.
iIf the Bluetooth®telephone list is already
full, you will be requested to de-authorize a
116 Telephony via the Bluetooth®interface
Telephone
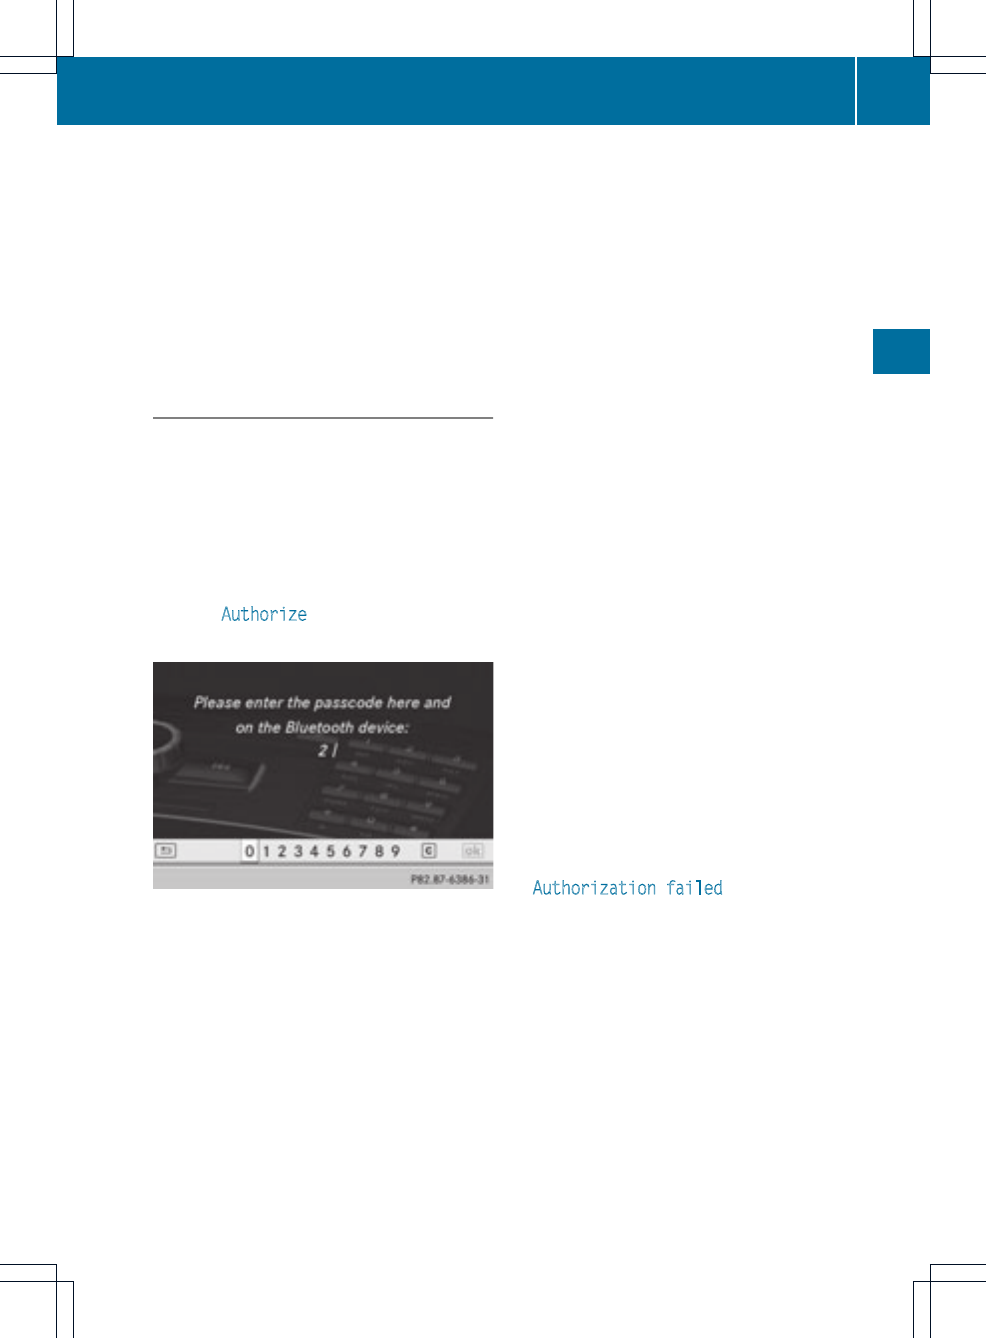
mobile phone (Ypage 119). If COMAND
does not find yourmobile phone, external
authorization (Ypage 118) may be
necessary.
iIf you call up the telephone list again, the
unauthorized devices are removed from the
list. In this case, start a new search to
update the Bluetooth®telephone list.
Authorizing (registering) amobile
phone
Option 1: using the passkey (access code)
XIn the Bluetooth®telephones list, selectthe
not yet authorized mobile phone by turning
cVd the COMAND controller.
XSelect the list symbol to the right of the
entry by sliding VY the COMAND
controller and press Wto confirm.
XSelect Authorize and press Wto confirm.
The input menu for the passkey appears.
The passkey is any one to sixteen-digit
number combination which you can choose
yourself. You must enter the same number
combination in COMAND and in the
Bluetooth®-capable mobile phone (see the
operating instructions of the mobile phone).
iSome mobile phones require a passkey
with four or more digits.
If you want to reauthorize a mobile phone
following de-authorization, you can select a
different passkey.
iMercedes-Benzrecommends de-
authorization in COMAND and on the
mobile phone. Subsequent authorization
may otherwise fail.
XTo enter a passkey in COMAND: press
the number keys in turn.
¬is highlighted after the first number
has been entered.
or
XSelect the digits in the digit bar one by one
by turning cVd the COMAND controller
and press Wto confirm. Then, select
¬.
XTo confirm an entry in COMAND: press
Wthe COMAND controller.
XNow enter the same passkey in the mobile
phone.
To make entries on the mobile phone: if
the Bluetooth®connection is successful, you
will be requested to enter the passkey
(access code, code) (see the mobile phone
operating instructions).
XEnter the same passkey in the mobile
phone as already entered in COMAND.
iAfter entering the passkey, you may also
need to enter a confirmation in your mobile
phone to connectcalls. Please check your
mobile phone display.
If the COMAND display shows the
Authorization failed message, you
may have exceeded the prescribed time
period. Repeat the procedure.
The mobile phone is connected to COMAND
(authorized). You can nowmake calls using
the COMAND hands-free system.
Option 2: use Secure Simple Pairing
The mobile phone (or the Bluetooth®audio
device) must support the Bluetooth®version
2.1for connection via Secure Simple Pairing.
COMAND creates a six-digit code, which is
displayed on the two devices that are to be
connected.
Telephony via the Bluetooth®interface 117
Telephone
Z
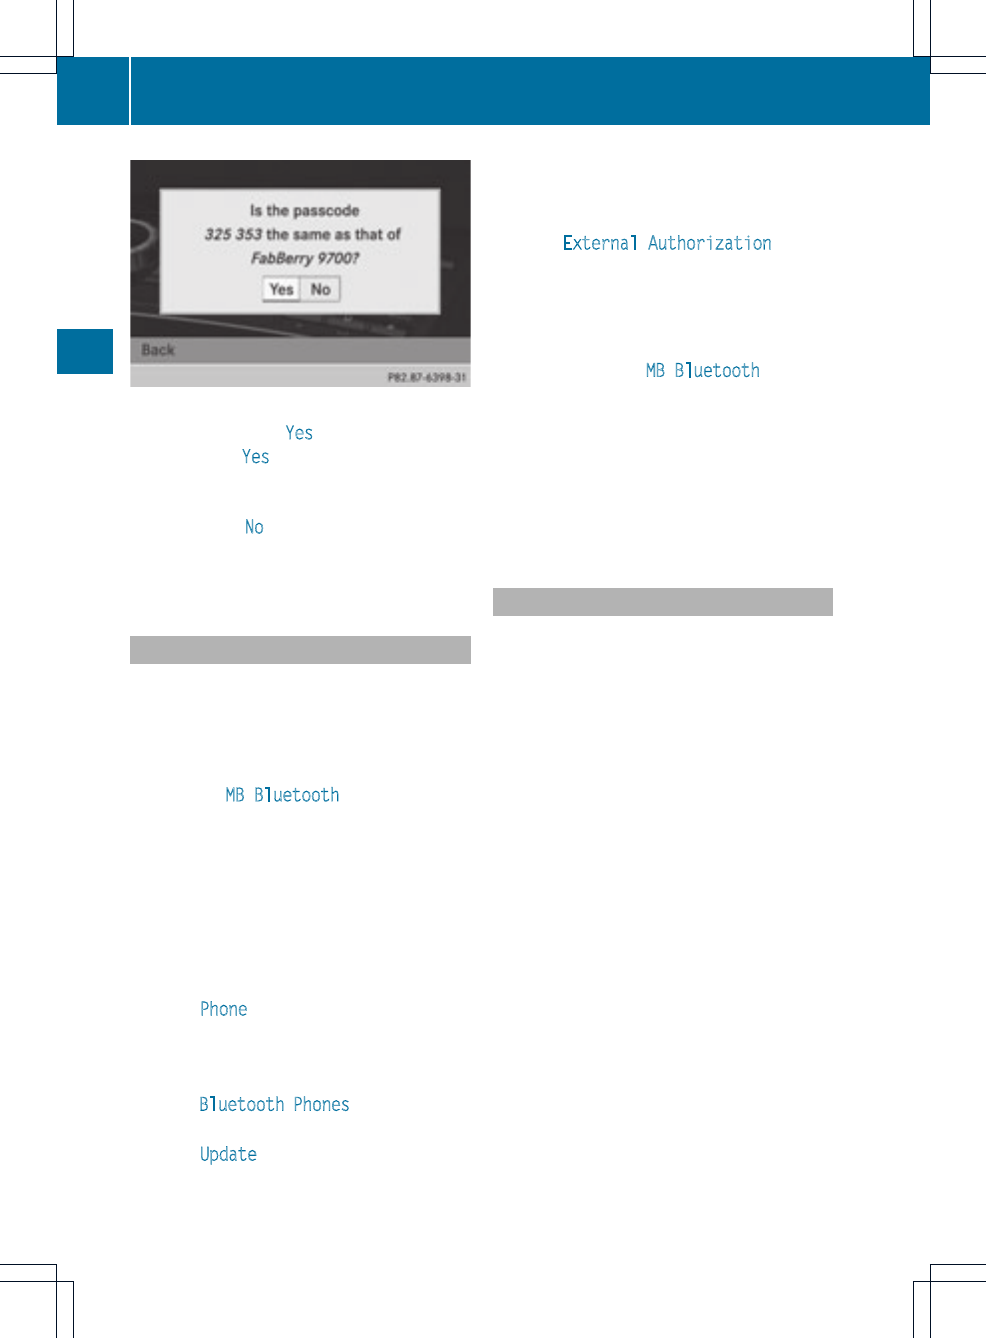
XIf the numeric code on both devices
matches, confirm Yes by pressing W.
If you select Yes, the authorization process
is completed and the mobile phone is
connected.
If you select No, the process will be
canceled.
XConfirm the message on the mobile phone.
External authorization
If COMAND does not detect yourmobile
phone, this may be due to particular security
settings on your mobile phone. In this case,
you can test if your mobile phone can find
COMAND. The Bluetooth®device name of
COMAND is MB Bluetooth.
Please note the following: some mobile
phones require that you establish the
connection to COMAND again once you have
entered the passkey (see the mobile phone
operating instructions). The mobile phone
cannot otherwise be authorized.
XPress the %function button on
COMAND.
XSelect Phone in the telephone basic menu
by sliding VÆand turning cVd the
COMAND controller and press Wto
confirm.
XSelect Bluetooth Phones and press Wto
confirm.
XSelect Update.
XSelect the list symbol to the right of the
entry by sliding VY the COMAND
controller and press Wto confirm.
XSelect External Authorization and
press Wto confirm.
XStart the Bluetooth®search on the mobile
phone (see the mobile phone operating
instructions).
XSelect COMAND (MB Bluetooth) on the
mobile phone.
XOption 1: when requested to do so, enter
the passkey first on the mobile phone and
then in COMAND.
XOption 2: confirm the displayed codes on
the mobile phone and in COMAND (Secure
Simple Pairing).
Connecting another mobile phone
If you have authorized more than one mobile
phone, you can switch between the individual
phones.
iYou can only switch to another authorized
phone if you are not currently making a call.
XSelect the mobile phone in the Bluetooth®
telephones list by turning cVd the
COMAND controller and press Wto
confirm.
The selected mobile phone is searched for
and connected if it is within Bluetooth®
range and if Bluetooth®is activated.
Only one mobile phone can be connected
at any one time. The currently connected
mobile phone is indicated by the #dot in
the Bluetooth®telephones list
(Ypage 116).
118 Telephony via the Bluetooth®interface
Telephone
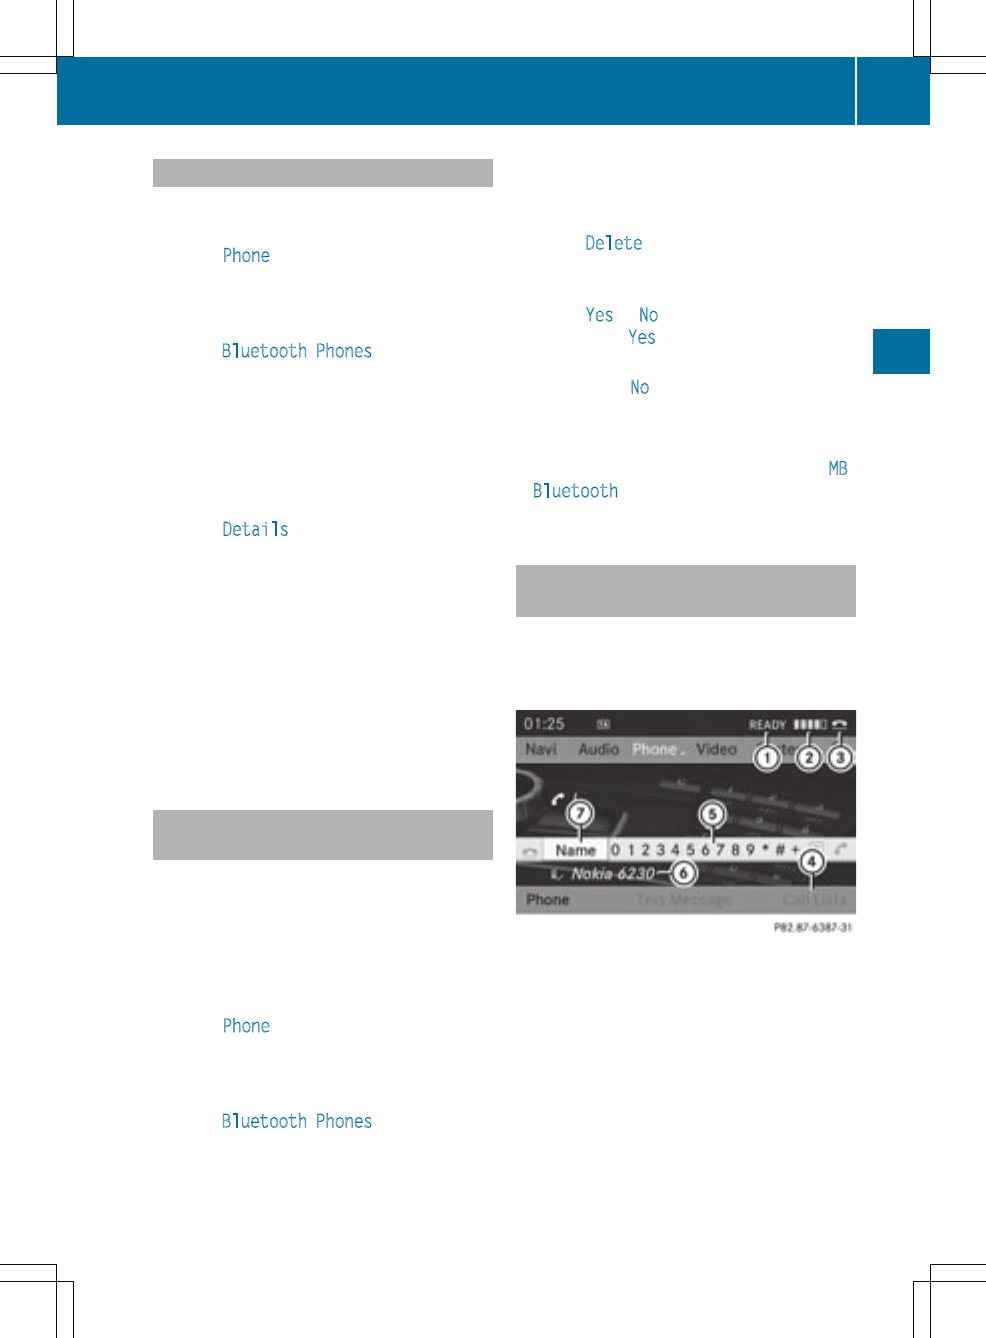
Displaying details
XPress the %function button on
COMAND.
XSelect Phone in the telephone basicmenu
by sliding VÆand turning cVd the
COMAND controller and press Wto
confirm.
XSelect Bluetooth Phones and press Wto
confirm.
XSelect the desired mobile phone in the
Bluetooth®telephones list.
XSelect the list symbol to the right of the
entry by sliding VY the COMAND
controller and press Wto confirm.
XSelect Details and press Wto confirm.
The following information concerning the
selected mobile phone is shown:
RBluetooth®name
RBluetooth®address
Ravailability status (shown after a new
search)
Rauthorization status
XTo close the detailed view: turn cVd or
slide XVY the COMAND controller.
De-registering (de-authorizing) a
mobile phone
iMercedes-Benz USA, LLC recommends
de-authorization on both COMAND and on
the mobile phone. Subsequent
authorization may otherwise fail.
XPress the %function button on
COMAND.
XSelect Phone in the telephone basic menu
by sliding VÆand turning cVd the
COMAND controller and press Wto
confirm.
XSelect Bluetooth Phones and press Wto
confirm.
XSelect the desired mobile phone in the
Bluetooth®telephones list.
XSelect the list symbol to the right of the
entry by sliding VY the COMAND
controller and press Wto confirm.
XSelect Delete and press Wto confirm.
Aprompt appears asking whetheryou
really wish to de-authorize this device.
XSelect Yes or No.
If you select Yes, the device will be deleted
from the Bluetooth®telephones list.
If you select No, the process will be
canceled.
iBefore re-authorizing the mobile phone,
you should also delete the device name MB
Bluetooth from your mobile phone's
Bluetooth®list.
Telephone basic menu (Bluetooth®
interface)
XPress the %function button.
If the mobile phone is ready for use, the
following display appears:
Telephone basic menu (Bluetooth®interface)
:Telephone status
;Signal strength of mobile phone network
Ä
=Receiver icon ¢or ¡
?To display call lists
ACharacter bar
BBluetooth®name of the currently
connected mobile phone
CTo display the COMAND phone book
Telephony via the Bluetooth®interface 119
Telephone
Z
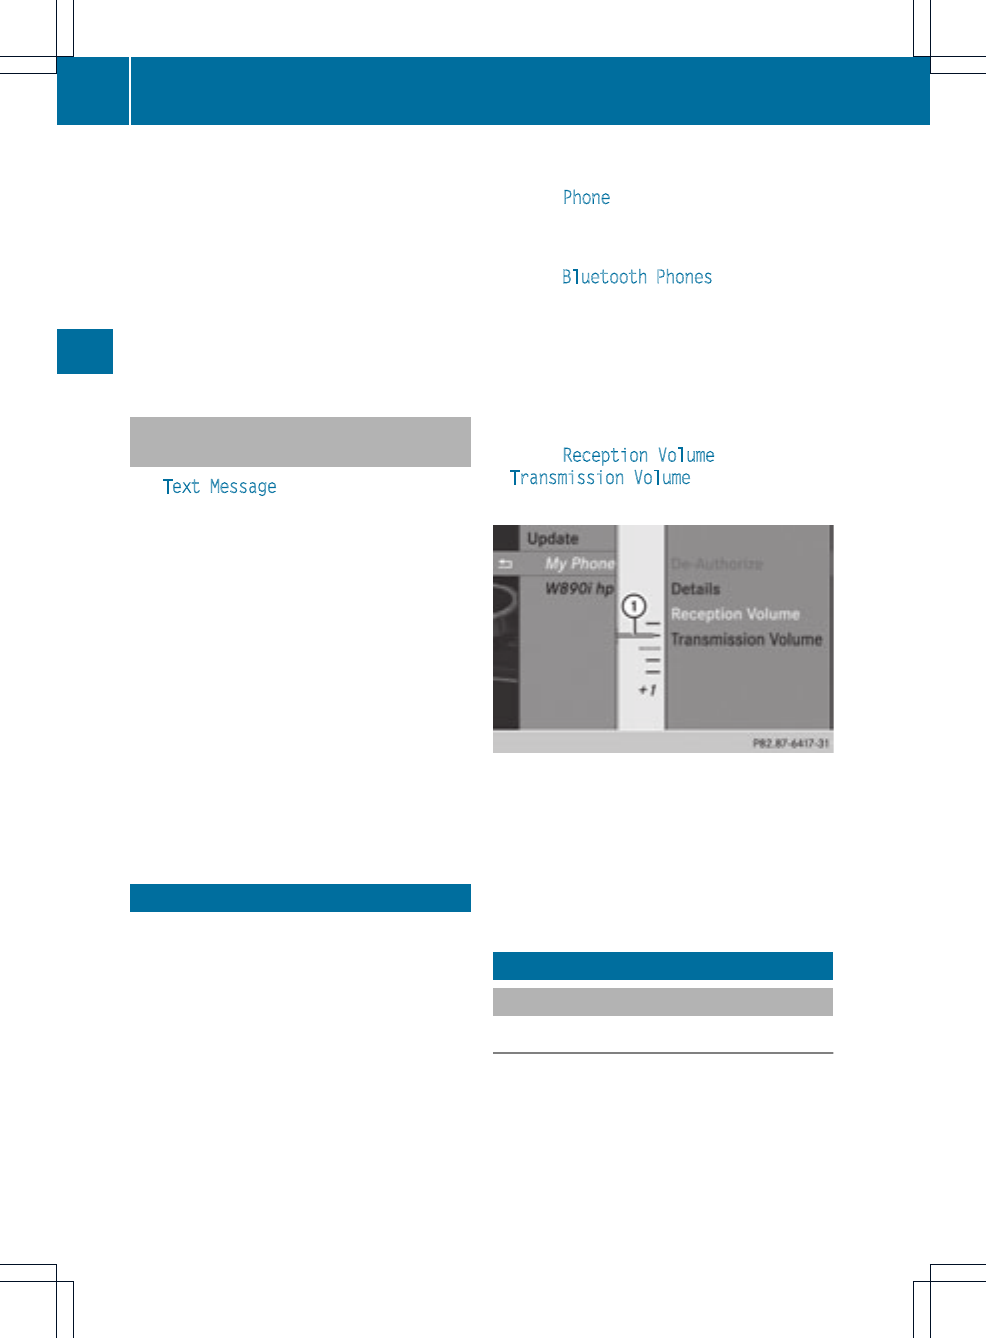
iDisplay ;may vary, depending on the
mobile phone connected.
Bars :display the current signal strength
of the mobile phone network. If all bars are
filled, you have optimum reception.
If no bars are shown, receptionis either
very poor or there is none at all.
Receiver icon =shows whether a call is
active/being connected ¡or not ¢.
Text message (SMS) display in
telephone basic menu
The Text Message menu item is available if
the Bluetooth®telephone supports the MAP
Bluetooth®profile (Message Access Profile)
and the text message has been downloaded
from the Bluetooth®telephone. The menu
item is otherwise grayed out and is not
available.
The 1mail icon is displayed when you have
an unread text message. The symbol
disappears once you have read the text
message. The úmail symbol is displayed
when the text message memory is full. The
symbol disappears once you delete at least
one text message.
Further information can be found in the "Text
messages (SMS)" section (Ypage 133).
Reception and transmission volume
Once the mobile phone has been authorized,
you can optimize the transmission and
reception volume settings. Find information
on the optimal setting for your mobile phone
on the Internet at
http://www.mbusa-mobile.com. Or call
the Mercedes-Benz Customer Assistance
Center at 1-800-FOR-MERCedes
(1-800-367-6372) (for the USA) or Customer
Relations at 1-800-387-0100 (for Canada).
iIncorrect settings may have a significant
impact on the quality of calls.
XPress the %function button.
XSelect Phone in the telephone basic menu
by turning cVd the COMAND controller
and press Wto confirm.
XSelect Bluetooth Phones and press Wto
confirm.
XSelect an authorized mobile phone from
the list by turning cVd.
XSelect the list symbol to the right of the
entry by sliding VY the COMAND
controller and press Wto confirm.
XSelect Reception Volume or
Transmission Volume and press Wto
confirm.
:Scale with indicator showing current
volume
XSelect a volume setting by turning cVd the
COMAND controller.
XTo close the setting scale: press Wor
slide XVY.
Telephone operation
Incoming call
Rejecting or accepting acall
When there is an incoming call, you see a
corresponding window in the display.
120 Telephone operation
Telephone
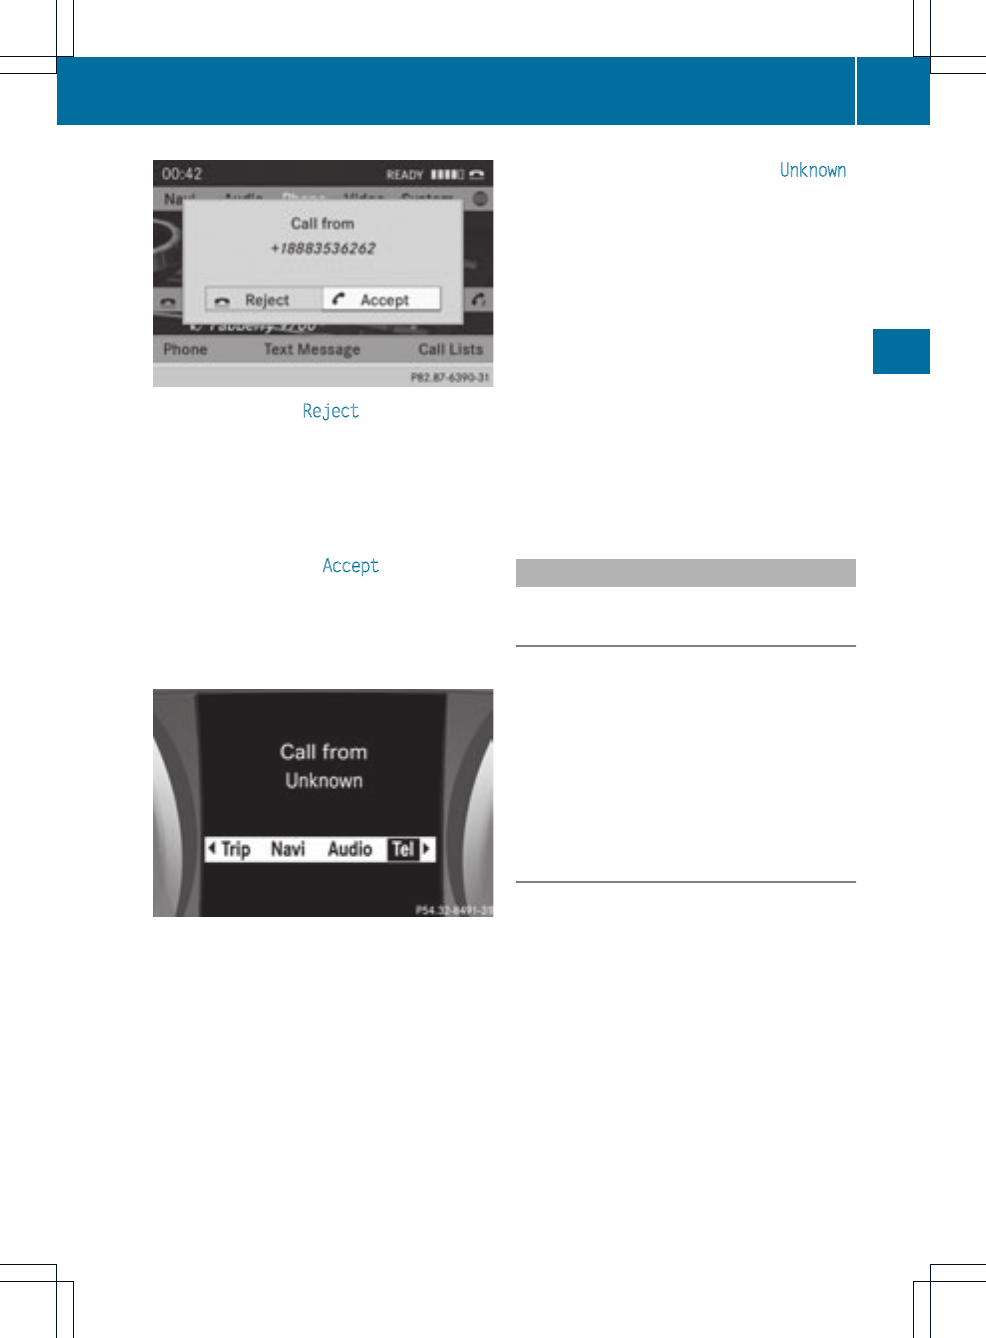
XTo reject: select Reject by turning cVd
the COMAND controller and press Wto
confirm.
or
XPress the ~button on COMAND or on
the multifunctionsteering wheel.
XTo accept: confirm Accept by pressing
W.
or
XPress the 6button on COMAND or on
the multifunctionsteering wheel.
Multifunction display (example)
iYou can also acceptthe call by voice
command using the Voice Control System
(see the separate operating instructions).
Once you have accepted the call, you can use
hands-free mode. The call volume can be
adjusted (Ypage 34). For more information,
see the "Functions during a single call
connection" section (Ypage 122).
The display shows the phone number or the
name and phone number (if the entry is stored
in the address book) or shows the Unknown
(phone number withheld) message.
iYou can also accept a call as described
above when another main function is
switched on in COMAND. Once you have
accepted the call, the display switches to
telephone mode. After the call is finished,
you see the display of the previous main
application again.
The display does not switch to telephone
mode if you:
Rhide the window with the %button
next to the COMAND controller and then
Raccept the call with the ;button on
the multifunction steering wheel
Making a call
Entering atelephone number using the
number keypad
XCall up the telephone basic menu
(Ypage 119).
XEnterthe digits using the number keypad.
XTo connect acall: press the 6button
on COMAND or on the multifunction
steering wheel.
Entering atelephone number using the
telephone basic menu
XCall up the telephone basic menu
(Ypage 119).
XSelect the digits one by one by turning
cVd and sliding ZVÆthe COMAND
controller and press Wto confirm.
XTo connect acall: select °in the
character bar and press Wto confirm.
or
XPress the 6button on COMAND or on
the multifunctionsteering wheel.
Telephone operation 121
Telephone
Z
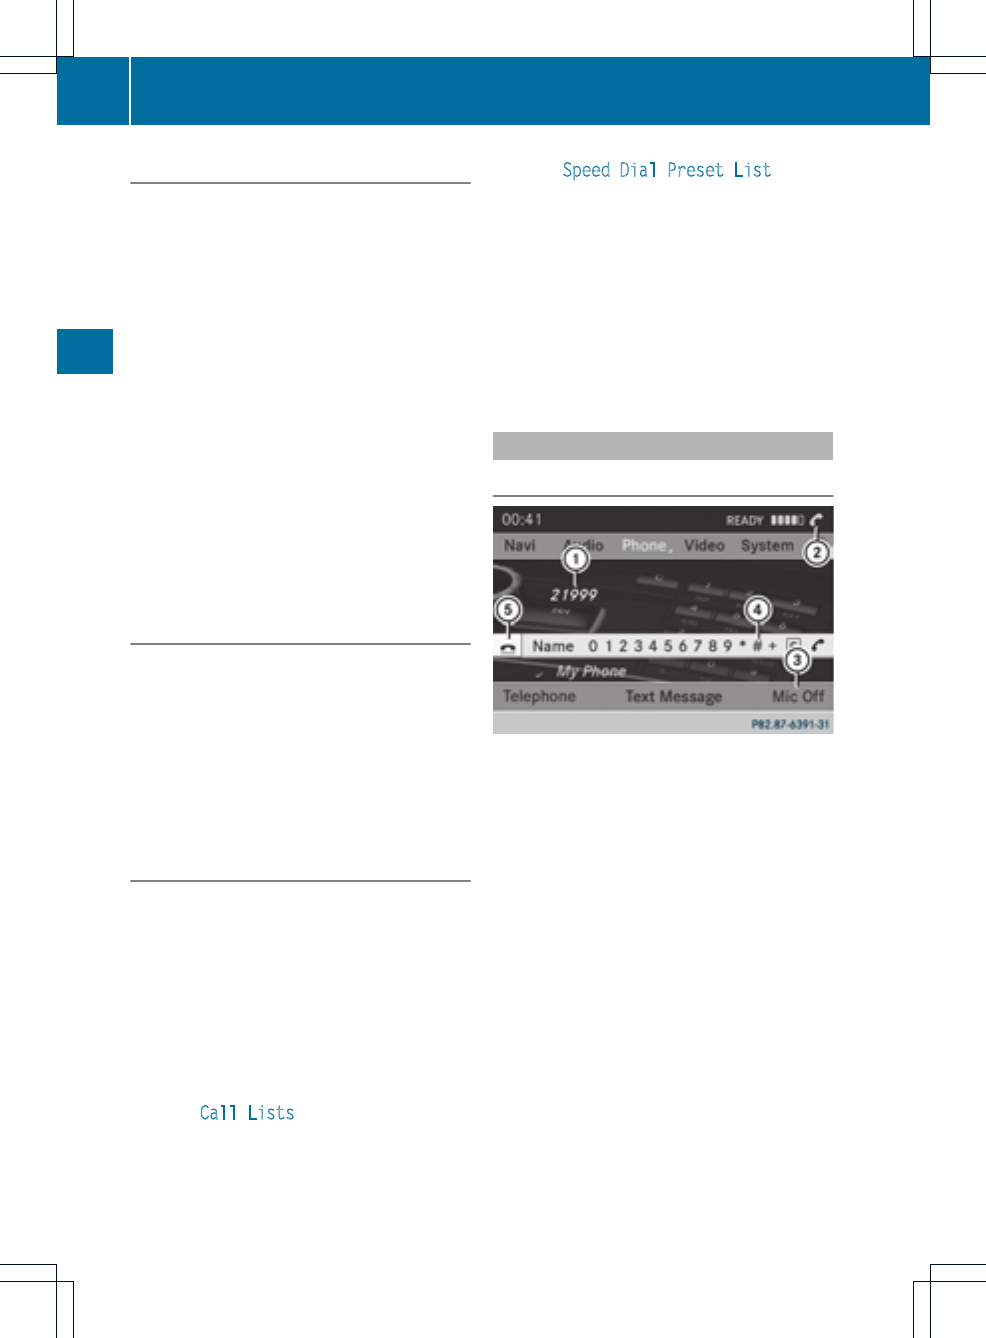
Redialing
On COMAND
XCall up the telephone basic menu
(Ypage 119).
XSelect °in the character bar and press
Wto confirm.
or
XIf the telephone basic menu is displayed,
press the 6button in COMAND.
In both cases, the calls dialed list appears.
The most recently dialed number is at the
top.
XTo select acall: turn cVd the COMAND
controller.
XTo connect the call: press Wthe
COMAND controller.
Connecting acall to an entry in acall list
or in the COMAND phone book
XOpen a call listand select an entry
(Ypage 129).
or
XCall up the COMAND phone book and
select an entry (Ypage 126).
XTo connectacall: press Wthe COMAND
controller or the 6button.
Making a call via speed dial
The speed dial listcontains stored phone
book entries (Ypage 131).
Option 1:
XHold down one of the number keys for
longer than two seconds.
Option 2:
XCall up the telephone basic menu
(Ypage 119).
XSelect Call Lists by sliding VÆand
turning cVd the COMAND controller and
press Wto confirm.
The speed dial list appears.
XSelect Speed Dial Preset List by
turning cVd the COMAND controller and
press Wto confirm.
The speed dial list appears.
XSelect the storage location and press Wto
confirm.
Irrespective of the option chosen, the
telephone basic menu appears and
displays the selected entry. This initiates
dialing.
Functions available during acall
Overview
Telephone operationwith a single call
:Personyou are calling
;Icon for active telephone connection
=To switch hands-free microphone on/off
?To send DTMF tones (not possible with all
mobile phones)
ATo end a call
The following functions:
Raccepting a waiting call
Rmaking a further call
Rcall waiting
are available if they are supported by the
network (only possible with a GSM network)
and your Bluetooth®mobile phone.
122 Telephone operation
Telephone
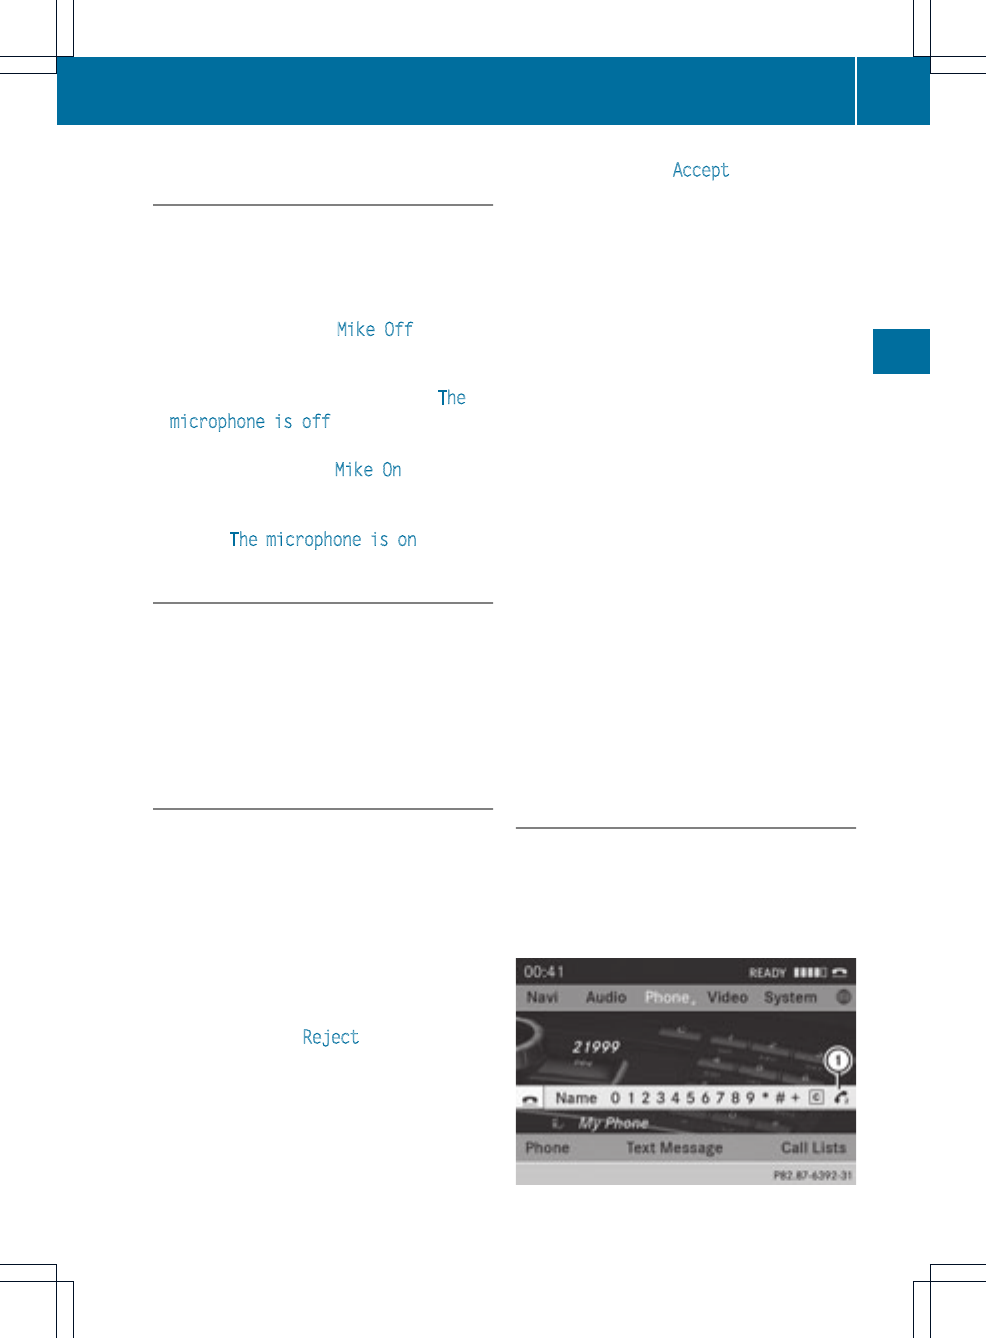
Switching the hands-free microphone
on/off
This function is also available during an active
phone call.
XCall up the telephone basic menu
(Ypage 119).
XTo switch off: select Mike Off and press
Wto confirm.
If the microphone is switched off, the
display shows the Qicon and the The
microphone is off message appears for
a short period.
XTo switch on: select Mike On and press
Wto confirm.
The Qsymbol disappears. You will briefly
see the The microphone is on message.
Ending an active call
XSelect ¢in the telephone basic menu and
press Wto confirm.
or
XPress the ~button on COMAND or on
the multifunction steering wheel.
The call on hold is activated.
Rejecting or accepting awaiting call
The call waiting function must be supported
by the mobile phone network provider and be
enabled.Depending on the mobile phone
used, the system behavior differs when
accepting a call (option 1and 2).
If you have a call in progress and receive
another call, a new window appears in the
display.You also hear a tone. You can accept
or reject the call.
XTo reject: select Reject and press Wto
confirm.
or
XPress the ~button on COMAND or on
the multifunction steering wheel.
XTo accept: select Accept and press Wto
confirm.
or
XPress the 6button on COMAND or on
the multifunction steering wheel.
Option 1: if you accept the waiting call, the
active call is ended.
The active call will also be ended if you
accept the waiting call using the Voice
Control System (see the separate
operating instructions).
Option 2: if you accept the waiting call, the
active call is put on hold. You can then
switch back and forth between both calls
(toggling) (Ypage 124).
iThe second option is available if your
mobile phone supports the toggling
function (via Bluetooth®).
Valid for both options: if you accept the
waiting call using the mobile phone, the active
call is put on hold. You then have two calls.
The call you have just accepted is active.
The COMAND display changes. If you
continue to operate functions on the mobile
phone, the COMAND display may differ from
that of the mobile phone.
Making a further call
You can make a second call while on the
phone with someone else. This action puts
the previous call on hold. The function is
available if your mobile phone supports this
function via Bluetooth®.
:Symbol for making a second call
Telephone operation 123
Telephone
Z
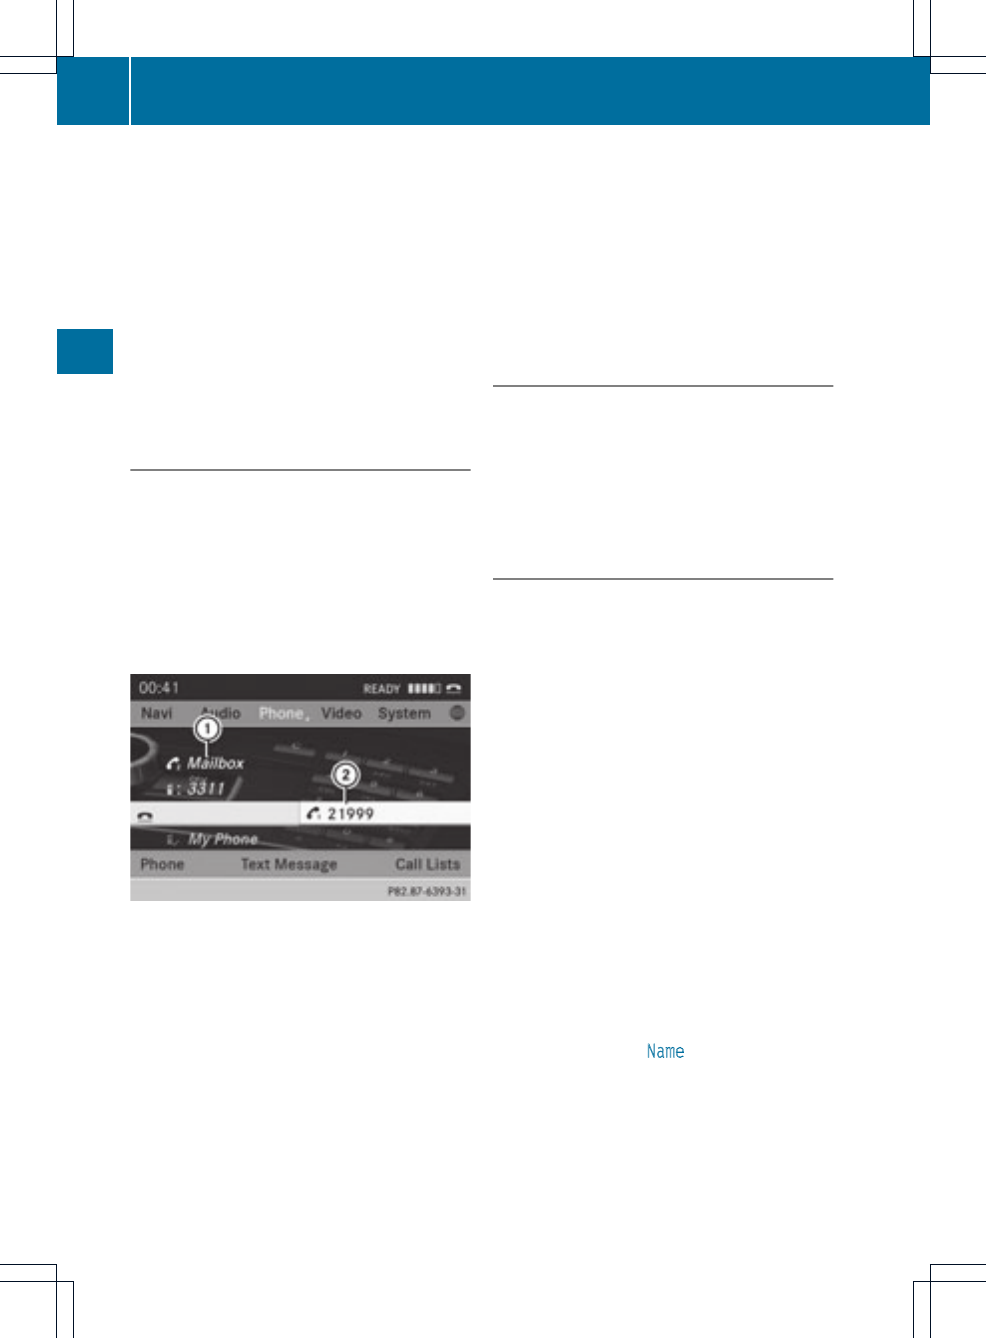
XSelect symbol :by turning cVd the
COMAND controllerand press Wto
confirm.
or
XPress the ;button on COMAND.
XEnter the phone number:
Rmanually (Ypage 121)
Rusing the phone book (Ypage 125)
Rfrom the call lists (Ypage 129)
Rusing speed dial (Ypage 122)
Call waiting
You can switch back and forth between calls
with this function. The functionis available if
your mobile phone supports the toggling
function (via Bluetooth®).
You can use the function if you are answering
a second call or making a second call.
Switching between the active call and the
call on hold
:Active call
;Call on hold
XConfirm symbol ;by pressing W.
or
XPress the ;button on COMAND or on
the multifunction steering wheel.
The previous call on hold is activated.
Ends an active call
XSelect ¢in the telephone basic menu and
press Wto confirm.
or
XPress the ~button on COMAND or on
the multifunction steering wheel.
The call on hold is activated.
Conference call
You can interconnect calls (active and on
hold) on the mobile phone. This permits
several parties to hear one another and speak
with one another.
You can also make a further call in COMAND
(Ypage 123).
Sending DTMF tones
This function is not supported by all mobile
phones.
Answering machines or other devices can be
controlled by DTMF tones, e.g. for remote
query functions.
XIf you would like to listen to the messages
on your answering machine, for example,
select the corresponding number.
XTo transmit individual characters: once
a connection has been established to the
answering machine, select the desired
characters in the character bar and press
Wto confirm.
or
XPress the corresponding key on the
COMAND number keypad.
Every character selected will be
transmitted immediately.
XTo send a phone book entry as a DTMF
sequence: select Name by turning cVd the
COMAND controller and press Wto
confirm.
XSelect the desired phone book entry and
press Wto confirm.
The entry is sent as a DTMF character
string.
124 Telephone operation
Telephone
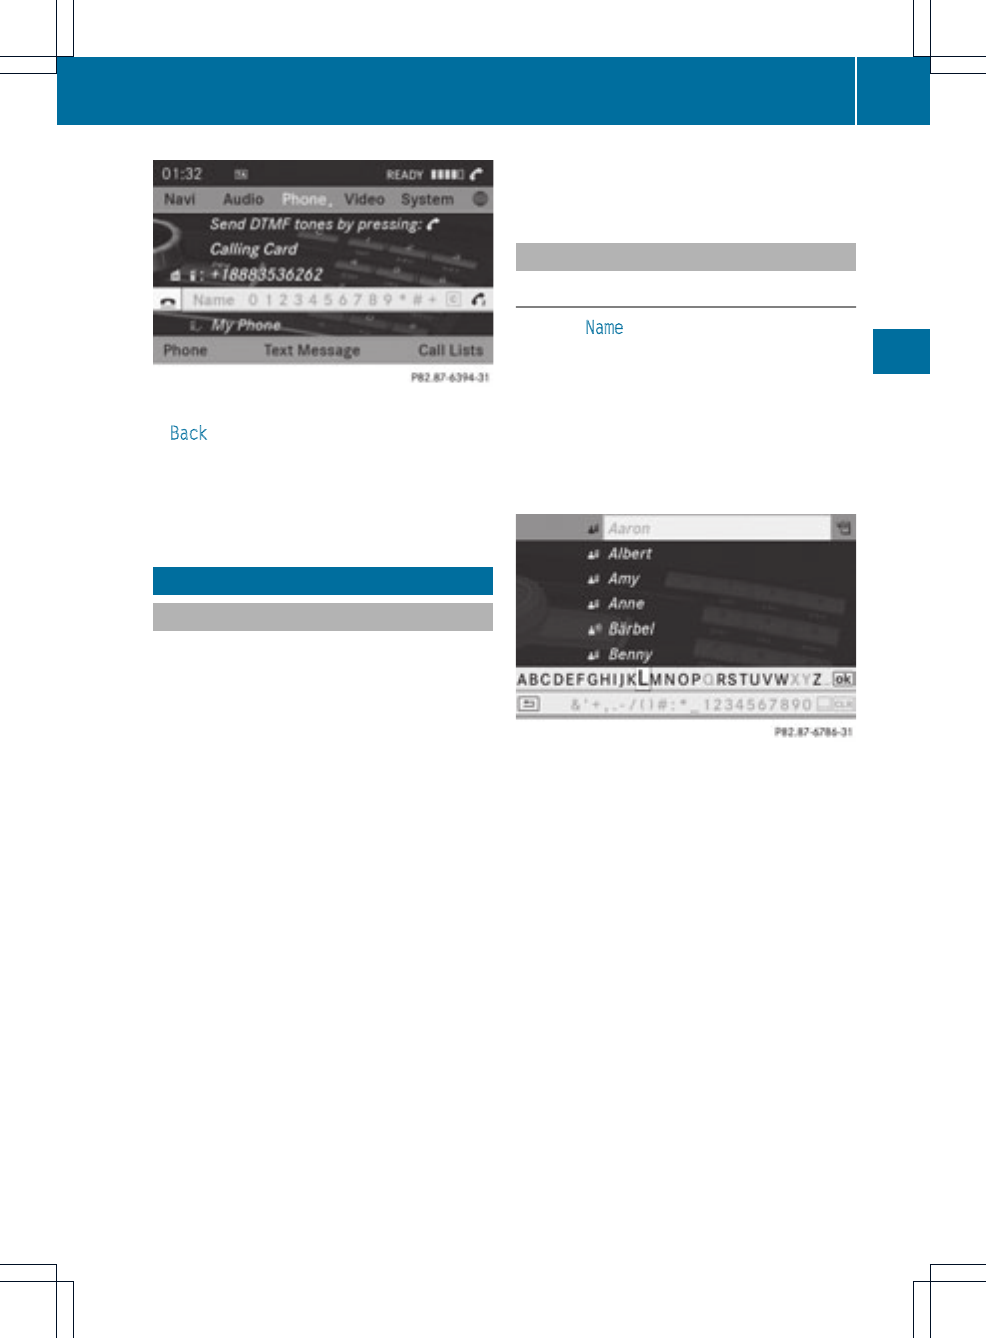
XTo return to the call display: select
Back and press Wto confirm.
iYou can also send DTMF tones using the
Voice Control System (see the separate
operating instructions).
Using the phone book
Introduction
The phone book displays the names and
phone numbers of all of the address book
entries saved in the COMAND address book.
If an address book entry does not have a
telephone number, it does not appear in the
phone book.
You can store telephone numbers in the
phone book or import contacts. The phone
book of the mobile phone is automatically
downloaded to COMAND after connection.
You can import contacts from the memory
card and the USB device into the phone book,
or receive vCards via Bluetooth®.
The functions:
Rimporting contacts
Rreceiving vCards
Rdeleting contacts
are described in detail in the "Address
book" section(Ypage 141).
iThe stored phone book and the vCards
remain in COMAND, even if you use
COMAND with another mobile phone. The
entries can be viewed without a mobile
phone. For this reason, delete the phone
book before selling or transferring
ownership of your vehicle.
Calling up the phone book
Overview
XSelect Name in the telephone basic menu
by turning cVd the COMAND controller
and press Wto confirm.
If the phone book contains entries, they will
be displayed in alphabetical order.
Character bar =is active.
The character bar is used for fast selection
of an entry.
XTo close the phone book: select &in
the character bar by sliding VÆand turning
cVd the COMAND controller and press
Wto confirm.
or
XPress the %button.
Using the phone book 125
Telephone
Z
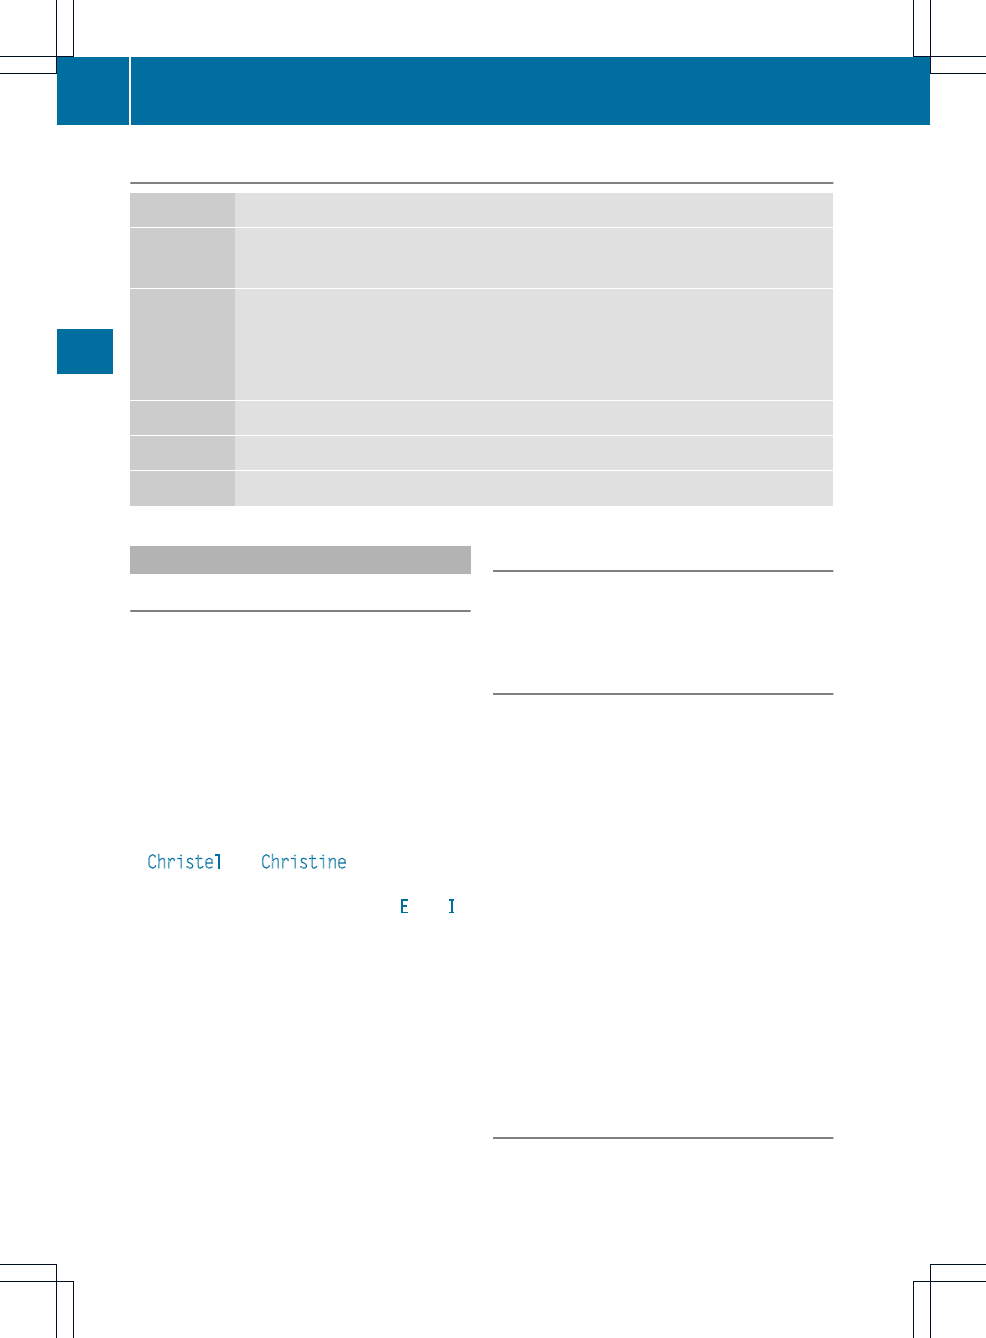
Symbol overview
Icon Explanation
ÆAddress book entry that has been entered or changed via COMAND
Imported contact that has been saved in the phone or address book
\Address book entry with voice tag
iThese entries have also been assigned a voice tag. Voice tags are available
in vehicles with the Voice Control System (see the separate operating
instructions).
ÃContact that has been imported from a mobile phone that supports PBAP
¯Entry that has been imported from the memory card or USB device
®Entry imported via the Bluetooth®interface
Searching for a phone book entry
Using the character bar
You determine the first letter of the entry you
are looking for with the first character you
enter.
XSelect a character by turning cVd the
COMAND controller and press Wto
confirm.
The first entry in the list that starts with the
letter selected is highlighted. If there are
similar entries, the next different character
is shown. For example, with entries such as
Christel and Christine, the beginnings
of the names are similar. In this case, you
will be offered a choice between Eand I.
XSelect the characters of the entry you are
searching for one by one and press Wto
confirm.
When the selection is clear, COMAND
switches automatically to the selection list.
XTo complete the search: switch from the
phone book with the character bar to the
selection list (Ypage 127).
The last list entry is automatically
highlighted.
Using the number keypad
Alternatively, you can also enter digits using
the number keypad (direct entry)
(Ypage 29).
Deleting characters
XTo delete an individual character: select
the 2symbol by turning cVd the
COMAND controller and press Wbriefly.
or
XBriefly press the 2button
Each time a character is deleted, the entry
most closely resembling the remaining
characters is shown at the top of the list.
XTo delete an entry: select the 2
symbol by turning cVd the COMAND
controller and press Wuntil the entry is
deleted.
or
XPress and hold the 2button until the
entire entry is deleted.
Changing the language of the character
bar
XSelect Band press W.
XSelect the desired language.
126 Using the phone book
Telephone
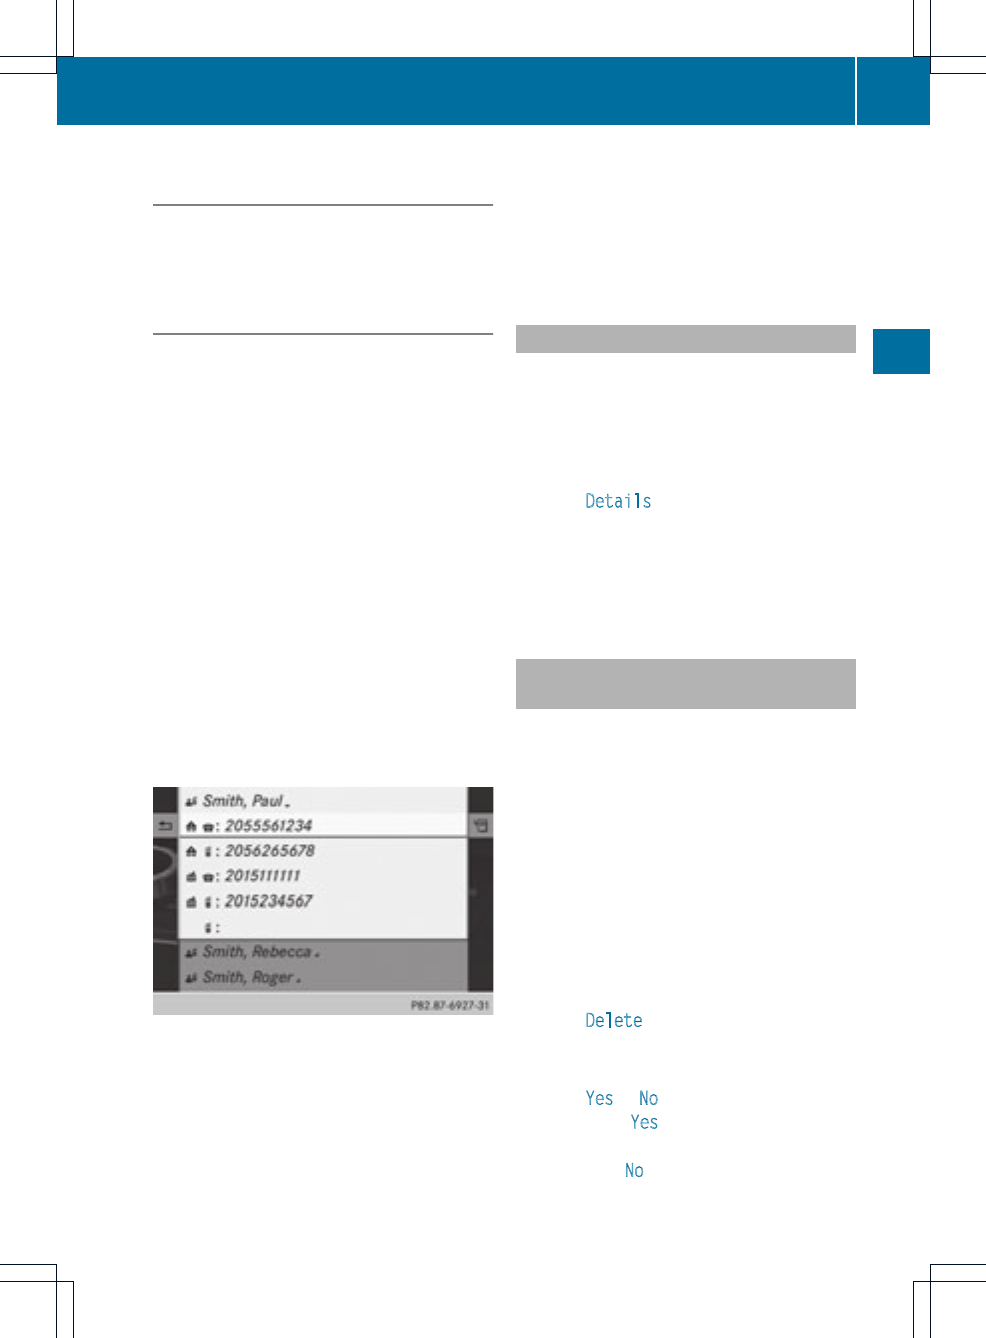
Changing the character set of the
character bar
XSelect pand press Wto confirm.
The characterset changes each time you
make this selection.
Selecting an entry directly from the list
You can switch to the list at any time during
character entry.
XSlide VZ the COMAND controller
repeatedly or press and hold Wuntil the
character bar disappears.
or
XSelect ¬and press Wto confirm.
XTo select an entry: turn cVd the
COMAND controller until the desired entry
is highlighted and press Wto confirm.
To select aphone number: the Gicon
indicates that an entry contains more than
one phone number.
XSelect a phone book entry with the Gicon
and press Wto confirm.
The sub-entries appear. The Gicon
changes to I.
Phone book entry with several entries
XSelect a sub-entry by turning cVd and
press Wto confirm.
XTo return to the phone book using the
character bar: select &in the list and
press Wto confirm.
or
XPress the %back button.
Displaying details for an entry
XSelect an entry in the selection list by
turning cVd the COMAND controller.
XSelect the listsymbol to the right of the
entry by sliding VY the COMAND
controller and press Wto confirm.
XSelect Details and press Wto confirm.
The detailed view appears.
XTo close the detailed view: slide XVY
repeatedly until the entryis highlighted
againorpress the %back button.
Deleting an entry from the phone
book
If the entry contains only phone numbers, it
is deleted from the phone book and address
book.
If there is additional data included along with
the phone number, e.g. a navigable
destination, the entry is deleted from the
phone book but retained in the address book.
XSelect an entry in the selection list by
turning cVd the COMAND controller.
XSelect the listsymbol to the right of the
entry by sliding VY the COMAND
controller and press Wto confirm.
XSelect Delete and press Wto confirm.
Aprompt appears asking whetherthe entry
should be deleted.
XSelect Yes or No and press Wto confirm.
If you select Yes, the entry is deleted in
accordance with the rules described above.
If you select No, the process will be aborted.
Using the phone book 127
Telephone
Z
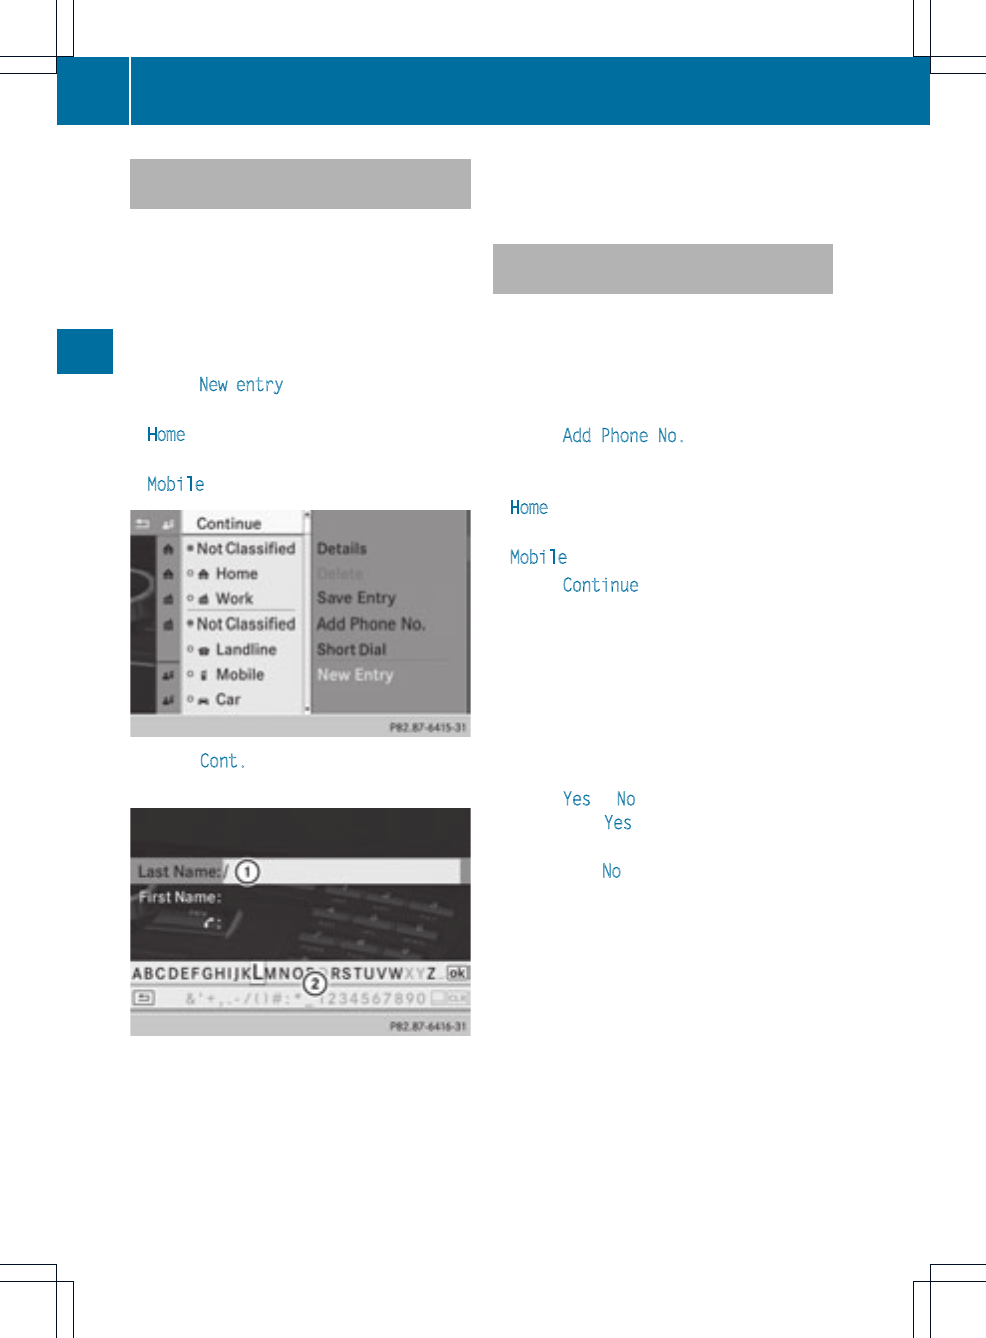
Creating a new entry in the phone
book
XSlide ZV the COMAND controller
repeatedly in the phone book until the
selectionlist appears.
XSelectthe list symbol on the right in the
selection list by sliding VY the COMAND
controller and press Wto confirm.
XSelect New entry and press Wto confirm.
XSelect a category for the number, e.g.
Home, and press Wto confirm.
XSelect a category for the phone, e.g.
Mobile, and press Wto confirm.
XSelect Cont. and press Wto confirm.
The input menu with data fields appears.
:Selected data field with cursor
;Character bar
XEnter characters and save the entry.
Proceed as described under character
entry in the "At a glance" section
(Ypage 28).
iThe entry is created in the phone book
and in the address book.
Adding telephone numbers to an
existing phone book entry
XSelect an entry in the selection list by
turning cVd the COMAND controller.
XSelect the list symbol to the right of the
entry by sliding VY the COMAND
controller and press Wto confirm.
XSelect Add Phone No. and press Wto
confirm.
XSelect a category for the number, e.g.
Home, and press Wto confirm.
XSelect a category for the phone, e.g.
Mobile, and press Wto confirm.
XSelect Continue and press Wto confirm.
COMAND stores the data if there are fewer
than five numbers assigned to the entry you
are searching for in the selected number
category.
If five numbers are stored for the entry in
the selected number category, a prompt
will appearasking whether you wish to
overwrite one of the existing numbers.
XSelect Yes or No and press Wto confirm.
If you select Yes, a selection list will appear
containing the five existing numbers.
If you select No, the process will be aborted.
XSelect the number to be overwritten by
turning cVd the COMAND controller and
press Wto confirm.
An input menu appears. The data field for
entering the new phone number is
highlighted.
XEnter characters and save the entry.
Proceed as described under character
entry in the "At a glance" section
(Ypage 28).
128 Using the phone book
Telephone
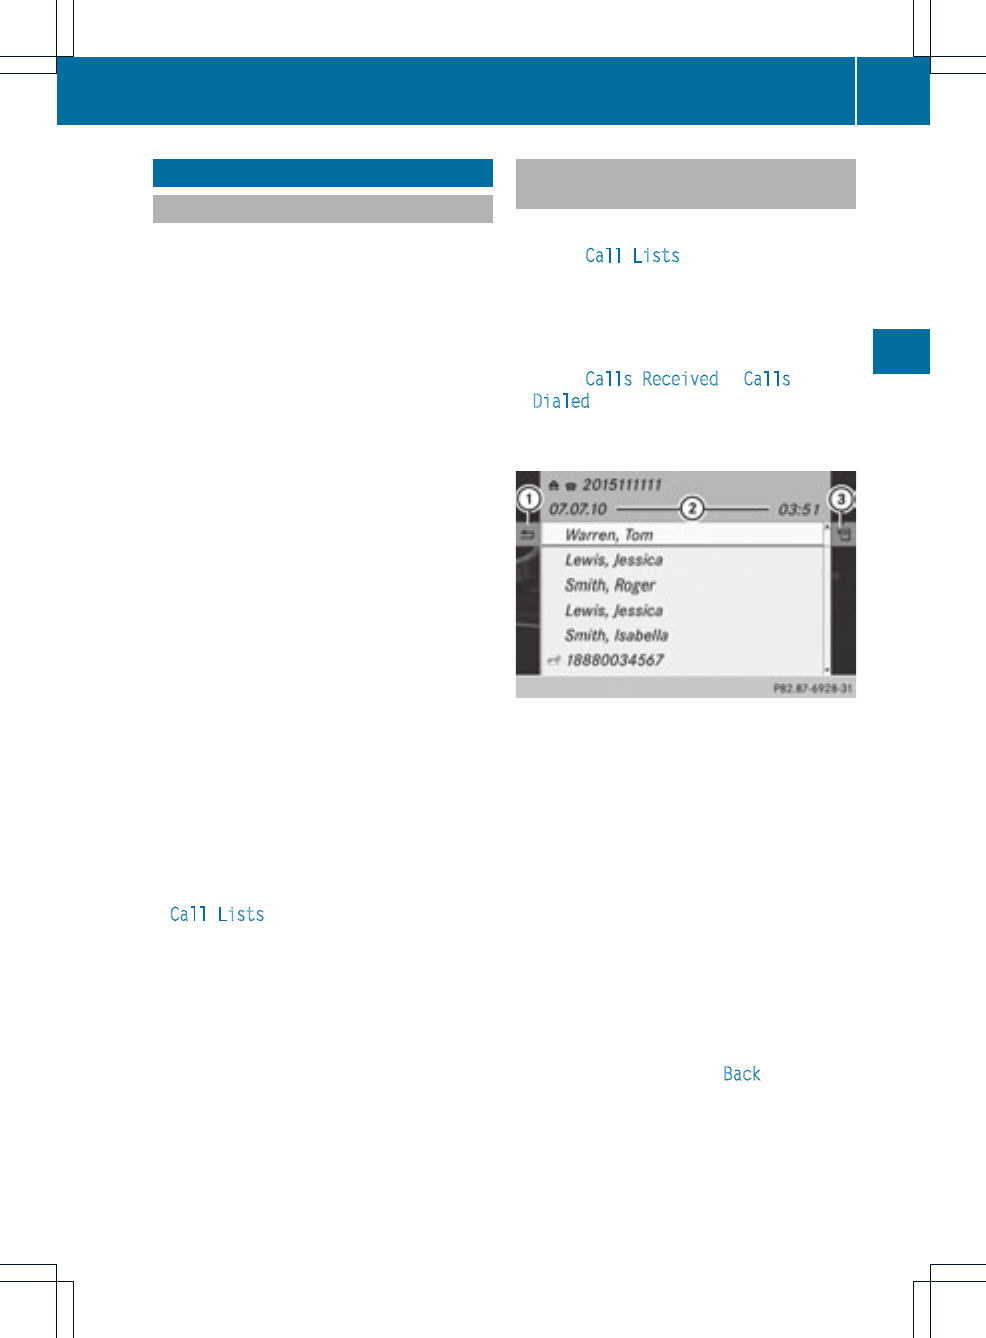
Using call lists
Introduction
COMAND displays lists of calls received
(including missed calls) and made during
phone operation.Call lists are notavailable
unless a mobile phone is connected to
COMAND.
COMAND supports the PBAP Bluetooth®
profile. How COMAND processes call lists
depends on the model of the mobile phone
connected:
RBluetooth®telephone with PBAP
Bluetooth®profile:
The call lists are downloaded automatically
from the mobile phone by COMAND as
soon as the mobile phone is connected to
COMAND.
RBluetooth®telephone without PBAP
Bluetooth®profile:
COMAND creates the call lists from calls
dialed and received (including missed calls)
as soon as the mobile phone is connected
with COMAND.
iFor Bluetooth®telephones without the
PBAP Bluetooth®profile, the call lists in
COMAND are not synchronized with those
on yourmobile phone. These calls may or
may not be listed on your mobile phone,
depending on the model.
iIf no mobile phone is connected, then the
Call Lists menu item is grayed out and
cannot be selected. If you connect a mobile
phone other than the previous one to
COMAND, the previously available call lists
and their entries will be deleted
automatically. They are still available on the
mobile phone itself.
iThe respective menu item can only be
selected if calls have already been made or
received in COMAND.
Displaying missed calls in the COMAND
display is not supported by all mobile
phones.
Opening the call list and selecting an
entry
XPress the %function button.
XSelect Call Lists in the telephone basic
menu by sliding VÆand turning cVd the
COMAND controller and press Wto
confirm.
Amenu appears.
XSelect Calls Received or Calls
Dialed using cVd and press Wto
confirm.
The corresponding list appears.
List of selected phone numbers (example)
:To close the list
;Date/time (if available), symbols (if
assigned) and telephone number of the
entry highlighted
=To call up options
iYou can also call up the list of dialed calls
by pressing the 6button when the
telephone basic menu is shown. In this
case, the list will only show phone
numbers.
XSelect an entry by turning cVd the
COMAND controller.
XTo dial a phone number: press W.
XTo close the list: select Back and press
Wto confirm or press the %button.
Using call lists 129
Telephone
Z
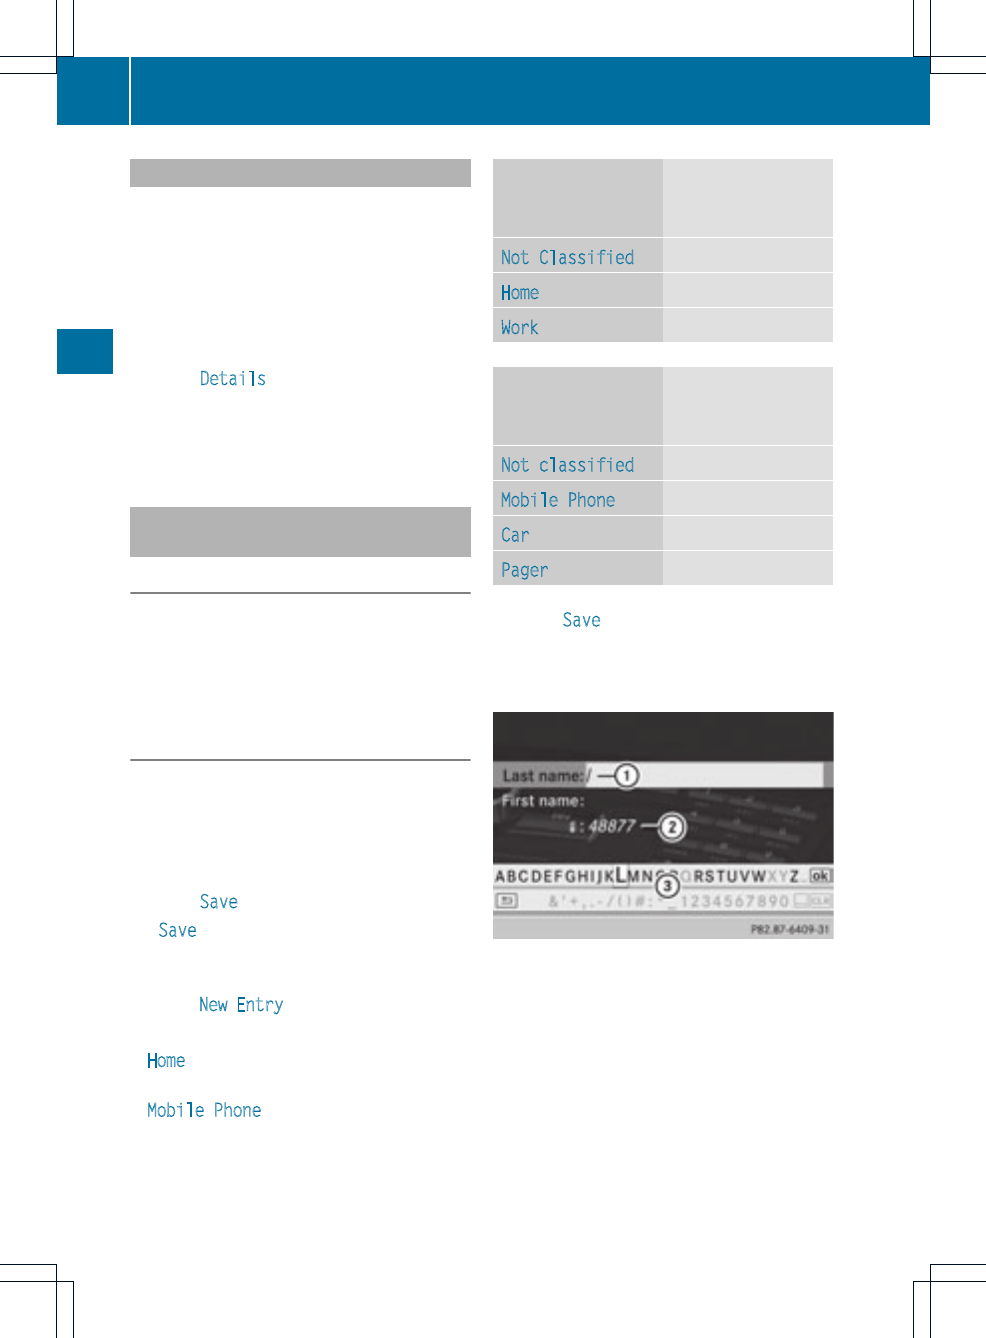
Displaying details about alist entry
COMANDcan also show a shortened list entry
in full.
XSelect a list entry by turning cVd the
COMAND controller.
XSelect the list symbol to the rightofthe
entry by sliding VY the COMAND
controller and press Wto confirm.
XSelect Details and press Wto confirm.
The detailed display appears.
XTo go back to the list: slide XVY
repeatedly until the list is highlighted.
Storing a phone number which has
not yet been stored
Introduction
For incoming calls from a person who is not
in the address book, COMAND displays the
phone number in the call list. You can save
this entry.
Storing as a new entry in the address
book
XOpen a call list and select an entry
(Ypage 129).
XSelect the list symbol to the right of the
entry by sliding VY the COMAND
controller and press Wto confirm.
XSelect Save and press Wto confirm.
iSave is shown in gray if the selected list
entry has already been saved in the address
book.
XSelect New Entry and press Wto confirm.
XSelect a category for the number, e.g.
Home, and press Wto confirm.
XSelect a category for the phone, e.g.
Mobile Phone, and press Wto confirm.
Number category Display (phone
book and address
book)
Not Classified No symbol
Home ¸
Work ·
Phone category Display (phone
book and address
book)
Not classified ;
Mobile Phone Ï
Car ´
Pager ¨
XSelect Save and press Wto confirm.
An input menu with data fields is shown.
The data field for the telephone number is
filled in automatically.
:Data field with cursor
;Telephone number and symbol for the
phone category (automatically entered)
=Character bar
XProceed as described under "Entering
characters" in the "Entering characters in
the address and phone books" section
(Ypage 31).
130 Using call lists
Telephone

Adding a phone number to an address
book entry
XOpen a call list and select an entry
(Ypage 129).
XSelectthe list symbol to the right of the
entry by sliding VY the COMAND
controller and press Wto confirm.
XSelect Save and press Wto confirm.
iSave is shown in gray if the selected list
entry has already been saved.
XSelect Add Phone No. and press Wto
confirm.
XSelect a category for the number, e.g.
Home, and press Wto confirm.
XSelect a category for the phone, e.g.
Mobile Phone, and press Wto confirm.
XSelect Save.
The search menu for address book entries
appears.
XSearch for the desired entry. Proceed as
described under "Searching for a phone
book entry" (Ypage 126).
XPress Wwhen you have finished searching.
COMAND stores the data if there are fewer
than five numbers assigned to the entry you
are searching for in the selected number
category.
You will see a message to this effect.
If five numbers are stored for the entry you
are searching for, a prompt will appear
asking whether you wish to overwrite one
of the existing numbers.
XSelect Yes or No and press Wto confirm.
If you select Yes, a selection list with the
five existing numbers is displayed.
If you select No, the process will be aborted.
XSelect the number to be overwritten in the
list by turning cVd the COMAND controller
and press Wto confirm.
COMAND overwrites the selected number
with the new data.
Deleting call lists
This function is available when COMAND
creates and manages the call lists.
This is the case if you use a Bluetooth®
telephone without the support of the PBAP
Bluetooth®profile.
iIf you delete the call lists from the mobile
phone (separate mobile phone operating
instructions), COMAND updates the call list
display the next time it connects. The call
lists are empty in the case described.
XSelect Call Lists in the telephone basic
menu by turning cVd the COMAND
controller and press Wto confirm.
XSelect Delete Call Lists and press W
to confirm.
Aprompt appears asking whetheryou wish
to delete all call lists.
XSelect Yes or No and press Wto confirm.
If you select Yes, the call lists are deleted.
If you select No, the process will be aborted.
Using the speed dial list
Storing a phone book entry in the
speed dial list
You can assign ten speed dial presets (0 –9)
to the speed dial list. There are two options
available for this purpose.
Option 1:
XSearch for a phone book entry in the phone
book (Ypage 126).
XIf an entry has several phone numbers,
select the desired numberby turning
cVd the COMAND controller.
Using the speed dial list 131
Telephone
Z

XSelect the list symbol to the right of the
entry by sliding VY the COMAND
controllerand press Wto confirm.
Amenu appears.
XSelect Speed dial by turning cVd the
COMAND controller and press Wto
confirm.
Amenu appears.
Speed dial menu
XConfirm Assign Speed Dial Preset by
pressing W.
The speed dial list appears. The selected
phone book entry is listed as the first entry.
The nextavailable speed dial presetis
highlighted.
XSelect the speed dial preset by turning
cVd the COMAND controller and press
Wto confirm.
The phone book entry is saved in the speed
dial preset.
Option 2
XCall up the telephone basic menu; see
(Ypage 119)
XSelect Call Lists by sliding VÆand
turning cVd the COMAND controller and
press Wto confirm.
XSelect Speed Dial Preset List and
press Wto confirm.
The speed dial list appears.
XSelect the list symbol to the right of the
entry by sliding VY the COMAND
controller and press Wto confirm.
XConfirm Assign Speed Dial Preset by
pressing W.
XProceed as described under option 1.
Making a call via speed dial
Adescription can be found in the "Making a
call" section (Ypage 122).
Deleting aspeeddial number
XTo delete a speed dial number: select
Delete Speed Dial Preset in the
"Speed dial" menu by turning cVd the
COMANDcontroller and press Wto
confirm.
The speed dial number is deleted.
XTo delete all speed dial numbers: select
Delete All Speed Dial Presets in the
"Speed dial" menu by turning cVd the
COMAND controller and press Wto
confirm.
You will be asked whether you want to
continue.
XSelect Yes or No and press Wto confirm.
If you select Yes, all speed dial numbers will
be deleted from the speed dial list.
If you select No, the process will be aborted.
132 Using the speed dial list
Telephone
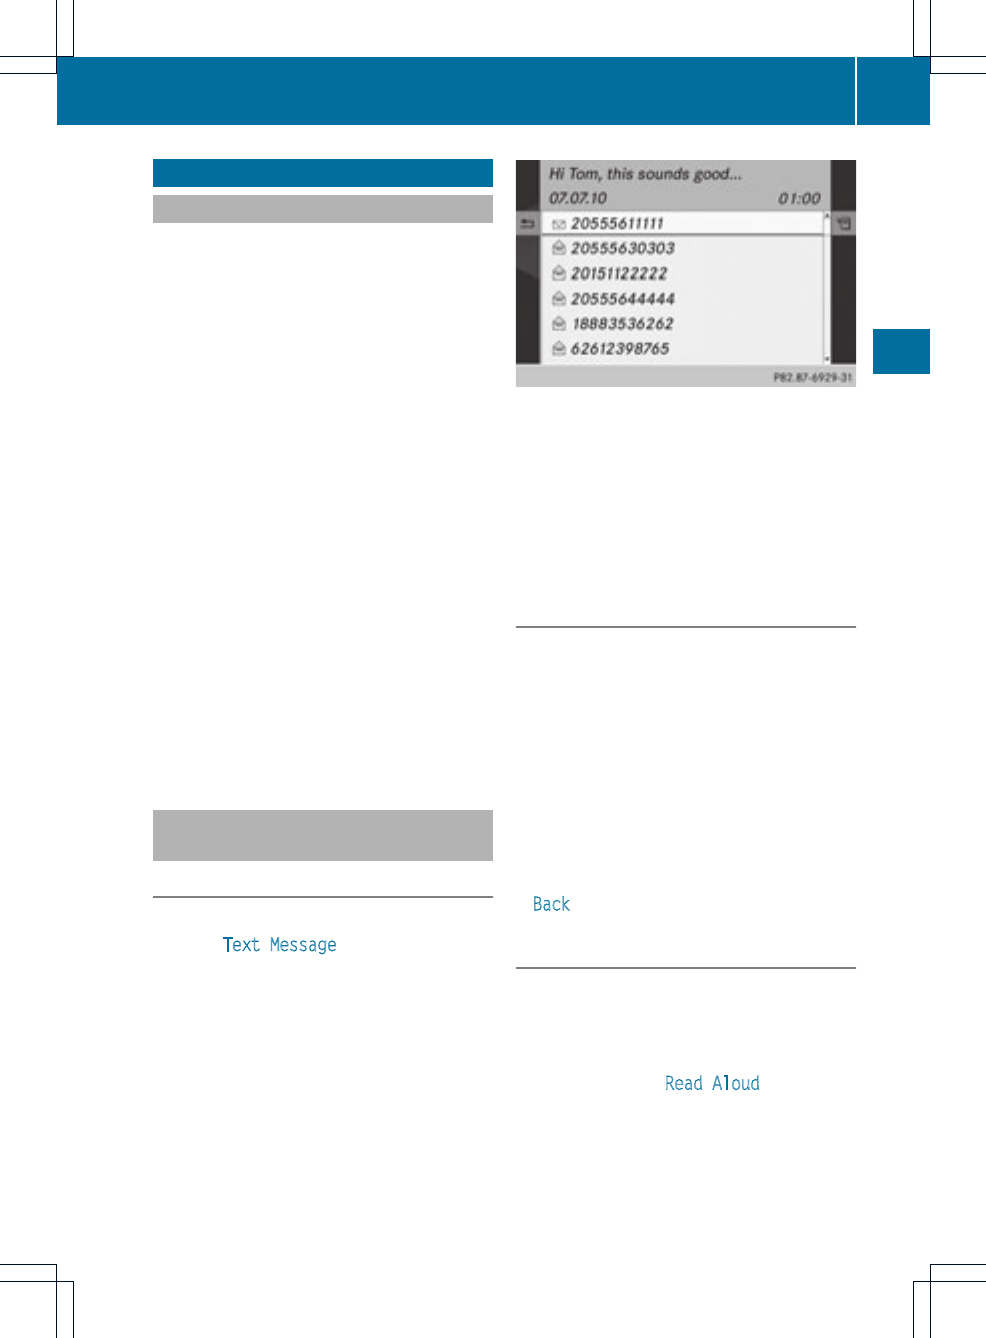
Textmessage (SMS)
Information and requirements
The functions can be used if the Bluetooth®
mobile phone supports the MAP (Message
Access Profile) Bluetooth®profile.
When the mobile phone is connected, the 30
mostrecenttext messages which are
currently stored on the phone are loaded to
the COMAND's textmessage inbox and
displayed.
iCOMAND may not load all the most
recenttext messages:
This is possible in exceptional cases, such
as with certain mobile phones, or when
there are a lot of textmessages in the
phone's inbox.
If the above conditions are fulfilled, new
incoming textmessages appear in the
COMAND textmessage inbox. In addition, a
tone sounds and the /icon appears. The
symbol disappears once you have read the
textmessage. The úmail symbol is
displayed when the textmessage memory is
full. The symbol disappears once you delete
at least one textmessage.
Displaying the text message (SMS)
inbox
Overview
XPress the %function button.
XSelect Text Message in the telephone
basic menu by turning cVd the COMAND
controller and press Wto confirm.
The textmessage inbox appears.
Text message (SMS) inbox
The shortened textorsender of the selected
textmessage (depending on the settings) as
well as the date and time at which the
selected textmessage was received are
displayed at the top and in the middle. The
0symbol appears if a textmessage has
not yet been read.
Reading atext message (SMS)
XSelect a text message in the text message
inboxby turning cVd the COMAND
controller and press Wto confirm.
The text message appears.
XTo scroll through the display or select
phone numbers in atext message: turn
cVd the COMAND controller.
The display scrolls up or down line by line,
or skips to the nextorprevious telephone
number and automatically highlights it.
XTo return to the list: press Wand select
Back.
Listening to atext message
You can set the language (Ypage 45)and the
speed of the read-aloud function
(Ypage 42).
XPress Wwhile a text message is being
displayed, select Read Aloud and press
Wto confirm.
COMAND reads outthe text message.
Text message (SMS) 133
Telephone
Z

XTo cancel the read-aloud function: press
the 8button.
or
XPress W, select Cancel Read-Aloud
Function and press Wto confirm.
Switching the display
You can switch between displaying the text
message sender or the text message content.
The sender display shows the sender of the
text message. If the sender is stored in the
COMAND phone book, the name is displayed.
The text display shows the first few words of
a text message.
XSelect a text message in the text message
inbox by turning cVd the COMAND
controller.
XTo switch to the text display: select the
list symbol to the right of the text message
by sliding VY the COMAND controller and
press Wto confirm.
XSelect Display Text and press Wto
confirm.
The view changes.
XTo switch to the sender display: select
the list symbol to the right of the text
message by sliding VY the COMAND
controller and press Wto confirm.
XSelect Display Sender and press Wto
confirm.
The view changes.
Displaying details and phone numbers
COMAND can also show a shortened sender
display in full.
XSelect a text message in the text message
inbox by turning cVd the COMAND
controller.
XSelect the list symbol to the right of the text
message by sliding VY the COMAND
controller and press Wto confirm.
XSelect Details and press Wto confirm.
The detailed display appears.
XTo close the detailed view: slide XVY the
COMAND controller.
Returning to the telephonebasic menu
XPress the %back button.
Managing text messages
Calling atext message (SMS) sender
XPress Wthe COMAND controller while the
text message is being displayed.
XSelect Call Sender and press Wto
confirm.
The telephone makes the call to the sender.
Using phone numbers in the text
You can use numbers that are red and
underlined in text messages (SMS).
iIt is possible that a highlighted numerical
sequence may notcontain a telephone
number.
XSelect a usable number when the text
message is displayed.
:Usable numerical sequence
XPress Wthe COMAND controller and
select Use.
XSelect Call.
The telephone makes the call.
134 Text message (SMS)
Telephone
iYou can use the "New entry" or "Add no."
functions to save this telephone number or
to add it to an existing entry.
Storing the sender as a new address
book entry
This function is not possible if the sender’s
telephone numberis already stored in the
address book.
XPress Wthe COMAND controller while the
text message is being displayed.
XSelect Save Number and press Wto
confirm.
XSelect New entry and press Wto confirm.
XProceed as described in the "Storing as a
new entry in the address book" section
(Ypage 130).
Storing atext message sender in an
existing address book entry
XPress Wthe COMAND controller while the
text message is being displayed.
XSelect Save Number and press Wto
confirm.
XSelect Add Phone No. and press Wto
confirm.
XProceed from the step "Select a number
category" in the "Adding telephone
numbers to an existing phone book entry"
section(Ypage 128).
Deleting atext message (SMS)
XSelect a text message in the text message
inboxby turning cVd the COMAND
controller.
XSelectthe list symbol to the right of the text
message by sliding VY the COMAND
controller and press Wto confirm.
XSelect Delete and press Wto confirm.
Adeletion prompt appears.
XSelect Yes or No and press Wto confirm.
If you select Yes, the textmessage is
deleted.
If you select No, the process will be aborted.
iThis delete function is not supported by
all mobile phones. The Deletion
Procedure Failed message appears.
Using the address book
Introduction
GWARNING
Please devote your attention first and
foremost to the traffic situation you are in.
Before your journey, please familiarize
yourself with the address book functions.
Only use the COMAND when road and traffic
conditions permit you to do so. Otherwise you
could be involved in an accidentinwhich you
or others could be injured.
The address book organizes and stores
entries which are entered from different
sources (mobile phone, memory card, USB
device, COMAND telephone book, navigation
system).
You can use these entries to make telephone
calls and for navigation.
iNumber of contacts in the address
book: the address book can store a total of
4000 contacts. 1500 entries are reserved
in the address book for mobile phone
contacts and 1500 for contacts you create
in COMAND or import from other sources.
The remaining 1000 entries are assigned
by COMAND as necessary.
iDisplay of mobile phone contacts:
contacts downloaded from the mobile
phone remain in the address book even if
the mobile phone is disconnected from
COMAND. This means that contacts which
have previously been available can be
displayed as soon as the mobile phone is
reconnected. The contacts are downloaded
again so that any new contacts that have
been added to the mobile phone can be
displayed.
Using the address book 135
Telephone
Z
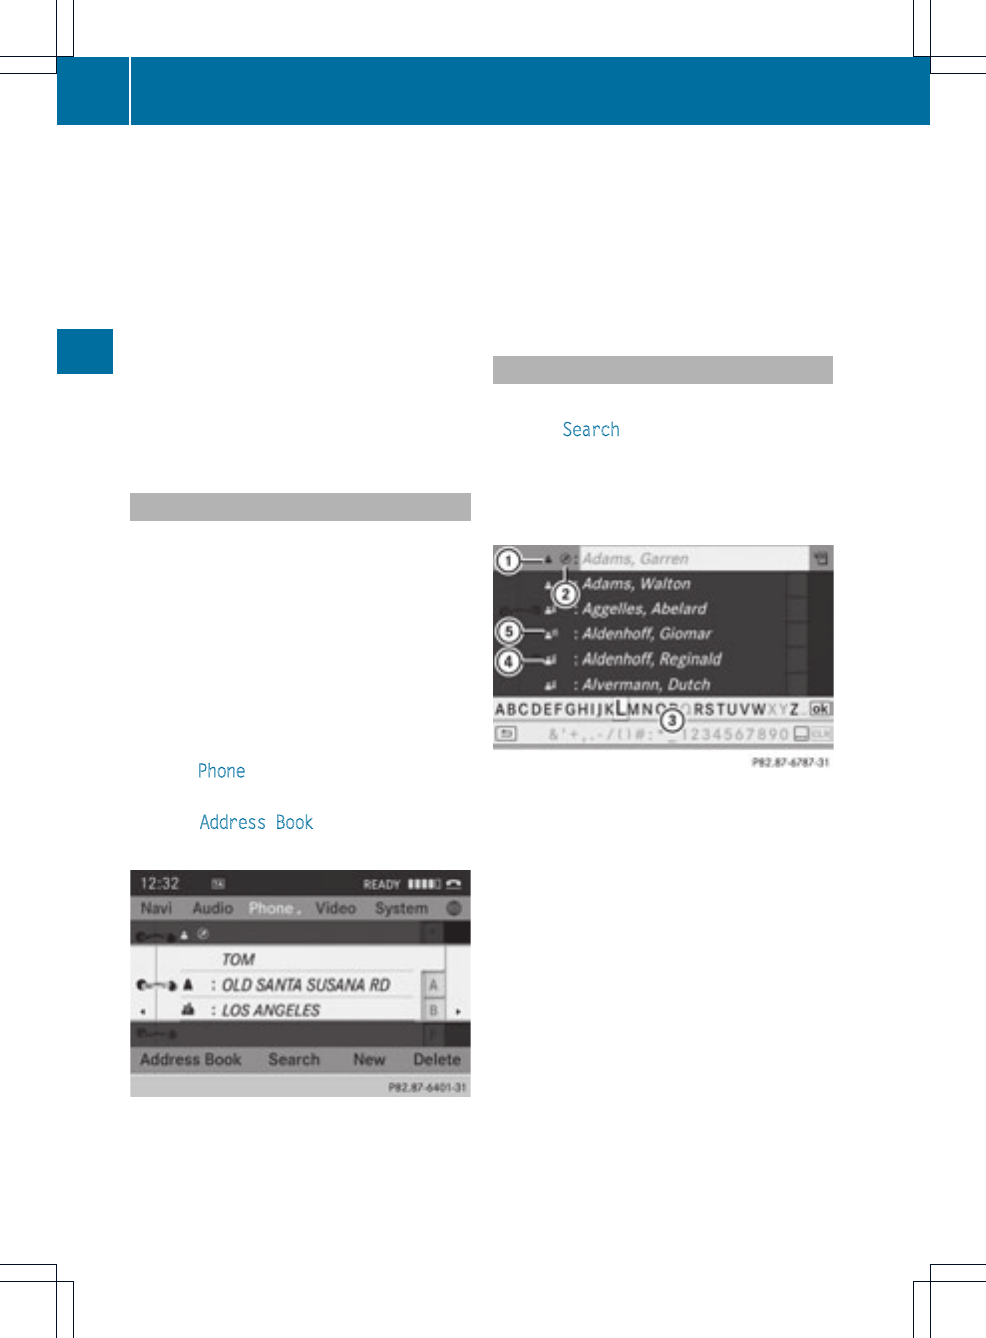
When a new mobile phone is connected to
COMAND, all the contacts from the
previous mobile phone are deleted from the
address book.
If a mobile phone is not (yet) connected to
COMAND, the contacts from that mobile
phone will not (yet) be shown in the address
book.
Address book entries remain stored when
the mobile phone is disconnected.
Therefore, you should delete your personal
data using the reset function before selling
your vehicle, for example (Ypage 47).
Calling up the address book
Option 1:
XPress the %function button.
You see the telephone basic menu or the
address book if it was open previously.
XWhen the telephone basic menu is
displayed, press the %function button
again.
Option 2:
XWith the telephone basic menu shown,
select Phone by sliding VZ the COMAND
controller and press Wto confirm.
XSelect Address Book from the menu and
press Wto confirm.
Address book with address book entry ¥and
navigable data ¤
iAn address book entry can contain the
following information:surname, first name,
company, two addresses, geo-coordinates
and up to five telephone numbers.
XTo browse in the address book: turn
cVd the COMAND controller.
XTo close the address book: press the
%button.
Searching for an address book entry
XCall up the address book (Ypage 136).
XSelect Search in the address book by
sliding VÆand turning cVd the COMAND
controller and press Wto confirm.
If there are more than eight entries, the
search menu and the characterbar appear.
Search menu with character bar
:¥Symbol for address book entry
;¤Symbol for complete address data
from the navigation system
=Characterbar
?dSymbol for phone book entry from the
mobile phone
AEntry with voice tag
Additional symbols are describedinthe
"Symbol overview" section (Ypage 126).
XProceed as described under "Searching for
a phone book entry" (Ypage 126).
136 Using the address book
Telephone

Creating a new entry in the address
book
You can enteraddress data directly into the
address book. If you store telephone
numbers in the COMAND phone book, these
are also saved in the address book. If you
store a navigation destination, COMAND
creates an address book entry which includes
the complete navigable address data.
XCall up the address book (Ypage 136).
XSelect New in the address book by sliding
VÆand turning cVd the COMAND
controller and press Wto confirm.
An input menu with data fields appears.
Input menu with data fields
:Selected data field with cursor
;Character bar
XEnter characters and save the entry.
Proceed as described under "Entering
characters" in the "Entering characters in
the address and phone books" section
(Ypage 31).
Deleting an address book entry
XOption 1: select Delete by sliding VÆand
turning cVd the COMAND controller and
press Wto confirm.
XOption 2: search for an address book entry
(Ypage 136).
XSelect the list symbol to the right of the
entry by sliding VY the COMAND
controller and press Wto confirm.
XSelect Delete and press Wto confirm.
Irrespective of the option chosen, a prompt
will appear.
XSelect Yes or No and press Wto confirm.
If you select Yes, the entry will be deleted.
If you select No, the process will be
canceled.
Displaying the detailed view for an
address book entry
Selecting an entry
XSearch for an address book entry and turn
cVd the COMAND controller to select it in
the selection list (Ypage 136).
or
XSelect an address book entry by browsing
(Ypage 136).
XIn both cases, press W.
The detailed view appears.
Detailed display for business details
:Returns to the previous menu
;\Symbol for business details
=Calls up options
Using the address book 137
Telephone
Z
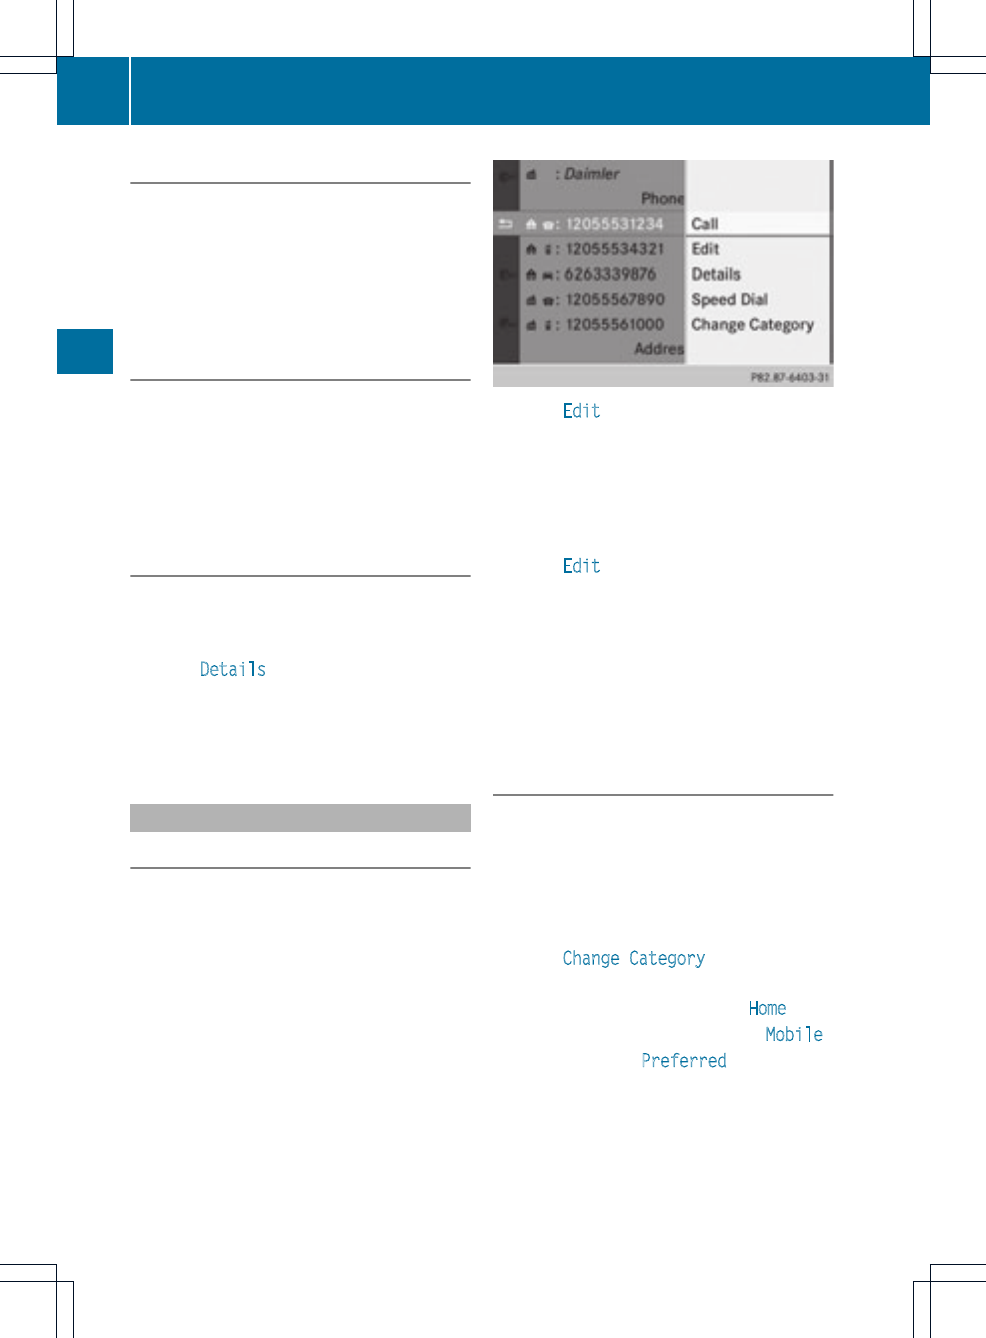
Starting route guidance to an address
XSelect the address data field by turning
cVd the COMAND controller and press
Wto confirm.
The route to the destination address is
calculated and route guidance starts
(Ypage 57).
Calling atelephone number
XSelect the phone number data field by
turning cVd the COMAND controller and
press Wto confirm.
This initiates dialing and you can then make
your call (Ypage 122).
Showing the details of an address book
entry
XSelect the list symbol to the rightofthe
entry by sliding VY the COMAND
controller and press Wto confirm.
XSelect Details and press Wto confirm.
The display is shown in full.
XTo close the detailed display: press the
%button.
Changing an address book entry
Changing an entry
XOption 1: search for an address book entry
and turn cVd the COMAND controller to
select it in the selection list (Ypage 136).
XSelect the list symbol to the right of the
entry by sliding VY the COMAND
controller and press Wto confirm.
Amenu appears.
XSelect Edit and press Wto confirm.
XOption 2: call up the detailed view for an
address book entry (Ypage 137).
XSelect the list symbol to the right of the
entry by sliding VY the COMAND
controller and press Wto confirm.
XSelect Edit and press Wto confirm.
Irrespective of the option, the input menu
containing data fields appears.
XProceed as described under "Entering
characters" in the "Entering characters in
the address and phone books" section
(Ypage 31).
Changing the category of a telephone
number data field
XDisplay the detailed view for an address
book entry (Ypage 137) and highlight the
telephone number data field.
XSelect the list symbol to the right of the
entry by sliding VY the COMAND
controller and press Wto confirm.
XSelect Change Category and press Wto
confirm.
XSelect a number category, e.g. Home.
XSelect a telephone category, e.g. Mobile.
XIf desired, select Preferred and press W
to confirm.
Depending on the previous status, you
switch the option on Oor off ª.The
phone number is displayed as the first
138 Using the address book
Telephone

numberinthe phone book and can be
dialed immediately.
XSelect Save and press Wto confirm.
The new category is stored.
Calling anumber stored in an entry
Conditions
The mobile phone must be connected via the
Bluetooth®interface.
Option 1
XDisplay details for an address book entry
(Ypage 137).
XSelect the phone numberdata field by
turning cVd the COMAND controller and
press Wto confirm.
The telephone makes the call. The display
switches to telephone mode.
Option 2
XDisplay details for an address book entry.
XSelect the phone number data field by
turning cVd the COMAND controller.
XSelect the list symbol to the rightofthe
data field by sliding VY the COMAND
controller and press Wto confirm.
XSelect Call and press Wto confirm.
The telephone makes the call.
Storing the phone number as aspeed
dial number
XDisplay details for an address bookentry.
XSelect the phone numberdata field by
turning cVd the COMAND controller.
XSelect the list symbol to the rightofthe
data field by sliding VY the COMAND
controller and press Wto confirm.
XSelect Speed Dial and press Wto
confirm.
You can now store the number in one of the
ten speed dial presets.
Starting route guidance to an entry
Note
This function is available as soon as you have
stored a destination in the destination
memory (Ypage 95). COMAND also saves
destinations in the address book together
with all the data required for route guidance.
Option 1
XSearch for an address book entry
(Ypage 136) with the Licon and select it
from the list.
XDisplay details for an address book entry
(Ypage 138).
XSelect the address data field by turning
cVd the COMAND controller and press
Wto confirm.
Option 2
XSearch for an address book entry
(Ypage 136) with the Licon and select it
from the list.
XSelect the list symbol to the right of the
entry by sliding VY the COMAND
controller and press Wto confirm.
XSelect Navigate and press Wto confirm.
Irrespective of the option chosen, route
guidance starts.
Option 3
Route guidance can also be started for an
address book entry without the ¤symbol. If
the address data or designations do not
Using the address book 139
Telephone
Z
match the digital map, COMAND prompts you
to re-enter the address.
iIt is best then to store the new address
under the address book entry. This will
provide you with an address book entry that
is suitable for navigation.
XEnter the destination address (Ypage 54).
XSelect Save from the address entry menu
and press Wto confirm.
XAssigning a destination to an address book
entry (Ypage 96).
Voice tags
Adding or changing avoice tag
You can enter voice tags via the Voice Control
System (see the separate operating
instructions). Once you have assigned a voice
tag to an address book entry, you can call up
this entry with a voice command and dial a
phone number, for example. You can add one
voice tag per address book entry.
XSearch for an address book entry with or
without a voice tag (¦symbol)
(Ypage 136).
XSelect the list symbol to the rightofthe
entry by sliding VY the COMAND
controller and press Wto confirm.
XSelect Voice Name and press Wto
confirm.
XSelect Add or Change and press Wto
confirm.
Subsequent operation is voice-controlled.
The Voice Control System guides you
through the dialogs.
Deleting avoice tag
XSearch for an address book entry with a
voice tag (Ypage 136).
XSelect the list symbol to the rightofthe
entry by sliding VY the COMAND
controller and press Wto confirm.
XSelect Voice Name and press Wto
confirm.
XSelect Delete and press Wto confirm.
Adeletion prompt appears.
XSelect Yes or No and press the 9button
to confirm.
If you select Yes, COMAND deletes the
voice tag.
If you select No, the process will be aborted.
Listening to avoice tag
XSearch for an address book entry with a
voice tag (Ypage 136).
XSelect the list symbol to the rightofthe
entry by sliding VY the COMAND
controller and press Wto confirm.
XSelect Voice Name and press Wto
confirm.
XSelect Listen and press Wto confirm.
You hear the voice tag.
Storing a phone book entry from the
mobile phone in the address book
Using this function you can save imported
phone book entries in the address book.
The following can be used as a source:
Rthe mobile phone
Rthe memory card
Rthe USB device
Rthe Bluetooth®Interface
Imported phone book entries are indicated in
the phone book by different icons
(Ypage 126).
140 Using the address book
Telephone
XSearch for an entry in the phone book on
the mobile phone d(Ypage 126).
XSelect the list symbol to the right of the
entry by sliding VY the COMAND
controllerand press Wto confirm.
XSelect Save Entry and press Wto
confirm.
The Saving Procedure Successful
message appears. The phone book entry is
now saved as an address book entry.
The diconis replaced by the ¥icon.
Importing contacts
Information and requirements
You can import contacts (vCards) from the
memory card and a USB device into the
address book, or receive vCards via
Bluetooth®.
iUp to 2500 entries can be imported into
the address book. Amessage notifies you
when the maximum number is reached.
You now have to delete existing entries
(Ypage 137)inorder to import new entries.
Depending on the source of the contact data,
different requirements apply:
Source Conditions
Memory card The SD memory card must
be inserted (Ypage 157)
and must contain
importable contact data.
USB device The USB device must be
inserted in the USB port
and must contain
importable contact data.
Requirements for receiving vCards via
Bluetooth®
You can receive vCards from devices (e.g.
from a PC) which support the sending of
vCards via Bluetooth®.
It is not necessary to authorize the device in
COMAND to do so.
Please bearthe following in mind:
RBluetooth®must be activated in COMAND
and on the Bluetooth®device (see
operating instructions for the device).
Rthe Bluetooth®device must be able to send
vCards via Bluetooth®(see operating
instructions for the device).
Rthe Bluetooth®device in the vehicle must
be switched on.
Importing from the memory card or USB
device
Entries imported from the memory card or
from a USB device have the ¯symbol.
The following conditions must be fulfilled in
order to import vCards:
RvCards (vcf files) may be located in the main
directory or in folders. COMAND allows for
a targeted selection of the corresponding
directories.
RvCards must have the file extension ".vcf".
iAvcf file can also containseveral vCards.
COMAND supports vCards in versions 2.1
and 3.0.
XSelect Address Book in the address book
or, if the telephone basic menu is shown,
select Phone by sliding VÆand turning
cVd the COMAND controller and press
Wto confirm.
XSelect Download Contacts and press W
to confirm.
Amenu appears.
XSelect From The Memory Card or From
USB Device in the menu by turning cVd
the COMAND controller and press Wto
confirm.
XSelect Add or Overwrite and press Wto
confirm.
Add imports the entries from the memory
card or USB device into the address book.
Using the address book 141
Telephone
Z
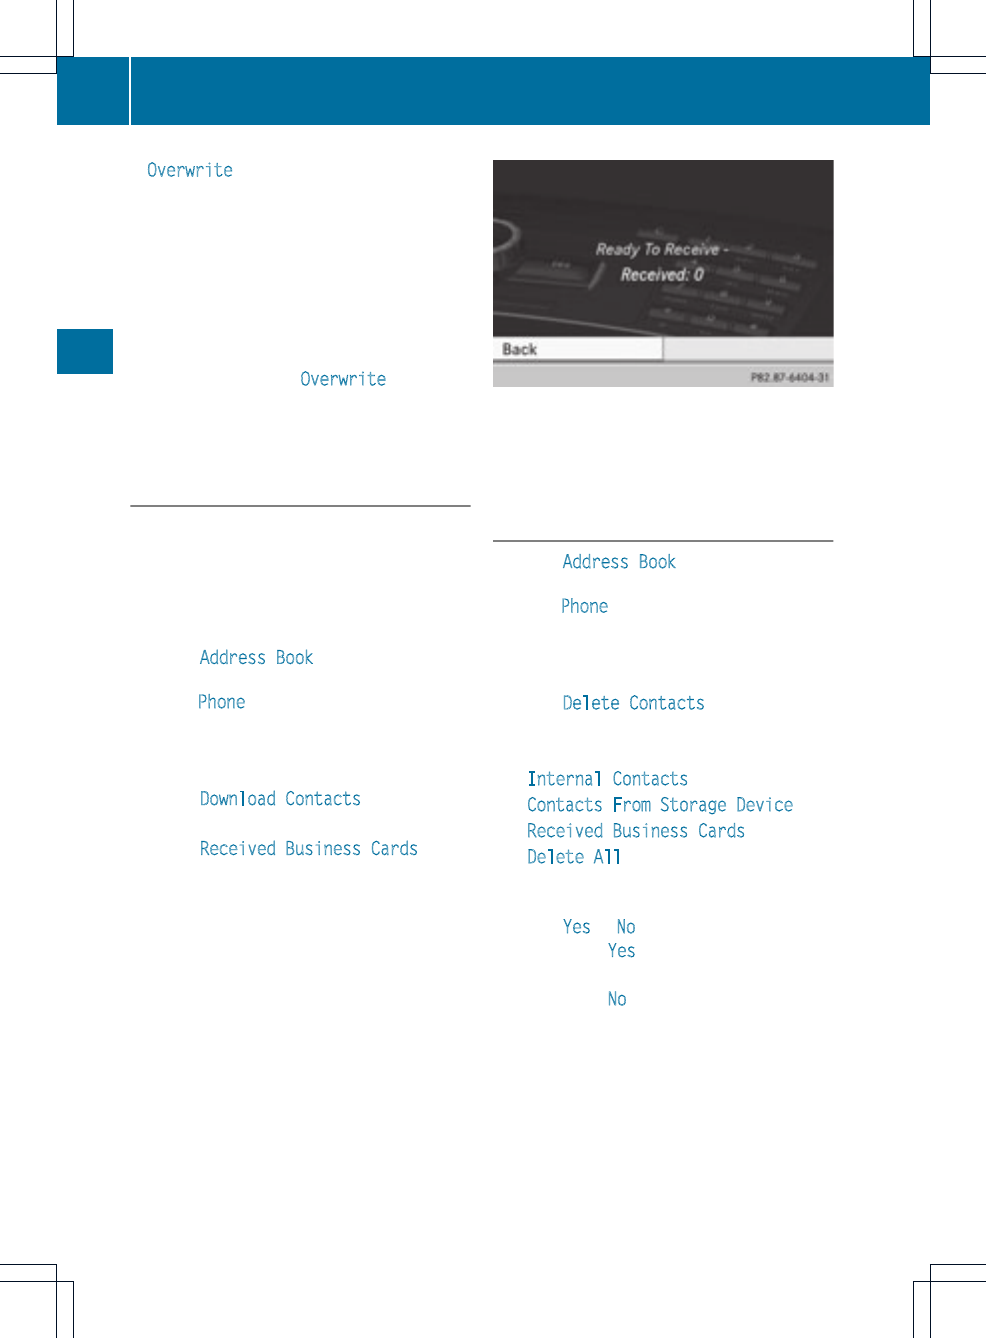
Overwrite imports the entries from the
memory card or USB device and overwrites
all entries in the address book with the
¯symbol. The previous entries are then
no longer available.
After the contact data has been imported
successfully, you will see amessage to this
effect. The address book or the respective
telephone basic menu is displayed.
iYou can select the Overwrite menu item
if the address book already contains
corresponding entries. Amessage notifies
you when the address book is full.
Receiving vCards via Bluetooth®
Received vCards are identified by the ®
symbol in the address book.
iIf you switch to another main function,
e.g. navigation, while receiving vCards, the
reception of vCards will be terminated.
XSelect Address Book in the address book
or, if the telephone basic menu is shown,
select Phone by sliding VÆand turning
cVd the COMAND controller and press
Wto confirm.
Amenu appears.
XSelect Download Contacts and press W
to confirm.
XSelect Received Business Cards in the
menu by turning cVd the COMAND
controller and press Wto confirm.
This interrupts the Bluetooth®connection
between COMAND and your active mobile
phone. COMAND is, however, ready to
receive vCards from another Bluetooth®
device (PC, mobile phone).
XStart the data transfer on the external
Bluetooth®device (see the operating
instructions for the device).
The number of vCards received is
displayed.
XTo end reception: press Wor the %
back button.
COMAND then reconnects with the mobile
phone.
Deleting contacts
XSelect Address Book in the address book
or, if the telephone basic menu is shown,
select Phone by sliding VÆand turning
cVd the COMAND controller and press
Wto confirm.
Amenu appears.
XSelect Delete Contacts and press Wto
confirm.
XSelect one of the following options:
RInternal Contacts
RContacts From Storage Device
RReceived Business Cards
RDelete All
Aprompt corresponding to yourselection
appears.
XSelect Yes or No and press Wto confirm.
If you select Yes, the contacts are deleted
according to your selection.
If you select No, the process will be
canceled.
142 Using the address book
Telephone

COMAND features ............................. 144
Radio mode ........................................ 144
Satellite radio .................................... 148
Audio CD/DVD and MP3 mode ........ 154
Music search ..................................... 165
MUSIC REGISTER .............................. 168
Bluetooth®audio mode .................... 172
Media Interface mode ...................... 178
Audio AUX mode ............................... 182
143
Audio
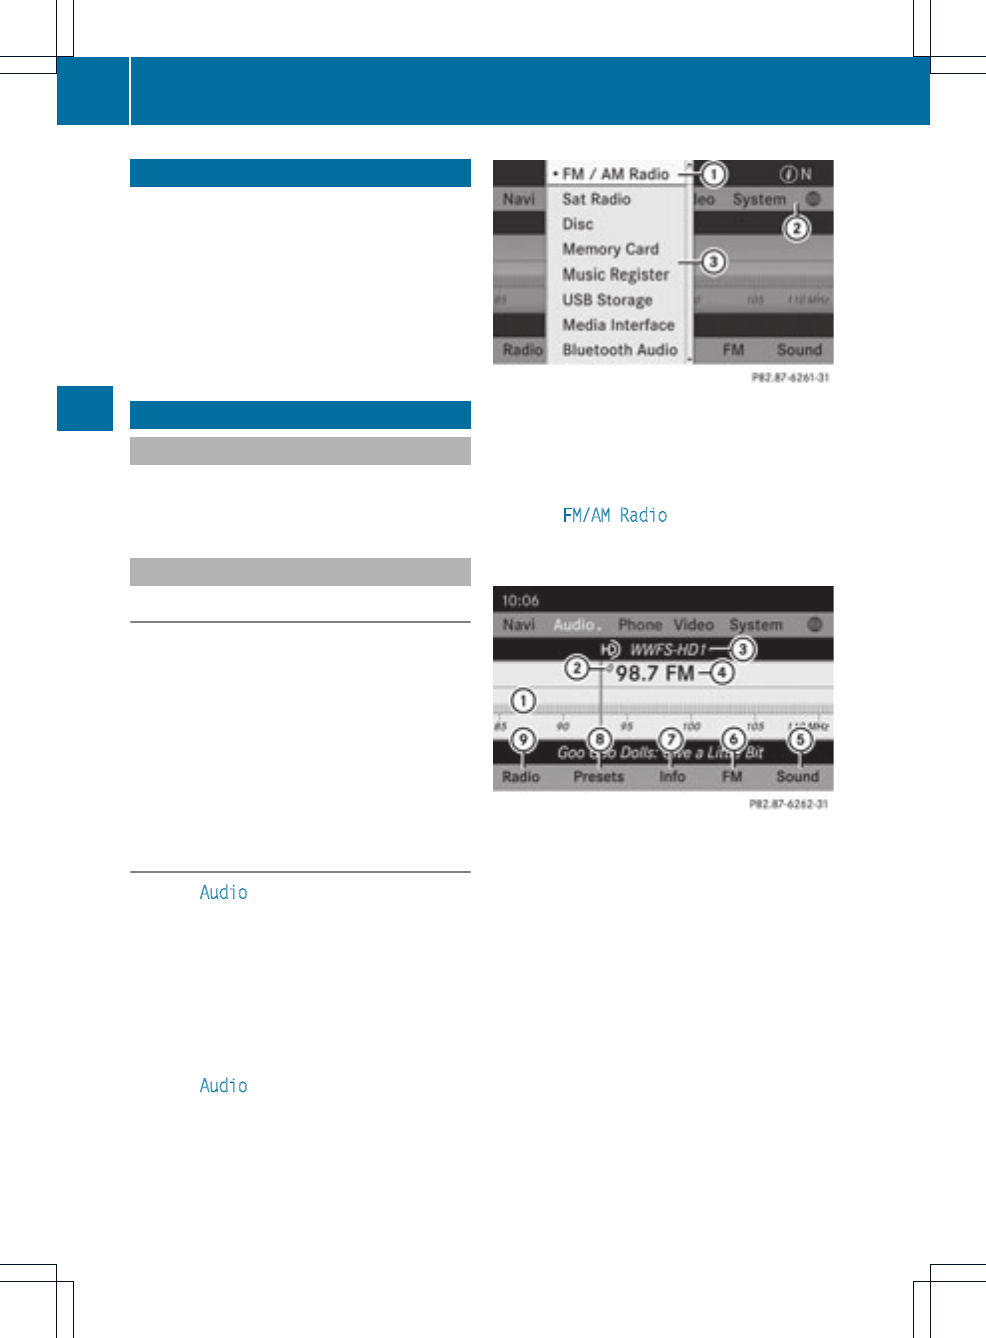
COMAND features
These Operating Instructions describe all
standard and optional equipmentavailable
for your COMAND system at the time of
purchase. Country-specificdeviations are
possible. Please note that your COMAND
system may not be equipped with all the
features described.
Radio mode
General information
iPortable electronic devices in the vehicle
may seriously impair radio reception.
Switching to radio mode
Option 1
XPress $the function button.
The radio display appears. You will hear the
last station played on the last waveband.
iRepeatedly pressing this function button
switches between the FM, AM and WB
wavebands in that order and then calls up
SatRadio mode. Pressing the button again
takes you back to FM radio mode.
Option 2
XSelect Audio in the main function bar by
sliding ZV and turning cVd the COMAND
controller and press Wto confirm.
If radio mode was the last mode selected,
it will now be active.
If another audio mode is switched on, you
can now switch to radio mode in the audio
menu.
XSelect Audio by sliding ZV the COMAND
controller and press Wto confirm.
The audio menu appears.
Example: audio menu
:Current audio operating mode
;Main function bar
=Audio menu
XSelect FM/AM Radio by turning cVd the
COMAND controller and press Wto
confirm.
Example: HD Radio display
:Display window with station settings
;Preset position of the selected station
=Name of the selected station (icon for HD
Radio™ and number of subprogram)
?Frequency of the selected station
ASound settings
BFM radio, AM radio or WB radio
CProgram information
DPreset functions
ERadio functions
144 Radio mode
Audio
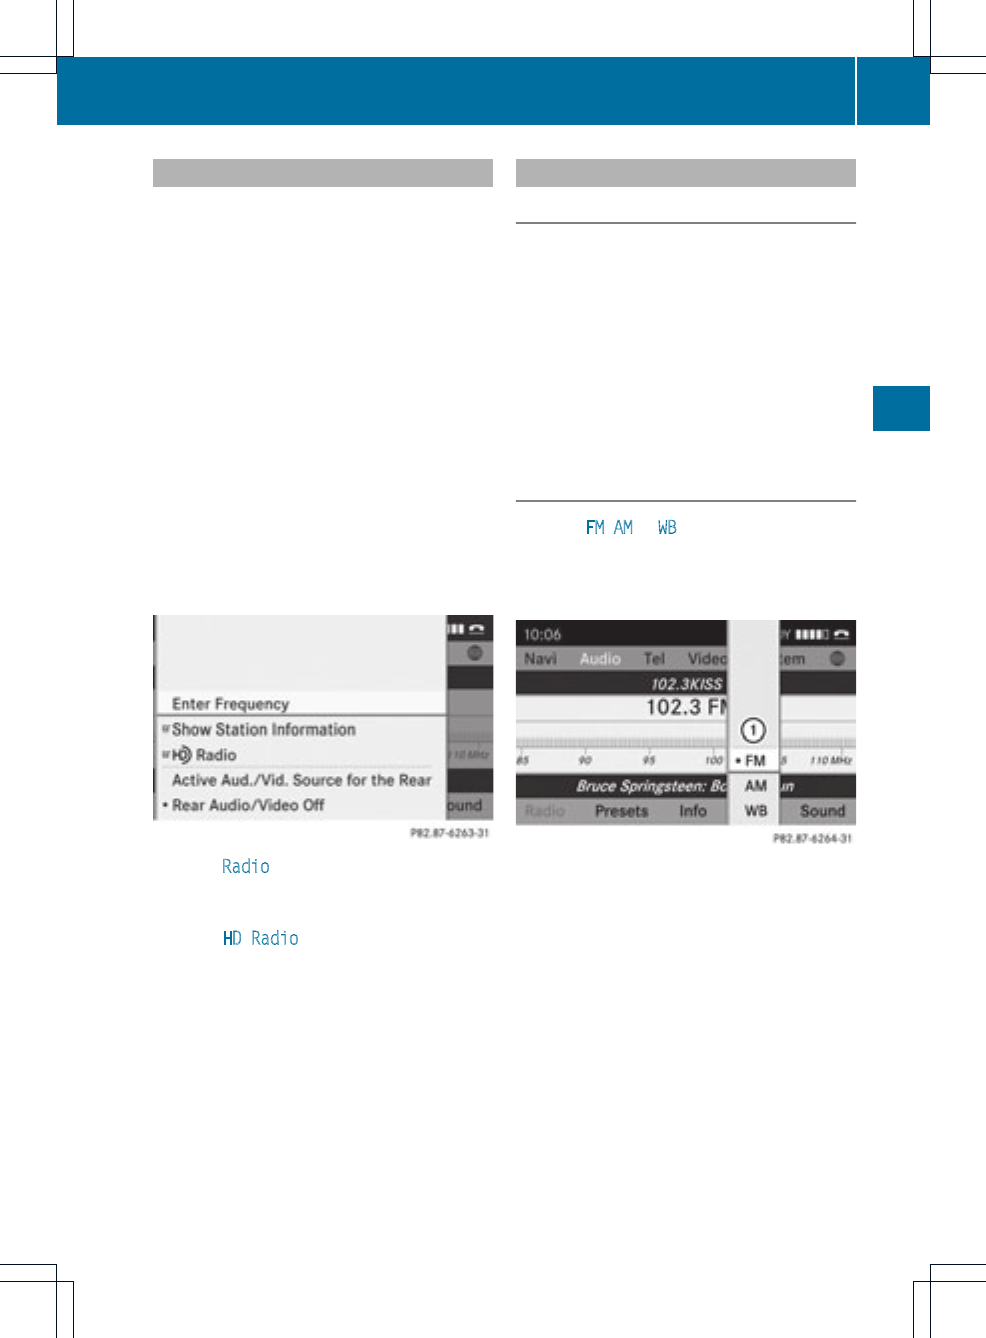
Notes on HD Radio™
iThe functions of HD Radio™ include:
Rdigital transmission in the same
wavebands as analog AM/FM.The
analog AM/FM stations remain in the
same position when selecting astation.
Rthe ability to broadcastseveral program
streams over a single FM frequency (e.g.
HD1, HD2 etc.).
Rinterference-free, clear reception.
RFM: sound in CD quality; AM: sound as
on analog FM stations.
Rtext-based information (e.g. artist, track
name) in the display.
For further information on HD Radio™, visit
http://www.hdradio.com.
You can deactivate HD Radio™ for the
selected frequency in the radio submenu.
XSelect Radio in the radio display by sliding
VÆthe COMAND controller and press W
to confirm.
XSelect HD Radio and press Wto confirm.
HD Radio™ is deactivated if the ªcheck
box is empty.
You hear the analog program of this
frequency.
As soon as you change to another HD Radio
frequency, the HD Radio™ is reactivated.
Switching wavebands
Option 1
You can switch the radio between the FM, AM
and WB waveband.
XPress the $function button repeatedly
until the desired waveband is selected.
iRepeatedly pressing this function button
switches between the FM, AM and WB
wavebands in that order and then calls up
SatRadio mode. Pressing the button again
takes you back to FM radio mode.
Option 2
XSelect FM,AM or WB in the radio display by
sliding VÆand turning cVd the COMAND
controller and press Wto confirm.
Waveband submenu is opened.
1Waveband submenu
The #dot shows the currently selected
waveband.
XSelect a waveband and press Wto confirm.
You will hear the last station played on the
selected waveband.
Radio mode 145
Audio
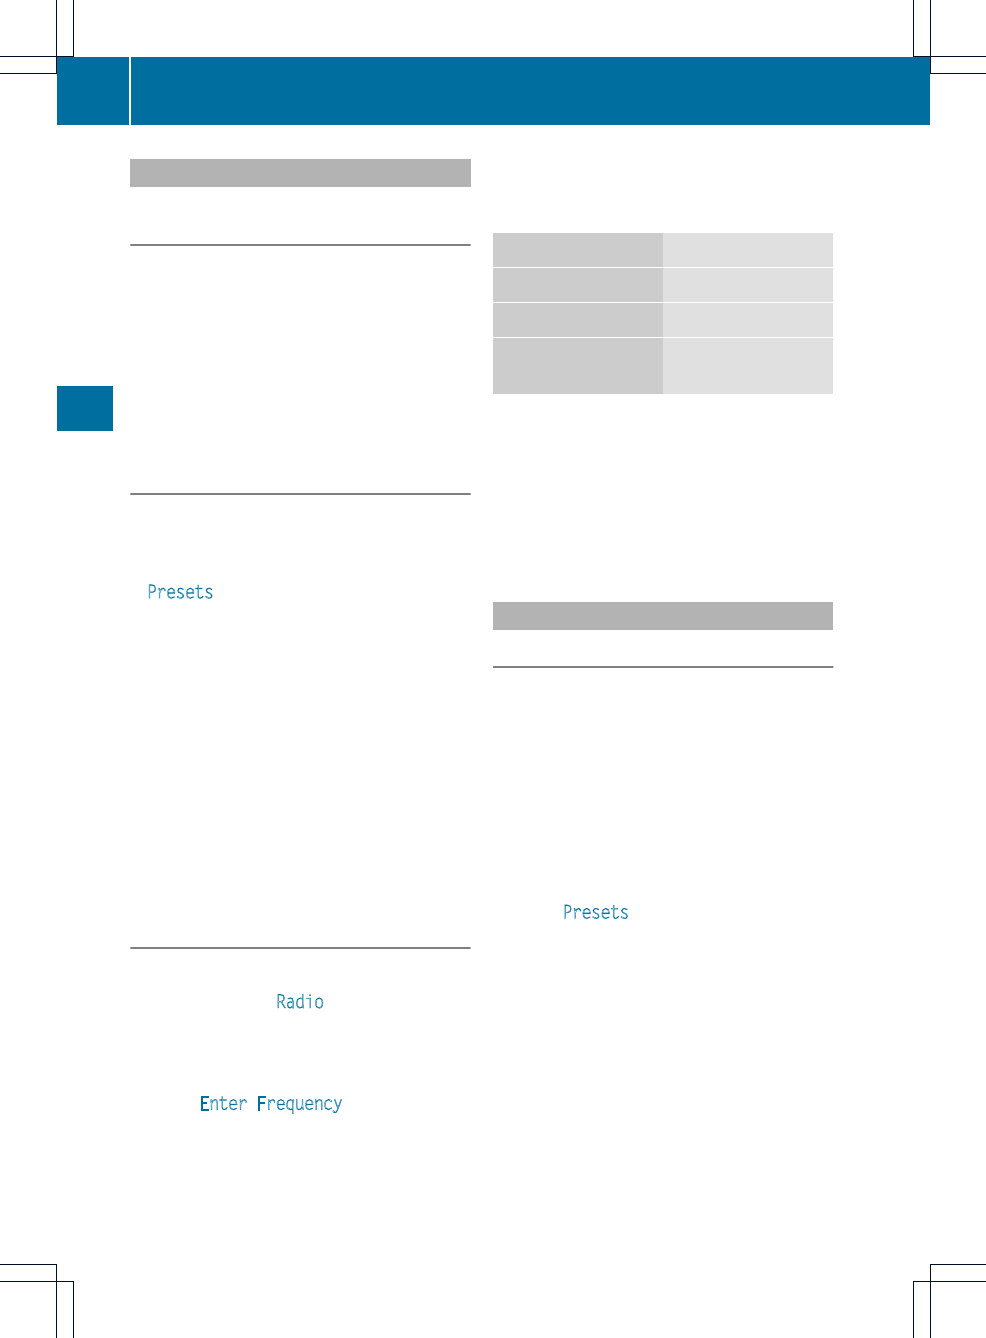
Selecting astation
Selecting astation using the station
searchfunction
XPress the Eor Fbutton.
or
XTurn cVd or slide XVY the COMAND
controllerwhile the display/selection
window in the radio display is active.
Station search scans up or down and stops
at the next station found.
Selecting stations via the station
presets
XQuick setting: press a number key, e.g.
l.
XDirectly in the station presets: select
Presets by sliding VÆand turning cVd
the COMAND controller and press Wto
confirm.
or
XPress Wthe COMAND controller when the
display/selection window is active.
The station preset memory appears. The
#dot indicates under which preset the
currently selected station is stored.
XSelect a station by turning cVd and
pressing Wto confirm or press a number
key, e.g. l.
Selecting stations by entering the
frequency manually
XOption 1: press the lbutton.
XOption 2: select Radio in the radio display
by sliding VÆand turning cVd the
COMAND controller and press Wto
confirm.
XSelect Enter Frequency and press Wto
confirm.
Irrespective of the option chosen, an input
menu will appear.
XEnter a frequency using the number keys.
COMAND tunes in to the frequency
entered.
Waveband Frequency
AM (MF) 530 – 1700 kHz
FM (VHF) 87.7 – 107.9 MHz
WB (Weather Band) Weather report
channels
iYou can only enter currently permitted
numbers.
iIf you enter a frequency in the FM or AM
wavebands which is outside the frequency
range, COMAND tunes in to the next lower
frequency.
Storing stations
Storing stations manually
There are ten presets available for the FM and
AM wavebands.
XQuick save: press and hold a number key,
e.g. l, until you hear a tone.
The station is stored.
XDirectly in the station presets: press W
the COMAND controller when the display/
selection window is active.
or
XSelect Presets by sliding VÆand turning
cVd the COMAND controller and press
Wto confirm.
In both cases, the station presets appear.
The #dot indicates under which preset
the currently selected station is stored.
146 Radio mode
Audio

Station memory (example)
XSelect a preset by turning cVd the
COMAND controllerand press and hold
Wuntil you hearatone.
The stationis stored under the preset.
Storing stations automatically
This function automatically stores stations
with adequate reception under the presets.
The search starts at the lowest frequency.
COMAND stores any stations found,
beginning with preset 1. The storing process
ends once the highest frequency has been
reached or once ten stations have been
found. Any stations stored manually under
the presets will be lost. COMAND may not
occupy all memory slots when storing.
XOption 1: press Wthe COMAND controller
when the display/selection window is
active.
The station preset memory appears.
XOption 2: select Presets by sliding VÆ
and turning cVd the COMAND controller
and press Wto confirm.
The station preset memory appears.
XIrrespective of the option, select
Autostore and press Wto confirm.
In both cases, COMAND searches for
stations that can be received. You will see
a message to this effect. The available
stations are automatically stored in the
preset positions.
XTo cancel storing: select Cancel and
press Wto confirm.
Weather Band
Switching on
XPress the $function button repeatedly
until the Weather Band is switched on.
or
XSelect the currently set waveband FM or
AM by sliding VÆand turning cVd the
COMAND controller and press Wto
confirm.
XSelect WB from the menu and press Wto
confirm.
Searching for achannel
XQuickselect: turn cVd or slide XVY the
COMAND controller while thedisplay/
selection window is active.
or
XPress the Eor Fbutton.
Channel search scans up or down and
stops at the next channel found.
Selecting achannel from the channel
list
XSelect Channel by sliding VÆand turning
cVd the COMAND controller and press
Wto confirm.
The channel listappears.
Radio mode 147
Audio
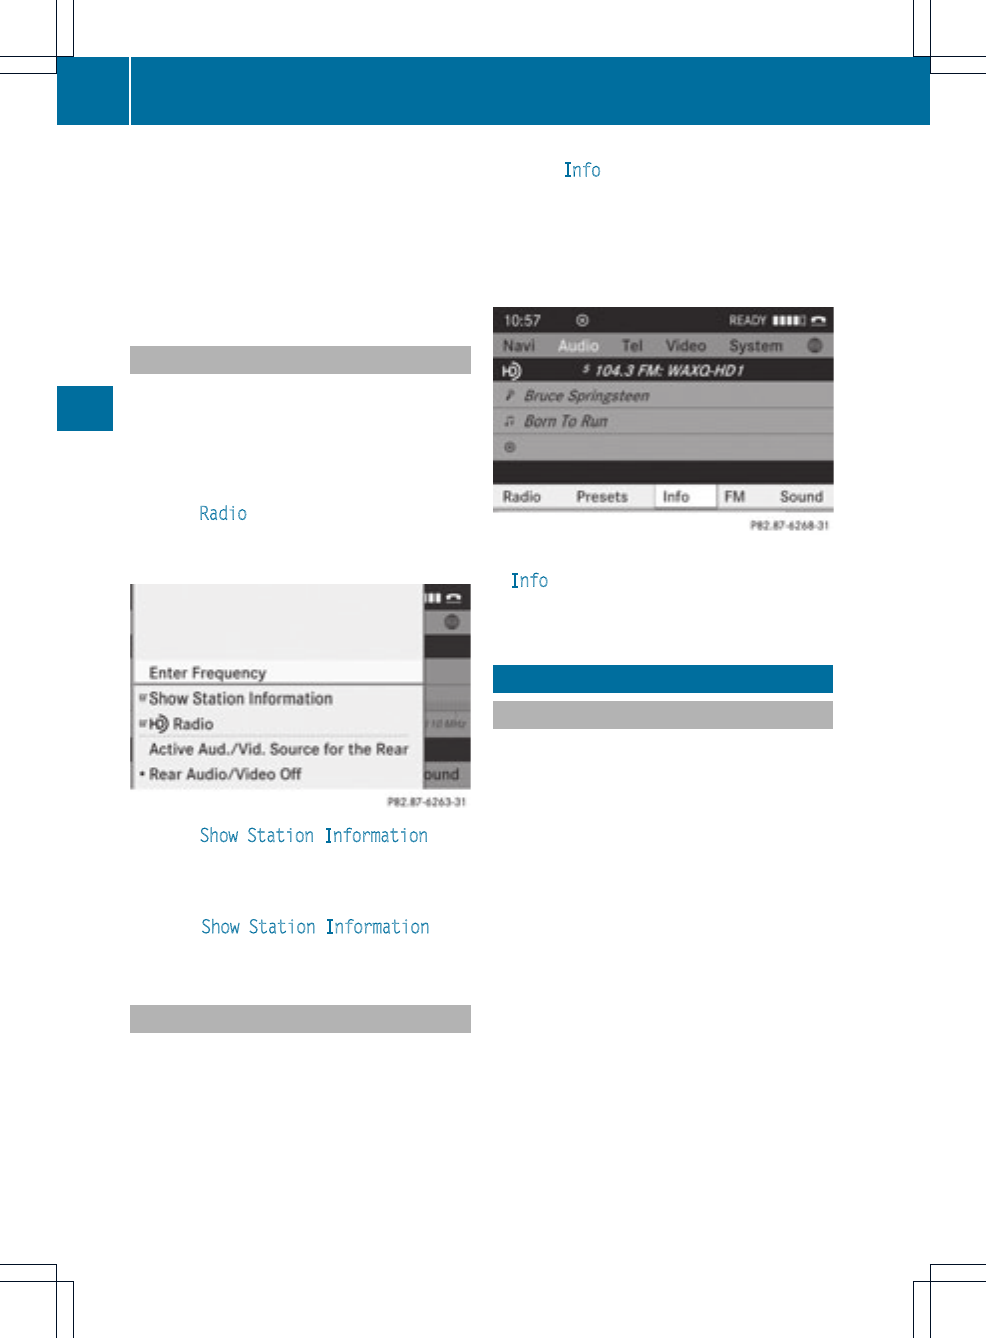
XSelect a channel by turning cVd the
COMAND controllerand press Wto
confirm.
or
XPress a numberkey on the control panel,
e.g. 4, at any time.
Displaying station information
This function is only available for analog FM
programs and digital AM/FM programs (HD
Radio™).
Information relevant to the current station is
shown below the main function bar.
XSelect Radio in the radio display by sliding
VÆand turning cVd the COMAND
controller and press Wto confirm.
XSelect Show Station Information by
sliding VÆand turning cVd the COMAND
controller and press Wto confirm.
Depending on the previous status, you
switch Show Station Information on
Oor off ª.
Displaying program information
This function is only available for analog FM
programs and digital AM/FM programs (HD
Radio™).
Information relevant to the current station is
shown in the display window.
XSelect Info in the radio display by sliding
VÆand turning cVd the COMAND
controller and press Wto confirm.
Information on the currently selected
station is displayed. Contentis dependent
on the station.
XTo return to the radio display: confirm
Info by pressing W.
XSlide ZV the COMAND controller up.
Satellite radio
Important notes
This section provides detailed information on
the following topics:
Rselecting a channel and program category
Rmemory functions
Rsound settings
iThe satellite radio mode described below
requires optionally available satellite radio
equipment and registration with a satellite
radio provider.
iNote that the categories and channels
shown in the illustrations depend on the
program content offered by the provider.
The program contents may vary. The
illustrations and descriptions in these
operating instructions may therefore differ
from the channels and categories offered
by the provider.
Satellite radio mode may be temporarily
unavailable or interrupted for a variety of
reasons. These reasons include
148 Satellite radio
Audio
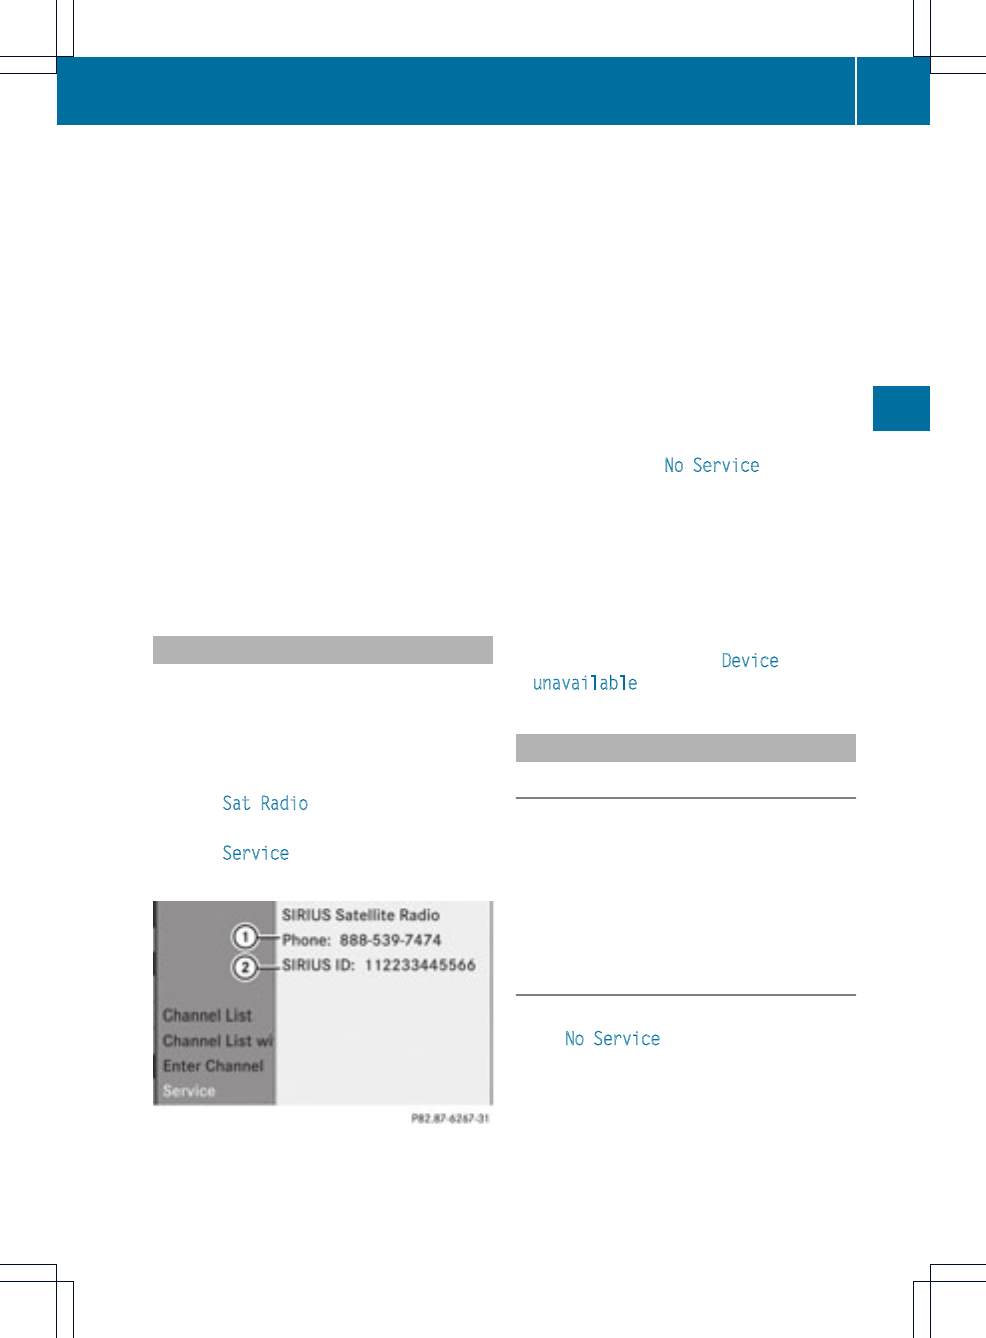
environmental or topographical conditions
as well as other issues beyond the control
of Mercedes-Benz USA, LLC. Operation
may also be impaired in certain locations
(e.g. tunnels, multi-storey car parks or
within as well as close to buildings).
iSIRIUS XM Radio offers more than 130
digital-quality radio channels providing
100% commercial-free music, sports, news
and entertainment.
SIRIUS XM Radio employs a fleet of high-
performance satellites to broadcast around
the clock throughout the USA and Canada.
The satellite radio program is available for
a monthly fee. Details are available from
the SIRIUS XM Service Center and at
http://www.sirius.com (USA) or
http://www.siriuscanada.com
(Canada).
Registering satellite radio
XSwitch on satellite radio mode
(Ypage 149).
The satellite radio main menu appears
showing the weather channel. You cannot
select any other stations.
XSelect Sat Radio in the lower menu bar
and press Wto confirm.
XSelect Service and press Wto confirm.
The service information screen appears.
Service information screen
1Provider's phone number (SIRIUS XM)
2SIRIUS XM ID of your satellite receiver
XCall the phone number of your satellite
radio provider shown on the screen.
iYou can also have the satellite service
activated online. To do so, visit the SIRIUS
XM Radio website at
http://www.sirius.com (USA) or
http://www.siriuscanada.com
(Canada).
Once the connection has been established:
XFollow the instructions of the service staff.
The activation process may take up to ten
minutes. If the activation is completed
successfully, the No Service message
appears in the display, followed by the
satellite radio main menu.
iIf registration is not included when
purchasing the system, your credit card
details will be required to activate your
account.
If the satellite receiver is not installed or
installed incorrectly, the Device
unavailable message will appear.
Switching on satellite radio mode
Notes
You can also use the multifunction steering
wheel to tune in channels or scroll through
lists, e.g. by pressing the =;
9: buttons (Ypage 23).
For important notes on registration, see
"Registering satellite radio" (Ypage 149).
Option 1
XPress $the function button.
The No Service message appears after
switching on or if no signal is being
received. Once COMAND receives the
signal, the satellite radio display appears.
The station last selected is played.
iRepeatedly pressing this function button
switches through the wavebands in the
order FM, AM, WB and subsequently
Satellite radio 149
Audio
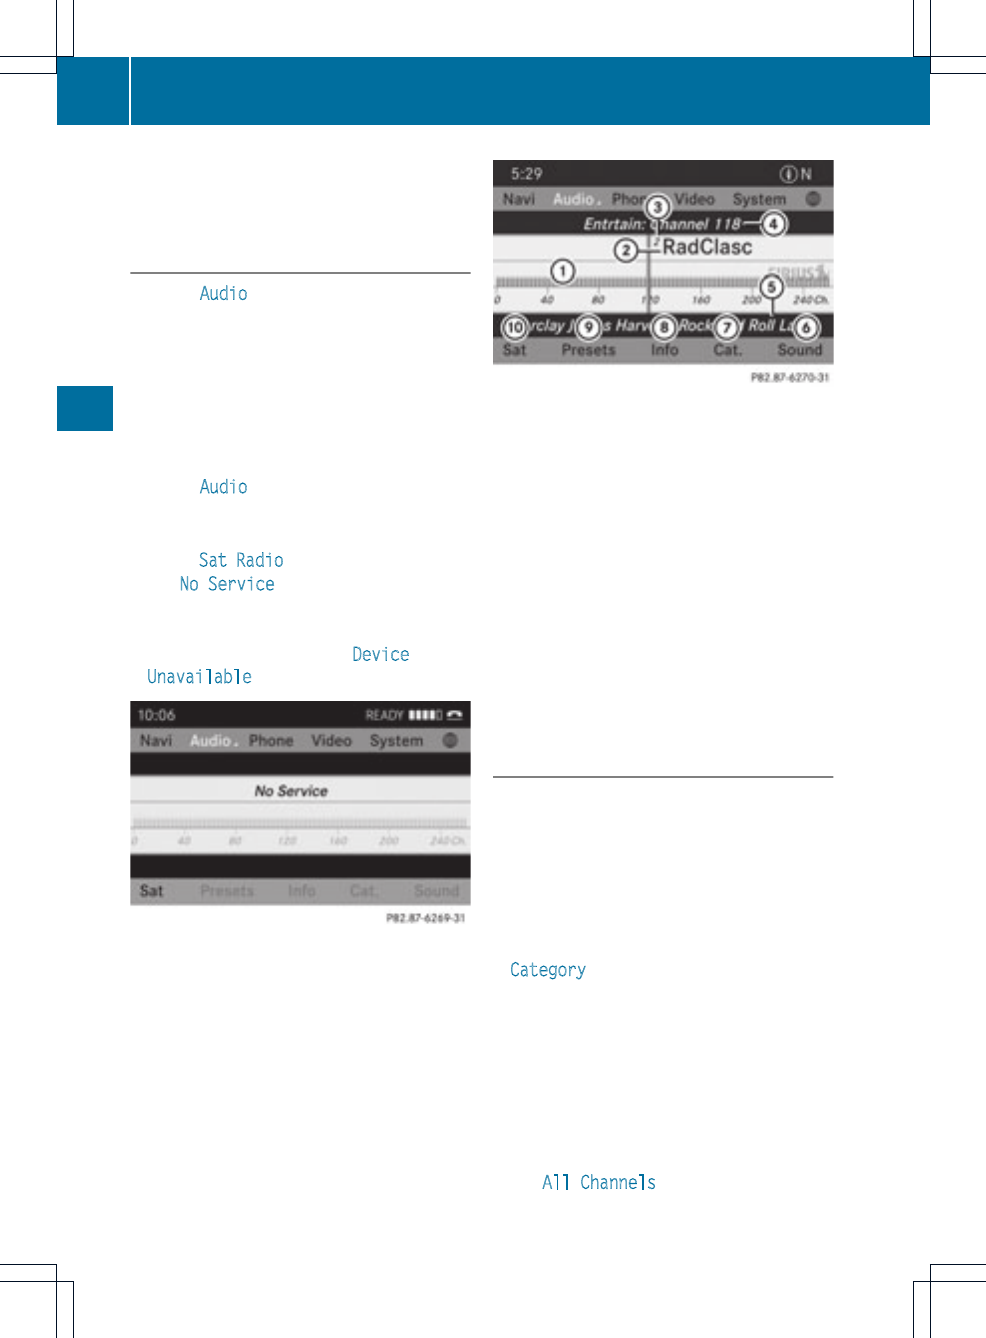
switches on the satellite radio. Pressing the
button againtakes you back to FM radio
mode.
Option 2
XSelect Audio in the main function bar by
sliding ZV and turning cVd the COMAND
controller and press Wto confirm.
If satellite radio mode was the last mode
selected, it will now be active.
If another audio mode is switched on, you
can now switch to satelliteradio mode in
the audio menu.
XSelect Audio by sliding ZV the COMAND
controller and press Wto confirm.
The audio menu appears.
XSelect Sat Radio and press Wto confirm.
The No Service message appears when
starting up or if no signal is being received.
If the satellite receiveris not installed or is
not installed correctly, the Device
Unavailable message will appear.
Once COMAND receives the signal, the
satellite radio display appears. The station
last selected is played.
Satellite radio main menu
1Satellite radio main display
2Channel name
3Preset
4Selected category/channel number
5Channel information (in brief)
6Sound settings
7Category list
8Channel information (in detail)
9Channel preset list
aSatellite radio menu
Channel information Acan be viewed in
detail (Ypage 153).
Changing the category
Satellite radio stations are sorted into various
categories. You can choose between the
different categories, such as news/talk
shows, sports or country, if they are available.
The category list is sorted alphabetically.
Selecting acategory
XTo call up the category list: select
Category by turning cVd the COMAND
controllerand press Wto confirm.
The category list appears.
XTo select acategory: select a category by
turning cVd the COMAND controller and
pressing Wto confirm.
The category selected is showninthe
display. You hear the station last selected
for this category.
The All Channels category is at the top
of the category list. This category is sorted
150 Satellite radio
Audio
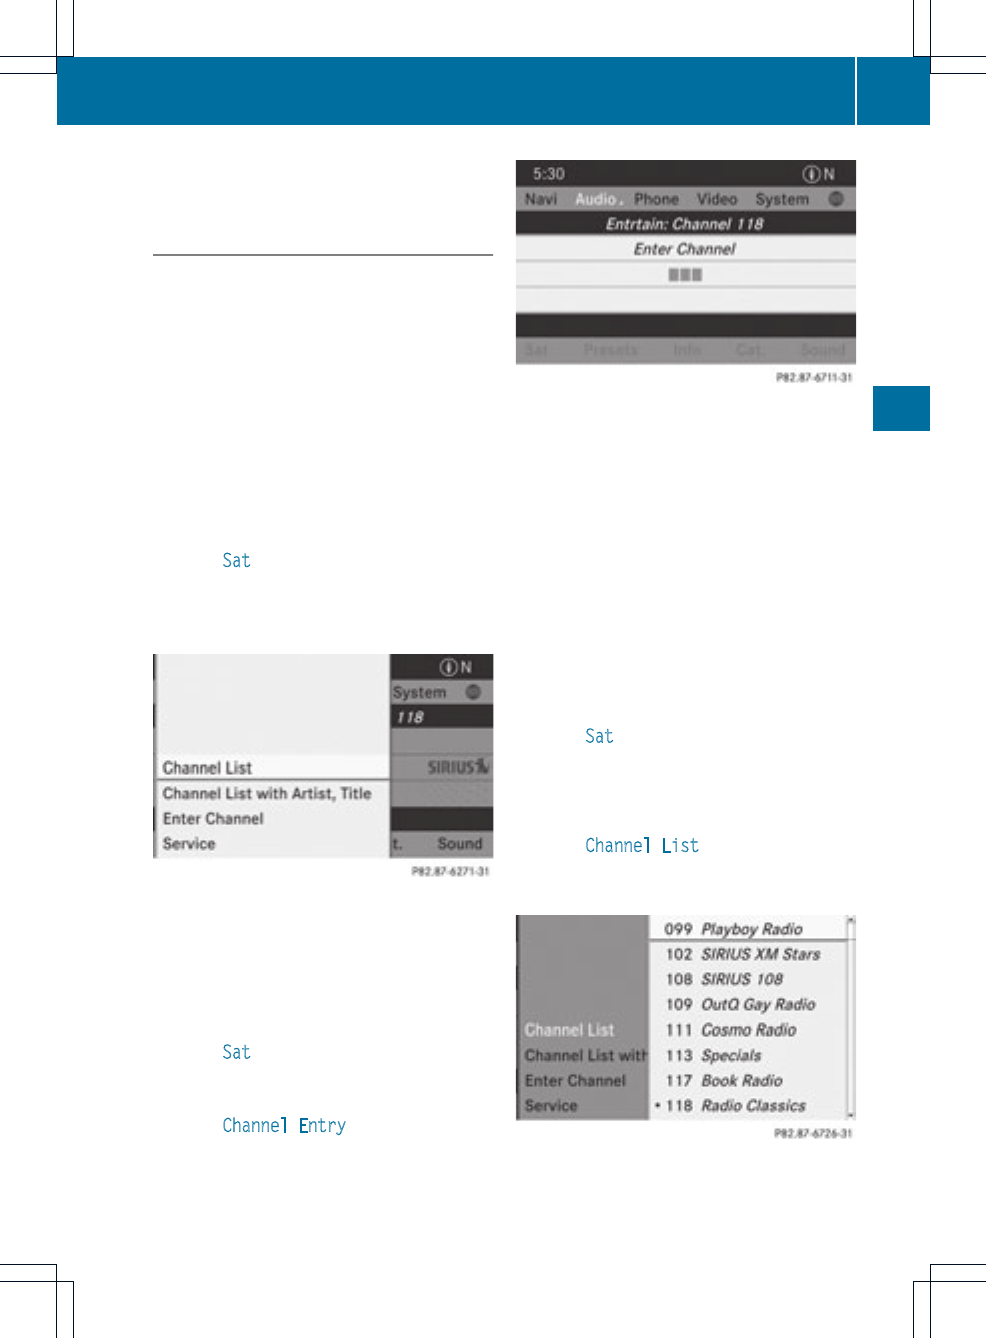
by channel number and allows you to
browse all available channels.
Selecting achannel
Channel search
XTurn cVd or slide XVY the COMAND
controllerwhile the display/selection
window in the SatRadio displayis active.
or
XPress the Eor Fbutton.
COMAND searches in both directions
(ascending and descending) and stops at
the next channel found in the selected
category.
Satellite radio menu
XSelect Sat in the submenu bar by turning
cVd the COMAND controller and press
Wto confirm.
The satellite radio menu appears.
Entering channel numbers directly
Option 1
XPress the lbutton.
An input menu appears.
Option 2
XSelect Sat in the submenu bar by turning
cVd the COMAND controller and press
Wto confirm.
XSelect Channel Entry and press Wto
confirm.
An input menu appears.
XTo enter achannel: irrespective of the
option, press the corresponding number
keys on the control panel one after the
other.
COMAND sets the selected channel.
iYou can only select currently permitted
digits.
Selecting a channel from the SatRadio
channel list
You can select a channel using eitherthe
channel list (option 1) or the channel list that
displays the artists or tracks currently being
played (option 2).
XSelect Sat in the submenu bar by turning
cVd the COMAND controller and press
Wto confirm.
Option 1
XSelect Channel List and press Wto
confirm.
The channel list appears.
Satellite radio 151
Audio
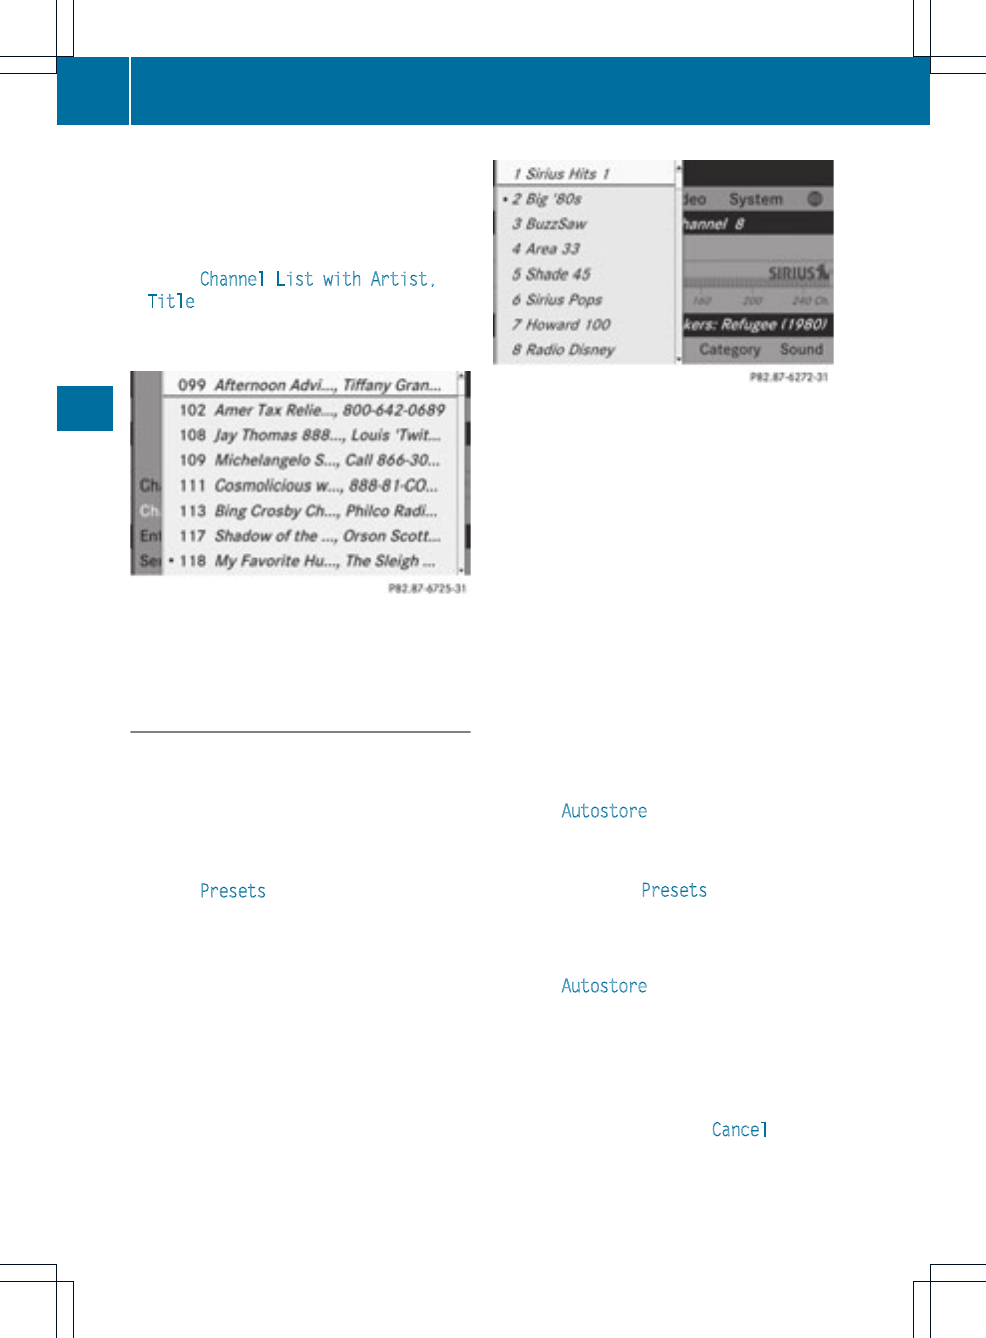
XSelect a channel by turning cVd the
COMAND controllerand press Wto
confirm.
Option 2
XSelect Channel List with Artist,
Title and press Wto confirm.
The channel list appears and displays the
artists and tracks currently being played.
XSelect a channel by turning cVd the
COMAND controller and press Wto
confirm.
Memory functions
Storing channels
iThere are ten presets available.
XPress Wthe COMAND controller when the
display/selectionwindow is active.
or
XSelect Presets in the submenu bar by
turning cVd the COMAND controller and
press Wto confirm.
In both cases, the channel presets appear.
The Rdot in front of a preset entry
indicates that the currently selected
station is stored under this preset.
Station presets
XSelectapreset by turning cVd the
COMAND controller and press and hold
Wuntil you hear a tone.
or
XPress and hold a number button, e.g.
n, until you hear a tone.
The channel is stored under the preset.
Storing channels automatically
This function automatically stores channels
with adequate reception in the preset
memory. Channels stored manually in the
preset memory will be overwritten.
XOption 1: press Wthe COMAND controller
when the display/selection window is
active.
XSelect Autostore in the presets by turning
cVd the COMAND controller and press
Wto confirm.
XOption 2: select Presets in the submenu
bar by sliding VÆand turning cVd the
COMAND controller and press Wto
confirm.
XSelect Autostore and press Wto confirm.
In both cases, COMAND searches for
channels that can be received. You will see
a message to this effect. The available
channels are automatically stored in the
preset positions.
XTo cancel storing: select Cancel and
press Wto confirm.
152 Satellite radio
Audio
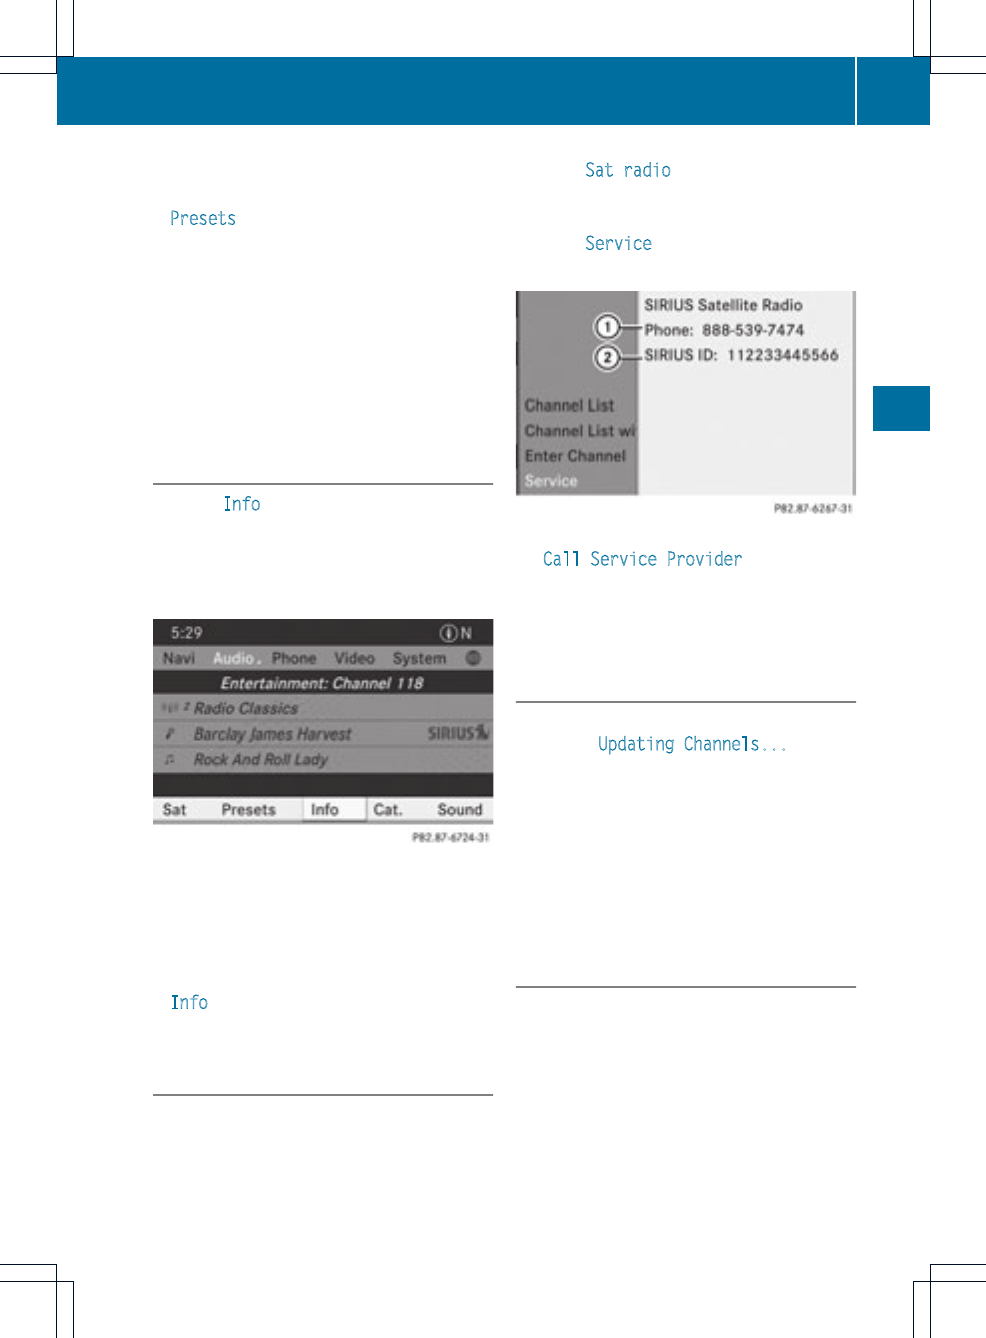
Selecting achannel from the preset list
XTo call up the preset list: select
Presets in the submenu bar by turning
cVd the COMAND controller and press
Wto confirm.
The channel presetlist appears.
XTo set achannel: select a presetby
turning cVd the COMAND controller and
press Wto confirm.
or
XPress a numberkey, such as n.
Displaying information
XSelect Info in the submenu bar by turning
cVd the COMAND controller and press
Wto confirm.
Information on the currently received
program is displayed.
If available, you see:
Rthe complete channel name
Rthe artist of the currently played track
Rthe currently played track
XTo return to the radio display: confirm
Info by pressing W.
XSlide ZV the COMAND controller up.
Displaying service information
The provider's customer service center is
available by phone at any time to answer any
general questions or questions on the
versions available.
XSelect Sat radio in the submenu bar by
turning cVd the COMAND controller and
press Wto confirm.
XSelect Service and press Wto confirm.
The provider's details appear.
1Provider's phone number (SIRIUS XM) or
Call Service Provider
2SIRIUS ID of your satellite receiver
XTo return to the SatRadio main display:
slide XVY the COMAND controller.
Channel list updates
When receiving a new channel list, the display
shows the Updating Channels...
message.
The station last selected is switched to mute
until the update has been completed.
Satellite radio mode is not available during
this process.
Once the update has been completed, the
satellite radio main menu appears. The
station last selected is played.
Sound settings
You will find details on the sound settings in
the "At a glance" section (Ypage 34).
Satellite radio 153
Audio

Audio CD/DVD and MP3 mode
Important safety notes
GWARNING
COMAND is classified as a Class 1laser
product.You must not open the casing. If you
open the casing, or if the casing is faulty or
damaged, there is a risk of exposure to
invisible laser radiation. This may damage
your eyes, or those of others.
COMAND does not contain any parts that can
be serviced by the user. For safety reasons,
all maintenance work must be carried out by
qualified aftersales technicians.
GWARNING
Only when the vehicle is stationary should
you:
Rload a disc
Reject a disc
There is a risk of being distracted from the
road and traffic conditions if this is done while
the vehicle is in motion.
Inserting/ejecting CDs/DVDs
Notes
If the CD/DVD has a printed side, this must
face upwards when the CD/DVD is inserted.
If neither side is printed, the side to be played
should face downwards. The system may not
be able to play CDs/DVDs with copy
protection.
iIf a medium contains other files in
addition to music files, the loading time
before the first track starts to play may be
longer.
Inserting discs into the DVD changer
The DVD changer has a fixed magazine with
six trays.
XTo insert aCD/DVD into the magazine
tray: press the Vload/ejectbutton.
Amenu shows the currentload status of
the magazine trays. The last tray selected
is identified by a red digit.
Magazine menu
XSelect a magazine tray to be filled by
turning cVd the COMAND controller and
press Wto confirm.
or
XPress a number key, e.g. j.
The DVD changer switches to the selected
magazine tray. You see the Please
wait... message.
You then see the Please insert disc
<x>. message.
iNever insert a data medium before
COMAND prompts you to do so. Never
insert more than one disc into a magazine
tray at a time.
XInsert a disc into the disc slot with the
printed side facing upwards.
154 Audio CD/DVD and MP3 mode
Audio
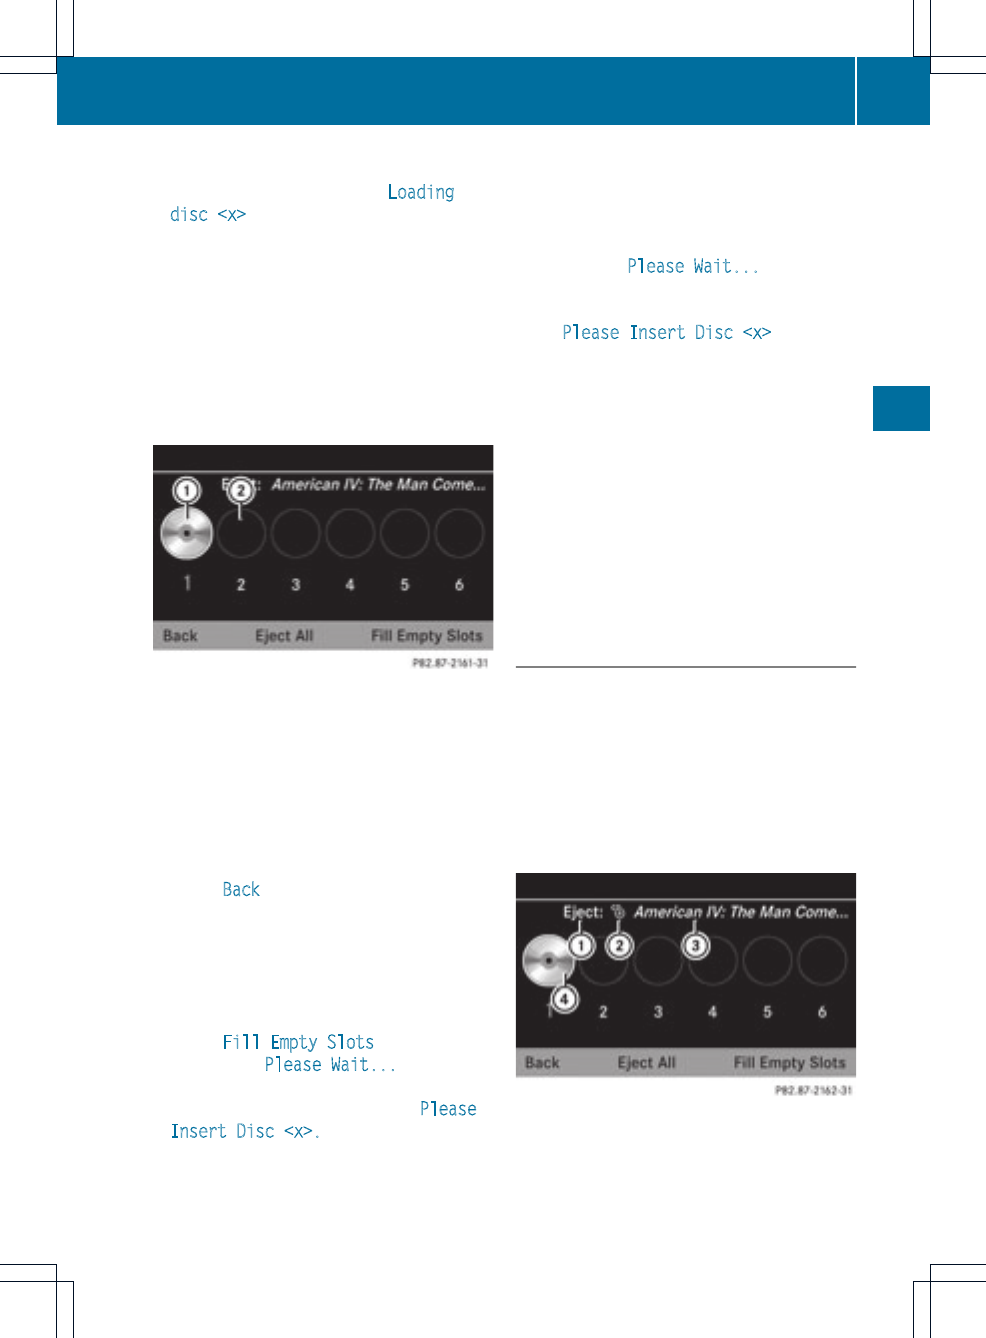
The DVD changer loads the disc into the
selected magazine tray. The Loading
disc <x> message appears.
iIt may take some time for the disc to be
loaded, depending on the type of disc. If no
disc is inserted for approximately 20
seconds, the display returnsto the
magazine menu.
The DVD changer plays the disc if:
Rit has been inserted correctly.
Rit is a permissible type of disc.
:Full magazine tray (eject function is
available)
;Empty magazine tray (disc can be
inserted)
XTo exit the menu: press the Veject/
load button again or press the %back
button.
or
XSelect Back by sliding VÆand turning
cVd the COMAND controller and press
Wto confirm.
XTo fill empty magazine trays: press the
Vload/eject button.
The magazine menu appears.
XSelect Fill Empty Slots.
You see the Please Wait... message.
COMAND switches to the next empty
magazine tray. You then see the Please
Insert Disc <x>. message.
iNever insert a data medium before
COMAND prompts you to do so. Never
insert more than one disc into a magazine
tray at a time.
XInsert a disc into the disc slot with the
printed side facing upwards.
You see the Please Wait... message.
Once the disc is loaded, the DVD changer
switches to the next empty tray. You see
the Please Insert Disc <x> message.
XRepeat this step until all trays are loaded.
The DVD changer will play the last disc
loaded if it has been inserted correctly and
is of a permissible type. This applies even
if not all trays have been loaded with a disc.
XTo cancel loading: press the Veject/
load button again or press the %back
button.
iIf you cancel loading with the %back
button, the system loads and plays the last
CD you inserted.
Ejecting discs from the DVD changer
If you remove one disc while playing another
disc, the DVD changer interrupts playback.
Playback continues once the disc has been
ejected.
XTo eject aCD/DVD: press the Vload/
eject button.
The magazine menu appears.The magazine
tray with the current disc is highlighted.
:Ejectpossible
;Disc type
=Disc name (only if stored on the disc)
?Current disc
Audio CD/DVD and MP3 mode 155
Audio
Z
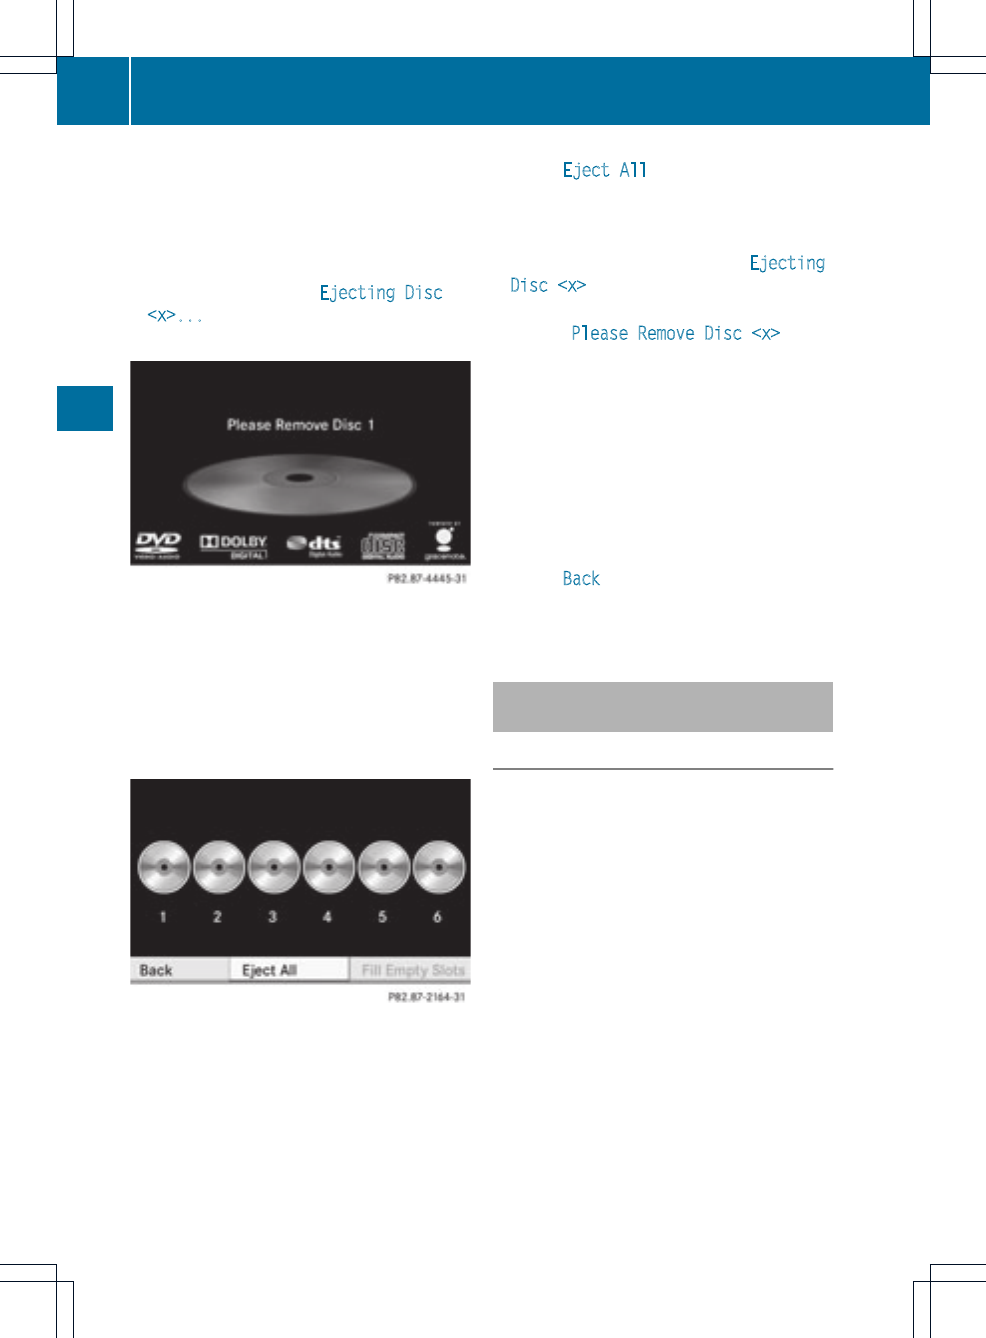
XSelect a magazine tray containing a disc by
turning cVd the COMAND controller and
press Wto confirm.
or
XPress a number key, e.g. j.
You see the message: Ejecting Disc
<x>... You then see the following
message:
XTake the disc outofthe slot.
If you do not take the disc out of the slot,
COMAND will draw it in again automatically
after a short while and load it again.
XTo eject all CDs/DVDs: press the V
load/eject button.
The magazine menu appears.
XSelect Eject All by sliding ÆVand
turning cVd the COMAND controller and
press Wto confirm.
The DVD changer ejects the last disc
selected. You see the message: Ejecting
Disc <x>
XTake the disc out of the disc slot when you
see the Please Remove Disc <x>
message.
The DVD changer switches to the next
loaded magazine tray and ejects the disc.
XRepeatthe last step until the magazine is
empty.
XTo exit the menu: press the Veject/
load button again or press the %back
button.
or
XSelect Back by sliding VÆand turning
cVd the COMAND controller and press
Wto confirm.
Inserting and ejecting an SD memory
card
General information
COMAND supports SD memory cards
(Secure Digital) and SDHC memory cards
(Secure Digital High Capacity).
iNot all memory cards available on the
market are designed for the temperatures
which may be reached in the vehicle.
If you are no longer using the SD memory
card, remove it from COMAND, as high
temperatures could damage the card.
Due to the wide range of SD memory cards
available on the market, playback cannot
be guaranteed for all brands of SD memory
card.
The readable storage capacity depends on
the memory card used. You can obtain
further information at any authorized
Mercedes-BenzCenter.
156 Audio CD/DVD and MP3 mode
Audio
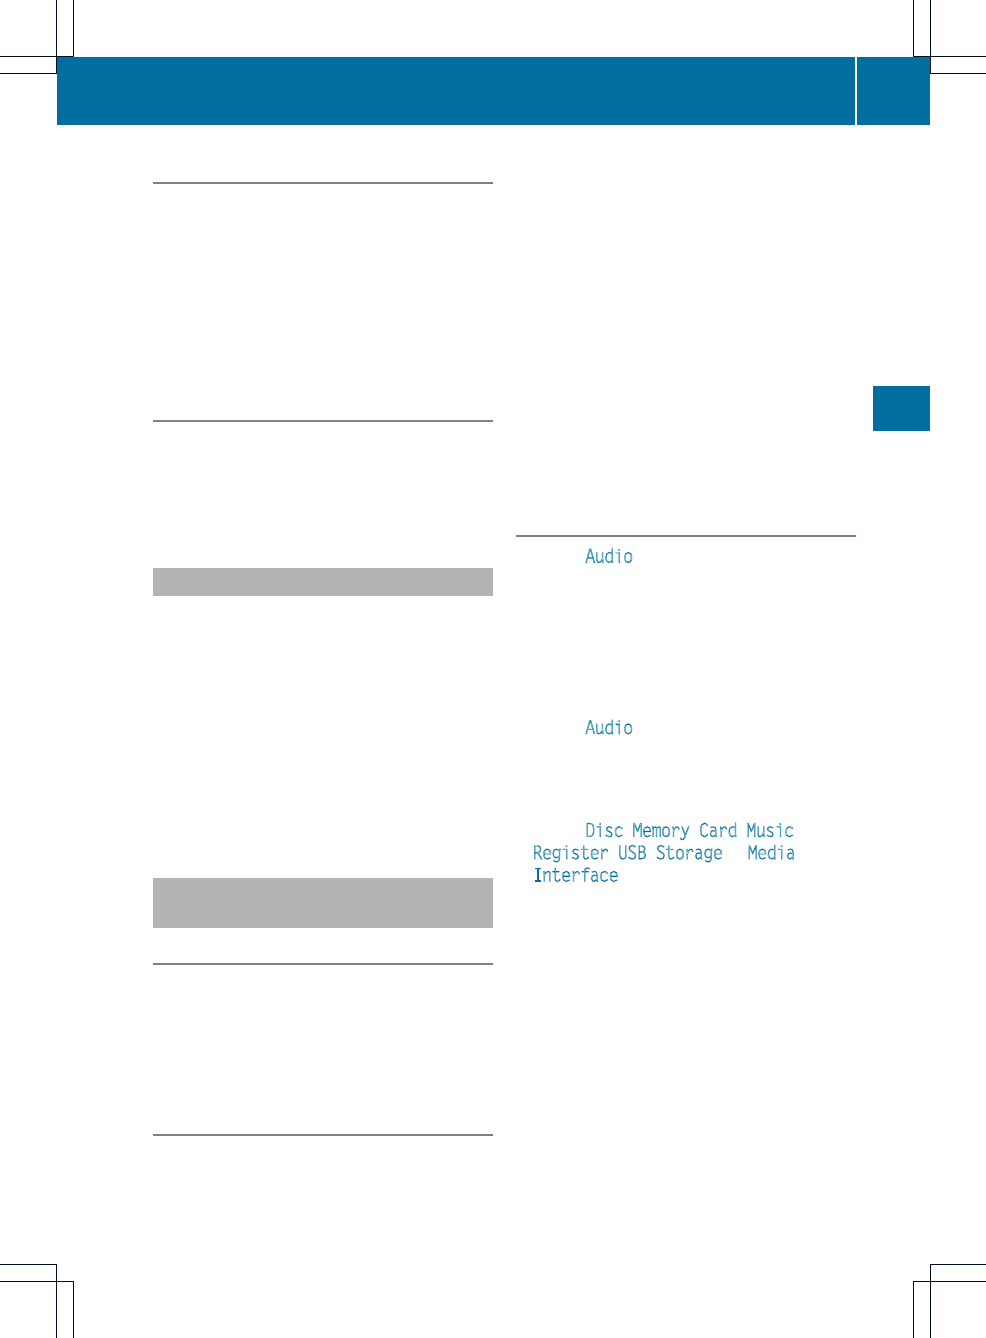
Inserting an SD memory card
XInsertthe memory card into the slot until it
engages in place. The side with the
contacts must face downwards and point
towards the slot.
COMAND loads the memory card and
shows a message to this effect.Ifno MP3
tracks can be found, you will see a message
to this effect.
Ejecting an SD memory card
XPress the memory card.
The memory card is ejected.
XTake the memory card out of the slot
(Ypage 17), position H.
Connecting aUSB device
The USB port is located in the stowage
compartment in the center console.
Electrical consumption at this connection
must not exceed a continuous current of
500 mA. If the electrical consumption is
higher, use a separate source to provide
power for the USB device (e.g.
12 Vpower supply).
XConnect the USB device (e.g. USB stick)to
the USB port.
Activating audio CD/DVD or MP3
mode
Option 1
XInsert aCD/DVD (Ypage 154),SD memory
card (Ypage 157) or connect aUSB device
(Ypage 157).
COMAND loads the mediuminserted and
starts to play it.
Option 2
XPress the hfunction button one or more
times.
iBy pressing the functionbutton
repeatedly, you can change the operating
mode in the following order:
Raudio CD/DVD / video DVD/MP3 CD/
MP3 DVD in the DVD changer (disc
mode)
Rmemory card mode
RMUSIC REGISTER
RUSB storage device
RMedia Interface or audio AUX mode
RBluetooth®audio mode
XSelectanaudio medium from the media list
(Ypage 159).
Option 3
XSelect Audio in the main function bar by
sliding ZV and turning cVd the COMAND
controller and press Wto confirm.
The last active audio source is now
activated.
You can activate a different audio source
using the audio menu.
XSelect Audio by sliding ZV and turning
cVd the COMAND controller and press
Wto confirm.
The audio menu appears.
XSelect Disc,Memory Card,Music
Register,USB Storage or Media
Interface and press Wto confirm.
This switches to the desired audio source.
XSelectanaudio medium from the media list
(Ypage 159).
Audio CD/DVD and MP3 mode 157
Audio
Z
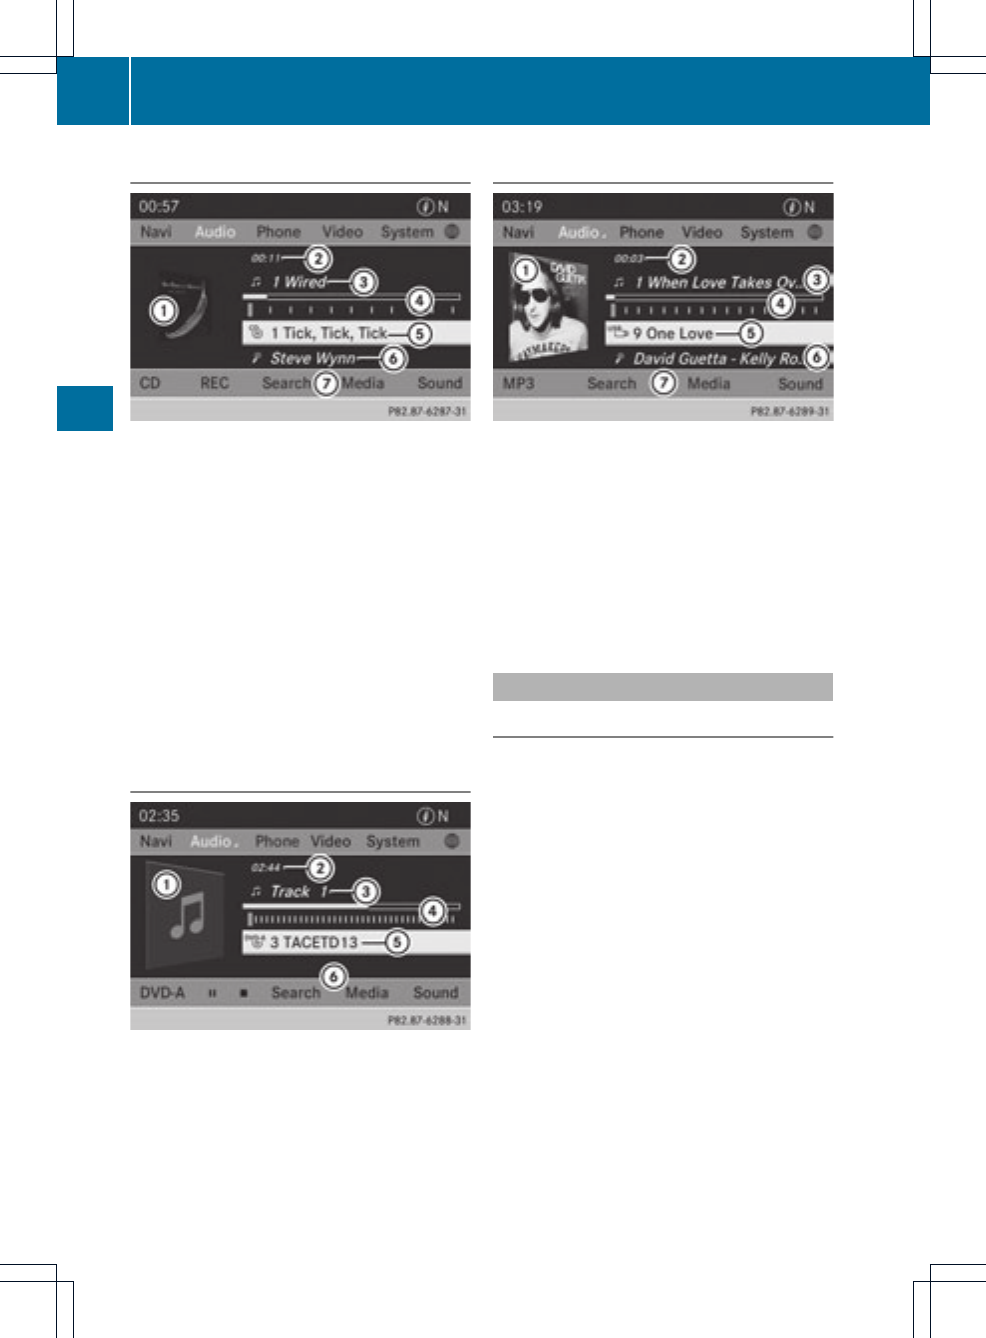
Example display: audio CD mode
:CD cover (if available)
;Track time
=Track number and track name (only if
stored on the disc as CD text or if
Gracenote®data is available)
?Graphic time and track display
ADisctype, disc position in the media list
and disc name (only if stored on the disc
as CD text or if Gracenote®data is
available)
BArtist (only if stored on the disc as CD text
or if Gracenote®data is available)
CCD mode menu
Example display: audio DVD mode
:Cover (if available)
;Track time
=Track number
?Graphic time and track display
ADisc type, disc position in the media list,
disc name (only if stored on the disc)
BAudio DVD mode menu
Example display: MP3 mode
:Cover (if available)
;Track time
=Track number and name
?Graphic time and track display
AMedium type, position of medium in the
media list, currentfolder
BArtist (if available)
CMP3 mode menu
Pause function
In audio CD/DVD and MP3 mode
XTo pause playback: briefly press the
8button.
The ,symbol appears at the top left in
the status bar.
XTo continue playback: briefly press the
8button again.
The ,symbol disappears.
158 Audio CD/DVD and MP3 mode
Audio
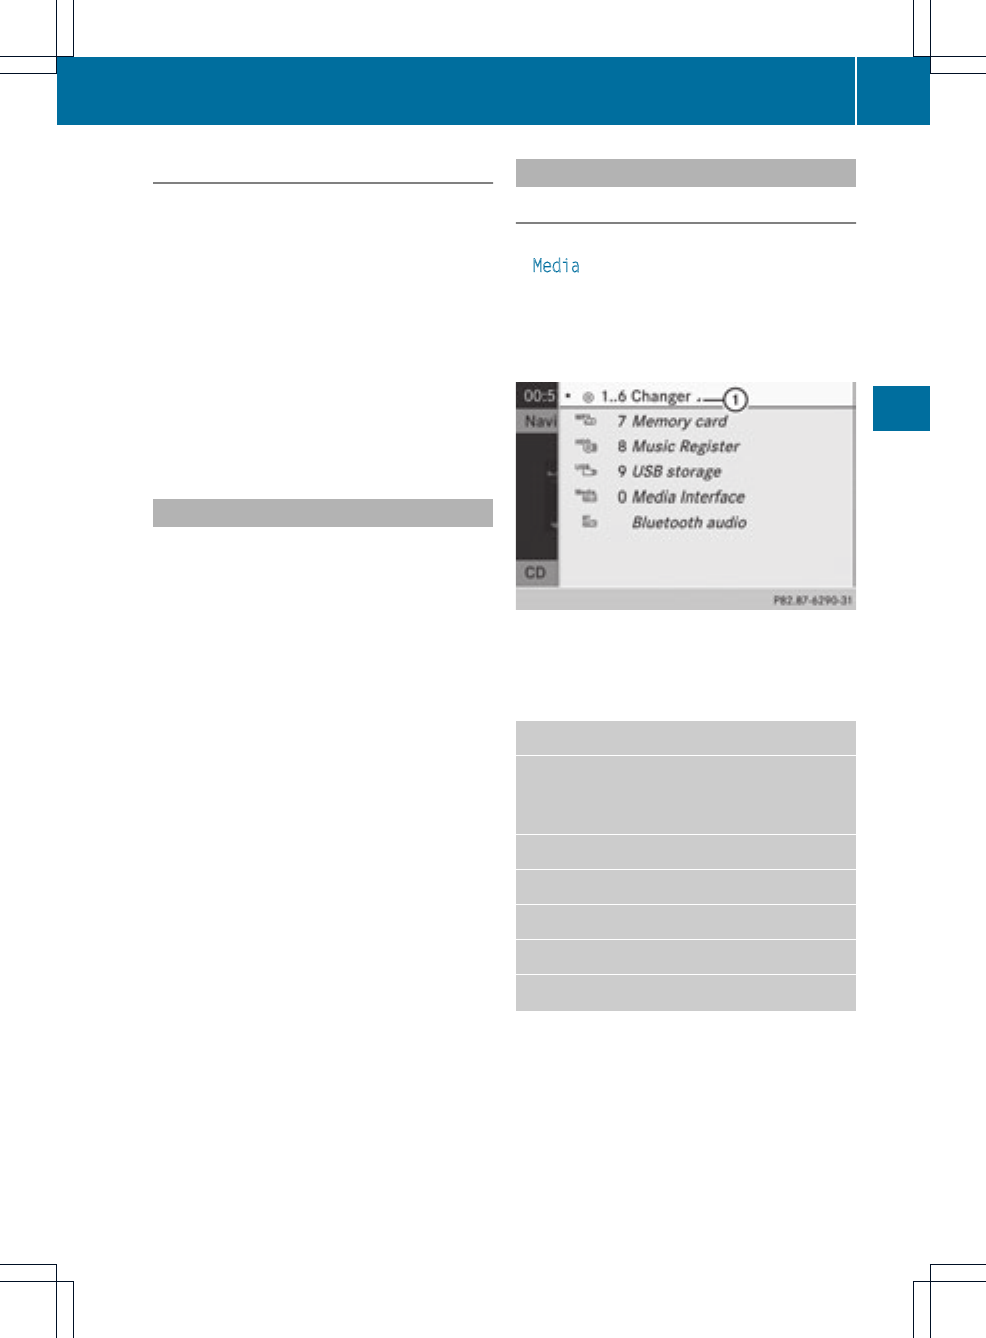
In audio DVD mode only
XTo pause playback: switch on audio DVD
mode (Ypage 157).
XSelect Ëby sliding VÆand turning
cVd the COMAND controller and press
Wto confirm.
The Ëdisplay changes to Ì.
XTo continue playback: select Ìand
press Wto confirm.
Playbackcontinues from the point where it
was interrupted. The Ìdisplay changes
to Ë.
Stop function
This function is only available in audio DVD
mode.
XSwitch on audio DVD mode (Ypage 157).
XTo interrupt playback: select Éby
sliding VÆand turning cVd the COMAND
controller and press Wto confirm.
The Ëdisplay changes to Ì.É
remains highlighted.
XTo continue playback: select Ìand
press Wto confirm.
Playback continues from the point where it
was interrupted.
XTo stop playback: while playback is
interrupted, select Éagain and press
Wto confirm.
or
XSelect Éand confirm by pressing W
twice in rapid succession.
Ìis highlighted.
XTo restart playback: select Ìand
press Wto confirm.
Playback starts at the beginning of the
DVD.
Selecting audio CD/DVD/MP3 discs
Selecting via the media list
XIn audio CD/DVD and MP3 mode: select
Media by sliding VÆor turning cVd the
COMAND controller and press Wto
confirm.
The media list appears. The #dot
indicates the current medium being played.
Media list when equipped with a DVD changer
:To display all magazine trays
The media list shows the discs currently
available.
Media list
Magazine trays, positions 1to 6: readable
data media are audio CDs, MP3 CDs or MP3
DVDs, audio DVDs and video DVDs.
Memory card, position 7
MUSIC REGISTER, position 8
USB storage device, position 9
Media Interface, position 0
Bluetooth®audio
iIf a disc cannot be read, an entry appears
next to the corresponding magazine tray.
XTo show all magazine trays: press Wthe
COMAND controller when :is
highlighted.
Audio CD/DVD and MP3 mode 159
Audio
Z

Media list showing all magazine trays
XSelect the data medium by turning cVd
the COMAND controller and press Wto
confirm.
iIf you select a video DVD, the system
switches to video DVD mode
(Ypage 186).
Selecting atrackusing the number
keypad
XPress a number key, e.g. n, when the
display/selection window is active.
The medium at the corresponding position
in the media list is loaded and then played.
Selecting atrack
Selecting by skipping to atrack
XTo skip forwards or back to a track: turn
cVd the COMAND controller when the
display/selectionwindow is active.
or
XPress the Eor Fbutton.
The skip forward function skips to the next
track.
The skip back function skips to the
beginning of the current track if the track
has been playing for more than
eight seconds.Ifthe track has been playing
for less than eight seconds, it skips to the
start of the previous track.
If you have selected the playback options
Random Tracks or Random Folder, the
track order is random.
Selecting atrackusing the number
keypad
XPress the ¯button on the number
keypad.
Anumerical entry field appears. The
number of positions offeredcorresponds to
the number of trackson the CD/DVD. Only
numbers that correspond to a track
number on the CD/DVD can be entered.
XEnter the desired track number using the
numberkeys.
The trackplays after the last possible
number is entered.
iPressing and holding a number key for
more than two seconds completes the
entry, and the corresponding track is
played.
Selecting atrackusing music search
Select music via categories (e.g. album,
artist) with the music search function.
If you select a category, COMAND starts a
search for track information if the following
conditions are fulfilled:
Rthe data carriers are inserted or connected
Rthe track information from these data
carriers is not yet contained in the
COMAND music database
COMAND imports track information from the
following data carriers:
Rdisc (audio CD/DVD/MP3)
Rmemory card
RMUSIC REGISTER
RUSB storage device
The Track information is complete
message appears once the search is
completed. COMAND stores the music data
in its own database. You can now select the
available music data within the desired
category.
160 Audio CD/DVD and MP3 mode
Audio
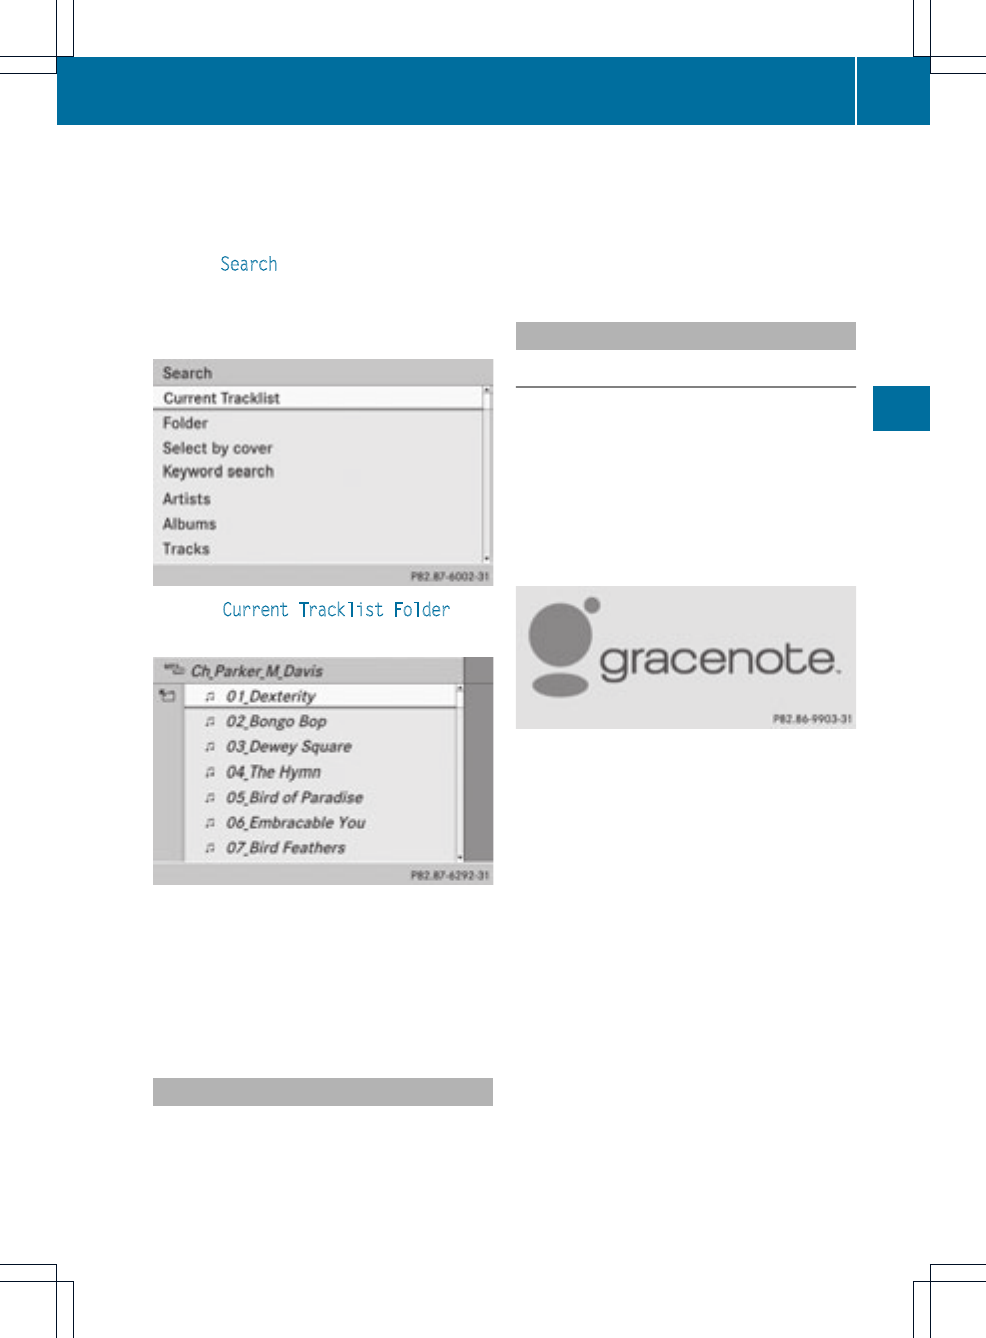
You will find further information on searching
for music in the "Music search" section
(Ypage 165).
XIn audio CD/audio DVDmode/MP3 mode,
select Search by sliding VÆand turning
cVd the COMAND controller and press
Wto confirm.
The category list appears.
XSelect Current Tracklist,Folder or a
category and press Wto confirm.
Current track list (example)
XSelect the track by turning cVd the
COMAND controller and press Wto
confirm.
The basic display appears and the track is
played.
Fast forwarding/rewinding
XWhile the display/selection window is
active, slide XVY and hold the COMAND
controller until the desired position has
been reached.
or
XPress and hold the Eor Fbutton
until the desired position is reached.
Gracenote Media Database
Introduction
This function is only available in audio CD
mode.
There is a version of Gracenote®music
recognition technology (Emeryville,
California, USA) on the COMAND hard disk.
You will recognize this by the logo which can
be seen in the bottom right-hand corner of
certain audio displays.
Many audio CDs contain CD text. COMAND
uses the information contained therein to
display the artist, album and track name.
If the audio CD does not contain any CD text
information, COMAND can use the Gracenote
Media Database to identify unknown audio
tracks when running in audio CD mode. This
is only possible if the relevant information is
saved in the Gracenote Media Database and
if the "Gracenote Media Database" function
is activated.
If this is the case, COMAND will display the
corresponding data such as artist, album and
track name in the relevant displays and lists.
If COMAND accesses the Gracenote Media
Database when reading an audio CD, you will
see the following message:
Audio CD/DVD and MP3 mode 161
Audio
Z
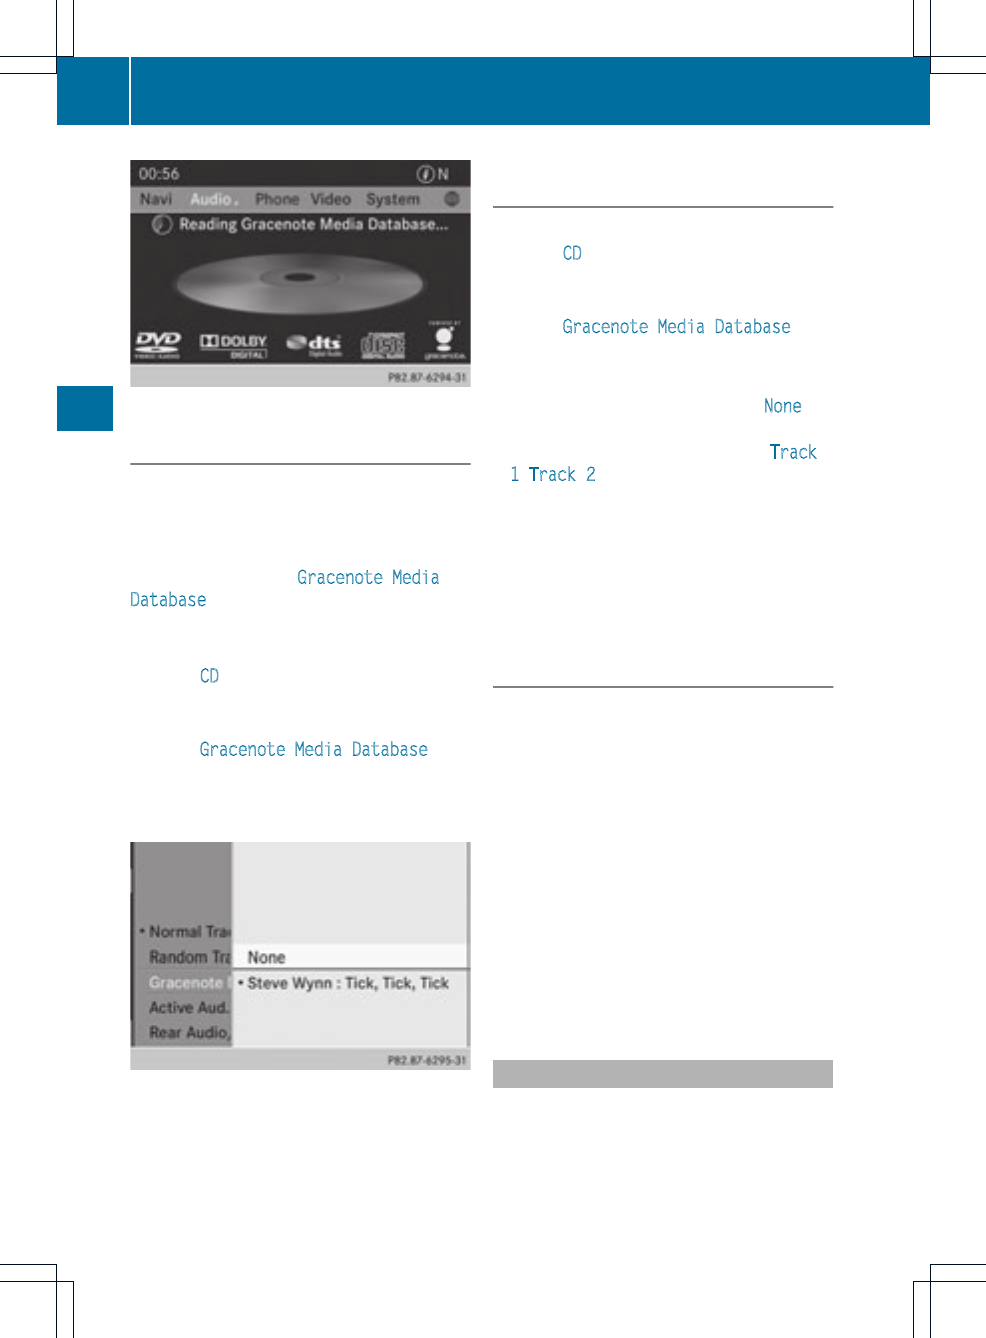
Selecting Gracenote®data to be
displayed
If several entries exist for the CD of a
particular artist, you can select which of the
entries should be shown.
If the inserted CD does not contain any
Gracenote®data, the Gracenote Media
Database menu item is shown in gray and
cannot be selected.
XSwitch on audio CD mode (Ypage 157).
XSelect CD by sliding VÆand turning cVd
the COMAND controller and press Wto
confirm.
XSelect Gracenote Media Database by
turning cVd the COMAND controller and
press Wto confirm.
Amenu appears.
The #dot indicates the currentselection for
the display.
XSelect an entry by turning cVd the
COMAND controller and press Wto
confirm.
Switching the Gracenote®data display
on/off
XSwitch on audio CD mode (Ypage 157).
XSelect CD by sliding VÆand turning cVd
the COMAND controller and press Wto
confirm.
XSelect Gracenote Media Database by
turning cVd the COMAND controller and
press Wto confirm.
XTo switch off the display: select None and
press Wto confirm.
In the basic display (Ypage 158), Track
1,Track 2 etc. are shown instead of the
Gracenote®data, for example.
XTo switch on the display: select an entry
in the menu by turning cVd the COMAND
controller and press Wto confirm.
Updating Gracenote®music
recognition technology and the
Gracenote Media Database
The digital data on the Gracenote Media
Database needs to be updated due to the
release of new CDs. Optimum functionality
can only be attained with up-to-date
Gracenote®music recognition technology.
Information about new versions can be
obtained from an authorized Mercedes-Benz
Center.
You can have your music recognition
software updated there with aDVD, or you
can update it yourself.
iThe Gracenote Media Database is
updated in conjunction with the navigation
system's digital map (Ypage 109).
Displaying the track and album
XPress the zbutton.
The current track and albumare displayed
in a window.
162 Audio CD/DVD and MP3 mode
Audio
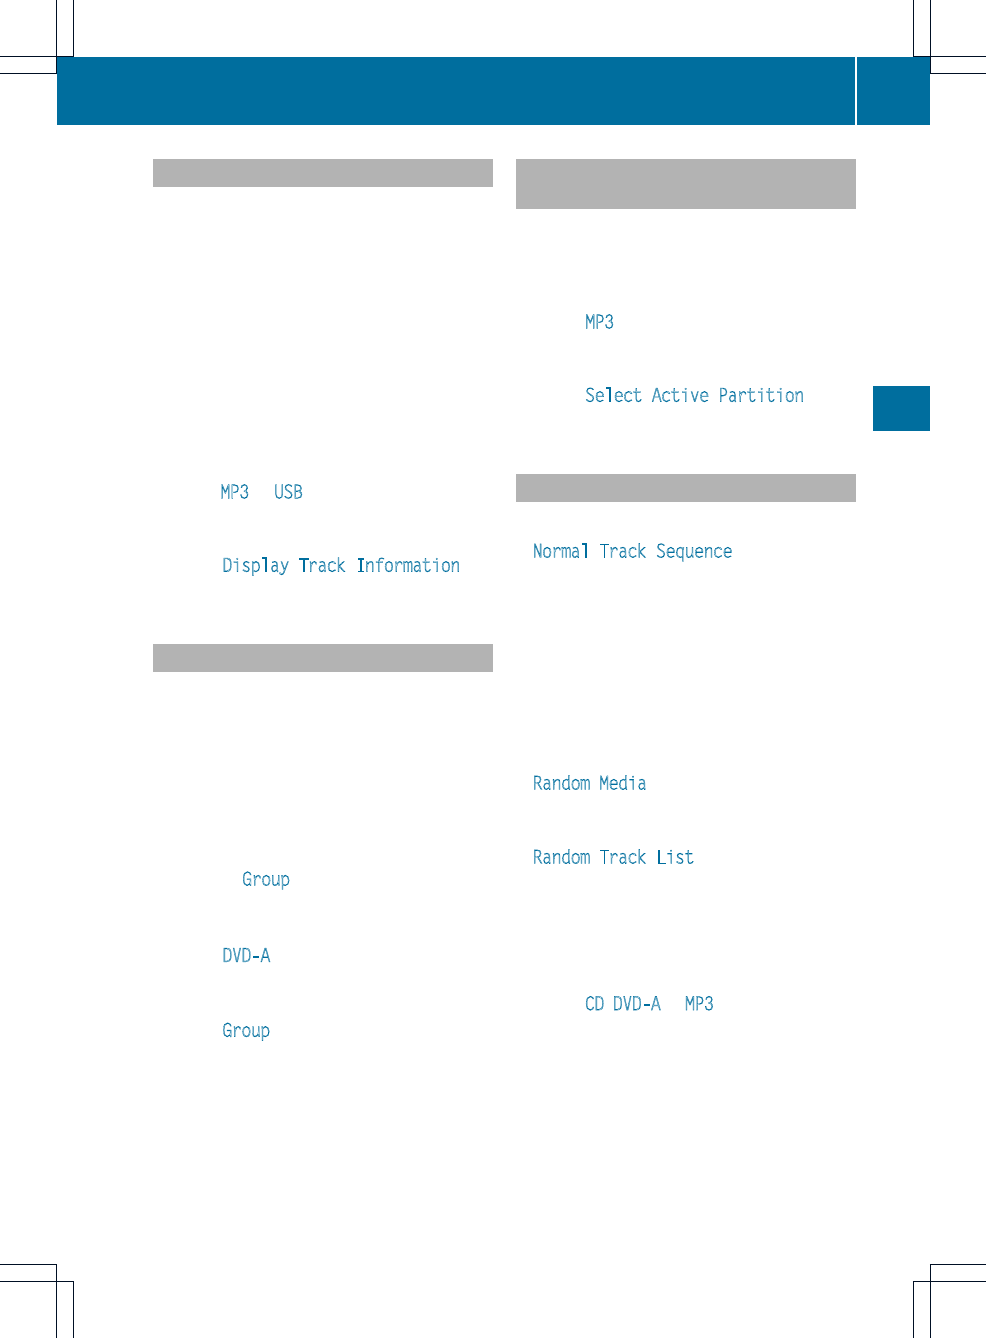
Displaying metadata (MP3 mode)
COMANDcan also display thealbum name
and artist (metadata) during playback, if this
information has been entered into the
system.
For all media that contain MP3 data (e.g.MP3
CD, SD memory card, MUSIC REGISTER), you
can determine whether:
Rthe metadata contained in the tags of the
encoded music data should be displayed
Rthe file and directory names should be
displayed during playback
XTo display the album and artist name:
select MP3 or USB in the basic display by
sliding VÆand turning cVd the COMAND
controller and press Wto confirm.
XSelect Display Track Information and
press Wto confirm.
Selecting agroup
The content of an audio DVD can be divided
into up to 9groups. The availability and type
of group depends on the respective DVD.
Agroup can contain musicindifferentsound
qualities (stereo and multichannel formats,
for example), or bonus tracks.
Each group can contain up to 99 tracks.
If an audio DVD only contains one audio
format, the Group menu item(s) cannot be
selected.
XSwitch on audio DVD mode (Ypage 157).
XSelect DVD-A by sliding VÆand turning
cVd the COMAND controller and press
Wto confirm.
XSelect Group by turning cVd and press
Wto confirm.
The #dot indicates the group currently
selected.
XSelect the desired group by turning cVd
and press Wto confirm.
XTo exit the menu: slide XVY the COMAND
controller or press the %back button.
Selecting an active partition (USB
mass storage devices only)
You can select this function for USB mass
storage devices when the storage device is
partitioned. Up to 9partitions (primary or
logical; FAT and FAT32) are supported.
XSelect MP3 in the basic display by sliding
VÆand turning cVd the COMAND
controller and press Wto confirm.
XSelect Select Active Partition and
press Wto confirm.
Playback options
The following options are available to you:
RNormal Track Sequence
The tracks are played in the normal order
(e.g. track 1, 2, 3, etc.).
In MP3 mode, the track order is determined
by the order in which the tracks are written
to the MP3 data carrier when it is created.
Alphabetical order is the mostcommon.
Once all the tracks in a folder have been
played, the tracks in the next folder are
played.
RRandom Media
All the tracks on the medium are played in
random order (e.g. track 3, 8, 5 etc.).
RRandom Track List (MP3 mode only)
You hear the tracks of the current track list
or the currently active folder (including all
sub-folders) in random order.
XTo select options: switch on audio CD/
DVD or MP3 mode (Ypage 157).
XSelect CD,DVD-A or MP3 by sliding VÆand
turning cVd the COMAND controller and
press Wto confirm.
The options list appears. The #dot
indicates the option selected.
XSelect an option by turning cVd and press
Wto confirm.
The option is switched on. For all options
except "Normal track sequence", you will
Audio CD/DVD and MP3 mode 163
Audio
Z

see a corresponding display in the display/
selection window. See the example of the
display in audio CD mode (Ypage 158).
iThe "Normal track sequence" option is
automatically selected when you change
the medium you are currently listening to
or when you select a different medium. If
an option is selected, it remains selected
after COMAND is switched on or off.
Notes on MP3 mode
General information
Depending on the volume and format of the
MP3 data, the length of time required for
reading the data may increase.
Permissible datacarriers
RCD-R and CD-RW
RDVD-R and DVD-RW
RDVD+R and DVD+RW
RSD memory card
RUSB storage device
Permissible file systems
RISO 9660/Joliet standard for CDs
RUDF for audio and video DVDs
RFAT16 or FAT32 for SD memory cards and
USB storage media
Multisession CDs
For multisessionCDs, the content of the first
session determines how COMAND will
process the CD. COMAND plays only one
session and gives priority to the audio CD
session.
If possible, use COMAND to play only CDs
which have been writteninone session.
File structure of a data carrier
Whenyou create a disc with compressed
music files, the tracks can be organized in
folders. Afolder may also contain subfolders.
A disc can contain amaximum of 255 folders.
Each folder can contain a maximum of
255 tracks and 255 subfolders.
The disc may contain no more than eight
directory levels. Files beyond the eighth level
will notbe recognized by the system.
Track and file names
When you create a disc with compressed
music files, you can assign names to the
tracks and folders.
COMAND uses these names accordingly for
the display. Folders which contain data other
than MP3 or WMA tracks are not displayed by
COMAND.
If MP3 or WMA files are stored in the root
directory itself, the root directory will also be
treated as a folder. COMAND will then show
the name of the root directory as the folder
name.
You must observe the following when
assigning tracknames:
Rtrack names must have at least one
character.
Rtrack names must have the extension
"mp3" or "wma".
Rthere must be a full stop between the track
name and the extension.
Example of a correct track name:
"Track1.mp3".
Permissible formats
COMAND supports the following formats:
RMPEG1 Audio Layer 3(MP3)
RMicrosoft Windows Media Audio V2, V7, V8
and V9 (WMA)
Radditional music files in AAC format with
the file extensions .aac, .mp4, .m4a
and .m4b, but not copy-protected iTunes
music files with the extension .m4p.
iIf, in addition to MP3 files, there are other
music files in these audio formats stored on
164 Audio CD/DVD and MP3 mode
Audio

the disc, the loading process may require a
longertime before the firsttrack is played.
iThe MP3 audio encoding method is under
license from Fraunhofer IIS (Institut
Integrierte Schaltungen – Institute for
Integrated Circuits) and Thomson.
Permissible bit and sampling rates
COMAND supports MP3 files of the following
types:
Rfixed and variable bit rates from 32 kbit/s
to 320 kbit/s
Rsampling rates of 8 kHz to 48 kHz
COMAND supports WMA files of the
following types:
Rfixed bit rates from 5 kbit/s to 384 kbit/s
Rsampling rates of 8 kHz to 48 kHz
COMAND does not support WMA files of the
following types:
RDRM (Digital Rights Management)
encrypted files
iOnly use tracks with a bit rate of at least
128 kbit/s and a sampling rate of at least
44.1 kHz. Lower rates can cause a
noticeable deteriorationinquality. This is
especially the case if you have activated a
surround sound function.
Notes on copyright
MP3 or WMA tracks that you create or play
backare generally subject to copyright
protection in accordance with the applicable
international and national regulations.
In many countries, reproductions, even for
private use, are not permitted without the
prior consent of the copyright holder.
Make sure that you know about the applicable
copyright regulations and that you comply
with these.
If you own these rights yourself, e.g. for your
own compositions and recordings, or if the
copyright holder has granted you permission,
these restrictions do not apply.
Notes on CDs/DVDs
Discs with copy protection are not
compatible with the audio CD standard and
therefore may not be ableto be played by
COMAND.
Playback problems may occur when playing
copied discs. There is a wide range of data
carriers, disc-writing software and writers
available. This variety means that there is no
guarantee that the system will be able to play
discs that you have copied yourself.
There may be playback problems if you play
CDs that you have copied yourself with a
storage capacity of more than 700 MB. CDs
of this type do not conform to the currently
applicable standards.
iOn many DVD audio discs, the last track
does not contain any music and COMAND
then switches to the next disc. This is
normal system behavior and does not mean
that there is a malfunction.
!Do not affix stickers or labels to the discs.
They could peel off and damage the drive.
The drive is designed to hold discs which
comply with the EN 60908 standard.
Therefore, you can only use discs with a
maximum thickness of 1.3 mm.
If you insert thicker discs, e.g. those that
contain data on both sides (DVD on one
side and audio data on the other), they
cannot be ejected and can damage the
drive.
Do not use discs with a diameter of 8 cm,
even with an adapter. Only use round discs
with a diameter of 12 cm.
iCOMAND is able to play back audio CDs
in multichannel audio format.
Music search
Calling up acategory list
XSwitch on an audio source and call up the
basic display, e.g. CD mode (Ypage 158).
Music search 165
Audio
Z
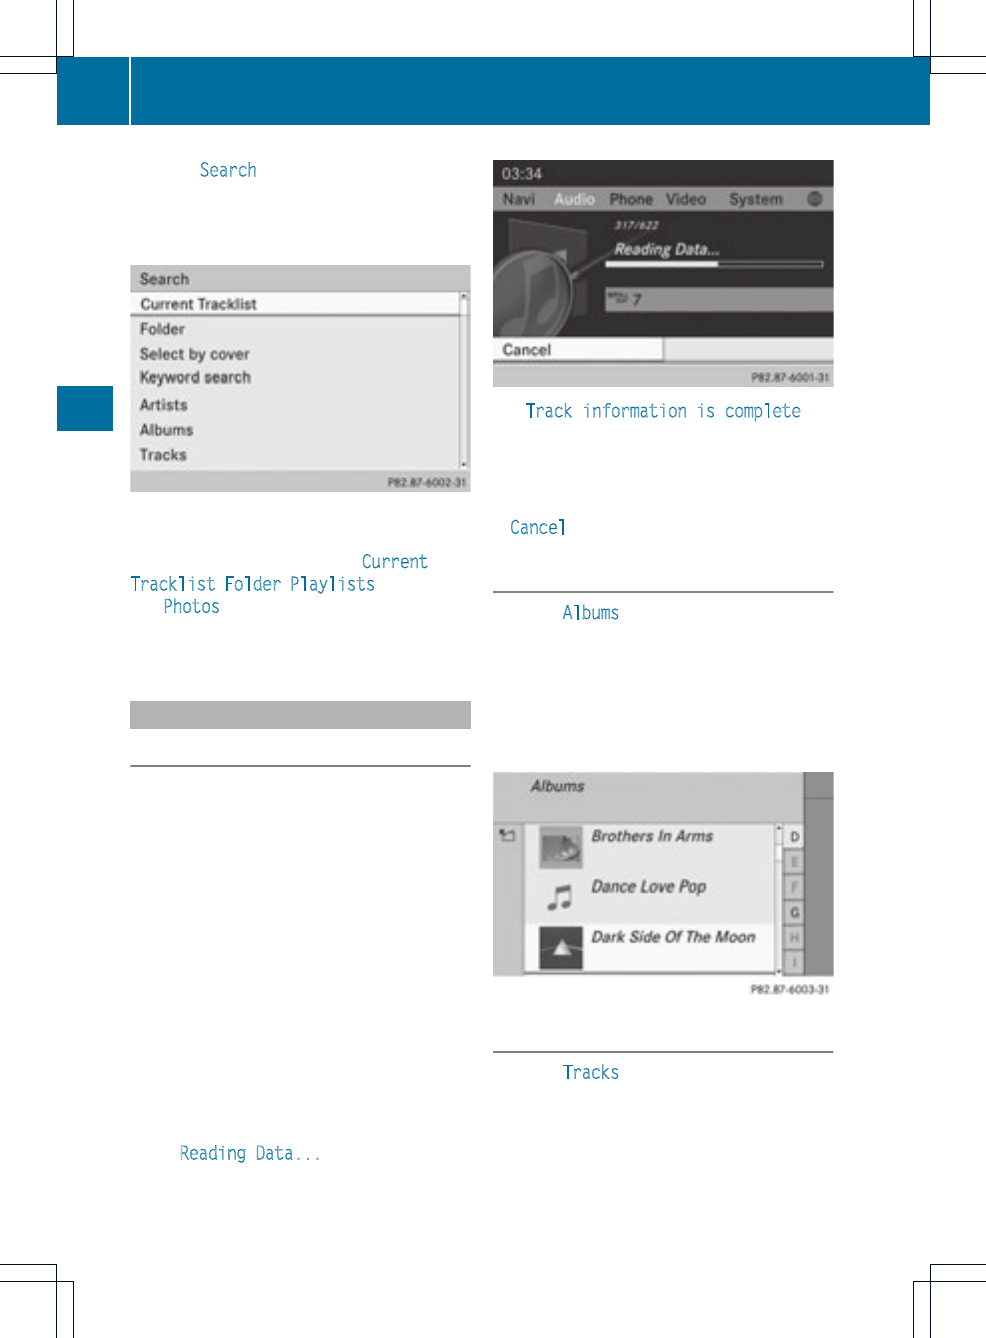
XSelect Search by sliding VÆand turning
cVd the COMAND controller and press
Wto confirm.
The category list appears.
Category list
The categories are displayed according to the
data available.The categories Current
Tracklist,Folder,Playlists (if available)
and Photos (if available) are already
assigned. The other available categories are
filled by the music search.
Selecting acategory
Starting a music search
If you select a category that contains no
content from the category list, the music
search starts.
The musicsearch finds tracks via all available
media. The search begins with the audio
source that is currently active.
The following media are included for the
music search:
Rdisc mode (audio CD/DVD/MP3)
Rmemory card
RMUSIC REGISTER
RUSB storage device
XSelect a category in the category list by
turning cVd the COMAND controller and
press Wto confirm.
The Reading Data... message appears.
The search may take some time, depending
on the number of tracks available.
The Track information is complete
message appears once the search is
completed. Playback then starts with the
previously active audio source.
XTo cancel the music search: confirm
Cancel by pressing W.
Selecting an album
XSelect Albums in the category list by
turning cVd the COMAND controller and
press Wto confirm.
The available albums are displayed
alphabetically. If there is a cover available
for an album, it is displayed in frontofthe
albumname.
Selecting atrack
XSelect Tracks in the category list
(Ypage 165) by turning cVd the COMAND
controllerand press Wto confirm.
The available tracks are displayed.
166 Music search
Audio

XSelect a track and press Wto confirm.
Playback starts.
Selecting ayear of publication
XSelect Year in the category list
(Ypage 165) by turning cVd the COMAND
controller and press Wto confirm.
XSelect an entry and press Wto confirm.
The genre list is displayed.
XSelect a genre, e.g.pop, and press Wto
confirm.
The track list is displayed.
XSelect a track and press Wto confirm.
Playback starts.
Selecting acover
XSelect Select By Cover in the category
list (Ypage 165) by turning cVd the
COMAND controller and press Wto
confirm.
The available covers are displayed in
alphabetical orderofthe artists.
XSelect the desired cover by turning cVd
the COMAND controller and press Wto
confirm.
The corresponding albumis played.
Selection via keyword search
XSelect Keyword Search in the category list
(Ypage 165) by turning cVd the COMAND
controller and press Wto confirm.
An input menu appears.
XEnter characters and confirm the entry.
Instructions for entering characters can be
found in the "Entering characters in the
phone book and address book" section
(Ypage 31).
Depending on the entry, the hits are shown
in a list.
Music search 167
Audio
Z
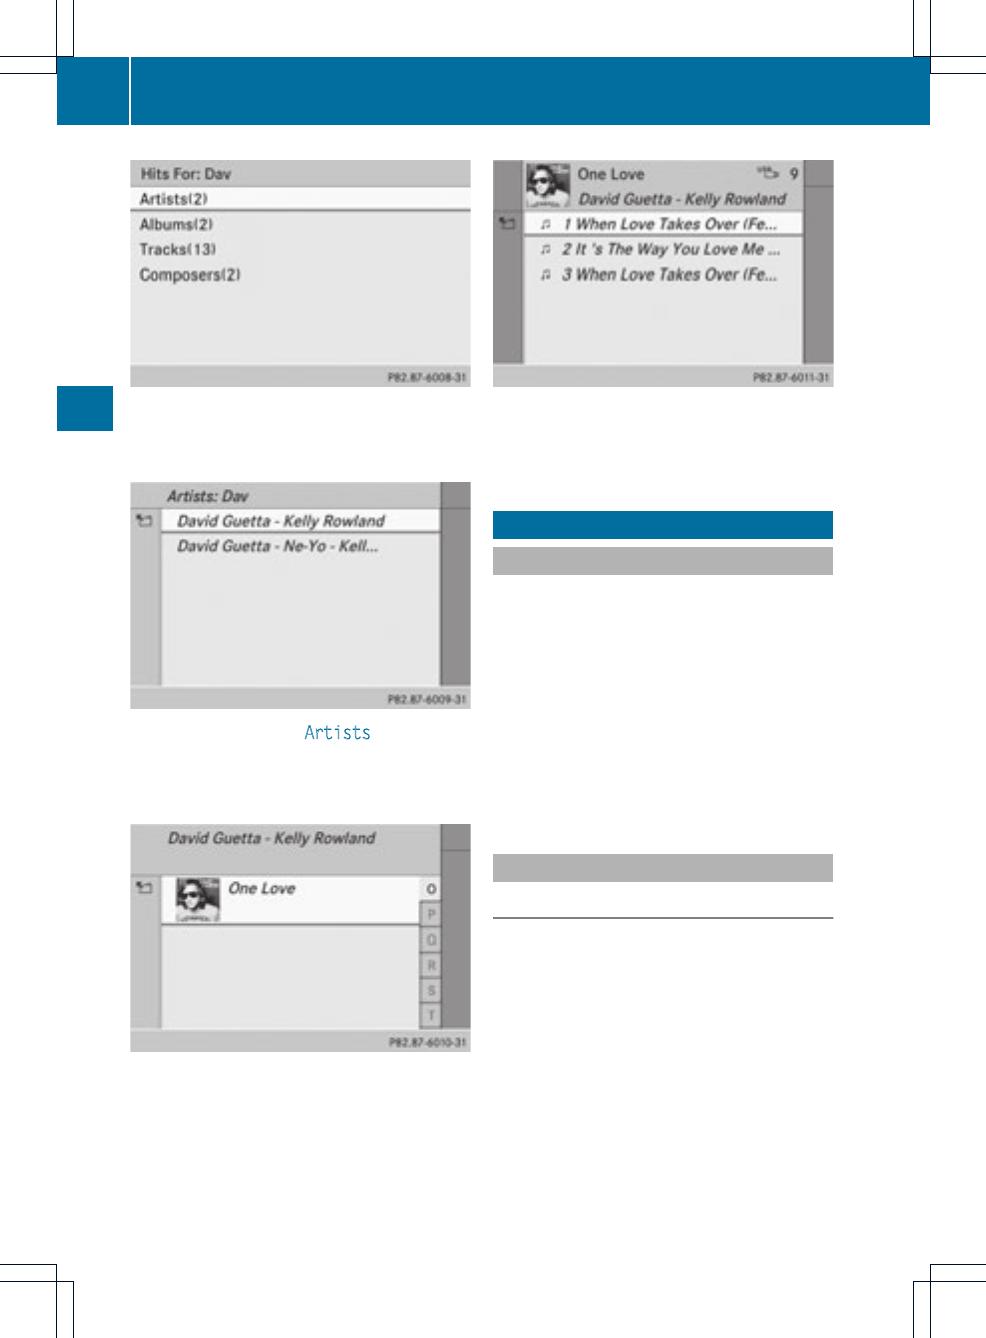
XSelect an entry by turning cVd the
COMAND controllerand press Wto
confirm.
XSelect an entry, e.g. Artists, and press
Wto confirm.
The albumand cover(if available) are
displayed.
XConfirm the album with W.
The tracks on the album are displayed.
XSelect a track and press Wto confirm.
Playback starts and the basic display
appears.
MUSIC REGISTER
General information
You can store music files in a compressed
format in the MUSIC REGISTER
(Ypage 169). The memory has a capacity of
10 GB.
!Retain the original music files in a secure
location. If you, for example, accidentally
reset COMAND to the factory settings with
the reset function, all music files in the
MUSIC REGISTER are deleted. Mercedes-
Benzis not liable for any loss of data.
Switching to MUSIC REGISTER
Option 1
XPress the hfunction button repeatedly
until the MUSIC REGISTER is switched on.
By pressing the function button repeatedly,
you can change the operating mode in the
following order:
Raudio CD/DVD/MP3 (disc)
Rmemory card mode
RMUSIC REGISTER
RUSB storage device
RMedia Interface or audio AUX mode
RBluetooth®audio mode
168 MUSIC REGISTER
Audio
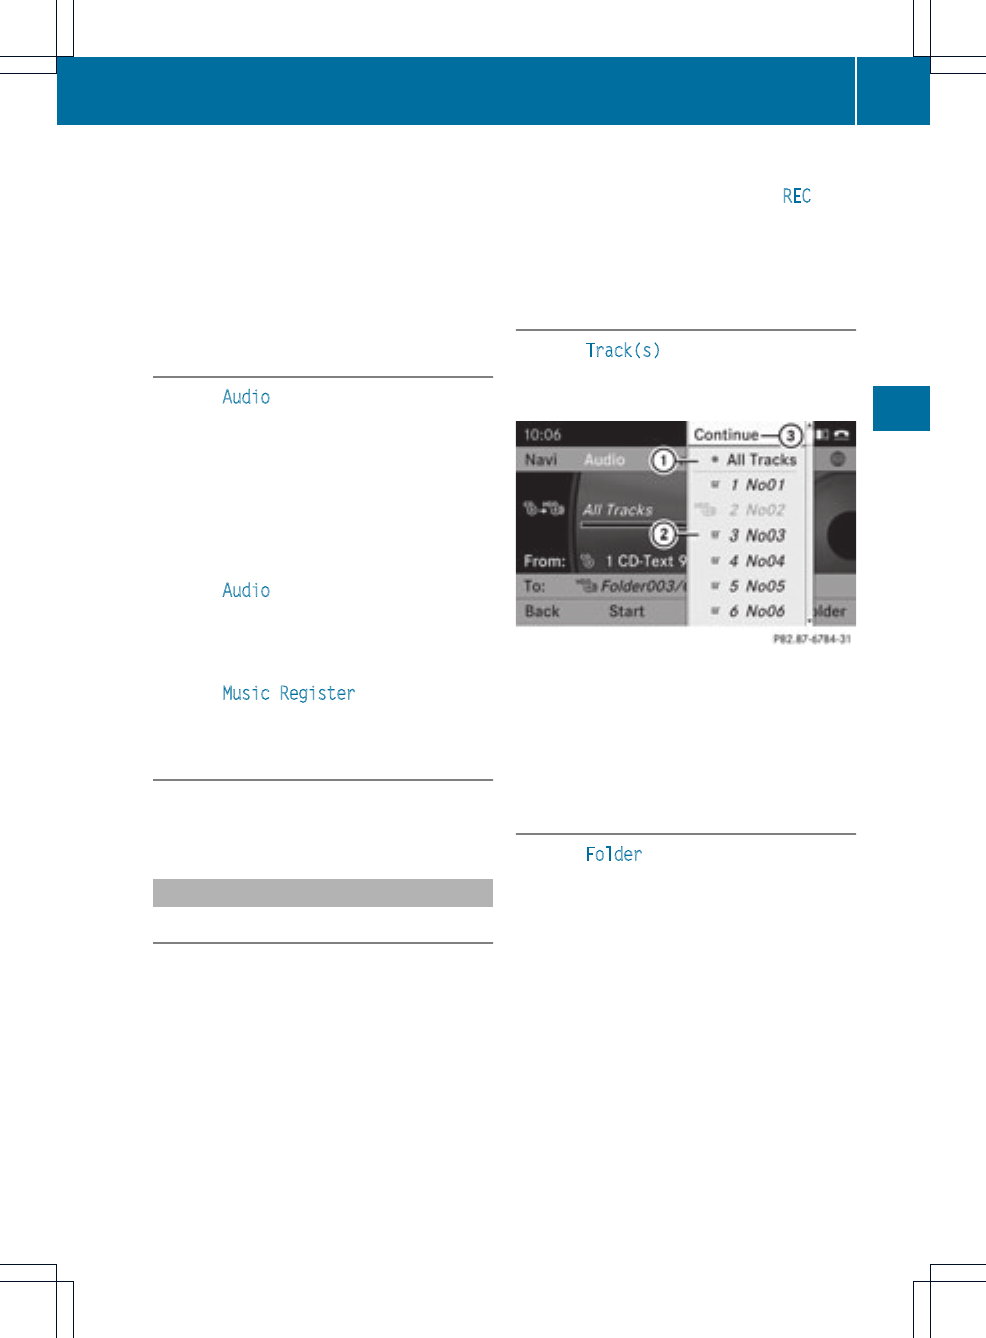
If music files are available, playback begins at
the point last listened to.
If there are no music files, you will see a
message to this effect.
XConfirm the message by pressing Wthe
COMAND controller and copy the music
files (Ypage 169).
Option 2
XSelect Audio in the main function bar by
sliding ZV and turning cVd the COMAND
controller and press Wto confirm.
If MUSIC REGISTER was the last mode
selected, it is now switched on.
If another audio source is switched on, you
can now switch on the MUSIC REGISTER in
the audio menu.
XSelect Audio by sliding ZV and turning
cVd the COMAND controller and press
Wto confirm.
The audio menu appears.
XSelect Music Register and press Wto
confirm.
Option 3
XPress the rnumber key (DVD changer).
The MUSIC REGISTER is switched on.
Importing music files
Introduction
You can copy music files in the file formats
MP3, WMA and AAC (with the file
extensions .m4p, .m4a, .m4b and .aac) from
the following media:
Rdiscs in the DVD changer
Rmemory card
RUSB storage device
iCD information such as album name, disc
name, artist and track is provided by the
Gracenote Media Database (Ypage 161).
XSwitch on audio CD mode (Ypage 157).
XWith an audio CD inserted, select REC in the
CD basicdisplay by sliding VÆand turning
cVd the COMAND controller and press
Wto confirm.
Step 1: selecting tracks to import
XSelect Track(s) by turning cVd the
COMAND controller and press Wto
confirm.
:To record all music files (standard)
;To record individual tracks O
=To confirm your selection
If you do not selectany tracks, every trackon
the CD will be imported.
Step2:selecting the target folder
XSelect Folder by turning cVd the
COMAND controller and press Wto
confirm.
MUSIC REGISTER 169
Audio
Z
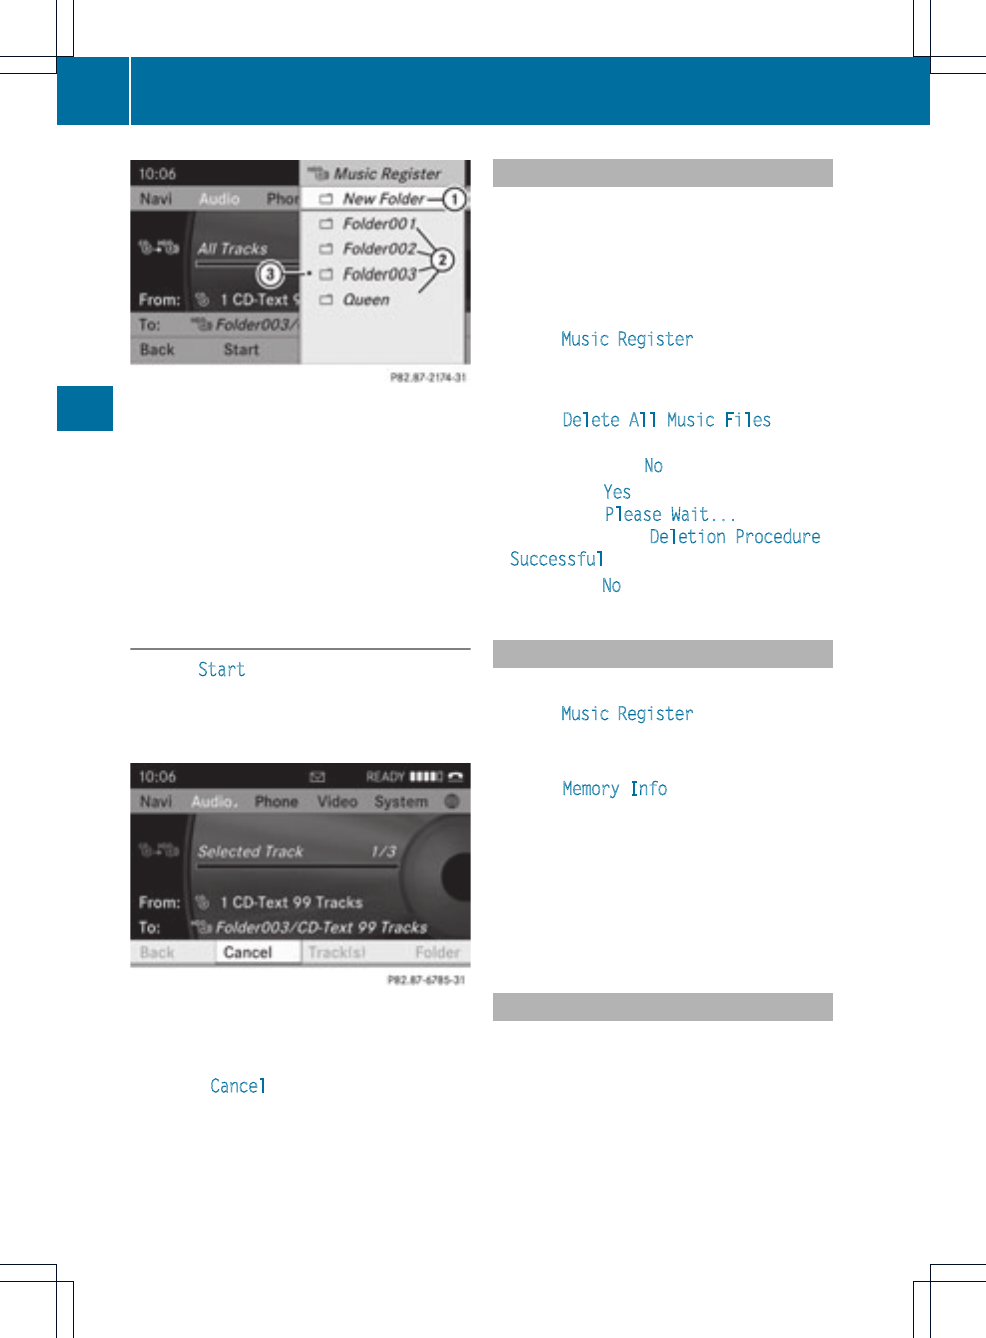
:To create a new folder (standard)
;Existing folders
=Currently selected folder
XSelect a folder by turning cVd the
COMAND controller and press Wto
confirm.
If you do not select a target folder, a new one
will be created.
Step 3: beginning the import
XSelect Start by turning cVd the COMAND
controller and press Wto confirm.
Information about the import source and
target as well as the progress is displayed.
The Audio CD basic display automatically
appears after successful import.
XTo cancel importing: during importing,
confirm Cancel by pressing Wthe
COMAND controller.
The Audio CD basic display appears.
Deleting all music files
This function deletes all music files from the
MUSIC REGISTER.
!In order to prevent malfunctions, do not
use COMAND during this time.
XSwitch to MUSIC REGISTER (Ypage 168).
XSelect Music Register by sliding VÆand
turning cVd the COMAND controller and
press Wto confirm.
XSelect Delete All Music Files and
press Wto confirm.
Aquery appears. No is highlighted.
If you select Yes, all musicfiles are deleted.
You see the Please Wait... message.
Then, you see the Deletion Procedure
Successful message.
If you select No, the process will be aborted.
Calling up memory space info
XSwitch to MUSIC REGISTER (Ypage 168).
XSelect Music Register by sliding VÆand
turning cVd the COMAND controller and
press Wto confirm.
XSelect Memory Info and press Wto
confirm.
The following is displayed:
Rstorage capacity
Ravailable memory
Roccupied memory
Rcontent (folders, tracks)
Music search
The music search finds tracks via all available
media. The search begins with the audio
source that is currently active.
The following media are included for the
music search:
Rdisc (audio CD/DVD/MP3)
Rmemory card
170 MUSIC REGISTER
Audio
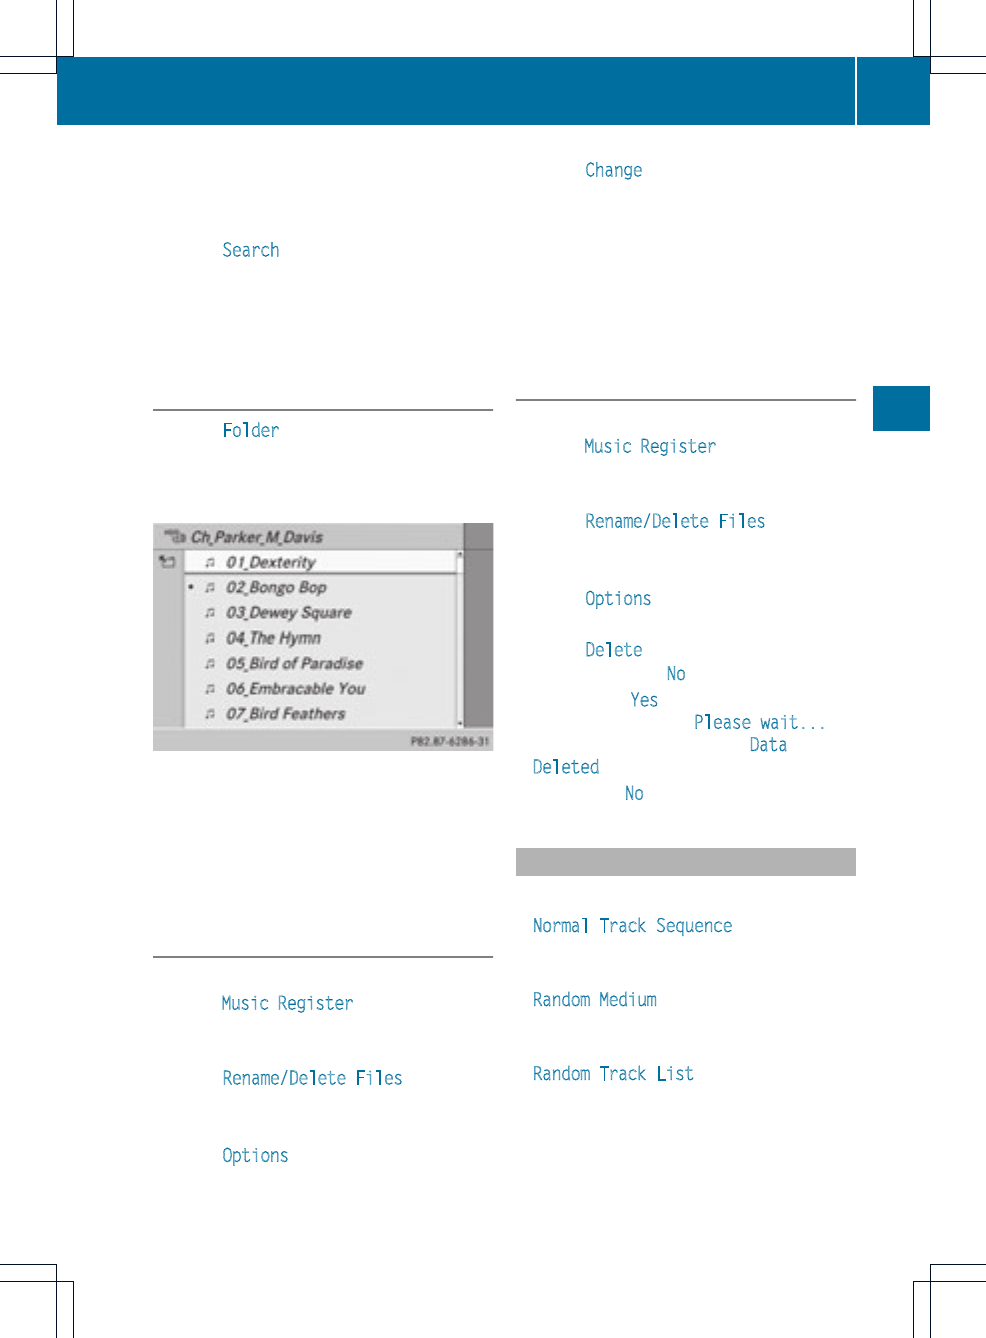
RMUSIC REGISTER
RUSB storage device
XSwitch to MUSIC REGISTER (Ypage 168).
XSelect Search by sliding VÆand turning
cVd the COMAND controller and press
Wto confirm.
The category list appears.
XSelect a track in a category (Ypage 165).
Example: opening afolder
XSelect Folder in the category list by
turning cVd the COMAND controller and
press Wto confirm.
You see the contents of the currentfolder.
The name of the current folder is at the top
and the track currently playing is indicated by
a#dot.
XTo switch to the next folder up: press the
%back button or slide XV the
COMAND controller.
Changing the folder/track name
XSwitch to MUSIC REGISTER (Ypage 168).
XSelect Music Register by sliding VÆand
turning cVd the COMAND controller and
press Wto confirm.
XSelect Rename/Delete Files and press
Wto confirm.
XSelect a folder/track by turning cVd.
XSelect Options by sliding VY and press
Wto confirm.
XSelect Change and press Wto confirm.
XEnter a name for the folder/track.
Instructionsfor entering characters can be
found in the "Entering characters in the
phone book and address book" section
(Ypage 31).
XTo save the changes: select ¬and
press Wto confirm.
Deleting folders/tracks
XSwitch to MUSIC REGISTER (Ypage 168).
XSelect Music Register by sliding VÆand
turning cVd the COMAND controller and
press Wto confirm.
XSelect Rename/Delete Files and press
Wto confirm.
XSelect a folder/track by turning cVd.
XSelect Options by sliding VY and press
Wto confirm.
XSelect Delete and press Wto confirm.
Aquery appears. No is highlighted.
If you select Yes, the folders/tracks are
deleted. You see the Please wait...
message.Then, you see the Data
Deleted message.
If you select No, the process will be aborted.
Playback options
The following options are available:
RNormal Track Sequence
The tracks are played in the normal order
(e.g. track 1, 2, 3, etc.).
RRandom Medium
All the tracks on the medium are played in
random order.
RRandom Track List (MP3 mode only)
The tracks in the currently active folder/
track list are played in a random order.
MUSIC REGISTER 171
Audio
Z
XTo select options: switch to the MUSIC
REGISTER (Ypage 168).
XSelect Music Register by sliding VÆand
turning cVd the COMAND controller and
press Wto confirm.
The options list appears. The #dot
indicates the optionselected.
XSelect an option and press Wto confirm.
The option is switched on. For all options
except Normal Track Sequence, you will
see a corresponding display in the display/
selection window.
iThe Normal Track Sequence option is
automatically selected when you change
the disc you are currently listening to or
when you select a differentmedium. If an
option is selected, it remains selected after
COMAND is switched on or off.
Bluetooth®audio mode
Connecting Bluetooth®audio devices
Conditions
Bluetooth®audio device
Bluetooth®audio mode requires a
Bluetooth®-capable audio device.
iNot all Bluetooth®audio devices available
on the market are equally suitable. For
more detailed information on suitable
Bluetooth®audio devices and on
connecting Bluetooth®audio devices to
COMAND, visit
http://www.mbusa-mobile.com (for
USA). Alternatively, call the Mercedes-Benz
Customer Assistance Center at
1-800-FOR-MERCedes (1-800-367-6372)
(for USA) or Customer Relations at
1-800-387-0100 (for Canada).
Before using Bluetooth®audio mode, you
should checkyour Bluetooth®audio device
for the following (see the Bluetooth®audio
device's operating instructions):
RBluetooth®audio profile
The Bluetooth®audio device must support
the A2DP and AVRCP Bluetooth®audio
profiles.
RBluetooth®visibility
On certain Bluetooth®audio devices, as
well as activating the Bluetooth®function,
the device itself must also be made
"visible" to other devices (see the
Bluetooth®audio device's operating
instructions).
RBluetooth®device name
This device name is predetermined but can
usually be changed. To make a clear
selection of the Bluetooth®device
possible, Mercedes-Benz recommends
that you customize the device name (see
the Bluetooth®audio device's operating
instructions).
iA2DP (Advanced Audio Distribution
Profile): Bluetooth®audio profile for audio
data transmission
AVRCP (Audio Video Remote Control
Profile): Bluetooth®audio profile for audio
data playback
XActivate Bluetooth®and Bluetooth®
visibility on the Bluetooth®audio device.
On COMAND
XActivate the Bluetooth®function in
COMAND (Ypage 45).
General information
Before using your Bluetooth®audio device
with COMAND for the first time, you will need
to authorize it.
When you authorize a new Bluetooth®audio
device, it is connected automatically.
Connection involves first searching for a
172 Bluetooth®audio mode
Audio
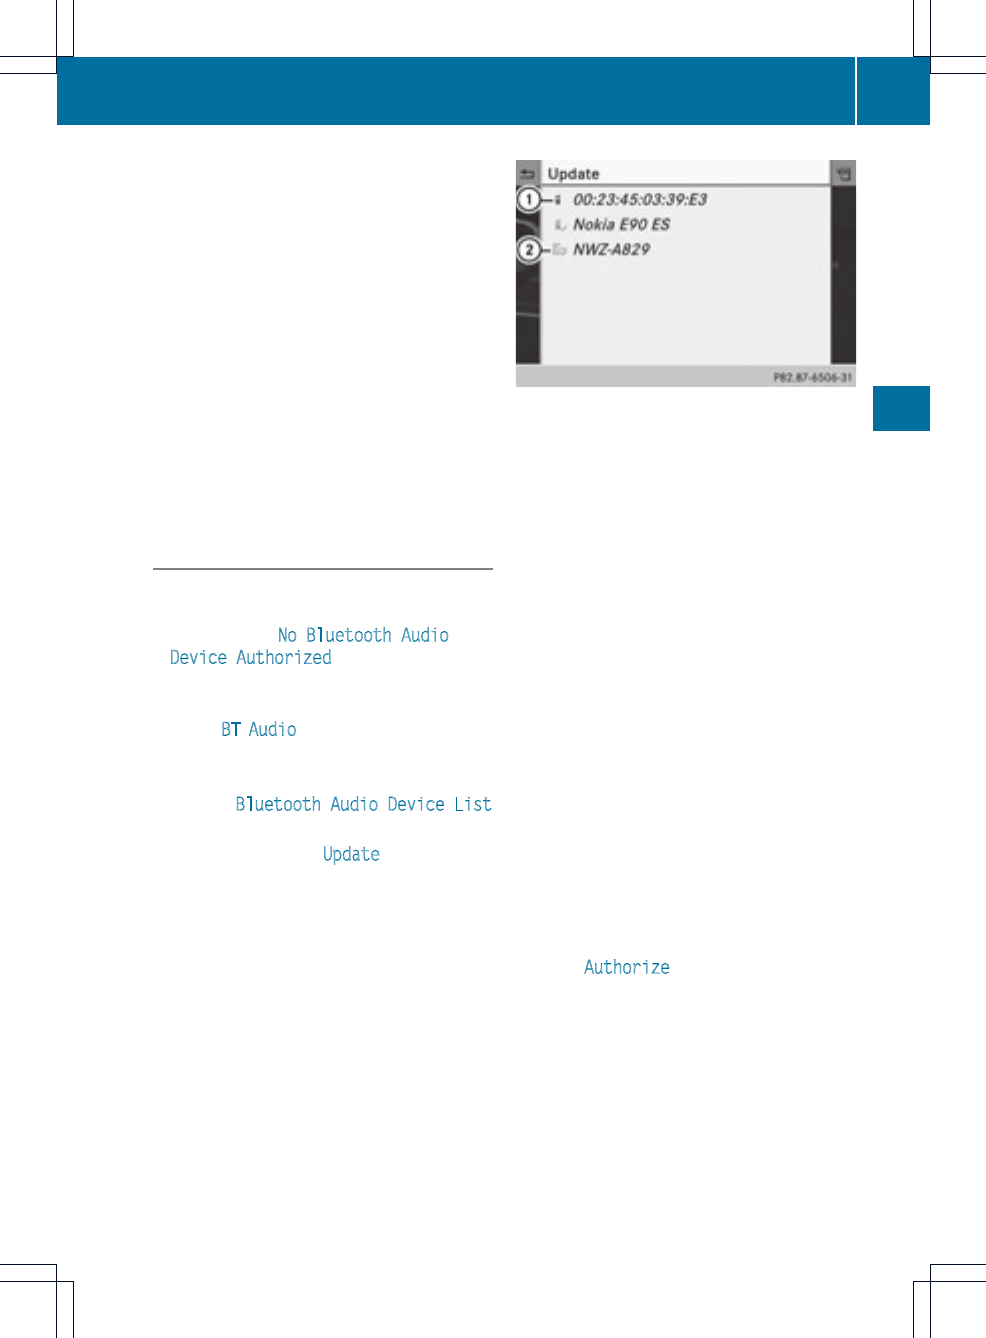
Bluetooth®audio device and then authorizing
it.
You can authorize up to fifteen Bluetooth®
devices.
iIf you authorize a mobile phone that
supports Bluetooth®audio, the A2DP and
AVRCP Bluetooth®audio profiles are
connected automatically. The mobile
phone is then entered in both the
Bluetooth®telephone list (Ypage 116) and
in the Bluetooth®device list (Ypage 173).
Mercedes-Benz recommends authorizing a
mobile phone in Bluetooth®telephony
(Ypage 116).
Searching for and authorizing a
Bluetooth®audio device
XSwitch on Bluetooth®audio mode
(Ypage 175).
If you see the No Bluetooth Audio
Device Authorized message, you will
need to connect the Bluetooth®audio
device first.
XSelect BT Audio by sliding VÆand turning
cVd the COMAND controller and press
Wto confirm.
XConfirm Bluetooth Audio Device List
by pressing Wthe COMAND controller.
XTo search: confirm Update by pressing
Wthe COMAND controller.
COMAND searches for Bluetooth®audio
devices within range and adds them to the
Bluetooth®device list. Bluetooth®audio
devices are detected if they support the
Bluetooth®audio profiles (A2DP, AVRCP).
The duration of the search depends on the
number of Bluetooth®audio devices within
range and theircharacteristics.
Example: Bluetooth®device list
:Newly detected mobile phone with
Bluetooth®audio function in range
;Bluetooth®audio player not within range
but previously authorized (icon appears in
gray)
The Bluetooth®device list displays all
authorized devices, whether they are within
range or not. After a device search, devices
which are within range but not authorized are
also displayed.
iWith some Bluetooth®audio devices,
playback must be initially started on the
device itself, so that COMAND can play the
audio data.
XTo authorize: select an unauthorized
Bluetooth®audio device from the list
(example: :) by turning cVd the
COMAND controller.
XSelect the symbol to the right of the
Bluetooth®audio device by sliding VY the
COMAND controller and press Wto
confirm.
XSelect Authorize and press Wto confirm.
Depending on the Bluetooth®audio device
used, you now have two options for
continuing with authorization.
XOption 1: enter the passkey. To do so,
proceed as described in the "Authorizing
(registering) a mobile phone" section
(Ypage 117).
After successful authorization, the
Bluetooth®audio device is connected and
starts playing.
Bluetooth®audio mode 173
Audio
Z
XOption 2 (Secure Simple Pairing): if the
digit codes displayed in COMAND and on
the Bluetooth®audio device are the same,
confirm Yes by pressing W.
If you select Yes, authorization continues
and the Bluetooth®audio device is
connected. Playback starts.
If you select No, authorization will be
canceled.
iThe Bluetooth®audio device must
support the Bluetooth®version 2.1 for
connection via Secure Simple Pairing.
COMAND creates a six-digit code, which is
displayed on the two devices that are to be
connected.
XExternal authorization: COMAND may
not be able to locate your Bluetooth®audio
device due to the specific security settings
of the Bluetooth®audio device itself. In this
case, check whether your Bluetooth®audio
device can locate the COMAND system
(Ypage 118). The Bluetooth®device name
of COMAND is MB Bluetooth.
After successful authorization, the
Bluetooth®audio device is connected and
starts playing.
Reconnecting aBluetooth®audio
device
The Bluetooth®audio profiles are connected
automatically under the following
circumstances:
Rone of the last two mobile phones to have
been connected has also been used as a
Bluetooth®audio player (if this function is
supported by the mobile phone).
Rthe mobile phone takes over the automatic
connection itself.
ABluetooth®audio player without telephone
functions is not automatically reconnected,
even if it was the last device connected.
If the No Bluetooth Audio Device
Connected message appears, you have two
options to connect a Bluetooth®audio
device:
Option 1
XConfirm Connect Last Device in the
basic display by pressing Wthe COMAND
controller.
If COMAND can locate the Bluetooth®
audio device, it will be connected and will
start playing.
iWith some Bluetooth®audio devices,
playback must be initially started on the
device itself, so that COMAND can play the
audio data.
Option 2
XSelect BT Audio by turning cVd the
COMAND controller and press Wto
confirm.
XConfirm Bluetooth Audio Device List
by pressing Wthe COMAND controller.
XSelectaBluetooth®audio device by turning
cVd the COMAND controller and press
Wto confirm.
If COMAND can locate the Bluetooth®
audio device, it will be connected and will
startplaying.
iWith some Bluetooth®audio devices,
playback must be initially started on the
device itself, so that COMAND can play the
audio data.
Bluetooth®audio device and
simultaneous search for mobile phones
During the search for mobile phones
(Ypage 116), the connection with the
Bluetooth®audio device is terminated. In the
Bluetooth®audio basic display
(Ypage 176), you will see the Received
Business Cards message and the
Received Business Cards menu item
cannot be selected.
174 Bluetooth®audio mode
Audio
Displaying details
XSelectaBluetooth®audio device in the
Bluetooth®device list.
XSelect the symbol to the right of the
Bluetooth®audio device by sliding VY the
COMAND controllerand press Wto
confirm.
XSelect Details and press Wto confirm.
The following informationconcerning the
selected mobile phone is shown:
RBluetooth®name
RBluetooth®address
Ravailability status (shown after an
update)
Rauthorization status
XTo close the detailed view: turn cVd or
slide XVY the COMAND controller.
De-authorizing (de-registering) a
Bluetooth®audio device
XSelect a Bluetooth®audio device in the
Bluetooth®device list.
XSelect the symbol to the right of the
Bluetooth®audio device by sliding VY the
COMAND controller and press Wto
confirm.
XSelect De-Authorize and press Wto
confirm.
Aprompt appears asking whetheryou
really wish to de-authorize this device.
XSelect Yes or No.
If you select Yes, the device will be deleted
from the Bluetooth®device list.
If you select No, the process will be aborted.
iBefore re-authorizing the Bluetooth®
audio device, you should also delete the
device name MB Bluetooth from your
Bluetooth®audio device's Bluetooth®list
(see the Bluetooth®audio device's
operating instructions).
Switching to Bluetooth®audio mode
Option 1
XConnect (Ypage 172) or reconnect
(Ypage 174) a Bluetooth®audio device.
COMAND activates the Bluetooth®audio
device. The basic display appears and the
device starts playing.
Option 2
XPress the hfunction button one or more
times.
iBy pressing the function button
repeatedly, you can change the operating
mode in the following order:
Raudio CD/DVD/MP3 (disc)
Rmemory card mode
RMUSIC REGISTER
RUSB storage device
RMedia Interface or audio AUX mode
RBluetooth®audio mode
Option 3
XSelect Bluetooth Audio (Ypage 159) in
the media list by turning cVd the COMAND
controller and press Wto confirm.
COMAND activates the connected device.
You will see a message to this effect.The
basic display then appears.
Bluetooth®audio mode 175
Audio
Z
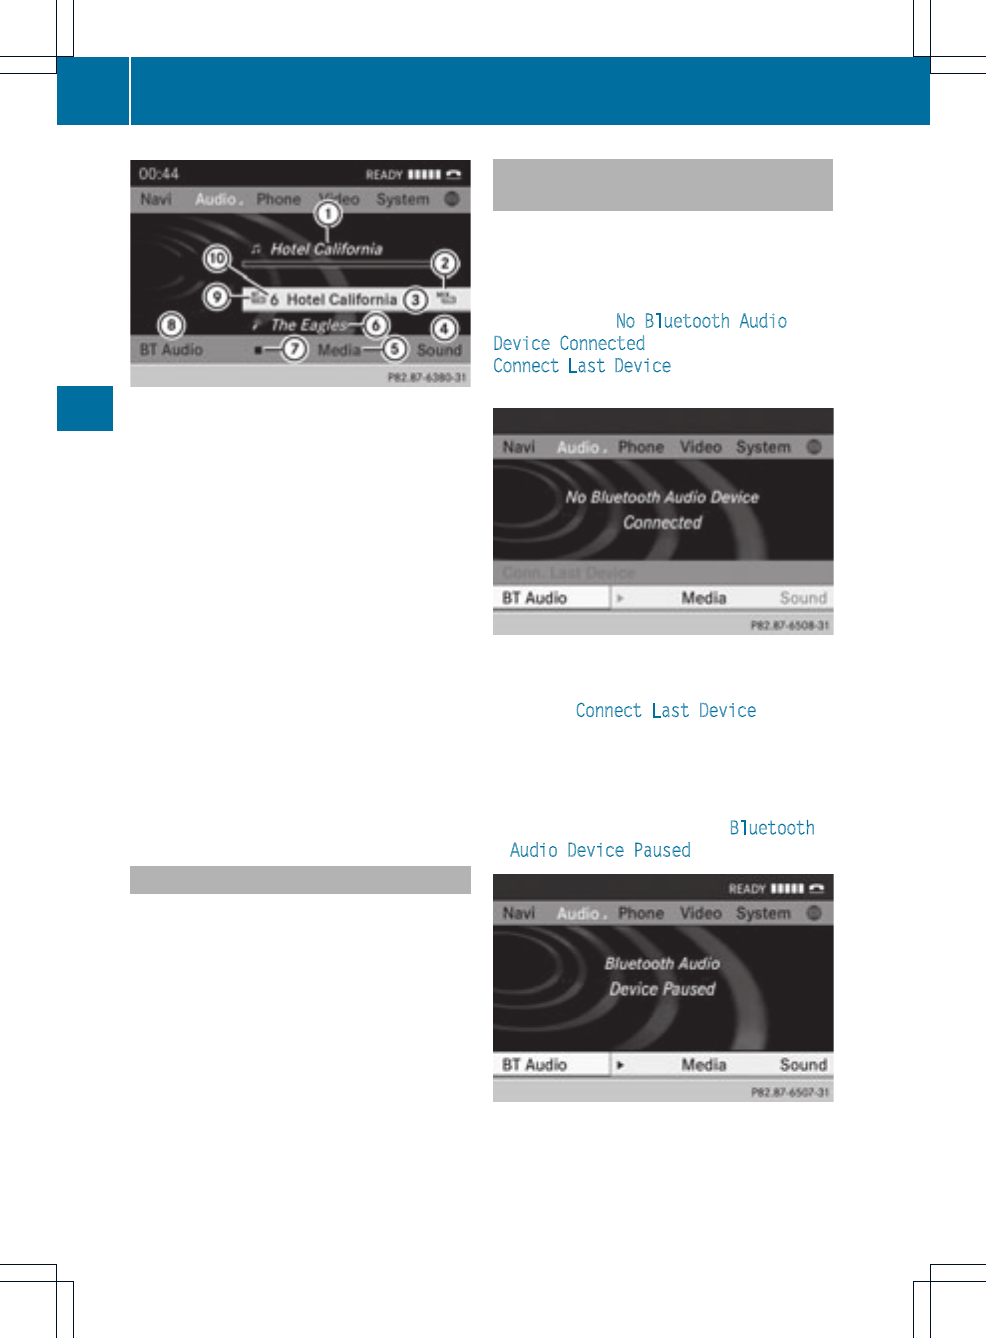
Example: Bluetooth®audio basicdisplay
:Track name
;Currentplayback settings (no symbol for
"Normal track sequence")
=Album name
?Sound settings
AMedia list
BArtist
CTo stop Éor start Ìplayback
DTo connect a Bluetooth®audio device or
increase the volume using COMAND
EBluetooth®audio data medium type
FData medium position in the media list
iIf the Bluetooth®audio device connected
supports metadata and corresponding data
is available, thenthe artist, track and album
name can be displayed.
Starting/stopping playback
XTo start playback: select Ìby sliding
VÆand turning cVd the COMAND
controller and press Wto confirm.
Playback starts. Selection is at É.
XTo stop playback: select Éby turning
cVd the COMAND controller and press
Wto confirm.
Amessage appears. Selection is at Ì.
XTo continue playback: select Ìby
turning cVd the COMAND controller and
press Wto confirm.
Amessage appears. Selection is at É.
Starting playback if the Bluetooth®
audio device has been stopped
During the search for mobile phones
(Ypage 116), the connection with the
Bluetooth®audio device is terminated. In the
Bluetooth®audio basic display (Ypage 176),
you will see the No Bluetooth Audio
Device Connected message and the
Connect Last Device menu item cannot be
selected.
When the search is finished, the Bluetooth®
audio device can be reconnected.
XConfirm Connect Last Device by
pressing W.
Depending on the Bluetooth®audio device
used, playback starts immediately or you
must start playback manually.
In this case, you will see the Bluetooth
Audio Device Paused message.
XTo start playback: select Ìby turning
cVd the COMAND controller and press
Wto confirm.
Playback resumes from the beginning.
176 Bluetooth®audio mode
Audio
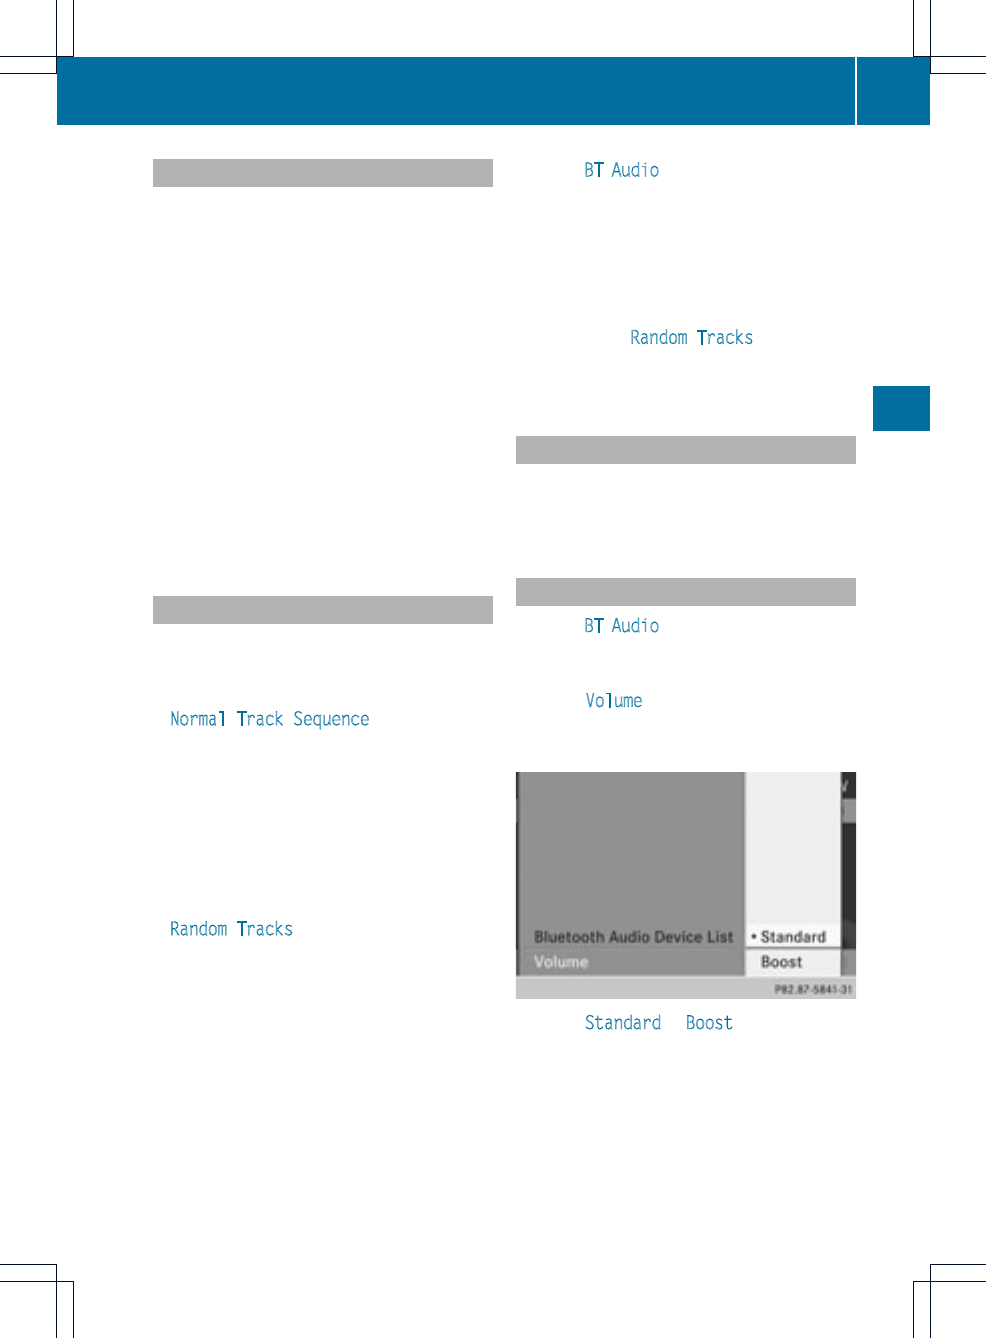
Selecting atrack
This functionis not supported by all
Bluetooth®audio devices.
XTo skip forwards or backwards to a
track: press the Eor Fbutton on
COMAND.
or
XPress the 9or :button briefly on
the multifunction steering wheel.
XRapid scroll: press and hold the 9
or :button on the multifunction
steering wheel until the desired track is
reached.
If you hold down the 9or :button,
the system runs through the list more
quickly.
Selecting playback options
If the Bluetooth®audio device supports the
corresponding function, the following options
are available:
RNormal Track Sequence
The tracks are played in the normal order
(e.g. track 1, 2, 3, etc.).
Audio data playback is determined by the
order in which the tracks are written to the
data carrier. Alphabetical order is the most
common. Once all the tracks in a folder
have been played, the tracks in the next
folder are played.
RRandom Tracks
All the tracks on the medium are played in
random order (e.g. track 3, 8, 5 etc.).
XSelect BT Audio by sliding VÆand turning
cVd the COMAND controller and press
Wto confirm.
The #dot indicates the option selected.
XSelect the option by turning cVd the
COMAND controller and press Wto
confirm.
If you select Random Tracks, you will see
a corresponding symbol in the display/
selection window.
Adjusting the sound settings
The sound settings are described using radio
mode as an example in the "Basic functions
of COMAND" section (Ypage 34).
Increasing the volume using COMAND
XSelect BT Audio by sliding VÆand turning
cVd the COMAND controller and press
Wto confirm.
XSelect Volume and press Wto confirm.
Amenu appears. The #dot indicates the
current setting.
XSelect Standard or Boost and press Wto
confirm.
You will find further information in the "Audio
AUX mode" section (Ypage 182).
Bluetooth®audio mode 177
Audio
Z
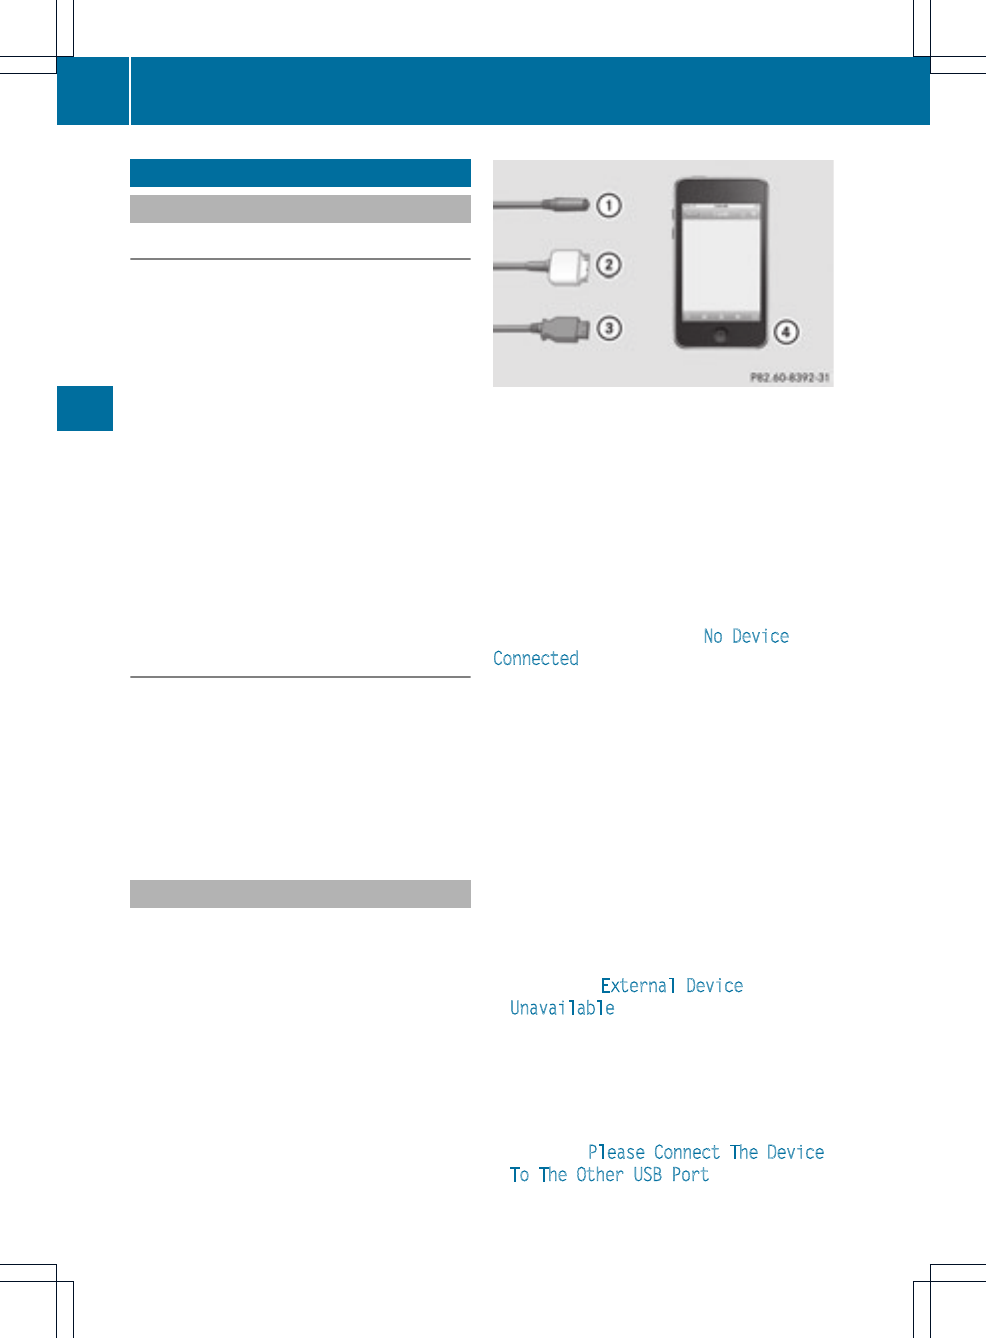
Media Interface mode
Connection options
Overview
The connection sockets are located in the
stowage compartment in the center console.
Device-specific adapter cables, included with
the Media Interface, are required to connect
external devices to the Media Interface.
iStore individual parts in asafe place.
Only use genuine Mercedes-Benz
connection cables.
You can connect the following data media to
COMAND via the Media Interface:
RiPod®
Rcertain MP3 players
iiPod®is a registered trademarkofApple
Inc., Cupertino, California, USA.
Supported devices
For details and a list of supported devices,
visit http://www.mbusa-mobile.com.
Alternatively, call the Mercedes-Benz
Customer Assistance Centerat
1-800-FOR-MERCedes (1-800-367-6372)
(for USA) or Customer Relations at
1-800-387-0100 (for Canada).
Connecting an external device
iDo not leave external devices in the
vehicle, as their correct function cannot be
guaranteed if they are subjected to
extreme temperatures, e.g. from exposure
to direct sunlight or very low outside
temperatures (see the operating
instructions of the respective device).
Mercedes-Benz USA, LLC accepts no
liability for damage to external devices.
Never connect more than one device at a
time. You will otherwise not be able to play
back from the external device.
:Four-pin socket for ⅛ inch stereo jack,
e.g. for MP3 players (audio and video)
;iPod®plug for connecting an iPod®
=USB socket for connecting an MP3 player
?Example of device: iPod®
XConnect the external device with suitable
socket :,;or =.
COMAND activates the device; a message
appears.
If you remove a device, the No Device
Connected message appears.
iA connected iPod®or MP3 playershould
not be simultaneously operated via the
Media Interface and the remote control
(e.g. Bluetooth®remote control) or directly
on the device itself as this may cause
unforeseen technical difficulties.
iConnecting a fully discharged iPod®or
MP3 player can result in an extended
initialization period.
Malfunction messages appearwhile the
device is being activated if:
RCOMAND does not support the device
connected (External Device
Unavailable message).
Rthe connected device consumes too much
power.
Rthe Media Interface connection is faulty.
Ra mass storage device (e.g. USB stick or
USB hard disk) is connected to the Media
Interface (Please Connect The Device
To The Other USB Port message).
178 Media Interface mode
Audio
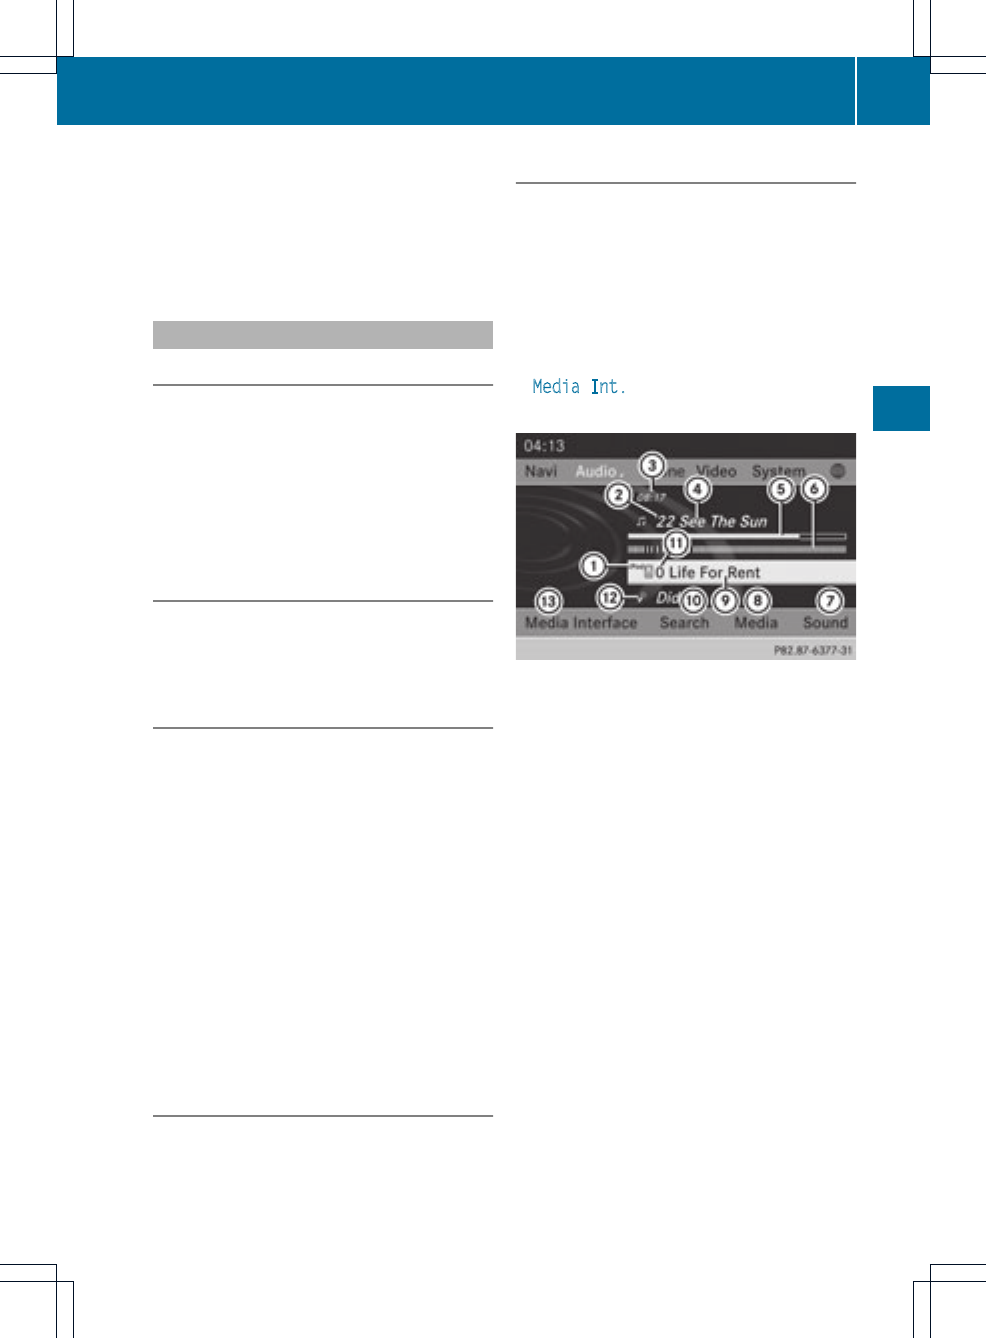
iThe separate USB connection ensures
quick access and expanded media content
options.
iConsult an authorized Mercedes-Benz
Center if you have further questions.
Switching to Media Interface mode
General information
In extreme cases, starting up individual
functions can take up to several minutes –
this depends on the external device and its
content (e.g. video podcasts).
Only use the original software to save files on
iPods or MP3 players. Otherwise, some or all
functions may not be available.
Option 1
XConnect an external device (Ypage 178).
COMAND activates the device. The basic
display then appears.
Option 2
The external device is connected to the Media
Interface.
XPress the hfunction button one or more
times.
By pressing the function button repeatedly,
you can change the operating mode in the
following order:
Raudio CD/DVD/MP3 (disc)
Rmemory card mode
RMUSIC REGISTER
RUSB storage device
RMedia Interface or audio AUX mode
RBluetooth®audio mode
Option 3
XPress the inumber button.
This selects the connected external audio
device directly.
Option 4
XIn the media list (Ypage 159), select the
entry at position 0 by turning cVd the
COMAND controller and press Wto
confirm.
COMAND activates the connected device.
You will see a message to this effect.The
basic display then appears.
If no device is connected, you will see the
Media Int. entry instead of a device
name.
Media Interface mode (iPod®mode) when
equipped with a DVD changer
:Type of data medium
;Track number
=Elapsed track time (also in format
00:00:00 for audio books)
?Track name
AGraphic time display
BGraphic track display
CSound settings
DMedia list
EAlbum name (if available)
FMusic search
GPosition in the media list
HArtist (if available)
IPlayback options
Type of device :connected is indicated by
the corresponding symbol for iPod®or MP3
player.
Media Interface mode 179
Audio
Z
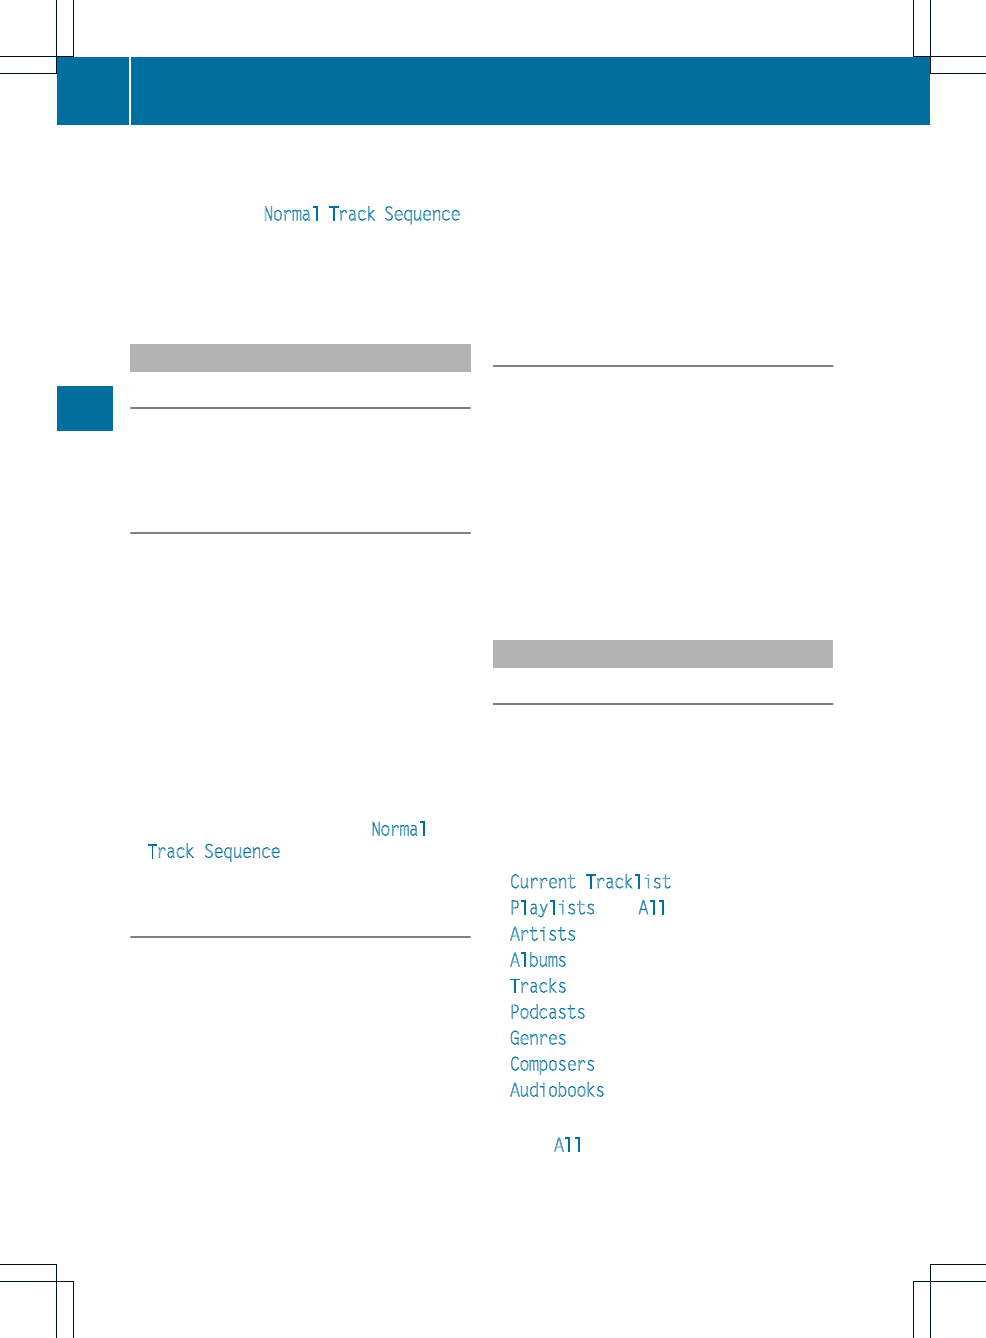
The currentplayback option (Ypage 163) is
shown with a symbol behind album name
E(no display for Normal Track Sequence).
iIf the device connected does not contain
any playable tracks, a message appears to
this effect.
Selecting music files
Note
COMAND displays the data stored on the
iPod®or MP3 player accordingto the filing
structure used in the respective medium.
Selecting by skipping to atrack
XTo skip forwards or back to a track: turn
cVd the COMAND controller when the
display/selectionwindow is active.
or
XPress the Eor Fbutton.
The skip forward function skips to the next
track. The skip back function skips to the
beginning of the current track if the track
has been playing for more than eight
seconds.Ifthe track has been playing for
less than eight seconds, it skips to the start
of the previous track.Ifyou have selected
a playback option other than Normal
Track Sequence, the track sequence is
random.
Selecting using the number keypad
XTo makeanentry: press the lbutton.
An input menu appears. The number of
characters available for input depends on
the number of stored tracks.
XTo enter a track number: press a number
key, e.g. q.
The digit is entered in the first position in
the input line.
iCOMAND will ignore and not display an
invalid digit.
XEnter more numbers if desired.
The trackplays after the last possible
number is entered.
iPressing and holding a number key for
more than two seconds completes the
entry, and the corresponding track is
played.
Fast forwarding/rewinding
XWhile the display/selection window is
active, slide XVY and hold the COMAND
controller until the desiredposition has
been reached.
or
XPress and hold the For Ebutton
until the desired position is reached.
iOn an iPod®/iPhone®, fast rewind only
functions within the current track.
Selecting acategory/playlist/folder
Overview
iPod®and certain MP3 players
For an iPod®or MP3 player, you can select
tracks using categories or folders.
Depending on the device connected, the
following categories may be available, for
example:
RCurrent Tracklist
RPlaylists (e.g. All)
RArtists
RAlbums
RTracks
RPodcasts
RGenres
RComposers
RAudiobooks
iSome playback categories contain the
entry All.Ifthis entry has been selected,
the entire content of the category selected
will be played.
180 Media Interface mode
Audio
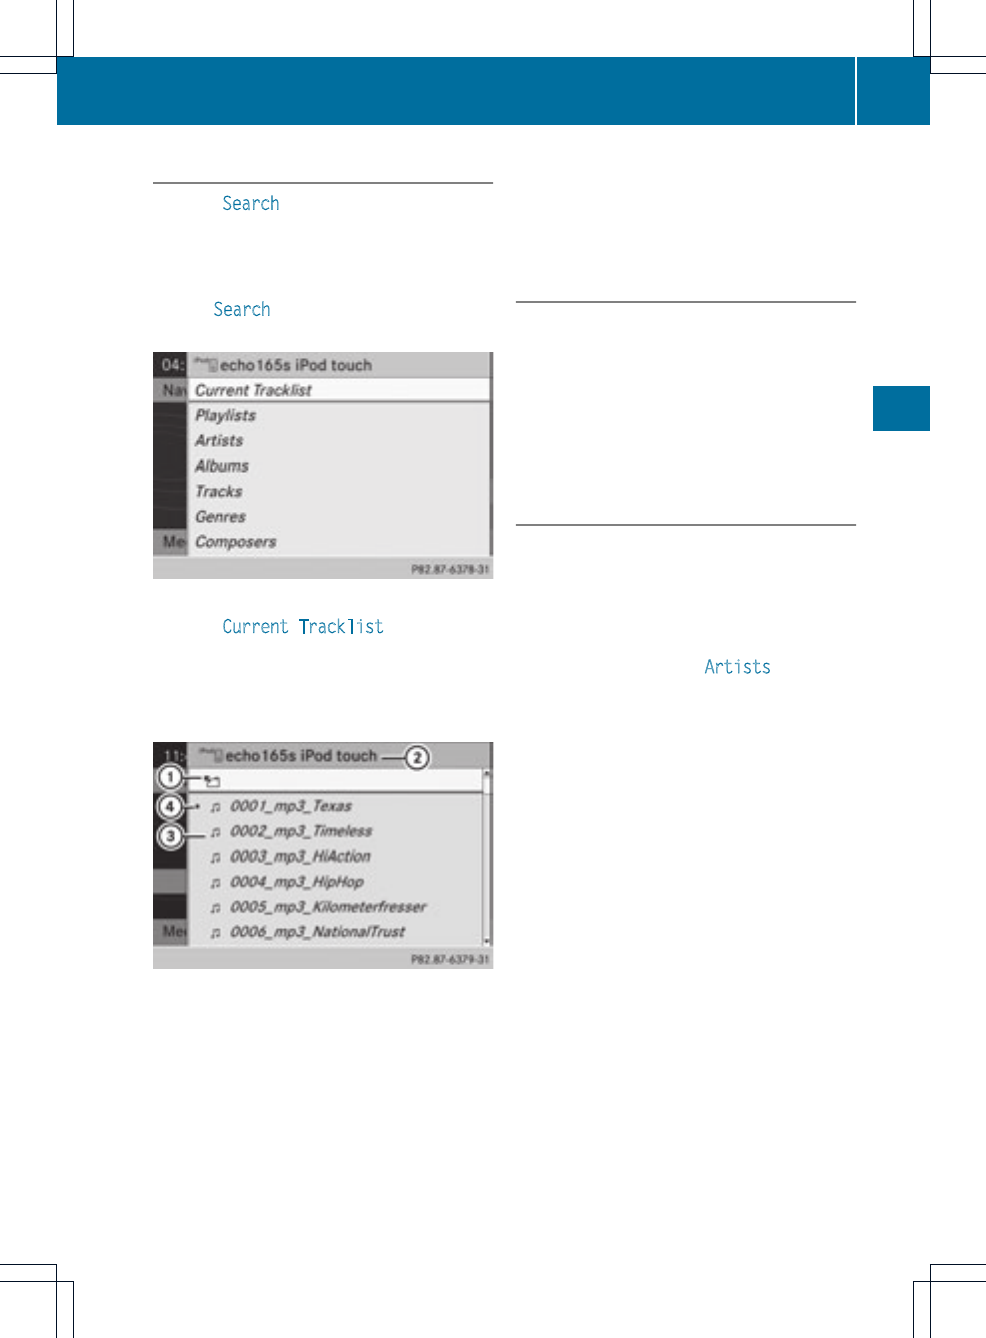
Calling up acategory list
XSelect Search in the basic display by
sliding VÆand turning cVd the COMAND
controller and press Wto confirm.
The category listappears.
iThe Search menu item is not available
until the device has been activated.
Example: category list
XSelect Current Tracklist by turning
cVd the COMAND controller and press
Wto confirm.
The content of the current track list
appears.
Example: current track list
:Symbol for next folder up
;Device icon and device name
=Track symbol
?Current title
XSelect the track by turning cVd the
COMAND controller and press Wto
confirm.
The trackis played.
XTo switch to the next folder up: slide
XV the COMAND controller or press the
%button.
Playing back the content of a category
or folder
XSelect the category or folder by turning
cVd the COMAND controller.
XPress Wthe COMAND controller for longer
than two seconds.
The content of the category or folder
selected is played in accordance with the
playback option (Ypage 163) selected.
Alphabetical track selection
iPod®and MP3 players
This function is available for alphabetically
sorted categories and folders. This function
is not available for albums or playlists, for
example.
XSelect a category, e.g. Artists, by turning
cVd the COMAND controller and press
Wto confirm.
The available artists are displayed.
XPress the corresponding number key once
or several times to select the first letter of
the artist's name (e.g. for an artist
beginning with the letter "C", press number
key lthree times).
The available letters are listed at the lower
edge of the display.
After a message, the first entry in the list
which matches the letter entered is
highlighted.
iIf no corresponding entry exists, the last
entry corresponding to aprevious letter is
highlighted instead.
iFor iPods®and MP3 players, the quality
of the search results is highly dependent on
the versionand language variant of the
software (e.g. iTunes®version) used to
populate the device.
Media Interface mode 181
Audio
Z
If different sorting rules are defined (e.g. in
iTunes®), the search is canceled without
any result.
Playbackoptions
The following options are available:
RNormal Track Sequence
Normal track sequence: you hearthe
tracks in their normal order (e.g. numerical
or alphabetical).
RRandom Medium
All the tracks on the medium are played in
random order.
RRandom Track List
The tracks in the currently active category
or folder, including any subfolders, are
played in random order.
iFor MP3 players, the random playlists
offer a maximum of 300 tracks chosen at
random.
XTo select a playback option: select
Media Interface in the basic display by
sliding VÆand turning cVd the COMAND
controller and press Wto confirm.
The options list appears. The #dot
indicates the option selected.
XSelect an option and press Wto confirm.
MP3 player instructions
Data formats
MP3 and WMA are supported as data formats
with fixed and variable bit rates (up to
320 kbits/s).
Special considerations when using MP3
players
Up to eight directory levels with up to 1000
tracks per directory are supported.
Do not use USB extension leads or adapters.
They can impair functionality.
iDRM (Digital Rights Management)
protected files are not supported by the
Media Interface.
Audio AUX mode
Notes on audio AUX mode
You can connect an external audio source
(AUX) to COMAND. The socket for this is
located in the glove box.
If COMAND is equipped with a Media
Interface, external audio sources are
connected using the corresponding cable set.
An AUX socket is not provided. The
connections for the Media Interface are
located in the stowage compartmentinthe
center console.
iYou will find further information online at
http://www.mbusa-mobile.com.Orcall
the Mercedes-BenzCustomerAssistance
Center at 1-800-FOR-MERCedes
(1-800-367-6372) (for the USA) or
Customer Relations at 1-800-387-0100
(for Canada).
Activating audio AUX mode
When you connect an external audio source,
audio AUX is not selected automatically.
XSelect Audio in the main function bar by
sliding ZV and turning cVd the COMAND
controller and press Wto confirm.
If AUX mode was the last mode selected, it
will now be active.
If another audio source is switched on, you
can now switch to audio AUX mode in the
audio menu.
XSelect Audio using ZV and press Wto
confirm.
The audio menu appears.
182 Audio AUX mode
Audio
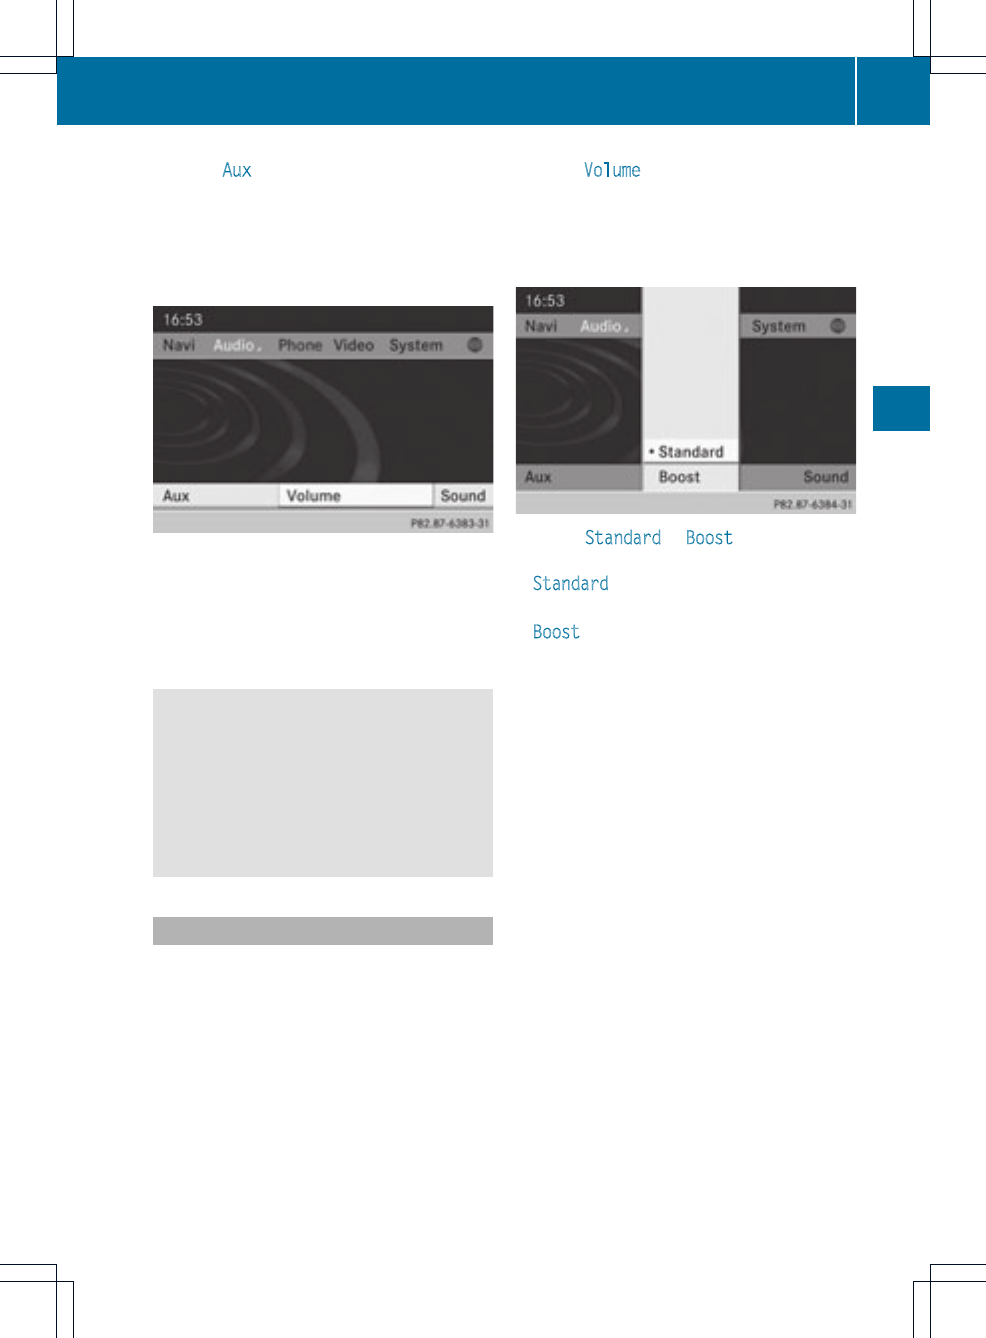
XSelect Aux using cVd and press Wto
confirm.
The audio AUX menu appears.The medium
in the external audio source is played, if the
source is connected and playback
selected.
Please see the respective operating
instructions for how to operate the external
audio source.
You will find details on volume (Ypage 33)
and sound (Ypage 34) settings in the "At a
glance" section.
GWARNING
External audio sources may have different
volumes, which can mean that system
messages such as traffic announcements and
navigation system announcements are much
louder. If necessary, please deactivate the
system messages or adjust their volume
manually.
Increasing the volume using COMAND
In some cases, the volume of the external
audio device may be quieter or louder, or the
usual maximum possible volume may be
lower. On some devices, it is possible to
adjust the volume separately. In this case,
start at a medium volume and increase it
gradually. This enables you to determine
whether the system is able to play the music
at high volume without distorting it.
XSelect Volume in the AUX display by turning
cVd the COMAND controller and press
Wto confirm.
Amenu appears. The #dot indicates the
current setting.
XSelect Standard or Boost and press Wto
confirm.
Standard:the volume of the external audio
source is adjusted to a standard value.
Boost:the volume of the external audio
source is raised by approximately 10 dB.
Audio AUX mode 183
Audio
Z

184

COMAND features ............................. 186
General information ......................... 186
Basic settings .................................... 186
Video DVD mode ............................... 186
AUX video mode ................................ 192
Picture viewer ................................... 193
185
Video
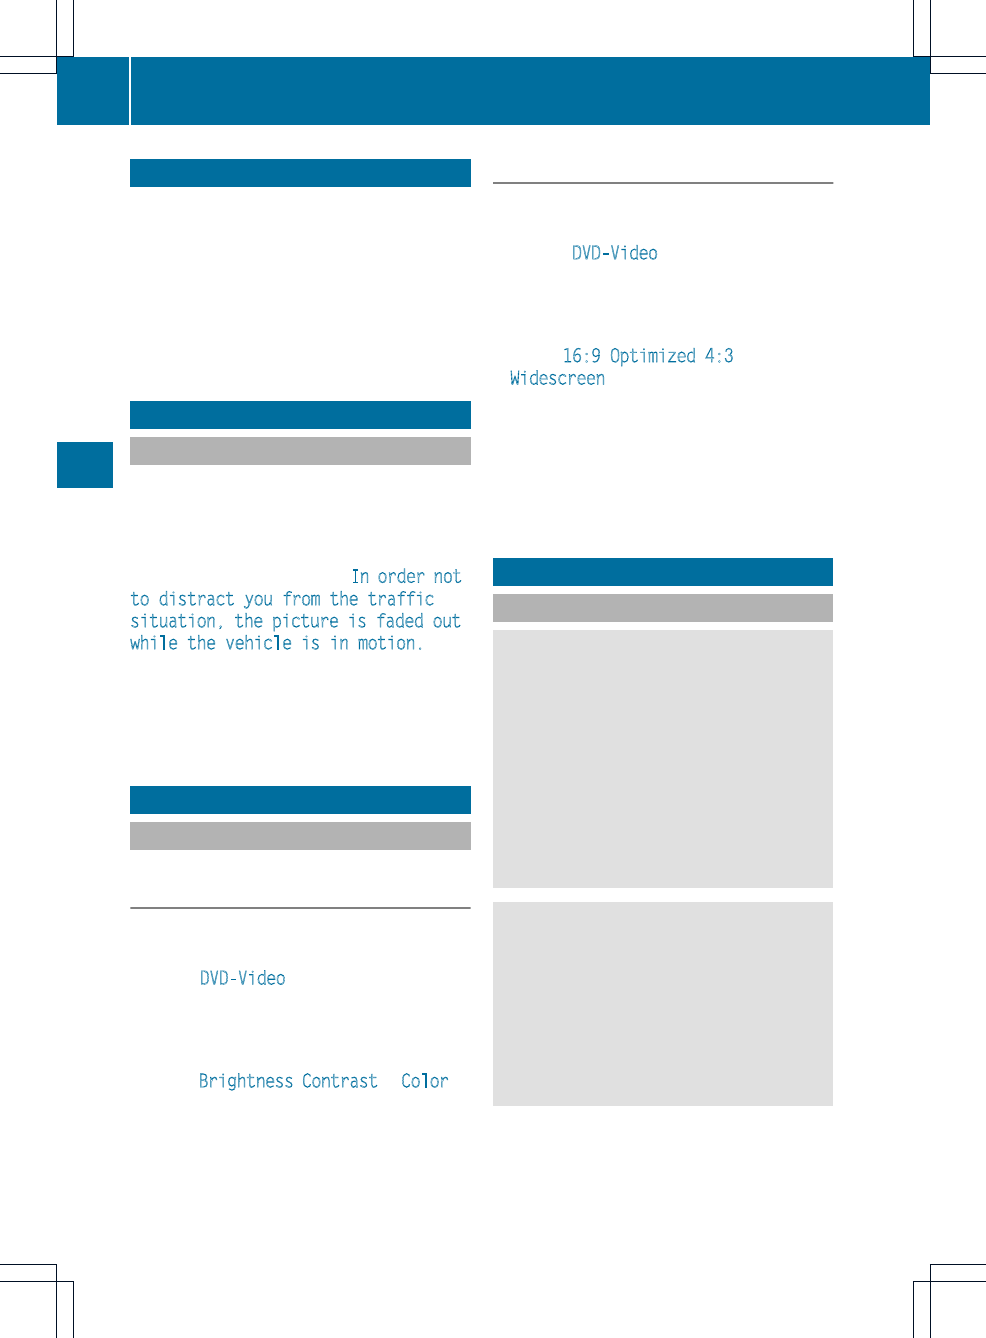
COMAND features
These Operating Instructions describe all
standard and optional equipmentavailable
for your COMAND system at the time of
purchase. Country-specificdeviations are
possible. Please note that your COMAND
system may not be equipped with all the
features described.
General information
Automatic picture shutoff
The video image is only displayed if the
selector lever of the transmission is in
position P.
If the selector lever of the transmission is
changed from position P, the In order not
to distract you from the traffic
situation, the picture is faded out
while the vehicle is in motion.
message appears
As soon as the selector lever of the
transmission is returned to position P, the
video image is shown.
Basic settings
Picture settings
Adjusting the brightness, contrast or
color
XPress Wthe COMAND controller to show
the menu.
XSelect DVD-Video by sliding VÆand
turning cVd the COMAND controller and
press Wto confirm.
Amenu appears.
XSelect Brightness,Contrast or Color by
turning cVd the COMAND controller and
press Wto confirm.
Changing the picture format
XPress Wthe COMAND controller to show
the menu.
XSelect DVD-Video by sliding VÆand
turning cVd the COMAND controller and
press Wto confirm.
Amenu appears.
XSelect 16:9 Optimized,4:3 or
Widescreen and press Wto confirm.
The dot in front of the entry indicates the
currently selected format.
XSelect a setting by turning cVd the
COMAND controller and press Wto
confirm.
Video DVD mode
Safety notes
GWARNING
COMAND is classified as a Class 1laser
product.You must not open the casing. If you
open the casing, or if the casing is faulty or
damaged, there is a risk of exposure to
invisible laser radiation. This may damage
your eyes, or those of others.
COMAND does not contain any parts that can
be serviced by the user. For safety reasons,
all maintenance work must be carried out by
qualified aftersales technicians.
GWARNING
Only when the vehicle is stationary should
you:
Rload a disc
Reject a disc
There is a risk of being distracted from the
road and traffic conditions if this is done while
the vehicle is in motion.
186 Video DVD mode
Video

Notes about discs
Playback problems may occurwhen playing
copied discs. There are a large variety of
discs, DVD authoring software, writing
software and writers available. This variety
means that there is no guarantee that the
system will be able to play discs that you have
copied yourself.
!Do not affix stickers or labels to the discs,
as they could peel off and damage
COMAND. Stickers can cause the disc to
bend, which can result in read errors and
disc recognition problems.
!COMAND is designed to accommodate
discs which comply with the EN 60908
standard. You can therefore only use discs
with a maximum thickness of 1.3 mm.
If you insert thicker discs, e.g. those that
contain data on both sides (DVD on one
side and audio data on the other), they
cannot be ejected and can damage
COMAND.
Use round discs with a diameter of 12 cm.
Do not use discs with a diameter of 8 cm,
even with an adapter.
DVD playback conditions
If video DVDsdonot conform to the NTSC or
PAL TV standards, they may create picture,
sound or other problems during playback.
COMAND can play back video DVDs
produced according to the following
standards:
Rregion code 1orregion code 0(no region
code)
RPAL or NTSC standard
You will generally find the relevant details
either on the DVD itself or on the DVD case.
iIf you insert a video DVD with a different
regioncode, you will see a message to this
effect.
iCOMAND is set to region code 1 at the
factory. This setting can be changed at an
authorized Mercedes-Benz Center. This will
allow you to play video DVDs with a
different region code, provided that they
are produced in accordance with the PAL
or NTSC standard. The region code can be
changed up to five times.
Function restrictions
Depending on the DVD, it is possible that
certain functions or actions will be
temporarily blocked or may not function at all.
As soon as you try to activate these functions
or actions, you will see the Ksymbol in the
display.
Inserting and removing DVDs
XProceed as described in the "Inserting and
ejecting CDs and DVDs" section
(Ypage 154).
Switching to video DVD mode
Option 1
XDVD changer: insert a video DVD.
XPress the hfunction button or the
%back button.
COMAND loads the medium inserted and
starts to play it.
Option 2
XPress the hfunction button one or more
times.
COMAND switches to the previous disc
operating mode.
Video DVD mode 187
Video
Z
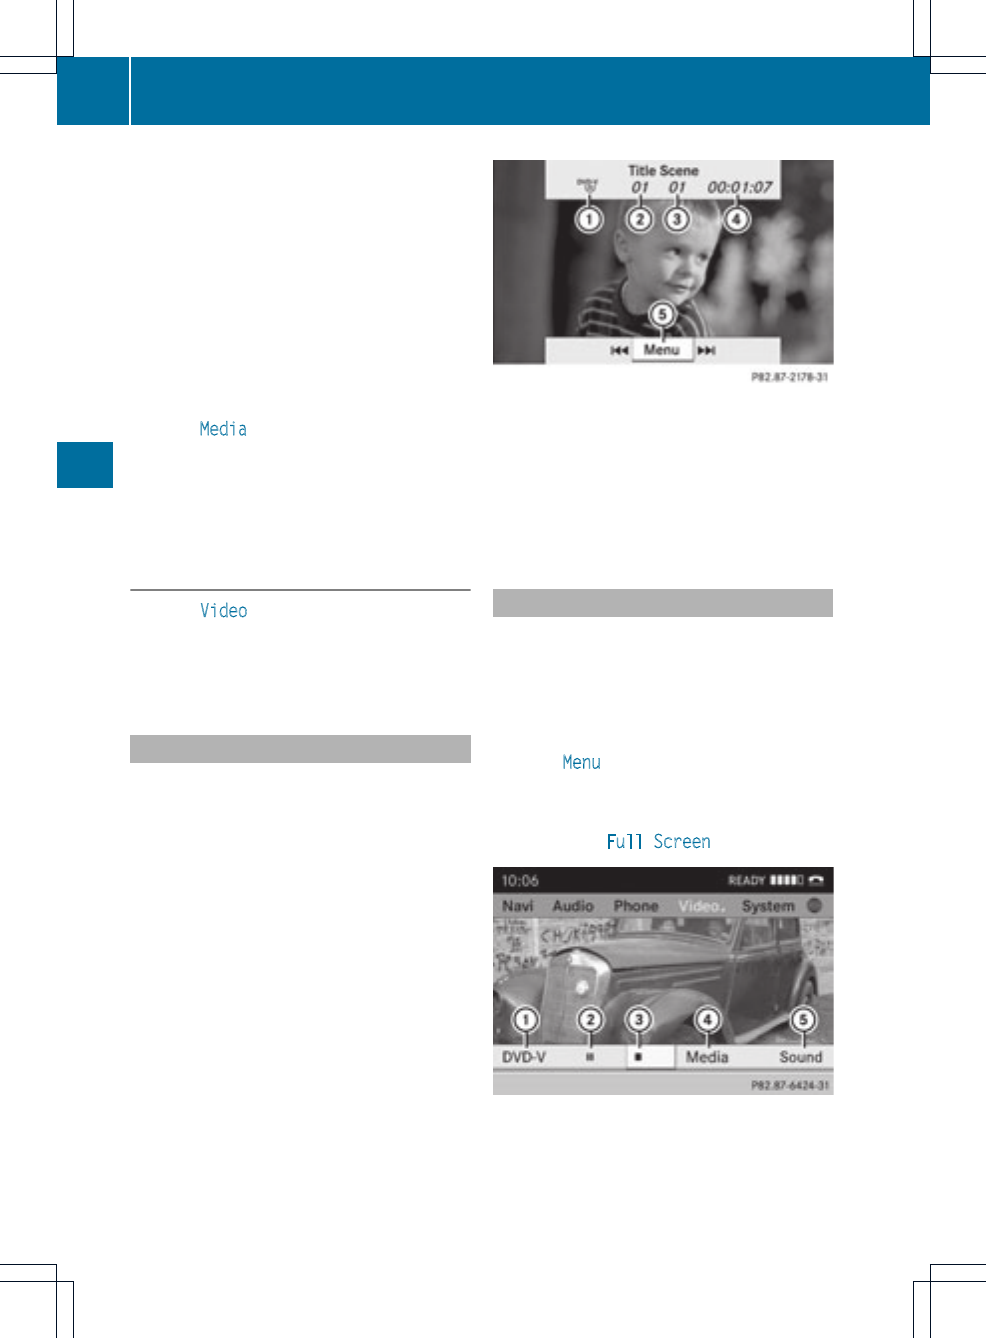
iBy pressing this function button
repeatedly, you can change the operating
mode in the following order:
Raudio CD/DVD, video DVD or MP3 disc
in the DVD changer
Rmemory card mode
RMUSIC REGISTER
RUSB storage device
RMedia Interface or audio AUX mode
RBluetooth®audio mode
XSelect Media by sliding VÆand turning
cVd the COMAND controller and press
Wto confirm.
XSelect a ývideo DVD from the media list
(Ypage 190).
Option 3
XSelect Video in the main function bar by
sliding ZV and turning cVd the COMAND
controllerand press Wto confirm.
Video DVD mode is switched on.
Hiding/showing the navigation menu
XTo display: slide ZVÆthe COMAND
controller.
iThis functionis not available while the
DVD's own menu (Ypage 190) is being
displayed.
XTo hide: slide ZVÆthe COMAND
controller.
or
XWait for approximately eight seconds.
Navigation menu displayed
:Disc type
;Current title
=Current scene
?Track time
ATo show the menu
Showing/hiding the menu
This function is not available while the DVD's
own menu (Ypage 190) is being displayed.
XTo display: in full-screen mode, press W
the COMAND controller.
or
XSelect Menu while the navigation menu is
shown and press Wto confirm.
XTo hide: slide ZV the COMAND controller
and confirm Full Screen by pressing W.
Menu shown
:Video DVD options
;Pause function
=Stop function
188 Video DVD mode
Video

?Media selection
ASound settings
Fast forwarding/rewinding
XIn full-screen mode, slide XVY and hold the
COMAND controller until the desired
position has been reached.
or
XPress and hold the Eor Fbutton
until the desired position is reached.
You see the navigation menu.
Stop function
XPress Wthe COMAND controller to show
the menu.
XTo interrupt playback: select Éby
turning cVd the COMAND controller and
press Wto confirm.
The Ëdisplay changes to Ì.The
video image is hidden.
XTo continue playback: select Ìand
press Wto confirm.
Playback continues from the point where it
was interrupted.
XTo stop playback: while playback is
interrupted, select Éagain and press
Wto confirm.
or
XDuring playback, confirm Éby pressing
Wtwice in rapid succession.
Ìis highlighted.
XTo restart playback: confirm the Ì
selection by pressing W.
Playback restarts from the beginning.
Pause function
XPress Wthe COMAND controller to show
the menu.
XTo pause playback: select Ëby
turning cVd the COMAND controller and
press Wto confirm.
The Ëdisplay changes to Ì.
XTo continue playback: select Ìand
press Wto confirm.
The menu is hidden.
Selecting ascene/chapter
If the film is divided into scenes or chapters,
you can select them directly while the film is
running, or skip forwards step-by-step. Some
DVDs do notpermit this at certain points (e.g.
during the opening credits).
It may also be possible to select the scene/
chapter from within the menu stored on the
DVD.
XTo skip forwards or back: in full-screen
mode, turn cVd or slide XVY the
COMAND controller.
or
XPress the Eor Fbutton on the
control panel.
The navigation menu (Ypage 188)appears
for approximately eight seconds.
Selecting afilm/title
This function is only available if the DVD is
divided into several films/titles.Ifthe DVD
contains several films, these can be selected
directly. Afilm can be selected either when
the DVDis being played back or when it is
stopped.
The film can also be selected from the menu
on the DVD itself.
Video DVD mode 189
Video
Z

XPress Wthe COMAND controller to show
the menu.
XSelect DVD-Video by turning cVd the
COMAND controller and press Wto
confirm.
XSelect DVD Functions and press Wto
confirm.
Amenu appears.
XSelect Title Selection by turning cVd
the COMAND controller and press Wto
confirm.
XSelect a film/title and press Wto confirm.
Selecting avideo DVD from the media
list
XPress Wthe COMAND controller to show
the menu.
XSelect Changer or Media by sliding VÆand
turning cVd the COMAND controller and
press Wto confirm.
The media list appears. The #dot
indicates the current medium being played.
Video DVDs are indicated by the ýicon.
XEquipped with a DVD changer: press W
the COMANDcontroller to display all
magazine trays.
XSelect a video DVD by turning cVd the
COMAND controller and press Wto
confirm.
COMAND loads the video DVD and begins
playing it.
iIf you select a CD, an audio DVD or an
MP3 medium, you switch to the respective
audio mode. You can find further
information about the media list on
(Ypage 159).
DVD menu
Calling up the DVD menu
The DVD menu is the menu stored on the DVD
itself. It is structured in various ways
according to the individual DVD and permits
certain actions and settings.
In the case of multi-language DVDs, for
example, you can change the DVD language
in the DVD menu.
XIn full-screen mode, press Wthe COMAND
controller to show the menu.
XSelect DVD-Video in the menu by turning
cVd the COMAND controller and press
Wto confirm.
XSelect DVD Functions and press Wto
confirm.
XSelect Menu and press Wto confirm.
The DVD menu appears.
Selecting menu items in the DVD menu
XSelect a menu item by sliding ZVÆor
turning XVY the COMAND controller and
press Wto confirm.
The menu appears.
iMenu items which cannot be selected are
shown in gray.
190 Video DVD mode
Video
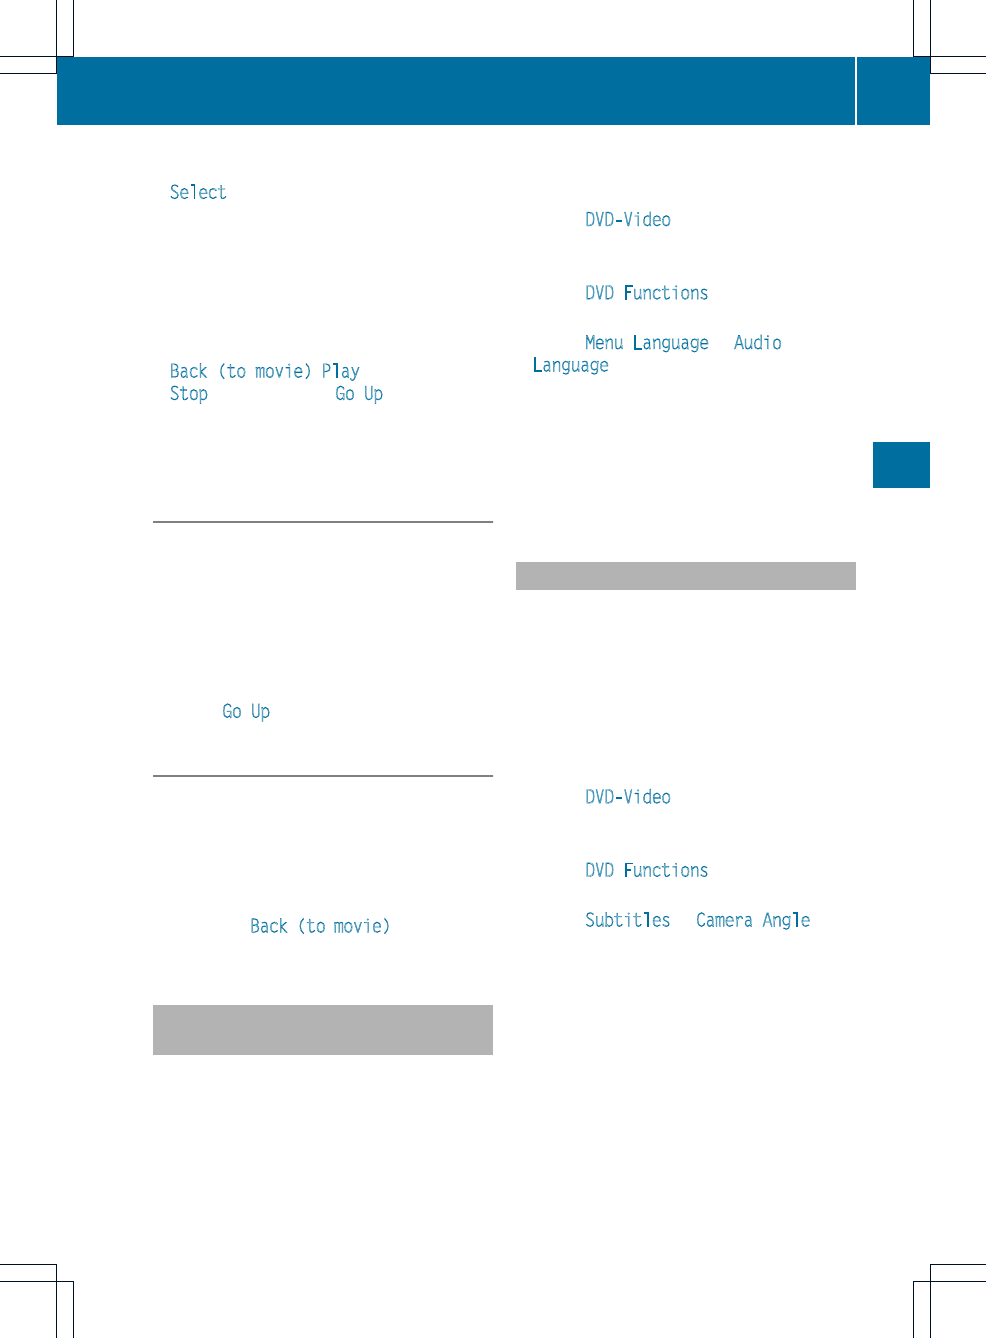
XTo reconfirm your selection: confirm
Select by pressing W.
COMAND executes the action.
Make a selection from the furtheroptions,
if necessary.
COMAND then switches back to the DVD
menu.
iDepending on the DVD, the menu items:
Back (to movie),Play,
Stop,.,/or Go Up may not
function or may not function at certain
points in the DVD menu. To indicate this,
the Kicon appears in the display.
Moving up one level in the DVD menu
XSelect the corresponding menu item in the
DVD menu and press Wthe COMAND
controller to confirm.
or
XSelect any menu item in the DVD menu and
press Wthe COMAND controller to
confirm.
XSelect Go Up and press Wto confirm.
Back to the film
XPress the %back button repeatedly
until you see the movie.
or
XSelect the corresponding menu item from
the DVD menu.
XSelect the Back (to movie) menu item in
the menu and press Wto confirm.
Setting the language and audio
format
This function is not available on all DVDs. If it
is available, you can set the DVD menu
language, the audio language or the audio
format. The number of settings is determined
by the DVD content. It is possible that the
settings may also be accessed in the DVD
menu (Ypage 190).
XIn full-screen mode, press Wthe COMAND
controller to show the menu.
XSelect DVD-Video in the menu by turning
cVd the COMAND controller and press
Wto confirm.
XSelect DVD Functions and press Wto
confirm.
XSelect Menu Language or Audio
Language and press Wto confirm.
In both cases, a menu appears after a few
seconds. The #dot in front of an entry
indicates the currently selected language.
XSelect a setting by turning cVd the
COMAND controller and press Wto
confirm.
Subtitles and camera angle
These functions are not available on all DVDs.
The number of subtitle languages and camera
angles available depends on the contentof
the DVD. It is possible thatthe settings may
also be accessed in the DVD menu
(Ypage 190).
XIn full-screen mode, press Wthe COMAND
controller to show the menu.
XSelect DVD-Video in the menu by turning
cVd the COMAND controller and press
Wto confirm.
XSelect DVD Functions and press Wto
confirm.
XSelect Subtitles or Camera Angle and
press Wto confirm.
In both cases, a menu appears. The #dot
in front of an entry indicates the current
setting.
XSelect a setting by turning cVd the
COMAND controller and press Wto
confirm.
Video DVD mode 191
Video
Z
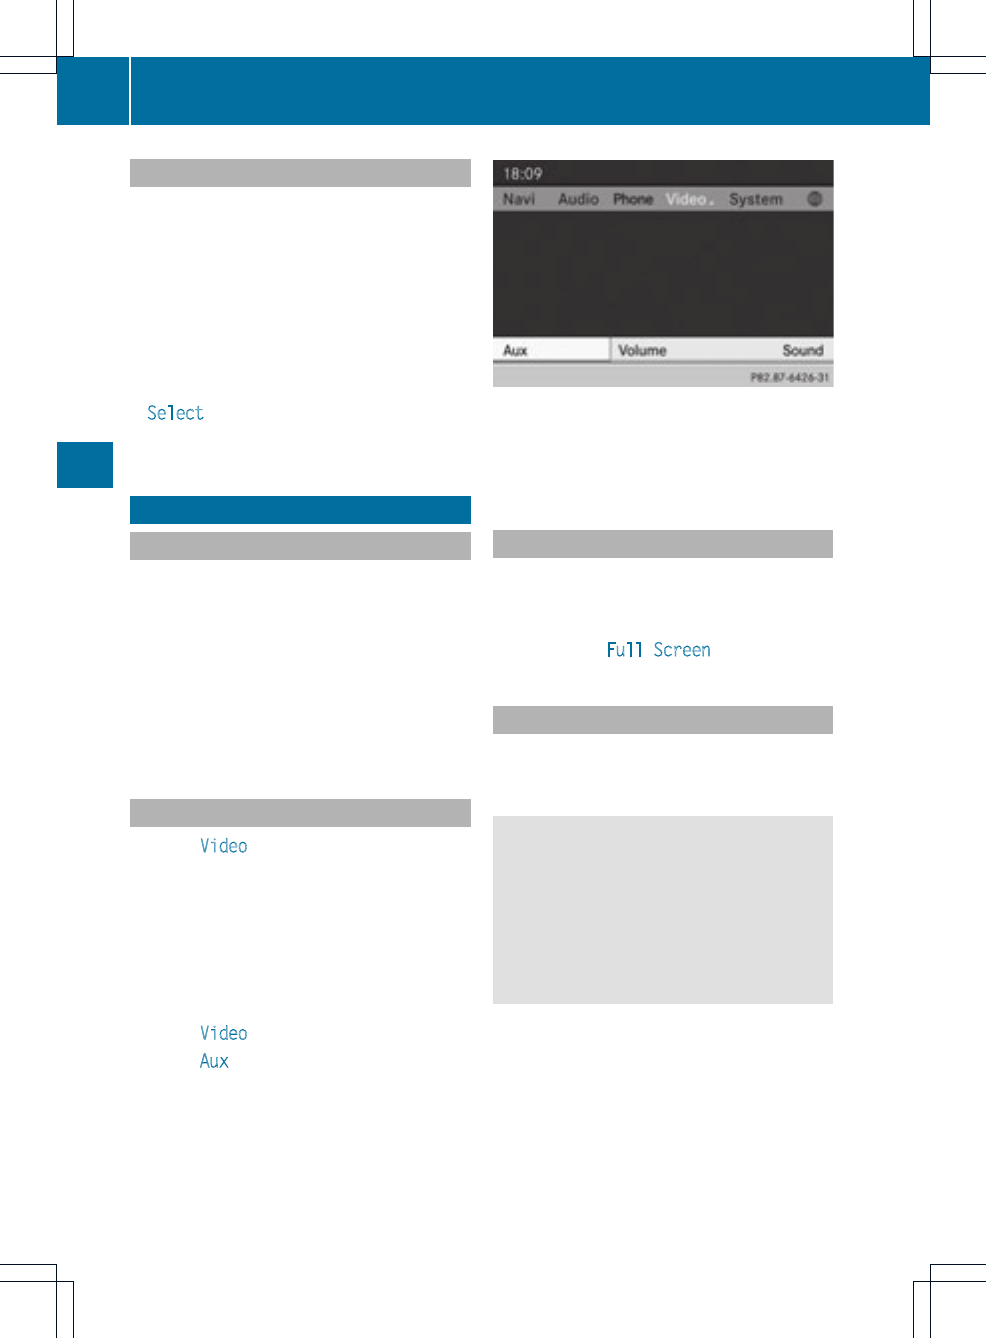
Interactive content
DVDs can contain interactive content (e.g. a
video game). In a video game, for example,
you may be able to influence events by
selecting and triggering actions. The type and
number of actions depend on the DVD.
XSelectanaction by sliding ZVÆor XVY the
COMAND controllerand press Wto
execute it.
A menu appears and the first entry,
Select, is highlighted.
XPress Wthe COMAND controller.
AUX video mode
Connecting external video sources
If your vehicle is equipped with a Media
Interface (Ypage 178), you can connect an
external video source (AUXvideo).
The 1/8inch audio/videojacks are in the
centerconsole stowage compartment.
iIn vehicles with a rear view camera, the
AUX video jack cannot be used for external
video sources.
Switching to AUX video mode
XSelect Video in the main function bar by
sliding ZV and turning cVd the COMAND
controller and press Wto confirm.
If AUX video mode was the last mode
selected, it will now be active.
If another video source is switched on, you
can now switch to AUX video mode in the
video menu.
XSelect Video and press Wto confirm.
XSelect Aux and press Wto confirm.
The AUX video menu appears. You will hear
and see the content of the external video
source if it is connected and switched to
playback.
AUX video mode
For details on how to operate the external
video source, see the respective device's
operating instructions.
Showing/hiding the menu
XTo show: press Wthe COMAND
controller.
XTo hide: slide ZV the COMAND controller
and confirm Full Screen by pressing W.
Volume and sound settings
You will find details on volume (Ypage 33)
and sound (Ypage 34) settings in the "At a
glance" section.
GWARNING
External video sources may have different
volumes, which can mean that system
messages such as traffic announcements and
navigation system announcements are much
louder. If necessary, please deactivate the
system messages or adjust their volume
manually.
iIt may be the case that a device which is
connected as an external video source
seems quieter or louder in the vehicle, or
that the usual maximum volume cannot be
reached. On some devices, it is possible to
adjust the volume separately. In this case,
start at a medium volume and increase it
gradually. This enables you to determine
192 AUX video mode
Video
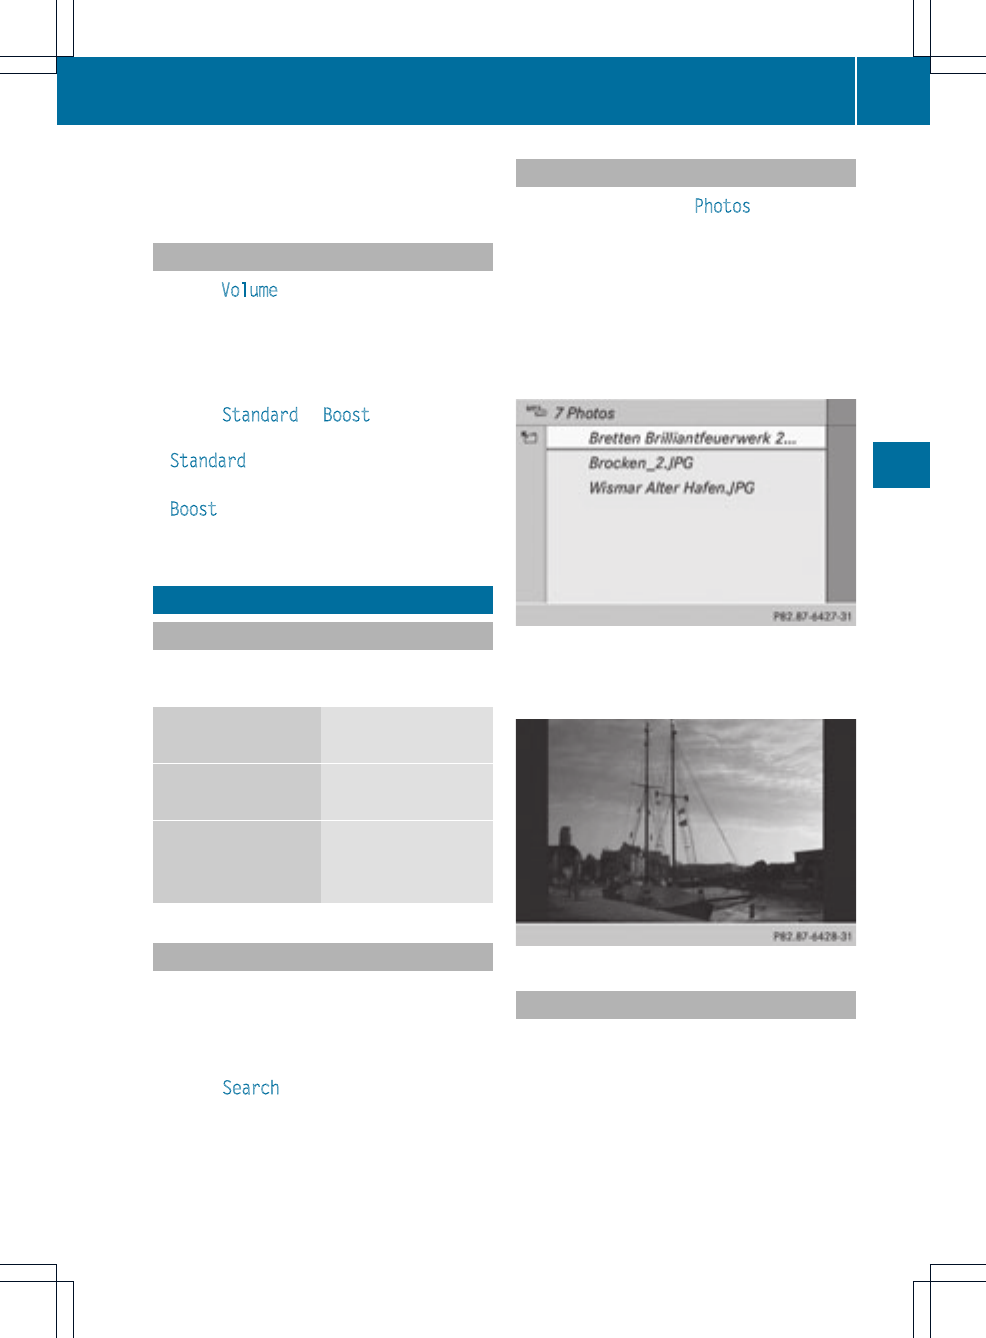
whether the system is able to play the
sound at high volume without distorting it.
Increasing the volume using COMAND
XSelect Volume in the AUX display by turning
cVd the COMAND controller and press
Wto confirm.
Amenu appears. The #dot indicates the
current setting.
XSelect Standard or Boost and press Wto
confirm.
Standard:the volume of the external video
source is adjusted to a standard value.
Boost: the volume of the external video
source is raised by approximately 10 dB.
Picture viewer
Introduction
If there are pictures on the active data
medium, you can look at them.
Data medium Supported picture
formats
CD/DVD with
picture files
jpeg, jpg
USB devices (sticks,
hard drives)
SD memory card:
jpeg, jpg
Calling up acategory list
XSelect a data medium (e.g. memory card)
with pictures in the audio menu
(Ypage 144) or in the media list
(Ypage 159).
XSelect Search in the basic display by
sliding VÆand turning cVd the COMAND
controller and press Wto confirm.
The category listappears.
Displaying pictures
XSelect (Ypage 166) Photos in the
category list by turning cVd the COMAND
controller and press Wto confirm.
Afolder directory appears.
XSelect a folder with photos and press Wto
confirm.
The folder displays the existing picture files
(example).
XSelect a photo and press Wto confirm.
The photo is displayed and the music is
stopped.
Changing the picture view
XPress Wthe COMAND controller.
Amenu appears.
Picture viewer 193
Video
Z
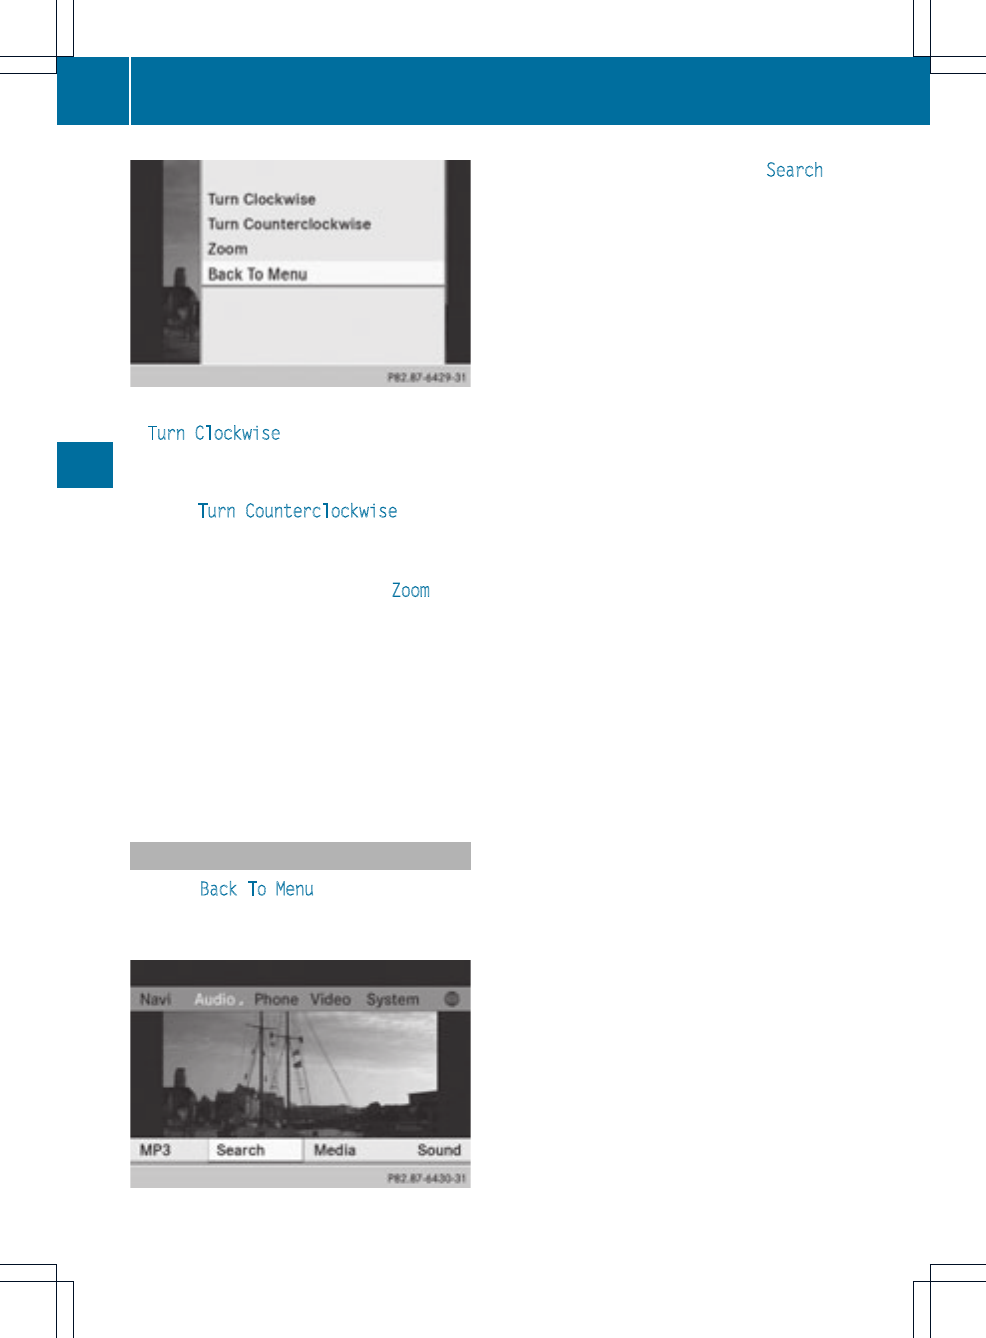
XTo turn the picture clockwise: confirm
Turn Clockwise by pressing Wthe
COMAND controller.
XTo turn the picture counter-clockwise:
select Turn Counterclockwise by
turning the cVd COMAND controller and
press Wto confirm.
XTo zoom into a picture: select Zoom by
turning the cVd COMAND controller and
press Wto confirm.
After you have zoomed into the picture, you
can move the section of the picture.
XSlide ZVÆand XVY the COMAND
controller.
XTo return to the original size: press W
the COMAND controller.
Exiting the picture viewer
XSelect Back To Menu in the menu by
turning cVd the COMAND controller and
press Wto confirm.
XTo start playing music: confirm Search
by pressing W.
The category list appears (Ypage 165).
XSelect a category by turning cVd the
COMAND controller and press Wto
confirm.
XSelect otherentries withinthe category
(e.g. track, album) until the music starts
playing.
194 Picture viewer
Video

COMAND features ............................. 196
SIRIUS Weather ................................ 196
195
Weather services

COMAND features
These Operating Instructions describe all
standard and optional equipmentavailable
for your COMAND system at the time of
purchase. Country-specificdeviations are
possible. Please note that your COMAND
system may not be equipped with all the
features described.
SIRIUS Weather
Introduction
For the reception of weather forecasts via
satellite radio, you will need a SIRIUS XM
Satellite Weather subscription.
When the Call SIRIUS to activate
system at 888-539-7474 message with the
SIRIUS device identification number appears,
you will first have to obtain access to the
weather service. Adescription of the
procedure can be found in the "Registering
satellite radio" section (Ypage 149).
COMAND can receive weather forecasts via
satellite radio for the entire USA (including
Alaska and Hawaii). The received weather
data can be displayed as an information chart
(daily forecast, five-day forecast, detail
information) or on the weather map.
The weather data received from a weather
station is stored in COMAND for an hour and
can be shown again immediately after
restarting the engine (e.g. after refueling).
The weather map can display the following
weather data with symbols:
Rrain radar
Rstorm characteristics
Rareas of high-pressure/low-pressure,
weather fronts
Rcourse of tropical cyclones (hurricanes,
typhoons)
Rwind direction and speeds
iThe rain radar cannot be displayed for
Alaska, Hawaii and Puerto Rico.
iHurricane: description of a tropical
cyclone which mostly develop in the
Atlantic Ocean or in the North Pacific
Ocean or South Pacific Ocean. The wind
speeds are above 74 mph (118 km/h). To
characterize the strength of a hurricane,
there are five categories.
Typhoon: the description of a tropical
cyclone that develops in the North West
Pacific Ocean. The wind speeds are in the
category of a hurricane.
Switching the SIRIUS weather display
on/off
Switching on
XSelect the globe icon in the main function
bar by sliding ZV and turning cVd the
COMAND controller and press Wto
confirm.
The SIRIUS weather basic display appears.
XConfirm SIRIUS Weather by pressing W.
The information chart shows the daily
forecast at the currentvehicle position.
196 SIRIUS Weather
Weather services
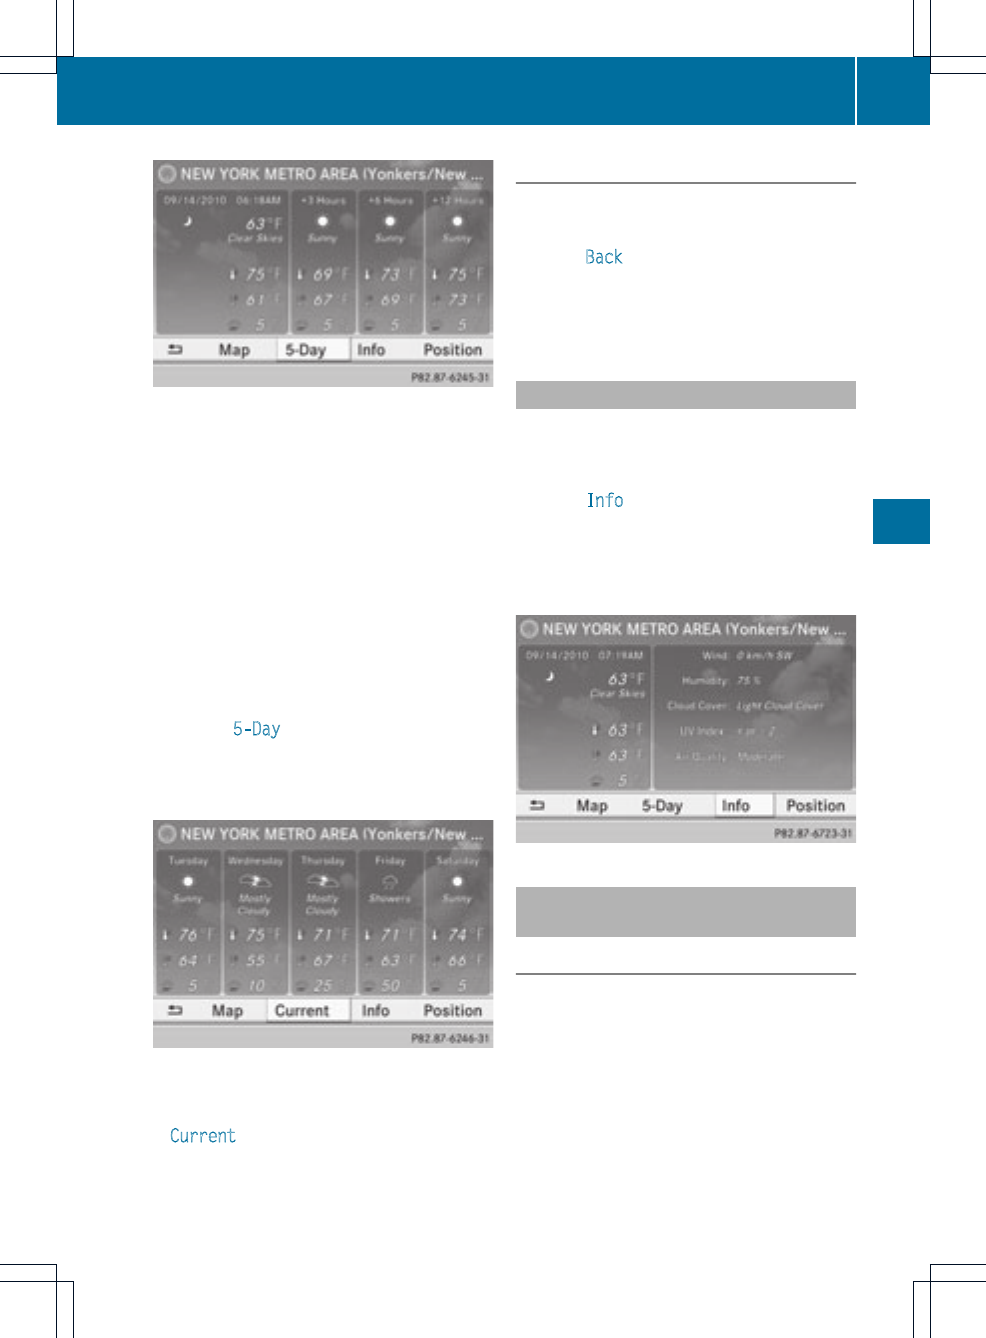
Daily forecastas an information chart (example)
You see the following information:
Rthe date and time of the weather message
received last
Rinformation on the current weather
(temperature, cloud cover) and forecast for
the next 3, 6, 12 hours
Rthe current highest temperature and
forecasts
Rthe current lowest temperature and
forecasts
Rthe probability of rain
XTo switch to the five-day forecast:
confirm 5-Day by pressing W.
The information chart displays the forecast
for the next five days in the currently
selected location.
Five-day forecast as an information chart
(example)
XTo return to the daily forecast: confirm
Current by pressing W.
Switching off
XPress the %button.
or
XSelect Back by turning cVd the COMAND
controller and confirm by pressing W.
Both options appearinthe SIRIUS weather
basic menu.
Displaying detailed information
Besides the current temperatures, you can
display information such as wind speeds and
UV index.
XSelect Info in the information chart by
turning cVd the COMAND controller and
press Wto confirm.
The information chart shows detailed
information for the selected area.
Selecting the area for the weather
forecast
Introduction
You can select the following areas:
Rthe current vehicle position
Rvicinity of the destination
Ra winter sports area
Ran area within the USA
You can select an area in the information
chart (first option), on the map (second
option) or from the memory, if you have
SIRIUS Weather 197
Weather services
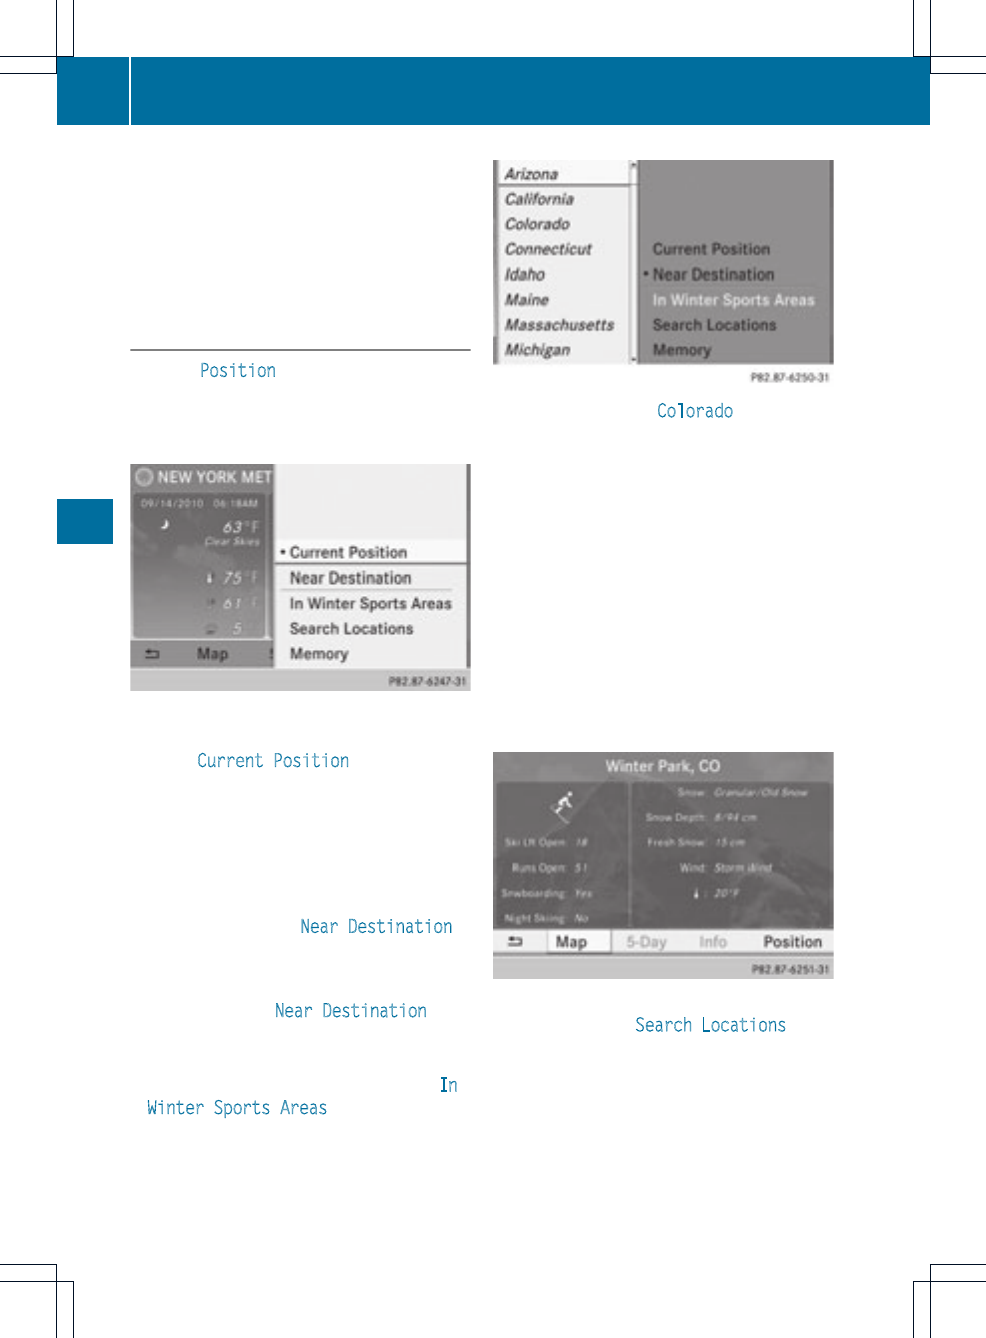
already saved areas in the memory
(Ypage 199).
iCOMAND receives weather forecastdata
from the nearest weather station at the
selected destination.
Option 1: selecting the location in the
information chart
XSelect Position in the information chart
by turning cVd the COMAND controller
and press Wto confirm.
Amenu appears.
"Selecting the area for the weather forecast" menu
XTo select the current vehicle position:
select Current Position and press Wto
confirm.
COMAND receives the weather data for the
currentvehicle position from the nearest
weather station and displays it
automatically.
XTo select the vicinity of the
destination: select Near Destination in
the menu by turning cVd the COMAND
controller and press Wto confirm.
iYou can select Near Destination if a
route has been calculated (Ypage 57). The
menu item is otherwise grayed out.
XTo select winter sport areas: select In
Winter Sports Areas in the menu, and
confirm by pressing W.
XSelect a state, e.g. Colorado, and press
Wto confirm.
XSelect a winter sports area from the menu
and press Wto confirm.
The weather data and other information is
displayed for the winter sports area that
has been selected. The data is supplied by
the nearest weather station.
The information chart shows the following
information (if available):
Rski slopes/ski lifts
Rsnowboarding and nighttime opening
Rsnow conditions (e.g. snow depth)
Rtemperature
XTo select the vicinity of another
location: select Search Locations in the
menu by turning cVd the COMAND
controller and press Wto confirm.
198 SIRIUS Weather
Weather services
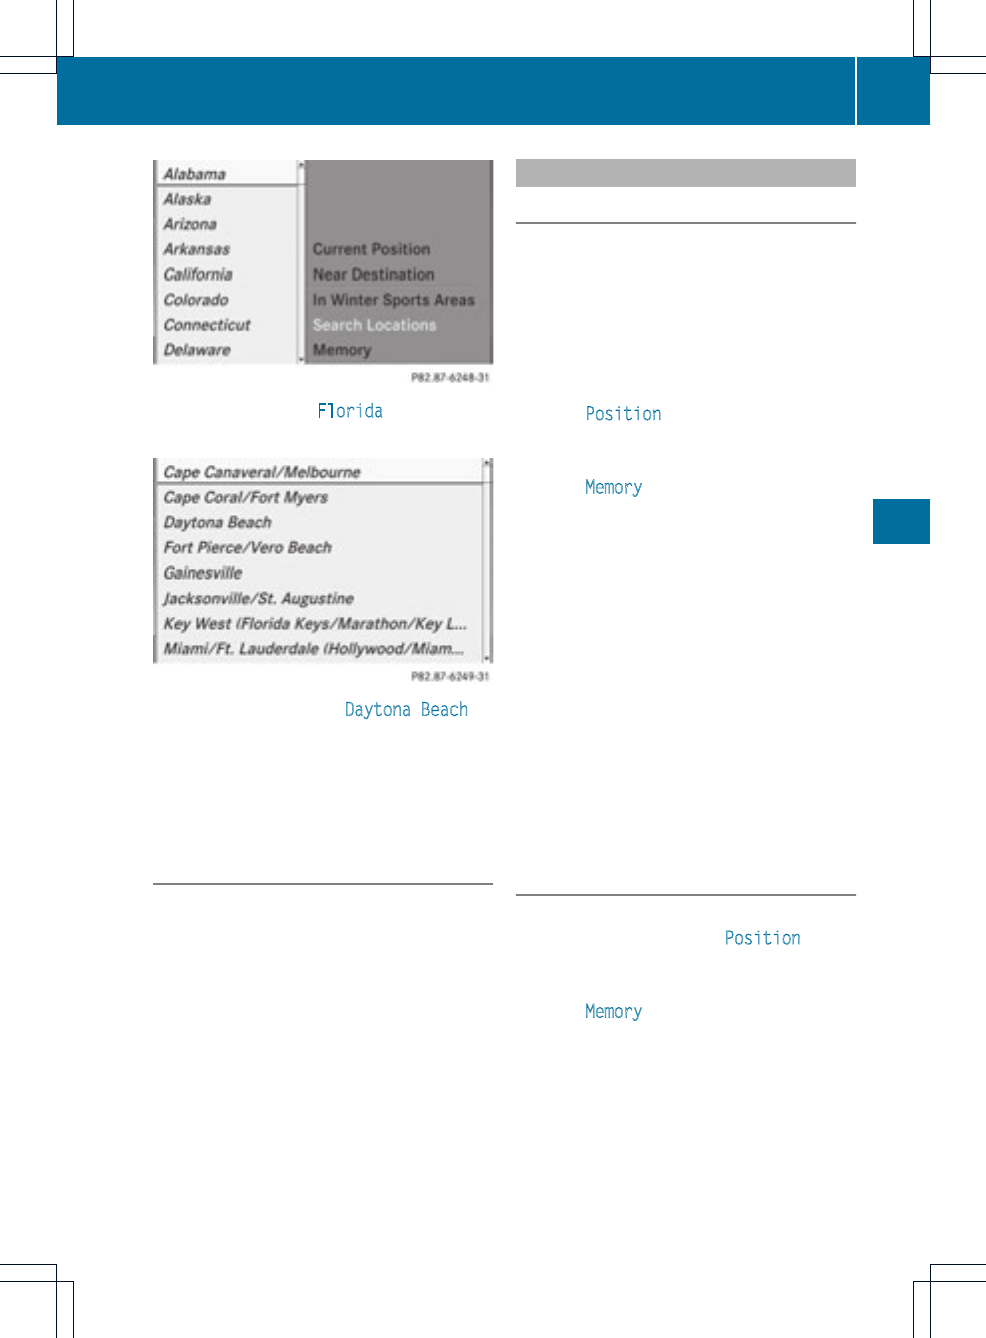
XSelect a state, e.g. Florida, and confirm
by pressing W.
XSelect a category, e.g. Daytona Beach,
and press Wto confirm.
The information chart shows the weather
forecastfor the selected area. The data is
supplied by the nearest weather station.
Option 2: selecting the area in the
weather map
XCall up the weather map (Ypage 200).
XMove the weather map so that the
crosshair is over the desired area
(Ypage 200).
XPress Wthe COMAND controller.
The information chart shows the weather
forecast for the selected area. The data is
supplied by the nearest weather station.
Memory functions
Storing the area in the weather memory
For areas that are frequently called up, 10
presets (0, 1–9) are available in the weather
memory.
XIn thepreset memory: select the area for
the weather forecast (Ypage 197).
The selected area is shown at the top in the
status bar.
XSelect Position in the information chart
by turning cVd the COMAND controller
and press Wto confirm.
XSelect Memory and press Wto confirm.
XSelect the presetby turning cVd or sliding
ZVÆthe COMAND controller.
XPress and hold Wthe COMAND controller
until the area is entered in the selected
preset.
XTo store rapidly: in the daily forecast
(Ypage 197) press and hold a number key,
e.g. l, until the preset position number
is shown in the status bar in front of the
area name.
iYou can also use this function in the five-
day forecast (Ypage 197), and in the
detailed information view (Ypage 197).
Selecting an area from the weather
memory
XFrom the weather memory: in the
information chart, select Position by
turning cVd the COMAND controller and
press Wto confirm.
XSelect Memory and press Wto confirm.
XSelect a preset that contains an entry by
turning cVd or sliding ZVÆthe COMAND
controller and press Wto confirm.
The weather data of the selected area is
shown.
XRapidselection: if there is an entry
available in the weather memory, e.g.when
SIRIUS Weather 199
Weather services
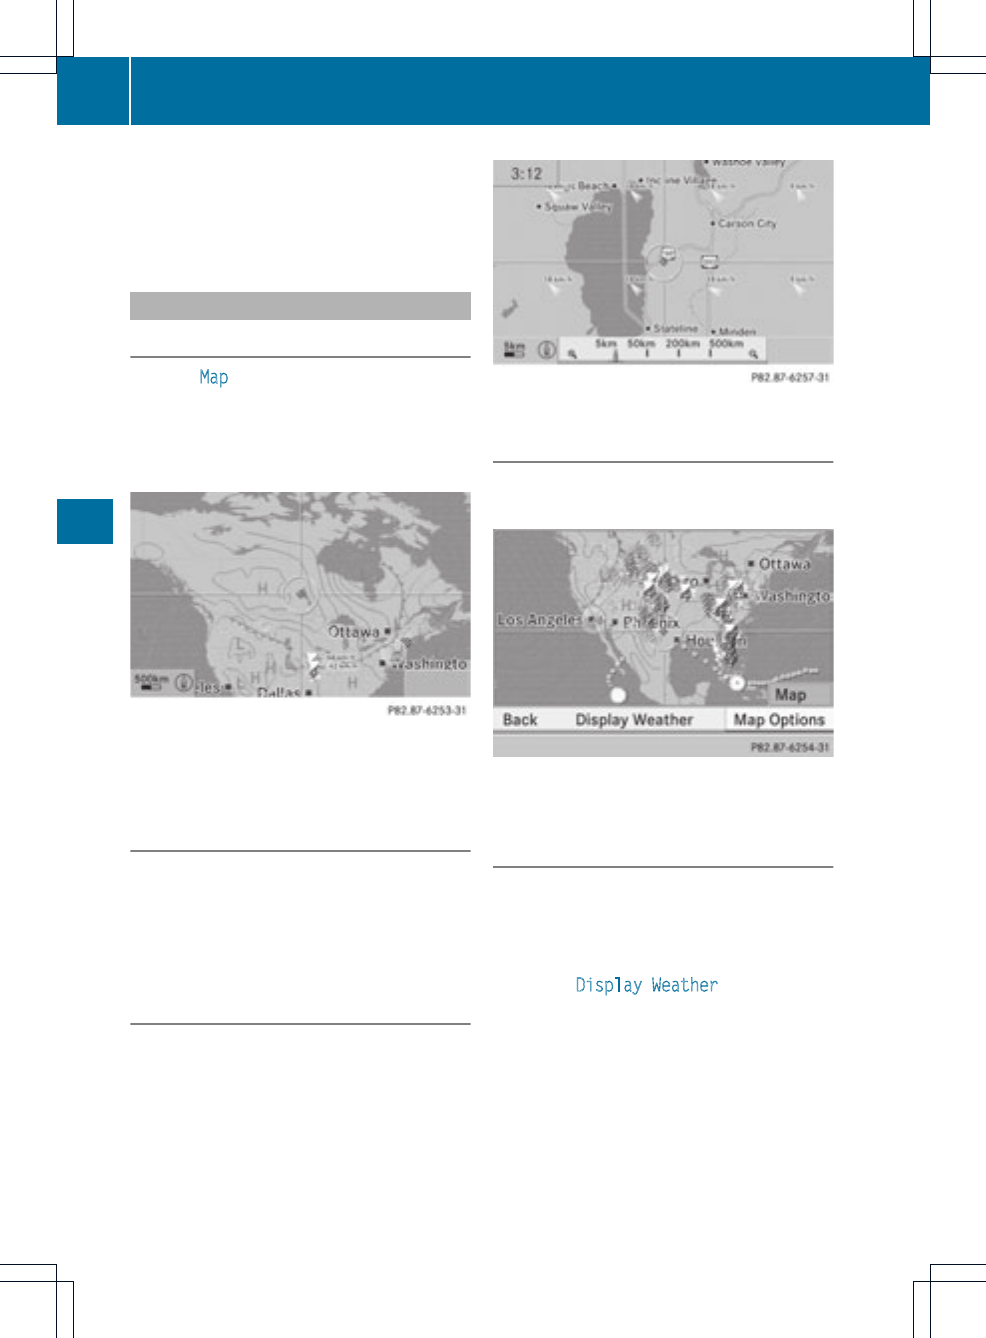
the daily forecast is shown, briefly press a
numberkey, such as l.
The weather data of the selected area is
shown.
Weather map
Calling up the weather map
XSelect Map in the information chart by
turning cVd the COMAND controller and
press Wto confirm.
The weather map appears in the 500 km
scale.
Weather map (example)
iFor the map display, you can activate the
topographic map style (Ypage 103).
Moving the weather map
XSlide XVY,ZVÆor aVb the COMAND
controller.
The weather map moves in the
corresponding direction under the
crosshair.
Changing the scale
XAs soon as you turn cVd the COMAND
controller, you see the scale bar.
XTurn cVd until the desired scale is set.
Showing/hiding the menu in the
weather map
XTo show: press Wthe COMAND controller
in the weather map.
XTo hide: slide up ZV the COMAND
controller.
Selecting a weather station in the map
XMove the weather map and crosshair to the
desired position (Ypage 200).
XPress Wthe COMAND controller.
The menu is shown.
XConfirm Display Weather by pressing
W.
COMAND receives the weather data for the
selected position from the nearest weather
station and displays it automatically as a
daily forecast.
200 SIRIUS Weather
Weather services
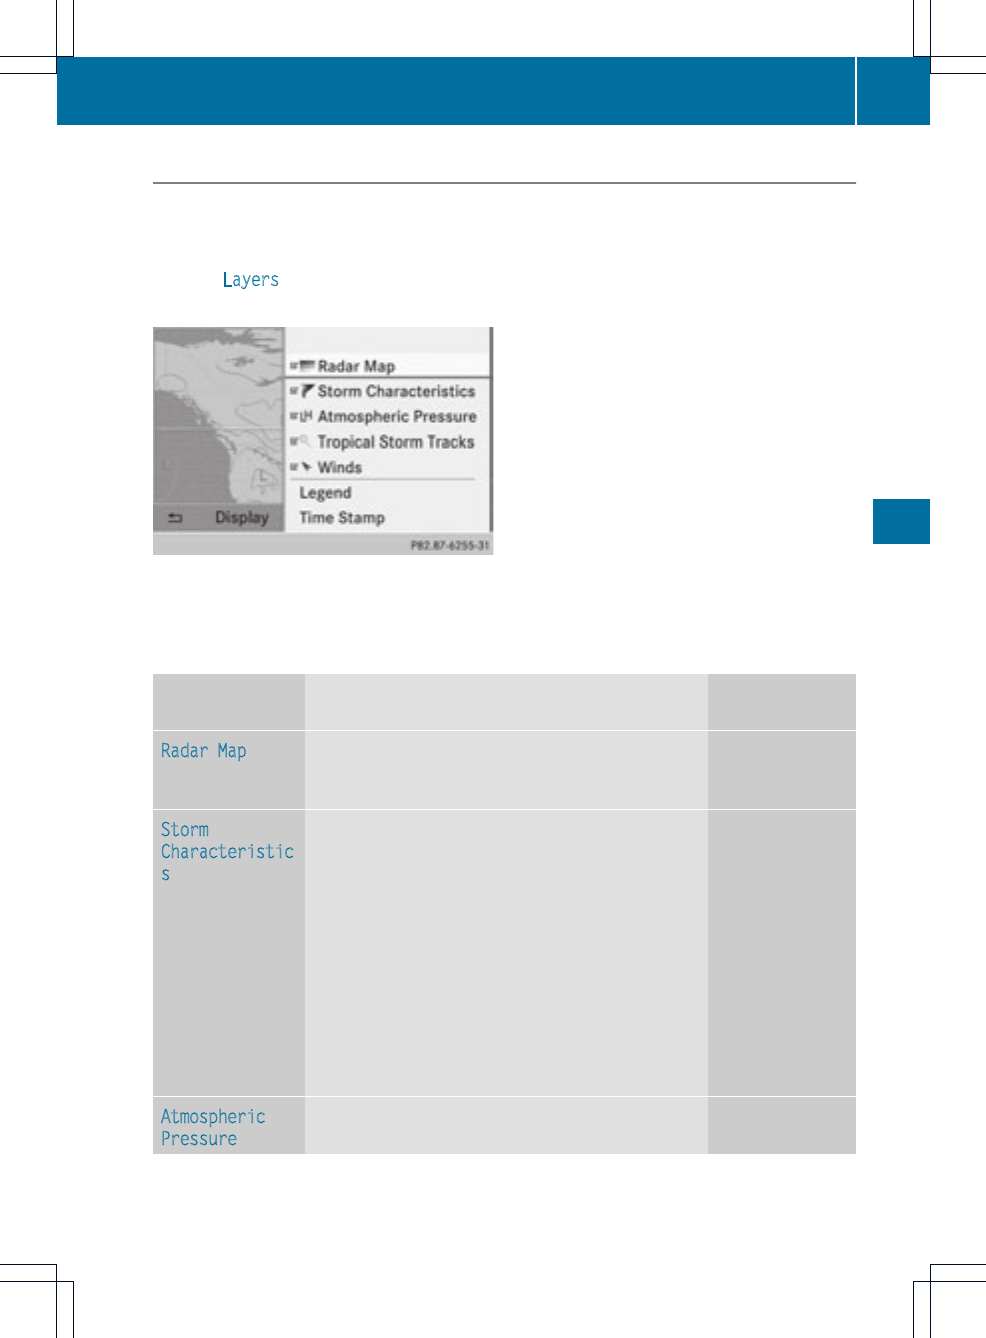
Switching layers on the map on/off
You can switch on differing layers, for example to display the rain radar, weather fronts and
the course of tropical storms on the map.
XDisplay the menu on the weather map (Ypage 200).
XSelect Layers by turning cVd the COMAND controller and press Wto confirm.
Amenu appears.
XSelect the layer by turning cVd and sliding ZVÆthe COMAND controller and press Wto
confirm.
Switch the display on Oor off ª.
Explanation
Layer Map display Selectable
scales
Radar Map Shows the rain radar as a colored area on the map,
for an explanation of the colors, see the "Legend"
section (Ypage 204).
All
Storm
Characteristic
s
Shows the characteristics of a storm
Characteristics are:
Rtornadic storm:
stormcell with strong winds (super cells), from
which a tornado (also know as twister) can
develop.
Rcyclone:
storm cells, from which a tornadic storm can
develop
Rhailstorm
Rthe likelihood of a hailstorm
All
Atmospheric
Pressure
Shows the position of high and low-pressure areas
(H, L), weather fronts and isobars
200 km, 500 km
SIRIUS Weather 201
Weather services
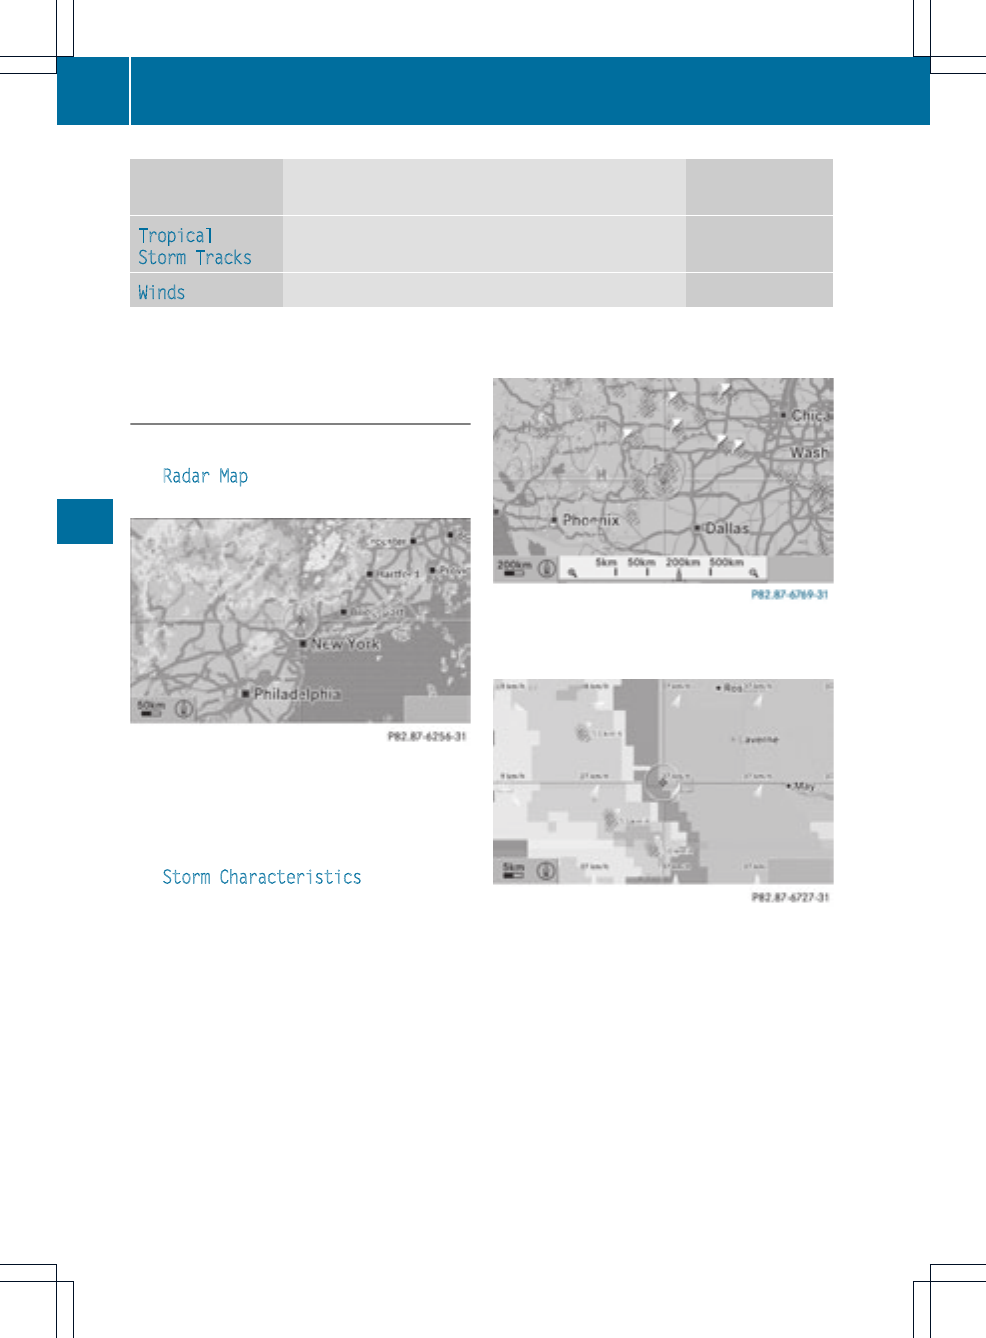
Layer Map display Selectable
scales
Tropical
Storm Tracks
Shows the path/directional movementspeed of a
tropical storm with time and strength information
All
Winds Shows the wind direction and wind speed 5 km
There are a number of illustrated examples in the following section.
Sample displays of weather data in the
map
Rain radar
The Radar Map display layer is activated
(Ypage 201) and weather data is available.
Weather map showing the rain radar
The precipitation radar legend can be called
up at (Ypage 204).
Storm characteristics
The Storm Characteristics display layer
is activated (Ypage 201)and weather data is
available.
Weather map showing a hailstormand tornadic
storms with the path and directional movement
speed (example)
Weather map showing a hailstorm (example)
The storms legend can be called up
(Ypage 204).
Displaying additional information
XSlide XVY,ZVÆor aVb the COMAND
controller and move the crosshair onto a
corresponding symbol.
XPress Wthe COMAND controller.
202 SIRIUS Weather
Weather services
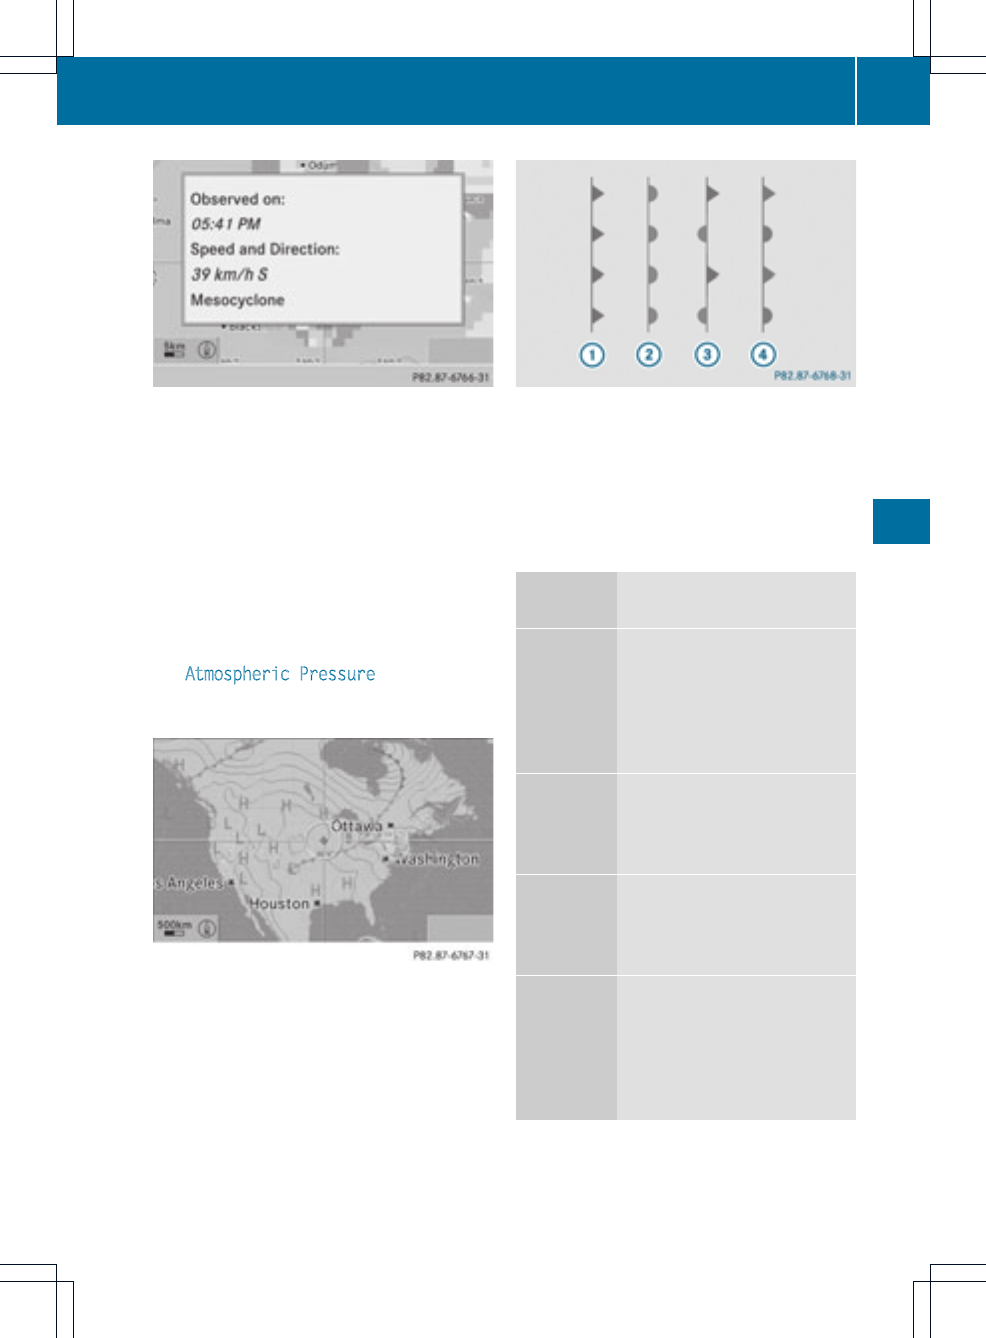
Weather map with information on a cyclone
(example)
The following information is shown (if
available):
Rcategory of the tropical storm
Rdate and time of observation (time stamp)
Rdirectional movementspeed and path
iThe directional movement speed is the
speed at which the stormcell moves.
Weather fronts
The Atmospheric Pressure display layer is
activated (Ypage 201) and weather data is
available.
Weather map showing the position of high and low-
pressure areas (H, L), weather fronts and isobars
(example)
iIsobars are lines that show where the air
pressure is the same.
Weather fronts (legend)
:Cold front(blue line with blue triangles)
;Warm front(red line with red semi-circles)
=Stationary front (red-blue line with red
semi-circles and blue triangles)
?Occlusion (violet line with a violet semi-
circle and triangles)
Weather
front
Explanation
Cold front If a cold front moves in, the
weather remains changeable
and there are often rain
showers and thunderstorms.
The air temperature
decreases.
Warm front This can mean longer periods
of rain and can lead to an
increase in cloud cover and a
slow increase in temperature.
Stationary
front
The weather front moves
minimally.The weather
remains changeable in this
area.
Occlusion This occurs when a faster cold
front reaches an advancing
warm front and combines
with it. The weather remains
changeable and rainy within
an occlusion.
SIRIUS Weather 203
Weather services
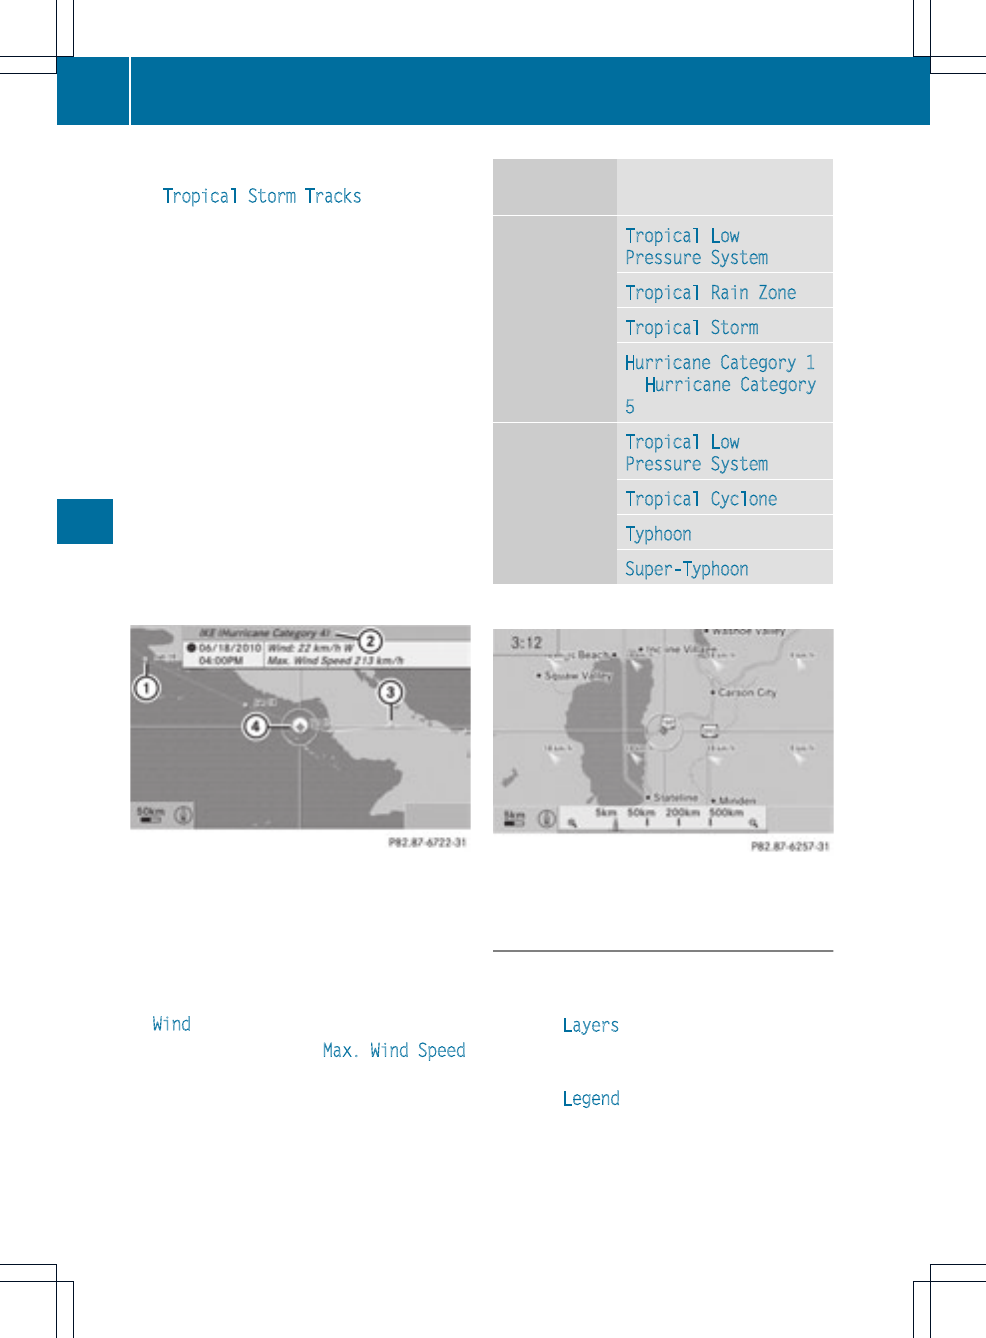
Path of tropical storms
The Tropical Storm Tracks display layer
is activated (Ypage 201) and weather data is
available.
Symbol ?shows the current position of the
tropical cyclone.
Adashed line shows the pathto date and the
predicted path of the cyclone.
More information ;can be shown on the
following positions:
Rpositions of previous path =
Rcurrent position ?
Rpositions on the predicted route with
information on date :
XIn the map, slide XVY,ZVÆor aVb the
COMAND controller and slide the crosshair
to ;or =.
XPress Wthe COMAND controller.
Weather map showing the path of a tropical low-
pressure area and further information (example)
Showing information ;(if available):
Rname of the tropical storm and category
Rtime stamp
Rdirectional movementspeed and path
(Wind)
Rmaximum wind speed (Max. Wind Speed)
iThe directional movement speed is the
speed at which the stormcell of a tropical
storm moves.
Atropical storm is separated into different
categories according to the location at which
it develops.
Region of
origin
Category
Atlantic,
North and
South Pacific
Oceans
Tropical Low
Pressure System
Tropical Rain Zone
Tropical Storm
Hurricane Category 1
to Hurricane Category
5
Northwest
Pacific
Tropical Low
Pressure System
Tropical Cyclone
Typhoon
Super-Typhoon
Wind directions and windspeeds
Weather map showing wind directions and wind
speeds (example)
Legend (precipitation radar and storms)
XDisplay the menu on the weathermap
(Ypage 200).
XSelect Layers by turning cVd the
COMAND controller and press Wto
confirm.
XSelect Legend and press Wto confirm.
204 SIRIUS Weather
Weather services

iThe symbol for a tornadic storm is also
valid for a cyclone (mesocyclone).
Precipitation type Color scale
Rain Seven color levels
from light (light
green) to heavy (red)
Mixed Light (light violet) to
heavy (violet)
Snow Light (light
turquoise) to heavy
(turquoise)
Time stamp
The time stamp shows when the weather data
was created by the weather station.
XDisplay the menu on the weather map
(Ypage 200).
XSelect Layers by turning cVd the
COMAND controller and press Wto
confirm.
XSelect Time stamp and press Wto
confirm.
The time stamps correspond to the time at
the vehicle's currentposition. The change
over from summer time to standard time is
performed automatically.
Changing to the information chart
XDisplay the menu on the weather map
(Ypage 200).
XSelect Display Weather and press Wto
confirm.
SIRIUS Weather 205
Weather services

206

COMAND features ............................. 208
General information ......................... 208
Basic functions ................................. 213
System settings ................................ 215
Audio CD/DVD and MP3 mode ........ 216
Video DVD mode ............................... 221
Operation with an active COMAND
source ................................................ 225
AUX mode .......................................... 228
207
Rear Seat Entertainment System

COMAND features
These Operating Instructions describe all
standard and optional equipmentavailable
for your COMAND system at the time of
purchase. Country-specificdeviations are
possible. Please note that your COMAND
system may not be equipped with all the
features described.
General information
Important safety notes
GWARNING
The RSE CD/DVD player is a Class 1laser
product.There is a danger of invisible laser
radiation when you open or damage the cover.
Do not remove the cover. The RSE CD/DVD
player does not contain any parts which can
be serviced by the user. For safety reasons,
have any necessary service work performed
by qualified personnel.
GWARNING
The driver should not wear a Rear Seat
Entertainment headset while operating the
vehicle under any circumstances. The use of
a headset while driving the vehicle could
drastically impair the ability to react to audible
traffic conditions (e.g. emergency sirens from
police/fire/ambulance, another car's horn,
etc.).
GWARNING
When not in use, headsets or external video
sources should be stored in asafe location
(e.g. one of the vehicle's storage
compartments) so that they are notloose
within the passenger compartment during
braking, vehicle maneuvers or a traffic
accident. Objects moving within the
passenger compartment could cause serious
personal injury to vehicle occupants.
GWARNING
Due to a potential chokinghazard, wired
headset usage by childrenshould only occur
with adultsupervision.
Components
Overview
The Rear Seat Entertainment System is
comprised of:
Rtwo rear-compartment screens behind the
front-seat head restraints
Rthe remote control
Ra CD/DVD drive
RAUX jacks on both screens (AUX display)
and on the CD/DVD drive (AUX drive)
Rtwo sets of cordless headphones
208 General information
Rear Seat Entertainment System
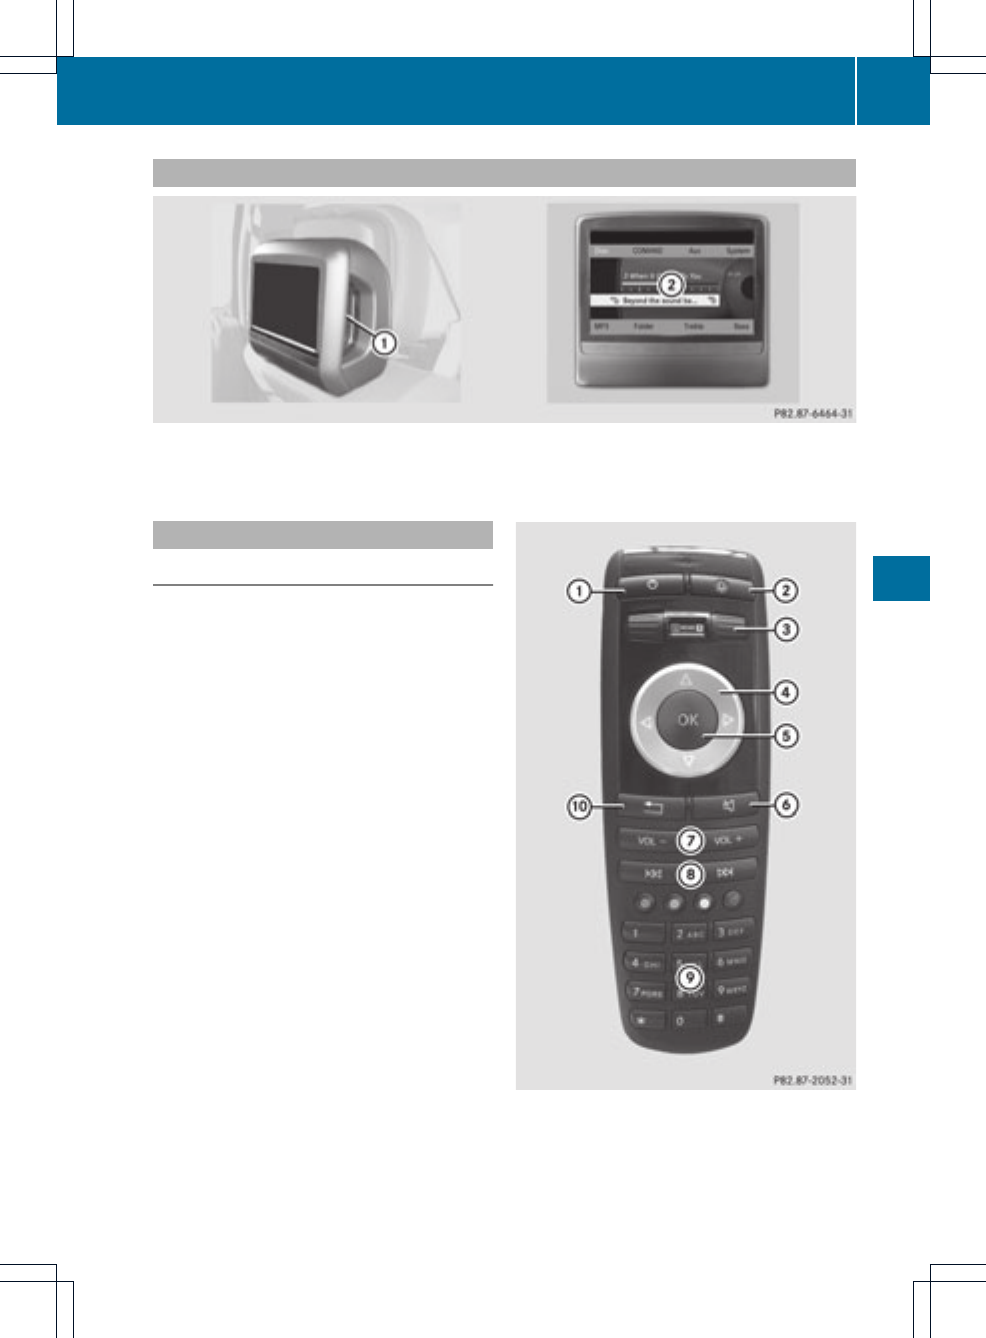
Rear-compartment screens
:AUX jacks, detailed view in the "CD/DVD drive and AUX jacks" section (Ypage 210)
;Display
Remote control
Overview
iTwo remote controls are included in the
scope of supply for the USA and Canada.
:Switches the screen on/off
;Switches the button lighting on/off
=Selects the screen for the remote control
?Selects a menu or menu item
General information 209
Rear Seat Entertainment System
Z
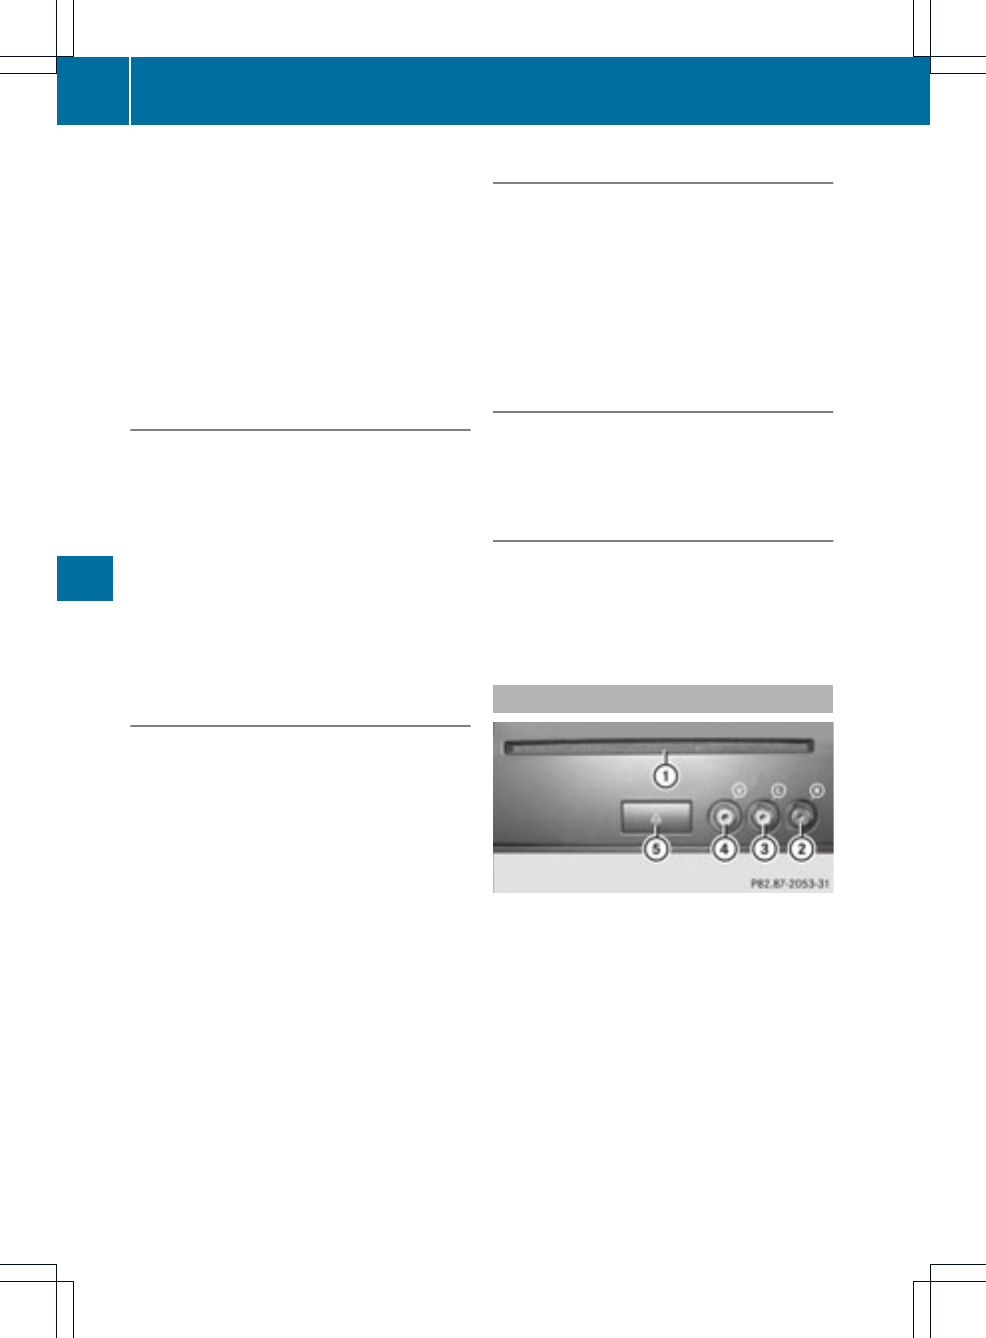
AConfirms a selection or setting
BSwitches sound on/off (forcorded
headphones)
CAdjusts the volume (for corded
headphones)
DSkips to atrack, fast-forward/fast-rewind
ESelects a track; direct entry
FExits a menu (back)
Selecting the screen for the remote
control
You can use the remote control to operate
one of the two rear screens at a time. To do
so, you must switch the remote control to the
desired screen.
XTo select the left-hand screen: turn
thumbwheel =until "LREAR" is
highlighted in the window.
XTo select the right-hand screen: turn
thumbwheel =until "REAR R" is
highlighted in the window.
Switching the screen on/off
If the SmartKey is in position 0or 1in the
ignitionlock (see the vehicle Operator's
Manual), or the SmartKey is not inserted, the
screens in the rear will switch off after 30
minutes. Before the screens switch off, they
show a message to this effect.
You can switch the screensback on.
However, this will discharge the starter
battery.
XPoint the remote control at the rear-
compartmentscreenwhich has been
selected for remote operation.
XPress button :on the remote control.
The respective rear screen switches on or
off.
iYou can only switch the screens on using
the remote control if the ignition is
switched on.
Switching the button lighting on/off
XPress button ;on the remote control.
Depending on the previous status, the
button lighting is switched on or off.
iIf you do not use the remote control for
about 15 seconds, the button lighting
switches off automatically.
Switching the sound on/off (corded
headphones only)
XPress button Bon the remote control.
The sound is switched on/off.
Selecting amenu/menu item and
confirming your selection
XSelect a menu/menu item using the
=;9: buttons on the
remote control and press the 9button to
confirm.
CD/DVD drive and AUX jacks
:CD/DVD slot
;AUX, right-hand (R) jackfor audio signal
(red)
=AUX, left-hand (L) jack for audio signal
(white)
?AUX, video (V) jack (yellow)
ACD/DVD eject button
The AUX jacks shown are for the AUX drive.
Identical jacks can be found on the right-hand
side of the rear-compartment screens (AUX
display), (Ypage 209).
210 General information
Rear Seat Entertainment System
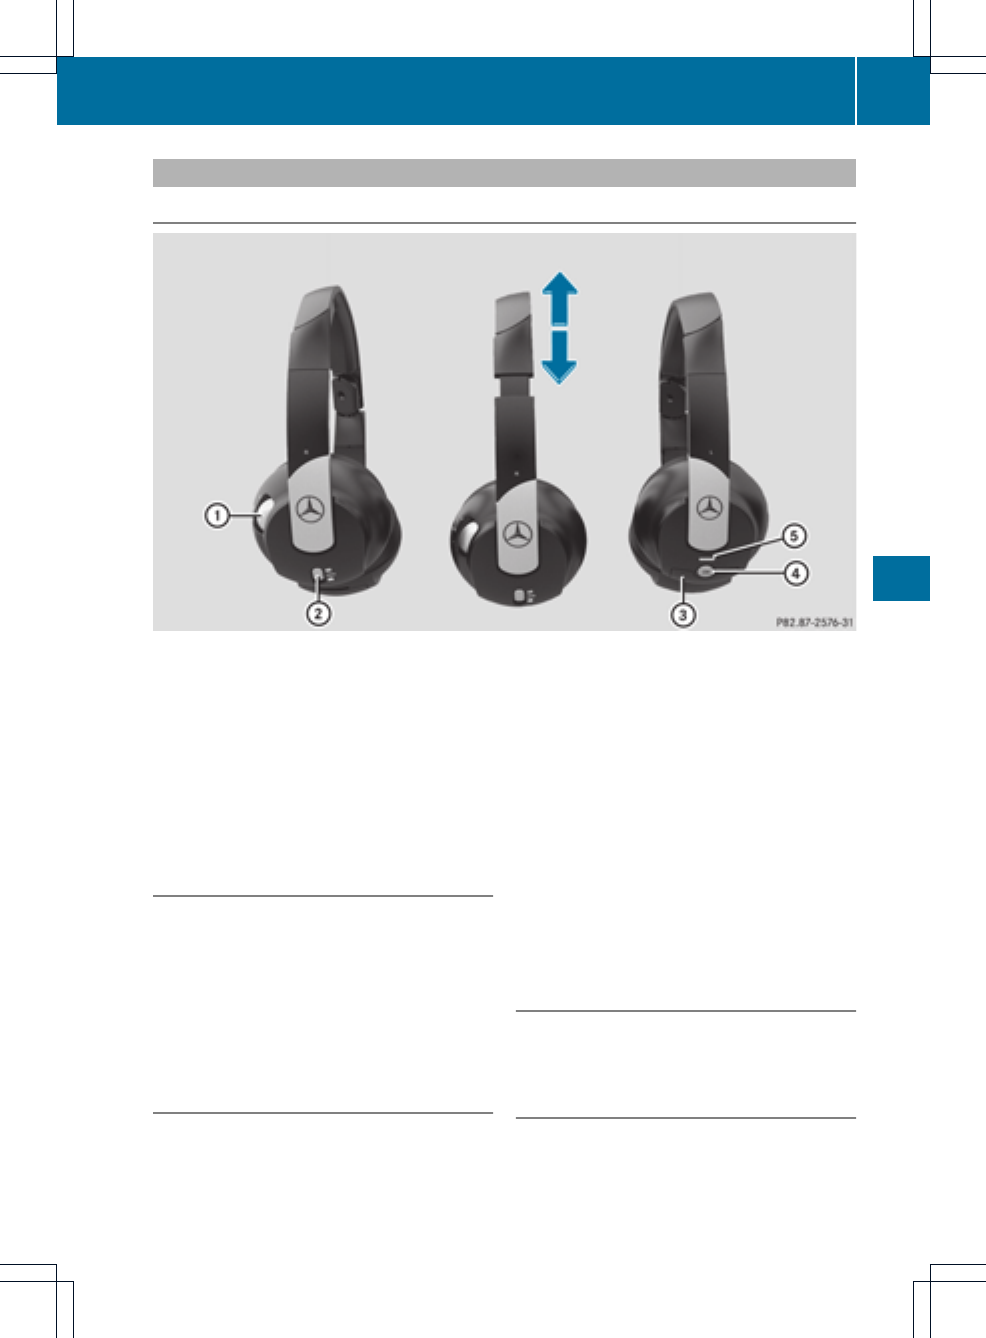
Cordless headphones
Overview
:Volume control
;Selects a screenfor the headphones
=Battery compartment cover
?Switches the cordless headphones on/off
AIndicator lamp with various displays (Ypage 211)
XOpen both sides of the headphones and adjust the fit of the headphones by pulling the
headphone band in the direction of the arrow.
Switching the cordless headphones
on/off
XPress button ?.
Depending on the previous status, the
headphones are switched on or off. To save
the battery, the headphones are switched
off automatically if they do not receive an
audio signal within three minutes.
Adjusting the volume of the
headphones
XTurn volume control :until the desired
volume has been set.
iIf you have connected corded
headphones to a rear-compartment
screen, you can adjust the volume by
pressing buttons Con the remote control
(Ypage 209).
Selecting ascreen for the headphones
XMove push slider ;to L(left-hand screen)
or R(right-hand screen).
Indicator lamp displays
The color of the indicator lamp shows
whether the headphones are switched on or
off and indicates the charge level of the
batteries inserted.
General information 211
Rear Seat Entertainment System
Z
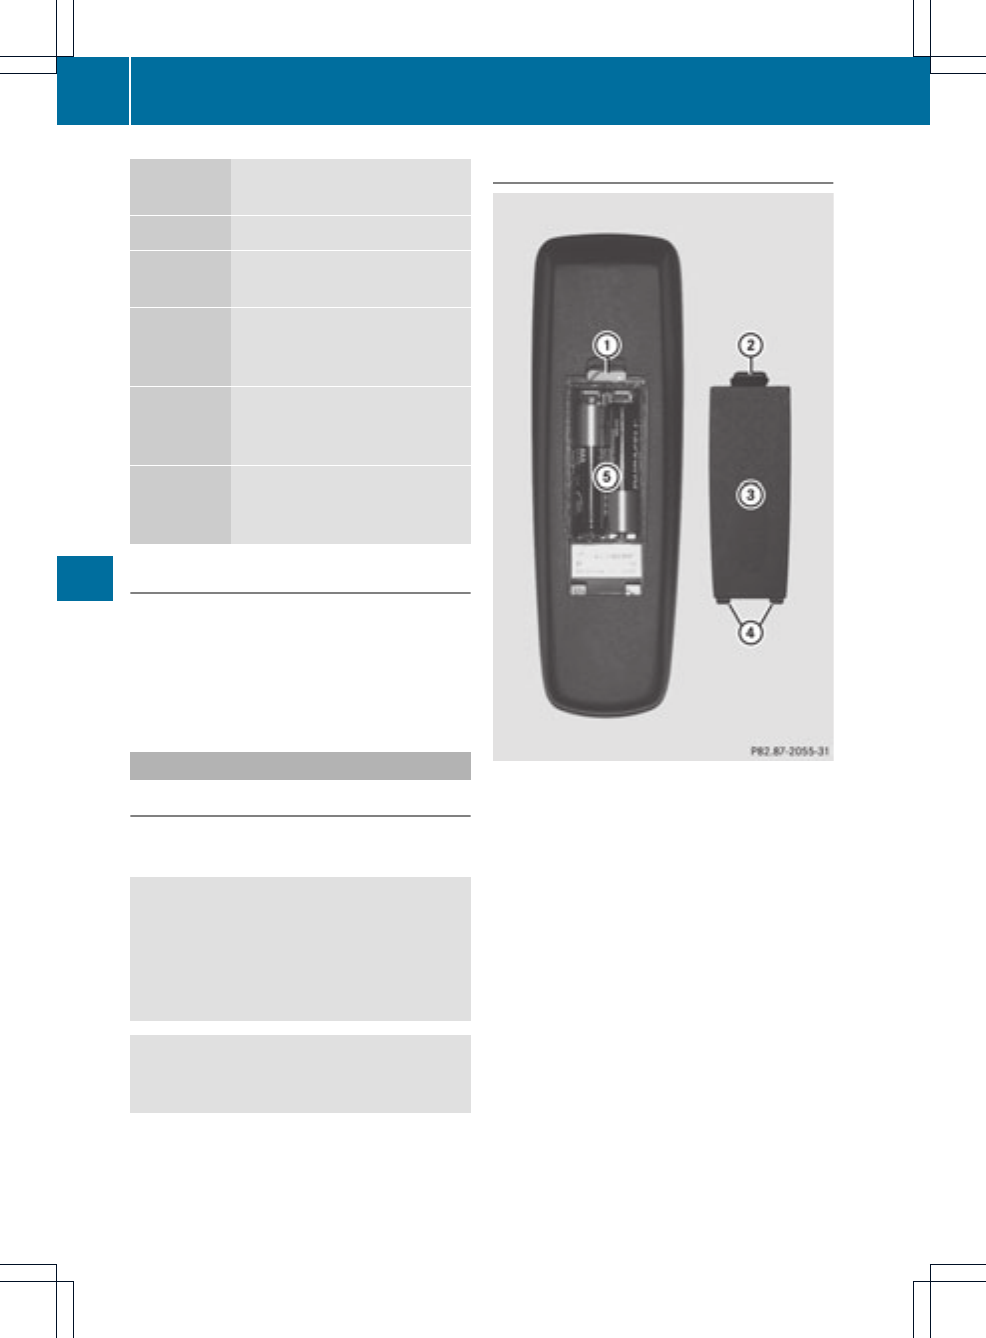
LED
display
Status
Green The batteries are fine.
Red The batteries are almost
discharged.
Lit
continuous
ly
The headphones are switched
on and connected to ascreen.
Flashing The headphones are
searching for the connection
to a screen.
No display
(dark)
The headphones are switched
off or the batteries are
discharged.
Connecting additional headphones
You can connect one additional set of corded
headphones to each of the two rearscreens
(Ypage 209). The socketis designed for
headphones with a 3.5 mm stereo jack plug
and an impedance of 32 ohms.
Changing batteries
Notes
Batteries are required for the remote control
and for the two sets of cordless headphones.
GWARNING
Keep the batteries out of the reach of
children. Consult a doctor immediately if a
child should swallow a battery.
Do not dismantle, short-circuit or burn a
battery.
HEnvironmental note
Dispose of discharged batteries in an
environmentally responsible manner.
On the remote control
:Battery compartment
;Catch tab
=Battery compartment cover
?Retaining lugs
ABatteries
The remote control contains 2 type AAA,
1.5 V batteries.
XTo open the battery compartment:
remove battery compartment cover =on
the back of the remote control.
XTo do so, press down catch tab ;and
remove battery compartment cover =.
XRemove discharged batteries Afrom the
tray.
212 General information
Rear Seat Entertainment System
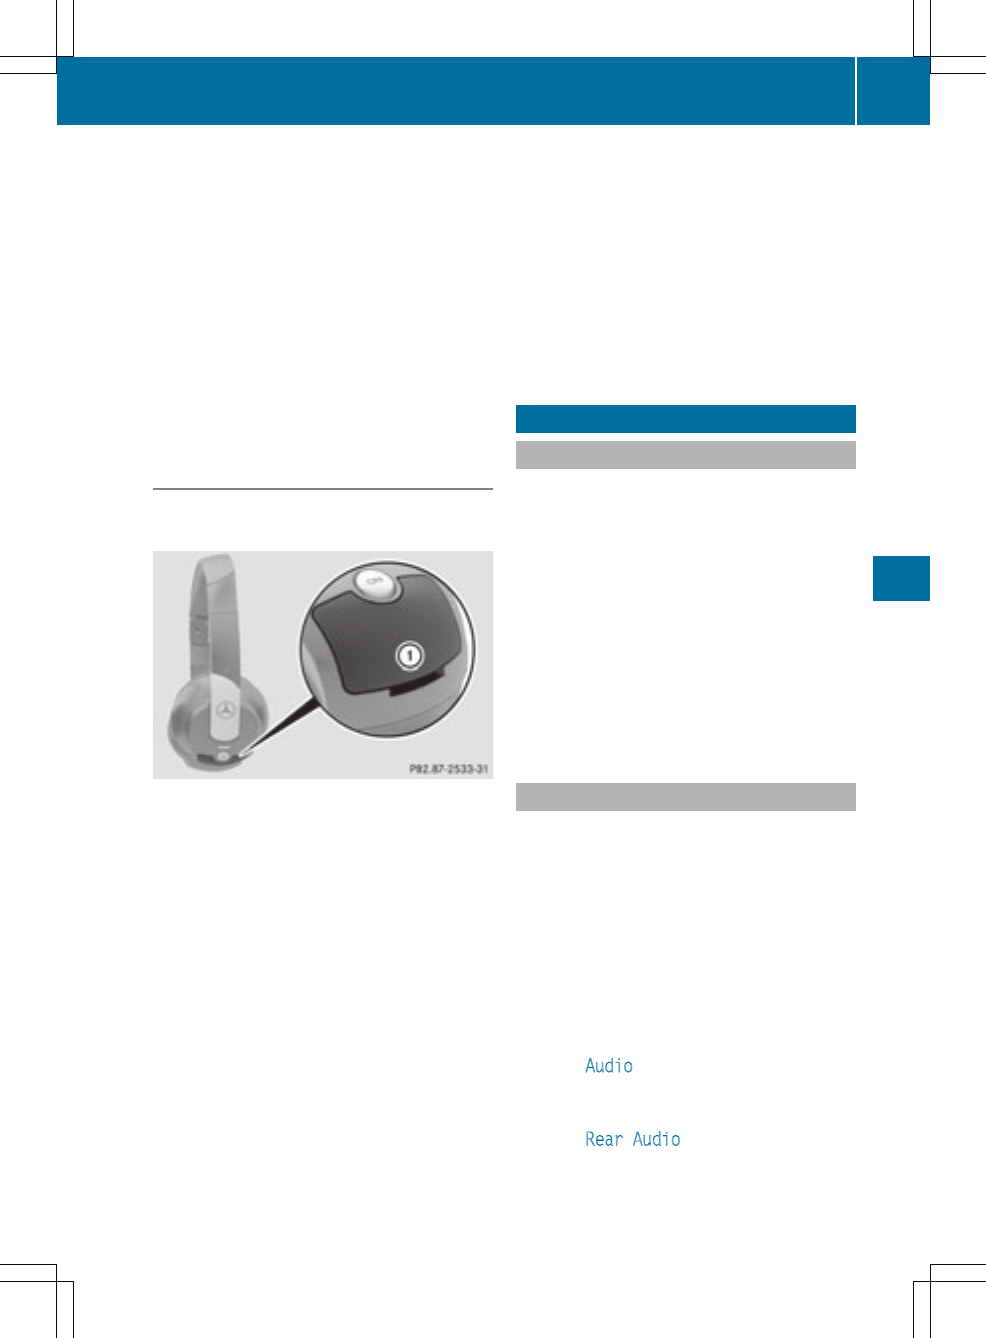
XInsert the new batteries. Observe the
polarity markings on the batteries and
battery compartment when doing so.
Left-hand battery: the positive pole (+)
must face upwards.
Right-hand battery: the positive pole (+)
must face downwards.
XTo close the battery compartment:
insert battery compartment cover =
starting with retaining lugs ?into the
battery compartment and allow catch
tab ;to engage in place.
On the cordless headphones
The battery compartment cover is located on
the left headphone.
:Battery compartment cover
The cordless headphones contain 2type AAA,
1.5 V batteries.
XTo open the battery compartment: flip
battery compartment cover :upwards.
As you do so, hold the left-hand side of the
headphones as shown to preventthe
batteries from falling out.
XRemove the discharged batteries from the
tray.
XInsert the new batteries. Observe the
polarity markings on the batteries and
battery compartmentwhen doing so.
Left-hand battery: the positive pole (+)
must face upwards.
Right-hand battery: the positive pole (+)
must face downwards.
XTo close the battery compartment:
press battery compartment cover
downwards until it engages into place.
If the batteries have been inserted
correctly, the indicator lamp will light up
green when the headphones are switched
on.
Basic functions
Using headphones
You can use the cordless headphones
supplied and/or up to two sets of corded
headphones connected to the corresponding
jack of the rear-compartment screens
(Ypage 209).
Information on:
Rswitching the cordless headphones on/off
Radjusting the volume of the headphones
Rselecting a screen for the headphones
can be found in the Cordless headphones
section (Ypage 211).
Using the main loudspeakers
This function is available in conjunction with
COMAND.
You can use the vehicle loudspeakers to
listen to a disc inserted in the rear-
compartmentdrive. To do so, at least one of
the rear-compartment screens must be set to
disc mode.
XTo set using COMAND: press, for
example, the $function button to
switch on an audio mode.
XSelect Audio by sliding ZV the COMAND
controller and press Wto confirm.
The Audio menu appears.
XSelect Rear Audio by turning cVd the
COMAND controller and press Wto
confirm.
Basic functions 213
Rear Seat Entertainment System
Z
iThe headphones' volume setting does not
affect the main loudspeakers.
Adjusting the sound settings
You can select the sound settings in the audio
CD/DVD/MP3, video DVD and AUX modes.
XSwitch on an operating mode (e.g. audio
CD mode) (Ypage 217).
XSelect Treble or Bass using
the :=; buttons on the remote
control and press the 9button to confirm.
An adjustmentscale appears.
XSelect a setting using the 9:
buttons and press the 9button to confirm.
Multiple users
Simultaneous use of the rear-
compartment disc drive
The two rear-compartment screens can be
operated almost entirely independently from
one another. However, there can be a conflict
in some menus if the two screens are used
simultaneously.
If the rear-compartment disc drive is being
used for both screens simultaneously,
selecting certain menus or settings on one of
the screens also affects the otherscreen.
The following functions affect both screens:
Rchanging playback options
Rselecting a track (fromatrack list or folder)
Rusing the play, pause and stop functions
Rfast forwarding/rewinding or scrolling
Rcalling up the DVD menu and navigating
withinit
R
setting the language, subtitles and camera
angle
Rcalling up interactive DVD content
The following functions affect only one
screen:
Raudio and video functions as well as picture
settings
Rswitching between full screen and the
menu
Switching between operating modes
When you exit an operating mode (e.g. audio
CD mode), the current setting is saved. If you
call up this operating mode againlater, there
are two possibilities:
Rthe operating mode has been changed on
the other screen.
Rthe operating mode has notbeen changed.
In the first case, the operating mode appears
as it is on the other screen.
In the second case, the setting appears on the
screen as it was when you last exited the
operating mode.
Picture settings
Overview
You can select these settings in video DVD
and AUX mode. Instructions for AUX mode
are detailed later (Ypage 228).
Adjusting the brightness, contrast and
color
XSwitch on video DVD mode (Ypage 221).
XTo show the menu: press the 9button
on the remote control.
or
XSelect (Ypage 188)Menu while the
navigation menu is shown and press the
9button to confirm.
XSelect DVD-Video using
the :=; buttons and press the
9button to confirm.
214 Basic functions
Rear Seat Entertainment System
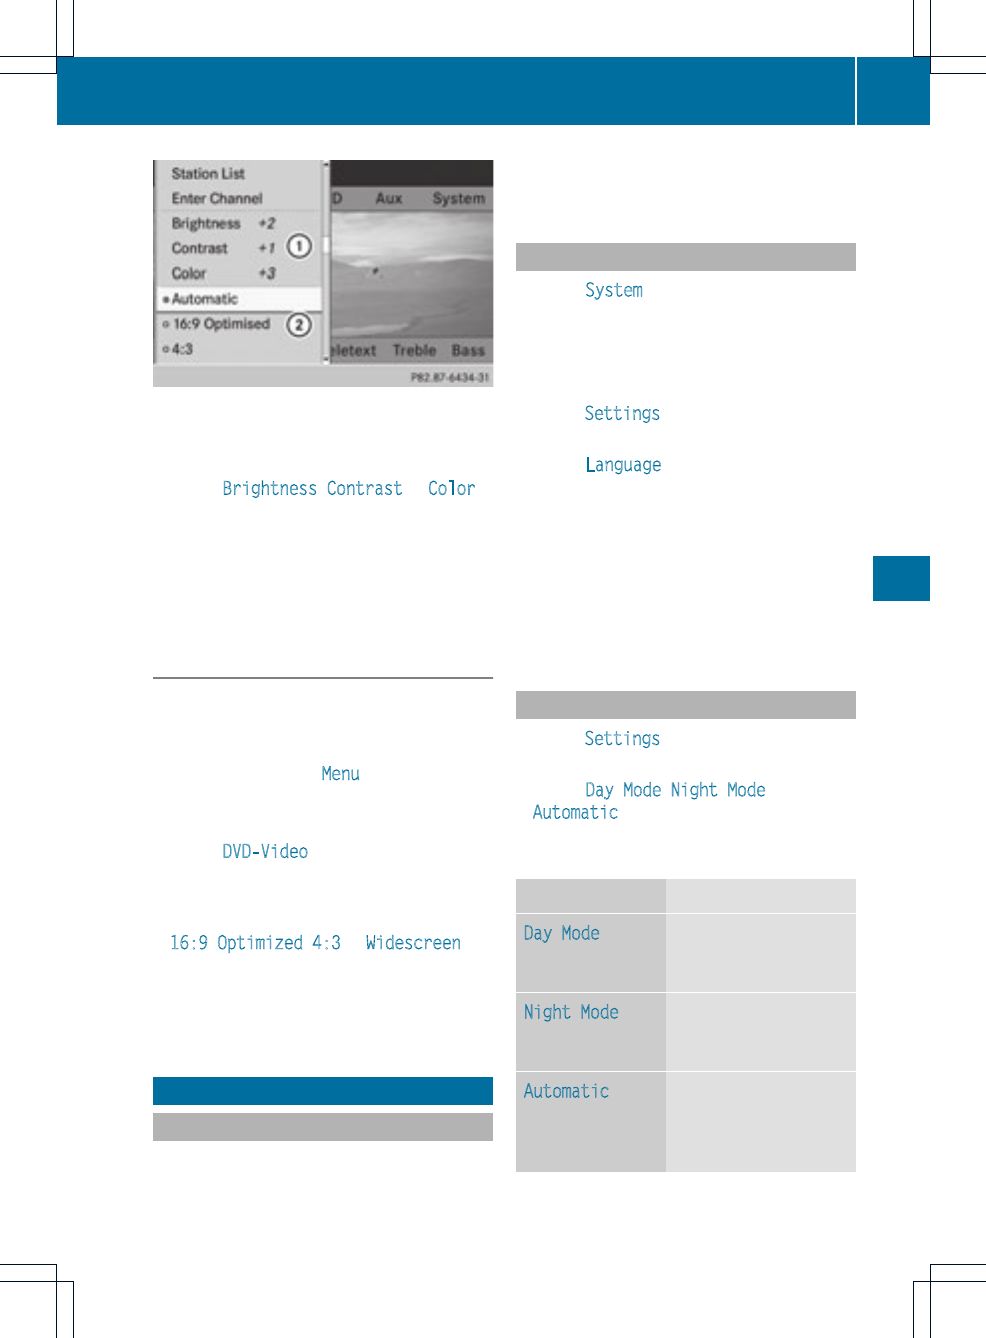
Example: TV mode
:Brightness, contrast and color
;Picture formats
XSelect Brightness,Contrast or Color
using the 9: buttons and press the
9button to confirm.
An adjustment scale appears.
XSelect a setting using the 9:
buttons and press the 9button to confirm.
Changing the picture format
XTo show the menu: press the 9button
on the remote control.
or
XSelect (Ypage 188)Menu while the
navigation menu is shown and press the
9button to confirm.
XSelect DVD-Video using
the :=; buttons and press the
9button to confirm.
The dot in front of one of the menu items
16:9 Optimized,4:3 or Widescreen
indicates the format currently selected.
XSelect a format using the 9:
buttons and press the 9button to confirm.
System settings
Note
You can adjustalmost all system settings
individually for each screen without affecting
the other screen. You make these settings
using the remote control (Ypage 209).
Selecting the display language
XSelect System using the 9=;
button on the remote control and press
9to confirm.
You see the system menu on the selected
rear screen.
XSelect Settings with the :button and
press the 9button to confirm.
XSelect Language using the 9:
buttons and press the 9button to confirm.
The list of languages appears. The #dot
indicates the current setting.
XSelectalanguage using the 9:
buttons and press the 9button to confirm.
The Rear Seat Entertainment System
activates the selected language.
Switching the display design
XSelect Settings with the :button and
press the 9button to confirm.
XSelect Day Mode,Night Mode or
Automatic using the 9: buttons
and press the 9button to confirm.
The dot indicates the current setting.
Design Explanation
Day Mode The display is set
permanently to day
design.
Night Mode The display is set
permanently to night
design.
Automatic The display design
changes depending on
the vehicle instrument
cluster illumination.
System settings 215
Rear Seat Entertainment System
Z
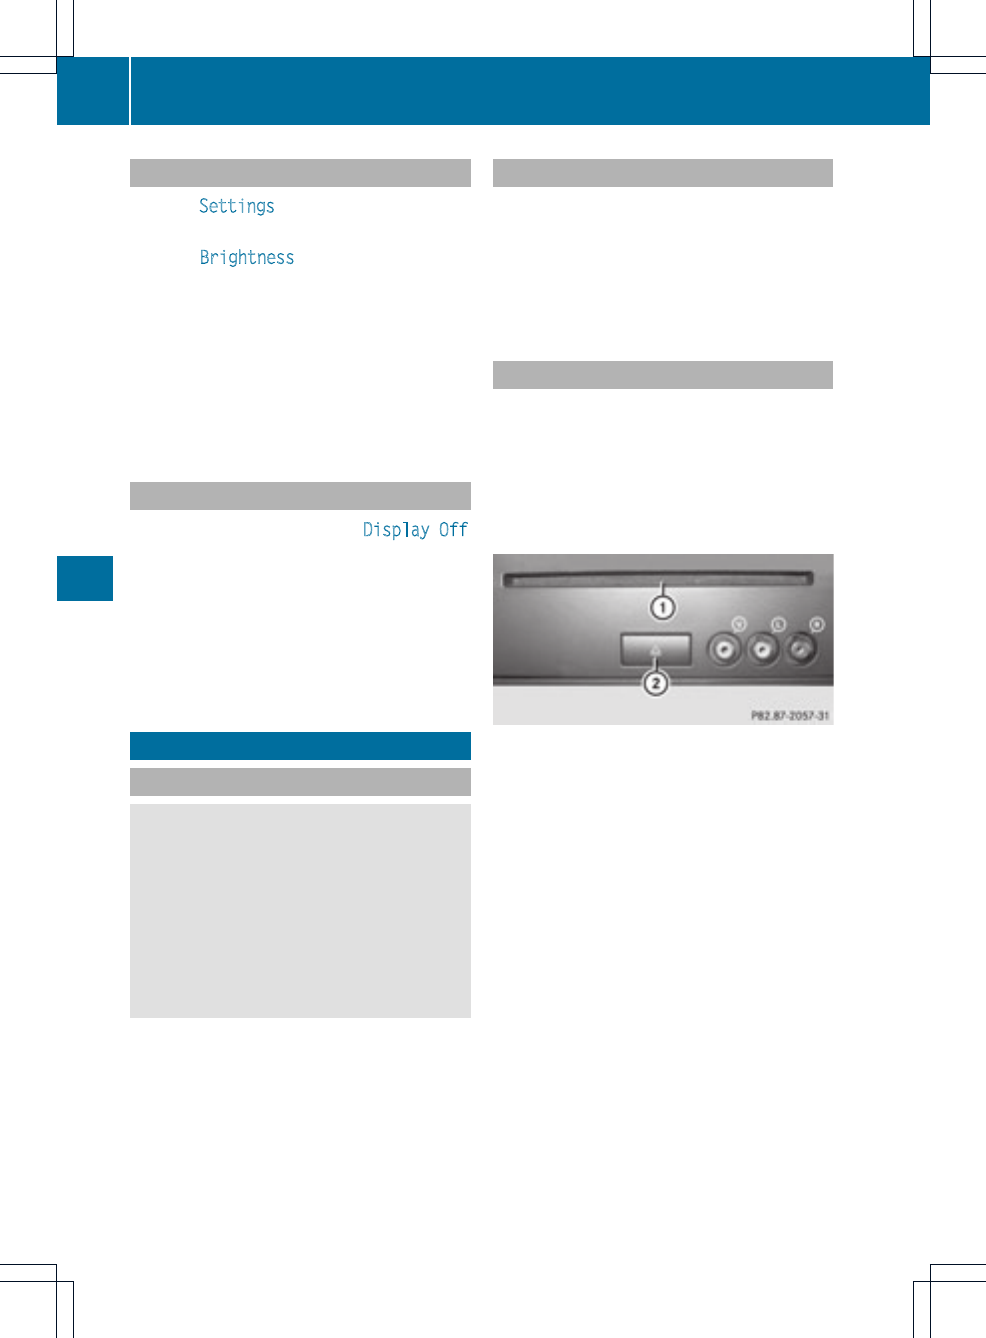
Setting the brightness
XSelect Settings with the :button and
press the 9button to confirm.
XSelect Brightness using the 9:
buttons and press the 9button to confirm.
Ascale appears.
XAdjust the brightness using the 9:
buttons and press the 9button to confirm.
The brightness barmoves up or down. The
picture becomes lighter or darker in
accordance with the scale.
Showing/hiding the picture
XTo hide the picture: select Display Off
in the system menu using the :;
buttons on the remote control and press
the 9button to confirm.
The picture is hidden.
XTo display the picture: press the 9
button.
Audio CD/DVD and MP3 mode
Safety note
GWARNING
The RSE CD/DVD player is a Class 1laser
product.There is a danger of invisible laser
radiation when you open or damage the cover.
Do not remove the cover. The RSE CD/DVD
player does not contain any parts which can
be serviced by the user. For safety reasons,
have any necessary service work performed
by qualified personnel.
General information
You will find information on the following
topics in the Audio section:
Rnotes on CDs/DVDs (Ypage 165)
Rnotes on MP3 mode (Ypage 164)
Rnotes on copyright (Ypage 165)
Inserting aCD/DVD
Depending on the model and the vehicle
equipment, the CD/DVD drive is located:
Rbehind the center console in a folding
compartment, or
Rin the center under the rear seats, or
Rin the armrestbetween the rear seats
:Disc slot
;Disc eject button
The CD/DVD drive is a single disc drive. If
there is already a disc inserted, this must be
ejected before another is inserted.
XInsertadisc into the disc slot.
The printed side of the disc must face
upwards. If neither side of the disc is
printed, the side you wish to play must face
downwards.
The CD/DVD drive draws in the disc.
216 Audio CD/DVD and MP3 mode
Rear Seat Entertainment System

The CD/DVD drive plays the disc:
Rif it has been inserted correctly and is a
permissible disc, and
Rafter you have switched on disc mode
(audio CD/audio DVD/MP3 mode)
(Ypage 217).
Data on an MP3 CD first needs to be loaded
by the drive. Loading may take some time,
depending on the number of folders and
tracks.
Removing aCD/DVD
XPress the þbutton.
The drive ejects the disc.
XTake the discout of theslot.
If you do not take the disc out of the slot,
the drive will draw it in again automatically
after a shortwhile.
Switching to audio CD, audio DVD or
MP3 mode
XInsert a CD/DVD (Ypage 216).
The Rear Seat Entertainment System loads
the inserted disc.
XSelect Disc in the menu using the
9=; buttons on the remote
control and confirm by pressing the 9
button.
The corresponding mode is switched on.
The Rear Seat Entertainment System plays
the disc.
Example: audio CD mode
:Type of data medium _
;Track number
=Track name (only if stored on the disc as
CD text)
?Track time
AGraphic time and track display
BCurrent playback settings (no symbol for
"Normal track sequence")
CTo set the bass
DTo set the treble
EDisc name (if stored on the disc as CD
text)
FTo call up the track list
GPlayback options
Example: audio DVD mode
:Type of data medium ü
;Track number
=Track name (if stored on the disc)
?Track time
AGraphic time and track display
BCurrent playback settings (no symbol for
"Normal track sequence")
Audio CD/DVD and MP3 mode 217
Rear Seat Entertainment System
Z

CTo set the bass
DTo set the treble
EDisc name (if stored on the disc)
FTo call up the track list
GStop function
HPause function
IPlayback options
Example: MP3 mode
:Type of data medium þ
;Track number
=Track name
?Track time
AGraphic time and track display
BCurrent playback settings (no symbol for
"Normal track sequence")
CTo set the bass
DTo set the treble
EDisc name or current folder
FTo call up the folder list
GPlayback options; to switch track
information on/off
iVariable bit rates in MP3 tracks can result
in the elapsed time shown being different
from the actual elapsed time.
Selecting atrack
Selecting by skipping to atrack
XTo skip forwards or backwards to a
track: press the =or ;button on
the remote control.
or
XPress the Eor Fbutton.
The skip forward functionskips to the next
track.
Skipping backwards restarts the current
track (ifithas been playing for more than
eightseconds) or starts the previous track
(if the currenttrack has only been playing
for a shorter time).
If you have selected the playback options
Random Tracks or Random Folder, the
track order is random.
Selecting by track list
In audio CD mode, the track list contains all
tracks on the disc currently playing.
In audio DVD mode, the track list contains all
tracks in the currently active group; see
"Setting the audio format" (Ypage 163).
In MP3 mode, the track list shows all tracks
in the currently active folderas well as the
folder structure, allowing you to select any
track on the MP3 CD.
XSelect Tracks (audio CD/DVD mode) or
Folder (MP3 mode) using
the :=; buttons on the remote
control, and confirm by pressing the 9
button.
or
XPress the 9button when the display/
selection window is selected.
The track list appears. The #dot indicates
the current track.
XSelect a track using the 9: buttons
and press the 9button to confirm.
218 Audio CD/DVD and MP3 mode
Rear Seat Entertainment System
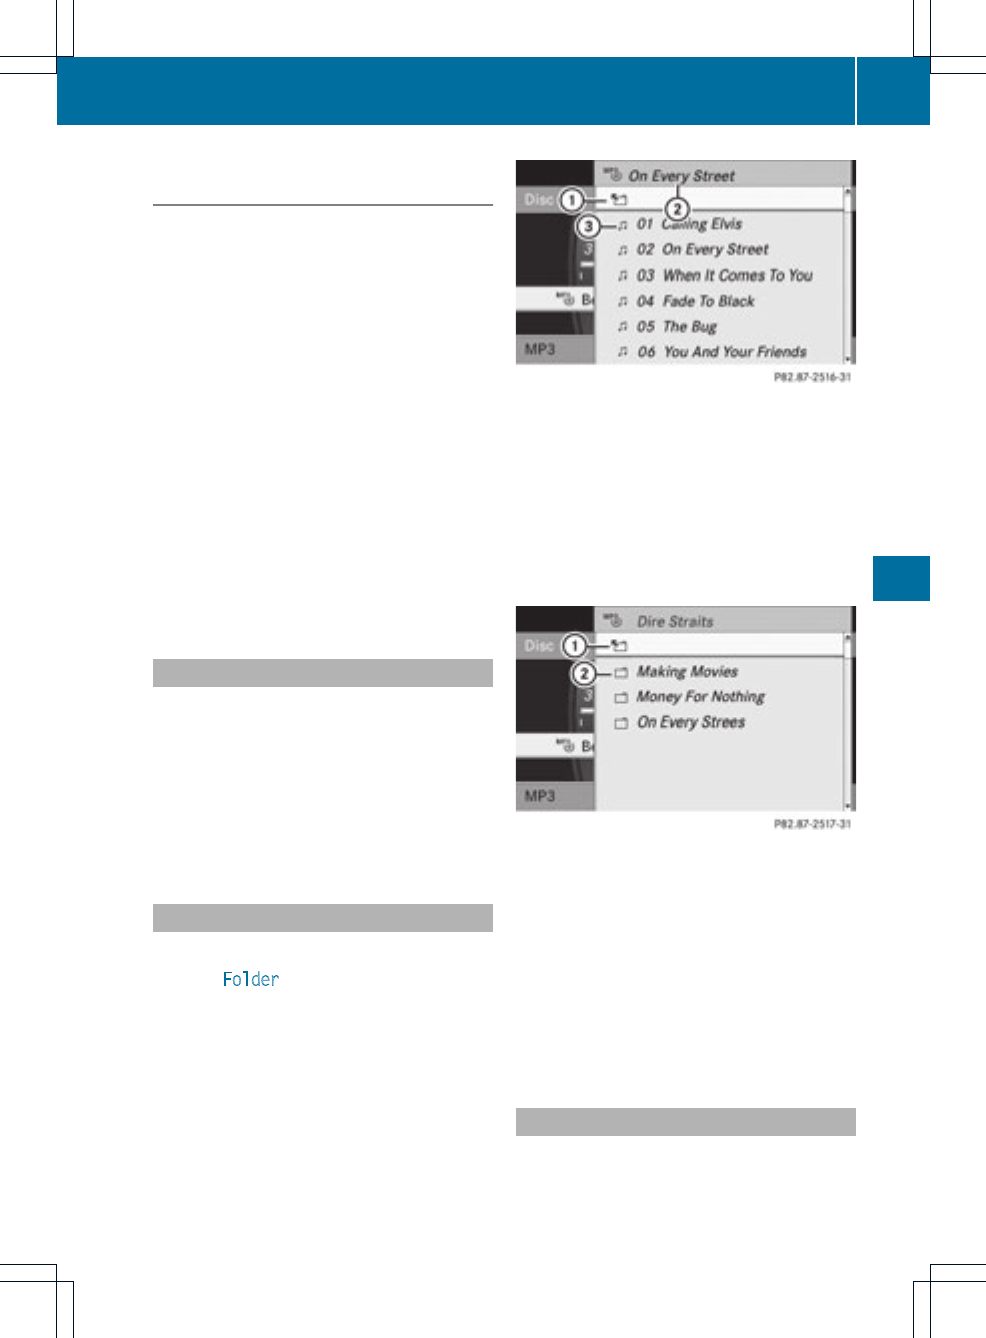
Making aselection by entering the track
number directly
XPress the hbutton on the remote
control.
The track entry display appears.
Example: track 2
XPress number button 2.
Example: track 12
XPress the corresponding number keys in
rapid succession.
iIt is notpossible to enter numbers that
exceed the number of tracks on the CD or
in the currently active folder.
XWait for approximately three seconds after
making the entry.
You will hear the track which has been
entered. The corresponding basic menu
then reappears.
Fast forwarding/rewinding
XWith the display/selection window active,
press the =or ;button on the
remote control repeatedly until you reach
the desired position.
or
XPress and hold the Eor Fbutton
until the desired position is reached.
Selecting afolder
This function is only available in MP3 mode.
XSelect Folder in MP3 mode using
the :=; buttons on the remote
controller and press the 9button to
confirm.
or
XPress the 9button when the display/
selectionwindow is selected.
The folder contentappears.
:Folder selection symbol
;Current folder name
=Track symbol
XTo switch to the superordinate folder:
select icon :using the 9: buttons
on the remote control and press the 9
button to confirm.
The display shows the nextfolder up.
:Folder selection symbol
;Folder icon
XSelect a folder using the 9: buttons
and press the 9button to confirm.
You will see the tracks in the folder.
XSelect a track using the 9: buttons
and press the 9button to confirm.
The track is played and the corresponding
folder is now the active folder.
Pause function
This function is only available in audio DVD
mode.
Audio CD/DVD and MP3 mode 219
Rear Seat Entertainment System
Z
XTo pause playback: select Ëusing
the :=; buttons on the remote
control and press the 9button to confirm.
The Ëdisplay changes to Ì.
XTo continue playback: select Ìand
press the 9button to confirm.
The Ìdisplay changes to Ë.
Stopfunction
This function is only available in audio DVD
mode.
XTo interrupt playback: select Éusing
the :=; buttons on the remote
control and press the 9button to confirm.
The Ëdisplay changes to Ì.
XTo continue playback: select Ìand
press the 9button to confirm.
Playback continues from the point where it
was interrupted.
XTo stop playback: while playback is
interrupted, select Éagain and press
the 9button to confirm.
Playback stops and returns to the
beginning of the DVD. Ìis highlighted.
XTo restart playback: select Ìand
press the 9button to confirm.
Playback starts from the beginning of the
DVD.
Setting the audio format
Further information on audio formats is
available in the "Audio" section
(Ypage 163).
XSelect DVD-A using the :=;
buttons on the remote controllerand press
9to confirm.
XSelect Group using the 9: buttons
and press the 9button to confirm.
The list of available audio formats appears.
The #dot indicates the format currently
selected.
XSelect an audio format using the
9: buttons and press the 9button
to confirm.
XTo exit the menu: press the =
or ;button.
Playbackoptions
Further information on playback options is
available in the "Audio" section
(Ypage 163).
XSelect CD,DVD-A or MP3 using
the :=; buttons on the remote
control and press the 9button to confirm.
The options list appears.The #dot
indicates the option currently selected.
XSelect Normal Track Sequence,Random
Tracks or Random Folder using the
9: buttons and press the 9button
to confirm.
The option is switched on. For all options
except Normal Track Sequence, you will
see a corresponding display in the display/
selection window.
iIf you change the disc, the Normal
Track Sequence option is activated
automatically.Ifanoption is selected, it
remains selected after the Rear Seat
Entertainment System is switched on or
off.
Switching track information on/off
(MP3 mode only)
If the function is switched on, folder and track
names are displayed.
If the function is switched off, disc and file
names are displayed.
XSelect MP3 using the :=;
buttons on the remote controller and press
the 9button to confirm.
220 Audio CD/DVD and MP3 mode
Rear Seat Entertainment System
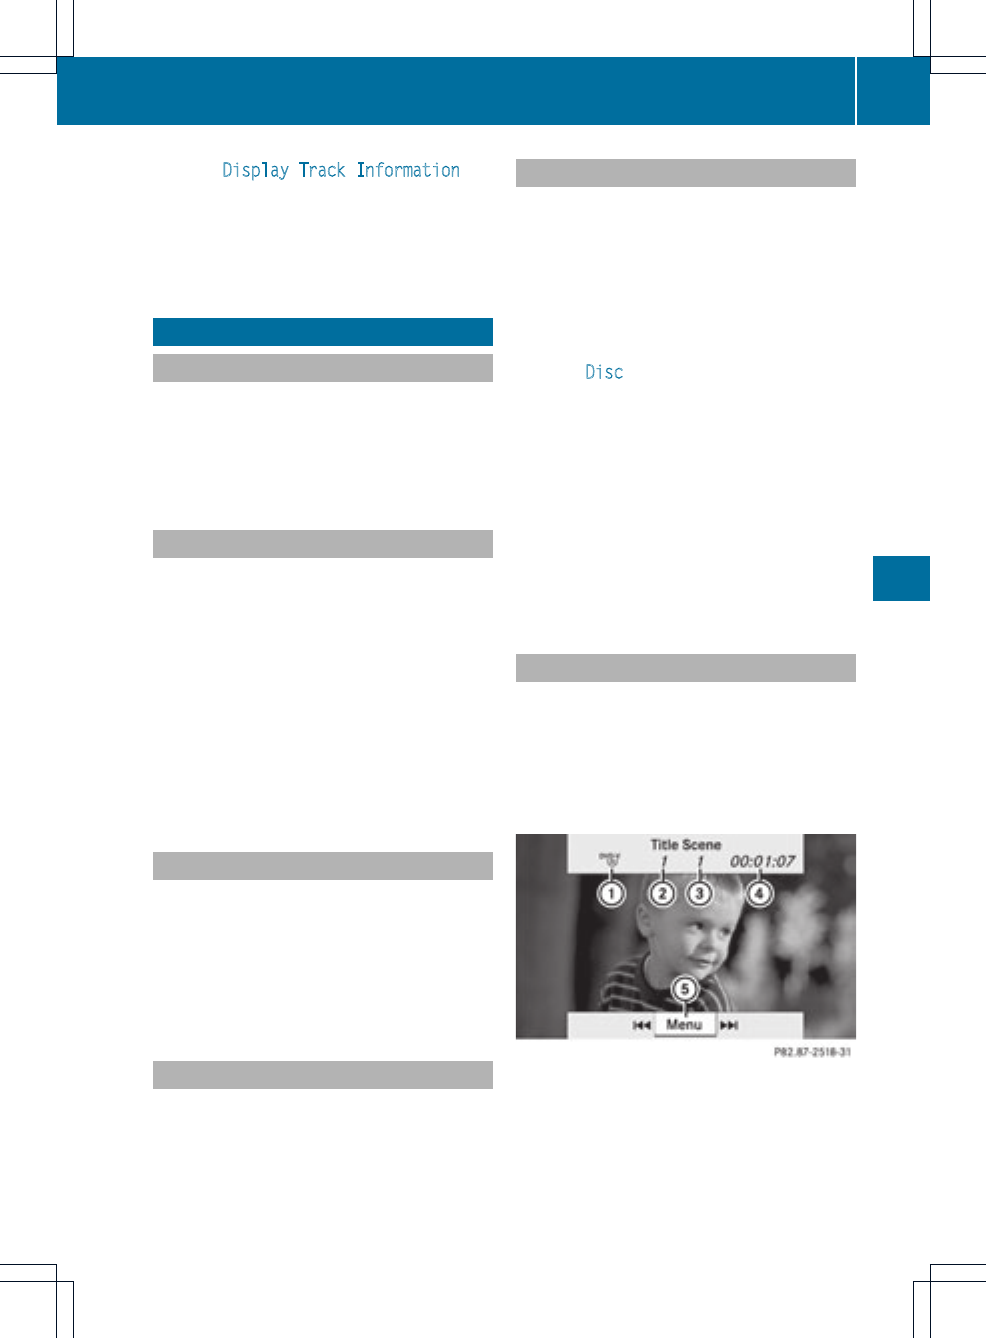
XSelect Display Track Information
using the 9: buttons and press the
9button to confirm.
The function is switched on Oor off ª,
depending on the previous status.
Video DVD mode
General information
Here you will find further information on the
following topics:
Rsafety notes (Ypage 154)
Rnotes on DVDs (Ypage 186)
DVD playbackconditions
Playback problems may occur when playing
copied discs. There is a large variety of discs,
DVDauthoring software, writing software and
writers available. This variety means that
there is no guarantee that the Rear Seat
EntertainmentSystem will be able to play
video DVDs that you havecopied yourself.
You will find further information in the Video
section (Ypage 187). Information regarding
COMAND also applies to the Rear Seat
Entertainment System.
Function restrictions
Depending on the DVD, it is possible that
certain functions or actions described in this
section will be temporarily blocked or may not
function at all. As soon as you try to activate
these functions or actions, you will see the
Ksymbol in the display.
Inserting and removing aCD/DVD
XProceed as described in the "Audio CD/
DVDand MP3 mode" section
(Ypage 216).
Switching to video DVD mode
XInsert a video DVD.
The Rear SeatEntertainment System loads
the disc.
If disc mode was the last mode selected, it
will now be active.
If it was not, switch on video DVD mode as
described in the following instruction.
XSelect Disc in the menu using the
9=; buttons on the remote
control and confirm by pressing the 9
button.
If the video DVD fulfills the playback
criteria, the filmeitherstarts automatically
or the menu saved on the DVD appears. If
the DVD menu appears, you must start the
film manually.
XSelect the corresponding menu iteminthe
DVD menu.
Hiding/showing the navigation menu
XTo show: press the 9or :button
on the remote control.
XTo hide: press the 9or :button.
or
XWait for approximately eight seconds.
Navigation menu
:Disc type
;Current title
=Current scene
Video DVD mode 221
Rear Seat Entertainment System
Z
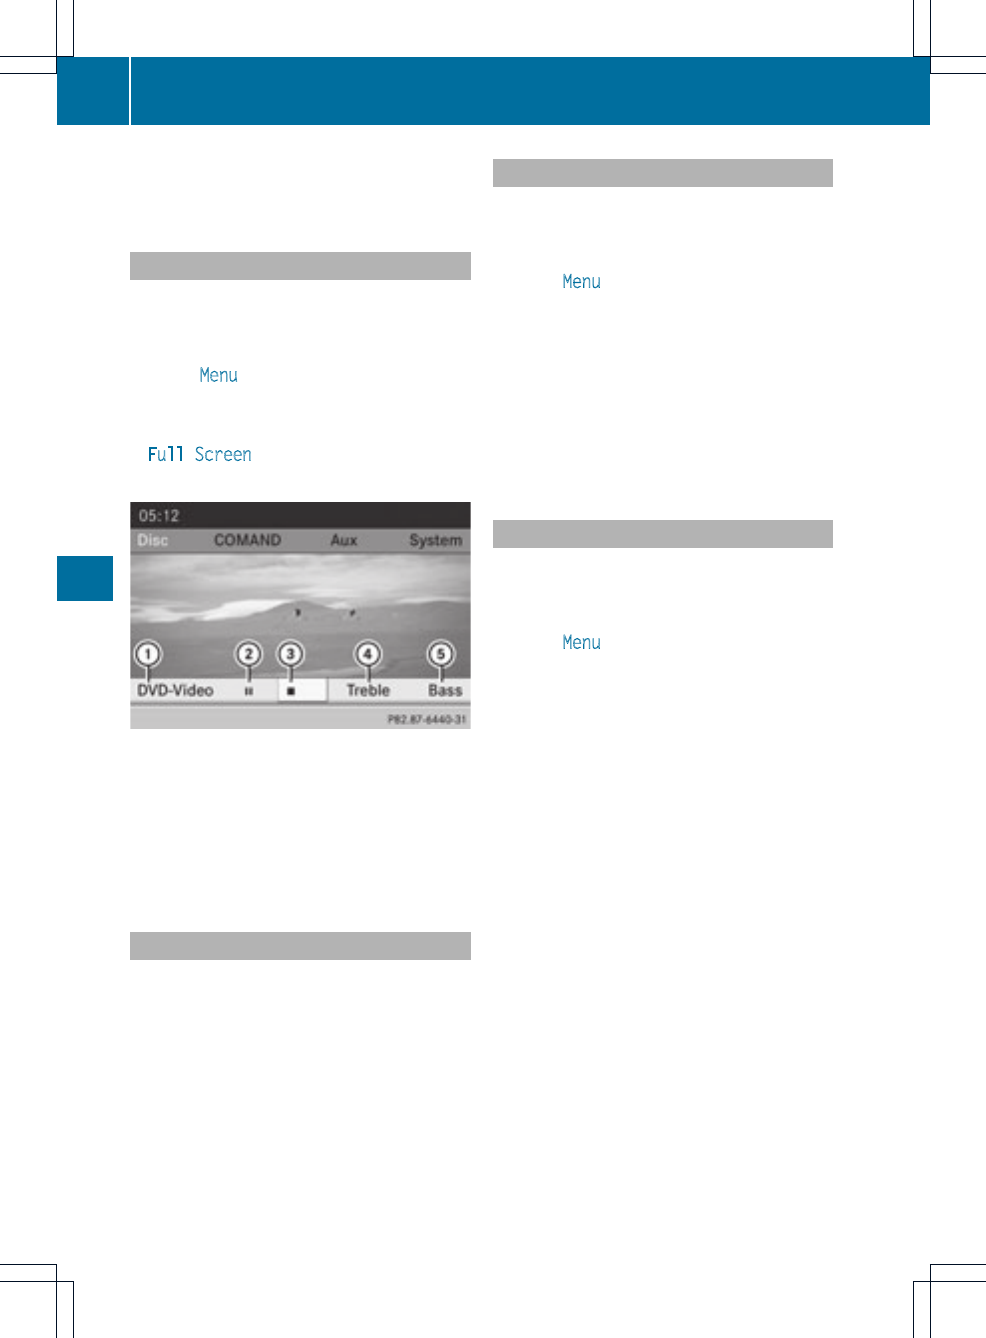
?Track time
ATo show the menu
Showing/hiding the menu
XTo show: press the 9button on the
remote control.
or
XSelect Menu while the navigation menu is
shown and press the 9button to confirm.
XTo hide: press the 9button, select
Full Screen and press the 9button to
confirm.
Menu system
:Video DVD options
;Pause function
=Stop function
?To set the treble
ATo set the bass
Fast forwarding/rewinding
XPress and hold the Eor Fbutton on
the remote control until the desired
position has been reached.
You see the navigation menu.
Pause function
XTo show the menu: press the 9button
on the remote control.
or
XSelect Menu while the navigation menu is
shown and press the 9button to confirm.
XTo pause playback: select Ëand press
the 9button to confirm.
The Ëdisplay changes to Ì.
XTo continue playback: select Ìand
press the 9button to confirm.
The menu is hidden.
Stop function
XTo show the menu: press the 9button
on the remote control.
or
XSelect Menu while the navigation menu is
shown and press the 9button to confirm.
XTo interrupt playback: select Éand
press the 9button to confirm.
The Ëdisplay changes to Ì.The
video image is hidden.
XTo continue playback: select Ìand
press the 9button to confirm.
Playback continues from the point where it
was interrupted. The menu is hidden.
XTo stop playback: while playback is
interrupted, select Éagain and press
the 9button to confirm.
Playback stops and returns to the
beginning of the DVD. Ìis highlighted.
XTo restart playback: select Ìand
press the 9button to confirm.
Playback starts from the beginning of the
DVD.
222 Video DVD mode
Rear Seat Entertainment System
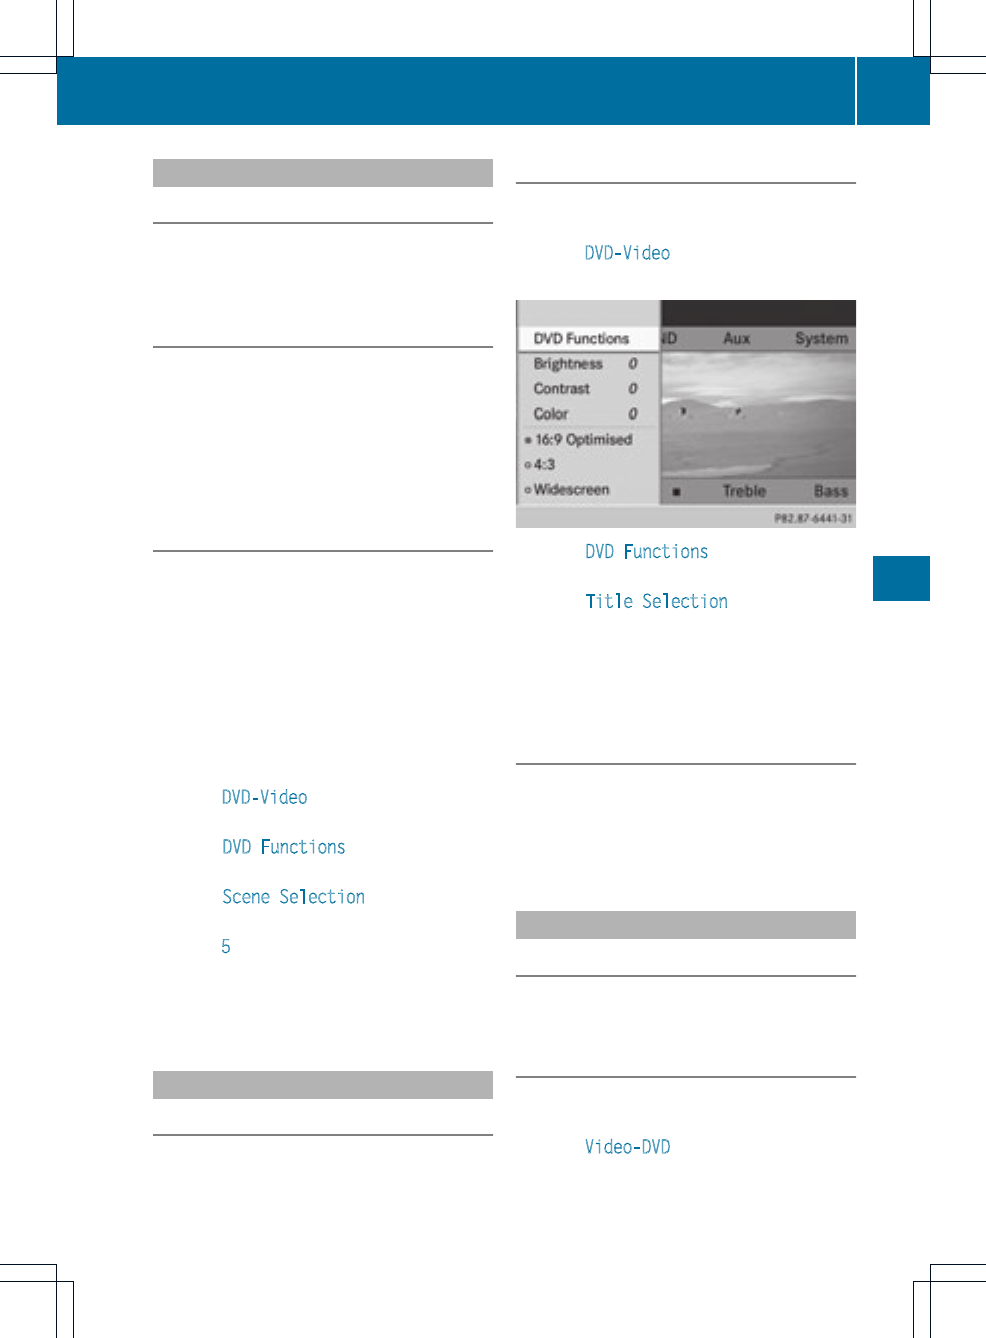
Selecting ascene/chapter
Note
Further information on this function is
available in the "Video" section
(Ypage 189).
Skipping forwards/backwards
XPress the =or ;button on the
remote control.
or
XPress the Eor Fbutton.
The navigation menu (Ypage 188) appears
for approximately eightseconds.
Selecting ascene/chapter directly
The examples illustrate how to select scene/
chapter 5.
XOption 1: while the film is playing, press
the hbutton on the remote control.
XPress the corresponding number key, such
as 5.
XOption 2: while the film is playing, press
the 9button on the remote control and
show the menu.
XSelect DVD-Video and press the 9button
to confirm.
XSelect DVD Functions and press the 9
button to confirm.
XSelect Scene Selection and press the
9button to confirm.
XSelect 5using the 9or :buttonand
press the 9button to confirm.
In both cases, playback will beginfrom the
fifth scene/chapter after a briefpause.
Selecting afilm/title
Note
Further information on this function is
available in the "Video" section
(Ypage 189).
Option 1
XPress the 9button on the remote control
and show the menu.
XSelect DVD-Video and press the 9button
on the remote control to confirm.
XSelect DVD Functions and press the 9
button to confirm.
XSelect Title Selection and press the
9button to confirm.
XTo call up the selection list: press the
9button.
XSelect a film/track.
Option 2
Example: selecting film 2
XPress button 2.
After a brief pause, the second film is
played.
DVD menu
Note
You will find further information on the DVD
menu in the "Video" section (Ypage 190).
Calling up the DVD menu
XPress the 9button on the remote control
and show the menu.
XSelect Video-DVD and press the 9button
on the remote control to confirm.
Video DVD mode 223
Rear Seat Entertainment System
Z
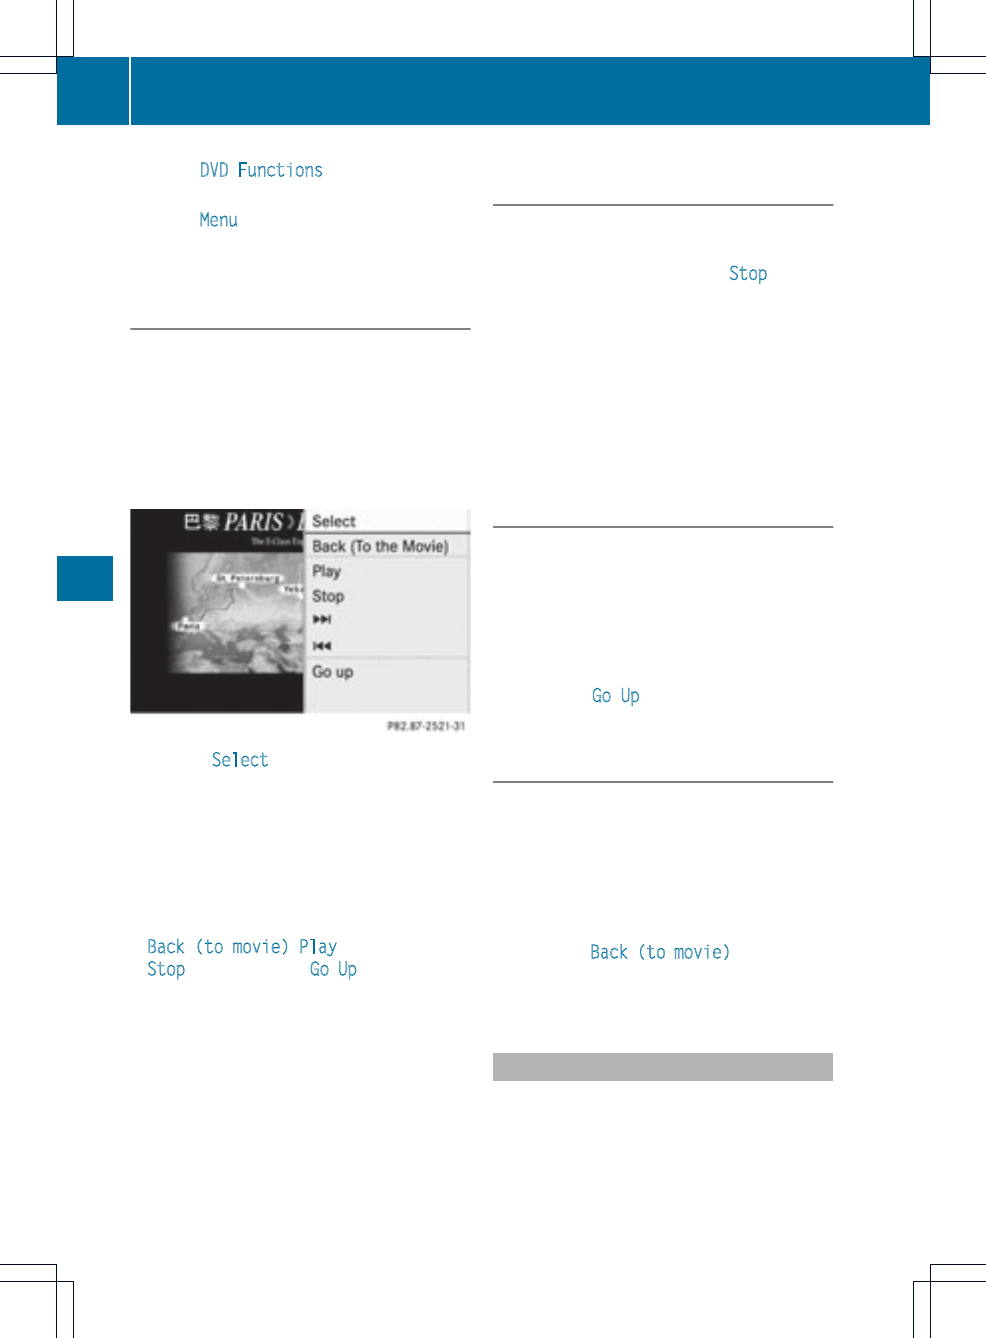
XSelect DVD Functions and press the 9
button to confirm.
XSelect Menu and press the 9button to
confirm.
The DVD menu appears.
Selecting menuitems in the DVD menu
XSelect a menu item using the
9:=; buttons on the
remote control and press the 9button to
confirm.
Amenu appears.
iMenu items which cannot be selected are
shown in gray.
XConfirm Select by pressing the 9button.
The Rear Seat Entertainment System
carries out the action or shows a submenu.
XIf available, additional optionscan now be
selected.
The Rear Seat Entertainment System then
switches back to the DVD menu.
iDepending on the DVD, the menu items:
Back (to movie),Play,
Stop,.,/or Go Up may either not
function at all or may not function at certain
points in the DVD menu. To indicate this,
the Kiconappears in the display.
Stopping a film or skipping to the
beginning or end of ascene
XSelect any menuitem from the DVD menu.
The menu appears.
XTo stop the film: select the Stop menu
itemand press the 9button on the remote
control to confirm.
XTo skip to the end of a scene: select
the /menu itemand press the 9
button to confirm.
XTo skipto the beginning of ascene:
selectthe .menu item and press the
9button to confirm.
Moving up one level in the DVD menu
XOption 1: press the %back button on
the remote control or select the
corresponding menu item in the DVD
menu.
XOption 2: select any menu item in the DVD
menu.
XSelect the Go Up menu item in the menu
and press the 9button to confirm.
Back to the film
XOption 1: press the %back button on
the remote control repeatedly until you see
the film, or select the corresponding menu
item in the DVD menu.
XOption 2: select any menu item in the DVD
menu and press the 9button to confirm.
XSelect the Back (to movie) menu item in
the menu and press the 9button to
confirm.
Setting the audio format
This function is not available on all DVDs. If it
is available, you can set the audio language
or the audio format. The number of settings
is determined by the DVD content. It may also
224 Video DVD mode
Rear Seat Entertainment System

be possible to access the settings from the
DVD menu.
XPress the 9button on the remote control
and show the menu.
XSelect DVD-Video and press the 9
button on the remote control to confirm.
XSelect DVD Functions and press the 9
button to confirm.
XSelect Audio Language and press the 9
button to confirm.
Amenu appears after a short while. The
#dot in front of an entry indicates the
currently selected language.
XSelect a language using the 9:
buttons and press the 9button to confirm.
XTo exit the menu: press the =
or ;button.
Subtitles and camera angle
These functions are not available on all DVDs.
The number of subtitle languages and camera
angles available depends on the contentof
the DVD. It may also be possible to access
the settings from the DVD menu.
XPress the 9button on the remote control
and show the menu.
XSelect DVD-Video and press the 9
button on the remote control to confirm.
XSelect DVD Functions and press the 9
button to confirm.
XSelect Subtitles or Camera Angle and
press the 9button to confirm.
In both cases, a menu appears after a few
seconds. The #dot in front of an entry
indicates the current setting.
XSelect a setting using the 9:
buttons and press the 9button to confirm.
XTo exit the menu: press the =
or ;button.
Interactive content
DVDs can also contain interactive content
(e.g. a video game).Inavideo game, you may
be able to influence events by selecting and
triggering actions. The type and number of
actions depend on the DVD.
XSelect an action using the
9;:= buttons on the
remote control and press the 9button to
execute it.
A menu appears and the first entry,
Select, is highlighted.
XPress the 9button.
Operation with an active COMAND
source
Switching the function on/off in
COMAND
You can transfer an audio or video source
selected in COMAND to the RearSeat
Entertainment System.
iIf you then switch modes in COMAND, the
new source will not be transmitted to the
Rear Seat Entertainment System.
XTo switch on the function in COMAND:
switch on the desired audio mode in
COMAND, e.g. CD mode (Ypage 157), or
show the menu in video DVD mode
(Ypage 188).
XSelect the menu item at the bottom left,
e.g. CD in audio CD mode, by sliding VÆ
and turning cVd the COMAND controller
and press Wto confirm.
Amenu appears.
Operation with an active COMAND source 225
Rear Seat Entertainment System
Z
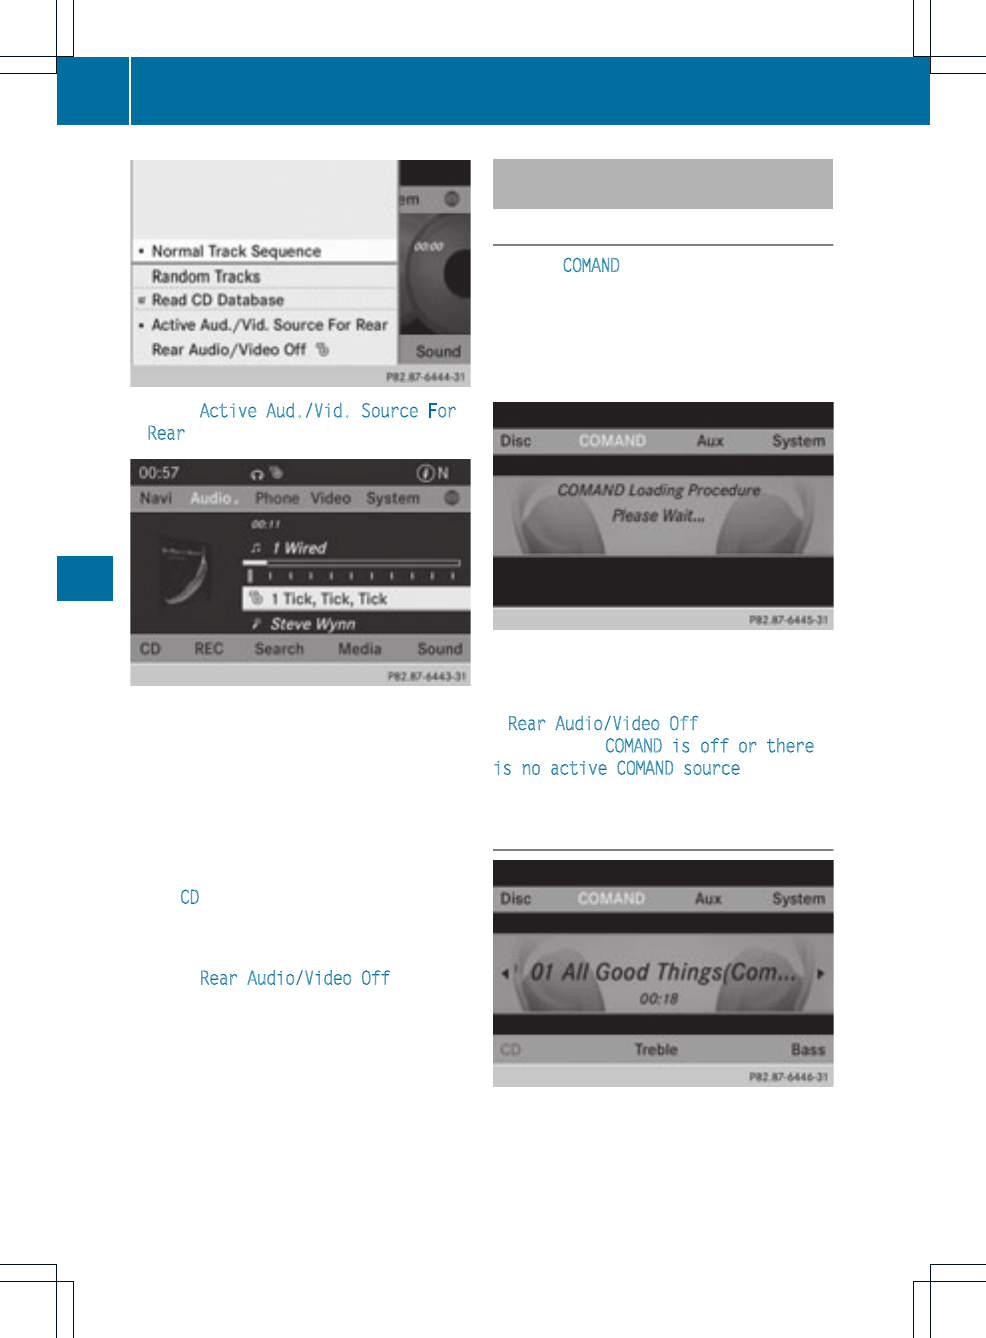
XSelect Active Aud./Vid. Source For
Rear and press Wto confirm.
In the status baratthe top, you will see the
headphones icon and the _icon for the
source that has been switched on.
XTo switch off the function in COMAND:
switch on the desired audio mode in
COMAND or show the menu in video DVD
mode.
XSelect the menu item at the bottom left,
e.g. CD in audio CD mode, by sliding VÆ
and turning cVd the COMAND controller
and press Wto confirm.
XSelect Rear Audio/Video Off_and
press Wthe COMAND controller to
confirm.
Selecting an active COMAND source
in the rear-compartment screen
Loading the active COMAND source
XSelect COMAND using the 9=;
buttons on the remote control and press
9to confirm.
The audio or video source selected in
COMAND is loaded in the Rear Seat
Entertainment System.
When the loading process is complete, the
audio or video source is set in the Rear Seat
Entertainment System.
If Rear Audio/Video Off is activated in
COMAND, the COMAND is off or there
is no active COMAND source message
appears.
Audio CD mode
Example: CD mode
226 Operation with an active COMAND source
Rear Seat Entertainment System
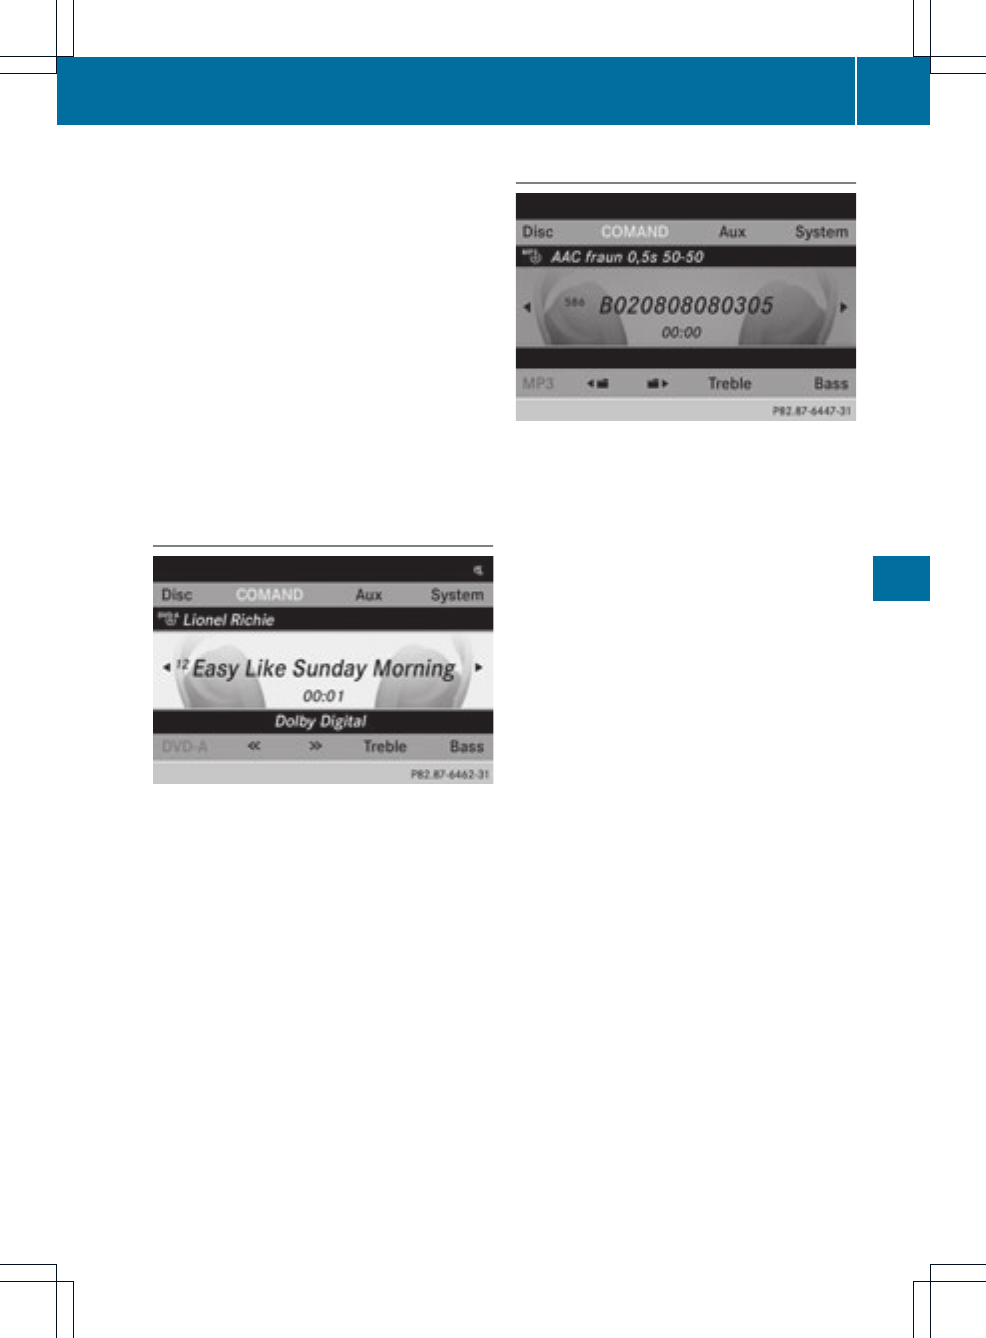
XTo select a track by skipping to a
track: press the =or ;button on
the remote control.
or
XPress the Eor Fbutton.
The skip forward functionskips to the next
track.
Skipping backwards restarts the current
track (ifithas been playing for more than
eightseconds) or starts the previous track
(if the currenttrack has only been playing
for a shorter time).
Additional setting option:
Rselecting the sound settings (Ypage 214)
Audio DVD mode
Example:audio DVDmode
XTo skip to the next/previous group:
press the :button on the remote
control.
XHighlight with the =or ;or bor
cbutton and press 9to confirm.
iInformation on groups can be found in the
"Setting the audio format" section
(Ypage 163).
Additional setting option:
Rselecting the sound settings (Ypage 214)
MP3 mode
Example: MP3 mode
XTo select a track by skipping to a
track: press the =or ;button on
the remote control.
or
XPress the Eor Fbutton.
The skip forward function skips to the next
track.
Skipping backwards restarts the current
track (if it has been playing for more than
eight seconds) or starts the previous track
(if the current track has only been playing
for a shorter time).
XTo selectafolder: press the :button
on the remote control.
XHighlight one of the two foldersymbols
with the =or ;buttonand press
9to confirm.
Depending on your selection, the previous
or next folderis selected and the first track
is played.
Additional setting option:
Rselecting the sound settings (Ypage 214)
Operation with an active COMAND source 227
Rear Seat Entertainment System
Z
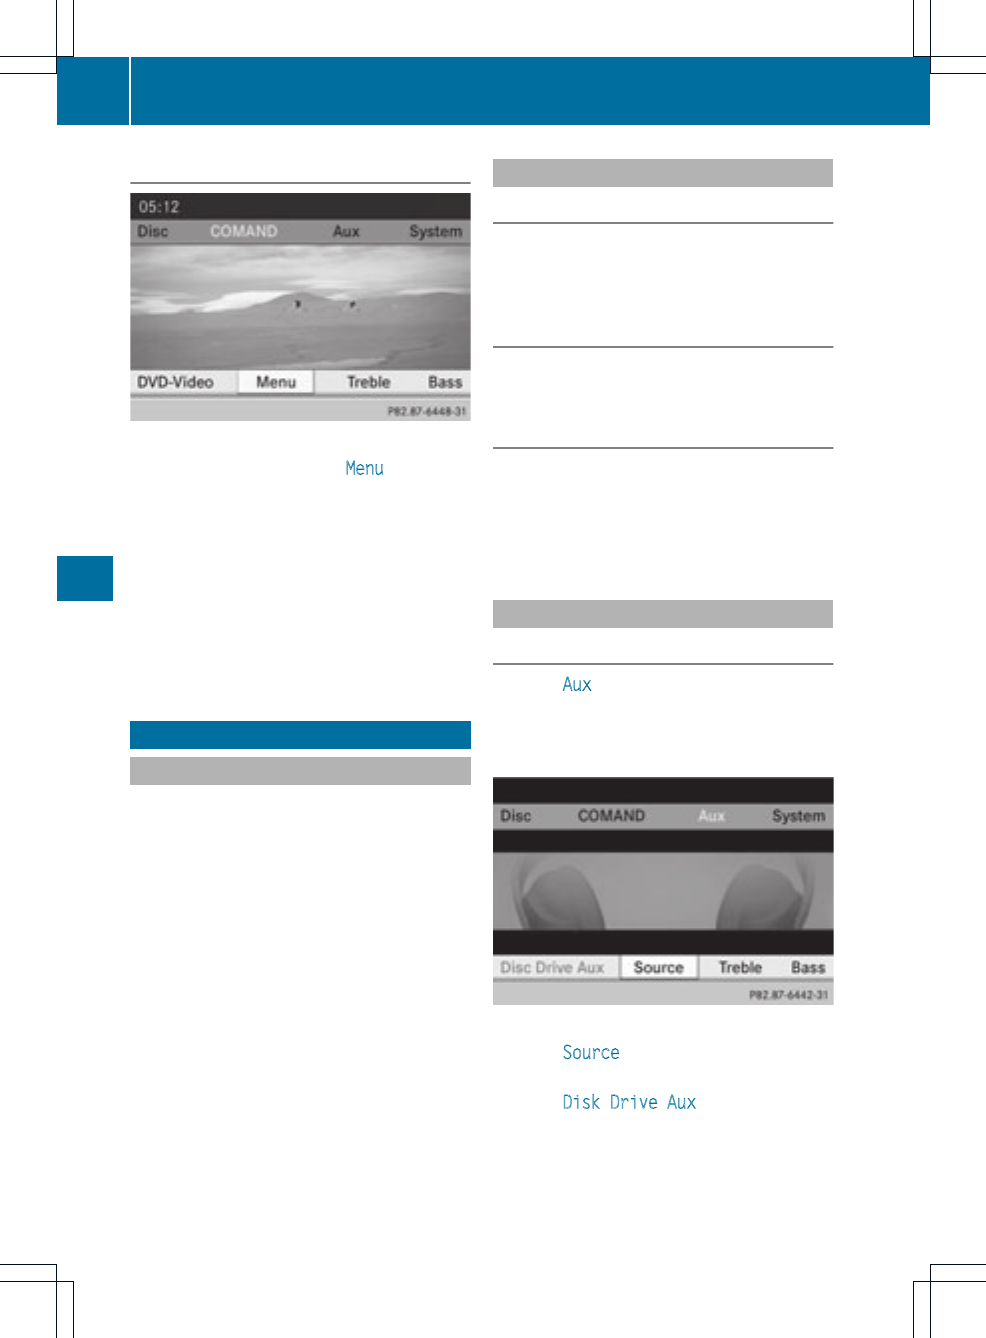
Video DVD mode
Example: video DVD mode
XTo hide a menu: confirm Menu with the
9button.
The video image is played in full screen
mode.
Additional setting options:
Rsetting the brightness, contrast and color
(Ypage 214)
Rchanging the picture format (Ypage 215)
Rselecting the sound settings (Ypage 214)
AUX mode
Introduction
You can connect one external video source to
each of the displays of the Rear Seat
Entertainment System (AUX display) and also
one external video source to the rear-
compartment CD/DVD drive (AUX drive) with
a sound and video signal.
Please see the corresponding operating
instructions for information on how to
operate the external video source.
For further details aboutexternal video
sources, please consult an authorized
Mercedes-Benz Center.
Connecting AUX equipment
AUX drive
The AUX drive jacks are located on the CD/
DVD drive next to the CD/DVD eject button
(Ypage 210).
Displaying AUX
The AUX display jacks are on the side of the
screen (Ypage 209).
Audio and video connection
XInsert the audio plugs for the left and right
signals into the corresponding Land R
jacks.
XInsert the video plug into the Vjack.
Activating AUX mode
AUX drive
XSelect Aux in the menu using the
9=; buttons on the remote
control and press the 9button to confirm.
The AUX menu appears.
AUX menu
XSelect Source from the AUX menu and
press the 9button to confirm.
XSelect Disk Drive Aux and press the 9
button to confirm.
You will hearand see the content of the
external video source if it is connected to
the CD/DVD drive and switched to
228 AUX mode
Rear Seat Entertainment System
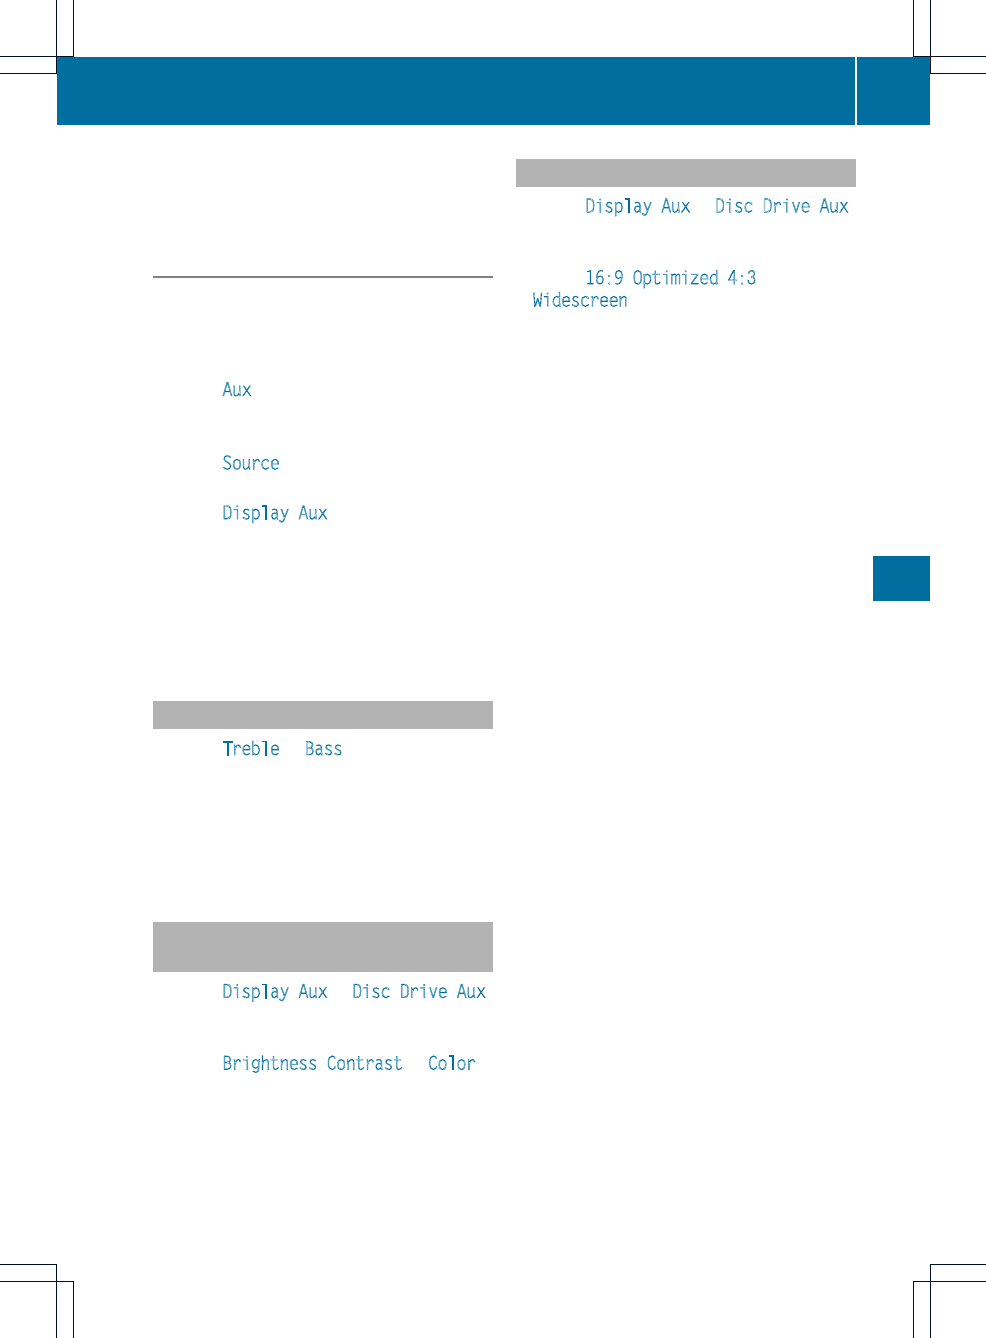
playback. If no video image is available
from the AUX source connected, you will
see an audio menu.
Displaying AUX
XSelect the screen by turning the scroll
wheel on remote control (Ypage 210)until
"LREAR " (left screen) or "REAR R" (right
screen) is highlighted in the window.
XSelect Aux in the menu using the
9=; buttons on the remote
control and press the 9button to confirm.
XSelect Source from the AUX menu and
press the 9button to confirm.
XSelect Display Aux and press the 9
button to confirm.
You will see and hearthe content of the
video source if it is switched to playback. If
no video image is available from the AUX
source connected, you will see an audio
menu.
Adjusting treble and bass
XSelect Treble or Bass in the AUX menu
and press the 9button on the remote
control to confirm.
An adjustment scale appears.
XSelect a setting using the 9or :
button and press the 9button to confirm.
Adjusting the brightness, contrast or
color
XSelect Display Aux or Disc Drive Aux
in the AUX menu and press the 9button
to confirm.
XSelect Brightness,Contrast or Color
and press the 9button to confirm.
An adjustment scale appears.
XSelect a setting using the 9or :
button and press the 9button to confirm.
Changing the picture format
XSelect Display Aux or Disc Drive Aux
in the AUX menu and press the 9button
to confirm.
XSelect 16:9 Optimized,4:3 or
Widescreen using the 9: buttons
and press the 9button to confirm.
The dot in front of a menu item indicates
the current setting.
AUX mode 229
Rear Seat Entertainment System
Z

230

231

232
