Mercedes Benz Car Amplifier Audio 50 Users Manual W211 US HU Mid
2015-02-05
: Mercedes-Benz Mercedes-Benz-Car-Amplifier-Audio-50-Users-Manual-398600 mercedes-benz-car-amplifier-audio-50-users-manual-398600 mercedes-benz pdf
Open the PDF directly: View PDF ![]() .
.
Page Count: 91
Mercedes
-
Benz
Audio 50 Operator’s Manual
Congratulations on your new
Mercedes-Benz car radio.
Please familiarise yourself with your car ra-
dio and read the operating manual before
driving off. This will ensure your complete
enjoyment of your car radio and prevent
danger to yourself and to others.
Depending on the equipment version and
your vehicle model, the following compo-
nents may be installed: CD changer*, tele-
phone*, LINGUATRONIC* and sound
system*.
The operating manual also contains de-
scriptions of these functions. Therefore, it
is possible that some of the descriptions
contained herein do not apply to your
radio.
Mercedes-Benz constantly update their car
radios to the latest technological stan-
dards and therefore retain the right to im-
plement changes in design, equipment and
technology. Thus, no liability can be de-
rived from the statements, illustrations
and descriptions contained in this operat-
ing manual.
For further questions, please contact your
Mercedes-Benz service centre.
This operating manual is a component part
of your vehicle. It should therefore always
be kept in your vehicle and should be
passed on to the new owner, if the car is
sold.
The Technical Editors of
DaimlerChrysler AG wish
you “Good driving”.

Contents
Introduction . . . . . . . . . . . . . . . . . . . . . 3
Concept of this manual . . . . . . . . . . . . . 3
Symbols . . . . . . . . . . . . . . . . . . . . . . . . . 4
Operating safety. . . . . . . . . . . . . . . . . . . 5
At a glance . . . . . . . . . . . . . . . . . . . . . . 7
Radio operating elements . . . . . . . . . . . 8
Cassette operating elements . . . . . . . . 10
CD operating elements . . . . . . . . . . . . 12
Telephone operating elements. . . . . . . 14
Multifunction steering wheel . . . . . . . . 16
Introduction . . . . . . . . . . . . . . . . . . . . 17
Menu system . . . . . . . . . . . . . . . . . . . . 18
Menu functions and submenus . . . 19
Quitting submenus . . . . . . . . . . . . . 19
General operation . . . . . . . . . . . . . . . . 20
Switching on/off . . . . . . . . . . . . . . 20
Volume . . . . . . . . . . . . . . . . . . . . . 20
Automatic volume control . . . . . . . 21
Balance and Fader . . . . . . . . . . . . 21
Bass and Treble . . . . . . . . . . . . . . . 22
Additional sound functions*. . . . . . 22
Audio . . . . . . . . . . . . . . . . . . . . . . . . . . 25
Audio main menu . . . . . . . . . . . . . . . . . 26
Calling up Audio main menu. . . . . . 26
Changing audio source. . . . . . . . . 26
Mute function . . . . . . . . . . . . . . . . 26
Radio mode . . . . . . . . . . . . . . . . . . . . . 27
FM or AM main menu . . . . . . . . . . . 27
Switching wavebands . . . . . . . . . . . 27
Selecting stations . . . . . . . . . . . . . 27
Storing stations . . . . . . . . . . . . . . 31
Weather band . . . . . . . . . . . . . . . . . 32
Changing weather band stations . . 33
Cassette Mode . . . . . . . . . . . . . . . . . . . 34
Opening cassette cover . . . . . . . . . 34
Closing cassette cover . . . . . . . . . . 34
Inserting cassette. . . . . . . . . . . . . 34
Ejecting cassette . . . . . . . . . . . . . . 35
Tape main menu . . . . . . . . . . . . . . 35
Switching cassette side . . . . . . . . 35
Selecting track . . . . . . . . . . . . . . . . 36
Fast forward/rewind. . . . . . . . . . . . 37
Skip blank. . . . . . . . . . . . . . . . . . . . 37
Dolby B NR Noise Reduction . . . . . 38
CD Mode . . . . . . . . . . . . . . . . . . . . . . . 39
General information . . . . . . . . . . . 39
Opening CD changer*. . . . . . . . . . . 40
Retracting CD changer* . . . . . . . . . 40
Loading CDs . . . . . . . . . . . . . . . . . . 40
Ejecting CDs . . . . . . . . . . . . . . . . . 43
CD main menu . . . . . . . . . . . . . . . . 45
Selecting CDs . . . . . . . . . . . . . . . . 46
Selecting track . . . . . . . . . . . . . . . . 47
Audible fast forward or
fast reverse. . . . . . . . . . . . . . . . . . . 49
Playback options. . . . . . . . . . . . . . . 50
Explanation of playback options . . . 50
Multifunction steering wheel . . . . . . . . 52
Telephone* . . . . . . . . . . . . . . . . . . . . . 53
Safety instructions . . . . . . . . . . . . . . . . 54
General information . . . . . . . . . . . . . . . 55
Operation . . . . . . . . . . . . . . . . . . . . . . . 57
Switching on telephone . . . . . . . . . 57
Switching off telephone . . . . . . . . 57
“911” emergency calls . . . . . . . . . . 58
Unlock code entry. . . . . . . . . . . . . . 59
Switching to telephone mode. . . . 59
Missed or unanswered calls . . . . . . 60

Contents
Telephone main menu . . . . . . . . . 60
Incoming call. . . . . . . . . . . . . . . . . . 61
Accepting call . . . . . . . . . . . . . . . . . 62
Terminating call . . . . . . . . . . . . . . . 62
Outgoing call. . . . . . . . . . . . . . . . . . 62
Entering phone number directly . . . 62
Redial function . . . . . . . . . . . . . . . . 63
Selecting entry from the
Recvd # list . . . . . . . . . . . . . . . . . . 63
Selecting entry from the
Dialed # list . . . . . . . . . . . . . . . . . . 64
Speed dial . . . . . . . . . . . . . . . . . . . . 65
Starting call. . . . . . . . . . . . . . . . . . . 66
Terminating call . . . . . . . . . . . . . . . 66
Active call . . . . . . . . . . . . . . . . . . . . 66
Telephone book . . . . . . . . . . . . . . . 68
Calling up the telephone book . . . . 68
Selecting telephone book entry . . . 69
Voice tag. . . . . . . . . . . . . . . . . . . . . 70
SMS . . . . . . . . . . . . . . . . . . . . . . . . . . . 71
SMS menu . . . . . . . . . . . . . . . . . . . 71
Switching between Sender
and Subject. . . . . . . . . . . . . . . . . . . 71
Selecting message . . . . . . . . . . . . . 71
Reading message . . . . . . . . . . . . . . 71
Deleting message . . . . . . . . . . . . . . 72
Quitting the SMS menu. . . . . . . . . . 72
Multifunction steering wheel . . . . . . . . 73
Service. . . . . . . . . . . . . . . . . . . . . . . . . 75
System menu . . . . . . . . . . . . . . . . . . . . 76
Calling up the System menu. . . . . . 76
Setting the time . . . . . . . . . . . . . . 76
Changing the display design . . . . . . 77
Brightness setting. . . . . . . . . . . . . . 77
Linguatronic* help text . . . . . . . . . . 77
Setting the language. . . . . . . . . . . 78
Technical terminology . . . . . . . . . . . . 79
Index . . . . . . . . . . . . . . . . . . . . . . . . . . 81

3
Concept of this manual
Introduction
Concept of this manual
This operating manual was designed to
help you to use your car radio in all situa-
tions. In order to make finding the informa-
tion easier, each chapter has its own
colour code.
At a glance
This will give you an overview of all operat-
ing elements
Introduction
Here, you will find a description of the
menu system and the general operating
functions
(e.g. switching on/off, volume and sound
settings).
Audio
Here, you will find all you need to know to
be able to operate the audio system (radio,
cassette and CD mode).
Telephone*
Here, you will find all necessary informa-
tion for operation of the telephone.
Service
Here, you will find all necessary informa-
tion to use the service functions.
Indexes
The glossary explains the most important
technical terms.
Content and keyword indexes are intended
to help you find information quickly.

4
Introduction
Symbols
Symbols
The following symbols are used in this
operating manual:
*This star indicates special equipment
for all models. Not all the models have
the same special equipment and there-
fore the equipment of your model may
differ from some descriptions and illus-
trations.
왘This symbol indicates that you should
perform an action.
왘Several of these symbols indicate a se-
ries of actions.
컄컄 This continuation symbol signifies
that a series of actions was inter-
rupted and will be continued on the
next page.
Warnings G
A warning points out possible hazards for
your safety, your health or your life.
i
A tip gives you advice or additional in-
formation.

5
Introduction
Operating safety
Operating safety
Accident hazard G
In order to avoid distraction which could
lead to an accident, system settings should
be entered with the vehicle at a standstill
and the system should be operated by the
driver only when traffic conditions permit.
Bear in mind that at a speed of just 30 mph
(approximately 50 km/h), your car is cover-
ing a distance of 50 feet (approximately
14 m) every second.
iFaults
The Audio 50, the CD-changer*, the
telephone*, the LINGUATRONIC* and
the Sound-system* are interconnect-
ed. Thus, the failure or incorrect remov-
al of one of the components can also
interfere with the function of the
others.
For this reason, work on the compo-
nents should be performed by a spe-
cialist workshop.
iServicing
Always have all servicing carried out by
a qualified specialist workshop.
DaimlerChrysler recommends your
Mercedes-Benz Service center, as this
has the necessary expertise and tools
for any necessary operations.
In particular for operations critical to
safety and operations on systems criti-
cal to safety, servicing by a qualified
specialist workshop is essential.

6

8
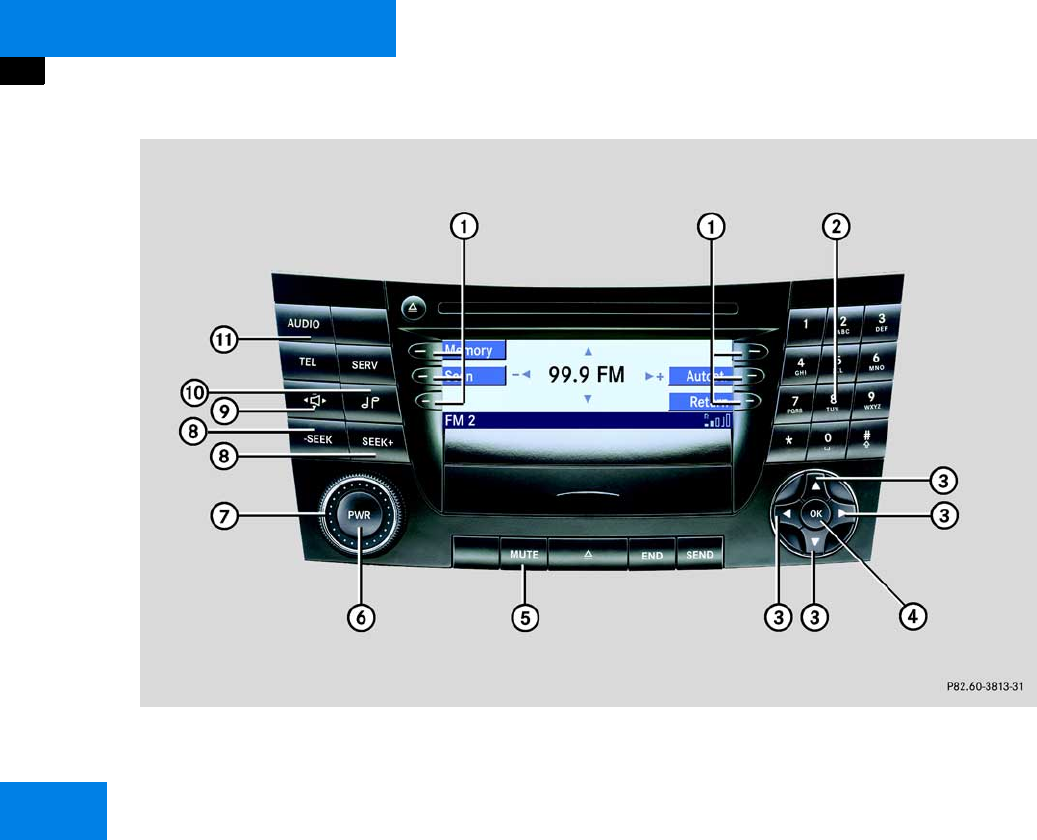
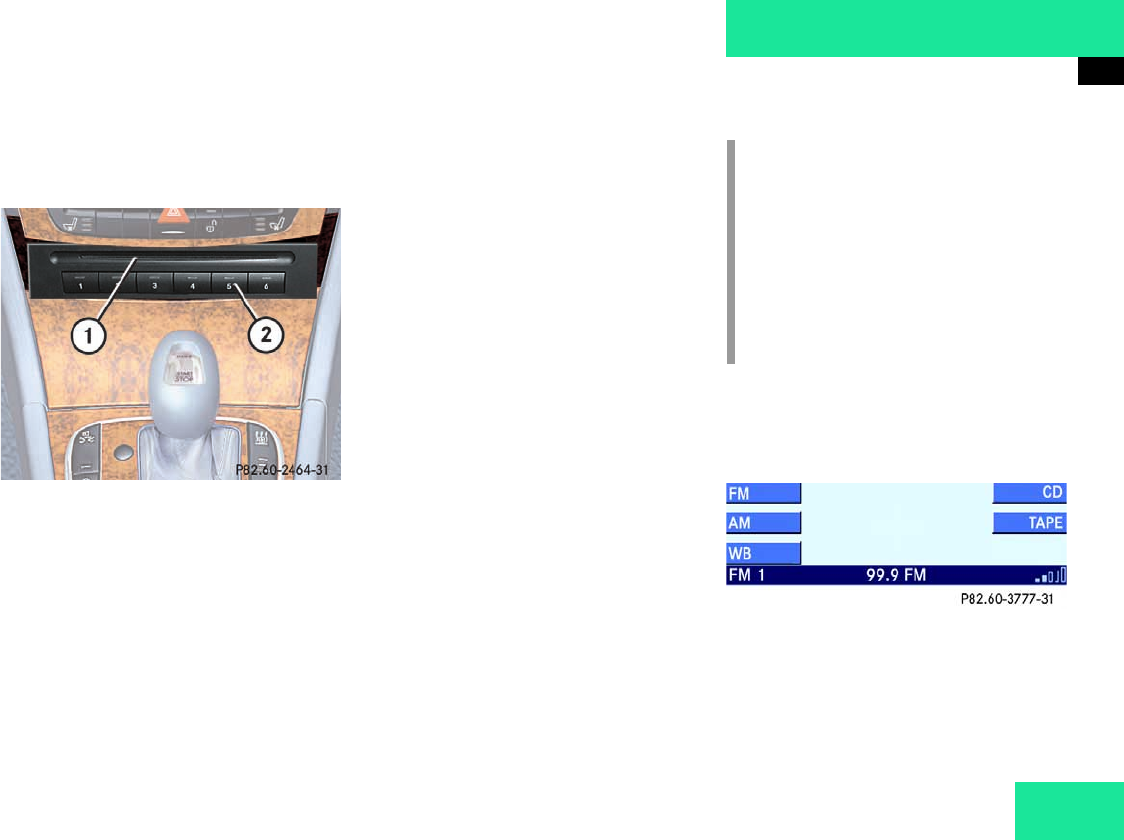
At a glance
Radio operating elements
Radio operating elements

9
At a glance
Radio operating elements
Function Page
1Soft keys
2! - 0
Manual frequency entry
Storing stations
Calling up preset memory
31
31
29
Function Page
3 r c d
Selection functions
4p Confirmation
5G Mute function 26
6K Switching on/off 20
7Volume adjustment 20
Function Page
8 and X
Station search
Manual tuning
28
30
9b Balance and Fader 30
10 k Bass and Treble 22
11 a Audio main menu 26

10
At a glance
Cassette operating elements
Cassette operating elements

11
At a glance
Cassette operating elements
Function Page
1Soft keys
2Closing cassette panel 34
3 r c d
Selection function
4p Confirmation
5Cassette cover
6 Opening cassette cover
and ejecting cassette 34
Function Page
7G
Mute function 26
8K Switching on/off 20
9Volume adjustment 20
10 X
Forward track search
Fast forward
36
37
Function Page
11
Backward track search
Rewind
36
37
12 b Balance and Fader 21
13 k Bass and Treble 22
14 a Audio main menu 26
12
At a glance
CD operating elements
CD operating elements

13
At a glance
CD operating elements
Function Page
1E CD ejection 43
2Soft keys
3CD slot 40
4! - 0
Track number entry
! - 6 and 0
Selecting CD
48
48
5 r c d
Selection functions
Function Page
6p Confirmation
7G Mute function 26
8K Switching on/off 20
9Volume adjustment 20
10
Backward track skip
Reverse
48
49
Function Page
11 X
Forward track skip
Forward
48
49
12 b Balance and Fader 21
13 k Bass and Treble 22
14 a Audio main menu 26
14
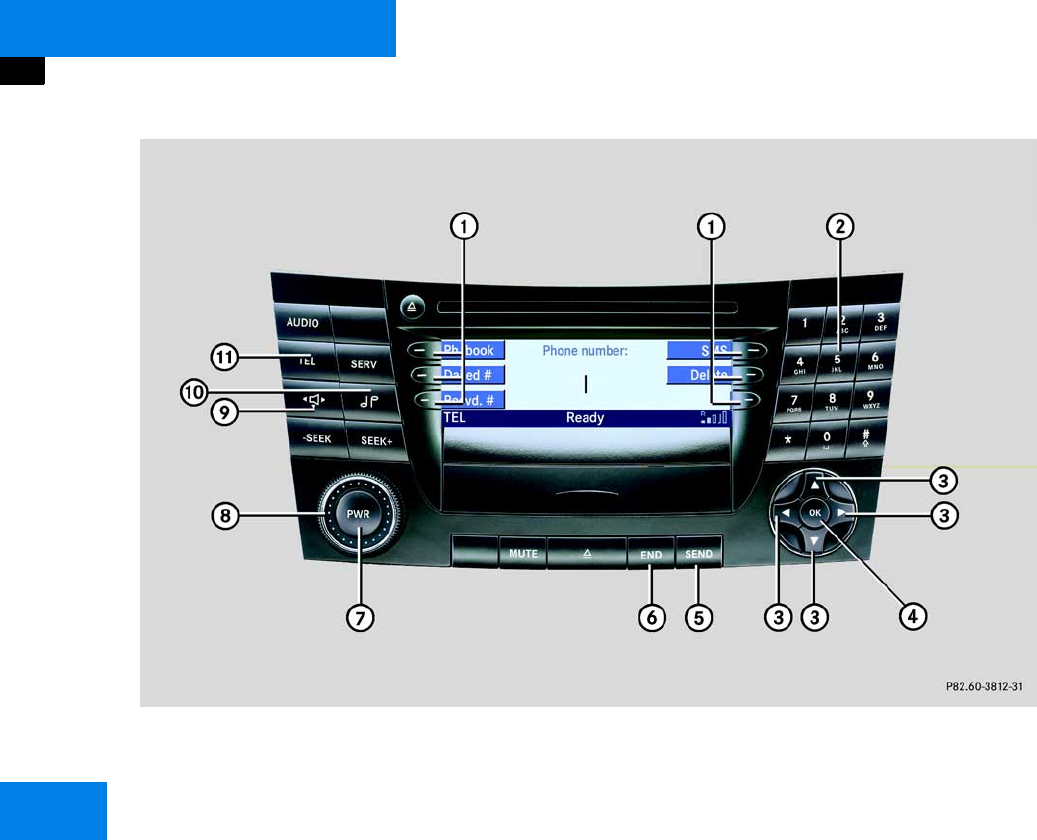
At a glance
Telephone operating elements
Telephone operating elements

15
At a glance
Telephone operating elements
Function Page
1Function buttons
2! - 0
Unlock code entry
Phone number entry
Speed dial
59
62
65
3 r c d
Selection function
4p Confirmation
Function Page
5J
Accepting call
Starting call
Redial function
62
66
63
6I Terminating call 67
7K Switching on/off 20
8Volume adjustment 20
Function Page
9b Balance and Fader 21
10 k Bass and Treble 22
11 t
Telephone main menu
Switching on telephone
Switching off telephone
60
57
57

16
At a glance
Multifunction steering wheel
Multifunction steering wheel
Function Page
1 Multifunction display
2 Adjusting volume
ç Quieter
æ Louder
Settings menu
20
20
Function Page
3 Making calls:
í
Accepting call
Starting call
Redial function
ì
Terminating call
62
66
63
67
4 Changing menu in multi-
function display:
è forwards
ÿ backwards
5CD and cassette mode:
j next track
k previous track
Function Page
5 Radio mode:
j next station
k previous station
Telephone mode:
j next list entry
k previous list entry

18
Introduction
Menu system
Menu system
The Audio 50 is easy to use thanks to its
menu system.
Each of the main functions, i.e. audio
(radio, CD and cassette mode), telephone*
and service, has its own main menu.
Main menus
왘Audio:
Press the a button (컄Page 26).
왘Telephone:
Press the t button (컄Page 60).
왘Service:
Press the s button (컄Page 76).
Menu display
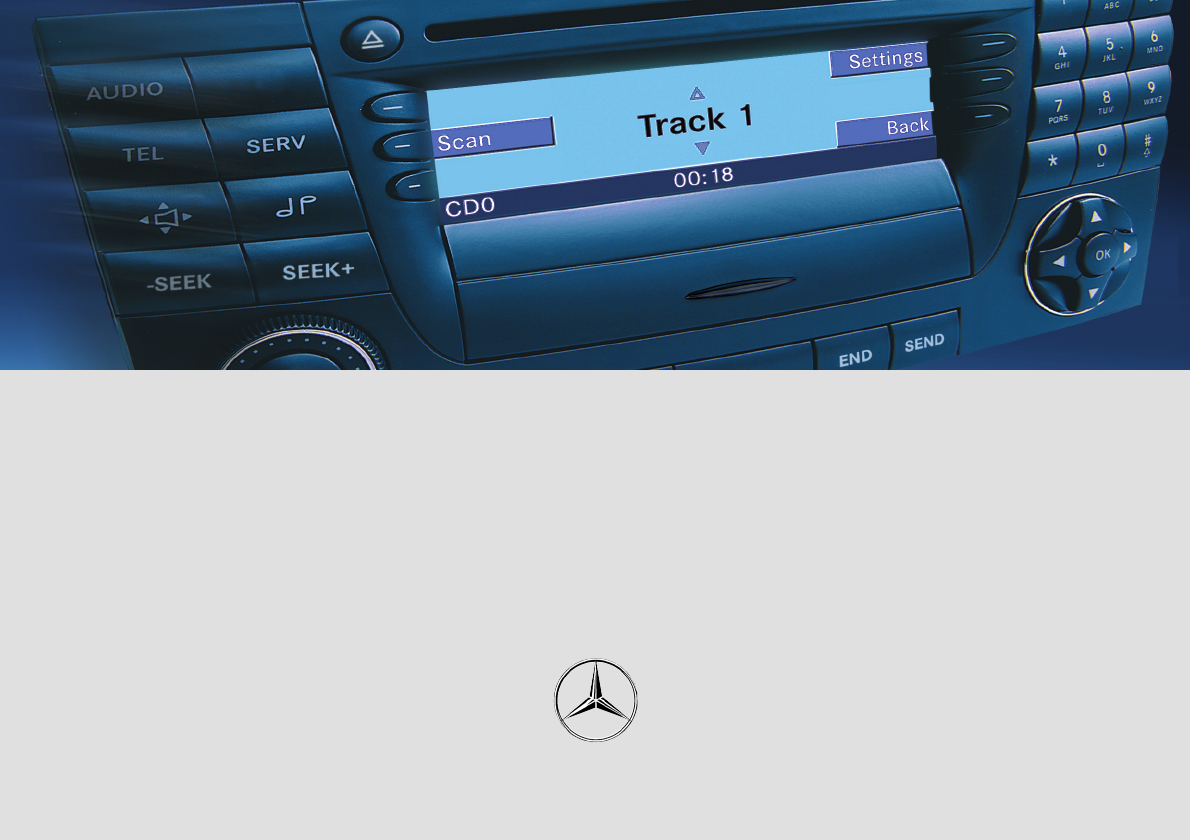
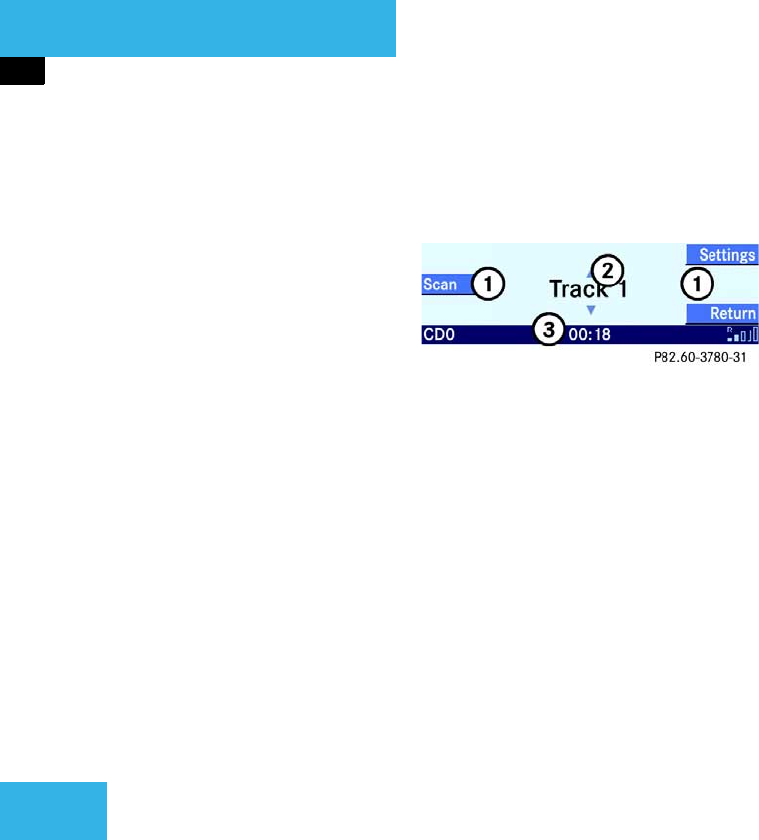
A display may have 3 areas.
Example: Single CD menu
1Soft keys
2Main area
3Status line
The functions currently assigned to the
function buttons are displayed in the
button area 1.
There may be a maximum of 3 soft keys on
both the left and the right side directly next
to the display.
The main area 2 displays messages or set-
tings.
The settings can be changed by operating
accordingly.
The status line 3 is divided into three
areas.
Left side:
The selected operating mode is given. In
this example: CD.
Center:
A status display for the selected operating
mode is given. In this example, the playing
time of the track.
Right side:
General status information is displayed,
regardless of the selected operating mode.
In this example: The strength of reception
for the telephone*.
19
Introduction
Menu system
Menu functions and submenus
In the menus, it is possible to switch func-
tions on and off and open other submenus
using the soft keys.
Example: FM main menu:
앫The Scan soft key switches the scan
search on or off.
앫The Memory soft key opens the Mem-
ory submenu.
In some situations, soft keys may not have
any function. In such cases, they have a
different appearance from the others.
Example: The soft keys OK and Delete
Quitting submenus
You can quit submenus using the Return
soft key. The display switches to the next
highest menu level.
The system does not adopt modified set-
tings that have not been stored.
There are exceptions when pressing the
Return soft key will also store new set-
tings. These exceptions are described in
detail.

20
Introduction
General operation
General operation
Switching on/off
Switching on
왘Turn the key in the steering lock to po-
sition 1 or 2.
or
왘Press the K button.
In both cases, the system defaults to
the mode last used before the unit was
switched off. The operating mode’s
main menu is displayed.
Switching off
왘Turn the key in the steering lock to po-
sition 0 and remove it.
or
왘Press the K button.
Volume
The volume settings for the audio sources
and the telephone* can be set indepen-
dently. The system automatically stores
each setting.
A single setting is stored for the radio, cas-
sette and CD audio sources. The system
automatically stores the setting.
Adjusting the volume
왘On the Audio 50 turn the rotary
control O.
or
왘On the multifunction steering wheel,
press æ or ç.
You will adjust the volume to be louder
or quieter, according to the direction of
rotation or the button that is pressed.
i
The system can be operated as follows:
앫from the Audio 50 itself
앫from the multifunction steering
wheel
In this operating manual, operation
from the Audio 50 and from the multi-
function steering wheel is described.
Unless otherwise specified, the de-
scriptions and the displays illustrated
relate to the Audio 50.
i
Without the key in position 1 or 2 of the
steering lock, the system automatically
switches off again after about 30 min-
utes.
21
Introduction
General operation
The system automatically stores the
volume settings on switching off.
After switching on again, the volume
may be quieter than when switched off.
It is quieter if:
앫the system was switched off for more
than 15 minutes
앫or if the volume was set to a value out-
side a certain range when switching off
Automatic volume control
The automatic volume control adjusts the
volume depending on
앫the vehicle speed (only in vehicles with-
out Sound-system*)
앫or noises inside the vehicle (only in ve-
hicles with Sound-system*)
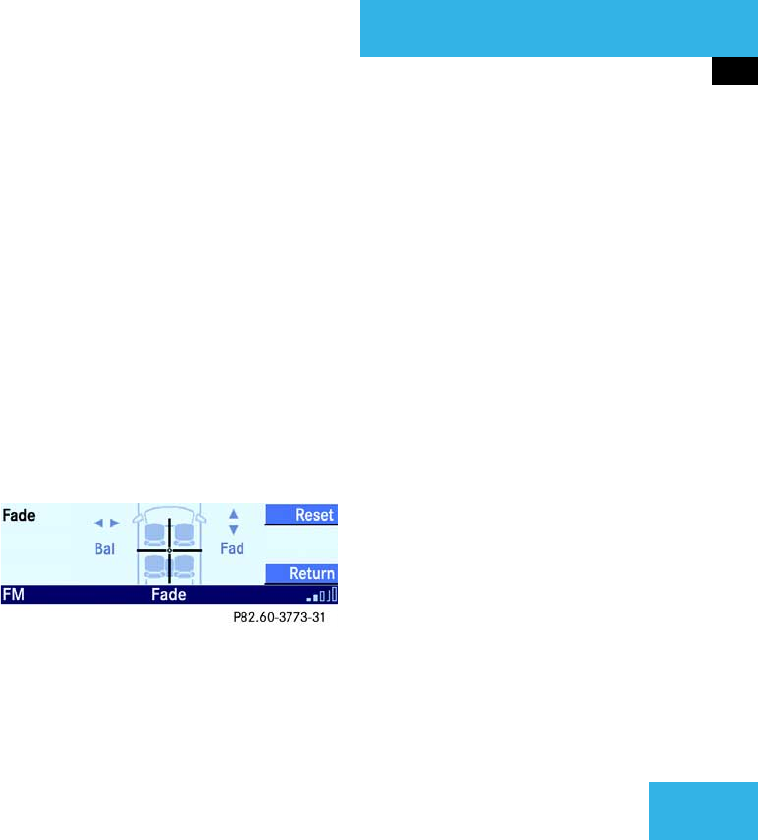
Balance and Fader
A single setting is stored for the balance
and the fader for radio, cassette and CD
mode. The system automatically stores
each setting.
The balance and the fader setting for tele-
phone mode are independent of all other
operating modes. The system automatical-
ly stores each setting.
Adjusting balance and fader:
왘Press b.
The Balance/Fader menu is displayed.
The vertical bar indicates the balance
setting.
The horizontal bar indicates the fader
setting.
왘Press or r.
This will change the balance setting.
or
왘Press c or d.
This will change the fader setting.
왘Press the Reset soft key if desired.
This will reset the balance and the fad-
er to the center setting.
왘Press p or the Return soft key.
or
왘Wait until the Volume menu disap-
pears.
The new setting is stored.
22
Introduction
General operation
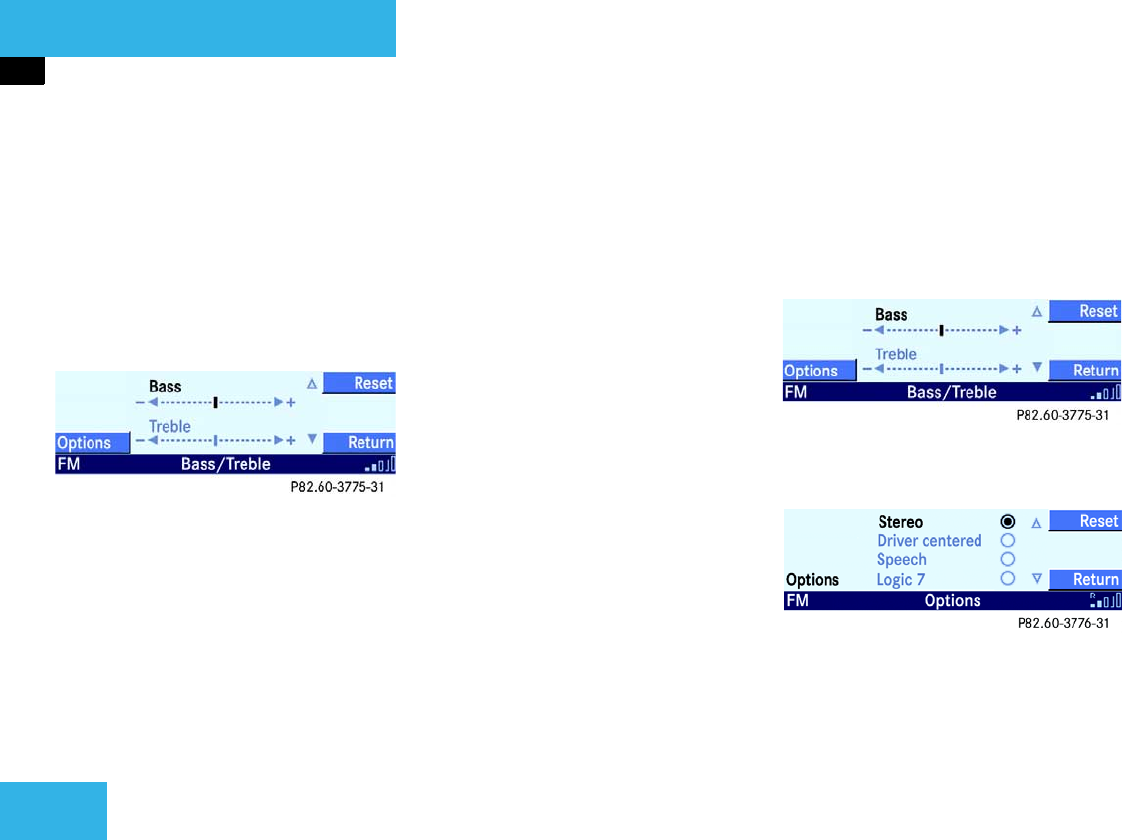
Bass and Treble
Different bass and treble settings are pos-
sible for all operating modes. The system
automatically stores each setting.
Adjusting bass and treble:
왘Press k.
The Tone menu is displayed.
왘By pressing c or d select either the
Bass or the Treble function.
왘Press or r.
This will change the bass or treble set-
ting.
왘Press the Reset soft key if desired.
This will reset the bass and the treble
setting to the center setting.
왘Press p.
or
왘Wait until the Tone menu disappears.
The new setting is stored.
Additional sound functions*
The following functions are available:
앫Stereo (컄Page 23)
앫Driver centered (컄Page 23)
앫Speech (컄Page 23)
앫Logic 7 (컄Page 23)
Selecting and activating function:
An additional sound function can be acti-
vated by selecting it in the Sound menu.
왘Press k.
The Tone menu is displayed.
왘Press the Options soft key.
The Sound menu is displayed.

23
Introduction
General operation
왘By pressing c or d select the de-
sired function.
or
왘Press the Reset soft key.
This will activate the Logic 7 function
(factory setting).
왘Press p.
The selected setting is stored. A corre-
sponding message is given in the sta-
tus line.
Explanation of the additional sound
functions
앫Stereo:
Conventional stereo sound.
앫Driver-centered:
Stereo sound, optimized for the driver’s
seat.
앫Speech:
Stereo sound, optimized for under-
standing speech.
앫Logic 7:
Ambient sound.
i
Logic 7 sound provides better spatial
sound quality than with conventional
stereo sound. Logic 7 sound functions
with all conventional stereo audio
sources (e.g. stereo cassette, stereo
CD and stereo radio stations).
If reception is poor, Logic 7 should be
switched off because this may consid-
erably impair the signal.

24

26
Audio
Audio main menu
Audio main menu
In the Audio main menu you can switch be-
tween the following audio sources:
앫Radio (FM, AM, WB wavebands)
앫Cassette (tape)
앫CD
In addition, you can also switch the mute
function on or off.
Calling up Audio main menu
왘On the Audio 50, press a.
The Audio main menu is displayed.
Changing audio source
Example: Switching to FM waveband
왘Call up the Audio main menu
(컄Page 26).
왘For radio mode in the FM waveband,
press the FM soft key.
The FM main menu with the last select-
ed station is displayed.
Mute function
Switching on mute function
왘On the Audio 50, press G.
The system is muted. Telephone calls
can still be heard.
In CD and cassette mode, the CD or the
cassette stops.
Switching off mute function
왘On the Audio 50, press G again.
or
왘Turn the volume rotary control.
The audio source selected before mute
function activation is heard.
P82.60-3777-31
P82.60-3785-31
27
Audio
Radio mode
Radio mode
Switching to radio mode
왘Call up the FM, AM or WB main menu
(컄Page 27).
The system automatically switches to
radio mode.
FM or AM main menu
왘Call up the Audio main menu
(컄Page 26).
왘Press the AM or FM soft key.
The FM main menu with the last select-
ed station is displayed.
or
The AM main menu with the last select-
ed station is displayed.
FM main menu:
AM main menu:
Switching wavebands
왘Call up the FM or the AM main menu
(컄Page 27).
The system switches to the FM or AM
waveband.
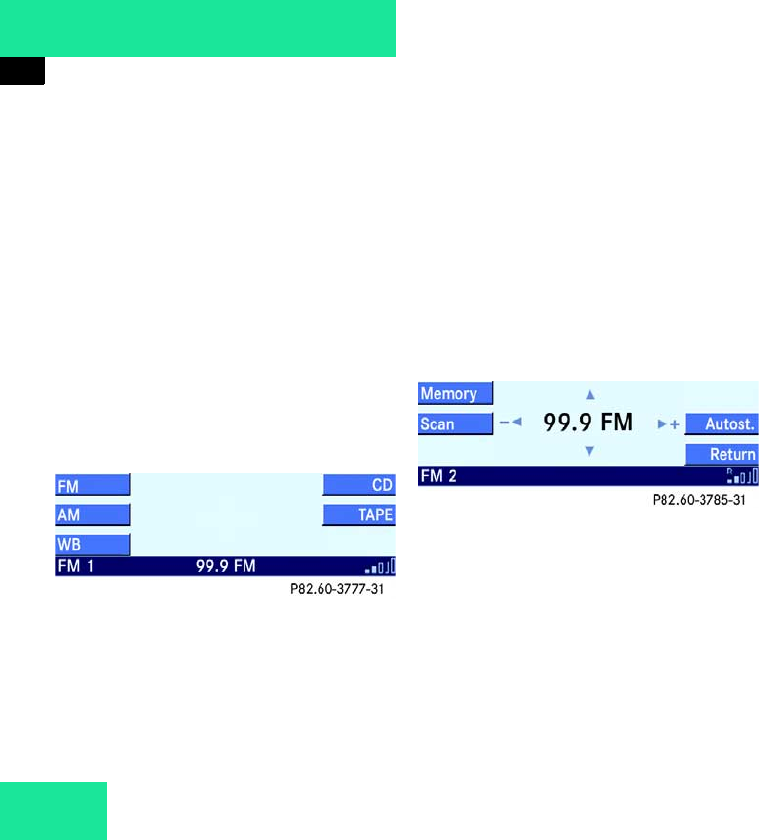
Selecting stations
You have the following options:
앫Selecting using frequency list
(컄Page 28)
앫Selecting using station search
(컄Page 28).
앫Selecting using station presets
(컄Page 29).
앫Selecting using Autostore presets
(컄Page 29).
앫Selecting using the scan search
(컄Page 30).
앫Selecting using manual tuning
(컄Page 30).
앫Selecting using manual frequency en-
try (컄Page 31).

28
Audio
Radio mode
Selecting using frequency list
The frequency list contains all the recep-
tion frequencies of the respective wave-
band, regardless of the stations that
currently can be received.
Only one list entry can be seen at a time,
showing the currently selected frequency
왘Switch on the desired waveband FM or
AM (컄Page 27).
왘By pressing , , or r select
a frequency from the list.
The system tunes to the selected fre-
quency.
Selecting using station search
왘Switch on the desired waveband FM or
AM (컄Page 27) or Weather Band
(컄Page 32).
왘On the Audio 50, press X or
Y.
The search proceeds upwards or down-
wards and stops at the next receivable
station.
or
왘Switch the multifunction display in the
instrument cluster to the Audio screen
(컄Page 52).
i
The frequency list is available in the FM
and AM waveband.
i
Frequency increments in the frequency
list:
c or dbutton:
200 kHz for FM
10 kHz for AM
r or button:
600 kHz for FM
30 kHz for AM
i
The station search is available in the
FM, AM and WB wavebands.

29
Audio
Radio mode
왘On the multifunction steering wheel,
press j or k.
The search proceeds upward or down-
ward and stops at the next receivable
station.
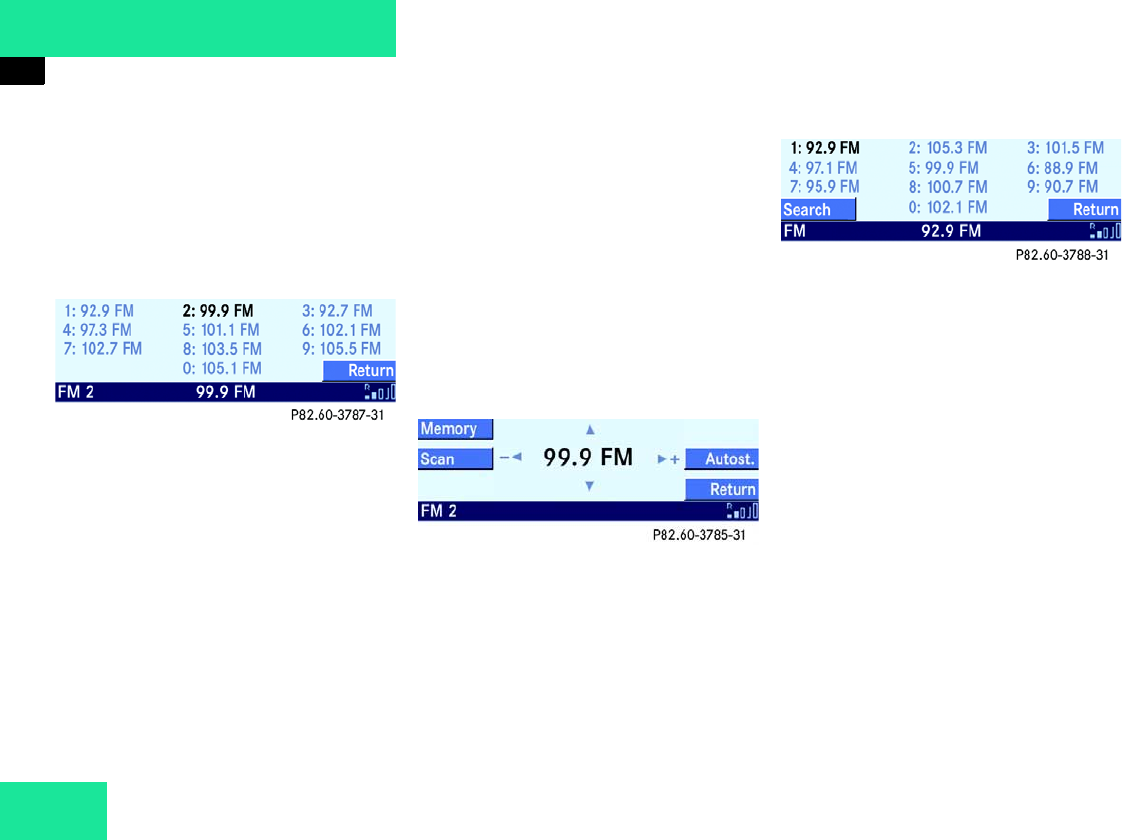
Selecting using station presets
The FM and the AM waveband each have
ten available presets.
You can access the presets using the num-
ber buttons or via the Memory menu.
Access using number buttons:
왘Switch on the desired waveband
(컄Page 27).
왘Press one of the buttons ! - 0.
The system tunes to the preset station.
Access via the Memory menu:
왘Switch on the desired waveband
(컄Page 27).
왘Press the Memory soft key.
The Station list menu is displayed.
왘By pressing c, d, or r select
a preset.
왘Press p.
The system tunes to the preset station.
After a short time, the main menu of
the respective waveband is displayed.
Selecting using Autostore presets
The FM and the AM waveband each have
ten available Autostore presets.
The presets are assigned stations in the or-
der of their reception quality (컄Page 32).
The station with the best reception quality
is stored at preset 1.
왘Switch on the desired waveband
(컄Page 27).
왘Press the Autost. soft key.
The Autostore menu is displayed. 컄컄

30
Audio
Radio mode
왘By pressing c, d, or r select
a preset.
왘Press p.
The system tunes to the preset station.
After a short time, the main menu of
the respective waveband is displayed.
Selecting using the scan search
The scan search is available in the FM and
AM waveband.
The scan search plays each receivable sta-
tion for approx. 8 seconds.
During the first search, stations with ex-
tremely good reception are played. During
the second search, stations with weaker
reception are also played.
The scan search automatically stops at the
station listened to before the scan search
was started.
왘Switch on the desired waveband
(컄Page 27).
왘Press the Scan soft key.
The scan starts.
왘Press the Scan soft key again.
The scan stops.
Selecting using manual tuning
Manual tuning is available in the FM and
AM wavebands.
왘Switch on the desired waveband
(컄Page 27).
왘Press X for forward or Y for
backward. Press and hold the button
for at least 2 seconds.
Manual tuning is activated.
왘Keep holding the button, or release it
and keep tapping it in quick succes-
sion.
Every press of the button causes the
frequency to change incrementally un-
til the button is released.
Manual tuning is deactivated if the but-
ton is not pressed for approx. 3 sec-
onds.
31
Audio
Radio mode
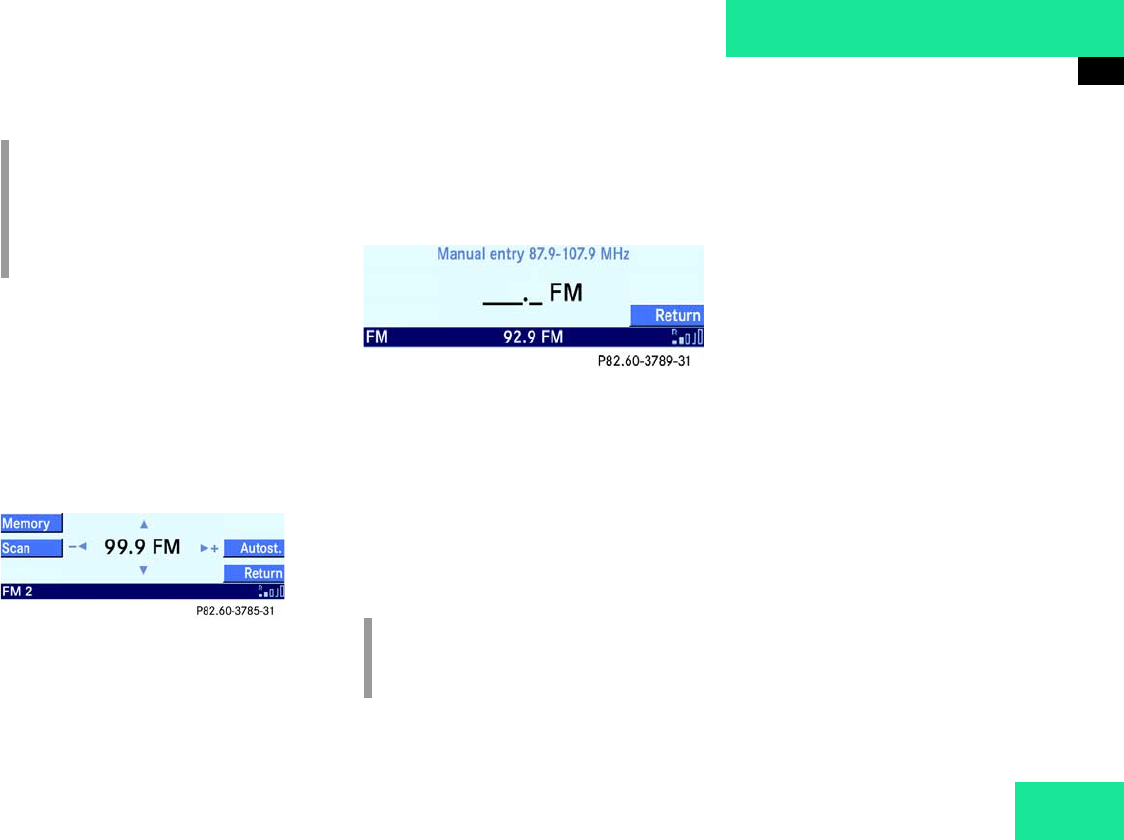
Selecting using manual frequency entry
Manual frequency entry is available in the
FM and AM wavebands.
Entry example: 97.9 MHz in the FM wave-
band:
왘Switch on the FM waveband
(컄Page 27).
왘Press Q.
The frequency entry screen is dis-
played. This gives the frequency range
of the FM waveband.
왘In sequence press the number
buttons 9, 7 and 9.
Each number entered is displayed on
the screen.
왘Press p.
The system tunes to the frequency. Af-
ter a short time, the FM main menu is
displayed.
Storing stations
The FM and the AM waveband each have
ten available presets.
You have the following options:
앫Manual storing (컄Page 31)
앫Storing using Autostore (컄Page 32)
Manual storing
Manuel storing using number buttons:
왘Tune to the station to be stored
(컄Page 27).
왘Press one of the buttons ! - 0 for
more than 2 seconds.
A signal tone can be heard and the sta-
tion is stored at the corresponding pre-
set.
i
Frequency increments for manual tun-
ing:
FM: 200 kHz
AM: 10 kHz
i
It is not possible to make entries out-
side the frequency range.
컄컄
32
Audio
Radio mode
Manuel storing using Memory menu:
왘Tune to the station to be stored
(컄Page 27).
왘Press the Memory soft key.
The Memory menu is displayed.
왘By pressing c, d, or r select
a preset.
왘Press p for more than 2 seconds.
The system stores the station. After a
short time, the main menu of the re-
spective waveband is displayed.
Storing using Autostore
The FM and the AM waveband each have
ten available Autostore presets.
The memory function assigns stations to
the presets in the order of their reception
quality.
The system stores the station with the best
reception quality at preset 1.
왘Switch on the desired waveband
(컄Page 27).
왘Press the Autost. soft key.
The Autostore memory is displayed.
왘Press the Search soft key.
The Autostore search starts.
After a while, the new preset assign-
ment is displayed.
The system tunes to the station stored
at preset 1. After a short time, the
Waveband main menu is displayed
again.
Weather band
You will be able to receive up to 7 weather
band stations.
왘Call up the Audio main menu
(컄Page 26).

33
Audio
Radio mode
왘Press the WB soft key.
The weather band station with the best
reception is called up.
Changing weather band stations
You have the following options for calling
up another weather band station:
앫Calling up stations using station search
앫Calling up stations using the number
buttons
앫Calling up stations manually
Calling up stations using station search:
왘On the Audio 50, press Y or
X.
The weather band station with the next
best reception is found and called up.
Calling up stations using the number but-
tons:
왘On the Audio 50, press one of the but-
tons ! to 7.
The selected weather band station is
called up.
Calling up stations manually
왘On the Audio 50, press c or d.
The next weather band station is called
up.
i
Depending on the vehicle’s position, it
will not be possible to receive all the
stations.
i
Depending on the vehicle’s position, it
will not be possible to receive all the
stations.

34
Audio
Cassette Mode
Cassette Mode
Switching to cassette mode
왘Open the cassette cover (컄Page 34)
and insert a cassette (컄Page 34).
or
왘Call up the Tape main menu
(컄Page 35).
Opening cassette cover
The cassette cover (컄Page 11) must be
open in order to insert a cassette. After in-
serting a cassette, you should close the
cover again.
왘Press .
The cassette cover opens.
If a cassette has already been inserted,
the Audio 50 ejects it.
Closing cassette cover
왘Push down at the mark on the cassette
cover (컄Page 11) until it latches in.
Inserting cassette
왘Open the cassette cover (컄Page 34).
왘Push the cassette into the cassette slot
until it engages, then press it lightly.
The Audio 50 will pull the cassette into
place and begins to play side 1. The
Tape main menu is displayed.
i
If the cassette cover remains open for
more than 30 seconds, a signal tone
briefly sounds.
When the cassette cover is open,
you cannot eject the CD changer*
(컄Page 40) or open the storage com-
partment in the center console.
Accident hazard G
Only insert a cassette into the Audio 50
when the vehicle is at a standstill. If attempt-
ed during driving, the distraction from the
traffic situation leads to increased danger of
accidents.
i
We recommend that you do not use
cassettes with a playing time of
120 minutes (120).
35
Audio
Cassette Mode
Side 1 is defined as the cassette side
that is facing upwards.
왘Close the cassette cover (컄Page 34).
Ejecting cassette
왘Press .
The cassette cover opens and the
Audio 50 ejects the cassette.
왘Remove the cassette from the slot.
왘Close the cassette cover (컄Page 34).
Tape main menu
왘Call up the Audio main menu
(컄Page 26).
왘Press the Tape soft key.
If a cassette is inserted, the Tape main
menu is displayed and the Audio 50
switches to cassette mode.
If there is no cassette inserted, a corre-
sponding message is briefly displayed.
Switching cassette side
You can switch the side of the cassette at
any point during playback.
The side switches automatically at the end
of the tape.
왘Call up the Tape main menu
(컄Page 35).
왘Press c.
This will switch the tape from side 1 to
side 2.
or
왘Press d.
This will switch the tape from side 2 to
side 1.
Switching cassette side from the multi-
function steering wheel:
왘Switch the multifunction display in
the instrument cluster to the Audio
screen. 컄컄

36
Audio
Cassette Mode
왘Press j.
This will switch the tape from side 1 to
side 2.
or
왘Press k.
This will switch the tape from side 2 to
side 1.
Selecting track
You have the following options:
앫Selecting using track search
(컄Page 36)
앫Selecting using scan search
(컄Page 36)
Selecting using track search
Starting search:
왘Call up the Tape main menu
(컄Page 35).
왘Press X or r.
The forward scan starts.
or
왘Press Y or .
The backward scan starts.
Canceling search:
왘On the Audio 50, press one of the
buttons X, r, Y or .
The Audio 50 switches to cassette
playback.
Selecting using scan search
The scan search starts playing a track for
approx. 8 seconds and then fast forwards
to the beginning of the next track.
왘Call up the Tape main menu
(컄Page 35).
왘Press the Scan soft key.
The scan starts.
i
There must be a gap between tracks of
at least 4 seconds.
Otherwise the track search and scan
search will not function.
i
Forward search:
The Audio 50 fast forwards the cas-
sette to the beginning of the next track
and then switches to cassette play-
back.
Backward search:
The Audio 50 rewinds the cassette to
the beginning of the track currently
playing and then switches to cassette
playback.

37
Audio
Cassette Mode
왘Press the Scan soft key again.
The scan stops.
Fast forward/rewind
왘Call up the Tape main menu
(컄Page 35).
왘Press X for more than 2 seconds.
The cassette winds forward.
or
왘Press for more than 2 seconds.
The cassette rewinds.
Interrupting fast forward/rewind:
왘Press one of the buttons X or
.
The Audio 50 switches to cassette
playback.
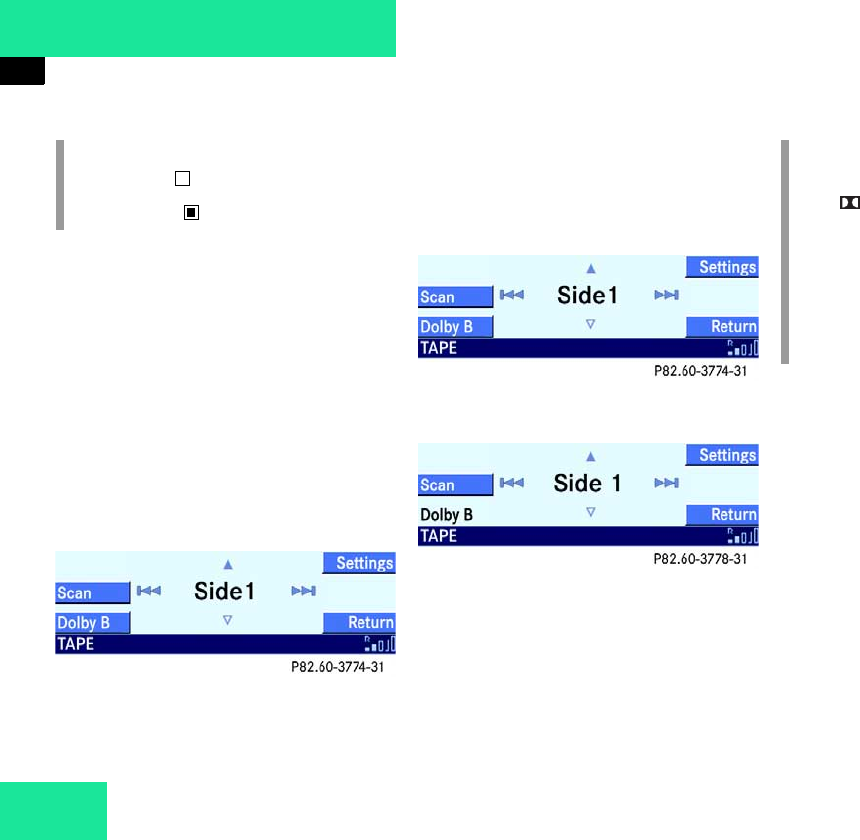
Skip blank
With skip blank switched on, the Audio 50
skips blank sections of the cassette which
are longer than approx. 10 seconds.
Switching skip blank on/off:
왘Call up the Tape main menu
(컄Page 35).
왘Press the Settings soft key.
The Settings menu is displayed.
왘Press .
This will switch skip blank on or off.
i
The cassette winds forward or back un-
til you interrupt it or until it reaches the
end / beginning of the tape.
i
The side is switched at the end of the
tape and cassette playback restarts.
Cassette playback starts immediately
at the beginning of the tape.
컄컄
38
Audio
Cassette Mode
The Tape main menu is displayed short-
ly after switching off or on.
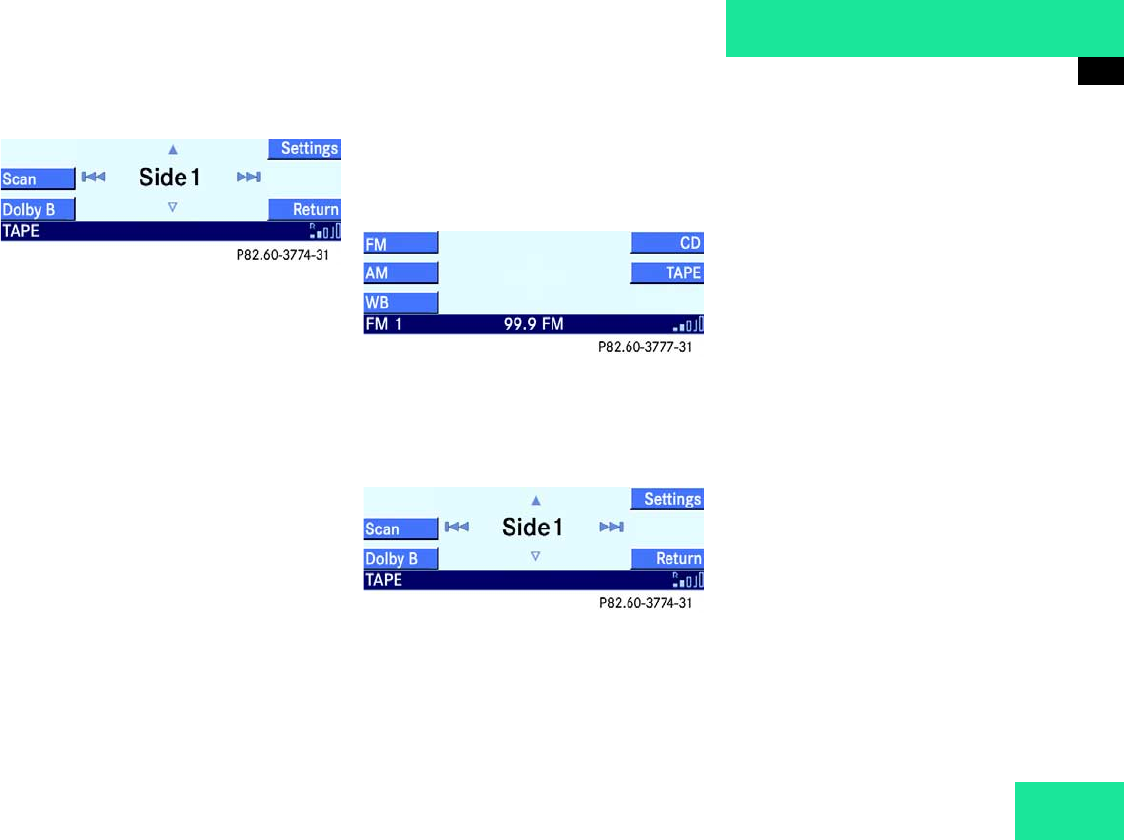
Dolby B NR Noise Reduction
Dolby B NR should be switched on for opti-
mum playback of cassettes recorded with
Dolby B NR.
Switching Dolby B NR on/off:
왘Call up the Tape main menu
(컄Page 35).
왘Press the Dolby B soft key.
This will switch Dolby B NR on or off.
Display with Dolby B NR switched off:
Display with Dolby B NR switched on:
i
Empty box : Skip blank off
Box filled in : Skip blank on
i
DOLBY and the double D sym-
bol are trademarks of the
Dolby Laboratories Licensing
Corporation.
Dolby noise reduction is manu-
factured under license from
Dolby Laboratories Licensing
Corporation.

39
Audio
CD Mode
CD Mode
General information
The system may not be able to play some
audio CDs with copy protection.
CDs should be handled with care in order
to prevent malfunction when playing.
Avoid leaving fingerprints and dust on the
CDs. You must not write on, or attach
stickers to CDs.
Clean CDs occasionally with a commercial-
ly available cleaning cloth. Do not use sol-
vents, anti-static spray, etc. for cleaning
purposes and replace the CDs into the CD
box, after use. Protect the CDs from heat
and direct sunlight.
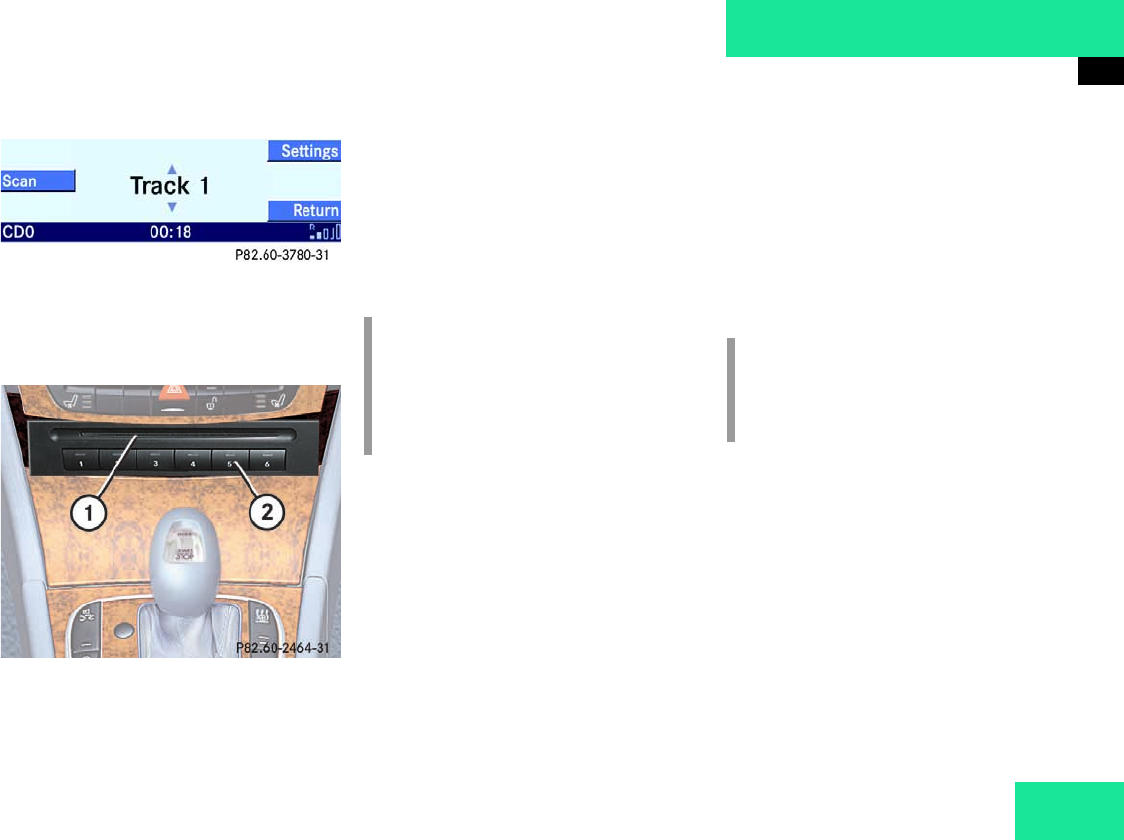
Switching to CD mode
왘Call up the CD main menu (컄Page 45).
or
왘Insert an audio CD into the Audio 50 or
the CD changer* (컄Page 40).
CD drive in the Audio 50 control unit
A CD drive is integrated into the Audio 50.
The drive can play audio CDs.
CD changer*
The CD changer* can play audio CDs. It is
mounted concealed in the center console.
You can eject or retract the CD changer* in
order to load or remove a CD.
Accident hazard G
Only insert CDs into the Audio 50 and the
CD changer* when the vehicle is at a stand-
still. When driving the vehicle, doing this
may create an accident hazard by diverting
your attention from the traffic.
Injury hazard G
The Audio 50 and the CD changer* are class
1 laser products. Invisible laser radiation will
cause a hazard if the housing is opened or
damaged.
Do not open the housing. There are no user
serviceable parts inside the Audio 50 or the
CD changer*. For safety reasons, any main-
tenance work must be performed exclusive-
ly by qualified service experts.

40
Audio
CD Mode
Opening CD changer*
1Open button
2Button field
왘Close the cassette cover on the
Audio 50 if it is open (컄Page 34).
Otherwise the CD changer* will not
open.
왘Press the open button 1.
The button field 2 pivots upwards, the
CD changer* opens.
Retracting CD changer*
왘Press the open button 1.
or
왘Wait 30 seconds after the last time a
button on the CD changer is pressed.
The button field 2 pivots downwards,
the CD changer* retracts.
Loading CDs Loading CD into Audio 50
The CD drive in the Audio 50 grips a CD.
Situated above the display is the CD slot
(컄Page 13) for loading the drive.
왘Insert a CD into the CD slot when the
Audio 50 is switched on. The printed
side of the CD must face upwards.
The Audio 50 pulls the CD into the unit.
If the CD is an audio CD, the system
switches to CD mode.
Accident hazard G
Only load CDs into the Audio 50 and the CD
changer* when the vehicle is at a standstill.
If attempted during driving, the distraction
from the traffic situation leads to increased
danger of accidents.
i
The Audio 50 and the CD changer*
may not be able to play some audio
CDs with copy protection.
The Audio 50 and the CD changer*
eject CDs that cannot be read or have
been inserted incorrectly.
41
Audio
CD Mode
Loading CDs into CD changer*
In order to insert CDs, you will need to
open the CD changer* (컄Page 40).
1CD slot
2Magazine compartment buttons
There is a built-in magazine in the CD
changer*. It can hold up to six CDs.
The CD changer* has six magazine com-
partment buttons 2 for controlling the
loading procedure. LEDs in the buttons in-
dicate the status of the corresponding
magazine compartment.
The status of a magazine compartment can
also be seen when selecting a CD in the
magazine menu (컄Page 47).
Situated above the buttons 2 is the CD
slot 1 for loading the CD changer*.
You have the following loading options:
앫Loading a single magazine compart-
ment (컄Page 41)
앫Loading all six magazine compart-
ments (컄Page 42)
Loading a single magazine compartment
왘Eject the CD changer* (컄Page 40).
i
Button LED off:
Magazine compartment empty
Button LED continuously red:
Magazine compartment full
i
Loading a magazine compartment in-
terrupts the playback of a CD in the
changer.
42
Audio
CD Mode
1CD slot
2Magazine compartment buttons
왘Briefly press the button 2 of the empty
magazine compartment that you wish
to load.
왘Wait until the LED in the button 2 flash-
es green.
This indicates that the CD changer* is
requesting the CD.
왘Push an audio CD into the CD slot 1
within approx. 15 seconds. The printed
side of the CD must face upwards.
The CD is retracted, the LED in the
magazine compartment button 2 has a
continuous red light. The system starts
playing the CD.
왘Retract the CD changer* (컄Page 40).
The loading procedure is complete.
Loading all six magazine compartments
Initial situation: All magazine compart-
ments empty.
The CD changer* loads all magazine com-
partments in order, starting with compart-
ment 1.
왘Open the CD changer* (컄Page 40).
1CD slot
2Magazine compartment buttons
왘Press the button 2 of an empty maga-
zine compartment for more than 2 sec-
onds.
The LEDs of all magazine compartment
buttons 2 briefly light up green 3 times.
왘Wait until the LED in the first magazine
compartment button 2 flashes green.
This indicates that the CD changer* is
requesting the CD.

43
Audio
CD Mode
왘Push an audio CD into the CD slot 1
within approx. 15 seconds. The printed
side of the CD must face upwards.
The CD is retracted; the first magazine
compartment is loaded.
The LED in the corresponding maga-
zine compartment button 2 has a con-
tinuous red light.
The CD changer* then requests the
next CD. The LED in the corresponding
magazine compartment button 2 now
flashes green.
왘Repeat the last step until all six maga-
zine compartments have been loaded.
The system plays the sixth CD. The LED
in the sixth magazine compartment
button 2 has a continuous red light.
왘Retract the CD changer* (컄Page 40).
The loading procedure is complete. Ejecting CDs
Ejecting CD from the Audio 50
왘Press E.
The Audio 50 ejects the CD.
왘Remove the CD from the slot.
If you do not remove the CD out of the
CD slot within approx. 15 seconds, the
Audio 50 retracts it again and starts
playing it.
i
If, instead of loading all 6 magazine
compartments, you only wish to load
compartments 1 – 4, for example, do
not push a fifth CD into the slot 1. The
CD changer* initially tries to load the
fifth CD, but then aborts the loading
procedure. The system automatically
starts playing the fourth CD.
i
If you eject an audio CD during play-
back, the unit plays the next available
audio CD in the CD changer*.
If there are no other audio CDs avail-
able, the system switches to the audio
source listened to before CD mode.

44
Audio
CD Mode
Ejecting CDs from the CD changer*
You have the following options:
앫Ejecting a single CD (컄Page 44)
앫Ejecting all CDs (컄Page 45)
Ejecting a single CD
1CD slot
2Magazine compartment buttons
왘Open the CD changer* (컄Page 40).
왘Briefly press the corresponding maga-
zine compartment button 2.
The LED in the button 2 flashes red.
The CD changer* ejects the CD.
왘Remove the CD from the slot 1 within
approx. 15 seconds.
If the CD is not removed within approx.
15 seconds, it is retracted again. The
system starts playing the CD.
The ejection procedure is complete.
왘Retract the CD changer* (컄Page 40).
i
If you are listening to a CD in the CD
changer and you eject another CD from
the changer:
While ejecting, the system interrupts
CD-playback. After ejection, the sys-
tem continues CD-playback.
If you eject the CD that you are current-
ly listening to:
The next available audio CD is played.
This may be a CD in the CD changer* or
the CD in the Audio 50. If there are no
other CDs available, the system
switches to the audio source listened
to before CD mode.
45
Audio
CD Mode
Ejecting all CDs
왘Open the CD changer* (컄Page 40).
1CD slot
2Magazine compartment buttons
왘Press the button 2 of a full magazine
compartment for more than 2 seconds.
The button LEDs of all the full magazine
compartments briefly light up red 3
times.
The CD changer* ejects the CDs one
after the other.
The LED in the respective magazine
compartment button 2 flashes red.
왘Remove each CD from the slot 1 within
approx. 15 seconds.
If a CD is not removed within approx.
15 seconds, the CD changer* aborts
the ejection procedure. The CD is re-
tracted again. The system starts play-
ing the CD.
The ejection procedure is complete
when all the CDs have been removed or
when the CD changer* has aborted the
procedure.
왘Retract the CD changer* (컄Page 40).
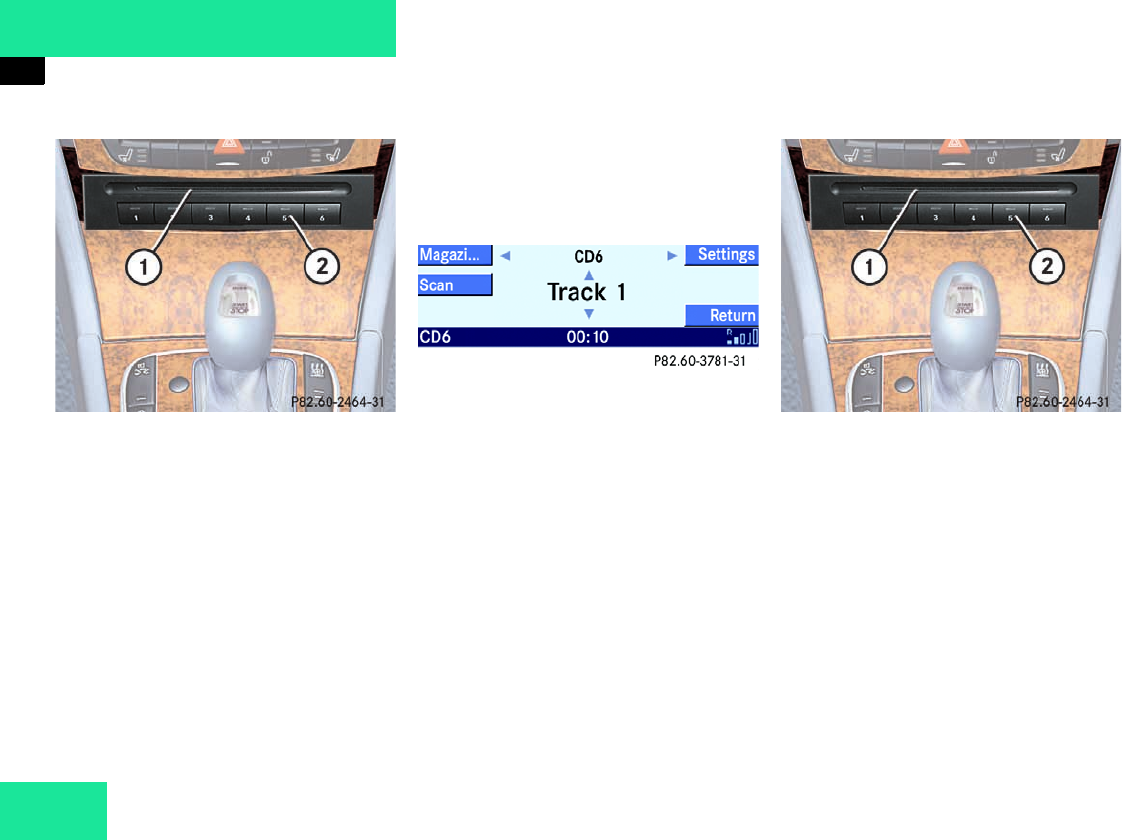
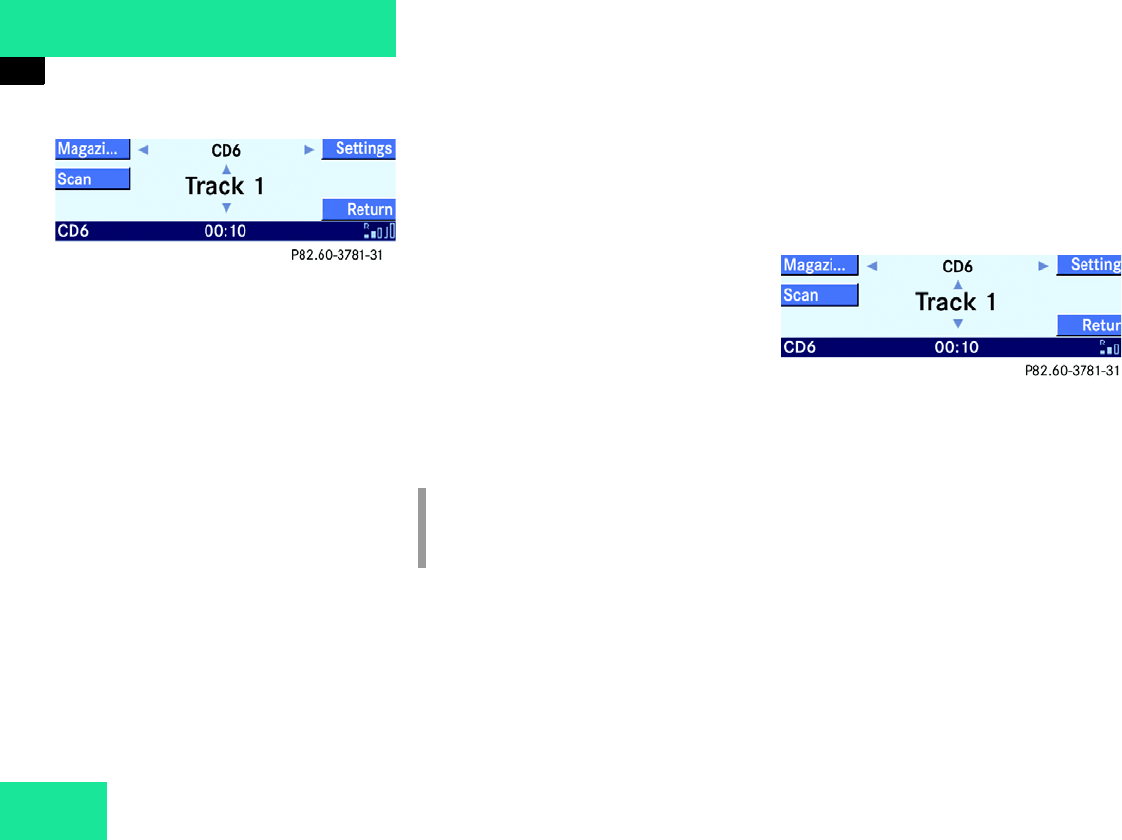
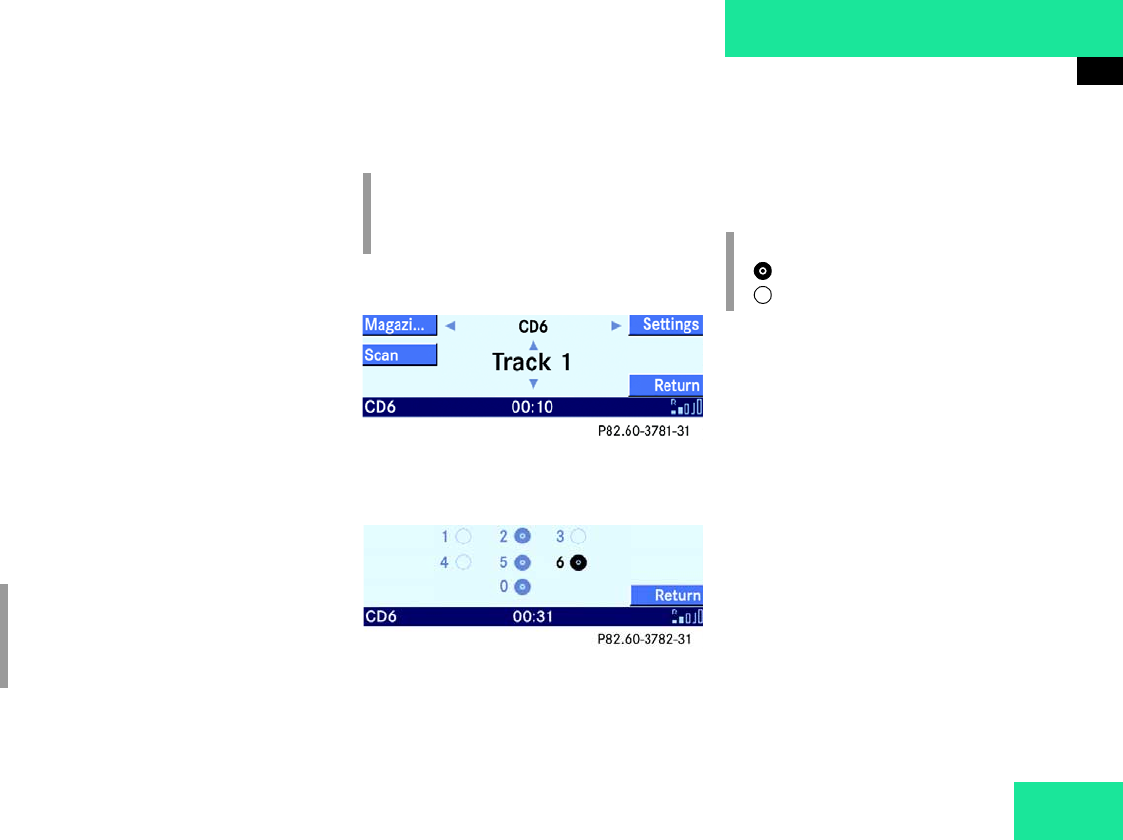
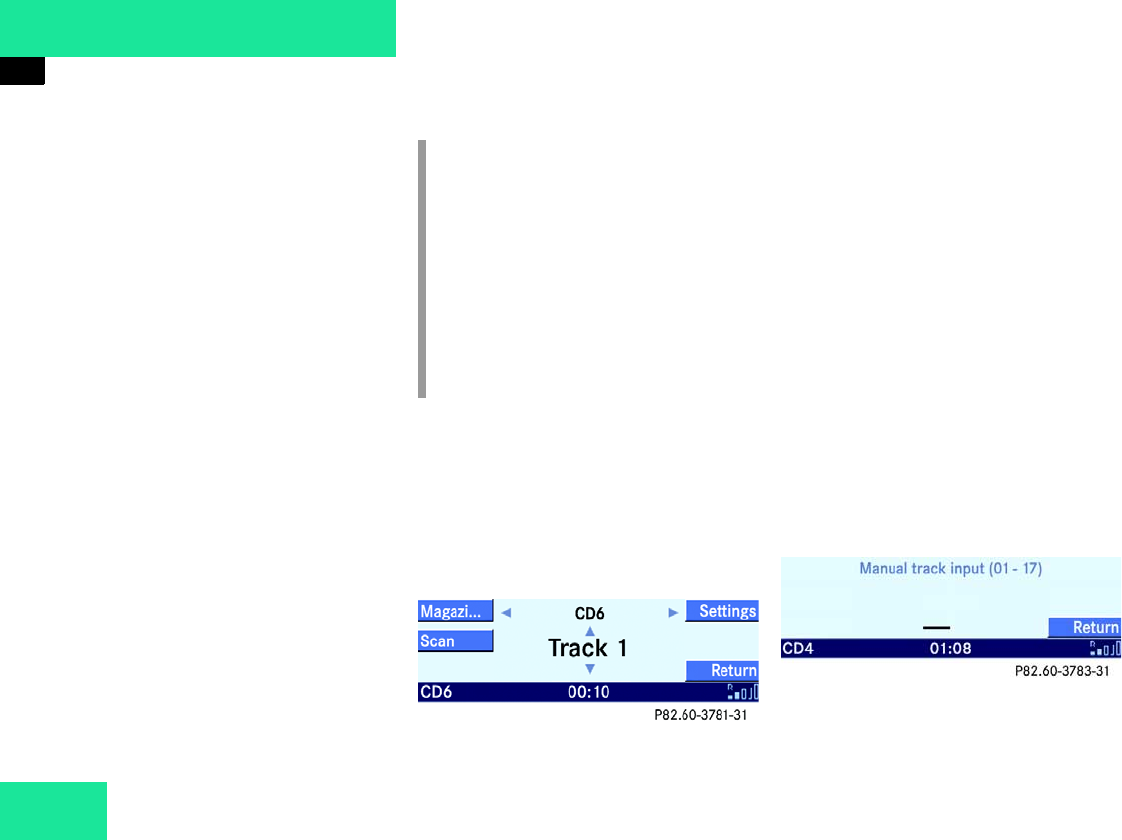
CD main menu
왘Call up the Audio main menu
(컄Page 26).
왘Press the CD soft key.
The CD main menu is displayed.
i
If you are listening to a CD in the
changer*:
Ejection of all CDs stops CD playback.
After ejection, the CD in the Audio 50
is played. If there is no audio CD in the
Audio 50, the system switches to the
audio source listened to before CD
mode.
46
Audio
CD Mode
You will hear the CD listened to last. If
the CD listened to last is no longer
available, the unit plays the next avail-
able audio CD.
This may be the CD in the Audio 50 or
a CD in the CD changer*.
If no audio CD is available, the system
does not switch to CD mode.
The message No CD inserted is
briefly displayed.
왘Insert an audio CD into the Audio 50 or
the CD changer* (컄Page 41).
Selecting CDs
The numbers 1 - 6 are assigned to the CDs
in the CD changer* magazine and the num-
ber 0 to the CD in the Audio 50.
You have the following selection options:
앫Selecting using CD list (컄Page 46)
앫Selecting by directly entering the CD
number (컄Page 47)
앫Selecting using Magazine menu
(컄Page 47)
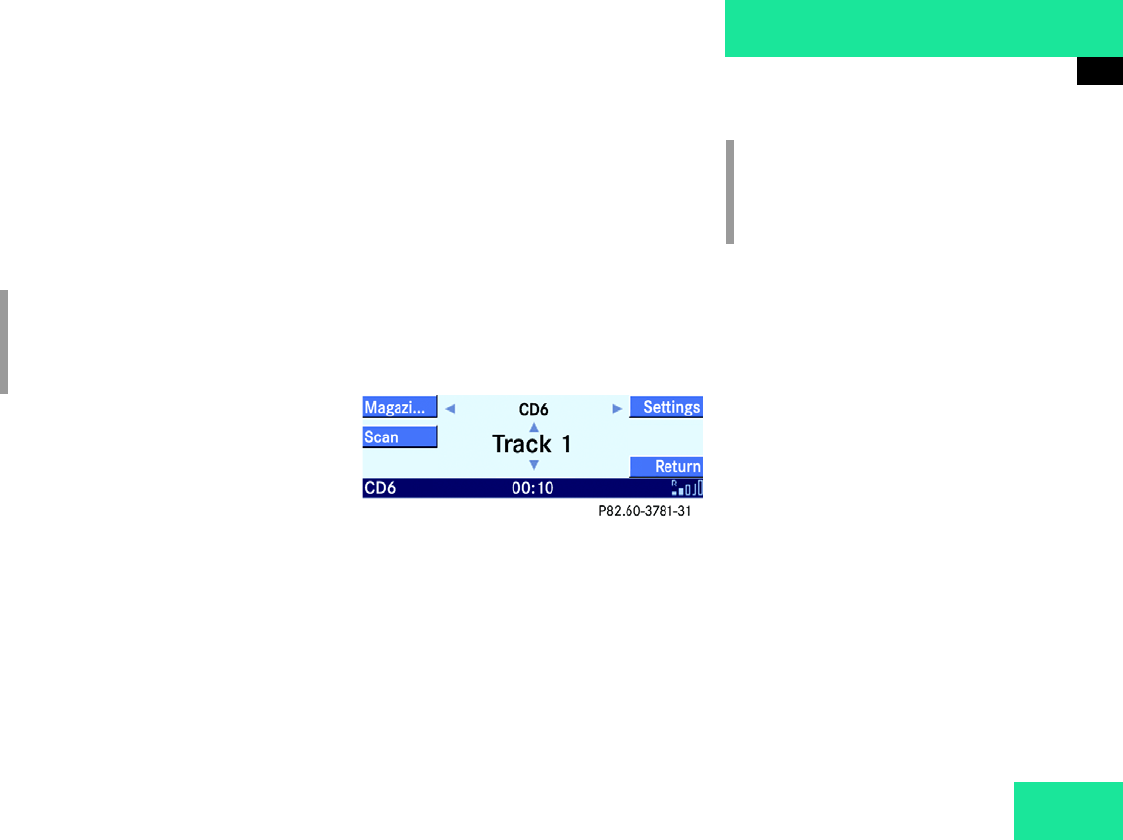
Selecting using CD list
The CD list contains all the loaded CDs.
Only one list entry can be seen.
The entry is given above the track display.
It shows the number of the CD currently
being played.
왘Call up the CD main menu (컄Page 45).
왘By pressing or select another
CD from the list.
You are only able to select loaded CDs.
왘Press p.
or
왘Do not change the selection.
The CD changes. You will hear the new-
ly selected CD.
i
A selection is only possible if at least 2
audio CDs are available.
47
Audio
CD Mode
Selecting by directly entering the CD
number
왘Call up the CD main menu (컄Page 45).
왘A selection by directly entering a num-
ber is possible using the buttons ! -
6.
Selection example: CD No. 3 in the CD
changer*
왘Press 3.
Selection example:
CD in the Audio 50 (CD No. 0)
왘Press 0.
The CD changes. You will hear the new-
ly selected CD.
Selecting using Magazine menu
왘Call up the CD main menu (컄Page 45).
왘Press the Magazi... soft key.
The Magazine menu is displayed.
왘By pressing c, d, or r select
a CD.
You are only able to select loaded CDs.
왘Press p.
The CD changes and the CD main menu is
displayed. You will hear the newly selected
CD.
Selecting track
You have the following options:
앫Selecting using track skip (컄Page 48)
앫Selecting using track liste (컄Page 48)
앫Selecting by manually entering track
number (컄Page 48)
앫Selecting using the scan search
(컄Page 49)
i
If you select a CD that is not available,
you will continue to hear the CD cur-
rently being played.
i
A selection is only possible if at least 2
audio CDs are available. i
= CD loaded
= CD not loaded
48
Audio
CD Mode
Selecting using track skip
Track skip on the Audio 50:
왘Call up the CD main menu (컄Page 45).
왘For forward skipping, press X.
or
왘 For backward skipping, press .
Track skip on the multifunction steering
wheel:
왘Switch the multifunction display in the
instrument cluster to the Audio screen
(컄Page 52).
왘For forward skipping, press j.
or
왘For backward skipping, press k.
Selecting using track liste
The track list contains all the tracks on the
CD currently being played. Only one list en-
try can be seen at a time, showing the
number of the track currently playing.
왘Call up the CD main menu (컄Page 45).
왘By pressing or select another
track from the list.
왘Press .
or
왘Do not change the selection.
You will hear the selected track.
Selecting by manually entering track
number
왘Call up the CD main menu (컄Page 45).
왘Press Q.
The Track input screen is displayed.
The number of tracks on the CD is dis-
played.
i
Forward track skip:
You will hear the next track.
Backward track skip:
If the track has been playing for more
than approx. 10 seconds, the unit skips
back to the beginning of this track. If
less than 10 seconds have played, the
unit skips back to the beginning of the
previous track.
49
Audio
CD Mode
Entry example: Track 1
왘Press !.
Entry example: Track 15
왘Press ! and 5 in quick succession.
왘Wait approx. 2 seconds after entering
the number.
You will hear the selected track. The
CD main menu is displayed.
Selecting using the scan search
The scan search starts playing each track
on the current CD for approx. 8 seconds.
It stops automatically at the track listened
to before the scan search was started. It is
also possible to end the scan search man-
ually.
Starting scan search:
왘Call up the CD main menu (컄Page 45).
왘Press the Scan soft key.
Terminating scan search manually:
왘Press the Scan soft key.
The track that was playing when the
scan was terminated remains selected.
Audible fast forward or fast reverse
왘Call up the CD main menu (컄Page 45).
왘Press X or and keep
pressed.
왘To terminate, release the X or
button.
i
It is not possible to enter a number
greater than the number of tracks on
the CD.
i
When you start the scan search, the
playback option
Normal sequence
(컄Page 50) is activated automatically.
50
Audio
CD Mode
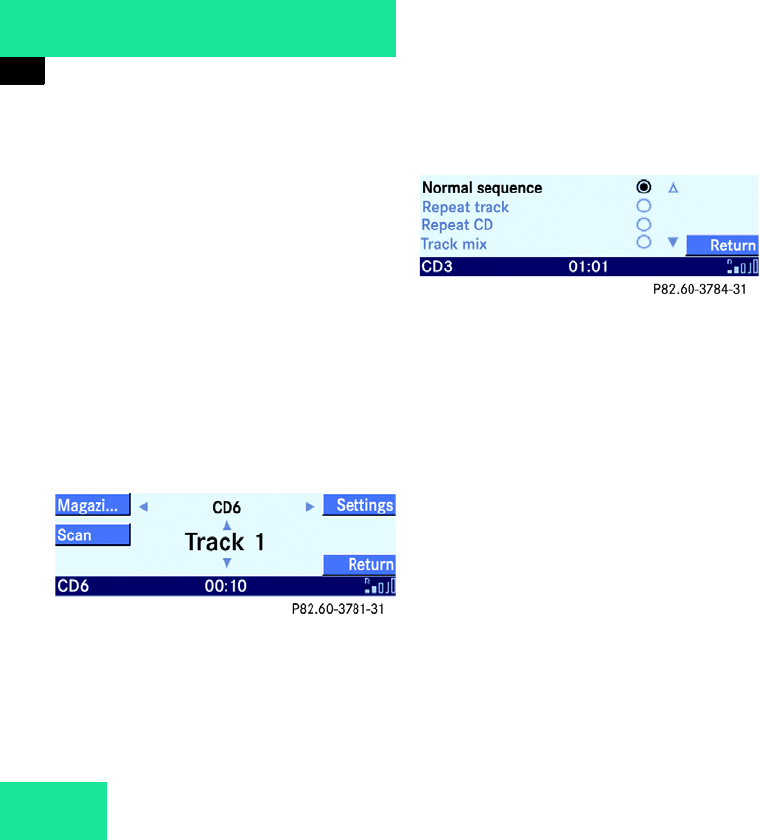
Playback options
The following options are available:
앫Normal sequence (컄Page 50)
앫Repeat track (컄Page 50)
앫Repeat CD (컄Page 51)
앫Track mix (컄Page 51)
앫CD mix (컄Page 51)
Activating playback options
Example: Repeat track option
왘Call up the CD main menu (컄Page 45).
왘Press the Settings soft key.
The Settings menu is displayed.
왘By pressing c or d select the
Repeat track menu item.
왘Press .
The option is activated. After a short
time, the CD main menu is displayed.
The activated option is given in the sta-
tus line.
Explanation of playback options
앫Normal sequence
You will hear the tracks in the normal
sequence (e.g. track 1, 2, 3 etc.).
If only one CD is available, the last
track is followed by the first track
again.
If two or more CDs are available, the
last track of one CD is followed by the
first track of the next CD.
The CDs change in the normal se-
quence (e.g. CD 1, 2, 3 etc.).
The last track of the last CD is followed
by the first track of the first available
CD.
앫Repeat track
The track currently playing is repeated
until this function is switched off.

51
Audio
CD Mode
앫Repeat CD
The CD currently playing is repeated
until this function is switched off.
앫Track mix
You will hear the tracks in random or-
der (e.g. track 3, 8, 5 etc.).
If two or more CDs are available, the
last track of one CD is followed by the
next CD. The CDs change in the normal
order (e.g. CD 1, 2, 3 etc.).
The last track of the last CD is followed
by the first available CD.
앫CD mix
You will hear at least 4 tracks from
one CD in random order (e.g. track 5,
7, 3, 9). Then the next CD follows.
The CDs change in random order
(e.g. CD 4, 1, 5 etc.).
i
It is only possible to select this function
if at least 2 audio CDs are available.
i
This function is only available for CDs
in the CD changer.
There must be at least 2 audio CDs in
the CD changer.
52
Audio
Multifunction steering wheel
Multifunction steering wheel
For controlling functions using the multi-
function steering wheel, the multifunction
display in the instrument cluster must be
switched to the Audio screen.
Switching multifunction display
왘On the multifunction steering wheel,
press è or ÿ repeatedly until
one of the following audio screens ap-
pear in the multifunction display in the
instrument cluster.
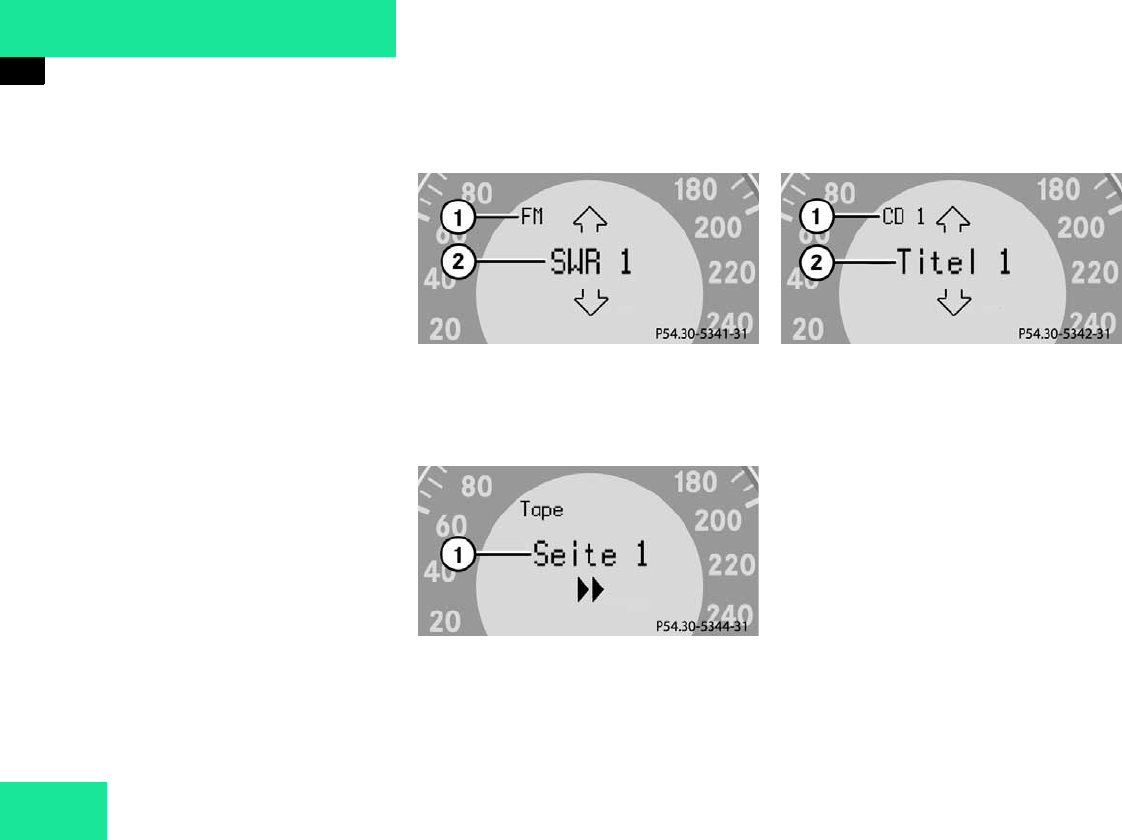
In radio mode:
1Waveband
2Station
In cassette mode:
1Current side
In CD mode:
1Current CD
2Current track


54
Telephone*
Safety instructions
Safety instructions
Accident hazard G
Using cell phones whose antenna is inside
the vehicle may cause the vehicle electronic
system to malfunction. The vehicle operat-
ing safety is thus endangered.
You may only use cell phones inside the ve-
hicle if they are connected to a separate ex-
ternal antenna approved by Mercedes-Benz.
Stop or park if you, as the driver, do not
want to use the hands-free system. Do not
stop or park where stopping is prohibited.
Accident hazard G
Bear in mind that at a speed of just 30 mph
(approximately 50 km/h), your car is cover-
ing a distance of 50 feet (approximately
14 m) every second. As driver, please de-
vote your attention primarily to the traffic.
Only use the telephone when traffic condi-
tions permit.
As driver, always observe the laws in the
country you are currently in when making
phone calls while driving.
Accident hazard G
As driver, only use the hands-free system for
making calls while driving for safety rea-
sons.
If making calls using the hands-free system,
drive attentively, close all the windows and
avoid all interfering noises.

55
Telephone*
General information
General information
If you vehicle is fitted with a cell phone
mount, you can insert certain cell phones
into the adapter. Further information can
be obtained from your Mercedes-Benz ser-
vice station.
앫If the message
Enter Unlock Code is displayed,
enter the unlock code (컄Page 59).
Only then will you be able to use all the
telephone functions.
You will still be able to make “911”
emergency calls (컄Page 58) if the tele-
phone is blocked by the unlock code.
앫A brief interruption of the connection
is not a malfunction of the phone.
The telephone automatically tries to
re-register on a network.
i
When the cell phone is inserted into
the telephone adapter*, you can oper-
ate it:
앫on the cell phone itself
앫on the Audio 50
앫on the multifunction steering wheel
앫via the Linguatronic*
The descriptions in this operating man-
ual presume that the cell phone is in-
serted into the telephone adapter.
i
In this operating manual, operation
from the Audio 50 and from the multi-
function steering wheel is described.
Unless otherwise specified, the de-
scriptions and the displays illustrated
relate to the Audio 50.
Operation at the cell phone is de-
scribed in a separate operating manu-
al.

56
Telephone*
General information
The telephone cannot be used or cannot
be used yet in the following situations:
앫If the telephone is not or not yet regis-
tered on a network.
The message No service appears
in the status line. The telephone auto-
matically tries to register on a network.
If there is no network available, you will
not be able to make “911” emergency
calls.
If you try to start an outgoing call, the
message No service Call not
possible will be displayed briefly.
앫If the message Telephone being
activated, please wait is dis-
played.
앫If the message Please insert
phone is displayed.
왘Insert the cell phone into the tele-
phone adapter (컄Vehicle operating
manual).

57
Telephone*
Operation
Operation
Switching on telephone
왘Switch on the Audio 50 (컄Page 20).
or
왘On the Audio 50, briefly press .
This calls up the Telephone main menu.
or
왘On the Audio 50, press for longer
than 3 seconds.
or
왘On the multifunction steering wheel,
press í.
or
왘Switch on the cell phone (컄Telephone
operating manual).
After switching on the telephone, the sys-
tem checks whether your cell phone has
an unlock code.
If there is an unlock code, the Audio 50 re-
quests you to enter this code.
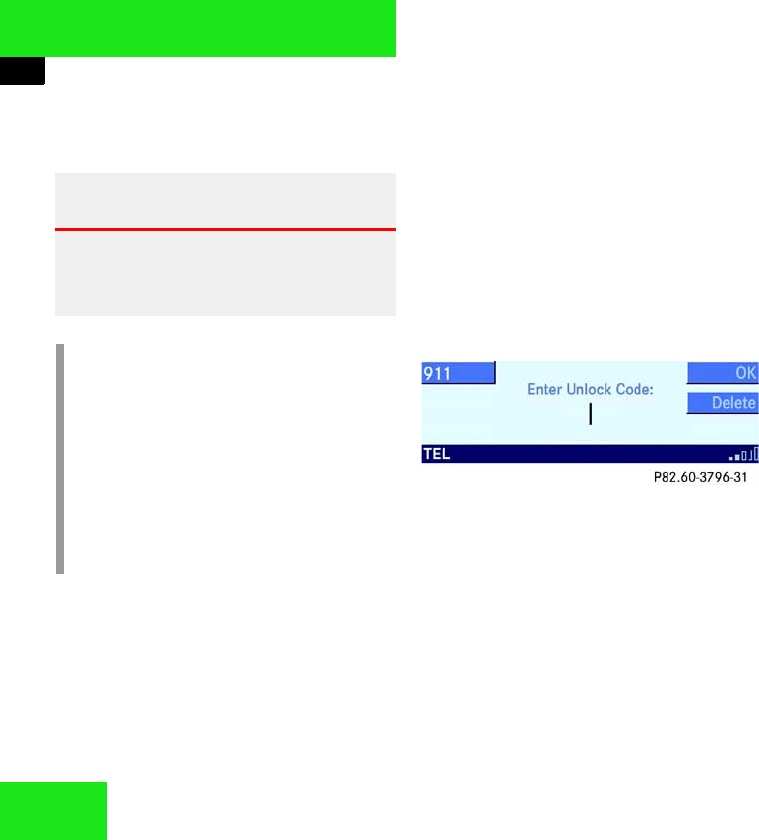
The message Enter Unlock Code:
then appears in the display.
왘Enter the unlock code using the num-
ber buttons (컄Page 59).
Switching off telephone
왘Turn the electronic key to position 0
and remove the key.
The telephone switches off after a de-
lay of about 1 - 2 minutes.
or
왘In the Telephone main menu,
press for longer than 3 seconds.
or
왘Switch off the cell phone (컄Telephone
operating manual).
58
Telephone*
Operation
“911” emergency calls
The “911” emergency call will also func-
tion if the telephone is blocked by the un-
lock code.
Making emergency call (unlock code not
entered yet)
You can make an emergency call from the
cell phone or from the Audio 50.
Calling from the cell phone (컄Telephone
operating manual).
Calling from the Audio 50:
왘On the Audio 50, press the 911 soft
key.
The telephone establishes the connec-
tion, you will hear the ringing tone.
왘Wait until someone answers and de-
scribe the emergency situation.
Making emergency call (unlock code al-
ready entered)
왘On the Audio 50, press in sequence the
number buttons 9, ! and !.
왘On the Audio 50, press J or, if the
Telephone menu has been called up in
the multifunction display, on the multi-
function steering wheel press í.
The telephone establishes the connec-
tion, you will hear the ringing tone.
왘Wait until someone answers and de-
scribe the emergency situation.
Warning G
The “911” emergency call system is a public
service. Using it without due cause is a crim-
inal offense.
i
The following conditions must be met
for a “911” emergency call:
앫telephone switched on
앫available cell phone network
If you cannot make an emergency call,
you will have to initiate rescue mea-
sures yourself.

59
Telephone*
Operation
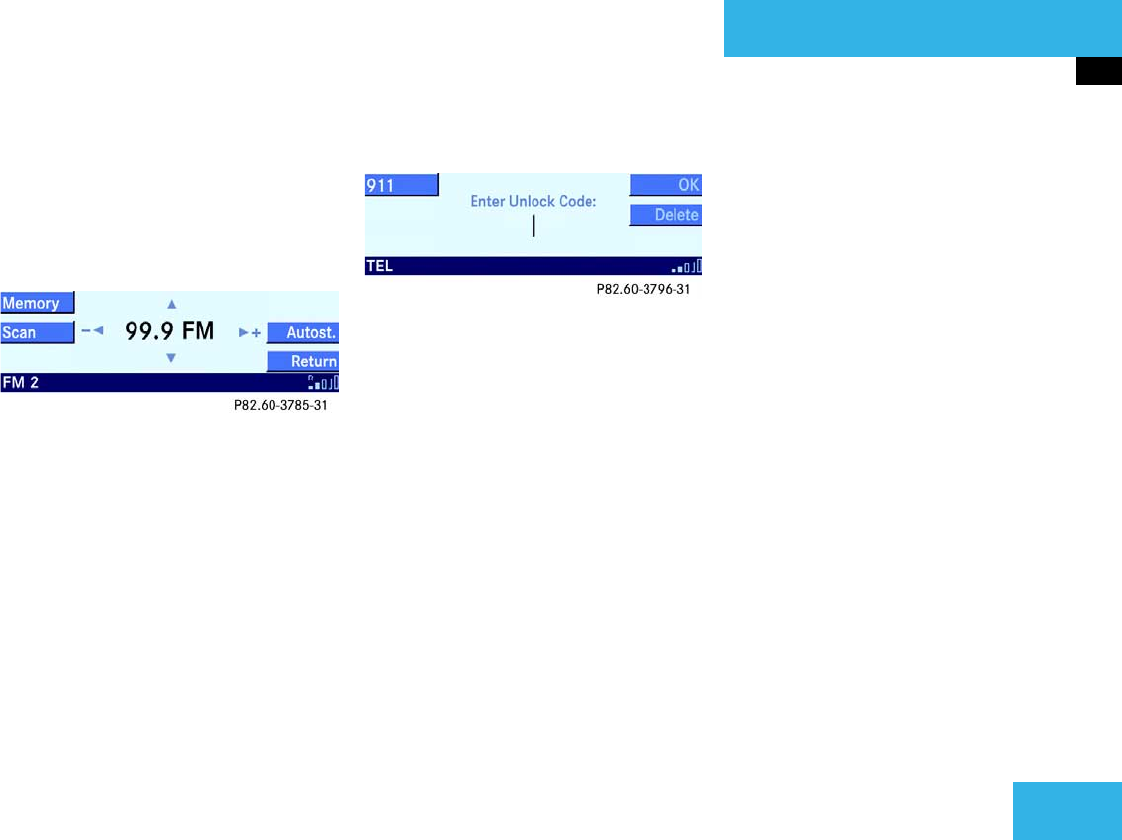
Unlock code entry
The unlock code protects the telephone
from unauthorized users. You can activate
the unlock code on the telephone
(컄Telephone operating manual).
Memorize the unlock code.
If the unlock code has been activated, the
telephone functions will only be available
after you have entered the code.
“911” emergency calls can also be made
without entering the unlock code
(컄Page 58).
Example: Unlock code 230
왘In sequence, press the number
buttons 2, 3 and 0.
Deleting the last one or more numbers:
왘Press the Delete soft key one or
more times.
왘After entering all the numbers press p
or the OK soft key.
If the entry is correct, all the telephone
functions are available.
After registering, you will see Ready in
the center of the status line.
If the entry is incorrect, you will have to
enter the unlock code again.
Switching to telephone mode
With the Audio 50 switched on, you can
switch to telephone mode from any other
operating mode as follows:
왘Press .
If applicable, the number of missed or
unanswered calls is displayed
(컄Page 60).
or
왘Press J.
or
왘Initiate an outgoing call (컄Page 62). 컄컄
60
Telephone*
Operation
The system automatically switches to tele-
phone mode:
앫with an incoming call
앫if you initiate an outgoing call
앫if the cell phone is inserted into the
telephone adapter* and you initiate an
outgoing call on the cell phone
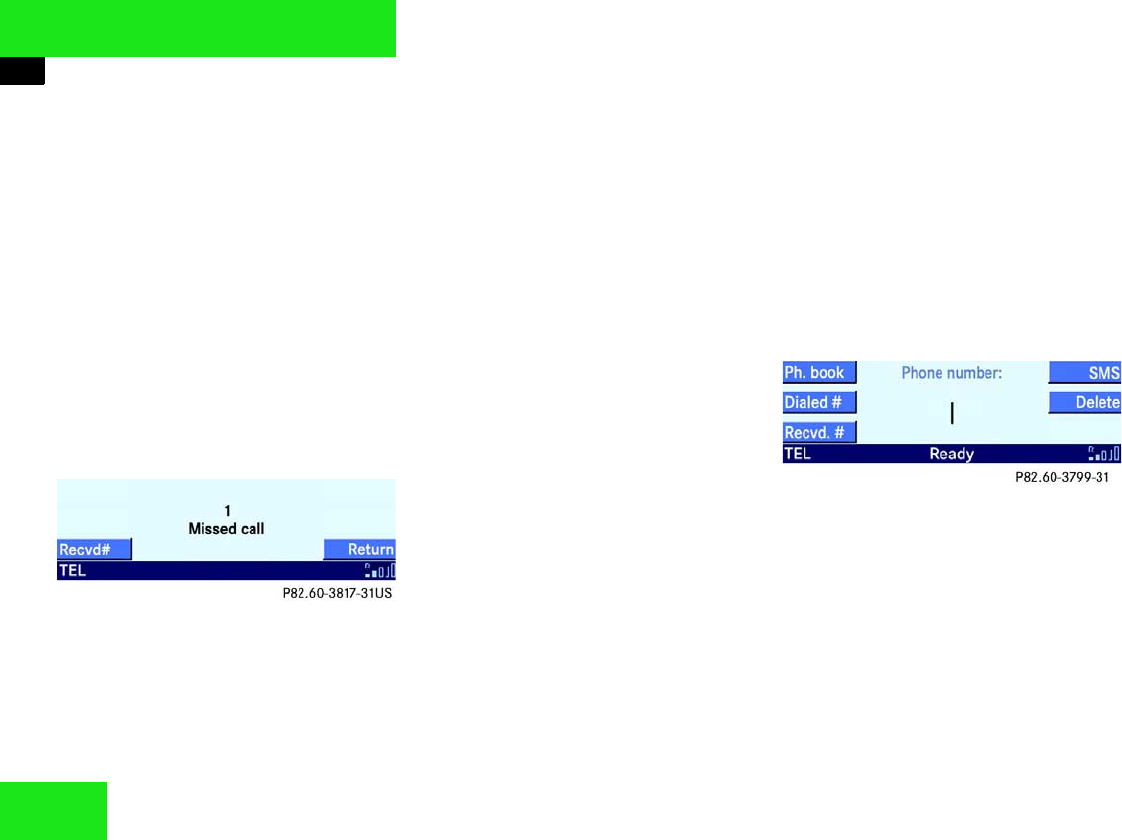
Missed or unanswered calls
When you call up the Telephone main
menu, the Missed Calls menu will appear
first, if applicable.
This will display the number of missed or
unanswered calls that were received while
the telephone was switched on.
Displaying calls:
왘Press the Rcvd # soft key.
The Rcvd # list is displayed
(컄Page 63).
Deleting missed calls and quitting menu:
왘Press the Return soft key.
The number of missed calls is reset
to 0. The Audio 50 returns to the Tele-
phone main menu.
Telephone main menu
왘Press .
The Telephone main menu is displayed.
Ready is displayed in the center of the
status line.
CDMA-Network: If you are not in a
home network, the roaming indicator
“R” will be shown.
The following messages may also be dis-
played:
앫Please insert phone
왘Insert the cell phone into the tele-
phone adapter (컄Vehicle operating
manual).
앫Telephone not installed
There is no telephone adapter installed
in your vehicle.
61
Telephone*
Operation
From the Telephone main menu you have
the following options
앫viewing outgoing calls (컄Page 64).
앫viewing incoming calls (컄Page 63).
앫Initiating redial function!(컄Page 61).
앫entering a phone number (컄Page 62).
앫calling up the telephone book
(컄Page 68)
Initiating redial function
왘In the Telephone main menu
(컄Page 60), press the Dialed #
soft key.
This displays a list containing the last
10 outgoing calls. You can select an en-
try from this list and then start the call
(컄Page 64).
You can also immediately redial the phone
number dialed last.
왘Briefly press the J button twice in
quick succession.
This starts the dialing procedure for the
phone number dialed last.
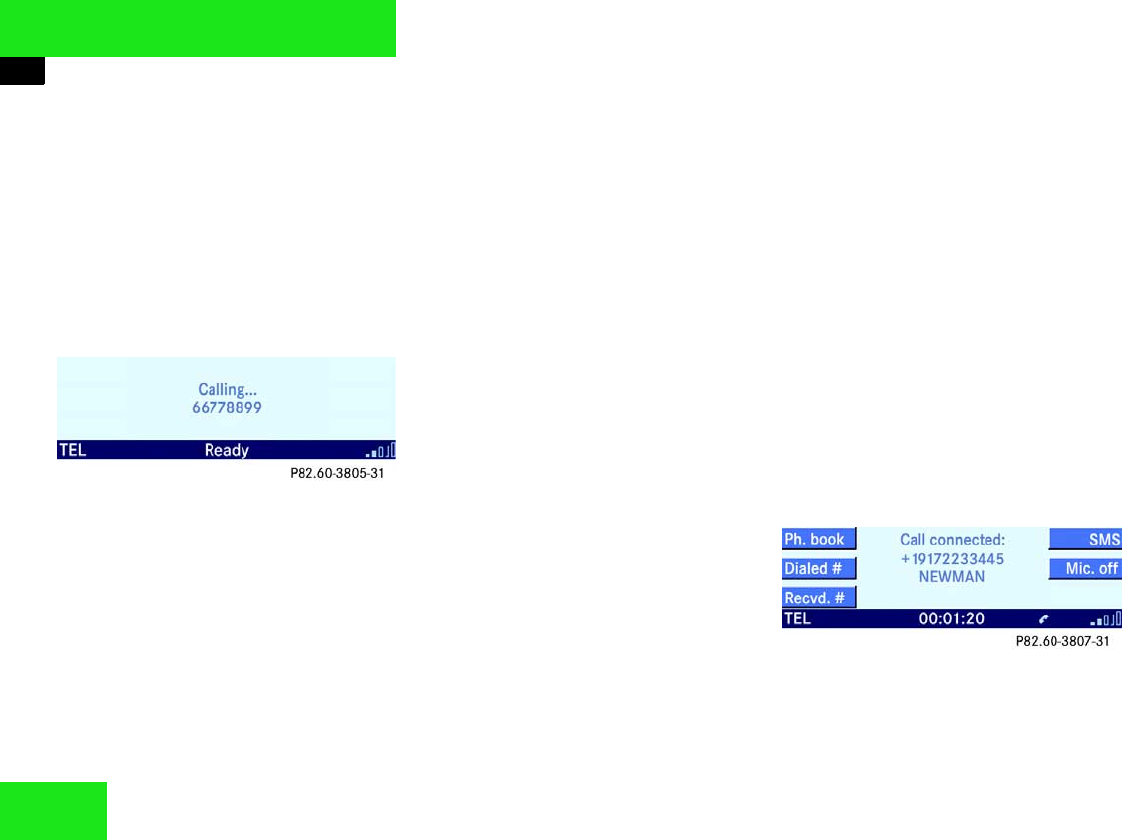
Incoming call
You will hear the ringing tone in the event
of an incoming call. The call screen is dis-
played on the Audio 50.
The call screen also appears in the multi-
function display in the instrument cluster.
i
The caller’s number only appears if it is
transmitted.
The caller’s name only appears if, in ad-
dition, the number and the name are
stored in the telephone book
(컄Page 68).

62
Telephone*
Operation
Accepting call
On the Audio 50:
왘Press J.
On the multifunction steering wheel:
왘Press í.
Once you have accepted, the call is ac-
tive.
You will conduct the call over the
hands-free system. The volume of the
call can be adjusted (컄Page 20).
Other operating functions can be found
under “Active call” (컄Page 66).
Terminating call
On the Audio 50:
왘Press I.
On the multifunction steering wheel:
왘Press ì.
Outgoing call
You will need to enter a number for an out-
going call.
The following options are available:
앫Entering phone number directly
(컄Page 62).
앫using the Redial function (컄Page 63).
앫Calling up the telephone book and se-
lecting an entry (컄Page 68).
앫selecting an entry from the Recvd #
list (컄Page 63).
앫selecting an entry from the
Dialed # list (컄Page 64).
앫using Speed dial (컄Page 65).
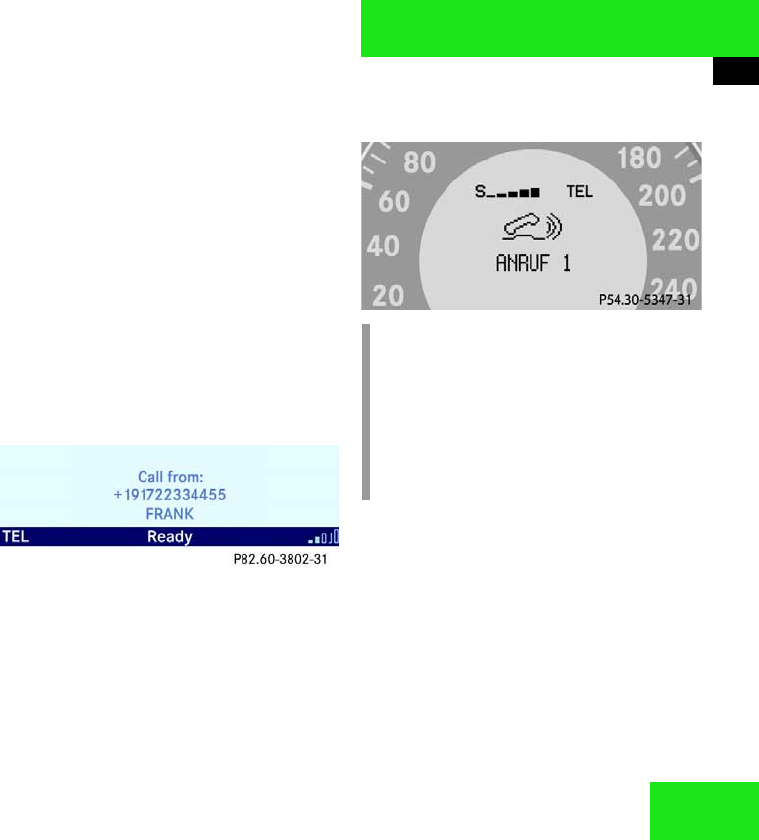
Entering phone number directly
왘Call up the Telephone main menu
(컄Page 60).
왘Using the 0 - 9 buttons, enter the
phone number.
Deleting last or all numbers:
왘Press the Delete soft key briefly
or press and hold.
왘After entering the phone number cor-
rectly, start the call (컄Page 66).
i
It is also possible to accept or termi-
nate a call from the cell phone
(컄Telephone operating manual).

63
Telephone*
Operation
Redial function
The redial function starts the call to the
last phone number dialed.
On the Audio 50:
왘Briefly press the J button twice in
quick succession.
On the multifunction steering wheel:
왘Switch the multifunction display in the
instrument cluster to the Telephone
main screen (컄Page 73).
왘Briefly press the í button twice in
quick succession.
Selecting entry from the
Recvd
RecvdRecvd
Recvd
#
list
The Audio 50 automatically saves a list of
the last 10 incoming calls. The list is or-
dered chronologically with the last incom-
ing call at the start of the list. If the list is
full, the oldest entry is overwritten with a
new one.
Calling up Recvd # list:
왘In the Telephone main menu, press the
Recvd # soft key.
The list is displayed, with the last in-
coming call highlighted. The phone
number is given in the status line.
Switching list display:
왘Press the 123 soft key.
This will switch to the number display.
or
왘Press the ABC soft key.
This will switch to the name display.
i
If you press J once, the
Dialed # list appears on the
Audio 50. This list contains at most the
last 10 outgoing calls.
You can select an entry from the
Dialed # list and then start the call
(컄Page 64).
i
If you only press the í button once,
this will call up the Dialed # list in
the multifunction display.
The Dialed # list contains at most
the last 10 outgoing calls. You will see
the last outgoing call. You can select a
call and then start the call (컄Page 65).
컄컄

64
Telephone*
Operation
Selecting list entry:
왘By pressing or select the de-
sired entry.
왘After selecting the desired entry, start
the call (컄Page 66).
Selecting entry from the
Dialed
DialedDialed
Dialed
# list
The Audio 50 automatically saves a list of
the last 10 outgoing calls. The list is or-
dered chronologically with the last outgo-
ing call at the start of the list. If the list is
full, the oldest entry is overwritten with a
new one.
Selecting from the Audio 50
Calling up Dialed # list:
왘Press J once.
or
왘In the Telephone main menu, press the
Dialed # soft key.
The list is displayed on the Audio 50,
with the last outgoing call highlighted.
Switching list display:
왘Press the 123 soft key.
This will switch to the number display.
or
왘Press the ABC soft key.
This will switch to the name display.
i
The number and name displays are
only possible if the caller has transmit-
ted his phone number.
In addition for the name display, the
phone number and the name must also
be stored in the telephone book.
i
If you press the J button twice,
the telephone immediately starts es-
tablishing a connection to the phone
number of the last outgoing call.

65
Telephone*
Operation
Selecting list entry:
왘By pressing c or select the de-
sired entry.
왘After selecting the desired entry, start
the call (컄Page 66).
Selecting from the multifunction steering
wheel
Calling up Dialed # list:
왘Switch the multifunction display in the
instrument cluster to the Telephone
main screen (컄Page 73).
왘Press í once
You will see the last outgoing call in the
multifunction display.
Selecting list entry:
왘Press j or k repeatedly until
the desired entry is given in the multi-
function display in the instrument clus-
ter.
왘After selecting the desired entry, start
the call (컄Page 66).
Speed dial
You can store and call up phone numbers
in the speed dial memory on the telephone
(컄Telephone operating manual).
It is also possible to do this from the
Audio 50.
왘Call up the Telephone main menu
(컄Page 60).
왘Press one of the buttons ! - 9 for
more than 2 seconds.
The telephone automatically starts call-
ing the number stored.
or
왘Briefly press one of the buttons ! -
9.
왘Starting the call (컄Page 66).
i
For the name display, the phone num-
ber and the name must be stored in the
telephone book.
i
If you press the í button twice, the
telephone immediately starts estab-
lishing a connection to the phone num-
ber of the last outgoing call.
i
When you press ì, the Telephone
main menu will be displayed again.
66
Telephone*
Operation
Starting call
On the Audio 50:
왘Enter a phone number (컄Page 62).
왘Press J.
The telephone establishes the connec-
tion to the phone number entered or
selected.
You will hear the ringing tone if the line
is not busy.
If the person you are calling answers,
the call is active.
You will conduct the call over the
hands-free system.
The volume of the call can be adjusted
(컄Page 20).
Other operating functions can be found
under “Active call” (컄Page 66).
On the multifunction steering wheel:
왘Enter a phone number (컄Page 62).
왘Press í.
The telephone establishes the connec-
tion to the phone number entered or
selected.
If the person you are calling answers,
the call is active. You will conduct the
call over the hands-free system.
The volume of the call can be adjusted
(컄Page 20).
Other operating functions can be found
under “Active call” (컄Page 66).
Terminating call
On the Audio 50:
왘Press I.
On the multifunction steering wheel:
왘Press ì.
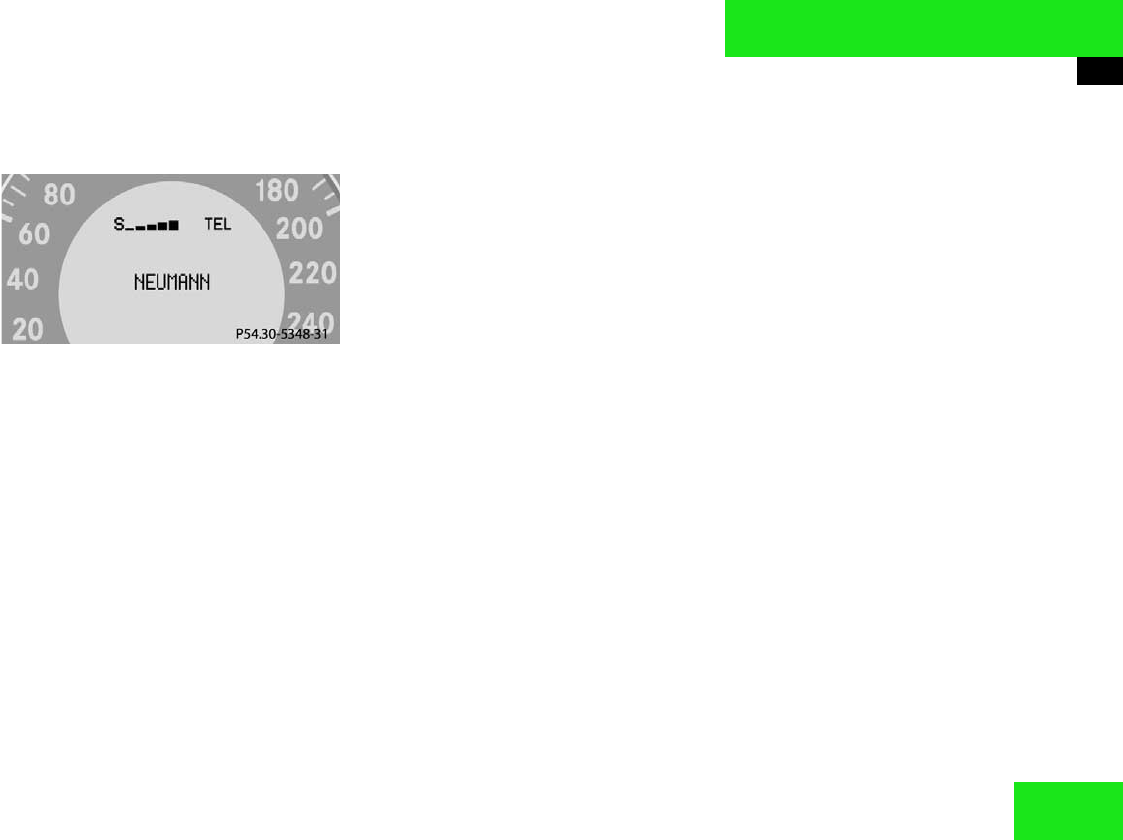
Active call
If you or the person you are calling an-
swers, the call is active.
The call screen is displayed. The call dura-
tion is given in the display.
Display on the Audio 50:
67
Telephone*
Operation
Display in the multifunction display:
The following functions are available dur-
ing a call:
앫Terminating active call (컄Page 67)
앫Switching hands-free microphone on/
off (컄Page 67)
앫Sending sequences of digits
(컄Page 67)
Terminating active call
On the Audio 50
왘Press I.
On the multifunction steering wheel
왘Press ì.
Switching hands-free microphone on/
off
왘Press the Mic. off soft key.
or
왘Press the Mic. on soft key.
If the microphone is switched off, the
other person will not hear you. You will
continue to hear him/her.
Sending sequences of digits
Answering machines or other devices can
be controlled by sequences of digits (e.g.
remote inquiry).
You can enter the sequence of digits man-
ually or send a sequence saved in the tele-
phone book.
Entering sequence of digits:
왘For each digit press one of the corre-
sponding buttons
0 - 9.
You can also send the characters Q
(*) and (#).
68
Telephone*
Operation
Telephone book
The telephone book is sorted in alphabeti-
cal order and contains the first 500 tele-
phone entries.
Calling up the telephone book
On the Audio 50:
왘In the Telephone main menu, press the
Ph. book soft key.
The telephone book is displayed on the
Audio 50, with one entry highlighted.
On the multifunction steering wheel:
왘Switch the multifunction display in the
instrument cluster to the Telephone
main screen (컄Page 73).
왘Press j or k.
A telephone book entry appears in the
multifunction display.
The following options are now available:
앫switching the telephone book display
on the Audio 50 (컄Page 69).
앫Selecting telephone book entry
(컄Page 69) and starting the call.
앫on the Audio 50 adding a voice tag to a
telephone book entry (컄Page 73).
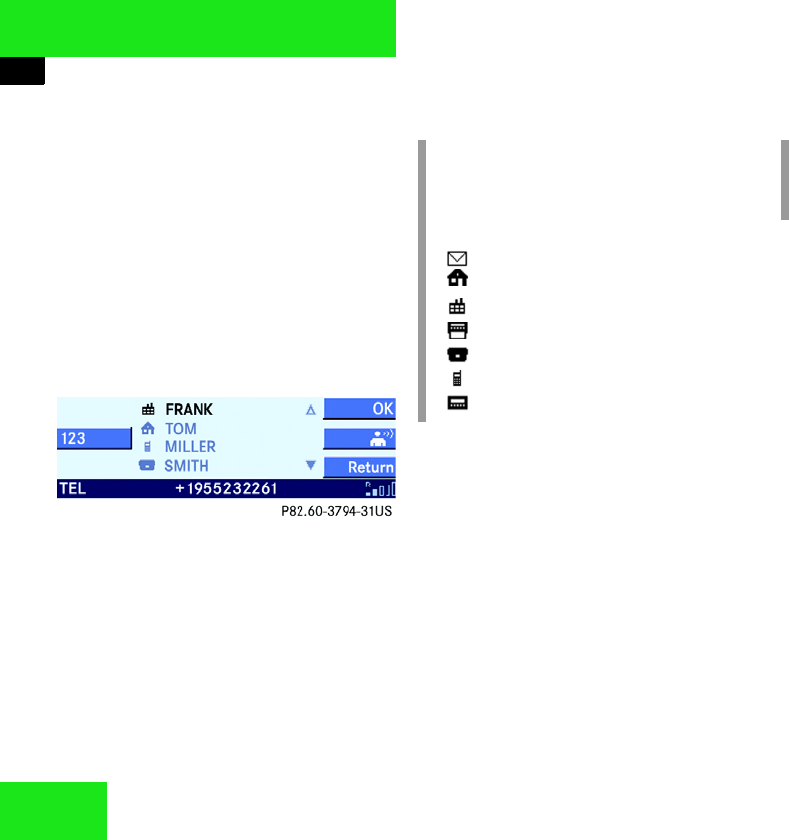
i
Depending on the entry made on the
telephone, various logos may be as-
signed to the phone numbers:
Mail address
Home number
Work number
Fax number
Main number
Mobile number
Pager number
i
When you press ì, the Telephone
main menu will be displayed again.

69
Telephone*
Operation
Switching telephone book display
왘On the Audio 50, call up the telephone
book (컄Page 68).
왘Press the 123 soft key.
This will switch to the number display.
The name of the highlighted entry is
still given in the status line.
or
왘Press the ABC soft key.
This will switch to the name display.
The number of the highlighted entry is
still given in the status line.
Selecting telephone book entry
왘Call up the Telephone book
(컄Page 68).
Selection on the Audio 50:
왘By pressing c or d select the de-
sired entry.
or
왘Using the buttons,
! - 0 enter a character. You will
have to press a button one or more
times in quick succession.
The first entry beginning with the char-
acter entered is selected. If there is no
corresponding entry, the last entry with
the previous character is selected.
왘If desired, change the selection using
the c or d button.
i
Press c or d for longer to acceler-
ate the selection.
i
Example of 7 button:
press 1 x = P
press 2 x = Q
press 3 x = R
press 4 x = S
press 5 x = 7
컄컄

70
Telephone*
Operation
Selection from the multifunction steering
wheel:
왘Press j or k repeatedly until
the desired entry is given in the multi-
function display in the instrument clus-
ter.
After selecting, you can start the call to the
selected entry (컄Page 66).
Voice tag
In vehicles with LINGUATRONIC* you can
also add a voice tag to telephone book en-
tries using Audio 50.
왘Select the desired telephone book en-
try (컄Page 69).
왘Press the soft key.
If a voice tag has not yet been assigned
to this telephone book entry, you will
be requested to repeat the text tag
twice.
왘Say the texttag twice.
Now you can also call up the telephone
book entry using LINGUATRONIC*
(컄LINGUATRONIC* operating
manual).
or
If a voice tag has already been assigned
to this telephone book entry, you will
be asked whether you want to delete
this voice tag.
i
You can add one voice tag per tele-
phone book entry.
LINGUATRONIC* can announce all
added voice tags (컄LINGUATRONIC*
operating manual).

71
Telephone*
SMS
SMS
You can receive, read and delete SMS
messages.
If a new SMS has been received, an enve-
lope symbol appears on the right of the
status line.
SMS menu
왘Call up the Telephone main menu
(컄Page 60).
왘Press the SMS soft key.
The SMS menu is displayed.
Switching between Sender and Subject
You can have the incoming SMS displayed
with the sender or the subject. If you have
selected the sender, the telephone num-
ber is displayed.
왘Press the Subject soft key.
The start of the SMS is displayed.
or
왘Press the Sender soft key.
The sender’s phone number is dis-
played.
Selecting message
왘Call up the SMS menu (컄Page 71).
왘By pressing c or d select a mes-
sage.
In the status line you will be able to see
when the message was received.
Reading message
왘Select a message (컄Page 71) and
press p.
This displays the text of the message.
i
The caller’s number only appears if it is
transmitted.
컄컄
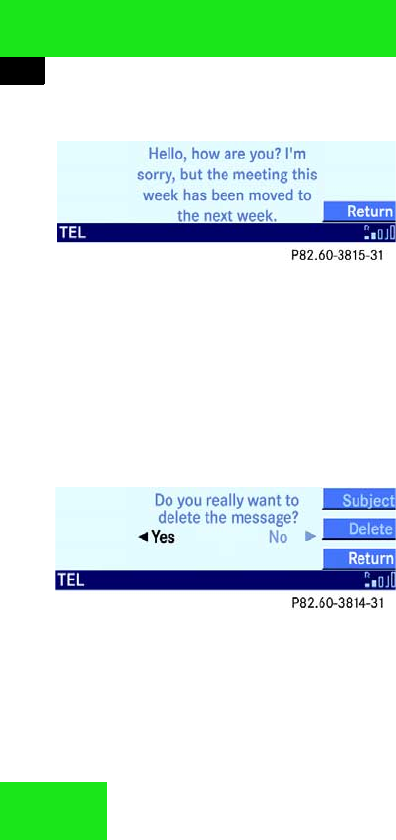
72
Telephone*
SMS
왘Press c or .
You can scroll through the text of the
message.
Deleting message
왘Select a message (컄Page 71).
왘Press the Delete soft key.
왘By pressing select the entry Yes.
왘Press p.
The message is deleted. The SMS
menu is displayed.
or
왘By pressing r select the entry No.
왘Press p.
The message is not deleted. The SMS
menu is displayed.
or
왘Press the Return soft key.
The message is not deleted. The SMS
menu is displayed.
Quitting the SMS menu
왘Press the Return soft key.
This will return you to the Telephone
main menu.
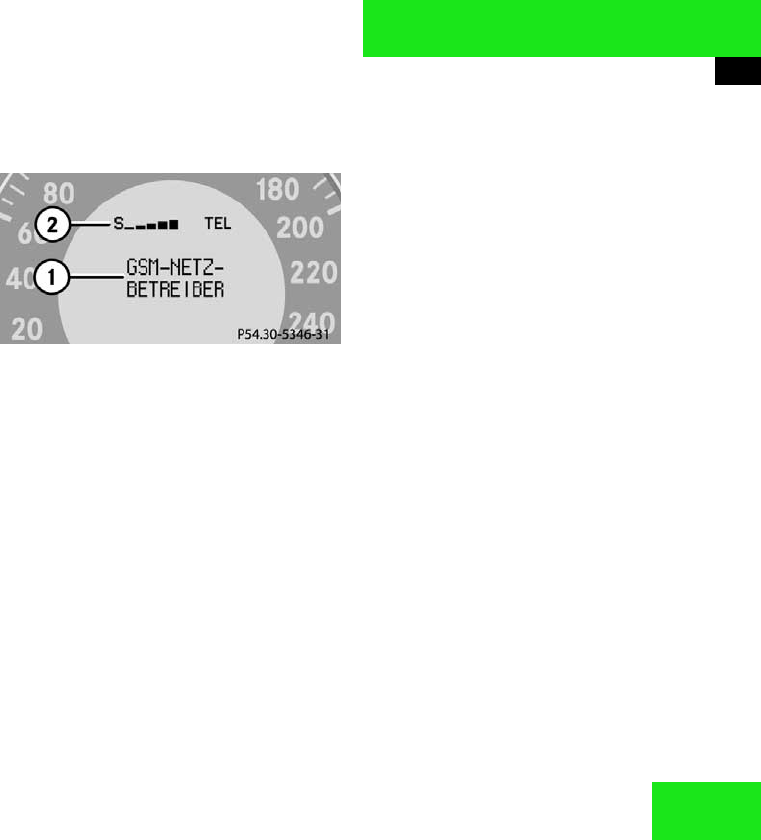
73
Telephone*
Multifunction steering wheel
Multifunction steering wheel
Using the telephone from the multifunction
steering wheel presumes in some cases
that the multifunction display in the instru-
ment cluster is switched to the Telephone
main menu.
Switching multifunction display
왘On the multifunction steering wheel,
press è or ÿ repeatedly until
the Telephone screen appears in the
multifunction display in the instrument
cluster.
The main screen or a list screen are dis-
played.
Main screen:
1Network provider
2Receiving signal strength
In the list screen, instead of the Ready
message, either a telephone book entry or
one of the last 10 outgoing calls will be dis-
played.
왘If you see the list screen, press ì.
This will switch to Telephone main
screen.

74

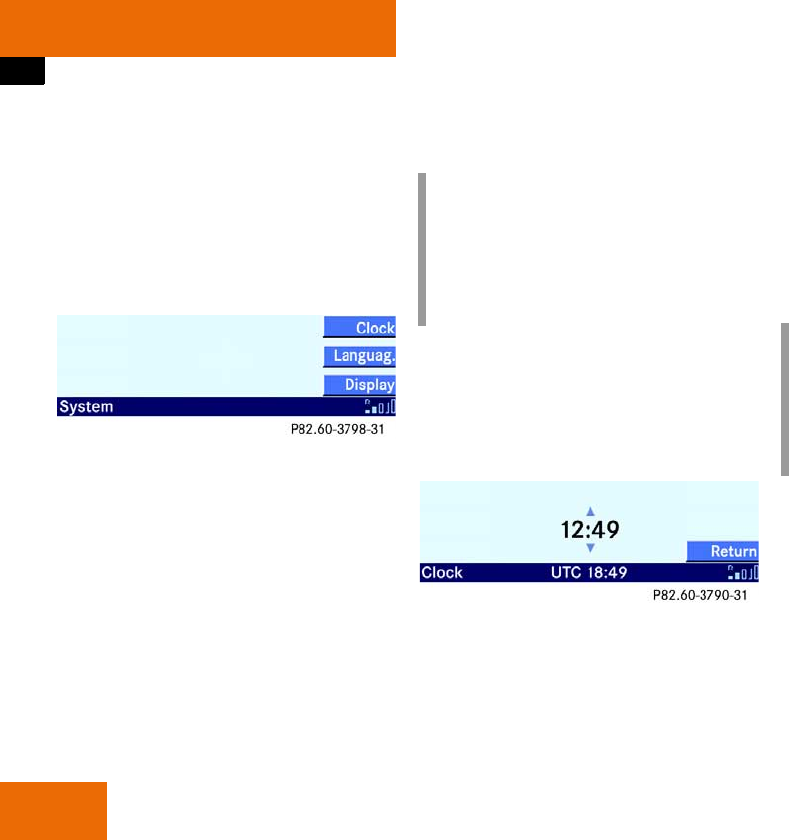
76
Service
System menu
System menu
In the System menu you can make settings
that relate to the entire system.
Calling up the System menu
왘Press s.
The System menu is displayed.
You now have the following options:
앫Setting the time! (컄Page 76).
앫Perform Display settings (컄Page 77).
앫Setting the language! (컄Page 78).
Setting the time
You should set the time sent by the GPS
satellites UTC to the correct time zone.
왘Call up the Service menu (컄Page 76).
왘Press the Clock soft key.
왘Press c or d.
This changes the time in half-hour in-
crements.
왘Press the Return soft key.
The System menu is displayed. The
new setting is stored.
i
It is only possible to set the time when
there is GPS reception.
The time change to summer or winter
time does not take place automatical-
ly. You will have to do this manually.
i
The time in the vehicle instrument clus-
ter changes automatically at the same
time if the instrument cluster has been
set accordingly (컄Vehicle operating
manual).

77
Service
System menu
Display settings
Calling up the display settings menu
왘Call up the Service menu (컄Page 76).
왘Press the Display soft key.
The Display settings menu is displayed.
Changing the display design
왘Call up the Display settings menu
(컄Page 77)
왘By pressing c or d select a design.
왘Press p.
앫Day mode option:
The display is set constantly to the
Day design.
앫Night mode option:
The display is set constantly to the
Night design.
앫Automatic option:
The display design changes de-
pending on the vehicle lighting con-
ditions.
Brightness setting
왘Call up the Display settings menu
(컄Page 77).
왘Press the Bright. soft key.
The brightness screen is displayed.
왘Press or r.
This will set the brightness.
왘Press the Reset soft key if desired.
This will set the brightness to the cen-
ter setting.
왘Press the Return soft key.
The new setting is stored.
Linguatronic* help text
If your vehicle is fitted with Linguatronic*,
you can switch the help text on or off from
the Audio 50.
The help text will then appear in the
display of the Audio 50 when you are
operating the system using Linguatronic
(컄Linguatronic* operating manual).
Switching on/off:
왘Call up the Display settings menu
(컄Page 77) 컄컄
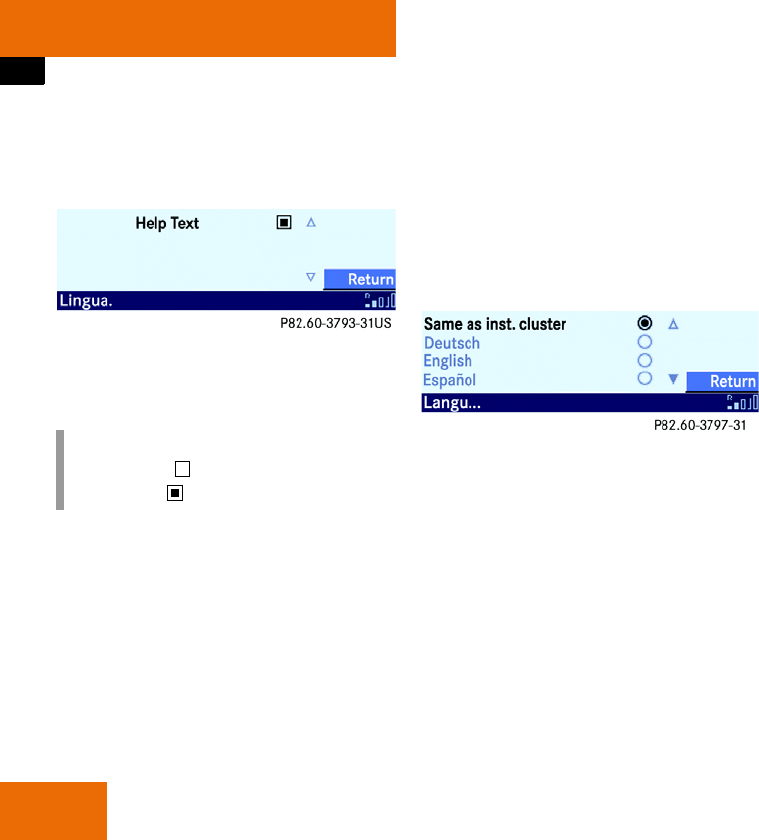
78
Service
System menu
왘Press the Lingua soft key.
The Help text screen is displayed.
The box next to the Help Text menu
item indicates whether the help text is
switched on or off.
왘Press p.
This will switch the help text on or off.
Setting the language
You can set the display language.
왘Call up the System menu (컄Page 76).
왘Press the Languag. soft key.
The language list is displayed.
왘By pressing c or d select an entry
from the list.
왘Press p.
앫Same as inst. cluster op-
tion:
The system installs the language
that is also selected in the instru-
ment cluster.
앫Other options:
The system installs the appropriate
language.
i
Empty box = off
Filled box = on
Insert
"Hilfetext Linguatronic.psd" il-
lustration

79
Technical terminology
Autostore
Enters the best-received stations in the
autostore memory, in order of their re-
ception quality.
Balance
Volume adjustment between left and
right loudspeakers.
Dolby B NR
(Dolby B Noise Reduction)
Noise reduction system in cassette
mode.
Fader
(Fader control)
Volume control between front and rear
loudspeakers.
Linguatronic*
Voice control system
Logic 7
Ambient sound playback system which
permits a better spatial sound quality
compared to stereo sound.
Soft keys
Keys which have different functions de-
pending on the operating mode select-
ed.
SCAN search
Plays receivable radio stations, CD /
cassette tracks in succession for ap-
prox. 8 seconds.
SMS
(Short Message Service)
Service for transmitting short text mes-
sages and other information.
Unlock code
Protects the telephone against unau-
thorized users.

80

81
Index
A
Accepting
Call (telephone) 62
Accident hazard 5, 34, 39, 40, 54
Active call 66
Adjusting
Balance 21
Bass 22
Fader 21
Sound functions 22
Treble 22
Volume 20
Adjusting sound functions 22
Adjusting the bass 22
Adjusting the treble 22
Audio 50
switching off 20
switching on 20
Automatic volume control 21
Autostore 29, 32, 79
B
Balance 79
adjusting 21
Bass 22
C
Call (telephone)
accepting 62
starting 66
terminating 66
Calling up
Telephone book 68
Cassette
ejecting 35
Forward 37
inserting 34
Rewind 37
Selecting track 36
Skip blank 37
Switching side 35
Cassette mode 34
Operating elements 10
switching to 34
CD
Copy protection 39, 40
ejecting 43
Forward 49
loading 40, 41
Mix 50
Repeat CD 50
Repeat track 50
Reverse 49
selecting 46
Selecting track 47
Track mix 50
CD changer*
opening 40
retracting 40
CD Mode
General information 39
CD mode 39
Operating elements 12
switching to 39
CD slot 13
Changing
Audio source 26
Display design 77
Changing audio source 26

82
Index
Closing
Cassette cover 34
Copy protection 39, 40
D
Deleting
SMS 72
Dialed # list 64
Display
Changing design 77
Enter Unlock Code 55, 57
No Network available 56
No service 56
Please insert phone 56, 60
Setting brightness 77
Telephone unavailable 60
Dolby B NR 38, 79
E
Ejecting
Cassette 35
CD 43
“911” emergency calls 58
ENTER UNLOCK CODE 55, 57
Entering
Frequency (radio mode) 31
Phone number 62
Unlock code 59
Entering phone number 62
Entering unlock code 59
F
Fader 79
adjusting 21
Faults 5
Forward
in cassette mode 37
in CD mode 49
Frequency entry (radio mode) 31
G
General information
on the CD mode 39
on the telephone mode 55
I
Incoming call 61
Injury hazard 39
Inserting
Cassette 34
L
Linguatronic* help text
switching off 77
switching on 77
List (telephone mode)
Dialed # 64
Recvd # 63
Loading
CD 40, 41
Logic 7 22, 79
M
Manual tuning 30
Menu system 18
Mix
CD 50
Track (CD mode) 50
Multifunction steering wheel
Operating elements 16
Mute function 26
N
NO NETWORK AVAILABLE 56
NO SERVICE 56
Noise reduction 38

83
Index
O
Opening
Cassette cover 34
Opening (CD changer*) 40
Opening/closing cassette cover 34
Operating elements
Cassette mode 10
CD mode 12
Multifunction steering wheel 16
Radio mode 8
Telephone mode 14
Operating safety 5
Outgoing call 62
P
Phone call
terminating 62, 66, 67
PLEASE INSERT PHONE 56, 60
Presets
Station 29, 31
R
Radio mode 27
Operating elements 8
switching to 27
Reading
SMS 71
Recvd # list 63
Redial function 61, 63
Repeat
CD 50
Track (CD mode) 50
Retracting (CD changer*) 40
Reverse
in CD mode 49
Rewind
in cassette mode 37
S
Safety instructions 5, 34, 39, 40, 54
Scan search 79
in cassette mode 36
in CD mode 49
in radio mode 30
Search
Station 28
Selecting
Cassette track 36
CD 46
CD track 47
Station 27
Telephone book entry 69
Selecting track
in cassette mode 36
in CD mode 47
Sending
Sequences of digits
(telephone mode) 67
Sending sequences of digits
(telephone mode) 67
Servicing 5
Setting
Display brightness 77
Language 78
Time 76
Setting the language 78
Setting the time 76
Short Message Service see SMS
Skip blank (cassette mode) 37
SMS 71, 79
deleting 72
Menu 71
reading 71
Soft keys 79
Speed dial 65
Starting
Call (telephone) 66

84
Index
Station
presets 29, 31
search 28
selecting 27
Switching
Cassette side 35
Multifunction display 52, 73
Telephone book display 69
to cassette mode 34
to CD mode 39
to radio mode 27
to telephone mode 59
Waveband 27
Switching hands-free
microphone on/off 67
Switching multifunction display 52, 73
Switching off
Audio 50 20
Dolby B NR 38
Hands-free microphone 67
Linguatronic* help text 77
Mute function 26
Noise reduction 38
Telephone 57
Switching on
Audio 50 20
Dolby B NR 38
Hands-free microphone 67
Linguatronic* help text 77
Mute function 26
Noise reduction 38
Telephone 57
Switching wavebands 27
T
Telephone
switching off 57
switching on 57
Telephone book 68
calling up 68
Selecting entry 69
Switching display 69
Telephone mode 55
General information 55
Operating elements 14
switching to 59
TELEPHONE UNAVAILABLE 60
Terminating
Call (telephone) 66
Phone call 62, 66, 67
Track mix (CD mode) 50
Treble 22
U
UTC 76
V
Voice tag 70
Volume
adjusting 20
Automatic volume control 21
W
Weather band 32
Mercedes Benz will be pleased to answer
all your questions:
Mercedes-Benz contact
Telephone: 00800-17777777
international: +4969-95307277
Internet
For further information on Mercedes Benz
vehicles and on DaimlerChrysler
please visit us on the internet:
www.mercedes-benz.com
www.daimlerchrysler.com
Printing
HAGO Druck und Medien GmbH
Technical editing
If you have questions or suggestions re-
garding this operating manual, please con-
tact the technical editing department at
the following address:
DaimlerChrylser AG, HPC: R821,
70546 Stuttgart
Editorial close: 30.05.2002
Re-printing, translation and
coping (including excerpts),
are prohibited without our written
permission.

- -
