Meridian America Digital Audio Processor 518 Users Manual 518a4
Digital Audio Processor Meridian 518 518user
Meridian 518 to the manual e174d9dc-22b3-4351-81cd-010e2d5c8456
2015-02-09
: Meridian-America Meridian-America-Digital-Audio-Processor-Meridian-518-Users-Manual-554962 meridian-america-digital-audio-processor-meridian-518-users-manual-554962 meridian-america pdf
Open the PDF directly: View PDF ![]() .
.
Page Count: 58

MERIDIAN 518 USER MANUAL
©
1992, 1993,
1995

2
518 User Guide
Contents
Sales and service in the UK...................4
Sales and service in the USA.................4
Designed & manufactured in the
UK by..................................................4
Acknowledgements................................4
Introduction ............................................5
About this manual..................................5
Conventions used in this
manual ...........................................5
About the 500-Series..............................5
Part 1.......................................................6
Unpacking the 518..................................6
Installing your 518..................................6
General precautions ............................6
Connections ........................................6
Siting...................................................6
Planning setup of 518 ............................7
What's inside a 518? ..............................7
Overview as Preamp (Type 0) .............8
Overview as Resolution
Enhancement Processor
(Type 1)........................................10
Overview as Mastering
Processor (Type
2)Mastering: overview...................12
Overview as Multimedia
Processor (Type 2).......................12
Customising features...........................13
Starting off with 518 .............................14
Checking ...........................................14
Switching on......................................14
If there is no display...........................14
Memory .............................................14
Standby.............................................14
Basic operation of 518 .........................14
Operating 518 as a Control Unit
(Type 0) ............................................15
Selecting a source .............................15
Adjusting the volume .........................15
Out....................................................15
In 16
Dither ................................................16
DSP...................................................17
Display ..............................................17
Emphasis Light..................................18
Clip Display .......................................18
Software version................................18
Advanced operation using the
Remote Control ...............................18
Putting the 518 in Standby ................ 18
Coming out of Standby...................... 18
Muting the sound............................... 19
Menu Keys........................................ 19
Operating 518 as Resolution
Enhancer (Type 1)........................... 19
Volume control.................................. 19
Gain control ...................................... 19
Memory............................................. 20
DSP.................................................. 20
Operation summary ............................. 20
On the 518 front panel....................... 20
With the Remote Control................... 20
Customising 518, an overview ............ 21
Restoring default settings.................. 21
Type: an overview............................. 21
Config: an overview........................... 21
How to customise 518 ......................... 22
Customising, general procedure........ 22
Customising using Type ..................... 23
Customising using Config .................. 24
How to use Config............................. 24
Setting up sources ............................ 27
Connections......................................... 29
Digital audio connections................... 29
Communications connections ............ 30
To connect to other Meridian
500 Series equipment .................. 30
Part 2..................................................... 31
Mastering Processor............................ 31
Description........................................... 32
518 as a Mastering or
Multimedia Processor (Type
2) ...................................................... 32
Meridian 500 Comms warning ........... 32
Emphasis Light ................................. 32
Selecting a source............................. 32
Gain control ...................................... 32
Memory............................................. 33
DSP.................................................. 33
Display.............................................. 33
Clip Display....................................... 34
Software versionError! Bookmark not defined.
Making Recordings.............................. 35
Transfer to editor ................................. 36
Transfer to the final carrier.................. 36
Noise shaper characteristics............... 37
518 Operating Background ................. 38

3
518 User Guide
Simple rules for using 518..................40
Additional technical information.........42
Specification.........................................42
Help!......................................................43
Standby point not lit ...........................43
Audible hiss at high volume
settings.........................................43
No output with Meridian 565,
DSP speaker or DAC....................43
No time display with Meridian
DSP speaker ................................43
Communications not working
between 518 and other
Meridian products. ........................43
Radio interference .............................43
Cleaning................................................44
Maintenance & Service.........................44
Part 3.....................................................45
Appendix 1 – Noise Shapes.................45
Appendix 2 – Hints on Mastering
with noise-shaping ......................... 47
Appendix 3 – RS232............................. 49
Appendix 4 –Resolution
Enhancement .................................. 50
Jitter and de-jittering.......................... 50
Dynamic-range.................................. 51
Dynamic-range optimisation
with Gain...................................... 52
Dynamic-range optimisation
with Pre-emphasis........................ 52
Dynamic-range optimisation
with Noise-shaped Dither ............. 54
DAC enhancement by using
high-frequency dither.................... 55
DAC or channel enhancement
by word-length matching .............. 55
Index..................................................... 56
Notes..................................................... 58

4
518 User Guide
Sales and service in the UK
Meridian Audio Ltd
Stonehill
Huntingdon
Cambs. PE18 6ED
England
Tel (0) 480 52144
Fax (0) 480 459934
Sales and service in the USA
Meridian America Inc.
3800 Camp Creek Parkway
Building 2400, Suite 112
Atlanta, GA 30331
Tel. (404) 344-7111
Fax (404) 346-7111
Designed & manufactured in the UK by
Digital Gramophone & Wireless Ltd
Stonehill
Huntingdon
Cambs. PE18 6ED
England
Copyright © 1992,1993,1995 Digital Gramophone & Wireless Ltd
Acknowledgements
Trademarks etc.
Boothroyd|Stuart Meridian and Meridian are registered trademarks of
Meridian Audio Ltd.
Super Bit-Mapping is a trademark of Sony Corp.
Testers
The processing in 518 has been beta tested in a 618 version over some
three years. Thanks in particular to Tony Faulkner (Green Room
Productions), David Chesky (Chesky Records), Tom Jung (DMP
Recording), David Smith (Sony Classical), Peter McGrath (Audiophon,
HM) and John Atkinson (Stereophile Magazine).
A list of their current 618 recordings is available from Meridian Audio on
request.
Designers
The 518 design team included Phil Boddy, Richard Hollinshead, Duncan
Smith, Bob Stuart and Rhonda Wilson.
Author: J R Stuart

Installation 5
518 User Guide
Introduction
The Meridian 518 Digital Audio Processor is part of the 500 Series of
advanced high-fidelity equipment.
In purchasing a Meridian 518 Digital Audio Processor, you have acquired
a refined piece of equipment that will continue to bring you listening
pleasure for many years. This manual will enable you to get the most from
it.
About this manual
Because the 518 is such a flexible item, we have divided this manual into
three parts.
Part 1 gives an overview of 518 and gives 'how to use' information for the
two common 'consumer' applications of Control Unit and Resolution
Enhancement.
Part 2 is more technical and describes how to use 518 as a Mastering or
Multimedia Processor.
Part 3 gives more technical information in Appendices.
Conventions used in this manual
506. A number such as 506 refers to a component in the Meridian 500
Series of audio equipment.
Display. Whenever a key name is printed in bold typeface, it means that
you should press this key. If the key name is not in bold type, it
indicates that the course of action is not required at present, e.g. ‘if
you want to change the display, press Display' means you can do this,
but it is not essential as part of the operation currently being
discussed.
Standby Italic form normally refers to the state of the 518. In some in-
stances, a key and the status of the equipment share the same name,
e.g. the Standby key and the Standby state.
Displays are illustrated in this form.
1. Sequences of actions are given in numbered lists.
About the 500 Series
The Meridian 500 Series is a unique system of digital, analogue and video
components designed to meet the demand for absolute quality, ease of
use and lasting value.
The flexibility of the Meridian 500 Series is such that you can assemble a
system as simple or as complex as you need, perfectly suited to your
requirements, and with the ability to add to it or change it at a later date
should those requirements change.
The Meridian 500 Series includes a sophisticated communications link, to
ensure that any configuration of units will work together as a fully
integrated system. The 500 Series communications system allows you to
control any combination of units using a single handset, and ensures that
your commands from the handset are interpreted unambiguously. Any
unit can be designated as the controller for the system, allowing you to
position the other units out of range from the handset beam if desired. It
also allows all the units to be switched off from the front panel of any unit
in the system.
Radio
54

Installation 6
518 User Guide
Part 1
Unpacking the 518
On opening the carton, you should have found the following parts:
• Meridian 518 Digital Audio Processor
• Power cord
• This manual
• 500 Series communications lead
If any of these items is missing, please contact your dealer. We suggest
that you retain the packing carefully as it provides maximum protection for
the unit in transit.
Installing your 518
General precautions
Before carrying out any installation, you should ensure that the 518 is
marked with the correct voltage for your local AC supply. Should this not
be the case, do not proceed – but contact your dealer.
As a general rule, you should not make any connections to the 518, or to
any other component in your system, whilst the AC power supply is con-
nected and switched on.
Connections
There are three types of connection that need to be made to the 518:
• power
• digital audio
• communications.
Audio connections need to be made to other components in your system.
Communication connections have to be made to most of the other
Meridian components in your system in order for them to act as one sys-
tem. The connections to your 518 are very important and care should be
taken in deciding which connections to make.
Connection details are described following page 29.
Siting
We recommend the following guidelines for location.
• The 518 should not be placed on top of a power amplifier.
• Avoid sites where it would be subjected to direct sunlight or where it is
near a heat source, e.g. a central heating radiator
• Avoid sites where the 518 could be subjected to strong magnetic ra-
diation, like near a power amplifier.
• Not too close to a television, or where connecting cables may be sub-
ject to, or cause, interference.
Tip In common with all digital products, the 518 emits some radio-fre-
quency signals. For this reason, try to keep all power cables and network
leads away from audio, antenna and loudspeaker cables. Some time
spent laying out the cables carefully will repay you with the best possible
performance later.
Overview of 518 7
518 User Guide
Planning setup of 518
Firstly, the 518 is a product for enthusiasts! We designed it for audio and
multimedia enthusiasts, keen listeners and those with enthusiasm for the
best sound.
However, 518 is something of a chameleon. What do we mean by that?
This is best explained by seeing what it does: 518 fulfils four very different
functions in one box.
We have categorised uses (applications) of 518 into four broad headings,
as follows:
• A simple 'preamp' or Control Unit for a purist digital audio system.
(Type 0) – see below.
• A Resolution Enhancement processor in a high-quality audio system.
(Type 1) – see the overviews on pages 10 and 49.
• A Mastering Processor, used in any recording, editing, mastering or
dubbing process. (Type 2) – see the overview on page 12.
• A peri-computer Multimedia Processor. (Type 2) – see the overview
on page 12.
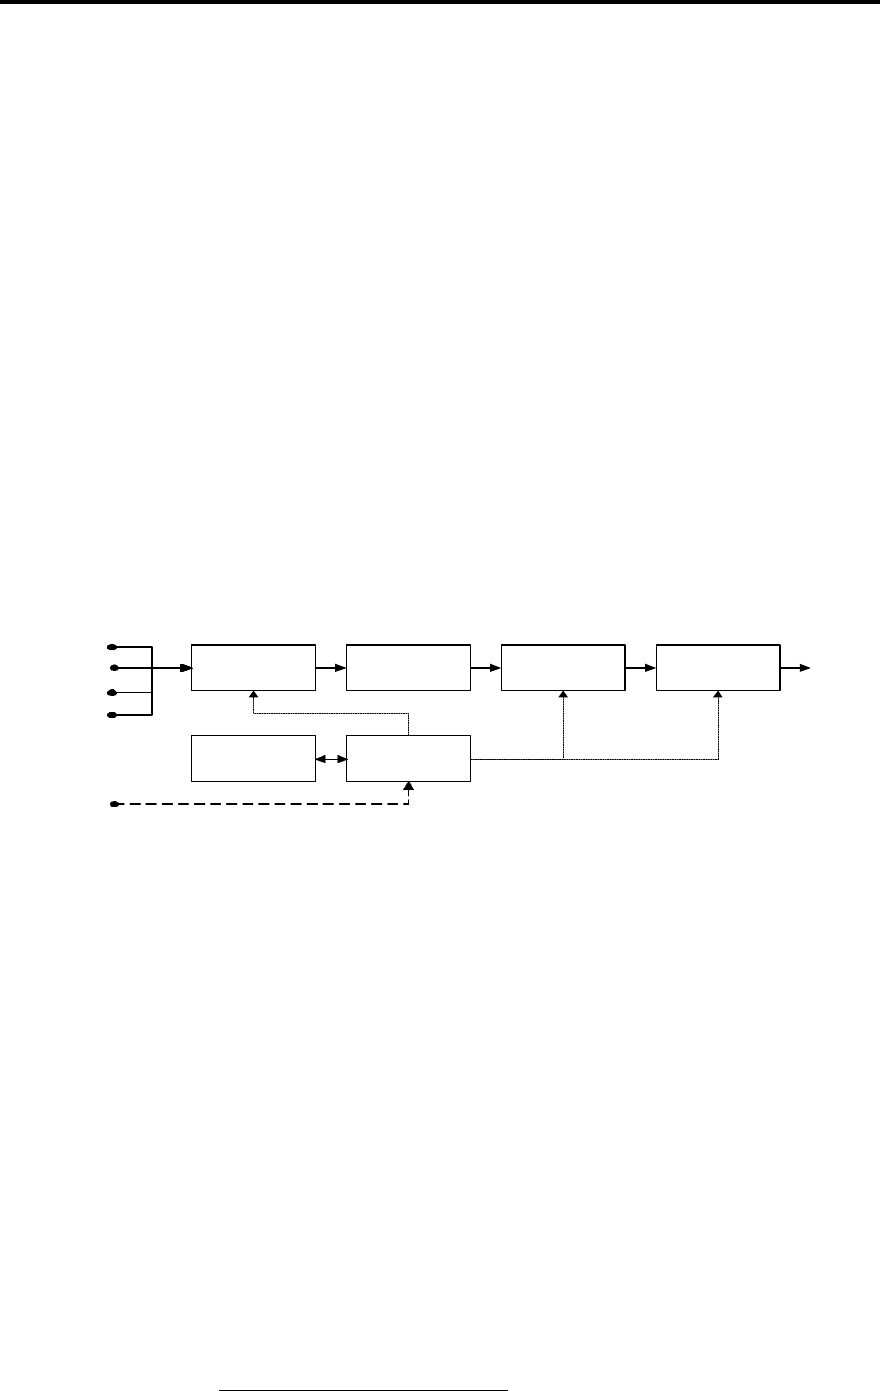
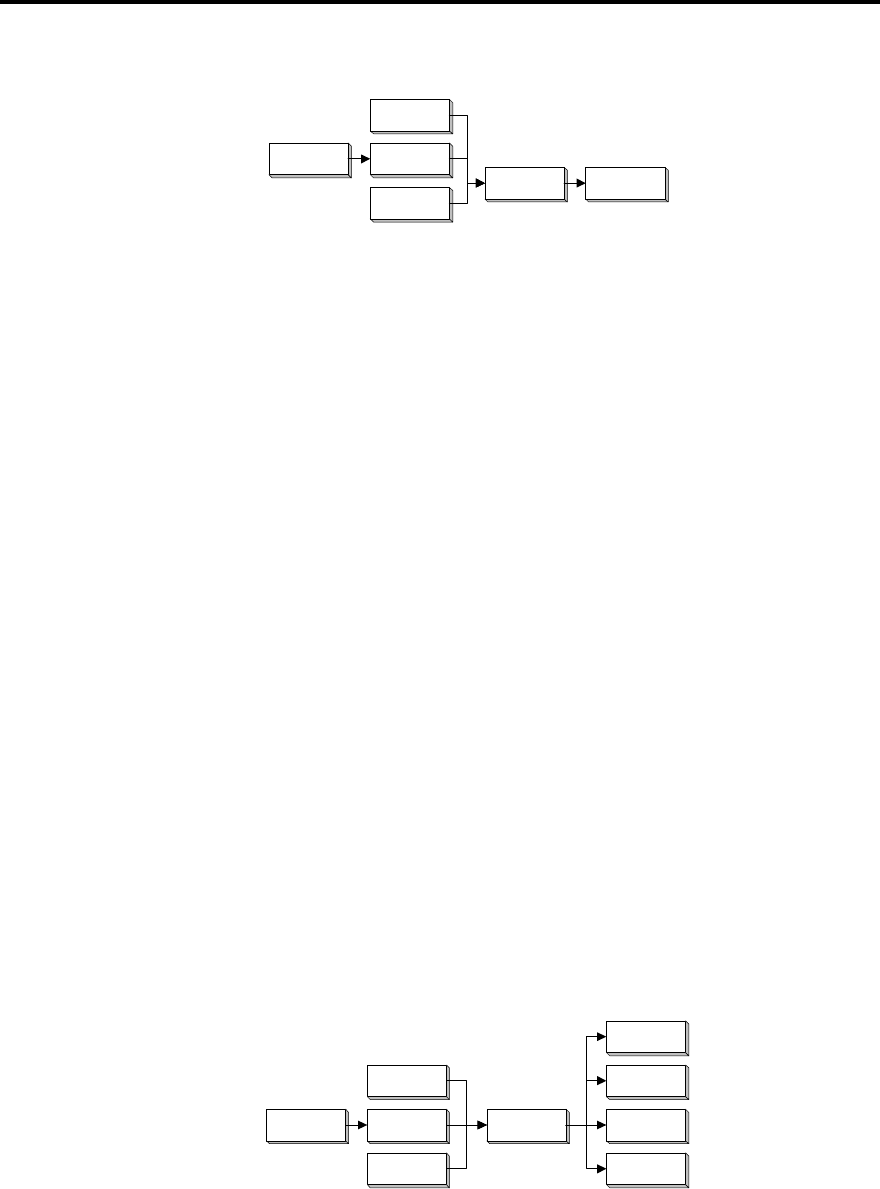
What's inside a 518?
Input Switch Twin PLL 42MHz DSP Digital Output
Front Panel Control
Computer
D1
D3
RS232
D2 Out
Internal block diagram for 518
Opt
518 is a 2-channel digital audio computer with four inputs – see the
diagram above. The selected input is de-jittered with a proprietary
Meridian twin phase-lock-loop that acts as a 'big flywheel' to regulate the
audio stream. By using this twin PLL we ensure that the outgoing digital
audio has very precise timing allowing the final output device (e.g. DAC)
to achieve its maximum sonic potential.1
Following the twin PLL is a fast (42MHz) 24-bit Digital Signal Processor,
which runs the user programs in 518. The DSP functions are all controlled
by an internal computer which co-ordinates the front-panel keys, remote
control sensor and display as well as RS232 control.
All software for 518 – control and DSP is held in a socketed EPROM. This
allows the potential of upgrades or new applications being issued later.
Following the DSP is a multistandard digital output.
1 For the technically interested, Figure 1 on page 49 shows the
performance of the twin PLL.
Overview of 518 8
518 User Guide
Overview as Preamp (Type 0)
Conventional analogue systems use a 'preamp' or control unit to gather
together the various sources and to control the level of signal fed to the
power amplifier so you can adjust volume.
Purists know that no matter how well a piece of analogue audio
electronics is designed, there will always be unwanted and irreversible
degradation, due to the addition of noise and distortion. Preamps are by
no means immune from this.
For this reason, Meridian have for many years been developing an all-
digital system where digital audio is handled by a digital controller (like
562) instead of a preamp. In these systems the signal is kept in the digital
domain right into the DSP loudspeakers. Apart from sophisticated
loudspeaker technology, the digital signal processing (DSP) in the
speakers also replaces the volume control.
Some quality-concious audiophiles (who still don't have DSP speakers)
prefer to use very simple replacements for the analogue preamp, placing
a passive volume control between an analogue source such as a CD
player or DAC and the power amp. This architecture gives very high
sound quality, but has a number of disadvantages – like it requires a very
sensitive power amp and has difficulties with impedance matching, hum,
noise and frequency response in the passive control.
The Meridian 518 can provide an enormous improvement in the sound
quality of some systems, by allowing you to dispense with the analogue
preamp altogether – providing you have a good enough digital–analogue
converter (DAC) and can route all signals in digital form.
For these applications – where a DAC can be connected directly to a
power amp – then 518 provides a radical upgrade by removing the
troublesome passive control.
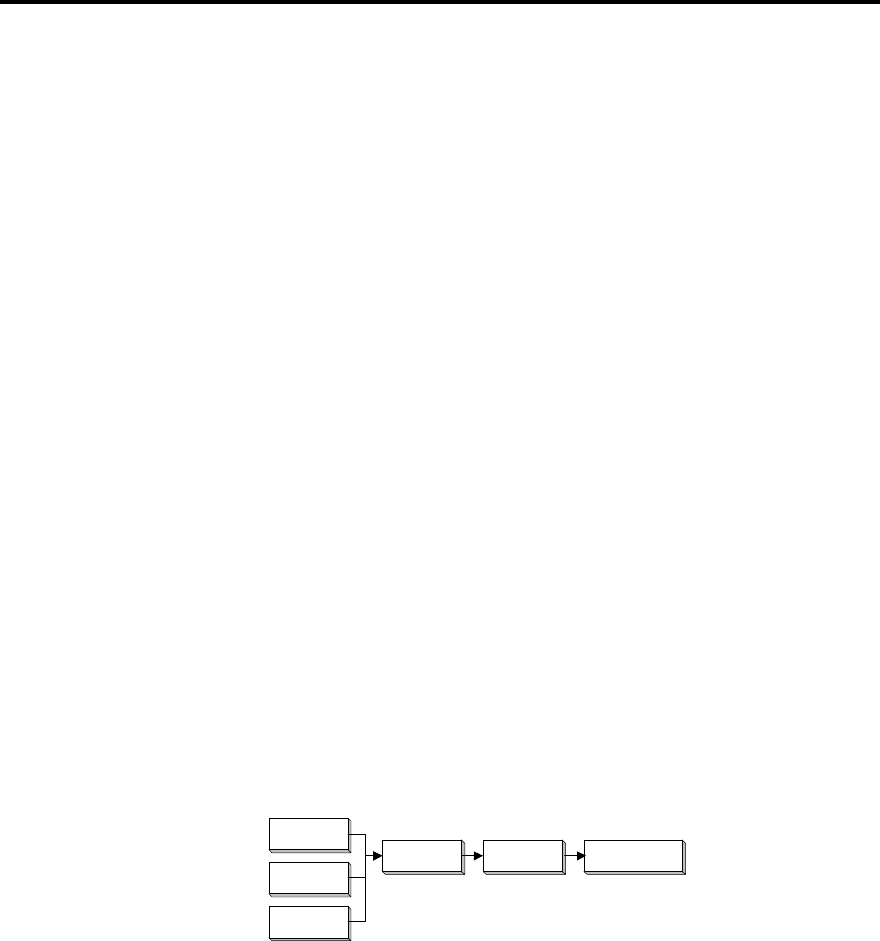
518 DAC Power Amp
CD Player
LaserDisc
DAT
Using 518 as a 'preamp'
The system is illustrated above. Up to four digital sources – like CD, DAT
or LaserDisc (often using the optical input) – are connected to the 518.
518 is then configured as Type 0 (see page 21) which makes it a system
controller with a fully-operational volume control.
The output of 518 is taken to a DAC (or digital power amp); the output of
the DAC is directly connected to the power amplifier.
The 518 performs more functions than switching and volume control. In
summary, it:
• smooths the sound by de-jittering the incoming data stream,
• performs resolution enhancement by word-length matching, shaped
dither DAC enhancement and the option of pre-emphasising the DAC.
For an overview of Resolution Enhancement see page 49.
Warning! Systems like this can sound incredibly good!
Overview of 518 9
518 User Guide
What about analogue sources?
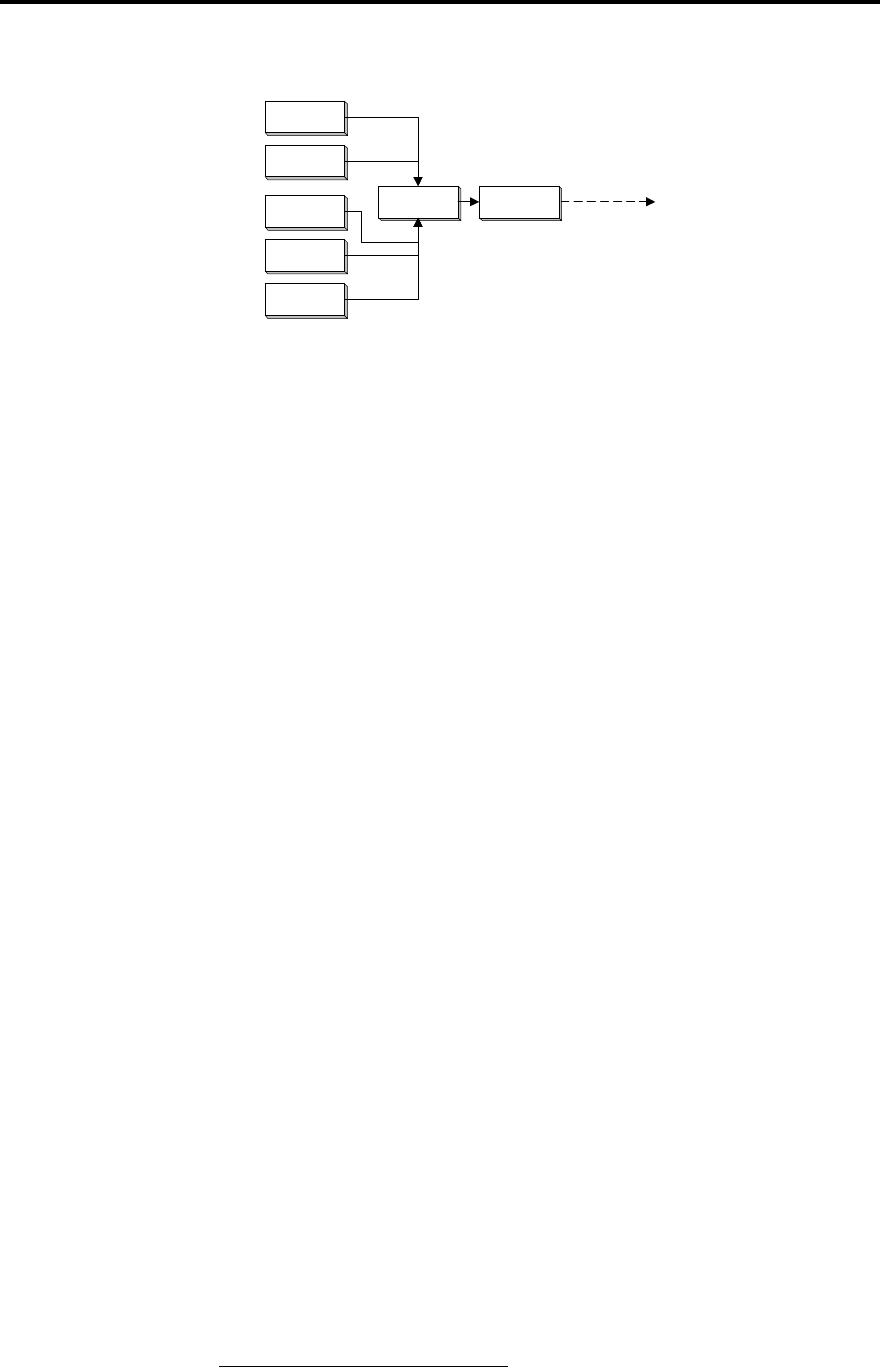
562 518
CD Player
LaserDisc
DAT
LP
Tuner
Using 518 with a 562
Analogue sources need to be converted to digital before passing through
518. Meridian make the 562 and 562V digital controllers, both of which
have very high quality delta-sigma analogue–digital converters.
By adding a 562 to the system you will be able to feed 7 analogue
sources (like radio, tape, even LP) in addition to 5 digital sources. A 562
also provides full tape copy and 2-room facilities.
518 and 562 work together seamlessly through the Meridian 500 Comms
system.2
What else do I need to know?
This is a high-performance system, and to be successful, there are a few
things to consider.
• Use a high-quality DAC. Preferably look for at least 18 bit precision.
The Meridian 563 is an 18 bit converter and is a very good choice. Of
course, 16 bit DACs will work, and the sound quality improvements
from 518 will be evident: the drawback is that 16 bit DACs may give
an audible background hiss when connected directly to a power
amplifier. The extent of this noise depends on the sensitivity of the
power amplifier and speaker used – and of course will be no more
than the noise the DAC currently gives you at high listening levels.
If the power amp has some adjustment, set its gain to the lowest
value that also allows 518 to give you the loudest result you need. As
a guideline, an 18 bit DAC should be quiet enough for a system where
the DAC maximum output (normally 2V) is well matched to the power
amp sensitivity.
• Make sure that the maximum output of the DAC (normally around 2V)
suits the maximum input level of the power amp. Your dealer will
advise on this.
• As there is no volume control between the DAC and power amp, it is
important that either the DAC you use does not have a serious turn-
on/off thump, or that you always turn the power amp on last and off
first.
• Preferably, the DAC will use analogue de-emphasis.
2 Setup details: set 518 to Type 0, set 562 to Type 1. Either can be the
system controller. Autoconfigure (see page 30) makes 562 the controller.
Make 518 the controller if you want to use the Menu keys on MSR.

Overview of 518 10
518 User Guide
Overview as Resolution Enhancement Processor
(Type 1)
There are a wide number of applications for this mode of 518: three
examples are described.
CD or LaserDisc playback improvement
Many installations use the 2-box CD player format of CD transport + DAC.
The CD transport provides a digital output, and of course may be a
normal CD player where the digital output is used to drive an outboard
DAC to improve the quality.
This CD playback system may then have its analogue output connected
to a preamp or integrated amplifier in the usual way.
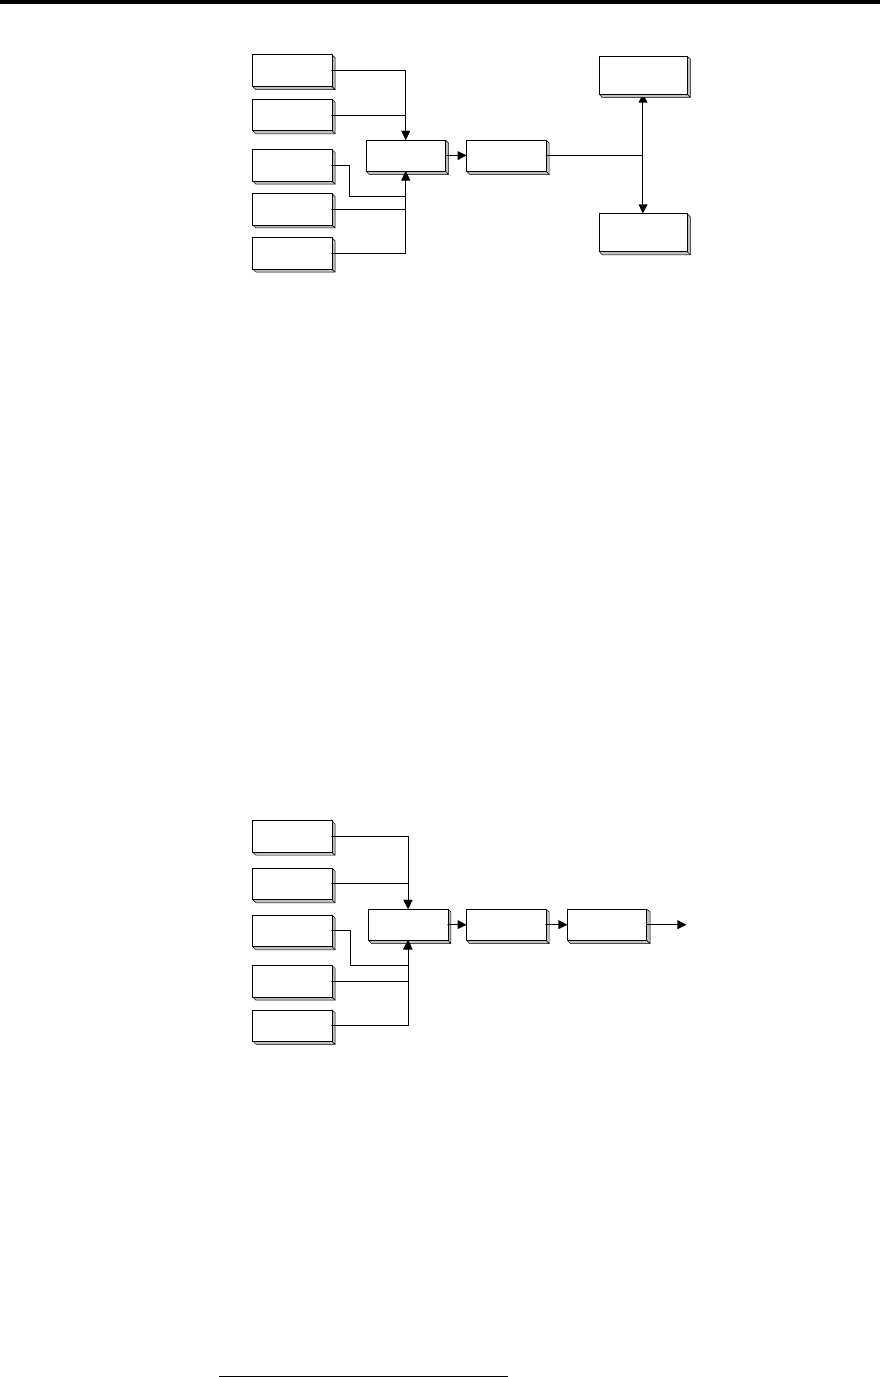
518 DAC Preamp
CD Player
LaserDisc
Analogue inputs
Using 518 as part of CD playback
The diagram above illustrates how 518 is added to such a system. The
picture shows that the source could be a CD transport, a LaserDisc player
or both.3
The 518 provides two resolution enhancement methods: de-jittering via
the twin PLL and DAC optimisation through DSP. These are explained in
'Overview of Resolution Enhancement' – page 49.
The de-jittering element is of great importance to some CD players, and of
enormous significance to any LaserDisc player as they tend to have
relatively high-jitter output. If you want to use a LaserDisc player for
serious CD listening, then the de-jittering in 518 is absolutely necessary.
The DSP DAC optimisation uses the techniques described in Appendix 4.
One function the 518 provides is matching the wordlength of the source to
the capability of the DAC, so for example, it can match LaserDisc or CD
(both 16 bits) to an 18 or 20 bit DAC.
Normally in this mode, the 518 is not used as a volume control. Optimum
performance for a disc will come, either from using unity-gain (i.e. 0dB
gain) or possibly a few dB boost to optimise the disc.
Meridian DSP speaker improvement
The Meridian DSP loudspeakers, provide the most advanced performance
and highest-resolution sound available today. The DSP speakers only
accept a digital input and in order to use analogue sources a Meridian 562
or 562V is often added. The 562 provides input handling for up to seven
analogue signals using its in-built 16 bit delta-sigma analogue-to-digital
converter (ADC).
3 Setup details: set 518 to Type 1. Adjust Out to match DAC.
Overview of 518 11
518 User Guide
562 518
CD Player
LaserDisc
DAT
LP
Tuner DSP
Speaker
DSP
Speaker
Using 518 with DSP Loudspeakers
As the diagram shows, a 518 can be placed between the 562 and the
Meridian DSP speakers. In this case, the 518 is used – very much as it is
for the earlier CD example – to provide further de-jittering and resolution
enhancement. The Meridian DSP speakers can read 22 bits on the input
and have analogue de-emphasis, so 518 can significantly improve the
sound of this system.4
Because 518 does not pass on subcode, the time display feature on
DSP5000 or DSP6000 becomes disabled. However the Meridian Comms
system keeps the speaker updated on the current track number.
Meridian Surround improvement
The Meridian 565 is a world-beating surround decoder. One of its unusual
features is the ability to accept digital signals directly to the DSP
decoding. This means, for example, that the signal from a LaserDisc can
be passed without the distortion of in-built (and often inferior) DACs and
results in a substantially improved sound.
The Meridian 565 can drive DSP, active or conventional loudspeakers in
any combination.
562V 518
CD Player
LaserDisc
DAT
LP
Tuner
565
Using 518 with a 565 Digital Surround Processor
Whatever the output configuration, the 518 should be placed before the
565 Digital Surround Processor – so that the precision of the inputs
(normally 16 bit) can be matched to the 20 bit input capability of 565.5
4 Setup details: set 518 to Type 1. Set Out to 22 C.
5 Setup details: set 518 to Type 1. Set Out to 20 C.
Overview of 518 12
518 User Guide
Overview as Mastering Processor (Type 2)
Using 518 as a Mastering Processor
518 Recorder
ADC
DAT
Recorder
Mixer
The 518 is closely related to the highly respected Meridian 618 Mastering
Processor; in fact 518 uses identical DSP to the 618 in this mode.
The Meridian 618 has been used for over three years by some of the
world's most experienced recording engineers and there is a long and
growing list of superior CDs that have used 618 in their production. See
page 4.
A mastering processor is used during recording, editing and transfer
processes. In the course of making a CD for example, the music may
pass through 518 two, three or four times.
The diagram shows 518 between a recorder – which may be DAT, reel–
reel, CDR, MO or hard disk – and a source which may be also a recorder
or an analogue-to-digital converter (ADC).
The Mastering processor provides these important functions at each
stage:
• de-jittering
• matching wordlengths output to input
• translating between consumer and professional serial interface modes
• stripping subcode and some flags
• level-shifting to optimise dynamic range
• fading during edits
• multiple re-dithering options
• DSP application of pre-emphasis or de-emphasis
• RS232 control
Overview as Multimedia Processor (Type 2)
Using 518 as a Multimedia Processor
518
Speaker
ADC
CD/DAT
Computer
Mixer Computer
DAT
CDR
The Multimedia application of 518 is somewhat similar to the Mastering
Processor just described.
Inevitably a PC is a very unfriendly place for high-quality sound for a
number of reasons. The nature of the electrical environment, the block
(i.e. 'jerky') access of hard-disc data and severe electrical noise combine
to seriously limit the jitter performance of digital audio functions and the
analogue performance of sound cards.
The principle benefits of using 518 in multimedia systems are:

Overview of 518 13
518 User Guide
• De-jittering. This is vital to getting good sound when recording or
playing back from a computer-based sound storage system.
• Matching wordlengths input to output. Hard disc storage systems tend
to use 16 or 24 bits. While 16 bit storage is quite adequate for simple
transfer, it does not allow any headroom for manipulation of the
signals – without degrading noise. 518 can be used to ensure that all
the headroom in the disc storage is used by boosting the incoming
signals to full code. 518 is also ideally suited to translating 24 bit
storage to a downstream 16 bit recording medium like DAT or CDR.
In fact, the noise-shaping options of 518 allow most of the subjective
dynamic range of a 20 bit master to be retained in the 16 bit storage
device.
• Accurate DSP. The quality of signal processing used in 518 is
substantially higher than that normally found in PC editors or sound
API functions. For example, 518 uses the most sophisticated re-
dithering technology combined with 72 bit internal processing to
ensure that any level changes or equalisations are made truly
transparent to the listener. Much of this technology is proprietary to
Meridian.
• RS232 control. The 518 supports direct RS232 control from a PC–
effectively turning it into a 2-channel DSP peripheral.
Customising features
As the previous sections illustrate, the 518 is very flexible. You have the
opportunity to significantly customise its functions to give you the
functionality that exactly suits your application.
The section ‘Customising 518, an overview' on page 37 describes the
options in detail.
We recommend that you first get to know the 518 using one of the
standard setups, and by working through this manual. Do not be afraid
later to experiment with customising – we have given you a simple way to
get back to where you started! (See page 23).
518 as provided has three standard configurations that we call Type
settings. Each Type gives a different set of options; this feature is
described fully on page 23.
Note By selecting a Type you automatically reset all custom settings for
518 to that default.
518 has four operating modes (not to be confused with setup Types):
• Normal
• Standby
• Type
• Config
Normal and Standby are the everyday operating modes: the basic operat-
ing instructions refer to these.
Type, and Config are used to make choices about the way 518 works.
These are described later in the section: ‘Configuring 518, an overview' on
page 37.

Using 518 in Hi Fi Systems 14
518 User Guide
Starting off with 518
Checking
Before turning on the power, check once again that you have made all the
connections correctly.
The 518 is designed to be left connected to AC power at all times and can
be run continuously.
Switching on
The power switch is located directly next to the power inlet on the right-
rear of 518.
1. Turn on the power switch at the rear of the unit. A small point on the
display should now be illuminated.
If there is no display
Check the integrity of the power connections, including any fuses in the
supply. If the display is still not illuminated, contact your dealer for help.
Memory
The 518 stores your latest settings for each Source in non-volatile
EEPROM memory and automatically returns to these settings either when
you come back to that Source, or on power-up.
The settings which are remembered for each Source are:
• Gain (not volume in Control Unit mode)
• DSP
• Dither
• In
• Out
Standby
The entire 500 Series is designed to be left connected to AC power at all
times.
This Standby state ensures that the components operate at maximum
efficiency from the moment you start listening. It is perfectly safe and
consumes a negligible amount of power. However, when you are not
going to use your system for an extended period of time, e.g. when you
are going on holiday, we would advise you to disconnect it from the AC
power supply.
Basic operation of 518
The majority of functions are available from the front panel controls. When
used as a preamplifier (Type 0), more functions are available using the
Meridian System Remote control. See ' Advanced operation using the
Remote Control' on page 15.
This section describes the front-panel operation for those controls that are
common to all applications.
The following sections describe differences when operating 518 as a
Control unit, as a Resolution Enhancer and as a Mastering processor.
.

Using 518 in Hi Fi Systems 15
518 User Guide
Note 518 can be used with or without other Meridian equipment. When it
is used as the main system control unit it is normally the ‘System
Controller’ and operates exactly as described below. Systems including
other Meridian control units like 562 or 565 or DSP speakers will always
elect for 518 not to be System Controller and there are some functional
differences.
Operating 518 as a Control Unit (Type 0)
Note Do not use 518 as a Control Unit if the system has a Meridian 565
or DSP loudspeaker. (Use Type 1)
Selecting a source
1. press Source until the input you require is indicated
2. release Source
or
press a Source key on the Remote
Selecting a source will bring 518 out of Standby.
Adjusting the volume
To increase the volume
1. press ,, the right-hand volume key on the 518
or
press the top red key on the Remote
To decrease the volume
1. press ,, the left hand volume key on the 518
or
press the bottom red key on the Remote Control
As you adjust the volume setting, the display will change to show the cur-
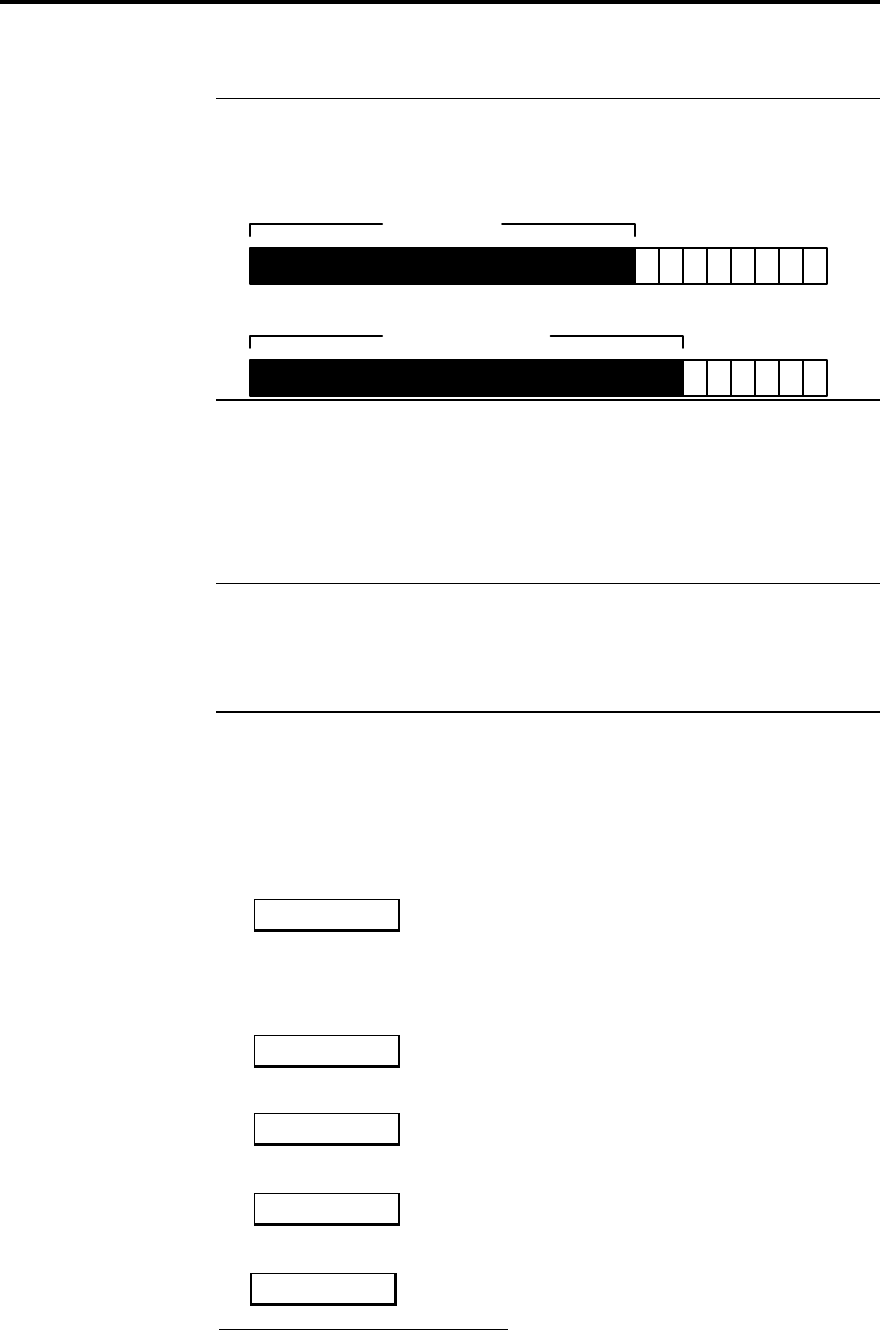
rent source and volume number. For example:
would indicate that you were listening to a Compact
Disc at a volume setting of 65. The volume level dis-
played will count up or down and ranges from 1 to 99. Each step is 1dB.
Subjectively a volume increase of 9dB is equivalent to a doubling of
loudness. Each volume number represents about a 11% change in loud-
ness; nine steps to double loudness. In a traditional analogue preamplifier
using a rotary volume control the mid-way position usually offers
approximately unity gain – with full volume corresponding to around
+20dBgain.
In 518 the unity-gain i.e. 0dB setting is at volume number 87. For normal
to high-level listening you should expect volume numbers in the region 60
to 90. For this reason 518 starts at power-up with volume number 87.
Out
1. Press Out to cycle between the output word options.
The Out key is used to set the number of output bits. It is also used to set
consumer or professional channel-status output format. The choices are:
16C, 18C, 20C, 22C, 24C, 16P, 18P, 20P, 22P, 24P
CD 65
Using 518 in Hi Fi Systems 16
518 User Guide
The numbers indicate the number of output bits. C and P represent the
choice of consumer and professional channel status formats respectively.
Information: 24 audio data bits are always written to the left and right
output words but the least significant bits, below the number of output bits
chosen, are set to zero.
e.g. for 16 C
00000000
16 data bits
e.g. for 18 C
00000000
18 data bits
In
1. Press In to cycle between the input word options.
The In key sets the number of input bits to be read from each input word.
The least significant bits below the number of input bits are masked (i.e.
ignored).
Note It is extremely important that the number of input bits is equal to or
greater than the number of data bits available on the input. If input is from
a device which is known to use some of the 24 data bits for non-audio
data or status1, the number of input bits must be equal to the number of
input audio data bits.
Both professional and consumer channel status input signals are
acceptable to the 518.
Dither
1. Press Dither to cycle between the dither options.
Appendix 1 shows the frequency shapes of these dithers.
Flat
Flat uses additive, white-spectrum, triangular probability-distribution
(TPDF) dither.
1. Press Dither again to choose between the dither options.
HP
HP (high-pass) uses additive, high-pass, TPDF dither.
Shape A
Shape A uses flat dither and a 2nd-order shaper optimised to MAF. 2
Shape B
Shape B uses flat dither and a 9th-order shaper optimised to MAP. 3
1For example, some A/D converters based on Crystal Semiconductor
converters may have level information embedded below the LSB.
2MAF, Minimum Audible Field, is the appropriate threshold curve for
human listeners with normal stereo loudspeakers.
Shape C

Using 518 in Hi Fi Systems 17
518 User Guide
Shape C uses flat dither and a 9th-order shaper optimised to MAF.
Shape D uses high-pass dither and a 9th-order shaper optimised to
MAF.
Shape E uses high-pass dither and a 2nd-order shaper optimised to
MAF.
DSP
1. Press DSP to select the primary processing mode.
The display will show:
Gain 87
Gain has a flat frequency response, but the level of the signal level is
adjusted using a precision dithered multiplication. All the front panel
keys are available to specify processing.
1. Press DSP again.
The display will show:
Emph 87
Emphasis ensures that the output of 518 is always pre-emphasised
according to the 50/15µs CD standard. 518 uses precision DSP to pre-
emphasis the signal providing the incoming signal is not already pre-
emphasised. If the incoming signal is pre-emphasised the red Emph
light indicates this.
Emphasis is the recommended mode for most program material
providing the DAC system is correctly designed and uses analogue de-
emphasis.
or:
De-Emph 87
De-Emph provides the CD de-emphasis function to very high precision
when the incoming signal is pre-emphasised. You would use this only
if you have a DAC which provides digital de-emphasis. This adaptive
mode ensures that the output of 518 is never pre-emphasised.
Note Gain functions in Emphasis and De-Emphasis, in fact all the front
panel keys are available to specify processing.
Display
1. Press Display key to select between the following display formats
Emph 67
Pre-emphasis option and gain setting, or
ShpB 67
Dither mode and gain setting, or
CD 67
Source and gain setting, or
3MAP, Minimum Audible Pressure, is the appropriate threshold curve for
human listeners using headphones.
Shape D
Shape E
Using 518 in Hi Fi Systems 18
518 User Guide
20C16 67
Input/output choice and gain setting, (This example indicates 20 bits of
input and 16 bits of output in consumer format), or
44k1 67
Sampling frequency and gain. If there is no input signal the display
would indicate no lock as follows:
N.L. 67
Emphasis Light
There is a light on the front panel Emph which indicates when the
channel status suggests that the incoming audio is pre-emphasised. It is
not affected by the user's settings on the 518 itself.
Clip Display
Some of the processing modes in 518 deliberately allow you to increase
the overall level of the signal. If the output signal exceeds full scale, the
518:
• clips (saturates) at full code (normally sounding benign on short
overloads), and
• displays a clip message like:
ClipL 89
The clip message will indicate whether the overload occurred on Left,
Right or both.
Clipping in DSP has nothing like the bad sonic consequences of clipping
analogue systems. Normally small amounts of clipping cannot be heard.
Software version
In Standby:
1. Press and hold Display.
The display will show the version number of the microcontroller
software, followed by the DSP version e.g.:
Advanced operation using the Remote Control
Putting the 518 in Standby
1. press Standby on the Remote Control
or
put another Meridian component into Standby.
Coming out of Standby
To start up the 518 from Standby
1. Select a source from the front panel or the Remote Control (MSR).
or
If the 518 is part of a Meridian system, bring any component out of
Standby. For example start up a Meridian CD-player.
DSP
1.5

Using 518 in Hi Fi Systems 19
518 User Guide
Muting the sound
The mute facility cuts off the sound by setting the volume level to zero.
To mute the sound
1. Press Mute on the Remote Control. The output will mute and the
display will change to:
To restore the sound
1. Press Mute a second time.
The volume level and display will be restored.
Menu Keys
When the 518 is used as a control unit and it is the system controller, then
the four menu keys on the MSR can be used to access the DSP, Dither,
In and Out menu functions.
To access a menu
1. Press ww or ee on the remote.
The menu will be displayed.
To change a menu
1. Press nn or ss on the remote.
Operating 518 as Resolution Enhancer (Type 1)
Note Do not use Resolution Enhancement mode if you want the 518 to
provide the volume control. (Use Type 0)
Volume control
The 518 does not provide the main system volume control in Resolution
enhancement (Type 1) mode.
If 518 is used with other Meridian controllers like 565 or DSP
loudspeakers, they will provide the volume function and the normal
Meridian 0–99 volume number display.
In Resolution Enhancement mode, 518 does provide a secondary gain
control which allows you to maximise the resolution of down-stream
processors and DACs by raising each piece to full digital code.
This function is called 'Gain' and does not follow the system volume
control.
Gain control
Gain control is provided in one decibel steps from +12 dB down to -99 dB.
1. Press ▲
The gain will increase in 1dB increments, and the display will show the
gain in dBs, something like:
1. Press ▼, to decrease the gain.
2.
Muted
CD
+2
Operation summary 20
518 User Guide
Memory
In Resolution Enhancement mode, 518 maintains a continuous memory of
the DSP, Dither, Gain, In and Out settings for each source.
So, if you had determined that, e.g. CD should always use Gain 0dB but
that Radio could always use Emphasis and +2dB, then 518 will remember
these and automatically reconfigure itself for each source.
DSP
In addition to the DSP modes offered in Control Unit (see page 15),
Resolution Enhancement adds Bypass.
Bypass transmits all 24 bits on the input to the output without any
processing.
Note When Bypass is chosen, all the other front panel keys are disabled.
Operation summary
On the 518 front panel
Key Action
Source Selects Source or input
Display Cycle the display through:
Processing option with gain in dB
Dither option with gain in dB
Input/output choices with gain in dB
Sampling frequency and gain in dB
Blank
DSP Select main processing method: Bypass,
Gain, Emphasis, De-emphasis.
Dither Select dither or noise shaper to be used
In Set number of input bits
Out Set number of output bits and consumer or
professional use of channel status
ss Decrease volume/gain
nn Increase volume/gain
With the Remote Control
Source keys Selects input depending on
customisation.
Standby Puts the 518 into the Standby
state.
Clear Autoconfigure (in Standby)
w ew e Access the Menus
n s n s Change the Menus
Fn + Display Change 518 Display
Red nn and ss Change the primary volume.
Mute Mutes output.

Customising 518: overview 21
518 User Guide
Customising 518, an overview
518 is a very sophisticated device with a huge number of options to allow
you to set up exactly the system you need or to experiment with new
possibilities.
Programming 518 is a straightforward process and you should not be
timid about experimenting. Although the setup is stored in non-volatile
memory called EEPROM, the EPROM (which you cannot change)
contains default Type settings and you can return to these at any time.
Restoring default settings
1. Switch off any power amplifiers that are connected to 518.
2. Switch off the 518 using the power switch on the back.
3. While pressing the Source key on the 518 front panel, switch the
power on again. The display will read:
4. Release the Source key
At this stage you can change the Type from 0 – 2 using the n and s
Volume keys.
5. Switch off the 518 using the power switch on the back.
6. After half a second, switch the 518 power on again.
Caution Some power amplifiers are very susceptible to small surges that
may result from the process of switching a preamplifier on and off. Some
– like the Meridian 205, 555 or 605 incorporate DC-offset protection that
may be triggered by this process. Meridian active or digital loudspeakers
are inherently proof against these surges and need not be switched off. In
general digital products like power amplifiers, recorders etc. will be
unpredictable when they have the digital signal interrupted.
518 has two setup options; Type and Config. These together with Normal
and Standby give the 518 four operating states. The following sections
give an overview.
Type: an overview
Type just described, restores one of the default settings. No further
actions are possible.
Config: an overview
Config mode is used for setting fundamentals of options and control.
Consequently in Config the outputs of 518 are muted while you make the
necessary choices. The choices available in Config are outlined in the
following sections.
Config: control settings
In Config you can make selections that effect the way 518 responds to
certain keys. The main choices of this kind are:
• whether the 518 is to auto-configure, or you will determine the
controller in the system.
• The ‘address’ of the product.
• whether or not Standby is permitted.1
1 Standby is not recommended for 'Pro' or Mastering situations
Type
1

Customising 518: overview 22
518 User Guide
• whether or not the Bypass DSP option is available.2
• whether or not a blank display option is allowed.
• whether or not the Emphasis DSP option is adaptive – i.e. reacts to
the incoming emphasis status.
• choices on how the volume control operates and displays.
Details of these are described in the next section.
Config: sources and inputs
In Config you can also make selections to do with sources, e.g.
•how many inputs will be active
•which sources you can select
•which key on the remote control selects which source
•the Logo for that input on the 518 display
•the physical input connection to 518.
•the Comms type of the source, i.e. whether it is a Meridian controllable
source like CD or Radio
•the address for that source product
2 Bypass is not available if the 518 is the system volume control!
How to customise 518
The 518 comes configured in Resolution Enhancement mode (Type 1)
and needs no customising to become operational.
There are a very large number of different configurations possible. This
section tells you how to change the configuration.
Customising, general procedure
518 has four operating modes (not to be confused with setup Types):
• Normal
• Standby
• Type
• Config
Normal and Standby are the everyday operating modes: the operating
instructions refer to these.
Type and Config are used to make choices about the way 518 works.
These are described in the section: ‘Configuring 518, an overview' on
page 37.
How to change to Type or Config
To change to Type or Config you use the same basic procedure.
1. Switch off any power amplifiers that are connected to the system.
2. Switch off the 518 using the power switch on the back.
3. While pressing the specific key for the operating mode you want on the
518 front panel, switch the power on again.
518 will display a message to inform you which mode it is in.
4. Release the key
At this stage you can make the adjustments required.
In step 3, the front panel key is:
•Type – press and hold Source.
•Config – press and hold Display.
•Normal – do not use any key!
Customise 518 using Type 23
518 User Guide
Caution Some power amplifiers are very susceptible to small surges that
may result from the process of switching a preamplifier on and off. Some
– like the Meridian 205 or 605 incorporate DC-offset protection that may
be triggered by this process. Meridian active or digital loudspeakers are
inherently proof against these surges and need not be switched off. In
general digital products like power amplifiers, recorders etc. will be
unpredictable when they have the digital signal interrupted.
How to change back to Normal
To revert to Normal .
1. Switch off the 518 using the power switch on the back.
2. After half a second, switch the 518 power on again.
Making changes to an existing setup
Config is a configuration editing mode, it does not reset on entry. Type
however performs a full reset of all parameters.
To make any changes to your custom configuration:
1. Change to Config,
2. make the changes you want,
3. change back to Normal.
Customising using Type
Type is a mode used specifically to setup 518 into one of three factory-
preset configurations.
• Type resets the following for all three Types.
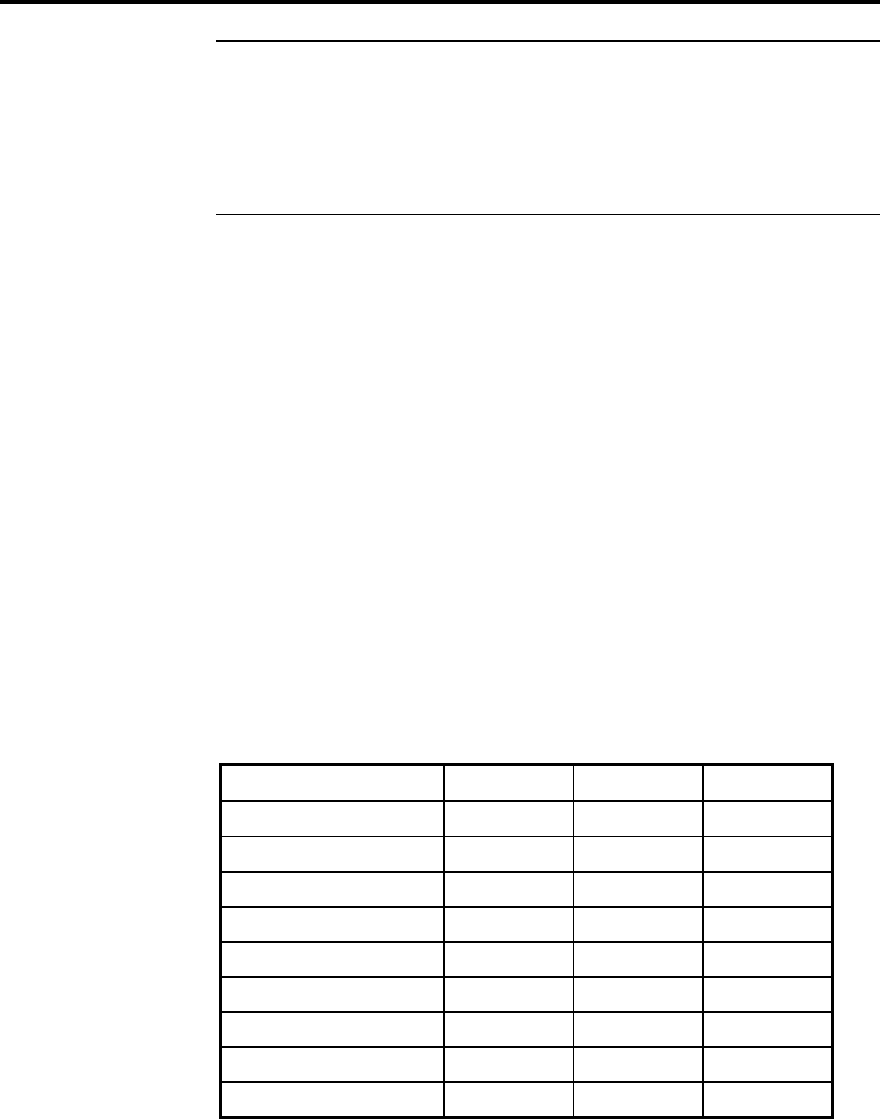
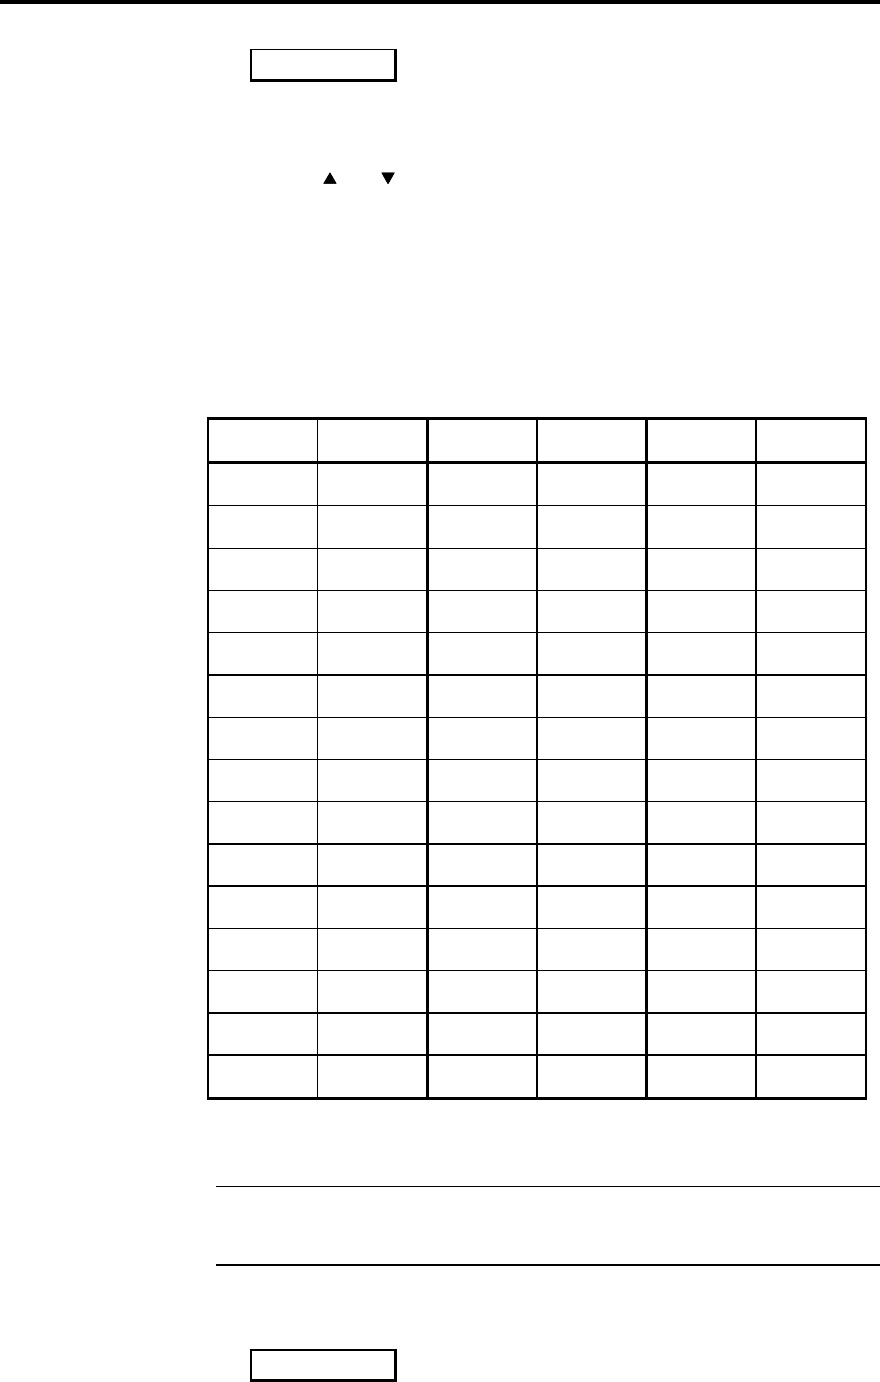
Setting Type 0 Type 1 Type 2
Controller Auto Auto N.Con
System Address 111
Product Address 111
Standby Y Y N
Bypass NY Y
Blank Y Y N
*Emph NNN
Volume MN N
Volume ## dB dB
Customise 518 using Type 24
518 User Guide
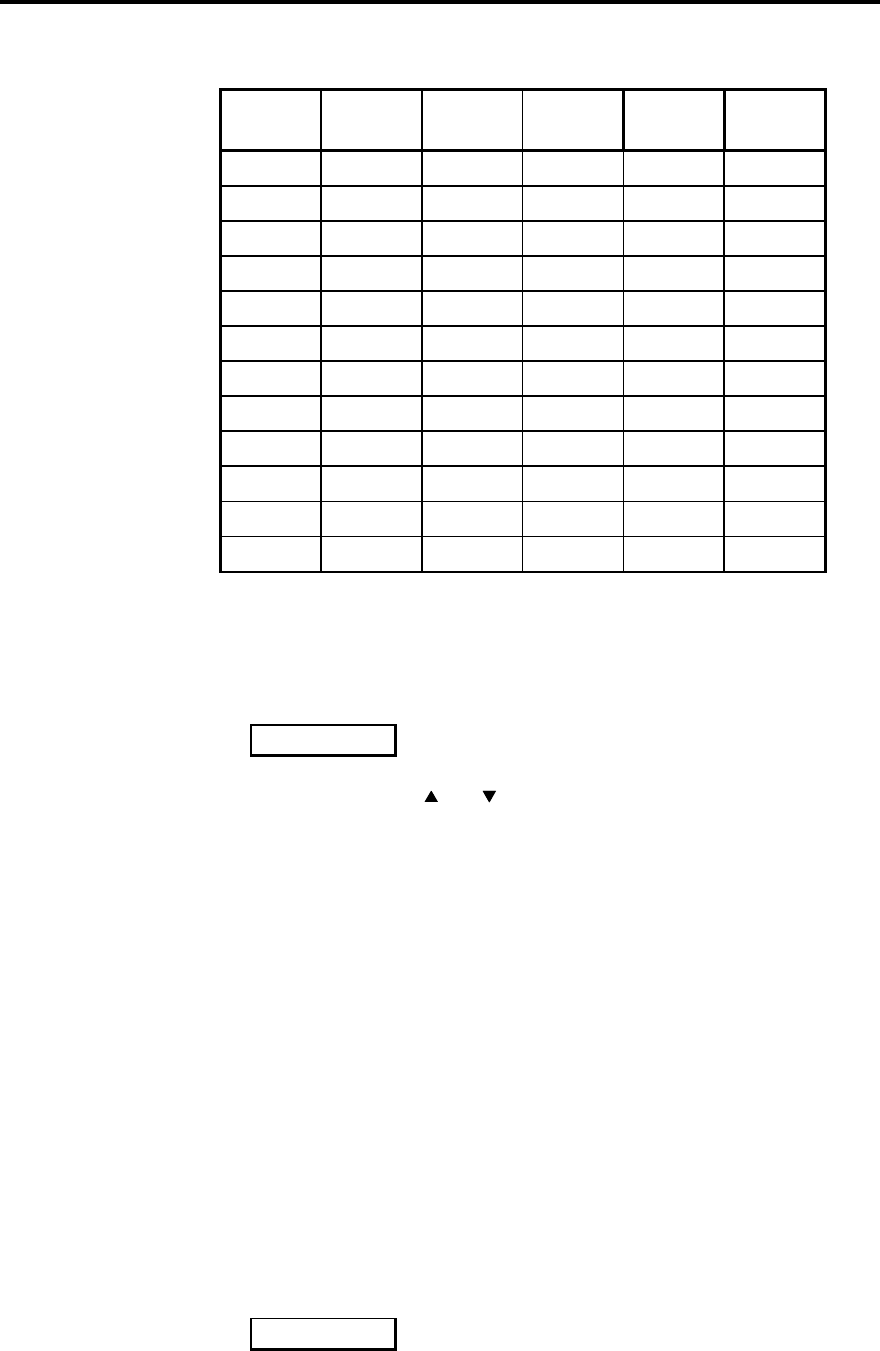
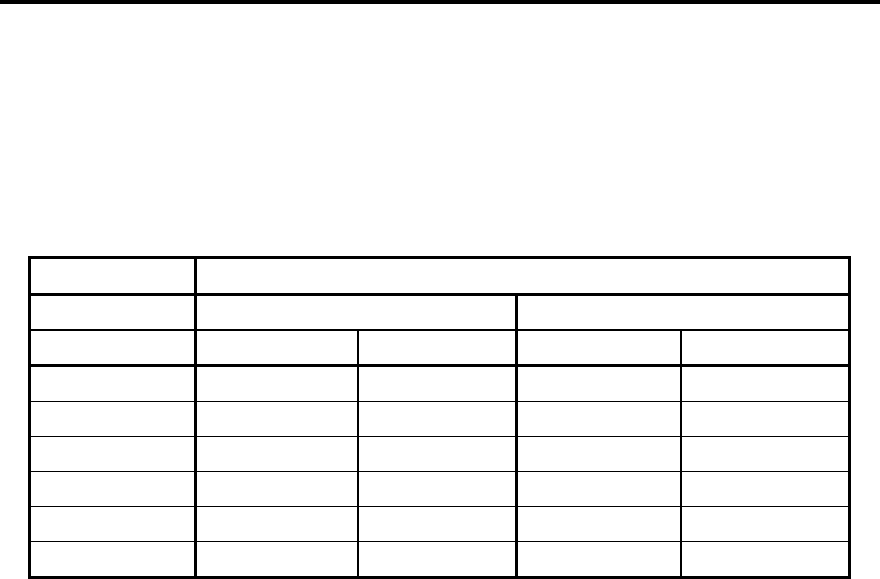
•Source-Logo-input mapping as shown below.
Source Logo Type 0
Input Type 1
Input Type 2
Input Comms
type
CD CD D1 D1 D1 1
Radio RD D1 D1 N2
LP LP D1 D1 N–
TV TV D1 D1 N–
Tape1 T1 D2 D1 D2 –
Tape2 T2 D3 D1 D3 –
CDR CR D1 D1 N–
Cable Cb D1 D1 N–
Text Tx D1 D1 N–
VCR1 V1 D1 D1 N–
VCR2 V2 D1 D1 N–
LD LD OP D1 OP –
Selecting Types
1. Switch off any power amplifiers that are connected to the system.
2. Switch off the 518 using the power switch on the back.
3. While pressing the Off key on the 518 front panel, switch the power on
again. The display will read:
4. Release the Off key
5. Use the front-panel and Volume keys to move the selection
between Types 0 – 2.
6. When you have the Type you want displayed, wait one second for 518
to action the choice.
7. Switch off the 518 using the power switch on the back.
8. After half a second, switch the 518 power on again to restore Normal
mode.
Customising using Config
In Config you can review and change settings to do with communications,
control and the hardware options you have. In Config you also make
choices about the number and types of sources, what the display shows
when you select them etc. The 518 is initially programmed to Type 1 and
all Types set up the source configuration as shown in the previous Tables.
How to use Config
1. Switch off any power amplifiers that are connected to the system.
2. Switch off the 518 using the power switch on the back.
3. While pressing the Display key on the 518 front panel, switch the
power on again. The display will read:
4. Release the Display key, the display will show:
Type
1
Config
Customising 518 using Config 25
518 User Guide
Selecting the controller mode
In Config mode:
1. Press Display until you see a display like:
2. Use the and , Volume keys to choose between:
•Auto, meaning configuring can be automatic
•Cont, meaning the 518 will be the system controller
•N.Con, meaning the 518 will not be the controller
Setting the system address for 518
In Config mode:
1. Press Display until you see a display like:
This means the system address is 1. The Meridian 500 Comms system
allows for up to eight systems operating on the same network. Unless you
are setting up a Multiroom system, or are advised to do so by Meridian
support personnel, we suggest you leave this on address 1.
Setting the product address for 518
In Config mode:
1. Press Display until you see a display like:
This means the product address is 1. The Meridian 500 Comms system
allows for up to eight products of the same type operating on the network.
Unless you are setting up a Multiroom system, or are advised to do so by
Meridian support personnel, we suggest you leave this on address 1.
Note When customisation is complete, switch the power off and then on
again to restore Normal mode and to save what you have done.
Setting the Standby mode for 518
In Config mode:
1. Press Display until you see a display like:
This means that Standby mode is available. To prevent Standby chose N.
2. Use the and , Volume keys to choose between Yes or No.
Setting the Bypass option for 518
In Config mode:
1. Press Display until you see a display like:
This means that Bypass is available. Bypass prevents the 518 operating
as a volume control and is therefore it is highly undesirable to access it by
mistake if you are using 518 to control volume.
2. Use the and , Volume keys to choose between Yes or No.
Auto
Auto
SA=1
PA=1
Stby
Y
Bypass
Y
Customising 518 using Config 26
518 User Guide
Setting the Blank display option for 518
In Config mode:
1. Press Display until you see a display like:
This means that a blank display is one of the options offered by the
Display key. To remove this option chose N.
2. Use the and , Volume keys to choose between Yes or No.
Setting the Emphasis option for 518
In Config mode:
1. Press Display until you see a display like:
*Emph Y means that pre-emphasis will be 'forced' on the output signal
irrespective of the incoming channel status (displayed with the Emph
light). Normally Emphasis is an adaptive setting that guarantees pre-
emphasis on the output. There may be requirements in mastering where
pre-emphasis needs to be applied even though incoming emphasis is
indicated.
'*Emph N' means use the adaptive method.
2. Use the and , Volume keys to choose between Yes or No.
Chose 'Y' to over-ride the incoming emphasis flag1.
If in doubt chose 'N'. '*Emph Y’ is not needed in normal use.
Setting the Volume mode for 518
In Config mode:
1. Press Display until you see a display like:
In the 500 Comms system there is provision for two volume controls, main
and secondary.
2. Use the and , Volume keys to choose between:
•N. No means that the gain control in 518 is independent of any
other Meridian components in the system and is stored by Source.
•M. Volume Main means that the volume control in 518 will follow
the main Meridian system and respond to the red keys on the
remote.
•S. Volume secondary means that the volume control in 518 will
follow the second volume control in the system and respond to the
shifted volume command on the remote. (Fn + Volume)
For further details on shifted commands see the manual supplied with the
remote control.
If in doubt choose VolM for a preamp and N for Resolution Enhancement.
Setting the Volume display
In Config mode:
1. Press Display until you see a display like:
1 Note. *Emph also allows De-emphasis of a signal not shown to be
emphasised.
Blank
Y
*Emph
N
Vol.
N
Customising 518 using Config 27
518 User Guide
The gain of 518 can either be displayed in absolute dB in the range -99dB
to +12dB, or as a Meridian volume number 0 to 99 – where 87
corresponds to 0dB.
2. Use the and , Volume keys to choose dB or ##.
Setting up sources
For each of the twelve source selection keys on the Remote control you
choose a display Logo and a physical input connection.
Normally as shown, we set the CD key to give a CD display with the D1
(Digital 1) input selected. You may however wish to display CD1 for your
main CD player and to connect it to D2.
A full list of possible logos and their meanings is:
Source Logo Source Logo Source Logo
CD CD S-VHS SV DAB DAB
Radio RD Betamax βmDig. Sat DSat
LP LP Camera Ca ADC ADC
Tape 1 T1 Video 8 V8 R-Reel Reel
Tape 2 T2 CD-V CD-V FM tuner FMTun
CDR Cr CD-I CD-I AM tuner AMTun
Cable Cb CD-T CD-T MW tuner MWRad
Teletext TX CD Photo CD Photo SW tuner SWRad
VCR 1 V1 CD Lib CD Li LW tuner LWRad
VCR 2 V2 CD Jbox CD Jbox Line Line
Laserdisc LD CD-ROM CD-ROM Mic. Mic
Satellite SA DAT DAT Aux Aux
CDX C2 DCC DCC Mixer Mixer
78 rpm 78 rpm Phono Phono Simul. Simul
VHS VH Minidisc Mdisc Computer PC
Choosing source logos
Note at any time in the source configuring process you can use the front-
panel Display key or the handset Mute key to return to the root menu
with a display like ‘Auto'.
In Config mode:
1. Press Source until you see a Remote-key (source) + logo display like
2. Press Source until the Remote key name for the source you wish to
configure is displayed.
Vol.
dB
CD CD
Customising 518 using Config 28
518 User Guide
3. Use the and Volume keys until the correct logo is indicated – see
the list above.
4. Make changes for all the source options.
Note If you select the logo ‘N’ the 518 will ignore that key on the Remote
control and that source will not be offered in the Normal source menu.
Changing the input for a source
In Config mode:
1. Press Source until you see a Remote-key (source) + logo display like
2. Press Source until the Remote key name for the source you wish to
configure is displayed.
3. Press DSP.
you should see the display change to one like:
The Remote control key you are setting up is the source name and it is
indicated on the left as before. Now the letters on the right indicate which
of the four physical input connectors will be selected.
To change the physical inputs:
1. Use the and Volume keys until the correct one is indicated
2. Make changes for all the source options by pressing Source.
Note When customisation is complete, switch the power off and then on
again to restore Normal mode and to save what you have done.
Choosing the Comms type for a source product
This setting currently only applies to a source which is a Meridian CD
player or Radio tuner.
In Config mode:
1. Press Source until you see a Remote-key (source) + logo display like
2. Press Source until the Remote key name for the source you wish to
configure is displayed.
3. Press DSP until you see a display like:
4. Use the and Volume keys to chose the Comms type.
CD players are always 1C, tuners are always 2C. NC means the source is
not Meridian.
5. Make changes for all the source options by pressing Source.
Choosing the address of a source product
In Config mode:
1. Press DSP until you see a display like:
2. Use the and Volume keys to choose the product address
3. Make changes for all the source options by pressing Source.
CD CD
CD D1
CD CD
CD 1C
CD 1A

Connecting 518 29
518 User Guide
Connections
There are three types of connection that need to be made to the 518.
• power, see page 14.
• digital audio, see page 40.
• communications, see page 30.
Digital audio connections
Digital connections are made:
• from the digital outputs of 518 to your digital power amplifiers, digital
loudspeakers, digital recording devices, editors.
• to the digital input of 518 from sources like CD, A/D converters,
mixers, digital recording devices, editors.
Digital connections should be made with either:
• high-quality 75Ω screened cable on SPDIF
• high-quality 110Ω balanced screened cable on AES/EBU.
For advice on the type of cable we suggest you consult your dealer and
the manual supplied with the source equipment.
Meridian has a range of suitable digital interconnects available as
accessories. We recommend you do not use cables intended for analogue
connection since these do not usually have the degree of shielding or an
impedance of 75Ω. Cable intended for UHF applications like antenna
down-lead is also unsuitable since it does not shield adequately in the 1–
30MHz region.
Warning. We strongly recommend the use of well-screened precision
coaxial cable. Certain ‘audiophile' cables are not screened. Screened
cable will minimise RF interaction with your system. Unscreened cables
for digital connections may cause illegal levels of RF interference.
Digital input connections
1. Make digital connections from each of your digital sources to an
appropriate digital input on 518. The digital inputs on 518 are labelled:
•D1 to D3 for the three cable inputs, and
•OP for the optical input.
These inputs are identical in performance and are assigned in Config.
D1 also has an AES/EBU connection. Only one can be used at a time, i.e.
D1 is either SPDIF or AES/EBU not both.
Digital output connection
1. Make digital connections from the output to the equipment you have
chosen to follow it.
You can use both the SPDIF and AES/EBU output connections at the
same time.

Connecting 518 30
518 User Guide
Communications connections
Communications connections are only made to other Meridian equipment.
The following sections describe the major points.
To connect to other Meridian 500 Series equipment
1. Connect one of the COMMS sockets on the rear panel of the 518 to
one of the COMMS sockets on another 500 Series unit, using the 500
Comms lead supplied.
2. Connect all the 500 Series products together in this way to form a
chain (not a loop). The order in which they are connected is not
important.
If the system is to operate in 500 mode, then, configure the units with the
following automatic setup procedure.
1. Switch all the units to Standby.
2. Press Clear on the handset.
Each unit will display:
One unit will then be designated as the controller and display:
All the other units will be configured as non-controllers and display:
The system is now set up and ready to use.
If for any reason the automatic setup does not give the configuration you
want, you can restore the default operation by selecting a Type or by
setting the controller status in Config as described on page 21.
Connecting to Meridian Digital speakers
1. Connect the phono plug on the end of the M-lead to the digital output
of the 518.
4. Connect one of the two DIN plugs on one end of the M-lead to one of
the COMMS sockets on the back of 518.
Note There are usually two DIN plugs on an M-lead. Take care to chose
the correct one and do not force the plug. The second plug is used to
connect to any 200 Series products in the range.
Auto
Con
NCon

Using 518 for Mastering and Multimedia 31
518 User Guide
Part 2
Mastering Processor
The Meridian 518 Digital Audio Processor has been designed to allow
the making of better recordings, and in particular to enable the
production of high-quality, enhanced-definition CDs.
The predominantly available channels for delivering high-quality sound
to consumers is stereo, linear-encoded 16 bit PCM. There is also no
realistic prospect of a widely-available improvement on this capability.
While CD is limited to 16 bits, we now have A/D converters, recorders
and editors operating with anywhere between 16 and 24 bit words.
The Meridian 518 provides the very best quality and combination of
signal-processing functions for use when preparing material for issue on
media like CD. In fact, using the unique signal processing in 518, CDs can
be produced with up to 19-bit subjective dynamic range.
The functions of 518 have been optimised for use in three stages of
the production process, namely:
• on location, processing the signal between the A/D converter and
recorder,
• during transfer of a recording to an editor,
• during transfer from editor to production master.
In each such step, the word-size can be different, and 518 can make
these processes optimal.
The signal-processing used is based on an extensive programme of
research, and is implemented in DSP with an internal precision of 72
bits to ensure exceptional transparency. For a very full technical
background, please see the papers referred to below: copies may be
obtained from Meridian. 1 2 3 4
518 also finds applications in professional or consumer replay
situations. Here the precision gain control and pre/de-emphasis
processing can replace the system preamp and enhance the dynamic
range of a D/A converter – see the earlier sections of this manual.
1J.R. Stuart and R.J. Wilson, "A Search for Efficient Dither for DSP
Applications", 92nd AES Convention, Vienna 1991, Preprint #3334
2J.R. Stuart, "Noise: Methods for estimating Detectability and Threshold", 94th
AES Convention, Berlin 1993, Preprint #3477
3M.A. Gerzon, P.G. Craven, J.R. Stuart, R.J. Wilson, "Psychoacoustic Noise-
Shaped Improvements to CD and other Linear Digital Media", 94th AES
Convention, Berlin 1993, Preprint #3501
4J.R. Stuart and R.J. Wilson, "Dynamic Range Enhancement Using Noise-
Shaped Dither Applied to Signals With and Without Pre-emphasis", In
preparation for AES Convention, Amsterdam 1994.

Using 518 for Mastering and Multimedia 32
518 User Guide
Description
The Meridian 518 Digital Audio Processor is a general-purpose digital-
domain DSP engine that operates on or between consumer or
professional interfaces at sampling frequencies between 32–50kHz and
with up to 24 bit input and output.
The supplied user programmes are intended for use in recording, editing,
mastering and replay situations.
The primary functions of 518 permit the correct signal processing when
moving between carriers or channels of different word size. Options are
also offered – in the form of noise-shaping, gain control and precision pre
and de-emphasis – to maximise the subjective dynamic range of the final
carrier or channel. Typical applications would be to use 518 at all stages,
i.e. between an A/D converter and a recorder; then between the recorder
and any editor; and finally between the editor and the final carrier.
518 has been extensively beta-tested, there are many highly-regarded
commercially-available CDs that have used its processes.
518 as a Mastering or Multimedia Processor (Type 2)
This section covers unusual features of 518 operation when used in
mastering or Multimedia processor mode (Type 2). Please refer to the
normal operating instructions on page 15 for more details.
Meridian 500 Comms warning
We strongly recommend that you do not connect anything to the Comms
sockets in Type 2. The behaviour of the 518 may be unpredictable.
If you want to use 518 as a Mastering or Multimedia Processor along with
other Meridian equipment, we suggest you start from Type 1 and build the
appropriate functionality in Config.
Emphasis Light
There is an Emph light on the front panel which indicates when the
channel status suggests that the incoming audio is pre-emphasised. It is
not affected by the user's settings on the 518 itself. Obviously in this
circumstance, it is not advisable to pre-emphasise again using 518!
Routinely 518 prevents you from making this mistake, however, against
the possibility that the incoming channel-status may be wrong, you can
over-ride this protection, see *Emph on page 26.
Selecting a source
1. press Source until the input you require is indicated
2. release Source
Gain control
Gain control is provided in one decibel steps from +12 dB down to -99 dB.
1. Press ▲
The gain will increase in 1dB increments, and the display will show the
gain in dBs, something like:
1. Press ▼, to decrease the gain.
D1
+2
Using 518 for Mastering and Multimedia 33
518 User Guide
Memory
In Mastering Processor mode, 518 maintains a continuous memory of the
DSP, Dither, Gain, In and Out settings for each source.
So, if you had determined that, e.g. D1 is an 18 bit source that should
always use Gain 0dB but that D2 is 16 bit and can always use Emphasis
and +2dB, then 518 will remember these and automatically reconfigure
itself for each source as you switch between them.
DSP
1. Press DSP to select the primary processing mode.
The display will show:
Bypass 0
Bypass transmits all 24 bits on the input to the output without any
processing.
Note When Bypass is chosen, all the other front panel keys are disabled.
1. Press DSP again.
The display will show:
Gain 0
Gain has a flat frequency response, but the level of the signal level is
adjusted using a precision dithered multiplication. All the front panel
keys are available to specify processing.
1. Press DSP again.
The display will show:
Emph 0
Emphasis ensures that the output of 518 is always pre-emphasised
according to the 50/15µs CD standard. 518 uses precision DSP to pre-
emphasis the signal providing the incoming signal is not already pre-
emphasised. If the incoming signal is pre-emphasised the red Emph
light indicates this.
or:
De-Emph 0
De-Emph provides the CD de-emphasis function to very high precision
– providing the incoming signal is emphasised (Emph light on).
Note Gain functions in Emphasis and De-Emphasis, and all the front
panel keys are available to specify processing.
Display
1. Press Display key to select between the following display formats
Emph +2
Pre-emphasis option and gain setting, or
ShpB +2
Dither mode and gain setting, or
CD +2
Source and gain setting, or

Using 518 for Mastering and Multimedia 34
518 User Guide
20C16 +2
Input/output choice and gain setting, (This example indicates 20 bits of
input and 16 bits of output in consumer format), or
44k1 +2
Sampling frequency and gain. If there is no input signal the display
would indicate no lock as follows:
N.L. +2
Clip Display
Some of the processing modes in 518 deliberately allow you to increase
the overall level of the signal. If the output signal exceeds full scale, the
518:
• clips (saturates) at full code (normally sounding benign on short
overloads), and
• displays a clip message like:
ClipL +10
The clip message will indicate whether the overload occurred on Left,
Right or both.
Clipping in DSP has nothing like the bad sonic consequences of clipping
analogue systems. Normally small amounts of clipping cannot be
detected.
Making Recordings
Case 1. The recording is made to the final carrier, DAT or CDR
at 16 bits
a) 16-bit A/D – 518 – CDR, use Bypass.
b) 20-bit A/D – 518 – CDR.
use Emphasis (if the material has sufficient headroom at high
frequencies), or:
use Gain (on the maximum setting which does not cause clipping)
with:
• Shape B, C or D.
• In set to 20.
• Out set to 16 C (possibly 16 P).
Case 2. The recording will be further processed: carrier and
A/D converter have the same word size
In this case use Bypass.
Case 3. The recording will be further processed: carrier has
more bits than the A/D converter
In this case use Bypass.
Case 4. The recording will be further processed: the carrier
has fewer bits than the A/D converter
Use Emphasis if the material has sufficient headroom at high
frequencies, or:
use Gain on the maximum setting which does not cause clipping.
In both cases, also select:
• Flat or H.P. dither. You may also use Shape A.
• In set to the number of bits in the A/D converter.

Using 518 for Mastering and Multimedia 35
518 User Guide
• Out set to the number of bits in the recorder.
Transfer to editor
Case 5. The recording and editor are the same word size
In this case use Bypass.
Case 6. The recording has fewer bits than the editor
In this case use Bypass.
Case 7. The recording has more bits than the editor
In this case use Emphasis (if the recording is not already pre-
emphasised) and if there is sufficient headroom at high frequencies, or:
use Gain on the maximum setting which does not cause clipping.
In both cases, also select:
• • Flat or H.P. dither. You may also use Shape A.
• In set to number of bits on the recording.
• • Out set to the number of bits used in the editor.
Transfer to the final carrier
Case 8. Editor and final carrier have same word size.
In this case use Bypass.
Case 9 Editor has fewer bits than final carrier
In this case use Bypass.
Case 10 Editor has more bits than final carrier
In this case use Emphasis (if the recording is not already pre-
emphasised) and if there is sufficient headroom at high frequencies, or:
use Gain on the maximum setting which does not cause clipping.
In both cases, also select:
• • Shape A, B, C or D.
• In set to number of bits on the output of the editor.
• • Out set to the number of bits on the final carrier.
Note In this circumstance, the editor should be set to put out the
maximum number of bits it can to preserve linearity.
About the Noise Shapers 36
518 User Guide
Noise shaper characteristics
Each noise shaper presents a different degree of subjective noise
reduction – we call that its ‘advantage’ – compared with normal dithering
using white TPDF dither. Each shaper also has a different degree of HF
boost. The parameters are summarised in the table below.
Shaper Advantage
44.1kHz 48kHz
Normal Pre-emphasis Normal Pre-emphasis
Flat TPDF 0.0dB 3.4dB 0.0dB 3.4dB
High-pass 3.5dB 7.0dB 3.5dB 7.0dB
Shape A 6.4dB 12.2dB 6.4dB 12.2dB
Shape B 19dB 22.6dB 19.6 23.6dB
Shape C 15.1dB 17.9dB 18.6dB 21.4dB
Shape D 15.3dB 21.5dB 19.9dB 23.5dB

Additional technical information 37
518 User Guide
518 Operating Background
Transparency in digital systems
Digital audio gives a unique opportunity to deliver exceptional sound
quality in a recording or broadcast. In the first decade of this technology,
considerable progress was made developing the gateways – i.e. A/D and
D/A conversion. The promise of digital audio is only deliverable if the
digital audio signal is handled with complete integrity.
It is has been a common misconception among practising engineers that
the signal is robust once it is in the digital domain. This combined with a
general misunderstanding about dither, has led to working practises that
degrade the potential of the recording. Obviously, it is necessary to
understand the signal processes, and to have a way to process the signal
optimally.
The 518 allows you to achieve a transparent channel with the maximum
subjective dynamic range. This section explains the technical background.
Digital Audio and Quantisation
Digital audio is used because it is possible to transmit the data through
space (broadcast) or time (recording) without any loss of information or
generation degradation. This property of digital audio makes it extremely
attractive. The major development in digital audio has been in extending
our comprehension of the processes of digitisation and reconstruction of
the original analogue signal.
Dither
Dither is an essential lubricant if a digital audio channel that includes
processing is to remain transparent.
Transparency in a digital channel is the result of maintaining linearity at both
high and low levels and not falling prey to signal-processing distortions like,
for example, noise modulation.
It is well established that in order for linearity to be maintained, dither
must be applied at every non-trivial signal processing stage. By non-trivial,
we include all operations that modify a sample. With very few exceptions,
arithmetic operations that modify a sample result in an increase in the
number of bits representing the output result; in a fixed size channel, this
can therefore lead to truncation or quantisation effects.
In a recording process, the typical non-trivial operations will be:
• Truncation and requantisation if the A/D converter has a larger word
size than the recorder.
• Truncation and requantisation if the recorder has a larger word size
than the editor.
• Truncation, requantisation and many potential signal-processing
errors in the editor itself.
• Truncation and requantisation if the editor has a larger word size than
the final carrier.
• Truncation and requantisation mastering house processes the
material (e.g. gain shift, dc filtering etc.).
It is well established that applying dither with triangular probability
distribution of ± 1 LSB to a quantisation process results in perfect
linearity, contributes no noise modulation and permits resolution of signal
elements below the LSB. It is therefore the ideal tool to achieve
transparent processing.

Additional technical information 38
518 User Guide
Unfortunately, although this process is generally understood, it is not
common practise to employ correct dithering procedures at these stages.
In fact, practising engineers are often under the misapprehension that
dither is only needed once in a system, or that if there is sufficient noise in
a recording then further dither will not be needed. This is an important
misunderstanding that has so often led to lost quality in recordings.
518 provides two additive triangular probability-distribution dither forms –
flat and high-pass. The essential difference between them is that H.P.
dither has a lower subjective noise-floor, being about 3.5dB less audible
than additive white dither.
Both spectra are illustrated in Appendix 1.
Noise Shaping with dither
Noise-shaping is a technique in which a filtered version of the quantisation
error plus dither is fed back and subtracted from the quantiser input. By
this technique, the total noise can be redistributed, moving the noise from
spectral regions where the listener is sensitive to other regions where they
are less audible.
In 518 we provide four different shapers; they are carefully selected for
their different properties, each optimised for a different application.
Dynamic Range
The dynamic range of a digital channel is defined by the maximum level –
often referred to as full-scale or 0dBFS – and by the quantisation noise
floor which is itself determined by the sample word-length. A normal
TPDF dithered quantisation introduces a benign uncorrelated addition to
the noise-floor.
A background to this and a method of calculating dynamic range is given
in the paper [2] referred to on page 31 of this manual.
From a users point of view, the noise-floor is determined by the number of
bits; the subjective noise-floor is determined by the spectrum of the noise,
i.e. the shaper used.
The most important application where maximising subjective dynamic-
range occurs is in a word-size reduction. Here the correct strategy for
maximising dynamic range is to use the Gain feature of 518 to raise the
overall recording so that it nearly reaches full-scale. (This can be done by
playing the recording and monitoring with a peak-hold indicator the
maximum level; then replay increasing the gain sufficient to raise the peak
to say -1dBFS).
Further maximising of the subjective dynamic-range can occur by
minimising the impact of the added noise using a shaper. For example, if
a 20-bit original recording achieved a peak level of -4dBFS, then
transferring it to a CD using Gain +3dB and Shape B could result in a 19-
bit subjective dynamic range on the CD. Transferring it without 518, i.e. by
truncation, will reduce the recording to 15 bit with unpleasant low-level
artefacts.
Pre and De-emphasis
The use of pre and de-emphasis as signal-processing means of
optimising the subjective dynamic range of analogue channels, should be
quite familiar ideas to audio engineers. In particular, pre and de-emphasis
have been used in channels where the analogue noise level showed an
increasing level with frequency, e.g. magnetic tape, shellac or vinyl
grooves and Frequency Modulation. In all these cases, a well-
documented property of music and speech is exploited, namely that for
material microphoned at normal listening positions, and of acoustic

Additional technical information 39
518 User Guide
source, the average and peak spectrum level declines with frequency
above a few kHz. Best use is therefore made of the channel by pre-
emphasising high-frequency signals to an extent where they are more
likely to occupy the capacity of the channel. De-emphasis is applied on
replay or reception and has the dual benefit of reducing noise and
distortion from the preceding chain.
So far, all linear PCM standards used for digital audio permit the use of
pre and de-emphasis; the universal characteristic being 50/15uS.
Probably this standard came into play originally because it helped to
alleviate the very real problems of linearity in early A/D and D/A
converters.
More recently, the use of pre-emphasis has been neglected in digital
audio. The main reasons for this being:
• prejudice based on the very considerable difficulty of designing a
transparent analogue pre-emphasis module in a microphone
preamplifier.
• the much-improved quality of A/D and D/A converters.
• the availability of A/D conversion with more significant bits than the
distribution channel (e.g. CD 16 bits).
This trend is mistaken, and for suitable material and conditions, a very
real benefit can be obtained using pre-emphasis. The improvements with
518 are unique since the noise-shaping is designed for that circumstance
and the pre-emphasis is effected in the DSP.
If we used pre-emphasis on the example of the previous section, the
resulting CD could have a subjective dynamic range of 20 bits.
Simple rules for using 518
This section lays out some simple rules for using 518 in three different
circumstances.
A step-down in sample word size
A step-down in sample word size while applying noise-shaping to give the
channel a subjective dynamic range as close as possible to the input data.
Such applications include transferring e.g. 20 bit masters to a 16 bit
carrier like CD. In these cases:
• Use Gain to bring peak level as close to full-scale as possible
• If the programme material permits, use pre-emphasis
• Use Shape B, C or D unless there is to be significant subsequent
editing – in which case use either Shape A or high-pass dither.
No change in sample size
Modification of a signal in a channel where the same number of bits are
used to define the input and output data. In this case we should be
concerned with minimising the impact on the subjective dynamic range of
the output signal. In these cases:
• Use Gain to bring peak level as close to full-scale as possible
• If the programme material permits, use pre-emphasis
• Use Shape A or high-pass dither.
Step up in dynamic range
Shifting incoming data to allow the output to have potential for a
subjective dynamic range that exceeds the input data without increasing
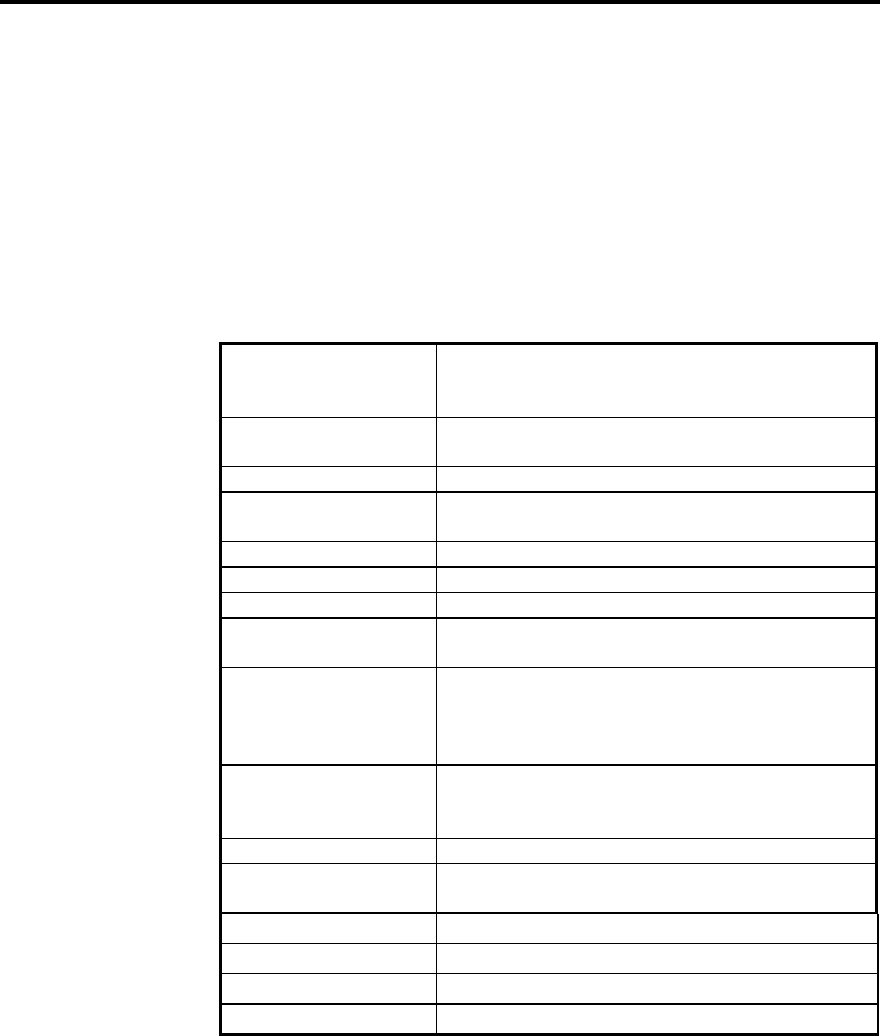
Additional technical information 40
518 User Guide
the dynamic range of the signal itself. A typical application may be a full-
range DSP volume control, where e.g. a 16 bit input is modified by a gain
control function and passed out to a DAC of 18 or 20 bits. In these cases:
• If the programme material permits, use pre-emphasis
• Use Shape A or high-pass dither.
Additional technical information
Specification
Inputs 3 cable and one TOSLINK optical.
Digital serial interface to AES/EBU or SPDIF
2 channels up to 24 significant bits
Outputs Digital serial interface to AES/EBU or SPDIF
2 channels up to 24 significant bits.
Sampling Frequency 32kHz – 48kHz.
Twin PLL Second phase-lock loop minimises jitter at
44.1kHz to approx. 3pS rms.
Input word selection 16, 18, 20, 22, 24 bits
Output word selection 16, 18, 20, 22, 24 bits
Channel status Output selectable professional or consumer
Dither options Additive white spectrum TPDF
Additive high-pass spectrum TPDF
Noise shapers 5 specific types offered, optimised for each
sampling frequency, with and without pre-
emphasis and for MAF and MAP hearing
thresholds.
Processing Gain control in 1dB steps from +12 to –99dB
Digital-domain pre-emphasis
Digital-domain de-emphasis
Accuracy 72 bit internal precision
Display Gain, processing mode, dither, incoming
emphasis, clipping.
Digital Subcode Channel status only
Controls Source, Display, DSP, Dither, In, Out, Gain
Dimensions 325 x 100 x 320mm, (12.9 x 3.9 x 12.6")
Weight 5 kg (10 lb.)

Support information 41
518 User Guide
Help!
Standby point not lit
Check the following:
1. There is AC power connected to the socket on the rear of the 518
2. The power switch on the rear panel of the 518 is turned on
If the 518 will still not illuminate, check any fuses in your power supply
and the fuse in the inlet of the 518. If these are all intact, contact your
dealer.
Audible hiss at high volume settings
The input dynamic range of any recordings you have are at maximum 16
bit. The reason for this is that CD and other consumer sources use a 16
bit standard. The analogue sources you have cannot achieve this kind of
range. For comparison, analogue sources are likely to be of the order of:
•FM Radio, 13 bits
•Reel-reel tape, 13 bits
•Cassette tape, 12 bits
•LP, 11 bits.
Note that there may be a difference between the dynamic-range of the
source channel when it is operating, and the noise you hear in Standby.
For example LP normally has lower noise when the stylus is not in the
groove; similarly tape will be quieter when it is stopped. CD may also be
quieter when it is stopped, producing so-called ‘digital silence’.
The 518 has a 16 bit capability from input to output on analogue sources.
When the volume is turned up high you may hear this dither as a hiss
when the sources are stopped. This hiss is lower than the background
noise of your recordings and is of no consequence.
No output with Meridian 565, DSP speaker or DAC
Many consumer products will mute when fed a signal in Professional
format. If you have no sound – try setting Out to C.
No time display with Meridian DSP speaker
518 removes unnecessary subcode as a method of reducing jitter and
therefore improving sound quality.
Because 518 does not pass on subcode, the time display feature on
DSP5000 or DSP6000 becomes disabled. However the Meridian Comms
system keeps the speaker updated on the current track number.
Communications not working between 518 and other
Meridian products.
If you have this problem check the connections carefully.
Are you using a mix of 200 and 500 mode units?
Radio interference
NOTE 518 is a digital audio and computing device which has been de-
signed to very high standards of electromagnetic compatibility.

Support information 42
518 User Guide
FCC WARNING: This equipment generates and can radiate radio fre-
quency energy and if not installed and used correctly in accordance with
our instructions may cause interference to radio communications or radio
and television reception. It has been type-tested and complies with the
limits set out in Subpart J, Part 15 of FCC rules for a Class B computing
device. These limits are intended to provide reasonable protection against
such interference in home installations.
If this equipment does cause or suffer from interference to/from radio or
television reception then the following measures should be tried:
1. Reorient the receiving aerial (or antenna) or route the antenna cable of
the receiver as far as possible from the 518 and its cabling.
2. Ensure that the receiver uses well-screened antenna cable.
3. Relocate the receiver with respect to the 518.
4. Connect the receiver and this product to different AC outlets.
5. If the problem persists contact your dealer.
EEC This product has been designed to comply with the limits set out in
EN55013 and EN55020C.
REMEMBER to switch all units off before changing any connections.
Cleaning
When cleaning the 518 bear in mind that the front of the unit is plastic,
and the display panel and top surface are glass.
Disconnect the power cord before cleaning the unit.
Note Do not use abrasive cleaners on any part of the 518.
Maintenance & Service
The Meridian 500 Series of hi-fi components have been carefully de-
signed to give years of untroubled service, and there are no user-service-
able parts inside the case, nor do the units require any form of mainte-
nance.
In the unlikely event that your 518 fails to function correctly, it should be
returned, in its original packing, to your Meridian dealer. In case of diffi-
culty within the UK or USA please contact our sales and service offices
shown on page 4.
Outside the UK: contact the importing agent for the territory. A list of
Meridian agents abroad is available from the above address.
No responsibility can be accepted for the 518 whilst in transit to the fac-
tory or an agent and customers are, therefore, advised to insure the unit.
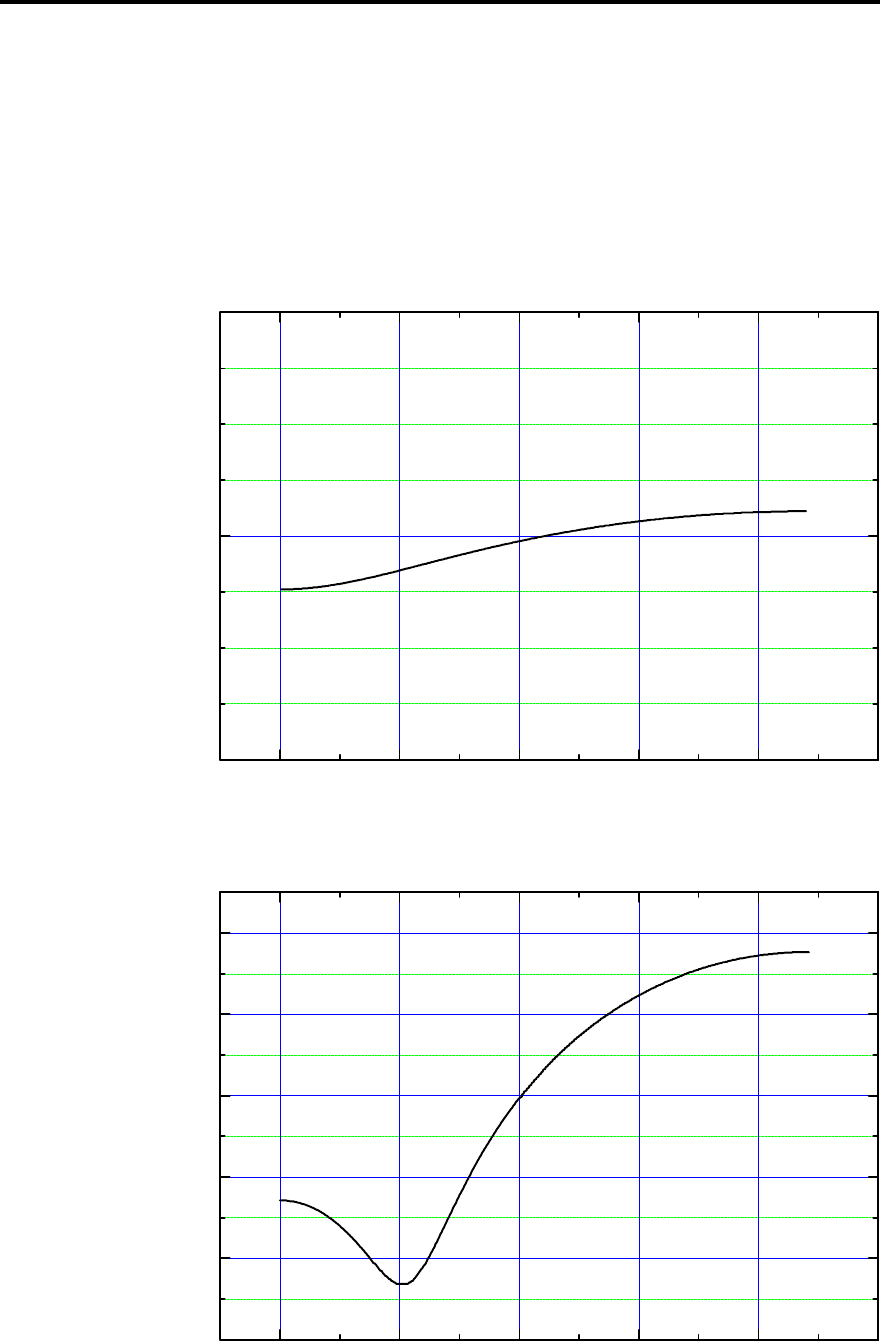
Appendix 1 – Noise Shapes 43
518 User Guide
Part 3
Appendix 1 – Noise Shapes
The graphs in this appendix show the relative noise spectra in dB for the
different shapers, compared with the flat-spectrum dither level for the
same word-size.
0Hz 5kHz 10kHz 15kHz 20kHz 25kHz
-20dB
0dB
20dB
Noise spectrum
Frequency
Above: noise spectrum using High-Pass additive TPDF dither at 44.1kHz
0Hz 5kHz 10kHz 15kHz 20kHz 25kHz
-15dB
-10dB
-5dB
0dB
5dB
10dB
Noise spectrum
Frequency
Above: noise spectrum for Shape A at 44.1kHz.
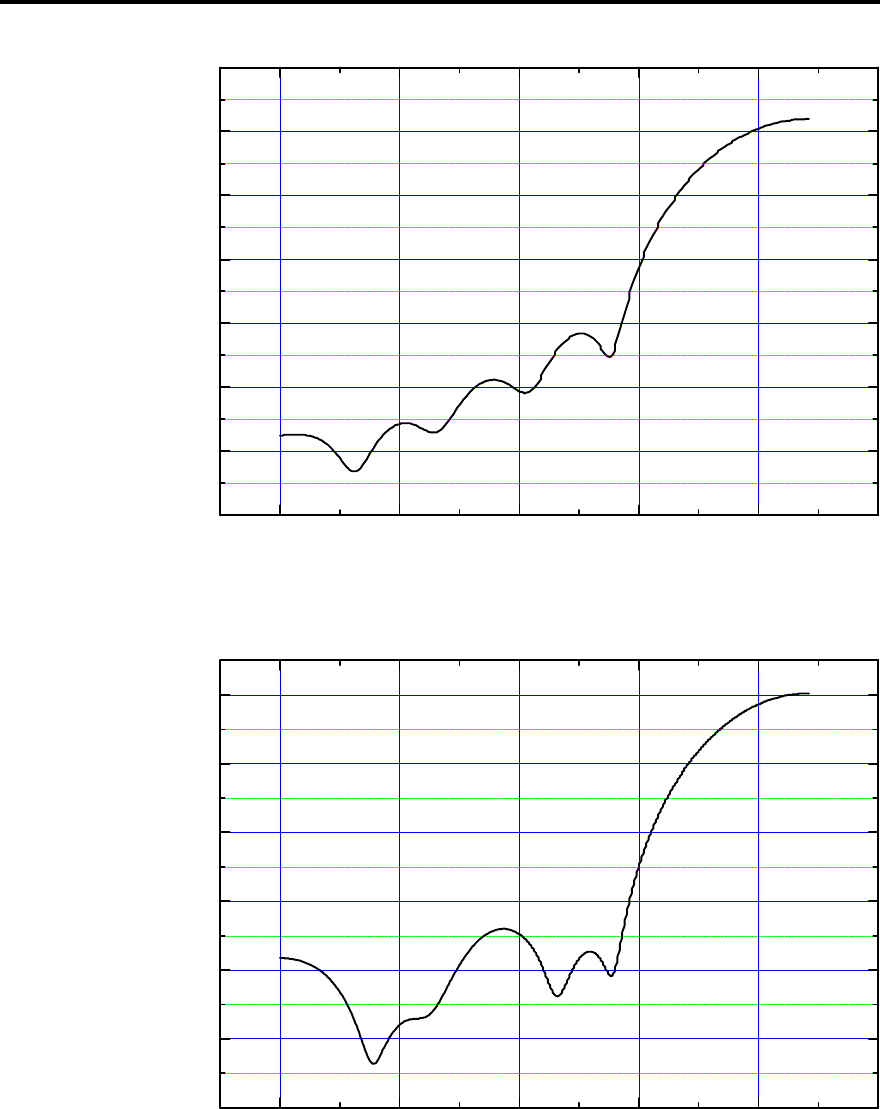
Appendix 1 – Noise Shapes 44
518 User Guide
0Hz 5kHz 10kHz 15kHz 20kHz 25kHz
-30dB
-20dB
-10dB
0dB
10dB
20dB
30dB
40dB
Noise Spectrum
Frequency
Above: noise spectrum for Shape B at 44.1kHz
0Hz 5kHz 10kHz 15kHz 20kHz 25kHz
-30dB
-20dB
-10dB
0dB
10dB
20dB
30dB
Noise Spectrum
Frequency
Above: noise spectrum for Shape C at 44.1kHz
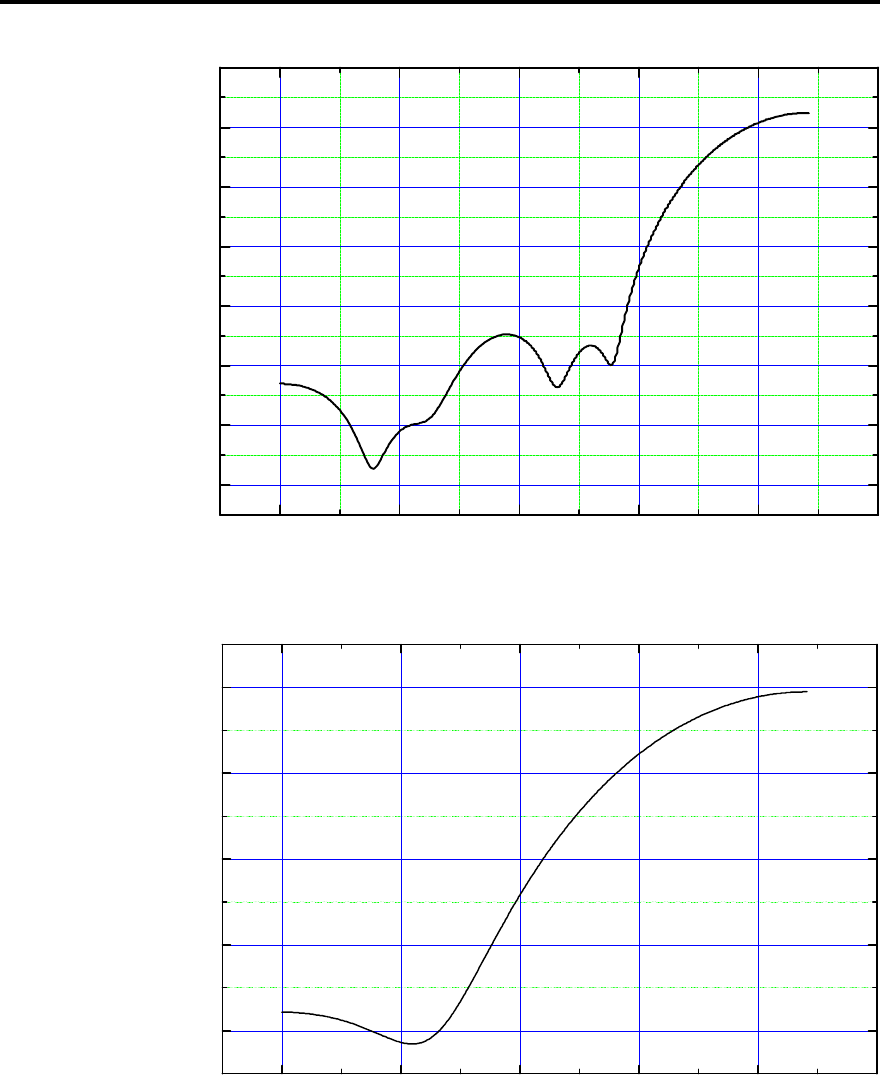
Appendix 1 – Noise Shapes 45
518 User Guide
0Hz 5kHz 10kHz 15kHz 20kHz 25kHz
-30dB
-20dB
-10dB
0dB
10dB
20dB
30dB
40dB
Noise Spectrum
Frequency
Above: noise spectrum of shape D at 44.1kHz.
Above: noise spectrum of shape E at 44.1kHz.

Appendix 2 – Hints on Mastering 46
518 User Guide
Appendix 2 – Hints on Mastering with noise-shaping
There are a few difficulties associated with employing noise-shaping
schemes to maximise the subjective dynamic-range of a digital audio
channel. These are now reviewed.
Vulnerability of the signal
The available dynamic range in a channel is only as wide as the
narrowest step. No matter how much care is taken with a recording, or to
maintain the maximum word-size right up to a noise-shaped dithered
truncation to e.g. 16 bits, the whole benefit can be thrown away if at that
stage a non-dithered signal process is carried out on the material. This is
not unheard of, a mastering house may e.g. choose to pass the signal
through an undithered dc filter!
This caution simply says that every process on the signal leading up to
delivery to the customer has to be reviewed for its impact on the noise-
floor and transparency. Such errors will be cumulative, but just one will
destroy any dynamic-range enhancements.
Audible results of digital errors and editing
Normal digital channels have provision for error detection and correction.
In sophisticated apparatus, short bursts of erroneous samples are
interpolated to reduce the audible effect. It is becoming more common in
CD replay systems, that the only error handling is a first-order hold; that is
when the system detects an erroneous sample, the previous valid sample
is output in its place.
This trend has partly been a response to the fact that errors on CD tend to
be single missing samples at an acceptably low rate. There are however
marked variations in this performance between players.
On normal music this strategy results in a minor modification to the
waveform and it usually passes unnoticed. The introduced sample is of
similar size to the signal, and is therefore readily incorporated or masked.
On normal material we also notice that errors occurring in silent passages
result in near-zero additions which tend to be inaudible.
Let us now consider the circumstance where a signal has been passed
through a noise-shaper with a function like Shape D. In loud passages
errors will be masked just as the normal circumstance. However channel
errors occurring in quiet or silent passages will tend to result in an audible
click (since the HF noise is boosted) with little or no material to mask it.
A similar problem pertains to editing ‘shaped’ material in quiet passages.
The requirement exists to maintain apparent continuity in the shaped
noise. We have observed clicks due to replay errors when shaped
material is re-played on cheap CD players, but no difficulty at all on
reasonable or up-market units.
Requirements for D/A conversion
Noise-shaping can be used to extend the audible dynamic range of a
channel beyond that which would be expected for a normal digital channel
of the same word-size. The essential principle by which this is achieved is
representing numbers below the LSB as an average of successive
bracketing numbers. For this system to work, the channel must exhibit
differential linearity equal to the resolution required.
We can illustrate this best by example. Let us assume that a signal has
been encoded with 20-bit precision and that a shaper type D has been
used to convey this signal onto a 16 bit CD channel. Measurement in the
digital domain shows very clearly the success with which the subjective

Appendix 2 – Hints on Mastering 47
518 User Guide
dynamic range is extended. Implicit in this theory is the fact that the digital
channel has near-infinite differential linearity, i.e. each bit has a magnitude
precisely twice or half the magnitude of the next.
When this signal is applied to a D/A converter some problems may arise.
First the D/A process may be associated with an oversampling digital
filter. Commonly these parts take no precautions with regard to dither and
introduce a quantisation noise-floor themselves at the approximate level
of the LSB in the filter, thereby obliterating lower-level information in the
signal. Secondly the D/A converter will not have perfect differential
linearity – there is no longer any reason why successive bits will maintain
a precise 2:1 ratio. The effect of this is also equivalent to quantisation at
the linearity level of the converter.
In summary therefore, the wide subjective dynamic range inherent in the
recording cannot be reproduced unless the replay D/A system has both a
word-size (in terms of associated oversampling filters) and a differential
linearity equivalent to the original material, which in this example was 20
bit. The result would be further improved by the correct use of dither and
noise-shaping in the digital filter.
That a subjective channel dynamic range of approaching 20 bit can be
conveyed on a 16 bit channel is quite remarkable. On reflection, it should
not be surprising that to realise this benefit, both the A/D and D/A sub-
systems must have the required 20-bit precision.

Appendix 3 – RS232 48
518 User Guide
Appendix 3 – RS232
The 518 may be operated via its RS232 interface.
Set the communication settings as follows:
• Baud rate 9600
• Data bits 8
• Stop bit 1
• Parity none
The 518 is operated by sending short command strings on the RS232
interface. Each command is terminated by a <return> (dec. 13). No echo
is implemented. Any subsequent <return> on its own repeats the last
command.
518 returns useful strings acknowledging the command and giving status
information.
Handset Functions
The following commands emulate the MSR remote control keys.
Sources send one of: CD, RD, LP, TV, T1, T2, CR, CB, TX, V1, V2, LD
Numbers send one of: N1, N2, N3, N4, N5, N6, N7, N8, N9, N0, DP
(decimal point)
Menus send one of: ML, MR, MP, MM (for w, e, n, s.)
Source send one of: PR (previous), PL (play), NE (next), PS (pause), FB
(fast back), ST (stop), FF (fast forward), RC (record), RP (repeat)
Memory: SR (store), CL (clear)
Status: DI (display), SB (standby)
Volume: VP (up), VM (down), MU (mute)
GoTo Functions
There are direct access functions that use two-character codes that may
be followed by additional numbers or parameters.
VN## Goto volume number
GN±## Goto gain number
BP Goto DSP Bypass
GA Goto DSP Gain
EM Goto DSP Emphasis
DE Goto DSP De-emphasis
DT# Goto dither # (0=flat, 1= HP, ....6=ShapeE)
IN## Goto input bits ##
OU##C Goto output bits ## (Consumer format)
OU##P Goto output bits ## (Professional format)

Appendix 4 –Resolution Enhancement 49
518 User Guide
Appendix 4 –Resolution Enhancement
Resolution enhancement in 518 depends on six techniques.
1. De-jittering
2. Dynamic-range optimisation with Gain
3. Dynamic-range optimisation with Pre-emphasis.
4. Dynamic-range optimisation with Noise-shaped Dither.
5. DAC enhancement by using high-frequency dither.
6. DAC or channel enhancement by word-length matching.
Jitter and de-jittering
Digital audio works by representing the acoustic waveform by a series of
evenly-spaced sample words. In digital-audio systems, it is quite possible
– in fact usual – for the data to pass without error. Unfortunately, where
the data is passed from process to process, the exact even timing of the
samples may become disturbed so that the samples arrive occasionally
slightly early or late. inaccuracy in the timing of the incoming stream is
called 'jitter' – and Meridian have been skilled at dealing with this since
1983.
When a jittered digital stream is fed to a DAC, the sound is degraded –
typically a listener will describe it as 'harsh', 'glassy' or 'bright' or lacking in
'spaciousness'.
The de-jittering element is of great importance to some CD players, and of
enormous significance to any LaserDisc player as they tend to have
relatively high-jitter output. If you want to use a LaserDisc player for
serious CD listening, then the de-jittering in 518 is absolutely necessary.
Another interesting aspect of jitter is that the current AES/EBU and SPDIF
interfaces use coding that causes some signal-dependent jitter to be
introduced. So, we can de-jitter a stream, but if it is then passed through a
series of digital interfaces then it will almost certainly benefit from de-
jittering again. Now, jitter does no harm in the digital domain: it is only
important that the stream be correct going into the final converter – which
in a Meridian system may be a DAC like 563, a Surround Processor like
565 or a DSP loudspeaker.
Figure 1. Showing jitter spectrum of twin PLL.
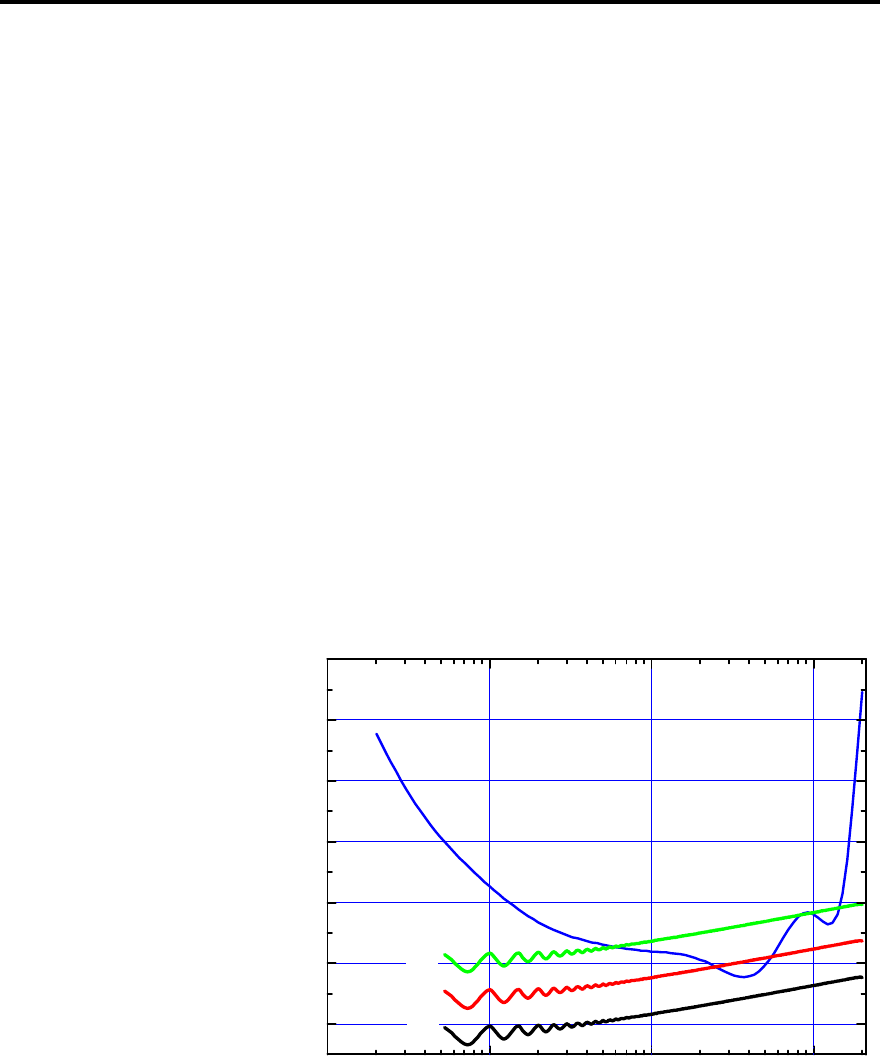
Appendix 4 –Resolution Enhancement 50
518 User Guide
The block diagram on page 7 shows the twin phase-lock-loop which 518
uses to smooth out the digital sample stream. Each loop acts as a
progressive 'flywheel' – following the average sample rate exactly – but
removing short-term speed unevenness.
Dynamic-range
The dynamic range of a channel or system is determined by the ratio
between the loudest signal it will carry without distortion and the
background noise.
For digital signals the loudest signal – full output of the channel – is called
full-scale and this level uses all the available bits.
In a system using digital components, the background noise may be
determined by:
• the analogue input signal
• the analogue output components like DAC, preamp or power amp
• the smallest word-size in the digital chain.
For digital systems to be transparent, dither is needed – this is described
on page 37. Whether the dither is added at the analogue–digital
conversion stage or later, it produces a defined noise-floor.
10Hz 100Hz 1kHz 10kHz
-20
0
20
40
60
80
100
20
18
16
dB spl
Frequency
Figure 2. Showing audibility of noise in dithered channels of
different wordsize at very high listening levels.
In the diagram above, an audio system has been modelled for the loudest
reasonable listening circumstance – where peak levels reach 120dB spl.
The 'U'-shaped curve is the threshold of human hearing – sounds below
this are inaudible. The three curves show the human-audible-significance
of the dither level in 16, 18 and 20 bit channels. The diagram shows that
for a digital audio system to reproduce the whole scope of human hearing
without noise – 19 bits are needed.
For interest and comparison, the diagram below compares this
circumstance with LP records where the playback is set for 115dB
maximum.
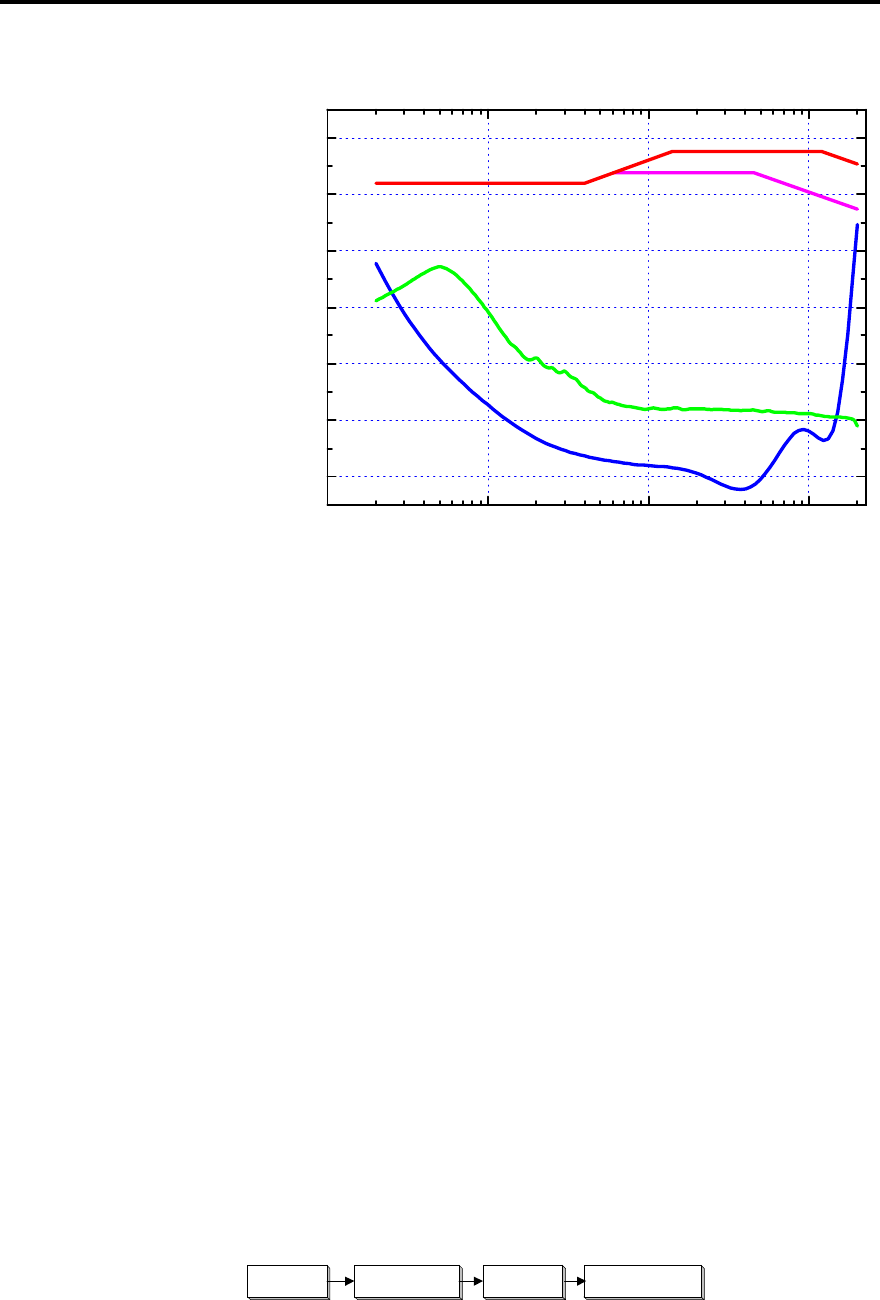
Appendix 4 –Resolution Enhancement 51
518 User Guide
Figure 3. Showing the audibility of noise in the LP system for
comparison with digital channels.
Dynamic-range optimisation with Gain
The noise-floor of a digital system is determined absolutely by the lowest
preceding wordsize. For nearly all commercial material this is 16 bits.
518 allows you to get the best out of whatever comes next, by making
sure that the full output capability is used. Gain can be used in Resolution
Enhancement and Mastering to boost the level of the signal to fill the
available capacity.
For some reason, many CDs are recorded well below maximum level. By
boosting these we are able to reduce the audible effect of noise in
subsequent processing, or digital filters in DACs, or in the analogue
electronics.
Getting this right is easy – 518 immediately tells you if had to 'clip' the
output because you asked for too much. See page 18.
Dynamic-range optimisation with Pre-emphasis
Real-world music and speech signals do not have equal energy at all
frequencies. Typically the loudest sounds happen in the mid-range and
peak levels are much reduced above 5kHz.
This fact has been exploited extensively in audio systems over the years,
with a system known as pre-emphasis.
Pre-emphasis Channel De-emphasisInput
Using Pre-emphasis and de-emphasis to improve channel performance
The diagram above shows the general pre-emphasis method. To take
best advantage of the channel – which could be an AM or FM radio link,
an LP record, a tape recording, a CD or a DAC – high-frequency signals
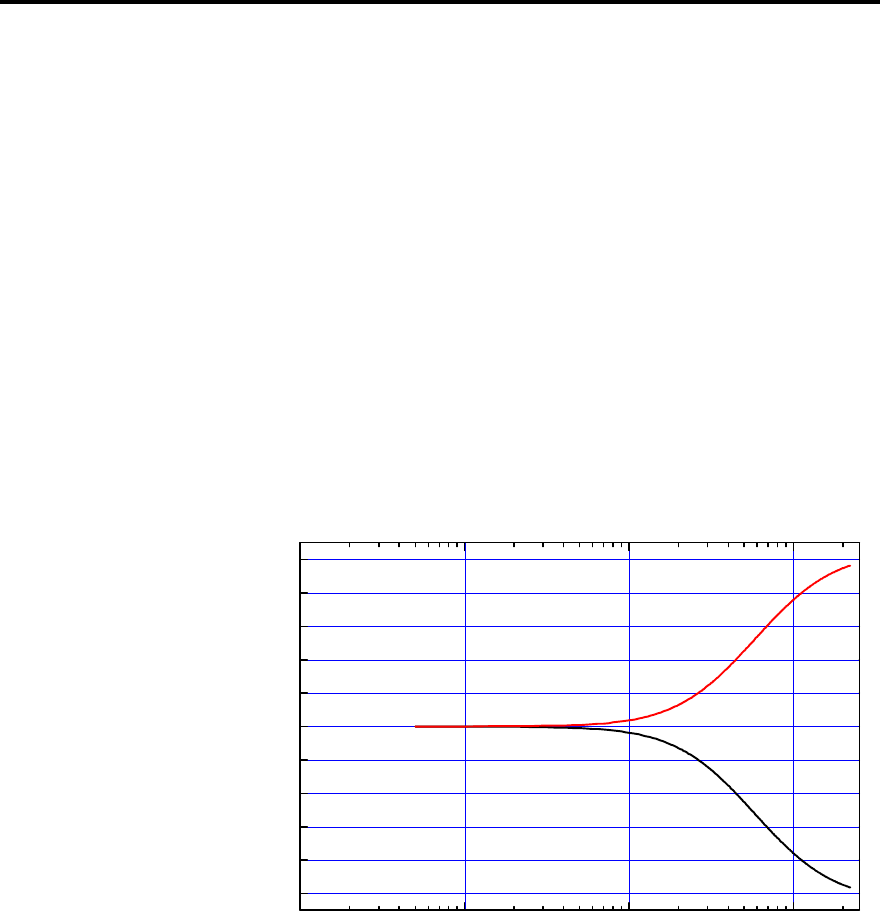
Appendix 4 –Resolution Enhancement 52
518 User Guide
are boosted. This boost process is called pre-emphasis. Now, in the
channel, the energy is more evenly distributed with frequency, and any
high-frequency noise and distortion in the channel is further below the
signal. In other words we get a better distortion and noise result in the
channel.
Before playing back the signal, we need to de-emphasise it to bring the
overall frequency response back to where it should have been. By cutting
the high-frequencies back, we also reduce the noise and distortion
introduced in the channel.
This process is used everyday for FM broadcast, tape and cassette
recording, for LP (RIAA pre- and de-emphasis) and for some CDs.
Now, boosting high frequencies is possible only when the program does
not have too much high-frequency content. Obviously anything that has
been through a pre- and de-emphasis process has the required spectrum.
The diagram below shows the pre-emphasis and de-emphasis curves for
CD – which are the curves used by 518. You can see that the highest
frequencies are boosted by nearly 10dB in the channel (on the disc).
Figure 4. Showing CD pre- and de-emphasis curves.
The 518 obtains resolution enhancement in making CD recordings by
using this pre-emphasis. All CD players know how to de-emphasise this
signal and recognise the pre-emphasis flag. When a signal coming in to
518 is pre-emphasised, the Emph light comes on. When 518 adds pre-
emphasis to a signal, the digital audio output stream carries an industry-
standard indication of pre-emphasis to tell downstream devices how to
handle this signal.
The 518 obtains resolution enhancement in playback systems by boosting
the high-frequency signals as it travels through signal processing or the
digital filters and conversion parts of a DAC. In the above diagram
'Channel' can be the digital and conversion part of an outboard converter.
The last block, 'De-emphasis' is normally in the final analogue sections of
the converter.
Well-designed converters use analogue de-emphasis so that all the noise
of the digital filters and converter are reduced. There are some cheap
implementations around that use digital-de-emphasis. This is bad design
and the benefits of this type of resolution enhancement are reduced if
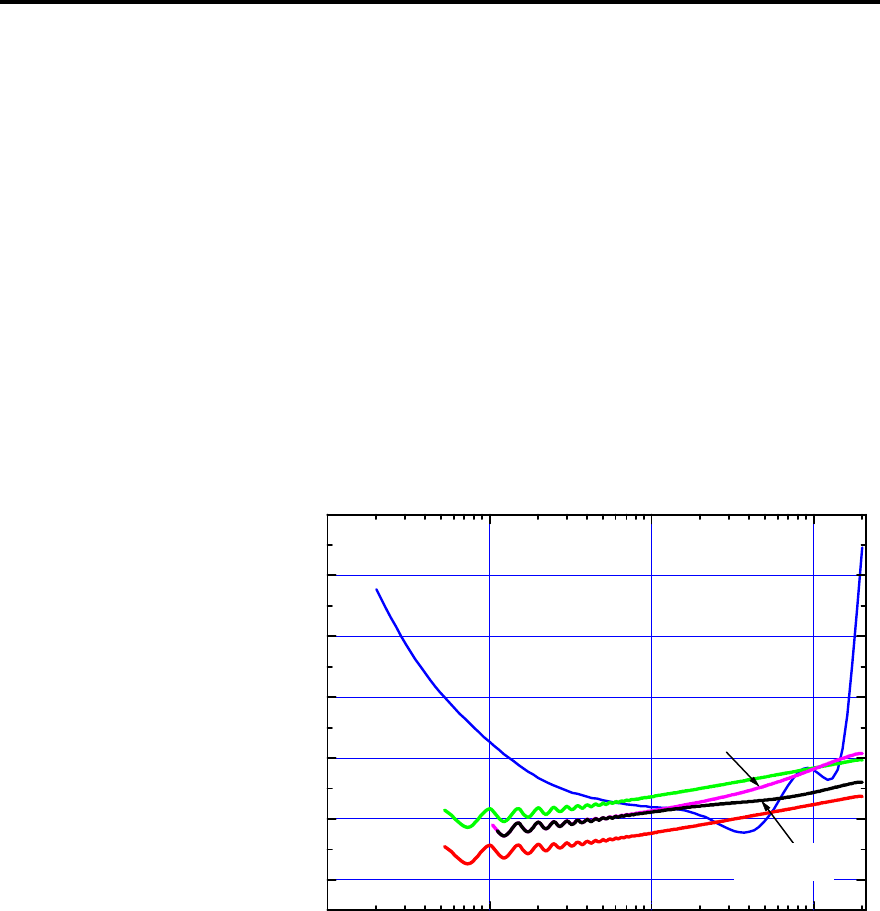
Appendix 4 –Resolution Enhancement 53
518 User Guide
such converters are used. Meridian has always used correct analogue de-
emphasis in its designs.
By wrapping 72-bit precision pre-emphasis and analogue de-emphasis
around a DAC, it effectively gains:
• one bit noise reduction
• two-bit increase in high-frequency resolution
• more than ten-fold (20dB) reduction of converter noise.
These are substantial gains and are clearly audible on a good system.
On some material, using pre-emphasis will raise the overall signal level to
give 'clip' messages. It is still a great step forward to use pre-emphasis
with some overall gain reduction. In other words, if using pre-emphasis on
a piece of music causes clipping, try using Emphasis with the gain
reduced to –2 or –3dB. You are still winning on resolution with most DACs
up to –6dB.
10Hz 100Hz 1kHz 10kHz
-20
0
20
40
60
80
100
dB spl
HP_Deem
HP
18
16
Figure 5. Showing the effect on audibility of the 518's High-
pass and Flat dithers. Also showing the noise reduction from
de-emphasis.
Dynamic-range optimisation with Noise-shaped
Dither
The section following page 37 describes some of the background to
noise-shaping.
Essentially noise-shaping works by an averaging method that is well
matched to human hearing. The noise-floor of the system is shaped by
moving energy from the mid-range – where listeners are most sensitive –
to high frequencies. A correctly designed noise-shaper allows the noise of
the channel to be made inaudible and allows resolution well below the
normal wordsize.
The diagram below shows how 518 can obtain inaudible noise and
effectively 20 bit resolution on a 16 bit CD!
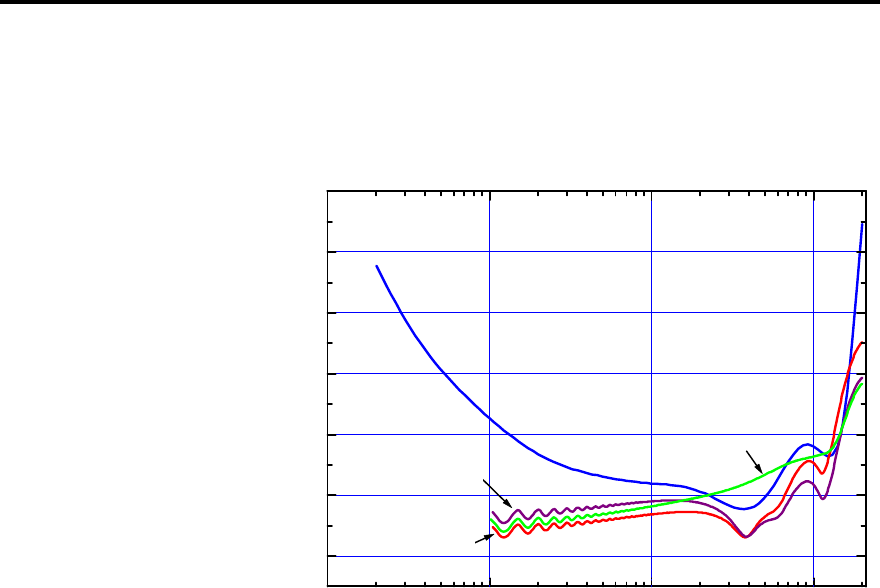
Appendix 4 –Resolution Enhancement 54
518 User Guide
10Hz 100Hz 1kHz 10kHz
-20
0
20
40
60
80
100
dB spl
SBM
Shape C
Shape D
Figure 6. Showing the effect on audibility of the 518's Shapes
C and D (C using pre-emphasis).
DAC enhancement by using high-frequency dither
The graphs above and in Appendix 1 (page 43) show that some of the
noise-shapers produce quite a lot of supersonic noise. This high level of
dither can have a very positive effect on DACs by causing them to
represent each level by averaging a large a number of different levels.
This high-frequency 'lubricant' tends to smooth out truncation and linearity
problems in real-world DACs.
Try the various shapes and see which one you like best in your system.
DAC or channel enhancement by word-length
matching
Digital systems work best if the input data is matched to the correct
wordsize for the device. Particularly where the signal has a larger
wordsize than the following device, then truncation distortion will arise.
The effects are real, but more subtle the other way round and are to do
with jitter and linearity.
In general 518 should be set to match the input and output wordlengths to
the incoming signal and following equipment. That will produce the
cleanest sound.

Index 55
518 User Guide
Index
500-Series, 5
562, 9
565 using with, 11
Acknowledgements, 4
AES/EBU
digital audio connections, 29
Analogue sources, 9
Autoconfigure, 30
Background noise, 41
Bypass, 33
Cable
for digital audio, 29
CD improvement, 10
Clip display, 18, 34
Communication
making connections, 30
Config
how to get into, 22
how to use, 24
overview, 21
Connections
AES/EBU, 29
Communications, 29, 30
digital, 29
digital audio, 29
general, 6
power, 29
Contents, 2
Customising
how to, 22
making changes, 23
overview, 21
using Config, 24
using Type, 23
with Config, 21
with Type, 21
Default settings, 21
Demute. see Mute
Digital
connection, 29
Display, 17
logos, 27
Dither explained, 37
DSP, 17, 33
DSP speaker improvement, 10
Dynamic range, 41, 50
Dynamic range explained, 38
Emph light, 18
Emphasis explained, 38
Emphasis light, 18
EPROM,version number, 18
Gain control, 19
Help!, 41
Hiss, 41
Input
changing for a source, 28
choosing in Config, 28
digital connections, 29
Inside 518, 7
Installation
customising, 13
general, 6
siting, 6
Types, 13
Introduction, 5
Jitter, 49
LaserDisc improvement, 10
Logo, 27
Mastering, 31
examples, 34
hints, 46
how to use, 32
Memory, 14, 20
Menus, 19
Multimedia, 12
how to use, 32
Mute
demuting, 19
how to, 19
Noise shape plots, 43
Noise shapers, 36
Noise, audible background, 41
Normal
how to get back to, 23
Operating
as preamp, 15
summary, 20
Output
digital audio connections, 29
Overview as preamp, 8
Overview as resolution enhancer, 10
Overview of mastering, 12
Overview of multimedia processor, 12
Planning a setup, 7
Power switch, 14
Preamp
overview, 8

Index 56
518 User Guide
Pre-emphasis explained, 38
Programming. see Customising
Radio interference, 41
Recording, 34
Remote control, 18
Repacking 518. see Unpacking
Resolution enhancement explained, 49
Resolution enhancer, 19
Restoring defaults, 21
RS232, 48
Service
where to get, 42
Setup. see Customising
automatic, 30
how to get into, 22
Specifications, 40
Standby
display, 14
getting into, 18
to get out of, 18
Surround sound, 11
Switching on, 14
Transfers, 35
Transparency explained, 37
Type
how to get into, 22
overview, 21
Unpacking 518, 6
Using
as control unit, 15
as mastering processor, 32
as resolution enhancer, 19
Version. see EPROM
Volume
display, 15
numbers, 15
Volume, adjusting, 15

Notes 57
518 User Guide
Notes

Notes 58
518 User Guide
