Micro Star Electronic Technology SDV105 SPORT DV User Manual
Shenzhen Micro Star Electronic Technology Co., Ltd. SPORT DV Users Manual
User manual
SPORT DV product specifications
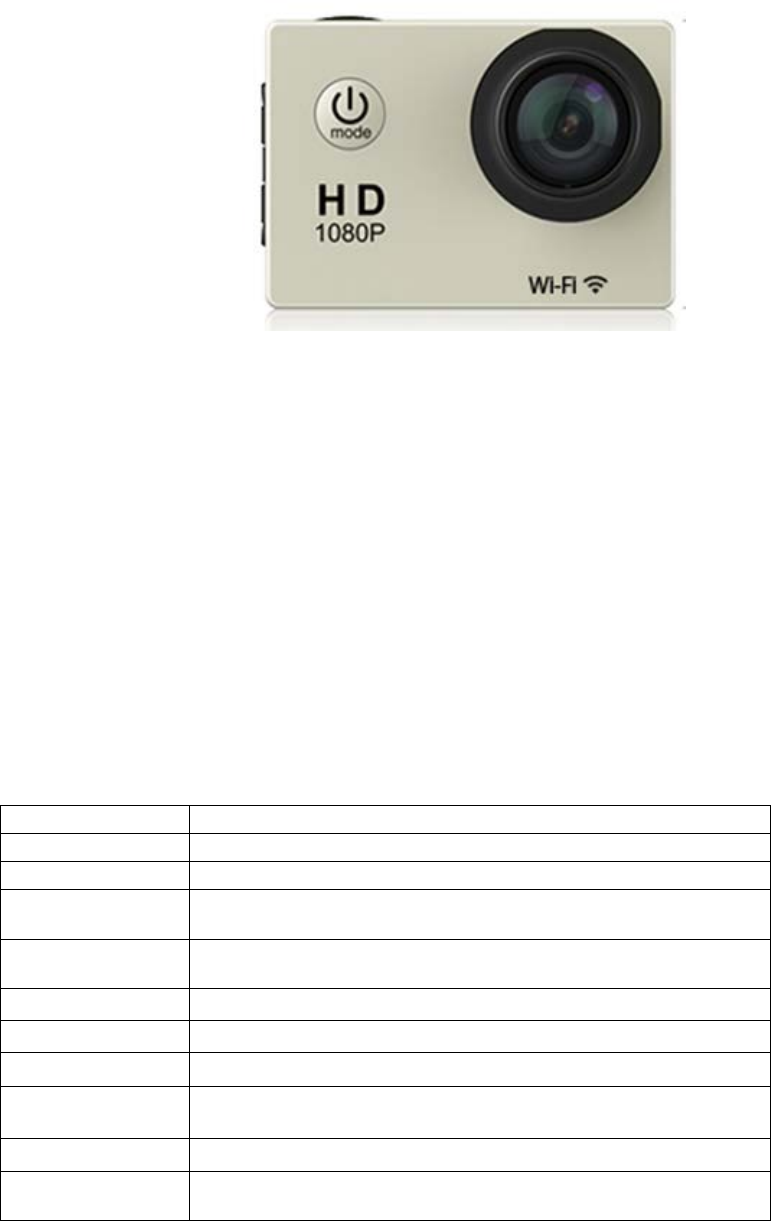
1. Product picture:
2.Product features:
1. Allwinner V3 solution with high performance price
2. Sensor OV4689
3. 170-degree high-definition wide-angle lens
4. Maximum video resolution : 1080P, 60 frame
5. 2.0-inch high-definition colorful screen
6. Unique slow shooting functions
7. high reproduction of color and good permeability of image
8. Low power consumption and WIFI video work more than 1.5 hours
(based on actual prototypes date)
3.Hardware Specifications:
Model number
SDV-105, SDV-106, SDV-107, SDV-108, SDV-109
DSP
V3
Sensor
OV4689
Resolution of
videos Recorded
1920*1080 60fps /1920*1080 30fps /1280*720 120fps /
1280*720 60fps /1280*720 30fps
Resolution of
Photos
16M /4M /2M /10M /8M/ 5M
Lens 170 HD wide-angle lens
Exposure -3, -2, -1, 0, 1, 2, 3
ISO Auto、100、200、400、800、1600
white balance
Automatic
(
default
)、
Sunny day
、
Cloudy
、
Incandescent Light、
Fluorescence
Zoom 4X
Photo Mode General photos; Timed pictures; Auto photos; Motion pictures

Video Mode
General Video; Recycling Video;
Time-lapse video
Slow shooting 1080p 60fps、720p 120fps(Default)
Display screen
LCD 2.0" LCD(960*240)
Image Format JPEG
Video Format MP4
Video Compression
Format H.264
Data Connections
Micro USB2.0, HDMI
(
Optional
)
Extend Memory
MAX to 64G, Micro SDHC
Power supply
5V/1A
LED
Blue:working LED
,
Yellow:WIFI LED
,
Red: charging LED
MIC
built-in
SPK
built-in
Battery Capacity
900MAH
Recording Time
1080P/About 90 minutes
(
based on actual prototypes date
)
Charging Time
About 2 hours
WIFI
802.11b/g, 802.11n(H20), 802.11n(H40)
Language Options
English, Simplified Chinese, Traditional Chinese, Ko
rean, Russian, French, German, Italian, Spanish, Po
rtuguese, Japanese
OS of working
Windows XP/7/8 SP3/Vista and Mac 10.5 or above
Size
59*41*29mm
Weight
44g(without batteries),58g with batteries
Working
temperature
-10℃~+55℃
storage temperature
-20
℃~
+70
℃
relative humidity
5%
~
95%
(
No frost
)
waterproof 30M can work underwater
Accessories
Waterproof case, 3M adhesive tape
,
adapter
,
bandage,base 1,base 2,bicycle stand,charger,
clip, Data wire,Fixed base, Helmet base, Open
waterproof shell, ribbon, switch support 1, switch
support 2, switch support 3, wiper, wire rope
,
manual
Applications
Extreme Sports, Outdoor Sport Activities,Bicycle,
Diving,Home security etc
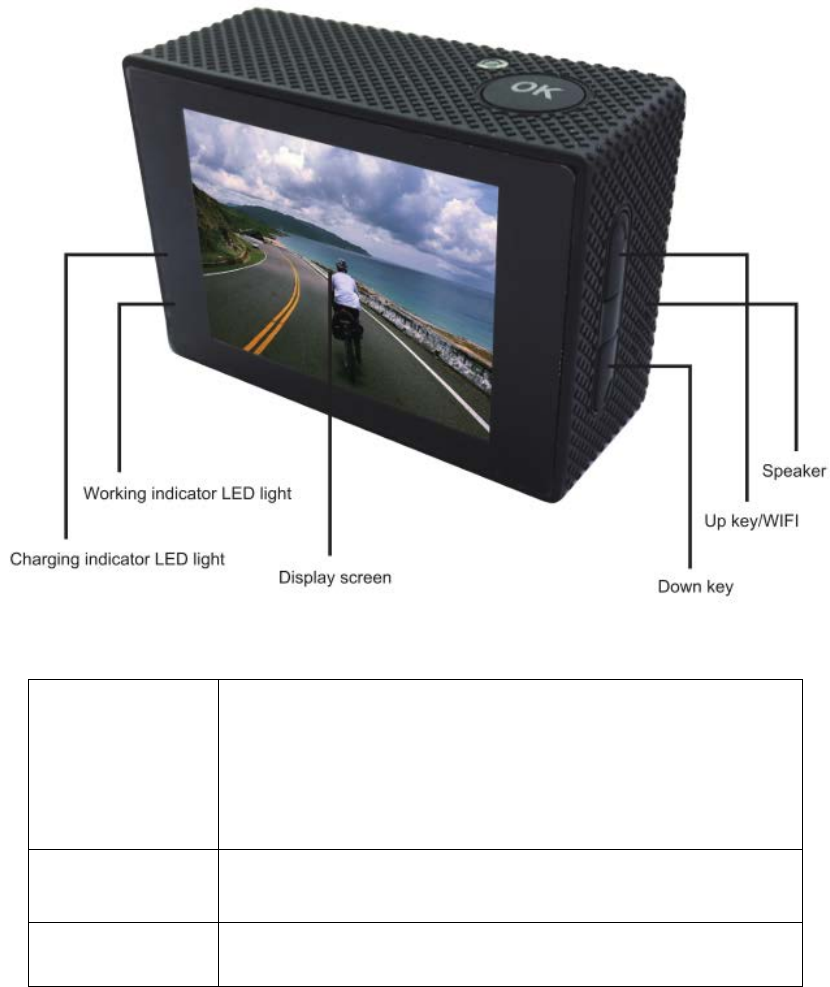
4.Product Definition
LED light:
Working LED light
(Blue)
1. When the device is starting-up, the blue light flashes quickly
three times.
2. Recording video, the blue light is flashing, if exiting the video,
the blue light flashes for seconds and then stays steady blue.
3. Screen savers and file playback, steady blue light.
4. When closing the device, the blue light flashes quickly,
Guangping blue light goes out.
WIFI LED light
(Yellow)
1. When opening WIFI, yellow light flashing;
2. After WIFI opened, steady yellow;
3. close the WIFI, the yellow light goes out.
Charging LED light
(Red)
1. when charging , Steady red;
2. Full, the red light goes out.
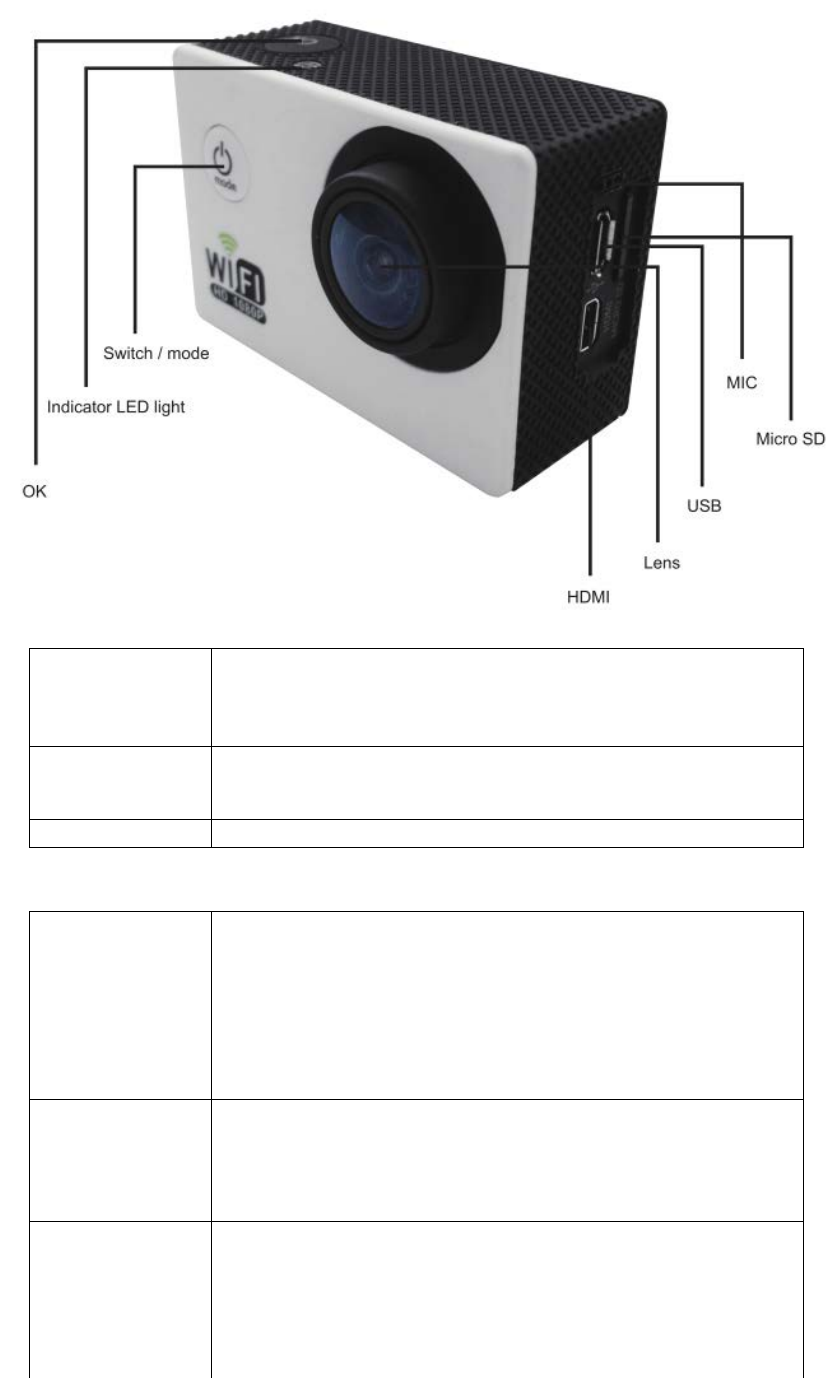
Interface Description:
USB interface
USB2.0,
Charging by Connecting the charger with USB cable, but also
connects PC (choose "U disk mode" to manage TF card data, "DV
mode" side by side rechargeable DV, "charging mode" to charge).
HDMI interface
With an HDMI cable (optional), and even high-definition TV
(HDTV)
DV images and sound can be output to an HDTV.
TF deck
Maximum support 64G, and support hot plug function.
Introduce of Key features:
Power key
(MODE)
1.press for 3 seconds to boot, and then press for 3 seconds to shut
down.
2. Under boot mode, shortly press to switch mode (video, pictures,
slow photography, file playback, settings);
3. parameter settings, file playback, photo browsing, shortly press
to exit to return.
Confirm key(OK
)
1. video / take photos/ Slow Photography / file playback /
parameter setting interface, shortly press to start the selection;
2. file browsing, shortly press to play / pause;
3. Under file playback screen, press the OK button for seconds, you
can delete the file.
Up key(WIFI)
1. On the settings/file playback interface, shortly press to choose a
previous menu or option
2. On the the video, photographs, slow photography interface,
shortly press to open/close the WiFi, press for seconds to enlarge
the zoom ;

3. In the file video playback screen, long-press to rewind.
Down key
1.On the video, photographs, slow photography interface,
long-press to lessen the zoom.
2. On the settings/file playback interface, shortly press to choose a
previous menu or option.
3. In the file video playback screen, long-press to fasten.
Introduce of Product Features:
Power ON/ OFF
1. Power ON:
Press "MODE" button, hear a beeping sound to boot.
2. Power OFF:
Power Press "MODE" button, hear a beeping sound to shuts down.
Switch the mode Shortly press MODE button, you can switch the mode in the video
/ camera/slow Photography/file playback/parameter setting.
Ordinary
recording video
Boot-
up, shortly press "OK" button to start recording, then on the
top of the LCD screen, the icons of the time and recorded video
displays , and then shortly press
"OK" button, the machine stops
recording and saves video files, on the top of LCD screen
displays the remaining recording time.
Loop-recording
When setting loop-recording parameters (2 minutes / 3 minutes / 5
minutes), the bottom-left of the screen displ
ays loop flag. And then
the system will automatically save the file. When the storage is full,
the camera will prompt the user whether to overwrite the first
paragraph of the file. If selecting the coverage, the device will
automatically delete the first
paragraph and continue recording.
Other like this.
Stop-motion
recording
When selecting time-compression recording video parameter (Off,
0.5s, 1s, 2s, 3s, 5s, 10s), on the time-lapse recording interface, the
bottom-left of the screen displays the icon of time-
lapse and
pressing the OK button to save the video to TF card. When playing
time-compressed video, it is for the quick action.
Slow photography
When Setting slow photography parameter (1080p / 60fps, 720p /
120fps), into the slow photography, the top-
left of the screen
displays the icon of slow photography. Seeing slow photography
video in the file playback is slow motion.
Ordinary taking
photo
In the camera interface, aiming at the object you want to shoot and
pressing the "OK" button to take pict
ures, and the device will
automatically save the photos.
Timing taking
photo
Set the timing photographing parameters (Off, 3s, 5s, 10s, 20s), in
camera mode, press "OK button" to enter timing camera mode
interface, the bottom-left of LCD displays timing mark. The system
begins to countdown, while the self-timer 1 .
Auto photography
Set up automatic shooting parameters (Off, 3 seconds, 5 seconds,
10 seconds, 30 seconds, 60 seconds), in camera mode, press "OK

button" to enter the automatic shooting mode interface, automatic
camera symbol below the LCD displays, and the system begins to
countdown, and then the cycle self-timer.
Trajectory
photography
Set trajectory camera parameters (Off, 3P / S, 5P / S, 10P / S, 20P /
S), in camera mode, press the "OK key" into the camera burst mode
(Example: Set 20P / S, each burst 20 pictures, and so on)
Playback file
Press the MODE button to enter the playback, via the arrow keys,
OK button, you can browse deleted pictures, play / fast forward /
rewind / pause / delete video files.
Recorded video, photos can locally playback or USB cable to
connect PC playback.
The newest file is defaulted first.
Delete file
In file playback interface, press for seconds "OK button", popping
up the dialog box to prompt to delete the current file.
Choose Yes, delete this file.
Digital zoom
In settings, open the zoom function, and press "up key" / "down
key" on recording, photography, slow shooting mode to zoom in or
out the image. Zoom 4 times, LCD displays the changed multiple
(X1.0-X4.0).
Image rotation
Set the opening/ closing of the image rotation.
After opening the image rotation, the menu screen character
displays rotated 180 degrees; After closing the image rotation, view
the video and photo files, then the image is highlighted.
LED light control
In settings, the users can open/close light (working light, charging
indicator light, WIFI LED light)
Time-mark
settings
Support for Time watermark settings (Off, date, time, date - time),
after the setting, the picture / video will display the current date and
time.
Time and date
settings
System supports for time and date settings, factory defaulted time:
2015/01/01 00:00.
Under the connection of the wifi, APP can be automatically or
manually corrected DV time.
Language option Engli
sh, Simplified Chinese, Traditional Chinese, Korean, Russian,
French, German, Italian, Spanish, Portuguese, Japanese;
Auto screen saver Support for screen saver settings (Off, 10 seconds, 20 seconds, 30
seconds)
Auto OFF support for automatic shutdown an
d time setting (Off, 1minutes, 3
minutes, 5minutes)
Light frequency
settings
Support for light frequency setting (auto, 50HZ, 60HZ)System
Parameter of
camera setting
ISO Sensitivity: Auto, 100,200,400,800,1600;
White balance: auto, sunny, cloudy, incandescent, fluorescent;
Exposure Compensation EV: -3, -2, -1, 0, 1, 2, 3
Sound settings Support for setting OFF / ON
WIFI switch
the system supports for setting, CLOSE / OPEN the WIFI; after
opening, LCD screen will display WIFI information (SSID,

password
) and WIFI flag, while the yellow LED light of wifi
flashes and waits for a link of a photo. If connected,WIFI indicator
light is bright continually..
WIFI connection
Before using wifi function, please install X-DV APP program on a
smart phone or tablet device.
Note: please download it on Google Play if Android smart
machine; please download it in the Apple Store if IOS smart
machine.
Connection procedure:
1. After boot-up, shortly press the up key, "WIFI waiting icon"
appears on the screen, then wifi light will flash;
2. Open the wifi connection of the phone , search for the WIFI
SSID "X10000-
686868" and connected (the original password is
66666666);
3. Click to open the XDV APP program, real-
time preview the
being recording video, remote recording, photog
raphy, file
playback / download / delete / share on APP.
WIFI SSID
settings
APP supports for setting WIFI SSID, the defaulted SSID:
X10000-XXXX
WIFI password
settings
APP supports for setting WIFI password, the defaulted 66666666
TF card storage
Maximum support for 64G TF card, hot-plug.
format
The system supports for TF card format.
Default settings
The system supports for the defaulted settings.
Auto OFF and
save the data
After automatic shutdown, the system automatically maintains the
last parameter;
Recording state, automatically shut down due to low power, the
system automatically save the video.
Use the compute
to check the file
connect the computer and the machine with the the USB cable ,
open the removable disk which has two folders, PHOTO folder and
VIDEO folder. Select any folder and open to view the
corresponding files.
checking function
of HDMI TV
(optional)
Connect High-
definition TV with an HDMI cable, adjust the TV to
HDMI state, then the LCD screen will shut down, the camera
operation can be shown on television, and the display resolution is
1024 * 768.
Charging up the
battery
Connect to the computer and power adapter or USB mobile power
for charging.
Recording video while charging.
Battery protection
When the battery voltage is too low, the screen prompts "Battery
Low, please charge" or automatic shutdown.
Software upgrade Support for APP through WIFI, remote upgrade for the firmware.
Other functions
Hardware electrical connections do against miss-mating protection,
over-current and over-
voltage protection can avoid crashing
system and have self-resetting repair.
APP functions
Support for
mobile APP (Android, IOS); remotely operate the DV
via WIFI; real-time preview images, video, photographs, recording;
document management; share download , setting parameter, remote
firmware upgrades and other functions.
Parameter settings:

Video settings
Video resolution
:
1920*1080 60fps /1920*1080 30fps /1280*720 120fps
1280*720 60fps / 1280*720 30Pfps
Loop recording: Off, 2 minutes, 3 minutes, 5 minutes
Stop-motion recording
:
off
、
0.5s
、
1s
、
2s
、
3s
、
5s
、
10s
;
Slow Photography: 1080p 60fps, 720p 120fps
Recording: OFF, ON
Photography
settings
Image resolution:
16M (4608x3456) /14M (4254x3264)/12M (4000x3000)/
10M (3648x2736) /8M (3264x2448) /5M (2560x1920)
Timing photography
:
off
、
3s
、
5s
、
10s
、
20s
Auto photography
:
off
、
3s
、
5s
、
10s
、
30s
、
60s
Trajectory photography
:
off
、
3P/S
、
5P/S
、
10P/S
、
20P/S
Camera settings
Exposure Compensation EV: -3, -2, -1, 0, 1, 2, 3
White balance: auto, sunny, cloudy, incandescent, fluorescent
ISO Sensitivity: Auto, 100,200,400,800,1600
Image rotation: OFF, ON;
Light frequency: automatic, 50HZ, 60HZ
LED: OFF, ON;
WIFI: OFF, ON
Buzzer: OFF, ON;
Automatic screen saver: Off, 10 seconds, 20 seconds, 30 seconds
Auto Power Off: Off, 1 minutes, 3 minutes, 5 minutes;
Time Watermark: OFF, ON;
Device settings
Languages: English, Simplified Ch
inese, Traditional Chinese,
Korean, Russian, French, German, Italian, Spanish, Portuguese,
Japanese
Time and date settings
Format
The default setting
Version
:
Model: X1
Software Version: X20150327V01
Update time :27/03/2015
Manufacturer: XDV
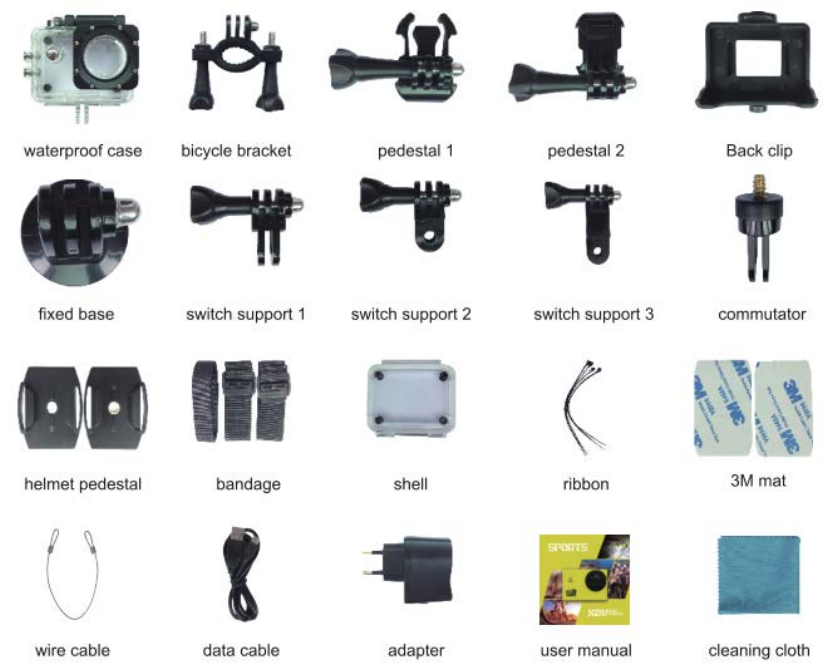
5.Accessory table:
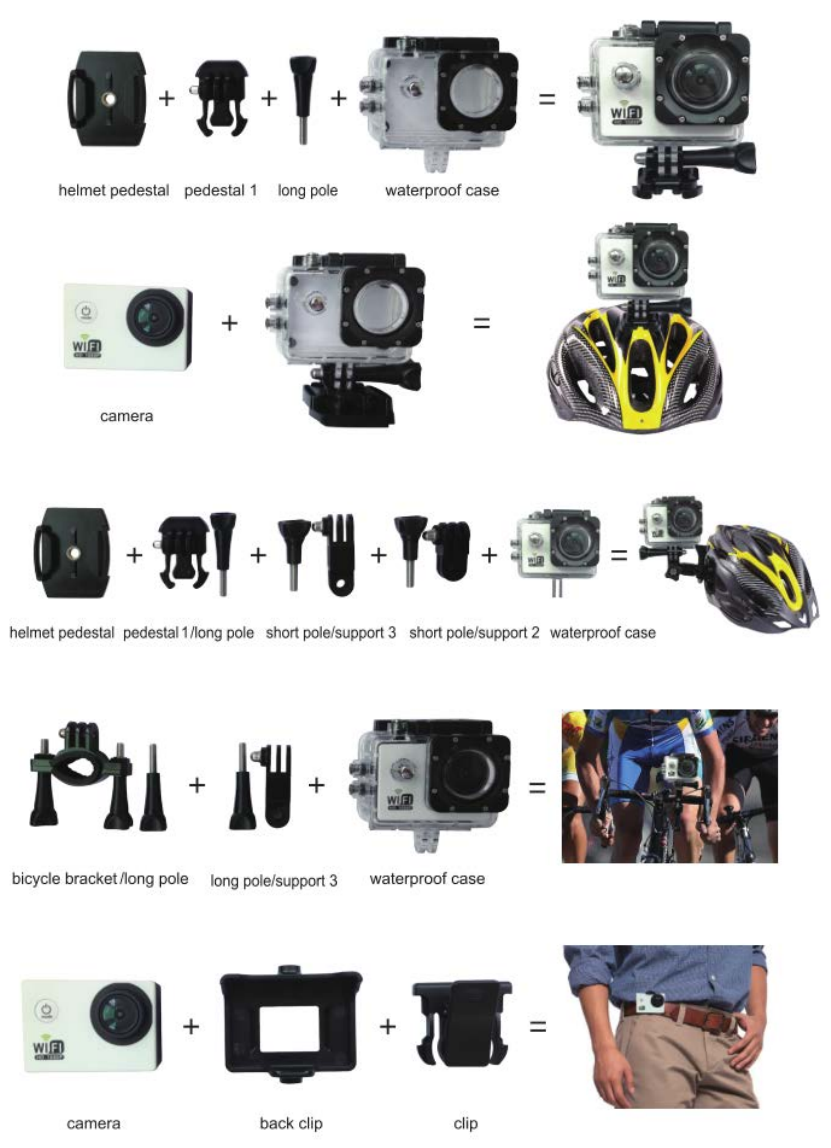
Application diagram of assemble:
(Tips: some features of the above functions may change, subjecting to the actual prototype,
without other notice.)
6.FCC Statement
This equipment has been tested and found to comply with the limits for a Class B digital device,
pursuant to Part 15 of the FCC Rules. These limits are designed to provide reasonable protection
against harmful interference in a residential installation. This equipment generates uses and can
radiate radio frequency energy and, if not installed and used in accordance with the instructions,
may cause harmful interference to radio communications. However, there is no guarantee that
interference will not occur in a particular installation. If this equipment does cause harmful
interference to radio or television reception, which can be determined by turning the equipment off
and on, the user is encouraged to try to correct the interference by one or more of the following
measures:
-- Reorient or relocate the receiving antenna.
-- Increase the separation between the equipment and receiver.
-- Connect the equipment into an outlet on a circuit different from that to which the receiver is
connected.
-- Consult the dealer or an experienced radio/TV technician for help.
This device complies with part 15 of the FCC Rules. Operation is subject to the following two
conditions:
(1) This device may not cause harmful interference, and (2) this device must accept any
interference received, including interference that may cause undesired operation.
Changes or modifications not expressly approved by the party responsible for compliance could
void the user's authority to operate the equipment.