Micro Star LAVIEZ7265 Wireless Network Adapter User Manual
Micro Star International Co Ltd Wireless Network Adapter
User Manual

User Guide
Lenovo LaVie Z
This document applies to the following models:
20FF0011US (LaVie Z HZ750)
20FF0012US (LaVie Z HZ750)
20FG0013US (LaVie Z HZ550)
Notes:
• Before using the product, be sure to read “Read this first” on page iii .
• Some instructions in this document are by default based on the Microsoft ® Windows® 8.1. If you are
using another Windows operating system, some operations might be slightly different. If you are using
other operating systems, some operations might not apply to you.
• The illustrations, icons, and on-screen text shown in this document might differ from the actual product.
Refer to the actual product.
• Configuration and application installation should be conducted by a user who has administrator privileges.
If a User Account Control screen comes up, be sure to confirm the contents before continuing.
First Edition (May 2015)
© Copyright Lenovo 2015.
LIMITED AND RESTRICTED RIGHTS NOTICE: If data or software is delivered pursuant a General Services Administration
“GSA” contract, use, reproduction, or disclosure is subject to restrictions set forth in Contract No. GS-35F-05925.
Contents
Read this first .................................... iii
Important safety information ................................. iv
Conditions that require immediate action . .
v
Safety guidelines ...........................................
v
Chapter 1. Product overview ..............
1
Checking that all included items are present . . . 1
Locating computer controls, connectors, and
indicators ............................................................... 1
Locations ........................................................ 1
Status LEDs .................................................... 3
Specifications ................................................. 4
Initial Setup ............................................................ 4
Important points when connecting ................. 4
Connecting to ac power ................................. 4
Windows Setup .............................................. 5
Using the fast startup function ............................... 5
Chapter 2. Keyboard ..........................
7
Chapter 3. The touchpad ....................
9
Chapter 4. External display ................ 11
Switching display outputs ...................................... 11
Intel®
WiDi ............................................................. 11
Precautions .................................................... 11
Connecting to an external display or a TV
set .................................................................. 12
Disconnecting from an external display or a
TV set ............................................................. 12
Chapter 5. Connecting to the
network ............................................... 13
Before connecting to a network ............................. 13
Ethernet connections ............................................. 13
Using the wireless-LAN connection ....................... 13
Chapter 6. System Configuration . . . 15
The BIOS Setup Utility ........................................... 15
Chapter 7. Security ............................. 17
© Copyright Lenovo 2015
Security chip function ............................................ 17
Notice on deleting data from your solid-state
drive ...................................................................... 18
Chapter 8. Recovery overview for the
Windows 8.1 operating system ......... 19
Before recovery ..................................................... 19
Refreshing your computer ...................................... 20
Resetting your computer to the factory default
settings .................................................................. 20
Using the advanced startup options ...................... 20
Recovering your operating system if Windows 8.1
fails to start ............................................. 21
Creating and using a recovery USB drive 21
Lenovo Factory Recovery USB Key . . 22
Appendix A. Regulatory
Information ......................................... 23
Wireless related information .................................. 23
Locations of the UltraConnect™ wireless
antennas ........................................................ 23
USA — Federal Communications Commission
(FCC) ............................................................. 24
Export classification notice ................................... 25
Electronic emission notices ................................... 25
Federal Communications Commission
Declaration of Conformity ............................... 25
WEEE and recycling statements ............................ 26
Important WEEE information ........................... 26
Battery recycling information for the United
States and Canada ......................................... 27
Appendix B. Restriction of Hazardous
Substances Directive (RoHS) ............. 29
European Union RoHS .......................................... 29
Appendix C. Notices ........................... 31
Precautions ........................................................... 32
Trademarks ............................................................ 32
Appendix D. Operating modes ............ 33
i

ii User Guide
Read this first
Be sure to follow the important tips given here to get the most use and enjoyment out of your computer.
Failure to do so might lead to discomfort or injury, or cause the computer to fail.
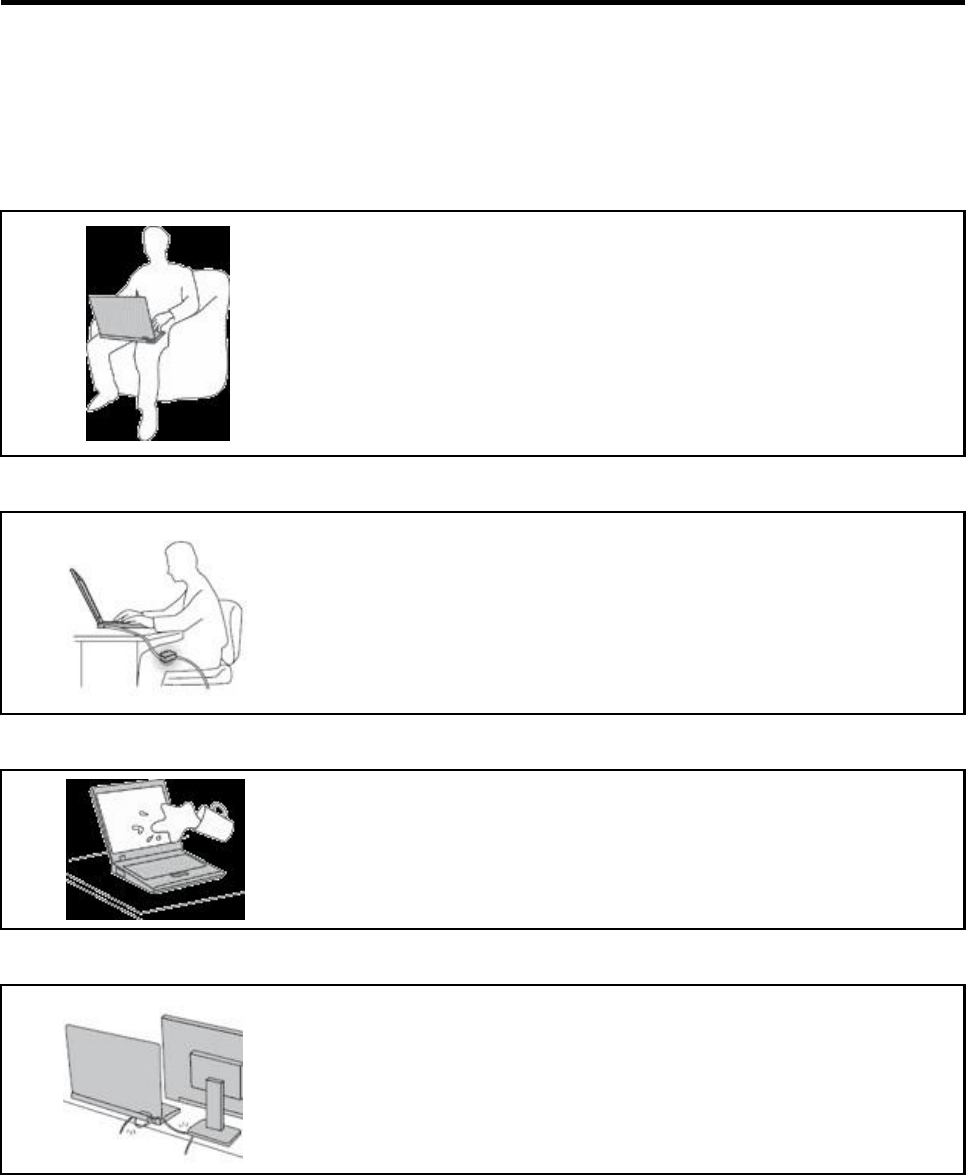
Protect yourself from the heat that your computer generates.
When your computer is turned on or the battery is charging, the base, the palm
rest, and some other parts may become hot. The temperature they reach
depends on the amount of system activity and the level of charge in the battery.
Extended contact with your body, even through clothing, could cause
discomfort or even a skin burn.
• Avoid keeping your hands, your lap, or any other part of your body in
contact with a hot section of the computer for any extended time.
• Periodically take hands from using the keyboard by lifting your hands from
the palm rest.
Protect yourself from the heat generated by the ac power adapter.
When the ac power adapter is connected to an electrical outlet and your
computer, it generates heat.
Extended contact with your body, even through clothing, may cause a skin
burn.
• Do not place the ac power adapter in contact with any part of your body
while it is in use.
• Never use it to warm your body.
Prevent your computer from getting wet.
To avoid spills and the danger of electrical shock, keep liquids away from your
computer.
Protect the cables from being damaged.
Applying strong force to cables may damage or break them.
Route communication lines, or the cables of an ac power adapter, a mouse, a
keyboard, a printer, or any other electronic device, so that they cannot be walked
on, tripped over, pinched by your computer or other objects, or in any way
subject to treatment that could interfere with the operation of your computer.
© Copyright Lenovo 2015
3
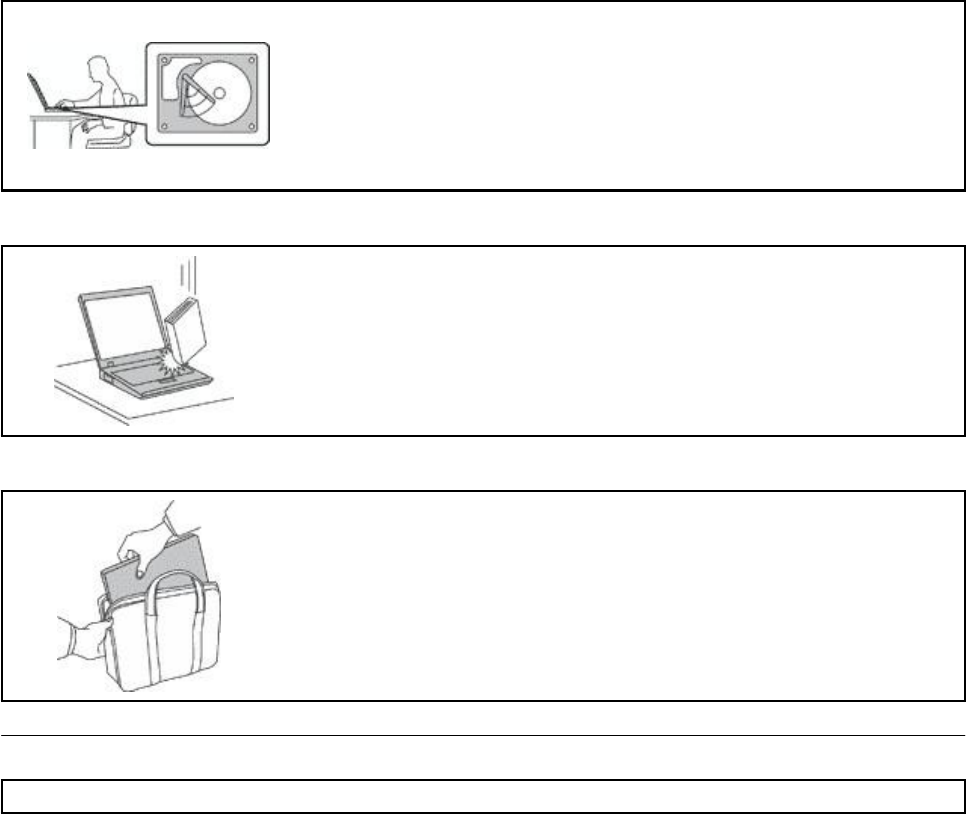
Protect your computer and data when moving it.
Before moving a computer equipped with a hard disk drive, do one of the
following:
• Turn it off.
• Put it in sleep mode.
• Put it in hibernation mode.
This will help to prevent damage to the computer, and possible loss of data.
Handle your computer gently.
Do not drop, bump, scratch, twist, hit, vibrate, push, or place heavy objects on
your computer, display, or external devices.
Carry your computer carefully.
• Use a quality carrying case that provides adequate cushioning and protection.
• Do not pack your computer in a tightly packed suitcase or bag.
• Before putting your computer in a carrying case, make sure that it is off, in sleep
mode, or in hibernation mode. Do not put a computer in a carrying case while it
is turned on.
Important safety information
Note: Read the important safety information first.
This information can help you safely use your notebook computer. Follow and retain all information included
with your computer. The information in this document does not alter the terms of your purchase agreement or
the Lenovo®
Limited Warranty. For more information, see “Warranty Information” in the Instructions for Safe
Use that comes with your computer.
Customer safety is important. Our products are developed to be safe and effective. However, personal
computers are electronic devices. Power cords, power adapters, and other features can create potential
safety risks that can result in physical injury or property damage, especially if misused. To reduce these risks,
follow the instructions included with your product, observe all warnings on the product and in the operating
instructions, and review the information included in this document carefully. By carefully following the
information contained in this document and provided with your product, you can help protect yourself from
hazards and create a safer computer work environment.
Note: This information includes references to power adapters and batteries. In addition to notebook
computers, some products (such as speakers and monitors) ship with external power adapters. If you have such
a product, this information applies to your product. In addition, computer products contain a coin-sized internal
battery that provides power to the system clock even when the computer is unplugged, so the
battery safety information applies to all computer products.
4
User Guide
Conditions that require immediate action
Products can become damaged due to misuse or neglect. Some product damage is serious enough
that the product should not be used again until it has been inspected and, if necessary, repaired by an
authorized servicer.
As with any electronic device, pay close attention to the product when it is turned on. On very rare
occasions, you might notice an odor or see a puff of smoke or sparks vent from your product. Or you
might hear sounds like popping, cracking or hissing. These conditions might merely mean that an
internal electronic component has failed in a safe and controlled manner. Or, they might indicate
a potential safety issue. However, do not take risks or attempt to diagnose the situation yourself.
Contact the Customer Support Center for further guidance. For a list of Service and Support phone
numbers, see the following Web site:
http://www.lenovo.com/support/phone
Frequently inspect your computer and its components for damage or wear or signs of danger. If
you have any question about the condition of a component, do not use the product. Contact the
Customer Support Center or the product manufacturer for instructions on how to inspect the
product and have it repaired, if necessary.
In the unlikely event that you notice any of the following conditions, or if you have any safety
concerns with your product, stop using the product and unplug it from the power source and
telecommunication lines until you can speak to the Customer Support Center for further guidance.
• Power cords, plugs, power adapters, extension cords, surge protectors, or power supplies that are
cracked, broken, or damaged.
• Signs of overheating, smoke, sparks, or fire.
• Damage to a battery (such as cracks, dents, or creases), discharge from a battery, or a buildup of foreign
substances on the battery.
• A cracking, hissing or popping sound, or strong odor that comes from the product.
• Signs that liquid has been spilled or an object has fallen onto the computer product, the power cord or
power adapter.
• The computer product, power cord, or power adapter has been exposed to water.
• The product has been dropped or damaged in any way.
• The product does not operate normally when you follow the operating instructions.
Note: If you notice these conditions with a product (such as an extension cord) that is not manufactured for or
by Lenovo, stop using that product until you can contact the product manufacturer for further instructions, or
until you get a suitable replacement.
Safety guidelines
Always observe the following precautions to reduce the risk of injury and property damage.
Service and upgrades
Do not attempt to service a product yourself unless instructed to do so by the Customer Support Center or
your documentation. Only use a Service Provider who is approved to repair your particular product.
Note: Some computer parts can be upgraded or replaced by the customer. Upgrades typically are
referred to as options. Replacement parts approved for customer installation are referred to as Customer
Replaceable Units, or CRUs. Lenovo provides documentation with instructions when it is appropriate for
customers to install options or replace CRUs. You must closely follow all instructions when installing or
replacing parts. The Off state of a power indicator does not necessarily mean that voltage levels inside a
product are zero. Before you remove the covers from a product equipped with a power cord, always make
© Copyright Lenovo 2015
5
sure that the power is turned off and that the product is unplugged from any power source. If you have any
questions or concerns, contact the Customer Support Center.
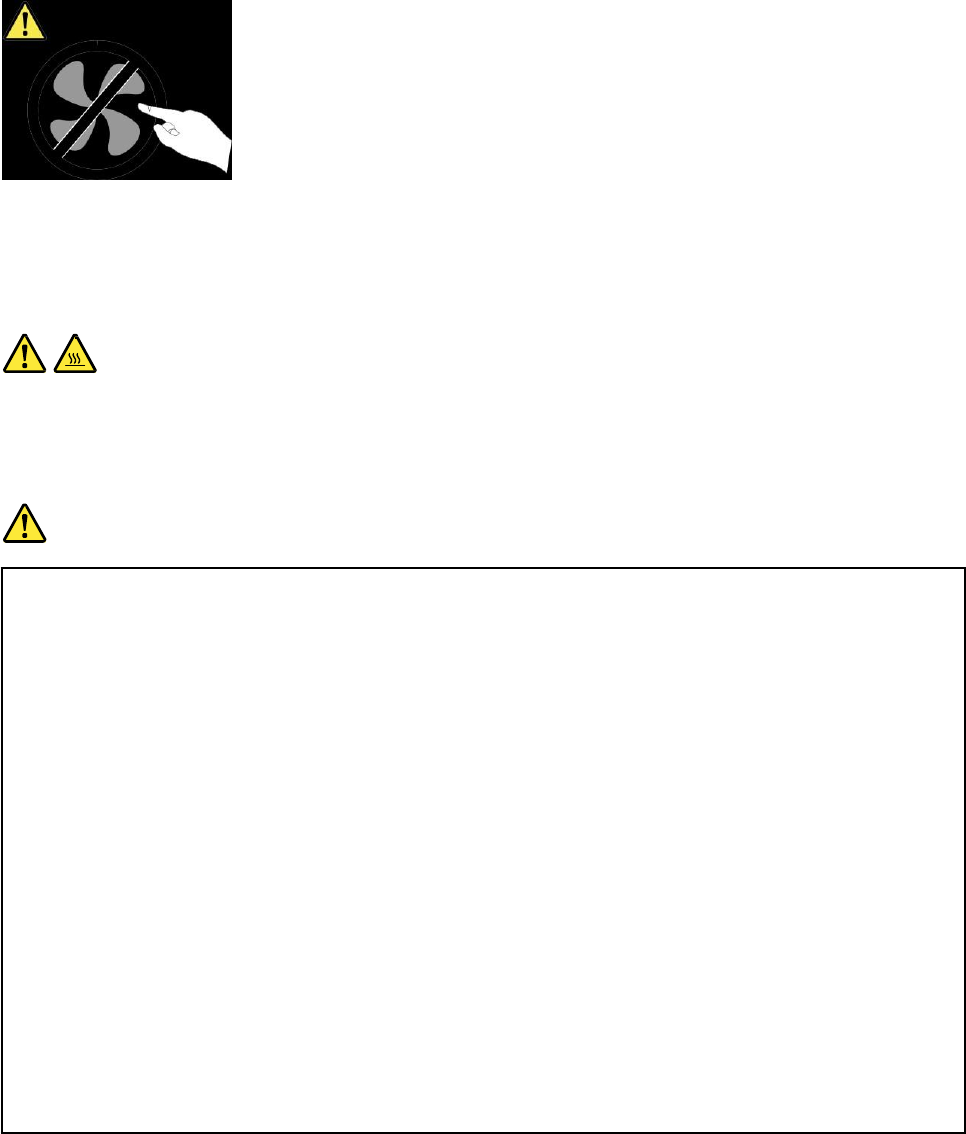
Although there are no moving parts in your computer after the power cord has been disconnected, the
following warnings are required for your safety.
CAUTION:
Hazardous moving parts. Keep fingers and other body parts away.
CAUTION:
Before you open the computer cover, turn off the computer and wait several minutes until the
computer is cool.
Power cords and power adapters
DANGER
Use only the power cords and power adapters supplied by the product manufacturer.
The power cords shall be safety approved. For Germany, it shall be H05VV-F, 3G, 0.75 mm2, or
better. For other countries, the suitable types shall be used accordingly.
Never wrap a power cord around a power adapter or other object. Doing so can stress the cord in
ways that can cause the cord to fray, crack, or crimp. This can present a safety hazard.
Always route power cords so that they will not be walked on, tripped over, or pinched by objects.
Protect power cords and power adapters from liquids. For instance, do not leave your power cord or
power adapter near sinks, tubs, toilets, or on floors that are cleaned with liquid cleansers.
Liquids can cause a short circuit, particularly if the power cord or power adapter has been stressed by
misuse. Liquids also can cause gradual corrosion of power cord terminals and/or the connector
terminals on a power adapter, which can eventually result in overheating.
Ensure that all power cord connectors are securely and completely plugged into receptacles.
Do not use any power adapter that shows corrosion at the ac input pins or shows signs of
overheating (such as deformed plastic) at the ac input pins or anywhere on the power adapter.
Do not use any power cords where the electrical contacts on either end show signs of corrosion or
overheating or where the power cord appears to have been damaged in any way.
6
User Guide
To prevent possible overheating, do not cover the power adapter with clothing or other objects
when the power adapter is plugged into an electrical outlet.
Extension cords and related devices
Ensure that extension cords, surge protectors, uninterruptible power supplies, and power strips that you use are
rated to handle the electrical requirements of the product. Never overload these devices. If power strips are
used, the load should not exceed the power strip input rating. Consult an electrician for more information if you
have questions about power loads, power requirements, and input ratings.
Plugs and outlets
DANGER
If a receptacle (power outlet) that you intend to use with your computer equipment appears to be
damaged or corroded, do not use the outlet until it is replaced by a qualified electrician.
Do not bend or modify the plug. If the plug is damaged, contact the manufacturer to obtain a
replacement.
Do not share an electrical outlet with other home or commercial appliances that draw large amounts
of electricity; otherwise, unstable voltage might damage your computer, data, or attached devices.
Some products are equipped with a three-pronged plug. This plug fits only into a grounded
electrical outlet. This is a safety feature. Do not defeat this safety feature by trying to insert it into
a non-grounded outlet. If you cannot insert the plug into the outlet, contact an electrician for an
approved outlet adapter or to replace the outlet with one that enables this safety feature. Never
overload an electrical outlet. The overall system load should not exceed 80 percent of the branch
circuit rating. Consult an electrician for more information if you have questions about power loads
and branch circuit ratings.
Be sure that the power outlet you are using is properly wired, easily accessible, and located close to
the equipment. Do not fully extend power cords in a way that will stress the cords.
Be sure that the power outlet provides the correct voltage and current for the product you are
installing.
Carefully connect and disconnect the equipment from the electrical outlet.
Power supply statement
DANGER
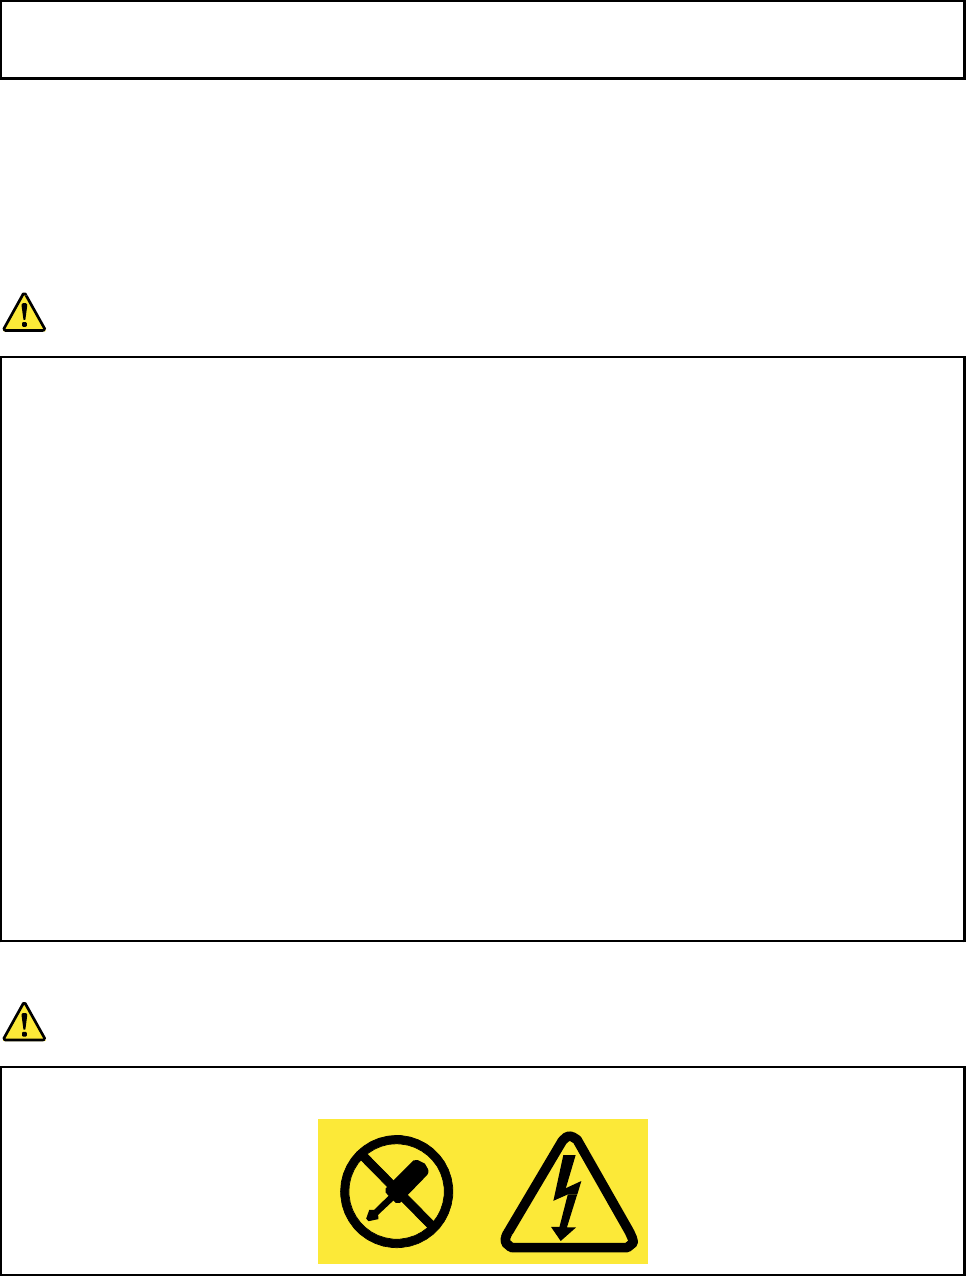
Never remove the cover on a power supply or any part that has the following label attached.
© Copyright Lenovo 2015
7

Hazardous voltage, current, and energy levels are present inside any component that has this label
attached. There are no serviceable parts inside these components. If you suspect a problem with one
of these parts, contact a service technician.
External devices
CAUTION:
Do not connect or disconnect any external device cables other than USB and 1394 cables while the
computer power is on; otherwise, you might damage your computer. To avoid possible damage to
attached devices, wait at least five seconds after the computer is shut down to disconnect external
devices.
General battery notice
DANGER
Batteries supplied by Lenovo for use with your product have been tested for compatibility and
should only be replaced with approved parts. A battery other than the one specified by Lenovo, or a
disassembled or modified battery is not covered by the warranty.
Battery abuse or mishandling can cause overheat, liquid leakage, or an explosion. To avoid possible
injury, do the following:
• Do not open, dissemble, or service any battery.
• Do not crush or puncture the battery.
• Do not short-circuit the battery, or expose it to water or other liquids.
• Keep the battery away from children
• Keep the battery away from fire.
Stop using the battery if it is damaged, or if you notice any discharge or the buildup of foreign
materials on the battery leads.
Store the rechargeable batteries or products containing the rechargeable batteries at room
temperature, charged to approximately 30 to 50% of capacity. We recommend that the batteries be
charged about once per year to prevent overdischarge.
Do not put the battery in trash that is disposed of in landfills. When disposing of the battery, comply
with local ordinances or regulations.
Notice for removable rechargeable battery
DANGER
Only recharge the battery strictly according to instructions included in the product documentation.
If the battery is incorrectly replaced, there is danger of an explosion. The battery contains a small
amount of harmful substance.
8
User Guide

Notice for built-in rechargeable battery
DANGER
Do not attempt to replace the built-in rechargeable battery. Replacement of the battery must be
done by a Lenovo-authorized repair facility or technician.
Only recharge the battery strictly according to instructions included in the product documentation.
The Lenovo-authorized repair facilities or technicians recycle Lenovo batteries according to local
laws and regulations.
Notice for non-rechargeable coin-cell battery
DANGER
Do not attempt to replace the non-rechargeable coin-cell battery. Replacement of the battery must
be done by a Lenovo-authorized repair facility or technician.
The Lenovo-authorized repair facilities or technicians recycle Lenovo batteries according to local
laws and regulations.
The following statement applies to users in the state of California, U.S.A.
California Perchlorate Information:
Products containing manganese dioxide lithium coin-cell batteries may contain perchlorate.
Perchlorate Material - special handling may apply, See
www.dtsc.ca.gov/hazardouswaste/perchlorate
Heat and product ventilation
DANGER
Computers, ac power adapters, and many accessories can generate heat when turned on and when
batteries are charging. Notebook computers can generate a significant amount of heat due to their
compact size. Always follow these basic precautions:
• When your computer is turned on or the battery is charging, the base, the palm rest, and some
other parts may become hot. Avoid keeping your hands, your lap, or any other part of your
body in contact with a hot section of the computer for any extended length of time. When you
use the keyboard, avoid keeping your palms on the palm rest for a prolonged period of time.
Your computer generates some heat during normal operation. The amount of heat depends on
the amount of system activity and the battery charge level. Extended contact with your body,
even through clothing, could cause discomfort or even a skin burn. Periodically take breaks
from using the keyboard by lifting your hands from the palm rest; and be careful not to use
the keyboard for any extended length of time.
• Do not operate your computer or charge the battery near flammable materials or in explosive
environments.
• Ventilation slots, fans and/or heat sinks are provided with the product for safety, comfort, and
reliable operation. These features might inadvertently become blocked by placing the product on a
bed, sofa, carpet, or other flexible surface. Never block, cover, or disable these features.
© Copyright Lenovo 2015
9

• When the ac power adapter is connected to an electrical outlet and your computer, it generates
heat. Do not place the adapter in contact with any part of your body while using it. Never use the
ac power adapter to warm your body. Extended contact with your body, even through clothing,
may cause a skin burn.
For your safety, always follow these basic precautions with your computer:
• Keep the cover closed whenever the computer is plugged in.
• Regularly inspect the outside of the computer for dust accumulation.
• Remove dust from vents and any perforations in the bezel. More frequent cleanings might be
required for computers in dusty or high-traffic areas.
• Do not restrict or block any ventilation openings.
• Do not operate your computer inside furniture, as this might increase the risk of overheating.
• Airflow temperatures into the computer should not exceed 35°C (95°F).
Electrical current safety information
DANGER
Electric current from power, telephone, and communication cables is hazardous.
To avoid a shock hazard:
• Do not use your computer during a lightning storm.
• Do not connect or disconnect any cables or perform installation, maintenance, or reconfiguration
of this product during an electrical storm.
• Connect all power cords to a properly wired and grounded electrical outlet.
• Connect to properly wired outlets any equipment that will be attached to this product.
• Whenever possible, use one hand only to connect or disconnect signal cables.
• Never turn on any equipment when there is evidence of fire, water, or structural damage.
• Disconnect the attached power cords, battery pack, and all the cables before you open the
device covers, unless instructed otherwise in the installation and configuration procedures.
• Do not use your computer until all internal parts enclosures are fastened into place. Never use
the computer when internal parts and circuits are exposed.
DANGER
Connect and disconnect cables as described in the following procedures when installing, moving, or
opening covers on this product or attached devices.
To connect:
1. Turn everything OFF.
2. First, attach all cables to devices.
3. Attach signal cables to connectors.
4. Attach power cords to outlets.
5. Turn devices ON.
To disconnect:
1. Turn everything OFF.
2. First, remove power cords from outlets.
3. Remove signal cables from connectors.
4. Remove all cables from devices.
10 User Guide
The power cord must be disconnected from the wall outlet or receptacle before installing all other
electrical cables connected to the computer.
The power cord may be reconnected to the wall outlet or receptacle only after all other electrical
cables have been connected to the computer.
DANGER
During electrical storms, do not perform any replacement and do not connect the telephone cable to
or disconnect it from the telephone outlet on the wall.
Liquid crystal display (LCD) notice
CAUTION:
The liquid crystal display (LCD) is made of glass, and rough handling or dropping the computer can
cause the LCD to break. If the LCD breaks and the internal fluid gets into your eyes or on your hands,
immediately wash the affected areas with water for at least 15 minutes; if any symptoms are present
after washing, get medical care.
Note: For products with mercury-containing fluorescent lamps (for example, non-LED), the fluorescent lamp
in the liquid crystal display (LCD) contains mercury; dispose of according to local, state, or federal laws.
Using headphones or earphones
CAUTION:
Excessive sound pressure from earphones and headphones can cause hearing loss. Adjustment of
the equalizer to maximum increases the earphone and headphone output voltage and the sound
pressure level. Therefore, to protect your hearing, adjust the equalizer to an appropriate level.
Excessive use of headphones or earphones for a long period of time at high volume can be dangerous if the
output of the headphone or earphone connectors do not comply with specifications of EN 50332-2. The
headphone output connector of your computer complies with EN 50332-2 Sub clause 7. This specification
limits the computer’s maximum wide band true RMS output voltage to 150 mV. To help protect against
hearing loss, ensure that the headphones or earphones you use also comply with EN 50332-2 (Clause 7 limits)
for a wide band characteristic voltage of 75 mV. Using headphones that do not comply with EN
50332-2 can be dangerous due to excessive sound pressure levels.
If your Lenovo computer came with headphones or earphones in the package, as a set, the combination of the
headphones or earphones and the computer already complies with the specifications of EN 50332-1. If
different headphones or earphones are used, ensure that they comply with EN 50332-1 (Clause 6.5
Limitation Values). Using headphones that do not comply with EN 50332-1 can be dangerous due to
excessive sound pressure levels.
Additional safety information
Plastic bag notice
DANGER
Plastic bags can be dangerous. Keep plastic bags away from babies and children to avoid danger of
suffocation.
© Copyright Lenovo 2015 11

Glass parts notice
CAUTION:
Some parts of your product may be made of glass. This glass could break if the product is dropped on a
hard surface or receives a substantial impact. If glass breaks, do not touch or attempt to remove it.
Stop using your product until the glass is replaced by trained service personnel.
Choking hazard notice
CHOKING HAZARD - Product contains small parts.
Keep away from children under three years.
Polyvinyl Chloride (PVC) cable and cord notice
Many personal computer products and accessories contain cords, cables or wires, such as power cords or
cords to connect the accessory to a personal computer. If this product has such a cord, cable or wire, then the
following warning applies:
WARNING: Handling the cord on this product or cords associated with accessories sold with this product will
expose you to lead, a chemical known to the State of California to cause cancer, and birth defects or other
reproductive harm. Wash hands after handling.
12 User Guide
Chapter 1. Product overview
Checking that all included items are present
Open the shipping box and check that all included items are there. Immediately contact the place of
purchase if any items happen to be missing or damaged.
Your shipping box includes:
• Instructions for Safe Use
• Power cord
• ac power adapter
• This computer
For the warranty information of your computer, go to:
http://www.lenovo.com/warranty-status
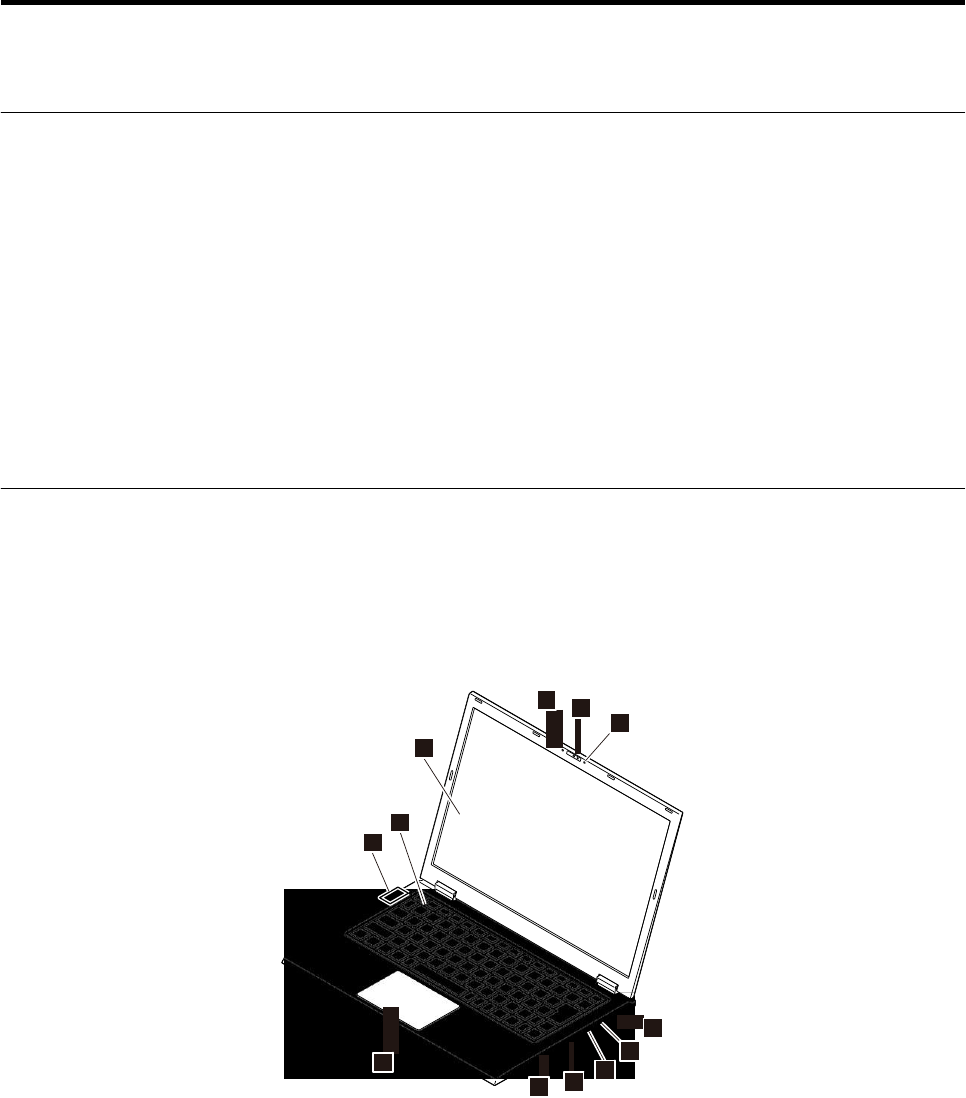
Locating computer controls, connectors, and indicators
Locations
Note: Depending on the model, your computer might look slightly different from the illustration in this topic.
Front and right-side view:
14
1
4
2
5
16
© Copyright Lenovo 2015
13
14
10
11
15
12
1
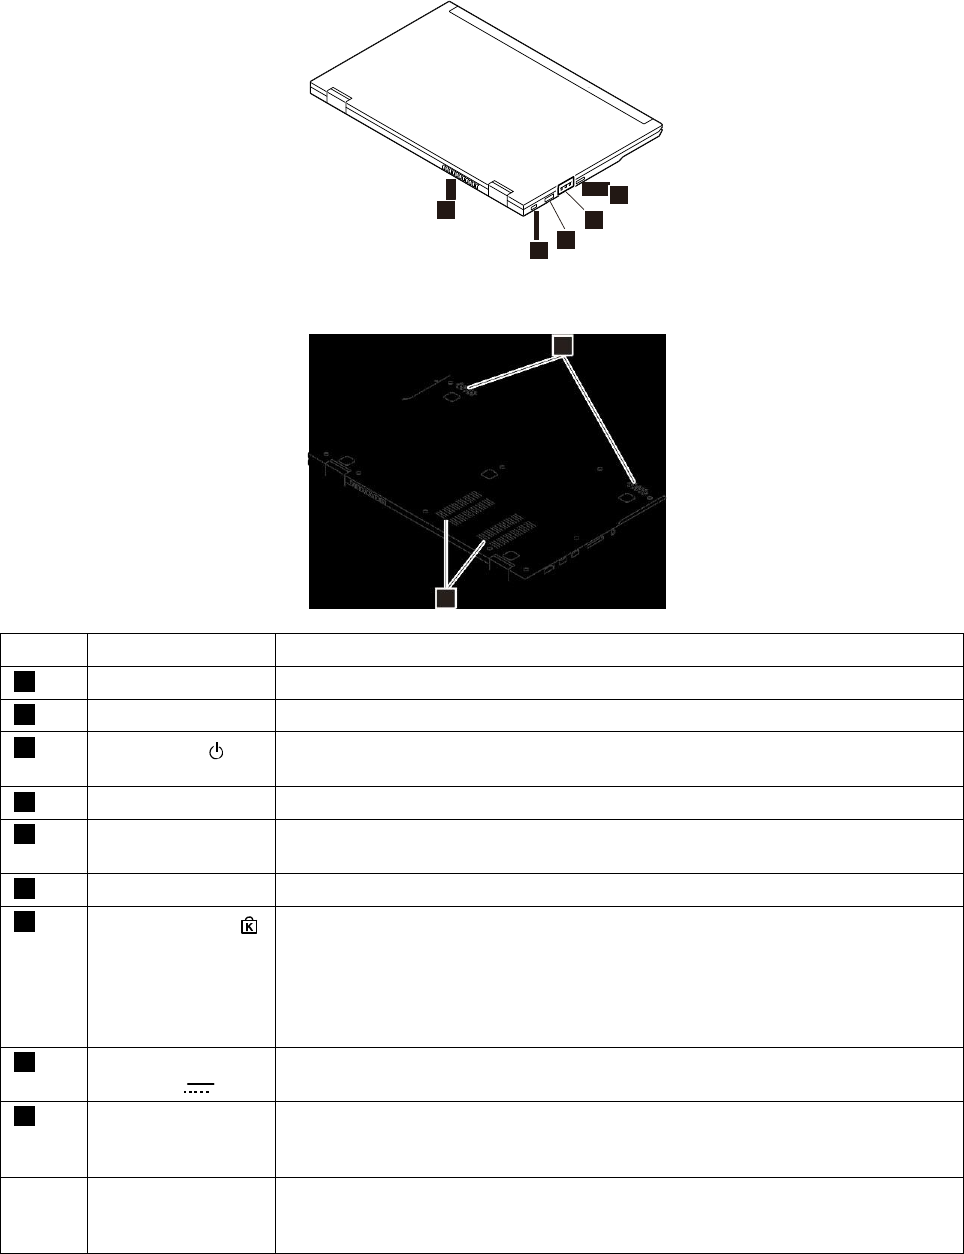
Back and left-side view:
3
9
Bottom view:
9
2
7
8
6
Number
Name
Explanation
1
LCD
Liquid crystal display (LCD) of the computer
2
Status LEDs
Indicators showing various states of the computer
3
Power button
Press the power button to turn on the computer, turn off the computer, or change
the power state.
4
Keyboard
Use the keyboard to input characters or control programs.
5
Touchpad
Use the touchpad to move the pointer, click an object, or perform scrolling, without
the need of a traditional mouse.
6
Speakers
Built-in stereo speakers
7
Security-lock slot
To protect your computer from theft, you can purchase a security cable lock that fits
the security-lock slot to lock the computer to a stationary object.
Note: You are responsible for evaluating, selecting, and implementing the locking
device and security feature. Lenovo makes no comments, judgments, or warranties
about the function, quality, or performance of the locking device and security
feature.
8
dc power-input
connector
Connect the ac power adapter to this connector.
9
Air vent
These holes enable air to circulate in the computer and to ensure proper cooling,
especially the cooling of the microprocessor. Avoid covering them with materials
such as hands or clothes.
10
HDMI connector
This connector is used to connect to High-Definition Multimedia Interface (HDMI™)
connectors compatible televisions or external displays that are equipped with an
HDMI port.
2
User Guide
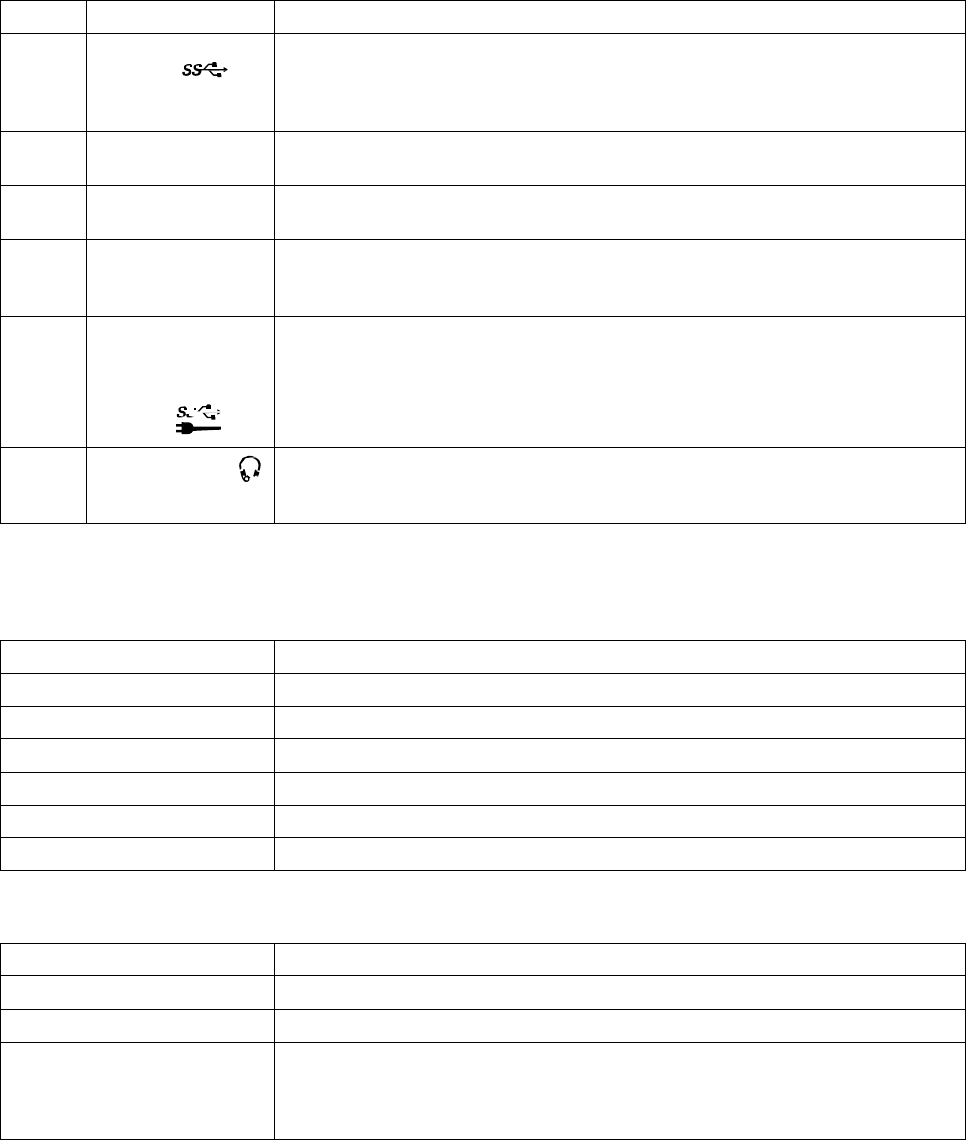
Number
Name
Explanation
11
USB 3.0
connector
The Universal Serial Bus (USB) 3.0 connector is used for connecting
USB-compatible devices, such as a USB printer or a digital camera.
Attention: When you attach a USB cable to the USB 3.0 connector, ensure that the
USB mark is facing upward. Otherwise the connector might get damaged.
12
SD (SDHC/SDXC)
memory card slot
The slot supports SD memory cards, SDHC memory cards, and SDXC memory
cards
13
Camera
Used the camera to take pictures or hold a video conference. While the camera is in
use, the indicator light on the side of the camera is on.
14
Microphones
The microphones capture sound and voice when used with a program capable of
handling audio. While you are using this microphone for recording, it is not possible
to play back what you are recording through speakers at the same time.
15
USB connector
(supports USB
3.0, Power off
USB Power Charge
function)
Used to connect devices that are compatible with USB 3.0. This connector also
enables you to charge some mobile digital devices or smartphones when your
computer is in sleep or hibernation mode.
16
Audio connector
Used to connect headphones or a headset that has a 4-pole (CTIA) mini-plug to
the audio connector to listen to the sound form the computer. The audio connector
does not support a conventional microphone.
Status LEDs
Power LED
LED state
Computer state
Solid blue
The computer is powered on.
Blinking blue
The computer is in entering sleep mode.
Solid orange
The battery power is low.
Slow-blinking orange
Low battery in sleep mode
Fast-blinking orange
Extremely low battery
Off
The computer is powered off or in hibernation mode.
Battery recharge LED
LED state
Computer state
Solid orange
The battery is recharging.
Blinking orange
There are battery recharging errors or deterioration errors.
Off
The computer is disconnected from the ac power adapter, or the battery is fully
charged.
Note: In some cases, when the battery is fully charged, or nearly fully charged, the
battery recharge LED will turn off and the battery will no longer be charged.
Caps lock LED
Chapter 1. Product overview
3

LED state
Computer state
Green
This indicates that the Caps Lock is on. In this case, all letters are entered as
capital letters.
Off
This indicates that the Caps Lock is off. In this case, all letters are entered as
lowercase letters.
Specifications
Model name
LaVie Z HZ750 : 20FF0011US / 20FF0012US, LaVie Z HZ550 : 20FG0013US
Microprocessor
Intel®
CoreTM i5 or i7 processor, depending on the models*1
Memory
Onboard, 4 GB or 8 GB low-power double data rate 3 low voltage synchronous dynamic
random access memory (LPDDR3), depending on the models*2
Power
Lithium polymer battery (DC 14.8 V, Typ. 2000 mAh) (The battery pack is a consumable.)
Input rating of the ac power adapter: 100 to 240 V ac, 50 to 60 Hz
Note: The included power cord is adapted to suit your region's specifications. For use
outside your region, another power cord will be required.
Storage
SATA solid-state drive: 128 GB or 256 GB, depending on the models
Power consumption
(maximum
configuration)
Approx. 45 W
External Dimensions
(excluding protrusions)
Depending on the models:
• Convertible model: 319 mm (12.6 inches) (wide) x 217 mm (8.5 inches) (depth) x 16.9
mm (0.7 inch) (height)
• Clamshell model: 319 mm (12.6 inches) (wide) x 212 mm (8.3 inches) (depth) x 16.9
mm (0.7 inch) (height)
Weight (including
battery)
Depending on the models:
• Convertible model: 926 g (2.0 lb)
• Clamshell model: 850 g (1.9 lb)
• *1: Supports hyperthreading technology. Enhanced Intel SpeedStep®
technology driver is built in.
• *2: For a 32-bit operating system, not all memory area can be used even with 4 GB or more memory
installed. The operating system can use only approximately 3 GB of memory. The available memory
capacity depends on the device configuration.
Initial Setup
Important points when connecting
• Do not touch connector terminals when connecting any items. Failure to do so might cause damage.
• Connect the LAN cable to your computer after completing Windows setup and firewall configuration.
This ensures that your computer is safely connected to a network.
Connecting to ac power
The power to run your computer can come either from the battery or from ac power. While you use ac
power, the battery charges automatically.
Your computer comes with an ac power adapter and a power cord.
4 User Guide

• ac power adapter: Converts ac power for notebook computer use.
• Power cord: Connects the ac outlet and the ac power adapter.
To connect the computer to ac power, do the following:
Attention: Using an improper power cord might cause severe damage to your computer.
Note: Ensure that you perform the actions in the order in which they are listed.
1. Connect the power cord to the ac power adapter.
2. Connect the ac power adapter to the power connector of the computer.
3. Connect the power cord into an electrical outlet.
Tips for using the ac power adapter
• When the ac power adapter is not in use, disconnect it from the electrical outlet.
• Do not bind the power cord tightly around the ac power adapter transformer pack when it is connected to
the transformer.
• Before you charge the batteries, make sure that their temperature is at least 10°C (50°F).
• You can charge the batteries when the ac power adapter is connected to the computer. You need to
charge the batteries in any of the following situations:
- When the battery icon in the Windows notification area shows a low percentage of battery power
remaining
- When the batteries have not been used for a long time
Windows Setup
When you turn on your computer for the first time, you need to perform Windows setup. To set up the
Windows operating system, make sure that your computer is connected to ac power. Then, follow the
on-screen instructions. Contact your system administrator for the appropriate settings when necessary.
Using the fast startup function
The fast startup function enables your computer to quickly start up from the power-off state. The fast startup
function is enabled by factory default.
Before installing or removing a peripheral device, disable the fast startup function and shut down the
computer. Otherwise, the device might not be detected by the system.
To enable or disable the fast startup function on your computer, do the following:
1. Click Desktop on the start screen.
2. Display the charm bar on the desktop, and then click Settings.
3. Click Control Panel.
4. Click System and Security, and then select Change what the power buttons do from the Power
Options.
5. Select Change settings that are currently unavailable.
6. In the Shutdown settings area, select the Turn on fast startup (recommended) check box to enable
fast startup or clear the check box to disable it.
7. Click Save changes.
Chapter 1. Product overview
5
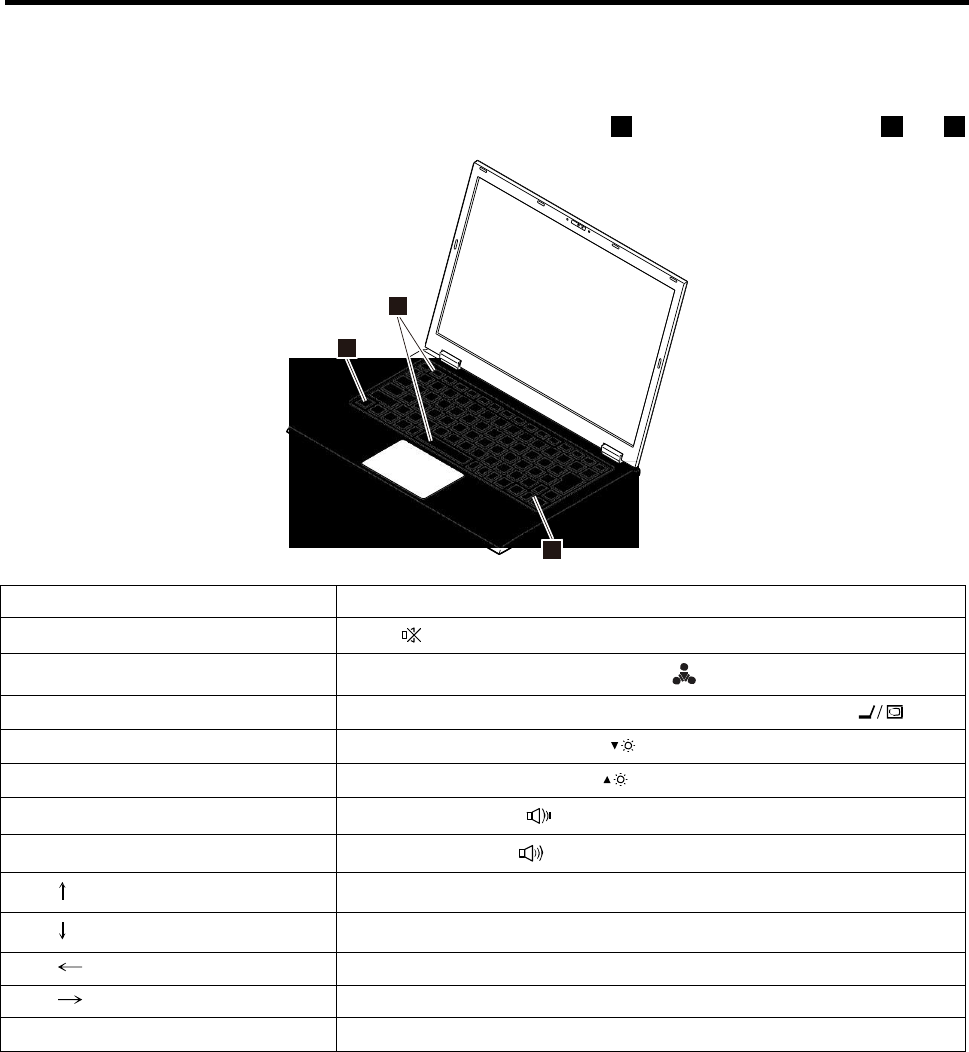
Chapter 2. Keyboard
The keyboard has several function keys, which consist of the Fn key 1 and the other function keys 2 and 3 .
2
1
3
Key combinations
Function
Fn+F1
Mute ( ) or unmute
Fn+F2
Turn on or turn off the wireless function
Fn+F3 *1
Switch between the computer display and the external display ( )
Fn+F7
Decrease the screen brightness
Fn+F8
Increase the screen brightness
Fn+F9
Decrease the volume
Fn+F10
Increase the volume
Fn +
Page up
Fn +
Page down
Fn +
Home
Fn +
End
Fn + Space bar *2
Turn on or turn off the touchpad
*1: This function is disabled if the driver is not installed.
*2: This function is disabled if the touchpad driver is changed to the Standard PS/2 port mouse.
© Copyright Lenovo 2015
7

Chapter 3. The touchpad
This chapter covers the touchpad usage and extended feature settings, as well as the driver update process.
Using the touchpad
When settings are at the factory default values, the following operations can be performed with the touchpad.
Operation name
Touchpad operation
Move the mouse
pointer
Touch the touchpad and move your finger in the direction as desired to move the mouse pointer.
Click
Press and immediately release any part of the touchpad except the lower right part or tap a
fingertip against the touchpad.
Right-click
Press and immediately release the lower right part of the touchpad.
Double-click
Move the pointer to an icon or folder and quickly click twice or quickly tapping the touchpad twice.
Drag
• Move the pointer to an icon or a folder, press the touchpad, and move your finger on the
touchpad while continuing to press the touchpad.
• Tap the touchpad with the pointer aligned on the target, and then touch the touchpad again
and move your finger.
Scroll
Click the application window displaying the scroll bar and touch two points on the touchpad.
The two points should be slightly separated from each other. Move your two fingers in the
direction you want to move the scroll bar.
Zoom
Click the application window that you want to zoom in to or zoom out from, and touch two points
on the touchpad. While keeping your fingers in the same place, you can zoom in or zoom out
by widening or narrowing the distance between your fingers.
Rotate
Click the application window that you want to rotate, and touch two points on the touchpad.
While keeping your fingers in the same place, rotate and twist the two fingers.
Notes:
• Scroll, zoom, and rotation are not supported by some applications.
• Tapping the touchpad to produce a click or double-click is called tapping or double tapping.
Configuring the touchpad
Configuration of the touchpad buttons, pointer behavior, and extended features is done using the Mouse
Properties window.
1. Click Control Panel.
2. Click Hardware and Sound, and click Mouse in Devices and Printers. The Mouse Properties window
should come up. Click on each tab in the Mouse Properties window to change the touchpad settings.
8 User Guide

Chapter 4. External display
Switching display outputs
Display outputs can be switched using the keyboard.
Note: The external display refers to the external display connected to the HDMI port on your computer.
To switch display outputs, do the following:
1. Press Fn+F3. The available outputs are displayed.
Screen output
Explanation
Computer screen only
Your computer display
Duplicate
Displays the same output on both your computer
screen and an external display
Extend
Extends the output from your computer display to an
external display
Second screen only
An external display
2. Select an output using the or key, and then press Enter. The display output will be switched
as desired.
Intel® WiDi
The Intel WiDi (Intel Wireless Display) function uses the wireless LAN function to display the screen of this
computer on an external display or TV set that has the Intel WiDi adapter.
Notes:
• The external display or TV set needs to have the optional Intel WiDi adapter.
• The external display or TV set needs to have an HDMI input terminal or composite video and audio input
terminals. In addition, they should have a terminal to connect the Intel WiDi adapter. Regarding whether
or not the Intel WiDi adapter can be connected, consult the manufacturer of the devices before you
purchase the adapter.
Precautions
• Intel WiDi uses the wireless LAN function. The high-speed and stable wireless LAN communication
environment is required because high-resolution screen images are transferred.
• Image and sound of an external display or TV set may be interfered with by the increased communication
speed or increased load of communication processing.
• When video images are played, instances of jerky motions or dropping frames may increase.
• The image and sound played on the external display or TV set are delayed by approximately 0.3 seconds
compared to those played on the computer. Therefore, it may be difficult to operate the mouse and
keyboard or to enter characters.
• Intel WiDi confirms to the High-bandwidth Digital Content Protection (HDCP) standard.
• The playback may fail depending on the copyright protection system adopted in the contents.
• If the Duplicate these displays option is selected when using Intel WiDi, the selectable screen resolutions
may be limited.
© Copyright Lenovo 2015
9
• If the computer is connected to an external display or TV set using Intel WiDi and if the sound settings
are changed, the connection with the computer may be terminated.
• If the Intel WiDi connection is used, and if the computer is manually switched to the Sleep, Hybrid Sleep,
or Hibernate, or if you wish to switch the Windows user account, terminate the WiDi application once and
release the WiDi connection.
• If the computer is connected to an external display or TV set using Intel WiDi and if the screen output is
changed to the LCD display of this computer only, the WiDi connection is terminated.
Connecting to an external display or a TV set
To connect the computer to an external display or a TV set using Intel WiDi, do the following:
1. Attach the Intel WiDi adapter to the external display or TV set. For more information about the WiDi
adapter, refer to the Intel WiDi adapter manual.
2. Prepare the display so that the Intel WiDi standby screen appears.
3. Display the Charm bar, and click Devices.
4. Click Project ➙ Add a wireless display.
5. When the connected device is detected, select the desired wireless display and follow the instructions
on the screen.
Note: If the WPS PIN input window is displayed, enter the 8-digit security code that is shown on the TV
set or external display, and click Next. Enter the 8-digit security code after enabling the use of
single-byte alphanumeric characters by selecting it from Single/Dual/Kanji.
Disconnecting from an external display or a TV set
To disconnect the computer from the external display or TV set, do the following:
1. Display the Charm bar, and click Devices.
2. Click Project ➙ Disconnect.
10 User Guide

Chapter 5. Connecting to the network
Your computer has one or more network cards that enable you to connect your computer to the Internet or
other network connections.
Before connecting to a network
This topic provides information about how to perform network setup in order to connect to a network.
Setting up a network connection
You can change the network connection settings by doing the following:
1. Open Control Panel.
2. Click Network and Internet ➙ View network status and tasks ➙ Change adapter settings.
3. Follow the on-screen instructions.
For more information, refer to the Windows help information system.
Setting the computer name and network to connect to
You can change settings related to the connected network such as your computer name. To change the
computer name, do the following:
1. Open Control Panel.
2. Click System and Security ➙ System.
3. Select Change settings under Computer name, domain, and workgroup settings.
4. Follow the on-screen instructions.
For more information, refer to the Windows help information system.
Ethernet connections
You can connect your computer to a local network or a broadband connection by using the built-in Ethernet
feature of the computer.
To attach an Ethernet cable to your computer, you need a ThinkPad® USB 3.0 Ethernet Adapter.
The Ethernet adapter is available as an option. You can purchase one from Lenovo at:
http://shop.lenovo.com/us/en/accessories/
DANGER
To avoid the risk of electrical shock, do not connect the telephone cable to the Ethernet connector
on the Ethernet adapter.
Using the wireless-LAN connection
Wireless connection is the transfer of data without the use of cables but by means of radio waves only.
© Copyright Lenovo 2015 11

Attention:
• If you want to use the wireless features on an airplane, check the wireless services with the airline before
boarding the airplane.
• If there are restrictions on the use of computer wireless features on an airplane, disable the wireless
features of your computer before boarding.
A wireless local area network (LAN) covers a relatively small geographic area, such as an office building or a
house. Devices based on the 802.11 standards can connect to this type of network.
Your computer comes with a built-in wireless network card and a configuration utility to help you establish
wireless connections and monitor the connection status. This enables you to stay connected to your network
while you are at the office, in a meeting room, or at home, with no need for a wired connection.
To establish a wireless-LAN connection, do the following:
1. Ensure that the wireless feature is enabled and airplane mode is set to off.
2. Click the wireless-network-connection-status icon in the Windows notification area. A list of
available wireless networks is displayed.
3. Double-click a network to connect to it. Provide required information if needed.
The computer automatically connects to an available wireless network when the location changes. Open
Network and Sharing Center to manage multiple network profiles. For more information, refer to the
Windows help information system.
Tips for using the wireless-LAN feature
To achieve the best connection, use the following guidelines:
• Place your computer so that there are as few obstacles as possible between the wireless-LAN access
point and the computer.
• Open your computer lid to an angle of slightly more than 90 degrees.
• If you use the wireless feature (the 802.11 standards) of your computer simultaneously with a Bluetooth
option, the data transmission speed can be delayed and the performance of the wireless feature can be
degraded.
Configuring the wireless-LAN modules
When the settings of your computer are set at factory default values, you can use the wireless LAN only with the
frequency band of 2.4 GHz. If you want to use the wireless LAN with the frequency band of 5 GHz, do the
following to configure the network adapters:
1. Open Control Panel. Set the view of Control Panel as Large icons.
2. Click Device Manager.
3. Double-click Network adapters, and then double-click Intel(R) Dual Band Wireless-AC 7265.
4. In the window opened, click the Advanced tab and then select Wireless Mode in the Property area.
5. In the Value drop-down list box, select 6. 802.11a/b/g.
6. Click OK, and then restart your computer if necessary.
12 User Guide
Chapter 6. System Configuration
The BIOS Setup Utility
Notes:
• Do not turn off your computer with the power switch while in the BIOS Setup Utility. When turning the
power off, be sure to either exit the BIOS Setup Utility and shut down your computer from the Windows
menu, or turn the power off after selecting Save Changes and Power Off from the Exit menu when you
wish to save the new settings.
• During the following states, if you turn on the power switch and start the BIOS Setup Utility, do not
change settings under the Advanced menu.
- Hibernation
- Shutdown when the fast startup function is enabled (for more information about the fast startup
function, see “Using the fast startup function” on page 5 )
To change the settings under Advanced menu, select Settings ➙ Power ➙ Restart from the charms
bar. When the computer is restarting, start the BIOS Setup Utility again. Now you can change the
settings under Advanced menu.
Entering the BIOS Setup Utility
Restart the computer. When the Lenovo logo is displayed, press F2 to start the BIOS Setup Utility.
BIOS Setup Utility basic operation
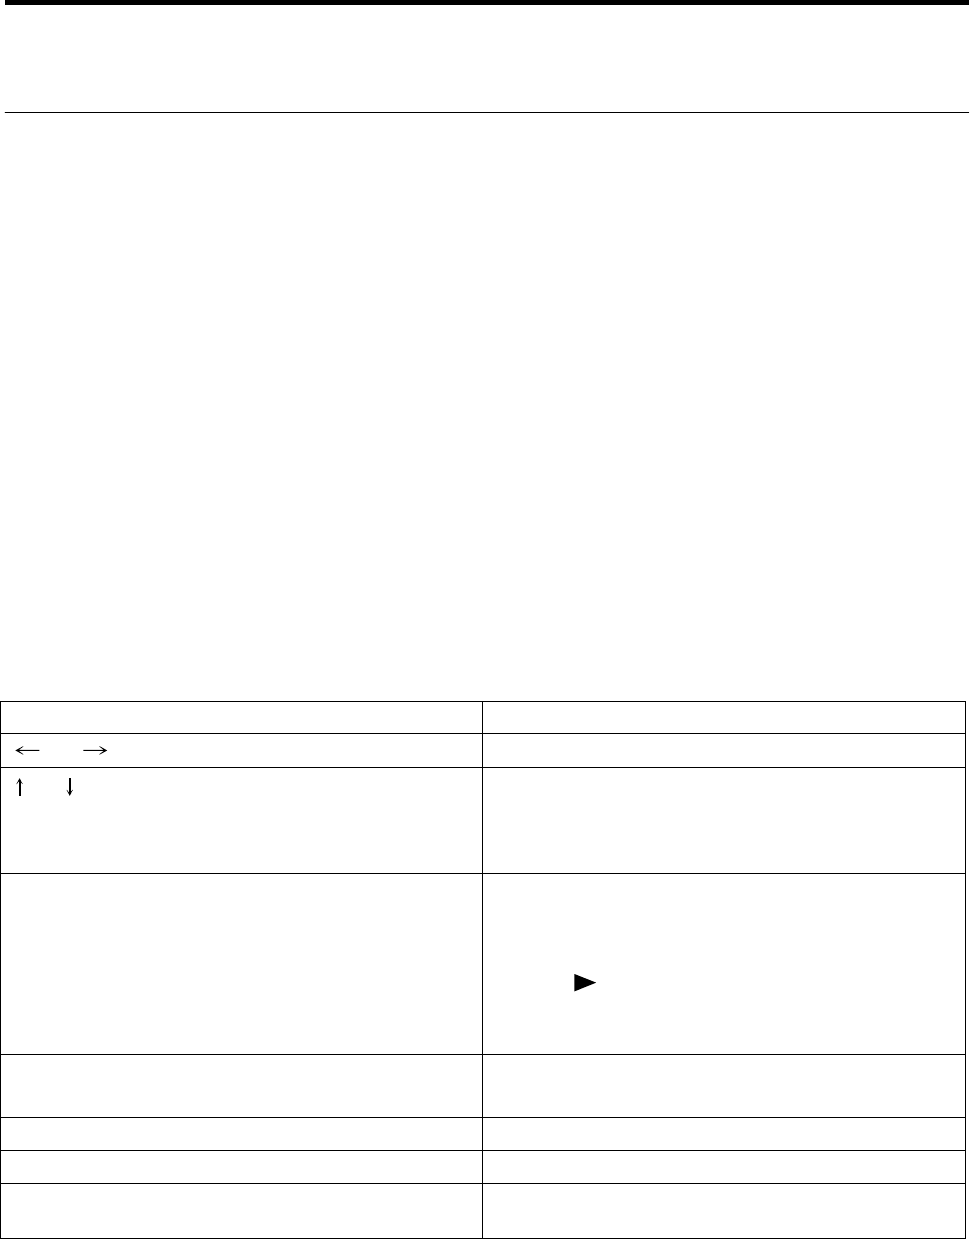
Use the keyboard to configure the BIOS settings. The following is a list of the main keys used.
Key
Function/Operation
and
Select menu bars such as Main or Advanced.
and
• Select items to be configured.
• In cases where possible configuration values are listed
on the screen, use these keys to select the desired
value.
Enter
• Brings up a list of possible configuration values for the
current item or displays the selected menu. It is also
used to select a setting value and close the menu.
• Displays the submenu for items that are highlighted
with a symbol.
• Moves digits when entering the System Time and
System Date parameters.
Esc
• Exits the BIOS Setup Utility without saving the settings
• Returns to the previous screen
F9
Returns all settings to the factory default settings.
F10
Saves any changes and restarts the computer.
Tab
Moves digits when entering the System Time and
System Date parameters.
Restoring the factory default setting
Do the following to restore your computer to the factory default settings:
© Copyright Lenovo 2015 13
1. Enter the BIOS Setup Utility.
2. Press the F9 key. A confirmation window is displayed.
3. Select Yes and press Enter. The factory default settings are loaded.
4. Press the F10 key. A confirmation window is displayed.
5. Select Yes and press Enter. The default settings are saved and the system will restart or power off.
14 User Guide

Chapter 7. Security
Security chip function
Notes:
• The security chip does not guarantee complete protection of data or hardware. Always exercise
appropriate caution when managing and handling important data.
• In addition to the security chip function, we recommend configuring supervisor and user passwords in
the BIOS Setup Utility.
• When performing computer recovery, reinstalling the operating system, resetting, or using a separately
sold operating system, initialize the security chip before enabling it.
Before sending your computer for repair
When you send your computer for repair, be sure to cancel supervisor and user password settings in the
BIOS Setup Utility and initialize the security chip to prevent information from being divulged.
Refer to the following procedures for security chip initialization.
If the Windows BitLocker drive encryption is used, first disable it and then initialize the security chip.
1. Turn on the power and immediately press the F2 key several times. The BIOS Setup Utility will then be
displayed.
2. In the Security menu, select Security Chip Configuration and press Enter.
3. Confirm that Current TPM State is set to Enabled&Activated. If Current TPM State is not set to
Enabled&Activated, enable the security chip, see “Enable the security chip” on page 17.
4. Set Change TPM State to Clear.
5. Press the F10 key. A confirmation message is displayed.
6. Select Yes and then press Enter. The settings are saved and the BIOS Setup Utility exits.
7. If a confirmation screen is displayed after the computer restarts, press Shift + F10. The settings are
saved and the computer restarts.
The security chip is now initialized.
Enable the security chip
After initializing the security chip, do the following to enable it for use again.
1. Turn on the computer. When the Lenovo logo is displayed, press F2 to start the BIOS Setup Utility.
2. In the Security menu, select Security Chip Configuration and press Enter.
3. Confirm that TPM Support is set to Enabled. If it is set to Disabled, change it to Enabled.
4. Set Change TPM State to Enable&Activate.
5. Press the F10 key. A confirmation message is displayed.
6. Select Yes and then press Enter. The settings are saved and the BIOS Setup Utility exits.
7. After the Windows system has started, restart the computer.
The features of the security chip are now enabled.
© Copyright Lenovo 2015 15

Note: You can reset security chip feature settings by setting Change TPM State to Clear. Therefore, we
recommend that you set up a supervisor password/user password before you use security chip features so that
a higher level of security can prevent a third party from resetting security chip feature settings.
Notice on deleting data from your solid-state drive
Some of the data stored on the solid-state drive might be sensitive. Handing your computer over to
someone else without deleting the loaded software, such as operating systems and application software,
might even violate license agreements. Be sure to delete data stored on the solid-state drive before you
dispose of, sell, or hand over your computer.
You can use the following methods to delete data from the solid-state drive:
• Move the data to the Recycle Bin, and then empty the Recycle Bin.
• Delete the data.
• Format your solid-state drive, using the software for initializing it.
• Use the recovery program provided by Lenovo to bring the solid-state drive back to the factory default
settings.
These operations, however, only change the file location of the data; they do not delete the data itself. In other
words, the data retrieval processing is disabled under an operating system such as Windows. The data is still
there, even though it seems to be lost. Thus, it is sometimes possible to read the data by use of special
software for data recovery. There is a risk that people of bad faith might read and misuse the critical data on
solid-state drives for unexpected purposes.
To prevent leakage of data, it is important that you delete all the data from the solid-state drive when you
dispose of, sell, or hand over your computer. You can destroy the data physically by smashing the solid-
state drive with a hammer, or magnetically by means of strong magnetic power, thus making the data
unreadable. But it is recommended that you use the software (payware) or service (pay service) developed for
that purpose. The process might take several hours.
For disposing of data on the solid-state drive, Lenovo provides Drive Erase Utility for Resetting the
Cryptographic Key and Erasing the Solid State Drive tool. Go to http://www.lenovo.com/support to
download these tools.
If an Encryption solid-state drive is supported and installed in your computer, you can logically dispose of
all the data on the drive in a short time by erasing the cryptographic key. The data encrypted with the old
key is not physically erased but remains on the drive; however, it cannot be decrypted without the old key.
This feature is also available with Drive Erase Utility for Resetting the Cryptographic Key and Erasing the
Solid State Drive tool.
16 User Guide

Chapter 8. Recovery overview for the Windows 8.1 operating
system
This section provides information about the recovery solutions for the Windows 8.1 operating system.
A Windows recovery image is preinstalled in the recovery partition on your computer. The Windows recovery
image enables you to refresh your computer, or reset your computer to the factory default settings.
You can create a recovery USB drive as backups or replacement for the Windows recovery image. With the
recovery USB drive, you can troubleshoot and fix the problems on your computer even if you cannot start the
Windows 8.1 operating system. It is recommended that you create the recovery USB drive as early as possible.
For more information, see “Creating the recovery USB drive” on page 21.
Before recovery
Read this section before performing recovery.
Required device
If the operating system is to be recovered from a recovery USB drive, a USB key of 16 GB or larger is required.
Backing up data from the solid-state drive
If there is data that you would like to maintain, make a backup of the data and then perform recovery. For
multi-user computers, each user should log on and make personal backups.
Maintaining system settings
Once recovery is performed, all the settings including system configuration will be reset to the factory default
settings. If you would like to use the current settings again after recovery, such as BIOS Setup Utility settings
and network settings, make a note of the current settings.
Restoring the BIOS Setup Utility settings
Before recovery, be sure to load the factory default settings for the BIOS Setup Utility.
Note: Be sure to initialize the security chip using the BIOS Setup Utility before the computer recovery. For the
security chip initialization, refer to “Before sending your computer for repair” on page 17.
Precautions during recovery
Take the following precautions during recovery:
• Be sure to follow the steps in this manual and on the recovery screen.
• Be sure to connect your computer to the ac power.
• Ensure that the computer power is turned on.
• Ensure that the wireless LAN function is turned on.
• Ensure that the peripheral devices are disconnected.
• Do not interrupt recovery.
• Do not leave the computer alone during recovery.
• If the message “Recovery could not be completed” is displayed, it is possible that model information is
written incorrectly. Contact your local service provider.
© Copyright Lenovo 2015 17

Refreshing your computer
If your computer does not perform well and the problem might be caused by a recently installed program,
you can refresh your computer without losing your personal files or changing your settings.
Attention: If you refresh your computer, only the programs that came with your computer and the programs
that you installed from Windows Store will be reinstalled.
To refresh your computer, do the following:
1. Move your pointer to the top-right or bottom-right corner of the screen to display the charms. Click
Settings ➙ Change PC settings ➙ Update and recovery ➙ Recovery.
2. In the Refresh your PC without affecting your files section, click Get started.
3. Follow the instructions on the screen to refresh your computer.
Resetting your computer to the factory default settings
If you want to recycle your computer or just start over, you can reset your computer to the factory default
settings. Resetting the computer will reinstall the operating system, reinstall all the programs that came with
your computer, and reset all the settings to the factory default settings.
Attention: If you reset the computer to the factory default settings, all your personal files and settings will be
deleted. To avoid data loss, make a backup copy of all the data that you want to keep.
To reset your computer to the factory default settings, do the following:
1. Move your pointer to the top-right or bottom-right corner of the screen to display the charms. Click
Settings ➙ Change PC settings ➙ Update and recovery ➙ Recovery.
2. In the Remove everything and reinstall Windows section, click Get started. Then click Next to
confirm the operation.
3. Depending on your needs, do one of the following:
• To perform a quick format, click Just remove my files to start the process. The process will take
several minutes.
• To perform a complete format, click Fully clean the drive to start the process. The process will
take several hours.
4. Follow the instructions on the screen to reset your computer to the factory default settings.
Using the advanced startup options
With the advanced startup options, you can change the firmware settings of the computer, change the
startup settings of the Windows operating system, start the computer from an external device, or restore the
Windows operating system from a system image.
To use the advanced startup options, do the following:
1. Move your pointer to the top-right or bottom-right corner of the screen to display the charms. Click
Settings ➙ Change PC settings ➙ Update and recovery ➙ Recovery.
2. In the Advanced startup section, click Restart now ➙ Troubleshoot ➙ Advanced options.
3. Select a desired startup option, and then follow the instructions on the screen.
18 User Guide

Recovering your operating system if Windows 8.1 fails to start
The Windows recovery environment on your computer is capable of operating independently from the
Windows 8.1 operating system. This enables you to recover or repair the operating system even if the
Windows 8.1 operating system fails to start.
After two consecutive failed boot attempts, the Windows recovery environment starts automatically. Then
you can choose repair and recovery options by following the instructions on the screen.
Note: Ensure that your computer is connected to ac power during the recovery process.
Creating and using a recovery USB drive
You can create a recovery USB drive as backups for the Windows recovery environment and the Windows
recovery image. If you cannot start the computer, you can use the recovery USB drive to troubleshoot and fix
the problems on your computer.
It is recommended that you create the recovery USB drive as early as possible. Once you create the recovery
USB drive, keep it in a safe place and do not use it to store other data.
Creating the recovery USB drive
To create the recovery USB drive, you need a USB drive with at least 16 GB of storage. The required USB
capacity depends on the size of the recovery image.
Attention: Creating the recovery USB drive will delete anything stored on the USB drive. To avoid data loss,
make a backup copy of all the data that you want to keep.
To create the recovery USB drive, do the following:
Note: Ensure that your computer is connected to ac power.
1. Move your pointer to the top-right or bottom-right corner of the screen to display the charms, and
click Search.
2. Type recovery in the Search field and click the Search button. Then click Create a recovery drive.
3. Click Yes in the User Account Control window to enable the recovery USB drive Creator program to start.
4. Ensure that you select the Copy the recovery partition from the PC to the recovery drive. option.
Then click Next.
Important: If you clear the Copy the recovery partition from the PC to the recovery drive. option,
you will create the recovery USB drive without the recovery partition content. You still can start the
computer from the recovery USB drive, but you might be unable to recover your computer if the
recovery partition on your computer is damaged.
5. Connect a proper USB drive, and then click Next.
6. Click Create in the Recovery Drive window. The creation of the recovery USB drive starts.
7. When the creation of the recovery USB drive finishes, do one of the following:
• To keep the recovery partition on your computer, click Finish.
• To delete the recovery partition on your computer, click Delete the recovery partition.
Attention: If you delete the recovery partition on your computer, do keep the recovery USB drive in a
safe place. The Windows recovery image will not be stored in your computer anymore, and you will need
the recovery USB drive to refresh or reset your computer.
8. Remove the USB drive. The recovery USB drive is created successfully.
Chapter 8. Recovery overview for the Windows 8.1 operating system 21

Using the recovery USB drive
If you cannot start your computer, or if you cannot start the Windows recovery image on your computer, use the
recovery USB drive to recover your computer.
To use the recovery USB drive, do the following:
Note: Ensure that your computer is connected to ac power during the following process.
1. Turn on the computer and start the BIOS Setup Utility.
2. On the Boot submenu, set the recovery drive as the first startup device.
3. Follow the on-screen instructions to recovery your computer.
For more information about the recovery solutions provided by the Windows 8.1 operating systems, go to:
http://go.microsoft.com/fwlink/?LinkID=263800
Lenovo Factory Recovery USB Key
Lenovo Factory Recovery USB Key enables you to reset your computer to the factory default settings.
To obtain a Lenovo Factory Recovery USB Key, contact Lenovo Customer Support Center. Shipping and
handling fees apply. For more information, see “Get Support” in the Instructions for Safe Use that came with
your computer.
To use the Lenovo Factory Recovery USB Key, do the following:
Note: Ensure that your computer is connected to ac power during the following process.
1. Turn off the computer, wait for about five seconds, and then connect the Lenovo Factory Recovery
USB Key to your computer.
2. Turn on the computer and immediately press F2 several times. The BIOS setup utility will then be started.
3. On the Boot submenu, set USB Hard Disk:UEFI:TransMemory PMAP as the first startup device.
4. Follow the on-screen instructions to reset your computer to the factory default settings.
22 User Guide

Appendix A. Regulatory Information
Wireless related information
Wireless interoperability
The M.2 wireless LAN card is designed to be interoperable with any wireless LAN product that is based
on Direct Sequence Spread Spectrum (DSSS), Complementary Code Keying (CCK), and/or Orthogonal
Frequency Division Multiplexing (OFDM) radio technology, and is compliant to the 802.11b/g Standard,
802.11a/b/g, 802.11n or 802.11ac on Wireless LANs, as defined and approved by the Institute of Electrical
and Electronics Engineers.
Usage environment and your health
Integrated wireless cards emit radio frequency electromagnetic energy like other radio devices. However, the
level of energy emitted is far much less than the electromagnetic energy emitted by wireless devices like for
example mobile phones.
Due to the fact that integrated wireless cards operate within the guidelines found in radio frequency safety
standards and recommendations, Lenovo believes they are safe for use by consumers. These standards and
recommendations reflect the consensus of the scientific community and result from deliberations of panels
and committees of scientists who continually review and interpret the extensive research literature.
In some situation or environment, the use of integrated wireless cards might be restricted by the proprietor of
the building or responsible representatives of the organization. These situations and areas might for
example include:
• Using the integrated wireless cards on board of airplanes, in hospitals or near petrol stations, blasting
areas (with electro-explosive devices), medical implants or body-worn electronic medical devices, such
as pace makers.
• In any other environment where the risk of interference to other devices or services is perceived or
identified as harmful.
If you are uncertain of the policy that applies to the use of wireless devices in a specific organization (such as
airport or hospital), you are encouraged to ask for authorization to use integrated wireless cards prior to turning
on the computer.
Locations of the UltraConnect™ wireless antennas
Lenovo LaVie Z models feature a diversified antenna system built into the display for optimal reception,
which enables wireless communication wherever you are.
© Copyright Lenovo 2015 23
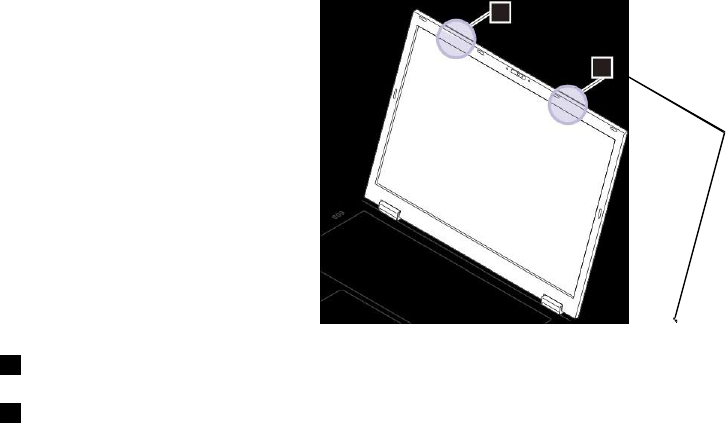
2
1
1 Wireless LAN antenna (main)
2 Wireless LAN antenna (auxiliary)
USA — Federal Communications Commission (FCC)
Approved wireless devices
This section presents the FCC ID and model number of each wireless device.
Preinstalled wireless LAN module
Lenovo LaVie Z:
FCC ID: I4L-LAVIEZ7265 (Models with wireless LAN: 7265NGW )
Notes:
• The wireless LAN and the Bluetooth features operate at different frequencies exclusively, and transmit
radio frequencies simultaneously.
• The wireless LAN modules marketed in the USA do not support or function in the extended channels
(12ch, 13ch).
Preinstalled wireless LAN and Bluetooth module
The wireless LAN and Bluetooth module in your computer is preinstalled by Lenovo, and you are prohibited to
replace with other wireless adapter nor remove it. If the device requires replacement due to some problem
during warranty, it must be serviced by a Lenovo authorized servicer.
FCC ID location
There is no FCC ID for the wireless LAN module shown on the enclosure of your computer. Instead you
will find an indicator pointing to the location of the FCC ID on the bottom of your computer. The FCC ID
is affixed on the approved module installed in the wireless LAN module slot, and the FCC ID is visible
prior to installation.
FCC RF exposure compliance
The total radiated energy from the antennas connected to one of the wireless LAN modules conforms to the
FCC limit of the SAR (Specific Absorption Rate) requirement regarding 47 CFR Part 2 section 1093, when the
computer was tested in either conventional notebook or tablet computer orientations.
24 User Guide

The transmission antennas for the wireless LAN module are located in the LCD cover. See “Locations of the
UltraConnect™ wireless antennas” on page 23.
Radio Frequency interference requirements
Each device has been tested and found to comply with the limits for a Class B digital device pursuant to
FCC Part 15 Subpart B. Refer to “Electronic emission notices” on page 25.
When you use a wireless LAN module in the 802.11 a/n transmission mode, note that high power radars are
allocated as primary users of the 5250 to 5350 MHz and 5650 to 5850 MHz bands. These radar stations can
cause interference with and/or damage this device.
Simultaneous use of RF transmitters
Your computer is approved for simultaneous use of one of the approved wireless LAN modules. For a list of
those transmitters, refer to “Approved wireless devices” on page 24.
Make sure of the following conditions when you use any other external RF option device:
1. When you use any other RF option device, you are requested to confirm that the device conforms to the
RF Safety requirement and is approved to use for your computer.
2. You must follow the RF Safety instructions of the RF option device that are included in the user manual
of the RF option device.
3. If the RF option device is prohibited to use in conjunction with another transmitters, you must turn
off all other wireless features in your computer.
This transmitter must not be co-located or operating in conjunction with any other antenna or transmitter.
Operations in the 5.15-5.25GHz band are restricted to indoor usage only.
Export classification notice
This product is subject to the United States Export Administration Regulations (EAR) and has an Export
Classification Control Number (ECCN) of 5A992.c. It can be re-exported except to any of the embargoed
countries in the EAR E1 country list.
Electronic emission notices
Federal Communications Commission Declaration of Conformity
The following information refers to the Lenovo LaVie Z computer, machine types: 20FF and 20FG.
This equipment has been tested and found to comply with the limits for a Class B digital device, pursuant
to Part 15 of the FCC Rules. These limits are designed to provide reasonable protection against harmful
interference in a residential installation. This equipment generates, uses, and can radiate radio frequency
energy and, if not installed and used in accordance with the instructions, may cause harmful interference
to radio communications. However, there is no guarantee that interference will not occur in a particular
installation. If this equipment does cause harmful interference to radio or television reception, which can be
determined by turning the equipment off and on, the user is encouraged to try to correct the interference by
one or more of the following measures:
• Reorient or relocate the receiving antenna.
• Increase the separation between the equipment and receiver.
• Connect the equipment into an outlet on a circuit different from that to which the receiver is connected.
• Consult an authorized dealer or service representative for help.
Lenovo is not responsible for any radio or television interference caused by using other than specified or
recommended cables and connectors or by unauthorized changes or modifications to this equipment.
Unauthorized changes or modifications could void the user's authority to operate the equipment.
Appendix A. Regulatory Information 25
This device complies with Part 15 of the FCC Rules. Operation is subject to the following two conditions: (1) this
device may not cause harmful interference, and (2) this device must accept any interference received, including
interference that may cause undesired operation.
Responsible Party:
Lenovo (United States) Incorporated
1009 Think Place - Building One
Morrisville, NC 27560
Phone Number: 919-294-5900
WEEE and recycling statements
Lenovo encourages owners of information technology (IT) equipment to responsibly recycle their equipment
when it is no longer needed. Lenovo offers a variety of programs and services to assist equipment owners in
recycling their IT products. For information on recycling Lenovo products, go to:
http://www.lenovo.com/recycling
Important WEEE information
The WEEE marking on Lenovo products applies to countries with WEEE and e-waste regulations (for
example, the European WEEE Directive, India E-Waste Management & Handling Rules, 2011). Appliances are
labeled in accordance with local regulations concerning waste electrical and electronic equipment (WEEE).
These regulations determine the framework for the return and recycling of used appliances as applicable
within each geography. This label is applied to various products to indicate that the product is not to be
thrown away, but rather put in the established collection systems for reclaiming these end of life products.
Users of electrical and electronic equipment (EEE) with the WEEE marking must not dispose of end of life
EEE as unsorted municipal waste, but use the collection framework available to them for the return, recycle,
and recovery of WEEE and to minimize any potential effects of EEE on the environment and human health
due to the presence of hazardous substances. For additional WEEE information, go to:
http://www.lenovo.com/recycling
26 User Guide

Battery recycling information for the United States and Canada
Appendix A. Regulatory Information 27

Appendix B. Restriction of Hazardous Substances Directive
(RoHS)
European Union RoHS
Lenovo products sold in the European Union, on or after 3 January 2013 meet the requirements of Directive
2011/65/EU on the restriction of the use of certain hazardous substances in electrical and electronic
equipment (“RoHS recast” or “RoHS 2”).
For more information about Lenovo progress on RoHS, go to:
http://www.lenovo.com/social_responsibility/us/en/RoHS_Communication.pdf
© Copyright Lenovo 2015 29
30 User Guide

Appendix C. Notices
Lenovo may not offer the products, services, or features discussed in this document in all countries. Consult your
local Lenovo representative for information on the products and services currently available in your area. Any
reference to a Lenovo product, program, or service is not intended to state or imply that only that
Lenovo product, program, or service may be used. Any functionally equivalent product, program, or service that
does not infringe any Lenovo intellectual property right may be used instead. However, it is the user's
responsibility to evaluate and verify the operation of any other product, program, or service.
Lenovo may have patents or pending patent applications covering subject matter described in this
document. The furnishing of this document does not give you any license to these patents. You can send
license inquiries, in writing, to:
Lenovo (United States), Inc.
1009 Think Place - Building One
Morrisville, NC 27560
U.S.A.
Attention: Lenovo Director of Licensing
LENOVO PROVIDES THIS PUBLICATION “AS IS” WITHOUT WARRANTY OF ANY KIND, EITHER EXPRESS
OR IMPLIED, INCLUDING, BUT NOT LIMITED TO, THE IMPLIED WARRANTIES OF NON-INFRINGEMENT,
MERCHANTABILITY OR FITNESS FOR A PARTICULAR PURPOSE. Some jurisdictions do not allow
disclaimer of express or implied warranties in certain transactions, therefore, this statement may not apply
to you.
This information could include technical inaccuracies or typographical errors. Changes are periodically
made to the information herein; these changes will be incorporated in new editions of the publication.
Lenovo may make improvements and/or changes in the product(s) and/or the program(s) described in this
publication at any time without notice.
The products described in this document are not intended for use in implantation or other life support
applications where malfunction may result in injury or death to persons. The information contained in this
document does not affect or change Lenovo product specifications or warranties. Nothing in this document
shall operate as an express or implied license or indemnity under the intellectual property rights of Lenovo or
third parties. All information contained in this document was obtained in specific environments and is
presented as an illustration. The result obtained in other operating environments may vary.
Lenovo may use or distribute any of the information you supply in any way it believes appropriate without
incurring any obligation to you.
Any references in this publication to non-Lenovo Web sites are provided for convenience only and do not in any
manner serve as an endorsement of those Web sites. The materials at those Web sites are not part of the
materials for this Lenovo product, and use of those Web sites is at your own risk.
Any performance data contained herein was determined in a controlled environment. Therefore, the result
obtained in other operating environments may vary significantly. Some measurements may have been
made on development-level systems and there is no guarantee that these measurements will be the same
on generally available systems. Furthermore, some measurements may have been estimated through
extrapolation. Actual results may vary. Users of this document should verify the applicable data for their
specific environment.
The software interface and hardware configuration described in all the manuals included with your computer
may not match the actual configuration of the computer you purchased.
© Copyright Lenovo 2015 31

Precautions
1. Unauthorized copying of all or part of the contents of this document is prohibited.
2. Distribution and copying all or part of the software without permission of the copyright owner is a
copyright infringement.
3. We shall bear no liability for claims of damages or lost profits resulting from the use of this product.
4. The Windows operating system installed on the internal solid-state drive of this computer is for use
with this product only.
5. The content in this document was created at the time of product creation. Contact information such as:
Customer Support, address, telephone numbers, and homepage content may change.
Trademarks
The following terms are trademarks of Lenovo in the United States, other countries, or both:
Lenovo
ThinkPad
UltraConnect
Microsoft and Windows are either registered trademarks or trademarks of Microsoft Corporation in the
United States and/or other countries.
Intel, Intel SpeedStep, and Intel Core are trademarks of Intel Corporation in the U.S. and/or other countries.
The terms HDMI and HDMI High-Definition Multimedia Interface are trademarks or registered trademarks of
HDMI Licensing LLC in the United States and other countries.
All other company names and brand names used on this manual are trademarks or registered trademarks of
their respective holders.
32 User Guide

Tips on cleaning the multi-touch screen
• Turn off the computer before cleaning the multi-touch screen.
• Use a dry, soft, and lint-free cloth or a piece of absorbent cotton to remove fingerprints or dust from the
multi-touch screen. Do not apply solvents to the cloth.
• Gently wipe the screen using a top-down motion. Do not apply any pressure on the screen.
Operating modes
This section provides information about the operating modes of your computer. Your computer provides the
notebook mode, stand mode, tablet mode, and tent mode that enable you to work more conveniently in your
working environment.
This section contains the following topics:
• “Rotating the computer display” on page 33
• “Notebook mode” on page 34
• “Stand mode” on page 35
• “Tablet mode” on page 36
• “Tent mode” on page 38
Rotating the computer display
This topic provides instructions on how to rotate the computer display properly. This topic also provides
information on the operating modes of your computer and corresponding display angle ranges.
The computer display can be opened to any angle up to 360 degrees as shown in the following illustration.
Attention: Do not rotate the computer display with too much force, otherwise the computer display or
hinges might be damaged. Do not apply too much force to the upper-right or upper-left corner of the
computer display.
Note: Your computer might look slightly different from the illustration in this topic.
Chapter 2. Using your computer 33
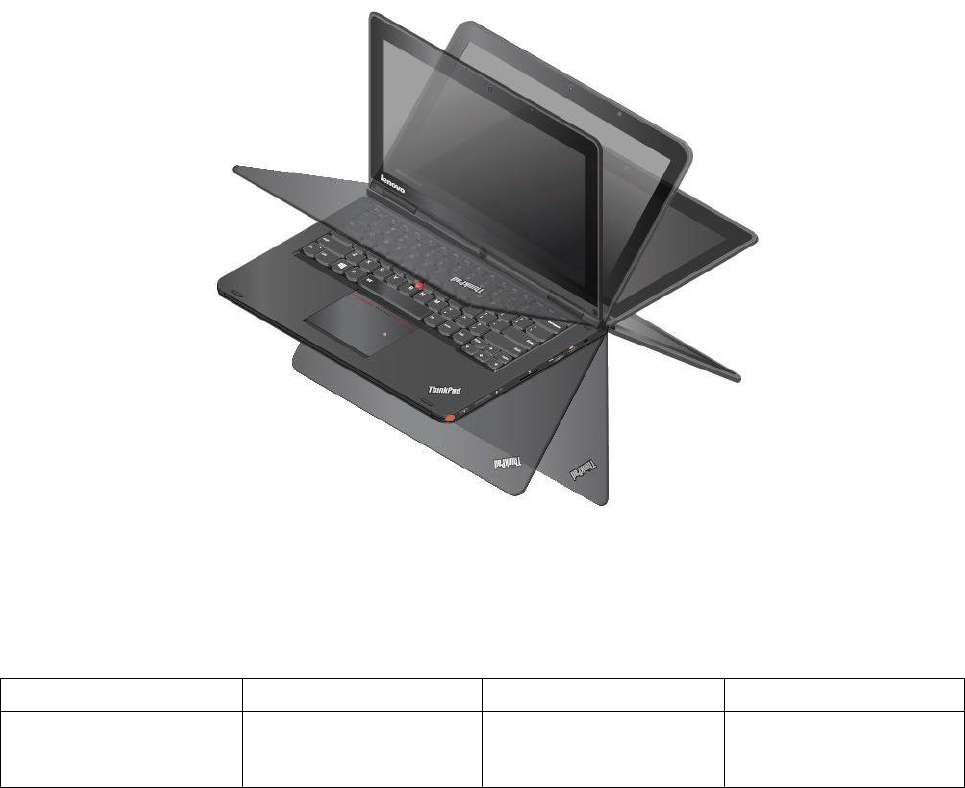
Display angle for each operating mode
The angle between the front of the computer display and the keyboard is different in each operating mode,
and the following table lists the angle range for each operating mode.
Table 3. Display angle for each operating mode
Notebook mode
Stand mode
Tablet mode
Tent mode
no more than 190 degrees
more than 190 degrees and
less than 350 degrees
360 degrees
no less than 270 degrees
and no more than 340
degrees
Notebook mode
This section provides information about notebook mode. You can use the computer in notebook mode in
scenarios that require using a keyboard and a mouse, such as editing documents and writing e-mails.
Attention: Do not rotate the computer display with too much force, otherwise the computer display or
hinges might be damaged. Do not apply too much force to the upper-right or upper-left corner of the
computer display.
Open the computer display slowly as shown in the following illustration. Your computer is now in notebook
mode.
Note: Your computer might look slightly different from the illustration in this topic.
34 User Guide
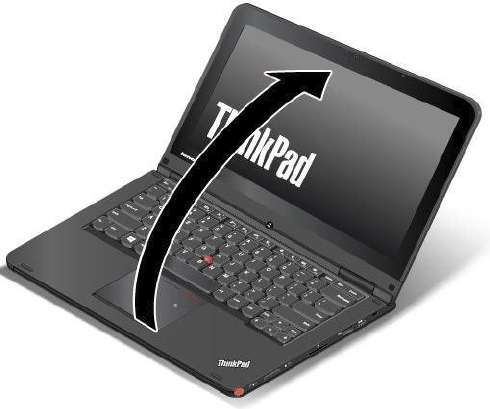
In notebook mode, the keyboard, the ThinkPad trackpad, and the TrackPoint pointing stick are automatically
enabled.
By default, the autorotate feature is enabled. To avoid undesired screen rotation, press the screen rotation lock
button to disable the autorotate feature. For instructions on how to use the button, refer to “Using the tablet
buttons” on page 22. After you press the screen rotation lock button, the autorotate feature is disabled and the
autorotate-off indicator is displayed on your screen.
Stand mode
This section provides information about stand mode. You can use the computer in stand mode in scenarios
that require limited interaction with the screen, such as viewing photos and playing videos.
Attention: Do not rotate the computer display with too much force, otherwise the computer display or
hinges might be damaged. Do not apply too much force to the upper-right or upper-left corner of the
computer display.
If your computer is in notebook mode, do the following to turn the computer into stand mode:
Note: Your computer might look slightly different from the illustrations in this topic.
1. Slowly rotate the display clockwise until the back of the display is facing the base cover.
Chapter 2. Using your computer 35
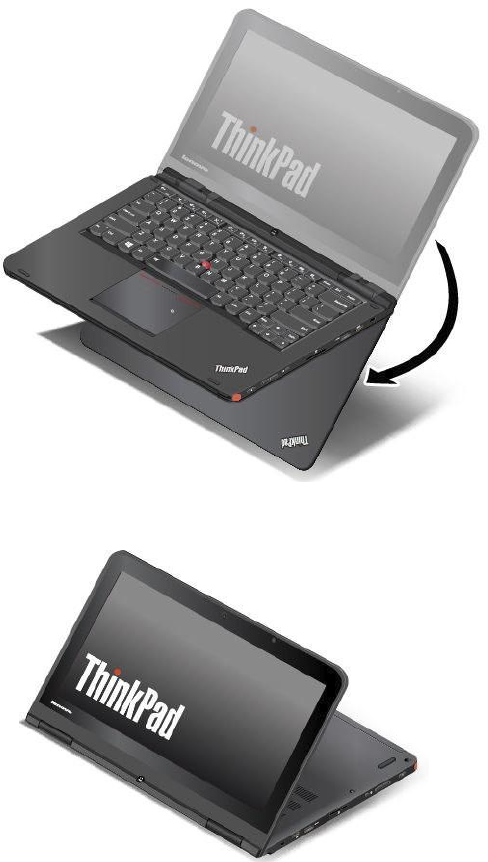
2. Position your computer as shown. Your computer is now in stand mode.
In stand mode, the keyboard, the ThinkPad trackpad, and the TrackPoint pointing stick are automatically
disabled.
By default, the autorotate feature is enabled. To avoid undesired screen rotation, press the screen rotation lock
button to disable the autorotate feature. For instructions on how to use the button, refer to “Using the tablet
buttons” on page 22. After you press the screen rotation lock button, the autorotate feature is disabled and the
autorotate-off indicator is displayed on your screen.
In stand mode, you can use the tablet buttons to control your computer. For instructions on how to use the
tablet buttons, refer to “Using the tablet buttons” on page 22.
Tablet mode
This section provides information about tablet mode. You can use the computer in tablet mode in scenarios
that require frequent interaction with the screen, such as browsing the Web site and watching movies.
36 User Guide
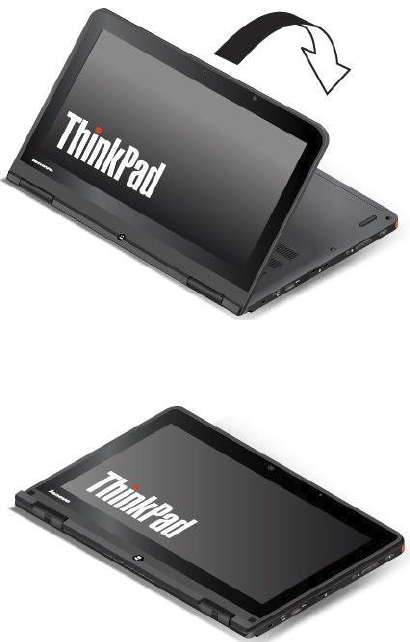
Attention: Do not rotate the computer display with too much force, otherwise the computer display or
hinges might be damaged. Do not apply too much force to the upper-right or upper-left corner of the
computer display.
If your computer is in stand mode, do the following to turn the computer into tablet mode from stand mode:
Note: Your computer might look slightly different from the illustrations in this topic.
1. Position your computer as shown and slowly rotate the computer display clockwise.
2. Position your computer as shown. Your computer is now in tablet mode. By default, the autorotate
feature is enabled.
3. To avoid undesired screen rotation in tablet mode, press the screen rotation lock button to disable
the autorotate feature. For instructions on how to use the button, refer to “Using the tablet buttons”
on page 22.
Note: After you press the screen rotation lock button, the autorotate feature is disabled and the
autorotate-off indicator is displayed on your screen.
Chapter 2. Using your computer 37
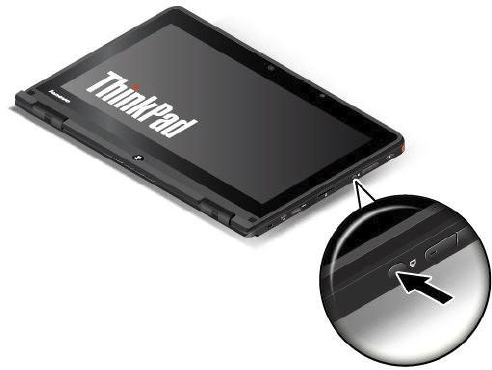
In tablet mode, the keyboard, the ThinkPad trackpad, and the TrackPoint pointing stick are automatically
disabled.
In tablet mode, you can use your computer in a creative and intuitive way by jotting down notes and
illustrations with the Tablet Digitizer Pen and then storing them digitally. For instructions on how to use the
Tablet Digitizer Pen, refer to “Using the Tablet Digitizer Pen” on page 22.
You can use the tablet buttons to control your computer. For instructions on how to use the tablet buttons,
refer to “Using the tablet buttons” on page 22.
Your computer comes with a multi-touch screen. For instructions on how to use the multi-touch screen,
refer to “Using the multi-touch screen” on page 23.
Tips on using your computer in tablet mode
• Do not pick up or hold the computer by the display only.
• Do not hit, vibrate, or bump the computer display.
• To allow free ventilation, do not place any obstacle, such as a thick -piled carpet or a soft cushion, in
front of the fan louvers.
• If you hold the computer with one hand while using it in tablet mode, do not expose it to excessive
vibration, shock, or rotation.
• When using computer outdoors, protect against exposure to rain or moisture.
• If you put your computer in a carrying case, put it into notebook mode and close the display.
Tent mode
This section provides instructions about tent mode. You can use the computer in tent mode in scenarios that
require limited interaction with the screen, such as viewing photos and making a presentation.
Attention: Do not rotate the computer display with too much force, otherwise the computer display or
hinges might be damaged. Do not apply too much force to the upper-right or upper-left corner of the
computer display.
38 User Guide
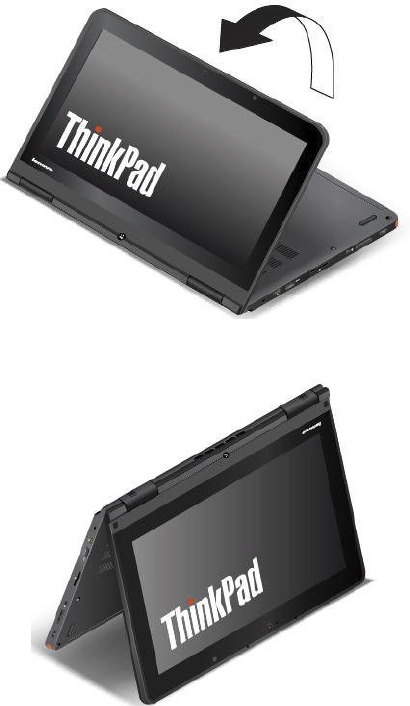
Turning the computer into tent mode from tablet mode
If your computer is in tablet mode, do the following to turn the computer into tent mode:
Note: Your computer might look slightly different from the illustrations in this topic.
1. Slowly open your computer display several inches. The screen rotates to the orientation for you to
look at in stand mode.
2. Position your computer as shown. Your computer is now in tent mode.
In tent mode, the keyboard, the ThinkPad trackpad, and the TrackPoint pointing stick are automatically
disabled.
By default, the autorotate feature is enabled. To avoid undesired screen rotation, press the screen rotation lock
button to disable the autorotate feature. For instructions on how to use the button, refer to “Using the tablet
buttons” on page 22. After you press the screen rotation lock button, the autorotate feature is disabled and the
autorotate-off indicator is displayed on your screen.
In tent mode, you can use the tablet buttons to control your computer. For instructions on how to use the
tablet buttons, refer to “Using the tablet buttons” on page 22. Your computer comes with a multi -touch
screen. For instructions on how to use the multi-touch screen in tablet mode, refer to “Using the multi-touch
screen” on page 23.
Chapter 2. Using your computer 39
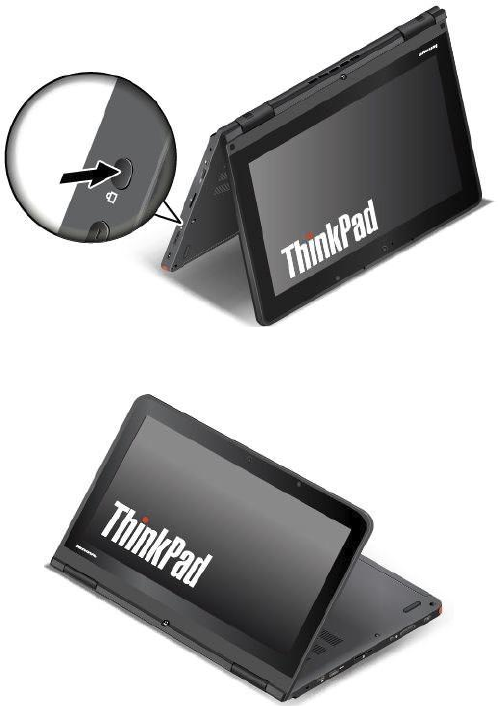
Turning the computer into stand mode from tent mode
If your computer is in tent mode, do the following to turn the computer into stand mode:
1. If the autorotate feature is disabled, press the screen rotation lock button to enable the autorotate feature.
2. Position your computer as shown. Your computer is now in stand mode.
Special keys
The following figure shows the locations of main special keys for your computer.
Notes:
• Your computer might look slightly different from the illustrations in this topic.
• In notebook mode, the keyboard, the ThinkPad trackpad, and the TrackPoint pointing stick are
automatically enabled. In stand mode, tablet mode, and tent mode, the keyboard, the ThinkPad trackpad,
and the TrackPoint pointing stick are automatically disabled.
40 User Guide