Micro Star MS5607 Portable Navigation Device User Manual 5607
Micro Star International Co Ltd Portable Navigation Device 5607
Users Manual
Federal Communication Commission Interference Statement
This equipment has been tested and found to comply with the limits for a Class B digital device, pursuant to
Part 15 of the FCC Rules. These limits are designed to provide reasonable protection against harmful
interference in a residential installation. This equipment generates, uses and can radiate radio frequency
energy and, if not installed and used in accordance with the instructions, may cause harmful interference to
radio communications. However, there is no guarantee that interference will not occur in a particular
installation. If this equipment does cause harmful interference to radio or television reception, which can
be determined by turning the equipment off and on, the user is encouraged to try to correct the interference
by one of the following measures:
z Reorient or relocate the receiving antenna.
z Increase the separation between the equipment and receiver.
z Connect the equipment into an outlet on a circuit different from that to which the receiver is
connected.
z Consult the dealer or an experienced radio/TV technician for help.
FCC Caution: Any changes or modifications not expressly approved by the party responsible for
compliance could void the user's authority to operate this equipment.
This device complies with Part 15 of the FCC Rules. Operation is subject to the following two conditions: (1)
This device may not cause harmful interference, and (2) this device must accept any interference received,
including interference that may cause undesired operation.

1
Important Safety Precaution
Always read and follow these basic safety precautions carefully when handling any piece of electronic
component.
1. Keep this User Manual for future reference.
2. Keep this equipment away from humidity.
3. Lay this equipment on a reliable flat surface before setting it up.
4. The openings on the enclosure are for air convection hence protects the equipment from overheating.
5. All cautions and warnings on the equipment should be noted.
6. Never pour any liquid into the opening that could damage or cause electrical shock.
7. If any of the following situations arises, get the equipment checked by a service personnel:
♦Liquid has penetrated into the equipment
♦The equipment has been exposed to moisture
♦The equipment has not work well or you can not get it work according to User Manual
♦The equipment has dropped and damaged
♦If the equipment has obvious sign of breakage
2
Thank you for your purchase MS-5607. This device combines multiple functions of GPS, Hands-Free,
photo viewer and music playback.
DestinAtor7 is embedded as Global Positioning System in MS-5607. Entire device is of user friendly
interface, just one tap leads you to more information needed. Instructions for installing and configuring
this product can be found in this manual. Before you begin to install and use this product, please read this
manual carefully for fully exploiting the functions of this product.
For photos stored in SD card, no need to search for another storage device, just insert into MS-5607 for immediate
photo sharing. Sharing moments take no time to wait.
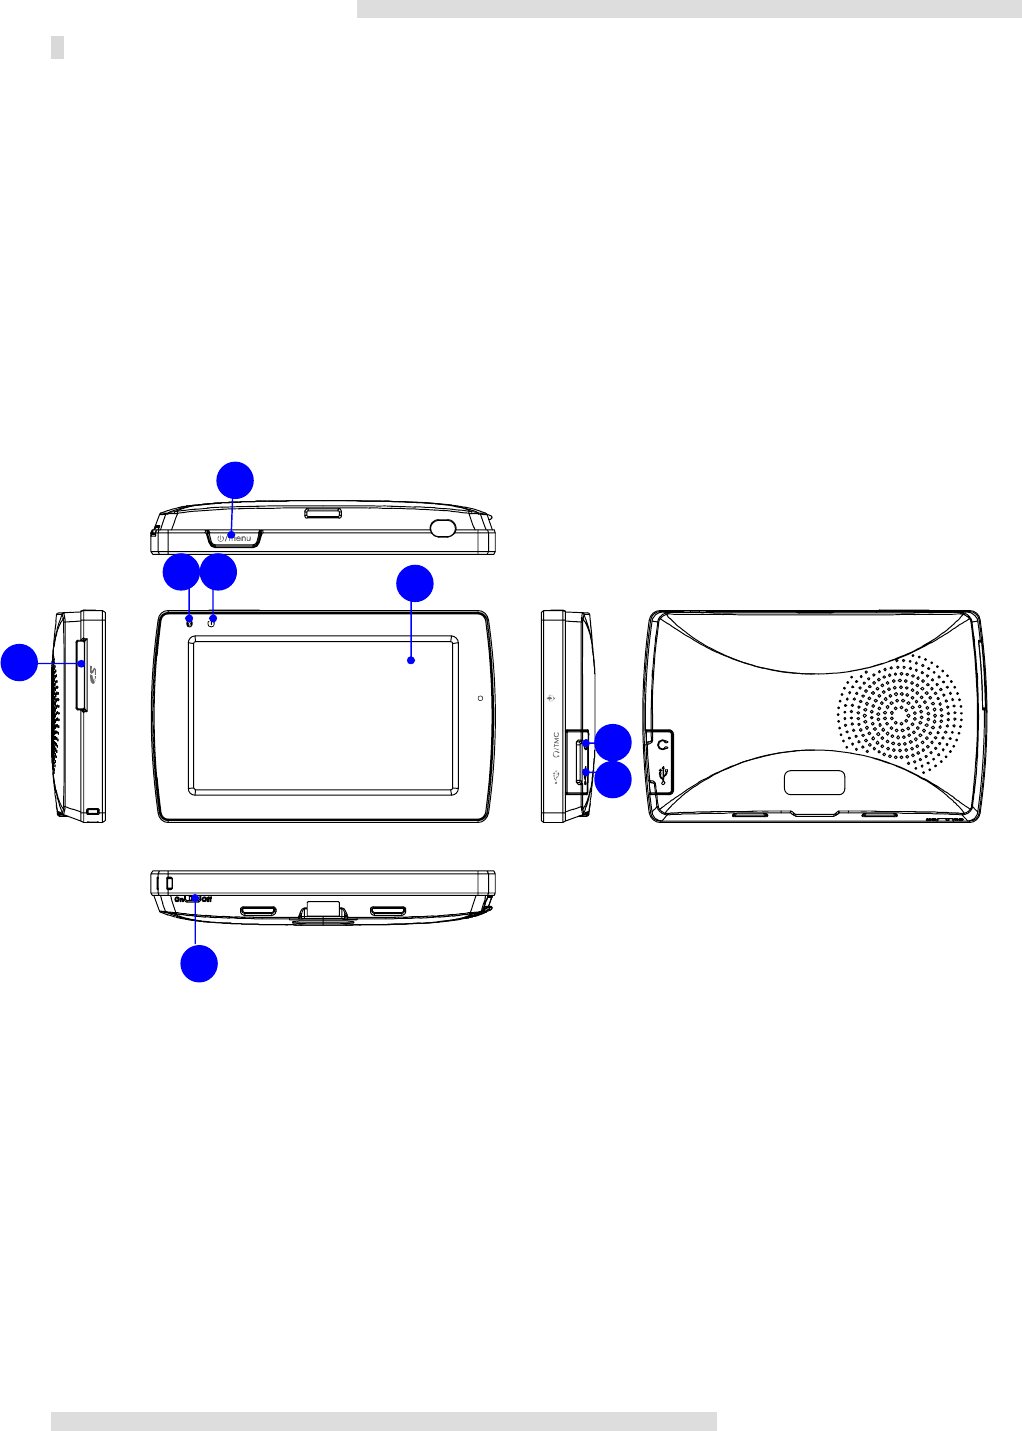
Overview
1. SD Card slot Insert SD memory card.
2. Power/Menu Press 3 seconds to Suspend/Resume and 1 second to Menu mode
3. Power LED Indicate power status.
4. Bluetooth LED Indicate Bluetooth status
5. Display Window Read status and information at this window.
6. Battery On/Off Power On/Off.
7. Audio out/TMC Insert Earphone/TMC Antenna here.
8. Mini USB port Connect to AC power adapter for charging.
2
1
35
6
7
4
8
3
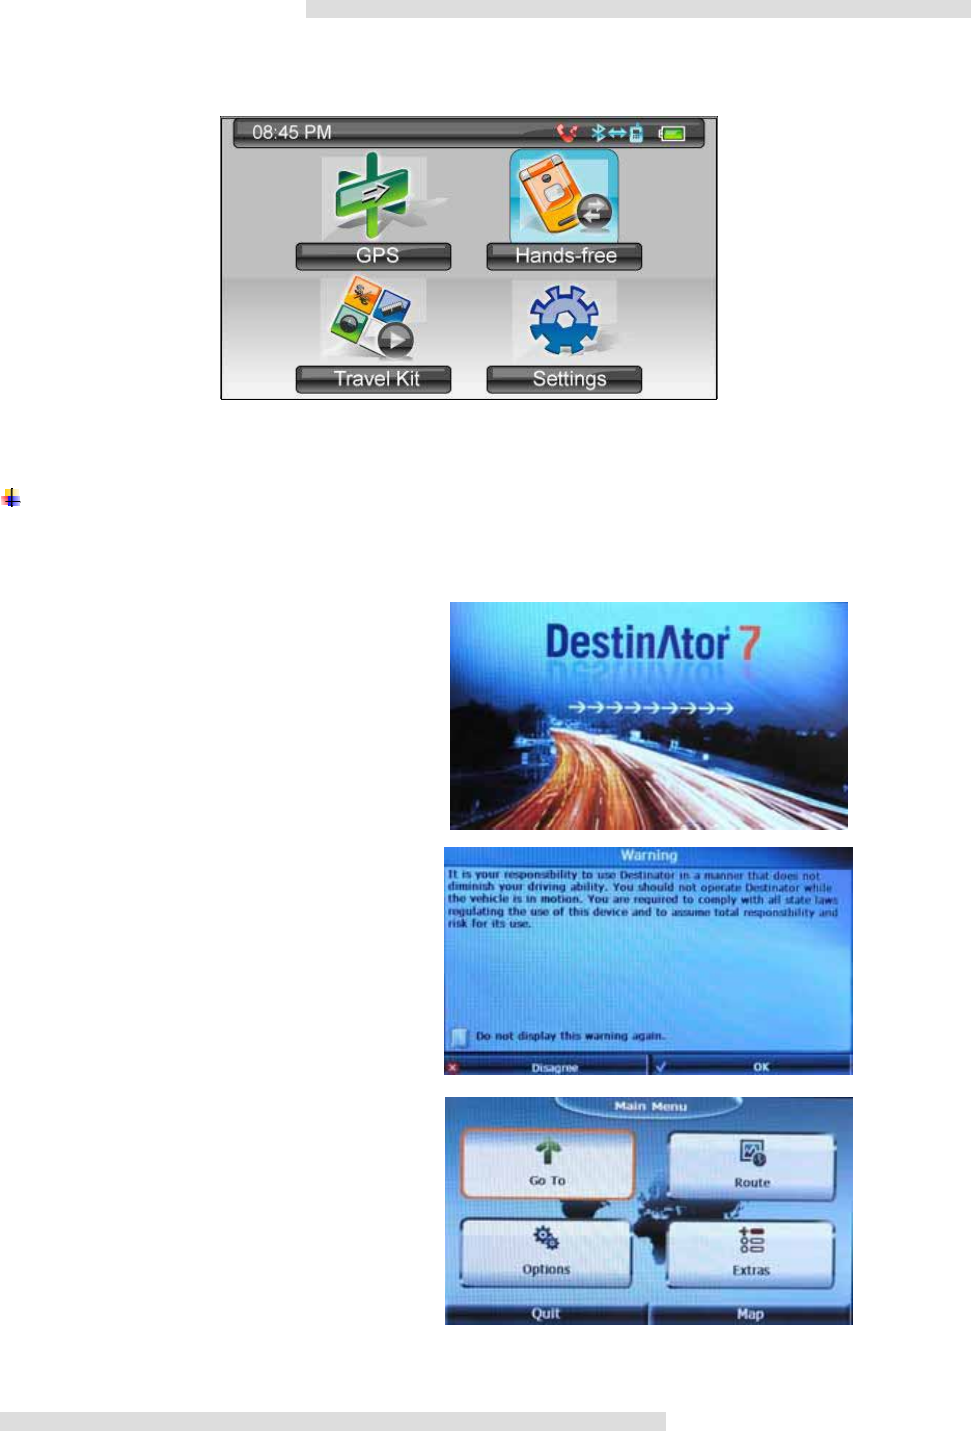
Below is the main menu one user powered on MS-5607. Four categories are available here to you to take
full use of this device.
Chapter 1 GPS(Global Positioning System)
1.1 How to locate destination
Following is suggested demonstration for user locates in Rue Monge in Paris and tries to find a route to
Musee du Louvre without knowing the exact address. In this case, we will search by Point of Interests.
Once touch on the GPS icon, DestinAtor 7
shows. Arrows indicates activating status.
A warning message appears, user has
to tap on OK to proceed.
Destinator main menu in the right. Tap on
Go To.
4
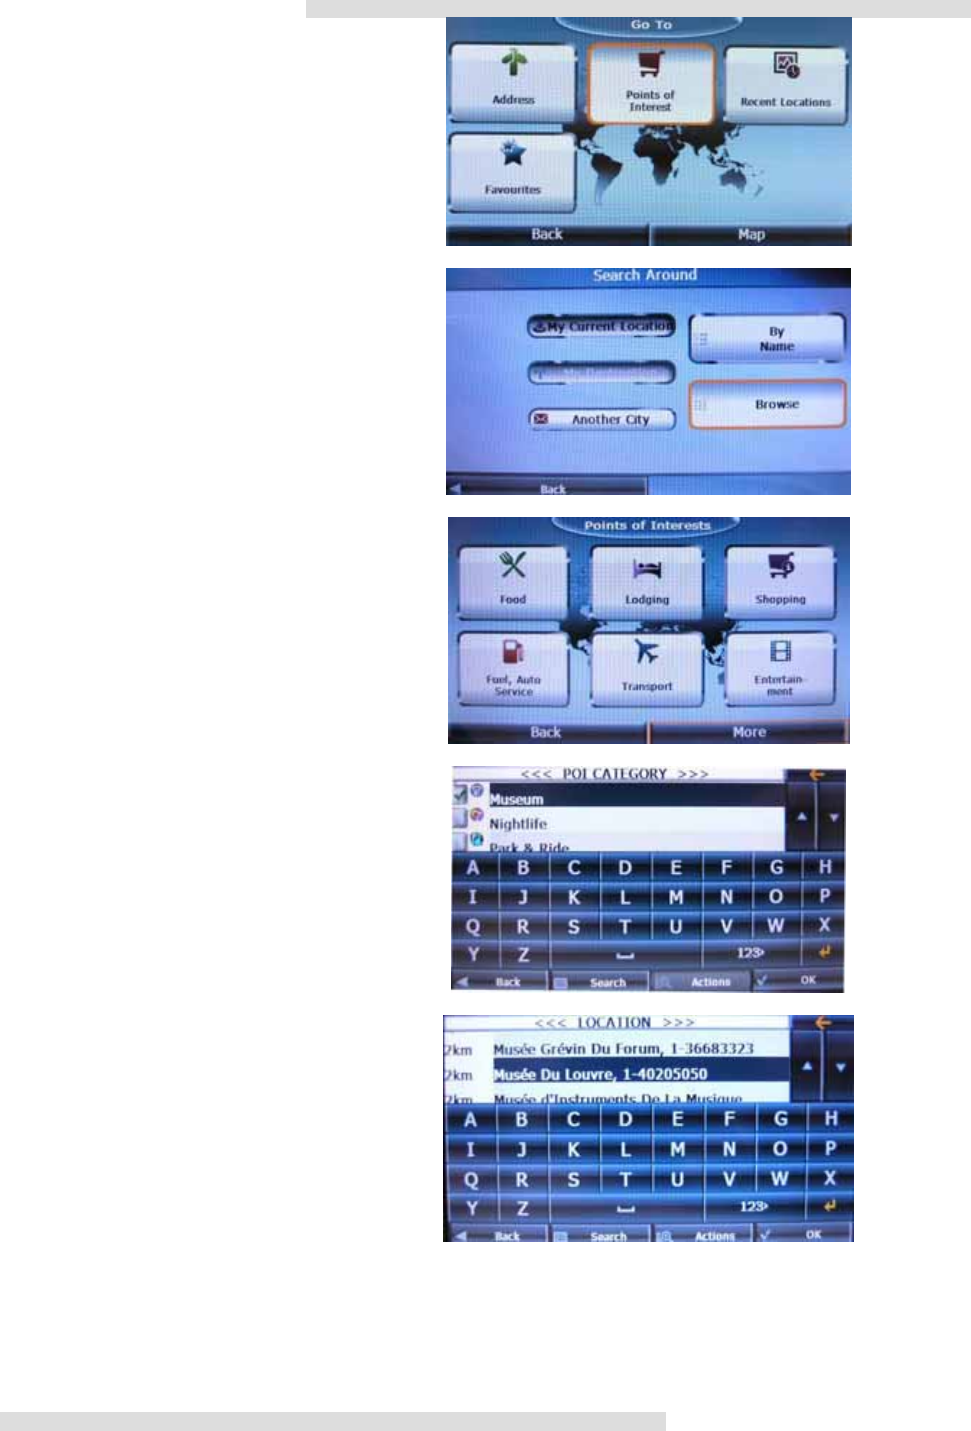
Since assuming not knowing the exact
address of Museum of Louvre. Select
Points of Interest.
Select Browse to see available Points of
Interest.
There are six general categories, tap More
for more options.
Select Museum category, and tap OK.
Search downwards to locate Musee Du
Louvre. Select OK to proceed.
5
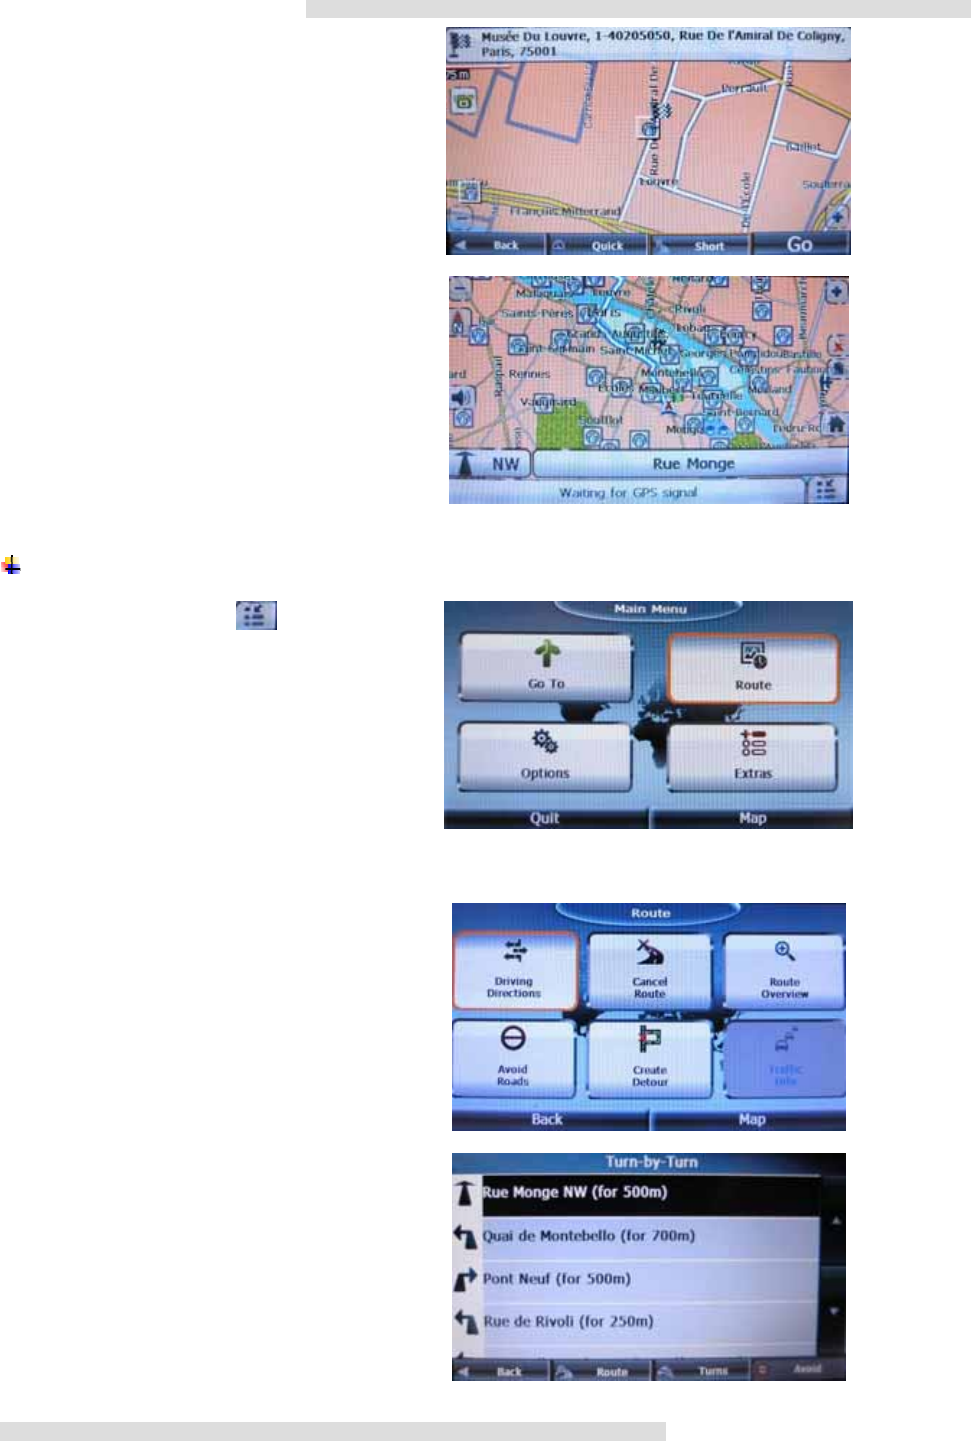
As Map shows Musee Du Louvre location,
tap Go.
Map in the right shows route from Rue
Monge to Musee Du Louvre as well as more
museums in the neighborhood.
There you go, allow the GPS lead you to
destination.
1.2 Route
To know route details, tap icon on
previous picture to back to Main Menu, and
select Route.
1.2.1 Driving Directions
Driving Directions to know route
Turn-by-Turn.
Picture indicates which street to turn and to
turn in which direction.

6
1.2.2 Route Overview
This option is to know overall scheduled
route.
Distance is also indicated in the right.
1.3 Options
This section changes display mode and
more settings.
Option Main Menu in the right.
Night Mode 3D Mode
7
Free Map Browsing Pedestrian Mode
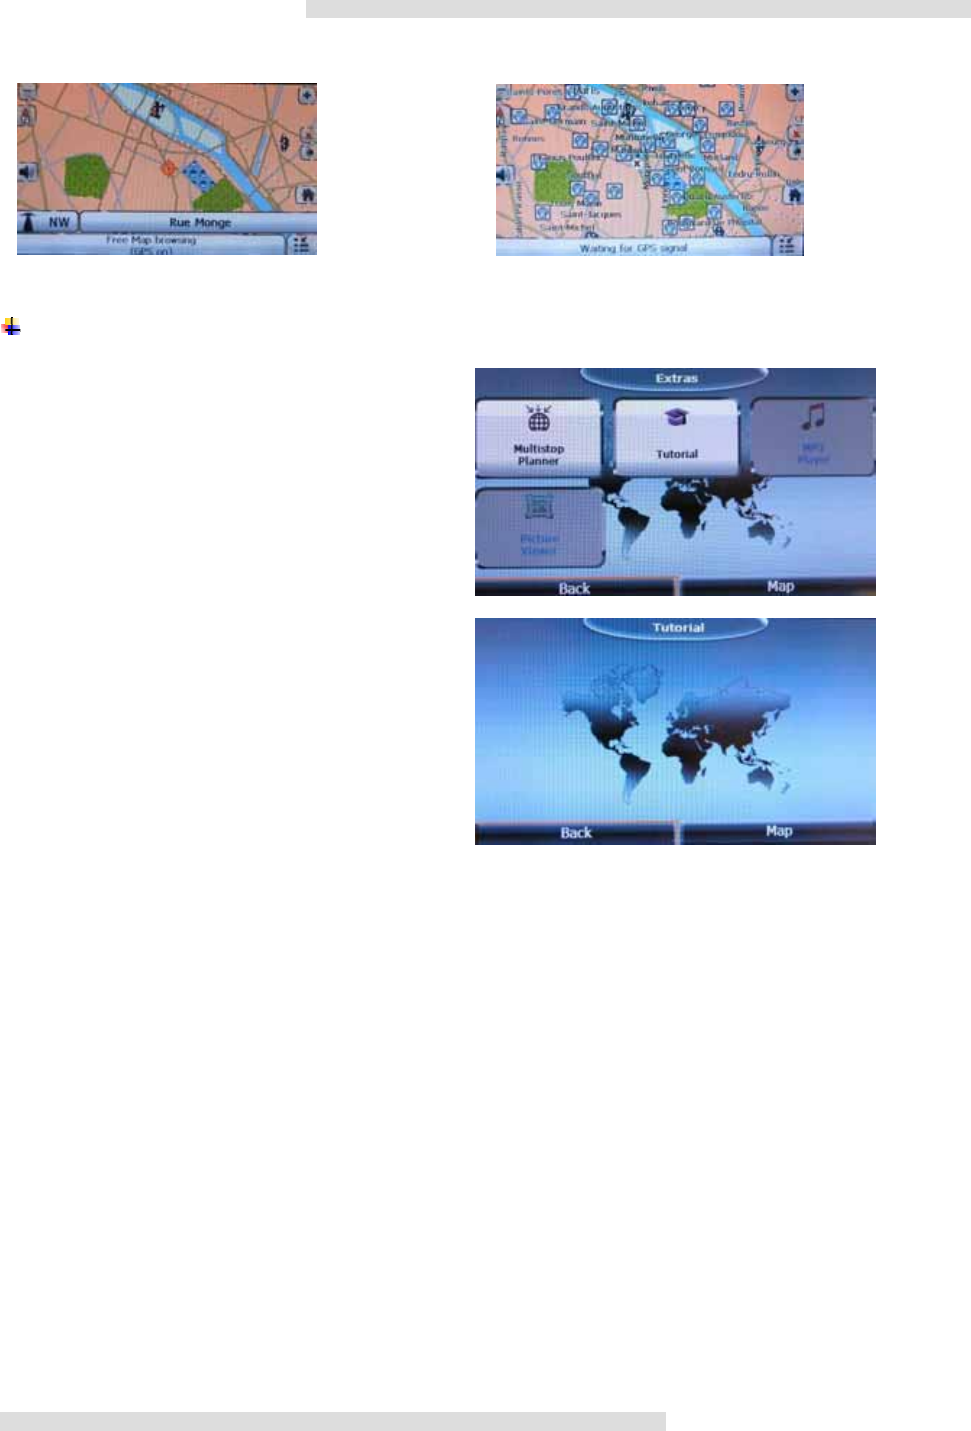
1.4 Extras
More Extra settings available.
Tutorial
8
Chapter 2: Hands-free
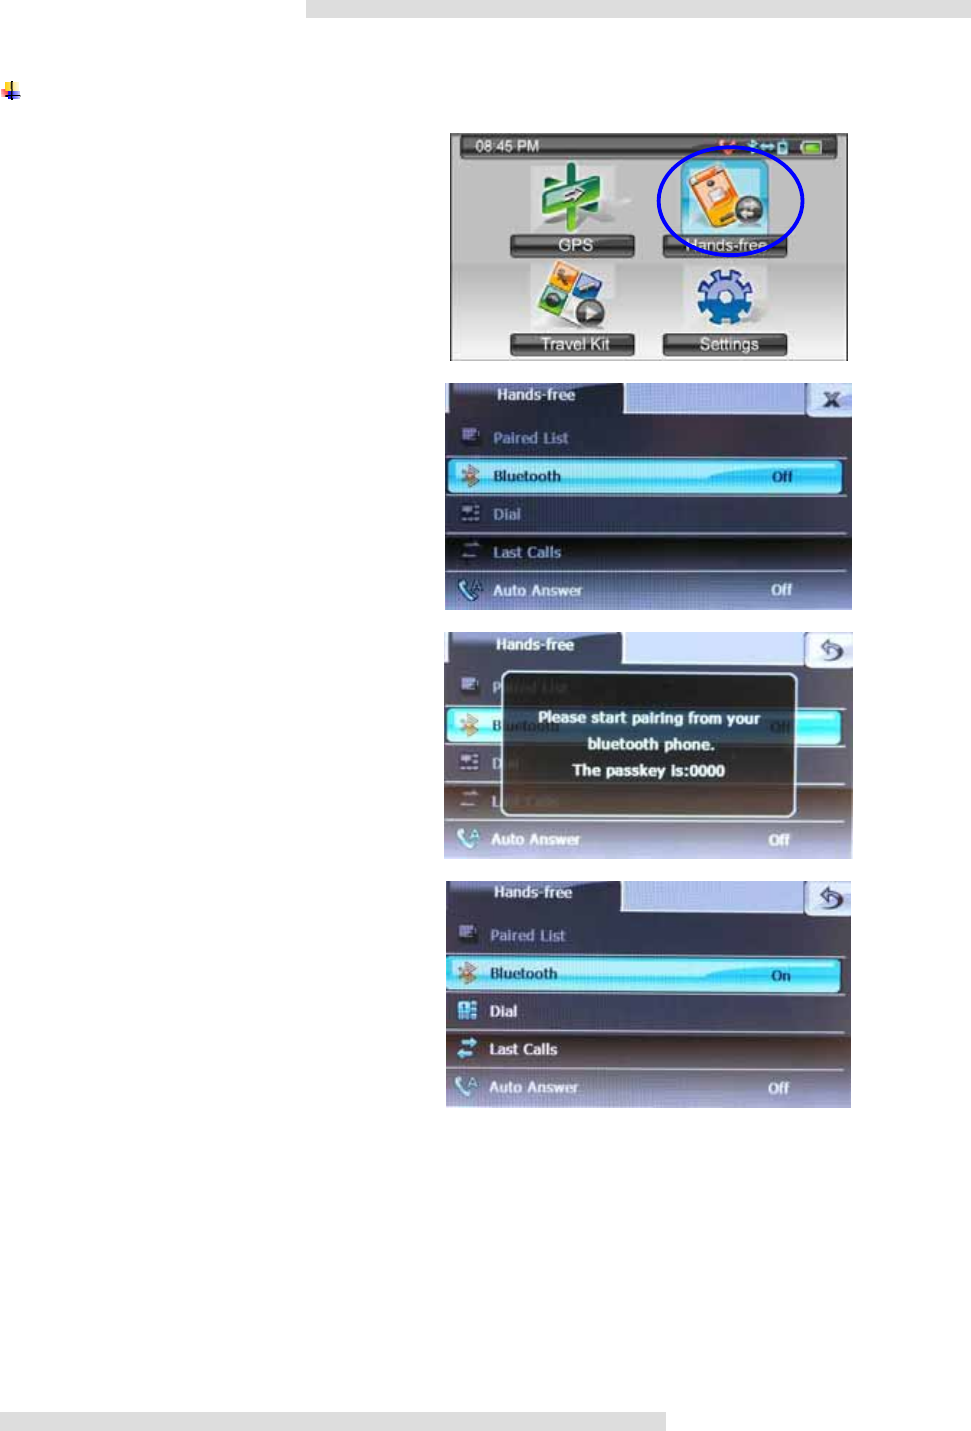
2.1 Bluetooth
Select Hands-free from Main Menu.
Select Bluetooth to able/ disable Bluetooth
function.
One tap on Bluetooth bar, a passkey notice
shall pop up. The passkey is: 0000.
After entering the passkey, Bluetooth
function is On.
2.1.1 How to pair and connect Bluetooth mobile phone to MS-5607
Make sure both Bluetooth mobile phone and MS-5607 have been paired and connected before user try to dial via
MS-5607.
Following is the connecting/pairing procedure between Sony Ericsson mobile phone and MS-5607.
Note:
a. To enable Bluetooth function of MS-5607, please refer to 2.1 Bluetooth. For mobile phone settings regarding
Bluetooth activation, please refer to mobile phone manual for details.

9
Select Settings in main menu in this mobile
phone.
Go to Connectivity, choose Bluetooth/
Handsfree.
Follow on-screen instructions to search
available Handsfree devices.
Note: The Bluetooth menu in mobile
phone might differ by different brands
and models.
MS-5607 has been found, press Select and
enter passcode: 0000.
Add to and then Connect to New
handsfree.

10
This picture shows MS-5607 has been
successfully paired and connected to
MS-5607. User may make phone calls via
MS-5607 now.
2.2 Paired List
Only when MS-5607 has been paired would
this selection be valid.
Shows mobile phone model used for
demonstration. User may tap icon to
connect to mobile phone again.
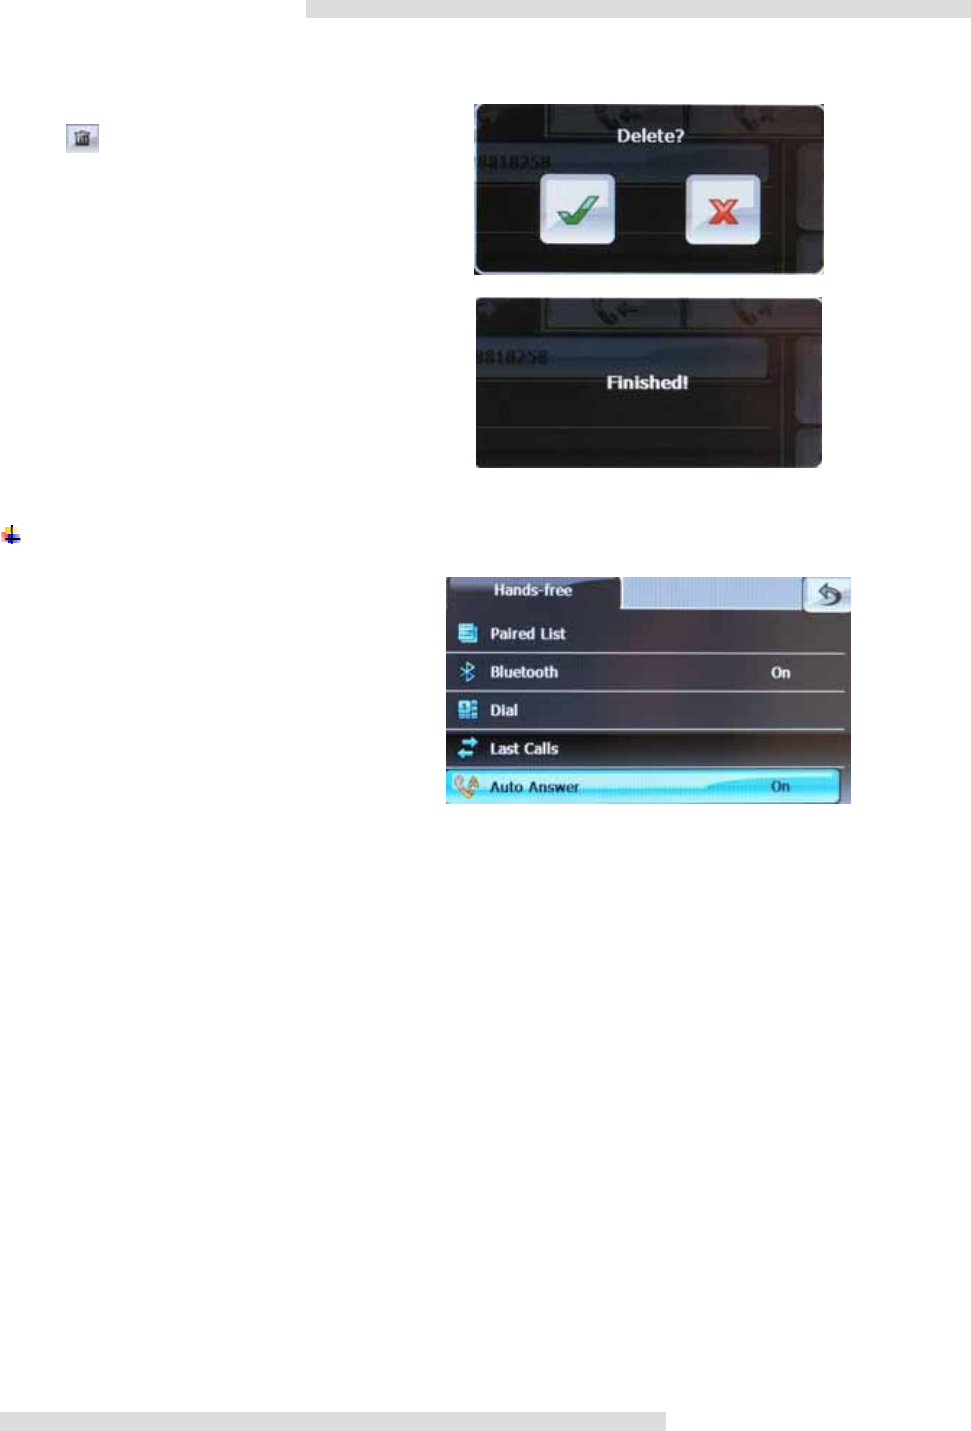
User can delete paired list when no longer
needed, just tap icon. Tap to
confirm.
Paired device is no longer available in the
paired list.
11
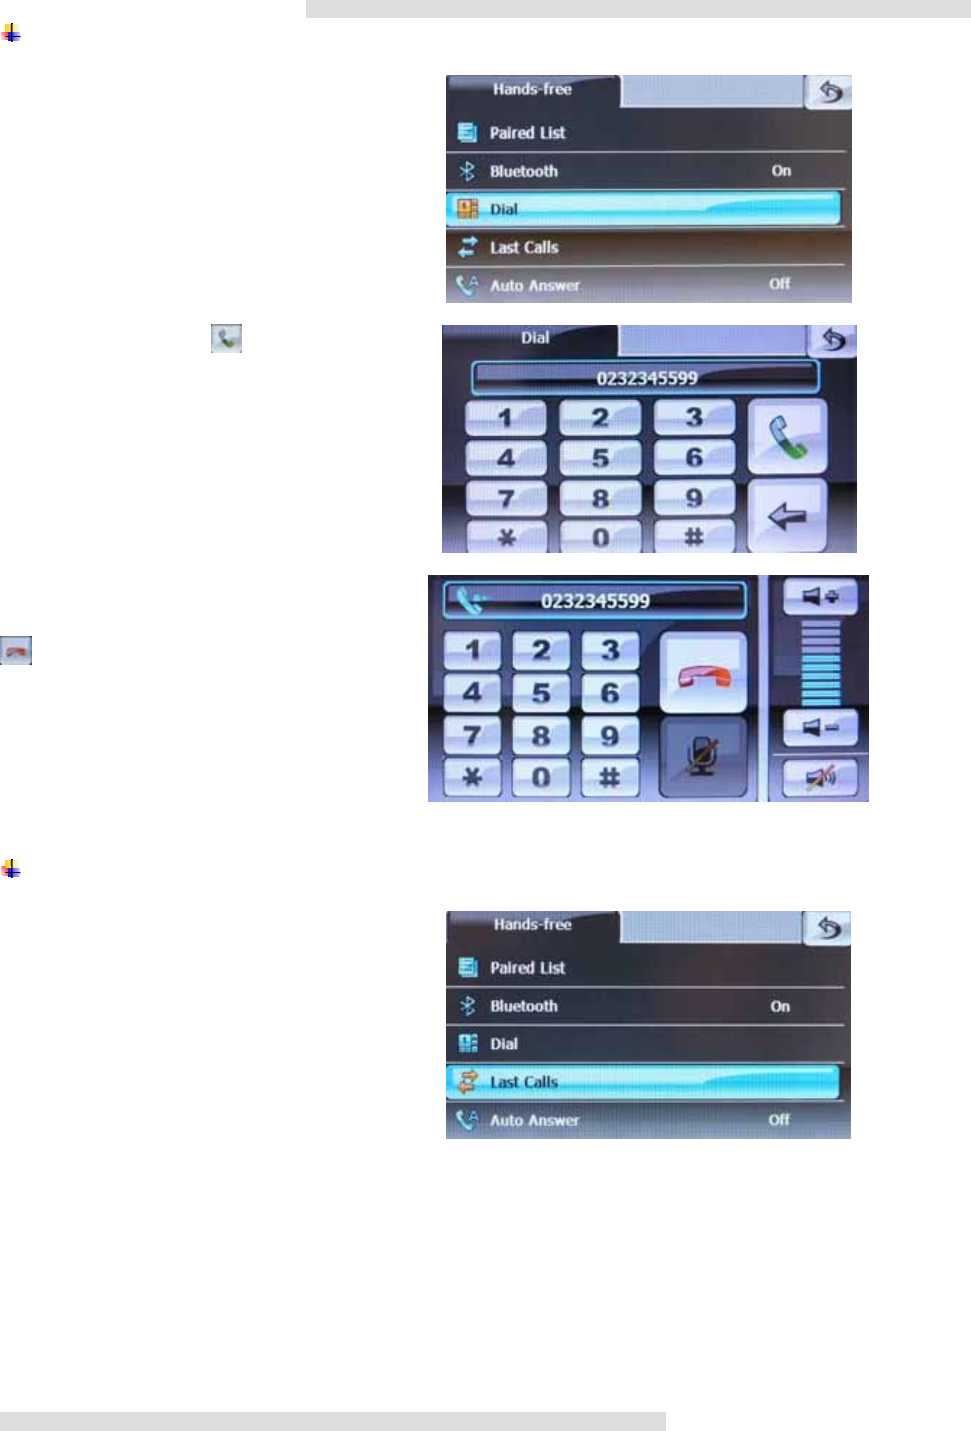
2.3 Dial
Select Dial from Main Menu.
Tap the number and tap to make the
call.
This picture indicates the call has been
connected. User can adjust Volume in the
right. Or hang up the phone by tapping
to end.
2.4 Last Calls
Select Last Calls to learn the number just
dialed or answered.
12
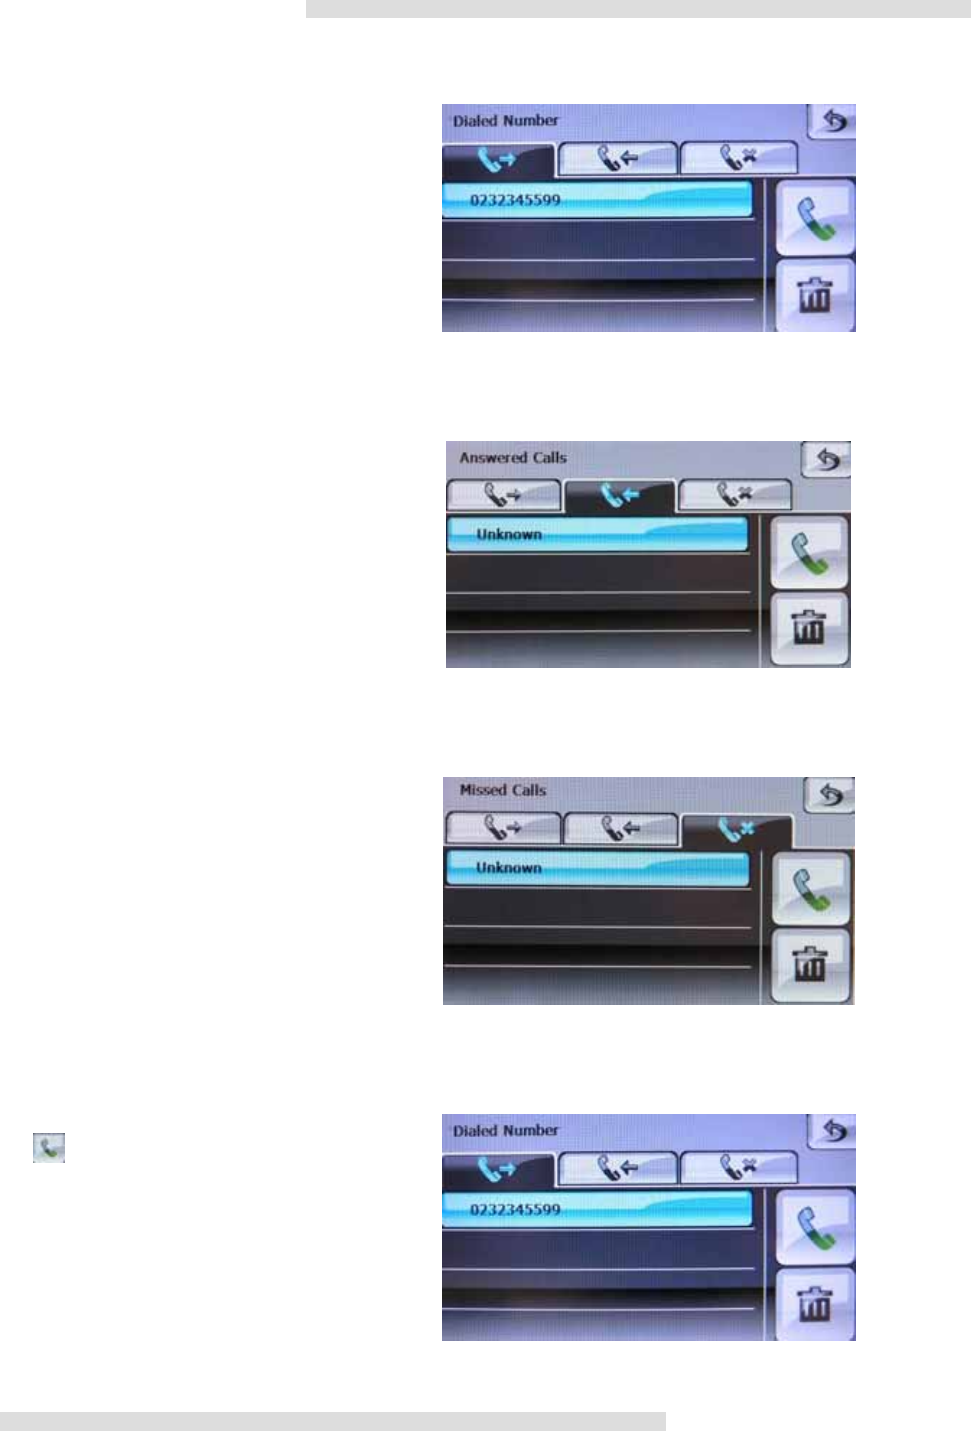
2.4.1 Dialed Number
Show the Dialed Number tab, user can tap
icons in the right to call again or to delete
call lists.
2.4.2 Answered Calls
Select Dialed Number tabtolearncalls
answered.
2.4.3 Missed Calls
Select Missed Calls tabtolearncalls
missed.
2.4.4 Redial Call From Last Call Tabs
Choose the number user intend to redial,
tap icon
13
2.4.5 Delete Call From Last Call Tabs
Choose the number user intend to delete,
just tap icon.
A transparent window Finished shall show
to remind user above process has been
made.
2.5 Auto Answer
Set On to auto answer incoming calls, tap
again to set to Off.
14
Chapter 3: Travel Kit
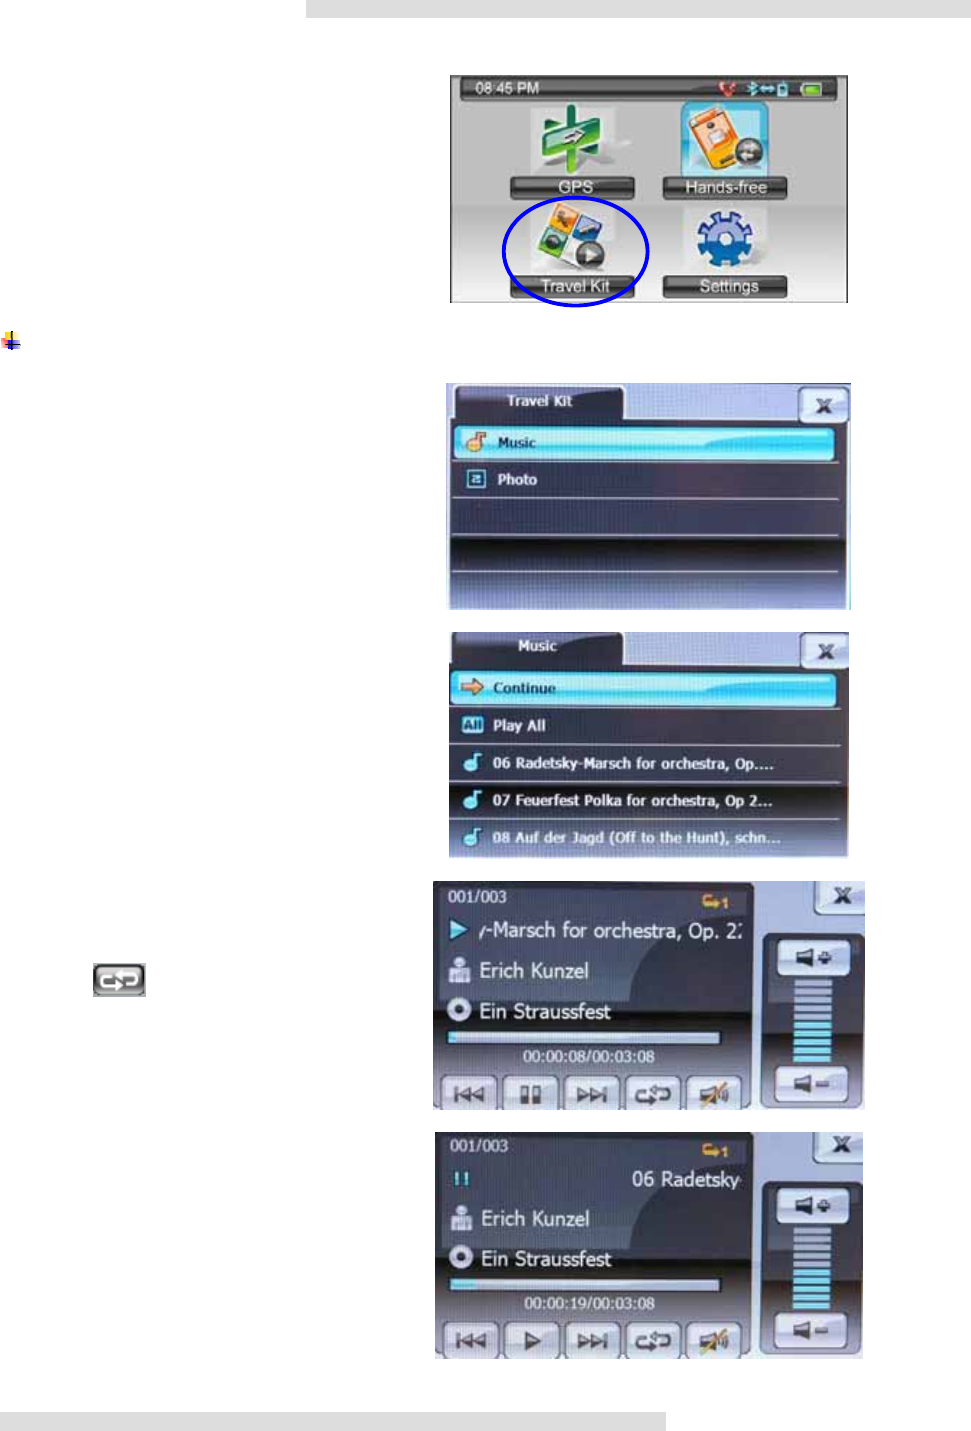
Select Travel Kit from Main Menu.
3.1 Music
Select Music.
User may tap Play All to listen all music
available or tap desired song as listed in the
right.
You may tap on the screen while playing,
relative information such as name of the
song, the artist and the album shall list
accordingly.
The icon indicates repeated all
function.
Just one touch screen will show available
option below. Previous, next, pause,
repeat mode.
Picture in the right indicates under pause
mode.
15
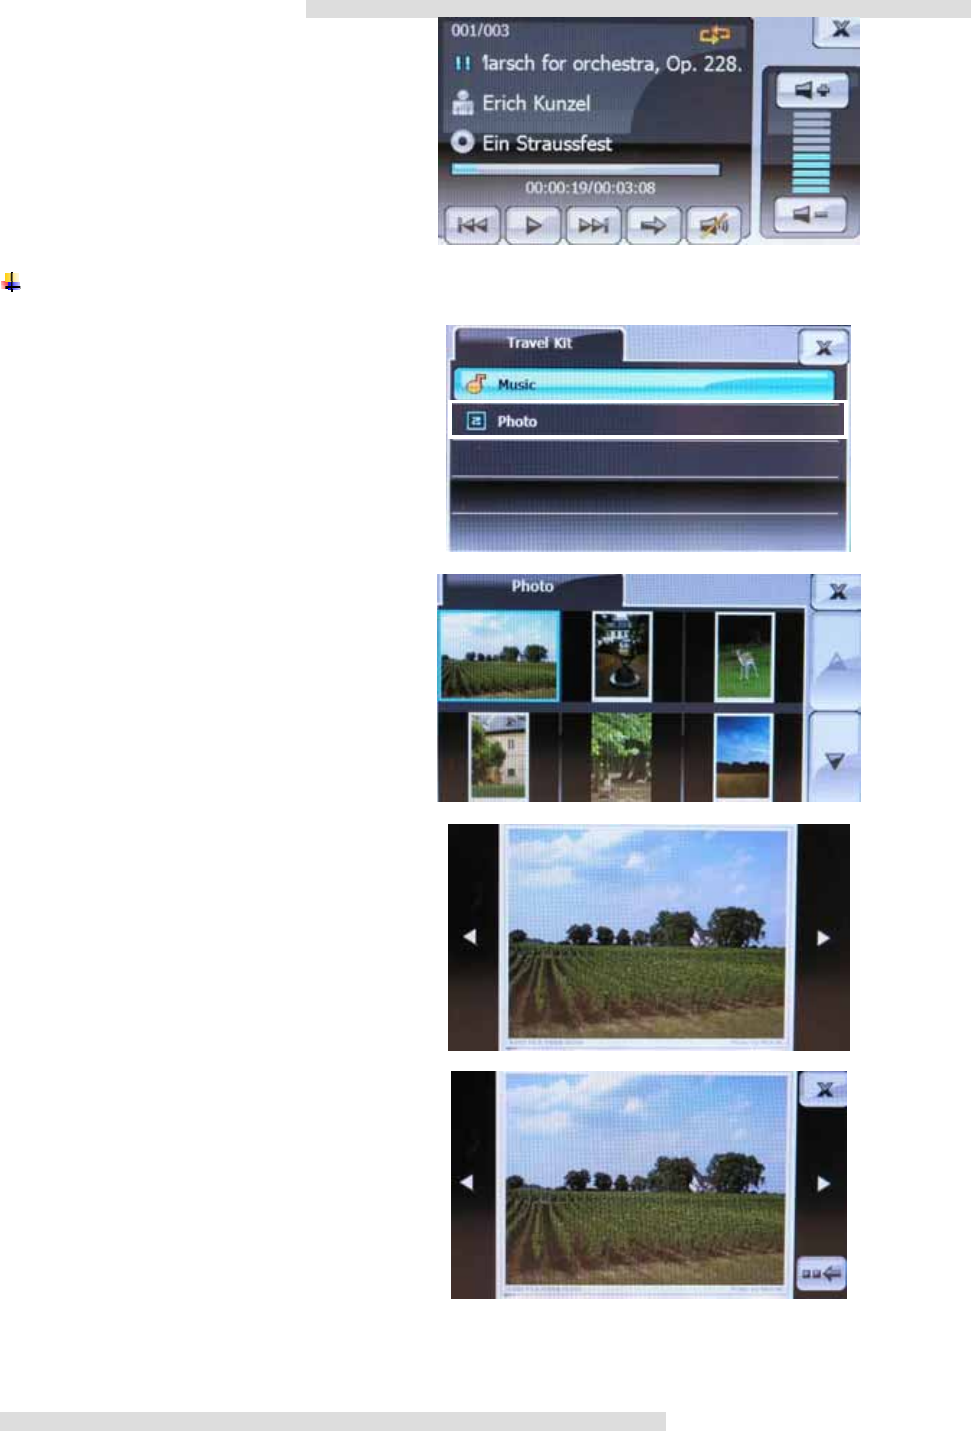
Picture in the right indicates under repeating
mode.
3.2 Photo
Select Photo.
Choose first photo for instance.
Enlarge view for this photo. Only
Previous and Next options are available
here.
Tap again to find the selection icon in the
bottom of the right side.

16
Taptheselectionicontobringupmore
selections. Selections from Left to right
are Slide show interval, rotate, zoom
in/out, mute, broadcast.
17
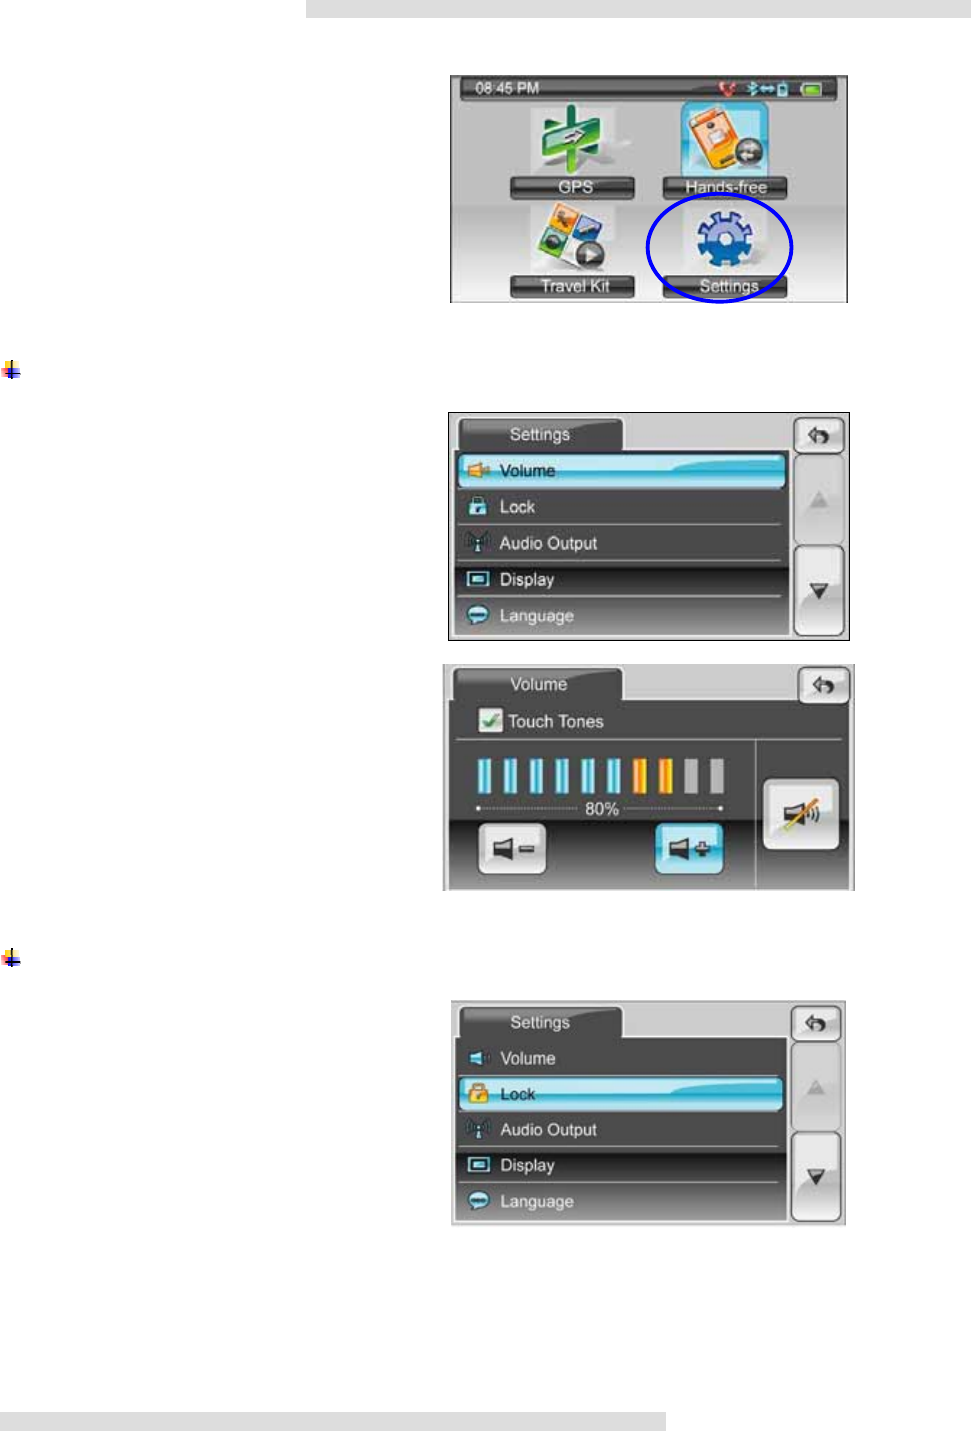
Chapter 4: Settings
Tap on Settings inthemainmenuto
proceed.
4.1 Volume
Tap Vol um e to adjust volume of this device.
Users may adjust either to increase volume
or to decrease volume at by tapping icons
below. If quiet operation is needed, tap
mute icon in the right.
4.2 Lock
Tap Lock to set lock screen.
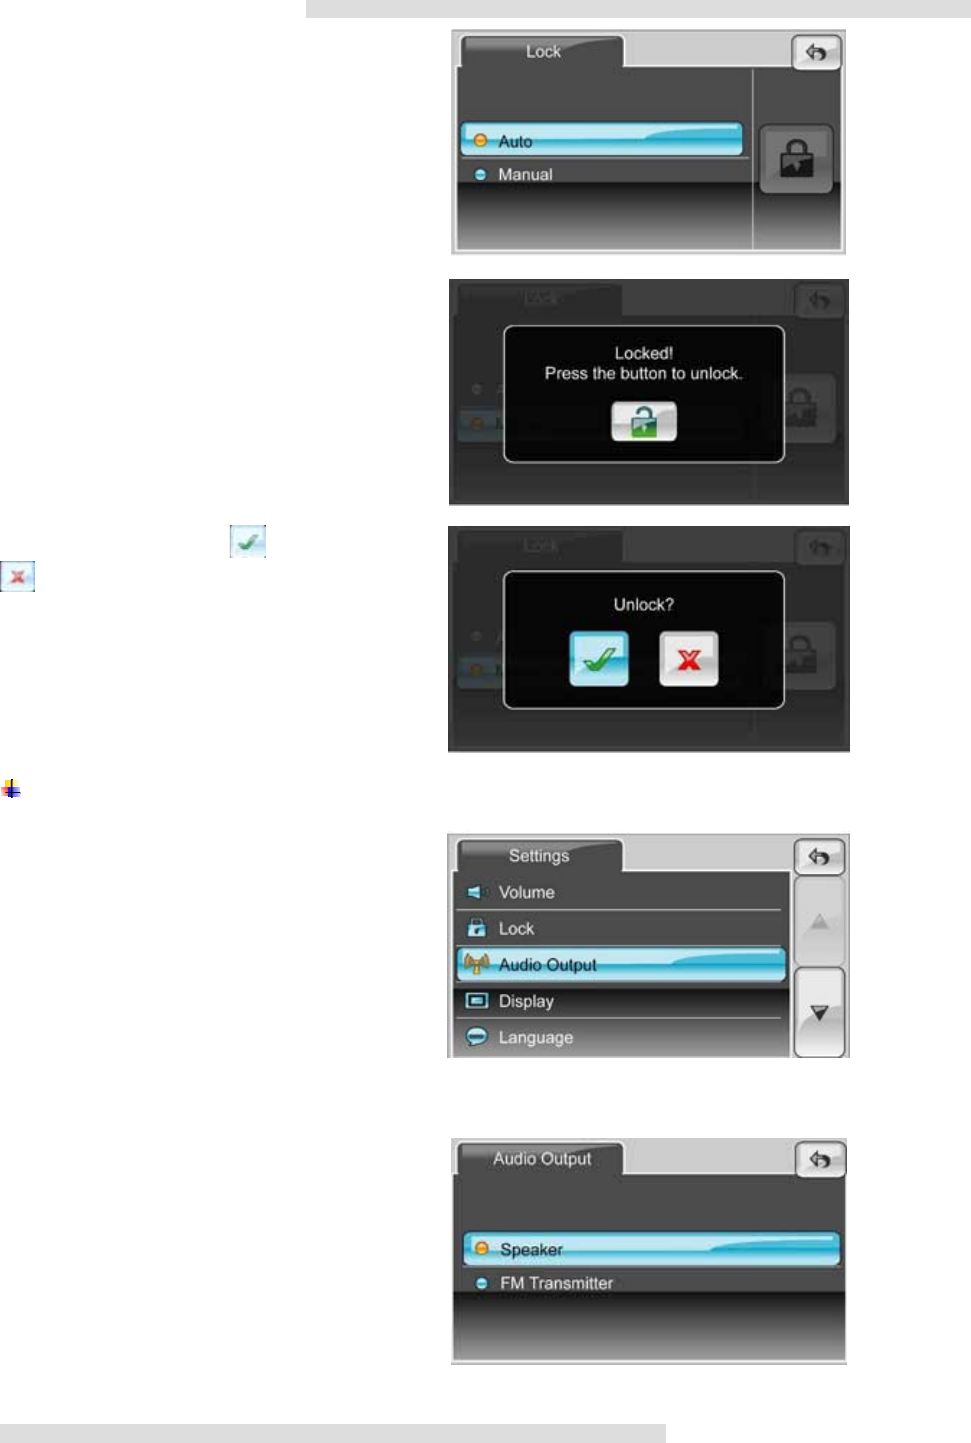
18
Users might like to select Auto or Manual at
their preference.
Select Auto, the screen will pop Locked
message when user left the device unused
for a while. In this case, tapping Unlock
icon to release.
A confirm message, tap to unlock or
to remain locked screen.
4.3 Audio Output
Tap Audio Output under Settings.
4.3.1 Speaker
Tap Speaker to activate speaker mode.
19
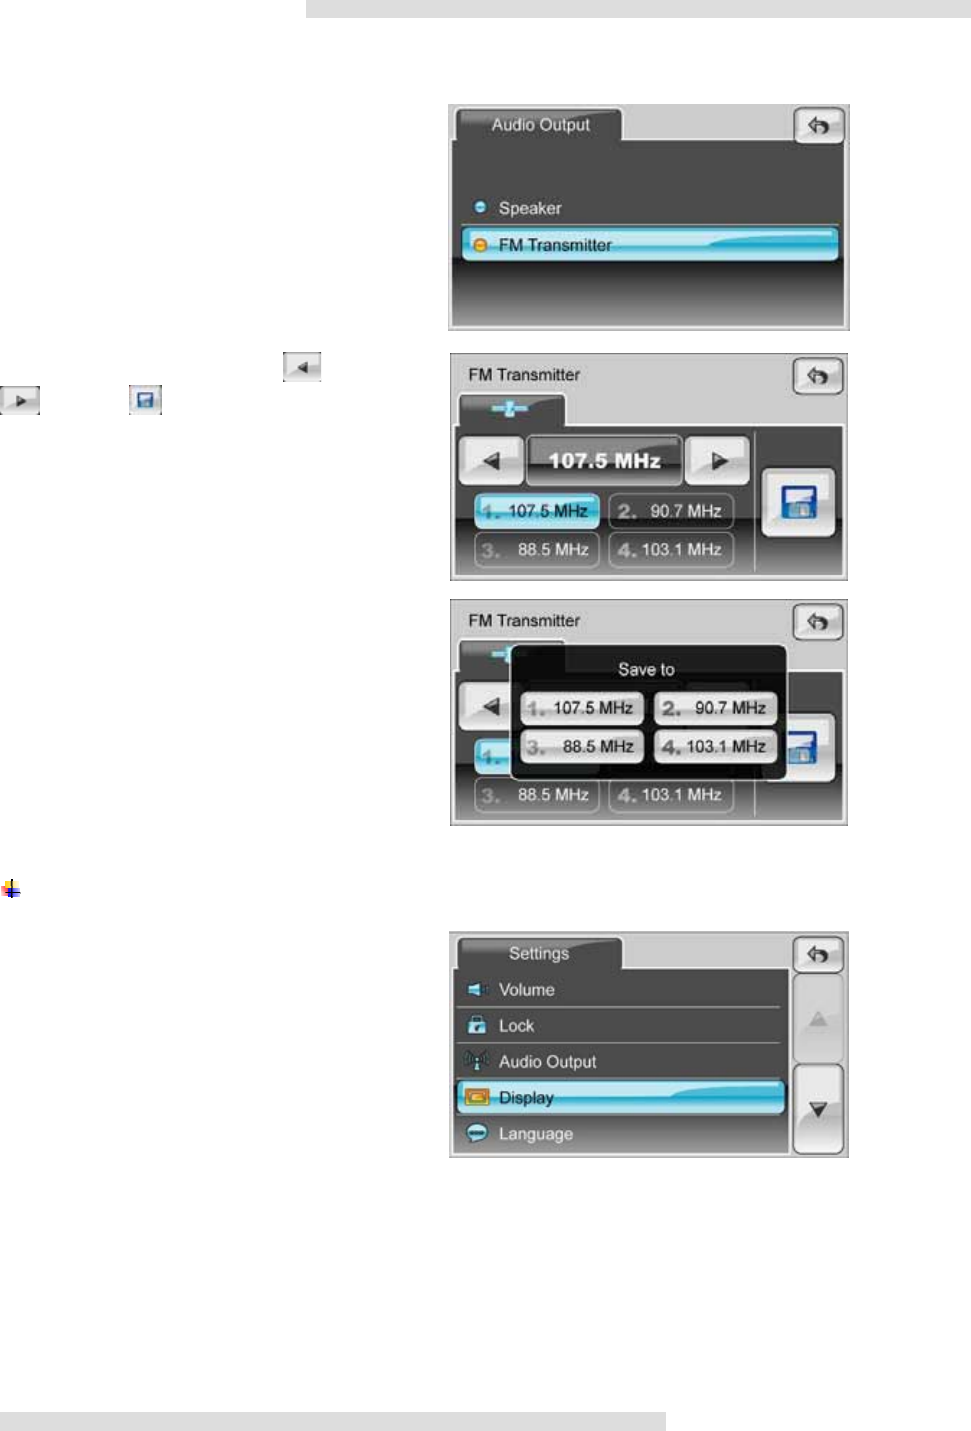
4.3.2 FM Transmitter
Tap FM Transmitter to enter FM
Transmitter setting.
User may adjust frequency by or
and save as one of your favorite
channels.
User can select various frequencies among
88.5~107.5 MHz to save up to four of your
most frequent used channels as listed in the
right.
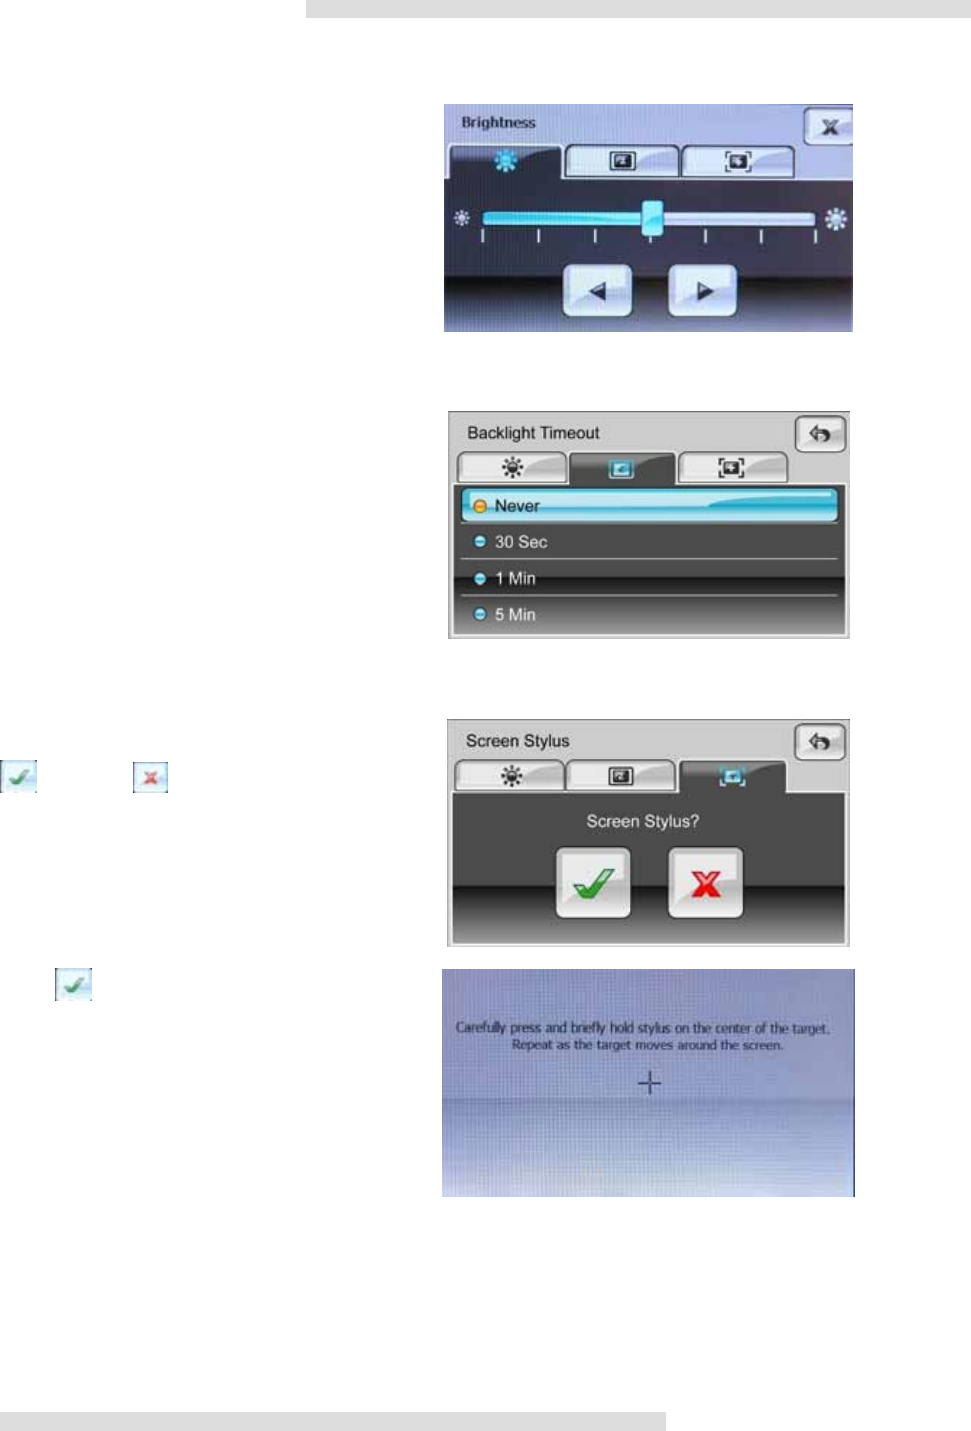
4.4 Display
Tap Display to set Brightness,Backlight
Timeout and Screen Stylus.
90
20
4.4.1 Brightness
Users can adjust screen brightness either
by tapping icons below to plus or minus
screen brightness at Brightness tab.
4.4.2 Backlight Timeout
Users can adjust Backlight Timeout at this
tab for power saving purposes.
4.4.3 Screen Stylus
Users can calibrate precision of this device
at Screen Calibration tab. Select Tap to
confirm or to cancel.
Once is selected, a cross symbol
shall display in the center, move your
finger as cross moves around.
21
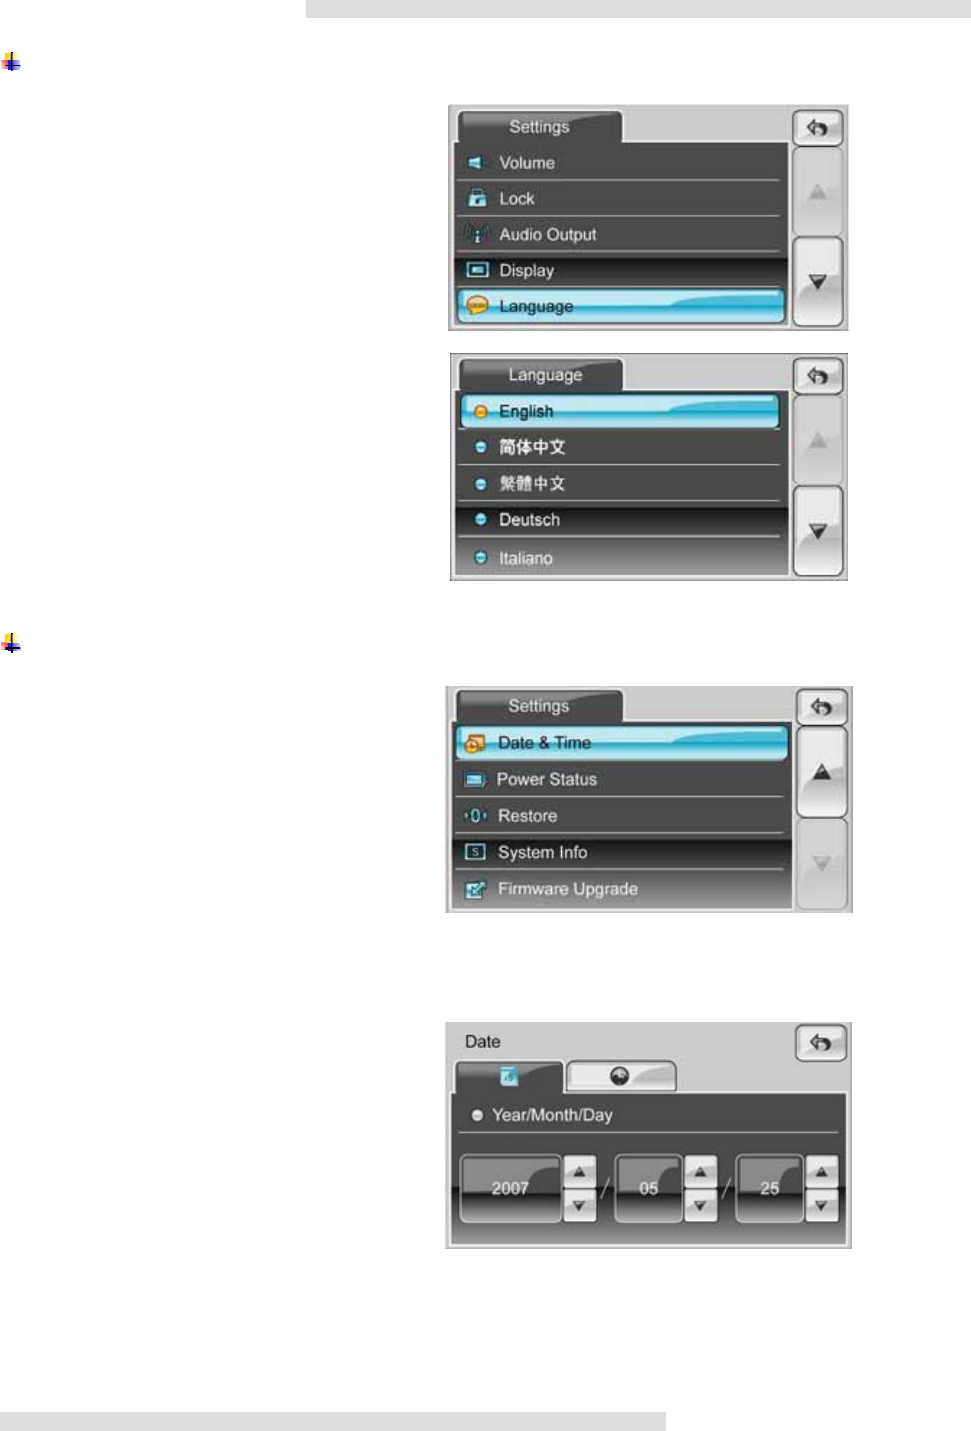
4.5 Language
Select display Language here.
There are ten languages available.
4.6 Date & Time
Select Date & Time to set local date and
time.
4.6.1 Date
Set date in Year/Month/Day format. By
adjusting icons in the right.
22
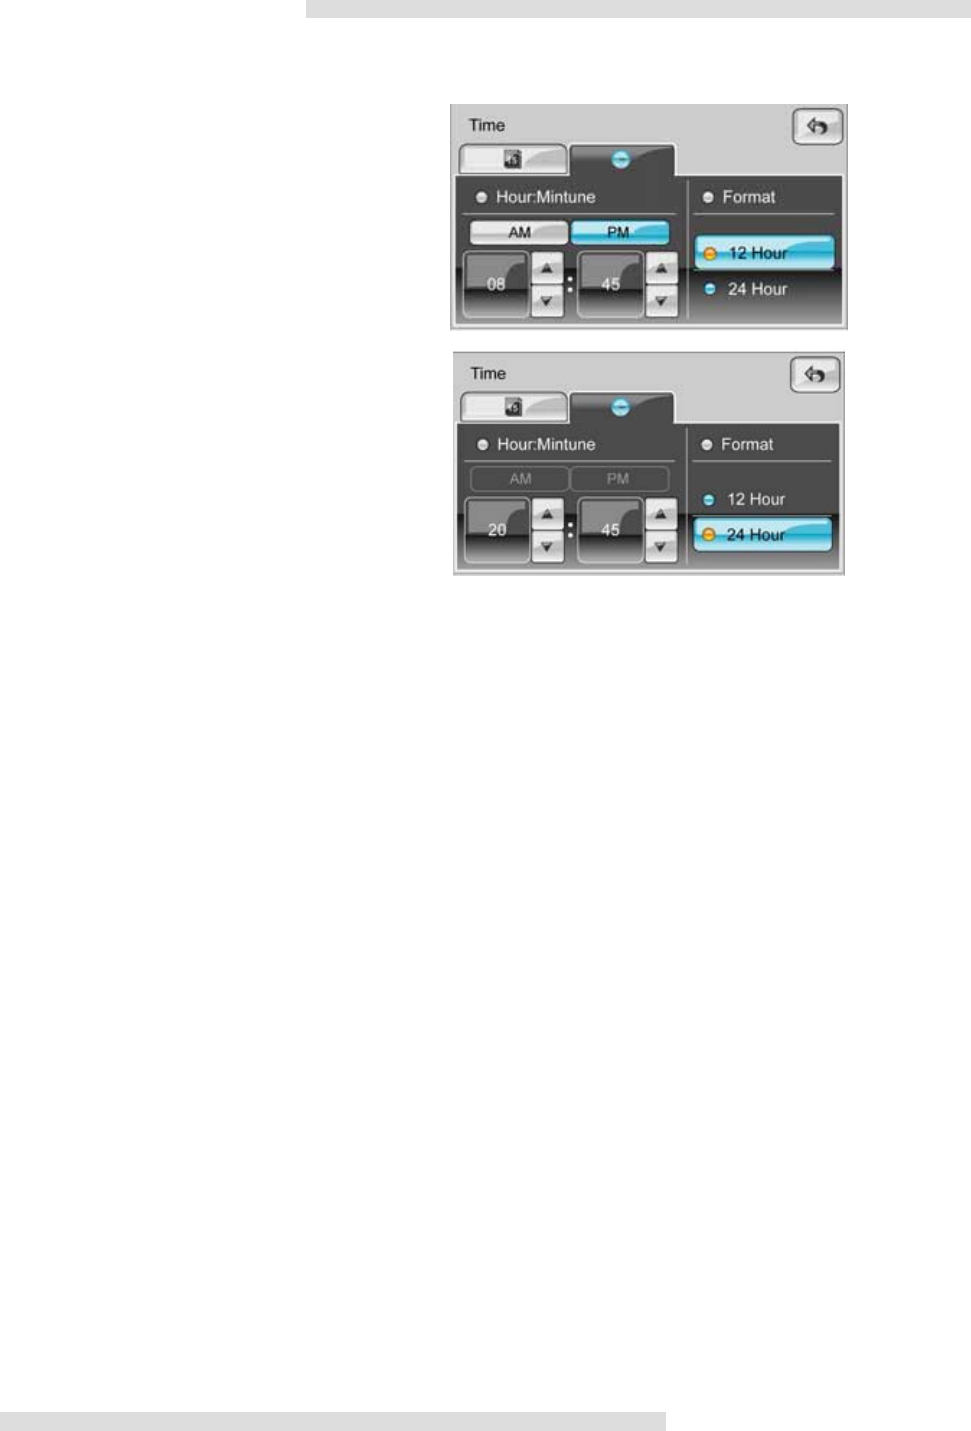
4.6.2 Time
Set time in Hour: Minute. Moreover, user
could change either in 12-hour format or
24-hour format as user’s preference.
23
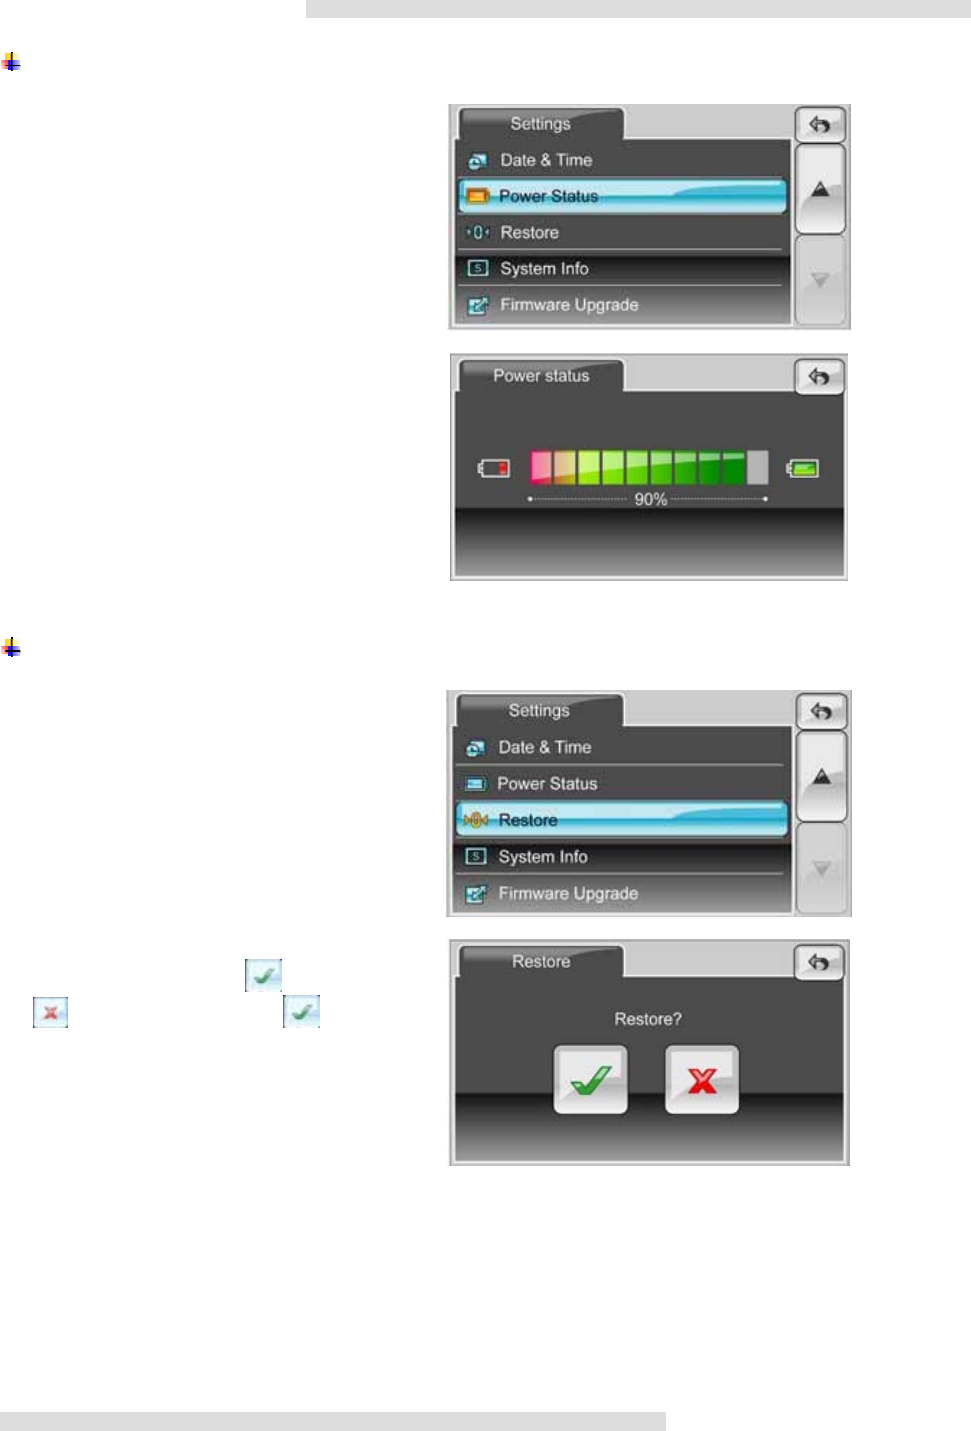
4.7 Power Status
Tap Power Status to learn current power
status.
From left to right indicates short to full
battery status.
4.8 Restore
Tap Restore to restore all defaults.
A window as in the right shall pop up to
confirm restoration. Tap to confirm
or to cancel. Once is
selected, a transparent icon shows
Finished will show in a few seconds.
24
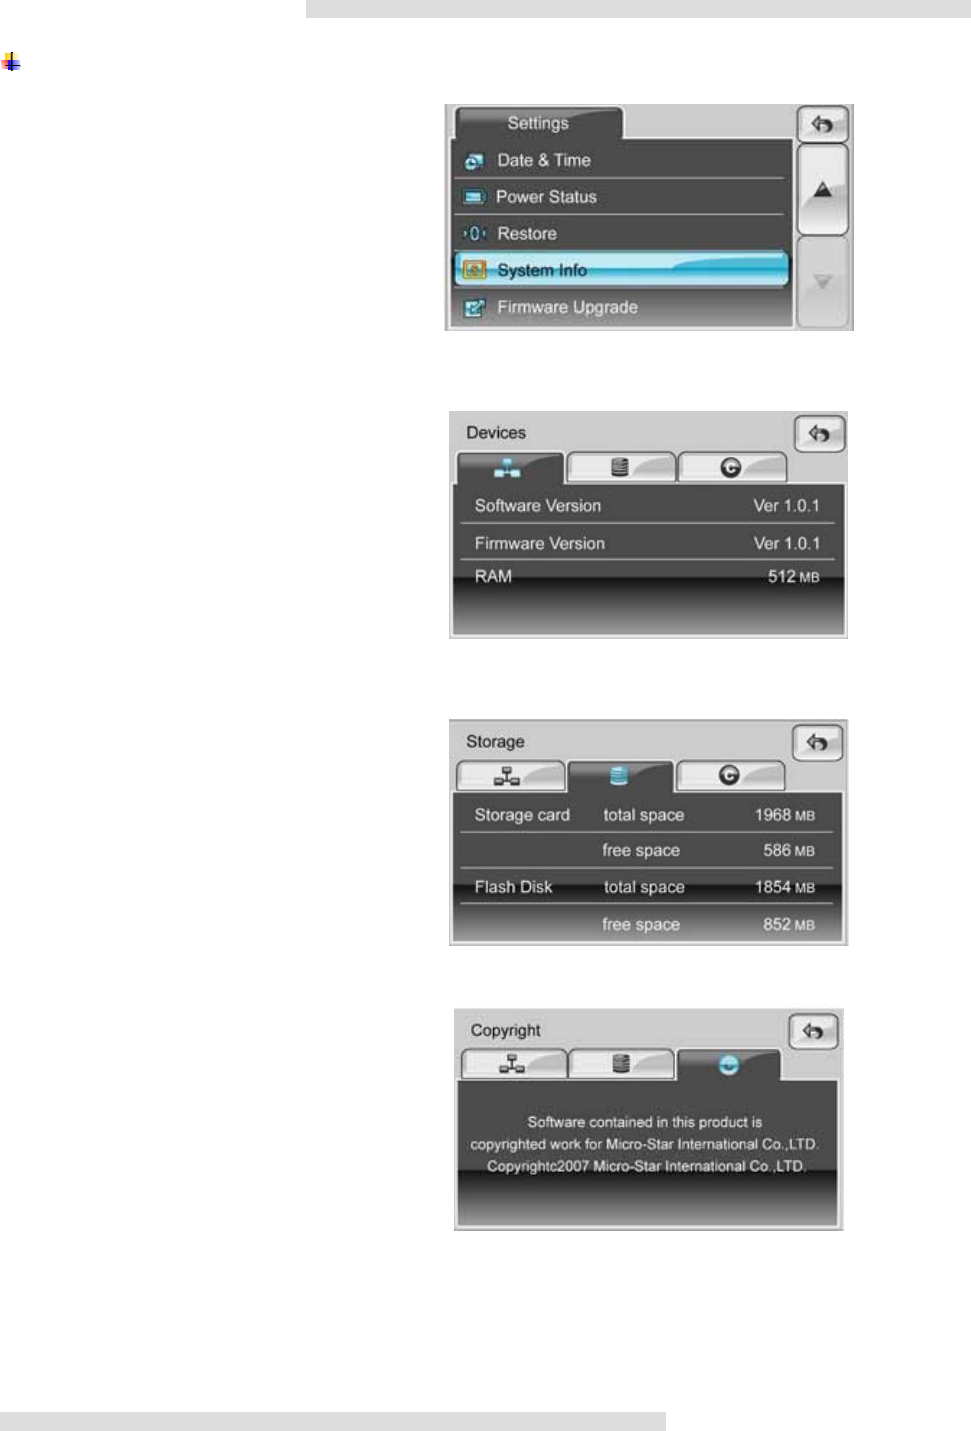
4.9 System Info.
Select System Info to know more details
regarding
4.9.1 Devices
Software Version,Firmware Version and
RAM capacity under Devices tab shows
here.
4.9.2 Storage
Tap Storage tabtoshowcapacityof
Storage Card, and Flash Disk.
4.9.3 Copyright
Tap Copyright tab to know copyright of this
product belongs to Micro Star International.
25
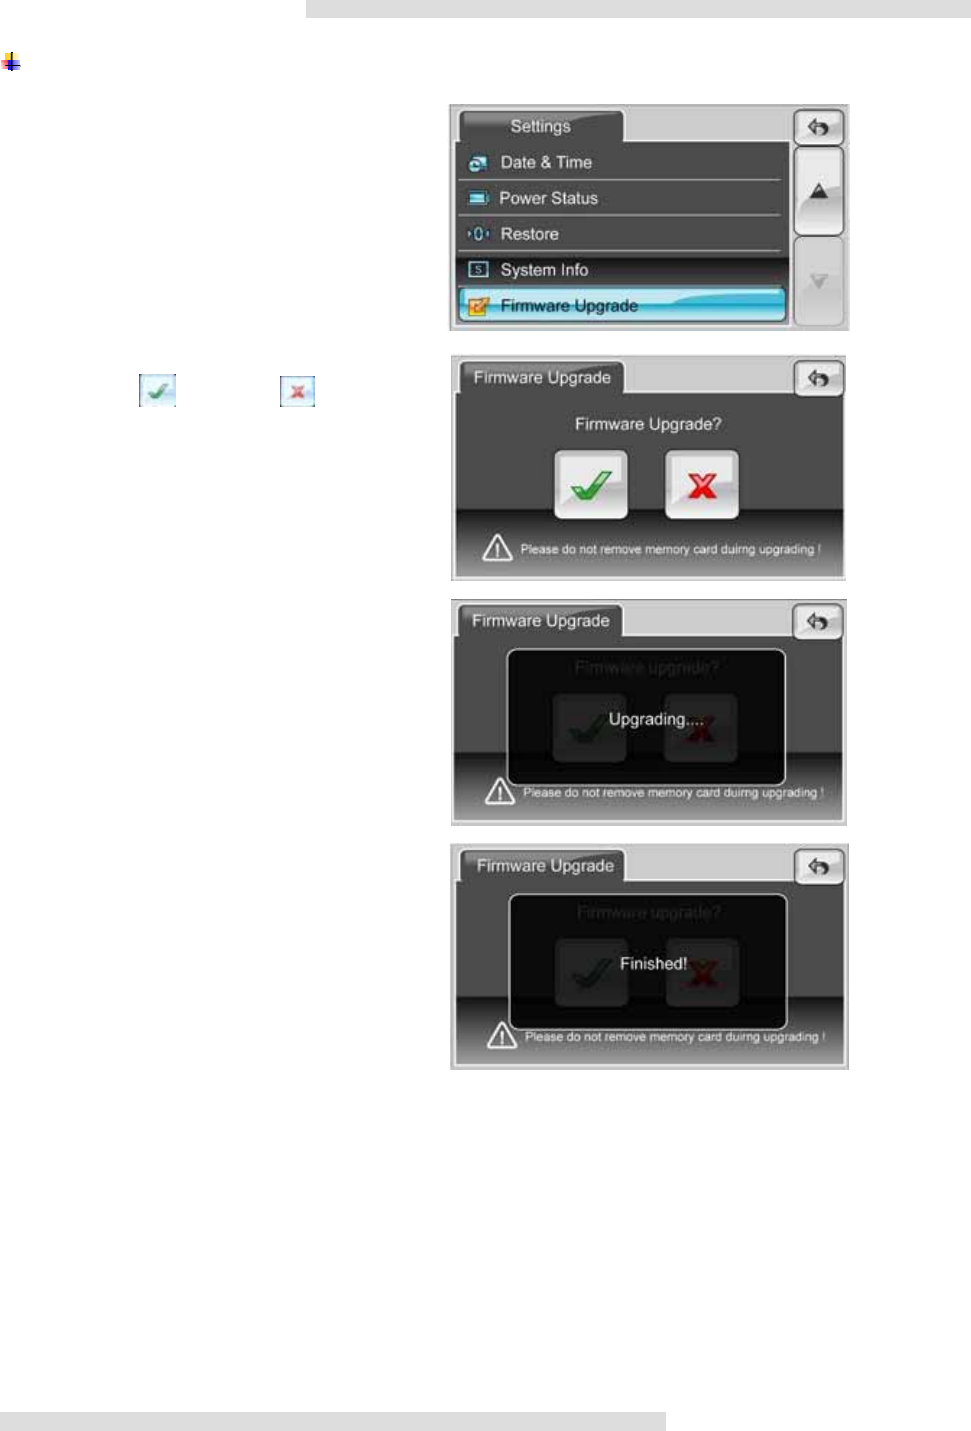
4.10 Firmware Upgrade
Tap Firmware Upgrade tab to upgrade
Firmware.
A window in the right shall pop up to
confirm. Tap to confirm or to
cancel.
Screen shall show current status as
Upgrading.
Then Firmware Upgrade Finished.