Micro Star MS6970B BLUETOOTH USB DONGLE User Manual D Work 2005 1st Communication
Micro Star International Co Ltd BLUETOOTH USB DONGLE D Work 2005 1st Communication
USERS MANUAL

MICRO-STAR INT’L
MS-6970B (v1.x)
Bluetooth Class 2 USB Dongle
6970Bv1.0-Preface.p65 2005/4/1, 下午 01:521

FCC-B Radio Frequency Interference Statement
This equipment has been tested and found to comply with the limits for a class B
digital device, pursuant to part 15 of the FCC rules. These limits are designed to
provide reasonable protection against harmful interference when the equipment is
operated in a commercial environment. This equipment generates, uses and can
radiate radio frequency energy and, if not installed and used in accordance with the
instruction manual, may cause harmful interference to radio communications. Op-
eration of this equipment in a residential area is likely to cause harmful interference,
in which case the user will be required to correct the interference at his own expense.
Notice 1
The changes or modifications not expressly approved by the party responsible for
compliance could void the user’s authority to operate the equipment.
Notice 2
Shielded interface cables and A.C. power cord, if any, must be used in order to
comply with the emission limits.
VOIR LA NOTICE D’INSTALLATION AVANT DE RACCORDER AU
RESEAU.
FCC ID: I4L-MS6970B
This device complies with part 15 of the FCC Rules. Opera-
tion is subject to the following two conditions: (1) This
device may not cause harmful interference, and (2) This de-
vice must accept any interference received, including inter-
ference that may cause undesired operation.
6970Bv1.0-Preface.p65 2005/4/1, 下午 01:522

FCC Requirement
This equipment complies with Part 68 of the FCC Rules. On the bottom of this
equipment is a label that contains, among other information, the FCC registration
Number, Ringer Equivalence Number (REN) and USOC jack type for this
equipment. You must, upon request, provide this information to your telephone
company.
An FCC compliant telephone cord and modular jack is provided with this equipment.
This equipment is designed to be connected to the telephone network or premise
wiring use a compatible modular jack which is Part 68 compliant. See installation
instructions for details.
The REN is useful to determine the quantity of devices you may connect to your
telephone line and still have all of those devices ring when your telephone number
is called. In most, but not all areas, the sum of the REN of all devices connected
to on line should not exceed five (5.0). To be certain of the number of devices you
may connect to your line, as determined by the REN, you should contact your local
telephone company to determine the maximum REN for your calling area. If your
telephone equipment causes harm to the telephone network, the Telephone Com-
pany may discontinue your service temporarily. If possible, they will notify you
in advance, but if advance notice is not practical, you will be notified as soon as
possible. You will be informed of your right to file a complaint with the FCC.
Your telephone company may make changes in its facilities, equipment, operations
or procedures that could affect the proper functioning of your equipment. If they
do, you will be notified in advance to you an opportunity to maintain uninter-
rupted telephone service.
If you experience trouble with this telephone equipment, please contact MICRO-
STAR INTERNATIONAL for information on obtaining service or repairs. The
telephone company may ask that you disconnect this equipment from the network
until the problem has been corrected or until you are sure that the equipment is not
malfunctioning.
This equipment may not be used on coin service provided by the telephone com-
pany. Connection to party lines is subject to stat tariffs.
6970Bv1.0-Preface.p65 2005/4/1, 下午 01:523

Copyright Notice
The material in this document is the intellectual property of MI-
CRO-STAR INTERNATIONAL. We take every care in the prepa-
ration of this document, but no guarantee is given as to the correct-
ness of its contents. Our products are under continual improve-
ment and we reserve the right to make changes without notice.
Trademarks
All trademarks used in this manual are the sole property of their
respective owners.
Pentium is a registered trademark of Intel Corporation.
Windows is a registered trademark of Microsoft Corporation.
Revision History
Revision Revision History Date
V 1.0 First Release March 2005
6970Bv1.0-Preface.p65 2005/4/1, 下午 01:524

Important Safety Precautions
Always read and follow these basic safety precautions carefully when handling any
piece of electronic component.
1. Keep this User’s Manual for future reference.
2. Keep this equipment away from humidity.
3. Lay this equipment on a reliable flat surface before setting it up.
4. The openings on the enclosure are for air convection hence protects
the equipment from overheating.
5. All cautions and warnings on the equipment should be noted.
6. Never pour any liquid into the opening that could damage or cause
electrical shock.
7. If any of the following situations arises, get the equipment checked by
a service personnel:
lThe USB cable is damaged
lLiquid has penetrated into the equipment
lThe equipment has been exposed to moisture
lThe equipment has not work well or you can not get it work
according to User’s Manual
lThe equipment has dropped and damage
lIf the equipment has obvious sign of breakage
8. DO NOT LEAVE THIS EQUIPMENT IN AN ENVIRONMENT
UNCONDITIONED, STORAGE TEMPERATURE ABOVE 600 C OR
BELOW -200C, IT MAY DAMAGE THE EQUIPMENT.
6970Bv1.0-Preface.p65 2005/4/1, 下午 01:525

CONTENTS
1. Introduction....................................................................................1
1.1 Bluetooth Technology..............................................................1
1.2 MSI™ Bluetooth USB Dongle................................................1
1.3 Hardware Specifications............................................................2
2. Installation.....................................................................................5
2.1 Package Checkup.......................................................................5
2.2 Software Installation.................................................................5
2.3 Hardware Installation................................................................6
3. Software Operations...................................................................9
3.1 Introduction to BlueSoleilTM .....................................................9
3.2 Basic Operations.....................................................................12
3.3 Getting Started.........................................................................19
3.4 BlueSoleil User Guides.............................................................34
4. Technical Support......................................................................47
5. Glossary.........................................................................................49
6970Bv1.0-Preface.p65 2005/4/1, 下午 01:526

User’s Guide
1
1. Introduction
1.1 Bluetooth Technology
The term “Bluetooth” refers to a worldwide standard for the
wireless exchange of data between two devices. In order to exchange
data, two Bluetooth devices must establish a connection. Before a
connection is established, one device must request a connection
with another. The second device accepts (or rejects) the connection.
The originator of the request is known as the client. The
device that accepts (or rejects) the request is known as the server.
Many Bluetooth devices can act as both client and server.
A client Bluetooth device runs a software program that re-
quests a connection to another device as part of its normal operation.
For example, the program may request a connection to a remote
computer, a printer, or a modem. Becoming a Bluetooth client
normally requires an action by the device operator, such as an
attempt to browse a remote computer, print a file, or dial out on a
modem.
Every Bluetooth device that provides a service must be pre-
pared to respond to a connection request. Bluetooth software is
always running in the background on the server, ready to respond to
connection requests.
1.2 MSI™ Bluetooth USB Dongle
MSI™ Bluetooth USB Dongle provides wireless technology
that revolutionizes personal connectivity. It is the solution for the
seamless integration of Bluetooth technology into personal
computers, enabling short-range wireless connections between desk-
top/laptop computers, Bluetooth-enabled peripherals (printers,
faxes,...), portable handheld devices, and connectivity to the
Internet.
6970Bv1.0.p65 2005/4/1, 下午 01:531

2
Bluetooth Class 2 USB Dongle
1.3 Hardware Specifications
General
H/W Interface USB 1.1
Standard Compliance Bluetooth Ver. 1.2
Throughput About 723Kbps (data hannels)
Operating Volt. 5V from USB interface
Operating Range 10M
Temperature Storage temp: -200 C~+700 C
Operating temp: 00 C~+550 C
Regulatory Approval FCC, CE, BSMI, C-Tick, DGT, BCIQ, SRRC, ICASA
Dimension 55 x 23 x 8.5 mm
Weight 7.6 g
Radio
Spread Spectrum Frequency Hopping Spread Spectrum (FHSS)
Frequency Range 2.4 ~ 2.4835GHz (2.4GHz ISM Band)
RF Channels Europe, USA, China, Japan
Frequencies: 2.400 - V 2.4835 GHz, 79 channels
France:
Outdoor use limited to 10 mW within the band
Frequencies: 2.454 - V 2.4835 GHz, 23 channels
Italy:
If used outside of own premises, general
authorization is required
Modulation GFSK, BT=0.5
Output Power Class Bluetooth Power Class 2
Output Power +4dBm (Max.)
Receiver Sensitivity -82dBm, BER< 0.1%
6970Bv1.0.p65 2005/4/1, 下午 01:532

User’s Guide
3
Max Input Level -5dBm
Power Control Yes
Base Band
Physical Links Support ACL link
Network Capabilities Support piconet point-to-point and
point-to multipoint connections
Link Manager
3-slot Packets Yes
5-slot Packets Yes
Slot Offset Yes
Timing Accuracy Yes
Switch Yes
Hold Mode Yes
Sniff Mode Yes
Test Mode Yes
Park Mode Yes
RSSI Yes
Power Control Yes
Authentication Yes
Encryption Yes
AFH Yes
Oeration System
System Support WindowsR 2000/ME/98/XP
6970Bv1.0.p65 2005/4/1, 下午 01:533

4
Bluetooth Class 2 USB Dongle
Profile
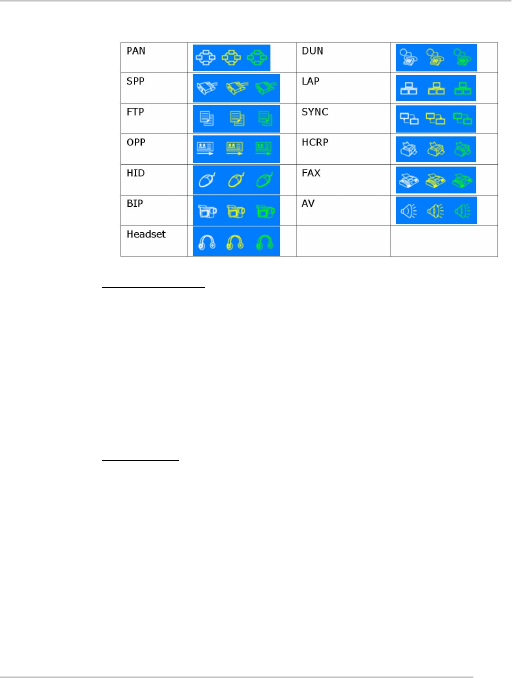
GAP Yes ( Generic Access Profile)
SDAP Yes (Service Discovery Profile)
SPP Yes (Serial Port Profile)
HSP Yes (Headset Profile, including Audio Gateway[AG]
and Headset [HS] )
DUN Yes (Dial Up Networking Profile)
FAX Yes (FAX Profile)
LAN Yes (LAN Access Profile)
OPP Yes (Object Push Profile)
FTP Yes (File Transfer Profile)
SYP Yes (Synchronization Profile)
PAN Yes (Personal Area Network Profile)
HID Yes ( Human Interface Device Profile)
GOEP Yes (Generic Object Exchange Profile)
HCRP Yes (Hard Copy Cable Replacement Profile)
A2DP Yes (Advanced Audio Distribution Profile)
BIP Yes (Basic Image Profile)
6970Bv1.0.p65 2005/4/1, 下午 01:584
User’s Guide
5
2. Installation
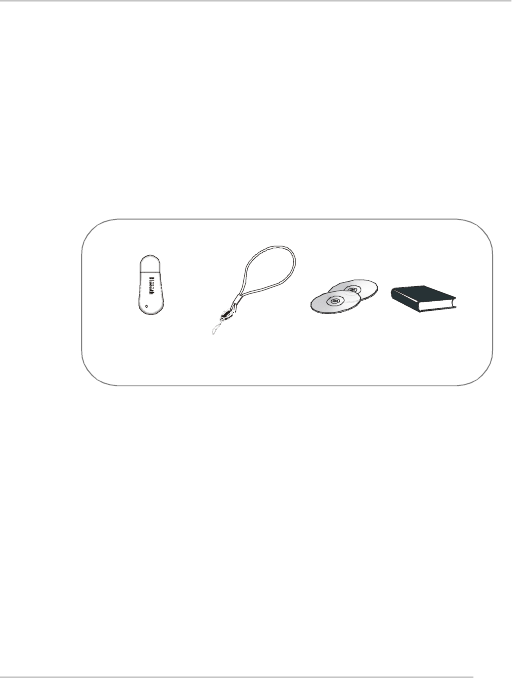
2.1 Package Checkup
Unpack the package and inspect all of the items carefully. If
any of the items is damaged or missing, please contact your local
dealer as soon as possible. Also, keep the box and packing materials
at hand, in case you need to ship the unit in the future.
2.2 Software Installation
1. Insert the supplied CD disk into the CD-ROM drive.
2. The CD will auto-run and the setup screen will appear.
3. Click on Bluetooth Software and follow the on-screen
instructions to complete the installation.
4. After completion of the installation, please restart your
computer.
Bluetooth
USB Dongle Strap Software
CD User’s
Guide
6970Bv1.0.p65 2005/4/1, 下午 01:585
6
Bluetooth Class 2 USB Dongle
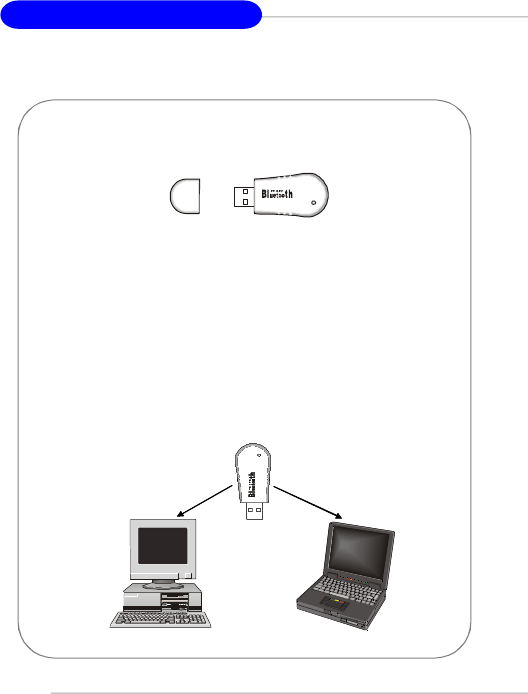
2.3 Hardware Installation
Uncap the Bluetooth USB Dongle.
1.
2. Connect the Bluetooth USB Dongle to any available USB ports
on the target devices with which you wish to establish wireless
Bluetooth connection. The target devices can be a desktop PC, a
laptop PC, or any other types of PCs with Windows® OS & USB
ports.
After installation, make sure that the USB Dongle is placed at a
location free from signal obstruction. Concrete walls, metal
substances, paints with metal composites,... etc. will cause sig-
nal obstruction and disable the Bluetooth function.
6970Bv1.0.p65 2005/4/1, 下午 01:536
User’s Guide
7
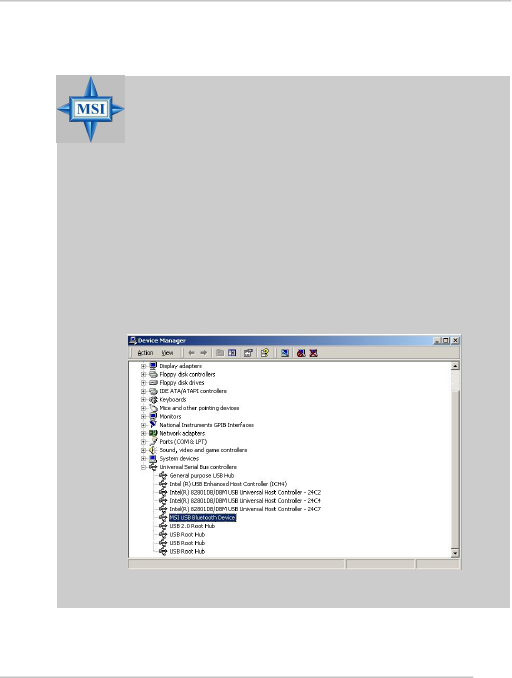
MSI Reminds You...
Note 1: The Bluetooth USB Dongle integrates one
blue LED to indicate the connection status (LED on
=> under connection / LED off => disconnection
or failed connection.)
Note 2: To make sure that the hardware & software
have been successfully installed, go to Control Panel
after restarting your system. Double-click System
and click the Device Manager tab. If the hardware
& software installation is complete, the MSI USB
Bluetooth Device should appear.
6970Bv1.0.p65 2005/4/1, 下午 01:537

8
Bluetooth Class 2 USB Dongle
NOTES
6970Bv1.0.p65 2005/4/1, 下午 01:538

User’s Guide
9
3. Software Operations
3.1 Introduction to BlueSoleil™
BlueSoleil is a Windows-based software from IVT that allows
your Bluetooth® enabled desktop or notebook computer to
wirelessly connect to other Bluetooth enabled devices.
BlueSoleil allows MS Windows users to wirelessly access a
wide variety of Bluetooth enabled digital devices, such as
cameras, mobile phones, headsets, printers, and GPS
receivers. You can also form networks and exchange data
with other Bluetooth enabled computers or PDAs.
Platforms supported by BlueSoleil include: Windows 98SE,
ME, 2000, and XP.
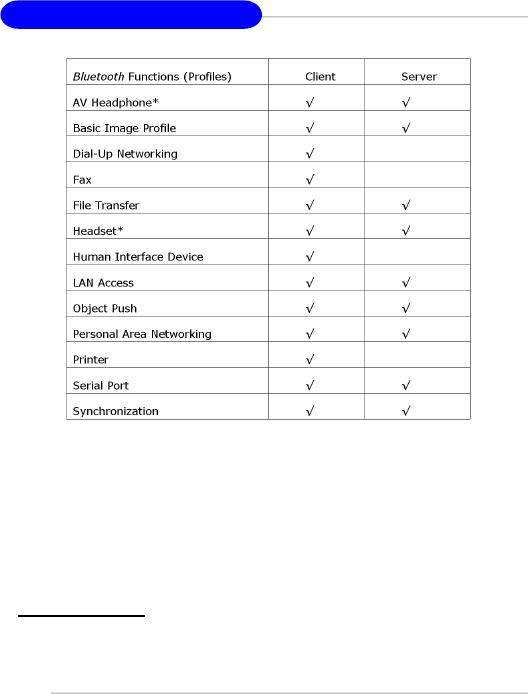
1. Bluetooth Functions
In order to connect and share services via Bluetooth wireless
technology, two devices must support the same Bluetooth
Profile(s) as well as opposite device roles (i.e., one must be
the server, and the other must be the client). Bluetooth
enabled devices often support multiple profiles, and if in-
volved in multiple connections, can perform different de-
vice roles simultaneously.
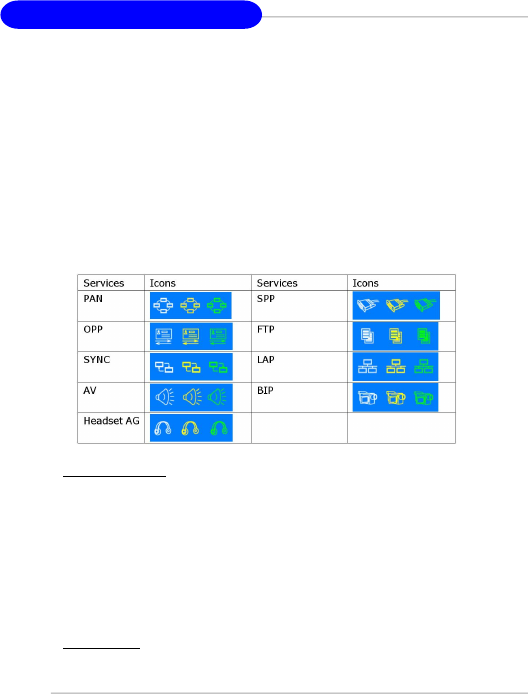
BlueSoleil supports the following Bluetooth functions
(Profiles) in the following device roles:
6970Bv1.0.p65 2005/4/1, 下午 01:539
10
Bluetooth Class 2 USB Dongle
Notes:
1. Only one Headset or AV Headphone connection can exist
at a time, since since there is only one virtual Bluetooth
audio device.
2. The Headset and AV Headphone Profiles do not work on
Windows 98SE or Windows Me.
2. Main Window
By default, BlueSoleil starts with the Main Window open.
Use the Main Window to perform your primary connection
6970Bv1.0.p65 2005/4/1, 下午 01:5310

User’s Guide
11
operations. The Main Window displays the local device (red
ball) as well as the remote devices detected in range. Differ-
ent icons distinguish different types of remote devices.
At the top of the Main Window are Service Buttons. After
you search for the services supported by a remote device, the
supported services of the selected device will be highlighted
Local Device — Basic Operations:
- Hover your mouse over the red ball to display the local
device’s Bluetooth name and address.
- Click on the red ball to start or stop searching for Bluetooth
devices in range.
- Right-click on the red ball to display a pop-up menu of
related operations (e.g., General Inquiry, My Services,
Security, etc.).
Remote Devices — Icon Meanings
- White — Idle. The normal state of the device.
- Yellow—Selected. You have selected the device.
- Green — Connected. The device is connected to your local
device.
Remote Devices — Operations
- Single-click to select.
- Double-click to search for the services supported by the
device.
- Right-click to display a pop-up menu of related operations
(e.g., Refresh Devices, Pair Devices, Connect, etc.).
Services — Icon Meanings
- White — Idle. The normal state.
- Yellow — Available. The service is available on the selected
device.
- Green — Connected. The service is active in a connection
with the remote device.
6970Bv1.0.p65 2005/4/1, 下午 01:5311

12
Bluetooth Class 2 USB Dongle
Services — Operations
- Hover your mouse over the service icon to display the
name of the service.
- Single-click on the service icon to connect.
- Right-click on the service icon to display a pop-up menu of
related operations.
3.2 Basic Operations
1. Insert Adapter
BlueSoleil supports Windows systems enabled with Bluetooth
wireless technology via either a USB adapter or a
CompactFlash (CF) card.
IMPORTANT! Be sure to insert the Bluetooth adapter
BEFORE you install the software!
USB Adapter:
1. Insert the USB adapter into the USB port of your computer.
CompactFlash Card:
1. Insert the CompactFlash card into your computer. To use
a CF card in a PC Card (PCMCIA) slot, first plug the card
into a CF-to-PC Card adapter.
2. The Found New Hardware Wizard will automatically start.
Make sure the installation CD is still in your computer. Fol-
low the wizard to install the card drivers.
6970Bv1.0.p65 2005/4/1, 下午 01:5312

User’s Guide
13
2. Install the Software
IMPORTANT! If you have any Bluetooth software pre-
viously installed on your computer, you must com-
pletely remove it first!
1. Insert the BlueSoleil software installation CD into the CD
drive of your computer.
2. Use My Computer or Windows Explorer to access your
CD drive. In the CD, click on SETUP.EXE.
3. Follow the directions on your screen to install the software.
4. As prompted, when software installation is complete, re-
start your computer.
3. Start BlueSoleil
1. Start BlueSoleil. Click on the BlueSoleil icon on your
desktop, or go to Start | Programs | IVT BlueSoleil | BlueSoleil.
Note: BlueSoleil will detect each insertion or removal of the
USB adapter. Alternatively, you can start BlueSoleil before
plugging in the USB adapter.
2.The very first time you use BlueSoleil, the Welcome to
Bluetooth screen will appear. Assign your Windows system a
name and device type, to be shown to other Bluetooth en-
abled devices. In most cases, you should leave the security
setting checked. Click OK.
6970Bv1.0.p65 2005/4/1, 下午 01:5313

14
Bluetooth Class 2 USB Dongle
4. Search for Other Bluetooth Enabled Devices
Before it can connect, your computer must first detect other
Bluetooth enabled devices in range.
Initiate a Device Search
1. Make sure that the Bluetooth enabled device you wish to
connect to is turned on, with sufficient battery power, and
set in discoverable mode. Have any necessary passkeys ready.
If necessary, you may also need to enable the service you
want to use on the remote device. Refer to the remote device’s
user documentation for instructions.
If you haven’t done so already, you may also want to assign
the device a Bluetooth name. Refer to the device’s user docu-
mentation for instructions.
2. In the Main Window, click on the red ball to start the
device search. Alternatively, you can click My Bluetooth |
My Device Inquiry or View | Refresh Devices or press F5.
3. After a few seconds, an icon will appear around the center
ball for each Bluetooth enabled device detected within the
radio range.
Note:
- The Main Window can display only eight discovered de
vices at a time. If BlueSoleil discovered more than eight
devices, use the scroll bar to view the remaining devices
discovered by BlueSoleil.
- To sort the devices by device name, device address, or
device type, click View | Arrange Devices.
4. Wait several seconds until BlueSoleil reports the name of
6970Bv1.0.p65 2005/4/1, 下午 01:5314

User’s Guide
15
each device.
5. If the device you want is not listed, make sure that the
device is turned on and discoverable and try searching again.
You have multiple options for starting another search:
- If you start another search by double-clicking on the red
ball or clicking My Bluetooth | My Device Inquiry or View
| Refresh Devices, then the list of previously detected de
vices will not be cleared.
- If you start another search by pressing F5, then the list of
previously detected devices will be cleared.
5. Establish Connection
Note: These are generic instructions for any type of Bluetooth
enabled device. Refer to the instructions in Chapter 3 for
specific details for the type of service you plan to use.
Normally, a connection is initiated from the client. Check
the chart in Chapter 1 to verify which device role BlueSoleil
supports for the service you wish to use.
- On the server side, start the service
- On the client side, initiate the connection
Start the Service
If you would like to use your computer as a server in a
Bluetooth connection, you must first start (enable) the ap-
propriate service(s) on your system.
1. Access the Service Window. Click View | Service Window.
2. If the icon for a service is highlighted (yellow), then the
service has already been started. If the icon is white, then
you need to start the service in order to use it. Right-click
6970Bv1.0.p65 2005/4/1, 下午 01:5315

16
Bluetooth Class 2 USB Dongle
the icon. In the pop-up menu, select Start Service. The icon
should now be highlighted (yellow). Serial Port icons will also
report which COM port is assigned to them.
Note:
- Icons will appear only for Bluetooth functions (Profiles)
which BlueSoleil supports in the Server device role. See
chart in the 1.1 Bluetooth Functions.
- Depending on your system, multiple icons for Serial COM
ports may appear.
3. After you have started the service in BlueSoleil, now you
are ready to initiate the connection from the remote device.
For instructions, refer to the user documentation for the
remote device.
Initiate the Connection
If you would like to use your computer as a client in a Bluetooth
connection, make sure that you have started (enabled) the
service on the remote device. Otherwise, BlueSoleil will not
be able to discover the service and connect to it. For
instructions, refer to the device’s user documentation.
1. Return to the Main Window. Click View | Main Window.
2. Double-click on the icon for the device you wish to con-
nect to. BlueSoleil will begin to search for information about
which services the device supports.
3. After the search, icons will be highlighted (yellow) at the
top of the BlueSoleil Main Window for services that are
supported by the device. Verify that the service you want to
use is supported.
4. Right-click on the device icon. In the pop-up menu, click
Connect, then select the service. BlueSoleil will start the
6970Bv1.0.p65 2005/4/1, 下午 01:5316

User’s Guide
17
connection. Depending on the security settings of each device,
you may need to enter the same passkey on each device in
order to bond the two devices.
5. A screen may appear asking if you want to set up auto-
matic connections. Click Yes or No.
6. If you are connecting to a phone, your phone may ask if
you want to ask the BlueSoleil computer to your device list.
Enter Yes and enter a passkey.
7. When the devices have successfully connected, the device
icon in the Main Window will turn green, and a green line will
appear between the red ball and the device icon. A red dot will
travel along the green line from the client to the server. A
signal strength icon will also appear next to the device icon.
The BlueSoleil icon in the task tray will also turn green to
indicate an active connection.
Note: A red check mark will appear next to the name of any
device that you have previously paired with your computer.
8. Depending on which services you are using, additional
screens may appear, and/or you may need to configure addi-
tional connection settings (e.g., user name, password, COM
port number, etc.). Refer to the instructions in Chapter 3 for
your specific service. After configuring the appropriate con-
nection settings, you should be ready to use your application.
9. To end a connection, in the Main Window, right-click on
the icon for a connected device. In the pop-up menu, click
Disconnect.
Note: You can only disconnect this way if your computer is
acting as a client device. If your computer is acting as a
server device, then you can disconnect in BlueSoleil by click-
6970Bv1.0.p65 2005/4/1, 下午 01:5317

18
Bluetooth Class 2 USB Dongle
ing View | Service Window, then right-clicking on the service
icon. In the pop-up menu, click Stop Service. Alternatively,
you can disconnect from the remote device.
6. Bluetooth Security
To modify your connection’s security settings, click My
Bluetooth | Security.
BlueSoleil offers three security levels:
- Low (Security Mode 1, Non-secure) No security procedure
is needed for connections.
- Medium (Security Mode 2, Service level enforced security)
Authentication or Authorization is requested when a spe
cific service is accessed by other Bluetooth enabled devices.
If two devices are connecting for the first time, or if two
devices do not have a trusted relationship, then the same
passkey must be provided on both sides to complete the
Authentication. This mode allows you to assign different
access rights for each service supported by the server device.
- High (Security Mode 3, Link level enforced security)
If either of two devices is in Mode 3, Authentication is
requested whenever a link connection is initiated between
two Bluetooth enabled devices. The passkey must be pro
vided on both sides to complete Authentication.
Note: In Security Mode 2, the user can add each authenti-
cated device into a trusted device list to expedite future
connections.
6970Bv1.0.p65 2005/4/1, 下午 01:5318

User’s Guide
19
3.3 Getting Started
1. AV Headphone
The AV Headphone Profile enables use of a Bluetooth en-
abled headphone to listen to high-quality stereo music played
on a computer.
Typical Usage
- Listen to music using a Bluetooth enabled AV headphone.
Step 1: Connect to the AV headphone.
Step 2: Play music using media player software on your
computer. Music will transmit wirelessly to the headphone.
2. Basic Imaging
The Basic Imaging Profile (BIP) enables users to receive
pictures from a Bluetooth enabled digital camera, mobile
phone, or other compatible device. It also enables remote
control of shooting, display, and other imaging functions.
Typical Usage
- Control camera to take pictures
- Receive pictures sent from BIP-enabled digital devices
Control Camera to Take Pictures
Step 1:Connect to the camera. A Bluetooth Camera Con-
troller will appear.
Step 2: Click the button to capture the image. The captured
image will be transmitted to your computer and displayed.
6970Bv1.0.p65 2005/4/1, 下午 01:5319

20
Bluetooth Class 2 USB Dongle
Step 1: Assign the directory where you would like to save
image files pushed from the client device. Click My Services
| Properties. Click on the Basic Image Push tab. In the Set
the image directory field, browse to select the file location.
Click OK.
Step 2: Start the BIP service.
Step 3: Send pictures from the remote device. For instructions,
refer to the user documentation for the remote device.
3. Dial-up Networking
The Bluetooth Dial-up Networking (DUN) Profile enables
users to wirelessly dial-up to the Internet through a Bluetooth
enabled modem or mobile phone that supports the DUN
Profile.
Typical Usage
- Dial-up to the Internet via a Bluetooth enabled mobile
phone.
- Dial-up to the Internet via a Bluetooth enabled modem.
Dial-up to the Internet via a Bluetooth enabled mobile phone.
Step 1: Connect to the phone’s Dial-Up Networking Service.
Step 2:The Dial-Up Dialog will appear. Enter the dial-up
number, User name, and Password. Make sure the correct
dial-up number is entered, then click on the Dial button.
Note: The default dial-up number *99***1# only works
with certain GPRS phones and service providers in the United
States. If necessary, enter the correct dial-up number for
your Internet Service Provider (ISP).
6970Bv1.0.p65 2005/4/1, 下午 01:5320

User’s Guide
21
Note: After you successfully connect, a screen will ask if you
would like to create a dial-up shortcut on your desktop. This
would allow you to conveniently dial up and connect by
simply clicking on the shortcut, without having to manually
start BlueSoleil. Alternatively, after starting BlueSoleil, you
can start the shortcut by clicking Tools | My Shortcuts.
Dial-up to the Internet via a Bluetooth enabled modem.
Step 1: Connect to the modem’s Dial-Up Networking Service.
Step 2:The Dial-Up Dialog will appear. Enter the dial-up
number, User name, and Password. Enter the correct dial-up
number, then click on the Dial button.
Note: The default dial-up number *99***1# does NOT work
with modems. You need to enter the correct dial-up number
for your Internet Service Provider (ISP).
Step 3: Use your email, Internet browsing or other applica-
tion that utilizes a dial-up connection.
Note: After you successfully connect, a screen will ask if you
would like to create a dial-up shortcut on your desktop. This
would allow you to conveniently dial up and connect by
simply clicking on the shortcut, without having to manually
start BlueSoleil.
4. FAX
The Bluetooth Fax Profile enables users to send faxes from
a computer via a Bluetooth enabled mobile phone or modem.
6970Bv1.0.p65 2005/4/1, 下午 01:5321

22
Bluetooth Class 2 USB Dongle
Typical Usage
- Send fax via a Bluetooth enabled mobile phone.
- Send Fax via a Bluetooth enabled modem.
Send fax via a Bluetooth enabled mobile phone
Step 1: Connect to the mobile phone’s fax service.
Step 2: Use your fax software to send the message.
Send fax via a Bluetooth enabled modem
Step 1: Connect to the modem’s fax service.
Step 2: Start your fax software. Configure your fax software
for the Bluelet Fax Modem (NOT the Bluelet Modem). Re-
fer to your fax software’s user documentation for instructions.
Step 3: Use your fax software to send the message.
5. File Transfer
The File Transfer Profile (FTP) enables users to transfer
files and/or folders between Bluetooth enabled laptops,
desktops, PDAs, mobile phones, etc.
Typical Usage
- Connect to a Bluetooth enabled mobile phone and transfer
files or folders to/from the phone.
- Share a folder on your computer with other Bluetooth
enabled devices.
- Access a shared folder on another Bluetooth enabled device.
Connect to a Mobile Phone
Step 1: Connect to the mobile phone’s FTP service.
Step 2: The phone’s folders are shown in a window. Users can
copy/paste/delete files or folders.
6970Bv1.0.p65 2005/4/1, 下午 01:5322

User’s Guide
23
Share a Folder on Your Computer with other Bluetooth En-
abled Devices
Step 1:Select the folder you would like to use for file sharing
and define the remote user privileges.
Click My Services | Properties. Click on the File Transfer
tab.
Share this folder: Browse to select the folder you would like
to share.
Share Permissions: Select Read and Write to allow others to
copy, paste or delete files/folders in this folder. Select Read
Only to allow others to only browse and copy files/folders
from this folder.
Step 2: Start the FTP service in BlueSoleil. Do not initiate
the connection in BlueSoleil.
Step 3: Browse your computer from the remote device. For
instructions, refer to the user documentation for the remote
device. When the remote device attempts to connect to
your computer, the Bluetooth Service Authorization screen
may appear. Click Yes.
Step 4: After successfully connecting, the remote device can
browse, copy, paste, and/or delete files on your computer,
depending on the remote folder privileges you allowed. For
instructions, refer to the user documentation for the remote
device.
Access a Shared Folder on Another Bluetooth Enabled Device.
Step 1:On the remote device, designate the folder/files to
share. Enable file sharing on the remote device. For
instructions, refer to the user documentation for the remote
device.
6970Bv1.0.p65 2005/4/1, 下午 01:5323

24
Bluetooth Class 2 USB Dongle
Note: If you do not enable file sharing on the remote device,
BlueSoleil will not be able to discover the device’s file sharing
service.
Step 2: Start the FTP service and initiate the connection in
BlueSoleil.
Step 3: A Remote Shared Folder screen will appear, display-
ing shared files/folders on the remote device, Use the screen
to browse, copy, paste, and/or delete files, depending on your
folder privileges.
6. Headset
The Headset Profile enables users to use a Bluetooth enabled
headset as wireless earplug or microphone.
Typical Usage
- Use Headset as a device for audio input/output.
Step 1: Connect to the Bluetooth enabled headset.
Step 2: Play music on your computer, or chat using network
meeting tools. You may need to press a multifunction button
on your headset to transmit audio between the computer and
the headset.
Note: For most Bluetooth enabled headsets, after you have
successfully connected for the first time, you can quickly
reconnect to BlueSoleil by simply pressing a multifunction
button on the headset.
6970Bv1.0.p65 2005/4/1, 下午 01:5324

User’s Guide
25
7. Human Interface Device
The Bluetooth Human Interface Device (HID) Profile en-
ables users to use Bluetooth enabled HID Devices such as
keyboards, mice or joysticks to control your computer.
Typical Usage
- Connect a Bluetooth enabled Mouse and a Keyboard to
Your Computer
Step 1: Connect the Bluetooth enabled mouse to your
computer.
Step 2: Connect the Bluetooth enabled keyboard to your
computer, following the instructions in Chapter 2. Before
you can use BlueSoleil to connect, you may need to press a
button on the keyboard to make it discoverable.
Note:
- The first time you connect the mouse or keyboard to your
computer, the Found New Hardware Wizard will automati
cally launch. In the first screen of the wizard, DO NOT
INSERT ANY CD and click Next. Follow the next screens
until you complete the wizard. If the wizard reappears,
cancel the wizard. You should be able to use the mouse or
keyboard with your computer.
- The Bluetooth enabled mouse/keyboard can automatically
re-connect to your computer after you successfully estab
lish the initial connection.
6970Bv1.0.p65 2005/4/1, 下午 01:5325

26
Bluetooth Class 2 USB Dongle
8. LAN Access
The Bluetooth LAN Access Profile (LAP) allows users to
access a Local Area Network (LAN) via a Bluetooth enabled
LAN access point.
Typical Usage
- Access a Local Area Network via a Bluetooth enabled LAN
access point
- Use your computer as a LAN Access Point
Access a LAN via a Bluetooth enabled Access Point (AP)
Step 1: Connect to the LAN AP’s LAP service.
Step 2: In the Connect Bluetooth LAP Connection dialog,
enter the user name and password if necessary. Click Connect.
Use your computer as a LAN Access Point (ADVANCED
USERS ONLY)
Step 1: Start the Bluetooth LAN Access service on BlueSoleil.
Step 2:Specify any static IP addresses necessary for LAP
clients. (Alternatively, you can use DHCP to have the sys-
tem dynamically assign IP addresses).
(1) In the Network Connections window, right-click In-
coming Connection, then select Properties.
(2) Select Incoming Connections Properties | Networking
-> Internet Protocol (TCP/IP), and click on the Properties
button.
(3) Select Specify TCP/IP addresses and enter the range of
IP addresses assigned to LAP clients.
6970Bv1.0.p65 2005/4/1, 下午 01:5326

User’s Guide
27
Note:
In order to use a Windows 98SE/Me system as an access
point, you must have already installed a Dial-up Adapter and
the Windows Direct Cable Connection component on the
system.
9. Object Push
The Bluetooth Object Push Profile (OPP) enables users to
send and receive Personal Information Management (PIM)
data objects (including messages, notes, calendar items, and
business cards) to and from a Bluetooth enabled PDA or
mobile phone.
The objects supported include:
- Contacts (*.vcf)
- Calendar items (*.vcs)
- Notes (*.vnt)
- Messages (*.vmg)
Typical Usage
- Push objects to a Bluetooth enabled mobile phone or PDA.
- Receive objects from a Bluetooth enabled mobile phone or
PDA.
Note: If you would like to push PIM objects to a PDA, make
sure that the PDA is ready to receive a PIM object before
you start. If necessary, enable Object Push on the PDA. For
instructions, refer the PDA’s user documentation.
Push Objects to a Bluetooth Enabled Mobile Phone
There are two methods to push objects:
6970Bv1.0.p65 2005/4/1, 下午 01:5327

28
Bluetooth Class 2 USB Dongle
Method 1: From BlueSoleil Main Window: Double-click on
the mobile phone or PDA icon to browse for service
information. The Object Push Service icon should be high-
lighted at the top of the screen. Right click the Object Push
Service icon, and in the pop-up menu click Send My Card.
Send My Card: Send your default business card.
Get Card: Get the phone’s default business card.
Send Objects: Select objects (PIM files ending in .vcf, .vcs, .
vnt, or .vmg) and send them to the phone.
Exchange cards: Have your computer and the phone to ex-
change their default business cards.
Method 2: From MS Outlook:
(1) Select the contact that you would like to send.
(2) In Outlook, click on the Push button on the toolbar, or
click File | Push.
(3) The Bluetooth Neighbors screen will appear. In the de-
vice list, select the phone or PDA that you wish to push the
contact to. Click on the Push button.
Receive Objects from a Bluetooth Enabled Mobile Phone
Step 1: Configure the parameters for the object push. From
the Main Window, click My Services | Properties. Click on
the Object Push tab.
Step 2: Start the Object Push service. Do not initiate a
connection, only start the service so that your computer will
be ready to receive objects.
Step 3: Send objects from the phone. For instructions, refer
to your phone’s user documentation.
6970Bv1.0.p65 2005/4/1, 下午 01:5328

User’s Guide
29
Notes:
- BlueSoleil creates a Bluetooth folder (with Inbox and Outbox
subfolders) in your My Documents folder for use with Ob-
ject Push. The Inbox is used to save objects received from
other devices. The Outbox is used to save objects sent out
from your computer.
- Your can set your default business card by clicking My
Services | Object Push. In the Send My Business Card field,
browse to select a contact as your default business card.
10. Personal Area Networking
The Bluetooth Personal Area Networking (PAN) Profile
enables PCs, laptops, PDAs, and other Bluetooth enabled
devices to form either of two kinds of PAN networks. In a
Group ad-hoc Network (GN), which functions as an isolated
network, multiple PAN Users (PANUs) are linked together
via a GN controller. Alternatively, a PAN can consist of
multiple PANUs linked to a Network Access Point (NAP),
which provides access to external Local Area Network (LAN)
infrastructure. BlueSoleil supports all three of these device
roles — GN (controller), PANU, and NAP.
Typical Usage
- Group Ad-hoc Network (Peer-to-peer networking) One
device acts as the GN, and others function as PANU devices.
These computers can visit each other or use an application
based on TCP/IP.
- Access a LAN via a Network Access Point (or a Computer
Acting as a NAP) After the computers connect to the NAP,
they become members of the LAN and can directly com-
municate with other computers in the LAN.
6970Bv1.0.p65 2005/4/1, 下午 01:5329

30
Bluetooth Class 2 USB Dongle
Connecting the PAN User (PANU)
Step 1: Connect to the server’s Personal Area Network service.
Step 2: Wait a few seconds for BlueSoleil to obtain and dis-
play your computer’s IP address.
Configuring the NAP/GN
Click Bluetooth Service | Properties and click on the Per-
sonal Area Network tab.
Scenario 1 Group Ad-hoc Network
Select Set up Bluetooth Personal Area Network and Enable
DHCP Server.
A DHCP server will be started on the GN. The PANU can
obtain an IP address automatically from this DHCP server if
the PANU does not set static IP address for the BT Network
Adapter.
Scenario 2 Access LAN via PAN-NAP
Select Access LAN Network and select a physical network
adapter, through which the NAP connects to a LAN, as the
LAN Adapter.
Scenario 3 Access the Internet via NAP
Select Access Internet and select a physical network adapter,
through which the NAP connects to Internet, as the WAN
Adapter. It will automatically enables NAT (Network Ad-
dress Translation, please refer to Windows Help Topic) func-
tion and a DHCP server.
Note: The BT Network Adapter on the PANU side must be
set to obtain an IP address automatically. The IP address is in
the form of 192.168.2.xxx, such as 192.168.2.1.
6970Bv1.0.p65 2005/4/1, 下午 01:5330

User’s Guide
31
11. Printer
The Bluetooth Printer Profile (HCRP) enables your com-
puter to connect to a Bluetooth enabled printer.
Typical Usage
- Print documents on a Bluetooth enabled Printer.
Step 1:Connect to the printer’s printer service.
(a) If your computer does not have the correct printer driv-
ers installed, BlueSoleil will prompt you to do so.
Install the driver for the printer, and remember to set the
printer port to the correct COM port number. To determine
the correct COM port number, in the Main Window, right-
click on the device icon. In the pop-up menu, select Status.
(b) If the printer driver has been installed, a message indi-
cates that the printer is ready.
Step 2: Print documents using the Bluetooth enabled printer.
In the application, be sure to select the correct printer and
printer port.
12. Serial Port
The Bluetooth Serial Port Profile (SPP) provides PCs,
laptops, PDAs, GPS receivers, cordless serial adapters, and
other Bluetooth enabled devices with a virtual serial port,
enabling them to connect with each other wirelessly via
Bluetooth instead of with a serial cable.
BlueSoleil supports four Bluetooth Serial Ports for outgoing
connections and two Bluetooth Serial Ports for incoming
connections.
6970Bv1.0.p65 2005/4/1, 下午 01:5331

32
Bluetooth Class 2 USB Dongle
Typical Usage
- Connect to other Bluetooth enabled devices via the Serial
Port.
Connect to a PDA
Step 1: Connect to the PDA’s Serial Port service.
Step 2: Use ActiveSync or any other application that uses a
serial connection.
Note:
- Serial Port Auto-Connection function. Once a target de
vice is assigned to a specific serial port, (e.g., COM5), when-
ever an application opens that serial port number, BlueSoleil
will automatically connect to the target device. Similarly,
whenever an application closes the Bluetooth serial port,
BlueSoleil will stop the connection. To check which de
vices are assigned to which COM ports, click Tools | Con
figurations | Connect With.
- Some applications only allow you to use a limited range of
COM port numbers. If the application does not allow you
to use a COM port number assigned by BlueSoleil, you will
not be able to use BlueSoleil with your application.
13. Bluetooth Synchronization
The Bluetooth Synchronization (SYNC) Profile enables us-
ers to synchronize PIM objects on their computer with that
of other Bluetooth enabled computers as well as Bluetooth
enabled mobile phones, PDAs, and other devices.
Four kinds of objects are supported:
- Contacts (*.vcf)
6970Bv1.0.p65 2005/4/1, 下午 01:5332

User’s Guide
33
- Calendars (*.vcs)
- Notes (*.vnt)
- Messages (*.vmg)
Supported MS Outlook versions: Outlook 2000, Outlook
2002 (xp), Outlook 2003.
Typical Usage
- Synchronize your computer with a Bluetooth enabled mo-
bile phone
Step 1: Connect to the mobile phone’s Synchronization
service.
Step 2: A synchronization dialog will appear. Click on the
Start button to synchronize. Contacts, calendars, notes and
emails in MS Outlook will be synchronized with those on the
phone.
Note:
- Users can start synchronization from MS Outlook using
the Bluetooth Add-In menus and buttons installed with
BlueSoleil.
- BlueSoleil can act as synchronization server. Click My
Services | Properties. Click on the Information Synchroni
zation tab, and select the type of PIM objects that you
would like to synchronize.
6970Bv1.0.p65 2005/4/1, 下午 01:5333

34
Bluetooth Class 2 USB Dongle
3.4 BlueSoleil User Guides
1. BlueSoleil Environment
1.1 Main Window
The Main Window displays the local device (red ball) and the
remote devices detected in range. Connecting and discon-
necting operations are conducted here. Connections are in-
dicated by green dashed lines between the local device and
connected remote devices.
By default BlueSoleil starts with the Main Window open. To
return to the Main Windows after switching views, click
View | Main Window.
The Local Bluetooth enabled device, known as “My Device”,
represents the user’s computer that is running BlueSoleil.
Operations
- Hover your mouse over the red ball to display the local
device’s Bluetooth name and address.
- Click on the red ball to start or stop searching for Bluetooth
devices in range.
- Right-click on the red ball to display a pop-up menu of
related operations (e.g., General Inquiry, My Services,
Security, etc.).
Remote Bluetooth Devices
Remote devices are other Bluetooth enabled devices that are
in the radio range of your local device. BlueSoleil uses differ-
ent icons to indicated different types of remote devices.
6970Bv1.0.p65 2005/4/1, 下午 01:5334
User’s Guide
35
Icon Meanings
There are 3 states for the service icons, indicated by differ-
ent colors.
- White — Idle. The normal state.
- Yellow — Available. The Bluetooth service is available on
the selected remote device.
- Green — Connected. The Bluetooth service is active in a
connection with the remote device.
Operations
- Hover your mouse over the service icon to display the
name of the service.
- Single-click on the service icon to connect.
- Right-click on the service icon to display a pop-up menu of
related operations.
6970Bv1.0.p65 2005/4/1, 下午 01:5335
36
Bluetooth Class 2 USB Dongle
1.2 Service Window
The Service Window displays the local Bluetooth services,
(i.e., the Bluetooth services supported by BlueSoleil). Use
the Service Window to start and stop services, as well as to
configure service properties. To access the Service Window,
click View | Service Window.
Local Service List
The Local Service List displays all of the Bluetooth services
supported by the local computer. Use this screen to start/
stop services.
Icon Meanings
There are 3 states for the local Bluetooth services, indicated
by different icon colors.
- White – Idle. The service has not been started.
- Yellow – Started. The local Bluetooth service has been
started.
- Green – Connected. Some remote device has connected to
the service.
Operations
- Single-click on the icon to select the service.
6970Bv1.0.p65 2005/4/1, 下午 01:5336

User’s Guide
37
- Double-click on the icon to Start/Stop a service.
- Right-click to display a pop-up menu of related operations.
1.3 Menus
BlueSoleil contains the following six menus:
- File Menu
- View Menu
- My Bluetooth Menu
- My Services Menu
- Tools Menu
- Help Menu
File Menu
Hide — Hide the BlueSoleil window. Connections can still
run when the window is hidden.
Always on Top — Keep the BlueSoleil window always on
top.
Exit — Exit BlueSoleil.
You can also exit BlueSoleil by right-clicking on the task
tray icon at the bottom of your screen. In the pop-up menu,
click Exit.
View Menu
Main Window — Show the BlueSoleil Main Window.
Service Window — Show the BlueSoleil Service Window.
Arrange Devices — Arrange remote devices by Device Name,
Device Address, or Device Type.
Refresh Devices — Refresh the list of remote devices de-
tected by BlueSoleil.
6970Bv1.0.p65 2005/4/1, 下午 01:5337

38
Bluetooth Class 2 USB Dongle
Note: If you select Refresh Devices, the list of previously
detected devices will not be cleared. To initiate a new device
search that will first clear the list, press F5.
My Bluetooth Menu
Bluetooth Device Inquiry — Search for other Bluetooth en-
abled devices in range.
Bluetooth Service Browsing — Browse for the services of
the selected remote device.
Security — Configure the security settings of the local de-
vice (e.g., passkey requirements, data encryption, etc.).
Properties — Configure the properties of the local device (e.
g., device name, accessibility, etc.).
My Services Menu
Start Service — Start the selected local Bluetooth service.
Stop Service — Stop the selected local Bluetooth service.
Status — View the status of the selected local Bluetooth
service.
Properties — Configure the properties of the local Bluetooth
services (e.g., automatic connections, shared file locations,
etc.).
Tools Menu
My Shortcuts — Display dialog Bluetooth Shortcuts.
Connect: Connect the selected shortcut.
Delete: Delete the selected shortcut.
Find Device — Click to find a device, by either of two search
criteria:
6970Bv1.0.p65 2005/4/1, 下午 01:5338

User’s Guide
39
By Bluetooth Device Address:
Enter a Bluetooth device address, in standard format (xx:xx:
xx:xx:xx:xx), and click on the Find button. The device with
the specified address will appear highlighted in the Main
Window.
By Name:
Check the By Name box, enter the Name of the device, and
click on the Find button. The device with the specified name
will appear highlighted in the Main Window.
Add New Device — Add a remote device by entering its
Bluetooth device address.
Add Device From History — Add a remote device from the
history list.
Add: Add the selected device.
Delete: Clear the selected device from the history
list.
Configurations->Connect With — If desired, assign a re-
mote device to automatically connect with a Bluetooth se-
rial port whenever an application opens the specified port.
Assign: Assign a device to the selected port.
Remove: Remove the Auto-Connection device as
signment for the selected port.
Configurations-> Unplug HID — Remove Human Interface
Devices from BlueSoleil.
Unplug: Unplug the selected HID device.
When you first connect the HID device to your computer,
BlueSoleil sets up the devices so that they will automatically
reconnect in case the connection is ever broken. After you
unplug an HID device, it will no longer automatically recon-
nect to your computer.
6970Bv1.0.p65 2005/4/1, 下午 01:5339

40
Bluetooth Class 2 USB Dongle
Bluetooth Device — Advanced hardware configuration, rec-
ommended for advanced users only. Please refer to 4.2 Hard-
ware Configuration for more details.
Help Menu
Contents and Index — Access BlueSoleil Online Help.
About BlueSoleil — Information about your version of
BlueSoleil.
2. Device Configurations
2.1 Hardware Configuration
BlueSoleil supports the following kinds of Bluetooth radio
adapters: USB and CF card.
To access the hardware configuration screens, click Tools |
Bluetooth Device…,
Bluetooth Device
Select the type of Bluetooth enabled device that you plan to
use, either a USB adapter or a CompactFlash (CF) card.
Advanced Configuration
The Advanced Configuration page will be enabled only if you
selected CF in the Bluetooth Device screen. Use the Ad-
vanced Configuration screen to configure detailed param-
eters including COM Port, Baud Rate, Byte Size, Parity, Stop
Bits, and Flow Control.
6970Bv1.0.p65 2005/4/1, 下午 01:5340

User’s Guide
41
2.2 Properties Configuration
To configure the properties of your local device, click My
Bluetooth | Properties…,
General
Device Name
The local device’s name, which will be shown to other
Bluetooth enabled devices.
Device Type
The device type of your local computer, (i.e., Desktop,
Laptop or Server).
Device Address
The address of the local device. Every Bluetooth enabled
device has a unique device.
Accessibility
Connecting Mode
- Connectable: Permits other Bluetooth enabled devices to
connect with your computer.
- Non-Connectable: Prohibits other Bluetooth enabled de
vices from connecting with your computer.
Discovery Mode
- General Discoverable: Permits other Bluetooth enabled de
vices to detect your computer.
- Limited Discoverable: Permits other Bluetooth enabled
devices to detect your computer with Limited Inquiry.
- Non-Discoverable: Prohibits other Bluetooth enabled de
vices from detecting your computer.
6970Bv1.0.p65 2005/4/1, 下午 01:5341

42
Bluetooth Class 2 USB Dongle
Bonding Mode (Pairing Mode)
- Accepts Bonding: Allow other Bluetooth enabled devices to
pair with your computer. If the other device initiates a
pairing procedure with your computer, each device must
enter the same passkey before the they will be paired.
- Does Not Accept Bonding: Rejects pairing attempts initi
ated by other Bluetooth enabled devices.
Hardware
View information about your Bluetooth hardware.
- Manufacturer: The manufacturer of the local Bluetooth
device.
- HCI Version: The HCI version of the local Bluetooth device.
- HCI Edition: The HCI edition of the local Bluetooth
device.
- LMP Version: The LMP version of the local Bluetooth
device.
- LMP Subversion: The LMP subversion of the local
Bluetooth device.
3. Security Configuration
Use the Security Configuration screens to specify the secu-
rity settings of your local device.
3.1 Pair / Un-pair Devices
Once a remote device has paired with your computer by
exchanging passkeys, passkeys will no longer be required for
further connections between your computer and the device.
6970Bv1.0.p65 2005/4/1, 下午 01:5342

User’s Guide
43
How to pair with another device
Automatically
If a passkey is required for connection, the devices will be
paired automatically the first time they successfully exchange
passkeys and connect. After a device has successfully paired
with your computer, the remote device icon in the Main
Window will have a red checkmark next to it.
Manually
In the Main Window, right click on the device icon, and in
the pop-up menu, select Pair Device. In the Enter Bluetooth
Passkey screen, enter the same passkey that you enter on
the remote device. After a device has successfully paired with
your computer, the remote device icon will have a red
checkmark next to it.
How to un-pair with another device
In the Main Window, right-click on the device icon, and in
the pop-up menu, select Unpair. The red checkmark next to
the device icon will disappear.
3.2 General Security
To access the security configuration screen, click My
Bluetooth | Security…
Security Level
Low
If checked, other devices will be able to access your device
freely without entering a passkey. However, if the remote
device requires a passkey to connect, then both devices need
to exchange passkeys.
6970Bv1.0.p65 2005/4/1, 下午 01:5343

44
Bluetooth Class 2 USB Dongle
Medium
The medium level provides service level security. You can
assign the appropriate level of access for each specific service.
For more details, see 4.3.4 Local Services Security.
High
If checked, passkeys must be exchanged for every incoming
and outgoing connection, unless the two devices have al-
ready paired in the past.
Bluetooth Passkey
Set Default Passkey
Use this setting to create a default passkey for all connections.
This saves you the effort of manually creating a passkey
whenever one is required.
Data Encryption
Enable Data Encryption
If checked, the data transmitted will be encrypted.
3.3 Managing Device Pairings
To access the device security configuration screen, click My
Bluetooth | Security and click on the Devices tab.
Paired Devices
This screen lists devices which have already paired with the
local device.
Remove Pairing
Click to remove the pairing relationship between the se-
lected device and the local device.
6970Bv1.0.p65 2005/4/1, 下午 01:5344

User’s Guide
45
Authorization
Click to select the local Bluetooth services that you wish to
allow the selected paired device to use. A list of local services
will appear. Select the services you wish to allow on the
remote device, then click OK.
Note:
The screen will only list the local services that require
authentication. The local services that do not require au-
thentication can be accessed freely. The Authorization but-
ton is enabled only when the Security Level is set to Medium.
3.4 Local Services Security
To access the local services security configuration screen,
click My Bluetooth | Security and click on the Services tab.
You can only configure security for local services when the
Security Level is set to Medium. (Set the Security Level in
the General Security screen.)
Local Services:
Authentication
If checked, a passkey is required whenever a remote device
attempts to connect with this service.
Encryption
If checked, data transmitted between devices for this service
will be encrypted.
Click to select the devices you wish to allow to use the
selected service.
6970Bv1.0.p65 2005/4/1, 下午 01:5345

46
Bluetooth Class 2 USB Dongle
In the Service Authorization screen, enter the following
settings:
Trusted Devices
Select to trust devices listed in this screen to use the selected
service on your device. A device can freely access the service
from your local device when trusted. Click Add/Remove to
edit the device list.
Trust all devices
Connection requests will be accepted from every device.
Prompt user if the device is not trusted for this service
If a non-trusted device attempts to access the service, a
dialog will appear to allow you to accept or reject the
connection.
Reject devices from using the service if not trusted for the
service
If a non-trusted device attempts to access the service, the
connection will be rejected automatically without informing
the user.
Notes:
If a device is trusted for a service, it may connect to this
service on your local device without informing you.
6970Bv1.0.p65 2005/4/1, 下午 01:5346

User’s Guide
47
4. Technical Support
Refer to the following sources for additional information
and for product and software updates.
vThe MSI website (http://www.msi.com.tw/) provides
updated information on MSI Bluetooth hardware and
software.
vFor technical support, please email to support@msi.com.
tw.
6970Bv1.0.p65 2005/4/1, 下午 01:5347

48
Bluetooth Class 2 USB Dongle
NOTES
6970Bv1.0.p65 2005/4/1, 下午 01:5348

User’s Guide
49
5. Glossary
BDA
Bluetooth Device Address. Every Bluetooth device has a unique
48-bit binary Bluetooth Device Address (BDA) burned into its
Read-Only Memory (ROM). This address cannot be changed
by the end-user.
A device’s BDA is usually displayed in hexadecimal format;
00:D0:B7:03:2E:9F is a valid BDA.
Each Bluetooth device also has an operator-configurable, user-
friendly name to help distinguish it from other Bluetooth
devices. The user-friendly name may be up to 99 alphanumeric
characters in length and may contain spaces. My Personal
Computer is a valid user-friendly name.
Device Inquiry
The process of searching for other Bluetooth devices.
DHCP
Dynamic Host Control Protocol-when enabled, connecting de-
vices are assigned an Internet Protocol (IP) address by the
server.
FTP
File Transfer Protocol
HCI
Host Controller Interface
6970Bv1.0.p65 2005/4/1, 下午 01:5349

50
Bluetooth Class 2 USB Dongle
IrDA
Infrared Data Association
IrMC
Infrared Mobile Communications
Link Key
An internally-generated unique security key that is exchanged
by paired devices as proof of identity before a connection is
established.
LMP
Link Manager Protocol—used by Bluetooth for internal
communications.
Page Scan Mode
A Bluetooth mode in which a server is actively listening
(scanning) for a client to “page” it. The server then answers the
page and attempts to set up a connection with the paging
device (the client).
Passkey
An alphanumeric string up to 16 characters in length. Passkeys
are also called PIN codes, or Personal Identification Numbers.
Piconet
A network of devices connected in an ad hoc fashion using
Bluetooth technology. A piconet is formed when at least two
6970Bv1.0.p65 2005/4/1, 下午 01:5350

User’s Guide
51
devices, such as a portable PC and a cellular phone, connect. A
piconet can support up to eight devices. When a piconet is
formed, one device acts as the master while the others act as
slaves for the duration of the piconet connection.
PIM
Personal Information Manager—an application, such as
Microsoft Outlook, that is used to manage contacts, keep track
of phone numbers, etc.
PIN
Personal Identification Number, also referred to as a “pass-
key” or “password.”
Scatternet
A group of independent and non-synchronized piconets that
share at least one common Bluetooth device. Bluetooth devices
must have point-to-multipoint capability to engage in scatternet
communication. There may be a maximum of 10 fully loaded
piconets in a scatternet.
Service Discovery
The process of determining the services that a Bluetooth server
provides.
SysTray
The Windows system tray-usually located in the lower-right
corner of the screen.
6970Bv1.0.p65 2005/4/1, 下午 01:5351