Using The 1D/2D Label Verification Kit 1d2dlabelverificationkitguide
2016-07-13
: Microscan 1D2Dlabelverificationkitguide 1d2dlabelverificationkitguide
Open the PDF directly: View PDF ![]() .
.
Page Count: 4
Copyright ©2014 Microscan Systems, Inc. P/N 83-220127-04 Rev A
Using the 1D/2D Label Verification Kit
Purpose
This document provides guidance to users of the
1D/2D Label Verification Kit
, part number
SLN-0000005
.
This kit consists of a light, lens, smart camera, and other accessories required to implement a verification
system that is compliant with the requirements of ISO 15415, ISO 15416, and AIM DPM guidelines, or a
custom verification configuration.
Kit Contents
Accessories
The required accessories are an Ethernet cable for the camera, a power supply, and power cables for
the camera and lighting.
The selection of accessories depends on the details of the installation, such as required cable length,
availability of suitable power, and whether the installation will employ continuous or strobed lighting.
The minimum set of accessories required to complete a bench-top installation is shown on the next
page. In the configuration shown, the Vision HAWK camera and the illuminator share a power supply
via a QX-1 Connection Block.
Part Number Quantity Description
98-000228-01 1 NERLITE, Smart Series Pharmalite, Dark Field, White, M12 Connector
GMV-6800-1034G 1
Vision HAWK C-Mount Smart Camera, WUXGA Mono, AutoVISION+Verification/OCV
98-000265-02 1 AutoVISION Verification Calibration Card
98-000259-01 1 Lens 25mm F/1.4-16, Front Thread 27mm P 0.5mm, 2/3” C-Mount
98-92800471 1 Lens Extension Tube, 5mm (C-CS Mount Adapter)
83-220127-01 1 User Documentation
Quick Start Guide
2Copyright ©2014 Microscan Systems, Inc.
Using the 1D/2D Label Verification Kit
Accessories – Hardware Configuration
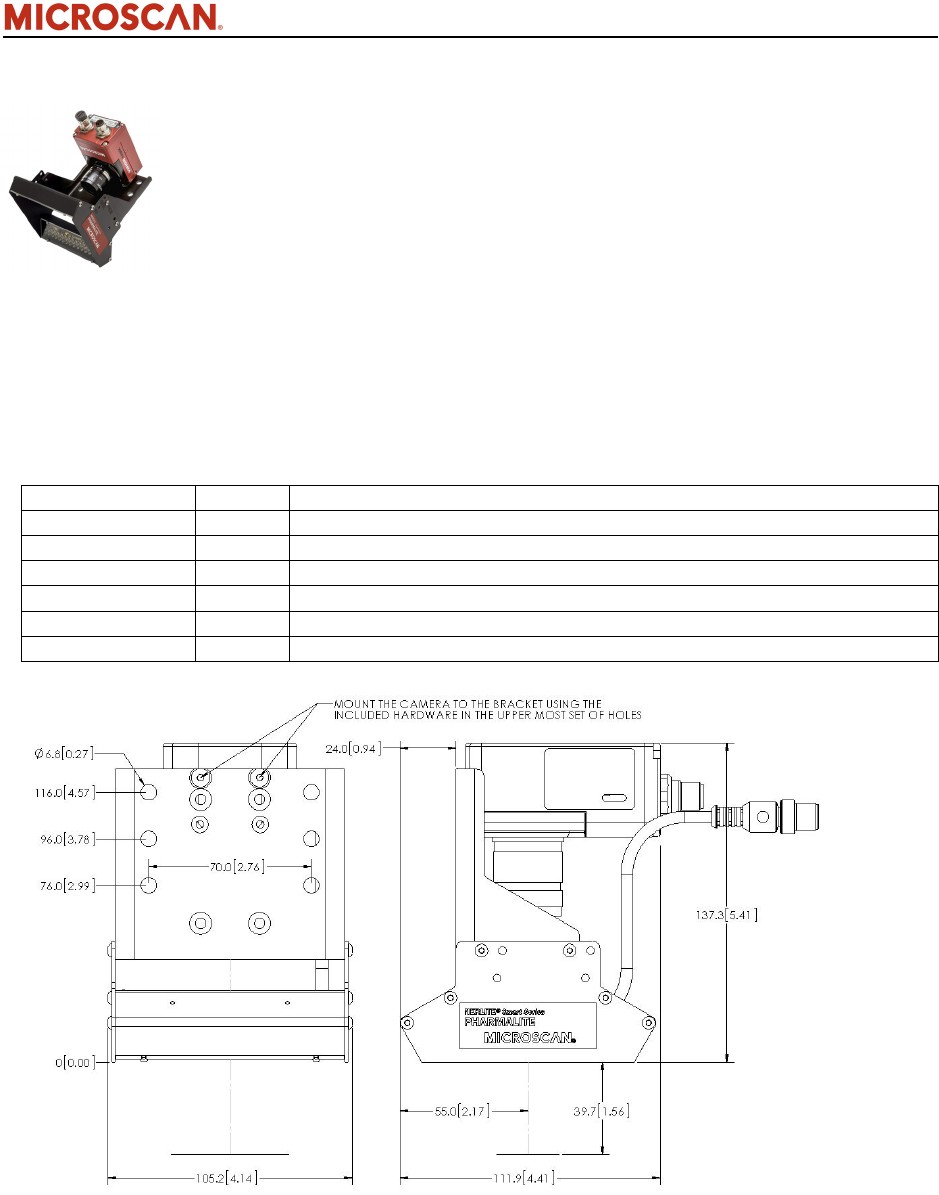
Mounting Positions
The 1D/2D Label Verification Kit is designed to be mounted with the bottom surface of the light 1 9/16
inches (39.7 mm) above the surface of the mark being inspected. At this position the back of the camera
is 6 15/16 inches (177.0 mm) above the surface. At this distance the field of view with the supplied 25
mm lens and 5 mm extension tube is 2.00” (50.8mm) x 1.06” (27.0mm).
Mounting Options and Hardware
The 1D/2D Label Verification Kit kit can be mounted using one or more of the six ¼ inch (6.8 mm)
through-holes in the Pharmalite back plate (using customer-supplied fasteners) or by means of the four
M4-tapped holes that are available on the top surface of the Vision HAWK.
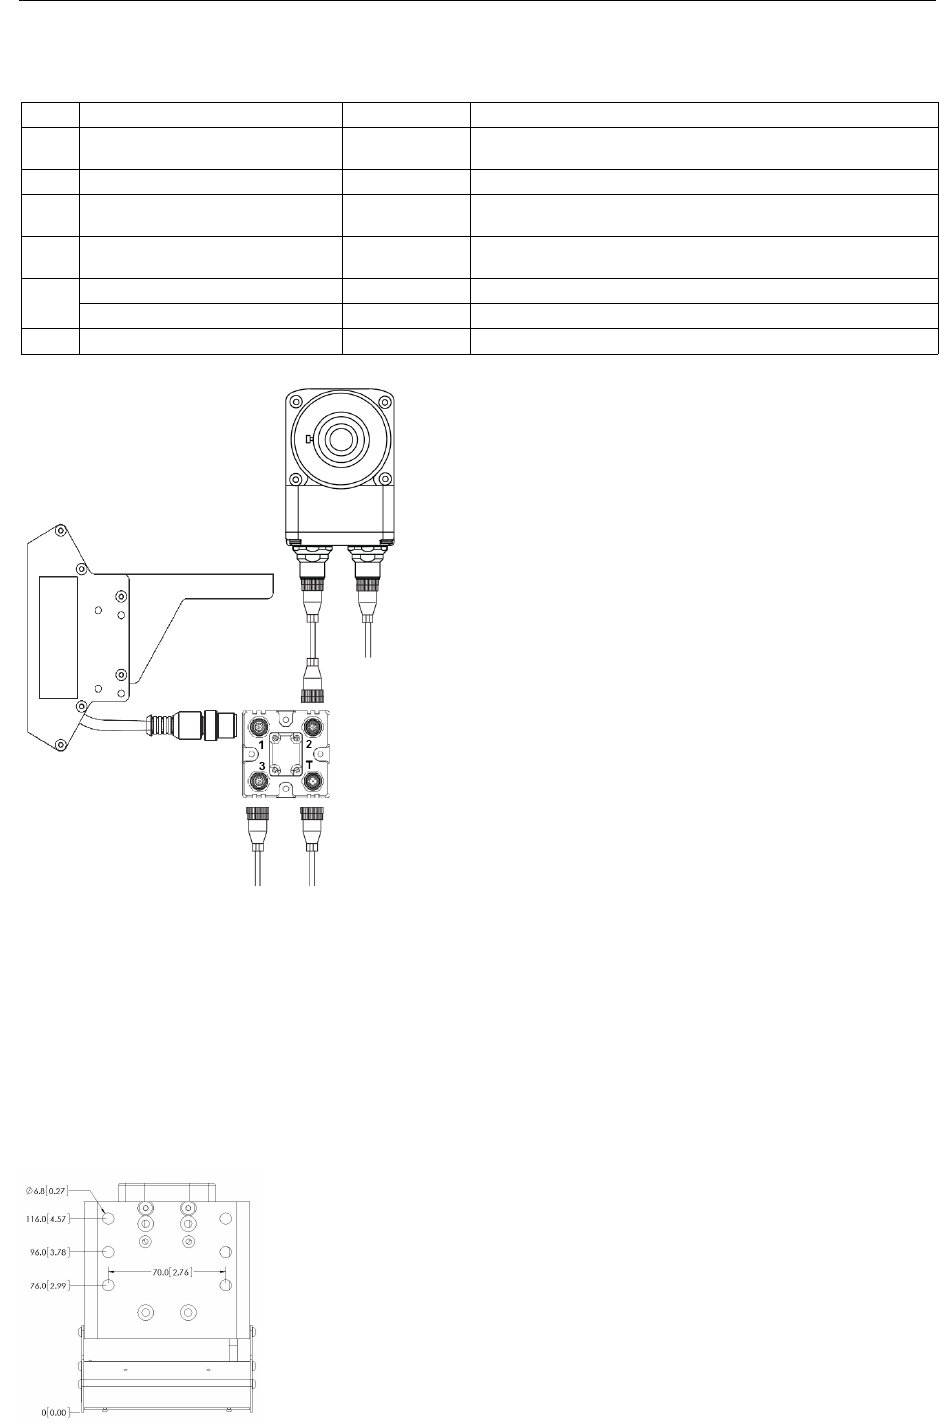
Item Function Part Number Description
1Camera/Light Power Supply 97-000012-01 QX Power Supply, 24V, M12 12-pin Socket, 1.3 m cable,
U.S. / Euro Plug
2Connection Block 98-000103-02 QX-1 Connection Block
3Ethernet Cable 61-000163-02 QX Cordset, Host, Ethernet, M12 8-pin Plug (Screw-On) to
RJ45, 3 m
4Camera Power and Signal Cable 61-000148-02 QX Cordset, Common, M12 12-pin, Socket (Screw-On) to
M12 12-pin Plug (Screw-On), 3 m
5Continuous Lighting Cable or 61-000204-01 Cable, Power, Smart Series to QX-1
Strobe Lighting Cable 61-000218-01 Cable, Smart Series to QX-1, Strobe, NPN
6Photo Sensor (Optional) 99-000020-02 Trigger, M12 4-pin Plug, NPN, Dark On, 2 m
1
2
3
4
5
6

3Copyright ©2014 Microscan Systems, Inc.
Using the 1D/2D Label Verification Kit
Alternate Mounting Option
You also have the option of using the QX Hawk Adapter Plate, part number 98-000143-01, which mounts
to the camera and offers a set of three ¼-20-threaded holes and two M6-threaded holes.
Applicability to Verification Standards
The verification methodologies described in this document do not meet the standard light angle geometries
for ISO 15415, ISO 15416, and AIM DPM, but the methods described here can be considered an alternate
geometry. This kit supports a camera and 60 degree dark field lighting configuration that is consistent
with the requirements of ISO 15415 (Information technology — Automatic identification and data capture
techniques — Bar code print quality test specification — Two-dimensional symbols) and AIM DPM 1-2006
AIM (Direct Part Mark Quality Guidelines). The equivalent standard for 1D verification (ISO 15416) calls
for a single source of oblique (45 degree) illumination in the reference configuration, while the Pharmalite
used in the 1D/2D Verification Kit provides an alternate geometry of oblique 60 degrees. AutoVISION
2.0/Visionscape 6.0 and higher support the verification methodologies defined in these standards for the
ECC 200 Data Matrix symbol.
ISO 15415 is best-suited to high-contrast 2D printed marks, ISO 15416 are best-suited to high-contrast
1D printed marks, and AIM DPM guidelines are intended for direct part marks.
Lighting Configurations
All the applicable standards require that the camera be mounted perpendicular to the marked surface.
ISO standards require at least 8 pixels per element. The AIM standard follows the ISO 15415 standard.
The minimum symbol element size (cell size or 1D narrow bar) that will provide the required number of
pixels per element with the supplied camera and lens is 0.012 inches.
The ISO standards indicate basic “reference optical geometries” – meaning lighting positions – and
alternate geometries that include oblique degrees incident light (Pharmalite). If an alternate geometry
such as Pharmalite is used, you must enter the 60 degree angle and wavelength (W) into AutoVISION’s
Symbol Quality Verification Tool and ensure that the angle and wavelength are also included in any
resulting verification report.

4Copyright ©2014 Microscan Systems, Inc.
Using the 1D/2D Label Verification Kit
Alternate Applications
If called upon to verify 1D symbols that are larger than those that can be graded with the 1D/2D Label
Verification Kit [maximum field of view 2.00” (50.8mm) x 1.06” (27.0mm)], you may find that the Large
Linear Verification Kit, part number SLN-0000006, can be usefully applied. The Large Linear Verification
Kit can also be used if strict adherence to the reference geometry and lighting wavelength is required
and the minimum 1D symbol narrow bar width is 0.012 inches.
The 1D/2D Label Verification Kit can be used to implement Optical Character Verification (OCV) on
glossy labels either in combination with 1D or 2D symbol verification or as a stand-alone application.
Marking Method
The 1D/2D Label Verification Kit works best when the mark is on a specular/reflective
surface (ink on glossy
label stock). The Dot Peen Verification Kit, part number SLN-0000004, may be a better solution with
marks that are on matte diffuse surfaces (ink on matte paper).
The Dot Peen Verification Kit should be used for dot peen marks in almost all circumstances. The choice
for laser marks depends on the form or the mark. If annealing/ablation has occurred, then the Dot Peen
Verification Kit is appropriate if the substrate is dark.
Operation
The Pharmalite illuminator is designed to be mounted 1 9/16” (39.7 mm) from the object being inspected.
Configuration and use of AutoVISION verification is covered in detail in the Symbol Quality Verification
Tool section of the AutoVISION Software User Manual (“autovisionmanual.pdf”, located in
C:\Microscan\Vscape\Documentation after AutoVISION installation) and also in AutoVISION Help,
which can be accessed from the File menu in AutoVISION software.
