Microsoft CU-13R Remote User Manual 9220825 en1
Microsoft Mobile Oy Remote 9220825 en1
User Manual

Nokia Car Kit CK-200
User and Installation Guide
9220825
Issue 1 EN

2
DECLARATION OF CONFORMITY
Hereby, NOKIA CORPORATION declares that this CK-200 product is in compliance with the
essential requirements and other relevant provisions of Directive 1999/5/EC. The product is
in conformity with the limits defined in Directive 2004/104/EC (amending Directive 72/245/
EEC), Annex I, paragraph 6.5, 6.6, 6.8 and 6.9. A copy of the Declaration of Conformity can be
found at http://www.nokia.com/phones/declaration_of_conformity/.
© 2010 Nokia. All rights reserved.
Nokia, Nokia Connecting People, Navi and the Nokia Original Accessories logo are
trademarks or registered trademarks of Nokia Corporation. Nokia tune is a sound mark of
Nokia Corporation. Other product and company names mentioned herein may be trademarks
or tradenames of their respective owners.
Reproduction, transfer, distribution, or storage of part or all of the contents in this document
in any form without the prior written permission of Nokia is prohibited. Nokia operates a
policy of continuous development. Nokia reserves the right to make changes and
improvements to any of the products described in this document without prior notice.
Bluetooth is a registered trademark of Bluetooth SIG, Inc.
TO THE MAXIMUM EXTENT PERMITTED BY APPLICABLE LAW, UNDER NO CIRCUMSTANCES
SHALL NOKIA OR ANY OF ITS LICENSORS BE RESPONSIBLE FOR ANY LOSS OF DATA OR
INCOME OR ANY SPECIAL, INCIDENTAL, CONSEQUENTIAL OR INDIRECT DAMAGES
HOWSOEVER CAUSED.
THE CONTENTS OF THIS DOCUMENT ARE PROVIDED "AS IS". EXCEPT AS REQUIRED BY
APPLICABLE LAW, NO WARRANTIES OF ANY KIND, EITHER EXPRESS OR IMPLIED, INCLUDING,
BUT NOT LIMITED TO, THE IMPLIED WARRANTIES OF MERCHANTABILITY AND FITNESS FOR A
PARTICULAR PURPOSE, ARE MADE IN RELATION TO THE ACCURACY, RELIABILITY OR
CONTENTS OF THIS DOCUMENT. NOKIA RESERVES THE RIGHT TO REVISE THIS DOCUMENT OR
WITHDRAW IT AT ANY TIME WITHOUT PRIOR NOTICE.
The availability of particular products may vary by region. Please check with your Nokia
dealer for details. This device may contain commodities, technology or software subject to
export laws and regulations from the US and other countries. Diversion contrary to law is
prohibited.
9220825/Issue 1 EN

3
Contents
For your safety......................... 5
Quick start................................ 6
First time setup ...................................... 6
Remote control ...................................... 6
1. Introduction ......................... 8
About this document............................ 8
Software updates .................................. 8
Bluetooth wireless technology .......... 9
2. Get started.......................... 10
Parts ........................................................ 10
Remote control CU-13R .................... 11
Display and standby mode................ 11
Display parts...................................... 11
Attach the display
to the mounting plate .................... 11
Rotate the display............................ 12
Information displayed
in standby mode............................... 12
Display indicators............................. 13
Insert the remote control
battery .................................................... 14
Navigate the menus............................ 14
Switch the car kit on or off .............. 15
Switch on ........................................... 15
Switch off........................................... 15
First time use ........................................ 15
Pair and connect the car kit............. 16
Connect the car kit manually....... 16
Connect the car kit
automatically .................................... 17
Disconnect the car kit..................... 17
Connect the car kit
to two devices ...................................... 17
3. Basic use ............................. 18
Copy contacts from
connected devices............................... 18
Manual copying................................ 18
Automatic copying .......................... 18
Calls......................................................... 18
Make a call ........................................ 19
Answer or reject a call.................... 20
Mute the microphone ........................ 20
Adjust speaker volume....................... 21
Manage two calls................................ 21
Switch a call between
the car kit and a connected
device...................................................... 21
Send tone strings................................. 22
Recent calls........................................... 22
View text messages ............................ 22
My own key........................................... 22
4. Settings ............................... 24
Connection settings............................ 24
Display settings.................................... 24
General settings................................... 25
Audio settings ...................................... 26
5. Troubleshooting.................. 27
Reset the car kit................................... 27
Connection issues................................ 27
Audio issues .......................................... 27
Other issues........................................... 28
6. Installation.......................... 29
Safety information.............................. 29
Update the software........................... 30
Install the car kit in a vehicle .......... 31
Junction box RX-73......................... 32
Remote control CU-13R................. 33
Display................................................. 35
Installer settings .................................. 36
Integration with a car
radio system.......................................... 36
4
Installation using
the ISO cable CA-160..................... 37
Installation using the power
cable CA-153P and an external
speaker................................................ 39
Installation using the power
cable CA-153P and direct
input cable CA-161......................... 41
Optional accessories........................... 42
Charging cable ................................. 42
Microphone ....................................... 42
External antenna ............................. 43
Check the operation
of the car kit......................................... 43
Care and maintenance........... 44
Additional safety
information ............................ 45
FCC/Industry Canada
notice...................................... 46
For your safety
5
For your safety
Read these simple guidelines. Not following them may be dangerous or illegal.
Read the complete user and installation guide for further information.
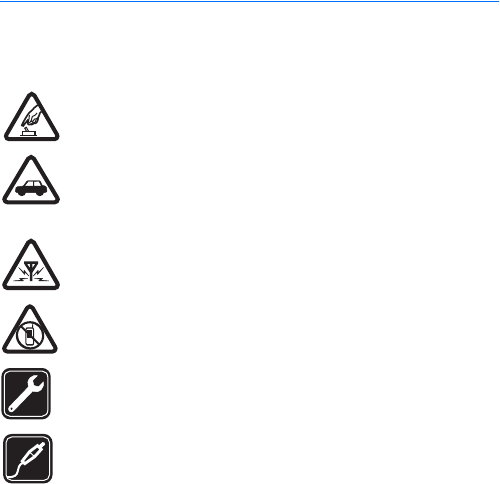
SWITCH ON SAFELY
Do not switch the device on when wireless phone use is prohibited or
when it may cause interference or danger.
ROAD SAFETY COMES FIRST
Obey all local laws. Always keep your hands free to operate the
vehicle while driving. Your first consideration while driving should be
road safety.
INTERFERENCE
All wireless devices may be susceptible to interference, which could
affect performance.
SWITCH OFF IN RESTRICTED AREAS
Follow any restrictions. Switch the device off near fuel, chemicals, or
blasting areas.
QUALIFIED SERVICE
Only qualified personnel may install or repair this product.
ACCESSORIES
Use only approved accessories. Do not connect incompatible
products.
When connecting to any other device, read its user guide for detailed safety
instructions. Do not connect incompatible products.
Quick start
6
Quick start
This section briefly describes the basic features of the car kit. For details,
see the respective sections in this guide.
■First time setup
1. Switch on the car kit (see p. 15) and your mobile device.
2. If you are prompted to select a language, turn the NaviTM wheel
(hereafter referred to as wheel) to scroll to the desired language, and
press the wheel.
3. Activate Bluetooth on your device, and set up a Bluetooth
connection between the car kit and the device.
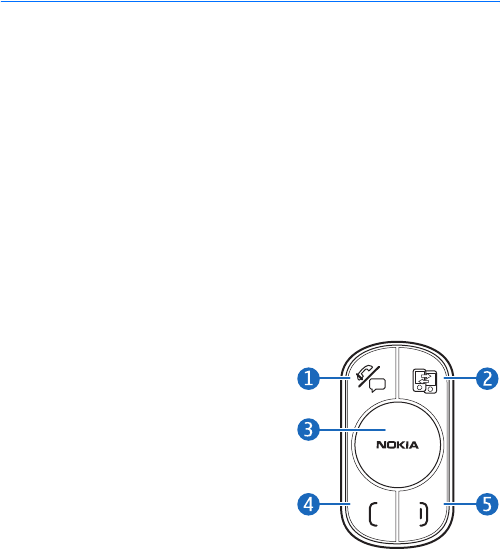
■Remote control
1. Voice dialling / Mute key
Press the voice dialling key to mute
or unmute a call, or to activate voice
dialling on a compatible mobile
device when no call is in progress.
2. Switch key
Press the switch key to switch
between the first and second
(primary and secondary) connected
devices when the Multipoint
connection feature is activated.
3. Navi wheel
• To enter a phone number or to use speed dialling, in standby
mode, turn the wheel left.
• To search for a contact in the contacts list, in standby mode, turn
the wheel right.
Quick start
7
• To adjust the volume during a call or to scroll through menu
items, turn the wheel left or right.
• To select, for example, Menu in standby mode or the highlighted
function in the menu, press the wheel.
4. Call key
• To make or answer a call or to switch between an active call and a
call on hold, press the call key.
• To view the list of last dialled numbers in standby mode, press the
call key.
• To redial the last dialled number in standby mode, press the call
key twice.
5. End key
• To end or reject a call, press the end key.
• To delete the previously entered character when entering text or
numbers, press the end key.
• To return to the previous menu level or display view, press the end
key.
• To return to standby mode from the menu functions, press and
hold the end key for about 2 seconds.

Introduction
8
1. Introduction
With the Nokia Car Kit CK-200, you can make and answer calls hands
free. You can also copy the contacts list from your two compatible
mobile devices to the car kit and view the copied contacts on the built-
in display to make calls through the connected device.
The car kit comes with a wireless remote control that allows you to
easily operate the car kit from a distance.
You can use Bluetooth to connect the car kit to two compatible devices
at the same time.
Read this guide carefully before having the car kit professionally
installed and before starting to use it. Also, read the user guide for the
device that you connect to the car kit. For the latest guides, additional
information, and downloads related to your Nokia product, go to
www.nokia.com/support.
This product may contain small parts. Keep them out of the reach of
small children.
Warning: The plugs of this device may contain a small amount of
nickel. Persons who are sensitised to nickel may have symptoms from
prolonged skin contact with the plugs.
■About this document
Setup and operation are described in “Get started”, p. 10, “Basic use”,
p. 18, and “Settings”, p. 24.
Troubleshooting tips can be found in “Troubleshooting”, p. 27.
Installation in a car is described in “Installation”, p. 29. The car kit
should only be installed by a qualified service technician using the
original Nokia parts supplied in the sales package.
■Software updates
You can update the software of the car kit.
Introduction
9
Download and install the Nokia car kit updater application from
www.nokia.com/support to a compatible computer.
Use a USB data cable that has a standard USB plug at one end and a
micro USB plug at the other end, to connect the car kit display to a
computer. The cable is sold separately.
Open the updater application, and follow the displayed instructions.
Keep the USB cable connected while the software is being updated.
■Bluetooth wireless technology
Bluetooth wireless technology allows you to connect compatible
devices without cables. The car kit and the other device do not need to
be in line of sight, but they should be within 10 metres (33 feet) of each
other. Connections may be subject to interference from other electronic
devices.
The car kit is compliant with the Bluetooth Specification 2.1 + EDR
supporting the following profiles: the Hands-Free Profile (HFP) 1.5,
Phone Book Access Profile (PBAP) 1.0, Object Push Profile (OPP) 1.1, and
File Transfer Profile (FTP) 1.1. Check with the manufacturers of other
devices to determine their compatibility with this device.
Get started
10
2. Get started
■Parts
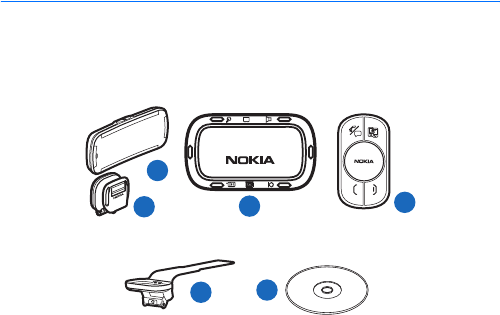
The car kit contains the following parts:
1. Main unit CK-200 with display
2. Mounting plate for main unit CK-200
3. Junction box RX-73
4. Remote control CU-13R with Navi wheel
5. Steering wheel mount for remote control CU-13R
6. CD that contains this guide
In addition, the sales package includes cables and other parts that are
needed when installing the car kit.
1
234
56
Get started
11
■Remote control CU-13R
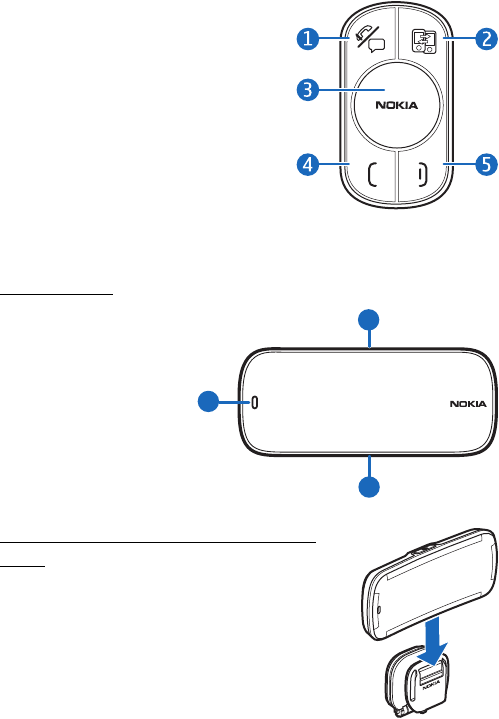
You can use the remote control to
operate the car kit. The device has a
Navi wheel that you can turn or press.
1. Voice dialling / mute key
2. Switch key
3. Navi wheel
4. Call key
5. End key
■Display and standby mode
Display parts
The display has the
following parts:
1. Power key
2. Microphone
3. Micro USB connector,
used to update the car
kit software from a
compatible computer
Attach the display to the mounting
plate
To use the car kit, slide the display onto the
mounting plate.
To detach the display, switch off the car kit, and
slide the display upwards from the mounting
plate.
1
2
3
Get started
12
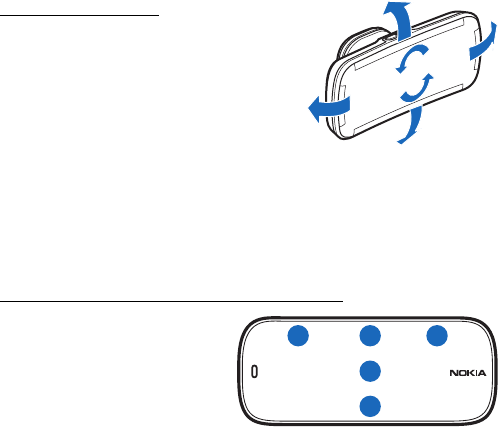
Rotate the display
When the display is attached to the
dashboard using the supplied mounting
plate, you can rotate the display in the
ball joint up to about 15 degrees left,
right, up, or down.
Do not try to force the display to rotate
further.
To adjust the angle of the mounting plate, loosen the screw at one end
of the hinge on the plate, turn the plate in steps of 45 degrees, and
tighten the screw.
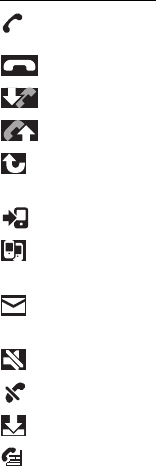
Information displayed in standby mode
When you switch on the car kit,
it enters standby mode. In
standby mode, the following
information is displayed when
the car kit is connected to a
compatible device:
1. The signal strength of the cellular network at the current location, if
this information is provided by the connected device; the higher the
bar, the stronger the signal
2. The name of the service provider, if this information is provided by
the connected device
3. The battery charge of the connected device, if this information is
provided by the device; the higher the bar, the more power left. If the
car kit is connected to two devices, the battery charge is displayed
for the primary device.
4. The Bluetooth name of the connected device. If the car kit is
connected to two devices, the primary device is displayed above the
secondary one.
5. The Menu function that allows you to open the list of menu
functions. To open the list, press the wheel.
123
4
5
Get started
13
To enter a phone number manually or to use speed dialling, turn the
wheel left.
To search for a contact in the contacts list of the car kit, turn the wheel
right.
To view the last dialled numbers, press the call key. See also “Recent
calls”, p. 22.
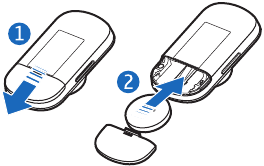
Display indicators
You have an active call.
You have a call on hold.
There is an incoming call.
There is an outgoing call.
You have missed calls in the device that is displayed above the
indicator.
The call is switched to the connected mobile device.
The Multipoint connection feature is activated, and you can
connect the car kit to two devices.
You have received a new text message to the device that is
displayed above the indicator.
You have muted the speakers connected to the car kit.
The car kit microphone is muted.
The car kit is copying contacts from a connected device.
Only call-related tones of the connected device are played
through the car kit speakers.
If the battery charge of the connected device is low, Battery low is
briefly displayed.
If the battery charge of the remote control is low, Remote control
battery low is displayed.
Get started
14
■Insert the remote control battery
The wireless remote control is powered by one CR2032 lithium coin cell
battery. Replace the battery only with the same or equivalent type.
1. Slide the cover away from
the device (1).
2. Insert the battery with the
negative (-) terminal
pointing towards the circuit
board, and slide the cover
back into place (2).
To avoid short-circuits that
may damage the battery, do not handle or store the battery with metal
objects.
To avoid battery leaks, remove the battery if the remote control is not
used for a month or longer.
If the battery leaks, wipe the remote control completely clean, and
install a new battery.
If the lithium coin battery is swallowed, seek medical attention
immediately. If the battery becomes lodged in the oesophagus, remove
it immediately.
Extreme temperatures reduce the performance and lifetime of the
battery. The remote control may not work or Remote control battery low
may be displayed temporarily in temperatures well below freezing.
■Navigate the menus
To open the list of menu functions in standby mode, press the wheel
when Menu is displayed.
To scroll to an item (such as a menu function) or through a list, turn the
wheel. To select an item, scroll to the item, and press the wheel.
To return to the previous menu level, press the end key.
To return from the menu functions to standby mode, press and hold the
end key for about 2 seconds.

Get started
15
■Switch the car kit on or off
If you are not certain whether the ignition sense wire is connected or
not, consult with the technician who installed the car kit.
Before you use the car kit, make sure the display is firmly in place on the
mounting plate.
Switch on
If the ignition sense wire is connected, the car kit switches on when you
turn on the car engine.
If the ignition sense wire is not connected, press the power key.
After the car kit switches on, it tries to make a Bluetooth connection to
one or two last connected devices, depending on the Multipoint
connection setting.
If no device is connected to the car kit within 10 minutes, the car kit
automatically switches off.
Switch off
If the ignition sense wire is connected, turn off the car engine, or press
the power key. If you have a call in progress on your device connected to
the car kit, press the power key to switch the call to the device and then
switch off the car kit.
If the ignition sense wire is not connected, to switch off the car kit, press
the power key. If the ignition sense wire is not connected and you
disconnect your device from the car kit (for example, to take it with
you), the car kit automatically switches off after 10 minutes.
Tip: After you turn off the car engine, do not leave the mobile
device connected to the car kit, to prevent accidental draining of
the car battery.
■First time use
When you switch on the car kit for the first time, you are asked to select
the language to use. Turn the wheel to scroll to the desired language,
and press the wheel.

Get started
16
After the language selection, you are asked to pair and connect the car
kit to a compatible Bluetooth device. See “Pair and connect the car kit”,
p. 16.
■Pair and connect the car kit
Before using the car kit, you must associate (pair) and connect it to a
compatible mobile device that supports Bluetooth wireless technology.
You can pair the car kit with up to eight devices and connect it to two
devices that support the HFP Bluetooth profile at a time.
To pair and connect the car kit to a compatible device:
1. If the car kit has not been previously paired with a device, switch on
the car kit and your device. The car kit enters pairing mode.
If you have previously paired with a device, to pair with another
device, in standby mode, select Menu > Settings > Connection >
Connection manager > Pair new device.
2. Within 3 minutes, activate Bluetooth on your device, and set it to
search for Bluetooth devices. For instructions, see the user guide of
your device.
3. On your device, select the car kit (Nokia CK-200) from the list of
found devices.
4. On your device, enter the Bluetooth passcode 0000, to pair and
connect the device to the car kit.
In some devices, you may need to make the connection separately
after pairing.
If pairing succeeds, the car kit is displayed in the list of currently paired
Bluetooth devices in your device, and the paired device is displayed in
the Connection manager menu of the car kit.
When the car kit is connected to your device and ready for use, the
Bluetooth name of the device is displayed.
Connect the car kit manually
When you switch on the car kit, it tries to connect to one or two last
connected devices, depending on the Multipoint connection setting.

Get started
17
To manually connect the car kit to a device (for example, after
connection loss), make sure the device is switched on, and, in standby
mode, select Menu > Settings > Connection > Connection manager and
the device.
Connect the car kit automatically
You may be able to set your mobile device so that the car kit connects to
it automatically. To activate this feature, modify the paired device
settings in the Bluetooth menu of your device.
Disconnect the car kit
To disconnect the car kit from your mobile device, close the connection
in the Bluetooth menu of your device. Alternatively, in standby mode,
select Menu > Settings > Connection > Connection manager and the
device you want to disconnect.
■Connect the car kit to two devices
You can connect the car kit simultaneously to two compatible Bluetooth
devices by default. To allow the car kit to connect to only one device at a
time, in standby mode, select Menu > Settings > Connection >
Multipoint connection > off. If you select on, the car kit can be
connected to two devices, and is displayed.
When you switch on the car kit and it connects to two devices, the first
connected device becomes the primary device and the other device the
secondary device. In standby mode, the name of the primary device is
shown above the secondary one. To set the secondary device as primary
or vice versa, press the switch key.

Basic use
18
3. Basic use
■Copy contacts from connected devices
You can copy contacts (names and phone numbers) from compatible
mobile devices that you connect to the car kit.
is displayed during copying. Copying may take several minutes,
depending on the number of contacts. While the contacts are being
copied, you cannot use the car kit.
Manual copying
If automatic copying is deactivated, you can copy the contacts
manually.
If your device supports the PBAP Bluetooth profile or AT commands, in
standby mode, select Menu > Settings > General > Start contact
download.
If your device does not support the PBAP Bluetooth profile, but it
supports the OPP Bluetooth profile, in your device, send the contacts as
business cards to the car kit.
Automatic copying
If you have activated the Automatic contact download setting, the car
kit automatically tries to copy the contacts from your device when the
device connects to the car kit. To activate automatic copying, in standby
mode, select Menu > Settings > General > Automatic contact
download > on.
If you have activated automatic copying, each time you connect your
device to the car kit, the contacts saved in the car kit are updated.
■Calls
During a call, speak towards the display or the external microphone that
is connected to the car kit. For optimal performance, make sure there
are no objects in front of the microphone. During a call, is displayed.

Basic use
19
You can only use the contacts of connected devices if you have copied
them to the car kit.
Make a call
You can use the remote control to make calls only on the primary device.
To make a call on the secondary device, set the device as primary, or
make the call from that device.
Instead of using the remote control, you can also make a call from the
primary device. Use the device in the normal way for calling.
To end the call (or cancel the call attempt), press the end key. If the
battery charge of the remote control is low, press the power key.
Dial a phone number
To use the remote control to enter the phone number, in standby mode,
turn the wheel left, or select Menu > Number entry. To dial a phone
number during a call, select Call options > Number entry.
Select the digits one by one. (To delete the previously entered digit,
press the end key.) When the phone number is displayed, press the call
key, or select .
Call a contact
To call a contact that you have copied to the car kit, in standby mode,
turn the wheel right, or select Menu > Contacts. To access the contacts
list during a call, select Call options > Contacts.
Select the first character of the contact, scroll to the contact, and press
the wheel or the call key. If the contact has several numbers, first select
the desired number, and then press the wheel or the call key.
Call a recently dialled number
To redial the number you last called (if your device supports this feature
with the car kit), press the call key twice when no call is in progress.
To call a recently dialled number, press the call key, scroll to the desired
name or phone number, and press the wheel or the call key.
If the car kit is connected to two devices, the call is made on the primary
device.

Basic use
20
Voice dialling
To activate voice dialling (if your device supports this feature with the
car kit), press the voice dialling key when no call is in progress. Say the
voice tag of the desired contact clearly. If the car kit is connected to two
devices, voice dialling is activated on the primary device.
For details on voice dialling, see the user guide of your device.
Speed dialling
Speed dialling is a quick way to call frequently used phone numbers.
To use speed dialling, turn the wheel left in standby mode, scroll to the
desired speed dial number (1-9), and press the call key.
To assign a phone number to a speed dial number, see “General
settings”, p. 25.
Answer or reject a call
When you receive a call, you hear a ringing tone through the speakers
connected to the car kit. The caller’s number is displayed if the cellular
network supports this function. The name saved with the number is
displayed if you have copied the name and number to the car kit. If the
name and number are not available, Private number is displayed.
To answer the call on the primary or secondary device, press the call key
or the wheel. If the battery of the remote control is discharged, press the
power key of the car kit.
To reject the call, press the end key.
■Mute the microphone
To mute or unmute the microphone during a call, press the voice dialling
/ mute key. Alternatively, select Call options and the desired function.
indicates that the microphone is muted.

Basic use
21
■Adjust speaker volume
To adjust the speaker volume during a call, turn the wheel. The selected
volume is saved for the current device. To set the default volume for
calls, see “Audio settings”, p. 26.
To mute the speakers, set the volume to the lowest level. is
displayed.
■Manage two calls
You can have two calls at the same time on one of the connected
devices and handle the calls from the car kit.
To answer a waiting call and end the active call, press the end key.
To answer a waiting call and put the active call on hold, press the call
key. When the call is on hold, is displayed.
To reject a waiting call, select Call options > Reject incoming call.
To end the active call and make the call on hold active, press the end
key.
To switch between the active call and the call on hold, press the call key.
When the car kit is connected to two devices and you receive a call to
the other device while you have an active call on one of the devices, first
end the active call and then answer the call, or answer the call from the
device. If you answer the call from the device, only the device functions
can be used to manage the call.
■Switch a call between the car kit and a
connected device
To switch a call between the car kit and a connected device, select Call
options > Activate handset or Activate handsfree. Some mobile devices
may close the Bluetooth connection until the call ends. indicates
that the call is switched to the device.

Basic use
22
■Send tone strings
To send a tone string such as a password (network service) during a call,
select Call options > Send DTMF. Select the characters one by one. (To
delete the previously entered character, press the end key.) To send the
string, select , or press the call key.
■Recent calls
When you connect a compatible mobile device to the car kit, the car kit
automatically copies the phone numbers of recent missed, received, and
dialled calls from the device, if these functions are supported by the
device and the cellular network.
To view recent calls, in standby mode, select Menu > Recent calls and a
call type. Scroll to a contact, and press the wheel to view the call details,
or press the call key to call the contact.
When you have missed calls, is displayed.
■View text messages
The Messages menu is only displayed if the connected device supports
the Nokia proprietary connectivity interface (LCIF).
If you receive a text message (network service) when the car kit is
connected to a compatible Nokia device, is displayed.
To view a new message from a compatible Nokia device, select Menu >
Messages and the message.
To call the sender of the displayed message, press the call key.
Alternatively, press the wheel, and select Call sender.
For compatibility, go to www.nokia.com/support.
■My own key
The My own key menu is only displayed if the Nokia Accessory Setup
Application is installed in the device that is connected to the car kit.
If the application is not already installed in your device, to check the
availability for your device, go to www.nokia.com/support.
Basic use
23
When you select this menu, the car kit performs the function that you
have specified for a short press of the My own key in the Nokia
Accessory Setup Application. You can set the car kit to read out loud a
new text message, call your favourite number, or reject a call and send a
predefined text message. For details, read the help of the application.

Settings
24
4. Settings
■Connection settings
To manage Bluetooth connections, in standby mode, select Menu >
Settings > Connection and from the following:
•Connection manager —To pair and connect the car kit to a
compatible device, select Pair new device. To connect the car kit to a
previously paired device or disconnect a device, select the device
from the list.
•Multipoint connection —You can connect the car kit to two devices
at the same time. If you select off, the car kit can be connected to
only one device at a time. When the car kit can connect to two
devices, is displayed.
If the car kit can connect to two devices at a time and you use the
redialling or voice dialling features, the call is made on the primary
device.
•Delete paired devices —Select the device that you want to delete
from the list of paired devices. If you select Delete all pairings,
pairings to all devices are deleted, and the car kit must be paired with
a device for use.
■Display settings
In standby mode, select Menu > Settings > Display and from the
following:
•Brightness —Select the desired level for display brightness.
•Night mode —Activate or deactivate night mode. If you select on,
the display backlight is dimmer.
•Display color —Select the colour for the display backlight. To define
your own colour, select Custom, and turn the wheel to set the
amount of red (R), green (G), and blue (B) in the colour. To move
between these tones, press the wheel.
•Auto dimming —Select the time after which the display is dimmed.

Settings
25
■General settings
In standby mode, select Menu > Settings > General and from the
following:
•Speed dials —Assign phone numbers to the speed dial numbers (1-9)
for the connected device (if two devices connected, the primary
device). Select an unassigned speed dial number. To assign a contact,
select Contacts. To manually enter a number, select Number entry.
To replace the contact that is assigned to a speed dial number, select
the speed dial number and Replace.
To view the contact that is assigned to a speed dial number, select
the speed dial number, contact, and View number. To call the
number, press the wheel or the call key.
To delete a contact from a speed dial number, select the speed dial
number and Delete. The contact is deleted only from the speed dial
number list, not from the contacts list.
To make a call using speed dialling, see “Speed dialling”, p. 20.
•Contacts view —Select whether the contacts copied to the car kit
are displayed one by one or as a list.
•Name display —Select whether the contacts list is sorted by first
name or last name.
•Automatic answer —Activate or deactivate automatic answer. If you
select on, the car kit automatically answers an incoming call after
two rings.
•Language —Select the language used.
•Start contact download —Copy the contacts from the connected
primary device to the car kit. When the contacts are being copied,
is displayed.
•Automatic contact download —Set the car kit to automatically
update the contacts from a compatible device each time you connect
it to the car kit. The car kit cannot be used during copying.
•Product info —View information about the car kit.

Settings
26
•Delete personal data —Delete contacts, speed dial numbers, or call
lists from the car kit.
•Restore factory settings —Reset the car kit settings to the default
values.
■Audio settings
In standby mode, select Menu > Settings > Audio and from the
following:
•Audible menu — Set the car kit to play some display texts, such as
the names of main menus. For information on available languages,
go to www.nokia.com/support.
•Audio routing —Select which sounds of the connected device are
played through the car kit speakers, muting the car radio. If you
select All device sounds, all the sounds are played. If you select Calls
only, only the call-related tones are played, and is displayed.
•Default volume —Select the default volume for speakers. To save the
setting, press the wheel.
•Car kit warning tones —Activate or deactivate the warning tones of
the car kit.

Troubleshooting
27
5. Troubleshooting
■Reset the car kit
The car kit doesn’t react to my actions. How can I reset it?
Slide the display up from the mounting plate for 10 seconds.
■Connection issues
I can’t use Bluetooth to connect the car kit to my device.
• Make sure the car kit is switched on and paired with your device.
• Make sure Bluetooth is activated on your device, and authorise the
car kit to connect to the device.
■Audio issues
My voice echoes on the other end of the line.
• Lower the volume of your car speaker. If the car kit is connected to
your car stereo system, lower the input level, if possible.
• Make sure the distance between the microphone and speakers is
optimal.
• Make sure the microphone does not point towards the speaker.
The speaker at the other end can’t hear my voice during a call.
• Make sure the device is properly connected to the car kit through a
Bluetooth connection.
• Speak towards the display or the optional external microphone that
is connected to the car kit. For optimal performance, make sure there
are no objects in front of the microphone.
• Make sure you have not accidentally muted the microphone.
The audio quality isn’t good or I can’t hear sound.
• If the car kit is connected to the car radio, make sure the car radio
volume is set properly.
Troubleshooting
28
• If the car kit is connected to an optional speaker, check that the car
kit volume is set properly.
• Make sure you have not accidentally muted the speaker volume.
• Make sure your car radio is switched on.
The car radio isn’t muted when I answer a call.
Ask the technician who installed the car kit to make sure the car radio
mute wire is properly connected. Not all cars have the mute wire.
■Other issues
The car kit doesn’t switch on when I turn on the car ignition.
Ask the technician who installed the car kit to make sure the ignition
sense wire is properly connected. If your car does not support ignition
sense, to switch the car kit on or off, press the power key of the car kit.
The remote control doesn’t work.
Replace the battery. If the remote control cannot be used, to answer or
end a call, press the power key of the display.

Installation
29
6. Installation
■Safety information
Observe the following safety guidelines when installing the car kit.
• Only a qualified service technician should install or service the car kit
using the approved original Nokia parts supplied in the sales
package. Faulty installation or service may be dangerous and may
invalidate any warranty which may apply to the car kit.
End users should remember that the car kit comprises of complex
technical equipment that requires professional installation using
special tools and expert know-how.
• Instructions given in this guide are general guidelines that apply to
the installation of the car kit in an automobile. However, due to the
wide variety of car types and models available on the market, this
guide cannot consider the individual technical requirements relevant
for any particular vehicle. Contact the vehicle manufacturer for
detailed information about the vehicle in question.
• The car kit is designed to be connected directly to a vehicle with a 12
V, negative grounding. Connection to a 24 V system requires a 24 V
to 12 V converter to be used in the VBatt line. The ignition line can be
connected directly to the 24 V system.
The car kit has in-built protection for over voltage, but a connection
using the wrong polarity might damage the unit.
• Remember that modern automotive systems include onboard
computers where key vehicle parameters are stored. Improper
disconnection of the car battery may cause loss of data,
necessitating extensive effort for reinitialisation of the system. If you
have any concerns, contact your car dealer before any installation
work is done.
• Do not wire the car kit equipment to the high-voltage lines of the
ignition system.
Installation
30
• When installing the parts of the car kit, make sure none of them
interfere with or hinder the steering or braking systems or other
controls or systems used in the operation of the vehicle (for example,
airbags). Make sure the car kit and any of its components are not
installed where you might come in contact with it in the event of an
accident or collision.
If the display of a mobile device is to be used, make sure the device is
mounted in a holder and that the device display is clearly visible to
the user.
• Your service technician or dealer may be able to provide you with
information on alternatives for mounting the equipment suitably in
your vehicle without requiring bore holes.
• Do not smoke when working on the car. Make sure there is no source
of fire or flame nearby.
• Take care not to cause damage to electrical cables, fuel or brake
lines, or safety equipment during installation work.
• RF signals may affect improperly installed or inadequately shielded
electronic systems in motor vehicles such as electronic fuel injection
systems, electronic antiskid (antilock) braking systems, electronic
speed control systems, and airbag systems. If you notice a fault or
change in the operation of such a system, contact your car dealer.
• Make sure cables are placed so that they will not be subject to
mechanical wear and tear (for example, not laid under car seats or
over sharp edges).
■Update the software
Before you install the car kit, update the software of the car kit to the
latest version.
Download and install the Nokia car kit updater application from
www.nokia.com/support to a compatible computer.
Use a USB data cable that has a standard USB plug at one end and a
micro USB plug at the other end, to connect the car kit display to a
computer. The cable is sold separately.
Installation
31
Open the updater application, and follow the displayed instructions.
Keep the USB cable connected while the software is being updated.
■Install the car kit in a vehicle
This section describes how to install the car kit parts in a vehicle. The
parts are explained in “Parts”, p. 10.
When installing the parts of the car kit, make sure none of them
interfere with or hinder the steering or braking systems or other controls
or systems used in the operation of the vehicle (for example, airbags). Do
not use screws to install the display if you mount it within the head
impact area. Use the supplied adhesive instead.
Installation of the car kit may cause warning or other alert tones in the
vehicle (such as reversing warning tones or lights left on alerts) to be
muted. For further information, contact the manufacturer of the vehicle
or its representative.
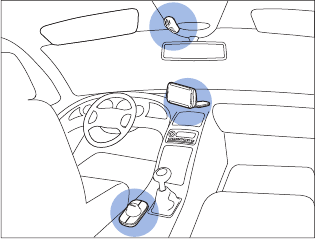
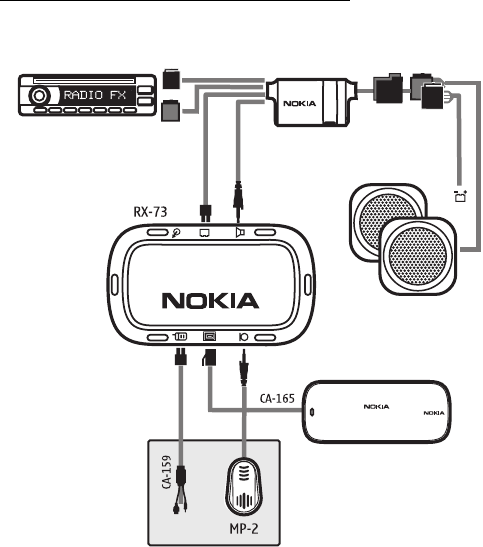
Example of appropriate installation, with the remote control mounted to
the console and with an optional external microphone. The external
microphone is only needed in noisy car environments.
Installation
32
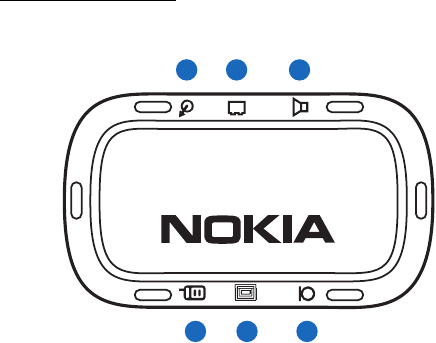
Junction box RX-73
The junction box has the following connectors:
1. Connector for direct input cable CA-161
2. Connector for power cable CA-153P or power cable of ISO cable CA-
160
3. Connector for optional speaker (such as Nokia SP-3) or speaker cable
of ISO cable CA-160
4. Connector for optional charging cable (such as CA-159)
5. Connector for display cable CA-165
6. Connector for optional external microphone (such as MP-2)
When you install the junction box, make sure the cables for the
microphone and speaker reach the places where you intend to mount
these parts.
Install the junction box in the car using suitable mounting material (not
supplied in the sales package). Make sure the junction box stays securely
in place.
123
46
5

Installation
33
Remote control CU-13R
The remote control should be located so that it is within easy reach of
the user. Do not mount the remote control within the head impact area.
When installing the remote control, make sure it does not interfere with
or hinder the steering or other controls or systems used in the operation
of the vehicle (for example, airbags).
You can attach the remote control to the steering wheel, or mount it to
the dashboard or the console between the driver’s and front passenger's
seat.
Mount using the supplied tape on the dashboard or console
1. Attach the supplied tape pad to the desired location in the car: peel
off the protective sheet from the bigger pad, and press the pad into
place.
When you peel off the protective sheet, do not touch the adhesive
side with your finger. Make sure the surface where you attach the
pad is dry and free from dirt and dust.
2. Peel off the protective sheet from the smaller pad, and attach the
pad to the bottom of the remote control. Do not cover the battery
cover of the remote control.
3. Press the pads firmly against each other, and check that the remote
control stays securely in place.
Mount to the steering wheel using the supplied strap
Install the remote control to the inside of the steering wheel. Do not
install the remote control to the centre or outside of the steering wheel.
1. Wrap the strap around the steering wheel (not shown in the figures).
2. Thread the strap behind the catch indicated with an arrow (1).
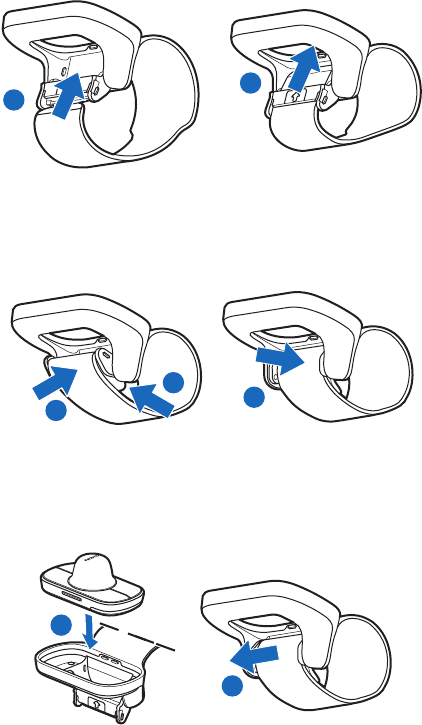
Installation
34
3. Pull the strap from the end to keep it securely in place (2).
4. Press the end of the strap downwards (3), and press the catch
upwards (4).
5. Press the catch against the steering wheel until it locks into place
(5).
6. Push the remote control into the holder (6).
To release the remote control, push it from the bottom, through the
opening in the holder.
To detach the strap, pull the catch away from the steering wheel (7).
1
2
3
45
6
7

Installation
35
Display
You can attach the display to the dashboard using the supplied
mounting plate.
The display should be located so that it is clearly visible for the user and
it can be easily rotated left, right, up, or down.
When installing the display, make sure it does not interfere with or
hinder the steering or braking systems or other controls or systems used
in the operation of the vehicle (for example, airbags).
Make sure the display cable reaches to the junction box.
For the built-in microphone, mount the display so that it is not too far
from the driver or exposed to direct air streams from the vents. If this is
not possible, use an optional external microphone.
Attach the mounting plate to the dashboard
1. Peel off the protective sheet from the adhesive on the mounting
plate.
2. Press the mounting plate firmly to the dashboard.
3. Guide the display cable CA-165 of the mounting plate, for example,
through the ventilation system (see the documentation of the car for
details), and connect the cable to the respective connector on the
junction box RX-73.
Attach the display to the mounting plate
1. Slide the display onto the mounting plate (1).
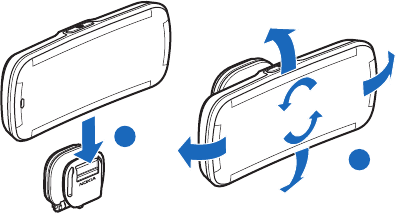
Installation
36
2. Set the display to the appropriate position (2).
3. To adjust the angle of the mounting plate, loosen the screw at one
end of the hinge on the plate, turn the plate (in steps of 45 degrees),
and tighten the screw.
To detach the display, slide it upwards from the mounting plate.
■Installer settings
The installer settings should only be modified by a qualified service
technician.
In standby mode, press and hold the power key for about 10 seconds,
and select from the following:
•DSP settings —Select the set of audio settings that suits best. To
activate the new settings, you may need to switch the car kit off and
back on.
•Microphone settings —Select whether you want to use the built-in
microphone or an optional external microphone.
■Integration with a car radio system
The car kit can be connected to a car radio system in three different
ways. Select the appropriate option according to the parts supplied in
the sales package.
For information about the connectors on the junction box RX-73, see
“Junction box RX-73”, p. 32.
1
2
Installation
37
You can connect the car kit to a speaker with an impedance of at least 4
ohms. If the impedance is over 8 ohms, the output power is significantly
lower than normal. With car specific wiring adapters, you can connect
the car kit to the vehicle without any modification to the existing
wiring. For availability, consult your service technician.
Installation using the ISO cable CA-160
When you connect the car kit to the car radio system with the ISO cable
CA-160, the car radio is muted when you make or receive a call.
1. To connect the ISO cable to the car radio:
• Disconnect the two ISO plugs from the car radio for power and
loudspeakers.
CA-160
CK-200
Installation
38
• Connect the female connector of the ISO cable to the power and
speaker connectors of the car wiring harness.
• Check the permanent +12 V feed (red wire) and ignition feed
(blue wire) on the junction box connector. If necessary, swap the
configuration connectors "+12V battery" and "Ignition" of the
ISO cable.
Check the correct location of the mute signal for the car radio,
and connect the configuration connector "Mute" to the
corresponding socket (Mute1, Mute2, or Mute3). By default, the
mute connector is connected to the ISO connector pin A2
(Mute2). If the car radio does not support the mute function,
leave the connector unconnected.
Plug the two ISO male connectors to the car radio.
2. Insert the speaker and power cable plugs of the ISO cable to the
respective connectors on the junction box.
3. Connect the display to the respective connector on the junction box.
Optional steps:
• To charge a compatible mobile device through the car kit, connect a
compatible charging cable (such as Nokia CA-159) to the junction
box.
• To use an external microphone (such as Nokia MP-2) instead of the
built-in one, connect the microphone to the respective connector on
the junction box, and modify the microphone settings (see “Installer
settings”, p. 36). In noisy car environments, you may need to use an
external microphone.
Installation
39
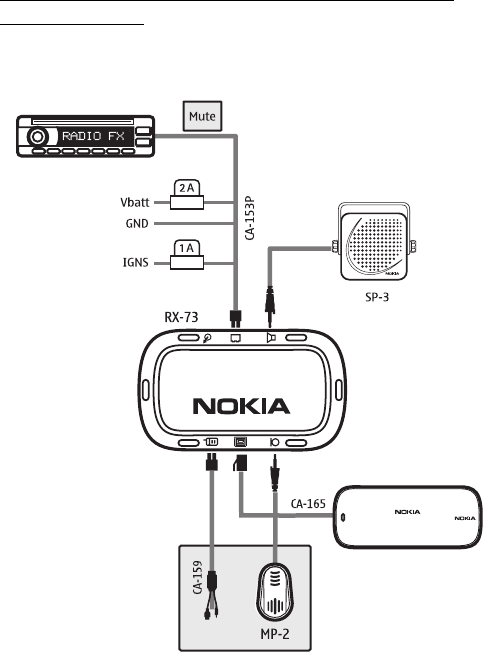
Installation using the power cable CA-153P and an
external speaker
In this setup, the junction box is connected to the car radio with the
power cable CA-153P, and an optional external speaker is used for calls.
1. Connect the wires of the power cable CA-153P to the car as follows:
• The black wire to the vehicle ground.
• The red wire to the permanent 12 V. Always connect the supplied
2 A fuse to this line, close to the source.
CK-200
Installation
40
• The blue wire to the Ignition or ACC (accessory) line. Always
connect the supplied 1 A fuse to this line, close to the source.
2. Connect the power cable to the respective connector on the junction
box.
3. Connect the speaker (such as Nokia SP-3) to the respective
connector on the junction box.
4. Connect the display to the respective connector on the junction box.
Optional steps:
• To mute the car radio when you make or receive a call, connect the
yellow mute wire of the power cable CA-153P to the car radio.
• To charge a compatible mobile device through the car kit, connect a
compatible charging cable (such as Nokia CA-159) to the junction
box.
• To use an optional external microphone (such as Nokia MP-2)
instead of the built-in one, connect the microphone to the respective
connector on the junction box, and modify the microphone settings
(see “Installer settings”, p. 36). You may need to use an external
microphone in noisy car environments.
Installation
41
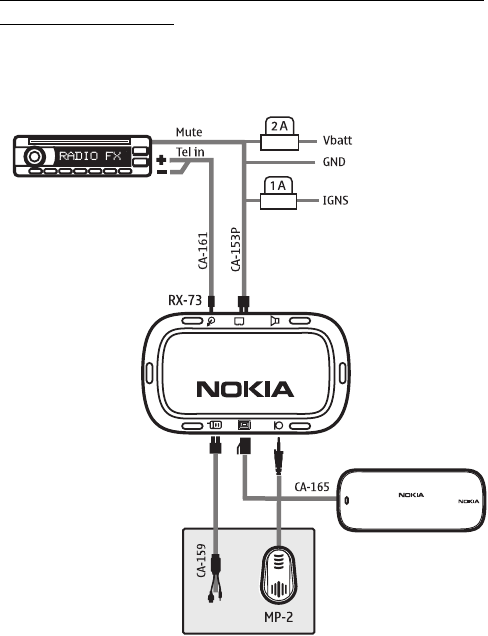
Installation using the power cable CA-153P and direct
input cable CA-161
In this setup, the junction box is connected to the car radio with the
power cable CA-153P and the direct input cable CA-161, and the car
radio speakers are used for calls.
1. Connect the wires of the power cable CA-153P to the car as follows:
• The black wire to the vehicle ground.
• The red wire to the permanent 12 V. Always connect the supplied
2 A fuse to this line, close to the source.
CK-200

Installation
42
• The blue wire to the Ignition or ACC (accessory) line. Always
connect the supplied 1 A fuse to this line, close to the source.
• The yellow wire to the car radio mute input.
2. Connect the direct input cable CA-161 to the respective connectors
on the car radio and the junction box.
3. Connect the display to the respective connector on the junction box.
In some cars, you may need to switch on the car radio to hear the call
audio.
Optional steps:
• To charge a compatible mobile device through the car kit, connect a
compatible charging cable (such as Nokia CA-159) to the junction
box.
• To use an optional external microphone (such as Nokia MP-2)
instead of the built-in one, connect the microphone to the respective
connector on the junction box, and modify the microphone settings
(see “Installer settings”, p. 36). You may need to use an external
microphone in noisy car environments.
■Optional accessories
You can extend the features of the car kit with optional accessories.
Consult your dealer or service technician for suitable accessories. Use
only approved and compatible accessories.
Charging cable
To charge a compatible mobile device from the car kit, leaving the
cigarette lighter free for other devices, you can use an optional charging
cable, such as CA-159.
Microphone
In noisy car environments, you can use an optional external microphone
(such as Nokia MP-2) to improve the audio quality, instead of the built-
in one. To use an external microphone, connect the microphone to the
respective connector on the junction box.

Installation
43
Select the mounting location of the microphone carefully, to increase
the quality of voice transmission.
The best place to mount the microphone is close to the rear view mirror.
Mount the microphone so that it points towards the driver’s mouth and
is at least 1 metre (3 feet) from the car kit speaker, to avoid audio
feedback.
Make sure the microphone cable reaches to the junction box.
Mount the microphone so that it is not exposed to air streams from the
vents. Do not place the microphone cable in the heating, ventilation, or
air-conditioning system. Use the supplied double-sided adhesive tape to
mount the microphone.
Insert the microphone plug into the microphone connector on the
junction box, and to lock it in place, turn the plug clockwise.
External antenna
The external antenna improves the reception of the mobile device in a
car. For availability, contact your dealer.
Note: In order to comply with RF exposure guidelines, install the
external antenna so that a minimum distance of 20 centimetres (8
inches) can be maintained between the external antenna and all
persons, with external antenna gain not exceeding 3 dBi.
■Check the operation of the car kit
After the car kit has been installed, check that it is mounted and
working properly. See also “Troubleshooting”, p. 27.

Care and maintenance
44
Care and maintenance
Your car kit is a product of superior design and craftmanship and should be
treated with care. The following suggestions will help you protect your warranty
coverage.
• Keep the car kit dry. Precipitation, humidity and all types of liquids or
moisture can contain minerals that will corrode electronic circuits.
• Do not use or store the car kit in dusty, dirty areas. Its moving parts and
electronic components can be damaged.
• Do not attempt to open the car kit.
• Do not use harsh chemicals, cleaning solvents, or strong detergents to clean
the car kit parts. Only use a soft, clean, dry cloth to clean the surface of the
parts.
• Do not paint the car kit parts. Paint can clog the moving parts and prevent
proper operation.
Recycle
Always return your used electronic products, batteries, and packaging materials
to dedicated collection points. This way you help prevent uncontrolled waste
disposal and promote the recycling of materials. Check product environmental
information and how to recycle your Nokia products at www.nokia.com/
werecycle, or nokia.mobi/werecycle.
The crossed-out wheeled-bin symbol on your product, battery, literature,
or packaging reminds you that all electrical and electronic products,
batteries, and accumulators must be taken to separate collection at the
end of their working life. This requirement applies in the European Union.
Do not dispose of these products as unsorted municipal waste. For more
environmental information, see the product Eco-Declarations at
www.nokia.com/environment.

Additional safety information
45
Additional safety information
■Vehicles
RF signals may affect improperly installed or inadequately shielded electronic
systems in motor vehicles such as electronic fuel injection systems, electronic
antiskid (antilock) braking systems, electronic speed control systems, and air bag
systems. For more information, check with the manufacturer or its representative
of your vehicle or any equipment that has been added.
Faulty installation or service may be dangerous and may invalidate any warranty
that may apply to the device. Check regularly that all wireless device equipment
in your vehicle is mounted and operating properly. Do not store or carry
flammable liquids, gases, or explosive materials in the same compartment as the
device, its parts, or accessories. For vehicles equipped with an air bag, remember
that air bags inflate with great force. Do not place objects, including installed or
portable wireless equipment in the area over the air bag or in the air bag
deployment area. If in-vehicle wireless equipment is improperly installed and the
air bag inflates, serious injury could result.

FCC/Industry Canada notice
46
FCC/Industry Canada notice
This device complies with Part 15 of the FCC Rules. Operation is subject to the following two conditions: 1.
This device may not cause harmful interference; and 2. This device must accept any interference received,
including interference that may cause undesired operation. This equipment has been tested and found to
comply with the limits for a Class B digital device, pursuant to Part 15 of the FCC Rules. These limits are
designed to provide reasonable protection against harmful interference in a residential installation. This
equipment generates, uses and can radiate radio frequency energy and, if not installed and used in
accordance with the instructions, may cause harmful interference to radio communications. However, there
is no guarantee that interference will not occur in a particular installation. If this equipment does cause
harmful interference to radio or television reception, which can be determined by turning the equipment off
and on, the user is encouraged to try to correct the interference by one or more of the following measures:
Reorient or relocate the receiving antenna. Increase the separation between the equipment and receiver.
Connect the equipment into an outlet on a circuit different from that to which the receiver is connected.
Consult the dealer or an experienced radio/TV technician for help. NOTE: FCC Radiation Exposure Statement:
This equipment complies with FCC radiation exposure limits set forth for an uncontrolled environment. This
transmitter must not be co-located or operating in conjunction with any other antenna or transmitter.
NOTE: Changes or modifications not expressly approved by Nokia could void the user's authority to operate
the equipment.