Microsoft HF-23 Nokia Display Car Kit CK-600 User Manual Manual
Microsoft Mobile Oy Nokia Display Car Kit CK-600 Manual
Manual

Nokia Display Car Kit CK-600
User and Installation Guide
9211132
Issue 1 EN

2
DECLARATION OF CONFORMITY
Hereby, NOKIA CORPORATION declares that this HF-23 product is in compliance with the
essential requirements and other relevant provisions of Directive 1999/5/EC. The product is
in conformity with the limits defined in Directive 2004/104/EC (amending Directive 72/245/
EEC), Annex I, paragraph 6.5, 6.6, 6.8 and 6.9. A copy of the Declaration of Conformity can be
found at http://www.nokia.com/phones/declaration_of_conformity/.
© 2008 Nokia. All rights reserved.
Nokia, Nokia Connecting People, Navi and the Nokia Original Accessories logo are
trademarks or registered trademarks of Nokia Corporation. Other product and company
names mentioned herein may be trademarks or tradenames of their respective owners.
Bluetooth is a registered trademark of Bluetooth SIG, Inc.
Reproduction, transfer, distribution, or storage of part or all of the contents of this document
in any form without the prior written permission of Nokia is prohibited.
Nokia operates a policy of ongoing development. Nokia reserves the right to make changes
and improvements to any of the products described in this document without prior notice.
To the maximum extent permitted by applicable law, under no circumstances shall Nokia be
responsible for any loss of data or income or any special, incidental, consequential or indirect
damages howsoever caused.
The contents of this document are provided “as is”. Except as required by applicable law, no
warranties of any kind, either express or implied, including, but not limited to, the implied
warranties of merchantability and fitness for a particular purpose, are made in relation to the
accuracy, reliability or contents of this document. Nokia reserves the right to revise this
document or withdraw it at any time without prior notice.
The availability of particular products may vary by region. Please check with your Nokia
dealer for details.
Export controls
This device may contain commodities, technology or software subject to export laws and
regulations from the US and other countries. Diversion contrary to law is prohibited.
9211132/Issue 1 EN

3
Contents
For your safety......................... 5
Quick start................................ 6
First time setup ...................................... 6
Input device ............................................ 6
1. Introduction ......................... 9
About this document............................ 9
Bluetooth wireless technology ........ 10
2. Get started.......................... 11
Parts ........................................................ 11
Input device CU-10............................. 12
Display and standby mode................ 12
Rotate the display............................ 12
Store the display in the pouch..... 13
Information shown
in the standby mode ....................... 13
Navigate the menus............................ 13
Switch the car kit on or off .............. 14
Switch on ........................................... 14
Switch off........................................... 14
First time use ........................................ 15
Pair and connect the car kit............. 15
Pair and connect with
phone or music player .................... 16
Connect the car kit manually....... 17
Connect the car kit
automatically .................................... 17
Disconnect the car kit..................... 17
Manage or clear the list
of paired devices .............................. 17
3. Calls .................................... 18
Make a call............................................ 18
Answer a call ........................................ 18
Adjust call volume............................... 19
Mute or unmute the microphone ... 19
Call register........................................... 19
Speed dialling....................................... 19
Switch a call between car kit
and connected device ........................ 20
Send DTMF tones................................. 20
4. Music player ....................... 21
Listen to music..................................... 21
Adjust music volume .......................... 22
Music player settings ......................... 22
5. Contacts .............................. 23
Search for a contact........................... 23
Speed dials ............................................ 23
Copy contacts to car kit .................... 24
6. Settings ............................... 25
Bluetooth settings............................... 25
User and installation settings.......... 25
Audio settings................................... 25
Display settings ................................ 26
General settings ............................... 26
Installation settings ........................ 27
7. Troubleshooting.................. 28
Reset the car kit................................... 28
Connection issues................................ 28
Audio issues .......................................... 29
Other issues........................................... 30
8. Installation.......................... 31
Safety information.............................. 31
Integration with a car radio
system..................................................... 32
Use the ISO cable CA-135............. 33
Use the power cable PCU-4.......... 36
Install the car kit in a vehicle .......... 38
Hands-free unit HF-23................... 39
Input device CU-10 ......................... 40
Display SU-34 ................................... 40
Microphone MP-2............................ 43
4
ISO cable CA-135 ............................ 43
Motion sensor................................... 44
Optional accessories........................... 44
Mobile holder ................................... 44
External antenna ............................. 44
Check the operation
of the car kit......................................... 45
Software updates................................ 45
Care and maintenance........... 46
Additional safety
information ............................ 47
FCC/Industry Canada notice.. 48
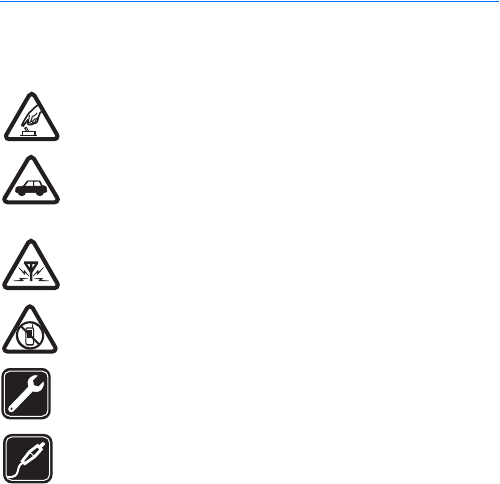
For your safety
5
For your safety
Read these simple guidelines. Not following them may be dangerous or illegal.
Read the complete user and installation guide for further information.
SWITCH ON SAFELY
Do not switch the device on when wireless phone use is prohibited or
when it may cause interference or danger.
ROAD SAFETY COMES FIRST
Obey all local laws. Always keep your hands free to operate the
vehicle while driving. Your first consideration while driving should be
road safety.
INTERFERENCE
All wireless devices may be susceptible to interference, which could
affect performance.
SWITCH OFF IN RESTRICTED AREAS
Follow any restrictions. Switch the device off near fuel, chemicals, or
blasting areas.
QUALIFIED SERVICE
Only qualified personnel may install or repair this product.
ACCESSORIES
Use only approved accessories. Do not connect incompatible
products.
When connecting to any other device, read its user guide for detailed safety
instructions. Do not connect incompatible products.
Quick start
6
Quick start
This section briefly describes the basic features of the car kit. For details,
see the respective sections in this guide.
■First time setup
1. Switch on the car kit (see p. 14) and your mobile phone or music
player.
2. When you are prompted to select a language for the texts on the car
kit display, turn the NaviTM wheel to scroll to the desired language,
and press the wheel.
3. Activate the Bluetooth feature on your phone or music player, and
set up a Bluetooth connection between the car kit and your device.
4. When you are prompted to copy the contacts from your device to the
car kit, turn the Navi wheel to scroll to Yes, and press the wheel to
start the copying. If you select No, you cannot use your saved
contacts to make calls with the car kit.
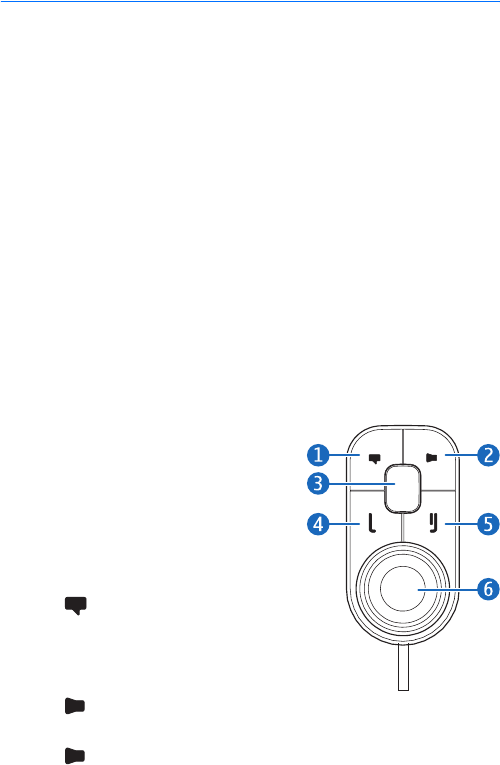
■Input device
When you use the input device to
operate the music player connected to
the car kit, the available music player
functions are shown on the car kit
display.
1. Voice dialling key
Press to activate voice dialling on
a compatible mobile phone when no
call is in progress.
2. Mute key
Press to mute or unmute the
external loudspeaker in the standby mode.
Press to mute or unmute the microphone during a call.

Quick start
7
Press and hold for about 2 seconds to switch a call from the car
kit to the compatible device connected to it.
3. Mode key
Press the mode key to switch between the standby mode and the
music player menu.
In the music player menu, press the mode key to start, pause, or
resume music playback on the compatible music player connected to
the car kit.
4. Call key
• Press to make or answer a call or to switch between an active
call and a call on hold.
• Press to view the list of last dialled numbers in the standby
mode.
• Press twice to redial the last dialled number in the standby
mode.
5. End key
• Press to end or reject a call.
• Press to delete a single character when you write text or
numbers.
• Press to return to the previous menu level or display view.
• Press and hold to return to the standby mode from the menu
functions.
• Press and hold to switch the car kit on or off (if the car kit is not
connected to the ignition system).
6. Navi wheel (hereafter referred to as wheel)
• Turn the wheel left or right to adjust the volume during a call or
while listening to music, or to scroll through menu items.
• Turn the wheel left in the standby mode to enter a phone number
or to use speed dialling.
• Turn the wheel right in the standby mode to search for a contact
in Contacts.
Quick start
8
• Press the wheel to perform the function shown at the bottom of
the display.

Introduction
9
1. Introduction
With the Nokia Display Car Kit CK-600, you can conveniently make and
answer calls hands-free and listen to music from your compatible
device.
You can also copy contacts from two compatible devices to the car kit,
which allows two users to use their contacts immediately after their
device is connected to the car kit. The contacts and the menu functions
of the car kit can be accessed with the supplied input device and display.
The car kit can be paired with up to eight Bluetooth devices at a time
and connected to a compatible mobile phone and music player at the
same time.
Read this guide carefully before having the car kit professionally
installed and using it. Also, read the user guide for the device that you
connect to the car kit. It provides important safety and maintenance
information.
Check www.nokia.com/support or your local Nokia website for the latest
guides, additional information, and downloads related to your Nokia
product.
This product may contain small parts. Keep them out of the reach of
small children.
■About this document
Setup and operation are described in “Get started”, p. 11, “Calls”, p. 18,
“Music player”, p. 21, “Contacts”, p. 23, and “Settings”, p. 25.
Troubleshooting tips can be found in “Troubleshooting”, p. 28.
Installation in a car is described in “Installation”, p. 31. The car kit
should only be installed by a qualified service technician using the
original Nokia parts supplied in the sales package.
Introduction
10
■Bluetooth wireless technology
Bluetooth wireless technology allows you to connect compatible
devices without cables. The car kit and the other device do not need to
be in line of sight, but they should be within 10 metres (33 feet) of each
other. Connections may be subject to interference from obstructions,
such as walls, or other electronic devices.
The car kit is compliant with the Bluetooth Specification 2.0 supporting
the following profiles: the Hands-Free Profile (HFP) 1.5 (to use the car
kit hands free with your mobile device for calling), Phone Book Access
Profile (PBAP) 1.0 (to copy contacts from your mobile device to the car
kit), Advanced Audio Distribution Profile (A2DP) 1.0 (to stream music
from your music player to the car kit), and Audio Video Remote Control
Profile (AVRCP) 1.0 (to operate the connected music player with the
input device). Check with the manufacturers of other devices to
determine their compatibility with this device.
Get started
11
2. Get started
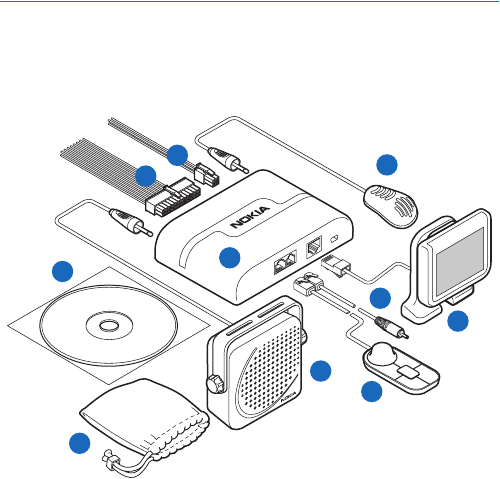
■Parts
The car kit contains the following parts:
1. Hands-free unit HF-23
2. ISO cable CA-135 (if supplied in the sales package)
3. Power cable PCU-4 (if supplied in the sales package)
4. Microphone MP-2
5. Display SU-34
6. Charging cable CA-134 with a Nokia 2.0 mm plug
7. Input device CU-10 with Navi wheel
8. Loudspeaker SP-3 (if supplied in the sales package)
9. Pouch CP-335 for storing the display when it is not used
2
1
3
5
6
7
10
9
8
4
Get started
12
10.CD that contains this user and installation guide
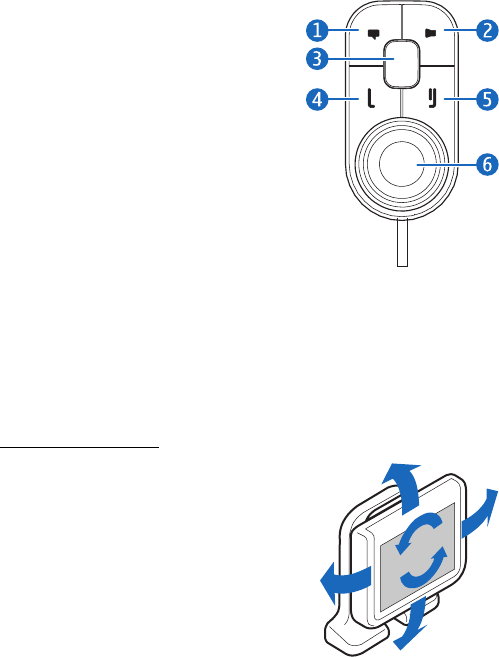
■Input device CU-10
You can operate the car kit using the
input device. The device is provided with
the Navi wheel that you can turn or
press.
1. Voice dialling key
2. Mute key
3. Mode key
4. Call key
5. End key
6. Navi wheel (hereafter referred to as
wheel)
The keys are illuminated for easy operation in the dark. For functions
that can be performed with the input device, see “Input device”, p. 6.
■Display and standby mode
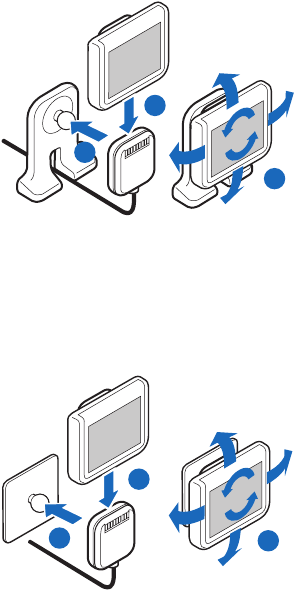
Rotate the display
When the display is attached to the
dashboard using the supplied stand, you
can rotate the display up to about 24
degrees left or right and up to about 20
degrees up or down.
When the display is attached to the
dashboard using the supplied mounting
plate, you can rotate the display up to
about 15 degrees left or right and up to
about 10 degrees up or down.
Do not try to force the display to rotate more.
Get started
13
Store the display in the pouch
When you do not use the display, detach it from the stand or mounting
plate, and put it into the supplied pouch to protect it against scratches.
Information shown in the standby mode
When the car kit is in the standby mode and connected to a compatible
device using Bluetooth wireless technology, the following information is
displayed:
1. Current status of the car kit, for
example, type of the connected
device (compatible mobile phone or
music player)
2. Signal strength of the cellular
network at the current location if
this information is provided by the
connected phone; the higher the
bar, the stronger the signal
3. Name or logo of the service provider if this information is provided by
the connected phone
4. Battery status of the connected phone if this information is provided
by the phone; the higher the bar, the more power left
5. Function that can be performed by pressing the wheel; in the
standby mode, pressing the wheel opens the list of menu functions
To enter a phone number manually or use speed dialling, turn the wheel
left. For details, see “Speed dials”, p. 23.
To search for a contact from Contacts in the car kit, turn the wheel right.
For details, see “Search for a contact”, p. 23.
To view the last dialled numbers, press . For details, see “Call register”,
p. 19.
■Navigate the menus
Many of the car kit functions are grouped into menus.
1
234
5

Get started
14
To open the list of menu functions in the standby mode, press the wheel
when Menu is displayed at the bottom of the display.
To scroll to an item (such as a menu function) or through a list, turn the
wheel left or right. To select an item, scroll to the item, and press the
wheel.
To return to the previous menu level, press . To return to the standby
mode, press and hold until the standby mode screen is displayed.
■Switch the car kit on or off
If you are not certain whether the ignition sense wire is connected or
not, consult with the technician who installed the car kit.
Switch on
If the ignition sense wire is connected, turn on the car ignition. When
the car kit is switched on, the display and the indicator light of the input
device turn on.
If the ignition sense wire is not connected, press and hold for about 5
seconds. Alternatively, turn on the ignition, start driving, and wait until
the built-in motion sensor switches the car kit on automatically (if the
motion sensor is turned on). When the motion sensor is on, the car kit
switches off after 2 minutes if no phone is connected to the car kit
during this time; to switch the car kit back on, press and hold for
about 5 seconds. To turn the motion sensor on or off, press the wheel in
the standby mode, and select Settings > Installation > Ignition sensor.
After the car kit is switched on, it tries to make a Bluetooth connection
to the phone that was last used with it.
Switch off
If the ignition sense wire is connected, turn off the car ignition. If you
have a call in progress on your phone connected to the car kit, the car kit
switches off after you end the call. When the car kit switches off, the
display and the indicator light of the input device turn off.

Get started
15
If the ignition sense wire is not connected, press and hold for about 5
seconds to switch off the car kit. If the ignition sense wire is not
connected and you disconnect your device from the car kit (for example,
to take it with you), the car kit automatically switches off after 2
minutes.
After you turn off the car ignition, do not leave the phone or music
player connected to the car kit to prevent accidental draining of the car
battery. If the phone or music player is left connected to the car kit, the
car kit automatically switches off after 12 hours.
■First time use
When you switch on the car kit for the first time, you are asked to select
the desired language for the texts on the car kit display. Turn the wheel
to scroll to the desired language, and press the wheel.
After the language selection, you are asked to pair and connect the car
kit with a compatible device using Bluetooth wireless technology. See
also steps 3 to 5 in “Pair and connect the car kit”, p. 15.
When your device is connected to the car kit, you are prompted to copy
the contacts from the device to the car kit. To start the copying, select
Yes. If you select No, you cannot use your saved contacts to make calls
with the car kit. To copy the contacts later, see “Copy contacts to car
kit”, p. 24.
■Pair and connect the car kit
Before using the car kit, you must associate (pair) and connect it with a
compatible mobile phone or music player that supports Bluetooth
wireless technology. See also “Bluetooth wireless technology”, p. 10.
When you use your device with the car kit, secure the device in the car
using a compatible mobile holder. However, you can maintain the
Bluetooth connection in the car even if you keep your device, for
example, in a handbag.
To charge the battery in your compatible Nokia device while using the
car kit, connect the device to the car kit using the supplied charging
cable.

Get started
16
You can pair the car kit with up to eight devices but connect it to only
one device supporting the HFP Bluetooth profile and another device
supporting the A2DP (and possibly AVRCP) profile at a time.
Pair and connect with phone or music player
If your phone supports the HFP and A2DP (and possibly AVRCP)
Bluetooth profiles and has a music player feature, you can use the car
kit to handle calls and play music.
If your phone does not support the A2DP Bluetooth profile, you can
separately pair the car kit with the phone and a music player that
supports this profile.
To pair and connect the car kit with a compatible phone or music player
after the first time use:
1. Switch on the car kit and your phone or music player.
If you want to pair and connect a music player that supports the
A2DP Bluetooth profile, disconnect the car kit from your phone if the
phone supports this profile.
2. Press the wheel in the standby mode, and select Bluetooth > Paired
devices > Pair new device.
3. Activate the Bluetooth feature on your device, and set it to search for
Bluetooth devices. For instructions, see the user guide of your device.
4. Select the car kit (Nokia CK-600) from the list of found devices on
your device, or follow the related instructions in the user guide for
the device.
The Bluetooth passcode 0000 is shown on the car kit display.
5. Enter the Bluetooth passcode 0000 to pair and connect the car kit
with your device. In some devices you may need to make the
connection separately after pairing. See “Connect the car kit
manually”, p. 17, or the user guide of your device.
If your device does not have a keypad, it may use the passcode 0000
by default. If this is not the case, see the user guide of the device to
change the default Bluetooth passcode to 0000.

Get started
17
If the pairing is successful and your device is connected to the car kit, a
related message is shown on the car kit display. The car kit also appears
in the menu of your phone or music player where you can view the
currently paired Bluetooth devices.
Connect the car kit manually
To manually connect the car kit to a paired phone or music player when
the car kit is switched on, press the wheel in the standby mode, select
Bluetooth > Connect phone or Connect music player, and select the
device from the list.
Connect the car kit automatically
You may be able to set your phone so that the car kit connects to it
automatically. To activate this feature in a Nokia device, change the
paired device settings in the Bluetooth menu.
When you switch on the car kit, the car kit tries to make a Bluetooth
connection to the last used phone. If this fails, the car kit tries to
connect to the second last used phone.
Disconnect the car kit
To disconnect the car kit from your phone or music player, close the
connection in the Bluetooth menu of your device. Alternatively, press
the wheel in the standby mode, and select Bluetooth > Active devices
and the device you want to disconnect.
Manage or clear the list of paired devices
The car kit saves the pairing information about the last eight Bluetooth
devices that have been paired with it.
To remove a device from the list of paired devices, press the wheel in the
standby mode, and select Bluetooth > Paired devices, the desired device,
and Delete pairing.
To clear the list of paired devices and reset the car kit to the factory
settings, press the wheel in the standby mode, and select Settings >
Restore factory settings.

Calls
18
3. Calls
■Make a call
To enter a phone number, turn the wheel left in the standby mode. Scroll
to the first digit of the phone number, and press the wheel. Select the
other digits of the phone number in the same way. (To delete the most
recent digit, press .) Once the phone number is displayed, press to
call it. To end the call (or cancel the call attempt), press .
To search for a contact from Contacts, see “Search for a contact”, p. 23.
To call the most recently dialled number, press twice. To call one of
the other recently dialled numbers, press , scroll to the desired name
or phone number, and press .
To activate the voice dialling feature on the connected phone, press
when you are not in a call, if your phone supports the use of this feature
with the car kit. Proceed as instructed in the phone user guide. For voice
dialling, you must save voice tags for the desired contacts in your phone.
■Answer a call
To answer a call, press or the wheel. The caller’s name is displayed if
the cellular network supports this function and you have copied the
caller’s contact information from the connected device to the car kit
(see “Copy contacts to car kit”, p. 24). If you do not answer the call, you
can view the caller’s name (or phone number) by pressing wheel after
the call (see also “Call register”, p. 19).
To reject an incoming call, press .
If you have set the Automatic answer function to On, the car kit
automatically answers the call. See “User and installation settings”,
p. 25.
To put a call on hold, press the wheel when Call options is displayed, and
select Hold; to make the call on hold active, select Unhold.
To answer a new call during a call if you have activated the call waiting
feature in your phone, press . The first call is put on hold. To reject the

Calls
19
new call, press . To switch between the active call and the call on hold,
press . To end the active call and make the call on hold active, press .
■Adjust call volume
To adjust the volume during a call or when a call is alerting, turn the
wheel left to decrease the volume or right to increase it. When you
change the volume, the horizontal bar at the top of the display moves
accordingly. The volume is set only for the current call. To set the default
volume for calls, see “Audio settings”, p. 25.
To mute the volume, press in the standby mode or when you receive
a call. To restore the original volume, press .
■Mute or unmute the microphone
To mute or unmute the microphone during a call, press ; or press the
wheel when Call options is displayed, and select the desired option.
When the microphone is muted, is displayed.
■Call register
The car kit registers the phone numbers of recent missed, received, and
dialled calls. The car kit registers missed and received calls only if the
cellular network supports these functions, and the device that you have
connected to the car kit is switched on and within the network service
area.
To view the recent calls, press the wheel in the standby mode, and select
Call register and a call type. To view the phone number of the selected
call, press the wheel. To call the phone number, press .
■Speed dialling
You can assign a contact to one of the speed dialling numbers, 1 - 9. See
“Speed dials”, p. 23.
To use speed dialling, turn the wheel left in the standby mode, and scroll
to the desired speed dialling number. The contact assigned to the speed
dialling number is displayed. To call the contact, press .

Calls
20
■Switch a call between car kit and connected
device
To switch a call from the car kit to your compatible phone, press and
hold for about 2 seconds. Some phones may close the Bluetooth
connection until the call ends.
To switch the call back to the car kit, press the wheel when Reconnect is
displayed, or use the relevant function on your device.
■Send DTMF tones
You can send DTMF tone strings (for example, a password) during a call.
Press the wheel when Call options is displayed, and select Send DTMF.
Scroll to the first digit of the string, and press the wheel. Select the
other digits of the string in the same way. (To delete the most recent
digit, press .) Once the whole string is displayed, press to send it as
DTMF tones.
Music player
21
4. Music player
You can use the car kit to listen to music from a compatible music player
(or its memory card) that supports the A2DP (and possibly AVRCP)
Bluetooth profile.
To open the music player menu, press the wheel in the standby mode,
and select Music. Alternatively, press the mode key to switch between
the standby mode and the music player menu. The car kit detects the
Bluetooth profiles supported by the connected music player and shows
the available functions.
Warning: Listen to music at a moderate level. Continuous
exposure to high volume may damage your hearing.
■Listen to music
To listen to music from your music player through the car kit, ensure
that the player is connected to the car kit and is ready for use, and open
the music player menu. The car kit shows the music player functions
that can be controlled with the input device.
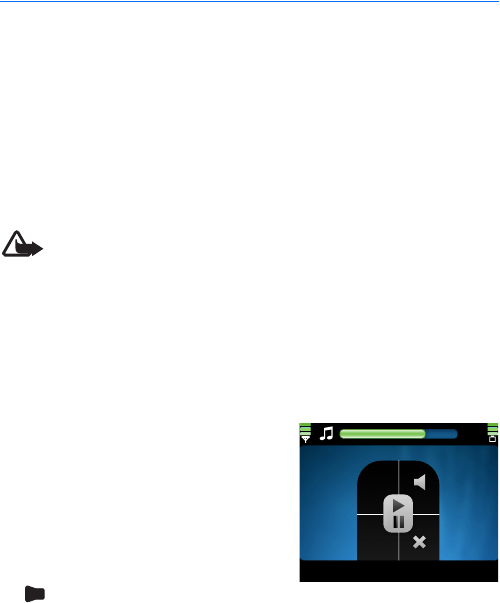
If your music player supports the A2DP
Bluetooth profile, you can do the
following:
• To play or pause the song that you
have selected on the music player,
press the mode key.
• To mute or unmute playback, press
.
Music player
22
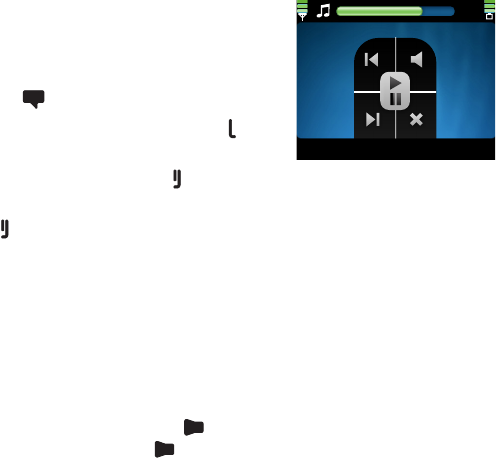
If your music player supports the AVRCP
Bluetooth profile, you can also do the
following:
• To select the previous song, press
.
• To select the next song, press .
To return to the previous screen without
stopping playback, press .
To exit to the standby mode without stopping playback, press and hold
for about 2 seconds.
If you receive or make a call while listening to music, the music is
paused until you end the call.
■Adjust music volume
To adjust the volume during music playback, turn the wheel left to
decrease the volume or right to increase it, or set the volume on your car
radio. To set the default volume for music, see “Audio settings”, p. 25.
To mute the volume, press during music playback. To restore the
original volume, press .
■Music player settings
To adjust the music player settings, open the music player menu, and
press the wheel when Music settings is displayed.
To view or change the music player connected to the car kit, select
Active music player. To change the music player, select the desired
player from the list. See also “Bluetooth settings”, p. 25.
To modify the tone of the music playback, select Equaliser and the
desired option. This setting cannot be changed if you use the car radio
amplifier for music.
To exit from the music settings, select Back.

Contacts
23
5. Contacts
You can copy names and phone numbers (contacts) from two
compatible mobile phones to the car kit, and use the contacts for
calling. This is convenient when you use the car kit with two phones
because you can access the contacts immediately while the contacts
saved in the phone are synchronised with the car kit in the background.
The copied contacts are saved in the Contacts menu. For details, see
“Copy contacts to car kit”, p. 24.
■Search for a contact
The car kit uses predictive search for faster access to the saved contacts.
The search only shows the available characters, and non-available
characters are greyed out.
To search for a contact in the standby mode, turn the wheel right, or
press the wheel, and select Contacts > Search.
To view all the contacts saved in Contacts, press , or select .
To only view contact names that start with certain letters, scroll to the
first letter of the name, and press the wheel. (For more available
characters, select the right arrow.) You can repeat this four times. To
delete the most recent letter, press . To view the list of names that
start with the entered letters, press , or select . To switch back to the
character list, press .
To call the default phone number of the selected contact, scroll to the
desired contact, and press . To call some other phone number of the
contact, press the wheel, scroll to the desired number, and press .
■Speed dials
Speed dialling is a quick way to call frequently used phone numbers. You
can assign a phone number to the speed dialling numbers, 1 - 9.
Speed dials must be turned on before using speed dialling (see “User and
installation settings”, p. 25).

Contacts
24
To set up speed dialling, press the wheel in the standby mode, and select
Contacts > Speed dials.
• To allow or prevent speed dialling, select Activate or Deactivate. If
you deactivate speed dialling, you are prompted to activate it when
you try to use speed dialling.
• To view the contacts assigned to speed dialling numbers, select View,
and scroll through the list. To call the selected contact, press the
wheel.
• To assign a name or phone number to a speed dialling number, select
Assign. To select the name from the contacts list, select the first
letter of the name. The names starting with this letter are shown.
Select the desired name, phone number, and speed dialling number.
• To delete an assigned speed dial, select Delete and the contact that
you want to remove from the speed dial list. The contact is removed
only from the speed dial list, not from Contacts.
■Copy contacts to car kit
You can copy the contacts saved in the internal memory of two
compatible mobile phones that you connect to the car kit.
To copy the contacts from the connected device, press the wheel in the
standby mode, and select Contacts > Download Contacts > Yes. is
displayed during the copying.
If you make or receive a call while the contacts are copied, the copying
may be stopped. In this case, start the copying again. While the contacts
are being copied, you cannot use the contacts saved in Contacts.
If you connect another device to the car kit, the contacts copied from
the previous device cannot be used. To use the contacts saved in the
new device with the car kit, copy the contacts to the car kit.
Each time you connect your device to the car kit, the contacts saved in
Contacts are updated if the contacts saved in the device have changed.

Settings
25
6. Settings
■Bluetooth settings
To manage Bluetooth connections, press the wheel in the standby mode,
and select Bluetooth.
To view the devices that are currently connected to the car kit, select
Active devices. To disconnect a device from the car kit, select the desired
device. To connect to a paired device when the device list is empty, press
the wheel and select the desired device.
To view the devices that are currently paired with the car kit, select
Paired devices. To pair the car kit with a compatible phone or music
player, select the device and Pair new device. To remove the pairing,
select the device and Delete pairing.
To connect the car kit with a paired phone or music player, select
Connect phone or Connect music player, and select the device from the
list. See also “Pair and connect the car kit”, p. 15.
■User and installation settings
You can save different user and installation settings for up to eight
paired devices.
Audio settings
To adjust the audio settings, press the wheel in the standby mode, and
select Settings > Audio.
To set the default volume for phone calls, select Handsfree volume, turn
the wheel left to decrease or right to increase the volume, and press the
wheel. See also “Adjust call volume”, p. 19.
To set the default volume for the music player, select Music volume, turn
the wheel left to decrease or right to increase the volume, and press the
wheel.
To define when the car radio is muted, select Phone sounds and the
desired option. If you select Calls only, the car radio is muted only when

Settings
26
you receive a call. If you select Always on, the car radio is muted when
the connected device produces any sound, for example, a text message
tone.
To turn the warning tones of the car kit on or off, select Warning tones
and the desired option.
Display settings
To adjust the display settings, press the wheel in the standby mode, and
select Settings > Display.
To turn the night mode on or off, select Night mode and the desired
option. If you select On, the display backlight is dimmer.
To set the direction of the menu rotation when you turn the wheel,
select Menu rotation and the desired option. If you select Clockwise, the
menu is rotated to the same direction to which you turn the wheel.
To change the colour of the display, such as the background and the
signal strength bar, select Colour themes and the desired colour theme.
To adjust the brightness of the display, select Brightness and the desired
brightness level.
To set the time after which the display backlight turns off in the standby
mode, select Auto dimming and the desired time. If you select Off, the
backlight remains always on when the car kit is switched on.
General settings
To adjust the general settings, press the wheel in the standby mode, and
select Settings > General.
To select whether the contacts saved in Contacts are sorted by first or
last name, select Sort order and the desired option.
To turn speed dialling on or off, select Speed dials and the desired
option. If you select On, the phone numbers assigned to the speed
dialling numbers, 1 - 9, can be dialled as described in “Speed dialling”,
p. 19.
To turn automatic answer on or off, select Automatic answer and the
desired option. If you select On, the car kit automatically answers an

Settings
27
incoming call. To set the time period after which the call is answered,
see the phone user guide.
To change the car kit language, select Language setting and the desired
language.
To view the software and hardware versions of the product, select
Product info. To scroll through the information, press the wheel
repeatedly.
To reset the car kit to the factory settings, select Restore factory
settings. Alternatively, switch on the car kit, and press and hold the
wheel for about 5 seconds.
Installation settings
The installation settings should only be changed by a qualified service
technician during the installation of the car kit. To adjust the settings,
press the wheel in the standby mode, and select Settings > Installation.
To turn the built-in motion sensor on or off, select Ignition sensor and
the desired option.
To select the appropriate music output, select Music output and the
correct mode according to the car radio setup. For details, see
“Integration with a car radio system”, p. 32.

Troubleshooting
28
7. Troubleshooting
■Reset the car kit
The car kit doesn’t react to my actions. How can I reset it?
Press and hold for about 10 seconds when the car kit is switched on.
The car kit restarts. The reset does not clear the car kit settings.
■Connection issues
I can’t connect the car kit to my device through a Bluetooth
connection.
• Ensure that the car kit is switched on and paired with your device.
• Check that the Bluetooth feature is activated on your device.
The car kit doesn’t establish a Bluetooth connection to my paired
device when I turn on the ignition or switch on the car kit.
• Check that the Bluetooth feature is activated on your device.
• Ask the technician who installed the car kit to ensure that the
ignition sense wire is properly connected.
• Ensure that your device is set to connect to the car kit automatically
when the car kit is switched on.
My car radio doesn’t have a stereo or auxiliary input.
Ask the technician who installs the car kit to use an adapter that allows
to connect the stereo outputs of the car kit to some other input on the
car radio (such as the CD changer connector) for stereo sound.
I can’t pair my compatible music device with the car kit.
Check that the Bluetooth passcode of the music device is 0000. If this is
not the case, change the passcode to 0000 as instructed in the user
guide of the music device.
Troubleshooting
29
■Audio issues
My voice echoes at the other end of the line.
• Lower the volume of your car speaker. If the car kit is connected to
your car stereo system, decrease the input level, if possible.
• Ensure that the distance between the microphone and speakers is
optimal.
• Ensure that the microphone does not point toward the speaker.
The caller can’t hear my voice during a call.
Ensure that the device is properly connected to the car kit through a
Bluetooth connection.
The audio quality isn’t good or I can’t hear sound.
• If the car kit is connected to the car radio, check that the car radio
volume is set properly.
• If the car kit is connected to the supplied loudspeaker, check that the
car kit volume is set properly.
The car kit doesn’t play sound in stereo.
• Check that the car radio is set to receive audio through the stereo
input.
• Check that you have selected the correct audio source in the car
radio.
• Check that the car radio volume is set properly.
The sound quality of music is similar to a phone call.
If you use the music player feature of your mobile phone, check that the
phone supports the A2DP Bluetooth profile and that no other A2DP
device is connected to the car kit. If your phone supports this profile and
another A2DP device is connected to the car kit, disconnect the other
device from the car kit and connect your phone.
If you use a music device that supports the A2DP Bluetooth profile,
check that no other A2DP device is connected to the car kit.
Troubleshooting
30
I can’t hear music played when the mobile phone or music device is
connected to the car kit.
• Check that your phone or music device supports the A2DP Bluetooth
profile and that no other A2DP device (for example, a Bluetooth
adapter using A2DP) is connected to the car kit.
• Check that the phone or music device is properly connected to the
car kit.
• Check that the car kit is properly connected to the stereo input on
your car radio. See “Integration with a car radio system”, p. 32, or
consult with the technician who installed the car kit.
The car radio isn’t muted when I answer a call.
Ask the technician who installed the car kit to ensure that the car radio
mute wire is properly connected.
■Other issues
The car kit doesn’t switch on when I turn on the car ignition.
Ask the technician who installed the car kit to ensure that the ignition
sense wire is properly connected.
The battery of the mobile phone doesn’t charge when the device is
connected to the car kit.
Check that the mobile phone is connected to the car kit with the
supplied charging cable.

Installation
31
8. Installation
■Safety information
Observe the following safety guidelines when installing the car kit.
• Only a qualified service technician should install or service the car kit
using the approved original Nokia parts supplied in the sales
package. Faulty installation or service may be dangerous and may
invalidate any warranty which may apply to the car kit.
End users should remember that the car kit comprises of complex
technical equipment that requires professional installation using
special tools and expert know-how.
• Instructions given in this guide are general guidelines that apply to
the installation of the car kit in an automobile. However, due to the
wide variety of car types and models available on the market, this
guide cannot consider the individual technical requirements relevant
for any particular vehicle. Contact the vehicle manufacturer for
detailed information about the vehicle in question.
• The car kit is suitable for use only in a vehicle with a 12-V, negative
grounding. Use on other supply voltages or alternative polarity will
damage the equipment.
• Remember that modern automotive systems include onboard
computers where key vehicle parameters are stored. Improper
disconnection of the car battery may cause loss of data,
necessitating extensive effort for reinitialisation of the system. If you
have any concerns, contact your car dealer before any installation
work is done.
• Do not wire the car kit equipment to the high-voltage lines of the
ignition system.
• When installing the parts of the car kit, ensure that none of them
interfere with or hinder the steering or braking systems or other
controls or systems used in the operation of the vehicle (for example,
airbags). Ensure that the car kit and any of its components are not
Installation
32
installed where you might come in contact with it in the event of an
accident or collision.
If the display of a mobile device is to be used, ensure that the device
is mounted in a holder and that the device display is clearly visible to
the user.
• Your service technician or dealer may be able to provide you with
information on alternatives for mounting the equipment suitably in
your vehicle without requiring bore holes.
• Do not smoke when working on the car. Ensure that there is no
source of fire or flame nearby.
• Take care not to cause damage to electrical cables, fuel or brake
lines, or safety equipment during installation work.
• RF signals may affect improperly installed or inadequately shielded
electronic systems in motor vehicles such as electronic fuel injection
systems, electronic antiskid (antilock) braking systems, electronic
speed control systems, and airbag systems. If you notice a fault or
change in the operation of such a system, contact your car dealer.
• Ensure that cables are placed so that they will not be subject to
mechanical wear and tear (for example, not laid under car seats or
over sharp edges).
■Integration with a car radio system
The car kit can be connected to a car radio system in three different
ways. Select the appropriate option according to the parts supplied in
the sales package.
For information about the connectors on the hands-free unit HF-23, see
“Hands-free unit HF-23”, p. 39.
You can connect the car kit to a loudspeaker with an impedance of at
least 2 ohms. The optimal impedance for the car kit is 4 ohms. If the
impedance is over 8 ohms, the output power is significantly lower than
normal.
Installation
33
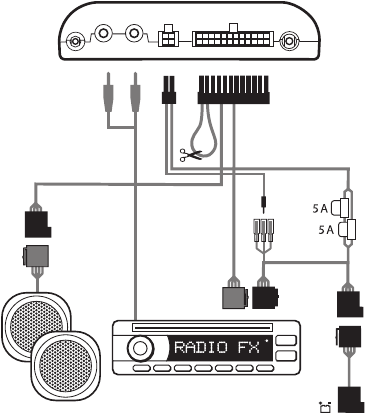
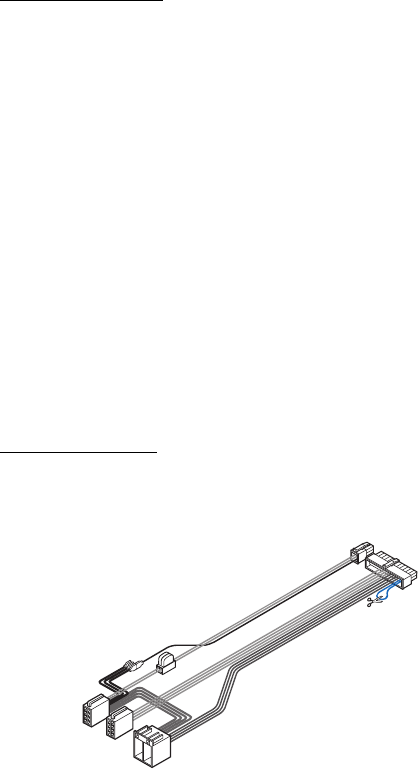
Use the ISO cable CA-135
When you connect the car kit to the car radio system with the ISO cable
CA-135, you can select if the car kit amplifier is used for calls and the
car radio amplifier is used for music, or if the car kit amplifier is used for
both.
Use the car kit amplifier for calls and music
In this setup, the car radio is muted when you make or receive a call or
listen to music from a connected device that supports the A2DP
Bluetooth profile.
The built-in amplifier of the car kit is used for calls and music played on
the A2DP device.
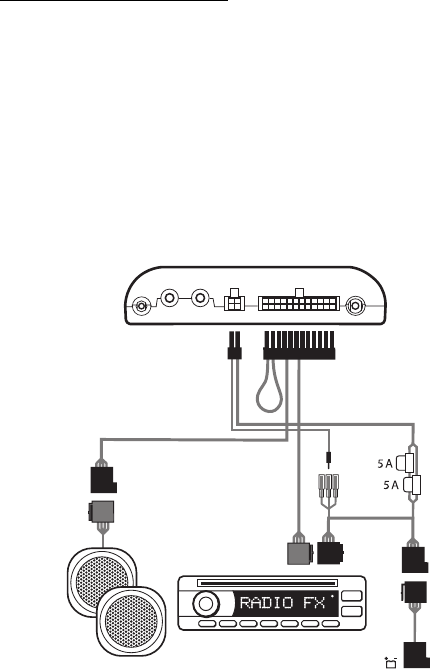
1. To connect the ISO cable to the car radio:
• Unplug the appropriate cables from the car radio, and insert the
ISO cable plug instead. Connect the open ends of the cables to
the car radio speakers.
Installation
34
• Connect one of the wires labelled Mute 1, Mute 2, or Mute 3 on
the car radio to the ISO cable. Leave the other mute wires
connected as they are.
• Insert the power cable plug of the ISO cable to the respective
connector on the hands-free unit.
• Check the +12-V power pin and the ignition pin on the car radio
and the respective pins of the ISO cable. If necessary, swap the
pins on the fuses of the ISO cable. Plug the ISO cable to the two
open ISO connectors.
2. Plug the ISO cable to the respective connector on the hands-free
unit.
3. Connect the external input device CU-10 and the microphone
MP-2 to the respective connectors on the hands-free unit.
4. To charge a compatible Nokia mobile phone through the car kit,
connect one end of the supplied charging cable CA-134 to the
hands-free unit and the other end to the 2.0 mm (0.08 inch) charging
connector of the phone.
5. Switch on the car kit, press the wheel in the standby mode, and
select Settings > Audio > Music output > System connector.
Use the car kit amplifier for calls and the car radio amplifier
for music
In this setup, the car radio is muted when you make or receive a call.
Installation
35
The amplifier and equaliser of your car radio are used for music played
on a connected device that supports the A2DP profile. The built-in
amplifier of the car kit is used for calls.
1. To connect the ISO cable to the car radio:
• Unplug the appropriate cables from the car radio, and insert the
ISO cable plug instead. Connect the open ends of the cables to
the car radio speakers.
• Connect one of the wires labelled Mute 1, Mute 2, or Mute 3 on
the car radio to the ISO cable. Leave the other mute wires
connected as they are.
• Insert the power cable plug of the ISO cable to the respective
connector on the hands-free unit.
• Check the +12-V power pin and the ignition pin on the car radio
and the respective pins of the ISO cable. If necessary, swap the

Installation
36
pins on the fuses of the ISO cable. Plug the ISO cable to the two
open ISO connectors.
2. Plug the ISO cable to the respective connector on the hands-free
unit.
3. Cut the loop indicated with scissors in the figure.
4. Connect the stereo outputs of the hands-free unit to the AUX input
of the car radio. Use an appropriate cable specific to your car radio
(this cable is not supplied with the car kit).
5. Connect the external input device CU-10 and the microphone
MP-2 to the respective connectors on the hands-free unit.
6. To charge a compatible Nokia mobile phone through the car kit,
connect one end of the supplied charging cable CA-134 to the
hands-free unit and the other end to the 2.0 mm (0.08 inch) charging
connector of the phone.
7. Switch on the car kit, press the wheel in the standby mode, and
select Settings > Audio > Music output > Automatic detection.
Use the power cable PCU-4
In this setup, the car radio is muted when you make or receive a call.
Installation
37
The loudspeaker SP-3 is used for calls, and the amplifier and equaliser of
your car radio are used for music played on a connected device that
supports the A2DP Bluetooth profile.
1. Connect the respective wires of the power cable PCU-4 to the car
battery and ignition sense (if available). Connect the car radio mute
wire (if available) to the car radio.
2. Plug the power cable to the respective connector on the hands-free
unit.
3. Connect the loudspeaker SP-3 to the respective connector on the
hands-free unit.
4. Connect the stereo outputs of the hands-free unit to the AUX input
of the car radio. Use an appropriate cable specific to your car radio
(this cable is not supplied with the car kit).
5. Connect the external input device CU-10 and the microphone
MP-2 to the respective connectors on the hands-free unit.
6. To charge a compatible Nokia mobile phone through the car kit,
connect one end of the supplied charging cable CA-134 to the
hands-free unit and the other end to the 2.0 mm (0.08 inch) charging
connector of the phone.
7. Switch on the car kit, press the wheel in the standby mode, and
select Settings > Audio > Music output > Automatic detection.
Alternatively, if the music is to be played back through an external
Installation
38
loudspeaker (such as the SP-3), select Mono speaker instead of
Automatic detection.
Do not use the internal amplifier of the hands-free unit to drive external
loudspeakers to play back music. If you need to replace a fuse on the
PCU-4 cable, only use a fuse with a rating of 2 A or less.
■Install the car kit in a vehicle
This section describes how to install the car kit parts in a vehicle. The
parts are explained in “Parts”, p. 11.
When installing the parts of the car kit, ensure that none of them
interfere with or hinder the steering or braking systems or other controls
or systems used in the operation of the vehicle (for example, airbags). Do
not use screws to install the display if you mount it within the head
impact area. Use the supplied adhesive instead.
Installation of the car kit may cause warning or other alert tones in the
vehicle (such as reversing warning tones or lights left on alerts) to be
muted. For further information, contact the manufacturer of the vehicle
or its representative.
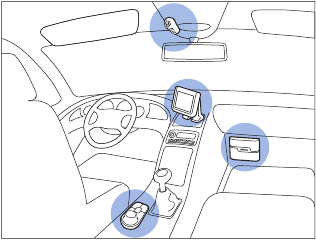
Example of appropriate installation, with the display mounted using the
supplied stand
Installation
39
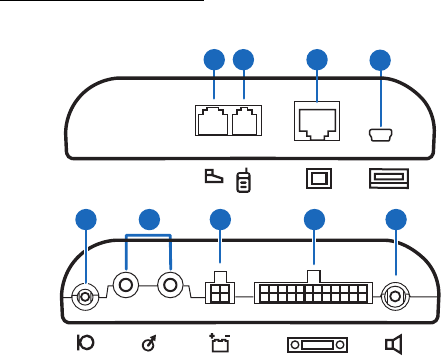
Hands-free unit HF-23
The hands-free unit has the following connectors:
1. Connector for input device CU-10
2. Connector for charging cable CA-134 (to charge a compatible Nokia
phone)
3. Connector for the display unit SU-34
4. Mini-USB connector for firmware update
5. Connector for microphone MP-2
6. Stereo outputs (standard RCA connectors) for connection to a car
radio with appropriate line-in ports. The outputs are active only
when you listen to music from a device that supports the A2DP
Bluetooth profile and that is connected to the car kit.
7. Connector for power cable PCU-4
8. Connector for ISO cable CA-135
9. Connector for loudspeaker SP-3
When you install the hands-free unit, ensure that the cables for the
microphone and loudspeaker reach the places where you intend to
mount these parts.
1234
6
5 7 8 9

Installation
40
Do not mount the hands-free unit inside a metal housing or on a metal
surface, because this will impair the Bluetooth connection between the
hands-free unit and the Bluetooth device that is connected to the car
kit. For an optimal connection, ensure that the distance between the
hands-free unit and a metal surface is over 4 mm (0.16 inch).
Install the hands-free unit in the car using suitable mounting material
(not supplied in the sales package). Ensure that the hands-free unit
stays securely in place.
Input device CU-10
The input device should be located so that it is within easy reach of the
user. Do not mount the input device within the head impact area.
Ensure that the input device cable reaches to the hands-free unit for
connection. The best location to mount the input device is horizontally
on the console between the driver’s and front passenger's seat so that
the input device keys are toward the front of the vehicle.
To mount the input device:
1. Attach the supplied tape pad to the desired location in the car: peel
off the protective sheet from a side of the pad, and press the pad into
place.
When you peel off the protective sheet, do not touch the adhesive
side with a finger. Ensure that the surface where you attach the pad
is dry and free from dirt and dust.
2. Peel off the protective sheet from the pad on the underside of the
input device and from the other side of the pad attached to the car.
3. Press the pads firmly against each other, and check that the input
device stays securely in place.
Display SU-34
The display should be located so that it is clearly visible for the user and
it can be easily rotated left, right, up, or down.
Installation
41
When installing the display, ensure that it does not interfere with or
hinder the steering or braking systems or other controls or systems used
in the operation of the vehicle (for example, airbags).
Ensure that the display cable reaches to the hands-free unit for
connection. Mount the display on the dashboard in the upright position.
When you peel off the protective sheet from the supplied adhesive, do
not touch the adhesive with a finger.
Mount the stand to the dashboard
To use the display with the supplied stand:
1. Peel off the protective sheet from a side of the supplied adhesive,
and attach it to the feet of the stand.
2. Place the display cable between the two feet of the stand, and lock it
in place between the teeth of the feet.
3. Peel off the protective sheet from the other side of the adhesive, and
press the stand firmly to the dashboard.
Ensure that the surface where you attach the stand is dry and free from
dirt and dust.
Mount the plate to the dashboard
To use the display with the supplied mounting plate:
1. Peel off the protective sheet from a side of the adhesive, and attach
it to the plate.
2. Peel off the protective sheet from the other side of the adhesive, and
press the plate firmly to a mounting device (such as a mounting
bracket) that is attached to the dashboard.
When you use screws instead of adhesives to install the plate, do not use
screws if you mount it within the head impact area. To drill the bore
holes, check the markings on the inner side of the plate that show where
the screws can be placed.
Attach the display to the stand or plate
To attach the display to the stand:
1. Press the ball hinge on the stand into the socket on the connector
part of the display cable (1).
Installation
42
2. Slide the display onto the connector part (2).
3. Set the display to the appropriate position (3).
To attach the display to the plate:
1. Press the ball hinge on the stand or plate into the socket on the
connector part of the display cable (1).
2. Slide the display onto the connector part (2).
3. Set the display to the appropriate position (3).
If you need to change the mounting, pull the connector part of the
display cable from the ball hinge. To detach the display, pull it from the
connector part.
3
2
1
3
2
1
Installation
43
Microphone MP-2
Select the mounting location of the microphone carefully to increase
the quality of voice transmission.
The best place to mount the microphone is close to the rear view mirror.
Mount the microphone so that it points toward the driver’s mouth and
at least 1 metre (3 feet) from the car kit loudspeaker to avoid audio
feedback.
Ensure that the microphone cable reaches to the hands-free unit for
connection.
Mount the microphone so that it is not exposed to air streams from the
vents. Do not place the microphone cable in the heating, ventilation, or
air-conditioning system. Use the supplied double-sided adhesive tape to
fix the microphone to reduce the amount of background noise of the car
that can interfere with your calls.
Insert the microphone plug into the microphone connector on the
hands-free unit, and turn the plug clockwise to lock it firmly. Use of any
other microphone than the supplied microphone may impact the audio
quality.
ISO cable CA-135
If the ISO cable CA-135 is supplied with the car kit, you can use it to
easily connect the car kit to a car radio that has ISO connectors. See
“Integration with a car radio system”, p. 32.

Installation
44
Motion sensor
The hands-free unit HF-23 contains a motion sensor that allows the car
kit to automatically switch on when you turn on the ignition and start
driving. The motion sensor works if it is activated and the ignition sense
wire is not connected.
To activate the motion sensor, switch on the car kit, press the wheel in
the standby mode, select Settings > Installation > Ignition sensor > On.
■Optional accessories
You can extend the features of the car kit with optional accessories.
Consult your dealer or service technician for suitable accessories for the
car kit. Use only approved and compatible accessories.
Mobile holder
To use your mobile device in a car, you can mount a mobile holder
designed for the device. For compatible holders for your device, contact
your dealer.
If the display of a mobile device is to be used, ensure that the device is
mounted in a holder and that the device display is clearly visible to the
user. Ensure that the holder does not interfere with or hinder the
steering or braking systems or other controls or systems used in the
operation of the vehicle (for example, airbags).
For mounting instructions, see the documentation that came with the
mobile holder.
External antenna
The external antenna improves the reception of the mobile phone in a
car. For availability, contact your dealer.
Note: In order to comply with RF exposure guidelines, install the
external antenna so that a minimum distance of 20 centimetres (8
inches) can be maintained between the external antenna and all
persons, with external antenna gain not exceeding 3 dBi.
Installation
45
■Check the operation of the car kit
After the car kit has been installed, check that it is mounted and
working properly. See also “Troubleshooting”, p. 28.
■Software updates
The firmware of the car kit can be updated from a compatible PC using a
standard USB cable (not supplied with the car kit) that has a USB plug at
one end and a mini-USB plug at the other end. Keep the USB cable
connected while the firmware is being updated. To update the firmware,
you need to download and install an installation program to your PC.
Check www.nokia.com/support or your local Nokia website for the
installation program, the latest firmware version, and additional
information.

Care and maintenance
46
Care and maintenance
Your car kit is a product of superior design and craftmanship and should be
treated with care. The following suggestions will help you protect your warranty
coverage.
• Keep the car kit dry. Precipitation, humidity and all types of liquids or
moisture can contain minerals that will corrode electronic circuits.
• Do not use or store the car kit in dusty, dirty areas. Its moving parts and
electronic components can be damaged.
• Do not attempt to open the car kit.
• Do not use harsh chemicals, cleaning solvents, or strong detergents to clean
the car kit parts.
• Do not paint the car kit parts. Paint can clog the moving parts and prevent
proper operation.
If the car kit is not working properly, take the defective part to your nearest
authorised service facility for service.

Additional safety information
47
Additional safety information
■Vehicles
RF signals may affect improperly installed or inadequately shielded electronic
systems in motor vehicles such as electronic fuel injection systems, electronic
antiskid (antilock) braking systems, electronic speed control systems, and air bag
systems. For more information, check with the manufacturer or its representative
of your vehicle or any equipment that has been added.
Faulty installation or service may be dangerous and may invalidate any warranty
that may apply to the device. Check regularly that all wireless device equipment
in your vehicle is mounted and operating properly. Do not store or carry
flammable liquids, gases, or explosive materials in the same compartment as the
device, its parts, or accessories. For vehicles equipped with an air bag, remember
that air bags inflate with great force. Do not place objects, including installed or
portable wireless equipment in the area over the air bag or in the air bag
deployment area. If in-vehicle wireless equipment is improperly installed and the
air bag inflates, serious injury could result.

FCC/Industry Canada notice
48
FCC/Industry Canada notice
NOTE: FCC Radiation Exposure Statement: This equipment complies with FCC radiation exposure limits set
forth for an uncontrolled environment. This transmitter must not be co-located or operating in conjunction
with any other antenna or transmitter. NOTE: Changes or modifications not expressly approved by Nokia
could void the user's authority to operate the equipment.