Microsoft NSD-3GW Dual Mode Cellular Phone (AMPS/CDMA) User Manual 6180i 1 1
Microsoft Mobile Oy Dual Mode Cellular Phone (AMPS/CDMA) 6180i 1 1
UserManual.wiki
>
Microsoft
>
NSD 3GW User Manual
Users Manual
Navigation menu
Upload a User Manual
Namespaces
Wiki Guide
HTML
PDF
Info
Views
User Manual
Discussion / Help
Navigation


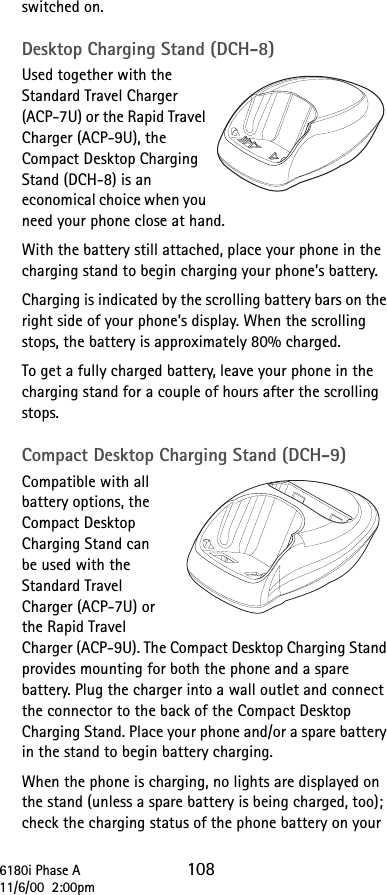
![6180i Phase A 4411/6/00 2:00pmSimply press the key for about 2 seconds while in or mode and the icon will appear. While in this mode, only numbers can be entered. Letters cannot be entered unless your phone is in mode.Press the # key again for a couple of seconds if you wish to deactivate the mode.Special characters (for storing names)While in mode (see page 22), you can quickly enter a commonly used special character ( . , ‘ ? @ - ) by pressing until the character appears.To display a list of all special characters, press . Scroll to highlight the character, then press Insert. . , ? ! : ; - + # * ( ) ‘ “ _ @ & $ £ % / < > ¿ ¡ § = [ ] ¥TIP: To quickly highlight a special character that appears toward the end of the list, press .Special Characters (for storing and calling num-bers)The following special characters are helpful when you store numbers to your phone book (see page 64). Simply press the key once or repeatedly, and the following characters can be stored within the number sequence. (p) creates a pause when a number is dialed; the digits located to the right of the “p” are automati-cally sent as touch tones after a 2.5 second pause (see page 80).(w) creates a “wait” when a number is dialed. The “w” makes your phone wait for you to press Send or , then it sends the digits located to the right of the “w” as touch tones (see page 80).You can add as many special characters as you need in a single number sequence.](https://usermanual.wiki/Microsoft/NSD-3GW/User-Guide-134215-Page-49.png)


![6180i Phase A 7111/6/00 2:00pmReceived calls optionsSee “Call log options” on page 30.Restore factory settings You can reset the settings of many of your phone’s features to factory defaults (as in a new phone).Restoring factory settingsPress Menu 4-2-4 (Settings - Phone settings - Restore factory settings), enter your phone’s security code and press OK.Note: Your phone book, timers, language selection, security code and lock codes are not reset. However, any profiles you have modified will reset when you restore your settings. Plus, if you are using your phone’s clock [versus using the network provided clock] it will reset as well.Renaming profiles See “Profiles” on page 69.Restricting callsThis feature allows you to restrict incoming and outgoing calls based on a list of phone numbers that you create.Note: When calls are restricted, calls may be possible to the emergency number programmed into your phone (for example, 911 or other official emergency numbers). However, Emergency key 9 may not operate depending on the type of restriction you choose. Adding a call restrictionYou can add up to 10 restrictions for outgoing calls, and 15 for incoming calls. The maximum number of characters you can enter for each restriction is 15.1. Press Menu 4-3-1 (Settings - Security settings - Restrict calls) 2. Scroll to Restrict outgoing calls or Restrict incoming calls and press Select](https://usermanual.wiki/Microsoft/NSD-3GW/User-Guide-134215-Page-76.png)

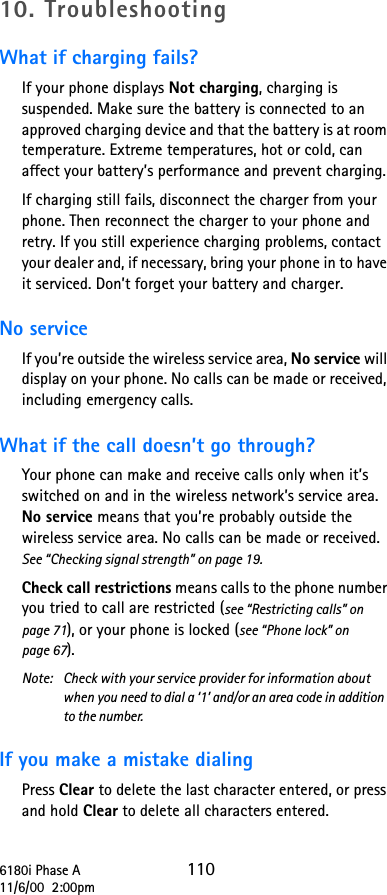
![6180i Phase A 9811/6/00 2:00pm, OR, press Options, Insert number.Inserting special charactersTo insert a special character (such as a punctuation mark), press and hold , OR press Options, Insert symbol. To quickly insert a period (.), press . To quickly insert double dashes (--) or three elipses (...), press a few times.Adding a word to your personal dictionaryIf your phone’s dictionary does not contain a word, you can add it to your personal dictionary. If the ? character appears after the word, press Spell. (OR, at any time while editing, press Options, Insert word.) Enter the word using traditional text input, and press OK. If your personal dictionary is full, the new word replaces the oldest added word.Deactivating predictive text input modeTo deactivate the predictive text feature, while editing a message, press Options, Dictionary, Dictionary off.TemplatesNote: Templates are available only in English.While you’re editing a message, press Options, then select Add template. Select a template:1. Call me at [ ]. (phone number/time/place)2. I’ll call you at [ ]. (time/place)3. Meet me at [ ]. (time/place)4. I’ll be there at [ ]. (time)5. I’ll be [ ] minutes late. (number of minutes)6. I’m running late.7. I’m on my way.8. Meeting cancelled.9. Meeting changed to [ ]. (time/place)10. Appointment cancelled.11. I love you!12. Thank you!](https://usermanual.wiki/Microsoft/NSD-3GW/User-Guide-134215-Page-103.png)
![6180i Phase A 9911/6/00 2:00pm13. I’m sorry.14. Call at your convenience.15. Please call ASAP.Brackets ([ ]) in a template represent a value that you can specify. (The value is not retained for future use; you enter the value each time you use the template.) If you select a template that contains brackets, you’ll be prompted to enter a value. You can edit the template text after you insert it into your message.Sending a mobile messageWhen you’re done editing your message, to send it:•Press •OR, press Options, then Send.If the network can’t send your message, a warning note should appear.Erasing mobile messagesTo erase the message you’re reading, press Options, Erase. To erase multiple messages, press Menu 0-1-1-5. Choose the type of message to erase.](https://usermanual.wiki/Microsoft/NSD-3GW/User-Guide-134215-Page-104.png)