Microsoft NSW-4DX Dual Band Tri-Mode TDMA Cellular Transceiver User Manual
Microsoft Mobile Oy Dual Band Tri-Mode TDMA Cellular Transceiver
Contents
- 1. Manual
- 2. Revised Manual
- 3. Revised Manual Page
Revised Manual
8260 User Guide version v. 0.06 [ i ] 4/21/00
Nokia 8260
User Guide
Version 0.06
includes
FCC addition (p. 112)
plus antenna picture (p. 7)
8260 User Guide version v. 0.06 [ ii ] 4/21/00
Copyright information
Part No. 9352523, Issue 1, nn.nnnn
© 2000 Nokia Mobile Phones. All rights reserved.
Printed in Canada nn/2000.
Nokia, Nokia Connecting People, and the Original Accessories logos are
trademarks of Nokia Corporation and/or its affiliates.
FCC/Industry Canada Notice
Your phone may cause TV or radio interference (for example, when using
a telephone in close proximity to receiving equipment). The FCC or
Industry Canada can require you to stop using your telephone if such
interference cannot be eliminated. If you require assistance, contact your
local service facility.
This device complies with part 15 of the FCC rules. Operation is subject to
the condition that this device does not cause harmful interference.
8260 User Guide version v. 0.06 [ iii ] 3/6/00
Contents
1. For your safety. . . . . . . . . . . . . . . . . . . . . . . . . . . . . . . .1
2. Welcome . . . . . . . . . . . . . . . . . . . . . . . . . . . . . . . . . . . .3
Before you begin. . . . . . . . . . . . . . . . . . . . . . . . . . . . . .3
Contacting Nokia . . . . . . . . . . . . . . . . . . . . . . . . . . . . .4
When you need to contact your service provider. . . .4
3. Prepare your phone for use . . . . . . . . . . . . . . . . . . . . .5
Install the battery . . . . . . . . . . . . . . . . . . . . . . . . . . . . .5
First, remove the back cover . . . . . . . . . . . . . . . . .5
Next, insert the battery . . . . . . . . . . . . . . . . . . . . .5
Last, replace the back cover. . . . . . . . . . . . . . . . . .5
Charge the battery . . . . . . . . . . . . . . . . . . . . . . . . .6
When you need to remove the battery . . . . . . . . . . . .6
4. Get to know your phone. . . . . . . . . . . . . . . . . . . . . . . .7
Keys and screen. . . . . . . . . . . . . . . . . . . . . . . . . . . . . . .7
Navigation keys. . . . . . . . . . . . . . . . . . . . . . . . . . . . . .10
Indicators and icons . . . . . . . . . . . . . . . . . . . . . . . . . .11
5. Make and answer calls . . . . . . . . . . . . . . . . . . . . . . . .14
Make a call . . . . . . . . . . . . . . . . . . . . . . . . . . . . . .14
Answer a call. . . . . . . . . . . . . . . . . . . . . . . . . . . . .14
Adjust the earpiece volume . . . . . . . . . . . . . . . . .15
8260 User Guide version v. 0.06 [ iv ] 3/6/00
Redial the last-dialed number . . . . . . . . . . . . . . 15
Use caller ID . . . . . . . . . . . . . . . . . . . . . . . . . . . . . 15
Keep calls private. . . . . . . . . . . . . . . . . . . . . . . . . 16
6. Use phone menus. . . . . . . . . . . . . . . . . . . . . . . . . . . . 17
Navigate menus . . . . . . . . . . . . . . . . . . . . . . . . . . . . . 17
Scroll through menus . . . . . . . . . . . . . . . . . . . . . 17
Use a shortcut . . . . . . . . . . . . . . . . . . . . . . . . . . . 17
Change menu levels. . . . . . . . . . . . . . . . . . . . . . . 18
Get help . . . . . . . . . . . . . . . . . . . . . . . . . . . . . . . . 18
List of shortcuts . . . . . . . . . . . . . . . . . . . . . . . . . . . . . 18
7. Enter letters and numbers. . . . . . . . . . . . . . . . . . . . . 22
Enter letters . . . . . . . . . . . . . . . . . . . . . . . . . . . . . . . . 22
Edit names . . . . . . . . . . . . . . . . . . . . . . . . . . . . . . 23
Change from capital (uppercase) letters . . . . . . 23
Use punctuation and special characters . . . . . . 23
Enter numbers. . . . . . . . . . . . . . . . . . . . . . . . . . . . . . . 24
Use special characters in numbers. . . . . . . . . . . 24
List of special characters. . . . . . . . . . . . . . . . . . . 24
8. Use the phone book . . . . . . . . . . . . . . . . . . . . . . . . . . 25
About the phone book . . . . . . . . . . . . . . . . . . . . . . . . 25
Use phone book menus . . . . . . . . . . . . . . . . . . . . . . . 25
Change views . . . . . . . . . . . . . . . . . . . . . . . . . . . . . . . 26
Add names and numbers . . . . . . . . . . . . . . . . . . . . . . 27
Change a stored telephone number . . . . . . . . . . . . . 27
8260 User Guide version v. 0.06 [ v ] 3/6/00
Recall and redial numbers . . . . . . . . . . . . . . . . . . . . .28
Erase stored names and numbers . . . . . . . . . . . . . . .29
Erase the entire phone book. . . . . . . . . . . . . . . . . . . .30
Check memory status . . . . . . . . . . . . . . . . . . . . . . . . .30
9. Use voice mail . . . . . . . . . . . . . . . . . . . . . . . . . . . . . . .31
When you have a message. . . . . . . . . . . . . . . . . . . . .31
Set up your voice mailbox . . . . . . . . . . . . . . . . . . . . .31
Set greetings and passwords . . . . . . . . . . . . . . . . . . .32
Listen to your voice messages . . . . . . . . . . . . . . . . . .32
10. Work with the call log . . . . . . . . . . . . . . . . . . . . . . . .33
Check the call log . . . . . . . . . . . . . . . . . . . . . . . . . . . .33
Check missed calls . . . . . . . . . . . . . . . . . . . . . . . .34
Check previously dialed calls. . . . . . . . . . . . . . . .35
Check received calls . . . . . . . . . . . . . . . . . . . . . . .35
Clear call lists . . . . . . . . . . . . . . . . . . . . . . . . . . . .35
Check call timers. . . . . . . . . . . . . . . . . . . . . . . . . . . . .36
Turn on a current call timer. . . . . . . . . . . . . . . . .37
Clear call timers . . . . . . . . . . . . . . . . . . . . . . . . . .37
11. Use advanced calling features . . . . . . . . . . . . . . . . . .38
Set in-call options. . . . . . . . . . . . . . . . . . . . . . . . . . . .38
Use call waiting. . . . . . . . . . . . . . . . . . . . . . . . . . . . . .39
Store the call waiting feature code. . . . . . . . . . .39
Manage calls. . . . . . . . . . . . . . . . . . . . . . . . . . . . .40
Make a conference call . . . . . . . . . . . . . . . . . . . .40
8260 User Guide version v. 0.06 [ vi ] 3/6/00
Use call forwarding . . . . . . . . . . . . . . . . . . . . . . . . . . 41
Store the call forwarding feature code . . . . . . . 41
Activate call forwarding . . . . . . . . . . . . . . . . . . . 42
Redial automatically . . . . . . . . . . . . . . . . . . . . . . . . . 43
Use a calling card. . . . . . . . . . . . . . . . . . . . . . . . . . . . 43
Save calling card information (step 1). . . . . . . . 43
Save calling card information (step 2). . . . . . . . 44
Choose a calling card to use. . . . . . . . . . . . . . . . 45
Make a calling card call . . . . . . . . . . . . . . . . . . . 46
Send your own number in caller ID. . . . . . . . . . . . . . 46
Store the Send Own Number feature code . . . . 46
Select a phone system (NAM) . . . . . . . . . . . . . . . . . . 47
Select the NAM for your phone . . . . . . . . . . . . . 48
Select digital or analog . . . . . . . . . . . . . . . . . . . . 48
Set touch tones. . . . . . . . . . . . . . . . . . . . . . . . . . . . . . 49
Set manual touch tones . . . . . . . . . . . . . . . . . . . 49
Set touch tone length . . . . . . . . . . . . . . . . . . . . . 49
Store touch tone sequences (strings). . . . . . . . . 50
12. Customize your phone . . . . . . . . . . . . . . . . . . . . . . . . 51
What are profiles? . . . . . . . . . . . . . . . . . . . . . . . . . . . 51
Select a different profile . . . . . . . . . . . . . . . . . . . . . . 51
Customize a profile . . . . . . . . . . . . . . . . . . . . . . . . . . 52
Set ringing options. . . . . . . . . . . . . . . . . . . . . . . . 53
Set the ringing volume . . . . . . . . . . . . . . . . . . . . 54
Set the ringing tone. . . . . . . . . . . . . . . . . . . . . . . 54
8260 User Guide version v. 0.06 [ vii ] 3/6/00
Set a vibrating alert . . . . . . . . . . . . . . . . . . . . . . .55
Set keypad tones. . . . . . . . . . . . . . . . . . . . . . . . . .55
Set warning and game tones. . . . . . . . . . . . . . . .56
Set the message alert tone . . . . . . . . . . . . . . . . .56
Set your phone to answer automatically . . . . . .57
Set the lights (car kit only) . . . . . . . . . . . . . . . . .57
Rename profiles. . . . . . . . . . . . . . . . . . . . . . . . . . . . . .58
Restore factory settings . . . . . . . . . . . . . . . . . . . . . . .58
Set the display language . . . . . . . . . . . . . . . . . . . . . .59
Set and display the clock . . . . . . . . . . . . . . . . . . . . . .59
Set the clock . . . . . . . . . . . . . . . . . . . . . . . . . . . . .59
Display the clock. . . . . . . . . . . . . . . . . . . . . . . . . .60
Select the time format. . . . . . . . . . . . . . . . . . . . .60
Add a welcome note. . . . . . . . . . . . . . . . . . . . . . . . . .60
Use 1-touch dialing . . . . . . . . . . . . . . . . . . . . . . . . . .61
Assign a name or number to a 1-touch
dial key . . . . . . . . . . . . . . . . . . . . . . . . . . . . . . . . .61
Change 1-touch dialing numbers . . . . . . . . . . . .62
Erase 1-touch dialing numbers . . . . . . . . . . . . . .62
Use emergency key 9 . . . . . . . . . . . . . . . . . . . . . . . . .62
Activate the emergency key 9 . . . . . . . . . . . . . . .63
Make an emergency call . . . . . . . . . . . . . . . . . . .63
Use caller groups. . . . . . . . . . . . . . . . . . . . . . . . . . . . .63
Add names to a caller group . . . . . . . . . . . . . . . .63
Assign a ringing tone to a caller group. . . . . . . .64
Rename a caller group . . . . . . . . . . . . . . . . . . . . .64
8260 User Guide version v. 0.06 [ viii ] 3/6/00
Remove names from a caller group . . . . . . . . . . 65
Display caller group graphics . . . . . . . . . . . . . . . 65
13. Security. . . . . . . . . . . . . . . . . . . . . . . . . . . . . . . . . . . . 66
Change your security code. . . . . . . . . . . . . . . . . . . . . 66
Protect your phone with the lock code. . . . . . . . . . . 67
Turn on the phone lock . . . . . . . . . . . . . . . . . . . . 67
Store an unlocked phone number. . . . . . . . . . . . 68
Call an unlocked phone number. . . . . . . . . . . . . 68
Answer a call while using a lock code . . . . . . . . 68
Change your lock code . . . . . . . . . . . . . . . . . . . . 68
Turn off the lock code . . . . . . . . . . . . . . . . . . . . . 69
Lock the keypad . . . . . . . . . . . . . . . . . . . . . . . . . . . . . 70
Activate keyguard . . . . . . . . . . . . . . . . . . . . . . . . 70
Deactivate keyguard . . . . . . . . . . . . . . . . . . . . . . 70
Answer a call while keyguard is active . . . . . . . 71
Restrict calls . . . . . . . . . . . . . . . . . . . . . . . . . . . . . . . . 71
Restrict outgoing calls. . . . . . . . . . . . . . . . . . . . . 71
Restrict incoming calls . . . . . . . . . . . . . . . . . . . . 72
14. Set network services features . . . . . . . . . . . . . . . . . . 73
Set up how your phone selects a system . . . . . . . . . 74
Select a public system. . . . . . . . . . . . . . . . . . . . . 75
Switch from private to public system . . . . . . . . 76
Roaming . . . . . . . . . . . . . . . . . . . . . . . . . . . . . . . . . . . 76
8260 User Guide version v. 0.06 [ ix ] 3/6/00
15. Send and receive text messages . . . . . . . . . . . . . . . .77
Write a message . . . . . . . . . . . . . . . . . . . . . . . . . . . . .77
About standard text input . . . . . . . . . . . . . . . . . .77
About predictive text input. . . . . . . . . . . . . . . . .78
Turn on predictive text input. . . . . . . . . . . . . . . .78
Keys and tools for predictive text input . . . . . . .79
Turn off predictive text input. . . . . . . . . . . . . . . .79
Notes about predictive text input. . . . . . . . . . . .80
Send a text message. . . . . . . . . . . . . . . . . . . . . . . . . .81
Save a message in the outbox. . . . . . . . . . . . . . .82
Resend a message from the outbox . . . . . . . . . .82
Receive a text message. . . . . . . . . . . . . . . . . . . . . . . .83
Read a text message. . . . . . . . . . . . . . . . . . . . . . .83
Choose options for a message. . . . . . . . . . . . . . .84
When your phone’s memory is full . . . . . . . . . . .84
Erase a message . . . . . . . . . . . . . . . . . . . . . . . . . . . . .85
Reply to a message . . . . . . . . . . . . . . . . . . . . . . . . . . .85
Forward a message . . . . . . . . . . . . . . . . . . . . . . . . . . .85
Retrieve a number. . . . . . . . . . . . . . . . . . . . . . . . . . . .85
16. Use your personal assistant . . . . . . . . . . . . . . . . . . . .87
Use the calendar . . . . . . . . . . . . . . . . . . . . . . . . . . . . .87
View the calendar. . . . . . . . . . . . . . . . . . . . . . . . .87
Move from day to day . . . . . . . . . . . . . . . . . . . . .88
Create a calendar note. . . . . . . . . . . . . . . . . . . . .88
View the day’s notes. . . . . . . . . . . . . . . . . . . . . . .92
8260 User Guide version v. 0.06 [ x ] 3/6/00
Erase notes . . . . . . . . . . . . . . . . . . . . . . . . . . . . . . 93
When a calendar alarm goes off. . . . . . . . . . . . . 93
Send or receive calendar notes. . . . . . . . . . . . . . 94
Send and receive business cards. . . . . . . . . . . . . . . . 95
Send a business card . . . . . . . . . . . . . . . . . . . . . . 95
View a received business card. . . . . . . . . . . . . . . 95
Save a viewed business card. . . . . . . . . . . . . . . . 95
Delete a viewed business card . . . . . . . . . . . . . . 96
Download ringing tones. . . . . . . . . . . . . . . . . . . . . . . 96
Notification of received ringing tone. . . . . . . . . 96
Listen to received ringing tones . . . . . . . . . . . . . 96
Save received ringing tones . . . . . . . . . . . . . . . . 96
Alarm clock. . . . . . . . . . . . . . . . . . . . . . . . . . . . . . . . . 97
Set the alarm clock . . . . . . . . . . . . . . . . . . . . . . . 97
Turn off the alarm clock when it rings. . . . . . . . 97
Turn off the alarm clock altogether . . . . . . . . . . 98
Calculator . . . . . . . . . . . . . . . . . . . . . . . . . . . . . . . . . . 98
Use the calculator . . . . . . . . . . . . . . . . . . . . . . . . 98
Convert currency . . . . . . . . . . . . . . . . . . . . . . . . . 99
17. Games . . . . . . . . . . . . . . . . . . . . . . . . . . . . . . . . . . . . 101
Memory. . . . . . . . . . . . . . . . . . . . . . . . . . . . . . . . . . . 101
Snake. . . . . . . . . . . . . . . . . . . . . . . . . . . . . . . . . . . . . 102
Logic . . . . . . . . . . . . . . . . . . . . . . . . . . . . . . . . . . . . . 102
Rotation . . . . . . . . . . . . . . . . . . . . . . . . . . . . . . . . . . 103
8260 User Guide version v. 0.06 [ xi ] 3/6/00
18. Reference information . . . . . . . . . . . . . . . . . . . . . . .104
Batteries, chargers, and accessories . . . . . . . . . . . .104
Important safety information. . . . . . . . . . . . . . . . . .106
Traffic safety. . . . . . . . . . . . . . . . . . . . . . . . . . . .106
Operating environment . . . . . . . . . . . . . . . . . . .106
Electronic devices. . . . . . . . . . . . . . . . . . . . . . . .107
Potentially explosive atmospheres . . . . . . . . . .108
Vehicles . . . . . . . . . . . . . . . . . . . . . . . . . . . . . . . .109
Emergency calls. . . . . . . . . . . . . . . . . . . . . . . . . . . . .110
Make an emergency call . . . . . . . . . . . . . . . . . .110
Radio frequency (RF) signals . . . . . . . . . . . . . . . 111
Care and maintenance. . . . . . . . . . . . . . . . . . . . 111
Accessories. . . . . . . . . . . . . . . . . . . . . . . . . . . . . . . . .113
Battery . . . . . . . . . . . . . . . . . . . . . . . . . . . . . . . . . . . .114
Chargers and other accessories . . . . . . . . . . . . . . . .115
Troubleshooting. . . . . . . . . . . . . . . . . . . . . . . . . . . . .117
19. Frequently asked questions (FAQ) . . . . . . . . . . . . . .119
20. Glossary of terms. . . . . . . . . . . . . . . . . . . . . . . . . . . .123
21. Technical information. . . . . . . . . . . . . . . . . . . . . . . .128
Index. . . . . . . . . . . . . . . . . . . . . . . . . . . . . . . . . . . . . . . . .133
8260 User Guide version v. 0.06 [ xii ] 3/6/00

8260 User Guide version v. 0.06 [ 1 ] 4/21/00
For your safety
1. For your safety
This section provides various safety guidelines. Read this information
before using your mobile phone (called phone throughout this guide).
Failure to comply with these guidelines could prove either dangerous or
illegal.
For more detailed safety information, see “Important safety information”
on page 107.
Road safety comes first
Don’t use a phone while driving. Park the vehicle first.
Switch off in hospitals
Switch off your phone when you are in a hospital or when you
are near medical equipment. Follow any regulations or rules
that are in force.
Switch off on aircraft
Do not use phones on airplanes as this can cause interference
with the navigational equipment. Also, the use of phones on
airplanes is illegal.
Switch off when refueling
Do not use your phone at a refueling point or near fuels or
chemicals of any kind.
Switch off near blasting
Do not use the phone where blasting is in progress. Observe
restrictions and follow any regulations or rules that are in force.
8260 User Guide version v. 0.06 [ 2 ] 4/21/00
Interference
All phones are susceptible to interference, which could affect
performance. This could impede the making of an emergency
call.
Use sensibly
Use only in the normal position (to ear). Avoid unnecessary
contact with the antenna when phone is on.
Qualified service
Only qualified service personnel can install or repair cellular
phone equipment.
Accessories and batteries
Use only approved accessories and batteries.
Do not connect incompatible products.
Calling
Make sure the phone is switched on and in service. Enter the
phone number, including the area code, then press . To end
a call press . To answer a call press .
Emergency calls
Make sure the phone is switched on and in service. Press and
hold at any time to clear the screen. Enter the emergency
number, then press . Give your location. Do not end the call
until told to do so.
Note: You can also press and hold the 9 key to make an
emergency call.
8260 User Guide version v. 0.06 [ 3 ] 4/21/00
Welcome
2. Welcome
•Before you begin
This section provides information that you need to know before you begin
using your phone.
This guide describes the Nokia 8260 phone, which is approved for use in
the 800/1900 MHz TDMA/AMPS networks.
Understand network services
A number of features known as network services are described in this
guide. These are special services you arrange through your wireless service
provider.
Before you can take advantage of these network services features, you
must subscribe to them through your service provider. Your service
provider will give you instructions on how to uses these network services.
This guide will instruct you on when you need to contact your service
provider for more step-by-step information.
Note: Some networks may not support all language-dependent
characters and/or services.
Visit Nokia on the Web
The latest version of this manual may be available on Nokia’s World Wide
Web site at:
www.nokia.com.
8260 User Guide version v. 0.06 [ 4 ] 4/21/00
•Contacting Nokia
Customer Service, USA
Nokia Mobile Phones
7725 Woodland Center Boulevard, Suite 150
Tampa, FL 33614
Tel:1-888-NOKIA2U (1-888-665-4228)
or (1) 813-288-3800
Fax: (1) 813-249-9619
TTY:1-800-24NOKIA (1-800-246-6542)
Customer Service, Canada
Nokia Products Ltd.
575 Westney Rd. South
Ajax, Ontario L1S 4N7
Tel:(1) 905-427-6654
•When you need to contact your
service provider
Some service providers enable you to contact them by pressing and
holding the 2 key on your phone. This feature can be helpful if you’re
having trouble dialing a number, especially when traveling outside your
home area.
If your service provider deems your problem to be Nokia related, the
service provider will let you know.
Note: This one-key feature might not be available on all systems.
Contact your service provider for availability.
8260 User Guide version v. 0.06 [ 5 ] 4/21/00
Prepare your phone for use
3. Prepare your phone
for use
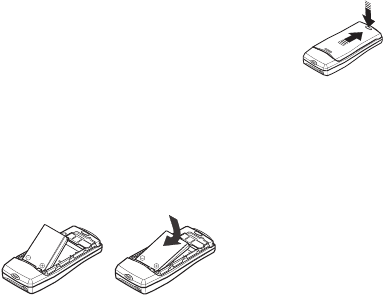
•Install the battery
First, remove the back cover
To attach and remove the battery, you need to
first remove the phone’s back cover.
1Press down on the tab on the bottom of
the cover.
1Slide the cover down and lift it off.
Next, insert the battery
Before you can use your phone, you must insert the battery.
2Place the top of the battery on the phone, with the gold contacts
toward the top of the phone.
3Press down on the bottom of the battery until it is fully down.
Last, replace the back cover
1Place the cover on top of the battery so that none of the battery is
showing.
2Slide the cover up until it clicks into place.

8260 User Guide version v. 0.06 [ 6 ] 4/21/00
Charge the battery
Before you use your phone, and when the battery runs down, you need to
charge it.
1Connect the lead from the charger to the bottom of the phone.
2Connect the charger to an AC wall outlet.
The messages Charger connected and then Charging appear. Then the
battery power indicator bar starts to flash up and down (scroll).
• You can use the phone while the battery is charging.
•Important: Disconnect your phone from the charger if the phone
becomes hot while you’re making a call.
• If the battery is totally empty, it might take a few minutes before the
charging indicator appears on the screen.
• The time it takes to charge the battery depends on the charger you use.
The battery is fully charged when the battery indicator bar stops
scrolling and the Battery full message appears (if the phone is on).
3Disconnect the charger from the AC outlet and the phone.
•When you need to remove
the battery
Later on, you may need to remove the battery.
1Make sure the phone is off.
2Remove the phone’s back cover, grasp
the ridge at the end of the battery with
a fingernail, and lift the battery out.
8260 User Guide version v. 0.06 [ 7 ] 4/21/00
Get to know your phone
4. Get to know your phone
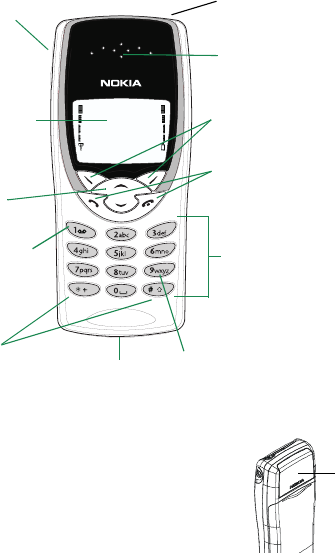
•Keys and screen
.Screen—which
always first
appears as the
Start screen
see page 9
Earpiece
see page 15
Selection keys
see page 8
Scroll keys
see page 10
Voice mail key
see page 31 Number keys
see page 8
Special
character keys
see page 8
Back of phone Internal
antenna
Talk and End keys
see page 8
Power key
see page 9
Volume keys
see page 8
Microphone Emergency key 9
see page 63
8260 User Guide version v. 0.06 [ 8 ] 4/21/00
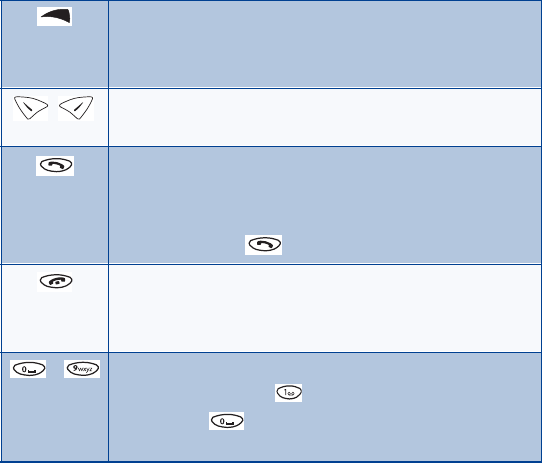
Keys
On/off key: Press and hold the key to switch the phone on
or off.
Note: This key is on the top of the phone.
Selection keys: Press to perform the function indicated by
the text on the screen above the key.
Talk key: Press to make or answer a call.
Tip: Press once to display a list that shows the last-dialed
numbers.
Tip: Press 9, then to make an emergency call.
End key: Press to end a call or silence the ringing for an
incoming call.
Tip: Press this key once to return to the Start screen.
- Number keys: Use keys 2 through 9 to enter numbers and
letters. Press and hold to call your voice mailbox.
Note: Press if you want to insert a blank space while
entering text.
8260 User Guide version v. 0.06 [ 9 ] 4/21/00
Get to know your phone
Power key
• Press and hold the Power key, which is located on the upper-right, top
portion of the phone.
Warning: Do not switch on the phone where wireless phone use
is prohibited, or where the use of a phone might cause
interference or could be a danger.
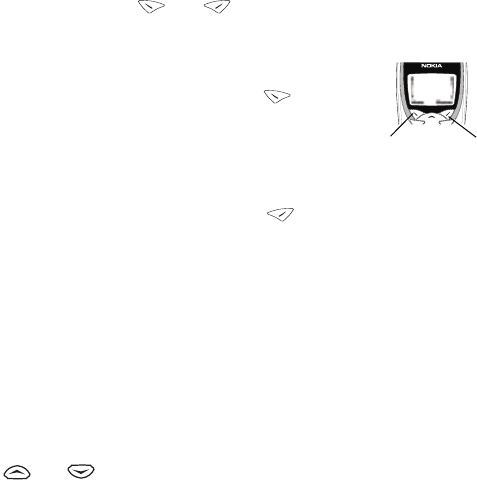
Start screen
When you turn on your phone, a Nokia welcome
appears, and then you see is the Start screen. The
Start screen is the “home base" for your phone.
If you have already made a feature choice and are no
longer at the Start screen but wish to return to this
screen:
• Press .
Special character keys: Use to enter special
characters.
For example: Pressing while you are in alpha mode
changes the letter case.
Scroll keys: Press to move through your phone’s menu or
phone book.
8260 User Guide version v. 0.06 [ 10 ] 4/21/00
•Navigation keys
Selection keys
Use the selection keys to navigate through and select the phone’s many
options.
At the Start screen, two options appear: Menu and Names.
The selection keys ( and ) are just below these options.
• The left selection key appears under Menu.
• The right selection key appears under Names..
When you press the left selection key , the
first menu item, Messages, appears. The text
above the left selection key becomes Select and
the text above the right selection key becomes
Exit.
When you press the right selection key , the six options for the Names
feature appear, along with the same Select and Exit options that appear
when you select Menu.
This guide refers to the selection keys by the names that appear above
them. Example: "Press Menu" means to press the selection key below the
word Menu.
Scroll key
Your phone has a scroll key with an up and a down arrow.
This guide refers to these arrows as if they were two separate keys:
( and ).
Left Right
8260 User Guide version v. 0.06 [ 11 ] 4/21/00
Get to know your phone
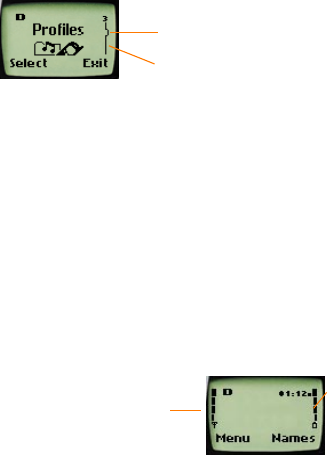
Scroll bar
When you press Menu, a scroll bar appears on the far right side of the
screen. This bar appears as a straight line with one tab, and it indicates
your location in the menu.
As you progress through the menu, the tab moves lower on the scroll bar.
If you move backward through the menu, the tab moves up.
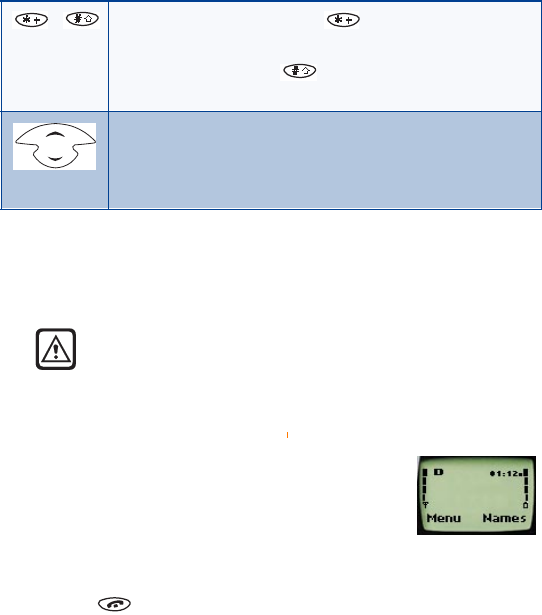
Indicators and icons
On your phone, you have two types of identifiers: indicators and icons.
Icons are graphical representations of a specific item or situation. For
example, an icon appears when you have a voice message waiting to be
heard.
Indicators show the status of something. The phone uses three types of
indicators:
• Signal strength
indicator
• Battery power
indicator
• Handset volume indicator
Signal strength: This indicator shows the signal strength of the wireless
network at your current location. The higher the bar, the stronger the
signal.
Scroll bar: This view shows the scroll b
a
three tab positions from the beginning
menu list. A number 3 appears above th
bar, showing the tab position.
Tab
Signal
strength
indicator
Battery
power
indicator
8260 User Guide version v. 0.06 [ 12 ] 4/21/00
Battery power: This indicator shows the battery charge level. The higher
the bar, the more power in the battery.
Handset volume: This indicator appears only during calls. It shows how
loud (or not) the volume is during the phone call.
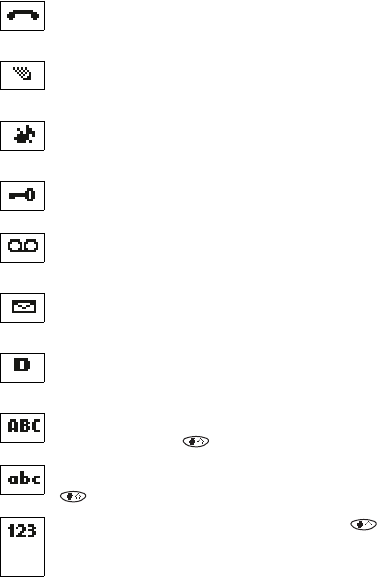
The list below shows what each icon means.
You have an active call.
The phone is waiting for you to enter a response.
.You have selected Silent as the current profile.
The keyguard has been activated to prevent any accidental key
presses.
You have one or more voice messages waiting.
You have one or more unread text messages waiting.
Digital service is available.
Any alpha characters that you enter will be uppercase (capital
letters). Press the key to switch to lowercase.
Any alpha characters that you enter will be lowercase. Press the
key to switch to uppercase.
This appears when you press and hold the key while storing
names. After switching to this numbers mode, you cannot enter
any alpha characters. You can only enter numbers.

8260 User Guide version v. 0.06 [ 13 ] 4/21/00
Get to know your phone
This appears when you press the ∗ key while storing names. You
are in special character mode, and you can select a special
character by pressing Insert.
The alarm clock is set.
You have a reminder in your Calendar to do something.
You have a reminder in your Calendar that it’s someone’s birthday.
You have a reminder in your Calendar to call someone.
You have a reminder in your Calendar of a meeting.

8260 User Guide version v. 0.06 [ 14 ] 4/21/00
5. Make and answer calls
Make a call
1Hold the phone as you would any other
telephone, with the earpiece over your ear
and the microphone near your mouth.
2Deactivate the keyguard, if it is on.
Nokia recommends that you use the keyguard,
so you need to check to see if it is on and deactivate it before you make
a call.
3Enter the phone number—including the area code—and press .
Note: Your phone has a built-in antenna. As with any other radio-
transmitting device, do not touch the antenna unnecessarily
while the phone is on. Contact with the antenna affects call
quality and could cause the phone to operate at a higher power
level than otherwise needed.
4Press to end the call or to cancel the call attempt.
Note: It is normal for your phone to become hot during use. If the phone
becomes too hot, it automatically drops the current call and
returns to the Start screen. Until the phone cools, you will be
unable to receive or make calls.
Answer a call
To answer a phone call:
1Press any key to answer the call.
2Press to end the call.
Tip: You can mute the ringing of an incoming call by pressing .

8260 User Guide version v. 0.06 [ 15 ] 4/21/00
Make and answer calls
Adjust the earpiece volume
You can adjust the earpiece volume (while in a call or at any time) by
pressing the volume keys on the upper left side of the phone.
• Press the key up to increase the volume.
• Press down to decrease the volume.
Redial the last-dialed number
To redial the last-dialed number on your phone:
1If not there, return to the Start screen by pressing Clear or .
Otherwise, proceed to step 2.
2Press two times.
Use caller ID
Caller ID is a network service that identifies incoming calls. Contact your
service provider to find out how to get this feature.
When Caller ID is active, your phone shows the caller’s phone number
during an incoming call, as long as this number is a part of your service
provider’s wireless network.
If the wireless network doesn’t recognize the calling number, one of the
following two messages appears: Call ID unavailable or Caller ID
unavailable.
If the calling party has blocked the Caller ID feature, one of the following
two messages appears: Call ID blocked or Caller ID Blocked.
If you have stored the name and number of the calling party in your phone
book and that number is supported by the wireless network, the caller’s
name might also appear.
8260 User Guide version v. 0.06 [ 16 ] 4/21/00
Keep calls private
The Voice Privacy feature encrypts the voice channel so that people
cannot eavesdrop on your phone conversations.
Voice Privacy is a network service, so you must contact your service
provider to obtain access to the feature.
To turn on Voice Privacy:
1Press Menu 4 > 5 > 1 (Settings > Network services > Voice
privacy).
2Scroll to On and press OK.
During a call, Voice Privacy becomes active and notifies you with a beep.
The message Voice privacy active also appears on the screen.
To turn off Voice Privacy:
• Repeat the steps above except, in step 2, scroll to Off.
Note: If you turn this feature on and Voice Privacy becomes inactive for
any reason, your phone displays the message Voice privacy not
active and beeps.
8260 User Guide version v. 0.06 [ 17 ] 4/21/00
Use phone menus
6. Use phone menus
•Navigate menus
A menu is a list of choices you can make. Your phone has 11 main menus.
Each main menu contains numerous submenus that allow you to use the
phone book, change the ringing tone, and so on. You can use menus and
submenus two ways: by scrolling or by using shortcuts.
Scroll through menus
1From the Start screen, press Menu, and then scroll through the menus
using the <<up>> and <<down>> keys.
2Press Options or OK, using the selection keys, at the option you want.
3Use the scroll and selection keys to navigate the submenus and to
return to the Start screen.
Use a shortcut
To get to options directly, without scrolling through lists, you can use a
shortcut.
Example
Suppose you want to customize a ringing option.
1From the Start screen, press Menu, and then press the number of the
menu item you want.
2For this example, press Menu 3 > 1 > 2 > 1 (the same as pressing
Menu > Profiles > Customize > Ringing Options).
3When the ringing options appear, scroll through them, select the one
you want, and press OK.

8260 User Guide version v. 0.06 [ 18 ] 4/21/00
Note: Don’t pause too long between numbers. The phone remembers
the last key pressed for only about 2 seconds. For example, if you
press Menu 3 > 4, and pause too long between 3 and 4, the result
is the same as pressing only Menu 3.
Change menu levels
• To return to the previous menu level, press Back or Exit.
• To return to the Start screen, press .
No menu setting changes are saved.
Get help
For most of the menu items in your phone, a brief help text is provided.
To view the help text of a menu item, scroll to an item and wait 5 seconds.
•List of shortcuts
Your phone’s menu may differ from the following list, depending on the
network services to which you have subscribed and the accessories you
are using. If you have any questions, call your service provider.
1Messages
1 Text messages (1 > 1)
1Inbox
2Saved
3 Write new
4Outbox
5Erase all
1 All read
2 All in inbox
3 All saved
4 All in outbox
2 Voice messages
1 Listen to voice messages
2 Voice mailbox number
3 Welcome Note
8260 User Guide version v. 0.06 [ 19 ] 4/21/00
Use phone menus
2 Call log
1 Missed calls
2 Dialed calls
3Received calls
4 Clear call lists
5 Call timers
3Profiles
1Normal
1 Select (not available for Headset or Car Kit)
2 Customize (the following submenus appear in all profiles)
1 Ringing options
2 Ringing volume
3 Ringing tone
4 Vibrating alert
5 Keypad tones
6 Warning and game tones
7 Message alert tone
8 Lights (available only with Car Kit)
9 Automatic answer (available only with Headset or Plug ’n
Play hands-free accessory, part of the Car Kit)
3 Rename a profile (not available for Headset or Car)
2Silent
3 Meeting
4 Outdoor
5Pager
6 Car (available only with Car Kit)
7 Headset (available only with Headset)
4Settings
1 Call settings
1 Emergency key 9
2 Automatic redial
3 Calling card
2 Phone settings
1Clock
2Alarm clock
3 Touch tones
1 Manual touch tones
2 Touch tone length
8260 User Guide version v. 0.06 [ 20 ] 4/21/00
4 Restore factory settings
5Language
1English
2French
3 Spanish
4 Portuguese
5 Russian
6Hebrew
7 Traditional Chinese
3 Security settings
1 Restrict calls
1 Restrict outgoing calls
2 Restrict incoming calls
2 Access codes
1Phone lock
2 Unlocked phone number
3 Change lock code
4Change security code
5 Hidden voice mailbox password
4 Auto update of date and time
1On
2 Confirm first
3Off
5 Network services
1 Voice privacy (must be added manually)
2 Call forwarding (must be added manually)
3 Call waiting (must be added manually)
4 Send own number (must be added manually)
5 Network feature setting
6 NAM selection
7 Public system selection (might not be available; see your
service provider)
8 Digital/analog selection (might not be available; see your
service provider)
5System
1Automatic
2Manual
3New search
6Games
1Memory
8260 User Guide version v. 0.06 [ 21 ] 4/21/00
Use phone menus
2Snake
3Logic
4Rotation
7Calculator
8Calendar
1View day
2Make note
3 Erase notes
4View all
5 Go to date
6 Set the date
9Keyguard
8260 User Guide version v. 0.06 [ 22 ] 4/21/00
7. Enter letters and
numbers
You use the phone’s keys to enter letters and numbers into your phone.
Note: For text messages and calendar notes, you can use predictive text
input, which sounds complex but is actually simple and fast. This
method is covered in “About predictive text input” on page 78.
•Enter letters
When you want to add new names or when you view
names in the phone book, your phone automatically
switches to the ABC mode. In ABC mode, your phone
displays the icon.
• Press a key once or several times to enter the letter(s) you want.
For example, press the 2 key three times to enter the letter C.
Key Characters Key Characters
1.,’?!-1 7PQRS7
2ABC2 8TUV8
3DEF3 9WXYZ9
4GHI4 0Enters an empty space or 0
5JKL5 *Special characters

8260 User Guide version v. 0.06 [ 23 ] 4/21/00
Enter letters and numbers
Edit names
To edit a name in the phone book:
• Use the scroll key to move the cursor to the left.
• Use the scroll key to move the cursor to the right.
• Press Clear to correct any mistakes.
Change from capital (uppercase) letters
To switch between capital letters (uppercase) and lowercase letters:
• Press the key.
The icon switches to , indicating that you are using
lowercase.
• To switch back to uppercase, press the key again.
Use punctuation and special characters
When in ABC mode, you can enter special characters. To do so, press the
key. The following special characters appear:
. , ? ! : ; - + # * ( ) ‘ “ _ @ & $ £ % / < > ¿ ¡ § = ¤ j E ¥
• Press or to move to the character that you want to use and
press Insert.
• Press # to move quickly up and down between rows of characters.
Tip: If you want to access a special character that appears toward the
end of this list, press for quicker access.
6MNO6 # Changes letter case; long
press toggles between ABC/
abc and 123 mode
Key Characters Key Characters
8260 User Guide version v. 0.06 [ 24 ] 4/21/00
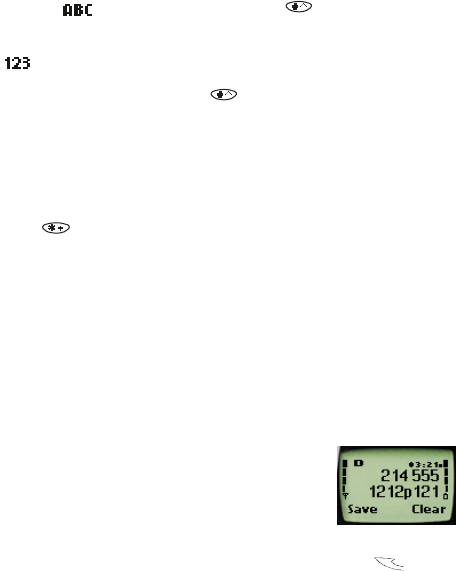
•Enter numbers
You use the 123 mode to enter numbers.
• If you are in mode, press and hold the key for about 2
seconds.
The icon appears, enabling you to enter only numbers.
• To return to ABC mode, press the key again for a couple of
seconds.
Use special characters in numbers
To insert special characters in the 123 mode:
• Press the key until the special character that you want to insert
appears.
These characters can be stored within the number sequence, and you
can add as many special characters as you need.
List of special characters
*Use as bypass key.
+Use to precede an international telephone number.
pUse to create a pause that will occur when a
number is dialed. The numbers you enter after
this special character are automatically sent as
touch tones after a 2.5-second pause.
wUse to create a “wait” when a number is dialed.
This means that when your phone waits for you to press before
it sends the number as touch tones.

8260 User Guide version v. 0.06 [ 25 ] 4/21/00
Use the phone book
8. Use the phone book
•About the phone book
Your phone includes a phone book that can store up to 250 names and
associated phone numbers. Stored numbers can be up to 32 digits long;
stored names can be up to 26 characters long.
Make entries unique
You cannot store identical names into your phone.
Example: You can’t have one entry for John Jones with a home number
and another entry for John Jones with a work number. You need to
store the names as, for example, John Jones Work and John Jones
Home.
If you enter a name that’s already in your phone book, the message
Replace? appears, followed by the currently stored name.
• Press Exit to end this input.
•Use phone book menus
The phone book has several menus from which you can choose. These
menus appear when you press Names. Use the scroll keys to move to the
menu you want to use.
Search Enables you to search for a specific name.
Add new Enables you to enter new names and numbers.
Options Enables you to choose your scrolling view and to
show the memory status.

8260 User Guide version v. 0.06 [ 26 ] 4/21/00
Change views
You can view your phone book in three different ways, listed below.
In all views, you can use the scroll keys to move up and down through the
list of names.
Select a scrolling view
1Press Names.
2Scroll to Options, then press Select.
1-touch dialing Enables you to assign up to seven 1-touch dial
locations.
Caller groups Enables you to rename or change the ringing tone for
a caller group.
Erase all Enables you to erase all names and numbers in the
phone book. To erase only one name and number at
a time, press Details, then Options while viewing a
name in the phone book.
Name list Displays all the names that are stored in your phone
book. Three names appear on the screen at a time.
Name+number Displays individual names and numbers. Only one
name appears on the screen at a time, with its
corresponding phone number. Name + number is the
default setting.
Name only Displays individual names only. You can view the
corresponding phone number by pressing Details and
then scrolling up or down.

8260 User Guide version v. 0.06 [ 27 ] 4/21/00
Use the phone book
3At Scrolling view, press Select.
4Scroll to the view that you want and press OK.
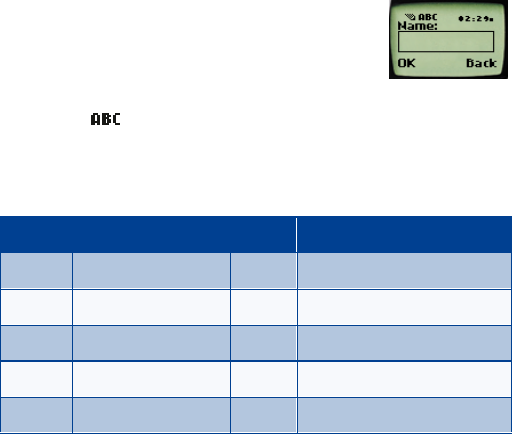
•Add names and numbers
1Press Names.
2Scroll to Add new and press Select.
3Using the keypad, enter the name. Use the
key to switch between upper and lowercase
letters.
4Press OK.
5Enter the phone number and press OK.
Shortcut
You can also enter numbers by using a shortcut from the Start screen.
1Enter a phone number and press Save.
2Enter a name at Name.
Note: Step 2 is optional.
3Press OK.
•Change a stored telephone number
You can change a number without changing its associated name.
1Press Names.
2At Search, press Select.
3Enter the first few letters of the first name of the person for whom
you are searching and press OK.
If you chose Name only as your scrolling view, continue to step 4. If
you chose Name+number as your scrolling view, proceed to step 5.
4Press Details to view the number.

8260 User Guide version v. 0.06 [ 28 ] 4/21/00
5Press Options
6If Edit is not highlighted, scroll to it and press Select.
7Press OK.
The associated number appears.
8Press and hold Clear to erase one number at a time.
Use the and keys move within the digits in the number.
9Enter the new number.
10 Press OK to save the new number.
•Recall and redial numbers
You can recall and dial numbers using one of three methods.
To recall and dial a number:
1At the Start screen, press or to display the names and
associated numbers that are stored in your phone book.
2Scroll to the appropriate name and press to dial the associated
number.

8260 User Guide version v. 0.06 [ 29 ] 4/21/00
Use the phone book
OR
1At the Start screen, press Names.
2Begin entering the first few digits of the number that you want to
call.
3When the appropriate name/number appears on the screen,
press to dial this number.
OR
1At the Start screen, press Names.
2At Search, press Select.
3Enter the name of the person that you want to call and press OK.
4When the appropriate name/number appears on the screen, press
to dial this number.
•Erase stored names and numbers
Note: You cannot undo Erase functions, so be careful!
1Using one of the methods described in “Recall and redial numbers”
on page 28, recall the stored name and its associated number.
If you chose Name only as your scrolling view, continue to step 2. If
you chose Name+number as your scrolling view, proceed to step 3.
2Press Details.
3Press Options.
4Scroll to Erase, then press Select.
The Erase? message appears.
5Press OK to erase this name and associated number.
8260 User Guide version v. 0.06 [ 30 ] 4/21/00
•Erase the entire phone book
You can erase the contents of your phone book. Note that this action
cannot be reversed! Once you have performed this procedure, all the
stored information in your phone book is erased.
To erase all the contents of your phone book:
1Press Names.
2Scroll to Erase all and press Select.
The message Are you sure? appears.
3If you truly want to erase the entire contents of your phone book,
press OK.
The Security code field appears.
4Enter your security code and press OK.
•Check memory status
You can check to see how many free and in-use memory locations are in
your directory.
1Press Names and scroll to Options.
2Press Select.
3Scroll to Memory status and press Select again.
A message appears that says Phone: xx free, xx in use, where xx
indicates the number of memory locations (phone entries) available
and in use.

8260 User Guide version v. 0.06 [ 31 ] 4/21/00
Use voice mail
9. Use voice mail
Voice mail is a network services feature. This feature enables those who
call you to leave a voice message that you can retrieve later.
•When you have a message
• Your phone beeps when you receive a voice message. Also, the message
New voice message appears on your phone’s screen, along with the
icon.
• If you have received more than one voice mail message, your phone
displays the number of messages that you have received.
Note: To use voice mail, you need to learn the voice mail system’s
various greetings, passwords, and prompts. Your service provider
can provide this information.
•Set up your voice mailbox
As part of your network’s voice mail feature, your service provider gives
you a voice mailbox phone number. Save this number in your phone to
make getting your voice messages quick and convenient.
1Press Menu 1 > 2 > 2 (Messages > Voice messages > Voice mailbox
number).
2Enter your voice mailbox phone number.
3Press OK.
• Press Yes if you want to save your voice mailbox password in your
phone.
• Press No if you don’t.
4If you selected Yes, enter your security code.
8260 User Guide version v. 0.06 [ 32 ] 4/21/00
4Press OK.
5Enter your voice mailbox password and press OK.
Your voice mailbox number can be up to 32 digits long and is used until
it’s changed. Therefore, if your phone number changes, you may need to
change your voice mailbox number along with it.
•Set greetings and passwords
These may vary in different wireless systems. If you need information
about how to record your greeting or how to store your password, contact
your service provider.
Note: If you store your voice mailbox password in your phone, the
phone immediately sends the password after you dial your voice
mailbox number. If you want the phone to wait before sending
the password, enter a "wait" character as the first character of
your password.
•Listen to your voice messages
1When your phone alerts you to new voice messages, press Listen and
follow the prompts.
2If you’d rather listen to your messages later, press Exit.
3To listen to your voice messages at a later time:
Press and hold the 1 key.
OR
Press Menu 1 > 2 > 1 (Messages > Voice messages > Listen to voice
messages).
The message Calling voice mailbox appears on the screen. Follow the
prompts to access your messages.

8260 User Guide version v. 0.06 [ 33 ] 4/21/00
Work with the call log
10.Work with the call log
The call log keeps track of the following information:
•Missed calls
• Numbers you’ve dialed
• Numbers from which you’ve received calls
• The amount of time you’ve spent on calls
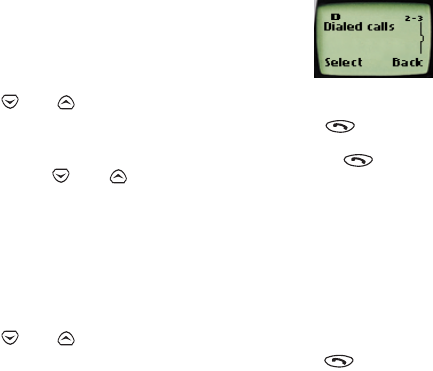
•Check the call log
Press Menu 2 to access Call log, then press Select.
The following submenus are available:
•Missed calls
• Dialed calls
• Received calls
• Clear call lists
• Call times
To select any of these options, press the Select key while the option is
displayed on the screen. The Missed calls, Dialed calls, and Received calls
menus include the following options (available when you press the
Options key):
Call time Shows the date and time during which the call was
connected—if the clock has been set.
Edit number Enables you to edit the displayed number.
Save Enables you to save the displayed number into your
phone book.
8260 User Guide version v. 0.06 [ 34 ] 4/21/00
Tip: You can dial any numbers that appear on your phone’s screen by
pressing .
Check missed calls
Your phone stores up to the last 10 numbers associated with calls you
have missed. When you miss a call(s), the message Missed calls appears
on your phone’s screen, along with the number of calls missed.
You are notified of missed calls only if your phone was turned on in the
service area from which the missed call originated.
To check missed calls:
1Press List.
The phone shows the numbers of the calls you missed.
2Either scroll through the list using the or keys until you
reach a number that you want to dial and press , or press Back
to return to the Start screen.
If you prefer, you can press Menu 2 > 1 (Call log > Missed calls), then
scroll through the list of numbers.
Note: If you chose the Forward if not answered option in the Call
Forwarding, then your phone treats these forwarded calls as
missed calls.
Erase Enables you to erase the displayed number from the call
log.
View number Enables you to view a number when an associated name
appears on the screen.
Note: This option works only if you have stored the
associated number in the phone book.
8260 User Guide version v. 0.06 [ 35 ] 4/21/00
Work with the call log
Check previously dialed calls
Your phone stores up to the last 10 numbers associated
with calls that you have dialed. To check this list of
numbers:
1Press Menu 2 > 2 (Call log - Dialed calls).
2Use or to scroll through the dialed numbers list and when
you reach the number that you want to dial, press .
You can also access previously dialed numbers by pressing , then
quickly pressing or to scroll through the list.
Check received calls
Your phone stores up to the last 10 numbers associated with calls that you
have answered. To check this list of numbers:
1Press Menu 2 > 3 (Call log > Received calls).
2Use or to scroll through the dialed numbers list and when
you reach the number that you want to dial, press .
Clear call lists
You can erase some or all of the numbers that appear in your phone’s call
log. You can erase dialed numbers, received call numbers, or missed call
numbers.
Warning: You cannot undo this operation.
8260 User Guide version v. 0.06 [ 36 ] 4/21/00
To erase some or all of the numbers listed in your call logs:
1Press Menu 2 > 4 (Call log > Clear call lists).
2Use or to scroll through the options list, which includes
the following options: All, Missed, Dialed, and Received.
3Stop at the appropriate option and press OK.
Note: The All option clears every number in every list, whereas the other
options clear only the numbers associated with that option. For
example, the Dialed option clears only the numbers associated
with calls you previously dialed.
•Check call timers
Your phone tracks the amount of time you spend on
each call. To obtain information about time spent on
phone calls:
1Press Menu 2 > 5 (Call log > Call timers).
2Use or to scroll through the options described in the
following list:
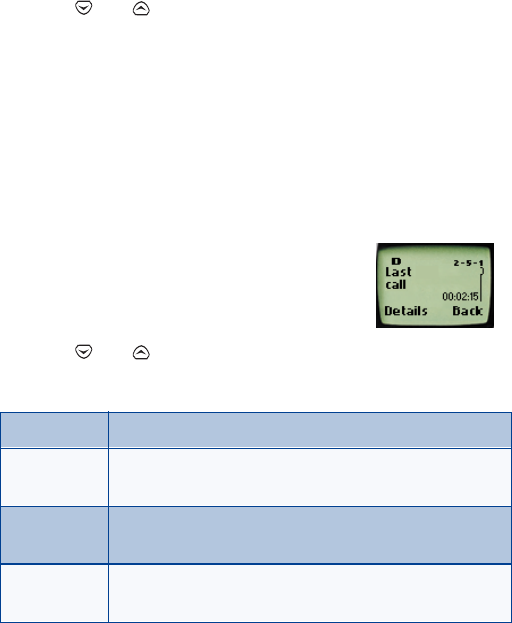
Last call Displays the call duration of the last made call.
Dialed calls Displays the duration of all outgoing calls since you
reset the timers.
All calls Displays the call duration of all calls that have been
made since you reset the timers.
Life timer Displays the duration of all calls for the life of your
phone. This option cannot be reset.
8260 User Guide version v. 0.06 [ 37 ] 4/21/00
Work with the call log
Warning: If you select the Clear timers option, the action cannot be
undone. If you use the call timers to log or track the amount
of time you are using your phone, you might want to record
the call timers before you erase them.
Turn on a current call timer
You can set your phone to display the running elapsed time while a call is
active. To do so:
1Press Menu 2 > 5 (Call log > Call timers).
2Press Details.
The message Current call timer appears.
3Press Select.
4Use or to scroll to On.
5 Press OK.
From this point on, each call you make or receive will be timed. After a
call has ended, press any key on your phone to clear the screen.
Clear call timers
1Press Menu 2 > 5 > 5 (Call log > Call timers > Clear timers). The
Security code field appears.
2Enter your security code and press OK.
Clear timers Clears all call timers for the currently selected Number
Assignment Module (NAM). Your phone includes
separate timers for each NAM used, with the exception
of the Life timer.

8260 User Guide version v. 0.06 [ 38 ] 4/21/00
11. Use advanced calling
features
•Set in-call options
Your phone allows you to use a number of features
during a call. These features are known as in-call
options.
Note: Many in-call options are network services features. To use these
options, you must contact your service provider.
You cannot use all these options at all times. This section tells you when
you can use a certain option.
1To access an option during a call, press Options.
2Choose from some or all of the following options:
Lock keys This option appears first only if your phone is connected
to a headset. Otherwise, the Mute option (see next)
appears first.
Mute Mutes the phone’s microphone.
If, somehow, your phone’s microphone has already been
muted, End mute appears instead of Mute.
Press Select to choose either of these options.
Note: These options can affect the microphones of any
accessories connected to the phone.
Touch tones Enables you to manually enter a touch tone string or
search for a string in your phone.

8260 User Guide version v. 0.06 [ 39 ] 4/21/00
Use advanced calling features
•Use call waiting
If you have call waiting, your phone beeps during a call to let you know
that someone else is calling you.
Depending on your caller ID setup, the phone might also display the
number of the incoming call.
Note: Call waiting may not be available in all wireless systems. Contact
your service provider for details and availability.
Before you can use call waiting, you must first store its feature code. Then
you must activate the call waiting feature.
Store the call waiting feature code
1Press Menu 4 > 5 > 5 (Settings > Network services > Network
feature setting).
The Feature code box appears.
2Enter the feature code your service provider gave to you and
press OK.
3Make sure that Activate is highlighted and press OK.
Activate call waiting
1Press Menu 4 > 5 > 3 (Settings > Network services > Call waiting).
2Use or to scroll to Activate and press OK.
New call Enables you to conference in another call while you are
in the midst of a call.
Menu Enables you to access the Menu.
Names Enables you to access the phone book.

8260 User Guide version v. 0.06 [ 40 ] 4/21/00
Your phone calls the network to confirm the feature code you entered.
After the network confirms the feature code, call waiting is activated.
Manage calls
Call waiting works with both local and long distance calls.
• To answer an incoming call, press .
• To switch from one call to another, press .
• To end both calls, press .
Make a conference call
While in a call, you can call another number and conference in a third
party.
1While in a call, you can either dial the number that you want to
conference in and press .
OR
You can press Options, scroll to New call, press OK, enter the phone
number, and press OK again.
If you don’t remember the number of the party you want to include in
the conference, and you know that this number is in your phone book,
you can recall the number.
2When the third party answers, press to connect all three
parties.
Note: To place one of the parties on hold, press again. If you press
a third time, the party you placed on hold rejoins the call,
and the second party is placed on hold. Once you place one of the
parties on hold, you are unable to rejoin all three parties.
3To drop all parties, press .

8260 User Guide version v. 0.06 [ 41 ] 4/21/00
Use advanced calling features
Recall a number from the phone book during a
conference call
If you don’t remember a number that you need to call while in another
call, and you know that this number is in your phone book, you can recall
the number without having to quit your current call. To do so:
1During the call, press Options.
2Scroll to Names and press OK.
3Press Select at Search.
4Enter name and press OK, or scroll through the phone book.
5Press .
•Use call forwarding
With call forwarding, you can forward incoming calls to another number.
This way, if you are unable to receive calls on your phone, all calls going
to that phone can be forwarded to another phone. You’ll never have to
miss an important call.
Note: The call forwarding feature might not be available in all wireless
systems. Contact your service provider for details and availability.
Before you can use call forwarding, you must first store its feature code.
Then you must activate the call forwarding feature.
You can use the call forwarding feature code manually as opposed to
storing it. Each time you need to forward phone calls, you must enter the
feature code before the phone number (for example, *72 555 1212).
Store the call forwarding feature code
1Press Menu 4 > 5 > 5 (Settings > Network services > Network
feature setting).
The Feature code field appears.
2Enter the feature code your service provider gave you and press OK.

8260 User Guide version v. 0.06 [ 42 ] 4/21/00
3Use or to scroll to Call forwarding and press Select.
Activate call forwarding
1Press Menu 4 > 5 > 2 (Settings > Network services > Call
forwarding).
2Scroll to the desired call forwarding option, as described in the table
below, and press Select.
3Highlight Activate and press OK.
4At the Number field, either enter the number to which you want
your calls forwarded or press Search to find this number in the phone
book (if the number is indeed in your phone book).
Forward all calls Forwards all incoming calls.
Forward if busy Forwards calls only when you’re on your
phone and do not have voice mail.
Forward if not
answered Forwards calls if you don’t answer. This
option is handy if you want to give your
phone to someone for a short period of time,
but you don’t want them to answer the
phone.
For example, you could use this option if you
give your child the phone to take out, in case
of an emergency, but you still want to receive
any incoming calls made to this phone.
Forward if out of reach Forwards calls if you are out of the serving
wireless network.
Cancel call forwarding Cancels all forwarding options that are
currently active.

8260 User Guide version v. 0.06 [ 43 ] 4/21/00
Use advanced calling features
5Press OK.
Your phone calls the network to confirm the feature code that you
entered in Menu 4 > 5 > 5. After the network confirms the feature code,
call forwarding is activated.
•Redial automatically
Automatic redial enables your phone to continue trying to call a number
that was busy due to wireless network problems.
When you call a number and get a busy signal because of network
problems, your phone redials this number up to 10 times. If you want to
stop this process prior to the tenth attempt, press . This stops the
automatic redialing.
Before you can use the Automatic Redial feature, you must activate it.
1Press Menu 4 > 1 > 2 (Settings > Call settings > Automatic redial).
2Use or to scroll to On.
3Press OK.
•Use a calling card
You can use a calling card when you dial long distance calls. First you
must first store your calling card information in the phone. Your phone
can store information about a maximum of four calling cards.
Save calling card information (step 1)
To save your calling card(s) information:
1Press Menu 4 > 1 > 3 (Settings > Call settings > Calling card).
2Scroll to the A, B, C, or D calling card and press Options.
3Scroll to Edit and press OK.
The Security code field appears.
8260 User Guide version v. 0.06 [ 44 ] 4/21/00
4Enter your security code and press OK.
The Dialing sequence field appears.
5Press Select.
6Use or to scroll through the list of dialing sequences, as
described in the table below.
* The calling cards listed in this column are frequently used with the
dialing sequences listed in the first column. However, this information
might vary and it is subject to change at the phone companies’
discretion.
7Press Select.
Save calling card information (step 2)
The order of the following steps may vary, depending on which dialing
sequence your card uses.
1Enter the number and, when prompted for the calling card’s access
number, enter the number and press OK.
Dialing sequence Use for cards that require you to: Associated cards
Access no.
+ phone no.
+ card no.
Dial 1-800 access number, then
phone number, then card number
(+ PIN if required).
MCI, AT&T True
Choice, Sprint
Canada, Unitel
Access no.
+ card no.
+ phone no.
Dial 1-800 access number, then
card number (+ PIN if required),
then phone number.
networkMCI,
WorldPhone MCI
Prefix
+ phone no.
+ card no.
Dial the prefix (any numbers that
must precede the phone number)
and phone number you want to
dial, then card number (+ PIN, if
required).
GTE, PacBell, AT&T,
Stentor

8260 User Guide version v. 0.06 [ 45 ] 4/21/00
Use advanced calling features
This number is usually the 1-800 number that is listed on the back of
the calling card.
You can also retrieve the access number from your phone book if
you’ve stored it. Simply press Search, then use or to find the
number.
2When prompted to enter a calling card (usually shown on the front
of the calling card) and PIN number, enter the number, and press OK.
3Press OK again when the Save changes? message appears.
4Use or to scroll to Card name, press Select, and enter the
card name using your phone’s keypad.
5Press OK.
Choose a calling card to use
If you have more than one calling card, you’ll need to choose one before
making a call.
1Press Menu 4 > 1 > 3 (Settings > Call settings > Calling card).
2Scroll to the desired card and press Options.
3Press or to highlight Select and press OK.
The Security code field appears.
4Enter your security code and press OK.
The message Card ready for use appears.

8260 User Guide version v. 0.06 [ 46 ] 4/21/00
Make a calling card call
To make a calling card call:
1Enter the phone number, including any prefix (such as 0 or 1) your
calling card might require when you make a calling card call. See
your calling card for instructions.
2Press and hold until your phone displays the message Card call,
wait for the message Wait for the tone, and press OK.
3When you hear the tone from your calling card service, press OK.
Note: This procedure might not apply to all of the calling card
options that are programmed into your phone. Please look
on the back of your calling card for more information, or
contact your long distance company.
•Send your own number in caller ID
You can determine, for each call you make, whether your telephone
number appears on another phone’s caller ID.
In most service areas, when you call others, your name is presented to
their caller ID (if they subscribe). With Send Own Number, you can block
(or not) the display of your number to others’ caller ID when you call them.
Note: Send Own Number might not be available in all wireless systems.
Contact your service provider for details and availability. Also
note that this feature is effective only when you call a number
that is equipped with caller ID.
Before you can use Send Own Number, you must first store its feature
code. Otherwise, this feature might not appear on your phone’s menu.
Store the Send Own Number feature code
1Press Menu 4 > 5 > 5 (Settings > Network services > Network
feature setting).

8260 User Guide version v. 0.06 [ 47 ] 4/21/00
Use advanced calling features
The Feature code field appears.
2Enter the feature code your service provider gave you and press OK.
3Use or to scroll to Send own number and press Select.
Your phone calls the network to confirm the feature code that you
entered in Menu 4 > 5 > 5. After the network confirms the feature code,
Send Own Number is activated.
Set whether your number will appear (or not)
1Press Menu 4 > 5 > 4 (Settings > Network services > Send own
number).
2Scroll to Yes (to show your number) or No (not to show it).
3Press OK.
4Enter the number you wish to call (or press Search to retrieve the
number from the phone book), and press OK.
•Select a phone system (NAM)
Your service provider programs, into your phone’s memory, its phone
number and system information when you first activate your phone. The
number assigned to your phone is called a Number Assignment Module
(NAM). This NAM provides service for only one service area.
However, your phone can be activated in up to three different service
areas. For example, your phone could be activated in Dallas, Chicago, and
New York. Each service area would assign a different phone number or
account to your phone.
You must select a NAM for your home system, and if you travel outside of
your home system, you can choose another NAM.
Only one NAM can be active at a time.

8260 User Guide version v. 0.06 [ 48 ] 4/21/00
Note: It might not be necessary to have up to three NAMs for your
phone if your service provider has service or roaming agreements
for each area in which you wish to use your phone. Contact your
service provider for details.
Select the NAM for your phone
1Press Menu 4 > 5 > 6 (Settings > Network services > NAM
selection).
2Scroll to the phone number you want to use and press OK.
Note: The first phone number on this list is the currently selected
number. You need at least one active number to make calls. You
cannot change from one NAM to another during a call.
Select digital or analog
Your phone can work in both digital and analog modes. The default mode
is digital and analog, which appears on your phone as Digit. & analog
when you press Menu 4 > 4 > 8 (Settings > Network services > Digital/
analog selection).
Note: This feature is available only for certain phones. Contact your
service provider for more information.
This mode means that your phone works in both digital and analog
networks. The phone always tries to find a digital network first, but if a
digital network is not available, the phone looks for an analog network.
After pressing Menu 4 > 4 > 8 (Settings > Network services > Digital/
analog selection), you can also choose to use one of the other two modes:
Analog Forces the phone to use only AMPS analog networks.
Digital Forces the phone to use only TDMA digital networks.
8260 User Guide version v. 0.06 [ 49 ] 4/21/00
Use advanced calling features
•Set touch tones
Touch tones are sounds that are produced when you
press the keys on your phone’s keypad. Sometimes,
touch tones are called DTMF tones, but this guide
calls them touch tones.
You can use touch tones for many automated over-the-phone services
such as checking bank balances and airline schedules and using your voice
mailbox. Touch tones can be sent only when a call is active.
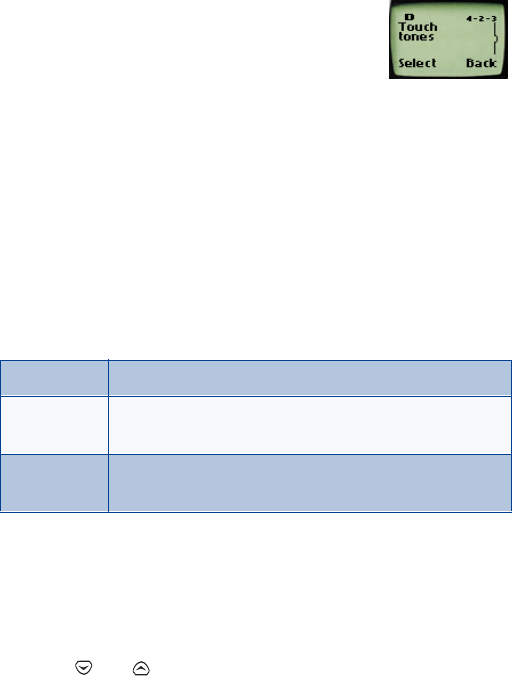
Set manual touch tones
1Press Menu 4 > 2 > 3 > 1 (Settings > Phone settings > Touch tones
> Manual touch tones).
2Select one of the following options, then press OK:
Set touch tone length
You can also set the length of each touch tone. To do this:
1Press Menu 4 2 3 2 (Settings - Phone settings - Touch tones - Touch
tone length).
2Use or to scroll to Short or Long. Short sets the tone
length to .1 second; Long sets the tone length to .5 second.
3Press OK.
Continuous The tone sounds for as long as you press and hold a key.
Fixed Sets the tone length to 0.1 second, regardless of how
long you press a key.
Off Turns off the tones. No tones are sent when you press a
key.
8260 User Guide version v. 0.06 [ 50 ] 4/21/00
Store touch tone sequences (strings)
You store touch tone strings the same way that you store names and
numbers in your phone book. You can store an entire digit sequence and
send it as touch tones for frequently used strings of numbers.
Store touch tone strings with phone numbers
1Enter the phone number that you want associated with a touch tone.
2Press ∗∗∗ (p) or ∗∗∗∗ (w).
w (wait): When you dial this phone number, your
phone first dials the number, then waits (because
of the w character) for you to press Send. When
you press Send, the phone sends your password.
p (pause): If you include a p character instead of a w, your phone
pauses for 2.5 seconds, then automatically sends your password as a
touch tone.
3Enter the touch tone string.
4Store the number as you normally would.
Send a touch tone string
1Press Menu 4 > 2 > 3 > 1 (Settings > Phone settings > Touch tones
> Manual touch tones).
2Make sure that the setting is not set to Off.
If it is, use or to scroll to one of the other options and press
OK.
3Then, during your call, press Options, scroll to Touch tones and press
OK.
4Enter the touch tone string or recall the string from the phone book,
and press OK.
Warning: If you send touch tones while in the analog mode, be careful
not to send confidential information.
8260 User Guide version v. 0.06 [ 51 ] 4/21/00
Customize your phone
12.Customize your phone
•What are profiles?
Profiles enable you to customize the following phone-
related items:
Ringing options
Ringing volume
Ringing tone
Vibrating alert
Keypad tones
Warning & game tones
Message alert
Your phone comes with seven profiles:
Normal (default setting)
Silent
Meeting
Outdoor
Pager
Car
Headset
You can customize any of the profiles. If at any time you want to return
to the original settings, you can do so.
•Select a different profile
1Quickly press the Power key.
2Quickly press the Power key again to scroll through each choice (or
you can use the scroll keys).
8260 User Guide version v. 0.06 [ 52 ] 4/21/00
3Press and hold the power key for a second (or you can press OK) to
select the highlighted profile.
Note: To select a different profile, your phone cannot be connected to
a car kit or a headset, and your phone must be at the Start screen.
•Customize a profile
1Press Menu 3 (Profiles).
2Use or to scroll to the desired profile
in the list.
Note: The Car and Headset profiles do not appear unless your phone is
connected to these accessories. If you connect your phone to a
car kit or to a headset, these profiles remain in the menu, unless
you choose to restore your phone’s factory settings.
3Press Options to view the options for the selected profile.
4Select one of the following options, then press OK.
Note: When you change a setting in the current profile, it affects only
that profile. Your phone’s normal settings do not change.
Select Activates the currently highlighted profile.
Customize Enables you to customize a profile by changing the
current settings.
• Press OK to choose from several lists.
Rename Enables you to rename the profile.
This option does not appear in the Normal, Headset, or
Car kit profiles.
8260 User Guide version v. 0.06 [ 53 ] 4/21/00
Customize your phone
Set ringing options
You can choose the tone that your phone uses to notify you of an
incoming call. This setting does not affect any incoming text message
alert tones.
1Press Menu 3 (Profiles).
Your phone lists each profile.
2Use or to scroll to the desired profile in the list for which
you want to set the ringing options, and press Options.
3Highlight Customize and press OK.
4Scroll to Ringing options and press Select.
5Scroll to one of the ringing options, as described below, and press OK.
6Use or to scroll to the desired caller group(s), then press
Mark to select or Unmark to deselect them.
Ring The phone rings until it is answered.
Ascending Ringing volume increases (gets louder) if the phone is
not answered.
Ring once The phone rings once to indicate an incoming call.
Beep once The phone beeps once to indicate an incoming call.
Caller groups Sets the ring to a silent ring, unless a call comes from a
number within a caller group.
Silent The phone makes no sound.

8260 User Guide version v. 0.06 [ 54 ] 4/21/00
Set the ringing volume
You can set the default ringing volume for incoming
voice calls and message alert tones.
1Press Menu 3 (Profiles).
2Use or to scroll to the profile for which
you want to set the ringing volume, and press Options.
3Highlight Customize and press OK.
4Scroll to Ringing volume and press Select.
5Scroll through the options. When you hear the volume level you wish
to use, press OK.
The ringing volume setting is stored individually for the handsfree car kit
and the headset.
Set the ringing tone
You can set your phone’s ringing tone to a specific sound—or tune—for
incoming voice calls.
Note: If you have already chosen a ringing option of either Silent or
Beep once (“Set ringing options” on page 53), the ringing tones
are already turned off.
1Press Menu 3 (Profiles).
Your phone lists each profile.
2Use or to scroll to the profile for which you want to set
the ringing tones.
3Press Options.
4Highlight Customize and press OK.
5Scroll to Ringing tone and press Select.
6Scroll through the options, and, when you hear the tone you want to
use, press OK.

8260 User Guide version v. 0.06 [ 55 ] 4/21/00
Customize your phone
Set a vibrating alert
Instead of choosing to have your phone ring, you can have it vibrate to
indicate an incoming call.
Note: If you have already chosen a ringing option of either Silent (“Set
ringing options” on page 53), the phone does not vibrate.
1Press Menu 3 (Profiles).
2Use or to scroll to the profile for which you want to set
the vibrating alert, and press Options.
3Highlight Customize and press OK.
4Scroll to Vibrating alert and press Select again.
5Use or to scroll to On and press OK.
The phone does not vibrate when it is connected to or placed in any
charging device.
Set keypad tones
Keypad tones set the volume of the tone you hear when you press your
phone’s keys.
1Press Menu 3 (Profiles).
2Use or to scroll to the profile for which you want to set
the keypad tones, and press Options.
3Highlight Customize and press OK.
4Scroll to Keypad tones and press Select again.
5Use or to scroll to one of the levels and press OK. (If you
choose Off, no keypad tones are made.)
If you chose the Silent profile in step 2, the keypad tones are turned off.

8260 User Guide version v. 0.06 [ 56 ] 4/21/00
Set warning and game tones
You can set warning tones and the tones used for the games in your
phone.
Warning tones include the sounds your phone makes during error
conditions, during confirmations, when you switch the phone on, when a
battery is low, and when you need to recharge the battery.
1Press Menu 3 (Profiles).
2Use or to scroll to the profile for which you want to set
the warning tones, and press Options.
3Highlight Customize and press OK.
4Scroll to Warning and game tones, then press Select.
5Scroll to On and press OK.
If you do not want to use warning or game tones, you can turn them off
by scrolling to Off and pressing OK.
Set the message alert tone
You can set your phone to use a certain tone to indicate an incoming text
message.
1Press Menu 3 (Profiles).
2Use or to scroll to the profile for which you want to set
the message alert tone, and press Options.
3Highlight Customize and press OK.
4Scroll to Message alert tone, then press Select.
5Use or to scroll through your choices.
The phone plays samples of each choice as you scroll to it.
6When you find the tone you want, press OK.

8260 User Guide version v. 0.06 [ 57 ] 4/21/00
Customize your phone
Set your phone to answer automatically
You can set your phone to answer incoming voice calls after one ring. This
feature can be used only when your phone is connected to a headset or
to an approved handsfree car kit that is equipped with the ignition sense
option, with the ignition on.
1Press Menu 3 (Profiles).
2Use or to scroll to either the Car or Headset profile and
press Options.
Note: Car and Headset do not appear unless your phone has
already been connected to a car kit or headset at least one
time.
3Highlight Customize and press OK.
4Scroll to Automatic answer and press Select again.
5Scroll to On and press OK.
Set the lights (car kit only)
While your phone is connected to a car kit, you can set the phone’s lights
two ways. You can either have the lights on only when you use the phone
or have them on the whole time the phone is connected to the car kit.
This feature works only when your phone is connected to a car kit.
1Press Menu 3 (Profiles).
2Use or to scroll to Car and press Options.
Note: Car does not appear in the list unless the phone is connected
to a car kit.
3Highlight Customize and press OK.
4Use or to scroll to Lights and press Select.

8260 User Guide version v. 0.06 [ 58 ] 4/21/00
5Scroll through your choices, which are listed and described in the
table below, and press OK.
•Rename profiles
1Press Menu 3 (Profiles).
2Use or to scroll to the desired profile and press Options.
3Scroll to Rename and press OK.
4Enter the new name and press OK again.
Note: You cannot rename the Normal, Headset, and Car kit
profiles.
•Restore factory settings
As was described in “Customize your phone” on page 51, you can change
the defaults that come with your phone. These defaults are known as
factory settings.
However, just as you can change some of these defaults, you can also
return them back to their original settings.
Note: The memory, timers, language selection, security code, and lock
codes are not reset. However, any profiles you have modified are
reset when you restore your settings.
1Press Menu 4 2 4 (Settings - Phone settings - Restore factory
settings)
2Enter your security code and press OK.
Automatic Instructs the phone to turn off the lights within 15
seconds if no keys are pressed.
On Instructs the phone to leave the lights on the entire time
that your phone is connected to the car kit.
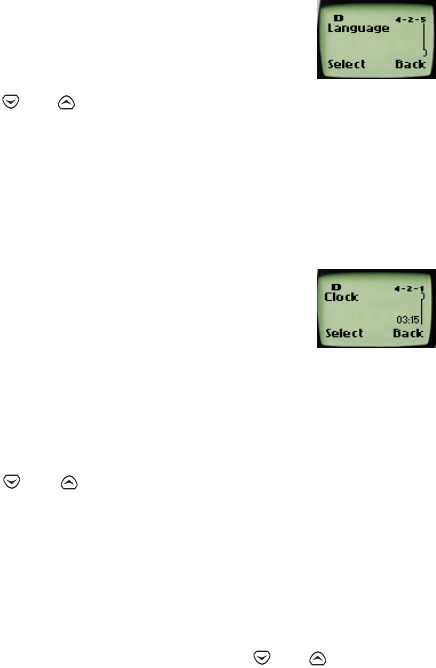
8260 User Guide version v. 0.06 [ 59 ] 4/21/00
Customize your phone
•Set the display language
You can set your phone to display a certain language.
To do this:.
1Press Menu 4 > 2 > 5 (Settings > Phone Settings
> Language).
2Use or to scroll to the language you want to use and press
OK.
You can choose from English, French, Spanish, Portuguese, Russian,
Hebrew, and Chinese Traditional.
•Set and display the clock
Your phone has an internal clock that you can set to
appear on the phone’s screen.
The clock is connected to an alarm clock. Refer to
“Alarm clock” on page 98 for more information.
Set the clock
To set the clock to the appropriate time:
1Press Menu 4 > 2 > 1 (Settings > Phone settings > Clock).
2Use or to scroll to Adjust time and press Select.
The Time field appears.
3Enter the time using an xx:xx format and press OK.
For example, to set your clock to 9:30, enter 09:30. If you set the time
format for 24-hour time, enter the number the same way: 09:30 or
23:12.
• If you set time format to am/pm, use or to scroll to am
or pm and press OK.
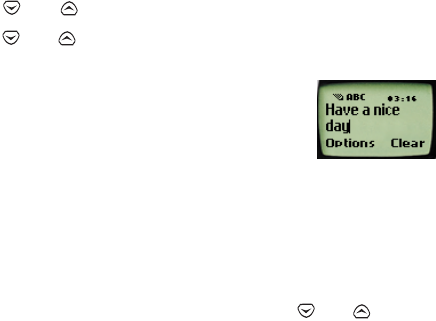
8260 User Guide version v. 0.06 [ 60 ] 4/21/00
• If you set the time format to 24-hour, the time is set as soon as
you press OK after adjusting the time.
Display the clock
1Press Menu 4 > 2 > 1 (Settings > Phone settings > Clock).
You see the clock on the screen.
2If you decide not to display the clock, press Select, then Hide clock,
then Select.
Only one of these options appears at a time.
Select the time format
You can change the way your clock shows the time, whether in am/pm
format or using a 24-hour clock.
1Press Menu 4 > 2 > 1 (Settings > Phone settings > Clock).
2Use or to scroll to Time format and press Select.
3Use or to scroll to either am/pm or 24-hour and press OK.
•Add a welcome note
You can set your phone to display a welcome note
each time you switch on your phone. This note could
say, for example: Hello. It could include your name, a
reminder, or more. The maximum length of this note is 36 characters.
1Press Menu 1 > 3 (Messages > Welcome note).
2Enter the text of the welcome note.
As you enter characters, they appear to the left of the cursor. Press Clear
to delete characters to the left of the cursor. Press or to move
the cursor right or left.
3Press Options.

8260 User Guide version v. 0.06 [ 61 ] 4/21/00
Customize your phone
4Use or to scroll to Save and press OK.
If you ever want to delete (erase) the welcome note, press Menu 1 >
3 (Options > Erase > OK).
•Use 1-touch dialing
You must store names and numbers in your phone book before you can
use 1-touch dialing.
You can assign a name from the phone book to a 1-touch dial location,
using your phone’s keys 2 through 8. When you press the key, the
associated number is automatically dialed.
•Keys 1 and 9: The 1 key is used exclusively to dial your voice mailbox.
The 9 key is used exclusively to make calls to the emergency number
that is programmed into your phone.
•Key 2: You can use the 2 key to dial a customer care operator (refer to
“When you need to contact your service provider” on page 4). You can
overwrite this feature and assign a 1-touch dial location to the 2 key.
Assign a name or number to a 1-touch
dial key
1Press Names and scroll to 1-touch dialing.
2Press Select.
3Use or to scroll to the first number that includes the
message (empty) and press Assign.
4Use or to scroll to the name and number to which you
want to assign this key and press Select.
Repeat these steps as many times as necessary.
5To call a number using 1-touch dialing, press and hold the
appropriate key for a few seconds.

8260 User Guide version v. 0.06 [ 62 ] 4/21/00
The phone dials the number.
Change 1-touch dialing numbers
After you have assigned 1-touch dialing numbers to a key, you can change
key and number associations at any time.
1Press Names.
2Use or to scroll to 1-touch dialing and press Select.
3Use or to scroll to the key you want to change and press
Options.
4Use or to scroll to Change and press Select.
5Use or to scroll to through phone book.
6When you reach the new number, press Select.
Erase 1-touch dialing numbers
You can erase 1-touch dialing key assignments at any time.
1Press Names
2Use or to scroll to 1-touch dialing and press Select.
3Use or to scroll to the key you want to erase and press
Options.
4Use or to scroll to Erase and press Select.
5Press OK.
•Use emergency key 9
When the emergency key feature is turned on, the phone attempts to
make an emergency call when you press 9 and . The phone dials the
emergency number preprogrammed into your phone.

8260 User Guide version v. 0.06 [ 63 ] 4/21/00
Customize your phone
Note: You can also dial an emergency call by pressing and holding 9
until the phone indicates it is attempting to make an emergency
call. This method does not work, however, when Keyguard is active
or when the phone is connected to a modem.
Activate the emergency key 9
Before you can use the emergency key feature, you must first activate it.
1Press Menu 4 > 1 > 1 (Settings > Call settings > Emergency key 9).
2Use or to scroll to On and press OK.
3If you ever want to deactivate this feature, press Menu 4 > 1 > 1
and scroll to Off.
Warning: Official emergency numbers vary by location. Only one
emergency number is programmed into your phone, and this
is the number that is dialed when you press key 9. However,
this might not be the proper number in all circumstances.
Make an emergency call
• Press 9 and .
•Use caller groups
You can create groups of names in your phone book and give each group
a different ringing tone. This allows you to recognize who is calling you
by the way your phone rings.
To use the caller group feature, you must also have access to caller ID.
Caller ID is a network services feature (see you service provider).
Add names to a caller group
Before you can create a caller group, you must include the names that will
make up a caller group in your phone book.
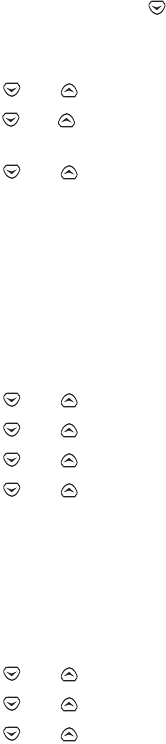
8260 User Guide version v. 0.06 [ 64 ] 4/21/00
1At the Start screen, press until you see the name or number you
want to assign to a caller group.
2Press Details, if shown; if not, press Options.
3Use or to scroll to Caller groups and press Select.
4Use or to scroll to the name/number that you want to add
to the caller group and press Select.
5Use or to scroll to the caller group to which you want to
add this name and press Select.
Assign a ringing tone to a caller group
After you have created a caller group, you can assign a specific ringing
tone to this group. This way, when someone from that group calls you,
you’ll be able to identify whether they’re a friend, a family member, or
otherwise from the ringing tone.
1At the Start screen, press Names.
2Use or to scroll to Caller groups and press Select.
3Use or to scroll to the group you want and press Select.
4Use or to scroll to Group ringing tone, and press Select.
5Use or to scroll to the tone that you want to assign and
press OK.
Tip: You can set your phone to ring only when people from certain caller
groups call you.Otherwise, the phone is silent.
Rename a caller group
1At the Start screen, press Names.
2Use or to scroll to Caller groups and press Select.
3Use or to scroll to the group you want and press Select.
4Use or to scroll to Rename group and press Select.
5Enter the group name and press OK.

8260 User Guide version v. 0.06 [ 65 ] 4/21/00
Customize your phone
Remove names from a caller group
1In the phone book, scroll to select the name you want to remove, and
press Options.
2Use or to scroll to Caller groups and press Select.
3Use or to scroll to No group and press Select.
The name is removed from the group.
Display caller group graphics
When someone calls you from a particular caller group, your phone can
display a graphic to identify that person’s caller group.
1Press Names.
2Use or to scroll to Caller groups and press Select.
3Use or to scroll to the caller group for which you want to
display a graphic and press Select.
4Use or to scroll to Group graphic and press Select.
5Use or to scroll to On. The graphic associated with that
caller group is now set to display.
8260 User Guide version v. 0.06 [ 66 ] 4/21/00
13.Security
Your phone is equipped with a versatile security system that prevents the
unauthorized use of the phone.
You cannot activate or use certain phone features without having first
successfully entered your phone’s security code.
• The default security code is 12345.
• Nokia highly recommends that you immediately change this code.
Then, write down and store the new code in a safe place, away from
your phone.
When entering your security code, a * appears on the screen each time you
press a number key. This prevents others from seeing your code.
If you incorrectly enter a security code five times in a row, your phone
won’t accept any entries for the next 5 minutes. However, if you realize
that you’ve entered the code incorrectly before pressing OK, you can use
Clear to erase the code, digit by digit, beginning with the last digit.
When this guide describes an action that requires the entry of your
security code, each step necessary to this action is provided.
•Change your security code
1Press Menu 4 > 3 > 2 > 4 (Settings > Security settings > Access
codes > Change security code).
The Security code field appears.
2Enter the default security code and press OK.
3At the message Enter new security code, enter your new security
code and press OK.
4At the message Verify new security code, enter your new security
code again and press OK.
8260 User Guide version v. 0.06 [ 67 ] 4/21/00
Security
The message Security code changed appears.
If you have changed your security code and don’t remember the new code,
contact your service provider. Once you have changed your security code,
the default setting is no longer valid.
•Protect your phone with the
lock code
The lock code enables you to activate and deactivate your phone. When
the lock code is on, you cannot access most of your phone’s memory or
menu features. Also, you cannot make phone calls without first entering
the lock code.
When you switch on the lock code, your phone locks after you switch it
off. Then, each time you switch your phone on, it prompts you for a lock
code when you press either Names or Menu.
Note: If you enter an incorrect lock code five times in a row, your phone
prompts you for the security code.
The default lock code is 1234. However, Nokia recommends that you
change this code immediately.
Turn on the phone lock
1Press Menu 4 > 3 > 2 > 1 (Settings > Security settings > Access
codes > Phone lock).
2Enter the lock code and press OK.
3Scroll to On and press OK again.
When your phone is locked, it might be possible to place a call to the
emergency number programmed into your phone, such as 911 or any other
official emergency number. You can either dial this emergency number or
press the emergency key 9 (if you have activated the 9 key to act as an
emergency key).
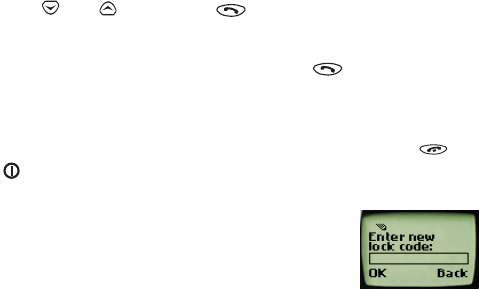
8260 User Guide version v. 0.06 [ 68 ] 4/21/00
You can also store a number in the Unlocked phone number location. This
allows you to call the number even though your phone is locked.
Store an unlocked phone number
1Press Menu 4 > 3 > 2 > 2 (Settings > Security settings > Access
codes > Unlocked phone number).
2Enter the lock code and press OK.
The Number field appears.
3Enter a phone number or press Search and scroll through the phone
book until the number you want to store appears.
4Press OK.
Call an unlocked phone number
• Press or once, then .
OR
• Manually enter the phone number and press .
Answer a call while using a lock code
• To answer a call while using a lock code, press any key except and
.
Change your lock code
1Press Menu 4 > 3 > 2 > 3 (Settings > Security
settings > Access codes > Change lock code).
The message Enter lock code appears.
2Enter the lock code and press OK.
Only numeric characters are accepted.
3Enter the new lock code and press OK.
8260 User Guide version v. 0.06 [ 69 ] 4/21/00
Security
4Verify the new lock code, and press OK.
When you change your lock code, make sure you store it in a safe place,
away from your phone. Avoid entering access codes similar to
emergency numbers to prevent accidental emergency calls.
Turn off the lock code
1Press Menu 4 > 3 > 2 > 1 (Settings > Security settings > Access
codes > Phone lock).
2Enter the lock code and press OK.
3Scroll to Off and press OK again.
With the lock code feature turned off, you can use your phone without
having to enter the lock code each time you turn your phone on.

8260 User Guide version v. 0.06 [ 70 ] 4/21/00
•Lock the keypad
When you lock the keypad, you prevent accidental key presses—for
example, when your phone is in a pocket or purse. This feature is called
keyguard.
Activate keyguard
There are three different ways to activate the
keyguard:
At the Start screen:
• Press and hold .
• Press
Menu .
• Press
Menu 9 (Keyguard).
When Keyguard is turned on, you might be able to make calls to the
emergency number that is programmed into your phone. For example, you
could dial 911 and press . When keyguard is on, however, you cannot
use the emergency key 9.
Note: Keyguard is automatically turned off when the phone is
connected to a car kit.
Deactivate keyguard
1Press Unlock.
2Press OK.
OR
• Press and hold until the message Unlock keys? appears.
• Press OK.

8260 User Guide version v. 0.06 [ 71 ] 4/21/00
Security
Answer a call while keyguard is active
During an incoming call, the keypad automatically unlocks.
• Press any key to answer the call.
After you end the call, keyguard automatically becomes active again.
• Press the Power key to quickly switch the lights on for 15 seconds.
•Restrict calls
You can restrict incoming and outgoing calls. To restrict outgoing calls,
you create a list of restrictions and apply the appropriate restriction.
Before you define restrictions for outgoing calls, only one restriction
option is available:
•Add restriction, which enables you to create your own list of outgoing
call restrictions. The maximum number of call restrictions that you can
define is ten.
After you have used the Add restriction option to add at least one
restriction, the following options are then available:
•Select: Allows you to select call restrictions from the outgoing calls
list.
•Edit: Allows you to edit an existing outgoing call restriction.
•Erase: Erases any existing outgoing call restrictions.
When calls are restricted, you might be able to make calls to the
emergency number that is programmed into your phone. For example, you
could dial 911 and press ). However, emergency key 9 might not work,
depending on the type of restriction you choose.
Restrict outgoing calls
1Press Menu 4 > 3 > 1 (Settings > Security settings > Restrict calls).
2Press Select.

8260 User Guide version v. 0.06 [ 72 ] 4/21/00
3Enter your security code and press OK.
4Scroll to Add restriction and press OK.
5Enter the number that you want to restrict and press OK.
For example: If you want to restrict all calls that begin with 1, enter 1.
This will restrict all outgoing long distance phone calls. If you want to
restrict all calls that begin with 972, enter 972, and so forth.
After you perform step 5, the Name field appears.
• If you want to add a name for the call restriction, enter the name
using your phone’s keypad and press OK.
• If you don’t want to add a name, just press OK.
Restrict incoming calls
To restrict incoming calls:
1Press Menu 4 > 3 > 1 (Settings > Security settings > Restrict calls).
2Use or to scroll to Restrict incoming calls and press Select.
3Enter your security code and press OK.
4Scroll to All calls and press Mark.
Press Unmark to remove an already-set restriction.
5Press Back. The Save changes? message appears.
6Press Yes.
Press No if you do not want to save the changes.
8260 User Guide version v. 0.06 [ 73 ] 4/21/00
Set network services features
14.Set network services
features
The following network services can be obtained from your service
provider:
•Voice privacy
• Call waiting
• Call forwarding
• Sending own number
When you subscribe to any of these services, your service provider gives
you a feature code that activates each service. Deactivation codes are
used to deactivate each service.
After you store the appropriate code in your phone, the code is sent to the
network to verify that you’re using the correct feature code. The voice
privacy feature does not require you to store a feature code before using
it.
More than one number? If your phone has more than one phone number
(or NAM) assigned to it, any stored feature codes apply only to your
primary phone number (or NAM 1).
After you store a feature code, the respective service appears as a menu
option on your phone’s screen. You can use these menus to activate and
deactivate the network services.

8260 User Guide version v. 0.06 [ 74 ] 4/21/00
•Set up how your phone selects a
system
Your phone is capable of working in residential, private, and public
systems (such as your home system). You can choose how your phone
selects a network to use.
Set up the way your phone selects a network
1Press Menu 5.
You see the following three options:
•Automatic: Your phone automatically searches for available
networks and chooses the appropriate one. Every time you turn
on your phone, it resets to Automatic.
•Manual: The phone searches for networks and then displays a
listing of all of the possible networks on your phone’s screen.
Next to each network, one of the following appears: Available: or
Not available:. If a network is designated as Not available, you
cannot use it.
•New Search: Your phone begins a new search for both private and
residential systems. When it finds the best system available, your
phone displays it on its screen. You can then select this system,
or start another search by pressing Next.
2Use or to scroll through the choices, and press OK when
you see the one you want.
If you have two phone numbers (or NAMs), the Manual and New search
features are used only with your primary phone number (NAM 1).
8260 User Guide version v. 0.06 [ 75 ] 4/21/00
Set network services features
Select a public system
When you take your phone outside its home system, the phone is said to
be "roaming." The phone can search for home-type systems—systems that
are the same type as your home system. Or, the phone can search for non-
home-type systems.
Note: The options described here may not be available for your phone.
See your service provider for information.
Your service provider programs a list of preferred systems into your phone.
These are systems with which your service provider has roaming
agreements. Your phone looks for these systems when you’re roaming.
1Press Menu 4 > 4 > 7 to tell your phone how to choose a public
system (network). Your selection remains active until you change it.
•Any system: When service is not available in your home system,
the phone searches for a preferred system of either type, then
your phone searches for a home-type system, then it searches for
a non-home-type system. The search continues until your phone
finds a system that can be used.
•Home type: When service is not available in your home system,
the phone searches for a home-type system first. However, if a
non-home-type system is found, then your phone will use this
system.
•Nonhome type: The phone searches for a non-home-type system
only; the home-type system is not used).
•Home only: The phone uses only its home system. It will not
roam.
2Scroll to the option you want and press OK.
8260 User Guide version v. 0.06 [ 76 ] 4/21/00
Switch from a private system to a public
system
1Press and hold Menu while you are not in a call.
Your phone displays the message Search public systems?
2Press OK and your phone uses the public system for the next (and
only the next) outgoing call.
After you complete this call, your phone returns to the Automatic
system selection.
•Roaming
The term roaming is used to indicate when your phone is not in its home
area. Calls made or received while you are roaming are usually more
expensive than calls made in your home area.
While roaming in some systems outside your home area, your phone may
not be recognized by the host system, which is the system in which you’re
travelling. You may not be able to place a call.
Contact your service provider for more specific information on how
roaming works with your phone and for information about coverage
limitations.
Roaming indicators
When your phone begins roaming:
• The phone beeps once and may display the word ROAM on your
phone’s screen, depending on how roaming works with your phone.
Contact your service provider for more details. If your phone is not
roaming, it either displays the word HOME or the name of your service
provider.
8260 User Guide version v. 0.06 [ 77 ] 4/21/00
Send and receive text messages
15.Send and receive text
messages
With the text message network service, you can send and receive short
text messages. You can also send and receive messages that contain a
person’s name and/or number (a "business card").
To get your messages, other phones must have text message capability. Or,
you can ask the service provider to convert the message to other formats
such as e-mail and fax.
The maximum length of a received text message is 160 characters. Your
phone has space for up to 80 text messages, depending on the length of
each message.
Note: Note: The maximum length of a text message differs, depending
on the capabilities of the network from which it originated. Also,
the text messages may appear different at different times. This
happens because messages can originate in networks other than
your own.
Contact your service provider for more information about this feature.
•Write a message
You can write a message two ways: using standard (ABC) text input or
using predictive text input.
About standard text input
Standard text input is the default mode for text entry. The ABC icon
<<ABC>> appears as visual confirmation.
1Find the key that is below the letter you want to enter.

8260 User Guide version v. 0.06 [ 78 ] 4/21/00
2Press it as many times as needed for the letter to appear on the
screen.
For example, to enter the name John:
Press J
Press O
Press H
Press N
About predictive text input
This method of text entry works differently than the way phone book
entries work. With predictive text input, you only need to press each
number key once for each letter.
For example, to write Nokia with the English dictionary selected:
(for N) (for o) (for k) (for i) (for a)
Since the displayed word changes after each key stroke, try to disregard
the word until you have keyed in all the characters.
Turn on predictive text input
1Press Menu, then Select.
2When Text messages appears, press Select.
3Scroll to Write new and press Select.
4Press Options and scroll to the dictionary you want (for example,
English).
5Press OK.
T9 dictionary activated appears. This means you can use predictive
text input to enter messages. In the text message window where you
write, the predictive text icon appears.
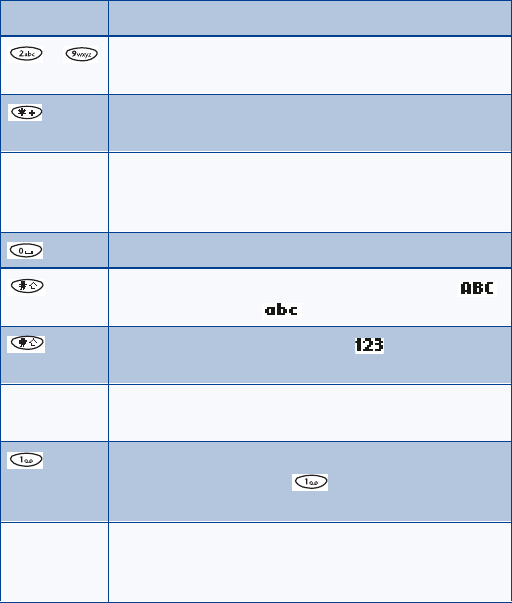
8260 User Guide version v. 0.06 [ 79 ] 4/21/00
Send and receive text messages
Keys and tools for predictive text input
Turn off predictive text input
• To switch from predictive text input to standard text input, repeat
steps 1 through 4 above
Key Purpose
- Use for word entry. Press each key only once for each
letter.
Press to view the next matching word if the underlined
word is not the word you intended.
Spell If the dictionary sees a word it doesn’t recognize, you see
Spell above the left selection key. Press Spell, enter the
word you want to enter, and press OK.
Press once to accept a word and add a space.
Press once quickly to change the character case.
indicates uppercase. indicates lowercase.
Press and hold to enter a number. indicates 123
mode. Press and hold again to write text letters.
Clear Press once to delete the character to the left of the
cursor.
Press once to add a punctuation mark. To change the
underlined symbol, press repeatedly until the
symbol you want appears.
Maximum number of characters available. The character
counter appears in the top right corner of the display
and counts down for each character added.
160
8260 User Guide version v. 0.06 [ 80 ] 4/21/00
• Scroll to Dictionary off and press OK.
Notes about predictive text input
• To insert a symbol, press and hold
. The symbol screen appears.
Select the desired symbol and press
Insert.
• When you’ve finished writing, make
sure the underlined word is the word
you intended to write.
If the word is correct
• Insert a punctuation mark, if needed.
• Press to confirm the change and enter a space.
• Start writing the next word.
If the word is not correct
• Press repeatedly until the desired word appears, then press
to confirm it.
OR
• Press Options, scroll to Matches, then press OK.
Scroll to the correct word and press Use.
• Start writing the next word.
When you enter a period to end a sentence, the phone switches to
mode so the that the first letter in the next word will be uppercase (a
capital letter).
Add a desired word to the match list
If the ? character appears after a word, the word you intended to write is
not in the dictionary. You can add the word to the dictionary.
1Press repeatedly until Spell appears in place of Options.
Symbol screen

8260 User Guide version v. 0.06 [ 81 ] 4/21/00
Send and receive text messages
2Press Spell and enter the word(s) using standard text input.
3Press OK to save the word(s).
Insert numbers
1To add a number to the message, press and hold until
appears.
2Enter the desired numbers, then press and hold to return to
ABC mode.
Insert symbols
1To put a symbol in the message, press Options and scroll to Insert
symbol.
2Select the desired symbol and press Insert.
Write compound words
1Write the first part of the word and press to accept it. Then
press Clear once to remove the space.
2Write the last part of the compound word and press to enter
the word in memory.
•Send a text message
1Press Menu 1 > 1 > 3 (Messages > Text messages > Write new).
The message screen appears.
2Enter a message of up to 160 characters.
3When you’ve finished writing, press Options, scroll to Send, then
press OK.
4Enter or recall the recipient’s phone number, then press OK.
Sending message appears
5When the message is successfully sent, Message sent appears.

8260 User Guide version v. 0.06 [ 82 ] 4/21/00
If you need to exit while writing the message, press at any time.
Later, press Menu 1 > 1 > 3 to return and finish writing the message.
If you turn off the phone without saving the message, the message will
be lost.
Save a message in the outbox
When writing a text message, it’s a good idea to save it in the outbox.
Then if there is a message delivery problem, you can easily resend the
message.
1While writing the message, press Options.
2Scroll to Save, then press OK.
Resend a message from the outbox
Messages in the outbox have one of two icons in front of them.
• The icon in front of a message heading shows that you have
attempted to send the message to the text message center.
• The icon shows that you have not yet tried to send the
message.
1Scroll to the message, then press Read.
2Press Options.
Send is selected.
3Press OK.
4Enter or find the number where you want to send the message, then
press OK.

8260 User Guide version v. 0.06 [ 83 ] 4/21/00
Send and receive text messages
•Receive a text message
When you receive a text message, the phone sounds a message alert tone
and the text message icon appears, along with one of the following
messages:
•Message received: Indicates that you have an unread message or page.
If you have more than one message or page, the appropriate number is
listed before this message.
When you receive the above message along with another message
Call, followed by a name and/or number, the Call message is a page.
Only the names of people who are stored in your phone book appear.
•New emergency message: Means that an emergency message or page
was sent by someone via the service provider. Emergency messages are
sent only in situations where life and/or property are in immediate
danger. Emergency messages are listed first and override all other
messages.
•Urgent: Means the message has a high priority.
Read a text message
1Press Read.
This takes you to the Inbox, with the new message selected.
2Press Read again to read the message.
3Press Options for a list of choices you have while reading the
message (see the list following this section).
4Press Select when the option you want is highlighted.
In your inbox, text messages are shown in the order in which they were
received, unless one is an emergency message. An emergency message
overrides any order and appears first.

8260 User Guide version v. 0.06 [ 84 ] 4/21/00
Choose options for a message
When you press Options while reading a message, the following choices
are available.
•When your phone’s memory is full
When your phone’s message memory is full, one or more messages of the
lowest priority are automatically deleted. These messages are usually
deleted from your phone’s inbox. An incoming emergency message could
force a deletion from your phone’s Saved folder.
If after deleting messages the memory is still full, your phone shows the
message No space: message waiting.
Read next Enables you to read the next message.
Erase Erases the current message.
Write
message Provides a space for you to create and send a message.
Save Saves this message to the Saved folder.
Call back Calls the person who sent you the text message, if their
phone number is included in the message.
You can also press <<talk>> while the message is
displayed to dial the number.
If more than one number is on the screen, the numbers
appear in a list. Scroll to the phone number you want to
call and press <<talk>>.
Forward Forwards the call to another person. That person must
have the appropriate message service.
Reply Provides a screen where you can write a reply.
8260 User Guide version v. 0.06 [ 85 ] 4/21/00
Send and receive text messages
• Clear the notification by pressing OK.
•Erase a message
1While reading a message, press Options.
2Scroll to Erase, then press OK.
Your phone asks you to confirm that you want to erase the message.
3Press OK.
•Reply to a message
1Press Options.
2Scroll to Reply, then press Select.
3Enter your message, then press Options.
4Scroll to Send, then press OK.
The phone displays the return number.
5Edit the number if needed, then press OK.
•Forward a message
1Press Options.
2Scroll to Forward, then press Select.
3Enter or find the recipient’s phone number, then press OK.
•Retrieve a number
You can save or dial a phone number that is included in a message.
1Press Options.
2Scroll to Get number, then press OK.
8260 User Guide version v. 0.06 [ 86 ] 4/21/00
3If more than one number is shown, scroll to the one you want, then
press OK.
The phone displays the number on the screen. You can dial it or save it as
if you had entered it yourself.
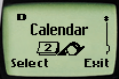
8260 User Guide version v. 0.06 [ 87 ] 4/21/00
Use your personal assistant
16.Use your personal
assistant
Your phone can be your personal assistant. It can wake you up in the
morning and remind you of meetings, birthdays, and tasks. You can check
the current time, calculate a tip at dinner, and convert currencies.
With a calendar, clock, alarm clock, and phone book, you have everything
at hand to use your phone effectively.
•Use the calendar
The calendar keeps track of birthdays, meetings,
reminders, and call you need to make. It can even sound
an alarm when it’s time for you to make a call or go to
a meeting.
Remember! Your phone must be switched on for the calendar to work. Do
not switch on the phone, however, where wireless phone use is prohibited
or where the use of the phone could cause interference or danger.
Alarm clock: You phone must remain on for you to use the calendar’s
alarm. If the phone is off, the alarm does not sound at the scheduled
time.
View the calendar
1Press Menu > 8 (Calendar).
If you haven’t already set the date, the phone prompts you to do so. To
set the date, proceed to step 2. Otherwise, proceed to step 3.
2Set the date using the mm/dd/yyyy format.
8260 User Guide version v. 0.06 [ 88 ] 4/21/00
For example: If the date is 04 May 2001, type 04052001. The numbers
you enter overwrite existing numbers.
3Press OK.
Today’s day and date appear.
Move from day to day
After you set the date, whenever you press Menu 8, your phone displays
the current date and day.
1To move forward or backward through the calendar, use <<down>>
or <<up>>.
2When you reach the date you want, press Options and scroll to
highlight the option you want.
Create a calendar note
This option enables you to create a note and associate it with one of the
following categories: Reminder, Call, Meeting, or Birthday. You can also
set an alarm for any calendar note.
1Go to the day you want, scroll to Make note, and press Select.
The list of categories appears.

8260 User Guide version v. 0.06 [ 89 ] 4/21/00
Use your personal assistant
2Scroll to the category you want and press OK.
Reminder The Subject field appears. Enter the info and press OK.
The current date appears.
• If you want to change the date for this reminder, do
so and press OK.
• If you do not want to change the date, just press OK.
The message Set alarm for the note? appears.
Press Yes or No.
If you press Yes, the Alarm date field appears.
Enter the date on which you want the alarm to sound
and press OK. The Alarm time field appears.
Enter the time at which you want the alarm to sound
using the hh:mm format and press OK. Select either am
or pm and press OK. The message Calendar note saved
appears.
If you don’t want to set an alarm, press No. The message
Calendar note saved appears.

8260 User Guide version v. 0.06 [ 90 ] 4/21/00
Call The Number field appears. You can either enter the
number and press OK, or you can press Search and scroll
through your phone book until you find the number that
you want and press OK. The Date field appears.
Enter the date on which you need to make this call and
press OK. The Time field appears.
Enter the time that you need to make this call using the
hh:mm format and press OK.
Select am or pm and press OK. The message Set alarm
for the note? appears.
Press Yes or No.
If you press Yes, the Alarm date field appears. Enter the
date on which you want the alarm to sound and press
OK.
The Alarm time field appears. Enter the time at which
you want the alarm to sound using the hh:mm format
and press OK.
Select either am or pm and press OK. The message
Calendar note saved appears.
If you don’t want to set an alarm, press No. The message
Calendar note saved appears.

8260 User Guide version v. 0.06 [ 91 ] 4/21/00
Use your personal assistant
Meeting The Subject field appears. Enter the information and
press OK. The current date appears.
If you want to change the date for this reminder, do so
and press OK. If you do not want to change the date, just
press OK. The Time field appears.
Enter the time when need to make this call using the
hh:mm format and press OK. Select am or pm and press
OK. The message Set alarm for the note? appears.
Press Yes or No. If you press Yes, the Alarm date field
appears. Enter the date on which you want the alarm to
sound and press OK. The Alarm time field appears.
Enter the time at which you want the alarm to sound
using the hh:mm format and press OK.
Select either am or pm and press OK. The message
Calendar note saved appears.
If you don’t want to set an alarm, press No. The message
Calendar note saved appears.

8260 User Guide version v. 0.06 [ 92 ] 4/21/00
View the day’s notes
You can review notes you’ve written for certain days.
3To review notes for a certain day, open the calendar and scroll to the
day you want.
4Press Options and then press View Day.
5Again press Options.
The following options are available:
Birthday The Name field appears. Enter the person’s name whose
birthday you want to be reminded of and press OK.
The Date field appears. Enter the month and day of this
person’s birthday and press OK. The Year of birth field
appears.
Enter the year using the yyyy format and press OK. The
message Set alarm for the note? appears.
Press Yes or No.
if you press Yes, the Alarm date field appears. Enter the
date on which you want the alarm to sound and press
OK. The Alarm time field appears. Enter the time at
which you want the alarm to sound using the hh:mm
format and press OK.
Select either am or pm and press OK. The message
Calendar note saved appears.
If you don’t want to set an alarm, press No. The message
Calendar note saved appears
Erase Clears a note from your calendar. An Erase note?
message appears to confirm your choice. Press OK.

8260 User Guide version v. 0.06 [ 93 ] 4/21/00
Use your personal assistant
Erase notes
This option enables you to erase notes. You can choose from the following
categories: Of chosen day, One by one, or All at once.
• After you choose a category, press Erase to delete the associated notes,
or press Back.
•If you choose All at Once, your phone deletes every note that is saved
in the calendar. When you’re asked to confirm, press Yes or No.
When a calendar alarm goes off
When an alarm goes off, you have two choices: you can either press OK
or Postpone.
• If you press OK, the alarm shuts off.
• If you press Postpone, the following message appears: Alarm will be
postponed for 10 min.
After 10 minutes, the alarm once again goes off. You can either:
• Press Postpone again OR
Edit Displays the note in the Subject field, when you’re
writing. Make the changes you want and press OK.
The date appears. Press OK again.
The Set alarm for the note? message appears. Press Yes
or No. The message Calendar note saved appears.
Move Enables you to move the note to another date. When you
press this option, the Date field appears.
Enter the date to which you want to move this note and
press OK. The message Calendar note saved appears.
Send note Sends the note to another person’s phone.
8260 User Guide version v. 0.06 [ 94 ] 4/21/00
• Press OK to stop the alarm.
Send or receive calendar notes
When someone sends you a calendar note, your phone displays Calendar
note received. You can save the note in your calendar and work with it in
the same way as any other note in your calendar, including setting an
alarm.
Send a calendar note
You can send a note to another phone user if the person has a phone that
can receive calendar notes.
1Create a new note, or scroll to the day where a note is stored.
2Press Options and scroll to Send note.
3In the Number box, enter the number to which you want to send the
note.
If the number is in your phone book, enter the name you want and
press Search to find the number.
4Press Send.
The phone sends your message.
Receive a calendar note
Caution: If you press Exit the calendar note will be deleted!
1When your phone displays Calendar note received, press Options
Show is selected.
2Press OK and scroll through the note to read it.
Save a received calendar note
1After viewing the calendar note, press Back.
2Scroll to Save, then press OK
8260 User Guide version v. 0.06 [ 95 ] 4/21/00
Use your personal assistant
Discard viewed calendar notes
After viewing the calendar note:
• Press Back, then press Back again.
•Send and receive business cards
Your phone can send or receive electronic business cards consisting of a
name and phone number. You can save received business cards in your
phone book.
Send a business card
1Find the name in your phone book.
2Press Options and scroll to Send bus. card.
3Press Select.
4Enter or recall the phone number to which you want to send the
business card, and press OK.
View a received business card
When you receive a business card, the phone displays Business card
received.
Note: If you press Exit at any time before saving the business card, the
business card will be deleted!
1When your phone displays Business card received, press Options.
2Show is selected. Press OK.
3Scroll through the available information.
Save a viewed business card
1After viewing the business card, press Back, scroll to Save, then press
OK.
8260 User Guide version v. 0.06 [ 96 ] 4/21/00
2At the Name: prompt, edit the name if you want to, then press OK.
3At the Number: prompt, edit the number if you want to, then press
OK.
Delete a viewed business card
After viewing the business card, press Back, then press Exit.
8260 User Guide version v. 0.06 [ 97 ] 4/21/00
Use your personal assistant
•Download ringing tones
You can download up to five ringing tones to replace the Personal entries
in your list of ringing tones. For details about this network service, contact
your wireless service provider.
Notification of received ringing tone
If you have this service and your phone receives a downloaded ringing
tone, your phone displays Ringing tone received.
Listen to received ringing tones
Note: If you press Exit at any time before saving the ringing tone, the
ringing tone will be deleted!
1When your phone displays Ringing tone received, press Options.
Playback is selected.
2Press OK.
The phone plays the ringing tone.
Save received ringing tones
1After listening to the ringing tone, press Back.
2Scroll to Save tone, then press OK.
3Choose which ringing tone you want to replace—either an empty
Personal placeholder, if any are remaining, or a previously
downloaded tone.
4Press OK.
The phone saves the new tone in the list of ringing tones.
Discard received ringing tones
You can discard a ringing tone if you don’t want to save it.
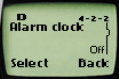
8260 User Guide version v. 0.06 [ 98 ] 4/21/00
• Press Exit.
OR
•Scroll to Discard tone, then press OK.
•Alarm clock
The alarm clock operates off your phone’s clock. You
can set the alarm clock to ring at any time, provided
your phone is turned on. The alarm clock’s volume is
determined by the current ringing volume and tone
settings.
If you have selected the Silent or Beep once ringing tone, then your alarm
clock quietly beeps once.
To set the time, see “Set and display the clock” on page 59.
Set the alarm clock
1Press Menu 4 > 2 > 2 (Settings > Phone settings > Alarm clock).
The Set alarm time message appears.
2Enter the time for which you want to set the alarm using the hh:mm
format and press OK.
Any existing numbers are replaced with the newly entered numbers.
3Select either am or pm and press OK. The Alarm on message appears.
Note: Step 3 appears only if you have selected the am/pm format.
Turn off the alarm clock when it rings
• When the alarm clock rings:
Press Stop to turn it off.
• Press Snooze to set the alarm to go off again in 10 minutes.
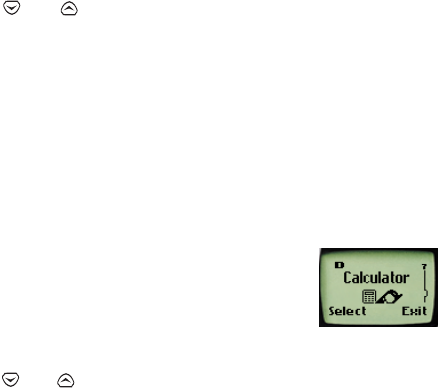
8260 User Guide version v. 0.06 [ 99 ] 4/21/00
Use your personal assistant
If you let the alarm ring for 1 minute or more without pressing a key,
it stops ringing, waits 10 minutes, and then rings again. This continues
until you press Stop.
Reminder: Your phone must be turned on for the alarm to sound.
Turn off the alarm clock altogether
If you decide that you don’t want the alarm to ever go off, you can turn
it completely off.
1Press Menu 4 > 2 > 2 (Settings > Phone settings > Alarm clock).
2Use or .to scroll to Off and press OK.
If you have selected the Silent or Meeting profile, your alarm beeps
only once. The best profile to use when using the alarm clock is Normal
or Outdoor, unless these profiles have been modified from their
original settings.
Warning: Do not switch on the phone where wireless phone use is
prohibited or where it might cause interference or danger.
•Calculator
Your phone’s calculator adds, subtracts, multiplies,
divides, and converts currencies.
Use the calculator
1Press Menu 7 (Calculator) and then press Options. A listing appears.
2Use or .to scroll to one of the following categories: Equals,
Add, Subtract, Multiply, Divide, To home, To visited, Exchange
rate, and press OK.
3Enter the first number in the calculation.
If you need to enter a number with a decimal point, press # to indicate
it.
8260 User Guide version v. 0.06 [ 100 ]4/21/00
4Then, based on the type of calculation that you need to perform, use
one of the following actions:
Instead of using the keystrokes listed in the above table, you can also
return to the list of options and choose Add, Subtract, Multiply, or
Divide and press OK. However, using the keystrokes is quicker.
5Enter the second number in the calculation and press Options.
Note: Repeat step 5 as many times as necessary. Press Clear to
erase any mistakes.
6Use or .to scroll to Equals and press OK.
Convert currency
You can use the calculator to first set the exchange rate and then to
calculate the exchange rate.
Set the exchange rate
1Press Menu 7 (Calculator), then press Options.
2Use or .to scroll to Exchange rate and press OK.
The message How many home units to a visited unit appears.
3Press OK again.
The Exchange rate field appears, with the number 1.
If you want to... then...
add press ∗ (for + symbol)
subtract press ∗∗ twice (for - symbol)
multiply press ∗∗∗ (for * symbol)
divide press ∗∗∗∗ (for / symbol)

8260 User Guide version v. 0.06 [ 101 ] 4/21/00
Use your personal assistant
4Enter the appropriate number
The number 1 is overwritten by the number you entered. To enter a
decimal point, use the # key.
5Press OK.
The Rate saved message appears.
Calculate the exchange rate
1Press Menu 7 (Calculator).
Above the Back key, the number 0 appears.
2Enter number of units comprising the exchange rate.
The number 0 is overwritten by the number you entered.
3Press Options and use or to scroll to one of the following
categories: To home or To visited.
4Press OK.
The converted currency rate appears above the Back key.
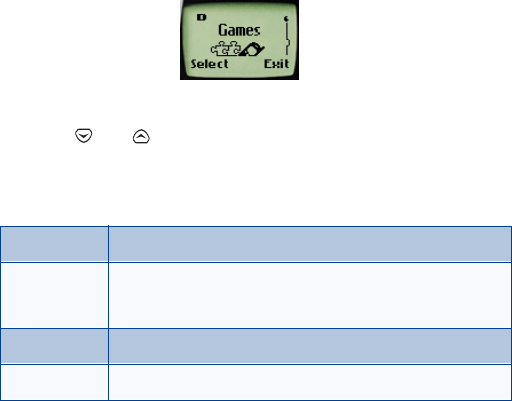
8260 User Guide version v. 0.06 [ 102 ]4/21/00
17.Games
You phone includes four exciting games that you can play whenever the
phone is turned on:
Memory
Snake
Logic
Rotation
1Press Menu 6 (Games) to display the listing of these games.
2Use or .to scroll to the game you want to play and press
Select.
A list of options appears:
3Press Select to choose an option.
•Memory
This game provides four black boxes, with pictures underneath. The object
is to find picture pairs as quickly as possible. You can choose a higher level
of play if you want to increase the number of boxes.
1Press the 5 key to reveal a picture.
New game Starts a new game.
Top score Displays the top score.
Note: This option is not available in the Logic game.
Instructions Describes how the game is played.
Level Sets the level of difficulty.
8260 User Guide version v. 0.06 [ 103 ] 4/21/00
Games
2Try to find picture pairs in as few tries as possible.
• Use the following keys to move around: 2 (up), 4 (left), 6 (right),
and 8 (down).
• Press the * key to jump over pictures that have already been
revealed or to move from the top left to the bottom right.
• Press the # key to jump to the left over already-revealed pictures
or to move from the bottom right to the top left.
Once found, pairs stay visible.
•Snake
This game places an object, which represents a piece of food, in the
middle of the screen. At the bottom of the screen is a line that represents
the snake.
1Use the following keys as cursors: 2 (up), 4 (left), 6 (right), and 8
(down).
2Move the snake toward the food and watch the snake grow.
The longer the snake’s tail grows, the higher the score. If the snake hits
its own tail or the surrounding wall, the game is over.
•Logic
This game asks you to find a secret combination of figures. At the
beginning of the game, four figures appear on the top left portion of the
phone’s screen. Underneath the far left of these figures is a blinking
bracket.
1Press the 5 key to replace the bracket with a blinking figure.
2Use the following keys as cursors: 2 (up), 4 (left), and 8 (down).
3Try to find the secret combination of figures.
8260 User Guide version v. 0.06 [ 104 ]4/21/00
To copy a figure from a previously accepted row, start scrolling with
the 4 key, move the cursor to the desired figure in the normal way, and
accept the selection with the 5 key.
4Once you think you have the right combination, press the * key.
The result is presented as a set of marks over the row. A correct figure
in the right place displays a rectangle. A correct figure in the wrong
place displays a line.
The game ends when all the figures are correct and in the right place.
•Rotation
This game asks you to put numbers in ascending order, as quickly as
possible. At the beginning of this game, you see various numbers, four of
which are surrounded by a box.
1Use the following keys as cursors: 2 (up), 4 (left), 6 (right), and 8
(down).
2Move the box up, left, right, and down.
3Within the box, use the 1 key to rotate the numbers counter-
clockwise, and use the 3 or 5 key to rotate the numbers clockwise.
The more quickly you put the numbers in order, the higher your score. The
higher the level at which you play, the more time you have to complete a
game.

8260 User Guide version v. 0.06 [ 105 ] 4/21/00
Reference information
18.Reference information
•Batteries, chargers, and
accessories
This section provides information about the phone’s batteries, accessories,
and chargers. Be aware that the information in this section is subject to
change as the batteries, chargers, and accessories change.
This phone is intended for use when supplied with power from an ACP-7U,
an ACP-8U, LCH-8, or an LCH-9. Other usage could invalidate any
approval given to this apparatus and might be dangerous.
Warning! When you purchase batteries, chargers, and
accessories for your phone, use only batteries, chargers, and
accessories that have received approval from the phone’s
manufacturer. The use of any other type of phone-related hardware will
invalidate any approval or warranty applying to the phone, and could also
be dangerous For availability of approved batteries, chargers, and
accessories, check with your dealer.
• When the battery is fully charged, the indicator will tell you that the
battery is fully charged.
• When you are not using a charger, disconnect it from the power
source. Do not leave the battery connected to a charger for more than
a week, since overcharging could shorten its lifespan. If left unused, a
fully charged battery will discharge itself over time.
Temperature extremes can affect the ability of your battery to charge.
Therefore, allow it to cool down or warm up before trying to charge it.
8260 User Guide version v. 0.06 [ 106 ]4/21/00
When the battery is running out of power and your phone only has a few
minutes of talk time remaining, a warning tone sounds and the Battery
low message appears briefly. When no more talk time is left, a warning
tone is sounded and the phone switches itself off.
Do not short-circuit the battery. Accidental short-circuiting can occur
when a metallic object, like a coin, a clip, or a pen causes a direct
connection of the + and - terminals of the battery, which are metal strips
on the back of the battery.
An example of short-circuiting could occur if you carry a spare battery in
your pocket or purse, where the battery could come into contact with
such objects like a coin. Short-circuiting could damage either the battery
or the connecting object.
Leaving the battery in hot or cold places, such as in a closed car in either
summer or winter conditions, will reduce the capacity and lifetime of the
battery. Always try to keep the battery between 15 C and 25 C (59 F and
77 F).
A phone with a hot or cold battery might not work temporarily, even if the
battery is fully charged. The performance of Li-Ion batteries is particularly
limited in temperatures below 0 C (32 F).
The following list provides a guideline that you can follow:
• When the operating time (talk time and standby time) is noticeably
shorter than normal, buy a new battery.
• Use the battery only for its intended purpose.
• Never use any charger or battery that is damaged and/or worn out.
• Batteries must be recycled or disposed of properly. Do not dispose of
batteries by putting them in fire!
• When you disconnect the power cord of any accessory, grasp and pull
the plug, not the cord.
8260 User Guide version v. 0.06 [ 107 ] 4/21/00
Reference information
•Important safety information
This section provides additional safety information. A brief overview of
safety can be found in “For your safety” on page 1.
Traffic safety
Do not use a hand-held telephone while driving a vehicle. Always park the
vehicle before using the phone.
After completing your phone conversation, always secure the phone back
into its holder; do not place the phone on the passenger seat or place it
where it can break loose in a collision or during a sudden stop.
Note: The use of an alert device to operate a vehicle’s lights or horn on
public roads is not permitted.
Remember: Safety—Your most important call.
Operating environment
Remember to follow any special regulations that are in force in any area,
and always switch off your phone wherever it is forbidden to use it.
Otherwise, the use of your phone could cause interference or danger.
When connecting the phone or any accessory to another device, read the
associated user guide first and obtain detailed safety instructions.
Note: Do not connect incompatible products.
As with other mobile radio transmitting equipment, you are advised that,
for the satisfactory operation of the equipment and for the safety of
personnel, it is recommended that the phone should only be used in the
normal operating position. This position is when the phone is held to your
ear with the antenna pointing over your shoulder.
8260 User Guide version v. 0.06 [ 108 ]4/21/00
Electronic devices
Most modern electronic equipment is shielded from radio frequency (RF)
signals. However, certain electronic equipment might not be shielded
against the RF signals from your wireless phone. The following four
subsections provide more information about this topic.
Pacemakers
Pacemaker manufacturers recommend that a minimum separation of six
inches (20 cm.) should be maintained between a handheld wireless phone
and a pacemaker to avoid potential interference with the pacemaker.
These recommendations are consistent with the independent research by
and recommendations of Wireless Technology Research. Persons with
pacemakers:
• should always keep the phone more than six inches (20 cm) from their
pacemaker when the phone is switched on
• should not carry the phone in a breast pocket
• should use the ear opposite the pacemaker to minimize the potential
for interference
Note: If you have any reason to suspect that interference is taking
place, switch off your phone immediately.
Hearing aids
Some digital wireless phones could interfere with some hearing aids. In
the event of such interference, you might want to consult your service
provider.
Other medical devices
Operation of any radio transmitting equipment, including cellular phones,
could interfere with the functionality of inadequately protected medical
devices. Consult a physician or the manufacturer of the medical device to
determine if they are adequately shielded from external RF energy. Also
contact these authorities if you have any questions.
8260 User Guide version v. 0.06 [ 109 ] 4/21/00
Reference information
Switch off your phone in health care facilities or where any posted
regulations instruct you to do so. Hospitals or health care facilities could
be using equipment that is sensitive to external RF energy.
Vehicles
RF signals could improperly affect installed or inadequately shielded
electronic systems in motor vehicles. These could include electronic fuel
injection systems, electronic anti-skid (anti-lock) braking systems,
electronic speed control systems, or air bag systems.
Check with the manufacturer or its representative regarding your vehicle.
You should also consult the manufacturer of any equipment that has been
added to your vehicle.
Posted facilities
Switch your phone off in any facility where posted notices so require.
Potentially explosive atmospheres
Switch off your phone if you are in any area that has a potentially
explosive atmosphere, and obey all signs and instructions. Sparks in such
areas could cause an explosion or fire, resulting in bodily injury or even
death.
You are advised to switch off the phone while at a refueling point (service
station). And, you are reminded of the need to observe restrictions
regarding the use of radio equipment in fuel depots (fuel storage and
distribution areas), chemical plants, or where blasting operations are in
progress.
Areas with a potentially explosive atmosphere are often—but not always—
clearly marked. These areas include the following: below deck on boats;
chemical transfer or storage facilities; vehicles using liquefied petroleum
gas (such as propane or butane); areas where the air contains chemicals
or particles, such as grain, dust or metal powders; and any other area
where you would normally be advised to turn off your vehicle engine.
8260 User Guide version v. 0.06 [ 110 ]4/21/00
Vehicles
Only qualified personnel should service the phone or install the phone in
a vehicle. Faulty installation or service could be dangerous and might
invalidate any warranty that could apply to the unit.
Regularly check that all wireless phone equipment in your vehicle is
mounted and operating properly.
Do not store or carry flammable liquids, gases or explosive materials in the
same compartment as the phone, its parts, or accessories.
For vehicles equipped with an air bag, remember that an air bag inflates
with great force. Do not place objects, including both the installed or the
portable wireless equipment, in the area over the air bag or in the air bag
deployment area. If the in-vehicle wireless equipment is improperly
installed and the air bag inflates, serious injury could result.
Switch off your phone before boarding an aircraft. The use of wireless
telephones in an aircraft may be dangerous to the operation of the
aircraft, disrupt the wireless telephone network and may be illegal.
Failure to observe these instructions could lead to the suspension or the
denial of telephone services to the offender, or it could result in legal
action, or both scenarios could apply.

8260 User Guide version v. 0.06 [ 111 ] 4/21/00
Reference information
•Emergency calls
IMPORTANT!
This phone, like any wireless phone, operates using radio signals,
wireless and landline networks, and user-programmed functions.
Because of this, connections in all conditions cannot be guaranteed.
Therefore, you should never rely solely on any wireless phone for essential
communications (e.g. medical emergencies).
Remember, to make or receive any calls, the phone must be switched on
and be used in a service area that has adequate signal strength.
Emergency calls might not be possible on all wireless phone networks or
when certain network services and/or phone features are in use. Check
with local service providers.
Always ensure that your phone is properly charged before attempting any
emergency calls. If you allow your battery to become empty, you will be
unable to receive or make calls, including emergency calls. You must then
wait a few minutes after the charging begins to place any emergency
calls.
Make an emergency call
1If the phone is not on, switch it on.
2Enter the emergency number for your present location (for example,
911 or any other official emergency number—emergency numbers
vary by location).
3Press .
If certain features are in use (Keyguard, fixed dialing, restrict calls, and so
on), you might first need to turn those features off before you can make
an emergency call. Consult this guide and your local cellular service
provider.

8260 User Guide version v. 0.06 [ 112 ]4/21/00
When making an emergency call, remember to give all of the necessary
information as accurately as possible. Remember that your wireless phone
might be the only means of communication at the scene of an accident—
do not terminate the call until given permission to do so.
Radio frequency (RF) signals
Your wireless handheld portable telephone is a low-power radio
transmitter and receiver. When it is on, it receives and sends out radio
frequency (RF) signals.
In August 1996, the Federal Communications Commission (FCC) adopted
RF exposure guidelines that included safety levels for handheld wireless
phones. Those guidelines are consistent with safety standards previously
set by both U.S. and international standards bodies:
ANSI C95.1 (1992)*, NCRP Report 86 (1986)*, ICNIRP (1996)*.
Those standards were based on comprehensive and periodic evaluations
of the relevant scientific literature. For example, over 120 scientists,
engineers, and physicians from universities, government health agencies
and industry reviewed the available body of research to develop the ANSI
Standard (C95.1).
The design of your phone complies with the FCC guidelines (and those
standards).
To maintain compliance with FCC RF exposure guidelines, use only Nokia
approved accessories. When carrying the phone while it is on, place the
phone in Nokia approved belt clip, carrying case or holster, or place the
phone in a pocket so that the keypad faces your body.
*American National Standards Institute, National Council on Radiation
Protection and Measurements; International Commission on Non-
Ionizing Radiation Protection.
8260 User Guide version v. 0.06 [ 113 ] 4/21/00
Reference information
Care and maintenance
Your phone is a product of superior design and craftsmanship and should
be treated with care. The suggestions below will help you to fulfill any
warranty obligations and allow you to enjoy this product for many years.
When using your phone, battery, charger, or any accessory:
• Keep it and all its parts and accessories out of the reach of small
children.
• Keep it dry. Precipitation, humidity, and liquids contain minerals that
will corrode electronic circuits.
• Do not use or store it in dusty, dirty areas as its moving parts can be
damaged.
• Do not store it in hot areas. High temperatures can shorten the life of
electronic devices, damage batteries, and warp or melt certain plastics.
• Do not store it in cold areas. When the phone warms up to its normal
operating temperature, moisture can form inside the phone, which
could damage the phone's electronic circuit boards.
• Do not attempt to open it. Non-expert handling of the device could
damage it.
• Do not drop, knock or shake it. Rough handling can break internal
circuit boards.
• Do not use harsh chemicals, cleaning solvents, or strong detergents to
clean it. Wipe it with a soft cloth that has been slightly dampened in
a mild soap-and-water solution.
• Do not paint it. Paint can clog the device’s moving parts and prevent
proper operation.
•If the phone, battery, charger, or any accessory is not working properly,
take it to your nearest qualified service facility. The personnel there
will assist you, and if necessary, arrange for service.

8260 User Guide version v. 0.06 [ 114 ]4/21/00
•Accessories
If you want to enhance your phone’s functionality, a range of accessories
is available for you. You can select any of these items to help
accommodate your specific communication needs. For availability of
these and other accessories, contact your service provider.
A few practical rules for accessory operation
• Keep all accessories out of reach of small children.
• When you disconnect the power cord of any accessory, grasp and pull
the plug, not the cord.
• Check regularly that any vehicle-installed accessories are mounted
and are operating properly.
• Installation of any complex car accessories must be made by qualified
personnel only.
• Use only batteries, chargers, and accessories that have been approved
by the phone manufacturer. The use of any other types could invalidate
any approval or warranty applying to the phone, and could be
dangerous.

8260 User Guide version v. 0.06 [ 115 ] 4/21/00
Reference information
•Battery
This section provides information about the phone’s battery. Be aware
that the information in this section is subject to change.
Note: This is a lithium ion (Li-Ion) battery. Dispose of used batteries in
accordance with any local regulations.
The tables shown in this section provide information about battery
options that are available for your phone, charging times with the Rapid
Travel Charger (ACP-8U), the Standard Travel Charger (ACP-7U), talk
times, and standby times. Consult your service provider for more
information.
Note: The charging times listed in the next section are approximate.
Charging times
• The times displayed above allow your battery to obtain approximately
80% of its capacity. When this happens, the battery scroll bars on your
phone’s screen stop scrolling.
• If you want to obtain 100% battery capacity, allow another 2 hours for
a “trickle” or “maintenance” charge.
Battery Option ACP-7U Charger ACP-8U Charger
BLB-3 Li-ion Battery 900 mAh 2 hrs 40 min 65 min

8260 User Guide version v. 0.06 [ 116 ]4/21/00
Standby and talk times
The above times are approximate. Battery operation times vary according
to signal conditions, network parameters that are set by the service
provider, and how you use your phone.
•Chargers and other accessories
This section provides information about the phone’s chargers and
accessories. Be aware that the information in this section is subject to
change as the chargers and accessories change.
The chargers and accessories that are described in this section are
available for your phone. Contact your dealer for details. Also, refer to the
accessories brochure that was included in your sales package for the entire
line of Nokia Original Accessories.
When a charger is not in use
• When a charger is not in use, disconnect it from the power source.
• Do not leave the battery connected to a charger for longer than a
week, since overcharging the battery could shorten its lifespan. If left
unused, a fully charged battery will discharge itself over time.
Battery
Option Digital Talk
Time Analog Talk
Time Standby Time
BLB-3 Li-ion
Battery 900
mAh
120 min to
200 min 60 min to
112 min 96 to 200 hrs (dig)
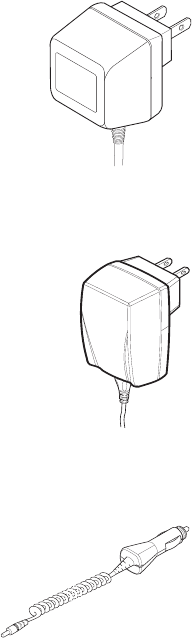
8260 User Guide version v. 0.06 [ 117 ] 4/21/00
Reference information
Standard Travel Charger
(ACP-7U)
This is a lightweight (187g) and durable AC
charger.
• To use the Standard Travel Charger, plug it into
a wall outlet and connect the lead from the
charger to the base of your phone.
Rapid Travel Charger (ACP-8)
This is a lightweight (100g) and durable AC charger.
Calls can be made during charging, even with a fully
discharged battery.
• To use the Rapid Travel Charger (ACP-8), plug it into
a standard 120V or 220V AC wall outlet, and connect
the lead from the charger to the base of your phone.
The charger can also be used together with the optional
Desktop Charging Stand. Approximate charging times
for discharged batteries are shown in “Charging times” on page 115.
Rapid Cigarette Lighter Charger (LCH-9)
You can charge your phone’s battery from
your vehicle battery by using the Rapid
Cigarette Lighter Charger (LCH-9). You can
also use this lightweight charger with the
Desktop Charging Stand.
Calls are possible during charging. A green
light indicates that the charger is ready for charging (when not charging)
or finished charging (if it has been charging). The battery charging times
are the same as those for the Rapid Travel Charger (ACP-8).

8260 User Guide version v. 0.06 [ 118 ]4/21/00
The input voltage range is from 11 to 32V DC, negative grounding. Avoid
prolonged charging with the Rapid Cigarette Lighter Charger (LCH-9)
when the car engine is not running; this could cause your car battery to
drain. Note also, that in some cars, the cigarette lighter plug is not
provided with electricity if the ignition is not switched on.
Desktop Charging Stand (DCV-11)
Used together with the Standard Travel Charger (ACP-7U) or the Rapid
Travel Charger (ACP-8U), the Desktop Charging Stand is an economical
choice when you need your phone close at hand, always ready for calls.
This charging stand allows you to charge your phone’s battery in an
upright, obtainable position on your desk.
• Charging is indicated by the scrolling battery bars that are located on
the right side of your phone’s Start screen.
• When the scrolling stops, the battery is approximately 80% charged.
The battery is fully charged a couple of hours after this time.
•Troubleshooting
This section provides a table that lists some of the most commonly-
encountered problems and provides possible solutions.
Problem Possible cause Possible solution
My phone isn’t charging. The charger and the
phone are not properly
connected.
Securely connect the
charger to the phone.
The charger is not
properly plugged in. Ensure that the
charger is plugged in
correctly.

8260 User Guide version v. 0.06 [ 119 ] 4/21/00
Reference information
My phone isn’t making/
answering calls. The battery is not
charged. Charge the battery.
The signal strength is
poor. If you are indoors,
move toward a
window.
I can’t listen to my voice
messages. You don’t have voice
mail service. Call your wireless
service provider.
I can’t listen to my voice
messages. (continued) You have not set up
your voice mailbox
with your service
provider.
Call your wireless
service provider.
You have not saved
your voice mail
number in your phone.
Refer to “Set up your
voice mailbox” on
page 31.
The voice mail number
you have saved is
incorrect.
Call your wireless
service provider.
You have forgotten
your password or are
entering it incorrectly.
Call your wireless
service provider.
Problem Possible cause Possible solution
8260 User Guide version v. 0.06 [ 120 ]4/21/00
19.Frequently Asked
Questions (FAQ)
This section lists and answers the questions that you most frequently ask.
Where necessary, the answers refer you to the appropriate text within this
guide.
Note: Some of the answers tell you to use menu shortcuts. For a
complete listing of these shortcuts, refer to “List of shortcuts” on
page 18.
Q. How do I lock my phone?
A. Press Menu 4 > 3 > 2 > 1 (Menu > Settings > Security settings >
access codes), enter your lock code, scroll to On, and press OK.
Q. How do I unlock my phone?
A. Press Menu 4 > 3 > 2 > 1 (Menu > Settings > Security settings >
access codes), enter your lock code, scroll to Off, and press OK.
Q. What is my lock code?
A. The lock code enables you to lock your phone, thus preventing
someone else from using it. The default lock code is 1234. However,
it is suggested that you change this code immediately.
Q. What is my security code?
A. The default security code is 12345. However, it is suggested that you
change this code immediately. Certain features can be used only
after the correct security code has been successfully entered.

8260 User Guide version v. 0.06 [ 121 ] 4/21/00
Frequently Asked Questions (FAQ)
Q. How do I lock the keypad?
A. There are three ways you can lock the keypad: press and hold ,
press Menu , or from the Start screen, press Menu > 9 (Menu >
Keyguard). The term Keyguard is also used in connection with this
feature.
Q. How do I unlock the keypad?
A. There are two ways you can unlock the keypad: press and hold
and then press OK, or press Unlock and OK. The term Keyguard is also
used in connection with this feature.
Q. How do I make the ringing louder?
A. Press Menu 3 > 1 > 2 > 2 (Menu > Profiles > Normal > Customize
> Ringing volume), then choose a volume level.
Q. How do I change the ringing tone?
A. Press Menu 3 (Menu > Profiles) and scroll through the list of profiles
until you find the one for which you want to set the ringing tone, then
press Options.
• Highlight Customize and press OK.
• Scroll to Ringing tones, then press Select.
• Scroll through the options. After you hear the tone you want to
use, press OK.
Q. How do I store my voice mailbox number?
A. Press Menu, enter your voice mailbox phone number, and press OK.
The screen tells you that the number is saved. Then the following
message appears: Save hidden voice mailbox password? Press Yes to
save this number.

8260 User Guide version v. 0.06 [ 122 ]4/21/00
This voice mailbox number is valid unless your phone number
changes. If your phone number changes, you will have to save a new
voice mailbox number.
Q. How do I call my voice mailbox number (retrieve voice messages)?
When your phone alerts you to new voice messages, press Listen and
follow the prompts. If you’d rather listen to your messages later, press
Exit.
To listen to your voice messages at a later time, perform one of the
following actions:
• Press and hold the 1 key.
•Press
Menu 1 > 2 > > 1 (Messages > Voice messages > Listen to
voice messages). The message Calling voice mailbox appears on
the screen. Follow the prompts to access your messages.
Q. How do I find my phone’s model number?
A. Turn your phone off, then remove the battery from the back of the
phone. On the sticker that is on the rear cover, after the word Model,
your phone’s model number is printed.
Q. How do I redial the last-dialed number.
A. Press and hold , or you can press twice, quickly.
Q. How do I assign a key to 1-touch dialing?
A. Press Names and scroll to 1-touch dialing.
Press Select.
Use or to scroll to the first number that includes the
message (empty) and press Assign.
Use or to scroll to the name/number to which you want to
assign to this key and press Select.
8260 User Guide version v. 0.06 [ 123 ] 4/21/00
Frequently Asked Questions (FAQ)
Repeat these steps as many times as necessary.
Q. How do I find out how many memory locations the phone has?
A. Press Names and scroll to Options.
Press Select.
Scroll to Memory status and press Select again. A message appears
that says Phone: xx free, xx in use where xx indicates the amount of
memory locations.
Q. How do I find my phone’s ESN (electronic serial number)?
A. Turn your phone off, then remove the battery from the back of the
phone. On the sticker that is on the rear cover, after the letters ESN,
your phone’s ESN is printed.
Q. How can I change the contrast of my phone’s display?
A. The contrast of your phone’s display is fixed and cannot be changed.
Q. How do I clear my call timers?
A. WARNING: The clearing of call timers cannot be undone.
Press Menu 2 5 5 and when the Security code field appears, enter
your security code and press OK.
8260 User Guide version v. 0.06 [ 124 ]4/21/00
20.Glossary
This section lists various terms and provides definitions.
antenna The portion of the phone that sends or receives radio
signals.
battery The power source for the phone.
call forwarding A network services feature that enables you to
forward incoming calls to another number.
call waiting A network services feature that enables your phone
to beep in while you are in the midst of a call. This
beep alerts you to the fact that someone else is
calling you.
caller ID A network services feature that identifies incoming
calls.
digital/analog
selection A network services feature that enables you to
switch your phone between digital and analog
modes. This feature is available only for certain
phones.
electronic serial
number (ESN) The identification number that is assigned to the
phone.
home system The system in which your phone works without
having to roam.

8260 User Guide version v. 0.06 [ 125 ] 4/21/00
Glossary
icons Small pictures that appear on your phone’s screen
and are representative of something.
For example, the icon indicates that you can
enter alpha text into a specific field.
keys Any key that appears on the phone. There are many
types of keys. For example, the key is a
number key; the key is a selection key.
The Power key turns the phone on and off.
keypad tones See tones.
message alert
tone See tones.
microphone The place on your phone into which you speak.
network services Special services to which your wireless service
provider can give you access. These include:
• Call forwarding
• Call waiting
•Caller ID
• Digital/analog selection
• Public system selection
• Send own number
• Selecting a phone system (NAM)
•Voice mail
•Voice privacy
page A type of text message in which either a name, or a
name and phone number, appears on the phone’s
Start screen.
8260 User Guide version v. 0.06 [ 126 ]4/21/00
public system
selection A network services feature that enables you to
switch from the default public system (home
system) your phone uses to either a private or a
residential system.
ringing tone See tones.
ringing volume The volume level at which your phone rings. You can
set this level to ring more or less loudly.
roaming Occurs when you take your phone to an area that is
outside of your home system.
scroll The act of moving through a list that is displayed on
your phone, such as a menu list or a listing of phone
numbers.
sending own
number A network services feature that enables you to
determine, on a per-call basis, whether you want
your telephone number to display on another
phone’s caller ID.
Selecting a NAM A network services feature that enables you to
associate a number with your public (home) system.
short message
service (SMS) The feature that enables the phone to receive short
text messages. Depending upon the service provider
and their network capabilities, the message can be
anywhere from 140 to 240 characters.
This phone uses both MT-SMS (mobile terminated
SMS) and MO-SMS (mobile originated SMS).
8260 User Guide version v. 0.06 [ 127 ] 4/21/00
Glossary
short message
service (more) MO-SMS mean that you can receive text messages
and reply to them. MT-SMS means that you can
receive text messages from external sources, but you
cannot reply to these messages.
Since this phone uses both types of SMS, the MO-
SMS overrides the MT-SMS. Therefore, you can reply
to messages.
Start screen The window on your phone on which information is
displayed—phone numbers, text messages, icons,
menu options, and more.
system A wireless network in which your phone works. There
are three types of systems: residential, private, and
public.
The public system is also known as a home system,
and it is in this system that your phone works. If you
take your phone outside of this system, roaming
occurs.
tones Sounds that the phone uses to indicate the sound:
• When you press a key—keypad tone
• When you receive a text message—message
alert tone
• When you receive a call—ringing tone
• When a warning condition occurs (such as when
a battery runs low) or when you’re playing a
game—warning and game tones
You can choose the way the tone sounds. For
example, you can choose a short ring, an ascending
ring, or a beep.
8260 User Guide version v. 0.06 [ 128 ]4/21/00
voice mail A network services feature that enables people who
call and miss you to leave a voice message on your
phone. You can then retrieve these messages from
your voice mailbox.
voice mailbox The area of the phone that collects and save the
voice messages left by those who call and miss you.
voice privacy A network services feature that encrypts the voice
channel so that people cannot eavesdrop on your
phone conversations.
volume The volume level you set for the earpiece. This
controls how loud the sound is in the earpiece.
You can adjust the volume (while in a call or at any
time) by pressing the volume keys on the upper left
side of the phone.
warning and
game tones See tones.

8260 User Guide version v. 0.06 [ 129 ] 4/21/00
Technical Information
21.Technical Information
Weight 96.9g (3.41 oz) with BLB-3 900
mAh Li-ion Battery
Size 85 cc
Frequency Range Lowband824.04 - 848.97 MHz
(TX)
869.04 - 893.97 MHz (RX)
Highband1850.04 - 1909.92
MHz (TX)
1930.08 - 1989.96 MHz (RX)
Transmitter Output Power Up to 600mW
Battery Voltage 3.6 V nominal
Operating Temperature -4°F to + 104°F
(-20°C to + 40°C)
Number of Channels 832 lowband
1997 highband
Number of NAMs 3
Memory Locations 250
Memory Capacity Alpha: 26 digits per location
Numeric: 32 digits per location
8260 User Guide version v. 0.06 [ 130 ]4/21/00
USA
NOKIA MOBILE PHONES – 7725 Woodland Center Boulevard, Suite 150,
Tampa, FL 33614
Tel: 1-888-NOKIA2U (1-888-665-4228)
Fax: (1) 813-249-9619
TTY:1-800-24NOKIA (1-800-246-6542)
CANADA
NOKIA PRODUCTS LTD. – 575 Westney Rd. South,
Ajax, Ontario L1S 4N7. Tel: (905) 427-6654
The information contained in this user guide was written for dual-mode
TDMA and AMPS phones. The right to make changes and improvements
to any of the products described in this guide without prior notice is
reserved.
Issue No. 1 Printed in Canada 01/00
©2000 Nokia Mobile Phones. All rights reserved.
Nokia is a trademark of Nokia Corporation and/or its affiliates.
8260 User Guide version v. 0.06 [ 131 ] 4/21/00
NOKIA One-Year Limited Warranty
22.NOKIA One-Year
Limited Warranty
Nokia Mobile Phones, Inc. (“NMP”) warrants that this cellular phone
(“Product”) is free from defects in material and workmanship that result
in Product failure during normal usage, according to the following terms
and conditions:
1. The limited warranty for the Product extends for ONE (1) year beginning
on the date of the purchase of the Product.
2. The limited warranty extends to the original purchaser of the Product
(“Consumer”) and is not assignable or transferable to any subsequent
purchaser/end-user.
3. The limited warranty extends only to Consumers who purchase the
Product in the United States.
4. During the limited warranty period, NMP will repair, or replace, at
NMP's option, any defective parts, or any parts that will not properly
operate for their intended use with new or factory rebuilt replacement
items if such repair or replacement is needed because of product
malfunction or failure during normal usage. No charge will be made to the
Consumer for any such parts. NMP will also pay for the labor charges
incurred by NMP in repairing or replacing the defective parts. The limited
warranty does not cover defects in appearance, cosmetic, decorative or
structural items, including framing, and any non-operative parts. NMP's
limit of liability under the limited warranty shall be the actual cash value
of the Product at the time the Consumer returns the Product for repair,
determined by the price paid by the Consumer for the Product less a
reasonable amount for usage. NMP shall not be liable for any other losses
or damages. These remedies are the Consumer’s exclusive remedies for
breach of warranty.
8260 User Guide version v. 0.06 [ 132 ]4/21/00
5. Upon request from NMP, the Consumer must prove the date of the
original purchase of the Product by a dated bill of sale or dated itemized
receipt.
6. The Consumer shall bear the cost of shipping the Product to NMP in
Melbourne, Florida. NMP shall bear the cost of shipping the Product back
to the Consumer after the completion of service under this limited
warranty.
7. The Consumer shall have no coverage or benefits under this limited
warranty if any of the following conditions are applicable:
a) The Product has been subject to abnormal use, abnormal conditions,
improper storage, exposure to moisture or dampness, unauthorized
modifications, unauthorized connections, unauthorized repair, misuse,
neglect, abuse, accident, alteration, improper installation, or other acts
which are not the fault of NMP, including damage caused by shipping.
b) The Product has been damaged from external causes such as collision
with an object, or from fire, flooding, sand, dirt, windstorm, lightning,
earthquake or damage from exposure to weather conditions, an Act of
God, or battery leakage, theft, blown fuse, or improper use of any
electrical source, or damage caused by the connection to other products
not recommended for interconnection by NMP.
c) NMP was not advised by the Consumer in writing of the alleged defect
or malfunction of the Product within fourteen (14) days after the
expiration of the applicable limited warranty period.
d) The Product serial number plate or the accessory data code has been
removed, defaced or altered.
e) The defect or damage was caused by the defective function of the
cellular system or by inadequate signal reception by the external antenna.
8. If a problem develops during the limited warranty period, the Consumer
shall take the following step-by-step procedure:
a) The Consumer shall return the Product to the place of purchase for
repair or replacement processing.
8260 User Guide version v. 0.06 [ 133 ] 4/21/00
NOKIA One-Year Limited Warranty
b) If “a” is not convenient because of distance (more than 50 miles) or for
other good cause, the Consumer shall ship the Product prepaid and
insured to:
Nokia Mobile Phones, Inc.
Attn: Repair Department
795 West Nasa Blvd.
Melbourne, FL. 32901
c) The Consumer shall include a return address, daytime phone number
and/or fax number, complete description of the problem, proof of
purchase and service agreement (if applicable). Expenses related to
removing the Product from an installation are not covered under this
limited warranty.
d) The Consumer will be billed for any parts or labor charges not covered
by this limited warranty. The Consumer will be responsible for any
expenses related to reinstallation of the Product.
e) NMP will repair or authorize the repair of the Product under the limited
warranty within 30 days after receipt of the Product by NMP or an NMP
authorized service center. If NMP cannot perform repair covered under
this limited warranty within 30 days, or after a reasonable number of
attempts to repair the same defect, NMP at its option, will provide a
replacement Product or refund the purchase price of the Product less a
reasonable amount for usage.
f) If the Product is returned to NMP during the limited warranty period,
but the problem with the Product is not covered under the terms and
conditions of this limited warranty, the Consumer will be notified and
given an estimate of the charges the Consumer must pay to have the
Product repaired, with all shipping charges billed to the Consumer. If the
estimate is refused, the Product will be returned freight collect. If the
Product is returned to NMP after the expiration of the limited warranty
period, NMP's normal service policies shall apply and the Consumer will
be responsible for all shipping charges.
8260 User Guide version v. 0.06 [ 134 ]4/21/00
[ 147 ]
Index
Numerics
1-touch dialing 61
A
ABC text entry 77
ABC text entry mode 22
accessories 113
accessories, operating 113
adding names and numbers 27
alarm
snoozing a calendar alarm 93
alarm clock 97
setting 97
turn off altogether 98
turning off or snoozing 97
answering a call 14
answering calls automatically 57
automatic answer 57
B
battery 114
chargers 115
charging 6
installing 5
removing 6
standby and talk times 115
battery power indicator 11, 12
business cards 95
C, D
calculator 98
calendar 87
creating a note 88
erasing notes 93
turning off alarms 93
viewing 87
calendar notes
receiving 94
sending 94
calendar notes, viewing 92
call forwarding 41
activating 42
store the feature code 41
call lists, clearing 35
call log 33
checking 33
call timer
clearing 37
turning on 37
call timers, checking 36
call waiting 39
activating 39
storing the feature code 39
using 40
caller groups
adding names 63
assigning ringing tone 64
display graphics 65
rename 64
caller groups with caller ID 63
caller ID 15
Send own number or block 46
calling cards 43
[ 148 ]
choosing 45
using 46
calls
answering 14
making 14
restricting incoming and outgo-
ing 71
chargers 115
clock
changing time format (am/pm,
24-hour) 59
display on screen 60
set 59
conference calls 40
currency conversion 99
digital/analog selection 20, 48
E, F
earpiece volume 15
emergency calls 2, 110
emergency key 9 62
end key 8
erasing stored numbers 29
exchange rate, calculating 100
G
game tones 56
games 101
logic 102
Memory 101
rotation 103
Snake 102
glossary of terms 123
H
handset volume indicator 11
handset volume marker 12
I, J
icons on the screen 11, 12, 13
in-call options 38
K
keyguard 70
keypad tones, setting 55
keypad, locking 70
keys 8, 9
Power 9
scroll 10
selection 10
keys on the phone 7
L
language, setting the phone 59
letters
ABC entry method 22
enter 22
uppercase and lowercase 23
lights, setting (car kit only) 57
listening to voice messages 32
lock code 67
M
maintenance 111
making a call 14
memory 84
[ 149 ]
memory status, checking 30
menus
navigate 17
phone book 25
scroll 17
shortcuts 17
Menus, navigating using the scroll
method 17
message alert tone 56
missed calls, checking 34
N
NAM 47
names
editing 23
network services
need to subscribe 3
setting 73
Nokia
contacting 4
Customer Service 4
World Wide Web 3
numbers
enter 24
special characters 24
O
one-touch dialing 61
P
personal assistant 87
phone
accessories 113
maintenance 111
protecting with lock code 67
reference information 104
safety guidelines 106
security 66
phone book 25
adding names and numbers 27
changing stored numbers 27
erasing entries 29
erasing whole 30
menus 25
unique entries 25
views 26
phone safety guidelines 1, 2
phone system
selecting 74
selecting (NAM) 47
selecting automatically 74
selecting different 74
selecting manually 74
selecting public 75
switching from private to public
76
Power key 9
predictive text
character counter 79
predictive text input
keys and tools 79
turning off 79
turning on 78
using 78
previously dialed calls, checking 35
profiles
customizing 52
list 51
renaming 58
[ 150 ]
selecting different 51
punctuation 23
Q
questions, frequently asked 119
R
radio frequency (RF) signals 111
received calls, checking 35
redailing automatically 43
redialing same number 15, 28
reference information 104
restoring factory settings 58
restricting incoming and outgoing
calls 71
ringing options 53
ringing tone 54
ringing tones, downloading 96
ringing volume 54
roaming 76
HOME 76
indicators 76
S
safety 1
scroll bar 11
scroll keys 9, 10
Scrolling method 17
security 66
security code 66
changing 66
preset (default) 66
service provider
contacting 4
settings
restoring factory defaults 58
shortcut
method 17
shortcuts
list 18
signal strength 11
signal strength indicator 11
special characters 23
Start screen 9
T, U
talk key 8
terms used in this guide 123
text messages
erasing 85
forwarding 85
receiving 83
resending from the outbox 82
sending 81
sending and receiving 77
writing 77
touch tones
setting 49
setting length 49
storing sequences (strings) 50
troubleshooting 117
troubleshooting (FAQs) 119
V
vibrating alert 55
voice mail 31
greetings and passwords 32
listening to messages 32
[ 151 ]
message received 31
setting up 31
voice privacy 16
W, X, Y, Z
warning tones 56
welcome note, adding 60
[ 152 ]