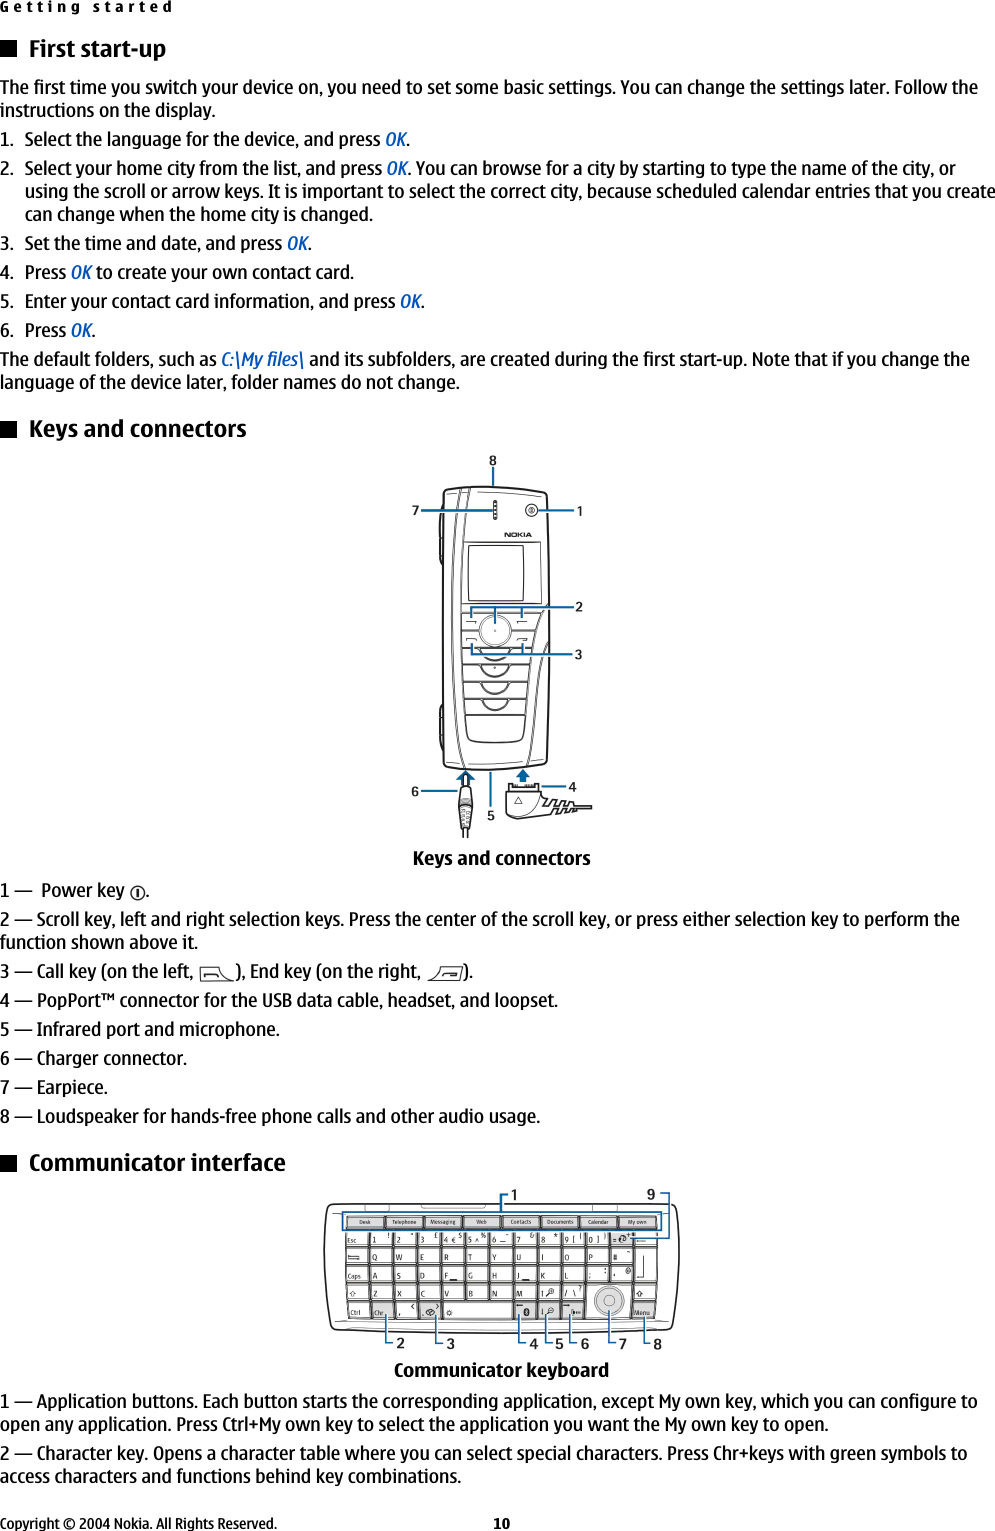
Microsoft RA-3 GSM 850/1800/1900 Communicator w/WLAN, BT User Manual User Guide

Microsoft Mobile Oy GSM 850/1800/1900 Communicator w/WLAN, BT User Guide

User Guide

Nokia 9500 Communicator User Guide9230978Issue 1
DECLARATION OF CONFORMITYWe, NOKIA CORPORATION declare under our sole responsibility that the product RA-2/RA-3 is in conformity with the provisions of the following Council Directive: 1999/5/EC. A copy of theDeclaration of Conformity can be found from www.nokia.com/phones/declaration_of_conformity/.Copyright © 2004 Nokia. All rights reserved.Reproduction, transfer, distribution or storage of part or all of the contents in this document in any form without the prior written permission of Nokia isprohibited.Copyright © 2004 Nokia. All rights reserved.Reproduction, transfer, distribution or storage of part or all of the contents in this document in any form without the prior written permission of Nokia is prohibited.Nokia, Nokia Connecting People, Xpress-on and Pop-port are trademarks or registered trademarks of Nokia Corporation. Other product and company names mentioned herein may betrademarks or tradenames of their respective owners.Nokia tune is a sound mark of Nokia Corporation.This product includes software licensed from Symbian Software Ltd (c) 1998-2004. Symbian and Symbian OS are trademarks of Symbian Ltd.This software is based in part of the work of the FreeType Team. This product is covered by one or more of the following patents: United States Patent 5,155,805, United States Patent5,325,479, United States Patent 5,159,668, United States Patent 2232861 and France Patent 90 05712.Java is a trademark of Sun Microsystems, Inc.Bluetooth is a registered trademark of Bluetooth SIG, Inc.RealPlayer, and the RealPlayer logo are trademarks or registered trademarks of RealNetworks, Inc.USE OF THIS PRODUCT IN ANY MANNER THAT COMPLIES WITH THE MPEG-4 VISUAL STANDARD IS PROHIBITED, EXCEPT FOR USE DIRECTLY RELATED TO (A) DATA OR INFORMATION (i) GENERATED BYAND OBTAINED WITHOUT CHARGE FROM A CONSUMER NOT THEREBY ENGAGED IN A BUSINESS ENTERPRISE, AND (ii) FOR PERSONAL USE ONLY; AND (B) OTHER USES SPECIFICALLY AND SEPARATELYLICENSED BY MPEG LA, L.L.C.Nokia operates a policy of continuous development. Nokia reserves the right to make changes and improvements to any of the products described in this document without prior notice.Under no circumstances shall Nokia be responsible for any loss of data or income or any special, incidental, consequential or indirect damages howsoever caused.The contents of this document are provided "as is". Except as required by applicable law, no warranties of any kind, either express or implied, including, but not limited to, the impliedwarranties of merchantability and fitness for a particular purpose, are made in relation to the accuracy, reliability or contents of this document. Nokia reserves the right to revise thisdocument or withdraw it at any time without prior noticeThe availability of particular products may vary by region. Please check with the Nokia dealer nearest to you.Export ControlsThis device may contain commodities, technology or software subject to export laws and regulations from the US and other countries. Diversion contrary to law is prohibited.FCC/INDUSTRY CANADA NOTICEYour device may cause TV or radio interference (for example, when using a telephone in close proximity to receiving equipment). The FCC or Industry Canada can require you to stop usingyour telephone if such interference cannot be eliminated. If you require assistance, contact your local service facility. This device complies with part 15 of the FCC rules. Operation is subjectto the condition that this device does not cause harmful interference.9230978/Issue 1
ContentsFor your safety.................................................................6ABOUT YOUR DEVICE....................................................................................6NETWORK SERVICES.....................................................................................6Shared memory...........................................................................................7Enhancements, batteries, and chargers..............................................71. Getting started.............................................................8Installing the SIM card, battery, and memory card.........................8Charging the battery..................................................................................9Switching the device on and off............................................................9Access codes.................................................................................................9First start-up..............................................................................................10Keys and connectors................................................................................10Communicator interface........................................................................10About the display...............................................................................11Common actions in several applications.......................................11Cover phone...............................................................................................12Display indicators..................................................................................12Keypad lock (Keyguard)......................................................................12Instructions in your device....................................................................12Using the CD-ROM.....................................................................................13Nokia support on the Web....................................................................132. Your communicator.................................................. 14Personalizing your device.....................................................................14Changing the front cover and key mat..........................................14Volume control..........................................................................................15Nokia PC Suite............................................................................................15Data mover.................................................................................................15Backup..........................................................................................................16Data transfer..............................................................................................16Synchronization........................................................................................16Installing applications and software.................................................17Installing Symbian software.............................................................17Installing Java™ applications............................................................18Java™............................................................................................................18Java MIDP.................................................................................................18Java PP......................................................................................................18Printing........................................................................................................18Setting printing options.....................................................................18Defining page setup.............................................................................19Problems with printing.......................................................................19Managing mobile printing settings................................................19Stickers in the sales package................................................................20Data connections......................................................................................20Wireless local area network (wireless LAN).................................20Packet data (general packet radio service, GPRS)......................20High-speed data calls (high-speed circuit switched data,HSCSD).......................................................................................................21GSM data calls.........................................................................................213. Cover phone...............................................................22Making a call..............................................................................................22Answering a call........................................................................................22Options during a call...............................................................................22Writing text................................................................................................22Accessing the menu functions.............................................................23Messages ....................................................................................................23Call register ................................................................................................24Contacts ......................................................................................................24Shortcuts to the contacts list............................................................24Searching for, adding, and deleting contacts..............................24Settings for the contacts.....................................................................241-touch dialing.......................................................................................25Other functions......................................................................................25Profiles ........................................................................................................25Settings .......................................................................................................254. Desk.............................................................................27Managing groups.....................................................................................27Creating new groups...............................................................................275. Telephone...................................................................28Making a call..............................................................................................28Viewing dialed, received, and missed calls......................................28Answering a call........................................................................................281-touch dialing..........................................................................................28Making a conference call........................................................................29Sending touchtones................................................................................29Setting the offline profile......................................................................29Call forwarding..........................................................................................29Call restriction............................................................................................29Call, network, and phone line settings..............................................30Call settings.............................................................................................30Advanced settings.................................................................................30Voice mailbox settings...........................................................................30Log.................................................................................................................30Viewing log details...............................................................................31Deleting log details..............................................................................316. Messaging...................................................................32Messaging center.....................................................................................32Writing and reading messages........................................................32Managing messages.............................................................................32Avoiding low memory.........................................................................33RIM BlackBerry........................................................................................33BB cshelp 2...........................................................................................33BB cshelp 3...........................................................................................33BB cshelp 4...........................................................................................33BB cshelp 5...........................................................................................33BB cshelp 6...........................................................................................33BB cshelp 7...........................................................................................33BB cshelp 8...........................................................................................33BB cshelp 9...........................................................................................33BB cshelp 10.........................................................................................33BB cshelp 11.........................................................................................33BB cshelp 12.........................................................................................33BB cshelp 13.........................................................................................33E-mail...........................................................................................................33Working online and offline................................................................33Changing the Internet connection...............................................34Writing and sending e-mail...............................................................34Sending options....................................................................................34Retrieving e-mail...................................................................................35Reading and replying to e-mail ......................................................35E-mail attachments..............................................................................35Changing e-mail replying and viewing preferences.................35E-mail account settings.......................................................................35Text messages...........................................................................................37Sending options for a text message...............................................37Replying to text messages.................................................................37Text message settings.........................................................................37Modifying message center settings................................................38Managing messages on the SIM card.............................................38Picture messages..................................................................................38Multimedia messages.............................................................................38Creating and sending multimedia messages..............................38Receiving multimedia messages.....................................................39Multimedia message account settings..........................................39Fax.................................................................................................................40Setting sending options for a fax....................................................40Saving a received fax...........................................................................40Editing fax settings...............................................................................40Receiving faxes from a remote fax box.........................................40Smart messages........................................................................................41Receiving operator logos...................................................................41Receiving ringing tones......................................................................41Receiving configuration messages.................................................41Receiving e-mail notifications..........................................................41Opening password-protected messages.......................................41Viewing bookmark messages...........................................................41Viewing configuration details..........................................................41Renaming settings................................................................................41Receiving provisioning settings.......................................................41Cell broadcast............................................................................................42
7. Web..............................................................................43Downloading files....................................................................................43Clearing the cache....................................................................................43Managing bookmarks.............................................................................44Changing browser settings...................................................................448. Contacts.......................................................................45Managing contact cards.........................................................................45Editing contact cards...............................................................................45Creating and editing contact card templates.................................46My contact card.........................................................................................46Sending contact cards.............................................................................46Sending a contact card........................................................................46Creating and editing contact groups.................................................46Managing contacts saved in the SIM card........................................47Copying and moving contacts to different databases.................47Contact card settings...............................................................................479. Documents..................................................................48Working with documents......................................................................48Formatting documents...........................................................................48Inserting and editing objects...............................................................49Viewing tables...........................................................................................49Using templates........................................................................................4910. Sheet..........................................................................50Workbooks.................................................................................................50Working with worksheets.....................................................................50Working with cells...................................................................................50Creating and modifying chart sheets................................................51List of functions........................................................................................5111. Presentations..........................................................55Viewing presentations...........................................................................55Viewing slide shows............................................................................55Showing slide shows with a data projector................................55Creating presentations...........................................................................55Inserting tables.........................................................................................56Working with different views..............................................................56Outline view............................................................................................56Notes view...............................................................................................56Slide master view..................................................................................5612. Calendar.................................................................... 57Creating calendar entries.......................................................................57Calendar icons........................................................................................57Managing calendar entries................................................................58Calendar settings......................................................................................58Calendar views..........................................................................................58Month view.............................................................................................58Week view...............................................................................................58Day view...................................................................................................59Weekly time schedule view...............................................................59Year schedule view...............................................................................59Anniversaries view...............................................................................59To-do lists view......................................................................................59Calendar files..............................................................................................5913. Instant messaging..................................................60IM cshelp 2..................................................................................................60IM cshelp 3..................................................................................................60IM cshelp 4..................................................................................................60IM cshelp 5..................................................................................................60IM cshelp 6..................................................................................................60IM cshelp 7..................................................................................................60IM cshelp 8..................................................................................................60IM cshelp 9..................................................................................................60IM cshelp 10................................................................................................60IM cshelp 11................................................................................................60IM cshelp 12................................................................................................6014. File manager............................................................ 61Managing files and folders....................................................................61Memory card security..............................................................................6115. Camera and Images...............................................63Camera.........................................................................................................63Taking a picture.....................................................................................63Recording a video clip.........................................................................63Camera settings.....................................................................................63Images.........................................................................................................64Viewing images.....................................................................................64Editing images.......................................................................................64Managing image files..........................................................................6416. Control panel...........................................................66Internet setup............................................................................................66Setting up an Internet access point................................................66Configuring advanced Internet access point settings..............66IP configuration page.......................................................................67Proxies page........................................................................................67Data call page......................................................................................67Script page...........................................................................................67Other page...........................................................................................67Setting up an Internet access point for a wireless LAN............68Configuring advanced Internet access point settings...........68EAP modules........................................................................................69Configuring Internet connection settings....................................70Selecting an Internet access point..................................................70General.........................................................................................................70Date and time.........................................................................................70Regional settings..................................................................................71Time page............................................................................................71Date page.............................................................................................71Numbers page....................................................................................71Currency page.....................................................................................71Telephone language............................................................................71My own key.............................................................................................71Display......................................................................................................71Wallpapers..............................................................................................72Enhancement settings.........................................................................72Data management...................................................................................72Application manager...........................................................................72Modifying installation settings.....................................................73Setting Java application security settings.................................73Camera folders.......................................................................................73Backup......................................................................................................73Memory.....................................................................................................73Messaging tools.....................................................................................73Telephone...................................................................................................73Profile settings.......................................................................................73Data call and fax call diverting (network service)......................74Messaging...................................................................................................74Service message....................................................................................74Connections................................................................................................74Wireless LAN...........................................................................................74Specifying wireless LAN settings..................................................75Creating a basic Internet access point for a wirelessLAN..........................................................................................................75Cable setup..............................................................................................75RealPlayer settings...............................................................................75Security........................................................................................................76Telephone security...............................................................................76Defining device lock settings.........................................................76Defining PIN code settings.............................................................76Changing the restriction password.............................................76Certificate manager..............................................................................76Managing certificates.......................................................................77Extras............................................................................................................77About product........................................................................................77Location privacy....................................................................................77Location request log............................................................................7717. Media applications.................................................78RealPlayer...................................................................................................78Playing media clips...............................................................................78Adjusting media volume....................................................................78Sending media clips.............................................................................78Music player................................................................................................79Listening to music................................................................................79Managing music tracks.......................................................................79Sending music........................................................................................79Voice rec......................................................................................................79Opening the voice recorder...............................................................79Contents
Recording a phone call or voice memo.........................................80Playing a voice recording...................................................................80Sending a voice recording..................................................................8018. Calculator..................................................................81Making calculations.................................................................................81Using the scientific calculator..............................................................81Saving numbers to memory.................................................................81Setting the number format in Calculator.........................................8119. Clock..........................................................................82Using world clock.....................................................................................82Using Alarm clock.....................................................................................82Alarms and reminders............................................................................82Cities and countries.................................................................................82Changing cities.......................................................................................82Locating cities on the world map....................................................82Creating and editing country entries.............................................82Creating and editing city entries.....................................................8320. Connectivity.............................................................84Wireless LAN...............................................................................................84Setting up an ad hoc network..........................................................84Cable connection......................................................................................84IP passthrough.......................................................................................84Bluetooth....................................................................................................85Bluetooth settings................................................................................85Sending data with Bluetooth............................................................85Receiving data with Bluetooth.........................................................85Pairing with a device...........................................................................86Ending a Bluetooth connection........................................................86Checking the status of the Bluetooth connection......................86Infrared........................................................................................................86Modem.........................................................................................................86Remote configuration (network service).........................................87Creating a new configuration server profile................................8721. Shortcuts..................................................................88General shortcuts.....................................................................................88Application-specific shortcuts..............................................................8822. Data transmission..................................................94Noise.............................................................................................................94Roaming......................................................................................................94Electrostatic discharge............................................................................94Dead spots and dropouts.......................................................................94Signal impairment...................................................................................94Low signal strength.................................................................................9423. Nokia orginal enhancements...............................95Battery..........................................................................................................95Wireless Headset HDW-2........................................................................95Wireless Clip-on Headset HS-3W.........................................................95Boom Headset HDB-4..............................................................................96Nokia Image Viewer SU-2......................................................................96Nokia Digital Pen SU-1B.........................................................................96Battery information......................................................97CARE AND MAINTENANCE...............................................98Additional safety information....................................99Operating environment.........................................................................99Medical devices.........................................................................................99Pacemakers.............................................................................................99Hearing aids............................................................................................99Vehicles........................................................................................................99Potentially explosive environments..................................................99Operating environment.........................................................................99Emergency calls......................................................................................100Certification Information (SAR) ........................................................100THIS DEVICE MEETS THE GOVERNMENT'S REQUIREMENTS FOREXPOSURE TO RADIO WAVES.............................................................100Technical information................................................101Nokia One-Year Limited Warranty..........................102Appendices .................................................................. 105Appendix A Message from the CTIA ................................................105(Cellular Telecommunications & Internet Association) to allusers of mobile phones....................................................................105A Guide to Safe and Responsible Wireless Phone Use........105Appendix B Message from the FDA...................................................105Message from the FDA.......................................................................105Index..............................................................................108Contents
For your safetyRead these simple guidelines. Not following them may be dangerous or illegal. Read the complete user guide for further information.SWITCH ON SAFELYDo not switch the device on when wireless phone use is prohibited or when it may cause interference or danger.ROAD SAFETY COMES FIRSTObey all local laws. Always keep your hands free to operate the vehicle while driving. Your first consideration while driving shouldbe road safety.INTERFERENCEAll wireless devices may be susceptible to interference, which could affect performance.SWITCH OFF IN HOSPITALSFollow any restrictions. Switch the device off near medical equipment.SWITCH OFF IN AIRCRAFTFollow any restrictions. Wireless devices can cause interference in aircraft.SWITCH OFF WHEN REFUELLINGDon't use the device at a refuelling point. Don't use near fuel or chemicals.SWITCH OFF NEAR BLASTINGFollow any restrictions. Don't use the device where blasting is in progress.USE SENSIBLYUse only in the normal position as explained in the product documentation. Don't touch the antenna unnecessarily.QUALIFIED SERVICEOnly qualified personnel may install or repair this product.ENHANCEMENTS AND BATTERIESUse only approved enhancements and batteries. Do not connect incompatible products.WATER-RESISTANCEYour device is not water-resistant. Keep it dry.BACK-UP COPIESRemember to make back-up copies or keep a written record of all important information.CONNECTING TO OTHER DEVICESWhen connecting to any other device, read its user guide for detailed safety instructions. Do not connect incompatible products.EMERGENCY CALLSEnsure the phone function of the device is switched on and in service. Press  as many times as needed to clear the display andreturn to the start screen. Key in the emergency number, then press  . Give your location. Do not end the call until givenpermission to do so.ABOUT YOUR DEVICEThe wireless device described in this guide is approved for use on the GSM 850/1800/1900 network. Contact your service provider for moreinformation about networks.When using the features in this device, obey all laws and respect privacy and legitimate rights of others.Warning:  Do not switch the device on when wireless device use may cause interference or danger.NETWORK SERVICESTo use the phone you must have service from a wireless service provider. Many of the features in this device depend on features in thewireless network to function. These Network Services may not be available on all networks or you may have to make specific arrangementswith your service provider before you can utilize Network Services. Your service provider may need to give you additional instructions forCopyright © 2004 Nokia. All Rights Reserved. 6
their use and explain what charges will apply. Some networks may have limitations that affect how you can use Network Services. Forinstance, some networks may not support all language-dependent characters and services.Your service provider may have requested that certain features be disabled or not activated in your device. If so, they will not appear on yourdevice menu. Contact your service provider for more information.This device supports WAP 2.0 protocols (HTTP and SSL) that run on TCP/IP protocols. Some features of this device, such as multimediamessages and Web browser require network support for these technologies.Shared memoryThe following features in this device may share memory: contacts, text messages, multimedia messages, ringing tones, audio files, calendarand to-do notes, files saved from any application (for example, office documents, images, audio files, and video clips), and downloadedapplications. Use of one or more of these features may reduce the memory available for the remaining features sharing memory. Forexample, saving many images may use all of the available memory. Your device may display a message that the memory is full when you tryto use a shared memory feature. In this case, delete some of the information or entries stored in the shared memory features beforecontinuing.Enhancements, batteries, and chargersCheck the model number of any charger before use with this device. This device is intended for use when supplied with power from ACP-12,AC-1, and LCH-12.Warning:  Use only batteries, chargers, and enhancements approved by Nokia for use with this particular model. The use of anyother types may invalidate any approval or warranty, and may be dangerous.For availability of approved enhancements, please check with your dealer. When you disconnect the power cord of any enhancement, graspand pull the plug, not the cord.Your device and its enhancements may contain small parts. Keep them out of reach of small children.For your safetyCopyright © 2004 Nokia. All Rights Reserved. 7
1. Getting startedThe Nokia 9500 Communicator offers you various business applications, such as e-mail, office tools, and Web browsing, andflexible and fast network connections with integrated wireless LAN and EGPRS (EDGE).Installing the SIM card, battery, and memory cardKeep all SIM cards out of the reach of small children. For availability and information on using SIM card services, contact yourSIM card vendor. This may be the service provider, network operator, or other vendor.Use only compatible Multimedia cards (MMC) with this device. Other memory cards, such as Secure Digital (SD) cards, do notfit in the MMC card slot and are not compatible with this device. Using an incompatible memory card may damage thememory card as well as the device, and data stored on the incompatible card may be corrupted.1. Always switch the device off and disconnect the charger before removing the battery.With the back of the device facing you, press the back cover release button (1), and slide the cover in the direction of thearrows.2. Insert the SIM card into the SIM card slot (1). Make sure that the beveled corner of the SIM card is pointing towards thecamera lens and the contact area on the card is facing downwards.Slide the memory card into the memory card slot (2). Make sure that the beveled corner of the memory card is pointingtowards the SIM card slot and the contact area is facing downwards. Note that the back cover must be in place so that thedevice recognizes the memory card.3. Insert the battery. Align the contacts of the battery with the corresponding connectors on the battery compartment.4. Insert the locking catches of the back cover into the corresponding slots, and slide the cover into place.Copyright © 2004 Nokia. All Rights Reserved. 8
Charging the battery1. Connect the charger to an AC wall outlet.2. Connect the power cord to the bottom of the device. See Figure Keys and connectors on page 10. The battery indicatorbar starts scrolling. If the battery is totally discharged, it may take a few minutes before the charging indicator is shown.The device can be used while charging.3. When the battery is fully charged, the bar stops scrolling. Disconnect the charger from the device and then from the ACoutlet.Switching the device on and off• To switch the device on, press and hold the power key. The communicator can be used without the phonefunctions when a SIM card is not inserted or when the Offline profile is selected.• If the device asks for a PIN or security code, enter the code, and press OK.• To switch the device off, press and hold the power key.Tip: When you switch the phone on, it recognizes the SIM card provider and configures the correct text message,multimedia message, and GPRS settings automatically.Tip: If you have removed the battery and inserted it back rapidly, you may need to press the power key before thedevice starts up.Your device has two internal antennas.Note:  As with any other radio transmitting device, do not touch either of the antennas unnecessarily when thedevice is switched on. Contact with the antenna affects call quality and may cause the device to operate at a higherpower level than otherwise needed. Not touching the antenna area during a phone call optimises the antennaperformance and the talktime of your device.Normal position: Hold the device with the antenna pointed up and over your shoulder.Access codesThe device uses several access codes to protect against unauthorized use of the device and the SIM card.You need the following access codes:• PIN and PIN2 code—The PIN (Personal Identification Number) code protects your SIM card against unauthorized use andis usually supplied with the SIM card. The PIN2 code may be supplied with some SIM cards, and is required to access somefunctions, such as fixed dialing.After three consecutive incorrect PIN code entries, the PIN code is blocked, and you must unblock it with a PUK (PersonalUnblocking Key) code before you can use the SIM card again. The PIN2 code may be supplied with some SIM cards, and isrequired to access some functions, such as fixed dialling number. If the codes are not supplied with the SIM card, contactthe service provider for your SIM card.• Lock code—The lock code protects your device against unauthorized use. The default lock code is 12345. Change thecode, and keep the new code in a safe place, separate from your device.• PUK and PUK2 codes—The PUK (Personal Unblocking Key) code is required to change a blocked PIN code. The PUK2 codeis required to change a blocked PIN2 code. If the codes are not supplied with the SIM card, contact the service provider foryour SIM card.•Restriction password—The restriction password is needed when using the Call restriction service. See Changing therestriction password on page 76.Some applications of the device use passwords and user names to protect against unauthorized use of the Internet and itsservices. These passwords are changed in the settings of the applications.Getting startedCopyright © 2004 Nokia. All Rights Reserved. 9
First start-upThe first time you switch your device on, you need to set some basic settings. You can change the settings later. Follow theinstructions on the display.1. Select the language for the device, and press OK.2. Select your home city from the list, and press OK. You can browse for a city by starting to type the name of the city, orusing the scroll or arrow keys. It is important to select the correct city, because scheduled calendar entries that you createcan change when the home city is changed.3. Set the time and date, and press OK.4. Press OK to create your own contact card.5. Enter your contact card information, and press OK.6. Press OK.The default folders, such as C:\My files\ and its subfolders, are created during the first start-up. Note that if you change thelanguage of the device later, folder names do not change.Keys and connectorsKeys and connectors1— Power key  .2—Scroll key, left and right selection keys. Press the center of the scroll key, or press either selection key to perform thefunction shown above it.3—Call key (on the left,  ), End key (on the right,  ).4—PopPort™ connector for the USB data cable, headset, and loopset.5—Infrared port and microphone.6—Charger connector.7—Earpiece.8—Loudspeaker for hands-free phone calls and other audio usage.Communicator interfaceCommunicator keyboard1—Application buttons. Each button starts the corresponding application, except My own key, which you can configure toopen any application. Press Ctrl+My own key to select the application you want the My own key to open.2—Character key. Opens a character table where you can select special characters. Press Chr+keys with green symbols toaccess characters and functions behind key combinations.Getting startedCopyright © 2004 Nokia. All Rights Reserved. 10
3—Help key. To get support using your device, press Chr+ .4—Bluetooth key. To activate Bluetooth, press the Chr+ .5—The Zoom keys. Pressing Chr+zoom keys makes the fonts and some icons larger or smaller.6—Infrared key. To activate infrared, press Chr+ .7—Scroll key. Press the scroll key left, right, up, or down to scroll through different lists. Press the center of the scroll key toselect or to perform the function of an underlined command button.8—Menu key. Press the Menu key to open the menu or in multipage dialogs to move from one page to another.9—Sync key. Establish a connection, and press Chr+  to synchronize your device with a compatible PC.Tip: You can use the arrow keys or the scroll key to move on the menus and the display, for example in the Webapplication.. The left arrow key is on the Bluetooth key (4), the up and down arrow keys on the zoom keys (5), andthe right arrow key on the infrared key (6).Tip: Press Esc to cancel selections and close dialogs and applications.Tip: Press the backspace key to delete items such as calendar entries and messages.The communicator display turns on when you open the cover. The application that was active the last time the device wasused is shown on the display. When you close the cover, the communicator display turns off.Desk main view1—Menu. Press the Menu key to open the menu. You can use the scroll key or the arrow keys to move in the menu, andpress the enter key to select a menu option.2—Folder. You can group applications, shortcuts, and notes to different folders. See Creating new groups on page 27.3—Scroll bar. For example, if you have a long file in Documents, the scroll bar helps you estimate where you are in the file,and how much of the file you can see. The longer the scroll bar, the more you can see of the file.4—Command buttons. The commands on the right side of the display correspond to the command buttons. Note that whena command is dimmed, it cannot be used.5—Application. To open an application from Desk, select the application, and press Open or the enter key.6—Indicator area. The indicator area shows application and system-related information.Multipage dialog1—Dialog pages. You can move from one page to another by pressing the menu key.2—Selection list. You can view different options in a selection list, and select one of them.3—Command buttons. You can use the command buttons to perform functions on a dialog page, or in a selection list.If there is more than one frame on the display, the selected frame is always highlighted. You can move between the framesby pressing the tab key.Tip: Press Chr+the tab key to switch between open applications. Press Chr+the tab key again to move in the list.About the displayA small number of missing, discolored, or bright dots may appear on the screen. This is a characteristic of this type of display.Some displays may contain pixels or dots that remain on or off. This is normal, not a fault.Common actions in several applicationsYou can find the following actions in several applications:• To switch between open applications, press Menu, select  , and select the application.Getting startedCopyright © 2004 Nokia. All Rights Reserved. 11
• To change the profile, press Menu, select  , and scroll to the profile you want. To modify the profile settings, such as theringing tones, select the profile and press Edit.• To activate a profile for a certain time, press Menu, select  , and select the desired profile. Press Timed, and set the time(up to 24 hours) when you want the profile setting to end. When the end time is reached, the previous profile, which wasnot timed, becomes active.• To save a file, press Menu, and select File → Save. There are different save options depending on the application you use.• To send a file, press Menu, and select File → Send. You can send a file as an e-mail, fax, short message, or multimediamessage; or send them using infrared or Bluetooth.• To add a shortcut, press Menu, and select File → Add to Desk. Scroll to the group to which you want to add the shortcut,and press Select. After you have selected the group, press OK. For example, you can add shortcuts to files or Web pages.• To print to a compatible printer, press Menu, and select File → Printing. You can preview items that you want to print, oredit the way printed pages look.• To cut, copy, and paste, press Menu, and select Edit, and Cut, Copy, and Paste.• To delete a file, press Menu, and select Edit → Delete.• To zoom in or out, press Menu, and select View → Zoom and the zoom type you want.• To insert special characters to text, press the Chr key.Cover phone• To view the most recently dialed numbers, press  . Scroll to a number or name, and press   again to call thenumber.• To call your voice mailbox (network service), press and hold  .• To view received text messages, press the scroll key right.• To open the contacts list, press the scroll key down.• To activate the camera, press the scroll key up.• To write and send text messages, press the scroll key left.• To change the profile, press the power key briefly, and scroll to the profile you want. Press Select to activate the profile.• To switch between two phone lines (network service), press and hold  .Display indicatorsThe signal strength of the cellular network at your current location. The higher the bar, the stronger the signal.The battery charge level. The higher the bar, the stronger the charge in the battery.You have received a message.You have locked the cover phone keypad.You have selected the silent profile, and the device does not ring for an incoming call or text message.You have an active infrared connection. If the indicator blinks, your device is trying to connect to the other device, or theconnection has been lost.You have selected all your calls to be forwarded to another number. and  Indicates the phone line that you have selected in the Settings → Call settings → Line for outgoing calls menu, ifyou have subscribed to two phone lines (network service).The timed profile is active. You can modify the profile settings, such as the ringing tones, in Control panel. See Profilesettings on page 73.You have missed a phone call.Keypad lock (Keyguard)When the keyguard is on, calls still may be possible to the official emergency number programmed into your device. Key inthe emergency number and press .Use the keypad lock (keyguard) to prevent the keys on the cover phone from being accidentally pressed.• To lock the keypad, press the center of the scroll key and  .• To unlock the keypad, press the center of the scroll key and  .• To lock the system, press the center of the scroll key and  . Note that you have to define a lock code with which youcan lock and unlock the system.Instructions in your device• To view instructions on the applications in your device, press Chr+ . The device help contains detailed instructions,which you conveniently carry with you all the time.Getting startedCopyright © 2004 Nokia. All Rights Reserved. 12
Using the CD-ROMThe sales package CD-ROM is compatible with Windows 98SE, Windows ME, Windows 2000, and Windows XP. The CD-ROMshould launch itself after you have inserted it into the CD-ROM drive of a compatible PC. If not, open Windows Explorer, right-click the CD-ROM drive where you inserted the CD-ROM, and select AutoPlay.You can find the extended User Guide for Nokia 9500 Communicator and some additional guides in the CD-ROM.You can also install the Nokia PC Suite and read the User's Guide for Nokia PC Suite from the CD-ROM. Note that Nokia PC Suitecan be used only with Windows 2000 and Windows XP.Nokia support on the WebCheck www.nokia.com or your local Nokia Web site for the latest version of this guide, additional information, downloads,and services related to your Nokia product.Getting startedCopyright © 2004 Nokia. All Rights Reserved. 13
2. Your communicatorPersonalizing your device• Covers - You can change the front covers of your device.• Cover selection keys - You can change the functions that are shown above the left and right selection keys.• Desk - You can organize the applications, shortcuts, and notes to folders, and create new folders on Desk.• My own key - You can configure the My own key to open your favorite application.• Background images - you can set a background image to your cover display and communicator display. See Wallpapers onpage 72. There are several wallpapers ready to use, and you can also use your own pictures as background images.• Color palette - You can change the color palette of your device.The left selection key in standby mode is Go to. You can use the key as a shortcut to your favorite functions.To activate a function, scroll to it, and press Select.• To add a function to the shortcut list, press Options, select Select options, scroll to a function, and pressMark. To remove a function from the list, select the function, and press Unmark.• To rearrange the functions in the list, press Options, and select Organize. Scroll to the function that you want to move,press Move, and select where you want to move the function.Changing the front cover and key matNote:  Before removing the cover, always switch off the power and disconnect the charger and any other device.Avoid touching electronic components while changing the covers. Always store and use the device with the coversattached.1. Press the front cover release button (1), and lift the front cover (2) in the direction of the arrow. Start at the bottom partof the device, and end by releasing the locking catches at the top of the device.2. Remove the key mat. A small nib (1) holds the key mat in place.3. Lift the front cover in the direction of the arrow.4. To replace the key mat, align it with the nib, and press it into place.5. To replace the front cover, align the locking catches with the top of the device at a low angle, and press the front coverdown until it locks into place.Copyright © 2004 Nokia. All Rights Reserved. 14
Volume controlWarning:  Do not hold the device near your ear when the loudspeaker is in use, because the volume may beextremely loud.• To adjust the volume level during a call, press the scroll key left or right.• To adjust the volume level when using the loudspeaker, open Telephone, and press the scroll key left or right.Nokia PC SuiteNokia PC Suite offers you a set of programs for managing your Nokia 9500 Communicator. For example, you can synchronizeyour contacts and calendar information, e-mail, and to-do items between the device and a compatible PC using Nokia PCSync, manage device folders using Nokia Phone Browser, back up and restore personal data using Nokia Content Copier, andinstall applications using Nokia Application Installer.For additional instructions on how to install and use the PC Suite, see the User's Guide for Nokia PC Suite on CD-ROM, or helpsin the Nokia PC Suite applications.To use Nokia PC Suite, you need to connect your device to a compatible PC using the DKU-2 (USB) cable, Bluetooth, orinfrared. See Connectivity on page 84.Install Nokia PC Suite from CD-ROM or from www.nokia.com. Note that Nokia PC Suite can only be used with Windows 2000and Windows XP.• If you want to use cable, connect the cable to a compatible PC, and then to the device.• If you want to use Bluetooth, pair the device and a compatible PC, and set the PC as authorized. See Pairing with a deviceon page 86.• If you want to use infrared, activate infrared on your device. See Infrared on page 86. Activate infrared on the compatiblePC, if necessary.You need to install DKU-2 (USB) drivers for cable connection, and you may need to install or update Bluetooth or infrareddrivers if you want to use the device as a modem. See the sales package CD-ROM,www.nokia.com and the User's Guide forNokia PC Suite for details.Data moverYou can use Data mover to transfer certain data, such as contacts and settings, from your Nokia 9200 series Communicator toyour Nokia 9500 Communicator with infrared or a memory card. Before you start, make sure that there is enough freememory in your communicators or memory card for the transfer. Note that if there is less than 2 MB of free memory in theNokia 9500 Communicator, you cannot start the transfer.Do not use the Nokia 9500 Communicator when using Data mover. If possible, switch off the cover phone. Make sure youhave enough battery power, or connect the device to a charger..Note that there may be additional steps, depending on the type of information that you want to transfer, the method oftransfer you want to use, the amount of free memory on your previous communicator or memory card, or the number ofsuccessful or unsuccessful transfers you have made previously.1. Go to Desk → Data mover. If there is data on a memory card, insert it to your Nokia 9200 series Communicator. PressContinue.2. Activate infrared in both devices, and press Connect. An infrared connection is established between the devices.3. Press Send data collector to send the data collector tool to your Nokia 9200 series Communicator. The tool startsautomatically after installation. If you have already installed the tool , press Connect data collector.Your communicatorCopyright © 2004 Nokia. All Rights Reserved. 15
4. In the Nokia 9500 Communicator, select the data you want to transfer from your Nokia 9200 series Communicator. Youcan transfer calendar and contact information, messages, settings, documents, and images.5. Press Transfer via IR or Transfer via memory card, depending on the method of transfer you want to use.6. Press Start transfer.7. Press OK after the transfer to finish.8. Press Exit to exit, or Convert memory card to convert a memory card for use in your Nokia 9500 Communicator.Note that the transfer may take some time.BackupYou can back up messages, and calendar and contact information to a memory card.Go to Desk → Tools → Backup.Before you start backing up or restoring data:• Close all other applications.• If possible, switch off the cover phone.• Make sure you have enough battery power.• To back up data to a memory card, press New backup. Enter a name for the backup, and select whether you want toperform a full or partial backup. Full backup copies all calendar and contact information, and messages. If you selectPartial backup, specify which items you want to include in the backup. Press Start backup.Tip:  You can also back up data in the File manager and Control panel applications.• To restore backup data from the memory card, select a backup, and press Restore. Select whether you want to restore allbackup data or selected items only. If you select Partial backup, specify which items you want to restore. Press Start restore.Data transferIf you have a Nokia 9500 Communicator and another device that supports data transfer, you can use Data transfer tosynchronize your calendar and contacts entries between the two devices.For information on compatible devices, contact your dealer, operator, or service provider.Go to Desk → Tools → Data transfer.1. Press New to create a new synchronization profile.2. Select the content you want to synchronize, and press Next.3. Select the connection type, and press Select. If you select infrared as the connection type, the synchronization is startedimmediately.4. If you selected Bluetooth as the connection type, press Search to search for the device you want to synchronize with. Tostop the search, press Stop.5. Scroll to the device you want to synchronize with, and press Select. The synchronization is started.• To view the synchronization log, press Menu, and select File → Synchronization log.SynchronizationThe Synchronization application enables you to synchronize your calendar or contacts with various calendar and addressbook applications on a compatible computer or remote Internet server. Your settings (what data is synchronized, whatconnection method is used) are saved to a synchronization profile, which is then used while synchronizing.The application uses SyncML technology for remote synchronization. For information on SyncML compatibility, contact thesupplier of the applications with which you want to synchronize your device.Go to Desk → Tools → Synchronization.Synchronizing calendar and contacts information1. Connect your device to a compatible PC. You can use infrared, Bluetooth, or a cable connection. See Connectivity on page84.2. Press Synchronize. If you selected Bluetooth, the device searches for available devices for synchronization. Press Stop toend the search, and Select to select a device with which you want to synchronize.3. Follow the instructions on the display.There is an existing profile for Nokia PC Suite, and the basic setup is done with Nokia PC Suite. You need to edit thesepredefined settings only if the settings have been changed.You may also receive the synchronization settings as a smart message from your service provider.Your communicatorCopyright © 2004 Nokia. All Rights Reserved. 16
Creating a new profile1. Press New. A profile creation wizard opens, helping you to define the correct settings. If a profile already exists, pressMenu, and select File → New.2. Define the following options:•Profile name—Enter a descriptive name for the profile.•Connection type—Select Bluetooth, Infrared, or Data cable to synchronize with a computer, or Internet to synchronizewith a server on the Internet.•Access point—If you selected Internet as the connection type, select an Internet access point.•Host address—If you selected Internet as the connection type, enter the address of the synchronization server.•Port—If you selected Internet as the connection type, enter the port number for the synchronization server.•User name—Enter your user ID for the synchronization server.•Password—Enter your password for the synchronization server.•Confirm password—Repeat the password for the synchronization server.3. Select contacts, calendar entries, or e-mail to synchronize.4. Enter the paths to the databases on your device and on the remote server, and select the Synchronization type. SelectNormal to synchronize information from the device to the remote server and back, One-way to telephone to synchronizeinformation from the remote server to the device, or One-way from telephone to synchronize information from the deviceto the remote server.5. Select whether you want to use the profile you created as a default synchronization profile.If you want to return to the default settings for PC Suite, press Menu, and select Tools → Reset PC Suite profile.• To edit an existing profile, select the profile, and press Edit.• To set one of the existing synchronization profiles as the default profile, select the profile, press Menu, and select File → Tools → Set as default.• To synchronize all database contents between the device and the server, press Menu, and select File → Sync → Slow sync.Note that this ignores the synchronization type set for a profile.• To delete a profile, select the profile, and press the backspace key.• To delete the database from the device, and replace it with the database on the server, press Menu, and select File → Sync → Replace telephone data.• To delete the database from the server, and replace it with the database on the device, press Menu, and select File → Sync → Replace server data.After you have synchronized your device with a compatible computer, you can view a synchronization log.• To open the synchronization log, select a profile, and press Log. The log shows, for example, the date and time of thesynchronization, and lists possible synchronization errors.For additional information on synchronizing, see the User's Guide for Nokia PC Suite or the help for Nokia PC Sync.Installing applications and softwareImportant:  Only install applications from sources that offer adequate protection against harmful software.You can install two types of applications and software to your device:• Applications and software specifically intended for the Nokia 9500 Communicator or compatible with the Symbianoperating system. These software installation files have the extension .SIS.• J2ME™ compatible with the Symbian operating system. The Java™ application installation files have the extensions .JADor .JAR.Installation files may be transferred to your device from a compatible computer, downloaded during browsing, or sent toyou in a multimedia message, as an e-mail attachment, or with Bluetooth. If you use PC Suite for Nokia 9500 Communicatorto transfer a file, save the file in the C:\nokia\installs folder in your device. If you use Microsoft Windows Explorer to transfer afile, save the file on a memory card (local disk).During installation, the device checks the integrity of the package to be installed. The device shows information about thechecks being carried out, and you are given options to continue or cancel the installation.See Certificate manager on page 76.Installing Symbian softwareWhen you install an update or repair to an application, you must have the original or a full backup to restore the application.To restore the original application, remove the application, and install it again from the original installation file or thebackup copy.Your communicatorCopyright © 2004 Nokia. All Rights Reserved. 17
• To install software, search the device memory or memory card for the installation file, select the file, and press the enterkey to start the installation. For example, if you received the installation file as an e-mail attachment, go to your mailbox,open the e-mail, select an installation file, and press the enter key to start the installation.Use the Application manager to remove software. See Application manager on page 72.Installing Java™ applications1. Search the device memory or memory card for the installation file, select the file, and press the enter key to start theinstallation. For example, if you received the installation file as an e-mail attachment, go to your mailbox, open the e-mail, select an installation file, and press the enter key to start the installation.2. Confirm the installation. The .JAR file extension is required for installation. If it is missing, the device may ask you todownload it. If there is no access point defined, you will be asked to select one. When you download the .JAR file, you mayneed to enter a user name and password to access the server. You can obtain these from the application provider.3. The device informs you when installation is complete.Tip: When browsing Web pages, you can download an installation file and install it immediately. Note, however,that the connection runs in the background during installation.Java™You can install and run Java™ applications on your device. See Installing applications and software on page 17.The Java platform for the Nokia 9500 Communicator is J2ME™. You can search for Java applications with the browser,download through the Internet, and store them in the Applications folder.To manage your Java applications, use the Application manager.J2ME on your device supports two Java environments: MIDP and Personal Profile.Tip: For development information, visit www.forum.nokia.com. Forum Nokia contains the Series 80 DeveloperPlatform, Java Software Development Kit (SDK), tools, technical notes, and applications.Java MIDPThe Java Mobile Information Device Profile environment supports the following APIs:• Java CLDC 1.1—hot spot implementation that is part of the Symbian OS• Java MIDP 2.0—security that assigns Java applications to the following domains: manufacturer, operator, trusted thirdparty, or untrusted• Java WMA—wireless messaging• Java Mobile Media—multimedia for mobile devices• Java Bluetooth—Bluetooth connectivity and Bluetooth Push for Java applications• Nokia UI—interfaces for sound and graphics• Java DRM—definitions of how content may be used• Java File—file server services• Java PIM—access to contents of the phonebook, calendar entries, and to-do list itemsJava PPThe Java Personal Profile environment supports the following APIs:• Java CDC 1.0—additional device connectivity• Java Foundation Profile 1.0—network and input/output support• Java Personal Profile 1.0—Java UI standard interface specifications and AWT for interfaces, graphics, and images• Java UI—standard Java interface specifications• JDBC—access for Java applications to a relational databasePrintingYou can print files to compatible printers in most applications.• To print a file to a compatible printer, press Menu, and select File → Printing → Print…. Check that the settings arecorrect, and press Print.• To change the printing settings, press Options.• To preview a file before printing, press Menu, select File → Printing → Print…, and press Preview. To start printing to acompatible printer, press Print. To modify the document size, margins, headers, footers or pagination, press Page setup.Setting printing optionsYour communicatorCopyright © 2004 Nokia. All Rights Reserved. 18
To change the file printing options, press Menu and select File → Printing → Print…, and press Options.On the Connection page, set the following:•Connection type—Select the method you want to use to connect to the printer.•Printer—Select the correct printer. If you select Hewlett-Packard, select the printer driver here, and the printer in Desk → Tools → Control panel → Extras.•On the Document page, set the following:•Number of copies—Select how many copies you want to print.Press Done to save the options.Defining page setup• To change the page size and orientation, press Menu, and select File → Printing → Page setup…. Select the Size tab.• To change the page size, scroll to Page size, and select a new size. Note that your printer may not be able to print all ofthe different options. The numbers in the Width and Height fields change according to the page size you select.• To define a customized page size, enter the numbers in the Width and Height fields.• To change the orientation of the printed page, scroll to Orientation. In Portrait, the height is larger than the width. InLandscape, the width is larger than the height.• To define the margins of a page, press Menu, and select File → Printing → Page setup…. Select the Margins tab, scroll toeach margin field, and enter a number.• To see view the new margins , close the Page setup dialog, press Menu, and select File → Printing → Print preview. Yourprinter may not be able to properly print documents with very narrow margins.• To define a header for a page, press Menu, and select File → Printing → Page setup…. Select the Header page, and enterthe text for the header. Press Insert to use a file name, object, page numbers, time, or date in the header.• To change the appearance of the text , press Format.• To move the header closer to or farther away from the top of the page, scroll to Distance from top of page and enter anumber. Your printer may not be able to print documents with very narrow margins properly.• To define a footer for a page, press Menu, and select File → Printing → Page setup…. Select the Footer tab, and enter thetext for the footer. Press Insert to use a file name, object, page numbers, time, or date in the footer.• To change the appearance of the text , press Format.• To move the footer closer to or farther away from the bottom of the page, scroll to Distance from bottom margin andenter a number.• To select the first page number, scroll to Start numbering at, and enter the number. You would usually start with either 1or 0.• To exclude the header or the footer from the first page, scroll to Include header on first page or Include footer on first page,press Change, and select No.Press Done to save the settings.Press the Menu key to move from one dialog page to another.Problems with printingYour device shows a note if you cannot connect the device to a compatible printer.Here are some starting points for troubleshooting:• Printer - check that the printer is switched on and online, print a test page, try to print while directly connected to theprinter, verify that the printer works with other wireless devices, or check that the printer is supported by your device.• Infrared - check that infrared is activated, the infrared ports of the device and the printer face each other, and there are nobright lights shining on either port.• Bluetooth - check that Bluetooth is activated and your device can locate Bluetooth devices other than the printer, and thedevice and printer are within range.• Wireless LAN - check that wireless LAN is activated and the wireless LAN settings are correct, the wireless printer iscompatible with your device, and verify other wireless LAN devices can find your wireless printer.Managing mobile printing settingsTo manage the Hewlett-Packard mobile printing settings, go to Desk → Tools → Control panel → Extras → hp printerselection' . Set the following:•Printer model—Select the printer you want to use. If the specific printer model is not available, select a similar model.Your communicatorCopyright © 2004 Nokia. All Rights Reserved. 19
•Quality mode—Select the quality of the print. Normal is for 600 dpi printing, Draft is for fast, 300 dpi printing, Best is for1200 dpi printing, and Max is for 2400/4800 dpi printing. To save ink or to increase the speed of printing, select theNormal or Draft.•Media type—Select the type of printing medium.•Color mode—Select whether to print in color or greyscale.Stickers in the sales packageThe stickers in the sales package contain important information for service and customer support purposes. The salespackage also includes instructions on how you should use these stickers.Data connectionsThis device supports packet data (GPRS), high-speed data calls (HSCSD), GSM data calls, and wireless LAN connections.Wireless local area network (wireless LAN)There may be restrictions on using wireless LAN in some locations. Check with your local authorities or service provider.Features using wireless LAN, or allowing such features to run in the background while using other features, increase thedemand on battery power and reduce the battery life.Your device is approved for use in a wireless LAN. You can use wireless LAN to send and receive e-mail, and connect yourdevice to the Internet.Your device supports the following wireless LAN features:• IEEE 802.11b standard• Data rates of up to 11 Mbit/s• Operation at a frequency of 2.4 GHz using direct sequence spread spectrum (DSSS) radio technology• Wired equivalent privacy (WEP) data encryption with keys up to 232 bits.• Wi-Fi protected access (WPA)Note that the WEP and WPA functions can be used only if they are supported by the network.If you move the device to another location within the wireless LAN and out of range of a wireless LAN access point, theroaming functionality can automatically connect your device to another access point that belongs to the same network. Aslong as you remain within range of access points that belong to the same network, your device can stay connected to thenetwork.Your device enables different types of communication in a wireless LAN. There are two operating modes to choose from:infrastructure and ad hoc.• The infrastructure operating mode allows two kinds of communication: wireless devices communicate with each otherthrough a wireless LAN access point or wireless devices communicate with a wired LAN device through a wireless LANaccess point.The advantage of the infrastructure operating mode is that you can have more control over network connections becausethey pass through an access point. A wireless device can access the services that are available in a regular wired LAN:company database, e-mail, the Internet, and other network resources, for example.• With 3rd party applications, you can send and receive data directly with each other in the ad hoc operating mode, forexample, to print. No wireless LAN access point is required. Simply make the necessary configurations and startcommunicating. Ad hoc networking is easy to set up, but communication is limited to devices that are within range.See Setting up an Internet access point for a wireless LAN on page 68.See Setting up an ad hoc network on page 84.Packet data (general packet radio service, GPRS)GPRS enables wireless access for mobile phones to data networks (network service). GPRS uses packet data technologywhere information is sent in short bursts of data over the mobile network. The benefit of sending data in packets is that thenetwork is occupied only when sending or receiving data. As GPRS uses the network efficiently, it allows for quick dataconnection set up and fast data transmission speeds.You must subscribe to the GPRS service. For availability and subscription to GPRS, contact your network operator or serviceprovider.Enhanced GPRS (EGPRS) is similar to GPRS, but it enables faster connection. For more information on the availability of EGPRSand data transfer speed, contact your network operator or service provider. Note that when you have selected GPRS as a databearer, the device uses EGPRS instead of GPRS if this is available in the network.Note that during a voice call, you cannot establish a GPRS connection, and an existing GPRS connection is put on hold.Your communicatorCopyright © 2004 Nokia. All Rights Reserved. 20
High-speed data calls (high-speed circuit switched data, HSCSD)HSCSD enables data transmission rates up to 43.2 kb/s, which is four times faster than standard data rates of the GSMnetwork. HSCSD is comparable to the speed of many computer modems that communicate with fixed telephone networks.For availability and subscription to high-speed data services, please contact your network operator or service provider.Note that sending data with HSCSD may drain the battery faster than normal voice or data calls, as the device may send datamore frequently to the network.GSM data callsA GSM data call enables data transmission rates of up to 14.4 kb/s. For availability and subscription to data services, contactyour network operator or service provider.Your communicatorCopyright © 2004 Nokia. All Rights Reserved. 21
3. Cover phoneWith the cover phone, you can, for example, take photos, make and receive calls, and change profiles. Most of these featuresare also available in the communicator interface.For more advanced tasks, use the communicator interface which you can access by opening the cover.Making a callTo make and receive calls, the cover phone must be switched on, the device must have a valid SIM card installed, and youmust be located in a service area of the cellular network.A GPRS connection is put on hold during voice calls.• To make a call, key in the phone number, including the area code. If you key in an incorrect character, press Clear.Tip: For international calls, press   twice to add the + character that replaces the international access code,and key in the country code, area code (omit the leading 0, if necessary), and phone number.To call the number, press the Call key. To end the call or cancel the call attempt, press the End key.Tip: To adjust the volume during a call, press the scroll key right to increase or left to decrease the volume.• To make a call using the saved contacts, scroll down in standby mode. Key in the first letters of the saved name. Scroll tothe name, and press the Call key.Tip: You can save new contacts in the Contacts menu in the phone or in the Contacts directory dialog in thecommunicator interface.• To call a recently dialed number, in standby mode, press the Call key to view up to 20 numbers that you have last called orattempted to call. Scroll to the desired number or name, and press the Call key.• To call your voice mailbox (network service), in standby mode, press and hold  , or press   and the Call key.• To call a phone number using 1-touch dialing when you have assigned the number to one of the keys   to  , do asfollows: Press the desired number key and the Call key in standby mode, or if the 1-touch dialing function is set on, pressand hold the number key in standby mode until the call is started. To assign a phone number to a number key, pressMenu in standby mode, and select Contacts → 1-touch dials. To set the 1-touch dialing function on, press Menu instandby mode, and select Settings → Call settings → 1-touch dialing.Answering a call• To answer a call, press the Call key.• To decline the call, press the End key. The call is forwarded if you have activated a call forward option such as Divert if busy.• To mute a ringing tone instead of answering a call, press Silence.• To answer a new call during a call when the Call waiting function is activated, press the Call key or Answer. The first call isput on hold. To end the active call, press the End key.Options during a callYou can press Options for some of the following functions during a call: Mute/Unmute, End call, End all calls, Contacts, Menu, Hold/Unhold, New call, Answer, Reject, and Lock keys.Other options during a call may include:•Conference— Allows you to merge an active and a held call into a conference call (network service).•Private— Allows you to converse privately with a selected participant during a conference call (network service).•Swap— Allows you to alternate between an active and a held call (network service).•Send DTMF—Allows you to send touchtone strings, for example, passwords. Key in the string or search for it in Contacts,and press DTMF.Note that you can key in the wait character w and the pause character p by repeatedly pressing  .•Transfer—Allows you to connect the held call to the active call and disconnect yourself from the call (network service).Writing textYou can key in text, for example, when you write a text message. Press a number key repeatedly until the desired characterappears. If the next letter is located on the same key as the present one, wait until the cursor is shown, and key in the letter.The characters available depend on the language selected for writing text. To insert a space, press  .• To delete a character to the left of the cursor, press Clear. To delete the characters quickly, press and hold Clear.• To change the character case, press  .• To change between letter and number mode, press and hold  .Copyright © 2004 Nokia. All Rights Reserved. 22
• To insert a number in letter mode, press and hold the desired number key.• To insert a special character, press   repeatedly.Alternatively, press  , scroll to the desired character, and press Use.Accessing the menu functionsThe cover phone offers a set of menu functions.Most of these functions are provided with a brief help text. To view the help text, scroll to the menu function, and wait forabout 15 seconds. You must activate help texts in Settings → Telephone settings before they are shown.Accessing a menu function• To access a function by scrolling, press Menu in standby mode, scroll to the desired main menu, for example, Settings, andpress Select. Scroll to a submenu, for example, Call settings, and press Select. Scroll to a setting, and press Select.• To access a function by using a menu shortcut, press Menu in standby mode, and within 2 seconds, key in the shortcutnumber of the menu, submenu, and setting that you want to use. The shortcut number is shown at the top right of thedisplay.• To return to the previous menu level, press Back. To exit the menu from the main menu list, press Exit. You can also exitthe menu by pressing the End key.Menu structureMessages 1 Write message, 2 Folders, 3 Voice messages, 4 Service commandsCall register1 Missed calls, 2 Received calls, 3 Dialed numbers, 4 Delete recent call lists, 5Call durationContacts 1 Search, 2 Add name, 3 Delete, 4 Settings, 5 1-touch dials, 6 Servicenumbers (shown if supported by your SIM card), 7 My numbers (shown ifsupported by your SIM card)ProfilesContains setting groups (profiles) that you can activate. Only one profilecan be active at a time.Settings1 Call settings, 2 Telephone settings, 3 Security settings, 4 Display settings, 5Time and date settings, 6 Right selection keyCameraAllows you to activate the camera and define its settings. See Camera onpage 63.SIM servicesAllows you to use the additional functions available on your SIM card.This menu is only available if supported by your SIM card.Messages Your device supports the sending of text messages beyond the normal 160-character limit. If your message exceeds 160characters, it will be sent as a series of two or more messages.At the top of the display, you can see the message length indicator counting backwards from 160. For example, 10/2 meansthat you can still add 10 characters for the text to be sent as two messages.Note that using special (Unicode) characters such as ë, â, á, take up more space.If there are special characters in your message, the indicator may not show the message length correctly. Before themessage is sent, the device tells you if the message exceeds the maximum length allowed for one message.Press Menu, and select Messages.You can write other types of messages on the communicator interface. See Messaging on page 32.• When sending messages, your device may display the words Message sent. This is an indication that the message hasbeen sent by your device to the message centre number programmed into your device. This is not an indication that themessage has been received at the intended destination. For more details about messaging services, check with yourservice provider. To write a text message, select Write message, and write the message. To send the message, press theCall key or Send, and enter the recipient's phone number, or press Search to search for it in the contacts list. If you pressOptions while writing the message, you can, for example, send the message to several recipients, or save the message forlater use.Tip: To access the short message editor in standby mode, press the scroll key left.• To view the contents of a text message folder, select Folders and the desired folder. To create a new folder, press Optionsin the folder list and select the appropriate function.Cover phoneCopyright © 2004 Nokia. All Rights Reserved. 23
Tip: To open the Inbox folder in standby mode, press the scroll key right.• To define or edit your voice mailbox number (network service), select Voice messages → Voice mailbox number. Key in thenumber, or search for it in the contacts list. You can obtain the voice mailbox number from your service provider ornetwork operator.• To listen to your voice messages (network service), select Voice messages → Listen to voice messages.• To send a service command to your service provider (network service), select Service commands. Write the command, andpress the Call key or Send.Call register You can view the phone numbers of missed, received, and dialed calls, and the approximate length of your calls.The phone saves missed and received calls only if the network supports these functions and if the phone is switched on andwithin the network service area.Press Menu, and select Call register.You can also view recent calls information on the communicator interface. See Viewing dialed, received, and missed calls onpage 28.Contacts You can view and manage the names and phone numbers (contacts) that you have saved in the phone memory or the SIMcard.In the phone memory, you can save names with several phone numbers. The number of names that you can save dependson the amount of information you have saved for each name.In the SIM card memory, you can save one phone number for each name.You can also use the more extensive Contacts application on the communicator interface.Shortcuts to the contacts listYou can also access the contacts list in the following ways:• In standby mode, press Names (if available), or press Go to, and select Contacts.• In standby mode, scroll down to the desired name, press Details, and scroll to a number.• During a call, press Options, and select Contacts.Searching for, adding, and deleting contacts• To search for a contact, in standby mode, press Menu, and select Contacts → Search, or press the scroll key down instandby mode. Key in the first letters of the desired name. Scroll to the desired name, and press Details. Scroll throughthe phone numbers added to the name.• To save a name and phone number in the selected memory, press Menu, and select Contacts → Add name. Key in the firstname, and press OK. Key in the second name, and press OK. Key in the phone number, including the area code, and pressOK. Select the number type, and press Select → Done.Tip: To use the phone number while abroad, press   twice (for the + character), and key in the country code,area code (omit the leading zero, if necessary), and phone number.Tip:  To quickly save a name and phone number in standby mode, key in the phone number, and press Save. Keyin the first name, and press OK. Key in the second name, and press OK → Done.• To save multiple numbers per name when the selected memory is Telephone, in standby mode, scroll down to the nameto which you want to add a number, and press Details. Press Options, and select Add number to add a new phonenumber to the name.• To delete contacts and all the numbers attached to them, in standby mode, press Menu, and select Contacts → Delete.Select One by one or Delete all.• To delete a single number added to a name, in standby mode, scroll down to the desired name, and press Details. Scrollto the number that you want to delete, press Options, and select Delete number.• To edit a name or number, in standby mode, scroll down to the desired name, and press Details. Press Options, and selectEdit name or Edit number. Edit the name or number, and press OK.Settings for the contactsIn standby mode, press Menu, and select Contacts → Settings, and one of the following options:•Memory in use—To select the memory that you want to use for your contacts.•Contacts view—To select how the contacts are shown.Cover phoneCopyright © 2004 Nokia. All Rights Reserved. 24
1-touch dialingTo assign a number to a 1-touch dialing key, press Menu in standby mode, select Contacts → 1-touch dials, and scroll to the1-touch dialing key number that you want.Press Assign → Search, and select the name and the number that you want to assign.If a phone number has already been assigned to the key, press Options, and select Change to change the phone number orDelete to remove the assignment.Other functionsIn standby mode, press Menu, and select Contacts and one of the following:•Service numbers—You can call the numbers that your service provider may have included in your SIM card (networkservices).•My numbers—You can view the numbers assigned to your SIM card if this is allowed by the card. Contact your serviceprovider for details.Profiles Press Menu, and select Profiles.• To change the profile, select the desired profile, and select Activate.• To activate a profile for a certain time, select the desired profile and Timed. Set the time (up to 24 hours) when you wishthe profile setting to end. When the end time is reached, the previous profile, which was not timed, becomes active.Tip: To activate a profile in standby mode, briefly press the power key, and select the desired profile.You can edit the profile settings in the communicator interface of your device. See Profile settings on page 73.Settings Press Menu, and select Settings.• To adjust call settings, select Call settings. Select from the following options: Select Call forward Select Anykey answer andOn if you want to answer an incoming call by briefly pressing any key except the power key, the selection keys, and theEnd key. Select Automatic redial and On to set the phone to make a maximum of 10 more attempts to connect the callafter an unsuccessful call attempt. Select 1-touch dialing and On if you want to call the names and phone numbersassigned to the 1-touch dialing keys   to   by pressing and holding the corresponding key. Select Call waiting andActivate to request the network to notify you when you receive a new call during a call (network service). Select Send mycaller ID and Yes to show your phone number to the person you are calling (network service). If you select Set by network,the device will use the setting that you have agreed with your service provider. Select Line for outgoing calls (networkservice) to select the phone line 1 or 2 for making calls. For example, you can have a private and a business line. If youselect Line 2 and have not subscribed to this network service, you are not be able to make calls. However, calls on bothlines can be answered regardless of the selected line. You can also prevent the line selection, if supported by your SIM card.Tip:  In standby mode, you can switch between the phone lines by pressing and holding  .• To adjust phone settings, select Telephone settings. Select from the following options: Select Cell info display to set thedevice to indicate when you use it in a cellular network based on Micro Cellular Network (MCN) technology (networkservice). Select Network selection to set the device to automatically select a cellular network available in your area. If youselect Manual, you can select a network that has a roaming agreement with your home service provider. Select ConfirmSIM service actions and Yes to set the phone to show confirmation messages that are sent between your phone and yourservice provider when you use SIM card services. Note that accessing these services may involve sending a text messageor making a phone call. You may be charged for these services. Select Help text activation to set the phone to show helptexts that guide you in using the menu functions of the cover phone. Select Start-up tone to play a tone when the coverphone is switched on.• To adjust phone security settings, select Security settings. Select from the following options: Select PIN code request to setthe phone to request your PIN code every time the phone is switched on. Some SIM cards do not allow this setting to bechanged. Select Call restriction service to restrict calls (network service). Select the desired all restriction option and set iton (Activate) or off (Cancel), or check whether the option is active (Check status). Select Access codes to change the securitycode, PIN code, PIN2 code, or barring password. Select Lock if SIM chgd to set the device to ask for the lock code when anunknown SIM card is inserted into your device. The device maintains a list of SIM cards that are recognized as the owner'scards. Select Lock System to lock the device. To unlock the device, press Unlock →  in standby mode.• To adjust phone display settings, select Display settings. Select from the following options: Select Color schemes to choosethe color for some parts of the phone display, such as the indicators for the signal strength and battery charge level.Select Operator logo to display or hide the operator logo. Select Screen saver timeout to set the period after which thescreen saver is activated.Cover phoneCopyright © 2004 Nokia. All Rights Reserved. 25
• To adjust the time and date settings, select Time and date settings.• To set the function for the right selection key in standby mode, select Right selection key. Select the desired function fromthe list.Cover phoneCopyright © 2004 Nokia. All Rights Reserved. 26
4. DeskDesk is a starting point from which you can open all applications in the device or on a memory card. Use the scroll key orarrow keys to move up and down on the screen.Desk shows all applications that are installed in your device. When you install new applications, they are shown on Desk aswell. Most applications are grouped in default groups, which are Personal, Office, Media, and Tools. If you have applicationson a memory card, those are shown on Desk or in one of the groups, depending on the application.The applications are grouped in the default groups as follows:• the Personal group: Telephone, Contacts, Messaging and Calendar• the Office group: Documents, Sheet, Presentations, File manager, and Calculator• the Media group: Web, Images, Voice rec., Music player, and RealPlayer• the Tools group: Control panel, Backup, Synchronization, Data transfer, Modem, Device manager, Cell broadcast, and Help• To open an application or group, or activate a shortcut, select the application, group, or shortcut , and press Open.• To remove an application, go to Desk → Tools → Control panel → Data management → Application manager.• To write a note, press Write note.Tip: To write a note in Desk main view, you can also press Desk.Tip: The notes are saved to the location you are in. For example, tips that are created from the Office group aresaved in that group You can view a list of all notes in Desk: press menu, and select View → Note list… .You can add your own shortcuts to Desk from most applications. The shortcuts can open a document or a Web page.• To add a shortcut to Desk, press Menu, and select File → Add to Desk. Scroll to the group you want to add the shortcut to,select the group, and press OK.• To remove a shortcut or note, press Menu, and select File → Delete.• To change the order of application, shortcut, or note icons, select the icon, press Menu, and select File → Move. Move theicon to its new location using the scroll key or arrow keys, and press Place here. You cannot move an application, shortcutor note to groups.• To increase or decrease the size of the icons, press Menu, and select View → Zoom in or Zoom out.• To add or change a background image, press Menu, and select Tools → Display settings…. Select the Desk page, and setWallpaper to Yes. In the Image file field, press Change to browse for an image. Scroll an image, and press OK.Tip: You can set a background image for the cover phone display on the Cover page of the same dialog.• To change the icon or name of a group, application, shortcut, or note, select the item, press Menu, and select File → Properties. Scroll to Icon, and press Change. Scroll to a new icon, and press Done. Scroll to Name, enter the new name, andpress Done.Managing groupsYou can group applications, shortcuts, or notes into different groups on Desk. You can have the same application or shortcutin several groups.• To open a group, select the group, and press Open.• To move an application, a shortcut, or a note to a different group, select an item, press Menu, and select File → Show ingroups…. The current group is marked. Scroll to a new group, select the group, and press Done.Creating new groupsYou can group applications, shortcuts, or notes to different groups in Desk. You cannot create a group inside a group, forexample, you cannot create a group inside the Office group.• To create a new group, press Menu, and select File → New group…. Enter a name for the group, and press OK.Copyright © 2004 Nokia. All Rights Reserved. 27
5. TelephoneIn Telephone, you can view the contacts you have stored in the telephone directory, SIM card, or memory card. You can alsomake phone calls, view recent calls, contact voice mailboxes, and define call settings.Warning:  Do not hold the device near your ear when the loudspeaker is in use, because the volume may beextremely loud.Making a callTo make and receive calls, the cover phone must be switched on, the device must have a valid SIM card installed, and youmust be located in a service area of the cellular network.• To make a call, go to Telephone, type the phone number, or select the contact from the list, and press Call.• To adjust the volume of the active call, press Audio controls. Press Volume + to increase the volume or Volume - todecrease it. Press Done] when the volume is set.• To view calls you have recently made, answered, or missed, press Recent calls, and select Dialed calls, Received calls, orMissed calls. To move from one dialog page to another, press Menu. To call a number, scroll to the number, and press Call.• To check your voice mail (network service), press Voice mailbox.Note that a GPRS connection is put on hold during voice calls.Viewing dialed, received, and missed callsYou can view calls that you have recently dialed, received, or missed.The phone saves missed and received calls only if the network supports these functions and if the phone is switched on andwithin the network service area.Press Recent calls, and select Dialed calls, Received calls, or Missed calls.To move from one dialog page to another, press Menu.You can also view call information in the Log. See Log on page 30.• To call a number, select a call in the list, and press Call.• To remove all calls from the list, press Clear all.• To save the phone number of the call in your Contacts directory, select the number in the list, press Menu, and select Edit→ Add to Contacts.Answering a callYou can see the name and telephone number of the incoming call (if allowed by the caller), or just the number if the numberis not included in your Contacts directory.• To answer the call, press Answer.Tip: If you want to have a private telephone conversation, use the hands-free set or close the device cover.• To mute the ringing tone , press Silence.• To decline the call, press Decline.1-touch dialing1-touch dialing allows you to make a call by pressing a number key and the Call key when the device cover is closed.Press Menu, and select Settings → 1-touch dials….• To assign a number key to a phone number, scroll to an 1-touch dialing key, and press Add number. Select the desirednumber from the Contacts directory.• To delete the phone number assigned to a number key, scroll to the 1-touch dialing key, and press Remove number.• To modify a phone number assigned to a number key, scroll to the 1-touch dialing key, and press Change number. Selectthe desired number from the Contacts directory.Copyright © 2004 Nokia. All Rights Reserved. 28
Making a conference callIn a conference call, you and up to five persons can hear each other simultaneously.• To make a conference call (network service), make a call, or answer an incoming call. During the call, make another call, oranswer another incoming call, and press Conference call.• To view a list of conference call participants, press Conference commands.• To mute a conference call, press Mute.• To remove a participant from the conference call, scroll to the participant in the list, and press Drop.• To have a private phone call with a participant, scroll to the participant in the list, and press Private call.Sending touchtonesYou can send touchtones during an active call to control your voice mailbox or other automated phone services.• To send a touchtone sequence, make a call, wait until the other end answers, press Menu, and select Call… → Send touchtone…. Select a predefined touchtone sequence, or type it.Tip:  You can attach touchtone sequences to contact cards. Go to Contacts, open a contact card, press Add field,and select DTMF.To insert a pause of about 2 seconds before, or between, touchtones, press the p key.To set the device to send the touchtones only after you press Send tone during a call, press the w key.Tip:  You can also send tones by pressing the number keys. When the device cover is closed, you can pressnumber keys on the phone keypad to send tones.Setting the offline profileThe offline profile prevents you from accidentally switching on your phone, making Internet connections, or using wirelessLAN or Bluetooth.Important:  In Offline and Flight profiles you cannot make (or receive) any calls, including emergency calls, or useother features that require network coverage. To make any calls, you must first activate the phone function bychanging profiles. If the device has been locked, you must enter the lock code before you can activate the phonefunction and make any emergency calls.To activate the offline profile, go to Telephone, press Menu, and select   → Offline.To allow communication again, press Exit profile → OK.Tip: You can activate the offline profile in any application menu, or from the cover phone.Call forwardingYou can forward incoming calls to your voice mailbox or to another phone number.To forward voice calls, go to Telephone, press Menu, and select Settings → Voice call forwarding.Select one of the following forwarding options:•Forward all calls —to forward all incoming calls•Forward if busy—to forward incoming calls when you have an active call•Forward if out of reach—to forward calls when the phone is either switched off or out of network coverage•Forward if not answered—to forward calls after a certain time period. Define the time you let the phone ring beforeforwarding the call in the Time delay field.Tip:  To activate Forward if busy, Forward if out of reach, and Forward if not answered in a single action, scroll toForward if not available, and press Change.• To check the current forwarding status, scroll to the forwarding option, and press Check status.• To stop forwarding voice calls, press Cancel all.Call restrictionYou can restrict incoming or outgoing calls, and international calls (network service).When calls are restricted, calls still may be possible to the official emergency number programmed into your device.To restrict voice calls, go to Telephone, and select Settings → Voice call restriction.Select one of the following restriction options:•Outgoing calls—to prevent making voice calls with your device•Incoming calls—to restrict incoming calls•International calls—to prevent calling to foreign countries or regionsTelephoneCopyright © 2004 Nokia. All Rights Reserved. 29
•Incoming calls when roaming—to restrict incoming calls when outside your home country•International except home country—to prevent calls to foreign countries or regions, but to allow calls to your home countryTo use the call barring service, you need the restriction password that you receive from your service provider when yousubscribe to the service.• To check the status of voice call restriction, scroll to the restriction option, and press Check status.• To stop voice call restriction, press Cancel all.Call, network, and phone line settingsIn the Other settings dialog you can define various settings related to calls and network services.Go to Telephone, press Menu, and select Settings → Other settings.Call settingsIn the Other settings dialog, select Call.• To show your phone number to the recipients of your calls (network service), scroll to Send my caller ID, press Change, andselect On.• To set the phone to briefly show the approximate duration of the last call, scroll to Summary after call, press Change andselect On.• To set the device to redial the number if it was busy at the first call attempt, scroll to Automatic redial, press Change, andselect On.Advanced settingsYou can restrict calls to certain numbers and select the phone line you want to use.When fixed dialling is activated, calls still may be possible to the official emergency number programmed into your device.In the Other settings dialog, select Advanced.• To allow calls only to certain numbers (fixed dialing), scroll to Fixed dialing number, press Change, and select On. Evenwhen fixed dialing is in use, you can browse the numbers saved in the device memory. If your SIM card does not supportfixed dialing, you cannot use this function.• To modify the list of fixed dialing numbers, scroll to Fixed dialing number, and press Number list.Tip: With fixed dialing, you can, for example, restrict calls to certain areas. In this case, type the area code in theNumber field.• To change the phone line for outgoing calls (network service), scroll to Telephone line in use, press Change, and select thephone line. To be able to use this function, you need a SIM card that supports the alternate line service and a subscriptionto two phone lines.• To prevent the phone line selection, scroll to Block line selection, press Change, and select Yes.Voice mailbox settingsYou can define the phone number of a voice mailbox and a touchtone sequence that you want to use with the mailbox(network service).Press Menu, and select Settings → Voice mailboxes….• To define a phone number of the voice mailbox , scroll to Number, and type the phone number. You can obtain thenumber of the voice mailbox service from your service provider.Tip: If you want to use your voice mailbox abroad, add the plus sign and the country or region code to thephone number.• To define a touchtone sequence for the voice mailbox, scroll to Touch tone, and type the tone sequence.LogIn the Log, you can view information, such as sent and received text messages and made and received calls, about thecommunication history of a device.• To access the Log, press Menu, and select Tools → Log.Shortcut: You can press Shift+Ctrl+L to open the Log in most applications.• To use the From/To information, press Use. You can answer text messages, faxes, or calls or add the caller or sender of amessage to your contacts by pressing the appropriate button.• To select the type of communication that you want to view , for example, only phone calls, press Filter by type.• To view Log events by direction, select View → Filter by direction…. You can, for example, view all communication, or viewonly incoming communication, outgoing communication, or missed communication.TelephoneCopyright © 2004 Nokia. All Rights Reserved. 30
• To sort the Log information in a different order, press Menu, and select one of the two options in View → Sorting order• To view detailed information about a communication event, press Details. For example, you can see the type, direction,and subject of a message, or the phone number of the caller or sender of a message.• To clear the contents of the Log, press Menu, and select Tools → Clear log….• To specify how long log events remain in the Log before they are deleted, press Menu, and select Tools → Log duration….• To copy a number from Log, press Menu, and select File → Copy number. You can paste the number to a new contact cardor message.• To view the amount of data sent and received with GPRS or wireless LAN, press Menu, and select Tools → GPRS datacounter or WLAN data counter.• To view Log events by type, press Filter by type. You can, for example, view all communication events, or view only calls,text messages, or faxes from a selected contact.• To view Log events by direction, select View → Filter by direction…. You can, for example, view all communication, or viewonly incoming communication, outgoing communication, or missed communication.Viewing log details• To view detailed information about a communication event, select the event, and press Details. For example, you can seethe type, direction, and subject of a message, or the phone number of the caller or sender of a message.Deleting log details• To set the time how long all communication events are held in the Log, press Menu, and select Tools → Log duration….• To clear communication events from the Log, press Menu, and select Tools → Clear log…. Enter the date before which allcommunication is deleted.TelephoneCopyright © 2004 Nokia. All Rights Reserved. 31
6. MessagingIn Messaging, you can create, send, receive, view, edit, and organize text messages, multimedia messages, e-mail messages,fax messages, and special text messages containing data, such as settings or bookmarks of Web pages. You can also receivemessages and data using Bluetooth or Infrared, receive service messages, cell broadcast messages, and send servicecommands.Before you can send or receive messages:• The cover phone must be switched on, the device must have a valid SIM card installed, and you must be located in aservice area of the cellular network. The device cover can either be open or closed.• The network you are using must support fax calls, data calls, and the Short Message Service if you want to use these.• The fax, data and Short Message Service must be activated for your SIM card.• The Internet access point (IAP) settings must be defined. See Internet setup on page 66.• The e-mail settings must be defined. See E-mail account settings on page 35.• The short message settings must be defined. See Text message settings on page 37.• The multimedia message settings must be defined. See Multimedia message account settings on page 39.Contact your service provider, network operator or Internet service operator for the correct settings.Tip: In most cases your Nokia 9500 Communicator automatically contains settings for text messages, multimediamessages, and GPRS when you take it into use. You may need to contact your network operator to activatemultimedia messages and GPRS before they become available.Messaging centerThe main view of Messaging has two frames: the list of folders on the left, and the messages from the selected folder on theright. Press the tab key to move between the frames.Folders in the Messaging main view:•Inbox—contains all received messages except e-mails and SIM card and cell broadcast messages. E-mail messages arestored in the remote mailbox.•Outbox—contains messages waiting to be sent.•Drafts—stores draft messages that have not been sent.•Sent—stores the last 20 messages that have been sent, except those sent using Bluetooth.Any remote mailboxes that you define are shown last in the list of folders.Writing and reading messages• To view a message, select the message, and press Open.• To expand a folder to full display size, press Open folder.• To write a new message, press Write message. Select the type of message, and press OK.• To reply to the sender and all recipients of an e-mail, press Menu, and select Write → Reply to all.• To forward a message, press Menu, and select Write → Forward. Note that it may not be possible to forward all messages.• To retrieve messages from your SIM card, press Menu, and select Receive → SIM messages. SIM messages are textmessages, that have been stored on your SIM card.• To sort messages in a specific order, press Menu, and select one of the options in the View → Sort by menu.• To print a message, press Menu, and select File → Printing → Print….• To change the page layout before printing, press Menu, and select File → Printing → Page setup….Managing messages• To create a new folder for messages, press Menu, and select File → New folder. Enter a Folder name, select where thefolder should be created, and press Create. Note that you cannot create subfolders in Inbox, Outbox, or Sent folders,except in IMAP4 remote Outbox, and Sent folders when online. IMAP 4 is a standard protocol for accessing e-mail on yourremote server. With IMAP4, you can conduct searches, create, delete and manage messages and folders on the server.• To rename a folder, select the folder, press Menu, and select File → Rename folder. Enter the new name, and pressRename. Note that you can only rename folders that you have created.Copyright © 2004 Nokia. All Rights Reserved. 32
• To move a message, select the message, press Menu, and select Edit → Move. Scroll to a new folder, and press Move. Ifyou want to move the message to a subfolder, select the main level folder, and press Expand.• To search for messages, press Menu, and select Edit → Find…. Enter the text for which you want to search, and press Find.• To refine your search, press Options.Avoiding low memoryYou should regularly delete messages from Inbox and Sent folders, and delete retrieved e-mail from the device memory tofree up memory space.• To delete e-mails from the device, press Menu, and select Tools → Delete e-mails locally…. Press Change, and select the e-mail you want to delete. For example, you can delete all e-mail or only e-mail that was received more than two weeksago. Press Delete now to delete the e-mails.Tip: Use this method to delete e-mail from the device, or the messages you delete are permanently deleted fromyour remote mailbox the next time you go online.To delete e-mail from the device and from the remote server, open an e-mail, and press Delete.• To empty the Sent folder automatically, press Menu, and select Tools → Sent items storage…. Set Delete sent items toautomatically, and enter the number of days after which the device empties the folder.RIM BlackBerryThis is the feature definition. It is a factual definition of the feature.BB cshelp 2BB cshelp 3BB cshelp 4BB cshelp 5BB cshelp 6BB cshelp 7BB cshelp 8BB cshelp 9BB cshelp 10BB cshelp 11BB cshelp 12BB cshelp 13E-mailTo write and read e-mail, go to Messaging.The Nokia 9500 Communicator mail system is compliant with Internet standards SMTP, IMAP4 (rev 1), and POP3.To receive and send mail, you must set up a remote mailbox service. This service may be offered by an Internet serviceprovider, a network service provider, or your company.Before you can send, receive, retrieve, reply to, and forward mail on your device, you must do the following:• You must configure an Internet access point (IAP) correctly. See Internet setup on page 66.• You must define your mail settings correctly. See E-mail account settings on page 35.Follow the instructions from your remote mailbox and Internet service providers. Contact your network and Internet serviceproviders or operator for the correct settings.Working online and offlineWorking online means working with your device connected to a remote mailbox through an Internet connection. Whenonline, you can delete, rename, or create new folders in your remote mailbox. When you work offline, which means thatyour device is not connected to a remote mailbox, you can delete only messages, not folders.Note that any changes you make in the remote mailbox folders while offline take effect in your remote mailbox the nexttime you go online and synchronize.If you delete an e-mail from your device when offline, the e-mail will be deleted from the remote mailbox the next time youconnect to the mailbox. You can delete a message from your device to save memory. See Avoiding low memory on page 33.MessagingCopyright © 2004 Nokia. All Rights Reserved. 33
Managing your e-mail offline enables you to save in connection costs and work in conditions that do not allow a dataconnection. If you work in conditions where one connection becomes unavailable, you can change the connection.Changing the Internet connectionIf your connection becomes unavailable, you may need to change the connection.• To use another connection, press Menu, and select Tools → Change connection. Scroll to a new connection, and pressConnect. Note that you must select an e-mail account and be online before you can change the connection, and that theconnection is changed only for that account.You are asked for confirmation if your current connection becomes unavailable, if you have not set the device to changeconnection automatically. See E-mail account settings on page 35.• To use another connection, scroll to the connection you want to use, and press Change.• To go online after selecting a new connection, press Connect.Writing and sending e-mailPress Write message, select E-mail, and press OK.• To write new e-mail, press Recipient. Select the recipient of the message from the Contacts directory, and press To. Enter asubject and the message, and press Send. You can also enter the recipient's e-mail address in the To: field. Note that e-mail addresses cannot contain accented characters such as Å, Ä, or É.Tip: If you select the primary recipient of the e-mail from the Contacts directory, you can also select otherrecipients using the Cc (the recipient is shown to all other recipients) and Bcc (the recipient is hidden from allother recipients) buttons.• To set the sending time or adjust other delivery settings, press Menu, and select Tools → Sending options….You can send documents, images, and other files as e-mail attachments.• To attach a file to an e-mail, press Insert file.Tip: All e-mail is stored in the Outbox before sending. Unless your e-mail is sent immediately, you can open theOutbox and suspend and resume sending or open the e-mail.To store the e-mail in the Drafts folder without sending it, press Close.Start writing or editing a message, press Menu, and select Tools → Preferences….• To change the font type or size of the text, select the appropriate field, and press Change. Select the new font type or fontsize, and press OK.Sending optionsTo define sending options for the e-mail you are writing, press Menu, and select Tools → Sending options….Select the Message page.• To set the importance of your e-mail, select Priority, and press Change.• To define the e-mail type , select Message type, and press Change.Select from these options:•Plain text (no MIME)—Select when the receiving e-mail system cannot display messages sent in the regular Internet e-mail format, MIME.•Plain text—Select to use the regular Internet e-mail format, MIME. The MIME format allows, for example, including imagesas attachments to the message.•Formatted text (HTML)—Select to use enhanced text formatting options, such as bold, italic, underline, or bullets. If thereceiving e-mail system does not support HTML, the message is shown as plain text without the formatting.• To receive a note when the recipient has opened the e-mail, select Request read report, press Change, and select Yes. Notethat some e-mail servers may not support read reports, or the user may have turned the read receipt sending off.Select the Delivery page.• To change the e-mail account you use to send the e-mail, select E-mail account in use, and press Change. Select the newaccount, and press OK.• To set the time you want to send the e-mail, select Send e-mail, and press Change.Select from these options:•Immediately—to send the e-mail immediately during the current connection•Upon request—to store the e-mail in the Outbox, from which you can send it later•During next connection—to send the e-mail the next time you establish a connection.MessagingCopyright © 2004 Nokia. All Rights Reserved. 34
Retrieving e-mailE-mail addressed to you is not automatically received by your device, but by your remote mailbox. To read your e-mail, youmust first connect to the remote mailbox and then select the e-mails you wish to retrieve into your device. Connection to aremote mailbox is established using data call, GPRS, wireless LAN, or IP passthrough. See Connectivity on page 84.Note that e-mail that you mark as deleted when offline will also be deleted from the remote mailbox server when the deviceis online again. You can delete local e-mail without deleting remote mailbox files. See Avoiding low memory on page 33.• To retrieve e-mail from a remote server, scroll to your mailbox, and press Retrieve e-mail.Select:•Mail headers (stay online)—to retrieve only the sender, date and subject information.•Messages—to retrieve entire e-mails without the attachments.•Messages and attachments—to retrieve all e-mails and the attachments they contain.•Ask before retrieving—to confirm whether the device should retrieve mails.Press Retrieve to go online and retrieve the mails.• If you have created subfolders in your IMAP4 mailboxes, you can view those folders with your device. To be able to viewfolders in your IMAP4 mailbox, establish an Internet connection, press Menu, and select Receive → Folder subscriptions….Note that you can only subscribe to folders in your IMAP4 mailboxes.• To view a remote folder, select a folder, and press Subscribe. Every time you go online the subscribed folders are updated.Note that this may take a lot of time if the folders are large.• To update the list of folders, press Update list.Reading and replying to e-mail• To reply to an e-mail, press Reply.Tip: If an e-mail contains Web addresses, e-mail addresses, or phone or GSM numbers, you can use them. Forexample, you can select a Web address or a phone number, and press the appropriate command button to open theWeb page, send e-mail or call the number.• To add new contacts to your Contacts directory, select the sender or a recipient from the header fields, press Menu, andselect Tools → Add to Contacts….Tip: If you reply to an e-mail that contains attached files, the attachments are not included in the reply. If youforward the received e-mail, attachments are included.• To forward an e-mail, press Menu, and select File → Forward.• To print an e-mail, press Menu, and select File → Printing → Print….E-mail attachmentsImportant:  E-mail messages may contain viruses or otherwise be harmful to your device or PC. Do not open anyattachment if you are not sure of the trustworthiness of the sender• To open an attachment, select the attachment, and press Open.• To save an attachment, select the attachment, and press Save.• To delete an attachment, select the attachment, and press Delete locally. Note that a copy of the attachment remains onthe e-mail server.Changing e-mail replying and viewing preferencesOpen a received e-mail, and press Preferences….• To include the text of the received e-mail in your replies, select Include message in reply, press Change, and select Yes.• To define the font type or size of text, select the appropriate field, and press Change. Choose the new font type or size,and press OK.E-mail account settingsAny changes you make to e-mail settings affect the way your e-mail is sent and received.Press Menu, select Tools → Account settings…, and press Create new.Scroll to the type of account that you want to create, and press OK.MessagingCopyright © 2004 Nokia. All Rights Reserved. 35
Define the following on the General page:•E-mail account name—Enter a descriptive name for the connection. Note that the maximum length of the name is 25characters.•My name—Enter your name.•Username—Enter your user name, given to you by your service provider.•Password—Enter your password. If you leave this field blank, you will be prompted for a password when you try toconnect to your remote mailbox.•My e-mail address—Enter the e-mail address given to you by your service provider. The address must contain the @character. Replies to your messages are sent to this address.•Internet access—Select the Internet access point that you want to use.•Default account—If you have created several e-mail accounts, select the e-mail account you want to use as the defaultaccount.Tip: You can move from one dialog page to another by pressing the Menu key.Define the following on the Servers page:•E-mail account type—Select the e-mail protocol your remote mailbox service provider recommends. Note that this settingcan be selected only once and cannot be changed if you have saved or exited from the mailbox settings.Tip: POP3 is a version of Post Office Protocol, a standard protocol for receiving e-mail from your remote server.With POP3, you can check your remote mailbox and download your e-mail. IMAP4 is a version of InternetMessage Access Protocol, a standard protocol for accessing e-mail on your remote server. With IMAP4, you canconduct searches, create, delete and manage messages and folders on the server.•Outgoing e-mail server—Enter the IP address or host name of the computer that sends your e-mail.•Incoming e-mail server—Enter the IP address or host name of the computer that receives your e-mail.•Use SMTP authentication—Select whether the SMTP (Simple Mail Transfer Protocol) server requires authentication, andenter the SMTP user name and password.Define the following on the Roaming page:•Change connection automatically—Select whether you want the device to switch between connections automatically ifconnection to the primary Internet access point is lost.•Second access, Third access, and Fourth access—Define the other possible Internet access options.Define the following on the Retrieve page:•Retrieve—Select whether you want to retrieve only the e-mail header information such as sender, subject and date, e-mails, or e-mails with their attachments.•Max. size of e-mail—Define how large e-mails are retrieved to your device.•Sync. e-mails in Inbox—Select the number of e-mails you want to download from the remote server to your Inbox.•Sync. e-mails in folders—Select the number of e-mails you want to download from the remote server to your folders.Define the following on the Advanced page:•Default e-mail type—Select whether to sent e-mail as Plain text, Plain text (no MIME) if the receiving e-mail system cannotdisplay e-mail sent in the regular Internet format, or Formatted text (HTML) to be able to use enhanced text formattingoptions.•Send e-mail—Select Immediately to send the e-mail as soon as possible, During next connection to send it the next timeyou retrieve e-mail, or Upon request to store the e-mail in the Outbox, from where you can send it later.•Include signature—Select whether you want to use a signature. Select Use my contact card to use the contact card in thedevice, or Custom to use a signature file that you can create for the e-mail account.•Request read report—Select whether you want to receive a note when the recipient has opened your e-mail.•Allow report requests—Select whether you want the sender of the e-mail to receive a note that you have read the e-mail.•Copy to my e-mail address—Select whether you want to receive a copy of every e-mail you send.•Secure login (APOP)—Select whether you want to use a POP3 secure login system, and the POP3 server you use supportsthis system.•Incoming secure connection—Select whether you want to use encryption to make the incoming connection secure. Secureconnection is used with POP3 and IMAP4 protocols to secure the connection to a remote mailbox. Note that the remoteserver must support secure connections for this function to work.•Outgoing secure connection—Select whether you want to use encryption to make the outgoing connection secure. Secureconnection is used with the SMTP protocol to secure the connection to a remote mailbox. Note that the remote servermust support secure connections for this function to work.•IMAP4 folder path—Enter the path to the IMAP4 inbox location in case the server cannot open it automatically. Normallyyou do not need to define the path.• To edit an existing account, select the account type that you want to edit, and press Edit.MessagingCopyright © 2004 Nokia. All Rights Reserved. 36
Text messagesYour device supports the sending of text messages beyond the normal 160-character limit. If your message exceeds 160characters, it will be sent as a series of two or more messages.In the navigation bar, you can see the message length indicator counting backwards from 160. For example, 10 (2) meansthat you can still add 10 characters for the text to be sent as two messages.Note that using special (Unicode) characters such as ë, â, á, ì take up more space.If there are special characters in your message, the indicator may not show the message length correctly. If Confirm multipartmessages is set to Yes, then before the message is sent, the device tells you if the message exceeds the maximum lengthallowed for one message. See Text message settings on page 37.Press Write message, select Text message, and press OK.• To write a new text message, press Recipient to select the recipients of the message, or enter the recipients' GSM phonenumbers in the To: field. If you enter more than one number, separate the numbers with a semicolon or by pressing theEnter key after each number. Write the message, and press Send. You can see the number of characters that are left in thecharacter counter. Note that a text message can only contain unformatted text.• To set the sending time or modify other delivery settings, press Sending options.Tip:  All text messages are stored in the Outbox until they are sent. Unless the text message is sent immediately,you can open the Outbox and suspend or resume the sending of the message.• To print the text message, press Menu, and select File → Printing → Print….Sending options for a text message• To set sending options for the current text message, press Sending options in the text message editor. To move from onedialog page to another, press the Menu key.On the Sending options page, define the following:•Service center in use—Select the message center to deliver the message.•Delivery report—Select whether to view the status of the sent text message in Log.•Send text message—Select when to send the text message. If you select Upon request, you must select the message inOutbox, and press Send to send it. If you select Scheduled, you must define the date and time when the message will besent.• To set sending options for all text messages, press Menu, and select Tools → Account settings…. Select Text message, andpress Edit.• To set sending options for the current text message, press Sending options in the text message editor. To move from onedialog page to another, press the Menu key.On the Advanced page, define the following:•Validity period—Select how long the message center stores a text message if a recipient cannot be reached. Maximum isthe maximum value allowed by the message center. Note that the network must support this feature.•Reply via same center—Select whether the reply to your message should be sent using the same message center numberyour message used.•Message conversion—Select whether to convert the text message into a fax, e-mail, or paging. Change this option only ifyou are sure that the message center can convert text messages into these other formats. Contact your network operatorfor more information.•Concatenation—Select No to send text messages longer than 160 characters as several messages. Select Yes to send textmessages that are longer than 160 characters as several messages, and allow them to be received as one long message bycompatible devices. Sending a message over 160 characters may be more expensive than one message.• To set sending options for all text messages, press Menu, and select Tools → Account settings…. Select Text message, andpress Edit.Replying to text messages• To respond to received text messages, open the message, and press Reply.• To call the sender of the text message, press Call sender.Tip: If the text message that you received contains a hyperlink, select the hyperlink, and press Open Web address toopen the browser. If the text message that you received contains a number, place the cursor on the number, andpress Call number to call the number.Text message settings• To define general sending options for text messages, press Menu, and select Tools → Account settings…. Select Textmessage, and press Edit. To move from one dialog page to another, press the Menu key.MessagingCopyright © 2004 Nokia. All Rights Reserved. 37
On the General page, define the following:•Service center in use—Select the message center to deliver the messages.•Delivery report—Select whether to view the status of the sent text messages in Log.•Send text message—Select when to send the text messages. If you select Upon request, you must select a message inOutbox and press Send to send it.•Validity period—Select how long the message center stores messages if a recipient cannot be reached. Note that thenetwork must support this feature.On the Concatenation page, define the following:•Concatenation—Select No to send text messages longer than 160 characters as several messages. Select Yes to send textmessages that are longer than 160 characters as several messages, and allow them to be received as one long message bycompatible devices. Sending a message over 160 characters may be more expensive than one message.•Confirm multipart messages—Select whether you want to see a confirmation note when you try to send text messagesexceeding 160 characters.On the Advanced page, define the following:•Reply via same center —Select whether the reply to your message should be sent using the same message center numberyour message used.•Include original in reply —Select whether to copy the text from a received text message to your reply.•Preferred connection—Select whether to send the text message by GSM network or GPRS. Note that the message will besend through GPRS only if GPRS is available. If GPRS is not available, the message will be sent through GSM.You can also edit text message options in Desk → Tools → Control panel → Messaging.Modifying message center settings• To view message centers, press Menu, and select Tools → Account settings…. Select Text message, and press Edit. InGeneral, press Service centers.• To edit message centers, press Edit, and enter the Service center name and Service center number.• To add new message centers, press New, and enter the Service center name and Service center number.• To delete message centers, scroll to a center, and press Delete.Managing messages on the SIM cardText messages may be stored on your SIM card.• To view text messages on the SIM card, press Menu, and select Receive → SIM messages.• To open a text message on the SIM card, select the message, and press Move. The message is moved to the Inbox anddeleted from the SIM card. Press Close to exit the SIM messages dialog. In Inbox, select the message, and press Open.• To copy a text message from the SIM card, select the message, and press Copy. The message is copied to the Inbox, andthe original remains on the SIM card.• To remove a text message from the SIM card, select the message, and press Delete.Picture messagesNote:  Picture message function can be used only if it is supported by your network operator or service provider.Only devices that offer picture message features can receive and display picture messages.• To view a picture message, select the message in Messaging, and press Open.• To reply to the sender, press Reply via text msg.. Note that the picture is not included in the reply.• To forward a picture message, press Forward. Press Recipient to select a recipient, write the message text, and press Send.Note that the picture message text cannot be longer than 120 characters.Multimedia messagesNote:  Only devices that offer compatible multimedia message or e-mail features can receive and displaymultimedia messages.The appearance of a multimedia message may vary depending on the receiving device.The default setting of the multimedia message service is generally on.Creating and sending multimedia messagesA multimedia message can contain text, images, or sound or video clips.Note that this function can be used only if it is supported by your network operator or service provider.MessagingCopyright © 2004 Nokia. All Rights Reserved. 38
Copyright protections may prevent some images, ringing tones, and other content from being copied, modified, transferredor forwarded.Before you can send and receive multimedia messages on your device, you must have your multimedia message settingsdefined correctly. Contact your service provider for the correct settings. See Multimedia message account settings on page 39.• To create a multimedia message, press Write message, scroll to Multimedia message, and press OK. Press Recipient to selectthe recipients of the message, or enter the recipients' GSM phone numbers or e-mail addresses in the To: field. If youenter more than one number, separate the numbers with a semicolon or by pressing the Enter key after each number.Enter a subject, and create the message. After the message is ready, press Send.Tip: You can also create multimedia messages directly from several applications, such as Images and File manager.• To add multimedia objects to a message, press Insert. You can insert images, sound clips, and video clips, and create pagebreaks in your message. Select the type of multimedia object you want to add, and press Insert.Tip: A multimedia message may contain several pages. If the cursor is in the To:, Cc:, or Subject: field when youadd a page, the new page becomes the first page of the message. Otherwise, the new page is added after thepage where the cursor is. Each page can contain only one video or one sound clip.• To add special effects to images in multimedia messages, press Menu, and select Options → Transition settings…. You canspecify the length of time an image is displayed and the style in which a new object is opened. You have to be inadvanced editing mode.• To preview a multimedia message before sending it, press Menu, and select View → Preview.• To delete a multimedia object, select the object you want to delete, press Menu, and select Edit → Delete and theappropriate menu option.• To delete a page, scroll to the page, press Menu, and select Edit → Delete → Page.You must be in the advanced editing mode to use most editing functions. Press Menu, and select Options → Upgrade editingmode.• To change the position of text in relation to images, press Menu, and select Tools → Slide layout. Select Text right or Textleft.• To edit the type, color, and formatting of text, select the text, press Menu, and select Options → Text format…. You canalso select the formatting before you start writing.• To change the background color of a multimedia message, press Menu, and select Options → Background color…. PressChange, scroll to a new color, and press OK. Press Done.• To change the sending options of a multimedia message, start to create or edit a message, press Menu, and selectOptions → Sending options…. You can select whether to receive delivery reports and how long the messaging center triesto send messages.Set the following options:•Receive report—Select whether you want to receive a notification when the message has been successfully delivered tothe recipient. Receiving a delivery report of a multimedia message that has been sent to an e-mail address may not bepossible.•Validity period—Select how long the messaging center tries to send the message. If the recipient of a message cannot bereached within the validity period, the message is removed from the multimedia messaging center. Note that the networkmust support this feature. Maximum is the maximum amount of time allowed by the network.Receiving multimedia messagesImportant:  Multimedia message objects may contain viruses or otherwise be harmful to your device or PC. Do notopen any attachment if you are not sure of the trustworthiness of the sender.Multimedia messages are received in your Inbox, and you can open or reply to them as to other messages.You can receive multimedia messages containing objects unsupported by your device, but you cannot view them. You can,however, forward these messages to another device.• To view a list of multimedia attachments in a message, press Menu, and select Tools → Objects….• To save a multimedia object, select the object, and press Copy to.• To play a multimedia object, select the object, and press Open.Multimedia message account settingsOn the Send page, define the following settings:•Internet access—Select the Internet access point (IAP) connection you want to use for sending messages.•Homepage—Enter the address of the multimedia messaging center.•Receive report—Select whether you want to receive a notification when the message has been successfully delivered tothe recipient. Receiving a delivery report of a multimedia message that has been sent to an e-mail address may not bepossible.MessagingCopyright © 2004 Nokia. All Rights Reserved. 39
•Sending time—Select when you want the multimedia message to be sent.•Validity period—Select how long the messaging center tries to send the message. If the recipient of a message cannot bereached within the validity period, the message is removed from the multimedia messaging center. Maximum is themaximum amount of time allowed by the network. Note that the network must support this feature.On the Receive page, define the following settings:•Receive multimedia messages—Select On if you want to receive multimedia messages. The reception of multimediamessages is on by default. Select Deferred if you want the multimedia messaging center to save the messages to beretrieved later. Change this setting to On when you want to retrieve the messages. Select Reject if you want to rejectmultimedia messages. The multimedia messaging center will delete the messages.•Receive advertisements—Select whether you want to receive messages defined as advertisements.•Receive anonymous messages—Select whether you want to receive messages from unknown senders.Fax• To send a fax, press Write message. Scroll to Fax, and press OK. Press Recipient, and select the recipient from the Contactsdirectory. You can also enter the number yourself. Write the message, and press Send.• To change the font and format of fax text, press Menu, and select Format → Font…, Formatting, or Alignment.• To add a document, sheet or image to a fax, press Insert object. Note that it may not always be possible to insert adocument to a fax. If you want to send a document as a fax, use the File → Send → Via fax option in Documents.• To print a fax, press Menu, and select File → Printing → Print…. Check that the printing settings are correct, and press Print.Setting sending options for a fax• To change the fax sending options, start writing a fax, press Menu, and select Tools → Sending options….On the Fax cover page, you can define what the first page of the fax looks like. Note that if you change the fax cover page,information you have already entered in the header of the current fax may be removed.In Send fax, you can define when the fax is sent. Note that if you select Upon request, you must open Outbox and send the faxfrom there.• To view a received fax, select the fax, and press Open. Press the arrow keys to scroll the fax.• To rotate a fax, press Rotate.• To zoom in or out, press Zoom in or Zoom out.Saving a received faxIn the Range selection dialog, you can select the section of the fax you want to export to another picture file format.• To save a multipage fax, open the fax, press Menu, and select File → Export…. Select Whole document to save the fax as awhole, Current page to save the page you are on, Selected to save a section that you selected, or User defined:  to enter thepage numbers of the pages you want to save.Editing fax settingsPress Menu, and select Tools → Account settings…. Select Fax, and press Edit.On the General page, define the following:•Fax cover page—Select whether to use a header or cover page for a fax. Select Template 1 to create a separate coverpage, Full template to use a cover page that includes all the contact information of both the sender and the recipient, yourremarks on the fax content, and the date, Header to display the sender and the recipient information and the date, orNone for no cover page.•Send fax—Select when to send the messages. If you select Upon request, you must select a message in Outbox, and sendthe fax from there.On the Advanced page, define the following:•Resolution—Select the resolution for your sent and received faxes.•ECM—Select whether erroneous fax pages are automatically corrected during sending. Note that also the receiving devicehas to support ECM.•Resend—Select whether to resend All pages or only the Missed pages if any fax pages failed to be sent.• To edit settings for fax forwarding or fax restriction, press Fax forwarding or Fax restriction.Receiving faxes from a remote fax boxYou can retrieve faxes from a remote fax box using fax polling, if available in the network. It allows you to make a fax call toa fax machine and then receive information by fax.MessagingCopyright © 2004 Nokia. All Rights Reserved. 40
• To receive faxes from a remote fax box through fax polling, press Menu, and select Receive → Dial fax poll. Enter the faxbox number, and press Call.Smart messagesThe device can receive many kinds of smart messages. Smart messages are text messages that contain data, for exampleoperator logos, ringing tones, bookmarks, or Internet access or e-mail account settings.The device can also receive service messages. Service messages are notifications of, for example, news headlines and maycontain a text message or a link. For availability and subscription, contact your service provider.Receiving operator logos• To set a received operator logo as the new operator logo, open the message that contains the operator logo, and pressSave. If you already have an operator logo, press Replace to confirm that you want to replace your current logo.• To delete the message that contains the operator logo, press Delete.Receiving ringing tones• To listen to a ringing tone, open the message that contains the tone, and press Play.• To save a ringing tone, press Save. If you already have a ringing tone with the same name, the new ringing tone isrenamed with a number after the name.Receiving configuration messages• To view a configuration message, select the message, and press Open.Tip: Configuration messages contain settings, such as Internet access point settings, e-mail account settings, ormessage center numbers, sent to you by a service provider.• To accept the settings, open the message, and press Save.Receiving e-mail notifications• To view an e-mail notification, select the message, and press Open.Tip: An e-mail notification is a message containing information on the number of new e-mail messages in yourmailbox.Opening password-protected messages• To view a message that is protected with a password, select the message, and press Open. Enter the correct password,and press OK. The password is usually supplied by the creator of the message, for example, the operator.Viewing bookmark messages• To view a message that contains a bookmark, select the message, and press Open.Tip: A bookmark contains a name and an address for a Web page.• To save a bookmark, press Save.Viewing configuration details• To view information on the configuration settings that you have received in a text message, open the message, and pressDetails.Tip: To save the settings, close the details dialog, and press Save.Note that you may not be able to view the details of all configuration settings you receive.Renaming settingsIf you try to save received settings with a name that already exists, you can select whether to replace or rename the settings.• To save the settings with another name, enter the new name, and press Rename .Note that you may not be able to rename all settings.Receiving provisioning settings• To view a message that contains connectivity settings, select the message, and press Open. If the device asks for apassword, enter your password, and press OK. Note that after three incorrect passwords, the message is deleted.MessagingCopyright © 2004 Nokia. All Rights Reserved. 41
• To accept the settings and configure your device, press Save. If you receive trusted server settings (basic connectivitysettings and the location of the server) from your service provider, the settings are saved automatically, and aninformation message is placed to your Inbox..Cell broadcastIn areas where the cell broadcast service is available (network service), you can receive messages on various topics fromyour service provider, such as weather or traffic conditions. For available topics and relevant topic numbers, contact yourservice provider. Note that a packet data (GPRS) connection may prevent cell broadcast reception. Contact your networkoperator for the correct GPRS settings.Go to Desk → Tools → Cell broadcast.• To open a cell broadcast message, select a topic, and press Read.Tip: To search for topics, enter a name or a number of a topic in the search field.• To receive a specific topic, select the topic, and press Subscribe. To stop receiving topics, select the topic, and pressUnsubscribe.• To stop receiving cell broadcast messages, press Reception off. To start receiving cell broadcast messages again, pressReception on.• To add, edit, or remove topics, press Menu, and select one of the Topic → More options menu options.• To create a blank topic list, press Menu, select List → Edit lists, and press New. Enter a name for the topic list, and press OK.• To create a topic list from selected topics, press Menu, select Topic → Add selected topics to list, and press New. Enter aname for the topic list, and press OK.• To define the automatic detection of new topics, press Menu, and select Tools → Settings → Add new topicsautomatically to list.• To define the language of the received messages, press Menu, and select Tools → Settings. Scroll to Language, and selecta language.MessagingCopyright © 2004 Nokia. All Rights Reserved. 42
7. WebTo connect to the World Wide Web:• You must configure the Internet access point and Internet connection settings. See Internet setup on page 66.• If you are using a data call or a GPRS connection, your wireless network must support data calls or GPRS, and the dataservice must be activated for your SIM card.Contact your service provider for the correct settings.The best way to browse Web pages is to use both the keyboard shortcuts and the pointer. Move the pointer on the pagewith the scroll key. Scroll the page up, down, left or right with the arrow keys. You can also use the tab key to select elementson a page.• To open a Web page, press Open Web address, enter the address of the page, and press OK. Note that if you are not online,you need to establish a connection.Tip: To open a link, move the pointer on the link, and press the scroll key.• To add a page that you are viewing to your bookmarks, press Menu, and select Tools → Add to bookmarks.• To maximize a Web page in the display or return it to normal display, press Menu, and select View → Full screen mode. Infull screen mode, press any of the command buttons to display the commands.• To adjust Web page content to the screen horizontally, press Menu, and select View → Fit to screen.• To save a Web page without images, press Menu, and select File → Save as….• To save an image, press Menu, and select File → Save as… → Save image as….• To save a Web page with frames, select the frame, press Menu, and select File → Save as… → Save frame as….• To print a Web page, press Menu, and select File → Printing → Print….• To open a new window, press Menu, and select File → Open → New window.• To switch between open windows, press Switch window.• To close extra windows, press Menu, and select View → Window list…. Scroll to the window that you want to close, andpress Close window.• To disconnect from the Internet, press Menu, and select File → Disconnect.Tip: Move the pointer on top of an image or link, and press Shift+the scroll key. A pop-up menu appears, allowingyou to save or load images or open links in new windows.• To save a cookie to your device, press Accept. A cookie is a file containing information such as personal settings for a Webpage.• To refuse a cookie, press Refuse.• To view a list of Web pages and Web addresses that you have visited or tried to visit, press Menu, and select Information→ History list. You can scroll the list using the scroll keys or arrow keys.• To clear the list, press Clear list.Downloading files• To download a file, move the pointer to the link to the file, and press Enter. You can see the name, type and size of thefile, the Web address to the file, and the application your device uses to open the file.• To download and save a file, press Save.• To download and open a file in the corresponding application, press Save and open.• To view details of downloads in progress, press Menu, and select View → Downloads….• To pause a download, select the download, and press Pause.• To cancel a download, select the download, and press Cancel download.• To remove the completed downloads from the list, press Clear completed.Clearing the cacheA cache is a memory location that is used to store data temporarily. If you have tried to access or have accessed confidentialinformation requiring passwords, empty the cache after each use. The information or services you have accessed is stored inthe cache.• To clear the cache, press Menu, and select Tools → Clear → Clear cache.Copyright © 2004 Nokia. All Rights Reserved. 43
Managing bookmarksYour device may have some bookmarks loaded for sites not affiliated with Nokia. Nokia does not warrant or endorse thesesites. If you choose to access them, you should take the same precautions, for security or content, as you would with anyInternet site.• To view a list of bookmarks, press Bookmarks.• To create a new bookmark, press New bookmark, enter the name and address of the bookmark, and press OK.• To open a bookmarked page, scroll to the bookmark, and press Go to.• To edit the name and address of a bookmark, scroll to the bookmark, and press Edit.• To create a new folder for bookmarks, press Menu, and select Bookmarks → Insert new folder…. Enter the name of thefolder, and press OK.• To rename a folder for bookmarks, select the folder, press Menu, and select Bookmarks → Rename folder…. Enter thename of the folder, and press OK.• To save your bookmarks as a Web page, press Menu, and select Bookmarks → Export as HTML….Changing browser settingsSelect the General page to edit:•Home page address—Enter the address of the first page that opens when you open the browser. Press Use current page ifyou want to use the page that you have opened as a home page.•Show images—Select whether you want to view all images on a Web page, no images on a Web page, or only thoseimages that have already been saved to the cache memory.•Frame options—Select whether you want to view all frames on a Web page at the same time or one by one.•Load in new window—Select the page that you want to open when you open a new browser window.Select the Services page to edit:•Use cookies—Select whether you want to accept all cookies, no cookies, or want the device to confirm every time a Webpage tries to save a cookie.Tip: A cookie is a file containing information such as personal settings for a Web page.•Enable plug-ins—Select whether you want to expand browser functionality with pre-installed plug-ins that enable theuse of Flash animations and other enhancements.•Enable JavaScript—Select whether you want the Web pages that you open to use JavaScript.•Enable automatic redirection—Select whether you want to automatically move to another Web page if you try to open aWeb page with a redirection command.Select the Advanced page to edit:•Maximum cache size—Select how much space you want to allocate to the cache memory.Tip: A cache is a memory location that is used to store data temporarily. If you have tried to access or haveaccessed confidential information requiring passwords, empty the cache after each use.•Empty cache on exit—Select whether you want to empty the cache when you close the browser.•Empty history list on exit—Select whether you want to empty the list of visited Web pages when you close the browser.•Delete cookies on exit—Select whether you want to remove all cookies from the device when you close the browser.•Use proxy configuration script—Select whether you want to use a proxy configuration script. If used, it will override proxysettings set for each Internet access point.•Script address—Enter the address for proxy configuration script.WebCopyright © 2004 Nokia. All Rights Reserved. 44
8. ContactsYou can use the Contacts application to create, edit, and manage all contact information, such as phone numbers andaddresses.The main contact database is in the communicator’s memory. You can also store contacts in the SIM card and in databaseson a memory card inserted in the device.The left frame of the Contacts main view (Contacts directory) shows the contents of the currently open contact database (1).The available contact databases are shown at the top of the list.Below the list there is a search box for finding entries (2).The right frame of the Contacts main view shows the contents of the contact card or contact group that you have selectedfrom the Contacts directory list.Contact card information is also used by, for example, the Telephone application.Managing contact cards• To open a contact database, scroll to the desired database in the Contacts directory list, and press Open.• To create a new contact card using the default template, press New card, type the contact information, and press Done.The card is added to the selected contact database.Tip: To use the phone number abroad, add a plus (+) character before the country code.• To open a contact card in the selected database, scroll to the contact in the Contacts directory list, and press Open.• To search for an existing contact card from the selected database, type the first letters of the contact in the search fieldbelow the Contacts directory list, scroll to the desired contact, and press Open.• To call a contact, scroll to the contact in the Contacts directory list, move to the right window, scroll to the phone number,and press Call.• To create a new contact card using a certain template, press Menu, and select File → New card and the template youwant to use.• To delete an existing contact card, scroll to the contact in the Contacts directory list, and press Delete and then Delete.• To send a text or multimedia message to a contact, scroll to the contact in the Contacts directory list, move to the rightwindow, scroll to a mobile phone number, and press Write text message or Write MMS.• To send a fax to a contact, scroll to the contact in the Contacts directory list, move to the right window, scroll to a faxnumber, and press Write fax.• To send an e-mail message to a contact, scroll to the contact in the Contacts directory list, move to the right window, scrollto the e-mail address, and press Write e-mail.• To copy all the contacts of a database, scroll to the database in the Contacts directory list, press Copy all, and select thedatabase where you want to copy the contact information.• To go to a Web address included in a contact card, scroll to the contact in the Contacts directory list, move to the rightwindow, scroll to the Web address, and press Go to.• To create a new database in your memory card , press Menu, and select File → More options → New database.• To exit the Contacts application, press Exit.Editing contact cards• To add a field to the contact card, press Add field.• To rename a field in the contact card, scroll to the field, and press Rename field. If you are not allowed to rename the field,Rename field is dimmed.• To delete a field from the contact card, scroll to the field, and press Delete field.• To change the default template for new contact cards, press Menu, select Tools → Settings → General → Defaulttemplate, press Change, and select the template.• To attach an image to the contact card, press Menu, and select Card → Insert picture. OR Scroll to the empty image frame,and press Insert picture.• To change the image in the contact card, scroll to the image, and press Change picture.• To delete the image from the contact card, press Menu, and select Card → Remove picture . OR Scroll to the image, andpress Remove picture.• To assign a certain ringing tone to a contact, press Menu, select Card → Ringing tone, and press Change.Copyright © 2004 Nokia. All Rights Reserved. 45
• To attach touchtones to a contact card, press Add field, select DTMF, and type a touchtone sequence.• To save the contact card and return to the Contacts main view, press Done.• To delete a contact card, press Menu, select File → Delete card.Creating and editing contact card templatesTemplates include a set of fields that the device uses when you create or view a contact card.Templates do not apply to contact cards in the SIM card, because the layout of a SIM contact card is fixed.• To create a new template, go to Contacts directory, press Menu, select Tools → Card templates, and press New.• To modify a template, go to Contacts directory, press Menu, select Tools → Card templates and the template, and pressOpen. To modify a field, scroll to it, and press Rename field or Delete field. To add a field, press Add field. To save thechanges to the fields and exit the contact card template, press Done.• To delete the template, press Menu, and select File → Delete template. If you delete the default template, the nexttemplate in the list becomes the new default template.My contact cardTip: You can use the information in My contact card as your electronic business card. You can send your businesscard as a message or using an infrared or Bluetooth connection, or use it on the fax header or cover page.• To modify the fields in your contact card, scroll to a field, and press Rename field, Delete field, or Add field.• To attach an image to your contact card, press Menu, and select Card → Insert picture, or scroll to the empty image frame,and press Insert picture.• To change the image in your contact card, scroll to the image, and press Change picture.• To delete the image from your contact card, press Menu, and select Card → Remove picture, or scroll to the image, andpress Remove picture.• To save the changes and exit My contact card, press Done.Sending contact cardsIn Contacts directory, you can send contact cards as business cards in vCard or Nokia Compact Business Card format tocompatible devices using the SMS, MMS, or e-mail service or an infrared or Bluetooth connection.To open Contacts directory, go to Contacts.Sending a contact cardGo to Contacts, scroll to a contact in the Contacts directory list, press Menu, and select File → Send.• To send a contact card as a business card to a compatible device, type the recipient's name in the To: field, or pressRecipient to select the name from the contacts directory. To send the business card, press Send. Note that if you select SMSas the sending method, contact cards will be sent without images.• To save the business card message as a draft, press Menu, and select File → Save. The message is saved in the Draftsfolder of the Messaging application.• To delete the business card, press Menu, and select File → Delete.• To add the message as a shortcut to Desk, press Menu, and select File → Add to Desk….• To undo the previous action, press Menu, and select Edit → Undo.• To edit the recipients, press Menu, select Edit → Cut to cut the selected text into the clipboard, Copy to copy the selectedtext into the clipboard, or Paste to paste the text from the clipboard to the To: field.• To open the next or previous message in the Drafts folder, press Menu, select View → Next message or Previous message.• To check the recipient names from the contact database, press Menu, select Tools → Check names. The letters that youhave typed in the To: field are matched to the contact database. If only one match is found, it is added to the To: field. Ifseveral matches are found, you can select the correct one from a list.Creating and editing contact groupsWith contact groups you can send the same message to a group of people at the same time.• To create a contact group, press Menu in Contacts directory, and select File → New group…. Scroll to Group name, and givea name for the group. To add a member to the group, press Add member, scroll to a contact in the list, and press Add. Toselect multiple contacts, press Shift and the scroll key.Tip: If you want to restrict incoming calls to a certain group of people, for example, while in a meeting, you cancreate a contact group that only includes those people. See Profile settings on page 73.• To open a contact group, scroll to a contact group in the Contacts directory list, and press Open.Tip: To attach an image to the contact group, press Menu, and select Group → Insert picture.ContactsCopyright © 2004 Nokia. All Rights Reserved. 46
• To remove a member from a contact group, open the group in the Contacts directory list, scroll to the member, and pressRemove member.Managing contacts saved in the SIM cardTip: The SIM card contains information identifying you as the network user.The length of the name and the phone number that you can save depends on the SIM card.• To save a new contact in your SIM card, open the SIM card directory, and press New contact. An empty SIM contact cardopens. Type the contact's name and phone number or fax number.• To edit a contact saved in the SIM card, scroll to the contact in the Contacts directory list, and press Open.• To delete a contact from the SIM card, scroll to the contact in the Contacts directory list, and press Delete.• To call a contact, scroll to the contact in the Contacts directory list, move to the right window, scroll to the phone number,and press Call.• To send a text or multimedia message to a contact, scroll to the contact in the Contacts directory list, move to the rightwindow, scroll to a mobile phone number, and press Write text message or Write MMS.• To copy the contents of the SIM card directory to another contact database, scroll to the SIM directory in the Contactsdirectory list, and press Open → Copy all. Select the database where you want to copy the contact information.• To change the sorting order of the names in the SIM card directory, press Menu, select View → Sort by → Name, or SIMlocation.Copying and moving contacts to different databasesYou can copy or move selected contacts from one database to another.• To keep a copy of the contact card in the original database , select Copy to and the contact database where you want tocopy the contact.• To move the contact card from the original database , select Move to and the contact database where you want to movethe contact. No copy of the contact card remains in the original database.The primary contact database is in the device. You can also store contact information in the databases of your SIM andmemory cards. The Contacts directory only displays one database at a time. To view the contents of a different database,select the database in the Contacts directory, and press Open.If you select the SIM card database, only the name and numbers of the contact cards can be copied. If the contact cardincludes more than one phone or fax number, each number is placed in a separate SIM memory location.Contact card settingsYou can select the default template for contact cards, the order in which you want the names displayed in the Contactsdirectory list, the address format used in contact cards, and the format of the business cards that you send.• To select the default contact card template, go to Contacts, press Menu, select Tools → Settings → General → Defaulttemplate, and press Change. Select the template from the list, and press OK. You cannot use a different template after youhave created the contact card. You can, however, add, delete, or rename the contact information fields of the contact card.• To change the order of names according to which contacts are listed in Contacts directory, go to Contacts, press Menu,select Tools → Settings → General → Name display, and press Change. Select First name Last name or Last name, Firstname, and press OK.• To change the display format of the addresses in contact cards, go to Contacts, press Menu, select Tools → Settings → General → Default country/region, and press Change. The address formats are defined according to the standard formatused in each country or region. Select the new country or region with the new address format from the list, and press OK.• To select the sending format for business cards, go to Contacts, press Menu, select Tools → Settings → General → Sending format via text message, and press Change. Select vCard to use the vCard format or Compact to use thecompressed format, and press OK.ContactsCopyright © 2004 Nokia. All Rights Reserved. 47
9. DocumentsIn Documents, you can write new and edit existing text documents. You can insert and view images and other files in thedocuments.Documents is one of the applications available in the Office group. Office also contains Sheet and Presentations applications,Calculator, and File manager application for file and folder management. To open the Office group, select Desk → Office, andpress Open.You can open, edit, and save documents created with Microsoft Word for Windows versions 97 and later. Note that not allfeatures and formatting of the original documents will be supported. The original document must not be passwordprotected. Documents created with other versions of Microsoft Word may only be viewed.Working with documentsMove within the document with the scroll key, and select text by pressing Shift+scroll key left right, up, or down.Tip: The menu contains many options that are familiar from other text editing applications.• To create a new document, start writing in the view that opens, or press Menu, and select File → New document → Blankdocument…. Write text or paste it from another document.• To open an existing document, press Menu, and select File → Open…. Browse for the folder where the file is saved.Tip: To open recently used documents, press Menu, and select File → Recent documents.• To copy or cut selected text, press Menu, and select Edit → Copy or Cut. To paste the text, go to the document where youwant to add the text, press Menu, and select Edit → Paste.• To paginate a document, press Menu, and select Tools → Paginate. This command divides the document into pages andupdates the page numbering.• To insert page breaks or line breaks into a document, press Menu, and select Insert → Page break or Line break.• To count words, press Menu, and select Tools → Word count.• To search for text in the document, press Menu, and select Edit → Find…. Enter the text you are looking for, and pressFind. To refine the search criteria, press Options. To replace the found item with something else, press Replace, enter thereplacement text, and press Replace.• To save and close a document, press Exit. If you have modified the file, press Save to save the document with a default filename. Press Save as to specify the file name and location, or press Discard changes to close the application without savingany changes.• To view the structure of a document, press Menu, and select View → Outline…. The document is structured by differentlevels of headings. Heading 1 is the top level, Heading 2 comes second, and so on. Body text is not shown in thedocument outline. To view more levels in the document outline, press Expand. To hide the lower levels, press Collapse. Tojump to a particular heading in the document, select the heading, and press Go to.• To hide or make text markers visible, press Menu, and select Tools → Preferences…. On the Basic options page, you candefine whether tab, space, and paragraph marks are shown in the document. On the Advanced options page, you candefine whether forced line breaks, nonbreaking spaces, and hard hyphen marks are shown in the document.• To open a particular page in a document, press Menu, and select Tools → Go to page…. In the Go to dialog, you can seehow many pages there are in the document and select a page you want to jump to. Enter the page number, and press Done.Formatting documentsYou can modify the style of a document on a font and paragraph level. You can use different fonts, font sizes, and styles. Youcan apply different predefined or user-defined styles by either modifying particular pieces of text separately, or by using atemplate on which the style of the text is based.• To format text, select the text, press Menu, and select Format → Font…, Formatting, Bullets…, or Paragraph. Select theappropriate formatting option. For example, you can add bold, italic, and underline formatting, change the font size andcolor, and add bullets and borders.• To edit or create a new paragraph style, press Style. Select the style you want to edit, and press Edit. Press New to create anew style. Give the new style a name, and specify the font, bullet, border, and spacing properties.• To change the paragraph style, move the cursor inside a paragraph, and press Style. Select the new style, and press Set.Copyright © 2004 Nokia. All Rights Reserved. 48
Inserting and editing objectsObjects in text documents are not links, but embedded attachments, which may increase the file size of the documentdramatically. Some object types are displayed as icons only.• To insert an object into a document, press Insert object. Select from the list the type of object you want to insert. PressInsert new to open the corresponding editor and create a new object or press Insert existing to open a list of existing files.Only those files that can be inserted are listed. Select a file, and press OK.• To resize an image, select the image, press Menu, and select Edit → Object → Object details…. On the Scaling page, youcan specify the width and height of the image, or resize the image by a specific percentage. On the Cropping page, youcan crop the image. Note that you cannot resize icons.• To open an object for viewing or editing, select the object, and press the enter key.• To remove an object from a document, select the object, and press the backspace key.Viewing tablesTables are shown as icons when the document has been created with Microsoft Word for Windows. Such tables can beopened for viewing in a separate view.• To view tables in a document, select the table icon, and press the enter key.• To copy the table, press Copy.• To exit the table view, press Close.Using templatesYou can use templates and save documents as templates. For example, you may have a company template which defines aparticular layout.• To save a document as a template, press Menu, and select File → Save → Save as template….• To select a template, press Menu, and select File → New document → Use template…. Browse for the folder where thetemplate is saved.DocumentsCopyright © 2004 Nokia. All Rights Reserved. 49
10. SheetIn Sheet you can store your data in a file that is called a workbook. Each workbook contains at least one worksheet. Aworkbook can also contain charts; a chart sheet is a sheet containing a chart that is based on data from a worksheet.Go to Desk → Office → Sheet.Workbooks• To create a new workbook, press Menu, and select File → New workbook.• To open an existing workbook, press Menu, and select File → Open. Browse for the folder where the file is saved.Tip: To open recently used workbooks, press Menu, and select File → Recent workbooks.Working with worksheets• To insert data into cells, move to the cell with the scroll key, and enter the information.• To format worksheets, select the cell or cells you want to format, press Menu, and select Format and an appropriate menuoption. You can change the font and number formats, and adjust alignment, row height, and column width. To formatborders or the background color of a cell, select Format → Cell appearance → Borders or Background color.• To add a new worksheet into a workbook, press Menu, and select Insert → New worksheet.• To switch to another worksheet, press Menu, and select View → Worksheets, or Sheets/Charts if the workbook contains atleast one chart. Select the worksheet, and press OK.• To keep rows visible when scrolling, select the row below the area that you want to remain visible. To keep columnsvisible, select the column to the right of the area that you want to remain visible. Press Menu, and select View → Freezepanes.• To search for data, press Menu, and select Edit → Find. Enter the text or numbers you want to find, and press Find. Tosearch the worksheet according to certain criteria, press Options.• To rename a worksheet, press Menu, and select Format → Rename worksheet. Enter the new name, and press Done.Working with cells• To clear contents or formatting from cells, select the cells, and press Clear. If you select Formats, the formatting of theselected cells is removed, but the content remains. The default style is used. If you select Contents, the content of theselected cells is deleted, but the formatting stays the same. All clears both formatting and contents of the selected cells.• To insert cells, select the area where you want to insert new cells, press Menu, and select Insert → Cells. You can insertcells above (Shift cells down) or to the left (Shift cells right) of the selected range. If you have selected only one cell, onlyone new cell is inserted, and if you have selected a range of cells, a corresponding range of blank cells is inserted. Toinsert a new row or column, select Entire row or Entire column, and press OK.• To select a range of cells, press Menu, and select Edit → Select. To select the entire worksheet, select Entire worksheet inthe Range field.Tip:  To select column A, select Reference, move to the Reference field and type A:A. Similarly, to select columns fromA to C, type A:C. To select row 1, type 1:1. To select columns from A to C and rows 2 and 3, type A2:C3.• To select the cells you have named on the worksheet, press Menu, and select Edit → Select. Select Named cells in theRange field, and select the cell in the Named area field. Once you have selected the cell, press Done.• To rearrange the order of cells, select the cells, press Menu, and select Tools → Sort → Top to bottom or Left to right. Onthe 1st column or 1st row page, select the direction of sorting, and to sort by case, select Yes in the Case sensitive field. Ifyou have selected more than one row or column, move to the second and third page to sort the next column or row.• To insert a function into a selected cell, press Insert function in the worksheet. Functions are used to automatecalculations. You can choose from different function categories, and each category has a set of functions. For example,MIN finds the lowest value in the numeric contents of a selected range of cells, AVERAGE calculates the average of thevalues, and SUM adds the values together. Once you have selected a function, press Done. The function is inserted into theselected worksheet cell. On the worksheet, press Point reference, select the cells you want to include in the function withShift+scroll key, and press OK.Example:  You want to add up the numbers in cells C2 to C6 and have the results appear in cell C7. Select cell C7,and press Insert function. Select the function SUM, press OK, and press Done. Press Point reference, select the cellrange C2 to C6 with Shift+scroll key, and press OK. The sum appears in cell C7.• To name a cell, select the cells you want to name, press Menu, and select Insert → Name → Add. Enter the name for thecell or range of cells. The coordinates of the cells you have selected on the worksheet are automatically inserted in theValue field. You can enter new coordinates to change the cell selection. You can also enter numbers or letters for use indifferent functions.Copyright © 2004 Nokia. All Rights Reserved. 50
Tip: You can use cell names to make calculating functions easier to understand. For example, cells named Rent andGroceries could be subtracted from a cell named Salary when calculating the money left for leisure activities aftermonthly living costs.Creating and modifying chart sheetsChart sheets contain charts based on information from worksheets. When you change the information on a worksheet, thechart is updated simultaneously.• To create a chart sheet, select the worksheet cells that contain the information you want to include in the chart, pressMenu, and select Insert → New chart. Select the chart type, make the chart two or three-dimensional, change the color ofthe background and axis, or add a title to the chart.• To change the range of cells on which the chart is based, press Sheets/ Charts, select the worksheet your chart is based on,and press OK. Select a new range of cells, press Menu, and select View → Sheets/Charts. Select the chart sheet, and pressOK. On the chart sheet, press Menu, and select Tools → Replace data. Press Replace ranges to confirm the change.• To replace chart sheet data, press Sheets/ Charts. Select the worksheet, and press OK. Edit the information in theworksheet, and press OK. Press Menu, and select View → Sheets/Charts. Select the chart, and press OK.• To change the general appearance of a chart, press Chart settings. You can select the chart type, make the chart three-dimensional, and change the color of the background and axis. You can also change the title shown in the chart.• To format a chart in more detail, press Select object. Select the object you want to edit, and press OK. Press the enter keyto open a dialog where you can modify the relevant settings.Tip: You can also select chart sheet objects by pressing the tab key.• To switch to another chart sheet in the same workbook, press Sheets/ Charts. Select the chart, and press OK.• To delete a chart sheet, press Menu, and select Chart → Delete chart.List of functionsFunctions are used to automate calculations. See Working with cells on page 50.ABS(number) Returns the absolute value of a number.ACOS(number) Returns the arccosine of a number.ADDRESS(row,column,paragraph,A1,pagename) Returns a reference to a row of a table.ASIN(number) Returns the arcsine of a number.ATAN(number) Returns the arctangent of a number.ATAN2 (x_num,y_num) Returns the arctangent from x- and y-coordinates.AVERAGE(number1,number2,...) Returns the average of its arguments.CELL(type of info,reference) Returns information about position, formatting and contents.CHAR(number) Returns the character for the number.CHOOSE(index_num,value1,value2,...) Chooses a value from a list of values.CODE(text) Returns the number of the first character.COLUMN(reference) Returns the column number of the reference.COLUMNS(array) Returns the number of columns in a reference.COMBIN(value1,value2,…) Returns the number of combinations for a given number of items.COS(number) Returns the cosine of a number.COUNT(value1,value2,...) Counts how many numbers are in the list of arguments.COUNTA(value1,value2,...) Counts how many values are in the list of arguments.COUNTBLANK(range) Counts the number of blank cells within a range.DATE(year,month,day) Returns the serial number of a particular date.DATEVALUE(date_text) Converts a date in the form of text to a serial number.DAY(serial_number) Converts a serial number to a day of the month.DDB(cost,salvage,life,period,factor) Returns the depreciation of an asset for a specified period using thedouble-declining balance method or some other method you specify.SheetCopyright © 2004 Nokia. All Rights Reserved. 51
DEGREES(angle) Converts radians to degrees.ERROR.TYPE(error_val) Returns a number corresponding to an error type.EXACT(text1,text2) Checks if two text values are identical.EXP(number) Returns e raised to the power of a given number.FACT(number) Returns the factorial of a number.False( ) Returns the logical value FALSE.FIND(find_text,within_text,start_num) Finds one text value within another (case-sensitive) one.FV(rate,nper,pmt,pv,type) Returns the future value of an investment.HLOOKUP(lookup_value,table_array,row_index_num,...) Looks in the top row of an array and returns the value of theindicated cell.HOUR(serial_number) Converts a serial number to an hour.IF(logical_test,value_if_true,value_if_false) Specifies a logical test to perform.INDEX(reference,row_num,column_num) Uses an index to choose a value from a reference.INDIRECT(reference,A1) Returns the reference of a text.INT(number) Rounds a number down to the nearest integer.IRR(value,guess) Returns the internal rate of return for a series of cash flows.ISBLANK(value) Returns TRUE if the value is blank.ISERR(value) Returns TRUE if the value is any error except #N/A.ISERROR(value) Returns TRUE if the value is any error value.ISLOGICAL(value) Returns TRUE if the value is a logical value.ISNA(value) Returns TRUE if the value is the #N/A error value.ISNONTEXT(value) Returns TRUE if the value is non text.ISNUMBER(value) Returns TRUE if the value is a number.ISTEXT(value) Returns TRUE if the value is a text.LEFT(text,num_chars) Returns the leftmost characters from a text value.LEN(text) Returns the number of characters in a text string.LN(number) Returns the natural logarithm of a number.LOG10(number) Returns the base-10 logarithm of a number.LOOKUP( ) Returns a value either from a one-row or one-column range, or froman array.LOWER(text) Converts text to lowercase.MAX(number1,number2,...) Returns the maximum value in a list of arguments.MID(text,start_num,num_chars) Returns a specific number of characters from a text string.MIN(number1,number2,...) Returns the minimum value in a list of arguments.MINUTE(serial_number) Converts a serial number to a minute.MOD(number,divisor) Returns the remainder from division.MONTH(serial_number) Converts a serial number to a month.N(value) Returns a value converted to a number.NOW( ) Returns the serial number of current date and time.NPV(rate,value1,value2,...) Returns the net present value of an investment based on a series ofperiodic cash flows and a discount rate.OFFSET(refernce,rows,cols,height,width) Returns a reference to a range that is a specified number of rowsand columns from a cell or range of cells.SheetCopyright © 2004 Nokia. All Rights Reserved. 52
PERMUT(number, number_chosen) Returns the number of permutations for a given number of items.PI( ) Returns the value of pi.PMT(rate,nper,pv,fv,type) Returns the periodic payment for an annuity.POWER(number,power) Returns the result of a number raised to a power.PRODUCT(number1,number2,..) Multiplies its arguments.PROPER(text) Capitalises the first letter in each word of a text value.PV(rate,nper,pmt,fv,type) Returns the present value of an investment.RADIANS(angle) Converts degrees to radians.RAND( ) Returns a random number between 0 and 1.RATE(nper,pmt,pv,fv,type,guess) Returns the interest rate period of an annuity.REPLACE(old_text,start_num,num_chars,new_text) Replaces characters within text.REPT(text,number_times) Repeats text a given number of times.RIGHT(text,num_chars) Returns the last character or characters from a text value.ROUND(number,num_digits) Rounds a number to a specified number of digits.ROW(row) Returns the row number of the specified row.ROWS(array) Returns the number of rows in a reference.SECOND(serial_number) Converts a serial number to a second.SIGN(number) Returns the character for the number.SIN(number) Returns the sine of the given angle.SLN(cost,salvage,life) Returns the straight-line depreciation of an asset for one period.SQRT(number) Returns a positive square root.STDEV(number1,number2,...) Estimates standard deviation based on a sample.STDEVP(number1,number2,...) Calculates standard deviation based on the entire population.STRING( ) Converts a number to text according to the given format string.SUM(number1,number2,...) Adds its arguments.SUMPRODUCT(array1,array2,…) Returns the sum of the multiplied arrays.SUMSQ(array1,array2) Returns the sum of the squares.SYD(cost, salvage, life, per) Returns the sum-of-years’ digits depreciation of an asset for aspecific period.T(value) Converts its arguments to text.TAN(number) Returns the tangent of a number.TERM( ) Calculates the number of payments for an investment, given theperiodic payment amount P, the interest rate R, and future value FV.TIME(hour,minute, second) Returns the serial number of a particular time.TIMEVALUE(time,text) Converts a time in the form of text to a serial number.TODAY( ) Returns a serial number of the current date.TRIM(text) Removes spaces from text.TRUE( ) Returns the logical value TRUE.TRUNC(number, num_digits) Truncates a number to an integer.TYPE(field) Returns a number which depends on the content of the selected field.UPPER(text) Converts text to uppercase.VALUE(text) Converts a text argument to a number.SheetCopyright © 2004 Nokia. All Rights Reserved. 53
VAR(number1,number2,...) Estimates variance based on a sample.VARP(number1,number2,...) Calculates variance based on the entire population.VLOOKUP(lookup_value,table_array,col_index_num,...) Searches for a value in the leftmost column of a table and returns avalue.YEAR(serial_number) Converts a serial number to a year.SheetCopyright © 2004 Nokia. All Rights Reserved. 54
11. PresentationsIn Presentations, you can open, view, edit, and save presentations created with Microsoft PowerPoint 97 or later. You can alsocreate new presentations. Note that not all features and formatting of the original files are supported.Go to Desk → Office → Presentations.Viewing presentations• To open an existing presentation, press Menu, and select File → Open…, or press Ctrl+O. Browse for the folder where thefile is saved. You can scroll the slide up and down, left and right with the scroll key.Tip: To open a recently viewed presentation, press Menu, and select File → Recent presentations.• To move between slides, press Next and Previous. To move directly to a specific slide, press Menu, and select Tools → Goto slide…. Select the slide from the list, and press Go.• To zoom the view, press Menu, and select View → Zoom.Tip: You can also zoom in and out by pressing Chr and the magnifying glass keys.• To view slides in full screen mode, press Menu, and select View → Full screen mode. In full screen mode, press any of thecommand buttons to display the commands. You can also use Ctrl+T to switch between the full screen and normal screenmodes.Viewing slide showsSpecial effects or animation in a presentation are shown in a slide show. Note that not all special effects or animations aresupported.• To start a slide show, press Menu, and select View → Slide show → View show.• To set slide show options, press Menu, and select View → Slide show → Show unsupported objects or Show animations.• To move between slides in a slide show, press Menu, and select Show → Next and Previous. To select the first or last slide,press Menu, and select Show → First slide or Last slide. To move to a specific slide, press Menu, and select Tools → Go toslide…. Select the slide from the list, and press Go.• To end the slide show, press Menu, and select Show → End show.Showing slide shows with a data projectorYou can show slide shows with a compatible data projector, or other compatible projection system. The slide show istransferred to the data projector using, for example, a Bluetooth connection.To be able to show slide shows with a compatible data projector, you need to install the drivers of the data projector. If thedrivers are not installed, the menu options are not visible. For more information, check with the data projector manufactureror its representative.• To show slide shows with a data projector, select the presentation, press Menu, and select View → Slide show → Showon external display. To start the slide show, press Menu, and select View → Slide show → View show. Note that no specialeffects or animations are supported. If the presentation contains notes, they are only visible on the communicator display.Tip: If you have not selected a data projector earlier, the External display dialog opens. Select a data projector, pressConnect, then Done.Tip: If you switch from the slide show view to another view during the show, for example, to outline view, thepresentation is no longer displayed on the external view. To continue showing the slide show with a data projector,switch back to the slide show view.• To change the data projector, press Menu, and select View → Slide show > External display settings…. In the Externaldisplay dialog, select a device from the list, and press Connect, then Done.• To stop showing a slide show with a data projector, press Menu, select View → Slide show, and deselect Show on externaldisplay.Creating presentations• To create a new presentation, press Menu, and select File → New presentation. Activate a text field by pressing the tabkey, and start writing. When you are ready, press OK, and move to the next text field. If you want to use a template, pressMenu, and select File → New presentation → Use template…. Browse for the folder where the template is saved.Tip: To move the text field inside the slide, select the text field with the tab key, and press the scroll key left, right,up, or down. To move the text field with smaller steps, press Ctrl+scroll key left, right, up, or down. Similarly, youcan move other objects, such as pictures or autoshapes.Copyright © 2004 Nokia. All Rights Reserved. 55
• To insert a new slide into a presentation, select the slide after which you want to add the slide, and press Insert slide.Select the layout you want to use in the new slide, and press Insert.• To insert images or autoshapes into a presentation, press Menu, and select Insert → Picture… or Autoshape…. Browse forthe folder where the image is saved, or select an autoshape from the list, and press Insert.Tip: To change the size of an object, press Shift+scroll key left, right, up, or down. To change the size with smallersteps, press Ctrl+Shift+scroll key left, right, up, or down.• To insert a text box into a presentation, press Menu, and select Insert → Text box. Enter the text, and press OK.Tip: The menu contains further text formatting options: press Menu, and select Format and a menu option. You canchange the font and number formats, add bullets, and adjust alignment.• To save a presentation, press Menu, and select File → Save → Save presentation or Save as…. The file is saved in PPTformat.• To format an object you have inserted into a slide, select the object, press Menu, and select Format → Object…. You canresize the object and rotate it. Note that not all objects, such as images or tables, can be rotated.Inserting tables• To insert a table into a presentation, press Menu, and select Insert → Table → Insert table…. Select the number of rowsand columns you want to have in the table, and press Insert.• To select cells in a table, select the table by pressing the tab key, then press the enter key. Press the tab key to select cells.• To add rows or columns to a table, select a cell, press Menu, and select Insert → Table → Insert column or Insert row. Anew column is inserted to the left of the selected cell, and a new row is inserted above the selected cell.• To remove rows or columns from a table, select a cell in the row or column you want to remove, press Menu, and selectInsert → Table → Delete column or Delete row.Working with different viewsPresentations consists of different views that help you when creating presentations.• To switch between the different views, press Menu, and select View → Slide, Notes, Outline, or Slide master.Outline viewThe outline view displays the text content of the presentation slides, and is used for organizing the content.• To open the outline view, press Menu, and select View → Outline.• To view the slide content, press Expand. To hide the content, press Collapse. To open a slide for editing, select the slide,and press the enter key.• To change the order of slides, select the slide you want to move, and press Move. Scroll up and down to move the positionmarker to a new location, and press OK.• To remove slides, select the slide you want to remove, and press Delete.Notes viewIn the notes view, you can read notes that have been attached to slides in the presentation. You can also add your own notes.• To open the notes view, press Menu, and select View → Notes. To move between the slides, press Next and Previous.• To add a note, activate a text field by pressing the tab key, and start writing in the text field. When you are ready, pressOK, and move to the next slide if needed.Slide master viewThe slide master is a slide that controls certain text characteristics that are common to all slides in a presentation. When youwant to change the look of your slides, change the slide master instead of changing each slide individually.• To open the slide master view, press Menu, and select View → Slide master. Activate a text field by pressing the tab key,and start writing. When you are ready, press OK, and move to the next text field.PresentationsCopyright © 2004 Nokia. All Rights Reserved. 56
12. CalendarIn Calendar, you can create and view scheduled events and appointments. You can also set alarms to calendar entries.You can synchronize your calendar data with a compatible computer using PC Suite on the product CD-ROM. For informationon synchronization, see the PC Suite guide.You can also synchronize calendar data with compatible phones. See Data transfer on page 16.Creating calendar entriesThere are four types of calendar entries:• Meeting entries are entries that have a specific date and time.• Memo entries are related to the whole day, not to a specific time of day. Memo entries do not appear in the Weekly timeschedule view.• Anniversary entries remind you of birthdays and special dates. They are repeated every year.• To-do notes remind you of things to do. They can be prioritized and organized into to-do lists.Calendar, Month view• To create a calendar entry, select the date, press Menu, and select File → New entry. Select the type of entry you want tocreate. Note that available settings for meeting, memo, anniversary, and to-do note entries vary.Define the settings on the following pages:•Details page—You can enter a description and specify a date for the entry. To set a specific start and end time, select Yesin the Timed field.•Notes page—You can enter extra information for the calendar entry. The icon   is added to the entry.•Alarm page—You can set an alarm for the entry. Select the Set alarm field and Yes. Enter the alarm time and the numberof days before the entry you want the alarm to go off. If you have a meeting entry that is linked to a specific time, enter inthe Time before field the amount of time before the meeting you want the alarm to go off. Note that you can set an alarmfor a to-do note only if you have set a due date on the Details page.•Repeat page—You can specify whether you want the entry to be repeated and when. Define the repeat type, frequency,and possible ending date.•Status page—You can define a color and symbol for the entry, define status, as well as specify whether you want tosynchronize the entry. If the status of an entry is uncertain, mark it as Tentative. You can cross out an entry if it has beencompleted. Crossing out an entry does not remove it from the calendar. If you select Private in the Synchronization field,the details of the entry will not be shown to others when you connect to a network and synchronize your calendar.Tip: Another way to create a calendar entry is to start typing your entry when you have opened Calendar. As youenter characters, the default entry dialog opens.Tip: Make sure you have selected the correct city in the Clock application, because scheduled calendar entries maychange when the current city is changed and is on another time zone.• To open and edit an entry, select the entry, and press Edit. Edit the details on the various pages.Calendar iconsThe following icons are used in Calendar:AlarmAnniversaryNoteMemoRepeating entryTentative entryTo-do noteTo-do note with high importanceTo-do note with low importanceUntimed entryCopyright © 2004 Nokia. All Rights Reserved. 57
Managing calendar entries• To cross out an entry or mark it as tentative, select the entry, press Menu, and select Entry → Crossed out or Tentative.Crossing out en entry does not remove it from the calendar.• To send a calendar entry, press Menu, and select File → Send. Select the method of sending.• To define default entry settings, press Menu, and select Entry → Default settings. Select an entry type, and enter thevalues you would most commonly use.• To change the type of an open entry, press Menu, and select Entry → Change entry type…. Select the new entry type fromthe list, and press Select.• To delete a calendar entry, select the entry, and press the backspace key. Press OK to confirm the deletion.• To move or delete several calendar entries, press Menu, and select Tools → Move/Delete…. To either move all thesuggested entries to a different file or delete them from the device, press OK. To define further criteria, press Options. Youcan specify whether calendar entries are deleted or moved to a file, the type of entries to be removed, and restrict theremoval to a specific time period.Tip:  You can also use shortcuts to delete or move calendar entries. To cut, press Ctrl+X; to copy, press Ctrl+C; and topaste, press Ctrl+V.• To search for calendar entries, press Menu, and select Tools → Find entry…. Enter the search keywords included in thedescription of the entry you are looking for, and press Find. Press Done → Find to start searching. In the Find results view,you can modify the found entry and open the previously open calendar view.• To refine the search criteria, press Menu, select Tools → Find entry…, and press Options. On the Details page, you canrefine the search, and restrict the target groups of the search on the basis of common properties.You can also restrict the search to a particular time period:•Whole calendar—Includes all entries in the search.•From today—Searches for entries in the future. Enter the Until date.•Until today—Searches for entries in the past. Enter in the From field the date from which you want to begin the search.•User defined—Allows you to set your own time period for the search. Enter the dates in the From and Until fields.Calendar settings• To modify general calendar settings, press Menu, and select Tools → General settings…. On the General page, you canchoose the view that opens when you open the Calendar application, and define where you want untimed entries toappear in calendar views. On the Preferred views page, you can change the order in which calendar views are listed. If youselect No for a calendar view, it is shown last in the list or not shown at all when you change views by pressing theCalendar application key repeatedly.Calendar views• To switch between the different calendar views, press Change view in any calendar view. Select a type of view from thelist, and press Select.Tip:  Press the Calendar application key repeatedly to browse the calendar views. Only preferred views are shown.To set the preferred views, press Menu, and select Tools → General settings… → Preferred views.• To edit calendar views, select a calendar view, press Menu, and select View → View settings….For more instructions on editing the settings of a view, see the Help function in the device.• To open a specific date in the calendar view, press Go to date, enter the date, and press OK. To go to today's date, pressToday. To view the date in the Month view, press Browse.Tip: To go to today's date in most calendar views, press the space bar on the keyboard.Month viewIn the Month view, you can browse the days of one month on the left frame, and view the entries for those days on the rightframe. Today's date is marked with a colored rectangle, days that have scheduled events are marked in bold and blue, andthe currently selected date is highlighted.To switch between the days of the month and day's entries, press the tab key.Week viewThe Week view shows the events for the selected week in seven day boxes. Today's date is marked with a colored rectangle.Tip: To quickly select a different date in day and week views, press the tab key, select the desired date, and pressthe enter key.CalendarCopyright © 2004 Nokia. All Rights Reserved. 58
Tip:  To change the starting day of the week, select Desk → Tools → Control panel → General → Regional settings.Select the Date page and the First day of the week field.Day viewThe Day view shows the events for the selected day. Entries are grouped into time slots according to their starting time. Toview the previous or next day, scroll left or right.Weekly time schedule viewThe Weekly time schedule view shows the reserved hours for the selected week. Only timed entries are shown. If a time boxcontains entries, the bar across the bottom of the weekly time schedule shows the details of the entry. The numbers to theright of the entry description indicate the number of entries in that time box. For example, 1/3 means that you are seeingthe details of the first of three entries. If a time box contains more than one entry, press the tab key to view a list of allentries.Tip:  You can select different bar colors for different types of entries. For example, use a green bar for hobbies and ared bar for business trips to get a quick overview of your activities during a week. To define a color for an entry,select the entry, and press Edit. Select the Status page, and Color/Symbol marking field.Year schedule viewThe Year schedule view shows the timetable for the selected year. Only entries with colors are shown. If there are severalcolors for the day, only one can be shown.Anniversaries viewThe Anniversaries view shows the anniversaries for four months at a time. No other entries are shown.Tip:  To change the number of months shown in the anniversary view, press Menu, and select View → View settings….To-do lists viewIn the To-do lists view, you can view and create lists that contain to-do notes. The page number in the upper right cornerindicates the position of the to-do list among other to-do lists. For example, 1/6 means that you are viewing the first to-dolist out of six. To view the previous or next list, scroll left or right. To see a list of all to-do lists, press the tab key.• To create a new to-do list, press Menu, and select File → New to-do list…. On the Details page, enter the name, position,and sorting order of the to-do list. On the Visibility page, define whether to-do notes are visible in to-do lists only or in allcalendar views, and the time position in which you want the to-do notes displayed in calendar views.Calendar filesYou can have more than one calendar file in use.• To create a new calendar file, press Menu, and select File → More options → New calendar…. Select a location for thecalendar file and enter a name for it. Press OK.• To open another calendar, press Menu, and select File → More options → Open calendar….• To save the currently open calendar file as a new file, press Menu, and select File → More options → Save as…. Select alocation for the new file and enter a name for it. Press OK.• To add the contents of a calendar file to the currently open calendar, press Menu, and select File → More options → Import…. Browse for the calendar file whose contents you want to import.CalendarCopyright © 2004 Nokia. All Rights Reserved. 59
13. Instant messagingThis is the feature definition. It is a factual definition of the feature.IM cshelp 2IM cshelp 3IM cshelp 4IM cshelp 5IM cshelp 6IM cshelp 7IM cshelp 8IM cshelp 9IM cshelp 10IM cshelp 11IM cshelp 12Copyright © 2004 Nokia. All Rights Reserved. 60
14. File managerIn File manager, you can manage the contents and properties of files and folders.Go to Desk → Office → File manager.On the left frame of the File manager view, you can browse and select folders. To expand and collapse folders, press thescroll key right and left. On the right frame you can open subfolders and files. To move up one folder level, select  , andpress Open. To move from one frame to another, press the tab key.Managing files and folders• To open a folder, select the folder, and press Open. A view of all the subfolders and files of the parent folder opens. Toopen a subfolder, select the folder, and press Open. To open the upper-level folder, select  , and press Open. Press Closefolder to return to the main view.• To open a file, select the file, and press Open. The appropriate application opens the file. Note that you can open only onefile at a time.Tip: To view hidden files, press Menu, and select View → Show all files.• To create a new file or folder, move to the location where you want to create the new file or folder, press Menu, andselect File → New folder or New file…. Enter the name, and press OK.• To move or copy files or folders, select the file or folder, press Menu, and select Edit → Cut or Copy. Then move to thelocation where you want to place the file or folder, press Menu, and select Edit → Paste.Tip: You can also move files or folders by pressing Move.• To rename files or folders, select the file or folder, press Menu, and select File → Rename. Enter the new name, andpressRename. It is recommended that you do not change the names of the default folders. Default folders are folders thatthe device creates during the first start-up, such as C:\My files\ and C:\My files emplates\.• To delete files or folders, select the file or folder, and press Delete.• To view and modify properties of a file, folder, or drive, select the file, folder, or drive, press Menu, and select File → Properties…. To prevent the file or folder from being edited, select the Read-only field, and select Yes. To change a file intohidden state, select the Hidden field and Yes.• To add a shortcut to Desk, select the file or folder, press Menu, and select File → Add to Desk…. Select the applicationgroups to which you want to add the shortcut.• To sort files and folders, press Menu, and select View → Sort by or Sorting order. Select one of the available options.• To send a file, select the file, press Menu, and select File → Send. Select the method of sending.• To modify File manager settings, press Menu, and select Tools → Settings…. You can define whether you want to be ableto browse the system directory and all its folders and files in File manager.Tip:  It is advisable to hide the system directory so that you cannot accidentally delete or move important systemfiles and risk causing software to malfunction.• To search for files and folders, press Menu, and select Tools → Find…. Enter the text that is included in the name of the fileor folder you are looking for, and press Find. To change the location or refine the search criteria, press Options. To findfiles and folders, use the following options:• wildcards: ? for any character and * for any string• operators: AND, OR, NOT• quotes: for example, "mobile phone" searches only for this phraseIn the Results of Find view, you can open and delete the files and folders found, as well as move, copy, rename, and sort them.Memory card security• To protect the memory card with a password, press Menu, and select Memory card → Security → Change password….Enter the current password (if already set); then enter the new password, confirm it, and press OK. The password is up to8 characters long, and it is asked for each time someone tries to access the memory card.Tip: The password is case-sensitive, and you can use upper and lowercase letters. You can also use numbers.Copyright © 2004 Nokia. All Rights Reserved. 61
• To remove the memory card password, press Menu, and select Memory card → Security → Remove password…. Enter thecurrent password, and press Remove.• To format a memory card, press Menu, and select Memory card → Format memory card…. All memory card data ispermanently deleted.• To back up or restore data to or from a memory card, press Menu, and select Memory card → Backup to memory card… orRestore from memory card….File managerCopyright © 2004 Nokia. All Rights Reserved. 62
15. Camera and ImagesCameraYou can take photos or record video clips with the built-in camera.The camera lens is on the back of the device, and the display of the cover phone works as a viewfinder. The camera producespictures in JPEG format and video clips in 3GPP format.• To open the Camera application, switch on the phone, and select Menu → Camera on the cover phone.Tip: To quickly open the camera viewfinder, press the scroll key up in standby mode. To quickly change the cameramode, for example, to video mode, press the scroll key left or right.You can view and modify photos in Images. See Images on page 64.Taking a picture1. On the cover phone, press Menu → Camera.2. If the light is dim, press Options → Switch mode, and select Night mode. Select Portrait photo to take smaller picturesthat take up less memory and can be attached to contact cards.3. Use the display as a viewfinder, aim at your subject, and press Capture. The device saves the photo in the default folder, orin the folder you have defined in Control panel.Tip:  To zoom in or out before taking a picture, press the scroll key up or down.4. If you do not want to keep the saved photo, press Delete. Press Back to return to the viewfinder to take another picture.Press Options, and select Open in Images to view the photo in the communicator interface.You can change the folder where the pictures are saved. See Camera folders on page 73.• To adjust the brightness or contrast, press Options and select Brightness or Contrast. Press the scroll key left or right todecrease or increase the brightness or contrast.• To set the picture you have taken as wallpaper, press Options → Set as wallpaper. Select Desk if you want the picture toappear in the Desk view, and select Cover if you want to add a background image to the cover phone display.Recording a video clip1. On the cover phone, press Menu → Camera.2. Press Options, and select Switch mode → Video.3. To start recording a video clip, press Record. The remaining recording time is shown on the top of the display. To pausethe recording, press Pause; to resume the recording, press Continue.4. To stop the recording, press Stop. The device saves the recording in the default folder, or in the folder you have defined inControl panel.5. If you do not want to keep the saved video clip, press Delete. Press Back to return to the viewfinder to record anothervideo clip. Press Options and select Open in RealPlayer to view the video clip in the RealPlayer application.You can change the folder where the video clips are saved. See Camera folders on page 73.• To mute or unmute the microphone, press Options, and select Mute or Unmute.• To adjust the brightness or contrast, press Options, and select Brightness or Contrast. Press the scroll key left or right todecrease or increase the brightness or contrast.Camera settings• To edit the camera settings, press Options, and select Settings.Define the following:•Image quality—Define how much the photo will be compressed when saving the image. High provides the best imagequality but takes more memory.•Video clip length—Select the length of the video clips that you record. The maximum length of a video clip isapproximately 1 hour, depending on the available memory. Default records video clips up to 100 KB, which is about 10seconds long. Only video clips that are of default length or shorter can be sent in a multimedia message.•Camera sounds—Define whether you want the camera to make a shutter sound when taking pictures.•Default title—Define the title that is used when saving a photo or video clip. If you select Automatic, the default title isused. If you select My title, you can key in a new title, or edit an existing one.Copyright © 2004 Nokia. All Rights Reserved. 63
ImagesGo to Desk → Media → Images.Images consists of two different views:• In the image browser view you can, for example, organize, delete, and rename images stored in your device or memorycard. The images can be displayed either as thumbnails or as a list of file names.• In the image viewer, which opens when you select an image in the image browser view and press Open, you can view,edit, and send individual images. Note that TIFF and animated GIF files cannot be edited.The following file formats are supported: JPEG, BMP, PNG, GIF 87a/89a, and TIFF/F (monochrome). The device does notnecessarily support all variations of the aforementioned file formats.Viewing images• To open an image for viewing, select an image in the image browser view, and press Open. The image opens in the imageviewer.• To open the next or previous image for viewing, press Menu, and select Go to → Next image or Previous image, or pressCtrl+F for the next image or Ctrl+B for the previous image.• To enlarge or reduce the viewed image on the display, press Menu, and select View → Zoom → Zoom in or Zoom out.• To view the image in full screen size, press Full screen. To return to normal view, press Menu, select View, and unselect Fullscreen. If you want the images to always open in full screen size, press Menu, and select Tools → Settings…. In the Alwaysopen image in full screen field, select Yes.Tip: To switch between the full screen and normal view, press Ctrl+T. In full screen mode, press any of thecommand buttons to display the commands.Editing images• To rotate an image, select an image, and press Open. Press Menu, and select Tools → Rotate. The image is rotatedclockwise by 90 degrees.• To flip an image horizontally or vertically, select an image, and press Open. Press Menu, and select Tools → Flip → Fliphorizontally or Flip vertically.• To crop an image, select an image, and press Open. Press Menu, and select Tools → Crop…. Press + or - to increase ordecrease the size of the selected area, or press Ctrl and scroll up, down, left, or right to change the shape of the selectedarea. To move the area selector inside the image, scroll up, down, left, or right. Press Crop to crop the image. The extraspace around the area selector is removed.• To resize an image, select an image, and press Open. Press Menu, and select Tools → Resize…. Select a percentage, orselect Custom size, and define the size yourself. If you want to zoom the image so that there are no empty margins at thesides of the screen, select Best fit. This option is useful when, for example, creating wallpaper for Desk. Note that theaspect ratio of the image cannot be changed when you select Best fit.Managing image filesCopyright protections may prevent some images, ringing tones, and other content from being copied, modified, transferredor forwarded.• To view detailed information about an image, select an image, press Menu, and select File → Properties…. Name, size,and format of the file; the time and date the file was last modified; and the resolution of the image in pixels aredisplayed. To prevent the image from being modified, select the Attributes page, and select Read-only and Yes.• To send an image, select the image, press Menu, and select File → Send, and the method to send.• To change the file format, select an image, and press Open. Press Menu, and select File → Save → Save as…. Press Change.Select the new file format, and press Done. Press OK to save the file.• To rename an image, select an image, press Menu, and select File → Rename…. Enter a new name, and press OK.• To make a copy of an image, select the image, press Menu, and select File → Duplicate….• To view images as a list of file names or as thumbnails, press Menu, and select View → Show as → Thumbnails or List.• To set an image as wallpaper, select the image, press Menu, and select Tools → Set as wallpaper. Select Desk if you wantthe image to appear in the Desk view, and select Cover if you want to add the background image to the cover phonedisplay.• To add an image to a contact card, select an image, press Menu, and select Tools → Add to contact card…. Press + or - toincrease or decrease the size of the selected area. To move the area selector inside the image, scroll up, down, left, orCamera and ImagesCopyright © 2004 Nokia. All Rights Reserved. 64
right. Press Menu, and select an option to zoom, rotate, or flip the image. When the image is ready, press Add. Select thecontact card to which the image is added, and press Done.Camera and ImagesCopyright © 2004 Nokia. All Rights Reserved. 65
16. Control panelIn Control panel, you can define and modify various settings of your device. Modifying these settings affects the operation ofyour device across several applications.Go to Desk → Tools → Control panel.Control panel, main view• To open an application in Control panel, select one of the folders in the left frame, then the appropriate item in the rightframe.• To zoom in on the Control panel view, press Menu, and select View → Zoom in.Internet setupGo to Desk → Tools → Control panel, and select Connections → Internet setup.To connect to the Internet, you need an Internet access point.For connecting to the Internet over GPRS, the device has predefined, default Internet access point settings. You can createnew Internet access points yourself, or you may receive your Internet access point settings in a message from your serviceprovider. This might reduce the number of settings you need to enter yourself, or eliminate the need altogether.The exact values for the settings are usually provided by your service provider. Follow the instructions given to you by yourservice provider very carefully.Tip: You may need to set up several Internet access points, depending on the sites you want to access. For example,browsing the Web may require one setup, and accessing your company intranet may require another connection.Setting up an Internet access point1. Select Connections → Internet setup.2. Press New. You can use an existing Internet access point as a basis for the new one: after you have pressed New, press Yes.Select the access point from the list, and press OK.3. Define the settings.•Internet settings name—Enter a descriptive name for the connection.•Internet settings type—Select the connection type. Depending on which connection you select, only certain settingswill be available during the setup process.•Network ID—Select the network ID according to the destination network you want to access with the Internet accesspoint. You can rename, and create new network IDs. Using the correct network ID ensures that the data traffic is routeddirectly to the desired destination network. Especially VPN (virtual private network) software may restrict data trafficfor a certain destination network. Network ID can be used to filter Internet access points when establishing an Internetconnection.•GPRS access point name (for GPRS only)—If you are not using a default Internet access point, define a name for theaccess point. You can obtain the name from your network operator or service provider.•Telephone number (for GSM data only)—Type the modem telephone number of the Internet access point.•Password prompt—Change this to Yes if you must write a new password every time you log on to a server, or if you donot want to save your password to the device.•User name—Type a user name if required by the service provider. The user name may be needed to make a dataconnection, and is usually provided by the service provider. The user name is often case-sensitive.•Password—A password may be needed to connect to the Internet, and is usually provided by the service provider. Thepassword is often case-sensitive.4. After defining the settings, press Advanced to define advanced settings, if necessary. Otherwise, press Finish or Done toexit the setup wizard.Configuring advanced Internet access point settingsPress Advanced when you have finished setting up the basic Internet access point settings. The pages and options availabledepend on the connection type you have selected.Copyright © 2004 Nokia. All Rights Reserved. 66
IP configuration pageNote that the two protocols (IPv4 and IPv6) require slightly different settings.•Network type (for GPRS only)—For a GPRS connection you must specify which protocol you want to use.•Auto retrieve IP—If you select Yes, the IP address is obtained automatically from the server. This setting is also calleddynamic IP address.•IP address—The IP address of the device. If the IP address is obtained automatically, you are not required to enter detailshere.•Auto retrieve DNS—If you select Yes for the IPv4 protocol, the DNS (domain name server) address is obtainedautomatically from the server. The respective value for the IPv6 protocol is Well known. DNS is an Internet service thattranslates domain names such as www.nokia.com into IPv4 addresses like 192.100.124.195, or IPv6 addresses like3ffe:2650:a640:1c2:341:c39:14. If you select No for the IPv4 protocol, or Manual for the IPv6 protocol, you must specify theIP addresses for the primary and secondary DNS servers.Proxies pageYou may want to use a proxy to quicken access to the Internet. Some Internet service providers require the use of Webproxies. Contact your Internet service provider to determine proxy details.If you have made an Internet connection to your company’s intranet, and are unable to retrieve Web pages from the generalInternet, you may need to set up a proxy server to retrieve Web pages outside your company’s intranet.Define the following:•Proxy protocol—Select the protocol type of the proxy. You can set different proxy settings for each protocol.•Use proxy server—Select Yes to use the proxy server.•Proxy server—Enter the IP address of the proxy server, or the domain name. Example domain names are: company.comand organisation.org.•Port number—The number of the proxy port. The port number is related to the protocol. Common values are 8000 and8080, but vary with every proxy server.•No proxy for—Define the domains for which the HTTP or HTTPS proxy is not needed.Data call pageDefine the following:•Connection type—Define the GSM data call type. To use High speed, the service provider must support this feature, and ifnecessary, activate it for your SIM card.•Remote modem type—Define whether the device uses an analog or digital connection. This setting depends on both yourGSM network operator and Internet service provider, because some GSM networks do not support certain types of ISDNconnections. For details, contact your Internet service provider. If ISDN connections are available, they establishconnections more quickly than analog methods.•Modem speed—This option allows you to limit the maximum connection speed. Higher data rates may cost more,depending on the service provider. The speed represents the maximum speed at which your connection will operate.During the connection, the operating speed may be less, depending on network conditions.•Modem initialization—You can control your device using modem AT commands. If required, enter characters specified byyour service provider.Script pageA script can automate the connection between the device and the server. Contact your Internet service provider to find outwhether you need a script.Define the following:•Use login script—If you select Yes, you can write or import a login script. You can edit the script in the Login script field.•Show terminal window—If you select Yes, once a connection is established, you see the execution of the script.Other pageDefine the following:•Use callback—Select Yes if you have a service that dials back to your device when you establish an Internet connection.•Callback type—Ask your Internet service provider for the correct setting. Server number refers to the standard Microsoftcallback, and Server number (IETF) refers to a callback approved by the Internet Engineering Task Force. Select Number touse a number that you define in the Callback number field.•Callback number—Enter the data call phone number of your device, which the callback server uses.•Allow plain text login—Select No, if you never want to send your password as plain text without encryption. Note thatthis option only affects PPP connections; e-mail and Web passwords are not encrypted. Some Internet service providersrequire that this option is set to Yes.Control panelCopyright © 2004 Nokia. All Rights Reserved. 67
•Use PPP compression—Select Yes to speed up the data transfer, if it is supported by the remote PPP server. If you haveproblems establishing a connection, select No.Setting up an Internet access point for a wireless LANYour device has a predefined Internet access point for a wireless LAN, but you can create new Internet access points yourself.1. Select Connections → Internet setup.2. Press New. You can use an existing Internet access point as a basis for the new one: after you have pressed New, press Yes.Select the access point from the list, and press OK.3. Define the settings.•Internet settings name—Enter a descriptive name for the Internet access point.•Internet settings type—Select Wireless LAN as the connection type.•Network ID—Select the network ID according to the destination network you want to access with the Internet accesspoint. You can rename and create new network IDs. Using the correct network ID ensures that the data traffic is routeddirectly to the desired destination network. Especially VPN (virtual private network) software may restrict data trafficfor a certain destination network. Network IDs can be used to filter Internet access points when establishing anInternet connection.•Network mode—If you select the Infrastructure mode, devices can communicate with each other and with wired LANdevices through a wireless LAN access point. If you select the Ad hoc mode, devices can send and receive data directlywith each other. No wireless LAN access point is needed.•Network name—Type the network name (SSID - service set identifier) as defined by the system administrator, or pressChange, and select one from the list. In the ad hoc mode, the users themselves name the wireless LAN. If you do notspecify the network name here, you are asked to select a network when you establish a wireless LAN connection.•Security mode—You must select the same security mode that is used in the wireless LAN access point. If you selectWEP (wired equivalent privacy) or WPA (Wi-Fi protected access), you must configure additional settings, too.4. After defining the settings, press Advanced to define advanced settings, if necessary. Otherwise, press Finish or Done toexit the setup wizard.Configuring advanced Internet access point settingsPress Advanced when you have finished setting up the basic Internet access point settings.The pages and options available depend on the settings you have chosen. Ask your system administrator for the correctvalues.IP configuration pageNote that the two protocols (IPv4 and IPv6) require slightly different settings.•Auto retrieve IP—If you select Yes, the IP address is obtained automatically from the server. This setting is sometimes alsocalled dynamic IP address. If you select No, you must specify the IP address, subnet mask, and default gateway in the fieldsbelow.•Auto retrieve DNS—If you select Yes for the IPv4 protocol, or DHCP for the IPv6 protocol, the primary and secondary DNS(domain name server) addresses are obtained automatically from the server. DNS is an Internet service that translatesdomain names such as www.nokia.com into IPv4 addresses such as 192.100.124.195, or IPv6 addresses like 3ffe:2650:a640:1c2:341:c39:14. If you select No for the IPv4 protocol, or Manual for the IPv6 protocol, you must specify the IPaddresses for the primary and secondary DNS servers.Proxies pageYou may want to use a proxy to quicken access to the Internet. Note also that some Internet service providers require theuse of Web proxies. Contact your Internet service provider to determine proxy details.If you have made an Internet connection to your company’s intranet, and are unable to retrieve Web pages from the generalInternet, you may need to setup a proxy server to retrieve Web pages outside your company’s intranet.Define the following:•Proxy protocol—Select the protocol type of the proxy. You can set different proxy settings for each protocol.•Use proxy server—Select Yes to use the proxy server.•Proxy server—Enter the IP address of the proxy server, or the domain name. Example domain names are: company.comand organisation.org.•Port number—The number of the proxy port. The port number is related to the protocol. Common values are 8000 and8080, but vary with every proxy server.•No proxy for—Define the domains for which the HTTP or HTTPS proxy is not needed.Control panelCopyright © 2004 Nokia. All Rights Reserved. 68
WPA pageIn the WPA mode field, select 802.1X if you want to use an EAP module for authentication. If you select Pre-shared key, typethe password (also called a master key) in the field below. Note that the same key must be entered in the wireless LANaccess point.EAP pageYou can configure various EAP (extensible authentication protocol) modules that are used for authentication and dataencryption. Note that corresponding values must be entered in the wireless LAN access point. EAP authentication is onlyavailable if you have selected WPA or 802.1x as the security mode.For instructions on editing the EAP module settings, see the Help function in the device.WEP pageYou can create up to four WEP keys. Corresponding values must be entered in the wireless LAN access point.•WEP authentication—Select Open or Shared as a means of authentication between the wireless device and the wirelessLAN access point.•WEP key in use—Select the WEP key you want to use with the Internet access point you are creating.•Key #1 length—Select the appropriate key length. Supported key lengths are 40, 104, and 232 bits. The more bits thereare in the key, the higher the level of security. WEP keys consist of a secret key and a 24-bit initialization vector. Forexample, some manufacturers refer to the 104-bit key as a 128-bit key (104+24). Both keys offer the same level ofencryption and are therefore interoperable.•Key #1 type—Select whether you want to enter the WEP key data in hexadecimal format (HEX) or in text form (ASCII).•Key #1 data—Enter the WEP key data. The number of characters you can enter depends on the key length you havechosen. For example, keys that are 40 bits long always consist of 5 alphanumeric characters or 10 hexadecimal characters.EAP modulesEAP modules are used in a wireless LAN to authenticate wireless devices and authentication servers.Note that the network must support this feature.Modifying the EAP-SIM settingsTo use EAP-SIM authentication, the cover phone must be switched on, and the device must have a valid SIM card installed.• To modify EAP-SIM settings for the Internet access point, select ConnectionsInternet setup. Select a wireless LAN Internetaccess point from the list, and Edit → Advanced. Select the EAP page. Select EAP-SIM from the list, and press Configure.Define the following:•Use manual user name—This setting overrides the user name in the initial identity response in a case when the serverrequires that the user performs the initial identification with a predefined user name, for example, with a Windows username. If you select Yes but leave the User name field empty, a random user name is generated for initial identity response.•Use manual realm—This setting overrides the realm of the initial identity response in a case when the server requiresthat the user performs the initial identification with a predefined realm. If you select No, the realm is derived from theIMSI (international mobile subscriber identity).•Use identity privacy—The EAP-SIM can have the server send a pseudonym identity for future authentications. This identityprevents the user's IMSI from being sent.•Maximum reauthentication count—The EAP-SIM can have the server send the wireless device a reauthentication identitythat can be used to speed up the upcoming authentications. You can specify how many times a single reauthenticationmechanism can be used until full authentication must be performed. If the reauthentications mechanisms are used toomany times, security may be compromised because the SIM card is not used in reauthentication.Modifying the EAP-TLS settings• To modify the EAP-TLS settings for an Internet access point, select Connections → Internet setup. Select a wireless LANInternet access point from the list, and press Edit → Advanced. Select the EAP page. Select EAP-TLS from the list, and pressConfigure.On the User certificates page, select which personal certificates are used for user authentication when using this Internetaccess point. This page shows all the installed personal certificates on the device. The certificates are enabled by default. Todisable a certificate, select the certificate, and press Disable.On the CA certificates page, select which authority certificates are valid for server verification in wireless LAN authenticationwhen using this Internet access point. This page shows all the installed authority certificates on the device. All certificatesare enabled by default. To disable a certificate, select the certificate, and press Disable.On the Cipher suites page, select which TLS (transport layer security) cipher suites you want to use with this Internet accesspoint. To enable a selected cipher suite, press Enable.On the Settings page, you can define additional settings related to EAP-TLS. For instructions on modifying these settings, seethe Help function in the device.Control panelCopyright © 2004 Nokia. All Rights Reserved. 69
Modifying the EAP-PEAP settings• To modify the EAP-PEAP settings for an Internet access point, select Connections → Internet setup. Select a wireless LANInternet access point from the list, and press Edit → Advanced. Select the EAP page. Select EAP-PEAP from the list, andpress Configure.On the User certificates page, select the personal certificates for user authentication when using this Internet access point.This page lists all personal certificates installed on the device. The certificates are enabled by default. To disable a certificate,select the certificate, and press Disable. On the CA certificates page, select which authority certificates are valid for serververification in wireless LAN authentication when using this Internet access point. This page shows all the installed authoritycertificates on the device. All certificates are enabled by default. To disable a certificate, select the certificate, and press Disable.On the Cipher suites page, select which TLS (transport layer security) cipher suites you want to use with this Internet accesspoint. To enable a selected cipher suite, press Enable.On the EAP types page, select and configure the authentication methods you want to run inside the EAP-PEAP method. PressPriority, and then Move up and Move down to change the priority order of the tunneled EAP types.On the Settings page, you can define additional settings related to EAP-PEAP. For instructions on modifying these settings,see the Help function in the device.Modifying the EAP-LEAP settings• To modify the EAP-LEAP settings for an Internet access point, select Connections → Internet setup. Select a wireless LANInternet access point from the list, and press Edit → Advanced. Select the EAP page. Select EAP-LEAP from the list, andpress Configure. If you enter your user name in the Username field, you need not give the user name during anauthentication session. If you do not want to be asked for the password, select No in the Password prompt field, and enterthe password in the Password field.Note that if you select No in the Password prompt field, the password is stored in the device, and this decreases the level ofsecurity.Configuring Internet connection settingsThese settings affect all Internet connections.• To configure common Internet connection settings, select Connections → Internet setup. Select the Idle page, and definethe time period after which the connection ends automatically and returns to standby mode if not used. You can specify adifferent time for each connection type, but the setting affects all Internet access points using that connection type.Some Internet connections may appear inactive, but they may still be sending and receiving data in the background. Theseconnections may postpone the closing of the connection.Select the Other page, and define the settings.•Ask before connecting—If you select Yes, a dialog appears every time you connect to the Internet, asking you to confirmthe connection or to change the Internet access point.•GPRS operating mode—Select Always on to keep the GPRS connection in alert mode and to switch the packet datatransfer on quickly when needed. If you select On when needed, the device uses a GPRS connection only when you start anapplication or action that needs it. Note that if there is no GPRS coverage and you selected Always on, the device willperiodically try to establish a GPRS connection.• To change the priority of Internet access points, select Connections → Internet setup. Press Priority, select an Internetaccess point, and press Move up or Move down. When you establish a data connection, the access points are searched forin the order you have specified.Selecting an Internet access pointWhen you establish an Internet connection, you are asked to select the Internet access point you want to use for thatconnection. In the Network connection dialog, select an Internet access point from the list, and press Connect. Beforeconnecting, you can filter the list of access points according to the network type. To view all Internet access points, select Allnetworks. To view Internet access points that are currently available, press Show available. For example, if you are using theOffline profile, no GPRS or GSM Internet access points are shown in the list.Tip: The Network connection dialog opens only if you have selected Yes in the Ask before connecting field in thegeneral Internet access point settings. To check the status of the setting, select Desk → Tools → Control panel, andConnections → Internet setup → Other page.GeneralGo to Desk → Tools → Control panel → General.Date and timeYou can change the time and date used by applications such as Calendar and Clock.Control panelCopyright © 2004 Nokia. All Rights Reserved. 70
• To set the current time and date, select General → Date and time, select the Time and Date fields, and enter the numbers.When setting the date, you can also press Browse to open a month grid where you can select a date.• To update date and time automatically, select General → Date and time. In the Auto time update field, select On. The time,date, and time zone information is updated to your device from the mobile phone network (network service). If the timezone changes, the current city also changes in the Clock application, and starting and ending times of your calendarentries are shown in local time. For the setting to take effect, the phone needs to be restarted.Tip: Check any alarms and scheduled calendar entries, as these may be affected by Auto time update.• To use daylight saving, select General → Date and time. In the Daylight-saving field, select On to use the system's daylightsaving time. Note that you cannot activate daylight saving if you have selected On in the Auto time update field.Tip: To change the time and date format, select General → Regional settings. Modify the settings on the Time andDate pages.Regional settingsYou can define the format for the local time, date, numbering, and currency.• To define regional settings, select General → Regional settings, and select the appropriate page.Time pageDefine the following:•Time format—Select the 12-hour or 24-hour clock system.•AM/PM format—If you selected the 12-hour clock format in the previous field, choose the way the 12-hour clock isexpressed.•Separator—Select the symbol that separates hours and minutes.Date pageDefine the following:•Date format—Choose the order of days, months, and years.•Separator—Select the symbol that separates days, months, and years.•First day of the week—Change the first day of the week.•Working days—Define which are the working days of the week.Numbers pageDefine the following:•Decimal point—Select the sign that is used as a decimal point.•Thousands separation—Select whether you want to use separation between thousands.•Thousands separator—Select the sign that is used to separate thousands and hundreds.•Measurement units—Select either metric or nonmetric units for length measurement.Currency pageDefine the following:•Currency symbol—Enter the symbol for the used currency.•Decimal places—Define the number of decimal figures used in currency numbers.•Symbol position—Define the position and spacing of the currency symbol and the number of currency units.•Negative value format—Define how a negative amount of currency is expressed.Telephone language• To change the language of the device, select General → Telephone language. Select the new language from the list, andpress Done. Press Reboot to restart the device.My own key• To select the application that opens when you press the My own key, select General → My own key. Press Select, select theapplication, and press Done.Display• To define the contrast and brightness of the display, select General → Display.Define the following:Control panelCopyright © 2004 Nokia. All Rights Reserved. 71
•Contrast level—Press + or - to increase or decrease the difference between the lightest and darkest areas on the screen.•Brightness—Press + or - to increase or decrease the amount of white the colors contain.•Brightness period—Select a time period after which the display is dimmed if the device remains inactive.•Screen saver—Select a time period after which the display is automatically switched off if there have been no key presseswithin that time.Tip: You can adjust brightness also by pressing Chr+space bar.• To define the color set for the dialogs and controls, select General → Display. On the Color page, select the Color palettefield, select one of the color sets, and press Done.• To define the cursor speed and acceleration, select General → Display, and select the Cursor settings page. Specify howfast the cursor moves, and how much it accelerates as you move it faster.Wallpapers• To change the background image of the communicator interface, select General → Wallpapers. Select the Desk page, andin the Wallpaper field, select Yes. Select the Image file field, and press Change. Pre-installed wallpapers are shown in theSelect wallpaper dialog. To search for other files, press Browse. Note that by default only image files are shown. To viewother types of files, press Show all files. To view the selected image, press Preview.Similarly, you can change the background image of the cover phone display on the Cover page.Enhancement settings• To let the device answer phone calls automatically when an enhancement is in use, select General → Enhancementsettings, select Headset, Loopset, or Car kit from the list, and press Edit. In the Automatic answer field, select On.• To select the profile that is activated when you attach an enhancement to your device, select General → Enhancementsettings, select Headset, Loopset, Car kit, or TTY from the list, and press Edit. Change the profile in the Default profile field.To select the currently active profile, select Active.• To keep the light of the cover phone switched on when the device is attached to a car kit, select General → Enhancementsettings, select Car kit from the list, and press Edit. In the Cover display lights field, select Always on.• To activate TTY/TDD (teletype device for deaf), select General → Enhancement settings, select TTY from the list, and pressEdit. In the TTY active field, select Yes.Data managementGo to Desk → Tools → Control panel → Data management.Application managerIn Application manager, you can view the details of installed applications or remove them from your device. You can alsospecify installation settings.You cannot install applications in Application manager. See Installing applications and software on page 17.When you open Application manager, the Installed software page lists all of the software packages that have been installed,with their name, version number, type, and size.• To view the details of an installed software package, select Data management → Application manager, and select theInstalled software page. Select an application or a component from the list, and press Details.• To uninstall applications or components, select Data management → Application manager. Select the software from thelist, press Remove, and confirm the removal. Note that some software packages update existing software, and after theinstallation you may only be able to remove the whole software package, not the update.Note that if you remove software, you can only reinstall it by using the original software package file, or by restoring a fullbackup that contains the removed software package. If you remove a software package, you may no longer be able to openfiles created with that software. If another software package depends on the software package that you removed, the othersoftware package may stop working. Refer to the documentation of the installed software package for details.• To view the installation log, select Data management → Application manager, and select the Install log page. A list showswhat software has been installed and removed, and the date of installation or removal. If you encounter problems withthe device after installing a software package, you can use this list to find out which software package may be the causeof the problem. The information in this list may also help to pinpoint problems that are caused by software packages thatare incompatible with each other.• To save the contents of the installation log, select Data management → Application manager, and select the Install logpage. Press Copy, and open the application where you want to paste the contents.Control panelCopyright © 2004 Nokia. All Rights Reserved. 72
Modifying installation settings• To modify installation settings, select Data management → Application manager, and select the Preferences page. You canselect options related to software installation.•Delete the source file after installation?—If you select Yes, the software package installation file is deleted from the deviceafter installation. If you download software packages using the Web browser, this may help to reduce the amount ofstorage space required. If you want to store the software package file for possible reinstallation, do not select this option,or make sure that you have a copy of the software package file stored on a compatible PC or on a CD-ROM.•Enable online certificate checking?—If you select Yes, the certificate of the file is verified during installation.•Web address for online certificate checking—Enter the Web address of the site that checks online certificates.•Preferred language—If the software package contains several language versions of the software, select the languageversion that you want to install.•Install application—Specify what kind of applications you want installed. If you select Only certified, only applicationswith validated certificates can be installed. Note that this setting applies only to Symbian operating system applications(SIS files).Setting Java application security settings• To modify the security settings of a Java application, select Data management → Application manager, and select theInstalled software page. Select a Java application from the list, and press Details. On the Network permissions and Privacypermissions pages, you can allow or restrict access to certain functions of the application.Camera folders• To change the folders where photos and video clips are saved, select Data management → Camera folders. In the Imagesfield, select a folder for photos, and in the Video field, select a folder for your video clips. The photos you take and thevideo clips you record are saved automatically in these folders.BackupSee Backup on page 16.Memory• To view memory consumption, select Data management → Memory. You can view the amount of free memory and thememory consumption of different items on your device and memory card.• To switch between device memory and memory card statistics, select Data management → Memory, and press Device orMemory card.Tip: To avoid memory getting low, you should regularly delete or transfer data to a memory card or PC.Messaging tools• To automatically empty the Sent folder in Messaging, select Data management → Messaging tools, and select Sent itemsstorage. Set Delete sent items to automatically, and enter the number of days after which the device empties the folder.• To delete messages from the device, select Data management → Messaging tools. Select Delete e-mails locally, and selectthe e-mail you want to delete. For example, you can delete all e-mail, or only e-mails that are more than two weeks old.Press Delete now to delete the messages.See Avoiding low memory on page 33.TelephoneDesk → Tools → Control panel → Telephone.•1-touch dials—See 1-touch dialing on page 28.•Voice call forwarding—See Call forwarding on page 29.•Voice call restriction—See Call restriction on page 29.•Voice mailboxes—See Voice mailbox settings on page 30.•Other settings—See Call, network, and phone line settings on page 30.Profile settingsYou can adjust and customize the device tones for different events, environments, or caller groups.• To modify a profile, select Telephone → Profile settings. Select a profile in the list, and press Edit. To create a new profile,press New. Define the settings on the different pages of the Profile settings dialog. Note that not all settings can bechanged for all profiles.Control panelCopyright © 2004 Nokia. All Rights Reserved. 73
Define the following:•Name—You can rename a profile, and give it any name you want. The Normal and Offline profiles cannot be renamed.•Ringing type—If you select Ascending, the ringing volume starts from level one and increases level by level to the setvolume level.•Ring tone—Press Change to select a ringing tone from the list. If the sound file is located on the memory card or inanother folder, press Browse to search for the file. To listen to the selected tone, press Play. If you have two alternatephone lines in use, you can specify a ringing tone for each line.•Personal tones—Select On if you want to use the personal ringing tones of callers that you have set in Contacts.•Clock alarm—Select an alarm tone that is used with the alarm clock. Similarly, you can specify an alarm tone for calendaralarms and received text, multimedia, and fax messages.•Keyboard tone—Set the volume level of the communicator keyboard.•Telephone keypad tone—Set the volume level of the phone keypad.•Notification tones—Set the tones made by the device when, for example, the battery is running out of power.•Play ring tone for—You can set the phone to ring only upon calls from phone numbers that belong to a selected contactgroup. Phone calls coming from outside that group will have a silent alert.Data call and fax call diverting (network service)Call diverting allows you to direct your incoming data and fax calls to another phone number.• To divert data or fax calls, select Telephone → Data call forwarding or Fax call forwarding.Define the following:•Forward all calls—When activated, all incoming calls are diverted.•Forward if busy—When activated, incoming calls are diverted if you are engaged in another call.•Forward if out of reach—When activated, incoming calls are diverted when the device is switched off or outside thenetwork service area.•Forward if not answered—When activated, incoming calls are diverted if you do not answer them within a certain timeperiod.•Forward if not available—In a single action, this option activates the following: Forward if busy, Forward if out of reach,and Forward if not answered.• To check whether the divert is active, select Telephone → Data call forwarding or Fax call forwarding, select the divertoption, and press Check status.• To cancel all data or fax call diverts, select Telephone → Data call forwarding or Fax call forwarding, and press Cancel all.MessagingGo to Desk → Tools → Control panel → Messaging.See Editing fax settings on page 40.See Multimedia message account settings on page 39.See Text message settings on page 37.Service message• To edit reception and authentication settings for service messages, select Messaging → Service message. In the Reception:field, select Yes if you want to receive all service messages to your Inbox. Select No to ignore all service messages.ConnectionsGo to Desk → Tools → Control panel → Connections.•Internet setup—See Internet setup on page 66.•Bluetooth—See Bluetooth on page 85.Wireless LAN• To view the status of the wireless LAN connection, select Connections → Wireless LAN. On the Status page you can viewthe connection status, network name, and connection security and quality.• To view information on networks, wireless LAN access points, or ad hoc networks, select Connections → Wireless LAN, andselect the Networks page. In the Display field, select the network item you want, and press View details.•Networks—Select this to view the all the wireless LAN networks that can be accessed, and the signal strength of thatnetwork.•Access points—Select this to view the wireless LAN access points that are currently in range and available, and the radiofrequency channel they are using.Control panelCopyright © 2004 Nokia. All Rights Reserved. 74
•Ad hoc networks—Select this to view available ad hoc networks.• To view details on EAP (extensible authentication protocol) security modules, select Connections → Wireless LAN, andselect the Security page. The page contains a list of the installed EAP modules that are used in a wireless LAN to relay portaccess requests between wireless devices, wireless LAN access points, and authentication servers. Select a module, andpress View details. Each of these modules can be modified together with Internet access points.Specifying wireless LAN settingsYou can change settings that are common to all wireless LAN connections.• To modify general wireless LAN settings, select Connections → Wireless LAN, and select the Settings page.Define the following:•Background scan interval—Specify how often you want the device to scan for available networks. To reduce batteryconsumption, select Never. The wireless LAN icon is displayed in the indicator area when a network is found.•Simultaneous Bluetooth usage—Select Allowed if you want to be able to use a Bluetooth connection during a wireless LANconnection.• To modify advanced wireless LAN settings, select Connections → Wireless LAN. Select the Settings page, and pressAdvanced settings. Press OK.Define the following:•Automatic configuration—Select Off if you want to specify the advanced wireless LAN settings manually. Do not changethe settings manually unless you are sure how each setting affects system performance. System performance may dropdramatically if automatic settings are not used.•Ad hoc channel—Specify the radio frequency channel on which you want to set up an ad hoc network. Select Automatic ifyou want to be allocated an available channel automatically.•Long retry limit—Specify the maximum number of transmission attempts of a frame whose size is greater than the RTS(request to send) threshold.•Short retry limit—Specify the maximum number of transmission attempts of a frame whose size is less than or equal tothe RTS threshold.•RTS threshold—Determines the data packet size at which the wireless LAN access point issues a request to send beforesending the packet.•TX power level—Specify the power level used when transmitting data.• To use the original factory settings, press Restore defaults.Creating a basic Internet access point for a wireless LANYou can quickly create an Internet access point that contains all the basic settings. An Internet access point is needed toconnect to the Internet.• To create a basic Internet access point, select Connections → Wireless LAN, and select the Networks page. Select thenetwork or wireless LAN access point for which you want to create the Internet access point, and press Create accesspoint. Press OK, and you are asked for the WEP key or WPA settings if required by the network. If the network does notrequire these security settings, you are shown details on the new Internet access point. Press OK.For instructions on modifying the WEP key or EAP module settings, see the Help function in the device.You can also create an Internet access point in more detail. See Setting up an Internet access point for a wireless LAN onpage 68.Cable setup• To specify how the data cable is used, select Connections → Cable setup.Select from the following options:•PC Suite connection—Select this to use the data cable to connect to PC Suite.•IP passthrough—Select this to connect your device to a compatible PC and use the Internet or network connection of thePC.•IP passthrough overrides PC Suite—Select this to automatically terminate a PC Suite connection via data cable when youconnect your device to a compatible PC and use the Internet or network connection of the PC.RealPlayer settingsTo access streaming data, such as real-time audio and video, you must set network and proxy settings for the RealPlayerapplication.• To modify RealPlayer settings, select Connections → RealPlayer settings.On the Network and Proxy pages, define the following:Control panelCopyright © 2004 Nokia. All Rights Reserved. 75
•Connection timeout:—Specify how long RealPlayer waits before reporting a network connection failure. Increase the timeif you frequently receive a time-out error.•Server timeout:—Specify how long RealPlayer waits for a response from the media server before disconnecting.•Port range:—Specify the port range that is used for receiving data.•Use proxy:—Select Yes, if your Internet service provider requires that a proxy server is used to connect to the Internet.•Host address:—Enter the proxy server address.•Port:—Enter the port number of the proxy server.SecurityGo to Desk → Tools → Control panel → Security.Telephone securityYou can modify the security settings for the PIN code, automatic locking of the device, and changing of the SIM card. You canalso change the PIN code, PIN2 code, lock code, and restriction password.Avoid using codes that are similar to emergency numbers, such as 112, to prevent accidental dialling of the emergencynumber.Codes are shown as asterisks. When changing a code, enter the current code, and then the new code twice.Defining device lock settingsTo make an emergency call while the device is in the offline or flight profiles, you may need to enter the lock code andchange the device to a calling profile before making any call, including a call to an emergency number.• To define device lock settings, select Security → Telephone security, and select the Device lock page.Define the following:•Autolock period—You can set a time-out after which the device is automatically locked and can be used only if the correctlock code is entered. When the device is locked, calls may still be possible to the official emergency number programmedinto your device. You can also answer incoming calls.•Lock code—Press Change to change the lock code. The new code must be 5 to 10 digits long. The preset code is 12345. Toavoid unauthorized use of your device, change the lock code. Keep the new code secret and in a safe place separate fromyour device.•Lock if SIM chgd—You can set the device to ask for the lock code when an unknown SIM card is inserted into your device.The device maintains a list of SIM cards that are recognized as the owner's cards.•Allow remote locking—If you set this option to Yes, you can lock the device by sending a text message from anotherphone. To do this, you need the lock code.• To create a remote locking message, select Security → Telephone security. Set the option Allow remote locking to Yes,enter your lock code, and enter text for the remote locking message in the Message field. Confirm the message, and pressDone. The remote locking message can be 5 to 20 characters or digits long. Press Reboot to restart the device and for thechanges to take effect.Defining PIN code settings• To define PIN code settings, select Security → Telephone security, and select the PIN codes page.Define the following:•PIN code request—If you set this option to On, the PIN code is requested each time the phone is switched on. Note thatthis setting cannot be changed if the phone is switched off or if there is no valid SIM card inserted. Note also that someSIM cards do not allow you to turn off the PIN code request.•PIN code—Press Change to change the PIN code. The PIN code must be 4 to 8 digits long. Changing the PIN code requiresthat PIN code request is selected, the device is on, and that there is a valid SIM card inserted.•PIN2 code—Press Change to change the PIN2 code. The PIN2 code must be 4 to 8 digits long. The PIN2 code is required toaccess some functions, such as the fixed dialing settings, which must be supported by your SIM card.Changing the restriction password• To change the password used for restricting voice, fax, and data calls, select Security → Telephone security, and select theCall restriction page. Select the Restriction password field, and press Change. Enter the current code, and then the new codetwice. The restriction password must be four digits long.Certificate managerImportant:  Note that even if the use of certificates makes the risks involved in remote connections and softwareinstallation considerably smaller, they must be used correctly in order to benefit from increased security. Theexistence of a certificate does not offer any protection by itself; the certificate manager must contain correct,Control panelCopyright © 2004 Nokia. All Rights Reserved. 76
authentic, or trusted certificates for increased security to be available. Certificates have a restricted lifetime. IfExpired certificate or Certificate not valid yet is shown even if the certificate should be valid, check that the currentdate and time in your device are correct.Before changing any certificate settings, you must make sure that you really trust the owner of the certificate and that thecertificate really belongs to the listed owner.Digital certificates may be used for:• connecting to an online banking service or another site or remote server to transfer confidential information• reducing the risk of viruses or other malicious software, and checking the authenticity of software when downloadingand installing itManaging certificatesPersonal certificates are certificates that are issued to you. They are listed on the User page.Authority certificates are on theOther page. They are used by some services, such as banking, for checking the validity ofother certificates.• To add certificates, select Security → Certificate manager. Press Add to add a new certificate. You can then browse for thecertificate file. Press Delete to remove a selected certificate.• To check the authenticity of a certificate, select Security → Certificate manager. Select a certificate, and press View details.The Issued to: field identifies the owner of this certificate. Make sure that this is the name of the party to whom thecertificate belongs. The Fingerprint: field uniquely identifies the certificate. Contact the help desk or customer service ofthe owner of the certificate and ask for the MD5 fingerprint of the certificate. Compare the fingerprint with the one shownin the dialog. If they match, the certificate is authentic.Tip: Check the authenticity of a certificate each time you add a new certificate.• To change the trust settings of a certificate, select Security → Certificate manager. Select the certificate, press View details,and press Trust settings. Depending on the certificate, a list of the applications that can use the selected certificate isshown. Select an application field, and change the value to Yes or No. Note that you cannot change the trust settings of apersonal certificate.• To change the private key store password, select Security → Certificate manager, select the Password page, and pressChange password. Enter the current password, press OK, and enter the new password twice. You need the private keystore password when using personal certificates. The private key store contains the secret keys that come with personalcertificates.ExtrasGo to Desk → Tools → Control panel → Extras.About product• To view the version number of the software, select Extras → About product, and scroll to the bottom of the dialog.Location privacySome networks allow others to request the position of your device (network service). Note that a separate positioningmodule is needed for this service.• To set the device to accept or reject all position requests, select Extras → Location privacy, and select the Verificationpolicy field. Select Accept all or Decline all.Location request log• To view the location request log, select Extras → Location request log. The log shows a list of received location requests,displaying the name or phone number of the requester, time and date, and whether the request was accepted.Control panelCopyright © 2004 Nokia. All Rights Reserved. 77
17. Media applicationsGo to Desk → Media.RealPlayerCopyright protections may prevent some images, ringing tones, and other content from being copied, modified, transferredor forwarded.Go to Desk → Media → RealPlayer.RealPlayer plays video, sound, and media from the Internet. RealPlayer plays many formats, including: MPEG-4, MP4 (notstreaming), 3GP, RV, RA, RAM, and RM.RealPlayer does not necessarily support all the variations of a media file format.Playing media clipsYou can play video clips and sound files that are stored in device memory or on a memory card, transferred to your devicefrom e-mail or compatible PC, or streamed to your device over the Internet.The progress bar displays the playing time, position, and length of a media clip. During playback, video pauses while themain menu or any dialog is displayed. Video is centered horizontally and vertically in the video area. If video is too large tofill either the whole width or height of the video area, the video is resized before rendering to preserve the original aspectratio.• To play streaming media, browse to a media file on the Internet, and press Play. If a network connection problem causesa playback error, RealPlayer will attempt automatically to reconnect to the Internet access point.• To play stored media, press Play. Playback stops automatically.• To stop playback or streaming, press Stop. Buffering or connecting to a streaming site stops, playback of a clip stops, andthe clip rewinds to the beginning. The clip remains selected in the media clip list.• To view the video clip in full-screen size, press Menu, and select View → Full screen. This changes the size of the videoarea to normal or full screen.• To save a media clip, press Menu, and select File → Save clip as…. To save an Internet connection link, press Menu, andselect File → Save link as….• To change the size of a video clip, press Menu, and select View → Zoom in or Zoom out. Zooming increases the size of thevideo to cover the maximum video area possible while the aspect ratio is maintained, or returns the video to its originalsize.• To close RealPlayer, press Exit. Buffering or connecting to a streaming site stops and playback of a clip stops.Tip: To add a shortcut to a media clip, press Menu, and select File → Add to Desk…. This creates a shortcut to theselected media clip. You cannot make a shortcut to an unsaved file.Adjusting media volume• To change media volume, scroll up or down.• To turn off the sound, press Set volume → Mute. Press Unmute to turn on sound.Sending media clipsYou can select media clips to attach to a message, a document, or a slide presentation.• To send a media clip, press Menu, and select File → Send. Select a method to send the clip to another device, and pressInsert.• To cancel insert, press Cancel. The media clip does not return to the original application, and you may select another clip.Copyright © 2004 Nokia. All Rights Reserved. 78
Music playerWarning:  Do not hold the device near your ear when the loudspeaker is in use, because the volume may beextremely loud.Go to Desk → Media → Music player.Music player can play and organize music tracks and sound files. Music player supports several sound formats: MP3, WAV,MIDI, AMR, and AAC.Listening to musicWarning:  Listen to music at a moderate level. Continuous exposure to high volume may damage your hearing.Music player displays a music track list, volume, shuffle and repeat indicators, the current active mode, and a progress bar.The progress bar shows the playing time, position, and length of a track.• To select a music track, scroll up or down in the music track list.• To play a music track, or tracks in the current folder, press Play. Playback stops automatically when the last track in theplaying order is complete.• To sort music tracks, press Menu, and select View → Sort by. List tracks in the current folder by name, file name, date, orsize. Sorting affects the playing order of tracks in the current folder.• To select the previous or next track, press Menu, and select Go to → Previous track or Next track. The selected track isbased on the current sort order.• To play music tracks again, press Menu, and select Playback → Repeat. This loops playback of tracks in the current folderfrom the last track in the playing order back to the first track.• To play music in random order, select a folder, press Menu, and select Playback → Random.Tip:  When a track plays, scroll left to seek backward or right to seek forward.Managing music tracks• To save music, press Menu, and select File → Save as…. Save music on a memory card or in phone memory.• To change music folders, press Menu, and select File → Change folder…. Use the dialog to select a new folder. New foldercontents are scanned, and music tracks are displayed in the track list.• To add a shortcut to music, press Menu, and select File → Add to Desk…. This creates a shortcut to the selected musictrack. You cannot create a shortcut to an unsaved file.• To change text size, press Menu, and select Edit → Zoom in or Zoom out. This changes the size of the list view text.Sending musicYou can send music as a message.• To send a track, press Menu, and select File → Send. Select a method to send the selected music track to another device.Press Insert. A music track can be sent as a message attachment.• To select a folder, press Change folder…. Use the dialog to select a new folder.• To cancel insert, press Cancel. The track does not return to the original application, and you may select another track.Voice rec.The recorder cannot be used when a data call or GPRS connection is active.Go to Desk → Media → Voice rec..Voice rec. can record a telephone conversation or voice memo, save the voice recording as a sound clip, play your clip orother sound files, and edit sound files. Voice rec. can play the following formats: WAV, AMR, AU, and compressed GSM.Opening the voice recorderYou can open Voice rec. and select a file, or create a shortcut that opens Voice rec. automatically and plays a sound clip.Media applicationsCopyright © 2004 Nokia. All Rights Reserved. 79
• To select a voice recording, press Menu, and select File → Open…. The Open file dialog is displayed, the current foldercontents are scanned, and voice recordings are listed.• To add a shortcut to a voice recording, press Menu, and select File → Add to Desk…. This creates a shortcut to the selectedvoice recording. You cannot create a shortcut to an unsaved file.Recording a phone call or voice memoYou can record a phone conversation or a voice memo. Voice rec. automatically creates a compressed sound clip in eitherWAV or AMR format.• To record a voice memo, press Menu, and select File → New clip, and press Record. Voice rec. begins to record all soundthat enters the external microphone. When you complete recording, select Stop. Press Menu, and select File → Save → Save clip. Type a name for the voice recording, and press OK.• To record a phone call, begin the call. When the call recipient answers, press Menu, and select File → New clip, and pressRecord. Voice rec. begins to record, and both parties will hear a tone every five seconds to indicate that the telephoneconversation is recorded. When you complete recording, select Stop. Press Menu, and select File → Save → Save clip.Type a name for the voice recording and select OK.• To continue recording at the end of a voice recording, select a voice recording, and press Record. Recording continues atthe endpoint of the previous recording.• To cancel a save, when you are asked to save your voice recording, the cancel command stops the current action andreturns to the previous action. The discard command erases the voice recording from device memory.Tip: The maximum length of a voice recording depends on the storage space available in device memory or on amemory card.Playing a voice recordingYou can play and pause a voice recording. You can save a voice recording that you made, or play and save a voice recordingthat you received inside a message. Voice rec. can play several formats: WAV, AU, AMR, and compressed GSM.The progress bar displays the playing time, position, and length of a voice recording.• To listen to a voice recording, press Play. Scroll left to seek backward or right to seek forward.• To pause a voice recording, press Pause. Playback resumes when you press Play.• To play a voice recording again, press Menu, and select Playback → Repeat. The voice recording will repeat.Tip: Voice recordings that you receive or record are temporary files. You must save the files that you want to keep.Sending a voice recordingYou can send a voice recording from your device to another device through infrared or Bluetooth, as its own e-mail message,or in a multimedia message.• To send a voice recording to another device with infrared, make sure that infrared is active on the receiving device. Selecta voice recording, press Menu, select File → Send, and use the infrared option. An infrared connection is establishedautomatically, and the voice recording is sent to the receiving device.• To transfer a voice recording with Bluetooth, make sure that Bluetooth is active on the receiving device. Select a voicerecording, press Menu, select File → Send, and use the Bluetooth option. Activate Bluetooth on your device, search for thereceiving device, select the receiving device from the list of available devices, and select Send. If the devices are pairedand authorized, or if a passcode is confirmed, the voice recording is transferred to the receiving device when an activeBluetooth connection is established.• To send a voice recording as a an e-mail, select a voice recording, press Menu, select File → Send, and use the mail option.The Mail application opens automatically, and the voice recording is ready to send as an attachment to your e-mailmessage.• To insert a voice recording into a multimedia message, select a voice recording, press Menu, select File → Send, and usethe multimedia message option. The MMS application is launched automatically, and the voice recording is ready to sendas an attachment to your multimedia message.Media applicationsCopyright © 2004 Nokia. All Rights Reserved. 80
18. CalculatorIn Calculator, you can make calculations, and save the results to the calculator memory for later use. The Desk calculator canbe used for basic calculations, and the Scientific calculator  for more advanced calculations.Note:  This calculator has limited accuracy and is designed for simple calculations.Go to Desk → Office → Calculator.Making calculations• To make a calculation, enter the first number of the calculation. Press the tab key, and select a function from the functionmap. Enter the second number of the calculation, and press the enter key.Note that the calculator performs operations in the order you enter them. Parentheses cannot be used to change the orderof operations.• To switch between the desk and scientific calculator, press Menu, and select View → Desk calculator or Scientific calculator .• To make a number positive or negative, write the number, and press m on the keyboard.• To print a calculation, press Menu, and select Printing → Print.Tip: To preview a page before printing, press Menu, and select Print preview → Printing in the menu.To change the layout of the page, press Menu, and select Page setup.Using the scientific calculatorPress Menu, and select View → Scientific calculator .• To make a calculation, enter the first number of the calculation. Press the tab key, and select a function from the functionmap. Enter the second number of the calculation, scroll to = in the function map, and press the enter key.• To invert a function, press i on the keyboard, and select the function.• To change the angle unit, press Menu, select Tools → Angle unit, and select Degrees, Radians, or Grads. You can see thecurrent angle unit in the field where you enter the numbers.Saving numbers to memoryYou can save 26 different numbers, unfinished calculations, or final results of calculations for later use.1. Press Ctrl+S. An arrow appears next to the value.2. Press Shift + the letter that you want to assign to the value. The letter appears next to the arrow.3. Press the enter key to store the value.• To use a saved value, enter the letter that you have assigned to the value, and continue the calculation normally.• To clear all values saved in the memory, press Ctrl+D.Setting the number format in Calculator• To change the number format, press Menu, and select Tools → Number format.Select:•Normal—to keep the default number format•Fixed—to set a fixed number of decimal places•Scientific—to set a fixed number of significant figuresCopyright © 2004 Nokia. All Rights Reserved. 81
19. ClockIn Clock, you can view the date and time of your home and destination city, and manage clock alarms.Go to Desk → Clock.Using world clock• To set the date and time, press Menu, and select Tools → Date and time….Tip: You can also update date and time automatically (network service). You can select this setting in Controlpanel. See Date and time on page 70.• To switch between the home and destination city information, press the tab key.• To change a city, select either the home or destination city, and press Change city.Tip: If you change the home city, the clock and calendar entries are updated. This is useful for example whenyou want to attend phone conferences.• To view and manage alarms, press Alarm clock.• To change the clock type, press Menu, and select View → Clock type, and select Analog or Digital.Tip: To change to the one-clock view which shows only your home city information, press Menu, and select View → Remote city details.Using Alarm clockIf the alarm time is reached while the device is switched off, the device switches itself on and starts sounding the alarmtone. If you press Stop/Stop, the device asks whether you want to activate the device for calls. Press No to switch off thedevice orYes to make and receive calls. Do not pressYes when wireless phone use may cause interference or danger.• To set an alarm, press New alarm, and enter the alarm time.• To modify an alarm, press Edit alarm.• To remove an alarm, press the backspace key.When the alarm sounds, press Stop to turn it off. Press Snooze to postpone the alarm.Alarms and remindersWhen an alarm set in clock or calendar goes off, an alarm note appears.• To postpone an alarm, press Snooze.Tip: The default snooze time is ten minutes.• To silence an alarm and keep the alarm note on the display, press Mute.• To silence an alarm and close the alarm note, press Stop.If you do not turn off an alarm, the alarm stops automatically after 15 minutes. The alarm note remains on the display.Cities and countriesChanging cities• To change a city, select the city that you want to change, and press Change city. Select the new city from the list, and pressSelect.You can see the location of the city on the map.Tip: Start typing in the search field to search for a city.Tip: Press Menu, and select File → New city… to add a new city to the list.Note that changing the home city may change the general system time of your device.Locating cities on the world map• To set the position of a city, select File → New city… or Edit → City details…, and press Set position. On the map, scroll tothe location of the city you want, and press OK.Creating and editing country entries• To create new or edit existing countries, select File → New country/region… or Edit → Country/Region details…. Enter thenew Country/Region name, select the Dialing code field, and enter the new number.Copyright © 2004 Nokia. All Rights Reserved. 82
Note that if you are editing an existing country, you can also edit the capital city.Creating and editing city entries• To create or edit city entries, select File → New city…, and enter the name of the city.You can also define the following settings:•Country/Region—Select a country from the list.•Area code—Enter the code that is used when making a phone call to the city.•Daylight-saving zone —Select a daylight saving time zone.•GMT offset—Select the time difference between a city and Greenwich Mean Time.•Latitude and Longitude—Enter the coordinates of a city, or press Set position to locate a city on the world map.ClockCopyright © 2004 Nokia. All Rights Reserved. 83
20. ConnectivityThere are several different connectivity types you can use with your device. You can use wireless connectivity methods suchas wireless LAN, Bluetooth or infrared, or a USB (Universal Serial Bus) cable connection for PC Suite or IP passthrough.Wireless LANYou can define access points for wireless LAN to use it for Internet access for applications that need to connect to theInternet. See Wireless LAN on page 74.Setting up an ad hoc networkWith 3rd party applications, ad hoc networks allow wireless stations to communicate directly with each other without anywireless LAN access points. One user creates the ad hoc network and other users then join the network.You must first create an Internet access point for the ad hoc network.To create an Internet access point for an ad hoc network1. Select Desk → Tools → Control panel, and select Connections → Internet setup.2. Press New. You can use an existing access point as a basis for the new one: after you have pressed New, press Yes, choosethe access point from the list, and press OK.3. Define the settings.•Internet settings name—Give a descriptive name for the connection.•Internet settings type—Select wireless LAN as the connection type.•Network ID—Select the network ID according to the destination network you want to access with the Internet accesspoint. You can rename, and create new network IDs. Using the correct network ID ensures that the data traffic is routeddirectly to the desired destination network. Especially VPN (virtual private network) software may restrict data trafficfor a certain destination network.•Network mode—Select Ad hoc.•Network name—Give the network a name.•Security mode—Select WEP if you want to use a WEP (wired equivalent privacy) key for authentication.4. If you selected WEP as a security mode, you need to configure these settings, too.•WEP key index—Select the a number for the WEP key.•WEP key length—Select the appropriate key length. Supported key lengths are 40, 104, and 232 bits. The more bitsthere are in the key, the higher the level of security.•WEP key type—Select whether you want to enter the WEP key data in hexadecimal format (HEX) or in text form (ASCII).•WEP key data—Enter the WEP key data. The number of characters you can enter depends on the key length you havechosen. For example, keys that are 40 bits long, consist of 5 alphanumeric characters, or 10 hexadecimal characters.5. Press Finish or Done when you have configured all the settings. If you need to configure advanced settings, pressAdvanced. See Configuring advanced Internet access point settings on page 68.Cable connectionYou can connect your device to a compatible PC using a DKU-2 (USB) cable . Connect the cable to the bottom of the device.See Figure Keys and connectors on page 10.You can also connect the cable to the desk stand of the device. Note that if you connect the cable to the desk stand, theconnector of the cable must be connected upside down.Note that you must install the DKU-2 driver to your PC before you can use a cable connection. See the sales package CD-ROMor www.nokia.com for details.IP passthroughYou can also use a cable for IP passthrough, where the device uses the Internet connection of a computer. You can use IPpassthrough as you use any Internet access point, for example for browsing or remote synchronization.Note that you cannot use IP passthrough at the same time as Nokia PC Suite. You can define cable connection settings inControl panel. See Cable setup on page 75.Note that you cannot activate modem if you select IP passthrough in cable connection settings. You must use PC Suiteconnection, or IP passthrough overrides PC Suite with no active IP passthrough connection.Copyright © 2004 Nokia. All Rights Reserved. 84
BluetoothThis device is compliant with Bluetooth Specification 1.1 supporting the following profiles: Generic Access Profile, ServiceDiscovery Profile, Serial Port Profile, Dial-Up Networking Profile, Generic Object Exchange Profile, Object Push profile, FileTransfer Profile, and Handsfree Profile. To ensure interoperability between other devices supporting Bluetooth technology,use Nokia approved enhancements for this model. Check with the manufacturers of other devices to determine theircompatibility with this device.There may be restrictions on using Bluetooth technology in some locations. Check with your local authorities or serviceprovider.Features using Bluetooth technology, or allowing such features to run in the background while using other features, increasethe demand on battery power and reduce the battery life.Bluetooth technology enables cost-free wireless connections between electronic devices within a maximum range of 10metres. A Bluetooth connection can be used to send images, videos, texts, business cards, calendar notes, or to connectwirelessly to devices using Bluetooth technology, such as computers.Since devices using Bluetooth technology communicate using radio waves, your device and the other devices do not need tobe in direct line-of-sight. The two devices only need to be within a maximum of 10 metres of each other, although theconnection can be subject to interference from obstructions such as walls or from other electronic devices.When you activate Bluetooth for the first time, you are asked to give a name to your device.Bluetooth settings• To modify the Bluetooth settings, select Desk → Tools → Control panel, and select Connections → Bluetooth. Select theSettings page.Define the following:•Bluetooth active—Select Yes to enable Bluetooth. If you select No, all active Bluetooth connections are ended, andBluetooth cannot be used for sending or receiving data.•My telephone's visibility—Select Shown to all so that your device can be found by other Bluetooth devices. If you selectHidden, your device cannot be found by other devices.•My Bluetooth name—Define a name for your device. The maximum length of the name is 247 characters.After you have set Bluetooth as active and changed your visibility to Shown to all, your device and its name can be seen byother Bluetooth device users.Tip:  To activate or deactivate Bluetooth, press Chr+  .Note that if Bluetooth was turned off as a result of entering Offline profile, you must re-enable Bluetooth manually.Sending data with BluetoothCopyright protections may prevent some images, ringing tones, and other content from being copied, modified, transferredor forwarded.There can be only one active Bluetooth connection at a time.1. Open an application where the item you want to send is stored. For example, to send a photo to another device, open theImages application.2. Select the item you want to send, press Menu, and select File → Send → Via Bluetooth.3. If you have searched for Bluetooth devices earlier, a list of the devices that were found previously is shown first. You cansee a device icon and the device name. To start a new search, press Search more. To interrupt the search, press Stop.4. Select the device you want to connect with, and press Send.5. If the other device requires pairing before data can be transmitted, you are asked to enter a passcode. Create your ownpasscode (1-16 characters long, numeric), and agree with the owner of the other Bluetooth device to use the same code.The passcode is used only once, and you do not have to memorize it. Devices that do not have a user interface have apreset passcode. After pairing, the device is saved to the Paired devices page.6. When the connection has been established successfully, the note Sending… is shown.Receiving data with BluetoothIf you want to receive data using Bluetooth, set Bluetooth to be active and selected the option Shown to all.When you receive data with Bluetooth from a device that is not authorized, you are first asked if you want to accept theBluetooth message. If you accept, the item is placed in the Inbox folder in the Messaging application.ConnectivityCopyright © 2004 Nokia. All Rights Reserved. 85
Pairing with a devicePairing means authentication. Pairing with a device makes device searches quicker and easier.Go to Desk → Tools → Control panel, and select Connections → Bluetooth.• To pair with a device, select the Paired devices page. Press New, then Start to start a device search. Select the device youwant to pair with, and press Pair. Enter the passcode, and press OK.Tip: The users of the devices using Bluetooth technology should agree together on the passcode, and use the samepasscode for both devices in order to pair them. Devices that do not have a user interface have a preset passcode.• To cancel pairing, select the Paired devices page. Select the device whose pairing you want to cancel, and press Delete.• To assign a short name for a paired device, select the Paired devices page. Select the device whose name you want tochange, and press Edit. In the Assign short name field, you can define a short name (nickname, alias) to help you recognizea certain device. This name is stored in the device memory and cannot be seen by other Bluetooth device users.• To set a device to be authorized or unauthorized, select the Paired devices page. Select the device, and press Edit. Move tothe Device authorized field, and select Yes. Connections between your device and the other device can be made withoutyour knowledge. No separate acceptance or authorization is needed. Select Yes for your own devices, for example, yourPC, or devices that belong to someone you trust. The icon   is added next to authorized devices in the list of paireddevices. If you select No, connection requests from this device need to be accepted separately every time.• To connect to a Bluetooth device, select the Paired devices page. Select the device from the list, press Edit, and pressConnect. Note that this option is available only with audio devices that require a more stable Bluetooth connection, forexample, Bluetooth headsets or car kits. Such devices must support the Bluetooth 1.1 specification and Handsfree profile.To end the connection to the selected device, press Disconnect.Ending a Bluetooth connectionA Bluetooth connection is disconnected automatically after sending or receiving data. Only with the PC Suite, and someenhancements such as headsets, the connection may be maintained even if it is not actively used.Checking the status of the Bluetooth connectionBluetooth is activeWhen the icon is blinking, your device is trying to connect to the other device.When the icon is shown continuously, the Bluetooth connection is active.InfraredDo not point the IR (infrared) beam at anyone's eye or allow it to interfere with other IR devices. This device is a Class 1 laserproduct.You can use infrared for sending and receiving files from other infrared devices.1. Make sure that the infrared ports of the devices face each other. The positioning of the devices is more important thanangle or distance.2. Press Chr+ .To end the infrared connection, press Chr+  again.ModemYou can use the device as a modem together with a compatible computer.Go to Desk → Tools → Modem.Before you can use your device as a modem:• You need the appropriate data communications software on your computer.• You must subscribe to the appropriate network services from your service provider or Internet service provider.• You must have the appropriate drivers installed on your computer. You need to install DKU-2 (USB) drivers for cableconnection, and you may need to install or update Bluetooth or infrared drivers.• It is recommended that you have Nokia Modem Options installed on your computer.See www.nokia.com and the User's Guide for Nokia PC Suite for details.• To connect the device to a compatible computer using an infrared connection, press Activate. To disconnect, press Disable.Tip: To use the device as a modem using a Bluetooth or cable connection, you must connect the device to acompatible computer, and activate the modem from the computer.Note that you may not be able to use some of the other communication features when the device is used as a modem.ConnectivityCopyright © 2004 Nokia. All Rights Reserved. 86
Remote configuration (network service)The Device manager application helps you configure connection settings, for example, e-mail, multimedia messaging, orInternet settings.Go to Desk → Tools → Device manager.The remote configuration connection is usually started by the server when device settings need to be updated.• To start a configuration session, select a profile from the list, and press Connect. If no remote configuration profiles havebeen defined, you must first create a new profile.• To disable configuration, select a profile, press Menu, and select Tools → Disable configuration. You cannot receiveconfiguration settings from any of the configuration servers for which you have a profile.When the configuration session has ended, you can view status information.• To open the configuration log, select a profile, and press Configuration log. The log file shows the latest configurationstatus of the selected profile.Creating a new configuration server profileThe configuration server profile contains the settings for the remote server. You can create several profiles if you need toaccess multiple servers.You may receive the configuration server profile settings as a special message from your service provider.1. If you have no profiles defined, press New, otherwise press Menu, and select File → New.2. If you already have profiles defined, choose whether you want to copy the values from an existing profile to be used asthe basis for the new profile.3. The Profile settings dialog opens.Define the following settings on the different pages of the dialog:•Server name—Type a name for the configuration server.•Server ID—Type the unique ID to identify the configuration server. Contact your service provider or systemadministrator for the correct value.•Password—Write a password to identify your device to the server. Confirm the password.•Active—Select Yes to allow the server to initiate a configuration session.•Accepted—Select Yes if you do not want the server to ask for your confirmation when it initiates a configurationsession.•Connection type—Select how you want to connect to the server.•Access point—Select the access point you want to use for the data connection to the server.•Host address—Type the URL address of the server. Contact your service provider or system administrator for thecorrect value.•Port—Type the port number of the server. Contact your service provider or system administrator for the correct value.•User name—Enter your user ID for the configuration server. Contact your service provider or system administrator foryour correct user ID.•Password—Type your password for the configuration server. Confirm it in the Confirm password field. Contact yourservice provider or system administrator for the correct password.• To edit the configuration profile settings, select the profile, and press Edit.• To delete a profile, select the profile, and press the backspace key.Tip: If you have deleted or modified the predefined PC Suite profile, you can restore it by pressing Menu, andselecting Tools → Reset PC Suite profile.ConnectivityCopyright © 2004 Nokia. All Rights Reserved. 87
21. ShortcutsThe following are some of the available keyboard shortcuts in your device.General shortcutsThese shortcuts are available in most applications.Ctrl+A Select allCtrl+C CopyCtrl+D DeleteCtrl+F FindCtrl+I SortCtrl+M MoveCtrl+N NewCtrl+O OpenCtrl+P PrintCtrl+S SaveCtrl+T Full screenCtrl+V PasteCtrl+X CutCtrl+Z UndoShift+Ctrl+E ZoomShift+Ctrl+G NextShift+Ctrl+L LogShift+Ctrl+P PreviousShift+Ctrl+S Save asShift+Ctrl+U Page setupShift+Ctrl+V Print previewShift+Ctrl+Z EditShift+Backspace Delete text from rightCtrl+Telephone Open the Recent calls view in the telephone applicationChr+alphabet Insert an accented characterChr+Tab Switch between open applicationsChr+Telephone key Redial the last dialed numberChr+Messaging key Retrieve mailShift+Ctrl+Chr+S ScreenshotApplication-specific shortcutsDeskCtrl+P PropertiesShift+Ctrl+M Go to the Personal application groupShift+Ctrl+S Show in groupsCtrl+My own key Configure the My own keyTelephoneCtrl+P View serial number (IMEI)Copyright © 2004 Nokia. All Rights Reserved. 88
Shift+Ctrl+B Call restrictionShift+Ctrl+M Voice mailboxesShift+Ctrl+O Other settingsShift+Ctrl+P Profile settingsShift+Ctrl+S 1-touch dialsShift+Ctrl+V Call forwardingMessagingCtrl+B Retrieve new messagesCtrl+G Retrieve mailCtrl+I Sort by (sorts by the property you have already selected, for example date or sender)Ctrl+L Go online, or go offline if a connection is activeCtrl+Q PropertiesCtrl+R ReplyCtrl+T Expand folder contentsCtrl+U DisconnectCtrl+Y Change the connectionShift+Ctrl+A Retrieve all messagesShift+Ctrl+B Retrieve the selected messagesShift+Ctrl+E Rename the selected folderShift+Ctrl+F Forward the selected messageShift+Ctrl+N Create a new folderShift+Ctrl+R Reply to allShift+Ctrl+S Sent items storageShift+Ctrl+T Account settingsShift+Ctrl+Z Delete messages locallyChr+Messaging Retrieve mailWebCtrl+B Add to bookmarksCtrl+E Close the browserCtrl+G BackGo to bookmark (in bookmark view)Ctrl+H Go to home pageCtrl+I Load all imagesInsert new folder (in bookmark view)Ctrl+K SettingsCtrl+M Fit to screenCtrl+N Open a new windowCtrl+R ReloadCtrl+T Full screen modeCtrl+U DisconnectCtrl+W View window listCtrl+Y Change the connectionCtrl+Z StopShortcutsCopyright © 2004 Nokia. All Rights Reserved. 89
Shift+Ctrl+B BookmarksEdit bookmark (in bookmark view)Shift+Ctrl+D View downloadsShift+Ctrl+F Reload frameShift+Ctrl+G ForwardShift+Ctrl+I Rename folder (in bookmark view)Shift+Ctrl+O Open a fileShift+Ctrl+R Reload allShift+Ctrl+S Save frame as...Shift+Ctrl+T View title barContactsCtrl+K SettingsCtrl+M Belongs to groups (in an open contact card)Ctrl+N New contact cardCtrl+P Database propertiesCtrl+R Ringing tone (in an open contact card)Ctrl+T Card templatesShift+Ctrl+B New databaseShift+Ctrl+C Copy toShift+Ctrl+D Remove the picture (in an open contact card)Shift+Ctrl+M Move toShift+Ctrl+N Create a new groupShift+Ctrl+O Insert a picture (in an open contact card)DocumentsCtrl+B BoldCtrl+G Go to pageCtrl+I ItalicsCtrl+U UnderlineShift+Ctrl+A Format paragraph alignmentShift+Ctrl+B Format bulletsShift+Ctrl+D Format bordersShift+Ctrl+F Format the fontShift+Ctrl+G Format the styleShift+Ctrl+J View details of the selected objectShift+Ctrl+K PreferencesShift+Ctrl+N Format line spacingShift+Ctrl+O Insert an objectShift+Ctrl+Y Format tabsShift+Ctrl+Z Edit the selected objectSheetCtrl+H Rename the worksheetCtrl+M Freeze panesCtrl+Q View worksheetsShortcutsCopyright © 2004 Nokia. All Rights Reserved. 90
Ctrl+W Insert a new worksheetCtrl+Y Insert cellsShift+Ctrl+A Format cell alignmentShift+Ctrl+B Format cell bordersShift+Ctrl+C Insert a new chartShift+Ctrl+D Delete the cellShift+Ctrl+F Format the fontShift+Ctrl+G Insert a page breakShift+Ctrl+H Format row heightShift+Ctrl+I Insert a functionShift+Ctrl+N Format numbersShift+Ctrl+O SettingsShift+Ctrl+P Format cell background colorShift+Ctrl+R RecalculateShift+Ctrl+T Show titleShift+Ctrl+W Format column widthShift+Ctrl+X Clear the cellPresentationsCtrl+T Full screen modeShift+Ctrl+A Format the alignmentShift+Ctrl+F Format the fontShift+Ctrl+J Format the selected objectShift+Ctrl+V View a slide showEnter key Start text editingEsc key Cancel text editingCalendarCtrl+A Create a new anniversaryCtrl+E Create a new eventCtrl+G Go to dateCtrl+K Edit view settingsCtrl+N Create a new appointmentCtrl+Q Change viewCtrl+S Create a new taskCtrl+T Edit the date and timeShift+Ctrl+A Set anniversary as the default entry typeShift+Ctrl+C Crossed out entryShift+Ctrl+D Move or delete the selected objectShift+Ctrl+E Set meeting as the default entry typeShift+Ctrl+K Edit general settingsShift+Ctrl+M Import entriesShift+Ctrl+O Set to-do as the default entry typeShift+Ctrl+P PropertiesShift+Ctrl+R Set memo as the default entry typeShortcutsCopyright © 2004 Nokia. All Rights Reserved. 91
Shift+Ctrl+T Tentative entryCtrl+Calendar Open the current day in the Day viewCalendar key Change viewFile managerCtrl+E Expand viewCtrl+H Show all filesCtrl+I Sort by (the property you have already selected, for example name or date)Ctrl+N New fileCtrl+O Collapse viewCtrl+P PropertiesCtrl+R Rename the selected objectCtrl+U Move up one levelShift+Ctrl+B Back up to memory cardShift+Ctrl+I Sorting order (the order you have already selected, for example ascending)Shift+Ctrl+K SettingsShift+Ctrl+N Create a new folderShift+Ctrl+Q Change memory card passwordShift+Ctrl+R Restore from memory cardImagesCtrl+B Previous image (with an image open)Ctrl+F Next image (with an image open)Ctrl+R Rotate image (with an image open)Ctrl+T Full screen (with an image open)RealPlayerCtrl+B Previous clip (with a video clip open)Ctrl+F Next clip (with a video clip open)Ctrl+M Mute (with a video clip open)Ctrl+R Repeat once (with a video clip open)Ctrl+T Full screen (with a video clip open)Shift+Ctrl+K SettingsShift+Ctrl+S Save clip as (with a video clip open)Music playerCtrl+B Previous trackCtrl+F Next trackCtrl+I Sort by (the property you have already selected)Ctrl+L Repeat allCtrl+M MuteVoice rec.Ctrl+L RepeatCtrl+M MuteCtrl+R RenameShift+Ctrl+K SettingsShortcutsCopyright © 2004 Nokia. All Rights Reserved. 92
CalculatorCtrl+B SubtractCtrl+F Flip layoutCtrl+I AddCtrl+R RecallCtrl+Y Function mapShift+Ctrl+C Clear allShift+Ctrl+D Desk calculatorShift+Ctrl+S Scientific calculatorClockCtrl+B Cancel the alarmCtrl+E View city detailsCtrl+K Alarm settingsCtrl+T Set the date and timeShift+Ctrl+A Alarm clockShift+Ctrl+E View country or region detailsShift+Ctrl+N Add a new cityShift+Ctrl+Q Set the clock typeShift+Ctrl+T Remote city detailsShift+Ctrl+W World clockDevice managerShift+Ctrl+C ConnectShortcutsCopyright © 2004 Nokia. All Rights Reserved. 93
22. Data transmissionThis device employs the data transmission capabilities of the GSM and WLAN networks to send multimedia messages, shortmessages and e-mail, and to establish connections with remote computers, for example.Wireless data connections can be made from most locations where your device operates, but it is recommended that youmove the device to a location where the strongest possible wireless signal can be obtained. When the signal is strong, datatransmission is efficient. Wireless data communications may perform differently from data communications transmittedover wires. This is due to the inherent characteristics of the wireless environment. Wireless connections may experience"noise", low or lost signals, and distortions.NoiseRadio interference from electronic appliances and equipment, as well as from other phones may affect the quality ofwireless data transmission.RoamingAs the device user moves from one network cell or WLAN access point coverage area to another, the signal strength of thechannel may drop. The network may hand over the user to a coverage area and frequency where the signal is stronger.Network roaming may also occur when the user is stationary, due to varying network traffic loads. Such roaming may causeslight delays in transmission.Electrostatic dischargeA discharge of static electricity from a finger or a conductor may cause erroneous functions in electrical devices. Thedischarge may result in distorted display and unstable software operation. Wireless connections may become unreliable,data may become corrupted, and transmission halted. In this case you need to end the existing call (if any), switch off thedevice (if on) and remove the battery. Then replace the battery and establish a new wireless connection.Dead spots and dropoutsDead spots are areas where radio signals cannot be received. Dropouts occur when the device user passes through an areawhere the radio signal is blocked or reduced by geographical features or large structures.Signal impairmentDistance and obstacles can cause signals to become out-of-phase. They can also cause reflected signals. Both situationsresult in a loss of signal strength.Low signal strengthDue to either distance or obstacles, the radio signal strength from a WLAN access point or a cell site may not be strongenough or stable enough to provide a reliable data connection for communication. Therefore, to ensure the best possiblecommunication, remember the following points:• The data connection works best when the device is in a stationary position. Attempting wireless data communicationwhile in a moving vehicle is not recommended.• Do not place the device on a metal surface.• Check on the device display that the signal strength is sufficient. Moving the device within a room, especially towards awindow, may result in a stronger signal. If a signal is not strong enough to support a voice call, data connection shouldnot be attempted until you can find a location with better signal reception.Copyright © 2004 Nokia. All Rights Reserved. 94
23. Nokia orginal enhancementsAn extensive range of enhancements is available for your device. Select the enhancements that accommodate your specificcommunication needs.Compatible enhancements:• Wireless Headset HDW-2• Wireless Clip-on Headset HS-3W• Wireless Boom Headset HS-4W• Headset HS-5• Boom Headset HDB-4• Retractable Headset HS-10• Stereo Headset HDS-3• Radio Headset HS-2R• Inductive Loopset LPS-4• Headrest hands-free BHF-3• Mobile Holder CR-6• Antenna Coupler AD-13• Mobile Charger LCH-12• Memory Card DTS-64• Memory Unit MMC 128MB• Connectivity Cable DKU-2• Connectivity Desk Stand DT-4• Image Viewer SU-2• Image Frame SU-4• Image Frame SU-7• Digital Pen SU-1B• Battery BP-5LFor availability of the enhancements, check with your local dealer. A few practical rules for enhancements operation:• Keep the enhancements out of reach of small children.• When you disconnect the power cord of any accessory, grasp and pull the plug, not the cord.• Check regularly that all mobile phone equipment in a vehicle is mounted and operating properly.Use only batteries, chargers, and enhancements approved by the phone manufacturer. The use of any other type mayinvalidate any approval or warranty applying to the phone, and may be dangerous.BatteryTechnical informationType Tech Capacity Talk time StandbyBP-5L Li-Po 1300 mAh Up to 4-6 hours Up to 4-6 hoursVariation in talk time and standby time may occur, depending on the SIM card, network and usage settings, and the style andenvironment of use.Wireless Headset HDW-2The Nokia Wireless Headset is small and lightweight, and provides a wireless audio connection to your compatibledevice.Wireless Clip-on Headset HS-3WThe Nokia Wireless Clip-on Headset is easy to wear, and it has a clip-on main body and earpiece for both business andpleasure.The headset uses Bluetooth wireless technology between the main body and a compatible phone. Basic call handling can bedone from the headset, which contains an LED that indicates an active wireless connection.Copyright © 2004 Nokia. All Rights Reserved. 95
Boom Headset HDB-4This small and lightweight headset has a beautiful and distinctive Nokia design. It provides excellentaudio quality. You can answer or end calls by pressing the button on the headset microphone.Nokia Image Viewer SU-2View and share pictures at work or at home by sending your images from a compatible device to the Nokia ImageViewer connected to your compatible TV or video projector. The Nokia Image Viewer is easy to carry with you.Nokia Digital Pen SU-1BUse your digital pen to create colorful, personalized messages send them to your compatible phone using Bluetoothtechnology, and forward them using MMS. You can also use the pen to store your notes on your compatible PC.Nokia orginal enhancementsCopyright © 2004 Nokia. All Rights Reserved. 96
Battery informationYour device is powered by a rechargeable battery. The full performance of a new battery is achieved only after two or threecomplete charge and discharge cycles. The battery can be charged and discharged hundreds of times but it will eventuallywear out. When the talk and standby times are noticeably shorter than normal, buy a new battery. Use only Nokia approvedbatteries, and recharge your battery only with Nokia approved chargers designated for this device.Unplug the charger from the electrical plug and the device when not in use. Do not leave the battery connected to a charger.Overcharging may shorten its lifetime. If left unused, a fully charged battery will lose its charge over time. Temperatureextremes can affect the ability of your battery to charge.Use the battery only for its intended purpose. Never use any charger or battery that is damaged.Do not short-circuit the battery. Accidental short-circuiting can occur when a metallic object such as a coin, clip, or pencauses direct connection of the positive (+) and negative (-) terminals of the battery. (These look like metal strips on thebattery.) This might happen, for example, when you carry a spare battery in your pocket or purse. Short-circuiting theterminals may damage the battery or the connecting object.Leaving the battery in hot or cold places, such as in a closed car in summer or winter conditions, will reduce the capacity andlifetime of the battery. Always try to keep the battery between 15°C and 25°C (59°F and 77°F). A device with a hot or coldbattery may not work temporarily, even when the battery is fully charged. Battery performance is particularly limited intemperatures well below freezing.Do not dispose of batteries in a fire! Dispose of batteries according to local regulations. Please recycle when possible. Do notdispose as household waste.Copyright © 2004 Nokia. All Rights Reserved. 97
CARE AND MAINTENANCEYour device is a product of superior design and craftsmanship and should be treated with care. The suggestions below willhelp you protect your warranty coverage.• Keep the device dry. Precipitation, humidity and all types of liquids or moisture can contain minerals that will corrodeelectronic circuits. If your device does get wet, remove the battery and allow the device to dry completely before replacingit.• Do not use or store the device in dusty, dirty areas. Its moving parts and electronic components can be damaged.• Do not store the device in hot areas. High temperatures can shorten the life of electronic devices, damage batteries, andwarp or melt certain plastics.• Do not store the device in cold areas. When the device returns to its normal temperature, moisture can form inside thedevice and damage electronic circuit boards.• Do not attempt to open the device other than as instructed in this guide.• Do not drop, knock, or shake the device. Rough handling can break internal circuit boards and fine mechanics.• Do not use harsh chemicals, cleaning solvents, or strong detergents to clean the device.• Do not paint the device. Paint can clog the moving parts and prevent proper operation.• Use a soft, clean, dry cloth to clean any lenses (such as camera, proximity sensor, and light sensor lenses).• Use only the supplied or an approved replacement antenna. Unauthorised antennas, modifications, or attachments coulddamage the device and may violate regulations governing radio devices.All of the above suggestions apply equally to your device, battery, charger, or any enhancement. If any device is not workingproperly, take it to the nearest authorized service facility for service.Copyright © 2004 Nokia. All Rights Reserved. 98
Additional safety informationOperating environmentRemember to follow any special regulations in force in any area and always switch off your device when its use is prohibitedor when it may cause interference or danger. Use the device only in its normal operating positions. This device meets RFexposure guidelines when used either in the normal use position against the ear or when positioned at least 5/8 inch (1.5cm) away from the body. When a carry case, belt clip, or holder is used for body-worn operation, it should not contain metaland should position at least 5/8 inch (1.5 cm) away from your body.In order to transmit data files or messages, this device requires a quality connection to the network. In some cases,transmission of data files or messages may be delayed until such a connection is available. Ensure the above separationdistance instructions are followed until the transmission is completed.Medical devicesOperation of any radio transmitting equipment, including wireless phones, may interfere with the functionality ofinadequately protected medical devices. Consult a physician or the manufacturer of the medical device to determine if theyare adequately shielded from external RF energy or if you have any questions. Switch off your device in health care facilitieswhen any regulations posted in these areas instruct you to do so. Hospitals or health care facilities may be using equipmentthat could be sensitive to external RF energy.PacemakersPacemaker manufacturers recommend that a minimum separation of 6 inches (15.3 cm) be maintained between a wirelessphone and a pacemaker to avoid potential interference with the pacemaker. These recommendations are consistent withthe independent research by and recommendations of Wireless Technology Research. Persons with pacemakers should:• always keep the device more than 6 inches (15.3 cm) from their pacemaker when the device is switched on;• not carry the device in a breast pocket; and• hold the device to the ear opposite the pacemaker to minimise the potential for interference.• If you have any reason to suspect that interference is taking place, switch off your device immediately.Hearing aidsSome digital wireless devices may interfere with some hearing aids. If interference occurs, consult your service provider.VehiclesRF signals may affect improperly installed or inadequately shielded electronic systems in motor vehicles such as electronicfuel injection systems, electronic antiskid (antilock) braking systems, electronic speed control systems, air bag systems. Formore information, check with the manufacturer or its representative of your vehicle or any equipment that has been added.Only qualified personnel should service the device, or install the device in a vehicle. Faulty installation or service may bedangerous and may invalidate any warranty that may apply to the device. Check regularly that all wireless device equipmentin your vehicle is mounted and operating properly. Do not store or carry flammable liquids, gases, or explosive materials inthe same compartment as the device, its parts, or enhancements. For vehicles equipped with an air bag, remember that airbags inflate with great force. Do not place objects, including installed or portable wireless equipment in the area over the airbag or in the air bag deployment area. If in-vehicle wireless equipment is improperly installed and the air bag inflates,serious injury could result.Potentially explosive environmentsSwitch off your device when in any area with a potentially explosive atmosphere and obey all signs and instructions.Potentially explosive atmospheres include areas where you would normally be advised to turn off your vehicle engine.Sparks in such areas could cause an explosion or fire resulting in bodily injury or even death. Switch off the device atrefuelling points such as near gas pumps at service stations. Observe restrictions on the use of radio equipment in fueldepots, storage, and distribution areas, chemical plants or where blasting operations are in progress. Areas with apotentially explosive atmosphere are often but not always clearly marked. They include below deck on boats, chemicaltransfer or storage facilities, vehicles using liquefied petroleum gas (such as propane or butane), and areas where the aircontains chemicals or particles such as grain, dust or metal powders.Operating environmentRemember to follow any special regulations in force in any area and always switch off your device when its use is prohibitedor when it may cause interference or danger. Use the device only in its normal operating positions. This device meets RFexposure guidelines when used either in the normal use position against the ear or when positioned at least 5/8inch (1.5cm)Copyright © 2004 Nokia. All Rights Reserved. 99
away from the body. When a carry case, belt clip, or holder is used for body-worn operation, it should not contain metal andshould position the device at least 5/8inch (1.5 cm) away from your body.In order to transmit data files or messages, this device requires a quality connection to the network. In some cases,transmission of data files or messages may be delayed until such a connection is available. Ensure the above separationdistance instructions are followed until the transmission is completed.Emergency callsImportant:  Wireless phones, including this device, operate using radio signals, wireless networks, landlinenetworks, and user-programmed functions. Because of this, connections in all conditions cannot be guaranteed.You should never rely solely on any wireless device for essential communications like medical emergencies.To make an emergency call:1. If the device is not on, switch it on. Check for adequate signal strength.Some networks may require that a valid SIM card is properly inserted in the device.2. Press   as many times as needed to clear the display and ready the device for calls.3. Key in the official emergency number for your present location. Emergency numbers vary by location.4. Press the   key.If certain features are in use, you may first need to turn those features off before you can make an emergency call. Consultthis guide or your service provider for more information. When making an emergency call, give all the necessary informationas accurately as possible. Your wireless device may be the only means of communication at the scene of an accident. Do notend the call until given permission to do so.Certification Information (SAR)THIS DEVICE MEETS THE GOVERNMENT'S REQUIREMENTS FOR EXPOSURE TO RADIO WAVES.Your mobile device is a radio transmitter and receiver. It is designed and manufactured not to exceed the limits for exposureto radio frequency (RF) energy adopted by the governments of the USA through the Federal Communications Commission(FCC) and Canada through Industry Canada (IC). These limits establish permitted levels of RF energy for the generalpopulation. The guidelines are based on standards that were developed by independent scientific organizations throughperiodic and thorough evaluation of scientific studies. The standards include a substantial safety margin designed to assurethe safety of all persons, regardless of age and health.The exposure guidelines for mobile devices employ a unit of measurement known as the Specific Absorption Rate or SAR.The SAR limit adopted by the USA and Canada is 1.6 watts/kilogram (W/kg) averaged over one gram of tissue. The limitincorporates a substantial margin of safety to give additional protection for the public and to account for any variations inmeasurements. Tests for SAR are conducted using standard operating positions with the device transmitting at its highestcertified power level in all tested frequency bands. The actual SAR level of an operating device can be well below themaximum value because the device is designed to use only the power required to reach the network. That amount changesdepending on a number of factors such as how close you are to a network base station.The highest SAR value reported to the FCC and IC for this device type when tested for use at the ear is 0.92 W/kg, and whenproperly worn on the body is 1.53 W/kg. SAR information on file with the FCC can be found under the Display Grant section ofwww.fcc.gov/oet/fccidafter searching on FCC ID PDNRA-2. SAR values reported in other countries may vary depending ondifferences in reporting and testing requirements and the network band. Additional SAR information may be provided underproduct information at www.nokia.com.Additional safety informationCopyright © 2004 Nokia. All Rights Reserved. 100
Technical informationCharacteristic ValueFeature SpecificationWeight 230 g with battery Li-Po 1300 mAhSize Length: 5.83 in (148 mm)Width: 2.20 in (56 mm)Thickness: 0.95 in (24 mm)Frequency range RA-2 EGSM 900/1800/1900RA-3 GSM 850/1800/1900Transmitter output power TBABattery voltage TBAOperating temperature TBAMemory 192 MB total in device128 MB application64 MB execution<2 GB MMC and RS-MMCCopyright © 2004 Nokia. All Rights Reserved. 101
Nokia One-Year Limited WarrantyNokia Inc. (“Nokia”) warrants that this cellular phone (“Product”) is free from defects in material and workmanship thatresult in Product failure during normal usage, according to the following terms and conditions:1. The limited warranty for the Product extends for ONE (1) year beginning on the date of the purchase of the Product. Thisone year period is extended by each whole day that the Product is out of your possession for repair under this warranty.2. The limited warranty extends only to the original purchaser (“Consumer”) of the Product and is not assignable ortransferable to any subsequent purchaser/end-user.3. The limited warranty extends only to Consumers who purchase the Product in the United States of America.4. During the limited warranty period, Nokia will repair, or replace, at Nokia’s sole option, any defective parts, or any partsthat will not properly operate for their intended use with new or refurbished replacement items if such repair orreplacement is needed because of product malfunction or failure during normal usage. No charge will be made to theConsumer for any such parts. Nokia will also pay for the labor charges incurred by Nokia in repairing or replacing thedefective parts. The limited warranty does not cover defects in appearance, cosmetic, decorative or structural items,including framing, and any non-operative parts. Nokia’s limit of liability under the limited warranty shall be the actualcash value of the Product at the time the Consumer returns the Product for repair, determined by the price paid by theConsumer for the Product less a reasonable amount for usage. Nokia shall not be liable for any other losses or damages.These remedies are the Consumer’s exclusive remedies for breach of warranty.5. Upon request from Nokia, the Consumer must prove the date of the original purchase of the Product by a dated bill ofsale or dated itemized receipt.6. The Consumer shall bear the cost of shipping the Product to Nokia in Melbourne, Florida. Nokia shall bear the cost ofshipping the Product back to the Consumer after the completion of service under this limited warranty.7. The Consumer shall have no coverage or benefits under this limited warranty if any of the following conditions areapplicable:a) The Product has been subjected to abnormal use, abnormal conditions, improper storage, exposure to moisture ordampness, unauthorized modifications, unauthorized connections, unauthorized repair, misuse, neglect, abuse,accident, alteration, improper installation, or other acts which are not the fault of Nokia, including damage caused byshipping.b) The Product has been damaged from external causes such as collision with an object, or from fire, flooding, sand, dirt,windstorm, lightning, earthquake or damage from exposure to weather conditions, an Act of God, or battery leakage,theft, blown fuse, or improper use of any electrical source, damage caused by computer or internet viruses, bugs,worms, Trojan Horses, cancelbots or damage caused by the connection to other products not recommended forinterconnection by Nokia.c) Nokia was not advised in writing by the Consumer of the alleged defect or malfunction of the Product withinfourteen (14) days after the expiration of the applicable limited warranty period.d) The Product serial number plate or the enhancement data code has been removed, defaced or altered.e) The defect or damage was caused by the defective function of the cellular system or by inadequate signal receptionby the external antenna, or viruses or other software problems introduced into the Product.8. Nokia does not warrant uninterrupted or error-free operation of the Product. If a problem develops during the limitedwarranty period, the Consumer shall take the following step-by-step procedure:a) The Consumer shall return the Product to the place of purchase for repair or replacement processing.b) If “a” is not convenient because of distance (more than 50 miles) or for other good cause, the Consumer shall ship theProduct prepaid and insured to:Nokia Inc., Attn: Repair Department795 West Nasa Blvd.Melbourne, FL 32901c) The Consumer shall include a return address, daytime phone number and/or fax number, complete description of theproblem, proof of purchase and service agreement (if applicable). Expenses related to removing the Product from aninstallation are not covered under this limited warranty.The Consumer shall include a return address, daytime phonenumber and/or fax number, complete description of the problem, proof of purchase and service agreement (ifapplicable). Expenses related to removing the Product from an installation are not covered under this limitedwarranty.d) The Consumer will be billed for any parts or labor charges not covered by this limited warranty. The Consumer will beresponsible for any expenses related to reinstallation of the Product.e) Nokia will repair the Product under the limited warranty within 30 days after receipt of the Product. If Nokia cannotperform repairs covered under this limited warranty within 30 days, or after a reasonable number of attempts toCopyright © 2004 Nokia. All Rights Reserved. 102
repair the same defect, Nokia at its option, will provide a replacement Product or refund the purchase price of theProduct less a reasonable amount for usage. In some states the Consumer may have the right to a loaner if the repairof the Product takes more than ten (10) days. Please contact the Customer Service Center at Nokia at the telephonenumber listed at the end of this warranty if you need a loaner and the repair of the Product has taken or is estimatedto take more than ten (10) days.f) If the Product is returned during the limited warranty period, but the problem with the Product is not covered underthe terms and conditions of this limited warranty, the Consumer will be notified and given an estimate of the chargesthe Consumer must pay to have the Product repaired, with all shipping charges billed to the Consumer. If theestimate is refused, the Product will be returned freight collect. If the Product is returned after the expiration of thelimited warranty period, Nokia’s normal service policies shall apply and the Consumer will be responsible for allshipping charges.9. You (the Consumer) understand that the product may consist of refurbished equipment that contains used components,some of which have been reprocessed. The used components comply with Product performance and reliabilityspecifications.10. ANY IMPLIED WARRANTY OF MERCHANTABILITY, OR FITNESS FOR A PARTICULAR PURPOSE OR USE, SHALL BE LIMITED TO THEDURATION OF THE FOREGOING LIMITED WRITTEN WARRANTY. OTHERWISE, THE FOREGOING LIMITED WARRANTY IS THECONSUMER’S SOLE AND EXCLUSIVE REMEDY AND IS IN LIEU OF ALL OTHER WARRANTIES, EXPRESS OR IMPLIED. NOKIA SHALL NOTBE LIABLE FOR SPECIAL, INCIDENTAL, PUNITIVE OR CONSEQUENTIAL DAMAGES, INCLUDING BUT NOT LIMITED TO LOSS OFANTICIPATED BENEFITS OR PROFITS, LOSS OF SAVINGS OR REVENUE, LOSS OF DATA, PUNITIVE DAMAGES, LOSS OF USE OF THEPRODUCT OR ANY ASSOCIATED EQUIPMENT, COST OF CAPITAL, COST OF ANY SUBSTITUTE EQUIPMENT OR FACILITIES, DOWNTIME,THE CLAIMS OF ANY THIRD PARTIES, INCLUDING CUSTOMERS, AND INJURY TO PROPERTY, RESULTING FROM THE PURCHASE ORUSE OF THE PRODUCT OR ARISING FROM BREACH OF THE WARRANTY, BREACH OF CONTRACT, NEGLIGENCE, STRICT TORT, OR ANYOTHER LEGAL OR EQUITABLE THEORY, EVEN IF NOKIA KNEW OF THE LIKELIHOOD OF SUCH DAMAGES. NOKIA SHALL NOT BELIABLE FOR DELAY IN RENDERING SERVICE UNDER THE LIMITED WARRANTY, OR LOSS OF USE DURING THE PERIOD THAT THEPRODUCT IS BEING REPAIRED.11. Some states do not allow limitation of how long an implied warranty lasts, so the one year warranty limitation may notapply to you (the Consumer). Some states do not allow the exclusion or limitation of incidental and consequentialdamages, so certain of the above limitations or exclusions may not apply to you (the Consumer). This limited warrantygives the Consumer specific legal rights and the Consumer may also have other rights which vary from state to state.12. Nokia neither assumes nor authorizes any authorized service center or any other person or entity to assume for it anyother obligation or liability beyond that which is expressly provided for in this limited warranty including the provider orseller of any extended warranty or service agreement.13. This is the entire warranty between Nokia and the Consumer, and supersedes all prior and contemporaneousagreements or understandings, oral or written, relating to the Product, and no representation, promise or condition notcontained herein shall modify these terms.14. This limited warranty allocates the risk of failure of the Product between the Consumer and Nokia. The allocation isrecognized by the Consumer and is reflected in the purchase price.15. Any action or lawsuit for breach of warranty must be commenced within eighteen (18) months following purchase of theProduct.16. Questions concerning this limited warranty may be directed to: Nokia Inc. Attn: Customer Service 7725 Woodland CenterBlvd., Ste. 150 Tampa, FL 33614 Telephone: 1-888-NOKIA-2U (1-888-665-4228) Facsimile: (813) 287-6612 TTY/TDD UsersOnly: 1-800-24-NOKIA (1-800-246-6542)17. The limited warranty period for Nokia supplied attachments and accessories is specifically defined within their ownwarranty cards and packaging.Nokia One-Year Limited WarrantyCopyright © 2004 Nokia. All Rights Reserved. 103
Patent list4868846 49456334969192 50122085016851 50459735059131 51278445128965 51689825173927 52009975218270 52297015230091 52415835267234 52706665271056 52890595292259 52931395307371 53111795313661 53172835319525 53316385350956 53512355357222 53614595365119 53789355396653 54009495408504 54107335416435 54205525430740 54324735444816 54463645450487 54716555473284 54794765479481 54856355487084 54902355491718 54932555493701 55242885534878 55375575564074 55658215566201 55685455570369 55749855581244 55901605594948 55965715597102 55981255809018 58091155819165 58217355826191 58270825832381 58325245835858 58358625956323 59563325956625 59566335960354 59603895963634 59639015966374 59663786088746 60914406091955 60944266094587 60946616097961 60979646098194 61057846199035 62018186201876 62019746202109 62021636204727 62048306205172 62089616327256 63337166341220 63412216343131 63471386347218 63479456350133 63514706438370 64399056441591 64416896442386 64459246445928 64459326449264 64494736549758 65497736550927 65530656553107 65565506556824 65604586560460 65638016643513 66468416646998 66470066647248 66472496650905 66545896658064 66614045603103 56065485613235 56213675625274 56339135634197 56380345640395 56527485835889 58386725839059 58417745842141 58452195850607 58571515859843 58621785970059 59778875987137 59874065987639 59916275991716 59995236005857 60091276107743 61079866108323 61119446112078 61120996115617 61187756119002 61190036209050 62091736222730 62229246223037 62230596229996 62400766240079 62434556351647 63518426356468 63567596356766 63598656359904 63632526363259 63658546449480 64529146455188 64562376456826 64611936463262 64632786463502 64658966567389 65705966570860 65709096570933 65710956574336 65744736577204 65776196661780 66621556662986 66648446665284 66652896665309 66656926667963 66681625664004 56640535669069 56781925678224 56921055697074 56994825701392 57061105862489 58706835884103 58841765884190 58872665889770 58900055892475 58930606009328 60118536011971 60141136014573 60182776023740 60261616028567 60291286119180 61218466122498 61252676128322 61285096130650 61377896140966 61414106243582 62495846253089 62593126259323 62596766262735 62659286266321 62663306366659 63696356370362 63703676370389 63703906370391 63705916374083 63778036466033 64665856469673 64703136470470 64730166473611 64736226477151 64804856580920 65809326582147 65840896584161 65841646584314 65876806587695 65878176671286 66712876671495 66715116674860 66750126675014 66783616678368 66785275706285 57128455715522 57220745726593 57269815729534 57295415732831 57346835895884 58963695898775 58989255901353 59052355907480 59077965912885 59146906031827 60351896035194 60352016038238 60386956041120 60412346041235 60437606144243 61446606144676 61447096145095 61481036148209 61514856151507 61544556266516 62691266269331 62717946274825 62757086278688 62824366285884 62858886377817 63814536381468 63850546385446 63854516392503 63926056393008 63931216480715 64872886487397 64874246493564 64973646498785 65019576501967 65045956591116 65939146594472 65944866597319 65979146597917 66006636603773 66065086678531 66809136680955 66810996681253 66838606687499 66903076691085 66938925737323 57374105740129 57487205752165 57521725754595 57549765758278 57605685915440 59179075918049 59206195920812 59208265924026 59240385926138 59261476044264 60471816047196 60497966050415 60523856055439 60583176060193 60727876154457 61635466164547 61670386167248 61672566167273 61700736171127 61726736285889 62861226292669 62952866298035 63008876301338 63075126308066 63080846393260 63935186396878 63970746397081 64009586407532 64151636415410 64178176507590 65101486512756 65161936522670 65228776526290 65295616529717 65322266606593 66115076611693 66148606614905 66150446615169 66219106622011 66254526694135 66941416697347 66976046697624 67074286708028 67112116711689 67140915761245 57791155786703 57873415787357 57937445797102 58024655805084 58053015930233 59369795940790 59419785944844 59459525946326 59466345946651 59536656073001 60757896076181 60785706081534 60817326084868 60849206085605 60883426173302 61756236178535 61845926185302 61889096192055 61922386195338 61989286314683 63170836317588 63203306321083 63212576324074 63242816324389 63271536418326 64248296427078 64297466430163 64301896430721 64341336437711 64382296532227 65322576535979 65384496538613 65392366542170 65426066542931 65462516625458 66287316629130 66335366633618 66337686634816 66364916639905 66399506714601 67147846717925 67179286718179 67213046721374 67217006721867 67248926724944 67282416728548 67285556735242 67352496738370 67385996741860 67420616744742 67479626748076 67482196748242 67512096751227 67514606751472 67542866756969 67572496757722 67603176760877 67630116763035 67658916765963 67661596771619 67716596771964 6775259Copyright © 2004 Nokia. All Rights Reserved. 104
AppendicesAppendix A Message from the CTIA(Cellular Telecommunications & Internet Association) to all users of mobile phonesA Guide to Safe and Responsible Wireless Phone Use1Safety is the most important call you will ever make.Tens of millions of people in the U.S. today take advantage of the unique combination of convenience, safety and value delivered by the wireless telephone. Quite simply,the wireless phone gives people the powerful ability to communicate by voice--almost anywhere, anytime--with the boss, with a client, with the kids, with emergencypersonnel or even with the police. Each year, Americans make billions of calls from their wireless phones, and the numbers are rapidly growing.But an important responsibility accompanies those benefits, one that every wireless phone user must uphold. When driving a car, driving is your first responsibility. Awireless phone can be an invaluable tool, but good judgment must be exercised at all times while driving a motor vehicle--whether on the phone or not.The basic lessons are ones we all learned as teenagers. Driving requires alertness, caution and courtesy. It requires a heavy dose of basic common sense--keep your headup, keep your eyes on the road, check your mirrors frequently and watch out for other drivers. It requires obeying all traffic signs and signals and staying within the speedlimit. It means using seatbelts and requiring other passengers to do the same.But with wireless phone use, driving safely means a little more. This brochure is a call to wireless phone users everywhere to make safety their first priority when behindthe wheel of a car. Wireless telecommunications is keeping us in touch, simplifying our lives, protecting us in emergencies and providing opportunities to help others inneed.When it comes to the use of wireless phones, safety is your most important call .Wireless Phone "Safety Tips"Below are safety tips to follow while driving and using a wireless phone which should be easy to remember.• Get to know your wireless phone and its features such as speed dial and redial. Carefully read your instruction manual and learn to take advantage of valuable featuresmost phones offer, including automatic redial and memory. Also, work to memorize the phone keypad so you can use the speed dial function without taking yourattention off the road.• When available, use a hands free device. A number of hands free wireless phone accessories are readily available today. Whether you choose an installed mounteddevice for your wireless phone or a speaker phone accessory, take advantage of these devices if available to you.• Position your wireless phone within easy reach. Make sure you place your wireless phone within easy reach and where you can grab it without removing your eyesfrom the road. If you get an incoming call at an inconvenient time, if possible, let your voice mail answer it for you.• Suspend conversations during hazardous driving conditions or situations. Let the person you are speaking with know you are driving; if necessary, suspend the call inheavy traffic or hazardous weather conditions. Rain, sleet, snow and ice can be hazardous, but so is heavy traffic. As a driver, your first responsibility is to payattention to the road.• Do not take notes or look up phone numbers while driving. If you are reading an address book or business card, or writing a "to do" list while driving a car, you are notwatching where you are going. It’s common sense. Don’t get caught in a dangerous situation because you are reading or writing and not paying attention to the road ornearby vehicles.• Dial sensibly and assess the traffic; if possible, place calls when you are not moving or before pulling into traffic. Try to plan your calls before you begin your trip orattempt to coincide your calls with times you may be stopped at a stop sign, red light or otherwise stationary. But if you need to dial while driving, follow this simpletip--dial only a few numbers, check the road and your mirrors, then continue.• Do not engage in stressful or emotional conversations that may be distracting. Stressful or emotional conversations and driving do not mix--they are distracting andeven dangerous when you are behind the wheel of a car. Make people you are talking with aware you are driving and if necessary, suspend conversations which havethe potential to divert your attention from the road.• Use your wireless phone to call for help. Your wireless phone is one of the greatest tools you can own to protect yourself and your family in dangerous situations--withyour phone at your side, help is only three numbers away. Dial 9-1-1 or other local emergency number in the case of fire, traffic accident, road hazard or medicalemergency. Remember, it is a free call on your wireless phone!• Use your wireless phone to help others in emergencies. Your wireless phone provides you a perfect opportunity to be a "Good Samaritan" in your community. If yousee an auto accident, crime in progress or other serious emergency where lives are in danger, call 9-1-1 or other local emergency number, as you would want others todo for you.• Call roadside assistance or a special wireless non-emergency assistance number when necessary. Certain situations you encounter while driving may require attention,but are not urgent enough to merit a call for emergency services. But you still can use your wireless phone to lend a hand. If you see a broken-down vehicle posing noserious hazard, a broken traffic signal, a minor traffic accident where no one appears injured or a vehicle you know to be stolen, call roadside assistance or other specialnon-emergency wireless number.Careless, distracted individuals and people driving irresponsibly represent a hazard to everyone on the road. Since 1984, the Cellular Telecommunications IndustryAssociation and the wireless industry have conducted educational outreach to inform wireless phone users of their responsibilities as safe drivers and good citizens. As weapproach a new century, more and more of us will take advantage of the benefits of wireless telephones. And, as we take to the roads, we all have a responsibility to drivesafely. The wireless industry reminds you to use your phone safely when driving.For more information, please call 1-888-901-SAFE. For updates: www.wow-com.com/consumer/issues/driving/articles.cfm?ID=85Appendix B Message from the FDAMessage from the FDA©July 18, 2001 For updates: www.fda.gov/cdrh/phones• Do wireless phones pose a health hazard? The available scientific evidence does not show that any health problems are associated with using wireless phones. There isno proof, however, that wireless phones are absolutely safe. Wireless phones emit low levels of radio frequency energy (RF) in the microwave range while being used.They also emit very low levels of RF when in the standby mode. Whereas high levels of RF can produce health effects (by heating tissue), exposure to low level RFthat does not produce heating effects causes no known adverse health effects. Many studies of low level RF exposures have not found any biological effects. Somestudies have suggested that some biological effects may occur, but such findings have not been confirmed by additional research. In some cases, other researchers havehad difficulty in reproducing those studies, or in determining the reasons for inconsistent results.• What is FDA's role concerning the safety of wireless phones? Under the law, FDA does not review the safety of radiation-emitting consumer products such as wirelessphones before they can be sold, as it does with new drugs or medical devices. However, the agency has authority to take action if wireless phones are shown to emitradio frequency energy (RF) at a level that is hazardous to the user. In such a case, FDA could require the manufacturers of wireless phones to notify users of the healthhazard and to repair, replace or recall the phones so that the hazard no longer exists. Although the existing scientific data do not justify FDA regulatory actions, FDAhas urged the wireless phone industry to take a number of steps, including the following: Support needed research into possible biological effects of RF of the type1 © 2001 Cellular Telecommunications & Internet Association. All Rights Reserved. 1250 Connecticut Avenue, NW Suite 800, Washington, DC 20036. Phone:(202) 785-0081Copyright © 2004 Nokia. All Rights Reserved. 105
emitted by wireless phones; Design wireless phones in a way that minimizes any RF exposure to the user that is not necessary for device function; and Cooperate inproviding users of wireless phones with the best possible information on possible effects of wireless phone use on human health. FDA belongs to an interagencyworking group of the federal agencies that have responsibility for different aspects of RF safety to ensure coordinated efforts at the federal level. The followingagencies belong to this working group: National Institute for Occupational Safety and Health Environmental Protection Agency Federal Communications CommissionOccupational Safety and Health Administration National Telecommunications and Information Administration The National Institutes of Health participates in someinteragency working group activities, as well. FDA shares regulatory responsibilities for wireless phones with the Federal Communications Commission (FCC). Allphones that are sold in the United States must comply with FCC safety guidelines that limit RF exposure. FCC relies on FDA and other health agencies for safetyquestions about wireless phones. FCC also regulates the base stations that the wireless phone networks rely upon. While these base stations operate at higher powerthan do the wireless phones themselves, the RF exposures that people get from these base stations are typically thousands of times lower than those they can get fromwireless phones. Base stations are thus not the subject of the safety questions discussed in this document.• What kinds of phones are the subject of this update? The term wireless phone refers here to hand-held wireless phones with built-in antennas, often called cell mobileor PCS phones. These types of wireless phones can expose the user to measurable radiofrequency energy (RF) because of the short distance between the phone and theuser’s head. These RF exposures are limited by Federal Communications Commission safety guidelines that were developed with the advice of FDA and other federalhealth and safety agencies. When the phone is located at greater distances from the user, the exposure to RF is drastically lower because a person's RF exposuredecreases rapidly with increasing distance from the source. The so-called cordless phones; which have a base unit connected to the telephone wiring in a house,typically operate at far lower power levels, and thus produce RF exposures far below the FCC safety limits.• What kinds of phones are the subject of this update? The term wireless phone refers here to hand-held wireless phones with built-in antennas, often called cell mobileor PCS phones. These types of wireless phones can expose the user to measurable radiofrequency energy (RF) because of the short distance between the phone and theuser’s head. These RF exposures are limited by Federal Communications Commission safety guidelines that were developed with the advice of FDA and other federalhealth and safety agencies. When the phone is located at greater distances from the user, the exposure to RF is drastically lower because a person's RF exposuredecreases rapidly with increasing distance from the source. The so-called cordless phones; which have a base unit connected to the telephone wiring in a house,typically operate at far lower power levels, and thus produce RF exposures far below the FCC safety limits.• What are the results of the research done already? The research done thus far has produced conflicting results, and many studies have suffered from flaws in theirresearch methods. Animal experiments investigating the effects of radiofrequency energy (RF) exposures characteristic of wireless phones have yielded conflictingresults that often cannot be repeated in other laboratories. A few animal studies, however, have suggested that low levels of RF could accelerate the development ofcancer in laboratory animals. However, many of the studies that showed increased tumor development used animals that had been genetically engineered or treatedwith cancer-causing chemicals so as to be pre-disposed to develop cancer in the absence of RF exposure. Other studies exposed the animals to RF for up to 22 hoursper day. These conditions are not similar to the conditions under which people use wireless phones, so we don’t know with certainty what the results of such studiesmean for human health. Three large epidemiology studies have been published since December 2000. Between them, the studies investigated any possible associationbetween the use of wireless phones and primary brain cancer, glioma, meningioma, or acoustic neuroma, tumors of the brain or salivary gland, leukemia, or othercancers. None of the studies demonstrated the existence of any harmful health effects from wireless phone RF exposures. However, none of the studies can answerquestions about long-term exposures, since the average period of phone use in these studies was around three years.• What research is needed to decide whether RF exposure from wireless phones poses a health risk? A combination of laboratory studies and epidemiological studies ofpeople actually using wireless phones would provide some of the data that are needed. Lifetime animal exposure studies could be completed in a few years. However,very large numbers of animals would be needed to provide reliable proof of a cancer promoting effect if one exists. Epidemiological studies can provide data that isdirectly applicable to human populations, but 10 or more years follow-up may be needed to provide answers about some health effects, such as cancer. This is becausethe interval between the time of exposure to a cancer-causing agent and the time tumors develop - if they do - may be many, many years. The interpretation ofepidemiological studies is hampered by difficulties in measuring actual RF exposure during day-to-day use of wireless phones. Many factors affect this measurement,such as the angle at which the phone is held, or which model of phone is used.• What is FDA doing to find out more about the possible health effects of wireless phone RF? FDA is working with the U.S. National Toxicology Program and withgroups of investigators around the world to ensure that high priority animal studies are conducted to address important questions about the effects of exposure toradiofrequency energy (RF). FDA has been a leading participant in the World Health Organization International Electromagnetic Fields (EMF) Project since itsinception in 1996. An influential result of this work has been the development of a detailed agenda of research needs that has driven the establishment of new researchprograms around the world. The Project has also helped develop a series of public information documents on EMF issues. FDA and the Cellular Telecommunications& Internet Association (CTIA) have a formal Cooperative Research and Development Agreement (CRADA) to do research on wireless phone safety. FDA providesthe scientific oversight, obtaining input from experts in government, industry, and academic organizations. CTIA-funded research is conducted through contracts toindependent investigators. The initial research will include both laboratory studies and studies of wireless phone users. The CRADA will also include a broadassessment of additional research needs in the context of the latest research developments around the world.• How can I find out how much radiofrequency energy exposure I can get by using my wireless phone? All phones sold in the United States must comply with FederalCommunications Commission (FCC) guidelines that limit radiofrequency energy (RF) exposures. FCC established these guidelines in consultation with FDA and theother federal health and safety agencies. The FCC limit for RF exposure from wireless telephones is set at a Specific Absorption Rate (SAR) of 1.6 watts per kilogram(1.6 W/kg). The FCC limit is consistent with the safety standards developed by the Institute of Electrical and Electronic Engineering (IEEE) and the National Councilon Radiation Protection and Measurement. The exposure limit takes into consideration the body’s ability to remove heat from the tissues that absorb energy from thewireless phone and is set well below levels known to have effects. Manufacturers of wireless phones must report the RF exposure level for each model of phone to theFCC. The FCC website (http://www.fcc.gov/oet/rfsafety) gives directions for locating the FCC identification number on your phone so you can find your phone’s RFexposure level in the online listing.• What has FDA done to measure the radiofrequency energy coming from wireless phones? The Institute of Electrical and Electronic Engineers (IEEE) is developing atechnical standard for measuring the radiofrequency energy (RF) exposure from wireless phones and other wireless handsets with the participation and leadership ofFDA scientists and engineers. The standard, Recommended Practice for Determining the Spatial-Peak Specific Absorption Rate (SAR) in the Human Body Due toWireless Communications Devices: Experimental Techniques, sets forth the first consistent test methodology for measuring the rate at which RF is deposited in theheads of wireless phone users. The test method uses a tissue-simulating model of the human head. Standardized SAR test methodology is expected to greatly improvethe consistency of measurements made at different laboratories on the same phone. SAR is the measurement of the amount of energy absorbed in tissue, either by thewhole body or a small part of the body. It is measured in watts/kg (or milliwatts/g) of matter. This measurement is used to determine whether a wireless phonecomplies with safety guidelines.• What steps can I take to reduce my exposure to radiofrequency energy from my wireless phone? If there is a risk from these products--and at this point we do not knowthat there is--it is probably very small. But if you are concerned about avoiding even potential risks, you can take a few simple steps to minimize your exposure toradiofrequency energy (RF). Since time is a key factor in how much exposure a person receives, reducing the amount of time spent using a wireless phone will reduceRF exposure. If you must conduct extended conversations by wireless phone every day, you could place more distance between your body and the source of the RF,since the exposure level drops off dramatically with distance. For example, you could use a headset and carry the wireless phone away from your body or use awireless phone connected to a remote antenna. Again, the scientific data do not demonstrate that wireless phones are harmful. But if you are concerned about the RFexposure from these products, you can use measures like those described above to reduce your RF exposure from wireless phone use.• What about children using wireless phones? The scientific evidence does not show a danger to users of wireless phones, including children and teenagers. If you wantto take steps to lower exposure to radiofrequency energy (RF), the measures described above would apply to children and teenagers using wireless phones. Reducingthe time of wireless phone use and increasing the distance between the user and the RF source will reduce RF exposure.Some groups sponsored by other nationalgovernments have advised that children be discouraged from using wireless phones at all. For example, the government in the United Kingdom distributed leafletscontaining such a recommendation in December 2000. They noted that no evidence exists that using a wireless phone causes brain tumors or other ill effects. Theirrecommendation to limit wireless phone use by children was strictly precautionary; it was not based on scientific evidence that any health hazard exists.• What about wireless phone interference with medical equipment? Radio frequency energy (RF) from wireless phones can interact with some electronic devices. Forthis reason, FDA helped develop a detailed test method to measure electromagnetic interference (EMI) of implanted cardiac pacemakers and defibrillators fromwireless telephones. This test method is now part of a standard sponsored by the Association for the Advancement of Medical instrumentation (AAMI). The final draft,a joint effort by FDA, medical device manufacturers, and many other groups, was completed in late 2000. This standard will allow manufacturers to ensure that cardiacpacemakers and defibrillators are safe from wireless phone EMI. FDA has tested hearing aids for interference from handheld wireless phones and helped develop avoluntary standard sponsored by the Institute of Electrical and Electronic Engineers (IEEE). This standard specifies test methods and performance requirements forhearing aids and wireless phones so that no interference occurs when a person uses a compatible phone and a accompanied hearing aid at the same time. This standardwas approved by the IEEE in 2000. FDA continues to monitor the use of wireless phones for possible interactions with other medical devices. Should harmfulinterference be found to occur, FDA will conduct testing to assess the interference and work to resolve the problem.Appendices Copyright © 2004 Nokia. All Rights Reserved. 106
• Where can I find additional information? For additional information, please refer to the following resources:FDA web page on wireless phoneshttp://www.fda.gov/cdrh/phones/index.html http://www.fda.gov/cdrh/phones/index.htmlFederal Communications Commission (FCC) RF Safety Program http://www.fda.gov/cdrh/phones/index.htmlInternational Commission on Non-Ionizing Radiation Protectionhttp://www.icnirp.del World Health Organization (WHO) International EMF Project http://www.who.int/emfNational Radiological Protection Board (UK) http://www.nrpb.org.uk/2004 For updates:http://www.fda.gov/cdrh/phonesAppendices Copyright © 2004 Nokia. All Rights Reserved. 107
IndexSymbols/Numerics1-touch dialing 22Aaccess codes 9access points 66, 68, 75ad hoc network 84adding an image to a contact card 64adding contacts 24alarm clock 82anniversaries view in calendar 59answering a call 22, 28Application manager 72applications 11, 17attachments 35, 39authentication 69autolock 76automatic redialing 25Bbackground image 72backing up data 16, 62, 73basic settings 10battery 8, 9battery charge level 12Bluetooth 85bookmark messages 41bookmarks 41, 44browser settings 44browsing the Internet 43business card 46Ccableconnections 84settings 75cache memory 43calculator 81calendar 57call log 24call register 24call restriction 29call waiting 25caller ID 25calls 22, 28camera 63camera folders 73CD-ROM 13cell broadcast 42cells 50certificates 76charging the battery 9chart sheets 51cities 10, 82, 83clock 82common actions 11communicator interface 10, 72concatenation 38conference calls 29configuration messages 41configuration server profiles 87connecting to the Internet 66connection settings 36connection status 86connections 20, 34, 41, 68, 74, 94cable 84infrared 86modem 86connectivity types 84connectors 10contact cards 10, 64contact groups 46contacts 24, 45one-touch dialing 25contacts list 24Control panel 70control panel 66cookies 43copying contacts 47countries 82cover phone 12, 22making a call 22creating calendar entries 57creating presentations 55currency format 71cursor 72customizing profiles 73Ddata calls 21, 67data connections 20data management 72data transfer 15, 16data transmission 94date and time 10, 70day view in calendar 59dead spots in radio signal 94declining a call 22desk 27dialed calls 24, 28display 11, 71, 72display indicators 12diverting calls 25document templates 49documents 48download details 43downloading files 43Ee-mail 33e-mail accounts 35e-mail attachments 35e-mail notifications 41EAP 69EAP authentication 69electrostatic discharge 94extended User Guide 13Extensible Authentication ProtocolSee EAPCopyright © 2004 Nokia. All Rights Reserved. 108
Ffaxes 40File manager 61files 61folders 32, 73footers 19formatting a memory card 62formatting documents 48formatting messages 34forwarding calls 29functions during a call 22functions in worksheets 50Ggeneral packet radio serviceSee GPRSGPRS 20groups 27GSM data calls 21Hheaders 19headset 72high-speed circuit switched dataSee HSCSDhigh-speed data calls 21HSCSD 21Iimages 38, 64indicators 12infrared 86installing applications 17, 72installing the SIM card, battery, and memory card 8instructions in your device 12Internet 34, 43, 66Internet access points 66, 68, 75IP address 68JJ2ME 18Java 18Java applications 18, 73Kkeyboard 10keyguard 12keypad lock 12keys 10Llanguage 10, 71line for outgoing calls 25listening to music 79location privacy 77location requests 77lock code 9locking the keypad 12locking time-out 76logs 16, 17, 24, 30, 72, 77, 87low memory 33low signal strength 94Mmail 33mail accounts 34mail servers 36making a call 22, 28margins 19memory 33memory card 8, 16, 61, 62memory status 73menu functions 23messages 23, 32, 38, 41reading 32writing 32messaging 32folders 32messaging center 32messaging tools 73missed calls 24, 28modem 86month view in calendar 58multimedia attachments 39multimedia messages 38Music player 79muting the ringing tone 28my contact card 46My own key 71my phone numbers 25Nnetwork 30noise 94Nokia PC Suite 15notes view in presentations 56notifications 41number format 71number format in calculator 81numbering 19Oobjects in documents 49offline 29, 33offline profile 29one-touch dialing 25, 28online 33operator logos 41outline view in presentations 56Ppacket data 20page size and orientation 19pairing with a device 86password protected messages 41passwords 9, 77PC Suite 15personal certificates 77personalizationfront cover 14key mat 14personalizing your device 14phone calls 22recording 80phone line 30phone security 76IndexCopyright © 2004 Nokia. All Rights Reserved. 109
picture messages 38pictures 63PIN code 9, 76playingmusic 79video and sound 78voice recordings 80power 9PowerPoint presentations 55presentations 55preview 18printing 18privacy settings 77private key store 77product information 77profiles 25, 73proxy settings 67, 68, 76PUK code 9Rradio interference 94radio signal 94reading e-mail 35RealPlayer 75, 78received calls 24, 28receiving data 85recent calls 24recording voice 79redialing 25regional settings 71rejecting a call 22reminders 82remote configuration 87remote fax boxes 40remote synchronization 16removing applications 72removing calendar entries 58replying to text messages 37resizing images 64restoring data 16, 73restricting calls 29retrieving e-mail 35ringing tones 41roaming 94Ssales package 20schedules 59scientific calculator 81scripting 67searching 33, 58contact name 24files and folders 61security 61, 73, 75, 76selecting an Internet access point 70sendingfaxes 40multimedia messages 38music 79text messages 37video clips 78voice recordings 80sending a contact card 46sending data 85sending e-mail 34service messages 74service numbers 25settings 25Bluetooth 85calendar 58calls 30camera 63connectivity 41contacts 47contacts list 24currency format 71current time and date 70cursor 72device language 71display colors 72display contrast and brightness 71documents 48e-mail 34, 35e-mail accounts 35fax 40first start-up 10headset 72Internet 66Internet access point for WLAN 68Java application security 73message centers 38multimedia 39phone line 30profiles 73RealPlayer 75regional settings 71remote configuration 87renaming received settings 41search options 58text messages 37trust settings 77voice mailbox 30wallpaper 72WLAN 75Sheet application 50shortcuts 12, 24signal strength 12, 94SIM card 8, 38, 47slide master view in presentations 56slide shows 55smart messages 41SMS messages 37software 17, 72software version 77sorting worksheets 50sound files 78speed dialing 22, 25static electricity 94stickers in the sales package 20switching the device on and off 9synchronizing 16Ttables 49, 56telephone application 28templates 46, 49IndexCopyright © 2004 Nokia. All Rights Reserved. 110
text editor 48text message centers 38text messages 37time and date 10, 70to-do lists view in calendar 59touchtones 29transferring data 15, 16trusted certificates 77Vversion of software 77video clips 63, 78visited Web pages 43voice mailbox 30voice memos 80Voice recorder 79volume 15Wwallpaper 72Webdownloading files 43Web browser 43week view in calendar 58weekly time schedule view in calendar 59WEP keys 69wireless LANSee WLANWLAN 20, 74ad hoc network 84WLAN plugins 69working online and offline 33worksheets 50world clock 82WPA authentication 69writing text 22Yyear schedule view in calendar 59IndexCopyright © 2004 Nokia. All Rights Reserved. 111

Navigation menu