Microsoft RH-31 GSM 850/1800/1900 Cellular Telephone User Manual ug cover
Microsoft Mobile Oy GSM 850/1800/1900 Cellular Telephone ug cover
UserManual.wiki
>
Microsoft
>
RH 31 User Manual
Users manual
Navigation menu
Upload a User Manual
Namespaces
Wiki Guide
HTML
PDF
Info
Views
User Manual
Discussion / Help
Navigation

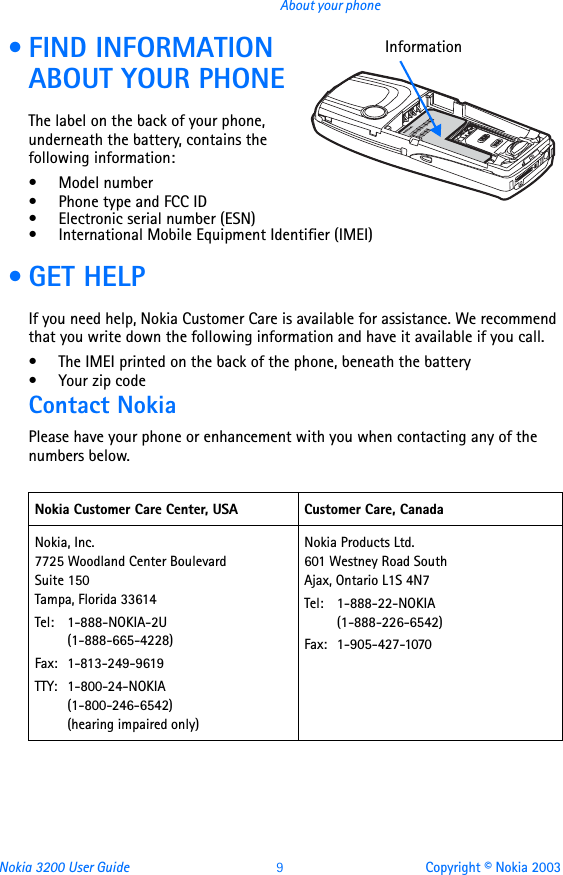
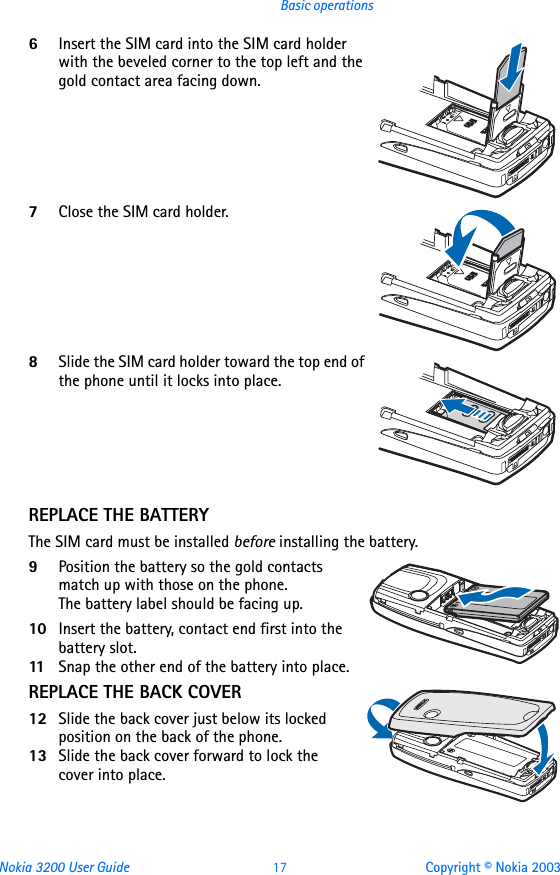
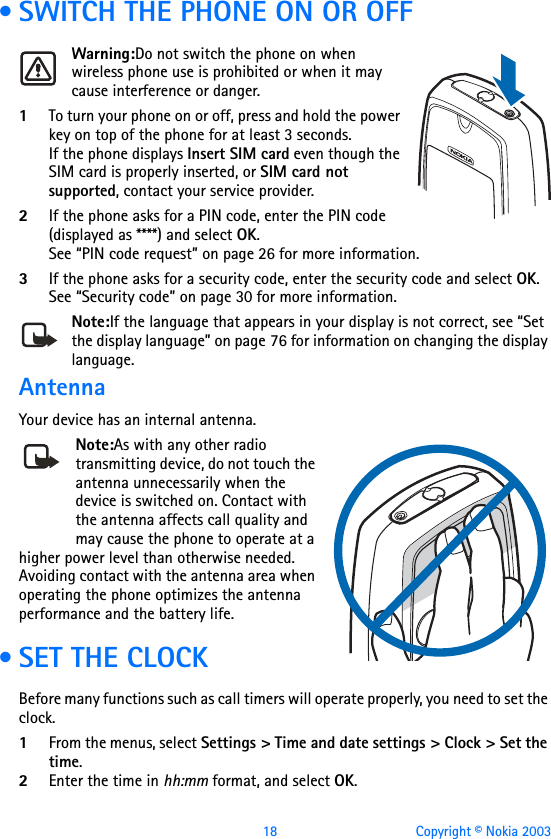
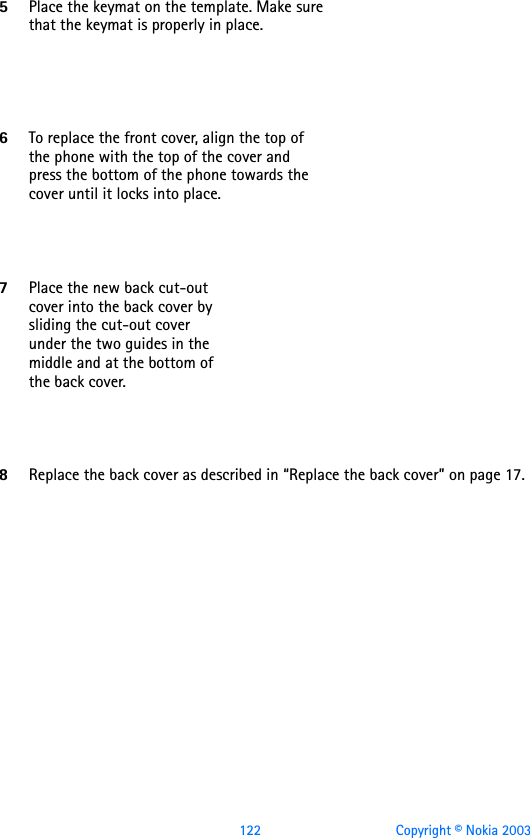
![[ vii ]ContentsQuick guide . . . . . . . . . . . . . . . . . . . . . . . . . . . . . . . . . . . . . . . . . . . . . . . . vi1 For your safety . . . . . . . . . . . . . . . . . . . . . . . . . . . . . . . . . .1About your device . . . . . . . . . . . . . . . . . . . . . . . . . . . . . . . . . . . . . . . . . . . .2Network services . . . . . . . . . . . . . . . . . . . . . . . . . . . . . . . . . . . . . . . . . . . . .2Shared memory . . . . . . . . . . . . . . . . . . . . . . . . . . . . . . . . . . . . . . . . . . . . . .32 Overview of functions . . . . . . . . . . . . . . . . . . . . . . . . . . . . . 4Camera . . . . . . . . . . . . . . . . . . . . . . . . . . . . . . . . . . . . . . . . . . . . . . . . . . . . .4FM radio . . . . . . . . . . . . . . . . . . . . . . . . . . . . . . . . . . . . . . . . . . . . . . . . . . . .4Flashlight . . . . . . . . . . . . . . . . . . . . . . . . . . . . . . . . . . . . . . . . . . . . . . . . . . .4Multimedia messaging service (MMS). . . . . . . . . . . . . . . . . . . . . . . . . . . .5Speakerphone. . . . . . . . . . . . . . . . . . . . . . . . . . . . . . . . . . . . . . . . . . . . . . . .5GPRS and EGPRS . . . . . . . . . . . . . . . . . . . . . . . . . . . . . . . . . . . . . . . . . . . . .5MIDP Java™ applications . . . . . . . . . . . . . . . . . . . . . . . . . . . . . . . . . . . . . .5Polyphonic sound (MIDI). . . . . . . . . . . . . . . . . . . . . . . . . . . . . . . . . . . . . . .6Advanced multimedia player . . . . . . . . . . . . . . . . . . . . . . . . . . . . . . . . . . .6Browser. . . . . . . . . . . . . . . . . . . . . . . . . . . . . . . . . . . . . . . . . . . . . . . . . . . . .6Special user interface features. . . . . . . . . . . . . . . . . . . . . . . . . . . . . . . . . .63 About your phone . . . . . . . . . . . . . . . . . . . . . . . . . . . . . . . . 8Register your phone . . . . . . . . . . . . . . . . . . . . . . . . . . . . . . . . . . . . . . . . . .8Terms . . . . . . . . . . . . . . . . . . . . . . . . . . . . . . . . . . . . . . . . . . . . . . . . . . . . . .8Find information about your phone . . . . . . . . . . . . . . . . . . . . . . . . . . . . . .9Get help . . . . . . . . . . . . . . . . . . . . . . . . . . . . . . . . . . . . . . . . . . . . . . . . . . . .9Start screen . . . . . . . . . . . . . . . . . . . . . . . . . . . . . . . . . . . . . . . . . . . . . . . .11Copyright protection . . . . . . . . . . . . . . . . . . . . . . . . . . . . . . . . . . . . . . . . .13Accessibility solutions . . . . . . . . . . . . . . . . . . . . . . . . . . . . . . . . . . . . . . . .13Nokia PC Suite . . . . . . . . . . . . . . . . . . . . . . . . . . . . . . . . . . . . . . . . . . . . . .13Phone menus . . . . . . . . . . . . . . . . . . . . . . . . . . . . . . . . . . . . . . . . . . . . . . .144 Basic operations . . . . . . . . . . . . . . . . . . . . . . . . . . . . . . . . 16Install the SIM card . . . . . . . . . . . . . . . . . . . . . . . . . . . . . . . . . . . . . . . . . .16Switch the phone on or off. . . . . . . . . . . . . . . . . . . . . . . . . . . . . . . . . . . .18Set the clock . . . . . . . . . . . . . . . . . . . . . . . . . . . . . . . . . . . . . . . . . . . . . . .18](https://usermanual.wiki/Microsoft/RH-31/User-Guide-352834-Page-8.png)
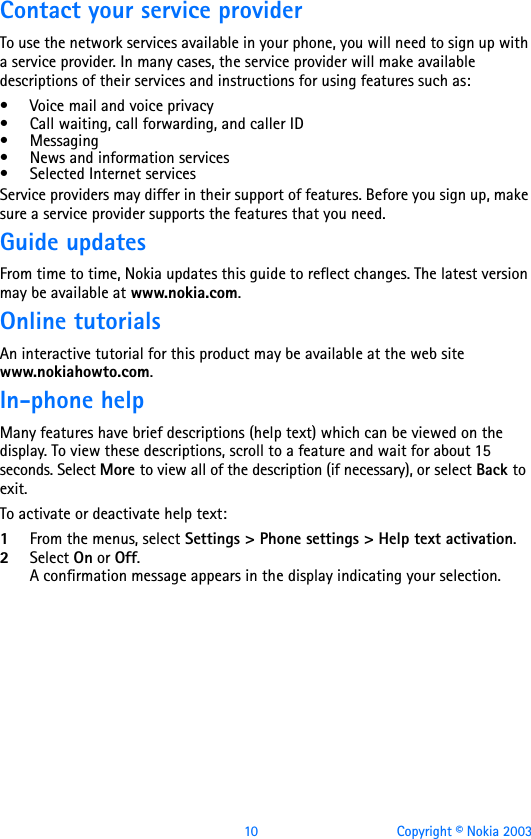
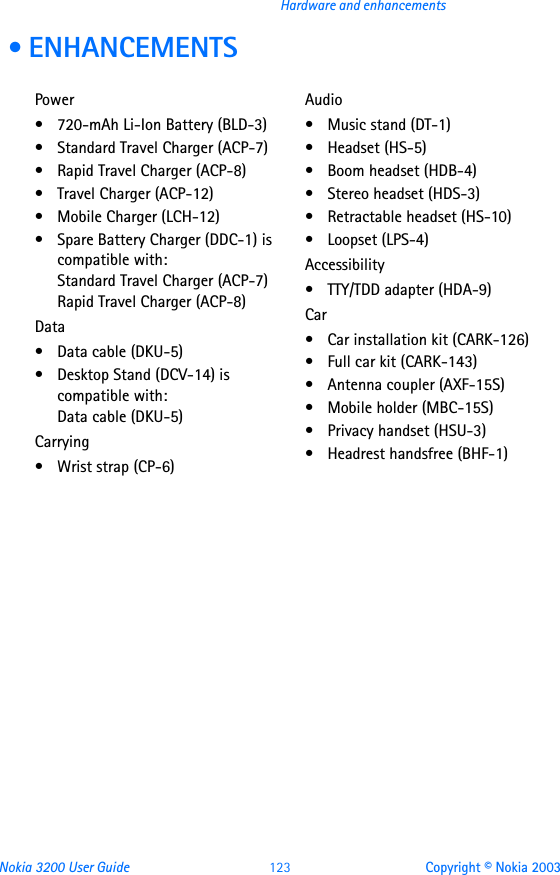
![[ viii ]Make and answer calls . . . . . . . . . . . . . . . . . . . . . . . . . . . . . . . . . . . . . . 19Adjust the earpiece volume. . . . . . . . . . . . . . . . . . . . . . . . . . . . . . . . . . . 20Use the loudspeaker. . . . . . . . . . . . . . . . . . . . . . . . . . . . . . . . . . . . . . . . . 20Call and set up your voice mail. . . . . . . . . . . . . . . . . . . . . . . . . . . . . . . . 21Listen to your voice messages. . . . . . . . . . . . . . . . . . . . . . . . . . . . . . . . . 21Options during a call . . . . . . . . . . . . . . . . . . . . . . . . . . . . . . . . . . . . . . . . 215 Text entry . . . . . . . . . . . . . . . . . . . . . . . . . . . . . . . . . . . . . 23Standard mode. . . . . . . . . . . . . . . . . . . . . . . . . . . . . . . . . . . . . . . . . . . . . 23Predictive text input . . . . . . . . . . . . . . . . . . . . . . . . . . . . . . . . . . . . . . . . 24Enter punctuation and special characters . . . . . . . . . . . . . . . . . . . . . . . 256 Phone security . . . . . . . . . . . . . . . . . . . . . . . . . . . . . . . . . 26Keyguard. . . . . . . . . . . . . . . . . . . . . . . . . . . . . . . . . . . . . . . . . . . . . . . . . . 26PIN code request . . . . . . . . . . . . . . . . . . . . . . . . . . . . . . . . . . . . . . . . . . . 26Call restrictions . . . . . . . . . . . . . . . . . . . . . . . . . . . . . . . . . . . . . . . . . . . . 27Fixed dialing . . . . . . . . . . . . . . . . . . . . . . . . . . . . . . . . . . . . . . . . . . . . . . . 28Closed user groups. . . . . . . . . . . . . . . . . . . . . . . . . . . . . . . . . . . . . . . . . . 29Security levels . . . . . . . . . . . . . . . . . . . . . . . . . . . . . . . . . . . . . . . . . . . . . 29Access codes. . . . . . . . . . . . . . . . . . . . . . . . . . . . . . . . . . . . . . . . . . . . . . . 307 Advanced multimedia player . . . . . . . . . . . . . . . . . . . . . . . 338 Menu functions . . . . . . . . . . . . . . . . . . . . . . . . . . . . . . . . 34Messages (Menu 1) . . . . . . . . . . . . . . . . . . . . . . . . . . . . . . 35Linked messages. . . . . . . . . . . . . . . . . . . . . . . . . . . . . . . . . . . . . . . . . . . . 35Before you can send and receive messages. . . . . . . . . . . . . . . . . . . . . . 35Icons . . . . . . . . . . . . . . . . . . . . . . . . . . . . . . . . . . . . . . . . . . . . . . . . . . . . . 36Options . . . . . . . . . . . . . . . . . . . . . . . . . . . . . . . . . . . . . . . . . . . . . . . . . . . 36Default message type . . . . . . . . . . . . . . . . . . . . . . . . . . . . . . . . . . . . . . . 37Font size . . . . . . . . . . . . . . . . . . . . . . . . . . . . . . . . . . . . . . . . . . . . . . . . . . 37Save your message center number. . . . . . . . . . . . . . . . . . . . . . . . . . . . . 38Organize messages with folders . . . . . . . . . . . . . . . . . . . . . . . . . . . . . . . 38Delete messages. . . . . . . . . . . . . . . . . . . . . . . . . . . . . . . . . . . . . . . . . . . . 39Message settings . . . . . . . . . . . . . . . . . . . . . . . . . . . . . . . . . . . . . . . . . . . 40Write and send a text message. . . . . . . . . . . . . . . . . . . . . . . . . . . . . . . . 42](https://usermanual.wiki/Microsoft/RH-31/User-Guide-352834-Page-9.png)
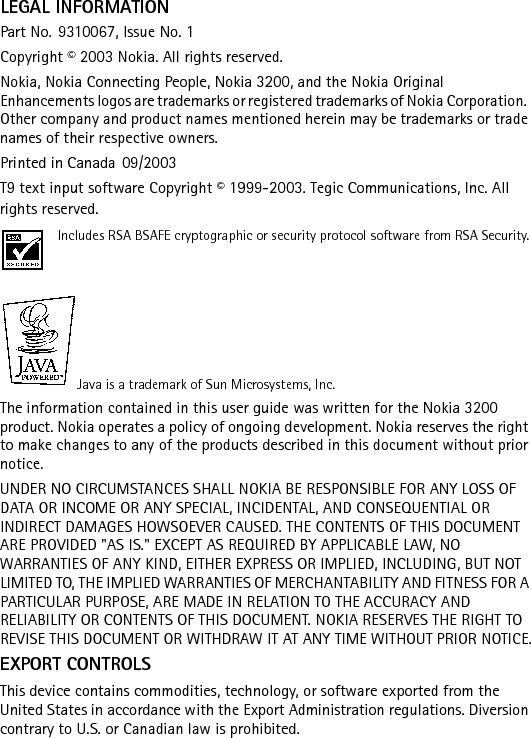
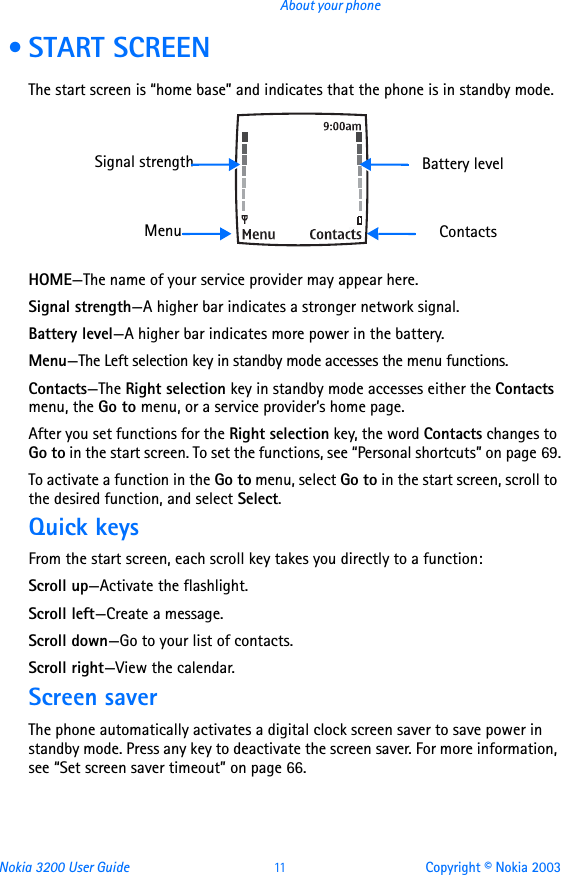
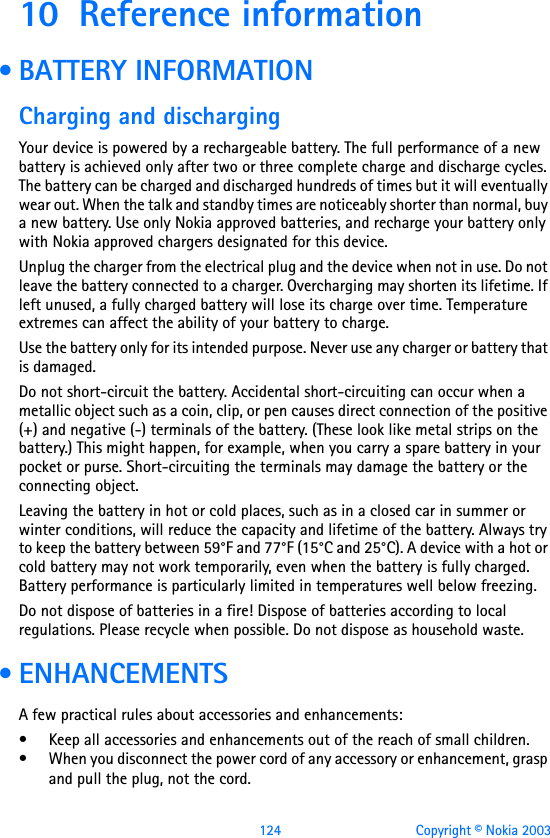
![[ ix ]Read messages. . . . . . . . . . . . . . . . . . . . . . . . . . . . . . . . . . . . . . . . . . . . . .43Reply to a message . . . . . . . . . . . . . . . . . . . . . . . . . . . . . . . . . . . . . . . . . .43Forward a message . . . . . . . . . . . . . . . . . . . . . . . . . . . . . . . . . . . . . . . . . .44Picture messages . . . . . . . . . . . . . . . . . . . . . . . . . . . . . . . . . . . . . . . . . . . .44E-mail . . . . . . . . . . . . . . . . . . . . . . . . . . . . . . . . . . . . . . . . . . . . . . . . . . . . .46Multimedia messages . . . . . . . . . . . . . . . . . . . . . . . . . . . . . . . . . . . . . . . .47Voice messages . . . . . . . . . . . . . . . . . . . . . . . . . . . . . . . . . . . . . . . . . . . . .50Info message service . . . . . . . . . . . . . . . . . . . . . . . . . . . . . . . . . . . . . . . . .52Service commands. . . . . . . . . . . . . . . . . . . . . . . . . . . . . . . . . . . . . . . . . . .52Call log (Menu 2) . . . . . . . . . . . . . . . . . . . . . . . . . . . . . . . 53Options . . . . . . . . . . . . . . . . . . . . . . . . . . . . . . . . . . . . . . . . . . . . . . . . . . . .53While viewing calls . . . . . . . . . . . . . . . . . . . . . . . . . . . . . . . . . . . . . . . . . .53View missed calls. . . . . . . . . . . . . . . . . . . . . . . . . . . . . . . . . . . . . . . . . . . .54View received calls . . . . . . . . . . . . . . . . . . . . . . . . . . . . . . . . . . . . . . . . . .54View dialed numbers . . . . . . . . . . . . . . . . . . . . . . . . . . . . . . . . . . . . . . . . .54View call times. . . . . . . . . . . . . . . . . . . . . . . . . . . . . . . . . . . . . . . . . . . . . .55Delete call lists. . . . . . . . . . . . . . . . . . . . . . . . . . . . . . . . . . . . . . . . . . . . . .55View duration of calls . . . . . . . . . . . . . . . . . . . . . . . . . . . . . . . . . . . . . . . .55Contacts (Menu 3). . . . . . . . . . . . . . . . . . . . . . . . . . . . . . . 56Contacts menu. . . . . . . . . . . . . . . . . . . . . . . . . . . . . . . . . . . . . . . . . . . . . .56Types of contact information . . . . . . . . . . . . . . . . . . . . . . . . . . . . . . . . . .56Save contact information . . . . . . . . . . . . . . . . . . . . . . . . . . . . . . . . . . . . .57Change the default (primary) number . . . . . . . . . . . . . . . . . . . . . . . . . . .58Search for an entry in contacts . . . . . . . . . . . . . . . . . . . . . . . . . . . . . . . .58Make a call from contacts . . . . . . . . . . . . . . . . . . . . . . . . . . . . . . . . . . . .59Add an image to a name or number . . . . . . . . . . . . . . . . . . . . . . . . . . . .59Edit a contact entry. . . . . . . . . . . . . . . . . . . . . . . . . . . . . . . . . . . . . . . . . .59Delete names and numbers. . . . . . . . . . . . . . . . . . . . . . . . . . . . . . . . . . . .59Copy contact entries . . . . . . . . . . . . . . . . . . . . . . . . . . . . . . . . . . . . . . . . .60Business cards . . . . . . . . . . . . . . . . . . . . . . . . . . . . . . . . . . . . . . . . . . . . . .601-touch dialing . . . . . . . . . . . . . . . . . . . . . . . . . . . . . . . . . . . . . . . . . . . . .61View info, service, and own numbers. . . . . . . . . . . . . . . . . . . . . . . . . . . .62Caller groups . . . . . . . . . . . . . . . . . . . . . . . . . . . . . . . . . . . . . . . . . . . . . . .62Select contacts view and memory . . . . . . . . . . . . . . . . . . . . . . . . . . . . . .63](https://usermanual.wiki/Microsoft/RH-31/User-Guide-352834-Page-10.png)
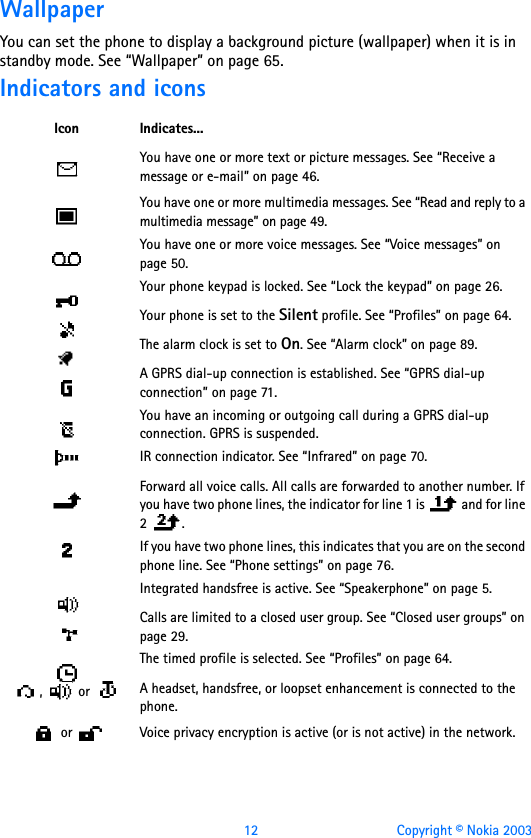
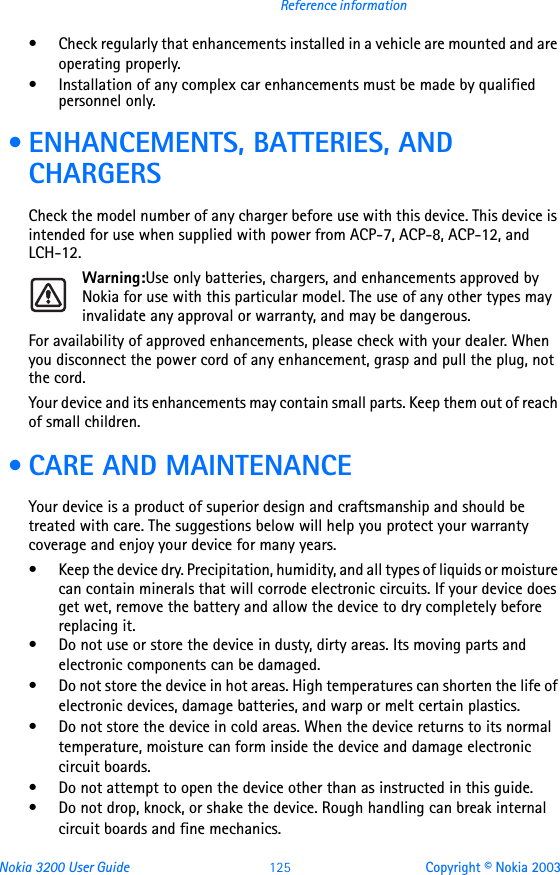
![[ x ]Settings (Menu 4). . . . . . . . . . . . . . . . . . . . . . . . . . . . . . . 64Over the Air (OTA) settings service. . . . . . . . . . . . . . . . . . . . . . . . . . . . . 64Profiles . . . . . . . . . . . . . . . . . . . . . . . . . . . . . . . . . . . . . . . . . . . . . . . . . . . 64Tone settings . . . . . . . . . . . . . . . . . . . . . . . . . . . . . . . . . . . . . . . . . . . . . . 65Display settings . . . . . . . . . . . . . . . . . . . . . . . . . . . . . . . . . . . . . . . . . . . . 65Time and date settings . . . . . . . . . . . . . . . . . . . . . . . . . . . . . . . . . . . . . . 67Personal shortcuts . . . . . . . . . . . . . . . . . . . . . . . . . . . . . . . . . . . . . . . . . . 69Connectivity . . . . . . . . . . . . . . . . . . . . . . . . . . . . . . . . . . . . . . . . . . . . . . . 70Call settings . . . . . . . . . . . . . . . . . . . . . . . . . . . . . . . . . . . . . . . . . . . . . . . 73Phone settings . . . . . . . . . . . . . . . . . . . . . . . . . . . . . . . . . . . . . . . . . . . . . 76Enhancement settings . . . . . . . . . . . . . . . . . . . . . . . . . . . . . . . . . . . . . . . 78Security settings . . . . . . . . . . . . . . . . . . . . . . . . . . . . . . . . . . . . . . . . . . . 79Restore factory settings . . . . . . . . . . . . . . . . . . . . . . . . . . . . . . . . . . . . . 79Gallery (Menu 5). . . . . . . . . . . . . . . . . . . . . . . . . . . . . . . . 81Folders. . . . . . . . . . . . . . . . . . . . . . . . . . . . . . . . . . . . . . . . . . . . . . . . . . . . 81Folder items . . . . . . . . . . . . . . . . . . . . . . . . . . . . . . . . . . . . . . . . . . . . . . . 81Edit an image . . . . . . . . . . . . . . . . . . . . . . . . . . . . . . . . . . . . . . . . . . . . . . 82Media (Menu 6) . . . . . . . . . . . . . . . . . . . . . . . . . . . . . . . . 84 Camera. . . . . . . . . . . . . . . . . . . . . . . . . . . . . . . . . . . . . . . . . . . . . . . . . . . 84Radio. . . . . . . . . . . . . . . . . . . . . . . . . . . . . . . . . . . . . . . . . . . . . . . . . . . . . 86Voice recorder . . . . . . . . . . . . . . . . . . . . . . . . . . . . . . . . . . . . . . . . . . . . . 87Organizer (Menu 7). . . . . . . . . . . . . . . . . . . . . . . . . . . . . . 89Alarm clock. . . . . . . . . . . . . . . . . . . . . . . . . . . . . . . . . . . . . . . . . . . . . . . . 89Calendar . . . . . . . . . . . . . . . . . . . . . . . . . . . . . . . . . . . . . . . . . . . . . . . . . . 90Calculator . . . . . . . . . . . . . . . . . . . . . . . . . . . . . . . . . . . . . . . . . . . . . . . . . 94Applications (Menu 8) . . . . . . . . . . . . . . . . . . . . . . . . . . . 96Games . . . . . . . . . . . . . . . . . . . . . . . . . . . . . . . . . . . . . . . . . . . . . . . . . . . . 96Collection . . . . . . . . . . . . . . . . . . . . . . . . . . . . . . . . . . . . . . . . . . . . . . . . . 97Services (Menu 9) . . . . . . . . . . . . . . . . . . . . . . . . . . . . . . 100Set up for browsing . . . . . . . . . . . . . . . . . . . . . . . . . . . . . . . . . . . . . . . . 100Sign on to the mobile Internet . . . . . . . . . . . . . . . . . . . . . . . . . . . . . . . 101Navigate the mobile Internet . . . . . . . . . . . . . . . . . . . . . . . . . . . . . . . . 101](https://usermanual.wiki/Microsoft/RH-31/User-Guide-352834-Page-11.png)
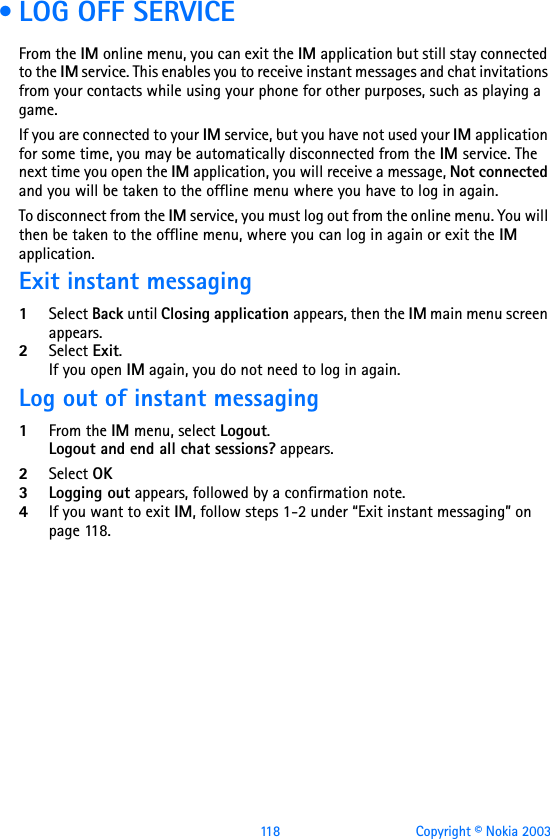
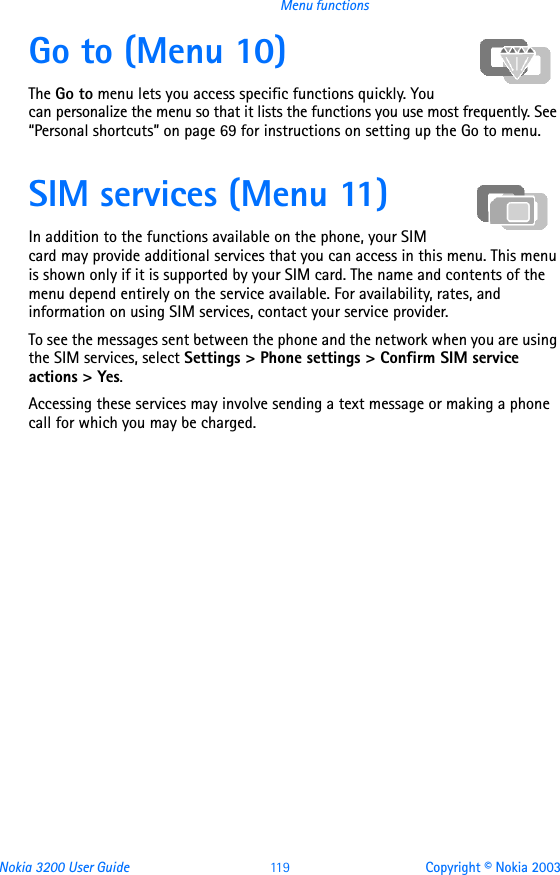
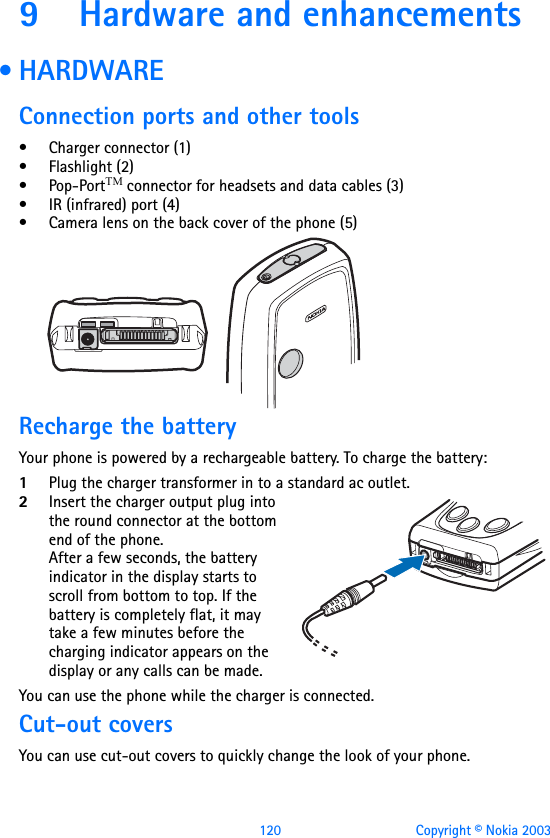
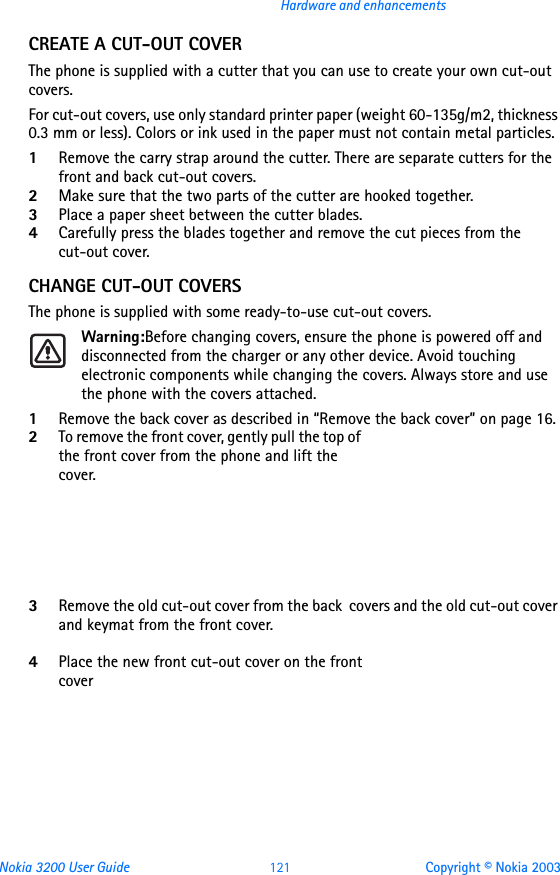
![[ xi ]Examples of mobile Internet sites . . . . . . . . . . . . . . . . . . . . . . . . . . . . .102Bookmarks . . . . . . . . . . . . . . . . . . . . . . . . . . . . . . . . . . . . . . . . . . . . . . . .102Service inbox . . . . . . . . . . . . . . . . . . . . . . . . . . . . . . . . . . . . . . . . . . . . . .103File upload . . . . . . . . . . . . . . . . . . . . . . . . . . . . . . . . . . . . . . . . . . . . . . . .104Disconnect from the Internet . . . . . . . . . . . . . . . . . . . . . . . . . . . . . . . . .104Set up an automatic connection . . . . . . . . . . . . . . . . . . . . . . . . . . . . . .104Receive a call while online . . . . . . . . . . . . . . . . . . . . . . . . . . . . . . . . . . .104Make a call while online . . . . . . . . . . . . . . . . . . . . . . . . . . . . . . . . . . . . .105Make an emergency call while online . . . . . . . . . . . . . . . . . . . . . . . . . .105Options while online . . . . . . . . . . . . . . . . . . . . . . . . . . . . . . . . . . . . . . . .105Security. . . . . . . . . . . . . . . . . . . . . . . . . . . . . . . . . . . . . . . . . . . . . . . . . . .106Allow or reject cookies . . . . . . . . . . . . . . . . . . . . . . . . . . . . . . . . . . . . . .107Create a digital signature . . . . . . . . . . . . . . . . . . . . . . . . . . . . . . . . . . . .107Appearance settings . . . . . . . . . . . . . . . . . . . . . . . . . . . . . . . . . . . . . . . .108Instant messaging . . . . . . . . . . . . . . . . . . . . . . . . . . . . . . 109Network selection . . . . . . . . . . . . . . . . . . . . . . . . . . . . . . . . . . . . . . . . . .109Obtain user name and password . . . . . . . . . . . . . . . . . . . . . . . . . . . . . .110Log into service . . . . . . . . . . . . . . . . . . . . . . . . . . . . . . . . . . . . . . . . . . . .110Set your availability. . . . . . . . . . . . . . . . . . . . . . . . . . . . . . . . . . . . . . . . .111Instant messages . . . . . . . . . . . . . . . . . . . . . . . . . . . . . . . . . . . . . . . . . . .111Chat Sessions. . . . . . . . . . . . . . . . . . . . . . . . . . . . . . . . . . . . . . . . . . . . . .112Contacts . . . . . . . . . . . . . . . . . . . . . . . . . . . . . . . . . . . . . . . . . . . . . . . . . .113Private groups . . . . . . . . . . . . . . . . . . . . . . . . . . . . . . . . . . . . . . . . . . . . .115Instant messaging settings . . . . . . . . . . . . . . . . . . . . . . . . . . . . . . . . . . .116Log off service . . . . . . . . . . . . . . . . . . . . . . . . . . . . . . . . . . . . . . . . . . . . .118Go to (Menu 10) . . . . . . . . . . . . . . . . . . . . . . . . . . . . . . .119SIM services (Menu 11) . . . . . . . . . . . . . . . . . . . . . . . . . . 1199 Hardware and enhancements . . . . . . . . . . . . . . . . . . . . . .120Hardware . . . . . . . . . . . . . . . . . . . . . . . . . . . . . . . . . . . . . . . . . . . . . . . . .120Enhancements . . . . . . . . . . . . . . . . . . . . . . . . . . . . . . . . . . . . . . . . . . . . .12310 Reference information . . . . . . . . . . . . . . . . . . . . . . . . . . . 124Battery information. . . . . . . . . . . . . . . . . . . . . . . . . . . . . . . . . . . . . . . . .124](https://usermanual.wiki/Microsoft/RH-31/User-Guide-352834-Page-12.png)
![[ xii ]Enhancements . . . . . . . . . . . . . . . . . . . . . . . . . . . . . . . . . . . . . . . . . . . . 124Enhancements, Batteries, and Chargers. . . . . . . . . . . . . . . . . . . . . . . . 125CARE AND MAINTENANCE . . . . . . . . . . . . . . . . . . . . . . . . . . . . . . . . . . 125ADDITIONAL SAFETY INFORMATION. . . . . . . . . . . . . . . . . . . . . . . . . . . 12611 Technical information . . . . . . . . . . . . . . . . . . . . . . . . . . . 13112 Nokia one-year limited warranty . . . . . . . . . . . . . . . . . . . 132Appendix A Message from the CTIA. . . . . . . . . . . . . . . . . 137Appendix B Message from the FDA . . . . . . . . . . . . . . . . . 141Index . . . . . . . . . . . . . . . . . . . . . . . . . . . . . . . . . . . . . . . 147](https://usermanual.wiki/Microsoft/RH-31/User-Guide-352834-Page-13.png)

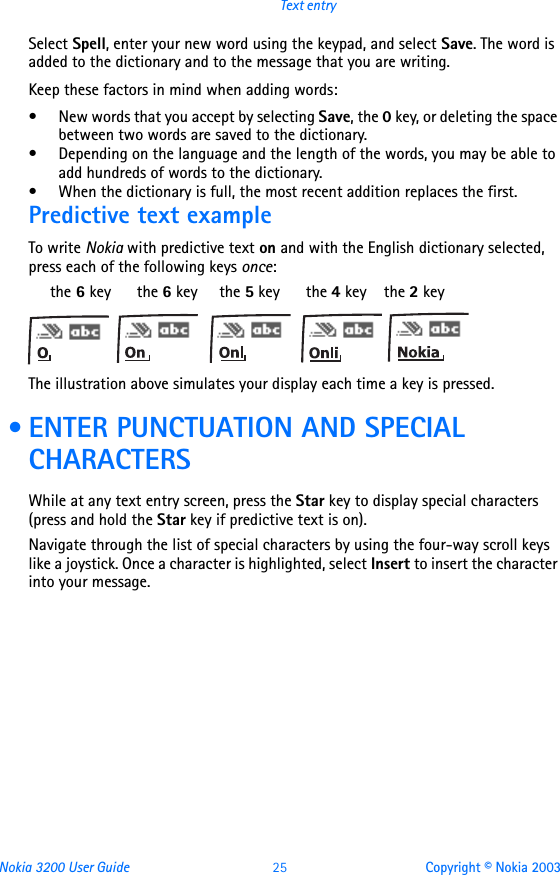
![6 Copyright © Nokia 2003 • POLYPHONIC SOUND (MIDI)Polyphonic sounds can be used in ringing tones, gaming sounds, and message alert tones. They consist of several sound components played at the same time, like an actual melody through a speaker. Your phone has sound components from over 40 instruments that can be used for polyphonic sounds and the phone can play four instruments simultaneously. The phone supports scalable polyphonic MIDI (SP-MIDI) format.You can receive polyphonic ringing tones using a multimedia service (see “Read and reply to a multimedia message” on page 49) or download them using the gallery menu [see “Gallery (Menu 5)” on page 81]. • ADVANCED MULTIMEDIA PLAYERThe built-in multimedia player allows you to view images and play audio and image animations. The multimedia player is activated by other features, such as the Gallery, when there are multimedia files to be displayed.See “Advanced multimedia player” on page 33 for more information. • BROWSERThe built-in browser can interpret both WAP-based and xHTML-based content.See “Services (Menu 9)” on page 100 for more information. • SPECIAL USER INTERFACE FEATURESYou can choose from two types of menu interface: List and Grid. See “Select menu view” on page 67 for more information.In the List interface, full color images introduce every menu. Use the Scroll up and Scroll down keys to navigate through the menus.](https://usermanual.wiki/Microsoft/RH-31/User-Guide-352834-Page-19.png)

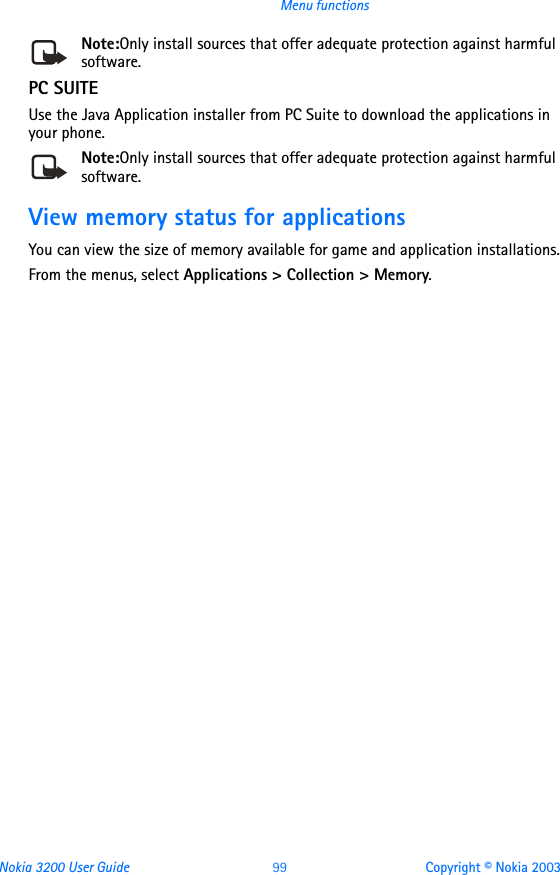
![Nokia 3200 User Guide 33 Copyright © Nokia 2003Advanced multimedia player7 Advanced multimedia playerThe advanced multimedia player gives you a wide array of options for handling image, audio, and image animation files. There is no menu item for the multimedia player. It is activated automatically whenever you use a function, such as the gallery or the camera, that handles multimedia files.The multimedia player lets you:• Send, receive, and save many types of multimedia files (see “Multimedia messages” on page 47).• Play, pause, mute, and unmute audio files [see “Gallery (Menu 5)” on page 81].• Set an audio file as your ringing tone [see “Gallery (Menu 5)” on page 81].• View image files such as photos and clip art [see “Gallery (Menu 5)” on page 81].• Zoom in on an image file [see “Gallery (Menu 5)” on page 81].• Sequentially view all image files in a folder as a slide show [see “Gallery (Menu 5)” on page 81].• Sequentially play all tone files in a folder [see “Gallery (Menu 5)” on page 81].• Set an image file as your wallpaper (see “Wallpaper” on page 65).• Adjust contrast in an image file [see “Gallery (Menu 5)” on page 81].• Edit image files by adding frames, text, and clip art (see “Edit an image” on page 82).• Play, pause, and restart image animation files [see “Gallery (Menu 5)” on page 81].](https://usermanual.wiki/Microsoft/RH-31/User-Guide-352834-Page-46.png)


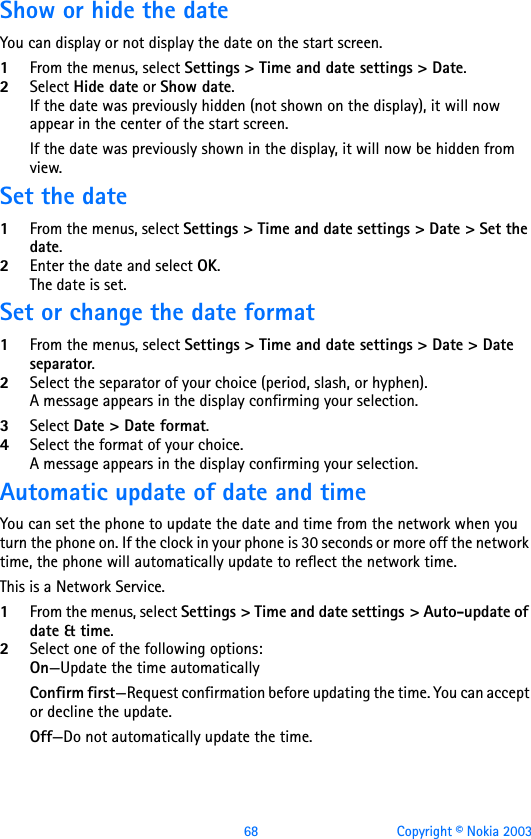


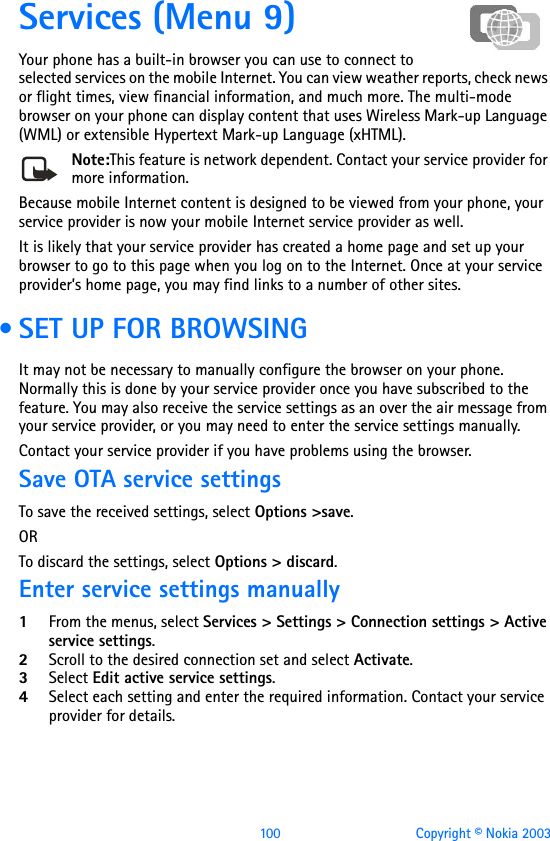
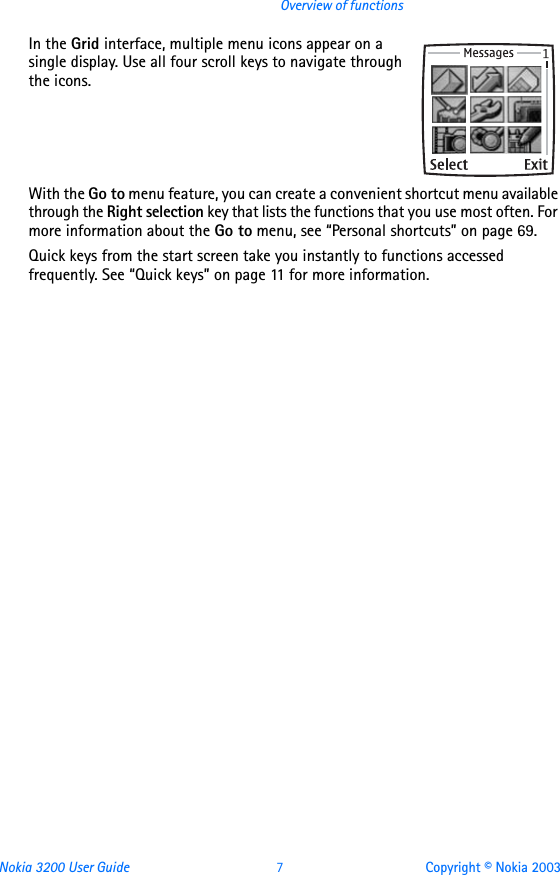
![102 Copyright © Nokia 2003 • EXAMPLES OF MOBILE INTERNET SITESThe following illustrations show most of the elements you may find on a mobile Internet site. These are examples only.1)Header line. Shows the current Internet site.2)Active link. Appears as a highlighted word.3)Inactive link. Appears as an underlined word.Scroll through the list of links using the Scroll up key and the Scroll down key.4)Selection list. Brackets [ ] appear when you have the option to enter information.5)Options. Select Options to go to the site menu and/or browser page.6)Back. Select Back to return to the previous page. 7)Data entry field. Brackets [ ] that enclose dots indicate when you need to enter information. In this example, you can enter your zip code to receive the local weather forecast. • BOOKMARKSYour device may have some bookmarks loaded for sites not affiliated with Nokia. Nokia does not warrant or endorse these sites. If you choose to access them, you should take the same precautions for security or content as you would with any Internet site.You can save addresses for your favorite sites as bookmarks. You can add up to 50 bookmarks to your browser. Once you have saved a bookmark, you can program the Go to menu to take you directly to that site. See “Personal shortcuts” on page 69.Enter bookmarks manually1From the menu, select Services > Bookmarks. After a brief pause, a list of bookmarks (if any) appear in the display.1)2)3)4)5) 6)7)](https://usermanual.wiki/Microsoft/RH-31/User-Guide-352834-Page-115.png)

![[ 137 ]Appendix A Message from the CTIA Appendix A Message from the CTIA (Cellular Telecommunications & Internet Association) to all users of mobile phones.© 2001 Cellular Telecommunications & Internet Association. All Rights Reserved.1250 Connecticut Avenue, NW Suite 800, Washington, DC 20036. Phone: (202) 785-0081](https://usermanual.wiki/Microsoft/RH-31/User-Guide-352834-Page-150.png)
![[ 138 ]Safety is the most important call you will ever make.A Guide to Safe and Responsible Wireless Phone Use Tens of millions of people in the U.S. today take advantage of the unique combination of convenience, safety and value delivered by the wireless telephone. Quite simply, the wireless phone gives people the powerful ability to communicate by voice--almost anywhere, anytime--with the boss, with a client, with the kids, with emergency personnel or even with the police. Each year, Americans make billions of calls from their wireless phones, and the numbers are rapidly growing.But an important responsibility accompanies those benefits, one that every wireless phone user must uphold. When driving a car, driving is your first responsibility. A wireless phone can be an invaluable tool, but good judgment must be exercised at all times while driving a motor vehicle--whether on the phone or not.The basic lessons are ones we all learned as teenagers. Driving requires alertness, caution and courtesy. It requires a heavy dose of basic common sense---keep your head up, keep your eyes on the road, check your mirrors frequently and watch out for other drivers. It requires obeying all traffic signs and signals and staying within the speed limit. It means using seatbelts and requiring other passengers to do the same.But with wireless phone use, driving safely means a little more. This brochure is a call to wireless phone users everywhere to make safety their first priority when behind the wheel of a car. Wireless telecommunications is keeping us in touch, simplifying our lives, protecting us in emergencies and providing opportunities to help others in need. When it comes to the use of wireless phones, safety is your most important call. Wireless Phone "Safety Tips" Below are safety tips to follow while driving and using a wireless phone which should be easy to remember. 1 Get to know your wireless phone and its features such as speed dial and redial. Carefully read your instruction manual and learn to take advantage of valuable features most phones offer, including automatic redial and memory. Also, work to memorize the phone keypad so you can use the speed dial function without taking your attention off the road.2 When available, use a hands free device. A number of hands free wireless phone accessories are readily available today. Whether you choose an installed mounted device for your wireless phone or a speaker phone accessory, take advantage of these devices if available to you.3 Position your wireless phone within easy reach. Make sure you place your wireless phone within easy reach and where you can grab it without removing your eyes from the road. If you get an incoming call at an inconvenient time, if possible, let your voice mail answer it for you.](https://usermanual.wiki/Microsoft/RH-31/User-Guide-352834-Page-151.png)
![[ 139 ]Appendix A Message from the CTIA 4 Suspend conversations during hazardous driving conditions or situations. Let the person you are speaking with know you are driving; if necessary, suspend the call in heavy traffic or hazardous weather conditions. Rain, sleet, snow and ice can be hazardous, but so is heavy traffic. As a driver, your first responsibility is to pay attention to the road.5 Do not take notes or look up phone numbers while driving. If you are reading an address book or business card, or writing a "to do" list while driving a car, you are not watching where you are going. It’s common sense. Don’t get caught in a dangerous situation because you are reading or writing and not paying attention to the road or nearby vehicles.6 Dial sensibly and assess the traffic; if possible, place calls when you are not moving or before pulling into traffic. Try to plan your calls before you begin your trip or attempt to coincide your calls with times you may be stopped at a stop sign, red light or otherwise stationary. But if you need to dial while driving, follow this simple tip--dial only a few numbers, check the road and your mirrors, then continue.7 Do not engage in stressful or emotional conversations that may be distracting. Stressful or emotional conversations and driving do not mix--they are distracting and even dangerous when you are behind the wheel of a car. Make people you are talking with aware you are driving and if necessary, suspend conversations which have the potential to divert your attention from the road.8 Use your wireless phone to call for help. Your wireless phone is one of the greatest tools you can own to protect yourself and your family in dangerous situations--with your phone at your side, help is only three numbers away. Dial 9-1-1 or other local emergency number in the case of fire, traffic accident, road hazard or medical emergency. Remember, it is a free call on your wireless phone!9 Use your wireless phone to help others in emergencies. Your wireless phone provides you a perfect opportunity to be a "Good Samaritan" in your community. If you see an auto accident, crime in progress or other serious emergency where lives are in danger, call 9-1-1 or other local emergency number, as you would want others to do for you.10 Call roadside assistance or a special wireless non-emergency assistance number when necessary. Certain situations you encounter while driving may require attention, but are not urgent enough to merit a call for emergency services. But you still can use your wireless phone to lend a hand. If you see a broken-down vehicle posing no serious hazard, a broken traffic signal, a minor traffic accident where no one appears injured or a vehicle you know to be stolen, call roadside assistance or other special non-emergency wireless number.Careless, distracted individuals and people driving irresponsibly represent a hazard to everyone on the road. Since 1984, the Cellular Telecommunications Industry Association and the wireless industry have conducted educational outreach to inform wireless phone users of their responsibilities as safe drivers and good citizens. As we approach a new century, more and more of us will take advantage of the benefits of wireless telephones. And, as we take to the roads, we all have a responsibility to drive safely.The wireless industry reminds you to use your phone safely when driving.](https://usermanual.wiki/Microsoft/RH-31/User-Guide-352834-Page-152.png)
![[ 140 ]For more information, please call 1-888-901-SAFE. For updates: http://www.wow-com.com/consumer/issues/driving/articles.cfm?ID=85 © 2001 Cellular Telecommunications & Internet Association. All Rights Reserved. 1250 Connecticut Avenue, NW Suite 800, Washington, DC 20036. Phone: (202) 785-0081](https://usermanual.wiki/Microsoft/RH-31/User-Guide-352834-Page-153.png)
![[ 141 ] Appendix B Message from the FDA Appendix B Message from the FDA (U.S. Food and Drug Administration) to all users of mobile phones.July 18, 2001 ..... For updates: http://www.fda.gov/cdrh/phones](https://usermanual.wiki/Microsoft/RH-31/User-Guide-352834-Page-154.png)
![[ 142 ]Consumer Update on Wireless PhonesU.S. Food and Drug Administration 1. Do wireless phones pose a health hazard?The available scientific evidence does not show that any health problems are associated with using wireless phones. There is no proof, however, that wireless phones are absolutely safe. Wireless phones emit low levels of radiofrequency energy (RF) in the microwave range while being used. They also emit very low levels of RF when in the stand-by mode. Whereas high levels of RF can produce health effects (by heating tissue), exposure to low level RF that does not produce heating effects causes no known adverse health effects. Many studies of low level RF exposures have not found any biological effects. Some studies have suggested that some biological effects may occur, but such findings have not been confirmed by additional research. In some cases, other researchers have had difficulty in reproducing those studies, or in determining the reasons for inconsistent results. 2. What is FDA's role concerning the safety of wireless phones?Under the law, FDA does not review the safety of radiation-emitting consumer products such as wireless phones before they can be sold, as it does with new drugs or medical devices. However, the agency has authority to take action if wireless phones are shown to emit radiofrequency energy (RF) at a level that is hazardous to the user. In such a case, FDA could require the manufacturers of wireless phones to notify users of the health hazard and to repair, replace or recall the phones so that the hazard no longer exists.Although the existing scientific data do not justify FDA regulatory actions, FDA has urged the wireless phone industry to take a number of steps, including the following:• Support needed research into possible biological effects of RF of the type emitted by wireless phones;• Design wireless phones in a way that minimizes any RF exposure to the user that is not necessary for device function; and• Cooperate in providing users of wireless phones with the best possible information on possible effects of wireless phone use on human health.FDA belongs to an interagency working group of the federal agencies that have responsibility for different aspects of RF safety to ensure coordinated efforts at the federal level. The following agencies belong to this working group:• National Institute for Occupational Safety and Health• Environmental Protection Agency• Federal Communications Commission• Occupational Safety and Health Administration• National Telecommunications and Information AdministrationThe National Institutes of Health participates in some interagency working group activities, as well.](https://usermanual.wiki/Microsoft/RH-31/User-Guide-352834-Page-155.png)
![[ 143 ] Appendix B Message from the FDA FDA shares regulatory responsibilities for wireless phones with the Federal Communications Commission (FCC). All phones that are sold in the United States must comply with FCC safety guidelines that limit RF exposure. FCC relies on FDA and other health agencies for safety questions about wireless phones. FCC also regulates the base stations that the wireless phone networks rely upon. While these base stations operate at higher power than do the wireless phones themselves, the RF exposures that people get from these base stations are typically thousands of times lower than those they can get from wireless phones. Base stations are thus not the subject of the safety questions discussed in this document. 3. What kinds of phones are the subject of this update?The term wireless phone refers here to hand-held wireless phones with built-in antennas, often called cell mobile or PCS phones. These types of wireless phones can expose the user to measurable radiofrequency energy (RF) because of the short distance between the phone and the user’s head. These RF exposures are limited by Federal Communications Commission safety guidelines that were developed with the advice of FDA and other federal health and safety agencies. When the phone is located at greater distances from the user, the exposure to RF is drastically lower because a person's RF exposure decreases rapidly with increasing distance from the source. The so-called cordless phones; which have a base unit connected to the telephone wiring in a house, typically operate at far lower power levels, and thus produce RF exposures far below the FCC safety limits. 4. What are the results of the research done already?The research done thus far has produced conflicting results, and many studies have suffered from flaws in their research methods. Animal experiments investigating the effects of radiofrequency energy (RF) exposures characteristic of wireless phones have yielded conflicting results that often cannot be repeated in other laboratories. A few animal studies, however, have suggested that low levels of RF could accelerate the development of cancer in laboratory animals. However, many of the studies that showed increased tumor development used animals that had been genetically engineered or treated with cancer-causing chemicals so as to be pre-disposed to develop cancer in the absence of RF exposure. Other studies exposed the animals to RF for up to 22 hours per day. These conditions are not similar to the conditions under which people use wireless phones, so we don’t know with certainty what the results of such studies mean for human health.Three large epidemiology studies have been published since December 2000. Between them, the studies investigated any possible association between the use of wireless phones and primary brain cancer, glioma, meningioma, or acoustic neuroma, tumors of the brain or salivary gland, leukemia, or other cancers. None of the studies demonstrated the existence of any harmful health effects from wireless phone RF exposures. However, none of the studies can answer questions about long-term exposures, since the average period of phone use in these studies was around three years.](https://usermanual.wiki/Microsoft/RH-31/User-Guide-352834-Page-156.png)
![[ 144 ]5.What research is needed to decide whether RF exposure from wireless phones poses a health risk?A combination of laboratory studies and epidemiological studies of people actually using wireless phones would provide some of the data that are needed. Lifetime animal exposure studies could be completed in a few years. However, very large numbers of animals would be needed to provide reliable proof of a cancer promoting effect if one exists. Epidemiological studies can provide data that is directly applicable to human populations, but 10 or more years follow-up may be needed to provide answers about some health effects, such as cancer. This is because the interval between the time of exposure to a cancer-causing agent and the time tumors develop - if they do - may be many, many years. The interpretation of epidemiological studies is hampered by difficulties in measuring actual RF exposure during day-to-day use of wireless phones. Many factors affect this measurement, such as the angle at which the phone is held, or which model of phone is used.6. What is FDA doing to find out more about the possible health effects of wireless phone RF?FDA is working with the U.S. National Toxicology Program and with groups of investigators around the world to ensure that high priority animal studies are conducted to address important questions about the effects of exposure to radiofrequency energy (RF).FDA has been a leading participant in the World Health Organization International Electromagnetic Fields (EMF) Project since its inception in 1996. An influential result of this work has been the development of a detailed agenda of research needs that has driven the establishment of new research programs around the world. The Project has also helped develop a series of public information documents on EMF issues.FDA and the Cellular Telecommunications & Internet Association (CTIA) have a formal Cooperative Research and Development Agreement (CRADA) to do research on wireless phone safety. FDA provides the scientific oversight, obtaining input from experts in government, industry, and academic organizations. CTIA-funded research is conducted through contracts to independent investigators. The initial research will include both laboratory studies and studies of wireless phone users. The CRADA will also include a broad assessment of additional research needs in the context of the latest research developments around the world. 7. How can I find out how much radiofrequency energy exposure I can get by using my wireless phone?All phones sold in the United States must comply with Federal Communications Commission (FCC) guidelines that limit radiofrequency energy (RF) exposures. FCC established these guidelines in consultation with FDA and the other federal health and safety agencies. The FCC limit for RF exposure from wireless telephones is set at a Specific Absorption Rate (SAR) of 1.6 watts per kilogram (1.6 W/kg). The FCC limit is consistent with the safety standards developed by the Institute of Electrical and Electronic Engineering (IEEE) and the National Council on Radiation Protection and Measurement. The exposure limit takes into consideration the body’s ability to remove heat from the tissues that absorb energy from the wireless phone and is set well below levels known to have effects.](https://usermanual.wiki/Microsoft/RH-31/User-Guide-352834-Page-157.png)
![[ 145 ] Appendix B Message from the FDA Manufacturers of wireless phones must report the RF exposure level for each model of phone to the FCC. The FCC website (http://www.fcc.gov/oet/rfsafety) gives directions for locating the FCC identification number on your phone so you can find your phone’s RF exposure level in the online listing. 8. What has FDA done to measure the radiofrequency energy coming from wireless phones?The Institute of Electrical and Electronic Engineers (IEEE) is developing a technical standard for measuring the radiofrequency energy (RF) exposure from wireless phones and other wireless handsets with the participation and leadership of FDA scientists and engineers. The standard, Recommended Practice for Determining the Spatial-Peak Specific Absorption Rate (SAR) in the Human Body Due to Wireless Communications Devices: Experimental Techniques, sets forth the first consistent test methodology for measuring the rate at which RF is deposited in the heads of wireless phone users. The test method uses a tissue-simulating model of the human head. Standardized SAR test methodology is expected to greatly improve the consistency of measurements made at different laboratories on the same phone. SAR is the measurement of the amount of energy absorbed in tissue, either by the whole body or a small part of the body. It is measured in watts/kg (or milliwatts/g) of matter. This measurement is used to determine whether a wireless phone complies with safety guidelines. 9. What steps can I take to reduce my exposure to radiofrequency energy from my wireless phone?If there is a risk from these products--and at this point we do not know that there is--it is probably very small. But if you are concerned about avoiding even potential risks, you can take a few simple steps to minimize your exposure to radiofrequency energy (RF). Since time is a key factor in how much exposure a person receives, reducing the amount of time spent using a wireless phone will reduce RF exposure.If you must conduct extended conversations by wireless phone every day, you could place more distance between your body and the source of the RF, since the exposure level drops off dramatically with distance. For example, you could use a headset and carry the wireless phone away from your body or use a wireless phone connected to a remote antenna.Again, the scientific data do not demonstrate that wireless phones are harmful. But if you are concerned about the RF exposure from these products, you can use measures like those described above to reduce your RF exposure from wireless phone use. 10. What about children using wireless phones?The scientific evidence does not show a danger to users of wireless phones, including children and teenagers. If you want to take steps to lower exposure to radiofrequency energy (RF), the measures described above would apply to children and teenagers using wireless phones. Reducing the time of wireless phone use and increasing the distance between the user and the RF source will reduce RF exposure.Some groups sponsored by other national governments have advised that children be discouraged from using wireless phones at all. For example, the government in the United Kingdom](https://usermanual.wiki/Microsoft/RH-31/User-Guide-352834-Page-158.png)
![[ 146 ]distributed leaflets containing such a recommendation in December 2000. They noted that no evidence exists that using a wireless phone causes brain tumors or other ill effects. Their recommendation to limit wireless phone use by children was strictly precautionary; it was not based on scientific evidence that any health hazard exists. 11. What about wireless phone interference with medical equipment?Radiofrequency energy (RF) from wireless phones can interact with some electronic devices. For this reason, FDA helped develop a detailed test method to measure electromagnetic interference (EMI) of implanted cardiac pacemakers and defibrillators from wireless telephones. This test method is now part of a standard sponsored by the Association for the Advancement of Medical instrumentation (AAMI). The final draft, a joint effort by FDA, medical device manufacturers, and many other groups, was completed in late 2000. This standard will allow manufacturers to ensure that cardiac pacemakers and defibrillators are safe from wireless phone EMI. FDA has tested hearing aids for interference from handheld wireless phones and helped develop a voluntary standard sponsored by the Institute of Electrical and Electronic Engineers (IEEE). This standard specifies test methods and performance requirements for hearing aids and wireless phones so that no interference occurs when a person uses a compatible phone and a accompanied hearing aid at the same time. This standard was approved by the IEEE in 2000.FDA continues to monitor the use of wireless phones for possible interactions with other medical devices. Should harmful interference be found to occur, FDA will conduct testing to assess the interference and work to resolve the problem. 12. Where can I find additional information?For additional information, please refer to the following resources:• FDA web page on wireless phones http://www.fda.gov/cdrh/phones/index.html• Federal Communications Commission (FCC) RF Safety Program http://www.fcc.gov/oet/rfsafety• International Commission on Non-Ionizing Radiation Protection http://www.icnirp.de• World Health Organization (WHO) International EMF Project http://www.who.int/emf• National Radiological Protection Board (UK) http://www.nrpb.org.uk/July 18, 2001 For updates: http://www.fda.gov/cdrh/phones](https://usermanual.wiki/Microsoft/RH-31/User-Guide-352834-Page-159.png)
![[ 147 ]IndexNumerics1-touch dialing . . . . . . . . . . 61, 74Aaccess codesPIN . . . . . . . . . . . . . . . . . . . . . . 26PIN2 . . . . . . . . . . . . . . . . . . . . . 31PUK . . . . . . . . . . . . . . . . . . . . . . 32security . . . . . . . . . . . . . . . . . . . 30access the Internet . . . . . . . . . 101activate call forwarding . . . . . 73adjustearpiece volume . . . . . . . . . . . 20ringing volume . . . . . . . . . . . . 64advanced multimedia player . 33alarm clock . . . . . . . . . . . . . . . . . 89answer a call . . . . . . . . . . . . . . . 20antenna . . . . . . . . . . . . . . . . . . . . 18anykey answer . . . . . . . . . . . . . . 74applications . . . . . . . . . . . . . . 96–99automatic redial . . . . . . . . . . . . 74automatic volume control . . . 73Bbatteryabout . . . . . . . . . . . . . . . . . . . 123recharge . . . . . . . . . . . . . . . . . 120bookmarks . . . . . . . . . . . . . . . . . 102brightness . . . . . . . . . . . . . . . . . . 67business cards . . . . . . . . . . . . . . 60Ccalculator . . . . . . . . . . . . . . . . . . . 94calendar . . . . . . . . . . . . . . . . . 90–94callduration . . . . . . . . . . . . . . . . . . 55forwarding . . . . . . . . . . . . . . . . 73lists, delete . . . . . . . . . . . . . . . . 55log . . . . . . . . . . . . . . . . . . . .53–55restriction . . . . . . . . . . . . . . . . . 27times . . . . . . . . . . . . . . . . . . . . . 55waiting . . . . . . . . . . . . . . . . . . . 75callergroups . . . . . . . . . . . . . . . . . . . . 62ID . . . . . . . . . . . . . . . . . . . . . . . . 75callsanswer . . . . . . . . . . . . . . . . . . . . 20emergency . . . . . . . . . . . . . . . 105make . . . . . . . . . . . . . . . . . . . . . 19reject . . . . . . . . . . . . . . . . . . . . . 20camera . . . . . . . . . . . . . . . . . . . . . . 84cancel call forwarding . . . . . . . 74cell info display . . . . . . . . . . . . . 76chat . . . . . . . . . . . . . . . . . . . .112–113clock radio . . . . . . . . . . . . . . . . . . 89clock, set . . . . . . . . . . . . . . . . . . . . 18closed user groups . . . . . . . . . . . 29color scheme . . . . . . . . . . . . . . . . 66conference calls . . . . . . . . . . . . . 19connection ports . . . . . . . . . . . 120connectivity . . . . . . . . . . . . . .70–72contacts . . . . . . . . . . . . . . . . .56–631-touch dialing . . . . . . . . . . . . 61add image . . . . . . . . . . . . . . . . . 59business cards . . . . . . . . . . . . . 60call from . . . . . . . . . . . . . . . . . . 59caller groups . . . . . . . . . . . . . . . 62](https://usermanual.wiki/Microsoft/RH-31/User-Guide-352834-Page-160.png)
![[ 148 ] copy . . . . . . . . . . . . . . . . . . . . . . 60delete . . . . . . . . . . . . . . . . . . . . 59find entry . . . . . . . . . . . . . . . . . 58info numbers . . . . . . . . . . . . . . 62memory . . . . . . . . . . . . . . . . . . . 63menu options . . . . . . . . . . . . . . 56own numbers . . . . . . . . . . . . . . 62save . . . . . . . . . . . . . . . . . . . . . . 57search . . . . . . . . . . . . . . . . . . . . 58select view . . . . . . . . . . . . . . . . 63service numbers . . . . . . . . . . . . 62currency conversion . . . . . . . . . 94customer care . . . . . . . . . . . . . . . . 9customize profile . . . . . . . . . . . . 64Ddate settings . . . . . . . . . . . . . . . . 68delete1-touch dialing entry . . . . . . . 62call lists . . . . . . . . . . . . . . . . . . . 55contact entry . . . . . . . . . . . . . . 59fixed dialing entry . . . . . . . . . . 28messages . . . . . . . . . . . . . . . . . . 39dialed numbers, view . . . . . . . . 54dictionary . . . . . . . . . . . . . . . . . . . 24displaybrightness . . . . . . . . . . . . . . . . . 67language . . . . . . . . . . . . . . . . . . 76settings . . . . . . . . . . . . . . . . . . . 65downloadapplications . . . . . . . . . . . . . . . 98games . . . . . . . . . . . . . . . . . . . . 96duration of calls . . . . . . . . . . . . 55Ee-mail . . . . . . . . . . . . . . . . . . . . . . 46emergency callswhile online . . . . . . . . . . . . . . .105extrascurrency conversion . . . . . . . . .94Ffixed dialing . . . . . . . . . . . . . 28–29flashlight . . . . . . . . . . . . . . . . . . . . . 4foldersgallery . . . . . . . . . . . . . . . . . . . .81message . . . . . . . . . . . . . . . . . . .38forward messages . . . . . . . . . . . .44Ggallery . . . . . . . . . . . . . . . . . . . . . . .81games . . . . . . . . . . . . . . . . . . . 96–97GPRS connectivity . . . . . . . . . . .71Hhelp text . . . . . . . . . . . . . . . . . . . .77Iimagesadd to contacts . . . . . . . . . . . . .59edit in gallery . . . . . . . . . . . . . .82infomessage service . . . . . . . . . . . .52numbers . . . . . . . . . . . . . . . . . . .62infrared connectivity . . . . . . . .70install SIM card . . . . . . . . . 16–17instant messaging . . . . . 109–118international calls . . . . . . . . . . .19Internetaccess . . . . . . . . . . . . . . . . . . . .101bookmarks . . . . . . . . . . . . . . . .102options . . . . . . . . . . . . . . . . . . .105security . . . . . . . . . . . . . . . . . .106](https://usermanual.wiki/Microsoft/RH-31/User-Guide-352834-Page-161.png)
![[ 149 ]Internet service . . . . . . . . 100–108Kkeyguard . . . . . . . . . . . . . . . . . . . 26Llanguage . . . . . . . . . . . . . . . . . . . . 76lock the keypad . . . . . . . . . . . . . 26Mmake a call . . . . . . . . . . . . . . . . . 19menus . . . . . . . . . . . . . . . . . . . . . . 14messagealert tone . . . . . . . . . . . . . . . . . 64messagesdefault type . . . . . . . . . . . . . . . 37delete . . . . . . . . . . . . . . . . . . . . 39e-mail . . . . . . . . . . . . . . . . . . . . 46folders . . . . . . . . . . . . . . . . . . . . 38forward . . . . . . . . . . . . . . . . . . . 44icons . . . . . . . . . . . . . . . . . . . . . 36info message service . . . . . . . . 52linked . . . . . . . . . . . . . . . . . . . . 35multimedia . . . . . . . . . . . . . 47–50options . . . . . . . . . . . . . . . . . . . 36picture . . . . . . . . . . . . . . . . 44–46read . . . . . . . . . . . . . . . . . . . . . . 43reply . . . . . . . . . . . . . . . . . . . . . 43send . . . . . . . . . . . .42, 45, 46, 48service commands . . . . . . . . . . 52settings . . . . . . . . . . . . . . . . 40–42text . . . . . . . . . . . . . . . . . . . . . . 42voice . . . . . . . . . . . . . . . . . . 50–52missed calls, view . . . . . . . . . . . 54multimediamessages . . . . . . . . . . . . . . 47–50player . . . . . . . . . . . . . . . . . . . . 33music stand . . . . . . . . . . . . . . . . . 79NNokia PC Suite . . . . . . . . . . . . . . 13notes, calendar . . . . . . . . . . .91–94Ooperator logo . . . . . . . . . . . . . . . 66organizer . . . . . . . . . . . . . . . . .89–95alarm clock . . . . . . . . . . . . . . . . 89calculator . . . . . . . . . . . . . . . . . 94calendar . . . . . . . . . . . . . . . . . . 90OTA settings . . . . . . . . . . . . . . . . 64over the air settings . . . . . . . . . 64own numbers . . . . . . . . . . . . . . . . 62PPC Suite . . . . . . . . . . . . . . . . . . . . 13personal shortcuts . . . . . . . . . . . 69phonememory . . . . . . . . . . . . . . . . . . . 76security . . . . . . . . . . . . . . . .26–32picture messages . . . . . . . . .44–46predictive text . . . . . . . . . . .24–25profiles . . . . . . . . . . . . . . . . . .64–65customize . . . . . . . . . . . . . . . . . 64select . . . . . . . . . . . . . . . . . . . . . 64timed . . . . . . . . . . . . . . . . . . . . . 65punctuation . . . . . . . . . . . . . . . . . 25Qquick keys . . . . . . . . . . . . . . . . . . . 11Rradio . . . . . . . . . . . . . . . . . . . . . . . . 86read messages . . . . . . . . . . . . . . . 43receive e-mail . . . . . . . . . . . . . . . 46received calls, view . . . . . . . . . . 54](https://usermanual.wiki/Microsoft/RH-31/User-Guide-352834-Page-162.png)
![[ 150 ] recharge the battery . . . . . . . 120redial a number . . . . . . . . . . . . . 19registration . . . . . . . . . . . . . . . . . . 8reject a call . . . . . . . . . . . . . . . . . 20reply to messages . . . . . . . . . . . 43restore factory settings . . . . . . 79ringing tone . . . . . . . . . . . . . . . . . 64Ssafety . . . . . . . . . . . . . . . . . . . . . . . . 1screen saver . . . . . . . . . . . . . . . . . 66securityInternet . . . . . . . . . . . . . . . . . . 106phone . . . . . . . . . . . . . . . . .26–32select profile . . . . . . . . . . . . . . . . 64self-timer . . . . . . . . . . . . . . . . . . . 85sendbusiness card . . . . . . . . . . . . . . 61caller ID . . . . . . . . . . . . . . . . . . . 75e-mail . . . . . . . . . . . . . . . . . . . . 46multimedia messages . . . . . . . 48picture messages . . . . . . . . . . . 45text messages . . . . . . . . . . . . . . 42servicecommands . . . . . . . . . . . . . . . . 52numbers . . . . . . . . . . . . . . . . . . 62setalarm clock . . . . . . . . . . . . . . . . 89clock . . . . . . . . . . . . . . . . . . . . . 18date . . . . . . . . . . . . . . . . . . . . . . 68radio channel . . . . . . . . . . . . . . 86settings . . . . . . . . . . . . . . . . . .64–80anykey answer . . . . . . . . . . . . . 74automatic redial . . . . . . . . . . . 74call forwarding . . . . . . . . . . . . . 73call waiting . . . . . . . . . . . . . . . . 75camera . . . . . . . . . . . . . . . . . . . .85cell info display . . . . . . . . . . . . .76color scheme . . . . . . . . . . . . . . .66display . . . . . . . . . . . . . . . . 65–67display brightness . . . . . . . . . . .67display language . . . . . . . . . . . .76enhancements . . . . . . . . . . . . . .78help text . . . . . . . . . . . . . . . . . .77language . . . . . . . . . . . . . . . . . .76line for outgoing calls . . . . . . .75OTA . . . . . . . . . . . . . . . . . . . . . . .64personal shortcuts . . . . . . . . . .69phone . . . . . . . . . . . . . . . . . 76–78phone memory . . . . . . . . . . . . .76profiles . . . . . . . . . . . . . . . . 64–65restore factory settings . . . . . .79screen saver . . . . . . . . . . . . . . . .66security . . . . . . . . . . . . . . . . . . .79send caller ID . . . . . . . . . . . . . .75start-up tone . . . . . . . . . . . . . . .78summary after call . . . . . . . . . .75time and date . . . . . . . . . . . . . .67tone . . . . . . . . . . . . . . . . . . . . . .65wallpaper . . . . . . . . . . . . . . . . . .65welcome note . . . . . . . . . . . . . .77shared memory . . . . . . . . . . . . . . .3shortcutspersonal . . . . . . . . . . . . . . . . . . .69SIM card, install . . . . . . . . . 16–17special characters . . . . . . . . . . .25start screen . . . . . . . . . . . . . . . . .11start-up tone . . . . . . . . . . . . . . . .78summary after call . . . . . . . . . .75Ttake a photo . . . . . . . . . . . . . . . . .84](https://usermanual.wiki/Microsoft/RH-31/User-Guide-352834-Page-163.png)
![[ 151 ]textentry . . . . . . . . . . . . . . . . . . 23–25messages . . . . . . . . . . . . . . . . . 42predictive . . . . . . . . . . . . . . 24–25time settings . . . . . . . . . . . . . . . . 67timed profile . . . . . . . . . . . . . . . . 65tones . . . . . . . . . . . . . . . . . . . . . . . 64turn off alarm clock . . . . . . . . 90Uunlock the keypad . . . . . . . . . . 26Vvibrating alert . . . . . . . . . . . . . . 64viewcall duration . . . . . . . . . . . . . . 55call times . . . . . . . . . . . . . . . . . 55dialed numbers . . . . . . . . . . . . 54missed calls . . . . . . . . . . . . . . . 54received calls . . . . . . . . . . . . . . 54voice maillisten to messages . . . . . . . . . . 21set up . . . . . . . . . . . . . . . . . . . . 21voice messages . . . . . . . . . . . 50–52volumeearpiece . . . . . . . . . . . . . . . . . . 20ringing tone . . . . . . . . . . . . . . . 64Wwallpaper . . . . . . . . . . . . . . . . . . . 65warranty . . . . . . . . . . . . . . . . . . . 132welcome note . . . . . . . . . . . . . . . 77](https://usermanual.wiki/Microsoft/RH-31/User-Guide-352834-Page-164.png)
![[ 152 ] 05/03NOTESPara obtener un manual del usuario en español favor de llamar o enviar un fax al teléfono 1-888-NOKIA-2U, fax 813-249-9619.](https://usermanual.wiki/Microsoft/RH-31/User-Guide-352834-Page-165.png)