Microsoft RH-52 GSM 850/1800/1900 Cellular Telephone W/Bluetooth User Manual 7610 FCCdraft2 04 08 2004 real
Microsoft Mobile Oy GSM 850/1800/1900 Cellular Telephone W/Bluetooth 7610 FCCdraft2 04 08 2004 real
UserManual.wiki
>
Microsoft
>
RH 52 User Manual
Manual
Navigation menu
Upload a User Manual
Namespaces
Wiki Guide
HTML
PDF
Info
Views
User Manual
Discussion / Help
Navigation

![[ vii ]FCC DRAFTPRELIMINARYNokia 7610 phone at a glance . . . . . . . . . . . . . . . . . vQuick guide. . . . . . . . . . . . . . . . . . . . . . . . . . . . . . . . vi1 FOR YOUR SAFETY . . . . . . . . . . . . . . . . . . . . . . . . . . 1About your phone. . . . . . . . . . . . . . . . . . . . . . . . . . . . . . . . . . . . . . 2Network services. . . . . . . . . . . . . . . . . . . . . . . . . . . . . . . . . . . . . . . 2Shared memory. . . . . . . . . . . . . . . . . . . . . . . . . . . . . . . . . . . . . . . . 32 General information . . . . . . . . . . . . . . . . . . . . . . . . . 4Register your phone . . . . . . . . . . . . . . . . . . . . . . . . . . . . . . . . . . . . 4E-newsletters . . . . . . . . . . . . . . . . . . . . . . . . . . . . . . . . . . . . . . . . . 4Follow graphic clues. . . . . . . . . . . . . . . . . . . . . . . . . . . . . . . . . . . . 4Find the phone label. . . . . . . . . . . . . . . . . . . . . . . . . . . . . . . . . . . . 5Contact Nokia. . . . . . . . . . . . . . . . . . . . . . . . . . . . . . . . . . . . . . . . . 5Accessibility solutions . . . . . . . . . . . . . . . . . . . . . . . . . . . . . . . . . . 63 Getting started . . . . . . . . . . . . . . . . . . . . . . . . . . . . . 7Remove the back cover . . . . . . . . . . . . . . . . . . . . . . . . . . . . . . . . . 7Insert the SIM card. . . . . . . . . . . . . . . . . . . . . . . . . . . . . . . . . . . . . 7Insert the memory card . . . . . . . . . . . . . . . . . . . . . . . . . . . . . . . . . 8Insert the battery . . . . . . . . . . . . . . . . . . . . . . . . . . . . . . . . . . . . . . 9Charge the battery . . . . . . . . . . . . . . . . . . . . . . . . . . . . . . . . . . . . . 9Switch the phone on or off . . . . . . . . . . . . . . . . . . . . . . . . . . . . . 10Attach the wrist strap . . . . . . . . . . . . . . . . . . . . . . . . . . . . . . . . . 10Tips on efficient operation. . . . . . . . . . . . . . . . . . . . . . . . . . . . . . 10If the phone requests a PIN code . . . . . . . . . . . . . . . . . . . . . . . . 10If the phone requests a lock code . . . . . . . . . . . . . . . . . . . . . . . . 11Set the time and date. . . . . . . . . . . . . . . . . . . . . . . . . . . . . . . . . . 11](https://usermanual.wiki/Microsoft/RH-52/User-Guide-417620-Page-7.png)
![[ viii ]FCC DRAFTPRELIMINARYMake a call . . . . . . . . . . . . . . . . . . . . . . . . . . . . . . . . . . . . . . . . . . 11Standby mode. . . . . . . . . . . . . . . . . . . . . . . . . . . . . . . . . . . . . . . . 11Icons . . . . . . . . . . . . . . . . . . . . . . . . . . . . . . . . . . . . . . . . . . . . . . . 12Menu . . . . . . . . . . . . . . . . . . . . . . . . . . . . . . . . . . . . . . . . . . . . . . . 14Options lists . . . . . . . . . . . . . . . . . . . . . . . . . . . . . . . . . . . . . . . . . 15Common actions for all applications . . . . . . . . . . . . . . . . . . . . . 15Search for items . . . . . . . . . . . . . . . . . . . . . . . . . . . . . . . . . . . . . . 16Volume control . . . . . . . . . . . . . . . . . . . . . . . . . . . . . . . . . . . . . . . 16Loudspeaker . . . . . . . . . . . . . . . . . . . . . . . . . . . . . . . . . . . . . . . . . 17Keyguard . . . . . . . . . . . . . . . . . . . . . . . . . . . . . . . . . . . . . . . . . . . . 174 Your phone. . . . . . . . . . . . . . . . . . . . . . . . . . . . . . . 18Make a call . . . . . . . . . . . . . . . . . . . . . . . . . . . . . . . . . . . . . . . . . . 18Answer a call. . . . . . . . . . . . . . . . . . . . . . . . . . . . . . . . . . . . . . . . . 20Call log . . . . . . . . . . . . . . . . . . . . . . . . . . . . . . . . . . . . . . . . . . . . . 215 Personal information . . . . . . . . . . . . . . . . . . . . . . . 25Contacts . . . . . . . . . . . . . . . . . . . . . . . . . . . . . . . . . . . . . . . . . . . . 25Presence (network service) . . . . . . . . . . . . . . . . . . . . . . . . . . . . . 29Positioning (network service) . . . . . . . . . . . . . . . . . . . . . . . . . . . 32Calendar . . . . . . . . . . . . . . . . . . . . . . . . . . . . . . . . . . . . . . . . . . . . 33To-do . . . . . . . . . . . . . . . . . . . . . . . . . . . . . . . . . . . . . . . . . . . . . . . 35Copy content from compatible Nokia phones . . . . . . . . . . . . . . 356 Multimedia. . . . . . . . . . . . . . . . . . . . . . . . . . . . . . . 36Camera . . . . . . . . . . . . . . . . . . . . . . . . . . . . . . . . . . . . . . . . . . . . . 36View images . . . . . . . . . . . . . . . . . . . . . . . . . . . . . . . . . . . . . . . . . 39RealPlayer . . . . . . . . . . . . . . . . . . . . . . . . . . . . . . . . . . . . . . . . . . . 40Movie director. . . . . . . . . . . . . . . . . . . . . . . . . . . . . . . . . . . . . . . . 41](https://usermanual.wiki/Microsoft/RH-52/User-Guide-417620-Page-8.png)
![[ ix ]FCC DRAFTPRELIMINARYGallery . . . . . . . . . . . . . . . . . . . . . . . . . . . . . . . . . . . . . . . . . . . . . . 427 Messaging. . . . . . . . . . . . . . . . . . . . . . . . . . . . . . . . 46Write text . . . . . . . . . . . . . . . . . . . . . . . . . . . . . . . . . . . . . . . . . . . 47Write and send messages. . . . . . . . . . . . . . . . . . . . . . . . . . . . . . . 50Create a multimedia presentation. . . . . . . . . . . . . . . . . . . . . . . . 52Inbox—receive messages . . . . . . . . . . . . . . . . . . . . . . . . . . . . . . . 53My folders . . . . . . . . . . . . . . . . . . . . . . . . . . . . . . . . . . . . . . . . . . 55Remote mailbox (network service) . . . . . . . . . . . . . . . . . . . . . . . 55Outbox. . . . . . . . . . . . . . . . . . . . . . . . . . . . . . . . . . . . . . . . . . . . . . 57View messages on a SIM card . . . . . . . . . . . . . . . . . . . . . . . . . . . 57Cell broadcast (network service) . . . . . . . . . . . . . . . . . . . . . . . . . 57Service command editor. . . . . . . . . . . . . . . . . . . . . . . . . . . . . . . . 58Messaging settings. . . . . . . . . . . . . . . . . . . . . . . . . . . . . . . . . . . . 588 Settings. . . . . . . . . . . . . . . . . . . . . . . . . . . . . . . . . . 63Phone. . . . . . . . . . . . . . . . . . . . . . . . . . . . . . . . . . . . . . . . . . . . . . . 63Call. . . . . . . . . . . . . . . . . . . . . . . . . . . . . . . . . . . . . . . . . . . . . . . . . 64Connection . . . . . . . . . . . . . . . . . . . . . . . . . . . . . . . . . . . . . . . . . . 65Date and time . . . . . . . . . . . . . . . . . . . . . . . . . . . . . . . . . . . . . . . . 69Security . . . . . . . . . . . . . . . . . . . . . . . . . . . . . . . . . . . . . . . . . . . . . 69Call restriction (network service). . . . . . . . . . . . . . . . . . . . . . . . . 72Network. . . . . . . . . . . . . . . . . . . . . . . . . . . . . . . . . . . . . . . . . . . . . 73Enhancement . . . . . . . . . . . . . . . . . . . . . . . . . . . . . . . . . . . . . . . . 739 Tools and applications. . . . . . . . . . . . . . . . . . . . . . . 74Application manager . . . . . . . . . . . . . . . . . . . . . . . . . . . . . . . . . . 74File manager . . . . . . . . . . . . . . . . . . . . . . . . . . . . . . . . . . . . . . . . . 76Voice commands. . . . . . . . . . . . . . . . . . . . . . . . . . . . . . . . . . . . . . 77](https://usermanual.wiki/Microsoft/RH-52/User-Guide-417620-Page-9.png)
![[ x ]FCC DRAFTPRELIMINARYDevice manager . . . . . . . . . . . . . . . . . . . . . . . . . . . . . . . . . . . . . . 7810 Personalization. . . . . . . . . . . . . . . . . . . . . . . . . . . . 80Profiles. . . . . . . . . . . . . . . . . . . . . . . . . . . . . . . . . . . . . . . . . . . . . . 80Themes. . . . . . . . . . . . . . . . . . . . . . . . . . . . . . . . . . . . . . . . . . . . . . 81Go to . . . . . . . . . . . . . . . . . . . . . . . . . . . . . . . . . . . . . . . . . . . . . . . 8211 Extras. . . . . . . . . . . . . . . . . . . . . . . . . . . . . . . . . . . 84Notes . . . . . . . . . . . . . . . . . . . . . . . . . . . . . . . . . . . . . . . . . . . . . . . 84Calculator . . . . . . . . . . . . . . . . . . . . . . . . . . . . . . . . . . . . . . . . . . . 84Converter. . . . . . . . . . . . . . . . . . . . . . . . . . . . . . . . . . . . . . . . . . . . 84Voice recorder. . . . . . . . . . . . . . . . . . . . . . . . . . . . . . . . . . . . . . . . 86Clock . . . . . . . . . . . . . . . . . . . . . . . . . . . . . . . . . . . . . . . . . . . . . . . 86Memory card. . . . . . . . . . . . . . . . . . . . . . . . . . . . . . . . . . . . . . . . . 87Wallet . . . . . . . . . . . . . . . . . . . . . . . . . . . . . . . . . . . . . . . . . . . . . . 90Games . . . . . . . . . . . . . . . . . . . . . . . . . . . . . . . . . . . . . . . . . . . . . . 9312 Instant messaging (IM) (network service) . . . . . . . . 94IM service provider icons. . . . . . . . . . . . . . . . . . . . . . . . . . . . . . . 94Register with an IM service. . . . . . . . . . . . . . . . . . . . . . . . . . . . . 95Before using IM . . . . . . . . . . . . . . . . . . . . . . . . . . . . . . . . . . . . . . 95Log in. . . . . . . . . . . . . . . . . . . . . . . . . . . . . . . . . . . . . . . . . . . . . . . 95IM settings . . . . . . . . . . . . . . . . . . . . . . . . . . . . . . . . . . . . . . . . . . 95IM conversations . . . . . . . . . . . . . . . . . . . . . . . . . . . . . . . . . . . . . 97IM contacts. . . . . . . . . . . . . . . . . . . . . . . . . . . . . . . . . . . . . . . . . . 98Group chat sessions . . . . . . . . . . . . . . . . . . . . . . . . . . . . . . . . . . 100Log off service. . . . . . . . . . . . . . . . . . . . . . . . . . . . . . . . . . . . . . . 10313 Web (mobile browser) . . . . . . . . . . . . . . . . . . . . . 104](https://usermanual.wiki/Microsoft/RH-52/User-Guide-417620-Page-10.png)
![[ xi ]FCC DRAFTPRELIMINARYBasic steps for web access. . . . . . . . . . . . . . . . . . . . . . . . . . . . . 104Browser service set-up. . . . . . . . . . . . . . . . . . . . . . . . . . . . . . . .104Make a connection. . . . . . . . . . . . . . . . . . . . . . . . . . . . . . . . . . .105Bookmarks. . . . . . . . . . . . . . . . . . . . . . . . . . . . . . . . . . . . . . . . . .105Browse. . . . . . . . . . . . . . . . . . . . . . . . . . . . . . . . . . . . . . . . . . . . . 106Download . . . . . . . . . . . . . . . . . . . . . . . . . . . . . . . . . . . . . . . . . . 107End a connection . . . . . . . . . . . . . . . . . . . . . . . . . . . . . . . . . . . .108Clear the cache. . . . . . . . . . . . . . . . . . . . . . . . . . . . . . . . . . . . . .109Browser settings. . . . . . . . . . . . . . . . . . . . . . . . . . . . . . . . . . . . . 10914 Connectivity . . . . . . . . . . . . . . . . . . . . . . . . . . . . . 111Bluetooth connection. . . . . . . . . . . . . . . . . . . . . . . . . . . . . . . . .111USB connection . . . . . . . . . . . . . . . . . . . . . . . . . . . . . . . . . . . . .115Connection manager . . . . . . . . . . . . . . . . . . . . . . . . . . . . . . . . . 115Connect your phone to a computer . . . . . . . . . . . . . . . . . . . . .116Use the CD-ROM. . . . . . . . . . . . . . . . . . . . . . . . . . . . . . . . . . . . . 116Synchronization . . . . . . . . . . . . . . . . . . . . . . . . . . . . . . . . . . . . .11615 Troubleshooting. . . . . . . . . . . . . . . . . . . . . . . . . . . 119SIM card . . . . . . . . . . . . . . . . . . . . . . . . . . . . . . . . . . . . . . . . . . .119Memory low . . . . . . . . . . . . . . . . . . . . . . . . . . . . . . . . . . . . . . . . 119Different ways to store data . . . . . . . . . . . . . . . . . . . . . . . . . . .120Phone display . . . . . . . . . . . . . . . . . . . . . . . . . . . . . . . . . . . . . . .120Bluetooth connection. . . . . . . . . . . . . . . . . . . . . . . . . . . . . . . . . 120Multimedia messaging. . . . . . . . . . . . . . . . . . . . . . . . . . . . . . . .120Messaging . . . . . . . . . . . . . . . . . . . . . . . . . . . . . . . . . . . . . . . . . .121Browser services . . . . . . . . . . . . . . . . . . . . . . . . . . . . . . . . . . . . .121Log . . . . . . . . . . . . . . . . . . . . . . . . . . . . . . . . . . . . . . . . . . . . . . . .121](https://usermanual.wiki/Microsoft/RH-52/User-Guide-417620-Page-11.png)
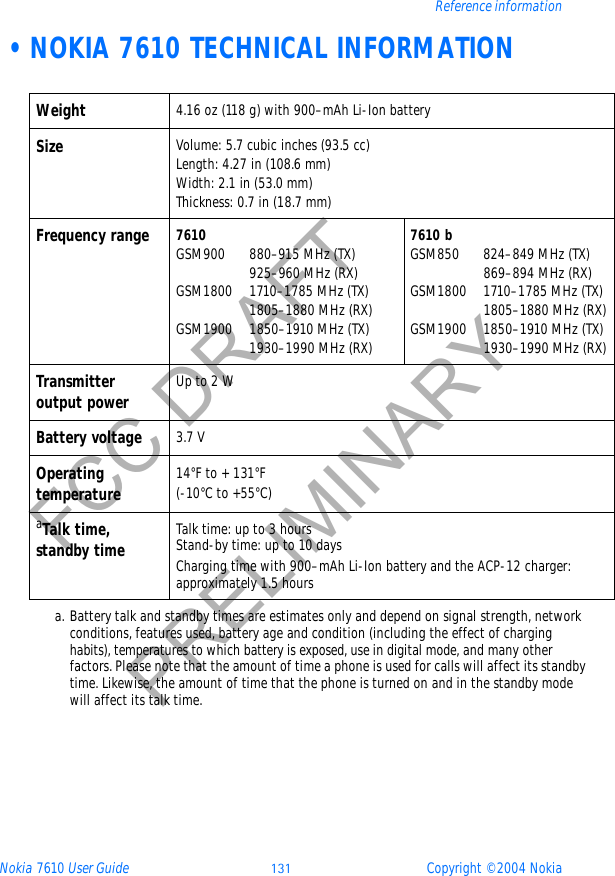
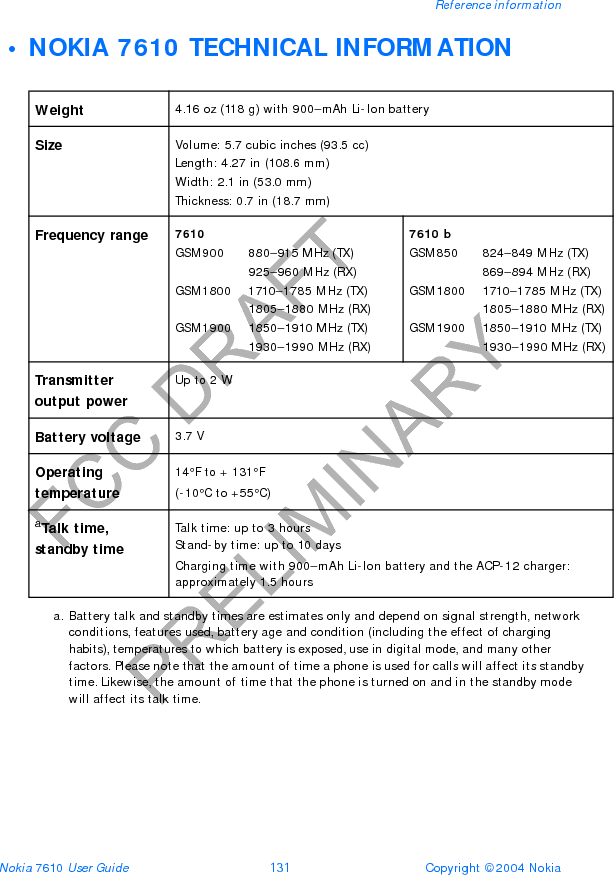
![[ xii ]FCC DRAFTPRELIMINARYPC connectivity. . . . . . . . . . . . . . . . . . . . . . . . . . . . . . . . . . . . . . 122Application not responding . . . . . . . . . . . . . . . . . . . . . . . . . . . . 12216 Reference information . . . . . . . . . . . . . . . . . . . . . 123Battery information . . . . . . . . . . . . . . . . . . . . . . . . . . . . . . . . . . 123Enhancements. . . . . . . . . . . . . . . . . . . . . . . . . . . . . . . . . . . . . . . 123Enhancements, batteries, and chargers . . . . . . . . . . . . . . . . . . 124Care and maintenance. . . . . . . . . . . . . . . . . . . . . . . . . . . . . . . . 125Additional safety information . . . . . . . . . . . . . . . . . . . . . . . . . . 126Emergency calls . . . . . . . . . . . . . . . . . . . . . . . . . . . . . . . . . . . . . 128Certification information (SAR). . . . . . . . . . . . . . . . . . . . . . . . . 129Nokia 7610 technical information . . . . . . . . . . . . . . . . . . . . . . 131Message from the CTIA . . . . . . . . . . . . . . . . . . . . 137Message from the FDA. . . . . . . . . . . . . . . . . . . . . 141Index . . . . . . . . . . . . . . . . . . . . . . . . . . . . . . . . . . 147](https://usermanual.wiki/Microsoft/RH-52/User-Guide-417620-Page-12.png)


![[ 137 ]Appendix A Message from the CTIA(Cellular Telecommunications & Internet Association) to all users of mobile phones.© 2001 Cellular Telecommunications & Internet Association. All Rights Reserved.1250 Connecticut Avenue, NW Suite 800, Washington, DC 20036. Phone: (202) 785-0081](https://usermanual.wiki/Microsoft/RH-52/User-Guide-417620-Page-149.png)
![[ 138 ]Safety is the most important call you will ever make.A Guide to Safe and Responsible Wireless Phone UseTens of millions of people in the U.S. today take advantage of the unique combination of convenience, safety and value delivered by the wireless telephone. Quite simply, the wireless phone gives people the powerful ability to communicate by voice--almost anywhere, anytime--with the boss, with a client, with the kids, with emergency personnel or even with the police. Each year, Americans make billions of calls from their wireless phones, and the numbers are rapidly growing.But an important responsibility accompanies those benefits, one that every wireless phone user must uphold. When driving a car, driving is your first responsibility. A wireless phone can be an invaluable tool, but good judgment must be exercised at all times while driving a motor vehicle--whether on the phone or not.The basic lessons are ones we all learned as teenagers. Driving requires alertness, caution and courtesy. It requires a heavy dose of basic common sense---keep your head up, keep your eyes on the road, check your mirrors frequently and watch out for other drivers. It requires obeying all traffic signs and signals and staying within the speed limit. It means using seatbelts and requiring other passengers to do the same.But with wireless phone use, driving safely means a little more. This brochure is a call to wireless phone users everywhere to make safety their first priority when behind the wheel of a car. Wireless telecommunications is keeping us in touch, simplifying our lives, protecting us in emergencies and providing opportunities to help others in need. When it comes to the use of wireless phones, safety is your most important call.Wireless Phone "Safety Tips"Below are safety tips to follow while driving and using a wireless phone which should be easy to remember. 1 Get to know your wireless phone and its features such as speed dial and redial. Carefully read your instruction manual and learn to take advantage of valuable features most phones offer, including automatic redial and memory. Also, work to memorize the phone keypad so you can use the speed dial function without taking your attention off the road.2 When available, use a hands free device. A number of hands free wireless phone accessories are readily available today. Whether you choose an installed mounted device for your wireless phone or a speaker phone accessory, take advantage of these devices if available to you.3 Position your wireless phone within easy reach. Make sure you place your wireless phone within easy reach and where you can grab it without removing your eyes from the road. If you get an incoming call at an inconvenient time, if possible, let your voice mail answer it for you.4 Suspend conversations during hazardous driving conditions or situations. Let the person you are speaking with know you are driving; if necessary, suspend the call in heavy traffic or hazardous weather conditions. Rain, sleet, snow and ice](https://usermanual.wiki/Microsoft/RH-52/User-Guide-417620-Page-150.png)
![[ 139 ]can be hazardous, but so is heavy traffic. As a driver, your first responsibility is to pay attention to the road.5 Do not take notes or look up phone numbers while driving. If you are reading an address book or business card, or writing a "to do" list while driving a car, you are not watching where you are going. It’s common sense. Don’t get caught in a dangerous situation because you are reading or writing and not paying attention to the road or nearby vehicles.6 Dial sensibly and assess the traffic; if possible, place calls when you are not moving or before pulling into traffic. Try to plan your calls before you begin your trip or attempt to coincide your calls with times you may be stopped at a stop sign, red light or otherwise stationary. But if you need to dial while driving, follow this simple tip--dial only a few numbers, check the road and your mirrors, then continue.7 Do not engage in stressful or emotional conversations that may be distracting. Stressful or emotional conversations and driving do not mix--they are distracting and even dangerous when you are behind the wheel of a car. Make people you are talking with aware you are driving and if necessary, suspend conversations which have the potential to divert your attention from the road.8 Use your wireless phone to call for help. Your wireless phone is one of the greatest tools you can own to protect yourself and your family in dangerous situations--with your phone at your side, help is only three numbers away. Dial 9-1-1 or other local emergency number in the case of fire, traffic accident, road hazard or medical emergency. Remember, it is a free call on your wireless phone!9 Use your wireless phone to help others in emergencies. Your wireless phone provides you a perfect opportunity to be a "Good Samaritan" in your community. If you see an auto accident, crime in progress or other serious emergency where lives are in danger, call 9-1-1 or other local emergency number, as you would want others to do for you.10 Call roadside assistance or a special wireless non-emergency assistance number when necessary. Certain situations you encounter while driving may require attention, but are not urgent enough to merit a call for emergency services. But you still can use your wireless phone to lend a hand. If you see a broken-down vehicle posing no serious hazard, a broken traffic signal, a minor traffic accident where no one appears injured or a vehicle you know to be stolen, call roadside assistance or other special non-emergency wireless number.Careless, distracted individuals and people driving irresponsibly represent a hazard to everyone on the road. Since 1984, the Cellular Telecommunications Industry Association and the wireless industry have conducted educational outreach to inform wireless phone users of their responsibilities as safe drivers and good citizens. As we approach a new century, more and more of us will take advantage of the benefits of wireless telephones. And, as we take to the roads, we all have a responsibility to drive safely.The wireless industry reminds you to use your phone safely when driving.For more information, please call 1-888-901-SAFE.For updates: http://www.wow-com.com/consumer/issues/driving/articles.cfm?ID=85](https://usermanual.wiki/Microsoft/RH-52/User-Guide-417620-Page-151.png)
![[ 140 ]](https://usermanual.wiki/Microsoft/RH-52/User-Guide-417620-Page-152.png)