Microsoft RH-68 GSM 850/1800/1900 Cellular Telephone User Manual Manual

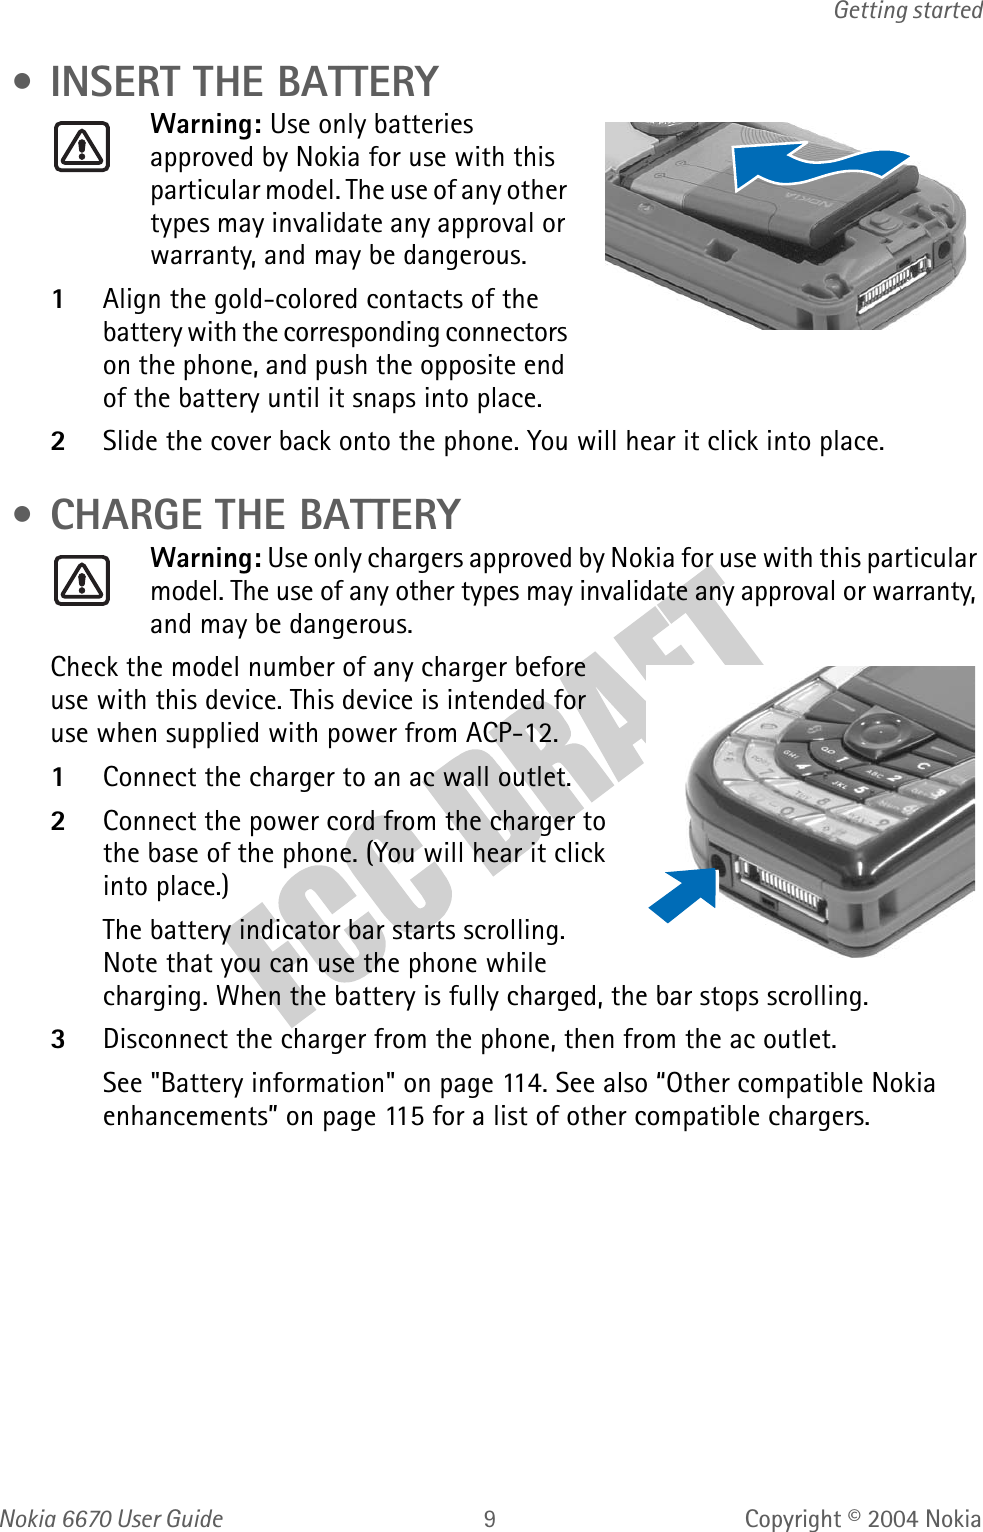
Microsoft Mobile Oy GSM 850/1800/1900 Cellular Telephone Manual

Manual

Nokia 6670 User Guide  i Copyright © 2004 NokiaNokia 6670 User GuidePhone information Numbers Where is the number?My number Wireless service providerVoice mail number Wireless service providerWireless provider’s number Wireless service providerProvider’s customer care Wireless service providerModel number Label on back of phone (under battery)Type number Label on back of phone (under battery)IMEI number Label on back of phone (under battery)
ii Copyright © 2004 NokiaNOTES
Nokia  User Guide LLL Copyright © 2004 NokiaLEGAL INFORMATIONDECLARATION OF CONFORMITYWe, NOKIA CORPORATION declare under our sole responsibility that the products RH-67 and RH-68 are in conformity with the provisions of the following Council Directive: 1999/5/EC. A copy of the Declaration of Conformity can be found at http://www.nokia.com/phones/declaration_of_conformityPART NO. XXXXXXX, ISSUE NO. 1Copyright © 2004 Nokia. All rights reserved.Nokia, Nokia 6670, Nokia Connecting People, Pop-Port, and the Nokia Original Enhancements logos are trademarks or registered trademarks of Nokia Corporation. Other company and product names mentioned herein may be trademarks or trade names of their respective owners.Printed ???????? 2004This product includes software licensed from Symbian Software Ltd. © 1998-2004. Symbian and Symbian OS are trademarks of Symbian Ltd.Includes RSA BSAFE cryptographic or security protocol software from RSA Security. Java and all Java-based marks are trademarks of Sun Microsystems, Inc.US Patent No 5818437 and other pending patents. T9 text input software Copyright (C) 1997-2003. Tegic Communications, Inc. All rights reserved.Bluetooth is a registered trademark of Bluetooth SIG, Inc.USE OF THIS PRODUCT IN ANY MANNER THAT COMPLIES WITH THE MPEG-4 VISUAL STANDARD IS PROHIBITED, EXCEPT FOR USE DIRECTLY RELATED TO (A) DATA OR INFORMATION (i) GENERATED BY AND OBTAINED WITHOUT CHARGE FROM A CONSUMER NOT THEREBY ENGAGED IN A BUSINESS ENTERPRISE, AND (ii) FOR PERSONAL USE ONLY; AND (B) OTHER USES SPECIFICALLY AND SEPARATELY LICENSED BY MPEG LA, L.L.C.The information contained in this user guide was written for the Nokia 6670 product. Nokia operates a policy of ongoing development. Nokia reserves the right to make changes to any of the products described in this document without prior notice.168
iv Copyright © 2004 NokiaUNDER NO CIRCUMSTANCES SHALL NOKIA BE RESPONSIBLE FOR ANY LOSS OF DATA OR INCOME OR ANY SPECIAL, INCIDENTAL, AND CONSEQUENTIAL OR INDIRECT DAMAGES HOWSOEVER CAUSED. THE CONTENTS OF THIS DOCUMENT ARE PROVIDED "AS IS." EXCEPT AS REQUIRED BY APPLICABLE LAW, NO WARRANTIES OF ANY KIND, EITHER EXPRESS OR IMPLIED, INCLUDING, BUT NOT LIMITED TO, THE IMPLIED WARRANTIES OF MERCHANTABILITY AND FITNESS FOR A PARTICULAR PURPOSE, ARE MADE IN RELATION TO THE ACCURACY AND RELIABILITY OR CONTENTS OF THIS DOCUMENT. NOKIA RESERVES THE RIGHT TO REVISE THIS DOCUMENT OR WITHDRAW IT AT ANY TIME WITHOUT PRIOR NOTICE.EXPORT CONTROLS This device may contain commodities, technology or software subject to export laws and regulations from the US and other countries. Diversion contrary to law is prohibited.FCC/INDUSTRY CANADA NOTICE Your device may cause TV or radio interference (for example, when using a telephone in close proximity to receiving equipment). The FCC or Industry Canada can require you to stop using your telephone if such interference cannot be eliminated. If you require assistance, contact your local service facility. This device complies with part 15 of the FCC rules. Operation is subject to the condition that this device does not cause harmful interference.Manufactured or sold under one or more of the following US patents:4868846 4945633 5001372 5101175 5151946 5173927 5212834 52300915241583 5311151 5317283 5331638 5335362 5353328 5371481 53789355384782 5396657 5400949 5416435 5442521 5446364 5479476 55263665553125 5557639 5565821 5570369 5581244 5600708 5625274 56776205692032 5729541 5760568 5794142 5802465 5809413 5827082 58391015844884 5845219 5870683 5884103 5889770 5907823 5912570 59146905914796 5917868 5920826 5956332 5956625 5956633 5966378 59778875987137 5991857 6006114 6011853 6014551 6014573 6026161 60351896038238 6043760 6047196 6049796 6050415 6055439 6060193 60699236072787 6081732 6084920 6084962 6094587 6097964 6105784 61120996115617 6119180 6121846 6128509 6138091 6140966 6144243 61446766148209 6151485 6151507 6163609 6164547 6167248 6185295 61889096249584 6259312 6266330 6272361 6282436 6292668 6295286 63110546314166 6324389 6324412 6347218 6363259 6370362 6370389 63778206381468 6392660 6400958 6453179 6463278 6470470 6487397 65226706198928 4969192 5266782 5390223 5444816 5487084 5640395 56640535699482 5701392 5722074 5754976 5805301 5835889 5857151 58598435862178 5898925 5930233 5946651 5960354 5960389 5963901 60058576011971 6031827 6118775 6128322 6137789 6167248 6170073 61785356195338 6199035 6240076 6266321 6285888 6356759 6377803 64301636438370 6456237 RE32580 5818437 5953541 6011554 4558302
Nokia  User Guidev Copyright © 2004 NokiaNokia 6670 phone at a glanceSend key  End keyPower key (on top) Charger connector, Pop-Port™ connector,and microphone (on bottom)Five-way scroll keyLeft selection keyMenu keyEdit keyClear keyRight selection keyDisplayEarpieceCamera lensNote: The internet symbolappear on all phones. on the 0 key does not Speaker (on side)
vi Copyright © 2004 NokiaQuick guideMake a call Enter a phone number, and press the Send key.Answer a call Press the Send key.Answer call during call Select Options > Answer, or press the Send key.End a call Press the End key.Decline a call Press the End key.Mute a call Select Options > Mute during a call.Redial Press the Send key twice.Adjust call volume Scroll left or right with the Scroll key during a call.Use the in-call menu Select Options during a call.Save a name and number Enter a number, select Options > Add to contacts > Create new, choose a category, enter a name, and select Done. See "Write text," p. 44. Look up a name Select Menu > Contacts, and in the search field at the bottom of the screen, key in the first letters of the name you want to find.Use 1-touch dialing Press and hold a key (2–9). You must assign a key to a number in Contacts. See "Assign 1-touch dialing keys," p. 26. Check voice mail Press and hold the 1 key (contact your service provider for details).Write and send text messagesSelect Menu > Messaging > New message > Text message. Enter the recipient in the To field. Enter the text message, and select Options > Send.Send a picture Capture a picture, allow the picture time to save, and then select Options > Send > Via multimedia. Enter the recipient in the To field. Enter the text message, and select Options > Send. Read a new message If a new message arrives, select Show to display the message.Press Press a key briefly and release it.Press and hold Press and hold a key for 2 to 3 seconds and release it.
Nokia  User Guidevii Copyright © 2004 NokiaContents1 For your safety . . . . . . . . . . . . . . . . . . . . . . . . . . . . . . . . . . . . . . . 1About your phone  . . . . . . . . . . . . . . . . . . . . . . . . . . . . . . . . . . . . . . . . . . . . . . . . . . . 2Network services . . . . . . . . . . . . . . . . . . . . . . . . . . . . . . . . . . . . . . . . . . . . . . . . . . . . 2Shared memory  . . . . . . . . . . . . . . . . . . . . . . . . . . . . . . . . . . . . . . . . . . . . . . . . . . . . . 32 General information . . . . . . . . . . . . . . . . . . . . . . . . . . . . . . . . . . . 4Register your phone. . . . . . . . . . . . . . . . . . . . . . . . . . . . . . . . . . . . . . . . . . . . . . . . . . 4E-newsletters . . . . . . . . . . . . . . . . . . . . . . . . . . . . . . . . . . . . . . . . . . . . . . . . . . . . . . . 4Follow graphic clues  . . . . . . . . . . . . . . . . . . . . . . . . . . . . . . . . . . . . . . . . . . . . . . . . . 4Find the phone label . . . . . . . . . . . . . . . . . . . . . . . . . . . . . . . . . . . . . . . . . . . . . . . . . 5Contact Nokia  . . . . . . . . . . . . . . . . . . . . . . . . . . . . . . . . . . . . . . . . . . . . . . . . . . . . . . 5Accessibility solutions . . . . . . . . . . . . . . . . . . . . . . . . . . . . . . . . . . . . . . . . . . . . . . . . 63 Getting started. . . . . . . . . . . . . . . . . . . . . . . . . . . . . . . . . . . . . . .  7Remove the back cover . . . . . . . . . . . . . . . . . . . . . . . . . . . . . . . . . . . . . . . . . . . . . . . 7Insert the SIM card  . . . . . . . . . . . . . . . . . . . . . . . . . . . . . . . . . . . . . . . . . . . . . . . . . . 7Insert the memory card . . . . . . . . . . . . . . . . . . . . . . . . . . . . . . . . . . . . . . . . . . . . . . . 8Insert the battery . . . . . . . . . . . . . . . . . . . . . . . . . . . . . . . . . . . . . . . . . . . . . . . . . . . . 9Charge the battery. . . . . . . . . . . . . . . . . . . . . . . . . . . . . . . . . . . . . . . . . . . . . . . . . . . 9Switch the phone on or off . . . . . . . . . . . . . . . . . . . . . . . . . . . . . . . . . . . . . . . . . . . 10Attach the wrist strap . . . . . . . . . . . . . . . . . . . . . . . . . . . . . . . . . . . . . . . . . . . . . . . 10Tips on efficient operation  . . . . . . . . . . . . . . . . . . . . . . . . . . . . . . . . . . . . . . . . . . . 10If the phone requests a PIN code . . . . . . . . . . . . . . . . . . . . . . . . . . . . . . . . . . . . . . 10If the phone requests a lock code. . . . . . . . . . . . . . . . . . . . . . . . . . . . . . . . . . . . . . 10Set the time and date . . . . . . . . . . . . . . . . . . . . . . . . . . . . . . . . . . . . . . . . . . . . . . . 11Make a call . . . . . . . . . . . . . . . . . . . . . . . . . . . . . . . . . . . . . . . . . . . . . . . . . . . . . . . . 11Standby mode  . . . . . . . . . . . . . . . . . . . . . . . . . . . . . . . . . . . . . . . . . . . . . . . . . . . . . 11Icons . . . . . . . . . . . . . . . . . . . . . . . . . . . . . . . . . . . . . . . . . . . . . . . . . . . . . . . . . . . . . 12Menu. . . . . . . . . . . . . . . . . . . . . . . . . . . . . . . . . . . . . . . . . . . . . . . . . . . . . . . . . . . . . 13Options lists . . . . . . . . . . . . . . . . . . . . . . . . . . . . . . . . . . . . . . . . . . . . . . . . . . . . . . . 15Common actions for all applications . . . . . . . . . . . . . . . . . . . . . . . . . . . . . . . . . . . 15Search for items. . . . . . . . . . . . . . . . . . . . . . . . . . . . . . . . . . . . . . . . . . . . . . . . . . . . 16Volume control. . . . . . . . . . . . . . . . . . . . . . . . . . . . . . . . . . . . . . . . . . . . . . . . . . . . . 16
viii Copyright © 2004 NokiaLoudspeaker. . . . . . . . . . . . . . . . . . . . . . . . . . . . . . . . . . . . . . . . . . . . . . . . . . . . . . . .17Keyguard . . . . . . . . . . . . . . . . . . . . . . . . . . . . . . . . . . . . . . . . . . . . . . . . . . . . . . . . . .174 Your phone. . . . . . . . . . . . . . . . . . . . . . . . . . . . . . . . . . . . . . . . .  18Make a call . . . . . . . . . . . . . . . . . . . . . . . . . . . . . . . . . . . . . . . . . . . . . . . . . . . . . . . .18Answer a call. . . . . . . . . . . . . . . . . . . . . . . . . . . . . . . . . . . . . . . . . . . . . . . . . . . . . . .20Call log. . . . . . . . . . . . . . . . . . . . . . . . . . . . . . . . . . . . . . . . . . . . . . . . . . . . . . . . . . . .215 Personal information . . . . . . . . . . . . . . . . . . . . . . . . . . . . . . . . .  24Contacts  . . . . . . . . . . . . . . . . . . . . . . . . . . . . . . . . . . . . . . . . . . . . . . . . . . . . . . . . . .24Presence (network service). . . . . . . . . . . . . . . . . . . . . . . . . . . . . . . . . . . . . . . . . . . .27Positioning (network service). . . . . . . . . . . . . . . . . . . . . . . . . . . . . . . . . . . . . . . . . .31Calendar  . . . . . . . . . . . . . . . . . . . . . . . . . . . . . . . . . . . . . . . . . . . . . . . . . . . . . . . . . .31To-do . . . . . . . . . . . . . . . . . . . . . . . . . . . . . . . . . . . . . . . . . . . . . . . . . . . . . . . . . . . . .33Copy content from compatible Nokia phones . . . . . . . . . . . . . . . . . . . . . . . . . . . .336 Multimedia. . . . . . . . . . . . . . . . . . . . . . . . . . . . . . . . . . . . . . . . .  34Camera. . . . . . . . . . . . . . . . . . . . . . . . . . . . . . . . . . . . . . . . . . . . . . . . . . . . . . . . . . . .34View images  . . . . . . . . . . . . . . . . . . . . . . . . . . . . . . . . . . . . . . . . . . . . . . . . . . . . . . .37Player . . . . . . . . . . . . . . . . . . . . . . . . . . . . . . . . . . . . . . . . . . . . . . . . . . . . . . . . . . . . .38Movie director. . . . . . . . . . . . . . . . . . . . . . . . . . . . . . . . . . . . . . . . . . . . . . . . . . . . . .39Gallery . . . . . . . . . . . . . . . . . . . . . . . . . . . . . . . . . . . . . . . . . . . . . . . . . . . . . . . . . . . .407 Messaging . . . . . . . . . . . . . . . . . . . . . . . . . . . . . . . . . . . . . . . . .  43Write text . . . . . . . . . . . . . . . . . . . . . . . . . . . . . . . . . . . . . . . . . . . . . . . . . . . . . . . . .44Write and send messages. . . . . . . . . . . . . . . . . . . . . . . . . . . . . . . . . . . . . . . . . . . . .47View a multimedia presentation . . . . . . . . . . . . . . . . . . . . . . . . . . . . . . . . . . . . . . .48Inbox—receive messages  . . . . . . . . . . . . . . . . . . . . . . . . . . . . . . . . . . . . . . . . . . . . .48My folders   . . . . . . . . . . . . . . . . . . . . . . . . . . . . . . . . . . . . . . . . . . . . . . . . . . . . . . . .50Remote mailbox (network service) . . . . . . . . . . . . . . . . . . . . . . . . . . . . . . . . . . . . .50Outbox . . . . . . . . . . . . . . . . . . . . . . . . . . . . . . . . . . . . . . . . . . . . . . . . . . . . . . . . . . . .52View messages on a SIM card . . . . . . . . . . . . . . . . . . . . . . . . . . . . . . . . . . . . . . . . .52Cell broadcast (network service) . . . . . . . . . . . . . . . . . . . . . . . . . . . . . . . . . . . . . . .53Service command editor. . . . . . . . . . . . . . . . . . . . . . . . . . . . . . . . . . . . . . . . . . . . . .53Messaging settings . . . . . . . . . . . . . . . . . . . . . . . . . . . . . . . . . . . . . . . . . . . . . . . . . .538 Settings . . . . . . . . . . . . . . . . . . . . . . . . . . . . . . . . . . . . . . . . . . .  58
Nokia  User Guideix Copyright © 2004 NokiaPhone  . . . . . . . . . . . . . . . . . . . . . . . . . . . . . . . . . . . . . . . . . . . . . . . . . . . . . . . . . . . . 58Call  . . . . . . . . . . . . . . . . . . . . . . . . . . . . . . . . . . . . . . . . . . . . . . . . . . . . . . . . . . . . . .59Connection . . . . . . . . . . . . . . . . . . . . . . . . . . . . . . . . . . . . . . . . . . . . . . . . . . . . . . . . 60Date and time. . . . . . . . . . . . . . . . . . . . . . . . . . . . . . . . . . . . . . . . . . . . . . . . . . . . . . 63Security. . . . . . . . . . . . . . . . . . . . . . . . . . . . . . . . . . . . . . . . . . . . . . . . . . . . . . . . . . . 64Call restriction (network service) . . . . . . . . . . . . . . . . . . . . . . . . . . . . . . . . . . . . . . 66Network  . . . . . . . . . . . . . . . . . . . . . . . . . . . . . . . . . . . . . . . . . . . . . . . . . . . . . . . . . . 67Enhancement . . . . . . . . . . . . . . . . . . . . . . . . . . . . . . . . . . . . . . . . . . . . . . . . . . . . . . 679 Tools and applications  . . . . . . . . . . . . . . . . . . . . . . . . . . . . . . . . 68Application manager . . . . . . . . . . . . . . . . . . . . . . . . . . . . . . . . . . . . . . . . . . . . . . . . 68File manager. . . . . . . . . . . . . . . . . . . . . . . . . . . . . . . . . . . . . . . . . . . . . . . . . . . . . . . 70Voice commands . . . . . . . . . . . . . . . . . . . . . . . . . . . . . . . . . . . . . . . . . . . . . . . . . . . 70Device manager . . . . . . . . . . . . . . . . . . . . . . . . . . . . . . . . . . . . . . . . . . . . . . . . . . . . 7210 Personalization . . . . . . . . . . . . . . . . . . . . . . . . . . . . . . . . . . . . . . 73Profiles . . . . . . . . . . . . . . . . . . . . . . . . . . . . . . . . . . . . . . . . . . . . . . . . . . . . . . . . . . . 73Themes . . . . . . . . . . . . . . . . . . . . . . . . . . . . . . . . . . . . . . . . . . . . . . . . . . . . . . . . . . . 74Go to . . . . . . . . . . . . . . . . . . . . . . . . . . . . . . . . . . . . . . . . . . . . . . . . . . . . . . . . . . . . . 7511 Extras. . . . . . . . . . . . . . . . . . . . . . . . . . . . . . . . . . . . . . . . . . . . . 77Notes. . . . . . . . . . . . . . . . . . . . . . . . . . . . . . . . . . . . . . . . . . . . . . . . . . . . . . . . . . . . . 77Calculator . . . . . . . . . . . . . . . . . . . . . . . . . . . . . . . . . . . . . . . . . . . . . . . . . . . . . . . . . 77Converter . . . . . . . . . . . . . . . . . . . . . . . . . . . . . . . . . . . . . . . . . . . . . . . . . . . . . . . . . 77Voice recorder  . . . . . . . . . . . . . . . . . . . . . . . . . . . . . . . . . . . . . . . . . . . . . . . . . . . . . 78Clock . . . . . . . . . . . . . . . . . . . . . . . . . . . . . . . . . . . . . . . . . . . . . . . . . . . . . . . . . . . . . 79Memory card  . . . . . . . . . . . . . . . . . . . . . . . . . . . . . . . . . . . . . . . . . . . . . . . . . . . . . . 80Wallet . . . . . . . . . . . . . . . . . . . . . . . . . . . . . . . . . . . . . . . . . . . . . . . . . . . . . . . . . . . . 82Games . . . . . . . . . . . . . . . . . . . . . . . . . . . . . . . . . . . . . . . . . . . . . . . . . . . . . . . . . . . . 8712 Instant messaging (IM) (network service) . . . . . . . . . . . . . . . . . . 88IM service provider icons. . . . . . . . . . . . . . . . . . . . . . . . . . . . . . . . . . . . . . . . . . . . . 88Register with an IM service  . . . . . . . . . . . . . . . . . . . . . . . . . . . . . . . . . . . . . . . . . . 89Before using IM . . . . . . . . . . . . . . . . . . . . . . . . . . . . . . . . . . . . . . . . . . . . . . . . . . . . 89Log in  . . . . . . . . . . . . . . . . . . . . . . . . . . . . . . . . . . . . . . . . . . . . . . . . . . . . . . . . . . . . 89IM settings . . . . . . . . . . . . . . . . . . . . . . . . . . . . . . . . . . . . . . . . . . . . . . . . . . . . . . . . 89
x Copyright © 2004 NokiaIM conversations. . . . . . . . . . . . . . . . . . . . . . . . . . . . . . . . . . . . . . . . . . . . . . . . . . . .90IM contacts . . . . . . . . . . . . . . . . . . . . . . . . . . . . . . . . . . . . . . . . . . . . . . . . . . . . . . . .92Group chat sessions . . . . . . . . . . . . . . . . . . . . . . . . . . . . . . . . . . . . . . . . . . . . . . . . .94Log off service. . . . . . . . . . . . . . . . . . . . . . . . . . . . . . . . . . . . . . . . . . . . . . . . . . . . . .9713 Web (mobile browser)  . . . . . . . . . . . . . . . . . . . . . . . . . . . . . . . .  98Basic steps for web access. . . . . . . . . . . . . . . . . . . . . . . . . . . . . . . . . . . . . . . . . . . .98Browser service set-up . . . . . . . . . . . . . . . . . . . . . . . . . . . . . . . . . . . . . . . . . . . . . . .98Make a connection . . . . . . . . . . . . . . . . . . . . . . . . . . . . . . . . . . . . . . . . . . . . . . . . . .99Bookmarks . . . . . . . . . . . . . . . . . . . . . . . . . . . . . . . . . . . . . . . . . . . . . . . . . . . . . . . . .99Browse . . . . . . . . . . . . . . . . . . . . . . . . . . . . . . . . . . . . . . . . . . . . . . . . . . . . . . . . . .  100Download  . . . . . . . . . . . . . . . . . . . . . . . . . . . . . . . . . . . . . . . . . . . . . . . . . . . . . . .  101End a connection  . . . . . . . . . . . . . . . . . . . . . . . . . . . . . . . . . . . . . . . . . . . . . . . . .  102Clear the cache . . . . . . . . . . . . . . . . . . . . . . . . . . . . . . . . . . . . . . . . . . . . . . . . . . .  102Browser settings . . . . . . . . . . . . . . . . . . . . . . . . . . . . . . . . . . . . . . . . . . . . . . . . . .  10314 Connectivity. . . . . . . . . . . . . . . . . . . . . . . . . . . . . . . . . . . . . . .  104Bluetooth connection. . . . . . . . . . . . . . . . . . . . . . . . . . . . . . . . . . . . . . . . . . . . . .  104USB connection. . . . . . . . . . . . . . . . . . . . . . . . . . . . . . . . . . . . . . . . . . . . . . . . . . .  107Connection manager  . . . . . . . . . . . . . . . . . . . . . . . . . . . . . . . . . . . . . . . . . . . . . .  107Connect your phone to a computer  . . . . . . . . . . . . . . . . . . . . . . . . . . . . . . . . . .  109Use the CD-ROM. . . . . . . . . . . . . . . . . . . . . . . . . . . . . . . . . . . . . . . . . . . . . . . . . .  109Synchronization  . . . . . . . . . . . . . . . . . . . . . . . . . . . . . . . . . . . . . . . . . . . . . . . . . .  10915 Troubleshooting . . . . . . . . . . . . . . . . . . . . . . . . . . . . . . . . . . . .  111SIM card  . . . . . . . . . . . . . . . . . . . . . . . . . . . . . . . . . . . . . . . . . . . . . . . . . . . . . . . .  111Memory low  . . . . . . . . . . . . . . . . . . . . . . . . . . . . . . . . . . . . . . . . . . . . . . . . . . . . .  111Different ways to store data . . . . . . . . . . . . . . . . . . . . . . . . . . . . . . . . . . . . . . . .  112Phone display  . . . . . . . . . . . . . . . . . . . . . . . . . . . . . . . . . . . . . . . . . . . . . . . . . . . .  112Bluetooth connection. . . . . . . . . . . . . . . . . . . . . . . . . . . . . . . . . . . . . . . . . . . . . .  112Multimedia messaging . . . . . . . . . . . . . . . . . . . . . . . . . . . . . . . . . . . . . . . . . . . . .  112Messaging . . . . . . . . . . . . . . . . . . . . . . . . . . . . . . . . . . . . . . . . . . . . . . . . . . . . . . .  113Browser services . . . . . . . . . . . . . . . . . . . . . . . . . . . . . . . . . . . . . . . . . . . . . . . . . .  113Log . . . . . . . . . . . . . . . . . . . . . . . . . . . . . . . . . . . . . . . . . . . . . . . . . . . . . . . . . . . . .  113PC connectivity . . . . . . . . . . . . . . . . . . . . . . . . . . . . . . . . . . . . . . . . . . . . . . . . . . .  113Application not responding . . . . . . . . . . . . . . . . . . . . . . . . . . . . . . . . . . . . . . . . .  113
Nokia  User Guidexi Copyright © 2004 Nokia16 Reference information . . . . . . . . . . . . . . . . . . . . . . . . . . . . . . . 114Battery information . . . . . . . . . . . . . . . . . . . . . . . . . . . . . . . . . . . . . . . . . . . . . . . . 114Enhancements . . . . . . . . . . . . . . . . . . . . . . . . . . . . . . . . . . . . . . . . . . . . . . . . . . . . 114Enhancements, batteries, and chargers . . . . . . . . . . . . . . . . . . . . . . . . . . . . . . . . 115Care and maintenance. . . . . . . . . . . . . . . . . . . . . . . . . . . . . . . . . . . . . . . . . . . . . . 116Additional safety information. . . . . . . . . . . . . . . . . . . . . . . . . . . . . . . . . . . . . . . . 117Emergency calls . . . . . . . . . . . . . . . . . . . . . . . . . . . . . . . . . . . . . . . . . . . . . . . . . . . 119Certification information (SAR) . . . . . . . . . . . . . . . . . . . . . . . . . . . . . . . . . . . . . . 120Technical information . . . . . . . . . . . . . . . . . . . . . . . . . . . . . . . . . . . . . . . . . . . . . . 12117 Appendix A. . . . . . . . . . . . . . . . . . . . . . . . . . . . . . . . . . . . . . . . 12318 Appendix B. . . . . . . . . . . . . . . . . . . . . . . . . . . . . . . . . . . . . . . . 127
xii Copyright © 2004 Nokia
Nokia  User GuideCopyright © 2004 NokiaFor your safety1 For your safetyRead these simple guidelines. Not following them may be dangerous or illegal. Read the complete user guide for further information.SWITCH ON SAFELYDo not switch the phone on when wireless phone use is prohibited or when it may cause interference or danger.ROAD SAFETY COMES FIRSTObey all local laws. Always keep your hands free to operate the vehicle while driving. Your first consideration while driving should be road safety.INTERFERENCEAll wireless phones may be susceptible to interference, which could affect performance.SWITCH OFF IN HOSPITALSFollow any restrictions. Switch the phone off near medical equipment.SWITCH OFF IN AIRCRAFTFollow any restrictions. Wireless devices can cause interference in aircraft.SWITCH OFF WHEN REFUELINGDon’t use the phone at a refueling point. Don’t use near fuel or chemicals.SWITCH OFF NEAR BLASTINGFollow any restrictions. Don’t use the phone where blasting is in progress.USE SENSIBLYUse only in the normal position as explained in the product documentation. Don’t touch the antenna unnecessarily.QUALIFIED SERVICEOnly qualified personnel may install or repair this product.ENHANCEMENTS AND BATTERIESUse only approved enhancements and batteries. Do not connect incompatible products.
2 Copyright © 2004 NokiaWATER-RESISTANCE Your phone is not water-resistant. Keep it dry.BACK-UP COPIESRemember to make back-up copies or keep a written record of all important information stored in your phone.CONNECTING TO OTHER DEVICESWhen connecting to any other device, read its user guide for detailed safety instructions. Do not connect incompatible products.EMERGENCY CALLSEnsure the phone is switched on and in service. Press the End key as many times as needed to clear the display and return to the main screen. Enter the emergency number, then press the Send key. Give your location. Do not end the call until given permission to do so. • ABOUT YOUR PHONEThe Nokia 6670 phone comes in two model types—the Nokia 6670 phone, which is approved for use in 900, 1800, and 1900 MHz GSM networks, and the Nokia 6670 b phone, which is approved for use in 850, 1800, and 1900 MHz GSM networks.To view your model type, refer to the information label under the battery. For more information about where this label is located, see “Find the phone label” on page 5.When using the features in this device, obey all laws and respect privacy and legitimate rights of others.Warning: To use any features in this device, other than the alarm clock, the phone must be switched on. Do not switch the device on when wireless phone use may cause interference or danger. • NETWORK SERVICESTo use the phone you must have service from a wireless service provider. Many of the features in this device depend on features in the wireless network to function. These Network Services may not be available on all networks, or you may have to make specific arrangements with your service provider before you can utilize Network Services. Your service provider may need to give you additional instructions for their use and explain what charges will apply. Some networks may have limitations that affect how you can use Network Services. For instance, some networks may not support all language-dependent characters and services.
Nokia  User GuideCopyright © 2004 NokiaFor your safetyYour service provider may have requested that certain features be disabled or not activated in your device. If so, they will not appear on your device menu. Contact your service provider for more information.When using the features in this device, obey all laws and respect privacy and legitimate rights of others. • SHARED MEMORYThe following features in this device may share memory: contacts, text messages, e-mail messages, multimedia messages, instant messages, images and ringing tones, video recorder, RealPlayer, calendar and to-do notes, themes, and downloaded applications. The use of one or more of these features may reduce the memory available for the remaining features sharing memory. For example, saving many images may use all of the available memory. Your phone may display a message that the memory is full when you try to use a shared memory feature. In this case, delete some of the information or entries stored in the shared memory features before continuing. Some of the features may have a certain amount of memory specially allotted to them in addition to the amount of memory shared with other features.
4 Copyright © 2004 Nokia2 General informationCongratulations on your purchase of a Nokia mobile phone. Your phone provides many functions that are practical for daily use, such as a digital camera, a video recorder, messaging, e-mail, a clock, an alarm clock, a calculator, and a calendar. Your phone can connect to a PC, laptop, or other device using a data cable or Bluetooth technology. For more information on connectivity, refer to the PC Suite user guide on the CD-ROM supplied with your phone. The PC Suite user guide, Nokia PC Suite, and all related software can be downloaded from the U.S. Mobile Phone products section of www.nokia.com. •REGISTER YOUR PHONEMake sure to register your phone at www.warranty.nokiausa.com or 1-888-NOKIA-2U (1-888-665-4228) if you need to call the center or have your phone repaired. • E-NEWSLETTERSWhen you register your phone, you may sign up for Nokia’s e-newsletter Nokia Connections. You will receive tips and tricks on using your phone, accessory information, and special offers. • FOLLOW GRAPHIC CLUESThis guide uses certain icons to alert you to important information.Note: Explains a feature or points out an important concept.Important: Indicates critical information on using a feature.Warning: Helps you avoid personal injury, damage to the phone, or property damage.
Nokia  User GuideCopyright © 2004 NokiaGeneral information • FIND THE PHONE LABELIf you ever need to call the Nokia Customer Care Center or your service provider, you will need to provide specific information about your phone. This information is located on the phone labels, which are found on the back of the phone beneath the battery.The inside cover of this guide has a chart in which you can enter the information from your phone label so that you can refer to it easily. •CONTACT NOKIATo help Nokia promptly answer your questions, please have the following information available before contacting the Nokia Customer Care Center (see “Find the phone label” on page 5 to locate this information):•Your phone model number (such as Nokia 6670 or Nokia 6670 b)• Type number (such as RH-67)•IMEI number•Your local zip code•The phone or enhancement in question Nokia Customer Care Center, USA Customer Care, CanadaNokia Mobile Phones7725 Woodland Center Blvd. Suite #150Tampa, Florida 33614Tel: 1-888-NOKIA-2U(1-888-665-4228)Fax: 1-813-249-9619For TTY/TDD users: 1-800-24-NOKIA(1-800-246-6542)Nokia Products Ltd.601 Westney Road SouthAjax, Ontario L1S 4N7Tel: 1-888-22-NOKIA (1-888-226-6542)Fax:  1-905-619-4360Website: www.nokia.caInformation label under battery
6 Copyright © 2004 Nokia • ACCESSIBILITY SOLUTIONSNokia is committed to making mobile phones easy to use for all users including those with disabilities. For more information, visit www.nokiaaccessibility.com.For more information on accessibility enhancements, see also “Phone adapter HDA-10 accessibility enhancement” on page 116.
Nokia  User GuideCopyright © 2004 NokiaGetting started3 Getting startedTo begin using your phone, a SIM card must be inserted into the phone. You may also use a memory card with the phone. Before you attempt to insert or remove a SIM card or memory card, review the following procedures to become familiar with the inside of your phone. “Nokia 7610 phone at a glance” on page v identifies other features on your phone. • REMOVE THE BACK COVERNote: Before removing the phone cover, always switch off the power and disconnect the phone from the charger or any other device. Always store and use the phone with the cover attached.1To open the cover, with the back of the phone facing you, press the locking catch in the direction of the arrow (1).2While pressing the locking catch, slide the back cover off of the phone (2).3Remove the battery from the phone if necessary. • INSERT THE SIM CARDKeep all SIM cards out of the reach of small children. For availability and information on using SIM card services, contact your SIM card vendor. This may be the service provider, network operator, or other vendor. For a better understanding of your SIM card, see “SIM card” on page 111.1Locate the SIM card slot.2To open the SIM card holder, slide the holder in the open direction (1), and lift the holder up (2).3Position the bottom of the SIM card in the top of the holder, and carefully slide the SIM card down into the holder, until the bottom of the card fits in the base of the slot.SIM card holderSIM card slot
8 Copyright © 2004 NokiaMake sure that the bevelled corner on the SIM card is at the top of the holder and that the gold-colored contact area on the card is facing the inside of the phone. 4To secure the SIM card, fold the SIM card holder back down into the phone (1), and slide the holder into the closed position (2) until it firmly snaps into place. • INSERT THE MEMORY CARDThis phone uses a reduced size multimedia card (RS-MMC). Only use RS-MMCs with this device. For more information on the memory card adapter, see “Attach and remove the memory card adapter” on page 81.Other memory cards, such as secure digital (SD) cards, do not fit in the memory card slot and are not compatible with this device. Attempts to use a noncompatible memory card may damage the memory card as well as the phone, and data stored on the noncompatible card may be corrupted. See “Memory card” on page 80 for further information.Keep all memory cards out of the reach of small children.See “Remove the back cover” on page 7 for details on removing the phone cover. 1Locate the memory card slot.2Insert the top of the memory card under the hood at the right side of the slot and carefully slide the memory card to the right until it fits in the slot.Make sure that the bevelled corner on the memory card is facing toward the bottom right side of the phone and that the gold-colored contact area on the card is facing downward.3Press the memory card into place. bevelled cornerMemory card slotbevelled corner
Nokia  User GuideCopyright © 2004 NokiaGetting started • INSERT THE BATTERYWarning: Use only batteries approved by Nokia for use with this particular model. The use of any other types may invalidate any approval or warranty, and may be dangerous.1Align the gold-colored contacts of the battery with the corresponding connectors on the phone, and push the opposite end of the battery until it snaps into place.2Slide the cover back onto the phone. You will hear it click into place. • CHARGE THE BATTERYWarning: Use only chargers approved by Nokia for use with this particular model. The use of any other types may invalidate any approval or warranty, and may be dangerous.Check the model number of any charger before use with this device. This device is intended for use when supplied with power from ACP-12.1Connect the charger to an ac wall outlet.2Connect the power cord from the charger to the base of the phone. (You will hear it click into place.)The battery indicator bar starts scrolling. Note that you can use the phone while charging. When the battery is fully charged, the bar stops scrolling. 3Disconnect the charger from the phone, then from the ac outlet.See "Battery information" on page 114. See also “Other compatible Nokia enhancements” on page 115 for a list of other compatible chargers.
10 Copyright © 2004 Nokia • SWITCH THE PHONE ON OR OFFPress and hold the Power key.After it is switched on, the phone goes through various start-up stages while it is loading software. It may be more than 30 seconds before the phone is ready for use. • ATTACH THE WRIST STRAPYou can attach the wrist strap at the top left corner or bottom right corner of the phone. Thread the strap through the holder and tighten it.Note: Only connect the strap to one fixture at a time. Use only Nokia approved enhancements. • TIPS ON EFFICIENT OPERATIONYour phone has an internal antenna on the back of the phone above the camera lens.Note: As with any other radio transmitting device, do not touch the antenna unnecessarily when the device is switched on. Contact with the antenna affects call quality and may cause the phone to operate at a higher power level than otherwise needed. Avoiding contact with the antenna area when operating the phone optimizes the antenna performance and the battery life. • IF THE PHONE REQUESTS A PIN CODEThe PIN code is usually supplied with the SIM card.Key in the code (displayed as ****), and press OK. For more information on PIN codes, see “Security” on page 64. • IF THE PHONE REQUESTS A LOCK CODEKey in the lock code (displayed as *****), and press OK. The factory setting for the lock code is 12345. For more information on security codes, see “Security” on page 64.
Nokia  User GuideCopyright © 2004 NokiaGetting started • SET THE TIME AND DATEIf you are prompted to enter the time and date when you turn your phone on, use the number keys 0–9 to key in the current time, then the date. Press OK to accept the settings. See also “Date and time” on page 63. • MAKE A CALL1In the standby mode, key in the phone number, including the area code.2If you make a mistake, press the Clear key to clear numbers.3Press the Send key, and wait for the answer.4Press the End key to finish the call or cancel the call attempt. •STANDBY MODEIndicators are shown when the phone is ready for use, with no characters keyed in. In this state, the phone is in the standby mode.The graduated bar (A) shows the signal strength of the cellular network at your current location. The higher the bar, the stronger the signal. The antenna symbol   is replaced with the GPRS symbol   when the GPRS connection has been set to When available and a connection is available in the network or in the current cell. See "GPRS" on page 62. The area to the right of the signal bar (B) shows an analog or a digital clock. See "Date and time" on page 63. The area above the date (C) indicates in which cellular network the phone is currently being used.The graduated bar (D) shows the battery charge level. The higher the bar, the more charge left in the battery.The navigation bar (E) shows the currently active profile. If the selected profile is Normal, the current date is displayed instead of the profile name.Current shortcuts (F) are assigned to the Left and Right selection keys.The background image (G) may be any image you select in the standby mode. See "Themes" on page 74. ABCDEFG
12 Copyright © 2004 NokiaYour phone has a screen saver. If there are no actions for 5 minutes, the display is cleared and a screen saver becomes visible. To deactivate the screen saver, press any key. You can also modify the screen saver display and the time that elapses before the screen saver starts. See “Themes” on page 74 and “Standby mode” on page 59. •ICONSSeveral icons may be displayed while the phone is in the standby mode. The icons are related to activity, data connections, enhancements, or voice volume.Activity indicatorsOne or more of the following icons may be shown when the phone is in the standby mode:You have received new messages to the inbox in Messaging. If the indicator is blinking, the phone memory is low, and you must delete some data. See "Memory low" on page 111. You have received one or more voice messages. See "Call voice mail" on page 18. There are messages waiting to be sent in Outbox. See "Outbox" on page 52. The ringing type has been set to Silent, message alert tone to Off, and IM alert tone to Off in the currently active profile. See "Profiles" on page 73. The phone keypad is locked. To unlock, press the Left selection key, then the * key.You have an active alarm. See "Clock" on page 79. See "Calendar" on page 31. A Bluetooth connection is active.All call forwarding is turned on. Indicates that all calls to the phone are forwarded to voice mail. See "Call forwarding (network service)" on page 21. If you have two phone lines, the forward indicator for the first line is   and for the second line  . See “Line in use (network service)” on page 60.You can make calls using phone line 2 only (network service). See "Line in use (network service)" on page 60.
Nokia  User GuideCopyright © 2004 NokiaGetting startedData connection indicatorsWhen an application is establishing a data connection, an indicator blinks in the standby mode. When an indicator is shown continuously, the connection is active.Enhancement indicatorsVoice volume indicators •MENUPress the Menu key to display the main menu. In the menu, you can access all the applications in your phone.Menu options are Open, List view or Grid view, Move, Move to folder, New folder, Rename, App. downloads, Memory details, Help, and Exit.Data callGPRS connection. The GPRS symbol is shown instead of the antenna symbol   when there is an active GPRS connection,   when there are multiple GPRS connections, and   for when the GPRS connection is put on hold during voice calls.Bluetooth connectionUSB connectionA headset is connected.A loopset is connected.Earpiece modeLoudspeaker mode
14 Copyright © 2004 NokiaMove in the menuUse the Scroll key as follows to navigate the menu:•Scroll up by pressing the Scroll key up (1).•Scroll down by pressing the Scroll key down (2).•Scroll left by pressing the Scroll key left (3).•Scroll right by pressing the Scroll key right (4).•Press the center of the Scroll key (hereafter, press the Scroll key) to open a selected application or folder (5).Close applicationsBackstep by pressing Back or Exit as many times as needed to return to the standby mode, or select Options > Exit.If you press the End key, the phone returns to the standby mode and the application is left open in the background. Pressing the End key will always end a call, even if another application is active and displayed.When you switch the phone off correctly, using the Power key, the phone will attempt to save any unsaved data and close any applications that are still open. This process may take a short time.Rearrange the menuYou can rearrange the menu icons as required. You can place more rarely used applications in folders and move applications that you use more often from a folder to the main menu. You can also create new folders.1Scroll to the item you want to move, and select Options > Move.A check mark is placed beside the application.2Scroll to where you want the application, and select OK.To move an item to a folder or from a folder to the menu, see “Common actions for all applications” on page 15.34152
Nokia  User GuideCopyright © 2004 NokiaGetting startedSwitch between open applicationsIf you have several applications open and want to switch from one application to another, press and hold the Menu key. The application switching window opens showing a list of applications that are currently open. Scroll to an application and press the Scroll key to go to it.If memory is getting low, the phone may close some applications. The phone saves any unsaved data before an application is closed. •OPTIONS LISTSOptions lists tell you which commands are available in different views and situations. The available commands change depending on the view. In some situations, when you press the Scroll key, a shorter options list appears, listing the main commands available in the view. • COMMON ACTIONS FOR ALL APPLICATIONSOpen items for viewing—When you are viewing a list of files or folders and want to open an item, scroll to the item and press the center of the Scroll key, or select Options > Open.Edit items—To change the contents of an item, open it for viewing and select Options > Edit. Use the Scroll key to view all fields of the item.Rename items—To give an item a new name, scroll to the file or folder and select Options > Rename. Remove, delete items—Scroll to the item, and select Options > Delete; or press the Clear key. To delete many items at a time, mark each item and delete all of them at once.Mark an item—There are several ways to select items in a list.•To select one item at a time, scroll to it, and select Options > Mark/Unmark > Mark; or press the Edit key and the Scroll key at the same time. A check mark is placed next to the item.•To select all items in the list, select Options > Mark/Unmark > Mark all.Mark multiple items—Press and hold the Edit key; then scroll up or down. As the selection moves, a check mark is placed next to the items. To end the selection, stop scrolling, and release the Edit key.•After you have selected all the items you want, move or delete them by selecting Options > Move to folder or Delete.•To unmark an item, scroll to it, and select Options > Mark/Unmark > Unmark; or press the Edit key and the Scroll key at the same time.
16 Copyright © 2004 NokiaCreate folders—To create a new folder, select Options > New folder. You are asked to give a name to the folder (up to 35 letters).Move items to a folder—To move items to a folder or between folders, select Options > Move to folder (not shown if there are no folders available). When you select Move to folder, a list of available folders opens, and you can also see the root level of the application (for moving an item out of a folder). Select the location to which you want to move the item, and select OK. Send items—To send items to compatible devices, scroll to the item that you want to send, and select Options > Send > Via multimedia or Via Bluetooth.•If you select to send the item in a multimedia message, an editor opens. Press the center of the Scroll key to select the recipients from the contacts directory, or write the phone number or e-mail address of the recipient in the To field. Add text or sound, and select Options > Send. See "Write and send messages" on page 47. •If you select Via Bluetooth, see “Send data by Bluetooth connection” on page 105. • SEARCH FOR ITEMSYou can search for a name, file, folder, or shortcut by using the search field. In some situations the search field is not visible automatically, but you can activate it by selecting Options > Find or by starting to key in letters.1To search for an item, start to key in text in the search field.The phone immediately starts to search for matches and moves the selection to the best match. 2To make the search more accurate, key in more letters and the selection moves to the item that best matches the letters.3When the correct item is found, press the Scroll key to open it. • VOLUME CONTROLWhen you have an active call or are listening to a sound, scroll right or left to increase or decrease the volume level, respectively. See also “Voice volume indicators” on page 13.
Nokia  User GuideCopyright © 2004 NokiaGetting started •LOUDSPEAKERThe loudspeaker allows you to speak and listen to the phone from a short distance without having to hold the phone to your ear. The loudspeaker can be used during a call, with sound and video applications, and when viewing multimedia messages. Sound and video applications use the loudspeaker by default. Using the loudspeaker makes it easier to use other applications while in a call.To activate the loudspeaker during an active call, select Loudsp. or Options > Activate loudsp. A tone is played, is shown in the navigation bar, and the volume indicator changes.The loudspeaker cannot be activated when a headset is connected to the phone.To turn off the loudspeaker during an active call, select Handset or Options > Activate handset.Important: Do not hold the phone near your ear when the loudspeaker is in use because the volume may be extremely loud. • KEYGUARDUse the keyguard (keypad lock) feature to help prevent accidental key presses.In the standby mode, press the Left selection key; then quickly press the *key. When the keys are locked,   appears on the display. Press the Left selection key; then quickly press the *key to unlock the keys.When keyguard is on, press the Send key to answer a call. During a call, the phone can be operated in the normal way.When the keyguard is on, calls still may be possible to the official emergency number programmed into your phone. Enter the emergency number (for example, 911), and press the Send key.
18 Copyright © 2004 Nokia4 Your phone • MAKE A CALL1In the standby mode, key in the phone number, including the area code.Scroll right or left to move the cursor. Press the Clear key to remove a number.For international calls, press the * key twice for the international prefix (the + character replaces the international access code), and key in the country code, the area code without 0, and the phone number.Calls described here as international may be made between regions of the same nation.2Press the Send key to call the number.3Press the End key to end the call (or to cancel the call attempt).Pressing the End key always ends a call, even if another application is active and displayed.You can make a call using your voice so that you do not need to key in the number. See "Voice dialing" on page 25. Use Contacts to make a call1To open the contacts directory, select Menu > Contacts, or press the Scroll key in the standby mode.2To find a contact, scroll to the desired name, or key in the first letters of the name. The search field opens automatically and matching contacts are listed. 3Press the Send key to start the call.If the contact has more than one phone number, scroll to the number and press the Send key to start the call.Call voice mailVoice mail (network service) is an answering service where callers can leave voice messages.•To call voice mail, press the 1key and the Send key in the standby mode, or press and hold the 1key.•If the phone asks for the voice mail number, key it in and press OK. Obtain this number from your service provider.
Nokia  User GuideCopyright © 2004 NokiaYour phoneTo forward calls to your voice mail, see “Call forwarding (network service)” on page 21.Each phone line may have its own voice mail number. See "Line in use (network service)" on page 60. CHANGE THE VOICE MAIL NUMBERTo change the phone number of your voice mail, select Menu > Tools > Voice mail > Options > Change number. Key in the number (obtained from your service provider), and press OK.1-touch dialingTo view the 1-touch dialing grid, select Menu > Tools > 1-touch.To assign a phone number to one of the 1-touch dialing keys (2–9), select Options > Assign. See also “Assign 1-touch dialing keys” on page 26. To call the number in the standby mode, press the corresponding 1-touch dialing key and the Send key.To turn the 1-touch dialing function on, select Menu > Settings > Call > 1-touch dialing > On. If the 1-touch dialing function is set to On, press and hold the corresponding 1-touch dialing key until the call is started.Make a conference call (network service)Conference calling allows you to make a conference call with up to six participants, depending on network limitations.1Make a call to the first participant.2To make a call to a new participant, select Options > New call.3Key in or search the memory for the phone number of the participant, and press Call. The first call is automatically put on hold.4When the new call has been answered, select Options > Conference to join the first participant in the conference call.5To end the active conference call, press the End key.To add a new person to the call, repeat step 2.To have a private conversation with one of the participants, select Options > Conference > Private. Scroll to the desired participant, and press Private. The conference call is put on hold in your phone, and the other participants can still continue talking with each other while you have a private discussion with one participant only. Once you have finished the private conversation, select Options > Conference to return to the conference call.
20 Copyright © 2004 NokiaTo drop one participant from the conference call, select Options > Conference > Drop participant; then scroll to the participant, and press Drop.The quickest way to make a new call is to dial the number, and press the Send key to start the call. The existing call is automatically put on hold. •ANSWER A CALLTo answer an incoming call, press the Send key.To end the call, press the End key.If you do not want to answer a call, press the End key.When a call comes in, select Silence to quickly mute the ringing tone.Options during a callSelect Options during a call for some of the following options: Answer, Decline, Swap, Activate loudsp. or Activate handset, End active call, End all calls, Hold or Unhold, Mute or Unmute, Conference, Transfer, Send touch tones, and Help.You might not have all of these options. Contact your service provider for more details.Loudspeaker and Handset may be displayed as options for the Right selection key and can be used as shortcuts for Activate handsfree and Deactivate handsfree, respectively.Swap is used to switch between the active call and the call on hold.Transfer is used to connect an incoming call or a call on hold with an active call and to disconnect yourself from both calls.Send touch tones is used to send DTMF tone sequences, for example, passwords or bank account numbers:1Key in the digits with the 0–9 keys.Each keystroke generates a DTMF tone, which is transmitted while the call is active. Press the *key repeatedly to produce *, p (inserts a pause of approximately 2 seconds before or between DTMF characters), and w (if you use this character, the remaining sequence is not sent until you press the Send key again during the call). Press the #key to produce #.2To send the tone, press OK.Call waiting (network service)If you have activated the call waiting service, the network will notify you of a new incoming call while you have a call in progress. 1During a call, press the Send key to answer the waiting call.The first call is put on hold.
Nokia  User GuideCopyright © 2004 NokiaYour phone2To switch between the two calls, press Swap.3To end the active call, press the End key; or to end both calls at the same time, select Options > End all calls.Call forwarding (network service)When call forwarding is activated, you can direct your incoming calls to another number, for example, to your voice mail number. For details, contact your service provider.Select Menu > Settings > Call forwarding.•Select one of the forwarding options, for example, select If busy to forward voice calls when your number is busy or when you reject incoming calls.•Select Options > Activate to turn the forwarding setting on, Cancel to turn the forwarding setting off, or Check status to check whether the forwarding is activated or not.•To cancel all active forwarding, select Options > Cancel all forwards.See also “Activity indicators” on page 12.Call restriction and call forwarding cannot be active at the same time. See "Call restriction (network service)" on page 66.  • CALL LOGSelect Menu > Log. You can use the log to monitor phone calls, text messages, data calls, and packet data connections registered by the phone. Filter the log to view just one type of event and create new contact cards based on the log information.Connections to your remote mailbox, multimedia messaging center, or browser pages are shown as data calls or packet data connections in the general communications log.Recent calls logSelect Menu > Log > Recent calls.The phone registers the phone numbers of missed, received, and dialed calls, and the date and time of your calls. The phone registers missed and received calls only if the network supports these functions and if the phone is switched on within the network service area.Options in the Missed, Received, and Dialed views are Call, Create message, Use number, Delete, Clear list, Add to Contacts, Help, and Exit.Missed calls and received callsTo view a list of the last 20 phone numbers received but not answered (network service), select Menu > Log > Recent calls > Missed calls.
22 Copyright © 2004 NokiaIf you receive indication of missed calls while in the standby mode, press Show to access the list of numbers. To call back, scroll to the number or name you want to call, and press the Send key.To view a list of the 20 numbers for calls most recently accepted (network service), select Menu > Log > Recent calls > Received calls.Dialed numbersTo view the 20 phone numbers for the most recently called or attempted, select Log > Recent calls > Dialed numbers.ERASE RECENT CALL LISTSTo clear all recent call lists, select Options > Clear recent calls in the Recent calls main view.To clear one of the call logs, open the log you want to erase and select Options > Clear list. To clear an individual event, open a log, scroll to the event, and press the Clear key. Confirm by pressing Yes.Call timersSelect Menu > Log > Call timers to view the duration of your incoming and outgoing calls.Note: The actual time invoiced for calls by your service provider may vary, depending upon network features, rounding-off for billing, and so forth.To erase call duration timers, select Options > Clear timers. For this you need the lock code. See "Security" on page 64. Note: Some timers may be reset during service or software upgrades.GPRS data counterSelect Menu > Log > GPRS counter.The GPRS data counter allows you to check the amount of data sent and received during packet data (GPRS) connections. This may be helpful if your service provider charges for GPRS connections based on the amount of data sent and received. The actual amount invoiced by your service provider may vary depending on rounding, taxes, or other factors.
Nokia  User GuideCopyright © 2004 NokiaYour phoneView the general logSelect Menu > Log and scroll right.In the general log, the sender or recipient name, phone number, name of the service provider, or access point is displayed for each communication event.Events such as a text message sent in more than one part and packet data connections, are logged as one communication event.FILTER THE GENERAL LOG1Select Options > Filter. A list of filters opens.2Scroll to a filter, and press Select.ERASE THE CONTENTS OF THE GENERAL LOGTo erase all the log contents, recent calls log, and messaging delivery reports permanently, select Options > Clear log. Select Yes to confirm.PACKET DATA COUNTER AND CONNECTION TIMERTo view how much data, measured in kilobytes, has been transferred and how long a certain GPRS connection has lasted, scroll to an incoming or outgoing event labeled GPRS and select Options > View details.Log settingsSelect Menu > Log > Options > Settings to open the list of settings.Log duration—The log events remain in the phone memory for a set number of days after which they are automatically erased to free memory. If you select No log, all the log contents, recent calls log, and messaging delivery reports are permanently deleted.Show call duration—Set to Yes or No. See "Call timers" on page 22.
24 Copyright © 2004 Nokia5 Personal information •CONTACTSTo open Contacts, press the center of the Scroll key in the standby mode, or select Menu > Contacts.In Contacts, you can store and manage contact information, such as names, phone numbers, and addresses.You can also add a personal ringing tone, voice tag, or a thumbnail image to a contact card. You can create contact groups, which allow you to send text messages or e-mail to many recipients with compatible devices at the same time.Options in Contacts are Open, Call, Create message, New contact, Open conversation, Edit, Delete, Duplicate, Add to group, Belongs to groups, Mark/Unmark, Copy to SIM direct., Go to web address, Send, Contacts info, SIM directory, Service numbers, Settings, Help, and Exit.Create and edit contact cards1Open Contacts and select Options > New contact. An empty contact card opens. 2Fill in the fields you want, and press Done. The contact card is saved in the phone memory and closed, after which you can see it in the contacts directory.To edit contact cards, see “Common actions for all applications” on page 15. Options when editing a contact card are Add thumbnail or Remove thumbnail, Add detail, Delete detail, Edit label, Help, and Exit.To delete contact cards, in the contacts directory, scroll to the contact card and select Options > Delete.To attach a small thumbnail image to a contact card, open a contact card, and select Options > Edit > Options > Add thumbnail. The thumbnail image is also shown when the contact is calling you. After you attach a thumbnail image to a contact card, select Add thumbnail to replace the image with a different thumbnail or Remove thumbnail to remove the thumbnail from the contact card.To assign default numbers and addresses to a contact card, open the contact card, and select Options > Defaults. A pop-up window opens, listing the different options.Copy between SIM card and phone memoryTo copy names and numbers from a SIM card to your phone, open Contacts, select Options > SIM directory, scroll to the names you want to copy, and select Options > Copy to Contacts.
Nokia  User GuideCopyright © 2004 NokiaPersonal informationIf you want to copy a phone, fax, or pager number from Contacts to your SIM card, select Contacts, open a contact card, scroll to the number, and select Options > Copy to SIM direct.Add a ringing tone for a contact card or groupYou can set a ringing tone for each contact card and group. When that contact or group member calls you, the phone plays the chosen ringing tone (if the caller’s telephone number is sent with the call and your phone recognizes it).1Press the Scroll key to open a contact card; or scroll right to go to groups, and select a contact group.2Select Options > Ringing tone. A list of ringing tones opens.3Scroll to the ringing tone you wish to use for the contact or group, and press Select.4To remove the ringing tone, select Default tone from the list of ringing tones.For an individual contact, the phone will always use the ringing tone that was assigned last. If you change a group ringing tone, then the ringing tone of a single contact that belongs to that group, the ringing tone of the single contact is used.Voice dialingYou can make a phone call by saying a voice tag that has been added to a contact card. Any spoken words can be a voice tag.When recording, hold the phone at a short distance away from your mouth. After the starting tone, say clearly the word, or words, you want to record as a voice tag.REQUIREMENTS FOR VOICE TAGSBefore using voice dialing, note the following:•Voice tags are not language-dependent. They are dependent on the speaker's voice.•You must say the name exactly as you said it when you recorded it.•Voice tags are sensitive to background noise. Record voice tags, and use them in a quiet environment.•Very short names are not accepted. Use long names, and avoid similar names for different numbers.Note: Using voice tags may be difficult in a noisy environment or during an emergency, so you should not rely solely upon voice dialing in all circumstances.
26 Copyright © 2004 NokiaADD A VOICE TAG TO A PHONE NUMBERVoice tags can only be added to phone numbers stored in phone memory. See "Copy between SIM card and phone memory" on page 24. 1In Contacts, scroll to the contact to which you want to add a voice tag, and press the Scroll key to open the contact card.2Scroll to the number to which you want to add the voice tag, and select Options > Add voice tag.3Press Start to record a voice tag. 4After the starting tone, clearly say the words you want to use as a voice tag.After recording, the phone plays the recorded tag, and Playing voice tag is displayed.When the voice tag has been successfully saved, Voice tag saved is displayed and a beep sounds. A symbol   can be seen next to the number in the contact card. To replay, erase, or change a voice tag, scroll to the item that has a voice tag (indicated by  ), and select Options > Voice tag > Playback, Change, or Delete.MAKE A CALL USING A VOICE TAG1In the standby mode, press and hold the Right selection key. A short tone is played, and Speak now is displayed.2When you make a call by using a voice tag, hold the phone at a short distance from your mouth, and say the voice tag clearly.The phone plays the original voice tag, displays the name and number, and dials the number of the recognized voice tag.If the phone plays the wrong voice tag or if you want to retry voice dialing, press Retry.Voice dialing should not be used when a data call or a GPRS connection is active because the voice call will interrupt the connection.Assign 1-touch dialing keys1-touch dialing is a quick way to call frequently used numbers. You can assign 1-touch dialing keys to eight phone numbers. Number 1 is reserved for voice mail. 1Open the contact card for which you want a 1-touch dialing key, and scroll to the phone number you want to add to 1-touch dialing.2Select Options > Assign 1-touch no..The 1-touch dialing grid opens, showing you the numbers from 2–9.3Scroll to a number and press Assign. When you return to the contact information view, the 1-touch dialing icon is displayed next to the number.4To call the contact by 1-touch dialing in the standby mode, press the 1-touch dialing key and Send key, or press and hold the 1-touch dialing key.
Nokia  User GuideCopyright © 2004 NokiaPersonal informationView subscribed contactsSelect Menu > Contacts, and scroll to the second tab to open the subscribed contacts list. This list allows you to view presence data, including availability and IM status, for all subscribed contacts. See also “Presence (network service)” on page 27 and “Instant messaging (IM) (network service)” on page 88.Options in the subscribed contacts view are Open, Call, Create message, Open conversation, Unsubscribe, Subscribe new, Mark/Unmark, My presence, Help, and Exit. If you are not logged in to the presence service, you will see only a few of these options.Manage contact groupsSelect Menu > Contacts, and scroll to the third tab to open the contact groups list.Options in the groups list view are Open, New group, Delete, Rename, Ringing tone, Contacts info, Settings, Help, and Exit.CREATE CONTACT GROUPS1In the contacts directory, scroll to the groups tab.2Select Options > New group.3Write a name for the group, or use the default name Group 1, and press OK.ADD MEMBERS TO A GROUP1In the contacts directory, scroll to the contact you want to add to a group, and select Options > Add to group.A list of available groups opens.2Select a group, and press the Scroll key to add the contact. • PRESENCE (NETWORK SERVICE)Select Menu > Presence.Options in Presence are Open, My availability, Viewers, Update presence, Login or Logout, Settings, Help, and Exit.Use the presence service to inform others when, where, and how you want to be contacted. Presence allows you to view and create a dynamic profile and share information or control services. Presence information is visible to other users of the service and can show where you are and what you are doing, as well as let others know whether you are available and whether you prefer for people to call or send messages.Before you can use the presence service, you must choose a service provider and save the settings of that service. You may receive the settings in a special text message, called a smart message, from the service provider that offers the presence service. See "Smart messages" on page 49. For more information, contact your service provider.Select Options > Login or Logout to log in and out of the presence service.
28 Copyright © 2004 NokiaThe presence application on your phone allows you to change your own published information and determine who is authorized to see your presence. To view the presence information of others, you must use the Contacts application. See "View subscribed contacts" on page 27. Change your availabilitySelect Options > My availability and one of the following:Available—You are available for people to call or send you messages, for example, your phone is set to Normal profile. See "Profiles" on page 73. Busy—You may be available for people to call or send you messages, for example, your phone is in Meeting profile.Not available—You are not available for people to call or send you messages, for example, your phone is in Silent profile.Change your presence informationYou can set up public, private, and blocked presence information, and define who can view your information.PUBLIC PRESENCESelect Menu > Presence > Public pres. to change your public presence information. This information is available to anyone you have not blocked. Select Options and one of the following:My availability—Select Available, Busy, or Not available.Viewers—Open the Current viewers list to see the names, phone numbers, or user IDs of the viewers whom you do not allow to view your private presence messages, but who are currently viewing your public presence. You can scroll to a viewer, press Options, and select from the following options:•Add to private list—Allow the viewer to also see your private presence.•Block—Prevent the viewer from seeing your presence information.•Add to contacts—Add the viewer to your contacts directory.•Refresh lists—Update the viewer lists. This option is only available when you are not logged in to the presence service.Login or Logout—Connect to or disconnect from the presence service.Update presence—Update your presence information to the presence service.Settings—Manage the publishing of your presence information.
Nokia  User GuideCopyright © 2004 NokiaPersonal informationPRIVATE PRESENCESelect Menu > Presence > Private pres. to change your private presence information. This information is only available to those whom you have authorized to view your private information. Select Options and one of the following:My availability—Select Available, Busy, or Not available.My presence msg.—Write a text message of up to 40 characters to describe your current availability. My presence logo—Add a logo to your availability information. Logo files are stored in Gallery. See "Gallery" on page 40. Viewers—Open your private presence viewers list to see the names, phone numbers, or user IDs of the viewers whom you allow to view your private presence messages. You can scroll to a viewer, press Options, and select from the following options:•Add new—Add a new viewer manually or from your contacts directory. You can only select a contact who has a user ID in the contact card.•Block—Prevent the viewer from seeing your presence information.•Add to contacts—Add the viewer to your contacts directory.•Remove from list—Remove the viewer from the private list. This option is available also when you mark several viewers in the list. If the list is empty, the option is not available. You can also scroll to a viewer and press the Clear key to prevent that viewer from seeing your private presence messages. •View details—Show the user ID information of the viewer.•Refresh lists—Update the viewer lists. This option is only available when you are not logged in to the presence service.Update presence—Update your presence information to the presence service.Login or Logout—Connect to or disconnect from the presence service.Settings—Manage the publishing of your presence.BLOCKED PRESENCESelect Menu > Presence > Blocked pres. to change your blocked presence information. Blocked viewers will see a screen containing no personal details. Select Options and one of the following:Viewers—Open your blocked viewers list to see the names, phone numbers, or user IDs of the viewers whom you have blocked from seeing your public or private presence information. You can scroll to a viewer, press Options, and select from the following options:•Unblock—Remove the viewer from the blocked list. You can also unblock a viewer by scrolling to the viewer and pressing the Clear key.•Add to private list—Allow the viewer to also see your private presence.
30 Copyright © 2004 Nokia•Add new—Add a new blocked viewer manually or from your contacts directory. You can only select a contact who has a user ID in the contact card.•Add to contacts—Add the viewer to your contacts directory.•View details—Show the user ID information of the viewer.•Refresh lists—Connect to the presence service to update the viewer lists. This option is only available when you are not logged in to the presence service.Update presence—Update your presence information to the presence service.Login or Logout—Connect to or disconnect from the presence service.Settings—Manage the publishing of your presence.Update your informationSelect Menu > Presence > Options > Update presence.This option is only available when you are logged in to the presence service, have changed your information in the Private Presence or Public Presence view, and have not updated that presence information yet.Presence settingsSelect Options > Settings from the Presence main menu, and select from the following: Show presence to—Select from the following:•Private & public—Both public and private presence is published.•Private viewers—Only private viewers can see your presence information.•Public viewers—Both public and private viewers see your public presence information.•No one—Your presence information is not published.Sync. with Profiles—Defines whether your published presence information is linked to your phone profile settings. When you choose an option other than Off, be sure to define your profile presence information as well (see “Create and customize profiles” on page 73). Select from the following:•Off—Your presence information is not changed, even if you change your phone profile setting.•On—Both Availability and Private message are changed when you change your phone profile setting.•Availability only—Private message is not changed when you change your profile.•Private msg. only—Availability is not changed when you change your profile setting.Server settings—Opens the Server settings menu in the IM feature. Select Presence login type from this menu to designate when you want to log in to the presence service. See “IM settings” on page 89 for further information on the login types.
Nokia  User GuideCopyright © 2004 NokiaPersonal information • POSITIONING (NETWORK SERVICE)Select Menu > Tools > Positioning.Positioning allows the network to detect the position of your phone. By enabling or disabling Positioning, you choose when your position information is provided to the network.To enable positioning in your phone, select Settings > Positioning > On. If you need to enter a lock code, see “Security” on page 64.When you receive a position request, a message is displayed showing the service that is making the request. Press Accept to allow your position information to be sent, or press Reject to deny the request.Position request messages are logged in the Recv. requests list. To view them, select Menu > Positioning > Recv. requests. The icon beside each request indicates whether the request is new, rejected, or accepted. If you want to see details of a request, scroll to the request, and press the center of the Scroll key. If you want to clear the Recv. requests list, select Options > Clear list. •CALENDARIn Calendar, you can keep track of your appointments, meetings, birthdays, anniversaries, and other events. You can also set a calendar alarm to remind you of upcoming events.Create entries1Select Menu > Calendar > Options > New entry and one of the following options: Meeting—Creates an appointment that has a specific date and time. Memo—Creates a general entry for a day.Anniversary—Creates a reminder for birthdays or special dates. Anniversary entries are repeated every year.2Fill in the fields, and scroll to move between fields.Subject or Occasion—Write a description of the event. Location—Indicates the place of a meeting (optional).Start time, End time, Start date, and End date.Alarm—Select On to display the Alarm time and Alarm date fields.
32 Copyright © 2004 NokiaRepeat—Press the center of the Scroll key to change the entry to be repeating. Shown with   in the day view.Repeat until—Set an ending date for the repeated entry, for example, the ending date of a weekly course you are taking. This option is shown only if you have selected to repeat the event.Synchronization—•Private—After synchronization the calendar entry can be seen only by you and it will not be shown to others, even if they have online access to view the calendar. •Public—The calendar entry is shown to others who have access to view your calendar online. •None—The calendar entry will not be copied when you synchronize your calendar. 3To save the entry, press Done.When editing or deleting a repeated entry, choose how you want the changes to take effect:All occurrences—All repeated entries are changed.This entry only—Only the current entry will be changed.Calendar viewsPress the #key in the month, week, or day views to automatically highlight today’s date.To key in a calendar entry, press any number key (1–0) in any calendar view. A meeting entry is opened, and the characters you keyed in are added to the Subject field.To go to a certain date, select Options > Go to date. Write the date, and press OK.Icons in the day view are   memo and   anniversary.Synchronization icons in the week and month views are red for private synchronization, blue for public synchronization, pink for no synchronization, and black for more than one synchronization entry in a day.Calendar settingsSelect Options > Settings and one of the following options:Calendar alarm tone—Select a personalized alarm tone, or no tone at all.Default view—Select the view that is shown first when you open Calendar.Week starts on—Change the starting day of the week. If you change the settings so that the week starts on a day other than Sunday, the week numbers will not be shown.Week view title—Change the title of the week view to be the week number or the week dates.
Nokia  User GuideCopyright © 2004 NokiaPersonal informationClear calendar memoryTo remove more than one event at a time, go to the month view, and select Options > Delete entry and one of the following:Before date—Delete all calendar entries that take place before a certain date. Enter the date before which all calendar entries will be deleted.All entries—Delete all calendar entries. •TO-DOIn the To-do list you can keep a list of tasks that you need to do. The to-do list uses shared memory. See "Shared memory" on page 3. 1Select Menu > To-do.2To start entering a to-do note, press any number key (1–0).The editor opens, and the cursor blinks after the letters you have entered in the Subject field.3Finish entering the task in the Subject field.4Scroll to the Due date field, and key in a date.5To set a priority for the task, scroll to the Priority field, and select High, Normal, or Low.6To save the to-do note, press Done.If you remove all characters from the Subject field and press Done, the note will be deleted, even if you are editing a previously saved note.To open a to-do note, scroll to it, and press the Scroll key.To delete a to-do note, scroll to it, and select Options > Delete; or press the Clear key, and select Yes to confirm.To mark a to-do note as completed, scroll to it, and select Options > Mark as done. To restore a to-do note, select Options > Mark as not done. •COPY CONTENT FROM COMPATIBLE NOKIA PHONESYou can move calendar, contacts, and to-do data from compatible Nokia phones to your phone using your PC and the PC Suite content copier application. Instructions for using the application can be found in the help function of PC Suite on the CD-ROM.
34 Copyright © 2004 Nokia6Multimedia •CAMERAYou can use the camera to take pictures and record videos while on the move. The images are automatically saved in Gallery, where you can rename them and organize them in folders. You can also send images and video recordings in a multimedia message, as an e-mail attachment, or by Bluetooth connection. The camera produces JPEG images, and video clips are recorded in the 3GPP file format with the .3gp file extension.To be added: PhotoRing, PhotoMail, Still Image Editor, Office Viewers, Access BrowserTake pictures1Select Camera in the standby mode, or select Menu > Camera, and scroll left to make sure you are on the Image tab. The camera opens, and you can see the viewfinder and the cropping lines, which show you the image area to be captured. You can also see the image counter, which shows you how many images, depending on the selected picture quality, fit in the memory of your phone or memory card, if you use one.Options before taking a picture are Capture, New, Activate night mode or Deact. night mode, Self-timer, Go to Gallery, Settings, Help, and Exit.2Scroll up to zoom in on your subject before taking the picture; scroll down to zoom out again. The zoom indicator to the right of the display shows the zoom level. The resolution of a zoomed picture is lower than that of a non-zoomed picture, but the image remains the same size. You may notice the difference in image quality if viewed on a PC.3To take a picture, press the Scroll key.Do not move the phone before the camera application starts to save the image. The image is saved automatically in Gallery. See "Gallery" on page 40. To take a photo immediately after another, select Options > Settings > Image > Show captured image, then select No. The photos do not remain on the display after being taken, are saved in the Gallery, and the camera is ready for use again. If camera images look smudgy, check that the camera lens protection window is clean. See "Care and maintenance" on page 116. The camera goes into battery saving mode if there have been no key presses within a minute. To continue taking pictures, press the Scroll key.
Nokia  User GuideCopyright © 2004 NokiaMultimediaOPTIONS AFTER CAPTURING AN IMAGEOptions after a picture has been taken are New, Delete, Send, Set as wallpaper, Rename image, Go to Gallery, Settings, Help, and Exit.If you do not want to save the image, select Options > Delete.To return to the viewfinder to take a new picture, press the Scroll key.You can insert an image into a contact card. See "Create and edit contact cards" on page 24. SELF-TIMERTo include yourself in the picture, use the self-timer to delay the taking of a picture.  Select Options > Self-timer > 10 seconds, 20 seconds, or 30 seconds > Activate. The camera takes the picture after the selected delay has elapsed.IMAGES AND MEMORY CONSUMPTIONYour phone has approximately 8 MB of free memory for images, contact information, calendar, messages, and so on. See "Shared memory" on page 3. Images taken using the high-quality setting and those taken in night mode take up the most memory.By using a memory card with your phone you can increase the number of images you can store. To see how much memory is available on your phone and memory card, see “View memory consumption” on page 70.The following table shows approximately how many images would fit in 1 MB of memory, depending on image type and quality:Record videos1Press Camera in the standby mode, or select Menu > Camera, and scroll right to the Video tab.Options before recording a video are Record, New, Activate night mode or Deact. night mode, Mute, Go to Gallery, Settings, Help, and Exit.2Press the Scroll key to start recording.To pause recording at any time, press Pause. To resume, press Continue.Scroll up to zoom in on your subject before or during recording; scroll down to zoom out.Image qualityImage type Basic Normal HighStandard 55 22 15Night 50 25 18
36 Copyright © 2004 Nokia3To stop recording, press Stop.The video clip is saved to either phone memory or the memory card, depending on the Memory in use setting. See "Camera and video settings" on page 36. To immediately play the video clip you just recorded, select Options > Play.To play previously saved video clips, go to Gallery. See "Gallery" on page 40.  Options after you have recorded a video are New, Play, Delete, Send, Rename, Go to Gallery, Settings, Help, and Exit.Camera and video settingsSelect Menu > Camera > Options > Settings to adjust the settings for still image captures and video recording. Select the following options:Image—Adjust the settings for still images:•Image quality—High, Normal, and Basic. The better the image quality, the more memory the image consumes. See "Images and memory consumption" on page 35. •Show captured image—To take a photo immediately after another, select No. The photos do not remain on the display after being taken, are saved in the Gallery,  and the camera is ready for use again. •Default image name—Allows you to set a name for saved images. By default, images are named Image(001), Image(002), Image(003), and so forth when they are saved.•Memory in use—Select whether you want to save your images in phone memory or on the memory card, if you use one.Video—Adjust the settings for recording videos:•Length—Available recording time is displayed above the top right corner of the viewfinder. Select one of the following video length options:Maximum—Recorded video length is restricted by available memory. Recordings can last up to 10 minutes, depending on available memory. Short—Restricts video length to optimize it for MMS sending.•Video resolution—Select 128x96 or 176x144.•Default video name—Allows you to set a name for saved videos. By default, videos are named Video(001), Video(002), Video(003), and so forth when they are saved.•Memory in use—Select whether you want to save your videos in phone memory or on the memory card, if you use one.
Nokia  User GuideCopyright © 2004 NokiaMultimedia • VIEW IMAGESPictures taken with the camera are stored as images in Gallery. See "Gallery" on page 40. Select Menu > Gallery > Images, and select an image. Press the Scroll key to display the image. In the images thumbnail view:1Scroll right or left to move between the phone and memory card.2To browse the list of images, scroll up and down.3Press the Scroll key to open an image. When the image is open, you can see the name of the image.When viewing an image, scroll right or left to go to the next or previous image in the current folder.Options when viewing an image are Send, Set as wallpaper, Rotate, Zoom in, Zoom out, Full screen, Delete, Rename, View details, Add to ’Go to’, Help, and Exit.You can view animated GIF files in the same way as other images.Zoom on a saved image1Select Options > Zoom in or Zoom out.You can see the zooming ratio at the top of the display. See "Keyboard shortcuts" on page 37. 2Press Back to return to the initial view. The zooming ratio is not stored permanently.If you zoom in on GIF animations while they are playing, the animation will freeze until normal zoom is resumed, when play will continue.FULL SCREENWhen you select Options > Full screen, the panes around the image are removed so that you can see more of the image. Press the Right selection key to return to the initial view. MOVE THE FOCUSWhen you are zooming an image, use the Scroll key to move the focus to the left, right, up, or down, so that you can take a closer look at one part of the image, for example, its upper right corner. Keyboard shortcuts1 key—Rotate image 90 degrees counterclockwise.3 key—Rotate image 90 degrees clockwise.5 key—Zoom in.
38 Copyright © 2004 Nokia0 key—Zoom out.* key—Change between full screen and normal view.Scroll key—Scroll up, down, left, right.When you rotate an image, the rotation status is not stored permanently. •PLAYERSelect Menu > RealPlayer.With RealPlayer, you can play local media files stored in the phone memory or memory card, or stream media files over the air from a streaming link. The streaming link can be activated during a browsing session or stored in the phone memory or memory card.Media files are video, music, or audio clips. Files with the extensions .3gp, .amr, .mp4, .ra, .rv, .rm, and .ram are supported by RealPlayer.RealPlayer does not support all file formats or all the variations of a file format. For example, RealPlayer will attempt to open all .mp4 files. However, some .mp4 files may include content that is not compliant with 3GPP standards and, therefore, is not supported by this phone. In this case, the operation might fail and result in partial playback or in an error message.Play media filesOptions in RealPlayer are Play, Pause, Continue, Stop, Mute, Unmute, Clip details, Settings, Help, and Exit. The available options may vary.To play a media file, select Menu > RealPlayer > Options > Open and one of the following:Most recent clips—Play one of the last six files played in RealPlayer.Saved clip—Scroll to a file in phone memory or on memory card, and press the Scroll key to play the file.Mem. card sound clips—Create a track list from all sound files on the memory card. When you create a track list this way, the first song in the list automatically begins playing.STREAM CONTENT OVER THE AIR•Select a streaming link saved in Gallery. Before your live content begins streaming, your phone will connect to the site and load the file.•Open the link to a file in the browser.To stream live content, you must first configure your default access point. See "Access points" on page 60. For the default access point, some service providers will require you to use an access point defined in your phone. Other service providers allow you to use a WAP access point. Contact your service provider for more information.
Nokia  User GuideCopyright © 2004 NokiaMultimediaIn RealPlayer, you can only open an rtsp:// URL address. You cannot open an http:// URL address. However, RealPlayer will recognize an http link to a .ram file since a .ram file is a text file containing an rtsp link.SHORTCUTS DURING PLAYWhen a media file is playing, use the Scroll key to seek (move quickly through the media file), and to mute the sound, as follows:Scroll up and hold to seek forward, or scroll down and hold to seek backward through the media file.Scroll left and hold until the   indicator is displayed to mute the sound.Scroll right and hold until you see the   indicator to turn on the sound.Change settingsSelect Options > Settings > Audio, Video, or Connection. • MOVIE DIRECTORSelect Menu > Movie.Use Movie director to create edited video clips that may contain video, sound, and text. Editing is carried out automatically according to the style that you select. The style determines the transitions and visual effects that are used in the video clip.Open Movie director, and scroll right or left to move between the   tab and the  tab.In the   tab, you can select the following options:Quick muvee—Create video clips suitable to be sent by multimedia message. You can select several video clips and the style you want to apply to them. The duration of the Quick muvee video clip is typically less than 10 seconds.Custom muvee—Create custom video clips by applying a style, music, and a message. You can set the duration and preview the video clip before saving. To create a custom movie, see “Create a custom movie” on page 40. Style downlds.—Download and install new styles.Settings—Select the setting you want to change:•Memory in use—Select Phone memory or Memory card.•Resolution—Select High, Low or Automatic.•Default muvee name—Enter a default name for your video clips.The   tab contains a list of video clips that you can Play, Send, Rename, and Delete.
40 Copyright © 2004 NokiaCreate a custom movie1Select Menu > Movie > Custom muvee. Define the following items:•Video—Select the source file or files you want to use. Select Mark/Unmark, Play, or Capture.•Style—Select a style from the list. Styles determine the effects and message caption. Each style is associated with default music and message text. •Music—Select a music clip from the list.•Message—Add a caption to the beginning and end of the video clip. You can enter a message or select one from the template. You can edit the default message text.2Select Options > Create muvee.3Select one of the following durations for the video clip:•Multimedia message to create a video size suitable to be sent by MMS•Same as music to create a video of the same duration as the selected music clip•User defined to enter the video duration manually.After the video preview is prepared, the Preview muvee view opens, where you can Play, Save the new video clip, and Recreate (to make a new variation of the video clip). • GALLERYSelect Menu > Gallery.Options in Gallery are Open (folder or item), Send, Delete, Create new, Move to folder, Copy to folder, New folder, Mark/Unmark, Edit, Rename, Gallery downloads, Image uploader, View details, Add to ’Go to’, Settings, Help, and Exit.Use Gallery to store and organize your images, sound clips, video clips, and streaming links. Open Gallery to see a list of the folders in the phone memory. Scroll right to see the folders on the memory card, if a memory card is installed.Scroll to Images, Sound clips, Video clips, or another folder that you have created, and press the Scroll key to open it.The open folder displays the following information:•An icon depicting the type of each file in the folder, or in the case of an image, a small thumbnail picture giving a preview of the image•The name of the file•The date and time a file was saved or the size of the file
Nokia  User GuideCopyright © 2004 NokiaMultimedia•Subfolders, if presentYou can browse, open, and create folders; and you can mark, copy, and move items to folders. See "Common actions for all applications" on page 15.  The options vary according to the content of the list of media files.Open filesSelect any file and press the Scroll key to open it. Each file will open in its corresponding application as follows:•Images files open in the image viewer. See "View images" on page 37. •Sound clips open and play in the music player.•Video clips and streaming links open and play in RealPlayer. See "Player" on page 38. •Subfolders open to display contents.Default images foldersSelect Gallery > Images. The Images folder is the default location where your phone saves images taken with the camera. Within the Images folder, there are additional default folders called Picture msgs., Presence logos, and Wallapers.PICTURE MESSAGES FOLDERSelect Gallery > Images > Picture msgs..Use this folder to store pictures sent to you in picture messages. To save a picture that you have received in a picture message, select Messaging > Inbox, open the message, and select Options > Save picture.Options in the picture messages folder are Open, Send, Delete, Mark/Unmark, Rename, View details, Help, and Exit.PRESENCE LOGOS FOLDERSelect Gallery > Images > Presence logos.Use this folder to store logos for Presence. See "Presence (network service)" on page 27. WALLPAPERS FOLDERSelect Gallery > Images > Wallpapers.Use this folder to store pictures that you want to use as background images.
42 Copyright © 2004 NokiaDownload filesTo download files into Gallery using the browser, select Options > Gallery downloads > Graphic downloads, Video downloads, or Tone downloads. The browser opens and you can choose a bookmark for the site from which to download. See "Bookmarks" on page 99. To download files, you must configure your default access point. See "Access points" on page 60. Once items have been downloaded, the browser closes, and the phone returns to Gallery.Upload images to an image server (network service)You can send your pictures to an image server to allow others to share your pictures online. Before you can upload images, you must set up the image server; you can get the specific settings from your service provider:1Select Settings > Image servers, and press the Left selection key. 2Fill in the details for each field. (See “Access points” on page 60.)3Press the Right selection key.To upload images:1Select Options > Image uploader.2To begin an upload, mark the images that you want to upload, and select Upload.3Enter a name for the folder on the image server in which the images will be stored, and press the Left selection key.Track lists for audio filesYou can create a track list to play audio files on your phone. Select Menu > Gallery > Options > Create new > Track list, and follow the screen prompts to select sound clips for the track list. To add multiple tracks at one time, press the Edit key and the Scroll key simultaneously to place a checkmark beside each track you want to add, and select Options > Select marked items.To play a track list, select Menu > Gallery and locate the track list in phone memory or on the memory card. Scroll to the track list, and press the Scroll key to begin playing it.To modify a track list, locate the track list in Gallery, and select Options > Edit track list > Options > Add sound clip.To delete clips, open the track list, scroll to a clip, and select Options > Delete.Options when the track list is playing are Pause, Edit track list, Clip details, Settings, Help, and Exit.
Nokia  User GuideCopyright © 2004 NokiaMessaging7MessagingNote: This function can only be used if it is supported by your network operator or service provider. Only devices that offer compatible picture message, multimedia message, or e-mail features can receive and display these messages. Devices that do not have multimedia features may receive details of a link to a web page.Select Menu > Messaging.In Messaging you can create, send, receive, view, edit, and organize:•Text messages•Multimedia messages (MMS)•E-mail messages•Smart messagesWhen you open Messaging, you can see the New message selection and a list of default folders:Inbox—Contains received messages except e-mail and cell broadcast messages. E-mail messages are stored in Mailbox. You can read cell broadcast messages by selecting Options > Cell broadcast.My folders—For organizing your messages into folders. Mailbox—When you open this folder, you can either connect to your remote mailbox to retrieve your new e-mail messages, or you can view your previously retrieved e-mail messages without logging in to the e-mail server. After you have defined settings for a new mailbox, the name given to that mailbox will replace Mailbox in the main view. See "E-mail" on page 55. Drafts—Stores drafts of messages that have not been sent.Sent—Stores the last 20 messages that have been sent. To change the number of messages to be saved, see “Other settings” on page 57.Messages or data that have been sent by a Bluetooth connection are not saved in the Draft or Sent folders.Outbox—Temporary storage place for messages waiting to be sent.
44 Copyright © 2004 NokiaMessaging options are Create message, Connect (shown if you have defined settings for the mailbox) or Disconnect (shown if there is an active connection to the mailbox), SIM messages, Cell broadcast, Service command, Settings, Help, and Exit. • WRITE TEXTYou can key in text in two different ways, using the method traditionally used in mobile phones or another method called predictive text input. Traditional text inputThe indicator   is shown on the top right of the display when you are writing text using traditional text input.Press a number key (1–9), repeatedly until the desired character appears. Note that there are more characters available for a number key than are printed on the key.Icons:   and   indicate the selected case.   means that the first letter of the next word is written in upper case, and all other letters will automatically be written in lower case.   indicates number mode.To insert a number, press and hold the corresponding number key.To switch between letter and number mode, press and hold the #key.If the next letter is located on the same key as the present one, wait until the cursor appears (or scroll right to end the time-out period), and key in the letter.If you make a mistake, press the Clear key to remove a character. Press and hold the Clear key to clear more than one character.Reports (network service)—You can request that the network send you a delivery report of the text messages, smart messages, and multimedia messages you have sent. To turn on delivery report reception, go to the Messaging main menu, select Options > Settings > Text message or Multimedia message, and select Receive report > Yes.It might not be possible to receive a delivery report of a multimedia message that has been sent to an e-mail address.Note: When sending messages, your device may display the words Message Sent. This is an indication that the message has been sent by your device to the message center number programmed into your device. This is not an indication that the message has been received at the intended destination. For more details about messaging services, check with your service provider.Before you create a multimedia message, write an e-mail, or connect to your remote mailbox, you must have the correct connection settings in place. See "Write and send messages" on page 47. See "Settings needed for multimedia messaging" on page 48.
Nokia  User GuideCopyright © 2004 NokiaMessagingThe most common punctuation marks are available under the 1key. Press the 1key repeatedly to reach the desired punctuation mark. You can also press the *key to open a list of special characters. Scroll through the list, and press Select to select a character.To insert a space, press the 0key. To move the cursor to the next line, press the 0key three times.To switch between upper and lower case, press the #key. Predictive text inputTo activate predictive text input, press the Edit key and select Predictive text on, or press the #key twice quickly when writing text. This will activate predictive text input for all editors in the phone. The   indicator is shown at the top of the display.1Write the desired word by pressing the keys 2–9. Press each key only once for one letter. The word changes after every key press.For example, to write Nokia when the English dictionary is selected, press the following keys:6 key for N6 key for o5 key for k4 key for i2 key for aThe word suggestion changes after each key press.2When you have finished the word, check that it is correct.If the word is correct, confirm it by scrolling right or by pressing the 0key to insert a space. The underlining disappears and you can begin to write a new word.If the word is not correct, you have the following options:•Press the *key repeatedly to view the matching words the dictionary has found one by one.•Press the Edit key, and select Predictive text > Matches to view a list of matching words. Scroll to the word you want to use, and press the Scroll key to select it.If the ? character is shown after the word, the word you intended to write is not in the dictionary. To add a word to the dictionary, press Spell, key in the word (up to 32 letters) using traditional text input, and press OK. The word is added to the dictionary. When the dictionary becomes full, a new word replaces the oldest added word.To remove the ? and clear characters one by one from the word, press the Clear key.
46 Copyright © 2004 NokiaTIPS ON PREDICTIVE TEXT INPUTErase a character—Press the Clear key. Press and hold the Clear key to clear more than one character.Change between the different character cases—Press the #key to change between the character cases Abc (), abc (), and ABC (). Note that if you press the #key twice quickly the predictive text input is turned off.Insert a number in letter mode—Press and hold the desired number key, or press the Edit key, and select number mode. Key in the numbers you want, and press OK.Insert symbols and punctuation marks—•The most common symbols and punctuation marks are available under the 1key. Press the 1key repeatedly to find the desired entry.•Press and hold the *key to open a list of special characters. Scroll through the list, and press Select to select a character; or press the Edit key, and select Insert symbol.The predictive text input will try to guess which commonly used punctuation mark (.,?!‘) is needed. The order and availability of the punctuation marks depend on the language of the dictionary.Choose from multiple entries—Press the *key repeatedly to view the matching words the dictionary has found one by one.Choose predictive text options—When a word has been entered with predictive text on, press the Edit key, select Predictive text, and select one of the following options:•Matches—View a list of words that correspond to your key presses. Scroll to the desired word, and press the Scroll key.•Insert word—Add a word (up to 32 letters) to the dictionary by using traditional text input. When the dictionary becomes full, a new word replaces the oldest added word.•Edit word—Open a view where you can edit the word. This option is available only if the word is active (underlined).•Off—Turn off predictive text input for all editors in the phone.WRITE COMPOUND WORDSWrite the first half of a compound word, and confirm it by scrolling right. Write the last part of the compound word, and press the 0key to add a space to complete the compound word.Copy and paste textIf you want to copy text to the clipboard, the following is the easiest method:1To select letters and words, press and hold the Edit key.At the same time, scroll right or left. As the selection moves, text is highlighted.
Nokia  User GuideCopyright © 2004 NokiaMessagingTo select lines of text, press and hold the Edit key. At the same time scroll down or up. 2To end the selection, release the Scroll key while holding the Edit key.3To copy the text to the clipboard while still holding the Edit key, press Copy; or release the Edit key, and press it once to open a list of editing commands, for example, Copy or Cut.If you want to remove the selected text from the document, press the Clear key.4To paste the text into a document, press and hold the Edit key, and press Paste; or press the Edit key once, and select Paste. • WRITE AND SEND MESSAGESBefore you can create a multimedia message, write an e-mail message, or connect to your remote mailbox, you must have the correct connection settings in place. See “Settings needed for multimedia messaging” on page 48.Options in the text message editor are Send, Add recipient, Insert, Delete, Check names, Message details, Sending options, Help, and Exit.1Select New message and one of the following options:Text message—Create and send a text message.To send a picture message, select Options > Insert > Picture. Each picture message is made up of several text messages. Therefore, sending one picture message may cost more than sending one text message.Multimedia message—Create and send a multimedia message (MMS).Copyright protections may prevent some images, ringtones, and other content from being copied, modified, transferred, or forwarded.E-mail—Create and send an e-mail. If you have not set up your e-mail account, you will be prompted to do so.2Press the Scroll key to select recipients from the contacts directory, or write the phone number or e-mail address of the recipient in the To field if you are sending an MMS or e-mail to the recipient. Press the #key to add a semicolon (;) to separate each recipient. 3Scroll to the message field.4Write the message.Your device supports the sending of text messages beyond the normal 160-character limit. If your message exceeds 160 characters, it will be sent as a series of two or more messages. In the navigation bar, you can see the message length indicator counting backwards from 160. For example, 10 (2) means that you can still add 10
48 Copyright © 2004 Nokiacharacters for the text to be sent as two messages. Using special (Unicode) characters such as ë, â, á, ì will take up more space.To add a media object to a multimedia message, select Options > Insert new > Image, Sound clip, Video clip, or Slide. Select the item you wish to add. 5To send the message, select Options > Send, or press the Send key.Settings needed for multimedia messagingYou may receive the settings as a smart message from your network operator or service provider. See "Smart messages" on page 49.  For availability of and subscription to data services, contact your network operator or service provider.Select Messaging > Options > Settings > Multimedia message > Access point in use and select the access point you created. See "Multimedia messages" on page 54. Settings needed for e-mailBefore you can send, receive, retrieve, reply to, and forward e-mail to a separate e-mail account, you must:•Configure an Internet access point (IAP). See "Connection" on page 60. •Define your e-mail settings. See "E-mail" on page 55. Follow the instructions given by your remote mailbox and Internet service provider. • VIEW A MULTIMEDIA PRESENTATIONWhen you receive a multimedia message that includes a presentation, select Play presentation. The presentation opens and starts. A multimedia message containing presentation content can still be viewed as a standard multimedia message.Objects within the presentation may not start automatically. If, for example, a video does not play when the presentation starts, move to the video clip object, and press the Scroll key. All objects can be selected individually and opened. • INBOX—RECEIVE MESSAGESOptions in Inbox are Open, Create message, Reply, Delete, Message details, Move to folder, Mark/Unmark, Help, and Exit.When there are unread messages in Inbox, the icon changes to  .In Inbox, the message icons indicate the kind of message: An unread text messageAn unread smart message
Nokia  User GuideCopyright © 2004 NokiaMessagingView multimedia objectsOptions in Objects are Open, Save, Send, Help, and Exit.To see the available media objects in the multimedia message, open the message, and select Options > Objects. In Objects you can view files that have been included in the multimedia message. You can choose to save the file in your phone or send it, for example, by Bluetooth connection to another compatible device.Important: Multimedia message objects may contain viruses or be harmful to your device or PC. Do not open any attachment if you are not sure of the trustworthiness of the sender.See "Certif. management" on page 65. Smart messagesYour phone can receive many kinds of smart messages; text messages that contain data (also called over-the-air (OTA) messages). To open a received smart message, open Inbox, scroll to the smart message ( ), and press the Scroll key.Picture message—Saves the picture in the Picture messages folder in Gallery for later use; select Options > Save picture. If you receive a business card file that has a picture attached, the picture will be saved to Contacts as well.Business card—Saves the contact information; select Options > Save business card. If certificates or sound files are attached to business cards, they will not be saved.Ringing tone—Saves the ringing tone to Gallery; select Options > Save.Operator logo—Saves the logo; select Options > Save. The operator logo can now be seen in the standby mode instead of the network operator’s own identification.Calendar entry—Saves the entry to Calendar; select Options > Save to Calendar.Web message—Saves the bookmark; select Options > Save to bookmarks. The bookmark is added to the Bookmarks list in browser services.If a message contains both browser access point settings and bookmarks, to save the data, select Options > Save all; or to view the bookmark and access point information separately, select Options > View details. If you do not want to save all data, select a setting or bookmark, open the details, and select Options > Save to Settings or Save to bookmarks, depending on what you are viewing.An unread multimedia messageAn unread service messageData received by Bluetooth connectionAn unknown message type
50 Copyright © 2004 NokiaE-mail notification—Tells you how many new e-mails you have in your remote mailbox. An extended notification may list more detailed information such as subject, sender, attachments, and so on.Wallet—Receives payment cards, loyalty cards, access cards, address cards, RFIDs, and tickets.In addition, you can receive a text message service number; voice mail number; profile settings for remote synchronization; access point settings for the browser, multimedia messaging, or e-mail; presence and IM settings; access point login script settings; or e-mail settings. To save the settings, select Options > Save to SMS sett., Save to Voice mail, Save to Settings, or Save to e-mail sett.Service messages (network service)Service messages can be, for example, notifications of news headlines, and they may contain a text message or address of a browser service. For availability and subscription, contact your service provider. • MY FOLDERS In My folders you can organize your messages into folders, create new folders, and rename and delete folders.You can use Templates to create text templates for messages that you send often. To create a new template, select Options > New template. • REMOTE MAILBOX (NETWORK SERVICE)When you open this folder, you can connect to your remote mailbox to do the following:•Retrieve new e-mail headings or messages.•View your previously retrieved e-mail headings or messages without logging in to the e-mail server.If you select New message > E-mail in Messaging, and you have not set up your e-mail account, you will be prompted to do so. See "Write and send messages" on page 47. When you create a new mailbox, the name you give to the mailbox automatically replaces Mailbox in Messaging. You can have up to six mailboxes.Open the mailboxWhen you open the mailbox, you can choose whether you want to view the previously retrieved e-mail messages and e-mail headings with or without connecting to the e-mail server.
Nokia  User GuideCopyright © 2004 NokiaMessagingWhen you scroll to your mailbox and press the Scroll key, Connect to mailbox? appears. Select Yes to connect to your mailbox or No to view previously retrieved e-mail messages while not logged in to the e-mail server.Another way to start a connection is to select Options > Connect.Retrieve e-mail messagesIf you are not logged in to the e-mail server, select Options > Connect to start a connection to a remote mailbox.1When you have an open connection to a remote mailbox, select Options > Retrieve e-mail and one of the following:New—Retrieve all new e-mail messages to your phone.Selected—Retrieve only the e-mail messages that have been marked. Use the Mark/Unmark > Mark or Unmark commands to select messages one by one. See "Common actions for all applications" on page 15. All—Retrieve all messages from the mailbox. To cancel retrieving, press Cancel. After you have retrieved the e-mail messages, you can continue viewing them online.2Select Options > Disconnect to close the connection and view the messages offline from the e-mail server.3To open an e-mail message, scroll to the e-mail you want to view, and press the Scroll key.If the e-mail message has not been retrieved (arrow in the icon is pointing outwards) and you are offline from the e-mail server, and select Open, you will be asked if you want to retrieve this message from the mailbox.To view e-mail attachments, open a message that has the attachment indicator , and select Options > Attachments. In Attachments, you can retrieve, open, or save attachments in supported formats. You can also send attachments by Bluetooth connection.Important: E-mail attachments may contain viruses or otherwise be harmful to your device or PC. Do not open any attachment if you are not sure of the trustworthiness of the sender.If your mailbox uses the IMAP4 protocol, you can decide whether to retrieve e-mail headings only, messages only, or messages and attachments. With the POP3 protocol, the options are e-mail headings only or messages and attachments. See "E-mail" on page 55. Delete e-mail messagesTo delete an e-mail from the phone while still retaining it in the remote mailbox, select Options > Delete > Phone only.
52 Copyright © 2004 NokiaThe phone mirrors the e-mail headings in the remote mailbox. If you delete the message content, the e-mail heading stays in your phone. If you want to remove the heading, delete the e-mail message from your remote mailbox first; then make a connection from your phone to the remote mailbox again to update the status.To delete an e-mail from both the phone and the remote mailbox, select Options > Delete > Phone and server.If you are not logged in to the e-mail server, the e-mail will be deleted from your phone. During the next connection to the remote mailbox, it will be automatically deleted from the remote mailbox. If you are using the POP3 protocol, messages marked to be deleted are removed only after you have closed the connection to the remote mailbox.UNDELETE MESSAGES WHEN OFFLINE FROM THE E-MAIL SERVERTo undelete an e-mail from both the phone and server, scroll to an e-mail that has been marked to be deleted during the next connection ( ), and select Options > Undelete.DisconnectWhen you are online, select Options > Disconnect to end the data call or GPRS connection to the remote mailbox. •OUTBOXOutbox is a temporary storage place for messages that are waiting to be sent. Status of the messages in Outbox are as follows:Sending—A connection is being made and the message is being sent.Waiting or Queued—When there are two similar types of messages in Outbox, one of them is waiting until the first one is sent.Resend at (time)—Sending has failed. The phone will try to send the message again after a time-out period. Press Send if you want to restart the sending immediately.Deferred—You can set documents to be on hold while they are in Outbox. Scroll to a message that is being sent, and select Options > Defer sending.Failed—The maximum number of sending attempts has been reached. If you were trying to send a text message, open the message and check that the sending settings are correct. • VIEW MESSAGES ON A SIM CARDSelect Messaging > Options > SIM messages.
Nokia  User GuideCopyright © 2004 NokiaMessaging • CELL BROADCAST (NETWORK SERVICE)Select Messaging > Options > Cell broadcast.You may be able to receive messages on various topics, such as weather or traffic conditions, from your service provider. For available topics and relevant topic numbers, contact your service provider. In the main view you can see:•The status of the topic:   for new, subscribed messages and   for new, unsubscribed messages.•The topic number, topic name, and whether it has been flagged ( ) for follow-up. You will be notified when messages belonging to a flagged topic have arrived.Options in Cell broadcast are Open, Subscribe or Unsubscribe, Hotmark or Remove hotmark, Topic, Settings, Help, and Exit.Note: A packet data (GPRS) connection may prevent cell broadcast reception. Contact your network operator for the correct GPRS settings. See "GPRS" on page 62.  • SERVICE COMMAND EDITORSelect Messaging > Options > Service command. Key in and send service requests (also known as USSD commands) for network services to your service provider (for example, a request for activation commands). • MESSAGING SETTINGSMessaging settings have been divided into groups according to the different message types. Scroll to the settings you want to edit, and press the Scroll key.Text messagesSelect Messaging > Options > Settings > Text message to open the following list of settings:Message centers—Lists all the message centers that have been defined.Msg. center in use (message center in use)—Defines which message center is used for delivering text messages and smart messages such as picture messages.Options when editing message center settings are Edit, New msg. center, Delete, Help, and Exit.Receive report (delivery report)—When this network service is set to Yes, the status of the sent message (Pending, Failed, or Delivered) is shown in the reports (network service).
54 Copyright © 2004 NokiaMessage validity—If the recipient of a message cannot be reached within the validity period, the message is removed from the message service center. Note that the network must support this feature. Maximum time is the maximum amount of time allowed by the network.Message sent as—The options are Text, Fax, Paging, and E-mail. For further information, contact your network operator. Change this option only if you are sure that your message center is able to convert text messages into these other formats.Preferred connection—You can send text messages over the normal GSM network or by GPRS, if supported by the network.Reply via same ctr. (network service)—By setting this option to Yes, if the recipient replies to your message, the return message is sent using the same message service center number. Note that this may not work between all operators.Multimedia messagesSelect Messaging > Options > Settings > Multimedia message to open the following list of settings:Access point in use—Select which access point is used as the preferred connection for the multimedia message center. See "Settings needed for multimedia messaging" on page 48. If you receive multimedia message settings in a smart message and save them, the received settings are automatically used for the access point. See "Smart messages" on page 49. Multimedia reception—Select from the following:•Only in home net.—Receive multimedia messages only when you are in your home network. When you are outside your home network, multimedia message reception is turned off.•Always on—Allow your phone to receive multimedia messages. •Off—Do not receive multimedia messages or advertisements at all.If Only in home net. or Always on is selected, your phone can make an active data call or GPRS connection without your knowledge.On receiving msg.—Select from the following: •Retr. immediately—The phone will try to retrieve multimedia messages instantly. If there are messages with deferred status, they will be retrieved as well.•Defer retrieval—The multimedia messaging center will save the message to be retrieved later. When you want to retrieve the message, set On receiving msg. to Retr. immediately.•Reject message—Reject multimedia messages. The multimedia message center will delete the messages.
Nokia  User GuideCopyright © 2004 NokiaMessagingAllow anon. messages—Select No, if you want to reject messages coming from an anonymous sender.Receive ads—Define whether you want to allow reception of multimedia message advertisements or not.Receive report—Set to Yes if you want the status of the sent message (Pending, Failed, or Delivered) to be shown in the reports. Receiving a delivery report of a multimedia message that has been sent to an e-mail address might not be possible.Deny report sending—Choose Yes if you do not want your phone to send delivery reports of received multimedia messages.Message validity (network service)—If the recipient of a message cannot be reached within the validity period, the message is removed from the multimedia message center. Maximum time is the maximum amount of time allowed by the network.Image size—Define the size of the image in a multimedia message. The options are Small (up to 160x120 pixels) and Large (up to 640x480 pixels). E-mailSelect Messaging > Options > Settings > E-mail. Select Mailboxes to open a list of mailboxes that have been defined, or select Mailbox in use to choose which mailbox you want to use.Options when editing Mailbox settings are Editing options, New mailbox, Delete, Help, and Exit.If no mailboxes have been defined, you will be prompted to do so. The following list of settings is shown (this information is available from your e-mail service provider):Mailbox name—Write a descriptive name for the mailbox.Access point in use (must be defined)—The Internet access point (IAP) used for the mailbox. Choose an IAP from the list. See "Connection" on page 60. My e-mail address (must be defined)—Write the e-mail address given to you by your service provider. The address must contain the @ character. Replies to your messages are sent to this address.Outgoing mail server (must be defined)—Write the IP address or host name of the computer that sends your e-mail.Send message (network service)—Define how e-mail is sent from your phone:•Immediately—A connection to the mailbox is started immediately after you have selected Send. •During next conn.—E-mail is sent when you connect to your remote mailbox the next time.Send copy to self—Select Yes to save a copy of the e-mail to your remote mailbox and to the address defined in My e-mail address.
56 Copyright © 2004 NokiaInclude signature—Select Yes if you want to attach a signature to your e-mail messages and to start to write or edit your signature text.User name—Write your user name, given to you by your service provider.Password—Write your password. If you leave this field blank, you will be prompted for the password when you try to connect to your remote mailbox.Incoming mail server (must be defined)—Write the IP address or host name of the computer that receives your e-mail.Mailbox type—Defines the e-mail protocol your remote mailbox service provider recommends. The options are POP3 and IMAP4. This setting can be selected only once and cannot be changed if you have saved or exited from the mailbox settings.Security—Used with the POP3, IMAP4, and SMTP protocols to secure the connection to the remote mailbox.APOP secure login—Used with the POP3 protocol to encrypt the sending of passwords to the remote e-mail server. This option is only shown if POP3 is selected for Mailbox type.Retrieve attachments—Retrieve e-mail with or without attachments. This option is only shown if the Mailbox type is set to IMAP4. Retrieve headers—Limit the number of e-mail headers you want to retrieve to your phone. The options are All and User defined. Used with the IMAP4 protocol only.Service messagesWhen you select Messaging > Options > Settings > Service message, the following list of settings opens:Service messages—Choose whether or not you want to allow reception of service messages.Download messages—Choose if you want to receive service messages only from authorized sources. Cell broadcast (network service)Check with your service provider about whether Cell broadcast is available and what the available topics and related topic numbers are. Select Messaging > Options > Settings > Cell broadcast to change the settings:Reception—On or Off.Language—All allows you to receive cell broadcast messages in every possible language. Selected allows you to choose in which languages you wish to receive cell broadcast messages. If the language you prefer is not in the list, select Other.
Nokia  User GuideCopyright © 2004 NokiaMessagingTopic detection—If you receive a message that does not belong to any of the existing topics, select On to save the topic number automatically. The topic number is saved to the topic list and shown without a name. Select Off if you do not want to save new topic numbers automatically. Other settingsSelect Messaging > Options > Settings > Other to open the following list of settings:Save sent messages—Choose if you want to save a copy of every text message, multimedia message, or e-mail that you have sent to the Sent folder.No. of saved msgs.—Define how many sent messages will be saved to the Sent folder at a time. The default limit is 20 messages. When the limit is reached, the oldest message is deleted.Memory in use—Define the memory store. Choices are phone memory or memory card, if one is used.
58 Copyright © 2004 Nokia8 SettingsSelect Menu > Settings.1Scroll to a setting group, and press the Scroll key to open it.2Scroll to a setting you want to change and press the Scroll key to:•Switch between options if there are only two (On/Off).•Open a list of options or an editor.•Open a slider view (scroll right to increase or left to decrease the value).You may be able to receive some settings from your service provider in a smart message, or some settings may be preprogrammed into the phone. See "Smart messages" on page 49.  •PHONESelect Menu > Settings > Phone > General, Standby mode, or Display.GeneralPhone language—You can change the language for the display texts in your phone. This change may also affect the format used for date and time and the separators used, for example, in calculations. If you select Automatic, the phone selects the language according to the information on your SIM card. After you have changed the display text language, you must restart the phone. Note: Changing the settings for Phone language or Writing language affects every application in your phone and the change remains effective until you change these settings again.Writing language—You can change the writing language of your phone. Changing the language affects the following features:•The characters available when you press any key (1–9)•The predictive text dictionary used•The special characters that are available when you press the *and 1keysPredictive text—Set predictive text input On or Off for all editors in the phone. Select a language for entering predictive text from the list available. You can also change this setting when you are in an editor. Press the Edit key, and select Predictive text > On or Off.
Nokia  User GuideCopyright © 2004 NokiaSettingsWelcome note or logo— The welcome note or logo is displayed briefly each time you switch on the phone. Select Default if you want to use the default image or animation. Select Text to write a welcome note (up to 50 letters). Select Image to choose a photo or picture from Gallery.Orig. phone settings—You can reset some of the settings to their original values. To do this, you need the lock code. See "Security" on page 64. After resetting the settings, the phone may take a longer time to power on. All documents and files that you have created are left as they are.Standby modeLeft selection key and Right selection key—You can change the shortcuts that appear over the Left selection key and Right selection key in the standby mode. In addition to the applications, you can have the shortcut point to a function, for example, New message.DisplayBrightness—Adjust the slide bar between Dark and Bright.Screen saver timeout—The screen saver is activated after the screen saver time-out period. When the screen saver is active, the display is cleared and you can see the screen saver bar.To deactivate the screen saver, press any key. •CALLSelect Menu > Settings > Call > Send my caller ID, Call waiting, Automatic redial, Summary after call, 1-touch dialing, Anykey answer, or Line in use.Send my caller ID (network service)This service allows you to display your phone number (Yes) or hide your number (No) from the person you call. This option may be set by your network operator or service provider when you subscribe.Call waiting (network service)The network will notify you of a new incoming call while you have a call in progress. Select Activate to request the network to activate call waiting, Cancel to request the network to deactivate call waiting, or Check status to check if the function is active or not.
60 Copyright © 2004 NokiaAutomatic redialWhen this setting is activated, your phone attempts to connect the call a maximum of ten times after an unsuccessful call attempt. Press the End key to stop automatic redialing.Summary after callActivate this setting if you want the phone to briefly display the approximate duration of the last call. 1-touch dialingSelect On, and the numbers assigned to the 1-touch dialing keys (2–9) can be dialed by pressing and holding the key. See "Assign 1-touch dialing keys" on page 26. Anykey answerSelect On, and you can answer an incoming call by briefly pressing any key, except the Right selection key, the Power key, and the End key.Line in use (network service)This setting is shown only if the SIM card supports two subscriber numbers, that is, two phone lines. Select the phone line (Line 1 or Line 2) you want to use for making calls and sending short messages. Calls on both lines can be answered regardless of the selected line.You cannot make calls if you select Line 2 and have not subscribed to this network service.To prevent line selection, select Line change > Disable if your SIM card supports this function. To change this setting, you need the PIN2 code. •CONNECTIONSelect Menu > Settings > Connection > Access points, GPRS, Data call, or Configurations.Access pointsAn access point is where your phone connects to the mobile Internet by way of a data call or packet data connection. An access point can be provided, for example, by a commercial Internet service provider (ISP), service provider, or network operator.Many service providers require an Internet access point (IAP) for your default access point. Other service providers allow you to use a browser access point. Contact your service provider for more information.To define access point settings, select Menu > Settings > Connection > Access points. If you have not yet used your phone to make a WAP connection, you may need to contact your service provider for assistance with the first-time connection, or visit www.nokia.com/phonesettings.
Nokia  User GuideCopyright © 2004 NokiaSettingsFill in these settings from the top because your Data bearer selection determines which fields are available:•Connection name—Give a descriptive name for the data connection.•Data bearer—The options are GPRS and Data call. The data bearer selection affects the other fields that are available. Fill in all fields marked with Must be defined, or with an asterisk. Other fields can be left empty, unless you have been instructed otherwise by your service provider.To use a data connection, your network operator or service provider must support this feature, and if necessary, activate it for your SIM card.•Access point name (for packet data only)—The access point name is needed to establish a connection to the GPRS network. You obtain the access point name from your network operator or service provider.•Dial-up number (for Data call only)—Enter the the modem telephone number of the access point.•User name—Enter a user name if the service provider requires it. The user name may be needed to make a data connection and is usually provided by the service provider. The user name is often case-sensitive.•Prompt password—If you must key in a new password every time you log on to a server or if you do not want to save your password to the phone, choose Yes.•Password—A password may be needed to make a data connection and is usually provided by the service provider. The password is often case-sensitive. When you are writing the password, the characters you enter are shown briefly and then changed to asterisks (*). The easiest way to enter numbers is to press and hold the number you want to enter, and then continue entering letters.•Authentication—Normal or Secure.•Homepage—This setting depends on what you are setting up. Write either the service address or the address of the multimedia messaging center.•Data call type (for data call only)—Analog, ISDN v.110, or ISDN v.120 defines whether the phone uses an analog or digital connection. This setting depends on both your GSM network operator and your Internet service provider (ISP) because some GSM networks do not support certain types of ISDN connections. For details, contact your ISP. If ISDN connections are available, they connect more quickly than analog methods.•Maximum data speed (for data call only)—The options are Automatic, 9600, or 14400, depending on what you have chosen in Data call type. This option allows you to limit the maximum connection speed when GSM data is used. Higher data rates may cost more, depending on the service provider.These speeds represent the maximum speed at which your connection will operate. During the connection, the operating speed may be less, depending on network conditions.
62 Copyright © 2004 NokiaADVANCED ACCESS POINT SETTINGSIf you need to enter advanced settings, contact your Internet service provider. To access advanced access point settings, select Menu > Settings > Connection > Access points, select the access point you want to modify, and select Options > Advanced settings. You can then define the following settings:•Phone IP address—The IP address of your phone•Primary name server—The IP address of the primary DNS server•Second. name server—The IP address of the secondary DNS server•Proxy serv. address—The IP address of the proxy server•Proxy port number—The port number of the proxy serverThese additional settings are shown if you selected Data call as the Data bearer type:•Use callback—This option allows a server to call you back once you make the initial call. Contact your service provider to subscribe to this service.The phone expects that the callback will use the same data call settings. The network must support that type of call in both directions.•Callback type—The options are Use server no. or Use other no. Ask your service provider which setting their configuration uses.•Callback number—Key in the phone data phone number that the dial back server uses. Usually, this number is the data call phone number of your phone.•Use PPP compression—When set to Yes, this option speeds up the data transfer, if the remote PPP server supports the compression. If you have problems with establishing a connection, try setting this to No. Contact your service provider for guidance.•Use login script—The options are Yes or No.•Login script—Insert the login script.•Modem initialization (modem initialization string)—This option controls your phone using modem AT commands. If modem initialization is required, enter characters specified by your service provider or Internet service provider.GPRSGPRS (general packet radio service) is a network service that allows mobile phones to send and receive data over an IP-based network. GPRS is a data bearer that enables wireless access to data networks, such as the mobile Internet.The applications that may use GPRS are multimedia, IM and text messaging, presence, streaming, browsing sessions, e-mail, data sync, Java™ application downloading, and the PC dial-up (such as Internet and e-mail).To use GPRS technology, you must first do the following:• Contact your service provider for availability and subscription.• Save the GPRS settings for each of the applications used.
Nokia  User GuideCopyright © 2004 NokiaSettingsFor information on pricing, contact your service provider.To define GPRS connection settings, select Menu > Settings > Connection > GPRS, and specify these settings:GPRS connection—If you select When available and your network supports packet data, the phone registers to the GPRS network. Also, starting an active packet data connection, for example, to send and receive e-mail, is quicker. If you select When needed, the phone will use a packet data connection only if you start an application or action that needs it. The GPRS connection can be closed after the applications no longer use it. If there is no GPRS coverage and you have chosen When available, the phone periodically tries to establish a packet data connection.Access point—The access point name is needed when you use your phone as a packet data modem to your computer.Data callOnline time—This setting affects all access points using a GSM data call. If there are no actions, the data call is dropped automatically after a time-out period. Select User defined (in which case you enter a time) or Unlimited.ConfigurationsWhen you open a message that contains configuration settings for your phone, the message is displayed in this viewer. If you do not have any configuration settings messages, this screen will be empty. To delete a message from this screen, press the Clear key.Options in the configurations viewer are Save, Message details, and Move to folder. • DATE AND TIMESelect Menu > Settings > Date and time. The Date and time settings allow you to define the date and time used in your phone, as well as change the date and time format and separators. You can also change the following settings:Clock type—Select Analog or Digital to change how the clock is displayed in the standby mode. See "Clock" on page 79. Clock alarm tone—Changes the tone played when the clock reaches an alarm time. Auto time update—Allows the network to update time, date, and time zone information to your phone (network service). For the auto time update setting to take effect, the phone needs to be restarted. Check any alarms because they may be affected by the auto time update.GMT offset—Changes the time zone for the clock time.Daylight-saving—Sets daylight saving time on or off.
64 Copyright © 2004 Nokia •SECURITYSelect Menu > Settings > Security > Phone and SIM or Certif. management.Phone and SIMIf your phone requests a security code, refer to the following explanations to determine what you should enter. If you forget or lose a PIN or PUK code or if you have not received such a code, contact your service provider.You can change the following codes: lock code, PIN code, and PIN2 code. These codes can only include the numbers from 0 to 9. The PUK (personal unblocking key) code is required to change a blocked PIN code. The PUK2 code is required to change a blocked PIN2 code. If the codes are not supplied with the SIM card, contact your service provider for the codes. The PUK and PUK2 codes are 8 digits long.Avoid using security codes similar to emergency numbers, such as 911, to prevent accidental dialing of the emergency number.•PIN code request—When the PIN code request is active, the code is requested each time the phone is switched on. Note that deactivating the PIN code request may not be allowed by some SIM cards.•PIN code (4 to 8 digits)—The PIN code protects your SIM card against unauthorized use. The PIN code is usually supplied with the SIM card.•After three consecutive incorrect PIN code entries, the PIN code is blocked. If the PIN code is blocked, you need to unblock the PIN code before you can use the SIM card again. See also the information below about the PUK code.•PIN2 code (4 to 8 digits)—The PIN2 code is supplied with some SIM cards and is required to access some functions, such as fixed dialing numbers (FDN).•Autolock period—You can set an autolock period, a time-out after which the phone is automatically locked and can be used only if the correct lock code is entered. Key in a number for the time-out in minutes, or select None to turn off the autolock period.To unlock the phone, key in the lock code.When the phone is locked, calls may still be possible to the official emergency number programmed into your phone.•Lock code (5 digits)—The lock code can be used to lock the phone and keypad to avoid unauthorized use. The factory setting for the lock code is 12345. To prevent unauthorized use of your phone, change the lock code. Keep the new code secret and in a safe place separate from your phone. If you forget or lose the lock code, contact your service provider.•Lock if SIM changed—Select Yes if you want the phone to prompt for the lock code when an unknown, new SIM card is inserted into your phone. The phone maintains a list of SIM cards that are recognized as the owner’s cards.
Nokia  User GuideCopyright © 2004 NokiaSettings•Fixed dialing—You can restrict your outgoing calls to selected phone numbers, if supported by your SIM card. You need the PIN2 code for this function. When this function is active, you can only call those phone numbers that are included in the fixed dialing list or which begin with the same digits as a phone number on the list.Press the Scroll key to set fixed dialing on. When fixed dialing is activated, calls still may be possible to the official emergency number programmed into your phone. To add new numbers to the fixed dialing list, select Options > New contact or Add from Contacts. Options in fixed dialing are Open, Call, Activ. fixed dialing or Deact. fixed dialing, New contact, Edit, Delete, Add to Contacts, Add from Contacts, Find, Mark/Unmark, Help, and Exit.•Closed user group (network service)—You can specify a group of people whom you can call and who can call you. For more information, contact your network operator or service provider. Select one of the following:Default—Activate the default group agreed on with the network operator.On—Use another group (you need to know the group index number).Off—Do not use closed user groups.When calls are limited to closed user groups, calls still may be possible to the official emergency number programmed into your phone.•Confirm SIM services (network service)—Sets the phone to display confirmation messages when you are using a SIM card service.•Restore server—Reset your connection settings allowing you to receive new settings from your service provider.Certif. managementOptions in Certif. management are Certificate details, Delete, Trust settings, Mark/Unmark, Help, and Exit.In the certificate management main view, you can see a list of authority certificates that have been stored in your phone. Scroll right to see a list of personal certificates, if available.Authority certificates are used by some browser services, such as banking services, for checking signatures or server certificates or other authority certificates.Server certificates are used to improve security in the connection between the phone and the gateway. The phone receives the server certificate from the service provider before the connection is established, and its validity is checked using the authority certificates saved in the phone. Server certificates are not saved.Server certificates may be needed, for example, when you want to do the following:•Connect to an online bank or another site or remote server for actions that involve transferring confidential information.
66 Copyright © 2004 Nokia•Decrease the risk of viruses or other malicious software and be sure of the authenticity of software when downloading and installing software.Important: Note that even if the use of certificates makes the risks involved in remote connections and software installation considerably smaller, they must be used correctly in order to benefit from increased security. The existence of a certificate does not offer any protection by itself; the certificate manager must contain correct, authentic, or trusted certificates for increased security to be available. Certificates have a restricted lifetime. If Expired certificate or Certificate not valid yet is shown even if the certificate should be valid, check that the current date and time in your device are correct.Before changing any certificate settings, you must make sure that you really trust the owner of the certificate and that the certificate really belongs to the listed owner.CHANGE THE TRUST SETTINGS OF AN AUTHORITY CERTIFICATEScroll to an authority certificate, and select Options > Trust settings. Depending on the certificate, a list of the applications that can use the selected certificate is shown. For example:•Internet—The certificate can certify e-mail and imaging servers.•App. installation—The certificate can certify the origin of new software. • CALL RESTRICTION (NETWORK SERVICE)Select Menu > Settings > Call restriction. Call restriction allows you to restrict outgoing and incoming calls with your phone. For this function, you need the restriction password, which you can obtain from your service provider.Select Options, and choose one of the following:Activate—Request the network to set call restriction on.Cancel—Set the selected call restriction off.Check status—Check whether the calls are blocked. Edit restr. passw.—Change the restriction password.Cancel all restrict.—Cancel all active call restrictions.You cannot restrict incoming calls while call forwarding or fixed dialing is active. See "Call forwarding (network service)" on page 21. See also “Security” on page 64.   When calls are restricted, calls still may be possible to certain official emergency numbers.
Nokia  User GuideCopyright © 2004 NokiaSettings •NETWORKSelect Menu > Settings > Network > Operator selection or Cell info display. Operator selectionAutomatic—Set the phone to automatically search for and select one of the cellular networks available in your area.Manual—Select the desired network manually from a list of networks. If the connection to the manually selected network is lost, the phone will sound an error tone and ask you to select a network again. The selected network must have a roaming agreement with your home network, that is, the operator whose SIM card is in your phone.Cell info displayOn or Off—Set the phone to indicate when it is used in a cellular network based on microcellular network (MCN) technology and to activate cell info reception (network service). • ENHANCEMENTSelect Menu > Settings > Enhancement and one of these options:Enhancement in use—If you are using an enhancement such as a loopset, headset, or TTY adapter, you must activate it by selecting Headset, Loopset, or TTY. If you have activated a loopset, the headset will use the same settings as the loopset.Headset, Loopset, TTY, and Handsfree—For each of these items, define the following settings:•Default profile—Select the profile to be activated each time you connect a certain enhancement to your phone. See "Change the profile" on page 73. •Automatic answer—Set the phone to answer an incoming call automatically after 5 seconds time when you connect a certain enhancement to your phone. If the incoming call alert is set to Beep once or Silent, you must answer the phone manually. This option is not available for TTY.See also “Enhancement indicators” on page 13.
68 Copyright © 2004 Nokia9 Tools and applicationsSelect Menu > Tools to access common tools and applications. For instructions on voice mail and 1-touch dialing, see “Call voice mail” on page 18 and “1-touch dialing” on page 19. • APPLICATION MANAGERSelect Menu > Tools > Manager.In App. manager you can install new compatible Symbian operating system applications (SIS files) and Java applications (Java MIDlets and MIDlet suites). You can also update and uninstall applications from the phone and monitor the installation history.Options in App. manager are Install, View details, View certificate, Update, Go to web address, Remove, View log, Send log, Settings, App. downloads, Help, and Exit.When you open App. manager, you can see a list of:•Applications saved in App. manager•Partially installed applications (indicated by  )•Fully installed applications that you can remove (indicated by  )You can only use Symbian operating system applications with a .SIS extension.Your phone supports J2ME™Java applications. Do not download PersonalJava™ applications to your phone; they cannot be installed.Install applicationsYou can install applications that are specifically intended for this phone and suitable for the Symbian operating system.If you install an application that is not intended specifically for this phone, it may function and look different from what was originally intended.Applications may be downloaded to your phone during browsing, received as attachments in multimedia messages or e-mails, or received by Bluetooth connection from another device, for example, a phone or a compatible PC.Important: Only install applications from sources that offer adequate protection against harmful software.To increase protection, the application installation system uses digital signatures and certificates for applications. Do not install the application if App. manager gives a security warning during installation.
Nokia  User GuideCopyright © 2004 NokiaTools and applicationsIf you install an update or repair to an existing application, the original application is removed and the update or repair takes its place. You must have the original application or a full backup copy of it in order to restore it after it has been removed. To restore the original application, first remove the updated or repaired application, and then install again from the original application or the backup copy.During installation, the phone checks the integrity of the application to be installed. The phone shows information about the checks being carried out, and you are given options on whether to continue or cancel the installation. Once the phone has checked the integrity of the application, it is installed on your phone.INSTALL APPLICATIONSOpen App. manager, scroll to the application, and select Options > Install to start the installation. You can also search the phone memory or the memory card, select the application, and press the Scroll key to start the installation.Some applications may give the option of partial installation, allowing you to select the particular components of an application that you want to install. If you are installing an application without a digital signature or a certificate, the phone warns you of the risks. Continue installation only if you are absolutely sure of the origin and contents of the application.INSTALL JAVA™ APPLICATIONSThe .JAR file is required for installation. If it is missing, the phone may ask you to download it. If there is no access point defined for App. manager, you will be asked to select one. When you are downloading the .JAR file, you may need to enter a user name and password to access the server. You obtain these from the supplier or manufacturer of the application.•To start a data connection and to view extra information about the application, scroll to it and select Options > Go to web address.•To start a data connection and check if there is an update available for the application, scroll to it and select Options > Update.JAVA SETTINGSTo change the default access point that a Java application uses for downloading extra data, select Options > Settings > Access point. See "Access points" on page 60. To change the security settings that determine the actions that a Java application is permitted to do, select Options > Settings. Not all Java applications permit you to change the security settings.Remove an application1Scroll to the application and select Options > Remove.2Press Yes to confirm the removal.
70 Copyright © 2004 NokiaIf you remove an application, you can only reinstall it if you have the original application or a full backup of the removed application. If you remove an application, you may no longer be able to open documents created with that application. If another application depends on the application that you removed, the other application may stop working. Refer to the documentation of the installed application for details. •FILE MANAGERSelect Menu > Tools > File mngr.Options in File manager are Open, Send, Delete, Move to folder, Copy to folder, New folder, Mark/Unmark, Rename, Find, View details, Memory details, Help, and Exit.In File manager, you can browse, open, and manage files and folders in the phone memory or on the memory card, if you use one.Open File manager to see a list of the folders in the phone memory. Scroll right to see the folders on the memory card, if you use one.You can browse, open, and create folders, mark, copy and move items to folders. See "Common actions for all applications" on page 15. Not all folders are visible in File manager (for example, system folders are not visible).View memory consumptionIf you have a memory card installed on your phone, you will have a choice of two memory views, one for the phone memory and one for the memory card. Scroll right or left to move from one memory tab to another.To check memory consumption of the current memory, select Options > Memory details.The phone calculates the approximate amount of free memory for storing data and installing new applications.In the memory views, you can view the memory consumption of the different data groups: Calendar, Contacts, Documents, Messages, Images, Sound files, Video clips, Applications, Mem. in use, and Free memory. • VOICE COMMANDSSelect Menu > Tools > Voice com..Options in Voice commands are Add voice command, Open, New application, Playback, Change, Delete, Delete all, Help, and Exit.You can use voice commands to start applications and profiles, and to dial numbers from Contacts, without having to look at the phone display. You record a word, or words, (voice command) and then say this voice command to open an application, activate a profile, or dial a number.
Nokia  User GuideCopyright © 2004 NokiaTools and applicationsYou can have only one voice command per item. Any spoken words can be a voice command. When recording, hold the phone at a short distance away from your mouth. After the starting tone, say clearly the word, or words, you want to record as a voice command.Voice commands have the same requirements as voice tags. Before recording a voice command, see “Requirements for voice tags” on page 25.Note:  You must say the voice command exactly as you said it when you recorded it. This may be difficult in, for example, a noisy environment or during an emergency, so you should not rely solely upon voice commands in all circumstances.Add a voice command to an application1In Voice commands, scroll to the application to which you are adding a voice command, and select Options > Add voice command. To add a voice command to a profile, you must have the Profiles folder open and a specific profile selected.Press ’Start’, then speak after tone is displayed.2Press Start to record a voice command.The phone sounds a starting tone, and the note Speak now is displayed.3Say the voice command.The phone will stop recording after approximately 5 seconds. After recording, the phone plays the recorded command. Voice command saved is displayed, and a beep sounds. A symbol   can be seen next to the application. If you do not want to save the recording, press Quit before the recording stops.Add an application to the listYou can assign voice commands to other applications that are not listed in the Voice commands main view.1In the Voice commands main view, select Options > New application.Available applications are displayed.2Scroll to the application that you want to add, and press Select.3Add a voice command to the new application. See "Add a voice command to an application" on page 71. Use a voice command to start an application1In the standby mode, press and hold the Right selection key. A short tone is played, and Speak now is displayed.2When you start an application by saying a voice command, hold the phone a short distance from your mouth, and say the voice command clearly. The phone plays the original voice command and starts the application.3If the phone plays the wrong voice command, press Retry.
72 Copyright © 2004 NokiaReplay, erase, or change a voice commandTo replay, erase, or change a voice command, scroll to the item that has a voice command (indicated by  ), and select Options and one of the following:Playback—Listen to the voice command again.Delete—Erase the voice command.Change—Record a new voice command. Press Start to record. •DEVICE MANAGERThis feature is operator dependent and may not be available on all phones. Contact your service provider for information and availability.Select Menu > Tools > Dev. mgr.Options in Device manager are Connect, New profile, Edit profile, Delete profile, Enable or Disable configurations, View log, Help, and Exit.When you need help with difficult phone configurations, Device manager allows a third party, such as your service provider, to assist you directly with phone settings. To allow device management, your phone must establish a connection and synchronize with the third party’s server. You can start the synchronization session from your phone, and you can accept or reject server-initiated synchronization attempts.A device manager profile must be defined before you can connect to a server. The third party who is assisting you can help define the profile settings:Server name—Display name of the server.Server ID—Remote device manager server ID.Server password—Password used in server alerts. Enter the password that must be provided by the device manager server when synchronizing with your phone.Access point—Internet access point your phone uses to establish the server connection. Choose from the list of access points defined in your phone. See "Access points" on page 60. Host address—Device management server URL.Port—Device management server port.User name—Your user name for this profile.Password—Your password for this profile.Allow configuration—Device management allowed on this server. Select Yes or No.Auto-accept all reqs.—Automatic or approved device management on this server. Select Yes to allow synchronization without your verification, or select No to verify each synchronization attempt.
Nokia  User GuideCopyright © 2004 NokiaPersonalization10 Personalization •PROFILESSelect Menu > Profiles.Use Profiles to adjust and customize sound tones for different events, environments, or caller groups.The currently selected profile is defined at the top of the display in the standby mode. If the Normal profile is in use, only the current date is shown.Options in Profiles are Activate, Customize, Create new, Delete profile, Help, and Exit.Change the profile1Select Menu > Profiles. A list of profiles opens.2Scroll to a profile, and select Options > Activate.Shortcut: To change the profile in the standby mode, press the Power key briefly, scroll to the profile you want to activate, and press OK.Create and customize profilesTo create a new profile, select Options > Create new. To modify a profile, select Options > Customize.Scroll to the setting you want to change, and press the Scroll key to open the choices:Ringing tone—Set the ringing tone for voice calls. Choose a ringing tone from the list. Press any key to stop the sound. If a memory card is used, tones stored on it have the   icon next to the tone name. Ringing tones use shared memory. See "Shared memory" on page 3.  You can also change ringing tones in Contacts. See "Add a ringing tone for a contact card or group" on page 25. Ringing type—When Ascending is selected, the ringing tone volume starts from level one and increases level by level to the set volume level.Ringing volume—Set the volume level for the ringing and message alert tones.Message alert tone—Set the tone for messages.IM alert tone—Set the tone for instant messages.Vibrating alert—Set the phone to vibrate at incoming voice calls and messages.Keypad tones—Set the volume level for keypad tones.Warning tones—Instruct the phone to sound a warning tone, for example, when the battery is running low on power.
74 Copyright © 2004 NokiaAlert for—Set the phone to ring only with calls from phone numbers that belong to a selected contact group. Phone calls coming from people outside the selected group will have a silent alert. You can select All calls, or you can select items from a list of contact groups, if you have created them. See "Create contact groups" on page 27. Availability—Choose Available, Busy, or Not available to be displayed as your presence information for the selected profile. This option is displayed only if you activate the proper Sync. with Profiles setting in the Presence application. See "Presence settings" on page 30. User availab. alerts—Enter a customized message (up to 40 characters) to display your current presence status for the selected profile. This option is displayed only if you activate the proper Sync. with Profiles setting in the Presence application. See "Presence settings" on page 30. Profile name—If you are creating a new profile, use this setting to give it a name. You can rename a profile and give it any name you want. The Normal profile cannot be renamed. •THEMESSelect Menu > Themes.You can change the look of your phone display by activating a theme. A theme can include the idle screen wallpaper, color palette, screen saver, and background image in Go to. Edit a theme for more detailed personalization.When you open Themes you will see a list of the available themes. The currently active theme is indicated by a check mark. Scroll right to see the themes on the memory card, if you use one.To preview a theme, scroll to the theme, and select Options > Preview. Press Select to activate the theme. You can activate the theme without previewing it by selecting Options > Apply from the main view.Options in Themes are Preview, Apply, Edit, Theme downloads, Delete, Help, and Exit.You can copy themes that you have downloaded. To copy a theme from your memory card to the phone memory, scroll to the theme and select Options > Copy to phone mem.. To copy a theme from your phone memory to the memory card, scroll to the theme and select Options > Copy to mem. card..
Nokia  User GuideCopyright © 2004 NokiaPersonalizationEdit themesTo personalize themes further, you can group together elements from other themes or images from Gallery: 1Scroll to a theme, and select Options > Edit to change the following options:Wallpaper—Choose an image to use as a background image in the standby mode. Select an image from one of the available themes or from Gallery, where your own images are saved.Color palette—Change the color used on the display.Screen saver—Select what is shown on the screen saver bar. Choose to display the time and date or write the text you want displayed. The location and background color of the screen saver bar changes in one minute intervals. Also, the screen saver changes to indicate the number of new messages and missed calls. You can set the time that elapses before the screen saver is activated. See "Standby mode" on page 59. Image in ‘Go to’—Choose an image to use as a background image in Go to. You can select an image from one of the available themes or from Gallery, where your own images are saved.2Select Back to accept the changes.3Select Options > Set to select the current theme. You can preview the updated theme by selecting Options > Preview. Note that you cannot preview all elements.Restore themesTo restore the currently selected theme to its original settings, select Options > Restore orig. theme when editing a theme. •GO TOPress Go to (Right selection key) in the standby mode, or select Menu > Extras > Go to.In Go to, you can store shortcuts, saved browser pages, and links to your favorite photos, video clips, notes, recorder sound files, and browser bookmarks.Options in Go to are Open, Edit shortcut name, Move, List view or Grid view, Help, and Exit.Default shortcuts in Go to: —opens Calendar to the current date,  —opens the Messaging inbox, and  —opens the Notes editor.
76 Copyright © 2004 NokiaYou can only add shortcuts from preinstalled applications and functions.1Open the application and scroll to the item that you want to add as a shortcut.2Select Options > Add to ’Go to’, and press OK.A shortcut in Go to is automatically updated if you move the item to which it points, for example, from one folder to another.Hints on using shortcuts:•To open a shortcut, scroll to the icon, and press the Scroll key. The file opens in the corresponding application.•To delete a shortcut, scroll to the shortcut, and select Options > Delete shortcut. Removing a shortcut does not affect the file to which it refers.•To change the shortcut name, select Options > Edit shortcut name. Write the new name. This change affects only the shortcut, not the file or item to which the shortcut refers. The default shortcuts can not be deleted.
Nokia  User GuideCopyright © 2004 NokiaExtras11 Extras •NOTESSelect Menu > Extras > Notes.You can link notes to Go to and send them to other devices. Plain text files (TXT format) you receive can be saved to Notes.Press any key from 1 to 0 to start to write. Press the Clear key to clear letters. Press Done to save. • CALCULATORSelect Menu > Extras > Calculator.Options in the calculator are Last result, Memory, Clear screen, Help, and Exit.1Enter the first number of your calculation. To add a decimal, press the #key.If you make a mistake, press the Clear key to erase it.2Scroll to an arithmetic function, and press the Scroll key to select it.3Enter the second number.4To execute the calculation, scroll to   and press the Scroll key.Press and hold the Clear key to clear the result of the previous calculation.Use   and   to view previous calculations and move in the sheet.Note: This calculator has limited accuracy and is designed for simple calculations. Rounding errors may occur, especially in long division. •CONVERTERSelect Menu > Extras > Converter.In Converter, you can convert measures from one unit to another; for example, you can convert length from yards to meters. Converter has limited accuracy and rounding errors may occur.Convert unitsOptions in Converter are Conversion type, Currency rates (not applicable to other units), Help, and Exit.To make currency conversions, you must first set the exchange rate. See "Set a base currency and exchange rates" on page 78.
78 Copyright © 2004 Nokia1Scroll to Type, and press the Scroll key to open a list of measures. 2Scroll to the measure you want to use, and press OK.3Scroll to the first Unit field, and press the Scroll key to open a list of available units. 4Select the unit from which you want to convert, and press OK.5Scroll to the next Unit field, and select the unit to which you want to convert.6Scroll to the first Amount field, and key in the value you want to convert.Press the #key to add a decimal, and press the *key to insert the +, - (for temperature), and E (exponent) symbols.The second Amount field changes automatically to show the converted value.The conversion order changes if you write a value in the second Amount field. The result is shown in the first Amount field.Set a base currency and exchange ratesBefore you can make currency conversions, you must choose a base currency (usually your domestic currency) and add exchange rates. The rate of the base currency is always 1. The base currency determines the conversion rates of the other currencies.1Select Currency as the measure type, and select Options > Currency rates.A list of currencies opens with the current base currency at the top.2To change the base currency, scroll to the currency (usually your domestic currency), and select Options > Set as base curr..When you change base currency, all previously set exchange rates are reset to zero, and you must enter new rates.3Add exchange rates, scroll to the currency, and key in a new rate, that is, how many units of the currency equal one unit of the base currency you have selected. 4After you have inserted all the required exchange rates, make the currency conversions. See "Convert units" on page 77.  • VOICE RECORDERSelect Menu > Extras > Recorder.Options in Voice recorder are Record sound clip, Delete, Rename sound clip, Send, Go to Gallery, Settings, Add to ’Go to’, Help, and Exit.The voice recorder allows you to record telephone conversations and voice memos. If you are recording a telephone conversation, both parties will hear a tone every 5 seconds during recording. Voice recorder cannot be used when a data call or GPRS connection is active.Recorded files are stored in Gallery. See "Gallery" on page 40.
Nokia  User GuideCopyright © 2004 NokiaExtrasSelect Options > Record sound clip, scroll to a function, and press the Scroll key to select it: •CLOCKSelect Menu > Extras > Clock.Options in Clock are Set alarm, Reset alarm, Remove alarm, Settings, Help, and Exit.Change settingsTo change the time or date, select Options > Settings. See also “Date and time” on page 63.Set an alarm1To set a new alarm, select Options > Set alarm.2Enter the alarm time, and press OK.When the alarm is active, the   indicator is shown.To cancel an alarm, select Clock > Options > Remove alarm.Stop an alarmPress Stop to turn off the alarm. Press Snooze to stop the alarm for 5 minutes, after which it will resume. You can do this a maximum of 5 times.If the alarm time is reached while the phone is switched off, the phone switches on and starts sounding the alarm tone. If you press Stop, you receive a message asking whether you want to activate the phone for calls. Press No to switch off the phone or Yes to make and receive calls.Do not press Yes when wireless phone use is prohibited or when it may cause interference or danger.RecordPauseStopFast forwardFast rewindPlay an opened sound file
80 Copyright © 2004 NokiaPersonalize the alarm tone1To personalize the alarm tone, select Options > Settings > Clock alarm tone.When you scroll through the list of tones, you can stop on a tone to listen to it before you make your selection. 2Press Select to select the current tone. •MEMORY CARDSelect Menu > Tools > Memory.Options in Memory card are Backup phone mem., Restore from card, Format mem. card, Memory card name, Set password, Change password, Remove password, Memory details, Help, and Exit.Keep all memory cards out of the reach of small children.For details on inserting a memory card into the phone, see “Insert the memory card” on page 8. You can use the memory card to back up information from phone memory and to store your multimedia files such as video clips, sound files, photos, messaging data, etc.Your phone may come with a Reduced Size MultiMediaCard (RS-MMC) that may contain add-on applications from independent developers. These applications are designed by the devlopers to be compatible with your phone. Nokia does not provide any warranty or support for these applications. Contact the content provider for any assistance needed.Use only compatible MultiMediaCards (MMC) with this device. Other memory cards, such as Secure Digital (SD) cards, do not fit in the MMC card slot and are not compatible with this device. Using an incompatible memory card may damage the memory card as well as the device, and data stored on the incompatible card may be corrupted.BY USING THE APPLICATIONS PROVIDED ON THE RS-MMC, YOU ACKNOWLEDGE THE SOFTWARE AND/OR APPLICATIONS (COLLECTIVELY, THE "SOFTWARE") ARE PROVIDED "AS IS" WITHOUT WARRANTY OF ANY KIND EXPRESS OR IMPLIED AND TO THE MAXIMUM EXTENT PERMITTED BY APPLICABLE LAW NEITHER NOKIA NOR ITS AFFILIATES MAKE ANY REPRESENTATIONS OR WARRANTIES, EXPRESS OR IMPLIED, INCLUDING BUT NOT LIMITED TO WARRANTIES OF TITLE, MERCHANTABILITY OR FITNESS FOR A PARTICULAR PURPOSE OR THAT THE SOFTWARE WILL NOT INFRINGE ANY THIRD PARTY PATENTS, COPYRIGHTS, TRADEMARKS OR OTHER RIGHTS. THERE IS NO WARRANTY BY NOKIA OR BY ITS AFFILIATES THAT ANY ASPECT OF THE SOFTWARE WILL MEET YOUR REQUIREMENTS OR THAT THE OPERATION OF THE SOFTWARE WILL BE UNINTERRUPTED OR ERROR-FREE. YOU ASSUME ALL RESPONSIBILITY AND RISK FOR THE SELECTION OF THE SOFTWARE TO ACHIEVE YOUR
Nokia  User GuideCopyright © 2004 NokiaExtrasINTENDED RESULTS AND FOR THE INSTALLATION, USE AND RESULTS OBTAINED FROM IT. TO THE MAXIMUM EXTENT PERMITTED BY APPLICABLE LAW, IN NO EVENT SHALL NOKIA, ITS EMPLOYEES OR AFFILIATES BE LIABLE FOR ANY LOST PROFITS, REVENUE, SALES, DATA, INFORMATION OR COSTS OF PROCUREMENT OF SUBSTITUTE GOODS OR SERVICES, PROPERTY DAMAGE, PERSONAL INJURY, INTERRUPTION OF BUSINESS, OR FOR ANY DIRECT, INDIRECT, INCIDENTAL, ECONOMIC, COVER, PUNITIVE, SPECIAL OR CONSEQUENTIAL DAMAGES, HOWEVER CAUSED AND WHETHER ARISING UNDER CONTRACT, TORT, NEGLIGENCE, OR OTHER THEORY OF LIABILITY ARISING OUT OF THE INSTALLATION OR USE OF OR INABILITY TO USE THE SOFTWARE, EVEN IF NOKIA OR ITS AFFILIATES ARE ADVISED OF THE POSSIBILITY OF SUCH DAMAGES. BECAUSE SOME COUNTRIES/STATES/JURISDICTIONS DO NOT ALLOW THE ABOVE EXCLUSION OR LIMITATION OF LIABILITY, BUT MAY ALLOW LIABILITY TO BE LIMITED, IN SUCH CASES, NOKIA, ITS EMPLOYEES’ OR AFFILIATES' LIABILITY SHALL BE LIMITED TO U.S.$50. Nothing contained in this disclaimer shall prejudice the statutory rights of any party dealing as a consumer. Attach and remove the memory card adapterThe RS-MMC comes with an adapter attachment that allows you to use the card in regular sized MMC slots (for instance, in other Nokia phones or in a card reader).Be sure to remove the adapter when you use the RS-MMC in your Nokia 6670 phone. See "Insert the memory card" on page 8. To remove the adapter, press the arrow labeled Push to release the catch (1), and gently pull the RS-MMC away from the adapter (2). To reattach the adapter, locate the long side of the RS-MMC (opposite from the side with the bevelled corner) and slide the card into the metal slots of the adapter.Make sure the RS-MMC is attached securely to the adapter before you attempt to use the card in another Nokia phone or in a card reader.Format memory cardWhen a memory card is formatted, all data on the card is permanently lost.Some memory cards are supplied pre-formatted and others require formatting. When formatting, the memory card should always be formatted in your Nokia 6670 phone to ensure correct operation. The memory access and performance cannot be guaranteed when formatting with another operating system.21bevelled corner
82 Copyright © 2004 NokiaYou can use File manager to check for data on a memory card before formatting it. See "File manager" on page 70. To format a memory card, select Options > Format mem. card, and select Yes to confirm. When formatting is complete, key in a name for the memory card (up to 11 letters or numbers).Back up and restore informationYou can back up the phone memory and restore it to your phone. To back up information from phone memory to the memory card, select Options > Backup phone mem. To restore information from the memory card to phone memory, select Options > Restore from card.Lock the memory cardYou can set a password to lock your memory card against unauthorized use. Select Options > Set password. You will be asked to enter and confirm your password. The password can be up to eight characters long.The password is stored in your phone and you do not have to enter it again while you are using the memory card on the same phone. If you want to use the memory card on another phone, you will be asked for the password again to unlock the card.Unlock a memory cardIf you insert another password-protected memory card in your phone, you will be prompted upon startup to enter the password of the card. Enter the password, and press OK to unlock the card, or press Cancel to leave the card locked. To unlock the card later, select Menu > Extras > Memory > Options > Unlock memory card. Enter the password, and press OK.Remove memory card passwordTo remove a memory card password entirely, select Options > Remove password. Once the password is removed, the memory card is unlocked and can be used on your phone or another phone without a password.Check memory consumptionYou can check the memory consumption of different data groups and the available memory for installing new applications or software on your memory card. Select Options > Memory details. • WALLETSelect Menu > Extras > Wallet.
Nokia  User GuideCopyright © 2004 NokiaExtrasWallet provides you with a storage area for your personal information, such as credit and debit card numbers, addresses, and other useful data (for example, user names and passwords).The information stored in the wallet can be easily retrieved while browsing to automatically fill in online forms on browser pages, for example, when the service asks for credit card details. Data in the wallet is encrypted and protected with a wallet code that you define.You can group wallet data into profiles that can be accessed, for example, for making purchases online.Because of the nature of the wallet, it will automatically close after 5 minutes. Enter the wallet code to regain access to the contents. You can change this automatic time-out period, if required. See "Wallet settings" on page 85. Options in Wallet are Open, Settings, Help, and Exit.Enter the wallet codeEach time you open the wallet you will be prompted for a wallet code.When you open the wallet for the first time, you must create your own security code:1Enter a code of your choice (4–10 alphanumeric characters), and press OK.You will be prompted to verify the code.2Enter the same code, and press OK.Do not give your wallet code to anyone else.If you enter the wallet code incorrectly on three consecutive attempts, the wallet application is blocked for 5 minutes. The blocked time increases if further incorrect wallet codes are entered.If you forget your wallet code, you will have to reset the code, and you will lose all information stored in the wallet. See "Reset the wallet and wallet code" on page 87. Store personal card detailsOptions when viewing or editing card details are Delete, Help, and Exit.1Select Cards from the main wallet menu.2Select a type of card:Payment cards—Credit and debit cardsLoyalty cards—Membership and store cards
84 Copyright © 2004 NokiaOnline acc. cards—Personal user names and passwords to online servicesAddress cards—Basic contact details for home/officeUser info cards—Customized personal preferences for online services3Select Options > Create new.An empty form opens. 4Fill in the fields, and press Done.You can also receive card information directly to the phone from a card issuer or service provider (if they offer this service). You are notified as to which category the card belongs. Save or discard the card. You can view and rename a saved card, but you cannot edit it.You can open, edit, or delete the fields in the card. Any changes will be saved upon exiting.Create personal notesPersonal notes are a means of storing sensitive information, for example, a bank account number. You can access the data in a personal note from the browser or send a note as a message.1Select Personal notes from the main wallet menu.2Select Options > Create new.An empty note opens. 3Press any key from 1 to 0 to start writing, and press the Clear key to clear characters if necessary. 4Press Done to save.Create a wallet profileOnce you have stored your personal details, you can combine them into a wallet profile. Use a wallet profile to retrieve wallet data from different cards and categories to the browser.1Select Wallet profiles from the main wallet menu.2Select Options > Create new.A new wallet profile form opens. 3Enter a name for the profile in the Profile name field.4Scroll to each of the following fields, and press the Scroll key to open a list of selections:Payment card—Select a card from the list.Loyalty card—Select a card from the list.Online access card—Select a card from the list.
Nokia  User GuideCopyright © 2004 NokiaExtrasShipping address—Select an address from the list.Billing address—By default this is Use shipping ad. If you require a billing address that is different from the shipping address, select one from the billing address list.User info card—Select a card from the list.Receive e-receipt—Select a destination from the list.Deliver e-receipt—Select To phone, To e-mail, or To pho. & e-mail.RFID sending—Set to On or Off. Defines whether or not your unique phone identification is sent with the wallet profile (for future development dependent on RFID-based ticketing).5Press Done to save the new profile.Retrieve information from wallet to your browserWhen using online mobile services supporting the wallet functionality, you can upload the data stored in your wallet to automatically enter your details into an online form. For example, by uploading your payment card details, you do not need to key in the card number and expiration date each time you need them (depending on the content being browsed). Also, you can retrieve your user name and password stored as an access card when connecting to a mobile service that requires authentication. See "Purchase an item" on page 101. View ticket detailsYou can receive notifications of electronic tickets purchased online with the browser. Received ticket notifications are stored in the wallet. To view the notifications:1Select Tickets from the main Wallet menu.2Select Options > View.The ticket details are displayed in a form. None of the fields in the ticket notification form can be edited.Options in Tickets are View, Delete, Rename, Mark/Unmark, Help, and Exit.Wallet settingsSelect Options > Settings from the main wallet menu to modify the following items: Wallet code—Change your wallet code. You will be prompted to enter the current code, create a new code, and verify the new code.RFID—Set the phone ID code, type, and sending options (for future development dependent on RFID-based ticketing).
86 Copyright © 2004 NokiaAutomatic close—Change the automatic time-out period (1–60 minutes). After the time-out period has elapsed, the wallet code must be re-entered to gain access to the contents.
Nokia  User GuideCopyright © 2004 NokiaExtrasReset the wallet and wallet codeTo reset both the contents of the wallet and the wallet code:1Key in *#7370925538# in the standby mode.2Enter the phone lock code, and press OK. See "Security" on page 64. 3To confirm that the data is erased, press OK.When opening the wallet again, you must enter a new wallet code. See "Enter the wallet code" on page 83.  • GAMESSelect Menu > Games.To start a game, scroll to the game icon, and press the Scroll key. For instructions on how to play the game, select Options > Help.
88 Copyright © 2004 Nokia12 Instant messaging (IM) (network service)Select Menu > IM.Options in Instant Messaging are Open, Login or Logout, Settings, Help, and Exit.Take text messaging to the next level by experiencing instant messaging in a wireless environment. Engage in instant messaging with friends and family as long as you all use the same IM service. Check with your wireless service provider for availability. Before you can start using IM on your phone, you must make sure that your phone can establish a GPRS connection. You must also register with the IM service you want to use. See “IM service provider icons” on page 88 for more information.Note: Due to variations in IM and wireless service providers, you may not have access to all of the features described in this guide.  • IM SERVICE PROVIDER ICONSSince each IM service has its own display text and icons associated with it, the display text and icons on your phone may appear differently for each IM service provider. If you have any questions about the differences in the various IM service providers’ display text and icons, contact your wireless service provider for more information. Examples of IM icons and their descriptions are as follows:Contact onlineContact not logged in to IMContact blockedTracking set for contactNew unread message
Nokia  User GuideCopyright © 2004 NokiaInstant messaging (IM) (network service) • REGISTER WITH AN IM SERVICEBefore you can use IM, you must register with an IM service to obtain an IM user name and password. You can obtain an IM user name and password by registering over the Internet (using your computer) with the IM service provider you have selected to use. During the registration process, you will have the opportunity to create the user name and password of your choice. For more information about signing up for IM services, contact your wireless service provider. • BEFORE USING IMBefore you can use the IM feature, your phone must have at least one access point defined. See "Access points" on page 60. An IM server must also be defined in your phone:1Select Menu > IM > Options > Settings > Server settings > Servers.2Select a server from the list, or select Options > New server to define a new server. If you need help defining a new server, contact your wireless service provider or IM service provider.You must also obtain a user name and password (see “Register with an IM service” on page 89). For more information about signing up for instant messaging services, contact your wireless service provider. •LOG INSelect Menu > IM > Options > Login, enter your user name and password, and press OK. After you have logged into IM initially, you have the option of a manual login or an automatic login. See “Automatic login” on page 90. • IM SETTINGSYou can customize your IM settings, depending upon the IM service you have selected. Select Options > Settings > IM settings from the main IM menu screen, and select the following:Use screen name—Select Yes to key in a nickname (up to 10 characters).IM presence—Select one of the following options:•Active for all—All other users see your status as online and you receive availability information and messages from all other users.•Active for cntcts.—Even though only the contacts in IM contacts see your status as online, you receive availability information and messages from all other users.•Not active—Your status to other users appears to be offline from the IM service, but you receive availability information and messages from all other users.
90 Copyright © 2004 NokiaAllow messages from and Allow invitations from—These settings define whether you receive instant messages or group invitations from All, IM contacts only, or None.Message speed—Select the speed at which new messages are displayed.Auto-reload availab.—Choose how to update information when your IM contacts log in or out of the IM service. Select Automatically or Manually.Reload user availab.—Use this setting to define which IM contacts are included in a manual or automatic status update. Select For all contacts to refresh the status information of all your IM contacts, or choose specific IM contacts.Automatic loginYou can log in automatically when you start the IM application. First you must ensure that your IM user ID and password are entered for your IM server. To check this, go to the IM main menu, and select Options > Settings > Server settings > Servers and the IM server you are using. Scroll to the User ID and Password fields to enter your information.To turn automatic login on, scroll to the IM login type field in the Server settings screen, and select On app. start-up. If you want to turn automatic login off, select Manual.Set up presence status updatesPresence allows you and other users to know who is online and available to chat. You can set your phone to update a contact’s presence status automatically every time it is changed. From the IM main menu, select Options > Settings > IM settings > Reload user availab.You can also designate whether your own presence information is updated when you log in to IM. From the IM main menu, select Options > Settings > Server settings > Presence login type > Automatic, Aut. in home net. (automatic in home network), On app. start-up, or Manual. For more information on the presence feature, see “Presence (network service)” on page 27. • IM CONVERSATIONSSelect Menu > IM > Conversations.Options in Conversations are Open, Delete, Add to IM contacts, New conversation, Set auto reply on, Blocking options, Close conversation, Settings, Help, and Exit.
Nokia  User GuideCopyright © 2004 NokiaInstant messaging (IM) (network service)You can send instant messages to anyone who uses the same IM service as you do, as long as you have that person’s user name. You can also add that person to IM contacts during an IM conversation. See “IM contacts” on page 92 for more information. More than one IM conversation can be active at the same time.Conversations lists all active conversations by IM contact name. Select one of the names to open the conversation with that person. The contact’s name is displayed at the top of the screen, and as the conversation progresses, the most recent message appears at the bottom of the screen, causing the last message to move up one level.Start a conversationYou must be able to select a contact who is online before you can begin a conversation.1From the IM main menu, select Conversations.2Select Options > New conversation > Select recipient or Enter User ID.If you choose Select recipient, a list of your IM contacts who are currently online is displayed. If you select Enter User ID, you must enter the exact user ID of the contact.After you select a recipient, a conversation view is opened with the recipient’s name displayed at the top of the screen. The conversation is still active, even if you leave the conversation view. You can return to it when you want by selecting Conversations from the IM main menu.Write and send to contact1Start a new conversation or open an active one from Conversations.2Enter your message in the field at the bottom of the screen. See "Write text" on page 44. 3To send the message, press the Scroll key, or select Options > Send.The message is displayed in the conversation view for that contact.Receive message and replyWhen you receive an instant message, your phone beeps (if the phone is not set to the Silent profile) and the sender’s reply appears beneath the most recent message in the conversation.Select Conversations from the IM main menu and open the conversation with the new message indicated by the   icon. You can also select IM contacts from the IM main menu, and the new message icon is displayed by the contact who sent you the message. Select the name to open the conversation.
92 Copyright © 2004 NokiaSaveTo save your conversation or group chat, perform the following steps before you end the conversation:1From the conversation view or group conversation view, select Options > Record convers.2In the Conversation name screen, enter a name for the conversation, and select OK.The conversation is saved as a note under the Extras phone menu.3To stop recording the conversation, select Options > Stop recording.To view saved conversations, select Menu > Extras > Notes, and open the conversation you want to view. To delete a saved conversation, highlight it in the list of Notes documents, and select Options > Delete.End a conversationSelect Conversations from the IM main menu, open the conversation you want to end, and select Options > End conversation. •IM CONTACTSAdd to IM contacts the names of your friends and family with whom you want to interact frequently through IM.Options in IM contacts are Open conversation, Contact details, Switch tracking on or off, New IM contact, Edit, Delete, Blocking options, My server contacts, Search, Settings, Help, and Exit.Add manually or from phone Contacts listFrom the IM main menu, select IM contacts > Options > New IM contact and one of the following:Enter manually—This option opens a new contact card. At a minimum, you must enter an exact IM user ID in the User ID field. You may also enter a first name, last name, and other contact numbers on this contact card. If you want to modify the contact card later, see “Contacts” on page 24.Add from Contacts—This option displays a list of entries from your contact directory. To select a contact to add to your IM contacts list, scroll to the contact, and press the Scroll key to select it (this places an X in the box beside the contact name). When you have chosen all the contacts you want to add, press OK.
Nokia  User GuideCopyright © 2004 NokiaInstant messaging (IM) (network service)SearchTo search for a person or group that is currently online, from the IM contacts screen, select Options > Search and one of the following:Groups—Select this option to search for an IM group by Group name, Topic, or Group members. If you search by group member, you must enter the member’s exact IM user ID.Users—Select this option to search for an IM user by User’s name, User ID, Phone number, or E-mail address. The search criteria does not have to be an exact match for the item for which you are searching.Add contact to IM contacts during IM session1Select Conversations from the IM main menu.2Scroll to the contact you want to add, and select Options > Add to IM contacts. You can also open the conversation, and select Options > Add to IM contacts.A contact card is opened for the new contact, and the contact’s IM user ID is automatically entered in the User ID field. You may also specify a first name, last name, and other contact phone numbers on this contact card.3Select Options > OK.RemoveFrom the IM main menu, select IM contacts, the contact you want to remove, and Delete > Yes.Block and unblockTo block a contact, select the contact name in IM contacts or in Conversations, and select Options > Blocking options > Add to blocked list.To unblock one or more contacts from the IM contacts list or from an open conversation, select Options > Blocking options > Unblock, scroll to the contact, and press the Scroll key to select it (this places an X in the box beside the contact name). When you have chosen all the contacts you want to unblock, press OK.View blocked listFrom the IM contacts list or from an open conversation, select Options > Blocking options > View blocked list.Set or remove alertTo set an alert for a contact to notify you when the contact’s availability changes, go to the IM contacts screen, and select the contact for whom you want to set an alert; then select Options > Switch tracking on.To remove the alert, select Options > Switch tracking off.
94 Copyright © 2004 Nokia • GROUP CHAT SESSIONSSelect IM groups from the IM main menu.The group chat feature allows you to converse with multiple participants simultaneously. You can create your own private group chats or be invited to join a live group chat in progress. During a group chat, all messages are displayed in one group conversation view screen. You can also save a group chat history. See “Save” on page 92.In IM groups, a list of IM groups that you have saved or are currently joined to is shown. The icon next to a group indicates whether it is:•A group that you saved and are currently joined to (  or  )•A group that you saved but are not currently joined to (  or  )•A group that you are currently joined to but have not saved ( )Options in the IM groups view are Open, Join group, Create new group, Leave IM group, IM group, Search, Settings, Help, and Exit.Options when you have an IM group conversation open are Send, Send private msg., Reply, Forward, Send invitation, Leave IM group, Add to banned list, IM group, Record convers. or Stop recording, Help, and Exit.Create chat group1From the IM main menu, select IM groups > Options > Create new group.2Select each of the following options and follow the prompts to enter the appropriate information:Group name—Enter a name for the new group, and select OK.Group topic—Enter a conversation topic for the group, and select OK. The default topic is General.Welcome note—Enter a welcome note of up to 100 characters, and select OK. The welcome note is displayed to any group member who logs in to the group.Group size—Enter the maximum group size, and select OK. The default size is 100 members.Allow search—Determine whether search engines are allowed to show the chat group as a search result. Select either Yes or No.Editing rights—Determine which group members should have rights to edit group properties. To give a member editing rights, scroll to that member name and press the Scroll key to mark the name. When you are finished, select OK. The Group creator always has editing rights and cannot be unmarked.
Nokia  User GuideCopyright © 2004 NokiaInstant messaging (IM) (network service)Group members—Determine whether to restrict the chat group to a list of members or to allow anyone to participate. Select either Selected only (chat group is restricted to a list of members) or All (anyone can join the chat group). See “Add and remove group members” on page 95 for more information.Banned list—Select contacts that cannot join the group or send messages to the group.Allow private msgs.—Determine whether participants in the chat group are allowed to send private messages during a group chat. Select either Yes or No.3Select Back.4Enter your screen name and select OK.You are connected to the new group conversation in the group conversation view. Join or leave a chat groupFrom the IM main menu, select IM groups, and select the group you want to join. Enter your screen name, and select OK. You are connected to the group conversation in the group conversation view, and the name of the chat group is displayed at the top of the screen.To leave the group, select Options > Leave IM group. Add and remove group membersYou can restrict a chat group to selected members by adding and removing contacts from the group members list.1In the group conversation view, select Options > IM group > IM group settings > Group members.2Scroll to Selected only, and select OK.The Group members screen is displayed.3To add a member, at the Group members screen, select Options > Add member, and one of the following:•IM contact to select from your list of IM contacts.•Enter user ID to enter the exact IM user ID.4To remove a member, at the Group members screen, scroll to the contact’s name, and select Options > Remove.5To remove all group members, at the Group members screen, select Options > Remove all.6When you are finished designating group members, select Back and then Done to return to the group conversation view.
96 Copyright © 2004 NokiaSend an invitation for a group chatMembers must be online before you can invite them to a group chat.1From the group conversation view, select Options > Send invitation.2Scroll to the contacts whom you want to invite to the group chat, press the Scroll key to insert an X into the box beside the contact name, and select OK.3Enter an invitation message, and select Done.The invitation is sent.4To invite other members to the group, repeat steps 2–3.When a member accepts an invitation, a message is displayed in the group conversation view announcing that the member has joined.Accept or reject invitations to group chatWhen you receive an invitation to a group chat, select Accept, enter your screen name, and select OK to accept the invitation.To reject the invitation, select Reject.Chat with group membersAll group chat messages are displayed in the group conversation view. The sender name is displayed in front of each message.Enter a message in the text entry area at the bottom of the screen; then select Options > Send, or press the Scroll key.Your message is displayed in the group conversation view under the last message received.If you close the group conversation view while the group chat is still active, you can return to it. In the IM main menu, select IM groups; then select the name of the chat group.Send a private messageWhile you are in a group chat, you can send a private message to one or more members of the group. The message cannot be seen by other group members who are not included in the private message.1From the group conversation view, select Options > Send private msg.2Select the contact to whom you want to send the private message.3Enter the message; then select Options > Send, or press the Scroll key.
Nokia  User GuideCopyright © 2004 NokiaInstant messaging (IM) (network service) • LOG OFF SERVICETo close the IM application and log out of the IM service at the same time, press Exit from the IM main menu. Ongoing conversations are automatically closed when you exit IM.To log out of the IM service but leave the IM application open, go to the IM main menu and select Options > Logout. You can also exit the IM application but still stay connected to the IM service. Press and hold the phone Menu key to bring up a list of open applications, and select Telephone to return to the standby mode. This enables you to receive instant messages from your contacts, when using your phone for other purposes, for example, if you want to send a text message. If you are connected to your IM service, but you have not used the IM application for some time, you may be automatically disconnected from the IM service. The next time you open the IM application, you must log in again. If you make a phone call, you will be disconnected from the IM service.To return to the IM application, you can either select Menu > IM, or you can press and hold the Menu key again, and select IM from the list of open applications.
98 Copyright © 2004 Nokia13 Web (mobile browser)Select Menu > Web, or press and hold the 0key in the standby mode.Various service providers maintain pages specifically designed for mobile phones, offering services such as news, weather reports, banking, travel information, entertainment, and games. With the mobile browser you can view these services as WML, XHTML, or HTML pages.If you have not yet used your phone to make a WAP connection, you may need to contact your service provider for assistance with the first connection, or visit www.nokia.com/phonesettings.Check the availability of services, pricing, and tariffs with your network operator and/or service provider. Service providers will also give you instructions on how to use their services. • BASIC STEPS FOR WEB ACCESS1Save the settings that are needed to access the browser service that you want to use. See "Browser service set-up" on page 98. 2Make a connection to the service. See "Make a connection" on page 99. 3Start browsing the web pages. See "Browse" on page 100. 4End the connection to the service. See "End a connection" on page 102.  • BROWSER SERVICE SET-UPReceive settings in a smart messageYou may receive service settings in a special text message called a smart message from the network operator or service provider that offers the service. See "Smart messages" on page 49. For more information, contact your network operator or service provider.Enter settings manuallyFollow the instructions given to you by your service provider.1Select Menu > Settings > Connection > Access points and define the settings for an access point. See "Connection" on page 60. 2Select Menu > Web > Options > Bookmark manager > Add bookmark.3Write a name for the bookmark and the address of the browser page defined for the current access point.
Nokia  User GuideCopyright © 2004 NokiaWeb (mobile browser) • MAKE A CONNECTIONOnce you have stored all the required connection settings, you can access browser pages.There are three different ways to access browser pages:•Select the homepage ( ) of your service provider.•Select a bookmark from the Bookmarks view.•Press the keys 2–9 to start to write the address of a browser service. The Go to field at the bottom of the display is immediately activated, and you can continue to write the address there.After you have selected a page or written the address, press the Scroll key to start downloading the page. •BOOKMARKSYour device may have some preinstalled bookmarks for sites not affiliated with Nokia. Nokia does not warrant or endorse these sites. If you choose to access them, you should take the same precautions for security or content as you would with any site.In the Bookmarks view, you can see bookmarks pointing to different kinds of browser pages. When you scroll through bookmarks, you can see the address of the highlighted bookmark in the Go to field at the bottom of the display.Bookmarks are indicated by the following icons:Options in Bookmarks (when a bookmark or folder is selected) are Open, Download, Back to page, Bookmark manager, Mark/Unmark, Navigation options, Advanced options, Send, Find bookmark, Details, Settings, Help, and Exit.Add bookmarks manually1In Bookmarks, select Options > Bookmark manager > Add bookmark.The starting page defined for the browser access point. If you use another browser access point for browsing, the starting page is changed accordingly.The last visited page. When the phone is disconnected from the service, the address of the last visited page is kept in memory until a new page is visited during the next connection.A bookmark showing the title.An automatic bookmark. See "Add bookmarks automatically" on page 100.
100 Copyright © 2004 Nokia2Start to fill in the fields.Only the address must be defined. The default access point is assigned to the bookmark if no other one is selected. Press the *key to enter special characters such as /, ., :, and @. Press the Clear key to clear characters.3Select Options > Save to save the bookmark.Add bookmarks automaticallyWhen you visit a web page, your browser automatically saves a bookmark in the automatic bookmarks folder ( ), which is located in the list of bookmarks when you open the Web application. Automatic bookmarks can be renamed and deleted, but they cannot be moved. To modify automatic bookmarks settings, select Options > Settings > Automatic bookmarks > On, Hide Folder, or Off. • BROWSEOn a browser page, new links appear underlined in blue and previously visited links in purple. Images that act as links have a blue border around them.Options when browsing are Open, Open Wallet, Service options, Bookmarks, Save as bookmark, Navigation options, Advanced options, Send bookmark, Find, Details, Settings, Help, and Exit.Keys and commands used in browsing•To open a link, press the Scroll key.•To scroll the view, use the Scroll key.•To enter letters and numbers in a field, press the 0–9 keys. Press the *key to enter special characters such as /, ., :, and @. Press the Clear key to clear characters.•To go to the previous page while browsing, press Back. If Back is not available, select Options > Navigation options > History to view a chronological list of the pages you have visited during a browsing session. The history list is cleared each time a session is closed.•To check boxes and make selections, press the Scroll key.•To retrieve the latest content from the server, select Options > Navigation options > Reload.•To open a sublist of commands or actions for the currently open browser page, select Options > Service options.•To disconnect from a browser service and to quit browsing, select Options > Advanced options > Disconnect.
Nokia  User Guide  Copyright © 2004 NokiaWeb (mobile browser)Save bookmarks•To save a bookmark while browsing, select Options > Save as bookmark.•To save a bookmark received in a smart message, select Menu > Messaging > Inbox, open the message, and select Options > Save to bookmarks. See "Smart messages" on page 49. View saved pagesOptions in Saved pages are Open, Back to page, Reload, Saved pages mngr., Mark/Unmark, Navigation options, Advanced options, Details, Settings, Help, and Exit.If you regularly browse pages containing information that does not change very often, you can save and then browse them when not logged in.To save a page, while browsing select Options > Advanced options > Save page.To open saved pages, scroll right in the Bookmarks view. In the Saved pages view, press the Scroll key to open a saved page. Saved pages are indicated by the   icon. In the Saved pages view you can also create folders to store your saved browser pages. Folders containing saved browser pages are indicated by the   icon.To start a connection to the browser service and to retrieve the page again, select Options > Navigation options > Reload. The phone stays online after you reload the page. • DOWNLOADYou can download items such as ringing tones, images, operator logos, software, and video clips through the mobile browser. These items may be provided free, or you can purchase them. To clear the cache after downloads, see “Clear the cache” on page 102.Once downloaded, items are handled by the respective applications on your phone (for example, a downloaded photo will be saved in Gallery).Important: Only install applications from sources that offer adequate protection against harmful software.Purchase an itemTo download an item:1Scroll to the link and select Options > Open.2Choose the appropriate option to purchase the item, for example, Buy.
102 Copyright © 2004 NokiaCarefully read all the information provided.If the online content is compatible, you can use your wallet information to make the purchase:1Select Open wallet. 2Enter your wallet code. See "Enter the wallet code" on page 83. 3Select the appropriate card category from your wallet.4Select Fill in.This uploads the selected wallet information.If the wallet does not contain all information necessary for the purchase, you will be requested to enter the remaining details manually.The information or services you access are stored in the cache. To empty the cache, see “Clear the cache” on page 102.Copyright protections may prevent some images, ringing tones, and other content from being copied, modified, transferred, or forwarded.Check an item before downloadingYou can see details about an item before you download it. Details about an item may include the price, a brief description, and size. 1Scroll to the link and select Options > Open. Details about the item are displayed on your phone.2If you want to continue with the downloading, press Accept, or if you want to cancel the download, press Cancel. • END A CONNECTIONSelect Options > Advanced options > Disconnect, or press and hold the End key to quit browsing and return to the standby mode. • CLEAR THE CACHEA cache is a memory location that is used to store data temporarily. The information or services you access are stored in the cache memory of the phone. If you have tried to access or have accessed confidential information requiring passwords, empty the cache after each use. To empty the cache, select Options > Navigation options > Clear cache.
Nokia  User GuideCopyright © 2004 NokiaWeb (mobile browser) • BROWSER SETTINGSFrom the Bookmarks screen, select Options > Settings and one of the following:Default access point—To change the default access point, press the Scroll key to open a list of available access points. The current default access point is highlighted. See "Connection" on page 60. Show images—Choose if you want to view pictures when you are browsing. If you choose No, you can later load images during browsing by selecting Options > Show images.Font size—You can choose 5 text sizes in the browser: Largest, Large, Normal, Small, and Smallest.Default encoding—Choose a language setting to make sure your browser pages display text characters correctly.Automatic bookmarks—Select On, Hide Folder, or Off. When you select Hide Folder, bookmarks are still automatically added to the Automatic bookmarks folder. See "Add bookmarks automatically" on page 100. Screen size—Select Normal screen, Select. keys only, or Full screen to change how the browser window is displayed in your phone screen. Rendering—Select By quality or By speed to determine how web pages are loaded. Cookies—Select Allow or Reject. You can enable or disable the receiving and sending of cookies (a means of content providers to identify users and their preferences for frequently used content).Security warnings—Choose to Hide or Show security warnings.Confirm touch tones—Select Always or First sending only. Choose whether you want to confirm before the phone sends DTMF tones during a voice call. For example, you can make a voice call while you are viewing a browser page, send DTMF tones while a voice call is in progress, and save a name and phone number in Contacts from a browser page. See "Options during a call" on page 20. Wallet—Choose On if you want the wallet to open automatically when a compatible browser page is opened.
104 Copyright © 2004 Nokia14 Connectivity • BLUETOOTH CONNECTIONSelect Menu > Connect. > Bluetooth.There may be restrictions on using Bluetooth devices in some locations. Check with your local authorities or service provider.Bluetooth technology enables wireless connections between electronic devices within a maximum range of 30 feet (10 meters). A Bluetooth connection can be used to send images, videos, texts, business cards, and calendar notes, or it can be used to connect wirelessly to compatible devices supporting the same Bluetooth protocols, such as computers.Since devices using Bluetooth technology communicate using radio waves, your phone and the other devices do not need to be in direct line-of-sight. The two devices only need to be within a maximum of 30 feet (10 meters) of each other, although the connection can be subject to interference from obstructions such as walls or from other electronic devices.When you activate a Bluetooth connection for the first time, you are asked to give a name to your phone.Bluetooth device compatibilityThis phone is designed to be compliant with and to adopt Bluetooth Specification 1.1. However, interoperability between the phone and other products with Bluetooth wireless technology depends also on the profiles and protocols used. To ensure interoperability between other devices supporting Bluetooth technology, use Nokia approved enhancements for this phone. Check with the manufacturers of other devices to determine their compatibility with this device. The Nokia 6670 phone supports the following profiles:•Dial-up networking profile as a gateway•Object push profile as a client and server•File transfer profile as a server•Hands-free profile as an audio gateway•Generic object exchange profile•Generic access profile•Serial port profile with the PC connectivity software
Nokia  User GuideCopyright © 2004 NokiaConnectivityFor more information on the compatibility between Bluetooth devices, consult their manufacturers.Bluetooth connection settings•Bluetooth—Select On if you want to use a Bluetooth connection. If you select Off, all active Bluetooth connections are ended, and Bluetooth connection cannot be used for sending or receiving data.•My phone’s visibility—If you select Shown to all, your phone can be found by other devices during device search. If you select Hidden, your phone cannot be found by other devices. •My phone’s name—Define a name for your phone. After you have set your Bluetooth connection as active and changed My phone's visibility to All, your phone and this name can be seen by other devices.Send data by Bluetooth connectionYour phone can only have one active Bluetooth connection at a time.1Open an application where the item you wish to send is stored.For example, to send a photo to another device, open the Gallery application. 2Scroll to the item you want to send, and select Options > Send > Via Bluetooth.The phone starts to search for devices within range. Devices using Bluetooth technology that are within range start to appear on the display one by one. You can see a device icon, the device name, the device type, or a short name. Paired devices are shown with  . A paired device is one where a Bluetooth connection already exists between your phone and the other device.To interrupt the search, press Stop. The device list freezes and you can start to form a connection to one of the devices already found.When searching for devices, some devices may show only the unique device addresses. To find out the unique address of your phone, enter the code *#2820# in the standby mode.If you have searched for devices earlier, a list of the devices that were found previously is shown first. To start a new search, select More devices. If you switch off the phone, the list of devices is cleared and the device search needs to be started again before sending data.
106 Copyright © 2004 Nokia3Scroll to the device with which you want to connect and press Select.The item you are sending is copied to Outbox and the note Connecting is shown.4Pairing (if not required by the other device, go to step 5.)•If the other device requires pairing before data can be transmitted, a tone sounds and you are asked to enter a passcode.•Create your own passcode (1–16 characters long, numeric) and agree with the owner of the other device to use the same code. This passcode is used only once and you do not have to memorize it. Devices that do not have a user interface have a preset passcode. See "Paired devices view" on page 106. •After pairing, the device is saved to the Paired devices view.5When the connection has been successfully established, Sending data is shown.Copyright protections may prevent some images, ringing tones, and other content from being copied, modified, transferred, or forwarded.Data received by Bluetooth connection can be found in the Inbox folder in Messaging. See "Inbox—receive messages" on page 48. Icons for different devices are  —Computer, —Phone, —Audio/video, and —Bluetooth deviceIf sending fails, the message or data will be deleted. The Drafts folder in Messaging does not store messages sent by Bluetooth connection.Check Bluetooth connection statusWhen   is shown in the standby mode, Bluetooth connection is active.When   is blinking, your phone is trying to connect to the other device.When   is shown continuously, the Bluetooth connection is active.Paired devices viewPairing with a device makes device searches easier and quicker. Paired devices are easier to recognize; they are indicated by   in the search result list. In the Bluetooth connection main view, scroll right to open a list of paired devices ( ).•To pair with a device, select Options > New paired device. The phone starts a device search. Scroll to the device with which you want to pair and press Select. After you exchange passcodes, the device is added to the paired devices list.•To cancel pairing, scroll to the device whose pairing you want to cancel and press the Clear key or select Options > Delete. If you want to cancel all pairings, select Options > Delete all.Note: If you are currently connected to a device and you delete the pairing with that device, the pairing is removed and the device connection is terminated, but the Bluetooth connection remains active on your phone.
Nokia  User GuideCopyright © 2004 NokiaConnectivity•To set a device to be authorized or unauthorized, scroll to the device, select Options, and then select one of the following:Set as authorized—Connections between your phone and this device can be made without your knowledge. No separate acceptance or authorization is needed. Use this status for your own devices, for example, your PC, or devices that belong to someone you trust. The icon   is added next to authorized devices in the Paired devices view.Set as unauthorized—Connection requests from this device need to be accepted separately every time.•To assign a short name to a device, select Options > Assign short name. Enter a name for the device.Receive data by Bluetooth connectionWhen you receive data by Bluetooth connection, a tone is played, and you are asked if you want to accept the message. If you accept, the item is placed in the Inbox folder in Messaging. Messages received by Bluetooth connection are indicated by  . See "Inbox—receive messages" on page 48. Close the Bluetooth connectionA Bluetooth connection is disconnected automatically after sending or receiving data. • USB CONNECTIONYou can use the Connectivity Cable DKU-2 to connect your Nokia 6670 phone to the USB port on your computer. Before using the connectivity cable, you must install the cable driver prior to PC Suite installation. Carefully follow the installation instructions given in the PC Suite user guide and the DKU-2 (USB) installation guide on the CD-ROM supplied with the phone.Making or answering phone calls during a computer connection is not recommended because it might disrupt the operation. • CONNECTION MANAGERSelect Menu > Connect. > Conn. mgr..
108 Copyright © 2004 NokiaIn Connection manager you can identify the status of multiple data connections, view details on the amount of data sent and received, and end unused connections.You can view details of data connections only. Voice calls are not listed.When you open Connection manager, you can see the following:•Open data connections: Data call GPRS•The status of each connection•Amount of data uploaded and downloaded for each connection (GPRS connections only)•The duration of each connection (data call connections only)Note: The actual time invoiced by your service provider may vary, depending on network features, rounding off for billing, and so forth.Options in Connection manager when there are one or more connections are Details, Disconnect, Disconnect all, Help, and Exit.View connection detailsTo view the details of a connection, scroll to a connection and select Options > Details. The following information is displayed:Name—The name of the Internet access point (IAP) in useBearer—The type of data connection: Data call or GPRSStatus—The current status of the connectionReceived—The amount of data, in bytes, received to the phoneSent—The amount of data, in bytes, sent from the phoneDuration—The length of time that the connection has been openSpeed—The current speed of both sending and receiving data in kB/sDial-up (GSM) or Name (GPRS)—The GSM dial-up number used or the name of the GPRS access point usedShared—The number of applications using the same connection. This option is not displayed if the connection is not shared.End connectionsScroll to a connection and select Options > Disconnect to end that connection only, or select Options > Disconnect all to close all currently open connections.
Nokia  User GuideCopyright © 2004 NokiaConnectivity • CONNECT YOUR PHONE TO A COMPUTERFor further information on how to make a connection to a compatible computer by USB or Bluetooth connection and how to install PC Suite, see the PC Suite user guide on the CD-ROM supplied with the phone. For further information on how to use Nokia PC Suite, see the help function on PC Suite or visit the support pages at www.nokia.com. • USE THE CD-ROMThe CD-ROM should launch itself after you have inserted it into the CD-ROM drive of your compatible PC. If not, proceed as follows:1Click the Windows Start button and select Programs > Windows Explorer.2On the CD-ROM drive, locate a file called PCSuite_us.exe and double-click it.The CD-ROM interface opens.3Locate PC Suite in the Install Software section.4Double-click the Nokia PC Suite file. The installation wizard will guide you through the installation process. • SYNCHRONIZATIONSelect Menu > Connect. > Sync.The Sync application enables you to synchronize your calendar, contacts, and notes with various calendar, address book, and notes applications on a compatible computer or on the Internet. Remote synchronization takes place over a Web or Bluetooth connection that you can initiate from your phone. Local synchronization takes place by a data cable connection to your PC.The synchronization application uses SyncML technology for synchronization. For information on SyncML compatibility, contact the supplier of the calendar, address book, or notes application with which you want to synchronize your phone data.Create a new synchronization profileOptions in the Sync main view are Synchronize, New sync profile, Edit sync profile, Delete, Help, and Exit.1Select Options > New sync profile. 2Choose whether you want to use the default setting values or copy the values from an existing profile to be used as the basis for the new profile.3Define the following:Sync profile name—Write a descriptive name for the profile.
110 Copyright © 2004 NokiaData bearer—Select Web or Bluetooth as your synchronization method.Access point—Select the access point you want to use for the data connection. This option is only available if you choose Web in the Data bearer setting.Host address—Contact your service provider or system administrator for the correct values.Port—Contact your service provider or system administrator for the correct values. This option is only available if you choose Web in the Data bearer setting.User name—Your user ID for the synchronization server. Contact your service provider or system administrator for your correct ID.Password—Write your password. Contact your service provider or system administrator for the correct value.4Scroll right and select which applications you would like to synchronize:Contacts—Select Yes if you want to synchronize your contacts.Calendar—Select Yes if you want to synchronize your calendar.Notes—Select Yes if you want to synchronize your notes.When you select Yes to synchronize each of these applications, you must also specify:•Remote database—Enter the correct path to the server for the remote address book (to sync with Contacts), the remote calendar (to sync with Calendar), or the remote notes application (to sync with Notes).•Synchronization type—Select Normal, To server only, or To phone only.5Press Done to save the settings. Synchronize dataIn the Sync main view, you can see the different profiles, and what kind of data will be synchronized: Calendar, Contacts, Notes, or all three.1In the main view, scroll to a profile and select Options > Synchronize. The status of the synchronization is shown at the bottom of the screen.To cancel synchronization before it is finished, press Cancel.You are notified when the synchronization has been completed.2After synchronization is complete, press View log, or select Options > View log to open a log file showing the synchronization status (Complete or Incomplete) and how many calendar, contact, and notes entries have been added, updated, deleted, or discarded (not synchronized) in the phone or on the server.
Nokia  User GuideCopyright © 2004 NokiaTroubleshooting15 Troubleshooting •SIM CARDA SIM (subscriber identity module) card is required for your Nokia GSM phone to operate. The SIM card is supplied by your service provider and has your mobile phone number and all subscriber account information programmed on it. You can save contact information from your contacts list on the SIM card so that when you use the SIM card in another GSM phone or terminal, your phone number and contacts will be available to you on the SIM card rather than stored in phone memory. Note that you can only save names and phone numbers on the SIM card.The SIM card in the Nokia 6670 phone is located under the battery in the top left corner. The SIM card must be inserted under the hood and the gold-colored contacts on the card must make direct contact with the gold-colored contacts in the card slot. See “Insert the SIM card” on page 7. •MEMORY LOWWhen one of the following notes is shown, the phone memory is low and you must delete some data:•Not enough memory to perform operation.•Delete some data first.•Memory low. Delete some data. To view what kind of data you have and how much memory the different data groups consume, select Menu > Tools > File mngr. > Options > Memory details.You may want to delete the following items regularly to avoid memory getting low:•Messages from the Inbox, Drafts, and Sent folders in Messaging.•Retrieved e-mail messages from the phone memory.•Saved browser pages.•Images, video clips, and sound clips in Gallery.If you want to delete contact information, calendar notes, call timers, call cost timers, game scores, or any other data, go to the respective application to remove the data.If you are deleting multiple items and one of the low memory notes is shown again, try deleting items one by one (starting from the smallest item).
112 Copyright © 2004 Nokia • DIFFERENT WAYS TO STORE DATA•Use Nokia PC Suite to make a backup copy of all data to your computer. See "Connect your phone to a computer" on page 109. •Send images to your e-mail address and then save the images to your computer.•Send data by Bluetooth connection to a compatible device.•Store data on a compatible memory card. •PHONE DISPLAYIf missing, discolored, or bright dots appear on the screen when you turn on your phone, this is a characteristic of this type of display. Some displays may contain pixels or dots that remain on or off. This is normal, not a fault.  • BLUETOOTH CONNECTIONIf you cannot end a Bluetooth connection, check to see if another device is pairing with (connected to) your phone but not sending data. If so, you can disconnect it by deactivating the Bluetooth link altogether. Select Menu > Connect. > Bluetooth, and select Bluetooth > Off.If you cannot find a device using Bluetooth technology, check the following:•Both devices have activated their Bluetooth connections. •The distance between the two devices is not over 30 feet (10 meters) or that there are no walls or other obstructions between the devices.•The other device is not in Hidden mode.•Both devices are compatible. • MULTIMEDIA MESSAGINGIf the phone cannot receive a multimedia message because memory is full, check the amount of memory in use (see “Memory low” on page 111). If the notes Retrieving message or Trying to retrieve message again are shown briefly, your phone is trying to retrieve a multimedia message from the multimedia messaging center. To stop the notes from displaying, you need to end the data connection because the phone is attempting to start the connection again and again. Also, try the following solutions:Check that the settings for multimedia messaging have been defined correctly and that there are no mistakes in phone numbers or addresses. Select Menu > Messaging > Options > Settings > Multimedia message.
Nokia  User GuideCopyright © 2004 NokiaTroubleshootingTo stop the phone from making a data connection, you have the following options. Select Menu > Messaging > Options > Settings > Multimedia message, and then:•Select On receiving msg. > Defer retrieval if you want the multimedia messaging center to save the message to be retrieved later, for example, after you have checked the settings. After this change, the phone still needs to send information notes to the network. When you want to retrieve the message, select Retr. immediately.•Select On receiving msg. > Reject message if you want to reject all incoming multimedia messages. After this change, the phone needs to send information notes to the network and the multimedia messaging center will delete all multimedia messages that are waiting to be sent to you.•Select Multimedia reception > Off if you want to ignore all incoming multimedia messages. After this change the phone will not make any network connections related to multimedia messaging.  • MESSAGINGIf you are composing a message and you cannot select a contact from the contacts directory, the contact card does not have a phone number or an e-mail address. Add the missing information to the contact card in Contacts. • BROWSER SERVICES If you receive the message No valid access point defined. Define one in Web settings, you need to insert the proper browser settings. Contact your service provider for instructions. •LOGIf the log appear empty, you may have activated a filter, and no communication events fitting that filter have been logged. To see all events in Logs, select Options > Filter > All communication. • PC CONNECTIVITYIf you have problems connecting the phone to a PC, make sure that Nokia PC Suite is installed and running on the PC. See the PC Suite user guide on the CD-ROM provided with the phone. For further information on how to use PC Suite, see the help function of PC Suite, or visit the support pages at www.nokia.com. • APPLICATION NOT RESPONDINGIf you need to close an application that is not responding, open the application switching window by pressing and holding the Menu key. Then scroll to the application, and press the Clear key to close the application.
114 Copyright © 2004 Nokia16 Reference information • BATTERY INFORMATIONYour device is powered by a rechargeable battery. The full performance of a new battery is achieved only after two or three complete charge and discharge cycles. The battery can be charged and discharged hundreds of times but it will eventually wear out. When the talk and standby times are noticeably shorter than normal, buy a new battery. Use only Nokia approved batteries, and recharge your battery only with Nokia approved chargers designated for this device.Unplug the charger from the electrical plug and the device when not in use. Do not leave the battery connected to a charger. Overcharging may shorten its lifetime. If left unused, a fully charged battery will lose its charge over time. Temperature extremes can affect the ability of your battery to charge.Use the battery only for its intended purpose. Never use any charger or battery that is damaged.Do not short-circuit the battery. Accidental short-circuiting can occur when a metallic object such as a coin, clip, or pen causes direct connection of the positive (+) and negative (-) terminals of the battery. (These look like metal strips on the battery.) This might happen, for example, when you carry a spare battery in your pocket or purse. Short-circuiting the terminals may damage the battery or the connecting object.Leaving the battery in hot or cold places, such as in a closed car in summer or winter conditions, will reduce the capacity and lifetime of the battery. Always try to keep the battery between 59°F and 77°F (15°C and 25°C). A device with a hot or cold battery may not work temporarily, even when the battery is fully charged. Battery performance is particularly limited in temperatures well below freezing.Do not dispose of batteries in a fire! Dispose of batteries according to local regulations. Please recycle when possible. Do not dispose as household waste. •ENHANCEMENTSA few practical rules about accessories and enhancements:•Keep all accessories and enhancements out of the reach of small children.•When you disconnect the power cord of any accessory or enhancement, grasp and pull the plug, not the cord.•Check regularly that enhancements installed in a vehicle are mounted and are operating properly.•Installation of any complex car enhancements must be made by qualified personnel only.
Nokia  User GuideCopyright © 2004 NokiaReference information • ENHANCEMENTS, BATTERIES, AND CHARGERSFor availability of approved enhancements, check with your dealer. BatteryThe 900 mAh, Li-Ion based BL-5C battery provides power in a thin and light package. Variation in operation times will occur depending on the charger used, the SIM card, network and usage settings, usage style, and environments. See "Technical information" on page 121. This device is intended for use when supplied with power from ACP-12.See also “Insert the battery” on page 9 and “Charge the battery” on page 9.Other compatible Nokia enhancementsHeadset audio•Wireless headsets (HDW-2 and HS-3W)•Wireless boom headset (HS-4W)•Boom headset (HDB-4)•Standard headset (HS-5)•Retractable headset (HS-10)•Phone adapter (HDA-10) (See “Phone adapter HDA-10 accessibility enhancement” on page 116.)Power•Charger (ACP-12)•Retractable charger (AC-1)Data•Connectivity cable (DKU-2)•RS-MMC (64 MB and 128 MB)Car•Wireless car kit (CK-1W)•Mobile charger (LCH-12)Imaging•Nokia observation camera•Image viewer (SU-5)•Image album (PD-1)•Camera flash (PD-2)Messaging•Digital pen (SU-1B)Cover/carrying•Xpress-on™ covers and style packs•Wrist strap
116 Copyright © 2004 NokiaPhone adapter HDA-10 accessibility enhancementThe HDA-10 phone adapter is a Nokia enhancement that allows you to connect your mobile phone to a Telecommunications Device for the Deaf (TTY/TDD) to make a call in digital mode. If you are using a phone adapter, you must activate it on your mobile phone by selecting Menu > Settings > Enhancement > Enhancement in use > TTY. In addition to the Nokia 6670 phone, you will need the following for TTY/TDD communication:•A TTY/TDD device that is cellular ready or cellular compatible•A cable for connecting the TTY/TDD to your phone, usually supplied by the manufacturer of the TTY/TDD device•The phone adapter (HDA-10), which can be purchased separately as an enhancement at www.nokia.comFor more information, see “Accessibility solutions” on page 6. • CARE AND MAINTENANCEYour device is a product of superior design and craftsmanship and should be treated with care. The suggestions below will help you protect your warranty coverage and enjoy your device for many years.•Keep the device dry. Precipitation, humidity, and all types of liquids or moisture can contain minerals that will corrode electronic circuits. If your device does get wet, remove the battery and allow the device to dry completely before replacing it.•Do not use or store the device in dusty, dirty areas. Its moving parts and electronic components can be damaged.•Do not store the device in hot areas. High temperatures can shorten the life of electronic devices, damage batteries, and warp or melt certain plastics.•Do not store the device in cold areas. When the device returns to its normal temperature, moisture can form inside the device and damage electronic circuit boards.•Do not attempt to open the device other than as instructed in this guide.18 in.
Nokia  User GuideCopyright © 2004 NokiaReference information•Do not drop, knock, or shake the device. Rough handling can break internal circuit boards and fine mechanics. •Do not use harsh chemicals, cleaning solvents, or strong detergents to clean the device. •Do not paint the device. Paint can clog the moving parts and prevent proper operation.•Use a soft, clean, dry cloth to clean any lenses (such as camera, proximity sensor, and light sensor lenses).•Use only the supplied or an approved replacement antenna. Unauthorized antennas, modifications, or attachments could damage the device and may violate regulations governing radio devices.All of the above suggestions apply equally to your device, battery, charger, or any enhancement. If any device is not working properly, take it to the nearest authorized service facility for service. • ADDITIONAL SAFETY INFORMATIONOperating environmentRemember to follow any special regulations in force in any area and always switch off your device when its use is prohibited or when it may cause interference or danger. Use the device only in its normal operating positions. This device meets RF exposure guidelines when used either in the normal use position against the ear or when positioned at least 7/8 inch (2.2 cm) away from the body.  When a carry case, belt clip, or holder is used for body-worn operation, it should not contain metal and should position the device at least 7/8 inch (2.2 cm) away from your body.Parts of the device are magnetic. Metallic materials may be attracted to the device, and persons with a hearing aid should not hold the device to the ear with the hearing aid. Always secure the device in its holder, because metallic materials may be attracted by the earpiece. Do not place credit cards or other magnetic storage media near the device, because information stored on them may be erased. Medical devicesOperation of any radio transmitting equipment, including wireless phones, may interfere with the functionality of inadequately protected medical devices. Consult a physician or the manufacturer of the medical device to determine if they are adequately shielded from external RF energy or if you have any questions. Switch off your phone in health care facilities when any regulations posted in these areas instruct you to do so. Hospitals or health care facilities may be using equipment that could be sensitive to external RF energy.
118 Copyright © 2004 NokiaPACEMAKERSPacemaker manufacturers recommend that a minimum separation of 6 inches (15.3 cm) be maintained between a wireless phone and a pacemaker to avoid potential interference with the pacemaker. These recommendations are consistent with the independent research by and recommendations of Wireless Technology Research. To minimize the potential for interference, persons with pacemakers should:•Always keep the device more than 6 inches (15.3 cm) from their pacemaker when the device is switched on•Not carry the device in a breast pocket•Hold the device to the ear opposite the pacemakerIf you have any reason to suspect that interference is taking place, switch off your device immediately.HEARING AIDSome digital wireless devices may interfere with some hearing aids. If interference occurs, consult your service provider.VehiclesRF signals may affect improperly installed or inadequately shielded electronic systems in motor vehicles such as electronic fuel injection systems, electronic antiskid (antilock) braking systems, electronic speed control systems, air bag systems. For more information, check with the manufacturer or its representative of your vehicle or any equipment that has been added.Only qualified personnel should service the device, or install the device in a vehicle. Faulty installation or service may be dangerous and may invalidate any warranty that may apply to the device. Check regularly that all wireless device equipment in your vehicle is mounted and operating properly. Do not store or carry flammable liquids, gases, or explosive materials in the same compartment as the device, its parts, or enhancements. For vehicles equipped with an air bag, remember that an air bags inflate with great force. Do not place objects, including installed or portable wireless equipment in the area over the air bag or in the air bag deployment area. If in-vehicle wireless equipment is improperly installed and the air bag inflates, serious injury could result.
Nokia  User GuideCopyright © 2004 NokiaReference informationPotentially explosive environmentsSwitch off your device when in any area with a potentially explosive atmosphere and obey all signs and instructions. Potentially explosive atmospheres include areas where you would normally be advised to turn off your vehicle engine. Sparks in such areas could cause an explosion or fire resulting in bodily injury or even death. Switch off the device at refuelling points such as near gas pumps at service stations. Observe restrictions on the use of radio equipment in fuel depots, storage, and distribution areas, chemical plants or where blasting operations are in progress. Areas with a potentially explosive atmosphere are often but not always clearly marked. They include below deck on boats, chemical transfer or storage facilities, vehicles using liquefied petroleum gas (such as propane or butane), and areas where the air contains chemicals or particles such as grain, dust or metal powders.FCC regulations prohibit using your wireless device while in the air. The use of wireless telephones in an aircraft may be dangerous to the operation of the aircraft, disrupt the wireless telephone network, and may be illegal.Failure to observe these instructions may lead to suspension or denial of telephone services to the offender, legal action, or both. • EMERGENCY CALLSImportant:  Wireless phones, including this phone, operate using radio signals, wireless networks, landline networks, and user-programmed functions. Because of this, connections in all conditions cannot be guaranteed. You should never rely solely on any wireless phone for essential communications like medical emergencies.To make an emergency call: 1If the phone is not on, switch it on. Check for adequate signal strength. Some networks may require that a valid SIM card is properly inserted in the phone. 2Press the End key as many times as needed to clear the display and ready the phone for calls. 3Key in the official emergency number for your present location. Emergency numbers vary by location. 4Press the Send key.If certain features are in use, you may first need to turn those features off before you can make an emergency call. Consult this guide or your service provider. When making an emergency call, give all the necessary information as accurately as possible. Your wireless phone may be the only means of communication at the scene of an accident. Do not end the call until given permission to do so.
120 Copyright © 2004 Nokia • Certification information (SAR)THE NOKIA 6670 DEVICE MEETS GUIDELINES FOR EXPOSURE TO RADIO WAVES.Your mobile device is a radio transmitter and receiver. It is designed and manufactured not to exceed the limits for exposure to radio frequency (RF) energy recommended by international guidelines (ICNIRP). These limits establish permitted levels of RF energy for the general population. The guidelines are based on standards that were developed by independent scientific organizations through periodic and thorough evaluation of scientific studies. The standards and guidelines include a substantial safety margin designed to assure the safety of the public, regardless of age and health and to account for any variations in measurements.The exposure guidelines for mobile devices employ a unit of measurement known as the Specific Absorption Rate or SAR. The SAR limit stated in the international guidelines is 2.0 watts/kilogram (W/kg) averaged over ten grams of tissue. Tests for SAR are conducted using standard operating positions with the device transmitting at its highest certified power level in all tested frequency bands. The actual SAR level of an operating device can be well below the maximum value because the device is designed to use only the power required to reach the network. That amount changes depending on a number of factors such as how close you are to a network base station. The highest SAR value when tested according to international testing procedures for use at the ear for device type RH-67 is 0.22 W/kg and for device type RH-68 is 0.52 W/kg. Your phone’s device type is listed on the label located under the battery.SAR values may vary depending on national reporting and testing requirements and the network band. Use of device accessories and enhancements may result in different SAR values. Additional SAR information may be provided under product information at www.nokia.com.USA and Canada: The SAR limit of USA (FCC) and Canada (IC) is 1.6 W/kg averaged over one gram of tissue. Device types RH-67 and RH-68 have also been tested against this SAR limit. The highest SAR value reported under this standard during product certification for use at the ear for device type RH-67 is 0.42 W/kg and when properly worn on the body is 0.58 W/kg.  The highest SAR value reported under this standard during product certification for use at the ear for device type RH-68 is 0.73 W/kg and when properly worn on the body is 0.60 W/kg. Information about this device can be found on the FCC's website at <http://www.fcc.gov/oet/fccid> by searching the equipment authorization system using FCC ID: QVVRH-67 and QVVRH-68.
Nokia  User GuideCopyright © 2004 NokiaReference information • TECHNICAL INFORMATIONWeight 4.16 oz (118 g) with 900–mAh Li-Ion batterySize  Volume: 5.7 cubic inches (93.5 cc)Length: 4.27 in (108.6 mm)Width: 2.1 in (53.0 mm)Thickness: 0.7 in (18.7 mm)Frequency range Nokia 6670GSM900880–915 MHz (TX)925–960 MHz (RX) GSM18001710–1785 MHz (TX)1805–1880 MHz (RX)GSM19001850–1910 MHz (TX)1930–1990 MHz (RX)Nokia 6670 bGSM850824–849 MHz (TX)869–894 MHz (RX) GSM18001710–1785 MHz (TX)1805–1880 MHz (RX)GSM19001850–1910 MHz (TX)1930–1990 MHz (RX)Transmitter output powerUp to 2 WBattery voltage 3.7 VOperating temperature14°F to + 131°F(-10°C to +55°C)aTalk time, standby timea. Battery talk and standby times are estimates only and depend on signal strength, network conditions, features used, battery age and condition (including the effect of charging habits), temperatures to which battery is exposed, use in digital mode, and many other factors. Please note that the amount of time a phone is used for calls will affect its standby time. Likewise, the amount of time that the phone is turned on and in the standby mode will affect its talk time.Talk time: up to 3 hoursStand-by time: up to 10 daysCharging time with 900–mAh Li-Ion battery and the ACP-12 charger: approximately 1.5 hours
122 Copyright © 2004 Nokia
Nokia  User Guide  Copyright © 2004 NokiaAppendix AAppendix A Message from the CTIA(Cellular Telecommunications & Internet Association) to all users of mobile phones.&HOOXODU7HOHFRPPXQLFDWLRQV&,QWHUQHW$VVRFLDWLRQ$OO5LJKWV5HVHUYHG&RQQHFWLFXW$YHQXH1:6XLWH:DVKLQJWRQ'&3KRQH
124 Copyright © 2004 Nokia6DIHW\LVWKHPRVWLPSRUWDQWFDOO\RXZLOOHYHUPDNHA Guide to Safe and Responsible Wireless Phone Use7HQVRIPLOOLRQVRISHRSOHLQWKH86WRGD\WDNHDGYDQWDJHRIWKHXQLTXHFRPELQDWLRQRIFRQYHQLHQFHVDIHW\DQGYDOXHGHOLYHUHGE\WKHZLUHOHVVWHOHSKRQH4XLWHVLPSO\WKHZLUHOHVVSKRQHJLYHVSHRSOHWKHSRZHUIXODELOLW\WRFRPPXQLFDWHE\YRLFHDOPRVWDQ\ZKHUHDQ\WLPHZLWKWKHERVVZLWKDFOLHQWZLWKWKHNLGVZLWKHPHUJHQF\SHUVRQQHORUHYHQZLWKWKHSROLFH(DFK\HDU$PHULFDQVPDNHELOOLRQVRIFDOOVIURPWKHLUZLUHOHVVSKRQHVDQGWKHQXPEHUVDUHUDSLGO\JURZLQJ%XWDQLPSRUWDQWUHVSRQVLELOLW\DFFRPSDQLHVWKRVHEHQHILWVRQHWKDWHYHU\ZLUHOHVVSKRQHXVHUPXVWXSKROG:KHQGULYLQJDFDUGULYLQJLV\RXUILUVWUHVSRQVLELOLW\$ZLUHOHVVSKRQHFDQEHDQLQYDOXDEOHWRROEXWJRRGMXGJPHQWPXVWEHH[HUFLVHGDWDOOWLPHVZKLOHGULYLQJDPRWRUYHKLFOHZKHWKHURQWKHSKRQHRUQRW7KHEDVLFOHVVRQVDUHRQHVZHDOOOHDUQHGDVWHHQDJHUV'ULYLQJUHTXLUHVDOHUWQHVVFDXWLRQDQGFRXUWHV\,WUHTXLUHVDKHDY\GRVHRIEDVLFFRPPRQVHQVHNHHS\RXUKHDGXSNHHS\RXUH\HVRQWKHURDGFKHFN\RXUPLUURUVIUHTXHQWO\DQGZDWFKRXWIRURWKHUGULYHUV,WUHTXLUHVREH\LQJDOOWUDIILFVLJQVDQGVLJQDOVDQGVWD\LQJZLWKLQWKHVSHHGOLPLW,WPHDQVXVLQJVHDWEHOWVDQGUHTXLULQJRWKHUSDVVHQJHUVWRGRWKHVDPH%XWZLWKZLUHOHVVSKRQHXVHGULYLQJVDIHO\PHDQVDOLWWOHPRUH7KLVEURFKXUHLVDFDOOWRZLUHOHVVSKRQHXVHUVHYHU\ZKHUHWRPDNHVDIHW\WKHLUILUVWSULRULW\ZKHQEHKLQGWKHZKHHORIDFDU:LUHOHVVWHOHFRPPXQLFDWLRQVLVNHHSLQJXVLQWRXFKVLPSOLI\LQJRXUOLYHVSURWHFWLQJXVLQHPHUJHQFLHVDQGSURYLGLQJRSSRUWXQLWLHVWRKHOSRWKHUVLQQHHG:KHQLWFRPHVWRWKHXVHRIZLUHOHVVSKRQHVVDIHW\LV\RXUPRVWLPSRUWDQWFDOOWireless Phone "Safety Tips"%HORZDUHVDIHW\WLSVWRIROORZZKLOHGULYLQJDQGXVLQJDZLUHOHVVSKRQHZKLFKVKRXOGEHHDV\WRUHPHPEHU *HWWRNQRZ\RXUZLUHOHVVSKRQHDQGLWVIHDWXUHVVXFKDVVSHHGGLDODQGUHGLDO&DUHIXOO\UHDG\RXULQVWUXFWLRQPDQXDODQGOHDUQWRWDNHDGYDQWDJHRIYDOXDEOHIHDWXUHVPRVWSKRQHVRIIHULQFOXGLQJDXWRPDWLFUHGLDODQGPHPRU\$OVRZRUNWRPHPRUL]HWKHSKRQHNH\SDGVR\RXFDQXVHWKHVSHHGGLDOIXQFWLRQZLWKRXWWDNLQJ\RXUDWWHQWLRQRIIWKHURDG :KHQDYDLODEOHXVHDKDQGVIUHHGHYLFH$QXPEHURIKDQGVIUHHZLUHOHVVSKRQHDFFHVVRULHVDUHUHDGLO\DYDLODEOHWRGD\:KHWKHU\RXFKRRVHDQLQVWDOOHGPRXQWHGGHYLFHIRU\RXUZLUHOHVVSKRQHRUDVSHDNHUSKRQHDFFHVVRU\WDNHDGYDQWDJHRIWKHVHGHYLFHVLIDYDLODEOHWR\RX 3RVLWLRQ\RXUZLUHOHVVSKRQHZLWKLQHDV\UHDFK0DNHVXUH\RXSODFH\RXUZLUHOHVVSKRQHZLWKLQHDV\UHDFKDQGZKHUH\RXFDQJUDELWZLWKRXWUHPRYLQJ\RXUH\HVIURPWKHURDG,I\RXJHWDQLQFRPLQJFDOODWDQLQFRQYHQLHQWWLPHLISRVVLEOHOHW\RXUYRLFHPDLODQVZHULWIRU\RX 6XVSHQGFRQYHUVDWLRQVGXULQJKD]DUGRXVGULYLQJFRQGLWLRQVRUVLWXDWLRQV/HWWKHSHUVRQ\RXDUHVSHDNLQJZLWKNQRZ\RXDUHGULYLQJLIQHFHVVDU\VXVSHQGWKHFDOOLQKHDY\WUDIILFRUKD]DUGRXVZHDWKHUFRQGLWLRQV5DLQVOHHWVQRZDQGLFHFDQEHKD]DUGRXVEXWVRLVKHDY\WUDIILF$VDGULYHU\RXUILUVWUHVSRQVLELOLW\LVWRSD\DWWHQWLRQWRWKHURDG
Nokia  User Guide  Copyright © 2004 NokiaAppendix A 'RQRWWDNHQRWHVRUORRNXSSKRQHQXPEHUVZKLOHGULYLQJ,I\RXDUHUHDGLQJDQDGGUHVVERRNRUEXVLQHVVFDUGRUZULWLQJDWRGROLVWZKLOHGULYLQJDFDU\RXDUHQRWZDWFKLQJZKHUH\RXDUHJRLQJ,W·VFRPPRQVHQVH'RQ·WJHWFDXJKWLQDGDQJHURXVVLWXDWLRQEHFDXVH\RXDUHUHDGLQJRUZULWLQJDQGQRWSD\LQJDWWHQWLRQWRWKHURDGRUQHDUE\YHKLFOHV 'LDOVHQVLEO\DQGDVVHVVWKHWUDIILFLISRVVLEOHSODFHFDOOVZKHQ\RXDUHQRWPRYLQJRUEHIRUHSXOOLQJLQWRWUDIILF7U\WRSODQ\RXUFDOOVEHIRUH\RXEHJLQ\RXUWULSRUDWWHPSWWRFRLQFLGH\RXUFDOOVZLWKWLPHV\RXPD\EHVWRSSHGDWDVWRSVLJQUHGOLJKWRURWKHUZLVHVWDWLRQDU\%XWLI\RXQHHGWRGLDOZKLOHGULYLQJIROORZWKLVVLPSOHWLSGLDORQO\DIHZQXPEHUVFKHFNWKHURDGDQG\RXUPLUURUVWKHQFRQWLQXH 'RQRWHQJDJHLQVWUHVVIXORUHPRWLRQDOFRQYHUVDWLRQVWKDWPD\EHGLVWUDFWLQJ6WUHVVIXORUHPRWLRQDOFRQYHUVDWLRQVDQGGULYLQJGRQRWPL[WKH\DUHGLVWUDFWLQJDQGHYHQGDQJHURXVZKHQ\RXDUHEHKLQGWKHZKHHORIDFDU0DNHSHRSOH\RXDUHWDONLQJZLWKDZDUH\RXDUHGULYLQJDQGLIQHFHVVDU\VXVSHQGFRQYHUVDWLRQVZKLFKKDYHWKHSRWHQWLDOWRGLYHUW\RXUDWWHQWLRQIURPWKHURDG 8VH\RXUZLUHOHVVSKRQHWRFDOOIRUKHOS<RXUZLUHOHVVSKRQHLVRQHRIWKHJUHDWHVWWRROV\RXFDQRZQWRSURWHFW\RXUVHOIDQG\RXUIDPLO\LQGDQJHURXVVLWXDWLRQVZLWK\RXUSKRQHDW\RXUVLGHKHOSLVRQO\WKUHHQXPEHUVDZD\'LDORURWKHUORFDOHPHUJHQF\QXPEHULQWKHFDVHRIILUHWUDIILFDFFLGHQWURDGKD]DUGRUPHGLFDOHPHUJHQF\5HPHPEHULWLVDIUHHFDOORQ\RXUZLUHOHVVSKRQH 8VH\RXUZLUHOHVVSKRQHWRKHOSRWKHUVLQHPHUJHQFLHV<RXUZLUHOHVVSKRQHSURYLGHV\RXDSHUIHFWRSSRUWXQLW\WREHD*RRG6DPDULWDQLQ\RXUFRPPXQLW\,I\RXVHHDQDXWRDFFLGHQWFULPHLQSURJUHVVRURWKHUVHULRXVHPHUJHQF\ZKHUHOLYHVDUHLQGDQJHUFDOORURWKHUORFDOHPHUJHQF\QXPEHUDV\RXZRXOGZDQWRWKHUVWRGRIRU\RX &DOOURDGVLGHDVVLVWDQFHRUDVSHFLDOZLUHOHVVQRQHPHUJHQF\DVVLVWDQFHQXPEHUZKHQQHFHVVDU\&HUWDLQVLWXDWLRQV\RXHQFRXQWHUZKLOHGULYLQJPD\UHTXLUHDWWHQWLRQEXWDUHQRWXUJHQWHQRXJKWRPHULWDFDOOIRUHPHUJHQF\VHUYLFHV%XW\RXVWLOOFDQXVH\RXUZLUHOHVVSKRQHWROHQGDKDQG,I\RXVHHDEURNHQGRZQYHKLFOHSRVLQJQRVHULRXVKD]DUGDEURNHQWUDIILFVLJQDODPLQRUWUDIILFDFFLGHQWZKHUHQRRQHDSSHDUVLQMXUHGRUDYHKLFOH\RXNQRZWREHVWROHQFDOOURDGVLGHDVVLVWDQFHRURWKHUVSHFLDOQRQHPHUJHQF\ZLUHOHVVQXPEHU&DUHOHVVGLVWUDFWHGLQGLYLGXDOVDQGSHRSOHGULYLQJLUUHVSRQVLEO\UHSUHVHQWDKD]DUGWRHYHU\RQHRQWKHURDG6LQFHWKH&HOOXODU7HOHFRPPXQLFDWLRQV,QGXVWU\$VVRFLDWLRQDQGWKHZLUHOHVVLQGXVWU\KDYHFRQGXFWHGHGXFDWLRQDORXWUHDFKWRLQIRUPZLUHOHVVSKRQHXVHUVRIWKHLUUHVSRQVLELOLWLHVDVVDIHGULYHUVDQGJRRGFLWL]HQV$VZHDSSURDFKDQHZFHQWXU\PRUHDQGPRUHRIXVZLOOWDNHDGYDQWDJHRIWKHEHQHILWVRIZLUHOHVVWHOHSKRQHV$QGDVZHWDNHWRWKHURDGVZHDOOKDYHDUHVSRQVLELOLW\WRGULYHVDIHO\7KHZLUHOHVVLQGXVWU\UHPLQGV\RXWRXVH\RXUSKRQHVDIHO\ZKHQGULYLQJ)RUPRUHLQIRUPDWLRQSOHDVHFDOO6$)()RUXSGDWHVKWWSZZZZRZFRPFRPFRQVXPHULVVXHVGULYLQJDUWLFOHVFIP",' 
126 Copyright © 2004 NokiaNOTES
Nokia  User Guide  Copyright © 2004 NokiaAppendix BAppendix BMessage from the FDA(U.S. Food and Drug Administration) to all users of mobile phones.-XO\ )RUXSGDWHVKWWSZZZIGDJRYFGUKSKRQHV
128 Copyright © 2004 NokiaConsumer Update on Wireless PhonesU.S. Food and Drug Administration1. Do wireless phones pose a health hazard?7KHDYDLODEOHVFLHQWLILFHYLGHQFHGRHVQRWVKRZWKDWDQ\KHDOWKSUREOHPVDUHDVVRFLDWHGZLWKXVLQJZLUHOHVVSKRQHV7KHUHLVQRSURRIKRZHYHUWKDWZLUHOHVVSKRQHVDUHDEVROXWHO\VDIH:LUHOHVVSKRQHVHPLWORZOHYHOVRIUDGLRIUHTXHQF\HQHUJ\5)LQWKHPLFURZDYHUDQJHZKLOHEHLQJXVHG7KH\DOVRHPLWYHU\ORZOHYHOVRI5)ZKHQLQWKHVWDQGE\PRGH:KHUHDVKLJKOHYHOVRI5)FDQSURGXFHKHDOWKHIIHFWVE\KHDWLQJWLVVXHH[SRVXUHWRORZOHYHO5)WKDWGRHVQRWSURGXFHKHDWLQJHIIHFWVFDXVHVQRNQRZQDGYHUVHKHDOWKHIIHFWV0DQ\VWXGLHVRIORZOHYHO5)H[SRVXUHVKDYHQRWIRXQGDQ\ELRORJLFDOHIIHFWV6RPHVWXGLHVKDYHVXJJHVWHGWKDWVRPHELRORJLFDOHIIHFWVPD\RFFXUEXWVXFKILQGLQJVKDYHQRWEHHQFRQILUPHGE\DGGLWLRQDOUHVHDUFK,QVRPHFDVHVRWKHUUHVHDUFKHUVKDYHKDGGLIILFXOW\LQUHSURGXFLQJWKRVHVWXGLHVRULQGHWHUPLQLQJWKHUHDVRQVIRULQFRQVLVWHQWUHVXOWV2. What is FDA’s role concerning the safety of wireless phones?8QGHUWKHODZ)'$GRHVQRWUHYLHZWKHVDIHW\RIUDGLDWLRQHPLWWLQJFRQVXPHUSURGXFWVVXFKDVZLUHOHVVSKRQHVEHIRUHWKH\FDQEHVROGDVLWGRHVZLWKQHZGUXJVRUPHGLFDOGHYLFHV+RZHYHUWKHDJHQF\KDVDXWKRULW\WRWDNHDFWLRQLIZLUHOHVVSKRQHVDUHVKRZQWRHPLWUDGLRIUHTXHQF\HQHUJ\5)DWDOHYHOWKDWLVKD]DUGRXVWRWKHXVHU,QVXFKDFDVH)'$FRXOGUHTXLUHWKHPDQXIDFWXUHUVRIZLUHOHVVSKRQHVWRQRWLI\XVHUVRIWKHKHDOWKKD]DUGDQGWRUHSDLUUHSODFHRUUHFDOOWKHSKRQHVVRWKDWWKHKD]DUGQRORQJHUH[LVWV$OWKRXJKWKHH[LVWLQJVFLHQWLILFGDWDGRQRWMXVWLI\)'$UHJXODWRU\DFWLRQV)'$KDVXUJHGWKHZLUHOHVVSKRQHLQGXVWU\WRWDNHDQXPEHURIVWHSVLQFOXGLQJWKHIROORZLQJ•6XSSRUWQHHGHGUHVHDUFKLQWRSRVVLEOHELRORJLFDOHIIHFWVRI5)RIWKHW\SHHPLWWHGE\ZLUHOHVVSKRQHV•'HVLJQZLUHOHVVSKRQHVLQDZD\WKDWPLQLPL]HVDQ\5)H[SRVXUHWRWKHXVHUWKDWLVQRWQHFHVVDU\IRUGHYLFHIXQFWLRQDQG•&RRSHUDWHLQSURYLGLQJXVHUVRIZLUHOHVVSKRQHVZLWKWKHEHVWSRVVLEOHLQIRUPDWLRQRQSRVVLEOHHIIHFWVRIZLUHOHVVSKRQHXVHRQKXPDQKHDOWK)'$EHORQJVWRDQLQWHUDJHQF\ZRUNLQJJURXSRIWKHIHGHUDODJHQFLHVWKDWKDYHUHVSRQVLELOLW\IRUGLIIHUHQWDVSHFWVRI5)VDIHW\WRHQVXUHFRRUGLQDWHGHIIRUWVDWWKHIHGHUDOOHYHO7KHIROORZLQJDJHQFLHVEHORQJWRWKLVZRUNLQJJURXS•1DWLRQDO,QVWLWXWHIRU2FFXSDWLRQDO6DIHW\DQG+HDOWK•(QYLURQPHQWDO3URWHFWLRQ$JHQF\•)HGHUDO&RPPXQLFDWLRQV&RPPLVVLRQ•2FFXSDWLRQDO6DIHW\DQG+HDOWK$GPLQLVWUDWLRQ•1DWLRQDO7HOHFRPPXQLFDWLRQVDQG,QIRUPDWLRQ$GPLQLVWUDWLRQ7KH1DWLRQDO,QVWLWXWHVRI+HDOWKSDUWLFLSDWHVLQVRPHLQWHUDJHQF\ZRUNLQJJURXSDFWLYLWLHVDVZHOO)'$VKDUHVUHJXODWRU\UHVSRQVLELOLWLHVIRUZLUHOHVVSKRQHVZLWKWKH)HGHUDO&RPPXQLFDWLRQV&RPPLVVLRQ)&&$OOSKRQHVWKDWDUHVROGLQWKH8QLWHG6WDWHVPXVWFRPSO\ZLWK)&&VDIHW\JXLGHOLQHVWKDWOLPLW5)H[SRVXUH)&&UHOLHVRQ)'$DQGRWKHUKHDOWKDJHQFLHVIRUVDIHW\TXHVWLRQVDERXWZLUHOHVVSKRQHV)&&DOVR
Nokia  User Guide  Copyright © 2004 NokiaAppendix BUHJXODWHVWKHEDVHVWDWLRQVWKDWWKHZLUHOHVVSKRQHQHWZRUNVUHO\XSRQ:KLOHWKHVHEDVHVWDWLRQVRSHUDWHDWKLJKHUSRZHUWKDQGRWKHZLUHOHVVSKRQHVWKHPVHOYHVWKH5)H[SRVXUHVWKDWSHRSOHJHWIURPWKHVHEDVHVWDWLRQVDUHW\SLFDOO\WKRXVDQGVRIWLPHVORZHUWKDQWKRVHWKH\FDQJHWIURPZLUHOHVVSKRQHV%DVHVWDWLRQVDUHWKXVQRWWKHVXEMHFWRIWKHVDIHW\TXHVWLRQVGLVFXVVHGLQWKLVGRFXPHQW3. What kinds of phones are the subject of this update?7KHWHUPZLUHOHVVSKRQHUHIHUVKHUHWRKDQGKHOGZLUHOHVVSKRQHVZLWKEXLOWLQDQWHQQDVRIWHQFDOOHGFHOOPRELOHRU3&6SKRQHV7KHVHW\SHVRIZLUHOHVVSKRQHVFDQH[SRVHWKHXVHUWRPHDVXUDEOHUDGLRIUHTXHQF\HQHUJ\5)EHFDXVHRIWKHVKRUWGLVWDQFHEHWZHHQWKHSKRQHDQGWKHXVHU·VKHDG7KHVH5)H[SRVXUHVDUHOLPLWHGE\)HGHUDO&RPPXQLFDWLRQV&RPPLVVLRQVDIHW\JXLGHOLQHVWKDWZHUHGHYHORSHGZLWKWKHDGYLFHRI)'$DQGRWKHUIHGHUDOKHDOWKDQGVDIHW\DJHQFLHV:KHQWKHSKRQHLVORFDWHGDWJUHDWHUGLVWDQFHVIURPWKHXVHUWKHH[SRVXUHWR5)LVGUDVWLFDOO\ORZHUEHFDXVHDSHUVRQV5)H[SRVXUHGHFUHDVHVUDSLGO\ZLWKLQFUHDVLQJGLVWDQFHIURPWKHVRXUFH7KHVRFDOOHGFRUGOHVVSKRQHVZKLFKKDYHDEDVHXQLWFRQQHFWHGWRWKHWHOHSKRQHZLULQJLQDKRXVHW\SLFDOO\RSHUDWHDWIDUORZHUSRZHUOHYHOVDQGWKXVSURGXFH5)H[SRVXUHVIDUEHORZWKH)&&VDIHW\OLPLWV4. What are the results of the research done already?7KHUHVHDUFKGRQHWKXVIDUKDVSURGXFHGFRQIOLFWLQJUHVXOWVDQGPDQ\VWXGLHVKDYHVXIIHUHGIURPIODZVLQWKHLUUHVHDUFKPHWKRGV$QLPDOH[SHULPHQWVLQYHVWLJDWLQJWKHHIIHFWVRIUDGLRIUHTXHQF\HQHUJ\5)H[SRVXUHVFKDUDFWHULVWLFRIZLUHOHVVSKRQHVKDYH\LHOGHGFRQIOLFWLQJUHVXOWVWKDWRIWHQFDQQRWEHUHSHDWHGLQRWKHUODERUDWRULHV$IHZDQLPDOVWXGLHVKRZHYHUKDYHVXJJHVWHGWKDWORZOHYHOVRI5)FRXOGDFFHOHUDWHWKHGHYHORSPHQWRIFDQFHULQODERUDWRU\DQLPDOV+RZHYHUPDQ\RIWKHVWXGLHVWKDWVKRZHGLQFUHDVHGWXPRUGHYHORSPHQWXVHGDQLPDOVWKDWKDGEHHQJHQHWLFDOO\HQJLQHHUHGRUWUHDWHGZLWKFDQFHUFDXVLQJFKHPLFDOVVRDVWREHSUHGLVSRVHGWRGHYHORSFDQFHULQWKHDEVHQFHRI5)H[SRVXUH2WKHUVWXGLHVH[SRVHGWKHDQLPDOVWR5)IRUXSWRKRXUVSHUGD\7KHVHFRQGLWLRQVDUHQRWVLPLODUWRWKHFRQGLWLRQVXQGHUZKLFKSHRSOHXVHZLUHOHVVSKRQHVVRZHGRQ·WNQRZZLWKFHUWDLQW\ZKDWWKHUHVXOWVRIVXFKVWXGLHVPHDQIRUKXPDQKHDOWK7KUHHODUJHHSLGHPLRORJ\VWXGLHVKDYHEHHQSXEOLVKHGVLQFH'HFHPEHU%HWZHHQWKHPWKHVWXGLHVLQYHVWLJDWHGDQ\SRVVLEOHDVVRFLDWLRQEHWZHHQWKHXVHRIZLUHOHVVSKRQHVDQGSULPDU\EUDLQFDQFHUJOLRPDPHQLQJLRPDRUDFRXVWLFQHXURPDWXPRUVRIWKHEUDLQRUVDOLYDU\JODQGOHXNHPLDRURWKHUFDQFHUV1RQHRIWKHVWXGLHVGHPRQVWUDWHGWKHH[LVWHQFHRIDQ\KDUPIXOKHDOWKHIIHFWVIURPZLUHOHVVSKRQH5)H[SRVXUHV+RZHYHUQRQHRIWKHVWXGLHVFDQDQVZHUTXHVWLRQVDERXWORQJWHUPH[SRVXUHVVLQFHWKHDYHUDJHSHULRGRISKRQHXVHLQWKHVHVWXGLHVZDVDURXQGWKUHH\HDUV5.What research is needed to decide whether RF exposure from wireless phones poses a health risk?$FRPELQDWLRQRIODERUDWRU\VWXGLHVDQGHSLGHPLRORJLFDOVWXGLHVRISHRSOHDFWXDOO\XVLQJZLUHOHVVSKRQHVZRXOGSURYLGHVRPHRIWKHGDWDWKDWDUHQHHGHG/LIHWLPHDQLPDOH[SRVXUHVWXGLHVFRXOGEHFRPSOHWHGLQDIHZ\HDUV+RZHYHUYHU\ODUJHQXPEHUVRIDQLPDOVZRXOGEHQHHGHGWRSURYLGHUHOLDEOHSURRIRIDFDQFHUSURPRWLQJHIIHFWLIRQHH[LVWV(SLGHPLRORJLFDOVWXGLHVFDQSURYLGHGDWDWKDWLVGLUHFWO\DSSOLFDEOHWRKXPDQSRSXODWLRQVEXWRUPRUH\HDUVIROORZXSPD\EHQHHGHGWRSURYLGHDQVZHUVDERXWVRPHKHDOWKHIIHFWVVXFKDVFDQFHU7KLVLVEHFDXVHWKHLQWHUYDOEHWZHHQWKHWLPHRIH[SRVXUHWRDFDQFHUFDXVLQJDJHQWDQGWKHWLPHWXPRUVGHYHORS
130 Copyright © 2004 NokiaLIWKH\GRPD\EHPDQ\PDQ\\HDUV7KHLQWHUSUHWDWLRQRIHSLGHPLRORJLFDOVWXGLHVLVKDPSHUHGE\GLIILFXOWLHVLQPHDVXULQJDFWXDO5)H[SRVXUHGXULQJGD\WRGD\XVHRIZLUHOHVVSKRQHV0DQ\IDFWRUVDIIHFWWKLVPHDVXUHPHQWVXFKDVWKHDQJOHDWZKLFKWKHSKRQHLVKHOGRUZKLFKPRGHORISKRQHLVXVHG6. What is FDA doing to find out more about the possible health effects of wireless phone RF?)'$LVZRUNLQJZLWKWKH861DWLRQDO7R[LFRORJ\3URJUDPDQGZLWKJURXSVRILQYHVWLJDWRUVDURXQGWKHZRUOGWRHQVXUHWKDWKLJKSULRULW\DQLPDOVWXGLHVDUHFRQGXFWHGWRDGGUHVVLPSRUWDQWTXHVWLRQVDERXWWKHHIIHFWVRIH[SRVXUHWRUDGLRIUHTXHQF\HQHUJ\5))'$KDVEHHQDOHDGLQJSDUWLFLSDQWLQWKH:RUOG+HDOWK2UJDQL]DWLRQ,QWHUQDWLRQDO(OHFWURPDJQHWLF)LHOGV(0)3URMHFWVLQFHLWVLQFHSWLRQLQ$QLQIOXHQWLDOUHVXOWRIWKLVZRUNKDVEHHQWKHGHYHORSPHQWRIDGHWDLOHGDJHQGDRIUHVHDUFKQHHGVWKDWKDVGULYHQWKHHVWDEOLVKPHQWRIQHZUHVHDUFKSURJUDPVDURXQGWKHZRUOG7KH3URMHFWKDVDOVRKHOSHGGHYHORSDVHULHVRISXEOLFLQIRUPDWLRQGRFXPHQWVRQ(0)LVVXHV)'$DQGWKH&HOOXODU7HOHFRPPXQLFDWLRQV&,QWHUQHW$VVRFLDWLRQ&7,$KDYHDIRUPDO&RRSHUDWLYH5HVHDUFKDQG'HYHORSPHQW$JUHHPHQW&5$'$WRGRUHVHDUFKRQZLUHOHVVSKRQHVDIHW\)'$SURYLGHVWKHVFLHQWLILFRYHUVLJKWREWDLQLQJLQSXWIURPH[SHUWVLQJRYHUQPHQWLQGXVWU\DQGDFDGHPLFRUJDQL]DWLRQV&7,$IXQGHGUHVHDUFKLVFRQGXFWHGWKURXJKFRQWUDFWVWRLQGHSHQGHQWLQYHVWLJDWRUV7KHLQLWLDOUHVHDUFKZLOOLQFOXGHERWKODERUDWRU\VWXGLHVDQGVWXGLHVRIZLUHOHVVSKRQHXVHUV7KH&5$'$ZLOODOVRLQFOXGHDEURDGDVVHVVPHQWRIDGGLWLRQDOUHVHDUFKQHHGVLQWKHFRQWH[WRIWKHODWHVWUHVHDUFKGHYHORSPHQWVDURXQGWKHZRUOG7. How can I find out how much radiofrequency energy exposure I can get by using my wireless phone?$OOSKRQHVVROGLQWKH8QLWHG6WDWHVPXVWFRPSO\ZLWK)HGHUDO&RPPXQLFDWLRQV&RPPLVVLRQ)&&JXLGHOLQHVWKDWOLPLWUDGLRIUHTXHQF\HQHUJ\5)H[SRVXUHV)&&HVWDEOLVKHGWKHVHJXLGHOLQHVLQFRQVXOWDWLRQZLWK)'$DQGWKHRWKHUIHGHUDOKHDOWKDQGVDIHW\DJHQFLHV7KH)&&OLPLWIRU5)H[SRVXUHIURPZLUHOHVVWHOHSKRQHVLVVHWDWD6SHFLILF$EVRUSWLRQ5DWH6$5RIZDWWVSHUNLORJUDP:NJ7KH)&&OLPLWLVFRQVLVWHQWZLWKWKHVDIHW\VWDQGDUGVGHYHORSHGE\WKH,QVWLWXWHRI(OHFWULFDODQG(OHFWURQLF(QJLQHHULQJ,(((DQGWKH1DWLRQDO&RXQFLORQ5DGLDWLRQ3URWHFWLRQDQG0HDVXUHPHQW7KHH[SRVXUHOLPLWWDNHVLQWRFRQVLGHUDWLRQWKHERG\·VDELOLW\WRUHPRYHKHDWIURPWKHWLVVXHVWKDWDEVRUEHQHUJ\IURPWKHZLUHOHVVSKRQHDQGLVVHWZHOOEHORZOHYHOVNQRZQWRKDYHHIIHFWV0DQXIDFWXUHUVRIZLUHOHVVSKRQHVPXVWUHSRUWWKH5)H[SRVXUHOHYHOIRUHDFKPRGHORISKRQHWRWKH)&&7KH)&&ZHEVLWHKWWSZZZIFFJRYRHWUIVDIHW\JLYHVGLUHFWLRQVIRUORFDWLQJWKH)&&LGHQWLILFDWLRQQXPEHURQ\RXUSKRQHVR\RXFDQILQG\RXUSKRQH·V5)H[SRVXUHOHYHOLQWKHRQOLQHOLVWLQJ8. What has FDA done to measure the radiofrequency energy coming from wireless phones?7KH,QVWLWXWHRI(OHFWULFDODQG(OHFWURQLF(QJLQHHUV,(((LVGHYHORSLQJDWHFKQLFDOVWDQGDUGIRUPHDVXULQJWKHUDGLRIUHTXHQF\HQHUJ\5)H[SRVXUHIURPZLUHOHVVSKRQHVDQGRWKHUZLUHOHVVKDQGVHWVZLWKWKHSDUWLFLSDWLRQDQGOHDGHUVKLSRI)'$VFLHQWLVWVDQGHQJLQHHUV7KHVWDQGDUG5HFRPPHQGHG3UDFWLFHIRU'HWHUPLQLQJWKH6SDWLDO3HDN6SHFLILF$EVRUSWLRQ5DWH6$5LQWKH+XPDQ%RG\'XHWR:LUHOHVV
Nokia  User GuideCopyright © 2004 NokiaAppendix B&RPPXQLFDWLRQV'HYLFHV([SHULPHQWDO7HFKQLTXHVVHWVIRUWKWKHILUVWFRQVLVWHQWWHVWPHWKRGRORJ\IRUPHDVXULQJWKHUDWHDWZKLFK5)LVGHSRVLWHGLQWKHKHDGVRIZLUHOHVVSKRQHXVHUV7KHWHVWPHWKRGXVHVDWLVVXHVLPXODWLQJPRGHORIWKHKXPDQKHDG6WDQGDUGL]HG6$5WHVWPHWKRGRORJ\LVH[SHFWHGWRJUHDWO\LPSURYHWKHFRQVLVWHQF\RIPHDVXUHPHQWVPDGHDWGLIIHUHQWODERUDWRULHVRQWKHVDPHSKRQH6$5LVWKHPHDVXUHPHQWRIWKHDPRXQWRIHQHUJ\DEVRUEHGLQWLVVXHHLWKHUE\WKHZKROHERG\RUDVPDOOSDUWRIWKHERG\,WLVPHDVXUHGLQZDWWVNJRUPLOOLZDWWVJRIPDWWHU7KLVPHDVXUHPHQWLVXVHGWRGHWHUPLQHZKHWKHUDZLUHOHVVSKRQHFRPSOLHVZLWKVDIHW\JXLGHOLQHV9. What steps can I take to reduce my exposure to radiofrequency energy from my wireless phone?,IWKHUHLVDULVNIURPWKHVHSURGXFWVDQGDWWKLVSRLQWZHGRQRWNQRZWKDWWKHUHLVLWLVSUREDEO\YHU\VPDOO%XWLI\RXDUHFRQFHUQHGDERXWDYRLGLQJHYHQSRWHQWLDOULVNV\RXFDQWDNHDIHZVLPSOHVWHSVWRPLQLPL]H\RXUH[SRVXUHWRUDGLRIUHTXHQF\HQHUJ\5)6LQFHWLPHLVDNH\IDFWRULQKRZPXFKH[SRVXUHDSHUVRQUHFHLYHVUHGXFLQJWKHDPRXQWRIWLPHVSHQWXVLQJDZLUHOHVVSKRQHZLOOUHGXFH5)H[SRVXUH,I\RXPXVWFRQGXFWH[WHQGHGFRQYHUVDWLRQVE\ZLUHOHVVSKRQHHYHU\GD\\RXFRXOGSODFHPRUHGLVWDQFHEHWZHHQ\RXUERG\DQGWKHVRXUFHRIWKH5)VLQFHWKHH[SRVXUHOHYHOGURSVRIIGUDPDWLFDOO\ZLWKGLVWDQFH)RUH[DPSOH\RXFRXOGXVHDKHDGVHWDQGFDUU\WKHZLUHOHVVSKRQHDZD\IURP\RXUERG\RUXVHDZLUHOHVVSKRQHFRQQHFWHGWRDUHPRWHDQWHQQD$JDLQWKHVFLHQWLILFGDWDGRQRWGHPRQVWUDWHWKDWZLUHOHVVSKRQHVDUHKDUPIXO%XWLI\RXDUHFRQFHUQHGDERXWWKH5)H[SRVXUHIURPWKHVHSURGXFWV\RXFDQXVHPHDVXUHVOLNHWKRVHGHVFULEHGDERYHWRUHGXFH\RXU5)H[SRVXUHIURPZLUHOHVVSKRQHXVH10. What about children using wireless phones?7KHVFLHQWLILFHYLGHQFHGRHVQRWVKRZDGDQJHUWRXVHUVRIZLUHOHVVSKRQHVLQFOXGLQJFKLOGUHQDQGWHHQDJHUV,I\RXZDQWWRWDNHVWHSVWRORZHUH[SRVXUHWRUDGLRIUHTXHQF\HQHUJ\5)WKHPHDVXUHVGHVFULEHGDERYHZRXOGDSSO\WRFKLOGUHQDQGWHHQDJHUVXVLQJZLUHOHVVSKRQHV5HGXFLQJWKHWLPHRIZLUHOHVVSKRQHXVHDQGLQFUHDVLQJWKHGLVWDQFHEHWZHHQWKHXVHUDQGWKH5)VRXUFHZLOOUHGXFH5)H[SRVXUH6RPHJURXSVVSRQVRUHGE\RWKHUQDWLRQDOJRYHUQPHQWVKDYHDGYLVHGWKDWFKLOGUHQEHGLVFRXUDJHGIURPXVLQJZLUHOHVVSKRQHVDWDOO)RUH[DPSOHWKHJRYHUQPHQWLQWKH8QLWHG.LQJGRPGLVWULEXWHGOHDIOHWVFRQWDLQLQJVXFKDUHFRPPHQGDWLRQLQ'HFHPEHU7KH\QRWHGWKDWQRHYLGHQFHH[LVWVWKDWXVLQJDZLUHOHVVSKRQHFDXVHVEUDLQWXPRUVRURWKHULOOHIIHFWV7KHLUUHFRPPHQGDWLRQWROLPLWZLUHOHVVSKRQHXVHE\FKLOGUHQZDVVWULFWO\SUHFDXWLRQDU\LWZDVQRWEDVHGRQVFLHQWLILFHYLGHQFHWKDWDQ\KHDOWKKD]DUGH[LVWV11. What about wireless phone interference with medical equipment?5DGLRIUHTXHQF\HQHUJ\5)IURPZLUHOHVVSKRQHVFDQLQWHUDFWZLWKVRPHHOHFWURQLFGHYLFHV)RUWKLVUHDVRQ)'$KHOSHGGHYHORSDGHWDLOHGWHVWPHWKRGWRPHDVXUHHOHFWURPDJQHWLFLQWHUIHUHQFH(0,RILPSODQWHGFDUGLDFSDFHPDNHUVDQGGHILEULOODWRUVIURPZLUHOHVVWHOHSKRQHV7KLVWHVWPHWKRGLVQRZSDUWRIDVWDQGDUGVSRQVRUHGE\WKH$VVRFLDWLRQIRUWKH$GYDQFHPHQWRI0HGLFDOLQVWUXPHQWDWLRQ$$0,7KHILQDOGUDIWDMRLQWHIIRUWE\)'$PHGLFDOGHYLFHPDQXIDFWXUHUVDQGPDQ\RWKHUJURXSVZDVFRPSOHWHGLQODWH7KLVVWDQGDUGZLOODOORZPDQXIDFWXUHUVWRHQVXUHWKDWFDUGLDFSDFHPDNHUVDQGGHILEULOODWRUVDUHVDIHIURPZLUHOHVVSKRQH(0,)'$KDVWHVWHGKHDULQJDLGVIRULQWHUIHUHQFHIURPKDQGKHOGZLUHOHVVSKRQHVDQGKHOSHGGHYHORSDYROXQWDU\VWDQGDUGVSRQVRUHGE\WKH,QVWLWXWHRI(OHFWULFDODQG(OHFWURQLF
132 Copyright © 2004 Nokia(QJLQHHUV,(((7KLVVWDQGDUGVSHFLILHVWHVWPHWKRGVDQGSHUIRUPDQFHUHTXLUHPHQWVIRUKHDULQJDLGVDQGZLUHOHVVSKRQHVVRWKDWQRLQWHUIHUHQFHRFFXUVZKHQDSHUVRQXVHVDFRPSDWLEOHSKRQHDQGDDFFRPSDQLHGKHDULQJDLGDWWKHVDPHWLPH7KLVVWDQGDUGZDVDSSURYHGE\WKH,(((LQ)'$FRQWLQXHVWRPRQLWRUWKHXVHRIZLUHOHVVSKRQHVIRUSRVVLEOHLQWHUDFWLRQVZLWKRWKHUPHGLFDOGHYLFHV6KRXOGKDUPIXOLQWHUIHUHQFHEHIRXQGWRRFFXU)'$ZLOOFRQGXFWWHVWLQJWRDVVHVVWKHLQWHUIHUHQFHDQGZRUNWRUHVROYHWKHSUREOHP12. Where can I find additional information?)RUDGGLWLRQDOLQIRUPDWLRQSOHDVHUHIHUWRWKHIROORZLQJUHVRXUFHV•)'$ZHESDJHRQZLUHOHVVSKRQHVKWWSZZZIGDJRYFGUKSKRQHVLQGH[KWPO•)HGHUDO&RPPXQLFDWLRQV&RPPLVVLRQ)&&5)6DIHW\3URJUDPKWWSZZZIFFJRYRHWUIVDIHW\•,QWHUQDWLRQDO&RPPLVVLRQRQ1RQ,RQL]LQJ5DGLDWLRQ3URWHFWLRQKWWSZZZLFQLUSGH•:RUOG+HDOWK2UJDQL]DWLRQ:+2,QWHUQDWLRQDO(0)3URMHFWKWWSZZZZKRLQWHPI•1DWLRQDO5DGLRORJLFDO3URWHFWLRQ%RDUG8.KWWSZZZQUSERUJXN-XO\)RUXSGDWHVKWWSZZZIGDJRYFGUKSKRQHV
Nokia  User Guide  Copyright © 2004 NokiaReference Information • Nokia ONE-YEAR LIMITED WARRANTY  Nokia Inc. (“Nokia”) warrants that this cellular phone (“Product”) is free from defects in material and workmanship that result in Product failure during normal usage, according to the following terms and conditions:1The limited warranty for the Product extends for ONE (1) year beginning on the date of the purchase of the Product. This one year period is extended by each whole day that the Product is out of your possession for repair under this warranty.2The limited warranty extends only to the original purchaser (“Consumer”) of the Product and is not assignable or transferable to any subsequent purchaser/end-user.3The limited warranty extends only to Consumers who purchase the Product in the United States of America.4During the limited warranty period, Nokia will repair, or replace, at Nokia’s sole option, any defective parts, or any parts that will not properly operate for their intended use with new or refurbished replacement items if such repair or replacement is needed because of product malfunction or failure during normal usage. No charge will be made to the Consumer for any such parts. Nokia will also pay for the labor charges incurred by Nokia in repairing or replacing the defective parts. The limited warranty does not cover defects in appearance, cosmetic, decorative or structural items, including framing, and any non-operative parts. Nokia’s limit of liability under the limited warranty shall be the actual cash value of the Product at the time the Consumer returns the Product for repair, determined by the price paid by the Consumer for the Product less a reasonable amount for usage. Nokia shall not be liable for any other losses or damages. These remedies are the Consumer’s exclusive remedies for breach of warranty.5Upon request from Nokia, the Consumer must prove the date of the original purchase of the Product by a dated bill of sale or dated itemized receipt.6The Consumer shall bear the cost of shipping the Product to Nokia in Melbourne, Florida. Nokia shall bear the cost of shipping the Product back to the Consumer after the completion of service under this limited warranty.7The Consumer shall have no coverage or benefits under this limited warranty if any of the following conditions are applicable:a) The Product has been subjected to abnormal use, abnormal conditions, improper storage, exposure to moisture or dampness, unauthorized modifications, unauthorized connections, unauthorized repair, misuse, neglect, abuse, accident, alteration, improper installation, or other acts which are not the fault of Nokia, including damage caused by shipping.
134 Copyright © 2004 Nokiab) The Product has been damaged from external causes such as collision with an object, or from fire, flooding, sand, dirt, windstorm, lightning, earthquake or damage from exposure to weather conditions, an Act of God, or battery leakage, theft, blown fuse, or improper use of any electrical source, damage caused by computer or internet viruses, bugs, worms, Trojan Horses, cancelbots or damage caused by the connection to other products not recommended for interconnection by Nokia.c) Nokia was not advised in writing by the Consumer of the alleged defect or malfunction of the Product within fourteen (14) days after the expiration of the applicable limited warranty period.d) The Product serial number plate or the enhancement data code has been removed, defaced or altered.e) The defect or damage was caused by the defective function of the cellular system or by inadequate signal reception by the external antenna, or viruses or other software problems introduced into the Product.8Nokia does not warrant uninterrupted or error-free operation of the Product. If a problem develops during the limited warranty period, the Consumer shall take the following step-by-step procedure:a) The Consumer shall return the Product to the place of purchase for repair or replacement processing.b) If “a” is not convenient because of distance (more than 50 miles) or for other good cause, the Consumer shall ship the Product prepaid and insured to:Nokia Inc., Attn: Repair Department795 West Nasa Blvd. Melbourne, FL 32901c) The Consumer shall include a return address, daytime phone number and/or fax number, complete description of the problem, proof of purchase and service agreement (if applicable). Expenses related to removing the Product from an installation are not covered under this limited warranty.d) The Consumer will be billed for any parts or labor charges not covered by this limited warranty. The Consumer will be responsible for any expenses related to reinstallation of the Product.e) Nokia will repair the Product under the limited warranty within 30 days after receipt of the Product. If Nokia cannot perform repairs covered under this limited warranty within 30 days, or after a reasonable number of attempts to repair the same defect, Nokia at its option, will provide a replacement Product or refund the purchase price of the Product less a reasonable amount for usage. In some states the Consumer may have the right to a loaner if the repair of the Product takes more than ten (10) days.
Nokia  User Guide  Copyright © 2004 NokiaReference InformationPlease contact the Customer Service Center at Nokia at the telephone number listed at the end of this warranty if you need a loaner and the repair of the Product has taken or is estimated to take more than ten (10) days.f) If the Product is returned during the limited warranty period, but the problem with the Product is not covered under the terms and conditions of this limited warranty, the Consumer will be notified and given an estimate of the charges the Consumer must pay to have the Product repaired, with all shipping charges billed to the Consumer. If the estimate is refused, the Product will be returned freight collect. If the Product is returned after the expiration of the limited warranty period, Nokia’s normal service policies shall apply and the Consumer will be responsible for all shipping charges.9You (the Consumer) understand that the product may consist of refurbished equipment that contains used components, some of which have been reprocessed. The used components comply with Product performance and reliability specifications.10 ANY IMPLIED WARRANTY OF MERCHANTABILITY, OR FITNESS FOR A PARTICULAR PURPOSE OR USE, SHALL BE LIMITED TO THE DURATION OF THE FOREGOING LIMITED WRITTEN WARRANTY. OTHERWISE, THE FOREGOING LIMITED WARRANTY IS THE CONSUMER’S SOLE AND EXCLUSIVE REMEDY AND IS IN LIEU OF ALL OTHER WARRANTIES, EXPRESS OR IMPLIED. NOKIA SHALL NOT BE LIABLE FOR SPECIAL, INCIDENTAL, PUNITIVE OR CONSEQUENTIAL DAMAGES, INCLUDING BUT NOT LIMITED TO LOSS OF ANTICIPATED BENEFITS OR PROFITS, LOSS OF SAVINGS OR REVENUE, LOSS OF DATA, PUNITIVE DAMAGES, LOSS OF USE OF THE PRODUCT OR ANY ASSOCIATED EQUIPMENT, COST OF CAPITAL, COST OF ANY SUBSTITUTE EQUIPMENT OR FACILITIES, DOWNTIME, THE CLAIMS OF ANY THIRD PARTIES, INCLUDING CUSTOMERS, AND INJURY TO PROPERTY, RESULTING FROM THE PURCHASE OR USE OF THE PRODUCT OR ARISING FROM BREACH OF THE WARRANTY, BREACH OF CONTRACT, NEGLIGENCE, STRICT TORT, OR ANY OTHER LEGAL OR EQUITABLE THEORY, EVEN IF NOKIA KNEW OF THE LIKELIHOOD OF SUCH DAMAGES. NOKIA SHALL NOT BE LIABLE FOR DELAY IN RENDERING SERVICE UNDER THE LIMITED WARRANTY, OR LOSS OF USE DURING THE PERIOD THAT THE PRODUCT IS BEING REPAIRED.11 Some states do not allow limitation of how long an implied warranty lasts, so the one year warranty limitation may not apply to you (the Consumer). Some states do not allow the exclusion or limitation of incidental and consequential damages, so certain of the above limitations or exclusions may not apply to you (the Consumer). This limited warranty gives the Consumer specific legal rights and the Consumer may also have other rights which vary from state to state.
136 Copyright © 2004 Nokia12 Nokia neither assumes nor authorizes any authorized service center or any other person or entity to assume for it any other obligation or liability beyond that which is expressly provided for in this limited warranty including the provider or seller of any extended warranty or service agreement.13 This is the entire warranty between Nokia and the Consumer, and supersedes all prior and contemporaneous agreements or understandings, oral or written, relating to the Product, and no representation, promise or condition not contained herein shall modify these terms.14 This limited warranty allocates the risk of failure of the Product between the Consumer and Nokia. The allocation is recognized by the Consumer and is reflected in the purchase price.15 Any action or lawsuit for breach of warranty must be commenced within eighteen (18) months following purchase of the Product.16 Questions concerning this limited warranty may be directed to: Nokia Inc. Attn: Customer Service7725 Woodland Center Blvd., Ste. 150Tampa, FL 33614Telephone: 1-888-NOKIA-2U (1-888-665-4228)Facsimile: (813) 249-9619TTY/TDD Users Only: 1-800-24-NOKIA (1-800-246-6542)
Nokia 6670 User Guide  Copyright © 2004 NokiaNumerics1-touch dialingAssign numbers 26Make calls 19AAccess points 60Accessibility solutions 6Accessories, See EnhancementsAlarmClock 79Tone 80Turn off or snooze 79Answer a call 20Antenna 10Application manager 68ApplicationsAdd voice commands to 71Install applications 69Java application settings 69Remove files 69Audio files, See Media filesBBackground image, See ThemesBatteryCharge 9Insert 9Talk time and standby time 115Bluetooth connection 104Close connection 107Connection requests 106Icons 106Pairing 106Receive data 107Send data 105Settings 105BrowserAccess points 60Bookmarks 99Browse 100Connect 99End connections 102Icons 99Service message settings 56Service messages 50WAP and XHTML pages 98CCache, clear 102Calculator 77Calendar 31Alarm tone 32Delete many entries simultaneously 33Settings 32Views 32Call lists, See LogCall register, See LogCall restriction 66Call timers 22Calls1-touch dialing 19Answer 20Conference calls 19Dialed 22Duration timers 22Forwarding 20International 18Make a call 18Missed 21Options during a call 20Recent 21Reject 20Settings 59
 Copyright © 2004 NokiaSettings for forwarding 21Transfer 20Use the Contacts directory 18Camera 34Memory consumption 35Record videos 35Self-timer 35Settings 36Take pictures 34CD-ROM 109Cell broadcast messages 53Cell info display 67Certificates (Certif.)Management 65Trust settings 66Chargers 115Clear memoryCalendar entries 33Clock 79CodePIN, See PIN codeSecurity, See SecurityComputer connections 109Conference calls 19ConnectionBluetooth 104End 108Indicators, See IconsManager 107Settings 60USB 107View details 108Contact cardsAssign 1-touch dialing 26Assign default numbers and addresses 24Create 24Data import 33Insert images 24Remote synchronization 110Ringing tones 25Voice tags 25, 26Contact groups 27Converter 77Add exchange rates 78Convert currencies 78Convert units 77CopySIM card to phone memory 24Text 46Customer care 5DData import 33Date, settings 63Delivery reports 44Dialed numbers 22Display settings 59See also ThemesDownload files to Gallery 42EEditContact cards 24Text 44Themes 75E-mailDelete 51Remote mailbox 50Retrieve 51Settings 55Undelete 52EnhancementsActivate 67
Nokia 6670 User GuideCopyright © 2004 NokiaDescriptions 115Rules for use 114Settings 67FFile formatsRealPlayer 38SIS file 10File manager 70Files, open 41Fixed dialing 65FoldersCreate and organize 16Open 41Forward calls 20Frequencies 2GGallery 40Download files from the Internet 42Folders 41Picture messages 41Upload images 42Wallpaper images 41Games 87GIF animations 37Go-to menu (shortcuts) 75GPRSConnection timer 23Data counter 22, 23Settings 62GSM data connections 108HHandsfree use, See LoudspeakerIIcons 12Activity 12Bluetooth connection 106Browser 99Data connection 13Enhancement 13GPRS connection 108In standby mode 12Text input 44, 45Voice volume 13Idle state, See Standby modeIM, See Instant messaging 88Image server 42Images 41Add to a contact card 24Full screen 37Keyboard shortcuts when viewing im-ages 37Memory consumption 35Move the focus 37Wallpapers folder 41Zoom 37Import data from other Nokia phones 33Indicators, See IconsInsertBattery 9Memory card 8SIM card 7InstallApplications 69Java files 69Instant messaging (IM)Contacts 92Conversations 90Group chat 94
 Copyright © 2004 NokiaLog in 89Log off 97Service provider icons 88Settings 89Internet access points (IAP), See Ac-cess pointsInternet service provider (ISP), See Access pointsJJavaInstall applications 69Settings 69KKeyguard 17Keypad lock, See KeyguardKeys, phone key definitions vLLanguageFor writing 58Set phone language 58Left selection key 59Listen to messages, See Voice mailLock code 10, 64Lock keypad, See KeyguardLock/unlock memory card, See Mem-ory cardLogData counter 22Erase contents 22, 23Filter 23General (all calls and connections) 23Recent calls, missed, and received calls 21Settings 23Loudspeaker 17MMailE-mail 50Voice mail 18Make calls 18Media filesFile formats 38Mute 39Play 38Search for 39Sound and video 40Media gallery, See GalleryMemory card 80Adapter 81Back up and restore phone memory 82Format 81Insert 8Lock with password 82Memory consumption 82Remove password 82Unlock 82Video clips 80Memory lowCheck memory consumption 82Troubleshooting 111Memory, view details 70Menu 13Menu key v, 13Rearrange the main Menu 14MessagingDelivery reports 44Inbox 48Main view 43
Nokia 6670 User Guide  Copyright © 2004 NokiaMessages on the SIM card 52My folders 50Outbox 52Sent folder settings 57Settings 53Text messages 47Write text 44Missed calls 21MMC, see Memory cardMobile browser, See BrowserModel number 2Movie director 39Music files, See Media filesMuteActive call 20Media files 39Ringing tone on incoming call 20My folders 50NNetwork Services 2Notes 77OOptions lists 15Organize the main Menu 14Outbox 52PPacket data, See GPRSPaste text 46PC Suite 109Personal notes 84PersonalizeAlarm clock tone 80Calendar alarm tone 32PhoneAdapter 116Display, See ThemesIllustration vModel number 2Network frequencies 2Phonebook, See Contact cardsPicture messages 41Pictures, See Camera and GalleryPIN codeUnblock 64Use when powering on 10Play media files 38Power on and off 10Predictive text inputHow to use 45Tips 46Turn off 46Presence 27Availability information 28Blocked 29Private 29Public 28Settings 30Viewers 28Profiles 73Rename 74Settings 73Purchase downloads 101QQuick guide viRRealPlayer 38File formats 38Play media files 38Settings 39
 Copyright © 2004 NokiaStream live content 38ReceiveCalls 20Data by Bluetooth connection 107Messages 48Ringing tones, Operator logos, and settings, see Smart messagesRecent calls log, See LogRecordSounds 78Videos 35Voice commands 71Register your phone 4Reject calls 20RemoteMailbox 50Synchronization 109Remote synchronization 109Remove an application 69Reports 44Restricting calls 66Right selection key 59Ringing tonesAdd a personal ringing tone 25Change 73Mute 20Receive in a smart message 49RS-MMC, see Memory cardSScreen saverDisplay 75Settings 59Scroll key 14SearchFor an item 16For media files 39SecurityCodes 64PIN, lock, and PUK codes 64Security certificates 65Settings 64Selection keys, changing 59Self-timer (for camera) 35SendData by Bluetooth connection 105Messages 47Service command editor 53Set time and date 11Settings 58–67Applications (Java) 69Bluetooth connection 105Calendar 32Call forwarding 21Call restriction 66Camera 36Cell broadcast (info service) 56Certificates 65Clock 79Connection 60Data call (GPRS) 63Date and time 63Display 59E-mail 55Enhancements 67Fixed dialing 65General 58Lock code 10, 64Log 23Messaging 53Messaging, Sent folder 57Phone 58PIN code 64RealPlayer 39Security 64
Nokia 6670 User Guide  Copyright © 2004 NokiaSounds (customize Profiles) 73Text messages 53Video recorder 36Wallet 85Shared memory 3ShortcutsAdd menu shortcuts 75Go to menu 75When viewing images 37SIM cardCopy names and numbers 24Definition 111Insert 7Messages 52SIS file 10Smart messages 49Snooze alarm 79SoftwareInstall applications 69Remove applications 69Sound files, See Media filesSpeed dialing, See 1-touch dialingStandby modeScreen description 11Settings 59standby times and talk times 121Stop alarm clock 79Store data 112Subscribed contacts (Presence) 27Switch between applications 15Synchronization 109SyncML 109Ttalk time 121Templates folder 50TextCopy and paste 46Input 44Messages, write and send 47Templates 50ThemesEdit 75Restore 75Wallpapers folder 41Thumbnails, in contact card 24Tickets 85Time and date settings 63To-do 33Tools1-touch dialing 19, 26Application manager 68Device manager 72File manager 70Voice mail 18Track list 42Traditional text input 44Transfer calls 20Troubleshooting 111TTY/TDD communication 6, 116UUnit converter 77Upload images 42USB connection 107USSD commands 53VVideo clipsCreate and save 35Open 41Video player, See RealPlayerVideo recorder
 Copyright © 2004 NokiaCreate and save video clips 35ViewConnection details 108GIF animations 37Voice commands 70Add 71Change or delete 72Start applications 71Voice dialing, See Voice tagsVoice mail 18Change the number 19Forward calls to voice mail 21Listen to messages 18Voice messages, See Voice mailVoice recorder 78Voice tags 25Add, change, and delete 26Make calls 26Volume control 16WWalletCreate a wallet profile 84Create personal notes 84Enter the wallet code 83Reset code 87Retrieve data into browser 85Settings 85Store personal card details 83View ticket details 85Wallpaper, See ThemesWAP pages, See BrowserWarranty 4, 133Web, See BrowserWrist strap 10Write textPredictive text input 45Traditional text input 44XXHTML pages, See BrowserZZoomOn saved images 37When recording video 35When taking a picture 34
;;;;;;;Para obtener un manual del usuario en español favor de llamar o enviar un fax al teléfono 1-888-NOKIA-2U, fax 813-249-9619.9230217

Navigation menu