Microsoft RM-139 GSM900/1800/1900 Cellular Telephone w/BT User Manual 9235874 3129 zh tw FCC
Microsoft Mobile Oy GSM900/1800/1900 Cellular Telephone w/BT 9235874 3129 zh tw FCC
Contents
- 1. manual
- 2. Manual
Manual
DECLARATION OF CONFORMITY
We, NOKIA CORPORATION declare under our sole responsibility that the product RM-139 is in conformity with the provisions
of the following Council Directive: 1999/5/EC.
A copy of the Declaration of Conformity can be found from http://www.nokia.com/phones/declaration_of_conformity/.
Copyright © 2005 Nokia. All rights reserved.
Reproduction, transfer, distribution or storage of part or all of the contents in this document in any form without the prior
written permission of Nokia is prohibited.
Nokia and Nokia Connecting People are trademarks or registered trademarks of Nokia Corporation. Other product and
company names mentioned herein may be trademarks or tradenames of their respective owners.
Nokia tune is a sound mark of Nokia Corporation.
US Patent No 5818437 and other pending patents. Tegic Communications, Inc. All rights reserved.
Includes RSA BSAFE cryptographic or security protocol software from RSA Security.
Java is a trademark of Sun Microsystems, Inc.
This product is licensed under the MPEG-4 Visual Patent Portfolio License (i) for personal and noncommercial use in
connection with information which has been encoded in compliance with the MPEG-4 Visual Standard by a consumer engaged
i
9235874_3129_zh_tw_FCC.book Page i Wednesday, October 26, 2005 7:36 PM

ii
in a personal and noncommercial activity and (ii) for use in connection with MPEG-4 video provided by a licensed video provider.
No license is granted or shall be implied for any other use.
Additional information, including that related to promotional, internal, and commercial uses, may be obtained from MPEG LA,
LLC. See <http://www.mpegla.com>.
Nokia operates a policy of continuous development. Nokia reserves the right to make changes and improvements to any of the
products described in this document without prior notice.
Under no circumstances shall Nokia be responsible for any loss of data or income or any special, incidental, consequential or
indirect damages howsoever caused.
The contents of this document are provided "as is". Except as required by applicable law, no warranties of any kind, either express or
implied, including, but not limited to, the implied warranties of merchantability and fitness for a particular purpose, are made in
relation to the accuracy, reliability or contents of this document. Nokia reserves the right to revise this document or withdraw it at
any time without prior notice.
The availability of particular products may vary by region. Please check with the Nokia dealer nearest to you.
FCC NOTICE
Your phone may cause TV or radio interference (for example, when using a telephone in close proximity to receiving equipment).
The FCC can require you to stop using your telephone if such interference cannot be eliminated. If you require assistance, contact
your local service facility. This device complies with part 15 of the FCC rules. Operation is subject to the condition that this device
does not cause harmful interference.
This device may contain commodities, technology, or software subject to export laws and regulations from the US and other
countries. Diversion contrary to law is prohibited.
931155X
Issue 1
9235874_3129_zh_tw_FCC.book Page ii Wednesday, October 26, 2005 7:36 PM
iii
For your safety
Read these simple guidelines. Not following them may be dangerous or illegal. Read the complete user guide for further
information.
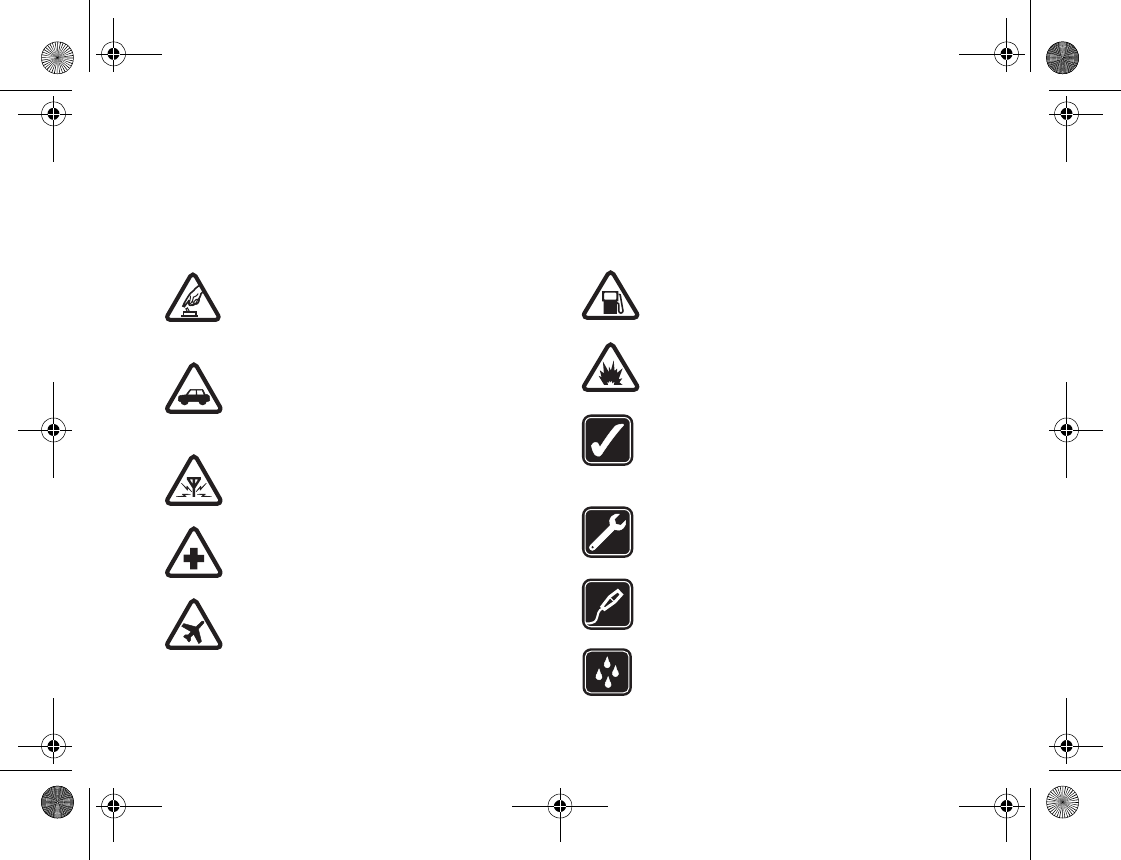
SWITCH ON SAFELY
Do not switch the device on when wireless phone
use is prohibited or when it may cause interference
or danger.
ROAD SAFETY COMES FIRST
Obey all local laws. Always keep your hands free to
operate the vehicle while driving. Your first
consideration while driving should be road safety.
INTERFERENCE
All wireless devices may be susceptible to
interference, which could affect performance.
SWITCH OFF IN HOSPITALS
Follow any restrictions. Switch the device off near
medical equipment.
SWITCH OFF IN AIRCRAFT
Follow any restrictions.Wireless devices can cause
interference in aircraft.
SWITCH OFF WHEN REFUELLING
Do not use the device at a refueling point. Do not
use near fuel or chemicals.
SWITCH OFF NEAR BLASTING
Follow any restrictions. Do not use the device
where blasting is in progress.
USE SENSIBLY
Use only in the normal position as explained in the
product documentation. Do not touch the antenna
unnecessarily.
QUALIFIED SERVICE
Only qualified personnel may install or repair this
product.
ENHANCEMENTS AND BATTERIES
Use only approved enhancements and batteries. Do
not connect incompatible products.
WATER-RESISTANCE
Your device is not water-resistant. Keep it dry.
9235874_3129_zh_tw_FCC.book Page iii Wednesday, October 26, 2005 7:36 PM
iv
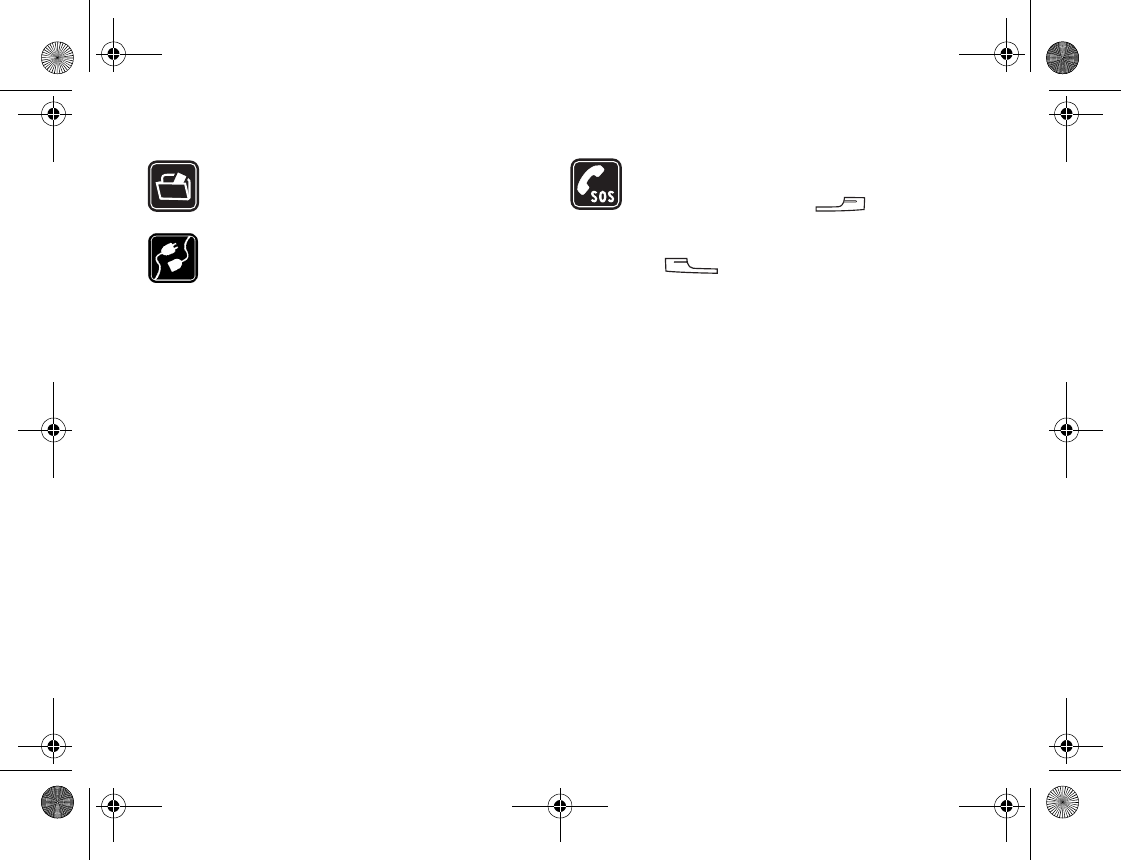
BACK-UP COPIES
Remember to make back-up copies or keep a written
record of all important information.
CONNECTING TO OTHER DEVICES
When connecting to any other device, read its user
guide for detailed safety instructions. Do not connect
incompatible products.
EMERGENCY CALLS
Ensure the phone function of the device is switched
on and in service. Press the key as many
times as needed to clear the display and return to the
start screen. Enter the emergency number, then press
the key. Give your location. Do not end the
call until given permission to do so.
Network services
To use the phone you must have service from a wireless service provider. Many of the features in this device depend on features in
the wireless network to function. These network services may not be available on all networks or you may have to make specific
arrangements with your service provider before you can utilize network services. Your service provider may need to give you
additional instructions for their use and explain what charges will apply. Some networks may have limitations that affect how you
can use network services. For instance, some networks may not support all language-dependent characters and services.
Your service provider may have requested that certain features be disabled or not activated in your device. If so, they will not appear
on your device menu. Your device may also have been specially configured. This configuration may include changes in menu names,
menu order, and icons. Contact your service provider for more information.
This device supports WAP 2.0 protocols (HTTP and SSL) that run on TCP/IP protocols.Some features of this device, such as MMS,
browsing, e-mail and content downloading using the browser or over MMS, require network support for these technologies.
For availability and information on using SIM card services, contact your SIM card vendor. This may be the service provider,
network operator, or other vendor.
9235874_3129_zh_tw_FCC.book Page iv Wednesday, October 26, 2005 7:36 PM

v
About your device
The wireless device described in this guide is approved for use on the GSM 900/1800/1900 and UMTS 2100 networks. Contact
your service provider for more information about networks.
When using the features in this device, obey all laws, and respect privacy and legitimate rights of others.
When taking and using images or video clips, obey all laws, and respect local customs as well as privacy and legitimate rights of
others.
Warning: To use any features in this device, other than the alarm clock, the device must be switched on. Do not switch
the device on when wireless device use may cause interference or danger.
9235874_3129_zh_tw_FCC.book Page v Wednesday, October 26, 2005 7:36 PM

vi
<Memo>
9235874_3129_zh_tw_FCC.book Page vi Wednesday, October 26, 2005 7:36 PM

vii
Table of Contents
1. Getting to Know Your Device....................... 1
Front View................................................................. 1
Rear View with Backcover Opened .......................... 3
Left Side View ........................................................... 4
Right Side View......................................................... 4
The Main Screen....................................................... 5
Status Bar Icons........................................................ 5
The Stylus ................................................................. 6
2. Getting Your Device Ready For Use............ 7
Installing the SIM Card.............................................. 7
Installing and Charging the Battery........................... 9
Installing the Battery............................................... 9
Removing the Battery........................................... 10
Charging the Battery ............................................ 11
Initial Setup ............................................................. 11
3. Basic Operations ....................................... 12
Turning On/Off Your Device.................................... 12
Turning On Your Device....................................... 12
Turning Off Your Device....................................... 12
Navigating the Main Screen.................................... 12
Entering Text and Numbers .................................... 13
Entering Text and Numbers Using the Virtual Keyboard
............................................................................. 13
Entering Latin Alphabets and Numeric Characters13
Entering Chinese Characters ............................... 14
Entering Text and Numbers Using the Handwriting
Recognition Method.............................................. 14
Entering Latin Alphabets and Numeric Characters14
Entering Chinese Characters ............................... 15
4. Using the Phone Functions ........................16
Making a Call .......................................................... 16
Making a Call Using the Phone Screen................ 16
Making a Call from the Contact List...................... 16
Making a Call from the Call Log ........................... 16
Making a Call Using Speed Dial ........................... 16
Making a Call Using Voice Commander............... 17
Answering a Call ..................................................... 17
Ending a Call ........................................................ 17
Operations During a Call......................................... 17
Adjusting Volume.................................................. 17
Holding/Retrieving a Call...................................... 18
Making Another New Call During a Call ............... 18
Answering an Incoming Call during a Call............ 18
Switching Calls ..................................................... 18
Ending All Calls .................................................... 18
Conference Call ...................................................... 18
Talking Privately to One Party during a Conference
9235874_3129_zh_tw_FCC.book Page vii Wednesday, October 26, 2005 7:36 PM

viii
Call ........................................................................18
Releasing a Calling Party During a Conference Call19
Ending a Conference Call .....................................19
Call Logs..................................................................19
Call Logs Options..................................................19
Miscellaneous Operations .......................................20
Ending All Calls .....................................................20
Showing Cost ........................................................20
Calling Voice Mail-box...........................................20
Hiding/Showing My Number..................................20
Transferring Sound ...............................................20
Calling Emergency Numbers ................................20
Adding Speed Dial ................................................21
Removing Speed Dial ...........................................21
Adding number to Contacts...................................21
Copying/Pasting Number ......................................21
Zoom .....................................................................22
Adjusting Call Settings ..........................................22
Adjusting Tones and Alerts ...................................22
Enabling/Disabling Automatic Keypad Lock..........22
Accessing Help .....................................................23
5. Using the Application Programs.................24
The Main Screen .....................................................24
Your Device Application Programs ..........................24
Messaging ...............................................................27
Creating and Sending Messages ..........................27
Message Folders...................................................29
Receiving and Viewing Messages........................ 29
Contacts.................................................................. 30
Creating a New Contact ....................................... 31
Importing Contacts from a SIM Card.................... 31
Exporting Contacts to a SIM Card........................ 31
Viewing Contacts.................................................. 31
Managing Contacts Folders ................................. 32
Managing Contacts .............................................. 32
Owner Card.......................................................... 34
Contacts Preferences........................................... 34
Calendar ................................................................. 34
Creating New Calendar Entries............................ 35
Calendar Views .................................................... 35
Managing Calendar Entries.................................. 35
Managing Calendar Folders ................................. 36
Setting up Calendar Preferences ......................... 36
Note ........................................................................ 37
Creating Notes ..................................................... 37
Managing Notes ................................................... 37
Managing Note Folders ........................................ 38
Settings................................................................... 38
Device Settings .................................................... 38
Connection Settings ............................................. 40
Network Settings .................................................. 41
Security Settings .................................................. 44
General Settings................................................... 45
Camera ................................................................... 50
9235874_3129_zh_tw_FCC.book Page viii Wednesday, October 26, 2005 7:36 PM

ix
Taking Still Pictures.............................................. 50
Capturing Video.................................................... 51
Camera Options When Taking Pictures and Capturing
Video .................................................................... 52
Image Settings ..................................................... 52
Video Settings ...................................................... 53
Music Player ........................................................... 54
Playing Music ....................................................... 54
Operations When Playing Music .......................... 54
Managing Songs .................................................. 55
Managing Music Folders ...................................... 56
Video Player............................................................ 56
Viewing Video Clips Using Video Player .............. 56
Managing Video Folders ...................................... 57
Managing Video Clips .......................................... 57
PhotoBase .............................................................. 58
Viewing Images .................................................... 58
Organizing Images ............................................... 60
Sending Images ................................................... 60
Editing Images...................................................... 61
Adding Special Effects to images......................... 62
Internet.................................................................... 65
Connecting to/Disconnecting from the Internet .... 65
Opening the Internet Browser .............................. 65
Opening Page ...................................................... 65
Key Operations When Browsing .......................... 66
Bookmarking Pages ............................................. 66
Saving Pages for Off-Line Browsing..................... 67
Going to Bookmarked Pages................................ 67
Operations When Viewing Pages......................... 67
Managing Bookmarks........................................... 68
Managing Bookmark Folders................................ 68
Browser Preferences ............................................ 69
Time ........................................................................ 70
Viewing Current Time and Date ........................... 70
Setting Time and Date.......................................... 70
To-Do ...................................................................... 70
Creating New Tasks ............................................. 71
Viewing Tasks ...................................................... 71
Managing Tasks ................................................... 71
Managing Task Folders ........................................ 72
To-Do Preferences ............................................... 72
Calculator................................................................ 73
Voice ....................................................................... 74
Creating a New Voice Note .................................. 74
Playing Voice Notes ............................................. 74
Deleting Voice Notes ............................................ 75
Sending Voice Notes ............................................ 75
Online Services....................................................... 75
GPRS Data Log ...................................................... 75
Viewing GPRS Data Log ...................................... 75
Resetting GPRS Data Count ................................ 76
Deleting GPRS Data Log...................................... 76
6. Expanding the Capabilities of Your Device.77
9235874_3129_zh_tw_FCC.book Page ix Wednesday, October 26, 2005 7:36 PM

x
Installing Application Programs ...............................77
Installing Application Programs from the Internet .77
Installing Application Programs from Installation Files
77
Uninstalling Application Programs ........................77
Installing/Removing a Memory Card........................78
Installing a Standard Memory Card.......................78
Installing a Mini SD Memory Card.........................78
Removing a Memory Card ....................................79
Formatting a Memory Card ...................................79
Renaming a Memory Card ....................................79
7. Managing and Personalizing Your Device..80
Managing Application Programs..............................80
Grouping Application Programs ............................80
Setting Application Programs on the Application
Shortcut Bar ..........................................................80
File Management .....................................................80
Personalizing Your Device.......................................80
Customizing User Profiles.....................................80
Selecting a User Profile.........................................81
8. Getting Your Device Connected and
Synchronized .................................................82
Connecting the Device to Other Devices.................82
Infrared Connection...............................................82
USB Connection....................................................82
Bluetooth Connection............................................82
Using the Device as a GPRS Modem..................... 84
Setting up GPRS Modem via USB Connection.... 84
Setting up GPRS Modem via Bluetooth Connection85
Synchronizing Data .............................................. 85
Performing Remote Synchronization with a Server85
9. Troubleshooting Information ...................... 87
Call Related Problems ............................................ 87
Message Problems ................................................. 87
Internet Problems.................................................... 88
Application Program Problems ............................... 88
Connection Problems.............................................. 89
System Problems.................................................... 89
10. Product Specifications ............................. 90
11. Battery information................................... 92
Charging and discharging....................................... 92
12. Genuine Enhancements .......................... 93
Power...................................................................... 93
Travel Charger (AC-1001C) ................................. 93
Audio....................................................................... 94
Fashion Stereo Headset (HS-46) ......................... 94
13. Care and Maintenance ............................ 95
14. Additional Safety Information ................... 96
Operating environment ........................................... 96
Medical devices ...................................................... 96
Pacemakers ......................................................... 96
9235874_3129_zh_tw_FCC.book Page x Wednesday, October 26, 2005 7:36 PM

xi
Hearing aids ......................................................... 96
Vehicles................................................................ 97
Potentially explosive environments......................... 97
Emergency calls ................................................... 97
To make an emergency call: ................................ 98
Certification information (SAR) ............................... 98
15. Limited Warranty.................................... 100
16. Your Details............................................ 102
9235874_3129_zh_tw_FCC.book Page xi Wednesday, October 26, 2005 7:36 PM

xii
<Memo>
9235874_3129_zh_tw_FCC.book Page xii Wednesday, October 26, 2005 7:36 PM
Getting to Know Your Device
1
1. Getting to Know Your Device
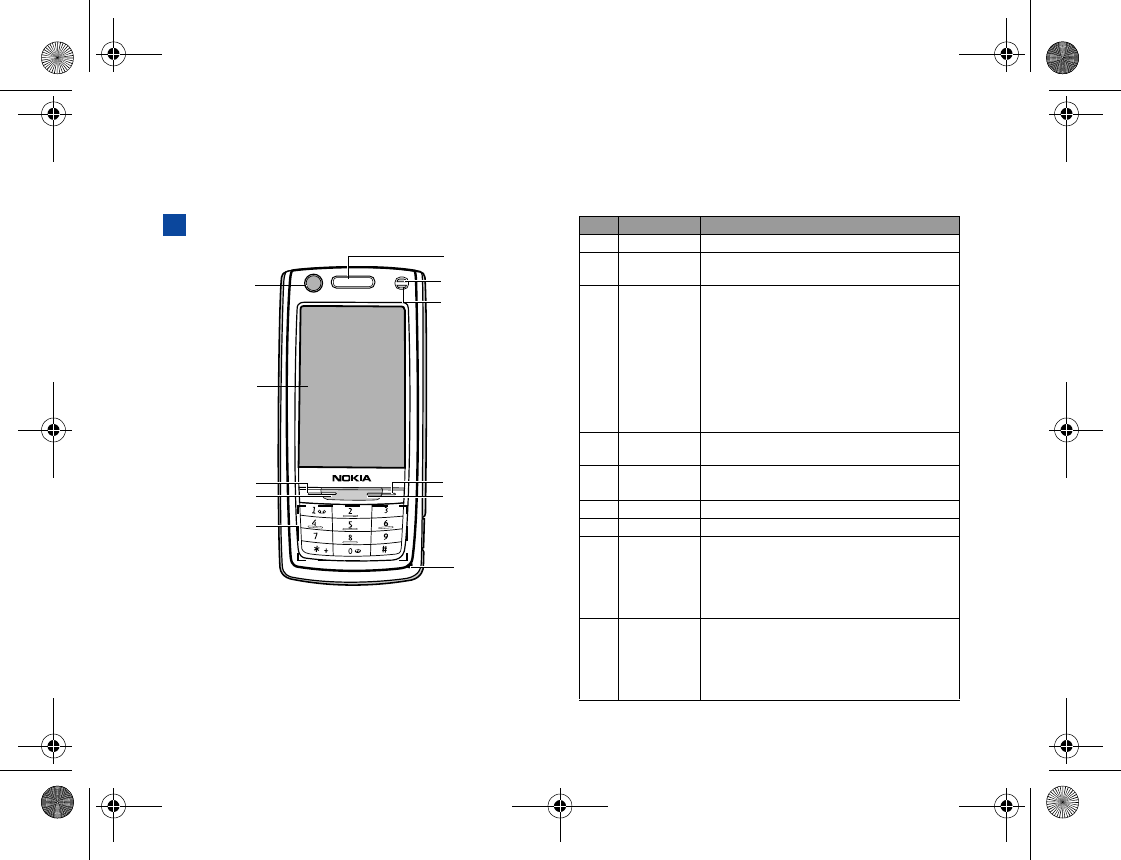
Front View
(1)
(2)
(3)
(4)
(5)
(6)
(11)
(10)
(9)
(8)
(7)
No. Name Description
(1) Power key Press this key to turn power on and off.
(2) Touch
screen
The interface for displaying information
and operating functions.
(3) Call key • In the Main screen, press this key to go
to the Phone screen.
• If there is an incoming call, press this
key to answer the call.
• In the Phone screen, press this key to
access the past call history.
• In the Phone screen, press and hold
this key for about 3 seconds to activate
Voice Commander.
(4) Left key Press this key to go to the preset mode.
The default setting is Calendar.
(5) Keypad Allows you to enter numbers, symbols
and navigate in menus and screens.
(6) Microphone Receives audio.
(7) Earpiece Generates audio.
(8) Network
status/
incoming
call
indicator
• Flashes in blue: you are under your
home network.
• Flashes blue quickly: there is an incom-
ing call.
(9) Battery/
message
indicator
• Flashes yellow: there is a new mes-
sage or a missed call.
• Lights up in red: the battery is being
charged.
• Flashes red: the battery is running low.
9235874_3129_zh_tw_FCC.book Page 1 Wednesday, October 26, 2005 7:36 PM
Getting to Know Your Device
2
(10) End key When there is an incoming call, press
this key to reject the call.
(11) Right Key • Press this key to go to the preset
mode. The default setting is Contacts.
• Press and hold this key for approxi-
mately 3 seconds to activate/deacti-
vate Silent mode.
9235874_3129_zh_tw_FCC.book Page 2 Wednesday, October 26, 2005 7:36 PM
Getting to Know Your Device
3
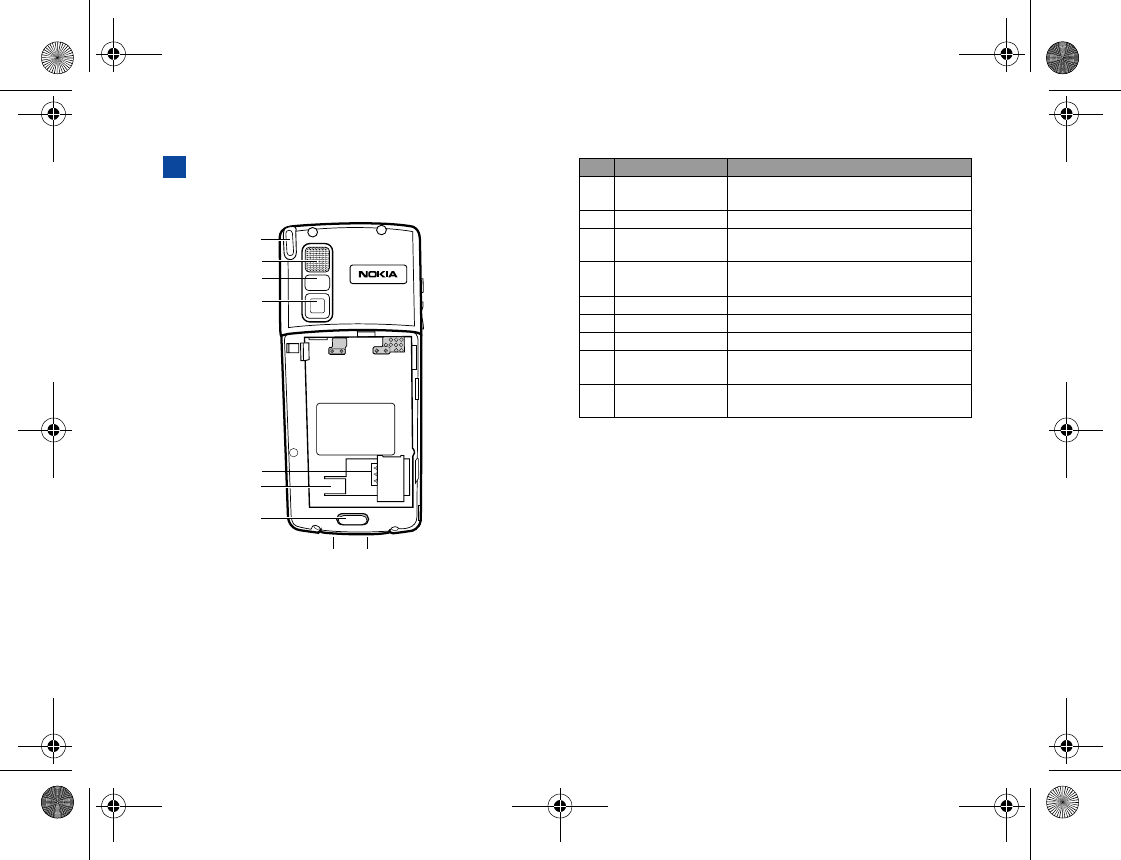
Rear View with Backcover Opened
(1)
(2)
(5)
(6)
(7)
(9)
(8)
(3)
(4)
No. Name Description
(1) Stylus and stylus
housing
Accommodates the stylus.
(2) Loudspeaker Generates audio.
(3) Self-taking
mirror
Used when taking your self photo.
(4) Camera Built-in type camera set for taking
pictures and video clips.
(5) SIM card socket Allows you to install a SIM card.
(6) SIM card stay Holds the SIM card in place.
(7) Battery latch Fixes the battery in place.
(8) USB connector Connects to a PC via the supplied
data cable.
(9) Battery charger
connector
Connects to the battery charger.
9235874_3129_zh_tw_FCC.book Page 3 Wednesday, October 26, 2005 7:36 PM
Getting to Know Your Device
4
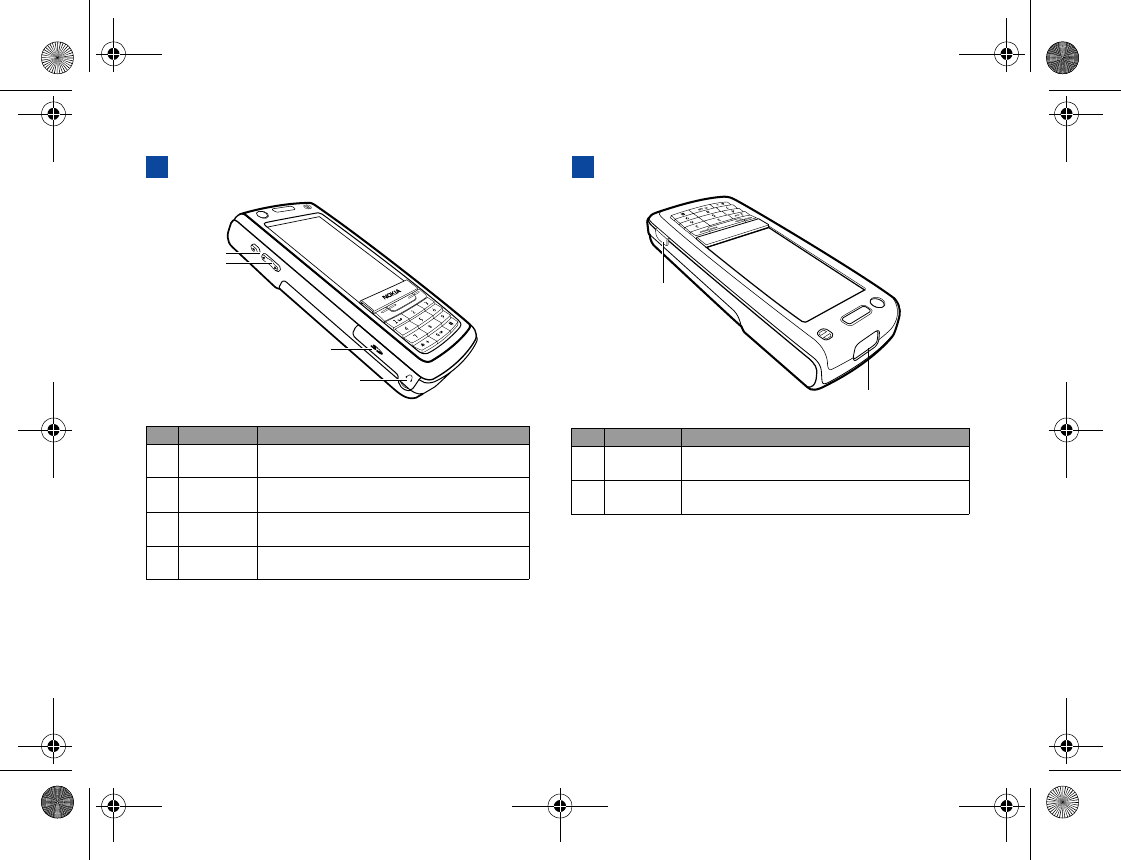
Left Side View Right Side View
No. Name Description
(1) Function
side key
Allows you to set as a hotkey to your
desired function.
(2) Volume
control key
Allows you to control volume.
(3) Memory
card slot
Allows you to install an SD memory card.
(4) Headset
connector
Connects the device to a compatible
headset.
(1)
(4)
(3)
(2)
No. Name Description
(1) Camera
key
Press this key to go to the Camera screen for
taking pictures or capturing video clips.
(2) Infrared
window
Connects to other devices that support
Infrared connection.
(1)
(2)
9235874_3129_zh_tw_FCC.book Page 4 Wednesday, October 26, 2005 7:36 PM
Getting to Know Your Device
5
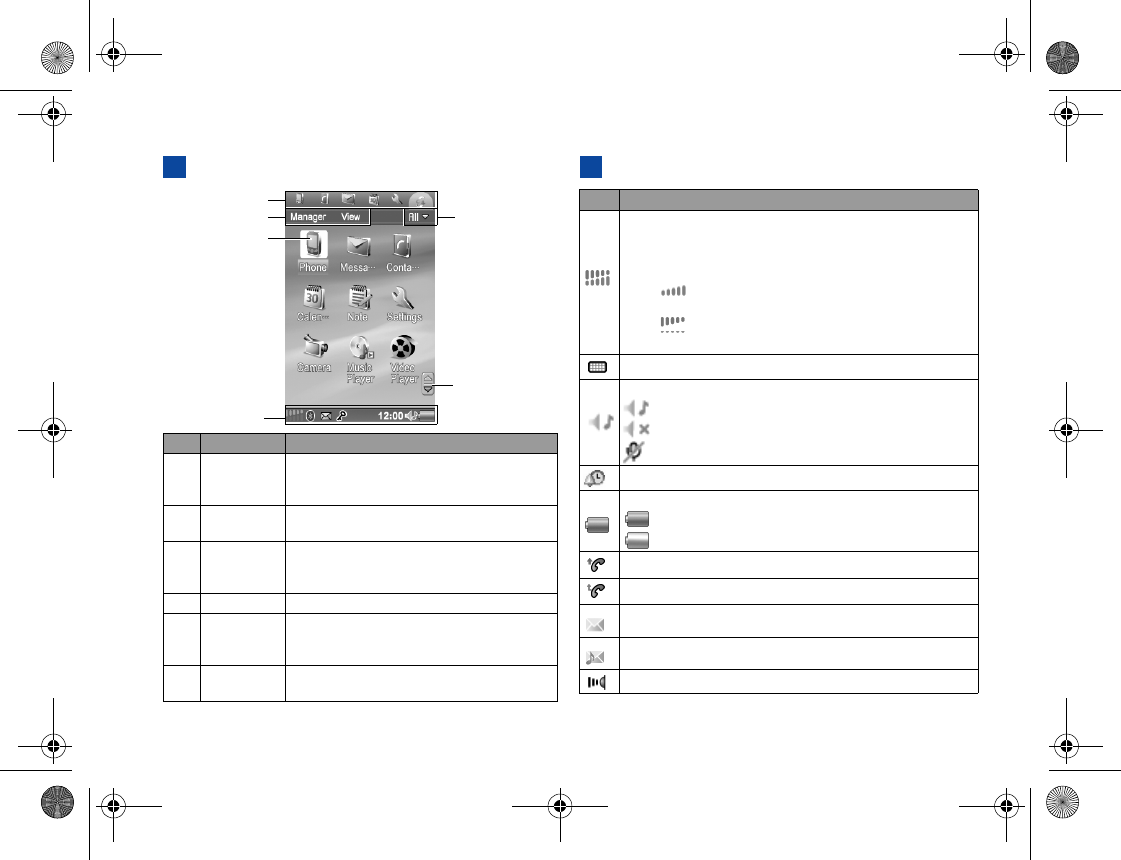
The Main Screen Status Bar Icons
No. Name Description
(1) Application
shortcut bar
Contains shortcut icons for instant access
to frequently used application programs.
You can also customize this shortcut bar.
(2) Menu bar Displays menu options in each application
program screen.
(3) Application
program
icons
Allows you to access application programs
on your device. Tap an icon to open the
application program it represents.
(4) Status bar Displays various status icons.
(5) Folder
menu
Tap this item to open a menu where you
can organize your application programs or
data using different folders.
(6) Scroll
buttons
Tap the up or down arrow on tis button to
scroll pages up or down in a screen.
(1)
(2)
(3)
(4)
(5)
(6)
Icon Description
Indicates signal strength. The more the vertical green
bars displayed, the better the signal reception.
Appearance of the blue bars indicates that the GPRS
network is connected.
• The icon indicates that GSM network signal is
available but no GPRS network is attached.
• The icon indicates that GPRS network is available
but no GSM network is attached.
Tap this icon to open the virtual keyboard.
Indicates the status of audio setting.
: the speakerphone is currently turned on
: the speakerphone is currently in silent mode
: the microphone has been muted
Indicates that an alarm has been set.
Indicates battery status.
: Battery full
: Battery empty
Appears when a call is in progress.
Indicates that you have missed call(s).
This icon appears when you have a new SMS message.
This icon appears when you have a new MMS message.
Indicates that the infrared function has been turned on.
9235874_3129_zh_tw_FCC.book Page 5 Wednesday, October 26, 2005 7:36 PM
Getting to Know Your Device
6
The Stylus
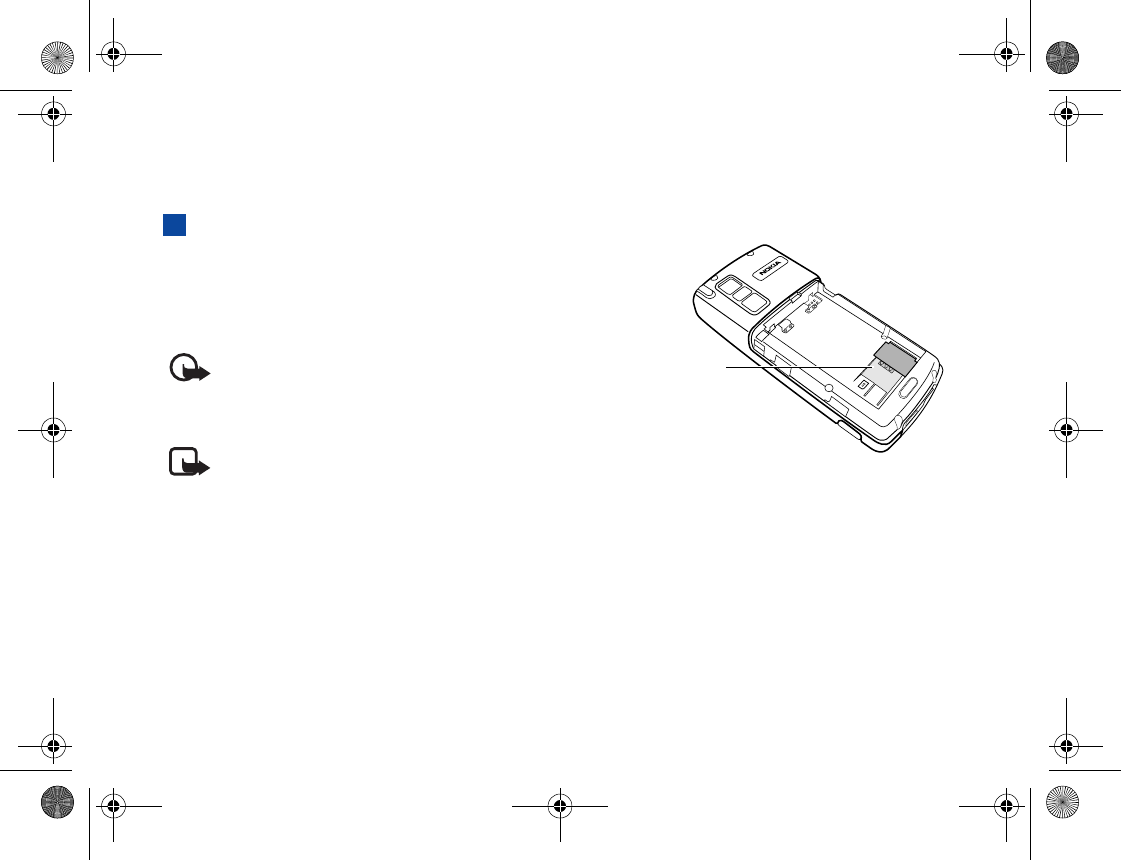
The touch screen and stylus design allows you to easily and
comfortably enter and browse information on your device.
You can take out the stylus from the device by gently pulling it
from the stylus housing as illustrated below:
The stylus can be further stretched to facilitate the convenience
of use.
When you want to put the stylus back, slowly insert it back into
the stylus housing.
You can use the pointed tip of the stylus to touch an icon on the
screen and to execute the function represented by that icon. This
is expressed as “tap” an icon in this users guide. You can also use
the stylus to enter text and numbers in combination with the
handwriting input method.
Important: Use only a stylus approved by Nokia for
use with this device. Using any other stylus may invalidate
any warranty applying to the device and may damage the
touch pad. Avoid scratching the touch pad. Never use an
actual pen or pencil or other sharp objects to write on the
touch pad.
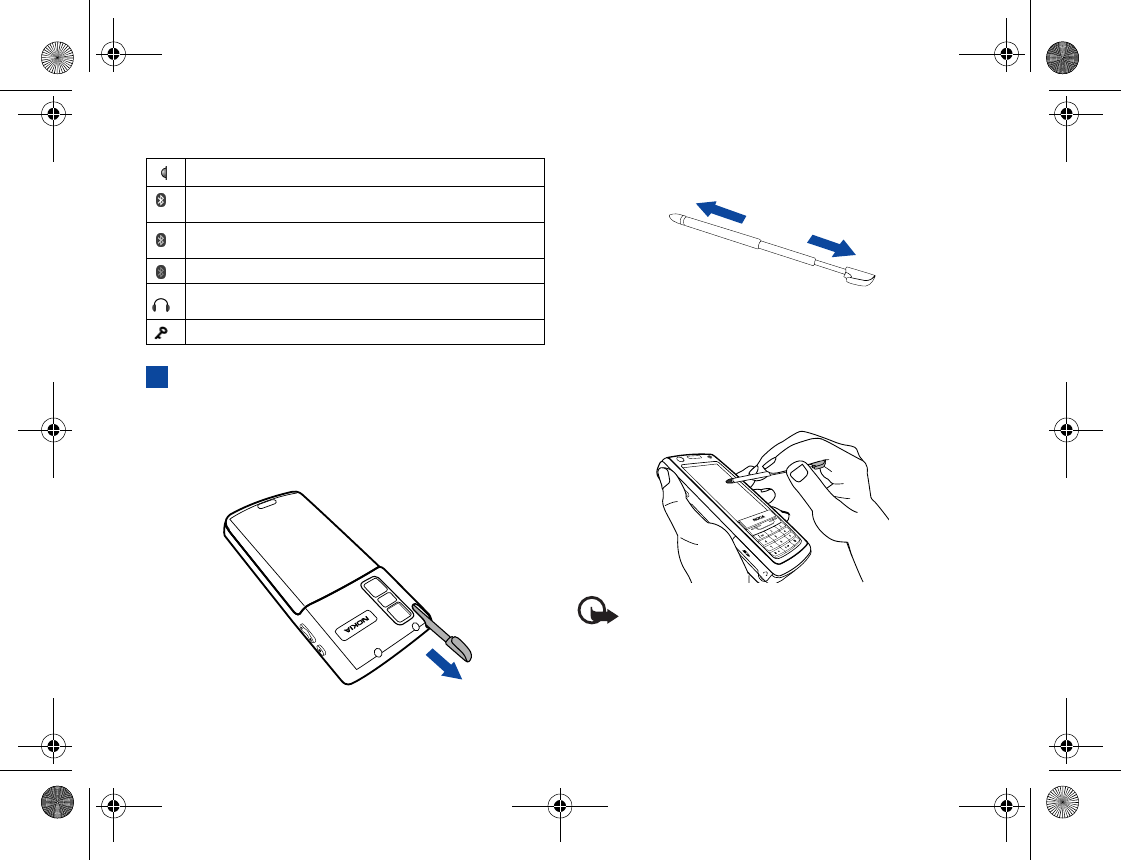
Indicates that infrared function is not turned on.
Indicates that the Bluetooth connectivity function has
been turned on.
Indicates that your phone is discoverable in the
Bluetooth network.
Indicates that Bluetooth connectivity is in progress.
This icon appears when a headset has been connected
to the device.
This icon appears when the keypad is locked.
9235874_3129_zh_tw_FCC.book Page 6 Wednesday, October 26, 2005 7:36 PM
Getting Your Device Ready For Use
7
2. Getting Your Device Ready For Use
Installing the SIM Card
Upon the completion of your subscription to your network
service provider, you receive a SIM (Subscriber Identity
Module) card. This card is used to store the services you have
subscribed to your network service provider. For example,
your phone number and phone book information.
Important: For availability and information on using
SIM card services, contact your SIM card vendor. This
may be the service provider, network operator, or other
vendor.
Note: You can still use some functions of your device
without SIM card in offline mode. You can still use the
device without a SIM card in Offline mode. To set Offline
mode, refer to "Offline" on page 43.
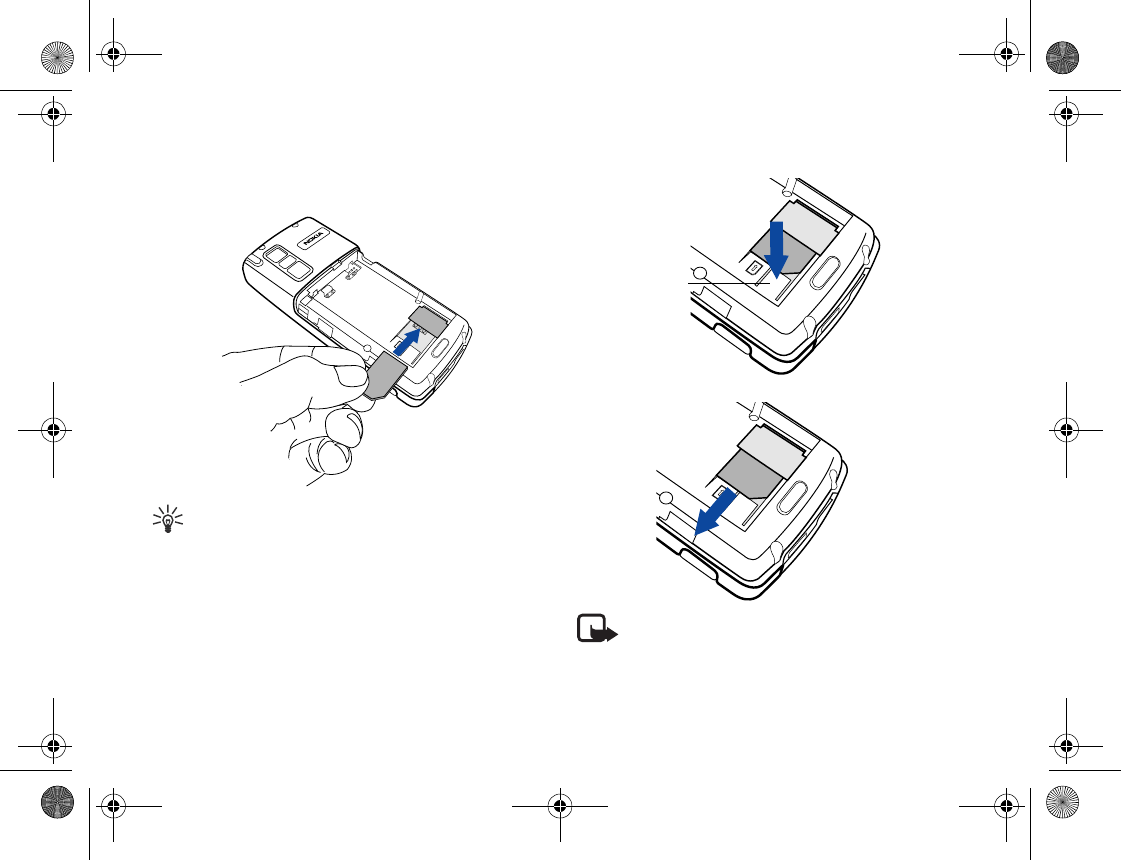
1. Turn the device over and locate the SIM card socket.
SIM card socket
9235874_3129_zh_tw_FCC.book Page 7 Wednesday, October 26, 2005 7:36 PM
Getting Your Device Ready For Use
8
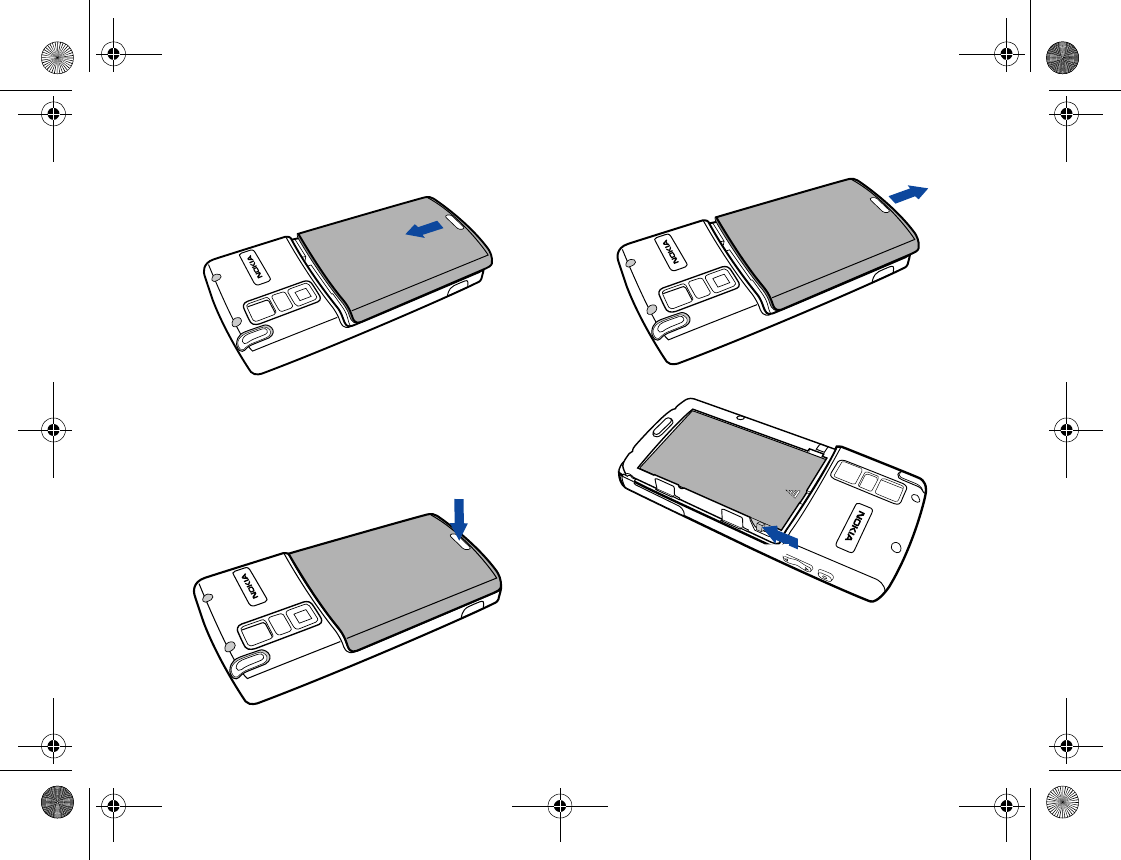
2. Slide the SIM card in under the metal plate in the SIM card
slot with the SIM card's metal contacts facing down and the
cut corner at the bottom right.
Tip! If you want to remove the SIM card, please do the
following:
1. Turn off the power of your device.
2. Remove the battery.
3. Press down the SIM card stay (as illustrated).
4. Push the card out of the slot.
Note: A PIN (Personal Identity Number) is associated
with the SIM card. The four-digit code is supplied with the
SIM card from your service provider and may have to be
entered when powering on the device. For more informa-
tion, contact your network service provider.
SIM card stay
9235874_3129_zh_tw_FCC.book Page 8 Wednesday, October 26, 2005 7:36 PM

Getting Your Device Ready For Use
9
Installing and Charging the Battery
Installing the Battery
1. Press the button at the bottom of the back cover and slide
the cover off the device.
2. Place the battery on the device with the battery’s contacts
facing downwards and the tooth on the bottom edge of the
battery in alignment with the hole on the device, and then
press the battery down gently to click it back into place.
9235874_3129_zh_tw_FCC.book Page 9 Wednesday, October 26, 2005 7:36 PM
Getting Your Device Ready For Use
10
4. Push the back cover down on the device and slide it into
place.
Removing the Battery
1. Turn off the power of the device.
2. Press the button at the bottom of the back cover and slide
the cover off the device.
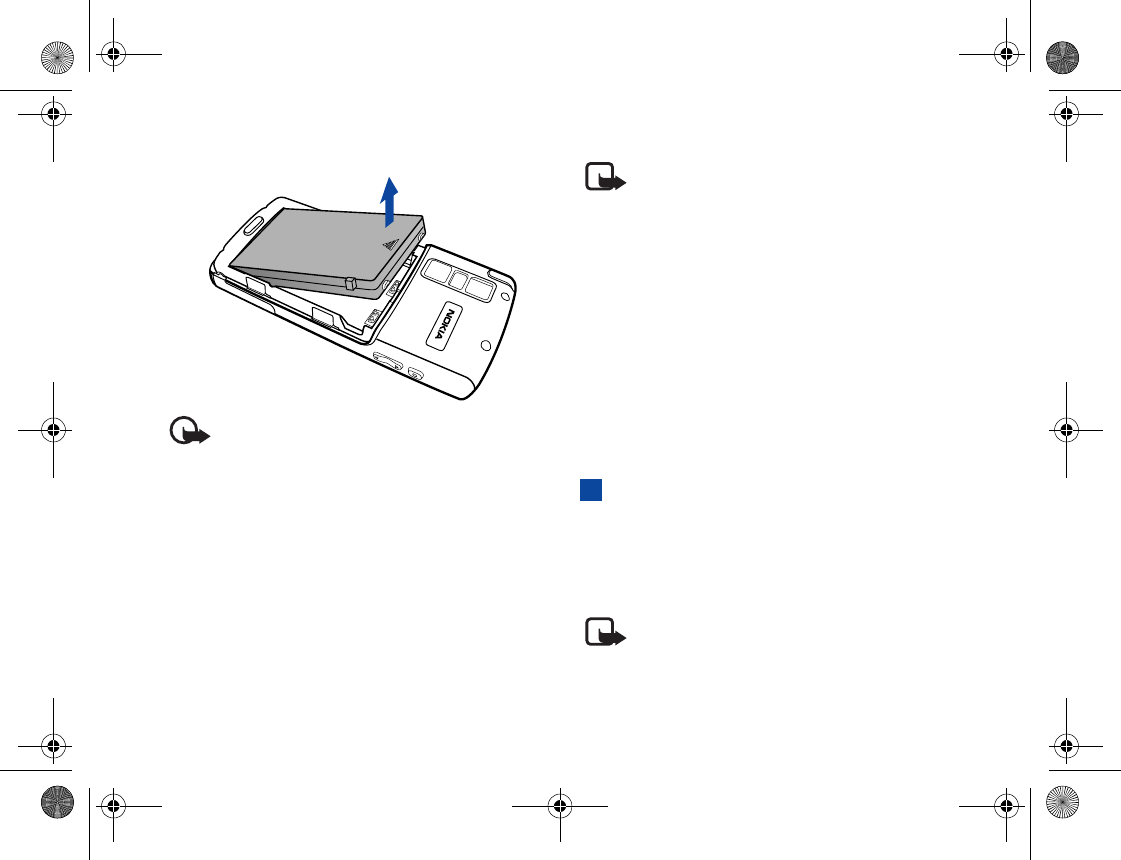
3. Slide the battery latch backward and lift the battery upward.
9235874_3129_zh_tw_FCC.book Page 10 Wednesday, October 26, 2005 7:36 PM
Getting Your Device Ready For Use
11
4. Remove the battery from the device.
Important: Do not remove the battery when your
device is on: you could lose all your personal settings
stored either in your SIM card or in Nokia 6708 memory.
Charging the Battery
1. Insert the charger connector into the battery charger socket
at the bottom of the device. Make sure you insert the con-
nector with the arrow sign on the top.
2. Plug the charger into a mains outlet.
3. After your phone is fully charged, disconnect the charger
from the mains outlet and your phone.
Note: It takes approximately 8 hours for the travel
charger to fully charge a new battery. However, actual time
needed may vary.
• It takes at least one charging-discharging cycle for the bat-
tery to reach its peak performance.
• Your device can also be charged when connected to the
USB via the supplied data cable.
• During charging, the screen of the device will indicate the
status of the battery being charged when powered off, and
the Battery/appointment/message indicator will stay red.
• When the battery is low, you will be prompted by a mes-
sage on the screen. When the battery is running out of
power, another message will appear to remind you to
recharge immediately. Your phone will then power off
automatically.
Initial Setup
1. Press and hold the power key for approximately 3 seconds.
2. The initial setup screen will follow within a few seconds,
asking you to select the language you want to use. Use the
stylus to tap the appropriate buttons and options, and then
follow the instructions on the screen to proceed.
Note: Refer to "Setting Date and Time" on page 70 for
how to setup current date and time.
9235874_3129_zh_tw_FCC.book Page 11 Wednesday, October 26, 2005 7:36 PM
Basic Operations
12
3. Basic Operations
Turning On/Off Your Device
Turning On Your Device
Press and hold the power key for approximately 3 seconds. The
welcome screen will appear.
Turning Off Your Device
When the power of the device is on, press and hold the power
key for approximately 3 seconds.
Navigating the Main Screen
In the Main screen, you can:
• Use the stylus to tap the desired icons in order to open a pro-
gram or select options.
• Use the keys on the device to perform simple selection and
confirmation:
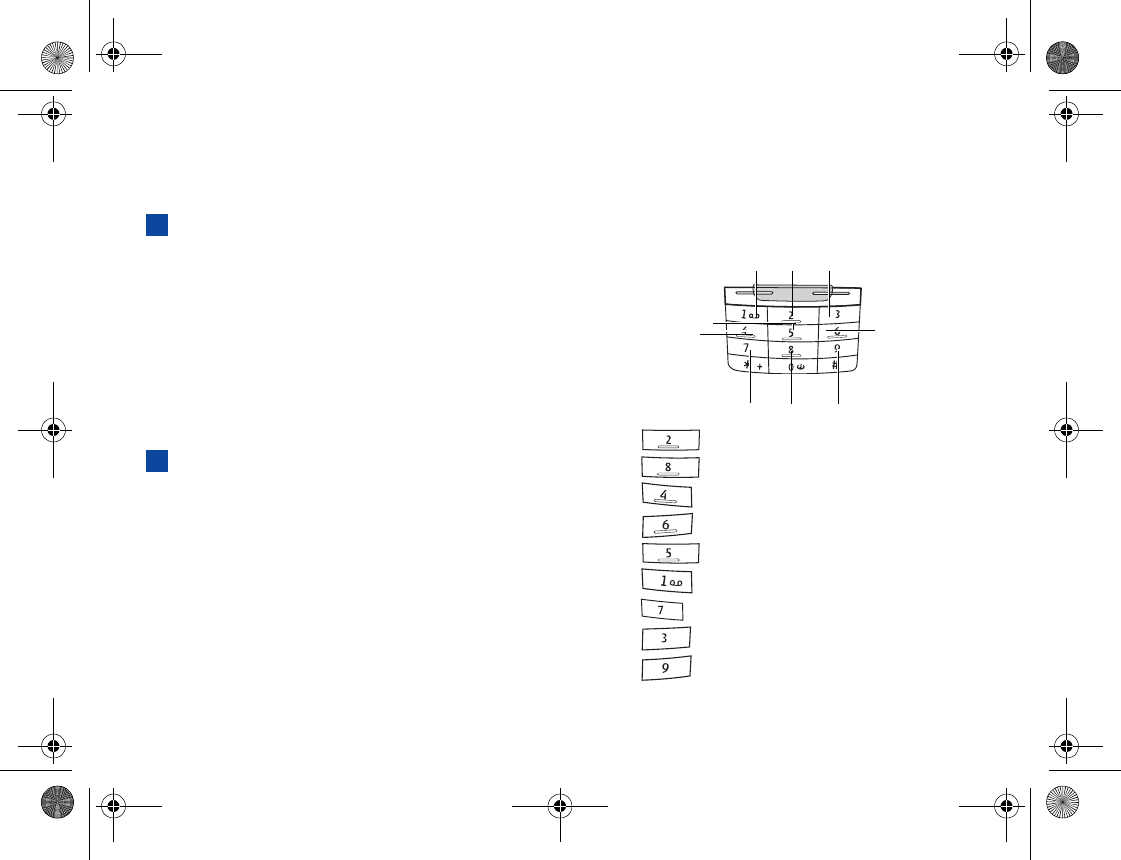
• Press the key to move the selection focus up.
• Press the key to move the selection focus down.
• Press the key to move the selection focus left.
• Press the key to move the selection focus right.
• Press the key to confirm selection.
• Press the key to go to the first page.
• Press the key to go to the last page.
• Press the key to go to the previous page.
• Press the key to go to the next page.
Up
Down
Left
Next page
Right
Select/Confirm
Last page
Previous page
First page
9235874_3129_zh_tw_FCC.book Page 12 Wednesday, October 26, 2005 7:36 PM
Basic Operations
13
Entering Text and Numbers
Entering Text and Numbers Using the
Virtual Keyboard
Whenever you want to enter/edit text and numbers, or when
you tap the icon, the virtual keyboard will appear on the
screen.
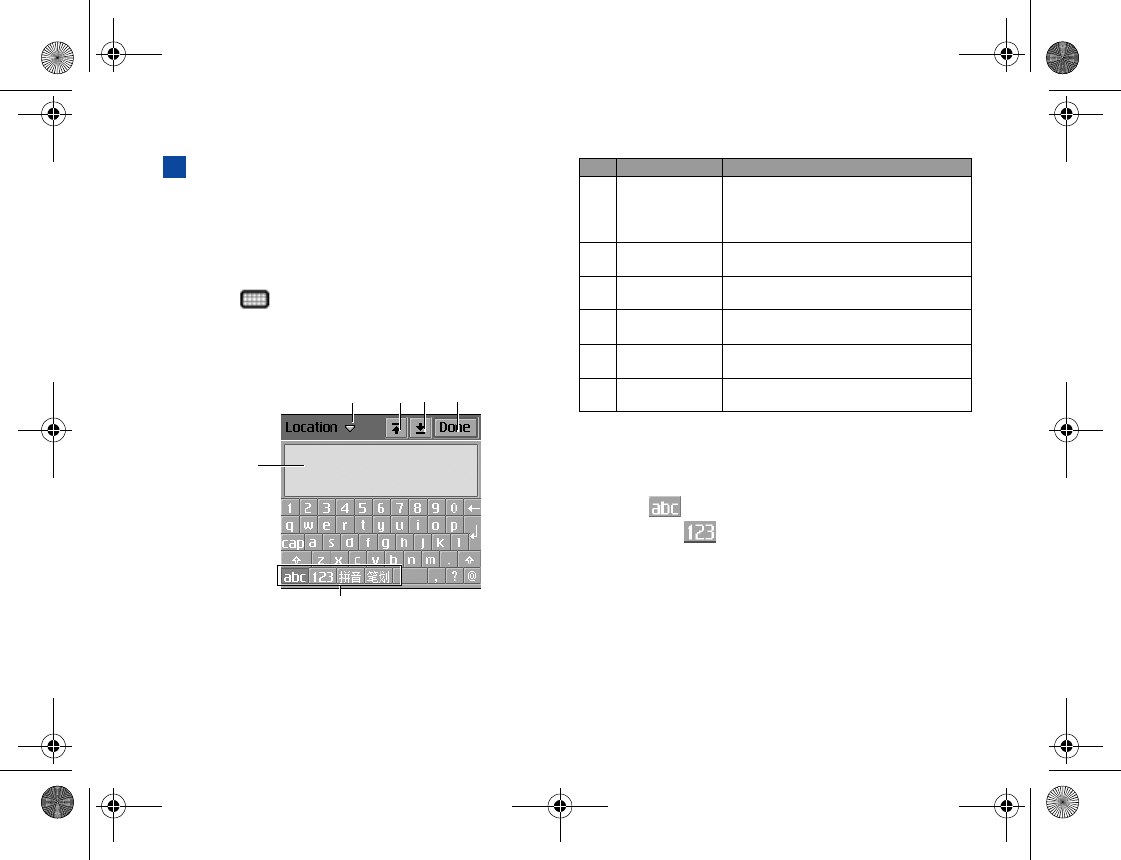
Please refer to the illustration below for a detailed description
of each part of the virtual keyboard and their functions.
Entering Latin Alphabets and Numeric
Characters
1. Tap the icon to switch to the Latin alphabet input
mode, or the icon to switch to the numeric character
input mode.
2. Tap the desired buttons on the virtual keyboard. The text
will appear in the Text display area.
3. Tap the Done button and the text will be placed in the text
entry field.
(a) (b) (c) (d)
(e)
(f)
Part Name Description
(a) Edit menu Tap this icon to open a menu where
you can select the Copy, Cut and
Paste commands and keyboard
language.
(b) First field button Tap this button to go to the first text
entry field.
(c) Last field button Tap this button to go to the last text
entry field.
(d) Done button Tap this button to hide the virtual
keyboard.
(e) Text display
area
Displays the text you entered.
(f) Input mode
buttons
Tap these buttons to switch among
different input modes.
9235874_3129_zh_tw_FCC.book Page 13 Wednesday, October 26, 2005 7:36 PM
Basic Operations
14
Entering Chinese Characters
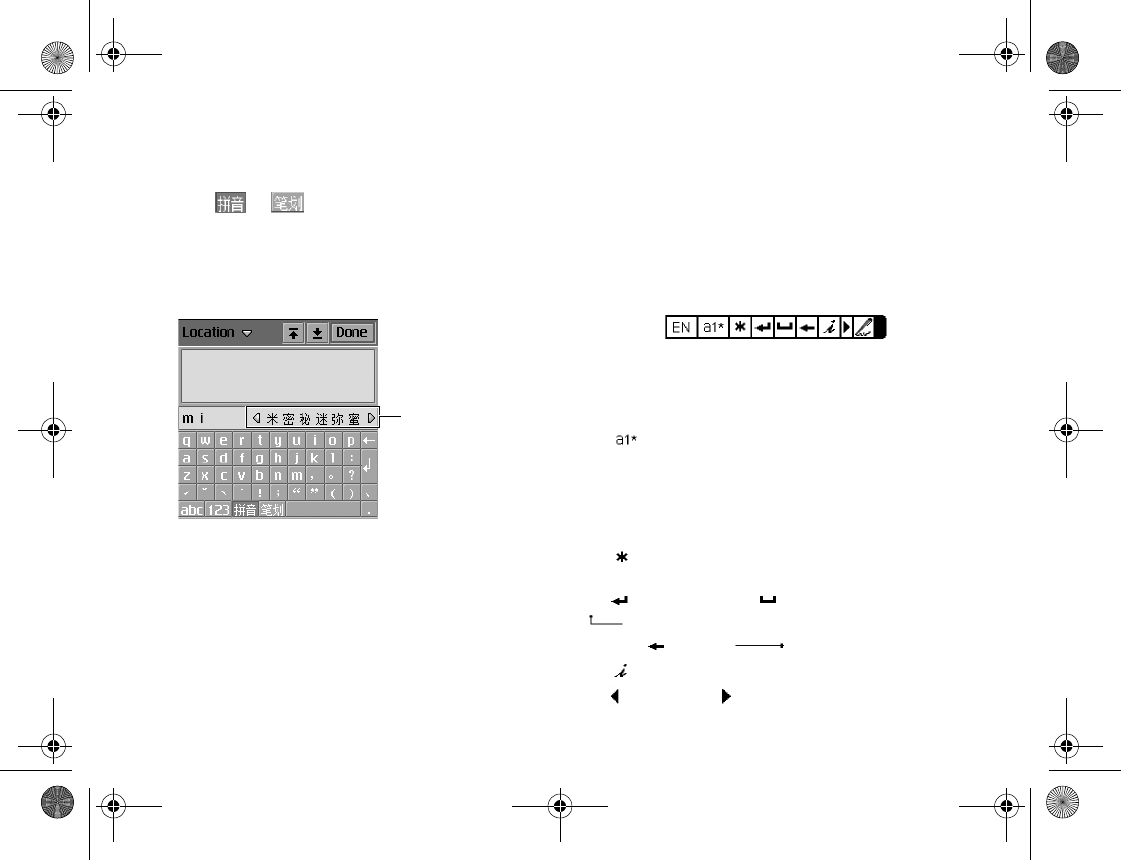
1. Tap the or button to switch to the Pinyin or
Stroke input method.
2. Tap the desired buttons on the virtual keyboard.
3. The candidates that match the phonetic symbols/pinyin
combination or strokes you tapped will appear in the Candi-
date area.
If the Chinese character you want to enter appears in the
candidate area, tap it and it will appear in the Text display area.
The possible associated characters will then follow in the
Candidate area. You can tap to choose an associated character
directly, or continue entering another character by tapping the
keys on the keyboard.
4. Tap the Done button and the text will be placed in the text
entry field.
Entering Text and Numbers Using the
Handwriting Recognition Method
your device is equipped with a powerful handwriting
recognition system that enables you to input data more
naturally and efficiently.
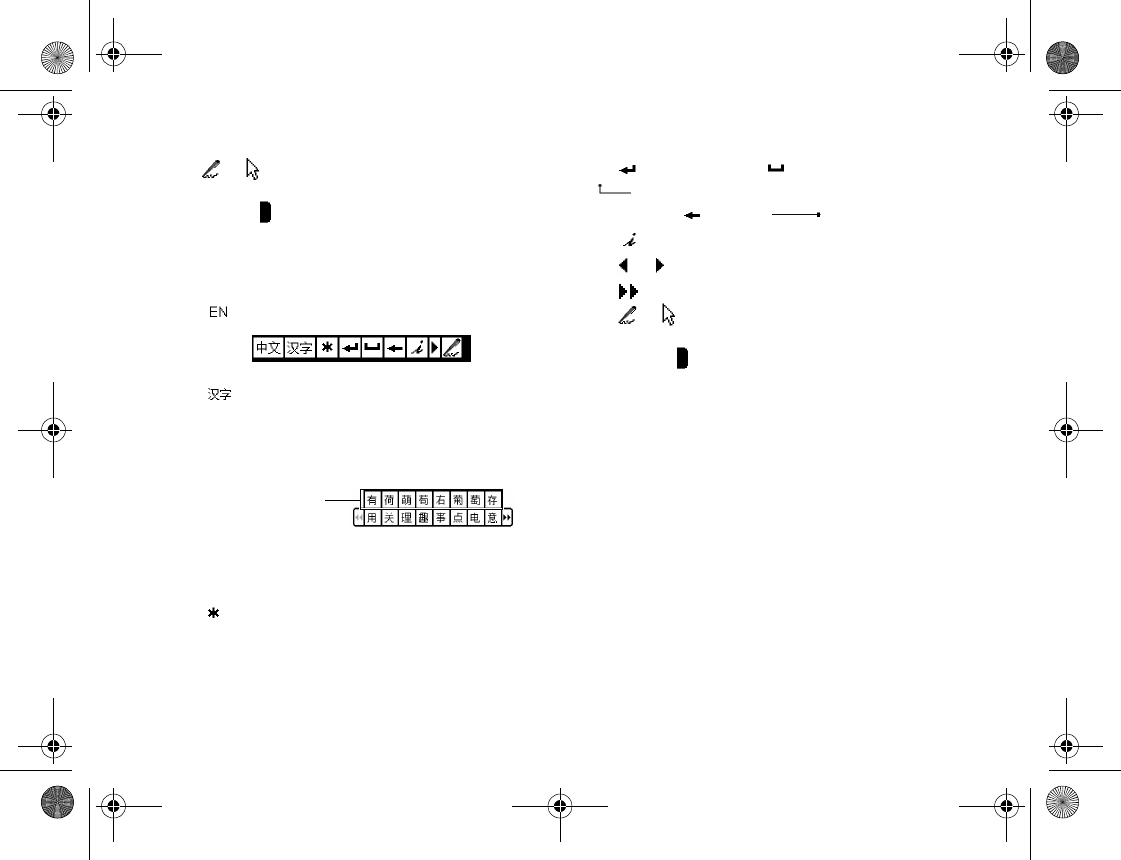
Whenever text entry is required, the following handwriting tool
bar will appear on the screen.
Entering Latin Alphabets and Numeric
Characters
1. Tap to change among Latin alphabet, numeric character
or symbol input modes. If the current field is a numeric field
- the mode is automatically switched to number.
2. Write from left to right and continuously on any part of the
screen. When you stop writing, your strokes will be recog-
nized and text will be placed in the input field automatically.
• Tap to open a menu that allows you to quickly enter cer-
tain punctuation marks.
• Tap to start a new line, to add a space (or write
from up to right). To delete a previously entered char-
acter, tap (or write from right to left).
• Tap to open Help.
• Tap to collapse, or to extend the Handwriting tool bar.
Candidate area
9235874_3129_zh_tw_FCC.book Page 14 Wednesday, October 26, 2005 7:36 PM
Basic Operations
15
• Tap or to switch between handwriting and selecting
mode.
• Tap and drag to adjust the position of the handwriting
toolbar on the screen.
Entering Chinese Characters
1. Tap to switch to the Chinese input mode.
2. Tap to change among Chinese character, numeric
character or symbol input modes.
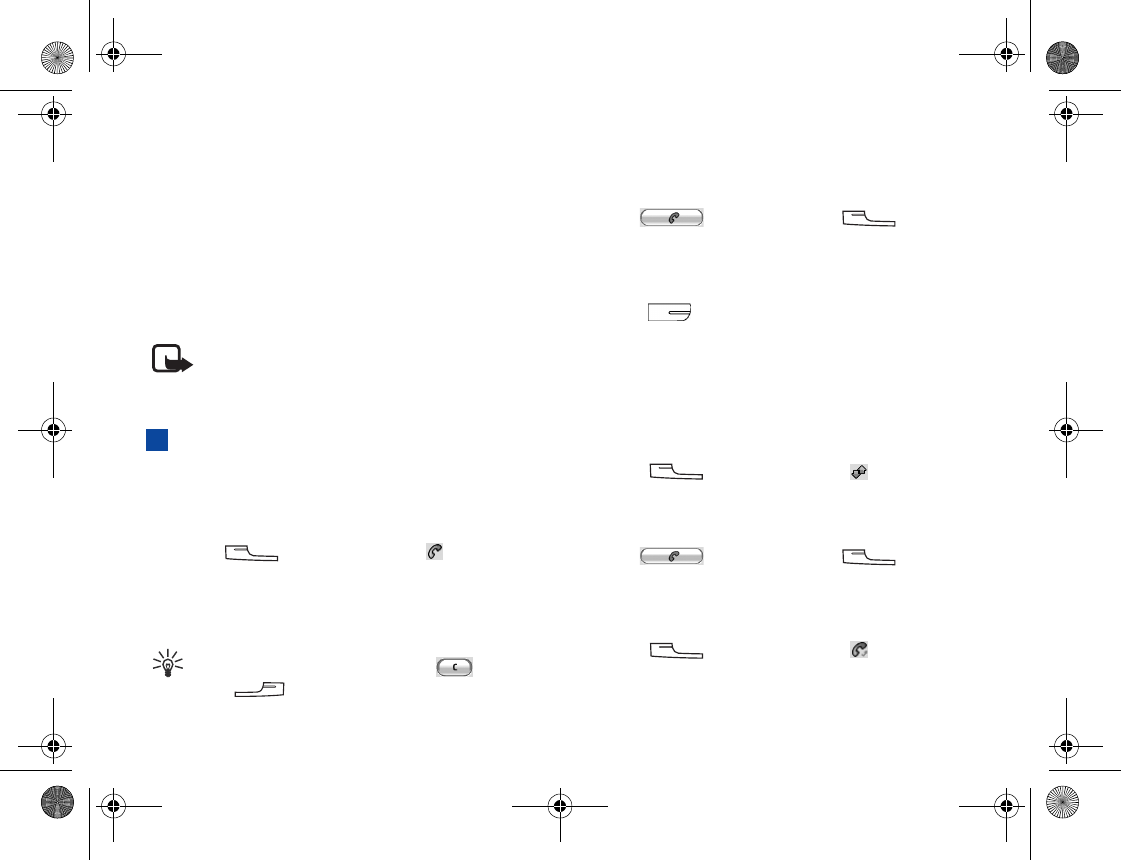
3. Write the character on the screen. When you stop writing,
your strokes will be recognized and the possible candidates
will appear in the candidate area.
If the Chinese character you want to enter appears in the
candidate area, tap it and it will be placed in the input field
automatically.
• Tap to open a menu that allows you to quickly enter cer-
tain punctuation marks.
• Tap to start a new line, to add a space (or write
from up to right). To delete a previously entered
character, tap (or write from right to left).
• Tap to open Help.
• Tap or to collapse or extend the Handwriting tool bar.
• Tap to extend the candidate area.
• Tap or to switch between handwriting and selecting
mode.
• Tap and drag to adjust the position of the handwriting
toolbar on the screen.
To setup handwriting recognition settings to fit your personal
writing habits, please refer to "Setting up smARTwriter" on
page 39.
Candidate area
9235874_3129_zh_tw_FCC.book Page 15 Wednesday, October 26, 2005 7:36 PM
Using the Phone Functions
16
4. Using the Phone Functions
Your device provides the phone functions with which you can:
• Make and receive phone calls.
• View phone records, including incoming calls and outgoing
calls.
• Use voice commander to initiate calls.
• Access advanced phone features, for example, call barring and
call divert.
Note: For availability and information on using SIM
card services, contact your SIM card vendor. This may be
the service provider, network operator, or other vendor.
Making a Call
To make an outgoing call, you have the following options:
Making a Call Using the Phone Screen
1. Press the key, and then tap the tab to go to the
Phone screen.
2. Tap the numeric buttons on the Phone screen, or press the
numeric keys on the keypad to enter the number you want
to call.
Tip! To clear a wrong number, tap the button, or
press the key.
3. Tap the button, or press the key to ini-
tiate the call.
Making a Call from the Contact List
1. Press the key to open the Contact screen.
2. Tap to select a contact that contains the number you want to
call. The contact will appear on the screen.
3. Tap the phone number of the record, and the call will be ini-
tiated automatically.
Making a Call from the Call Log
1. Press the key, and then tap the tab to switch to
the Call Log screen.
2. Tap a call log item on the Call Log screen. The content of the
selected call log item will appear.
3. Tap the button, or press the key to ini-
tiate the call.
Making a Call Using Speed Dial
1. Press the key, and then tap the tab to switch to
the Speed Dial screen.
9235874_3129_zh_tw_FCC.book Page 16 Wednesday, October 26, 2005 7:36 PM
Using the Phone Functions
17
2. Tap a speed dial icon on the screen, or press and hold a
numeric key on the keypad representing the number
(name) you want to call. The call will be initiated automat-
ically.
Note: Refer to "Adding Speed Dial" on page 21 for
how to set up speed dial.
Tip! You can repeat making the last dialed call by
pressing the key.
• You can also call the first 9 numbers in your Contacts by
pressing a numeric key followed by the and
key on your device. For example, to call contact
#7, press , , .
Making a Call Using Voice Commander
1. Press and hold the key for about 3 seconds. The
Voice Commander will appear on the screen prompting
you to say the command.
2. Speak the name you recorded for the contact you want to
call.
3. Your device will identify the name and initiate the call.
Note: Using voice tags may be difficult in a noisy
environment or during an emergency, so you should not
rely solely upon voice dialing in all circumstances.
Answering a Call
When you have an incoming call, caller’s name (if available,
depending on the setting of the caller’s phone and the
network), picture (if enabled) and the following options will
appear on the screen.
Answer: Tap this button to answer the call. You can also answer
the call by pressing the key.
Mute: Turn off the ring signal temporarily. you can choose to
tap the Answer button to answer it later, or the Send busy
button to reject it.
Send busy: Tap this button to reject the call (or press the
key).
Ending a Call
To end a call, tap the End button, or press the key.
Operations During a Call
Adjusting Volume
1. During a call, tap the icon on the Status bar. The
Sounds dialog will appear. Alternatively, you can press the
volume key on the left side of the device.
2. Tap and drag the Call volume slider to adjust call volume.
You can also tap the Speaker phone or Mute microphone
9235874_3129_zh_tw_FCC.book Page 17 Wednesday, October 26, 2005 7:36 PM
Using the Phone Functions
18
check box to play sound via the speaker phone or mute the
microphone during the call.
Warning: Do not hold the device near your ear when
the loudspeaker is in use, because the volume may be
extremely loud.
Holding/Retrieving a Call
During a call, tap the Hold button to hold current call. To
retrieve the held call, tap the Retrieve button.
Making Another New Call During a Call
During a call, use the numeric buttons on the Phone screen, or
press the numeric keys on the keypad to make another call. The
call in progress will be put on hold automatically.
Answering an Incoming Call during a Call
To answer an incoming call during a call, tap the Answer button,
or press the key. The current active call will be put on
hold automatically.
When the new incoming call is disconnected, the old call will be
retrieved automatically.
Switching Calls
If you have multiple active calls in progress simultaneously, you
can tap the Switch button to switch calls.
Ending All Calls
To end all active calls, tap the End button or press the
key.
Conference Call
To make a conference call (network service):
1. During a call, make a new call to another new calling party,
or answer a new incoming call. Repeat this step if there are
multiple calling parties.
2. Tap the Join calls button. All active calling parties will be
joined together.
Talking Privately to One Party during a
Conference Call
1. Tap the party you would like to call privately.
2. A menu will appear. Tap Extract party. The selected calling
party will become the only active one and others will be put
on hold automatically.
9235874_3129_zh_tw_FCC.book Page 18 Wednesday, October 26, 2005 7:36 PM
Using the Phone Functions
19
Releasing a Calling Party During a
Conference Call
1. Tap a calling party on the screen.
2. A menu will appear. Tap Release party.
Ending a Conference Call
To end a conference call, tap the End button.
Call Logs
The Call Logs function provides you with the records of the
following call types:
• Answered calls (indicated by the icon)
• Outgoing calls (indicated by the icon)
• Missed calls (indicated by the icon)
• Rejected calls (indicated by the icon)
Tip! If you have missed call(s), the Missed calls dialog
will stay on the screen letting you know about the number
of calls missed. Tap the View button to enter the Missed
Call Logs screen. If Cancel is tapped, the icon will stay
on the screen and you can tap it to open the Missed calls
dialog box.
To access Call Logs:
1. Press the key, and then tap the tab to open
the Call Logs screen.
2. Tap All Calls to open a menu for selecting the type of call
logs you want to view.
3. Tap to select a call type on the menu, and the correspond-
ing call logs will appear on the screen.
4. Tap a call log record and the detail information will appear
on the screen.
Tip! You can make a phone call from a call log record.
Please refer to "Making a Call from the Call Log" on
page 16 for details.
Call Logs Options
Viewing Call Information
1. Press the key, and then tap the tab to open
the Call Logs screen.
2. Tap Phone and select Total call info.
3. The Total call info screen will appear. You can tap the Reset
button to reset call information, or tap the Done button to
exit.
Deleting All Call Logs
1. Press the key, and then tap the tab to open
the Call Logs screen.
2. Tap Phone and select Delete all calls.
9235874_3129_zh_tw_FCC.book Page 19 Wednesday, October 26, 2005 7:36 PM
Using the Phone Functions
20
Miscellaneous Operations
Press the key, and then tap the tab to go to the
Phone screen. Tab Phone and you will find the following
options.
Ending All Calls
1. Return to the Phone screen.
2. Tap Phone and select End all calls.
Showing Cost
When enabled, upon ending an outgoing call, the cost of the call
will appear on the screen.
Note: The actual invoice for calls and services from
your service provider may vary, depending on network fea-
tures, rounding off for billing, taxes and so forth. To show
cost, refer to "Call settings" on page 47 to set the Call cost
first.
Calling Voice Mail-box
Press and hold the key to start calling your voice mail-box.
Note: If your voice mail-box number is not set, you will
be prompted to enter it. The voice mail-box number is available
from your network service provider.
Hiding/Showing My Number
When making an outgoing call, you can choose to hide or show
your phone number to the recipient of your call.
1. Press the key, and then tap the tab to enter the
Phone screen.
2. Enter the phone number you want to call.
3. Tap Phone and select Hide my number or Show my number.
4. Tap the button, or press the key to ini-
tiate the call.
Transferring Sound
During a call, you can use this option to transfer the call from
the paired Bluetooth headset to the handset.
1. Press the key to enter the Phone screen.
2. Tap Phone and select Transfer sound.
Note: To enable this function, you have to pair your
device with a Bluetooth headset first. Once the call is trans-
ferred from the Bluetooth headset to the device during a
call, you cannot transfer the call back to the Bluetooth
headset again.
Calling Emergency Numbers
This operation allows you to easily access the pre-stored
emergency numbers.
9235874_3129_zh_tw_FCC.book Page 20 Wednesday, October 26, 2005 7:36 PM

Using the Phone Functions
21
1. Press the key, and then tap the , , or
tabs to enter the Phone screen.
2. Tap Phone and select Emergency numbers.
3. Tap to choose an emergency number from the box, and
then tap the Done button to begin dialing the selected
number.
Tip: Depending on your local network service, the
emergency numbers may be called without a SIM card as
long as you are under the GSM network coverage. Please
check with your network service provider for details.
Adding Speed Dial
Method 1
1. Press the key, and then tap the tab to switch
to the Speed Dial screen.
2. Tap to choose an empty speed dial icon. A Select contact
window will appear.
3. Choose an appropriate folder, and tap to select a contact
from the window, then tap the Done button.
Method 2
1. Press the key, and then tap the tab to switch
to the Speed Dial screen.
2. Press and hold a numeric key representing an empty speed
dial on the keypad for about 3 seconds.
3. A Select contact window will appear. Choose an appropri-
ate folder, and tap to select a contact, then tap the Done
button.
Removing Speed Dial
1. Press the key, and then tap the tab to switch
to the Speed Dial screen.
2. Tap Edit and select Remove speed dial.
3. The Remove speed dial window will appear. Tap to select
the speed dial numbers you want to remove and then tap
the Done button.
Adding number to Contacts
1. Press the key, and then tap the tab to enter
the Phone screen.
2. Enter the phone number.
3. When finished, tap Edit and select Add to contacts.
Copying/Pasting Number
With this operation, you can copy the number you entered in
the Phone screen for pasting onto other application programs,
for example, Calendar, or copy the number in other
application programs onto the Phone screen.
9235874_3129_zh_tw_FCC.book Page 21 Wednesday, October 26, 2005 7:36 PM
Using the Phone Functions
22
Copying number
1. Press the key, and then tap the tab to enter the
Phone screen.
2. Enter the phone number.
3. When finished, tap Edit and select Copy number.
Pasting number
1. Copy the phone number from other application programs.
2. Press the key, and then tap the tab to enter the
Phone screen.
3. Tap Edit and select Paste number.
Zoom
This operation enlarges the user interface on the screen for
easier identification and access.
1. Press the key to enter the Phone screen.
2. Tap Edit and select Zoom.
Adjusting Call Settings
You can access Call settings following either of the methods
below:
• In the Phone screen, tap Edit and select Call settings.
• Go to Settings by tapping the icon in the Main screen, and
then tap Call settings on the General tab.
For more information about Call settings, see "Call settings"
on page 47.
Adjusting Tones and Alerts
This operation allows you to customize the audio settings of
your device.
1. Press the key, and then tap the tab to enter the
Phone screen.
2. Tap Edit and select Tones and alerts.
3. Tap to choose a profile from the menu that appears.
4. Adjust sound settings by selecting a sound for each setting
item (for example, ringing tone, SMS sound, or MMS
sound.) from the menu, or select Find sound to locate a
sound file on your device.
5. Tap the Save button to save your settings for the selected pro-
file, or the Done button to save and apply your settings.
Enabling/Disabling Automatic Keypad
Lock
1. Tap the icon on the Application shortcut bar.
2. Tap View and select Keypad lock.
3. A Keypad lock box will appear. Tap to check/uncheck the
Enable automatic keypad lock check box and then tap the
Done button to enable/disable automatic keypad lock.
9235874_3129_zh_tw_FCC.book Page 22 Wednesday, October 26, 2005 7:36 PM
Using the Phone Functions
23
If automatic keypad lock is enabled, the keys on your device or
buttons on the Phone screen will be locked if there is no key or
button operation for 30 seconds.
Tip: You can also press the key, then the
key in the Phone screen to enable keypad lock.
To disable keypad lock, press the key, and then the
key.
Accessing Help
The Help system on your device provides you with instant
information about how to use your device.
To access Help:
1. Press the key to enter the Phone screen.
2. Tap Edit and select Help.
9235874_3129_zh_tw_FCC.book Page 23 Wednesday, October 26, 2005 7:36 PM
Using the Application Programs
24
5. Using the Application Programs
The Main Screen
The Main screen is where you can easily access the application
programs on your device (for example, Agenda, Contacts,
Messaging, and Web).
• Tap the icon on the Application shortcut bar, all applica-
tion program icons on your device are displayed. Tap an
application program icon to open the application program it
represents.
• You can also tap one of the icons at the top of the screen.
These are shortcuts that are always visible. To customize your
shortcuts, see "Setting Application Programs on the
Application Shortcut Bar" on page 80.
If you have a lot of application programs on your device, use
folders to organize them in the Main screen. There are pre-set
folders, such as Office (for business application programs) and
Internet (for web-based application programs). To organize
your application programs in folders, see "Grouping
Application Programs" on page 80.
Your Device Application Programs
Your device comes pre-installed with the following application
programs:
Phone
For using the phone functions. See "Using the Phone Functions"
on page 16 for details.
Messaging
For creating, sending and receiving messages. See "Messaging"
on page 27 for details
Contacts
For managing your contacts. Your contact database can also be
used for making phone calls or sending emails. See "Contacts"
on page 30 for details.
Calendar
For organizing your personal appointments and events. See
"Calendar" on page 34 for details.
Note
A very useful program for jotting down memos. See "Note" on
page 37 for details.
Settings
Allows you to setup the settings of your device. See "Settings" on
page 38 for details.
9235874_3129_zh_tw_FCC.book Page 24 Wednesday, October 26, 2005 7:36 PM

Using the Application Programs
25
Camera
Use this application program with the built-in camera for
capturing still photos and video clips. See "Camera" on page 50
for details.
Music player
With this application program you can listen to music
transferred from your PC or downloaded from the Internet.
See "Music Player" on page 54 for details.
Video player
For playing video clips captured by the built-in camera,
transferred from your PC or downloaded from the Internet.
See "Video Player" on page 56 for details.
PhotoBase
Allows you to view and edit images on your device. See
"PhotoBase" on page 58 for details.
Internet
Allows you to surf the Internet and access various on-line
information. See "Internet" on page 65 for details.
Time
For configuring time/date information and setting alarms. See
"Time" on page 70 for details.
To - d o
For tracking your daily todo items. See "To-Do" on page 70 for
details.
Calculator
Your handy calculator for making calculations. See
"Calculator" on page 73 for details.
Remote sync
For performing synchronization via remote connection, refer
to "Performing Remote Synchronization with a Server"
on page 85 for details.
Voice
For recording and playing voice notes. See "Voice" on page 74
for details.
Screen saver
For displaying the screen saver of your device.
Online services
For accessing services of your network service provider. See
"Online Services" on page 75 for details.
GPRS data log
For tracking your GPRS connection history. See "GPRS Data
Log" on page 75 for details.
9235874_3129_zh_tw_FCC.book Page 25 Wednesday, October 26, 2005 7:36 PM
Using the Application Programs
26
9 Ball
You can play the built-in billiards on the device. For details, read
the help document.
• Press or to switch to different options.
• Press to enter or exit the selected option.
Extra Applications
This feature provides you the access to the support pages which
requires GPRS connection. With this feature you can install the
software on your device or access the care and service
information.
File Manager
The function allows you to manage the files on the device, or
check the memory information.
Quickpoint
Allows you to view Powerpoint presentations and open native
PC format e-mail attachments directly on your device. For
details, tap View to read Help.
Quicksheet
This application provides 84 of the commonest formulae found
in Microsoft Excel on your device. For details, tap View to read
Help.
Quickword
This application allows you to work with text and word
processing documents on your device. For details, tap View to
read Help.
Recon
With this application program you can use your smart phone to
remote control some of your home applications such as TV,
DVD player, Air conditioner and so on.
Stuntcar Extreme
You can play the built-in car race game. For details, read Help.
Super Drop Mania
A built-in game for you to play. For details, read Help.
Voice Commander
This program allows you to control your smart phone by voice.
You can use voice to make a phone call, look up contact person's
information or start a program.
XLex Dictionary
A built-in dictionary on the device allows you to look up the
English and Chinese words. For details, tap XLex Dictionary
and read Help.
9235874_3129_zh_tw_FCC.book Page 26 Wednesday, October 26, 2005 7:36 PM
Using the Application Programs
27
Messaging
With the Messaging application program, you can exchange
and manage the following types of messages:
Note: You need subscription to related services to
your network service provider.
• In order to use the Messaging functions, you may need to
set up message settings in advance. Please refer to "Mes-
saging accounts" on page 43 and "Internet accounts" on
page 42.
SMS (Short Message Service) messages (indicated by the
icon)
An SMS message is a text message delivered from your device
via the message center of your service provider to the recipient.
In addition to text, it can contain pictures, sounds, melodies
and animations.
MMS (Multimedia Message Service) messages (represented
by the icon)
An MMS message is a message that can contain text, pictures,
animations, audio clips and melodies.
Important: Exercise caution when opening messages.
Multimedia message objects may contain malicious soft-
ware or otherwise be harmful to your device or PC.
Email messages (represented by the icon)
Messages that support POP3, IMAP4, MIME and SMTP
protocols and are the same as the ones you can send and
receive using your PC.
Important: Exercise caution when opening messages.
email messages may contain malicious software or other-
wise be harmful to your device or PC.
Creating and Sending Messages
Creating and Sending an SMS Message
1. In the Messaging screen, tap SMS.
2. Tap the New button, or tap Message and select New.
3. Enter the recipient’s phone number in the To : field. You can
also tap To : to pick up one or multiple recipient from your
contacts.
4. Enter the body text of the message. An SMS message allows
the entry of up to 160 characters (70 for non-latin charac-
ters) per message, and if the length of your message body
exceeds such limit, it will be split into several separate ones
and combined into one single message on the recipient’s
phone (if supported). You can tap located at the
upper right corner of the screen to get the information
about current message length information.
Tip: You can tap Edit and select the Cut, Copy, Paste
and Select all commands when editing text.
9235874_3129_zh_tw_FCC.book Page 27 Wednesday, October 26, 2005 7:36 PM
Using the Application Programs
28
5. (Optional) Tap the button to insert a smiley into the
message.
6. (Optional) Tap the button to insert an animation into
the message.
7. (Optional) Tap the button to insert sound into the mes-
sage.
8. (Optional) Tap the button to switch between normal and
bold text types.
9. (Optional) Tap the button to change text size.
10. (Optional) Tap the button to view common used text.
11. Tap the tab to determine if you want to receive a deliv-
ery report for current message. Tap to select On or Off. If On
is selected, you will receive a report regarding the delivery
status when the message is sent.
12. Tap the Send button to send the message. If you want to
save the message in the Draft box for future editing, tap the
button.
Note: If for any reason the message can not be sent, it
will be stored in the Outbox.
Creating an MMS Message
1. In the Messaging screen, tap MMS.
2. Tap the New button, or tap Message and select New.
Note: An MMS message comprises several slides and
you can add text and sounds to each slide. When the mes-
sage is opened and viewed on the recipient’s phone, the
slides are automatically played. The sound will also be
played if the slide contains it.
3. Enter the recipient’s phone number in the To: field. You can
also tap To : to pick up one or multiple recipient from your
contacts.
4. Enter the subject in the Subj: field.
5. Enter message body text.
6. (Optional) Tap the icon to browse and insert an image
into current slide. To change or delete selected image, tap the
image and select Select image or Delete image.
7. (Optional) Tap the icon to insert sounds into current
slide.
8. (Optional) To add more slides, tap the icon, or tap Mes-
sage and then select New slide. To go to a slide, tap or .
To delete current slide, tap Message and then select Delete
slide. You can also tap to setup the duration of each
slide.
9. To preview the slides, tap the icon.
10. Tap to go to the tab where you can select the carbon
copy and blind carbon copy recipients, select a priority level
for the message, and check the message size.
9235874_3129_zh_tw_FCC.book Page 28 Wednesday, October 26, 2005 7:36 PM
Using the Application Programs
29
11. Tap to go to the tab where you can attach an image,
audio recording, video clip, document or other files to cur-
rent message.
12. Tap the Send button to send the message. If you want to
save the message in the Draft box for future editing, tap the
button.
Note: If for any reason the message can not be sent, it
will be stored in the Outbox.
Creating an Email Message
Note: In order to use email, you need to complete
message settings in advance. Please refer to "Messaging
accounts" on page 43.
1. In the Messaging screen, tap an email account.
2. Tap the New button, or tap Message and select New.
3. Enter the recipient’s email address in the To: field. You can
also tap To : to pick up one or multiple recipient from your
contacts.
4. Enter the subject in the Subj: field.
5. Enter the message body text.
6. (Optional) Tap the button to browse and add attach-
ment to the mail.
7. Tap the Send button to send the email. A dialog will pop up
asking whether you want to send the message immediately
or save the message to Outbox for sending later. Tap to
select an appropriate option and then tap the Done button.
Note: If for any reason the message can not be sent, it
will be stored in the Outbox.
Message Folders
By default, each message account has 4 different message fold-
ers:
• Inbox: Contains received messages.
• Outbox: Contains messages that are ready to be sent but not
sent.
• Draft: Contains unfinished messages.
• Sent: Contains a copy of the sent messages.
You can tap a folder name at the upper right corner of each
mail account screen and tap to select a different folder.
Receiving and Viewing Messages
Receiving and Viewing SMS and MMS Messages
When you have new unread SMS or MMS messages, the
notification icon ( for SMS, for MMS) will appear on
the Status bar. You can tap the icon to view the message.
When viewing messages, you can tap Message and choose to
perform the following operations:
• New: Create a new message.
• Reply: Reply to the sender.
• Forward: Send the received message to other recipients.
• Find: Find a specific word in the message.
9235874_3129_zh_tw_FCC.book Page 29 Wednesday, October 26, 2005 7:36 PM
Using the Application Programs
30
• Find next: Find the word again.
• Call Sender: Make a call to the sender of the message.
• Move to SIM Card or Move to Messaging (available for SMS
messages): Move current message to the memory on SIM
card or your device, depending on where the message is cur-
rently saved.
• Delete message: Delete current message.
You can also tap the From: field and select to perform the
following actions:
• Call: Call this number.
• Send SMS: Send an SMS message to this number.
• Send MMS: Send an MMS message to this number.
• Save contact: Save this number as a new contact.
Receiving and Viewing Email
1. In the Messaging screen, tap an email account.
2. Tap the Get&Send button.
Note: In order to receive and view email, you need to
set up Internet and message settings in advance. Please refer
to "Messaging accounts" on page 43 and "Internet accounts"
on page 42.
3. You will be connected to the Internet automatically, and the
device will start receiving email from your mailbox.
4. The received email will appear on the screen. Tap an email
message to open and read it. If there are attachments in the
email, you can tap to open and view them if they are sup-
ported by the application programs on the device.
When viewing messages, you can tap Message and choose to
perform the following operations:
• New: Create a new email.
• Reply: Reply to the sender.
• Reply to all: Reply to all recipients.
• Forward: Send the received email to other recipients.
• Send attachment: Send the attachment of current email.
• Find: Find a specific word in the email.
• Find next: Find the word again.
• Delete message: Delete current email.
• Disconnect: Break the connection to your mailbox.
You can also tap the From: field and select to perform the
following actions:
• Send Email: send an email to this address.
• Send MMS: send an MMS message to this address.
• Save contact: save this address as a new contact.
Contacts
With the Contact application program, you can easily manage
your contacts. In addition to just carrying and viewing these
records, you can also quickly make phone calls, send messages/
email and open web pages thanks to the integration with other
application programs.
9235874_3129_zh_tw_FCC.book Page 30 Wednesday, October 26, 2005 7:36 PM
Using the Application Programs
31
Creating a New Contact
Creating a New Contact from the Phone Screen
See "Adding number to Contacts" on page 21 for more
information.
Creating a New Contact from the Contacts Screen
1. In the Contacts screen, tap Contacts and select New.
2. Tap Unfiled and select a folder where you want to place this
contact.
3. Enter contact information.
Tip: You can specify a ringing tone for the contact by
selecting a ringing tone from the Ringing tone drop-down
menu.
Note: The personalized ringing tone will only be
played if your phone network is CLI (Calling Line Iden-
tity) compatible, so the caller can be identified. Otherwise,
the default ring tone will be used, regardless of your selec-
tion of ringing tone.
4. (Optional) Tap the tab to enter your note for this con-
tact.
5. (Optional) Tap the tab to specify a picture for this con-
tact. Tap the icon to open a box where you can browse
and select a picture.
Note: To prevent failure when recording the voice
tag, it is recommended that you do so in a quiet location.
7. Tap the button to save the contact.
Importing Contacts from a SIM Card
1. Make sure that the SIM card is installed on your device.
2. In the Contact screen, tap All and select SIM card.
3. Tap Edit and select Copy all to contacts.
4. In the box that follows, tap the Yes button.
Exporting Contacts to a SIM Card
1. Make sure that the SIM card is installed on your device.
2. In the Contacts screen, tap to select a folder that contains
the contact you want to export.
3. Tap to open the contact from the list.
4. Tap Edit and select Copy to SIM card.
Viewing Contacts
The Contact screen displays all contacts on your device. You
can also tap a tab below to view only the contacts that begin
with the letters on the tab.
To view the detail information of a contact, tap a contact on
the screen.
9235874_3129_zh_tw_FCC.book Page 31 Wednesday, October 26, 2005 7:36 PM
Using the Application Programs
32
You ca n :
• Tap the icon, icon or the phone number to make a call
to the person.
• Tap the icon or the mail address to start composing a new
email for the person.
Note: E-mail messages are automatically placed in
Outbox before sending. If sending does not succeed, the e-
mail is left in the Outbox.
• Tap the icon or the web address to open the web page in
the Internet application program.
Managing Contacts Folders
1. In the Contacts screen, tap All and select Edit folders.
2. You can:
• Tap the Add button to create a new folder. You will then be
asked to enter a name for the new folder. When finished, tap
the Done button.
• Tap to select a folder on the list and then tap the Delete but-
ton to delete the selected folder.
• Tap the Rename button to change the name of the selected
folder. Make changes and then tap the Done button.
Managing Contacts
Finding a Contact
1. In the Contacts screen, tap Contacts and select Find.
2. Enter the search keyword and specify where in Contacts will
be searched (in all fields or in Names & Company).
3. Tap the Find button.
4. The contacts that match your search keyword will appear on
the screen. You can tap to select and open a contact.
Editing a Contact
1. Open a contact.
2. Tap Edit and select Edit contact.
3. Make changes to the contact information.
4. Tap the button.
Deleting a Contact
Method 1
1. Open a contact.
2. Tap Contacts and select Delete contact.
Method 2
1. In the Contacts screen, tap Contacts and select Contacts
manager.
2. Tap to select a folder that contains the contact you want to
edit from the Folder drop-down list.
3. In the box below, tap to check the contact(s) you want to
edit. You can also tap the Select all check box to select all
contacts in the selected folder.
4. Tap the Delete button, and then the Yes button in the box
that follows.
9235874_3129_zh_tw_FCC.book Page 32 Wednesday, October 26, 2005 7:36 PM

Using the Application Programs
33
5. Tap the Done button.
Copying Contacts
1. Open a contact.
2. Tap Edit and select Copy contact.
Pasting Contacts
In the Contacts screen, tap Edit and select Paste contact.
Moving Contacts to a Different Folder
1. In the Contacts screen, tap Contacts and select Contacts
manager.
2. Tap to select a folder that contains the contact you want to
move from the Folder drop-down list.
3. Tap to check the contact(s) you want to move. You can also
tap the Select all check box to select all contacts in the
selected folder.
4. Tap the Move button, and then tap to select the folder
where the contact(s) will be moved in the Folder drop-
down list in the box that follows.
5. You can tap the Folder button if you wish to create a new
folder. Then tap the Move button.
Sending Contacts
Sending a Contact
1. Open a contact.
2. Tap Contacts and select Send as.
3. Select from the following and then tap the Done button:
• MMS: Send the contact to another mobile phone as an MMS
attachment. The MMS message screen will follow for you to
compose the message.
• Message: Send the contact to another compatible mobile
phone via an SMS message. Enter the number of the recipi-
ent and then tap the Send button.
• Bluetooth: Send the contact to other devices that support
Bluetooth technology. A box will appear showing found
paired devices. Tap to select a device and then tap the Send
button.
• Infrared: Send the contact to other devices that support
infrared connection. Align the infrared port of your device
with that of the other device and then tap the Send button.
Sending Multiple Contacts
1. In the Contacts screen, tap Contacts and select Contacts
manager.
2. Tap to select a folder that contains the contacts you want to
edit from the Folder drop-down list.
3. Tap to check the contact(s) you want to send. You can also
tap the Select all check box to select all contacts in the
selected folder.
4. Tap the Send button.
5. Perform the same operation as described in step 3 in "Send-
ing a Contact" on page 33.
Sending All Contacts in a Folder
1. In the Contacts screen, tap All and select a folder.
2. Tap Contacts and select Send this folder.
9235874_3129_zh_tw_FCC.book Page 33 Wednesday, October 26, 2005 7:36 PM
Using the Application Programs
34
3. Perform the same operation as described in step 3 in "Send-
ing a Contact" on page 33.
Owner Card
The owner card is your electronic name card. Once created, you
can exchange it freely with other people.
Creating Your Owner Card
Method 1
1. In the Contacts screen, tap Contacts and select New.
2. Enter your personal data.
3. Tap Contacts and select Set as owner card.
4. Tap the button.
Method 2
1. Open a contact.
2. Tap Contacts and select Set as owner card.
Sending Owner Card
1. In the Contacts screen, tap Contact and select Send owner
card.
2. Perform the same operation as described in step 3 in "Send-
ing a Contact" on page 33.
Editing Owner Card
1. In the Contacts screen, tap Contacts and select View owner
card.
2. Perform the same operation as described in "Editing a Con-
tact" on page 32.
Contacts Preferences
1. In the Contacts screen, tap Edit and select Preferences.
2. In the box that follows, tap to select a method by which the
Contacts application program sorts your contacts.
3. If you want the preferred phone number to appear next to
the contact name when viewing, tap the Show preferred
phone number check box. If this option is selected and no
preferred number is specified, the first phone number in the
contact will be used as the preferred number.
4. Tap the Done button.
Specifying Preferred Phone Number for Contacts
1. Open a contact.
2. Tap Edit and then select Edit contact.
3. Edit the contact information.
4. Tap Edit and then select Show in list.
5. Tap to select a preferred number from the drop-down menu.
6. Tap the Done button.
Calendar
To open the Calendar application program, tap the Calendar
icon in the Main screen.
9235874_3129_zh_tw_FCC.book Page 34 Wednesday, October 26, 2005 7:36 PM
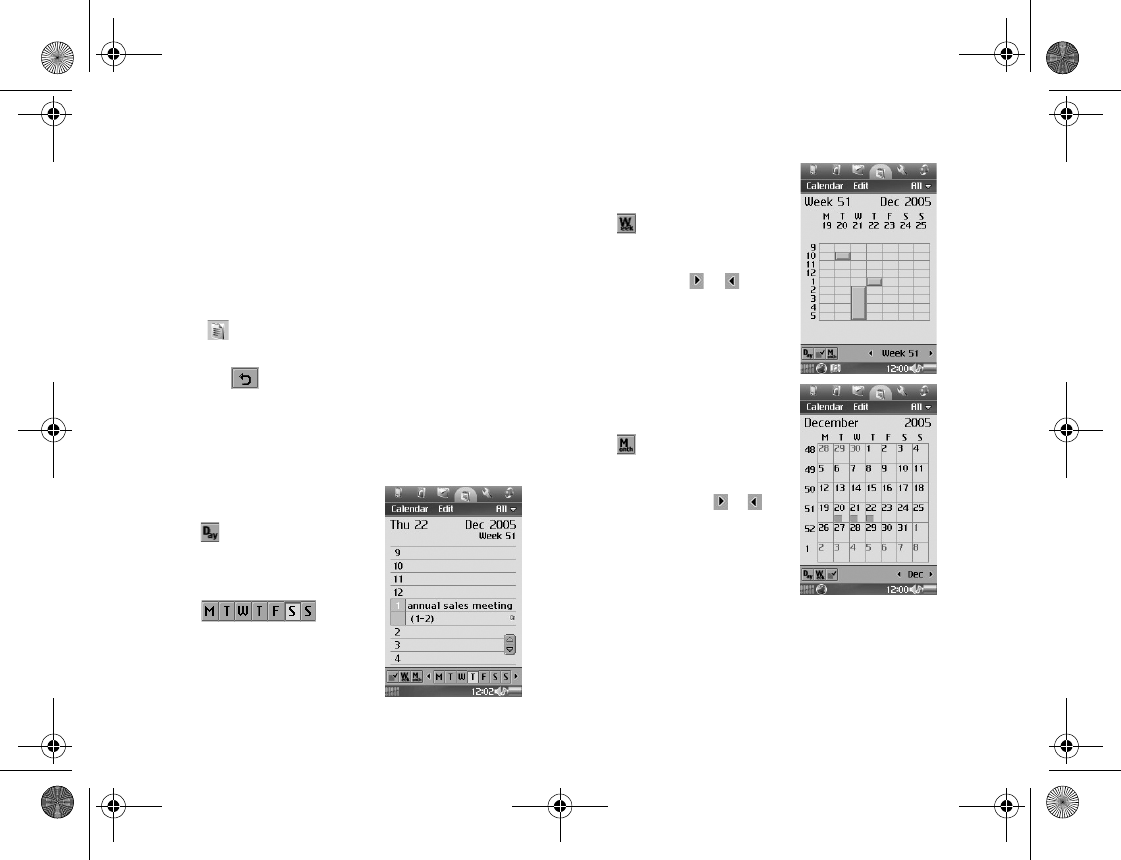
Using the Application Programs
35
Creating New Calendar Entries
To create a new Calendar entry:
1. In the Calendar screen, tap Calendar and select New.
2. Tap Unfiled and select a folder where you want to store the
new entry.
3. Enter the description of the entry and other necessary
information.
4. Tap to switch to the note page to write down your note
for this entry (optional).
5. Tap the button to save the entry.
Calendar Views
The Calendar screen provides different views:
Managing Calendar Entries
Finding an Entry
To find a specific Calendar entry:
• Tap to change to Day
view. Calendar entries
appear as vertical bars. In
Day view, tap a button on
the bar
to go to a specific day in
the week.
• Tap to change to Week
view. Calendar entries
appear as vertical bars. In
Week view, tap or to
go to the previous or next
week.
• Tap to change to
Month view. Calendar
entries appear as squares.
In Month view, tap or
to go to the previous or
next month.
9235874_3129_zh_tw_FCC.book Page 35 Wednesday, October 26, 2005 7:36 PM
Using the Application Programs
36
1. In the Calendar screen, tap Calendar and select Find.
2. Enter the keyword and select Everywhere, Future or Past to
select where to search.
3. Tap the Find button.
4. The entries that match your search keyword will appear on
the screen. You can tap to select and open an entry.
Editing an Entry
1. Open a Calendar entry by tapping it in different views.
2. Make changes to the entry.
3. Tap the button to save your changes.
Deleting an Entry
1. Open a Calendar entry by tapping it in different views.
2. Tap Calendar and select Delete entry.
Deleting Entries in a Period of Time
1. When in Calendar screen, tap Calendar and select Remove
entries.
2. Tap to select a removal range and then tap the Done button.
Moving a Calendar entry to the To-do Application
Program
1. Open a Calendar entry by tapping it in different views.
2. Tap Calendar and select Move to To-do.
3. Tap the Ye s button. The entry will appear in the To-do appli-
cation program.
4. Tap the button to save your changes.
Cutting, Copying or Pasting a Calendar Entry to the
To-do Application Program
1. Open a Calendar entry by tapping it in different views.
2. Tap Edit and select Cut entry or Copy entry.
3. Open the To-do application program.
4. Tap Edit and then select Paste entry.
Managing Calendar Folders
1. In the Calendar screen, tap All and select Edit folders.
2. You can:
• Tap the Add button to create a new folder. You will then be
asked to enter a name and specify a color for the entries that
belong to the new folder. When finished, tap the Done but-
ton.
• Tap to select a folder in the list and then tap the Delete button
to delete the selected folder.
• Tap the Edit button to edit selected folder. Make changes and
then tap the Done button.
Setting up Calendar Preferences
To access Calendar preferences:
9235874_3129_zh_tw_FCC.book Page 36 Wednesday, October 26, 2005 7:36 PM
Using the Application Programs
37
1. In the Calendar screen, tap Edit and select Preferences.
2. The Calendar preferences window will appear. Set up the
options on the General and Alarm tabs.
3. Tap the Done button.
Note
With the Note application program you can quickly and easily
jot down notes, whether in typed letters or freehand drawing.
You can also easily exchange them by sending them to different
devices.
Creating Notes
Method 1
1. In the Note screen, tap Note and select New.
2. Tap Unfiled and select a folder where you want to place the
new note.
3. Enter the body of your note. You can tap the button to
get bold text, and the button to start a bullet list.
4. Tap to switch to the drawing tab for making a free-
hand drawing. When drawing, tap the button to
change stroke color, the button to change stroke thick-
ness, or the button to activate the eraser.
5. Tap the button to save the note.
Method 2
1. Copy text from other application programs.
2. In the Note screen, tap Edit and select Paste.
Managing Notes
Editing Notes
1. Tap to open a note on the Note screen.
2. Make changes to the note.
3. Tap the button to save the note.
Deleting Notes
1. Open a note on the Note screen.
2. Tap Note and select Delete note.
Sending Notes
1. Open a note on the Note screen.
2. Tap Note and select Send as.
3. Select from the following and then tap the Done button:
• Bluetooth: Send the note to other devices that support Blue-
tooth technology. A box will appear showing found paired
devices. Tap to select a device and then tap the Send button.
• Message: Send the note to another mobile phone via an SMS
message. Enter the number of the recipient and then tap the
Send button.
9235874_3129_zh_tw_FCC.book Page 37 Wednesday, October 26, 2005 7:36 PM

Using the Application Programs
38
• MMS: Send the note to another mobile phone as an MMS
attachment. The MMS message screen will follow for you to
compose the message.
• Infrared: Send the note to other devices that support infrared
connection. Align the infrared port of your device with that
of the device and then tap the Send button.
Managing Note Folders
1. In the Note screen, tap All and select Edit folders.
2. You can:
• Tap the Add button to create a new folder. You will then be
asked to enter a name for the new folder. When finished, tap
the Done button.
• Tap to select a folder on the list and then tap the Delete but-
ton to delete the selected folder.
• Tap the Edit button to edit the selected folder. Make changes
and then tap the Done button.
Settings
Settings is a list of all settings sorted into groups. By adjusting
these settings, you can control the behavior of your device. To go
to the Settings screen, tap the icon.
Device Settings
Back Light
You can the back light to be Automatic, On, or Off. Choose from
the drop-down list and tap the OK button.
Auto power on/off
You can set the device to be powered on or off automatically.
International
Use these settings to set your current location as well as the
currency, distance and number formats for use in other
application programs.
You can access these settings on two different tabs: Location and
Numbers. Select appropriate settings from the drop-down
menus and then tap the Done button.
Preferences
You can set the shortcuts to your preferred features in the Main
screen, and set the hot keys to specific functions. When finished
setting, tap the Done button.
Screen saver
You can enable or disable the screen saver and choose the screen
saver.
9235874_3129_zh_tw_FCC.book Page 38 Wednesday, October 26, 2005 7:36 PM

Using the Application Programs
39
Date & Time
Adjusting the date and time here sets these throughout your
device.
Adjusting Time and Date
1. In the Date & Time tab, tap the Date box. A calendar will
appear on the screen.
2. Tap to select current date from the calendar.
3. Tap the Time box and adjust current time. Tap the upper
part of the boxes that enclose the hour and minute to
increase the numbers, or the lower part of the boxes to
decrease them.
4. Tap Daylight-saving if you want to use this feature. Select
the daylight-saving zone(s) from the dialog that appears
and then tap the Done button.
5. Tap the Done button.
Changing Date Format
You can customize the display of times and dates throughout
your device on the Format tab.
Specifying Workdays
In the Wo r kdays tab, you can specify the days of the week that
you normally work. You can set alarms in the Time application
program that only sound on a workday. Specifying the first day
of your week customizes the display of both Week and Month
views in the Agenda application program.
Text input
There are two ways of entering text into your device:
• The smARTwriter handwriting recognition system: your pen
strokes on the screen are converted to individual letters,
numbers, or other characters.
• The virtual keyboard: you can "type" text by tapping the
"keys."
The method that you select here is enabled automatically when
you need to enter text into your device. If you load other text
input software, select it and adjust its settings here.
Setting up smARTwriter
You can change the setting of the smARTwriter handwriting
recognition system according to your writing habits. That is,
you can “train” smARTwriter to improve the accuracy of
recognition.
1. In the Text input setup box, select smARTwriter from the
Primary input method drop-down menu and then tap
Setup.
2. Configure the following options:
• Line color: for selecting the color of pen strokes on the
screen.
• Line thickness: for selecting the thickness of pen strokes on
the screen.
• Timeout: for specifying the time between you finish writing
and smARTwriter starts recognizing.
• Add space: check this check box if you want smARTwriter to
automatically add a space after each word.
• Personalize: tap this button to open the Personalize screen
that contains two tabs: the Personalize tab and the Browse
tab.
9235874_3129_zh_tw_FCC.book Page 39 Wednesday, October 26, 2005 7:36 PM

Using the Application Programs
40
Creating Personalized Writing Models
1. In the Personalize tab, select a character set and character
from the Set and Character drop-down menus.
2. Write the character in your own way in the Write a box.
3. Tap Save.
In the Browse tab you can browse the preset handwriting
models.
SystemSounds Setting
Allows you to change the settings of warning tone, button click
sound, and screen tap sound.
User profiles
You can personalize how your device looks and sounds by
configuring and applying user profiles. A user profile is a
combination of user settings, including sound settings, display
theme settings and appearance settings. You can also set up
different profiles for use in different occasions.
To customize a user profile:
1. Tap to select a profile from the Profiles drop-down menu.
2. Specify the settings by selecting options in drop-down
menus.
Tip: You can tap the icon to listen to the sound.
Welcome Message
You can enable the welcome message by checking the check box.
And you can input your customized message in the dialog
frame, and change colors and font types (italic, underline,
bold).
Language
Selects the system language on your device. To do so, tap to
select a language and then tap Done. The device is rebooted
automatically for the change to take effect.
Depending on the region-specific configuration, you may also
delete some user-installed languages to conserve memory space.
To do so, tap to select a language and then tap Delete.
Banner
You can enable the personal banner by checking the check box.
And you can input your customized greetings in the dialog
frame.
By enabling the user greeting; next time when you turn on your
device, your customized banner will pop up.
Connection Settings
USB cable
You can use this option to set up the cable connection mode
between the device and PC.
9235874_3129_zh_tw_FCC.book Page 40 Wednesday, October 26, 2005 7:36 PM

Using the Application Programs
41
• PC Connect: select this item before connecting the device to
your PC and using the PC Sync to perform synchronization
and backup/restore.
• Modem: select this item before connecting the device to your
PC and use the device as a modem.
Infrared
See "Infrared Connection" on page 82.
Bluetooth
See "Bluetooth Connection" on page 82.
Network Settings
Important: Use only services that you trust and that
offer adequate security and protection against harmful
software.
GSM networks
Like any mobile phone, your device connects to a “network”,
which is the path that carries your phone calls, messages, web
pages, and emails. The device is designed to use with the GSM
and GPRS networks.
When you make a phone call, your device uses GSM. When
you connect to the Internet, your device uses either GSM or
GPRS depending on the type of Internet account that you
select. Dial-up and high-speed dial-up Internet accounts
connect to the GSM network. GPRS Internet accounts connect
to the GPRS network.
When you send or receive SMS messages, your device can use
either GPRS or GSM, and, if there is no coverage with one
network, it can automatically switch to the other.
The GSM networks setting enables you to select an appropriate
network manually if you want to change the network you are
connected to, and set up a preferred list of networks. The
network and band selections must be supported by your
network service provider.
Changing Network Search Mode
Tap the Search mode tab and select Automatic or Manual. If
Manual is selected, the device will list all of the networks found
for you to choose from.
Selecting Another Network
Tap the Search mode tab and select Manual. The device will
scan all available networks and show them in a dialog box for
you to choose from.
Note: Not all of the networks listed may be available
to you. Please refer to your network service provider for
further details.
Creating a Preferred Network List
1. Tap the Preferred list tab and then the Add network button.
2. Tap to select a network from the list.
3. Select a position (priority) of the network in the preferred
network list.
9235874_3129_zh_tw_FCC.book Page 41 Wednesday, October 26, 2005 7:36 PM

Using the Application Programs
42
4. Tap Done.
Note: Please consult your network service provider for
availability and further details about the preferred network
list function.
Internet accounts
With access to the Internet you can use email and connect to the
web. You can create 2 types of Internet accounts depending on
your ISP and the type of network you have access to:
• Dial-up account: this is indicated by the icon. With a dial-
up account, you are charged for the length of time that you're
connected to the Internet.
• GPRS account: this is indicated by the icon. With a GPRS
account, you are charged for the amount of information you
view, download, or send when you're connected to the Inter-
net. GPRS accounts have -GPRS appended to their name.
Creating New Internet Accounts
You can manually set up the Internet account, or ask your
service provider to send you a message that contains the
required setup information and creates the account
automatically on your device.
To manually set up an Internet account:
1. Tap New on the Accounts tab.
2. Enter the name of the connection in the Account name field.
3. Select a connection type from the Connection type drop-
down menu.
4. Set up the settings according to the data from your network
service provider.
5. Tap Done.
Editing Internet Accounts
1. In the Accounts tab, tap to select an account.
2. Tap Edit.
3. Edit the settings of the selected account.
4. Tap Done.
Deleting Internet Accounts
1. In the Accounts tab, tap to select an account.
2. Tap Delete, and then Yes.
Wap accounts
WAP account settings are essential for using Internet
connections and MMS service via a WAP gateway. You can
manually set up the WAP account, or ask your service provider
to send you a message that contains the required setup
information and creates the account automatically on your
device.
To manually set up a WAP account:
1. Tap New on the Basic tab.
2. Enter the name of the connection in the Account name field.
3. Select an Internet connection from the Internet account
drop-down menu. Before you tap the User Proxy check box,
have the following data ready from your network service
provider:
Address: ____________________
9235874_3129_zh_tw_FCC.book Page 42 Wednesday, October 26, 2005 7:36 PM
Using the Application Programs
43
Port: _______________________
Username: __________________
Password: ___________________
4. Set up the settings according to the data from your network
service provider.
5. Tap the Preferred tab and tap to check the Use WAP
account check box.
6. Select a preferred WAP account for Internet connection
and MMS delivery from the Preferred drop-down menu.
7. Tap Done.
Editing WAP Accounts
1. In the Basic tab, tap to select an account.
2. Tap Edit.
3. Edit the settings of the selected account.
4. Tap Done.
Deleting Internet Accounts
1. In the Basic tab, tap to select an account.
2. Tap Delete, then Yes .
Offline
The Offline mode is used where mobile phones and Bluetooth
wireless functions are not allowed. To immediately activate the
Offline mode, tap the Offline now button.
You can also check or uncheck the check box in the dialog to
determine if you want the device to prompt you with the
Power menu when you press the power key.
Messaging accounts
Messaging accounts contain various settings for using email,
SMS, MMS and Cell Broadcast services. These accounts must
be properly set up before the services can be used.
Cell Broadcast messages are the general messages that your
network service provider broadcasts to all subscribers in a
particular area. These messages are broadcast in numbered
channels. For example, channel 30 might be for local weather,
60 for traffic reports, 80 for information of local hospitals,
taxis, or pharmacies.
Note: Please contact your operator for a list of avail-
able channels and the information they provide.
Manually Set up Messaging Accounts
1. Have the account data ready from your network service
provider.
2. Set up the settings on each tab according to the data.
3. Tap Done.
Email account data
SMS account data
• SMS Service centre address: ______________________
• Character set: 7bit UCS2
• Message stored for: 1 hour 6 hours 1 day 7 days
Maximum
• Connection type: GPRS only GSM only
• Delivery report
9235874_3129_zh_tw_FCC.book Page 43 Wednesday, October 26, 2005 7:36 PM
Using the Application Programs
44
• Use reply path
MMS account data
• Account Name: ______________________
• MMS Gateway: ______________________
• Messages valid for: 1 hour 6 hours 1 day 7 days
Maximum
• Transport: WAP HTTP
• Internet account (Only available when HTTP is selected in
Transport): (Select an Internet account for use with MMS
transmission).
• WAP account (Only available when WAP is selected in Trans-
port): (Select a WAP account for use with MMS transmis-
sion).
Cell Broadcasting Message setting
1. Tap the Enable cell broadcast check box on the CBM tab to
enable the reception of Cell Broadcasting messages.
2. Tap New and select a channel from the dialog box that
appears, and then tap OK.
3. To delete a channel, tap a channel and tap Delete, Ye s .
Security Settings
IP Security manager
The IP security manager displays stored policies and only one
policy can be activated at a time. There are two types of
passwords needed:
• IP security password: is to be set when installing the very first
policy, i.e. this password is only set once, but it is possible to
change it later at any time by tapping Password button.
• Import password: is needed when installing a policy and the
supplier of the policy gives this.
WIM PIN settings
WIM is used for performing security functions, especially to
store and process information needed for user identification
and authentication. I.e. it's a tamper-resistant store for private
keys, certificates and other objects that may require a PIN for
access or modification.
You can select a PIN from the PIN choice list. The WIM objects
list changes content dynamically, displaying only the keys that
are protected by the selected PIN and also have an associated
certificate. Other keys that are protected by the selected PIN but
don't have an associated certificate are not shown in the WIM
object list.
You can change status of a PIN:
• Enable PIN: A PIN code that is enabled is requested for
authorization of an operation. To proceed with the operation
you must enter the PIN code.
• Disable PIN: A PIN code that is disabled is not requested to
authoress an operation to proceed.
You can change the PIN code:
• Select the PIN you want to change and tap Change PIN.
• If a PIN code has been blocked, you must unblock it before it
can be used again. Select the PIN you want to change and tap
Change PIN.
9235874_3129_zh_tw_FCC.book Page 44 Wednesday, October 26, 2005 7:36 PM
Using the Application Programs
45
Tip: For information on how to unblock the PIN,
please consult your network service provider.
Password
Sets the password of your device. Choose to never use the
password or to be asked to enter the password whenever the
device is powered on. You can edit the owner information as
well.
General Settings
Storage Manager
With Storage manager you can do the following:
Managing files
1. In the Storage manager screen, tap File.
2. Select from the Location and Ty p e drop-down menus to
locate the files in the File box below.
3. Tap the check box beside each file to select the file. You can
select multiple files.
4. Tap Copy to copy the selected file to another location, or
Delete to delete the file from memory.
Uninstalling programs
1. In the Storage manager screen, tap Uninstall.
2. Tap to select a program you want to remove from the device
and then tap Uninstall.
Power
Allows you to change the auto power save setting.
By default, your device will display the screensaver if there is
no key or touch screen operation for 2 minutes. If you set Auto
power save to be 3 minutes, 1 minute after the screensaver is
displayed, the device will enter auto power save mode
automatically.
In auto power save mode, the device can be waken
automatically by an incoming call. You can also wake the
device up by pressing the power key.
Master reset
Use Master reset only if you want to reset all the settings on
your device to the way they were after initial setup. If you want
to keep installed application programs, uncheck the Delete
user installed applications check box.
Warning: All user data, as well as pre-installed media
files and application program data files will be deleted and
all settings will be set to the state they were, when the
device was originally delivered.
Format disk
When you format a disk, you delete all the information on it,
including any application programs that you've installed.
Any memory card that you install on your device are also
displayed.
9235874_3129_zh_tw_FCC.book Page 45 Wednesday, October 26, 2005 7:36 PM

Using the Application Programs
46
Renaming a Disk
You can rename a disk to give it a more meaningful name.
1. Tap to select a disk you want to rename from the Disk drop-
down menu and then tap Rename.
2. Enter the new name and then tap Done.
Formatting a Disk
You can use this function to format a newly purchased memory
card for use with the device, or delete all data on the card at
once. To format a disk:
1. Tap to select a disk you want to format from the Disk drop-
down menu and then tap Format.
2. Tap Ye s .
3. The formatting progress starts. Wait until the formatting is
carried out completely.
Important: When formatting a memory card, do not
remove it during the process, otherwise the card or data will
be damaged.
Brightness & Alignment
Allows you to change the brightness and calibrate the touch
screen.
Setting Brightness
1.To adjust brightness of the display, drag the slider to the left
or right.
2. Tap Done.
Adjusting Alignment
1. Tap Alignment tab in Brightness & Alignment.
2. Follow the on-screen instructions.
3. Tap YES to accept the new settings.
Certificate Manager
Digital certificates ensure that the web or WAP pages you visit,
or any software you install, really are created by the person you
expect.
Certificates may be presented on the pages that you view or the
software that you download. Your device compares these
certificates with a set of certificates that's stored in Certificate
manager to ensure the authenticity of the page or software. If
the certificates don't match, your device informs you, and
allows you to:
• Prevent the page being loaded or the software being installed,
or
• Continue at your own risk
Important: Even if the use of certificates makes the
risks involved in remote connections and software installa-
tion considerably smaller, they must be used correctly in
order to benefit from increased security. The existence of a
certificate does not offer any protection by itself; the certifi-
cate manager must contain correct, authentic, or trusted
certificates for increased security to be available. If Expired
certificate or Certificate not valid yet is shown even if the
certificate should be valid, check that the current date and
time in your device are correct.
9235874_3129_zh_tw_FCC.book Page 46 Wednesday, October 26, 2005 7:36 PM
Using the Application Programs
47
Security Information
Security information is displayed when Certificate manager
can't be sure of the origin of the page or software. For example,
security information will be displayed if:
• The certificate on a page has expired
• The identity of a software manufacturer can't be verified
Security information is also displayed when a certificate on
your device:
• Has expired
• Has been revoked by the independent organization that
issued it
Adding and Removing Certificates
Your device handles certificates automatically so, most of the
time, you can browse the Internet without using Certificate
manager. If you do need to add or remove a cer tificate, you will
usually be informed by your network operator or system
administrator. You should remove a certificate from
Certificate manager if you are informed, or suspect, that the
certificate:
• Does not belong to the person who supplied it
• Was issued incorrectly by the independent organization that
created it
Type of Certificate
The type can be either User or Certificate Authority.
• User certificate contains your identity. This type of certifi-
cate is used when the server asks for client authentication.
The client application program requests you to identify
yourself by choosing a user certificate.
• Certificate Authority certificates contain server details. This
type of certificate is handled by your device when the server
only requires server authentication. This means that your
identity remains anonymous.
VoiceCommander Setting
Allows you to configure VoiceCommander settings.
Locks
Using this feature, you can prevent unauthorized persons from
using your phone to make or receive phone calls. You can
enable/disable the SIM card lock function and change the SIM
card PIN with this setting option.
• To enable or disable SIM card lock, tap to select At power on
or Off. If the SIM card lock is enabled, you will be prompted
to enter the PIN before entering the online mode of the
device.
• To change SIM card PIN, tap the Change Codes tab and then
tap the Change SIM card PIN or Change SIM card PIN2
button.
• Tap Done to exit.
Call settings
Note: If the SIM card is not installed, certain setting
items will not appear on the screen.
Accepted Callers
Accepted callers are those whose calls can reach you. Others
will be automatically rejected.
9235874_3129_zh_tw_FCC.book Page 47 Wednesday, October 26, 2005 7:36 PM
Using the Application Programs
48
1. Select from the following options in the Accept calls from
drop-down menu:
• All callers: Everyone can call you.
• All except listed callers: Everyone can call you except the ones
in the rejected caller list. Tap the Add new button to add call-
ers to the list.
• None: No one can call you.
• 2. Tap Done to exit.
Add to Contacts
If this function is activated, after a call has ended, if the phone
number is not already stored in the Contacts application
program, you will be asked if you want to add it.
1. Tap the Add party to contacts drop-down menu and select
On. To deactivate this function, tap Off.
2. Tap Done.
Auto redial
If an outgoing call is failed to connect to the network, you can
choose to redial the number automatically or to be prompted to
make the call again.
1. Tap Off, Auto redial, or Prompt redial in the drop-down list
to set Auto redial.
2. Tap Done to exit.
Call Costs
The call costs function allows you to set a limit for total call
costs. If call costs exceed this limit, the device will no longer be
able to dial pay calls.
To set up call costs:
1. Enter the price unit for calculating call cost in the Price per
unit field. The value must be between 0.01 and 9999999.
2. Enter the 3-character name of currency in the Currency field.
3. Select a Credit status: Limited or Unlimited.
4. Enter a credit limit in the Remaining credit field. The value
must be between 0.01 and 9999999.
5. Tap Done.
6. Enter your PIN 2 code and then tap Done.
Note: The PIN2 is the second PIN code. Its main use is
in controlling restricted services. For example, call time
limits and restricted phone numbers.
• If the PIN2 code is incorrectly entered three times consecu-
tively, it will be locked. To unlock it, you will need to enter
the PUK2 code, which you obtain from your network oper-
ator.
If the Credit status is set to Limited and there is only 30 seconds
of credit left, the message "Low credit" will appear on the screen.
If “Credit expired” appears, you can not make any chargeable
calls.
Note: For the availability and more information about
the Call meter function, please consult your network ser-
vice provider.
Call Waiting
If there is an incoming call when you are in the middle of
another call and the call waiting function is enabled, the screen
9235874_3129_zh_tw_FCC.book Page 48 Wednesday, October 26, 2005 7:36 PM

Using the Application Programs
49
will display the number (if available) of the incoming call and
call waiting message to alert you.
1. After Call waiting is selected, the device will inquire the sta-
tus of your call waiting setting. This will take a few seconds.
2. Select from the following options:
• On: Enable call waiting.
• Off: Disable call waiting.
3. Tap Done to exit.
Calling Cards
You can use this option to set up the device for use with your
calling cards.
1. Tap the New button to add a new calling card.
2. Enter necessary information and then tap the Done button.
3. Tap Calling card mode to select from Off, Prompt before
call or Always use calling card. If you have multiple calling
cards, select one from the Calling cards box first.
4. Tap the Done button.
To delete a calling card, tap to select one in the Calling cards
box and then tap the Delete button.
To edit a calling card, tap to select one in the Calling cards box
and then tap the Edit button.
Connection alert
When the connection alert function is activated, you will be
informed when a successful phone connection is made.
1. Select from the Select connection alert drop-down list. The
available options are Off, Vibrate, Ring, and Flash.
2. Tap Done.
Divert calls
1. After Divert call is selected, the device will inquire the sta-
tus of your call waiting setting. This will take a few seconds.
2. According to the call type you want to setup, tap the Vo i c e
or Data & Fax tab.
3. Tap to select a divert condition (for example, When busy
divert to:) and then select from the following options:
• Voi ce mail: divert the call to your voice mail-box.
• Lookup in contacts: pick a number from your contacts.
• Enter number: enter the number directly.
• Off: cancel diverting calls.
4. Tap the Done button to exit.
Handsfree
With this function you can setup the way your device works
with the handsfree kit. Tap to select an option:
Options for Answering Mode
• Normal: answer the call as normal.
• Any key: the incoming call will be answered automatically
after any key is pressed.
• After 5 seconds: the incoming call will be answered automat-
ically after 5 seconds.
Tip! You can press and hold the button on the control-
ler of the handsfree to answer and end calls.
Options for Bluetooth: Preferred sound device
• Phone: use the keys on the device to manage calls.
9235874_3129_zh_tw_FCC.book Page 49 Wednesday, October 26, 2005 7:36 PM
Using the Application Programs
50
• Headset: use the keys on the device or the headset to manage
calls. If a Bluetooth headset is used, please choose Headset as
the preferred device.
• Handsfree: use the keys on the device or the handsfree (Blue-
tooth car kit) to manage calls. If a Bluetooth car kit is used,
please choose Handsfree as the preferred device.
Incoming Call Picture
If the incoming caller has a picture stored in the Contact
application program, the picture will appear on the screen when
his/her call is received.
Tap to check or uncheck the Show large pop-up picture for
incoming calls check box. If checked, the picture will be shown.
Restrict Calls
You can request your network service provider to block the
dialing or receiving of certain calls. The call barring services
require the support of your network. To activate or cancel any of
the options, you must enter the network password provided by
the network service provider.
1. After Restrict calls is selected, the device will inquire the sta-
tus of your current setting. This will take a few seconds.
2. According to the call type you want to setup, tap the Voice or
Data & Fax tab.
3. Tap to select a divert condition (for example, When busy
divert to:) and then select from the following options:
• On: enable call restriction.
• Off: disable call restriction.
4. Tap the Done button. You will be asked to enter the restrict
code. Enter the code and tap the Done button.
5. To change the restrict code, tap the Change password button.
Voice Mail
You must enter the voice mail-box number here before you can
access your voice mail. The voice mail-box number is available
from your network service provider.
Enter your voice mail-box number and then tap the Done
button.
Camera
With the built-in camera and the Camera application program,
you can take still pictures, capture video clips for viewing on the
device or sharing them with your friends or family by sending
them via MMS messages or transferring them to PC.
Taking Still Pictures
1. Press and hold the Camera key for 2 seconds. The Camera
application program will open automatically.
2. Preview the image using the viewfinder. You can also tap the
+ (or press the key) or - button on the screen (or
press the key) to zoom in or out on the object.
3. Tap the icon to set your desired Camera settings.
4. Press the Camera key and the still image will be captured and
saved.
9235874_3129_zh_tw_FCC.book Page 50 Wednesday, October 26, 2005 7:36 PM
Using the Application Programs
51
Note: When the image is being saved, the buttons on
the screen will become unavailable temporarily.
• When the Camera key is pressed while taking a picture, a
shutter sound will be generated, even if you have put the
device in Silent mode.
5. The picture you just took will appear in the viewfinder.
Yo u c a n :
• Tap the button to delete the picture.
• Tap the button to send the picture. Select from the
following and then tap the Done button:
• MMS: send the picture to another mobile phone as an MMS
attachment. The MMS message screen will follow for you to
compose the message.
Note: Only devices that have compatible features can
receive and display multimedia messages. The appearance
of a message may vary depending on the receiving device.
• Bluetooth: send the picture to other devices that support
Bluetooth technology. A box will appear showing found
paired devices. Tap to select a device and then tap the Send
button.
• Infrared: send the picture to other devices that support
infrared connection. Align the infrared port of your device
with that of the other device and then tap the Send button.
• Tap the button to rename the picture.
• Tap the button to view the picture in the PhotoBase
application program.
• Tap the button to exit.
Capturing Video
1. Press the Camera key. The Camera application program
will open automatically.
2. Press the icon to go to video mode.
3. Preview the image using the viewfinder. You can also tap
the + (or press the key) or - button on the screen
(or press the key) to zoom in or out on the
object.
Tip! It is recommended that you tap the + button once
to zoom in on the image one level to get better video qual-
ity.
• Try to keep the distance between the sound source and the
microphone of the device within about 10-15 cm distance
when shooting video in order to obtain better sound
recording quality.
4. Tap the “Record” button or press the Camera key to
start capturing video.
5. When capturing is in progress, you can perform the follow-
ing operations:
• Tap the button to pause capturing. Tap the button
again to resume capturing.
9235874_3129_zh_tw_FCC.book Page 51 Wednesday, October 26, 2005 7:36 PM
Using the Application Programs
52
• Tap the + button (or press the key) to zoom in on
the image.
• Tap the - button (or press the key) to zoom out on
the image.
• Tap the button or press the Camera key to stop captur-
ing. The video clip will be saved.
Note: When the video clip is being saved, the buttons
on the screen will become unavailable temporarily.
• Tap the button to exit without saving.
6. Alternatively, you can perform the following operations after
a video clip is captured:
• Tap the button to delete the video clip.
• Tap the button to send the video clip. Select from the fol-
lowing and then tap the Done button:
• MMS: Send the video clip to another compatible mobile
phone as an MMS attachment. The MMS message screen will
follow for you to compose the message.
Note: Only devices that have compatible features can
receive and display multimedia messages. The appearance
of a message may vary depending on the receiving device.
• Bluetooth: Send the video clip to other devices that support
Bluetooth technology. A box will appear showing found
paired devices. Tap to select a device and then tap the Send
button.
• Infrared: Send the video clip to other devices that support
infrared connection. Align the infrared port of your device
with that of the other device and then tap the Send button.
• Tap the button to rename the video clip.
• Tap the button to play the video clip.
• Tap the button to exit without saving.
Camera Options When Taking Pictures
and Capturing Video
Press to enter the option menu and setup images or
video settings.
Image Settings
When taking pictures, you can choose to set different camera
settings for better effect. Tap the icon to set your desired
camera settings and tap an item in the pop-up options menu to
configure its corresponding settings.
• Image size: Tap to select a suitable image size. Larger image
size and higher image quality will result in larger picture files.
• Night Mode: Tap to set the night mode on or off.
• Effect: Tap to select different image effect such as Normal,
Mono, Sepia, Blush and Negative.
• Burst-Mode: Tap to set the burst-mode on or off. If you set
the burst-mode on, there are three burst-mode for you to
choose: 6 Multishot, 9 Multishot and 16 Multishot.
9235874_3129_zh_tw_FCC.book Page 52 Wednesday, October 26, 2005 7:36 PM
Using the Application Programs
53
Note: When the camera is set to be Burst-mode, to
take a multishot, press and hold the Camera key.
• Self-Timer: When taking pictures, you can enable the 10-
second self-timer by setting Self timer on.
• Anti-Shaking: Your device supports anti-shaking function
when taking pictures. Tap this item to set this function on or
off.
• Settings: Tap to adjust different settings, such as Quality,
White Balance, Exposure Area, Exposure Bracketing, and
Anti-Flicker.
• Memory Storage: Tap to select a default storage location
(phone memory or SD memory), and filenames.
• Help: Tap to view the camera help file.
• About: Tap to see more information about the camera.
Video Settings
When capturing video, you can choose to set different camera
settings for better effect. Tap the icon to set your desired
camera settings and tap an item in the pop-up options menu
configure its corresponding settings.
• Night Mode: Tap to set the night mode on or off.
• Effect: Tap to select different image effect such as Normal,
Mono, Sepia, Blush and Negative.
• Settings: Tap to adjust settings of Audio Settings, Quality,
White Balance, Exposure Area, Anti-Flicker, and Format.
• Memory Storage: Tap to select a default storage location
(phone memory or SD memory), filename and size mode
(for displaying under the viewfinder when capturing video)
for video clips.
• Help: Tap to view the camera help file.
• About: Tap to see more information about the camera.
Note: When size mode is set to "MMS", the maxi-
mum video size is 95KB.
• When size mode is set to "Maximum available memory",
all free memory space will be used for recording.
• When size mode is set to "In seconds", the maximum
length of video can be specified. (Max. 300 seconds)
• When size mode is set to "In KB", the maximum size of
video can be specified.
Note: It is recommended that you save the images/
video to the memory card to prevent phone memory from
running low.
Ta p Done to confirm your settings, or Default to reset all
camera settings to default values. Tap Cancel to exit the camera
settings screen.
Note: It is recommended that when you finish using
the Camera application program, tap Camera and select
Exit to close it in order to save memory space.
9235874_3129_zh_tw_FCC.book Page 53 Wednesday, October 26, 2005 7:36 PM
Using the Application Programs
54
Music Player
With the Music player application program, you can play music
tracks/files in the following formats:
• AMR files (.amr)
• MP3 files (.mp3)
• WAV files (.wav)
• MIDI files (.mid)
Playing Music
1. Tap the Music player application program icon in the Main
screen.
2. Tap All and select the location (folder) that contains the
music files.
3. The song list will appear in the screen.
Tip! To sort songs on the song list, tap Thumbnails and
then select Sort by name, Sort by date or Sort by size.
Note: It is recommended that you save music files on
the memory card to prevent phone memory from running
low.
• When copying music files to the device memory/memory
card, put them in the folder named "audio" in the "Media
files" folder. You can also create new sub-folders in the
"audio" folder to store music files.
Tap to check the songs you want to play in the song list and then
tap the button (or press the key) to start
playing them.
Warning: Listen to music at a moderate level. Contin-
uous exposure to high volume may damage your hearing.
Do not hold the device near your ear when the loudspeaker
is in use, because the volume may be extremely loud.
Operations When Playing Music
When playing music, you can:
• Tap the button to stop playing music.
• Tap the button (or press the key) to pause
playing current song. Tap the button again to resume normal
playback.
• Tap the button (or press the key) to go to the
next song.
• Tap the button (or press the key) to go to the
previous song.
• Tap the icon to enable random playback. Tap the icon
again to disable it.
• Tap the icon to enable repeat playback. Tap the icon
again to disable it.
9235874_3129_zh_tw_FCC.book Page 54 Wednesday, October 26, 2005 7:36 PM
Using the Application Programs
55
Managing Songs
Renaming Songs
1. Tap the icon to open song list, and then tap a song to
select it.
2. Tap the button.
3. Enter the new name for the song and then tap OK.
Sending Songs
1. Tap the icon to open song list, and then tap a song to
select it. You can select multiple songs.
2. Tap the button.
3. Select from the following and then tap the Done button:
• Email: send the song(s) as email attachments.
• MMS: send the song(s) to another mobile phone as MMS
attachments. The MMS message screen will follow for you
to compose the message.
• Bluetooth: send the song(s) to other devices that support
Bluetooth technology. A box will appear showing found
paired devices. Tap to select a device and then tap the Send
button.
• Infrared: send the song(s) to other devices that support
infrared connection. Align the infrared port of your device
with that of the device and then tap the Send button.
Copying Songs
1. Tap the icon to open song list, and then tap a song to
select it.
2. Tap the button.
3. Tap to select a folder where the song will be copied from the
Folder drop-down list.
4. If necessary, change the name of the song by entering a new
name in the Name field.
5. Tap Save.
6. Tap Copy.
Moving Songs
1. Tap the icon to open song list, and then tap a song to
select it.
2. Tap the button.
3. Tap to select a folder where the song will be moved from the
Folder drop-down list.
4. If necessary, change the name of the song by entering a new
name in the Name field.
5. Tap Save.
6. Tap OK.
Deleting Songs
1. Tap the icon to open song list, and then tap a song to
select it.
9235874_3129_zh_tw_FCC.book Page 55 Wednesday, October 26, 2005 7:36 PM
Using the Application Programs
56
2. Tap the button.
3. Tap YES.
Viewing Song Information
1. Tap the icon to open song list, and then tap a song to
select it.
2. Tap the button.
Managing Music Folders
1. In the song list screen, tap All and select Edit Folders.
2. You can:
• Tap the Add button to create a new folder. Enter the name for
the new folder and specify the storage location (phone stor-
age or memory card) and then tap the Done button.
• Tap to select a folder on the list and then tap the Delete but-
ton to delete the selected folder.
• Tap the Edit button to rename selected folder. Enter a new
name and specify the storage location (phone storage or
memory card) and then tap the Done button.
Note: It is recommended that when you finish using
the Music player application program, tap Music and select
Exit to close it in order to save memory space.
Video Player
With Video player, you can view video clips captured by the
camera or transferred from other devices. The Video player
application program accepts video clips in the MPEG 4, 3GP
format.
Viewing Video Clips Using Video Player
1. Tap the Video player application program icon in the Main
screen.
2. Tap All and select a folder. You can select to view the video
clips in the device memory, the memory card or both.
3. The thumbnails and related time, date and length informa-
tion of the video clip files will appear.
4. Tap to select a video clip you want to play and then tap the
button (or press the key). Video player will
start playing the video clip.
Note: When copying video files to the device memory/
memory card, put them in the folder named "video" in the
"Media files" folder. You can also create new sub-folders in
the "video" folder to store video files.
Options When Viewing Video Clips
When viewing video clips, you can:
9235874_3129_zh_tw_FCC.book Page 56 Wednesday, October 26, 2005 7:36 PM
Using the Application Programs
57
• Tap the button (or press the key) to pause
the video image.
• Tap the button (or press the key) to play the
next video clip.
• Tap the button (or press the key) to play the
previous video clip.
• Tap the button to stop playing the video and return to
the file list screen.
• Tap the icon to enable random playback. Tap the icon
again to disable it.
• Tap the icon to enable repeat playback. Tap the icon
again to disable it.
• Tap the icon to switch to the options of the slow-
motion playback.
Note: The sound is muted during the slow-motion
playback.
Managing Video Folders
1. In the Video player screen, tap All and select Edit folders.
2. You can:
• Tap the Add button to create a new folder. Enter the name
for the new folder and then tap the Done button.
• Tap to select a folder on the list and then tap the Delete but-
ton to delete the selected folder.
• Tap the Edit button to rename selected folder. Enter a new
name and then tap the Done button.
Managing Video Clips
Deleting Video Clips
1. Tap the icon to open video list.
2. Tap to select the video clip you want to delete.
3. Tap the button, and then tap Ye s .
Renaming Video Clips
1. Tap the icon to open video list.
2. Tap to select the video clip you want to rename.
3. Tap the button.
4. Enter the new name in the dialog that appears and then tap
OK.
Sending Video Clips
1. Tap the icon to open video list.
2. Tap to select the video clip you want to send.
3. Tap the button.
4. Select from the following and then tap the Done button:
9235874_3129_zh_tw_FCC.book Page 57 Wednesday, October 26, 2005 7:36 PM
Using the Application Programs
58
• Bluetooth: send the video clip to other devices that support
Bluetooth technology. A box will appear showing found
paired devices. Tap to select a device and then tap the Send
button.
• MMS: send the video clip to another mobile phone as an
MMS attachment. The MMS message screen will follow for
you to compose the message.
• Infrared: send the video clip to other devices that support
infrared connection. Align the infrared port of your device
with that of the device and then tap the Send button.
Viewing Video Clip Information
1. Tap the icon to open video list.
2. Tap to select a video clip.
3. Tap the button. The information about the video clip
will appear on the screen.
Tip! You can also tap Options and use the commands.
Note: It is recommended that when you finish using
the Video player application program, tap Video and select
Exit to close it in order to save memory space.
PhotoBase
PhotoBase is a powerful image management application
program that allows you to view, edit, organize pictures and add
special effects to pictures taken by your camera or downloaded/
transferred from other locations.
Viewing Images
1. Tap the PhotoBase application program icon in the Main
screen.
2. In the PhotoBase screen, tap All and select a folder.
Note: When copying image files to the device memory/
memory card, put them in the folder named "image" in the
"Media files" folder. You can also create new sub-folders in
the "image" folder to store image files.
9235874_3129_zh_tw_FCC.book Page 58 Wednesday, October 26, 2005 7:36 PM
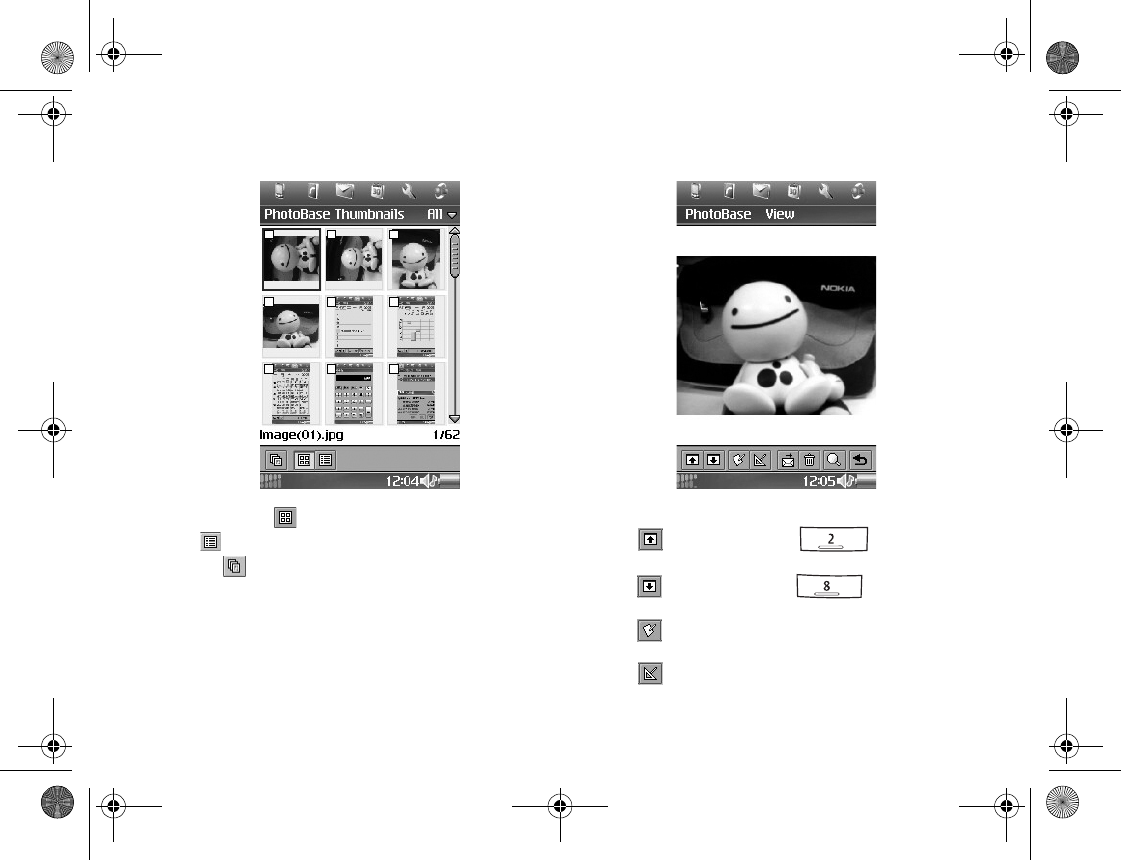
Using the Application Programs
59
3. The images in the selected folder will appear.
• You can tap the button to view images as thumbnails, or
the button to view images as a list.
• Tap the button to view images as slideshows.
• Tap Thumbnails or List and select Sort by name, Sort by date
or Sort by size to sort images according to different condi-
tions.
4. Tap a thumbnail or an item in the list to open the image.
The image will appear in the image viewing screen.
Image viewing options
When viewing an image, you can:
• Tap the button (or press the key) to go to
the previous image.
• Tap the button (or press the key) to go to the
next image.
• Tap the button to open the image editing screen for edit-
ing current image.
• Tap the button to open the image workshop screen for
applying special effects to current image.
9235874_3129_zh_tw_FCC.book Page 59 Wednesday, October 26, 2005 7:36 PM
Using the Application Programs
60
• Tap the button to send the current image.
• Tap the button to delete the current image.
• Tap the button to enlarge or reduce the viewing size.
• Tap the button to return to the thumbnail or list view.
Organizing Images
Managing Image Folders
1. In the image thumbnail or list view, tap All and select Edit
folders.
2. You can:
• Tap the Add button to create a new folder. You will then be
asked to enter a name for the new folder. When finished, tap
the Done button.
• Tap to select a folder on the list and then tap the Delete but-
ton to delete the selected folder.
• Tap the Edit button to edit selected folder. Make changes and
then tap the Done button.
Copying Images to a Different Folder
1. In the image thumbnail or list view, select images you want
to copy by checking the check boxes on image thumbnails or
next to image items.
2. Tap PhotoBase and select Copy ticked picture(s) to.
3. Select a folder from the drop-down list and then tap the
Copy button.
Deleting Images
Method 1
1. In the image thumbnail or list view, select images you want
to delete by checking the check boxes on image thumbnails
or next to image items.
2. Tap PhotoBase and select Delete ticked picture(s).
3. Tap the Ye s button.
Method 2
1. Open an image from the thumbnail or list view.
2. Tap the button on the image viewing screen.
3. Tap the Ye s button.
Sending Images
1. Open an image from the thumbnail or list view.
2. Tap the button on the image viewing screen.
3. Select from the following and then tap the Done button:
• Bluetooth: send the image to other devices that support Blue-
tooth technology. A box will appear showing found paired
devices. Tap to select a device and then tap the Send button.
• MMS: send the image to another mobile phone as an MMS
attachment. The MMS message screen will follow for you to
compose the message.
• Infrared: send the image to other devices that support infra-
red connection. Align the infrared port of your device with
that of the device and then tap the Send button.
9235874_3129_zh_tw_FCC.book Page 60 Wednesday, October 26, 2005 7:36 PM
Using the Application Programs
61
Editing Images
Rotating Images
1. Open an image from the thumbnail or list view.
2. Tap the button to open the image editing screen.
3. Tap the button to rotate the image 90 degrees clock-
wise, or the button to rotate the image 90 degrees
counter-clockwise.
4. Tap the button and then tap Yes to save your changes.
Flipping Images
1. Open an image from the thumbnail or list view.
2. Tap the button to open the image editing screen.
3. Tap the button to flip the image horizontally, or the
button to flip the image vertically.
4. Tap the button and then tap Yes to save your changes.
Cropping Images
1. Open an image from the thumbnail or list view.
2. Tap the button to open the image editing screen.
3. Tap the button and then tap Continue in the box that
appears.
4. Use the stylus to draw a cropping frame that encompasses
the area you want to crop from the original image.
5. If necessary, tap the crossed arrow at the center of the frame
to adjust its position on the original image. You can also
tap the small red dots at each corner of the frame to adjust
its size.
6. Tap the button. The image will be cropped.
7. Tap the button and then tap Ye s to save your changes.
9235874_3129_zh_tw_FCC.book Page 61 Wednesday, October 26, 2005 7:36 PM
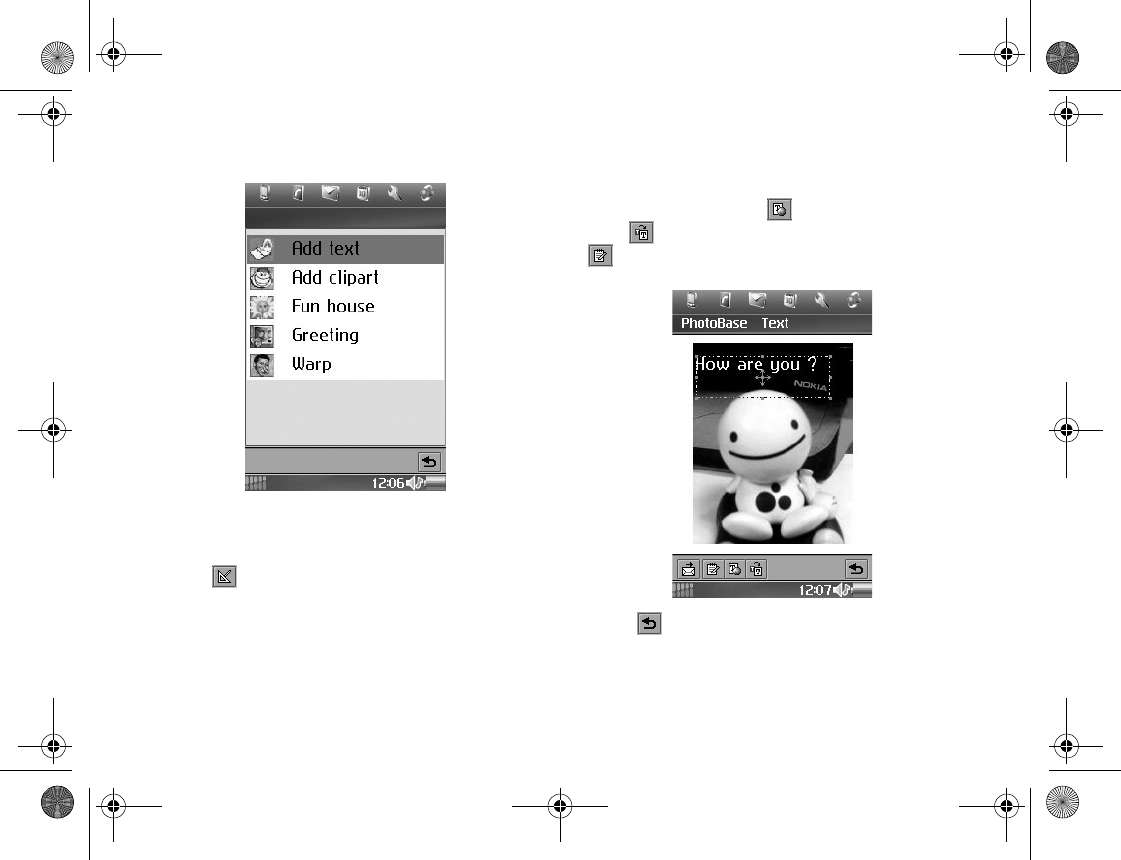
Using the Application Programs
62
Adding Special Effects to images
Adding Text to Images
1. Open an image from the thumbnail or list view.
2. Tap the button to open the image workshop screen.
3. Tap Add text.
4. Enter the text you want to add to the image and then tap OK.
5. You will see a text frame on the image with the text you just
entered in it. If necessary, tap and drag the crossed arrow
mark at the center of the text frame to adjust its position on
the image, or tap and drag the small red dots at each corner
of the text frame to adjust its size.
6. If necessary, you can tap the button to change text color,
or the button to change text size. You can also tap the
button to add more text or edit the text in the text
frame.
7. Tap the button and then tap Yes to save your changes.
Adding Clipart to Images
1. Open an image from the thumbnail or list view.
9235874_3129_zh_tw_FCC.book Page 62 Wednesday, October 26, 2005 7:36 PM
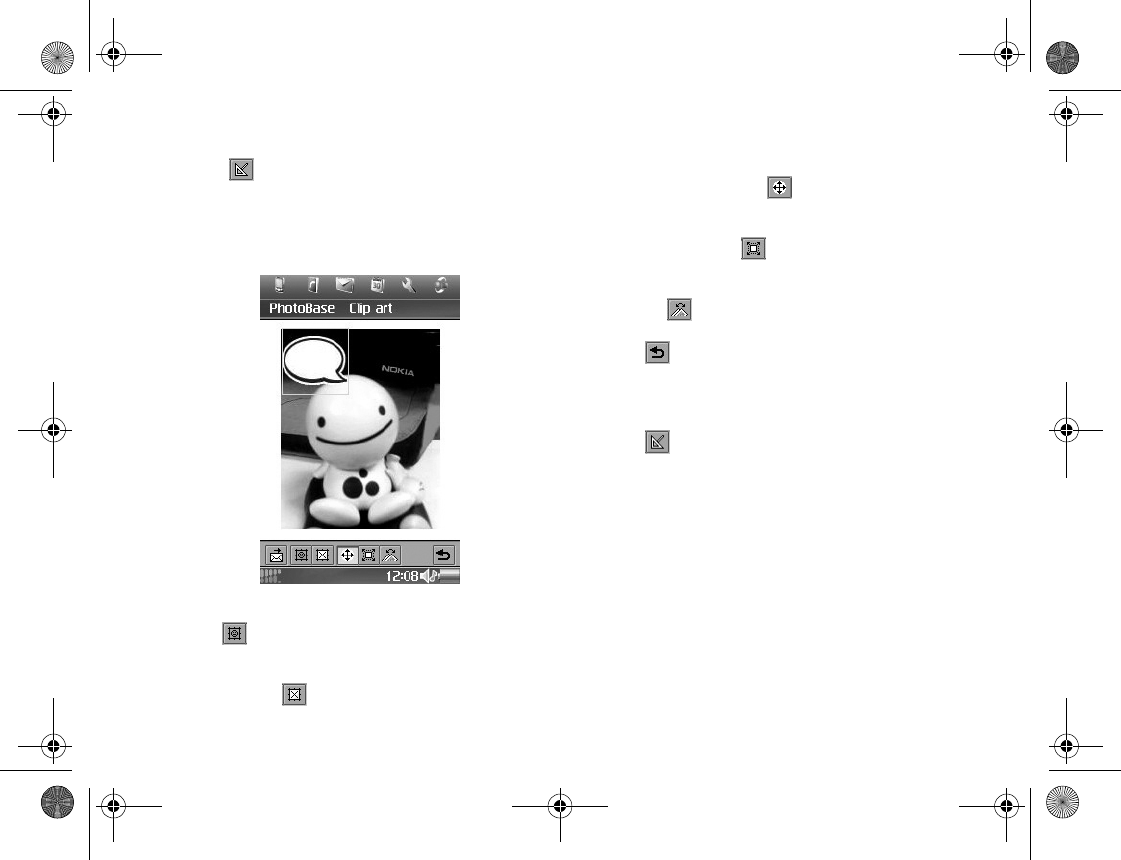
Using the Application Programs
63
2. Tap the button to open the image workshop screen.
3. Tap Add clipart.
4. Tap Emotions and select a clipart category.
5. Tap to select a clipart image. The clipart image will appear
on the original image.
6. If necessary, you can also do the following:
• Tap the button to add more clipart images to the origi-
nal image.
• Delete a clipart image by tapping it on the original image
and then tap the button.
• Adjust the position of the clipart image by tapping it on the
original image, tapping the button and then tap and
drag the clipart image.
• Adjust the size of the clipart image by tapping it on the orig-
inal image, tapping the button and then tap and drag
the clipart image.
• Rotate the clipart image by tapping it on the original image,
tapping the button and then tap and drag the clipart
image.
7. Tap the button and then tap Ye s to save your changes.
Adding Frames
1. Open an image from the thumbnail or list view.
2. Tap the button to open the image workshop screen.
3. Tap Fun house.
4. Tap Bobble_heads and select a frame type.
9235874_3129_zh_tw_FCC.book Page 63 Wednesday, October 26, 2005 7:36 PM
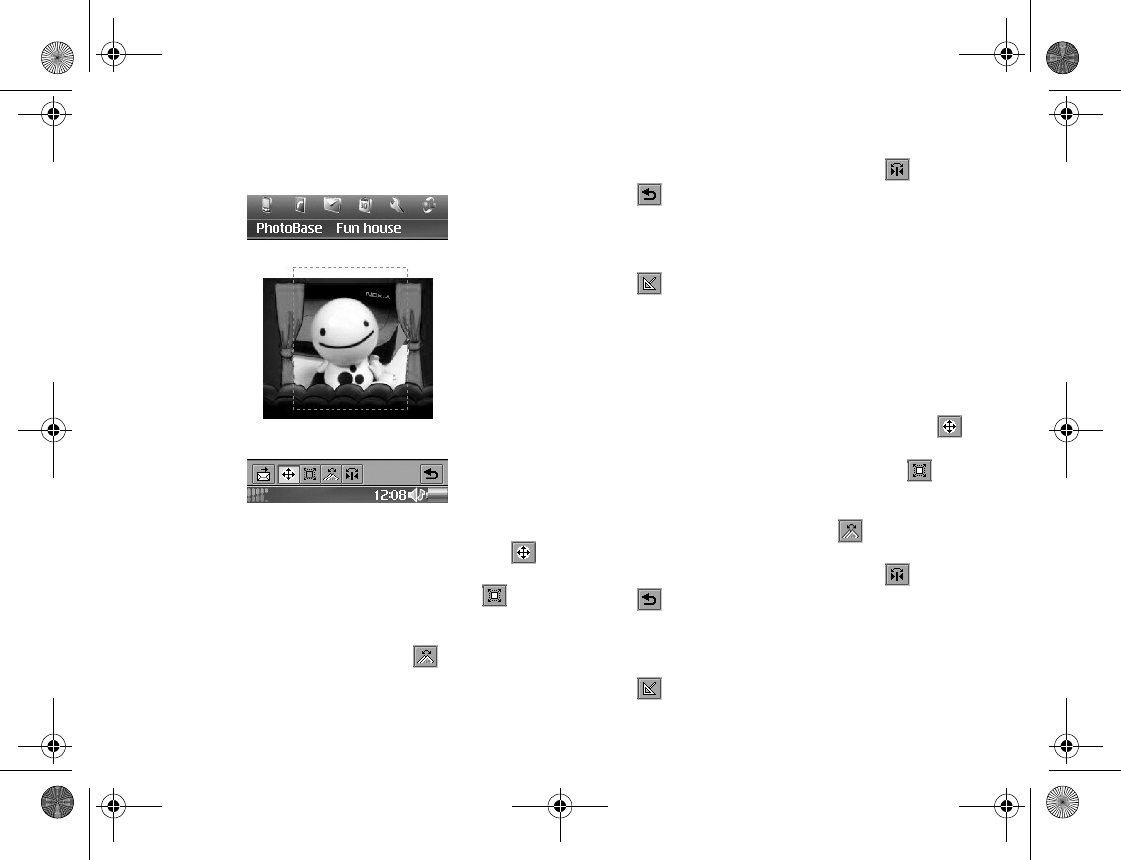
Using the Application Programs
64
5. Tap to select a frame. The frame will appear on the original
image.
6. If necessary, you can also do the following:
• Adjust the position of the original image by tapping the
button and then tap and drag the original image.
• Adjust the size of the original image by tapping the but-
ton and then tap and drag the dotted border of the original
image.
• Rotate the original image by tapping the button and then
tap and drag the original image.
• Flip the original image vertically by tapping the button.
7. Tap the button and then tap Yes to save your changes.
Using Greeting Card Templates
1. Open an image from the thumbnail or list view.
2. Tap the button to open the image workshop screen.
3. Tap Greeting.
4. Tap to select a template type.
5. Tap to select a template. The template will appear on the
original image.
6. If necessary, you can also do the following:
• Adjust the position of the original image by tapping the
button and then tap and drag the original image.
• Adjust the size of the original image by tapping the but-
ton and then tap and drag the dotted border of the original
image.
• Rotate the original image by tapping the button and then
tap and drag the original image.
• Flip the original image vertically by tapping the button.
7. Tap the button and then tap Yes to save your changes.
Adding Warping Effects
1. Open an image from the thumbnail or list view.
2. Tap the button to open the image workshop screen.
9235874_3129_zh_tw_FCC.book Page 64 Wednesday, October 26, 2005 7:36 PM
Using the Application Programs
65
3. Tap War pin g.
4. Tap War p and select a pen size for warping: Large pen,
Medium pen or Small pen.
5. Tap and drag the portions you want to create warping effect
on the original image. To clear all changes, tap Warp and
then select Undo all changes.
6. Tap the button and then tap Yes to save your changes.
Note: It is recommended that when you finish using
the Photo Base application program, tap PhotoBase and
select Exit PhotoBase to close it in order to save memory
space.
Internet
The Internet browser allows you to view information on the
Wor ld Wid e Web or on WAP pag e s. You c an a lso bo okmar k
your favorite pages or save them for off-line viewing.
Before you can use Internet, you need to set up an Internet
account in Settings. If you intend to use certain WAP services,
it might also be necessary to set up a WAP account in Settings.
Note: Proxy settings for a WAP gateway should be set
in the WAP account. Other proxy settings should be set in
the Internet account.
Connecting to/Disconnecting from the
Internet
If your device is not connected to the Internet when you try to
load a Web page, it will connect automatically. It then remains
connected until the idle time you have specified in the Internet
accounts settings has elapsed or you disconnect manually.
To disconnect, tap on the Status bar and select Disconnect.
Opening the Internet Browser
Method 1
Press and hold the key on the device.
Method 2
Tap the Internet application program icon in the Main screen.
Method 3
Tap a URL (web address) in a mail or message.
Opening Page
1. Tap Internet and select Open page.
2. In the Location field, enter the web address and then tap
Open. If you have previously visited certain web pages,
their addresses will appear in the drop-down list. You can
also tap to select one from them.
To start browsing the Web, just tap any link on the page. Then
you can move around on the Web by simply tapping links. A
9235874_3129_zh_tw_FCC.book Page 65 Wednesday, October 26, 2005 7:36 PM
Using the Application Programs
66
link can be an image or colored, underlined text. An image link
is shown with a thin, blue frame that fades away after a second.
After a page has been loaded, you can use Find and Find next in
the Internet menu to search for a specific text on that page.
Note: Pages with frames and Java scripts may not dis-
play properly in the browser.
• If some or all of the images on the web page can’t be dis-
played, they will appear as . Try loading the data again
by tapping Internet and select Reload page or Load all
images.
Tip! To switch between full screen and normal view, tap
Edit and select Full screen, or simply press the
key.
• To bring up a popup menu with useful commands, press
the key.
Key Operations When Browsing
When browsing, you can use the following keys to conveniently
move through the web pages and links.
Scrolling Pages
• Press the key to scroll page up.
• Press the key to scroll page down.
• Press the key to scroll page left.
• Press the key to scroll page right.
Link Navigation
• Use the keys and , or and
, to select and navigate between links. A selected
link is highlighted.
• Press to open a selected link.
• Press to return to the previous page.
• If a link is highlighted when you want to use the Scan text
function, press any of the normal scrolling keys ,
, or .
Bookmarking Pages
1. Navigate to the page you want to bookmark.
2. Tap Internet and select Add to bookmarks.
3. Enter the bookmark name in the Name field and select a
location where the bookmark will be saved in the Folder
drop-down list, and then tap Done.
Tip! Alternatively, you can bookmark a page by tapping
and holding the link to the page and select Add to book-
marks.
9235874_3129_zh_tw_FCC.book Page 66 Wednesday, October 26, 2005 7:36 PM
Using the Application Programs
67
Saving Pages for Off-Line Browsing
1. Navigate to the page you want to save.
2. Tap Internet and select Save page.
3. Enter the name for the page in the Name field and select a
location where the page will be saved in the Folder drop-
down list, and then tap Done.
Note: This saves the information on the Web page.
However, images and sounds will not be saved.
• Some Web pages are not allowed to be cached. These pages
can not be saved.
To open a saved page:
1. Go to the Bookmarks view.
2. Tap the name of the saved page that you want to open.
Note: If you tap a link on a saved page, you will prob-
ably get an error message because the linked page is not
available offline.
Going to Bookmarked Pages
1. Tap Internet and select Bookmarks. Alternatively, you can
tap the button on the browser screen.
2. The bookmark list screen will appear.
Tap a bookmark and the bookmarked page will appear on the
browser screen.
Operations When Viewing Pages
Pages and Bookmarks
• To move among recently visited pages, tap the or
button.
• To stop loading a page, tap the button.
• To return to the home page, tap the button. See "Basic
Options" on page 69 for how to setup your home page.
• To go to the bookmark list, tap the button.
• To return from the bookmark list to the browser screen, tap
the button.
Links to Pages
• To open a link, tap the link or tapping and holding the link
and then select Open link.
• To view link information, tap and hold the link and then
select Link information.
Links to Phone Numbers
• To make a call to the phone number, tap and hold the link
and then select Call.
• To send an SMS to the phone number, tap and hold the link
and then select New SMS.
• To send an MMS to the phone number, tap and hold the link
and then select New MMS.
9235874_3129_zh_tw_FCC.book Page 67 Wednesday, October 26, 2005 7:36 PM

Using the Application Programs
68
• To add the phone number to your contacts, tap and hold the
link and then select New contact.
Links to Email
• To send an email to the link address, tap and hold the link and
then select New Email.
• To send an MMS to the link address, tap and hold the link and
then select New MMS.
• To add the email address to your contacts, tap and hold the
link and then select New contact.
Images
• To save an image on the page, tap and hold the image and
select Save image.
• To copy an image to the clipboard, tap and hold the image
and select Copy image.
• To view an image in a separate image viewer, tap and hold the
image and select View image.
• To send an image, tap and hold the image and select Send
image as.
Managing Bookmarks
Deleting Bookmarks
1. Tap the button to go to the bookmark list.
2. Tap the check box beside each bookmark item to select it.
You can select multiple bookmarks.
3. Tap Internet and select Delete.
4. Tap Ye s .
Editing Bookmarks
1. Tap the button to go to the bookmark list.
2. Tap the check box beside a bookmark item to select it.
3. Tap Edit and select Edit.
4. Tap Edit.
5. Edit the location, name, folder of the bookmark or preferred
WAP account for connecting to this page and then tap the
Done button.
Sending Bookmarks
1. Tap the button to go to the bookmark list.
2. Tap the check box beside a bookmark item to select it.
3. Tap Edit and select Edit.
4. Tap Send as.
5. Select a method for sending the bookmark and then tap the
Done button.
Managing Bookmark Folders
1. In the bookmark list, tap All and select Edit folders.
2. You can:
• Tap the Add button to create a new folder. Enter the name for
the new folder and then tap the Done button.
9235874_3129_zh_tw_FCC.book Page 68 Wednesday, October 26, 2005 7:36 PM
Using the Application Programs
69
• Tap to select a folder on the list and then tap the Delete but-
ton to delete the selected folder.
• Tap the Rename button to rename selected folder. Enter a
new name and then tap the Done button.
Browser Preferences
The Internet browser allows you to change the way the browser
deal with the web page contents, security and Internet
connections by setting up the preferences options.
To access the preferences options, tap Edit on the browser
screen and select Preferences.
Basic Options
• Homepage location: you can specify a favorite page as the
default home page when opening the Internet browser by
entering the complete address.
• WAP account: Select the WAP account to be used when the
home page is loaded.
• Full screen on new page: Specify whether to switch to the full
screen view when viewing the new page.
• Vertical scroll bar: Specify whether the vertical scroll bar will
be displayed.
• Load images: Select if the images will be loaded when open-
ing a page. If images are not loaded, the page will open
faster.
• Play sound: Select if sound should be played when opening a
page that contains it.
• Play animation: Select if animations should be played when
opening a page that contains them.
Security Options
• Allow cookies: Select if you want to receive cookies when
browsing.
Advanced Options
• WAP Push settings: You can select if you want to receive the
Push messages from your network service provider (Enable
WAP Pu s h), if the URL should be opened automatically
upon reception (Auto load URL), if the out-of-date Push
messages should be removed automatically (Auto delete
expired), and if sound should be played when a Push mes-
sage is received (Push sound).
Note: For more information about the availability of
the WAP Push messages, please consult your network ser-
vice provider.
• Cache size: Cache is the space for storing the data of visited
web pages for faster loading the next time you visit it. Drag
the slider to adjust the size of cache space. To clear the data
in cache, tap Clear cache. To clear the history record of vis-
ited web pages, tap Clear history.
9235874_3129_zh_tw_FCC.book Page 69 Wednesday, October 26, 2005 7:36 PM
Using the Application Programs
70
Time
The Time application program allows you to view and set time,
date and location information. Besides, you can also set 3
different alarms.
Viewing Current Time and Date
You can view current time and by tapping the clock display on
the Status bar, or open Time in the Main screen.
In the Time screen, you can:
Setting Time and Date
Specifying Your Current Location
Before setting time and date, you must first select your current
location.
1. In the Time screen, tap Time and select Set location on the
menu that appears.
2. In the Location tab, tap to set the country information.
3. Tap the Numbers tab to set the number format.
4. Tap the Done button.
Setting Date and Time
1. In the Time screen, tap Time and select Set date & time on
the menu that appears.
2. In the Date and time tab, enter current time and date.
3. Tap the Format tab and specify time and date format.
4. Tap to go to the Workd ay s tab and set workdays in a
week.
5. Tap the Done button.
Setting Alarms
1. In the Time screen, tap one of the 3 alarm fields.
2. The alarm setting screen will appear.
3. Complete necessary setup and then tap the Done button.
You can set up to 3 alarms.
Activating/Deactivating Alarms
To enable or disable an alarm, check or uncheck the check box
in each alarm field on the Time screen.
Operations When an Alarm Goes off
When an alarm goes off, you can tap Snooze to postpone the
alarm for 5 minutes, or Silence to turn off alarm sound. To turn
off the alarm, tap Done (or press the key).
To - Do
The To-Do application program helps you to manage your todo
items and track the status. Besides, you can also exchange the to-
do items with that of the Agenda application for easy planning
of your daily schedule.
9235874_3129_zh_tw_FCC.book Page 70 Wednesday, October 26, 2005 7:36 PM
Using the Application Programs
71
Creating New Tasks
1. In the To-Do screen, tap To -d o and select New.
2. Tap Unfiled and select a folder where you want to place the
new task.
3. Enter a description of the task, and then specify the follow-
ing:
• Completed: check the check box if the task is already com-
pleted.
• Priority: select a priority for the task.
• Due date: if the task has a due date, you can tap to check this
check box, tap the date that appears and then select a date
from a calendar.
• Alarm: to set alarm, tap to check this check box, tap the date
and time that appear and then adjust alarm time.
• Private: if this check box is checked, when you synchronize
tasks with other devices, the private tasks will not be seen.
4. Tap the tab and write a note for the task.
5. Tap the button to save the new task.
Viewing Tasks
You can view your tasks on the To-Do screen. Overdue tasks
will turn into red. You can sort the tasks by tapping Edit and
select Sort by priority or Sort by date.
To view a task, tap a task item on the To-Do screen. The details
of the task will appear on the screen.
Managing Tasks
Changing Task Status
If a task is completed, you can check the check box of each task
on the To-Do screen to mark the task as “completed”.
Finding a Task
To find a specific task:
1. In the To-Do screen, tap To-do and select Find.
2. Enter the keyword and select where to search.
3. Tap the Find button.
4. The tasks that match your search keyword will appear on
the screen. You can tap to select and open a task.
Editing a Task
1. Open a task by tapping it on the To-Do screen.
2. Make changes to the task.
3. Tap the button to save your changes.
Deleting a Task
1. Open a task by tapping it on the To-Do screen.
2. Tap To - d o and select Delete To-do.
3. Tap the Done button.
9235874_3129_zh_tw_FCC.book Page 71 Wednesday, October 26, 2005 7:36 PM

Using the Application Programs
72
Deleting Completed Tasks
1. In the To-Do screen, tap To to and select Delete completed.
2. Select whether to delete all completed tasks, or just the com-
pleted tasks in a specific folder.
3. Tap Ye s to delete the tasks.
Moving Tasks to the Agenda Application Program
1. Open a task by tapping it on the To-Do screen.
2. Tap To - d o and select Move to Calendar.
3. Tap the Done button.
Pasting Tasks from the Agenda Application
Program
1. Cut or copy an agenda entry in the Agenda application pro-
gram.
2. In the To-Do screen, tap Edit and select Paste entry.
Sending Tasks
1. Open a task on the To-Do screen.
2. Tap To - d o and select Send as.
3. Select from the following and then tap the Done button:
• Bluetooth: send the task to other devices that support Blue-
tooth technology. A box will appear showing found paired
devices. Tap to select a device and then tap the Send button.
• Message: send the task to another mobile phone via an SMS
message. Enter the number of the recipient and then tap the
Send button.
• MMS: send the task to another mobile phone as an MMS
attachment. The MMS message screen will follow for you to
compose the message.
• Infrared: send the task to other devices that support infrared
connection. Align the infrared port of your device with that
of the device and then tap the Send button.
Managing Task Folders
1. In the To-Do screen, tap All and select Edit folders.
2. You can:
• Tap the Add button to create a new folder. Enter the name for
the new folder and then tap the Done button.
• Tap to select a folder on the list and then tap the Delete but-
ton to delete the selected folder.
• Tap the Rename button to rename selected folder. Enter a new
name and then tap the Done button.
To-Do Preferences
1. In the To-Do screen, tap Edit and select Preferences.
2. Set the following items:
• Display due dates: if unchecked, the set due dates for each task
will not appear on the To-Do screen.
• Display completed: if unchecked, the completed tasks will not
appear on the To-Do screen.
• Alarm sound: tap to select a preferred alarm sound from the
drop-down list.
9235874_3129_zh_tw_FCC.book Page 72 Wednesday, October 26, 2005 7:36 PM

Using the Application Programs
73
• Alarm vibrator: if checked, the device will vibrate when the
task alarm goes off.
Calculator
You can turn your device into a handy calculator with the
Calculator application program.
Note: This calculator has limited accuracy and is
designed for simple calculations.
To perform calculations, tap the numeric and operative
buttons on the Calculator screen, and then tap the button
to display calculation result.
Yo u ca n t ap Calculator and then select Copy or Paste to copy a
value from or paste it to other application programs.
There are several additional buttons on the Calculator screen:
9235874_3129_zh_tw_FCC.book Page 73 Wednesday, October 26, 2005 7:36 PM
Using the Application Programs
74
Voice
You can use the Voice application program to record voice notes
and save them as sound clips. You can also send them via MMS
and email, or use them as ring tones.
Creating a New Voice Note
1. In the Voice screen, tap Vo i ce and then select New Voice
note, or tap the New button.
2. Tap the button to start recording.
3. To adjust microphone volume, drag the microphone slider
to the left or right.
4. To stop recording, tap the button. The recording will be
saved automatically with recording date and time. You can
also tap the button to play the voice note.
Tip! It is recommended that you keep the distance
between the sound source and the microphone of the
device within about 10 ~ 15 cm in order to obtain better
recording quality.
Playing Voice Notes
1. In the Voice screen, tap the or button to select a
voice note.
2. Tap the button to start playing the selected voice note.
3. To adjust playback volume, drag the volume slider
to the left or right.
4. To pause playing the voice note, tap the button. To
resume normal playback, tap the button again.
Button Description
• Tap this button for the first time to get a value
from the calculator memory.
• Tap it for a second time to clear the calculator
memory.
• Tap this button to save an entered value to calcu-
lator memory.
• When there is already a value on the screen, tap
this button to add it to the value in the memory.
Tap this button to deduct the entered value from
that in the calculator memory.
Tap this button to delete the last digit you entered.
Tap this button to reset the value on the screen to
0.
9235874_3129_zh_tw_FCC.book Page 74 Wednesday, October 26, 2005 7:36 PM
Using the Application Programs
75
Deleting Voice Notes
1. In the Voice screen, tap the or button to select the
voice note to delete.
2. Tap the Delete button.
Sending Voice Notes
1. In the Voice screen, tap the or button to select a
voice note to send.
2. Tap Voice and then select Send as.
3. Select from the following and then tap the Done button:
• Bluetooth: send the voice note to other devices that support
Bluetooth technology. A box will appear showing found
paired devices. Tap to select a device and then tap the Send
button.
• MMS: send the voice note to another mobile phone as an
MMS attachment. The MMS message screen will follow for
you to compose the message.
• Infrared: send the voice note to other devices that support
infrared connection. Align the infrared port of your device
with that of the device and then tap the Send button.
Online Services
Depending on your network service provider, you may be able
to subscribe for certain additional services, such as online
banking services or provision of weather or traffic
information. Usually the setting for accessing these services are
programmed by your network service provider on your SIM
card so your device can identify them.
For more information on how to subscribe to these additional
online services and how to use them, please consult your
network service provider.
GPRS Data Log
You can use the GPRS data log to track the size of data sent and
received via the GPRS data connection.
Viewing GPRS Data Log
1. Tap the GPRS data log application program icon in the
Main screen.
2. Tap to select a GPRS connection in the screen.
9235874_3129_zh_tw_FCC.book Page 75 Wednesday, October 26, 2005 7:36 PM
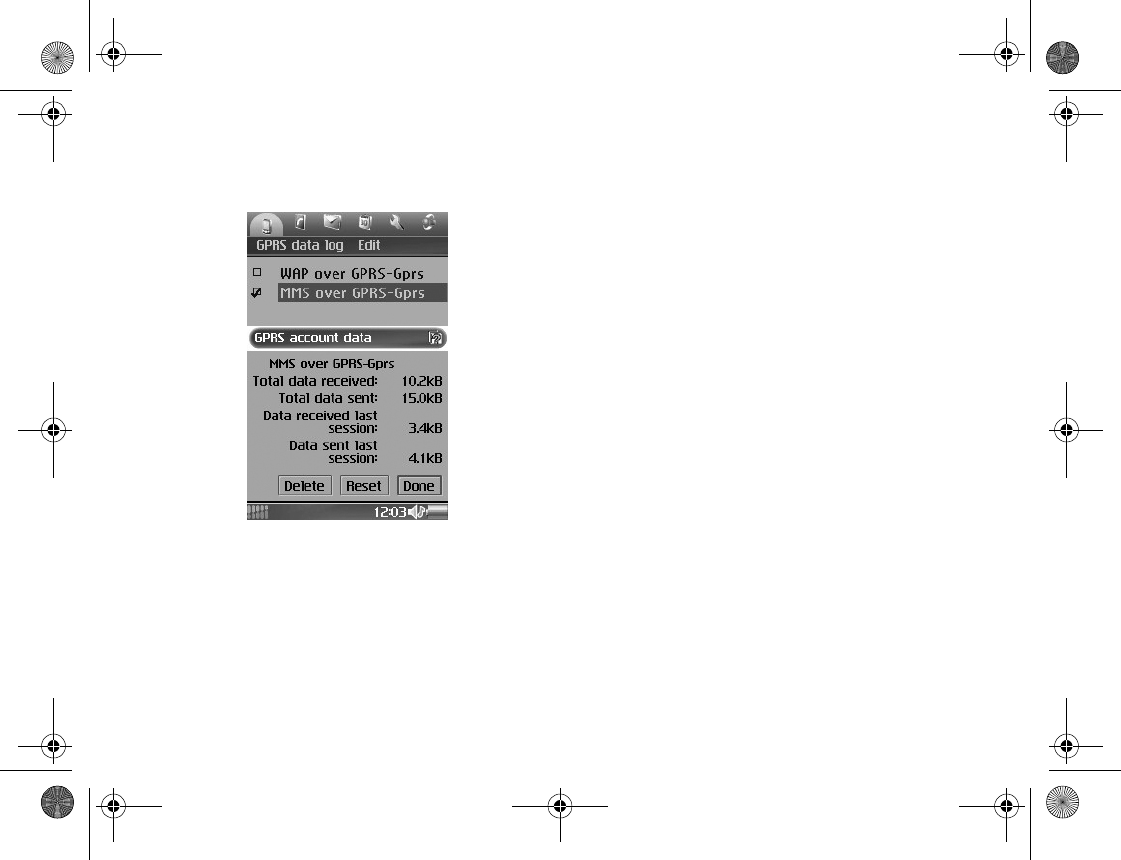
Using the Application Programs
76
3. Related information, including total data sent, total data
received, data received last session and data sent last session,
will appear in a new dialog.
4. Tap Done to close the dialog.
Resetting GPRS Data Count
Ta p Reset in the dialog.
Deleting GPRS Data Log
Ta p Delete in the dialog.
9235874_3129_zh_tw_FCC.book Page 76 Wednesday, October 26, 2005 7:36 PM
Expanding the Capabilities of Your Device
77
6. Expanding the Capabilities of Your Device
Installing Application Programs
The Symbian operating system adopted by your device is an
open system in the industry, and you can install various
application programs designed for it. These programs can be
obtained from the Internet, from email attachments, on CDs,
memory cards or from other devices.
The installation files of the application programs are available
in the following formats:
• SIS (Symbian Standard Installation)
• JAR (Java Archive)
Important: Application programs not officially
approved and tested by may result in malfunction or loss
of data, and should not be held responsible for these dam-
ages.
Important: Only install and use applications and
other software from sources that offer adequate security
and protection against harmful software.
Installing Application Programs from the
Internet
Usually when you download an application program from the
Internet, installation will start automatically after the file is
completed saved to your device. Follow the instructions of the
installer to complete the installation process.
Installing Application Programs from
Installation Files
Follow the steps below to install application programs from
the installation files on CDs, memory cards, emails or received
from other devices.
1. Locate the installation file and save it to the device or the
memory card.
2. In the Main screen, tap Manager and select Install.
3. The available programs for installation will appear in the
box. Tap to select the program you want to install and then
tap Install.
Uninstalling Application Programs
To uninstall application programs from your device:
1. In the Main screen, tap Manager and select Uninstall.
2. Installed programs on your device will appear. Tap to select
the program you want to uninstall and then tap Uninstall.
Note: If another software package depends on the
software package that you removed, the other software
9235874_3129_zh_tw_FCC.book Page 77 Wednesday, October 26, 2005 7:36 PM