Microsoft RM-179 WCDMA/GSM Cellular Phone with BT/WLAN User Manual P2954 en

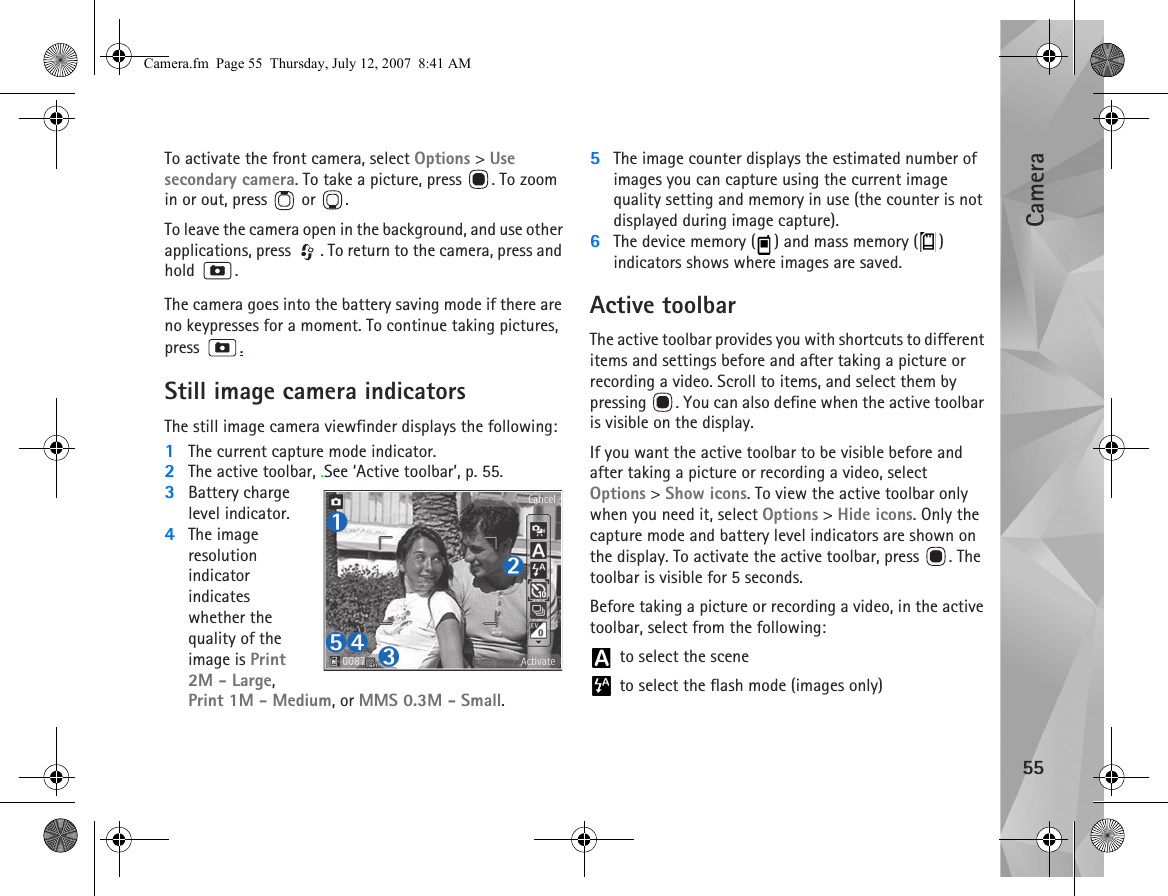
Microsoft Mobile Oy WCDMA/GSM Cellular Phone with BT/WLAN P2954 en

Users Manual Part 1

Nokia N81 User GuideEN 9204561ISSUE 1 ENP2954_en.book  Page 1  Tuesday, July 3, 2007  1:44 PM
DECLARATION OF CONFORMITYHereby, NOKIA CORPORATION declares that this RM-179 product is in compliance with the essential requirements and other relevant provisions of Directive 1999/5/EC. A copy of the Declaration of Conformity can be found at http://www.nokia.com/phones/declaration_of_conformity/.© 2007 Nokia. All rights reserved.Nokia, Nokia Connecting People, N-Gage, Nseries, N81, Navi, and Visual Radio are trademarks or registered trademarks of Nokia Corporation. Nokia tune is a sound mark of Nokia Corporation. Other product and company names mentioned herein may be trademarks or tradenames of their respective owners.Reproduction, transfer, distribution, or storage of part or all of the contents in this document in any form without the prior written permission of Nokia is prohibited.This product includes software licensed from Symbian Software Ltd (c) 1998-2007. Symbian and Symbian OS are trademarks of Symbian Ltd.Java™ and all Java-based marks are trademarks or registered trademarks of Sun Microsystems, Inc.US Patent No 5818437 and other pending patents. T9 text input software Copyright (C) 1997-2007. Tegic Communications, Inc. All rights reserved.Portions of the Maps software are copyright © 2007 The FreeType Project. All rights reserved.This product is licensed under the MPEG-4 Visual Patent Portfolio License (i) for personal and noncommercial use in connection with information which has been encoded in compliance with the MPEG-4 Visual Standard by a consumer engaged in a personal and noncommercial activity and (ii) for use in connection with MPEG-4 video provided by a licensed video provider. No license is granted or shall be implied for any other use. Additional information, including that related to promotional, internal, and commercial uses, may be obtained from MPEG LA, LLC. See <http://www.mpegla.com>.Nokia operates a policy of ongoing development. Nokia reserves the right to make changes and improvements to any of the products described in this document without prior notice.TO THE MAXIMUM EXTENT PERMITTED BY APPLICABLE LAW, UNDER NO CIRCUMSTANCES SHALL NOKIA OR ANY OF ITS LICENSORS BE RESPONSIBLE FOR ANY LOSS OF DATA OR INCOME OR ANY SPECIAL, INCIDENTAL, CONSEQUENTIAL OR INDIRECT DAMAGES HOWSOEVER CAUSED.THE CONTENTS OF THIS DOCUMENT ARE PROVIDED “AS IS”. EXCEPT AS REQUIRED BY APPLICABLE LAW, NO WARRANTIES OF ANY KIND, EITHER EXPRESS OR IMPLIED, INCLUDING, BUT NOT LIMITED TO, THE IMPLIED WARRANTIES OF MERCHANTABILITY AND FITNESS FOR A PARTICULAR PURPOSE, ARE MADE IN RELATION TO THE ACCURACY, RELIABILITY OR CONTENTS OF THIS DOCUMENT. NOKIA RESERVES THE RIGHT TO REVISE THIS DOCUMENT OR WITHDRAW IT AT ANY TIME WITHOUT PRIOR NOTICE.The availability of particular products and applications and services for these products may vary by region. Please check with your Nokia dealer for details, and availability of language options.Export controlsThis device may contain commodities, technology or software subject to export laws and regulations from the US and other countries. Diversion contrary to law is prohibited.FCC/INDUSTRY CANADA NOTICEYour device may cause TV or radio interference (for example, when using a telephone in close proximity to receiving equipment). The FCC or Industry Canada can require you to stop using your telephone if such interference cannot be eliminated. If you require assistance, contact your local service facility. This device complies with part 15 of the FCC rules. Operation is subject to the following two conditions: (1) This device may not cause harmful interference, and (2) this device must accept any interference received, including interference that may cause undesired operation. Any changes or modifications not expressly approved by Nokia could void the user's authority to operate this equipment.The third-party applications provided with your device may have been created and may be owned by persons or entities not affiliated with or related to Nokia. Nokia does not own the copyrights or intellectual property rights to the third-party applications. As such, Nokia does not take any responsibility for end-user support, functionality of the applications, or the information in the applications or these materials. Nokia does not provide any warranty for the third-party applications.BY USING THE APPLICATIONS YOU ACKNOWLEDGE THAT THE APPLICATIONS ARE PROVIDED AS IS WITHOUT WARRANTY OF ANY KIND, EXPRESS OR IMPLIED, TO THE P2954_en.book  Page 2  Tuesday, July 3, 2007  1:44 PM
3MAXIMUM EXTENT PERMITTED BY APPLICABLE LAW. YOU FURTHER ACKNOWLEDGE THAT NEITHER NOKIA NOR ITS AFFILIATES MAKE ANY REPRESENTATIONS OR WARRANTIES, EXPRESS OR IMPLIED, INCLUDING BUT NOT LIMITED TO WARRANTIES OF TITLE, MERCHANTABILITY OR FITNESS FOR A PARTICULAR PURPOSE, OR THAT THE APPLICATIONS WILL NOT INFRINGE ANY THIRD-PARTY PATENTS, COPYRIGHTS, TRADEMARKS, OR OTHER RIGHTS. Issue 1 EN, 9204561P2954_en.book  Page 3  Tuesday, July 3, 2007  1:44 PM
Hello4HelloModel number: Nokia N81-1. Hereinafter referred to as Nokia N81.The Nokia N81 8GB device is entertainment on the go! Enjoy high-quality music and gaming wrapped in a sleek and stylish package, complete with a brilliant 2.4-inch display, dedicated media and game keys, outstanding audio quality, and 8 GB of memory.With your Nokia N81 8GB you can enjoy your favorite music on the go. The Nokia Music Store* offers you over one million songs to browse and purchase—over the air using your N81 8GB and at home with your compatible PC. If you are tired of struggling with wires, connect to compatible stereo headphones with Bluetooth connectivity.Experience high quality mobile gaming with dedicated game keys and enjoy stellar graphics that give you a new way to have fun.The multimedia menu offers you direct access to your content, and the new Navi™ wheel helps to explore your songs, videos, and pictures quickly and easily. Experience intelligent key illumination, which keeps keys hidden until you need them.Let the fun begin!*To check the Nokia Music Store availability in your country, visit music.nokia.com.P2954_en.book  Page 4  Tuesday, July 3, 2007  1:44 PM
ContentsHello............................................................4For your safety...........................................8Support .................................................... 11Extended user guide ...........................................................11Help ........................................................................................11Get started.............................................................................11Additional applications......................................................11Nokia support and contact information .......................11Your Nokia N81...................................... 12Welcome ................................................................................12Settings ..................................................................................12Transfer content from another device...........................12Essential indicators.............................................................14Navi™ scroll key....................................................................15Multimedia menu................................................................15Power saver LED...................................................................16Volume and loudspeaker control ....................................16Headset...................................................................................16Prolong battery life.............................................................17Maps ......................................................................................17Download! ............................................................................17Software updates................................................................18Music ........................................................19Music player ........................................................................19Nokia Music Store  .............................................................23Radio ......................................................................................24Nokia Podcasting  ...............................................................26Games .......................................................30Contacts (phonebook) ............................31Save and edit names and numbers................................31Copy contacts.......................................................................32Add ringing tones for contacts .......................................33Create contact groups .......................................................33Messaging ...............................................34Write text..............................................................................35Write and send messages .................................................35Inbox—receive messages ..................................................36Mailbox .................................................................................37Listen to messages..............................................................39View messages on a SIM card.........................................39P2954_en.book  Page 5  Tuesday, July 3, 2007  1:44 PM
Messaging settings.............................................................40Gallery .....................................................45View and browse files........................................................ 45Print Basket ..........................................................................46Albums ................................................................................... 47Back up files......................................................................... 47Edit images ........................................................................... 47Edit video clips..................................................................... 48Slide show............................................................................. 50Presentations........................................................................ 50Image print ........................................................................... 51Print online ........................................................................... 51Share online.......................................................................... 52Home network with Gallery............................................. 52Camera......................................................54Take pictures ........................................................................ 54Take pictures in a sequence............................................. 59You in the picture—self-timer......................................... 59Tips on taking good photographs................................... 60Record videos....................................................................... 61Web ..........................................................64Browse the web................................................................... 64Connection security ...........................................................67Bookmarks view...................................................................67End connection.................................................................... 68Settings.................................................................................. 68Tools..........................................................70File manager ........................................................................ 70Mass memory tool ............................................................. 70Voice commands ................................................................ 71Connections..............................................72Wireless LAN ........................................................................72Bluetooth connectivity ..................................................... 74Connection manager .........................................................77USB ........................................................................................ 78PC connections .................................................................... 78Device manager ..................................................................79Home network  .................................................................... 80Wireless Keyboard  .............................................................82Synchronization ................................................................. 83Applications .............................................84Clock ......................................................................................84Calculator ............................................................................. 85Notes ..................................................................................... 85Application manager ......................................................... 85Calendar ............................................................................... 87P2954_en.book  Page 6  Tuesday, July 3, 2007  1:44 PM
Recorder ................................................................................88RealPlayer .............................................................................89Adobe Flash Player .............................................................90IM—instant messaging.......................................................90Nokia Lifeblog  .....................................................................93Digital rights management  .............................................96Adobe Reader  ......................................................................97Converter ..............................................................................98Personalize your device .......................... 99Profiles—set tones ..............................................................993-D tones ........................................................................... 100Change the look of your device  .................................. 101Active standby................................................................... 102Make calls ............................................. 103Voice calls........................................................................... 103Video calls........................................................................... 108Video sharing..................................................................... 110Answer or decline a call ................................................. 112Log ....................................................................................... 113Settings ................................................ 115General ............................................................................... 115Phone .................................................................................. 121Connection .........................................................................124Applications .......................................................................128Troubleshooting: Q&A.......................... 129Battery information ............................. 132Charging and discharging...............................................132Nokia battery authentication guidelines....................132Care and maintenance ......................... 134Additional safety information............. 135Index ...................................................... 140P2954_en.book  Page 7  Tuesday, July 3, 2007  1:44 PM
8For your safetyRead these simple guidelines. Not following them may be dangerous or illegal. Read the complete user guide for further information.SWITCH ON SAFELY Do not switch the device on when wireless phone use is prohibited or when it may cause interference or danger.ROAD SAFETY COMES FIRST Obey all local laws. Always keep your hands free to operate the vehicle while driving. Your first consideration while driving should be road safety.INTERFERENCE All wireless devices may be susceptible to interference, which could affect performance.SWITCH OFF IN HOSPITALS Follow any restrictions. Switch the device off near medical equipment.SWITCH OFF IN AIRCRAFT Follow any restrictions. Wireless devices can cause interference in aircraft.SWITCH OFF WHEN REFUELING Do not use the device at a refueling point. Do not use near fuel or chemicals.SWITCH OFF NEAR BLASTING Follow any restrictions. Do not use the device where blasting is in progress.USE SENSIBLY Use only in the positions as explained in the product documentation. Do not touch the antenna areas unnecessarily.QUALIFIED SERVICE Only qualified personnel may install or repair this product.ENHANCEMENTS AND BATTERIES Use only approved enhancements and batteries. Do not connect incompatible products.WATER-RESISTANCE Your device is not water-resistant. Keep it dry.BACK-UP COPIES Remember to make back-up copies or keep a written record of all important information stored in your device.P2954_en.book  Page 8  Tuesday, July 3, 2007  1:44 PM
9CONNECTING TO OTHER DEVICES When connecting to any other device, read its user guide for detailed safety instructions. Do not connect incompatible products.EMERGENCY CALLS Ensure the phone function of the device is switched on and in service. Press the end key as many times as needed to clear the display and return to the standby mode. Enter the emergency number, then press the call key. Give your location. Do not end the call until given permission to do so.About your deviceThe wireless device described in this guide is approved for use on the (E)GSM 850, 900, 1800, and 1900 and UMTS 2100 networks. Contact your service provider for more information about networks.The 2100 MHz UMTS is not used in North America and has been turned off in your device. To activate the 2100 MHz UMTS frequency for use outside North America, select Menu > Tools > Settings > Phone > Network > Network Mode > Dual Mode.When using the features in this device, obey all laws and respect local customs, privacy and legitimate rights of others, including copyrights. Not all networks support all features offered in this device. For instance, Video Calls, Video Sharing, Push-to-Talk, and Instant Messaging are not compatible with the networks in the United States of America.Copyright protections may prevent some images, music (including ringing tones), and other content from being copied, modified, transferred, or forwarded. Your device supports internet connections and other methods of connectivity. Like computers, your device may be exposed to viruses, malicious messages and applications, and other harmful content. Exercise caution and open messages, accept connectivity requests, download content, and accept installations only from trustworthy sources. To increase the security of your device, consider installing, using, and regularly updating antivirus software, firewall, and other related software on your device and any connected computer. Warning: To use any features in this device, other than the alarm clock, the device must be switched on. Do not switch the device on when wireless device use may cause interference or danger.The office applications support common features of Microsoft Word, PowerPoint, and Excel (Microsoft Office 97, 2000, and XP). Not all file formats can be viewed or modified.During extended operation, such a high-speed data connection, the device may feel warm. In most cases, this condition is normal. If you suspect the device is not working properly, take it to the nearest authorized service facility.short-safety.fm  Page 9  Thursday, July 12, 2007  8:17 AM
10Your device may have preinstalled bookmarks and links for third-party internet sites. You may also access other third-party sites through your device. Third-party sites are not affiliated with Nokia, and Nokia does not endorse or assume liability for them. If you choose to access such sites, you should take precautions for security or content.The images in this guide may differ from your device display.Network servicesTo use the phone you must have service from a network service provider. Many of the features require special network features. These features are not available on all networks; other networks may require that you make specific arrangements with your service provider before you can use the network services. Your service provider can give you instructions and explain what charges will apply. Some networks may have limitations that affect how you can use network services. For instance, some networks may not support all language-dependent characters and services.Your service provider may have requested that certain features be disabled or not activated in your device. If so, these features will not appear on your device menu. Your device may also have a special configuration such as changes in menu names, menu order, and icons. Contact your service provider for more information. This device supports WAP 2.0 protocols (HTTP and SSL) that run on TCP/IP protocols. Some features of this device, such as MMS, browsing, and e-mail require network support for these technologies.Enhancements, batteries, and chargersAlways switch the device off and disconnect the charger before removing the battery.Check the model number of any charger before use with this device. This device is intended for use when supplied with power from an AC-3, AC-4, or AC-5 charger and from an AC-1, ACP-8, ACP-9, ACP-12, or LCH-12 charger when used with the CA-44 charger adapter.The battery intended for use with this device is BP-6MT. Warning: Use only batteries, chargers, and enhancements approved by Nokia for use with this particular model. The use of any other types may invalidate any approval or warranty, and may be dangerous.For availability of approved enhancements, please check with your dealer. When you disconnect the power cord of any enhancement, grasp and pull the plug, not the cord.P2954_en.book  Page 10  Tuesday, July 3, 2007  1:44 PM
Support11SupportExtended user guideAn extended version of this user guide is available at www.nseries.com/support or your local Nokia website.Help When an application is open, select Options > Help to access help for the current view.When you are reading the instructions, to switch between help and the application that is open in the background, press and hold  .To open help from the main menu, select Tools >Utilities > Help. Select the desired application to view its help topics.Get startedSee the get started guide for keys and parts information, instructions for setting up the device and for other essential information.Additional applicationsThere are various applications provided by Nokia and different third-party software developers that help you do more with your Nokia N81. These applications are explained in the guides that are available on the Nokia N81 product support pages on www.nseries.com/support or your local Nokia website.Nokia support and contact informationCheck www.nseries.com/support or your local Nokia website for the latest guides, additional information, downloads, and services related to your Nokia product.If you need to contact customer service, check the list of local Nokia contact centers at www.nokia.com/customerservice. For maintenance services, check your nearest Nokia service center at www.nokia.com/repair.Nokia Customer Care Center, USA4630 Woodland Corporate Blvd., Suite 160Tampa, Florida 336141-888-NOKIA-2U (888-665-4228)Fax: 1-813-249-9619For TTY/TDD users only:1-800-24NOKIA (1-800-246-6542)In Canada, call 1-888-22NOKIA (888-226-6542)Support.fm  Page 11  Thursday, July 12, 2007  9:31 AM
Your Nokia N8112Your Nokia N81WelcomeWhen you switch on your device for the first time, Welcome is displayed. Select from the following:Settings wizard—to configure various settings, such as e-mailPhone switch—to transfer content, such as contacts and calendar entries, from a compatible Nokia device. See ‘Transfer content from another device’, p. 12.Demo—to view a demonstration about your deviceTo access Welcome later, press  , and select Tools > Utilities > Welcome. You can also access the individual applications from their menu locations.SettingsYour device normally has MMS, GPRS, streaming, and mobile internet settings automatically configured in the device, based upon your network service provider information. You may have settings from your service providers already installed in your device, or you may receive or request the settings from the network service providers as a special message.To change the general settings in your device, such as language, standby mode, and display settings, see ‘Phone’, p. 121.Transfer content from another deviceWith the Switch application, you can transfer content, such as contacts and calendar entries, between two compatible Nokia devices using Bluetooth connectivity.When using the application for the first time, you can transfer content from a compatible Nokia device to your Nokia N81.The type of content that can be transferred depends on the model of the device from which you want to transfer content. Your device notifies you if the other device is not compatible.To retrieve data from your other device for the first time, on your Nokia N81, select Phone switch in the Welcome application, or press  , and select Tools > Utilities > Switch. Follow the instructions on the display.P2954_en.book  Page 12  Tuesday, July 3, 2007  1:44 PM
Your Nokia N8113After the first transfer, you can synchronize ( ), retrieve ( ), or send ( ) data between compatible devices. Later, you can use a shortcut from a previous transfer to repeat the transfer with the same settings. See the extended user guide and in-device help for further instructions.The Switch application can be used without the SIM card, too. If the other device cannot be powered on without a SIM card, you can insert your SIM card in it. When the Nokia N81 is switched on without a SIM card, the offline profile is automatically activated.Transfer content1To retrieve data from your other device for the first time, on your Nokia N81, select Phone switch in the Welcome application, or press  , and select Tools > Utilities > Switch.2To have the Nokia N81 search for devices with Bluetooth connectivity, select Continue. If you have not already defined a name for your Nokia N81, you are prompted for one. Accept the default name, or define a name of your own.3For some device models, the Switch application is sent to the other device as a message. To install Switch on the other device, open the message, and follow the instructions on the display.4Select the device from which you want to transfer content from the list. You are asked to enter a code on your Nokia N81. Enter a code of your choosing (1-16 digits), and select OK. Enter the same code on the other device, and select OK. The devices are now paired. See ‘Pair devices’, p. 76.5Select the content you want to transfer.Once the transfer has started, you can cancel it and continue later.Synchronize, retrieve, or send contentAfter the first transfer, you may select from the following to start a new transfer, depending on the model of the other device:  to synchronize content between your Nokia N81 and the other device, if the other device supports synchronization. The synchronization is two-way. If an item is deleted in one device, it is deleted in both. You cannot restore deleted items with synchronization. to retrieve data from the other device to your Nokia N81. With retrieval, data is transferred from the other device to your Nokia N81. You may be asked to keep or delete the original data in the other device, depending on the device model. to send data from your Nokia N81 to your other deviceIf Phone switch cannot transfer an item, depending on the type of the other device, you can add the item to the Nokia folder to C:\Data\Nokia or E:\Data\Nokia and transfer it P2954_en.book  Page 13  Tuesday, July 3, 2007  1:44 PM
Your Nokia N8114from there. When you select the folder to transfer, the items are synchronized in the corresponding folder in the other device, and vice versa.Use shortcuts to repeat a transferAfter a data transfer, you can save a shortcut with the transfer settings to the main view to repeat the same transfer later.To edit the shortcut, scroll to it, and select Options > Shortcut settings. You can, for example, create or change the name of the shortcut.A transfer log is shown after every transfer. To view the log of a previous transfer, scroll to a shortcut in the main view, and select Options > View log.Handle transfer conflictsIf an item to be transferred has been edited in both devices, the device attempts to merge the changes automatically. If this is not possible, there is a transfer conflict. Select Check one by one, Priority to this phone, or Priority to other phone to solve the conflict. For further instructions, select Options > Help.Essential indicators The device is being used in a GSM network. The device is being used in a UMTS network (network service). You have one or more unread messages in the Inbox folder in Messaging. You have received new e-mail in the remote mailbox. There are messages waiting to be sent in the Outbox folder. You have missed calls. Shown if Ringing type is set to Silent, and Message alert tone and E-mail alert tone are set to Off. The device keypad is locked. A clock alarm is active. The second phone line is being used (network service). All calls to the device are diverted to another number. If you have two phone lines (network service), a number indicates the active line. A compatible headset is connected to the device.   indicates the connection has been lost. A compatible loopset is connected to the device. A compatible Text phone is connected to the device. A data call is active. P2954_en.book  Page 14  Tuesday, July 3, 2007  1:44 PM
Your Nokia N8115 A GPRS packet data connection is active.   indicates the connection is on hold and   that a connection is available. A packet data connection is active in a part of the network that supports EDGE.   indicates the connection is on hold and   that a connection is available. The icons indicate that EDGE is available in the network, but your device is not necessarily using EDGE in the data transfer. A UMTS packet data connection is active.   indicates the connection is on hold and   that a connection is available. You have set the device to scan for wireless LANs, and a wireless LAN is available. See ‘Wireless LAN’, p. 72. A wireless LAN connection is active in a network that has encryption. A wireless LAN connection is active in a network that does not have encryption. Bluetooth connectivity is on. Data is being transmitted using Bluetooth connectivity. When the indicator is blinking, your device is trying to connect with another device. A USB connection is active.Navi™ scroll keyHereinafter referred to as the scroll key.Use the scroll key to move around the menus ( ,  , ,  ), and to select items ( To activate the additional Navi™ wheel functionality, press  , and select Tools > Settings > General  >Sensor settings > Navi wheel > On). Use Navi wheel to quickly browse through lists in the gallery and music player, and to navigate in the multimedia menu. Just slide your finger around the rim of the scroll key clockwise or counterclockwise. Tip! When in the menus, instead of using the scroll key, you can use the number keys,  , and   to quickly access the applications. For example, in the main menu, press   to open Messaging.Multimedia menuWith the multimedia menu, you have quick and easy access to multimedia content, games, your most important contacts, and most recent internet bookmarks and landmarks. Try it, for example, for images and music.Your_phone.fm  Page 15  Friday, July 13, 2007  11:32 AM
Your Nokia N8116To open or close the multimedia menu, press  . To browse the tiles, slide your finger around the rim of the scroll key. To scroll up or down in a tile, press   or  . To select items, press  . To return to the multimedia menu from an open application, press  .To change the order of the tiles, select Options > Arrange tiles.Power saver LEDThe display is switched off to save battery power after the screen saver is activated. A LED blinks to indicate that the device is powered on, but in the sleep mode. To switch off the LED, see ‘Sleep mode’, p. 117.Volume and loudspeaker controlTo increase or decrease the volume level when you have an active call or are listening to a sound, press the volume key.The built-in loudspeaker allows you to speak and listen from a short distance without having to hold the device to your ear. Warning: Do not hold the device near your ear when the loudspeaker is in use, because the volume may be extremely loud. To use the loudspeaker during a call, select Options > Activate loudspeaker. To turn off the loudspeaker, select Options > Activate handset.HeadsetYou can connect a compatible headset or compatible headphones to the Nokia AV Connector (3.5 mm) of your device. You may need to select the cable mode.Do not connect products that create an output signal as this may cause damage to the device. Do not connect any voltage source to the Nokia AV Connector.When connecting any external device or any headset, other than those approved by Nokia for use with this device, to the Nokia AV Connector, pay special attention to volume levels. Warning: When you use the headset, your ability to hear outside sounds may be affected. Do not use the headset where it can endanger your safety.Your_phone.fm  Page 16  Friday, July 13, 2007  11:32 AM
Your Nokia N8117To optimize audio performance, attach the supplied earpads to the headset.To use a headset or headphones with a compatible remote control unit, for example, the Nokia Audio Adapter AD-54, connect the unit to the connector in the device, then connect the headset or headphones to the unit.Some headsets do not include a microphone. For phone calls, use such a headset with a remote control unit or the microphone of the device.The Nokia Audio Adapter AD-54 has multimedia volume controls that are used to adjust the volume only for music or video playback.When using certain headset enhancements, for example, the Nokia Audio Adapter AD-54, to adjust the volume during a call, use the volume key in the device.Prolong battery lifeFeatures using Bluetooth connectivity, wireless LAN, and packet data connections, or allowing such features to run in the background while using other features, increase the demand on battery power and reduce the battery life.To prolong the operating time of your device, switch Bluetooth connectivity off when you do not need it. Also set Packet data connection to When needed for the device to use a packet data connection only if you start an application or action that needs it. See ‘Packet data’, p. 127.To close the applications running in the background that you do not use, press and hold  , select the applications from the list, and press  .Maps Press , and select Maps. With an external Bluetooth GPS receiver and Maps, you can see your current location on the map, browse maps for different cities and countries, search for addresses and different points of interest, and plan routes from one location to another.You can also purchase extra services, such as city guides and a navigation service with voice guidance. For more information on the application, see www.nseries.com/support or your local Nokia website.Download! Download! (network service) is a mobile content shop available on your device. You can browse, download, and install items, such as applications and media files, to your device from the internet. Press , and select Download!. Your_phone.fm  Page 17  Friday, July 13, 2007  11:32 AM
Your Nokia N8118The items are categorized under catalogs and folders provided by different service providers. Some items may be chargeable, but you can usually preview them free of charge.Software updatesNokia may produce software updates that may offer new features, enhanced functions, or improved performance. You may be able to request these updates through the Nokia Software Updater PC application. To update the device software, you need the Nokia Software Updater application and a compatible PC with Microsoft Windows 2000 or XP operating system, broadband internet access, and a compatible data cable to connect your device to the PC.To get more information and to download the Nokia Software Updater application, visit www.nokia.com/softwareupdate or your local Nokia website.If software updates over the air are supported by your network, you may also be able to request updates through the device. See ‘Device manager’ and ‘Software updates’, p. 79. Tip! To check the software version in your device, enter *#0000# in the standby mode.Your_phone.fm  Page 18  Friday, July 13, 2007  11:32 AM
Music19MusicMusic player Music player supports files formats such as .aac, .aac+, .eaac+, .mp3, .wav, and .wma. Music player does not necessarily support all features of a file format or all the variations of file formats. You can also use Music player to listen to podcast episodes. Podcasting is the method for delivering audio or video content over the internet using either RSS or ATOM technologies for playback on mobile devices and PCs. Warning: Listen to music at a moderate level. Continuous exposure to high volume may damage your hearing. Do not hold the device near your ear when the loudspeaker is in use, because the volume may be extremely loud.To add songs to your device, see ‘Transfer music’, p. 21.For more information about copyright protection, see ‘Digital rights management’, p. 96.Play a song or a podcast episode Tip! To open the music player tile of the multimedia menu, press  . See ‘Multimedia menu’, p. 15.1Press , and select Music > Music player.2Select Music or Podcasts.3Select categories to navigate to the song or podcast episode you want to hear. Slide your finger around the rim of the scroll key to browse the lists.4To play the selected file or list of files, press  .To pause playback, press  , and to resume, press   again. To stop playback, press  .To fast forward or rewind, press and hold  or .To go to the next item, press  . To return to the beginning of the item, press  . To skip to the previous item, press   again within 2 seconds after a song or podcast has started.To switch random play ( ) on or off, select Options > Shuffle. To repeat the current item ( ), all items ( ), or to switch repeat off, select Options > Repeat.P2954_en.book  Page 19  Tuesday, July 3, 2007  1:44 PM
Music20If you play podcasts, shuffle and repeat are automatically switched off.To adjust the volume, use the volume key.To modify the tone of the music playback, select Options > Equaliser.To modify the balance and stereo image or to enhance bass, select Options > Audio settings.To view a visualization during playback, select Options > Start visualisation.To return to the standby mode and leave the player playing in the background, press the end key, or to switch to another open application, press and hold  .Music menuTo select more music to play in the Now playing view, select Music.The music menu shows the music available in the device. All songs lists all music. To view sorted songs, select Albums, Artists, Genres, or Composers. To view playlists, select Playlists.To refresh the library after you have updated your device outside Music player, select Options > Refresh.PlaylistsTo view and manage playlists, in the music menu, select Playlists. The following playlists appear automatically: Most played tracks, Recently played songs, and Recent additions.To view details of the playlist, select Options > Playlist details.Create a playlist1Select Options > Create playlist.2Enter a name for the playlist, and select OK.3Select Yes to add songs now or No to add the songs later.4If you selected Yes, select artists to find the songs you want to include in the playlist. Press   to add items. To show the song list under an artist title, press  . To hide the song list, press  .5When you have made your selections, select Done. To add more songs later, when viewing the playlist, select Options > Add songs.To add songs, albums, artists, genres, and composers to a playlist from the different views of the music menu, select an item and Options > Add to a playlist > Saved playlist or New playlist.To remove a song from a playlist, select Options > Remove from playlist. This does not delete the song from the device; it only removes it from the playlist.Music.fm  Page 20  Tuesday, July 3, 2007  1:48 PM
Music21To reorder songs in a playlist, scroll to the song you want to move, and select Options > Reorder list. To grab songs and drop them to a new position, use the scroll key.PodcastsThe Podcast menu shows the podcasts available in the device.To refresh the collection after you have updated your device outside Music player, select Options > Refresh Music library.Podcast episodes have three states: Never played, Partially played, and Completely played.If an episode is partially played, it plays from the last playback position the next time it is played.If an episode is never played or completely played, it plays from the beginning.Home network with music playerWith UPnP architecture and a wireless local area network (WLAN), you can create a home network of compatible devices. Home network enables you to play content stored in your Nokia N81 remotely on a compatible device. You can also copy files from your Nokia N81 to a compatible UPnP enabled device. For more information, see ‘Home network’, p. 80 and ‘Home network with Gallery’, p. 52.Play a song or a podcast remotely1Press , and select Music > Music player.2Select music or podcasts.3Select categories in the following menus to navigate to the song or podcast episode you want to hear. Slide your finger around the rim of the scroll key to browse the lists.4Select the song or podcast you want to hear, and select Options > Play > Play via home network.5Select the device in which the file is played.Copy songs or podcasts wirelesslyTo copy or transfer media files from your device to another compatible device, such as a UPnP compatible PC, select a file and Options > Move and copy > Copy to home network or Move to home net.. Content sharing does not have to be switched on.Transfer musicYou can transfer music from a compatible PC or other compatible devices using a compatible USB cable or Bluetooth connectivity. For details, see ‘Bluetooth connectivity’, p. 74.PC requirements for music transfer:•Microsoft Windows XP operating system (or later)P2954_en.book  Page 21  Tuesday, July 3, 2007  1:44 PM
Music22•A compatible version of the Windows Media Player application. You can get more detailed information about Windows Media Player compatibility from the Nokia N81 section of the Nokia website.•Nokia Nseries PC Suite 1.6 or laterTransfer music from PCYou can use three different methods to transfer music:•To view your device on a PC as an external mass memory where you can transfer any data files, make the connection with a compatible USB cable or Bluetooth connectivity. If you are using the USB cable, select Data transfer as the connection mode.•To synchronize music with Windows Media Player, connect the compatible USB cable and select Media player as the connection mode.•To use Nokia Music Manager in Nokia Nseries PC Suite, connect the compatible USB cable and select PC Suite as the connection mode.Mass storage and media player modes can only be used with files placed in the mass memory of your device.To change the default USB connection mode, press  , and select Tools > Connectivity > USB > USB mode.If you transfer music using Data transfer or PC Suite transfer mode, you must refresh the library in your device after you have updated the song selection in your device. To refresh the library, in the Music menu, select Options > Refresh Music library.Both Windows Media Player and Nokia Music Manager in Nokia Nseries PC Suite have been optimized for transferring music files. For information about transferring music with Nokia Music Manager, see the Nokia Nseries PC Suite user guide.Music transfer with Windows Media PlayerMusic synchronization functions may vary between different versions of the Windows Media Player application. For more information, see the corresponding Windows Media Player guides and help.Manual synchronizationAfter connecting your device with a compatible PC, Windows Media Player selects manual synchronization if there is not enough free memory in your device. With manual synchronization, you can select the songs and playlists that you want to move, copy, or remove.The first time you connect your device you must enter a name that is used as the name of your device in Windows Media Player.To transfer manual selections:1After your device is connected with Windows Media Player, select your device in the navigation pane, if more than one device is connected.P2954_en.book  Page 22  Tuesday, July 3, 2007  1:44 PM
Music232Drag the songs or albums to the list pane for synchronization. To remove songs or albums, select an item in the list, and click Remove from list.3Check that the list pane contains the files you want to synchronize and that there is enough free memory on the device. Click Start Sync. to start the synchronization.Automatic synchronizationTo change the default file transfer option in Windows Media Player, click the arrow under Sync, select your device, and click Set up Sync. Clear or select the Sync this device automatically check box.If the Sync this device automatically check box is selected and you connect your device, the music library in your device is automatically updated based on playlists you have selected in Windows Media Player.If no playlists have been selected, the whole PC music library is selected for synchronization. Note that your PC library may contain more files that can fit to the device. See the Windows Media Player help for more information.The playlists on your device are not synchronized with the Windows Media Player playlists.Nokia Music Store In the Nokia Music Store (network service) you can search, browse, and purchase music to download to your device. To purchase music, you first need to register for the service.To check the Nokia Music Store availability in your country, visit music.nokia.com.To access the Nokia Music Store, you must have a valid internet access point in the device. For more details, see ‘Access points’, p. 124.To open the Nokia Music Store, press  , and select Music > Music store. In the main page, select Help for further instructions. Tip! To find more music in different categories of the music menu, select Options > Go to Music store in the music player.Music store settingsYou may be asked to enter the following settings:Default acc. pt.—Select the access point to use when connecting to the music store.In the music store, you may be able to edit the settings by selecting Options > Settings.P2954_en.book  Page 23  Tuesday, July 3, 2007  1:44 PM
Music24You can also access the Nokia Music Store from your compatible PC at music.nokia.com. In the main page, select Help for further instructions.Radio Press  , and select Music > Radio. When you open Visual Radio for the first time, a wizard helps you to save local stations.You can use the application as a traditional FM radio with automatic tuning and saved stations, or with parallel visual information related to the radio program on the display, if you tune to stations that offer Visual Radio service. The Visual Radio service uses packet data (network service). You can listen to the FM radio while using other applications.You can see the latest list of all the stations that offer Visual Radio service at http://www.visualradio.com. If you do not have access to the Visual Radio service, the operators and radio stations in your area may not support Visual Radio.To check availability and costs, and to subscribe to the service, contact your service provider. You can normally make a call or answer an incoming call while listening to the radio. The radio is muted when there is an active call.Listen to the radioNote that the quality of the radio broadcast depends on the coverage of the radio station in that particular area.The FM radio depends on an antenna other than the wireless device antenna. A compatible headset or enhancement needs to be attached to the device for the FM radio to function properly.Press  , and select Music > Radio. To start a station search, select   or  , or press and hold the media keys   or  . To change the frequency manually, select Options > Manual tuning.If you have previously saved radio stations, to go to the next or previous saved station, select   or  , or press the media keys   or  .To adjust the volume, press the volume keys. Select Options to use the loudspeaker, view and listen to available stations, edit station details, start visual service, save the current station, or leave the radio playing in the background.To listen to the radio using the loudspeaker, select Options > Activate loudspeaker. P2954_en.book  Page 24  Tuesday, July 3, 2007  1:44 PM
Music25 Warning: Listen to music at a moderate level. Continuous exposure to high volume may damage your hearing. Do not hold the device near your ear when the loudspeaker is in use, because the volume may be extremely loud.To view available stations based on location, select Options > Station directory (network service).To save the current tuned station to your station list, select Options > Save station. To open the list of your saved stations, select Options > Stations.To return to the standby mode and leave the FM radio playing in the background, select Options > Play in background.View visual contentTo view available visual content for a tuned station, select  or Options > Start visual service. If the visual service ID has not been saved for the station, enter it, or select Retrieve to search for it in the station directory (network service).When the connection to the visual service is established, the display shows the current visual content.Saved stationsTo open the list of your saved stations, select Options > Stations.To listen to a saved station, select Options > Station > Listen. To view available visual content for a station with Visual Radio service, select Options > Station > Start visual service. To change station details, select Options > Station > Edit.SettingsSelect Options > Settings and from the following:Start-up tone—Select whether a tone is played when the application is started.Auto-start service—Select Yes to have the Visual Radio service start automatically when you select a saved station that offers Visual Radio service.Access point—Select the access point used for the Visual Radio data connection. You do not need an access point to use the application as an ordinary FM radio.Current region—Select the region you are currently located in. This setting is displayed only if there was no network coverage when the application was started.P2954_en.book  Page 25  Tuesday, July 3, 2007  1:44 PM
Music26Nokia Podcasting With the Nokia Podcasting application, you can search, discover, subscribe to, and download podcasts over the air, and play, manage, and share audio and video podcasts with your device.To open Nokia Podcasting, press  , and select Music > Podcasting.For more information, see the extended user guide at www.nseries.com/support or your local Nokia website.SettingsBefore using Nokia Podcasting, set your connection and download settings.The recommended connection method is wireless LAN (WLAN). Check with your service provider for terms and data service fees before using other connections. For example, a flat rate data plan can allow large data transfers for one monthly fee.To search for wireless LANs available within range, press  and select Tools > Connectivity > Conn. mgr. > Available WLAN networks. To create an internet access point in a network, select Options > Define access point.Select Music > Podcasting > Options > Settings. Under Connection and Download you can select the access point to the internet, define the podcast search service, define the location where to save your podcasts and how often they are updated and set limits for the podcast downloads.Connection settingsTo edit the connection settings, press   and select Music > Podcasting > Options > Settings > Connection. Define the following:Default access point—Select the access point to define your connection to the internet.Search service URL—Define the podcast search service to be used in Search.Download settingsTo edit the download settings, press  , and select Music > Podcasting > Options > Settings > Download. Define the following:Save to—Define the location where you want to save your podcasts. For optimal use of storage space, mass memory is recommended.Update interval—Define how often podcasts are updated.Next update date—Define the date of the next automatic update.P2954_en.book  Page 26  Tuesday, July 3, 2007  1:44 PM
Music27Next update time—Define the time of next automatic update.Automatic updates only occur if a specific default access point is selected and Nokia Podcasting is running. If Nokia Podcasting is not running, the automatic updates are not activated.Download limit (%)—Define the size of the memory that is used for podcast downloads.If limit exceeds—Define what to do if the downloads exceed the download limit.Setting the application to retrieve podcasts automatically may involve the transmission of large amounts of data through your service provider’s network. Contact your service provider for information about data transmission charges.To restore the default settings, select Options > Restore default in the Settings view.SearchSearch helps you to find podcasts by keyword or title.The search engine uses the podcast search service you set up in Podcasting > Options > Settings > Connection > Search service URL.To search for podcasts, press  ,select Music > Podcasting > Search, and enter the desired keywords. Tip! Search looks for podcast titles and keywords in descriptions, not specific episodes. General topics, such as football or hip-hop, usually give better results than a specific team or artist.To subscribe to a marked channel or channels and add it to your Podcasts, select Subscribe. You can also add a podcast to your Podcasts by selecting one.To start a new search, select Options > New search. To go the website of the podcast select Options > Open web page (network service).To see the details of a podcast, select Options > Description. To send a selected podcast or podcasts to another compatible device, select Options > Send.The available options may vary.DirectoriesDirectories help you to find new podcast episodes to which to subscribe.To open Directories, press  , and select Music > Podcasting > Directories.P2954_en.book  Page 27  Tuesday, July 3, 2007  1:44 PM
Music28Contents of the Directories change. Select the desired directory folder to update it (network service). When the color of the folder changes, press the scroll key again to open it.Directories can include top podcasts listed by popularity or themed folders. To open the desired folder topic, press the scroll key. A list of podcasts is displayed.To subscribe to a podcast, select the title, and press the scroll key. After you have subscribed to episodes of a podcast, you can download, manage, and play them in Podcasts.To add a new directory or folder, select Options > New > Web directory or Folder. Enter a title, URL of the .opml (Outline Processor Markup Language), and select Done.To edit the selected folder, web link, or web directory, select Options > Edit.To import an .opml file stored on your device, select Options > Import OPML file. Select the location of the file, and import it.To send a directory folder as a multimedia message or by Bluetooth connectivity, select the folder and Options > Send.When you receive a message with an .opml file sent by Bluetooth connectivity, open the file to save the file into Received in Directories. Open Received to subscribe to any of the links to add to your Podcasts.DownloadAfter you have subscribed to a podcast, from Directories, Search, or by entering a URL, you can manage, download, and play episodes in Podcasts.To see the podcasts you have subscribed to, select Podcasting > Podcasts. To see individual episode titles (an episode is a particular media file of a podcast), select the podcast title. To start a download, select the episode title. To download, or continue downloading selected or marked episodes, select Options > Download or Continue download. You can download multiple episodes at the same time.To play a portion of a podcast during download or after partial downloading, select Podcasts > Options > Play preview.Fully downloaded podcasts can be found in Podcasts folder, but will not be shown until the music library is refreshed.The available options may vary.P2954_en.book  Page 28  Tuesday, July 3, 2007  1:44 PM
Music29Play and manage podcastsTo display the available episodes from the selected podcast, select Options > Open. Under each episode, you will see the file format, the size of the file, and time of the upload.When the podcast is fully downloaded, to play the full episode, select Podcasts > Options > Play, or press   and select Music > Music player > Podcasts.To update the selected podcast, or marked podcasts, for a new episode, select Options > Update.To stop the updating of the selected podcast or marked podcasts, select Options > Stop update. To add a new podcast by entering the URL of the podcast, select Options > New podcast.If you do not have an access point defined or if during packet data connection you are asked to enter a user name and password, contact your service provider.To edit the URL of the selected podcast, select Options > Edit.To delete a downloaded podcast or marked podcasts from your device, select Options > Delete.To send the selected podcast or marked podcasts to another compatible device as .opml files as a multimedia message or by Bluetooth connectivity, select Options > Send.To update, delete, and send a group of selected podcasts at once, select Options > Mark/Unmark mark the desired podcasts, and select Options to choose the desired action.To open the website of the podcast (network service), select Options > Open web page.Some podcasts provide the opportunity to interact with the creators by commenting and voting. To connect to the internet to do this, select Options > View comments.P2954_en.book  Page 29  Tuesday, July 3, 2007  1:44 PM
Games30GamesYour Nokia N81 is compatible with the N-Gage™ gaming experience. With N-Gage, you can download and play high-quality multiplayer games.Your device includes either one of the following applications:•Discover N-Gage application—With this preview application you can get information about the upcoming N-Gage gameplay experience, try out game demos, and download and install the full N-Gage application when it becomes available•N-Gage application-The full featured application gives you access to the complete N-Gage experience replacing the Discover N-Gage application in the menu. You can find new games, try and buy games, find other players, and access scores, events, chat, and more. Some features may not be available at the time of software installation on your device, check www.n-gage.com for software updates.Press  , and select Games to get started.For the full N-Gage experience, you need internet access on your device, either through the cellular network or wireless LAN. Contact your service provider for more information on data services. For more information, visit www.n-gage.com.P2954_en.book  Page 30  Tuesday, July 3, 2007  1:44 PM
Contacts (phonebook)31Contacts (phonebook) Press , and select Contacts. In Contacts you can save and update contact information. You can add a personal ringing tone or a thumbnail image to a contact card. You can also create contact groups, which allow you to send text messages or e-mail to many recipients at the same time. You can add received contact information (business cards) to contacts. Contact information can only be sent to or received from compatible devices.To view the amount of contacts, groups, and the available memory in Contacts, select Options > Contacts info.Save and edit names and numbers1Select Options > New contact.2Fill in the fields that you want, and select Done.To edit contact cards in Contacts, scroll to the contact card you want to edit, and select Options > Edit. You can also search for the desired contact by entering the first letters of the name to the search field. A list of the contacts starting with the letters appear on the display. Tip! To add and edit contact cards, you can also use Nokia Contacts Editor available in Nokia Nseries PC Suite. To attach a small thumbnail image to a contact card, open the contact card, and select Options > Edit > Options > Add thumbnail. The thumbnail image is shown when the contact calls.To listen to the voice tag assigned to the contact, select a contact card and Options > Play voice tag. See ‘Voice dialing’, p. 108.To send contact information, select the card you want to send and Options > Send business card > Via text message, Via multimedia, or Via Bluetooth. See ‘Messaging’, p. 34 and ‘Send data using Bluetooth connectivity’, p. 75. Tip! To print contact cards on a compatible Basic Print Profile (BPP) equipped printer with Bluetooth connectivity (such as HP Deskjet 450 Mobile Printer or HP Photosmart 8150), select Options > Print.To add a contact to a group, select Options > Add to group (shown only if you have created a group). See ‘Create contact groups’, p. 33.To check to which groups a contact belongs, select the contact and Options > Belongs to groups.To delete a contact card in Contacts, select a card, and press . P2954_en.book  Page 31  Tuesday, July 3, 2007  1:44 PM
Contacts (phonebook)32Default numbers and addressesYou can assign default numbers or addresses to a contact card. In this way if a contact has several numbers or addresses, you can easily call or send a message to the contact to a certain number or address. The default number is also used in voice dialing.1In Contacts, select a contact.2Select Options > Defaults.3Select a default to which you want to add a number or an address, and select Assign.4Select a number or an address you want to set as a default.The default number or address is underlined in the contact card.Copy contactsTo copy names and numbers from a SIM card to your device, press  , and select Contacts > Options > SIM contacts > SIM directory, the names you want to copy and Options > Copy to Contacts.To copy contacts to your SIM card, in Contacts, select the names you want to copy and Options > Copy to SIM directory, or Options > Copy > To SIM directory. Only the contact card fields supported by your SIM card are copied. Tip! You can synchronize your contacts to a compatible PC with Nokia Nseries PC Suite. SIM directory and other SIM servicesFor availability and information on using SIM card services, contact your SIM card vendor. This may be the service provider or other vendor.Press  , and select Contacts > Options > SIM contacts > SIM directory to see the names and numbers stored on the SIM card. In the SIM directory you can add, edit, or copy numbers to contacts, and you can make calls.To view the list of fixed dialing numbers, select Options > SIM contacts > Fixed dial contacts. This setting is only shown if supported by your SIM card.To restrict calls from your device to selected phone numbers, select Options > Activate fixed dialling. You need your PIN2 code to activate and deactivate fixed dialing or edit your fixed dialing contacts. Contact your service provider if you do not have the code. To add new numbers to the fixed dialing list, select Options > New SIM contact. You need the PIN2 code for these functions.When you use Fixed dialling, packet data connections are not possible, except when sending text messages over a packet data connection. In this case, the message center number and the recipient’s phone number must be included on the fixed dialing list.P2954_en.book  Page 32  Tuesday, July 3, 2007  1:44 PM
Contacts (phonebook)33When fixed dialing is activated, calls may be possible to the official emergency number programmed into your device.For more information, see the extended user guide at www.nseries.com/support or your local Nokia website.Add ringing tones for contactsTo add a ringing tone, press   to open a contact card or go to the groups list, and select a contact group. Select Options > Ringing tone and the tone you want to use.To define a ringing tone for a contact or a contact group, do the following:1Press   to open a contact card or go to the groups list, and select a contact group.2Select Options > Ringing tone. A list of ringing tones opens.3Select the ringing tone you want to use for the individual contact or the members of selected group. You can also use a video clip as a ringing tone.When a contact or group member calls you, the device plays the chosen ringing tone (if the caller’s telephone number is sent with the call and your device recognizes it).To remove the ringing tone, select Default tone from the list of ringing tones.Create contact groups1In Contacts, press   to open the groups list.2Select Options > New group. 3Write a name for the group or use the default name and select OK. 4Select the group and Options > Add members.5Scroll to a contact, and press   to mark it. To add multiple members at a time, repeat this action on all the contacts you want to add.6Select OK to add the contacts to the group.To rename a group, select Options > Rename, enter the new name, and select OK.Remove members from a group1In the groups list, select the group you want to modify.2Scroll to the contact, and select Options > Remove from group.3Select Yes to remove the contact from the group.P2954_en.book  Page 33  Tuesday, July 3, 2007  1:44 PM
Messaging34Messaging Press  , and select Messaging (network service).  Important: Exercise caution when opening messages. E-mail messages may contain malicious software or otherwise be harmful to your device or PC. Only devices that have compatible features can receive and display multimedia messages. The appearance of a message may vary depending on the receiving device.To create a new message, select New message.Messaging contains the following folders: Inbox—Received messages, except e-mail and cell broadcast messages, are stored here. E-mail messages are stored in the Mailbox. My folders—Organize your messages into folders. Tip! To avoid rewriting messages that you send often, use texts in the templates folder. You can also create and save your own templates. Mailbox—Connect to your remote mailbox to retrieve your new e-mail messages or view your previously retrieved e-mail messages offline. See ‘E-mail’, p. 41. Drafts—Draft messages that have not been sent are stored here. Sent—The last messages that have been sent, excluding messages sent using Bluetooth connectivity are stored here. To change the number of messages to be saved, see ‘Other settings’, p. 44. Outbox—Messages waiting to be sent are temporarily stored in the outbox, for example, when your device is outside network coverage.For more information, see the extended user guide at www.nseries.com/support or your local Nokia website. Reports—You can request the network to send you a delivery report of the text messages and multimedia messages you have sent (network service).To enter and send service requests (also known as USSD commands), such as activation commands for network services, to your service provider, select Options > Service command in the main view of Messaging.Cell broadcast (network service) allows you to receive messages on various topics, such as weather or traffic conditions, from your service provider. For available topics and relevant topic numbers, contact your service provider. In the main view of Messaging, select Options > Cell broadcast.P2954_en.book  Page 34  Tuesday, July 3, 2007  1:44 PM
Messaging35Cell broadcast messages cannot be received in UMTS networks. A packet data connection may prevent cell broadcast reception.Write textABC, abc, and Abc indicate the selected character mode. 123 indicates the number mode.To switch between the letter and number mode, press and hold  . To switch between the different character modes, press  .To insert a number in the letter mode, press and hold the desired number key. is displayed when you write text using traditional text input and    when using predictive text input.With predictive text, you can enter any letter with a single keypress. Predictive text input is based on a built-in dictionary to which you can add new words.To activate predictive text input, press  , and select Activate predictive text. Tip! To turn predictive text input on or off, quickly press  twice.Write and send messagesBefore you can create a multimedia message or write an e-mail, you must have the correct connection settings in place. See ‘E-mail settings’, p. 37 and ‘E-mail’, p. 41.The wireless network may limit the size of MMS messages. If the inserted picture exceeds this limit, the device may make it smaller so that it can be sent by MMS.Select New message, and fill in the fields. To change the visible fields or insert media objects or other items, select Options. To send the message, press the call key.1Select New message and from the following:Text message—to send a text messageMultimedia message—to send a multimedia message (MMS)Audio message—to send an audio message (a multimedia message that includes one sound clip)E-mail—to send an e-mail2In the To field, press   to select recipients or groups from contacts, or enter the recipient’s phone number or e-mail address. To add a semicolon (;) that separates the recipients, press  . You can also copy and paste the number or address from the clipboard.3In the Subject field, enter the subject of the multimedia message or e-mail. To change the fields that are visible, select Options > Address fields.P2954_en.book  Page 35  Tuesday, July 3, 2007  1:44 PM
Messaging364In the message field, write the message. To insert a template, select Options > Insert or Insert object > Template.5To add a media object to a multimedia message, select Options > Insert object > Image, Sound clip, or Video clip.6To take a new picture or record sound or video for a multimedia message, select Insert new > Image, Sound clip, or Video clip. To insert a new slide to the message, select Slide.To see what the multimedia message looks like, select Options > Preview.7To add an attachment to an e-mail, select Options > Insert > Image, Sound clip, Video clip, Note, or Other for other file types. E-mail attachments are indicated by .8To send the message, select Options > Send, or press the call key. Note: Your device may indicate that your message was sent to the message center number programmed into your device. Your device may not indicate whether the message is received at the intended destination. For more details about messaging services, contact your service provider.Your device supports the sending of text messages beyond the character limit for a single message. Longer messages are sent as a series of two or more messages. Your service provider may charge accordingly. Characters that use accents or other marks, and characters from some language options, take up more space, limiting the number of characters that can be sent in a single message. You may not be able to send video clips that are saved in the .mp4 format or that exceed the size limit of the wireless network in a multimedia message. Tip! You can combine images, video, sound, and text to a presentation and send it in a multimedia message. Start to create a multimedia message, and select Options > Create presentation. The option is shown only if MMS creation mode is set to Guided or Free. See ‘Multimedia messages’, p. 41.Inbox—receive messages In the Inbox folder,   indicates an unread text message,  an unread multimedia message,   an unread audio message, and   data received through Bluetooth connectivity.P2954_en.book  Page 36  Tuesday, July 3, 2007  1:44 PM
Messaging37When you receive a message,   and 1 new message are shown in the standby mode. To open the message, select Show. To open a message in Inbox, scroll to it, and press  .To reply to a received message, select Options > Reply.Multimedia messages Important: Exercise caution when opening messages. Multimedia message objects may contain malicious software or otherwise be harmful to your device or PC. You may receive a notification that a multimedia message is waiting in the multimedia message center. To start a packet data connection to retrieve the message to your device, select Options > Retrieve.When you open a multimedia message ( ), you may see an image and a message.   is shown if sound is included, or   if video is included. To play the sound or the video, select the indicator.To see the media objects that have been included in the multimedia message, select Options > Objects.If the message includes a multimedia presentation,   is displayed. To play the presentation, select the indicator.Data and settingsYour device can receive many kinds of messages that contain data, such as business cards, ringing tones, operator logos, calendar entries, and e-mail notifications. You may also receive settings from your service provider or company information management department in a configuration message.To save the data from the message, select Options and the corresponding option.Web service messagesWeb service messages are notifications (for example, news headlines) and may contain a text message or a link. For availability and subscription, contact your service provider.Mailbox E-mail settings Tip! Use Settings wizard to define your mailbox settings. Press  , and select Tools > Utilities > Sett. wizard.P2954_en.book  Page 37  Tuesday, July 3, 2007  1:44 PM
Messaging38To use e-mail, you must have a valid internet access point (IAP) in the device and define your e-mail settings correctly. See ‘Access points’, p. 124.If you select Mailbox in the Messaging main view and have not set up your e-mail account, you are prompted to do so. To start creating the e-mail settings with the mailbox guide, select Start. See also ‘E-mail’, p. 41.You must have a separate e-mail account. Follow the instructions given by your remote mailbox and internet service provider (ISP).When you create a new mailbox, the name you give to the mailbox replaces Mailbox in the Messaging main view. You can have up to six mailboxes.Open the mailboxWhen you open the mailbox, the device asks if you want to connect to the mailbox (Connect to mailbox?).To connect to your mailbox and retrieve new e-mail headings or messages, select Yes. When you view messages online, you are continuously connected to a remote mailbox using a data connection.To view previously retrieved e-mail messages offline, select No.To create a new e-mail message, select New message > E-mail in the messaging main view or Options > Create message > E-mail in your mailbox. See ‘Write and send messages’, p. 35.Retrieve e-mail messagesIf you are offline, select Options > Connect to start a connection to the remote mailbox.Select Options > Retrieve e-mail and one of the options. To close the connection, select Options > Disconnect. To open an e-mail message, press the scroll key . 1When you have an open connection to a remote mailbox, select Options > Retrieve e-mail and one of the following:New—to retrieve all new messagesSelected—to retrieve only the messages that have been markedAll—to retrieve all messages from the mailboxTo stop retrieving messages, select Cancel.2If you want to close the connection and view the e-mail messages offline, select Options > Disconnect.3To open an e-mail message, press . If the e-mail message has not been retrieved and you are offline, you are asked if you want to retrieve this message from the mailbox.To view e-mail attachments, open the message, and select the attachment field indicated by   . If the attachment P2954_en.book  Page 38  Tuesday, July 3, 2007  1:44 PM
Messaging39has a dimmed indicator, it has not been retrieved to the device; select Options > Retrieve.Retrieve e-mail messages automaticallyTo retrieve messages automatically, select Options > E-mail settings > Automatic retrieval. For more information, see ‘Automatic retrieval’, p. 43.Setting the device to retrieve e-mail automatically may involve the transmission of large amounts of data through your service provider's network. Contact your service provider for information about data transmission charges.Delete e-mail messagesTo delete the contents of an e-mail message from the device while still retaining it in the remote mailbox, select Options > Delete. In Delete message from:, select Phone only.The device mirrors the e-mail headings in the remote mailbox. Although you delete the message content, the e-mail heading stays in your device. If you want to remove the heading as well, you must first delete the e-mail message from your remote mailbox, and then make a connection from your device to the remote mailbox again to update the status.To delete an e-mail from the device and the remote mailbox, select Options > Delete. In Delete message from:, select Phone and server.To cancel deleting an e-mail from the device and server, scroll to an e-mail that has been marked to be deleted during the next connection ( ), and select Options > Restore.Disconnect from the mailboxWhen you are online, to end the data connection to the remote mailbox, select Options > Disconnect.Listen to messagesYou can listen to audio, mail, multimedia, and text messages in the Inbox.To listen to a message, select it and select Options > Listen. View messages on a SIM cardBefore you can view SIM messages, you must copy them to a folder in your device.1In the Messaging main view, select Options > SIM messages.P2954_en.book  Page 39  Tuesday, July 3, 2007  1:44 PM
Messaging402Select Options > Mark/Unmark > Mark or Mark all to mark messages.3Select Options > Copy. A list of folders opens.4To start copying, select a folder and OK. To view the messages, open the folder.Messaging settingsFill in all fields marked with Must be defined or with a red asterisk. Follow the instructions given by your service provider. You may also obtain settings from your service provider in a configuration message.Some or all message centers or access points may be preset for your device by your service provider, and you may not be able to change, create, edit, or remove them.Press  , and select Messaging > Options > Settings > Text message to view defined message centres, use character conversion, select message center for text messages, get delivery reports, define resend for failed attempts, convert text message to other formats if allowed by you service provider, select the connection, and select the same message centre for replies.Text messagesPress  , and select Messaging > Options > Settings > Text message and from the following:Message centres—View a list of all text message centers that have been defined.Character encoding— To use character conversion to another encoding system when available, select Reduced support.Message centre in use—Select which message center is used to deliver text messages.Receive report—Select whether the network sends delivery reports on your messages (network service).Message validity—Select how long the message center resends your message if the first attempt fails (network service). If the message cannot be sent within the validity period, the message is deleted from the message center.Message sent as—Contact your service provider to learn if your message center is able to convert text messages into these other formats.Preferred connection—Select the connection to be used.Reply via same centre—Select whether you want the reply message to be sent using the same text message center number (network service).Press  , and select Messaging > Options > Settings > Multimedia message to define the image size of the messages, choose a creation mode that guides or restricts sending unsupported messages, select the access point, and select where you want to retrieve the multimedia P2954_en.book  Page 40  Tuesday, July 3, 2007  1:44 PM
Messaging41messages. You can also reject advertisements and messages from anonymous senders, get log reports of the sent messages, deny sending of delivery reports and define resend for failed sending attempts.Multimedia messagesPress , and select Messaging > Options > Settings > Multimedia message and from the following:Image size—Define the size of the image in a multimedia message.MMS creation mode—If you select Guided, the device informs you if you try to send a message that may not be supported by the recipient. If you select Restricted, the device prevents you from sending messages that may not be supported. To include content in your messages without notifications, select Free.Access point in use—Select which access point is used as the preferred connection.Multimedia retrieval—Select how you want to receive messages. To receive messages automatically in your home cellular network, select Auto in home netw.. Outside your home cellular network, you receive a notification that there is a message to retrieve in the multimedia message center.Outside your home cellular network, sending and receiving multimedia messages may cost you more.If you select Multimedia retrieval > Always automatic, your device automatically makes an active packet data connection to retrieve the message both in and outside your home cellular network.Allow anon. msgs.—Select whether you want to reject messages from an anonymous sender.Receive adverts—Define whether you want to receive multimedia message advertisements.Receive report—Select whether you want the status of the sent message to be shown in the log (network service).Deny report sending—Select whether you want to deny your device sending delivery reports of received messages.Message validity—Select how long the message center resends your message if the first attempt fails (network service). If the message cannot be sent within the validity period, the message is deleted from the message center.E-mailPress , and select Messaging > Options > Settings > E-mail.To select which mailbox you want to use for sending e-mail, select Mailbox in use and a mailbox.P2954_en.book  Page 41  Tuesday, July 3, 2007  1:44 PM
Messaging42To remove a mailbox and its messages from your device, scroll to it, and press  .To create a new mailbox, select Options > New mailbox.Select Mailboxes and a mailbox to change the following settings: Connection settings, User settings, Retrieval settings, and Automatic retrieval.Connection settingsTo edit the settings for the e-mail you receive, select Incoming e-mail to enter your user name and password, enter the name of the incoming mail server, select the access point, enter a name for the mailbox, select the mailbox type, select the security options and password encryption for POP3 accounts.To edit the settings for the e-mail you receive, select Incoming e-mail and from the following:User name—Enter your user name, given to you by your service provider.Password—Enter your password. If you leave this field blank, you are prompted for the password when you try to connect to your remote mailbox.Incoming mail server—Enter the IP address or host name of the mail server that receives your e-mail.Access point in use—Select an internet access point (IAP). See ‘Access points’, p. 124.Mailbox name—Enter a name for the mailbox.Mailbox type—Defines the e-mail protocol that your remote mailbox service provider recommends. The options are POP3 and IMAP4. This setting cannot be changed.Security (ports)—Select the security option used to secure the connection to the remote mailbox.Port—Define a port for the connection.APOP secure login (for POP3 only)—Use with the POP3 protocol to encrypt the sending of passwords to the remote e-mail server while connecting to the mailbox.To edit the settings for the e-mail you send, select Outgoing e-mail to enter your e-mail address, the name of the outgoing mail server, and settings for User name, Password, Access point in use,  Security (ports), and Port similar to the ones in Incoming e-mail.To edit the settings for the e-mail you send, select Outgoing e-mail and from the following:My e-mail address—Enter the e-mail address given to you by your service provider.Outgoing mail server—Enter the IP address or host name of the mail server that sends your e-mail. You may only be able to use the outgoing server of your service provider. Contact your service provider for more information.P2954_en.book  Page 42  Tuesday, July 3, 2007  1:44 PM
Messaging43The settings for User name, Password, Access point in use,  Security (ports), and Port are similar to the ones in Incoming e-mail.User settingsAdd your own name, define send method, get a copy of sent messages, and define e-mail alerts.My name—Enter your own name. Your name replaces your e-mail address in the recipient’s device when the recipient’s device supports this function.Send message—Define how e-mail is sent from your device. Select Immediately for the device to connect to the mailbox when you select Send message. If you select During next conn., e-mail is sent when the connection to the remote mailbox is available.Send copy to self—Select whether you want to send a copy of the e-mail to your own mailbox.Include signature—Select whether you want to attach a signature to your e-mail messages.New e-mail alerts—Select whether you want to receive the new e-mail indications (a tone, a note, and a mail indicator) when new mail is received.Retrieval settingsDefine which parts of and how many e-mail messages are retrieved and define some options of the subscription folders for IMAP4 E-mail to retrieve—Define which parts of the e-mail are retrieved: Headers only, Size limit (POP3), or Msgs. & attachs. (POP3).Retrieval amount—Define how many new e-mail messages are retrieved to the mailbox.IMAP4 folder path (for IMAP4 only)—Define the folder path for folders to be subscribed.Folder subscriptions (for IMAP4 only)—Subscribe to other folders in the remote mailbox and retrieve content from those folders.Automatic retrievalSelect how and when to retrieve headings.E-mail notifications—To automatically retrieve the headings to your device when you receive new e-mail in your remote mailbox, select Auto-update or Only in home netw..E-mail retrieval—To automatically retrieve the headings of new e-mail messages from your remote mailbox at defined times, select Enabled or Only in home netw.. Define when and how often the messages are retrieved.P2954_en.book  Page 43  Tuesday, July 3, 2007  1:44 PM
Messaging44E-mail notifications and E-mail retrieval cannot be active at the same time.Setting the device to retrieve e-mail automatically may involve the transmission of large amounts of data through your service provider's network. Contact your service provider for information about data transmission charges.For more information, see the extended user guide at www.nseries.com/support or your local Nokia website.Web service messagesPress  , and select Messaging > Options > Settings > Service message. Select whether you want to receive service messages. If you want to set the device to automatically activate the browser and start a network connection to retrieve content when you receive a service message, select Download messages > Automatically.Cell broadcastCheck the available topics and related topic numbers with your service provider. Press  , and select Messaging > Options > Settings > Cell broadcast and from the following:Reception—Select whether you want to receive cell broadcast messages.Language—Select the languages in which you want to receive messages: All, Selected, or Other.Topic detection—Select whether the device automatically searches for new topic numbers, and saves the new numbers without a name to the topic list.Other settingsPress  , and select Messaging > Options > Settings > Other and from the following:Save sent messages—Select whether you want to save a copy of the text messages, multimedia messages, or e-mail that you send to the Sent folder.Number of saved msgs.—Define how many sent messages are saved to the Sent folder at a time. When the limit is reached, the oldest message is deleted.Memory in use—Select the memory where you want to save your messages: Phone memory or Mass memory.P2954_en.book  Page 44  Tuesday, July 3, 2007  1:44 PM
Gallery45Gallery To store and organize your images, video clips, sound clips, playlists, and streaming links, or share your files with other compatible UPnP devices through wireless LAN, press  , and select Gallery. Tip! To open the image tile of the multimedia menu, press  . See ‘Multimedia menu’, p. 15.View and browse filesSelect Images & videos , Tracks, , Lifeblog , Sound clips , Streaming links , Presentations , or All files  , and press   to open it. The content in the Images & videos folder is shown in the landscape mode.You can browse and open folders; and mark, copy, and move items to folders. You can also create albums; and mark, copy, and add items to albums.To open a file, press  . Video clips, .ram files, and streaming links are opened and played in RealPlayer, and music and sound clips in Music player. See ‘RealPlayer’, p. 89, and ‘Music player’, p. 19.To download images or videos, in the Images & videos folder, select the download icon. The browser opens, and you can select a bookmark you want to use to download items.Images and video clipsPictures taken and video clips recorded with the camera are stored in the Images & videos folder in Gallery. Images and video clips can also be sent to you in a multimedia message, as an e-mail attachment,  or through Bluetooth connectivity. To be able to view a received image or video clip in Gallery or in the Real player, you must first save it.Select Gallery > Images & videos. The images and video clip files are in a loop, and ordered by date. The number of files is displayed. To browse the files, slide your finger around the rim of the scroll key.When the image is opened, to zoom in an image, press the game keys next to the display. The zooming ratio is not stored permanently.To rotate the selected image left or right, select Options > Rotate > Left or Right.To edit a video clip or a photo, select Options > Edit. An image editor or a video editor opens. See ‘Edit video clips’, p. 48. See ‘Edit images’, p. 47. P2954_en.book  Page 45  Tuesday, July 3, 2007  1:44 PM
Gallery46To create custom video clips, select a video clip or several clips in the gallery, and select Options > Edit. See ‘Edit video clips’, p. 48.To print your images on a compatible printer, or to store them for printing, select Options > Print. See ‘Image print’, p. 51. You can also tag images for later printing to the Print Basket in Gallery. See ‘Print Basket’, p. 46.To add an image or a video clip to an album in the gallery, select Options > Albums > Add to album..To use the picture as a background image, select the picture and Options >Use image > Set as wallpaper.To delete an image or video clip, from the active toolbar, select Delete. See ‘Active toolbar’, p. 46.To switch from Gallery to the camera, press the capture key.Active toolbarIn the Images & videos folder, you can use the active toolbar as a shortcut to select different tasks. The active toolbar is available only when you have selected an image or a video clip. In the active toolbar, scroll up or down to different items, and select them by pressing the scroll key. The available options vary depending on the view you are in and whether you have selected an image or a video clip. You can also define whether the active toolbar is always visible on the display or activated by a keypress.If you want the active toolbar to be visible on the display, select Options > Show icons.If you want the active toolbar to be visible only when you need it, select Options > Hide icons. To activate the active toolbar, press  .Select from the following: to play the selected video clip to send the selected image or video clip /   to add or remove an image from the Print Basket. See ‘Print Basket’, p. 46.  to view the images in the Print Basket to start a slide show of your images to delete the selected image or video clip to print the viewed imageThe available options may vary depending on the view you are in.Print BasketYou can tag images to the Print Basket, and print them later with a compatible printer or in a compatible printing Gallery.fm  Page 46  Tuesday, July 3, 2007  1:51 PM
Gallery47kiosk, if available. See ‘Image print’, p. 51. The tagged images are indicated with   in the Images & videos folder and albums.To tag an image for later printing, select an image and Add to Print Basket from the active toolbar.To view the images in the Print Basket, select View Print Basket from the active toolbar, or select   from the Images & videos folder (available only when you have added pictures to the Print Basket).To remove an image from the Print Basket, select an image in the Images & videos folder or in an album, and Remove from print from the active toolbar.AlbumsWith albums you can conveniently manage your images and video clips. To view the albums list, select Images & videos > Options > Albums > View albums. To add a picture or a video clip to an album in the gallery, scroll to a picture or video clip, and select Options > Albums > Add to album. A list of albums opens. Select the album to which you want to add the picture or video clip. You can also create a new album.To remove a file from an album, press  . The file is not deleted from the Images & videos folder in Gallery.To create a new album, in the albums list view, select Options > New album.Back up filesTo transfer and back up media files from your device to a compatible PC through the wireless LAN, select Options > Transfer > Start. See ‘Wireless LAN’, p. 72.Your device starts a device search. Select a device, and a folder to which you want to transfer the media files. Select OK.To change the storage device or folder settings, select Options > Transfer > Settings > Storage device or Storage folder.Edit imagesTo edit the pictures after taking them, or the ones already saved in Gallery, select Options > Edit. Select Options > Apply effect to open a grid where you can select different edit options indicated by small icons. You can crop and rotate the image; adjust the brightness, color, contrast, and resolution; and add effects, text, clip art, or a frame to the picture.P2954_en.book  Page 47  Tuesday, July 3, 2007  1:44 PM
Gallery48Crop imageTo crop an image, select Options > Apply effect > Crop. To crop the image size manually, select Manual or a predefined aspect ratio from the list. If you select Manual, a cross is displayed in the upper left corner of the image. Use the scroll key to select the area to crop, and select Set. Another cross is displayed in the lower right corner. Again select the area to be cropped. To adjust the first selected area, select Back. The selected areas form a rectangle that forms the cropped image.If you selected a predefined aspect ratio, select the upper left corner of the area to be cropped. To resize the highlighted area, use the scroll key. To freeze the selected area, press  . To move the area within the picture, use the scroll key. To select the area to be cropped, press  .Reduce rednessTo reduce redness of the eyes in an image, select Options > Apply effect > Red eye reduction. Move the cross onto the eye, and press  . A loop is displayed on the display. To resize the loop to fit the size of the eye, use the scroll key. To reduce the redness, press  .Useful shortcutsShortcuts in the image editor:•To view an image in the full screen, press  . To return to the normal view, press   again.•To rotate an image clockwise or counterclockwise, press  or .•To zoom in or out, press   or  .•To move on a zoomed image, scroll up, down, left, or right.Edit video clipsTo edit video clips in Gallery and create custom video clips, scroll to a video clip, and select Options > Edit > Merge, Change sound, Add text, or Cut. See ‘Gallery’, p. 45.The video editor supports video file formats 3gp and .mp4, and sound file formats .aac, .amr, .mp3 and .wav. It does not necessarily support all features of a file format or all the variations of file formats.The custom video clips are automatically saved in the Images & videos in Gallery. The clips are saved in the mass memory.Add images, video, sound, and textYou can add images, video clips, and text to a video clip selected in Gallery to create custom video clips.P2954_en.book  Page 48  Tuesday, July 3, 2007  1:44 PM
Gallery49To combine an image or a video clip with the selected video clip, in the Images & videos folder, select Options > Edit > Merge > Image or Video clip. Select the desired file.To add a new sound clip and replace the original sound clip in the video clip, select Options > Edit > Change sound and a sound clip. To add text to the beginning or the end of the video clip, select Options > Edit > Add text, enter the text you want to add, and select OK. Then select where you want to add the text: Beginning or End.Cut video clipYou can trim the video clip, and add start and end marks to exclude parts from the video clip. In the Images & videos folder, select Options > Edit > Cut.To play the selected video clip from the start, select Options > Play.To select which parts of the video clip are included in the custom video clip, and define the start and end points for them, scroll to the desired point on the video, and select Options > Start mark or End mark. To edit the start or end point of the selected part, scroll to the desired mark, and press the scroll key. You can then move the selected mark forwards or backwards on the timeline.To remove all the marks, select Options > Remove > All marks.To preview the video clip, select Options > Play marked section. To move on the timeline, scroll left or right.To stop playing the video clip, select Pause. To continue playing the clip, select Options > Play. To return back to the cut video view, select Back.To save the changes, and return to Gallery, select Done.Edit video clips to sendTo send a video clip, select Options > Send > Via multimedia, Via e-mail, Via Bluetooth, or Post to web. Contact your network service provider for details of the maximum multimedia message size that you can send.If you want to send a video clip that is over the maximum multimedia message size allowed by your service provider, you can send the clip using Bluetooth wireless technology. See ‘Send data using Bluetooth connectivity’, p. 75. You can also transfer your videos to a compatible PC using Bluetooth connectivity, or a compatible USB data cable.You can also cut the video clip for sending it in a multimedia message. In the video editor main view, select Options > Movie > Edit for MMS. The duration and size of the video clip is shown on the display. To edit the size P2954_en.book  Page 49  Tuesday, July 3, 2007  1:44 PM
Gallery50of the clip, scroll left or right. When the clip is the proper size to send, select Options > Send via MMS.If your video clip is in .mp4 format, you may not be able to send it in a multimedia message. To change the file format of the clip, scroll to it in Gallery, and select Options > Edit > Options > Settings > Resolution > MMS compatible. Return to the video editor main view, select Options > Movie > Save, and enter a name for the clip. The video clip is saved in .3gpp format and can be sent in a multimedia message. The file format of the original video clip does not change.Slide showIn the active toolbar, select Start slide show ( ) to view a slide show of images in full screen. The slide show starts from the selected file. Select from the following:Pause—to pause the slide showContinue—to resume the slide show, if pausedEnd—to close the slide showTo browse the images, press   (previous) or   (next) (available only when Zoom and pan is off).To adjust the tempo of the slide show, before starting the slide show, select Options > Slide show > Settings > Delay between slides.To make the slide show move smoothly from one slide to another, and let the gallery randomly zoom in and out in the images, select Zoom and pan.To add sound to the slide show, select Options > Slide show > Settings and from the following:Music—Select On or Off.Song—Select a music file from the list.To decrease or increase the volume, use the volume key in your device.PresentationsWith presentations, you can view SVG (scalable vector graphics) files, such as cartoons and maps. SVG images maintain their appearance when printed or viewed with different screen sizes and resolutions. To view scalable vector graphics, select Presentations, scroll to an image, and select Options > Play. To pause playing, select Options > Pause.To zoom in, press  . To zoom out, press  .To rotate the image 90 degrees clockwise or counter-clockwise, press   or  . To rotate the image 45 degrees, press   or  .To switch between full screen and normal screen, press .P2954_en.book  Page 50  Tuesday, July 3, 2007  1:44 PM
Gallery51Image printTo print images with Image print, select the image you want to print, and the print option in the gallery, camera, image editor, or image viewer.Use Image print to print your images using a compatible USB data cable, wireless LAN, or Bluetooth connectivity.You can only print images that are in .jpeg format. The pictures taken with the camera are automatically saved in .jpeg format.To print to a printer compatible with PictBridge, connect the data cable before you select the print option, and check that the data cable mode is set to Image print or Ask on connection. See ‘USB’, p. 78.Printer selectionWhen you use Image print for the first time, a list of available compatible printers is displayed after you select the image. Select a printer. The printer is set as the default printer.If you have connected a printer compatible with PictBridge using a compatible Nokia connectivity cable, the printer is automatically displayed.If the default printer is not available, a list of available printing devices is displayed.To change the default printer, select Options > Settings > Default printer.Print previewAfter you select the printer, the selected images are displayed using predefined layouts. To change the layout, press   or   to browse through the available layouts for the selected printer. If the images do not fit on a single page, press   or   to display the additional pages.Print settingsThe available options vary depending on the capabilities of the printing device you selected.To set a default printer, select Options > Default printer.To select the paper size, select Paper size, the size of paper from the list, and OK. Select Cancel to return to the previous view.Print onlineWith Print online, you can order prints of images online directly to your home, or to a store where you can pick them up. You can also order different products with the selected image, such as mugs or mouse pads. The available products depend on the service provider.P2954_en.book  Page 51  Tuesday, July 3, 2007  1:44 PM
Gallery52To use Print online, you must have at least one printing service configuration file installed. The files can be obtained from printing service providers that support Print online.For more information on the application, see www.nseries.com/support or your local Nokia website.Share onlineWith Online share, you can share images and video clips in compatible online albums, weblogs, or in other compatible online sharing services on the web. You can upload content, save unfinished posts as drafts and continue later, and view the content of the albums. The supported content types may vary depending on the service provider.To use Online share, you must subscribe to the service with an online image sharing service provider, and create a new account. You can usually subscribe to the service on the web page of the service provider. Contact your service provider for details on subscribing to the service. For more information on compatible service providers, see the product support pages at www.nseries.com/support or your local Nokia website.For more information on the application, see www.nseries.com/support or your local Nokia website.Home network with GalleryWith UPnP architecture and wireless local area network (WLAN) you can create a home network of compatible devices. Home network enables you to view content stored in your Nokia N81 remotely on a compatible device. You can also copy files between your Nokia N81 and a compatible UPnP enabled device. For more information, see ‘Home network’, p.80 and ‘Home network with music player’, p. 21.Show media files stored in your deviceTo select images, videos, and sound clips stored in your device, and show them in another home network device, such as a compatible TV, do the following:1In Gallery, select an image, a video clip, or a sound clip.2Select Options > Show via home network.3Select a compatible device in which the media file is shown. The images are shown both in the other home network device and your device, and the video clips and sound clips are played only in the other device.To print images saved in Gallery through Home netw. with a UPnP compatible printer, select the print option in Gallery. See ‘Image print’, p. 51. Content sharing does not have to be switched on.P2954_en.book  Page 52  Tuesday, July 3, 2007  1:44 PM
Gallery53To search files with different criteria, select Options > Find. To sort the found files, select Options > Sort by.Copy media filesTo copy or transfer media files from your device to another compatible device, such as a UPnP compatible PC, select a file in Gallery and Options > Move and copy > Copy to home network or Move to home net.. Content sharing does not have to be switched on.To copy or transfer files from the other device to your device, select a file in the other device and Options > Copy to > Phone memory or Mass memory. Content sharing does not have to be switched on.P2954_en.book  Page 53  Tuesday, July 3, 2007  1:44 PM
Camera54CameraYour Nokia N81 has two cameras, a high resolution camera on the back of the device (the main camera in landscape mode) and a lower resolution camera on the front (the secondary camera in portrait mode). You can use both cameras to take still pictures and record videos.Your device supports an image capture resolution of 1600x1200 pixels using the main camera. The image resolution in this guide may appear different.The images and video clips are automatically saved in the Images & vids. folder in Gallery. The cameras produce .jpeg images. Video clips are recorded in the MPEG-4 file format with the .mp4 file extension, or in the 3GPP file format with the .3gp file extension (sharing quality). See ‘Video settings’, p. 62.You can send images and video clips in a multimedia message, as an e-mail attachment, or by using Bluetooth connectivity or wireless LAN connection. You can also upload them to your compatible online album. See ‘Share online’, p. 52.Take picturesWhen taking a picture, note the following:•Use both hands to keep the camera still.•The quality of a digitally zoomed picture is lower than that of a nonzoomed picture.•The camera goes into the battery saving mode if there are no keypresses for a moment. To continue taking pictures, press  .To take a picture, do the following:1To activate the main camera, press and hold . If the camera is in Video mode, select Switch to image mode from the active toolbar.2To take a picture, in the main camera, press  . Do not move the device before the image is saved. To zoom in or out, use the volume key in your device.To make lighting and color adjustments before taking a picture, use the scroll key to scroll through the active toolbar. See ‘Setup settings—color and lighting’, p. 58. Saving the captured image may take longer if you change the zoom, lighting, or color settings.P2954_en.book  Page 54  Tuesday, July 3, 2007  1:44 PM
Camera55To activate the front camera, select Options > Use secondary camera. To take a picture, press  . To zoom in or out, press   or  .To leave the camera open in the background, and use other applications, press  . To return to the camera, press and hold .The camera goes into the battery saving mode if there are no keypresses for a moment. To continue taking pictures, press  .Still image camera indicatorsThe still image camera viewfinder displays the following:1The current capture mode indicator.2The active toolbar, .See ‘Active toolbar’, p. 55.3Battery charge level indicator.4The image resolution indicator indicates whether the quality of the image is Print 2M - Large, Print 1M - Medium, or MMS 0.3M - Small.5The image counter displays the estimated number of images you can capture using the current image quality setting and memory in use (the counter is not displayed during image capture).6The device memory ( ) and mass memory ( ) indicators shows where images are saved.Active toolbarThe active toolbar provides you with shortcuts to different items and settings before and after taking a picture or recording a video. Scroll to items, and select them by pressing  . You can also define when the active toolbar is visible on the display.If you want the active toolbar to be visible before and after taking a picture or recording a video, select Options > Show icons. To view the active toolbar only when you need it, select Options > Hide icons. Only the capture mode and battery level indicators are shown on the display. To activate the active toolbar, press  . The toolbar is visible for 5 seconds.Before taking a picture or recording a video, in the active toolbar, select from the following: to select the scene to select the flash mode (images only)Camera.fm  Page 55  Thursday, July 12, 2007  8:41 AM
Camera56 to activate the self-timer (images only). See ‘You in the picture—self-timer’, p. 59. to activate the sequence mode (images only). See ‘Take pictures in a sequence’, p. 59. to select a color effect to show or hide the viewfinder grid (images only) to adjust white balance to adjust the exposure compensation (images only) to adjust light sensitivity (images only) to switch between the video and image modesThe icons change to reflect the current status of the setting.The available options vary depending on the capture mode and view you are in.See also active toolbar options in ‘After taking a picture’, p. 56 and ‘Active toolbar’, p. 46 in Gallery.See also active toolbar options in ‘After taking a picture’, p. 56, ‘After recording a video’, p. 62, and ‘Active toolbar’, p. 46 in Gallery.After taking a pictureAfter you take the picture, select the following from the active toolbar (available only if Show captured image is set to Yes in still image camera settings):•If you do not want to keep the image, select Delete.•To send the image, press the left selection key, or select Send. For more information, see ‘Messaging’, p. 34, ‘Bluetooth connectivity’, p. 74, and ‘Share online’, p. 52. This option is not available during an active call. You can also send the image to a call recipient during an active call. Select Send to caller (only available during an active call).•To tag images to the Print Basket for later printing, select Add to Print Basket.•To send the picture to a compatible online album, select Post to  (available only if you have set up an account for a compatible online album. See ‘Share online’, p. 52).To use the picture as wallpaper in the active standby, select Options > Set as wallpaper.To set the image as a call image for a contact, select Options > Set as contact call img..P2954_en.book  Page 56  Tuesday, July 3, 2007  1:44 PM
Camera57Still image camera settingsThere are two kinds of settings for the still image camera: Image setup and main settings. To adjust Image setup, see ‘Setup settings—color and lighting’, p. 58. The setup settings return to the default settings after you close the camera, but the main settings remain the same until you change them again.Select Options > Settings to select the right image quality for different purposes, select the album where to save the images, view the captured image after it has been taken, use digital zoom, select the capture tone, select the memory for saving the images or restore the default settings.To change the main settings, select Options > Settings and from the following:Image quality— Print 2M - Large (1600x1200 resolution), Print 1M - Medium (1152x864 resolution) or MMS 0.3M - Small (640x480 resolution). If you want to print the image, select Print 2M - Large or Print 1M - Medium. To send the image through MMS, select MMS 0.3M - Small.These resolutions are only available in the main camera.Add to album—Select whether you want to save the image to a certain album in the gallery. If you select Yes, a list of available albums opens.Show captured image—Select Yes if you want to see the captured image after it is taken, or No if you want to continue taking pictures immediately.Default image name—Define the default name for the captured images.Extended digital zoom (main camera only)—On (continuous) allows the zoom increments to be smooth and continuous between digital and extended digital zoom, On (paused) allows the zoom increments to pause at the digital and extended digital step point, and Off allows a limited amount of zoom while retaining the image resolution.Capture tone—Select the tone you want to hear when you take a picture.Memory in use—Select where to store your images.Restore camera settings—Select Yes to return the default values to the camera settings.FlashThe flash is available only in the main camera.Keep a safe distance when using the flash. Do not use the flash on people or animals at close range. Do not cover the flash while taking a picture.P2954_en.book  Page 57  Tuesday, July 3, 2007  1:44 PM
Camera58The camera has an LED flash for low light conditions. The following flash modes are available for the still image camera: Automatic (), R. eye redu. (), On (), and Off (). To change the flash mode, in the active toolbar, select the desired flash mode.Setup settings—color and lightingTo enable the camera to reproduce colors and lighting more accurately, or to add effects to your pictures or videos, use the scroll key to scroll through the active toolbar, and select from the following options:White balance—Select the current lighting condition from the list. This allows the camera to reproduce colors more accurately.Exposure compensation (images only)—If you are shooting a dark subject against very light background such as snow, adjust the exposure to +1 or even +2 to compensate the background brightness. For light subjects against dark background, use -1 or -2. Flash—Select the desired flash mode. See ‘Flash’, p. 57.Colour tone—Select a color effect from the list.Light sensitivity (images only)—Increase the light sensitivity in low light to decrease the risk of getting unsharp or too dark images. Higher sensitivity may increase the graininess of the images.The screen display changes to match any settings you make, so that you see how the change affects the pictures or videos.The available settings vary depending on the selected camera.The setup settings are camera specific; if you change the settings in the secondary camera, the settings in the main camera do not change. The setup settings do, however, transfer between the image and video modes. The setup settings return to the default settings when you close the camera.If you select a new scene, the color and lighting settings are replaced by the selected scene. See ‘Scenes’, p. 58. You can change the setup settings after selecting a scene if needed.ScenesA scene helps you to find the right color and lighting settings for the current environment. The settings of each scene have been set according to a certain style or environment. Scenes are only available in the main camera.In the active toolbar, select from the following options:P2954_en.book  Page 58  Tuesday, July 3, 2007  1:44 PM
Camera59Video scenesAutomatic ( ) (default) and Night ()Image scenesAuto () (default), User defined (), Portrait (), Landscape (), Sports (), Night (), and Night portrait ().When you take pictures, the default scene is Auto.To make your own scene suitable for a certain environment, scroll to User defined, and select Options > Change. In the user defined scene you can adjust different lighting and color settings. To copy the settings of another scene, select Based on scene mode and the desired scene.Take pictures in a sequenceThe sequence mode is available only in the main camera.To set the camera to take six pictures or more in a sequence (if enough memory is available), in the active toolbar, select Sequence mode > Burst to take six pictures, or the time interval for taking pictures. The number of pictures taken depends on the available memory.To take six pictures, press  . To stop taking pictures, press Cancel. To take more than six pictures, press and hold . To stop taking pictures, release it. The number of pictures taken depends on the available memory.To use a time interval between taking pictures, select Sequence mode and a time interval. To start taking pictures, press  . To stop taking pictures before the time ends, press   again.After you take the pictures, they are shown in a grid on the display. To view a picture, press   to open it. If you used a time period for taking pictures, the last taken picture is shown on the display.You can also use the sequence mode with the self-timer. When using the self-timer, the maximum number of pictures is six pictures.To return to the sequence mode viewfinder, press  .To switch off the sequence mode, in the active toolbar, select Sequence mode > Single shot.You in the picture—self-timerThe self-timer is available only in the main camera.Use the self-timer to delay the capture so that you can include yourself in the picture. To set the self-timer delay, in the active toolbar, select Self timer > 2 seconds, 10 seconds, or 20 seconds. To activate the self-timer, select P2954_en.book  Page 59  Tuesday, July 3, 2007  1:44 PM
Camera60Activate. The device beeps when the timer is running. The camera takes the picture after the selected delay elapses. To switch off Self timer, in the active toolbar, select Self timer > Off. Tip! In the active toolbar, select Self timer > 2 seconds to keep your hand steady when taking a picture.For more information, see the extended user guide at www.nseries.com/support or your local Nokia website.Tips on taking good photographsPicture qualityUse the appropriate picture quality. The camera has three picture quality modes (Print 2M - Large, Print 1M - Medium, or MMS 0.3M - Small). Use the High setting to make sure that the camera produces the best picture quality available. Note however, that better picture quality requires more storage space. For MMS and e-mail attachments it may be necessary to use MMS 0.3M - Small setting. You can define the quality in Options > Settings.BackgroundUse a simple background. For portraits and other pictures with people, avoid having your subject in front of a cluttered, complex background that may distract attention from the subject. Move the camera, or the subject, when these conditions cannot be met. Move the camera closer to the object to take clearer portraits.DepthWhen shooting landscapes and sceneries, add depth to your pictures by placing objects in the foreground. If the foreground object is too close to the camera, it may be blurred.Lighting conditionsChanging the source, amount, and direction of light can change photographs dramatically. Here are some typical lighting conditions:•Light source behind the subject. Avoid placing your subject in front of a strong light source. If the light source is behind the subject or visible in the display, the resulting picture may have weak contrast, may be too dark, and may contain unwanted light effects.•Sidelit subject. Strong side light gives a dramatic effect but may be too harsh, resulting in too much contrast. P2954_en.book  Page 60  Tuesday, July 3, 2007  1:44 PM
Camera61•Light source in front of the subject. Harsh sunlight may cause the subjects to squint their eyes. The contrast may also be too high.•Optimal lighting is found in situations where there is plenty of diffused, soft light available, for example, on a bright, partially cloudy day or on a sunny day in the shadow of trees. Record videos1To activate the main camera, press and hold  . If the camera is in the Image mode, select Switch to video mode from the active toolbar. 2Press   to start recording. In the portrait mode, use the scroll key for recording. The record icon   is shown and a tone sounds, indicating that recording has started. 3Select Stop to stop recording. The video clip is automatically saved to the Images & vids. folder of Gallery. See ‘Gallery’, p. 45. The maximum length of the video clip depends on the available memory.To pause recording at any time, select Pause. The pause icon ( ) blinks on the display. Video recording automatically stops if recording is set to pause and there are no keypresses within a minute. Select Continue to resume recording.To zoom in or out of the subject, press the volume key on the side of the device. In the portrait mode, to zoom in or out, press   or  .To make lighting and color adjustments before recording a video, use the scroll key to scroll through the active toolbar. See ‘Setup settings—color and lighting’, p. 58 and ‘Scenes’, p. 58.To activate the front camera, select Options > Use secondary camera.Video capture indicatorsThe video viewfinder displays the following:1The current capture mode indicator.2The audio mute on indicator.3The active toolbar, which you can scroll through before recording to select different items and settings (the toolbar is not displayed during recording). See ‘Active toolbar’, p. 55.4Battery charge level indicator.Camera.fm  Page 61  Thursday, July 12, 2007  8:41 AM
Camera625The video quality indicator indicates whether the quality of the video is High, Normal, or Sharing.6The video clip file type.7The total available video recording time. When you are recording, the current video length indicator also shows the elapsed time and time remaining.8The device memory ( ) and mass memory ( ) indicators show where videos are saved.To display all viewfinder indicators, select Options > Show icons. Select Hide icons to display only the video status indicators, and during the recording, the available record time, zoom bar when zooming, and the selection keys.For more information, see the extended user guide at www.nseries.com/support.After recording a videoAfter you record a video clip, select the following from the active toolbar (available only if Show captured video is set to On in Video settings):•To immediately play the video clip you just recorded, select Play.•If you do not want to keep the video, select Delete.•To send the video clip using multimedia message, e-mail, or Bluetooth connectivity, press the call key, or select Send. For more information, see ‘Messaging’, p. 34, ‘Bluetooth connectivity’, p. 74, and ‘Share online’, p. 52. This option is not available during an active call. You may not be able to send video clips saved in the .mp4 file format in a multimedia message. You can also send the video clip to a call recipient during an active call. Select Send to caller.•To upload the video clip to a compatible online album, select Post to (available only if you have set up an account for a compatible online album. See ‘Share online’, p. 52).Video settingsThere are two kinds of settings for the video recorder: Video setup and main settings. To adjust Video setup settings, see ‘Setup settings—color and lighting’, p. 58. The setup settings return to the default settings after you close the camera, but the main settings remain the same until you change them again. To change the main settings, select Options > Settings and from the following:Video quality—Set the quality of the video clip to High (best quality for long term usage and playback on a compatible TV or PC and handset), Normal (standard quality for playback through your handset), or Sharing (limited video clip size to send using a multimedia message). If you want to view the video on a compatible TV or PC, select High, which has QVGA resolution (320x240) and the .mp4 file format. To send the video clip through P2954_en.book  Page 62  Tuesday, July 3, 2007  1:44 PM
Camera63MMS, select Sharing (QCIF resolution, .3gp file format). The size of the video clip recorded with Sharing is limited to 300 KB (about 20 seconds in duration) so that it can be conveniently sent as a multimedia message to a compatible device.Audio recording—Select Mute if you do not want to record sound.Add to album—Select whether you want to add the recorded video clip to a certain album in Gallery. Select Yes to open a list of available albums.Show captured video—Select whether you want the first frame of the recorded video clip to be shown on the display after the recording stops. Select Play from the active toolbar (main camera) or Options > Play (secondary camera) to view the video clip.Default video name—Define the default name for the captured video clips.Memory in use—Define the default memory store.Restore camera settings—Select Yes to return the default values to the camera settings.P2954_en.book  Page 63  Tuesday, July 3, 2007  1:44 PM
Web64Web Press  , and select Web (network service). Shortcut: To start the Web browser, press and hold  in the standby mode.With the Web browser, you can view hypertext markup language (HTML) web pages on the internet as originally designed. You can also browse web pages that use extensible hypertext markup language (XHTML), or the wireless markup language (WML), and that are designed specifically for mobile devices.With Web, you can zoom in and out on a page, use Mini Map and Page Overview to navigate on pages, read web feeds and blogs, bookmark web pages, and download content.Check the availability of services, pricing, and fees with your service provider. Service providers will also give you instructions on how to use their services.To use the Web browser, you need an access point to connect to the internet. See ‘Access points’, p. 124.Browse the webTo browse a web page, in the bookmarks view, select a bookmark, or enter the address in the field ( ). Then press .Select Options to go to, save, or reload a page; open a new browser window; save a bookmark; or block pop-ups.To open links and make selections, press  .To enter a new web page address you want to visit, select Options > Go to web address. Tip! To visit a web page saved as a bookmark in the bookmarks view, while browsing, press   and select a bookmark.To retrieve the latest content of the page from the server, select Options > Navigation options > Reload.To save the web address of the current page as a bookmark, select Options > Save as bookmark.To use visual history to view snapshots of the pages you have visited during the current browsing session, select Back (available if History list is set on in the browser settings and the current page is not the first page you visit). To go to a previously visited page, select the page.P2954_en.book  Page 64  Tuesday, July 3, 2007  1:44 PM
Web65To save a page while browsing, select Options > Tools > Save page. You can save pages and browse them later, when offline. You can also group these saved pages into folders. To access the pages you have saved, select select Options > Bookmarks> Saved pages.To open a sublist of commands or actions for the currently open page, select Options > Service options (if supported by the web page).Shortcuts while browsing•Press   to open your bookmarks.•Press   to search for keywords in the current page.•Press   to return to the previous page.•Press   to list all open windows. •Press   to close the current window if two or more windows are open.•Press   to show the page overview of the current page. Press   again to zoom in and view the desired section of the page.•Press   to enter a new web address.•Press   to go to the start page.•Press   or   to zoom the page in or out.Text searchTo search for keywords within the current web page, select Options > Find > Text, and enter a keyword. To go to the previous match, press  . To go to the next match, press . Tip! You can also search for keywords within the page by pressing  ..Toolbar in the browserWith the toolbar, you can select the most frequently used features in the browser. To open the toolbar, press and hold   on an empty spot on a web page. To move within the toolbar, press   or  , To select a feature, press  .In the toolbar, select from the following:•Frequently used links to view a list of the web addresses you visit frequently•Page overview to view the overview of the current web page•Find to search for keywords within the current page•Reload to refresh the page•Subscribe to web feeds (if available) to view a list of available web feeds on the current web page, and subscribe to a web feedDownload and purchase itemsYou can download items such as ringing tones, images, operator logos, themes, and video clips. These items can be provided free of charge, or you can purchase them. Downloaded items are handled by the respective P2954_en.book  Page 65  Tuesday, July 3, 2007  1:44 PM
Web66applications in your device; for example, a downloaded photo can be saved in Gallery. Important: Only install and use applications and other software from trusted sources, such as applications that are Symbian Signed or have passed the Java VerifiedTM testing.1To download the item, select the link.2Select the appropriate option to purchase the item (for example, “Buy”).3Carefully read all the information provided.To continue the download, select Accept. To cancel the download, select Cancel.When you start a download, a list of ongoing and completed downloads from the current browsing session is displayed. To view the list, select Options > Downloads. In the list, scroll to an item, and select Options to cancel ongoing downloads, or open, save, or delete completed downloads.Mini MapMini Map helps you to navigate on web pages that contain a large amount of information. When Mini Map is set on in the browser settings and you scroll through a large web page, Mini Map opens and shows an overview of the web page you browse. To move on Mini Map, press ,  ,  , or  . When you find the desired location, stop scrolling; Mini Map disappears, leaving you to the selected spot.Mini Map shows an overview of the web page you browse. To scroll in the Mini Map view, press  ,  ,  , or  . When you find the desired location, stop scrolling; Mini Map disappears, leaving you to the selected spot.To set Mini Map on, select Options > Settings > General > Mini Map > On.Page overviewWhen you are browsing a web page that contains a large amount of information, you can use Page Overview to view what kind of information the page contains.To show the page overview of the current page, press  . To find the desired spot on the page, press  ,  ,  , or . Press   again to zoom in and view the desired section of the page.Web feeds and blogsWeb feeds are xml files on web pages that are used by the weblog community and news organizations to share the latest headlines or text, for example, news feeds. Blogs or weblogs are web diaries. Most of the web feeds use RSS and ATOM technologies. It is common to find web feeds on web, blog, and wiki pages.P2954_en.book  Page 66  Tuesday, July 3, 2007  1:44 PM
Web67The Web browser automatically detects if a web page contains web feeds. To subscribe to a web feed, select Options > Subscribe. To view the web feeds you have subscribed to, in the bookmarks view, select Web feeds.To update a web feed, select it, and select Options > Refresh.To define how the web feeds are updated, select Options > Settings > Web feeds. See ‘Settings’, p. 68.Connection securityIf the security indicator   is displayed during a connection, the data transmission between the device and the internet gateway or server is encrypted.The security icon does not indicate that the data transmission between the gateway and the content server (or place where the requested resource is stored) is secure. The service provider secures the data transmission between the gateway and the content server.Security certificates may be required for some services, such as banking services. You are notified if the identity of the server is not authentic or if you do not have the correct security certificate in your device. For more information, contact your service provider. See also ‘Certificate management’, p. 119 for more information on the certificates and certificate details.Bookmarks viewThe bookmarks view allows you to select web addresses from a list, or from a collection of bookmarks in the Auto. Bookmarks folder. You can also enter the URL address of the web page you want to visit directly into the field ( ). indicates the starting page defined for the default access point.You can save URL addresses as bookmarks while browsing on the internet. You can also save addresses received in messages to your bookmarks, and send saved bookmarks.To open the bookmarks view while browsing, press  , or select Options > Bookmarks.To edit the details of a bookmark, such as the title, select Options > Bookmark manager > Edit.In the bookmarks view, you can also enter other browser folders. The Web browser allows you to save web pages during browsing. In the Saved pages folder, you can view the content of the pages you have saved offline.The Web browser also keeps track of the web pages you visit during browsing. In the Auto. Bookmarks folder, you can view the list of visited web pages.In Web Feeds, you can view saved links to web feeds and blogs you have subscribed to. Web feeds are commonly found on major news organization web pages, personal P2954_en.book  Page 67  Tuesday, July 3, 2007  1:44 PM
Web68weblogs, online communities that offer latest headlines, and article summaries. Web feeds use RSS and ATOM technologies.End connectionTo end the connection and view the browser page offline, select Options > Tools > Disconnect, or to end the connection and close the browser, select Options > Exit.Pressing the end key does not end the connection but takes the browser to the background.To delete the information the network server collects about your visits to various web pages, select Options > Clear privacy data > Delete cookies.Empty the cacheThe information or services you have accessed are stored in the cache memory of the device.A cache is a memory location that is used to store data temporarily. If you have tried to access or have accessed confidential information requiring passwords, empty the cache after each use. The information or services you have accessed are stored in the cache. To empty the cache, select Options > Clear privacy data > Clear cache.SettingsUnder General settings you can change the access point, define the home page, and set Mini Map or History list on or off. Under Page settings you can change the character coding, if the text is not shown correctly and set automatic page reload on or off. Under Privacy settings you can disable or enable automatic bookmarks and saving of form data. Under web feeds settings you set the automatic update of web feeds on or off.For more information, see the extended user guide at www.nseries.com/support or your local Nokia website.Select Options > Settings and from the following:General settingsAccess point—Change the default access point. See ‘Connection’, p. 124. Some or all access points may be preset for your device by your service provider, and you may not be able to change, create, edit, or remove them.Homepage—Define the home page.Mini Map—Set Mini Map on or off. See ‘Mini Map’, p. 66.P2954_en.book  Page 68  Tuesday, July 3, 2007  1:44 PM
Web69History list—While browsing, to select Back to see a list of the pages you have visited during the current browsing session, set History list on.Security warnings—Hide or show security notifications.Java/ECMA script—Enable or disable the use of scripts.Page settingsLoad content—Select whether you want to load images and other objects while browsing. If you select Text only, to load images or objects later during browsing, select Options > Tools > Load images.Screen size—Select between the Full screen view and the normal view with the Options list.Default encoding—If text characters are not shown correctly, you can select another encoding according to language for the current page.Font size—Define the font size that is used for web pages.Block pop-ups—Allow or block automatic opening of different pop-ups while browsing.Automatic reload—If you want the web pages to be refreshed automatically while browsing, select On.Privacy settingsAuto. bookmarks—Enable or disable automatic bookmark collecting. If you want to continue saving the addresses of the visited web pages into the Auto. Bookmarks folder, but hide the folder from the bookmarks view, select Hide folder.Form data saving—If you do not want the data you enter into different forms on a web page to be saved and used the next time you open the page, selectOff.Cookies—Enable or disable the receiving and sending of cookies.Web feeds settingsAutomatic updates—Define whether you want the web feeds to be updated automatically or not, how often you want to update them and which connection to use. Setting the application to retrieve web feeds automatically may involve the transmission of large amounts of data through your service provider's network. Contact your service provider for information about data transmission charges.Acc. point for auto-update (only available when Automatic updates is on)—Change the access point for auto-update.P2954_en.book  Page 69  Tuesday, July 3, 2007  1:44 PM
Tools70ToolsFile manager To browse files and folders, press  , and select Tools > File mgr.. The device memory view ( ) opens. Press   to open the mass memory view ( ).To find a file, select Options > Find and the memory from which to search. Enter a search text that matches the file name.To view what types of data you have in the device and how much memory the different data types consume, select Options > Memory details. The amount of available free memory is shown in Free memory.Memory low—free memoryMany features of the device use memory to store data. The device notifies you if the memory is low.To free device memory, transfer data to a compatible PC.To remove data to free memory, use File manager to delete files you no longer need, or go to the respective application. For example, you can remove the following:•Messages in the folders in Messaging and retrieved e-mail messages from the mailbox•Saved web pages•Contact information•Calendar notes•Applications shown in App. manager that you do not needMass memory tool To monitor the amount of used and free space in the device mass memory, press  , and select Tools > Utilities > Memory. To see how much disc space the different applications and data types use, select Options > Memory details.To change the name of the mass memory, select Options > Mass memory name.To back up information from the device memory to the mass memory, select Options > Back up phone memory.To restore information from the mass memory to the device memory, select Options > Rest. from mass mem..Format mass memoryWhen mass memory is reformatted, all data in the memory is permanently lost. Back up data you want to keep before P2954_en.book  Page 70  Tuesday, July 3, 2007  1:44 PM
Tools71formatting the mass memory. You can use Nokia Nseries PC Suite to back up data to a compatible PC. Digital rights management technologies (DRM) may prevent some back-up data from being restored. Contact your service provider for more information about DRM used for your content. See also ‘Digital rights management’, p. 96.To format mass memory, select Options > Format mass memory. Select Yes to confirm.Formatting does not guarantee that all confidential data stored in the device mass memory is permanently destroyed. Standard formatting only marks the formatted area as available space and deletes the address to find the files again. The recovery of formatted or even overwritten data may still be possible with special recovery tools and software. Voice commands You can use voice commands to control your device. For more information about the enhanced voice commands supported by your device, see ‘Voice dialing’, p. 108.To activate enhanced voice commands for starting applications and profiles, you must open the Voice comm. application and its Profiles folder. Press  , and select Tools > Utilities > Voice comm. > Profiles; the device creates voice tags for the applications and profiles. To use enhanced voice commands, press and hold the right selection key in the standby mode, and say a voice command. The voice command is the name of the application or profile displayed in the list.To add more applications to the list, select Options > New application. To add a second voice command that can be used to start the application, select Options > Change command, and enter the new voice command as text. Avoid very short names, abbreviations, and acronyms.To listen to the synthesized voice tag, select Options > Playback.To change voice command settings, select Options > Settings. To switch off the synthesizer that plays recognized voice tags and commands in the selected device language, select Synthesiser > Off. To reset voice recognition learning, for example, when the main user of the device has changed, select Remove voice adapts..P2954_en.book  Page 71  Tuesday, July 3, 2007  1:44 PM
Connections72ConnectionsWireless LANYour device supports wireless local area network (wireless LAN). With wireless LAN, you can connect your device to the internet and compatible devices that have wireless LAN. For information about using your device with other compatible UPnP devices through wireless LAN, see ‘Home network with Gallery’, p. 52 and ‘Home network with music player’, p. 21.To use wireless LAN, a wireless LAN must be available in the location and your device must be connected to the wireless LAN.Some places, like France, have restrictions on the use of wireless LAN. Check with your local authorities for more information.Features using wireless LAN, or allowing such features to run in the background while using other features, increase the demand on battery power and reduce the battery life.Your device supports the following wireless LAN features:•IEEE 802.11b/g standard•Operation at a frequency of 2.4 GHz•Wired equivalent privacy (WEP) with keys up to 128 bits, Wi-Fi protected access (WPA), and 802.1x encryption methods. These functions can be used only if they are supported by the network.Wireless LAN connectionsTo use wireless LAN, you must create an internet access point (IAP) in a wireless LAN. Use the access point for applications that need to connect to the internet. See ‘Wireless LAN access points’, p. 73. Important: Always enable one of the available encryption methods to increase the security of your wireless LAN connection. Using encryption reduces the risk of unauthorized access to your data. A wireless LAN connection is established when you create a data connection using a wireless LAN internet access point. The active wireless LAN connection ends when you close the last application using the connection. To end all the connections simultaneously, see ‘Connection manager’, p. 77.You can use wireless LAN during a voice call or when packet data is active. You can only be connected to one wireless LAN access point device at a time, but several applications can use the same internet access point.P2954_en.book  Page 72  Tuesday, July 3, 2007  1:44 PM
Connections73When the device is in the Offline profile, you can still use wireless LAN (if available). Remember to comply with any applicable safety requirements when establishing and using a wireless LAN connection. Tip! To check the unique media access control (MAC) address that identifies your device, enter *#62209526# in the standby mode.WLAN wizard The WLAN wizard helps you to connect to a wireless LAN and manage your wireless LAN connections.The WLAN wizard shows the status of your wireless LAN connections in the active standby mode. To view the available options, scroll to the row showing the status, and press .If the search finds wireless LANs, and for example, WLAN network found is displayed, to automatically create an IAP and start the web browser using this IAP, select the status, Start Web browsing, and the network.If you select a secured wireless LAN network, you are asked to enter the relevant passcodes. To connect to a hidden network, you must enter the correct network name (service set identifier, SSID). To create a new access point for a hidden WLAN, select New WLAN. After entering the required data, the connection is automatically tested.If you are connected to a wireless LAN, the IAP name is displayed. To start the web browser using this IAP, select the status and Continue Web browsing. To end the connection in the wireless LAN, select the status and Disconnect WLAN.If wireless LAN scanning is off and you are not connected to any wireless LAN, WLAN scanning off is displayed. To set scanning on and search for available wireless LANs, scroll to the row showing the status, and press  .To start a search for available wireless LANs, select a status and Search for WLAN. To set wireless LAN scanning off, select a status and WLAN scanning off.To access the WLAN wizard in the menu, press  , and select Tools > WLAN wiz..Wireless LAN access pointsTo search for wireless LANs available within range, press , and select Tools > WLAN wiz..Select Options and from the following:Filter WLAN networks—to filter out wireless LANs in the list of found networks. The selected networks are filtered out the next time the application searches for wireless LANs.Details—to view the details of a network shown in the list. If you select an active connection, the connection details are displayed.P2954_en.book  Page 73  Tuesday, July 3, 2007  1:44 PM
Connections74Define access point—to create an IAP in a wireless LANEdit access point—to edit the details of an existing IAPYou can also use Conn. mgr. to create IAPs.Operating modesThere are two operating modes in wireless LAN: infrastructure and ad hoc.The infrastructure operating mode allows two kinds of communication: wireless devices are connected to each other through a wireless LAN access point device, or wireless devices are connected to a wired LAN through a wireless LAN access point device.In the ad hoc operating mode, devices can send and receive data directly with each other. To create an internet access point for an ad hoc network, see ‘Access points’, p. 124.Bluetooth connectivity You can connect wirelessly to other compatible devices with Bluetooth connectivity. Compatible devices may include mobile phones, computers, and enhancements such as headsets and car kits. You can use Bluetooth connectivity to send images, video clips, music and sound clips, and notes; connect wirelessly to your compatible PC (for example, to transfer files); connect to a compatible printer to print images with Image print. See ‘Image print’, p. 51.The two devices need to be within 10 meters (33 feet) of each other, but the connection may be subject to interference from obstructions such as walls or from other electronic devices.This device is compliant with Bluetooth Specification 2.0 supporting the following profiles: Advanced Audio Distribution Profile, Basic Imaging Profile, Dial-up Networking Profile, File Transfer Profile, Generic Object Exchange Profile, Generic Access Profile, Hands-Free Profile, Headset Profile, Object Push Profile, and Serial Port Profile. To ensure interoperability between other devices supporting Bluetooth connectivity, use Nokia approved enhancements for this model. Check with the manufacturers of other devices to determine their compatibility with this device.There may be restrictions on using Bluetooth connectivity in some locations. Check with your local authorities or service provider.Features using Bluetooth connectivity, or allowing such features to run in the background while using other features, increase the demand on battery power and reduce the battery life. P2954_en.book  Page 74  Tuesday, July 3, 2007  1:44 PM

Navigation menu