Microsoft RM-211 CDMA 800 Cellular Phone User Manual N6066 UG EN FCC 060831
Microsoft Mobile Oy CDMA 800 Cellular Phone N6066 UG EN FCC 060831
UserManual.wiki
>
Microsoft
>
RM 211 User Manual
Manual
Navigation menu
Upload a User Manual
Namespaces
Wiki Guide
HTML
PDF
Info
Views
User Manual
Discussion / Help
Navigation


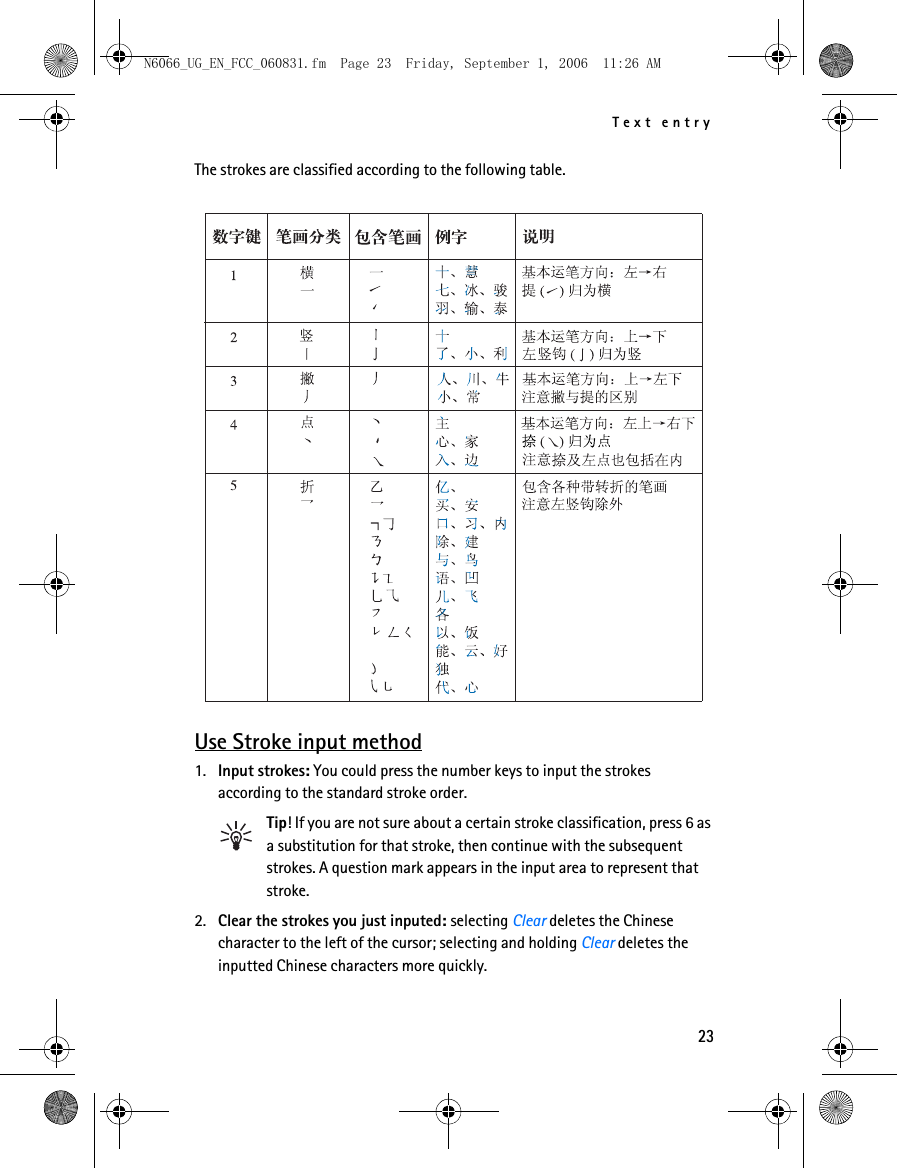
![N6066_UG_EN_FCC_060831.fm Page 22 Friday, September 1, 2006 11:26 AM Text entry candidate character, then press OK to select the highlighted Chinese character. 6. Exit predictive: You phone will keep predictive function until you select Back. You need to input pinyin letter for the next Chinese character.If all predictive Chinese characters are not your desired, press Back to delete the predictive characters, or input the pinyin letter for the next Chinese character directly.7. Clear inputted characters: After clearing all pinyin letters and tone marks, press Clear to delete the character to the left of the cursor; Press and hold Clear to delete the character to the left of the cursor more quickly. Use the down and up scroll keys to move the cursor. Predictive pinyin input example: To input 生日快乐1. Enter into Create message. 2. Input pinyin letter sheng for 生: Press 7, 4, 3, 6, 4 in sequence, and finally press 1 once for the first tone. 3. Select 生 from candidate list, then press OK. 4. Press right scroll key to select 日 from predictive character list, then press OK. 5. Input pinyin letter kuai for 快: Press 5, 8, 2, 4 in sequence, and finally press [1] twice for the fourth tone. 6. Select 快 from candidate list, then press OK. 7. Select 乐 from predictive character list, then press OK. 8. You phone will keep predictive function until you select Back. ■Stroke input method The strokes constituting Chinese characters have been divided into five categories: horizontal, vertical, left-falling, dot, and turning. Each category corresponds to a number key from 1 to 5, respectively. 22](https://usermanual.wiki/Microsoft/RM-211/User-Guide-717307-Page-23.png)
![N6066_UG_EN_FCC_060831.fm Page 36 Friday, September 1, 2006 11:26 AM Messages 4. Select Options > Delete. 5. Select Yes to delete the message or No to exit. Delete all messages in a folder 1. In the standby mode, select Menu > Messages > Text messages > Delete messages. 2. Select the messages you want to delete: All—Deletes all messages in all of the folders. All read—Deletes any messages that have been read in all of the folders. All unread—Deletes any messages that have not been read in all of the folders. 3. Select and Mark the folders that have messages you want to delete: Inbox—Deletes all messages from the inbox folder. Outbox—Deletes all messages from the outbox folder. Sent items—Deletes all messages from the Sent items folder. Drafts—Deletes all messages from the drafts folder. Archive—Deletes all messages from the archive folder. [My folder]—Deletes all messages from [My folder] folder. 4. Select Done > Yes to empty the marked folder. Change sending options To change sending options for all future text messages, in the standby mode, select Menu > Messages > Text messages > Message settings > Sending optionsand the setting you want to change:Priority—Set the priority of the message as Normal or Urgent.Delivery reports—Send a note to yourself confirming delivery of the message. Select On or Off.Signature—Create a signature to send with text messages.To change sending options for one message, in the standby mode, select Menu > Messages > Text messages > Create message > Options > Sending options, andMark or Unmark the setting you want to change:Urgent—Set the priority of the message as urgent.36](https://usermanual.wiki/Microsoft/RM-211/User-Guide-717307-Page-37.png)