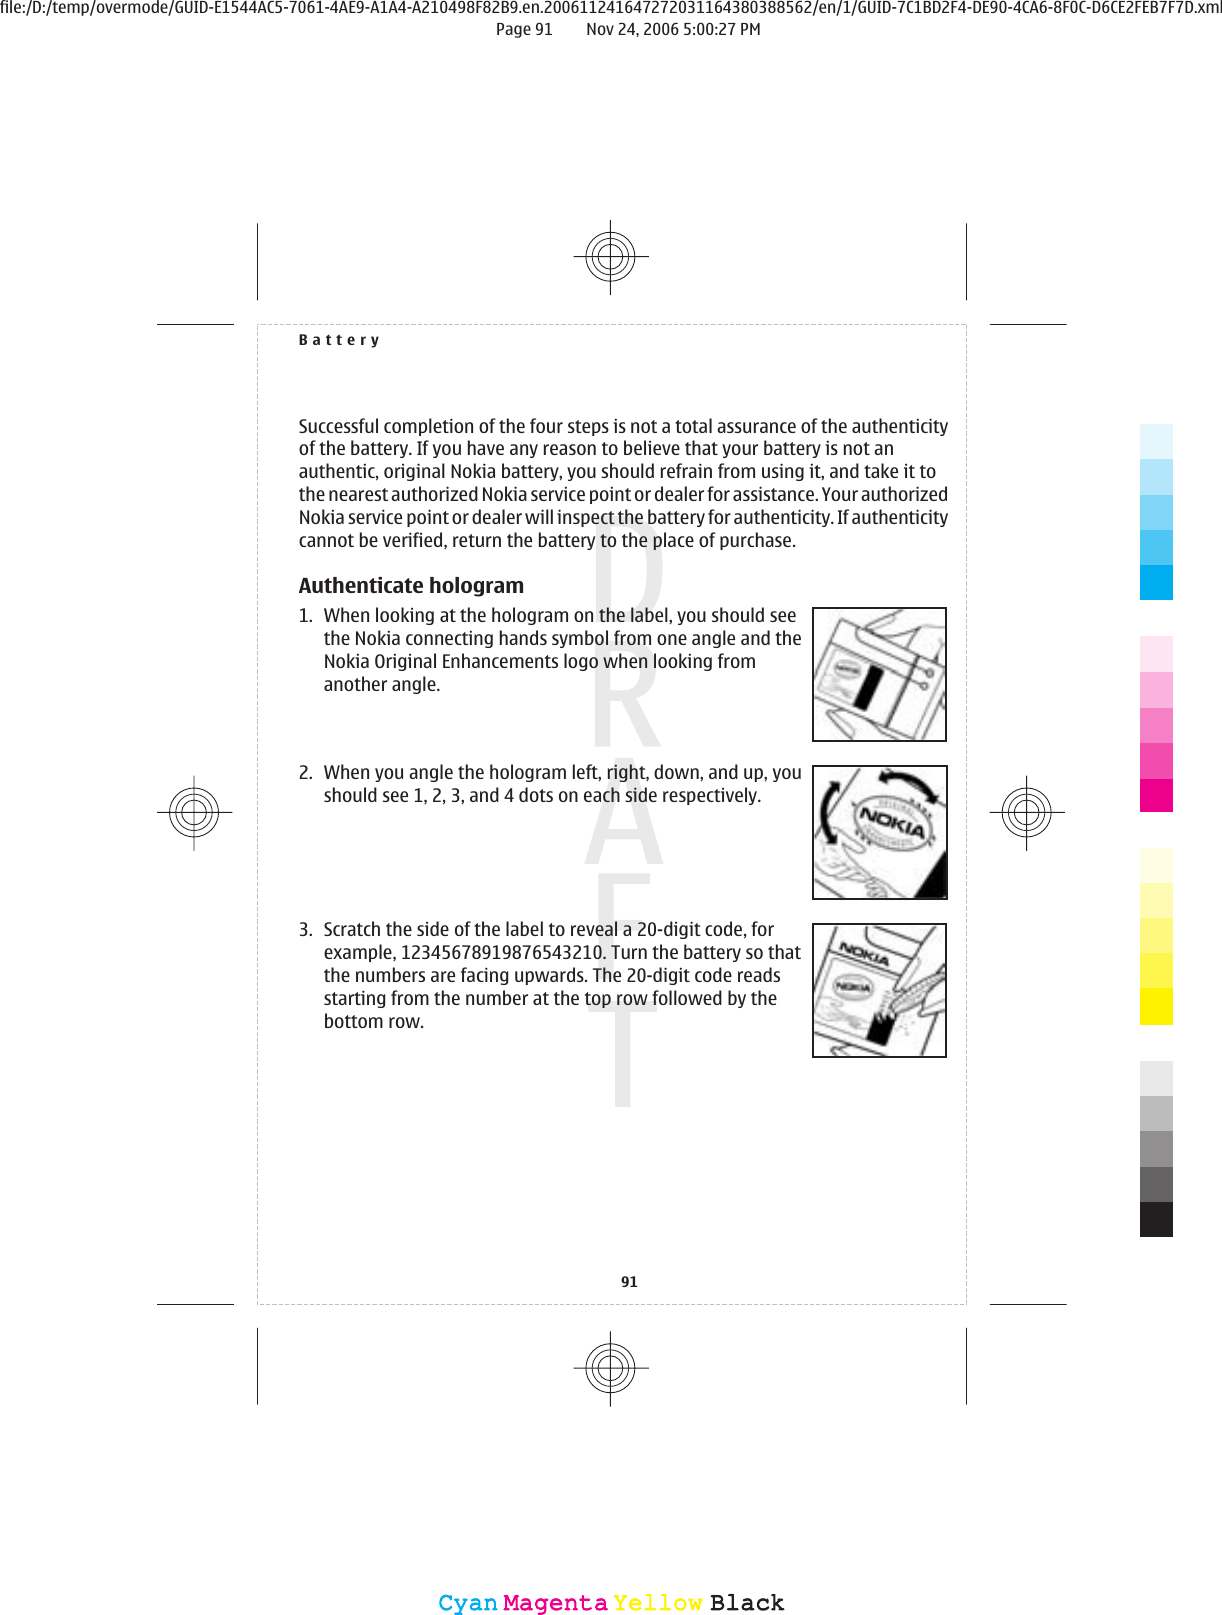
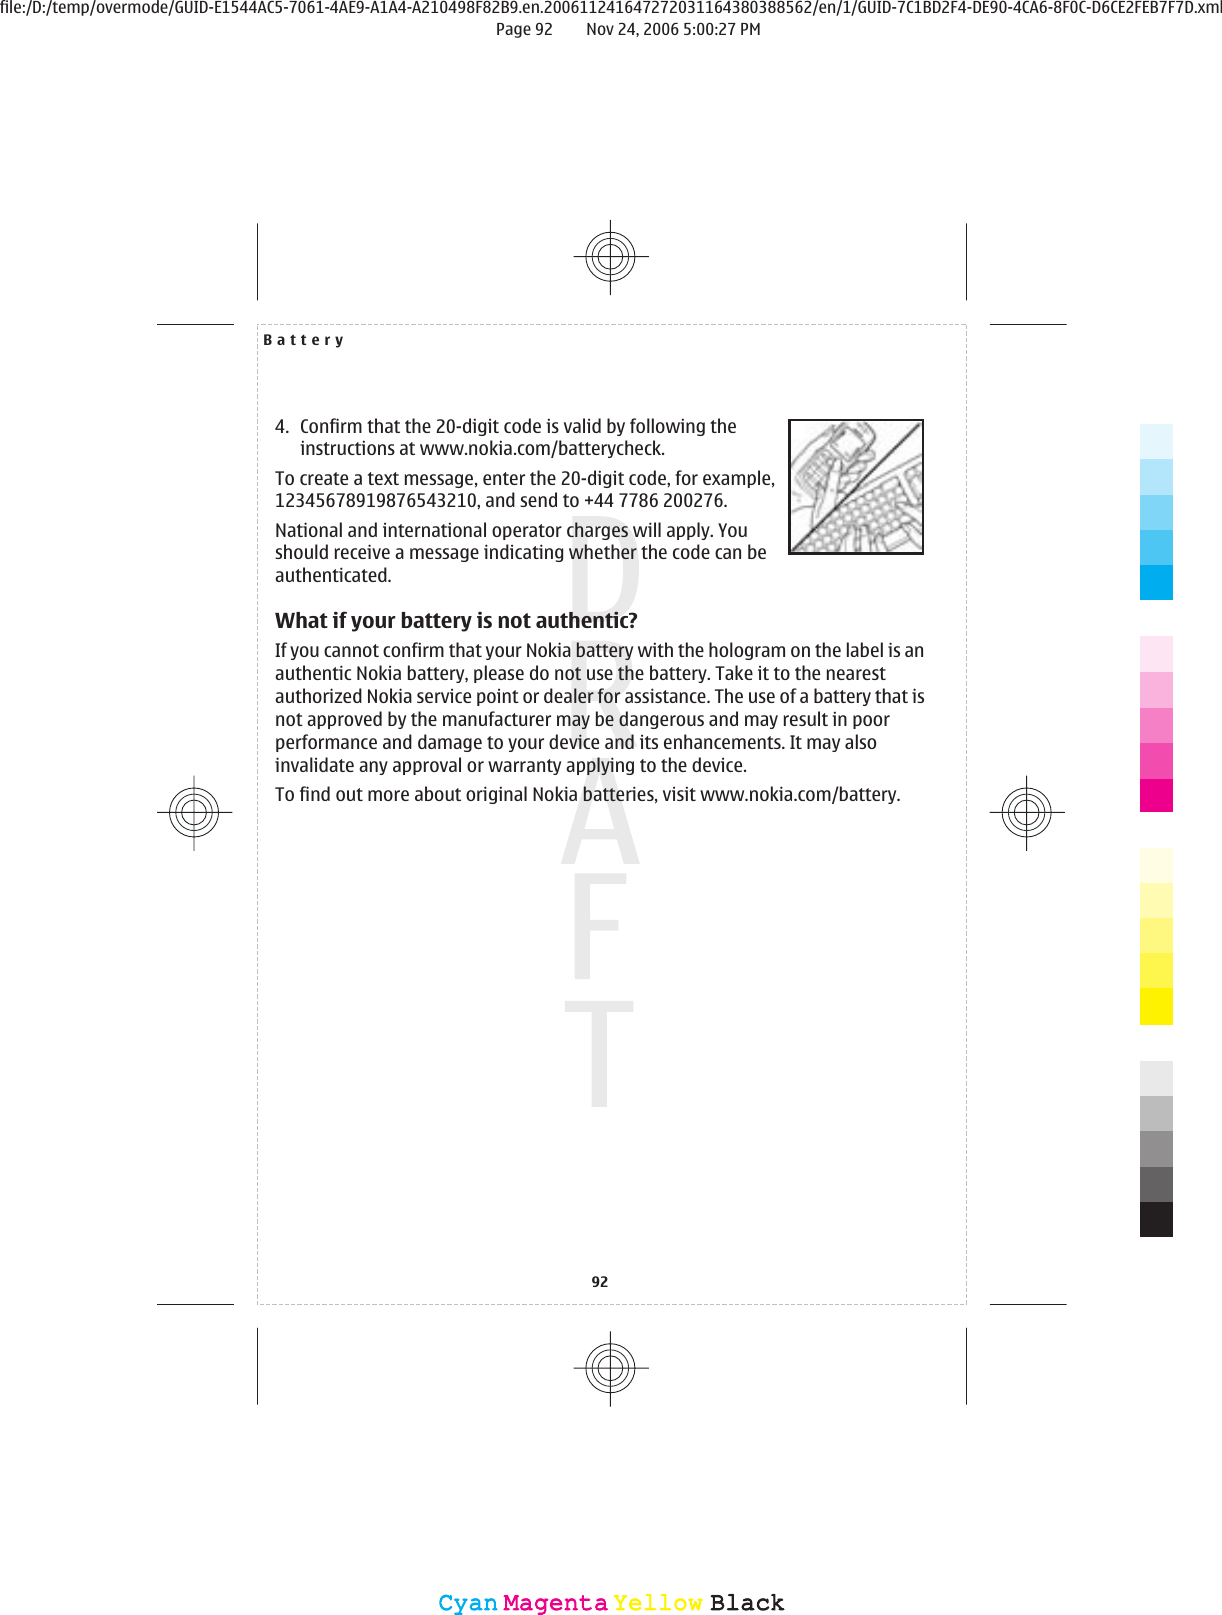
Microsoft RM-222 GSM 850/1800/1900MHz Cellphone w/BT User Manual Manual

Microsoft Mobile Oy GSM 850/1800/1900MHz Cellphone w/BT Manual

Manual

Nokia 6300b User Guide92533xxIssue 1CyanCyanMagentaMagentaYellowYellowBlackBlackfile:/D:/temp/overmode/GUID-E1544AC5-7061-4AE9-A1A4-A210498F82B9.en.200611241647272031164380388562/en/1/GUID-7C1BD2F4-DE90-4CA6-8F0C-D6CE2FEB7F7D.xmlPage 1 Nov 24, 2006 5:00:27 PM
DECLARATION OF CONFORMITYHereby, NOKIA CORPORATION declares that this RM-222 product is in compliance with theessential requirements and other relevant provisions of Directive 1999/5/EC. A copy of theDeclaration of Conformity can be found at www.nokia.com/phones/declaration_of_conformity/.The crossed-out wheeled bin means that within the European Union the product must be taken to separate collectionat the product end-of-life. This applies to your device but also to any enhancements marked with this symbol. Donot dispose of these products as unsorted municipal waste. For more information, see product Eco-Declaration orcountry specific information at www.nokia.com.Reproduction, transfer, distribution, or storage of part or all of the contents in this document in any form without the priorwritten permission of Nokia is prohibited.Nokia, Nokia Connecting People, Nokia Care, Visual Radio, and Navi are trademarks or registered trademarks of NokiaCorporation. Nokia tune is a sound mark of Nokia Corporation. Other product and company names mentioned herein maybe trademarks or tradenames of their respective owners.US Patent No 5818437 and other pending patents. T9 text input software Copyright © 1997-2006. Tegic Communications,Inc. All rights reserved.Includes RSA BSAFE cryptographic or security protocol software from RSA Security.Java and all Java-based marks are trademarks or registered trademarks of Sun Microsystems, Inc.This product is licensed under the MPEG-4 Visual Patent Portfolio License (i) for personal and noncommercial use inconnection with information which has been encoded in compliance with the MPEG-4 Visual Standard by a consumerengaged in a personal and noncommercial activity and (ii) for use in connection with MPEG-4 video provided by a licensedvideo provider. No license is granted or shall be implied for any other use. Additional information, including that related topromotional, internal, and commercial uses, may be obtained from MPEG LA, LLC. See http://www.mpegla.com.Nokia operates a policy of ongoing development. Nokia reserves the right to make changes and improvements to any ofthe products described in this document without prior notice.TO THE MAXIMUM EXTENT PERMITTED BY APPLICABLE LAW, UNDER NO CIRCUMSTANCES SHALL NOKIA OR ANY OF ITS LICENSORSBE RESPONSIBLE FOR ANY LOSS OF DATA OR INCOME OR ANY SPECIAL, INCIDENTAL, CONSEQUENTIAL OR INDIRECT DAMAGESHOWSOEVER CAUSED.THE CONTENTS OF THIS DOCUMENT ARE PROVIDED "AS IS". EXCEPT AS REQUIRED BY APPLICABLE LAW, NO WARRANTIES OF ANYKIND, EITHER EXPRESS OR IMPLIED, INCLUDING, BUT NOT LIMITED TO, THE IMPLIED WARRANTIES OF MERCHANTABILITY ANDFITNESS FOR A PARTICULAR PURPOSE, ARE MADE IN RELATION TO THE ACCURACY, RELIABILITY OR CONTENTS OF THIS DOCUMENT.NOKIA RESERVES THE RIGHT TO REVISE THIS DOCUMENT OR WITHDRAW IT AT ANY TIME WITHOUT PRIOR NOTICE.The availability of particular products and applications for these products may vary by region. Please check with your Nokiadealer for details, and availability of language options.This device complies with Directive 2002/95/EC on the restriction of the use of certain hazardous substances in electricaland electronic equipment.0434CyanCyanMagentaMagentaYellowYellowBlackBlackfile:/D:/temp/overmode/GUID-E1544AC5-7061-4AE9-A1A4-A210498F82B9.en.200611241647272031164380388562/en/1/GUID-7C1BD2F4-DE90-4CA6-8F0C-D6CE2FEB7F7D.xmlPage 2 Nov 24, 2006 5:00:27 PM
Export controlsThis device may contain commodities, technology or software subject to export laws and regulations from the US and othercountries. Diversion contrary to law is prohibited.Copyright © 2006 Nokia. All rights reserved.FCC/INDUSTRY CANADA NOTICEYour device may cause TV or radio interference (for example, when using a telephone in close proximity to receivingequipment). The FCC or Industry Canada can require you to stop using your telephone if such interference cannot beeliminated. If you require assistance, contact your local service facility. This device complies with part 15 of the FCC rules.Operation is subject to the following two conditions: (1) This device may not cause harmful interference, and (2) this devicemust accept any interference received, including interference that may cause undesired operation. Any changes ormodifications not expressly approved by Nokia could void the user's authority to operate this equipment.92533xx/Issue 1CyanCyanMagentaMagentaYellowYellowBlackBlackfile:/D:/temp/overmode/GUID-E1544AC5-7061-4AE9-A1A4-A210498F82B9.en.200611241647272031164380388562/en/1/GUID-7C1BD2F4-DE90-4CA6-8F0C-D6CE2FEB7F7D.xmlPage 3 Nov 24, 2006 5:00:27 PM
ContentsFor your safety ...........................................7About your device......................................8Network services........................................9Shared memory..........................................9Enhancements...........................................101. General information............................11Access codes........................................................11Configuration setting service........................12Download content.............................................12Software updates..............................................12Nokia support.....................................................132. Get started.............................................14Install SIM card and battery...........................14Insert a microSD card.......................................15Remove the microSD card...............................15Charge the battery............................................16Switch the device on and off.........................16Antenna................................................................17Headset.................................................................17Strap......................................................................183. Your device............................................18Keys and parts....................................................18Standby mode....................................................19Flight mode.........................................................22Keypad lock (keyguard)...................................22Functions without a SIM card........................234. Call functions.........................................23Make a call...........................................................23Answer or reject a call......................................24Options during a call........................................255. Write text...............................................25Text modes..........................................................25Traditional text input.......................................26Predictive text input.........................................266. Navigate the menus............................277. Messaging..............................................27Text messages....................................................27Multimedia messages......................................29Message sending process...............................30Postcards..............................................................31Flash messages..................................................31Nokia Xpress audio messaging.....................32Memory full..........................................................32Folders...................................................................33E-mail application.............................................33Instant messages..............................................36Voice messages..................................................39Info messages.....................................................40Service commands............................................40Delete messages................................................40SIM messages......................................................40Message settings...............................................418. Contacts..................................................43Save names and phone numbers.................43Save details..........................................................44Settings.................................................................44Groups...................................................................45Search for a contact..........................................45Copy or move contacts.....................................45Edit contact details...........................................45Delete contacts...................................................46Synchronize all...................................................46Business cards....................................................46Dialing shortcuts................................................46Info, service, and my numbers......................479. Call log and positioning......................47Call log...................................................................47Positioning..........................................................48CyanCyanMagentaMagentaYellowYellowBlackBlackfile:/D:/temp/overmode/GUID-E1544AC5-7061-4AE9-A1A4-A210498F82B9.en.200611241647272031164380388562/en/1/GUID-7C1BD2F4-DE90-4CA6-8F0C-D6CE2FEB7F7D.xmlPage 4 Nov 24, 2006 5:00:27 PM
10. Settings................................................48Profiles..................................................................48Themes.................................................................49Tones.....................................................................49Display...................................................................49Time and date....................................................50My shortcuts........................................................50Bluetooth.............................................................52Packet data..........................................................53Data transfer.......................................................54USB data cable....................................................55Call..........................................................................56Phone....................................................................56Enhancements....................................................57Configuration......................................................58Security.................................................................59Software updates over the air.......................60Restore factory settings..................................6111. Operator menu...................................6112. Gallery..................................................61Folders and files.................................................62Print images........................................................62Memory card.......................................................6213. Media....................................................63Camera and video..............................................63Media player........................................................65Music player.........................................................65Radio.....................................................................67Voice recorder.....................................................68Equalizer...............................................................69Stereo widening................................................6914. Push to talk.........................................69PTT channels.......................................................70Switch PTT on and off......................................70Make and receive a PTT call............................71Callback requests...............................................72Add a one-to-one contact...............................72PTT settings.........................................................73Configuration settings.....................................7415. Organizer.............................................74Alarm clock..........................................................74Calendar................................................................75To-do list..............................................................75Notes.....................................................................76Calculator.............................................................76Timers...................................................................77Stopwatch............................................................7716. Applications........................................78Launch a game...................................................78Launch an application......................................78Application options...........................................78Download an application................................7817. Web.......................................................79Set up browsing.................................................80Connect to a service..........................................80Browse pages.....................................................80Bookmarks...........................................................81Appearance settings.........................................82Security settings................................................82Download settings............................................83Service inbox.......................................................83Cache memory....................................................84Browser security................................................8418. SIM services.........................................8619. PC connectivity...................................87Nokia PC Suite.....................................................87Packet data, HSCSD, and CSD..........................87Bluetooth.............................................................87Data communication applications...............8820. Technical information......................8821. Battery.................................................89Battery information..........................................89Nokia battery authenticationguidelines............................................................90Care and maintenance............................93Additional safety information...............94ContentsCyanCyanMagentaMagentaYellowYellowBlackBlackfile:/D:/temp/overmode/GUID-E1544AC5-7061-4AE9-A1A4-A210498F82B9.en.200611241647272031164380388562/en/1/GUID-7C1BD2F4-DE90-4CA6-8F0C-D6CE2FEB7F7D.xmlPage 5 Nov 24, 2006 5:00:27 PM
Small children.....................................................94Operating environment...................................94Medical devices..................................................94Vehicles.................................................................95Potentially explosive environments............96Emergency calls..................................................97CERTIFICATION INFORMATION (SAR)..............97Index...................................................99ContentsCyanCyanMagentaMagentaYellowYellowBlackBlackfile:/D:/temp/overmode/GUID-E1544AC5-7061-4AE9-A1A4-A210498F82B9.en.200611241647272031164380388562/en/1/GUID-7C1BD2F4-DE90-4CA6-8F0C-D6CE2FEB7F7D.xmlPage 6 Nov 24, 2006 5:00:27 PM
For your safetyRead these simple guidelines. Not following them may be dangerous or illegal. Read thecomplete user guide for further information.SWITCH ON SAFELYDo not switch the device on when wireless phone use is prohibited or when it maycause interference or danger.ROAD SAFETY COMES FIRSTObey all local laws. Always keep your hands free to operate the vehicle whiledriving. Your first consideration while driving should be road safety.INTERFERENCEAll wireless devices may be susceptible to interference, which could affectperformance.SWITCH OFF IN HOSPITALSFollow any restrictions. Switch the device off near medical equipment.SWITCH OFF IN AIRCRAFTFollow any restrictions. Wireless devices can cause interference in aircraft.SWITCH OFF WHEN REFUELINGDo not use the device at a refueling point. Do not use near fuel or chemicals.SWITCH OFF NEAR BLASTINGFollow any restrictions. Do not use the device where blasting is in progress.USE SENSIBLYUse only in the normal position as explained in the product documentation. Do nottouch the antenna unnecessarily.7CyanCyanMagentaMagentaYellowYellowBlackBlackfile:/D:/temp/overmode/GUID-E1544AC5-7061-4AE9-A1A4-A210498F82B9.en.200611241647272031164380388562/en/1/GUID-7C1BD2F4-DE90-4CA6-8F0C-D6CE2FEB7F7D.xmlPage 7 Nov 24, 2006 5:00:27 PM
QUALIFIED SERVICEOnly qualified personnel may install or repair this product.ENHANCEMENTS AND BATTERIESUse only approved enhancements and batteries. Do not connect incompatibleproducts.WATER-RESISTANCEYour device is not water-resistant. Keep it dry.BACK-UP COPIESRemember to make back-up copies or keep a written record of all importantinformation stored in your device.CONNECTING TO OTHER DEVICESWhen connecting to any other device, read its user guide for detailed safetyinstructions. Do not connect incompatible products.EMERGENCY CALLSEnsure the phone function of the device is switched on and in service. Press theend key as many times as needed to clear the display and return to the standbymode. Enter the emergency number, then press the call key. Give your location. Donot end the call until given permission to do so.About your deviceThe wireless device described in this guide is approved for use on the GSM 850, andGSM 1800 and 1900 networks. Contact your service provider for more informationabout networks.The wireless device described in this guide is approved for use on the GSM 850, andGSM 1800 and 1900 networks. Contact your service provider for more informationabout networks.About your device8CyanCyanMagentaMagentaYellowYellowBlackBlackfile:/D:/temp/overmode/GUID-E1544AC5-7061-4AE9-A1A4-A210498F82B9.en.200611241647272031164380388562/en/1/GUID-7C1BD2F4-DE90-4CA6-8F0C-D6CE2FEB7F7D.xmlPage 8 Nov 24, 2006 5:00:27 PM
When using the features in this device, obey all laws and respect local customs,privacy and legitimate rights of others, including copyrights.Copyright protections may prevent some images, music (including ringing tones),and other content from being copied, modified, transferred, or forwarded.Warning:  To use any features in this device, other than the alarm clock, the devicemust be switched on. Do not switch the device on when wireless device use maycause interference or danger.Network servicesTo use the phone you must have service from a wireless service provider. Many of the featuresrequire special network features. These features are not available on all networks; othernetworks may require that you make specific arrangements with your service provider beforeyou can use the network services. Your service provider can give you instructions and explainwhat charges will apply. Some networks may have limitations that affect how you can usenetwork services. For instance, some networks may not support all language-dependentcharacters and services.Your service provider may have requested that certain features be disabled or not activatedin your device. If so, these features will not appear on your device menu. Your device mayalso have a special configuration such as changes in menu names, menu order, and icons.Contact your service provider for more information.This device supports WAP 2.0 protocols (HTTP and SSL) that run on TCP/IP protocols. Somefeatures of this device, such as multimedia messaging (MMS), e-mail application, instantmessaging, remote synchronization, and content downloading using the browser or MMS,require network support for these technologies.Shared memoryThe following features in this device may share memory: gallery, contacts, text messages,multimedia messages, and instant messages, e-mail, calendar, to-do notes, Java™ games andNetwork services9CyanCyanMagentaMagentaYellowYellowBlackBlackfile:/D:/temp/overmode/GUID-E1544AC5-7061-4AE9-A1A4-A210498F82B9.en.200611241647272031164380388562/en/1/GUID-7C1BD2F4-DE90-4CA6-8F0C-D6CE2FEB7F7D.xmlPage 9 Nov 24, 2006 5:00:27 PM
applications, and note application. Use of one or more of these features may reduce thememory available for the remaining features sharing memory. Your device may display amessage that the memory is full when you try to use a shared memory feature. In this case,delete some of the information or entries stored in the shared memory features beforecontinuing.EnhancementsPractical rules about accessories and enhancements•Keep all accessories and enhancements out of the reach of small children.•When you disconnect the power cord of any accessory or enhancement, grasp and pull theplug, not the cord.•Check regularly that enhancements installed in a vehicle are mounted and are operatingproperly.•Installation of any complex car enhancements must be made by qualified personnel only.Enhancements10CyanCyanMagentaMagentaYellowYellowBlackBlackfile:/D:/temp/overmode/GUID-E1544AC5-7061-4AE9-A1A4-A210498F82B9.en.200611241647272031164380388562/en/1/GUID-7C1BD2F4-DE90-4CA6-8F0C-D6CE2FEB7F7D.xmlPage 10 Nov 24, 2006 5:00:27 PM
1. General informationAccess codesSecurity codeThe security code (5 to 10 digits) helps to protect your phone against unauthorizeduse. The preset code is 12345. You can change the code, and set the phone torequest the code. See "Security," p. 59.PIN codesThe personal identification number (PIN) code and the universal personalidentification number (UPIN) code (4 to 8 digits) help to protect your SIM cardagainst unauthorized use. See "Security," p. 59.The PIN2 code (4 to 8 digits) may be supplied with the SIM card and is required forsome functions.The module PIN is required to access the information in the security module. See"Security module," p. 84.The signing PIN is required for the digital signature. See "Digitalsignature," p. 86.PUK codesThe personal unblocking key (PUK) code and the universal personal unblocking key(UPUK) code (8 digits) are required to change a blocked PIN code and UPIN code,respectively. The PUK2 code (8 digits) is required to change a blocked PIN2 code. Ifthe codes are not supplied with the SIM card, contact your local service providerfor the codes.Barring passwordThe barring password (4 digits) is required when using the Call barring service.See "Security," p. 59.11CyanCyanMagentaMagentaYellowYellowBlackBlackfile:/D:/temp/overmode/GUID-E1544AC5-7061-4AE9-A1A4-A210498F82B9.en.200611241647272031164380388562/en/1/GUID-7C1BD2F4-DE90-4CA6-8F0C-D6CE2FEB7F7D.xmlPage 11 Nov 24, 2006 5:00:27 PM
Configuration setting serviceTo use some of the network services, such as mobile internet services, MMS, NokiaXpress audio messaging, or remote internet server synchronization, your deviceneeds the correct configuration settings. For more information on availability,contact your service provider, nearest authorized Nokia dealer, or visit the supportarea on the Nokia website. See "Nokia support," p. 13.When you have received the settings as a configuration message and the settingsare not automatically saved and activated, Configuration settings received isdisplayed.To save the settings, select Show > Save. If required, enter the PIN code suppliedby the service provider.To discard the received settings, select Exit or Show > Discard.Download contentYou may be able to download new content (for example, themes) to your phone(network service).Important:  Use only services that you trust and that offer adequatesecurity and protection against harmful software.For the availability of different services, pricing, and tariffs, contact your serviceprovider.Software updatesNokia may produce software updates that may offer new features, enhancedfunctions, or improved performance. You may be able to request these updatesthrough the Nokia Software Updater PC application. To update the device software,you need the Nokia Software Updater application and a compatible PC withMicrosoft Windows 2000 or XP operating system, broadband internet access, anda compatible data cable to connect your device to the PC.General information12CyanCyanMagentaMagentaYellowYellowBlackBlackfile:/D:/temp/overmode/GUID-E1544AC5-7061-4AE9-A1A4-A210498F82B9.en.200611241647272031164380388562/en/1/GUID-7C1BD2F4-DE90-4CA6-8F0C-D6CE2FEB7F7D.xmlPage 12 Nov 24, 2006 5:00:27 PM
To get more information and to download the Nokia Software Updater application,visit www.nokia.com/softwareupdate www.nokiausa.com/softwareupdate oryour local Nokia website.If software updates over the air are supported by your network, you may also beable to request updates through the device.See "Software updates over the air," p. 60.Downloading software updates may involve the transmission of large amounts ofdata through your service provider's network. Contact your service provider forinformation about data transmission charges.Make sure that the device battery has enough power, or connect the charger beforestarting the update.Important:  Use only services that you trust and that offer adequatesecurity and protection against harmful software.Nokia supportSupport informationCheck www.nokia.com/support or your local Nokia website for the latest versionof this guide, additional information, downloads, and services related to your Nokiaproduct.Configuration settings serviceYou may also download free configuration settings such as MMS, GPRS, e-mail, andother services for your device model at www.nokia.com/support.Nokia PC SuiteYou may find PC Suite and related information on the Nokia website atwww.nokia.com/support.General information13CyanCyanMagentaMagentaYellowYellowBlackBlackfile:/D:/temp/overmode/GUID-E1544AC5-7061-4AE9-A1A4-A210498F82B9.en.200611241647272031164380388562/en/1/GUID-7C1BD2F4-DE90-4CA6-8F0C-D6CE2FEB7F7D.xmlPage 13 Nov 24, 2006 5:00:27 PM
Customer serviceIf you need to contact customer service, check the list of local NokiaCare contact centers at www.nokia.com/customerservice.MaintenanceFor maintenance services, check your nearest Nokia service center atwww.nokia.com/repair.2. Get startedInstall SIM card and batteryAlways switch the device off and disconnect the charger before removing thebattery.For availability and information on using SIM card services, contact your SIM cardvendor. This may be the service provider or other vendor.This device is intended for use with BL-4C battery. Always use original Nokiabatteries. See "Nokia battery authentication guidelines," p. 90.The SIM card and its contacts can be easily damaged by scratches or bending, sobe careful when handling, inserting, or removing the card.1. To remove the back cover of thedevice, press and slide the cover (1).Remove the battery as shown (2).2. Open the SIM card holder (3). Insertthe SIM card with the gold-coloredcontact surface facing down into theholder (4). Close the SIM card colder(5).Get started14CyanCyanMagentaMagentaYellowYellowBlackBlackfile:/D:/temp/overmode/GUID-E1544AC5-7061-4AE9-A1A4-A210498F82B9.en.200611241647272031164380388562/en/1/GUID-7C1BD2F4-DE90-4CA6-8F0C-D6CE2FEB7F7D.xmlPage 14 Nov 24, 2006 5:00:27 PM
3. Observe the battery contacts (6), andinsert the battery (7). Slide the backcover into its place (8).Insert a microSD cardUse only compatible microSD cards approved by Nokia for use with this device.Nokia uses approved industry standards for memory cards, but some brands maynot be fully compatible with this device. Incompatible cards may damage the cardand the device and corrupt data stored on the card.1. Remove the back cover of the device.2. Insert the card into the microSD card slot with thecontact surface facing down, and press it until it locksinto place.3. Close the back cover of the device.Remove the microSD cardImportant:  Do not remove the memory card in the middle of an operationwhen the card is being accessed. Removing the card in the middle of anoperation may damage the memory card as well as the device, and datastored on the card may be corrupted.You can remove or replace the microSD card during phone operation withoutswitching the device off.1. Make sure that no application is currently accessing the microSD memory card.2. Remove the back cover of the device.3. Press the microSD card slightly in to release the lock.4. Remove the microSD card from the slot.Get started15CyanCyanMagentaMagentaYellowYellowBlackBlackfile:/D:/temp/overmode/GUID-E1544AC5-7061-4AE9-A1A4-A210498F82B9.en.200611241647272031164380388562/en/1/GUID-7C1BD2F4-DE90-4CA6-8F0C-D6CE2FEB7F7D.xmlPage 15 Nov 24, 2006 5:00:27 PM
Charge the batteryCheck the model number of any charger before use with this device. This device isintended for use when supplied with power from an AC-3 or AC-4 charger.Warning:  Use only batteries, chargers, and enhancements approved byNokia for use with this particular model. The use of any other types mayinvalidate any approval or warranty, and may be dangerous.For availability of approved enhancements, please check with your dealer. Whenyou disconnect the power cord of any enhancement, grasp and pull the plug, notthe cord.1. Connect the charger to a wall socket.2. Connect the lead from the charger to the socket on thebottom of your device.If the battery is completely discharged, it may take a fewminutes before the charging indicator appears on thedisplay or before any calls can be made.The charging time depends on the charger used. Charging a BL-4C battery with theAC-3 charger takes approximately 2 hours and 45 minutes while the device is inthe standby mode.Switch the device on and offTo switch the device on or off, press and hold the power key. See "Keys andparts," p. 18.If the device prompts for a PIN or a UPIN code, enter the code (displayed as ****),and select OK.The device may prompt you to set the time and date. Enter the local time, selectthe time zone of your location in terms of the time difference with respect toGreenwich mean time (GMT), and enter the date. See "Time and date," p. 50.When you switch on your device for the first time and the device is in the standbymode, you may be prompted to get the configuration settings from your serviceGet started16CyanCyanMagentaMagentaYellowYellowBlackBlackfile:/D:/temp/overmode/GUID-E1544AC5-7061-4AE9-A1A4-A210498F82B9.en.200611241647272031164380388562/en/1/GUID-7C1BD2F4-DE90-4CA6-8F0C-D6CE2FEB7F7D.xmlPage 16 Nov 24, 2006 5:00:27 PM
provider (network service). For more information refer to Connect to support. See"Configuration," p. 58. See "Configuration setting service," p. 12.AntennaYour device has an internal antennaNote:  As with any other radio transmitting device,do not touch the antenna unnecessarily when thedevice is switched on. Contact with the antennaaffects call quality and may cause the device tooperate at a higher power level than otherwiseneeded. To optimize antenna performance andbattery life, avoid contact with the antenna areawhen operating the device.HeadsetWarning:  Listen to music at a moderate level. Continuous exposure to highvolume may damage your hearing.Pay special attention to volume level if you connect any other headsets to thedevice.Warning:  When you use the headset, your ability to hear outside soundsmay be affected. Do not use the headset where it can endanger your safety.Do not connect products that create an output signal as this may causedamage to the device. Do not connect any voltage source to the Nokia AVConnector.When connecting any external device or any headset, other than thoseapproved by Nokia for use with this device, to the Nokia AV Connector, payspecial attention to volume levels. Get started17CyanCyanMagentaMagentaYellowYellowBlackBlackfile:/D:/temp/overmode/GUID-E1544AC5-7061-4AE9-A1A4-A210498F82B9.en.200611241647272031164380388562/en/1/GUID-7C1BD2F4-DE90-4CA6-8F0C-D6CE2FEB7F7D.xmlPage 17 Nov 24, 2006 5:00:27 PM
StrapThread a strap through the eyelet of the device as shownin the picture, and hook it behind the clamp.3. Your deviceKeys and parts1 — Earpiece2 — Display3 — Left and right selection key4 — Navi™ key: 4-way scroll key and middle selection key5 — Call key6 — Keypad7 — End keyYour device18CyanCyanMagentaMagentaYellowYellowBlackBlackfile:/D:/temp/overmode/GUID-E1544AC5-7061-4AE9-A1A4-A210498F82B9.en.200611241647272031164380388562/en/1/GUID-7C1BD2F4-DE90-4CA6-8F0C-D6CE2FEB7F7D.xmlPage 18 Nov 24, 2006 5:00:27 PM
8 — Microphone9 — Charger connector10 — Nokia AV Connector (2.5 mm)11 — Micro USB cable connector12 — Volume down key13 — Volume up key14 — Power key15 — Camera lensWarning:  The Navi key (4) in this device may contain nickel. It is notdesigned for prolonged contact with the skin. Continuous exposure to nickelon the skin may lead to a nickel allergy.Standby modeWhen the device is ready for use, and you have not entered any characters, thedevice is in the standby mode.Display1 — Signal strength of the cellular network2 — Battery charge status3 — IndicatorsYour device19CyanCyanMagentaMagentaYellowYellowBlackBlackfile:/D:/temp/overmode/GUID-E1544AC5-7061-4AE9-A1A4-A210498F82B9.en.200611241647272031164380388562/en/1/GUID-7C1BD2F4-DE90-4CA6-8F0C-D6CE2FEB7F7D.xmlPage 19 Nov 24, 2006 5:00:27 PM
4 — Name of the network or the operator logo5 — Clock6 — Main screen7 — The function of the left selection key is Go to or a shortcut to another function.See "Left selection key," p. 50.8 — The function of the middle selection key is Menu.9 — The function of the right selection key is Names or a shortcut to anotherfunction. See "Right selection key," p. 51. Operator variants may have an operator-specific name to access an operator-specific website.Power savingYour device has a Power saver and a Sleep mode feature in order to save batterypower in the standby mode when no key of the device is pressed. These featuresmay be activated. See "Display," p. 49.Active standbyThe active standby mode displays a list of selected device features and informationthat you can directly access.To switch active standby on or off, select Menu > Settings > Display > Activestandby > Active standby mode > On or Off.In the standby mode, scroll up or down to navigate in the list, and choose Selector View. The arrows indicate that further information is available. To stopnavigation, select Exit.To organize and change the active standby mode, select Options and from theavailable options.Shortcuts in the standby modeTo access the list of dialed numbers, press the call key once. Scroll to the numberor name, and press the call key to call the number.To open the web browser, press and hold 0.Your device20CyanCyanMagentaMagentaYellowYellowBlackBlackfile:/D:/temp/overmode/GUID-E1544AC5-7061-4AE9-A1A4-A210498F82B9.en.200611241647272031164380388562/en/1/GUID-7C1BD2F4-DE90-4CA6-8F0C-D6CE2FEB7F7D.xmlPage 20 Nov 24, 2006 5:00:27 PM
To call your voice mailbox, press and hold 1.Use keys as a shortcut. See "My shortcuts," p. 50.Indicators  unread messages  unsent, canceled, or failed messages  missed call/  Your phone is connected to the IM service, and the availability status isonline or offline.  instant messages received  The keypad is locked.  The phone does not ring for an incoming call or text message.  The alarm clock is activated.  The countdown timer is running.  The stopwatch is running in the background./  The phone is registered to the GPRS or EGPRS network./  A GPRS or EGPRS connection is established./  The GPRS or EGPRS connection is suspended (on hold).  A Bluetooth connection is active./  A push-to-talk connection is active or suspended.  If you have two phone lines, the second phone line is selected.  All incoming calls are diverted to another number.  The loudspeaker is activated, or the music stand is connected to the device.  Calls are limited to a closed user group.  The timed profile is selected.Your device21CyanCyanMagentaMagentaYellowYellowBlackBlackfile:/D:/temp/overmode/GUID-E1544AC5-7061-4AE9-A1A4-A210498F82B9.en.200611241647272031164380388562/en/1/GUID-7C1BD2F4-DE90-4CA6-8F0C-D6CE2FEB7F7D.xmlPage 21 Nov 24, 2006 5:00:27 PM
//  A headset, handsfree, or loopset is connected to the device.Flight modeYou can deactivate all radio frequency functions and still have access to offlinegames, calendar, and phone numbers.Use the flight mode in radio sensitive environments—on board aircraft or inhospitals. When the flight mode is active,  is shown.Select Menu > Settings > Profiles > Flight > Activate or Personalise to activateor setup the flight mode.To deactivate the flight mode, select any other profile.Emergency call in flight mode - Enter the emergency number, press the call key,and select Yes when Exit flight profile? is displayed. The phone attempts to makean emergency call.Warning:  With the flight profile you cannot make or receive any calls,including emergency calls, or use other features that require networkcoverage. To make calls, you must first activate the phone function bychanging profiles. If the device has been locked, enter the lock code. If youneed to make an emergency call while the device is locked and in the flightprofile, you may be also able to enter an official emergency numberprogrammed in your device in the lock code field and select 'Call'. The devicewill confirm that you are about to exit flight profile to start an emergencycall.Keypad lock (keyguard)To prevent accidental keypresses, select Menu, and press * within 3.5 seconds tolock the keypad.To unlock the keypad, select Unlock, and press * within 1.5 seconds. If Securitykeyguard is set to On, enter the security code if requested.To answer a call when keyguard is on, press the call key. When you end or rejectthe call, the keypad automatically locks.Your device22CyanCyanMagentaMagentaYellowYellowBlackBlackfile:/D:/temp/overmode/GUID-E1544AC5-7061-4AE9-A1A4-A210498F82B9.en.200611241647272031164380388562/en/1/GUID-7C1BD2F4-DE90-4CA6-8F0C-D6CE2FEB7F7D.xmlPage 22 Nov 24, 2006 5:00:27 PM
Further features are Automatic keyguard and Security keyguard. See"Phone," p. 56.When the keyguard is on, calls may be possible to the official emergency numberprogrammed into your device.Functions without a SIM cardSeveral functions of your device may be used without installing a SIM card (forexample, the data transfer with a compatible PC or another compatible device).Some functions appear dimmed in the menus and cannot be used.4. Call functionsMake a callNumber dialing1. Enter the phone number, including the area code.For international calls, press * twice for the international prefix (the + characterreplaces the international access code), enter the country code, the area codewithout the leading 0, if necessary, and the phone number.2. To call the number, press the call key. To adjust the volume in a call, press thevolume key up or down.3. To end the call or to cancel the call attempt, press the end key.You can search for a name or phone number that you have saved in Contacts. See"Search for a contact," p. 45. Press the call key to call the number.To access the list of dialed numbers, press the call key once in the standby mode.To call the number, select a number or name, and press the call key.Call functions23CyanCyanMagentaMagentaYellowYellowBlackBlackfile:/D:/temp/overmode/GUID-E1544AC5-7061-4AE9-A1A4-A210498F82B9.en.200611241647272031164380388562/en/1/GUID-7C1BD2F4-DE90-4CA6-8F0C-D6CE2FEB7F7D.xmlPage 23 Nov 24, 2006 5:00:27 PM
Dialing shortcutsAssign a phone number to one of the number keys, 2 to 9. See "Dialingshortcuts," p. 46.Call the number in one of the following ways:Press a number key, then the call key.ORIf Speed dialling is set to On, press and hold a number key until the call begins.Further details are described in Speed dialling. See "Call," p. 56.Enhanced voice dialingYou can make a phone call by saying the name that is saved in the contact list ofthe device.Voice commands are language-dependent. Set the Recognition lang. before usingvoice dialing. See "Phone," p. 56.Note:  Using voice tags may be difficult in a noisy environment or duringan emergency, so you should not rely solely upon voice dialing in allcircumstances.1. In the standby mode, press and hold the right selection key or the volume downkey. A short tone sounds, and Speak now is displayed.2. Speak the voice command clearly. If the voice recognition is successful, a listwith matches is shown. The device plays the voice command of the first matchon the list. If it is not the correct command, scroll to another entry.Using voice commands to carry out a selected device function is similar to voicedialing. See "Voice commands," p. 51.Answer or reject a callTo answer an incoming call, press the call key. To end the call, press the end key.To reject an incoming call, press the end key. To mute the ringing tone, selectSilence.Call functions24CyanCyanMagentaMagentaYellowYellowBlackBlackfile:/D:/temp/overmode/GUID-E1544AC5-7061-4AE9-A1A4-A210498F82B9.en.200611241647272031164380388562/en/1/GUID-7C1BD2F4-DE90-4CA6-8F0C-D6CE2FEB7F7D.xmlPage 24 Nov 24, 2006 5:00:27 PM
To answer a waiting call during an active call (network service), press the call key.The first call is put on hold. To end the active call, press the end key. You may alsoactivate the Call waiting function. See "Call," p. 56.Options during a callMany of the options that you can use during a call are network services. Foravailability, contact your service provider.During a call, select Options and from the following options:Call options are Mute or Unmute, Contacts, Menu, Lock keypad, Record, Voiceclarity, Loudspeaker or Handset.Network options are Answer or Reject, Hold or Unhold, New call, Add toconference, End call, End all calls, and the following:•Send DTMF —  to send tone strings•Swap —  to switch between the active call and the call on hold•Transfer —  to connect a call on hold to an active call and disconnect yourself•Conference —  to make a conference call•Private call  — to have a private discussion in a conference callWarning:  Do not hold the device near your ear when the loudspeaker isin use, because the volume may be extremely loud.5. Write textText modesTo enter text (for example, when writing messages) you can use traditional orpredictive text input.When you write text, press and hold Options to toggle between traditional textinput, indicated by  , and predictive text input, indicated by  . Not alllanguages are supported by predictive text input.Write text25CyanCyanMagentaMagentaYellowYellowBlackBlackfile:/D:/temp/overmode/GUID-E1544AC5-7061-4AE9-A1A4-A210498F82B9.en.200611241647272031164380388562/en/1/GUID-7C1BD2F4-DE90-4CA6-8F0C-D6CE2FEB7F7D.xmlPage 25 Nov 24, 2006 5:00:27 PM
The character cases are indicated by  ,  , and  . To change the character case,press #. To change from the letter to number mode, indicated by  , press andhold #, and select Number mode. To change from the number to the letter mode,press and hold #.To set the writing language, select Options > Writing language.Traditional text inputPress a number key, 2 to 9, repeatedly until the desired character appears. Theavailable characters depend on the selected writing language.If the next letter you want is located on the same key as the present one, wait untilthe cursor appears and enter the letter.To access the most common punctuation marks and special characters, repeatedlypress the number key 1 or press * to select a special character.Predictive text inputPredictive text input is based on a built-in dictionary to which you can also addnew words.1. Start writing a word, using the keys 2 to 9. Press each key only once for oneletter.2. When you finish writing the word and it is correct, to confirm it by adding aspace, press 0.If the word is not correct, press * repeatedly, and select the word from the list.If the ? character is displayed after the word, the word you intended to write isnot in the dictionary. To add the word to the dictionary, select Spell. Enter theword using traditional text input, and select Save. To write compound words,enter the first part of the word, and press the scroll key right to confirm it. Writethe last part of the word, and confirm the word.3. Start writing the next word.Write text26CyanCyanMagentaMagentaYellowYellowBlackBlackfile:/D:/temp/overmode/GUID-E1544AC5-7061-4AE9-A1A4-A210498F82B9.en.200611241647272031164380388562/en/1/GUID-7C1BD2F4-DE90-4CA6-8F0C-D6CE2FEB7F7D.xmlPage 26 Nov 24, 2006 5:00:27 PM
6. Navigate the menusThe device offers you an extensive range of functions that are grouped into menus.1. To access the menu, select Menu.2. Scroll through the menu, and select an option (for example, Settings).3. If the selected menu contains further submenus, select one (for example, Call).4. If the selected menu contains further submenus, repeat step 3.5. Select the setting of your choice.6. To return to the previous menu level, select Back.To exit the menu, select Exit.To change the menu view, select Options > Main menu view > List, Grid, Gridwith labels, or Tab.To rearrange the menu, scroll to the menu to be moved, and select Options >Organise > Move. Scroll to where you want to move the menu, and select OK. Tosave the change, select Done > Yes.7. MessagingYou can read, write, send, and save text, multimedia, email, audio, and flashmessages and postcards. All messages are organized into folders.Text messagesYour device supports the sending of text messages beyond the character limit fora single message. Longer messages are sent as a series of two or more messages.Your service provider may charge accordingly. Characters that use accents or othermarks, and characters from some language options, take up more space, limitingthe number of characters that can be sent in a single message.Navigate the menus27CyanCyanMagentaMagentaYellowYellowBlackBlackfile:/D:/temp/overmode/GUID-E1544AC5-7061-4AE9-A1A4-A210498F82B9.en.200611241647272031164380388562/en/1/GUID-7C1BD2F4-DE90-4CA6-8F0C-D6CE2FEB7F7D.xmlPage 27 Nov 24, 2006 5:00:27 PM
With the short message service (SMS) you can send and receive text messages andreceive messages that can contain pictures (network service).Before you can send any text or SMS email message, you must save your messagecenter number. See "Message settings," p. 41.To check SMS email service availability and to subscribe to the service, contact yourservice provider. You can save an email address in Contacts. See "Savedetails," p. 44.Write and send a text message1. Select Menu > Messaging > Create message > Text message.2. Enter one or more phone numbers or e-mail addresses in the To: field. Toretrieve a phone number or e-mail address, select Add.3. For a SMS e-mail, enter a subject in the Subject: field.4. Write your message in the Message: field.An indicator at the top of the display shows the total number of characters leftand the number of messages needed for sending. For example, 673/2 meansthat there are 673 characters left and that the message will be sent as a seriesof 2 messages.5. To send the message, select Send. See "Message sending process," p. 30.Read and reply to a [Editorial Note: Edited by: jsw Date created:11/03/2006 Comment type: insert Change: required text]message1. To view a received message, select Show. To view it later, select Exit.2. To read the message later, select Menu > Messaging > Inbox.   is shown ifyou have unread messages in the inbox.3. To reply to a message, selectReply and the message type.4. Create the reply message.5. To send the message, select Send. See "Message sending process," p. 30.Messaging28CyanCyanMagentaMagentaYellowYellowBlackBlackfile:/D:/temp/overmode/GUID-E1544AC5-7061-4AE9-A1A4-A210498F82B9.en.200611241647272031164380388562/en/1/GUID-7C1BD2F4-DE90-4CA6-8F0C-D6CE2FEB7F7D.xmlPage 28 Nov 24, 2006 5:00:27 PM
Multimedia messagesOnly devices that have compatible features can receive and display multimediamessages. The appearance of a message may vary depending on the receivingdevice.The wireless network may limit the size of MMS messages. If the inserted pictureexceeds this limit, the device may make it smaller so that it can be sent by MMS.A multimedia message (MMS) can contain text and objects such as images, soundclips, or video clips.To check availability and to subscribe to the multimedia messaging service (MMS),contact your service provider. See "Message settings," p. 41.Write and send a multimedia message1. Select Menu > Messaging > Create message > Multimedia.2. Create your message.Your device supports multimedia messages that contain several pages (slides).A message can contain a calendar note and a business card as attachments. Aslide can contain text, one image, and one sound clip; or text and a video clip.To insert a slide in the message, select New; or select Options > Insert >Slide. To insert a file in the message, select Insert.3. To view the message before sending it, select Options > Preview.4. To send the message, select Send.5. Enter one or more phone numbers or e-mail addresses in the To: field. Toretrieve a phone number or e-mail address, select Add.6. For an SMS e-mail, enter a subject in the Subject: field.7. To send the message, select Send. See "Message sending process," p. 30.Write and send a multimedia plus messageAny content can be added to the multimedia plus message. Such content might beimages, video clips, sound clips, business cards, calendar notes, themes, streaminglinks, or even unsupported files (for example, files received with an e-mail).Messaging29CyanCyanMagentaMagentaYellowYellowBlackBlackfile:/D:/temp/overmode/GUID-E1544AC5-7061-4AE9-A1A4-A210498F82B9.en.200611241647272031164380388562/en/1/GUID-7C1BD2F4-DE90-4CA6-8F0C-D6CE2FEB7F7D.xmlPage 29 Nov 24, 2006 5:00:27 PM
1. Select Menu > Messaging > Create message > Multimedia plus.2. Enter one or more phone numbers or e-mail addresses in the To: field. Toretrieve a phone number or e-mail address, select Add.3. Enter a subject and write your message.4. To insert a file in the message, select Insert or Options > Insert and the filetype.5. To view the message before sending it, select Options > Preview.6. To send the message, select Send. See "Message sending process," p. 30.Read and reply to a multimedia messageImportant:  Exercise caution when opening messages. E-mail messages ormultimedia message objects may contain malicious software or otherwisebe harmful to your device or PC.1. To view the received message, select Show. To view it later, select Exit.2. To view the whole message if the received message contains a presentation,select Play. To view the files in the presentation or the attachments, selectOptions > Objects or Attachments.3. To reply to the message, select Options > Reply and the message type.4. Create the reply message.5. To send the message, select Send. See "Message sending process," p. 30.Message sending processTo send the message, select Send. The phone saves the message in the Outboxfolder, and the sending starts.Note:  Your device may indicate that your message was sent to the messagecenter number programmed into your device. Your device may not indicatewhether the message is received at the intended destination. For moredetails about messaging services, contact your service provider.If an interruption occurs while the message is being sent, the phone tries to resendthe message a few times. If these attempts fail, the message remains in theMessaging30CyanCyanMagentaMagentaYellowYellowBlackBlackfile:/D:/temp/overmode/GUID-E1544AC5-7061-4AE9-A1A4-A210498F82B9.en.200611241647272031164380388562/en/1/GUID-7C1BD2F4-DE90-4CA6-8F0C-D6CE2FEB7F7D.xmlPage 30 Nov 24, 2006 5:00:27 PM
Outbox folder. To cancel the sending of the messages in the Outbox folder, scrollto the desired message, and select Options > Cancel sending.PostcardsWith the postcard messaging service (network service), create and send postcardsthat may contain an image and a greeting text. The postcard is sent to the serviceprovider using multimedia messaging. The service provider prints the postcard andsends it to the postal address given with the message. MMS must be activatedbefore this service can be used.Before you can use the postcard service, you must subscribe to the service. To checkthe availability and costs and to subscribe to the service, contact your networkoperator or service provider.To send a postcard, select Menu > Messaging > Create message > Postcard. Fillin the address; mandatory editor fields are marked by a *. Scroll to the image field,select Insert and an image from the gallery, or New image to insert a recentimage; then write your greeting text. To send the message, select Send.Flash messagesFlash messages are text messages that are instantly displayed upon reception.Flash messages are not automatically saved.Write a flash messageSelect Menu > Messaging > Create message > Flash message. Enter therecipient’s phone number and write your message. The maximum length of a flashmessage is 70 characters. To insert a blinking text into the message, selectOptions > Insert blink charact. to set a marker. The text after the marker blinks.To end the blinking text range, insert a second marker.Read and reply to a flash messageA received flash message is indicated with Message: and a few words from thebeginning of the message.Messaging31CyanCyanMagentaMagentaYellowYellowBlackBlackfile:/D:/temp/overmode/GUID-E1544AC5-7061-4AE9-A1A4-A210498F82B9.en.200611241647272031164380388562/en/1/GUID-7C1BD2F4-DE90-4CA6-8F0C-D6CE2FEB7F7D.xmlPage 31 Nov 24, 2006 5:00:27 PM
To read the message, select Read.To extract numbers and addresses from the current message, select Options > Usedetail.To save the message, select Save and the folder in which you want to save it.Nokia Xpress audio messagingYou can use the MMS to create and send a audio message in a convenient way. MMSmust be activated before you can use audio messages.Create a message1. Select Menu > Messaging > Create message > Audio message. The voicerecorder opens. See "Voice recorder," p. 68.2. Speak your message.3. Enter one or more phone numbers in the To: field, or select Add to retrieve anumber.4. To send the message, select Send.Listen to a messageTo open a received audio message, select Play.If more than one message is received, select Show > Play.To listen to the message later, select Exit.Memory fullWhen you receive a message, and the memory for the messages is full, Memoryfull. Unable to receive messages. is displayed.To delete old messages, select OK > Yes and the folder. Scroll to the desiredmessage, and select Delete.To delete more messages, select Mark. Mark all the messages you want to delete,and select Options > Delete marked.Messaging32CyanCyanMagentaMagentaYellowYellowBlackBlackfile:/D:/temp/overmode/GUID-E1544AC5-7061-4AE9-A1A4-A210498F82B9.en.200611241647272031164380388562/en/1/GUID-7C1BD2F4-DE90-4CA6-8F0C-D6CE2FEB7F7D.xmlPage 32 Nov 24, 2006 5:00:27 PM
FoldersThe device saves received messages in the Inbox folder. Messages that have notyet been sent are saved in the Outbox folder.To set the device to save the sent messages in the Sent items folder, selectMenu > Messaging > Message settings > General settings > Save sentmessages.To edit and send messages that you have written and saved in the drafts folder,select Menu > Messaging > Drafts.You can move messages to the Saved items folder. To organize your Saveditems subfolders, select Menu > Messaging > Saved items.To add a folder, select Options > Add folder.To delete or rename a folder, scroll to the desired folder, and select Options >Delete folder or Rename folder.To create a new template, save a message as a template, or access the templatelist, and select Menu > Messaging > Saved items > Templates.E-mail applicationThe email application uses a packet data connection (network service) to allow youto access your email account. This email application is different from the SMS emailfunction. To use the email function on your device, you need a compatible emailsystem.You can write, send, and read email with your device. Your device supports POP3and IMAP4 email servers. This application does not support keypad tones.Before you can send and retrieve any email messages, you must obtain a new e-mail account or use your current account. To check the availability of your emailaccount, contact your email service provider.Check your email settings with your email service provider. You may receive the e-mail configuration settings as a configuration message. See "Configuration settingservice," p. 12.Messaging33CyanCyanMagentaMagentaYellowYellowBlackBlackfile:/D:/temp/overmode/GUID-E1544AC5-7061-4AE9-A1A4-A210498F82B9.en.200611241647272031164380388562/en/1/GUID-7C1BD2F4-DE90-4CA6-8F0C-D6CE2FEB7F7D.xmlPage 33 Nov 24, 2006 5:00:27 PM
To activate the email settings, select Menu > Messaging > Message settings > E-mail messages. See "E-mail messages," p. 43.Setting wizardThe setting wizard starts automatically if no e-mail settings are defined in thephone.To enter the settings manually, select Menu > Messaging > E-mail > Options >Manage accounts > Options > New. The options for Manage accounts allow youto add, delete, and change the email settings.Write and send an emailYou can write your email message before connecting to the email service; orconnect to the service first, then write and send your email.1. Select Menu > E-mail > Write new e-mail.2. If more than one e-mail account is defined, select the account from which youwant to send the e-mail.3. Enter the recipient’s email address, write the subject, and enter the e-mailmessage. To attach a file from Gallery, select Options > Attach file.4. To send the email message, select Send > Send now.To save the email in the Outbox folder to be sent later, select Send > Sendlater.To edit or continue writing your email later, select Options > Save as draft. Theemail is saved in Outboxes > Drafts.To send the email later, select Menu > Messaging > E-mail > Options > Sendnow or Send and check for e-mail.Download e-mailTo download email messages that have been sent to your email account, selectMenu > Messaging > E-mail > Check new e-mail. If more than one e-mail accountis defined, select the account from which you want to download the email. The e-mail application only downloads e-mail headers at first. Select Back > Inboxes,Messaging34CyanCyanMagentaMagentaYellowYellowBlackBlackfile:/D:/temp/overmode/GUID-E1544AC5-7061-4AE9-A1A4-A210498F82B9.en.200611241647272031164380388562/en/1/GUID-7C1BD2F4-DE90-4CA6-8F0C-D6CE2FEB7F7D.xmlPage 34 Nov 24, 2006 5:00:27 PM
the account name, the new message, and Retrieve to download the complete e-mail message.To download new e-mail messages and to send e-mail that has been saved in theOutbox folder, select Options > Send and check for e-mail.Read and reply to e-mailImportant:  Exercise caution when opening messages. E-mail messages ormultimedia message objects may contain malicious software or otherwisebe harmful to your device or PC.1. Select Menu > Messaging > E-mail > Inboxes, the account name, and thedesired message.2. To reply to an email, select Reply > Original text or Empty message. To replyto many, select Options > Reply to all. Confirm or edit the email address andsubject; then write your reply.3. To send the message, select Send > Send now.E-mail foldersYour phone saves email that you have downloaded from your email account inInboxes. Inboxes contains the following folders: “Account name” for incoming e-mail, Archive for archiving email, Custom 1—Custom 3 for sorting e-mail, Junkwhere all spam email is stored, Drafts for saving unfinished email, Outbox forsaving email that has not been sent, and Sent items for saving email that has beensent.To manage the folders and their email content, select Options to view the availableoptions of each folder.Spam filterThe spam filter allows you to put specific senders on a black or white list. Black listsender messages are filtered to Junk. Unknown and white list sender messagesare downloaded into the account inbox.Messaging35CyanCyanMagentaMagentaYellowYellowBlackBlackfile:/D:/temp/overmode/GUID-E1544AC5-7061-4AE9-A1A4-A210498F82B9.en.200611241647272031164380388562/en/1/GUID-7C1BD2F4-DE90-4CA6-8F0C-D6CE2FEB7F7D.xmlPage 35 Nov 24, 2006 5:00:27 PM
To activate and define a spam filter, select Options > Spam filter > Settings in themain email idle screen.To blacklist a sender, select the email message in the Inboxes folder andOptions > Blacklist sender.Instant messagesNote:  Depending on your IM service, you may not have access to all of thefeatures described in this guide.With instant messaging (IM) (network service) you can send short, simple textmessages to online users. You have to subscribe to a service and register with theIM service you want to use. For more information about signing up for IM services,contact your service provider.)To set the required settings for the IM service, use the option Connectionsettings. See "Access," p. 36.The icons and texts on the display may vary, depending on the IM service.AccessSelect Menu > Messaging > IMs. IMs may be replaced by another term dependingon the service provider. If more than one set of connection settings for IM serviceis available, select the one you want.Select from the following options:•Login — to connect to the IM service. To set the phone to automatically connectto the IM service when you switch on the phone, in the login session, selectAutomatic login: > On.•Saved conversations — to view, erase, or rename the conversations that yousaved during an IM session•Connection settings — to edit the settings needed for messaging and presenceconnectionMessaging36CyanCyanMagentaMagentaYellowYellowBlackBlackfile:/D:/temp/overmode/GUID-E1544AC5-7061-4AE9-A1A4-A210498F82B9.en.200611241647272031164380388562/en/1/GUID-7C1BD2F4-DE90-4CA6-8F0C-D6CE2FEB7F7D.xmlPage 36 Nov 24, 2006 5:00:27 PM
ConnectTo connect to the service, access the instant messages menu, select the IM service,if needed, and Login.To disconnect from the IM service, select Options > Logout.SessionsWhen connected to the service, your status, as seen by others, is shown in a statusline: My status: Online, My status: Busy, or Status: Appear off. To change yourown status, select Change.Below the status line there are three folders containing your contacts that showtheir status: Conversations, Online (), and Offline (). To expand the folder, scrollto it, and select Expand (or scroll right).To collapse the folder, select Collapse (or scroll left).•Conversations — shows the list of new and read instant messages or invitationsto IM during the active IM session:  indicates a new group message  indicates a read group message  indicates a new instant message  indicates a read instant message  indicates an invitationThe icons and texts on the display depends on the IM service.•Online () — shows the number of contacts that are online•Offline () — shows the number of contacts that are offlineTo start a conversation, expand the online or the offline folder, scroll to thecontact with whom you want to chat, and select Chat. To answer an invitationor reply to a message, expand the Conversations folder, scroll to the contact towhom you want to chat, and select Open.•Groups > Public groups — List of bookmarks to public groups provided by theservice provider (not visible if groups are not supported by the network). To startMessaging37CyanCyanMagentaMagentaYellowYellowBlackBlackfile:/D:/temp/overmode/GUID-E1544AC5-7061-4AE9-A1A4-A210498F82B9.en.200611241647272031164380388562/en/1/GUID-7C1BD2F4-DE90-4CA6-8F0C-D6CE2FEB7F7D.xmlPage 37 Nov 24, 2006 5:00:27 PM
a IM session with a group, scroll to a group, and select Join. Enter the screenname that you want to use as your nickname in the conversation. When youhave successfully joined the group conversation, you can start a groupconversation. You can create a private group. See "Groups," p. 39.•Search > Users or Groups  — to search for other IM users or public groups onthe network by phone number, screen name, e-mail address, or name. If youselect Groups, you can search for a group by a member in the group, groupname, topic, or ID.•Options > Chat or Join group — to start the conversation when you have foundthe user or the group that you wantAccept or reject an invitationIf you receive a new invitation, to read it, select Read. If more than one invitationis received, select an invitation and Open. To join the private group conversation,select Accept, and enter the screen name you want to use as your nickname. Toreject or delete the invitation, select Options > Reject or Delete.Read an instant messageIf you receive a new message that is not a message associated with an activeconversation, New instant message is displayed. To read it, select Read. If morethan one message is received, select a message and Open.New messages received during an active conversation are held in IMs >Conversations. If you receive a message from someone who is not in IMcontacts, the sender ID is displayed. To save a new contact that is not in the phonememory, select Options > Save contact.Participate in a conversationTo join or start an IM session, write your message, and select Send.If you receive a new message during a conversation from a person who is not takingpart in the current conversation,  is displayed, and the phone sounds an alerttone. Write your message, and select Send. Your message is displayed, and thereply message is displayed below your message.Messaging38CyanCyanMagentaMagentaYellowYellowBlackBlackfile:/D:/temp/overmode/GUID-E1544AC5-7061-4AE9-A1A4-A210498F82B9.en.200611241647272031164380388562/en/1/GUID-7C1BD2F4-DE90-4CA6-8F0C-D6CE2FEB7F7D.xmlPage 38 Nov 24, 2006 5:00:27 PM
Add IM contactsWhen connected to the IM service, in the IM main menu, select Options > Addcontact > By mobile number, Enter ID manually, Search from server, or Copyfrom server (depending on the service provider). To start a conversation, scroll toa contact, and select Chat.Block or unblock messagesWhen you are in a conversation and want to block messages, select Options >Block contact.To block messages from a specific contact in your contacts list, scroll to the contactin Conversations, and select Options > Block contact > OK.To unblock a contact, in the IM main menu, select Options > Blocked list. Scroll tothe contact you want to unblock, and select Unblock > OK.GroupsYou can use the public groups provided by the service provider or create your ownprivate groups for an IM conversation.You can bookmark public groups that your service provider may maintain. Connectto the IM service, and select Groups > Public groups. Select a group and Join. Ifyou are not in the group, enter your screen name as your nickname for the group.To delete a group from your list, select Options > Delete group.To search for a group, select Groups > Public groups > Search groups.To create a private group, connect to the IM service, and, from the main menu,select Options > Create group. Enter the name for the group and the screen namethat you want to use as your nickname. Mark the private group members in thecontacts list, and write an invitation.Voice messagesThe voice mailbox is a network service to which you may need to subscribe. Formore information, contact your service provider.Messaging39CyanCyanMagentaMagentaYellowYellowBlackBlackfile:/D:/temp/overmode/GUID-E1544AC5-7061-4AE9-A1A4-A210498F82B9.en.200611241647272031164380388562/en/1/GUID-7C1BD2F4-DE90-4CA6-8F0C-D6CE2FEB7F7D.xmlPage 39 Nov 24, 2006 5:00:27 PM
To call your voice mailbox, select Menu > Messaging > Voice messages > Listento voice msgs..To enter, search for, or edit your voice mailbox number, select Voice mailboxno..If supported by the network,   indicates new voice messages. To call your voicemailbox number, select Listen.Info messagesYou can receive messages on various topics from your service provider (networkservice). For more information, contact your service provider.Select Menu > Messaging > Info messages and from the available options.Service commandsService commands allow you to write and send service requests (USSD commands)to your service provider, such as activation commands for network services.To write and send the service request, select Menu > Messaging > Serv.commands. For details, contact your service provider.Delete messagesDelete a single message, all messages, or a folder.To delete messages, select Menu > Messaging > Delete messages > Bymessage to delete a single message, By folder to delete all messages from a folder,or All messages.SIM messagesSIM messages are specific text messages that are saved to your SIM card.You can copy or move those messages from the SIM to the phone memory, but notvice versa.Messaging40CyanCyanMagentaMagentaYellowYellowBlackBlackfile:/D:/temp/overmode/GUID-E1544AC5-7061-4AE9-A1A4-A210498F82B9.en.200611241647272031164380388562/en/1/GUID-7C1BD2F4-DE90-4CA6-8F0C-D6CE2FEB7F7D.xmlPage 40 Nov 24, 2006 5:00:27 PM
To read SIM messages, select Menu > Messaging > Options > SIM messages.Message settingsGeneral settingsGeneral settings are common for text and multimedia messages.Select Menu > Messaging > Message settings > General settings and from thefollowing options:•Save sent messages — Select Yes to save the sent messages in the Sentitems folder.•Overwriting in Sent — Select Allowed to overwrite old sent messages withthe new ones when the message memory is full. This setting is shown only ifyou select Save sent messages > Yes.•Font size — Select the font size used in messages.•Graphical smileys — Select Yes to set the device to replace character-basedsmileys with graphical ones.Text messagesThe text message settings affect the sending, receiving, and viewing of text andSMS e-mail messages.Select Menu > Messaging > Message settings > Text messages and from thefollowing options:•Delivery reports — Select Yes to ask the network to send delivery reports aboutyour messages (network service).•Message centres — Select Add centre to set the phone number and name ofthe message center that is required for sending text messages. You receive thisnumber from your service provider.•Msg. centre in use — to select the message center in use•E-mail msg. centres — Select Add centre to set the phone numbers and nameof the e-mail center for sending SMS e-mail.•E-mail centre in use — to select the SMS e-mail message center in useMessaging41CyanCyanMagentaMagentaYellowYellowBlackBlackfile:/D:/temp/overmode/GUID-E1544AC5-7061-4AE9-A1A4-A210498F82B9.en.200611241647272031164380388562/en/1/GUID-7C1BD2F4-DE90-4CA6-8F0C-D6CE2FEB7F7D.xmlPage 41 Nov 24, 2006 5:00:27 PM
•Message validity — to select the length of time for which the network attemptsto deliver your message•Messages sent via — to select the format of the messages to be sent: Text,Paging, or Fax (network service)•Use packet data — Select Yes to set GPRS as the preferred SMS bearer.•Character support — Select Full to select all characters in the messages to besent as viewed. If you select Reduced, characters with accents and other marksmay be converted to other characters.•Rep. via same centre — Select Yes to allow the recipient of your message tosend you a reply using your message center (network service).Multimedia messagesThe message settings affect the sending, receiving, and viewing of multimediamessages.You may receive the configuration settings for multimedia messaging as aconfiguration message. See "Configuration setting service," p. 12. You can alsoenter the settings manually. See "Configuration," p. 58.Select Menu > Messaging > Message settings > Multimedia messages and fromthe following options:•Delivery reports — Select Yes to ask the network to send delivery reports aboutyour messages (network service).•Img. size (MMS plus) — to set the image size in multimedia plus messages•Image size (MMS) — to set the image size in multimedia messages•Default slide timing — to define the default time between slides in multimediamessages•Allow MMS receptn. — Select Yes or No to receive or block the multimediamessage. If you select In home network, you cannot receive multimediamessages when outside your home network. The default setting of themultimedia message service is generally In home network. The availability ofthis menu depends on your phone.•Incoming MMS msgs. — to allow the reception of multimedia messagesautomatically, manually after being prompted, or to reject the reception. Thissetting is not shown if Allow MMS receptn. is set to No.Messaging42CyanCyanMagentaMagentaYellowYellowBlackBlackfile:/D:/temp/overmode/GUID-E1544AC5-7061-4AE9-A1A4-A210498F82B9.en.200611241647272031164380388562/en/1/GUID-7C1BD2F4-DE90-4CA6-8F0C-D6CE2FEB7F7D.xmlPage 42 Nov 24, 2006 5:00:27 PM
•Allow adverts — to receive or reject advertisements. This setting is not shownif Allow MMS receptn. is set to No, or Incoming MMS msgs. is set to Reject.•Configuration sett. — Select Configuration to display the configurations thatsupport multimedia messaging. Select a service provider, Default, or Personalconfig. for multimedia messaging. Select Account and a MMS account containedin the active configuration settings.E-mail messagesThe settings affect sending, receiving, and viewing email. You may receive thesettings as a configuration message. See "Configuration setting service," p. 12. Youcan also manually enter the settings. See "Configuration," p. 58.Select Menu > Messaging > Message settings > E-mail messages to display theoptions.8. ContactsYou can save names and phone numbers (contacts) in the device memory and inthe SIM card memory.The device memory can save contacts with additional details, such as various phonenumbers and text items. You can also save an image for a limited number ofcontacts.The SIM card memory can save names with one phone number attached to them.The contacts saved in the SIM card memory are indicated by  .Save names and phone numbersNames and numbers are saved in the used memory.To save a name and phone number, select Menu > Contacts > Names > Options >Add new contact.Contacts43CyanCyanMagentaMagentaYellowYellowBlackBlackfile:/D:/temp/overmode/GUID-E1544AC5-7061-4AE9-A1A4-A210498F82B9.en.200611241647272031164380388562/en/1/GUID-7C1BD2F4-DE90-4CA6-8F0C-D6CE2FEB7F7D.xmlPage 43 Nov 24, 2006 5:00:27 PM
Save detailsIn the device memory you can save different types of phone numbers, a tone or avideo clip, and short text items for a contact.The first number you save is automatically set as the default number and isindicated with a frame around the number type indicator (for example,  ). Whenyou select a name from contacts (for example, to make a call), the default numberis used unless you select another number.Make sure that the memory in use is Phone or Phone and SIM. See"Settings," p. 48.Search for the contact to add a detail, and select Details > Options > Add detail.Select from the available options.SettingsThese settings define where the contact information is stored, how it is displayed,and how much memory remains.Select Menu > Contacts > Settings and from the following options:•Memory in use  — to select the SIM card or phone memory for your contacts.Select Phone and SIM to recall names and numbers from both memories. Inthat case, when you save names and numbers, they are saved in the phonememory.•Contacts view  — to select how the names and numbers in Contacts aredisplayed•Name display —  to select whether the contact’s first or last name is displayedfirst•Font size  — to set the font size for the list of contacts•Memory status —  to view the free and used memory capacityContacts44CyanCyanMagentaMagentaYellowYellowBlackBlackfile:/D:/temp/overmode/GUID-E1544AC5-7061-4AE9-A1A4-A210498F82B9.en.200611241647272031164380388562/en/1/GUID-7C1BD2F4-DE90-4CA6-8F0C-D6CE2FEB7F7D.xmlPage 44 Nov 24, 2006 5:00:27 PM
GroupsSelect Menu > Contacts > Groups to arrange the names and phone numbers savedin the memory into caller groups with different ringing tones and group images.Search for a contactSelect Menu > Contacts > Names and scroll through the list of contacts, or enterthe first characters of the name to search.Copy or move contactsTo copy or move a contact between the SIM card memory and the phone memory,select Menu > Contacts > Names. Select the contact to copy or move andOptions > Copy contact or Move contact.To copy or move several contacts, select the first contact to copy or move andOptions > Mark. Mark the other contacts, and select Options > Copy marked orMove marked.To copy or move all contacts between the SIM card memory and the phone memory,select Menu > Contacts > Copy contacts or Move contacts.The SIM card memory can save names with one phone number attached to them.Edit contact detailsSearch for the contact, and select Details.To edit a name, number, or text item or to change the image, select Options >Edit.To change the number type, scroll to the desired number, and select Options >Change type. To set the selected number as the default number, select Options >Set as default.Contacts45CyanCyanMagentaMagentaYellowYellowBlackBlackfile:/D:/temp/overmode/GUID-E1544AC5-7061-4AE9-A1A4-A210498F82B9.en.200611241647272031164380388562/en/1/GUID-7C1BD2F4-DE90-4CA6-8F0C-D6CE2FEB7F7D.xmlPage 45 Nov 24, 2006 5:00:27 PM
Delete contactsTo delete a contact, search for the desired contact, and select Options > Deletecontact.To delete all the contacts and the details attached to them from the phone or SIMcard memory, select Menu > Contacts > Del. all contacts > From phonememory or From SIM card.To delete a number, text item, or an image attached to the contact, search for thecontact, and select Details. Scroll to the desired detail, and select Options >Delete and from the available options.Synchronize allSynchronize your calendar, contacts data, and notes with a remote internet server(network service).See "Synchronize from a server," p. 55.Business cardsYou can send and receive a person’s contact information from a compatible devicethat supports the vCard standard as a business card.To send a business card, search for the contact, and select Details > Options >Send business card.When you receive a business card, select Show > Save to save the business cardin the phone memory. To discard the business card, select Exit > Yes.Dialing shortcutsYour device can dial a phone number with one keypress. The number keys, 2 to 9,can have a phone number assigned to them. To assign a phone number to a numberkey, select Menu > Contacts > Speed dials, and scroll to the number to assign asthe shortcut for Speed dialling.Select Assign, or if a number has already been assigned to the key, selectOptions > Change.Contacts46CyanCyanMagentaMagentaYellowYellowBlackBlackfile:/D:/temp/overmode/GUID-E1544AC5-7061-4AE9-A1A4-A210498F82B9.en.200611241647272031164380388562/en/1/GUID-7C1BD2F4-DE90-4CA6-8F0C-D6CE2FEB7F7D.xmlPage 46 Nov 24, 2006 5:00:27 PM
Select Search and the contact to assign the shortcut. If Speed dialling is off, thephone asks whether you want to activate it.To make a call using the shortcuts, press and hold the corresponding key. See"Dialing shortcuts," p. 24.Info, service, and my numbersSelect Menu > Contacts and from one of these submenus:•Info numbers —  to call the information numbers of your service provider if thenumbers are included on your SIM card (network service)•Service numbers  — to call the service numbers of your service provider, if thenumbers are included on your SIM card (network service)•My numbers —  to view the phone numbers assigned to your SIM card, if thenumbers are included on your SIM card.9. Call log and positioningCall logThe device registers your missed, received, and dialed calls if the network supportsit and the device is switched on and within the network service area.To view the information on your calls, select Menu > Log > Missed calls, Receivedcalls, or Dialled numbers.To view your recent missed and received calls and the dialed numberschronologically, select Call log. To view the contacts to whom you most recentlysent messages, select Msg. recipients.To view the approximate information on your recent communications, selectMenu > Log > Call duration, Data counter, or Pack. data timer.To view how many text and multimedia messages you have sent and received,select Menu > Log > Message log.Call log and positioning47CyanCyanMagentaMagentaYellowYellowBlackBlackfile:/D:/temp/overmode/GUID-E1544AC5-7061-4AE9-A1A4-A210498F82B9.en.200611241647272031164380388562/en/1/GUID-7C1BD2F4-DE90-4CA6-8F0C-D6CE2FEB7F7D.xmlPage 47 Nov 24, 2006 5:00:27 PM
Note:  The actual invoice for calls and services from your service providermay vary, depending on network features, rounding off for billing, taxes,and so forth.Note:  Some timers, including the life timer, may be reset during service orsoftware upgrades.PositioningThe network may send you a position request (network service). Contact yourservice provider to subscribe and to agree upon the delivery of positioninginformation.To accept or reject the position request, select Accept or Reject. If you miss therequest, the phone automatically accepts or rejects it according to what you haveagreed with your network operator or service provider. The phone displays 1missed position request. To view the missed positioning request, select Show.To view the information on the 10 most recent privacy notifications and requestsor to delete them, select Menu > Log > Positioning > Position log > Openfolder or Delete all.10. SettingsProfilesYour phone has various setting groups called profiles, for which you can customizethe phone tones for different events and environments.Select Menu > Settings > Profiles, the desired profile, and from the followingoptions:•Activate — to activate the selected profile•Personalise — to personalize the profile. Select the setting you want to change,and make the changes.Settings48CyanCyanMagentaMagentaYellowYellowBlackBlackfile:/D:/temp/overmode/GUID-E1544AC5-7061-4AE9-A1A4-A210498F82B9.en.200611241647272031164380388562/en/1/GUID-7C1BD2F4-DE90-4CA6-8F0C-D6CE2FEB7F7D.xmlPage 48 Nov 24, 2006 5:00:27 PM
•Timed — to set the profile to be active until a certain time (up to 24 hours) andset the end time. When the time set for the profile expires, the previous profilethat was not timed becomes active.ThemesA theme contains elements for personalizing your device.Select Menu > Settings > Themes and from the following options:•Select theme — to set a theme. A list of folders in Gallery opens. Open theThemes folder, and select a theme.•Theme downloads — to open a list of links to download more themesTonesYou can change the tone settings of the selected active profile.Select Menu > Settings > Tones. You can find the same settings in the Profilesmenu. See "Profiles," p. 48.To set the phone to only ring for calls from phone numbers that belong to a selectedcaller group, select Alert for. Scroll to the caller group you want or All calls, andselect Mark.Select Options > Save to save the settings or Cancel to leave the settingsunchanged.If you select the highest ringing tone level, the ringing tone reaches its highestlevel after a few seconds.DisplaySelect Menu > Settings > Display and from the available options:•Wallpaper — to add the background image in the standby mode•Active standby — to switch the active standby mode on or off and to organizeand personalize the active standby mode•Standby font colour — to select the color for the texts in the standby modeSettings49CyanCyanMagentaMagentaYellowYellowBlackBlackfile:/D:/temp/overmode/GUID-E1544AC5-7061-4AE9-A1A4-A210498F82B9.en.200611241647272031164380388562/en/1/GUID-7C1BD2F4-DE90-4CA6-8F0C-D6CE2FEB7F7D.xmlPage 49 Nov 24, 2006 5:00:27 PM
•Navigation key icons — to display the icons of the current scroll key shortcutsin the standby mode when active standby is off•Screen saver — to set your device to display a screen saver. To download morescreen savers, select Graphic downloads. To set the time after which the screensaver is activated, select Time-out.•Power saver — to save some battery power. The date and a digital clock aredisplayed when no function of the device is used for a certain time.•Sleep mode — to save some battery power•Font size — to set the font size for messaging, contacts, and web pages•Operator logo — to set your device to display or hide the operator logo•Cell info display — to display the cell identity, if available from the networkTime and dateTo change the clock type, time, time zone, and date settings, select Menu >Settings > Time and date > Time, Date, or Auto-update of time (networkservice).When traveling to a different time zone, select Menu > Settings > Time anddate > Time > Time zone and the time zone of your location in terms of the timedifference with respect to Greenwich mean time (GMT) or coordinated universaltime (UTC). The time and date are set according to the time zone and enable yourdevice to display the correct sending time of received text or multimedia messages.My shortcutsWith personal shortcuts you get quick access to often used functions of the device.Left selection keyTo select a function from the list, select Menu > Settings > My shortcuts > Leftselection key.If the left selection key is Go to to activate a function, in the standby mode, selectGo to > Options and from the following options:•Select options — to add a function to the shortcut list or to remove oneSettings50CyanCyanMagentaMagentaYellowYellowBlackBlackfile:/D:/temp/overmode/GUID-E1544AC5-7061-4AE9-A1A4-A210498F82B9.en.200611241647272031164380388562/en/1/GUID-7C1BD2F4-DE90-4CA6-8F0C-D6CE2FEB7F7D.xmlPage 50 Nov 24, 2006 5:00:27 PM
•Organise — to rearrange the functions on your personal shortcut listRight selection keyTo select a function from the list, select Menu > Settings > My shortcuts > Rightselection key.Navigation keyTo assign other device functions from a predefined list to the navigation key (scrollkey), select Menu > Settings > My shortcuts > Navigation key.Voice commandsCall contacts and carry out device functions by speaking a voice command.Voice commands are language-dependent, and you must set the Recognitionlang. before using voice commands. See "Phone," p. 56.To select the device function to activate with a voice command, select Menu >Settings > My shortcuts > Voice commands and a folder. Scroll to a function.indicates that the voice tag is activated. To activate the voice tag, select Add. Toplay the activated voice command, select Play. See "Enhanced voicedialing," p. 24.To manage the voice commands, scroll to a device function, and select Optionsand from the following:•Edit or Remove — to change or deactivate the voice command of the selectedfunction•Add all or Remove all — to activate or deactivate voice commands to allfunctions in the voice commands listSettings51CyanCyanMagentaMagentaYellowYellowBlackBlackfile:/D:/temp/overmode/GUID-E1544AC5-7061-4AE9-A1A4-A210498F82B9.en.200611241647272031164380388562/en/1/GUID-7C1BD2F4-DE90-4CA6-8F0C-D6CE2FEB7F7D.xmlPage 51 Nov 24, 2006 5:00:27 PM
BluetoothBluetooth wireless technologyBluetooth technology allows you to connect the device to a compatible Bluetoothdevice within 10 meters (32 feet). Since devices using Bluetooth technologycommunicate using radio waves, your device and the other devices do not need tobe in direct line-of-sight, although the connection can be subject to interferencefrom obstructions such as walls or from other electronic devices.This device is compliant with Bluetooth Specification 2.0 + EDR supporting thefollowing profiles: generic access, network access, generic object exchange, hands-free, headset, object push, file transfer, dial-up networking, SIM access, and serialport. To ensure interoperability between other devices supporting Bluetoothtechnology, use Nokia approved enhancements for this model. Check with themanufacturers of other devices to determine their compatibility with this device.There may be restrictions on using Bluetooth technology in some locations. Checkwith your local authorities or service provider.Features using Bluetooth technology, or allowing such features to run in thebackground while using other features, increase the demand on battery power andreduce the battery life.Set up a Bluetooth connectionSelect Menu > Settings > Connectivity > Bluetooth and from the followingoptions:•Bluetooth —  Select On to activate the Bluetooth function.   indicates thatBluetooth is activated.•My phone's visibility — to define how your device is shown to other Bluetoothdevices•Search audio enhanc. — to search for compatible Bluetooth audio devices.Select the device that you want to connect to the phone.•Active devices — to check which Bluetooth connection is currently activeSettings52CyanCyanMagentaMagentaYellowYellowBlackBlackfile:/D:/temp/overmode/GUID-E1544AC5-7061-4AE9-A1A4-A210498F82B9.en.200611241647272031164380388562/en/1/GUID-7C1BD2F4-DE90-4CA6-8F0C-D6CE2FEB7F7D.xmlPage 52 Nov 24, 2006 5:00:27 PM
•Paired devices — to search for any Bluetooth device in range. Select New tolist any Bluetooth device in range. Select a device and Pair. Enter an agreedBluetooth passcode of the device (up to 16 characters) to pair the device to yourdevice. You must only give this passcode when you connect to the device for thefirst time. Your device connects to the other device, and you can start datatransfer.•My phone's name — to set the device name for Bluetooth connectionsIf you are concerned about security, turn off the Bluetooth function, or set Myphone's visibility to Hidden. Always accept only Bluetooth communication fromothers whom you trust.Packet dataGeneral packet radio service (GPRS) is a network service that allows mobile devicesto send and receive data over an Internet protocol (IP)-based network.To define how to use the service, select Menu > Settings > Connectivity > Packetdata > Packet data conn. and from the following options:•When needed — to set the packet data connection to established when anapplication needs it. The connection will be closed when the application isterminated.•Always online — to set the device to automatically connect to a packet datanetwork when you switch the device onYou can connect the device using Bluetooth wireless technology or USB data cableconnection to a compatible PC and use the device as a modem to enable GPRSconnectivity from the PC.To define the settings for connections from your PC, select Menu > Settings >Connectivity > Packet data > Packet data settings > Active access point, andactivate the access point you want to use. Select Edit active access pt. > Alias foraccess point, enter a name to change the access point settings, and select OK.Select Packet data acc. pt., enter the access point name (APN) to establish aconnection to a network, and select OK.Settings53CyanCyanMagentaMagentaYellowYellowBlackBlackfile:/D:/temp/overmode/GUID-E1544AC5-7061-4AE9-A1A4-A210498F82B9.en.200611241647272031164380388562/en/1/GUID-7C1BD2F4-DE90-4CA6-8F0C-D6CE2FEB7F7D.xmlPage 53 Nov 24, 2006 5:00:27 PM
You can also set the EGPRS dial-up service settings (access point name) on your PCusing the Nokia Modem Options software. See "Nokia PC Suite," p. 87. If you haveset the settings both on your PC and on your device, the PC settings are used.Data transferSynchronize your calendar, contacts data, and notes with another compatibledevice (for example, a mobile device), a compatible PC, or a remote internet server(network service).Your device allows data transfer with a compatible PC or another compatible devicewhen using the device without a SIM card.Transfer contact listTo copy or synchronize data from your device, the name of the device and thesettings must be in the list of transfer contacts. If you receive data from anotherdevice (for example, a compatible mobile device), the corresponding transfercontact is automatically added to the list, using the contact data from the otherdevice. Server sync and PC synchronisation are the original items in the list.To add a new transfer contact to the list (for example, a mobile device), selectMenu > Settings > Connectivity > Data transfer > Options > Add transfercontact > Phone synchronisation or Phone copy, and enter the settingsaccording to the transfer type.To edit the copy and synchronize settings, select a contact from the transfer contactlist and Options > Edit.To delete a transfer contact, select it from the transfer contact list and Options >Delete.Data transfer with a compatible deviceFor synchronization use Bluetooth wireless technology or a cable connection. Theother device must be activated for receiving data.To start data transfer, select Menu > Settings > Connectivity > Data transfer andthe transfer contact from the list other than Server sync or PC synchronisation.Settings54CyanCyanMagentaMagentaYellowYellowBlackBlackfile:/D:/temp/overmode/GUID-E1544AC5-7061-4AE9-A1A4-A210498F82B9.en.200611241647272031164380388562/en/1/GUID-7C1BD2F4-DE90-4CA6-8F0C-D6CE2FEB7F7D.xmlPage 54 Nov 24, 2006 5:00:27 PM
According to the settings, the selected data is copied or synchronized.Synchronize from a PCTo synchronize data from calendar, notes, and contacts, install the Nokia PC Suitesoftware of your device on a compatible PC. Use Bluetooth wireless technology ora USB data cable to connect your device with the PC and start the synchronizationfrom the PC.Synchronize from a serverTo use a remote internet server, subscribe to a synchronization service. For moreinformation and the settings required for this service, contact your service provider.You may receive the settings as a configuration message. See "Configurationsetting service," p. 12.1. To start the synchronization from your device, select Menu > Settings >Connectivity > Data transfer > Server sync.2. Depending on the settings, select Initialising synchronisation or Initialisingcopy.Synchronizing for the first time or after an interrupted synchronization may takeup to 30 minutes to complete.USB data cableYou can use the USB data cable to transfer data between the device and acompatible PC or a printer supporting PictBridge. You can also use the USB datacable with Nokia PC Suite.To activate the device for data transfer or image printing, connect the data cable.Confirm "USB data cable connected. Select mode." and select from the followingoptions:•Nokia mode — to use the cable for PC Suite•Printing & media — to use the device with a PictBridge compatible printer orwith your compatible PCSettings55CyanCyanMagentaMagentaYellowYellowBlackBlackfile:/D:/temp/overmode/GUID-E1544AC5-7061-4AE9-A1A4-A210498F82B9.en.200611241647272031164380388562/en/1/GUID-7C1BD2F4-DE90-4CA6-8F0C-D6CE2FEB7F7D.xmlPage 55 Nov 24, 2006 5:00:27 PM
•Data storage — to connect to a PC that does not have Nokia software and usethe device as a data storage deviceTo change the USB mode, select Menu > Settings > Connectivity > USB datacable and the desired USB mode.CallSelect Menu > Settings > Call and from the following options:•Call divert — to divert your incoming calls (network service). You may not beable to divert your calls if some call barring functions are active. See"Security," p. 59.•Voice clarity — Select Active to enhance speech intelligibility especially in noisyenvironments.•Anykey answer — Select On to answer an incoming call by briefly pressing anykey, except the power key, the left and right selection keys, or the end key.•Automatic redial — Select On to make a maximum of 10 attempts to connectthe call after an unsuccessful call attempt.•Speed dialling — Select On to dial the names and phone numbers assigned tothe number keys 2 to 9 by pressing and holding the corresponding numberkey.•Call waiting — Select Activate to have the network notify you of an incomingcall while you have a call in progress (network service). See "Answer or reject acall," p. 24.•Summary after call — Select On to briefly display the approximate durationafter each call.•Send my caller ID — Select Yes to show your phone number to the person youare calling (network service). To use the setting agreed upon with your serviceprovider, select Set by network.•Outgoing call line — to select the phone line 1 or 2 for making calls if supportedby your SIM card (network service)PhoneSelect Menu > Settings > Phone and from the following options:Settings56CyanCyanMagentaMagentaYellowYellowBlackBlackfile:/D:/temp/overmode/GUID-E1544AC5-7061-4AE9-A1A4-A210498F82B9.en.200611241647272031164380388562/en/1/GUID-7C1BD2F4-DE90-4CA6-8F0C-D6CE2FEB7F7D.xmlPage 56 Nov 24, 2006 5:00:27 PM
•Language settings — To set the display language of your device, select Phonelanguage. Automatic selects the language according to the information on theSIM card. To select the USIM card language, select SIM language. To set alanguage for the voice playback, select Recognition lang.. See "Enhanced voicedialing," p. 24.•Security keyguard — To set the device to ask for the security code when youunlock the keyguard. enter the security code, and select On.•Automatic keyguard — to lock the keypad automatically after a preset timedelay when the device is in the standby mode and no function of the device hasbeen used. Select On, and set the time.•Welcome note — to write the note that is shown when the device is switchedon•Flight query — The device asks every time when it is switched on whether youwant to use the flight profile. With the flight profile, all radio connections areswitched off. The flight profile should be used in areas sensitive to radioemissions.•Phone updates — to receive software updates from your service provider(network service). This option may not be available, depending on your device.See "Software updates over the air," p. 60.•Operator selection — Select Automatic to set the device to automaticallyselect one of the cellular networks available in your area. With Manual you canselect a network that has a roaming agreement with your service provider.•Confirm SIM actions — See "SIM services," p. 86.•Help text activation — to select whether the device shows help texts•Start-up tone — The device plays a tone when it is switched on.EnhancementsThis menu or the following options are shown only if the device is or has beenconnected to a compatible mobile enhancement.Select Menu > Settings > Enhancements. Select an enhancement, and dependingon the enhancement, from the following options:Settings57CyanCyanMagentaMagentaYellowYellowBlackBlackfile:/D:/temp/overmode/GUID-E1544AC5-7061-4AE9-A1A4-A210498F82B9.en.200611241647272031164380388562/en/1/GUID-7C1BD2F4-DE90-4CA6-8F0C-D6CE2FEB7F7D.xmlPage 57 Nov 24, 2006 5:00:27 PM
•Default profile — to select the profile that you want to be automaticallyactivated when you connect to the selected enhancement•Automatic answer — to set the device to answer an incoming callautomatically after 5 seconds. If (QTN_FORM_RINGING_OPTIONS)Incoming callalert is set to Beep once or Off, automatic answer is off.•Lights — to set the lights permanently On. Select Automatic to set the lightson for 15 seconds after a keypress.•Text phone — Select Use text phone > Yes to use the text device settingsinstead of headset or loopset settings.If your device is provided with a hearing aid coil, select Hearing aid > T-coil hrng.aid mode > On to optimize the sound quality when using a t-coil hearing aid. is shown when the T-coil hrng. aid mode is active.ConfigurationYou can configure your device with settings that are required for certain services.Your service provider may also send you these settings. See "Configuration settingservice," p. 12.Select Menu > Settings > Configuration and from the following options:•Default config. sett. — to view the service providers saved in the device. To setthe configuration settings of the service provider as default settings, selectOptions > Set as default.•Activ. def. in all apps. — to activate the default configuration settings forsupported applications•Preferred access pt. — to view the saved access points. Scroll to an access point,and select Options > Details to view the name of the service provider, databearer, and packet data access point or GSM dial-up number.•Connect to support — to download the configuration settings from yourservice provider•Device manager sett. — to allow or prevent the device from receiving softwareupdates. This option may not be available, depending on your device. See"Software updates over the air," p. 60.Settings58CyanCyanMagentaMagentaYellowYellowBlackBlackfile:/D:/temp/overmode/GUID-E1544AC5-7061-4AE9-A1A4-A210498F82B9.en.200611241647272031164380388562/en/1/GUID-7C1BD2F4-DE90-4CA6-8F0C-D6CE2FEB7F7D.xmlPage 58 Nov 24, 2006 5:00:27 PM
•Personal config. sett. — to manually add new personal accounts for variousservices and to activate or delete them. To add a new personal account if youhave not added any, select Add; otherwise, select Options > Add new. Selectthe service type, and select and enter each of the required parameters. Theparameters differ according to the selected service type. To delete or activate apersonal account, scroll to it, and select Options > Delete or Activate.SecurityWhen security features that restrict calls are in use (such as call barring, closed usergroup, and fixed dialing), calls may be possible to the official emergency numberprogrammed into your device.Select Menu > Settings > Security and from the following options:•PIN code request and UPIN code request — to set the device to ask for yourPIN or UPIN code every time the device is switched on. Some SIM cards do notallow the code request to be turned off.•PIN2 code request — to select whether the PIN2 code is required when usinga specific device feature which is protected by the PIN2 code. Some SIM cards donot allow the code request to be turned off.•Call barring service — to restrict incoming calls to and outgoing calls from yourdevice (network service). A barring password is required.•Fixed dialling — to restrict your outgoing calls to selected phone numbers ifthis function is supported by your SIM card. When the fixed dialing is on, GPRSconnections are not possible except while sending text messages over a GPRSconnection. In this case, the recipient’s phone number and the message centernumber must be included in the fixed dialing list.•Closed user group — to specify a group of people whom you can call and whocan call you (network service)•Security level — Select Phone to set the device to ask for the security codewhenever a new SIM card is inserted into the device. If you select Memory, thedevice asks for the security code when the SIM card memory is selected, and youwant to change the memory in use.•Access codes — to change the security code, PIN code, UPIN code, PIN2 code,or barring passwordSettings59CyanCyanMagentaMagentaYellowYellowBlackBlackfile:/D:/temp/overmode/GUID-E1544AC5-7061-4AE9-A1A4-A210498F82B9.en.200611241647272031164380388562/en/1/GUID-7C1BD2F4-DE90-4CA6-8F0C-D6CE2FEB7F7D.xmlPage 59 Nov 24, 2006 5:00:27 PM
•Code in use — to select whether the PIN code or UPIN code should be active•Authority certificates or User certificates — to view the list of the authorityor user certificates downloaded into your device. See "Certificates," p. 85.•Security module sett. — to view Secur. module details, activate Module PINrequest, or change the module PIN and signing PIN. See "Access codes," p. 11.Software updates over the airWarning:  If you install a software update, you cannot use the device, evento make emergency calls, until the installation is completed and the deviceis restarted. Be sure to back up data before accepting installation of anupdate.Your service provider may send device software updates over the air directly toyour device (network service). This option may not be available, depending on yourdevice.Software update settingsTo allow or disallow software updates, select Menu > Settings > Configuration >Device manager sett. > Serv. softw. updates and the following options:•Always allow — to perform all software downloads and updates automatically•Always reject — to reject all software updates•Confirm first — to perform software downloads and updates only after yourconfirmation (default setting)Request a software updateSelect Menu > Settings > Phone > Phone updates to request available softwareupdates from your service provider. Select Current softw. details to display thecurrent software version and check whether an update is needed. Select Downl.phone softw. to download and install a software update. Follow the instructionson the display.Settings60CyanCyanMagentaMagentaYellowYellowBlackBlackfile:/D:/temp/overmode/GUID-E1544AC5-7061-4AE9-A1A4-A210498F82B9.en.200611241647272031164380388562/en/1/GUID-7C1BD2F4-DE90-4CA6-8F0C-D6CE2FEB7F7D.xmlPage 60 Nov 24, 2006 5:00:27 PM
Install a software updateIf the installation was canceled after the download, select Install softw. updateto start the installation.The software update may take several minutes. If there are problems with theinstallation, contact your service provider.Restore factory settingsTo reset some of the menu settings to their original values, select Menu >Settings > Rest. factory sett.. Enter the security code.The names and phone numbers saved in Contacts are not deleted.11. Operator menuThis menu lets you access a portal to services provided by your network operator.The name and the icon depend on the operator. For more information contact yournetwork operator. The operator can update this menu with a service message. See"Service inbox," p. 83.12. GalleryCopyright protections may prevent some images, music (including ringing tones),and other content from being copied, modified, transferred or forwarded.Manage images, video clips, music files, themes, graphics, tones, recordings, andreceived files. These files are stored in the device memory or an attached memorycard and may be arranged in folders.Your device supports an activation key system to protect acquired content. Alwayscheck the delivery terms of any content and activation key before acquiring them,as they may be subject to a fee.Operator menu61CyanCyanMagentaMagentaYellowYellowBlackBlackfile:/D:/temp/overmode/GUID-E1544AC5-7061-4AE9-A1A4-A210498F82B9.en.200611241647272031164380388562/en/1/GUID-7C1BD2F4-DE90-4CA6-8F0C-D6CE2FEB7F7D.xmlPage 61 Nov 24, 2006 5:00:27 PM
Folders and filesTo see the list of folders, select Menu > Gallery.To view the list of files in a folder, select a folder and Open.To see the available options of a folder or a file, select a folder or a file andOptions.To view the folders of the memory card when moving a file, scroll to the memorycard, and press the scroll key right.Print imagesYour device supports Nokia XPressPrint to print images that are in the .jpeg format.The images taken with the built-in camera are automatically saved in the .jpegformat.To connect your device to a compatible printer, use a data cable or send the imageBluetooth to a printer supporting Bluetooth technology. See "PCconnectivity," p. 87.Select the image you want to print and Options > Print.Memory cardWarning:  Keep all memory cards out of the reach of small children.Use a memory card to store your multimedia files such as video clips, music tracks,sound files, images, and messaging data.Some of the folders in Gallery with content that the device uses (for example,Themes) may be stored on the memory card.To insert and remove a memory card see "Insert a microSD card", p.15 and "Removethe microSD card", p. 15.Gallery62CyanCyanMagentaMagentaYellowYellowBlackBlackfile:/D:/temp/overmode/GUID-E1544AC5-7061-4AE9-A1A4-A210498F82B9.en.200611241647272031164380388562/en/1/GUID-7C1BD2F4-DE90-4CA6-8F0C-D6CE2FEB7F7D.xmlPage 62 Nov 24, 2006 5:00:27 PM
Format the memory cardSome supplied memory cards are preformatted; others require formatting. Consultyour retailer to find out if you must format the memory card before you can use it.When you format a memory card, all data on the card is permanently lost.To format a memory card, select Menu > Gallery or Applications, the memorycard folder  , and Options > Format memory card > Yes.When formatting is complete, enter a name for the memory card.Lock the memory cardSet a password to lock your memory card against unauthorized use.Select the memory card folder   and Options > Set password. The passwordcan be up to eight characters long. The password is stored in your device, and youdo not have to enter it again while you are using the memory card on the samedevice. If you want to use the memory card on another device, you are asked forthe password.To delete the password, select Options > Delete password.Check memory consumptionCheck the memory consumption of different data groups and the available memoryto install new applications or software on your memory card.Select the memory card   and Options > Details.13. MediaCamera and videoTake images or record video clips with the built-in camera.Media63CyanCyanMagentaMagentaYellowYellowBlackBlackfile:/D:/temp/overmode/GUID-E1544AC5-7061-4AE9-A1A4-A210498F82B9.en.200611241647272031164380388562/en/1/GUID-7C1BD2F4-DE90-4CA6-8F0C-D6CE2FEB7F7D.xmlPage 63 Nov 24, 2006 5:00:27 PM
Take a pictureTo use the still picture function, select Menu > Media > Camera or if the videofunction is on, scroll left or right.To take a picture in landscape format, hold the device in a horizontal position. Tozoom in and out in the camera mode, scroll up and down or press the volume keys.To take a picture, select Capture. The device saves the pictures on the memorycard, if available, or on the phone memory.Select Options to set Night mode on if the lighting is dim, Self-timer on toactivate the self-timer, or Img. sequence on to take pictures in a fast sequence.With the highest picture size setting, three pictures are taken in a sequence; withother size settings, five pictures are taken.Select Options > Settings > Image preview time and a preview time to displaythe taken pictures. During the preview time, select Back to take another picture orSend to send the picture as a multimedia message.Your device supports a picture capture resolution up to 1600 x 1200 pixels.Record a video clipTo activate the video function, select Menu > Media > Video; or if the camerafunction is on, scroll left or right.To start the video recording, select Record; to pause the recording, select Pause;to resume the recording, select Continue; to stop the recording, select Stop.The device saves the video clips on the memory card, if available, or in the devicememory.Camera and video optionsTo use a filter, select Options > Effects > False colours, Greyscale, Sepia,Negative, or Solarise.To adopt the camera to the light conditions, select Options > White balance >Auto, Daylight, Tungsten, or Fluorescent.Media64CyanCyanMagentaMagentaYellowYellowBlackBlackfile:/D:/temp/overmode/GUID-E1544AC5-7061-4AE9-A1A4-A210498F82B9.en.200611241647272031164380388562/en/1/GUID-7C1BD2F4-DE90-4CA6-8F0C-D6CE2FEB7F7D.xmlPage 64 Nov 24, 2006 5:00:27 PM
To change other camera and video settings and to select the image and videostorage, select Options > Settings .Media playerView, play, and download files, such as images, audio, video, and animated images;or view compatible streaming videos from a network server (network service).Select Menu > Media > Media player > Open Gallery, Bookmarks, Go toaddress, or Media downloads to select or download media.Select Menu > Media > Media player > FF/Rew interval to set the step width forfast forward or rewind.Configuration for a streaming serviceYou may receive the configuration settings required for streaming as aconfiguration message from the service provider. See "Configuration settingservice," p. 12. You can also enter the settings manually. See"Configuration," p. 58.To activate the settings, do the following:1. Select Menu > Media > Media player > Streaming settings >Configuration.2. Select a service provider, Default, or Personal config. for streaming.3. Select Account and a streaming service account contained in the activeconfiguration settings.Music playerYour device includes a music player for listening to music tracks or other MP3 orAAC sound files that you have downloaded from the web or transferred to thedevice with Nokia PC Suite. See "Nokia PC Suite," p. 87.Music files stored in the music folder in the device memory or on the memory cardare automatically detected and added to the music library during the startup ofthe device.To open the music player, select Menu > Media > Music player.Media65CyanCyanMagentaMagentaYellowYellowBlackBlackfile:/D:/temp/overmode/GUID-E1544AC5-7061-4AE9-A1A4-A210498F82B9.en.200611241647272031164380388562/en/1/GUID-7C1BD2F4-DE90-4CA6-8F0C-D6CE2FEB7F7D.xmlPage 65 Nov 24, 2006 5:00:27 PM
Play music tracksWarning:  Listen to music at a moderate level. Continuous exposure to highvolume may damage your hearing. Do not hold the device near your earwhen the loudspeaker is in use, because the volume may be extremely loud.Operate the music player with the virtual keys on the display.When you open Music player, the details of the first track on the default track listare shown. To start playing, select .To adjust the volume level, use the volume keys of the device.To pause the playing, select .To skip to the next track, select . To skip to the beginning of the previous track,select .To fast forward the current track, select and hold . To rewind the current track,select and hold . Release the key at the position you want.To stop the music player, select Back.Music player optionsIn the music player menu, select from the following options:•Show tracks  — View all available tracks of the active track list and play thedesired track. To play a track, scroll to the desired track, and select Play.•Music library —  View all available tracks ordered according to Artists,Albums, Genres, Composers, or Track lists. Select Update library to refreshthe lists. To find track lists generated with the Nokia Music Manager, select Tracklists > My track lists.•Play options —  Select Random to play the tracks on the track list in randomorder. Select Repeat to play the current track or the entire track list repeatedly.•Media equaliser —  to select or define an equalizer setting•Add to Favourites —  to add the current track to the favorite track list•Play via Bluetooth —  to connect and play the tracks on an audio accessoryusing Bluetooth technology•Use tone —  Set the currently played music track, for example, as a ringing tone.Media66CyanCyanMagentaMagentaYellowYellowBlackBlackfile:/D:/temp/overmode/GUID-E1544AC5-7061-4AE9-A1A4-A210498F82B9.en.200611241647272031164380388562/en/1/GUID-7C1BD2F4-DE90-4CA6-8F0C-D6CE2FEB7F7D.xmlPage 66 Nov 24, 2006 5:00:27 PM
•Send —  to send the current track by a multimedia message or using Bluetoothtechnology•Web page —  to access a web page associated with the currently played track,which is dimmed if no web page is available.•Music downloads —  to connect to a web service•Memory status —  to view the free and used memory capacityRadioThe FM radio depends on an antenna other than the wireless deviceantenna. A compatible headset or enhancement needs to be attached tothe device for the FM radio to function properly.Warning:  Listen to music at a moderate level. Continuous exposure to highvolume may damage your hearing. Do not hold the device near your earwhen the loudspeaker is in use, because the volume may be extremely loud.Select Menu > Media > Radio.To use the graphical keys  ,  ,  , or   on the display, scroll left or right to thedesired key, and select it.Save radio frequencies1. To start the search, select and hold   or  . To change the radio frequency in0.05 MHz steps, briefly press   or  .2. To save a frequency to a memory location, 1 to 9, press and hold thecorresponding number key. To save a frequency to a memory location from 10to 20, press briefly 1 or 2, and press and hold the desired number key, 0 to 9.3. Enter the name of the radio station.Listen to the radioSelect Menu > Media > Radio. To scroll to the desired frequency, select   or  ,or press the headset key. To select a radio station, briefly press the correspondingnumber keys. To adjust the volume, press the volume keys.Select from the following options:Media67CyanCyanMagentaMagentaYellowYellowBlackBlackfile:/D:/temp/overmode/GUID-E1544AC5-7061-4AE9-A1A4-A210498F82B9.en.200611241647272031164380388562/en/1/GUID-7C1BD2F4-DE90-4CA6-8F0C-D6CE2FEB7F7D.xmlPage 67 Nov 24, 2006 5:00:27 PM
•Switch off  — to turn off the radio•Enable visual service  — to save a new station (shown if a new station isdetected)•Loudspeaker or Headset — to listen to the radio using the loudspeaker orheadset. Keep the headset connected to the device. The lead of the headsetfunctions as the radio antenna.•Mono output or Stereo output —  to listen to the radio in monophonic soundor in stereo•Stations  — to select the list of saved stations. To delete or rename a station,scroll to the desired station, and select Options > Delete station or Rename.•Search all stations — to automatically search the available stations at yourlocation•Set frequency — to enter the frequency of the desired radio station•Station directory — to access a website with a list of radio stations•Visual Radio — Select Automatically to set whether Visual Radio (networkservice) automatically starts when you turn on the radio. Some radio stationsmay send text or graphical information that you can view using the Visual Radioapplication. To check the availability and costs, contact your service provider.When an application using a packet data or HSCSD connection sends or receivesdata, it may interfere with the radio.Voice recorderRecord speech, sound, or an active call, and save them in Gallery. This is usefulwhen recording a name and phone number to write down later.Record sound1. Select Menu > Media > Voice recorder. To use the graphical keys  ,  , oron the display, scroll left or right to the desired key, and select it.2. To start the recording, select  . To start the recording during a call, selectOptions > Record. While recording a call, all parties to the call hear a faintbeeping. When recording a call, hold the device in the normal position near toyour ear. To pause the recording, select  .Media68CyanCyanMagentaMagentaYellowYellowBlackBlackfile:/D:/temp/overmode/GUID-E1544AC5-7061-4AE9-A1A4-A210498F82B9.en.200611241647272031164380388562/en/1/GUID-7C1BD2F4-DE90-4CA6-8F0C-D6CE2FEB7F7D.xmlPage 68 Nov 24, 2006 5:00:27 PM
3. To end the recording, select  . The recording is saved in Gallery >Recordings.Select from the following Options:•Play last recorded —  to listen to the latest recording•Send last recorded —  to send the last recording•Recordings list  — Select Recordings to see the list of recordings in GalleryEqualizerControl the sound when using the music player by amplifying or diminishingfrequency bands.Select Menu > Media > Equaliser.To activate a set, scroll to one of the equalizer sets, and select Activate.To view, edit, or rename a selected set, select Options > View, Edit, or Rename.Not all sets can be edited or renamed.Stereo wideningStereo widening enhances the audio output of the device when you are using astereo headset by enabling a wider stereo sound effect.To change the setting, select Menu > Media > Stereo widening.14. Push to talkPush to talk (PTT) is a two-way radio service available over a GPRS cellular network(network service).You can use PTT to have a conversation with one person or with a group of people(channel) having compatible devices. While you are connected to the PTT service,you can use the other functions of the device.Push to talk69CyanCyanMagentaMagentaYellowYellowBlackBlackfile:/D:/temp/overmode/GUID-E1544AC5-7061-4AE9-A1A4-A210498F82B9.en.200611241647272031164380388562/en/1/GUID-7C1BD2F4-DE90-4CA6-8F0C-D6CE2FEB7F7D.xmlPage 69 Nov 24, 2006 5:00:27 PM
To check availability, costs, additional features and to subscribe to the service,contact your network operator. Roaming services may be more limited than fornormal calls.Before you can use the PTT service, you must define the required PTT servicesettings. See "PTT settings," p. 73. See "Configuration settings," p. 74.PTT channelsPTT channel typesA PTT channel comprises a group of people (for example, friends or a work team)who joined the channel after they were invited. When you call a channel, allmembers joined to the channel hear the call simultaneously.In a Public channel, every channel member can invite other persons; in a Privatechannel, only the channel creator can invite others.You can set the status of each channel to Active or Inactive.The number of active channels and the number of members per channel is limited.Contact your service provider for details.Create a channelTo add a channel, select Menu > Push to talk > Add channel, and enter the settingsin the form fields.To send an invitation to the channel, select Yes. To send further invitations, selectMenu > Push to talk > Channel list, a channel, and Options > Send invitation.Switch PTT on and offTo connect to the PTT service, select Menu > Push to talk > Switch PTT on. indicates the PTT connection.   indicates that the service is temporarilyunavailable. If you have added channels to the phone, you are automatically joinedto the active channels.To disconnect from the PTT service, select Switch PTT off.Push to talk70CyanCyanMagentaMagentaYellowYellowBlackBlackfile:/D:/temp/overmode/GUID-E1544AC5-7061-4AE9-A1A4-A210498F82B9.en.200611241647272031164380388562/en/1/GUID-7C1BD2F4-DE90-4CA6-8F0C-D6CE2FEB7F7D.xmlPage 70 Nov 24, 2006 5:00:27 PM
You may assign a default function to the PTT (volume up) key to open the channellist, the contacts list, or a single channel or contact. See "PTT settings," p. 73.Make and receive a PTT callWarning:  Do not hold the device near your ear when the loudspeaker isin use, because the volume may be extremely loud.To make a channel call, a one-to-one call, or a call to multiple recipients, you musthold the PTT (volume up) key as long as you talk. To listen to the response, releasethe PTT (volume up) key.Check the login status of your contacts in Menu > Push to talk > Contacts list:- person available,   - person unknown,   - person does not want to bedisturbed, but can receive callback request,   - person has PTT switched off.This service depends on your network operator and is only available for subscribedcontacts. To subscribe a contact, select Options > Subscribe contact, or if one ormore contacts are already marked, Subscribe marked.Make a channel callTo make a call to a channel, select Channel list in the PTT menu, scroll to the desiredchannel, and press and hold the PTT (volume up) key.Make a one-to-one callTo start a one-to-one call, select Menu > Contacts > Names, or Menu > Push totalk > Callback inbox, Channel list, or Contacts list. Select a contact, a member,or a nickname, and press and hold the PTT (volume up) key.Make a PTT call to multiple recipientsYou can select multiple PTT contacts from the contact list.1. Select Menu > Push to talk > Contacts list, and mark the desired contacts.2. Press and hold the PTT (volume up) key to start the call. The participatingcontacts are shown on the display as soon as they join the call.Push to talk71CyanCyanMagentaMagentaYellowYellowBlackBlackfile:/D:/temp/overmode/GUID-E1544AC5-7061-4AE9-A1A4-A210498F82B9.en.200611241647272031164380388562/en/1/GUID-7C1BD2F4-DE90-4CA6-8F0C-D6CE2FEB7F7D.xmlPage 71 Nov 24, 2006 5:00:27 PM
3. Press and hold the PTT (volume up) key to talk to them. Release the PTT (volumeup) key to hear the response.4. Press the end key to terminate the call.Receive a PTT callA short tone notifies you of an incoming PTT call, which you can accept or reject.When you press and hold the PTT (volume up) key while the caller is talking, youhear a queuing tone, and Queuing is displayed. Wait for the other person to finish;then you can talk immediately.Callback requestsSend a callback requestIf you make a one-to-one call and do not get a response, you can send a callbackrequest from following lists:•Menu > Contacts > Names•Menu > Push to talk > Callback inbox, Channel list, or Contacts listSelect a contact, a member, or a nickname and Options > Send PTT callback.Respond to a callback requestWhen someone sends you a callback request, Callback request received isdisplayed in the standby mode. To open the Callback inbox, select View. The listof nicknames of the persons who have sent you callback requests is shown. Tomake a one-to-one call, select the desired request, and press and hold the PTT(volume up) key.Add a one-to-one contactYou can save the names of persons to whom you often make one-to-one calls inthe following ways:Push to talk72CyanCyanMagentaMagentaYellowYellowBlackBlackfile:/D:/temp/overmode/GUID-E1544AC5-7061-4AE9-A1A4-A210498F82B9.en.200611241647272031164380388562/en/1/GUID-7C1BD2F4-DE90-4CA6-8F0C-D6CE2FEB7F7D.xmlPage 72 Nov 24, 2006 5:00:27 PM
•To add a PTT address to a name in Contacts, search for the desired contact, andselect Details > Options > Add detail > PTT address. A contact appears in thePTT contact list only if you enter a PTT address.•To add a contact to the PTT contacts list, select Menu > Push to talk > Contactslist > Options > Add contact.•To add a contact from the channel list, connect to the PTT service, select Channellist, and scroll to the desired channel. Select Members, scroll to the memberwhose contact information you want to save, and select Options.•To add a new contact, select Save as. To add a PTT address to a name inContacts, select Add to contact.PTT settingsSelect Menu > Push to talk > PTT settings and from the following options:•1 to 1 calls — Select On to allow the reception of incoming one-to-one calls. Toset the device to first notify you of incoming one-to-one calls with a ringing tone,select Notify.•PTT key def. function — to set the PTT (volume up) key to one of the followingfunctions: Open contact list, Open channel list, or Call contact or group.Select a contact, a group, or Call PTT channel; and select a channel. When youpress and hold the PTT (volume up) key, the selected function is performed.•Show my login status — to enable or disable the sending of the login status•PTT status in startup — Select Yes or Ask first to automatically connect to thePTT service when you switch the device on.•PTT when abroad — to switch the PTT service on or off when the device is usedoutside of the home network•Send my PTT address — Select No to hide your PTT address from channel andone-to-one calls.Push to talk73CyanCyanMagentaMagentaYellowYellowBlackBlackfile:/D:/temp/overmode/GUID-E1544AC5-7061-4AE9-A1A4-A210498F82B9.en.200611241647272031164380388562/en/1/GUID-7C1BD2F4-DE90-4CA6-8F0C-D6CE2FEB7F7D.xmlPage 73 Nov 24, 2006 5:00:27 PM
Configuration settingsYou may receive the settings for connecting to the service from your serviceprovider. See "Configuration setting service," p. 12. You can also enter the settingsmanually. See "Configuration," p. 58.To select the settings for connecting to the service, select Menu > Push to talk >Configur. sett..15. OrganizerAlarm clockTo set the device to sound an alarm at a desired time, select Menu > Organiser >Alarm clock.Set the alarmTo set the alarm, select Alarm time, and enter the alarm time.To change the alarm time when the alarm time is set, select On.To set the device to alert you on selected days of the week, select Repeat alarm.To select the alarm tone or set the radio as the alarm tone, select Alarm tone. Ifyou select the radio as an alarm tone, connect the headset to the device.To set a snooze time-out, select Snooze time-out and the time.Stop the alarmWhen the alarm time is reached, the device sounds an alert tone and flashesAlarm! and the current time on the display, even if the device is switched off.To stop the alarm, select Stop. If you let the device continue to sound the alarmfor a minute or select Snooze, the alarm stops for the time you set in Snooze time-out, then resumes.Organizer74CyanCyanMagentaMagentaYellowYellowBlackBlackfile:/D:/temp/overmode/GUID-E1544AC5-7061-4AE9-A1A4-A210498F82B9.en.200611241647272031164380388562/en/1/GUID-7C1BD2F4-DE90-4CA6-8F0C-D6CE2FEB7F7D.xmlPage 74 Nov 24, 2006 5:00:27 PM
If the alarm time is reached while the device is switched off, the device switchesitself on and starts sounding the alarm tone. If you select Stop, the device askswhether you want to activate the device for calls. Select No to switch off the deviceor Yes to make and receive calls. Do not select Yes when wireless device use maycause interference or danger.CalendarSelect Menu > Organiser > Calendar.The current day has a frame around the number. If there are any notes set for theday, the day is in bold type. To view the day notes, select View. To view a week,select Options > Week view. To delete all notes in the calendar, select the monthor week view, and Options > Delete all notes.In Settings you can set the date, time, time zone, date or time format, dateseparator, default view, or the first day of the week. In Auto-delete notes you canset the device to delete old notes automatically after a specified time.Make a calendar noteSelect Menu > Organiser > Calendar.Scroll to the date, and select Options > Make a note and one of the following notetypes:   Meeting,   Call ,  Birthday,   Memo, or   Reminder. Fill in thefields.Note alarmThe device displays the note, and, if an alarm is set, sounds a tone. If a call noteis displayed, press the call key to make the call.To stop the alarm and to view the note, select View. To stop the alarm for 10minutes, select Snooze. To stop the alarm without viewing the note, select Exit.To-do listSave a note for a task that you must do.Organizer75CyanCyanMagentaMagentaYellowYellowBlackBlackfile:/D:/temp/overmode/GUID-E1544AC5-7061-4AE9-A1A4-A210498F82B9.en.200611241647272031164380388562/en/1/GUID-7C1BD2F4-DE90-4CA6-8F0C-D6CE2FEB7F7D.xmlPage 75 Nov 24, 2006 5:00:27 PM
Select Menu > Organiser > To-do list. To make a note if no note is added, selectAdd; otherwise, select Options > Add. Fill in the fields, and select Save.To view a note, scroll to it, and select View. While viewing a note, you can alsoselect an option to edit the attributes. You can also select an option to delete theselected note and delete all the notes that you have marked as done.NotesTo write and send notes, select Menu > Organiser > Notes.To make a note if no note is added, select Add; otherwise, select Options > Makea note. Write the note, and select Save.CalculatorThe calculator in your device provides basic arithmetic and trigonometric functions,calculates the square and the square root, the inverse of a number, and convertscurrency values.Note:  This calculator has limited accuracy and is designed for simplecalculations.Calculations - Select Menu > Organiser > Calculator. When 0 is displayed on thescreen, enter the first number in the calculation. Press # for a decimal point. Scrollto the desired operation or function, or select it from the Options. Enter the secondnumber. Repeat this sequence as many times as it is necessary. To start a newcalculation, first select and hold Clear.Currency conversion - To perform a currency conversion select Options >Exchange rate. Select either of the displayed options. Enter the exchange rate,press # for a decimal point, and select OK. The exchange rate remains in thememory until you replace it with another one. To perform the currency conversion,enter the amount to be converted, and select Options > In domestic or Inforeign.Note:  When you change the base currency, you must enter new exchangerates because all previously set exchange rates are cleared.Organizer76CyanCyanMagentaMagentaYellowYellowBlackBlackfile:/D:/temp/overmode/GUID-E1544AC5-7061-4AE9-A1A4-A210498F82B9.en.200611241647272031164380388562/en/1/GUID-7C1BD2F4-DE90-4CA6-8F0C-D6CE2FEB7F7D.xmlPage 76 Nov 24, 2006 5:00:27 PM
TimersCountdown timer - To start the countdown timer, select Menu > Organiser >Countd. timer > Normal timer, enter the alarm time, and write a note that isdisplayed when the time expires. To change the countdown time, select Changetime. To start the timer, select Start. To stop the timer, select Stop timer.Interval timer -  To have an interval timer with up to 10 intervals started, firstenter the intervals. Select Menu > Organiser > Countd. timer > Interval timer.To start the timer, select Start timer > Start.StopwatchYou can measure time, take intermediate times, or take lap times using thestopwatch. During timing, the other functions of the device can be used.Using the stopwatch or allowing it to run in the background when using otherfeatures increases the demand on battery power and reduces the battery life.Select Menu > Organiser > Stopwatch and from the following options:•Split timing — to take intermediate times. To start the time observation, selectStart. Select Split every time that you want to take an intermediate time. Tostop the time observation, select Stop. To save the measured time, selectSave. To start the time observation again, select Options > Start. The new timeis added to the previous time. To reset the time without saving it, selectReset.•Lap timing — to take lap times•Continue — to view the timing that you have set in the background•Show last — to view the most recently measured time if the stopwatch is notreset•View times or Delete times — to view or delete the saved timesTo set the stopwatch timing in the background, press the end key.Organizer77CyanCyanMagentaMagentaYellowYellowBlackBlackfile:/D:/temp/overmode/GUID-E1544AC5-7061-4AE9-A1A4-A210498F82B9.en.200611241647272031164380388562/en/1/GUID-7C1BD2F4-DE90-4CA6-8F0C-D6CE2FEB7F7D.xmlPage 77 Nov 24, 2006 5:00:27 PM
16. ApplicationsYou can manage applications and games. These files are stored in the devicememory or an attached memory card and may be arranged in folders.You can format, lock, and unlock the memory card. See "Memory card," p. 62.Launch a gameYour device software may include some games.Select Menu > Applications > Games. Scroll to the desired game, and selectOpen.To set sounds, lights, and shakes for the game, select Menu > Applications >Options > Application settings. You can select more options. See "Applicationoptions," p. 78.Launch an applicationYour device software may include some Java applications.Select Menu > Applications > Collection. Scroll to an application, and selectOpen.Application options•Update version  — to verify that a new version of the application is availablefor download from the web (network service)•Web page —  to provide further information or additional data for theapplication from an internet page (network service), if available•Application access —  to restrict the application from accessing the networkDownload an applicationYour device supports J2ME Java applications. Ensure that the application iscompatible with your device before downloading it.Applications78CyanCyanMagentaMagentaYellowYellowBlackBlackfile:/D:/temp/overmode/GUID-E1544AC5-7061-4AE9-A1A4-A210498F82B9.en.200611241647272031164380388562/en/1/GUID-7C1BD2F4-DE90-4CA6-8F0C-D6CE2FEB7F7D.xmlPage 78 Nov 24, 2006 5:00:27 PM
Important:  Only install and use applications and other software fromtrusted sources, such as applications that are Symbian Signed or havepassed the Java VerifiedTM testing.You can download new Java applications and games in different ways.•Select Menu > Applications > Options > Downloads > App. downloads; thelist of available bookmarks is shown. See "Bookmarks," p. 81.•Use the Nokia Application Installer from PC Suite to download the applicationsto your device.For the availability of different services, pricing, and tariffs, contact your serviceprovider.Your device may have some bookmarks or links preinstalled for or may allow accessto sites provided by third parties not affiliated with Nokia. Nokia does not endorseor assume any liability for these sites. If you choose to access them, you shouldtake the same precautions, for security or content, as you would with any internetsite.17. WebImportant:  Use only services that you trust and that offer adequatesecurity and protection against harmful software.With your device browser, access various mobile internet services that use wirelessmarkup language (WML) or extensible hypertext markup language (XHTML) on theirpages. Appearance may vary due to screen size. You may not be able to view alldetails of the internet pages.Check the availability of these services, pricing, tariffs, and instructions with yourservice provider.Web79CyanCyanMagentaMagentaYellowYellowBlackBlackfile:/D:/temp/overmode/GUID-E1544AC5-7061-4AE9-A1A4-A210498F82B9.en.200611241647272031164380388562/en/1/GUID-7C1BD2F4-DE90-4CA6-8F0C-D6CE2FEB7F7D.xmlPage 79 Nov 24, 2006 5:00:27 PM
Set up browsingYou may receive the configuration settings required for browsing as aconfiguration message from the service provider that offers the service that youwant to use. See "Configuration setting service," p. 12.You can also enter all the configuration settings manually. See"Configuration," p. 58.Connect to a serviceEnsure that the correct configuration settings of the service are activated.1. To select the settings for connecting to the service, select Menu > Web >Settings > Configuration sett..2. Select Configuration. Only the configurations that support browsing serviceare shown. Select a service provider, Default, or Personal config. for browsing.See "Set up browsing," p. 80.3. Select Account and a browsing service account contained in the activeconfiguration settings.4. Select Displ. term. window > Yes to perform manual user authentication forintranet connections.Make a connection to the service in one of the following ways: Select Menu >Web > Home; or in the standby mode, press and hold 0.To select a bookmark of the service, select Menu > Web > Bookmarks.To select the last URL, select Menu > Web > Last web addr..To enter the address of the service, select Menu > Web > Go to address. Enter theaddress of the service, and select OK.Browse pagesAfter you make a connection to the service, you can start browsing its pages. Thefunction of the device keys may vary in different services. Follow the text guideson the device display. For more information, contact your service provider.Web80CyanCyanMagentaMagentaYellowYellowBlackBlackfile:/D:/temp/overmode/GUID-E1544AC5-7061-4AE9-A1A4-A210498F82B9.en.200611241647272031164380388562/en/1/GUID-7C1BD2F4-DE90-4CA6-8F0C-D6CE2FEB7F7D.xmlPage 80 Nov 24, 2006 5:00:27 PM
Browse with phone keysTo browse through the page, scroll in any direction.To select an item, press the call key or Select.To enter letters and numbers, press 0 to 9.To enter special characters, press *.Direct callingWhile browsing, you can make a phone call and save a name and a phone numberfrom a page.BookmarksYou can save page addresses as bookmarks in the device memory.1. While browsing, select Options > Bookmarks; or in the standby mode, selectMenu > Web > Bookmarks.2. Scroll to a bookmark, and select it; or press the call key to make a connection tothe page associated with the bookmark.3. Select Options to view, edit, delete, or send the bookmark; to create a newbookmark; or to save the bookmark to a folder.Your device may have some bookmarks or links preinstalled for or may allow accessto sites provided by third parties not affiliated with Nokia. Nokia does not endorseor assume any liability for these sites. If you choose to access them, you shouldtake the same precautions, for security or content, as you would with any internetsite.When you have received a bookmark, 1 bookmark received is displayed. To viewthe bookmark, select Show.Web81CyanCyanMagentaMagentaYellowYellowBlackBlackfile:/D:/temp/overmode/GUID-E1544AC5-7061-4AE9-A1A4-A210498F82B9.en.200611241647272031164380388562/en/1/GUID-7C1BD2F4-DE90-4CA6-8F0C-D6CE2FEB7F7D.xmlPage 81 Nov 24, 2006 5:00:27 PM
Appearance settingsWhile browsing, select Options > Other options > Appearance settings; or in thestandby mode, select Menu > Web > Settings > Appearance settings and fromthe following options:•Text wrapping — to select how the text is displayed•Font size — to set the font size•Show images — Select No to hide images on the page.•Alerts — Select Alert for unsec. conn. > Yes to set the device to alert you whena secure connection changes to an unsecure connection while browsing.•Alerts — Select Alert for unsec. items > Yes to set the device to alert when asecure page contains an unsecure item. These alerts do not guarantee a secureconnection. See "Browser security," p. 84.•Character encoding — Select Content encoding to set the encoding for thebrowser page content.•Character encoding — Select Unicode (UTF-8) addr. > On to set the device tosend a URL as UTF-8 encoding.•Screen size — to set the screen layout to Full or Small•JavaScript — to enable the Java scriptsSecurity settingsCookiesA cookie is data that a site saves in the cache memory of your device. Cookies aresaved until you clear the cache memory. See "Cache memory," p. 84.While browsing, select Options > Other options > Security > Cookie settings; orin the standby mode, select Menu > Web > Settings > Security settings >Cookies.To allow or prevent the device from receiving cookies, select Allow or Reject.Web82CyanCyanMagentaMagentaYellowYellowBlackBlackfile:/D:/temp/overmode/GUID-E1544AC5-7061-4AE9-A1A4-A210498F82B9.en.200611241647272031164380388562/en/1/GUID-7C1BD2F4-DE90-4CA6-8F0C-D6CE2FEB7F7D.xmlPage 82 Nov 24, 2006 5:00:27 PM
Scripts over secure connectionYou can select whether to allow the running of scripts from a secure page. Thephone supports WML scripts.While browsing, to allow the scripts, select Options > Other options > Security >WMLScript settings; or in the standby mode, select Menu > Web > Settings >Security settings > WMLScripts in conn. > Allow.Download settingsTo automatically save all downloaded files in Gallery, select Menu > Web >Settings > Downloading sett. > Automatic saving > On.Service inboxThe device is able to receive service messages sent by your service provider(network service). Service messages are notifications (for example, newsheadlines) that may contain a text message or an address of a service.Service inbox accessTo access the Service inbox in the standby mode, when you have received a servicemessage, select Show.If you select Exit, the message is moved to the Service inbox.To access the Service inbox later, select Menu > Web > Service inbox. To accessthe Service inbox while browsing, select Options > Other options > Serviceinbox. Scroll to the message you want, and select Retrieve to activate the browserand download the marked content.To display detailed information on the service notification or delete the message,select Options > Details or Delete.Web83CyanCyanMagentaMagentaYellowYellowBlackBlackfile:/D:/temp/overmode/GUID-E1544AC5-7061-4AE9-A1A4-A210498F82B9.en.200611241647272031164380388562/en/1/GUID-7C1BD2F4-DE90-4CA6-8F0C-D6CE2FEB7F7D.xmlPage 83 Nov 24, 2006 5:00:27 PM
Service inbox settingsSelect Menu > Web > Settings > Service inbox sett. and from the followingoptions:•Service messages — to set whether you want to receive service messages•Message filter —  Select On to set the device to receive service messages onlyfrom content authors approved by the service provider. To view the list of theapproved content authors, select Trusted channels.•Autom. connection — Select On to set the device to automatically activate thebrowser from the standby mode when the device has received a servicemessage. If you select Off, the device activates the browser only after you selectRetrieve when the device has received a service message.Cache memoryA cache is a memory location that is used to store data temporarily. If you havetried to access or have accessed confidential information requiring passwords,empty the cache after each use. The information or services you have accessed arestored in the cache.To clear the cache while browsing, select Options > Other options > Clear thecache.In the standby mode, select Menu > Web > Clear the cache.Browser securitySecurity features may be required for some services, such as online banking orshopping. For such connections you need security certificates and possibly asecurity module, which may be available on your SIM card. For more information,contact your service provider.Security moduleThe security module improves security services for applications requiring a browserconnection and allows you to use a digital signature. The security module mayWeb84CyanCyanMagentaMagentaYellowYellowBlackBlackfile:/D:/temp/overmode/GUID-E1544AC5-7061-4AE9-A1A4-A210498F82B9.en.200611241647272031164380388562/en/1/GUID-7C1BD2F4-DE90-4CA6-8F0C-D6CE2FEB7F7D.xmlPage 84 Nov 24, 2006 5:00:27 PM
contain certificates as well as private and public keys. The certificates are saved inthe security module by the service provider.To view or change the security module settings, select Menu > Settings >Security > Security module sett..CertificatesImportant:  Even if the use of certificates makes the risks involved inremote connections and software installation considerably smaller, theymust be used correctly in order to benefit from increased security. Theexistence of a certificate does not offer any protection by itself; thecertificate manager must contain correct, authentic, or trusted certificatesfor increased security to be available. Certificates have a restricted lifetime.If "Expired certificate" or "Certificate not valid yet" is shown even if thecertificate should be valid, check that the current date and time in yourdevice are correct.There are three kinds of certificates: server certificates, authority certificates, anduser certificates. You may receive these certificates from your service provider.Authority certificates and user certificates may also be saved in the security moduleby the service provider.To view the list of the authority or user certificates downloaded to your phone,select Menu > Settings > Security > Authority certificates or User certificates. is displayed during a connection if the data transmission between the phoneand the content server is encrypted.The security icon does not indicate that the data transmission between thegateway and the content server (or place where the requested resource is stored)is secure. The service provider secures the data transmission between the gatewayand the content server.Web85CyanCyanMagentaMagentaYellowYellowBlackBlackfile:/D:/temp/overmode/GUID-E1544AC5-7061-4AE9-A1A4-A210498F82B9.en.200611241647272031164380388562/en/1/GUID-7C1BD2F4-DE90-4CA6-8F0C-D6CE2FEB7F7D.xmlPage 85 Nov 24, 2006 5:00:27 PM
Digital signatureYou can create digital signatures with your phone if your SIM card has a securitymodule. The digital signature is the same as signing your name to a paper bill,contract, or other document.To create a digital signature, select a link on a page (for example, the title of thebook you want to buy and its price). The text to be signed is shown and may includethe amount and date.Check that the header text is Read and that the digital signature icon  is shown.If the digital signature icon does not appear, there is a security breach; do not enterany personal data (such as your signing PIN).To sign the text, read all of the text first, and select Sign. The text may not fit withina single screen. Therefore, make sure to scroll through and read all of the text beforesigning.Select the user certificate you want to use, and enter the signing PIN. The digitalsignature icon disappears, and the service may display a confirmation of yourpurchase.18. SIM servicesYour SIM card may provide additional services. You can access this menu only if itis supported by your SIM card. The name and contents of the menu depend on theavailable services.For availability and information on using SIM card services, contact your SIM cardvendor. This may be the service provider or other vendor.To set the phone to show you the confirmation messages sent between your phoneand the network when you are using the SIM services, select Menu > Settings >Phone > Confirm SIM actions > Yes.Accessing these services may involve sending messages or making a phone call forwhich you may be charged.SIM services86CyanCyanMagentaMagentaYellowYellowBlackBlackfile:/D:/temp/overmode/GUID-E1544AC5-7061-4AE9-A1A4-A210498F82B9.en.200611241647272031164380388562/en/1/GUID-7C1BD2F4-DE90-4CA6-8F0C-D6CE2FEB7F7D.xmlPage 86 Nov 24, 2006 5:00:27 PM
19. PC connectivitySend and receive email, and access the internet when your device is connected toa compatible PC through a Bluetooth or a data cable connection. Use your devicewith a variety of PC connectivity and data communications applications.Nokia PC SuiteWith Nokia PC Suite you can synchronize contacts, calendar, notes, and to-do notesbetween your device and the compatible PC or a remote internet server (networkservice). You may find more information and PC Suite on the Nokia website. See"Nokia support," p. 13.Packet data, HSCSD, and CSDWith your phone, you can use the packet data, high-speed circuit switched data(HSCSD), and circuit switched data (CSD, GSM data) data services. For availabilityand subscription to data services, contact your network operator or serviceprovider.The use of HSCSD services consumes the battery faster than normal voice or datacalls.BluetoothUse Bluetooth technology to connect your compatible laptop to the internet. Yourphone must have activated a service provider that supports internet access, andyour PC has to support Bluetooth PAN (personal area network). After connecting tothe network access point (NAP) service of the phone and pairing with your PC, yourphone automatically opens a packet data connection to the internet. PC Suitesoftware installation is not necessary when using the NAP service of the phone.See "Bluetooth wireless technology," p. 52.PC connectivity87CyanCyanMagentaMagentaYellowYellowBlackBlackfile:/D:/temp/overmode/GUID-E1544AC5-7061-4AE9-A1A4-A210498F82B9.en.200611241647272031164380388562/en/1/GUID-7C1BD2F4-DE90-4CA6-8F0C-D6CE2FEB7F7D.xmlPage 87 Nov 24, 2006 5:00:27 PM
Data communication applicationsFor information on using a data communication application, refer to thedocumentation provided with it.Making or answering phone calls during a computer connection is notrecommended as it might disrupt the operation.For better performance during data calls, place the device on a stationary surfacewith the keypad facing downward. Do not move the device during a data call. Forexample, do not hold the device during a data call.20. Technical informationWeight 3.52 oz (100 g) incl. BL-4C batteryBattery 860 mAh Li-Ion BatteryNetworks Wireless networks GSM 900, 1800 and 1900 (RM-217), GSM850, 1800 and 1900 (RM-222)Size Volume: 3.4 in3 (55.6 cm3)Length: 4.2 in (106.8 mm)Width: 1.7 in (43.8 mm)Thickness: 0.5 in (13.1 mm)Frequency range(Rx)GSM 850: 869–894 MHzGSM 900: 925–960 MHzGSM 1800: 1805–1880 MHzGSM 1900: 1930–1990 MHzTechnical information88CyanCyanMagentaMagentaYellowYellowBlackBlackfile:/D:/temp/overmode/GUID-E1544AC5-7061-4AE9-A1A4-A210498F82B9.en.200611241647272031164380388562/en/1/GUID-7C1BD2F4-DE90-4CA6-8F0C-D6CE2FEB7F7D.xmlPage 88 Nov 24, 2006 5:00:27 PM
Frequency range(Tx)GSM 850: 824–849 MHzGSM 900: 880–915 MHzGSM 1800: 1710–1785 MHzGSM 1900: 1850–1910 MHzTx output power 2 W (max)Battery voltage 3.7 V DCNumber ofchannelsGSM 850: 124GSM 900: 174GSM 1800: 374GSM 1900: 299Phone memorysize32 MB flash memory16 MB RAMOperatingtemperature59 °F to 77 °F15 °C to 25 °C21. BatteryBattery informationYour device is powered by a rechargeable battery. The battery can be charged anddischarged hundreds of times, but it will eventually wear out. When the talk andstandby times are noticeably shorter than normal, replace the battery. Use onlyNokia approved batteries, and recharge your battery only with Nokia approvedchargers designated for this device.If a replacement battery is being used for the first time or if the battery has notbeen used for a prolonged period, it may be necessary to connect the charger, thendisconnect and reconnect it to begin charging the battery.Battery89CyanCyanMagentaMagentaYellowYellowBlackBlackfile:/D:/temp/overmode/GUID-E1544AC5-7061-4AE9-A1A4-A210498F82B9.en.200611241647272031164380388562/en/1/GUID-7C1BD2F4-DE90-4CA6-8F0C-D6CE2FEB7F7D.xmlPage 89 Nov 24, 2006 5:00:27 PM
Unplug the charger from the electrical plug and the device when not in use. Do notleave a fully charged battery connected to a charger, since overcharging mayshorten its lifetime. If left unused, a fully charged battery will lose its charge overtime.If the battery is completely discharged, it may take several minutes before thecharging indicator appears on the display or before any calls can be made.Use the battery only for its intended purpose. Never use any charger or battery thatis damaged.Do not short-circuit the battery. Accidental short-circuiting can occur when ametallic object such as a coin, clip, or pen causes direct connection of the positive(+) and negative (-) terminals of the battery. (These look like metal strips on thebattery.) This might happen, for example, when you carry a spare battery in yourpocket or purse. Short-circuiting the terminals may damage the battery or theconnecting object.Leaving the battery in hot or cold places, such as in a closed car in summer or winterconditions, will reduce the capacity and lifetime of the battery. Always try to keepthe battery between 15°C and 25°C (59°F and 77°F). A device with a hot or coldbattery may not work temporarily, even when the battery is fully charged. Batteryperformance is particularly limited in temperatures well below freezing.Do not dispose of batteries in a fire as they may explode. Batteries may also explodeif damaged. Dispose of batteries according to local regulations. Please recycle whenpossible. Do not dispose as household waste.Do not dismantle or shred cells or batteries. In the event of a battery leak, do notallow the liquid to come in contact with the skin or eyes. In the event of such aleak, flush your skin or eyes immediately with water, or seek medical help.Nokia battery authentication guidelinesAlways use original Nokia batteries for your safety. To check that you are gettingan original Nokia battery, purchase it from an authorized Nokia dealer, look for theNokia Original Enhancements logo on the packaging, and inspect the hologramlabel using the following steps:Battery90CyanCyanMagentaMagentaYellowYellowBlackBlackfile:/D:/temp/overmode/GUID-E1544AC5-7061-4AE9-A1A4-A210498F82B9.en.200611241647272031164380388562/en/1/GUID-7C1BD2F4-DE90-4CA6-8F0C-D6CE2FEB7F7D.xmlPage 90 Nov 24, 2006 5:00:27 PM
Successful completion of the four steps is not a total assurance of the authenticityof the battery. If you have any reason to believe that your battery is not anauthentic, original Nokia battery, you should refrain from using it, and take it tothe nearest authorized Nokia service point or dealer for assistance. Your authorizedNokia service point or dealer will inspect the battery for authenticity. If authenticitycannot be verified, return the battery to the place of purchase.Authenticate hologram1. When looking at the hologram on the label, you should seethe Nokia connecting hands symbol from one angle and theNokia Original Enhancements logo when looking fromanother angle.2. When you angle the hologram left, right, down, and up, youshould see 1, 2, 3, and 4 dots on each side respectively.3. Scratch the side of the label to reveal a 20-digit code, forexample, 12345678919876543210. Turn the battery so thatthe numbers are facing upwards. The 20-digit code readsstarting from the number at the top row followed by thebottom row.Battery91CyanCyanMagentaMagentaYellowYellowBlackBlackfile:/D:/temp/overmode/GUID-E1544AC5-7061-4AE9-A1A4-A210498F82B9.en.200611241647272031164380388562/en/1/GUID-7C1BD2F4-DE90-4CA6-8F0C-D6CE2FEB7F7D.xmlPage 91 Nov 24, 2006 5:00:27 PM
4. Confirm that the 20-digit code is valid by following theinstructions at www.nokia.com/batterycheck.To create a text message, enter the 20-digit code, for example,12345678919876543210, and send to +44 7786 200276.National and international operator charges will apply. Youshould receive a message indicating whether the code can beauthenticated.What if your battery is not authentic?If you cannot confirm that your Nokia battery with the hologram on the label is anauthentic Nokia battery, please do not use the battery. Take it to the nearestauthorized Nokia service point or dealer for assistance. The use of a battery that isnot approved by the manufacturer may be dangerous and may result in poorperformance and damage to your device and its enhancements. It may alsoinvalidate any approval or warranty applying to the device.To find out more about original Nokia batteries, visit www.nokia.com/battery.Battery92CyanCyanMagentaMagentaYellowYellowBlackBlackfile:/D:/temp/overmode/GUID-E1544AC5-7061-4AE9-A1A4-A210498F82B9.en.200611241647272031164380388562/en/1/GUID-7C1BD2F4-DE90-4CA6-8F0C-D6CE2FEB7F7D.xmlPage 92 Nov 24, 2006 5:00:27 PM
Care and maintenanceYour device is a product of superior design and craftsmanship and should be treatedwith care. The following suggestions will help you protect your warranty coverage.•Keep the device dry. Precipitation, humidity, and all types of liquids or moisturecan contain minerals that will corrode electronic circuits. If your device does getwet, remove the battery, and allow the device to dry completely before replacingit.•Do not use or store the device in dusty, dirty areas. Its moving parts andelectronic components can be damaged.•Do not store the device in hot areas. High temperatures can shorten the life ofelectronic devices, damage batteries, and warp or melt certain plastics.•Do not store the device in cold areas. When the device returns to its normaltemperature, moisture can form inside the device and damage electronic circuitboards.•Do not attempt to open the device other than as instructed in this guide.•Do not drop, knock, or shake the device. Rough handling can break internalcircuit boards and fine mechanics.•Do not use harsh chemicals, cleaning solvents, or strong detergents to clean thedevice.•Do not paint the device. Paint can clog the moving parts and prevent properoperation.•Use a soft, clean, dry cloth to clean any lenses, such as camera, proximity sensor,and light sensor lenses.•Use only the supplied or an approved replacement antenna. Unauthorizedantennas, modifications, or attachments could damage the device and mayviolate regulations governing radio devices.•Use chargers indoors.•Always create a backup of data you want to keep, such as contacts and calendarnotes.93CyanCyanMagentaMagentaYellowYellowBlackBlackfile:/D:/temp/overmode/GUID-E1544AC5-7061-4AE9-A1A4-A210498F82B9.en.200611241647272031164380388562/en/1/GUID-7C1BD2F4-DE90-4CA6-8F0C-D6CE2FEB7F7D.xmlPage 93 Nov 24, 2006 5:00:27 PM
•To reset the device from time to time for optimum performance, power off thedevice and remove the battery.These suggestions apply equally to your device, battery, charger, or anyenhancement. If any device is not working properly, take it to the nearestauthorized service facility for service.Additional safety informationSmall childrenYour device and its enhancements may contain small parts. Keep them out of thereach of small children.Operating environmentThis device meets RF exposure guidelines when used either in the normal useposition against the ear or when positioned at least 2.2 centimeters (7/8 inches)away from the body. When a carry case, belt clip, or holder is used for body-wornoperation, it should not contain metal and should position the device the above-stated distance from your body.To transmit data files or messages, this device requires a quality connection to thenetwork. In some cases, transmission of data files or messages may be delayeduntil such a connection is available. Ensure the above separation distanceinstructions are followed until the transmission is completed.Parts of the device are magnetic. Metallic materials may be attracted to the device.Do not place credit cards or other magnetic storage media near the device, becauseinformation stored on them may be erased.Medical devicesOperation of any radio transmitting equipment, including wireless phones, mayinterfere with the functionality of inadequately protected medical devices. Consulta physician or the manufacturer of the medical device to determine if they areAdditional safety information94CyanCyanMagentaMagentaYellowYellowBlackBlackfile:/D:/temp/overmode/GUID-E1544AC5-7061-4AE9-A1A4-A210498F82B9.en.200611241647272031164380388562/en/1/GUID-7C1BD2F4-DE90-4CA6-8F0C-D6CE2FEB7F7D.xmlPage 94 Nov 24, 2006 5:00:27 PM
adequately shielded from external RF energy or if you have any questions. Switchoff your device in health care facilities when any regulations posted in these areasinstruct you to do so. Hospitals or health care facilities may be using equipmentthat could be sensitive to external RF energy.Implanted medical devicesManufacturers of medical devices recommend that a minimum separation of 15.3centimeters (6 inches) should be maintained between a wireless device and animplanted medical device, such as a pacemaker or implanted cardioverterdefibrillator, to avoid potential interference with the medical device. Persons whohave such devices should:•Always keep the wireless device more than 15.3 centimeters (6 inches) from themedical device when the wireless device is turned on.•Not carry the wireless device in a breast pocket.•Hold the wireless device to the ear opposite the medical device to minimize thepotential for interference.•Turn the wireless device off immediately if there is any reason to suspect thatinterference is taking place.•Read and follow the directions from the manufacturer of their implantedmedical device.If you have any questions about using your wireless device with an implantedmedical device, consult your health care provider.Hearing aidsSome digital wireless devices may interfere with some hearing aids. If interferenceoccurs, consult your service provider.VehiclesRF signals may affect improperly installed or inadequately shielded electronicsystems in motor vehicles such as electronic fuel injection systems, electronicantiskid (antilock) braking systems, electronic speed control systems, and air bagAdditional safety information95CyanCyanMagentaMagentaYellowYellowBlackBlackfile:/D:/temp/overmode/GUID-E1544AC5-7061-4AE9-A1A4-A210498F82B9.en.200611241647272031164380388562/en/1/GUID-7C1BD2F4-DE90-4CA6-8F0C-D6CE2FEB7F7D.xmlPage 95 Nov 24, 2006 5:00:27 PM
systems. For more information, check with the manufacturer, or its representative,of your vehicle or any equipment that has been added.Only qualified personnel should service the device or install the device in a vehicle.Faulty installation or service may be dangerous and may invalidate any warrantythat may apply to the device. Check regularly that all wireless device equipment inyour vehicle is mounted and operating properly. Do not store or carry flammableliquids, gases, or explosive materials in the same compartment as the device, itsparts, or enhancements. For vehicles equipped with an air bag, remember that airbags inflate with great force. Do not place objects, including installed or portablewireless equipment in the area over the air bag or in the air bag deployment area.If in-vehicle wireless equipment is improperly installed and the air bag inflates,serious injury could result.Using your device while flying in aircraft is prohibited. Switch off your device beforeboarding an aircraft. The use of wireless teledevices in an aircraft may be dangerousto the operation of the aircraft, disrupt the wireless telephone network, and maybe illegal.Potentially explosive environmentsSwitch off your device when in any area with a potentially explosive atmosphere,and obey all signs and instructions. Potentially explosive atmospheres includeareas where you would normally be advised to turn off your vehicle engine. Sparksin such areas could cause an explosion or fire resulting in bodily injury or evendeath. Switch off the device at refueling points such as near gas pumps at servicestations. Observe restrictions on the use of radio equipment in fuel depots, storage,and distribution areas; chemical plants; or where blasting operations are inprogress. Areas with a potentially explosive atmosphere are often, but not always,clearly marked. They include below deck on boats, chemical transfer or storagefacilities, vehicles using liquefied petroleum gas (such as propane or butane), andareas where the air contains chemicals or particles such as grain, dust, or metalpowders.Additional safety information96CyanCyanMagentaMagentaYellowYellowBlackBlackfile:/D:/temp/overmode/GUID-E1544AC5-7061-4AE9-A1A4-A210498F82B9.en.200611241647272031164380388562/en/1/GUID-7C1BD2F4-DE90-4CA6-8F0C-D6CE2FEB7F7D.xmlPage 96 Nov 24, 2006 5:00:27 PM
Emergency callsImportant:  Wireless phones, including this device, operate using radiosignals, wireless networks, landline networks, and user-programmedfunctions. Because of this, connections in all conditions cannot beguaranteed. You should never rely solely on any wireless device for essentialcommunications like medical emergencies.To make an emergency call:1. If the device is not on, switch it on. Check for adequate signal strength.Some networks may require that a valid SIM card is properly inserted in thedevice.2. Press the end key as many times as needed to clear the display and ready thedevice for calls.3. Enter the official emergency number for your present location. Emergencynumbers vary by location.4. Press the call key.If certain features are in use, you may first need to turn those features off beforeyou can make an emergency call. Consult this guide or your service provider formore information.When making an emergency call, give all the necessary information as accuratelyas possible. Your wireless device may be the only means of communication at thescene of an accident. Do not end the call until given permission to do so.CERTIFICATION INFORMATION (SAR)THIS MOBILE DEVICE MEETS GUIDELINES FOR EXPOSURE TO RADIOWAVES.Your mobile device is a radio transmitter and receiver. It is designed not to exceedthe limits for exposure to radio waves recommended by international guidelines.These guidelines were developed by the independent scientific organizationICNIRP and include safety margins designed to assure the protection of all persons,regardless of age and health.Additional safety information97CyanCyanMagentaMagentaYellowYellowBlackBlackfile:/D:/temp/overmode/GUID-E1544AC5-7061-4AE9-A1A4-A210498F82B9.en.200611241647272031164380388562/en/1/GUID-7C1BD2F4-DE90-4CA6-8F0C-D6CE2FEB7F7D.xmlPage 97 Nov 24, 2006 5:00:27 PM
The exposure guidelines for mobile devices employ a unit of measurement knownas the Specific Absorption Rate or SAR. The SAR limit stated in the ICNIRP guidelinesis 2.0 watts/kilogram (W/kg) averaged over 10 grams of tissue. Tests for SAR areconducted using standard operating positions with the device transmitting at itshighest certified power level in all tested frequency bands. The actual SAR level ofan operating device can be below the maximum value because the device isdesigned to use only the power required to reach the network. That amountchanges depending on a number of factors such as how close you are to a networkbase station. The highest SAR value under the ICNIRP guidelines for use of the deviceat the ear is 0.63 W/kg.Use of device accessories and enhancements may result in different SAR values. SARvalues may vary depending on national reporting and testing requirements andthe network band. Additional SAR information may be provided under productinformation at www.nokia.com.Your mobile device is also designed to meet the requirements for exposure to radiowaves established by the Federal Communications Commission (USA) and IndustryCanada. These requirements set a SAR limit of 1.6 W/kg averaged over one gramof tissue. The highest SAR value reported under this standard during productcertification for use at the ear is 0.76 W/kg and when properly worn on the bodyis 0.61 W/kg. Information about this device model can be found at www.fcc.gov/oet/fccid by searching the equipment authorization system using FCC ID:PPIRM-222.Additional safety information98CyanCyanMagentaMagentaYellowYellowBlackBlackfile:/D:/temp/overmode/GUID-E1544AC5-7061-4AE9-A1A4-A210498F82B9.en.200611241647272031164380388562/en/1/GUID-7C1BD2F4-DE90-4CA6-8F0C-D6CE2FEB7F7D.xmlPage 98 Nov 24, 2006 5:00:27 PM
IndexSymbols/Numerics1-touch dialing 46Aaccess codes 11active standby 20, 49alarm clock 74antenna 17anykey answer 56applications 78audio adapter 17audio messaging 32automatic redial 56Bbackground image 49barring password 11battery 89charging 16battery charge status 19blacklist 35Bluetooth 52, 87bookmarks 81browser 79appearance settings 82bookmarks 81browse pages 80cache 84certificates 85cookies 82digital signature 86security 84setup 80WML scripts 83Ccache memory 84calculator 76calendar 75note 75call divert 56call functions 23call key 18call log 47call waiting 24, 56caller id 56callsanswer 24dialed 47international 23making of 23missed 47options 25received 47reject 24settings 56voice dialing 24camera 63, 64camera key 18capitals 25caselower 2599CyanCyanMagentaMagentaYellowYellowBlackBlackfile:/D:/temp/overmode/GUID-E1544AC5-7061-4AE9-A1A4-A210498F82B9.en.200611241647272031164380388562/en/1/GUID-7C1BD2F4-DE90-4CA6-8F0C-D6CE2FEB7F7D.xmlPage 99 Nov 24, 2006 5:00:27 PM
upper 25certificates 85channel types 70characters 25charge the battery 16clock 50codes 11configuration 58configuration setting service 12connectivity 87contact information 13contacts 431-touch dialing 46business cards 46copy 45delete 46dialing shortcuts 46edit details 45groups 45info numbers 47move 45my numbers 47save details 44save names 43save phone numbers 43search 45service numbers 47settings 44synchronize 46cookies 82countdown timer 77CSD 87currency conversion 76customer service 13Ddatacommunication 88technical 88transfer 54data cable 55, 87date settings 50dialing 23dialing shortcuts 24, 46digital signature 86display 19, 49downloads 12, 83Ee-mail application 33earpiece 18edit text 25end key 18ending a call 23enhancements 57equalizer 69exchange rate 76Ffactory settings 61flash messages 31flight mode 22flight query 57See also flight modeFM radio 67font size 50Index100CyanCyanMagentaMagentaYellowYellowBlackBlackfile:/D:/temp/overmode/GUID-E1544AC5-7061-4AE9-A1A4-A210498F82B9.en.200611241647272031164380388562/en/1/GUID-7C1BD2F4-DE90-4CA6-8F0C-D6CE2FEB7F7D.xmlPage 100 Nov 24, 2006 5:00:27 PM
Ggallery 61files 62folders 62print images 62games 78HhandsfreeSee loudspeakerheadphones 17headset 17hearing aid 57help text 57HSCSD 87Iidle mode 19IMAP4 33indicators 21info messages 40info numbers 47installation 14instant messaging 36internet 79interval timer 77Jjunk folder 35Kkeyguard 22automatic 57security 57keypad 18keypad lock 22keys 18call key 18end key 18keyguard 22keypad 18keypad lock 22power 18scroll key 18selection keys 18Llanguage 57voice playback 57location information 48log 47loudspeaker 18, 25Mmedia player 65memory card 62insert 15memory full 32menu 27message center number 28message sending 30messagesaudio messaging 32delete 40flash messages 31folders 33info messages 40postcard 31service commands 40Index101CyanCyanMagentaMagentaYellowYellowBlackBlackfile:/D:/temp/overmode/GUID-E1544AC5-7061-4AE9-A1A4-A210498F82B9.en.200611241647272031164380388562/en/1/GUID-7C1BD2F4-DE90-4CA6-8F0C-D6CE2FEB7F7D.xmlPage 101 Nov 24, 2006 5:00:27 PM
settings 41SIM messages 40text 27voice messages 39microphone 18microSD cardinsert 15MMSSee multimedia messagesmultimedia messages 29music player 65my numbers 47Nnavigation 27navigation keySee scroll keyNokia contact information 13note 75notes 76number dialing 23number mode 25Ooffline mode 23operator menu 61operator selector 57organizer 74Ppacket data 87parts 18PC connectivity 87PC Suite 87phone settings 56phone software updates 57phonebookSee contactsphonelockSee keypad lockPictBridge 55picture 64PIN codes 11POP3 33positioning 48postcards 31power key 18power saver 50power saving 20predictive text input 26print images 62profiles 48PTTSee push to talkPUK codes 11push to talk 69settings 74pushed messages 83Rradio 67recorder 68redial 56Sscreen 49screen saver 50scroll key 18scrolling 27Index102CyanCyanMagentaMagentaYellowYellowBlackBlackfile:/D:/temp/overmode/GUID-E1544AC5-7061-4AE9-A1A4-A210498F82B9.en.200611241647272031164380388562/en/1/GUID-7C1BD2F4-DE90-4CA6-8F0C-D6CE2FEB7F7D.xmlPage 102 Nov 24, 2006 5:00:27 PM
security 59browser 84certificates 85codes 11module 84security code 11selection keys 18serviceinbox 83messages 83service commands 40service numbers 47services 79SIM 86settings 48active standby 49Bluetooth 52browser appearance 82call 56clock 50configuration 58data transfer 54date 50display 49downloads 83enhancements 57font size 50messages 41phone 56power saver 50profiles 48push to talk 73, 74restoring 61screen saver 50security 59service inbox 84shortcuts 50sleep mode 50standby mode 50themes 49time 50time zone 50tones 49USB data cable 55wallpaper 49shortcuts 20, 50left selection key 50right selection key 51scroll key 51voice commands 51signal strength 19SIMmessages 40services 86SIM card 23installation 14sleep mode 50SMSSee text messagesoftware update 12, 60installing 61requesting 60spam filter 35speed dialing 56standby mode 19, 50start up tone 57status indicators 19stereo widening 69Index103CyanCyanMagentaMagentaYellowYellowBlackBlackfile:/D:/temp/overmode/GUID-E1544AC5-7061-4AE9-A1A4-A210498F82B9.en.200611241647272031164380388562/en/1/GUID-7C1BD2F4-DE90-4CA6-8F0C-D6CE2FEB7F7D.xmlPage 103 Nov 24, 2006 5:00:27 PM
stopwatch 77strap 18streaming service 65synchronization 54Ttake a picture 64technical information 88text 25text message 27text modes 25themes 49time settings 50time zone 50timer 77to-do list 75tones 49traditional text input 26Uunlock keypad 22USB connector 18USB data cable 55Vvideo clips 64visual radio 68voice clarity 56voice commands 51voice dailing 24voice messages 39voice recorder 68volume key 18Wwallpaper 49web 79welcome note 57wireless markup language 79WML scripts 83write text 25XXHTML 79Zzoom key 18Index104CyanCyanMagentaMagentaYellowYellowBlackBlackfile:/D:/temp/overmode/GUID-E1544AC5-7061-4AE9-A1A4-A210498F82B9.en.200611241647272031164380388562/en/1/GUID-7C1BD2F4-DE90-4CA6-8F0C-D6CE2FEB7F7D.xmlPage 104 Nov 24, 2006 5:00:27 PM

Navigation menu