Microsoft RM-384 Cellular/PCS CDMA phone with Bluetooth User Manual N8208 EN RUIM INDON silver 09012008
Microsoft Mobile Oy Cellular/PCS CDMA phone with Bluetooth N8208 EN RUIM INDON silver 09012008
Manual
RM-384 User Guide
draft

©2008 Nokia. All rights reserved.
Nokia, Nokia Connecting People, and Navi are trademarks or registered trademarks of Nokia
Corporation. Nokia tune is a sound mark of Nokia Corporation. Other product and company
names mentioned herein may be trademarks or tradenames of their respective owners.
Reproduction, transfer, distribution, or storage of part or all of the contents in this document
in any form without the prior written permission of Nokia is prohibited.
Includes RSA BSAFE cryptographic or security protocol software from RSA security.
This product is licensed under the MPEG-4 Visual Patent Portfolio License (i) for personal and
noncommercial use in connection with information which has been encoded in compliance
with the MPEG-4 Visual Standard by a consumer engaged in a personal and noncommercial
activity and (ii) for use in connection with MPEG-4 video provided by a licensed video
provider. No license is granted or shall be implied for any other use. Additional information,
including that related to promotional, internal, and commercial uses, may be obtained from
MPEG LA, LLC. See <http://www.mpegla.com>.
The availability of particular products and applications and services for these products may
vary by region. Please check with your Nokia dealer for details, and availability of language
options.
Nokia operates a policy of ongoing development. Nokia reserves the right to make changes
and improvements to any of the products described in this document without prior notice.
TO THE MAXIMUM EXTENT PERMITTED BY APPLICABLE LAW, UNDER NO CIRCUMSTANCES
SHALL NOKIA OR ANY OF ITS LICENSORS BE RESPONSIBLE FOR ANY LOSS OF DATA OR
INCOME OR ANY SPECIAL, INCIDENTAL, CONSEQUENTIAL OR INDIRECT DAMAGES
HOWSOEVER CAUSED.
THE CONTENTS OF THIS DOCUMENT ARE PROVIDED “AS IS”. EXCEPT AS REQUIRED BY
APPLICABLE LAW, NO WARRANTIES OF ANY KIND, EITHER EXPRESS OR IMPLIED, INCLUDING,
BUT NOT LIMITED TO, THE IMPLIED WARRANTIES OF MERCHANTABILITY AND FITNESS FOR A
PARTICULAR PURPOSE, ARE MADE IN RELATION TO THE ACCURACY, RELIABILITY OR
CONTENTS OF THIS DOCUMENT. NOKIA RESERVES THE RIGHT TO REVISE THIS DOCUMENT OR
WITHDRAW IT AT ANY TIME WITHOUT PRIOR NOTICE.
Export controls
This device may contain commodities, technology or software subject to export laws and
regulations from the US and other countries. Diversion contrary to law is prohibited.
The third-party applications provided with your device may have been created and may be
owned by persons or entities not affiliated with or related to Nokia. Nokia does not own the
copyrights or intellectual property rights to the third-party applications. As such, Nokia does
not take any responsibility for end-user support, functionality of the applications, or the
information in the applications or these materials. Nokia does not provide any warranty for
the third-party applications.
draft
BY USING THE APPLICATIONS YOU ACKNOWLEDGE THAT THE APPLICATIONS ARE PROVIDED
AS IS WITHOUT WARRANTY OF ANY KIND, EXPRESS OR IMPLIED, TO THE MAXIMUM EXTENT
PERMITTED BY APPLICABLE LAW. YOU FURTHER ACKNOWLEDGE THAT NEITHER NOKIA NOR
ITS AFFILIATES MAKE ANY REPRESENTATIONS OR WARRANTIES, EXPRESS OR IMPLIED,
INCLUDING BUT NOT LIMITED TO WARRANTIES OF TITLE, MERCHANTABILITY OR FITNESS FOR
A PARTICULAR PURPOSE, OR THAT THE APPLICATIONS WILL NOT INFRINGE ANY THIRD-
PARTY PATENTS, COPYRIGHTS, TRADEMARKS, OR OTHER RIGHTS.
FCC NOTICE
Your device may cause TV or radio interference (for example, when using a telephone in close
proximity to receiving equipment). The FCC can require you to stop using your telephone if
such interference cannot be eliminated. If you require assistance, contact your local service
facility. This device complies with part 15 of the FCC rules. Operation is subject to the
following two conditions: (1) This device may not cause harmful interference, and (2) this
device must accept any interference received, including interference that may cause
undesired operation. Any changes or modifications not expressly approved by Nokia could
void the user's authority to operate this equipment.
xxxxxxx/Issue 1
draft

Contents
SAFETY ............................................................................................... 7
General information.......................................................................... 9
Access code ......................................................................................................................... 9
Software updates............................................................................................................... 9
Getting help...................................................................................................................... 10
1. Get started ................................................................................... 11
Insert battery and UIM card ........................................................................................ 11
MicroSD card.................................................................................................................... 13
Charge the battery.......................................................................................................... 14
Switch your device on or off ....................................................................................... 14
Antenna ............................................................................................................................. 15
Connect the headset...................................................................................................... 15
Wrist strap ........................................................................................................................ 16
2. Your device................................................................................... 17
Keys and parts.................................................................................................................. 17
Standby mode .................................................................................................................. 19
Indicators and icons....................................................................................................... 20
Keyguard............................................................................................................................ 21
3. Call functions............................................................................... 22
Make and answer calls.................................................................................................. 22
Speed dialling................................................................................................................... 23
Loudspeaker...................................................................................................................... 23
4. Write text..................................................................................... 24
English input .................................................................................................................... 24
Enter special characters and punctuation marks .................................................. 25
5. Messaging .................................................................................... 26
Text messages .................................................................................................................. 26
Distribution lists.............................................................................................................. 28
Voice messages................................................................................................................ 28
Minibrowser messages .................................................................................................. 29
E-mail messages.............................................................................................................. 29
6. Contacts ....................................................................................... 32
Names ................................................................................................................................ 32
draft
Contacts settings............................................................................................................. 32
Groups................................................................................................................................. 33
Speed dials ........................................................................................................................ 33
Service numbers............................................................................................................... 34
My number........................................................................................................................ 34
Delete contacts entries .................................................................................................. 34
Move contacts.................................................................................................................. 34
Copy contacts................................................................................................................... 34
7. Log ............................................................................................... 35
8. Settings........................................................................................ 36
Profiles................................................................................................................................ 36
My homescreen................................................................................................................ 36
Display ................................................................................................................................ 37
Themes................................................................................................................................ 39
Tones ................................................................................................................................... 39
Date and time settings .................................................................................................. 40
My shortcuts..................................................................................................................... 41
Call settings ...................................................................................................................... 42
Phone settings.................................................................................................................. 43
Carrier settings................................................................................................................. 44
Connectivity...................................................................................................................... 44
Accessory settings........................................................................................................... 46
Security settings .............................................................................................................. 47
Application settings........................................................................................................ 47
Network settings ............................................................................................................. 48
Network services.............................................................................................................. 48
Restore factory settings................................................................................................. 48
Phone details .................................................................................................................... 49
9. Gallery.......................................................................................... 50
Gallery folders .................................................................................................................. 51
Memory card..................................................................................................................... 51
Use files to personalise your device ........................................................................... 51
Work with files................................................................................................................. 51
10.Camera ....................................................................................... 53
Capture an image............................................................................................................ 53
Record a video clip.......................................................................................................... 53
Camera options................................................................................................................ 54
11.Media ......................................................................................... 56
Music player...................................................................................................................... 56
draft
Media player..................................................................................................................... 58
Stereo FM radio............................................................................................................... 59
Recorder............................................................................................................................. 60
Equaliser ............................................................................................................................ 60
Stereo widening .............................................................................................................. 60
12.Organiser .................................................................................... 61
Alarm clock ....................................................................................................................... 61
Calendar............................................................................................................................. 61
Notes .................................................................................................................................. 62
To-do list ........................................................................................................................... 62
Calculator.......................................................................................................................... 62
Countdown timer............................................................................................................ 63
Stopwatch......................................................................................................................... 64
13.Voice commands ........................................................................ 65
Activate and use voice commands............................................................................. 65
Voice Command Settings.............................................................................................. 65
14.Applications................................................................................ 68
15.Minibrowser................................................................................ 69
16.Extras .......................................................................................... 70
Games................................................................................................................................. 70
Converter........................................................................................................................... 70
World clock....................................................................................................................... 70
17.Accessories.................................................................................. 71
18.Battery and charger information.............................................. 72
Nokia battery authentication guidelines ................................................................. 73
Care and maintenance .................................................................... 75
Additional safety information........................................................ 77
Index................................................................................................. 82
draft
SAFETY
7
SAFETY
Read these simple guidelines. Not following them may be dangerous or illegal.
Read the complete user guide for further information.
SWITCH ON SAFELY
Do not switch the device on when wireless phone use is prohibited or
when it may cause interference or danger.
ROAD SAFETY COMES FIRST
Obey all local laws. Always keep your hands free to operate the
vehicle while driving. Your first consideration while driving should be
road safety.
INTERFERENCE
All wireless devices may be susceptible to interference, which could
affect performance.
SWITCH OFF IN RESTRICTED AREAS
Follow any restrictions. Switch the device off in aircraft, near
medical equipment, fuel, chemicals, or blasting areas.
QUALIFIED SERVICE
Only qualified personnel may install or repair this product.
ACCESSORIES AND BATTERIES
Use only approved accessories and batteries. Do not connect
incompatible products.
WATER-RESISTANCE
Your device is not water-resistant. Keep it dry.
■About your device
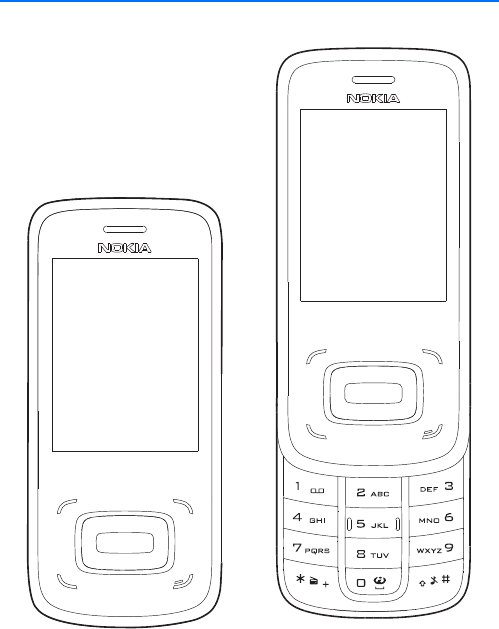
The wireless device (RM-384) described in this guide is approved for use on the
CDMA 800 and 1900 MHz networks. Contact your service provider for more
information about networks.
When using the features in this device, obey all laws and respect local customs,
privacy and legitimate rights of others, including copyrights.
Copyright protection may prevent some images, music, and other content from
being copied, modified, or transferred.
draft

SAFETY
8
Your device may have preinstalled bookmarks and links for third-party internet
sites. You may also access other third-party sites through your device. Third-
party sites are not affiliated with Nokia, and Nokia does not endorse or assume
liability for them. If you choose to access such sites, you should take precautions
for security or content.
Warning: To use any features in this device, other than the alarm clock,
the device must be switched on. Do not switch the device on when
wireless device use may cause interference or danger.
Remember to make back-up copies or keep a written record of all important
information stored in your device.
When connecting to any other device, read its user guide for detailed safety
instructions. Do not connect incompatible products.
■Network services
To use the device you must have service from a wireless service provider. Many of
the features require special network features. These features are not available on
all networks; other networks may require that you make specific arrangements
with your service provider before you can use the network services. Using
network services involves transmission of data. Check with your service provider
for details about fees in your home network and when roaming in other
networks. Your service provider can give you instructions and explain what
charges will apply. Some networks may have limitations that affect how you can
use network services. For instance, some networks may not support all language-
dependent characters and services.
Your service provider may have requested that certain features be disabled or not
activated in your device. If so, these features will not appear on your device
menu. Your device may also have a special configuration such as changes in
menu names, menu order, and icons. Contact your service provider for more
information.
This device supports WAP 2.0 protocols (HTTP and SSL) that run on TCP/IP
protocols. Some features of this device, such as media and browser messages
require network support for these technologies.
draft

General information
9
General information
Congratulations on your purchase of the Nokia mobile device. It
provides several functions for practical daily use, such as a hands-free
loudspeaker, an alarm clock, a calculator, a calendar, and more. Your
device can connect to a PC, laptop, or other device using a data cable. To
personalise it, you can set your favourite ringing tones, wallpaper,
screensaver, and other features.
■Access code
The PIN code protects your UIM card from unauthorised access. The PIN
code can be 4 to 8 digits in length. The default PIN code may vary
depending on your wireless service provider.
After three successive incorrect entries, the PIN code is blocked. To
unblock it, you must enter your Personal Unblocking Key (PUK) code.
To configure access code settings, select Menu > Settings > Security,
enter your default lock code, select OK and from the available options.
If you forget the code and your device is locked, your device will require
service and additional charges may apply. For more information, contact
a Nokia Care point or your device dealer.
■Software updates
If software updates over the air are supported by your network, you may
also be able to request updates through the device. See "Phone
settings", p. 43.
Downloading software updates may involve the transmission of large
amounts of data through your service provider’s network. Contact your
service provider for information about data transmission charges.
Make sure that the device battery has enough power, or connect the
charger before starting the update.
draft

General information
10
Warning: If you install a software update, you cannot use the
device, even to make emergency calls, until the installation is
completed and the device is restarted. Be sure to back up data
before accepting installation of an update.
■Getting help
Nokia support on the web
Check www.nokia.com/support or your local Nokia website for the latest
guides, additional information, downloads, and services related to your
Nokia product.
draft
Get started
11
1. Get started
■Insert battery and UIM card
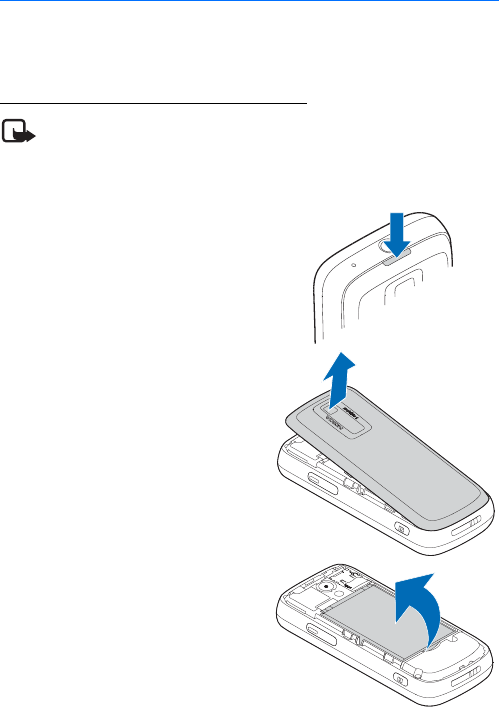
Remove the back cover and battery
Note: Always switch off the power and disconnect the charger
and any other device before removing the cover. Avoid touching
electronic components while changing the cover. Always store
and use the device with the cover attached.
1. Press the back cover release
button on the top of the device.
2. Lift the back cover off carefully.
3. Lift the battery up from its
compartment.
draft

Get started
12
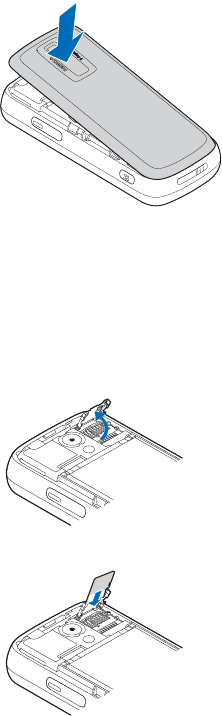
Install the UIM card
The user identity module (UIM) card can be easily damaged by
scratching or bending, so be careful when handling, inserting, or
removing it. The UIM card slot is located under the battery. Keep the
UIM card out of the reach of small children.
1. Slide forward the card holder and lift it from the holder.
2. Hold the bevelled corner of the
UIM card facing up and aligned
with the bevelled corner of the
card holder.
3. Insert the UIM card into the
holder with the gold-coloured
contacts facing down, matching
up with the gold-coloured
contacts on the device.
4. Slide back the card holder and
lock it into place.
Replace the battery and back cover
1. Insert the battery, gold-coloured
contact end first, into the battery
slot.
2. Push down on the other end of the
battery to snap it into place.
draft
Get started
13
3. Replace the back cover so that the
cover tabs align with the slots in
the device. Press the cover down
gently until it clicks into place.
■MicroSD card
Use only compatible microSD cards approved by Nokia for use with this
device. Your device supports microSD cards up to 32GB. Nokia uses
approved industry standards for memory cards, but some brands may
not be fully compatible with this device. Incompatible cards may
damage the card and the device and corrupt data stored on the card.
To insert the microSD card:
1. Remove the back cover.
2. Lift open the microSD holder
cover.
3. Slide the card into the holder
carefully with the gold-coloured
contacts facing down, and close
the cover.
4. Replace the cover.
draft
Get started
14
Important: Do not remove the memory card in the middle of an
operation when the card is being accessed. Removing the card in
the middle of an operation may damage the memory card as well
as the device, and data stored on the card may be corrupted.
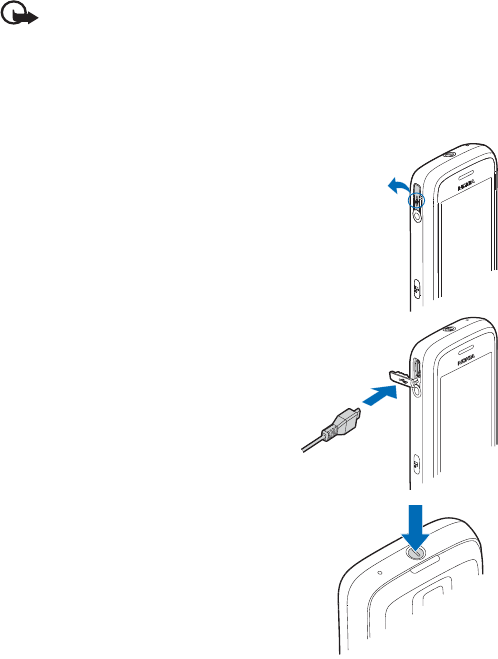
■Charge the battery
Your battery has been precharged, but
the charging levels may vary.
1. Connect the charger to a wall
outlet.
2. Connect the charger to the device.
You can use your device while it is
charging.
3. When the battery is fully charged,
disconnect the charger from the
device, then from the wall outlet to
save energy.
■Switch your device on or
off
1. Press and hold the end key for at
least 4 seconds.
2. Enter the lock code or PIN code, if
necessary, and select OK. See "Security
settings", p. 47.
draft

Get started
15
■Antenna
Your device may have internal and
external antennas. As with any radio
transmitting device, avoid touching
the antenna area unnecessarily while
the antenna is transmitting or
receiving. Contact with such an
antenna affects the communication
quality and may cause the device to
operate at a higher power level than
otherwise needed and may reduce the
battery life.
■Connect the headset
Do not connect products that create an output signal as this may cause
damage to the device. Do not connect any voltage source to the Nokia
AV Connector.
When connecting any external device or any headset, other than those
approved by Nokia for use with this device, to the Nokia AV connector,
pay special attention to volume levels.
A compatible headset may be purchased with your device or separately
as an accessory. See "Accessory settings", p. 46.
1. Plug the headset connector into the
connector on the side of your device.
appears on the screen.
2. Position the headset on your ear.
With the headset connected, you can
make, answer, and end calls as usual.
draft
Get started
16
Warning: When you use the headset, your ability to hear
outside sounds may be affected. Do not use the headset where
it can endanger your safety.
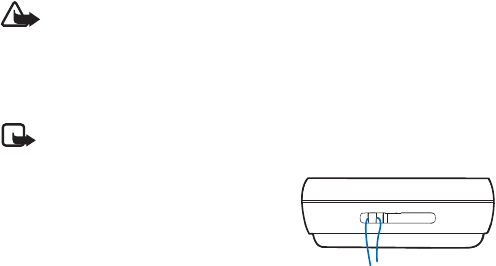
■Wrist strap
Note: The wrist strap does NOT come in the box.
Thread the wrist strap, and tighten it.
draft
Your device
17
2. Your device
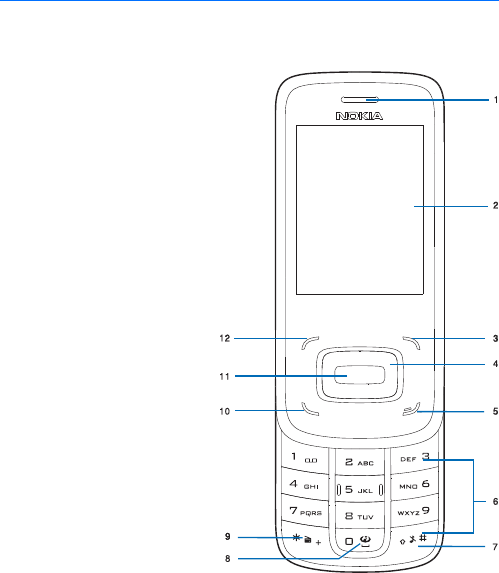
■Keys and parts
1. Earpiece
2. Display screen
3. Right selection key
4. Navi™ key; hereafter
referred to as scroll key
5. End key
6. Keypad
7. Silent key — Press and
hold to turn on the Silent
profile.
8. Wireless internet key —
Press and hold to access
internet services.
9. Radio key — Press and
hold to turn on the radio.
10.Call key
11.Middle selection key
12.Left selection key
draft
Your device
18
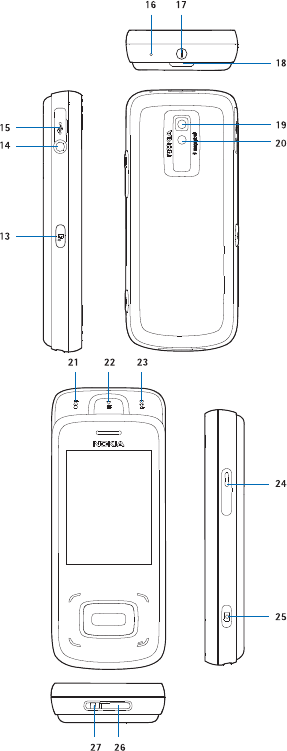
13.Voice command key
14.Headset connector
15.Charger/USB port
16.Microphone
17.Power button
18.Back cover release
button
19.Camera lens
20.Camera flash
21.Open the media keys
under the 2-way slide.
Rewind key — Press to
play the previous song
in your playlist, or press
and hold to rewind
through the current
song.
22.Play/Pause key — Press
to play or pause a song
in your playlist.
23.Fast forward key —
Press to play the next
song in your playlist, or
press and hold to fast-
forward through the
current song.
draft

Your device
19
24.Volume/Zoom key — Press to control audio volume or to zoom when
you are using the camera.
25.Camera button
26.Microphone
27.Wrist strap eyelet
■Standby mode
Depending on your wireless service provider and the model number of
your device, some or all of the following indicators and shortcut keys
may be available in the standby mode.
Home screen
The home screen indicates that your device
is in the standby mode.
1. Signal strength — The number of bars
indicates the strength of the signal
received by the device.
2. Battery strength — Four bars indicate a
fully charged battery.
3. Time — The time of day is displayed.
4. The right selection key — Press the right
selection key to access your contacts list.
5. The middle selection key — Press the
middle selection key to access the main
menus.
6. The left selection key — Press the left selection key to access a list of
your favourite applications. To add items to the list, select Add and
from the available options.
7. Active standby — See "Active standby", p. 20.
draft

Your device
20
Active standby
The active standby displays a list of selected device features and
information that you can directly access, such as application shortcuts,
information from the radio and music player, calendar events, and a
customisable note.
To switch active standby on or off, select Menu > Settings > Display >
Active standby > Active standby mode > On or Off.
To view or customise the active standby key, see "Configure active
standby", p. 37. In the standby mode, select the active standby key to
activate the navigation, then scroll up or down in the list, and choose
Select or View. To stop navigation, select Exit. To organise and change
the active standby, select Options and from the available options. If no
keys are pressed in a certain time, the device automatically deactivates
the navigation.
■Indicators and icons
Depending on your wireless service provider and the model number of
your device, some or all of the following indicators and icons may be
available in the standby mode and active standby mode.
An alarm is set. See "Alarm clock", p. 61.
A headset is connected to the device. See "Accessory settings", p.
46.
Your device keypad is locked. See "Keyguard", p. 21.
The loudspeaker is on.
Your device is set to the Silent profile. See "Profiles", p. 36.
The stopwatch timer is running in the background.
You have new text messages. See "Text messages", p. 26.
You have new voice messages. See "Voice messages", p. 28. This
icon shows only when the network supports this function.
You have missed a call. See "Log", p. 35.
The countdown timer is running.
draft

Your device
21
The current profile is timed. See "Profiles", p. 36.
■Keyguard
With the keyguard, you can lock the keypad to prevent accidental
keypresses. When the keypad is locked, it unlocks if you receive a call.
When the call ends, it is automatically locked again.
To set the keypad to lock automatically when the device is in the
standby mode and no function of the device has been used for a certain
time, select Menu > Settings > Phone > Automatic keyguard > On.
To lock the keypad manually, select Menu, and press * within 4 seconds.
When the keyguard is on, calls may be possible to the official emergency
number programmed into your device.
To unlock the keypad, select Unlock, and then press * within 4 seconds.
draft

Call functions
22
3. Call functions
■Make and answer calls
Make a call
To make a call, enter the phone number, including the country code and
area code, if necessary. To delete a character, press Clear. Press the call
key to call the number. Use the volume keys to adjust the volume of the
earpiece or headset during the phone call. To end the call, press the end
key.
Use voice commands to make a call
To start voice dialling, press the voice command key. If a compatible
headset with a headset key is attached, press and hold the headset key
to start voice dialling. A short tone sounds and the device prompts you
to say a command. Say clearly the name or number that is saved in your
contacts list. After about 2.5 seconds, the device dials the number. If the
recognised contact was not correct, press the end key to end the call,
and try again. See "Activate and use voice commands", p. 65.
Make a conference call
Conference calling (network service) allows you to take part in a
conference call with two other participants. During a call, to make a call
to a new participant, select Options > New call. Enter the number you
want, and press the call key. When the new call is answered, press the
call key to connect the calls. To end the conference call, select
Options > End all calls, or press the end key.
Answer or reject a call
To answer an incoming call, press the call key. To reject the call without
answering, press the end key. To reject the call and send the caller a text
message, select Send msg > Send to send the default message (see "Call
draft

Call functions
23
settings", p. 42), or Options and from the available options to send a
different message.
■Speed dialling
Press and hold the assigned number key, 2-9, to start speed dialling one
of your contacts.
To use this feature, you need:
— Assign a speed dialling number key to the desired contact, see "Speed
dials", p. 33.
— Turn on the speed dial feature, see "Call settings", p. 42.
■Loudspeaker
You can use your device as a loudspeaker during a call.
Warning: Do not hold the device near your ear when the
loudspeaker is in use, because the volume may be extremely
loud.
To activate the loudspeaker during a call, select Loudsp., and close the
fold.
To deactivate the loudspeaker during a call, open the fold, and select
Normal.
The loudspeaker is deactivated automatically when a call (or a call
attempt) ends or when certain accessories are connected.
draft
Write text
24
4. Write text
■English input
To enter English, you can use either standard or predictive English input.
To switch between the standard English and predictive English input
modes, select Options > Prediction options > Prediction > On or Off.
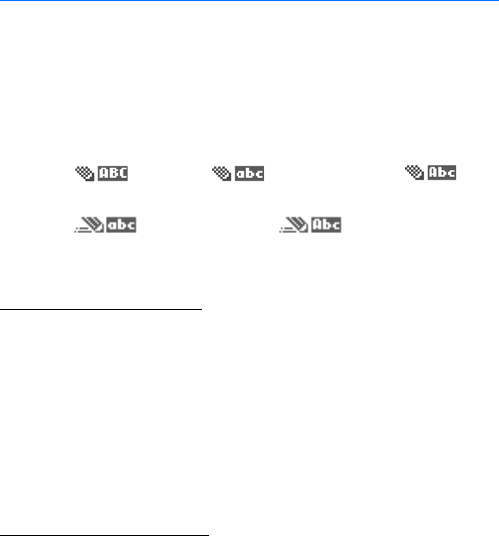
In the standard English input mode, press # to switch between
uppercase , lowercase , and sentence case .
In the predictive English input mode, press # to switch between
lowercase , and sentence case .
To enter a number, press and hold # and select Number mode.
Standard English input
• Press a number key from 2 to 9 to enter the first letter on the key,
twice to enter the second letter, and so on.
If the next letter is located on the same key as the current one, wait
until the cursor appears.
•Press Clear to delete one letter to the left of the cursor. Press and
hold Clear to delete letters quickly.
• To insert a space, press 0.
Predictive English input
With predictive English input, you can use the built-in dictionary when
writing, and add new words to it. You can use predictive English input
only when the writing language is English.
1. Start writing a word using the keys from 2 to 9. Press each key once
for each letter.
draft
Write text
25
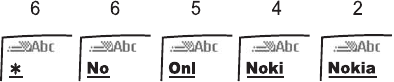
The following example shows what is displayed when you write
"Nokia" using predictive English input. Press 6-6-5-4-2.
2. Press 0 to confirm a word and insert a space after it.
If the word is not correct, press * repeatedly until the desired word
appears, and then confirm.
If * appears, enter an additional key to make a match with the built-
in dictionary.
If the ? character is displayed after the word, the word you intend to
write is not in the dictionary. To add the word to the dictionary, select
Spell. Enter the word using standard English input, and select Save.
■Enter special characters and punctuation marks
If you are using the standard English or number mode, press * to view
the list of special characters and punctuation marks. Scroll to the one
you want, and select Use.
If you are using the standard English input mode, press 1 repeatedly to
enter frequently used punctuation marks.
draft
Messaging
26
5. Messaging
If you have subscribed to a messaging network service, you can send and
receive messages between compatible mobile devices that also
subscribe to a messaging service. You can also exchange e-mail.
Messaging features are network services.
Note: The message sent icon or text on your device screen does
not indicate that the message is received at the intended
destination.
■Text messages
Write and send a text message
1. Select Menu > Messaging > Text messages > Create message.
2. Scroll to the To: field, and enter the recipient’s phone number. You
can also send a text message to an e-mail address by entering the
address in the To: field.
3. Scroll to the Message: field, and write a message.
An indicator at the top of the display shows the total number of
characters left.
4. Scroll down, and select Send.
Messages are automatically stored in the Outbox folder as they are
sent. If your service is interrupted while sending, the message is
stored in the Outbox folder until another delivery attempt is made.
Read and reply to a text message
When you receive a message, a notification and are displayed. Select
Show to read the message, or Exit to dismiss the notification and read
the message later from the Inbox folder. If necessary, scroll up or down
to view the whole message.
With the message open, select Reply to write your replay, and select
Send.
draft

Messaging
27
Delete text messages
You must delete old and unlocked messages when your message
memory is full. To lock or unlock the message, select Menu > Messaging
> the folder containing the message, the desired message, and select
Options > Lock or Unlock.
Delete a single message
1. Select Menu > Messaging > Text messages.
2. Select the folder containing the message you want to delete.
3. Scroll to the message you want to delete, and select Options >
Delete > Yes.
Delete all messages in a folder
1. Select Menu > Messaging > Text messages > Delete messages.
2. Select All, All read, or All unread to indicate which messages to
delete in a folder.
3. Scroll to each folder that has messages you want to delete, and
select Mark > Done > Yes, or select Options > Mark all > Done > Yes.
Text message settings
You can configure text message settings to personalise your message
format, and contents of the Inbox and Outbox folders.
Select Menu > Messaging > Text messages > Message settings >
Sending options and from the following:
Priority — The recipient views an alert icon for urgent messages
(compatible Nokia devices only).
Delivery reports — Set the system to send a delivery report to the Inbox
folder each time you send a message.
Send callback number — Assign a number to attach to each message.
Signature — Append a signature to each message.
Select Menu > Messaging > Text messages > Message settings > Other
settings and from the following:
draft

Messaging
28
Save incoming text messages — Select where to save incoming
messages.
Message font size — Select a font size.
Message overwriting — Automatically replace old messages in the Inbox
and Sent items folders when new ones arrive.
Save sent messages — Select whether to save sent messages.
Queue msgs. when digital unavailable — Select whether to store
messages in the Outbox folder until they can be sent with digital service.
■Distribution lists
You can send text messages quickly and conveniently to a list of
contacts. To create and edit lists, select Menu > Messaging >
Distribution lists and from the available options.
■Voice messages
Voice mail is a network service that allows you to listen to voice
messages recorded in the voice mail box. For more information, contact
your service provide.
To enter, view or edit your voice mailbox number, select Menu >
Messaging > Voice messages > Voice mailbox number.
Listen to voice messages
When you receive a voice message, your device beeps, displays , or
both. If you receive more than one voice message, your device shows the
number of voice messages received. Select Listen to listen to the
message, or Exit to dismiss the notification.
To dial the voice mailbox number, in the standby mode, press and hold 1,
or select Menu > Messaging > Voice messages > Listen to voice
messages. Follow the instructions to listen to your voice messages.
draft

Messaging
29
■Minibrowser messages
You can use the minibrowser to check e-mail messages. This is network
service.
To connect to the browser, select Menu > Messaging > Minibrowser
Messages > Connect.
For more information on using the minibrowser in your device to access
web pages and other online services, see "Minibrowser", p. 69.
Important: Exercise caution when opening messages. Messages
may contain malicious software or otherwise be harmful to your
device or PC.
■E-mail messages
The e-mail application uses a packet data connection (network service)
to allow you to access your e-mail account from your device when you
are not in the office or at home. To use the e-mail function on your
device, you need a compatible e-mail system. Your device supports POP3
and IMAP4 e-mail servers.
Before you can send and retrieve any e-mail messages, you must obtain
a new e-mail account or use your current account.
You can set up a maximum of five e-mail accounts on your device. Each
account is stored as a separate mailbox.
Set up a mailbox
Select Menu > Messaging > E-mail message > Settings > Options >
New account and from the following:
Account name — Enter a name for your mailbox.
Protocol — Select the protocol recommended by your service provider.
User name — Enter the user name of your e-mail address
(username@domainname).
Password — Enter a password. If you leave this field blank, you are
prompted for the password when you try to connect to your remote
mailbox.
draft

Messaging
30
Incoming domain name — Enter the IP address or host name of the mail
server that receives your mail.
Incoming port — Define a port for incoming mail.
SMTP domain name — Enter the IP address or host name of the mail
server that delivers your mail.
Outgoing SMTP port — Define a port for outgoing mail.
Email address — Enter your e-mail address.
Save on server — Save recently received messages on the server.
Receive unread only — Your mailbox receives unread messages only.
Download — Read downloaded messages on your device, or view
downloaded titles and read the complete messages online.
Retrieve e-mail messages
Select Menu > Messaging > E-mail message > Inbox > Receive, and an
account. If you have not saved the password for the account, enter the
password. If the account is not active, select Yes to activate the account
and receive e-mail.
E-mail message settings
To activate, connect to, edit, or delete a mailbox, select Menu >
Messaging > E-mail message > Settings, a mailbox, Options and from
the available options.
Write and send an e-mail message
1. Select Menu > Messaging > E-mail message > New e-mail.
2. Scroll to the To:, Cc:, or Bcc: fields, and either enter e-mail addresses
directly, or select Add > Recently used or Contacts.
3. Scroll to the Subject: field and enter a title.
4. Scroll to the Message: field and write a message with the keypad.
5. Select Options > Send.
draft

Messaging
31
Read and reply to an e-mail message
To read an e-mail message, select Menu > Messaging > E-mail message
> Inbox, and the message.
To reply to the message, select Reply > Yes to quote the original
message, or Reply > No to start with a blank message.
draft
Contacts
32
6. Contacts
■Names
You can access and add to the list of contacts and caller groups saved on
your device, UIM card, or both.
Add new contacts
Select Menu > Contacts > Names > Add (if the list is empty) or Options
> Add new contact, enter the name and phone number, and select Save.
Search for a contact
Select Menu > Contacts > Names > Options > Search, enter the first
letters of the name you are searching for, scroll to the desired contact,
and select Details.
Edit contacts entries
Select Menu > Contacts > Names, scroll to the entry you want to edit,
and select Options > Edit contact.
Business cards
You can send and receive contacts as business cards via text messages,
e-mail messages, or Bluetooth. Select Menu > Contacts > Names, scroll
to the desired contact, and select Details > Options > Send bus. card.
■Contacts settings
Select Menu > Contacts > Settings and from the following options:
Memory in use — Select where to store your contacts.
Contacts view — Select how the names and numbers in Contacts are
displayed.
Name display — Select whether the contact’s first or last name is
displayed first.
draft

Contacts
33
Font size — Set the font size for the list of contacts.
Memory status — View the free and used memory capacity.
■Groups
To identify callers, you can add contacts to caller groups, and assign a
unique ringing tone or graphic to each group.
Create and edit caller groups
To create new caller groups, select Menu > Contacts > Groups > Add (if
the list is empty), or Options > Add new group, enter details for the
group, and select Save.
To edit group name, image and tone, scroll to a group and select Options
> Group details.
To delete a group, scroll to the group and select Options > Delete group
> Yes.
Add a contact to a group
Select Menu > Contacts > Groups, a group, and View > Add.
Remove a contact from a group
Select Menu > Contacts > Groups, a group, and View, scroll to the
contact you want to remove, and select Options > Remove member >
Yes.
■Speed dials
You can associate a number key from 2 to 9 with an entry in the
contacts list. To activate or deactivate speed dialling, see "Call settings",
p. 42.
Assign a key to speed dialling
Select Menu > Contacts > Speed dials, scroll to an empty speed dialling
slot, and select Assign > Search and the desired contact.
draft

Contacts
34
If speed dialling is off, the device prompts you to turn speed dialling on.
Change speed dialling numbers
Select Menu > Contacts > Speed dials, scroll to the assigned speed
dialling slot, and select Options > Change > Yes > Search and the
desired contact.
Delete speed dialling numbers
Select Menu > Contacts > Speed dials, scroll to the assigned speed
dialling slot, and select Options > Delete > Yes.
■Service numbers
Your UIM card may include preinstalled service numbers of your service
provider (network service). To call a service number, select Menu >
Contacts > Service numbers.
■My number
To display the phone number of the device, select Menu > Contacts >
My numbers > View.
■Delete contacts entries
To delete all entries in your contacts list, select Menu > Contacts > Del.
all contacts > From phone memory or From SIM card > Yes, enter your
lock code, and select OK.
■Move contacts
To move contacts between the device memory and the UIM card, select
Menu > Contacts > Move contacts.
■Copy contacts
To copy contacts between the device memory and the UIM card, select
Menu > Contacts > Copy contacts.
draft

Log
35
7. Log
Call register stores information about your recent missed, received, and
dialled calls. Select Menu > Log and from the following:
Call log — View a list of all calls.
Missed calls — View a list of calls that have not been answered.
Received calls — View a list of calls that have been answered.
Dialled numbers — View a list of numbers that have been dialled.
Message recipients — View a list of recent message recipients.
Clear log lists — Clear any or all of the log lists.
Call duration — View the duration of the last call, all received calls, all
dialled calls, or all calls. To reset the timers, select Clear timers, enter
your lock code, and select OK.
Data/fax calls — View details of data or fax calls.
Minibrowser calls — View details of Minibrowser calls.
draft

Settings
36
8. Settings
■Profiles
A profile defines how your device reacts when you receive a call , select
Menu > Settings > Profiles > the desired profile and from the available
options.
Activate — Use the profile.
Personalise — Set the profile tones, alerts, volumes, and more. Scroll
down to each option, and scroll left or right to change the default
setting.
Timed — Set the profile to end after a certain time (not available for the
Flight profile). Enter the time in HH:MM format.
Warning: With the flight profile you cannot make or receive
any calls, including emergency calls, or use other features that
require network coverage. To make calls, you must first activate
the device function by changing profiles. If the device has been
locked, enter the lock code. If you need to make an emergency
call while the device is locked and in the flight profile, you may
be also able to enter an official emergency number programmed
in your device in the lock code field and select ’Call’. The device
will confirm that you are about to exit flight profile to start an
emergency call.
■My homescreen
You can select organic desktop, active standby, or basic standby for your
home screen, and configure useful features such as the theme and
shortcut keys.
Select Menu > Settings > My homescreen and from the following:
Current homescreen — Select the standby mode for your home screen.
Personalise view — Select the content displayed in the active standby
mode.
Homescreen access — Select the active standby key.
draft

Settings
37
Homescreen switch — Configure the shortcut keys for your home screen.
■Display
To modify the look and feel of the phone display, select Menu > Settings
> Display.
Wallpaper
Select Menu > Settings > Display > Wallpaper and from the following:
Image — Use a saved image from Gallery as a wallpaper for the active
profile. See "Gallery", p. 50.
Image format — Edit the currently active wallpaper.
Slide set — Go to folders in Gallery, and select images to show as a slide
show.
Open Camera — Capture an image with the camera to use as a
wallpaper.
Graphic downloads — Use a downloaded image on your device as a
wallpaper for the active profile.
On or Off — Activate or deactivate the wallpaper.
Configure active standby
See "Active standby", p. 20. Select Menu > Settings > Display > Active
Standby and from the following:
Active standby mode — Turn the active standby mode on or off.
Personalise view — Select the content displayed in the active standby
mode. Scroll to a content field, and select Change or Assign to
personalise content. To move content, or to select and organise
shortcuts for a shortcut bar, select Options.
Active standby key — Select a shortcut key to turn the active standby
mode on or off. You can also configure the active standby key when
setting shortcuts. See "My shortcuts", p. 41.
draft

Settings
38
Set the standby mode font colour
Select Menu > Settings > Display > Standby font colour and from the
available colours.
Navigation key icons
To turn navigation key icons on or off, select Navigation key icons.
Set the display brightness
Select Menu > Settings > Display > Display brightness and a brightness
level.
Set the banner
To enter text or assign a logo to display as a banner in the standby mode,
or to use the default banner, select Menu > Settings > Display > Banner
and from the available options.
Set and edit a screen saver
Select Menu > Settings > Display > Screen saver and from the
following:
Image — Use a saved image from Gallery as a screen saver. See "Gallery",
p. 50.
Image format — Edit the currently active screen saver.
Slide set — Go to Gallery, and select images to show as a slide show.
Video clip — Use a saved video clip from Gallery as a screen saver. See
"Gallery", p. 50.
Open Camera — Capture an image with the camera to use as a screen
saver.
Analogue clock — Set a traditional clock as the screen saver.
Digital clock — Set a digital clock as the screen saver.
Time-out — Set the length of time the device is inactive before the
screen saver is displayed.
On or Off — Activate or deactivate the screen saver.
draft

Settings
39
Use the power saver
To activate the power saver, select Menu > Settings > Display > Power
saver > On. A clock is displayed when the phone is not used for a certain
time.
Use sleep mode
To activate the sleep mode, select Menu > Settings > Display > Sleep
mode > On. The display turns off when the phone is not used for a
certain time.
Set the backlight time-out
To conserve battery life, you can set the phone backlighting to dim when
idle. To set the backlight duration, select Menu > Settings > Display >
Backlight time-out > Default or Personalise, and enter a time in MM:SS
format.
Set slide animation
To set whether an animation displays when you open the slide. Select
Menu > Settings > Display > Slide animation > On or Off.
■Themes
Selecting a theme automatically loads a wallpaper, screen saver, default
ringing tone and background image for that theme.
To select a theme, select Menu > Settings > Themes > Select theme, and
a theme.
To download a theme, select Menu > Settings > Themes > Theme
downloads > Add, and enter the web address to download from and the
title of the theme.
■Tones
You can adjust the ringing volume and configure ringing tones, the
vibrating alert, keypad tones, and more for the active profile.
draft
Settings
40
If you select the highest ringing tone level, the ringing tone reaches its
highest level after a few seconds.
Select Menu > Settings > Tones and from the following:
Incoming call alert: — Select a tone, or turn incoming call alert off.
Ringing tone: — Download a ringing tone, use a ringing tone from
Gallery, or use the Nokia tune ringing tone.
Ringing volume: — Select the volume for ringing tones.
Light effects: — Turn light effects on or off.
Incoming call video: — Select a file from Gallery, or turn incoming call
video off.
Vibrating alert: — Turn vibrating alert on or off.
Message alert tone: — Select the alert for incoming messages.
Keypad tones: — Select the volume for the tone played when you press a
key.
End of list tone: — Select whether to play a tone when you scroll to the
end of a list.
Other tones: — Turn other tones on or off.
Application tones: — Turn application tones on or off.
Alert for: — Select which calls and other events the device alerts you for.
■Date and time settings
To modify the date and time settings, select Menu > Settings > Date and
time and from the following:
Date & time settings — Set the date and time.
Date and time format — Select the format for the date and time displays.
You can select the order in which year, month, and date are displayed,
and select the 24-hour or 12-hour format for the clock. You can also
show or hide the date and time displays.
Auto-update of time — Set whether the device updates the time
automatically by connecting to the network.
draft

Settings
41
■My shortcuts
Left selection key
To assign a shortcut function to the left selection key, select Menu >
Settings > My shortcuts > Left selection key, and from the available
options.
Right selection key
To assign a shortcut function to the right selection key, select Menu >
Settings > My shortcuts > Right selection key, and from the available
options.
Navigation key
To select shortcut functions for the scroll key, select Menu > Settings >
My shortcuts > Navigation key, scroll to the desired scroll key, and select
Change and from the available options.
To remove the shortcut function from a key, in the navigation key menu,
scroll to the desired key, and select Change > (empty).
To reassign a function to a key, in the navigation key menu, scroll to the
desired key, and select Assign and from the available options.
You cannot assign a function to the designated active standby key
(either up or down key).
If both up and down scroll keys are set as the active standby key,
assigning a function to either of them will automatically lock the other
one as the active standby key.
Active standby key
To select the key or keys to access the active standby mode, select Menu
> Settings > My shortcuts > Active standby key > Navigation key up,
Navigation key down, or Nav. key up/down.
draft

Settings
42
Voice commands
You can use voice commands to quickly access menu functions. See
"Voice commands", p. 65.
■Call settings
To customise how your device handles incoming and outgoing calls,
select Menu > Settings > Call and from the following:
Call rejection msg. — Edit the default call reject message.
Anykey answer — Select whether pressing any key answers a call.
Preferred carrier — Select whether to activate services of your preferred
carrier.
Automatic redial — Select whether to redial a number automatically if
the number you are calling is busy.
Speed dialling — Turn speed dialling on or off.
Calling card — Store up to four calling card numbers to make long
distance calls quickly.
Abbreviated dialling — Select whether to activate service codes
(network service).
International prefix — Edit the prefix for calling international direct
dialled numbers. When you are dialling a number and you enter + before
the number, the international prefix is automatically used.
Data/fax calls — Display the data rate for data calls.
Call summary — Select whether the device displays a summary of call
information at the end of a call.
Show call time on display — Select whether to show the elapsed time
when a call is in progress.
Slide call handling — Select whether opening the slide answers a call,
and whether closing the slide ends a call.
Ringing tone for no caller ID — Turn this feature on or off, or set it by
network.
Video ringing tone — Turn video ringing tones on or off.
draft
Settings
43
■Phone settings
To customise your phone settings, select Menu > Settings > Phone and
from the following:
Language settings — Set the language of your phone menu and display.
Touch key settings — Set sensitivity, vibration strength, and vibration
pattern for the left and right selection keys, the call key, and the end
key, or turn selection key vibration off.
Memory status — View the amount of memory used and the remaining
memory on the device and the memory card.
Automatic keyguard — Turn automatic keyguard on or off. See
"Keyguard", p. 21.
DTMF tones — Select settings for DTMF tones. These are the tones
produced by your device when you are dialling a number. They are
commonly used by automated services such as telephone banking and
help desks.
Start-up tone — Select whether a tone is played when you switch your
device on.
Switch off tone — Select whether a tone is played when you switch your
device off.
Welcome note — Edit the welcome note that is displayed when you
switch your device on.
Flight query — Select whether to display a prompt when you turn flight
mode query on or off.
Phone updates — Check for software updates and download them
(network service). See "Software updates", p. 9.
Confirm SIM actions — Show the confirmation messages sent between
your phone and the network when you are using the UIM services.
Help text activation — Select whether a short help text is displayed for
certain menu items.
draft

Settings
44
■Carrier settings
To configure settings for the browser and WAP, select Menu > Settings
> Carrier settings > an operator and from the following:
Activate — Set an available network service.
Configure — Edit the proxy address, user name, password, or homepage
of the browser, select Browser and from the available options. Edit the
user name, password, or IP address of DNS of BREW, select BREW and
from the available options.
Restore defaults — Restore all preference settings to default.
■Connectivity
Bluetooth connectivity
You can connect wirelessly to other compatible devices with wireless
Bluetooth technology. Compatible devices may include mobile devices,
computers, and accessories such as headsets and car kits. You can use
Bluetooth connectivity to send images, video clips, music and sound
clips, and notes; and connect wirelessly to your compatible PC (for
example, to transfer files).
This device is compliant with Bluetooth Specification 2.0 + EDR
supporting the following profiles: Advanced Audio Distribution Profile,
Audio/Video Control Transport, Audio/Video Remote Control Profile,
Bluetooth Printing and Basic Imaging Profiles, Dial-up Networking, File
Transfer Profile, Generic Audio/Video Distribution Profile, Hands Free
Profile 1.5, Mono Headset, Object Push Profile, and Phone Book Access
Profile. To ensure interoperability between other devices supporting
Bluetooth technology, use Nokia approved accessories for this model.
Check with the manufacturers of other devices to determine their
compatibility with this device.
Features using Bluetooth technology increase the demand on battery
power and reduce the battery life.
draft
Settings
45
Security tips
• Operating the device in hidden mode is a safer way to avoid
malicious software.
• Do not accept Bluetooth connectivity from sources you do not trust.
• Alternatively, switch off the Bluetooth function. This does not affect
other functions of the device.
Set up Bluetooth connectivity
To turn on Bluetooth connectivity, select Menu > Settings >
Connectivity > Bluetooth > Bluetooth > On.
To allow your device to be found by other devices with Bluetooth
wireless technology, select My phone’s visibility > Permanent visibil. To
allow visibility for a limited period, select Temporary visibil. To hide your
device from other devices, select Hidden.
To edit the name shown to other devices using Bluetooth connectivity,
select My phone’s name.
Connect a Bluetooth audio device
Select Menu > Settings > Connectivity > Bluetooth > Search audio
enhanc. and the device that you want to connect.
View the list of your bluetooth connection
To view active Bluetooth connections, select Menu > Settings >
Connectivity > Bluetooth > Active devices. To disconnect a connection,
select a device and Disconnect.
Transfer data using pairing
To enable data transfer between your device and another device with
Bluetooth connectivity, you can set up an association (pairing). To pair
with a new device for the first time, you must enter the passcode of
1-16 numeric characters agreed with you and the owner of the device.
Select Menu > Settings > Connectivity > Bluetooth > Paired devices. To
search available devices, select New. To connect to a device, highlight a
device, select Pair, and enter the passcode.
draft

Settings
46
To edit settings for a paired device, select Menu > Settings >
Connectivity > Bluetooth > Paired devices, the device, Options >
Settings and from the following:
Assign short name — Assign a short name to the paired device.
Auto-conn., no conf. — Select whether to allow your device to connect
to the paired device without a confirmation prompt.
USB data cable
You can transfer data between your device and a compatible PC by
using a compatible USB data cable.
Important: To make a call, disconnect the USB data cable from
the device.
To have the device ask the purpose of the USB cable connection each
time the cable is connected, select Menu > Settings > Connectivity >
USB data cable > Ask on connection.
Nokia PC Suite
You can use Nokia PC Suite to make a backup copy of all data,
synchronise information between your device and PC (such as calendar
notes and contacts entries), and download music and video clips to your
device.
1. After installing Nokia PC Suite on your PC, connect your PC with your
device by using a compatible USB data cable.
2. Select Menu > Settings > Connectivity > USB data cable > PC Suite.
Data storage
You can use your device as a USB mass storage device.
To set the computer to recognise your device as a USB mass storage
device, select Menu > Settings > Connectivity > USB data cable > Data
storage.
■Accessory settings
You can configure settings for compatible accessories the device is
connected to.
draft
Settings
47
Select Menu > Settings > Enhancements and from the following:
Headset — Select the default profile to use when a headset is connected,
or select whether calls are answered automatically when a headset is
connected.
Handsfree — Select the default profile to use when a handsfree
accessory is connected, configure lights settings, or select what happens
when the device detects that the car ignition is switched on.
Charger — Select a default profile to use when a charger is connected.
■Security settings
You can configure security settings for your device, UIM card, memory,
and calls.
When calls are restricted, calls may be possible to the official emergency
number programmed into your device.
To personalise security settings, select Menu > Settings > Security,
enter the preset lock code 1234, and select from the following:
PIN code request — Set your device to ask for your PIN code each time
the device is switched on.
Phone lock — Lock or unlock the device immediately or when switched
on. When the device is locked, you must enter your lock code to use the
phone again.
Allowed number when lock active — Enter a number that you can call
even when the device is locked.
Call restrictions — Allow or block all outgoing or incoming calls or only
the numbers you select.
Security level — Select a security level for your device and your memory
card.
Access codes — Change the lock code or PIN code.
■Application settings
You can set tones, lights, and vibration to use when you start an
application.
draft
Settings
48
Select Menu > Settings > App. settings and from the available options.
■Network settings
You can configure settings for roaming (using other networks than your
home network), and digital or analogue mode.
Select Menu > Settings > Network and from the following:
Roaming options — Select whether to allow roaming when you are out
of your home network, and the roaming option you prefer.
Mode — Select the digital or analogue mode you prefer.
Roam call ring. tone — Select whether to use a special ringing tone for
roaming calls.
Service change tones — Select whether to play a tone when you start
roaming with another network.
■Network services
You can configure settings for network services. For availability, contact
your service provider.
Select Menu > Settings > Network serv. > Network feature sett., enter
the feature code from your service provider, and from the following:
Call divert — Configure call divert settings. You can divert all calls, calls
when the line is busy, calls that you do not answer, data calls, or calls
when you are out of network coverage.
Call waiting — Have the network notify you of an incoming call while
you have a call in progress.
Send my caller ID — Select whether receiving party can see your number.
To view your number, select My number selection.
■Restore factory settings
You can reset your phone settings to factory defaults.
1. Select Menu > Settings > Rest. factory sett. and from the following:
draft
Settings
49
Restore settings only — Restore all preference settings to default
without deleting any personal data.
Restore all — Restore all default device settings, and delete all
personal data.
2. Select Continue, enter the lock code, and select OK. See "Security
settings", p. 47.
■Phone details
To view details of your device, select Menu > Settings > Phone details
and from the available options.
draft

Gallery
50
9. Gallery
In this menu you can manage images, video clips, music files, themes,
graphics, tones, recordings, and received files. You can use a compatible
microSD card to extend the memory capacity.
Digital rights management
Content owners may use different types of digital rights management
(DRM) technologies to protect their intellectual property, including
copyrights. This device uses various types of DRM software to access
DRM-protected content. With this device you can access content
protected with WMDRM and OMA DRM 1.0. If certain DRM software
fails to protect the content, content owners my ask that such DRM
software’s ability to access new DRM-protected content be revoked.
Revocation may also prevent renewal of such DRM-protected content
already in your device. Revocation of such DRM software does not affect
the use of content protected with other types of DRM or the use of non-
DRM-protected content.
Digital rights management (DRM) protected content comes with an
associated activation key that defines your rights to use the content.
If your device has OMA DRM-protected content, to back up both the
activation keys and the content, use the backup feature of Nokia PC
Suite. Other transfer methods may not transfer the activation keys
which need to be restored with the content for you to be able to
continue the use of OMA DRM-protected content after the device
memory is formatted. You may also need to restore the activation keys
in case the files on your device get corrupted.
If your device has WMDRM protected content, both the activation keys
and the content will be lost if the device memory is formatted. You may
also lose the activation keys and the content if the files on your device
get corrupted. Losing the activation keys or the content may limit your
ability to use the same content on your device again. For more
information, contact your service provider.
draft
Gallery
51
■Gallery folders
To set how folders in Gallery are displayed, Select Menu > Gallery >
Options > Type of view or Sort.
To add a new folder to Gallery, select Menu > Gallery > Options > Add
folder, or other options to edit the folder you created.
■Memory card
You can configure settings for a memory card that is installed in your
device. To change memory card settings, select Menu > Gallery >
Options and Rename mem. card or Format mem. card. See "MicroSD
card", p. 13.
■Use files to personalise your device
To view and edit an image, select Menu > Gallery > Images, an image,
Open > Options and from the available options.
To use an image as a wallpaper, screen saver, or contact image, select
Menu > Gallery > Images, an image, Options > Use Image and from the
available options.
To use a video clip as a wallpaper, screen saver, call video, or contact
video, select Menu > Gallery > Video clips, a video clip, Options > Use
video clip and from the available options.
To apply a theme, select Menu > Gallery > Themes, a theme, and Apply.
See "Themes", p. 39.
■Work with files
To edit a file, scroll to a file, select Options > and from the available
options.
To edit multiple files, scroll to the files and select Options > Mark. Select
Mark to continuous choose other files, and then select Options > Move
marked.
To delete a file, scroll to the file, and select Options > Delete.
To delete all files, select Options > Delete all.
draft
Gallery
52
To delete multiple files, scroll to the file and select Options > Mark.
Select Mark to continuous choose other files, and then select Options >
Delete marked.
Scroll to a file, and select Options > Send > E-mail Message or Via
Bluetooth.
To send multiple files, scroll to the files, select Options > Mark. Select
Mark to continuous choose other files, and then select Options > Send
marked and from the available options.
To view details of a file, select Options > Details.
To check the memory status, scroll to a file, select Options > Memory
status and from the available options.
draft

Camera
53
10. Camera
You can use the device to capture images or record video clips with the
built-in 3.2-megapixel camera.
Keep a safe distance when using the flash. Do not use the flash on
people or animals at close range. Do not cover the flash while taking a
picture.
■Capture an image
Your device supports an image capture resolution of 2048 x 1536 pixels,
and produce images in JPEG format.
1. In the standby mode, press the camera key or select Menu > Media >
Camera to activate the camera.
2. To capture an image, press the camera key or select Capture. Press
the volume keys to zoom in or out.
3. To delete the image you have captured, select Delete. To use the
picture, select Options and from the following:
Send — Send the image in an e-mail message or using Bluetooth
connectivity.
Attach to contact — Set the image to display when the contact you
select calls you.
Rename — Rename the image.
Delete — Discard the image.
New image — Return to the camera mode.
Open Gallery — Save the image in Gallery. You can set it as a
wallpaper or screensaver, or use it in other ways. See "Gallery", p. 50.
■Record a video clip
Your device supports a video record resolution of 320 x 240 pixels, and
produce video clips in 3g2 format.
draft
Camera
54
1. In the standby mode, press the camera key or select Menu > Media >
Camera and scroll left to switch to the video mode.
2. To record a video clip, press the camera key or select Record. Press
the volume keys to zoom in or out. To pause recording, select Pause.
To resume recording, select Continue.
3. To stop recording, select Stop. The multimedia player opens. To play
the video clip, select Play. To pause the video clip, select Pause. To
delete or use the video clip, select Options and from the following:
Delete — Discard the video clip.
New video clip — Return to the video mode.
Send — Send the video clip in an e-mail message or using Bluetooth
connectivity.
Rename — Rename the video clip.
Open Gallery — Save the video clip in Gallery. You can set it as a
screensaver or incoming call video, or use it in other ways. See
"Gallery", p. 50.
■Camera options
You can control appearance and other options for capturing images and
recording video clips. Select Menu > Media > Camera > Options and
from the following options.
Video or Still image — Switch between the camera mode and video
mode.
Brightness — Control the brightness level for images you capture
(camera mode only).
Night mode on or Night mode off — Enhance quality of images you
capture at night (camera mode only).
Mute or Unmute — Select whether sound is recorded for video clips
(video mode only).
Flash on or Flash off — Turn the camera flash on or off.
Self-timer — Select from the available time periods (camera mode only).
draft
Camera
55
Effects — Select from various colour and other effects for the images or
video clips you capture.
White balance — Select the type of light source you are using.
Image sequence on or Image sequence off — Take a sequence of five
images.
View previous — View the previous image or video clip you captured.
Open Gallery — Go to Gallery to save or use your images or video clips.
See "Gallery", p. 50.
Settings — Configure resolution and image quality, image preview time
(how long a new image is displayed before returning to the camera
mode), camera sounds, the default title for images or video clips you
capture, the storage memory (device memory, memory card, or folders in
Gallery) and whether the camera opens in the camera mode or video
mode.
draft
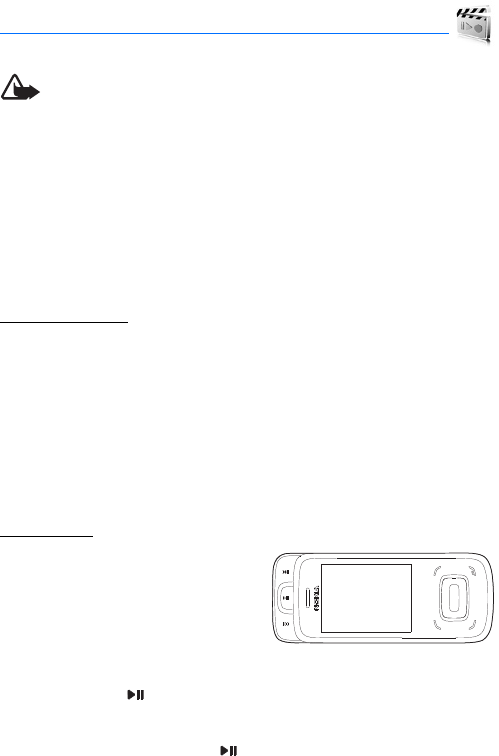
Media
56
11. Me dia
Warning: Listen to music at a moderate level. Continuous
exposure to high volume may damage your hearing. Do not hold
the device near your ear when the loudspeaker is in use,
because the volume may be extremely loud.
■Music player
Music player supports files formats such as AAC and MP3. Music player
does not necessarily support all features of a file format or all the
variations of file formats.
Transfer music
You can transfer music from a compatible PC using Nokia PC suite or
Bluetooth connectivity (see "Bluetooth connectivity", p. 44). For
information about transferring music with Nokia PC suite, see the Nokia
PC Suite user guide.
To refresh the library after you have updated the song selection in your
device, select Menu > Media > Music player > Options > Update library
after all the music files are transferred.
Play music
To open music player, select Menu >
Media > Music player > Go to Music
player. The details of the first track on
the default playlist are shown. Open
the media keys under the 2-way slide,
and select from the following:
• To play, press .
• To adjust the volume level, press the volume key up or down.
• To pause the playing, press again.
• To stop the playing, press and hold the end key.
draft

Media
57
• To skip to the next track, press .
• To rewind to the beginning of the previous track, press .
• To fast forward the current track, press and hold , and release
the key at the position you want.
• To rewind the current track, press and hold .
• To mute audio, select Options > Mute audio.
• To play music using a currently connected Bluetooth audio device,
select Options > Play via Bluetooth.
• To configure play settings, select Options > Settings and from the
following:
Shuffle — Play songs from the current playlist in a random order.
Repeat — Repeat the current song, or the whole playlist.
Equaliser — Modify the tone of music playback. Select one of the
preset settings, or customise your own settings.
Stereo widening — Make left and right stereo signals sound further
apart.
Music player theme — Select a colour theme for the music player.
Music menu
To view all the music available in the device and compatible memory
card (if inserted), select Menu > Media > Music player and from the
following options:
— To view all music, select All songs.
— To view and manage playlists, select Playlists.
— To view sorted music, select Artists, Albums, or Genres.
— To view and play video clips, select Videos.
Create a new playlist
Select Menu > Media > Music player > Playlists > Create playlist, enter
a name and select OK.
draft
Media
58
Default playlists
Now playing — The currently playing playlist.
Most played songs — The songs you play most often.
Recently added — The most recently added songs.
Recently played — Recently played songs.
To play a playlist, scroll to the playlist and select Play. See "Play music",
p. 56.
Add songs to playlists
To add a song or video clip to a playlist, select the song or video clip and
Options > Add to playlist. To add all songs in a category to a playlist,
select All songs > Options > Add to playlist > a desired playlist > Add.
Manage a list
To manage a playlist, scroll to the playlist, select Options > Open >
Options and from the following:
Organise list — Change the order of songs in the list.
Send — Send the current song in an e-mail message or using Bluetooth
connectivity.
Remove — Remove the currently playing song from the playlist.
Add to playlist — Add the currently playing song to another playlist. See
"Add songs to playlists", p. 58.
Song details — View details about the currently playing song.
Download music and video clips
Downloading is a network service. In the music menu, select All songs,
Playlists, Artists, Albums, Genres, or Videos, and select Options >
Downloads and from the following:
Bookmarks — Go to a predefined bookmark.
Go to address — Enter an address to go to.
■Media player
To view images, including animated images, and play video and audio
files, select Menu > Media > Media player and from the following:
draft

Media
59
Open Gallery — Select a file from Gallery to open in the media player.
See "Gallery", p. 50.
Go to address — Browse for streaming audio or video.
Streaming settings — Select whether to use a proxy server, change the
default access point, and set the port range used when connecting.
FF/Rew interval — Set the interval at which video or audio will fast-
forward or rewind. Select from the available intervals, or enter an
interval in MM:SS format.
■Stereo FM radio
The radio depends on an antenna other than the wireless device
antenna. A compatible headset or accessory needs to be attached to the
device for the radio to function properly.
Listen to the radio
1. Connect a compatible headset to the device.
2. Select Menu > Media > Radio. The station location number, the
name of the radio station (if you have saved the station), and the
frequency of the radio station are displayed.
3. If you have saved radio stations, scroll up or down to the station you
want to listen to.
You can also select a radio station by pressing the corresponding
number keys.
draft

Media
60
Tune a radio station
1. When the radio is on, select or to change the radio
frequency in steps of 0.05-MHz, or select and hold or to
search for a station. Searching stops when a station is found.
2. To save the station to a memory location from 1 to 9, press and hold
the corresponding number key.
To save the station in a memory location from 10 to 20, press 1 or 2,
and press and hold the desired number key, from 0 to 9.
3. Enter the name of the station, and select OK.
You can make or answer a call while listening to the radio. During the
call, the radio is muted.
■Recorder
You can record sound with your device and save them to the Recordings
folder in Gallery. The maximum length of a recording is three minutes.
Record speech or sound
1. Select Menu > Media > Recorder > . The start tone indicates that
recording has begun.
2. To finish recording, select . Your recording is saved in Gallery >
Recordings.
■Equaliser
You can select audio effects for listening to files on your device. Select
Menu > Media > Equaliser and from the available options.
■Stereo widening
You can select stereo widening for a 3D audio effect when listening to
files on your device. Select Menu > Media > Stereo widening > On.
draft

Organiser
61
12. Organiser
Use the various tools and applications to customise your phone and use
your phone as an organiser and a personal digital assistant.
■Alarm clock
Select Menu > Organiser > Alarm clock, and set the repeat interval,
alarm tone, and snooze time as needed. When an alarm is set, is
displayed in the standby mode.
The alarm sounds even when the device is switched off. Select Stop to
end the alarm, or Snooze to stop for the time you set in Snooze time-
out:, and then resumes.
To turn off an alarm, select Menu > Organiser > Alarm clock, scroll to
the Alarm: field, and select Change > Off > Options > Save.
■Calendar
Select Menu > Organiser > Calendar.
The current day is indicated by a frame. The day scheduled with events is
highlighted in bold shape, and the beginning of the note is shown below
the calendar. To view the day notes, select View.
To view the event in a specific date, select Options > Go to date, enter
the date, and select OK.
To configure other settings of the calendar, select Options > Settings
and from the available options.
Make a calendar note
1. To create a calendar note, select Menu > Organiser > Calendar,
highlight the required event date, and Options > Make a note.
2. Select the event type.
3. Fill in the entry fields you want to complete, and finally select Save.
draft

Organiser
62
The event information of current date is played in the active standby
mode.
Set an alarm
You can set an alarm for each calendar note. The alarm sounds at the
time you set. The alarm stops when you select View or Exit.
■Notes
You can write and save information in notes and send notes as text
messages or using Bluetooth connectivity. Select Menu > Organiser >
Notes.
To create a note when no notes have been saved, select Add, write a
note with your keypad, and select Save.
To use a note, select the note, View > Options and from the available
options.
■To-do list
Use the to-do list to keep track of your tasks. You can save a note for a
task, and mark the note as done when you have completed it. You can
sort notes by priority or by date. Select Menu > Organiser > To-do list
and from the available options.
■Calculator
The calculator can add, subtract, multiply, divide, calculate squares and
square roots, and convert currency values.
Note: This calculator has limited accuracy and is designed for
simple calculations.
1. Select Menu > Organiser > Calculator.
2. Enter the first number in the calculation. Press # for a decimal point
if necessary.
To add (+), subtract (-), multiply (*), or divide (/), press * repeatedly.
To perform a square or square root calculation, select Options >
Square or Square root.
draft

Organiser
63
3. Enter the second number in your calculation.
4. Select Equals to complete the calculation or Options and from the
available options.
Currency converter
You can convert between foreign and domestic currencies.
Note: When you change base currency, you must enter new
exchange rates because all previously set exchange rates are
cleared.
Select Menu > Organiser > Calculator > Options > Exchange rate and
from the available options.
■Countdown timer
The countdown timer only works when the device is on.
Normal timer
To activate the countdown timer, select Menu > Organiser >
Countdown timer > Normal timer, enter the alarm time, and write a note
that is displayed when the time expires.
1. To change the countdown time, select Change time.
2. To start the timer, select Start.
3. To stop the timer, select Stop timer.
Interval timer
1. To have an interval timer with up to 10 intervals started, first enter
the intervals.
2. Select Menu > Organiser > Countdown timer > Interval timer.
3. To start the timer, select Start timer > Start.
draft

Organiser
64
Settings
You can select whether the timer automatically continues to the next
period. Select Menu > Organiser > Countdown timer > Settings >
Contin. to next period > Confirm first or Automatic.
■Stopwatch
The stopwatch can be used for elapsed time measurement, such as for a
sporting event. The elapsed time is displayed in HH:MM:SS.SS format.
Select Menu > Organiser > Stopwatch > and from the following
options:
— To measure intermediate times, select Split timing > Start. Select
Split every time you want to take an intermediate time.
— To measure lap times, select Lap timing > Start. Select Lap every time
you want measure the time from zero.
To stop the watch, select Stop. To reset the watch to zero, select
Options > Reset with the watch in stopped mode.
If you press the end key and return to the standby mode, the clock
continues to run in the background, and is displayed.
To return to the stopwatch, select Menu > Organiser > Stopwatch >
Continue.
Warning: Using the stopwatch or allowing it to run in the
background when using other features increases the demand on
battery power and reduces the battery life.
draft

Voice commands
65
13. Voice commands
Voice commands transform your device into your own virtual personal
assistant, allowing you to use your voice to make phone calls, look up
contacts, play and control your music, and more.
■Activate and use voice commands
To activate voice commands, press the voice command key (see "Your
device", p. 17). Select Menu > Settings > My shortcuts > Voice
commands. The following options are displayed:
Call <Name or #> — Say "Call" and a name or a phone number from
Contacts. For example, "Call Tom Smith", "Call Tom Smith’s cell", or "Call
617 515 212".
Send Text <Name or #> — If you give a full-sentence command, such as
"Send text to Tom", you are asked to confirm the message and give the
contact number. A message based on the message type you requested
opens.
Lookup <Name> — To retrieve and display information of the contact,
say "Lookup" and the name from Contacts (for example, "Lookup Tom").
Go To <Menu> — To open the list of menu options on your device and to
select the menu item you want, say "Go to", or say a full command with
the application name (for example, "Go to Contacts").
Check <Item> — Say "Check". You are asked for a list of items. Say
"Check status" to hear all status information for your device, including
network status, voicemail, messages, number of missed calls, time and
date, battery level, signal strength, and volume.
For detailed instructions on how to use each command, select the
command you want and Help.
■Voice Command Settings
You can personalise settings for your voice command functions.
draft

Voice commands
66
Command confirmation
When your device is unsure of the name or number you have said, a list
of three choices is shown.
To display the choices, press the voice command key, and select Settings
> Confirmation > Automatic or Always Confirm.
To display only the best match, press the voice command key, and select
Settings > Confirmation > Never Confirm.
Voice adaptation
You can adapt the system to your voice to improve the accuracy of your
voice commands. The adaptation process takes a few minutes. The
system will prompt you to say a series of short commands, including
different names and numbers.
To use voice adaptation, press the voice command key, and select
Settings > Adaptation > Adapt Voice.
User modes
You can set the system to prompt for information, read out content you
select, or sound beeps only.
To use beeps instead of verbal prompts, press the voice command key,
and select Settings > Modes > Expert Mode.
To hear verbal prompts for information, press the voice command key,
and select Settings > Modes > Prompt Mode.
To hear the system read out the menu items as you navigate, press the
voice command key, and select Settings > Modes > Readout Mode.
Speakerphone
You can configure how the speakerphone behaves when voice
recognition is activated.
To use the default settings, press the voice command key, and select
Settings > Speakerphone > Automatic.
draft

Voice commands
67
To use the speakerphone for all outgoing audio, press the voice
command key, and select Settings > Speakerphone > Always On.
To use the internal speakerphone for all outgoing audio, press the voice
command key, and select Settings > Speakerphone > Always Off.
About the voice command
To view more information about the voice command, press the voice
command key, and select Settings > About.
draft

Applications
68
14. Applications
Applications is a network service. If your wireless service provider
supports this feature, you will find useful applications preinstalled on
your phone. Also, you can manage and download new applications that
may be offered by your wireless provider. Select Menu > Applications
and from the available options.
draft

Minibrowser
69
15. Minibrowser
You can use the minibrowser for music, tones downloads and more.
These are network services. For availability, subscription, and charging
rates, contact your service provider.
To use the minibrowser, select Menu > Minibrowser. Your device
attempts to connect to your wireless service provider’s home page. If
you receive an error message, your device may not be set up for
browsing. Contact your wireless service provider to make sure that your
device is configured properly.
A cache is a memory location that is used to store data temporarily. If
you have tried to access or have accessed confidential information
requiring passwords, empty the cache after each use. The information or
services you have accessed are stored in the cache. To empty the cache,
select Menu > Minibrowser > Menu > Advanced > Clear > ClearCache.
draft

Extras
70
16. Extras
Extras includes a group of extra features, including games, a converter
to convert measures from one unit to another, and a world clock to see
the current time in four locations.
■Games
Select Menu > Extras > Games to access the games on your device.
■Converter
To convert measures from one unit to another, select Menu > Extras >
Converter II.
Converter II has limited accuracy, and rounding errors may occur.
To change the settings, select Options and from the following:
Set conversion — Select the unit to convert.
Clear all — Clear the display.
Reverse conversion — Reverse the units being converted. For example,
pound to kilogram becomes kilogram to pound.
Configure — Select the default units to convert.
Instructions — View further instructions.
Change sign — Add or remove the minus sign after a unit has been
converted.
■World clock
World clock allows you to see the current time in four locations. To
configure the locations, set the time zone and time format, or view
instructions, select Menu > Extras > World clock > Options and from
the available options.
draft

Accessories
71
17. Accessories
Warning: Use only batteries, chargers, and accessories
approved by Nokia for use with this particular model. The use of
any other types may invalidate any approval or warranty, and
may be dangerous.
For availability of approved accessories, please check with your dealer.
When you disconnect the power cord of any accessory, grasp and pull
the plug, not the cord.
draft

Battery and charger information
72
18. Battery and charger information
Your device is powered by a rechargeable battery. The battery intended
for use with this device is BL-4C. Nokia may make additional battery
models available for this device. This device is intended for use when
supplied with power from the following chargers: AC-6. The exact
charger model number may vary depending on the type of plug. The plug
variant is identified by one of the following: E, EB, X, AR, U, A, C, or UB.
The battery can be charged and discharged hundreds of times, but it will
eventually wear out. When the talk and standby times are noticeably
shorter than normal, replace the battery. Use only Nokia approved
batteries, and recharge your battery only with Nokia approved chargers
designated for this device. Use of an unapproved battery or charger may
present a risk of fire, explosion, leakage, or other hazard.
If a battery is being used for the first time or if the battery has not been
used for a prolonged period, it may be necessary to connect the charger,
then disconnect and reconnect it to begin charging the battery. If the
battery is completely discharged, it may take several minutes before the
charging indicator appears on the display or before any calls can be
made.
Always switch the device off and disconnect the charger before
removing the battery.
Unplug the charger from the electrical plug and the device when not in
use. Do not leave a fully charged battery connected to a charger, since
overcharging may shorten its lifetime. If left unused, a fully charged
battery will lose its charge over time.
Always try to keep the battery between 15°C and 25°C (59°F and 77°F).
Extreme temperatures reduce the capacity and lifetime of the battery. A
device with a hot or cold battery may not work temporarily. Battery
performance is particularly limited in temperatures well below freezing.
Do not short-circuit the battery. Accidental short-circuiting can occur
when a metallic object such as a coin, clip, or pen causes direct
connection of the positive (+) and negative (-) terminals of the battery.
draft
Battery and charger information
73
(These look like metal strips on the battery.) This might happen, for
example, when you carry a spare battery in your pocket or purse. Short-
circuiting the terminals may damage the battery or the connecting
object.
Do not dispose of batteries in a fire as they may explode. Batteries may
also explode if damaged. Dispose of batteries according to local
regulations. Please recycle when possible. Do not dispose as household
waste.
Do not dismantle, cut, open, crush, bend, deform, puncture, or shred
cells or batteries. In the event of a battery leak, do not allow the liquid to
come in contact with the skin or eyes. In the event of such a leak, flush
your skin or eyes immediately with water, or seek medical help.
Do not modify, remanufacture, attempt to insert foreign objects into the
battery, or immerse or expose it to water or other liquids.
Improper battery use may result in a fire, explosion, or other hazard. If
the device or battery is dropped, especially on a hard surface, and you
believe the battery has been damaged, take it to a service centre for
inspection before continuing to use it.
Use the battery only for its intended purpose. Never use any charger or
battery that is damaged. Keep your battery out of the reach of small
children.
■Nokia battery authentication guidelines
Always use original Nokia batteries for your safety. To check that you
are getting an original Nokia battery, purchase it from a Nokia
authorised service centre, and inspect the hologram label using the
following steps:
Successful completion of the steps is not a total assurance of the
authenticity of the battery. If you have any reason to believe that your
battery is not an authentic, original Nokia battery, you should refrain
from using it, and take it to the nearest authorised Nokia service point
or dealer for assistance. Your authorised Nokia service point or dealer
will inspect the battery for authenticity. If authenticity cannot be
verified, return the battery to the place of purchase.
draft

Battery and charger information
74
Authenticate hologram
1. When you look at the hologram on the label, you
should see the Nokia connecting hands symbol
from one angle and the Nokia Original
Enhancements logo when looking from another
angle.
2. When you angle the hologram left, right, down
and up, you should see 1, 2, 3 and 4 dots on each
side respectively.
Successful completion of the steps is not a total assurance of the
authenticity of the battery. If you have any reason to believe that your
battery is not an authentic, original Nokia battery, you should refrain
from using it, and take it to the nearest Nokia authorised service centre
or dealer for assistance. If authenticity cannot be verified, return the
battery to the place of purchase.
What if your battery is not authentic?
If you cannot confirm that your Nokia battery with the hologram on the
label is an authentic Nokia battery, please do not use the battery. Take it
to the nearest authorised Nokia service centre or dealer for assistance.
The use of a battery that is not approved by Nokia may be dangerous and
may result in poor performance and damage to your device and its
accessories. It may also invalidate any approval or warranty applying to
the device.
To find out more about original Nokia batteries, visit
www.nokia.com/battery.
draft

Care and maintenance
75
Care and maintenance
Your device is a product of superior design and craftsmanship and should be
treated with care. The following suggestions will help you protect your warranty
coverage.
• Keep the device dry. Precipitation, humidity, and all types of liquids or
moisture can contain minerals that will corrode electronic circuits. If your
device does get wet, remove the battery, and allow the device to dry
completely before replacing it.
• Do not use or store the device in dusty, dirty areas. Its moving parts and
electronic components can be damaged.
• Do not store the device in hot areas. High temperatures can shorten the life of
electronic devices, damage batteries, and warp or melt certain plastics.
• Do not store the device in cold areas. When the device returns to its normal
temperature, moisture can form inside the device and damage electronic
circuit boards.
• Do not attempt to open the device other than as instructed in this guide.
• Do not drop, knock, or shake the device. Rough handling can break internal
circuit boards and fine mechanics.
• Do not use harsh chemicals, cleaning solvents, or strong detergents to clean
the device.
• Do not paint the device. Paint can clog the moving parts and prevent proper
operation.
• Use only the supplied or an approved replacement antenna. Unauthorised
antennas, modifications, or attachments could damage the device and may
violate regulations governing radio devices.
• Use chargers indoors.
• Always create a backup of data you want to keep, such as contacts and
calendar notes.
• To reset the device from time to time for optimum performance, power off
the device and remove the battery.
These suggestions apply equally to your device, battery, charger, or any
accessory. If any device is not working properly, take it to the nearest authorised
service facility for service.
draft

Care and maintenance
76
Disposal
The crossed-out wheeled-bin symbol on your product, literature, or
packaging reminds you that all electrical and electronic products,
batteries, and accumulators must be taken to separate collection at
the end of their working life. This requirement applies to the European
Union and other locations where separate collection systems are
available. Do not dispose of these products as unsorted municipal
waste.
By returning the products to collection you help prevent uncontrolled
waste disposal and promote the reuse of material resources. More
detailed information is available from the product retailer, local waste
authorities, national producer responsibility organizations, or your
local Nokia representative. For the product Eco-Declaration or
instructions for returning your obsolete product, go to country-
specific information at www.nokia.com.
draft

Additional safety information
77
Additional safety information
■Small children
Your device and its accessories may contain small parts. Keep them out of the
reach of small children.
■Operating environment
This device meets RF exposure guidelines when used either in the normal use
position against the ear or when positioned at least 2.2 centimetres (7/8 inch)
away from the body. When a carry case, belt clip or holder is used for body-worn
operation, it should not contain metal and should position the device the
above-stated distance from your body.
To transmit data files or messages, this device requires a quality connection to
the network. In some cases, transmission of data files or messages may be
delayed until such a connection is available. Ensure the above separation
distance instructions are followed until the transmission is completed.
Parts of the device are magnetic. Metallic materials may be attracted to the
device. Do not place credit cards or other magnetic storage media near the
device, because information stored on them may be erased.
■Medical devices
Operation of any radio transmitting equipment, including wireless phones, may
interfere with the functionality of inadequately protected medical devices.
Consult a physician or the manufacturer of the medical device to determine if
they are adequately shielded from external RF energy or if you have any
questions. Switch off your device in health care facilities when any regulations
posted in these areas instruct you to do so. Hospitals or health care facilities may
be using equipment that could be sensitive to external RF energy.
Implanted medical devices
Manufacturers of medical devices recommend that a minimum separation of
15.3 centimetres (6 inches) should be maintained between a wireless device and
an implanted medical device, such as a pacemaker or implanted cardioverter
defibrillator, to avoid potential interference with the medical device. Persons
who have such devices should:
• Always keep the wireless device more than 15.3 centimetres (6 inch) from the
medical device when the wireless device is turned on.
draft

Additional safety information
78
• Not carry the wireless device in a breast pocket.
• Hold the wireless device to the ear opposite the medical device to minimise
the potential for interference.
• Turn the wireless device off immediately if there is any reason to suspect that
interference is taking place.
• Read and follow the directions from the manufacturer of their implanted
medical device.
If you have any questions about using your wireless device with an implanted
medical device, consult your health care provider.
Hearing aids
Some digital wireless devices may interfere with some hearing aids. If
interference occures, consult your service provider.
Warning: For hearing aid compatibility, you must turn off the
Bluetooth connectivity.
■Vehicles
RF signals may affect improperly installed or inadequately shielded electronic
systems in motor vehicles such as electronic fuel injection systems, electronic
antiskid (antilock) braking systems, electronic speed control systems, and air bag
systems. For more information, check with the manufacturer, or its
representative, of your vehicle or any equipment that has been added.
Only qualified personnel should service the device or install the device in a
vehicle. Faulty installation or service may be dangerous and may invalidate any
warranty that may apply to the device. Check regularly that all wireless device
equipment in your vehicle is mounted and operating properly. Do not store or
carry flammable liquids, gases, or explosive materials in the same compartment
as the device, its parts, or accessories. For vehicles equipped with an air bag,
remember that air bags inflate with great force. Do not place objects, including
installed or portable wireless equipment in the area over the air bag or in the air
bag deployment area. If in-vehicle wireless equipment is improperly installed and
the air bag inflates, serious injury could result.
Using your device while flying in aircraft is prohibited. Switch off your device
before boarding an aircraft. The use of wireless teledevices in an aircraft may be
dangerous to the operation of the aircraft, disrupt the wireless telephone
network, and may be illegal.
draft

Additional safety information
79
■Potentially explosive environments
Switch off your device when in any area with a potentially explosive atmosphere,
and obey all signs and instructions. Potentially explosive atmospheres include
areas where you would normally be advised to turn off your vehicle engine.
Sparks in such areas could cause an explosion or fire resulting in bodily injury or
even death. Switch off the device at refuelling points such as near gas pumps at
service stations. Observe restrictions on the use of radio equipment in fuel
depots, storage, and distribution areas; chemical plants; or where blasting
operations are in progress. Areas with a potentially explosive atmosphere are
often, but not always, clearly marked. They include below deck on boats,
chemical transfer or storage facilities and areas where the air contains chemicals
or particles such as grain, dust, or metal powders. You should check with the
manufacturers of vehicles using liquefied petroleum gas (such as propane or
butane) to determine if this device can be safely used in their vicinity.
■Emergency calls
Important: This device operates using radio signals, wireless networks,
landline networks, and user-programmed functions. If your device
supports voice calls over the internet (internet calls), activate both the
internet calls and the cellular phone. The device will attempt to make
emergency calls over both the cellular networks and through your
internet call provider if both are activated. Connections in all conditions
cannot be guaranteed. You should never rely solely on any wireless
device for essential communications like medical emergencies.
To make an emergency call:
1. If the device is not on, switch it on. Check for adequate signal strength.
Depending on your device, you may also need to complete the following:
• Insert a UIM card if your device uses one.
• Remove certain call restrictions you have activated in your device.
• Change your profile from offline or flight profile mode to an active profile.
2. Press the end key as many times as needed to clear the display and ready the
device for calls.
3. Enter the official emergency number for your present location. Emergency
numbers vary by location.
4. Press the call key.
draft

Additional safety information
80
When making an emergency call, give all the necessary information as accurately
as possible. Your wireless device may be the only means of communication at the
scene of an accident. Do not end the call until given permission to do so.
■Certification information (SAR)
This mobile device meets guidelines for exposure to radio waves.
Your mobile device is a radio transmitter and receiver. It is designed not to
exceed the limits for exposure to radio waves recommended by international
guidelines. These guidelines were developed by the independent scientific
organization ICNIRP and include safety margins designed to assure the
protection of all persons, regardless of age and health.
The exposure guidelines for mobile devices employ a unit of measurement known
as the Specific Absorption Rate or SAR. The SAR limit stated in the ICNIRP
guidelines is 2.0 watts/kilogram (W/kg) averaged over 10 grams of tissue. Tests
for SAR are conducted using standard operating positions with the device
transmitting at its highest certified power level in all tested frequency bands. The
actual SAR level of an operating device can be below the maximum value
because the device is designed to use only the power required to reach the
network. That amount changes depending on a number of factors such as how
close you are to a network base station. The highest SAR value under the ICNIRP
guidelines for use of the device at the ear is 0.56 W/kg.
Use of device accessories may result in different SAR values. SAR values may vary
depending on national reporting and testing requirements and the network band.
Additional SAR information may be provided under product information at
www.nokia.com.
Your mobile device is also designed to meet the requirements for exposure to
radio waves established by the Federal Communications Commission (USA) and
Industry Canada. These requirements set a SAR limit of 1.6 W/kg averaged over
one gram of tissue. The highest SAR value reported under this standard during
product certification for use at the ear is 0.93 W/kg and when properly worn on
the body is 0.67 W/kg.
■Technical information
Type designation — RM-384
Dimensions — Width 44 mm; length 100mm; depth 14 mm
Weight — 115 g with 860 mAh Li-Ion Battery (BL-4C)
Display — 2.2" 240x320 pixels, 16.7M colours
Camera — 3 megapixels with fixed-focus, digital zoom, and flash
draft
Additional safety information
81
Wireless networks — CDMA 800 and 1900 MHz
■Battery Information
This section provides information about battery charging times with the AC-6
charger, and talk and standby times. Be aware that the information in this
section is subject to change. For more information, contact your service provider.
Important: Battery talk and standby times are estimates only and
depend on signal strength, network conditions, features used, battery
age and condition, temperatures to which battery is exposed, use in
digital mode, and many other factors. The amount of time a device is
used for calls will affect its standby time. Likewise, the amount of time
that the device is turned on and in the standby mode will affect its talk
time.
Charging times
Talk and standby times
Charger options AC-6
BL-4C 860 mAh Li-lon battery Up to 3 hours 30
minutes
Function Digital
Talk time Minimum 4 hours
Standby time Minimum 264 hours
draft

82
Index
A
accessories 71
alarm clock 61
applications 68
B
back cover
removing 11
replacing 13
battery
charging 14
charging times 80
information 72
removing 11
replacing 12
talk and standby times 80
Bluetooth connectivity 44
C
calculator 62
calendar 61
call settings 42
calls
answering 22
making 22
camera 53
care and maintenance 75
charger
charging times 80
connecting 14
information 72
contacts list
deleting 34
converter 70
countdown timer 63
currency converter 63
E
e-mail 29
emergency calls 79
English text entry 24
extras 70
F
factory settings
restoring 48
G
gallery 50
H
headset 15
I
images
capturing 53
inbox
e-mail 30
text messages 26
indicators and icons 20
K
keyguard 21
L
log 35
loudspeaker 23
M
media 59
messages
e-mail 30
minibrowser 29
replying to 26, 31
text 26
voice 28
writing and sending 26, 30
microSD card 13
minibrowser 69
N
network services 8, 48
draft
83
notes 62
O
organiser 61
P
phone
settings 43
R
roaming 48
S
safety 7, 77
security settings 47
settings 36
special characters 25
speed dials 33
standby mode 19
start screen 19
stereo FM radio 59
stopwatch 64
switching the device on and off 14
T
talk and standby times 80
technical information 80
text entry
English 24
special characters 25
themes 39
time and date settings 40
to-do list 62
tone settings 39
U
UIM card 12
V
voice commands 65
voice recorder 60
W
world clock 70
wrist strap 16
draft