Microsoft SU2 Image Viewer User Manual
Microsoft Mobile Oy Image Viewer
Users Manual
User’s Guide for SU2 Image Viewer
9355896
Issue 1
SU2_en1.fm Page 1 Tuesday, March 11, 2003 11:00 AM

DECLARATION OF CONFORMITY
We, NOKIA CORPORATION, declare under our sole responsibility that the product
SU-2 is in conformity with the provisions of the following Council Directive: 1999/5/EC.
A copy of the Declaration of Conformity can be found at
http://www.nokia.com/phones/declaration_of_conformity/.
Copyright © 2003 Nokia. All rights reserved.
Reproduction, transfer, distribution or storage of part or all of the contents in this document
in any form without the prior written permission of Nokia is prohibited.
Nokia and Nokia Connecting People are registered trademarks of Nokia Corporation. Other
product and company names mentioned herein may be trademarks or tradenames of their
respective owners.
Nokia operates a policy of continuous development. Nokia reserves the right to make
changes and improvements to any of the products described in this document without prior
notice.
Under no circumstances shall Nokia be responsible for any loss of data or income or any
special, incidental, consequential or indirect damages howsoever caused.
The contents of this document are provided "as is". Except as required by applicable law, no
warranties of any kind, either express or implied, including, but not limited to, the implied
warranties of merchantability and fitness for a particular purpose, are made in relation to the
accuracy, reliability or contents of this document. Nokia reserves the right to revise this
document or withdraw it at any time without prior notice
The availability of particular products may vary by region. Please check with the Nokia dealer
nearest to you.
9355896/ Issue 1
SU2_en1.fm Page 2 Tuesday, March 11, 2003 11:00 AM

3
Contents
Introduction ............................. 4
Bluetooth wireless technology .......... 4
Chargers and batteries......................... 5
Power supply for the SU-2
Image Viewer....................................... 5
Installing the batteries ..................... 5
Technical data ........................................ 6
Overview .................................................. 7
Using the SU-2 Image Viewer
for the first time .................................... 8
1. Using the SU-2 Image
Viewer 9
Before using the SU-2 Image
Viewer....................................................... 9
SU-2 Image Viewer memory
and picture formats .............................. 9
Viewing images with the
SU-2 Image Viewer ......................... 10
Using the SU-2 Image Viewer
with several paired phones ........... 10
SU-2 Image Viewer modes............ 11
SU-2 Image Viewer icons .............. 12
List of countries using the
SECAM TV standard ............................ 12
2. Battery information ........... 14
Charging and Discharging................. 14
Care and maintenance ........... 15
SU2_en1.fm Page 3 Tuesday, March 11, 2003 11:00 AM

Introduction
4
Introduction
The SU-2 Image Viewer can be connected to compatible phones that
support Bluetooth wireless technology. You can view a single picture or
a set of pictures that you have taken with the phone camera on a TV
screen or compatible video projector.
Read this user’s guide carefully before using the SU-2 Image Viewer.
More detailed information about phone features is provided in the user’s
guide of your phone. Check your phone’s guide for important safety and
maintenance information. In addition, consult your TV’s instructions on
connecting external devices.
■Bluetooth wireless technology
Since Bluetooth devices communicate using radio waves, your
Bluetooth phone and the SU-2 Image Viewer do not need to be in line of
sight. The two devices need to be within a maximum of 10 meters of
each other, although the connection can be subject to interference from
obstructions, such as walls, or from other electronic devices.
The SU-2 Image Viewer is specially designed for compatible Nokia
phones that support Bluetooth wireless technology. However, the SU-2
Image Viewer can be used with any compatible Bluetooth devices that
support the Object Push Profile (OPP) or Basic Imaging Profile (BIP). A
Bluetooth profile is a set of commands that your phone uses for
controlling the SU-2 Image Viewer.
Note that the devices need to support Bluetooth wireless technology.
The SU-2 Image Viewer is compliant with and adopts Bluetooth
Specification 1.1. However, interoperability between the SU-2 Image
Viewer and other Bluetooth enabled products is not guaranteed and
depends on compatibility. For more information on the compatibility
between the SU-2 Image Viewer with other Bluetooth enabled products,
please check with the product manufacturer.
In some countries, there may be restrictions on using Bluetooth devices.
Check with your local authorities.
SU2_en1.fm Page 4 Tuesday, March 11, 2003 11:00 AM
Introduction
5
■Chargers and batteries
Check the model number of any charger before use with this device. The SU-2
Image Viewer is intended for use with the following chargers: ACP-7, ACP-8 and
ACP-12.
Warning! Use only batteries and chargers approved by the
manufacturer for use with this particular enhancement. The use of any
other types will invalidate any approval or warranty applying to the
enhancement, and may be dangerous.
For availability of approved batteries and chargers, please check with your dealer.
When you disconnect the power cord of any enhancement, grasp and pull the
plug, not the cord.
Power supply for the SU-2 Image Viewer
The SU-2 Image viewer uses either the provided AAA batteries or a
compatible charger as a source of power. When connected to a charger,
the SU 2- Image Viewer does not use the batteries. Therefore, the
batteries can be left in the device, even if they are rechargeable.
When using batteries as a power source, the SU-2 Image Viewer
automatically enters sleep mode after 10 minutes, if it is switched on,
but not connected to a Bluetooth device. When the batteries are
running out of power, a low battery icon is displayed on the TV screen
and the SU-2 Image Viewer switches off after 3 minutes.
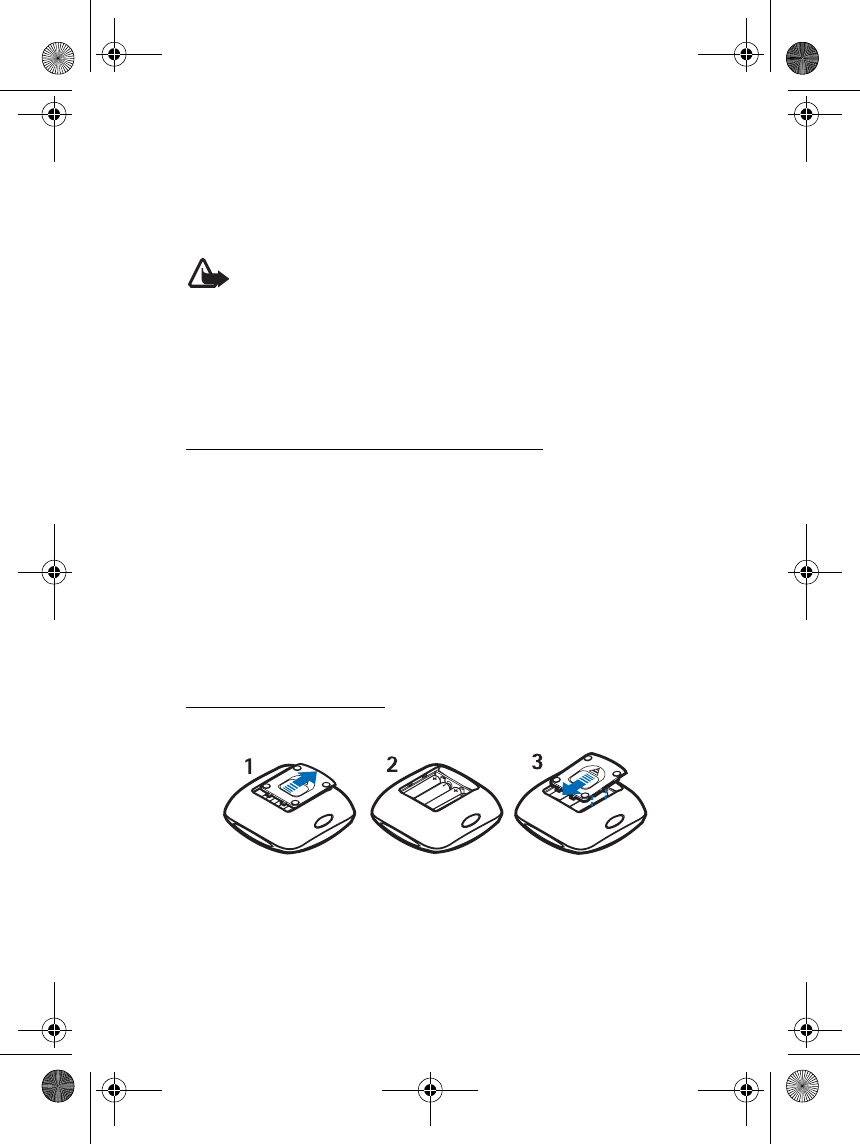
Installing the batteries
Install the batteries as shown in the picture below.
Note: Always switch the power off and disconnect the device from the
charger or any other enhancement before removing the cover.
SU2_en1.fm Page 5 Tuesday, March 11, 2003 11:00 AM

Introduction
6
■Technical data
• Weight: 105 g
•Length: 98 mm
•Width: 98 mm
• Thickness: 42 mm
• Operating time up to 90 - 255 min (depending on battery level)
• Operating temperature: 5o C to 55o C (indoor use only)
• Compatibility: The SU-2 Image Viewer is compatible with PAL and
NTSC standards. SECAM TV sets require a special adapter that is not
supplied in the sales package. The SECAM adapter can be bought in
hardware shop. You can also connect the SU-2 Image Viewer to a
compatible video projector through an AV connector.
• Power supply: 4 AAA batteries or Nokia chargers: ACP-7, ACP-8,
ACP-12
• Connection: RCA connector for TV, Bluetooth (version 1.1) for the
phone.
SU2_en1.fm Page 6 Tuesday, March 11, 2003 11:00 AM
Introduction
7
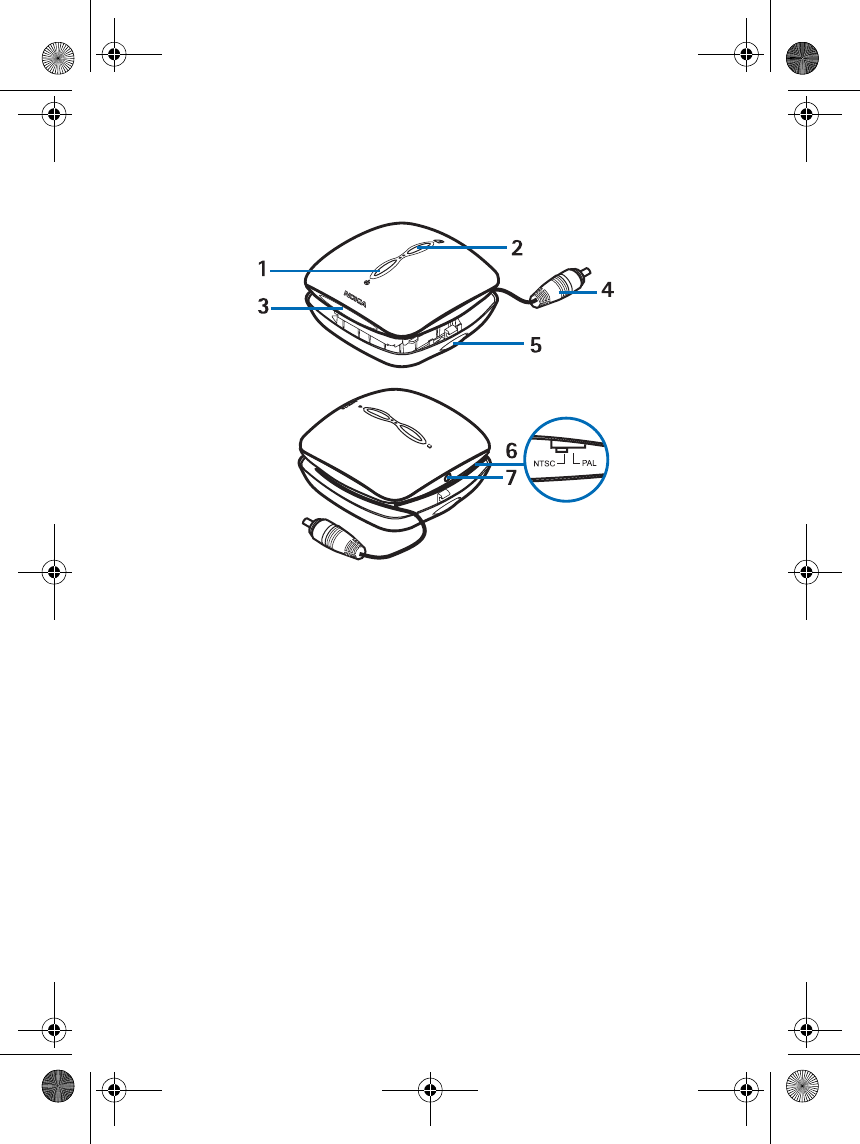
■Overview
The SU-2 Image Viewer has the following parts:
1. Power on/off/rotate button, see page 10 for use
2. Pause/continue button, see page 10 for use.
3. Power/Bluetooth status indicator light (blue)
4. RCA connector and cable
5. Rrelease buttons on both sides, see Using the SU-2 Image Viewer for
the first time on page 8.
6. NTSC/PAL switch
7. Battery indicator light (green)
SU2_en1.fm Page 7 Tuesday, March 11, 2003 11:00 AM
Introduction
8
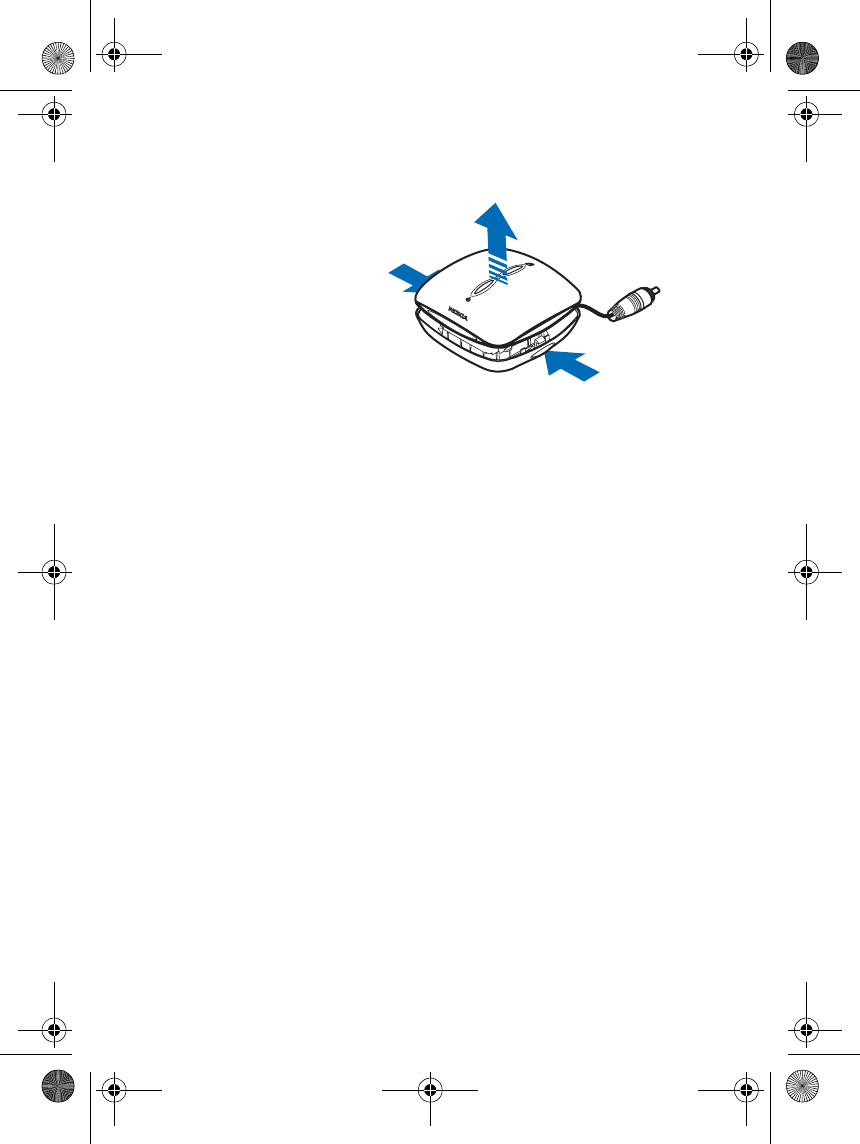
■ Using the SU-2 Image Viewer for the first time
1. Press the release
buttons on both sides
of the SU-2 Image
Viewer to lift the cover
up.
Check that the NTSC/
PAL switch is in the
correct position and
that it corresponds to
the TV standard used in
your country.
2. Connect the SU-2 Image Viewer to the RCA connector on your TV.
If your TV does not have a RCA connector, you need a RCA/SCART
adapter, which you can obtain from a hardware shop.
3. Switch on the SU-2 Image Viewer. The Nokia logo appears on your TV
screen.
4. Make sure that your phone is switched on. Then, enter your phone’s
Bluetooth menu and activate the Bluetooth connection.
5. Enter the submenu where you can set the phone to search for
Bluetooth devices, and start the search. The phone searches for all
Bluetooth devices within about 10 meters and shows them in a list.
6. Select the SU-2 Image Viewer from the list.
7. Key in the four digit verification code ("pair") to your phone. The code
is shown on your TV screen in the top right corner.
Once you have keyed in the verification code, your phone sends it to
the SU-2 Image Viewer. See Using the SU-2 Image Viewer with
several paired phones on page 10.
The blue indicator light shows that the Bluetooth connection is
active. The SU-2 Image Viewer appears in the phone menu where you
can view the Bluetooth devices that are currently paired with your
phone.
8. Start using the SU-2 Image Viewer.
SU2_en1.fm Page 8 Tuesday, March 11, 2003 11:00 AM
Using the SU-2 Image Viewer
9
1. Using the SU-2 Image Viewer
■Before using the SU-2 Image Viewer
Before you start using the SU-2 Image Viewer, check the following on
your TV, phone and SU-2 Image Viewer:
TV:
1. Your TV is switched on and you have selected the right AV channel.
2. Your TV screen has been set to a 4/3 ratio.
Phone:
1. Your compatible phone is switched on and the Bluetooth connection
is active, see your phone’s user’s guide.
2. You phone is paired with the SU-2 Image Viewer. For instructions see
Using the SU-2 Image Viewer for the first time on page 8.
SU-2 Image Viewer:
1. You have set the NTSC/PAL switch on the SU-2 Image Viewer in
accordance with the TV standard used in your country. See List of
countries using the SECAM TV standard on page 12.
2. The SU-2 Image Viewer is switched on and the Nokia logo is
displayed on your TV screen.
3. The SU-2 Image Viewer is paired with your phone. For instructions,
see Using the SU-2 Image Viewer for the first time on page 8.
4. The SU-2 Image Viewer is within 10 meters of your phone and there
are no obstructions, such as walls, or other electronic devices
between the TV image viewer and the phone.
■SU-2 Image Viewer memory and picture formats
The SU-2 Image Viewer supports the most common variations of the
JPEG format. The image size can be up to 640 x 480 pixelsThe SU-2
Image Viewer can show up to 65 pictures or a total of 3 MB of images.
You can display one image at a time or a set of images as a slide show.
Sending more than one image to the SU-2 Image Viewer automatically
starts a slide show. The default display time for each image in slide show
SU2_en1.fm Page 9 Tuesday, March 11, 2003 11:00 AM
Using the SU-2 Image Viewer
10
mode is 8 seconds. Sending new image(s) replaces all images in the SU-
2 Image Viewer’s memory. Switching off the SU-2 Image Viewer erases
all images from its memory.
Viewing images with the SU-2 Image Viewer
You can view images one by one or in slide show mode. If you send more
than one picture to the SU-2 Image Viewer at a time, the pictures are
automatically displayed as a slide show.
Power on/off/rotate button
• To switch on the SU-2 Image Viewer, press the button briefly (3 s.),
then release it.
• To switch the SU-2 Image Viewer off, press the button briefly (3 s.)
• To rotate an image 90 degrees clockwise, press the button briefly
(less than 3 s.). Each keypress rotates the picture one step.
Pause/continue/time change button
• To pause a slide show, press the button briefly (less than 3 s.)
• To continue a slide show, press the button briefly (less than 3 s.)
• To switch the length of the time display times between 8 and 4 s.,
press the button briefly (3 s.)
When you send pictures to the SU-2 Image Viewer, the power/Bluetooth
status indicator light blinks. If during the image transfer the connection
between the phone and the SU-2 Image Viewer fails, the connection
failure icon appears on the TV screen. Resend the image again. Note that
you can pair up to 10 devices with the SU-2 Image Viewer and send
images from one device at a time.
Using the SU-2 Image Viewer with several paired phones
The SU 2- Image Viewer can be paired with up to 10 phones, but it can
be connected to only one phone at a time.
If the SU-2 Image Viewer is switched on within 10 metres of several
paired phones, it tries to connect to the phone that was first paired with
the SU-2 Image Viewer.
SU2_en1.fm Page 10 Tuesday, March 11, 2003 11:00 AM
Using the SU-2 Image Viewer
11
If the SU-2 Image Viewer cannot connect to the first paired phone (for
example, it is switched off or its user rejects the connection), the SU-2
Image Viewer tries to connect to the phone that was last used with the
SU-2 Image Viewer.
If the SU-2 Image Viewer cannot connect to either of the two phones, it
can be discovered by other phones. This is shown by the blue indicator
light.
If you want to use the SU-2 Image Viewer with a paired phone that is
not the first paired or the last used one, make the connection in your
phone’s Bluetooth menu.
SU-2 Image Viewer modes
Discoverable mode:
• The SU-2 Image Viewer is visible to other Bluetooth devices that are
using inquiry scan. The SU-2 Image Viewer can also be connected to
new compatible Bluetooth devices.
• Power/Bluetooth indicator is active. If the charger is connected, the
battery indicator light is active.
Transfer mode:
• The SU-2 Image Viewer is in transfer mode when it is receiving
images over a Bluetooth connection. When the images have been
received, the SU-2 Image Viewer returns to discoverable mode. You
can send multiple images during one transfer session. Note that only
one transfer session can be active at a time.
• Power/Bluetooth indicator light is active. If the charger is connected,
the battery indicator light is active.
Power supply mode:
• The SU-2 Image Viewer is in power supply mode when it is connected
to the charger.
Sleep mode:
• The SU-2 Image Viewer enters sleep mode when it is powered by
batteries and has not been used for 10 minutes. Sleep mode is not
activated, if the SU-2 Image Viewer is connected to a charger, or an
ongoing slide show has notd finished being displayed.
SU2_en1.fm Page 11 Tuesday, March 11, 2003 11:00 AM
Using the SU-2 Image Viewer
12
Battery low mode:
• When the batteries are low, the SU-2 Image Viewer does not enter
sleep mode. Low batteries are indicated by an icon on your TV screen.
Plug a charger into the SU-2 Image Viewer to continue to display
images. If you remove the batteries from the SU-2 Image Viewer, all
displayed pictures are erased.
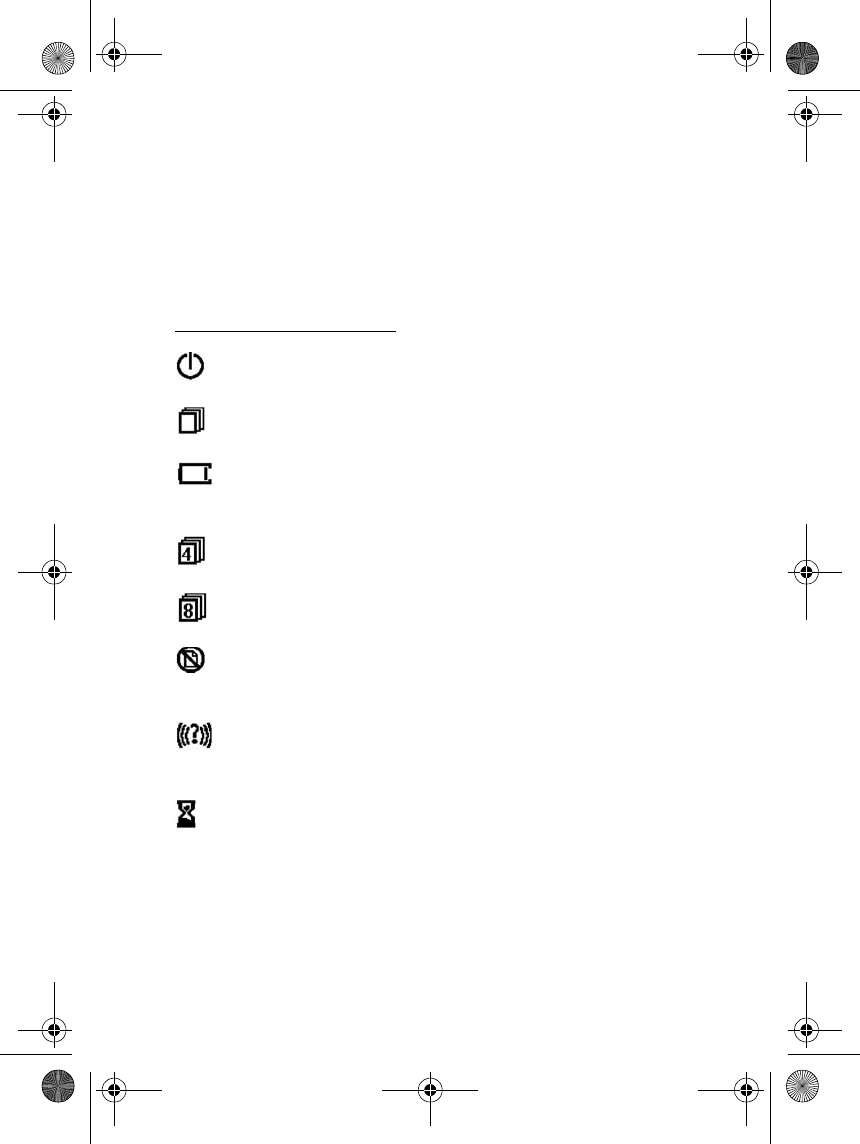
SU-2 Image Viewer icons
The power on/off icon is located next to the power button on
the SU-2 Image Viewer.
The slide show icon is located next to the pause/continue
button on the SU-2 Image Viewer.
The low battery icon is shown on the TV screen to indicate that
the SU-2 Image Viewer will soon switch off, and that it needs to
be connected to the charger.
The slide show display time is shown on the TV screen to
indicate that the time interval is 4 seconds.
The slide show display time is shown on the TV screen to
indicate that the time interval is 8 seconds.
The wrong image icon is shown on TV screen to indicate that the
image is not in the correct format (JPEG), or that the pixels are
above VGA resolution.
The out of range icon is shown on TV screen when the Bluetooth
connection between the phone and the SU-2 Image Viewer is
broken while sending the images.
The image transfer icon is shown on TV screen when the first
image is sent to the SU-2 Image Viewer.
■List of countries using the SECAM TV standard
The following information may not be completely accurate as some
countries have an official TV standard, but new cable companies
broadcast using a different system. To use the SU-2 Image Viewer with
the SECAM TV standard, you need a SECAM/PAL or SECAM/NTSC
SU2_en1.fm Page 12 Tuesday, March 11, 2003 11:00 AM
Using the SU-2 Image Viewer
13
adapter that can be obtained from a hardware shop. The SECAM TV
standard is in use in the following countries:
Bulgaria, Burkina Faso, Burundi, Chad, Dahomey, Djibouti, Egypt
(SECAM/PAL), France, French Polynesia, Gabon, Guadelupe, Guyana
(French), Hungary (SECAM/PAL), Iran, Iraq, Ivory Coast, Lebanon, Libya,
Luxembourg (PAL/SECAM), Madagascar, Mali, Martinique, Mauritania,
Mauritius, Monaco, Mongolia, Morocco, New Caledonia, Niger, Reunion,
Russia, Rwanda, Saudi Arabia (SECAM/PAL), Syria, Tahiti, Togo, Tunisia,
Ukraine (PAL/SECAM), Zaire
SU2_en1.fm Page 13 Tuesday, March 11, 2003 11:00 AM
Battery information
14
2. Battery information
Your SU-2 Image Viewer can be powered by 4 AAA batteries. Make sure
that you change the batteries regularly to ensure the longest operation
time. Note that if you use a compatible Nokia charger as a power supply,
you do not need to remove the batteries from the SU-2 Image Viewer. In
addition, note that the SU-2 Image Viewer does not use the batteries
when it is connected to a charger.
■Charging and Discharging
When the operating time (talk-time and standby time) is noticeably shorter than
normal, it is time to buy a new battery.
Use only batteries approved by the manufacturer. Unplug the charger when not
in use. Do not leave the battery connected to a charger for longer than a week,
since overcharging may shorten its lifetime. If left unused a fully charged battery
will discharge itself over time.
Use the battery only for its intended purpose.
Never use any charger or battery which is damaged.
Do not short-circuit the battery. Accidental short-circuiting can occur when a
metallic object (coin, clip or pen) causes direct connection of the + and -
terminals of the battery (metal strips on the battery) for example when you carry
a spare battery in your pocket or purse. Short-circuiting the terminals may
damage the battery or the connecting object.
Leaving the battery in hot or cold places, such as in a closed car in summer or
winter conditions, will reduce the capacity and lifetime of the battery. Always try
to keep the battery between 15°C and 25°C (59° F and 77° F). A device with a hot
or cold battery may temporarily not work, even when the battery is fully charged.
Batteries' performance is particularly limited in temperatures well below
freezing.
Do not dispose of batteries in a fire !
Dispose of batteries according to local regulations (e.g. recycling). Do not dispose
as household waste.
SU2_en1.fm Page 14 Tuesday, March 11, 2003 11:00 AM

Care and maintenance
15
Care and maintenance
Your SU-2 Image Viewer is a product of superior design and craftsmanship and
should be treated with care. The suggestions below will help you to fulfil any
warranty obligations and to enjoy this product for many years.
• Keep all enhancements out of the reach of small children.
• Keep the SU-2 Image Viewer dry. Precipitation, humidity and all types of
liquids or moisture can contain minerals that will corrode electronic circuits.
• Do not use or store the SU-2 Image Viewer in dusty, dirty areas. Its moving
parts can be damaged.
• Do not store the SU-2 Image Viewer in hot areas. High temperatures can
shorten the life of electronic devices, damage batteries, and warp or melt
certain plastics.
• Do not store the SU-2 Image Viewer in cold areas. When it warms up (to its
normal temperature), moisture can form inside, which may damage
electronic circuit boards.
• Do not attempt to open the SU-2 Image Viewer. Non-expert handling may
damage it.
• Do not drop, knock or shake the SU-2 Image Viewer. Rough handling can
break internal circuit boards.
• Do not use harsh chemicals, cleaning solvents, or strong detergents to clean
the SU-2 Image Viewer.
• Do not paint the SU-2 Image Viewer. Paint can clog the moving parts and
prevent proper operation.
If the SU-2 Image Viewer is not working properly, take it to your nearest qualified
service facility. The personnel there will assist you and, if necessary, arrange for
service.
SU2_en1.fm Page 15 Tuesday, March 11, 2003 11:00 AM
Federal Communication Commission Interference Statement
This equipment has been tested and found to comply with the limits for a Class B digital
device, pursuant to Part 15 of the FCC Rules. These limits are designed to provide
reasonable protection against harmful interference in a residential installation. This
equipment generates, uses and can radiate radio frequency energy and, if not installed and
used in accordance with the instructions, may cause harmful interference to radio
communications. However, there is no guarantee that interference will not occur in a
particular installation. If this equipment does cause harmful interference to radio or
television reception, which can be determined by turning the equipment off and on, the user is
encouraged to try to correct the interference by one of the following measures:
- Reorient or relocate the receiving antenna.
- Increase the separation between the equipment and receiver.
- Connect the equipment into an outlet on a circuit different from that
to which the receiver is connected.
- Consult the dealer or an experienced radio/TV technician for help.
This device complies with Part 15 of the FCC Rules. Operation is subject to the following two
conditions: (1) This device may not cause harmful interference, and (2) this device must
accept any interference received, including interference that may cause undesired operation.
FCC Caution: Any changes or modifications not expressly approved by the party responsible
for compliance could void the user's authority to operate this equipment.
IMPORTANT NOTE:
FCC Radiation Exposure Statement:
This equipment complies with FCC radiation exposure limits set forth for an uncontrolled
environment.
This transmitter must not be co-located or operating in conjunction with any other antenna or
transmitter.