Midea Kitchen Appliances EM159KYY Microwave Oven User Manual VG8EM159KYY

Guangdong Midea Kitchen Appliances Manufacturing Co.,Ltd Microwave Oven VG8EM159KYY

VG8EM159KYY_User Manual
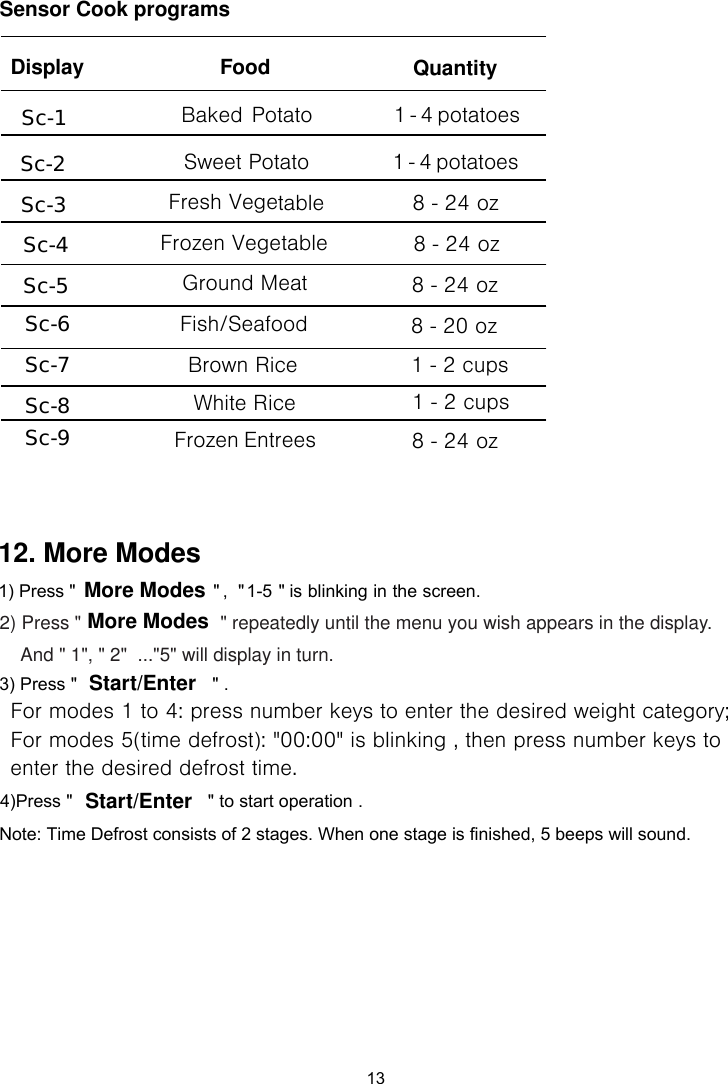
SAVE THESE INSTRUCTIONS CAREFULLYRead these instructions carefully before using yourmicrowave oven,and keep it carefully.If you follow the instructions, your oven will provide you withmany years of good service.Model: EM159K9X
PRECAUTIONS TO AVOID POSSIBLEEXPOSURE TO EXCESSIVE MICROWAVEENERGY(a)  Do not attempt to operate this oven with the door open since       operation can result in harmful exposure to microwave energy.      It is important not to defeat or tamper with the safety interlocks.(b)  Do not  place any object between the oven front face and the door or allows soil or       cleaner residue to accumulate on sealing surfaces.(c)  Do not operate the oven if it is damaged. It is particular  important that      the oven door close properly and that there is no damage to the:      (1) DOOR (bent)      (2) HINGES AND LATCHES (broken or loosened)(3) DOOR SEALS AND SEALING SURFACE(d)  The oven should not be adjusted or repaired by anyone except properly      qualified service personnel.open-door SlySpecificationsModel:Rated Voltage:Rated Input Power(Microwave):Rated Output Power(Microwave):Oven Capacity:Turntable Diameter:External Dimensions:Net Weight:EM159K9XApprox.   kg120V~60Hz1100W 1650W59L2360mm759x409x446mm28.2
WARNING -1. Read all instructions before using the    appliance.2. Read and follow the specific: EXCESSIVE MICROWAVE ENERGY"    found on page 2.combustible materials are placed inside the oven to facilitate cooking. only to properly grounded outlet. See found on  page 5. accordance with the provided installationinstructions.To reduce the risk of burns, electric shock, fire, injury to persons or exposureto excessive microwave energy:3. This appliance must be grounded. Connect"PRECAUTIONS TO AVOID POSSIBLE EXPOSURE TO"GROUNDING INSTRUCTIONS"4. Install or locate this appliance only in5. Some products such as whole eggs and sealed containers - for example, closed glassjars - are able to explode and should not be heated in this oven.6. Use this appliance only for its intended use as described in the manual. Do not usecorrosive chemicals or vapors in this appliance. This type of oven is specificallydesigned to heat, cook or dry food. It is not designed for industrial or laboratory use.      supervision is necessary when used      by children.7. As with any appliance, close      damaged cord or plug, if it is not      working properly, or if it has been      damaged or dropped.8. Do not operate this appliance if it has a      by qualified service personnel.      Contact nearest authorized service      facility for examination, repair, or      adjustment.9. This appliance should be serviced only10. Do not cover or block any openings on the appliance.11. Do not store this appliance outdoors. Do not use this product near water - for      example, near a kitchen sink, in a wet      basement, near a swimming pool, or      similar location.1 . Do not immerse cord or plug in water.21 . Keep cord away from heated surface.14. Do not let cord hang over edge of      table or counter.315. When cleaning surfaces of door and oven that comes together on closing the door,16. To reduce the risk of fire in the oven cavity:1). Do not overcook food. Carefully attend appliance when paper, plastic, or other2). Remove wire twist-ties from paper or plastic bag before placing bag in oven.3). If material inside of the oven ignite, keep oven door closed, turn oven off, anddisconnect the power cord,  shut off power at the fuse or circuit breaker panel.4). Do not use the cavity for storage purposes. Do not leave paper products, cookingutensils, or food in the cavity when not in use.      point without appearing to be boiling. Visible bubbling or boiling when the container is       removed from the microwave oven is not always present. 17. Liquids, such as water, coffee, or tea are able to be overheated beyond the boilingIMPORTANT SAFETY INSTRUCTIONSprecautions should be followed, includingWhen using electrical appliances basic safetyfollowing:the use only mild, nonabrasive soaps, or detergent applied with a sponge or soft cloth.or 3
 stand in the microwave oven for a short time     before removing the container. spoon or other utensil into the container.GROUNDING   INSTRUCTIONSTHIS COULD RESULT IN VERY HOT LIQUID SUDDENLY BOILING OVER WHENTo reduce the risk of injury to persons:1) Do not overheat the liquid.2) Stir the liquid both before and halfway through heating it.3) Do not use straight-sided containers with narrow necks.4) After heating, allow the container to5) Use extreme care when inserting aWARNING - Improper use of the grounding can result in a risk of electric shock.Consult a qualified electrician or serviceman if the grounding instructions are not completely or if doubt exists as to whether the appliance is properly grounded.extension cord, use only a 3-wire extension cord that has aThe marked rating of the extension cord shall be equal to or greater than the electricalappliance.understood,If it is necessary to use an3-blade grounded plug, and 3-slot receptacle that will accept the plug on the appliance.rating of theElectric Shock HazardTouching some of the internal components can cause serious personal injury or death.disassemble this appliance.DANGER - Do notElectric Shock HazardImproper use of the grounding can result in electric shock. Do not plug into an outlet untilappliance is properly installed and grounded.WARNING -1. A short power-supply cord is provided to reduce the risks resulting from becoming    entangled in or tripping over a longer cord.2. Longer cord sets or extension cords are available and may be used if care is exercised    in their use.SA E THESE INSTRUCTIONS18. As with any appliance, close supervision is necessary when the microwave oven isused by children.19. If material inside of the oven should ignite, the oven door should be kept closed, theappliance turned off, the power cord disconnected, or the power shut off at the fuseor circuit breaker panel.THE CONTAINER IS DISTURBED OR A UTENSIL IS INSERTED INTO THE LIQUID.This appliance must be grounded. In the event of an electrical short circuit, groundingof electric shock by providing an escape wire for theappliance is equipped with a cord having a plugged into an outlet that is properly installed and grounded.grounding wire with a grounding plug.reduces the risk electric current. This The plugmust beV4
1. Operation of the microwave oven may cause interference to your radio, TV     or similar2. When there is interference, it may be reduced or eliminated by taking the    following    1) Clean door and sealing surface of the oven    2) Reorient the receiving antenna of radio or television.    3) Relocate the microwave oven with respect to the receiver.    4) Move the microwave oven away from the receiver.    5) Plug the microwave oven into a different outlet so that microwave ovenare on different branch circuits.RADIO INTERFERENCEequipment.measures:             and receiver3. If a long cord or extension cord is used:   1) The marked electrical rating of the cord set or extension cord should be at least asgreat as the electrical rating of the appliance.    2) The extension cord must be a grounding-type  3-wire cord.    3) The longer cord should be arranged so that it will not drape over the counter top or        tabletop where it can be pulled on by children or tripped over unintentionally.SAFETY1.   The oven must be on a leveled surface.2.   The turntable and turntable roller rest must be in the oven during cooking. Place the      cookware gently on the turntable and handle it carefully to avoid  possible breakage.3.   Incorrect use of browning dish may cause the turntable to break.4.   Use only the specified bag size when using Direct Access Popcorn.5.   The oven has several built-in safety switches to ensure that the power remains off when      the door is open. Do not tamper with these switches.6.   Do not operate the microwave oven empty. Operating the oven with no food or food that      is extremely low  in moisture can cause fire, charring or sparking.7.   Do not cook bacon directly on the turntable. Excessive local heating of the turntable      may cause the turntable to break.8.   Do not heat baby bottles or baby food in the microwave oven. Uneven heating      may occur and could cause physical injury.5
9.   Do not heat narrow-necked containers, such as syrup bottles.10. Do not attempt to deep-fry in your microwave oven.11. Do not attempt home canning in this microwave oven, as it is impossible to be sure      all contents of the jar have reached boiling temperature.12. Do not use this microwave oven for commercial purpose. This microwave oven is made      for household use only.13. To prevent delayed eruptive boiling of hot liquids and beverages or scalding yourself,      stir liquid before placing the container in the oven and again halfway through cooking      time. Let stand in the oven for a short time and stir again before removing the container.14. Use carefully when cooking food in the microwave oven to avoid burning due to      excessive cooking.15. When the appliance is operated in the combination mode, children should only use the      oven under adult supervision due to the temperatures generated.16. Failure to maintain the oven in a clean condition could lead to deterioration that could      adversely affect the life of the appliance and possibly result in a hazardous situation.Personal Injury HazardTightly-closed utensils could explode. Closed containers should be opened and plasticpierced before cooking.Utensil Test:1. Fill a microwave-safe container with 1 cup of cold    water (250ml) along with the2. Cook on maximum power for 1 minute.3. Carefully feel the utensil. If the empty utensil is    warm, do not use it for microwave4. Do not exceed 1 minute cooking time.UTENSILSSee the instructions on "Materials you can use in microwave oven or to be avoided inThere may be certain non-metallic utensils that are not safe to use for microwaving. Ifutensil in question following the procedure below.CAUTION -pouches should bemicrowave oven."in doubt, you can test theutensil in question.cooking.6
Materials you can use in microwave ovenUtensils RemarksAluminum foil Shielding only. Small smooth pieces can be used to cover thin parts ofmeat or poultry to prevent overcooking. Arcing can occur if foil is tooclose to oven walls. The foil should be at least 1 inch (2.5cm) away fromoven walls.Follow manufacturer* instructions. The bottom of browning dish must beat least 3/16 inch (5mm) above the turntable. Incorrect usage may causethe turntable to break.Microwave-safe only. Follow manufacturer's instructions. Do not usecracked or chipped dishes.Always remove lid. Use only to heat food until just warm. Most glass jarsare not heat resistant and may break.Heat-resistant oven glassware only. Make sure there is no metallic trim.Do not use cracked or chipped dishes.Follow manufacturer* instructions. Do not close with metal tie. Makeslits to allow steam to escape.Use for short*erm cooking/warming only. Do not leave oven unattendedwhile cooking.Use to cover food for reheating and absorbing fat. Use with supervisionfor a short-term cooking only.Use as a cover to prevent splattering or a wrap for steaming.Microwave-safe only. Follow the manufacturer* instructions. Should belabeled "Microwave Safe". Some plastic containers soften, as the foodinside gets hot. "Boiling bags" and tightly closed plastic bags should beslit, pierced or vented as directed by package.Microwave-safe only. Use to cover food during cooking to retainmoisture. Do not allow plastic wrap to touch food.Thermometers Microwave-safe only (meat and candy thermometers).Wax paper Use as a cover to prevent splattering and retain moisture.Browning dishGlass jarsGlasswareOven cookingbagsPaper platesand cupsPaper towelsParchmentpaperPlasticPlastic wrapDinnerwareMaterials to be avoided in microwave ovenUtensils RemarksAluminum trayFood carton withmetal handleMetal or metal-trimmed utensilsMetal twist tiesPaper bagsPlastic foamWoodMetal shields the food from microwave energy. Metal trim maycause arcing.May cause a fire in the oven.Plastic foam may melt or contaminate the liquid inside when exposedto high temperature.Wood will dry out when used in the microwave oven and may splitor crack.May cause arcing. Transfer food into microwave-safe dish.May cause arcing. Transfer food into microwave-safe dish.May cause arcing and could cause a fire in the oven.7
PART NAMESFront viewBottom view1Top vent grill2Display3Control panel4Door handle5Window6Surface lights7Ventilation filtersCooling FanThe cooling fan runs during all cooking modes. The fan can be heard when it is running, and warm air may be felt as it is released from the oven vent. The fan may also run after the oven is off.Oven VentThe oven vent is located at the top of the unit. Warm air may be released from the vent before, during and after cooking. It is normal to see steam escaping from the vent, and condensation may collect in this area. This area may be warm when the oven is in use. Do not block the vent, since it is important for air circulation.8Convection FanThe convection fan operates modes. mode, the opened.during all convection When the oven is operating in a convection fan turns off automatically when the door is
Control panelSettings Change basic settingsClock Set time of day Turntable (on/off) Switches turntable on or offSensor Reheat Reheat food with automatic Sensor Cook Cook food with automatic Auto Defrost Defrost food with automatic settingssettingssettingsPopcorn Select popcorn bag sizeBeverage Heat beverages, selectKeep Warm Set Keep Warm featureMore Modes Enter more modes for cookingPower Level Set power level for microwave tion+30 Seconds Add 30 seconds to microwave Kitchen Timer Set kitchen timer0 - 9 Use the number keys to enter cus-tomized valuesVent (high/low) Turn kitchen ventilation feature on/offLight Turn surface light on/offClear/Off Clear entered value/turn appliance offStart/Enter Confirm input, start operationsizeconvenience   beverage operatimerPress button FunctionPress button    Function9
 10 power levels are available.  Level   10   9   8   7   6   5   4   3   2   1   Power        Display   PL10   PL9   PL8   PL7   PL6   PL5   PL4   PL3   PL2   PL1   100% 90% 80% 70% 60% 50% 40% 30% 20% 10%    1)    "00:00"   to remind you to  2)  Press the number keys and enter the correct time. For example, time is 10:12 now,        please press  "1,0,1,2" in turn.  3)  Press "                        "In waiting state, press " " once.time.The clock can be set in 12-hour mode. or "  "  and 99 seconds)            " button to cnfirm the clock.orcounting down.   1)  ress the number keys to set the cooking time.(The maximum cooking time and 99 seconds)  2) Press " " repeatedly to adjust the power level. The default power is PL10.  3) Press "                          " to start microwave cooking.  1) In waiting state, press "   " button to cook with 100% power level for 30     Each press on the same button can increase 30 seconds. The maximum    99 minutes and 59 seconds. 2) During  press " "   to  cooking time isEach press on the same button can increase 30 seconds.     99 minutes and 59 seconds.cooking time iswill blink in the display  input the  once,  "00:00" will blink in the display. In waiting state, pis 99 minutes cooking process(except defrost or keep warm),increase the cooking time.  maximumClockStart/Enter ClockKitchen Timer"                           " to confirm setting. The kitchen time will start   Start/Enter Kitchen TimerPower LevelStart/Enter+30 Seconds+30 Seconds101 . Power LevelOperation2 . Clock3 . Kitchen Timer4 . Time Cook5 . Add Cooking Time (+30 Seconds) 1) Press " 2) Press the number keys and enter the timer time.(The maximum cooking time is 99 minutes   3) Press "                         "seconds.The
1) Press "     " once, "dEF1" will blink in the display. " repeatedly to choose the desired function. And "dEF1", "dEF2""dEF3" will display in turn. 2) Press "    3) Press "                                 " to confirm the function. The screen will display "0.0 lb". 4) Press the number keys to set the weight of the food.                                " to start defrosting.5) Press "  Note: Defrosting consists of 3 stages. When the first one and last one stage is finished, 5 beeps Auto DefrostAuto DefrostStart/EnterStart/Enter11Auto Defrost programsProgram  Food Weight rangeGround meat 0.5 - 3 lbsMeat pieces (steaks, chops) 0.5 - 3 lbs Poultry pieces 0.5 - 3 lbsdEF3dEF2dEF1 6. Auto Defrost  ,  "00:00"     will blink in the display.keeping warm.      " repeatedly until the number you wish appears in the display.       "1"SET: approximate 1.2 ounces        2"SET: approximate 2.5 ounces        3"SET: approximate 3.5 ounces        For example, press " " once , "1.2" appears in the LED.   2) Press"  " to cook. "Start/EnterKeep WarmPopcornPopcornStart/Enter 7. Keep Warm 8. Popcorn 1) Press " 2) Press the number keys to set the time of keeping warm.(The maximum time is 60 minutes).  3) Press "                         " to confirm setting. The oven will start 1) Press " will sound.
     " repeatedly until the number you wish appears in the display.       "1"SET: approximate 0.5 cup (about  8 ounces)        "2"SET: approximate 1.0 cup (aboutn 16 ounces)        "3"SET: approximate 1.5 cups (about 24 ounces)        For example, press " " once , "0.5" appears in the display.   2) Press "         "4"SET: approximate 2.0 cups (about 32 ounces)                      " to cook.BeverageBeverageStart/Enter12 ,  "    is blinking in the screen."Sr-1"" repeatedly until the menu you wish appears in the display.And "Sr-1", "Sr-2" will display in turn.Sensor Reheat programsProgram no. Food QuantityDinner plate 8Casserole, pasta 2 to 4 cupsSr-1Sr-2Sensor ReheatSensor ReheatStart/Enter 9. Beverage 10. Sensor Reheat1) Press "  1) Press "2) Press "  3) Press "                          " to start  sensor reheat mode. The appliance starts sensing.   ,  "    is blinking in the screen.Sc-1"" repeatedly until the menu you wish appears in the display.And "Sc-1", "Sc-2", "Sc-3"..."Sc-9" will display in turn.                            "Sensor CookSensor Cook 11. Sensor Cook 1) Press "2) Press "      The microwave is operating during sensing. When sensing is complete, two short beeps will     sound and the calculated cook time will start to count down. Note: Do not open the door during the sensing process, or the program will be cancelled.Start/Enter 3) Press "                          " to start  sensor cook mode. The appliance starts sensing.       The microwave is operating during sensing. When sensing is complete, two short beeps will     sound and the calculated cook time will start to count down. Note: Do not open the door during the sensing process, or the program will be cancelled.16 Ozto
FoodBaked Potato 1 - 4 potatoes  Sweet PotatoFresh Vege table 8 - 24 oz  Frozen Vege table 8 - 24 oz  Ground Meat  Fish/Seafood  Brown Rice    White Rice  Frozen Entrees1 - 4 potatoes  8 - 24 oz  8 - 20 oz  Quantity  DisplaySc-1Sc-2Sc-3Sc-4Sc-5Sc-6Sc-7Sc-8Sc-9Sensor Cook programs13 ,   "    is blinking in the screen.1-5 "" repeatedly until the menu you wish appears in the display.And " 1", " 2"  ..."5" will display in turn.Press "                          " .  For modes 1 to 4: press number keys to enter the desired weight category; For modes 5(time defrost): "00:00" is blinking , then press number keys to 3) 2) Press "  Note: Time Defrost consists of 2 stages. When one stage is finished, 5 beeps will sound.enter  the  desired  defrost  time.                          "More ModesMore ModesStart/EnterStart/Enter 12. More Modes 1) Press "4)Press "                          " to start operation .  1 - 2 cups  1 - 2 cups  8 - 24 oz
Available modesMode no. Name Input1Melt butter 1 = 2 tablespoons  2 = ] cup 3 = ^ cup2Melt chocolate 1 = 1 cup  2 = 2 cups3Soften ice cream 1 = 4 oz. 2 = 8 oz. 3 = 16 oz. 4 = 32oz. 5 = 48 oz.4Soften cream cheese 1 = 3 oz. 2 = 6 oz. 3 = 8 oz.5Time defrost Enter defrost time 14The Vent feature moves steam and other cooking vapors from the cooking microwave oven. You can set four different vent speeds.Set the vent feature by pressing"                       " repeatedly. The  ventilation ¾ will light up on the display.Vent levelDisplay4 (high)321 (low)OFFsurface of the range below the 13 .Operating the Ventilation Fan1 LO324 HIOFFVent (high/low)symbol
The appliance is equipped with a cooking surface light, to light the surface With the"         "  button you can set two brightness BrightnessHighLowOffunderneath the appliance.levels.14 .Turning the Surface Light on/offDisplay LO HIOFFLight15For best cooking results, leave the turntable on. It can be turned off for To turn the turntable off, press"                            "  once. The Á symbol and"OFF"  lights up briefly. Press the Á symbol and"ON" lights up briefly.large dishes.the turntable on. The 15 .Turning the turntable on / offbutton again to turn Turntable (on/off)To activate the panel lock: for more than 3 seconds. The ¿ symbol lights sounds.To deactivate the panel lock: for more than 3 seconds. The ¿  symbol unlocked.16 .Panel LockPress and hold"                " Press and hold "              " up in the display, a double beep disappears from the display. The panel is Clear/OffClear/Off
Example: Turn clock display on/off. twice.1 to turn the clock display on,  2 to turn Start/Enter .Note:  You can only change one setting at a time. To change another menu first and begin from step 1.setting, you have to exit the settings Display FunctionSettings button1 - on 2 - offonce Clock display in stand-by mode on/off 1 - on 2 - offtwicePressSndCloButton sounds on/off Clo and OFF or On alternate in the display.press Settings17 .Settings16the clock display off.1)   Press"            "   Press the number button   Press  "                    " 2) 3)
    lation ports are not restricted.d. Use correct cooking time,    power level.Improper defrostinga. Materials to be avoided in    microwave oven were used.b. Cooking time, power level is    not suitable.c. Food is not turned or stirred.a. Use microwave-safe    cookware only.b. Use correct cooking time,    power level.c. Turn or stir food.MAINTENANCETroubleshootingCheck your problem by using the chart below and try the solutions for each problem. If themicrowave oven still does not work properly, contact the nearest authorized service center.TROUBLEOven will not startPOSSIBLE CAUSE POSSIBLE REMEDYa. Electrical cord for oven is     not plugged in.b. Door is open.c. Wrong operation is set.a. Plug into the outlet.b. Close the door and try    again.c. Check instructions.Arcing or sparkinga. Materials to be avoided in    microwave oven were    used.b. The oven is operated when    empty.c. Spilled food remains in the    cavity.a. Use microwave-safe    cookware only.b. Do not operate with oven    empty.c. Clean cavity with wet towel.Unevenly cooked foodsa. Materials to be avoided in    microwave oven were    used.b. Food is not defrosted    completely.c. Cooking time, power level    is not suitble.d. Food is not turned or stirred.a. Use microwave-safe    cookware only.b. Completely defrost food.c. Use correct cooking time,    power level.d. Turn or stir food.Overcooked foods Cooking time, power level isnot suitable. Use correct cooking time,power level.Undercooked foodsa. Materials to be avoided in    microwave oven were used.b. Food is not defrosted    completely.c. Oven ventilation ports are    restricted.d. Cooking time, power level is    not suitable.a. Use microwave-safe    cookware only.b. Completely defrost food.c. Check to see that oven venti-    lation ports are not restricted.d. Use correct cooking time,    power level.Improper defrostinga. Materials to be avoided in    microwave oven were used.b. Cooking time, power level is    not suitable.c. Food is not turned or stirred.a. Use microwave-safe    cookware only.b. Use correct cooking time,    power level.c. Turn or stir food.MAINTENANCE17

Navigation menu