Midea Kitchen Appliances EM920AMN Microwave Oven User Manual users manual
Guangdong Midea Kitchen Appliances Manufacturing Co.,Ltd. Microwave Oven users manual
users manual

INSTRUCTION MANUAL
Microwave Oven
SAVE THESE INSTRUCTIONS CAREFULLY
Read these instructions carefully before using your
microwave oven, And keep it carefully for future reference.
If you follow the instructions, your oven will provide you with
many years of good service.
MODEL:EM920AFW-P

1
SPECIFICATIONS
PRECAUTIONS TO AVOID POSSIBLE
EXPOSURE TO EXCESSIVE
MICROWAVE ENERGY
(a) Do not attempt to operate this oven with the door open since this can result
in harmful exposure to microwave energy.It is important not to
break
or
tamper with the safety interlocks.
(b) Do not place any object between the oven front face and the door or
allow soil or cleaner residue to accumulate on sealing surfaces.
(c) Do not operate the oven if it is damaged. It is particularly important
that the oven door closes properly and that there is no damage to the:
(1) DOOR(dent)
(2) HINGES AND LATCHES(broken or loosened)
(3) DOOR SEALS AND SEALING SURFACE
(d) The oven should not be adjusted or repaired by anyone except properly
qualified service personnel.
Model:
Power Source:
Power Consumption:
Maximum Output:
Oven Capacity:
Turntable Diameter:
External Dimensions (LxWxH):
Net weight:
E(A)M920AFW-P
120V~ 60Hz
1300 W
900W
0.7Cu.ft.
9.7 inches
20.3X15.2X13.0 inches
Approx. 25.1LB

SAFETY
2
1. The oven must be on a leveled surface.
2. The turntable and turntable roller rest must be in the oven during cooking. Place the
cookware gently on the turntable and handle it carefully to avoid possible breakage.
3. Incorrect use of browning dish may cause the turntable to break.
4. Use only the specified bag size when using Direct Access Popcorn.
5. The oven has several built-in safety switches to ensure that the power remains off when
the door is open. Do not tamper with these switches.
6. Do not operate the microwave oven empty. Operating the oven with no food or food that
is extremely low in moisture can cause fire, charring or sparking.
7. Do not cook bacon directly on the turntable. Excessive local heating of the turntable
may cause the turntable to break.
8. Do not heat baby bottles or baby food in the microwave oven. Uneven heating
may occur and could cause physical injury.
9. Do not heat narrow-necked containers, such as syrup bottles.
10. Do not attempt to deep-fry in your microwave oven.
11. Do not attempt home canning in this microwave oven as it is impossible to be sure all
contents of the jar have reached boiling temperature.
12. Do not use this microwave oven for commercial purpose. This microwave oven is made
for household use only.
13. To prevent delayed eruptive boiling of hot liquids and beverages or scalding yourself,
stir liquid before placing the container in the oven and again halfway through cooking
time. Let stand in the oven for a short time and stir again before removing the container.
14. Please do notice the food in the microwave oven to avoid burning due to excessive
cooking when cooking food in it.
15. When the appliance is operated in the combination mode, children should only use the
oven under adult supervision due to the temperatures generated.
16. Failure to maintain the oven in a clean condition could lead to deterioration of the
surface that could adversely affect the life of the appliance and possibly result in a
hazardous situation.

1. Read all instructions before using the
appliance.
2. Read and follow the specific:" PRECAU-
TIONS TO AVOID POSSIBLE EXPOSURE
TO EXCESSIVE MICROWAVE ENERGY".
3. As with most cooking appliances,close
supervision is necessary to reduce the
risk of a fire in the oven cavity.
If materials inside the oven ignite:
1.Keep the oven door closed
2.Turn the oven off, and unplug the appliance.
3.Disconnect the power at the fuse or circuit
breaker panel.
Keep in mind the following rules at all times:
1.Do not overcook food. Carefully attend the
appliance when paper,plastic,or other combus-
tible materials are placed inside the oven to
facilitate cooking.
2.Do not use the oven cavity for storage pur-
poses. Do not store combustible items su-
ch as bread, cookies, paper products, etc.
inside the oven. If lightning strikes the power
line, the oven may turn on by itself.
3.Remove wire twist-ties and metal handles
from paper or plastic containers/bags before
placing them in the oven.
4.This oven must be grounded. Connect only
to properly grounded outlet. See"GROUN-
DING INSTRUCTIONS".
5. Install or locate this oven only in accordance
with the installation instructions provided.
6. Some products such as whole
eggs, water with oil or fat, sealed
containers and closed glass jars are able
to explode and therefore should not be
heated in this oven.
7. Use this appliance only for its intended
uses as described in the manual. Do
not use corrosive chemicals or vapors
in this appliance. This oven is specifically
designed to heat or cook food. It is not
designed for industrial or laboratory
use.
8. As with any appliance, close supervision
is necessary when used by children.
9. Do not operate this oven if it has a
damaged cord or plug, if it is not working
properly or if it has been damaged or
dropped.
10. This appliance should be serviced
only by qualified service technicians.
Contact the nearest authorized
service facility for examination,repair
or adjustment.
11. Do not cover or block any vents on the
oven.
12. Do not store or use this appliance
outdoors.
13. Do not use this oven near water,for
example, near a kitchen sink, in a wet
basement, near a swimming pool, or
similar locations.
14. Do not immerse cord or plug in water.
15. Keep cord away from heated surfaces.
16. Do not let cord hang over edge of table
or counter.
17. When cleaning door and oven surfaces
use only mild, nonabrasive soaps or
detergents applied with a sponge or
soft cloth.
Important Safety Instructions
SAFETY
WARNING— To reduce the risk of the fire, electric shock, injury to
persons, or exposure to excessive microwave oven
energy when using your appliance, follow
basic precautions, including the following:
4
SAVE THESE INSTRUCTIONS

DANGER
Electric Shock Hazard Touching
some of the internal components
can cause serious personal injury
or death.Do not disassemble this
appliance
.
WARNING
Electric Shock Hazard
Improper use of the grounding
can result in electric shock. Do
not plug into an outlet until
appliance is properly installed
and grounded.
Three-pronged
(grounding) plug
18.Liquids, such as water, coffee, or tea are
able to be overheated beyond the boiling
point without appearing to be boiling. Visible
bubbling or boiling when the container is
removed from the microwave oven is not
always present. THIS COULD RESULT IN
VERY HOT LIQUIDS SUDDENLY BOILING
OVER WHEN THE CONTAINER IS DIS-
TURBED OR A SPOON OR OTHER UT-
ENSIL IS INSERTED INTO THE LIQUID.
To reduce the risk of injury to persons:
i) Do not overheat the liquid.
ii) Stir the liquid both before and halfway
through heating it.
iii) Do not use straight-sided containers
with narrow necks.
iv) After heating, allow the container to
stand in the microwave oven for a short
time before removing the container.
v) Use extreme care when inserting a
spoon or other utensil into the container.
Grounding Installation
Properly polarized and
grounded outlet
This appliance must be grounded. In the event of an elec-
trical short circuit, grounding reduces the risk of electric
shock by providing an escape wire for the electric current.
This appliance is equipped with a cord having a grounding
wire with a grounding plug. The plug must be plugged into
an outlet that is properly installed and grounded.
Consult a qualified electrician or serviceman if the ground-
ing instructions are not completely understood or if doubt
exists as to whether the appliance is properly grounded.
If it is necessary to use an extension cord, use only a 3-
wire extension cord that has a 3-pronged grounding plug,
and a 3-slot receptacle that will accept the plug on the
appliance.
1. A short power-supply cord is provided to reduce the
risks resulting from becoming entangled in or tripping
over a longer cord.
2. Longer cord sets or extension cord is provided to
reduce the risks resulting from becoming entangled
in or tripping over a longer cord.
3. If a long cord sets or extension cord is used: 1)The
marked electrical rating of the cord set or extension
cord should be at least as great as the electrical rating
of the appliance. 2)The extension cord must be a
grounding-type 3-wire cord, and 3)The longer cord
should be arranged so that it will not drape over the
counter top or tabletop where it can be pulled on by
children or tripped over unintentionally.
Utensils
5

CAUTION
Personal Injury Hazard
Tightly-closed utensils
could explode. Closed
containers are opened and
plastic pouches pierced
before cooking.
See next page for further instructions “Materials you
can use in microwave oven or to be avoided in micro-
wave oven.”There may be certain non-metallic utensils
that are not safe to use for microwaving. If in doubt,
you can test the utensil in question following the
procedure below.
Utensil Test:
1. Fill a microwave-safe container with 1 cup of cold
water (250ml) along with the utensil in question.
2. Cook on maximum power for 1 minute.
3. Carefully feel the utensil. If the empty utensil is warm,
do not use it for microwave cooking.
4. Do not exceed 1 minute cooking time.
6
Materials you can use in microwave oven
Utensils Remarks
Aluminum foil Shielding only. Small smooth pieces can be used to cover thin parts of meat
or poultry to prevent overcooking. Arcing can occur if foil is too close to
oven walls. The foil should be at least 1 inch (2.5cm) away from oven walls.
Browning dish Follow manufacturer’s instructions. The bottom of browning dish must be at
least 3/16 inch (5mm) above the turntable.Incorrect usage may cause
the turntable to break.
Dinnerware Microwave-safe only. Follow manufacturer’s instructions. Do not use cracked
or chipped dishes.
Glass jars Always remove lid. Use only to heat food until just warm. Most glass jars
are not heat resistant and may break.
Glassware Heat-resistant oven glassware only. Make sure there is no metallic trim. Do
not use cracked or chipped dishes.
Oven cooking Follow manufacturer’s instructions. Do not close with metal tie. Make slits to
bags allow steam to escape.
Paper plates Use for short –term cooking/warming only. Do not leave oven unattended while
and cups cooking.
Paper towels Use to cover food for reheating and absorbing fat. Use with supervision for a
short-term cooking only.
Parchment Use as a cover to prevent splattering or a wrap for steaming.
paper
Plastic Microwave-safe only. Follow the manufacturer’s instructions.Should be labelled
“Microwave Safe”. Some plastic containers soften as the food inside gets hot.
“Boiling bags” and tightly closed plastic bags should be slit, pierced or vented
as directed by package.
Plastic wrap Microwave-safe only. Use to cover food during cooking to retain moisture. Do
not allow plastic wrap to touch food.
Thermometers Microwave-safe only (meat and candy thermometers).
Wax paper Use as a cover to prevent splattering and retain moisture.
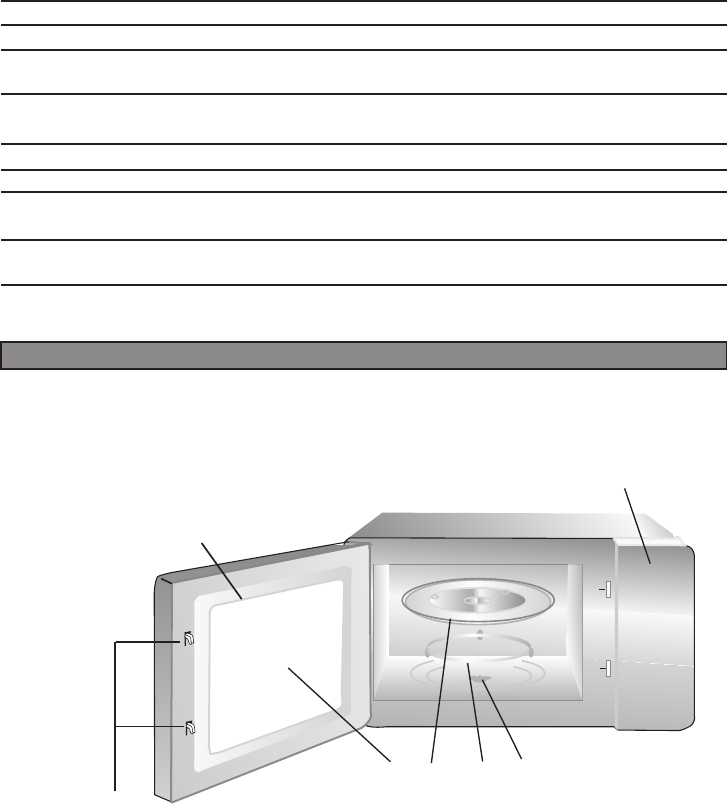
A)Control panel
B)Turntable shaft
C)Turntable ring assembly
D)Glass tray
E)Observation window
F) Door assembly
G)Safety interlock system
6
Materials to be avoided in microwave oven
Utensils
Aluminum tray
Food carton with
metal handle
Metal or metal-
trimmed utensils
Metal twist ties
Paper bags
Plastic foam
Wood
F
G
A
CB
ED
SETTING UP YOUR OVEN
Names of Oven Parts and Accessories
Remove the oven and all materials from the carton.
Your oven comes with the following accessories:
Glass tray 1
Turntable ring assembly 1
Instruction Manual 1
Shuts off oven power if door is opened during operation.
7
Remarks
May cause arcing. Transfer food into microwave-safe dish.
May cause arcing. Transfer food into microwave-safe dish.
Metal shields the food from microwave energy. Metal trim may cause
arcing.
May cause arcing and could cause a fire in the oven.
May cause a fire in the oven.
Plastic foam may melt or contaminate the liquid inside when exposed
to high temperature.
Wood will dry out when used in the microwave oven and may split or
crack.
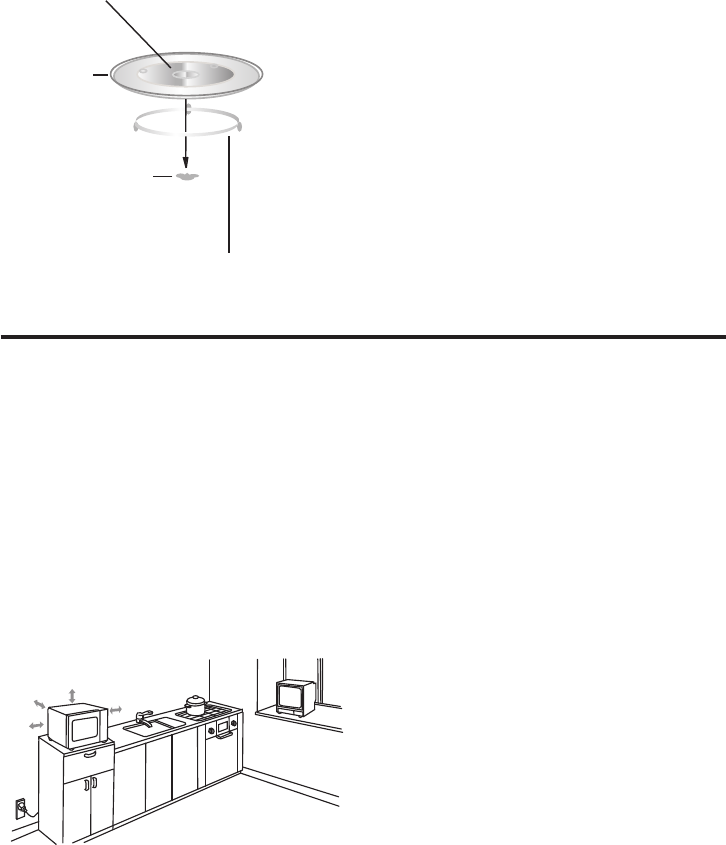
Installation
Remove all packing material and accessories.
Examine the oven for any damage such as
dents or broken door. Do not install if oven is
damaged.
Countertop
Cabinet: Remove any protective film found
on the cabinet surface.
Do not remove the light brown Mica cover
that is screwed to the oven cavity to
protect the magnetron.
Installation
1. Select a level surface that provide
enough open space for the intake
and/or outlet vents.
A minimum clearance of 3.0 inch
(7.5cm) is required between the oven and
any adjacent wall.One side must be open.
(1) Leave a minimum clearance of 12
inch(30cm) above the oven.
(2) Do not remove the legs from the
bottom of the oven.
(3) Blocking the intake and/or outlet openings
can damage the oven.
(4)Place the oven as far away from
radios and TV as possible.Operation
of microwave oven may cause interference
to your radio or TV reception.
2. Plug your oven into a standard household
outlet. Be sure the voltage and the
frequency is the same as the voltage and
the frequency on the rating label.
WARNING: Do not install oven over a
range cooktop or other heat-producing
appliance. If installed could be damaged
and the warranty would be void.
Hub(underside)
Glass tray
Turntable ring assembly
Turntable shaft
3.0 inch(7.5cm)
3.0 inch(7.5cm)
12 inch(30cm)
OPEN
8
a. Never place the
glass tray
upside down.The
glass tray
should never be restricted.
b. Both
glass tray
and
turntable ring assembly
must always
be used during cooking.
c. All food and containers of food are always placed
on the
glass tray
for cooking.
d. The
glass tray
rotates clockwise; this is normal.
e. If
glass tray
or
turntable ring assembly
cracks or breaks, contact
your nearest authorized service center.
TURNTABLE INSTALLATION

8
OPERATION
1. Power Level
Ten power levels are available.
Level
Power
10
100%
9
90%
8
80%
7
70%
6
60%
5
50%
4
40%
3
30%
2
20%
1
10%
Remarks: When a power between level 10-8 is chosen, the high level indicator is lighted
and it will flash in operation.
When a power between level 7-1 is choosen, the low level indicator is lighted and it will
flash in operation.
2. Operation and Function
1). Clock Setting
When the microwave oven is plugged into an outlet, the oven will display
"0:00".
(1) Press " CLOCK/ PRE-SET ", LCD will display 00:00, clock indicator
will be lighted. The hour figures will flash; ":" and "0" will be lighted.
(2) Press the numerical pads to input higher hour, then the lower hour will be flashing.
Press the numerical pads to input lower hour, then the higher minutes will be flashing.
Press the numerical pads to input higher minutes, then the lower minutes will be
flashing. Press the numerical pads to input lower minutes.
(3) Press " AM/PM " to choose AM or PM. AM or PM will be selected in turn by pressing the
button of "AM/PM" continuously and "A" or "P" will be displayed in turn.
(4) Press " CLOCK/PRE-SET " to finish clock setting, and the clock indicator will go out. ":"
will be flashing and the clock will be lighted.
(5) If the numbers input are not within the range of 1:00—12:59, the setting will be invalid
until valid numbers are input.
Note: In the process of clock setting, if the " Stop " button is pressed or if there is no
operation within 1 minute, the oven will go back to the former setting automatically.
2). One Power Cooking
(1) Keep on pressing " POWER " to choose microwave power. The indicators for "MICRO"
and "POWER" will be lighted together.
(2) Press numerical pads to input the cooking time; the maximum cooking time is 99
minutes and 99 seconds.
(3) Press " START " to start cooking, and the remained cooking time will be displayed. ":"
and the indicators for "MICRO", "POWER" will be flashing.

3). Two Stage Cooking
(1) Keep on pressing " POWER " to choose the power level for the first cooking stage,
indicators for "MICRO" and "POWER" will be lighted together.
(2) Press numerical pads to input the time for the first cooking. The maximum cooking time
is 99 minutes and 99 seconds
(3) Keep on pressing " POWER " to choose power level 2, "MICRO" and "POWER" will be
lighted together.
(4) Press numerical pads to input the second cooking time, the maximum cooking time is
99 minutes and 99 seconds.
(5) Press " START " to start cooking, and the remained cooking time will be displayed; ":"
and indicators for "MICRO", "POWER" will be flashing.
(6) One "beep" will be sound when the first cooking ends, and then the second cooking will
begin.
4). Fast Starting
(1) In waiting state, instant cooking at 100% power level can be started by selecting a
cooking time from one to five minutes by pressing corresponding numerical pad. Press
" +30SEC " to increase the cooking time; the maximum cooking time is 99 minutes and
99 seconds.
(2) In waiting state, instant cooking at 100% power level with 30 seconds' cooking time can
be started by pressing " +30SEC ". Each press on the same button will increase cooking
time by 30 seconds. The maximum cooking time is 99 minutes and 99 seconds.
Note: Each press on "+30SEC" can increase the cooking by 30 seconds for the micro and
Auto menu cooking. However, the operation will not work under "Auto Defrost" operation.
5). Defrosting By Weight Function
(1) Press " Defrosting WT ", LCD will display "dEF1"; when at the same
time indicators for "MICRO", "DEFROST" will be lighted.
(2) Press numerical pads to input weight to be defrosted. "Oz" indicator will be lighted.
Input the weight ranged between 4~100Oz.
(3) If the weight input is not within 4~100, the input will be invalid. No "beep" will be sound
and the microwave will not work until valid numbers are input .
(4) Press " START " to start defrosting and the remained cooking time will be displayed. ":"
and indicators for "MICRO" and "DEFROSTING" will be flashing and the "Oz" indicator
will go out.
9

6). Defrosting By Time Function
(1) Press " Defrosting By Time ", LCD will display "dEF2". At the same
time, indicators for "MICRO", "DEFROST" will be lighted.
(2) Press numerical pads to input defrosting time. The effective time range is 00:01~99:99
(3) If the time input is not within 00:01~99:99, no "beep" will be sound and the oven will not
work until valid numbers are input.
(4) The default microwave power is power level 3. If you want to change the power level,
press " POWER " once, and the LCD will display "PL 3", then press the numerical pad
of the power level wanted.
(5) Press " START " to start defrosting. The remained cooking time will be displayed. ":"
and indicators for "MICRO" and "DEFROSTING" will be flashing.
7). Auto Menu Cooking
(1) Press matching button to choose Auto Menu subject, and at the same time
"AUTO COOK" and indicator for "MICRO" will be lighted. Keep on pressing the matching
button to choose the weight or quantity. "Oz" or "Micro" indicators will be lighted together.
(2) Press " START " to start cooking, and the remained cooking time will be displayed.
"AUTO COOK" and "MICRO" indicators will be flashing together.
8). Memory Function
(1) Press " MEMORY " for one to five times to choose memory 1 to memory 5. "1" to "5"
will be displayed.
(2) Set a cooking program, and press " START " to start the cooking or press " MEMORY "
to save the " MEMORY " setting. Two stage power cooking program can also be set
the same way. When " MEMORY " is pressed the oven will turn back to the waiting
state. The set program saved will be operated at once by pressing " START ".
Note: Memory cooking can be used as cooking programs in pre-set cooking. If in the
process of pre-setting, memory cooking programs is set at the same time, only cooking
programs can be recorded and the pre-set time will not be recorded.
9). Pre-set Function
(1) Set a cooking program wanted.
(2) Press " CLOCK/PRE-SET " to display the current clock, "clock" indicator will be lighted
and the higher hour indicator will be flashing, ":" and other "0" 's will be lighted.
(3) Press the numerical pads to input higher hour, and the lower hour will be flashing;
(4) Press the numerical pads to input lower hour, and the higher minutes will be flashing;
(5) Press the numerical pads to input higher minutes, and the lower minutes will be flashing.
10

(6) Press the numerical pads to input lower minutes, and press " START " to confirm the
pre-set cooking. The oven will then turn back to the clock displaying state, and the clock
indicator and ":" will be flashing.
(7) When the pre-set time is reached, two "beep" will be sound denoting the beginning of
the cooking.
Note: The clock must be set before the pre-set cooking. If the cooking program has not
been set and only pre-set time has been programmed, the oven can only be used as an
alarm clock and five "beep" will be sound when the pre-set time is reached.
10). Inquiring Function
(1) In clock state, press " AM/PM " to display "A" or "P" for 3 seconds.
(2) In cooking state, press " CLOCK ", the LCD will display clock for three seconds and "A"
or "P" will be displayed for another 3 seconds.
(3) In pre-set state, LCD will display the clock and the seconds will be flashing at the same
time. Press " AM/PM " and "A" or "P" will be displayed for 3 seconds. Then press
" CLOCK " to inquire the pre-set time. The pre-set time will be flashing for 3 seconds,
then "A" or "P" will be displayed for another 3 seconds. After that, the oven will turn
back to the clock state.
(4) In the one power cooking state, press " POWER " to inquire microwave power level, and
the current microwave power will be displayed. After three seconds, the oven will turn
back to the previous state.
(5) In the two stage power cooking state, the inquiring way can be done by the same way as
above.
11). Lock-out Function for Children
Lock: In waiting state, press " STOP " for 3 seconds, there will be a long "beep" denoting
entering into the children lock-out state and LCD will display " "
Unlock: In locked state, press " STOP " for 3 seconds, there will be a long "beep" denoting
that the lock is released.
12). Fan Pro-longed Protection Function
If the cooking time is equal to or above 5 minutes, for the last 15 seconds, the microwave
cooking will be stopped automatically, and only the fan will be still cooking.
11
13). Automatic Going Out Function
When the door is kept open, the oven light will be on and will go out automatically without
any operation for 10 minutes.
14). Cooking End Reminding Function
When cooking ends, there will be 5 "beep" which is reminding the completion of cooking.
15). Display Specification
(1) In waiting state , LCD will display clock and ":" will not flash.
(2) In function setting state, LCD will display the related setting.
(3) In the operation and suspending state, LCD will display the residual cooking time.
(4) In the operation or suspending state or when the door is open, the flashing "Micro"
indicator will be lighted and the indicator will be flashing when the oven is restarted.
12
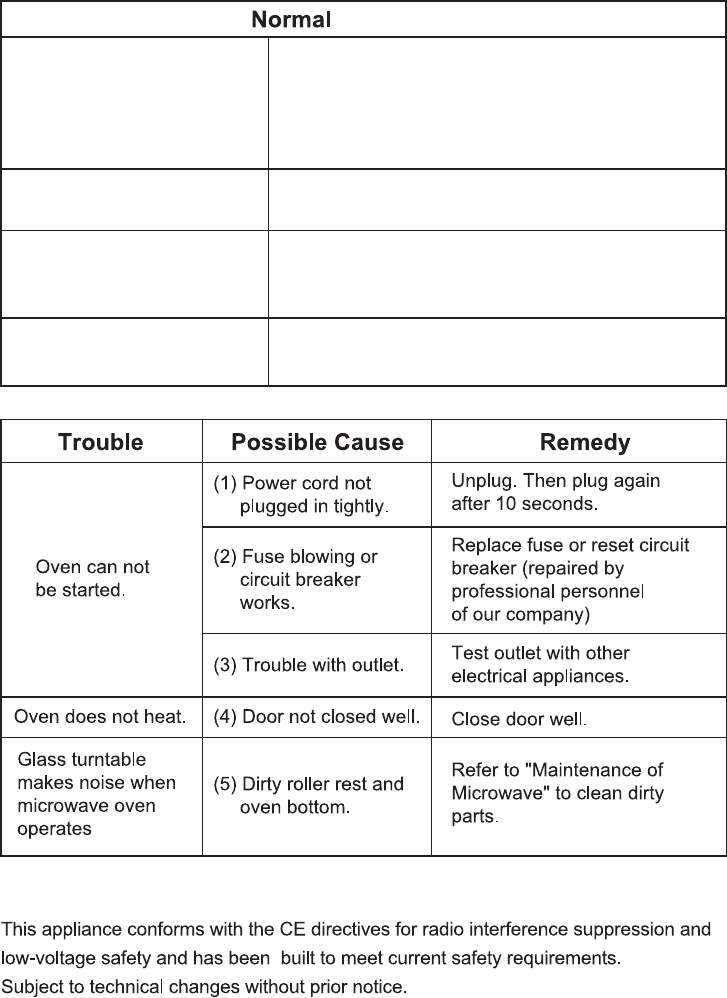
Trouble shooting
Radio and TV reception may be interfered when
microwave oven is operation. It is similar to the
interference of small electrical appliances , like
mixer , vacuum cleaner,and electric fan.
It is normal.
Microwave oven interfering
TV reception
Dim oven light In low power microwave cooking , oven light may
become dim . It is normal.
In cooking , seam may come out of food . Most will
come out from vents . But some may accumulate
on cool place like oven door . It is normal.
It does no damage to oven if it operates empty for
quite short time . But it should be avoided.
Steam accumulating on
door, hot air out of vents
Oven started accidentally
with no food in .
13
14
4. This product will make disturbance in AV product, if any
disturbance is occured, use different electrical source jack to supply
electricity or use low power or away from them.