Midea Kitchen Appliances EM925AYYPA Microwave Oven User Manual
Guangdong Midea Kitchen Appliances Manufacturing Co.,Ltd Microwave Oven
UserManual.wiki
>
Midea Kitchen Appliances
>
EM925AYYPA User Manual
>
User Manual
Contents
1.
Users Manual
2.
User Manual
3.
Users Manual 1
4.
Users Manual 2
User Manual
Navigation menu
Upload a User Manual
Namespaces
Wiki Guide
HTML
PDF
Info
Views
User Manual
Discussion / Help
Navigation


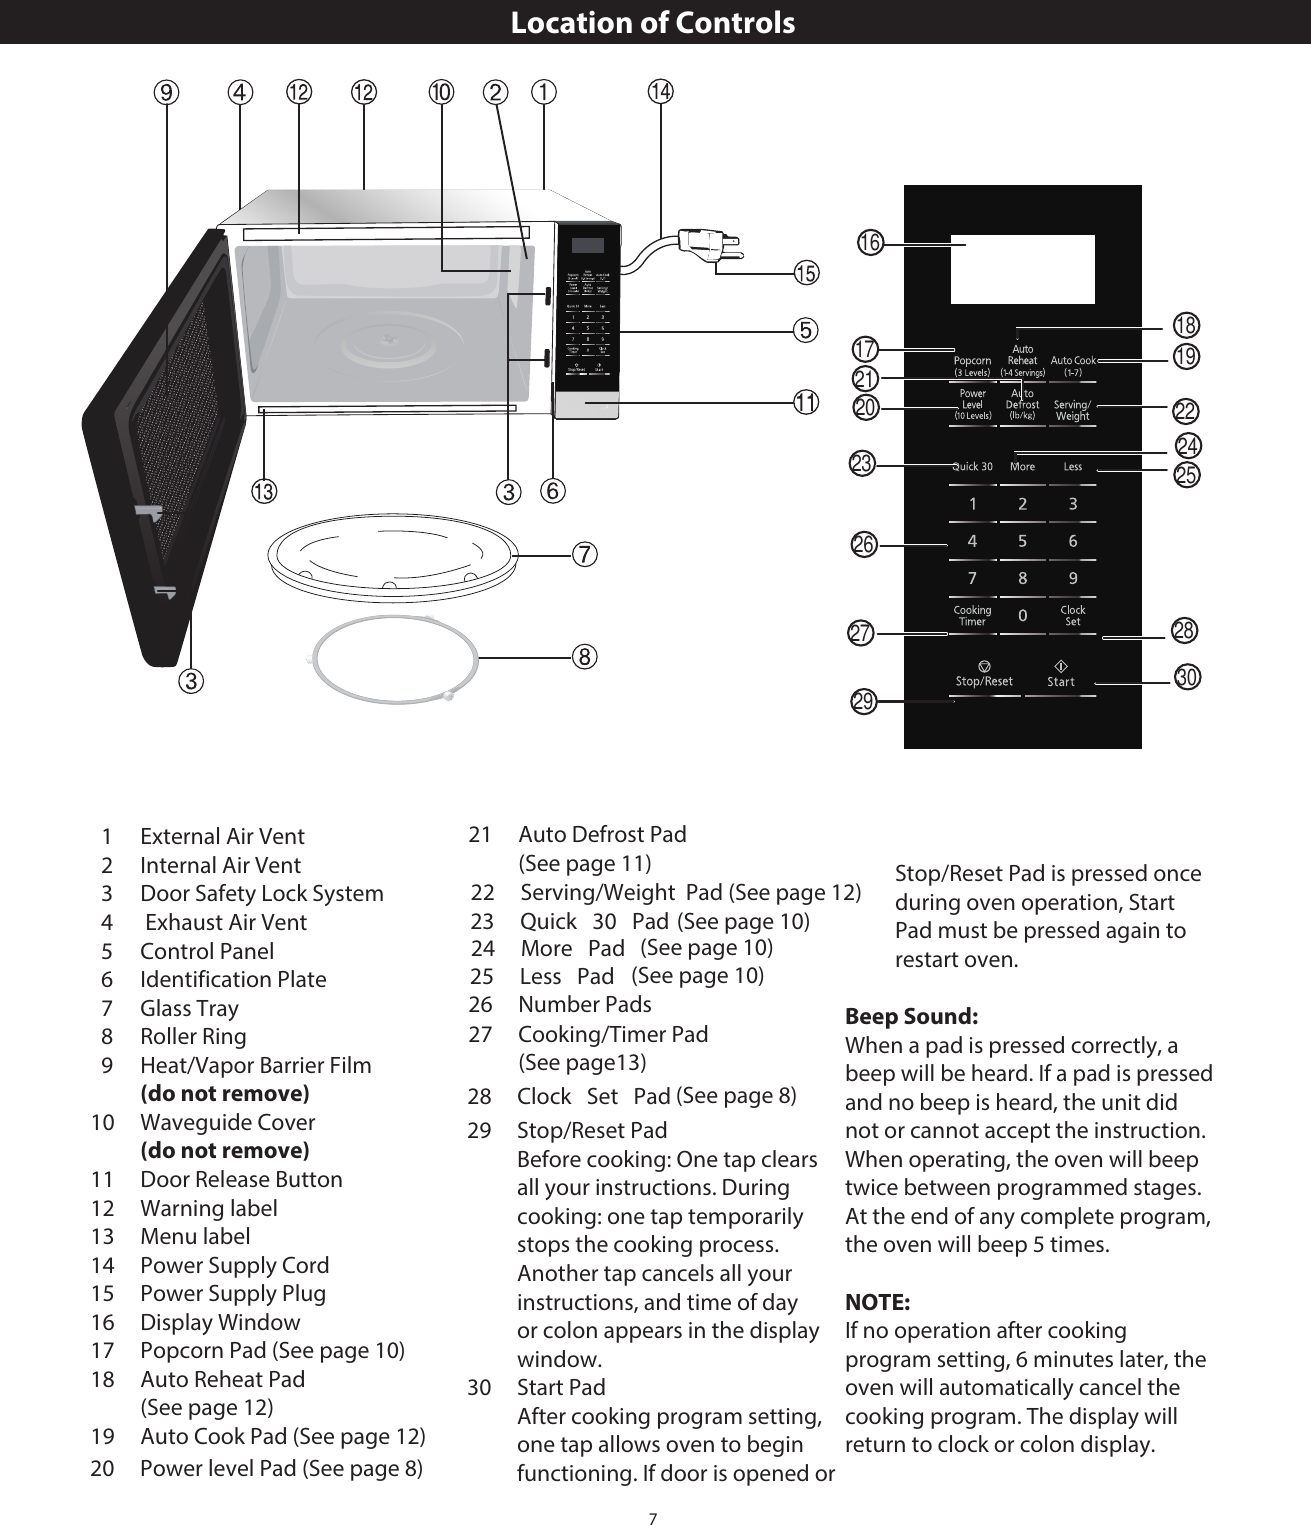
![11Operation (continued)DefrostPress Start. Defrosting will start. Larger weight foods will cause a signal midway through defrosting. If two beeps sound, turn over and/or rearrange foods.NOTE: The maximum weight for (2.7 kg).“ ” will appear briefly in the display, then a dash will appear next to the weight units. Enter weight of the food using the Number pads.223Defrosting Tips & Techniques1This feature allows you to defrost foods such as meat, poultry and seafood, simply by entering the weight. Press .ConversionFollow the chart to convert ounces or hundredths of a pound into tenths of a pound. To use Auto Defrost, enter the weight of the food in pounds (1.0) and tenths of a pound (0.1). If a piece of meat weighs 1.95 lbs or 1 lb 14 oz, enter 1.9 lbs.Ounces Hundredths of a PoundTenths of a Pound01 - 23 - 456 - 789 - 1011 - 121314 - 15.01 - .05.06 - .15.16 - .25.26 - .35.36 - .45.46 - .55.56 - .65.66 - .75.76 - .85.86 - .950.00.10.20.30.40.50.60.70.80.9Preparation For Freezing:1. Freeze meats, poultry, and fish in packages with only one or two layers of food. Place wax paper between layers.2. Package in heavy-duty plastic wraps, bags (labeled “For Freezer”), or freezer paper.3. Remove as much air as possible.4. Seal securely, date, and label.To Defrost:1. Remove wrapper. This helps moisture to evaporate. Juices from food can get hot and cook the food.2. Set food in microwave safe dish.3. Place roasts fat-side down. Place whole poultry breast-side down.4. Select power and minimum time so that items will be under-defrosted.5. Drain liquids during defrosting.6. Turn over (invert) items during defrosting.After Defrosting:1. Large items may be icy in the center. Defrosting will complete during Standing Time.2. Let stand, covered, following stand time directions on page 9.3. Rinse foods indicated in the chart.4. Items which have been layered should be rinsed separately or have a longer stand time.FOODDEFROST TIME at P3 mins (per lb)DURING DEFROSTINGAFTER DEFROSTINGStand Time RinseFish and SeafoodCrabmeat[up to 3 lbs. (1.4 kg)] 6 Break apart/Rearrange5 min. YESFish Steaks 4 to 6 Turn overFish Fillets 4 to 6 Turn over/RearrangeSea Scallops 4 to 6 Break apart/Remove defrosted piecesWhole sh 4 to 6 Turn overMeatGround Meat 4 to 5Turn over/Remove defrosted portion 10 min.NORoasts[2½-4 lbs. (1.1-1.8 kg)] 4 to 8 Turn over 30 min. in fridge.Chops/Steak 6 to 8 Turn over/Rearrange5 min.Ribs/T-bone 6 to 8 Turn over/RearrangeStew Meat 4 to 8 Break apart/Remove defrosted piecesLiver (thinly sliced) 4 to 6 Drain liquid/Turn over/Separate piecesBacon (sliced) 4 Turn over ----PoultryChicken, Whole[up to 3 lbs. (1.4 kg)]4 to 6 Turn over 20 min. in fridge.YESCutlets 4 to 6 Break apart/Turn over/Remove defrosted Pieces 5 min.Pieces 4 to 6 Break apart/Turn over 10 min.Cornish hens 6 to 8 Turn overTurkey Breast[5-6 lbs. (2.3-2.7 kg)] 6 Turn over 20 min. in fridge.Auto Auto DefrostAuto Defrost is 6 lbs. NOTE: When the oven is set to lbs, the Auto Defrost will not start with 0.2 lbs. or less, because it is too small an amount of food. It will work normally starting at 0.3lbs. There are no restrictions when the scale is set to kg. Def](https://usermanual.wiki/Midea-Kitchen-Appliances/EM925AYYPA.User-Manual/User-Guide-4196323-Page-13.png)