Midea Kitchen Appliances XC942KYYPCB Microwave Oven User Manual OR7 NEW Model EN 4 indd
Guangdong Midea Kitchen Appliances Manufacturing Co.,Ltd Microwave Oven OR7 NEW Model EN 4 indd
UserManual.wiki
>
Midea Kitchen Appliances
>
XC942KYYPCB User Manual
VG8XC942KYYPCB_User Manual
Navigation menu
Upload a User Manual
Namespaces
Wiki Guide
HTML
PDF
Info
Views
User Manual
Discussion / Help
Navigation


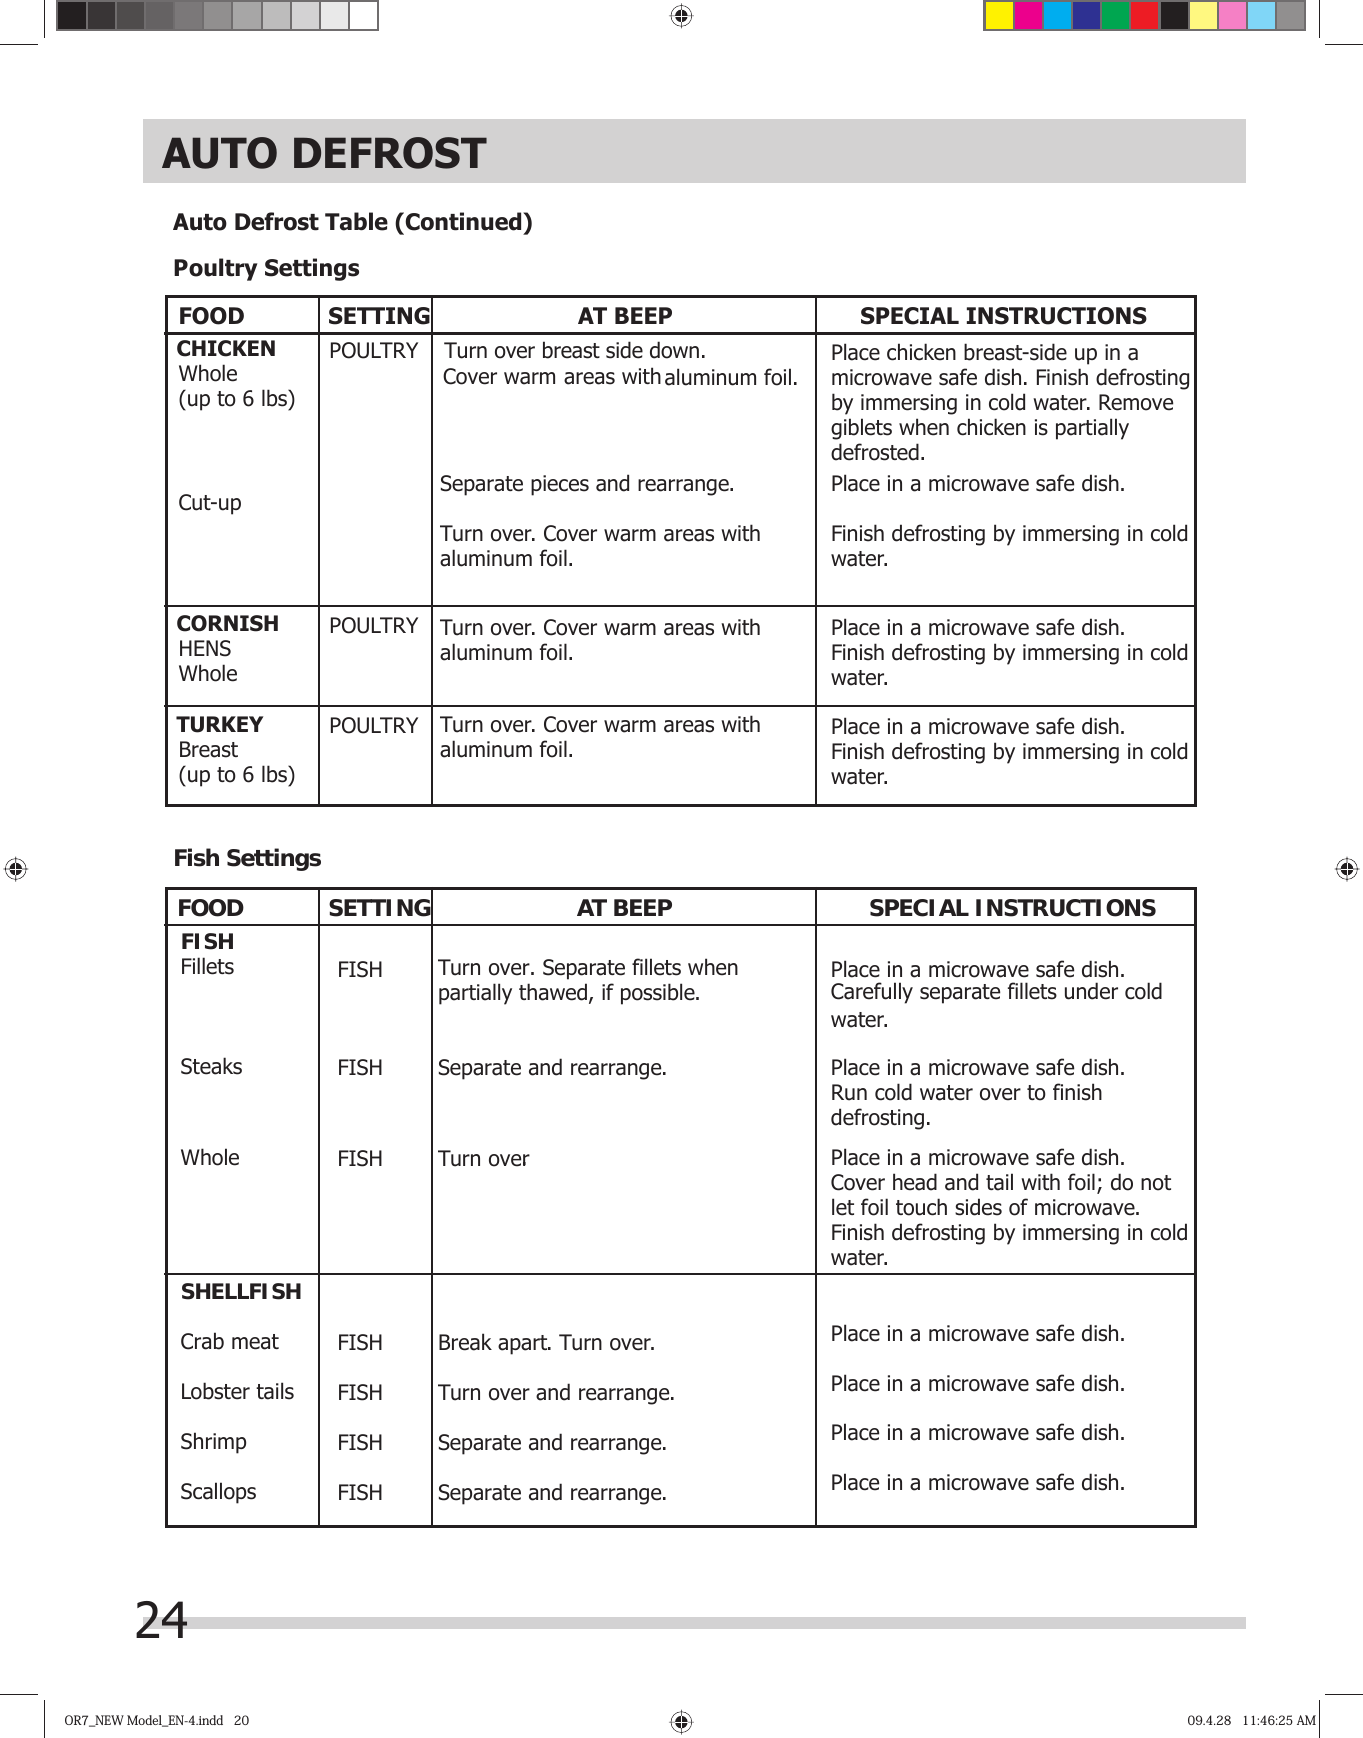
![OR7_NEW Model_EN-4.indd 18OR7_NEW Model_EN-4.indd 18 09.4.28 11:46:24 AM09.4.28 11:46:24 AM20 Combination Cooking&RPELQDWLRQFRRNLQJKHOSVWREURZQDQGFULVSIRRGV%HHIEXUJHUV R] PLQXWHVIRUWZR 3ODFHRQPLFURZDYHSURRISODWHGUDLQIDWDQGWXUQKDOIZD\WKURXJKFRRNLQJ%HHIUXPSURDVW NJ5DUHPLQXWHV 3ODFHIDWVLGHGRZQRQORZUDFNVHDVRQVKLHOGLIQHFHVVDU\0HGLXPPLQXWHV $IWHUFRRNLQJOHDYHWRVWDQGIRUPLQXWHV:HOOGRQHPLQXWHV/DPE NJ 5DUH PLQXWHV 3ODFHIDWVLGHGRZQRQORZUDFNEUXVKZLWKPDULQDGHDQGURDVWUROOHGERQHOHVV 0HGLXPPLQXWHV VHDVRQVKLHOGLIQHFHVVDU\$IWHUFRRNLQJOHDYHWRVWDQGIRU:HOOGRQH PLQXWHV PLQXWHV3RUN FKRSV 5DUHPLQXWHV 3ODFHRQKLJKUDFNEUXVKZLWKPDULQDGHDQGVHDVRQ&RRN 0HGLXPPLQXWHV XQWLOQRORQJHUSLQNRULQWHUQDOWHPSHUDWXUHUHDFKHV):HOOGRQHPLQXWHV 7XUQKDOIZD\WKURXJKFRRNLQJ$IWHUFRRNLQJFRYHUZLWKIRLODQGOHDYHWRVWDQGIRUPLQXWHV3RUN FKRSV 5DUHPLQXWHV 3ODFHRQKLJKUDFNEUXVKZLWKPDULQDGHDQGVHDVRQ&RRN 0HGLXPPLQXWHV XQWLOQRORQJHUSLQNRULQWHUQDOWHPSHUDWXUHUHDFKHV):HOOGRQHPLQXWHV 7XUQKDOIZD\WKURXJKFRRNLQJ$IWHUFRRNLQJFRYHUZLWKIRLODQGOHDYHWRVWDQGIRUPLQXWHV3RUN NJ 5DUH PLQXWHV 3ODFHIDWVLGHGRZQRQORZUDFNVHDVRQVKLHOGLIQHFHVVDU\ORLQURDVWUROOHG 0HGLXPPLQXWHV $IWHUFRRNLQJFRYHUZLWKIRLODQGOHDYHWRVWDQGIRUERQHOHVV :HOOGRQHPLQXWHV PLQXWHV&KLFNHQEUHDVWV OE PLQXWHV :DVKDQGGU\PHDWUHPRYHVNLQSODFHWKLFNHVWSRUWLRQWRRXWVLGHRQKLJKUDFN&KLFNHQ OE PLQXWHV 3ODFHRQKLJKUDFNEUXVKZLWKEXWWHUDQGVHDVRQDVERQHOHVVSRUWLRQV UHTXLUHG7XUQKDOIZD\WKURXJKFRRNLQJ&RRNXQWLOQRORQJHUSLQNDQGMXLFHVUXQFOHDU$IWHUFRRNLQJFRYHUZLWKIRLODQGOHDYHWRVWDQGIRUPLQXWHV&KLFNHQZKROH NJ PLQXWHV :DVKDQGGU\ELUGSODFHEUHDVWGRZQRQORZUDFNEUXVKZLWKEXWWHUDQGVHDVRQDVUHTXLUHG7XUQDQGGUDLQKDOIZD\WKURXJKFRRNLQJ&RRNXQWLOQRORQJHUSLQNDQGMXLFHVUXQFOHDU $IWHUFRRNLQJFRYHUZLWKIRLODQGOHDYHWRVWDQGIRUPLQXWHV7HPSHUDWXUHLQWKLJKVKRXOGEHDSSU R[)TYPE TIME NOTESQUANTITYCONVECTION COOKING](https://usermanual.wiki/Midea-Kitchen-Appliances/XC942KYYPCB/User-Guide-3314009-Page-20.png)


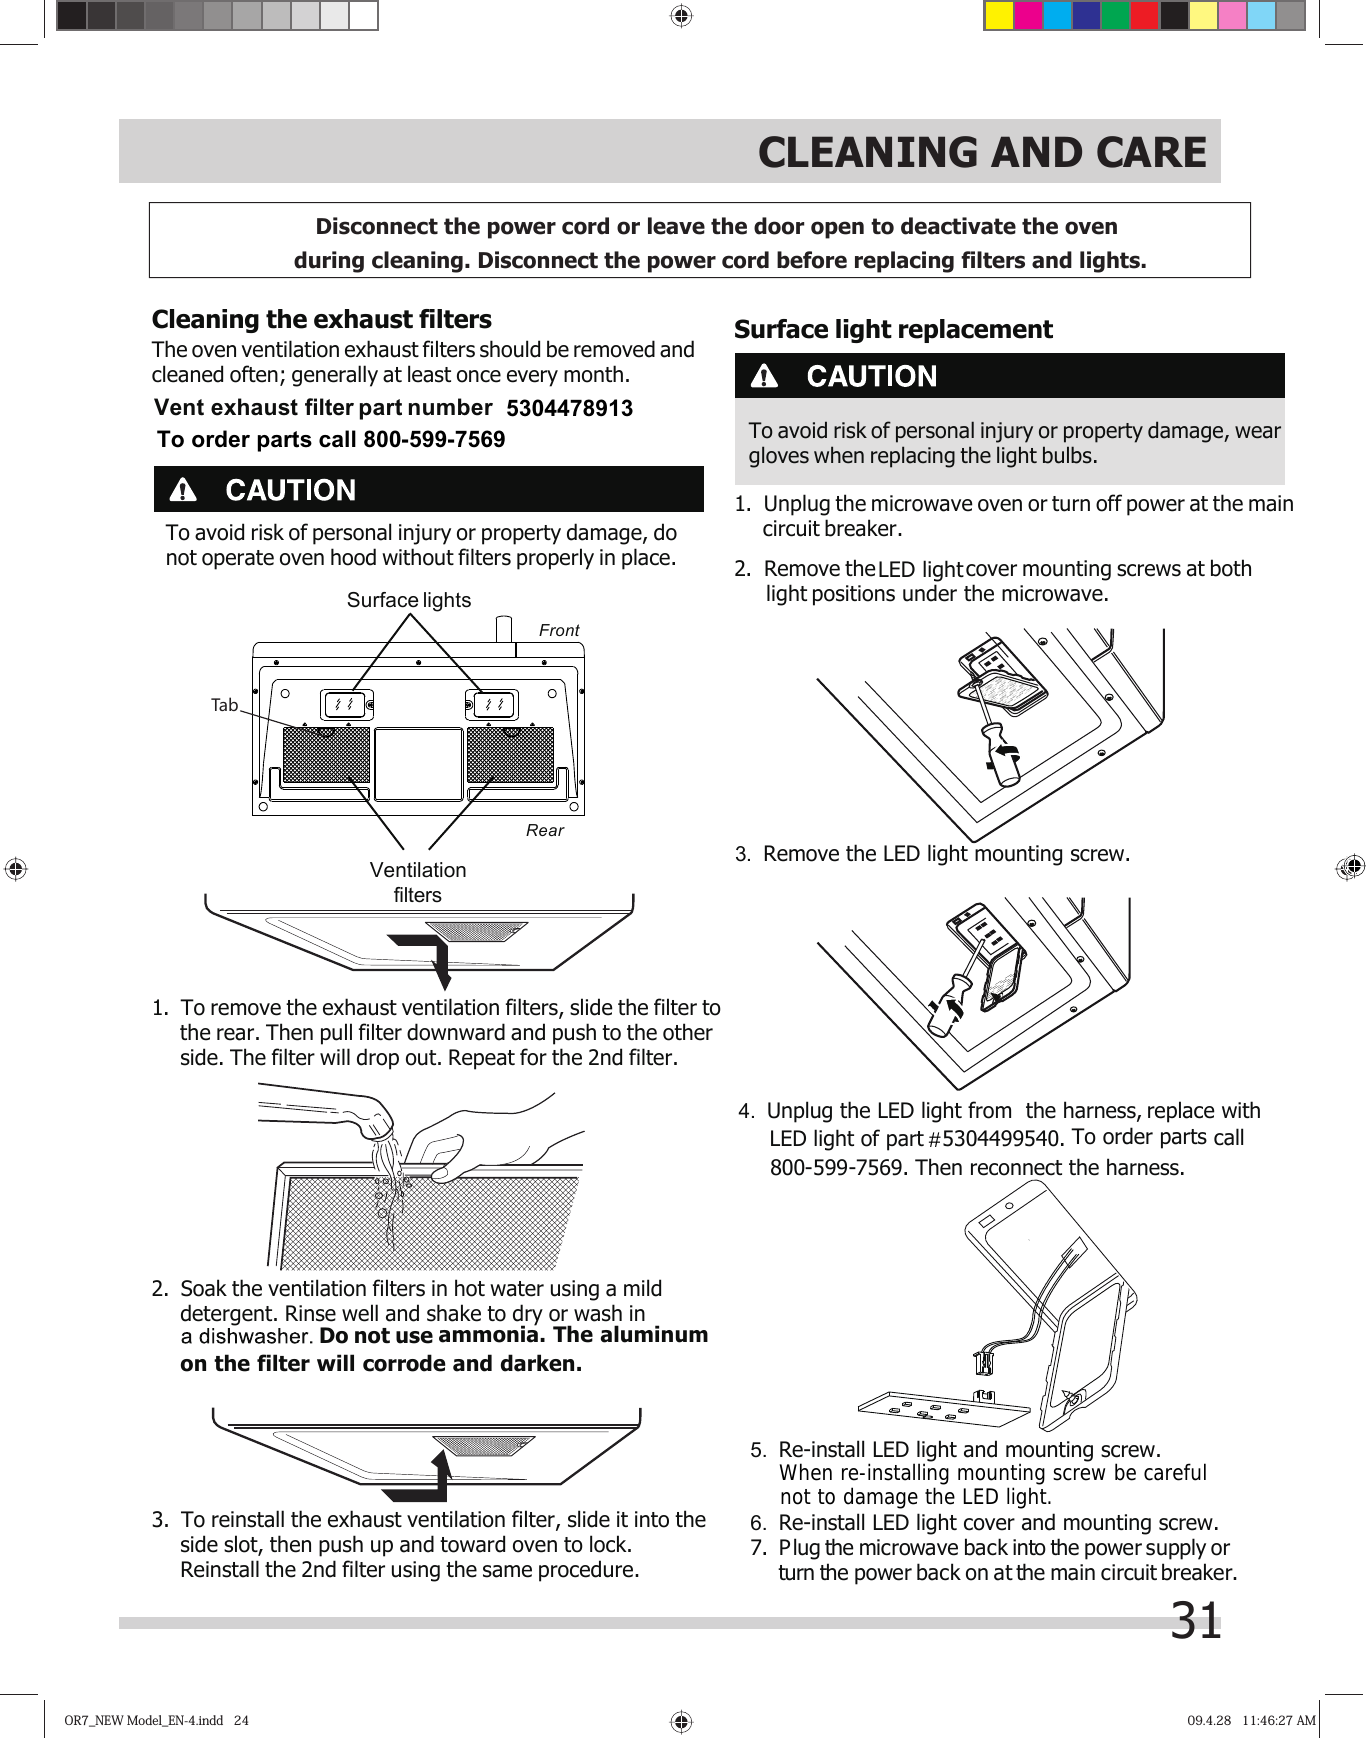

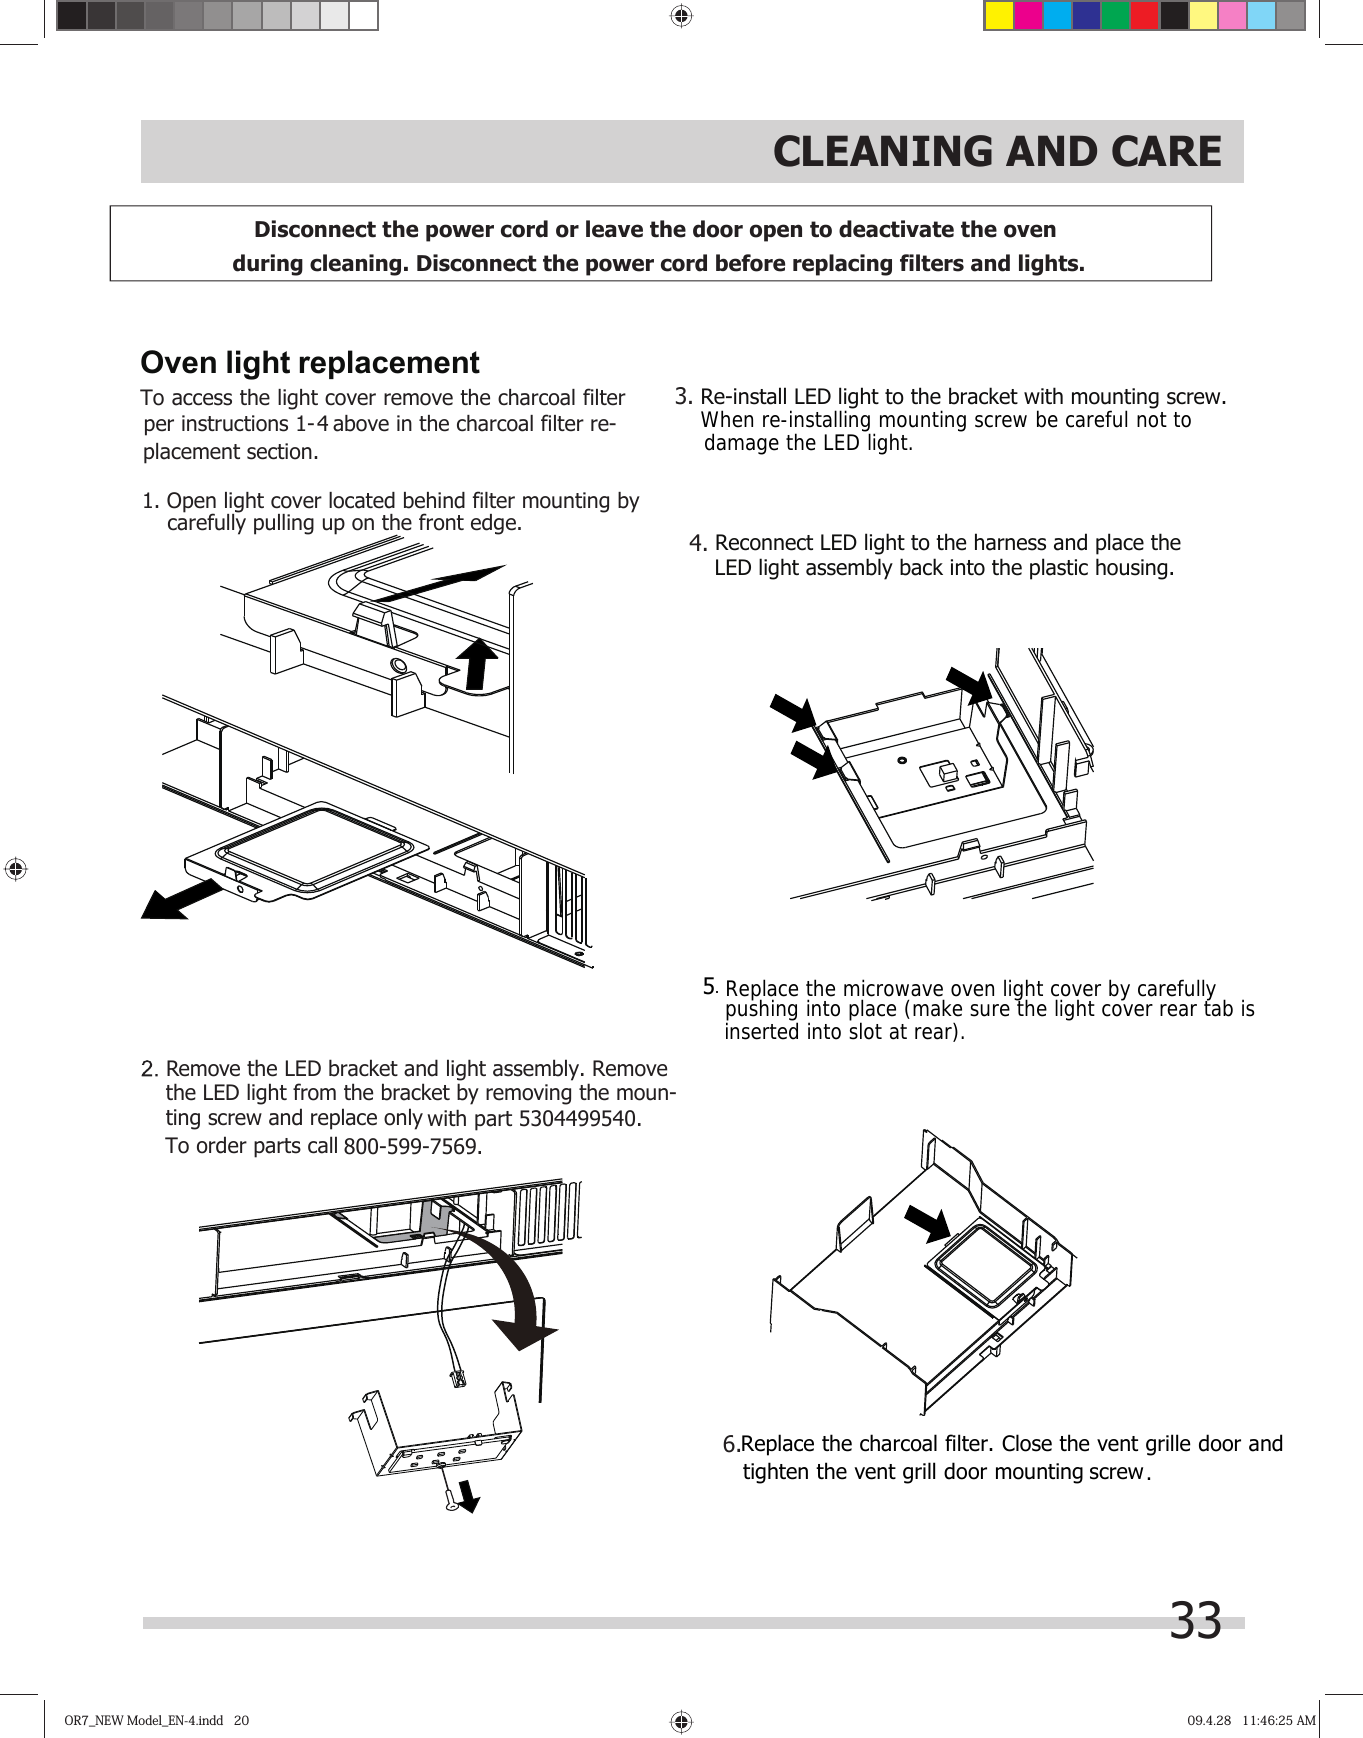
![OR7_NEW Model_EN-4.indd 25OR7_NEW Model_EN-4.indd 25 09.4.28 11:46:27 AM09.4.28 11:46:27 AMSERVICE CALL CHECKPlease check the following before calling for service: Place one cup of water in a glass measuring cup in the microwave oven and close the door securely. Operate the microwave oven for one minute at HIGH 100%.A Does the microwave oven light come on? YES ____ NO ____B Does the cooling fan work? (Put your hand on the louver above the .)YES ____ NO ____C Does the turntable rotate? (It is normal for the turntable to turn in either direction.) YES ____ NO ____D Is the water in the microwave oven warm? YES ____ NO ____If “NO” is the answer to any of the above questions, please check electrical outlet, fuse and/or circuit breaker. If they are functioning properly, CONTACT YOUR NEAREST ELECTROLUX AUTHORIZED SER-VICER.A microwave oven should never be serviced by a “do-it-yourself” repair person.NOTESvery rapidly, check Demonstration Mode on page 234 If time appearing in the display is counting down Control Panel$&/LQH9ROWDJH 6LQJOHSKDVH9+]$&RQO\$&3RZHU5HTXLUHG)UHTXHQF\ 0+]&ODVV%*URXS2XWVLGH'LPHQVLRQVLQFOXGLQJKDQGOH&DYLW\'LPHQVLRQV0LFURZDYHRYHQ&DSDFLW\&RRNLQJ8QLIRUPLW\ 7XUQWDEOH:HLJKW:RUN1LJKW/LJKW2YHQ/LJKWSPECIFICATIONS 7KH,QWHUQDWLRQDO(OHFWURWHFKQLFDO&RPPLVVLRQ¶VVWDQGDUGL]HGPHWKRGIRUPHDVXULQJRXWSXWZDWWDJH7KLVWHVWPHWKRGLVZLGHO\UHFRJQL]HG7KLVLVWKHFODVVLILFDWLRQRI,60,QGXVWULDO6FLHQWLILFDQG0HGLFDOHTXLSPHQWGHVFULEHGLQWKH,QWHUQDWLRQDO6WDQGDUG&,635 ,QWHUQDOFDSDFLW\LVFDOFXODWHGE\PHDVXULQJPD[LPXPZLGWKGHSWKDQGKHLJKW$FWXDOFDSDFLW\IRUKROGLQJIRRGLVOHVV,QFRPSOLDQFHZLWKVWDQGDUGVVHWE\FCC )HGHUDO&RPPXQLFDWLRQV&RPPLVVLRQ$XWKRUL]HGDHHS&RPSOLHVZLWK'HSDUWPHQWRI+HDOWKDQG+XPDQ6HUYLFHV'++6UXOH&)57LWOH&KDSWHU,6XEFKDSWHU- 7KLVV\PERORQWKHQDPHSODWHPHDQVWKHSURGXFWLVOLVWHGE\8QGHUZULWHUV/DERUDWRULHV,QF 7KLVV\PERORQWKHQDPHSODWHPHDQVWKHSURGXFWLVOLVWHGE\8QGHUZULWHUV/DERUDWRULHV,QFIRUXVHLQ2XWSXW3RZHU :2XWSXW3RZHUFRQYHFWLRQ&X)W[[$SSUR[QHW OEJURVV OEIRU &DQDGD8-15/16(D) 20-1/4(W) 13-15/16(H)[[16-13/32(D) 29-7/8(W) 15-7/16(H)8FGMV155CTF, FGMV155CTD2*1.5W LED, the part number is 5304499540.1*1.5W LED, the part number is 5304499540.1450W 13A1450W8.](https://usermanual.wiki/Midea-Kitchen-Appliances/XC942KYYPCB/User-Guide-3314009-Page-34.png)