Midea Kitchen Appliances XM031AYY Microwave Oven User Manual WM7302B Eng
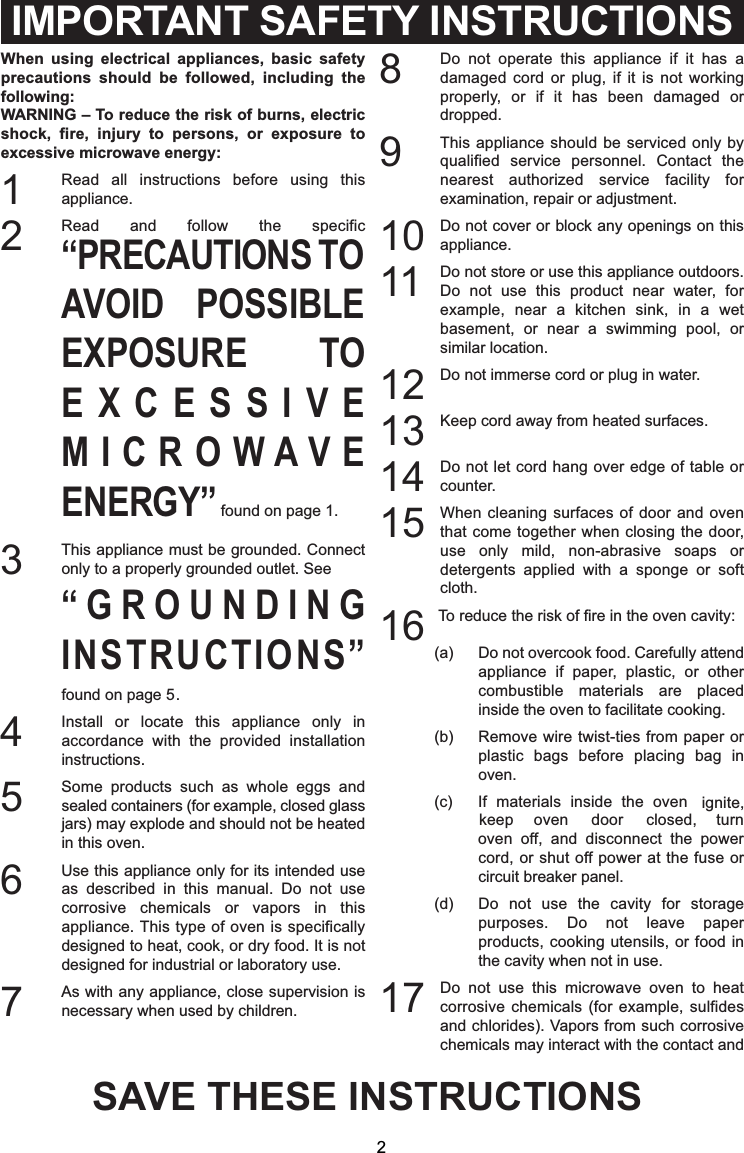
Guangdong Midea Kitchen Appliances Manufacturing Co.,Ltd Microwave Oven WM7302B Eng
UserManual.wiki
>
Midea Kitchen Appliances
>
XM031AYY User Manual
VG8XM031AYY_User Manual
Navigation menu
Upload a User Manual
Namespaces
Wiki Guide
HTML
PDF
Info
Views
User Manual
Discussion / Help
Navigation
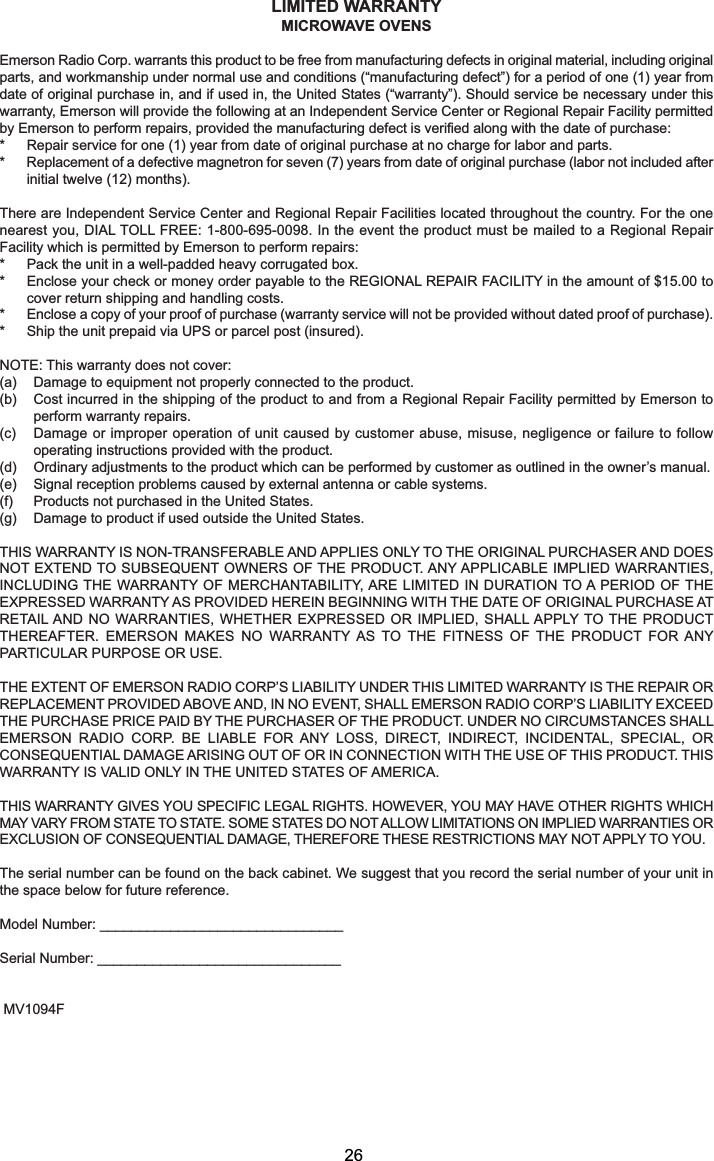
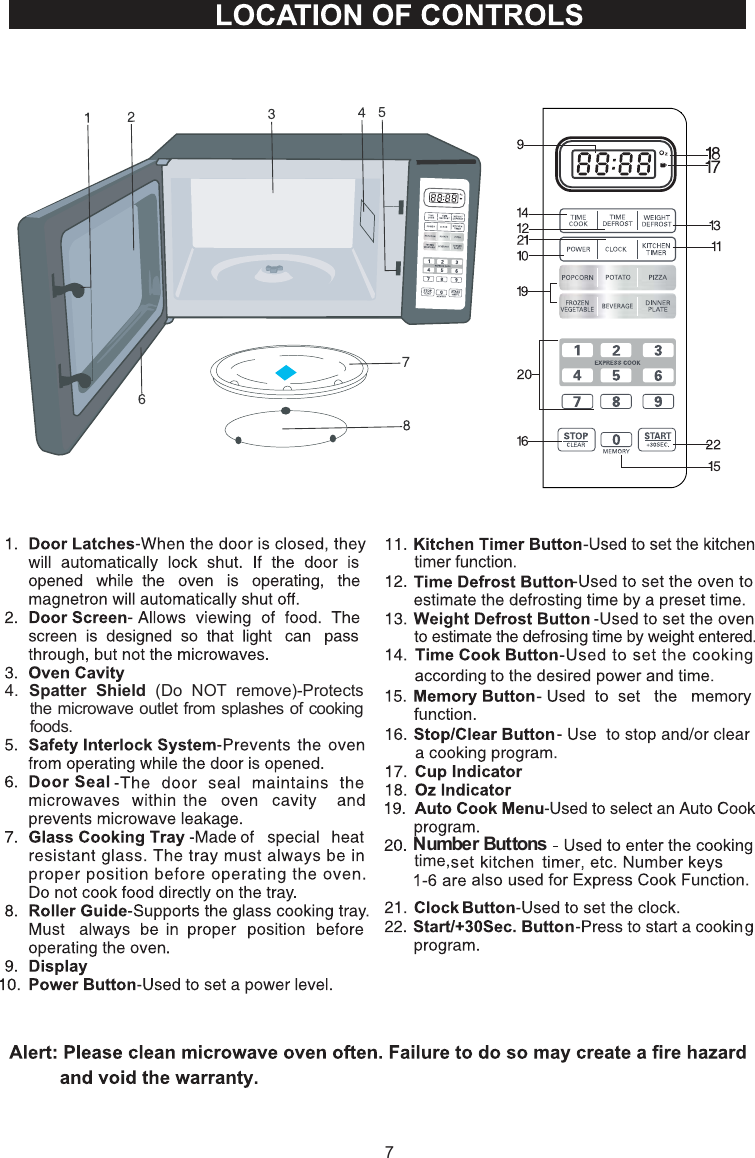
![3It is better to UNDERCOOK RATHER THANOVERCOOK foods. If food is undercooked, itcan always be returned to the oven for furthercooking. If food is overcooked, nothing can bedone. Always start with minimum cooking times.4SMALL QUANTITIES of food or foods withLOW MOISTURE content can burn, dry out orcatch on fire if cooked too long.5Do NOT boil eggs in their shell. Pressure maybuild up and the eggs may explode.6Potatoes, apples, egg yolks, whole acornsquash and sausage are some examples offoods with NONPOROUS SKINS. These mustbe pierced before cooking to prevent bursting.7POPCORN must be popped in a microwavecorn popper. Microwave popped corn producesa lower yield than conventional popping. Do notuse oven for popcorn unless popped in amicrowave approved popcorn utensil or unlessit’s commercially packaged and recommendedespecially for microwave ovens. Do not use oilunless specified by the manufacturer.8Do NOT attempt to deep fat fry in your oven.9HEATED LIQUIDS can ERUPT if not mixedwith air. Do not heat liquids in your microwaveoven without first stirring.10 Do NOT use paper towels to cover food asthey can ignite.SAFETY PRECAUTIONSFEDERAL COMMUNICATIONS COMMISSION RADIOFREQUENCY INTERFERENCE STATEMENTWARNING: This equipment generates and uses ISM frequency energy and if not installed and used properly,in strict accordance with the manufacturer's instructions, may cause interference to radio and televisionreception.It has been type-tested and found to comply with limits for an ISM Equipment pursuant to part 18 of FCCRules, which are designed to provide reasonable protection against such interference in a residentialinstallation.However, there is no guarantee that interference will not occur in a particular installation. If this equipment doescause interference to radio or television reception, which can be determined by turning the equipment off andon, the user is encouraged to try to correct the interference by one or more of the following:* Reorient the receiving antenna of radio or television.* Relocate the Microwave oven with respect to the receiver.* Move the microwave oven away from the receiver.* Plug the microwave oven into a different outlet so that microwave oven and receiver are on differentbranch circuits.THE MANUFACTURER is not responsible for any radio or TV interference caused by UNAUTHORIZEDMODIFICATION to this microwave oven. It is the responsibility of the user to correct such interference.ARCINGIf you see arcing, press STOP/CLEAR button and correct the problem.Arcing is the microwave term for sparks in the oven.Arcing is caused by:* Metal or foil touching the side of the oven.* Foil not molded to food (upturned edges act like antennas).DO NOT LEAVE OVEN UNATTENDED WHILE COOKING!SAVE THESE INSTRUCTIONS4**5HF\FOHGSDSHUWRZHOVFRQWDLQLQJVPDOOPHWDOSLHFHVEHLQJXVHGLQWKHPLFURZDYH%XUQWFDUERQL]HGIRRGUHVLGXHRUJUHDVHVSDWWHUHGLQVLGHRIFDELQHW* Metal, such as twist-ties, poultry pins, or gold rimmed dishes in the microwave.](https://usermanual.wiki/Midea-Kitchen-Appliances/XM031AYY/User-Guide-1651211-Page-5.png)

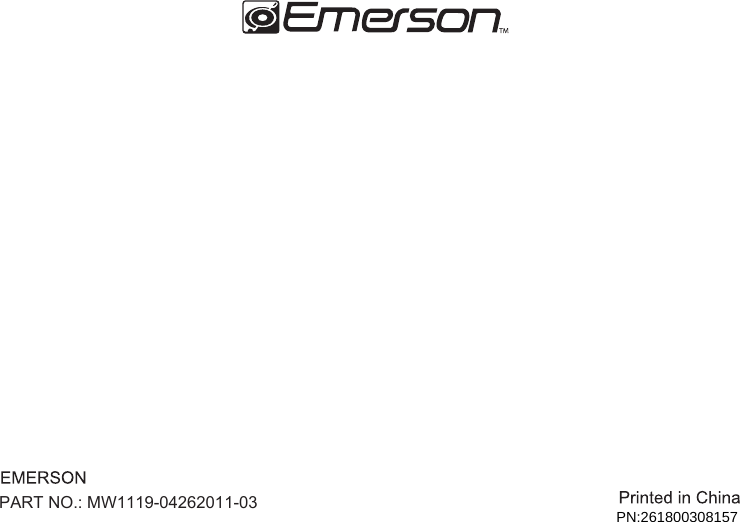
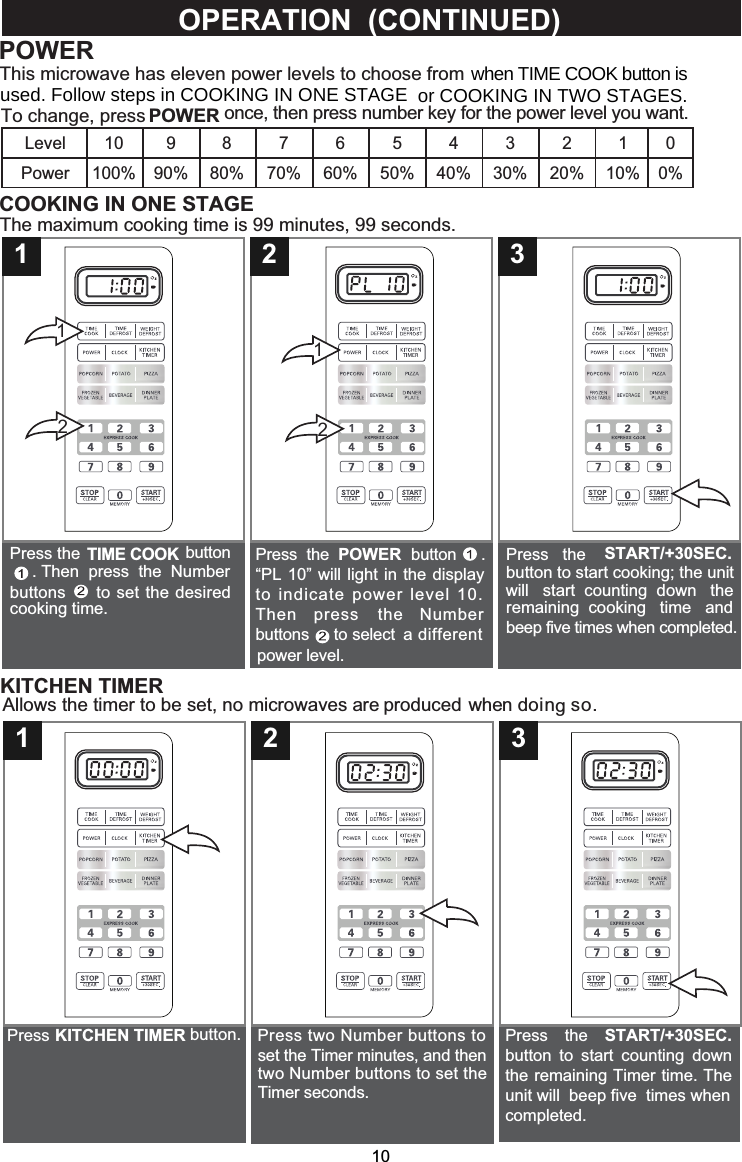
![97LPH'HIURVWZLOODXWRPDWLFDOO\VHWWKHRYHQWRGHIURVWDWDWLPHVHWE\WKHXVHU7KHPLQLPXPWLPHIRU7LPH'HIURVWLVRQHVHFRQG7KHPD[LPXPWLPHLVPLQXWHVVHFRQGV:(,*+7'()52677,0('()526723(5$7,21&217,18(':HLJKW'HIURVWOHWV\RXHDVLO\GHIURVWIRRGVE\HOLPLQDWLQJJXHVVZRUNLQGHWHUPLQLQJGHIURVWLQJWLPH7KHPLQLPXPZHLJKWIRU$XWR:HLJKW'HIURVWLVR]DQGPD[LPXPZHLJKWLVR]E\WKH1XPEHUEXWWRQVRIWKHGHVLUHGSRZHUOHYHO3UHVVWKH:(,*+7'()5267EXWWRQ3UHVV WKH 1XPEHU EXWWRQV WRVHW WKH GHVLUHG ZHLJKW LQRXQFHV3UHVV WKH 67$576(&EXWWRQ WR VWDUW GHIURVWLQJ WKHXQLW VWDUW FRXQWLQJ GRZQ WKHUHPDLQLQJGHIURVWLQJ WLPHDQGEHHSILYHWLPHVZKHQFRPSOHWHG3UHVV7,0('()5267EXWWRQ 7KHQ SUHVV WKH 1XPEHUEXWWRQVWRVHW WKH GHVLUHGWLPH7KHGHIDXOWPLFURZDYHSRZHULVSRZHU7RFKDQJHSUHVV32:(5EXWWRQRQFHIROORZHG3UHVV WKH67$576(&EXWWRQ WR VWDUW GHIURVWLQJ WKHXQLW VWDUW FRXQWLQJ GRZQ WKHUHPDLQLQJGHIURVWLQJWLPHDQGEHHSILYHWLPHVZKHQFRPSOHWHG 1212ZLOOZLOO](https://usermanual.wiki/Midea-Kitchen-Appliances/XM031AYY/User-Guide-1651211-Page-10.png)

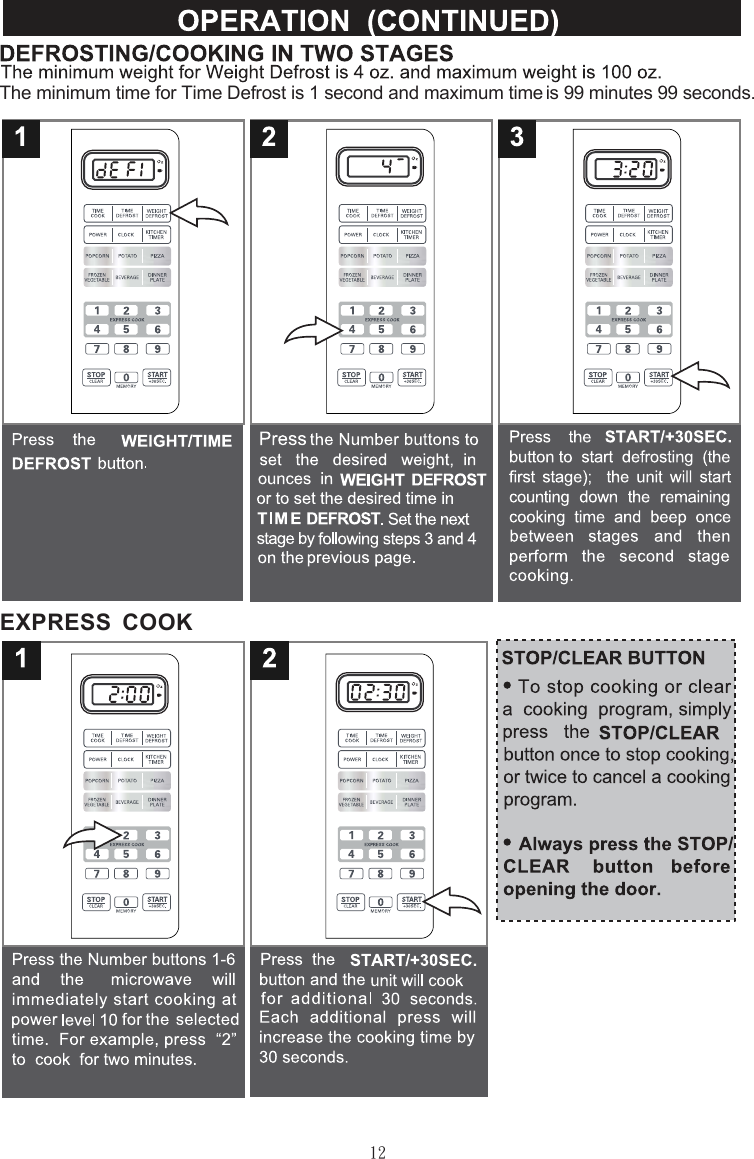

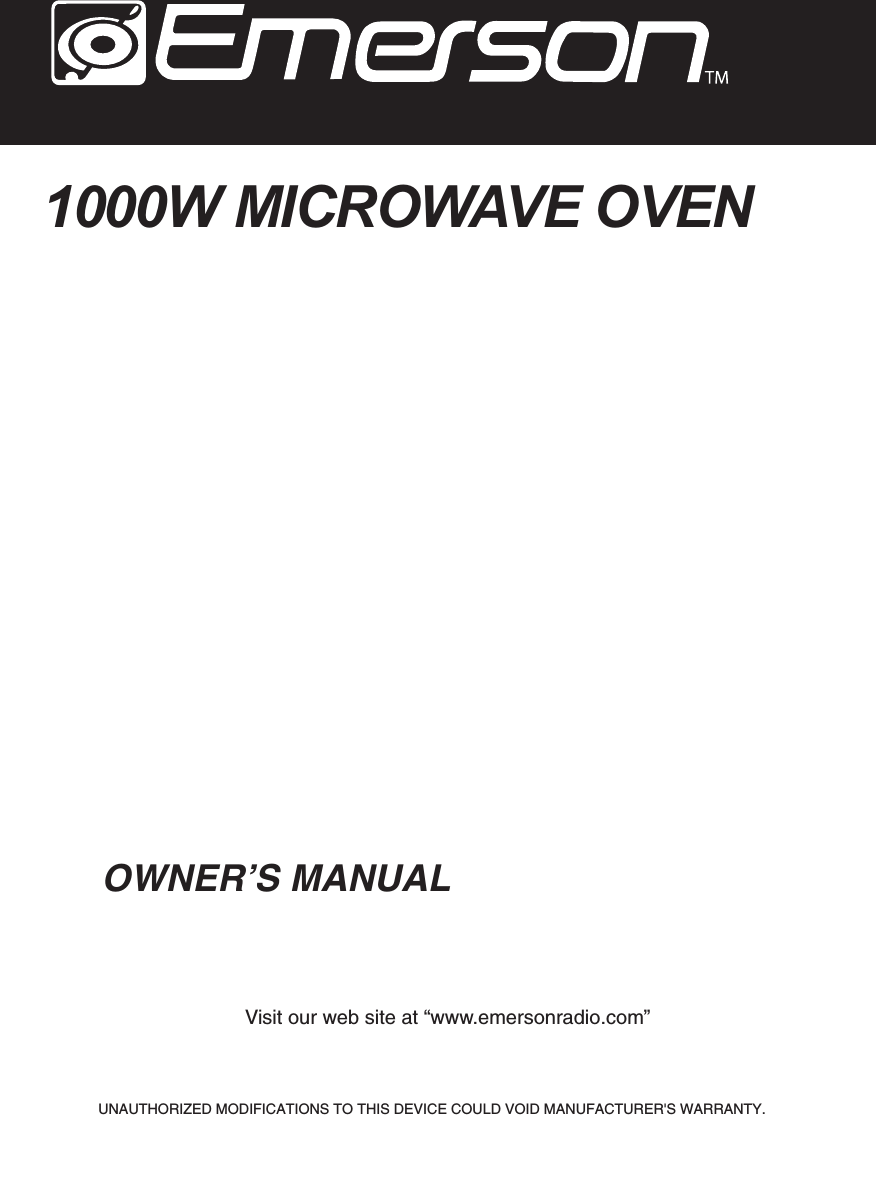
![1423(5$7,21&217,18('3RSFRUQ2QFH7ZLFH7KUHHWLPHV2QFH7ZLFH2QFH7ZLFH2QFH7ZLFH2QFH7ZLFH2QFH7ZLFH2]2]2]&XS&XSV&XSV2]2]2]2]2]2]3RWDWR3L]]D%HYHUDJH'LQQHU3ODWH)UR]HQ9HJHWDEOH%XWWRQ 3UHVV :HLJKW3RUWLRQ2]2]2]R]SLHFHPOFXS$872&22.0(18&+$577KUHHWLPHV7KUHHWLPHV7KUHHWLPHV7KUHHWLPHV7KUHHWLPHV](https://usermanual.wiki/Midea-Kitchen-Appliances/XM031AYY/User-Guide-1651211-Page-15.png)