Midea Kitchen Appliances XM159KYY Microwave Oven User Manual 1
Guangdong Midea Kitchen Appliances Manufacturing Co.,Ltd Microwave Oven 1
UserManual.wiki
>
Midea Kitchen Appliances
>
XM159KYY User Manual
VG8XM159KYY_User manual
Navigation menu
Upload a User Manual
Namespaces
Wiki Guide
HTML
PDF
Info
Views
User Manual
Discussion / Help
Navigation

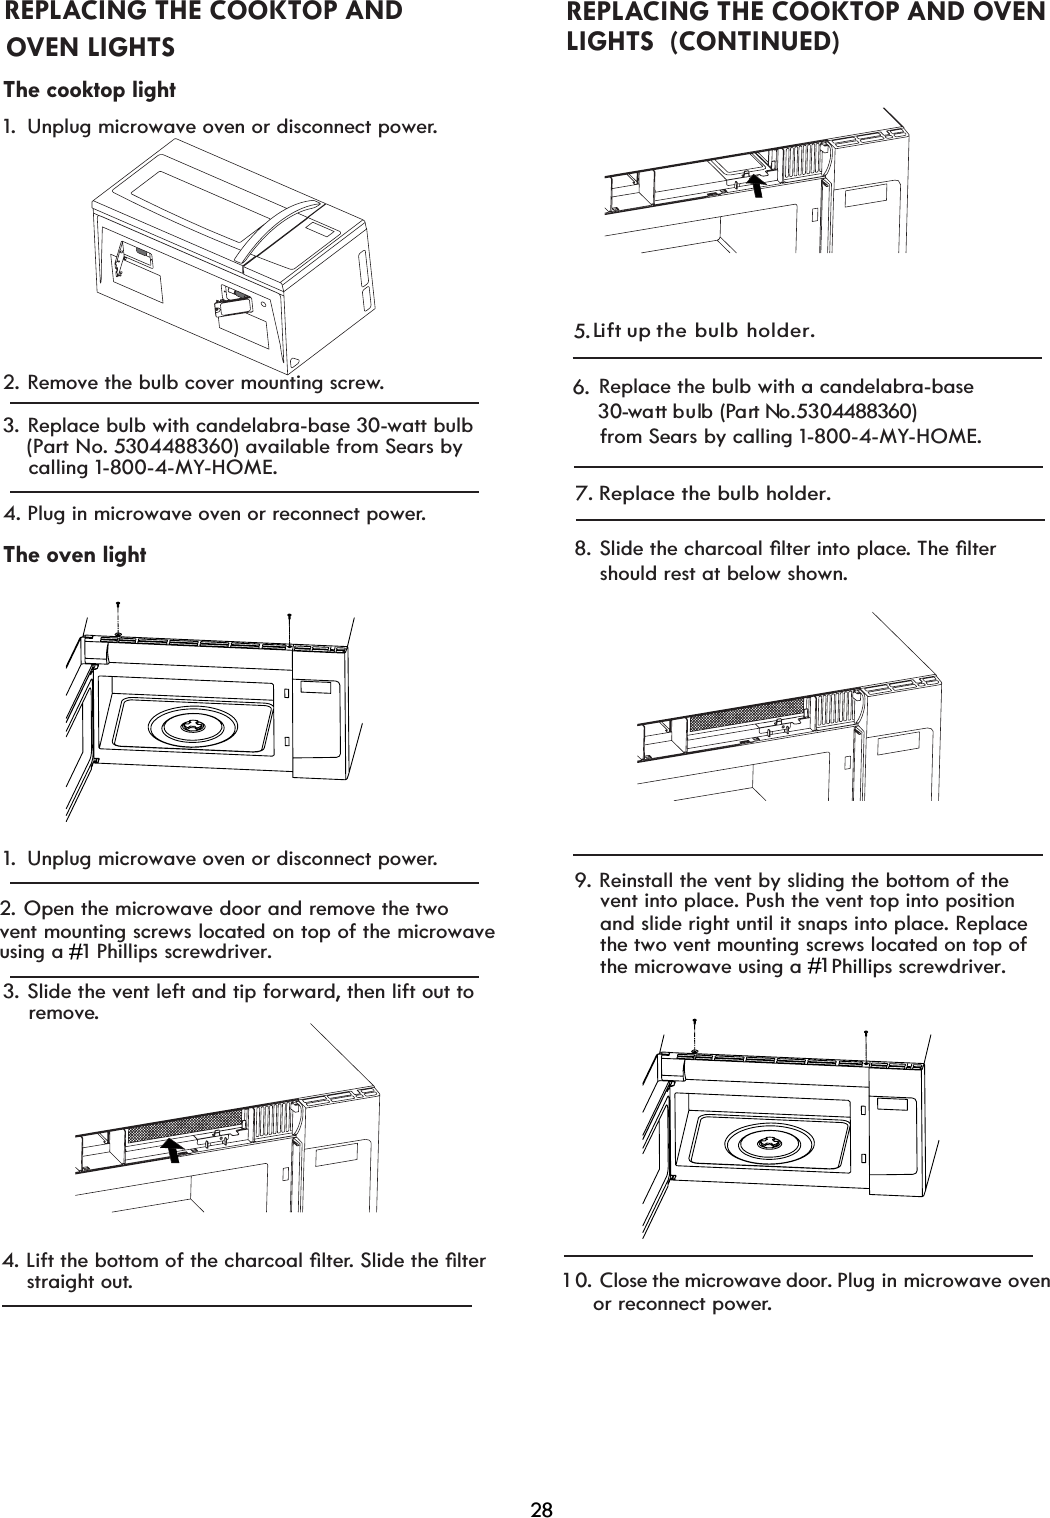
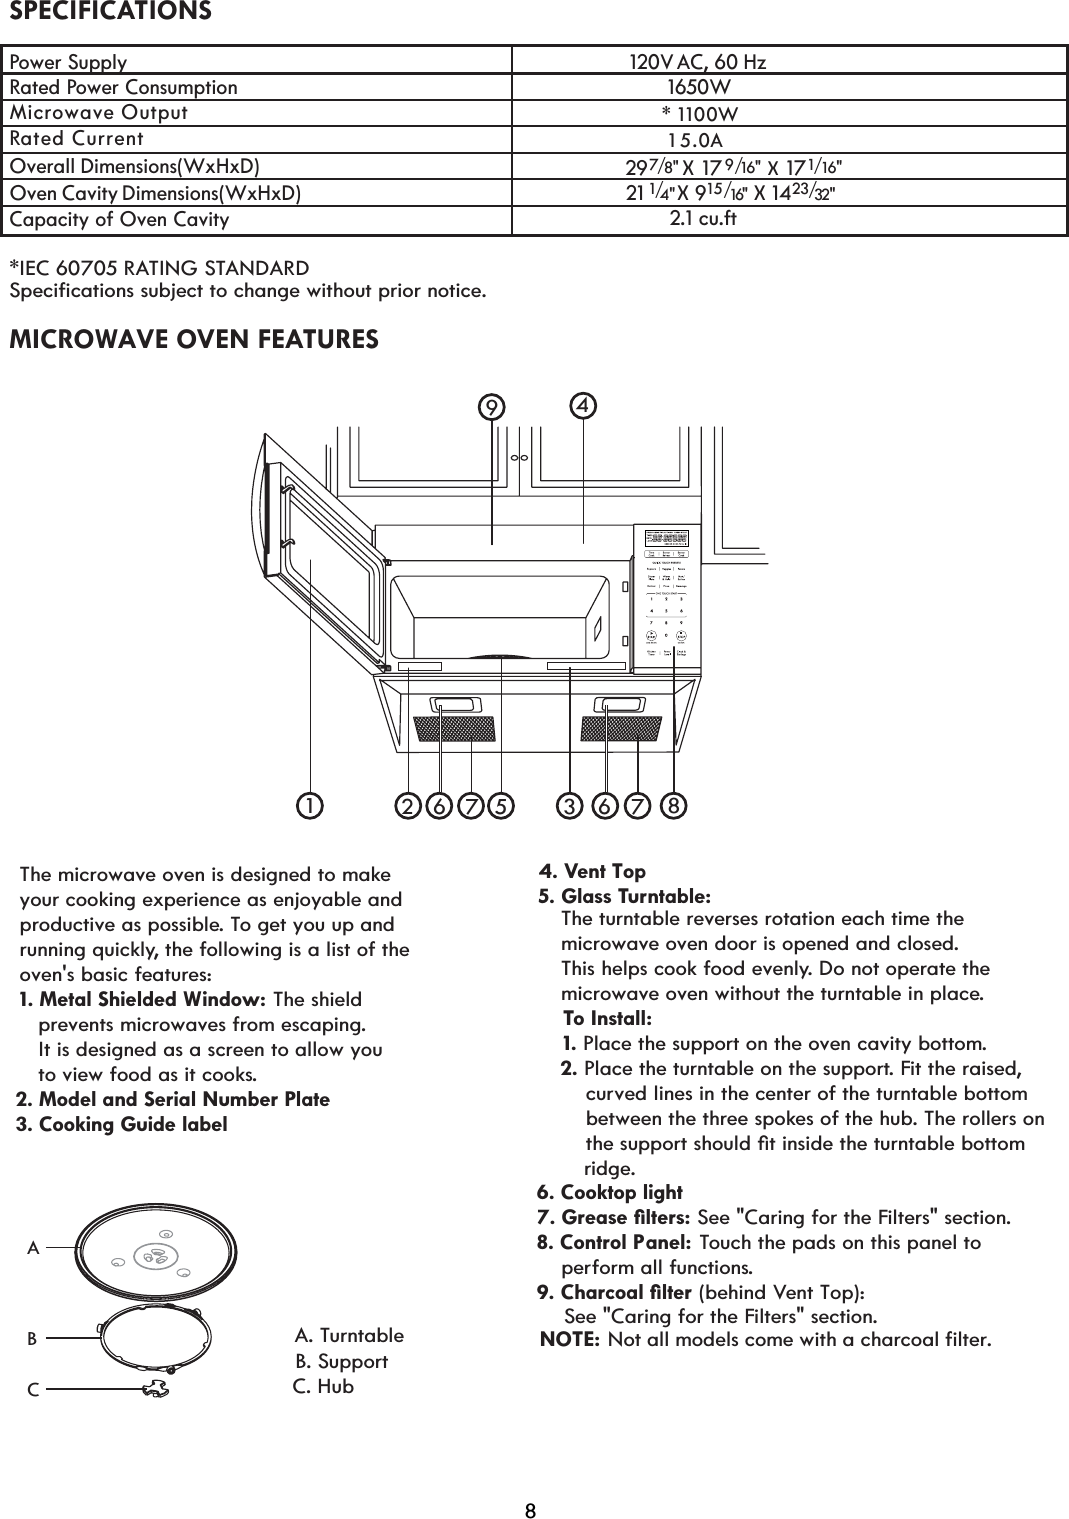
![v The microwave oven should be serviced only E\TXDOL VHrvice personnel. Call an authorized service company for examination, repair, or adjustment.v6HHGRRUVXrface cleaning instructions in the "Caring for Your Microwave Oven" section.vTRUHGXFHWKHULVNRIILUHLQWKHRYHQFDYLW\ - Do not overcook food. Carefully attend to the microwave oven when paper, plastic, or other combustible materials are placed inside the oven to facilitate cooking. - Remove wire twist-ties from paper or plastic bags before placing bags in oven. - If materials inside the oven ignite, keep oven door closedWXUQRYHQR power cordRUVKXWRIISRZHUDWWKHIXVHRU circuit breaker panel. - Do not use the cavity for storage purposes. Do not leave paper products, cooking utensils, or food in the cavity when not in use.v7KLV0LFURZDYH2YHQLVVXLWDEOHIRUXVHDERYH both gas and electric cooking equipment.v7KLV0LFURZDYH2YHQLVLQWHQGHGWREHXVHG above ranges with a maximum width of 36inches ( cm).v&OHDQVentilating Hoods frequently - grease VKRXOGQRWDFFXPXODWHRQKRRGRUILOWHr.v:KHQpDPLQJIRRGVXQGHUWKHKRRd, turn the fan on.v8VHFDUHZKHQFOHDQLQJWKHYHQtKRRGoOWHr. Corrosive cleaning agents, such as lye-based oven cleanersPD\GDPDJHWKHoOWHr.v2YHUVL]HGIRRGVRURYHUVL]HGPHWDOXWHQVLOV should not be inserted in the microwave oven,DVWKH\PD\FUHDWHDILUHRUULVNRIHOHFWULFVKRFk.v'RQRWFOHDQZLWKPHWDOVFRXULQJSDGs. PiecesFDQEUHDNRIIWKHSDGDQGWRXFKHOHFWULFDO parts, causing a risk of electric shock.v'RQRWVWRUHDQ\WKLQJGLUHFWO\RQWRSRIWKH microwave oven when the microwave oven is in operation.v'RQRWFRYHURUEORFNDQ\RSHQLQJVRQWKH microwave oven.v'RQRWVWRUHWKLVPLFURZDYHRYHQRXWGRRUs.v'RQRWXVHWKHPLFURZDYHRYHQQHDUZDWHUIRU example, near a kitchen sink, in a wet basement, near a swimming pool, or similar location.v'RQRWLPPHUVHFRUGRUSOXJLQZDWHr.vKeep cord away from heated surfaces.v'RQRWOHWFRUGKDQJRYHUHGJHRIWDEOHRUFRXQWHr.v'RQRWPRXQWRYHUDVLQk.v'RQRWFRYHUUDFNVRUDQ\RWKHUSDUWRIWKHRYHQZLWK metal foil. Doing so will cause overheating of the oven.v/LTXLGVVXFKDVZDWHrFRIIHe, or tea are able to overheat beyond the boiling point without appearing to be boiling due to surface tension of the liquid. Visible bubbling or boiling when the container is removed from the microwave oven is not always present. This could result in very hot liquids suddenly boiling over when a spoon or other utensil is inserted into the liquid. To reduce the risk of injury to persons: 1) Do not overheat the liquid. 2) Stir the liquid before and halfway through heating it . 3) Do not use straight -sided containers with narrow necks. 4) After heating , allow the container to stand in the microwave oven for a short time before removing the container. 5) Use extreme caution when inserting a spoon or other utensil into the container.IMPORTANT SAFETY INSTRUCTIONSILHGff, and disconnect the 91SAVE THESE INSTRUCTIONS4](https://usermanual.wiki/Midea-Kitchen-Appliances/XM159KYY/User-Guide-1920651-Page-4.png)
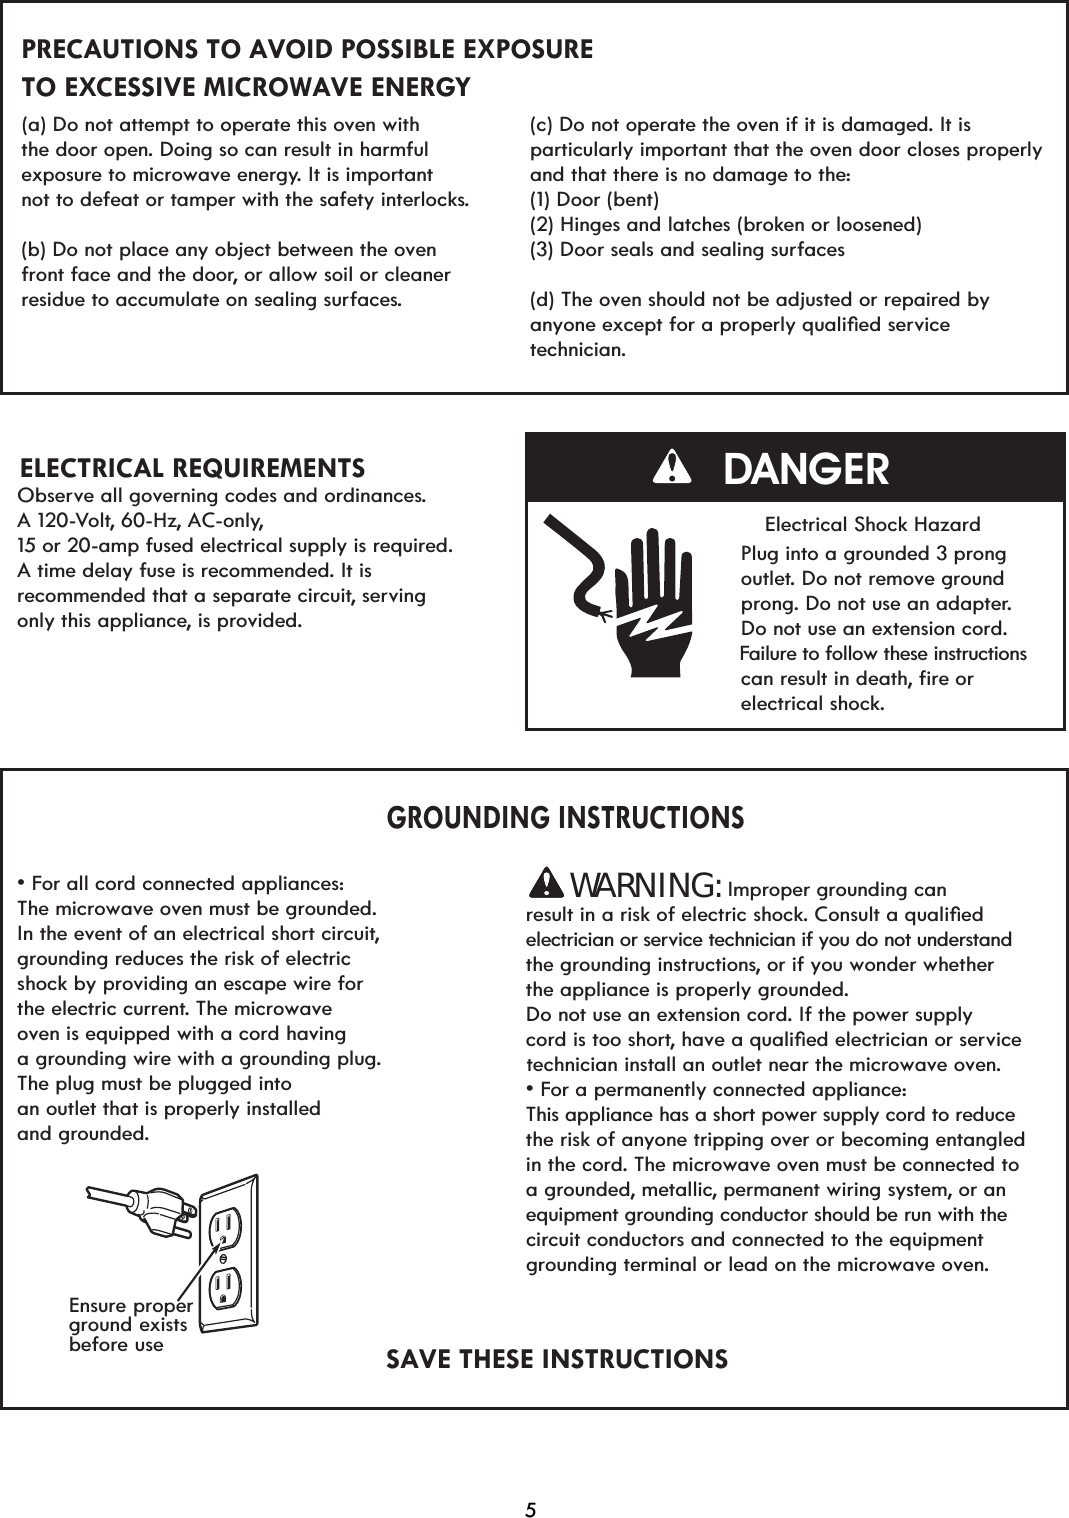
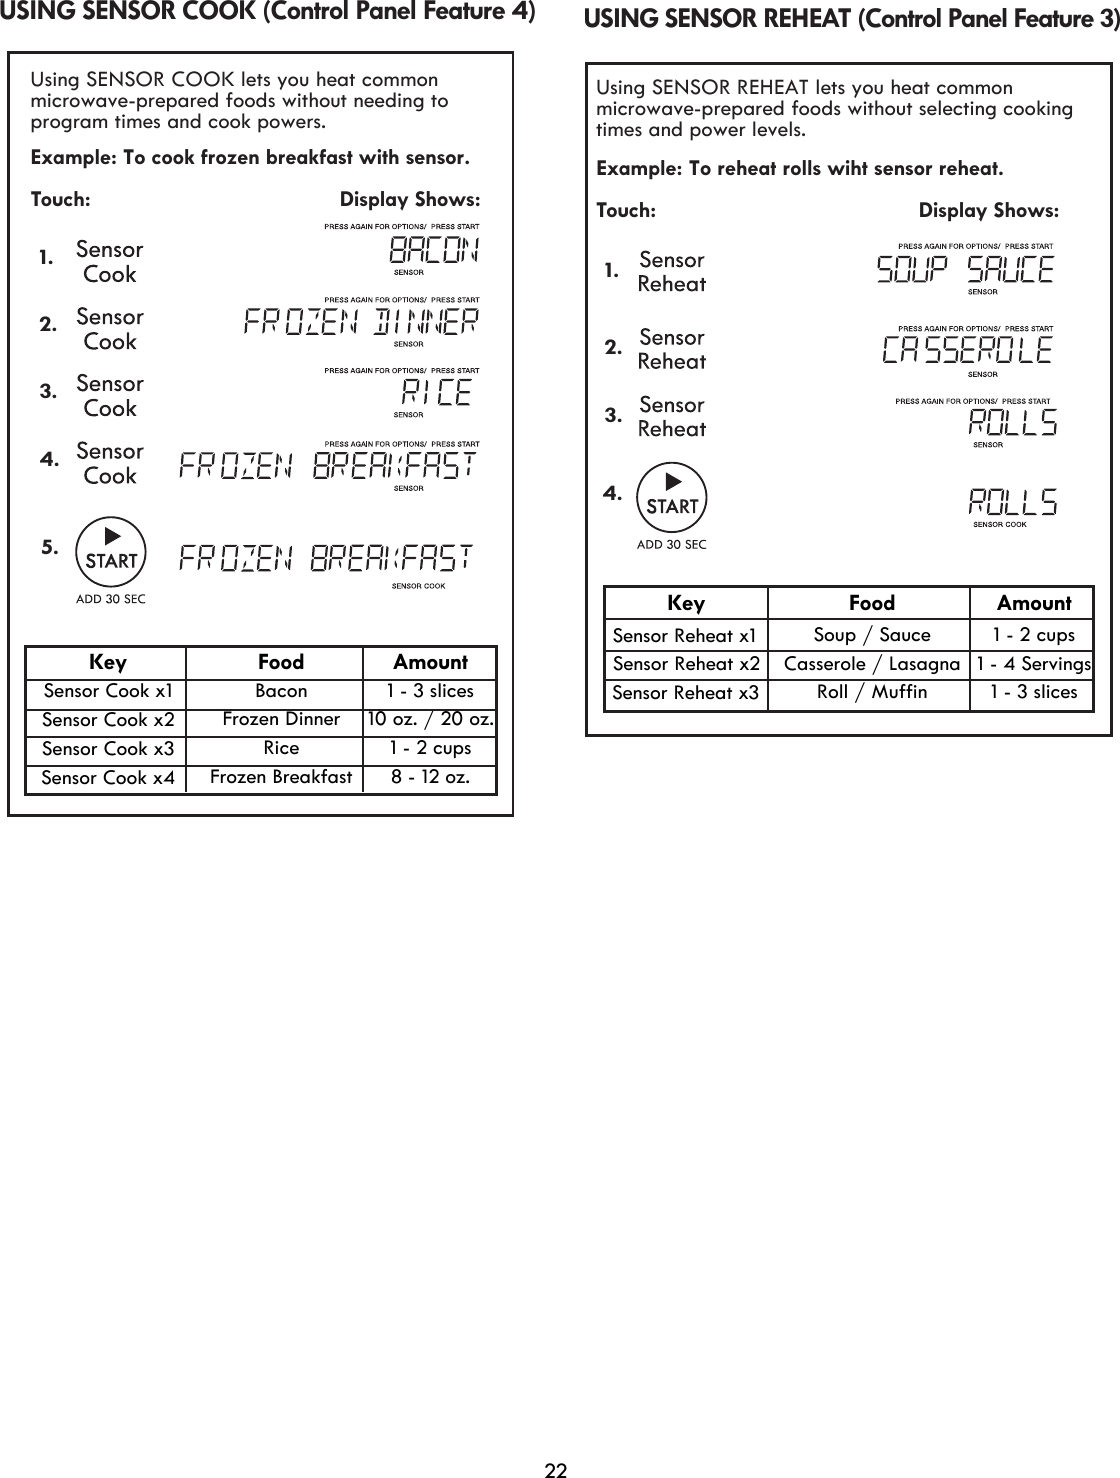
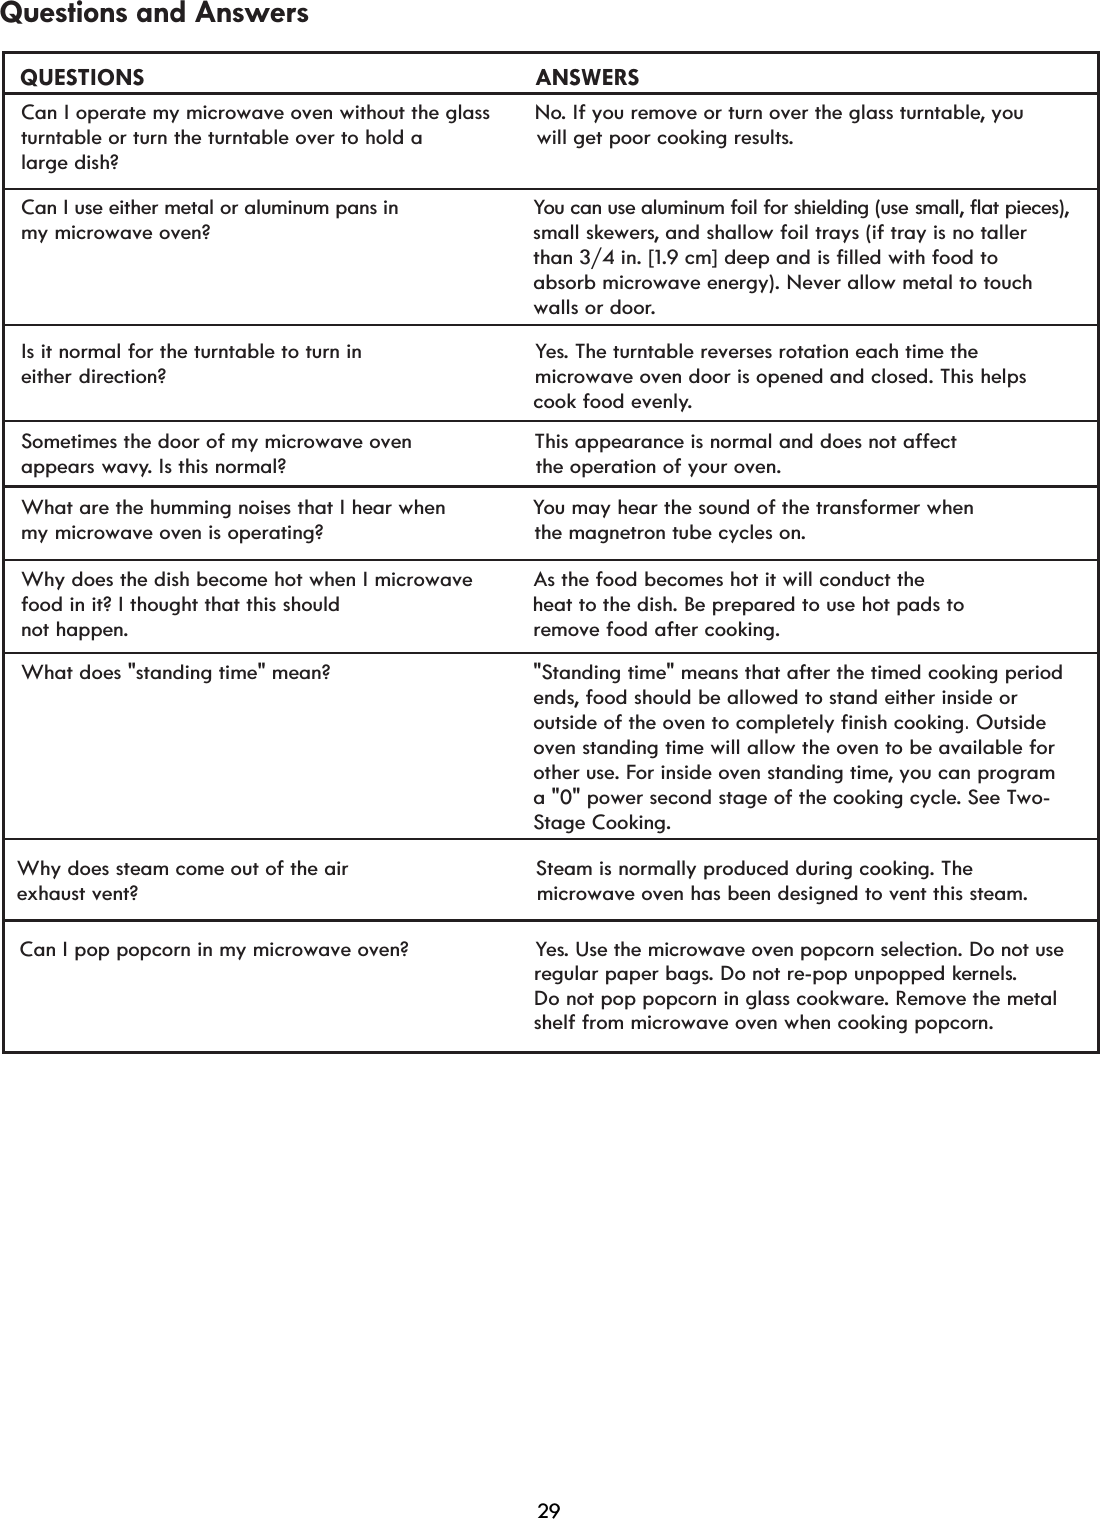
![CONTROL PANEL FEATURESYour microwave oven control panel lets you select the desired cooking function quickly and easily. All you have to do is touch the necessary Command Pad. The following is a list of all the Command and Number Pads located on the control panel. For more information on these features, see the “Using Your Microwave Oven” section.1. Display: The display includes a clock and indicators that show the time of day, cooking time settings, cook powers, sensor, quantities, weights and cooking functions selected.2. Time Cook: Touch this pad, followed by Number Pads, to set a cooking time.3. Sensor Reheat: Touch this pad to reheat microwavable foods without entering a cook 4. Sensor Cook: Touch this pad to cook microwavable 5. Popcorn: Touch this pad to sizes of popcorn without entering a cook time or power. Remove metal rack before cooking popcorn .Touch this pad to reheat one to four slices of pizza without entering a cook time or power.Touch this pad to cook fresh or frozen vegetables without entering a cook time or power. Touch this pad, followed by Number 3DGVWRWKDZIUR]HQPHDWSRXOWU\oVKE\ weight.Touch this pad to cook up to four potatoes without entering a cook time or power.13. Beverage: Touch this pad to heat one 14. Number Pads: Touch number pads to enter time, cook power, quantity, weight, or food category.15b. Add 30 Sec. 100% cook power, or to add extra time to your current16. STOP: cancel a program during cooking, or to clear the Display.17. Kitchen Timer: Touch this pad to set the kitchen timer.18. Power level: Touch this pad after the cook time has been set, followed by a Number Pad to set the amount of microwave energy released to cook the food. The higher19. Clock & Setting: Touch this pad to enter the correct time of day or set options. TRXFKWKLVSDGWR Touch this pad to turn the light on high, QLJKWORZRUR. the number, the higher the microwave power or "cooking speed.": Touch this pad to cook for 30 seconds at Touch this pad to erase an incorrect command, ff.cup or twocup sized beverages cooking cycle. or running.1b. TIMER: Icon displayed when timer is being set cooking.1c. COOK: Icon displayed when starting microwave 1d. DEFR: Icon displayed when defrosting food 1e. LOCK: Icon displayed control lock.1g. PRESS START: Icon displayed when a valid function can be started.1 h . k g ''''` oz lb: Icon displayed when choosing theweight.,,15a. START: Touch this pad to start or restart a function. cook.1a. SENSOR: Icon displayed when using sensor pop one of three bag12. Pizza: 21. Vent set Dely:Touch this pad to Touch this pad to keep the foodwarm.9foods without entering a cook time or power. time or power.melt or softenselected items.1b1d1e1h1f 1g1a 1c1251715b615a125616 3 4 7101388912111819146. Veggies: 7. Potato:10. Melt/Soften:9. Warm & Hold:11. Defrost:Touch this pad to cook the food. 8. Dinner plate:LightON-NITE-OFFVent 4 SPEEDS - OFFVentSET DELAYchoose four speeds. Touch this pad to turn set the vent delay time. 20.22. Light On/Nite/Off: Vent 4 Speeds-off20 21 221f. PRESS AGAIN FOR OPTIONS: when additional options are available.Icon displayedin](https://usermanual.wiki/Midea-Kitchen-Appliances/XM159KYY/User-Guide-1920651-Page-9.png)
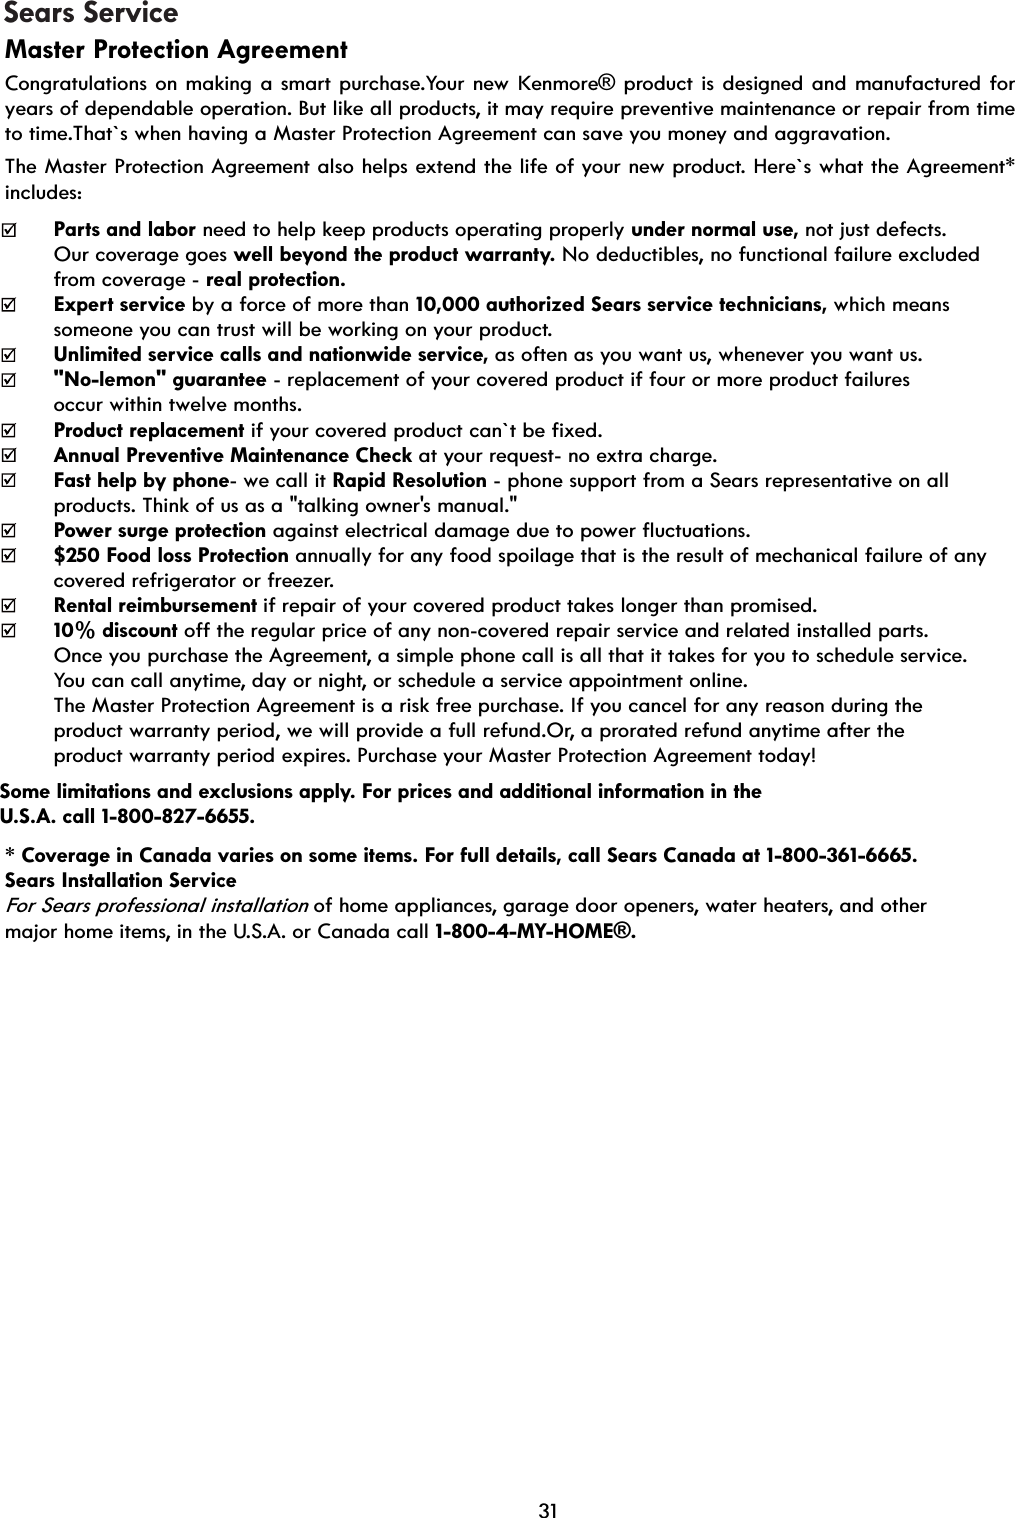
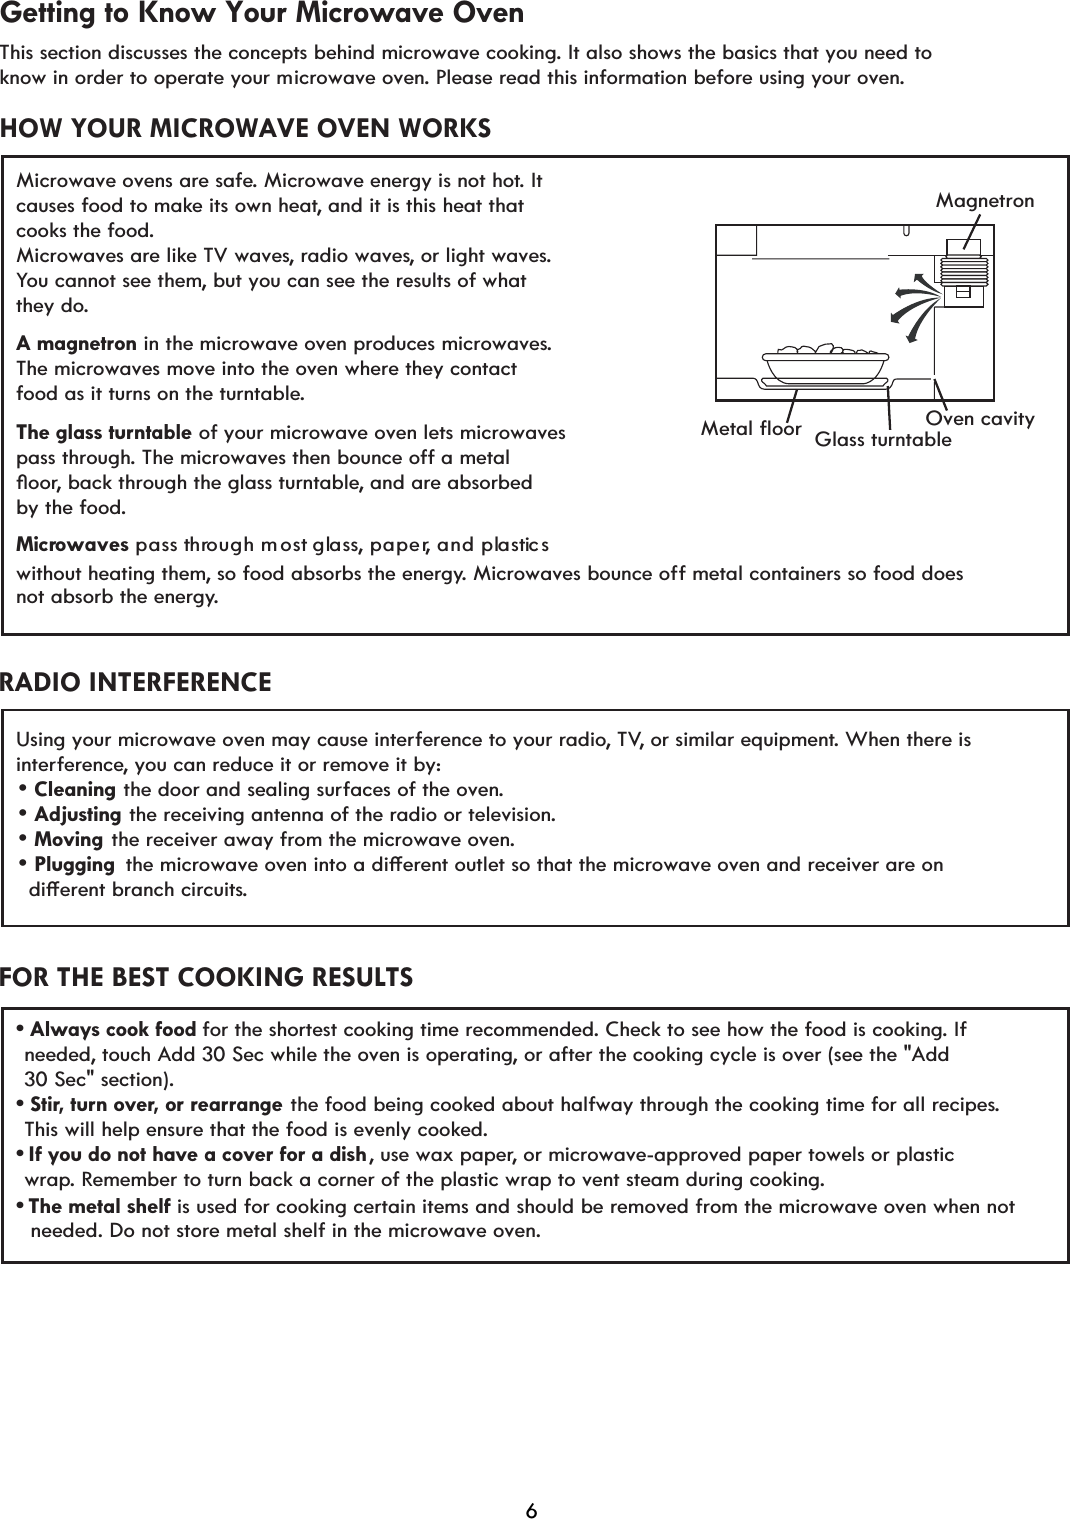
![Using Aluminum FoilNOTE: Metal containers should not be used in a microwave oven. There are, however, some exceptions. If you have purchased food prepackaged in an aluminum foil container, refer to the instructions on the package. When using aluminum foil containers, cooking times may be longer because microwaves will only penetrate the top of the food. When using aluminum containers without package instructions, follow these guidelines:v3ODFHWKHFRQWDLQHULQDJODVVERZODQGDGGVRPHwater so that it covers the bottom of the containerv$OZD\VUHPRYHWKHOLGWRDYRLGGDPDJHWRWKHRYHn.v8VHRQO\XQGDPDJHGFRQWDLQHUs.v'RQRWXVHFRQWDLQHUVWDOOHUWKDQLn. (1.9 cm).v7KHFRQWDLQHUPXVWEHDWOHDVWKDOIoOOHd.vTo avoid arcing, there must be a minimum of 1/4 in. (64 cm) between the aluminum container and the walls of the oven and also between two aluminum containers. more than 1/4 in. (64 cm). This ensures even heating of the container bottom.v$OZD\VSODFHWKHFRQWDLQHURQWKHWXUQWDEOe.v6KLHOd, with small pieces of aluminum foil, parts of food that may cook quickly; such as wing tips and leg ends of poultry.v+HDWLQJIRRGLQDOXPLQXPIRLOFRQWDLQHUVXVXDOO\WDkes up to double the time compared to reheating in plastic, glass, china, or paper containers. The time when food is ready will vary depending upon the type of container used.vLet food stand for 2 to 3 minutes after heating so that heat is spread evenly throughout container.Cooking you should not do in your microwave ovenv'RQRWSXWFDQQHGIRRGVLQWKHRYHn. Closed glass jars may explode, resulting in damage to the oven.v'RQRWXVHWKHPLFURZDYHRYHQWRVWHULOL]HREMHFWVEaby bottles, etc,WLVGLèFXOWWRkeep the oven at the high temperature needed for sterilization.11](https://usermanual.wiki/Midea-Kitchen-Appliances/XM159KYY/User-Guide-1920651-Page-11.png)