Midland Radio 75445 UHF Portable Transceiver User Manual
Midland Radio Corporation UHF Portable Transceiver Users Manual
Users Manual
P20 Owner’s Guide
(75-445)
2
TABLE OF CONTENTS
FCC Licensing Information....................................................................................... 2
TIPS FOR GETTING THE MOST FROM YOUR P20................................................ 3
A NOTE ABOUT THE CTCSS or DCS CODES..................................................... 4
PREPARATION........................................................................................................... 5
BATTERIES.............................................................................................................5
CHARGING THE BATTERIES...............................................................................5
BELT CLIP...............................................................................................................6
QUICK USE INSTRUCTIONS: ...................................................................................6
POWER SAVE CIRCUIT............................................................................................. 6
RANGE OF UHF RADIOS .......................................................................................... 6
FEATURES AND LOCATION OF CONTOLS ...........................................................7
TURNING THE RADIO ON OR OFF .....................................................................7
LOCKING THE CONTROLS .................................................................................. 7
UNLOCKING THE CONTROLS.............................................................................7
SELECTING THE CHANNEL................................................................................. 8
PROGRAMMING THE ACTIVE CHANNEL.........................................................8
ADJUSTING THE VOLUME................................................................................... 8
ADJUSTING THE SQUELCH................................................................................. 8
USING THE CALL FUNCTION.............................................................................. 8
USING THE MONITOR FUNCTION......................................................................8
TURNING ON OR OFF THE BUTTON PRESS BEEP........................................... 9
TURNING ON THE DISPLAY BACKLIGHT.........................................................9
TURNING THE ROGER BEEP ON OR OFF..........................................................9
ACTIVATING SCAN FUNCTIONS........................................................................ 9
ACTIVATING “PRIVACY” CODES..................................................................... 10
DCS CODES.......................................................................................................... 12
RESETTING THE RADIO.....................................................................................12
OPERATING THE HANDS FREE VOX (VOICE OPERATED TRANSMIT) ..... 13
SETTING REMOTE MONITOR MODE...............................................................14
SETTING MEMORY CHANNELS .......................................................................15
ACCESSING MEMORY CHANNELS.................................................................. 15
DISPLAY SYMBOLS ............................................................................................ 16
TROUBLESHOOTING ..............................................................................................17
CARE OF RECHARGEABLE NI-CAD BATTERIES............................................... 18
SERVICE: ..................................................................................................................19
TECHNICAL SPECIFICATIONS*............................................................................ 20
LIMITED WARRANTY.............................................................................................21
FCC Licensing Information
3
This Midland model P20 radio operates on FM communication frequencies subject to
the Rules and Regulations of the Federal Communications Commission. The FCC
requires that all operators using Private Land Mobile frequencies obtain a radio
license before operating their equipment. Application for your FCC license is made on
FCC form 600 and schedules D, E, and G.
To have the forms faxed to you, call the FCC Fax-on-Demand system at 1-202-418-
0177 from your Fax machine and request document 000600 for all forms and
instructions.
To have this form mailed to you, call the FCC forms hotline at: 1-800-418-3676
For questions concerning license application, contact the FCC at 1-888-CALL-FCC
(1-888-225-5322), or go to http://www.fcc.gov.
OPTIONAL ACCESSORIES FOR YOUR RADIO
Accessory Name Model Number
Ni-cad Battery (single “AA” 3 required).......................………..18-BATT
Ni-MH Battery (single “AA” 3 required).......................……….18-NBAT
Standard Charger……………..………………………………..…..18-396
Charger Stand ……………………………………………......……18-383
Dual Charger Stand …………………………………………….....18-385
Lapel Microphone with Ear-bud Speaker………………………….22-405
Speaker/Microphone…………………………………………..…...22-411
Boom Microphone Headset ……………………………………….22-540
Call 816 241 8500 ext. 200 to order accessories.
THIS RADIO COMPLIES WITH PART 15 OF THE FCC RULES. OPERATION IS
SUBJECT TO THE CONDITION THAT THIS DEVICE DOES NOT CAUSE
HARMFUL INTERFERENCE.
Your Midland model P20 UHF FM business two-way radio is designed to provide
you with line-of-sight communications for a range up to 4 miles. The model P20
incorporates channels with 38 different CTCSS and 83 DCS codes to provide the best
in quiet communications. Also this radio offers scan, power save, 9 memory channels
and a multifunction back-lighted liquid crystal display. This unit also incorporates
VOX (voice operated transmit) that allows hands free use when the radio is equipped
with certain accessories.
TIPS FOR GETTING THE MOST FROM YOUR P20
Due to the band of operation (464/467/469 MHz) the P20 provides communications
that are virtually free of atmospheric interference (skip) that is common on lower

4
frequency bands. Along with this and an antenna system that is very efficient,
communications range is surprisingly good. Many times the limit to maximum possible
range is environmental factors such as blockage caused by trees, buildings, hills, or
other obstructions. If you find communication is not possible, many times this can be
overcome by moving only a few feet to a new location. Range is greatly reduced while
operating from a metal building or from a vehicle. Battery condition also affects range.
The P20 operates on rechargeable Ni-Cad batteries or alkaline batteries. While this
unit has been designed with gaskets for water resistance and ruggedness it is a
precision piece of electronic equipment that should not be exposed to water or
handled carelessly. Normal care should result in years of trouble free operation. Do
not leave batteries installed over a long period of time as leakage may occur, that can
destroy the radio. If you experience problems operating the radio, turn off the radio,
press and hold the “F” button and turn on the radio. This will cause the radio to return
to the factory settings. Always save your receipt, as it is required for warranty
consideration.
WARNING
Your wireless hand-held portable transceiver contains a low
power transmitter. When the Push-to-Talk (PTT) button is
pressed it sends out radio frequency (RF) signals. The device
is authorized to operate at a duty factor not to exceed 50%. In
August 1996, the Federal Communications Commission (FCC)
adopted RF exposure guidelines with safety levels for hand-
held wireless devices.
To maintain compliance with the FCC's RF exposure guidelines,
this transmitter and its antenna must maintain a separation
distance of least 2 inches (5 centimeters) from your face.
Speak in a normal voice, with the antenna pointed up and away
from the face at the required separation distance. The belt clip
is for storage purposes only. DO NOT TRANSMIT WHILE
USING THE BELT CLIP. To transmit, hold the device away
from your body and ensure the antenna is at least 2 inches (5
centimeters) from your body when transmitting.
A NOTE ABOUT THE CTCSS or DCS CODES
This radio incorporates 38 CTCSS (Continuos Tone Coded Squelch System) codes
and 83 DCS (Digital Coded Squelch) codes that, when activated, prevent the user

5
from hearing other radios that do not have the same code. These codes do not make
your conversation private. If you experience difficulties contacting or hearing other
radios in your group make sure the CTCSS or DCS code is set the same on all radios.
If you are using the P20 where interference from other radios or electrical devices are
present, enabling the CTCSS or DCS codes will usually mute the interference. Many
times interference will be noticed by the presence of loud static from the speaker.
PREPARATION
BATTERIES
P20 radios operate with 3 AA Alkaline, Ni-Cad (nickel cadmium) or Ni-MH (nickel
metal hydride) batteries (optional). Ni-Cad batteries provide about 15 hours of use.
Alkaline batteries will provide about 45 hours of use and Ni-MH batteries will
provide about 24 hours of use. The P20 may be supplied with Ni-Cad or NI-MH
batteries and a wall charger. Ni-Cad and Ni-MH batteries must be charged prior to
use. Charge at least 10 hours with the standard charger. If you are using Ni-MH
batteries charge at least 16 hours. DO NOT attempt to charge any type of Alkaline
batteries in this radio.
To Install Batteries:
Hold the radio face down. Press the latch so it swings away from the cover.
1. Lift the battery cover slightly. Gently slide the cover off the unit.
2. Insert 3 AA batteries observing the proper polarity.
3. Replace the battery cover over the batteries and fasten with the latch.
Battery Indicator:
The battery Condition indicator in the display will show the amount of charge of your
batteries. Replace alkaline or recharge the Ni-Cad batteries as soon as possible after
the indicator shows 2 segments or less of the battery lit.
CHARGING THE BATTERIES
Your P20 may not include rechargeable batteries and a charger. Install the batteries
observing their polarity. If you are using rechargeable batteries and the Midland
standard charger (model 18-396), plug the charger into a 115 volt wall socket and the
charger plug into the charge jack under the cover marked “CHG” ( item 7on
Page 6 illustration) on the bottom of the radio. Allow the batteries to charge 10 hours
for Ni-Cad and 16 hours for Ni-MH prior to use. Never attempt to charge any type
of Alkaline battery in this radio. When using a drop-in charger (models 18-383 or
18-385) follow the setup instructions then simply set the radio in the charger stand and
observe that the LED on the charger is lit. The radio should be turned off while
charging.
6
BELT CLIP
The P20 comes standard with a belt clip. Attach it to the radio back by sliding the top
of the clip up over the two rectangular bosses on the back of the radio until it snaps
into place. To detach the belt clip, press the lever inside the top of the clip away from
the radio body and slide the clip toward the bottom of the radio.
!
!!
! The belt clip is intended for storage of the radio only (waiting for a call). Do not
transmit the radio while attached to your belt. (see warning on page 4)
QUICK USE INSTRUCTIONS:
Install fresh Alkaline or fully charged Ni-Cad or Ni-MH batteries.
Turn the unit on by rotating the ON/OFF Volume control clockwise.
The squelch is factory set and is not adjustable.
Make sure the radio you want to talk to does not have the CTCSS or other codes
turned on.
To talk, press and hold the “PTT” (Push to Talk) button on the side of the radio
marked “PTT”. Talk into the front of the radio about 6 inches from your mouth.
To listen release the “PTT” button.
" Other functions will be described later.
POWER SAVE CIRCUIT
This part of the operation of the radio is completely automatic and not adjustable.
When the radio has not transmitted or received a signal for several seconds it will
begin to cycle from a sleep mode to fully on. This occurs several times a minute. If a
signal is received or you cause the radio to transmit, the radio will become fully on.
This cycling from sleep to fully on increases the battery life more than 50%. An icon
in the upper right of the display flashing “SAVE” will verify this.
RANGE OF UHF RADIOS
The best range between portable UHF radios is achieved when they are operating in
open terrain outside of buildings and vehicles. Anyone using a portable unit inside a
vehicle will experience a significant loss of range.
7
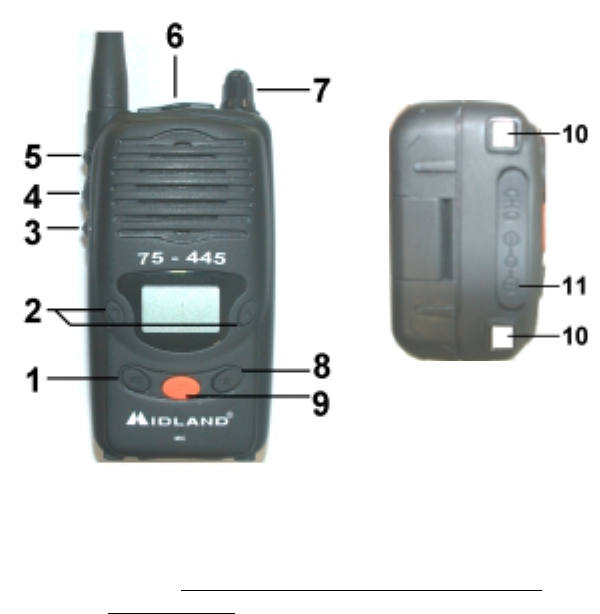
FEATURES AND LOCATION OF CONTOLS
1 VOX button 2-Up/Down Buttons 3-Monitor Button 4-Push to Talk Button
5-Call Button 6-Accessory jacks 7-On/Off Volume Control 8-Enter Button
9-Function Button 10-charging contacts 11-Charge Jack
THE RADIO MUST NOT BE SCANNING OR TRANSMITTING AND THE
CONTOLS NOT LOCKED BEFORE THE CONTROLS WILL WORK PROPERLY.
TURNING THE RADIO ON OR OFF
Rotate the ON/OFF Volume control (7) clockwise to turn the radio ON. An audible
tone will indicate the radio is on. The display will go through a 1 second self test and
go to operation mode. Rotate the ON/OFF Volume control counter clockwise to turn
the radio off.
LOCKING THE CONTROLS
Press and hold the “MON” button (3) for about 3 seconds a beep (if enabled) will be
heard and the KEY icon will be displayed. The “PTT” and the “CALL” are the only
buttons active. If any other buttons are pressed 3 quick beeps will be heard.
UNLOCKING THE CONTROLS
Press and hold the “MON” button (3) for about 3 seconds a beep (if enabled) will be
heard and the KEY icon will not be displayed.
8
SELECTING THE CHANNEL
Press the “/\” or “\/” button (2) to select the desired channel.
(ONLY IF TWO CHANNELS ARE ACTIVE)
!
!!
! If only one channel is programmed and the /\ or \/ button is pressed 2 quick beeps
will be heard.
PROGRAMMING THE ACTIVE CHANNEL
1. With the radio turned off, press and hold the “ENTER” button and turn the radio
on. Release the button after the power-up tone.
2. Press the “F” button twice or until you see “1-oN” or “1-FF” displayed.
3. To review channel programming status, press “/\” or “\/” buttons to display each
channel number. The channel number followed by “oN” indicates an active
channel. A channel number followed by-“ FF” indicates an inactive frequency.
" You can have only two channels in the active mode at a time. If you try to
activate more than two channels, the radio will beep two or three times. Check
and turn off any other active channels and try again.
4. To change the status of a channel, use the /\ or \/ buttons to select the programmed
channel to be removed or added from use. Press the PTT button to change the
status from “oN” to “FF”. Select the new active channel with the /\ or \/ buttons.
Press the “ENTER” button to return to normal operation.
ADJUSTING THE VOLUME
Rotate the ON/OFF Volume control (7) clockwise to increase the volume. Rotate the
ON/OFF Volume control counter clockwise to decrease the volume.
ADJUSTING THE SQUELCH
Squelch is preset, no adjustment is available.
USING THE CALL FUNCTION
Press and release the “CALL” button (5) on the side of the radio.
This will cause the radio to transmit a tone to alert the other people in your group to
listen for a message.
!
!!
! Use of the call function is discouraged if using the 22-405 or the 22-540
USING THE MONITOR FUNCTION
1. Press and release the “MON” button (3) on the side of the radio to open the
squelch.
" This allows you to over ride the squelch and the “CTCSS” or “DCS” tones.
This is useful to monitor the channel before you transmit to ensure there is not
someone using the channel when you have “CTCSS” or “DCS” tones
programmed. This is also useful if you suspect someone in your group does not
have the proper “CTCSS” or “DCS” tones programmed.
2. Press and release the “MON” button or wait 10 seconds to restore the squelch to
normal.

9
TURNING ON OR OFF THE BUTTON PRESS BEEP
1. With the radio turned off, press and hold the “ENTER” button (8) and turn the
radio on. The radio will display all segments available on the display and sound
the power up tone. Release the “ENTER” button when the radio powers up. The
display will show “FF” or ” oN” depending on the previous setting, and below in
smaller letters “BEEP”
2. Press and release the “/\” or “\/” button to change the setting.
3. The setting “oN” is Beep on. The setting “FF” is Beep off.
4. Press and release the “ENTER” button to return to operating mode.
TURNING ON THE DISPLAY BACKLIGHT
Press and release the “ENTER” button (8). A beep will be heard (if enabled). The
backlight will stay on for about 5 seconds then turn off.
TURNING THE ROGER BEEP ON OR OFF
Roger beep is a sound the radio transmits when you release the “PTT” button (4).
1. With the radio turned off, press and hold the “ENTER” button and turn the radio
on. The radio will display all segments available on the display and sound the
power up tone. Release the “ENTER” button when the radio powers up. The
display will show “FF” or ” oN” depending on the previous setting, and below in
smaller letters “BEEP”
2. Press and release repeatedly the “F” button (usually twice). An icon of a musical
note will be displayed above “oN” or “FF” on the display.
3. Press and release the “/\” or “\/” button to change the setting.
" The setting “oN” is Roger beep on. The setting “FF” is Roger beep off.
" The Roger beep is the same sound as the Power Up tone
4. Press and release the “ENTER” button to return to operating mode.
" Use of roger beep is discouraged when earphones or headsets are in use.
ACTIVATING SCAN FUNCTIONS
The P20 has three scan modes. The most popular and most used is the “BUSY”
channel scan. This allows the radio to stop on a channel that someone is talking on.
When the radio stops on a “Busy” channel, the scan will stop and resume after about 5
seconds. The second is the “OPEN” channel scan. This allows the radio to stop on the
channel NOT used. The third is “DUAL WATCH”. This allows you to monitor the
active channel and one of the ten available channels.
Busy Channel Scan:
1. Press and release the ”F” button (9), the ”SCAN” icon will begin flashing in the
lower center of the display.
2. Press and release the “/\” or “\/” button to activate scan. The unit will now begin
scanning the active channels.

10
" Pressing the “PTT” (push to talk) button will cause the radio to stop scanning
and return to normal operate mode.
" When you enter the “program mode” with the “F” button the radio will go
back to operate mode after about 8 seconds if no buttons are pressed.
Open Channel Scan:
1. Press and release the “F” button repeatedly (usually twice) until the “B.SCAN”
icon flashes in the lower center of the display.
2. Press and release the ”/\” or “\/” button to activate scan. The radio will begin to
scan for the OPEN channel.
" Scanning will stop on the open channel for about 5 seconds then move to the
other channel.
3. Press the “PTT” button to stop scanning and talk on that channel.
4. To reactivate scan repeat steps above.
" When you enter the “program mode” with the “F” button the radio will go
back to operate mode after about 8 seconds if no buttons are pressed.
Dual Watch
Dual watch is a function that allows you to scan the current active channel and one
other channel.
1. Select the active channel.
2. Press the “F” button repeatedly (usually 5 times) until “DW” is flashing in the top
of the display.
3. Select the second channel to be scanned.
" About 3 seconds after your selection of the second channel is complete the
radio will begin switching between the two channels.
" When the radio hears activity on either channel, scanning will stop on that
channel for about 5 seconds and then resume scanning.
" If communication is desired on the channel scanning stopped on, press the
“PTT” button. This will deactivate Dual Watch and allow you to communicate
normally.
4. To reactivate Dual Watch repeat steps above.
ACTIVATING “PRIVACY” CODES
To activate “CTCSS” codes
1. Press the “F” button repeatedly (usually 3 times) to cause the icon “CTCSS” to
be displayed in the upper left of the display to flash.
2. Press and release the “/\” or “\/” buttons to select the “CTCSS” code you desire.
" A code of “00” means no code is programmed.
" You must do this for each of the channels you want CTCSS codes on.
" Activating the “CTCSS” code will prevent you from hearing any conversation
that is not using the same “CTCSS” code. This does not make your
conversation private.
11
The following is a list of frequencies of the CTCSS codes. Different brands of radios
may use a different number code for the frequencies. For operation with other brands
of radios the selected CTCSS frequency must match.
01=67.0 Hz 11=97.4 Hz 21=136.5 Hz 31=192.8 Hz
02=71.9 Hz 12=100.0 Hz 22=141.3 Hz 32=203.5 Hz
03=74.4 Hz 13=103.5 Hz 23=146.2 Hz 33=210.7 Hz
04=77.0 Hz 14=107.2 Hz 24=151.4 Hz 34=218.1 Hz
05=79.7 Hz 15=110.9 Hz 25=156.7 Hz 35=225.7 Hz
06=82.5 Hz 16=114.8 Hz 26=162.2 Hz 36=233.6 Hz
07=85.4 Hz 17=118.8 Hz 27=167.9 Hz 37=241.8 Hz
08=88.5 Hz 18=123.0 Hz 28=173.8 Hz 38=250.3 Hz
09=91.5 Hz 19=127.3 Hz 29=179.9 Hz 00=OFF
10=94.8 Hz 20=131.8 Hz 30=186.2 Hz

12
DCS CODES
There are 83 “DCS” codes. These are used in the same manor as the “CTCSS”
codes.
To activate the DCS Codes
1. Press the “F” button repeatedly until the “DCS” icon flashes (usually 4 times).
2. Press the “/\” or “\/” button to select the “DCS” code you desire.
3. Press the “ENTER” button when you have made your selection.
" When you enter the program mode with the “F” button, the radio will go back
to operate mode after about 8 seconds if no buttons are pressed.
" A code of “00” means no code is programmed.
" You must do this for all the channels you want “DCS” codes on.
" Turning on the “DCS” code will prevent you from hearing any conversation
that is not using the same “DCS” code. This does not make your conversation
private.
The following list contains the values of the “DCS” codes. Different brands of radios
may use different codes. For operation with other brands of radios the selected
“DCS” value must be the same.
01=023 11=071 21=134 31=223 41=306 51=411 61=503 71=631 81=734
02=025 12=072 22=143 32=226 42=331 52=412 62=506 72=632 82=743
03=026 13=073 23=152 33=243 43=315 53=413 63=516 73=654 83=754
04=031 14=074 24=155 34=244 44=331 54=423 64=532 74=662
05=032 15=114 25=156 35=245 45=343 55=431 65=546 75=664
06=043 16=115 26=162 36=251 46=346 56=432 66=565 76=703
07=047 17=116 27=165 37=261 47=351 57=445 67=606 77=712
08=051 18=125 28=172 38=263 48=364 58=464 68=612 78=723
09=054 19=131 29=174 39=265 49=365 59=465 69=624 79=731
10=065 20=132 30=205 40=272 50=371 60=466 70=627 80=732
RESETTING THE RADIO
If the radio stops responding to button presses or otherwise does not function properly
in some cases the radio can be reset to restore normal operation.
To reset the radio: With the radio off, press and hold the “F” button and turn the radio
on. Release the “F” button when the radio powers up. (see turning the radio on)
" This operation will reset the radio to factory settings and will erase all
memory channels that have been programmed.
13
OPERATING THE HANDS FREE VOX (VOICE OPERATED TRANSMIT)
To get the most use from the “VOX” feature you must first determine what sensitivity
level is needed to activate the “VOX” control. Sensitivity is how loud you have to talk
to activate the “VOX” circuit. The “VOX” has 6 levels of sensitivity that can be
adjusted. The 1 option you can talk in a normal voice with no background noise to
activate the “VOX” circuit. The higher level numbers will require increasing voice
level to activate the “VOX” circuit. This is useful in noisier areas that might activate
the “VOX” without talking. The next adjustment is the delay. This is a function of the
“VOX” that keeps the radio in transmit mode after you stop talking. A delay that is set
to short will cause the “VOX” circuit to stop between some words. The delay is
adjustable to 6 levels. Level 1, the shortest will give about one half second of delay.
Increasing the delay value extends the transmitter time to two seconds or more. By
activating the “VOX” you only have to talk into the front of the radio or use a headset
to make the radio transmit. The PTT (push to talk) button is not functional in “VOX”
mode. It is recommended to use a headset when using the “VOX” feature.
Choosing VOX operation
Press and hold the VOX button of the radio for one second so “VOX” icon appears on
the display.
Setting “VOX” Sensitivity Level:
" The sensitivity is adjustable by 6 levels. Level 1 is the most sensitive.
To set the sensitivity level
1. With the radio turned off, press and hold the “ENTER” button and turn the radio
on. The radio will display all segments available on the display and sound the
power up tone. Release the “ENTER” button after the radio powers up. The
display will show “FF” or ”on” depending on the previous setting, and below in
smaller letters “BEEP”
2. Press the “F” button repeatedly (usually three times) until you see “LE” on the
display.
" The number next to “LE” is the sensitivity level setting.
3. Press the “/\” or “\/” button repeatedly to change the “VOX” sensitivity.
4. Proceed to step 2 below if setting the delay is desired.
5. Press and release the “ENTER” button to return to the operation mode or press
the “F” button to continue settings.
Setting “VOX” Delay.
The Delay is adjustable by 6 levels. Level 1 is the least amount of delay.
1. Refer to step one above.
2. Press and release the “F” button until “dL” is on the display.
" The numbers next to the “dL” is the delay setting.
3. Press the “/\” or “\/” button to change the DELAY setting.
4. Press and release the “ENTER” button to return to operation mode.

14
Using accessories while in “VOX” mode.
Accessories for private listening are available. Those with a “VOX/PTT” switch
built in can be used with the P20 in “VOX” mode. Turn on the radio. Set the radio to
“VOX”. Set the accessory VOX/PTT switch to” VOX”.
! Key beep tones may sound very loud when using a headset or earpiece. We
advise turning off tones and avoid using the call feature when using accessories.
SETTING REMOTE MONITOR MODE
1. Choose a channel to be used, set BOTH radios to that channel.
2. With the radio to be used for the monitor off, press and hold the “ENTER” button
and turn the radio on.
3. Release the “ENTER” button when the radio powers up.
4. Press and release the “F” button repeatedly until “bb” (usually 5 times) is on the
display.
5. Press and release the “/\” or “\/” button repeatedly to select the sensitivity level.
" The two numbers to the right of the “bb” is the sensitivity. This can be set from
01 to 06. A sensitivity level of 01 is the most sensitive.
6. Adjust the volume as desired.
7. Press and release the “ENTER” button to activate remote monitor mode.
" The radio will enter monitor mode after 1 minute. If the remote radio hears a
sound, the radio will send the call signal. After the call is complete the remote
radio will transmit for 10 seconds. This allows you to hear the sound. After the
10 seconds of transmit is complete, the remote radio will go to receive for 10
seconds allowing you to transmit to the remote radio. This cycle continues 3
times then the remote radio goes back to monitor mode.
" To ensure reliable communications, be certain fresh batteries are used.
! WARNING This monitoring is NOT intended in any way as a life saving device.
To exit the remote monitor mode
Switch the radio off then on.

15
SETTING MEMORY CHANNELS
" There are 9 memory channels available.
To set Memory Channels
1. Press the “F” button repeatedly until the “M” is displayed above the flashing
memory channel number in the lower left of the display.
2. Select a memory channel by pressing and releasing the “/\” or “\/” buttons.
" If the channel you want to program is the displayed channel when you access
the memory program mode, you must change the channel and return to that
channel before programming is allowed.
3. Press and release the “F” button. The first number (usually will be 0) will flash.
Choose a channel by pressing and releasing the “/\” or “\/” button.
" The next step has three options. 1. Choosing a “CTCSS” tone. 2. Choosing a
“DCS” tone. 3. Choosing no tone at all.
4. Press and release the “F” button. The next two numbers (usually will be 00) will
flash as well as the “CTCSS” in the upper left of the display. If no tone is desired
go to step 5. Select a “CTCSS” tone desired or press and release the “F” button
again. The “DCS” will begin to flash, select a “DCS” tone desired.
5. Press and release the “ENTER” button to complete the programming.
" The “CTCSS or “DCS” must be flashing when you press the “ENTER”
button to complete the programming.
" After pressing the “ENTER” button, the radio will go back to normal
operating mode.
ACCESSING MEMORY CHANNELS
1. Press and release the “F” button repeatedly (usually 6 times) until the display
shows a number in the lower right of the display.
" This will be the location without the “M” above the number.
" If the number is flashing this indicates the memory channel has not been
programmed.
2. Press and release the “/\” or “\/” button to select a “Memory Channel”
previously programmed.
" To exit the “Memory Channel” mode, press and release the “ENTER”
button or press the “F” button twice.

16
DISPLAY SYMBOLS
CAUTION: DON’T EXPOSE THE DISPLAY TO EXTREME HOT OR
COLD TEMPERATURE
1. Channel number: Displays channel number 1-10.
2. TX Symbol Indicates unit transmitting.
3. RX Symbol Indicates busy channel.
4. CTCSS Code Symbol: Indicates “CTCSS” tone is active
5. DCS Symbol: Indicates that Digital Coded Squelch mode is on.
6. Musical note indicates ROGER BEEP is on.
7. SAVE Symbol: Flashes indicating battery save is active.
8. Key Symbol indicates when the keypad has been locked. Only the “PTT” and
“CALL” buttons are active when this indicator is on.
9. Shows the “CTCSS” or “DCS” code you have selected. When this is on, other
radios you talk to must be set to the same code.
10. DW Symbol: Indicates Dual Watch channel selection is active.
11. VOX Symbol: Indicates “VOX” is activated
12. B.SCAN indicates the scan mode B is in use. SCAN indicates the normal scan
mode is in use
13. BEEP indicates the button press tone is active.
14. Battery symbol shows the battery condition. Replace or recharge the batteries
when this indicator displays 2 or fewer segments of the battery.
15. M Symbol: Indicates a memory channel is active.
16. Number indicates memory channel in use.(when programmed)

17
TROUBLESHOOTING
PROBLEM SOLUTION
No Power 1. Check battery installation and/or replace batteries
Cannot Receive Messages 1. Make sure the volume is set high enough.
2. Confirm the radios have the same channel and or
CTCSS/DCS code settings.
3. Change your location, you may be out of range.
4. Install batteries properly or replace.
5. Buildings, obstructions, operating indoors or in
vehicles may interfere with communication.
Change your location.
6. Make sure the radio is not transmitting. This could
be due to the radio being switched to VOX
operation or accessories not set properly.
Range is Short 1. Operating the radio from a vehicle or from a metal
building will decrease the range. If possible operate
outside of vehicles or buildings.
2. Carrying the radio so that the antenna is very near
the body will decrease the range. Hold the radio in the
open for the best range.
3. Battery condition can affect range. Replace or
recharge batteries.
Interference/Static 1. Using the CTCSS should stop you from hearing
interference from other users and computers.
2. Radios too close. Radios must be at least 5 feet
apart.
3. Radios too far apart. Obstacles interfere with
transmissions. Talk range is up to 4 miles in
unobstructed, clear areas.
Radio is not responding to
button presses 1. Make sure radio is not in “VOX” mode.
2. Make sure key lock is not on. See To lock the
controls
3. Make sure radio is not transmitting.
4. Radio might need to be reset, See Resetting Radio.
5. Ensure accessory microphone is set properly (see
Page 12).
Display is dim 1. Reposition or replace batteries.

18
Charger not functioning 1. Charger pin is not properly in place. Check that
charger is fully inserted into the jack on the
bottom of the radio. If using the drop-in charger,
check the contacts on the bottom of the radio they
may require cleaning. If all is correct allow the
batteries to charge for the specified time.
2. Ensure the outlet the charger is plugged into is
functioning properly.
3. Check that the batteries are installed in the radio
properly.
4. Remove batteries from the radio and try to charge
separately.
CARE OF RECHARGEABLE NI-CAD BATTERIES
ALWAYS DISPOSE OF BATTERIES PROPERLY
Always follow the battery manufactures recommendations for
Charging and disposing of Ni-cad batteries.
The following is meant as general information regarding Ni-cad batteries.
1. Occasionally allow the batteries to fully discharge before recharging. The battery
indicator showing less than two segments will indicate full discharge.
2. Always allow the battery to fully charge before using. This requires 10 hours with
the approved charger. (Ni-MH batteries require 16 hours for full charge.)
3. The above will prevent the batteries from developing “memory” which effectively
reduces their capacity.
4. It is better to store Ni-cad batteries that are discharged rather than charged.
Note: Do not charge any type of alkaline batteries in this unit.

19
SERVICE:
If you have a problem which you believe requires service, please call first and speak
with a service technician. Many problems can be remedied over the phone without
returning the unit for service.
If it ever becomes necessary to return your unit for service:
1. Pack the unit in its original box and packing.
2. Pack the original box in a suitable shipping carton. Improper packing will result
in damage during shipment.
3. Include a photocopy of the bill of sale showing the date of purchase.
4. Include a brief description of the problem you are having.
5. Include a DAYTIME telephone number.
6. Include a money order or Visa or Master Card credit card number for $7.50 to
cover shipping and handling. No personal checks please.
7. You do not need to return accessory unless they maybe directly related to the
problem.
8. This information must be included before Warranty Service can be considered.
Failure to include these items will delay the repair of the radio until these items
are received.

20
TECHNICAL SPECIFICATIONS*
GENERAL
Frequency range...........................................................................464/467/469 MHz
Channels...............................................................................................................10
Modulation type................................................................................................. FM
Antenna impedance ....................................................................................50 Ohm
Loud-speaker..........………..................................................................8 Ohm 0.5W
Microphone...................................................................................…electronic type
Power supply.............................................3 AA Ni-cads or Alkaline(3.6/4.5VDC)
RECEIVER
Sensitivity at 12dB Sinad..............................................................................0.35µV
Selectivity........................................................................................................50 dB
Squelch range...................................................................................…...Automatic
Audio output power...........................................0.25W @ 8 Ohm (10% distortion)
Distortion at 500 mV.........................................................................................7%
Audio frequency response.....................................................................400-2400 Hz
TRANSMITTER
RF Output Power...........................................….......nominal 1000 mW @ 4.5VDC
Frequency Tolerance.................................................................................0.00025%
Harmonic Suppression...................................................................more than 50 dB
Modulation......................................................................................FM +/- 2.5 kHz
*Specifications are nominal and subject to change
CHANNEL FREQUENCIES
01=464.500 05=467.850 09=469.500 /
02=464.550 06=467.875 464.500
03=467.7625 07=467.900 10=469.550 /
04=467.8125 08=467.925 464.550

21
LIMITED WARRANTY
Midland Consumer Radio Inc. will repair or replace, at its option without
charge, any Midland FRS transceiver which fails due to a defect in material or
workmanship within ONE YEAR following the initial consumer purchase.
This warranty does not include any carrying cases, earphones, or antennas,
which may be a part of or included with the warranted product.
Performance of any obligation under this warranty may be obtained by
returning the warranted product, freight prepaid, along with proof of purchase date, to
Midland Consumer Radio Inc., Warranty Service Department, 1670 North Topping
Avenue, Kansas City, Missouri 64120.
Warranty information may be obtained by writing Midland Consumer Radio,
Warranty Service Department at the above address.
This warranty gives you specific legal rights, and you may also have other
rights, which vary, from state to state.
Note: The above warranty applies only to merchandise purchased in the United States
of America or any of the territories or possessions thereof, or from a U.S. Military
exchange.
Midland Consumer Radio
1670 N. Topping
Kansas City, Mo. 64120
Printed in Korea
Phone: (816) 241-8500
FAX: (816) 241-5713
E-mail: midlndcb@midlandradio.com
URL: www.midlandradio.com