Midland Radio BTNEXT Bluetooth Headset User Manual Manual
Midland Radio Corporation Bluetooth Headset Manual
Manual

UK
Midland BT Next - 1
Index
Main features .......................................................................................................................................................................................................16
Technical specifications of Midland BT NEXT ........................................................................................................................................................16
Charging batteries ................................................................................................................................................................................................17
Unit and fixing system description .......................................................................................................................................................................17
Switching your Midland BT NEXT on and off ......................................................................................................................................................... 19
Operative ‘mode’...................................................................................................................................................................................................19
Maximum distance ..............................................................................................................................................................................................19
How to pair two BT NEXT ......................................................................................................................................................................................20
Pairing the BT NEXT to Bluetooth devices ............................................................................................................................................................. 22
How to listen to the FM Radio ..............................................................................................................................................................................24
How to use the wired audio input ........................................................................................................................................................................25
Using a PMR446 transceiver with cable connection .............................................................................................................................................25
Setup and special configurations .........................................................................................................................................................................26
Setup and firmware update .................................................................................................................................................................................27
Warranty .............................................................................................................................................................................................................. 27
European CE Notice Certification and Safety Approval Information ......................................................................................................................27

2 - Midland BT Next
UK
MIDLAND BTNEXT
Multi rider intercom system
BTNext is an intercom communication system solution for motor cyclists.The design is very slim and aerodynamic, all the main functions are easy to operate thanks to the big three
buttons placed on the front of the unit.
BTNext is fixed on the helmet using the adhesive plate or the screw mounting clamp. Thanks to the audio kit with ultra slim speakers you can enjoy high quality stereo music while
riding.
Main features
›Intercom distance up to 1 mile (1,6Km).
›Connect up to four people for intercom communication
›Listen to stereo FM Radio with RDS
›Connect your phone to receive and place phone call and listen to stereo music
›Connect your GPS for voice street indication
›Connection for PMR466 radio with internal or external Bluetooth
›AUX wired connection for MP3 player and PMR446 radio
›Setup and Firmware update via USB connection to a PC
Midland BTNext is available in two versions:
›Single BTNext Intercom kit with one unit only
›Twin BTNext Intercom kit with with two units
Depending on the model purchased, the package contains the following
parts:
BTNext single
›1 BTNext communication unit
›1 audio kit with two stereo speakers, microphone with boom and wired mi-
crophone
›1 plate with bi-adhesive strip to fix the unit onto the helmet
›1 clamp to fix the unit onto the helmet
›1 stereo audio cable for iPod/ or other MP3 players
›1 miniUSB wall-mounting power supply
›Wind Suppressing Foam Microphone Cover, Allen key and Velcro strip for as-
sembly
BTNext Twin
›2 BTNext communication units
›2 audio kits with two stereo speakers, microphone with boom and wired mi-
crophone
›2 plates with bi-adhesive strip to fix the unit onto the helmet
›2 clamps to fix the unit onto the helmet
›2 stereo audio cable for iPod/ or other MP3 players
›1 miniUSB wall-mounting power supply with double plug
›Wind Suppressing Foam Microphone Cover, Allen key and Velcro strip for as-
sembly
The units included in the TWIN kit are already paired and can therefore be immedia-
tely used in Intercom mode.
Technical specifications of Midland BTNext
General:
›Bluetooth ver. 2.1 stereo (Headset/Handsfree/A2DP protocol)
›AGC system automatically controls the volume in relation to background noise
›Voice (VOX) or manual communications activation
›Manual controls to enable: telephone, intercom and wire connection
›Stereo FM Radio with RDS
›Fully waterproof
›Lithium battery with 10 hours talk time
›Recharge time: app. 6 hours
Bluetooth connections:
With identical device for Rider to Pillion or Bike-to-Bike Intercom mode, up to a
maximum distance range of 1 mile (1,6km)
Attention: You can reach 1 mile (1,6Km) intercom distance if the flip up antenna
is up and if you are in line of site without obstructions and interferences (the riders
must be always in sight).
Bluetooth devices:
›Mobile phone with MP3 player Stereo (A2DP protocol), GPS (Garmin Zumo and
TomTom Rider 1 and 2)
›PMR446 transceivers (with built-in or external Bluetooth connection) for
group bike-to-bike communications
Wire connections:
›For stereo audio input (iPod/MP3 player)
›For PMR446 transceivers (with optional cable)
Attention: Midland BTNext is designed to withstand rain and water. However, if it
is raining, always verify that the rubber caps protecting the sockets are fully fitted.
UK
Midland BT Next - 3
Charging batteries
Attention: Make sure that the unit is fully charged before use. Allow at least 8 hours
for a full charge before using the unit for the first time.
Charge the unit by inserting the wall-charger into the charging socket (lift the
rubber cover to insert the plug).
The red LED on the unit will start flashing when charging begins.
Allow the headset to charge until the unit stops flashing or the blue LED turns on.
When the charge is complete (the red LED is not flashing), release the headset
from the charger.
Normally, after the first time, it takes 6 hours for a full charge.
Attention: every time the mini USB recharging plug is inserted (or detached), the
device is automatically turned off. To use it while it is in charge, you should turn the
device on with the plug already inserted.
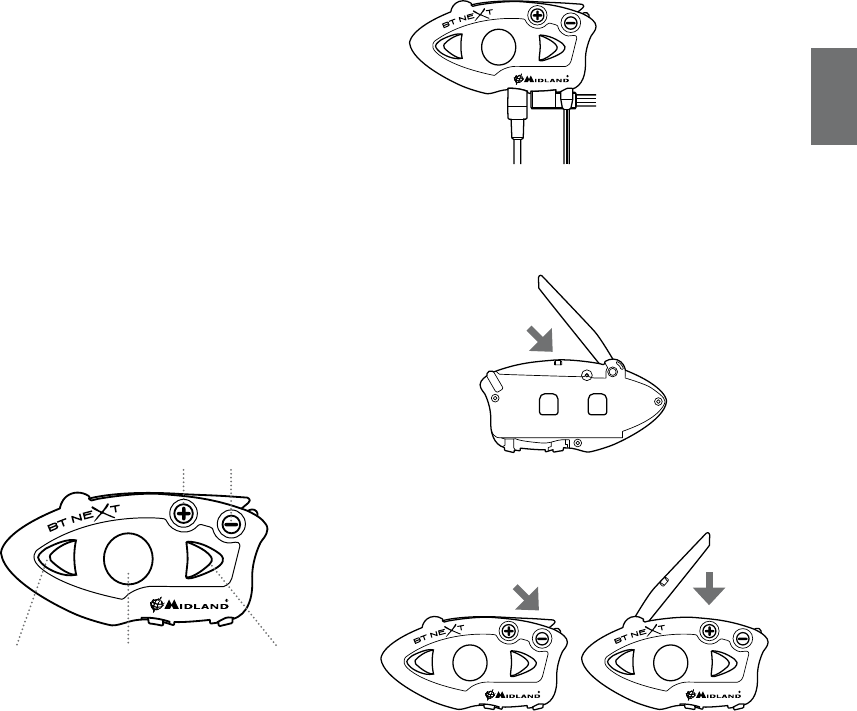
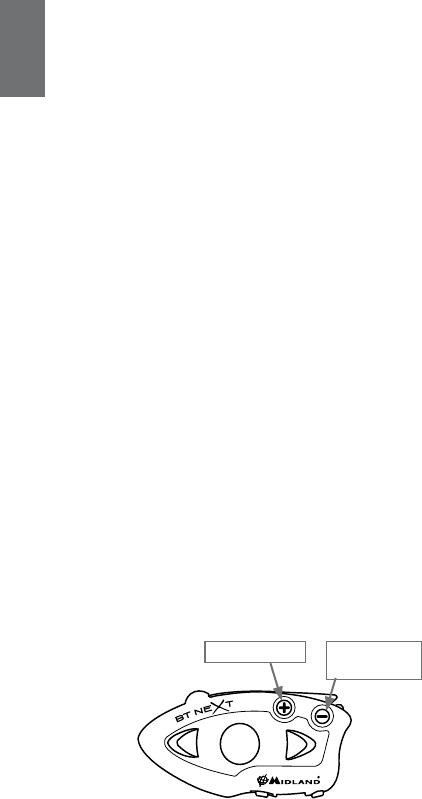
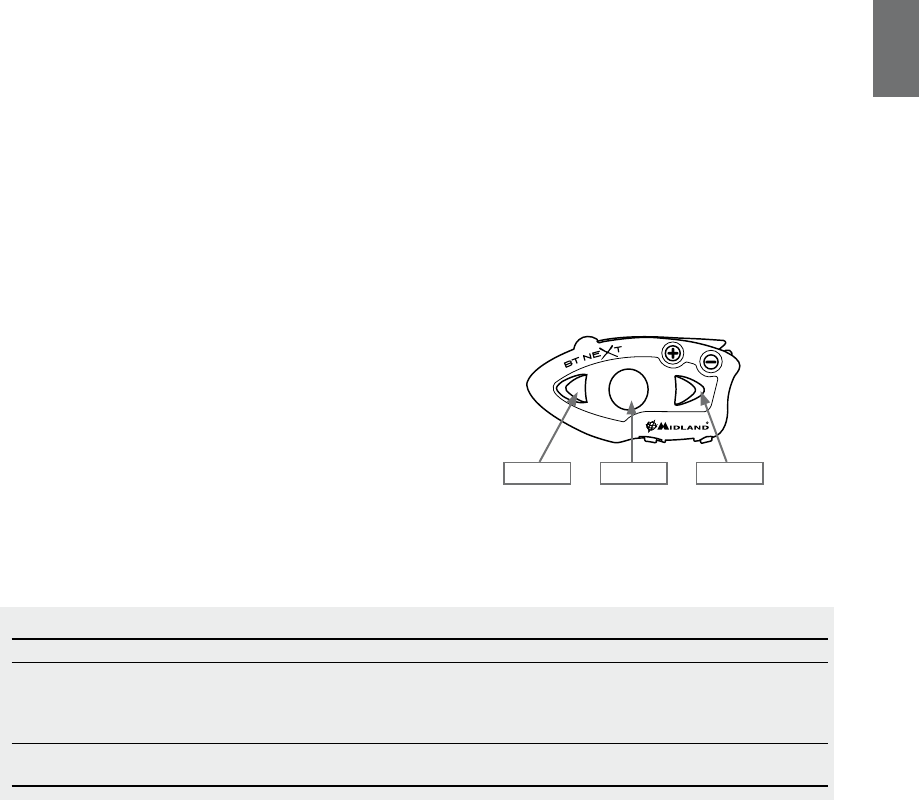
Unit and fixing system description
BT Next description
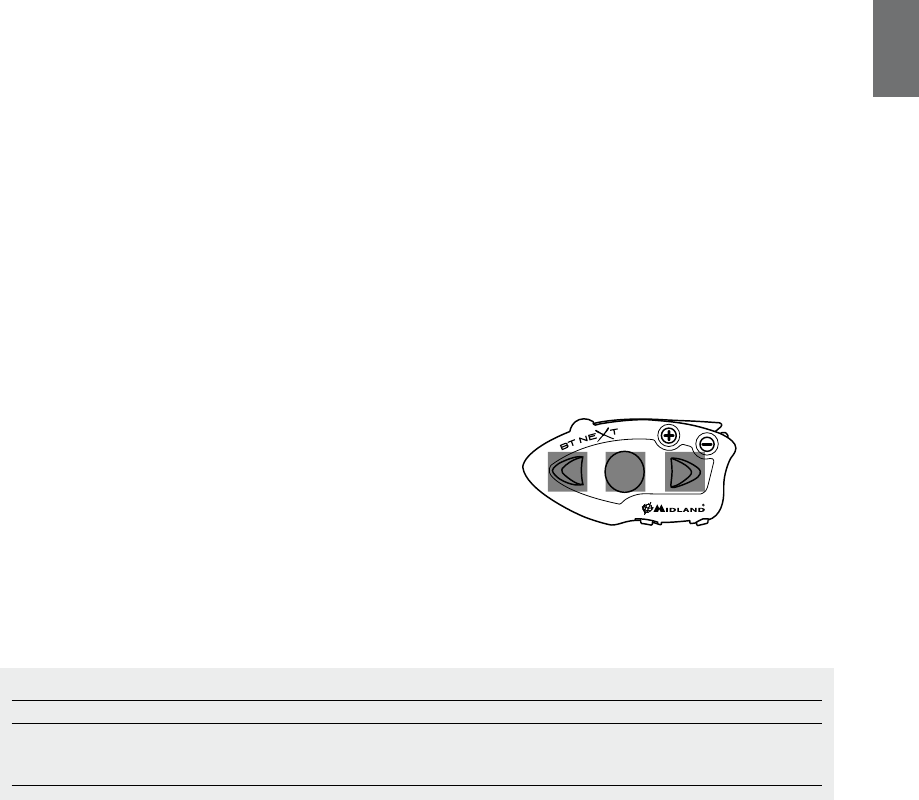
The BTNext has five buttons on the front; the main three big button are multi
functions buttons: the Forward (on the left), the middle button and the Rear (on
the right), the two small rounded buttons are the Volume + and Volume -.
Description of the wired connections
On the bottom of the unit you can find three wired connection:
Charger jack: enables to recharge the unit using a standard miniUSB power
supply
Audio kit jack: enable to connect an audio kit (stereo headset and microphone)
Auxiliary audio jack (AUX) 2.5mm: can be used to connect an audio source, like
a stereo iPod/MP3 player or PMR446 transceiver
In addition the BTNext has a flip up antenna on the top for maximum distance
performance.
To lift the antenna, press gently backward and the antenna will automatically
lift up.
To close the antenna just press it down and be sure to move it back into the closed
position.
Middle button
Volume -Volume +
Forward button Backward button
Charger jack
Audio kit jack
Auxiliary audio jack (AUX)
4 - Midland BT Next
UK
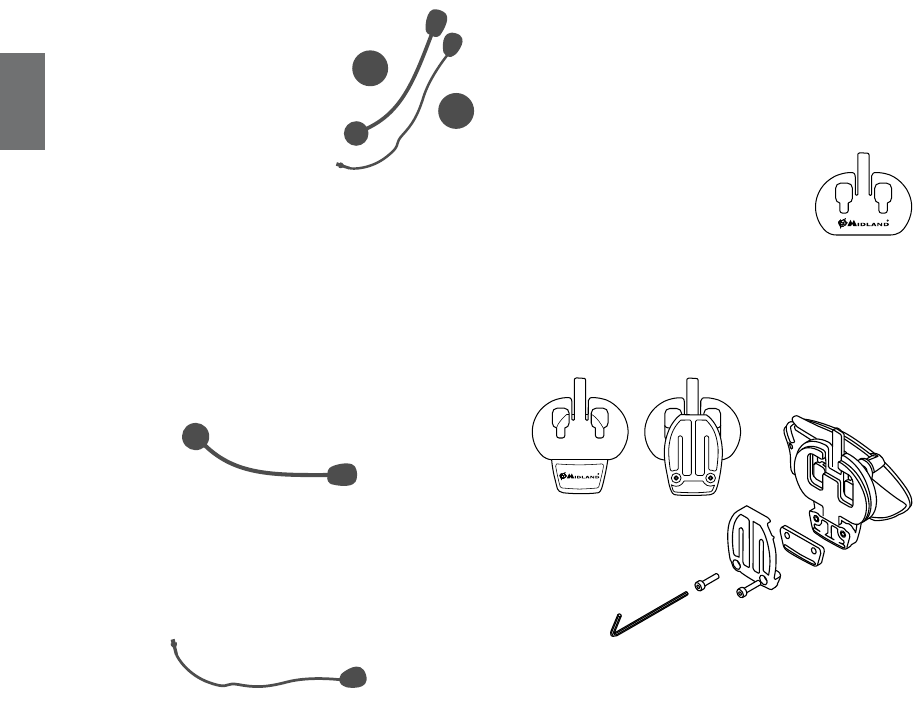
Description of the audio kit
The audio system includes two ultra-flat
stereo speakers and two interchangeable
microphones, which are both supplied with
a bracket and wired connection.
Fixing the stereo speakers
The two stereo speakers have a Velcro/adhesive strip that aids their fixing into
your helmet.
Beware not to completely cover your ear with the speakers, you must always be
able to listen to the traffic sound and your indicators.
The microphone can be fixed onto the helmet in two ways:
Boom Microphone
Place the section with the Velcro/adhesive strip between the padding and the
rigid cover of the helmet, so that the microphone is correctly positioned in front of
your mouth and that the white symbol is facing your mouth. This type of micro-
phone is suited for Open Faced and Flip Front helmets.
Wired microphone
Using the Velcro/adhesive strip, place the microphone inside the helmet in front
of your mouth. This type of microphone is more suited for Full Faced helmets. The
mini connector on the microphone allows you choose the microphone that best
suits the helmet you are using.
Audio kit jack
The audio kit must then be connected to the central jack of the Midland BTNext
unit using the “L” shaped connector.
Description of the installation brackets
The Midland BTNext can be fixed onto the helmet in two different ways: By either
using the plate with bi-adhesive strip, or the clamp. These methods allow you to
safely “fix” the BTNext unit onto your helmet and to remove it at any time in order
to recharge or store it.
Plate with bi-adhesive strip
The fixing plate has a bi-adhesive strip on one of
its sides. To fix the plate in place, clean the appli-
cation area on the helmet surface, remove the bi-
adhesive film and
place the fixing plate on the helmet by keeping it
contact with the surface for a few seconds.
Screw Clamp
Using the Allen Key, loosen the two screws on the clamp and place the rear plate
between the helmet padding and the external rigid protection. Then, tighten the
two screws in order to firmly fix the clamp in place. Inside the clamp is included a
small plastic spacer that can be removed to give a tighter fit if required.
Fitting and removing your Midland BTNext
The BTNext can be easily fitted onto the helmet by sliding it downwards so that
it fits into the slot of the selected fixing device (plate with bi-adhesive strip or
clamp). BTNext is maintained in position thanks to the fixing clip located on the
upper section (A).
To detach the BTNext, simply press the fixing clip and push the unit upwards.
UK
Midland BT Next - 5
Switching your Midland BTNext on and off
Switching the unit on:
Press and hold “Middle” button down for approximately 3 seconds until the BLUE
indicator lights.
Switching the unit off:
Press and hold both “Middle” and “Rear” buttons together for approximately 3 se-
conds until the RED indicator flashes 3 times, thus lessening the chances that you
might turn off the unit accidentally (especially whilst wearing gloves).
Operative “mode”
The BTNext can operate in three main “mode”: Intercom, Phone and FM Radio.
The 3 multi function buttons can have different functionality depending on which
mode the unit is at that moment.
›In “Intercom mode” the buttons lets you manage communications with up
to 4 people, talking one by one. Just press one of the three buttons to open
the intercom.
›In “Phone mode” you can manage your Bluetooth cellular phone to place/
answer a phone call or to listen to the music (in stereo mode). Please use your
phone responsibly and safely.
›In “FM Radio mode” you can listen to your favourite radio station in stereo,
seek for a specific radio station and save it (6 memory are available).
You can switch (toggle) from one mode to the other simply pressing the Middle
button for 3 seconds. A voice announcement will tell in which mode you are on.
The toggle sequence is the following:
›Intercom mode (if another unit has been paired)
›FM Radio mode
›Phone mode (if a phone has been paired)
Every time you turn on the unit, the default mode is Intercom (if it was previously
paired to another unit), otherwise it will be Phone (If was paired to a phone).If no
pairing was made – the only possible mode is FM.
For example if you are in Intercom mode, you can use the three buttons to open
and close the intercom connection to up to three other units. When you are in FM
Radio mode the same buttons lets you scan the radio station frequency and turn
on and off the radio.
If you want to change mode, you just press long the middle button and listen to
the voice announcement, until you reach the one you are looking for.
If you need to know in which mode the unit currently is, just press the “Volume +
“ and “Volume –“ button together. A voice announcement will tell you the current
mode.
Maximum Distance
You can reach 1 mile (1,6Km) intercom distance if the flip up antenna is up and
if you are in line of site without obstructions and interferences (the riders must
be always in sight).
Here is an example of the buttons main functionality based on the mode you are on.
Mode Forward (Left button) Middle button Rear (Right button)
Intercom Open/close the intercom to the first rider
Open/close the intercom to the second
rider Open/close the intercom to the Third rider
Phone
Redial last number/accept or reject
incoming call
Phone (while music play) Forward the song Play/pause Backward the song
FM Radio Scan up FM Radio On/off Scan down

6 - Midland BT Next
UK
How to pair two BT Next unit
The two units supplied in the same BTNext box, are already paired and ready to
use, which mean you don’t need to perform this procedure. The unit are already
paired using the Middle button.
If the devices are not part of the same kit, or the units has been purchased sepa-
rately, you need to first pair it in order to use it.
To pair the BTNext to another BTNext unit
To pair the BTNext to another BTNext unit, you must first enter the setup mode:
1. Turn off the unit
2. Press and hold down the middle button about 7 sec., until the Red light is on
permanently.
3. Now press the Middle button for 3 seconds. The Blue and Red light will flash.
4. Do the same procedure on the other unit, When successfully paired, each unit
will have the Blue light on for one second and than go back to the setup mode
(Red light always on).
5. Now the pairing procedure is complete, you just need to exit the setup mode
before you can use the units:
6. Double click on the Middle button, the Red light will turn off and the Blue
light will start flashing.
You can use now your BTNext.
How to use the Intercom with two units
To use the intercom feature, be sure the both units are turned on and correctly
paired together.
Attention: For intercom communication between Driver and Passenger, there is no
need to keep the flip up antenna in the up position. For Bike-to-Bike intercom the
antenna must be in the upper position.
Manual activation
Press the Middle button on one of the two units. Communication is enabled and
remains active until you press again the middle button. The intercom need some
second to activate, you will hear a beep tone when the intercom is open.
Voice activation (VOX)
Simply start talking, after some seconds the communication will be opened and
will remain active for the time you are talking. If there is no conversation the
intercom will be closed after 20 seconds. If needed you can close the intercom
manually without waiting 20 seconds (just press the middle button).
If needed, you can temporarily disable the VOX feature simply by pressing the
Backward button for 7 sec. Two sound beep will advise you when the VOX is di-
sabled. To turn the VOX on again, just press the same button, one beep sound
will advise you that the VOX is now active (or just turn the unit off and on again).
Attention: The Voice activation (VOX) can open the intercom communication only
to the unit that was paired with the Middle button. If you chose to use a different
button (Rear or ), you will be able to active the intercom only manually.
Adjusting the volume
Your Midland BTNext uses AGC technology, which automatically adjusts the liste-
ning volume in relation to background noises.
However, it is also possible to manually adjust the volume by means of the “Volu-
me +” and “Volume -“buttons.
Attention: volume can be adjust only when an audio connection is active.
How to pair the BTNext to more than two units
The BTNext unit can be paired to maximum three other BT unit (four in total).
The BTNext has three main buttons (Forward, Middle and Rear). It is up to you
which button use to pair and activate the intercom, you are totally free to choose
the button you like more. The same button you will use to pair the unit will be also
used to activate the intercom communication.
Remember that each device can always be paired with other 3 units at your choi-
ce; as shown in the picture here below, also ‘crossed’ pairing can be done.
For example you can decide to pair one motorbike rider unit to the Forward but-
ton, your passenger to the Middle button and another rider to the Rear button.
In this way you can have in total 4 units paired together and talk to each person,
one by one, simply by pressing the corresponding button (the same used for the
pairing). Every time you open the intercom connection to one person, the pre-
vious connection will be closed.
The connection is not a “chain”, when two person are talking it is not possible to
break (interrupt) the communication by one of the other two units riding out of
the maximum distance range.
Rider1
Rider2 Rider3
Passenger1
UK
Midland BT Next - 7
Pair the BTNext to another BTNext unit
To pair the BTNext to another BTNext unit, you must first enter the setup mode:
1. Turn off the unit
2. Press and hold down the middle button about 7 sec., until the Red light is on
permanently.
3. Now press one of the three buttons (Forward, Middle or Rear) for 3 seconds
depending on which button you would like use to open the intercom to the
other unit. The Blue and Red light will flash.
4. Repeat the same procedure on the other unit, you don’t need to use the same
button, you can choose one of the three buttons not previously used.
5. When successfully paired, each unit will have the Blue light on for one second
and then go back to the setup mode (Red light always on). Now the unit is
ready for another pairing procedure, and you can pair another BTNext unit
following the same procedure, but using a different button.
If you don’t have more devices to pair, you must exit the setup mode before you
can use the units:
›Double click on the Middle button, the Red light will turn off and the Blue
light will start flashing.
You can use now your BTNext.
How to use the Intercom with more than two units
To use the intercom feature, be sure that all the units are turned on and correctly
paired together
Attention: For intercom communication between Driver and Passenger there is no
need to keep the flip-up antenna in the up position. For Bike to Bike intercom the
antenna must be in the upper position.
Manual activation
Press the button corresponding to the unit you would like to communicate with.
After about 4 seconds the intercom communication will open.
The communication remains active until you press again the same button. To
quickly open the intercom to another person, just press the button corresponding
to the other unit, the intercom will be automatically closed and the new connec-
tion will be open (see Table A).
Voice activation (VOX)
The voice activation feature can open the intercom only to the unit paired to the
Middle button. While no other communication is open, simply start talking and
the communication will be open and remain active for all the time you are talking.
If there is no conversation the intercom will be closed after 20 seconds. If needed
you can close the intercom manually without waiting 20 seconds, pressing the
Middle button.
If needed, you can temporarily disable the VOX feature simply by pressing the
Rear button for 7 sec. Two sound beep will advise you when the VOX is disabled.
To turn the VOX on again, just press the same button, one beep sound will advise
you that the VOX is now active (or just turn the unit off and on again).
Hint: this feature is very useful when you have a specific person that you like
to talk to more often (for example your passenger). In this way you don’t
need to press a button to open the communication.
Unit already busy
If you try to open a intercom connection to another person that is already busy
talking with some one else (or is in a middle of a phone conversation), you will
hear a “busy” double beep tone. Just wait sometime and try again, maybe this
time the “line” is not busy.
The person who is called, will be advised that someone is trying to call and will
hear a voice announcement with the number of the button from which the re-
quest is coming.
In this way as soon as the first conversation is over, the person can easily contact
the caller by opening the intercom of the specific button number (indicated by
the voice announcement).
A- Manual activation
Mode Forward button Middle button Rear button
Intercom Short press: Open/Close intercom to paired
raider
Short press: Open/Close intercom to paired
raider
Long press: Change mode
Short press: Open/Close intercom to paired
raider
Long press: Toggle on/off wired
2
1
3
8 - Midland BT Next
UK
How to pair the BTNext to previous BT line unit
The BTNext is compatible with all the BT line unit from Midland. You can pair the
BTNext to a BT2, BT1 or BTNext unit and the max distance of the intercom is defi-
ned from the lower possible.
To pair the BTNext to another BT line unit, you must first enter the setup mode:
1. Turn off the unit
2. Press and hold down the Middle button about 7 sec., until the Red light is on
permanently.
3. Now press long (3 sec) one of the three buttons (Forward, Middle or Rear)
depending on which button you will like to use to open the intercom to that
unit. The Blue and Red light will flash.
4. Follow the procedure on the other unit’s instruction manual (normally you can
use the “Volume +” button on all the previous BT line units).
5. When successfully paired, each unit will have the Blue light on for one second
and than go back to the setup mode (Red light always on).
Now the BTNext unit is ready for other pairing procedure, and you can pair ano-
ther BT line unit following the same procedure, but using a different button on
the BTNext.
If you don’t have more devices to pair, you must exit the setup mode from both
units before you can use them: for BT NEXT double click on the Middle button, the
Red light will turn off and the Blue light will start flashing. For the other devices
of BT line, please refer to their own user manual.
Pairing the BTNext to Bluetooth devices
The BTNext unit can be paired to other Bluetooth devices, like Phone, GPS Naviga-
tor or PMR446 Radio with built-in or external Bluetooth.
The pairing procedure must be done using the “Volume +” or the “Volume -“
buttons.
›Pairing to the “Volume +” button: for Phone with music (A2DP stereo). All
devices paired to “Volume +” button has higher priority and will interrupt all
the other communication (like Intercom, FM Radio and Music).
›Pairing to the “Volume -” button: for GPS navigators and other devices
which the audio must be always in background.
Attention: The “Volume -” button does not support the pairing with a phone or with
A2DP stereo protocol devices.
Pairing to a phone
The cellular phone can be paired only to the “Volume +”, in this way it is possible
to manage all the phone functionalities and listen to the stereo music. An inco-
ming call the higher priority, that means all other communications will be closed
(Intercom, FM Radio, Music).
Pairing to a GPS navigator
The GPS can be paired to the “Volume - “ button. In this case the GPS street
voice announcements are always in background (the intercom is not closed).
Attention: If you need to connect both Phone and GPS, you must pair the GPS to the
“Volume –“ button and the Phone to the GPS it self (not anymore to the “Volume
+” button).
In this case the GPS street voice announcement and the phone calls are always in
background and will not interrupt the Intercom conversation.
GPS Navigator with stereo music player
If the GPS is also a stereo MP3 player and you want to listen to stereo music, you
must pair the GPS to the “Volume +” button. In this configuration the GPS street
voice announcements will interrupt all other communication (Intercom, FM Ra-
dio, Music).
When the GPS is paired to the “Volume +” button the “Phone” mode is activated.
Pairing to a PMR446 radio with integrated or external Bluetooth
The PMR446 Radio must be paired to the “Volume –“ button, so that the PMR446
radio is always in the background even when you talk on the intercom.
Attention: in addition to a PMR446 transceiver, if you want to connect also a GPS
navigator you must pair the GPS to the “Volume +” button. In this configuration the
GPS street voice announcements will interrupt all other communication (Intercom,
FM Radio, Music).
When the GPS is paired to the “Volume +” button the “Phone” mode is activated.
How to pair the BTNext to a Phone
To pair the BTNext to a Phone, you must first enter the setup mode:
1. Turn off the unit
2. Press and hold down the middle button about 7 sec., until the Red light is on
permanently.
3. Now press for 3 seconds the “Volume +” button, the Blue and Red light will flash.
4. Enable the Bluetooth device search feature on your mobile phone
5. After some seconds, “Midland BT NEXT” will be displayed on your mobile pho-
ne. Follow the pairing procedure of your Phone. If a pin code is requested you
must enter “0000” (four time zero).
› GPS
› PMR446 radio
› Phone (GPS)
UK
Midland BT Next - 9
When successfully paired, the Blue light of the unit will be on for one second and
than the unit will exit the setup mode and switch to the working mode (the Blue
light will start flashing).
You can use now your BTNext together with the Phone.
How to use a Phone
After pairing your phone to the BTNext unit you must switch to the “Phone” mode
in order to use it. Press the middle button until you hear “Phone” from the voice
announcement. Now all the three main button are dedicated to the phone (see
Table B)
Answering a call
When you hear the phone ring, you can answer in two different ways:
Vocally:
Simply say one word to answer the call and start talking.
Remembering that you can only do this if you answer the call after the third Ring.
Attention: be aware that some phones may not support voice answering
Manually:
Tap the “Forward” button and start speaking.
Rejecting a call
If you don’t wish to answer, you can let the mobile phone ring or press the “For-
ward” button for a few seconds (you will hear one audio confirmation tone).
Making a call
There are several ways to make a call.
From the mobile keypad:
Dial the number on the mobile keypad:
Press “Send” on the mobile phone.
To redial the last number:
Press “Forward” button for 3 seconds in order to redial the last number (you will
hear one audio confirmation tone).
To make a voice call:
Briefly press “Forward” button. If your mobile phone supports voice calls, you will
be asked to speak the name of the contact you wish to call.
Priority: Calls have a high priority, which means that all other communications are
temporarily disabled when a call arrives and automatically re-enabled once the call
ends.
Ending a call
There are several ways to end a call:
›Wait for the called person to end the call.
›Press the “Forward” button (you will hear an audio confirmation tone).
›Press “End” button on the mobile phone.
Using the MP3 player feature of the mobile phone
Many mobile phones are now designed to be used as stereo MP3 players. The
BTNext device fully supports the A2DP and AVRCP protocols that enable you to
listen to stereo music and remotely control your mobile phone’s MP3 player. You
can even use the buttons on the BTNext unit to control the following play options:
Play, Pause, Forward and Backward.
Available controls:
›To play/pause music: click on the “Middle” button.
›To skip forward to the next song: press the “Forward” button.
›To skip backwards to the previous song: press the “Rear” button..
B-Phone mode
Mode Forward button Middle button Rear button
Phone Short press: Voice dial /accept or close if it is
in progress
Long press: redial last number/ or reject
incoming call
Long press: Change mode Long press: toggle on/off wired
Phone (when music play) Short press: Forward the song Short press: Play/pause
Long press: Change mode
Short press: Backward the song
Play/PausaForward Backward

10 - Midland BT Next
UK
Priority: the music listening mode has the lowest priority. Therefore, it will always
be disabled when another type of communication is enabled.
How to pair the BTNext to a GPS
In general is possible to pair the BTNext to all the GPS for motorbike that support
Bluetooth headset connection.
To pair the BTNext to a GPS, you must first enter the setup mode:
1. Turn off the unit
2. Press and hold down the “Middle” button about 7 sec., until the Red light is
on permanently.
3. Now press firmly (3 sec) the “Volume -” button, the Blue and Red light will
flash.
4. Enable the Bluetooth device search feature on your GPS
5. After some seconds, “Midland BT NEXT” will be displayed on your GPS.
6. Follow the pairing procedure of your GPS. If a pin code is requested you must
enter “0000” (four times zero).
7. When successfully paired, the Blue light of the unit will be on for one second
and then the unit will exit the setup mode and switch to the working mode
(the Blue light will start flashing).
You can now use your BTNext and the GPS street voice announcement are always
in background.
If you pair the GPS to the Volume + button (because for example the “Volume
–“ button was already used), you loose the possibility to pair the phone to the
BTNext unit. You can overcome this limit by pairing the phone directly to the GPS
and then the GPS to the BTNext unit. All the phone features are therefore mana-
ged by the GPS itself.
How to use a GPS
When paired using the “Volume -” button the GPS will be automatically connec-
ted and the voice announcement are always in background also if the intercom
is active.
When the GPS is paired to the “Volume +” button, the street voice announcement
will always interrupt the intercom. In addition, remember to switch to “Phone”
mode in order to listen and control the music (play/pause - backward and for-
ward).
If the phone is connected thru the GPS you must use the control buttons on the
GPS screen in order to control the phone functionality.
How to pair PMR446 transceiver with integrated Bluetooth
If your PMR446 trasceiver has an integrated Bluetooth (like the G8BT), you must
pair the trasceiver using the “Volume –“ button:
›Turn off the unit
›Press and hold down the “Middle” button about 7 sec., until the Red light is
on permanently.
›Now press firmly (3 sec) the “Volume -” button, the Blue and Red light will
flash.
›Follow now the pairing procedure explained on the manual of the transceiver
itself
Attention: If you are pairing to a G8BT transceiver, just when the BTNext finish the
pairing (only the Blu LED is flashing) you must follow this procedure to activate the
Bluetooth connection:
›Turn off and on the G8BT and then press for 3 sec. the “BT” button.
›Follow the same procedure every time you need to reconnect the G8BT to the
BTNext (no need to make the pairing procedure again)
How to listen to the FM Radio
The FM Radio receiver is integrated inside the unit. You just need to switch to the
“FM Radio” mode in order to use it. Long press the middle button until you hear
“FM radio” from the voice announcement. Now all the three main button are de-
dicated to the FM Radio (See Table C).
Attention : To toggle wired on/off pressing long the Backward button, you need first
to stop the FM Radio (Press the Middle button briefly).
When you press the Forward or the Backward button briefly, you can scan up or
down the 6 recorded stations. A voice announcement will tell you the number of
which memory you are entering. A double beep tone will be played when the last
or the first recorded station is reached.
To save the station you are listening, press the Forward and Rear buttons together
for 3 sec. You will hear a beep tone for confirmation.
The station is saved over the last recorded station used.
Thanks to the RDS system, the FM Radio will choose the strongest signal available
for the radio station you like to listen.
The RDS system is OFF by default, if needed you can toggle on/off the RDS pres-
sing together the “Volume +” and “Volume –“ buttons for 3 sec when the radio is
on. A voice announcement will tell you the RDS status.
C-Radio FM mode
Mode Forward button Middle button Rear button
FM Radio Short press: Scan recorded
Long press: seek station up
Short press: On/off
Long press: Change mode
Short press: Scan recorded
Long press: seek station down

UK
Midland BT Next - 11
FM Radio with intercom
When you are in “FM Radio” mode is not possible to manually open the inter-
com, you can only open it using VOX feature (just talk) to the unit paired on the
“Middle” button. To manually activate the intercom you must switch to “Intercom”
mode.
How to use the wired audio input
Your Midland BTNext is also supplied with a wired audio input (AUX), that can
be used to connect an audio source, like an iPod (or any other MP3 Player) or a
PMR446 transceiver for group communication or for a coverage increase.
Listening to music
To listen to music from the wired input, connect the audio source using the cable
supplied with the BTNext unit. The volume level can be adjusted using the Vou-
me + and Volume – button, or automatically adjusted by the AGC system, which
means that you only need to adjust the volume of your iPod/ MP3 player to a level
that will allow you to listen to music in normal speed.
Attention: never set the volume of the MP3 Player to the maximum possible. Nor-
mally the best level is about the 70% of the maximum.
Hint: We recommend that you perform a few tests adjusting the volume of your
iPod/MP3 player so at the normal speed the Headset volume is suited to your
needs. The AGC system will automatically increase the volume on higher speed.
Make a note to remember this setting for future trips.
Enabling/disabling the wired input
If needed the wired input can be enabled or disabled:
Enabling/Disabling: Make a Long press on the “Rear” button (you will hear one
audio beep tone for enabling confirmation and two audio beep tone for disa-
bling).
Attention: if you are in FM mode, you must first turn off the radio and then make a
“long”press on the Rear button.
Priority
The BTNext manage the different connection/audio sources based on the fol-
lowing priority rules.
Changing of the operative mode
Every time you change mode (long press of the middle button to toggle between
Intercom/ FM Radio / Phone), the previous audio is closed and the control goes
to the new mode.
Intercom
The Intercom has always a higher priority against the music from the FM Radio or
Phone (including GPS in music play mode). Every time you open the intercom the
music from a Bluetooth source is stopped. Only the audio/Music from the “AUX
wired connection” is always in background by default.
Phone calls
The phone call has always the higher priority and will interrupt every connection,
like music, intercom. Only the AUX wired connection can be still on if the setting
“Wired connection always in background” was enabled.
GPS voice announcement
The voice announcements from the GPS are available in background also during
intercom
AUX wired connection
Music or audio from the AUX wired connection, by default it is always in the
background also when the intercom is open or during a phone call. It is possible
to change this beaver following the procedure described in the “Setup and Special
configuration” chapter.
Using a PMR446 transceiver with the cable connection
In order to connect the transceiver to your Midland BTNext, you need to purchase
the specific 2.5mm plug AUX cable, sold separately. S
ome manufacturers radios use a different pin configuration, so we recommend
that you ask your dealer as to which cable is best suited to your needs
The cable connected to the transceiver normally has also a PTT button that can be
placed on the handlebar of your bike or held in your hand (If you are the pillion
rider).
To communicate via the attached radio, press the PTT button to speak and release
it to listen. It is not possible to talk and listen simultaneously.
Adjust the volume of the transceiver to your needs, remembering that the volume
adjustment is controlled by the automatic AGC system and that it will therefore
be automatically increased in relation to background noise.
If you wish to use a PMR446 transceiver for group communications and simul-
taneously maintain the Intercom feature enabled between two or more BTNext
devices, you must remember that every time you talk to communicate with the
PMR 446 transceiver (pressing the PTT button), you will also activate the intercom
of the BTNext to the unit connected to the “Middle” button (thanks to the VOX
feature).
To avoid the Intercom activation when you speak on the PMR446, you can decide
to pair the BTNext unit on the “Rear” or “Forward” (where the VOX is not active) or
if you still want to use the “Middle” button, you must disable the VOX feature, as

12 - Midland BT Next
UK
explained in the previous section.
Attention! If you disable the VOX feature, you will only be able to answer incoming
phone calls by pressing the “Forward” button.
Setup and special configurations
Resetting all paired devices
Sometimes you may find it necessary to delete all the pairing references stored in
the BTNext unit (reset operation).
To perform this operation you must first enter the setup mode:
›Turn off the unit
›Press and hold down the “Middle” button about 7 sec., until the Red light is
on permanently.
›Than simultaneously press and hold down the “Volume +” and “Volume –“
buttons for 3 seconds. The Blue Light will be lit on for 1 sec and than back
to steady RED.
›Double click on the “Middle” button to exit the “Setup” mode and use the
BTNext.
This procedure deletes all the paired Bluetooth devices stored in the memory and
it is therefore possible to start a new “clean” pairing session.
Back to factory setting
Sometimes you may find it necessary to go back to the factory setting, to reset all
the changes/setup already made and have a “clean” unit.
To perform this operation you must first enter the setup mode:
›Turn off the unit
›Press and hold down the “Middle” button about 7 sec., until the Red light is
on permanently.
›Than simultaneously press and hold down all the three buttons “Forward”-
“Middle”-“Rear” for 3 seconds. The Blue Light will be lit on for 1 sec and than
back to steady RED.
›Double click on the “Middle” button to exit the “Setup” mode and use the
BTNext.
Adjusting/ Disabling the VOX feature (Intercom and telephone)
The Intercom feature can be enabled both manually and vocally (VOX). The VOX
activation is influenced by the background noise and therefore by the speed.
For optimum results, it is possible to choose one of the following four microphone
sensitivity levels: high, medium, low and very low. The default setting of BTNext
is “low”. It is also possible to disable the VOX feature in order to activate the Inter-
com and phone call answering features in manual mode only.
Adjusting the sensitivity of the microphone (VOX)
To perform this operation you must first enter the setup mode:
1. Turn off the unit
2. Press and hold down the “Middle” button about 7 sec., until the Red light is
on permanently.
3. Your BTNext is now in “Set up mode”.
4. Press the “Rear” button until the red light indicator changes to a steady blue.
5. Now, press “Volume +” or “Volume -“ to increase or reduce sensitivity. Every
time you press the Volume buttons the RED light will flash for confirmation.
When you reach the end of the upper and lower limit, the RED light will not
flash.
6. Press again the “Backward” button; the Blue light will flash several times, in
order to let you know the selected sensitivity:
One flash = VOX disabled
Twice = very low sensitivity
3 times= low sensitivity
4 times= medium sensitivity (default setting)
5 times = high sensitivity
The light indicator is now back to steady RED (“Set up mode”) and the
changes are confirmed
7. If needed, you can adjust again the sensitivity repeating the steps from point
1, otherwise exit the Setting mode by double clicking the “Middle” button.
Once the red light turns off, the blue led starts blinking. Now you can use your
BTNext.
Disabling the VOX feature (Intercom and telephone)
Follow all the procedure described in the previous steps and choose the option of
only one flash (VOX disabled).
Wired connection always in background
This feature let you keep the wired connection always on, even when the phone
or the intercom is open. This feature can be useful when you connect a PMR446
transceiver.
By default this option is on.
Disabling:
›Enter the “Setup” mode:
›Turn off the unit
›Press and hold down the “Middle” button about 7 sec., until the Red light is
on permanently.
›Press the “Forward” and “Middle” button together for 3 seconds. The blue LED
will flash twice.
›Double click on the “Middle” button to exit the “Setup” mode and use the
BTNext.

14 - Midland BT Next
UK