Midland Radio CB1 CB TRANSCEIVER User Manual
Midland Radio Corporation CB TRANSCEIVER Users Manual
Contents
- 1. Users Manual
- 2. Part 95 Statement
Users Manual

1
www.midlandradio.com
CB-1
40 Channel CB radio with RF Gain
Owner’s Manual
www.midlandradio.com

2
www.midlandradio.com
Welcome to the World of Midland Electronics ������������������������������������������������������������������ 3
How to install your Midland mobile CB ����������������������������������������������������������������������������� 3
Installation and Operating Accessories ����������������������������������������������������������������������������� 4
Where to Locate your CB Transceiver ������������������������������������������������������������������������������ 4
Mechanical Mounting �������������������������������������������������������������������������������������������������������� 4
Power Wiring (negative ground only) �������������������������������������������������������������������������������� 5
Installation of Microphone Hanger ������������������������������������������������������������������������������������ 5
Antenna:
Selection �����������������������������������������������������������������������������������������������������������������������5
Installation ��������������������������������������������������������������������������������������������������������������������� 6
Tuning ��������������������������������������������������������������������������������������������������������������������������� 6
Range ��������������������������������������������������������������������������������������������������������������������������� 6
Noise ��������������������������������������������������������������������������������������������������������������������������������� 6
Front Panel Controls ��������������������������������������������������������������������������������������������������������� 8
Back Panel ������������������������������������������������������������������������������������������������������������������������ 8
Transceiver Operation ������������������������������������������������������������������������������������������������������� 9
Technical Specications �������������������������������������������������������������������������������������������������� 10
Service �����������������������������������������������������������������������������������������������������������������������������11
Index

3
www.midlandradio.com
Welcome to the World of Midland Electronics
Congratulations on your purchase of a state-of-the-art mobile CB radio� In the years
ahead, you can expect to realize time and again why Midland holds the front running
position among CB users everywhere� You will come to know that Midland power is
more than just a slogan, but the heading of long list of benets� As your Midland CB
experience unfolds and grows, we hope you will remember that CB is only one kind
of electronic excellence available under the Midland name�
Your 40 channel CB represents the state of the art in high tech engineering� The unit
incorporates microprocessor controlled PLL circuitry for precise tuning�
How to Install your Midland Mobile CB
This transceiver may be installed in any 12-volt negative ground-system car or truck�
Most current U�S� and foreign vehicles use a negative system, but some older
models and some newer large trucks may have a positive ground�
Check the requirements for your vehicle before you begin installation�
Generally, you have a negative-ground system if the minus ( - ) battery terminal is
connected to the motor block� Contact your dealer in the event you are unable to
determine your vehicle’s polarity system�

4
www.midlandradio.com
Installation and Operating Accessories:
1� Easy removal mounting bracket system�
2� Microphone bracket system�
3� All main-unit and microphone mounting hardware needed for normal installation�
4� Plug-in microphone with coil cord�
5� FCC part 95, Subpart D�
6� Owner’s Manual�
Where to Locate your CB Transceiver:
Your new Midland CB is designed to be installed under the dash or vertically on a
console of your vehicle� Safety and convenience are the primary considerations in
deciding exactly where to locate your radio�
Caution: Be sure that the unit is located so that it does not interfere with the driver,
supplemental restraint systems (air bags) or impair access to any controls� Connecting
cables must be routed and secured in such a manner as not to interfere with the
operation of the brake, accelerator or other controls� Interference from either the unit or
connecting cables may contribute to the loss of control of the vehicle�
Mechanical Mounting:
1� Heeding the caution, use the mounting bracket as a template for marking the
location of screw holes under the dash� Use an awl, nail or other sharp pointed
object to mark the hole locations�
2� Drill a 1/8” hole for each screw hole in the mounting bracket� Attach the bracket to
the dash with the Phillips head sheet metal screws provided�
Extreme care should be exercised when drilling into the dash to avoid
damage to under-dash electronic ignition, cruise control, instrument and /
or accessory wiring�
3� Position the main unit between the bracket arms in line with the retention knobs� Set
the angle for optimum operating, comfort and accessibility�
4� Tighten the retention knobs�

5
www.midlandradio.com
Power Wiring (negative ground only):
1� If you have not determined whether your vehicle has a negative or positive ground,
do so now� Then disconnect the negative lead from the battery to prevent short cir-
cuits that can occur during wiring� Do not connect this transceiver to positive ground
electrical systems�
2� With negative ground
A� Connect the positive (RED WIRE) the one with in-line fuse holder to either the (a)
fuse block, (b) cigarette lighter, or (c) directly to the positive post on your battery�
Usually, the fuse block is the most convenient connecting point� It is also
possible to connect to the Accessory terminal on the fuse block or ignition switch,
so that your CB automatically goes off when the ignition goes off�
B� Tightly connect the ground (BLACK WIRE) directly to the vehicle’s metal frame� A
good direct metal-to-metal ground is essential for optimum performance�
Installations using the cigarette lighter socket for power require an extra ground
wire from the radio chassis to the vehicle if the radio is not fastened to a
grounded part of the vehicle�
Installation of Microphone Hanger:
Mounting holes are provided on the microphone hanger bracket� The bracket can be
attached to the vehicle dash, the holes provided on the left side of the radio, or other
convenient location�
Antenna:
You can choose from two types of mobile CB antennas: full-length whip and loaded
whip - and a variety of mounts (depending on where you locate your antenna)� The
dealer who sold you your Midland CB can advise which type is best for you�
*Where you locate your antenna does make a difference.*
Some general rules for antenna location that can aid CB performance:
1� Put your mount as high on the vehicle as possible�
The higher the proportion of antenna length that is above the roof, the better�
2� If possible, mount the antenna in the center of whatever surface you choose�
3� Keep antenna cables away from noise sources, such as the ignition system, gauges,
etc�
4� Make sure you have a solid metal-to-metal ground�
5� Exercise care to prevent cable damage�
Essentially, you have ve location choices: the roof, gutter, rear deck, front cowl or
rear bumper� Where you decide to locate your antenna will determine the type of
antenna you install� Consult your Midland CB dealer for advice and guidance, and
measure your needs against the attributes of the various Midland antenna models
they carry�

6
www.midlandradio.com
Antenna Installation:
Follow the manufacturer’s installation instructions carefully�
Warning: Never operate your CB radio without attaching an antenna or with a broken
antenna cable� This will result in damage to transmitter circuitry�
Safety notice: The antenna used for this radio must be installed to provide a
separation distance of at least 8 in� (20cm) from all persons and must not be
co-located or operating in conjunction with any other antenna or transmitter�
Tuning Your Antenna:
Some antennas are factory tuned� However, performance can usually be improved by
slightly lengthening or shortening the antenna using a Standing Wave Radio (SWR)
meter� For the exact procedures to be used, refer to the antenna manufacturer’s
installation manual�
You can buy an SWR meter separately or have your antenna checked by your Midland
CB Dealer’s service department�
Factors affecting CB range:
Essentially, they are the same inuences that optimize or limit AM and FM broadcast
signals�
Terrain: Hills, valleys and buildings naturally interrupt and shorten CB signals� In short,
anything that is between you and the person you want to talk to can shorten your CB
range� You can expect to maintain maximum transmitting/receiving performance in
at, open country�
Weather: You can expect that CB range will be reduced – perhaps drastically – in times
of atmospheric disturbance, such as in a thunderstorm or heavy snow� Sunspots too
are known to adversely affect CB performance�
Noise:
A common source of excessive noise is the ignition system� In many vehicles today the
electric fuel pump is another possible source of noise� If you suspect this is true, turn
off the ignition� With the CB in receive mode if the noise is no longer present then
this is the source of the noise� In some cases the noise can be reduced or eliminated
by making sure the CB radio chassis is grounded� This is in addition to the power
cord� In extreme cases, additional grounding of components may be necessary�

7
www.midlandradio.com
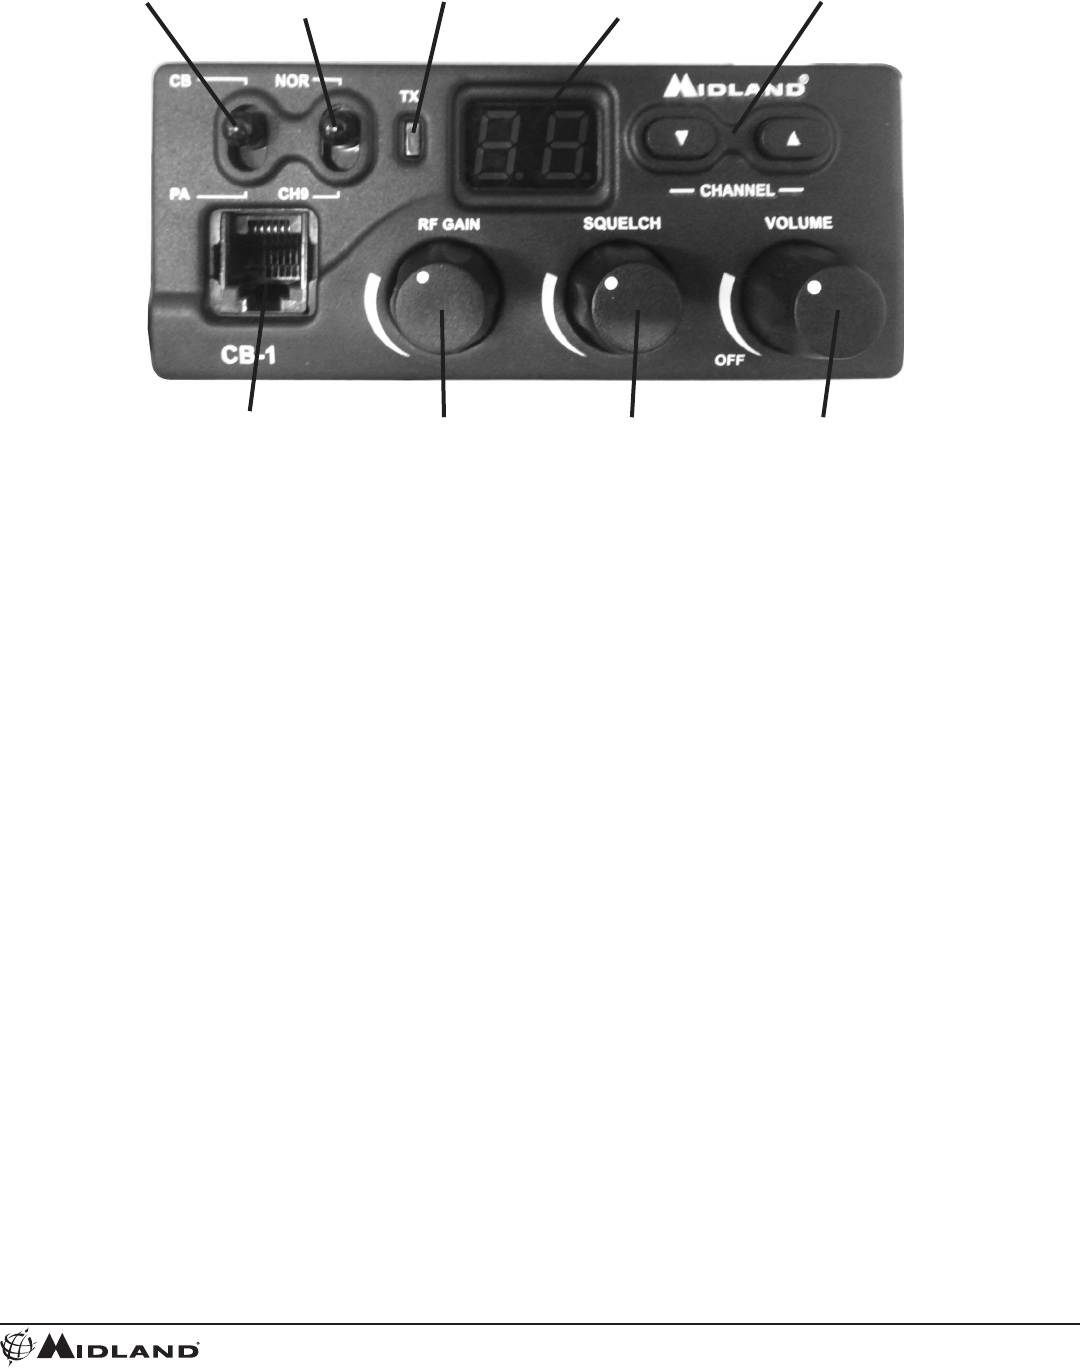
Operating Controls:
Microphone Connector: Plug in the supplied microphone to this connector�
Received signals will not be heard without the microphone�
ON/OFF Volume Knob: In the off position your transceiver power is off� Turn this
control clockwise to switch on the unit and adjust the volume�
Channel Buttons: This easy-to-operate control allows changing of CB channels, either
up or down�
Squelch Control: Adjust this control until background noise just disappears� If the
control is adjusted too far clockwise it may cause muting of weaker signals�
Channel Indicator: The LED displays the channel number�
TX LED: Indicator shows the unit is transmitting�
PA/CB Switch: When in PA mode, it causes your voice to operate the optional external
PA speaker� In CB mode, the microphone operates the transmitter�
Channel 9/Normal Switch: Allows you listen to emergency channel 9�
CB/PA
Switch
Normal /
CH9
Switch
TX
Indicator
Digital
Channel
Indicator
Channel
Select Buttons
Locking
Mic
Connector
RF Gain
Knob
Squelch
Knob
Volume
Knob

8
www.midlandradio.com
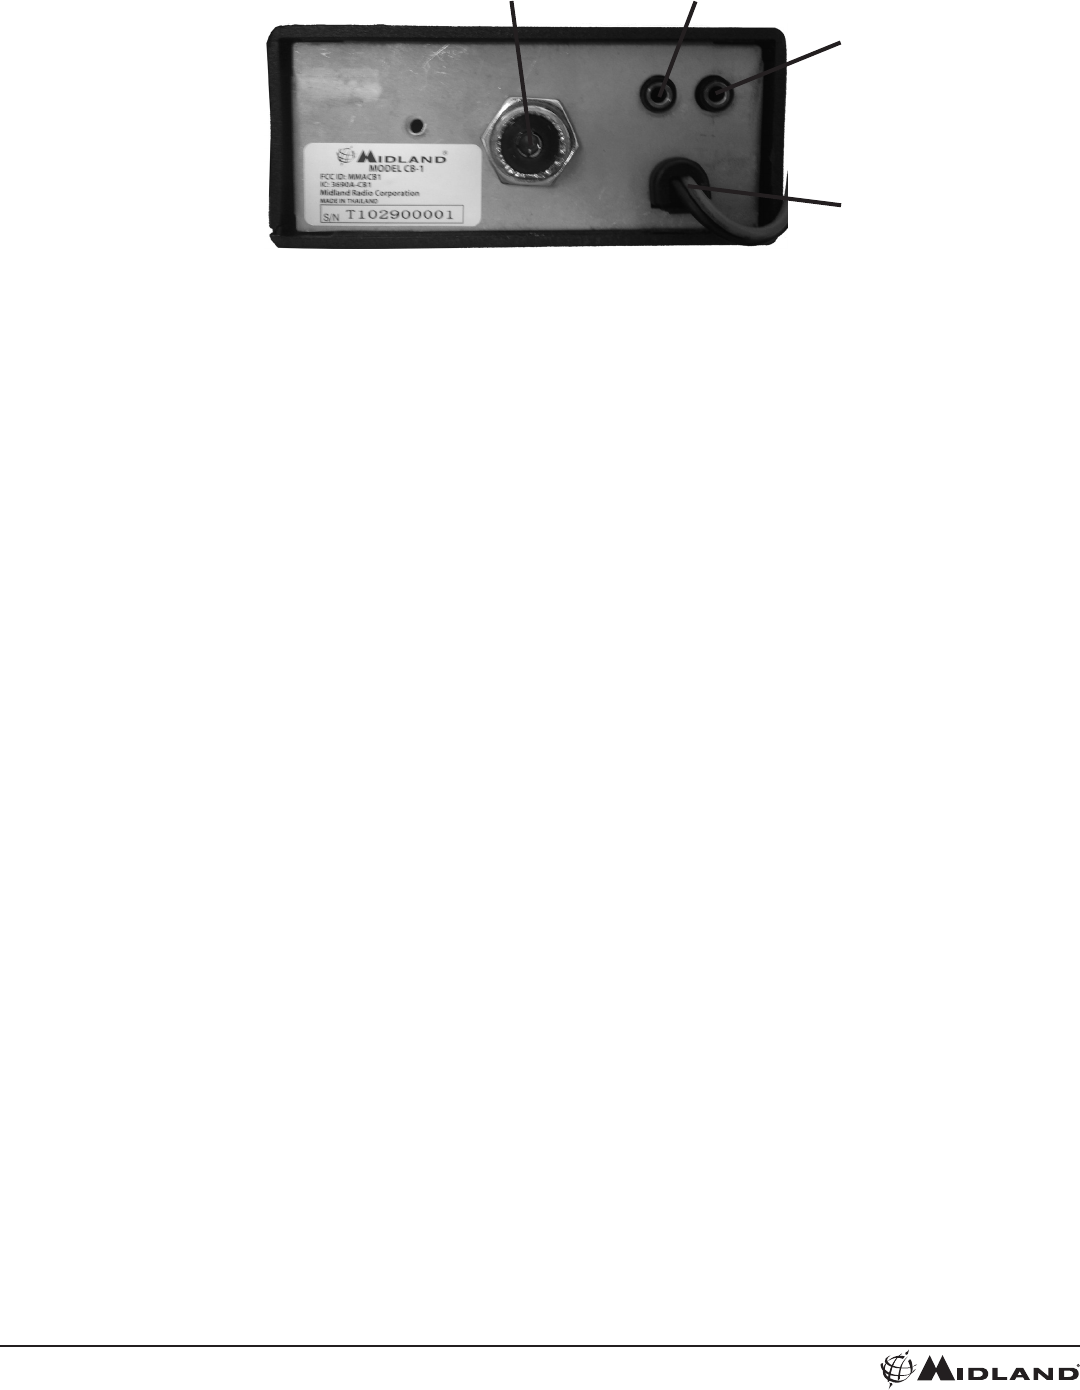
Back Panel:
Antenna Connector: Connect a standard 50-ohm CB antenna to this connector�
External Speaker Jack: When a speaker is connected to this jack, the internal speaker
is by-passed� All received signals will be heard through the external speaker� The
speaker connected to the “EXT” jack should be rated at 8 ohms and 5 watts�
PA Jack: An optional PA speaker may be attached to your transceiver through the PA
output jack on the back panel� This allows you to communicate with pedestrians or
other vehicles through your CB microphone� The speaker connected to the “PA” jack
should be rated at 8 ohms and 5 watts�
DC 13�8V POWER Cord: Connects to power cord with in line 2 amp fuse�
How To Operate your Transceiver:
You should become familiar with the controls and complete the preceding installation
instructions before attempting to operate your CB�
1� Rotate the on/off volume control clockwise to turn the unit on�
2� Adjust the squelch control fully counter-clockwise so noise is heard�
3� Adjust the volume for a normal listening level�
4� Rotate the squelch control until the noise just disappears�
5� Select the desired channel�
6� To transmit, press the PTT bar on the side of the microphone� Hold the microphone
2 to 3 inches from your mouth and speak in a normal voice�
7� To receive, simply release the PTT bar�
Warning: Do not attempt to make any internal adjustments� Internal adjustments
and/or modications can lead to illegal operation as dened by the FCC rules and
regulations, Part 95� They must be made only by qualied technical personnel�
Illegal operation can lead to serious consequences�
Antenna
Connector
PA
Jack EXT
Speaker
Jack
13�8VDC
Power
Cord

9
www.midlandradio.com
Technical Specications:
General
Frequency Range �������������������������������������������������������������������������������� 26�965-27�405 MHz
Channels ������������������������������������������������������������������������������������������������������������������������� 40
Modulation Type �������������������������������������������������������������������������������������������������������������AM
Antenna Impedance �����������������������������������������������������������������������������������������������������50 Ω
Loudspeaker ������������������������������������������������������������������������������������������������������������������8 Ω
Microphone������������������������������������������������������������������������������������������������� 1000 ٠Electret
Power Supply ���������������������������������������������������������������������������13�8 VDC negative ground
Size ������������������������������������������������������������������������������ 4-7/8” (W) x 6-1/2” (D) x 1-1/2” (H)
Unit Weight ����������������������������������������������������������������������������������������������������������1 lb� 10 oz
Receiver (CB, 26�965-27�405 MHz,)
Sensitivity at 10dB S/N ����������������������������������������������������������������������������������������������0�7 µV
Selectivity ���������������������������������������������������������������������������������������������������� 45dB + 10 kHz
Squelch Range �������������������������������������������������������������������������������������������0�5 µV - 500 µV
Audio Output Power �������������������������������������������������������������3�0 W @ 8 ٠(10% distortion)
Distortion at 1000 mV ����������������������������������������������������������������������������������������������������� 3%
Audio Frequency response �����������������������������������������������������������������������������400-2400 Hz
Intermediate Frequency ������������������������������������������������������1st: 10�695 MHz 2nd: 455 kHz
Spurious Response ��������������������������������������������������������������������������������������������������> 45dB
Transmitter
RF Output Power �������������������������������������������������������������������������������������������������������4�0 W
Frequency Tolerance �����������������������������������������������������������������������������������������������0�005%
Harmonic Suppression ��������������������������������������������������������������������������������������������> 60 dB
Modulation ��������������������������������������������������������������������������������������������������AM 90% (± 5%)

10
www.midlandradio.com
Service:
If it ever becomes necessary to return your unit for service:
Pack the unit in its original box and packing, improper packing may result in damage
during shipment� Be sure to remove the microphone from the radio before packing�
Include a full description of any problems� Include a daytime telephone number in the
event we need more information�
You do not need to return accessory items (brackets, screws, power cord, antenna,
etc�) unless they may be directly related to the problem�
Include a photocopy of the bill of sale or other proof of purchase showing the date of
sale (credit card statements are not acceptable)� This information must be included
before warranty service can be considered�
A at rate charge of $45 will apply to radios not covered by the Warranty� Master Card,
Visa, Cashier’s Check or Money Order will be accepted for payment only� Personal
checks will not be accepted and will delay the repair of your radio until we receive
payment by approved methods�
Midland Radio Corporation
Hereby certies that this unit has
been designed, manufactured,
FCC type accepted and certied
in accordance with Part 95 and
Part 15, Subpart C of the current
FCC rules and regulations as of
the date of manufacture�

11
www.midlandradio.com
Limited Warranty:
Midland Radio Corporation will repair or replace, at its option without charge this model
CB1 Citizens Band transceiver that fails due to a defect in material or workmanship
within Three years following the initial consumer purchase�
This warranty does not include any accessories, which may be a part of or included
with the warranted product, or the cost of labor for removal or re-installation of the
product in a vehicle or other mounting�
Performance of any obligation under this warranty may be obtained by returning the
warranted product, freight prepaid, along with proof of purchase date, to Midland
Radio Corporation , Warranty Service Department, 5900 Parretta Drive, Kansas City,
Missouri 64120, or to any “Midland Authorized Warranty Service Station,” or to the
place of purchase (if a participating dealer)� This warranty gives you specic legal
rights, and you may also have other rights which vary from state to state�
Note: The above warranty applies only to merchandise purchased in the United States
of America or any of the territories or possessions thereof, or from a U�S� Military ex-
change� For warranty coverage on merchandise purchased elsewhere, consult the
supplemental warranty information included with this product or ask your dealer�
MIDLAND RADIO CORPORATION
5900 Parretta Drive
Kansas City, MO 64120
Phone 816-241-8500
E-mail: mail@midlandradio�com
www�midlandradio�com
Printed in Thailand