Midland Radio SAU1900E PCS Band CDMA Wireless Local Loop Transceiver User Manual LAU 800 USERS GUIDE Rev B
Midland Radio Corporation PCS Band CDMA Wireless Local Loop Transceiver LAU 800 USERS GUIDE Rev B
Manual

1
SAU-1900E USER’S GUIDE
(Draft: Version 0.00)
INTRODUCTION
Your new MAXON SAU-1900E is designed to provide quality sounding voice
communications to other people using almost any regular wire-line telephone in areas
where normal ‘wired’ telephone service is not available. By using the same technology as
digital cellular telephones, your SAU-1900E, in conjunction with a cellular service
provider, replaces the traditional wire-line service with a state of the art wireless
telephone service.
TABLE OF CONTENTS
GETTING STARTED .................................................................................................................................... 2
GETTING TO KNOW YOUR SAU-1900E ..................................................................................................3
SERIAL NUMBER ........................................................................................................................................ 4
SECURITY..................................................................................................................................................... 5
SAFETY ......................................................................................................................................................... 5
Personal Safety............................................................................................................................................ 5
Dangerous Operating Environments ........................................................................................................... 6
SAU-1900E INSTALLATION AND CONNECTION................................................................................... 7
Existing Telephone Service......................................................................................................................... 7
Battery Installation...................................................................................................................................... 8
Battery Charging ......................................................................................................................................... 9
Where to Install The SAU-1900E............................................................................................................. 10
Modular Jack Requirements...................................................................................................................... 11
Desktop Installation .................................................................................................................................. 11
Wall-Mount Installation............................................................................................................................ 12
Connecting the SAU-1900E to Your Telephone(s)................................................................................... 14
SAU-1900E OPERATION ........................................................................................................................... 16
LED Indicators.......................................................................................................................................... 16
Making Calls............................................................................................................................................. 17
Receiving Calls ......................................................................................................................................... 18
Advanced Features.................................................................................................................................... 18
DATA COMMUNICATIONS/MODEMS/FAXES/ETC............................................................................. 18
THE BATTERY, AND WHEN TO REPLACE IT ...................................................................................... 18
Battery Replacement ................................................................................................................................. 19
CLEANING THE SAU-1900E..................................................................................................................... 21
TROUBLESHOOTING GUIDE .................................................................................................................. 22
ACCESSORIES/OPTIONS .......................................................................................................................... 27
TECHNICAL SPECIFICATIONS ............................................................................................................... 28
FCC NOTICE (pending approval)................................................................................................................ 29
WARRANTY INFORMATION................................................................................................................... 29
FOR YOUR RECORDS ............................................................................................................................... 29
2
GETTING STARTED
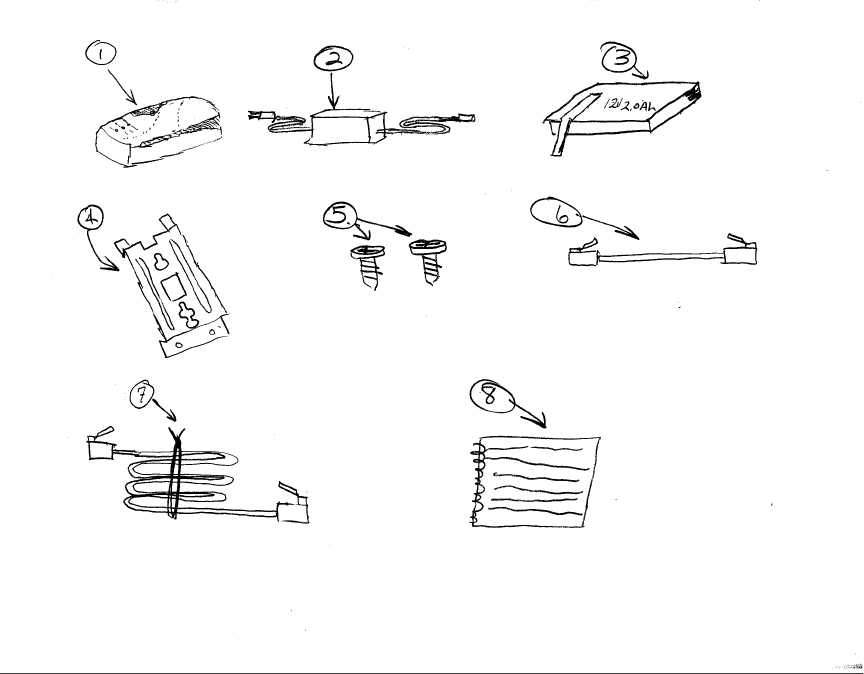
Make sure that the following items are enclosed in your SAU-1900E box:
1. SAU-1900E unit
2. AC power supply
3. 12V battery
4. Wall mounting bracket
5. Screws for bracket (2 M4x6mm self-tapping, Phillips head screws)
6. 8” (20.3cm) telephone cable for wall mounting
7. 6’ (1.83m) telephone cable for desktop use
8. This user’s guide
9. Warranty card (not shown).
If any parts are missing, please contact your service provider or dealer.
For your convenience, please keep the SAU-1900E’s original carton and packing material
in case of a return or needed warranty work.
3
Note: Please read through this entire manual before starting the installation and use of
your SAU-1900E. If you have any questions concerning the installation or use of your
SAU-1900E, please contact the dealer where you purchased your SAU-1900E.
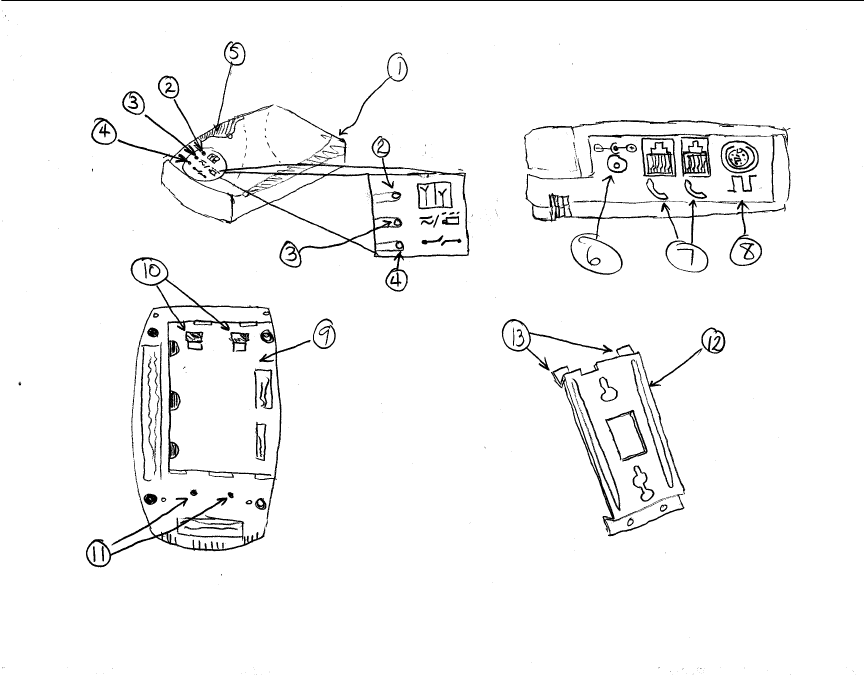
GETTING TO KNOW YOUR SAU-1900E
1. Antenna
2. Signal LED
3. AC/Battery LED
4. Disruption LED
5. SIMM Card Cover (not used at this time)
6. Power connector
7. Two RJ-11 Modular Jacks
8. Service Port (to be used only by your service provider or dealer).
9. Battery door cover
10. Bracket Prong Recesses
11. Wall Mounting Bracket screw holes
12. Wall Mounting Bracket
13. Bracket Prongs
4
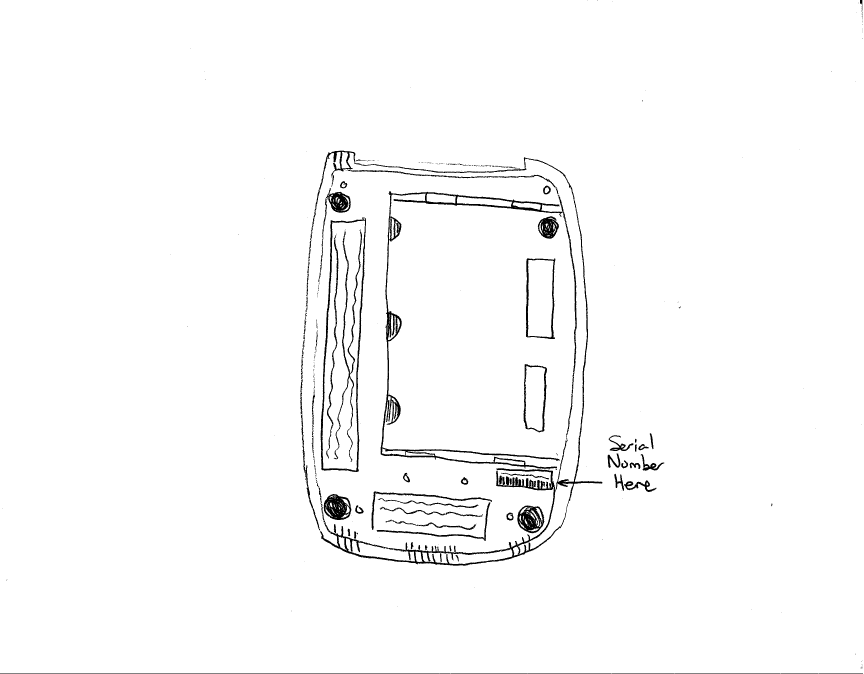
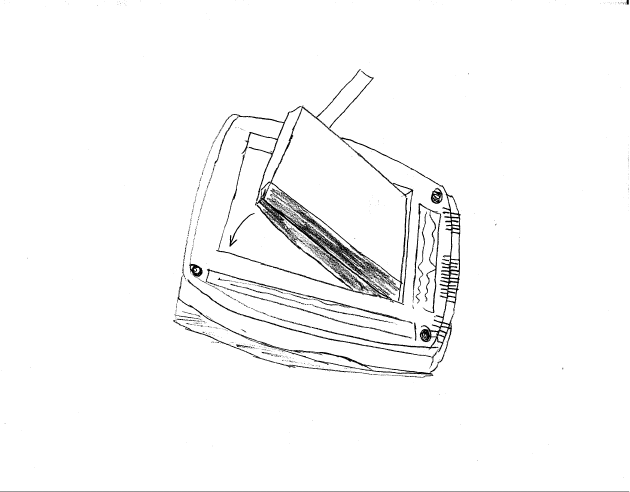
SERIAL NUMBER
Whenever you call the network operator or service provider with questions about
your SAU-1900E, they will need the serial number of your SAU-1900E. This is printed
on the label attached to the back of the SAU-1900E on a label above a bar code (see
figure below). An ideal time to record the serial number of your SAU-1900E would be
when installing the SAU-1900E for the first time. Record the serial number in the back of
this guide, and store this guide (along with your sales receipt) in a safe place separate
from the SAU-1900E for future reference.
5
SECURITY
If your SAU-1900E is ever lost or stolen you must report it to your network
operator or service provider as soon as possible so that they can prevent your SAU-1900E
from unauthorized use. This is important, as you may be liable for the cost of
unauthorized calls until your SAU-1900E is reported lost or stolen. The network operator
or service provider will need the serial number of your SAU-1900E in order to prevent it
from unauthorized use.
SAFETY
Personal Safety
Your SAU-1900E is basically a radio transmitter and receiver. When it is
powered (either from the AC power supply or from the internal battery) it receives and
transmits radio frequency (RF) energy and the system handling your calls controls its
power level. It may transmit RF energy even when you are not actively placing a call in
response to data sent by the service provider or in response to incoming calls. The design
of the SAU-1900E complies with national safety guidelines with respect to human
exposure and RF energy. However, you can choose to limit RF exposure even further by
locating the SAU-1900E in a room, or closet, remote from the areas where your
telephones are located.
Furthermore, your SAU-1900E internally uses voltages/currents that could pose
possible electric shock hazards, which could result in bodily injury. For your safety, do
not attempt to open the SAU-1900E for any purpose other than replacing the battery
(refer to Battery Installation and Battery Removal) or determining the serial number of
your SAU-1900E (refer to SERIAL NUMBER).
The SAU-1900E enclosure has several slots and openings that are provided to
protect it from overheating by providing adequate ventilation. In order for adequate
ventilation to be provided, these slots and openings must never be covered or blocked.
To prevent blocking these slots and openings, do not place the SAU-1900E on a bed,
sofa, rug, or other similar surface, nor place anything on the SAU-1900E. Furthermore,
do not push any object through these slots and openings as the object may touch
dangerous voltage points or cause damage to the SAU-1900E, which could result in risk
of fire or electrical shock.
Finally, you need to unplug the SAU-1900E from the wall outlet and remove the
internal battery, and contact your service provider or dealer for service of the SAU-1900E
whenever one or more of the following has occurred:
1. When the AC power supply cords (either the cord that plugs into the SAU-1900E or
the cord that plugs into a wall outlet) is damaged or frayed.
6
2. If liquid has been spilled into the SAU-1900E.
3. If the SAU-1900E has been exposed to water or rain.
4. If the SAU-1900E has experienced a severe, physical shock and the cabinet has been
damaged.
5. If the SAU-1900E exhibits a distinct change in performance that is not documented in
these instructions.
6. If the SAU-1900E does not operate normally according to these instructions, and the
troubleshooting guide has not solved the problem. Do not attempt to service the
SAU-1900E yourself, as this could result in risk of fire or personal injury.
Dangerous Operating Environments
IT IS RARE, BUT YOUR SAU-1900E OR ATTACHED PHONES AND
ACCESSORIES COULD GENERATE SPARKS. THEREFORE, YOU SHOULD NOT
LOCATE THE SAU-1900E IN AN AREA WITH A POTENTIALLY EXPLOSIVE
ATMOSPHERE SINCE ANY SPARK COULD CAUSE AN EXPLOSION OR A FIRE
RESULTING IN BODILY INJURY, OR EVEN DEATH.
DO NOT STORE FLAMMABLE GAS, FLAMMABLE LIQUID, OR
EXPLOSIVES CLOSE TO THE SAU-1900E.
CONSTRUCTION CREWS OFTEN USE REMOTE-CONTROL RF DEVICES
TO SET OFF EXPLOSIVES, SO DO NOT USE THE SAU-1900E IN AREAS WHERE
BLASTING OPERATIONS ARE IN PROGRESS.
TO PREVENT FIRE OR SHOCK HAZARD, DO NOT EXPOSE THE SAU-
1900E TO RAIN OR ANY TYPE OF MOISTURE.
7
SAU-1900E INSTALLATION AND CONNECTION
The SAU-1900E is designed to provide telephone-like service in areas for which
normal wire line telephone service is not available or where the installation of additional
telephone wire lines are not considered practical.
Existing Telephone Service
The SAU-1900E is intended to provide voice communications using regular,
wire-line telephones without a wire-line service provider. It can also be used to provide
additional lines in a house or business that already have wire-line service. However, the
SAU-1900E cannot be tied into lines that already have existing wire-line or wireless
telephone service. If the SAU-1900E is tied into these existing telephone lines, it will
disrupt the SAU-1900E’s capability of providing telephone service as well as disrupting
the other telephone service.
To test for an existing telephone service, plug a telephone into a wall jack in the
house or business that you want to use the SAU-1900E. Follow the telephone’s
instructions for placing a call, listening for a dial tone. If no dial tone is heard while
trying to place a call, the SAU-1900E can be used. If a dial tone is heard, you already
have some type of telephone service. Contact your service provider or dealer for
instructions on what you should do in this situation.
8
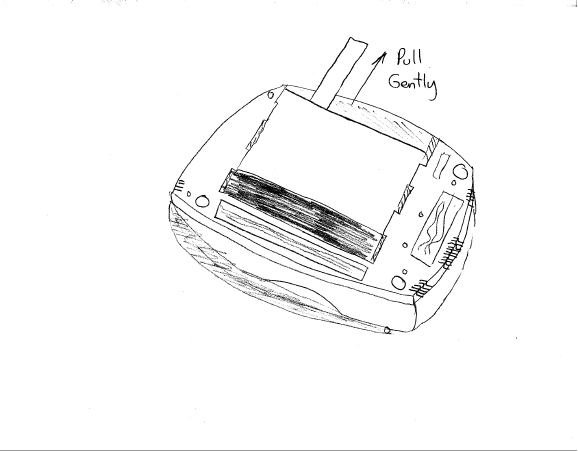
Battery Installation
Before installing the SAU-1900E, you need to install the battery into the SAU-
1900E.
1. Insure that nothing is connected to the SAU-1900E.
2. Place a soft cloth on a flat work surface, such as a table.
3. Turn the SAU-1900E upside down onto a soft cloth and orient the SAU-1900E such
that the three semi-circular/ridged cover release latches are toward you.
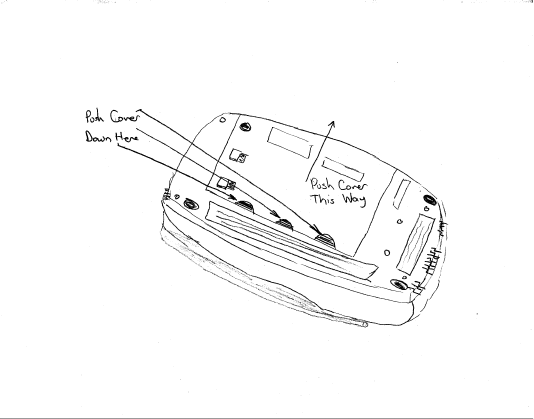
4. Remove the battery cover by depressing the semi-circular/ridged cover release latches
and pushing the cover away from you. It should move toward the edge opposite you.
Slide the cover completely out.
5. Turn or rotate the battery so that the silver terminals on the battery will align with the
battery terminals located in the battery compartment.
6. Then insert the end of the battery closest to the terminals into the compartment, while
also pulling gently on the battery strap (so that it will not be bunched up on the side of
the battery). Press the battery into the compartment so it fits flush with the bottom of
the housing.
7. Slide the battery cover in place (making sure that the strap lays flat on the battery) and
make sure the latches lock into place.
9
Battery Charging
The SAU-1900E has a built-in battery charger. It will automatically restore a fully
discharged battery to nearly full charge within 24 hours of AC power being restored or
applied. No external charger is necessary.
CAUTION:
1. Avoid battery terminal short circuits (in other words, DO NOT let anything metal
touch the two silver terminals on the battery at the same time). A fully charged
battery can supply a very large current (more than 100 amps) which create a large
amount of heat resulting in burns, smoke, or even fire.
2. DO NOT expose the battery to open flame.
3. DO NOT disassemble the battery. The batteries contain dilute sulfuric acid, which
could damage eyes, skin or clothing and result in loss of eyesight or burns.
4. The battery contains lead and should be recycled or disposed of properly. Contact
your service provider or dealer for details.
5. Only use approved batteries (YUASA OR YUASA-EXIDE Model NP2-12). Using
other batteries will invalidate your warranty and may cause damage or injury as well.
10
Where to Install the SAU-1900E
Also before installing the SAU-1900E, you need to determine where you want to
install it. The SAU-1900E can be used on a flat horizontal surface, such as a desktop,
table, etc. It can also be mounted on a wall. However, you should consider the following
in determining where to install your SAU-1900E:
1. Do not place the SAU-1900E on an unstable cart, table, stand, etc. The SAU-1900E
may fall and be damaged.
2. Place the SAU-1900E near an AC electrical outlet, or wherever AC power is
available.
3. If you wish to use the SAU-1900E to drive your house or business telephone lines,
place the SAU-1900E by a modular telephone wall jack that is connected to other
modular telephone jacks within your house or business.
4. Do not place the SAU-1900E by anything that generates a great amount of heat, such
as radiators, baseboard heaters, portable heaters, space heaters, ovens, fireplaces, etc.
Placement of the SAU-1900E by these locations could possibly damage the exterior
enclosure and effect the performance of the SAU-1900E.
5. Do not place the SAU-1900E near liquids, for example near sinks, kitchen counter-
tops, kitchen tables, bathtubs, swimming pools, in wet basements, etc.
6. Do not place the SAU-1900E in direct sunlight, such as by a window. Direct sunlight
can cause the exterior finish to fade, and possibly cause the SAU-1900E to
malfunction.
7. Do not place the SAU-1900E where the temperature will be below -15°C (+5°F) or
above +50°C (+122°F). Temperatures beyond these ranges could possibly damage
the SAU-1900E.
8. It is recommended not to place the SAU-1900E by a television set. Although every
effort has been made for the SAU-1900E to not cause interference on a television,
interference is still possible.
9. Use of cordless telephones with the SAU-1900E is permissible. However, you may
want to keep the cordless telephone base and handset away from the SAU-1900E, as
they may generate interference toward each other.
10. Computers can some times cause interference to the SAU-1900E. If the sound quality
of your SAU-1900E degrades when switching on a computer, move the SAU-1900E
further away from the computer (i.e. case, monitor, etc.). You may also want to plug
the SAU-1900E’s AC power supply into another outlet that is different from the
computer.
11. Microwave ovens can sometimes generate interference to the SAU-1900E. If the
sound quality of your SAU-1900E degrades when switching on a microwave oven,
move the SAU-1900E further away from the oven. You may also want to plug the
SAU-1900E’s AC power supply into another outlet that is different from the oven.
12. If possible, try to place the SAU-1900E in the highest place that is practical and
convenient. Do not place the SAU-1900E in a basement, if possible.
13. If you use any type of radio transmitters, such as citizen band radios, amateur radio,
etc., it is recommended not to place the SAU-1900E by these radios or their antennas.
11
You may also want to plug the SAU-1900E’s AC power supply into another outlet
that is different from the radio transmitter.
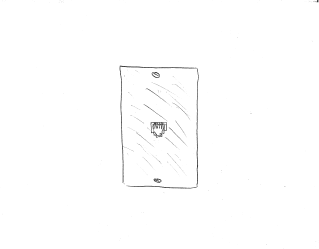
Modular Jack Requirements
The SAU-1900E uses two RJ-11 type modular jacks (RJ-11 jack, shown below).
These types of jacks are very convenient for connecting and disconnecting phones to your
SAU-1900E, and connecting the SAU-1900E to an existing telephone network in your
house or business. However, it is possible that where the SAU-1900E is to be used,
another type of jack or even bare wire connections could be used instead. If this is the
case, please contact the dealer where you purchased your SAU-1900E or your local
service company for the appropriate adapters and instructions for their use.
Desktop Installation
Installing your SAU-1900E on a desktop is very easy. Simply place the
SAU-1900E on any flat, horizontal, stable surface, such as a desktop or table. Then
proceed to the section entitled connecting the SAU-1900E to Your Telephone(s).
12
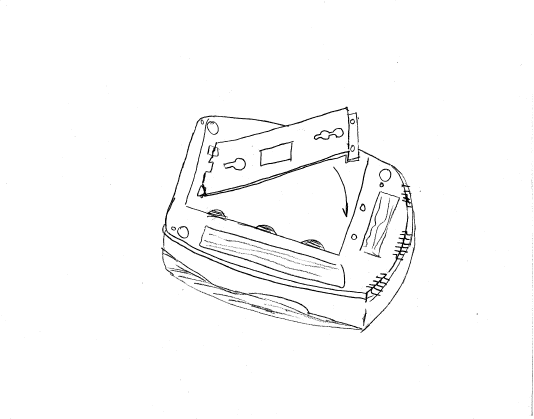
Wall-Mount Installation
Before installing the SAU-1900E on a wall, make sure that you have already
installed the battery (refer to Battery Installation).
For the SAU-1900E to be mounted on a wall, a telephone wall plate must already
be installed (it is not included with the SAU-1900E). If you do not have a wall plate, and
wish to mount your SAU-1900E on the wall, you will need to contact a general contractor
to run the telephone wire and install the wall plate.
Note: The SAU-1900E is heavier than most telephones. It is highly recommended that
the above-mentioned wall plate be secured to the wall with anchor bolts, or other such
means of making an extremely secure attachment of the wall plate to the wall.
For this installation, you will need a small, Phillips head screwdriver.
1. Place a soft cloth on a flat surface, such as a table.
2. Place the SAU-1900E upside down on the cloth, such that the grills on the front of the
SAU-1900E are facing you.
3. Take the wall-mounting bracket in hand. On one end of the bracket you have a flat
surface with two small holes. This is the bottom of the bracket. On the other end you
will see two small, rectangular prongs. This is the top of the bracket. Place these
prongs into the top of the battery cover into the prong recesses, and let the other end
of the bracket touch the bottom portion of the SAU-1900E.
4. Line the holes in the bottom part of the bracket with the holes in the SAU-1900E.
13
5. Using the screws that came with the SAU-1900E, place the screws into holes on the
SAU-1900E through the holes in the bracket, and screw in the screws until the
bracket is secure to the SAU-1900E.
Note: Do not use any other screws other than what is included in your package. If you
lose the screws, however, you may use two M4, self-tapping Phillips head screws of
lengths between 5-8mm, but absolutely no longer than 8mm.
6. Taking the SAU-1900E bracket assembly in hand, insert the supplied short telephone
cable through the small opening in the top of the bracket (between the prongs). Then,
pull the telephone cable through the rectangular opening in the middle of the bracket.
7. Plug the end of the telephone cable that is now placed in the middle opening of the
bracket into the wall plate.
8. Gently pulling up on the free end of the telephone cable, take up the slack of the
cable, and slip the mounting holes of the bracket over the wall plate posts.
9. Slide the SAU-1900E firmly into place by pushing gently down (you will feel the
SAU-1900E stop moving when it is locked into position).
10. Insert the free end of the telephone cable into one of the RJ-11 jacks on the top of the
SAU-1900E.
14
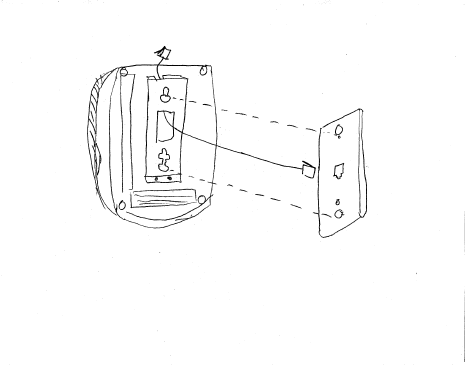
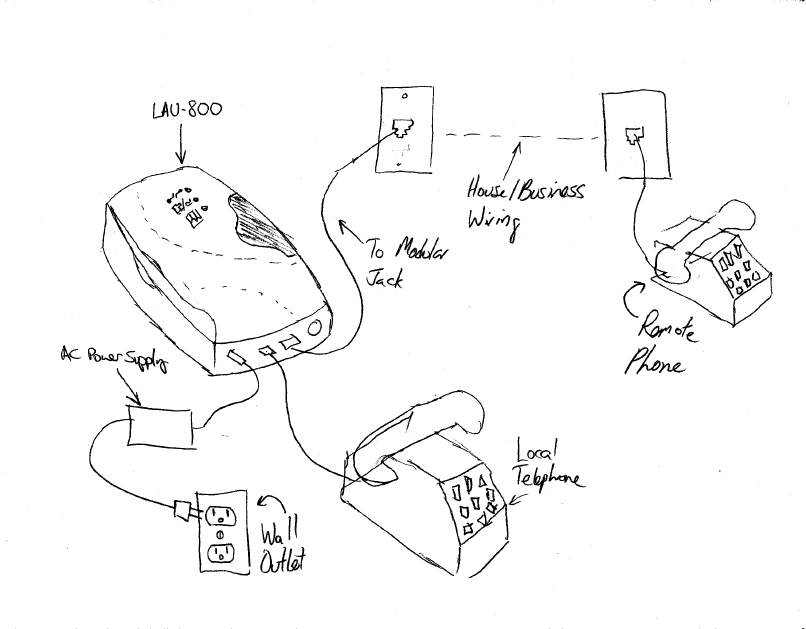
Connecting the SAU-1900E to Your Telephone(s)
The SAU-1900E may be connected to up to 4 Ringer Equivalency Number (REN)
loads. The actual number of telephones that may be connected, however, depends upon
the load each telephone provides. Telephone manufacturer’s are required by FCC
regulations to stamp the value of the telephone load on the telephone themselves (usually
the bottom) and these numbers usually appear as follows: “REN: 1.0B” or “REN: 0.3A”.
It may also appear as “RINGER EQUIVALENCE: 1.0A”. You can ignore the ‘A’ or ‘B’
designations and only count the actual number values shown. Make sure that after adding
up the REN's on all the phones, the count does not exceed 4.0.
To connect the SAU-1900E in a business, or residence, is relatively easy. The
following diagram shows a typical installation for two phones:
1. Determine the location where the SAU-1900E will be installed (see Where to Install
the SAU-1900E).
2. Install the SAU-1900E (see Desktop Installation or Wall-Mount Installation).
3. Verify that the included antenna on the SAU-1900E is pointing up (vertically). If you
are using an external antenna, connect the antenna connector to the SAU-1900E.
4. Connect the AC power supply adapter plug into the POWER jack on the back of the
SAU-1900E, then plug the AC power supply into an AC Wall Outlet.
▲
▲▲
▲! Warning: Use only the AC power supply that came with the SAU-1900E. Use of
any other AC power supply could damage the SAU-1900E and void your warranty.
▲
▲▲
▲! Warning: Make sure that the AC power supply voltage input of the power supply
provided with your SAU-1900E matches the AC voltage in your house or business. If
you are not sure, contact a qualified electrician.
▲
▲▲
▲! Warning: Do not overload electrical wall outlets and electrical extension cords as
this can result in the risk of fire or electrical shock.
▲
▲▲
▲! Warning: Place the AC power supply cord where it will not be abused by people
walking on it, pets chewing on it, etc.
5. Using a standard RJ-11 modular jack connector connect the SAU-1900E to a
telephone or modular wall jack using common two-wire or four-wire flat telephone
cable. (This will have already been done in the wall-mount installation).
15
The longest length of cabling for which the SAU-1900E has been designed is
1000 feet (305 meters). This should be sufficient for most installations. However, if your
wiring is longer than 1000 feet, you may experience some audio problems with your
telephone(s).
Note: Do not allow anything to rest on telephone cords attached to the SAU-1900E. Do
not locate the cord in a pathway or in a location where it is easily accessible to pets or
small children, etc.
6. After installing the SAU-1900E, follow the instructions of one of the attached
telephones to place a call, but do not dial a number. If you hear a dial tone within a
few minutes of power-up, the SAU-1900E is properly connected and has detected the
local network service provider. You may begin making and receiving telephone calls.
7. If you hear a BEEP - BEEP - BEEP -…. Etc. the SAU-1900E has also been connected
properly, but has not located a network service provider. Adjust the antenna and/or
move the SAU-1900E to try to find an area of maximum RF reception. If you are still
unable to receive a dial tone you should contact your service provider for assistance.
8. If you don’t hear any sounds coming from the telephone, follow the telephone’s
instructions for placing a call, and listen to the receiver while pressing some of the
number keys on the telephone. If you do not hear any tones coming from the
telephone speaker the problem could be a faulty cable or connector, or the SAU-
16
1900E may not be powered (dead or missing battery and no power from the AC/DC
adapter). If all of these items have been checked and you still have no tones coming
from the telephone you should return it to your service provider for service and/or
assistance.
SAU-1900E OPERATION
LED Indicators
Your SAU-1900E has three LED's (light emitting diodes) to let you know the
status of your SAU-1900E unit. They are:
SIGNAL: This LED is an indicator of the received signal strength from a cellular base
station that communicates with your SAU-1900E. It has three possible states:
1. When the SIGNAL LED is constantly lit your SAU-1900E and the cellular base
station should have no difficulties communicating with each other.
2. When the SIGNAL LED is blinking, this means that communication between the
SAU-1900E and the cellular base station is working, but marginal. This means that
you should still be able to place and receive calls, but could possibly experience
occasional dropouts in your conversation and even occasional dropped calls. (If you
are using the included antenna, and experience this condition frequently, you may
want to talk to your service provider about getting an externally mounted antenna to
improve your reception.)
3. When the SIGNAL LED is not lit, this means that your SAU-1900E is not
communicating with the cellular base station. This means that you will not be able to
place a call or receive a call on your SAU-1900E.
AC/BATTERY: This LED is an indicator of the power source being presently used by the
SAU-1900E. It has three possible states:
1. A constantly lit AC/BATTERY LED indicates that AC power is being used to power
the SAU-1900E.
2. When the AC/BATTERY LED is blinking, this indicates that no AC power is present,
and the internal battery is powering the SAU-1900E.
3. When the AC/BATTERY LED is off, this indicates that the SAU-1900E is not
powered (i.e. no AC power is provided, and either the internal battery has been
completely discharged or is not installed). In this condition, the SAU-1900E will not
be able to provide any telephone service.

17
DISRUPTION: This LED is an indicator of a malfunction of the SAU-1900E. It has two
possible states:
1. When the DISRUPTION LED is lit, the SAU-1900E has definitely experienced a
malfunction. Service is required for the SAU-1900E. Call your dealer for
instructions on returning the SAU-1900E. You will receive a RMA (Return
Merchandise Authorization) number. Send the SAU-1900E to your dealer with
the RMA number on it at the address the dealer specifies. Please send the SAU-
1900E for repair in the original carton and packing material. If your original
carton and packing material is not available, ask your dealer for instructions on
how to pack your SAU-1900E so that damage will not occur during shipment.
2. When the DISRUPTION LED is not lit, one of three things is true:
a) The SAU-1900E is working properly and is being powered by either AC
power or the battery.
b) AC power or the battery does not power the SAU-1900E. The SAU-
1900E cannot operate without some type of electrical power.
c) AC power or the battery is powering the SAU-1900E, but the SAU-1900E
is still not working properly. The disruption LED can indicate most, but
not all problems that could occur with the SAU-1900E.
Making Calls
Making calls on a telephone connected to the SAU-1900E is nearly as simple as
placing a call on a standard wire-line service. Simply follow the telephone’s instructions
for placing a call and press the keys for the number you wish to call. Once you have
entered all the digits, press the <#> key to send the dialed number to the service provider.
At this point operation is identical to a wire-line phone.
Note: In order for a telephone to be used to place calls with the SAU-1900E, the
telephone must be a touch-tone phone only or a phone that is switchable between
“TONE” and “PULSE”(“ROTARY”) dial. On the phones that are switchable between
“TONE” and “PULSE”(“ROTARY”) the phone must be set to “TONE” to place a call.
A “PULSE”(“ROTARY”) phone can be used to receive calls; However, you will not be
able to use any advanced features such as CALL FORWARDING, 3-WAY CALLING,
etc., or any other feature that requires you to dial a number. For your convenience, we
recommend using only phones that use only “TONE” or that are “TONE/PULSE”
switchable.
18
Receiving Calls
Receiving calls on a telephone connected to the SAU-1900E is identical to
receiving calls on a standard wire-line service. When a telephone that is connected to the
SAU-1900E rings, simply follow the telephone’s instructions for receiving a call.
Advanced Features
Your service provider may support other features such as CALLER ID, CALL
WAITING, CALL FORWARDING, 3-WAY CALLING and other similar features. If
you are interested in using these features contact your service provider for details.
DATA COMMUNICATIONS/MODEMS/FAXES/ETC.
Your SAU-1900E will provide quality voice communications, but it will not
support data communications, such as using an analog modem or facsimile machine
(“fax” machine). If you need these types of services, contact your service provider or
dealer about the MDL-1 Analog Fax/Data Service option for your SAU-1900E.
THE BATTERY, AND WHEN TO REPLACE IT
Your SAU-1900E comes with a sealed lead-acid battery for supplying backup
power in the event of an outage, or brownout, of normal AC power. Under normal usage
conditions your battery can be used for up to four years. The battery allows you to place
or receive a call even after AC power has been lost for a short time (known as backup
time). The actual backup time will vary with the age of the battery, how many times it
has been charged and discharged, and distance from the telephone service provider’s RF
transmitter/receiver. However, you should consider replacing the battery if any one or
more of the following occurs:
1. The battery is older than fours years.
2. While AC power is removed from the SAU-1900E (by unplugging the AC power
supply from the wall outlet), the battery indicator does not blink every 2-3 seconds.
3. No sound can be heard out of a telephone connected to the SAU-1900E when the AC
power supply adapter is not powered (by unplugging the AC power supply from the
wall outlet).
19
4. It can no longer provide 1 hour of talk-time following a full charge (a battery will
reach a near-full charge condition after AC power has been on for 24 hours
continuously).
5. When it no longer can provide at least 16 hours of standby time following a full
charge (a battery will reach a near-full charge condition after AC power has been on
for 24 hours continuously).
Battery Replacement
1. Before you begin, make sure that you have purchased a new battery.
2. Place the antenna down into the down position, or if you are using an external
antenna, disconnect the antenna.
3. Disconnect the SAU-1900E’s AC power supply from the wall outlet, and then from
the back/top of the SAU-1900E.
4. Disconnect all telephone lines that are plugged into the back/top of the SAU-1900E.
5. If you have installed your SAU-1900E using the desktop installation, skip to step 14.
Otherwise, you will need a small, Phillips head screwdriver.
6. Place a soft cloth on a flat work surface, such as a table.
7. Holding onto the top of the SAU-1900E with one hand, push the bottom of the SAU-
1900E up gently until you feel it unlock.
8. Pull the SAU-1900E gently toward you. It should come off the wall plate.
9. Unplug the short telephone cable that is plugged into the wall plate.
10. Remove the short telephone cable from the bracket by pulling the cable through the
small opening in the bracket between the prongs. Save this cable, you will need it to
reinstall the SAU-1900E.
11. Place the SAU-1900E on the soft cloth, with the bracket side up and the screws
toward you.
12. Unscrew the screws that are holding the bracket in place.
13. Move the end of the bracket where the screws were located up slightly, and then pull
the bracket toward you to remove the bracket.
20
14. Turn the SAU-1900E upside down onto a soft cloth (this has already been done if you
had a wall-mount installation) and orient the SAU-1900E such that the three semi-
circular/ridged cover release latches are toward you.
15. Remove the battery cover by depressing the semi-circular/ridged cover release latches
while pushing the cover away from you. It should move toward the edge opposite
you. Slide the cover completely out.
16. Remove the battery. This is easily accomplished by holding onto the SAU-1900E
with one hand while still laying on the table, and gently pulling the exposed battery
strap straight up until the battery comes loose from the battery compartment. (If for
some reason the battery strap is not available, is damaged, etc. The battery can also be
removed by turning the SAU-1900E over while holding your hand under the battery
with the battery facing the floor and then gently tapping the edge of the SAU-1900E
onto a tabletop until the battery slides out. Do not drop the battery as this may cause
it to leak acid).
17. Follow the instructions in the section entitled Battery Installation, starting with step
#5, to install your new battery.
18. If you had installed your SAU-1900E on a wall, follow the instructions in the section
entitled Wall-Mount Installation to reattach the bracket and mount the SAU-1900E to
a wall plate.
19. Follow the instructions in the section entitled connecting the SAU-1900E to Your
Telephone(s) to reconnect your SAU-1900E.
20. Properly dispose of the used battery by taking it to a recycling plant.
21
CLEANING THE SAU-1900E
To remove dust from the SAU-1900E, a soft, dry cloth or feather duster may be
used. To clean the SAU-1900E, first unplug AC power supply from the wall outlet.
Then a soft cloth dampened (not soaked) with a mild soap/water solution may be used.
Do not use any other chemicals on the SAU-1900E, such as dust sprays, cleaners, etc.
These chemicals could damage the finish on the exterior of the SAU-1900E. After you
have finished cleaning the SAU-1900E, do not forget to plug the AC power supply back
into the wall socket.
22
TROUBLESHOOTING GUIDE
Problem Possible Cause Solution(s)
AC/Battery LED Off AC power supply not
connected
Check that the AC power
supply is connected to the
SAU-1900E and a working
AC outlet
AC Outlet not powered 1. Check that the AC
outlet the SAU-1900E is
plugged into is working
with another AC
powered device, such as
a working lamp. If the
lamp does not work, the
outlet is faulty. Contact
an electrician.
2. A power outage has
occurred, and either the
internal battery has not
been installed or is
completely discharged.
Wait for electrical
service to be restored.
Internal Battery Not
Installed
The SAU-1900E cannot
operate without an internal
battery during a power
outage or without AC
power. Install the battery
Battery is discharged The SAU-1900E can only
operate from the internal
battery for a maximum of
20 hours. Either replace the
discharged battery with a
freshly charged battery, or
wait for electrical service to
be restored.
Battery is older than four
years
The battery used in the
SAU-1900E has a shelf life
of around 4 years. Replace
the battery.
AC/Battery LED Blinking AC power supply not
connected
Check that the AC power
supply is connected to the
SAU-1900E and a working
23
AC outlet
AC Outlet not powered 1. Check that the AC
outlet the SAU-1900E is
plugged into is working
with another AC
powered device, such as
a working lamp. If the
lamp does not work, the
outlet is faulty. Contact
an electrician.
2. A power outage has
occurred. The SAU-
1900E is operating off
of internal battery
power. Wait for your
electrical service to be
restored.
Signal LED Blinks All the
Time
Poor Reception 1. Antenna is not in the
“up” (vertical) position.
2. Antenna not connected.
3. Move the SAU-1900E
around to see if the LED
stops blinking and turns
on constantly, i.e. try
different locations in
your house or business.
4. An external antenna is
needed. Contact your
service provider for
assistance.
Signal LED Off No Power to the SAU-
1900E
Make sure that the SAU-
1900E has power by
looking at the AC/Battery
LED
Poor Reception 1. Antenna is not in the
“up” (vertical) position.
2. Antenna not connected.
3. Move the SAU-1900E
around to see if the
SIGNAL LED starts to
blink, or turns on
constantly, i.e. try
different locations in
24
your house or business
4. An external antenna is
needed. Contact your
service provider for
assistance.
No Sound From a
Connected Telephone
Problem With Telephone Check the telephone’s
instruction manual for
possible solutions. Try a
known good telephone.
No Power to the SAU-
1900E
Make sure that the SAU-
1900E has power by
looking at the AC/Battery
LED
Phone not connected to
SAU-1900E either directly
or through a modular jack
Connect the phone to the
SAU-1900E directly or
connect the SAU-1900E to
a modular jack in the house
and connect the phone to
another modular jack on the
same circuit.
Telephone cable defective Try a known good
telephone cable.
Modular jack wired
incorrectly
Try plugging the telephone
directly into the SAU-
1900E
You have the SAU-1900E
plugged into a live PSTN
line.
Make sure that the only
connection to the SAU-
1900E is going directly to a
known working telephone.
If the telephone works, you
may have a telephone line
already.
No dial tone, just a BEEP,
BEEP, BEEP, …
After the SAU-1900E is
turned on, it goes into
registration process
It can sometimes take up to
one minute for the SAU-
1900E to register with the
base station. Wait for one
minute.
Poor Reception 1. Antenna is not in the
“up” (vertical) position.
2. Antenna not connected.
3. Move the SAU-1900E
around to see if the
SIGNAL LED stops
blinking, i.e. different
locations in your house
25
or business.
4. Need external antenna.
Contact your service
provider for assistance.
Telephone(s) never ring Telephone’s ringer not on Follow your telephone’s
instructions for turning on
its ringer
Too many telephones
connected to your SAU-
1900E
Add up the Reno’s on the
back of each telephone
connected to your SAU-
1900E. If this total number
is greater than 4.0, you will
have problems ringing all of
the phones properly. Make
the number less than 4.0 by
removing some of the
telephones or changing to
telephones with smaller
REN's.
You have not received any
telephone calls
Call your service provider
and ask them to give you a
call to check your service.
Telephones do not ring well
Too many telephones
connected to your SAU-
1900E
Add up the REN's on the
back of each telephone
connected to your SAU-
1900E. If this total number
is greater than 4.0, you will
have problems ringing all of
the phones properly. Make
the number less than 4.0 by
removing some of the
telephones or changing to
telephones with smaller
REN's.
Poor sound in your
telephones, or person on
other end of conversation
complains of poor sound
You have too many
telephones off hook.
You will achieve the best
audio quality with a single
telephone off hook.
Too much cable is
connected to the SAU-
1900E.
The SAU-1900E can only
drive 1000 feet (305 meters)
of telephone cable.
Your SAU-1900E is located
close to electronic devices
such as microwave ovens,
radios, hair dyers, etc.
Move the SAU-1900E away
from these devices and
make sure that the SAU-
1900E’s AC power supply
26
is powered by a different
outlet than the other
electronic device.
The person on the other end
of the phone conversation is
having problems
Call somebody else and see
if you hear the same noise
and/or problem.
You can receive calls, but
you cannot place calls, even
though a dial tone is heard
Pulse or rotary phone is
being used to place a call
The SAU-1900E will only
accept tones from a touch-
tone compatible phone.
Make sure that the phone
you are using is touch-tone
only or switched to touch-
tone.
If the above troubleshooting guide does not solve your problem with the SAU-1900E,
contact your service provider or dealer. They will be glad to help you resolve your
problem.
27
ACCESSORIES/OPTIONS
The following accessories/options may be ordered from your dealer or service
provider:
1. Internal battery and battery strap (Maxon #xx)
2. External antenna kit (Maxon #xx)
3. MDL-1 Analog Fax/Data Service Option (Maxon #xx)
28
TECHNICAL SPECIFICATIONS
Physical
Weight: 1.7kg (3.75 pounds)
Size: 240mm x 145.8mm x 60mm (9.4 in. x 5.75 in. x 2.4 in.)
Environmental
Operating Temperature Range: -15°C to +50°C (+5°F to +122°F)
Storage Temperature Range: -40°C to +70°C (-40°F to +158°F) without battery
-40°C to +60°C (-40°F to +140°F) with battery, less than two
weeks
-40°C to +25°C (-40°F to +77°F) long time storage with
battery
Humidity: 0-95%, non-condensing
Power
Battery Requirements: 12V, 2.0Ah sealed, lead acid battery (Yuasa Exide or Yuasa
NP2-12)
Battery Storage Temperature Range: -40°C to + 60°C (-40°F to 140°F)
Battery Standby Time: 22 hours or better (with new, fully charged battery)
Battery Talk Time: 1.5 hours or better (with new, fully charged battery)
110/120V, 60Hz AC Power Supply Requirements: Maxon Model #A51813D,
19VDC@1.1A
220V, 50Hz AC Power Supply Requirements: Maxon Model #A51909DG(R),
19VDC@0.9A
230V, 50Hz AC Power Supply Requirements: Maxon Model #A51909DG(I),
19VDC@0.9A
Radio Transmitter/Reciver
Technology: 1900MHz CDMA (Code Division Multiple Access), meeting EIA JSTD-
008 standards.
Transmit Frequency Range: 1850MHz - 1910MHz, Wideband Spread Spectrum
‘Minimum’ Maximum Transmit Output Power: 200mW
Receive Frequency Range: 1930MHz - 1990MHz, Wideband Spread Spectrum
Receiver Sensitivity: -104dBm / 1.23MHz BW @ < 0.5% FER
Antenna Impedance: 50Ω
Telephone Interface
Hum and noise (into telephones): 55dBrnC (with CCITT filter)
Maximum REN Load: 4.0
Maximum Driven Cable Length: 305 meters (1000 feet)
Type phone used: Touch tone capable
Telephone Interface Connector: RJ-11
29
FCC NOTICE (pending approval)
This equipment has been tested and found to comply with the limits for a Class B
digital device pursuant to Part 15 of the FCC rules. These limits are designed to provide
reasonable protection against harmful interference in a residential installation. This
equipment generates, uses, and radiates radio frequency energy and, if not installed and
used in accordance with the instructions, may cause harmful interference to radio or
television communications. However, there is no guarantee that interference will not
occur in a particular installation. If this equipment does cause harmful interference to
radio or television reception, which can be determined by turning the equipment off and
on, the user is encouraged to try to correct the interference by one or more of the
following measures:
n Re-orient or relocate this equipment.
n Re-orient or relocate the receiving antenna of the device displaying the interference.
n Increase the separation between this equipment and the receiver.
n Connect this equipment into an AC outlet on a circuit different from that to which the
receiver is connected.
n Contact your service provider or dealer or an experienced radio/TV technician for
help.
WARRANTY INFORMATION
Please see the enclosed warranty card for warranty information for your SAU-
1900E.
FOR YOUR RECORDS
Please record the following information for warranty and in case your SAU-1900E
is stolen or lost:
Date of Purchase: ________________
Where Purchased: _________________
Serial Number: ____________________
Attach sales receipt here.