Miele and Cie KG MW6041 Household Microwave Convection Oven User Manual usermanual
Miele & Cie. KG Household Microwave Convection Oven usermanual
Users Manual
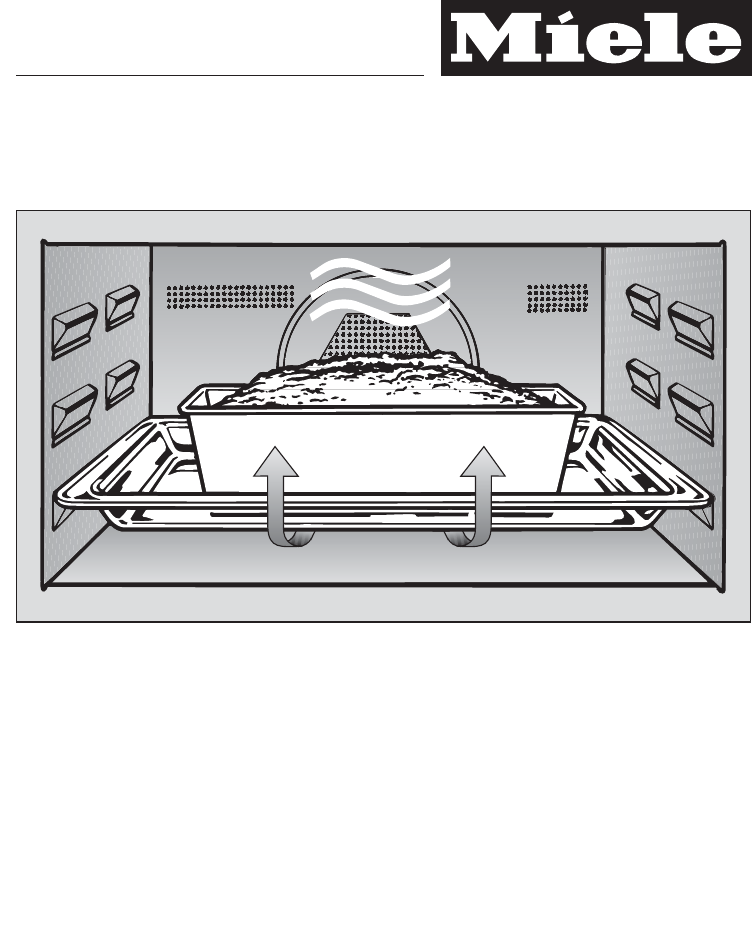
Operating Instructions
Convection microwave oven
H 4080 BM
DRAFT FOR B0 SERIES
NOT FOR SERIAL PRODUCTION
To prevent accidents
and machine damage
read these instructions
before
installation or use.
UV
M.-Nr. 06 426 190

IMPORTANT SAFETY INSTRUCTIONS . . . . . . . . . . . . . . . . . . . . . . . . . . . . . . . . . 4
Guide to the oven. . . . . . . . . . . . . . . . . . . . . . . . . . . . . . . . . . . . . . . . . . . . . . . . . 10
Guide to the display. . . . . . . . . . . . . . . . . . . . . . . . . . . . . . . . . . . . . . . . . . . . . . . 11
Oven accessories . . . . . . . . . . . . . . . . . . . . . . . . . . . . . . . . . . . . . . . . . . . . . . . . 12
Oven accessories . . . . . . . . . . . . . . . . . . . . . . . . . . . . . . . . . . . . . . . . . . . . . . . . . 12
Guide to the functions. . . . . . . . . . . . . . . . . . . . . . . . . . . . . . . . . . . . . . . . . . . . . 13
User function . . . . . . . . . . . . . . . . . . . . . . . . . . . . . . . . . . . . . . . . . . . . . . . . . . . . . 13
Safety features . . . . . . . . . . . . . . . . . . . . . . . . . . . . . . . . . . . . . . . . . . . . . . . . . . . . 14
Energy saving . . . . . . . . . . . . . . . . . . . . . . . . . . . . . . . . . . . . . . . . . . . . . . . . . . . . 14
Functions . . . . . . . . . . . . . . . . . . . . . . . . . . . . . . . . . . . . . . . . . . . . . . . . . . . . . . . 15
Microwave function h. . . . . . . . . . . . . . . . . . . . . . . . . . . . . . . . . . . . . . . . . . . . . 15
Traditional oven functions . . . . . . . . . . . . . . . . . . . . . . . . . . . . . . . . . . . . . . . . . . . 16
Convection Bake. . . . . . . . . . . . . . . . . . . . . . . . . . . . . . . . . . . . . . . . . . . . . . . . 16
Auto Roast . . . . . . . . . . . . . . . . . . . . . . . . . . . . . . . . . . . . . . . . . . . . . . . . . . . . 16
Broil. . . . . . . . . . . . . . . . . . . . . . . . . . . . . . . . . . . . . . . . . . . . . . . . . . . . . . . . . . 16
Convection Broil . . . . . . . . . . . . . . . . . . . . . . . . . . . . . . . . . . . . . . . . . . . . . . . . 16
Defrost . . . . . . . . . . . . . . . . . . . . . . . . . . . . . . . . . . . . . . . . . . . . . . . . . . . . . . . 16
Combination functions . . . . . . . . . . . . . . . . . . . . . . . . . . . . . . . . . . . . . . . . . . . . . . 17
Master Chef . . . . . . . . . . . . . . . . . . . . . . . . . . . . . . . . . . . . . . . . . . . . . . . . . . . . . . 17
Controls . . . . . . . . . . . . . . . . . . . . . . . . . . . . . . . . . . . . . . . . . . . . . . . . . . . . . . . . 18
Before using the oven . . . . . . . . . . . . . . . . . . . . . . . . . . . . . . . . . . . . . . . . . . . . . 20
Commissioning the oven . . . . . . . . . . . . . . . . . . . . . . . . . . . . . . . . . . . . . . . . . . . . 20
Cleaning the appliance . . . . . . . . . . . . . . . . . . . . . . . . . . . . . . . . . . . . . . . . . . . . . 21
Heat the oven. . . . . . . . . . . . . . . . . . . . . . . . . . . . . . . . . . . . . . . . . . . . . . . . . . . . . 21
Operating sequence . . . . . . . . . . . . . . . . . . . . . . . . . . . . . . . . . . . . . . . . . . . . . . 22
Selecting cooking times . . . . . . . . . . . . . . . . . . . . . . . . . . . . . . . . . . . . . . . . . . . 25
Master Chef . . . . . . . . . . . . . . . . . . . . . . . . . . . . . . . . . . . . . . . . . . . . . . . . . . . . . 26
Favorites . . . . . . . . . . . . . . . . . . . . . . . . . . . . . . . . . . . . . . . . . . . . . . . . . . . . . . . . 28
Sabbath. . . . . . . . . . . . . . . . . . . . . . . . . . . . . . . . . . . . . . . . . . . . . . . . . . . . . . . . . 29
Contents
2

Settings J. . . . . . . . . . . . . . . . . . . . . . . . . . . . . . . . . . . . . . . . . . . . . . . . . . . . . . . 30
Language J. . . . . . . . . . . . . . . . . . . . . . . . . . . . . . . . . . . . . . . . . . . . . . . . . . . . . . 30
Clock . . . . . . . . . . . . . . . . . . . . . . . . . . . . . . . . . . . . . . . . . . . . . . . . . . . . . . . . . . . 30
Temperatures . . . . . . . . . . . . . . . . . . . . . . . . . . . . . . . . . . . . . . . . . . . . . . . . . . . . . 31
Oven Light . . . . . . . . . . . . . . . . . . . . . . . . . . . . . . . . . . . . . . . . . . . . . . . . . . . . . . . 31
Temperature °F/°C . . . . . . . . . . . . . . . . . . . . . . . . . . . . . . . . . . . . . . . . . . . . . . . . . 31
Tone Options . . . . . . . . . . . . . . . . . . . . . . . . . . . . . . . . . . . . . . . . . . . . . . . . . . . . . 32
Display . . . . . . . . . . . . . . . . . . . . . . . . . . . . . . . . . . . . . . . . . . . . . . . . . . . . . . . . . . 33
System Lock . . . . . . . . . . . . . . . . . . . . . . . . . . . . . . . . . . . . . . . . . . . . . . . . . . . . . 33
Warming Function . . . . . . . . . . . . . . . . . . . . . . . . . . . . . . . . . . . . . . . . . . . . . . . . . 33
Power Level . . . . . . . . . . . . . . . . . . . . . . . . . . . . . . . . . . . . . . . . . . . . . . . . . . . . . . 33
Reset . . . . . . . . . . . . . . . . . . . . . . . . . . . . . . . . . . . . . . . . . . . . . . . . . . . . . . . . . . . 34
Timer . . . . . . . . . . . . . . . . . . . . . . . . . . . . . . . . . . . . . . . . . . . . . . . . . . . . . . . . . . . 35
Selecting cookware for microwave ovens . . . . . . . . . . . . . . . . . . . . . . . . . . . . . 36
Defrosting . . . . . . . . . . . . . . . . . . . . . . . . . . . . . . . . . . . . . . . . . . . . . . . . . . . . . . . 41
Reheating . . . . . . . . . . . . . . . . . . . . . . . . . . . . . . . . . . . . . . . . . . . . . . . . . . . . . . . 43
Cooking. . . . . . . . . . . . . . . . . . . . . . . . . . . . . . . . . . . . . . . . . . . . . . . . . . . . . . . . . 45
Defrosting and re-heating / cooking. . . . . . . . . . . . . . . . . . . . . . . . . . . . . . . . . . 49
Broiling . . . . . . . . . . . . . . . . . . . . . . . . . . . . . . . . . . . . . . . . . . . . . . . . . . . . . . . . . 50
Roasting . . . . . . . . . . . . . . . . . . . . . . . . . . . . . . . . . . . . . . . . . . . . . . . . . . . . . . . . 52
Using the roast probe . . . . . . . . . . . . . . . . . . . . . . . . . . . . . . . . . . . . . . . . . . . . . 54
Roasting . . . . . . . . . . . . . . . . . . . . . . . . . . . . . . . . . . . . . . . . . . . . . . . . . . . . . . . . 56
Baking . . . . . . . . . . . . . . . . . . . . . . . . . . . . . . . . . . . . . . . . . . . . . . . . . . . . . . . . . . 57
Canning. . . . . . . . . . . . . . . . . . . . . . . . . . . . . . . . . . . . . . . . . . . . . . . . . . . . . . . . . 60
Cleaning and Care . . . . . . . . . . . . . . . . . . . . . . . . . . . . . . . . . . . . . . . . . . . . . . . . 62
Frequently asked questions . . . . . . . . . . . . . . . . . . . . . . . . . . . . . . . . . . . . . . . . 65
Technical Service . . . . . . . . . . . . . . . . . . . . . . . . . . . . . . . . . . . . . . . . . . . . . . . . . 68
Electrical connection. . . . . . . . . . . . . . . . . . . . . . . . . . . . . . . . . . . . . . . . . . . . . . 69
Installation . . . . . . . . . . . . . . . . . . . . . . . . . . . . . . . . . . . . . . . . . . . . . . . . . . . . . . 70
3

When using electrical appliances, basic safety precautions should always be
followed, including the following:
WARNING - To reduce the risk of burns, electric shock, fire, injury to persons,
or exposure to excessive microwave energy:
Read all instructions before installing
or using the oven.
Read and follow the specific
"PRECAUTIONS TO AVOID
POSSIBLE EXPOSURE TO
EXCESSIVE MICROWAVE ENERGY".
This appliance is intended for
residential use only.
Only use the appliance for its
intended purpose. The manufacturer
cannot be held responsible for
damages caused by improper use
of this oven.
This appliance complies with current
safety requirements. Improper use of
the appliance can lead to personal
injury and material damage.
Electrical safety
Installation, repair and mainten-
ance work should be performed by
a Miele authorized service technician in
accordance with national and local
safety regulations and the provided
installation instructions. Contact the
Miele Technical Service for
examination, repair or adjustment.
Repairs and other work by unauthorized
persons could be dangerous and may
void the warranty.
Before installation make sure that
the voltage and frequency listed on
the data plate correspond with the
household electrical supply. This data
must correspond in order to prevent
injury and machine damage. If in doubt,
consult a qualified technician.
To guarantee the electrical safety
of this appliance, continuity must
exist between the appliance and an
effective grounding system. It is
imperative that this basic safety
requirement be met. If there is any
doubt, have the electrical system of the
house checked by a qualified
electrician. The manufacturer cannot be
held responsible for responsible for
damages caused by the lack, or
inadequacy of, an effective grounding
system.
IMPORTANT SAFETY INSTRUCTIONS
4

The appliance must only be
operated after it has been correctly
installed in cabinetry. This is necessary
to ensure that all electrical components
are shielded.
This appliance is not designed for
maritime use or for use in mobile
installations such as recreational
vehicles or aircraft. However, under
certain conditions it may be possible for
an installation in these applications.
Please contact the Miele Technical
Service Department with specific
requirements.
Before service or maintenance
work the power supply must be
disconnected.
If the electrical cord is damaged it
must be replaced by a Miele
Service technician with a genuine Miele
spare part.
Do not use an extension cord to
connect the appliance to electricity.
Do not open the casing of the
oven. Danger of electric shock!
Use
The appliance is intended for
domestic use only: defrosting,
heating, cooking, baking, roasting,
broiling and canning of food.
It is not designed for industrial or
laboratory use.
Do not use corrosive chemicals or
vapors in this appliance.
Do not use the appliance to store
or dehydrate flammable materials.
This is a fire hazard.
Do not use the oven to heat the
room. Due to the high temperatures
radiated, objects left near the oven
could catch fire.
Prevent children from touching the
appliance when in use.
Times for cooking, heating and
defrosting food in the microwave
are shorter than that of traditional
operation modes. Extensive
microwaving lead to dry food and
possible ignition. Fire hazard!
Do not use the microwave mode to
dry bread, bread rolls, flowers,
herbs, etc. Use the convection mode.
Do not heat cushions filled with
herbs, gel, etc. with the microwave
mode. The cushions could ignite even
when removed from the oven after
heating. This is a fire hazard.
IMPORTANT SAFETY INSTRUCTIONS
5

Do not use full power warming
empty dishes. The lack or minimum
amount of food could cause damage to
the appliance.
Supervise cooking with grease or
oils. Oils and grease could ignite.
Never heat undiluted alcohol in the
microwave oven as it can easily
ignite.
Do not can cans in the appliance.
High pressure in the cans can
cause them to burst. This could result in
injury or damage.
If materials inside the oven should
ignite, keep the oven door closed
to avoid fueling any flames. Turn the
oven off or disconnect the power
supply.
Cover food stored in the oven
interior. Condensation from food
and drinks could cause corrosion
damage to the oven. It also prevents
the food from drying up.
Spills or stains from food and
liquids containing salt should be
immediately cleaned from the stainless
steel interior. Corrosion may occur.
The glass tray and combi rack can
support a maximum weight of
17.5 lb (8 kg). The accessories may be
damaged if overstrained.
Do not lean, sit or place heavy
items on the open oven door. The
machine may be damaged.
Never place the hot glass tray on a
cold surface, such as a tiled or
granite countertop. The glass tray may
crack. Set the glass tray on a trivet
instead.
Do not use a steam cleaner to
clean this appliance. The steam
from the cleaning appliance could
penetrate live components and
permanently damage the oven or cause
injury.
Do not operate this appliance if it
has a damaged cord or plug, if it is
not working properly, or if it has been
damaged or dropped.
Do not cover or block any opening
on the appliance.
This appliance must not be
installed or operated outdoors.
Do not use this appliance near
water, e.g. sink, wet basement,
swimming pool, etc.
IMPORTANT SAFETY INSTRUCTIONS
6

Microwave function
PRECAUTIONS TO AVOID
POSSIBLE EXPOSURE TO
EXCESSIVE MICROWAVE
ENERGY
Do not attempt to operate this oven
with the door open since open-door
operation can result in harmful
exposure to microwave energy. It is
important not to defeat or tamper
with the safety interlocks.
Do not place any object between the
oven front face and the door or allow
soil or cleaner residue to accumulate
on sealing surfaces.
Do not operate the oven if it is
damaged. It is particularly important
that the oven door closes properly
and that there is no damage to the:
(1) door (bent), (2) hinges and
latches (broken or loosened),
(3) door seals and sealing surfaces.
The oven should not be adjusted or
repaired by anyone except properly
qualified service personnel.
Items not suitable for use in the
microwave oven: metal
containers, aluminum foil, cutlery,
dishware with metal decoration, crystal
glass containing lead, bowls with a
knurled rim, non-temperature safe
plastic dishware, wooden dishware,
metal clips, wire twist ties, food
containers with metal coverings or
residues of it.
Danger of machine damage and fire
hazard.
The provided combi rack is specially
designed for the wavelength of the
microwaves and use for the oven.
Do not leave the appliance
unattended when heating food in
disposable, e.g. plastic, paper,
combustible materials.
See "Dishware for Microwave / Plastics".
Do not heat food in the oven in a
heat retaining packaging, e.g. take
out food bags.
The packaging contains a thin layer of
aluminum foil which reflects the
microwaves. This reflected energy can
cause the paper layer to ignite.
IMPORTANT SAFETY INSTRUCTIONS
7

Before serving food remember to
allow a sufficient standing time.
Always check the temperature of the
food itself after taking it out of the
microwave. Do not judge by the plate
temperature. The heat is created in the
food, the dishes may stay cool to the
touch.
Always check the temperature
before serving heated baby food.
After heating the baby food, stir or
shake the food, then test it.
To check on the food temperature
open the oven door. Use a special
food thermometer to measure the food
temperature. Do not use thermometers
containing mercury or liquids since they
are not suitable for high temperatures
and break easily.
Never cook or reheat food or
liquids in sealed containers or
bottles. Remove the nipple or cap from
baby bottles before heating it in the
microwave. Built-up pressure may
cause them to burst. Danger of injuries.
The combi rack will get hot when
used in the microwave. Danger of
burns.
When heating liquids, the provided
boiling wand should be placed into
the container.
When heating liquids, milk, sauces etc.,
in the oven without the boiling wand,
the boiling point of the liquid may be
reached without the production of
typical bubbles. The liquid does not
boil evenly. This ‘boiling delay" can
cause a sudden build up of steam
bubbles, when the container is
removed from the oven or shaken. This
can lead to the liquid boiling over
suddenly and explosively. Danger of
burning!
The built-up pressure may force the
oven door open. This could result in
injury or damage. The boiling wand
ensures that the liquid boils evenly and
that steam bubbles form at an early
stage.
IMPORTANT SAFETY INSTRUCTIONS
8

Eggs can only be cooked in their
shells in the microwave oven in a
specially designed egg-boiling device.
Hard-boiled eggs should not be
reheated in the microwave oven. The
eggs may burst, even when they have
been removed from the oven.
Eggs can be cooked without their
shells in the microwave oven only if
the yolk membrane has been
punctured first. The pressure could
otherwise cause the egg yolk to
explode. Danger of injuries.
Food with a thick skin or peel, such
as tomatoes, sausages and
potatoes should be pierced or the skin
cut in several places before cooking to
allow steam to vent and prevent the
food from bursting.
Do not use dishware with hollow
handles or lid knobs. Moisture can
get into the hollow parts. (The hollow
parts of some dishware can be vented.)
Danger of built-up pressure and the
explosion of the hollow parts may
cause injuries.
Traditional functions:
Convection Plus, Auto Roast, Broil,
Convection broil
Caution! Danger of burns!
When using traditional functions the
oven interior gets very hot.
Do not allow children to touch or to
play in, on or near the oven when it
is in operation. The oven gets hot at the
oven door glass, the vapor vent, the
handle and the operating controls.
Danger of burns.
Use pot holders when working with
a hot appliance. Especially the
upper heating element gets extremely
hot when using the functions broil and
convection broil. Danger of burning!
Allow the heating element to cool
to the touch before attempting to
lower it for cleaning the oven. Danger of
burns.
Do not use force to lower the upper
heating element. It may get
damaged.
SAVE THESE
INSTRUCTIONS
IMPORTANT SAFETY INSTRUCTIONS
9
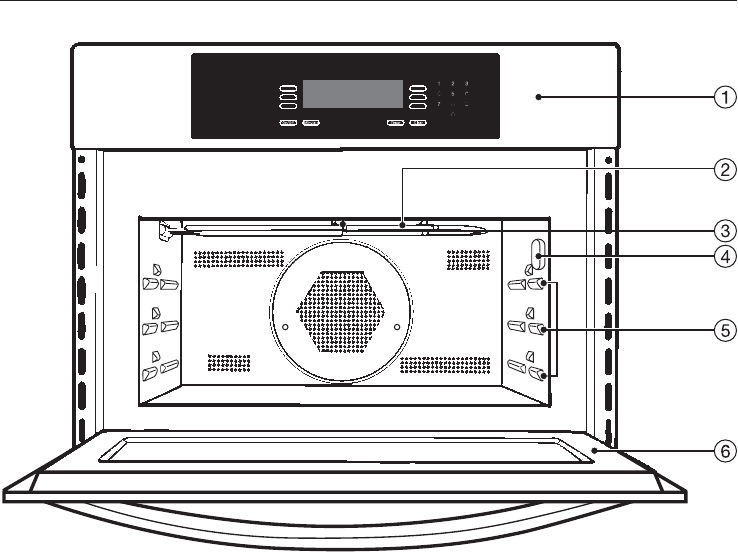
aControl panel
bUpper heating element
cLight
dRoast probe socket
eThree level runners
fOven door
Guide to the oven
10
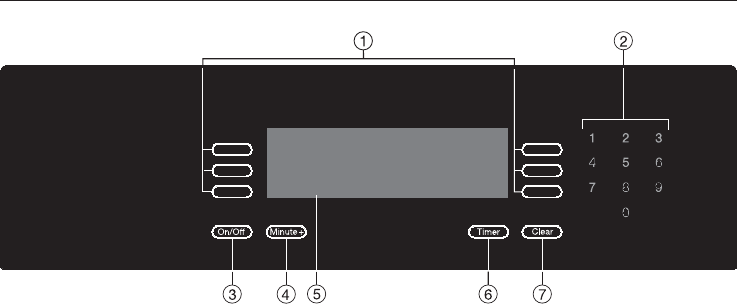
aTouch controls to select or set a function
bKeypad to enter times or temperatures
cOn/Off
dMinute +
eDisplay
fTimer
gClear
to delete the last entry or to go back to the previous menu
Guide to the display
11

Oven accessories
Two glass trays with non-tip safety
notches
The glass pans are suitable for all oven
functions. They have non-tip safety
notches which prevent them from being
pulled out completely.
When inserted the safety notches
have to face the rear.
The glass tray has to be lifted to be
taken out from the interior.
Combi rack insert into the glass tray
Insert the combi rack together with the
glass tray. Depending on the oven
function and food height the combi rack
can be inserted with the curve upwards
or downward to the glass tray to have
an optimum distance to the upper
heating element.
The combi rack is specially
designed for microwaves. It should
not be set on the stainless steel
bottom of the oven, since direct
contact could lead to sparks.
Boiling wand
When heating liquids, the provided
boiling wand should be placed into the
container. It results in even boiling of
the liquid.
Roast probe
The roast probe is inserted in the food
to monitor the roasting process. For
more information see "Using the roast
probe".
Oven accessories
12

User function
Types of operation
Solo functions
–Microwave
to defrost, heat and cook food in a
short period of time
–Convection Bake
to bake or cook food with heated air
fanned through the interior
–Auto Roast
to roast and cook food automatically
– Broil
to broil flat cuts of food.
Broiling is done with the oven door
closed.
– Convection broil
to broil large cuts of meat or poultry.
Broiling is done with the oven door
closed.
– Defrost
Combination functions
For combinaton of the microwave
function with a traditional function
(Convection Plus, Convection Broil,
Broil, Auto Roast).
Minute Plus
To start the microwave with maximum
power for 1 minute.
Master Chef Function
contains an easy to use list of preset
functions of commonly cooked foods.
Favorites
to save often used settings under a
selected name.
Sabbath Mode
For religious observance, the oven can
be set to run for the duration of the
Sabbath.
Preselection Automatic
to preselect a cooking process.
Turn off Automatic
to turn off the cooking process.
Timer
To time any kitchen activity, i. e.
cooking eggs. Two times can be
entered.
Time of day display
When the oven is turned off, the display
shows the time of day.
The display can be deselected.
Guide to the functions
13

Safety features
System lock
When locked the oven cannot be
operated, see "Settings - System lock".
Automatic Safety Shut Off
An operation with traditional function
can be started without a time set. To
prevent a run-on operation and fires,
the oven shuts off automatically
depending on the function used and
the temperature between 1 hour and 10
hours after the last operation.
When the microwave was turned off
after one operation but bull be used for
a second cooking process right away,
the microwave power eill only be turned
on again after 30 seconds.
^Start the second process after 30
seconds.
Energy saving
Door contact switch
If the door is being opened during
operation, the heating and convection
fan will automatically turn off.
After closing the door and pressing
Start, the operation continues. When
the door was opened at a solo
traditional function, the operation will
continue immediately after closing the
door. It doesn’t need to be restarted.
Interior light turned off
The interior light can be set to turn off
after the process starts.
Guide to the functions
14

Microwave function
Microwave cooking offers the benefits
of speed, convenience and nutritional
advantages when food does not require
browning or crisping.
The following microwave power settings
are available:
–At an electrical connection of 240V:
80 W, 150 W, 300 W, 450 W, 600 W,
850 W und 1000 W.
– At an electrical connection of 208 V:
80 W, 150 W, 300 W, 450 W, 600 W
und 850 W.
They are shown in a bar. The full bar
shows the maximum power. If only two
segments are shown the minimum
power is displayed.
How it works
In a microwave oven there is a
high-frequency tube called a
magnetron. This converts electrical
energy into microwaves. The
microwaves are evenly distributed in
the onven interior and are also reflected
from the metal walls. The microwaves
reach from all sides on and into the
food.
The cookware must be conductable for
microwaves so they can reach the food.
The microwaves conduct porcelain,
glass, carton, plastic but no metal. Do
not use containers made of metal, or
which contain metal, for example in the
form of gold or silver trim, see "Suitable
cookware for microwave ovens". The
metal reflects the microwaves and this
could lead to sparks. The microwaves
cannot be absorbed.
The microwaves penetrate through the
container directly into the food.
All food contains moisture molecules
which, when subjected to microwave
energy, start to oscillate 2.5 billion times
a second. The friction caused by this
vibration creates heat, which first starts
developing around the outside of the
food and then slowly penetrates
towards the center.
The moisture content of food will affect
the speed at which it is cooked.
As heat is produced directly in the
food,
– food can generally be cooked
without adding much liquid or
cooking oil.
– defrosting, reheating and cooking in
a microwave oven is quicker than
using traditional oven methods.
– nutrients, such as vitamins and
minerals, are generally retained.
–color, texture and taste of food are
not impaired.
The microwave procuction is stopped
once the process is interrupted or the
door is opened.
During the process the closed, intakt
door provides a sufficient protection of
microwaves.
Functions
15

Traditional oven functions
–Convection Bake
–Auto Roast
–Broil
–Convection Broil
–Defrost
These cook and brown the food.
Convection Bake
This system works by the circulation of
heated air.
It takes in the air, heats it over a ring
heating element and fans it back
through the openings in the back panel.
Since the heat reaches the food
immediately, there is no need to
preheat the oven.
Execption: Preheat the oven when
roasting roast beef / tenderloin or when
baking dark bread.
The Convection Plus function allows to
bake on two levels at the same time.
Auto Roast
Auto Roast heats the oven to a high
temperature to sear the meat, retaining
moisture and tenderness. The oven
temperature then automatically returns
to the preselected setting.
Broil
As the element needs to radiate a high
heat in order to cook the food, it will
glow red hot several minutes after
being turned on and produce sufficient
infra-red heat for broiling. Pre-heat the
oven with the oven door closed for
approx. 5 minutes before starting to
cook.
Convection Broil
The hot air from the grill is distributed
over the food by the fan on the rear wall
of the oven. This allows a lower
temperature to be selected than for
normal broiling.
Defrost
The warm air is distributed over the
food by the fan on the rear wall of the
oven.
Functions
16

Combination functions
–Combination Bake
–Combinaton Auto Roast
–Combination Broil
–Micro Broil
The combination functions allow a fast
heating, cooking and browing of food.
The microwave function can be
combined with all traditional functions.
The combination with Convection Plus
is the most suitable. Since the heat gets
immediately to the food, the time and
energy efficiency is greatest.
In general when using combination
programs, you should not set the
microwave power level higher than
150 W for baking, and not higher than
450 W for cooking and broiling.
They are shown in a bar. The full bar
shows the maximum power of 450 W. If
only three segments are shown the
minimum power (80 W) is displayed.
Master Chef
The "Master Chef" function contains an
easy to use list of preset functions of
commonly cooked foods such as pizza,
chicken and french fries.
Functions
17

The oven has a large display and sensor controls. These sensors allow the
operation of the oven.
Touch controls
Next to and below the display are
electronic sensor controls which react
to the touch of a finger.
The oven is operated by the touch of
the respective sensor control.
Every touch of the controls is confirmed
by a tone.
C
When the oven is turned on the
display shows the allocation of the
controls.
On/Off
turns the oven on or off.
Minute +
To start the microwave with maximum
power for 1 minute.
Timer
to time any kitchen activity, for
example to cook eggs. Two seperate
times can be entered.
Clear
to delete the last entry. If more than
one function is entered, a question is
diplayed which one the user would
like to delete.
The Number key pad lights up, when
entries for temperatures or times are
needed.
Controls
18

Display
+
This symbol is allocated to a sensor
control and shows in the display with
a menu or an order, like "more",
"back", "OK", etc. If more menu points
are available, "more" will be
displayed as the last menu.
The desired setting is selected by
touching the sensor next to it. The
display shows a maximum of six
menus.
By touching the sensor on the right
side, the "next menu page" will be
displayed.
The entry possibilities for times or
temperatures are highlighted in the
display. These numbers are entered
by the number key pad.
L
The currently selected setting is
marked by a check.
K
Additional information for operation
are marked with this sign. Confirm
with "OK" to close these info
windows.
Controls
19

Commissioning the oven
Once the appliance is plugged in, the
Welcome display comes on. After a few
seconds the clock is displayed.
When commissioning the machine the
Welcome screen changes into the
language selection.
The left display column shows the
language selections. The selected
language is marked by a Lcheck.
Selecting a language
^Touch the sensor next the desired
language until it shows in the display.
^Select the desired language. The
selected language will be marked by
aLcheck.
^Confirm the selection with "more".
Selecting the time format
^Select the desired time format and
confirm with "more".
Setting the time of day
^Set the current time of day with the
sensors next to +and –. Set the
hours. Confirm with "more" and set
the minutes.
To set the time of day with the
number key pad, set the hours and
minutes and confirm the setting with
"more".
Selecting the desired clock display
^Select between "On for 1 minute" or
"On during use" by touching the
sensor next to it.
^Confirm with "more".
The commissioning is finished.
The current time of day shows and the
oven can be used.
Before using the oven
20

Cleaning the appliance
Remove the protective film from the
appliance front (if present).
^Wipe the interior with a solution of
warm water and liquid dishwashing
detergent. Dry with a soft cloth.
Leave the door open until the interior
is completely dry. Odors and
corrosion may occur.
^Wash the accessories.
Heat the oven
New ovens may have a slight odor
during the first use. To eliminate the
odor quickly, the oven should be
operated at a high temperature for
2 hours.
Before heating the oven, remove all
accessories and labels from the oven.
Make sure the room is well ventilated
during this process.
^Touch the "On" control.
^Select the "Bake" function.
^Select "Convection Bake".
^Select "Temperature".
^Set the temperature fo 435 °F
(225 °C) using the keypad.
^Set the timer to run the oven for
2 hours by touching the "Delay Start"
control.
^Select "Duration". Set the duration by
entering "2", "0", "0" using the keypad.
^Touch the "OK" control.
The oven will run for 2 hours and the
remaining will appear in the display.
Before using the oven
21

Turning the oven on
^Touch the On/Off sensor to turn the
oven on.
The main menu appears.
There are nine menus with submenus.
^Select the desired menu by touching
the sensor next to it.
Main menus
Bake
The functions recommended for baking
show
–Convection Bake
–Combination Bake
When Convection Bake is selected, the
convection fan starts and the oven
preheats to a default set temperature of
320 °F (160 °C). A temperature
between 122 °F (50 °C) and 437 °F
(225 °C) can be selected. Cooking
times and delay start times can be
programmed. A tone sounds once the
selected temperature is reached.
The function Combination Bake allows
to program the total baking time and
delay starts. Select the microwave
power setting (max. 450 W) and the
temperature of the traditional function.
Operating sequence
22

Broil
The functions recommended for broiling
show
–Broil
–Convection Broil
–Combination Broil
–Micro Broil
Depending on the selected function the
duration of broiling and a delay start
can be programmed.
In the combination functions, the power
setting of the microwave (max. 450 W),
total time, temperature of the traditional
function and delay start can be
selected.
+Microwave
Select power setting, duration and
combination functions.
+Master Chef
Contains automatic programs. See
"Master Chef" for more information
about these programs.
+Defrost
Select the duration and a temperature
between 68 °F (25 °C) and 122 °F
(50 °C).
+Roast
The functions recommended for
roasting show
–Auto Roast
–Combination Auto Roast
When Auto Roast is selected, the
convection fan starts and the oven
preheats to a default set temperature of
320 °F (160 °C). A temperature
between 212 °F (100 °C) and 410 °F
(210 °C) can be selected. Cooking
times and delay start times can be
programmed.
The function Combination Auto Roast
allows to program the total roasting time
and delay starts. Select the microwave
power setting (max. 450 W) and the
temperature of the traditional function.
+Favorites
Save often used settings and set a
recipe name to easily search for your
favorites.
+Sabbath
Two functions can be selected
–Convection Bake
–Broil
+Settings J
Some settings, for example languages,
can be set (see "Settings").
Operating sequence
23

When selecting a sub menu (i. e.
Master Chef, Favorites, Settings)
another menu level is shown.
By selecting a menu you will get into
the next menu level.
The desired selection can be set.
The currently selected setting is shown
in the display.
Afunction (i.e. Convection Bake) has
different submenus which can be
adjusted.
+Temperature
+Power Level
+Delay Start
+Duration
The oven is factory set so that it starts
automatically. Only when microwaving
is used the oven must be started
manually.
Manually starting a microwave
function
^Turn the oven on.
^Select the desired function, i. e.
microwave. The sub menu is shown.
^Select the desired function, i. e.
microwave.
^Select the desired duration for
microwaving.
^Select a microwave power setting.
^Confirm with "OK".
^Start the oven.
The remaining time and time of day is
displayed during the running process.
To stop the operation, touch the "Stop"
sensor.
The door is unlocked when using the
microwave and can be opened at any
time. The operation is interrupted and
will be contined once the door is
closed.
To end a running process, touch the
On/Off sensor.
Operating sequence
24

Cooking processes can be turned off
automatically or be turned on and off.
Once a function is selected, "Delay
Start" can be selected.
+Duration
Enter the cooking time. After the time
has elapsed, the oven turns
automatically off.
+Desired Start Time
+Desired End Time
The start and end time is the time when
a cooking process should start or end.
The oven turns on or off at this point in
time.
To automatically turn a cooking
process off, a duration or end can be
entered.
To automatically turn a cooking
process on or off the cooking times
can be entered by
–duration and end time.
–duration and start time.
–start and end time.
The time not entered will be determined
automatically, but cannot be adjusted.
The entered process can be saved to
the Favorites as an own program with
"Add to favorites", see "Favorites".
The start time will be displayed until the
oven heat is turned on.
When the process is elapsed, the
elapsed remaining time will be
displayed.
After the process has elapsed
"Finished" will be displayed and a
signal tone will sound.
Checking and adjusting
entered cooking times
Times, which were entered for a
cooking process, can be checked or
adjusted at any time by call up the
respective function.
Deleting entered cooking times
^Touch the "Clear" sensor.
All data will be deleted during a power
failure.
Selecting cooking times
25

When using the "Master Chef"
function to cook meat or poultry
insert the grease filter in front of the
fan opening.
The "Master Chef" function contains an
easy to use list of preset functions of
commonly cooked foods such as pizza,
chicken and french fries.
For some programs the maximum food
weight must not be exceeded. See
"Maximum food weight".
Pay attention to respective notes in the
display. For example the display shows
a note to insert the roast probe or to
add liquid.
^Select "Master Chef" from the main
menu.
Master Chef menus
+Poultry
+Meat
+Fish
+Pizza
+Baked Goods
+Casseroles
+Vegetables
+Soup
After selecting the desired food group,
you can selet from (except "Pizza",
"Baked Goods")
+Cook
+Reheat
+Defrost
^Follow the requests and notes until
the program starts.
^A delayed start can be selected.
An automatic program can only be
ended ahead of time, if the oven is
turned off.
Once an automatic program has
started, the remaining time will be
displayed.
After the process has ended "Finished"
will be displayed and a signal tone will
sound.
If the food is not cooked to your desire,
the elapsed automatic program can be
extended.
^Select "Extend" from the sub-menu.
Master Chef
26
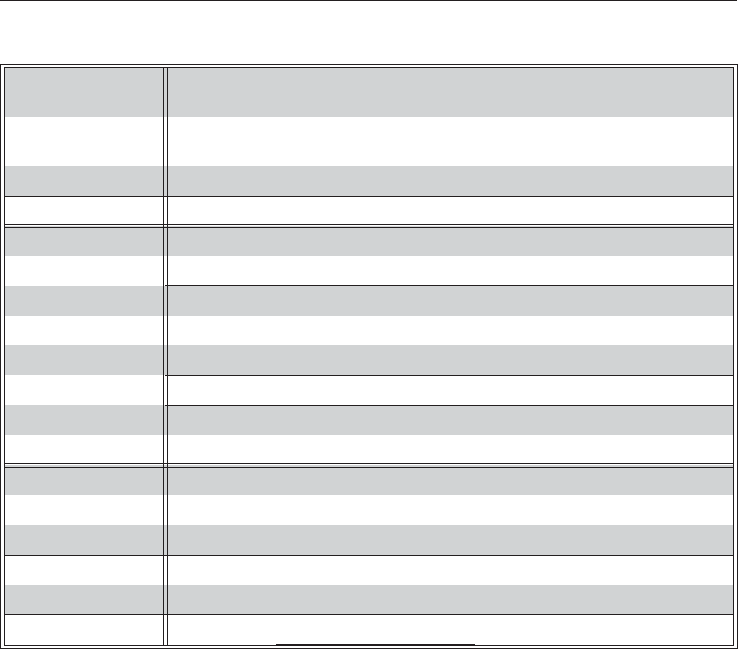
Maximum food weight
Poultry Turkey whole max. 10 lbs (4.5 kg)
without stuffing
whole, stuffed max. 10 lbs (5.5 kg)
without stuffing
Breast max. 6 lbs (2.5 kg)
Goose whole max. 10 lbs (4.5 kg)
Meat Beef Roast beef / Tenderloin max. 7 lbs (3 kg)
Tenderloin max. 7 lbs (3 kg)
Pork Shoulder / neck roast max. 7 lbs (3 kg)
Cutlett piece max. 7 lbs (3 kg)
Tenderloin each 10-11 oz. (300 g)
Veal Tenderloin 23-35 oz (650-1000 g)
Lamb Leg max. 5 lbs (max. 2 kg)
Saddle max. 6 lbs (max. 2.5 kg)
Fish Steaks 5-7oz (150-200 g)
Filet / pieces 4.5 lbs (2 kg)
whole max. 5.5 lbs (2.5 kg)
Lobster tails max. 5 pieces up to 10 oz (280 g)
max. 4 pieces up to 1.1 lbs (500g)
Paella fresh max. 4.5 lbs (2 kg)
Master Chef
27

If you often cook a recipe with the same
settings (function, time, temperature)
you can save them as a "favorite" for
easy recall.
Saving af favorite
^Enter the function, temperature and
cooking times of the recipe.
The oven will begin heating.
^Touch the "Add to Favorites" control.
Your "favorite" must be named before it
can be saved to the memory.
^Enter the letters and numbers of the
name by touching the controls left
and right of the alpha-numeric list.
Confirm each character entry by
touching the "Select" control.
^Toch the "OK" control when naming is
complete to save the "favorite" to
memory.
Your "favorite" can now be recalled from
the "Favorites" list. When selected the
oven will automatically use the saved
settings.
^Touch "Clear" to cancel the running
function if you are not cooking.
Selecting Favorites
^Select "Favorites" on the main menu.
^Select and start the personal recipes.
Delete Favorites
^Select "Favorites" on the main menu
and the sub-menu "Clear favorites".
^Select the desired favorite and
delete.
Favorites
28

Default temperature 375°F/190°C
For religious observance, the oven can
be set to run for the duration of the
Sabbath there will be no visual change
to the control panel and the clock will
not be displayed.
In this function, only "Convection Bake"
and "Broil" are available.
^Select the desired Sabbath function
while the door is closed.
The oven will stay in "Hold" mode until
the oven door is opened again.
^Open the oven door.
^Place the food in the oven.
^Close the oven door.
After a 5 minute delay, the oven will
start heating until the set temperature is
reached. This temperature will be held
constant for 72 hours.
Once the Sabbath function has started
the settings cannot be changed. The
oven can only be turned off with the
"On/Off" control.
After the end of Sabbath
After 72 hours, the oven willshut off and
"F55" will appear in the display.
Turn the oven off to reset it to normal
operation.
Sabbath
29

The default oven settings can be
changed in the function "Settings J". In
this function you can customize the
oven to suit your preferences. Settings
may be adjusted by touching the
appropriate touch control.
Language J
^Select the touch control next to the
desired language and confirm by
touching "OK".
The symbol Jindicates the "Language"
setting. If you accidentally select an
unfamiliar language, simply look for the
symbol Jtouch the control next to the
flag symbol and select your language
of choice.
Clock
"Enter Time" appears in the display.
^Enter the current time using the
keypad.
Different settings can be selected by
touching the control next to the option:
– the size of the clock display,
Size Normal or LARGE
– the time format,
12 hour or 24 hour
– whether or not the time is displayed,
Clock-Display On or Off
^Touch the "OK" control to confirm the
entries.
If power to the oven is cut off for more
than 4 days, the clock will have to be
reset.
Settings J
30

Temperatures
The default temperature of each
function can be adjusted within the
range shown below. If a temperature
out of the range is selected, the oven
will revert to the default temperature.
^Touch the control of the function
whose default temperature you wish
to alter.
^Enter the new default temperature
using the keypad.
The next time this function is selected,
the new temperature will be used.
Oven Light
The "on" duration of the oven light can
be altered.
^Touch the control of the light setting
you wish to choose.
– "Off after 1 minute"
The light goes off after the first
minute of a function.
–"On during use"
The oven light remains lit during a
function.
The selected setting will apear in the
display.
^Touch the "OK" control to confirm the
selection.
Temperature °F/°C
All oven temperatures can be displayed
in either Fahrenheit or Celsius degrees.
^Touch the "Temperature" control to
toggle between °F and °C.
Settings J
31

Tone Options
Unique tones may be set for each of
the two timers to differentiate the timers
from an oven function tone.
"Timer 1" and "Timer 2"
The tone of "Timer 1" and "Timer 2" can
be set to one of five tone options.
^Selct "Timer 1 Tone" or "Timer 2 Tone"
by touching the corresponding
control.
With every touch of the respective
control, another tone will sound and the
display will show the tone number.
For example, Timer 1 Tone 1.
^Select the tone for each timer.
"Keypad Tone"
The keypad can be set to make a
sound with every touch of a control.
^Touch the "Keypad tone" control to
toggle between the on and off
settings.
"Volume"
This control adjust the volume of the
tone options.
^Touch the "Volume" control until you
hear the desired volume.
"Tone Short / Long"
The duration of the timer and oven
tones can be modified.
–"Tone short" will beep in quick
succession when an oven signal or
the oven timer sounds.
– "Tone long" a continuous tone will
sound when an oven signal or the
oven timer sounds.
^Touch the "Tone" control to toggle
between the short and long setting.
^Touch the "OK" control to confirm the
"Tone Options" settings.
When the tone sounds to indicate an
oven signal or the timer, touch any
number on the keypad to turn off the
tone.
Settings J
32

Display
The brightness and contrast of the oven
display can be adjusted by touching
the controls next to "Brightness" and
"Contrast".
System Lock
The oven can be locked.
The oven is set by default to
"Do not accept".
The display shows a lock which is
either open or closed. When selecting
the lock, it can be opened with "Off" or
closing with "On". The timer can still be
used.
The oven will remain locked after a
power failure.
Warming Function
The microwave has a built-in
keep-warm function which is activated
by default. Food which is not
immediately removed from the oven will
be kept warm for a short period of time.
The display shows "Keep warm".
The function can be deselected. The
"keep warm" function can not be set as
a separate function.
Power Level
The default power settings for
microwave and combined microwave
functions can be shown and adjusted.
Following microwave power levels
are available for microwave:
–At an electrical connection of 240V:
80 W, 150 W, 300 W, 450 W, 600 W,
850 W und 1000 W.
– At an electrical connection of 208 V:
80 W, 150 W, 300 W, 450 W, 600 W
und 850 W.
They are shown in a bar. The full bar
shows the maximum power. If only two
segments are shown the minimum
power is displayed.
Following microwave power levels
are available for combined functions:
80 W, 150 W, 300 W, 450 W
They are shown in a bar. The full bar
shows the maximum power of 450 W. If
only three segments are shown the
minimum power (80 W) is displayed.
Settings J
33

Reset
The factory settings of the oven can be
restored through the "Reset" function.
Temperatures
If the request is confirmed with "yes", all
changed temperatures will be restored
to the factory default.
Settings
If the request is confirmed with "yes", all
changed settings will be restored to the
factory default.
Favorites
If the request is confirmed with "yes", all
changed "favorite" entries will be
deleted. Once deleted, these entries
cannot be restored.
Settings J
34

The timer can be used to time any
activity in the kitchen and can be set
independently of a cooking function.
Two alarms (Timer 1 and 2) can be
selected simultaneously.
A maximum time of 99 minutes and
59 seconds can be selected.
Setting a timer
^Touch the "Timer" control.
^Use the keypad to enter the desired
time in minutes and seconds.
The second timer can be set in the
same way as the first.
The count down of Timer 1 and 2 is
shown in the lower area of the display.
At the end of the timed period, a tone
will sound.
^Touch "Clear" to cancel the timer
tone.
Cancelling a timer
^Touch the "Clear" control.
^Touch the control for the timer to be
cancelled or to cancel both timers
and a running function touch "All
Functions".
^Touch "OK".
Timer
35
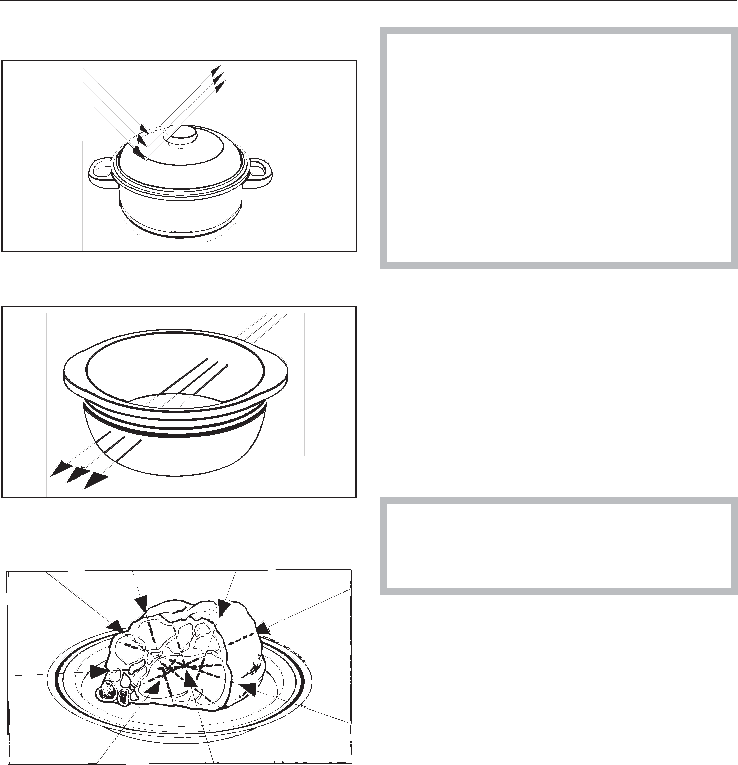
Microwaves
–are reflected by metal,
– pass through glass and chinaware,
–are absorbed by the food.
For microwaving the food, set the
glass tray always on the first runner
level from below. If the food is set
directlly on the oven bottom it will not
defrost/cooked/heated evenly since
the microwaves can’t reach the food
from below.
Set the food, bowls, plates, etc. in
the middle of the glass tray.
Material and shape
The material and shape of containers
used affect cooking results and times.
Circular and oval containers work best.
The food will heated more evenly that in
square container.
Metal
Do not use metal containers,
aluminum foil, cutlery and dishes
with metal decor for microwaving.
The metal reflects the microwaves
which can damage the microwave
oven.
Selecting cookware for microwave ovens
36

Exceptions:
–Pre-cooked meals in aluminium foil
containers can be defrosted and
reheated in the microwave oven.
Important: Remove the lid before
heating the food.
The food is heated only from above.
To heat the food evenly place it in a
container suitable for microwaving.
–For even defrosting and to avoid
overcooking unevenly shaped cuts of
meat, poultry or fish, small pieces of
aluminium foil may be used to mask
wing-tips or other thin parts for the
last few minutes of the process.
Make sure that the aluminium foil is
at least 1 inch (2.5 cm) from the
oven walls at all times. It must not
touch the walls.
– Metal meat skewers or clamps
should only be used if they are very
small in comparison to the size of the
cut of meat.
The enclosed combi rack is suitable for
microwaving. Do not set it on the
interior bottom.
The combi rack gets hot.
Glassware
Heat-resistant glass or ceramic glass
are ideal for use in the microwave oven.
Crystal glass contains lead and
glass bowls with a waved rim could
cause the glass to crack. Both are
unsuitable.
Porcelain (chinaware)
Porcelain (chinaware) is a suitable
material.
Do not use porcelain with gold or
silver edging or items with hollow
knobs or handles, as insufficient
ventilation may cause pressure.
Earthenware
Decorated earthenware is only suitable
if the decoration is beneath an all-over
glaze.
Earthenware can get very hot, and
may crack.
Glazes and colors
Some glazes and colors contain
metallic substances. They are not
suitable for the microwave.
Selecting cookware for microwave ovens
37

Plastics
Use plastic dishes only for
Microwave - Solo.
Plastics must be heat-resistant up to
230 °F (110 °C).
The plastics might melt into the food.
Special plastic utensils, designed for
use in microwave ovens are available
from retail outlets.
Plastic dishes made from melamine is
not suitable. It gets hot during cooking.
When purchasing plasticware, make
sure that it is suitable for use in a
microwave oven.
Disposable containers, such as trays
made from styrofoam, can only be used
for very short timed warming and
reheating of food.
Plastic boiling bags can be used for
cooking and re-heating.
They should be pierced beforehand
so that steam can escape. This
prevents a build-up of pressure and
reduces the risk of the bag bursting.
Roasting bags and -tubes
can be used. Roasting tubes should be
about 15 inches (40 cm) longer and
roasting bags about 7 inches (20 cm)
longer than the food being roasted, and
carefully tied with string. Turn the ends
over and secure them. Holes should be
pierced according to the
manufacturer’s instructions.
Do not use metal clips or wire ties,
even if bound by paper.
Fire hazard!
Wood
Wooden containers are not suitable.
The water from the wood evaporizes
during the cooking process. The wood
dries out and cracks.
Disposable containers
Only those plastic disposable
containers specified under "Plastics"
are suitable for use in a microwave
oven.
Do not leave the oven unattended
when re-heating or cooking food in
disposable containers made of
plastic, paper or other inflammable
material.
Disposable containers are not always
recyclable or degradable.
Selecting cookware for microwave ovens
38

Testing dishes
If in doubt as to whether glass,
earthenware or china plates or dishes
are suitable for use in a microwave
oven, a simple test can be performed:
^Set the empty cookware onto the
middle of the glass tray on the first
runner from below.
^Close the door.
A microwave oven process cannot
be started until the door is closed.
^Press the On/Off touch control for the
main menu.
^Select the Microwave function.
The highest microwave setting
(1000 W) is highlighted.
^Confirm with "OK".
^Set a duration of 30 seconds and
confrim with "OK".
If a crackling noise is heard
accompanied by sparks during the
test, turn the oven off immediately.
Press the On/Off touch control.
Any cookware which causes this
reaction is unsuitable for use in the
microwave oven.
If in doubt about the suitability of
containers, please contact the
supplier.
This test cannot be used to check
whether items with hollow knobs or
handles are suitable for use in a
microwave oven.
Selecting cookware for microwave ovens
39
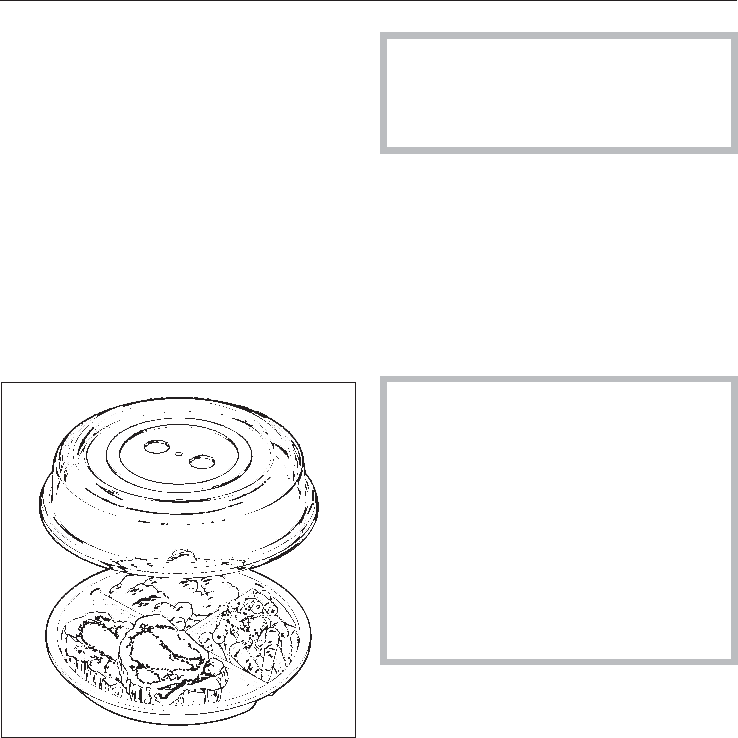
Covering the food
A cover
–prevents too much steam escaping,
especially when cooking foods which
need longer to cook, such as
potatoes.
–shortens and evens out the cooking
process.
–avoids a dry up of the food.
–prevents any loss of aroma.
–prevents soiling of the oven interior.
Cover the food for microwaving with a
glass or plastic lid suitable for
microwave ovens. They are available in
retail stores.
Plastic wrap suitable for microwaving
can be used. Unsuitable clingfilm can
melt into the food.
Do not heat food in closed
containers like baby food glass
container. Open the container before
heating.
Do not use a lid or cover if
–cooking meals which are to be given
a crisp finish, cooking breaded or
battered foods
–cooking food with a crisp finish, i.e.
toast.
– a combination function is selected.
Use the cover only for
Microwave-Solo. The plastics is only
heat-resistant up to 230 °F (110 °C).
Higher temperatures (Broiling,
Convection Plus, etc.) can cause the
cover to melt into the food.
The cover should not seal the
container. Smaller container
diameters prevent the steam from
escaping. The cover might melt.
Selecting cookware for microwave ovens
40

The microwave defrosts food gentle
and fast.
The following microwave settings are
recommended for defrosting:
–80 W
Defrosting delicate food such as
heavy cream, butter, cream cake,
cheese.
–150 W
defrosting all other foods.
The respective automatic programs are
ideal for defrosting.
See the table on the following page for
more information.
^Take the frozen food from the
packaging and put it in microwave
suitable cookware.
^Set the cookware onto the middle of
the glass tray on the first runner from
the bottom.
When defrosing larger amounts of food,
i.e. 4 lbs (2 kg) fish, the glass tray can
be used as a defrosting container in the
first runner from the bottom.
Hints for defrosting with the
Automatic program:
If defrosting larger food amounts which
contains of smaller portions, set a lower
overall weight as if for a large compact
piece. The food will defrost more
evenly. Example: 4 lbs meat portioned
to 4 packages a 1 lbs 3 lbs instead of 4
lbs
Turn, stir or separate the food about
half-way through the defrosting time.
When using the Automatic program a
tone sound and a hint is displayed as a
reminder.
After defrosting
Allow the food to stand at room
temperature long enough to distribute
the heat evenly throughout the food.
Defrosting
41

Table for Defrosting food
Microwave power
settings
Amount 150 W
Time in
minutes
80 W
Time in
minutes
Adjusting time at
room temperature1)
in minutes
Dairy products
Heavy cream
Butter
Cheese slices
Milk
Quark
250 ml (125 °C)
250 g (125 °C)
250 g (125 °C)
500 ml (125 °C)
250 g (125 °C)
–
–
–
14 – 16
10 – 12
13 – 17
8 – 10
6 – 8
–
–
10 – 15
5 – 10
10 – 15
10 – 15
10 – 15
Cake / Cookies / Bread
Pound cake
Pound cake
Fruit cake
Butter cake
Cream cake
Yeast cookies,
danish cookies
1 piece approx.
3.5 oz (100 g)
10 oz (300 g)
3 piece approx.
10 oz (300 g)
3 piece approx.
10 oz (300 g)
1 piece approx.
3.5 oz (100 g)
3 piece approx.
10 oz (300 g)
4 pieces
1 – 2
4 – 6
6 – 8
5 – 7
–
–
6 – 8
–
–
–
–
1.5
4 – 4.5
–
5 – 10
5 – 10
10 – 15
5 – 10
5 – 10
5 – 10
5 – 10
Meat 2) – – – 10 – 15
Poultry 2) – – – 10 – 15
Fish2) – – – 10 – 15
Vegetables 2) – – – 10 – 15
Fruit 2) – – – 5 – 10
Stew 2) – – – 10 – 15
Soup 2) – – – 10 – 15
Bread 2) – – – 5 – 10
Complete meals 2) – – – 5 – 10
1) The temperature distributes evenly in the food during this time.
2) Use the respective Automatic program.
The data are all appoximate.
Defrosting
42

The microwave is useful for reheating
food.
To heat select
–for drinks a setting of 1000 W,
–for food a setting of 600 to 850 W.
–for baby food a setting of 450 W.
Take care that the baby food is at
eating temperature when served.
Heat baby food only for 30 seconds
to 1 minute on 450 Watt.
The respective automatic programs are
ideal for reheating.
Always use a lid or cover for re-heating
food, except when a drier finish is
needed, e.g. breaded poultry/meat.
Open glass containers before
reheating food.
Remove the lid of baby food glass
containers.
Remove the lid or nipple from baby
bottles before heating.
To heat a liquid insert the enclosed
boiling wand into the container.
Do not heat rehard boiled eggs,
even without the shell, in the
microwave oven. The eggs can
burst.
The time required depends on the food,
its initial temperature and the amount to
be cooked. Food taken straight from
the refrigerator requires longer to reheat
than food stored at room temperature.
Always ensure that food is
sufficiently cooked or reheated.
If in doubt that a sufficiently high
temperature has been reached,
continue reheating for a little longer.
Stir the food halfway through the
re-heating.
When using the Automatic program a
tone will sound as a reminder. Stir the
outer portion to the middle since the
rims are reheated faster.
After re-heating
Be careful when removing a dish
from the oven. It may be hot.
The cookware will not be heated by the
microwave (exception: heat-resistant
earthenware), but by the heat transfer
of the food.
Allow food to stand for a few minutes at
room temperature once a programme
has ended to allow heat to be
distributed evenly. The temperatures
are adjusted.
After heating food, especially food
for babies and small children, stir
the food or shake the container and
check that the temperature does not
pose any danger. Double check
after it has been left to stand.
Reheating
43

Table for Re-heating food
Drinks ** Microwave power
settings
Amount 1000 W
Time in
minutes
450 W
Time in
minutes
Adjusting time at
room temperature
1)
in minutes
Coffee
140 - 149 °F (60 - 65 °C)
Milk
140 - 149 °F (60 - 65 °C)
WaterBoiling
Baby bottle (milk)
Mulled wine, Grog
140 - 149 °F (60 - 65 °C)
1 cup,7 oz (200 ml)
1 cup, 7 oz (200 ml)
1 cup, 4 oz (125 ml)
approx. 39" (200 ml)
1 Glass
7 oz (200 ml)
0:50 – 1:10
1– 1:50***
1 – 1:50
–
0:50 – 1:10
–
–
–
0:50 – 1***
–
–
–
–
1
–
Food *** Microwave power
settings
Amount 600 W
Time in
minutes
450 W
Time in
minutes
Adjusting time at
room temperature
1)
in minutes
Baby food
Meat ****
Poultry ****
Fish ****
Vegetables ****
Stew ****
Soup ****
Complete dish ****
Wiener in 4 oz (250 ml) of
water
Pork shop, cooked
Fish fillet, fried
Potato pancakes
Gravy
1 Glass, 7 oz
–
–
–
–
–
–
–
3.5 oz (100 g)
7 oz (200 g)
7 oz (200 g)
9 oz (250 g)
9 oz (250 ml)
–
–
–
–
–
–
–
–
3 – 4
3 – 5
3 – 4
3 – 5
4 – 5
0:30 – 1
–
–
–
–
–
–
–
–
–
–
–
–
1
3 – 5
3 – 5
3 – 5
3 – 5
3 – 5
3 – 5
3 – 5
1
2
2
1
1
* The temperature distributes evenly in the food during this time.
** Insert the boiling wand in the container.
*** The times are for the initial food temperature of 41 °F (5 °C).
**** Use the respective Automatic program.
Food which is usually not stored in the fridge is assumed to have a roomtemperature of 68°F (20 °C).
Except. baby food and delicate sauces, reheat food to a temperature between 158-167 °F (70-75 °C).
The data are all appoximate.
Reheating
44

To cook food all functions and
combined functions are suitable.
The function Microwave is suitable for
cooking casseroles or rice pudding.
Select the 850 W setting for the inital
cooking, 450 W for the continued
cooking and 150 W for the finish.
The function Convection Plus is
recommended to braise or stew of
potatoes or vegetables.
Select a combined function to shorten
the cooking time and for a browning
finish.
The combined functions Microwave +
Broil is suitable for cooking and
gratinating casseroles or toast.
Function Microwave
Place the food in a microwave-safe dish
and cover it.
Set the cookware onto the middle of the
glass tray on the first runner from the
bottom.
Add a little water to vegetables.
Vegetable cooking times depend on the
texture of the vegetable. Fresh
vegetables contain more water and is
faster done.
Food taken straight from the refrigerator
requires longer to reheat than food
stored at room temperature.
Stir and turn food at least once during
cooking. At the Automatic program a
tone sound as a reminder.
Food with a thick skin or peel, such as
tomatoes, sausages, jacket potatoes
and aubergines, should be pierced or
the skin cut in several places before
cooking to allow steam to vent and
prevent the food from bursting.
Boil eggs in shell only with a special
dish in the microwave. The eggs
might burst even when taken from
the oven. The special cookware is
availabe from retail stores.
Eggs can be cooked without their shells
in the microwave oven only if the yolk
membrane has been punctured several
times first. The pressure could
otherwise cause the egg yolk to
explode.
Cooking
45

Function Convection Plus
^Insert the glass tray with the combi
rack on the first runner level.
Suitable cookware:
Heat-resistant casserole dish, china,
earthenware, pots with heat-resistant
handles.
Cover the food which is supposed to
stew, like potatoes or vegetables. It also
prevents the food from drying up.
Food, which is supposed to have a
crust, i.e. meat, is cooked without a
cover.
Combination functions
^Set the cookware on the glass tray
and insert it inthe first runner level.
Only use microwavesuitable and
heat-resistant cookware. No metal!
Do not cover the food when using
combination functions especially not in
the combination function Microwave +
Broil. The food will not brown.
Ensure that food, such as meat and
fish, are cooked for an appropriate
length of time.
Cooking
46

Table for cooking food
Microwave power setting
Amount 850 W
Time in
min.
+ 450 W
Time in
min.
Compen-
sation time at
room temp.*
in Min.
Meat
Meatballs w/ gravy ** – – – 2 – 3
Poultry
Chicken w/ mustard sauce **
Chicken w/ curry sauce **
Poultry risotto
–
–
ca. 1,6 kg
–
–
10 +
–
–
15
2 – 3
2 – 3
3 – 5
Fish
Fishfilet w/ gravy **
Fish curry **
–
–
–
–
–
–
2 – 3
3 – 5
Fresh vegetables
Carrots **
Cauliflower **
Peas **
Bell pepper stripes **
Brussels sprout **
Asparagus **
Brokkoli florets **
Leek **
Green beans **
–
–
–
–
–
–
–
–
–
–
–
–
–
–
–
–
–
–
–
–
–
–
–
–
–
–
–
2 – 3
2 – 3
2 – 3
2 – 3
2 – 3
2 – 3
2 – 3
2 – 3
2 – 3
Frozen vegetables
Peas, mixed vegetables
Spinach
Brussels sprout
Brokkoli
Leek
450 g
450 g
300 g
300 g
450 g
5
5
4
3
4
+
+
+
+
+
11
7
6
6
8
2
2
2
2
2
Desserts
Red fruit jelly 6 – 8 – –
* During this time the temperature is distributed evenly in the food.
** Use the e
The data are all appoximate.
Cooking
47
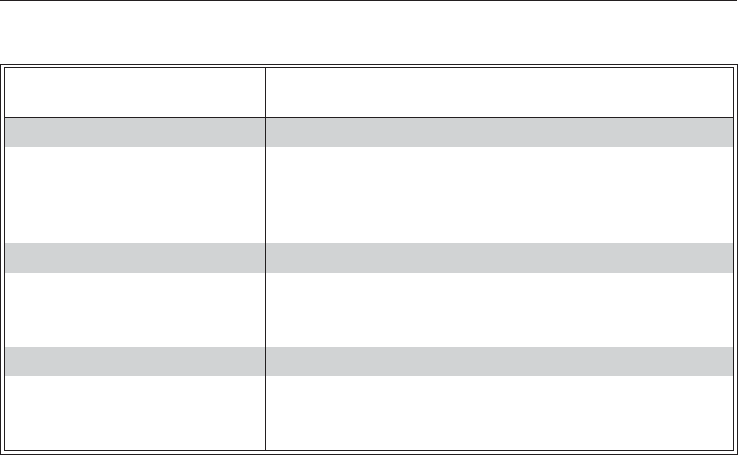
Table for roasting, scollopping and browning food
Amount Heating function Time in
Min.
Meat 1)
Pork roast
Smoked pork roast w/ honey crust
Veal roast
Meat loaf
1000 g
1000 g
1000 g
ca. 1200 g
300 W + Heißluft Plus 160 °C
Heißluft Plus 180 °C
Heißluft Plus 180 °C
300 W + Heißluft Plus 180 °C
ca. 65
ca. 70
ca. 120
ca. 40
Poultry 1)
Chicken, whole
Goose drums, 3 pieces
Turkey breast
1000 g
ca. 1500 g
ca. 1000 g
300 W + Heißluft Plus 180 °C
Heißluft Plus 170 °C
Heißluft Plus 170 °C
35 – 45
ca. 120
ca. 100
Small dishes 2)
Toast with different topping
Baked artichoke hearts
Chicken nuggets, fresh 1)
4 Stück
8 – 10 Stück
ca. 1000 g
Grill
Grill
Heißluft Plus 190 °C
5 – 9 3)
8 – 10 3)
ca. 20 4)
1) first level runner from bottom
2) second level runner from bottom, rack turned upside down
3) preheat the oven for 5 minutes, set food on the rack
4) preheat the oven
Insert the glass tray with the rack in the level described.
Compensation time at room temperature:
approx. 5 minutes, cooking times under 10 minutes about 2 minutes
The data are all appoximate.
Cooking
48

To defrost, heat and cook at the same
time use
–the function Microwave,
–the combination function
Microwave + Broil
The function Microwave is suitable for
frozen food, which does not require
browing.
The combined functionis
recommended for already cooked
dishes, which are supposed to be
gratinated and browned.
Function Microwave
Frozen meals can be defrosted and
then re-heated or cooked. Consult the
manufacturer’s instructions.
Remove the food from its packaging
and place in a covered microwave-safe
dish for defrosting and re-heating or
cooking. Soups and vegetables should
be stirred several times during the
process. Separate slices of meat
half-way through the program. Turn
pieces of meat and fish at the half-way
stage.
Frozen meals in cardboard trays which,
according to manufacturer’s
instructions are suitable for use in a
traditional oven, are microwave-safe.
Combination functions
The function Microwave + Broil is
recommended for frozen meals which
require browning. Select a microwave
power setting of 450 W. The oven
automatically sets a default broiling
temperature which cannot be changed.
Insert the frozen meal in a
heat-resistant, microwave-safe
cookware and set it on the glass tray.
Set the glass tray in the second runner
level. Do not cover the food.
Frozen foods in an aluminum tray must
be set directly on the glass tray.
If the food is not sufficiently browened,
set the aluminium tray on the combi
rack and set it with the glass tray in the
first runner level.
Defrosting and re-heating / cooking
49

To broil use the functions Broil,
Convection broil and the combi
functions Microwave + Broil and
Microwave + Convection Broil.
The function Broil is designed for flat
food like pork chops, steak, burgers,
toast and grilled toasts.
The function Convection Broil is
designed for broiling food with a larger
diameter like shish kebab, roasts and
poultry.
The combined functions allow an
additonal microwave power setting of
450 W over the total broiling time.
Preparing the food for broiling
Rinse meat with cold flowing water and
pad dry. Do not salt slices of meat.
Lean meat can be basted with oil.
Other fats tend to become dark or
smoke. Chicken can be basted with
butter.
Clean and salt flat fish and fish slices
as usual and sprinkle with lemon juice.
Broiling
Broiling is done with a fixed setting.
There is no temperature setting
possible.
Before broiling, preheat the broiling
heating element for 5 minutes with the
door closed.
Do not add the Microwave function.
To broil baste the combi rack with oil
and place the food on it.
The slices should be evenly thick so
that the broiling time is the same.
Insert the glass tray with the combi rack
depending on the food in the second or
third runner level.
The rack can be used depending on
the food height to allow an optimum
distance to the upper heating element.
Turn broil good at the half-way stage.
Convection Broil
Usually the first level runner from the
bottom is suited best. When in doubt
insert the rack here. To increase the
ventilation below the food, the rack
should be turned upside down. The
second runner level can be selected for
very flat food.
Testing the food
To test how far the food is cooked,
press down with a spoon.
–If it is very elastic, it is rare.
–If it is slightly elastic, it is medium.
–If it is not elastic at all, it is well done.
Broiling
50
Table for Broiling
Preheat the broiling heat element for 5
minutes.
Flat broil 1) total broiling time
in minutes2)
Steaks 25 – 30
Burgers 30 – 35
Bratwurst 20 – 25
Fish fillets 16 – 20
Toast 2 – 4
Grilled toast 5 – 9
Tomatoes 8 – 10
Peaches 7 – 10
1) Third runner level
2) Turn broil good at the half-way stage.
The data are all appoximate.
Broiling
51

To roast use
–the function Auto Roast,
–the combination function
Microwave + Auto Roast
Meat and Poultry will brown with the
Auto Roast function.
The roasting time is shortend when the
combined functions are selected.
The combination function is not suitable
for roast beef and tenderloin. The meat
will be cooked before it gets brown.
Do not preheat the oven.
Exeption: Pre-heat the oven to the
temperature recommended in the
recipe when cooking roast beef or
tenderloin.
Roasting in a closed pot is the most
suitable because:
– The moisture is retained and the
meat stays tender.
– The oven interior stays cleaner as
with broilin on the combi rack.
–There will be enough stock to cook
gravy.
Take the lid off after half of the roasting
time to allow the meat to brown.
Auto Roast
Insert the glass tray with the combi rack
on the first runner level.
Suitable cookware:
Casserole, Roasting tray, heat resistant
glass casserole, earthen cookware. The
cookware must have heat-resistant
handles.
Set the cookware direktly on the glass
tray.
The roasting time depends on the type,
size and thickness of the meat.
How to determine the roasting time:
Hight of the roast x times per
centimeter (see table for the respective
meat)
Meat Time
per centimeter
height
Beef / Game 15 – 18 Min.
Pork / Veal / Lamb 12 -15 Min.
Roast beef / Tenderloin 12 -15 Min.
Example:
Roast beef, 8 cm thick
8 x 15 min per cm = 120 min. roasting
time
The larger the cut of meat to be
roasted, the lower the temperature that
should be used. Set a 50 °F (10 °C)
lower temperature for 6 lbs and higher.
The roasting process will take a little
longer, but the meat will be cooked
evenly and the outside will become
crisp.
Roasting on the rack takes a 68 °F
(20 °C) lower temperature that roasting
in the pot.
Turn the rack upside down on the glass
tray.
Use the specified roast temperatures.
When the temperature is too high, the
meat will brown but not cook.
Roasting
52

Microwave + Auto Roast
Insert the glass tray with the combi rack
on the first runner level.
Use only heat resistant cookware, but
without a metal lid. Microwaves do not
go through metal and will not reach the
food.
Using roasting foil
–measure the foil 40 cm longer than
the meat or poultry
–Close it tightly with string. See
"Suitable cookware for microwave
ovens"
When using Auto Roast set an
additional microwave setting for the
total roasting time.
– For meat and fish a microwave
setting of 300 W.
– Poultry a setting of 150 W.
After roasting
Take the food from the oven and wrap it
in aluminum foil. Let it sit for 10 minutes.
When carving the food, there will be
less juice.
Tips for roasting
Roasting in a covered pot
Season the meat and place in the pot.
Add some butter, margarine or a little
oil. Add about 1/2 cup of water when
roasting a large cut of meat or roasting
poultry with a high fat content.
The browning is done by the end of the
roasting time. The meat gets an
intensive browning, when the lid is
taken off 15 - 20 minutes before the end
of roasting.
Roasting on the rack
Add a little oil to very lean meat or
place a few strips of bacon on top to
help retain moisture.
Do not add too much liquid during
roasting. The browining of the meat will
be hindert.
Roasting poultry
For crispy skin, baste the poultry ten
minutes before the end of cooking with
salt water.
Roasting deep frozen meat
Deep frozen meat up to 3 lbs (1.5 kg)
can be roasted in Auto Roast without
defrosting. The roasting time will extend
for about 20 minutes.
Roasting
53

The oven comes equipped with a roast
probe.
The roast probe allows you to monitor
the cooking temperatures.
The roast probe tip measures the core
temperature of the meat. When the
temperature is reached the oven
heating is automatically turned off.
The roast probe can be used during the
following functions:
–Auto Roast
– Convection Plus
– Microwave (Solo and Combination)
Using the roast probe
^Prepare the meat.
^Insert the roast probe completely
into the food so that the tip reaches
the core.
Poultry: Insert the roast probe tip in
the thickest part of the breast.
Please note
The meat can be put in a pot or on the
rack with the glass tray. When using
broiling bags, insert the roast probe
through the foil into the meat core.
Fat and bones might impair the
measuring and can cause the oven to
turn off. Therefore the tip should not
touch bones and should not be
inserted at fatty parts of the meat.
Select the higher core temperature in
the roast table for meat with a high fat
content.
Using the roast probe
54
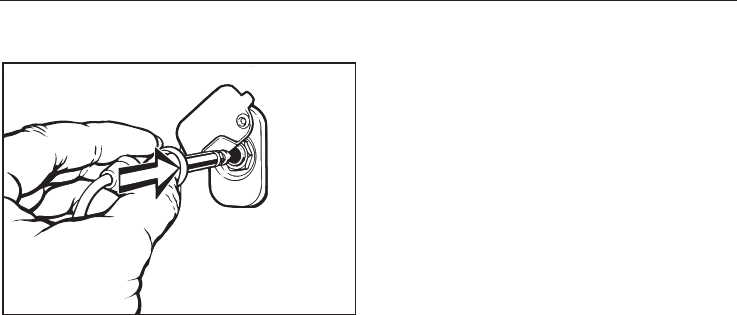
^Insert the food in the oven.
^Plug the roast probe into the outlet
until it clicks.
^Close the appliance door.
^Select the desired function.
The display shos the oven default
temperature and the default core
temperature.
^If desired adjust the oven default
temperature.
^Select "Core temperature" and adjust.
The core temperatured needed
depends on the food to be cooked. See
the roasting table for more information.
The rising core temperatue can be
monitored in the display during an
ongoing cooking process.
The cooking time results automatically.
Once the selected core temperature
is reached:
–the display shows "Finished".
–a signal tone sounds.
–the oven turns off automatically.
–the cooling fan stays on.
Note
A delayed start is possible.
After roasting the meat, cover the food
for about 10 minutes with aluminum foil.
During this time the core temperature
will rise by 41 - 50 °F (5 - 10 °C).
Insert the roast probe in another part
and repeat the process if
– the roast probe tip does not reach
the meat core (at large cuts of meat).
– the meat is not cooked to your
desire.
The time for the temperature monitored
roasting is comparable with the time at
time depending roasting.
Using the roast probe
55

Table for rasting food
Auto Roast Microwave + Auto Roast
Temperature
in °F (°C) 1) Time
in
minutes
Microwave
power
in W
Temperatur
e
in °F (°C)
1)
Time
in
minutes
Core
temper
ature
°C
Roast beef
approx. 2.2 lbs (1 kg)
170 – 190 100 – 120 300 180 70 – 80 85 – 90
Tenderloin,Roast beef 2)
approx. 2.2 lbs (1 kg) 190 – 210 35 – 45 – – –
40 – 65
3)
Game roast
approx. 2.2 lbs (1 kg)
180 – 200 90 – 110 300 180 65 – 75 75 – 85
Pork roast
approx. 2.2 lbs (1 kg) 170 – 190 100 – 120 300 180 70 – 80 80 – 85
Pork loin, cutletts
approx. 2.2 lbs (1 kg) 170 – 190 60 – 80 300 180 45 – 55 70 – 75
Smoked pork chop
approx. 2.2 lbs (1 kg)
170 – 190 60 – 70 300 180 40 – 50 75 – 80
Meat loaf
approx. 2.2 lbs (1 kg)
160 – 180 60 – 70 300 180 35 – 40 75 – 80
Veal roast
approx. 2.2 lbs (1 kg)
170 – 190 100 – 120 300 180 70 – 80 70 – 75
Leg of lamb
approx. 3.3 lbs (1.5 kg)
170 – 190 90 – 120 300 180 70 – 80 80 – 85
Poultry 1.7 lb - 2.2 lbs
(0.8 kg - 1 kg)
170 – 190 50 – 60 150 180 40 – 45 85
Poultry
approx. 4.4 lbs (2 kg)
170 – 190 90 – 110 150 180 70 – 80 85
Poultry
approx. 8.8 lbs (8 kg)
160 – 180 150 – 180 150 170 100 – 120 85
Fish, whole
approx. 3.3 lbs (1.5 kg) 160 – 180 35 – 55 – – – 75 – 80
Times are for preheated oven.
1) Roating in a pot
If roasted on the rack, set the temperature 68 °F (20 °C) lower.
2) Preheat the oven
3) rare 40 - 45, medium 50 - 55, well done 60 - 65 °C
The data are all appoximate.
Roasting
56
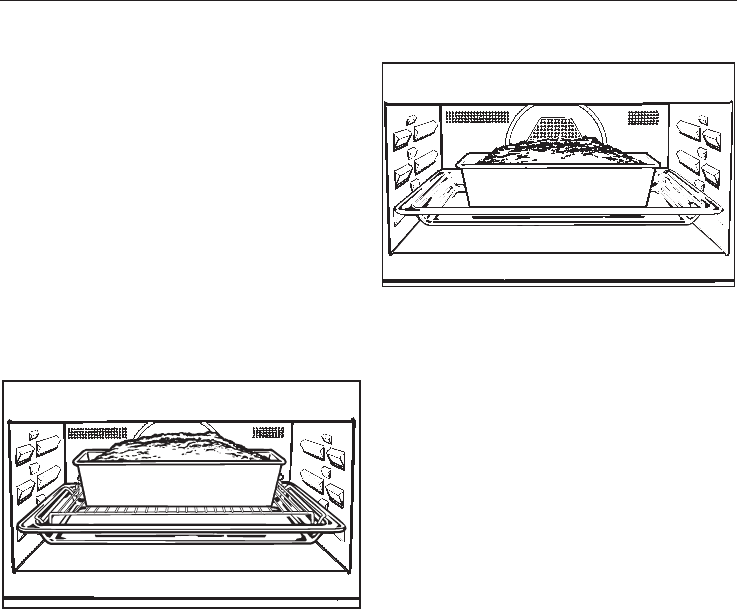
To bake use
–function Convection Plus
–the combination function Microwave
+ Convection Plus
The function Convection Plus is
suitable for cookies, sponge cakes, puff
pastry, etc.
The combined function is suitable to
bake dough with a longer baking time
like yeast or sponge dough.
Function Convection Plus
Bake cakes in a form on a first runner
level from the bottom. Turn the rack
upside down on the glass tray to
ensure airflow for the convection.
When baking cookies or cakes on a
cookie sheet, select the 2nd runner
level from the bottom to get an even
browning.
Use the 2nd and 3rd level for baking
several trays at the same time.
Every heat-resistant material of
bakeware is suitable.
Shiny, thin pans are not recommended.
Do not select a too long baking time.
Cookies might dry up if baked too long.
Combination functions
^Insert the glass tray with the cake
form into the first level runner.
Suitable bakeware: heat-restistant glass
or ceramic so microwaves could get
through the material. Metal cake forms
reflect microwaves. Microwaves will
reach the cake only from the top which
will extend the baking time.
Metal cake forms can lead to sparking.
Set the form in the middle of the glass
tray, so that the form does not touch the
side walls.
If sparking occurs, do not use the form
for the combination function.
Baking
57

Do not use baking forms from paper
coated with aluminum foil (for
example from cake mixtures). This is
a fire hazard.
Set an additional microwave setting for
the total baking time. The microwave
power should not be more that 150 W.
Tips for baking
Regard the information about
temperature, microwave power,
runner levels and times given in the
baking table.
Different cake forms, dough portions
and baking habits are considered.
Set square cake forms horizontal in
the oven. The heat will be distributed
evenly in the cake form.
The gently treatment of food serves
your health.
Cake, Pizza, French fries should be
baked golden-yellow not dark
brown.
Tips for gentle cooking and even
browning
Cakes, cookies, deep frozen products
such as french fries, frozen cakes,
pizzas and baguettes are gently
cooked and browned
– if the lower temperature of the
recipe/packaging info is selected.
Select the temperature not higher
that the recipe/packaging. Higher
temperatures shorten the baking
time, but will affect the browning
degree.
The food could not be fully cooked.
– When the shortest baking time is
elapsed, check if the food is done.
Test cakes and cookies by sticking a
toothpick in the dough. If no dough is
sticking on the toothpick the food is
done.
–Line the cookie sheet with
parchment paper when cooking
greasy food like french fries.
Baking
58

Table for baking
Convection Plus Microwave + Convection Plus
Temperature
in °F (°C)1) Time
in minutes
Microwave
power
in W
Temperatur
e
in °F (°C)1
Time
in
minutes
Sponge cake dough
Pound cake
Muffins1)
Marble cake (form)
Fruit pies with meringue1)
Fruit pie (glass tray)1)
Fruit pie (form)
Shortcake
Cookies1)
150 – 170
150 – 170
150 – 170
150 – 170
150 – 170
150 – 170
150 – 170
150 – 170
55 – 70
25 – 35
60 – 70
45 – 50
35 – 45
55 – 65
25 – 30
20 – 30
–
–
–
–
–
–
–
–
–
–
–
–
–
–
–
–
–
–
–
–
–
–
–
–
Shortcake dough
Ta r t
Shortcake
Roll 1)
160 – 180
160 – 180
160 – 180
30 – 35
25 – 30
20 – 25
–
–
–
–
–
–
–
–
–
Bread dough
Shortcake
Coffee cake (glass tray)1)
Cookies1)
Apple pie
Apricot cake
150 – 170
150 – 170
150 – 170
150 – 170
150 – 170
25 – 30
40 – 50
20 – 30
45 – 55
60 – 70
–
–
–
–
–
–
–
–
–
–
–
–
–
–
–
Yeast dough
Coffe cake (glass tray)1)
Fruit pie (glass tray)1)
Fruit cake
White bread
Brown bread
Pizza (glass tray)1)
Pastry with filling1)
150 – 170
160 – 180
150 – 170
160 – 180
140 – 160
170 – 190
150 – 170
35 – 45
40 – 50
55 – 65
40 – 50
150 – 180
40 – 50
25 – 30
–
150
–
–
–
150
–
–
170
–
–
–
180
–
–
35 – 40
–
–
–
30 – 40
–
Choux pastry, Cream puffs 1) 160 – 180 30 – 40 – – –
Puff pastry 1) 180 – 200 20 – 25 – – –
Egg white sweets,
macaroons1) 120 – 140 35 – 45 – – –
Times are for preheated oven. Times will shorten by 10 minutes when preheating the oven.
1) second level runner
2) When using the combination functions, set the form onto glass tray.
Baking
59
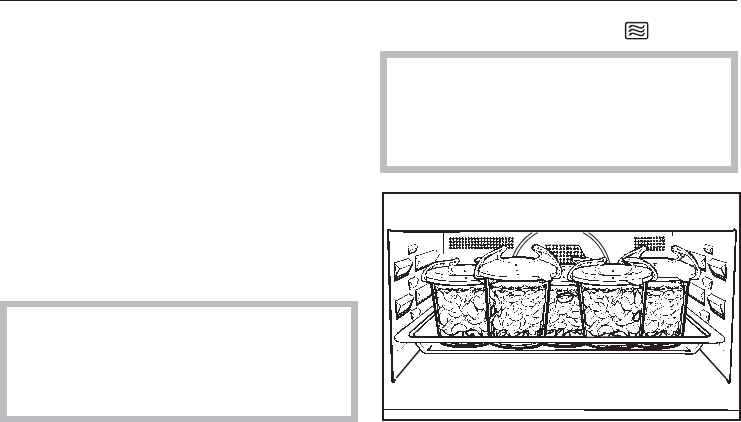
To can food use
–the function Microwave,
–Function Convection Plus
Suitable canning containers
–Canning jars
–only for Convection Plus: Jars with
screw caps Only use special jars for
canning. They are available in retail
stores.
Cans are not suitable for canning.
High pressure in the cans can cause
them to burst. This could result in
injury or damage.
Prepare the jars as usual.
Fill them up to 1" below the rim.
5 jars of 1 pint can be canned at a time.
Function Microwave
Close the jars only with microwave
suitable brackets or with tape.
Never use metal brackets. Sparking
can occur.
^Set the jars on the glass tray on the
first runner from the bottom.
^Select a 850 W power setting and
wait until evenly bubbling occurs.
The time required depends on:
– Original temperature of jar contents
–number of jars.
Duration until evenly bubbling occurs:
1 jar approx. 3 minutes
2 jars approx. 6 minutes
3 jars approx. 9 minutes
4 jars approx. 12 minutes
5 jars approx. 15 minutes.
This time is sufficient for fruit.
When canning vegetables, reduce the
microwave power to 450 W when
bubbling starts and cook
–carrots approx. 15 minutes.
–peas approx. 25 minutes.
Canning
60
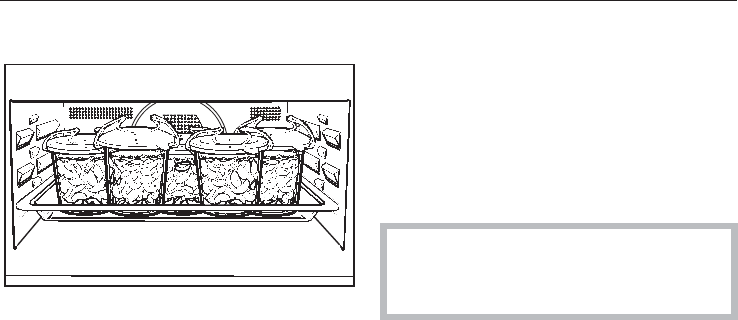
Function Convection Plus
^Set the jars on the glass tray and
insert it on the first runner level.
^Select a temperature of 302 - 338 °F
(150-170 °C).
This temperature setting is valid until
bubbling occurs. Five 1 pint jars need
about 30-40 minutes before bubbling
occurs.
When bubbling occurs
Fruit
^Continue canning for 25 - 30 minutes
but use the residual heat.
^Leave the selected function but
select the lowest temperature.
This ensures that the cooling fan
continues to work and no moisture is
collected in the oven interior.
Vegetables
^Lower the temperature to 212 °F
(100 °C) and continue to cook the
vegetables:
Asparagus, carrots for 60 - 90 minutes
Peas for 90 - 120 minutes
^Lower the temperature but keep the
function.
After canning
^Remove the jars from the oven and
let them sit for 24 hours covered with
a dish towel.
^Remove the brackets or the tape and
check if all jars are tightly closed.
Canning
61

Interior, door inside
The interior and the door inside are
hot after use.
Danger of burns!
Let the oven cool and clean the
interior, the door inside and the
gasket. Clean the oven after every
use, accumulated soiling makes
cleaning more difficult and could
lead to damages of the appliance.
Check the door and door seal at
regular intervals for any sign of
damage.
Do not use the Microwave function if
the door or gasket is damaged. Call
the Technical Service.
The interior is made of stainless steel.
Due to the high temperatures in the
traditional functions the stainless steel
can darken.
Clean the interior, the door inside and
the door gasket with a sponge and a
solution of warm water and non
abrasive liquid detergent. Dry with a
soft cloth.
Hard to clean soiling: Heat a glass of
water 2 - 3 minutes in the oven until the
water boils. The steam condenses at
the interior walls and soaks the soiling.
Stainless steel surfaces can be cleaned
using a non-abrasive stainless steel
cleaner.
Never use abrasive cleaners,
scouring pads or steel wool on any
part of the oven. They will damage
the surfaces. When using caustic
(oven) cleaners read the instructions
of the manufacturer and do not
spray it in the openings.
Avoid too much water as this could
penetrate the openings.
To neutralize odors in the microwave
put a cup of water with some lemon
juice in the oven and simmer for a few
minutes.
Soiling such as spilt juices and cake
mixtures are best removed while the
oven or tray is still warm.
Spilt fruit juices may cause lasting
discoloration of the surfaces.
Cleaning and Care
62
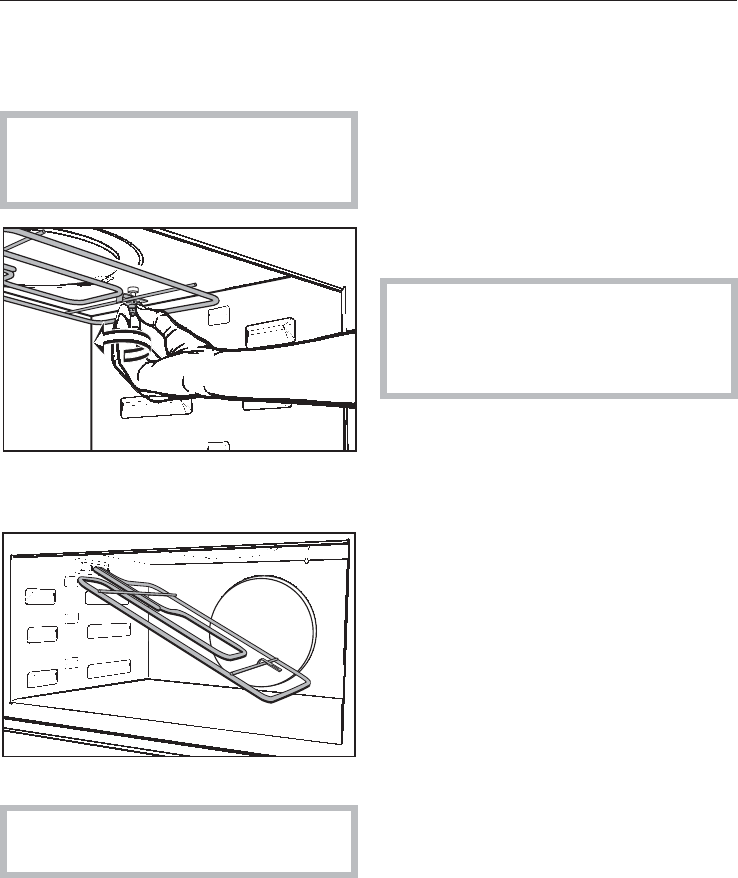
Interior ceiling
To clean the interior ceiling, the upper
heating element can be lowered.
Wait for the upper heating element
to cool to the touch before lowering
it. Danger of burns.
^Unscrew the nut and lower the upper
heating element.
^Lower the upper heating element.
Do not use force! It might get
damaged.
^After cleaning move the upper
heating element in its original
position. Tighten the nut.
Appliance front
^All external surfces and controls can
be cleaned with warm water and
liquid dish soap applied with a
sponge.
^Dry with a soft cloth.
Glass surfaces
Glass surfaces are not scratch-proof.
Never use abrasive cleaners,
scouring pads, steel wool or oven
cleaners on glass surfaces. They will
damage them.
Stainless steel
Stainless steel surfaces can be cleaned
using a non-abrasive stainless steel
cleaner.
To help prevent resoiling, a conditioner
for stainless steel can also be used.
Apply sparingly with even pressure.
Cleaning and Care
63

Oven accessories
Combi rack
The rack should be washed and dried
after each use. It is easier to clean if
you soak it in a solution of hot water
and dishwashing detergent. Remove
stubborn soils with a stainless steel
cleaner.
Glass tray
Clean the glass tray in the dishwasher
or wash it by hand.
Do not use abrasive cleaning agents,
they will damage the surface.
Boiling wand
The boiling wand can be washed in a
dishwasher.
Roast probe
Clean the roast probe only with a damp
cloth.
Do immerse the roast probe in water
and do not wash it in the
dishwasher. The roast probe will get
damaged.
Cleaning and Care
64

Installation work and repairs should
only be performed by a qualified
technician in accordance with all
applicable national and local codes
and standards.
Repairs and other work by
unqualified persons could be
dangerous and may void the
warranty.
The following faults can be corrected
without contacting the Miele Service
Department:
Why is the display dark when the
oven is first turned on?
^Possible fault
– the appliance is correctly plugged in,
– The circuit breaker has tripped.
Check the breaker.
– The display setting is set to "Off after
1 minute". See "Settings - Clock
display".
What if the oven does not heat?
^Possible fault
–Close the door firmly.
–Select a watt and time setting for the
microwave function.
–Select a watt and a time setting for
the microwave and a temperature
setting for a traditional function.
Why is there no noise when the oven
door is opened during operation with
traditional function?
This is normal. If the door is opened
during operation, a safety contact
switch causes the heating elements
and the fan to shut off.
Why is a noise heard after turning the
oven off?
This is normal. The fan will continue to
run for a short time to cool the oven.
When the oven has cooled sufficiently,
the fan will turn off automatically.
The fan will stop when the door is
opened during the cooling phase. The
fan will continue when the door is
closed again until the cooling phase is
finished.
Frequently asked questions
65

Why does the oven operate but the
light is off?
^The interior light has been turned off.
See "Settings - Oven light".
The light bulb is bad.
To reduce the risk of electric shock,
disconnect the appliance from the
power supply by shutting off the
power main or tripping the circuit
breaker.
^Loosen the screw of the light cover
and take the cover off.
^Remove the bulb and replace it with
a new one.
^Neue Halogenlampe einsetzen.
Only use a 12 V, 10 W, 572 °F (300 °C)
heat resistant, Osram Type 64418,
W271 bulb.
^Do not touch the new light bulb with
your fingers: touching the bulb will
reduce its life. Follow the
manufacturer’s instructions.
^Restore the power mains.
Why is the food not adequately
defrosted, heated or cooked at the
end of the selected process?
^Possible fault
–When interrupting a process the
microwave must be started again.
–Check if the selected power has the
approbiate time setting when
cooking with the microwave. The
lower the power, the longer the time.
What if cakes and cookies ar not
cooked enough?
^Possible fault
– Check if the right baking temperature
is selected.
– Check if the recipe was changed.
When using more liquid and eggs a
longer baking time is required.
Frequently asked questions
66

Why is there uneven browning?
^Possible fault
–Oven temperature too high.
–Shiny or thin pans were used. Shiny
or thin pans were used.
Why does the food cool so fast when
heated or cooked with Microwave?
In the microwave oven, food begins to
cook from the outside first, the inside of
the food relying on the slower
conduction of heat.
If food is cooked at a high power level it
is possible that the heat may not have
reached the center of the food. At the
temperature equalization time the food
will become hot in the inside and cools
at the outside.
When heating a menu, select a lower
power setting and a longer time.
Why are there strange noises when
the microwave oven is being used?
^Possible fault
–Sparks are created by the use of
dishware with a metallic finish. See
"Selecting cookware for microwave
ovens".
–The food is covered with aluminium
foil. Remove the aluminum foil.
If the fault could not be fixed, call
the Technical Service.
Do not open the casing of the
appliance.
The appliance must be repaired by
a qualified service technician.
Frequently asked questions
67

In the event of a fault which you cannot
easily fix yourself, please contact the
Miele Technical Service Department.
U1-800-999-1360
techservmieleusa.com
V1-800-565-6435
servicemiele.ca
When contacting Technical Service
please quote the serial number and
model of your oven. This information is
visible on the silver data plate along the
right side of the oven.
Technical Service
68

,CAUTION: Before servicing,
disconnect the power supply by
either removing the fuse, shutting off
the power main or manually
"tripping" the circuit breaker.
Installation work and repairs should
only be performed by a qualified
technician in accordance with all
applicable codes and standards.
Repairs and service by unqualified
persons could be dangerous and
the manufacturer will not be held
responsible.
Before connecting the appliance to
the power supply, make sure that the
voltage and frequency listed on the
data plate correspond with the
household electrical supply. This
data must correspond to prevent
machine damage. Consult an
electrician if in doubt.
Only operate the appliance after it
has been installed into cabinetry.
The plug must be plugged into an
appropriate outlet that is installed
and grounded in accordance with all
local codes and ordinances.
Power supply
The oven comes equipped with a 7.2 ft.
(2.2 m) power cord with a
NEMA 14-30 P molded plug ready for
connection to a 120/240 V, 30 A, 60 Hz
power supply.
WARNING: THIS APPLIANCE
MUST BE GROUNDED
Installer:
Please leave these instructions with
the consumer.
Electrical connection
69
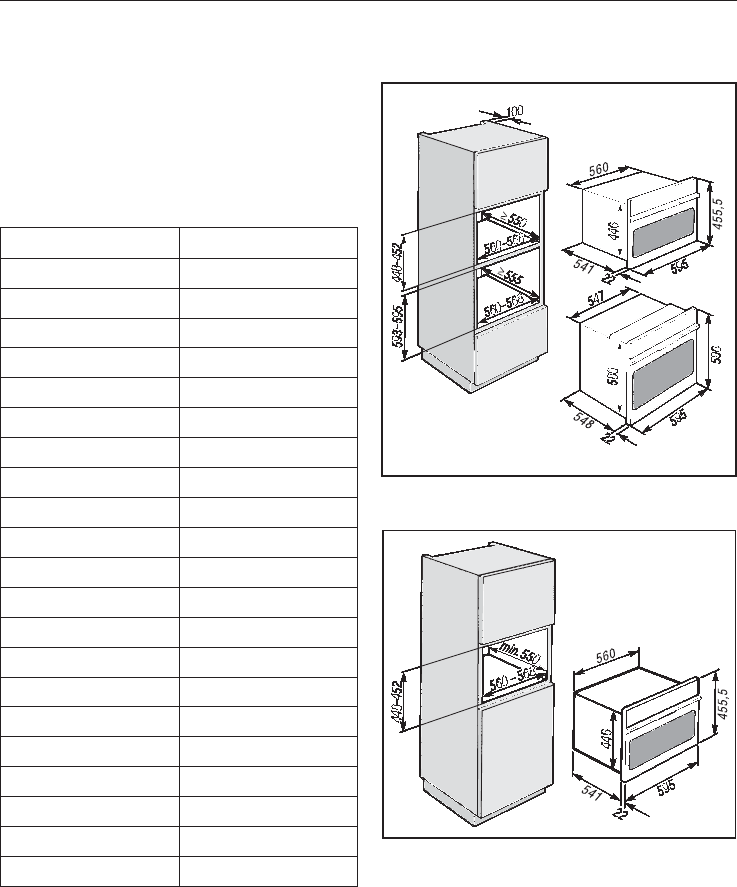
Installation options
^The appliance is designed for
installastion into a tall cabinet in
combination with an oven, in a tall
cabinet or under the countertop.
Installation dimensions
mm inches
22 7/8
100 4
452 17 13/16
446 17 9/16
448 17 5/8
452 17 13/16
455.5 18
460 18 1/8
465 18 5/16
541 21 5/16
547 21 9/16
548 21 9/16
550 21 5/8
555 21 7/8
560 22 1/16
568 22 3/8
580 22 13/16
593 23 3/8
595 23 7/16
596 23 7/16
600 23 5/8
Installation in a tall cabinet in
combination with an oven
Installation in a tall cabinet
Installation
70
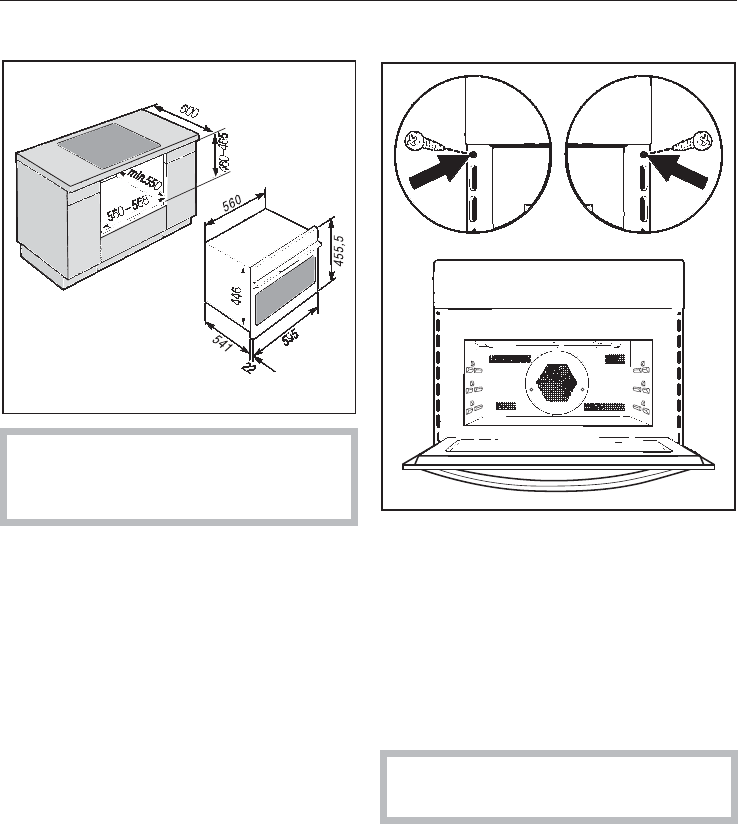
Installation under a countertop
When installed under a cooktop
regard the installation instructions
and dimensions of the cooktop.
Installation
^Connect the oven to the electrical
supply.
^Set the oven into the cabinet niche,
push it all the way in and align it
right-angled.
^Open the oven and fix the appliance
with the two supplied screws at the
side panels of the cabinet.
Do not use the appliance until it has
been installed.
Installation
71
Alteration rights reserved / 1305 M.-Nr. 06 426 190 / 00
en-US
M.-Nr. 06 426 190 / 00
/US
M.-Nr. 06 426 190 / 00