Miele Microwave Oven M 8261 1 Users Manual 8160 User Guide
M 8261-1 to the manual 2892914c-1b44-46b8-bd1e-f0008f22bd52
2015-01-24
: Miele Miele-Microwave-Oven-M-8261-1-Users-Manual-222351 miele-microwave-oven-m-8261-1-users-manual-222351 miele pdf
Open the PDF directly: View PDF ![]() .
.
Page Count: 56
- Contents
- Description of the appliance 4
- Caring for the environment 7
- Warning and Safety instructions 8
- How the microwave oven works 14
- Modes of operation 15
- Suitable containers for microwave ovens 16
- Before using for the first time 20
- Time of day display 21
- Operation 22
- Operation - Grilling 27
- Gourmet plate 29
- Operation - Automatic programmes 34
- Saving your favourite programme 36
- Changing the settings 38
- Reheating 40
- Cooking 41
- Defrosting/Defrosting and reheating or cooking 42
- Some suggested uses 43
- Cleaning and care 44
- Problem solving guide 47
- After sales service 49
- Electrical connection 50
- Installation 51
Operating instructions
Microwave oven
M 8261-1
To avoid the risk of accidents or
damage to the appliance it is
essential to read these instructions
before it is installed or used for the
first time. M.-Nr. 07 269 520
en - AU, NZ

Description of the appliance.........................................4
Oven interior and accessories.........................................4
Control panel ......................................................5
Accessories supplied ...............................................6
Grilling rack.....................................................6
Glass tray ......................................................6
Gourmet plate ...................................................6
Cover .........................................................6
Boiling rod......................................................6
Caring for the environment..........................................7
Warning and Safety instructions .....................................8
How the microwave oven works.....................................14
Modes of operation ...............................................15
What can a microwave oven do?......................................15
In what ways can a microwave oven be used? ...........................15
Microwave Solo mode ...........................................15
Grilling........................................................15
Combination mode
(Microwave + Grill) ..............................................15
Automatic programmes ..........................................15
Suitable containers for microwave ovens .............................16
Material and shape ................................................16
Testing dishes for their suitability .....................................18
The cover ........................................................19
Before using for the first time.......................................20
Time of day display ...............................................21
Setting the time of day ..............................................21
Altering the time of day .............................................21
Switching off the time of day display ...................................21
Night time switch-off ...............................................21
Operation .......................................................22
To open the door ..................................................22
Placing the dish in the oven..........................................22
Turntable......................................................22
To close the door ..................................................22
Starting a programme ..............................................22
"door" message.................................................23
Contents
2

Interrupting or re-starting a programme ................................24
Altering the settings ................................................24
To cancel a programme ............................................24
At the end of a programme ..........................................24
Automatic warming function .........................................24
Quick start (programmable) .........................................25
System lock ......................................................25
Minute minder ....................................................26
Altering a minute minder entry .....................................26
Minute minder + cooking function ..................................26
Operation - Grilling ...............................................27
Gourmet plate....................................................29
Use.............................................................29
Some suggested uses ..............................................29
Recipes .........................................................30
Operation - Automatic programmes .................................34
Automatic defrosting ...............................................34
Automatic cooking .................................................34
Saving your favourite programme ...................................36
Changing the settings .............................................38
Reheating .......................................................40
Cooking.........................................................41
Defrosting/Defrosting and reheating or cooking .......................42
Some suggested uses .............................................43
Cleaning and care ................................................44
Oven interior and inside of the door ...................................44
Appliance front ...................................................45
Accessories supplied ..............................................46
Problem solving guide ............................................47
After sales service ................................................49
Electrical connection..............................................50
Installation ......................................................51
Contents
3
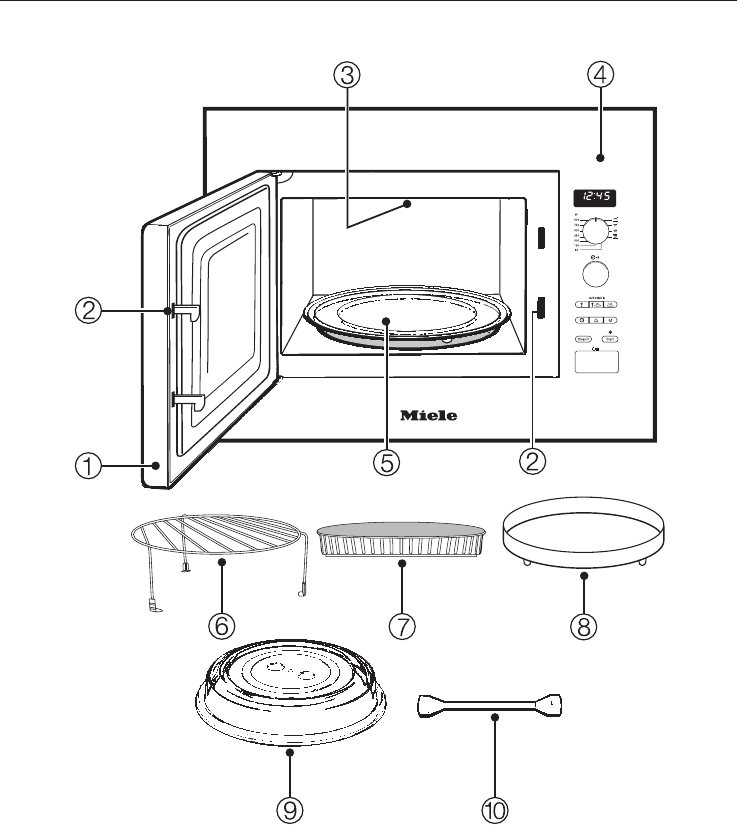
Oven interior and accessories
aOven door
bDoor locking mechanism
cQuartz grill
dControl panel
eTurntable
fGrilling rack
gGlass tray
hGourmet plate
iCover
jBoiling rod
Description of the appliance
4

Control panel
kElectronic timer and clock display
lRotary selector for microwave power,
grill and combination programmes
mRotary selector
to enter time and weight
nAutomatic programme buttons
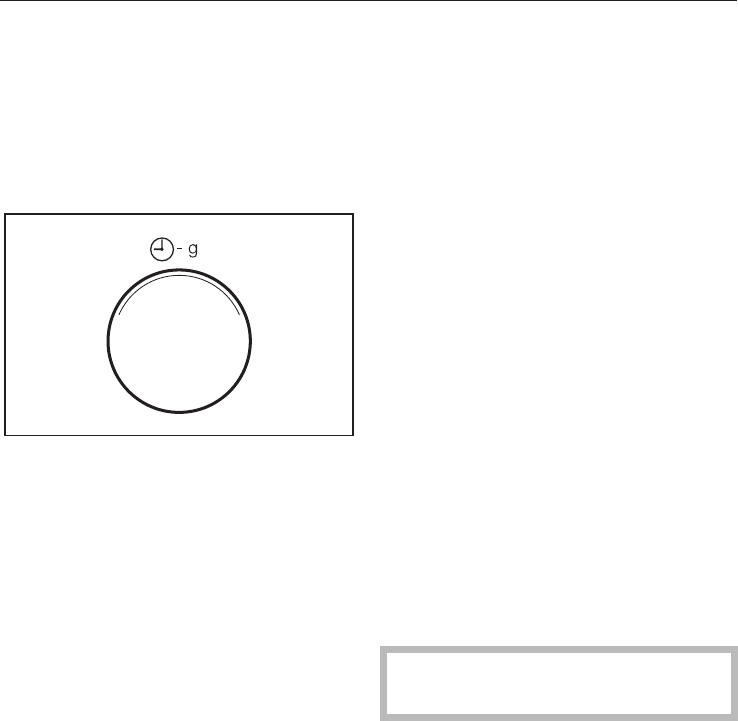
oTime of day button m
pMinute minder button l
qMemory button (to save a 1-3 stage
programme sequence)
rStop/cancel button
sStart button / Add a minute
button / Quick start button
(programmable) c
tDoor release button a
Description of the appliance
5

Accessories supplied
Grilling rack
The grilling rack can be used for all
functions with and without
microwave power, except for
Microwave Solo mode.
To avoid the grilling rack being used
inadvertently on Microwave Solo, it
should not be kept inside the
microwave oven.
Glass tray
The glass tray is suitable for use with all
cooking functions.
When grilling directly on the rack, the
glass tray should be placed underneath
the rack to catch any fat or juices.
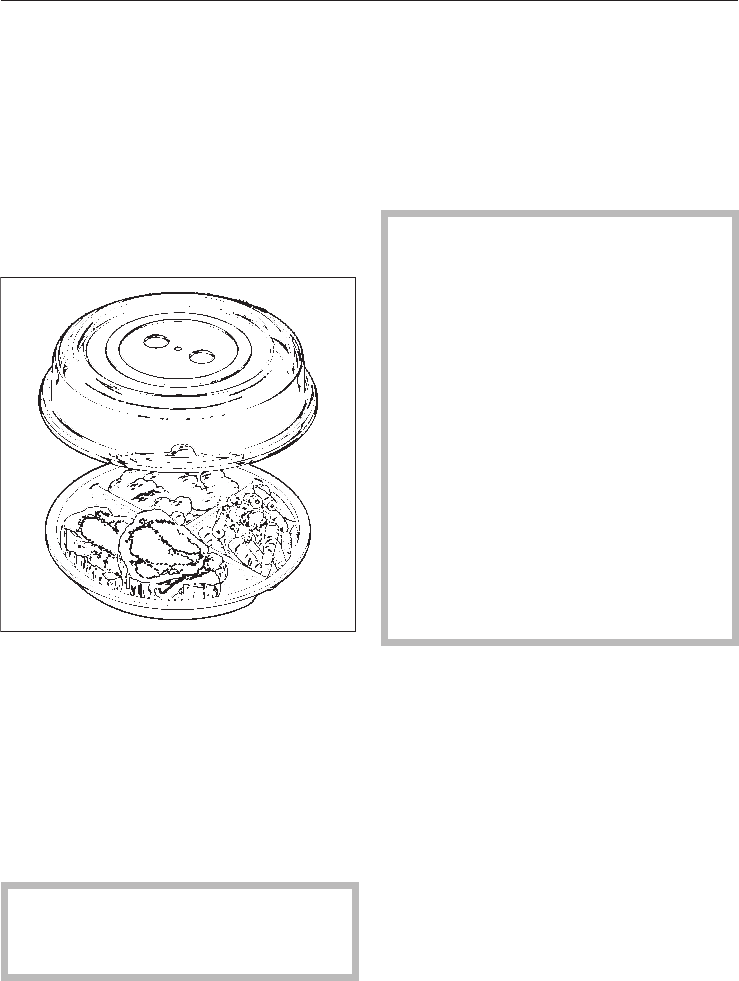
Gourmet plate
The gourmet plate is a round, non-stick
grilling plate. It can be used to heat
snacks or small meals quickly whilst
maintaining crispness.
Cover
The cover supplied must only be used
in the Microwave Solo mode.
It prevents the food from drying out and
the oven from becoming dirty, and it
accelerates the heating process.
Boiling rod
When heating liquids, the boiling rod
provided should always be placed in
the container. It helps liquids to heat
evenly.
Description of the appliance
6

Disposal of the packing
material
The transport and protective packing
has been selected from materials which
are environmentally friendly for
disposal, and can normally be
recycled.
Ensure that any plastic wrappings,
bags, etc. are disposed of safely and
kept out of the reach of babies and
young children. Danger of suffocation.
Dispose of or recycle all packaging
materials safely as soon as possible.
Disposal of your old appliance
Electrical and electronic appliances
often contain materials which, if
handled or disposed of incorrectly,
could be potentially hazardous to
human health and to the environment.
They are, however, essential for the
correct functioning of your appliance.
Please do not therefore dispose of it
with your household waste.
Please dispose of it at your local
community waste collection/recycling
centre, and ensure that it presents no
danger to children while being stored
for disposal.
It should be unplugged or
disconnected from the mains electricity
by a competent person.
Caring for the environment
7

This appliance complies with all
relevant local and national safety
requirements. Improper use can
present a risk of both personal injury
and material damage.
To avoid the risk of accidents and
damage to the appliance, please
read these instructions carefully
before installation and before using
it for the first time. They contain
important notes on installation,
safety, operation and care of the
appliance.
Keep these instructions in a safe
place and pass them on to any
future user.
Correct application
~The appliance is intended for
domestic use only: to cook, defrost,
reheat and grill food. Any other usage
is not supported by the manufacturer
and could be dangerous.
The manufacturer cannot be held liable
for damage caused by improper or
incorrect use of the appliance.
~This appliance is not intended for
use by persons (including children)
with reduced physical, sensory or
mental capabilities, or lack of
experience and knowledge, unless they
have been given supervision or
instruction concerning its use by a
person responsible for their safety.
~Never use the microwave to store or
dry items which could ignite easily.
Moisture evaporates. Fire hazard.
Safety with children
~This appliance is not a toy! To avoid
the risk of injury, keep children away
from it at all times, and do not let them
play with it or use the controls. They
should be supervised whenever you
are working in the kitchen.
~Older children may only use the
microwave oven if its operation has
been clearly explained to them and
they are able to use it safely,
recognising the dangers of misuse.
Technical safety
~Before setting up the appliance,
check it for any externally visible
damage. Never install or attempt to use
a damaged appliance. Danger of injury.
~If the connection cable is damaged,
it must be replaced by a Miele
approved service technician.
~Do not use the microwave if
– the door is warped.
– the door hinges are loose.
– holes or cracks are visible in the
casing, the door or the oven interior
walls.
Operating the appliance with this type
of damage will result in microwave
leakage and present a hazard to the
user.
Warning and Safety instructions
8

~Never open the casing of the
appliance.
Tampering with electrical connections
or components and mechanical parts is
highly dangerous and can cause
operational faults or electric shock.
~Before connecting the appliance to
the mains supply, make sure that the
rating on the data plate corresponds to
the voltage and frequency of the
household supply. This data must
correspond in order to avoid risk of
damage to the appliance. Consult a
qualified electrician if in any doubt.
~Do not connect the appliance to the
mains electricity supply by an extension
lead or a multi-socket unit. These do
not guarantee the required safety of the
appliance (e.g. danger of overheating).
~The electrical safety of this
appliance can only be guaranteed
when continuity is complete between it
and an effective earthing system which
complies with current local and national
safety regulations. It is most important
that this basic safety requirement is
present and tested regularly, and
where there is any doubt, the
household wiring system should be
inspected by a qualified electrician.
The manufacturer cannot be held liable
for the consequences of an inadequate
earthing system (e.g. electric shock).
~For safety reasons, this appliance
may only be used when it has been
fully installed.
~Repairs may only be carried out by
a suitably qualified and competent
person in accordance with national and
local safety regulations. Repairs and
other work by unqualified persons
could be dangerous. The manufacturer
cannot be held liable for unauthorised
work.
~While the appliance is under
guarantee, repairs should only be
undertaken by a service technician
authorised by the manufacturer.
Otherwise the guarantee will be
invalidated.
~The appliance is only completely
isolated from the electricity supply
when:
– it is switched off at the wall socket
and the plug removed.
– the mains fuse is disconnected,
– or the screw-out fuse is removed (in
countries where this is applicable).
~Faulty components must only be
replaced by genuine Miele original
spare parts. The manufacturer can only
guarantee the safety of the appliance
when Miele replacement parts are
used.
~This equipment may only be used in
mobile installations such as ships,
caravans, aircraft etc. if a risk
assessment of the installation has been
carried out by a suitably qualified
engineer.
~In countries where there are areas
which may be subject to infestation by
cockroaches or other vermin, pay
particular attention to keeping the
appliance and its surroundings in a
clean condition at all times. Any
damage which may be caused by
cockroaches or other vermin will not be
covered by the guarantee.
Warning and Safety instructions
9

Correct use
~Always ensure that food is
sufficiently heated.
Many factors will affect the overall
cooking time, including the size and
amount of food, its initial temperature,
changes to the recipe, and the shape
and size of the cooking container.
Some foods may contain
micro-organisms which are only
destroyed by thorough cooking,
therefore when cooking or reheating
foods, e.g. poultry, it is particularly
important that food is fully cooked
through (at temperatures over 70°C for
more than 10 minutes). If in doubt,
select a longer cooking or reheating
time.
~It is important that the heat is
allowed to spread evenly throughout
the food being cooked. This can be
achieved by stirring and/or turning the
food, and by observing a sufficiently
long standing time, which should be
added to the time needed for cooking,
reheating or defrosting.
~Always remember that times for
cooking, reheating and defrosting in a
microwave oven are usually
considerably shorter than with
traditional methods of food preparation.
Excessively long cooking times can
lead to food drying out and burning, or
could even cause it to catch fire. There
is also a danger of fire if breadcrumbs,
flowers, herbs, etc., are dried in the
microwave oven.
Always ensure that this type of
procedure is supervised.
~Do not use the microwave function
to heat up cushions or pads filled with
cherry kernels, wheat grains, lavender
or gel, such as those used in
aromatherapy. These pads can ignite
when heated, even after they have
been removed from the microwave.
~Exercise caution when cooking or
reheating food with a high sugar
content, e.g. Christmas pudding. If
heated for too long, the sugar may
caramelise or ignite.
~The microwave is not suitable for
cleaning or disinfecting items.
Items can get extremely hot, and there
is a danger of burning when the item is
removed from the microwave. Fire
hazard.
~Do not use full power to warm empty
dishes or to dry out herbs. Do not use
the appliance without food, or if it is
incorrectly loaded.
~Never cook or reheat food or liquids
in sealed containers, jars or bottles.
With baby bottles, the screw top and
teat must be loosened. Otherwise
pressure builds up which can cause
the bottle or container to explode,
posing a severe risk of injury.
Warning and Safety instructions
10
~Before serving, remember to allow a
sufficient standing time and then
always check the temperature of the
actual food itself after taking it out of the
microwave. The temperature of the
container is not an indication of the
temperature of the food or liquid in it.
This is particularly important when
preparing food for babies, children,
and the elderly or infirm. Shake or stir
baby milk and food thoroughly after
heating, and try it for temperature to
ensure that it will not scald the baby.
When heating food and drinks,
remember that the heat is created in
the food itself, and that the container
will normally be cooler. The dish is only
warmed by the heat of the food.
~When heating liquids, the boiling rod
provided should always be placed into
the container.
When heating liquids, milk, sauces etc.
in the oven without the boiling rod, the
boiling point of the liquid may be
reached without the production of
typical bubbles. The liquid does not
boil evenly throughout. This so-called
'boiling delay' can cause a sudden
build-up of bubbles when the container
is removed from the oven or shaken,
which can lead to the liquid boiling over
suddenly and explosively. Danger of
burning.
The formation of bubbles can be so
strong that the pressure forces the oven
door open, with a danger of burning.
The boiling rod ensures that bubbles
are produced, and that liquids heat
evenly.
~To avoid fuelling any flames, do not
open the oven door if smoke occurs in
the oven interior.
Interrupt the process by pressing the
Stop/C button twice. Switch off at the
wall socket, and where applicable,
remove the plug. Do not open the door
until the smoke has dispersed.
~Never heat undiluted alcohol in the
microwave, as this can easily ignite.
Fire hazard.
~Do not heat up tins in the
microwave. Pressure can build up and
they may explode, resulting in injury or
damage.
~Cover any food which is left in the
microwave to be kept hot, as moisture
in the food could lead to corrosion
damage in the microwave. This also
prevents the food from drying out.
~Try to avoid the interior walls being
splashed with food or liquids containing
salt. If it does happen, wipe these away
thoroughly to avoid corrosion on the
stainless steel surface.
Warning and Safety instructions
11

~Do not use any containers or cutlery
made from or containing metal,
aluminium foil, lead crystal glassware,
temperature-sensitive plastics, wooden
utensils or cutlery, metal clips or wire
ties. Do not use bowls with milled rims,
or plastic pots with the foil lid only
partially removed. Such items could be
damaged or cause a fire hazard.
The rack and gourmet plate supplied
with the appliance are designed to be
compatible with microwaves and can
therefore be used for grilling with or
without the microwave function. Do not
use the rack for Microwave Solo.
~Do not use the rack and the gourmet
plate at the same time. This will
damage the gourmet plate.
Always place the gourmet plate directly
on the turntable.
~Do not use the cover with the
gourmet plate, as the cover will get too
hot.
~Do not leave the oven unattended
when reheating or cooking food in
disposable containers made of plastic,
paper or other inflammable materials.
Before using single-use plastic
containers, make sure they are suitable
for use in microwave ovens. See
"Suitable containers for microwave
ovens".
~Eggs can only be cooked in their
shells in the microwave oven in a
specially designed egg-boiling device
available from specialist shops.
Similarly, hard-boiled eggs should not
be reheated in the microwave oven as
this may lead to the eggs bursting,
even after they have been taken out of
the oven.
~Eggs can be cooked without their
shells using microwave heat only if the
yolk membrane has been punctured
several times first.
The pressure could otherwise cause
the egg yolk to explode.
Danger of injury.
~Food with a thick skin or peel, such
as tomatoes, sausages, jacket potatoes
and aubergines, should be pierced or
the skin cut in several places before
cooking to allow steam to escape and
prevent the food from bursting.
~Do not reheat food in the oven in
heat-retaining bags which are intended
for normal ovens, such as roasting
bags. These heat-retaining bags
usually contain a thin layer of aluminium
foil which reflects microwaves. This
reflected energy can, in turn, cause the
outer paper covering to become so hot
that it ignites.
~Always ensure that food, the
gourmet plate or a browning dish has
been placed in the microwave, and that
the turntable is in place, before
switching on.
~Do not use the appliance for deep
frying food, and do not leave it
unattended when cooking with oils and
fats as these can be a fire hazard if
allowed to overheat.
Warning and Safety instructions
12

~Ovenproof earthenware can retain a
considerable amount of moisture.
Eartherware and porcelain containers
with hollow handles and lid knobs must
only be used in this oven if they have
vent holes which allow the moisture to
escape. Without vent holes pressure
can build up, causing the container to
crack or shatter with the danger of
injury.
~When grilling with or without the
microwave function, the oven interior,
grill element and door can get hot. Do
not let small children touch the oven
while it is in operation, as there is the
danger of being burnt. Supervise its
use by elderly or infirm people.
~Wear oven gloves when placing
dishes in, and taking them out of the
oven, or when handling dishes or food
in the oven if the grill is on or has just
been in operation. Danger of burning.
~The gourmet plate gets extremely
hot when in use. Always use oven
gloves when handling it to avoid burns.
Place it on a suitable heat-resistant mat
or pot rest.
The rack and glass tray get hot during
grilling (with and without the microwave
function).
Take care not to burn yourself on them.
~Never place the hot glass tray (or
any other hot cooking containers) on a
cold surface, such as a tiled or granite
worktop. The glass tray or container
could crack or shatter, and the worktop
surface could get damaged. Use a
suitable heat-resistant mat or pot rest.
~Do not use the appliance to heat up
the room. Due to the high temperatures
radiated, objects left near the appliance
could catch fire.
~When using kitchen appliances
connected to sockets near the
appliance, ensure that the cable cannot
get trapped in a hot oven door, which
could melt the cable insulation and be
dangerous.
~To check food temperature, first
interrupt the cooking process. Only use
a thermometer specifically approved for
food use to measure the temperature of
the food. Never use a thermometer
containing mercury or liquid, as these
are not suitable for use with very high
temperatures and will break very easily.
~Do not use a steam-cleaning
appliance to clean this appliance.
Pressurised steam could reach the
electrical components and cause a
short circuit.
The manufacturer cannot be held
liable for damage caused by
non-compliance with these Warning
and Safety instructions.
Warning and Safety instructions
13

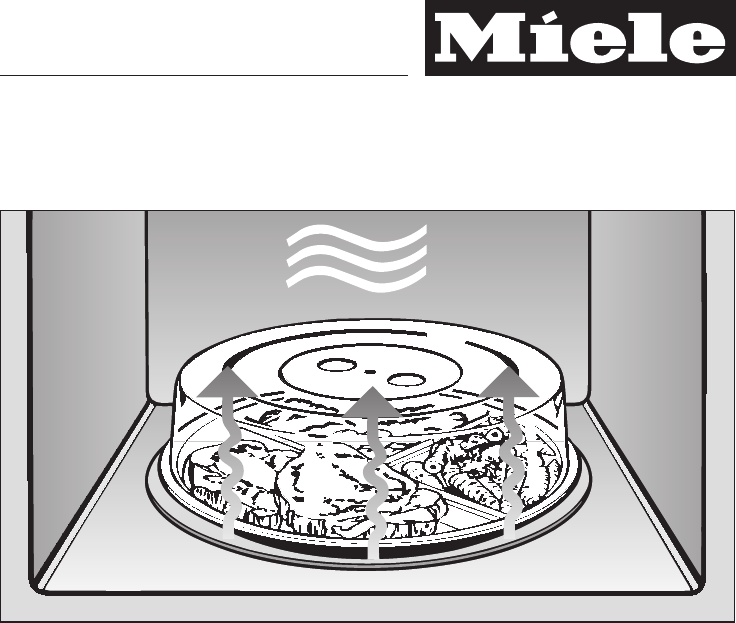
In a microwave oven there is a
high-frequency tube called a
magnetron. This converts electrical
energy into microwaves. These
microwaves are distributed evenly
throughout the oven interior, and
rebound off the metal sides of the oven
interior to reach the food from all sides.
Microwave distribution is improved with
the turntable engaged.
In order for microwaves to reach the
food, they must be able to penetrate
the cooking utensil being used.
Microwaves can penetrate porcelain,
glass, cardboard and plastics, but not
metal. Do not, therefore, use utensils
made of metal, or which contain metal,
for example in the form of gold or silver
trim. The metal reflects the microwaves
and this could lead to the creation of
sparks. The microwaves cannot be
absorbed.
Microwaves pass through a suitable
container and find their way directly into
the food. All food contains moisture
molecules which, when subjected to
microwave energy, start to oscillate 2.5
thousand million times a second. The
friction caused by this vibration creates
heat, which first starts developing
around the outside of the food and then
slowly penetrates towards the centre.
The moisture, fat and sugar content of
food will affect the speed at which it is
cooked.
As heat is produced directly in the
food,
–food can generally be cooked
without adding much liquid or
cooking oil.
–cooking, reheating and defrosting in
a microwave oven is quicker than
using conventional methods.
–nutrients, such as vitamins and
minerals, are generally retained.
–the colour, texture and taste of food
are not impaired.
Microwaves stop being produced as
soon as the cooking process is
interrupted or the appliance door is
opened.
When the appliance is in operation, the
closed, sealed door prevents
microwaves escaping from the
appliance.
How the microwave oven works
14

What can a microwave oven
do?
In the microwave oven, food is cooked,
reheated or defrosted quickly.
You can use the microwave in the
following ways:
–Food can be defrosted, reheated or
cooked by entering a power setting
and a time.
–Deep-frozen, ready-made meals can
be defrosted and then reheated or
cooked.
– The microwave oven can also be
used for other tasks, e.g. for proving
dough, melting chocolate and butter,
dissolving gelatine etc.
In what ways can a microwave
oven be used?
Microwave Solo mode
Suitable for defrosting, reheating and
cooking.
Grilling
Ideal for grilling very thin cuts of meat,
e.g. bacon.
Combination mode
(Microwave + Grill)
Ideal for browning dishes with
toppings. The microwave cooks the
food, and the grill browns it.
Automatic programmes
You can choose from the following
automatic programmes:
– Five defrosting programmes
(N:Ad1toAd5),
–Four cooking programmes for frozen
food
(N °:AC1toAC4).
–and eight cooking programmes for
fresh food
(°:AC1toAC8).
These programmes are weight
dependent. You enter the weight of the
food, and then the cooking time is
calculated automatically.
Modes of operation
15
Microwaves
–are reflected by metal,
– pass through glass, porcelain,
plastic and card,
–and are absorbed by food.
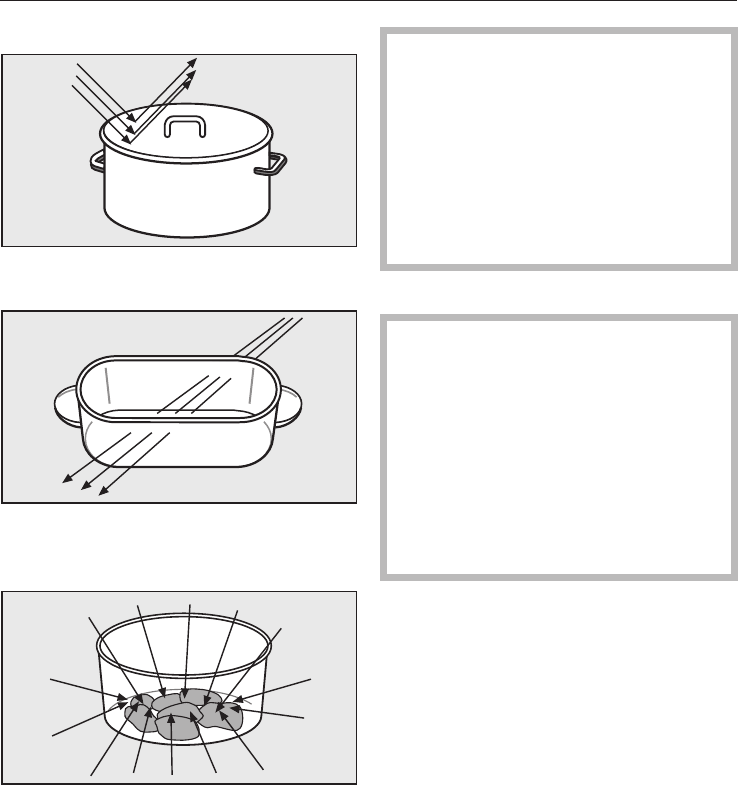
Material and shape
The material and shape of containers
used affect cooking results and times.
Heat distribution is more even in round
and oval shaped flat containers than in
rectangular containers, providing better
results.
Containers and lids with hollow
handles or knobs in which moisture
can collect are unsuitable, unless
the hollowed areas are adequately
vented.
Without vent holes pressure can
build up, causing the container to
crack or shatter with the danger of
injury.
Metal
Metal containers, aluminium foil,
metal cutlery, and china with
metallic decoration such as gold
rims or cobalt blue must not be used
on microwave mode.
Metal reflects microwaves and
obstructs the cooking process.
Also, avoid using plastic pots where
the foil lid has not be completely
removed.
Exceptions:
–Ready meals in aluminium foil dishes
These can be defrosted and reheated
in the microwave oven, if
recommended by the manufacturer.
Remove the lid and make sure the foil
dish is at least 2 cm from the oven walls
at all times.
Important:
As food is only heated from the top, it is
better to remove the food from the
aluminium foil container and transfer it
to a dish suitable for a microwave oven.
The heat distribution will be more even.
Suitable containers for microwave ovens
16

Do not place aluminium foil dishes
on the grilling rack in case the dish
sparks or arcs. If sparks occur,
transfer food to a microwave-safe
container.
–Pieces of aluminium foil
For even defrosting and to avoid
overcooking unevenly shaped cuts of
meat, poultry or fish, small pieces of
aluminium foil may be used to mask
wingtips or other thin parts for the last
few minutes of the programme.
Make sure that the aluminium foil is
at least 2 cm from the oven walls at
all times. It must not touch the walls.
– Metal meat skewers or clamps
These should only be used if they are
very small in comparison to the size of
the cut of meat.
Glassware
Heat-resistant glass or ceramic glass
are ideal for use in the microwave oven.
Crystal glass is unsuitable as it
contains lead which could cause the
glass to crack in the microwave.
Porcelain
Porcelain is a suitable material.
Do not use porcelain with gold or
silver edging or items with hollow
knobs or handles, as insufficient
ventilation may cause pressure.
Earthenware
Decorated earthenware is only suitable
if the decoration is beneath an all-over
glaze.
Earthenware can get very hot, and
may crack.
Glazes and colours
Some glazes and colours contain
metals which make them unsuitable
for use in a microwave oven.
Wood
Wooden dishes are not suitable.
Moisture contained in the wood
evaporates when exposed to
microwave energy, causing the
wood to dry and crack.
Plastics
When purchasing plasticware, make
sure that it is suitable for use in a
microwave oven.
Plastics must only be used with
Microwave Solo.
They must be heat-resistant to a
minimum of 110°C. Otherwise the
plastic may melt and fuse with the
food.
Special plastic utensils designed for
use in microwave ovens are available
from good retail outlets.
Melamine is not suitable as it absorbs
energy and heats up.
Suitable containers for microwave ovens
17

Disposable containers, such as trays
made from polystyrene, can only be
used for very short, timed warming and
reheating of food.
Plastic boiling bags can be used for
cooking and reheating. They should
be pierced beforehand so that
steam can escape. This prevents a
build-up of pressure and reduces
the risk of the bag bursting.
Do not use metal clips, plastic clips
containing metal parts, or paper ties
containing wire. There is a danger
that they will ignite when heated.
Disposable containers
Only those plastic disposable
containers which are specified by the
manufacturer as suitable for use in a
microwave oven may be used.
Do not leave the oven unattended
when reheating or cooking food in
disposable containers made of
plastic, paper or other inflammable
materials.
Disposable containers are not always
recyclable or bio degradable.
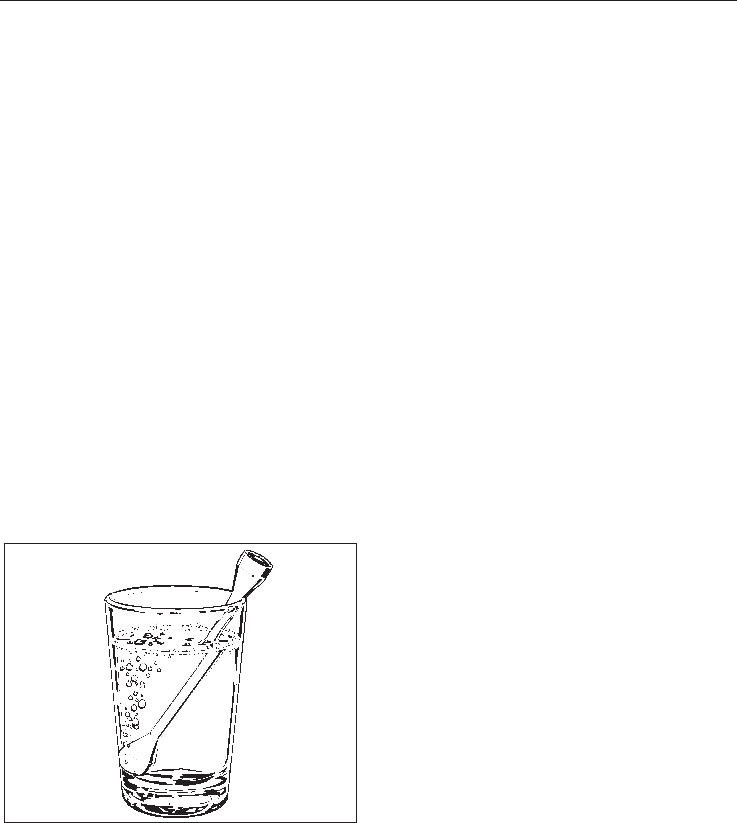
Testing dishes for their
suitability
If in doubt as to whether glass,
earthenware or porcelain plates or
dishes are suitable for use in a
microwave oven, a simple test can be
performed:
^Place the item you wish to test in the
centre of the oven, fill a suitable glass
with water and also place this in the
oven.
^Close the door.
^Turn the power selector to 900 W.
^Enter a time of 30 seconds with the
time selector.
^Press the Start button.
At the end of the test, the water in
the glass should be warm and the
dish cool. If the dish is hot and the
water cold, it would be unwise to
use the dish.
If a crackling noise is heard
accompanied by sparks during the
test, switch the appliance off imme-
diately (press button Stop/C twice).
Any crockery which causes this
reaction is unsuitable for use with
microwave power.
If any doubt exists about the
suitability of containers, please
contact the supplier.
This test cannot be used to check
whether items with hollow knobs or
handles are suitable for use with
microwave power.
Suitable containers for microwave ovens
18
The cover
–prevents too much steam escaping,
especially when cooking foods which
need longer to cook, such as
potatoes.
–speeds up the cooking process.
–prevents food from drying out.
–helps keep the oven interior clean.
Always cover food with the cover
supplied.
Alternatively, use lids or covers made of
microwave-safe glass or plastic, or use
a clingfilm recommended for use in a
microwave oven (pierce as instructed
by the manufacturer).
Heat can cause normal clingfilm to
distort and fuse with the food.
Sealed glass containers, such as
jars of baby food, must be opened
before they are placed in the oven.
Do not use a lid or cover if
–food coated with breadcrumbs is
being cooked.
–cooking meals which are to be given
a crisp finish.
–the gourmet plate is being used.
Because the cover can only
withstand temperatures of up to
110°C, it must only be used in
Microwave Solo mode. It must not
be used in conjunction with the
gourmet plate. At temperatures in
excess of 110°C, the plastic can
melt and get into the food.
The cover should not form a seal
with the container. If the cover is
used with a container which only has
a narrow diameter, there might not
be enough room for condensation to
escape through the holes in the top.
The cover could get too hot and
could start to melt.
Suitable containers for microwave ovens
19
Important:
After unpacking, let the appliance
stand for approx. 2 hours at room
temperature after transporting it to
its final location before connecting it
to the mains.
This is important for the correct
electronic functioning of the appliance.
^Remove all the packaging materials
and any protective foil from the
appliance.
Do not remove the cover to the
microwave outlet inside the oven,
nor the film covering the inside of
the door.
^Check the appliance for any
damage.
Do not use the microwave if
– the door is warped.
– the door hinges are loose.
– holes or cracks are visible in the
casing, the door or the oven interior
walls.
Operating the appliance with this
type of damage will result in
microwave leakage and present a
hazard to the user.
^Clean the inside of the oven and all
the accessories with warm water
applied with a well wrung-out soft
sponge or cloth.
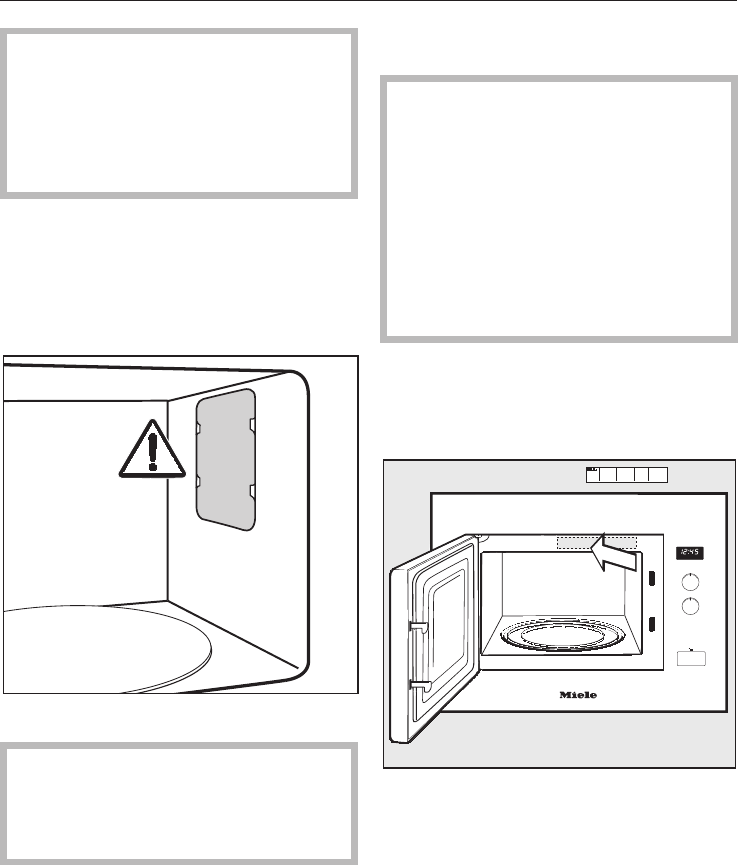
^Stick the enclosed short instructions
to the frame behind the door as
illustrated, making sure they do not
block any of the vents.
Before using for the first time
20
Setting the time of day
^Connect the appliance to the mains
electricity supply.
12:00 and the msymbol will flash in
the display until the current time of
day is set. Before this, the time of
day will start to run from 12:00, as
the clock will start as soon as the
appliance is connected to the mains
electricity supply.
^Turn the time selector to set the hour.
^Press the mbutton.
^Then turn the time selector to set the
minutes.
^Press the mbutton to confirm, or wait
a few seconds.
The set time is now registered. The
colon between hours and minutes
flashes.
Altering the time of day
^Press the mbutton.
The msymbol will flash in the
display, and the current hour will light
up for a few seconds.
^Use the time selector to alter the
hour.
^Press the mbutton to confirm, or wait
a few seconds.
The msymbol will flash, and the
current minutes will light up for a few
seconds.
^Use the time selector to alter the
minutes.
^Press the mbutton to confirm, or wait
a few seconds.
Switching off the time of day
display
^Press and hold the mbutton in until
the display goes dark.
Pressing and holding the mbutton
again will bring the time of day back in
the display.
Night time switch-off
The time of day display can be set to
switch itself off from 23:00 hrs until
04:00 hrs.
Setting the time of day display to
switch off at night
^Press and hold in the Stop/C button,
and at the same time press the m
button.
ON appears in the display.
The appliance can still be operated.
To switch the display back on:
^Press and hold the Stop/C button,
and at the same time press the m
button.
OFF appears in the display.
Time of day display
21
To open the door
^Press the abutton to open the
door.
If the microwave oven is being used,
opening the door will interrupt the
cooking programme.
Placing the dish in the oven
Ideally the dish should be placed in the
middle of the oven.
Turntable
The turntable helps the food to cook,
reheat or defrost evenly.
Do not operate the microwave
without the turntable in place.
The turntable starts turning
automatically when the appliance is
operated.
Do not cook, reheat or defrost food
directly on the turntable. Check that the
dish is not larger in size than the
turntable.
Turn or stir food during cooking, or turn
the dish so that it heats up evenly.
To close the door
^Push the door firmly shut.
Press the Start button again to resume
an interrupted cooking programme.
The appliance will not start again if
the door has not been closed
properly.
Starting a programme
Use the appropriate selector to choose
the microwave power level and the
cooking time.
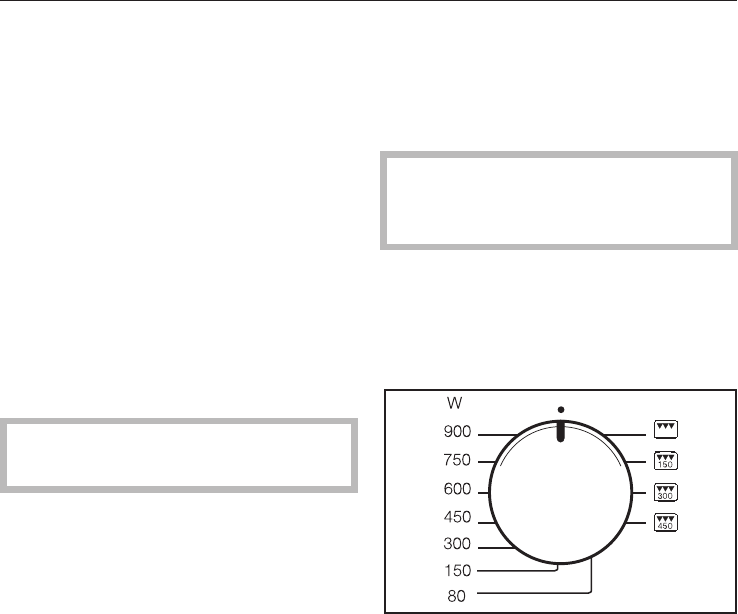
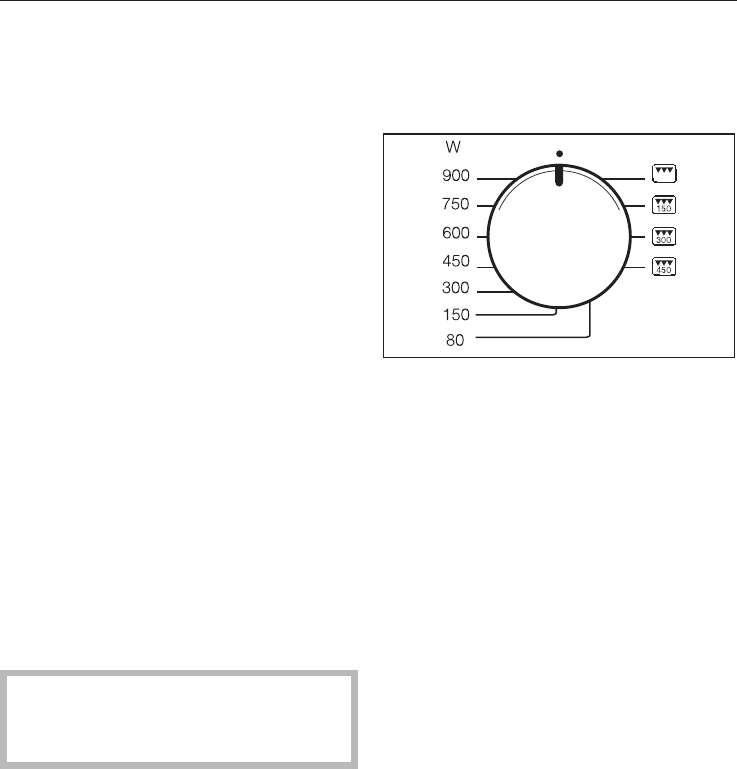
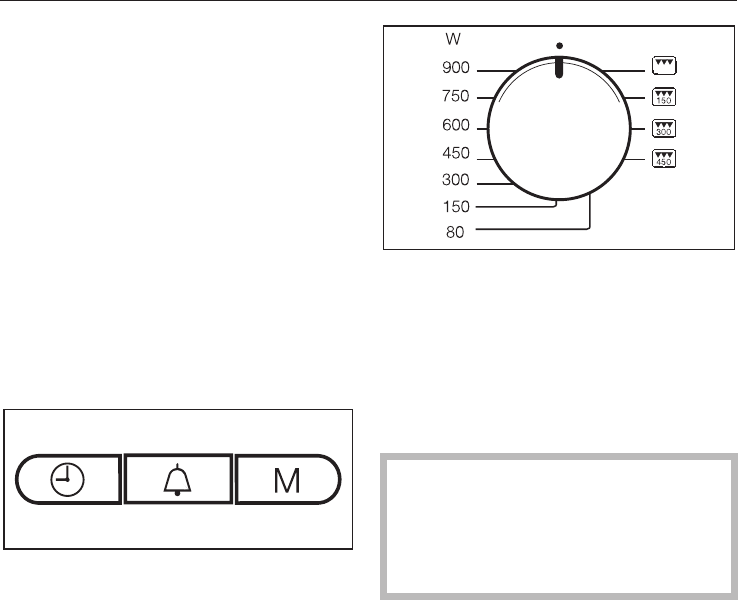
^Use the power selector to select a
microwave power level.
The hsymbol lights up in the
display and 0:00 flashes.
There is a choice of 7 power levels.
The higher the power level, the more
microwaves reach the food.
Operation
22
When heating up food which cannot be
stirred or turned during cooking, as with
a plated meal, it is best to use a lower
microwave power level.
This ensures the heat is distributed
evenly. Heat for long enough to cook
the food properly.
^Set the required time using the time
selector.
Any time between 10 seconds and
90 minutes can be selected.
Exception: If the maximum microwave
power is selected, a maximum cooking
duration of 15 minutes can be set. If
you then continue to select full power,
the power level may reduce to 600 W,
and this is shown in the display
(protection against overheating).
The time required depends on:
–the initial temperature of the food.
Food taken from the refrigerator will
need longer to reheat or cook than
food already at room temperature.
–the type and texture of the food.
Fresh vegetables contain more water
and cook more quickly than stored
vegetables.
–the frequency of stirring or turning
the food.
Frequent stirring or turning heats the
food more evenly, and it is therefore
ready in a shorter time.
–the amount of food.
As a general rule, allow approx. time
and a half for double the quantity.
For a smaller quantity, possibly
shorten the time but ensure food is
cooked thoroughly.
–the shape and material of the
container.
^Press the Start button to start the
programme.
The interior lighting comes on.
A programme can only be started if the
door is closed.
"door" message
The "door" message in the display is a
reminder that the appliance should not
be used without food inside it.
Operating the appliance without
food can damage the appliance.
If the door has been closed for 20
minutes or longer when the Start button
is pressed, the word door will appear in
the display to remind you to open the
door and make sure there is food in the
oven before you press Start. You
cannot start a process until you do this.
Operation
23

Interrupting or re-starting a
programme
At any time you can . .
...interrupt a programme:
^Press the Stop/C button, or open the
appliance door.
The time stops counting down.
...continue the programme:
^Close the door and press Start.
The programme continues.
Altering the settings
If you discover after starting a
programme that . .
...theMicrowave power level is too
high or too low, you can
^select a new level.
...thetime set is too short or too long,
you can
^interrupt the programme (press the
Stop/C button once), use the time
selector to set a new time and
continue the programme (press the
Start button),
or alternatively:
^the cooking duration can be
increased by pressing the Start
button during operation. Each time
the Start button is pressed, the
cooking duration is increased by
another minute. (Exception: the
increased cooking time is in
increments of 30 seconds when the
microwave is being used on
maximum power.)
To cancel a programme
^Press the Stop/C button twice.
At the end of a programme
An audible tone will sound when the
cooking programme is complete. The
oven interior lighting goes out.
The audible tone will sound briefly as a
reminder every 5 minutes for 20
minutes after the end of the
programme.
^If you want to stop the audible tone,
press the Stop/C button.
Automatic warming function
The warming function will switch on
automatically at 80 W for a maximum of
15 minutes approx. 2 minutes after the
end of a cooking programme which has
used at least 450 W, providing the door
remains closed and no buttons are
pressed.
h,80WandH:H will light up in the
display.
Opening the door or operating one of
the buttons or selectors while the
warming function is in progress cancels
the function.
The warming function cannot be set as
a separate function.
Operation
24

Quick start (programmable)
Pressing the Start button cis sufficient
to set the appliance operating on
maximum power.
Three set times are stored in the
memory:
^30 secs: Press Start conce
^1 min: Press Start ctwice
^2 min: Press Start cthree times
Pressing the Start cbutton four times
in succession will bring back the first
stored time and so on.
The cooking duration can be increased
by pressing the Start button during
operation; each time the Start button is
pressed, the cooking duration is
increased by another 30 seconds.
Programming times
To alter the set times:
^Use the Start cbutton to select the
time you want to reprogramme (press
once, twice or three times), and hold
the Start cbutton pressed in.
^While holding the Start button
pressed in, alter the time with the
time selector (to max. 15 minutes).
The altered programme runs when
the Start cbutton is released.
An interruption to the power supply
will cancel any altered programmed
times, and they will need to be
entered again.
System lock
The system lock prevents the appliance
being used by children, for example.
To activate the system lock
^Press and hold the Stop/C button in
until an audible tone sounds and the
key symbol appears in the display:
The key symbol will go out after a short
time.
The key symbol reappears whenever
any button or one of the rotary selectors
is operated.
After an interruption to the mains
power supply, the system lock will
need to re-activated.
To cancel the system lock
^Press the Stop/C button again and
hold it pressed in until an audible
tone sounds.
Operation
25

Minute minder
The minute minder can be used to time
any activity in the kitchen, e.g. boiling
eggs. The time set counts down in one
second steps.
^Press the lbutton.
0:00 flashes in the display and the l
symbol lights up.
^Use the time selector to set the
minute minder time you require.
^Press the Start button to start the
minute minder.
The minute minder time will start itself
after a few seconds if the Start button
is not pressed.
^At the end of the minute minder time,
an audible tone sounds. The time of
day reappears and the lsymbol
flashes.
^Press the Stop/C button once and the
lsymbol disappears.
Altering a minute minder entry
^Press the Stop/C button.
The minute minder time is
interrupted.
^Set a new minute minder time, as
described above.
Minute minder + cooking function
The minute minder can be used at the
same time as a cooking function, and
counts down in the background.
^Press the lbutton whilst the cooking
function is in progress.
0:00 flashes in the display and the l
symbol lights up.
^Use the time selector to set the
minute minder time you require.
^After a few seconds the minute
minder time set will begin to count
down.
A few seconds later, the display will
change again to show the cooking
duration counting down. The minute
minder time is represented by the l
symbol in the background.
The Start button is not used in this
instance to start the minute minder, as
pressing the Start button would also
increase the cooking duration by a
minute.
To find out the minute minder time
remaining
^Press the lbutton.
The minute minder time still
remaining will show in the display.
Operation
26
The grill can be used on 4 settings: by
itself, and in combination with the
Microwave function at one of three
different power levels.
If the total grilling time required is less
than 15 minutes, the grill should be
pre-heated for approx. 5 minutes
before placing food under it.
Thin, flat cuts of fish and meat should
usually be turned half way through
grilling for even results. Larger,
chunkier pieces should be turned
several times.
Grilling times depend on the type and
thickness of the food and on the user's
preference for a rare or well-cooked
result.
When grilling directly on the rack, the
glass tray should be placed underneath
the rack to catch any fat or juices.
^Place the food in a suitable dish.
^Place the glass tray, the rack and
glass tray, or the dish containing the
food on the turntable.
Caution. The rack and glass tray
become hot during use.
Danger of burning.
The glass tray and grill rack will be
easier to clean if washed in soapy
water immediately after grilling.
Grilling without the Microwave
function
Ideal for grilling thin cuts of meat, e.g.
steak or sausages.
^Turn the power selector to n.
The grill symbol nwill light up in the
display. 0:00 will flash.
^Select a cooking duration using the
time selector.
^Press the Start button.
An audible tone will sound at the end
of the process.
To change a cooking duration
The cooking duration can be changed
during operation. To do this, interrupt
the cooking programme by pressing
the Stop/C button, and change the
duration. Continue the cooking process
by pressing the Start button.
The cooking duration can also be
extended during operation by pressing
the Start button once for each minute
you wish to extend the cooking duration
by.
The area on the ceiling around the grill
becomes discoloured over time. This is
an unavoidable consequence of use,
and does not impair the function of the
appliance in any way.
Operation - Grilling
27
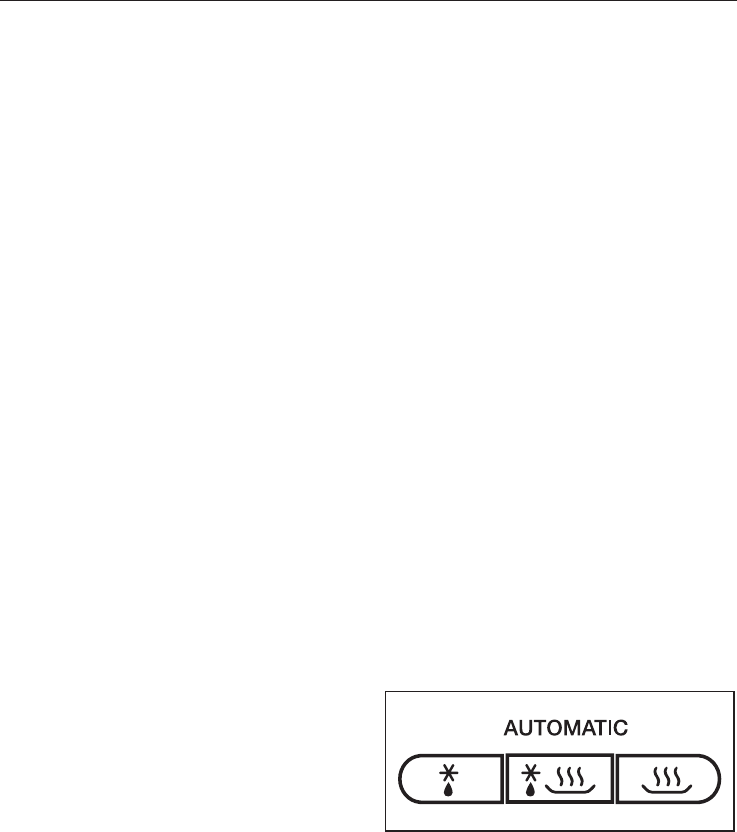
Combination mode -
Microwave + Grill
This function is very good for baking
and browning. The microwave cooks
the food, and the grill browns it.
The grill can be combined with one of
three different microwave power levels:
150, 300 and 450 Watt.
It is possible during the cooking
process to switch between the different
power levels without interrupting the
programme.
^Use the programme selector to select
the required combination Q,Xor
L.
h, the microwave power level and
the grill symbol nwill light up in the
display. 0:00 will flash.
^Select a cooking duration using the
time selector.
^Press the Start button.
An audible tone will sound at the end
of the process.
To change a cooking duration
The cooking duration entered can be
changed during operation if required.
Interrupt the process by pressing the
Stop/C button, and change the
duration. To continue, press the Start
button.
The cooking duration can also be
extended during operation by pressing
the Start button once for each minute
you wish to extend the cooking duration
by.
Operation - Grilling
28

Use
The gourmet plate gets extremely
hot when in use. Always use oven
gloves when handling it to avoid
burns. Place it on a suitable
heat-resistant mat or pot rest.
Before using for the first time
Before using the gourmet plate for the
first time, fill it with 400 ml water and
add 3-4 tbsps vinegar or lemon juice.
Heat for 10 minutes on 450 W + Grill
L.
The gourmet plate has an easy to
clean anti-stick coating so that food
can be removed easily. The coating
is susceptible to cuts and scratches.
Therefore do not cut food up directly
on the plate.
Use wooden or plastic utensils to
mix or turn food. Metallic or sharp
objects can damage the coating.
Searing/browning food
^When using the gourmet plate, make
sure that the food is ready to transfer
to the gourmet plate as soon as it has
heated up.
^Place the gourmet plate directly on
the turntable.
Do not place it on the rack as this
could cause sparking and damage
the gourmet plate.
^Heat the plate up on 450 W + Grill
Lfor approx. 5 minutes.
If using oil, you can either heat up the
oil on the gourmet plate, or you can
heat the oil separately and then add it
to the plate.
Butter, however, should always be
added after heating up the gourmet
plate. It has a lower burning point than
oil and would get too dark or burn if
added too soon.
Always dry meat, poultry, fish and
vegetables thoroughly before placing
them on the gourmet plate.
Do not use the gourmet plate to
cook eggs or reheat cooked eggs.
The eggs can burst.
Some suggested uses
Pre-heat the gourmet plate directly on
the turntable for 5 minutes at 450 W +
Grill L.
Fish fingers (frozen),
150g+2tbsp oil
L, 3-4 minutes each side
Hamburgers 2 burgers + 2 tbsp oil
L, 3-4 minutes each side
Croquette potatoes (frozen),
10-12 + 2 tbsp oil
L, 6-8 minutes, turning halfway
through
Fillet steak, approx. 200 g
Q, 5 minutes each side (according to
taste)
Pizza (frozen), 300 g,
L, 7-9 minutes
Pizza (fresh), without pre-heating
L, 15 minutes approx.
(depending on topping)
Gourmet plate
29

Recipes
Croque monsieur (Serves 3)
6 slices of bread
30 g soft butter
75 g grated Emmental cheese
3 slices of cooked ham
Butter the bread. Add the cheese to
three of the bread slices in equal
amounts and add a slice of ham. Place
the remaining three slices of bread on
top of the ham with the buttered side
face down. Pre-heat the gourmet plate
for 5 minutes at 450 W + Grill. Remove
from the oven, then place the bread on
the gourmet plate. Now place the
gourmet plate back on the turntable,
and brown for approx 3 minutes per
side at 450 W + Grill.
Other fillings could include drained
tuna fish, finely sliced onion rings,
pineapple, cheese and ham.
Vegetable medley (Serves 3)
2 onions
2 tbsp oil
100 g mushrooms, cleaned
150 g baby carrots or carrot slices
100 g broccoli florets
1 red pepper
1 tomato
Salt, pepper
30 g grated Parmesan cheese
Slice the onions into fine rings. Half,
quarter and deseed the pepper, and
then cut into strips. Dice the tomato.
Place the gourmet plate on the
turntable, and pre-heat for approx. 5
minutes at 450 W + Grill. Place the oil
and the onions on the gourmet plate,
and brown the onions for approx 2
minutes at 450 W + Grill. Add the
mushrooms, carrots, broccoli, pepper
strips, diced tomato and seasoning.
Mix well. Cook for 6 minutes at 450 W
+ Grill. Turn out and sprinkle with
Parmesan cheese before serving.
Gourmet plate
30

Home-made potato rösti
(Serves 2)
400 g peeled potatoes
2 small onions
50 g grated Emmental cheese
Salt, pepper
20 g butter
Coarsely grate the potato and onion,
and mix together with the cheese, salt
and pepper. Place the gourmet plate
on the turntable, and pre-heat for
approx. 5 minutes at 450 W + Grill. Melt
the butter on the hot gourmet plate.
Remove from the oven, and add the
potato mixture and press it into the
gourmet plate. Place the gourmet plate
back on the turntable, and cook for
approx 8 minutes at 450 W + Grill. Turn
over, and cook for a further 4 minutes
until golden.
Garnish with smoked salmon or strips
of ham.
Pork fillets
(Serves 2)
1 piece pork fillet (approx. 400 g)
4 rashers streaky bacon
Salt, pepper
10 g butter
200 g sliced mushrooms
200 ml double cream
2 tbsp brandy
Cut the pork into 4 slices. Season each
slice with salt and pepper, and wrap in
a rasher of streaky bacon. Secure with
a cocktail stick if necessary. Place the
gourmet plate on the turntable, and
pre-heat for approx. 5 minutes at 450 W
+ Grill. Remove from the oven. Add the
butter to the plate, and place the pork
slices on top. Now place the gourmet
plate back on the turntable, and cook
for approx 3 minutes per side at 450 W
+ Grill. Transfer the meat to a serving
dish, cover and keep warm. Add the
mushrooms, cream and brandy to the
juices from the meat. Lightly cook for
approx. 4 minutes at 900 W. Serve with
the meat.
Pork fillet in a Roquefort sauce
Cut a piece of pork into 4 slices. Cook
for approx. 4 minutes in the pre-heated
gourmet dish at 450 W + Grill. Add 50
ml white wine, 125 ml double cream, 2
tbsp roux (made from 1 tbsp each of
flour and melted butter) and 150 g
Roquefort cheese. Stir the sauce until
smooth, and cook for a further 3
minutes.
Gourmet plate
31

Curried chicken
(Serves 3)
600 g chicken or turkey breasts
2 tbsp oil
2 tbsp white wine
2 tbsp apple juice
1 tbsp lemon juice
Salt, freshly ground black pepper
1 tsp curry powder
A pinch of finely chopped rosemary
A pinch of ground ginger
A pinch of cayenne pepper
1/2tsp Tabasco sauce
20 g butter
Dice the meat into2x2cmpieces.
Combine the rest of the ingredients
apart from the butter, mix together well,
and sprinkle over the meat. Turn the
meat so it is well coated with the herbs
and spices, and leave to stand for
approx. 30 minutes. Place the gourmet
plate on the turntable, and pre-heat for
approx. 5 minutes at 450 W + Grill.
Remove from the oven, melt the butter
in the heated plate, then add the meat.
Place the plate back on the turntable,
and cook for approx. 4 minutes at 450
W + Grill. Turn the meat, and cook for a
further 4 minutes at the same setting.
Drain surplus liquid from the meat if
necessary so that it browns well.
Fisherman's salmon (Serves 2)
2 pieces of salmon fillet (each 150 g)
1 tbsp lemon juice
Salt, white pepper
Drizzle the salmon with the lemon juice,
and leave to stand for approx. 10
minutes. Place the gourmet plate on the
turntable, and pre-heat for approx. 5
minutes at 450 W + Grill. Remove from
the oven, pat the fish dry with kitchen
paper, and place on the gourmet plate.
Place the gourmet plate back on the
turntable, and cook for approx 11/2-2
minutes per side at 450 W + Grill.
Serve with rice, hollandaise sauce or
melted butter and a fresh green salad.
Gourmet plate
32

Pineapple cake
For the cake:
2 eggs
80 g sugar
11/2ripe bananas
30 g chocolate chips
100 g plain flour
3/4tsp. baking powder
Topping:
1 tin pineapple chunks
(drained weight 240 g)
11/2tbsp brown sugar
11/2tbsp desiccated coconut
Beat together the eggs and sugar until
frothy. Mash the bananas with a fork,
and add to the egg mixture. Sift
together the flour and the baking
powder, stir in the chocolate chips, and
fold into the mixture. Spread the mixture
into the gourmet plate. Scatter the
drained pineapple over the mixture,
and sprinkle over the sugar and
desiccated coconut. Place the gourmet
plate on the turntable. Bake the cake
for approx. 10 minutes at 450 W + Grill
until golden. Cut into 8 slices.
Quick almond tart
For the pastry:
100 g plain flour
1/2level tsp baking powder
75 g butter or margarine
30 g sugar
Filling:
75 g butter
100 g chopped almonds
Few drops of almond essence
30 g sugar
1/2packet vanilla sugar
75 ml double cream
To spread over the top:
50 g apricot jam
Mix together the flour, baking powder,
butter and sugar, and knead to a
smooth dough. Roll out the mixture into
the gourmet plate, and build up the
edges to 1 cm. Place the gourmet plate
on the turntable, and bake the pastry
for approx. 4 minutes at 450 W + Grill.
For the filling, melt the butter in a pan
on the hob, stir in the rest of the
ingredients and simmer for approx. 5
minutes. Whilst still hot, spoon the
mixture into the pastry case. Place the
gourmet plate on the turntable, and
bake the tart for approx. 5 minutes at
450 W + Grill until golden. When cool,
spread with apricot jam. Cut into 8
slices.
Gourmet plate
33
All of the automatic programmes are
weight dependent.
After selecting a programme, enter the
weight of the food. The microwave
automatically calculates the time
according to the weight given.
After cooking, allow the food to stand at
room temperature for the suggested
number of minutes ("standing time") to
allow the heat to be distributed evenly
through the food.
Automatic defrosting
There are five programmes for
defrosting different types of food
(button N). The standing time for
programme Ad 3 is up to 30 minutes,
depending on the weight, and approx.
10 minutes for the remaining
programmes.
Ad10Steak, cutlets (0.2 –1.0 kg)
Ad21Mince (0.2 – 1.0 kg)
Ad3;Chicken (small, whole)
(0.9 – 1.8 kg)
Ad4TCakes (0.1 – 1.4 kg)
Ad5kBread (0.1 – 1.0 kg)
Automatic cooking
There are four programmes for frozen
food and eight programmes for fresh
food. The standing time for each of
these programmes is approx. 2
minutes.
Cooking food from frozen N °
AC11Vegetables (0.1 – 0.6 kg)
AC23Ready meal which can be
stirred (0.3 – 1.0 kg)
AC3WBakes and gratins
(0.2 – 0.6 kg)
AC42Chips (0.2 – 0.4 kg)
Cooking fresh food °
AC11Vegetables (0.1 – 0.6 kg)
AC2EPotatoes (0.1 – 0.8 kg)
AC3_Fish (0.5 – 1.5 kg)
AC43Kebabs (0.2 – 0.8 kg)
AC5;Chicken (small, whole)
(0.9 –1.8 kg)
AC64Chicken drumsticks
(0.25 – 1.0 kg)
AC75Fish pie (0.5 – 1.5 kg)
AC8WSavoury bakes, e.g.
Potato gratin (0.5 – 1.5 kg)
^Press the relevant button repeatedly
until the automatic programme
required shows in the display. For
example, to call up programme AC 5
;(Chicken, small, whole), press
°five times.
Operation - Automatic programmes
34

g will flash in the display to request the
weight to be entered, and the
programme (e.g. AC 5) will light up,
together with the symbols for the
functions being used (hfor Microwave
and nfor Grill).
^Use the rotary selector to enter the
weight.
^Press the Start button.
The time (which depends on the
weight) will begin to count down, and
the symbols for the functions that are
currently in use will light up (hand/or
n).
An audible tone will sound halfway
through the cooking time.
^Interrupt the programme to turn or stir
the food, and then continue the
programme.
The programmed time can, if
necessary, be extended by a few
minutes during operation by pressing
the Start button repeatedly until the time
required shows in the display. On all
programmes it is only possible to
extend the time by a few minutes.
An audible tone will sound when the
cooking programme is complete.
The interior lighting of the oven goes
out.
Operation - Automatic programmes
35
One favourite programme can be
saved in memory. This programme can
be used for your most frequently
cooked recipe. This programme can
have up to 3 stages (e.g.: 1 minute at
600 W, followed by 2 minutes on Grill,
and finally 3 minutes at 150 W + Grill).
Programming
(The example given is for a 3-stage
programme.)
^First select the function for the first
stage.
^Then select the duration.
^Press button M.
1 will light up in the display, and 2 will
flash.
^Then select the second function and
duration.
^Press button M again.
2 will light up in the display, and 3 will
flash.
^Now select the third function and
duration, and then press the M
button.
After this third step, you can use the M
button to scroll through your entry and
check it.
^When you have finished
programming, turn the power
selector to the 12 o'clock position.
^Start the programme to save the
entry. Only ever run the entire
programme with food in the
appliance.
If there is no food in the appliance,
then press the Stop/C button twice
as soon as you have started it so
that the appliance is not damaged
by having no food in it.
1- and 2-stage programmes can be
saved in the same way: the
programming process is finished when
the programme selector is in the 12
o'clock position and the Start button
has been pressed, while pressing the
M button shows the next stage.
Changing an entry
^Entering a new programme overrides
the previously saved programme.
Saving your favourite programme
36

To call up your favourite programme
^Turn the programme selector to the
12 o'clock position.
^Press the M button.
^Press the Start button.
In the event of a power cut, the
favourite programme is no longer
saved and must be re-entered.
Saving your favourite programme
37
Some of the standard settings for the
appliance (which are set at the factory)
have an alternative which you can
select if required.
Please consult the chart for the different
options. The factory settings are
marked with a star* on the chart.
Proceed as follows:
^Press and hold the mand M buttons
at the same time until PIand vlight
up in the display. Then release them.
If you press them for too long, the
time of day will appear again in the
display.
^Use the time selector to select the
setting that you wish to change (PI
to P5and P0). Turn it until the
setting required shows in the display.
^Then press the M button to call up
the setting.
Swill appear in the display to show
that the setting can be changed.
^Turn the time selector if you wish to
change the setting (see chart), and
confirm your entry by pressing the M
button (for P5and P0, press and
hold the M button for approx. 4
seconds).
The change is then stored in memory.
Pwill appear in the display again,
together with the number for the setting.
The other settings can be changed in
the same way.
^When you have finished making the
changes you require, press the
Stop/C button.
The altered settings are retained
after a power cut.
Changing the settings
38

Setting Settings available (* factory default)
PI Night time switch-off S0*
SI
Night time switch-off is deactivated.
Night time switch-off is activated.
The time of day display is switched off from
11 pm to 4 am.
P2 Automatic warming
function
SI*
S0
The automatic warming function is activated.
The automatic warming function is
deactivated.
P3 "door" message SI*
S0
The "door" message appears if the door has
not been opened during the 20 minutes
before Start is pressed. Start is then
blocked, as it is assumed that there is no
food in the microwave.
The "door" message does not appear.
P4 Audible tone SI*
S0
The audible tone sounds briefly as a
reminder every 5 minutes for 20 minutes
after the end of the programme.
The audible tone is deactivated.
P5 Demo mode
(for dealer
showroom use only)
S0*
SI
Demo mode is deactivated. When demo
mode is deactivated,____ appears briefly
in the display.
The microwave is set to the showroom demo
mode. When a button or selector is
operated, MES_ shows briefly in the display.
The appliance can be operated, but the
microwave and grill functions do not come
on.
P0 Factory default SI*
SO
Factory default settings have been restored,
or have not been changed.
Factory default settings have been changed.
Changing the settings
39

Select the following microwave power
levels to reheat food:
Drinks .....................900W
Food ......................600W
Food for babies and toddlers . 450 Watt
We do not recommend heating or
reheating food or drinks for babies
or young children in the microwave
oven. Any decision to do this is the
responsibility of the user, and should
only be done with the utmost care.
Pasteurised or sterilised cooked
food should be gently heated at
450 W, and tasted to make sure it is
not too hot for a baby's palate
before serving. When reheating
other food or drink, heat to a high
temperature and allow to cool to a
suitable heat for eating. For formula
milk follow the manufacturer's
instructions.
Tips on reheating
Always use a lid or cover for reheating
food, except when a drier finish is
needed, e.g. breaded poultry/meat.
Always remove the lids from jars,
especially jars of baby food.
Loosen the screw cap with the
rubber teat before warming baby
bottles.
When reheating liquids, place the
boiling rod supplied with the
appliance into the cup or glass.
Never reheat hard boiled eggs in a
microwave oven, even without the
shell. The eggs can burst.
Food taken straight from the refrigerator
will take longer to reheat than food
stored at room temperature. The time
required depends on the nature of the
food, its initial temperature and the
amount to be cooked.
Always ensure that food is
sufficiently cooked or reheated.
If in any doubt that a sufficiently high
temperature has been reached,
continue reheating for a little longer.
Stir or turn food from time to time during
cooking. Stir the food from the outside
towards the middle, as food heats more
quickly from the outside.
After reheating
Be careful when removing a dish
from the oven. It may be hot.
Although heat is not normally produced
in the container itself by the
microwaves (apart from stoneware),
heat transfer from the food to the
container may be considerable, making
the container itself hot.
Allow food to stand for a few minutes at
room temperature at the end of a
reheating process to enable the heat to
spread evenly throughout the food.
After heating food, especially food
for babies and small children, stir
the food or shake the container and
check that the temperature does not
pose any danger. Double check
after it has been left to stand.
Reheating
40

Place the food in a microwave-proof
dish and cover it.
When cooking, it is a good idea to
select a power level of 900 W to start
with and then when the food is hot
reduce the power level to 450 W for
more gentle continued cooking.
For dishes such as rice or semolina
pudding, first select a power level of
900 W, and then reduce it to 150 W for
simmering.
Tips on cooking
Vegetable cooking times depend on
the texture of the vegetable.
Fresh vegetables contain more water
than vegetables which have been
stored, and usually cook more quickly.
Add a little water to vegetables which
have been kept stored.
Food taken straight from the refrigerator
takes longer to cook than food which
has been kept at room temperature.
Stir or turn food from time to time during
cooking to help it cook more evenly.
Ensure that food such as meat and
fish are thoroughly cooked for an
appropriate length of time.
Food with a thick skin or peel, such as
tomatoes, sausages, jacket potatoes
and aubergines, should be pierced or
the skin cut in several places before
cooking to allow steam to escape and
to prevent the food from bursting.
Eggs can only be cooked in their
shells in the microwave oven in a
specially designed egg-boiling
device available from specialist
shops.
Eggs can burst, even after they have
been taken out of the oven.
Eggs can be cooked without their shells
in the microwave oven only if the yolk
membrane has been punctured several
times first.
The pressure could otherwise cause
the egg yolk to explode.
After cooking
Be careful when removing a dish
from the oven. It may be hot.
Although heat is not normally produced
in the container itself by the
microwaves (apart from stoneware),
heat transfer from the food to the
container may be considerable, making
the container itself hot.
Allow food to stand for a few minutes at
room temperature at the end of cooking
to enable the heat to spread evenly
throughout the food.
Cooking
41

Defrosting
Select the following microwave power
settings to reheat food:
–80 W
for defrosting very delicate food, e.g.
cream, butter, gateau and cheese.
–150 W
for defrosting everything else.
Remove the food from its packaging
and place in a microwave-proof
container. Do not cover. Turn, stir or
separate the food about halfway
through the defrosting time.
To defrost meat, unpack the frozen
meat and place it on an upturned plate
in a glass or china container so that the
meat juice can run off and be collected.
Turn halfway through defrosting.
It is particularly important to observe
food hygiene rules when defrosting
poultry. Do not use the liquid from
the defrosted poultry. Pour it away,
and wash the tray, the sink and your
hands. Danger of salmonella
poisoning.
Fish does not need to be fully defrosted
before cooking.
Defrost so that the surface is sufficiently
soft to take herbs and seasoning.
Defrosting followed by
reheating or cooking
Deep-frozen food can be defrosted and
immediately reheated or cooked.
After defrosting, select 900 W followed
by 450 W.
Remove the food from its packaging
and place in a covered
microwave-proof dish for defrosting
and reheating or cooking. Exception:
Minced meat should be left uncovered
while cooking.
Soups, stew and vegetables should be
stirred several times during the
process. Carefully separate and turn
slices of meat halfway through the
programme. Turn pieces of fish at the
halfway stage.
After defrosting followed by
reheating or cooking
Allow the food to stand at room
temperature for a few minutes to enable
the heat to spread evenly throughout
the food.
Defrosting/Defrosting and reheating or cooking
42

Food Quantity Micro-
wave
power
level
(in watts)
Time
(in
minutes)
Notes
Melting butter and
margarine
100 g 450 1:00 – 1:10 Do not cover.
Melting chocolate 100 g 450 3:00 – 3:30 Do not cover.
Stir halfway through melting.
Dissolving gelatine 1 packet +
5 tbsp water
450 0:10 – 0:30 Do not cover.
Stir halfway through dissolving.
Preparing flan
topping/jelly glaze
1 packet +
250 ml liquid
450 4 – 5 Do not cover.
Stir halfway through heating.
Yeast dough Made with
100 g flour
80 3 – 5 Cover and leave to prove.
Popcorn 1 tbsp (20 g)
popcorn
900 3 – 4 Place popcorn in a 1-litre
container, cover and cook.
Salad dressings 125 ml 150 1 – 2 Heat uncovered on a gentle
heat.
Tempering citrus
fruits
150 g 150 1 – 2 Place on a plate, do not cover.
Bacon 100 g 900 2 – 3 Place on kitchen paper, do not
cover.
Softening ice
cream
500 g 150 2 Place open ice cream container
in microwave.
Warming plates 4 plates 900 2 – 3 Do not heat plates with metal rim
or decoration in microwave.
Skinning tomatoes 3 tomatoes 450 6 – 7 Cut a cross shape into the top of
each tomato, cover, and heat in
a little water. The skins will slip
off easily. Take care, as the
tomatoes may get very hot.
Strawberry jam 300 g
strawberries,
300 g jam sugar
900 7 – 9 Mix the fruit and sugar in a deep
container, cover and cook.
Defrosting and
baking bread rolls
2 rolls 150 + Grill
Grill
1–2
4–6
Place uncovered on the rack,
turning halfway through.
The information given in this chart is intended only as a guide.
Some suggested uses
43

In Australia and New Zealand, Miele
branded cleaning and conditioning
products, as well as a microfibre which
is suitable for cleaning surfaces such
as stainless steel, glass, plastic and
chrome without the use of chemicals,
are available to purchase from Miele or
the Spare Parts Department.
Disconnect the microwave oven
from the power supply before
cleaning (e.g. switch off at the
socket and remove the plug).
Oven interior and inside of the
door
The oven interior can get hot during
use. To avoid the danger of being
burnt, wait until it has cooled down
before cleaning. It should be
cleaned after each use. Waiting too
long can make cleaning
unnecessarily difficult and in some
cases impossible.
In certain circumstances, very heavy
soiling can even damage the
appliance.
The oven interior and door interior can
be cleaned using a damp cloth with a
little washing-up liquid or a mild
detergent and water. Wipe dry with a
soft cloth.
For more heavy soiling, heat a glass of
water for 2 to 3 minutes until the water
begins to boil. The steam will collect on
the walls and soften the soiling.
The oven interior can now be wiped
clean using a little washing-up liquid if
necessary.
Do not remove the cover to the
microwave outlet inside the oven,
nor the film covering the inside of
the door.
Do not let water or any small
particles penetrate the vents in the
appliance.
Wring out cloths before using them
to wipe out the oven to avoid
moisture getting into the openings.
Do not use abrasive cleaners, as
these scratch the surface.
Cleaning and care
44
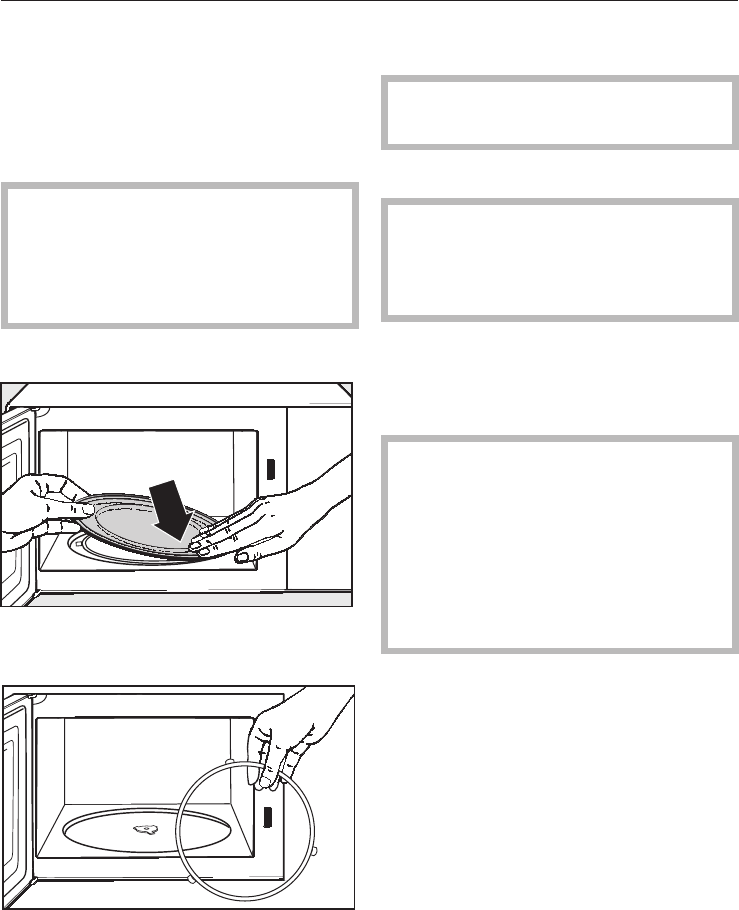
To neutralise odours in the oven, put a
cup of water with some lemon juice in
the oven and simmer for a few minutes.
The door should be kept clean at all
times and checked at regular intervals
for any signs of damage.
If any damage is noticed, the
appliance should not be used until
the fault has been rectified by a
Miele authorised and trained service
technician.
To clean the interior:
^Remove the turntable, and wash in
the dishwasher or by hand.
^Always keep the roller ring
underneath it clean as well as the
oven floor to enable the turntable to
turn smoothly.
^Clean the area between the turntable
and the carrier.
Do not turn the carrier manually, as
this could damage the drive motor.
Appliance front
Remove any soiling immediately.
If not, it might become impossible to
remove and could cause the surface
to alter or discolour.
Clean the front using a suitable
microfibre cloth or with a sponge and a
solution of hot water and washing-up
liquid. Then dry with a soft cloth.
All types of outer surface are
susceptible to scratching. Scratches
on glass surfaces could even cause
a breakage.
Contact with unsuitable cleaning
agents can alter or discolour the
outer surfaces.
Cleaning and care
45

To avoid damaging the outer surface,
do not use:
–cleaning agents containing soda,
ammonia, acids or chlorides,
–cleaning agents containing
descaling agents,
–abrasive cleaning agents, e.g.
powder cleaners and cream
cleaners,
–solvent-based cleaning agents,
–stainless steel cleaning agents,
–dishwasher cleaner,
– oven sprays,
– glass cleaning agents,
– hard, abrasive sponges and
brushes, e.g. pot scourers,
– sharp metal scrapers.
Accessories supplied
Boiling rod
The boiling rod can be washed in a
dishwasher.
Cover
Wash and dry the cover after each use.
The cover can be washed in a
dishwasher. However, discolouration
caused by natural dyes, e.g. from
carrots, tomatoes or ketchup, may
occur.
This discolouration is irreversible but
does not affect the stability of the cover.
Rack
Wash and dry the rack after each use.
It is dishwasher-proof, or can be
washed by hand in hot water with a little
washing up liquid.
Remove stubborn soils with a stainless
steel cleaner.
Glass tray
The glass tray can be washed by hand
using a solution of hot water and
washing up liquid or in a dishwasher.
Do not use abrasive cleaning agents.
Gourmet plate
Clean the gourmet plate with hot water
and a cloth with a little washing-up
liquid to remove any grease.
Do not use wire wool, or abrasive
sponges, aggressive or abrasive
cleaning agents.
The gourmet plate is not suitable for
cleaning in a dishwasher.
If the gourmet plate has been used to
prepare foods with a strong aroma, you
can neutralise any odours by adding
some water and lemon juice to the
gourmet plate and heating in the
microwave at maximum power for a few
minutes. Rinse the gourmet plate
afterwards with clean water.
Cleaning and care
46

Repairs to this appliance must only
be carried out by a Miele approved
service technician in strict
accordance with current local and
national safety regulations. Repairs
and other work by unqualified
persons could be dangerous. The
manufacturer cannot be held liable
for unauthorised work.
Some minor problems can be corrected
without contacting the Miele Service
Department.
What to do if...
...aprogramme will not start.
Check whether,
^the appliance door is closed
properly.
^the system lock has been activated
(see "System lock").
^the appliance is plugged into the
mains supply and switched on at the
socket.
^the mains fuse has tripped (call a
qualified electrician or the Service
Department if it has. See "After sales
service").
. . . a noise can be heard after a
cooking programme.
This is not a fault.
The cooling fan will continue to run for a
while after the oven has been switched
off to dispel any moisture from the oven
and prevent it settling on the control
panel or surrounding furniture.
It will switch off automatically.
. . . the display does not light up.
Check whether,
^the time of day display has been
switched off (press and hold the m
button for a few seconds).
^the time of day display has been
programmed to switch off at night.
. . . the turntable does not turn
smoothly.
^Check whether the area underneath
the roller ring is clean.
^Check whether the surfaces between
the turntable and the carrier are
clean.
Remove any soiling.
. . . food is not adequately defrosted,
heated or cooked at the end of the
selected cooking duration.
^Check whether the correct power
level was selected for the duration
set.
The lower the power level, the longer
the duration required.
^Check whether the programme has
been interrupted and not restarted.
Problem solving guide
47

. . . strange noises are heard when
the microwave oven is being used.
Check whether,
^the food is covered with aluminium
foil.
If so, remove it.
^Sparks are being created by the use
of crockery with a metallic finish. See
notes on suitable types of containers.
. . . the time of day in the display is
not accurate.
If there has been a power cut, the time
automatically switches back to 12:00.
The time of day needs to be re-set.
^Set the correct time of day.
. . . food cools down too quickly.
In the microwave oven, food begins to
cook from the outside first, the inside of
the food relying on the slower
conduction of heat.
If food is cooked at a high power level,
it is possible that the heat may not have
reached the centre of the food, so it is
hot on the outside but cold in the
centre. During standing time heat is
transferred to the centre of the food.
This may leave the food warm in the
middle but cool on the outside. When
reheating food with different densities,
such as plated meals, it is therefore
sensible to select a lower power level
and lengthen the duration required.
. . . the microwave switches itself off
during a cooking, reheating or
defrosting programme.
There may be insufficient air circulation.
Check whether,
^the air inlet or outlet is blocked.
Remove any objects if necessary. The
appliance switches off automatically in
cases of overheating. Cooking can be
continued after a cooling-down period.
If the microwave oven switches itself off
repeatedly, please call the Miele Ser-
vice Department.
If it is not possible to remedy a fault
by following the instructions given
above, on no account open the
appliance casing.
This microwave oven should only be
repaired by a suitably qualified
technician trained by Miele.
Problem solving guide
48

In the event of any faults which you
cannot remedy yourself, or if the
appliance is under guarantee, please
contact:
–your Miele Dealer
or
–the Miele Service Department (see
back cover for address).
When contacting your Dealer or the
Miele Service Department, please
quote the model and serial number of
your appliance. These are to be found
on the data plate inside the front of the
appliance.
Please note that telephone calls may
be monitored and recorded to
improve our service.
After sales service
49

Before connecting the appliance,
ensure that it has not been
damaged in any way. Do not use a
damaged appliance.
All electrical work should be carried out
by a suitably qualified and competent
person in strict accordance with
national and local safety regulations.
The appliance is supplied with a mains
cable and moulded plug ready for
connection to an a.c. single phase
220-240 V 50 Hz supply.
The voltage and connected load are
given on the data plate which is located
inside the door to the appliance. Please
ensure that these match the household
mains supply.
Connection should be made via a
suitable switched socket, or via a
suitable isolator, which complies with
national and local safety regulations,
and the on/off switch should be easily
accessible after the appliance has
been installed. If it is installed via an
isolator switch, connection must be
carried out by an electrician.
For extra safety it is advisable to install
a residual current device with a trip
current of 30 mA.
WARNING
THIS APPLIANCE MUST BE
EARTHED
If the connection cable is damaged
it must be replaced by a Miele
approved Service Technician only.
Electrical connection
50
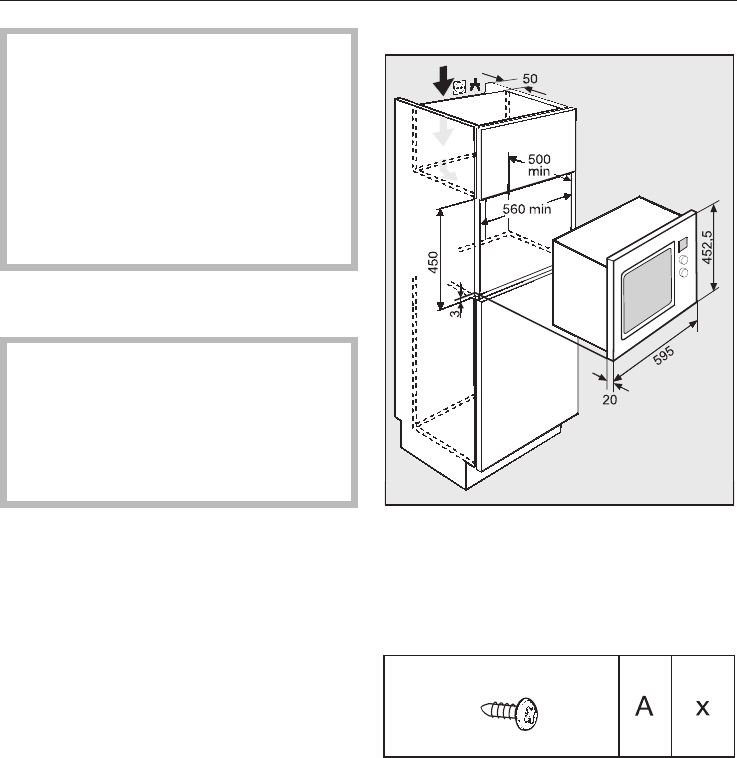
When building in the appliance,
ensure that the vent outlets at the
front of the appliance are not
hindered, and that there is adequate
ventilation to the rear of the housing
unit by leaving a large enough gap
(see diagram: 50 mm x unit width).
Do not block the ventilation gaps
with any objects.
The appliance is designed to be built
into a tall unit.
To transport the appliance, make
sure that you lift it by the appliance
housing and not by the frame. The
frame is not sturdy enough to bear
the weight of the appliance when it
is being carried.
Building-in dimensions
Building-in kit
The following items are supplied in the
accessory pack for installing the
appliance:
Installation
51
4 x 16mm
3
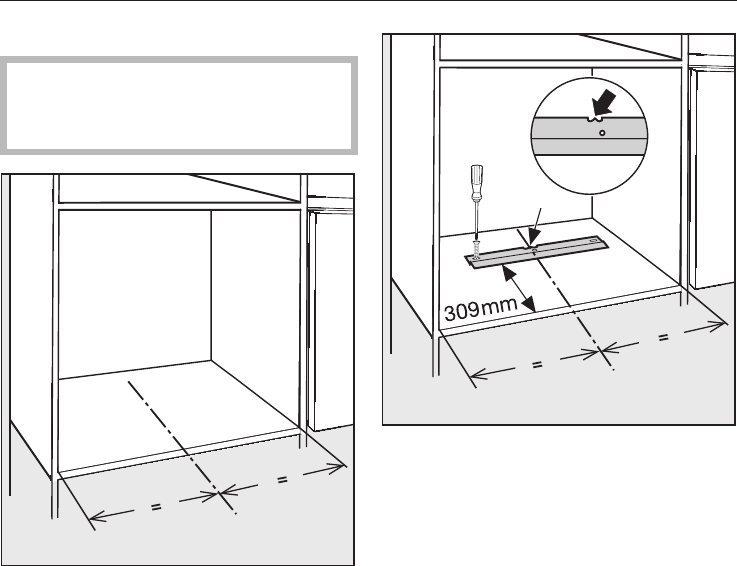
Installation
The appliance must be built in
before it can be used. Otherwise it
poses an electric shock hazard.
^Draw a line inside the housing unit to
mark the middle of the unit as
illustrated.
^Position the fitting bracket on this
middle line. Use the indented mark
on the bracket to guide you.
^Fit one screw ainto the centre of the
first long slot.
^Check the alignment with the front
edge of the unit and with the middle
line, and then fit another screw a
into the other long slot.
^Then tighten both of these screws.
^Place the appliance in the housing
unit and using your hands push on
both sides of the back of the oven
interior to move the appliance into
position. It will engage in position
when it is correctly installed.
^Check that it is correctly aligned.
^If it is not aligned correctly, carefully
pull it back out of the niche and
realign it by slightly adjusting the
position of the bracket on the long
slots.
Installation
52
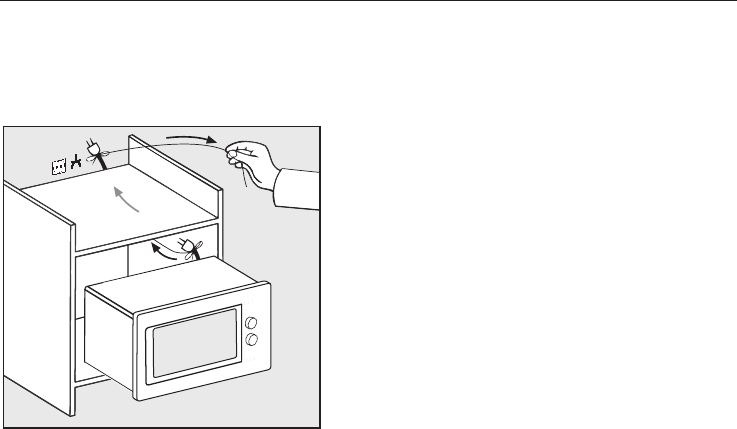
^When correctly aligned, insert the
third screw ainto the middle of the
bracket to prevent the bracket
moving out of position.
^Slide the appliance into the housing
unit, and pull the cable with the plug*
through the back of the unit.
^Connect the appliance to the
electricity supply.
^Then push the appliance right back
into the housing unit as described
above.
* Plug shown is for illustration
purposes only.
Installation
53
54
55

Alteration rights reserved / 1108
M 8261-1
M.-Nr. 07 269 520 / 00
