MilDef Crete DB6 5" Handhold Computer User Manual DB6 User Guide WTS REVISE
MilDef Crete Inc. 5" Handhold Computer DB6 User Guide WTS REVISE
UserManual.wiki
>
MilDef Crete
>
DB6 User Manual
Users Manual
Navigation menu
Upload a User Manual
Namespaces
Wiki Guide
HTML
PDF
Info
Views
User Manual
Discussion / Help
Navigation


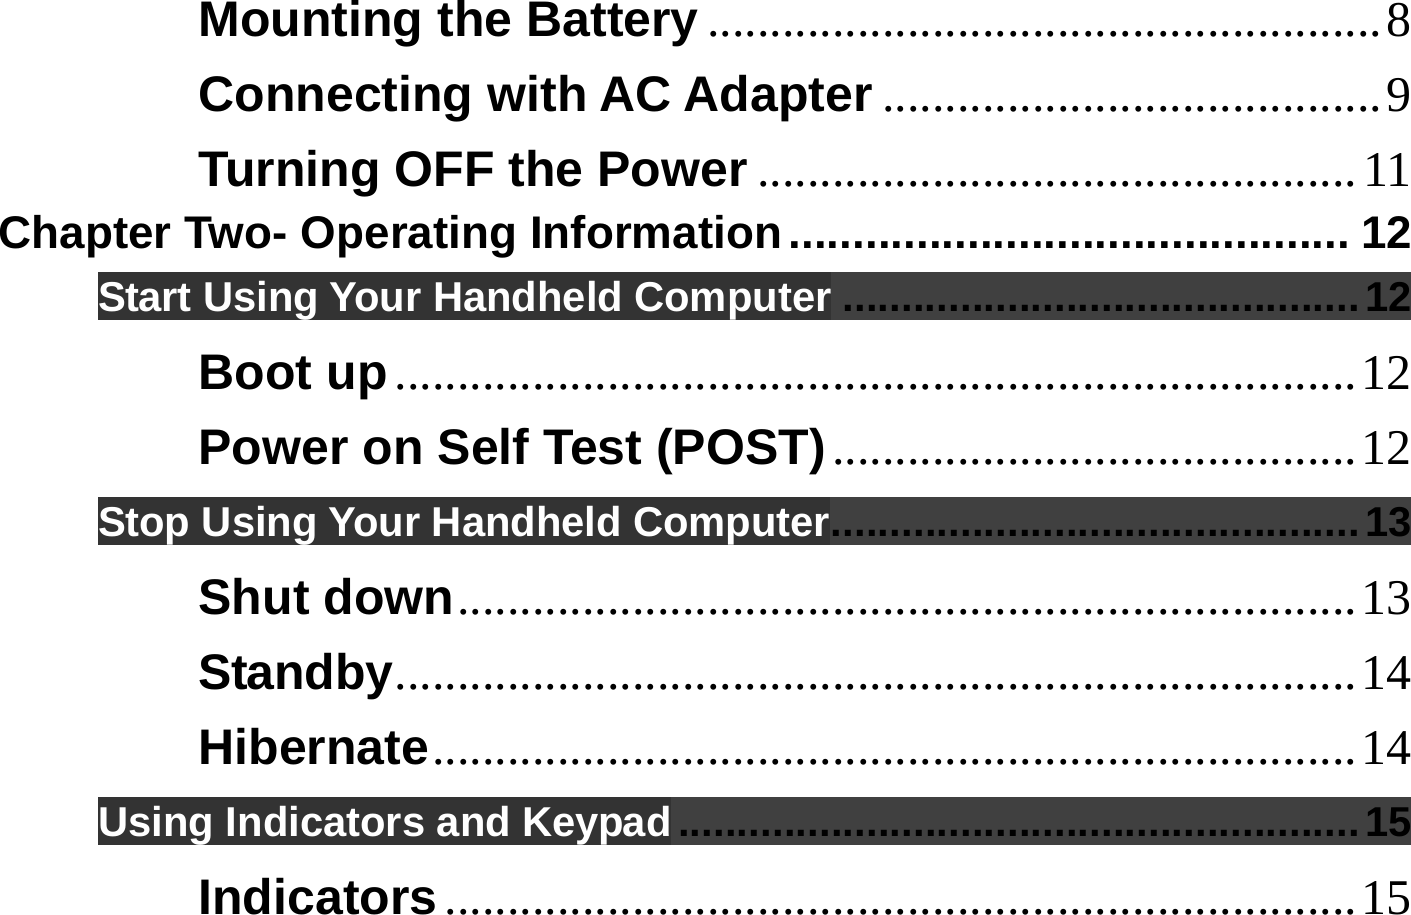


![34 Main Menu In Main Menu, you are able to see the System Overview and the operating instructions. BIOS SETUP UTILITY Main Advanced PCIPnP Boot Security Exit System Overview AMIBIOS Version : 08.00.15 Build Date : 03/01/10 ID :1AAAA000 Processor Intel (R) Atom (TM) CPU Z530 @ 1.60GHz Speed : 1600MHz Count : 1 System Memory Size : 2043MB System Time [16:15:25] System Date [Thu 05/20/2010] CMC Lo-Module: OD2.02x, Hi-Module:OD2.018x Use [Enter], [TAB] or [SHIFT-TAB] to select a field. Use [+] or [-] to configure system Time. ← Select Screen ↑↓ Select Item –/+ Change Values Tab Select Field F1 General Help F10 Save and Exit Esc Exit](https://usermanual.wiki/MilDef-Crete/DB6/User-Guide-1353575-Page-51.png)
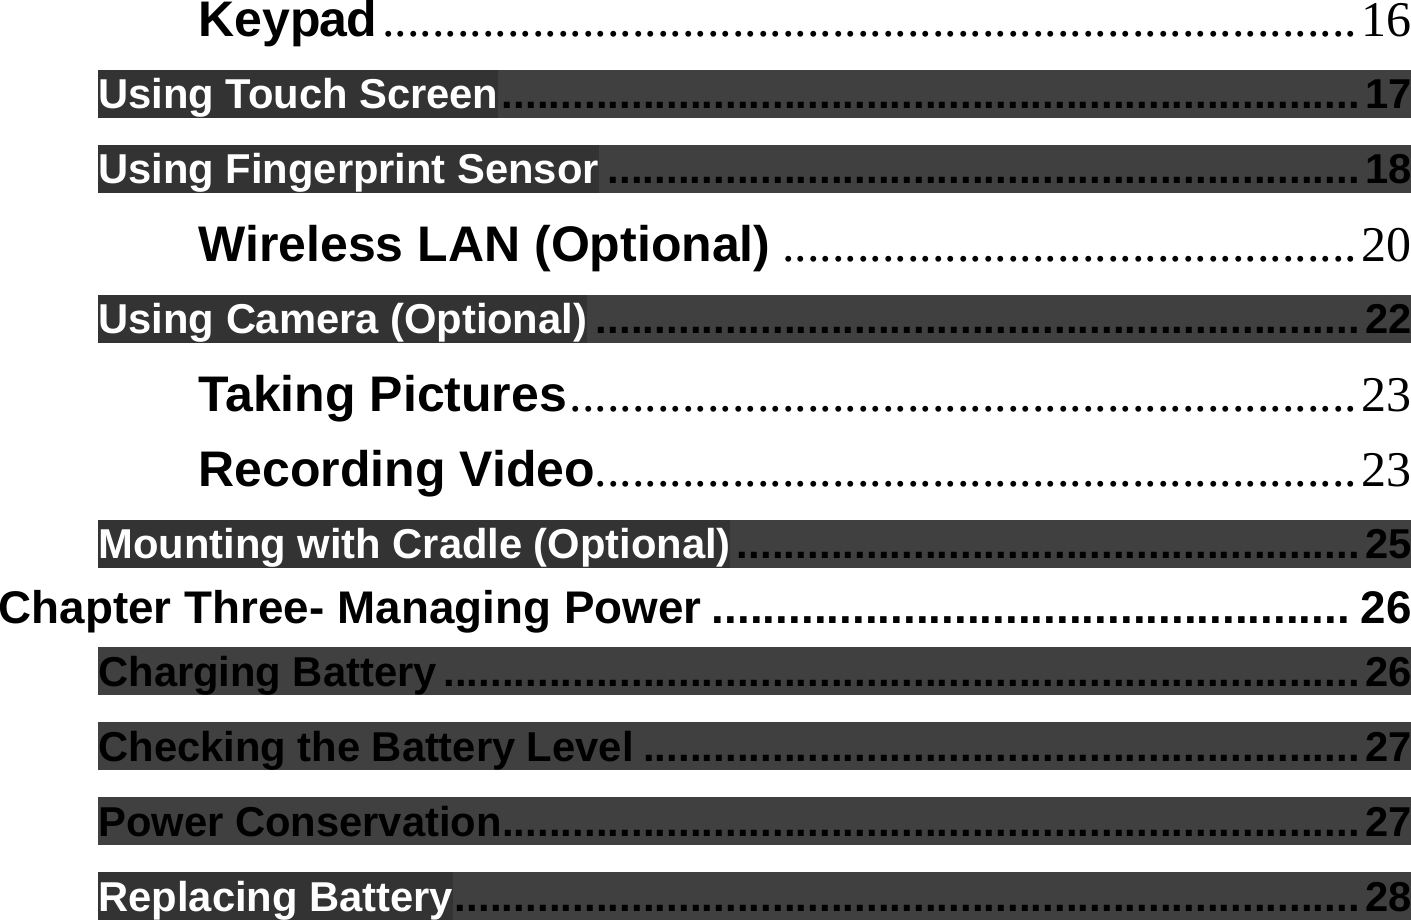
![35 Advanced Menu In Advanced Menu, you are able to do the advanced settings. BIOS SETUP UTILITY Main Advanced PCIPnP Boot Security Exit Advanced Settings Warning: Setting wrong values in below sections may cause system to malfunction. ► CPU Configuration ► IDE Configuration ► SuperIO Configuration ► ACPI Configuration ► MPS Configuration ► PCI Express Configuration ► Smbios Configuration ► USB Configuration ► RF Item Configuration COM 2 redirection [Cradle] Thermal cooling trip point [119C] Critical trip point [127C] ConfigureCPU. ← Select Screen ↑↓ Select Item Enter Go to Sub Screen F1 General Help F10 Save and Exit Esc Exit](https://usermanual.wiki/MilDef-Crete/DB6/User-Guide-1353575-Page-52.png)
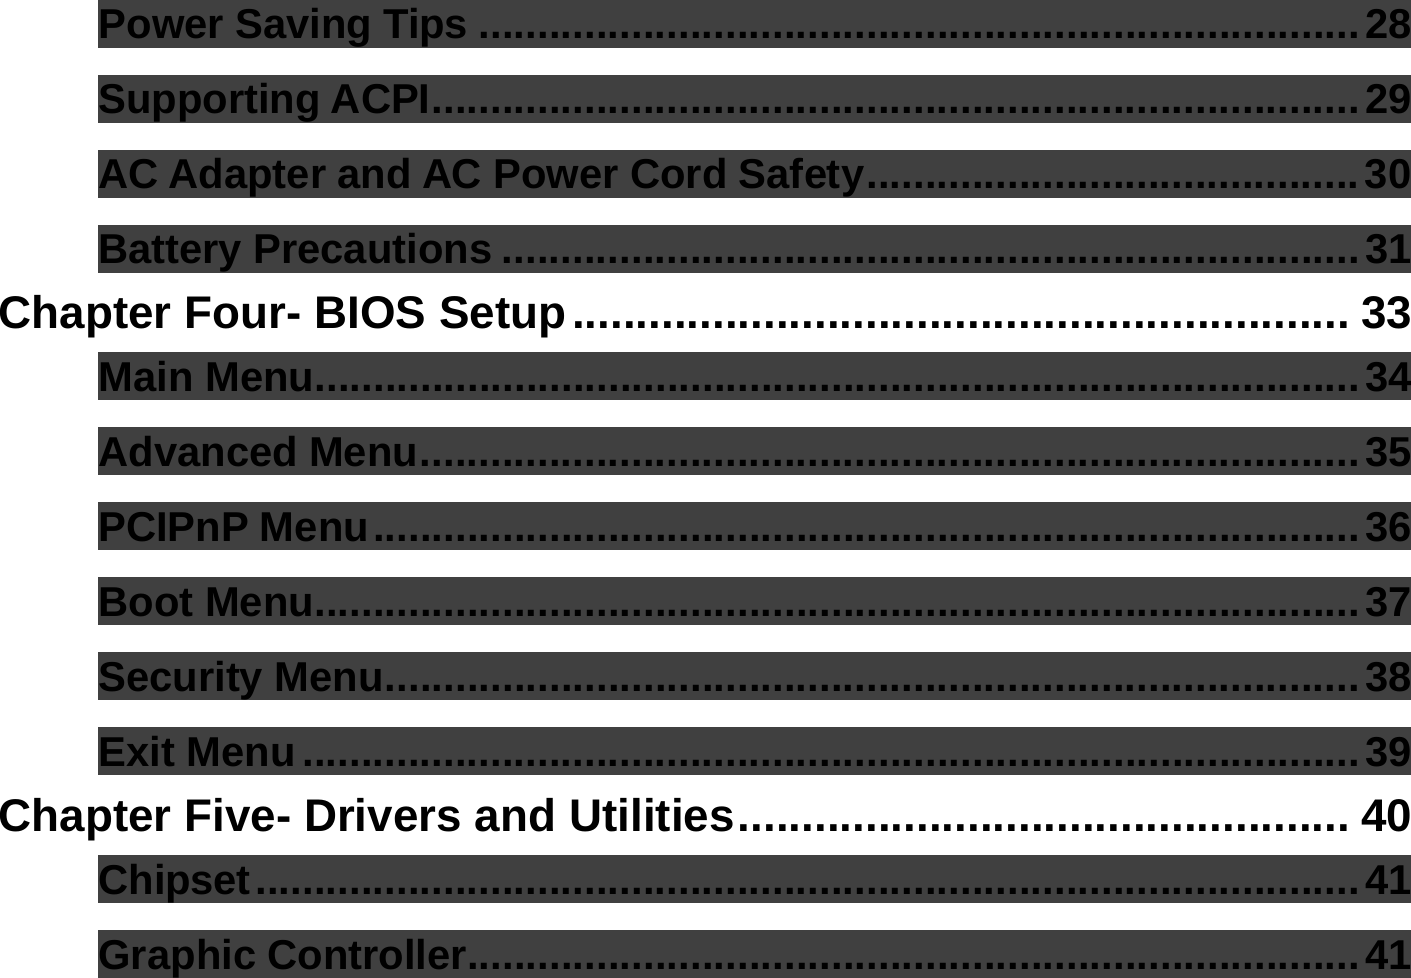
![36 PCIPnP Menu In PCIPnP Menu, you are able to do the advanced PCI/PnP settings. BIOS SETUP UTILITY Main Advanced PCIPnP Boot Security Exit Advanced PCI/PnP Settings Warning: Setting wrong values in below sections may cause system to malfunction. Clear NVRAM [No] Plug & Play O/S [No] PCI Latency Timer [64] Allocate IRQ to PCI VGA [Yes] Palette Snooping [Disabled] PCI IDE BusMaster [Disabled] Offboard PCI/ISA IDE Card [Auto] IRQ3 [Available] IRQ4 [Available] IRQ5 [Available] IRQ7 [Available] IRQ9 [Available] IRQ10 [Available] IRQ11 [Available] Configure NVRAM during System Boot. ← Select Screen ↑↓ Select Item +- Change Option F1 General Help F10 Save and Exit Esc Exit](https://usermanual.wiki/MilDef-Crete/DB6/User-Guide-1353575-Page-53.png)
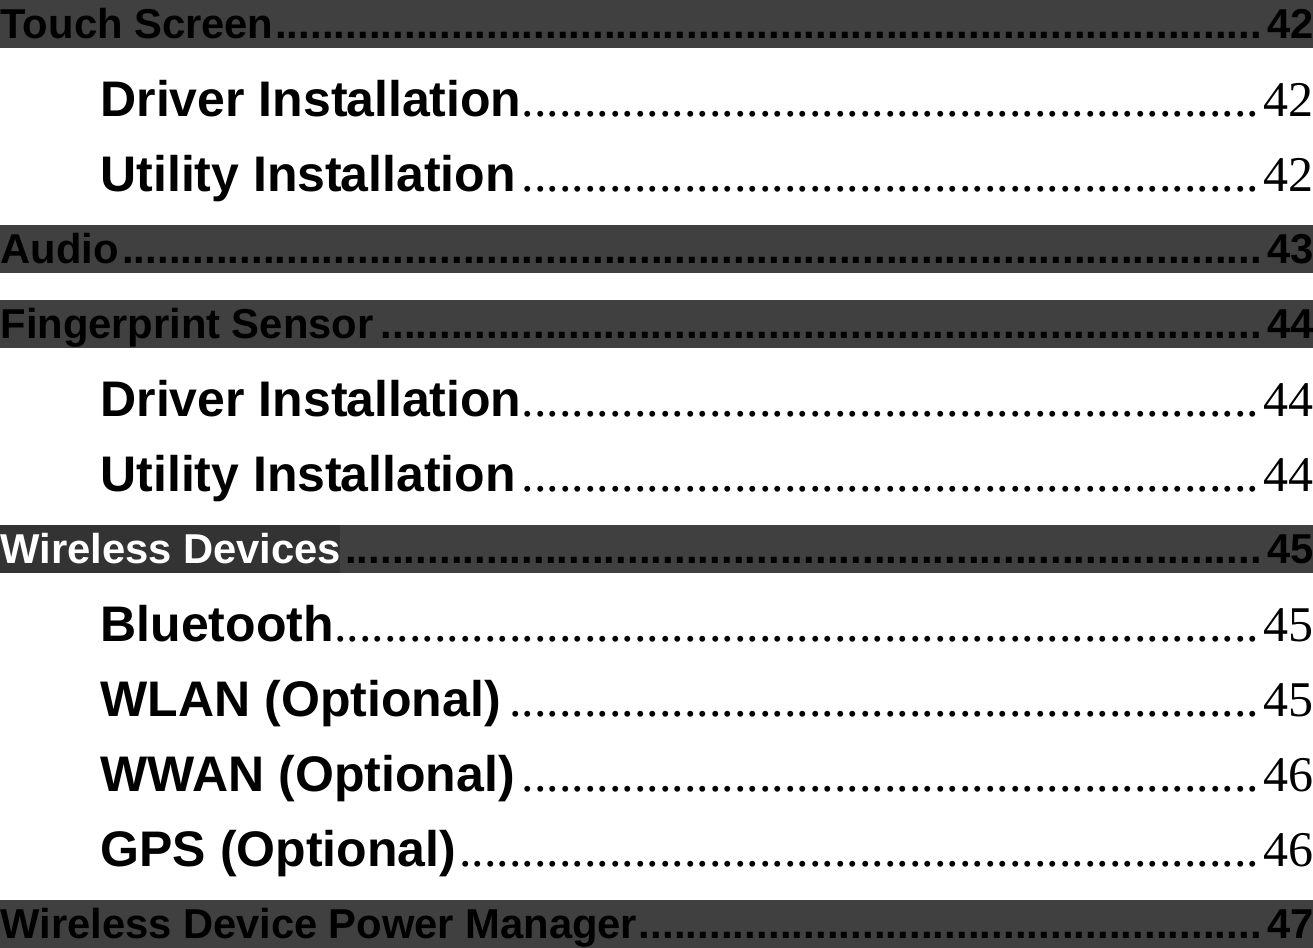
![37 Boot Menu In Boot Menu, you are able to do the boot settings. BIOS SETUP UTILITY Main Advanced PCIPnP Boot Security Exit Boot Settings ► Boot Settings Configuration 1st Boot Device [USB] 2nd Boot Device [HDD:PM-MTRON MSD-P] 3rd Boot Device [CD/DVD] 4th Boot Device [Removable Dev.] Configure Settings during System Boot. ← Select Screen ↑↓ Select Item Enter Go to Sub Screen Tab Select Field F1 General Help F10 Save and Exit Esc Exit](https://usermanual.wiki/MilDef-Crete/DB6/User-Guide-1353575-Page-54.png)
![38 Security Menu In Security Menu, you are able to do the security settings. BIOS SETUP UTILITY Main Advanced PCIPnP Boot Security Exit Security Settings Supervisor Password :Not Installed User Password :Not Installed Change Supervisor Password Change User Password Boot Sector Virus Protection [Disabled] Install or Change the password. ← Select Screen ↑↓ Select Item Enter Change F1 General Help F10 Save and Exit Esc Exit](https://usermanual.wiki/MilDef-Crete/DB6/User-Guide-1353575-Page-55.png)