MilDef Crete DF6 Handheld Computer User Manual
MilDef Crete Inc. Handheld Computer Users Manual
Users Manual
HANDHELD COMPUTER
DF6
USER’S GUIDE
(PRELIMINARY DRAFT)

Notice
Copyright© 2013, MilDef Crete Inc. All rights reserved.
No part of this publication may be reproduced and modified without the written permission of
MilDef Crete Inc.
MilDef Crete Inc. reserves the right to make changes in the products or the product specifications
without any prior notice. Customers are advised to contact MilDef Crete for updated product
information.
MilDef Crete makes no representations or warranties, either expressed or implied, with respect to
the contents hereof and specifically disclaims any warranties for the correctness of this book, nor
any license grant of MilDef Crete's patents or intellectual properties. MilDef Crete assumes no
liability for customer's loss or damage caused by using this document.
Trademarks
Windows CE is a registered trademark of Microsoft Corp.
TI AM3715 Sitara
TM
Processor is a registered trademark of Texas Instruments Inc.
All other brands and product names are trademarks or registered trademarks of their respective
holders.

Revision History:
Revision Date Changes Author

Regulatory Information/ Disclaimers
Installation and use of this computer must be in strict accordance with the instructions included in
the user documentation provided with the product. Any changes or modifications (including the
antennas) made to this device that are not expressly approved by the manufacturer may void the
user’s authority to operate the equipment.
The manufacturer is not responsible for any radio or television interference caused by
unauthorized modification of this device, or the substitution of the connecting cables and
equipment other than manufacturer specified. It is the responsibility of the user to correct any
interference caused by such unauthorized modification, substitution or attachment. Manufacturer
and its authorized resellers or distributors will assume no liability for any damage or violation of
government regulations arising from failing to comply with these guidelines.

FCC (Federal Communications Commission) Statement
This equipment has been tested and found to comply with the limits for a Class-B digital device
pursuant part 15 of the FCC Rules. These limits are designed to provide reasonable protection
against harmful interference in a residential installation.
This equipment generates, uses, and radiates radio frequency energy. If not being installed and
used in accordance with the instructions, it may cause harmful interference to radio
communications. However, there is no guarantee that interference will not occur in a particular
installation. If this equipment does cause harmful interference to radio or television reception,
which can be determined by turning the equipment off and on, the user is encouraged to try to
correct the interference by one or more of the following measures:
Re-orient or relocate the receiving antenna.
Increase the separation between the equipment and receiver.
Connect the equipment into an outlet on a circuit different from that to which the receiver is
connected.
Consult the dealer or an experienced radio/TV technician for help.
This device complies with Part 15 of the FCC Rules. Operation is subject to the following two
conditions:
This device may not cause harmful interference.
This device must accept any interference received, including interference that may cause
undesired operation.

FCC Caution
To assure continued compliance, any changes or modifications not expressly approved by
the party responsible for compliance could void the user's authority to operate this
equipment. (Example: use only shielded interface cables when connecting to computer or
peripheral devices).

CE
ProductswiththeCEMarkingcomplywithboththeEMCDirective(2004/108/EC)andtheLow
VoltageDirective(2006/95/EC)issuedbytheCommissionoftheEuropeanCommunity.
CompliancewiththesedirectivesimpliesconformitytothefollowingEuropeanNorms:
EN55022 CISPR22RadioFrequencyInterference
EN55024EN61000‐4‐2,EN61000‐4‐3,EN61000‐4‐4,EN61000‐4‐5,EN61000‐4‐6,
EN61000‐4‐8,EN61000‐4‐11,EN61000‐3‐2,EN61000‐3‐3,
GenericImmunityStandard
LVDEN60950‐1:2006+A11:2009+A1:2010+A12:2011
IEC60950‐1:2005+AM1:2009
R&TTE(CE)ManualRegulatoryRequirement
WLAN‐IEEE802.11b/g/n
802.11b/g/nRestrictions:
Europeanstandardsdictatemaximumradiatedtransmitpowerof100mWEIRPandfrequency
range2.400‐2.4835GHz.

CEDeclarationofConformity
ItisconfirmedtocomplywiththerequirementssetoutintheCouncilDirectiveonthe
approximationofthelawsofthememberstatesrelatingtoElectromagneticCompatibility
Directive(2004/108/EC),Low‐voltageDirective(2006/95/EC)andtheproceduresgiveninR&TTE
Directive(99/5/EC).
Theequipmentwaspassed,andtheequipmenttestwasperformedaccordingtothefollowing
Europeanstandards:
EN300328V1.7.1(2006)
EN301489‐1V1.8.1(2008‐04)/EN301489‐17V1.3.2(2008‐04)
EN62311:2008
EN300440V1.6.1(2010‐08)
UL,TÜV
ACAdapter(TÜVincludesLVDEN60950)

Power Conservation
This handheld computer consumes less power compared to conventional consumer computers.
The power consumption may be further reduced by properly configuring the Power Management
Setup.
It is recommended that the power saving features be enabled even when not running on battery
power. Power Management features can conserve power without degrading system performance.
Power Safety
There are specific power requirements for your handheld computer:
Only use an approved AC adapter designed for this handheld computer.
There is a 3-prong grounded plug for the AC adapter. The 3
rd
prong is an important
mechanism for ensuring product safety. Please do not neglect the importance of this
mechanism. If you are unable to access a compatible outlet, please hire a qualified electrician
to install a compatible outlet for you.
When unplugging the AC power cord, please make sure to disconnect the cord by pulling from
the plug head instead of pulling from the wire to prevent wire damage.
Make sure the power outlet and any other extension cord(s) you use can support the total
current load of all the connected devices.
Before cleaning the handheld computer, please make sure it is disconnected from any
external power source.
Warning
Before any upgrade procedures, make sure the power is turned off, and all the cables
are disconnected. Also, it is advisable to remove your battery to prevent your handheld
computer from accidentally turning on.
Battery Precautions
Only use batteries designed for this handheld computer. Using incompatible battery types
may cause explosion, leakage or damage to the computer.
Do not remove the battery from the computer while the computer is powered on.
Do not continuously use a battery that has been dropped, or that appears damaged (e.g. bent
or twisted) in any way. Even if the computer is able to continuously work with a damaged
battery, the circuit damage may occur and possibly cause fire.
Always use the charger designed for this computer to recharge the battery. Incorrect
recharging may cause the battery to explode.
Do not try to service a battery by yourself. For battery service or replacement, please contact
your service representatives.
Please dispose of damaged battery promptly and carefully. Explosion or leakage may occur, if
the battery is exposed to fire, improperly handled or discarded.
Battery Disposal & Caution
The product that you have purchased contains a rechargeable battery.
The battery is recyclable. At the end of its service life, under various
state and local laws, it may be illegal to dispose of this battery into the
municipal waste stream. Check with your local solid waste officials for
details in your area for recycling options or proper disposal. Danger of
explosion may possibly occur, if the battery is incorrectly replaced.
Replace only with the same or the equivalent battery recommended by
the manufacturer. Discard the used battery according to the
manufacturer’s instructions.

Environmental Information, Material Safety & Recycling
All materials used in the manufacturing of this equipment are recyclable or environmentally
friendly. Please recycle the packing materials in accordance with local regulations at the end of the
product's service life.
Notice:
The equipment may contain insignificant amount of hazardous substances for health and
environment below control level.
To avoid spreading such substances into the eco system and to minimize the pressure on the
natural environment, you are encouraged to reuse or recycle most of the materials in a safe
way after the product’s service life.
For more information on collection, reuse and recycle of materials, please consult local or
regional waste administrations for more information. You can also contact your dealer for
more information on the environmental details of the equipment.
The symbol of the crossed out wheeled bin indicates that the product (electrical
and electronic equipment) should not be placed in municipal waste. Please check
local regulations for disposal of electronic products.
TABLE OF CONTENTS
Chapter 1 - Getting Started .................................................................................... 1
Unpacking...................................................................................................................1
Workplace ..................................................................................................................2
Environmental Ratings ...............................................................................................2
Ruggedness ................................................................................................................2
Appearance Overview................................................................................................3
Ready for Use .............................................................................................................7
Chapter 2 - Operating Information....................................................................... 10
Start Using Your Handheld Computer......................................................................10
Stop Using Your Handheld Computer ......................................................................12
Using the Touchscreen .............................................................................................15
Audio Features .........................................................................................................18
Manage SIM Card / Micro SD Card ..........................................................................19
Set and Manage Device Password ...........................................................................21
Device Connectivity..................................................................................................22
Wi-Fi.........................................................................................................................22
Bluetooth..................................................................................................................22
GPS ...........................................................................................................................22
COM .........................................................................................................................22
Chapter 3 - Managing Power................................................................................ 30
USB AC Adapter........................................................................................................30
Battery......................................................................................................................31
Chapter 4 - Using Special Applications.................................................................. 34
Display Rotation .......................................................................................................34
Device Power Manager ............................................................................................35
Backlight Control ......................................................................................................36
Device Information...................................................................................................37
Function Keys ...........................................................................................................37
USB Client Function..................................................................................................37
Battery Notification..................................................................................................37
Chapter 5 - Specifications..................................................................................... 43
Processor..................................................................................................................43
Memory and Storage ...............................................................................................43
Audio ........................................................................................................................43
Display......................................................................................................................43
Wireless Communication Devices............................................................................44
Camera .....................................................................................................................45
I/O Port.....................................................................................................................44
Battery......................................................................................................................44
AC Adapter ...............................................................................................................45
Dimensions & Weight...............................................................................................45
Case Materials and Color .........................................................................................45
Certification..............................................................................................................46
Chapter 6 - Maintenance and Service................................................................... 48
Cleaning....................................................................................................................48
Troubleshooting .......................................................................................................48
RMA Service .............................................................................................................50

Chapter 1 - 1
Getting Started
Chapter 1 - Getting Started
Unpacking
The following list of items are packaged and shipped along with your handheld computer. If any of
these items is missing or damaged, please notify your dealer immediately.
Handheld Computer Unit
AC Adapter
1M USB Cable (Micro USB to USB)
Utility DVD
Quick Guide

Chapter 1 - 2
Getting Started
Workplace
A clean and moisture-free environment is preferred. Make room for air circulation. Remember to
avoid areas from:
Sudden or extreme changes in temperature.
Extreme heat.
Strong electromagnetic fields (Near television set, motor rotation area, etc.).
Dust or high humidity.
If this handheld computer is required to work in a hostile environment, please maintain your
handheld computer regularly by cleaning dust, water, and etc. to keep it in an optimal operating
condition.
Environmental Ratings
Operating Temperature: -20 ºC ~ +60 ºC
Operating Altitude: 0 meter ~ 4,572 meters
Operating Humidity: Up to 95% (non-condensing)
Ruggedness
This handheld computer is designed with rugged features, such as vibration, shock, dust, and
rain/water protection. However, it is still necessary to provide appropriate protection while
operating in hostile environments.
Chapter 1 - 3
Getting Started
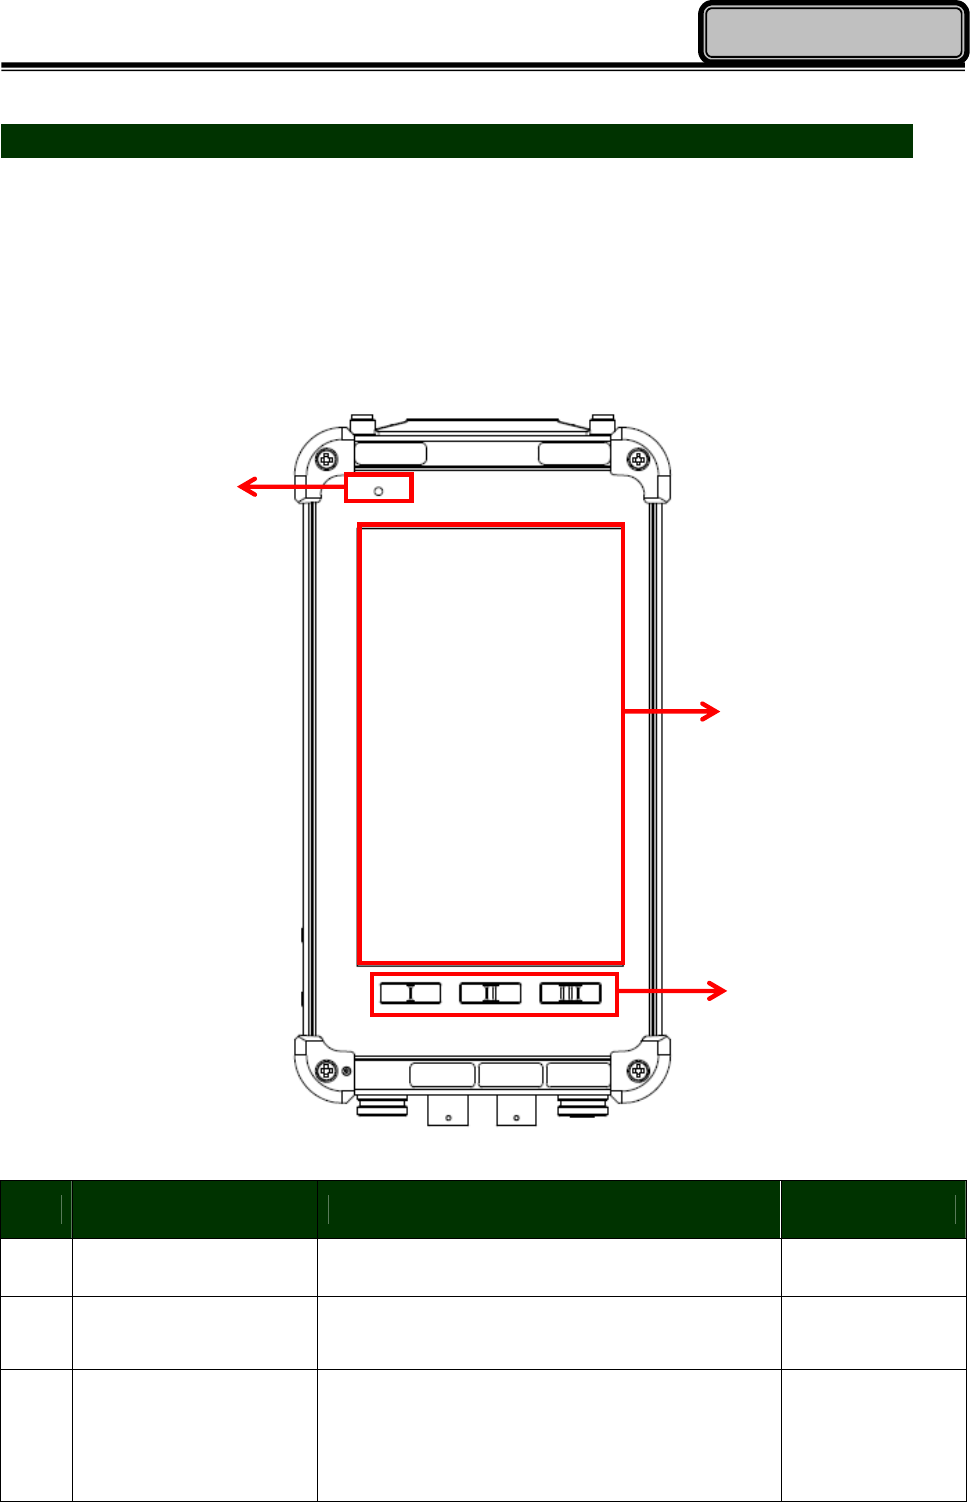
Appearance Overview
Before starting to use your handheld computer, it is advisable that you take a quick glance to
familiarize yourself with the locations of your device’s external buttons and components.
Front View
No. Feature Functional Description Remark
1 LED/Charge Indicator LED lights up (orange) when charging begins.
2 LCD/Touch LCD Resolution: 480 x 800.
Single-touch resistive touchscreen.
3 Function Keys Embedded function keys define or
customized.
Refer to
Chapter 4 - 3 for
setting.
1
2
3
Chapter 1 - 4
Getting Started
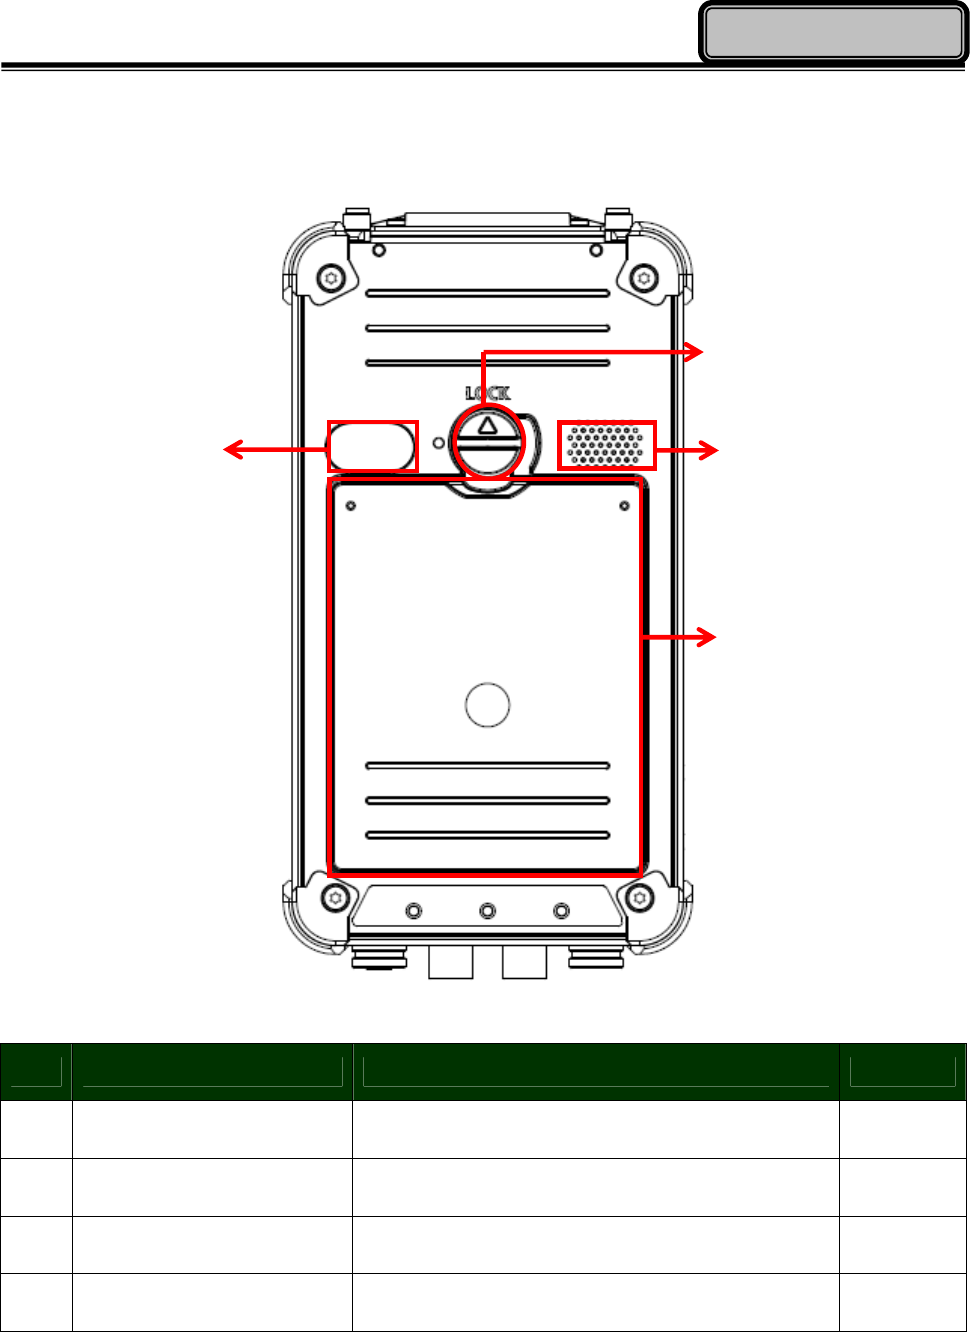
Rear View
No. Feature Functional Description Remark
1 Battery Lock Slot-type head for locking the battery.
2 Speaker Mono Speaker for audio output.
3 Battery Pack Provides power source to your device.
4 Optional Camera Module 5.0 MP camera with LED fill light.
1
2
3
4
Chapter 1 - 5
Getting Started
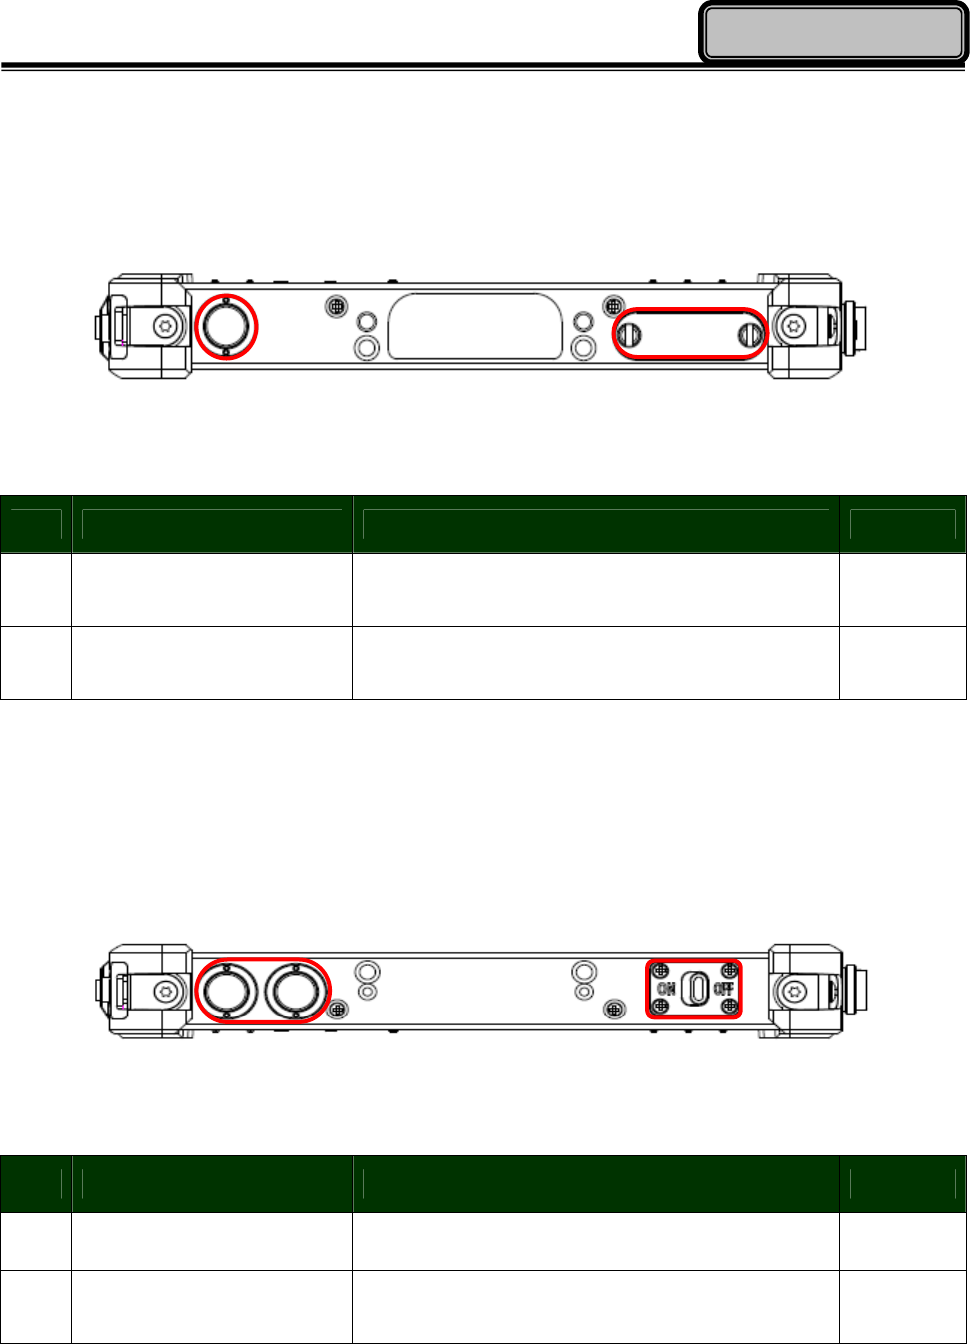
Right View
No. Feature Functional Description Remark
1 Power Button Turns the device on or off.
Put the device to lock or suspend mode.
2 SIM Card Slot
Micro SD Card Slot
SIM card slot for connectivity.
Removable mass storage media.
Left View
No. Feature Functional Description Remark
1 Volume Control Increases/decreases device audio volume.
2 Optional Night Vision
Switch Switch on/off the night vision function
1
2
1
2
Chapter 1 - 6
Getting Started
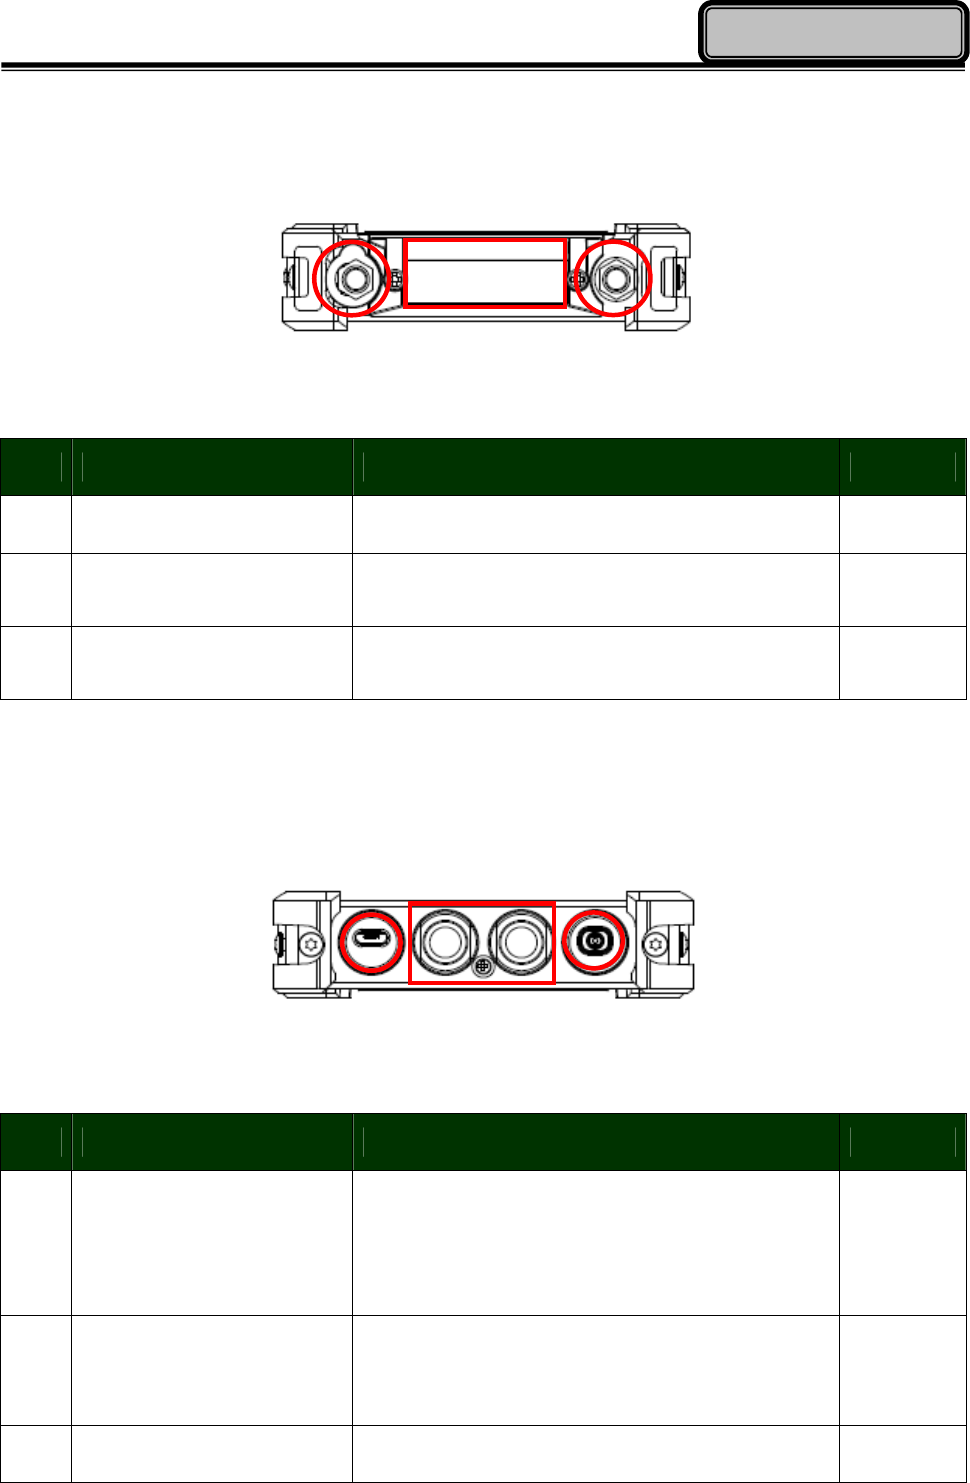
Top View
No. Feature Functional Description Remark
1 Embedded Antennas Optional Embedded Antennas for GPS
2 Location 1 Optional SMA Antenna function:
WiFi & Bluetooth, GPS
3 Location 2 Optional SMA Antenna function:
WiFi & Bluetooth, GPS
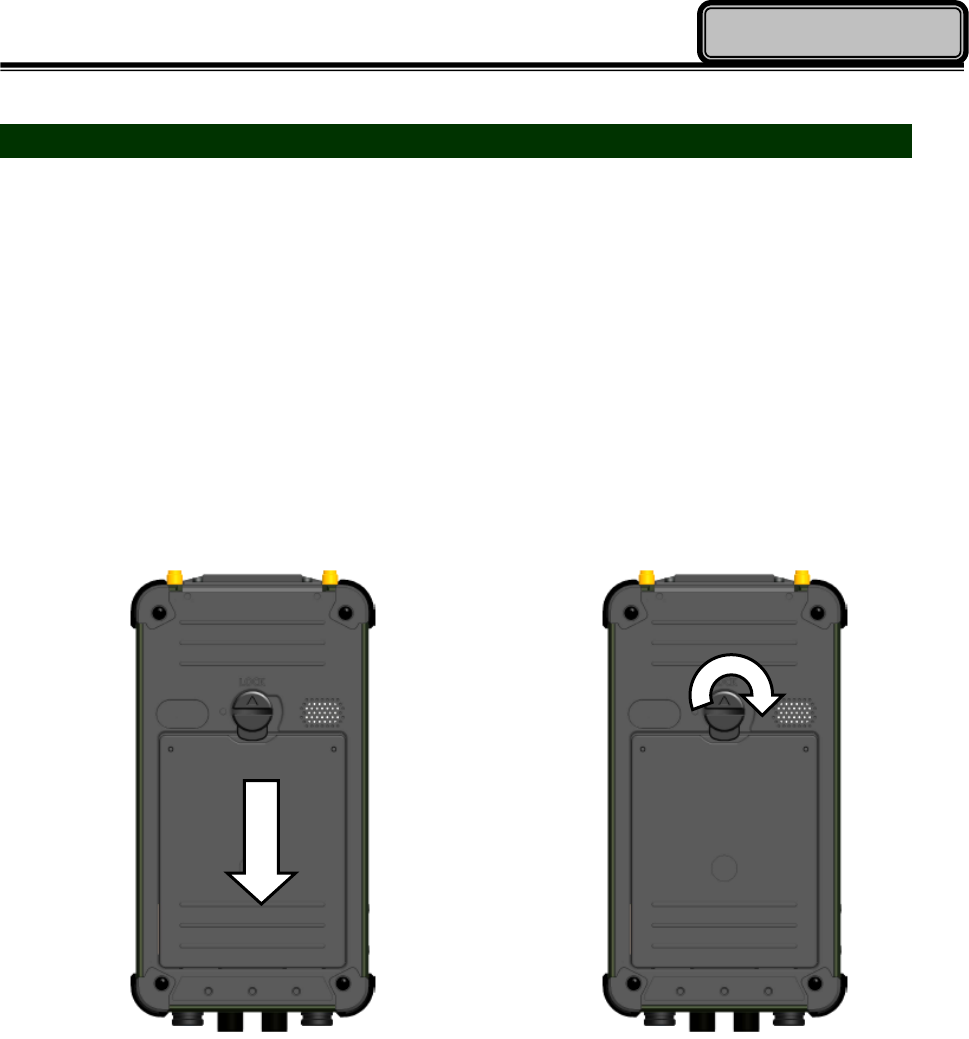
Bottom View
No. Feature Functional Description Remark
1 DC-in Jack
DC-in jack to connect to AC adapter.
I: Micro USB
M: DC-in 5V with sealed LEMO 8or9?? pin
Connector
2 Location 5
Optional Fisher 8 pin connector.
Choose 1 out of 5 for each connector:
RS232, USB, 100M LAN, VGA, Headset
Refer to
3 Headset Headset
1
1
3
2
2
3
Chapter 1 - 7
Getting Started
Ready for Use
After taking a quick look at your handheld computer, the following illustrations will help you setup
your handheld computer ready for operations.
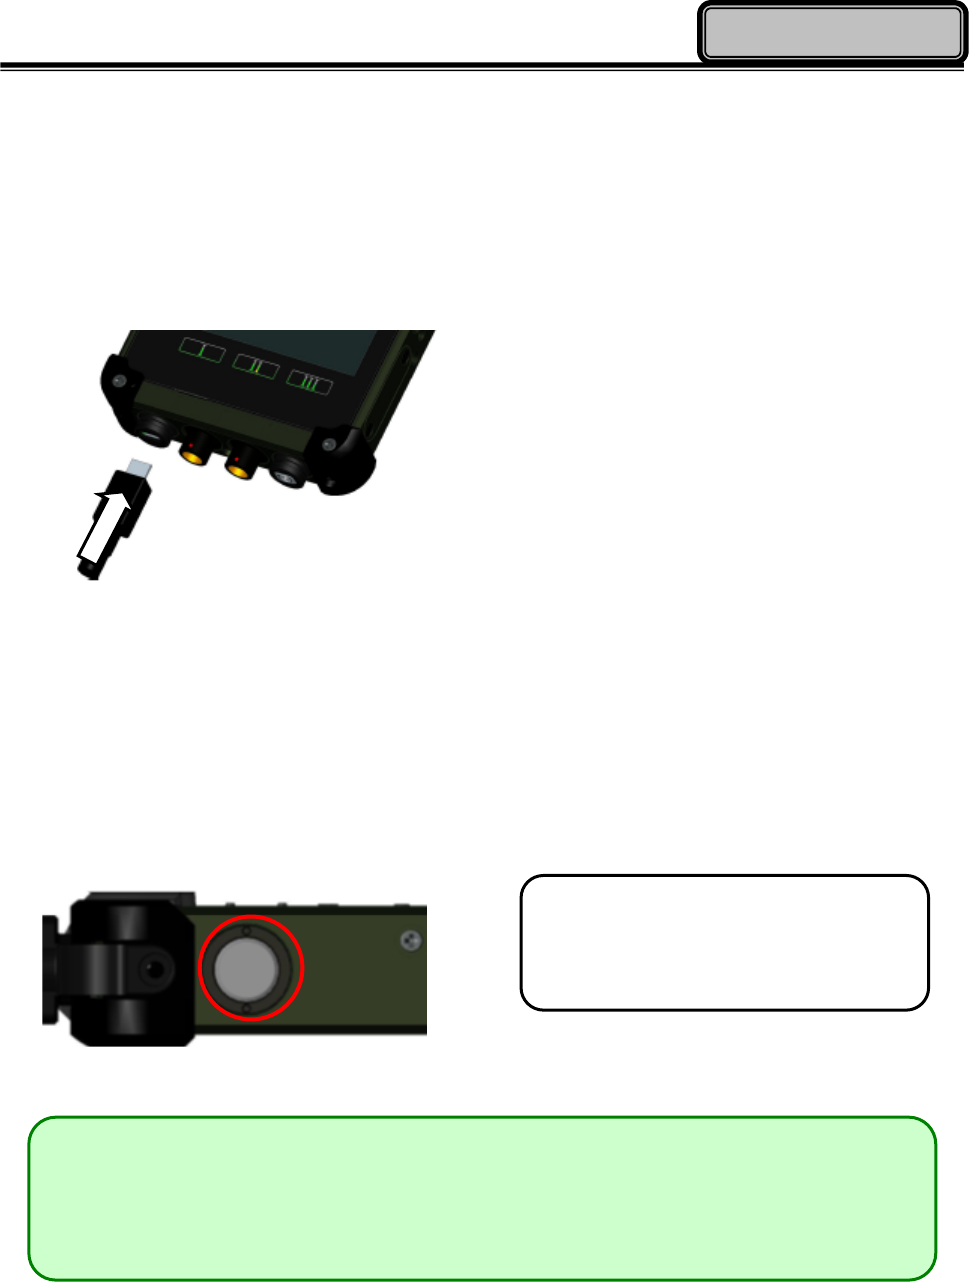
Mounting the Battery
A. Mount the battery into the battery bay.
B. Turn clockwise and lock firmly with a
slot screwdriver or a coin.
Chapter 1 - 8
Getting Started
Connecting the AC Adapter
1. Insert the USB cable to the micro USB
client.
2. Connect the end of the USB cord to the
USB AC adapter.
3. Plug the USB AC adapter into an
electrical outlet.
Turning ON the Power
A. Make sure the battery is securely mounted. Connect all power cords properly.
B. Turn on the power of your handheld computer by pressing the “Power Button“.
Press the button to turn on the
power of your handheld computer.
Note:
You can turn on the power of your handheld computer without a mounted battery if
your handheld computer is directly attached to an external power source.

Chapter 1 - 9
Getting Started
Turning Off the Power
To turn off the power of your handheld computer, press the power button once and wait for the
Power Menu to be displayed onscreen. From the Power Menu, tap the “Power Off” icon to turn off
the power of your handheld computer.
Note:
If you lose power during operation (i.e. running out of battery), all unsaved work
and data will be lost.
Chapter 3 - 10
Operating Information
Chapter 2 - Operating Information
Start Using Your Handheld Computer
Turn on your handheld computer by using the power button. After turning on the power of your
handheld computer, the device will boot up with Windows CE 6.0 R3.
Boot Up
When you turn on the power, your handheld computer will start to load the required boot up files
and processes for operation. This start-up procedure is called “boot up”. Your handheld computer
requires approximately 20 seconds of Boot Up time before the OS is fully loaded.
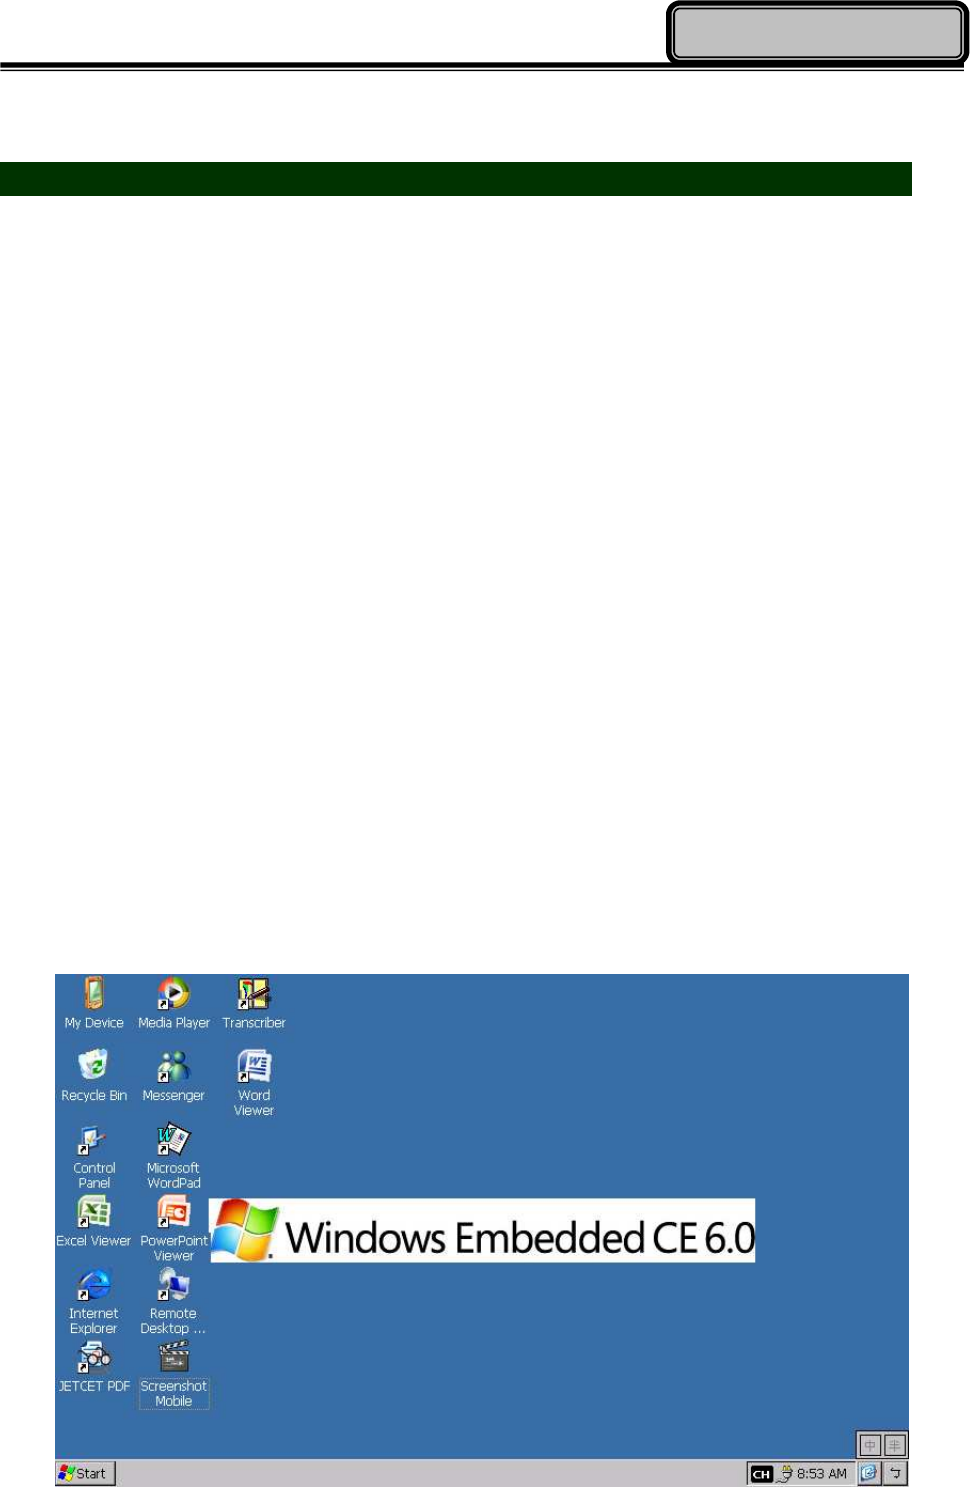
Desktop Screen
After boot up, you will be presented with the desktop screen. Windows CE 6.0 shares much of its
visual design elements with other desktop and notebook operating systems from Microsoft. You
can create application short-cuts of to your desktop, change the background wallpaper, as well as
modify the display font size, etc., in a similar fashion.
Chapter 3 - 11
Operating Information
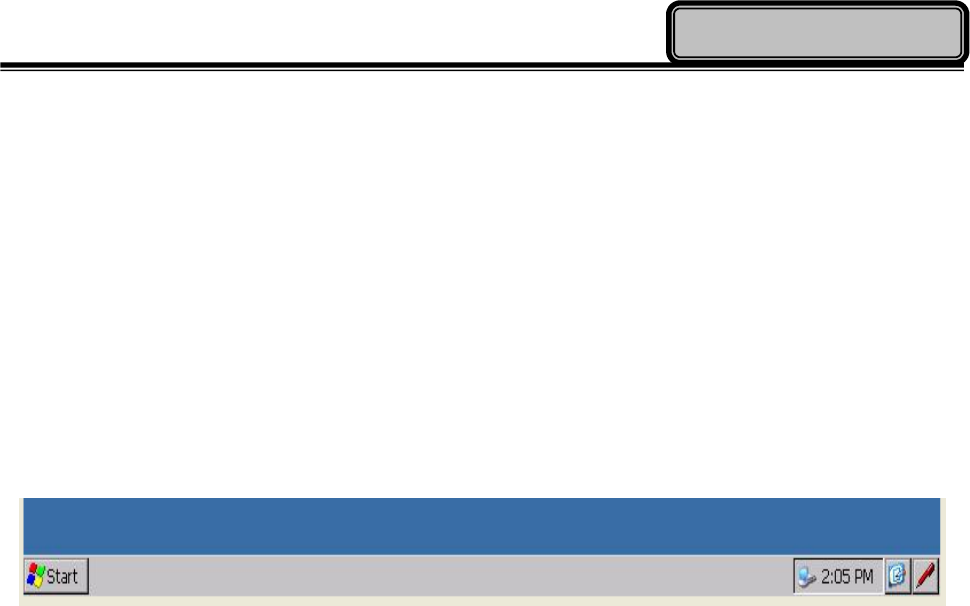
Start Menu and Task Bar
The Start Menu, which is located at the bottom of your desktop, allows you to access programs
and applications installed within your handheld computer, launch applications, as well as access
the control panel to change device settings. The Task Bar provides a quick overview of running
programs and applications, allowing multi-tasking and switching between different applications
conveniently. A sample image of Start Menu and Task Bar is provided below.
For more information regarding the use of Start Menu and Task Bar, please refer to Microsoft
Windows CE Reference Manual.
Chapter 3 - 12
Operating Information
Stop Using Your Handheld Computer
In order to conserve your device battery life, you may place your device into one of the several
power states available, either temporarily or for an extended period of time. You can change the
power state of your handheld computer anytime by pressing the power button to open up the
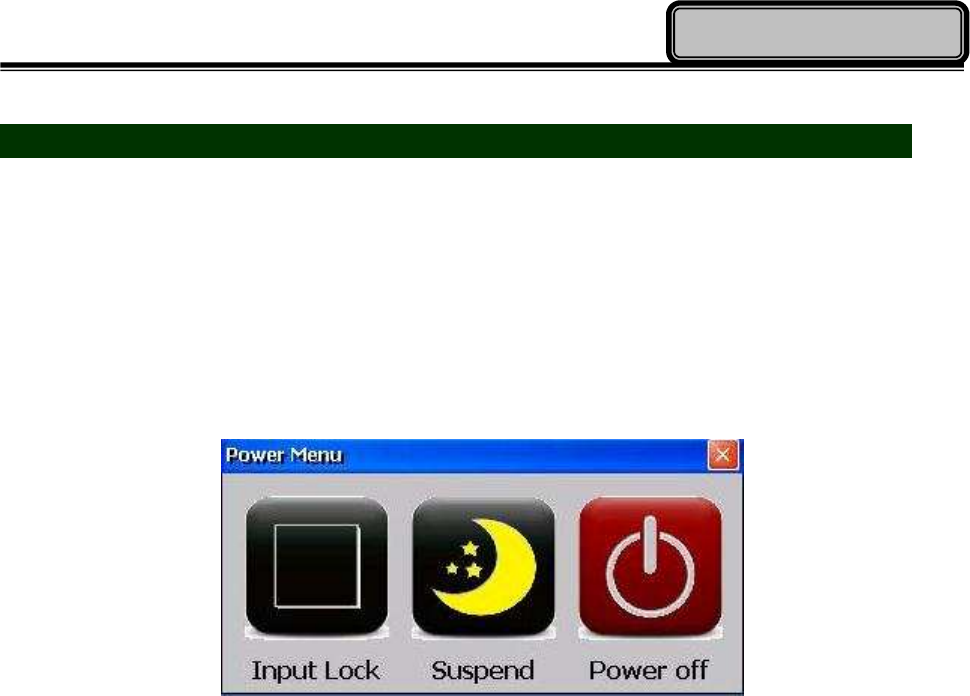
Power Menu.
The Power Menu provides three power states for you to choose from. Each state has a certain level
of power consumption and supported functionalities. The states are discussed below.
Input Lock
In Input Lock state, the device LCD display is turned off, all tap inputs and button inputs (except the
power button) are disabled. Applications that were launched prior to entering this state will
continue to run; established wireless connectivity will be maintained (as long as the wireless
signals are not lost). All unsaved application data prior to entering this state are maintained.
By placing your handheld device into this less battery-power intensive state, you will be able to
allow applications that require wireless connectivity to continue operating without interruption. As
such, Lock state is an ideal state for your device when you want to conserve battery life without
compromising your established wireless connectivity.
Input Lock is the most power intensive of the three Off states. You can enter this state by pressing
the power button once to call up the Power Menu, then tap the “Lock” icon. To return to On state,
press the power button again.

Chapter 3 - 13
Operating Information
Suspend
In Suspend state, the device LCD display is turned off, all tap inputs and button inputs (except the
power button) are disabled. Applications that were launched prior to entering this state will be put
on halt; established wireless connectivity will be lost. All unsaved application data prior to entering
this state are maintained.
By placing your handheld device into this state, you can conserve even more battery life than Lock
state. However, this additional battery conservation means that you will not be able to maintain
your device’s wireless connectivity, or keep applications running. All unsaved data prior to entering
this state is maintained.
Suspend is an ideal state for your device when you want to conserve more battery life, do not need
to keep wireless connectivity on constantly, but want to keep your device ready to resume back to
work on a moment’s notice.
Suspend is the balance between power consumption and functionality of the three Off states. You
can enter this state by pressing the power button once to call up the Power Menu, then tap the
“Suspend” icon. To return to On state, press the power button again.
Power Off
In Power Off state, your handheld device is completely turned off. All applications are terminated,
no wireless connectivity is established and all unsaved data are lost.
Power Off is an ideal state for your handheld device when you do not need to operate your device
for an extended period of time.
Power Off is the most power conservative of the three Off states (no power drain except natural
battery discharge). You can enter this state by pressing the power button once to call up the Power
Menu, then tap the “Power Off” icon.

Chapter 3 - 14
Operating Information
Hard Reset
In the event that your handheld computer hangs or stops responding, you can perform a Hard
Reset by pressing and holding the power button for 8 seconds. This action will invoke your device
to perform a graceful reset without damaging any components of your device. Please note that any
unsaved work or data will be lost after a Hard Reset.
In the unlikely event that your device cannot invoke Hard Reset, please unplug all attached power
cords and peripheral devices, then remove the battery pack.

Chapter 3 - 15
Operating Information
Using the Touchscreen
Basic Operation
Your handheld computer is equipped with a highly sensitive touch screen, allowing you to navigate
on the touch screen easily without using other external devices. To conduct operation with your
touchscreen, please begin by using the stylus provided with your handheld device.
A list of operating tips is provided below to help you operate the touch screen more effectively
with your stylus pen.
Desired Operation Stylus Action
Single Click Tap the touch screen once with your stylus pen.
Double Click Quickly tap the touch screen twice with your stylus pen.
Drag and Drop
To drag, tap and hold the object gently with your stylus pen. Without
moving your stylus pen away from the touch screen, move your stylus
pen until you reach your destination.
To drop, simply release your stylus pen from the touch screen.
Right Click Press and hold your stylus pen on one point of the touch screen for 2
to 3 seconds. This is the same as using the right click of a mouse.
Chapter 3 - 16
Operating Information
Entering Information
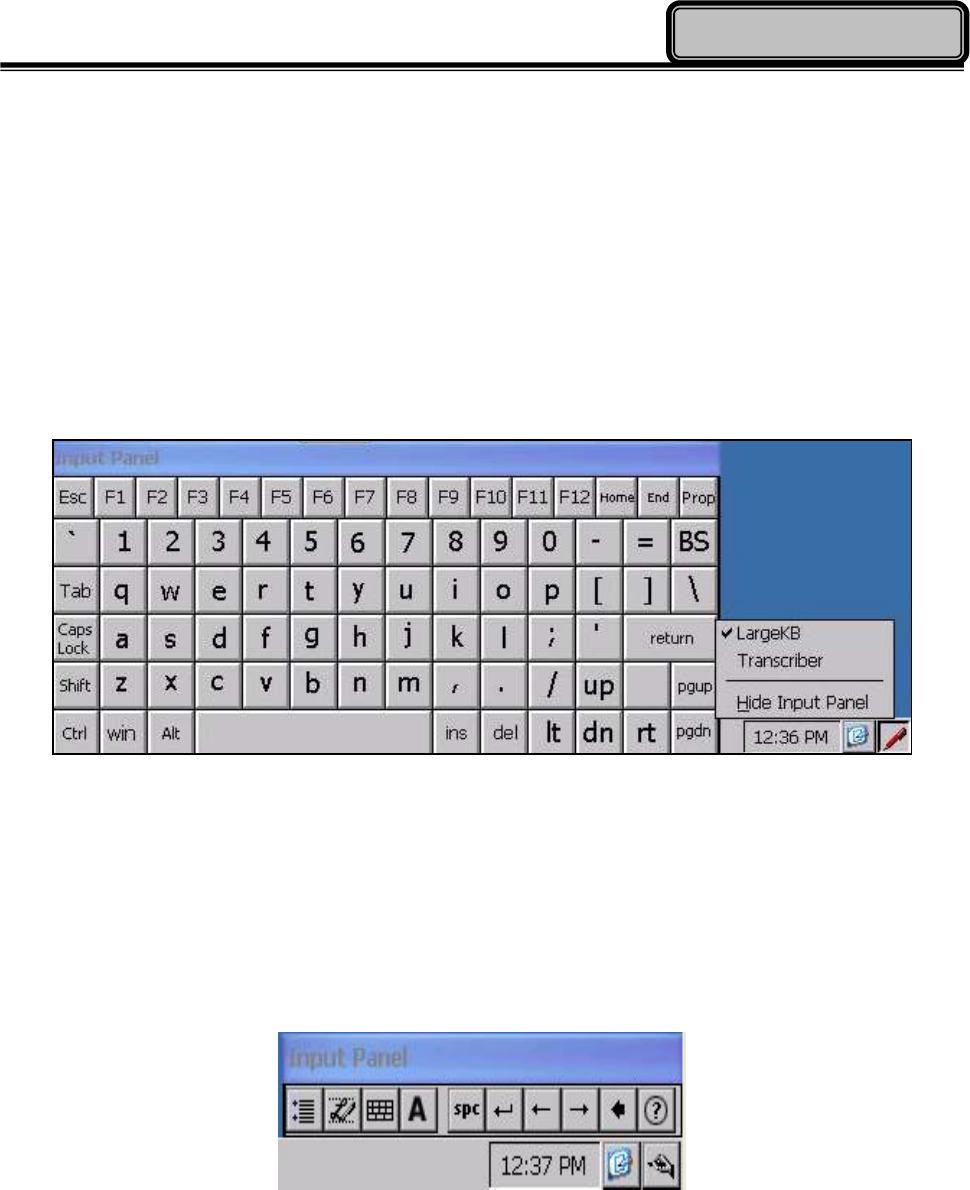
A virtual keyboard is provided with your device for text and information input. To access the virtual
keyboard, please tap on the Input Panel icon of your Task Bar. Your handheld computer is
configured a large-sized virtual keyboard for your operational convenience. To hide your virtual
keyboard, please tap on the Input Panel icon and select Hide Input Panel.
The other application to input information is Transcriber, which provides you to insert information
as natural as writing on a piece of paper. To activate Transcriber, please tap on the Input Panel icon
of your Task Bar. To hide your virtual keyboard, please tap on the Input Panel icon and select Hide
Input Panel.
Chapter 3 - 17
Operating Information
Stylus Calibration
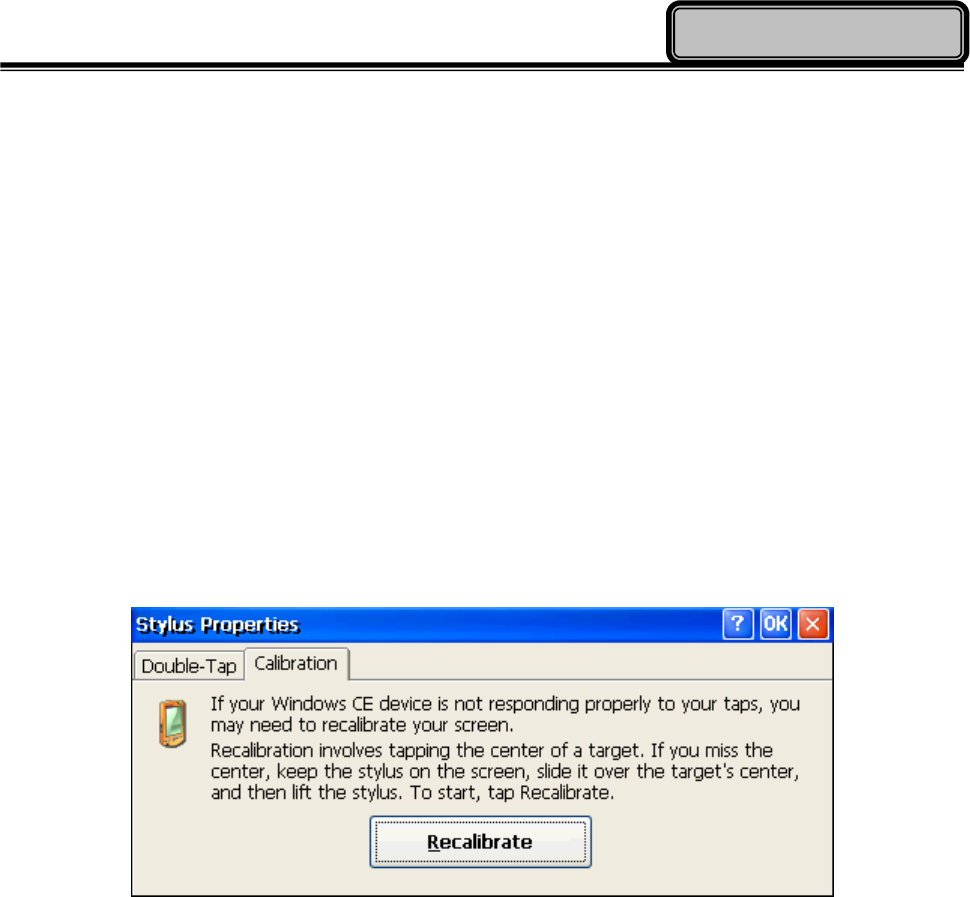
In order to maintain the accuracy of the inputs and touches you perform, stylus calibration is
required. Before using the touch screen, please follow the instructions below to calibrate your
touchscreen for a more precise positioning. You can access the Stylus Properties menu via the
following path: Start => Settings => Control Panel => Stylus
Under Stylus Properties window, please navigate to Calibration tab, then tap “Recalibrate” to start
the recalibration process. You can recalibrate your stylus by using the built-in Windows CE stylus
calibration function anytime. Follow the instructions displayed onscreen to complete calibration.
Chapter 3 - 18
Operating Information
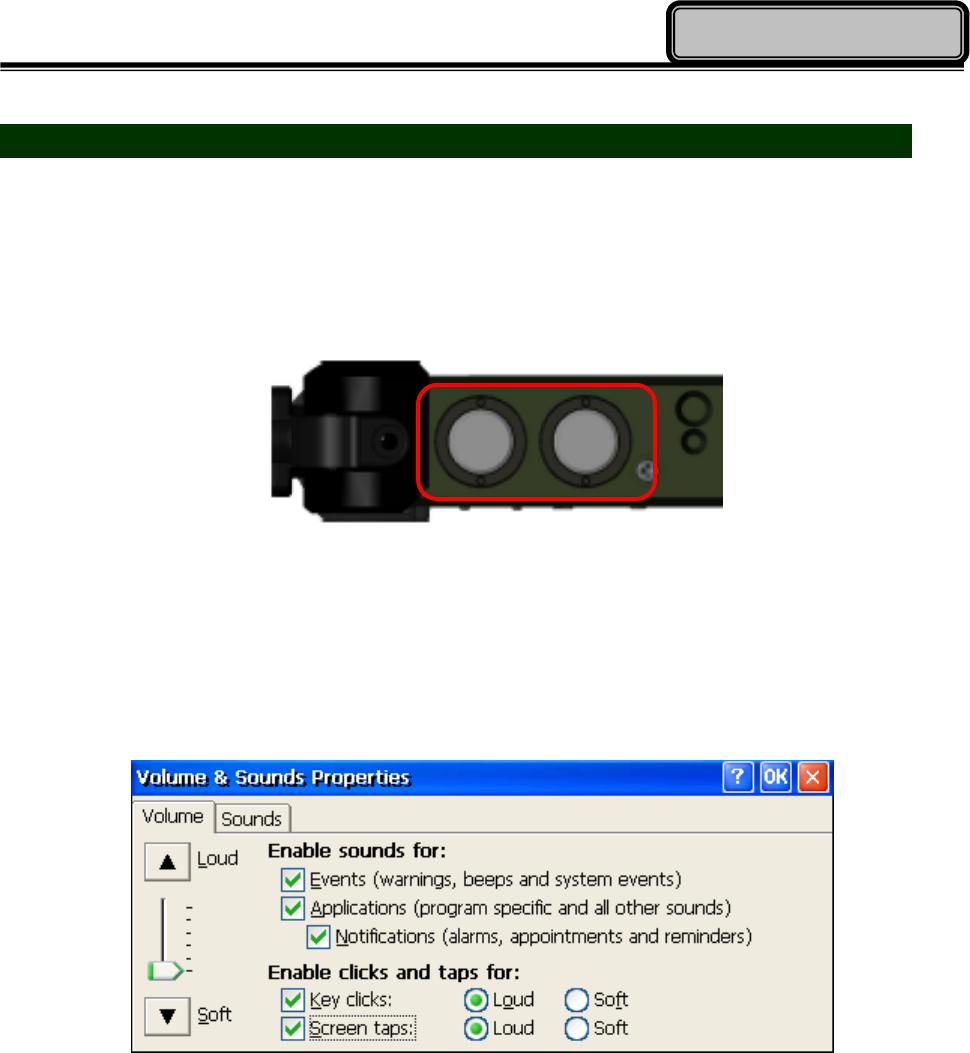
Audio Features
Your handheld computer is equipped with an audio codec for sound playback. To adjust the
volume of your device, please use the volume up/down button located at the upper left side of
your device.
Alternatively, you can also adjust volume through the built-in audio functions of Windows CE. You
can access Volume & Sounds Properties via the following path:
Start => Settings => Control Panel.
Chapter 3 - 19
Operating Information
Manage SIM Card / Micro SD Card
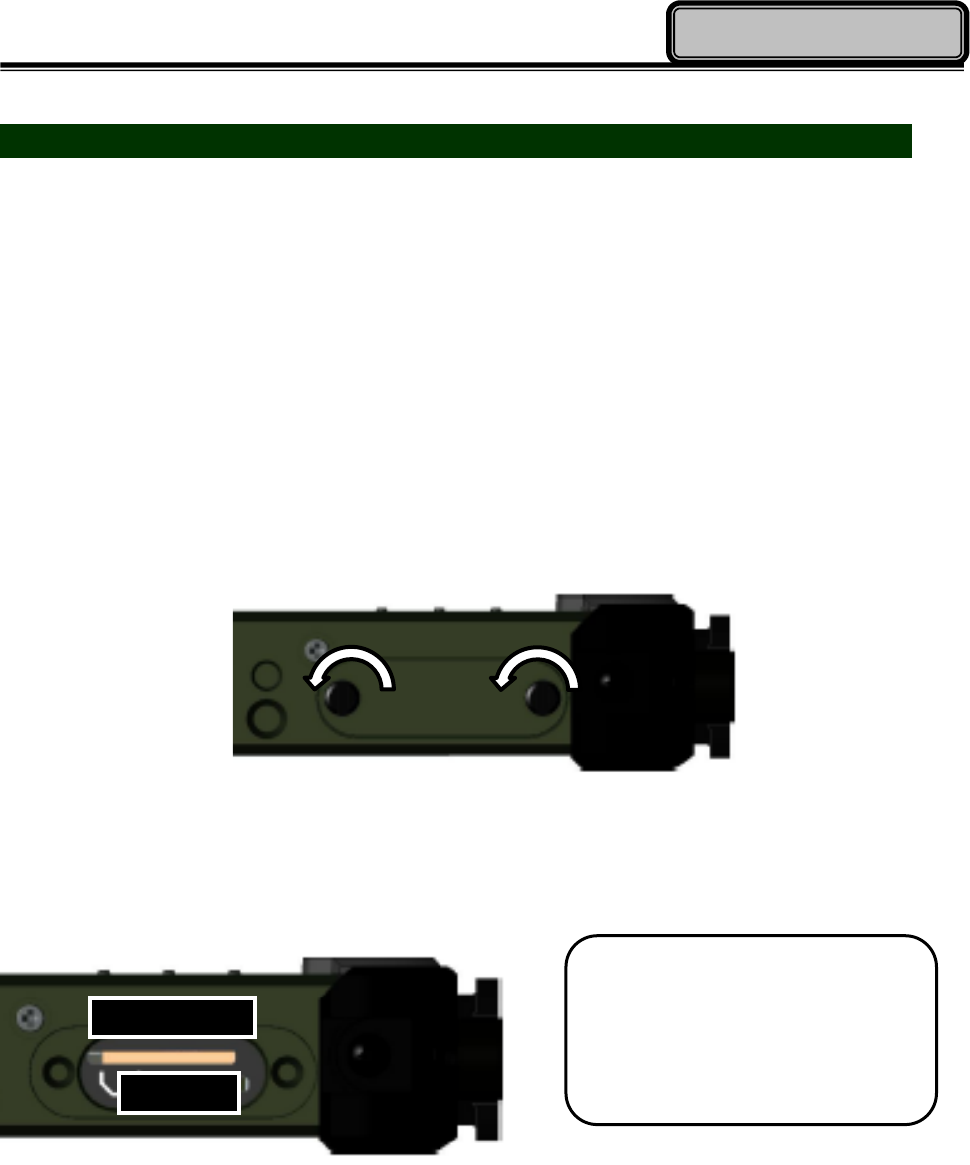
Your handheld computer has a SIM card slot for wireless connectivity, as well as a Micro SD card
slot for storage expansion. The SIM card slot supports the Mini-SIM format. The Micro SD card slot
supports SDHC format, which supports card capacity up to 32 GB.
The card slots are located at the bottom-right side of your handheld computer. To remove the card
slot cover, please use a slot head screwdriver or a suitable sized coin. Turn counterclockwise to
unlock.
The SIM card slot occupies the top side of the expansion cards compartment. The micro SD card
slot is located at the bottom side.
Please take note of the card slot differences to prevent insertion of incompatible card types, and
do not attempt to force the cards into wrong card slots to prevent damage to your handheld
computer.
Note:
Image shown with LCD facing
down
SIM Card
Micro SD
Chapter 3 - 20
Operating Information
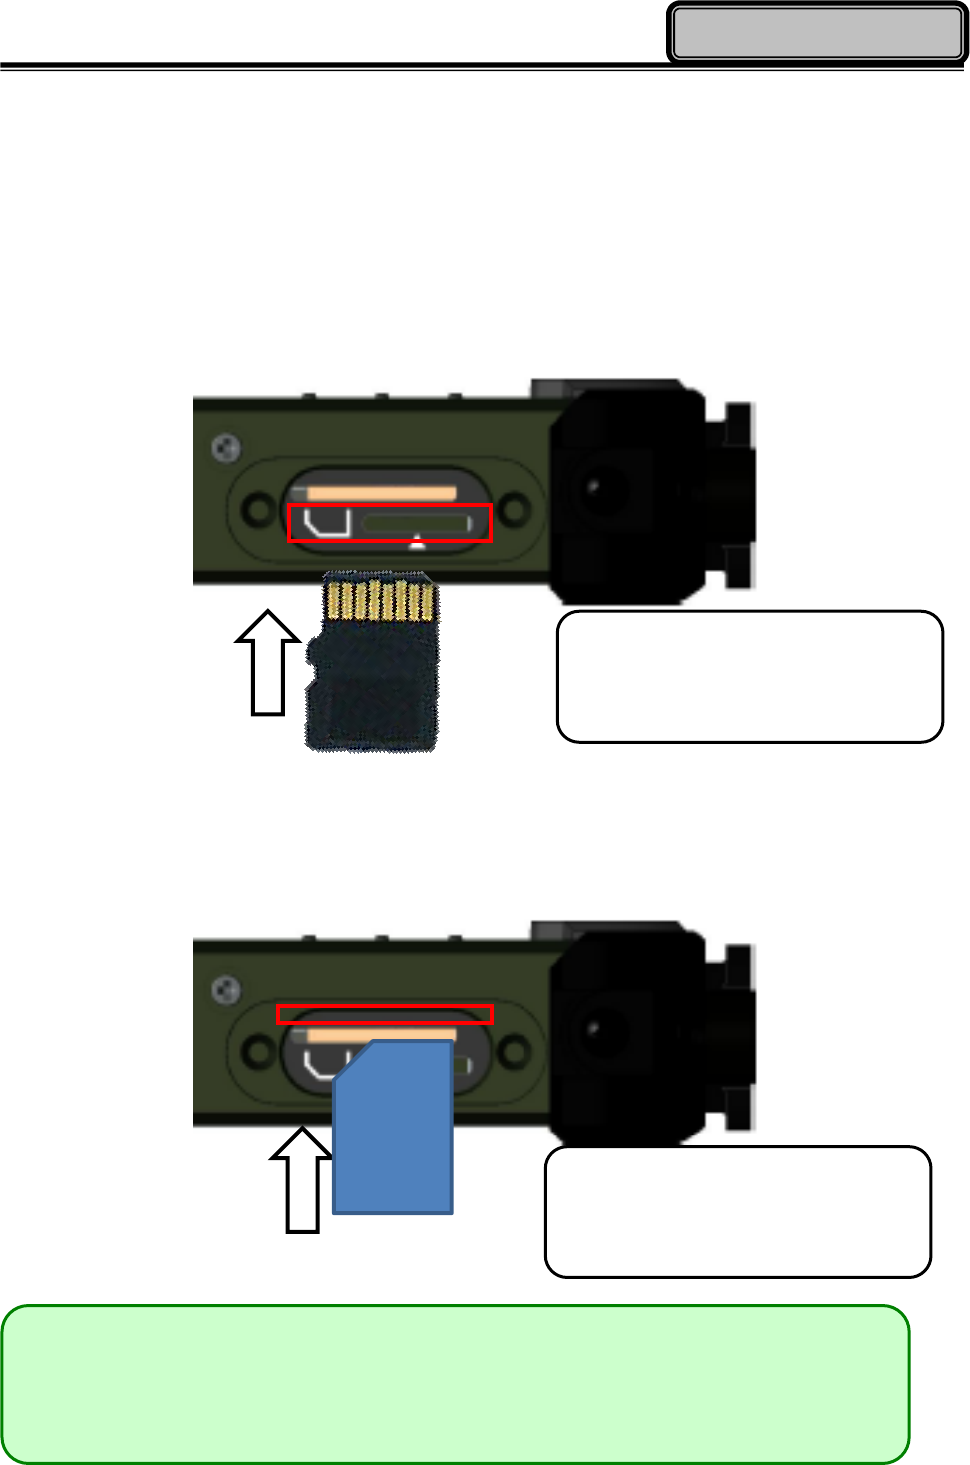
The design of SIM card and micro SD card slots are foolproof; if you encounter difficulty in inserting
the cards, please turn/reverse the cards and try again. When inserting SIM card and micro SD card,
the connector pins of your cards should be facing the center (the green bar in the image above).
Inserting Micro SD Card
Inserting SIM Card
Note:
Do not have a sudden removal of SD/ SIM cards when the device is turned on. Such
an action may cause data loss..
Insert Micro SD card into the bottom
card slot with pins facing up.
Insert SIM card into the top card slot
with pins facing down.
Chapter 3 - 21
Operating Information
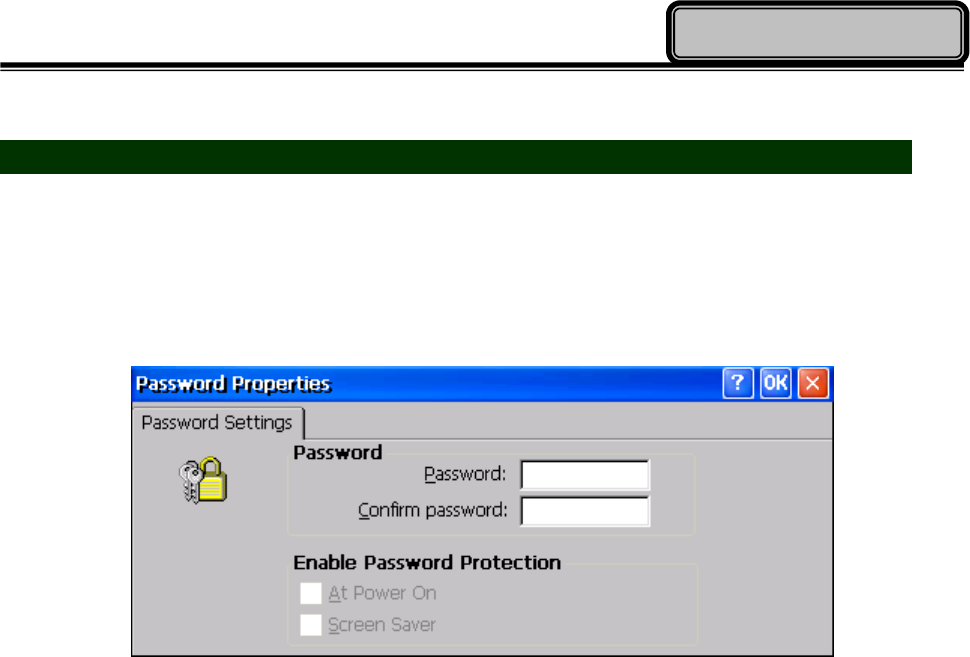
Set and Manage Device Password
You can set a password for your handheld computer by setting up proper password settings. You
can access password settings via Start => Settings => Control Panel => Password.
You can set to enable password protection at power up or screen saver. When set to power up,
your handheld computer will prompt you for password. When set to screen saver mode, your
device will prompt for password every time the device returns to operation from screen saver.
Chapter 3 - 22
Operating Information
Device Connectivity
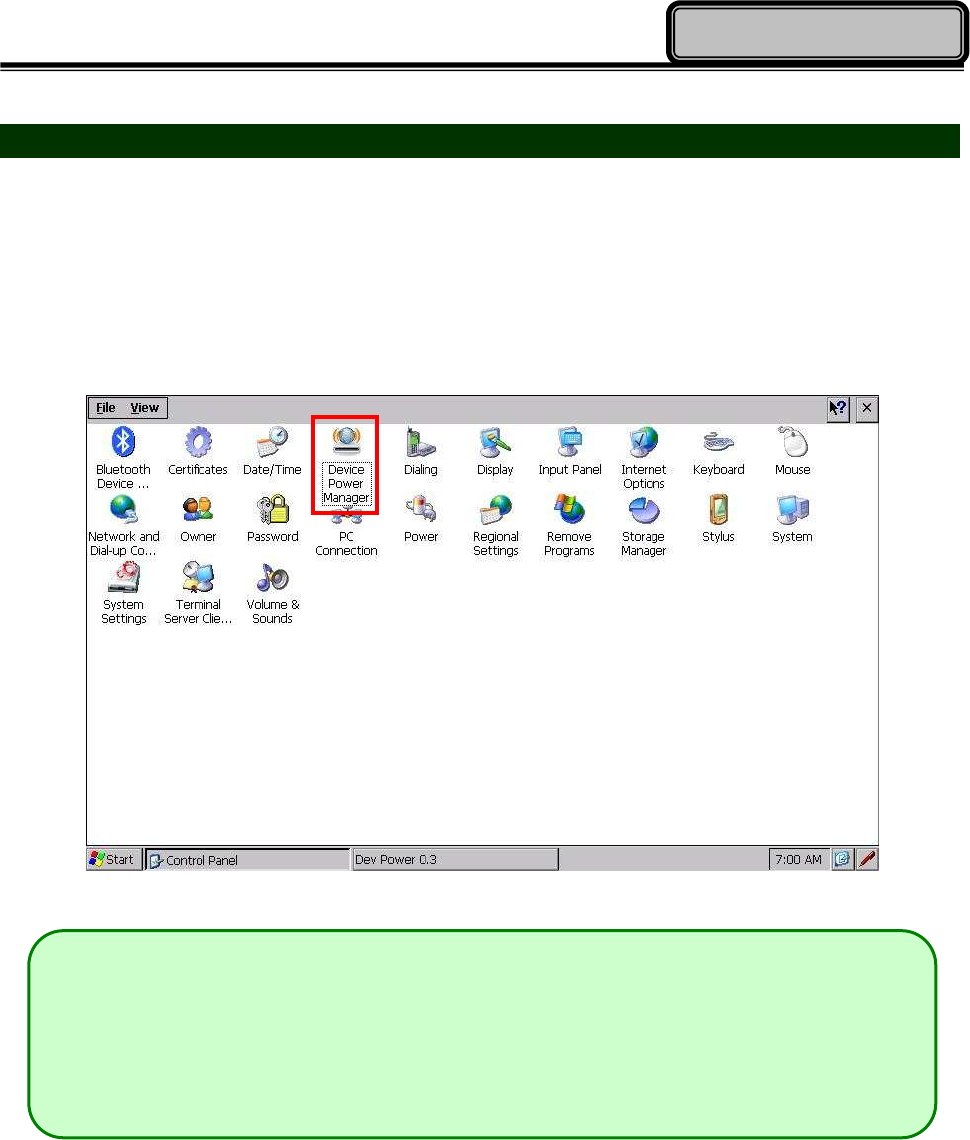
For your ease of operations, you can turn on or off your wireless devices through the proprietary
software application - “Device Power Manager”. Device Power Manager can be accessed via the
following path: Start => Settings => Control Panel
Note:
The following section describes connectivity options that are for selected models
only. Please check with your distributor to determine the device connectivity
available for your specific model.

Chapter 3 - 23
Operating Information

Chapter 3 - 24
Operating Information
Wi-Fi (Optional)
Wi-Fi is an optional wireless communication module for your handheld computer for Wi-Fi
connectivity. The Wi-Fi module of your handheld computer supports IEEE 802.11 b/g. To activate
your Wi-Fi function, please follow the illustrations below:
1. Activate the Device Power Manager
After activating the Device Power Manager, press the Wi-Fi button to enable Wi-Fi functions.
2. Establish Wi-Fi Connections
You can access the Wi-Fi connection setup menu via Start => Settings => Control Panel =>
Device Power Manager => Wi-Fi. A pop-up window will then appear, and input the necessary
wireless network information, such as SSID, server IP, and security keys to gain access.
Note:
For more information on establishing Wi-Fi connections, please refer to Microsoft
Windows CE Reference Manual.

Chapter 3 - 25
Operating Information
Bluetooth (Optional)
A Class 2, Bluetooth® v2.1 + EDR system with A2DP is available for your handheld computer. This
module is backward compatible with v1.1/1.2/2.0 devices and provides your handheld computer
with a short-range wireless communication protocol to connect with other compatible devices. To
activate your Bluetooth functions, please follow the instructions below.
1. Activate the Device Power Manager
After activating the Device Power Manager, press the Bluetooth button to enable Bluetooth
functions.
2. Establish Bluetooth Connections
You can access the Bluetooth Manager menu via Start => Program => BthManager.
Authenticate other Bluetooth devices to connect with your handheld computer to expand
your device functionalities. For more details, please refer to the following introduction.

Chapter 3 - 26
Operating Information
3. Using BthManager
(This section will be added when the software is available.)

Chapter 3 - 27
Operating Information
GPS (Optional)
An optional GPS module is available for your handheld computer. This GPS module supports both
GPS and Galileo systems, allowing your device to support GPS applications and functions. To
activate your GPS functions, please follow the instructions below.
1. Activate the Device Power Manager
After activating the Device Power Manager, press the GPS button to enable GPS functions.
2. Activate GPS functions
Please install your GPS applications and launch. Setup your GPS application accordingly to
perform required GPS functionalities.
Chapter 3 - 28
Operating Information
COM (Optional)
An optional COM port is available for your handheld computer. The COM port allows your
handheld computer to interface and communicate with other equipment. To activate your COM
functions, please follow the instructions below.
1. Activate the Device Power Manager
After activating the Device Power Manager, press the COM button to enable COM port
functions.
Note:
This optional COM port is on port 5.

Chapter 3 - 29
Operating Information

Chapter 3 - 30
Operating Information
Chapter 3- Managing Power
USB AC Adapter
The USB AC adapter performs two functions:
It powers the computer from an external AC source.
It charges the computer battery.
The adapter automatically detects the AC line voltage (100V or 240V) and adjusts accordingly.
The following are recommended when using the USB AC adapter:
Use a properly grounded AC outlet.
Use one AC outlet exclusively for the computer. Having other appliances on the same line may
cause interference.
Use a power strip with built-in surge protection.
Connecting the USB AC adapter:
Insert the USB cable to the micro USB client.
Connect the end of the USB cord to the USB AC adapter.
Plug the USB AC adapter into an electrical outlet.
AC Adapter Indicator:
The green LED indicates that AC power is ready.
Note:
To ensure system stability, please connect your computer to an external power source
when operating at
-
20 °C ambient temperature.

Chapter 3 - 31
Operating Information
Battery
The power source of your handheld computer will automatically switch to battery when external
power source (such as USB AC adapter or optional vehicle adapter) is disconnected. The following
section provides battery related information, operation, as well as power-saving tips.
Battery Low
When the battery is nearly exhausted, Windows CE will give out a “Battery Low” warning message.
Once the Battery Low warning occurs, please:
Save and close the files you are currently working on
Plug in the USB AC adapter to recharge the battery
Charging the Battery
Plug in the AC adapter (or optional vehicle adapter) to start battery charging. If the battery is at full
capacity, the internal sensing circuitry will stop high current charge within several minutes.
Chapter 3 - 32
Operating Information
Battery Gauge
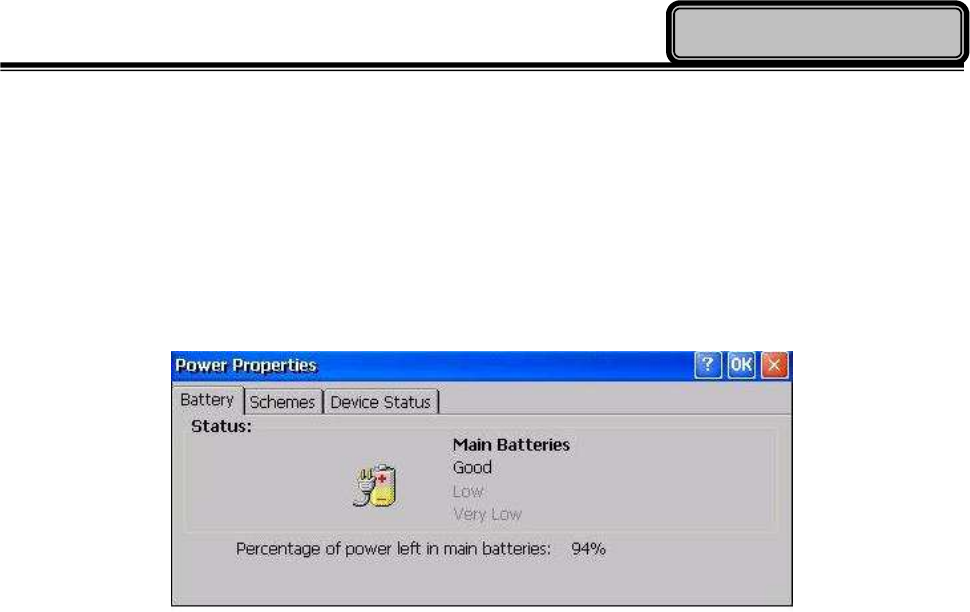
You may check battery status from battery gauge in Windows CE. Please tap on the power/battery
icon to expand the battery gauge window, as shown below.
Alternatively, you can find via the path: Start => Settings => Control Panel => Power
Battery Power Saving Tips
You may extend the battery life of your handheld computer by:
Lower the LCD display brightness using backlight control.
Put your device into lock or suspend state to conserve battery life.
Power off the handheld computer when the device will not be used for an extended period of
time.
Changing Battery
When the battery is nearly exhausted, you can continue operation by either connecting your
handheld computer to an external power source (such as AC adapter or vehicle adapter), or
replacing the battery.

Chapter 3 - 33
Operating Information
Note:
Always remember to turn OFF the power of your handheld computer
before changing the battery.
Chapter 4 - 34
Using Special Applications
Chapter 4 - Using Special Applications
Display Rotation
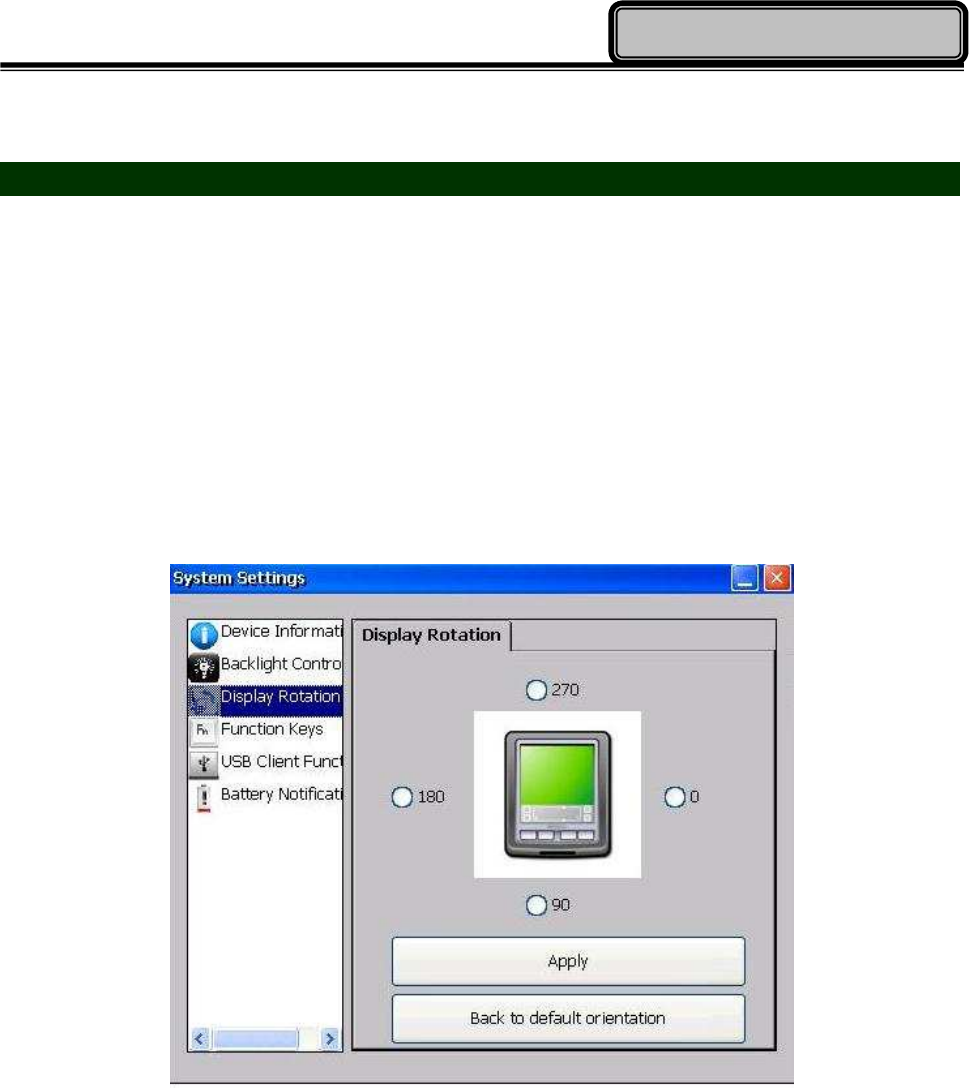
Display Rotation enables your device to change display between landscape and portrait
orientations. You can change the display orientation of your device between 4 types of rotation
angles.
This application can be accessed via the following path: Start => Settings => Control Panel =>
System Settings => Display Rotation
To change the orientation of your device, please tap the desired rotational angle then tap the
“Apply” button to proceed. To return your device to its default orientation, please tap the “Back to
default orientation” button.

Chapter 4 - 35
Using Special Applications
Device Power Manager
Device Power Manager is a pre-installed software application supplied with your handheld
computer, designed for your operational convenience. By integrating your handheld computer’s
connectivity into a single application, you can easily turn on or off specific connectivity function(s)
during unneeded times to conserve battery life.
This application can be accessed via the following path: Start => Settings => Control Panel =>Device
Power Manager
To enable or disable a specific connectivity function, tap the corresponding connectivity function
icon once with your stylus.
Chapter 4 - 36
Using Special Applications
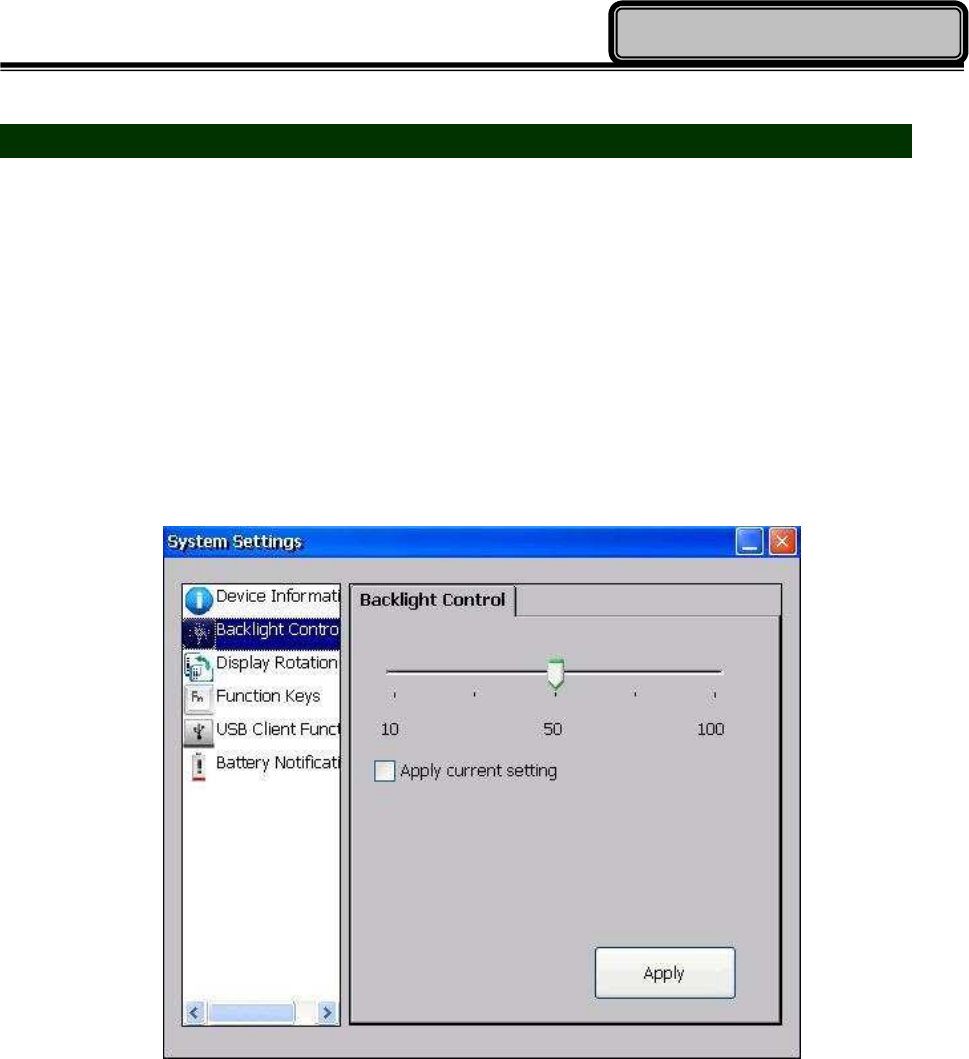
Backlight Control
Backlight Control functions to adjust the backlight intensity of your handheld computer. By
adjusting the backlight level to a desirable level, the battery life of your device can be extended.
This application is also useful for limiting the backlight level during low-profile operations.
The application can be accessed via the following path: Start => Settings => Control Pane l =>
System Settings => Backlight Control
The backlight of your handheld computer has a 5-step brightness level. To change backlight
brightness level, please adjust the backlight to a desirable level, tap the “Apply current setting”
checkbox. Finally, tap the “close button” to close the window.
Chapter 4 - 37
Using Special Applications
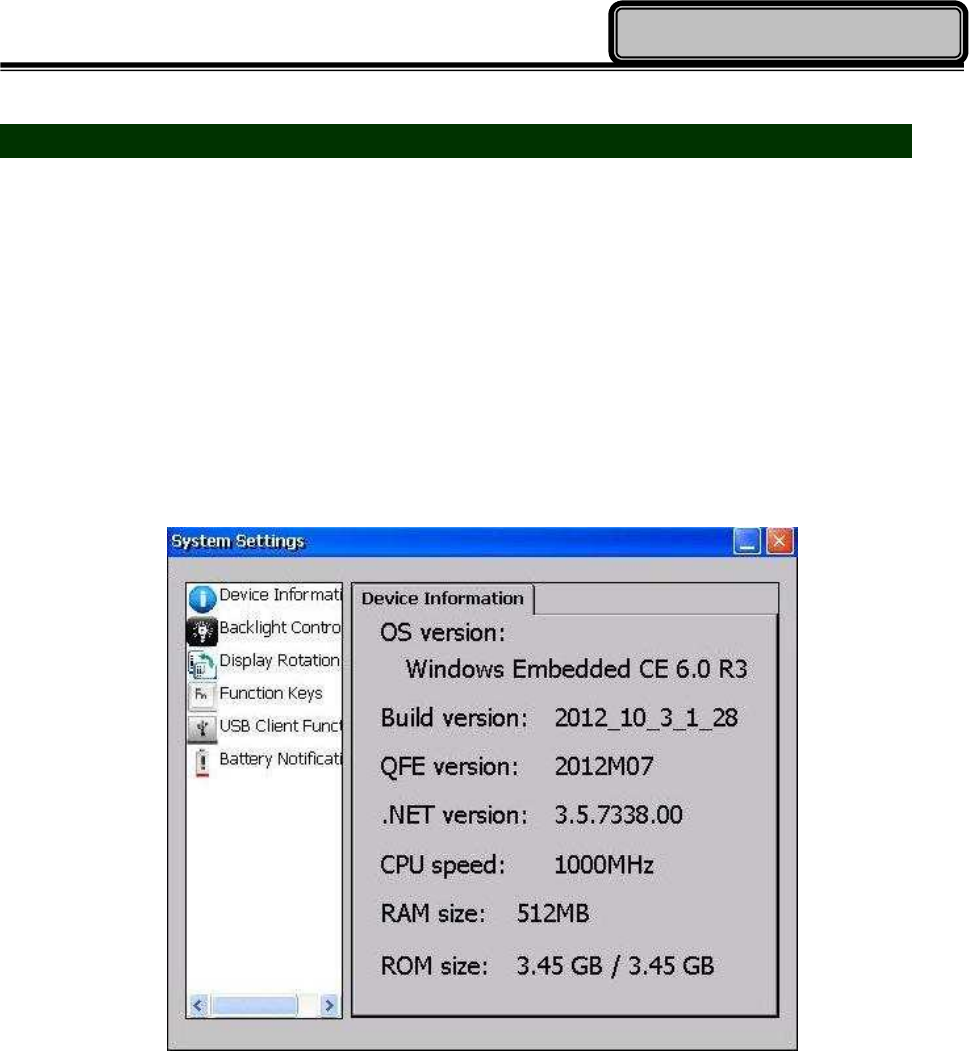
Device Information
Under Device Information, you can view detailed information of your handheld computer.
Information such as the OS Version, Build Version, CPU clock frequency, amount of On-Board
RAM/ROM, etc., are listed here.
The application can be accessed via the following path: Start => Settings => Control Panel =>
System Settings => Device Information
Chapter 4 - 38
Using Special Applications
Function Keys
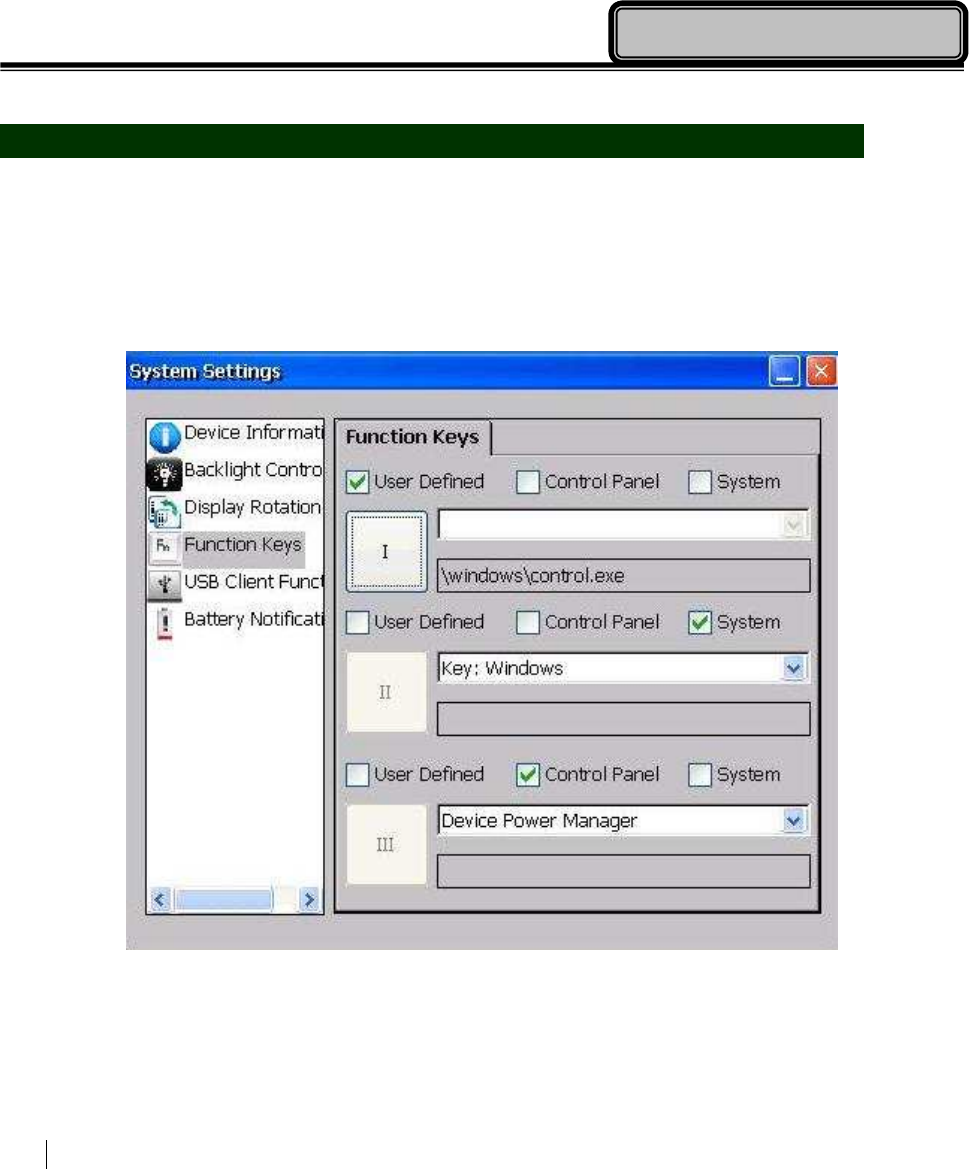
Function Keys is an application that can call up operational features instantly. There are three
function keys for users to assign.
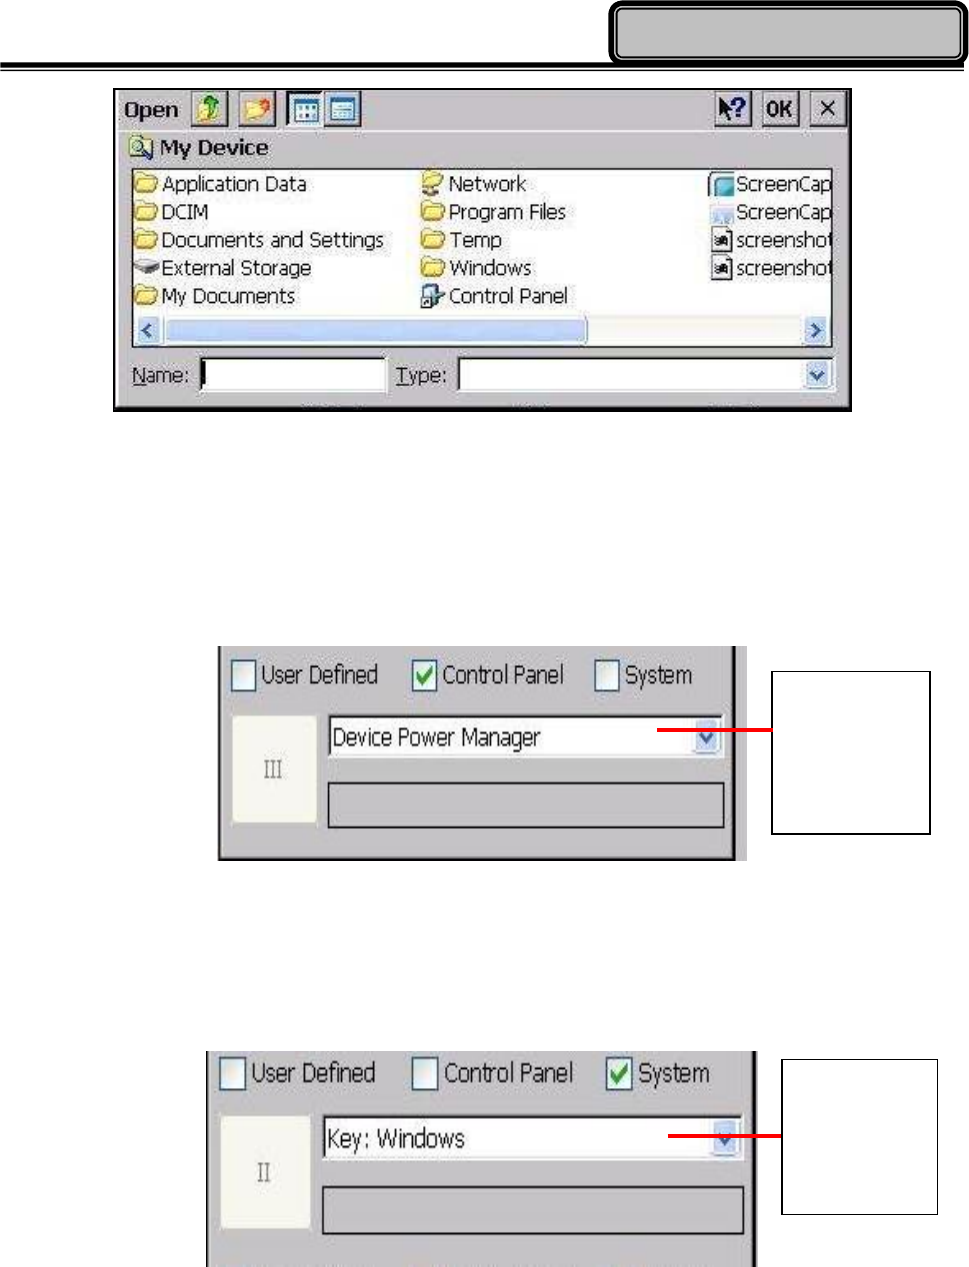
To activate the User Define function, please first tap the User Defined checkbox, and next tap the
function key. Then, a pop-up window will appear (as the figure below) and you can choose which
application program you want to assign. Once you have done, please tap “OK” on the upper right
side.
Chapter 4 - 39
Using Special Applications
To activate Control Panel, please first choose a function key, such as II in the figure below, and tap
the Control Panel box. Then, tap one of the applications in the dropdown list, and the setting will
be completed.
To activate the System, please first choose a function, such as III in the figure below, and tap the
System box. Then tap the dropdown list to select the setting.
Tap to select
the desired
application.
Tap to select
the desired
setting.
Chapter 4 - 40
Using Special Applications
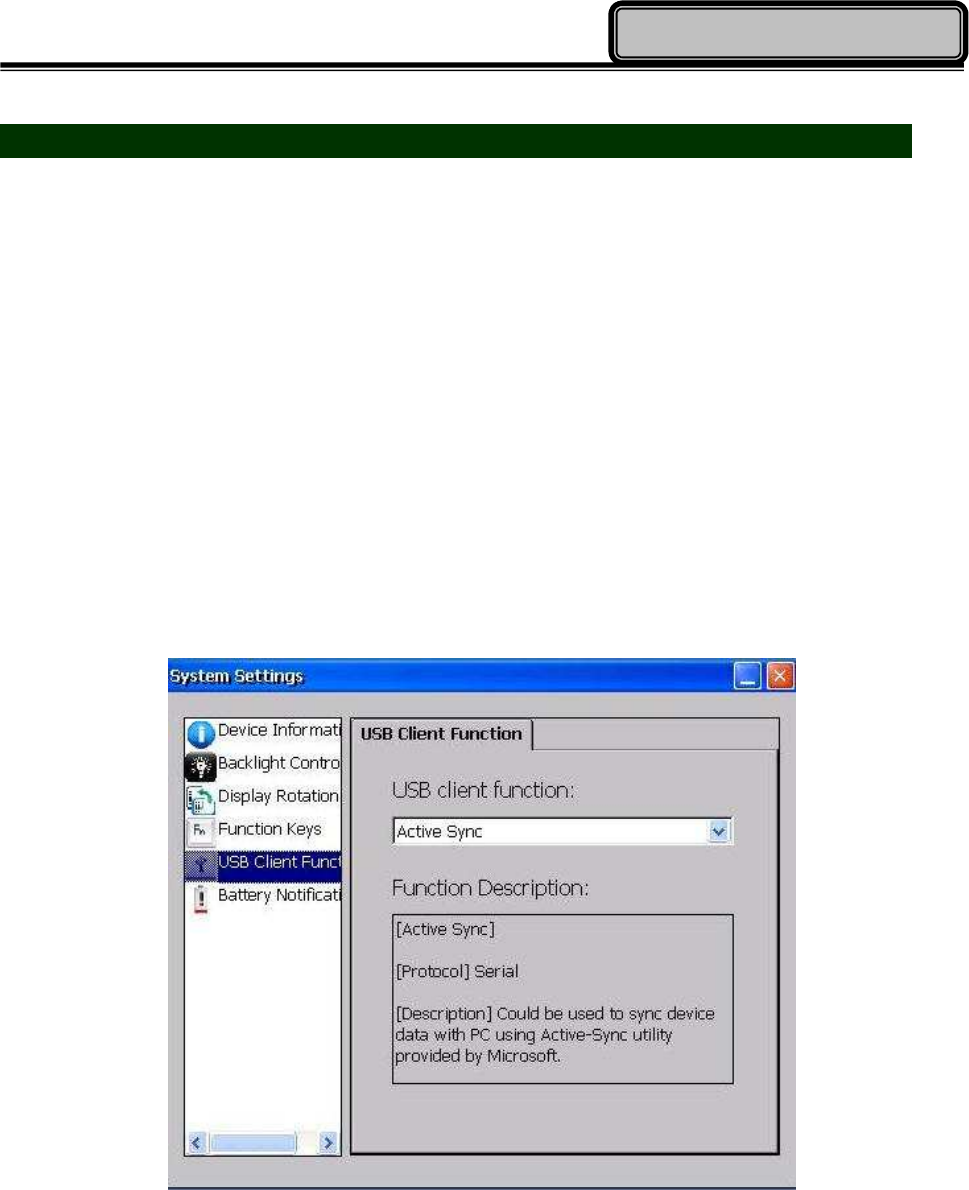
USB Client Function
USB Client Function lets you to define the function when your handheld is connected to the host.
There are three kinds of USB Client functions, including Active Sync, USB Disk, and Network. Active
Sync allows you to transmit files, music, or document between your handheld and PC
synchronically. USB Disk features as the storage of your PC when you insert a memory card in your
handheld device. Network can share the network resource between your handheld and PC.
To activate the desired function, please follow the following path: Start => Settings => Control
Panel => System Settings => USB Client Function. Then, tap the dropdown list to select the desired
function.
Chapter 4 - 41
Using Special Applications
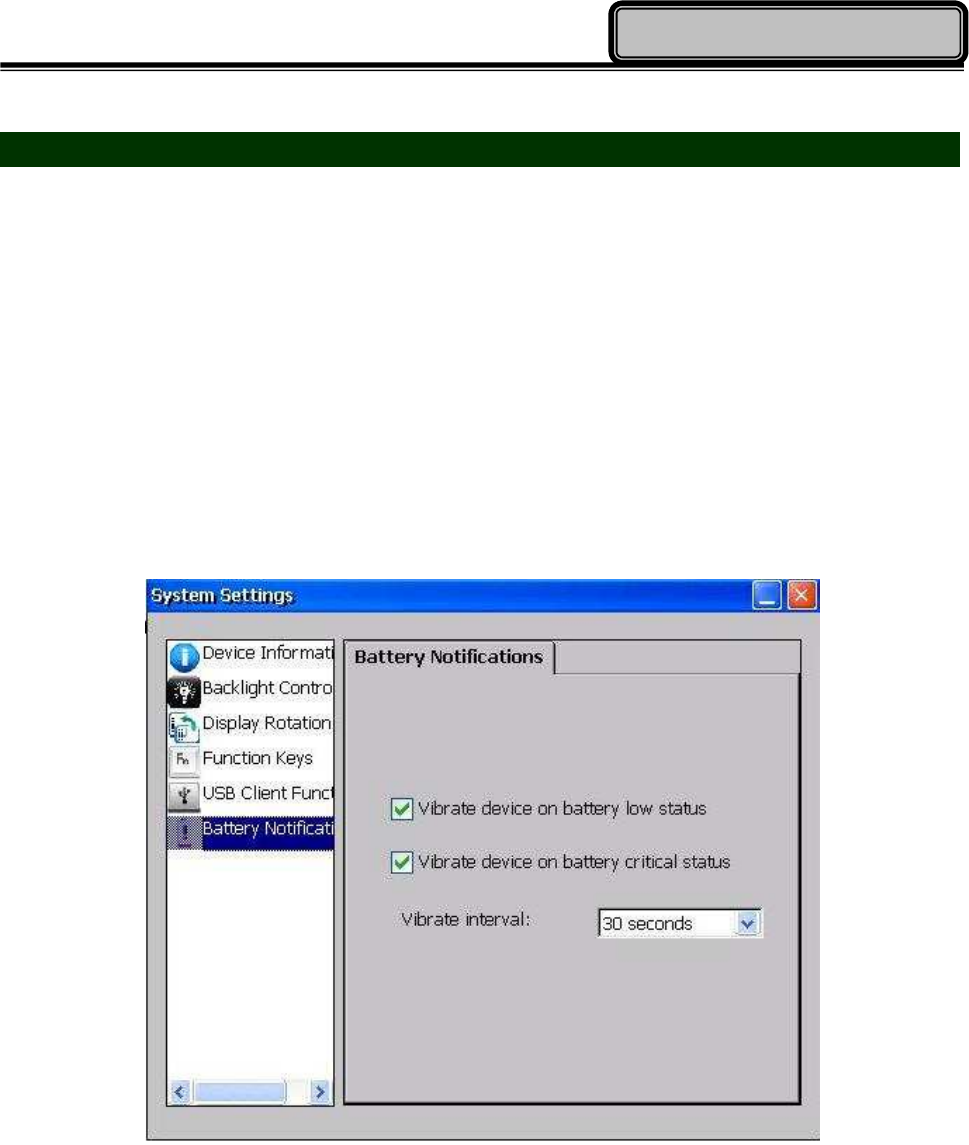
Battery Notifications
Battery Notification is an application that warns users that the battery is running very low by
vibrating the device. There are two occasions of vibration including “Vibrate device on battery low
status” and “Vibrate device on battery critical status”.
To apply the function, tap the checkbox once to enable (tab again to disable). You can also decide
the frequency of vibration by “Vibrate internal” with the span between 30 seconds to 10 minutes.

Chapter 4 - 42
Using Special Applications

Chapter 5 - 43
Specifications
Chapter 5 - Specifications
Processor
Texas Instruments AM3715 Sitara™ 1 GHz
Based on enhanced ARM Cortex™-A8
45 nm fabrication process
Memory and Storage
RAM: 512 MB Mobile RAM
ROM: 4 GB (Default)
Removable Mass Storage: SDHC Micro SD card slot x 1 (up to 32 GB)
Audio
Built-in Audio codec and amplifier
Mono Speaker (Back Side)
Embedded Microphone for sound recording
Display
5” WVGA LCD with LED backlight (480 x 800 Resolution)
Anti-Glare, Anti-Reflective Screen Treatments
LED Backlight Brightness 300 nits
Single Touch Resistive Touchscreen
Optical Bonding
Optional Night Vision

Chapter 5 - 44
Specifications
Wireless Communication Devices (Options)
Wi-Fi 802.11 b.g.n & Bluetooth v2.1: WG-7310
GPS: Ublox LEA6H
I/O Ports
Right:
Micro SD/SIM slot
Expansion POGO Connector
Top:
SMA Ant.
Bottom:
I: Sealed Micro USB (USB Client)
M: Sealed DC-in 5V with LEMO Conn. (8 pin)
Optional Sealed Fisher Connector 1~3*: Choose 1 out of 5 for each connector
- RS232 x 1
- USB x 1
- 100M LAN x 1
- VGA x 1
- Headset x 1
Battery
3.7V 3520 mAh Lithium-ion Battery
5 hours Charging Time (System OFF)/ 5~8 hours (System ON)
6 hours Battery life (Idle) (TBD)
Note:
For sealed fisher connectors, each function can only be chosen once.

Chapter 5 - 45
Specifications
AC Adapter
10W (5V/2A) Micro USB Plug
Input: AC 100V-240V 50/60 Hz
Output: DC 5V/2A
Camera (Option)
5.0 Megapixel auto-focus camera with LED flashlight
Double Capacity Battery (Option)
3.7V, 7040mAh Li-ion battery pack
Dimensions & Weight
175 mm (W) x 90 mm (D) x 20 mm (H) (Dimensions measured with bumpers)
Weight: 395 g / 0.87 lb. (standard unit, with battery package)
310 g / 0.67 lb. (standard unit, without battery package)
Case Materials and Color
Antenna Cover: Recyclable UL grade PC + ABS GE C2800 or C6200
Body: Magnesium Alloy AZ91D + Recyclable UL grade PC + ABS GE
C2800 or C6200
Buttons: Silicon Rubber
PCB: FR-4, UL 94V0
Battery: Rechargeable Lithium Ion
(Electrochemistry system: LiCoO2+C=Li1-XCoO2+CLiX)
Packing: Carton: Recycled/Recyclable Paper (unbleached)
Cushion: Recyclable EPE

Chapter 5 - 46
Specifications
Carrying Bag: Recyclable PE Fiber
Quick Guide: Recycled/Recyclable Paper
Color: NATO Green/Black
Certification
CE
FCC
WEEE
REACH
I: IP65; M: IP66
MIL-STD-810G
MIL-STD-461F
Accessories
Wall Mount 10W (5V/2A) AC Adapter (DC-in cable length: 1M)
1M USB Cable (Micro USB to USB)
Optional Stylus Pen with holder
Optional Carry Bag
Optional 1M USB cable (LEMO to USB0
Multi Battery Charger MCDF

Chapter 5 - 47
Specifications

Chapter 6 - 48
Maintenance and Service
Chapter 6 - Maintenance and Service
Cleaning
ALWAYS turn off the power, unplug the power cord and remove the battery before cleaning.
The exterior of the device and display may be wiped with a clean, soft, and lint-free cloth. If there
is difficulty removing dirt, apply non-ammonia, non-alcohol based glass cleaner to the cloth and
wipe clean.
An air gun is recommended for cleaning water and dust. For salty water please clean with fresh
water then blow-dry with an air gun. Be sure not to turn the computer up-side down while there is
water being applied.
Troubleshooting
Should the computer fail to function properly, this section presents common problems and the
solutions. If troubleshooting solutions are unsuccessful, please refer to RMA Service section
below.
Power Problems
Power
Problems
When I turn on the Handheld computer, it does not respond.
- If you are using battery power, check if the battery is charged
- If you are using AC power, ensure that the connection of AC adapter is
correct.
I cannot return from Hibernation while on battery power
- The battery might be drained. Please plug the Handheld into AC power.
Networking Problems
Wi-Fi
I cannot connect to a wireless Wi-Fi network
• Make sure that:
- Your handheld computer is within the range of a wireless access point..

Chapter 6 - 49
Maintenance and Service
- Check the Device Power Manager that the Wi-Fi has been turned on.
Bluetooth
I cannot connect to another device with Bluetooth network
• Ensure that:
- Both devices have Bluetooth turned on.
- The distance between the two devices is not over 10 meters/32 feet
and that there are no large obstructions between the devices.
- Both devices are compatible.
GPS
I cannot connect to a mobile broadband network
• Do the following:
- Check the Device Power Manager that the GPS has been turned on.
- If you are outdoors, please move away from buildings or obstructions,
and expose your device to open sky.
- If you are indoors, please move closer to a window.

Chapter 6 - 50
Maintenance and Service
RMA Service
1. If troubleshooting steps are unsuccessful, consult your dealer for RMA.
2. Shipping instructions:
3. Remove any personal data.
4. Use the original shipping container and packing materials, if possible.
5. If the original packing materials are not available, wrap the equipment with soft material (e.g.
PU/PE form) then put the wrapped equipment into a hard cardboard shipping box.
6. Include a sheet with the following information: (Note: Please keep a copy of this sheet for
your records)
Name
Address
Unit serial number
Place and date of purchase or the original invoice number
Date of failure
7. A DETAILED Description of the problems you have encountered
8. A list of the hardware/software configuration, if applicable.
9. Clearly mark the outside of the shipping box with the RMA #. If RMA # is not present on the
shipping box, receiving will be unable to identify it and it might be returned.
10. Unless prior arrangements have been made, the customer is responsible for all shipping costs.
Unauthorized use of the company’s shipping accounts is not permitted.