Mileseey Technology GMC170001 Laser Distance Meter User Manual
Shenzhen Mileseey Technology Co., Ltd Laser Distance Meter Users Manual
Users Manual
Laser Distance Meter
T7 Series Quick Start
Product Overview
Thank you for using MileSeey handheld laser distance meter, please read the
instruction carefully before operation.
T7 will be one of milestone products in laser distance history developed by
MileSeey this year.
Thanks to creative skeleton design, robust housing, compact inner structure, P7
offers the perfect features of IP65 waterproof, drop-resistance and super long
lifespan. With 2- inch colored touch display and tempered glass cover on the
surface, it enables user to operate freely. P7 has been approved by international
authorized Lab that water and dust proof could reach IP65.
T7 is supported with smart bluetooth connectivity to remotely measure and
transfer real data to other device, it enlarges the interactivity between human and
device. With rechargeable Ni-MH batteries, it’s very environment friendly.Adopted
with dry battery identifying technology, it will be much more safe.
More than that, T7 also offers comprehensive measuring functions of Area,
Volume,Pythagorean, Auto level, Auto height etc. which can meet the
measurement needs of most people and provide high-quality measurement
experience for your try.
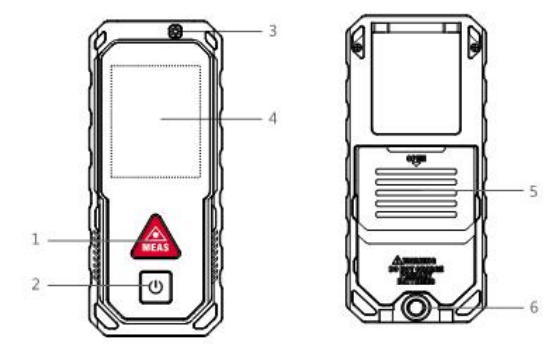
Appearance
1. Measure Button
Activate the measuring mode, press button to

measure.
2.ON/OFF/Clear/Return Button
Long press to switch ON/OFF, short press to clear
the previous operations or return to main menu.
3. Laser Emitter Indication
4. Touch Screen
5. Battery Compartment
6.Tripod Screw Hole
Safety Instructions
The safety instructions should be read through carefully before the product is used
for the first time.
if the equipment is used in a manner not specified by the manufacturer, the
protection provided by the equipment may be impaired.
Warning
aThe device is categorized into Class 2 laser product. DO NOT stare at laser
directly or shoot at others or it will cause damage to eyes.
b.The product is in accordance with strict standards and regulations through the
development and manufacturing, but still can’t entirely exclude the possibility of
interference to other devices, may cause discomfort to human and animals.
Please DO NOT use this product under explosive or corrosive environment.
Please DO NOT use this product near medical devices.
Please DO NOT use this product on the plane.
FCC Warning:
This equipment has been tested and found to comply with the limits for a Class B
digital device, pursuant to part 15 of the FCC Rules. These limits are designed to
provide reasonable protection against harmful interference in a residential installation.
This equipment generates, uses and can radiate radio frequency energy and, if not
installed and used in accordance with the instructions, may cause harmful
interference to radio communications. However, there is no guarantee that
interference will not occur in a particular installation. If this equipment does cause
harmful interference to radio or television reception, which can be determined by

turning the equipment off and on, the user is encouraged to try to correct the
interference by one or more of the following measures:
—Reorient or relocate the receiving antenna.
—Increase the separation between the equipment and receiver.
—Connect the equipment into an outlet on a circuit different from that to which the
receiver is connected.
—Consult the dealer or an experienced radio/TV technician for help.
MODIFICATION: Any changes or modifications not expressly approved by the
grantee of this device could void the user’s authority to operate the device.
This device complies with part 15 of the FCC Rules. Operation is subject to the
following two conditions:
(1) This device may not cause harmful interference, and
(2) this device must accept any interference received, including interference that
may cause undesired operation.
1,Disposal
Everyone is responsible for environmental protection.
It’s prohibited to dispose used batteries together with household waste, please
collect used batteries to designated waste station.
This product must not be recycled with household waste. Dispose of the product
appropriately in accordance with the national regulations in your country.
2,Scope of Responsibility
MileSeey will not be responsible for the damages caused by improper use below:
*Using the product without instruction;
*Use of accessories from othermanufacturers without approval from MileSeey ;
*Carrying out modification or conversion of the product.
Battery Installation and Instructions
Press and slide the cover toward the rear of the body to open the battery door.
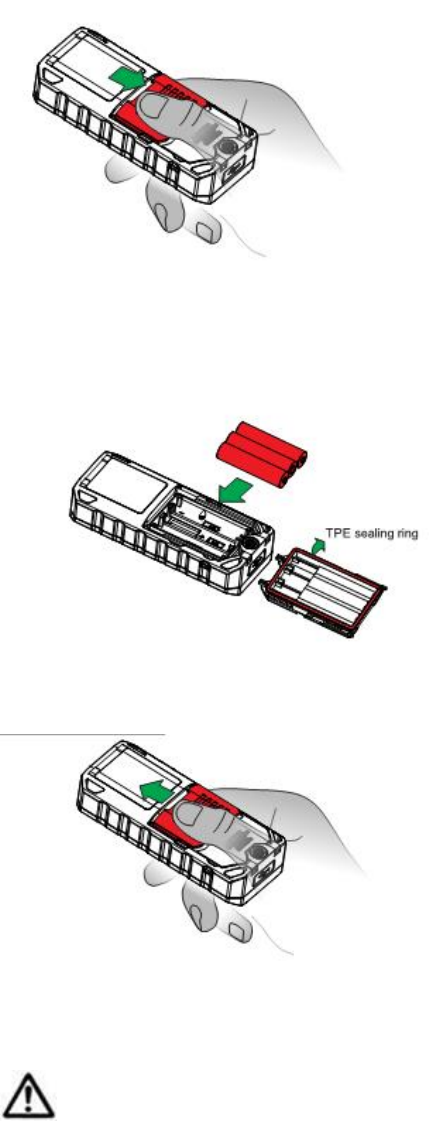
Insert 3* AAA rechargeable NI-MH batteries,observing correct polarity.
*TPE sealing ring has been adopted inside of the cover to prevent water and dust.
After the battery is placed, cover and hold the battery door, press and slide to the
top, the cover can be sealed.
The product uses rechargeable NI-MH batteries. Please use provided USB cable
while charging. The computer can also be used to charge, but this takes more time.
Warning:
When use dry batteries, please DO NOT use USB to charge. DO NOT mix
rechargeable batteries with dry batteries at the same time to avoid accidents. Any
damage caused by improper use of charging dry battery is not covered by the
warranty, MileSeey will not beresponsible for it.While charging, the device may heat
up, thisis normal, and will not affect the product performance and lifetime.

Please unplug the charger and take off the batteries when not in use.
Warning:
Do not use aggressive cleaning agents or solutions. Use only a clean, soft cloth for
cleaning.
Specification
Specification T7
Measuring Range 0.2-40/60/80/100
Measuring Accuracy ±(2.0mm+5x10
-
5
D)
Single Distance
Measurement
Continuous
Measurement
Area Measurement
Volume Measurement
Pythagoras (2-point)
Pythagoras (3-point)
Pythagoras (3-point)
Auto Level
Auto Height
Point to Point (P2P)
Add/Subtract
Bluetooth4.0
Screen Rotation
Tilt Sensor
USB Data Export
Screen Setting
Screen Display 2-inch colored touch display
Measuring Reference Top/Tripod screw/Bottom
Measuring Units m/ft/in/ft+in
Memory 20sets
Auto Power Switch-off After 180s
Ingress Protection IP65
Laser Class Class II
Class Type 630-670nm1mW
Battery Type 5VDC through USB port or 3.6VDC by
rechargeble batteries(size AAA 1.2Vx3)
or 4.5VDC by non-rechargeable
batteries(size AAA 1.5Vx3)
Operating Temperature 0~+4032°F~+104°F
Altitude up to 2000m
Humidity 0-95%
Dimension 115*49*26mm
1. Measuring Range
The Maximum range shall be different according to different models. The actual
range refers to the package.
2. Measuring Accuracy("D" stands for measured distance)If measuring under
favorable conditions, such as smooth surface, proper temperature and
indoor lighting, the device is able to work within certain range as indicated.
Maximum deviation occurs under unfavorable conditions such as bright sunlight or
when measuring to poorly reflecting or very rough surfaces.
Tips: In case of bright sunlight and bad reflection of the object, please use the target
plate or reflector.
Touchscreen Operations
Display Screen
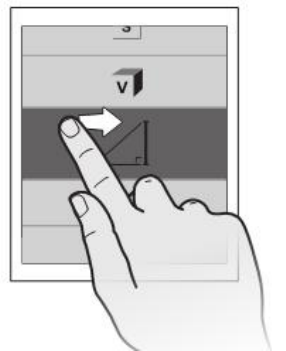
Touch screen, Mode selection display; Slide right to setup menu, slide up and down
to select measuring mode accordingly.
Slide left to Add/Subtract mode, Add/Subtract calculation can be made to Distance,
Area and Volume measurement;
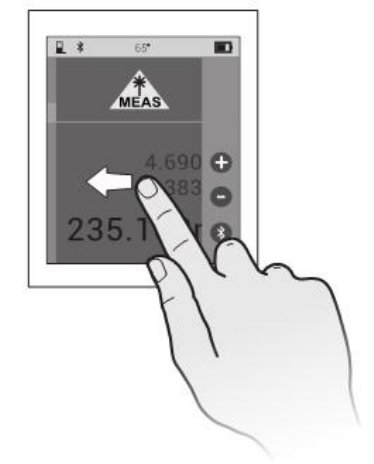
Slide down to setup menu, pull up to
retract it.
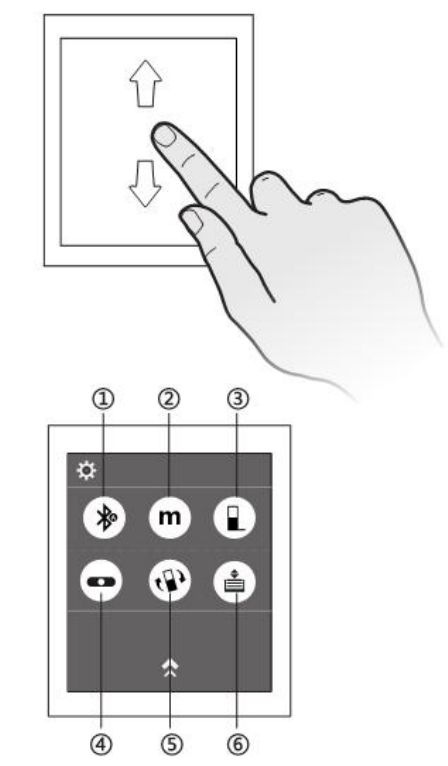
Bluetooth
Press to activate or de-activate the Bluetooth to remotely control the measurement
by connecting with App, 3 modes can be selected.
1.Automatic Bluetooth Transfer Mode:Upload the measurement data to App
automatically.
2.Manual Bluetooth Transfer Mode:Press to select , in any measurement mode, click
Bluetooth icon on status bar to transfer current data to App.
3.When the icon turns grey, the Bluetooth shut off.
Measuring Unit
Press to change the measuring units m/ft/in/ft+in)
Measuring Reference
Press to change the reference (Front/Tripod/Rear) , Rear is the default reference.
Digital Level
Digital level Press to activate d , the electronic tilt sensor makes it easier to achieve
horizontal alignment with the real-time measuring angle.
R Screen otation
Activate screen orientation setting; it will automatically switch to LANDSCAPE display
when the device placed horizontally.
Memory
Press or Press to recall memory values.slide to view history values, press to delete
the selected records.
A Measuring interface
B Summary line
Operation Instructions
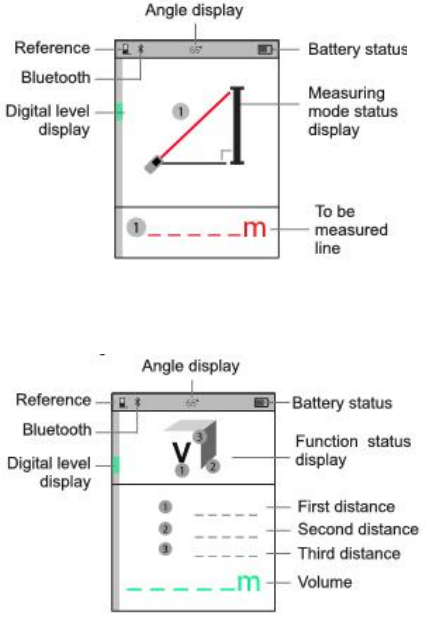
The Single distance measurement prompt when it is switched ON. Slide right to
function menu, dragging to view all the icons; the latest measuring line and distance
data are displayed in Red, Measured data marked in Gray, the summary line
displayed in Green.
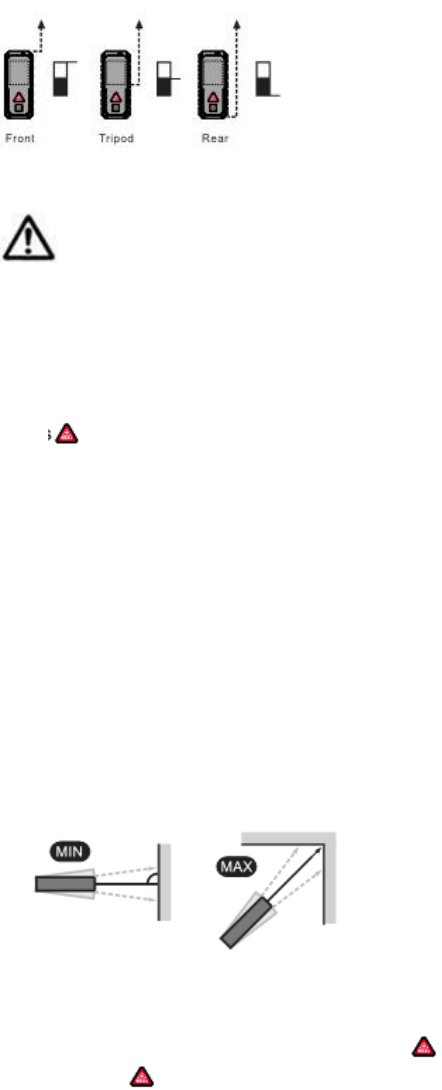
The measuring data should be different due to different reference settings.
Power on the device, measure in the certain distance within ±2mm accuracy, it can
work properly.
Single Distance Measurement
The device will come to Single distance measurement when it is switched ON.
Press after aiming at target to get result in summary line.
Continuous Measurement
The Continuous measurement allows the user to measure the Maximum or Minimum
distance from a fixed measuring point. Press and sweep slowly the laser back and
forth and up and down over the desired target point.
The value for Maximum and Minimum distances are indicated in the display as well
as the last measured value marked in green.
You can choose Max or Min value accordingto your needs.
*This function will be stopped automatically after 5 minutes of inactivity.
Area Measurement
According to reminding of the red line, press to get the distance for 1st line(e.g
Length),press again for 2nd line(e.g Width), the Area is calculated and displayed
in the summary line.
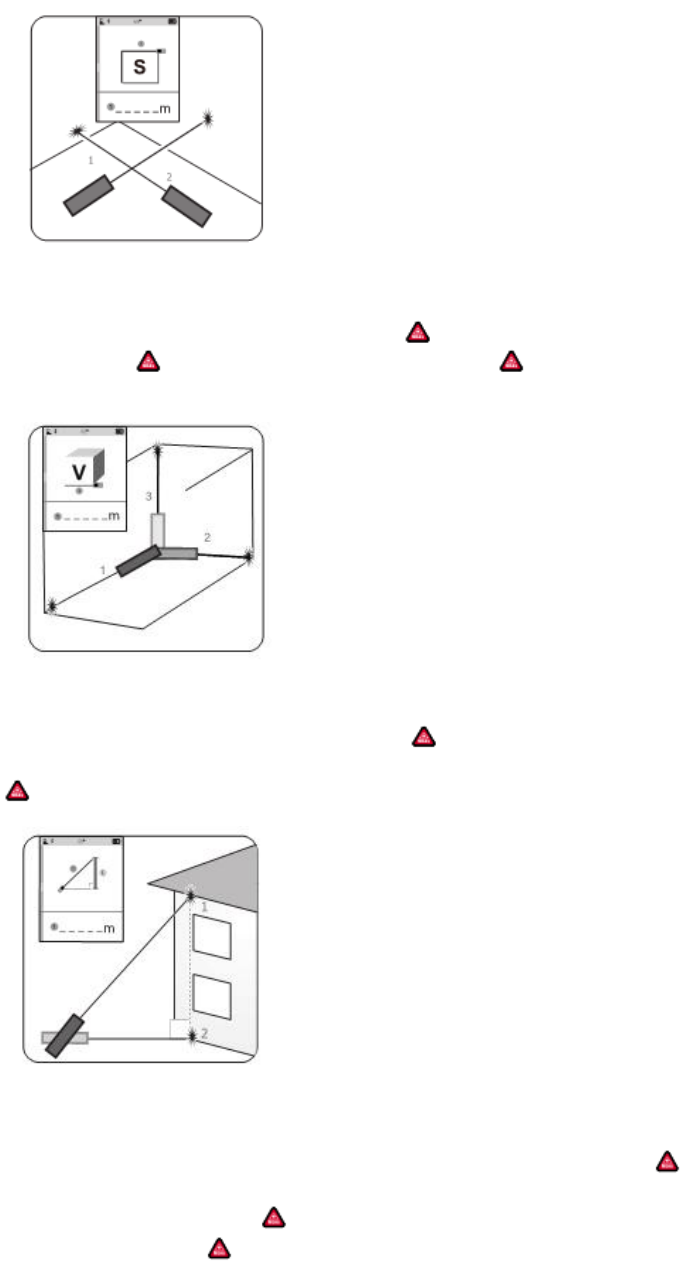
Volume Measurement
According to reminding of the red line,press to get the distance for 1st line(e.g
Length),press again for 2nd line(e.g Width), press third time for 3rd line (e.g
Height), theVolume is calculated and displayed in the summary line.
Pythagoras (2-point)
According to reminding of the red line, press to get the distance of 1st line,
change to the horizontal direction of the object from the fixed measuring point, press
again to get the distance of 2nd line, the result is displayed in the summary line.
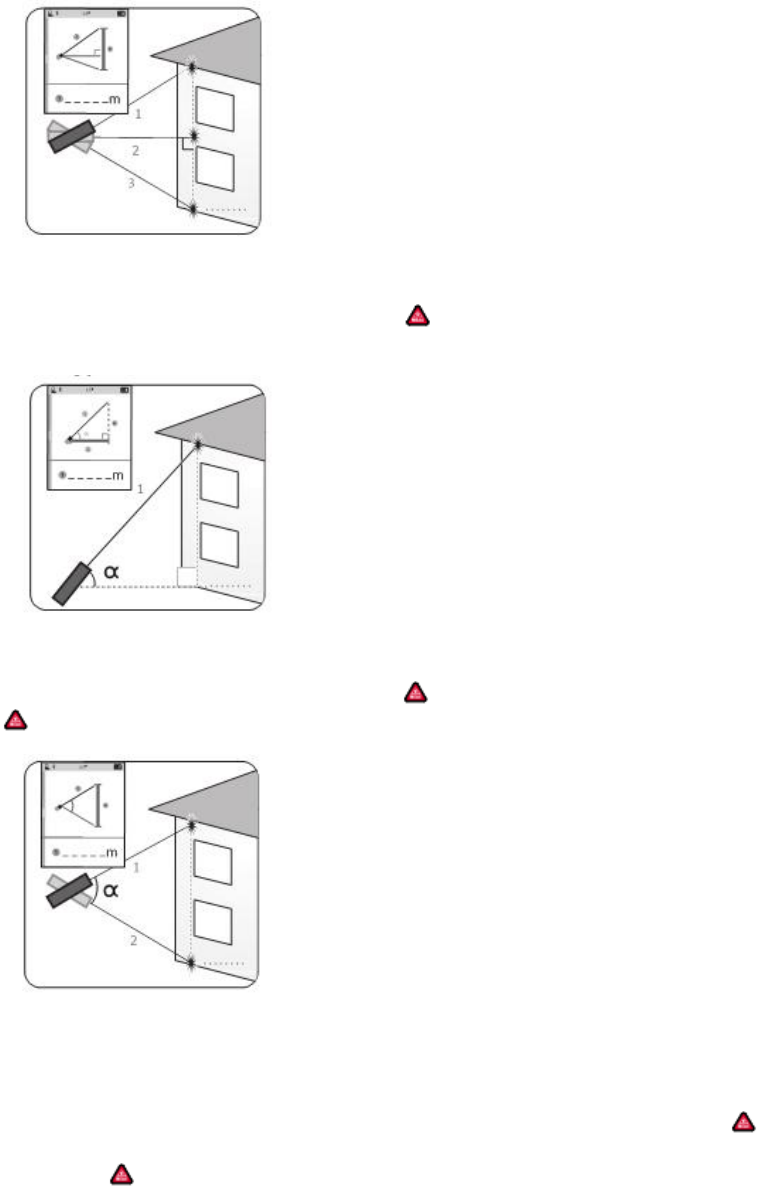
Pythagoras (3-point)
According to reminding of the red line, aiming at 1st target point, press to get
the distance of 1st line, change to the horizontal direction of the object from the
fixed measuring point, press again to get the distance of 2nd Line, move to the
3rd target point, press to get the distance of 3rd line, the result is displayed in the
summary line.
Auto Level Measurement
According to reminding of the red line,press to get the distance of hypotenuse,
vertical and horizontal lines, the result is displayed in line accordingly.
Auto Height Measurement
According to reminding of the red line,press to get the distance for 1st line; press
again for 2nd line, then you can get vertical height displayed in summary line.
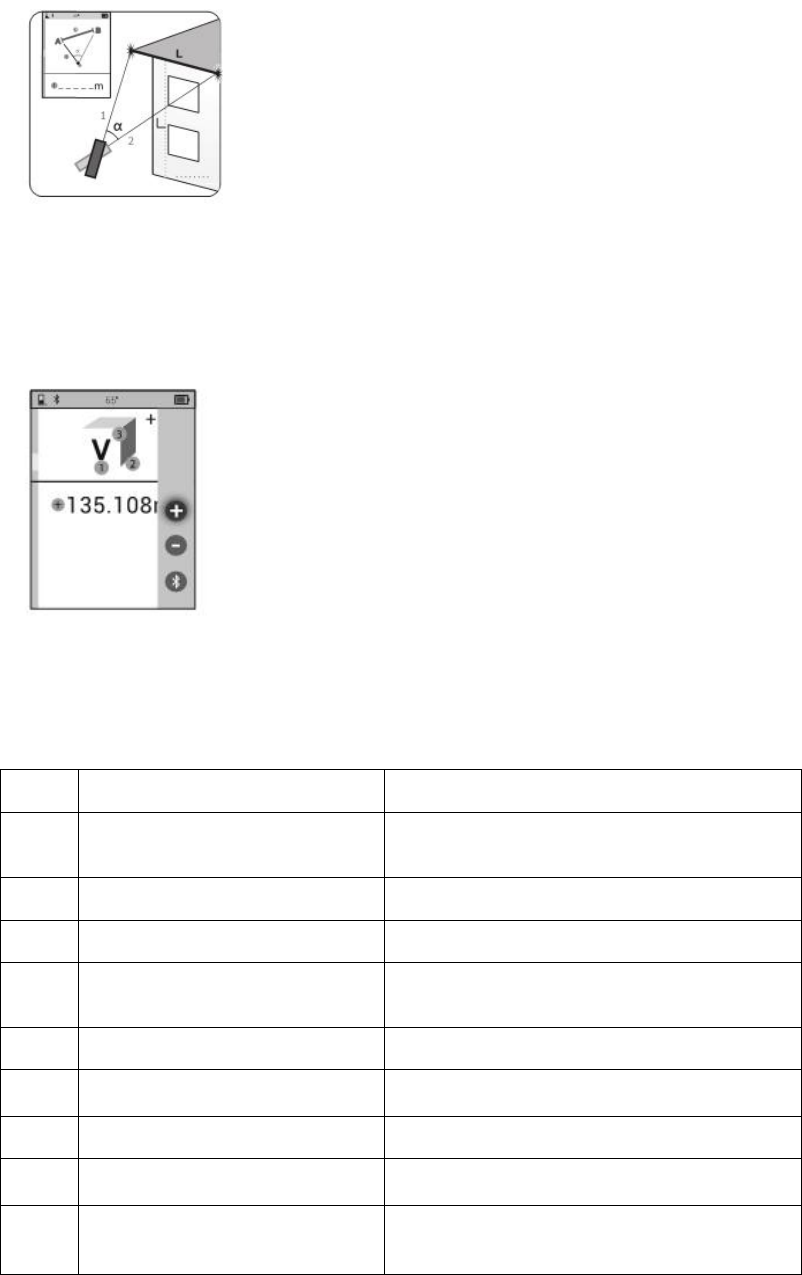
Point to Point (P2P) Measurement
Follow the instruction:“To set the measuring reference for the center point of
rotation, wait for stable performance before operating”,hold the device still and wait
until the instruction icon disappear. According to reminding of the red line,press
to get the distance to 1st laser point, move the device from the fixed measuring
point, press again to get the distance to 2nd laser point,the distance between two
points is displayedin the summary line.
Add/Subtract
Under the mode of Distance, Area and Volume measurement, slide to left to
Add/subtract Menu, press "+" or "-" to make add/subtraction calculations on the
basis of previous record, the result is displayed in the summary line.
Trouble Shooting
All errors or failures will be shown as codes.
The following table explains the meaning ofcodes and solutions.
Code
Cause
Corrective Measure
204
Calculation error
Refer to user manual,
repeat the procedures.
208
Excessive current
Please contact your distributor
220
Low battery
Replace new batteries.
252
Temperature
too high
Let device cool down
253
Temperature
too
low
Warm device up
255
Received signal
,
too weak o r
Measuring time too long
Change target surface
256
Change target surface
Change target surface
261
Out of the
range of
measurement
Select the measurement
distance within the
range of measurement.
500
Hardware error
Switch on/off thedevice several times.If the
symbol still appears, please contact,your dealer
for assistance
App Download
Contact Us
Shenzhen Mileseey Technology Co., LTD.
Email: info@mileseey.net
Tel: +86 755 86329055
Fax: +86 755 86701592
Website: www.mileseey.net
Add.: 6/F, Building 9, Zhongguan Honghualing, Industrial South Park II, 1213,
Liuxian Ave, Taoyuan Street, Nanshan District,Shenzhen, 518055, P.R. China.
Copyrights
The product specifications are subject to change without notice, all final
interpretation rights were reserved by Mileseey Technology Co., Ltd. All trademarks,
product images,technical parameters are properties of Mileseey Technology Co., Ltd.
All rights reserved.