Millennial Net RT-5209Z2 Wireless Sensor Networking Device User Manual i Bean 5209
Millennial Net Wireless Sensor Networking Device i Bean 5209
UserManual.wiki
>
Millennial Net
>
RT 5209Z2 User Manual
Manual
Navigation menu
Upload a User Manual
Namespaces
Wiki Guide
HTML
PDF
Info
Views
User Manual
Discussion / Help
Navigation


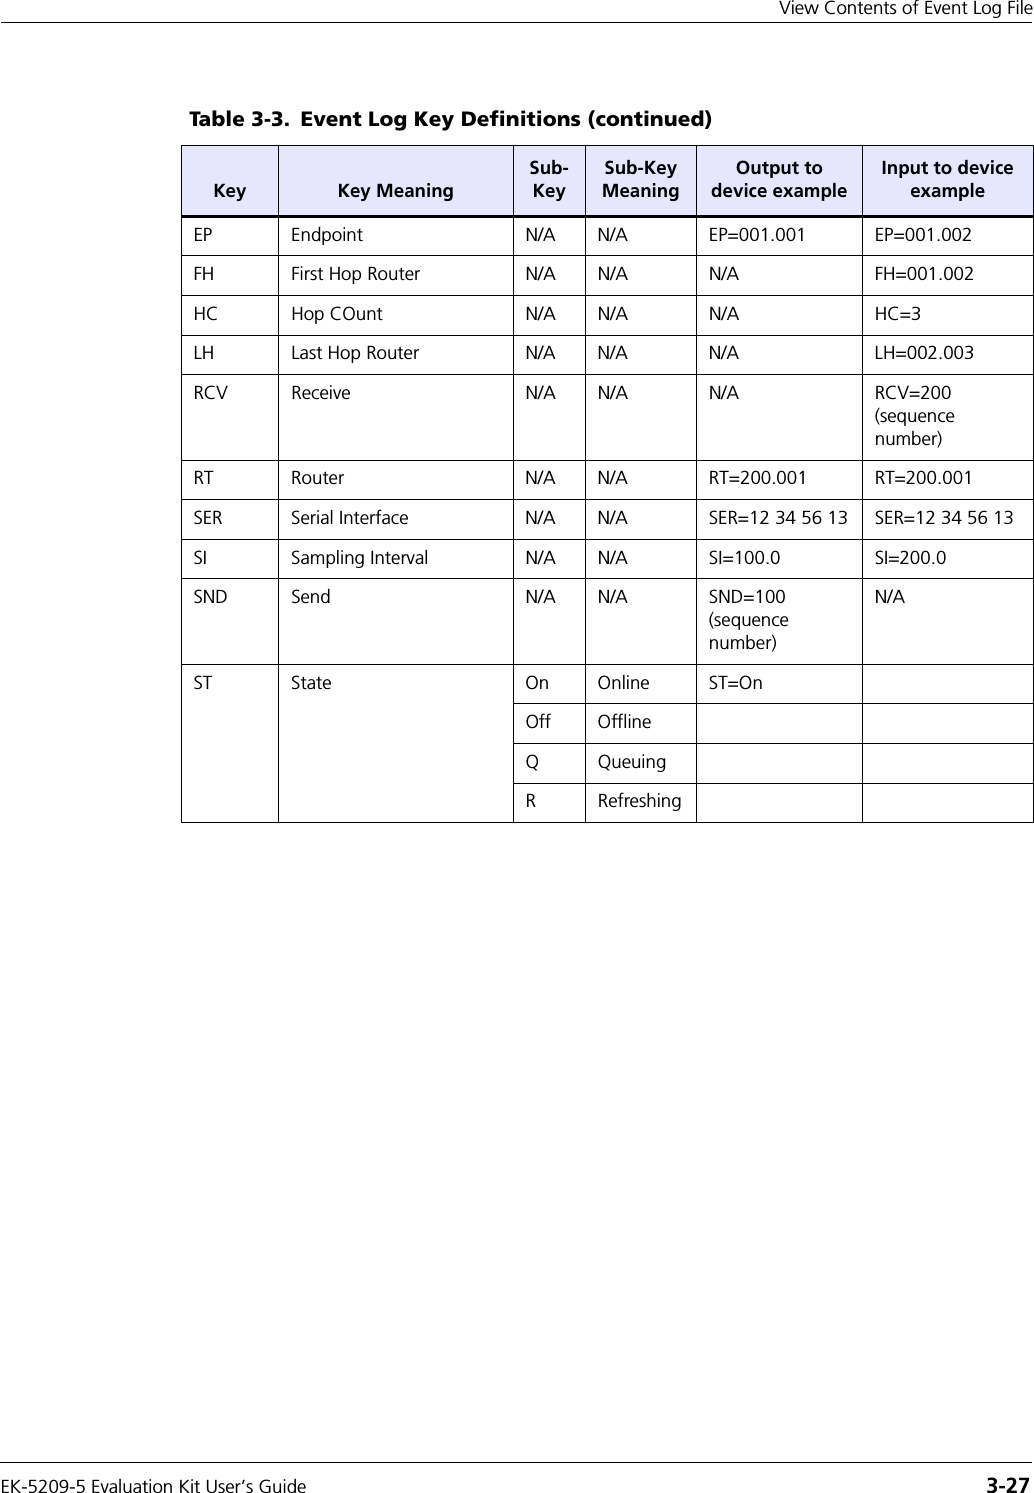
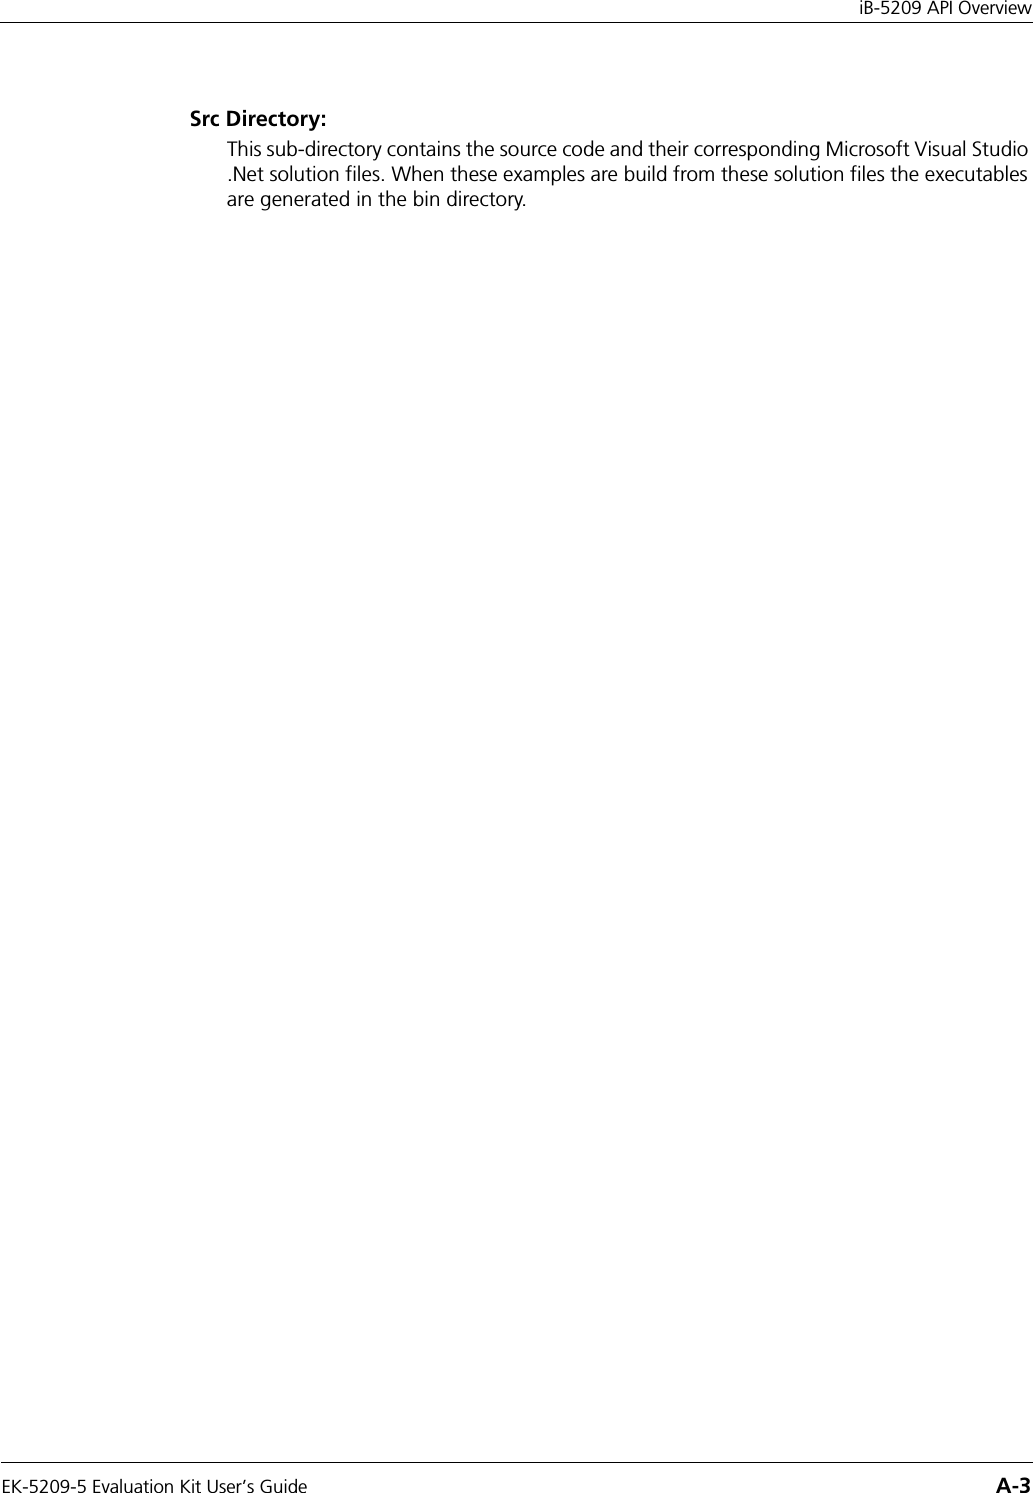

![EK-5209-5 Evaluation Kit User’s Guide A-5iBeanAPI.hiBeanAPI.hData Structures1. ibApi_APIHANDLEtypedef ibApi_UINT16 ibApi_APIHANDLE;This handle represents an API session. It is created by ibApi_Open() and used by most of the other API functions.2. ibApi_RESULTtypedef enum ibApi_RESULT_e ibApi_RESULT;The API functions are standardized to return the value ibApi_RESULT, which is a signed 32-bit integer. If the integer is negative, then it is an error code such as ibApi_RESULT_ERR_INVALIDHANDLE or ibApi_RESULT_ERR_NOTPERMITTED. (See iBeanAPI.h for a full listing of error codes.) Otherwise, the result can be ibApi_RESULT_SUCCESS or a non-negative value specific to the particular function.3. ibApi_GROUPIDstruct ibApi_GROUPID_s {ibApi_UINT8 words[4];};typedef struct ibApi_GROUPID_s ibApi_GROUPID;The group ID is a 32-bit address that is used to identify a specific network of i-Bean devices and is shared by all the devices within the network. (In the current implementation, each i-Bean network group can only have one i-Bean Gateway.) A range of group IDs is allocated by Millennial Net for each customer. The API functions are standardized to return the value ibApi_RESULT, which is a signed 32-bit integer. If the integer is negative, then it is an error code such as ibApi_RESULT_ERR_INVALIDHANDLE or ibApi_RESULT_ERR_NOTPERMITTED. (See iBeanAPI.h for a full listing of error codes.) Otherwise, the result can be ibApi_RESULT_SUCCESS or a non-negative value specific to the particular function.4. ibApi_DEVICEIDstruct ibApi_DEVICEID_s {ibApi_UINT8 words[8];};typedef struct ibApi_DEVICEID_s ibApi_DEVICEID;The device ID is a 64-bit address that uniquely identifies an i-Bean network component such as endpoint, router, or gateway.](https://usermanual.wiki/Millennial-Net/RT-5209Z2/User-Guide-463655-Page-67.png)
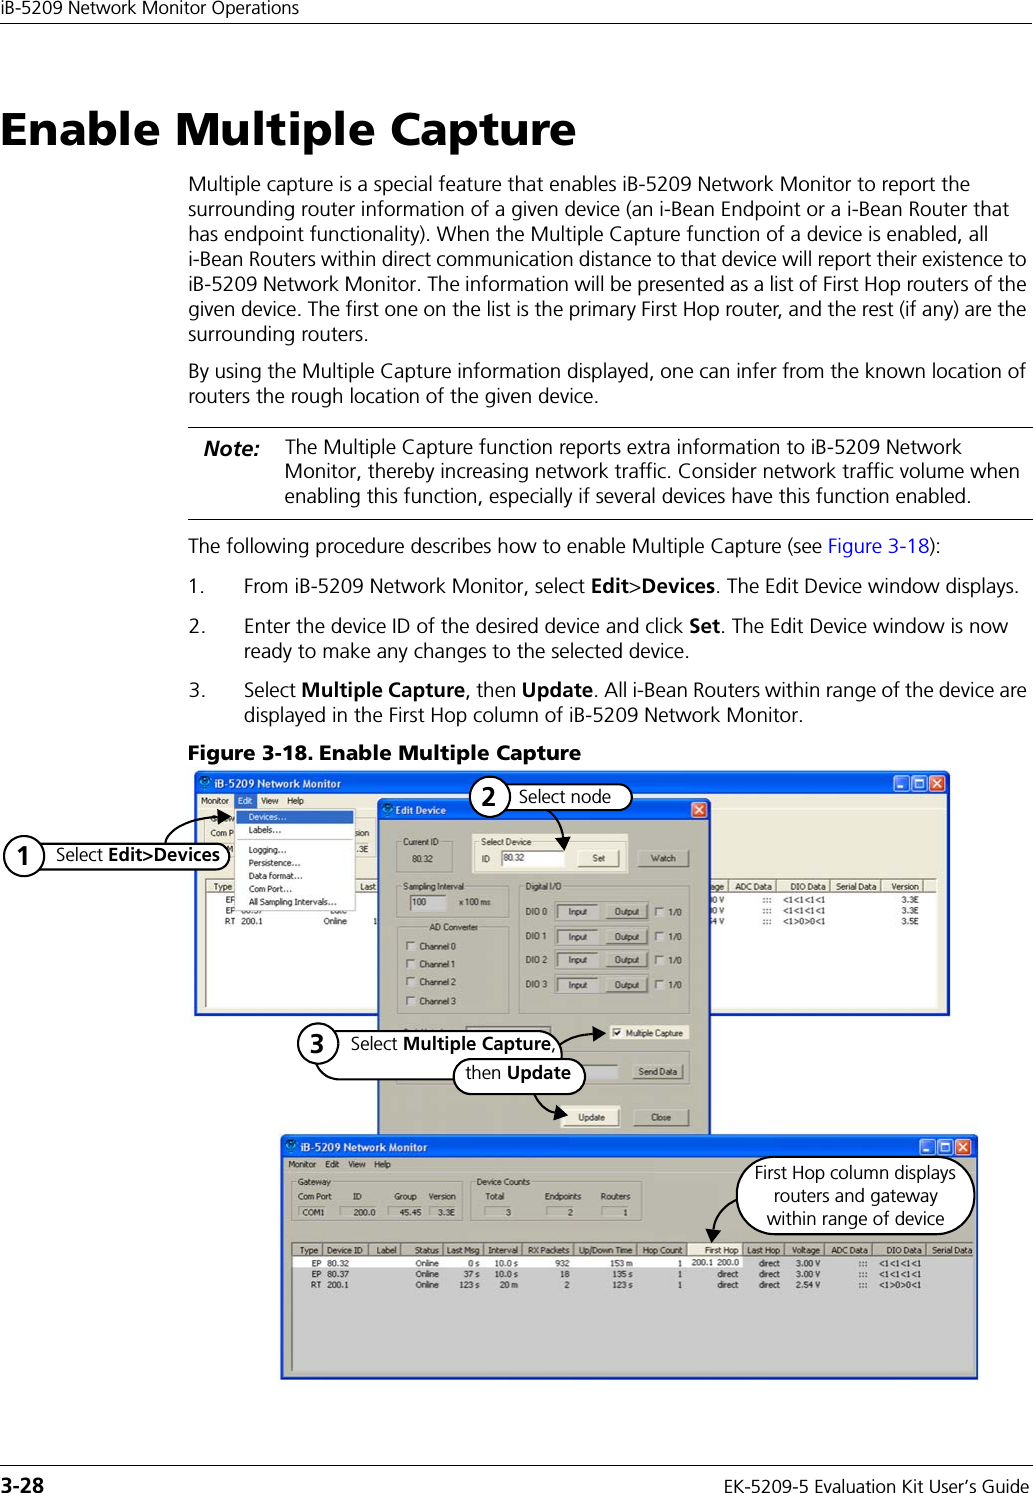
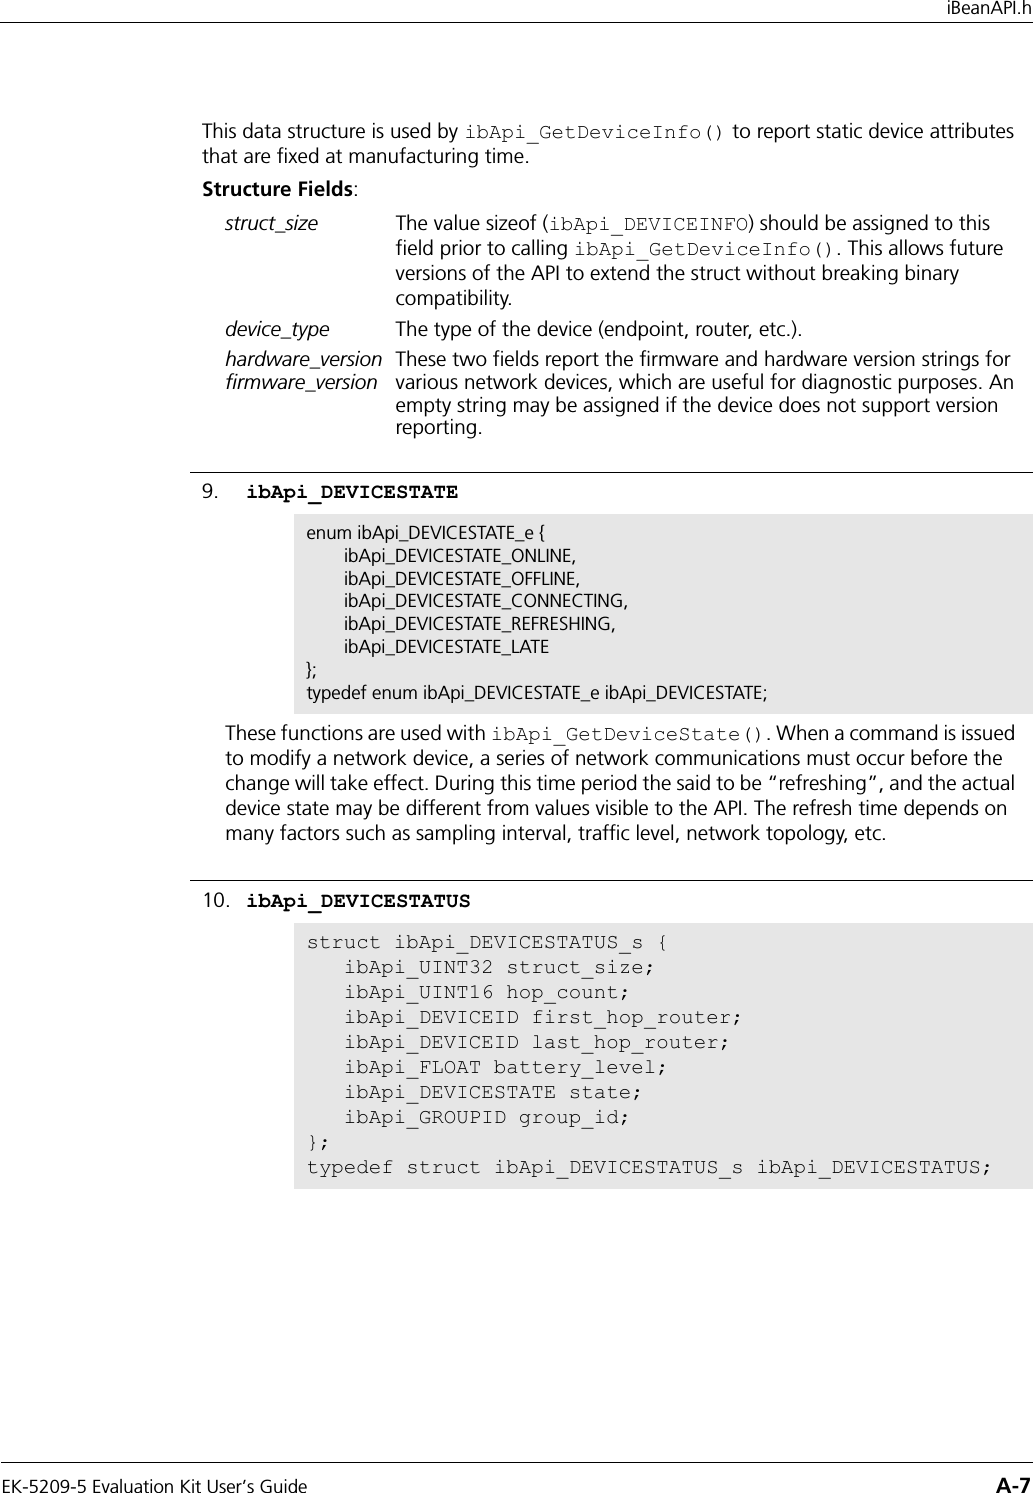
![A-6 EK-5209-5 Evaluation Kit User’s Guide5. ibApi_COMPARISONenum ibApi_COMPARISON_e {ibApi_COMPARISON_LESSTHAN,ibApi_COMPARISON_EQUAL,ibApi_COMPARISON_GREATERTHAN};typedef enum ibApi_COMPARISON_e ibApi_COMPARISON;This enum is used for the return value of functions that compare things. Note that these values are non-negative to enable casting as ibApi_RESULT.6. ibApi_IOMODEenum ibApi_IOMODE_e {ibApi_IOMODE_OUTPUT=0,ibApi_IOMODE_INPUT=1};typedef enum ibApi_IOMODE_e ibApi_IOMODE;This is used by functions such as ibApi_IO_SetDIOConfig() for configuring channels for input or output.7. ibApi_DEVICETYPEenum ibApi_DEVICETYPE_e {ibApi_DEVICETYPE_ENDPOINT = (1<<0),ibApi_DEVICETYPE_ROUTER = (1<<1),ibApi_DEVICETYPE_ROUTERBEAN = (1<<2),ibApi_DEVICETYPE_GATEWAY = (1<<3),ibApi_DEVICETYPE_ANY = 0xf /* used with filter */};typedef enum ibApi_DEVICETYPE_e ibApi_DEVICETYPE;This is used to identify the device type. The ibApi_DEVICETYPE_ENDPOINT and ibApi_DEVICETYPE_ROUTERBEAN implement various I/O interfaces, whereas ibApi_DEVICETYPE_ROUTER and ibApi_DEVICETYPE_GATEWAY do not.8. ibApi_DEVICEINFO#define ibApi_MAX_VERSION_STRLEN 32struct ibApi_DEVICEINFO_s {ibApi_UINT32 struct_size;ibApi_DEVICETYPE device_type;ibApi_CHAR hardware_version[ibApi_MAX_VERSION_STRLEN];ibApi_CHAR firmware_version[ibApi_MAX_VERSION_STRLEN];};typedef struct ibApi_DEVICEINFO_s ibApi_DEVICEINFO;](https://usermanual.wiki/Millennial-Net/RT-5209Z2/User-Guide-463655-Page-68.png)


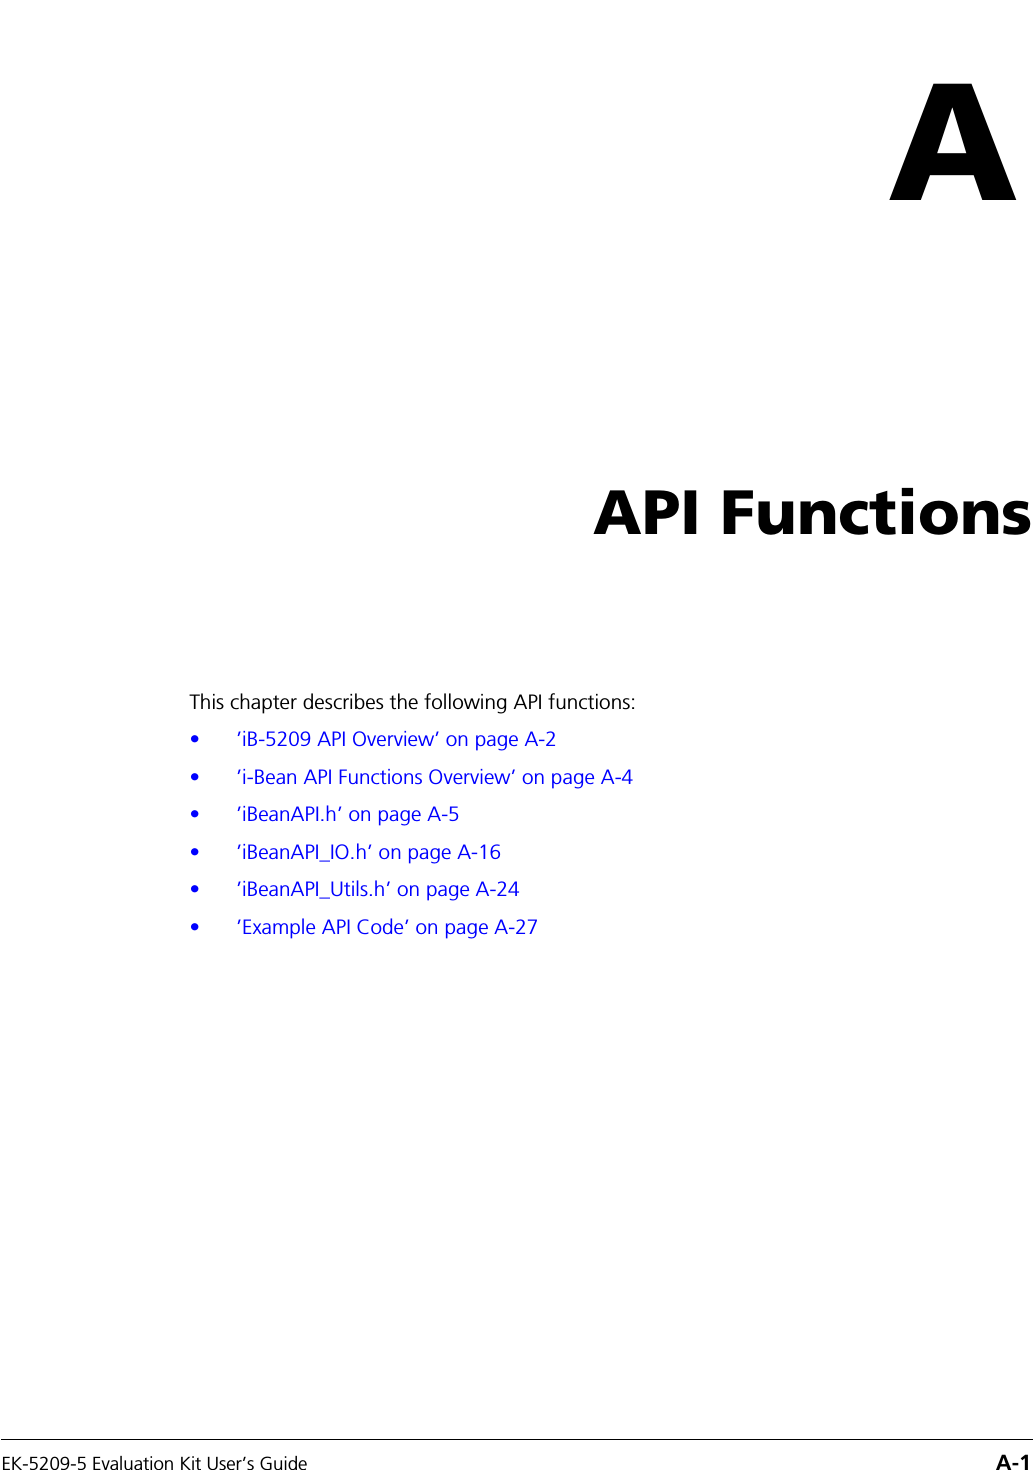
![EK-5209-5 Evaluation Kit User’s Guide A-11iBeanAPI.hThis function returns the actual software version for the API, which can differ from ibApi_EXPECTED_VERSION if DLL’s are mixed.Return Value:An IbApi_VERSION value if successful, error code (<0) if not.4. ibApi_GetNetworkList()ibApi_FUNC ibApi_GetNetworkList(ibApi_APIHANDLE api_hdl,ibApi_GROUPID networks[],ibApi_UINT32 networks_size);This retrieves a list of group ID’s for the networks managed by the server.Parameters:param api_hdl: (input) API handle returned from ibApi_Open()networks: (output) array of group ID’s that is managed by the servernetworks_size: (input) ibApi_INT32, maximum size for the network[]Return Value:The actual number of networks (which can exceed networks_size if the written data was truncated), or an error code (<0) if unsuccessful.5. ibApi_GetDeviceList()ibApi_FUNC ibApi_GetDeviceList(ibApi_APIHANDLE api_hdl,ibApi_GROUPID network,ibApi_DEVICETYPE device_typeibApi_DEVICEID devices[],ibAPI_UINT32 devices_size);](https://usermanual.wiki/Millennial-Net/RT-5209Z2/User-Guide-463655-Page-73.png)
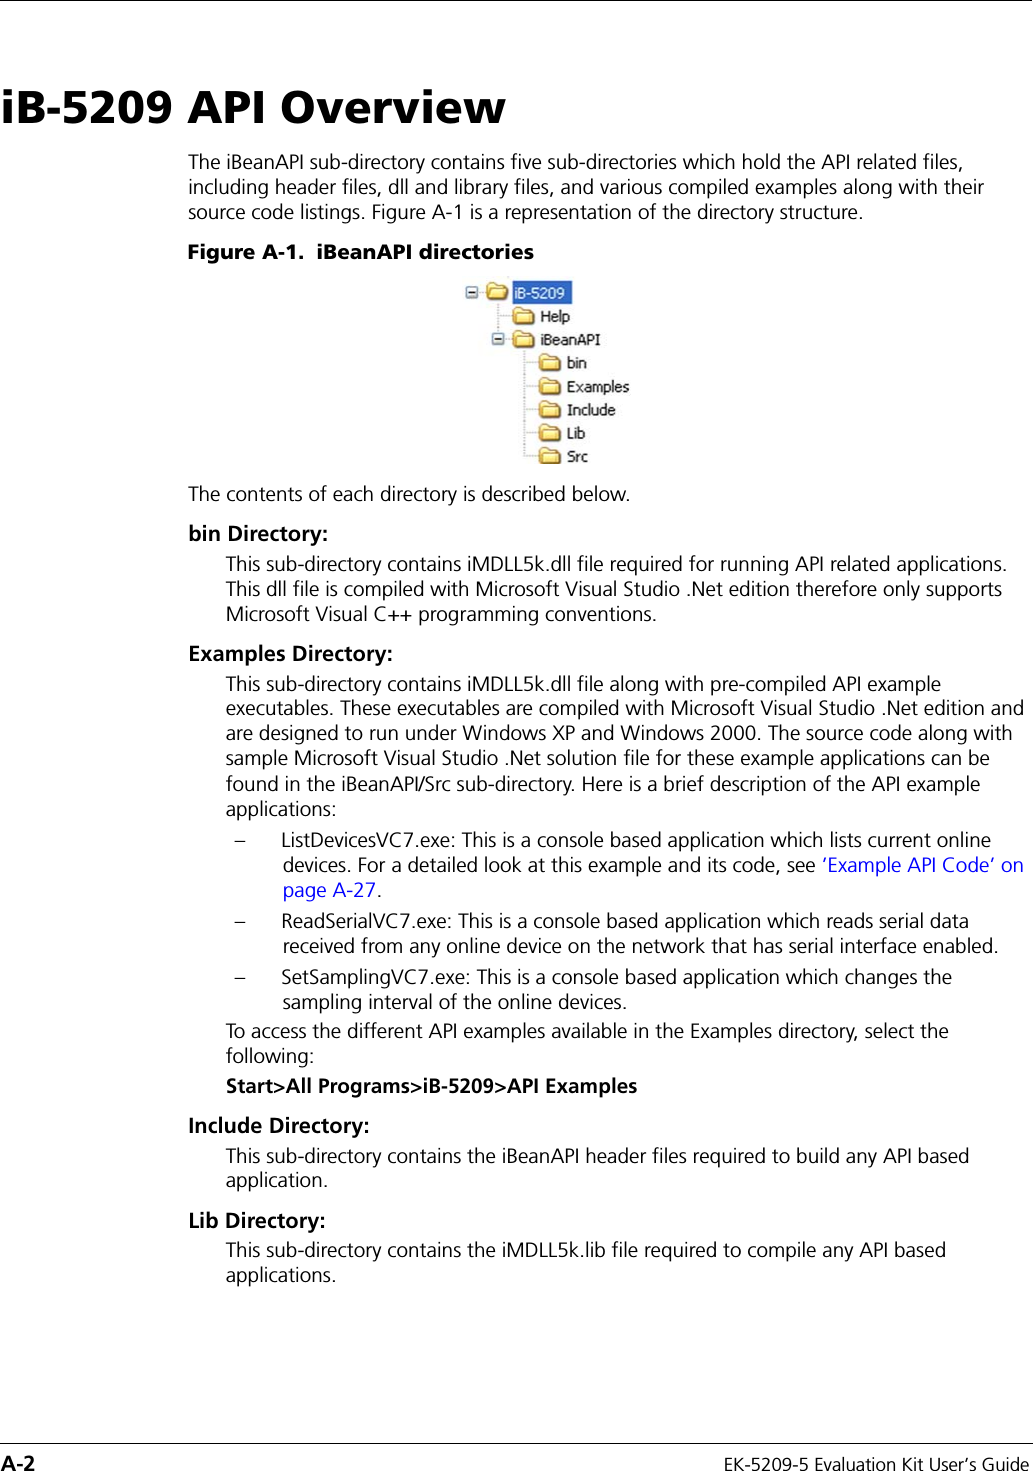
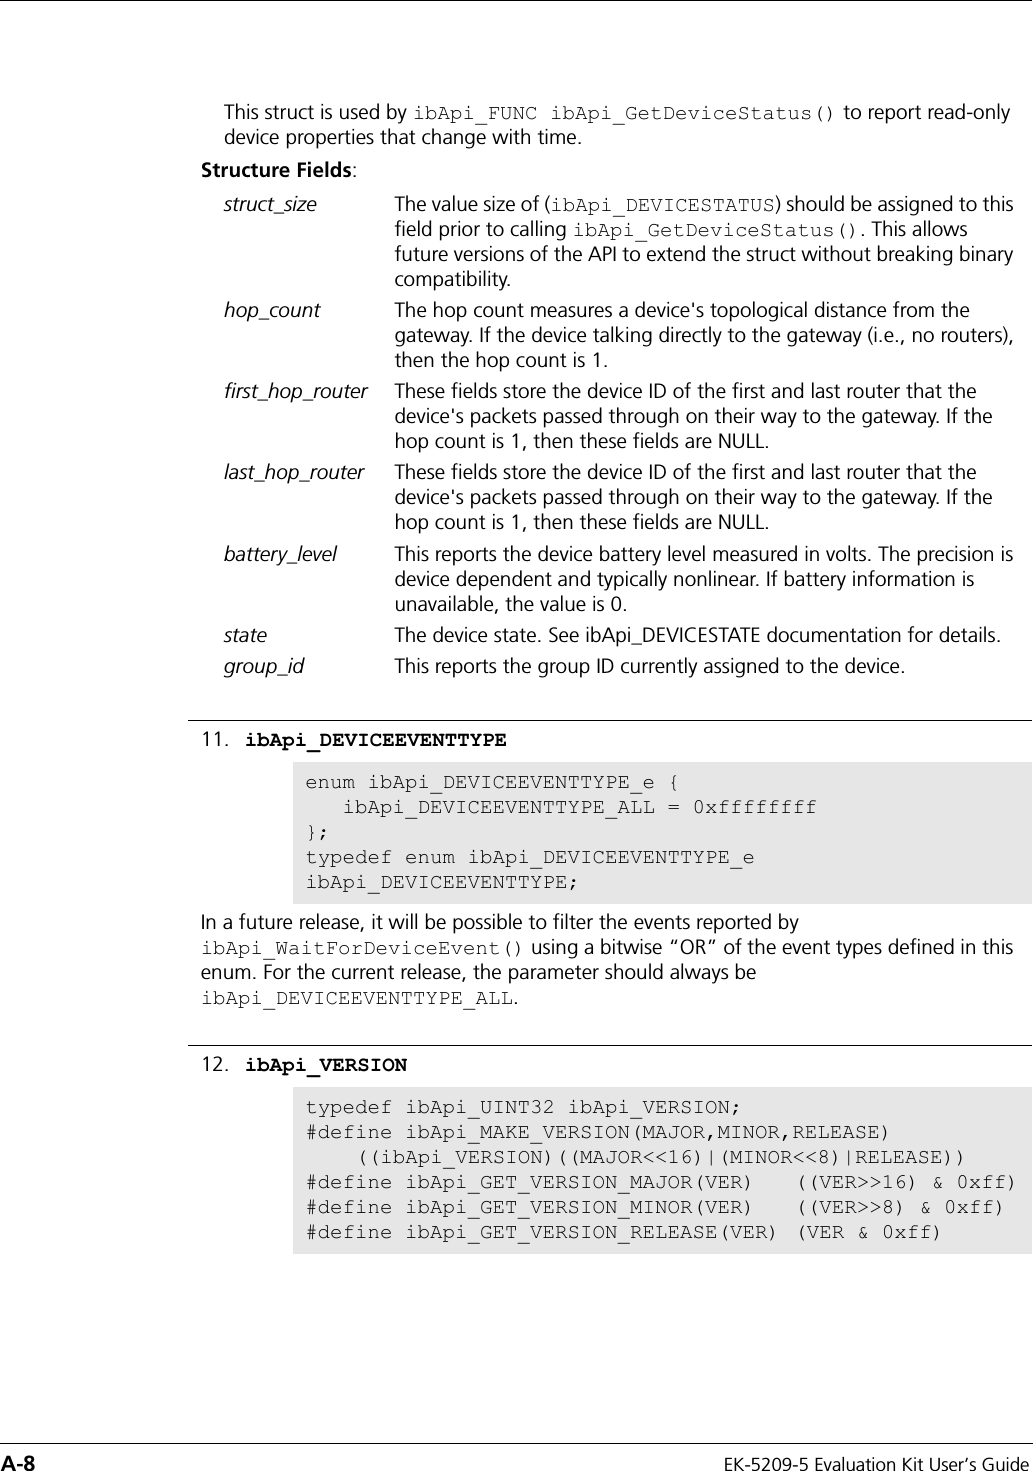
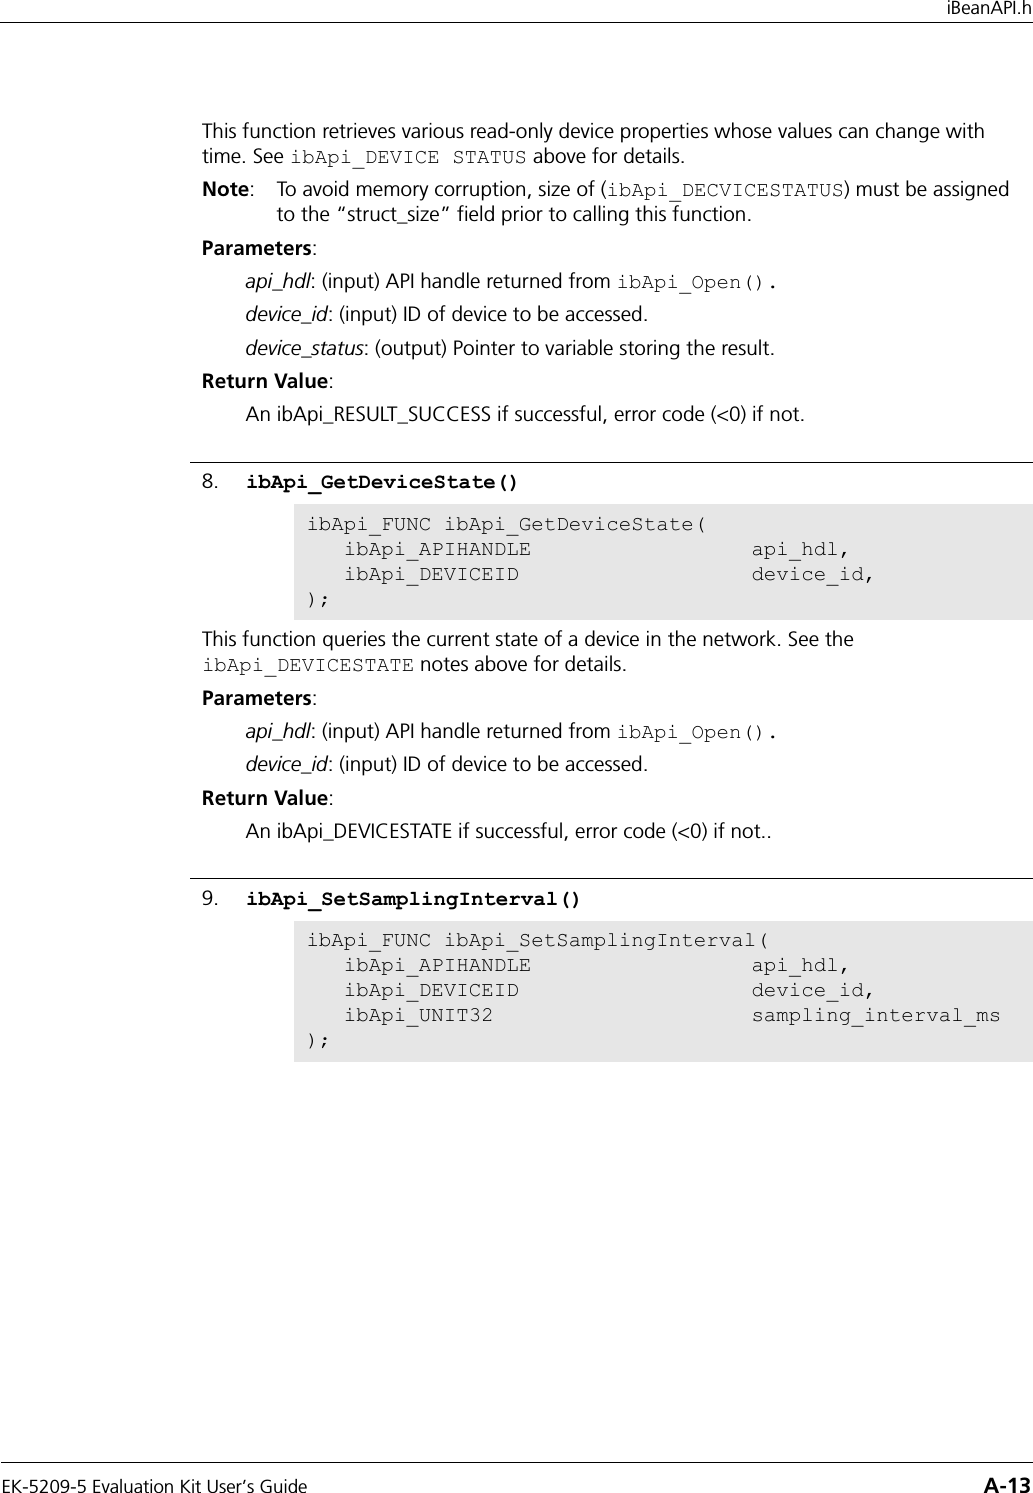
![A-12 EK-5209-5 Evaluation Kit User’s GuideThis retrieves the ID’s of the devices in the network. The device_type parameter is a bitwise OR of the ibApi_DEVICETYPE constants that filters the result. (To retrieve all devices, use ibApi_DEVICETYPE_ANY.)Parameters:param api_hdl: (input) API handle returned from ibApi_Open().network: (input) Group ID of the network.device_type: (input) Device type filter.devices: (output) Array of device ID’s to store the result.devices_size: (input) Maximum size for devices[].Return Value:The actual number of devices (which can exceed devices_size if the written data was truncated), or an error code (<0) if unsuccessful.6. ibApi_GetDeviceInfo()ibApi_FUNC ibApi_GetDeviceInfo(ibApi_APIHANDLE api_hdl,ibApi_DEVICEID device_id,ibApi_DEVICEINFO * device_info);This function retrieves various static device attributes that are predetermined at manufacturing time. Thus, these values only need to be queried once for a particular device. See ibApi_DEVICEINGFO above for details.Note: To avoid memory corruption, size of (ibApi_DECVICEINFO) must be assigned to the “struct_size” field prior to calling this function.Parameters:api_hdl: (input) API handle returned from ibApi_Open().device_id: (input) ID of device to be accessed.device_info: (output) Pointer to variable storing the result.Return Value:An ibApi_RESULT_SUCCESS if successful, error code (<0) if not.7. ibApi_GetDeviceStatus()ibApi_FUNC ibApi_GetDeviceStatus(ibApi_APIHANDLE api_hdl,ibApi_DEVICEID device_id,ibApi_DEVICESTATUS * device_status);](https://usermanual.wiki/Millennial-Net/RT-5209Z2/User-Guide-463655-Page-74.png)

![A-22 EK-5209-5 Evaluation Kit User’s Guide11. ibApi_IO_GetSerialBufferStatus()ibApi_FUNC ibApi_IO_GetSerialBufferStatus (ibApi_APIHANDLE api_hdl,ibApi_DEVICEID device_id,ibApi_IOMODE io_mode);For the given device, this function retrieves the status of the out going serial data buffer. The return value gives the number of empty packet slots in the buffer. A negative return value denotes an error and a zero return value means there is currently no out going empty packet slots.Parameters:api_hdl: (input) API handle returned from ibApi_Open().device_id: (input) ID of the device to be accessed.io_mode: (input) Data direction to be accessed.Return Value:The empty out going packet slots if successful, or an error code (<0) if not.12. ibApi_IO_WriteSerial()ibApi_FUNC ibApi_IO_WriteSerial (ibApi_APIHANDLE api_hdl,ibApi_DEVICEID device_id,ibApi_UINT8 buffer[],ibApi_UINT8 buffer_size);This writes a user data packet to the specified device handle. The ibApi_FIELDID_USERDATAMODE field must have been previously set to something other than ibApi_USERDATAMODE_DISABLED. (Note that on some devices, this will disable other peripherals, such as DIO.) The specific contents of the user data block and its maximum size are application defined. The buffer_size variable determines the number of bytes sent (note that NULL bytes receive no special interpretation.) To query the maximum payload size, call ibApi_WriteSerialData() with buffer_size=0.Parameters:api_hdl: (input) API handle returned from ibApi_Open().device_id: (input) ID of the device to be accessed.buffer: (input) User data packet to transmit.buffer_size: (input) Number of bytes in the user data packet.Return Value:The maximum buffer size if successful, or an error code (<0) if not.](https://usermanual.wiki/Millennial-Net/RT-5209Z2/User-Guide-463655-Page-84.png)
![EK-5209-5 Evaluation Kit User’s Guide A-23iBeanAPI_IO.h13. ibApi_IO_ReadSerial()ibApi_FUNC ibApi_IO_ReadSerial (ibApi_APIHANDLE api_hdl,ibApi_DEVICEID device_id,ibApi_UINT8 buffer[],ibApi_UINT8 buffer_size,ibApi_UINT8 seq_num);For the given device, this retrieves the user data packet that arrived most recently. The ibApi_IO_SERIALMODE setting must have been previously something other than ibApi_IO_SERIALMODE_DISABLED. The input buffer holds a single packet (i.e., an arriving packet overwrites the previous one). Lost packets can be detected by gaps in the sequence numbers, which increment whenever a packet is received. If no new data is available, then the return value is 0.Parameters:api_hdl: (input) API handle returned from ibApi_Open().device_id: (input) ID of the device to be accessed.buffer[ ]: (output) Buffer to store the incoming user data packet.buffer_size: (input) Maximum size for buffer[ ].seq_num: (output) Sequence number identifying this packet, or NULL if this information is not needed.Return Value:Error code or the actual size of the result (which could exceed buffer_size if the written data was truncated)](https://usermanual.wiki/Millennial-Net/RT-5209Z2/User-Guide-463655-Page-85.png)
![EK-5209-5 Evaluation Kit User’s Guide A-29Example API Code/***************************************************************************/void WaitForKey(void) { printf("\r\nPress any key to close..."); _getch(); printf("\r\n");}/**************************************************************************** * This is a simple wrapper for detecting and reporting API error return * values. In C++, this function could throw an exception object. */ibApi_RESULT CheckResult(ibApi_RESULT result) { char error_text[256]; /* * Error codes always have a negative value. */ if (result >= 0) return result; /* * For the purposes of this example, ibApi_RESULT_ERR_TIMEOUT is not a * fatal error. */ if (result == ibApi_RESULT_ERR_TIMEOUT) return result; /* * This interprets the error code, writing the result to the error_text * variable */ ibApi_Utils_GetErrorDescription(result,error_text,sizeof(error_text)); printf("\r\nERROR: %s\r\n",error_text); /* * Technically, ibApi_Close() should be called before exiting, e.g. via * an atexit() handler. (This is omitted in the example for simplicity.) */ WaitForKey(); exit(1); return 0;}](https://usermanual.wiki/Millennial-Net/RT-5209Z2/User-Guide-463655-Page-91.png)
![A-30 EK-5209-5 Evaluation Kit User’s Guide/***************************************************************************/void ListDevices(ibApi_APIHANDLE api_hdl) {#define DEVICEIDS_MAX 100 ibApi_GROUPID groupid; ibApi_DEVICEID deviceids[DEVICEIDS_MAX]; int deviceids_count; char deviceid_text[256]; int sampling_interval; int i; ibApi_DEVICEINFO deviceinfo; ibApi_DEVICESTATUS devicestatus; /* * The ibApi_GetNetworkList() function returns a list of the groups * currently managed by the network. If the gateway is not properly * connected to the monitor, then this list will be empty. */ if (CheckResult(ibApi_GetNetworkList(api_hdl,&groupid,1) < 1)) { printf("The network is empty\r\n"); return; } /* * List the gateways in the group, which typically should be * only one. */ printf("\r\nGATEWAYS\r\n"); deviceids_count = CheckResult(ibApi_GetDeviceList(api_hdl, groupid, ibApi_DEVICETYPE_GATEWAY, deviceids,DEVICEIDS_MAX)); /* * If the buffer limit was exceeded, then display partial results */ if (deviceids_count > DEVICEIDS_MAX) deviceids_count = DEVICEIDS_MAX; for (i=0; i<deviceids_count; ++i) { /* * Note that the struct_size must be assigned BEFORE calling * ibApi_GetDeviceInfo(). This allows compatibility with future API * versions that implement additional fields. */ deviceinfo.struct_size = sizeof(deviceinfo);](https://usermanual.wiki/Millennial-Net/RT-5209Z2/User-Guide-463655-Page-92.png)
![EK-5209-5 Evaluation Kit User’s Guide A-31Example API Code CheckResult(ibApi_GetDeviceInfo(api_hdl,deviceids[i],&deviceinfo)); CheckResult(ibApi_Utils_ConvertDeviceIdToText(deviceids[i], deviceid_text,sizeof(deviceid_text),MIN_DEVICEID_WORDS)); printf(" %10s fw=\"%s\" hw=\"%s\"\r\n", deviceid_text, deviceinfo.firmware_version,deviceinfo.hardware_version); } /* * List the routers. */ printf("\r\nROUTERS\r\n"); deviceids_count = CheckResult(ibApi_GetDeviceList(api_hdl, groupid, ibApi_DEVICETYPE_ROUTER|ibApi_DEVICETYPE_ROUTERBEAN, deviceids,DEVICEIDS_MAX)); if (deviceids_count > DEVICEIDS_MAX) deviceids_count = DEVICEIDS_MAX; for (i=0; i<deviceids_count; ++i) { /* * Note that the struct_size must be assigned BEFORE calling * ibApi_GetDeviceStatus(). */ devicestatus.struct_size = sizeof(devicestatus); CheckResult(ibApi_GetDeviceStatus(api_hdl,deviceids[i],&devicestatus)); CheckResult(ibApi_Utils_ConvertDeviceIdToText(deviceids[i], deviceid_text,sizeof(deviceid_text),MIN_DEVICEID_WORDS)); printf(" %10s (%i hops)\r\n", deviceid_text, devicestatus.hop_count); } /* * List the endpoints. */ printf("\r\nENDPOINTS\r\n"); deviceids_count = CheckResult(ibApi_GetDeviceList(api_hdl, groupid, ibApi_DEVICETYPE_ENDPOINT, deviceids,DEVICEIDS_MAX)); if (deviceids_count > DEVICEIDS_MAX) deviceids_count = DEVICEIDS_MAX; for (i=0; i<deviceids_count; ++i) {](https://usermanual.wiki/Millennial-Net/RT-5209Z2/User-Guide-463655-Page-93.png)
![A-32 EK-5209-5 Evaluation Kit User’s Guide CheckResult(ibApi_Utils_ConvertDeviceIdToText(deviceids[i], deviceid_text,sizeof(deviceid_text),MIN_DEVICEID_WORDS)); sampling_interval = CheckResult(ibApi_GetSamplingInterval(api_hdl,deviceids[i])); printf(" %10s (%i ms)\r\n", deviceid_text, sampling_interval); }}/***************************************************************************/int main() { /* * This handle represents the current API session. */ ibApi_APIHANDLE api_hdl; ibApi_VERSION api_version; api_version = ibApi_GetApiVersion(); printf("\r\nInitializing API Version %i.%i.%i\r\n\r\n", ibApi_GET_VERSION_MAJOR(api_version), ibApi_GET_VERSION_MINOR(api_version), ibApi_GET_VERSION_RELEASE(api_version) ); /* * ibApi_Open() is called to begin the session. Your application * should ensure that ibApi_Close() is called to release the handle * before exiting. */ api_hdl = CheckResult(ibApi_Open(ibApi_EXPECTED_VERSION,"local","")); ListDevices(api_hdl); CheckResult(ibApi_Close(api_hdl)); WaitForKey(); return 0;}](https://usermanual.wiki/Millennial-Net/RT-5209Z2/User-Guide-463655-Page-94.png)