Minolta Di152 183 Use And Maintenance Manual Di152fax
di152183 a9450a0d-91d3-4def-8dde-37e61fffc7a3 Minolta Fax Machine Di152 183 User Guide |
2015-01-05
: Minolta Minolta-Di152-183-Use-And-Maintenance-Manual-166949 minolta-di152-183-use-and-maintenance-manual-166949 minolta pdf
Open the PDF directly: View PDF ![]() .
.
Page Count: 336 [warning: Documents this large are best viewed by clicking the View PDF Link!]
Di152f/Di183f
Fax unit for Di152/183 FX-1
User Manual

Energy Star®
As an ENERGY STAR® Partner, we have determined that this machine
meets the ENERGY STAR® Guidelines for energy efficiency.
What is an ENERGY STAR® Product?
An ENERGY STAR® product has a special feature that allows it to
automatically switch to a “low-power mode” after a period of inactivity. An
ENERGY STAR® product uses energy more efficiently, saves you money
on utility bills and helps protect the environment.
Recycled Paper (USA market only)
Your Minolta machine has been designed to use the following Recycled
Paper.
Minolta Recycled Bond: Item No. 8925 701
20% Post Consumer Waste

Di152f/Di183f i
Contents
1 Introduction
1.1 END USER LICENSE AGREEMENT.............................................1-1
1. SOFTWARE................................................................................1-1
2. LICENSE AGREEMENT.............................................................1-1
3. LICENSE.....................................................................................1-1
4. RESTRICTIONS .........................................................................1-2
5. LIMITED WARRANTY ................................................................1-2
6. LIMITATION OF REMEDIES ......................................................1-2
7. TERMINATION ...........................................................................1-3
8. GOVERNING LAW .....................................................................1-3
9. GOVERNMENT END USERS ....................................................1-3
1.2 We Want You to Be a Satisfied Customer ..................................1-4
For U.S.A. Users
FCC Part 15-Radio Frequency Devices..........................................1-4
For Canada Users
Interference-Causing Equipment Standard (ICES-003 Issue 3) .....1-4
1.3 Safety Information.........................................................................1-6
Warning and Precaution Symbols...................................................1-6
Meaning of Symbols........................................................................1-6
WARNING.......................................................................................1-7
CAUTION........................................................................................1-8
Precautions for Routine Use ...........................................................1-9
FCC Part 68 – Telecommunication Devices .................................1-10
Warning For The Setting Of Header And Footer...........................1-11
IC CS-03-Telecommunication Devices .........................................1-11
Laser Safety..................................................................................1-12
Internal Laser Radiation................................................................1-12
CDRH Regulation..........................................................................1-13
Laser Safety Label ........................................................................1-14
Ozone Release .............................................................................1-14
Notice for Ni-MH Batteries ............................................................1-15
1.4 About the User Manual...............................................................1-16
Explanation of Manual Conventions..............................................1-16
[ ] key.............................................................................................1-16
1.5 Explanation of Basic Concepts and Symbols..........................1-17
Paper Feeding...............................................................................1-17
“Width” and “Length” .....................................................................1-18
Paper Orientation..........................................................................1-18

ii Di152f/Di183f
2 Precautions
2.1 Installation Precautions ............................................................... 2-1
Installation site................................................................................ 2-1
Power source.................................................................................. 2-1
Space Requirements...................................................................... 2-2
2.2 Operation Precautions ................................................................. 2-3
Operating Environment................................................................... 2-3
Proper Use ..................................................................................... 2-3
Transporting the Machine............................................................... 2-4
Care of Machine Supplies .............................................................. 2-4
2.3 Legal Restrictions on Copying.................................................... 2-5
3 Before Making Copies or Faxing
3.1 Available Copy Features.............................................................. 3-1
3.2 Available Fax Features................................................................. 3-6
3.3 Components and Their Functions .............................................. 3-8
3.4 Part Names and Their Functions .............................................. 3-10
Main Unit ...................................................................................... 3-10
Inside of Main Unit........................................................................ 3-12
Automatic Document Feeder (Optional) ....................................... 3-13
Multiple Bypass Tray (Optional) ................................................... 3-14
Paper Feed Cabinet (Optional)..................................................... 3-15
Shifting Unit (Optional) ................................................................. 3-16
Job Tray (Optional)....................................................................... 3-17
3.5 Names of Control Panel Parts and Their Functions................ 3-18
Control Panel Parts and Their Functions...................................... 3-18
Display Indications........................................................................ 3-22
3.6 Useful Operations....................................................................... 3-24
Cancelling Settings....................................................................... 3-24
Auto Panel Reset.......................................................................... 3-24
Energy Saver Mode (Preheat Mode)............................................ 3-25
Auto Shut-Off................................................................................ 3-25
Queued Copy Jobs....................................................................... 3-25
Interrupting Copy Jobs ................................................................. 3-26
Auto Paper Source Change Feature ............................................ 3-26
Access Numbers .......................................................................... 3-26
To enter an access number.......................................................... 3-27
Printing From the Computer ......................................................... 3-27
Scanning From the Computer ...................................................... 3-27

Di152f/Di183f iii
3.7 Power Switch and Default Settings...........................................3-28
Turning the Machine On and Off...................................................3-28
To turn on the machine .................................................................3-28
To turn off the machine .................................................................3-28
Turning On the Machine................................................................3-29
Default Settings.............................................................................3-29
3.8 Selecting and Checking Initial Settings....................................3-30
Required Settings..........................................................................3-30
Checking the Initial Settings..........................................................3-30
To set the current date and time ...................................................3-31
To specify the user fax number.....................................................3-32
To program the user name............................................................3-33
Specifying the Phone Dialing System ...........................................3-34
To specify the telephone dialing system .......................................3-34
Specifying the Phone Wiring System............................................3-35
To specify the telephone wiring system ........................................3-35
3.9 Entering Text ...............................................................................3-36
Inputting Example .........................................................................3-37
3.10 Copy Paper ..................................................................................3-39
Paper Specifications .....................................................................3-39
Print Area ......................................................................................3-42
Paper Storage...............................................................................3-42
3.11 Original Documents....................................................................3-43
Document Feeding........................................................................3-43
Precautions for Loading Documents into the Automatic
Document Feeder .........................................................................3-44
Precautions for Positioning Documents on the Original Glass......3-44
4 Basic Copy Operations
4.1 Loading the Document .................................................................4-1
With the Automatic Document Feeder ............................................4-1
To load the document .....................................................................4-1
To load documents of mixed sizes..................................................4-2
With the Original Glass ...................................................................4-5
To position sheet documents ..........................................................4-5
To position translucent or transparent documents..........................4-6
To position a book...........................................................................4-7
4.2 Making Copies...............................................................................4-9
To make a simple copy ...................................................................4-9

iv Di152f/Di183f
4.3 Selecting the Paper Source ....................................................... 4-11
To make copies using the “Auto Paper” function.......................... 4-11
To copy with a manually selected paper size............................... 4-12
To copy onto special paper (1st Tray) .......................................... 4-13
4.4 Making Copies on Manually Fed Paper .................................... 4-14
Paper That Can Be Fed Manually ................................................ 4-14
Copying Onto Manually Fed Paper .............................................. 4-15
To copy using the Manual Bypass Tray ....................................... 4-15
To copy using the Multiple Bypass Tray....................................... 4-17
To copy onto a custom paper size................................................ 4-19
4.5 Specifying a Zoom Setting ........................................................ 4-21
Zoom Settings .............................................................................. 4-21
To make copies using the “AUTO” zoom setting.......................... 4-21
To make copies using a specific zoom setting ............................. 4-22
To make copies using the “X/Y Zoom” function............................ 4-23
4.6 Specifying the Copy Density (“Auto/Photo” function) ........... 4-25
To make copies after specifying a copy density ........................... 4-26
4.7 Interrupting Copy Jobs .............................................................. 4-27
To interrupt a copy job.................................................................. 4-27
5 Advanced Copy Operations
5.1 Single-Sided Copies..................................................................... 5-1
To make copies using the “2in1” (or “4in1”) copy function ............. 5-2
To make copies using the “Book Separation” function ................... 5-3
5.2 Finishing Copies (“Sort” and “Group” functions) .................... 5-5
Sorting ............................................................................................ 5-6
Grouping......................................................................................... 5-7
Specifying Finishing........................................................................ 5-8
To make copies using a Finishing function..................................... 5-8
5.3 Erasing Sections of Copies ......................................................... 5-9
Precautions on the Erased Margin Location................................. 5-10
Setting the “Erase” Function......................................................... 5-11
To make copies using an “Erase” setting ..................................... 5-11
5.4 Negative/Positive Inverted Copying ......................................... 5-12
To make copies using the negative/positive inverted
copy function ................................................................................ 5-12
5.5 Making Copies for Filing (“File Margin” function)................... 5-13
Precautions on the Binding Margin Location................................ 5-13
To make copies using the “File Margin” function.......................... 5-13

Di152f/Di183f v
5.6 Programmed Copy Jobs.............................................................5-15
To store a copy program...............................................................5-15
To recall a copy program ..............................................................5-16
6 Faxing
6.1 Document Specifications for Transmission...............................6-1
6.2 Basic Faxing..................................................................................6-3
To fax using the Automatic Document Feeder................................6-3
To fax documents positioned on the Original Glass........................6-5
If the Memory Becomes Full While Scanning Fax Documents .......6-7
6.3 Transmission Settings..................................................................6-8
Adjusting the Fax Resolution ..........................................................6-8
To specify the resolution .................................................................6-8
6.4 Dialing ..........................................................................................6-10
To fax by entering the fax number directly using the
10-Key Pad ...................................................................................6-11
To fax using one-touch dialing ......................................................6-12
To fax using speed dialing ............................................................6-13
To fax using group dialing.............................................................6-14
To fax using program dialing.........................................................6-15
To fax using combination dialing...................................................6-16
To fax using the phone book.........................................................6-17
To search the phone book ............................................................6-18
To redial the last recipient called...................................................6-19
6.5 Receiving .....................................................................................6-20
Receiving Automatically/Manually.................................................6-20
6.6 Checking Transmission Results................................................6-22
To check the transmission result...................................................6-22
7 Fax Transmission/Reception Methods
7.1 Transmission Methods.................................................................7-1
Memory Transmission.....................................................................7-1
Book Transmission..........................................................................7-1
Manual Transmission......................................................................7-1
To send a fax manually...................................................................7-2
Batch Transmission.........................................................................7-3
To fax using batch transmission......................................................7-3
Broadcast Transmission..................................................................7-4
To fax using broadcast transmission...............................................7-4
Timer Transmission.........................................................................7-7
To fax using timer transmission ......................................................7-7
Mailbox Transmission .....................................................................7-9

vi Di152f/Di183f
To fax using mailbox transmission ................................................. 7-9
Relay Initiation Transmission........................................................ 7-11
To fax using relay initiation transmission...................................... 7-11
Relay Broadcast Transmission..................................................... 7-13
Direct Transmission...................................................................... 7-14
To fax using direct transmission ................................................... 7-14
Polling Transmission .................................................................... 7-16
To set up polling transmission ...................................................... 7-16
To delete a document from the polling transmission setup .......... 7-18
Cancelling (Deleting) a Document Queued in the
Memory for Transmission............................................................. 7-19
To cancel a queued document ..................................................... 7-19
7.2 Reception Methods .................................................................... 7-21
Manual Reception......................................................................... 7-21
To receive a fax manually............................................................. 7-21
Memory Reception ....................................................................... 7-21
Mailbox Reception........................................................................ 7-22
To retrieve a document from a mailbox........................................ 7-22
Polling Reception.......................................................................... 7-23
To receive a fax using polling reception ....................................... 7-23
7.3 Using F codes ............................................................................. 7-25
Using Mailboxes ........................................................................... 7-26
Specifying F codes ....................................................................... 7-27
When sending faxes..................................................................... 7-27
Programming recipients................................................................ 7-28
8 Expanded Functions by Connecting a Computer
8.1 Setting Up for PC Faxing/PC Scanning ...................................... 8-1
Modem Specifications .................................................................... 8-1
8.2 Setting Up for PC Scanning......................................................... 8-1
9 Utility Mode – Copy Functions
9.1 Specifying Machine Settings (“MACHINE SETTING” Menu) .... 9-2
To select the “MACHINE SETTING” menu .................................... 9-3
To set the “AUTO PANEL RESET” function................................... 9-4
To set the “ENERGY SAVE MODE” (preheat mode) function ....... 9-5
To set the “AUTO SHUT OFF” function.......................................... 9-6
To specify the ADF (Automatic Document Feeder)
scanning image quality (“DENSITY(ADF)” function) ...................... 9-7
To specify the printing density (“PRINT DENSITY” function) ......... 9-8
To set the “LCD CONTRAST” function........................................... 9-8
To set the “BUZZER VOLUME” function ........................................ 9-9
To set the “LANGUAGE” function................................................... 9-9

Di152f/Di183f vii
To set the “INITIAL MODE” function .............................................9-10
9.2 Setting Up the Paper Sources
(“PAPER SOURCE SETUP” Menu)............................................9-11
To select the “PAPER SOURCE SETUP” menu...........................9-12
To specify the automatic paper size detection units
(“INCH/METRIC” function) ............................................................9-13
To specify the size of paper loaded into the 1st Tray
(“TRAY1 PAPER” function)...........................................................9-14
To set the “AUTO SELECT” function ............................................9-16
9.3 Specifying User-Managed Service Tasks
(“USER MANAGEMENT” Menu).................................................9-17
To perform the “DRUM DEHUMIDIFY” function ...........................9-17
To perform the “TONER REPLENISHER” function.......................9-18
9.4 Specifying Administrative Settings
(“ADMIN. MANAGEMENT” Menu)..............................................9-19
To select the “ADMIN. MANAGEMENT” menu.............................9-20
To set the “AUTO SHUT OFF” function ........................................9-21
To turn on/off user (section) management....................................9-22
To register user (section) access numbers...................................9-23
To change/delete user (section) access numbers ........................9-24
To display/clear the total count for a specific account...................9-26
To print the total counts for all accounts (sections).......................9-28
To clear the total counts for all accounts.......................................9-29
To set the “REMOTE MONITOR” function....................................9-30
9.5 Specifying Copy Settings
(“COPY SETTING 1” & “COPY SETTING 2” Menus) ................9-31
To select the “COPY SETTING 1” menu ......................................9-32
To set the “PAPER PRIORITY” function.......................................9-33
To set the “DENSITY PRIORITY” function....................................9-34
To set the “AUTO” density level
(“DENSITY LEVEL(A)” function) ...................................................9-34
To set the manual density level
(“DENSITY LEVEL(M)” function)...................................................9-35
To set the “BINDING POS.” function.............................................9-35
To specify the binding width (“MARGIN SETTING” function) .......9-36
To specify the erased width (“ERASE SETTING” function) ..........9-36
To select the “COPY SETTING 2” menu ......................................9-37
To set the “MIXED ORIGINAL” function........................................9-38
To set the “COPY PRIORITY” function.........................................9-38
To specify the default finishing mode
(“OUTPUT PRIORITY” function)...................................................9-39
To set the “4IN1 COPY ORDER” function ....................................9-39
To set the “CRISSCROSS MODE” function..................................9-40

viii Di152f/Di183f
10 Utility Mode – Fax Functions
10.1 Programming Fax Settings (“FAX REGISTRATION” Menu) ... 10-1
To select the “FAX REGISTRATION” menu................................. 10-2
Setting Up One-Touch Dialing (“ONE-TOUCH DIAL” function).... 10-3
To program a one-touch dial key.................................................. 10-4
To change/delete a programmed one-touch dial key ................... 10-6
Setting Up Speed Dialing (“SPEED DIAL” function)..................... 10-8
To program a speed dial number ................................................. 10-8
To change/delete a programmed speed dial number................. 10-11
Setting Up Group Dialing (“GROUP DIAL” function) .................. 10-13
To program a group of fax numbers........................................... 10-13
To change/delete a programmed group of fax numbers ............ 10-14
Setting Up Program Dialing (“PROGRAM DIAL” function) ......... 10-16
To set program dialing................................................................ 10-16
To change/delete a programmed broadcast transmission ......... 10-17
To change/delete a programmed timer transmission ................. 10-19
To change/delete a programmed mailbox transmission............. 10-20
To change/delete a programmed polling reception .................... 10-22
To change/delete a programmed relay initiation transmission ... 10-23
Setting Up Batch Transmissions (“BATCH TX” function) ........... 10-25
To set batch transmitting ............................................................ 10-25
To change the batch transmission setting .................................. 10-27
To delete the batch transmission setting.................................... 10-28
Setting Up Mailboxes (“MAILBOX” function) .............................. 10-29
To register a mailbox.................................................................. 10-29
To delete a mailbox .................................................................... 10-30
Setting Up Relay Boxes (“RELAY BOX” function)...................... 10-31
To program the relay box ........................................................... 10-32
To delete the relay box............................................................... 10-34
10.2 Specifying Transmission Settings
(“TX OPERATION” Menu) ........................................................ 10-35
To select the “TX OPERATION” menu....................................... 10-35
To specify the default scanning contrast
(“SCAN CONTRAST” function) .................................................. 10-36
To specify the default resolution setting
(“RESOLUTION” function).......................................................... 10-37
To set the “DEFAULT TX” function............................................. 10-38
To specify if one-touch dialing transmission (Copy mode) is
allowed (“OT-DIAL IN COPY” function)...................................... 10-38
10.3 Specifying Reception Settings (“RX OPERATION” Menu) ... 10-39
To select the “RX OPERATION” menu ...................................... 10-41
To select the memory reception mode
(“MEMORY RX MODE” function) ............................................... 10-42
To cancel memory reception ...................................................... 10-43
To set the “NO.of RINGS” function............................................. 10-44

Di152f/Di183f ix
To set the “REDUCTION RX” function........................................10-44
To set the “RX PRINT” function ..................................................10-45
To set the “RX MODE” function ..................................................10-45
To set the “FORWARD” function.................................................10-46
To set the “FOOTER” function ....................................................10-47
To set the “SELECT TRAY” function...........................................10-47
10.4 Specifying Communication Settings
(“COMM.SETTING” Menu)........................................................10-48
To set the “LINE MONITOR” function .........................................10-49
10.5 Specifying Report Output (“REPORTING” Menu)..................10-50
To select the “REPORTING” menu.............................................10-50
To set the “ACTIVITY REPORT” function...................................10-51
To set the “RESERV.REPORT” function ....................................10-52
To set the “TX RESULT REPORT” function ...............................10-52
To set the “RX RESULT REPORT” function...............................10-53
11 Confirmation Mode
11.1 Checking Transmission Results................................................11-1
11.2 Checking the Machine’s Counters
(“MACHINE COUNTER” Menu) ..................................................11-1
To check the counters...................................................................11-2
11.3 Outputting a report/list (“PRINT REPORT” menu)...................11-3
To output a report/list ....................................................................11-3
Transmission Result Report..........................................................11-4
Reception Result Report...............................................................11-4
Activity Report...............................................................................11-4
Queued Job List............................................................................11-5
Queued Job Images......................................................................11-5
List of One-Touch Dial Keys .........................................................11-5
List of Speed Dial Numbers ..........................................................11-5
List of Programmed Keys..............................................................11-5
Relay Box List ...............................................................................11-6
Machine Settings List....................................................................11-6
Configuration Page .......................................................................11-6
PCL Font List ................................................................................11-6
12 Error Messages
12.1 When the Message “LOAD PAPER” Appears ..........................12-1
To load paper into the 1st Tray .....................................................12-1
To load paper into the 2nd Tray....................................................12-3
To load paper into the Multiple Bypass Tray.................................12-4

x Di152f/Di183f
12.2 When the Message “TONER EMPTY” Appears ....................... 12-5
To replace the toner bottle............................................................ 12-5
12.3 When the Message “PAPER JAM” Appears ............................ 12-8
To clear a paper misfeed in the main unit or 1st Tray .................. 12-8
To clear a paper misfeed in the Paper Feed Cabinet................. 12-12
To clear a paper misfeed in the Multiple Bypass Tray................ 12-13
12.4 When the Message “ORIGINAL DOC.JAM” Appears ............ 12-15
To clear a misfeed in the Automatic Document Feeder ............. 12-15
12.5 Main Error Messages and Their Remedies ............................ 12-18
13 Troubleshooting
13.1 When Incorrect Copies Are Produced...................................... 13-1
13.2 When Copying Is Not Performed Correctly.............................. 13-4
13.3 When Faxing Is Not Performed Correctly ................................ 13-5
Faxes Cannot Be Sent ................................................................. 13-5
Faxes Cannot Be Received.......................................................... 13-6
Calls Cannot Be Sent ................................................................... 13-7
14 Appendix
14.1 Specifications ............................................................................. 14-1
Main Unit Di152*/Di152f/Di183*/Di183f ........................................ 14-1
Automatic Document Feeder AF-10 ............................................. 14-2
Paper Feed Cabinet PF-120......................................................... 14-3
Shifting Unit OT-103..................................................................... 14-3
Job Tray JS-202 ........................................................................... 14-3
Multiple Bypass Tray MB-5........................................................... 14-4
14.2 List of Utility/Function/Confirm Menu Commands.................. 14-5
Utility Menu Commands ............................................................... 14-5
14.3 Care of the Machine ................................................................... 14-9
Cleaning ....................................................................................... 14-9
Housing ........................................................................................ 14-9
Original Glass............................................................................... 14-9
Document Pad.............................................................................. 14-9
Control Panel.............................................................................. 14-10
14.4 Function Combination Table ................................................... 14-11
Function Combination Table....................................................... 14-11
Function combination codes....................................................... 14-11
14.5 Paper Size and Zoom Ratio Tables......................................... 14-12
Copy Paper Sizes....................................................................... 14-12
Zoom Ratios ............................................................................... 14-13

Di152f/Di183f xi
14.6 Power Outages..........................................................................14-16
14.7 Glossary.....................................................................................14-17
Terms and Definitions .................................................................14-17
15 Index

xii Di152f/Di183f

Introduction 1
Di152f/Di183f 1-1
1 Introduction
1.1 END USER LICENSE AGREEMENT
PLEASE READ CAREFULLY THE LICENSE AGREEMENT BELOW
BEFORE INSTALLING THE SOFTWARE. INSTALLING THE
SOFTWARE INDICATES YOUR ACCEPTANCE OF THE TERMS AND
CONDITIONS BELOW. IF YOU DO NOT AGREE WITH THEM, YOU
SHOULD PROMPTLY RETURN THE SOFTWARE UNUSED.
1. SOFTWARE
“Software” means the computer program contained in the package,
together with all codes, techniques, software tools, format, design,
concepts, methods and ideas associated with the computer program and
all documentation related thereto.
2. LICENSE AGREEMENT
This is s license agreement for sale. Minolta owns, or has been licensed
from other owners, copyrights in the Software. Except as in this
Agreement, you are not granted any rights to patents, copyrights, trade
names, trademarks (whether registered or unregistered), or any other
rights, franchises or licenses in respect of the Software. Title to the
Software and any copy made from it is retained by Minolta or such other
owners.
3. LICENSE
Minolta, hereby grand to you, and you agree to accept a non-exclusive,
non-transferable and limited license and you may:
(1) install and use the Software on a single computer.
(2) use the Software only for your own customary business or personal
purpose.
(3) make a copy of the Software for backup or installation purpose only in
support of the normal and intended use of the Software.

1Introduction
1-2 Di152f/Di183f
(4) transfer possession of copies of the Software to another party by
transferring a copy of this Agreement and all other documentation along
with at least one complete unaltered copy of the Software, provided that
(i) you must, at the same time, either transfer to such other party or
destroy all your other copies of the Software. (ii) such transfer of
possession terminates your license from Minolta, and (iii) such other party
shall accept and be bound by these license terms by its initial use of the
Software.
4. RESTRICTIONS
(1) You shall not without the written consent of Minolta:
(i) use, copy, modify, merge or transfer copies of the Software except as
provided herein, (ii) reverse assemble or reverse compile the Software
except as permitted by law; or (iii) sublicense, rent, lease or distribute the
Software or any copy thereof.
(2) You shall not export or re-export the Software in any from under
violation of export restrictions by the government of your country.
5. LIMITED WARRANTY
Minolta warrants the media on which the software is recorded to be free
from defects in materials and workmanship under normal use. Warranty
details and limitations for the Hardware containing the Software are
described in the Statement of Limited Warranty which was supplied with
the hardware. With the exception of the foregoing express warranties
applicable to hardware and media only, the Software is not warranted and
is provided “AS IS”.
SUCH WARRANTIES ARE IN LIEU OF ALL OTHER WARRANTIES,
EXPRESS OR IMPLIED, INCLUDING, BUT NOT LIMITED TO, THE
IMPLIED WARRANTIES OF MERCHANTABILITY AND FITNESS FOR A
PARTICULAR PURPOSE.
6. LIMITATION OF REMEDIES
IN NO EVENT WILL MINOLTA BE LIABLE FOR ANY LOST PROFITS,
LOST DATA, OR ANY OTHER INCIDENTAL OR CONSEQUENTIAL
DAMAGES THAT RESULT FROM USE OR INABLITY TO USE THE
SOFTWARE, EVEN IF MINOLTA OR ITS AUTHORISED
REMARKETERS HAVE BEEN ADVISED OF THE POSSIBILITY OF
SUCH DAMAGES OR FOR ANY CLAIM BY YOU BASED ON A THIRD
PARTY CLAIM.

Introduction 1
Di152f/Di183f 1-3
7. TERMINATION
You may terminate your license at any time by destroying the Software
and all your copies of it or as otherwise described in these terms. Minolta
may terminate your license if you fail to comply with these terms. Upon
such termination, you agree to destroy all your copies of the Software.
8. GOVERNING LAW
This Agreement shall be governed by the laws of the country where the
delivery is made to the original customer.
9. GOVERNMENT END USERS
If you are acquiring the Software on behalf of any unit or agency of the
United States Government, the following provisions apply. Use,
duplication or disclosure by the Government is subject to restrictions as
set forth in the Rights in Technical Data and Computer Software clause at
FAR 252.227-7013, subdivision (b)(3)(ii) or sub paragraph (c)(1)(ii), as
appropriate. Further use, duplication or disclosure is subject to restrictions
to restricted rights software as set forth in FAR 52.227-19(c)(2).
YOU ACKNOWLEDGE THAT YOU HAVE READ THIS AGREEMENT,
UNDERSTAND IT, AND AGREE TO BE BOUND BY ITS TERMS AND
CONDITIONS. NEITHER PARTY SHALL BE BOUND BY ANY
STATEMENT OR REPRESENTATION NOT CONTAINED IN THIS
AGREEMENT. NO CHANGE IN THIS AGREEMENT IS EFFECTIVE
UNLESS WRITTEN AND SIGNED BY PROPERLY AUTHORISED
REPRESENTATIVES OF EACH PARTY. BY INSTALLING THIS
SOFTWARE, YOU AGREE TO ACCEPT THE TERMS OF THIS
AGREEMENT.

1Introduction
1-4 Di152f/Di183f
1.2 We Want You to Be a Satisfied Customer
Thank you for choosing a Minolta Di152/Di152f/Di183/Di183f.
This User Manual describes the functions, operating procedures,
precautions, and basic troubleshooting for the Di152*/Di152f/Di183*/
Di183f. Before using this machine, be sure to read the User Manual
thoroughly in order to ensure that you use the machine efficiently. After
you have gone through the manual, store it in the holder on the machine
and keep it handy at all times.
Please contact your local authorized Minolta Dealer for support and
technical assistance.
Note that some of the illustrations of the machine used in the User Manual
may be different from what you actually see on your machine.
* The Di152/Di183 have only the optional Fax unit for Di183/Di152 FX-1
installed.
For U.S.A. Users
FCC Part 15-Radio Frequency Devices
NOTE: This equipment has been tested and found to comply with the
limits for a Class A digital device, pursuant to Part 15 of the FCC Rules.
These limits are designed to provide reasonable protection against
harmful interference when the equipment is operated in a commercial
environment. This equipment generates, uses, and can radiate radio
frequency energy and, if not installed and used in accordance with the
instruction manual, may cause harmful interference to radio
communications.
Operation of this equipment in a residential area is likely to cause harmful
interference in which case the user will be required to correct the
interference at his own expense.
WARNING: The design and production of this unit conform to FCC
regulations, and any changes or modifications must be registered with the
FCC and are subject to FCC control. Any changes made by the purchaser
or user without first contacting the manufacturer will be subject to penalty
under FCC regulations.

Introduction 1
Di152f/Di183f 1-5
For Canada Users
Interference-Causing Equipment Standard (ICES-003 Issue 3)
This Class A digital apparatus complies with Canadian ICES-003.
Cet appareil numérique de la classe A est conforme à la norme NMB-003
du Canada.
This device complies with Part 15 of the FCC Rules. Operation is subject to the following
two conditions:
(1) This device may not cause harmful interface, and (2) this device must accept any
interface received, including interface that may cause undesired operation.
1Introduction
1-6 Di152f/Di183f
1.3 Safety Information
This section contains detailed instructions on the operation and mainte-
nance of this machine. To achieve optimum utility of this device, all oper-
ators should carefully read and follow the instructions in this manual.
Please keep this manual in a handy place near the machine.
* Please note that some parts of the contents of this section may not correspond with the pur-
chased product.
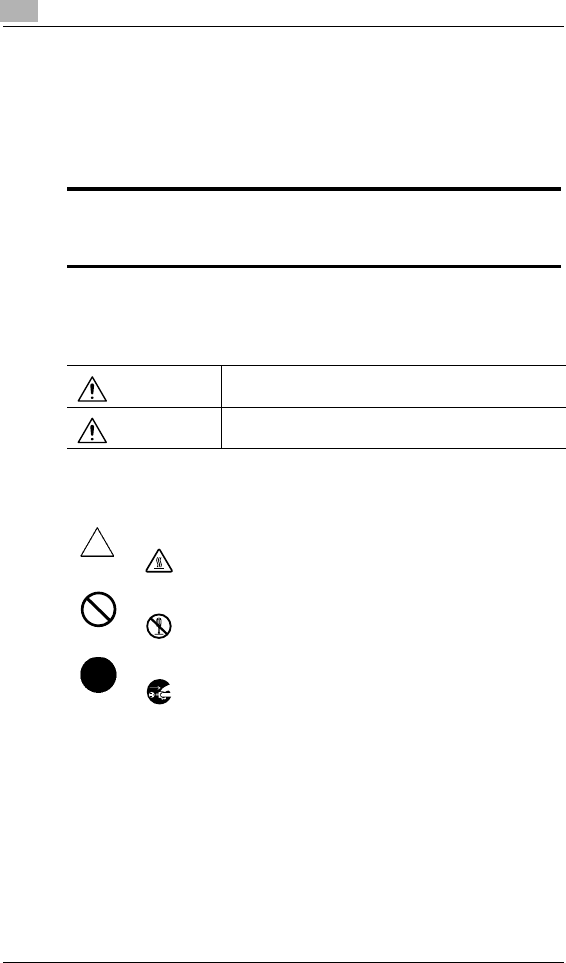
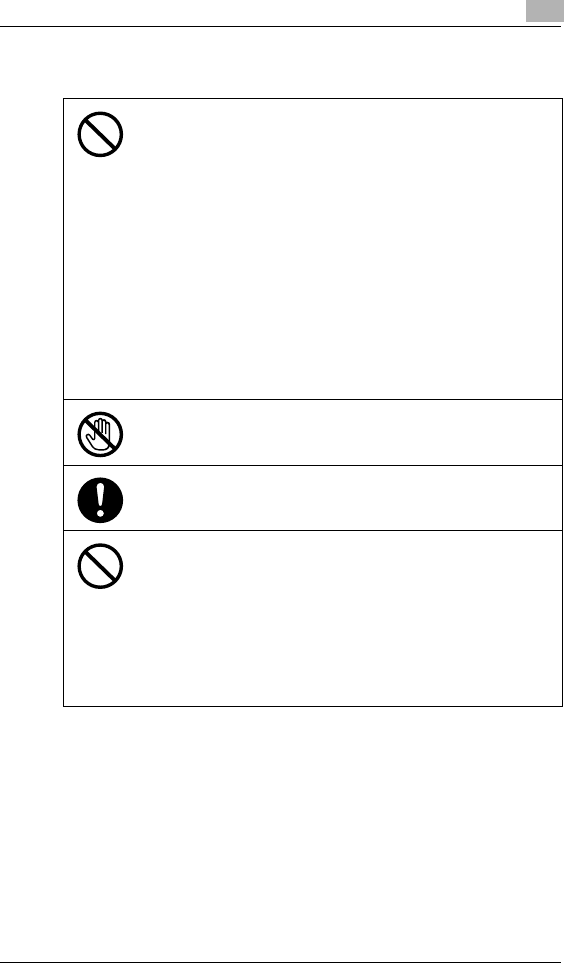
Warning and Precaution Symbols
Meaning of Symbols
Please read the next section before using this device. It contains important information
related to user safety and preventing equipment problems.
Make sure you observe all of the precautions listed in this manual.
Ignoring this warning could cause serious injury or even death.
Ignoring this caution could cause injury or damage to property.
WARNING:
CAUTION:
A triangle indicates a danger against which you should take precaution.
This symbol warns against possible high temperature.
A diagonal line indicates a prohibited course of action.
This symbol warns against dismantling the device.
A black circle indicates an imperative course of action.
This symbol indicates you must unplug the device.
Introduction 1
Di152f/Di183f 1-7
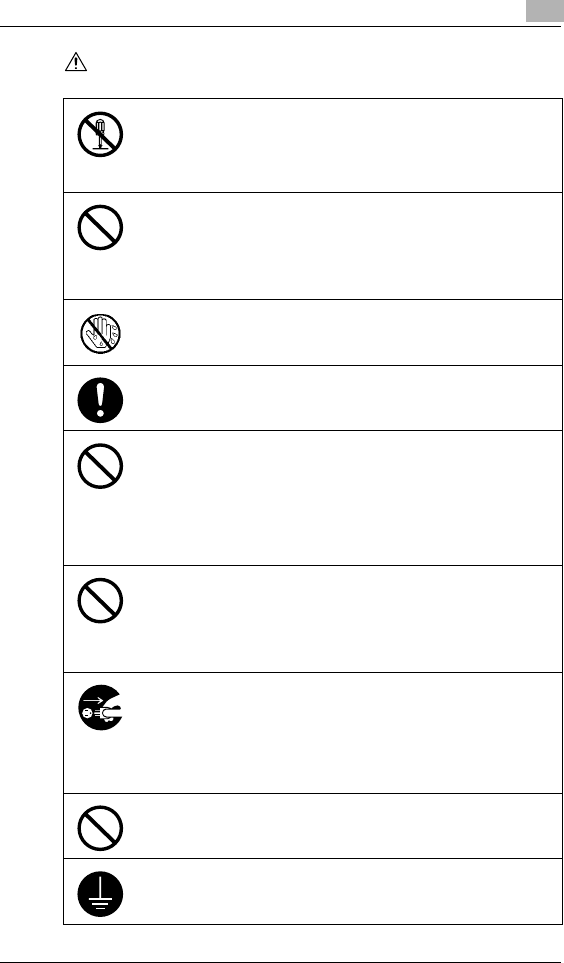
WARNING
• Do not modify this product: Fire, electrical shock, or breakdown could re-
sult. If the product employs a laser, the laser beam source could cause
blindness.
• Do not attempt to remove the covers and panels which have been fixed to
the product. Some products have a high-voltage part or a laser beam
source inside that could cause an electrical shock or blindness.
• Use only the power cord supplied in the package. Failure to use this cord
could result in fire or electrical shock.
• Use only the specified power source voltage. Failure to do so could result
in fire or electrical shock.
• Do not use a multiple outlet adapter to connect any other appliances or
machines. Use of a power outlet for more than the marked current value
could result in fire or electrical shock.
Do not unplug and plug in the power cord with a wet hand: An electrical shock
could result.
Plug the power cord all the way into the power outlet. Failure to do so could
result in fire or electrical shock.
• Do not scratch, abrade, place a heavy object on, heat, twist, bend, pull on,
or damage the power cord. Use of a damaged power cord (exposed core
wire, broken wire, etc.) could result in fire or breakdown.
Should any of these conditions be found, immediately turn OFF the power
switch, unplug the power cord from the power outlet, and then call your
authorized service representative.
• In principle, do not use an extension cord. Use of an extension cord could
cause fire or electrical shock. Contact your authorized service representa-
tive if an extension cord is required.
Do not place a flower vase or other container that contains water, or metal
clips or other small metallic objects on this product. Spilled water or metallic
objects dropped inside the product could result in fire, electrical shock, or
break-down.
Should a piece of metal, water, or any other similar foreign matter get inside
the product, immediately turn OFF the power switch, unplug the power cord
from the power outlet, and then call your authorized service representative.
• If this product becomes inordinately hot or emits smoke, or emits an unusu-
al odor or noise, immediately turn OFF the power switch, unplug the power
cord from the power outlet, and then call your authorized service represen-
tative. If you keep on using it as is, fire or electrical shock could result.
• If this product has been dropped or its cover damaged, immediately turn
OFF the power switch, unplug the power cord from the power outlet, and
then call your authorized service representative. If you keep on using it as
is, fire or electrical shock could result.
Do not throw the toner cartridge or toner into an open flame. The hot toner
may scatter and cause burns or other damage.
Connect the power cord only to an electrical outlet that is equipped with a
grounding terminal.
1Introduction
1-8 Di152f/Di183f
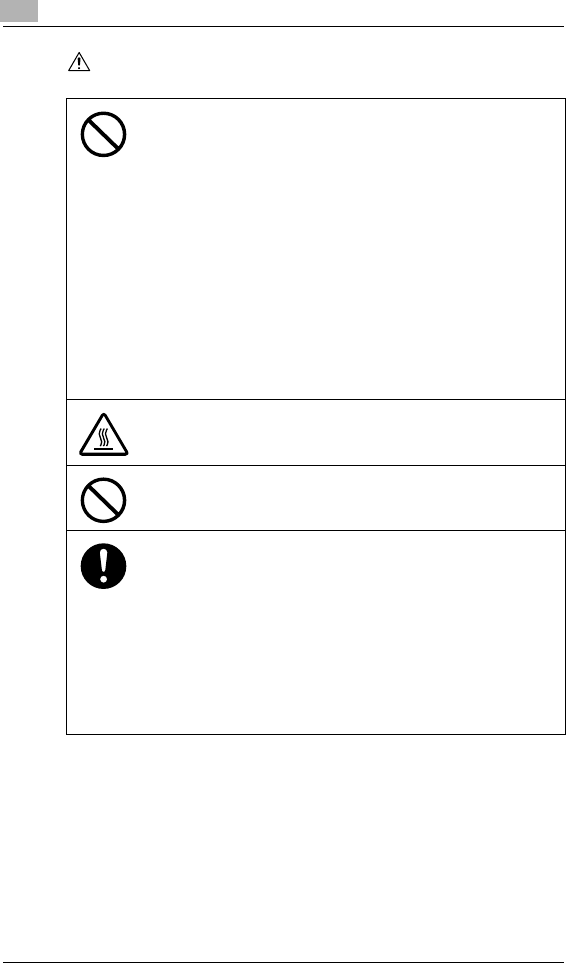
CAUTION
• Do not use flammable sprays, liquids, or gases near this product, as fire
could result.
• Do not leave a toner unit or drum unit in a place within easy reach of
children.
Licking or ingesting any of these substances could injure your health.
• Do not let any object plug the ventilation holes of this product. Heat could
accumulate inside the product, resulting in a fire or malfunction.
• Do not install this product at a site that is exposed to direct sunlight, or near
an air conditioner or heating apparatus. The resultant temperature changes
inside the product could cause a malfunction, fire, or electrical shock.
• Do not place the product in a dusty place, or a site exposed to soot or
steam, near a kitchen table, bath, or a humidifier. Fire, electrical shock, or
breakdown could result.
• Do not place this product on an unstable or tilted bench, or in a location
subject to a lot of vibration and shock. It could drop or fall, causing personal
injury or mechanical breakdown.
• After installing this product, mount it on a secure base. If the unit moves or
falls, it may cause personal injury.
• Do not store toner units and PC drum units near a floppy disk or watch that
are susceptible to magnetism. They could cause these products to mal-
function.
The inside of this product has areas subject to high temperature, which may
cause burns. When checking the inside of the unit for malfunctions such as a
paper misfeed, do not touch the locations (around the fusing unit, etc.) which
are indicated by a “Caution! High Temperature!” warning label.
Do not place any objects around the power plug, as the power plug may be
difficult to pull out when an emergency occurs.
• Always use this product in a well ventilated location. Operating the product
in a poorly ventilated room for an extended period of time could injure your
health. Ventilate the room at regular intervals.
• Whenever moving this product, be sure to disconnect the power cord and
other cables. Failure to do this could damage the cord or cable, resulting in
fire, electrical shock, or breakdown.
• When moving this product, always hold it by the locations specified in the
User manual or other documents. If the unit falls it may cause severe per-
sonal injury. The product may also be damaged or malfunction.
• Remove the power plug from the outlet at least twice a year and clean the
area between the plug terminals. Dust that accumulates between the plug
terminals could cause a fire.
• When unplugging the power cord, be sure to hold onto the plug. Pulling on
the power cord could damage the cord, resulting in fire or electrical shock.
Introduction 1
Di152f/Di183f 1-9
Precautions for Routine Use
• Do not store toner units, PC drum units, or other supplies and consumables
in a place subject to direct sunlight and high temperature or humidity, as
poor image quality and malfunction could result.
• Do not attempt to replace the toner unit and PC drum unit in a place ex-
posed to direct sunlight. If the PC drum is exposed to intense light, poor im-
age quality could result.
• Do not unpack a toner unit or PC drum unit until the very time of use. Do
not leave an unpacked unit standing. Install it immediately or poor image
quality could result.
• Do not keep toner units and PC drum units in an upright position or upside
down, as poor image quality could result.
• Do not throw or drop a toner unit or PC drum unit, as poor image quality
could result.
• Do not use this product in an area where ammonia or other gases or chem-
icals are present. Failure to do so may shorten the service life of the prod-
uct, cause damage or decrease performance.
• Do not use this product in an environment with a temperature outside the
range specified in the User manual, as breakdown or malfunction could re-
sult.
• Do not attempt to feed stapled paper, carbon paper or aluminum foil
through this product, as malfunction or fire could result.
Do not touch or scratch the surface of the toner unit developing roller or the
PC drum, as poor image quality could result.
Use the supplies and consumables recommended by the dealer. Use of any
supply or consumable not recommended could result in poor image quality or
breakdown.
• Do not rest your weight on the control panel, as a malfunction could result.
• Normal international communications may at times not be possible de-
pending on line conditions.
• If tap or well water is used in a humidifier, impurities in the water are dis-
charged into the air and may be deposited inside the printer, resulting in
poor image quality. It is recommended that pure water that does not contain
any impurities be used in the humidifier.
• The cooling fan may be activated automatically, but this suggests no prob-
lems.
• Ni-MH (Nickel Metal Hydride) Batteries are installed inside machine as
back up memory batteries. Please dispose according to local, state and
federal regulations.

1Introduction
1-10 Di152f/Di183f
FCC Part 68 – Telecommunication Devices
This equipment complies with Part 68 of the FCC rules. On the rear panel
of this equipment is a label that contains, among other information, the
FCC registration number and Ringer Equivalence Number (REN) for this
equipment. If requested, provide this information to your telephone
company.
This equipment uses THE FOLLOWING USOC JACKS: RJ11C.
The REN is useful to determine the quantity of devices you may connect
to your telephone line and still have all of those devices ring when your
number is called. In most, but not all areas, the sum of the RENs of all
devices should not exceed five (5.0). To be certain of the number of
devices you may connect to your line, as determined by the REN, you
should call your local telephone company to determine the maximum REN
for your calling area.
If your telephone equipment causes harm to the telephone network, the
Telephone Company may discontinue your service temporarily. If
possible, they will notify you in advance. But if advance notice isn’t
practical, you will be notified as soon as possible. You will be advised of
your right to file a complaint with the FCC.
Your telephone company may make changes to its facilities, equipment,
operations, or procedures that could affect the proper operation of your
equipment. If they do, you will be given advance notice so as to give you
an opportunity to maintain uninterrupted service.
If you experience trouble with this equipment, please contact:
Minolta Corporation
101 Williams Drive Ramsey.
New Jersey 07446
U.S.A.
The telephone company may ask you to disconnect this equipment from
the network until the problem has been corrected or you are sure that the
equipment is not malfunctioning.
This equipment may not be used on coin service provided by the
telephone company. Connection to party lines is subject to state tariffs.
(Contact your state public utility commission or corporation commission
for information.)
Customer Information For Privately Owned Coin Phones
To comply with state tariffs, the telephone company must be given
notification prior to connection.

Introduction 1
Di152f/Di183f 1-11
In some states, prior approval of connection must be obtained from the
state Public Utility Commission, Public Service Commission or state
Corporation Commission.
Warning For The Setting Of Header And Footer
The Telephone Consumer Protection Act of 1991 makes it unlawful for
any person to use a computer or other electronic device to send any
message via a telephone fax machine unless such maessage clearly
contains in a margin at the top or bottom of each trasmitted page or on the
first page of the transmission, the date and time it is sent and an
identification of the business or other entity, or other individual sending the
message and the telephone number of the sending machine or such
business, other entity, or individual.
In order to program this information into your fax machine, you should
complete the following steps. (Refer to p. 3-32 and p. 3-33.)
IC CS-03-Telecommunication Devices
NOTICE:
Industry Canada (IC) label identifies certified equipment. This certification
means that the equipment meets certain telecommunications network
protective, operational, and safety requirements. IC does not guarantee
the equipment will operate to the user’s satisfaction.
Before installing this equipment, users should ensure that it is permissible
to be connected to the facilities of the local telecommunications company.
The equipment must also be installed using an acceptable method of
connection. In some cases, the company’s inside wiring associated with a
single line individual service may be extended by means of a certified
connector assembly (telephone extension cord). The customer should be
aware that compliance with the above conditions may not prevent
degradation of service in some situations.
Repairs to certified equipment should be made by an authorized
Canadian maintenance facility designated by the supplier. Any repairs or
alterations made by the user to this equipment, or equipment
malfunctions, may give the telecommunications company cause to
request the user to disconnect the equipment.
Users should ensure for their own protection that the electrical ground
connections of the power utility, telephone lines, and internal metallic
water pipe system, if present, are connected together. This precaution
may be particularly important in rural areas.
CAUTION:
Users should not attempt to make such connections themselves, but
should contact the appropriate electric inspection authority, or electrician,
as appropriate.

1Introduction
1-12 Di152f/Di183f
NOTICE:
The Ringer Equivalence Number (REN) assigned to each terminal
device provides an indication of the maximum number of terminals
allowed to be connected to a telephone interface. The termination on an
interface may consist of any combination of devices subject only to the
requirement that the sum of the Ringer Equivalence Numbers of all the
devices does not exceed 5. REN = 0.2
If you experience trouble with this equipment, please contact:
Minolta Business Equipment (Canada), Ltd.
369 Britannia Road E.
Mississauga, Ontario L42 2H5
Tel: (905) 890-6600
Laser Safety
This is a digital machine which operates using a laser. There is no
possibility of danger from the laser provided the machine is operated
according to the instructions in this manual.
Since radiation emitted by the laser is completely confined within
protective housing, the laser beam cannot escape from the machine
during any phase of user operation.
This machine is certified as a Class 1 laser product: This means the
machine does not produce hazardous laser radiation.
Internal Laser Radiation
Maximum Average Radiation Power: 26.4 µW at the laser aperture of the
print head unit.
Wavelength: 770-795 nm
This product employs a Class 3b laser diode that emits an invisible laser
beam.
The laser diode and the scanning polygon mirror are incorporated in the
print head unit.
The print head unit is NOT A FIELD SERVICE ITEM:

Introduction 1
Di152f/Di183f 1-13
Therefore, the print head unit should not be opened under any
circumstances.
There is a laser aperture at the location shown above, which must,
however, NEVER be viewed directly by the user.
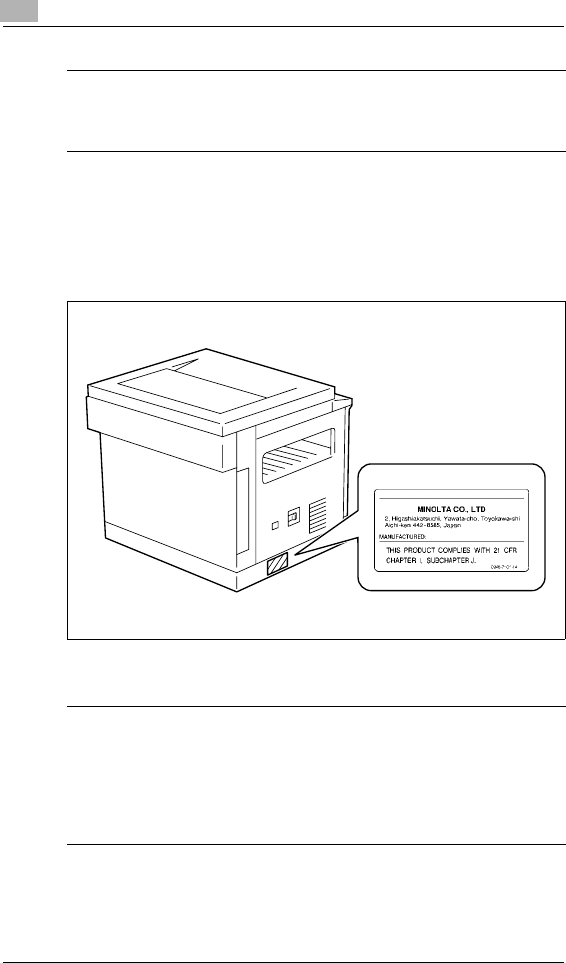
CDRH Regulation
This machine is certified as a Class 1 Laser product under Radiation
Performance Standard according to the Food, Drug and Cosmetic Act of
1990. Compliance is mandatory for Laser products marketed in the United
States and is reported to the Center for Devices and Radiological Health
(CDRH) of the U.S. Food and Drug Administration of the U.S. Department
of Health and Human Services (DHHS). This means that the device does
not produce hazardous laser radiation.
The label shown on page 1-14 indicates compliance with the CDRH
regulations and must be attached to laser products marketed in the United
States.
Print Head
Laser Aperture of the
Print Head Unit
1Introduction
1-14 Di152f/Di183f
This is a semiconductor laser. The maximum power of the laser diode is
5 mW and the wavelength is 770-795 nm.
Laser Safety Label
A laser safety label is attached to the outside of the machine as shown be-
low.
Ozone Release
CAUTION
Use of controls, adjustments or performance of procedures other than
those specified in this manual may result in hazardous radiation
exposure.
NOTE
= Locate the Machine in a Well Ventilated Room =
A negligible amount of ozone is generated during normal operation of
this machine. An unpleasant odor may, however, be created in poorly
ventilated rooms during extensive machine operations. For a comfort-
able, healthy, and safe operating environment, it is recommended that
the room well ventilated.

Introduction 1
Di152f/Di183f 1-15
Notice for Ni-MH Batteries
Ni-MH (Nickel Metal Hydride) Batteries are installed inside machine as
back up memory batteries. Please dispose according to local, state and
federal regulations.
REMARQUE
= Placer l’appareil dans une pièce largement ventilée =
Une quantité d’ozone négligable est dégagée pendant le fonctionne-
ment de l’appareil quand celui-ci est utilisé normalement. Cependant,
une odeur désagréable peut être ressentie dans les pièces dont l’aéra-
tion est insuffisante et lorsque une utilisation prolongée de l’appareil est
effectuée. Pour avoir la certitude de travailler dans un environnement
réunissant des conditions de confort, santé et de sécurité, il est
préférable de bien aérer la pièce ou se trouve l’appareil.

1Introduction
1-16 Di152f/Di183f
1.4 About the User Manual
Explanation of Manual Conventions
The marks and text formats used in this manual are described below.
WARNING
Failure to observe instructions highlighted in this manner may result
in fatal or critical injuries.
§Observe all warnings in order to ensure safe use of the machine.
CAUTION
Failure to observe instructions highlighted in this manner may result
in serious injuries or property damage.
§Observe all cautions in order to ensure safe use of the machine.
Note
(* May also appear as “Important” or “Tip”)
Text highlighted in this manner contains useful information and tips to
ensure safe use of the machine and serve as supplementary
information. It is recommended that you read all of them.
1The number 1 as formatted here in-
dicates the first step of a sequence
of actions.
2Subsequent numbers as formatted
here indicate subsequent steps of a
sequence of actions.
?Text formatted in this style pro-
vides additional assistance.
§Text formatted in this style describes the action that will ensure the
desired results are achieved.
[ ] key
The names of keys on the Control Panel are written as shown above.
An illustration inserted here shows
what operations must be performed.

Introduction 1
Di152f/Di183f 1-17
1.5 Explanation of Basic Concepts and Symbols
The use of words and symbols in this manual are explained below.
Paper Feeding
During printing, paper is supplied from the right side of the machine and
fed into the Exit Tray on top with the printed surface of the page facing
down. The paper feed direction is shown by the arrows in the diagram
below.
1Introduction
1-18 Di152f/Di183f
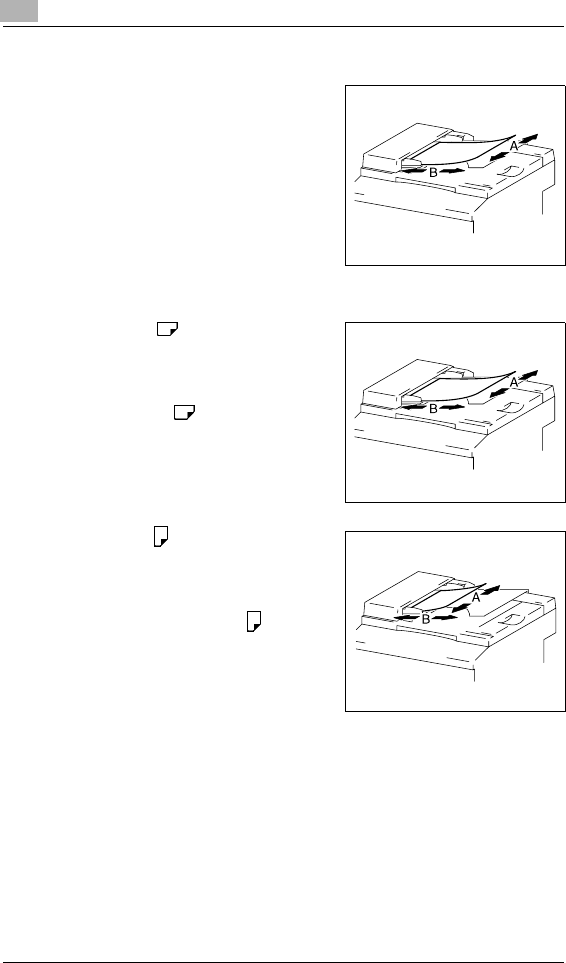
“Width” and “Length”
Whenever paper dimensions are
mentioned in this manual, the first value
always refers to the width of the paper
(shown as “A” in the illustration) and the
second to the length (shown as “B”).
A: Width
B: Length
Paper Orientation
Lengthwise ( )
If the width (A) of the paper is shorter
than the length (B), the paper has a
vertical or portrait orientation, indicated
by either “L” or .
Crosswise ( )
If the width (A) of the paper is longer
than the length (B), the paper has a
horizontal or landscape orientation,
indicated by either “C” or .

Precautions 2
Di152f/Di183f 2-1
2 Precautions
Observe the following precautions to keep the machine in the best
possible conditions.
2.1 Installation Precautions
Installation site
To ensure utmost safety and prevent possible malfunctions, install the
machine in a location that meets the following requirements:
-A location away from curtains, etc. that may catch fire and burn easily
-A location that is not exposed to water or other liquids
-A location free from direct sunlight
-A location out of the direct airflow of an air conditioner or heater, and
not exposed to extremely high or low temperatures
-A well-ventilated location
-A location that is not exposed to high humidity
-A location that is not extremely dusty
-A location not subjected to undue vibrations
-A stable and level location
-A location where ammonia or other organic gases are not generated
-A location that does not put the operator in the direct airflow of exhaust
from the machine
-A location that is not near any kind of heating devices
Power source
The power source requirements are as follows.
GVoltage Fluctuation: Within ±10% (127 V: +6%, -10%)
GFrequency Fluctuation: Within ±3 Hz
HUse a power source with as few voltage or frequency fluctuations as
possible.
2Precautions
2-2 Di152f/Di183f
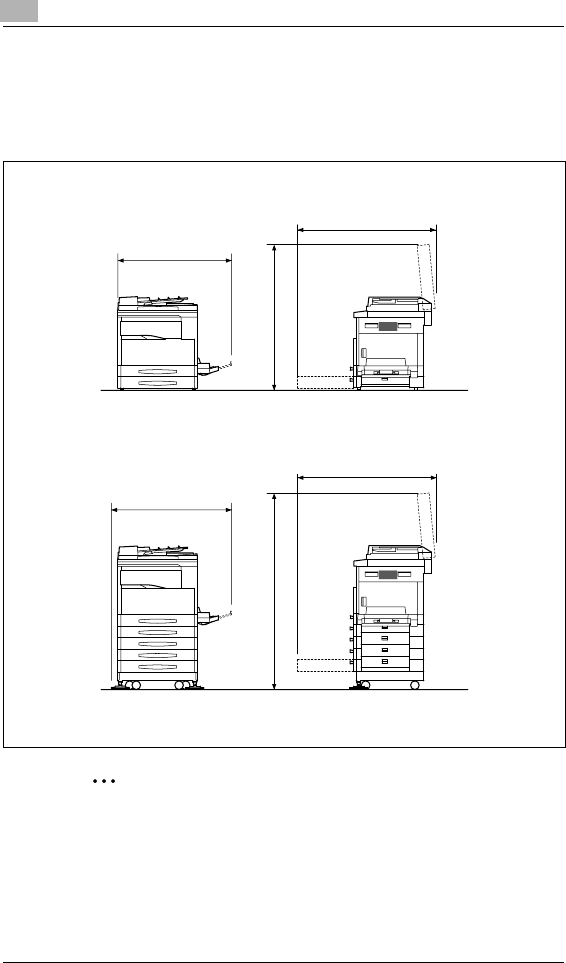
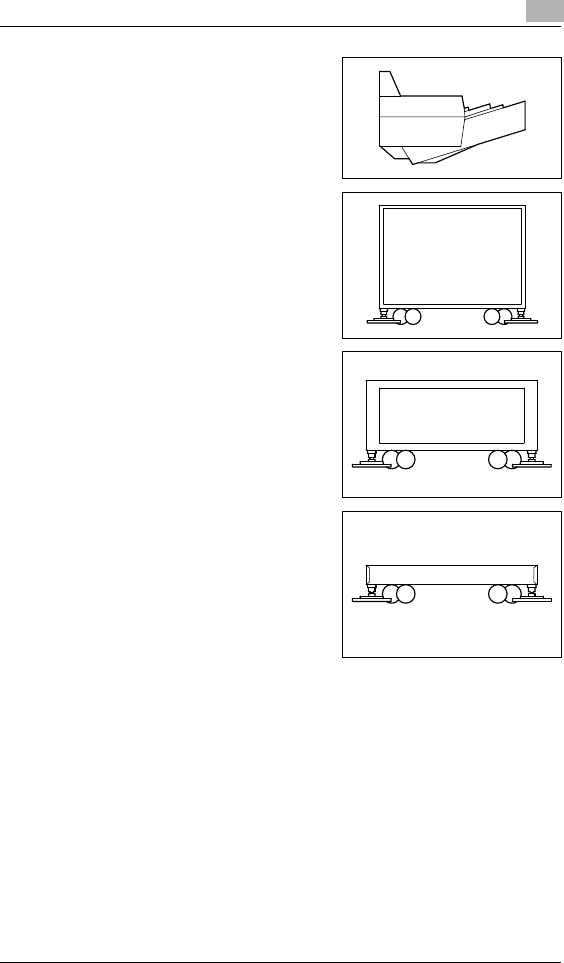
Space Requirements
To ensure easy machine operation, supply replacement, and mainte-
nance, adhere to the recommended space requirements detailed below.
Note
Be sure to allow a clearance of 4 inch or more at the back of the
machine, and 6 inch or more at the right of the machine for the removal
of misfed papers.
40-3/4
42
37-3/4
<Di152/Di152f>
Unit: inch
40-3/4
60
39-1/4
<Di183/Di183f>

Precautions 2
Di152f/Di183f 2-3
2.2 Operation Precautions
Operating Environment
The environmental requirements for correct operation of the machine are
as follows:
GTemperature: 50°F to 90°F (10°C to 30°C) with fluctuations of no more
than 18°F (10°C) within an hour
GHumidity: 15% to 85% with fluctuations of no more than 10% within an
hour
Proper Use
To ensure the optimum performance of the machine, follow the
precautions listed below:
-Never place heavy objects on the Original Glass or subject it to
shocks.
-Never open any machine doors or turn OFF the machine while it is
making copies/printing, as a paper misfeed could result.
-Never bring any magnetized object, or use flammable sprays or
liquids, near the machine.
Always make sure that the power plug is completely plugged into the
electrical output.
-Always make sure that the machine’s power plug is visible and not
hidden by the machine.
Always unplug the machine from the electrical outlet if the machine is
not to be used for a long period of time.
Always provide good ventilation when making a large number of
continuous copies/printed pages.
CAUTION
A negligible amount of ozone is generated during normal operation
of this machine. An unpleasant odor may, however, be detected in
poorly ventilated rooms during extensive machine operations.
§For a comfortable operating environment, it is recommended that the
room be well ventilated.
2Precautions
2-4 Di152f/Di183f
CAUTION
The area around the Fusing Unit is extremely hot.
§Do not touch any area other than those authorized in the manual to
reduce the risk of burns. Be especially careful not to touch parts
marked with warning labels, and their surrounding areas.
§If you get burnt, immediately cool the skin under cold water, and then
seek professional medical advice.
Transporting the Machine
If you need to transport the machine over a long distance, consult your
Tech. Rep.
Care of Machine Supplies
Use the following precautions when handling the machine supplies (toner,
paper, etc.).
Store the supplies in a location that meets the following requirements:
Free from direct sunlight
Away from any heating apparatus
Not subjected to high humidity
Not extremely dusty
Paper that has been removed from its wrapper but not loaded in the
machine should be stored in a sealed plastic bag in a cool, dark place.
-Use only toner that has been manufactured specifically for this
machine. Never use other types of toner.
-Keep all supplies out of the reach of children.
CAUTION
Be careful not to spill toner inside the machine or get toner on your
clothes or hands.
§If your hands become soiled with toner, immediately wash them with
soap and water.
§If toner gets in your eyes, immediately flush them with water, and then
seek professional medical advice.

Precautions 2
Di152f/Di183f 2-5
2.3 Legal Restrictions on Copying
Certain types of documents must not be copied with the purpose or intent
to pass copies of such documents off as the originals.
The following is not a complete list, but is meant to be used as a guide to
responsible copying.
<Financial Instruments>
GPersonal checks
GTravelers checks
GMoney orders
GCertificates of deposit
GBonds or other certificates of indebtedness
GStock certificates
<Legal Documents>
GFood stamps
GPostage stamps (canceled or uncanceled)
GChecks or drafts drawn by government agencies
GInternal revenue stamps (canceled or uncanceled)
GPassports
GImmigration papers
GMotor vehicle licenses and titles
GHouse and property titles and deeds
<General>
GIdentification cards, badges, or insignias
GCopyrighted works without permission of the copyright owner
In addition, it is prohibited under any circumstances to copy domestic or
foreign currencies, or works of art, without permission of the copyright
owner.
When in doubt about the nature of a document, consult with legal counsel.

2Precautions
2-6 Di152f/Di183f
Before Making Copies or Faxing 3
Di152f/Di183f 3-1
3 Before Making Copies or Faxing
3.1 Available Copy Features
The main copy functions available with this machine are listed below. For
details on their operation, refer to the pages indicated.
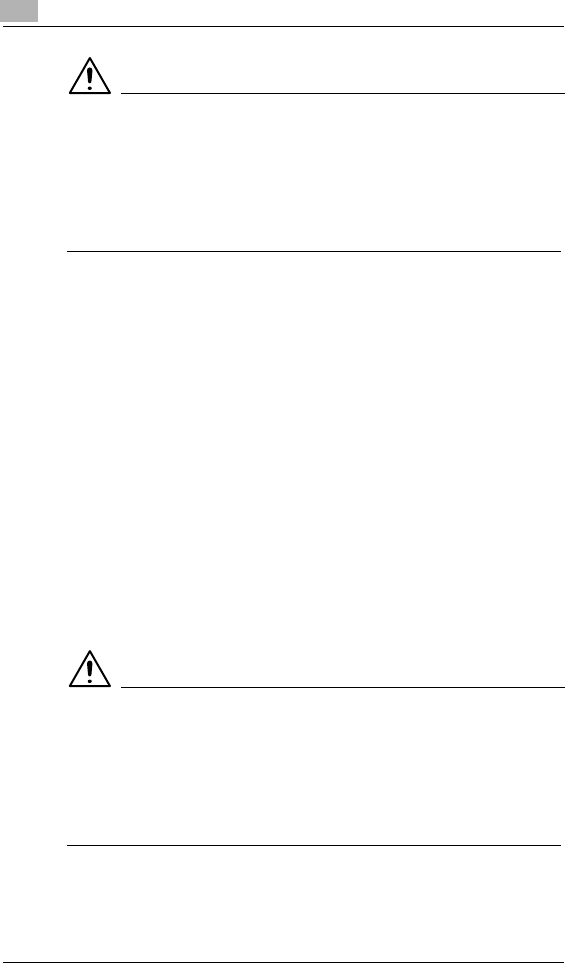
Copying (p. 4-1)
GSingle-sided copies
G“2in1” copy function
G“4in1” copy function
G“Book Separation” function

3Before Making Copies or Faxing
3-2 Di152f/Di183f
“Zoom” function (p. 4-21)
GReduced/full-sized/enlarged
G“X/Y Zoom” function (p. 4-23)

Before Making Copies or Faxing 3
Di152f/Di183f 3-3
Finishing (p. 5-5)
G“Sort” function
G“Group” function
GCrisscross output (sorting)
GCrisscross output (grouping)
Note
The required options differ depending on the desired copy function.
3Before Making Copies or Faxing
3-4 Di152f/Di183f
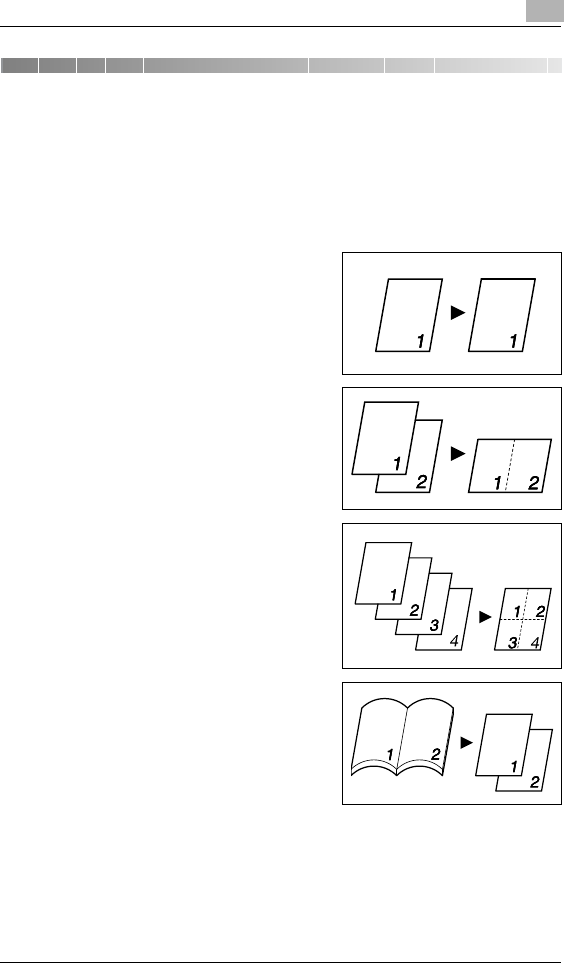
Special features
G“Erase” function (p. 5-9)
GNegative/positive-inverted copy
function (p. 5-12)
G“File Margin” function (p. 5-13)
Before Making Copies or Faxing 3
Di152f/Di183f 3-5
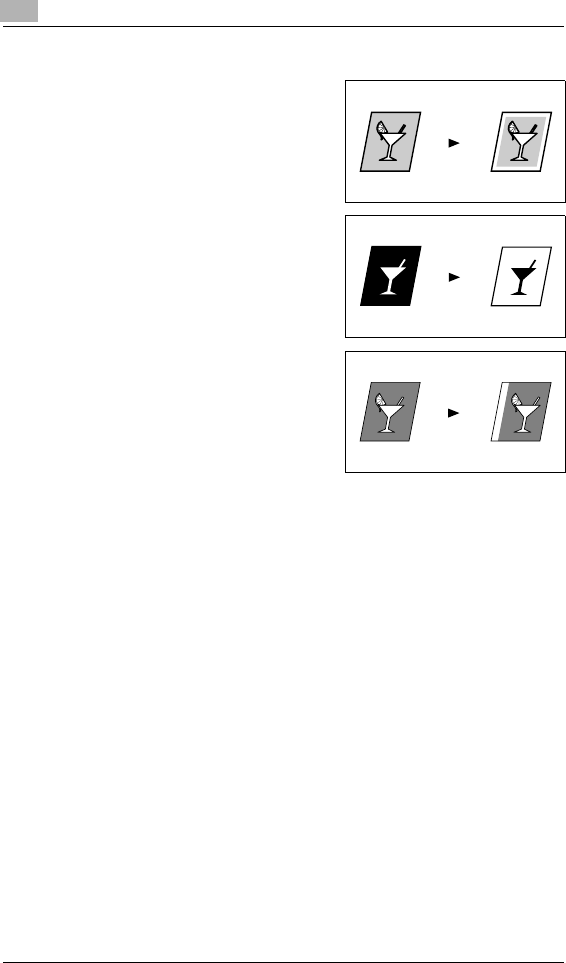
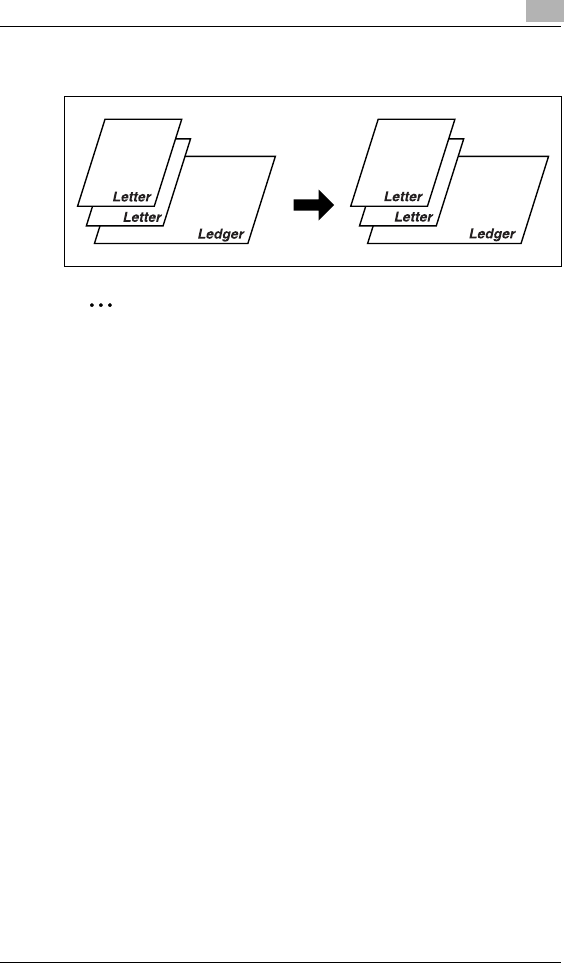
“Mixed Orig.” function (p. 4-2)
GMixed originals
Note
The “Mixed Orig.” function is only available when an Automatic
Document Feeder (optional) is installed.
3Before Making Copies or Faxing
3-6 Di152f/Di183f
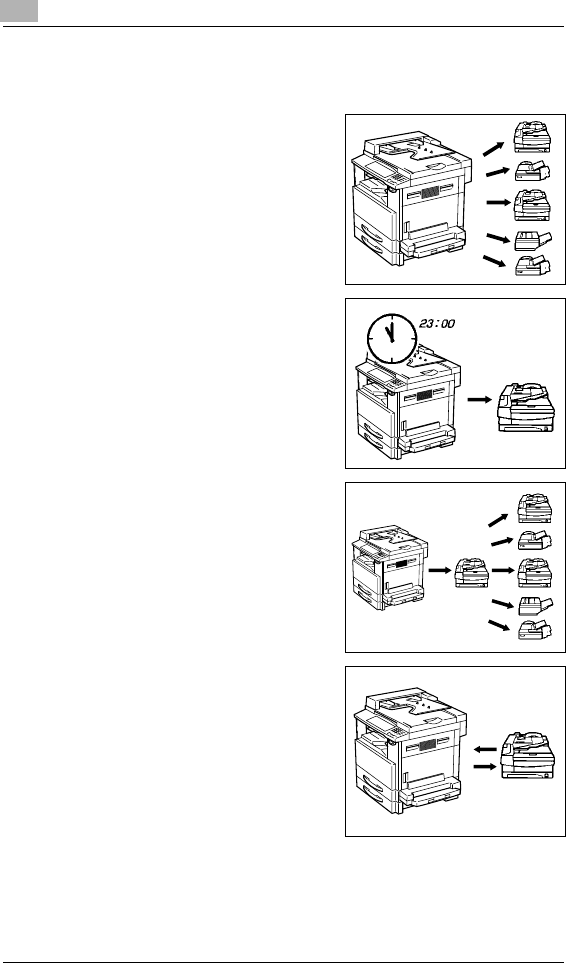
3.2 Available Fax Features
Sending
GBroadcast transmission (p. 7-4)
GTimer transmission (p. 7-7)
GRelay initiation transmission
(p. 7-11)
GPolling transmission (p. 7-16)
Transmission
Send
request
Before Making Copies or Faxing 3
Di152f/Di183f 3-7
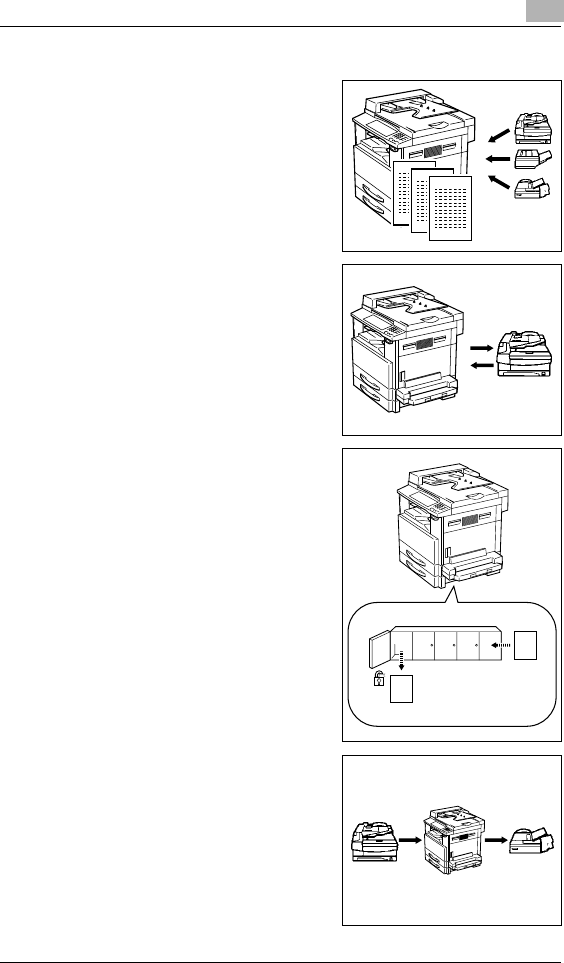
Receiving
GMemory reception (p. 7-21)
GPolling reception (p. 7-23)
GMailbox reception (p. 7-22)
GForwarding (p. 10-46)
Receive
Transmission
request
A
B
Mailbox
Mailbox ID Fax
Print
transmission
(F code)
3Before Making Copies or Faxing
3-8 Di152f/Di183f
3.3 Components and Their Functions
Each of the components of the machine as well as their functions are
described below.
GMain unit Di152/Di152f/Di183/
Di183f
GOriginal Cover Kit OC-5 (optional)
Presses down on the document
positioned on the Original Glass.
GAutomatic Document Feeder AF-10
(optional)
Automatically feeds one document
page at a time for scanning.
GPaper Feed Cabinet PF-120
(optional)
Includes a paper tray that can be
loaded with up to 250 sheets of
copy paper. (With the Di152f, one
can be installed; with the Di183f, up
to four can be installed.)
GShifting Unit OT-103 (optional)
Sorts or groups pages according to the specified Finishing function.
GJob Tray JS-202 (optional)
Separates received faxes, printouts and copies between and collects
them in the upper and lower trays.
Before Making Copies or Faxing 3
Di152f/Di183f 3-9
GMultiple Bypass MB-5 (optional)
Allows a maximum of 50 sheets of
paper to be supplied through the
Bypass Tray.
GCopy Desk PF-11T (optional)
Adjusts the height of the machine
after Paper Feed Cabinets have
been installed (Use when only one
or no Paper Feed Cabinets are
installed.)
GCopy Desk CD-3M (optional)
Adjusts the height of the machine
after Paper Feed Cabinets have
been installed (Use when only one
or no Paper Feed Cabinets are
installed.)
GCopy Table CT-3 (optional)
Adjusts the height of the machine
after Paper Feed Cabinets have
been installed (Use when only one
or no Paper Feed Cabinets are
installed.)
GPrinter Controller Pi1802e (optional)
Internal printer controller that allows this machine to be connected to
a computer and used as a printer.
GNetwork Interface Card NC-3 (optional)
Allows this machine to be used as a printer over a network.
GInternet Fax & Network scan kit SU-1 (optional)
Allows scanned images to be sent to a computer or Internet fax via an
Internet mail server, and enables e-mail to be received.
G32MB Memory for Copier M32-3 (optional for Di152/Di183)
Increases (32 MB) the copier memory.
G8MB Memory for Fax M8-2 (optional for Di152f/Di183f)
Increases (8 MB) the fax memory. This allows more sent and received
faxes to be stored.
3Before Making Copies or Faxing
3-10 Di152f/Di183f
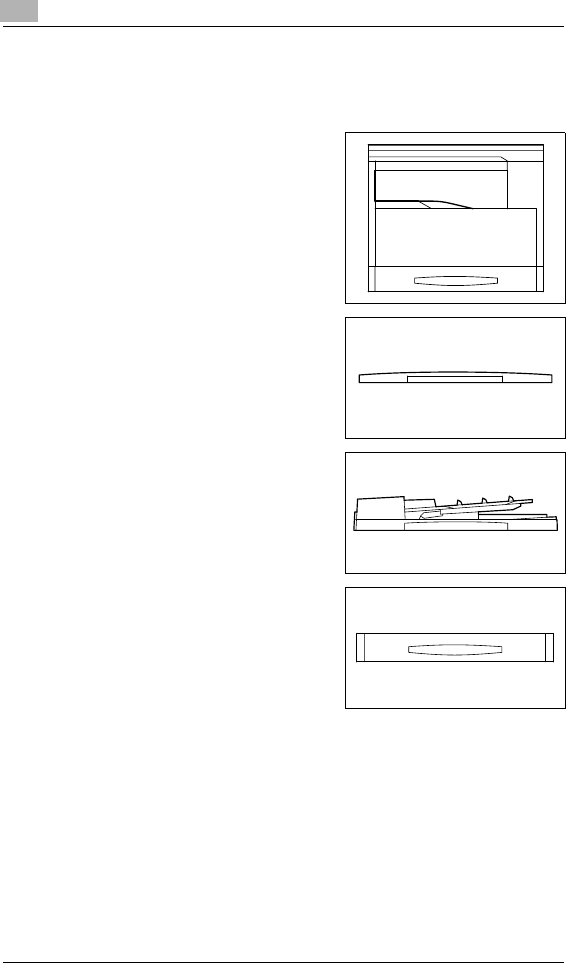
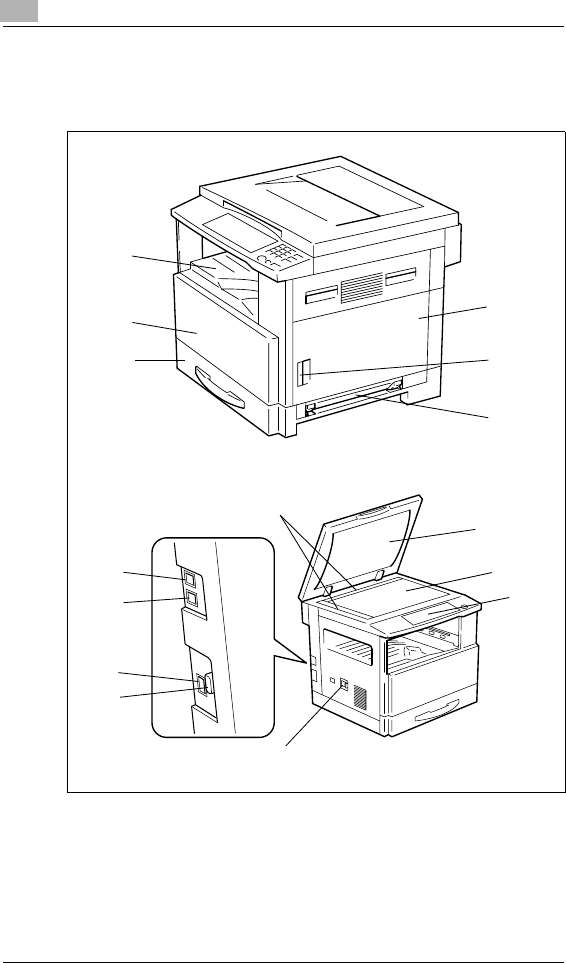
3.4 Part Names and Their Functions
Main Unit
*The illustration above shows the optional Original Cover Kit installed.
1
2
3
6
4
5
13
14
15
12
11
10
8
7
9

Before Making Copies or Faxing 3
Di152f/Di183f 3-11
No. Part Name Description
1 Copy Tray Collects fed-out copies facing down.
2 Front Cover Opened when replacing the toner bottle.
(p. 12-5)
3 1st Tray • Holds up to 250 sheets of paper.
• The paper size can be adjusted freely.
• Can be loaded with special paper. (p. 3-39)
4 Manual Bypass Tray • Used for manual feeding of paper.
• The paper is fed one sheet at a time.
• Can be loaded with special paper. (p. 3-39)
5 Lock Release Lever Used to open and close the Side Cover.
6 Side Cover Opened when clearing paper misfeeds.
7 Power Switch Used to turn the machine on and off. (p. 3-28)
8 Serial Interface
Connector Used for connecting the RS232C interface cable when
this machine is used for PC faxing and PC scanning.
9 Network Interface
Connector Used for connecting the network cable when this
machine is used for Internet faxing and network
scanning.
10 External Telephone
Connector (TEL) Used for connecting the cord from the telephone.
11 Telephone Line
Connector (LINE) Used for connecting the telephone cord from the wall
jack.
12 Document Scales Used to align the document.
(p. 4-5)
13 Original Cover (optional) Presses down on the document positioned on the
Original Glass.
14 Original Glass When manually feeding a document, position it on the
Original Glass so that it can be scanned.
Position the document face down on the glass. (p. 4-5)
15 Control Panel Used to start copying or to make various settings.
(p. 3-18)
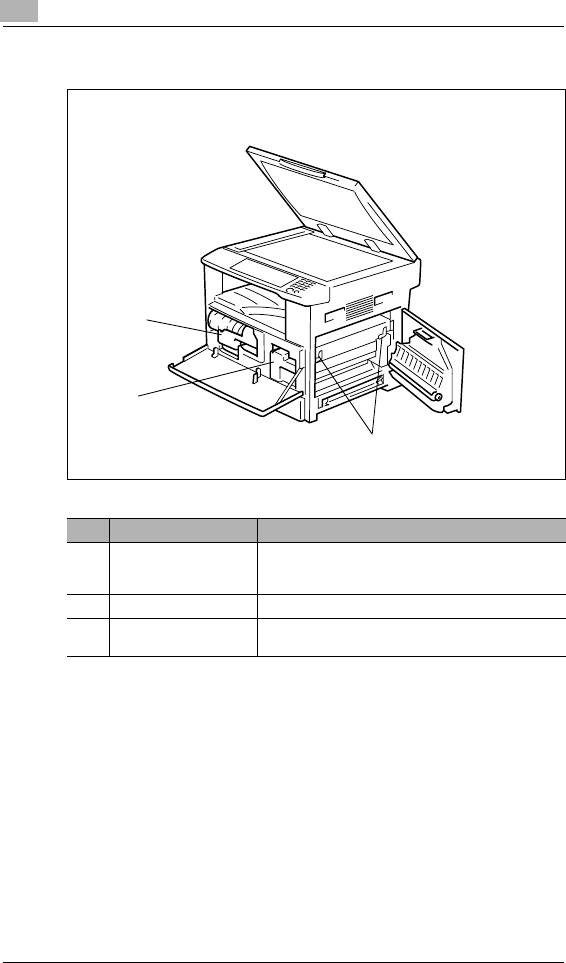
3Before Making Copies or Faxing
3-12 Di152f/Di183f
Inside of Main Unit
2
1
3
No. Part Name Description
1 Imaging Unit Creates the copy image.
Replacement of the Imaging Unit must be performed by
a service representative.
2 Toner Bottle Holder Opened when replacing the toner bottle.
3 Pressure Lever Used when clearing paper misfeeds in the fusing unit.
(p. 12-8)
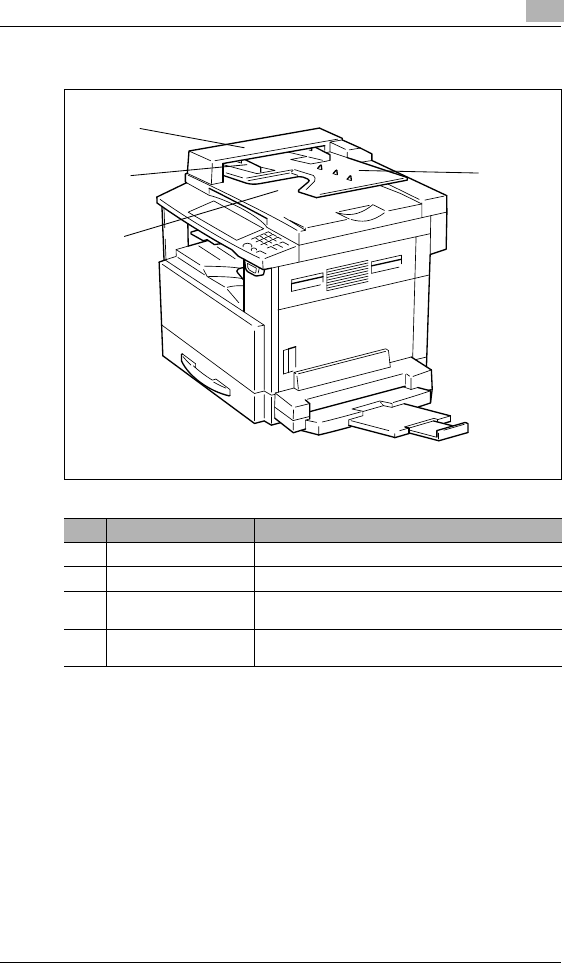
Before Making Copies or Faxing 3
Di152f/Di183f 3-13
Automatic Document Feeder (Optional)
1
2
3
4
No. Part Name Description
1 Document Exit Tray Collects documents that have been scanned.
2 Document Guide Plate Adjusted to the size of the document. (p. 4-1)
3 Document Feeder Cover
(Doc. Feed Cover) Opened when clearing document misfeeds. (p. 12-8)
4 Document Feeder Tray Holds the documents to be scanned; load documents
face up. (p. 4-1)
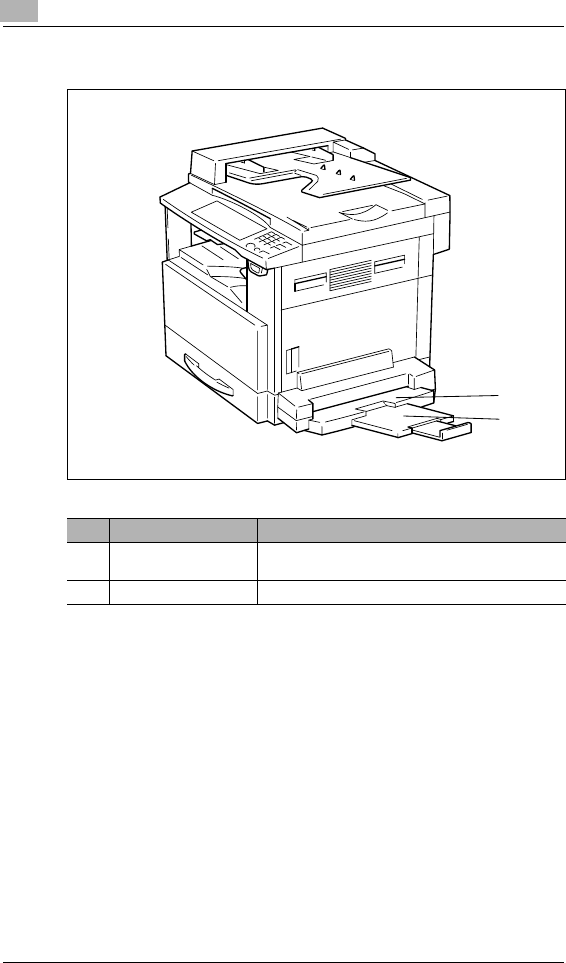
3Before Making Copies or Faxing
3-14 Di152f/Di183f
Multiple Bypass Tray (Optional)
5
6
No. Part Name Description
5 Bypass Tray Holds up to 50 sheets (plain paper) or 20 sheets (special
paper) of paper. (p. 4-17)
6 Bypass Tray Extender Pulled out when large-sized paper is loaded.
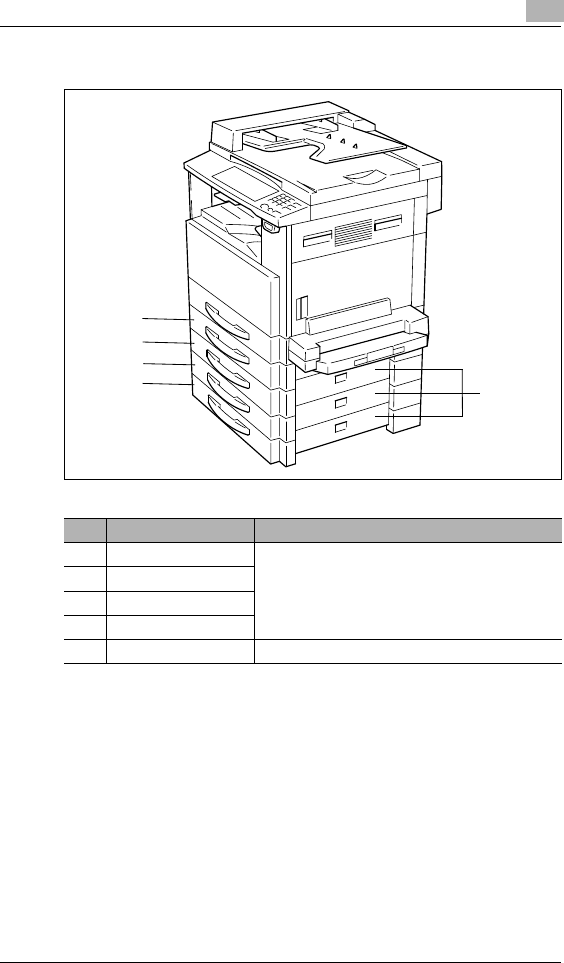
Before Making Copies or Faxing 3
Di152f/Di183f 3-15
Paper Feed Cabinet (Optional)
7
8
9
10 11
No. Part Name Description
7 2nd Tray Holds up to 250 sheets of paper (plain paper).
With the Di183/Di183f, up to four Paper Feed Cabinets
can be installed.
With the Di152/Di152f, one Paper Feed Cabinet can be
installed.
83rd Tray
9 4th Tray
10 5th Tray
11 Side Cover Opened when clearing paper misfeeds. (p. 12-12)
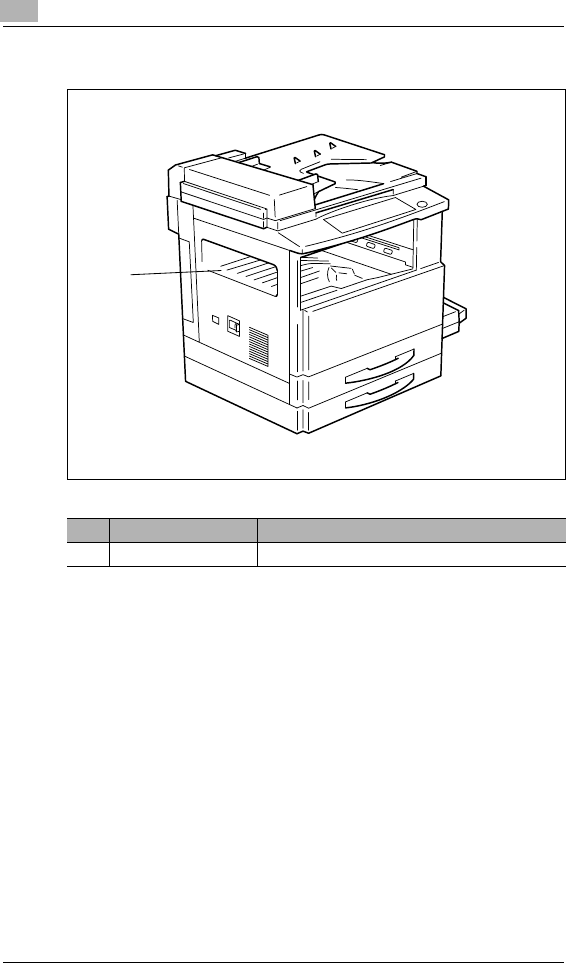
3Before Making Copies or Faxing
3-16 Di152f/Di183f
Shifting Unit (Optional)
12
No. Part Name Description
12 Copy Tray Collects fed-out copies that have been sorted.
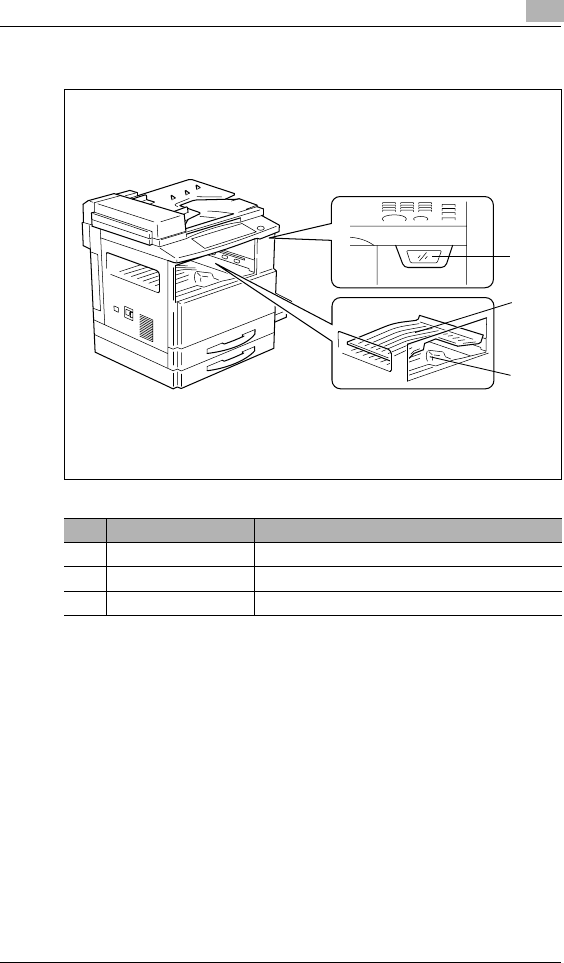
Before Making Copies or Faxing 3
Di152f/Di183f 3-17
Job Tray (Optional)
With the Job Tray installed
13
14
15
No. Part Name Description
13 Copy Tray Lamp Lights up when paper is fed into the Upper Copy Tray.
14 Upper Copy Tray Collects computer printouts or received faxes.
15 Lower Copy Tray Collects copies.
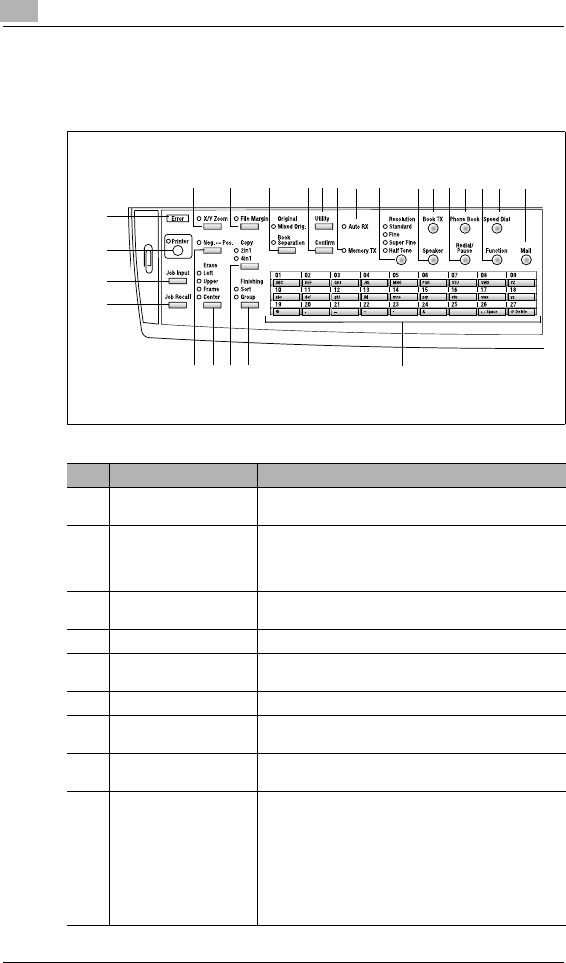
3Before Making Copies or Faxing
3-18 Di152f/Di183f
3.5 Names of Control Panel Parts and Their Functions
Control Panel Parts and Their Functions
1
2
3
4
5 6 7 8 9 10 11 12 1314151617 18 19
24
23
22
21
20
No. Part Name Function
1 “Error” indicator Lights up when an error has occurred.
Refer to “Error Messages” on page 12-1.
2 [Printer] key/indicator Lights up while data is being printed from the computer
and flashes while data is being sent.
For details, refer to the User Manual for the Printer
Controller.
3 [Job Input] key Used to store the current copy settings (Up to two copy
programs can be stored).
4 [Job Recall] key Used to recall a stored copy program.
5 [X/Y Zoom] key Used to specify different scaling proportions for the
vertical and horizontal directions.
6 [File Margin] key Press to select the “File Margin” function.
7 [Original] key Used to select between the “Mixed Orig.” function and
the “Book Separation” function.
8 [Confirm] key Used to view the transmission results or the counters, or
to print a transmission result report.
9 [Utility] key Used to enter Utility mode and display the first Utility
mode screen.
• MACHINE SETTING, PAPER SOURCE SETTING,
USER MAINTENANCE,
ADMIN. MANAGEMENT, COPY SETTING 1 & 2,
FAX REGISTRATION,
TX OPERATION, RX OPERATION, COM.SETTING,
REPORTING, INITIAL USER DATA
Refer to “Utility Mode – Fax Functions” on page 10-1.

Before Making Copies or Faxing 3
Di152f/Di183f 3-19
10 “Memory TX” indicator Lights up when the memory transmission function is
selected.
11 “Auto RX” indicator Lights up when the automatic reception function is
selected.
12 [Resolution] key Used to select the image quality (transmission
resolution).
13 [Speaker] key Press to answer the call. Press again to hang up.
14 [Book TX] key Press when transmitting a document positioned on the
Original Glass.
15 [Redial/Pause] key • Redials the last number called.
• While dialing, used to generate a pause when
transferring from an internal to an external line or
receiving information services.
16 [Phone Book] key Used to display the information programmed for one-
touch dialing, group dialing and speed dialing.
17 [Function] key Used to select a function.
• BROADCAST (broadcast transmission), TIMER TX
(timer transmission), MAILBOX TX (mailbox
transmission), PRINT MAILBOX RX (retrieve mailbox
faxes), POLLING TX (polling transmission)
POLLING RX (polling reception), RELAY INITIATE
(relay initiation transmission), CANCEL RESERV.
(cancel queued job), TX MODE (transmission mode),
Internet fax reception (with the Internet Fax &
Network scan kit installed)
Refer to “Fax Transmission/Reception Methods” on
page 7-1.
18 [Speed Dial] key Used to dial previously programmed fax numbers
represented by 3-digit numbers.
19 [Mail] key Press to enter Mail Address mode. The indicator lights
up in green to indicate that an e-mail address can be
entered.
(Available only when the Internet Fax & Network scan kit
is installed.)
20 [Neg. Pos.] key Press to make copies with the dark- and light-colored
areas of the document inverted.
21 [Erase] key Used to select the area of the document that is erased.
22 [Copy] key Used to select between the “2in1” and the “4in1” copy
functions.
23 [Finishing] key Used to select a copy Finishing function.
24 One-touch dial keys • Used to dial previously programmed fax numbers.
• Used to enter text such as a name.
No. Part Name Function
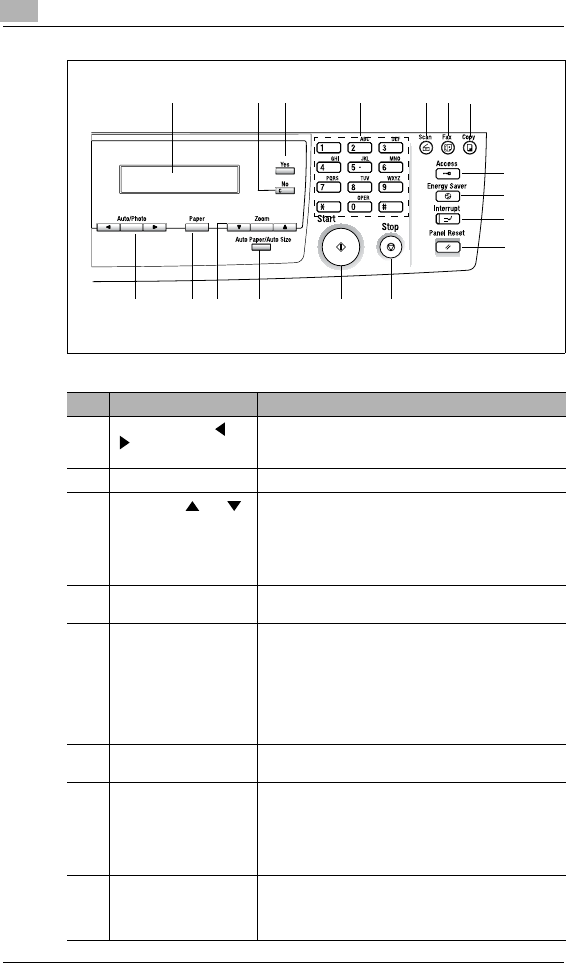
3Before Making Copies or Faxing
3-20 Di152f/Di183f
41 40 39 38 37 36 35
34
33
32
31
302928272625
No. Part Name Function
25 [Auto/Photo] key, and
keys • Used to specify the scanning density of copies.
• Used to specify the selection at the left or right in
setting screens.
26 [Paper] key Used to select the size of the paper to be printed on.
27 [Zoom] key, and
keys • Used to select a preset enlargement or reduction
ratio.
• With each press, a zoom ratio between ×0.50 and
×2.00 in 0.01 increments is selected.
• Used to specify the selection above or below in
setting screens and menus.
28 [Auto Paper/Auto Size]
key Used to select between the “Auto Paper” or the “Auto
Size” function.
29 [Start] key • Starts copying.
• Starts a fax transmission.
• Queues a copy job if pressed while the machine is
warming up. (p. 3-25)
• The indicator lights up in green to indicate that the
machine is ready to start copying or it lights up in
orange to indicate that the machine is not ready to
start copying.
30 [Stop] key • Stops the multi-page copy operation.
• Stops the fax transmission or reception.
31 [Panel Reset] key • Cancels all copy functions and returns them to their
default settings (Deletes all queued jobs). (p. 3-24)
• Cancels all fax functions and returns them to their
default settings.
*Queued timer transmission faxes and documents
received during memory reception are not cancelled.
32 [Interrupt] key Press to enter Interrupt mode. The indicator lights up in
green to indicate that the machine is in Interrupt mode.
Press again to cancel Interrupt mode and return to the
mode before Interrupt mode was entered. (p. 3-26)

Before Making Copies or Faxing 3
Di152f/Di183f 3-21
33 [Energy Saver] key Press to enter Energy Saver mode. (p. 3-25)
34 [Access] key Used with user management. (p. 3-26)
35 [Copy] key Press to enter Copy mode. The indicator lights up in
green to indicate that the machine is in Copy mode.
36 [Fax] key Press to enter Fax mode. The indicator lights up in green
to indicate that the machine is in Fax mode.
37 [Scan] key Press to enter Scan mode. The indicator lights up in
green to indicate that the machine is in Scan mode.
(Available only when the Internet Fax & Network scan kit
is installed.)
38 10-Key Pad • Used to specify the number of copies.
• Used to enter setting values.
• Used to enter fax numbers.
• Used to enter speed dial numbers.
39 [Yes] key Confirms the current setting.
40 [No] key Erases the entered numbers and letters.
Returns to the previous screen.
41 Display Displays setting menus, error messages, and specified
settings such as the number of copies, the zoom ratio
and fax numbers.
No. Part Name Function
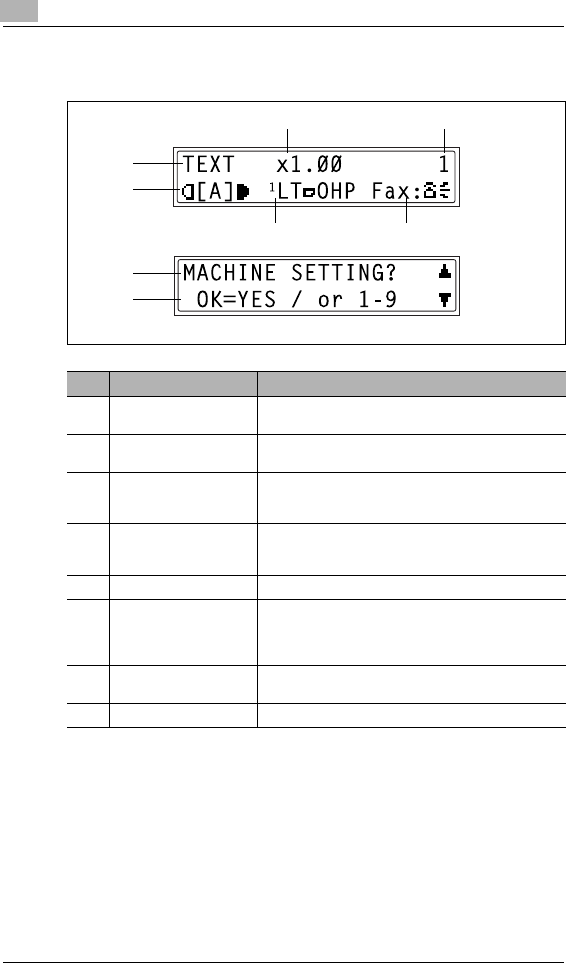
3Before Making Copies or Faxing
3-22 Di152f/Di183f
Display Indications
In Copy mode:
1
2
7
8
6 5
43
No. Display Indication Description
1 Copy density (document
type) Indicates the document type for the copy density setting.
“[A]” (AUTO), “PHOTO” or “TEXT”
2 Copy density (density
level) Indicates the density level for the copy density setting.
3 Paper source Indicates the selected paper tray. If special paper is
selected, the paper type is displayed.
“AUTO” or a paper tray and paper size, paper type
4 Fax status
Sub-messages Indicates the current faxing status.
Messages describing the current status (such as when
warming up) appear.
5 Number of copies Indicates the specified number of copies.
6 Zoom ratio Indicates the current zoom ratio setting.
“AUTO” or the current zoom ratio setting is displayed.
“×[X/Y]” indicates that the “X/Y Zoom” function is
selected.
7 Menu or function name • Displays the current menu, function or settings.
• Error messages are displayed when errors occur.
8 Messages Displays messages such as operating instructions.
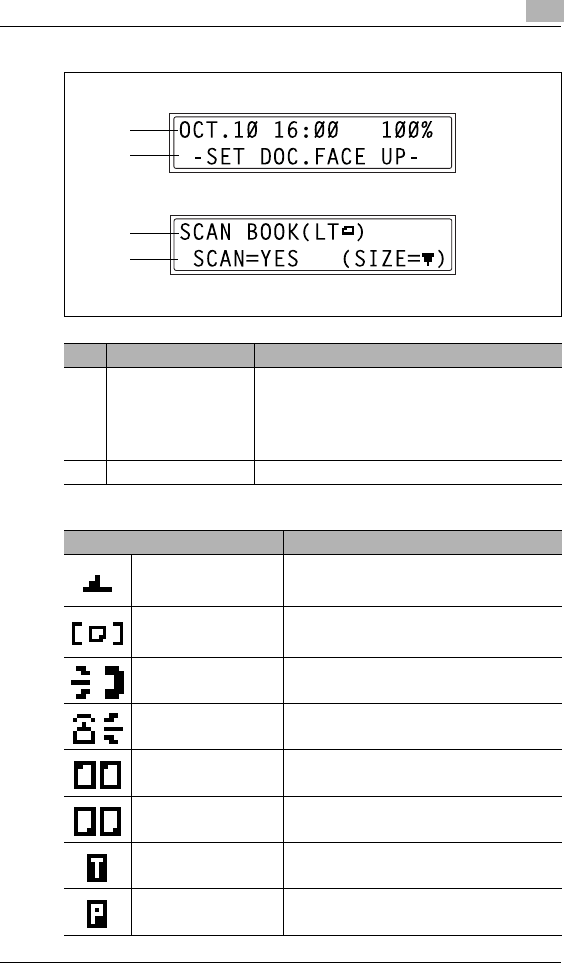
Before Making Copies or Faxing 3
Di152f/Di183f 3-23
In Fax mode:
Symbol list:
1
2
1
2
No. Display Indication Description
1 Mode or function name • Indicates the currently selected mode or function
settings.
• Displays the current menu, function or settings.
• Error messages are displayed when errors occur.
• The current date and remaining memory is displayed
during standby.
2 Messages Displays messages such as operating instructions.
Symbol Description
Manual bypass Paper is loaded in the Manual Bypass Tray.
Custom paper size The paper setting for the Manual Bypass Tray is a
custom paper size.
Dialing A fax number is being dialed.
Ringing The machine is being called.
Sending The document is being sent.
Receiving A document is being received.
In standby for timer
transmission A document is queued for timer transmission.
In standby for polling
transmission A document is queued for polling transmission.

3Before Making Copies or Faxing
3-24 Di152f/Di183f
3.6 Useful Operations
Cancelling Settings
Press the [Panel Reset] key to cancel all modes and functions (zoom ratio,
number of copies, recipient specified for fax transmission, fax resolution,
etc.) and reset them to their defaults. (All selected settings are cancelled.)
Tip
Pressing the [Panel Reset] key is the easiest way to cancel all
specified settings at the same time.
In order to avoid accidentally using settings from previous copy or fax
jobs, press the [Panel Reset] key to return all functions to their
defaults, and then select the desired settings.
Auto Panel Reset
The machine automatically resets all modes and functions to their defaults
one minute after copying is finished or after a key is pressed, without the
need for the [Panel Reset] key to be pressed.
Tip
The length of time until the machine automatically resets itself can be
set to 30 seconds or any number of minutes between 1 and 5.
The “AUTO PANEL RESET” function can even be turned off.
For details, refer to “To set the “AUTO PANEL RESET” function” on
page 9-4.
Note
While in Fax mode, the machine resets itself one minute after the last
key was pressed, regardless of the “AUTO PANEL RESET” function
setting.

Before Making Copies or Faxing 3
Di152f/Di183f 3-25
Energy Saver Mode (Preheat Mode)
Instead of turning off the machine, it can be put into a standby mode
(Energy Saver mode).
The Energy Saver mode can be turned on by pressing the [Energy Saver]
key. In addition, if the machine is not used for a set length of time, it
automatically enters Energy Saver mode. The default length of time until
the machine enters Energy Saver mode is 15 min.
In order to conserve energy, the display in the Control Panel is turned off
during preheat mode.
Cancel Energy Saver mode by pressing any key in the Control Panel.
Note
If the auto shut-off function activates while the machine is in Energy
Saver mode, the machine is automatically turned off.
Tip
The length of time until the machine automatically enters Energy
Saver mode can be set between 1 min and 240 min.
For details, refer to “To set the “ENERGY SAVE MODE” (preheat
mode) function” on page 9-5.
Auto Shut-Off
In order to conserve energy, this machine can be set to automatically shut
off after a set length of time. As a default, the “AUTO SHUT OFF” function
is turned off.
Tip
The length of time until the machine automatically shuts off can be set
between 15 min and 240 min. Refer to page 9-6.
Queued Copy Jobs
If a document is loaded and the [Start] key is pressed after the machine is
turned on but before it is ready to begin copying, the machine queues the
job and automatically starts copying after it has finished warming up.
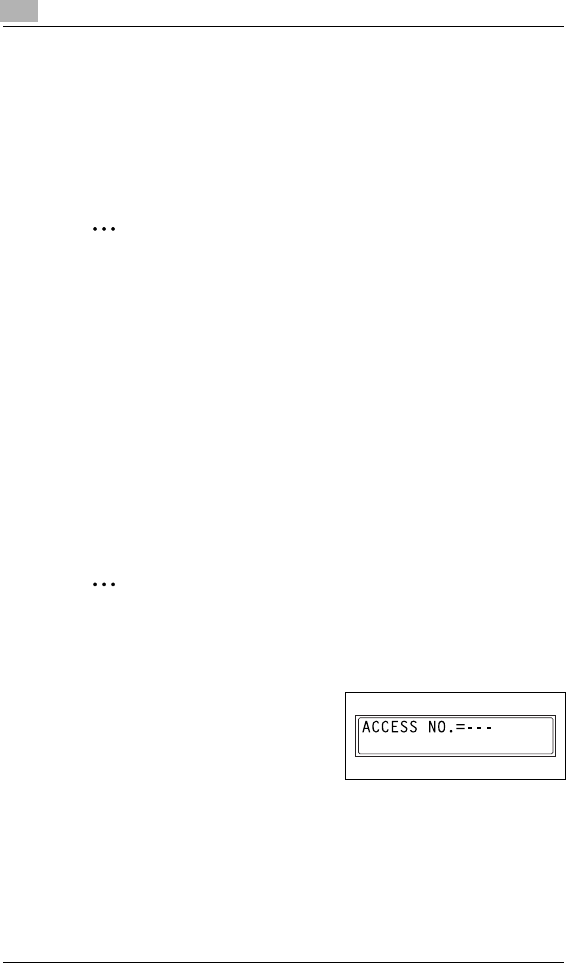
3Before Making Copies or Faxing
3-26 Di152f/Di183f
Interrupting Copy Jobs
During long continuous copy or print operations, the machine may be
needed to quickly copy a different document. Press the [Interrupt] key to
temporarily stop the current copy operation.
Press the [Interrupt] key again to continue the previously stopped copy
operation.
Note
Some functions cannot be interrupted. In addition, some functions are
not available while a copy job is interrupted. For details, refer to
“Function Combination Table” on page 14-11.
Auto Paper Source Change Feature
If the paper tray runs out of paper while copying, the machine will
automatically switch to a different paper source and continue copying
provided that the new tray contains paper of the same type and size in the
same orientation.
Access Numbers
If user (section) access numbers have been specified, use of the machine
can be limited to specific users or to a specified number of copies for each
account.
Note
If access numbers have been specified, the machine cannot be used
unless the access number is entered first.
Access number input screen:
GIn order to use this function, the
access numbers must be specified
with the “COPY TRACK” function
from the “ADMIN. MANAGEMENT”
menu (p. 9-22).

Before Making Copies or Faxing 3
Di152f/Di183f 3-27
To enter an access number
1Using the 10-Key Pad, enter the 3-
digit account (section) access
number.
HIf you wish to correct the entered
access number, press the [No]
key, and then enter the correct number.
2Press the [Access] key.
3The main screen of the initial mode appears and copying can be
started. Select the desired settings.
4When you are finished making copies, press the [Access] key.
Printing From the Computer
If the optional Printer Controller is installed, the machine can be used as
a printer.
For operating instructions, refer to the User Manual enclosed with the
Printer Controller.
Scanning From the Computer
If the enclosed TWAIN Driver is installed, the machine can be used as a
scanner for a computer.
For operating instructions, refer to the instruction manual enclosed with
the TWAIN Driver.
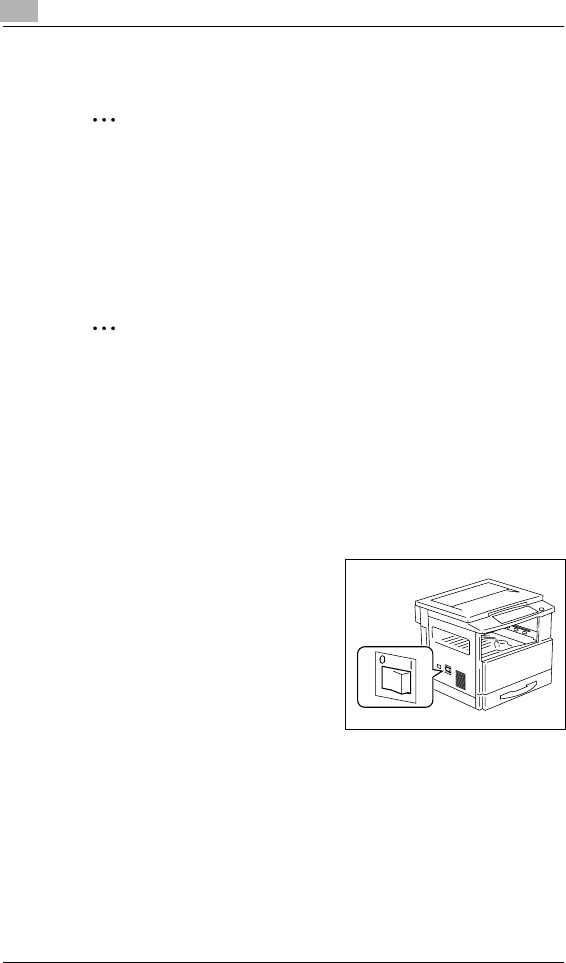
3Before Making Copies or Faxing
3-28 Di152f/Di183f
3.7 Power Switch and Default Settings
Note
Do not turn off the machine while it is making copies or printing,
otherwise a paper misfeed may occur. Make sure that all copy/print
operations are finished before turning off the machine.
Do not turn off the machine while it is sending or receiving a fax,
otherwise a transmission error or paper misfeed may occur. Make
sure that all fax transmissions/receptions are finished before turning
off the machine.
Note
When the machine is turned off, all settings except the stored copy
programs and Utility mode settings are reset to their defaults.
If the machine is not used for 15 min, it automatically enters Energy
Saver mode.
The length of time until the machine enters Energy Saver mode or
automatically shuts off can be specified using functions in the Utility
mode. For details, refer to “Specifying Machine Settings (“MACHINE
SETTING” Menu)” on page 9-2.
Turning the Machine On and Off
To turn on the machine
§Set the Power Switch to “|”.
To turn off the machine
§Set the Power Switch to “O”.

Before Making Copies or Faxing 3
Di152f/Di183f 3-29
Turning On the Machine
After the machine is turned on, the indicator on the [Start] key lights up in
orange and “PLEASE WAIT!” appears in the display while the machine
warms up.
At this time, a document can be loaded into the Automatic Document
Feeder and the [Start] key pressed to queue the job. (p. 3-25)
Even though the [Start] key is pressed, the copy operation does not begin
until the machine has finished warming up (after about 30 seconds at a
room temperature of 73.4°F (23°C)).
Default Settings
The settings that are automatically selected when the machine is turned
off or the [Panel Reset] key is pressed are called the “default settings”.
These settings serve as a reference for all functions.
Copy mode
GNumber of copies: 1
GCopy density: AUTO
GZoom ratio: Full size (× 1.00)
GPaper source: AUTO (with the Automatic Document Feeder installed)
GFinishing function: Non-sort
Fax mode
GResolution: Standard
GContrast: Medium
GTransmission mode: Memory transmission
GReception mode: Automatic reception
GPaper size/source priority: Priority to the paper size
GTransmission source: Within document
Tip
The default settings can be customized using the functions in the
Utility mode (“9 Utility Mode – Copy Functions” and “10 Utility Mode –
Fax Functions”).

3Before Making Copies or Faxing
3-30 Di152f/Di183f
3.8 Selecting and Checking Initial Settings
In order for the many functions of this machine to be used to their fullest
capacity, certain settings including the time and one-touch dial key must
first be specified.
In addition, several settings, such as when the various reports are printed,
are specified during production, but can be changed as required. Before
starting to operate this machine, check these settings.
Required Settings
Before using the machine, the following must be specified.
GCurrent date/time
GUser fax number
GPhone dialing system
GCommunication (external/internal) settings
If the following are specified, the machine can be used more efficiently.
GTransmission source (your name and fax number)
GOne-touch dial keys
GSpeed dial numbers
GProgrammed fax functions and numbers
Checking the Initial Settings
Since each function has been set during production, their settings should
be checked, then changed as necessary. (Refer “9 Utility Mode – Copy
Functions” to and “10 Utility Mode – Fax Functions”.)
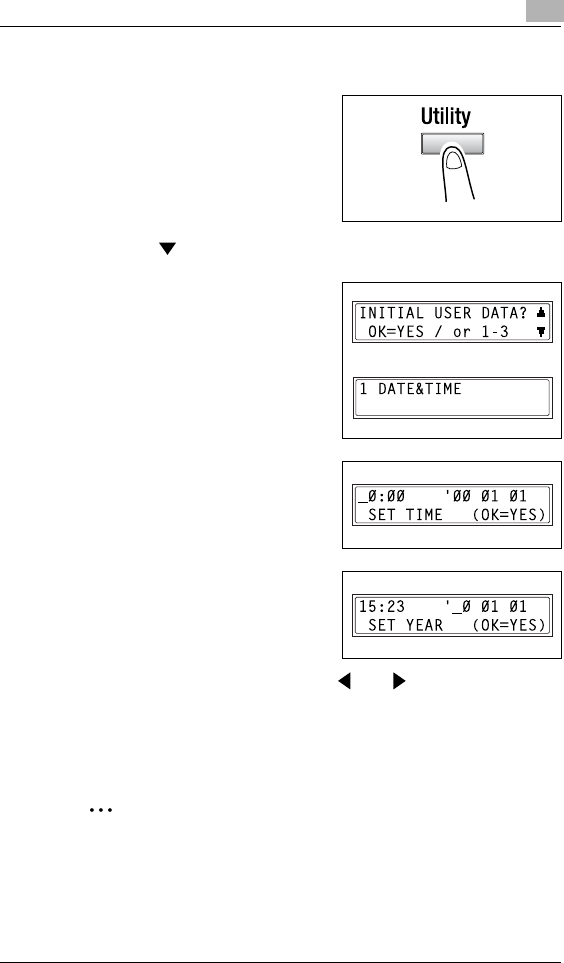
Before Making Copies or Faxing 3
Di152f/Di183f 3-31
To set the current date and time
1Press the [Utility] key.
The first screen of the Utility mode
appears.
2Press the key 11 times to select “INITIAL USER DATA”.
3From the 10-Key Pad, press the [1]
key.
A screen appears, allowing you to
specify the time and date.
4Using the 10-Key Pad, enter the
time.
HThe time is set on a 24-hour
system.
5Using the 10-Key Pad, enter the
date (year, month and day).
HFor the year, enter the last two
digits.
HIn the screen that allows you to
set the time and date, press the and keys to move the
cursor (_) to the desired location.
6Press the [Yes] key.
The “INITIAL USER DATA” menu appears again.
Note
The time setting of this machine automatically switches to daylight
savings time during the period indicated below.
From 2 am on the first Sunday of April to 2 am on the last Sunday of
October

3Before Making Copies or Faxing
3-32 Di152f/Di183f
To specify the user fax number
The user fax number is the fax number that will appear in the header of
faxes sent from this machine.
The fax number can contain a maximum of 20 digits.
The keys that can be used to enter the fax number are: the number keys
(0 through 9), Space, + and -.
1Press the [Utility] key.
The first screen of the Utility mode
appears.
2Press the key 11 times to select “INITIAL USER DATA”.
3From the 10-Key Pad, press the [2]
key.
A screen appears, allowing you to
enter the user fax number.
4Using the 10-Key Pad, enter the
user fax number.
HIf you wish to correct the entered
number, press the [No] key, and
then enter the new number.
5Press the [Yes] key.
The “INITIAL USER DATA” menu appears again.

Before Making Copies or Faxing 3
Di152f/Di183f 3-33
To program the user name
The user name is the name that will appear in the header of faxes from
this machine.
The transmission source information is printed at the top of sent faxes.
The user name can be a maximum of 32 characters long.
1Press the [Utility] key.
The first screen of the Utility mode
appears.
2Press the key 11 times to select “INITIAL USER DATA”.
3From the 10-Key Pad, press the [3]
key.
A screen appears, allowing you to
enter the user name.
4Enter the user name using the one-
touch dial keys.
HFor details on entering text, refer
to “Entering Text” on page 3-36.
5Press the [Yes] key.
The “INITIAL USER DATA” menu appears again.
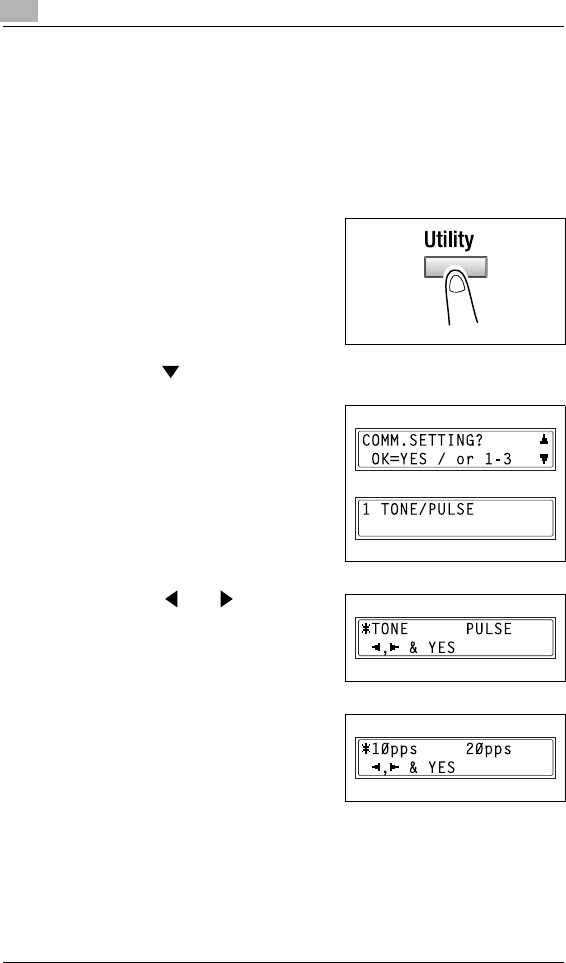
3Before Making Copies or Faxing
3-34 Di152f/Di183f
Specifying the Phone Dialing System
There are two types of telephone dialing systems: tone dialing (PB) and
pulse dialing (DP10pps or DP20pps). Faxes cannot be sent if this
machine is not set to the system used by your telephone line. Select the
correct setting after checking which type of dialing system is used.
To specify the telephone dialing system
1Press the [Utility] key.
The first screen of the Utility mode
appears.
2Press the key 9 times to select “COMM.SETTING”.
3From the 10-Key Pad, press the [1]
key.
4Using the and keys, select
either “TONE” (for tone dialing) or
“PULSE” (for pulse dialing), and
then press the [Yes] key.
5If “PULSE” was selected, select
either “10pps” or “20pps”, and then
press the [Yes] key.
The “COMM.SETTING” menu
appears again.
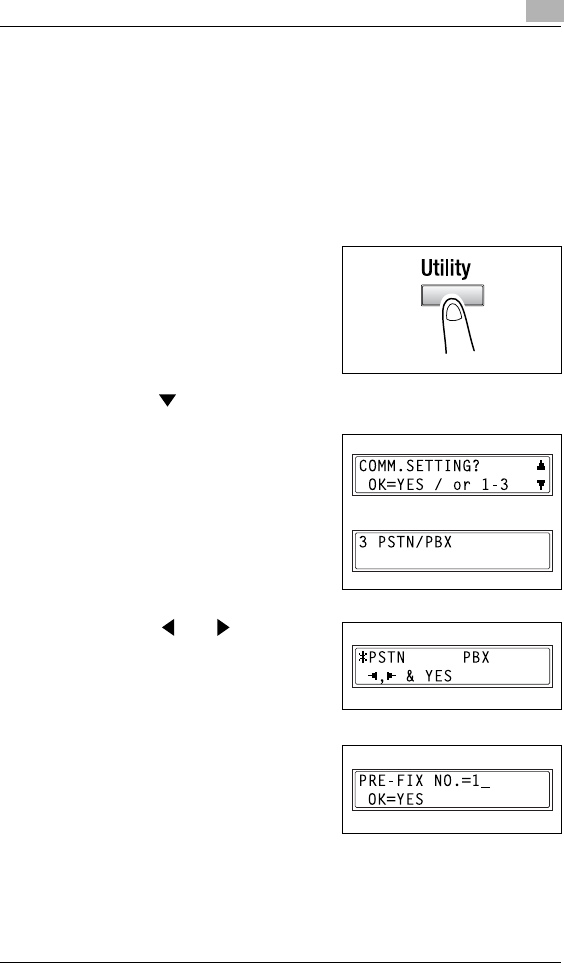
Before Making Copies or Faxing 3
Di152f/Di183f 3-35
Specifying the Phone Wiring System
The connected wiring system can be set to either PSTN (Public Switched
Telephone Network) or PBX (Private Branch Exchange).
For a PBX system, the outside line access number (or extension number)
must be specified. The outside line access number (or extension number)
is programmed in the [#] key.
To specify the telephone wiring system
1Press the [Utility] key.
The first screen of the Utility mode
appears.
2Press the key 9 times to select “COMM.SETTING”.
3From the 10-Key Pad, press the [3]
key.
4Using the and keys, select
either “PSTN” (Public Switched
Telephone Network) or “PBX”
(Private Branch Exchange), and
then press the [Yes] key.
5If “PBX” was selected, use the 10-
Key Pad to enter the number that
should be dialed to access the
outside line, and then press the
[Yes] key.
The “COMM.SETTING” menu appears again.
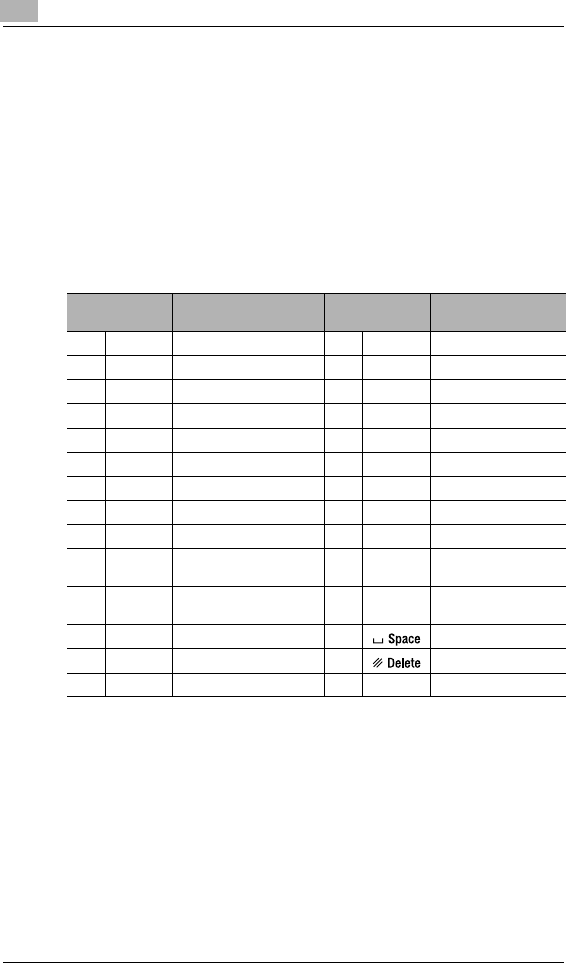
3Before Making Copies or Faxing
3-36 Di152f/Di183f
3.9 Entering Text
When specifying the user name or programming one-touch dial keys with
the recipient name, letters, accented characters, numbers and symbols
can be entered.
Key operation:
GOne-touch dial keys [01] through [27]: Used to enter letters and
symbols.
G10-Key Pad: Used to enter numbers.
List of characters available with each one-touch dial key:
* Repeatedly press the one-touch dial key to scroll through the corresponding characters and
symbols listed until the desired character appears in the display.
One-touch dial
key Available characters* One-touch dial
key Available characters*
01 ABC ABC 15 pqr pqr
02 DEF DEF 16 stu stu
03 GHI GHI 17 vwx vwx
04 JKL JKL 18 yz yz
05 MNO MNO 19 @ @
06 PQR PQR 20 . . (period)
07 STU STU 21 _ _ (underscore)
08 VWX VWX 22 + +
09 YZ YZ 23 - - (hyphen)
10 abc abc 24 & &#∗/!=?$%[]’^`{}|˜()”
,:;<>
11 def def 25 ÄäÖöÜüáÉéíóúÅÎàçÆ
Ñ¿Øøß
12 ghi ghi 26 (space)
13 jkl jkl 27 (deletes)
14 mno mno
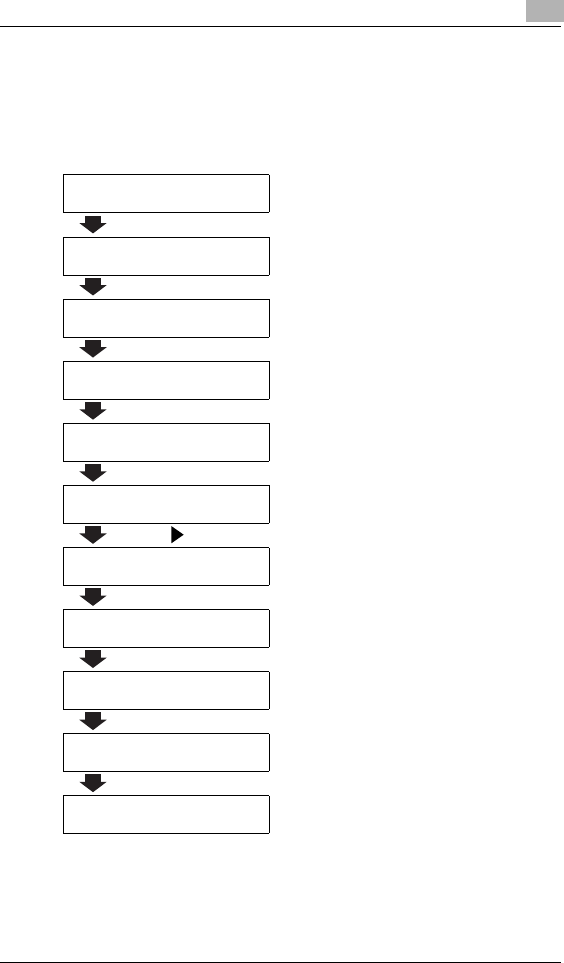
Before Making Copies or Faxing 3
Di152f/Di183f 3-37
Inputting Example
To enter the name “NJ Office”
* The cursor (_) flashes alternately with the character at its current
location.
NAME=_
Press the [MNO] key twice.
NAME=N
Press the [JKL] key once.
NAME=NJ
Press the [Space] key once.
NAME=NJ
Press the [MNO] key 3 times.
NAME=NJ O
Press the [def] key 3 times.
NAME=NJ Of
Press the key.
NAME=NJ Of_
Press the [def] key 3 times.
NAME=NJ Off
Press the [ghi] key 3 times.
NAME=NJ Offi
Press the [abc] key 3 times.
NAME=NJ Offic
Press the [def] key twice.
NAME=NJ Office

3Before Making Copies or Faxing
3-38 Di152f/Di183f
Correcting text and input precautions
GTo erase all entered text, press the [No] key.
GTo delete only part of the entered text, use the and keys to
move the cursor (_) to the character that you wish to delete, and then
press the [Delete] key (one-touch dial key [27]).
GTo change an entered character, use the and keys to move the
cursor (_) to the character that you wish to change, and then enter the
new character. (The character at the cursor’s position is replaced with
the new character.)
GIf the same one-touch dial key is needed to enter two characters in a
row, press the key after selecting the first character. (Refer to the
above example.)
GTo enter a space, press one-touch dial key [26].

Before Making Copies or Faxing 3
Di152f/Di183f 3-39
3.10 Copy Paper
Paper Specifications
For details on loading the paper, refer to “When the Message “LOAD
PAPER” Appears” on page 12-1.
1st Tray Specifications
Paper types Plain paper (16 lb to 24 lb), recycled paper
Special paper: Cards (24-1/4 lb to 41-3/4 lb), OHP
transparencies, postcards, and label sheets
Paper sizes 11 × 17 L to 5-1/2 × 8-1/2
Width: 3-9/16 to 11-11/16; Length: 5-1/2 to 17
In metric:
A3 L to A5 C, FLS (8-1/4 × 13)
Width: 3-9/16 to 11-11/16; Length: 5-1/2 to 17
* When the length is set between 16-9/16 inch and
17 inch, the maximum width that can be set is 11 inch.
When the width is set between 11-1/16 inch and 11-11/
16 inch, the maximum length that can be set is 16-1/2
inch.
Paper capacity Plain or recycled paper: 250 sheets
Special paper: 20 sheets
2nd (3rd/4th/5th) Tray Specifications
Paper types Plain paper (16 lb to 24 lb) and recycled paper
Paper sizes 11 × 17 L to 5-1/2 × 8-1/2
In metric:
A3 L to A5 C, FLS (8-1/4 × 13)
Paper capacity 250 sheets
Manual Bypass Tray Specifications
Paper types Plain paper (16 lb to 24 lb), recycled paper
Special paper: Cards (24-1/4 lb to 41-3/4 lb), OHP
transparencies, postcards, and label sheets
Paper sizes Width: 3-9/16 to 11-11/16; Length: 5-1/2 to 17
Paper capacity 1 sheet at a time
Multiple Bypass Tray Specifications
Paper types Plain paper (16 lb to 24 lb), recycled paper
Special paper: Cards (24-1/4 lb to 41-3/4 lb), OHP
transparencies, postcards, and label sheets
Paper sizes Width: 3-9/16 to 11-11/16; Length: 5-1/2 to 17
Paper capacity Plain or recycled paper: 50 sheets
Special paper: 20 sheets

3Before Making Copies or Faxing
3-40 Di152f/Di183f
Note:
GLoad only copy paper of the specified type, size and amount,
otherwise paper misfeeds or other problems may occur.
GIf paper with a size in metric (A4, A3, etc.) is loaded into a paper tray,
select the appropriate setting for the “INCH/METRIC” function in the
Utility mode. (p. 9-13)
GIf paper with a non-standard size is loaded into the 1st Tray, select the
appropriate setting using the “TRAY1 PAPER” function in the Utility
mode. (p. 9-14)
GIf paper with a non-standard size is loaded into the Manual Bypass
Tray or Multiple Bypass Tray, select paper size setting “CUSTOM”
before making copies, and then enter the corresponding paper size.
(p. 4-19)
GIf cards, OHP transparencies, or postcards are loaded into the 1st
Tray, select the appropriate setting using the “TRAY1 PAPER”
function in the Utility mode. (p. 9-14)
GIf cards, OHP transparencies, or postcards are loaded into the Manual
Bypass Tray or Multiple Bypass Tray, select the appropriate paper
type before making copies. (p. 4-15 or p. 4-17)
GIf you do not want automatic paper size/paper source selection to be
activated when recycled paper is loaded into a paper tray, select the
appropriate setting using the “AUTO SELECT” function in the Utility
mode. (p. 9-16)
GIf FLS paper with a size other than the default FLS size (8-1/4 × 13) is
loaded, the setting must be changed. For details, contact your service
representative.
GDo not load paper of different sizes into the same paper tray.

Before Making Copies or Faxing 3
Di152f/Di183f 3-41
The following types of paper should not be used, otherwise decreased
print quality, paper misfeeds or damage to the machine may occur.
-OHP transparencies that have already been fed through the machine
(even if the transparency is still blank)
-Paper that has been printed on by a heat-transfer printer or an inkjet
printer
-Paper that is either extremely thick or extremely thin
-Folded, curled (rolled), wrinkled, or torn paper
-Perforated paper or paper with punched holes
-Extremely smooth or extremely rough paper, or paper with an uneven
surface
-Paper that has been treated, such as carbon-backed, heat-sensitive or
pressure-sensitive paper
-Paper that has been decorated with foil or embossing
-Paper of a non-standard shape (not rectangular)
-Paper that is bound with glue, staples or paper clips
-Paper with labels attached
-Paper with ribbons, hooks, buttons, etc. attached
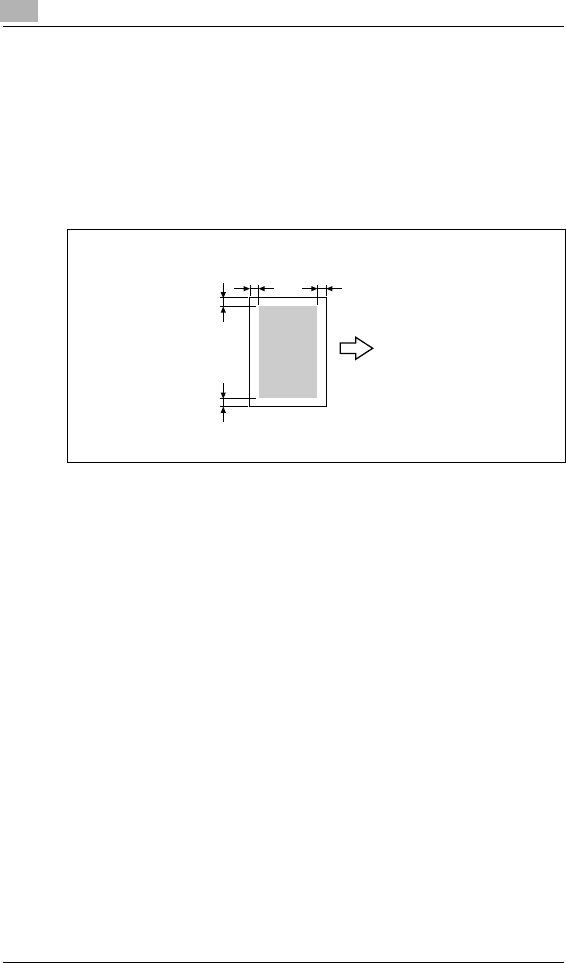
3Before Making Copies or Faxing
3-42 Di152f/Di183f
Print Area
Any part of the image within the area indicated below is not copied.
GA margin 1/4 inch (4 mm) from the leading edge of the paper (A)
GA margin 1/4 inch (4 mm) from the trailing edge of the paper (B)
GA margin 1/4 inch (4 mm) on both sides of the paper (C) (If the Printer
Controller is installed and the machine is being used to print from a
host computer, the image cannot be printed within the area 1/4 inch
(4 mm) from all edges of the paper.)
Paper Storage
Observe the following precautions when storing copy paper.
GStore the paper in a location that meets the following requirements.
HNot exposed to direct sunlight
HNot exposed to fire
HNot exposed to high humidity
HNot extremely dusty
GUnwrapped paper should be stored in a plastic bag in a cool, dry
location.
GKeep paper out of the reach of children.
Paper output direction
AB
C
C
A: 1/4 inch (4 mm)
B: 1/4 inch (4 mm)
C: 1/4 inch (4 mm)

Before Making Copies or Faxing 3
Di152f/Di183f 3-43
3.11 Original Documents
Document Feeding
Note
Be sure to use documents appropriate for the feed method being used,
otherwise a paper misfeed or damage to the document may occur.
Document feed
method Document type Document size
Automatic Document
Feeder Sheet documents
Single-sided documents
Capacity: 13-1/4 lb to 29-1/4 lb
Documents of mixed sizes
Capacity: 16 lb to 24 lb
11 × 17 L to 5-1/2 × 8-1/2 L
Document width:
3-9/16 inch to 11-11/16 inch
Document length:
8-1/4 inch to 17 inch
Original Glass Sheet documents, books, and
large objects
Maximum weight: 6-1/2 lb
11 × 17 L to 5-1/2 × 8-1/2 L
Document width:
Up to 11-11/16 inch
Document length: Up to 17 inch

3Before Making Copies or Faxing
3-44 Di152f/Di183f
Precautions for Loading Documents into the Automatic Document
Feeder
The following types of documents should not be loaded into the Automatic
Document Feeder, otherwise paper misfeeds or damage to the document
may occur. Instead, these types of documents should be positioned on the
Original Glass.
GThin documents such as typewriter paper or paraffin paper
GThick documents
GStandard size documents larger than 11 × 17 or smaller than 5-1/2 ×
8-1/2
GDocuments that are highly translucent or transparent such as OHP
transparencies or diazo photosensitive paper
GWrinkled, folded, curled (rolled), or torn documents
GDocuments bound with glue, staples or paper clips
GCoated documents such as carbon-backed paper
Precautions for Positioning Documents on the Original Glass
The following precautions should be observed when positioning the
above-listed types of documents on the Original Glass.
GFor documents of a non-standard size:
The document size cannot be detected automatically; therefore, the
“Auto Paper” and the “Auto Size” functions cannot be used. Press the
[Paper] key and select the appropriate paper size (paper tray), or
press the [Zoom] key and select the appropriate zoom ratio. (p. 4-11
and p. 4-21)
GFor highly translucent or transparent documents (such as OHP
transparencies or diazo photosensitive paper):
Place a blank sheet of paper of the same size over the document.
(p. 4-1)
GFor objects such as books (thick documents):
Scan without closing the Original Cover or Automatic Document
Feeder. In addition, do not press down extremely hard on the
document, otherwise the machine may be damaged. (The Original
Glass can only resist a weight of up to 6-1/2 lb.)
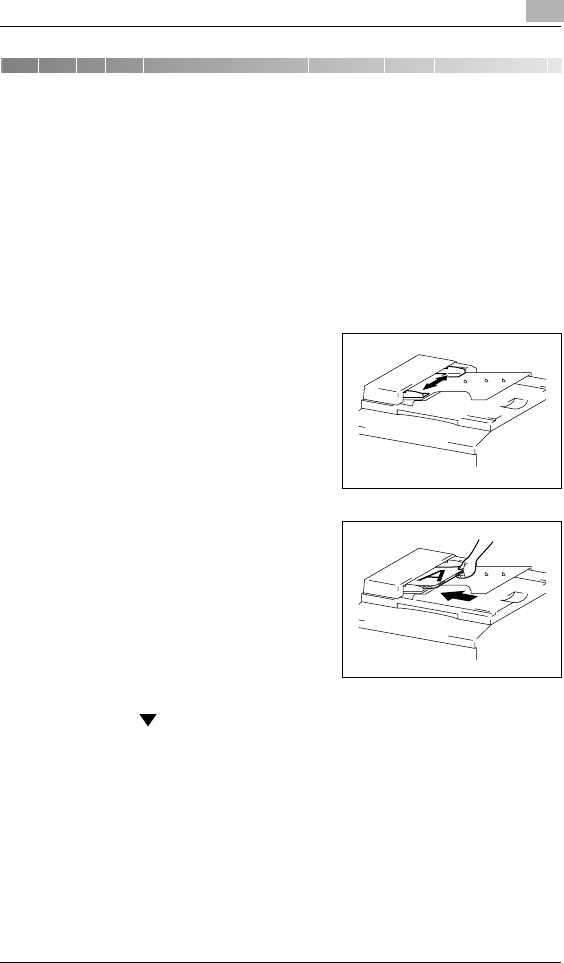
Basic Copy Operations 4
Di152f/Di183f 4-1
4 Basic Copy Operations
4.1 Loading the Document
The document can be loaded into the Automatic Document Feeder
(optional) or positioned on the Original Glass. Position the document
correctly according to the type of document being copied.
With the Automatic Document Feeder
To load the document
1Adjust the Document Guide Plates
to fit the size of the document.
2Load the document pages to be
copied face up into the Automatic
Document Feeder.
?Have the necessary precautions
been observed when loading
the document?
§A maximum of 50 document
pages can be loaded.
§Do not load so many pages that the top of the stack is higher than
the mark.
§Be sure to adjust the Document Guide Plates so that they are
against the edges of the document, otherwise the document may
not be fed in straight.
§The paper sizes that can automatically be detected when loaded
into the Automatic Document Feeder are 11 × 17 L, 11 × 15 L,
Legal L, Letter L, Letter C, 5-1/2 × 8-1/2 L, A4 L and A4 C. If paper
of other sizes or non-standard sizes is loaded, the size cannot be
detected or it may be detected incorrectly.
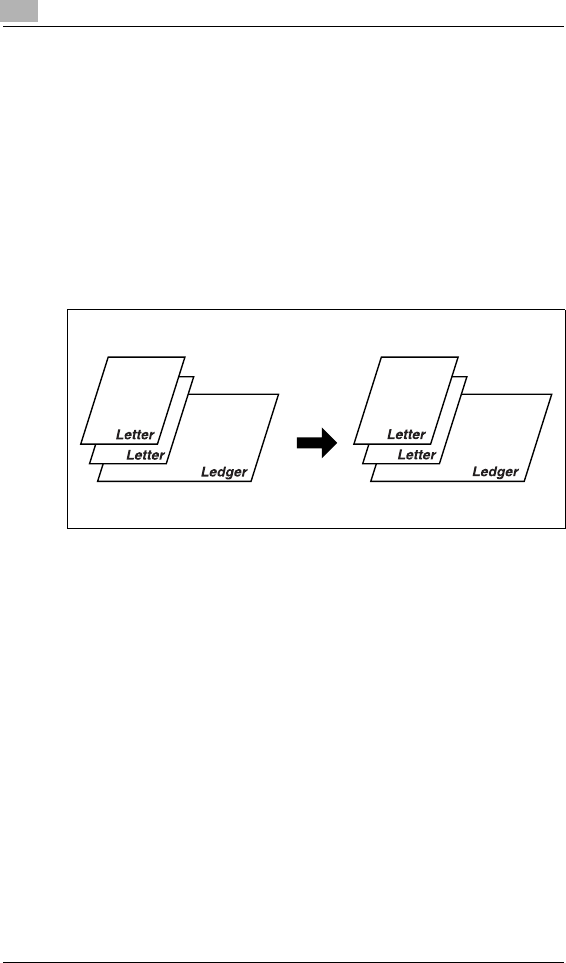
4Basic Copy Operations
4-2 Di152f/Di183f
§Documents of mixed sizes can be loaded into the Automatic
Document Feeder. Refer to “To load documents of mixed sizes” on
page 4-2 for more information.
3Select the desired copy settings. For details, refer to “Making Copies”
on page 4-9 and “Advanced Copy Operations” on page 5-1.
4Press the [Start] key to begin feeding and copying the loaded
document pages, starting from the top page.
To load documents of mixed sizes
Documents containing pages of different sizes can be loaded as a set into
the Automatic Document Feeder.
Precautions for loading documents of mixed sizes:
Documents of different sizes can be copied only if all pages have the
same width.
For example: A document consisting of Ledger L (11 × 17 L)- and
Letter C-size pages
(Auto Paper)
Copies
Documents
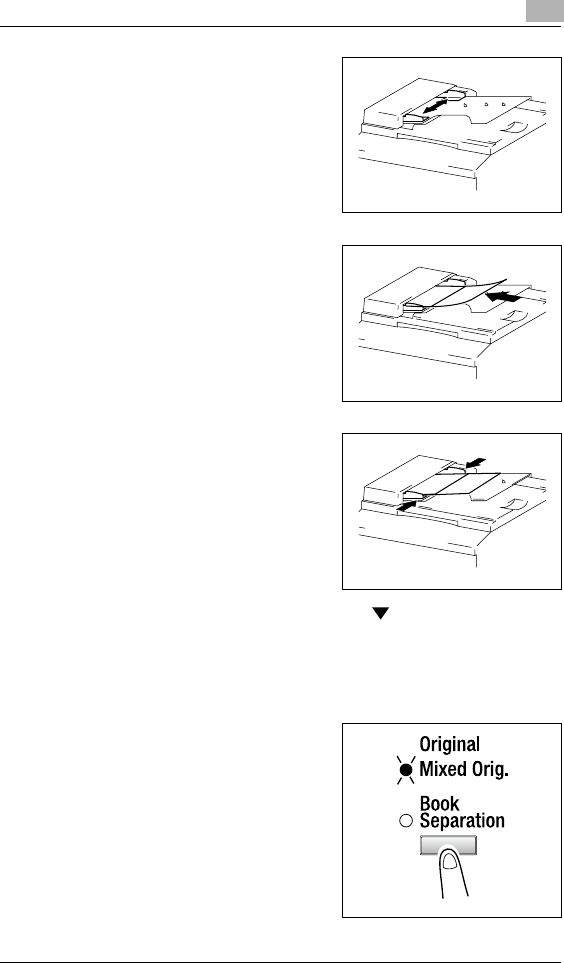
Basic Copy Operations 4
Di152f/Di183f 4-3
1Open the Document Guide Plates.
2Load the document pages to be
copied face up.
3Adjust the Document Guide Plates
to fit the size of the document.
?Have the necessary precautions
been observed when loading
the document?
§A maximum of 50 document
pages can be loaded.
§Do not load so many pages that
the top of the stack is higher than the mark.
§Be sure to adjust the Document Guide Plates so that they are
against the edges of the document, otherwise the document may
not be fed in straight.
4Press the [Original] key until the
“Mixed Orig.” indicator lights up.
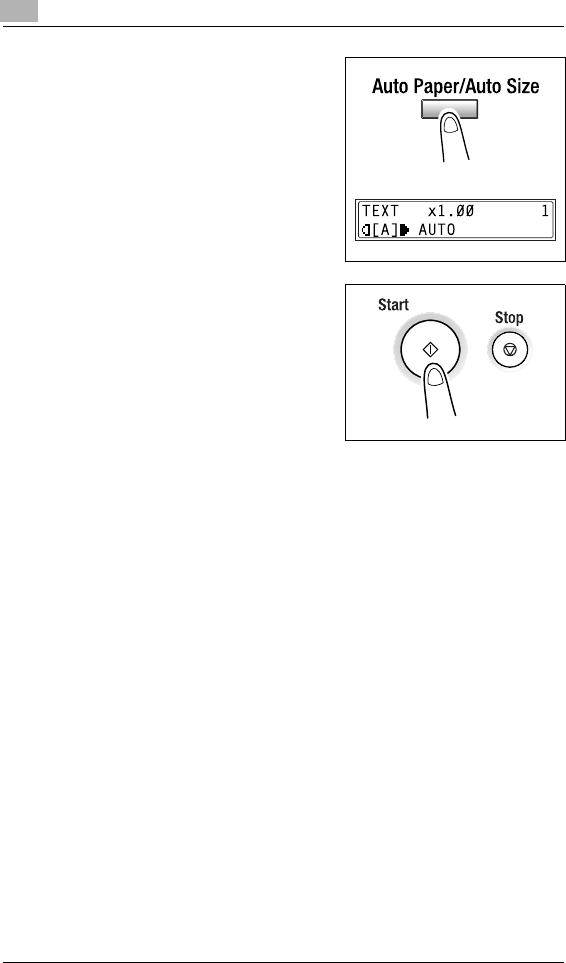
4Basic Copy Operations
4-4 Di152f/Di183f
5Press the [Auto Paper/Auto Size]
key until the “Auto Paper” function is
selected.
HCheck that “AUTO” appears in
the bottom line of the screen.
6Press the [Start] key to begin
feeding and copying the loaded
document pages, starting from the
top page.
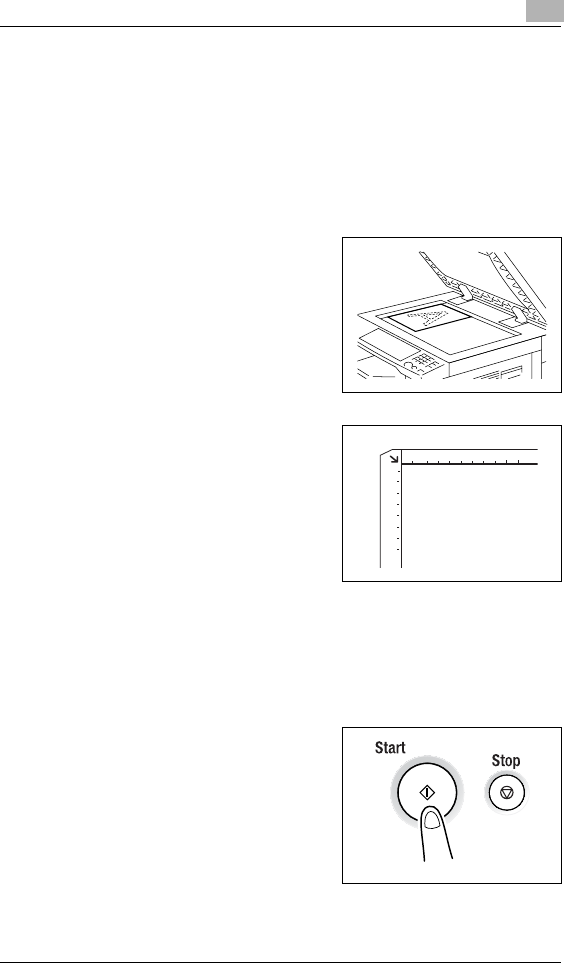
Basic Copy Operations 4
Di152f/Di183f 4-5
With the Original Glass
To position sheet documents
For plain documents or documents that cannot be loaded into the
Automatic Document Feeder, position them as described below.
1Lift open the Original Cover, or the Automatic Document Feeder if it is
installed.
2Position the document to be copied
face down on the Original Glass.
3Align the document on the scales
above and to the left of the Original
Glass.
4Carefully close the Original Cover, or the Automatic Document Feeder
if it is installed.
5Select the desired copy settings. For details, refer to “Making Copies”
on page 4-9 and “Advanced Copy Operations” on page 5-1.
6Press the [Start] key to copy the
document.
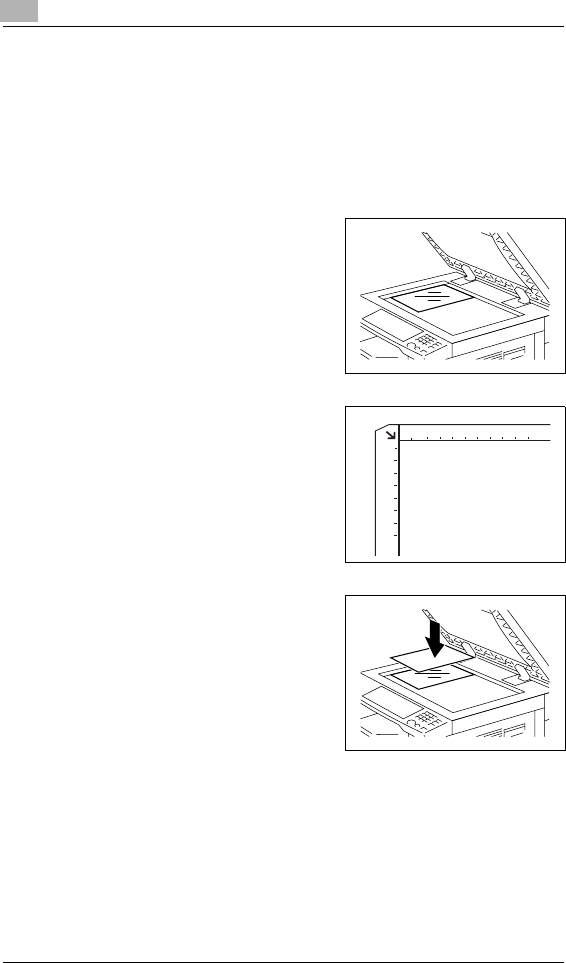
4Basic Copy Operations
4-6 Di152f/Di183f
To position translucent or transparent documents
When copying a highly transparent or translucent document, such as OHP
transparencies, tracing paper or diazo photosensitive paper, position it as
described below.
1Lift open the Original Cover, or the Automatic Document Feeder if it is
installed.
2Position the document to be copied
face down on the Original Glass.
3Align the document on the scales
above and to the left of the Original
Glass.
4Place a blank sheet of paper of the
same size over the document.
5Carefully close the Original Cover, or the Automatic Document Feeder
if it is installed.
6Select the desired copy settings. For details, refer to “Making Copies”
on page 4-9 and “Advanced Copy Operations” on page 5-1.
7Press the [Start] key to copy the document.
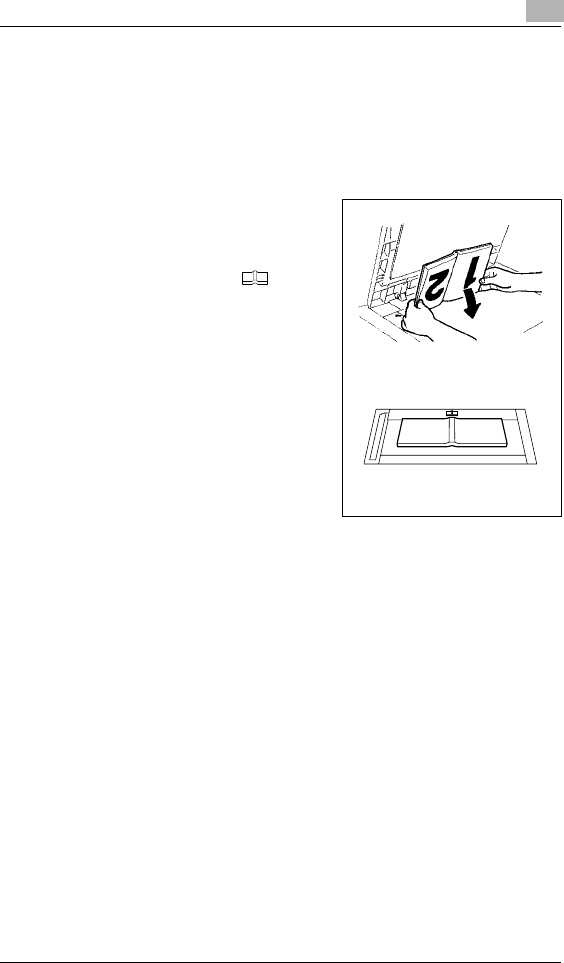
Basic Copy Operations 4
Di152f/Di183f 4-7
To position a book
When copying two facing pages of a bound document, such as a book or
magazine, position it as described below.
1Lift open the Original Cover, or the Automatic Document Feeder if it is
installed.
2Position the book face down onto
the Original Glass, with the top of
the book toward the rear of the
machine and with the center of the
book aligned with the mark in
the Document Scale.
?Have the necessary precautions
been observed when positioning
the book on the Original Glass?
§Do not place objects weighing
more than 6-1/2 lb on the
Original Glass. In addition, do
not press down extremely hard
on the document, otherwise the
machine may be damaged.
3Carefully close the Original Cover, or the Automatic Document Feeder
if it is installed.
?Is a thick book or object being copied?
§Make the copy without closing the Original Cover or Automatic
Document Feeder. When the document is being scanned without
closing the Original Cover or Automatic Document Feeder, do not
look directly at the bright light that may shine through the Original
Glass. Although the light that shines through the Original Glass is
bright, it is not a laser beam and, therefore, is not as dangerous.

4Basic Copy Operations
4-8 Di152f/Di183f
4Press the [Original] key until the
“Book Separation” indicator lights
up.
5Select the desired copy settings. For details, refer to “Making Copies”
on page 4-9 and “Advanced Copy Operations” on page 5-1.
6Press the [Start] key to copy the document.
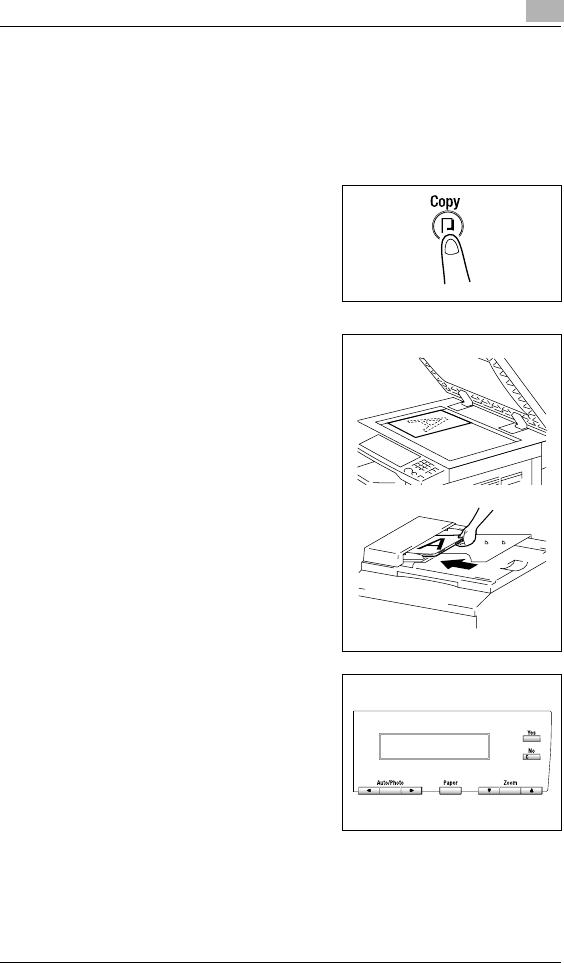
Basic Copy Operations 4
Di152f/Di183f 4-9
4.2 Making Copies
The following procedure describes how to load documents and make a
simple copy of it.
To make a simple copy
1Press the [Copy] key to enter Copy
mode.
2Load the document to be copied.
HRefer to “Loading the
Document” on page 4-1.
3Select the desired copy settings.
HPaper (p. 4-11)
HZoom (p. 4-21)
HCopy density (p. 4-25)
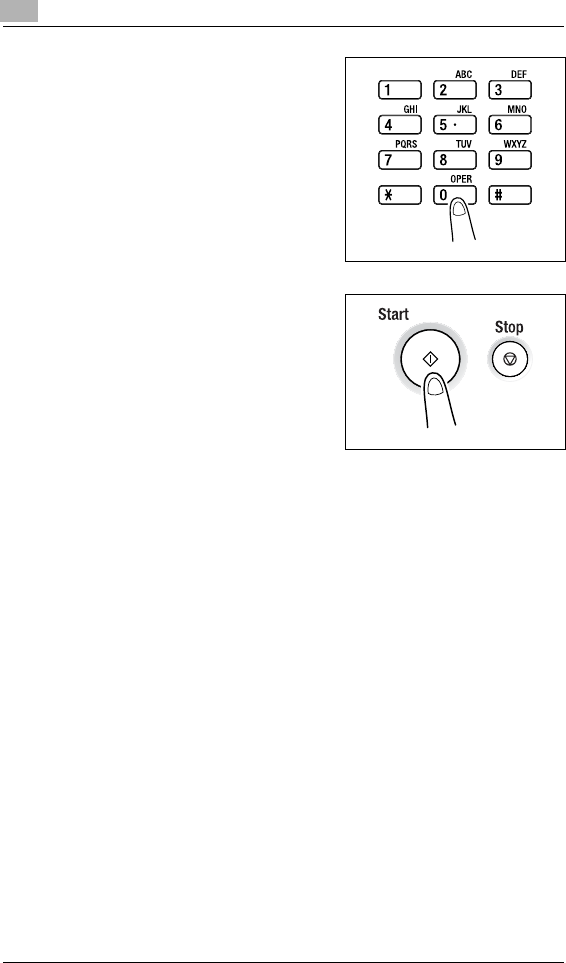
4Basic Copy Operations
4-10 Di152f/Di183f
4Using the 10-Key Pad, enter the
desired number of copies. The
number of copies can be set to any
number between 1 and 99.
5Press the [Start] key.
The set number of copies are made.
To stop copying before the set
number of copies have been made,
press the [Stop] key.
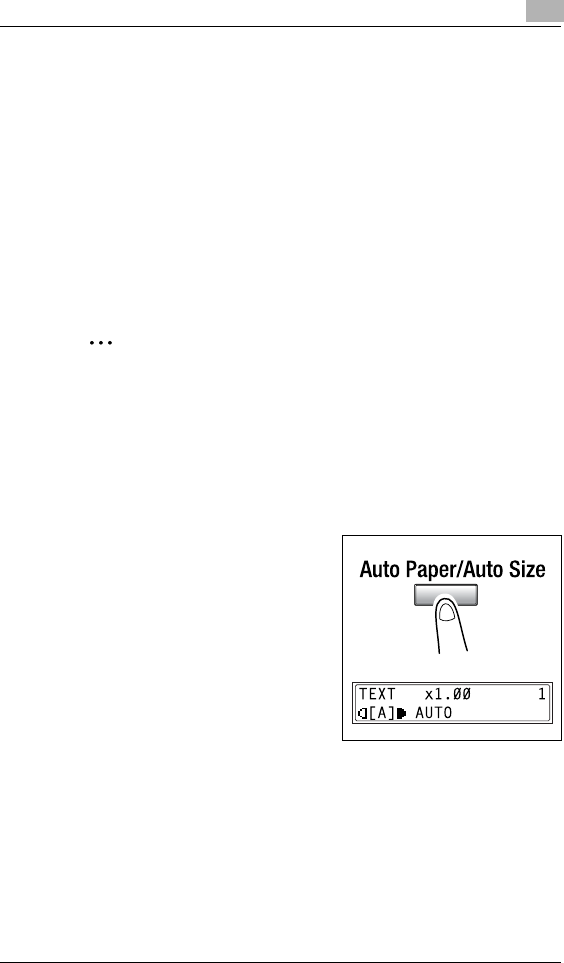
Basic Copy Operations 4
Di152f/Di183f 4-11
4.3 Selecting the Paper Source
Before making a copy, the paper tray containing the paper that will be
used must be selected. Either the paper source is selected automatically
when the size of the document is detected, or the desired paper source
can be selected manually.
GAuto Paper:
If the “Auto Paper” function is selected, the paper tray containing the
most suitable size of paper is selected based on the size of the
document and the specified.
GManual paper selection:
The paper tray containing the paper that you wish to use can be
selected.
Note
The Automatic Document Feeder (optional) is needed for copying with
the “Auto Paper” function.
To make copies using the “Auto Paper” function
1Load the document into the Automatic Document Feeder.
HRefer to “Loading the Document” on page 4-1.
2Press the [Auto Paper/Auto Size]
key until the “Auto Paper” function is
selected.
HCheck that “AUTO” appears in
the bottom line of the screen.
3If necessary, specify any other copy settings.
HZoom (p. 4-21)
HCopy density (p. 4-25)
4Using the 10-Key Pad, enter the desired number of copies, and then
press the [Start] key.

4Basic Copy Operations
4-12 Di152f/Di183f
Note
If “NO SUITABLE PAPER” appears in the display immediately after
the [Start] key is pressed, no tray is loaded with paper of the most
suitable size. Either load paper with the appropriate size, or press the
[Paper] key and select the desired paper size, and then press the
[Start] key again.
To copy with a manually selected paper size
1Load the document to be copied.
HRefer to “Loading the Document” on page 4-1.
2Press the [Paper] key, and then
select the desired paper size.
HCheck that the correct
document size appears in the
bottom line of the screen.
3If necessary, specify any other copy settings.
HZoom (p. 4-21)
HCopy density (p. 4-25)
4Using the 10-Key Pad, enter the desired number of copies, and then
press the [Start] key.

Basic Copy Operations 4
Di152f/Di183f 4-13
To copy onto special paper (1st Tray)
If special paper, such as OHP transparencies, postcards or cards, are
loaded into the 1st Tray, first set the “TRAY1 PAPER” function in the
“PAPER SOURCE SETUP” menu of the Utility mode (“To specify the size
of paper loaded into the 1st Tray (“TRAY1 PAPER” function)” on
page 9-14).
Depending on the paper type set for the “TRAY1 PAPER” function, the
screen changes as shown below.
Postcards or cards OHP transparencies

4Basic Copy Operations
4-14 Di152f/Di183f
4.4 Making Copies on Manually Fed Paper
Manually feed the copy paper if you wish to make copies onto paper not
loaded into any paper tray or onto special paper, such as OHP
transparencies, postcards or cards.
Paper That Can Be Fed Manually
Paper types:
GPlain or recycled paper (thickness: 16 lb to 24 lb)
GSpecial paper
HCards (thickness: 24-1/4 lb to 41-3/4 lb)
HOHP transparencies
HPostcards
HLabel sheets
Paper sizes:
GMaximum: 11-11/16 × 17
GMinimum: 3-9/16 × 5-1/2
Note
When copying using the Manual Bypass Tray, only one page at a time
can be loaded. However, if the Multiple Bypass Tray (optional) is
installed, up to 50 sheets of paper can be loaded and fed manually.
For cards, postcards and OHP transparencies, up to 20 sheets can be
loaded.
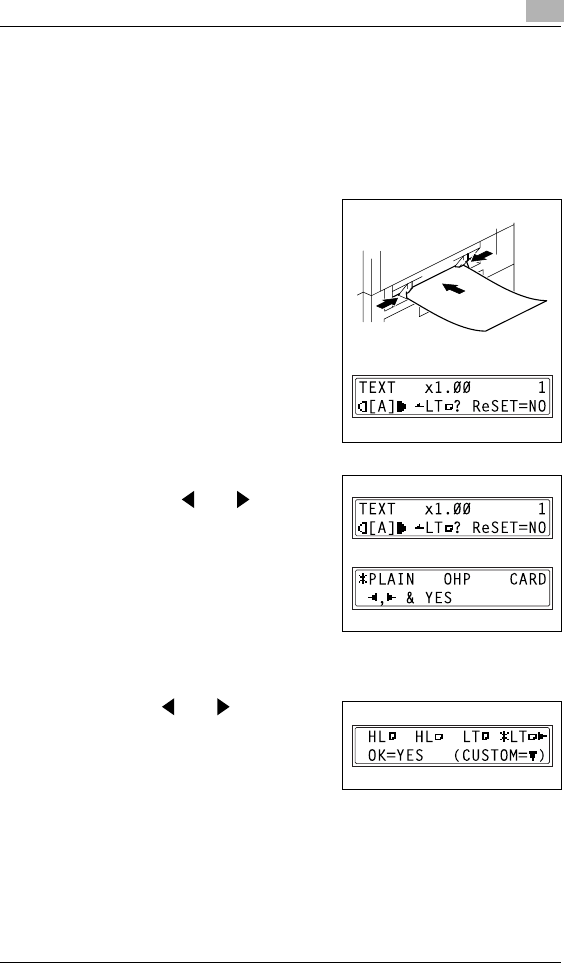
Basic Copy Operations 4
Di152f/Di183f 4-15
Copying Onto Manually Fed Paper
To copy using the Manual Bypass Tray
1Load the document to be copied.
HRefer to “Loading the Document” on page 4-1.
2Adjust the paper guides to fit the
size of the paper, and then insert
one sheet of paper with the front
side facing down, lightly sliding the
paper as much as possible into the
feed slot.
The manual bypass mark appears
in the bottom line of the screen.
?Is a card or a postcard loaded?
§Make sure that it is not curled
(rolled).
3Press the [No] key (“RESET”), and
then use the and keys to
select the type of paper loaded.
4Press the [Yes] key.
5Using the and keys, select
the size of paper loaded.
HIf “OHP” was selected in step 3,
set the paper size to Letter C or
Letter L.
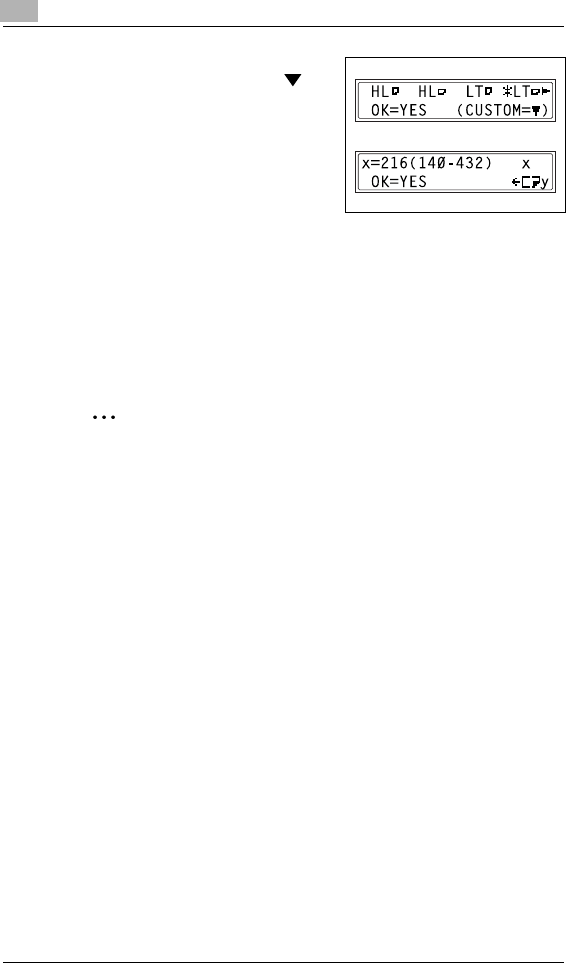
4Basic Copy Operations
4-16 Di152f/Di183f
HIf paper with a non-standard
size is loaded, press the key
(“CUSTOM”), and then use the
10-Key Pad to enter the paper
size. (For details, refer to
page 4-19.)
6Press the [Yes] key.
7If necessary, specify any other copy settings.
HZoom (p. 4-21)
HCopy density (p. 4-25)
8Press the [Start] key.
Tip
To copy onto more pages using the same settings, feed paper into the
Manual Bypass Tray to begin making copies automatically.
To make continuous copies onto cards, postcards or OHP
transparencies, load them into the 1st Tray. (“To load paper into the
1st Tray” on page 12-1)
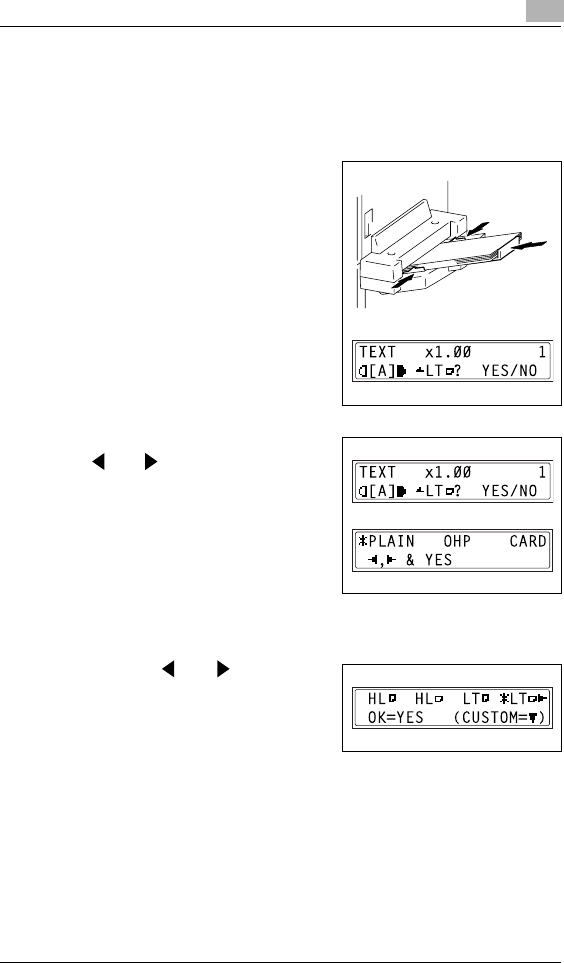
Basic Copy Operations 4
Di152f/Di183f 4-17
To copy using the Multiple Bypass Tray
1Load the document to be copied.
HRefer to “Loading the Document” on page 4-1.
2Adjust the Bypass Tray Extender
and the paper guides to fit the size
of the paper, and then load the
paper with the front side facing
down, lightly sliding the paper as
much as possible into the feed slot.
The manual bypass mark appears
in the bottom line of the screen.
?Are sheets of cards or postcards
loaded?
§Make sure that they are not
curled (rolled).
3Press the [No] key, and then use the
and keys to select the type of
paper loaded.
4Press the [Yes] key.
5Using the and keys, select
the size of paper loaded.

4Basic Copy Operations
4-18 Di152f/Di183f
HIf paper with a non-standard
size is loaded, press the key
(“CUSTOM”), and then use the
10-Key Pad to enter the paper
size. (For details, refer to
page 4-19.)
HIf “OHP” was selected in step 3,
set the paper size to Letter C or
Letter L.
6Press the [Yes] key.
7If necessary, specify any other copy settings.
HZoom (p. 4-21)
HCopy density (p. 4-25)
8Press the [Start] key.
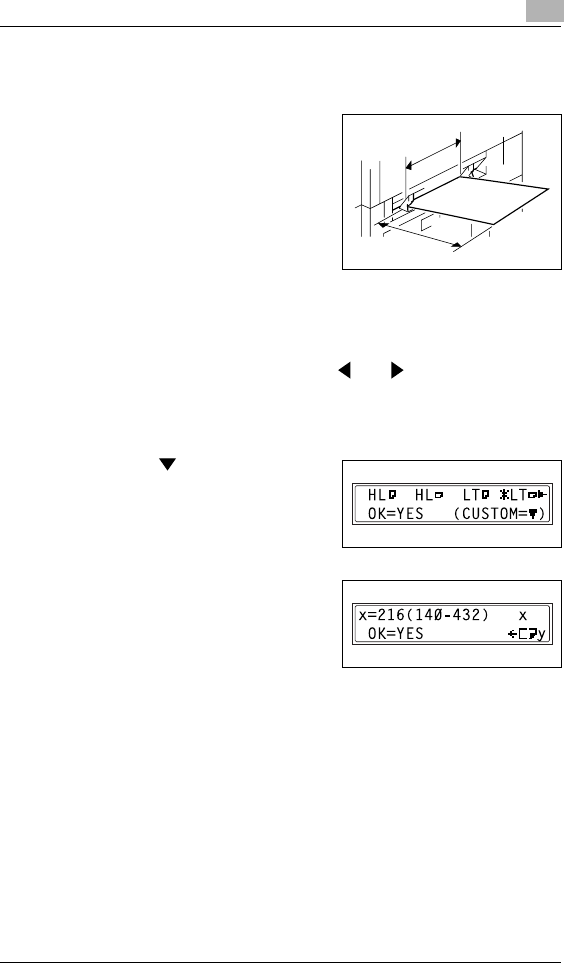
Basic Copy Operations 4
Di152f/Di183f 4-19
To copy onto a custom paper size
Precautions for entering custom paper sizes:
When entering a custom paper size,
be sure to specify the width and
length measurements correctly.
When using the 10-Key Pad to enter
a custom paper size, the values are
entered in millimeters. The
conversion ratio is shown below.
1 inch = 25.4 mm
1Load the document to be copied.
2Load the paper into the Manual Bypass Tray.
3Press the [No] key, and then use the and keys to select the type
of paper loaded.
4Press the [Yes] key.
5Press the key (“CUSTOM”).
6Using the 10-Key Pad, enter the
length (mm) of the loaded paper.
HThe paper length can be set
between 5-1/2 inch (140 mm)
and 17 inch (432 mm).
HIf you wish to correct the entered setting, press the [No] key, and
then use the 10-Key Pad to enter the new number.
7Press the [Yes] key.
Width (y)
Length (x)

4Basic Copy Operations
4-20 Di152f/Di183f
8Using the 10-Key Pad, enter the
width (mm) of the loaded paper.
HThe paper width can be set
between 3-9/16 inch (90 mm)
and 11-11/16 inch (297 mm).
HIf you wish to correct the entered setting, press the [No] key, and
then use the 10-Key Pad to enter the new number.
9If necessary, specify any other copy settings.
HZoom (p. 4-21)
HCopy density (p. 4-25)
10 Press the [Start] key.
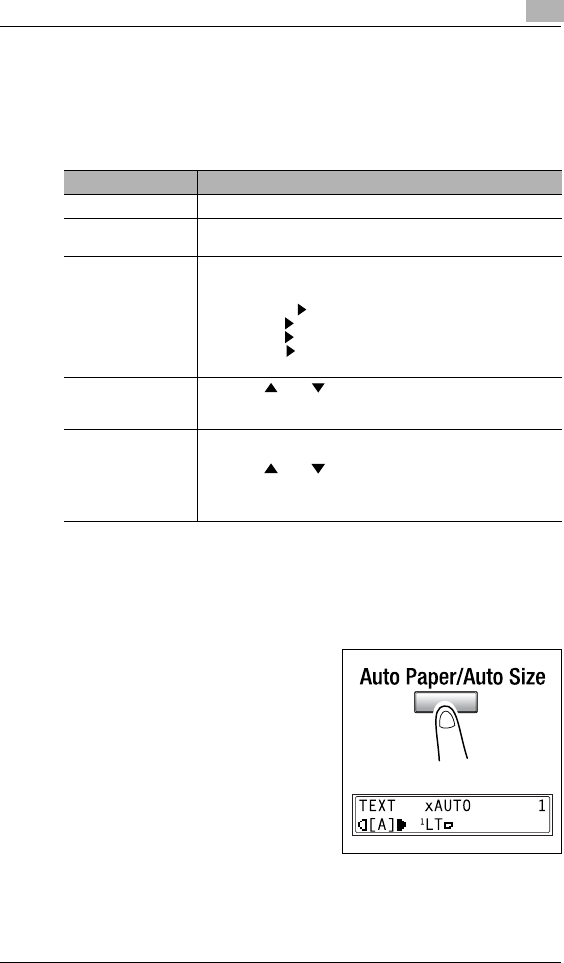
Basic Copy Operations 4
Di152f/Di183f 4-21
4.5 Specifying a Zoom Setting
By specifying a zoom ratio, the copy can be enlarged or reduced.
Zoom Settings
To make copies using the “AUTO” zoom setting
1Load the document to be copied.
HRefer to “Loading the Document” on page 4-1.
2Press the [Auto Paper/Auto Size]
key until the “Auto Size” function is
selected.
HCheck that “AUTO” appears in
the top line of the screen.
“Zoom” setting Description
Full size Copies are made at the same size as the document (× 1.00).
“AUTO” zoom ratio The most appropriate zoom ratio is automatically selected based
on the size of the document loaded and the specified paper size.
Preset zoom ratios The following common zoom ratios for copying from various
standard document sizes to standard paper sizes are available.
× 0.50
× 0.64 (11 × 17 Letter)
× 0.78 (Legal Letter)
× 1.21 (Legal 11 × 17)
× 1.29 (Letter 11 × 17)
× 2.00
Zoom ratios selected
using the up and down
Zoom keys
Using the and keys, the zoom ratio can be adjusted
(increased or reduced) in 0.01 increments.
A zoom ratio between × 0.50 and × 2.00 can be set.
“X/Y Zoom” function Copies can be made using different scaling proportions for the
vertical and horizontal directions.
Using the and keys, the zoom ratio can be adjusted
(increased or reduced) in 0.01 increments.
The vertical and horizontal zoom ratios can be set between × 0.50
and × 1.00.
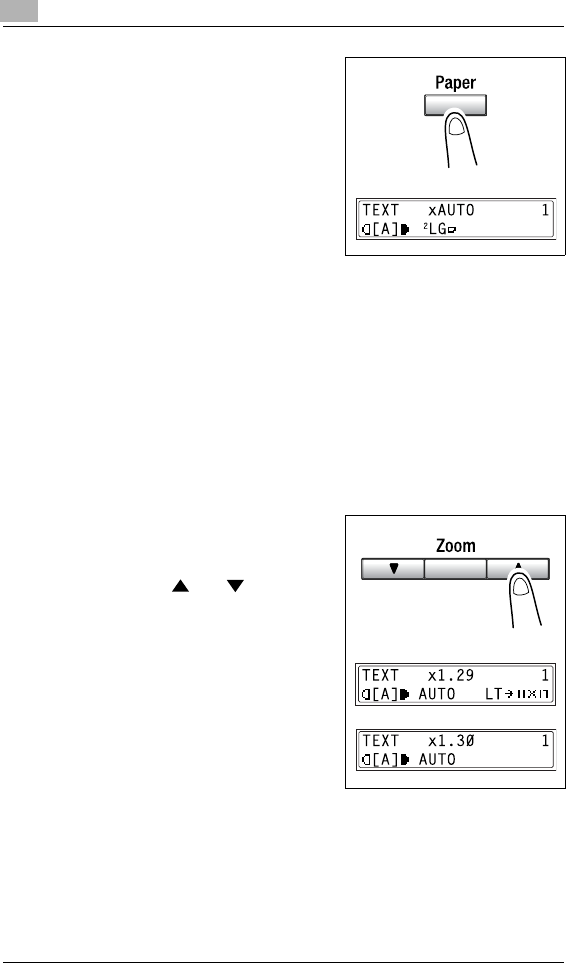
4Basic Copy Operations
4-22 Di152f/Di183f
3Press the [Paper] key, and then
select the desired paper size.
4If necessary, specify any other copy settings.
HCopy density (p. 4-25)
5Using the 10-Key Pad, enter the desired number of copies, and then
press the [Start] key.
To make copies using a specific zoom setting
1Load the document to be copied.
HRefer to “Loading the Document” on page 4-1.
2Press the [Zoom] key, and then
select the desired zoom ratio.
HTo select a specific zoom ratio,
use the and keys to
specify the desired zoom ratio.
The zoom ratio increases and
decreases in 0.01 increments.
3If necessary, specify any other copy settings.
HPaper (p. 4-11)
HCopy density (p. 4-25)
4Using the 10-Key Pad, enter the desired number of copies, and then
press the [Start] key.
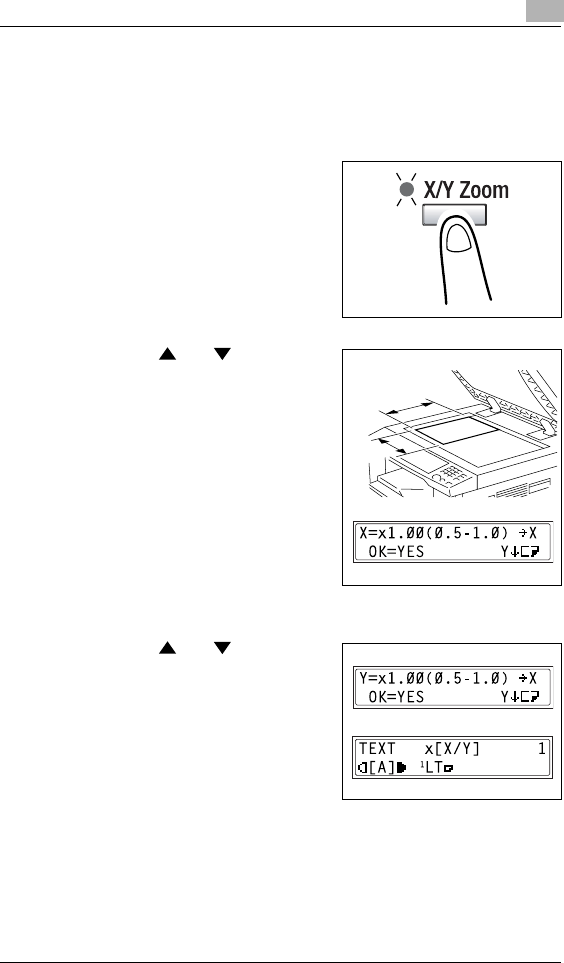
Basic Copy Operations 4
Di152f/Di183f 4-23
To make copies using the “X/Y Zoom” function
1Load the document to be copied.
HRefer to “Loading the Document” on page 4-1.
2Press the [X/Y Zoom] key until the
“X/Y Zoom” indicator lights up.
3Using the and keys, select
the desired zoom ratio for the length
(X), and then press the [Yes] key.
HThe zoom ratio increases and
decreases in 0.01 increments.
HPress the [No] key to reset the
zoom ratio to “× 1.00”.
HThe zoom ratio can be changed
by using the [Zoom] key. Each
press of the [Zoom] key
changes the zoom ratio as
shown below.
× 0.50 →× 0.64 →× 0.78 →
×1.00 →× 0.50 . . .
4Using the and keys, select
the desired zoom ratio for the width
(Y), and then press the [Yes] key.
HThe zoom ratio increases and
decreases in 0.01 increments.
HPress the [No] key to reset the
zoom ratio to “× 1.00”.
HThe zoom ratio can be changed
by using the [Zoom] key. The
zoom ratios that can be selected are shown in the step above.
Width (Y)
Length
(X)

4Basic Copy Operations
4-24 Di152f/Di183f
5If necessary, specify any other copy settings.
HPaper (p. 4-11)
HCopy density (p. 4-25)
6Using the 10-Key Pad, enter the desired number of copies, and then
press the [Start] key.

Basic Copy Operations 4
Di152f/Di183f 4-25
4.6 Specifying the Copy Density (“Auto/Photo”
function)
Document type and copy density settings
G“TEXT” setting:
The automatic density level and 5 manual density levels are available.
H“AUTO” density level:
The density level is automatically adjusted according to the document
being copied.
HManual density levels:
In order to prevent the image on the back of newspaper or magazine
articles from appearing in the copy, press the key to select a level
toward “LIGHT”. In order to copy pale colors in bright areas of an
image, press the key to select a level toward “DARK”. Since
selecting a level too much toward “DARK” may copy the media color
or selecting a level too much toward “LIGHT” may produce a very faint
copy, select the appropriate level depending on the document.
G“PHOTO” setting:
Select this setting when copying documents with many areas with
varying halftones, such as photos.
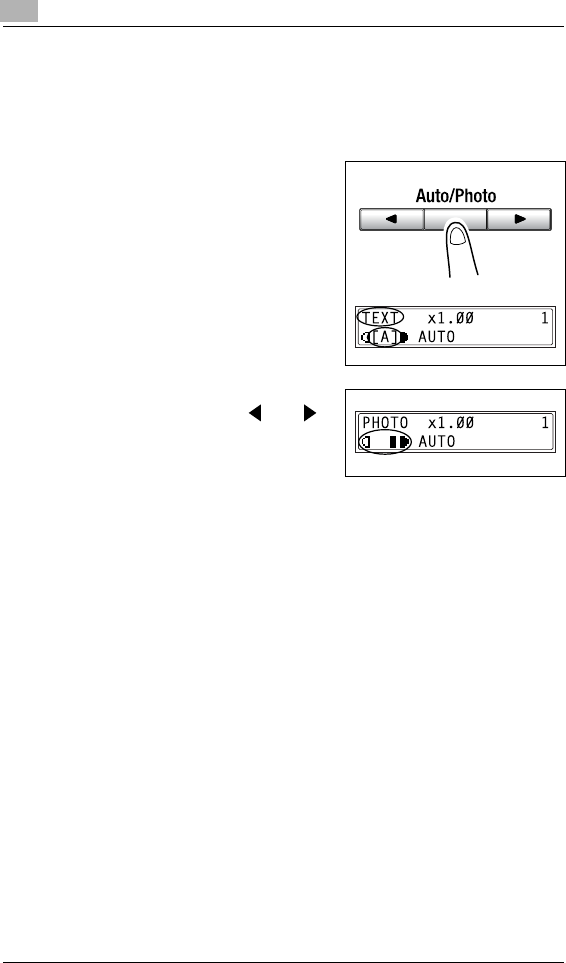
4Basic Copy Operations
4-26 Di152f/Di183f
To make copies after specifying a copy density
1Load the document to be copied.
HRefer to “Loading the Document” on page 4-1.
2Press the [Auto/Photo] key to select
between the “[A]” (AUTO),
“PHOTO” and “TEXT” settings.
HThe current setting appears on
the left side of the screen.
3If the “PHOTO” or “TEXT” setting
was selected, use the and
keys to adjust the density level.
4If necessary, specify any other copy settings.
HPaper (p. 4-11)
HZoom (p. 4-21)
5Using the 10-Key Pad, enter the desired number of copies, and then
press the [Start] key.
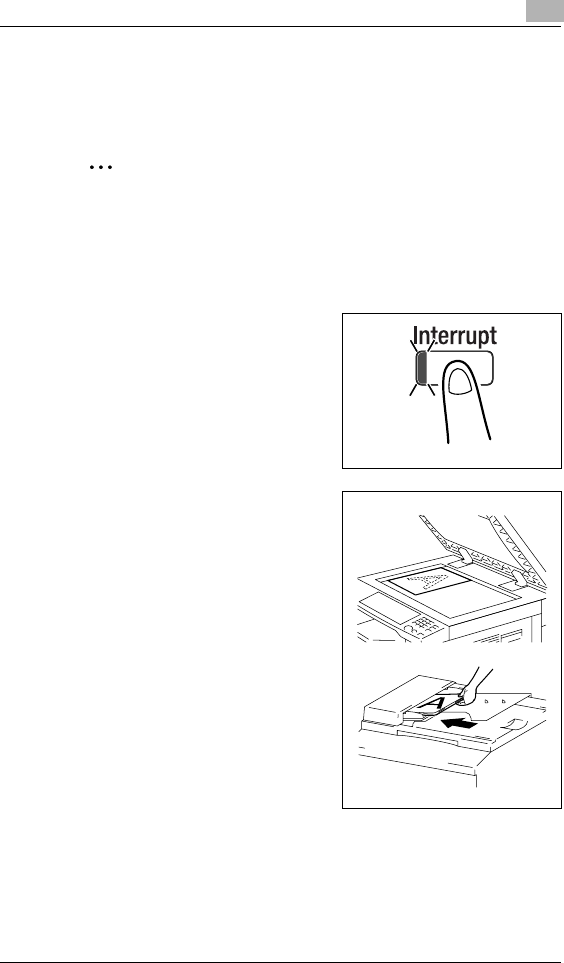
Basic Copy Operations 4
Di152f/Di183f 4-27
4.7 Interrupting Copy Jobs
Long continuous copy operations can quickly be paused by pressing the
[Interrupt] key in order to copy a different document.
Note
Some functions cannot be interrupted. In addition, some functions are
not available while a copy job is interrupted. For details, refer to
“Function Combination Table” on page 14-11.
To interrupt a copy job
1Press the [Interrupt] key. The
“Interrupt” indicator lights up and the
current copy operation is paused.
HWhen the [Interrupt] key is
pressed, all functions are reset
to their defaults.
2Remove the current document, and
then load the other document that
you wish to copy.
3If necessary, specify any other copy settings.
HPaper (p. 4-11)
HZoom (p. 4-21)
HCopy density (p. 4-25)

4Basic Copy Operations
4-28 Di152f/Di183f
4Using the 10-Key Pad, enter the desired number of copies, and then
press the [Start] key to copy the other document.
5After the other document is copied, press the [Interrupt] key. The
“Interrupt” indicator goes off, and all copy functions return to their
previous settings.
6Reload the document that was removed in step 2.
7Press the [Start] key to continue the interrupted copy job.
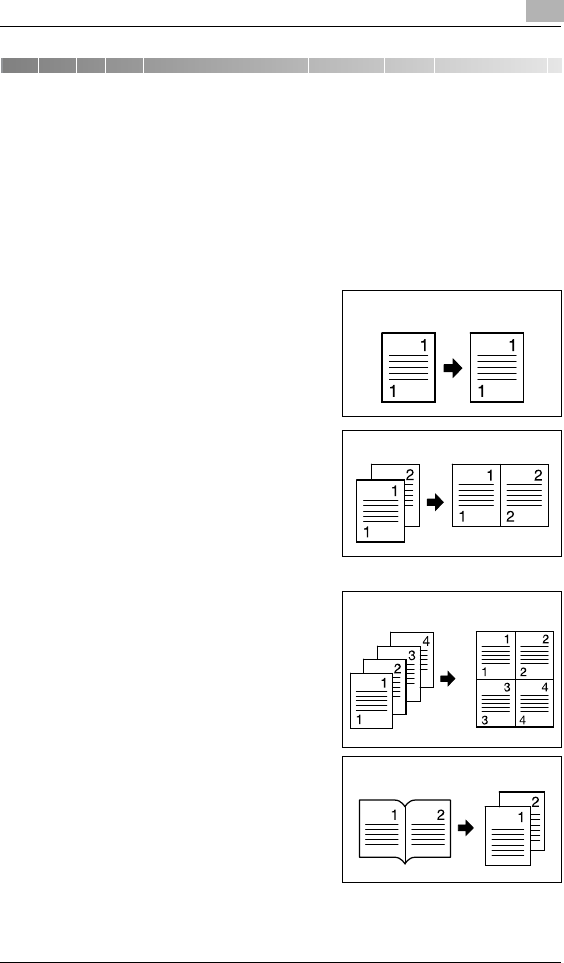
Advanced Copy Operations 5
Di152f/Di183f 5-1
5 Advanced Copy Operations
5.1 Single-Sided Copies
The setting combinations of the various document and copy types and the
procedures for selecting the appropriate settings are described below.
Using the various functions available by pressing the [Original] and the
[Copy] keys, you can select the most suitable copy method.
Copy methods
GSingle-sided copies:
A single-sided copy is produced
from a single-sided document.
G“2in1” copy function:
A single-sided copy is produced
from two single-sided document
pages.
HImportant:
This function is only available when
the Automatic Document Feeder is
installed.
G“4in1” copy function:
A single-sided copy is produced
from four single-sided document
pages.
HImportant:
This function is only available when
the Automatic Document Feeder is
installed.
G“Book Separation” function:
A single-sided copy is produced
from each of the two pages of an
open book.
Documents Copies
Documents Copies
Documents Copies
Documents Copies
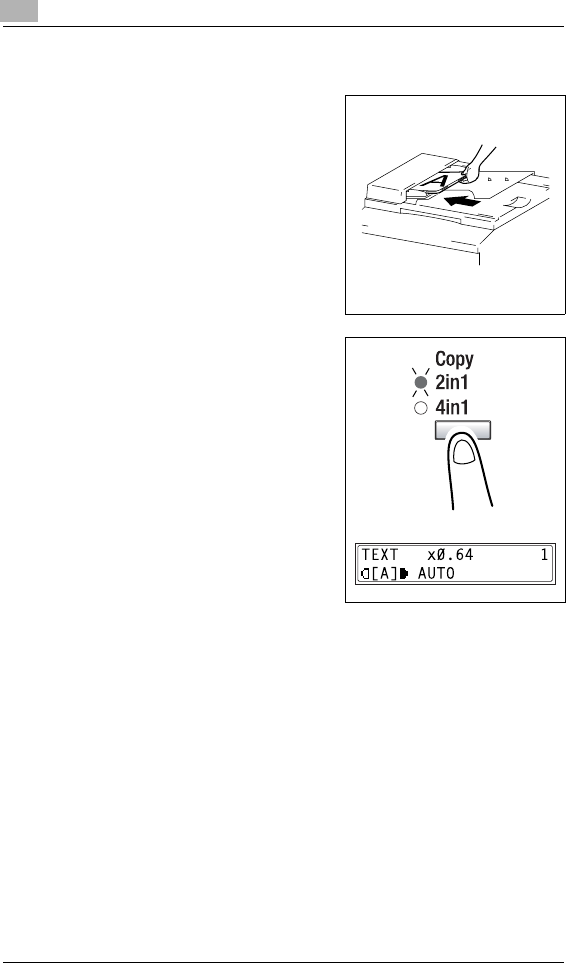
5Advanced Copy Operations
5-2 Di152f/Di183f
To make copies using the “2in1” (or “4in1”) copy function
1Load the document to be copied
into the Automatic Document
Feeder.
HRefer to “Loading the
Document” on page 4-1.
2Press the [Copy] key until the “2in1”
(or “4in1”) indicator lights up.
3If necessary, specify any other copy settings.
4Using the 10-Key Pad, enter the desired number of copies, and then
press the [Start] key.
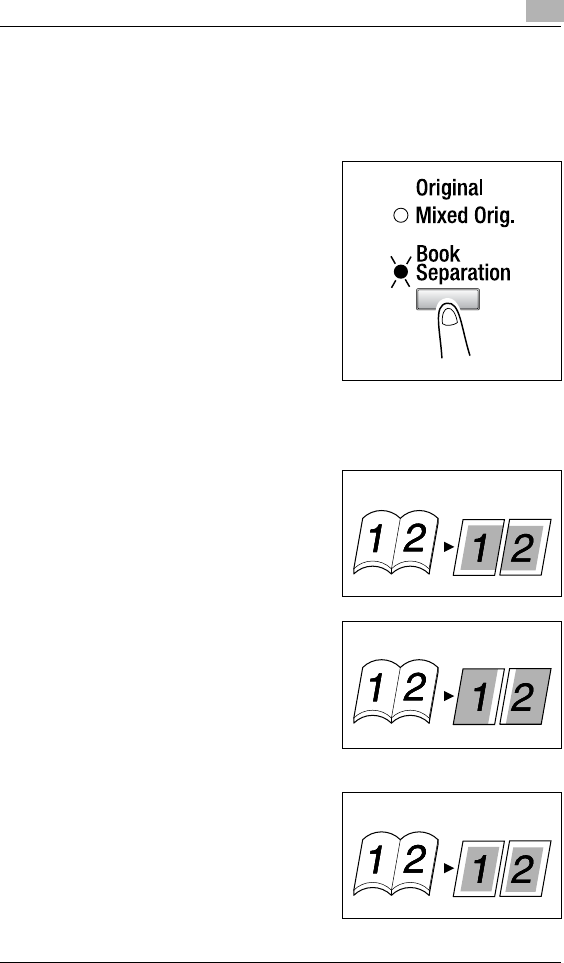
Advanced Copy Operations 5
Di152f/Di183f 5-3
To make copies using the “Book Separation” function
1Load the document to be copied.
HRefer to “Loading the Document” on page 4-1.
2Press the [Original] key until the
“Book Separation” indicator lights
up.
HThe default binding setting is for
left-bound books. To copy right-
bound books, change the
document type using the
“BINDING POS.” function in the
Utility mode (p. 9-35).
3To erase the area around the text and/or the binding of the book, press
the [Erase] key to select the desired erase setting.
There are three erase settings available.
H“Frame” erase setting
The pages are copied with a
blank area framing the text.
H“Center” erase setting
The pages are copied with a
blank area along the binding.
H“Frame” and “Center” erase
settings
The pages are copied with blank
areas framing the text and along
the binding.
Documents Copies
Documents Copies
Documents Copies

5Advanced Copy Operations
5-4 Di152f/Di183f
?Do you know how large of an area is erased?
§The width of the erased area for the “Frame” setting can be set
between 1/4 inch (5 mm) and 3/4 inch (20 mm), in 1 mm (Approx.
1/16 inch ) increments. The default setting is 1/2 inch (10 mm).
§The width of the erased area for the “Center” setting is fixed at 1/2
inch (10 mm).
§The width of the erased area for the “Frame” setting can be
changed using the “ERASE SETTING” function in the Utility mode
(p. 9-36).
4If necessary, specify any other copy settings.
5Using the 10-Key Pad, enter the desired number of copies, and then
press the [Start] key.
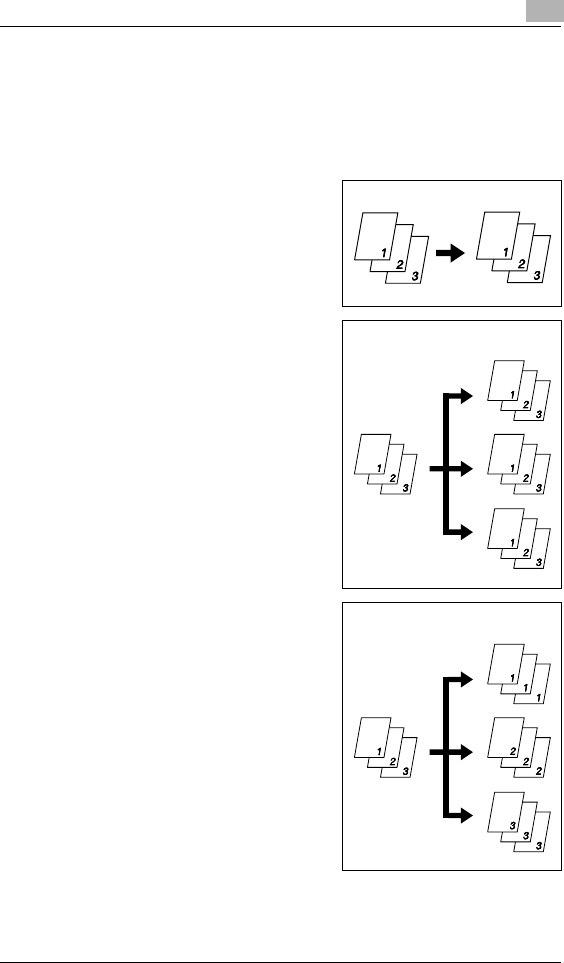
Advanced Copy Operations 5
Di152f/Di183f 5-5
5.2 Finishing Copies (“Sort” and “Group” functions)
When copying or printing two or more sets of a document, the copies can
be divided either by sets containing a copy of each page (sorted) or by
pages (grouped).
Finishing methods
GNon-sort:
The copies are stacked on top of
each other as they are fed out.
G“Sort” function:
The copies are automatically
divided into sets with each set
containing a copy of each page.
G“Group” function:
The copies are automatically
divided into stacks containing all
copies of the same page.
Documents Copies
Documents Copies
Documents Copies
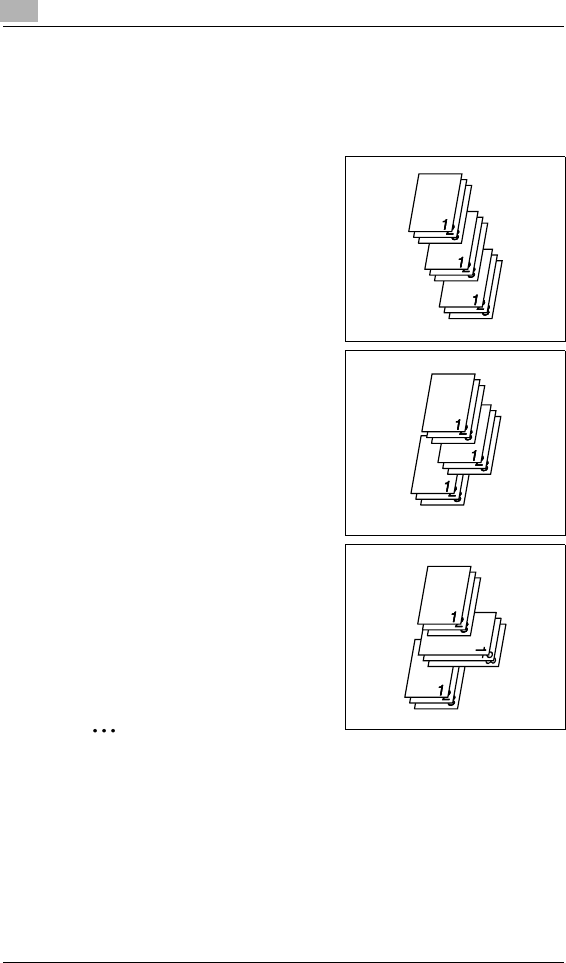
5Advanced Copy Operations
5-6 Di152f/Di183f
Sorting
The copies are fed out automatically separated into sets.
There are three ways of sorting: electronic sorting, shifted sorting and
crisscross sorting.
GElectronic sorting
The copies are fed out automatically
divided into sets containing one
copy of each page.
HThe Automatic Document Feeder
must be installed.
GShifted sorting
Sets containing one copy of each
page are fed out in an alternating
shifted pattern.
HThe Automatic Document Feeder
and Shifting Unit must be installed.
GCrisscross sorting
Sets containing one copy of each
page are fed out in an alternating
crisscross pattern.
HThe Automatic Document Feeder
and Paper Feed Cabinet (or
Multiple Bypass) must be installed.
Note
For crisscross sorting, paper of the same size and type must be loaded
horizontally in one paper tray and vertically in another tray.
Crisscross sorting is not possible if the Shifting Unit is installed.
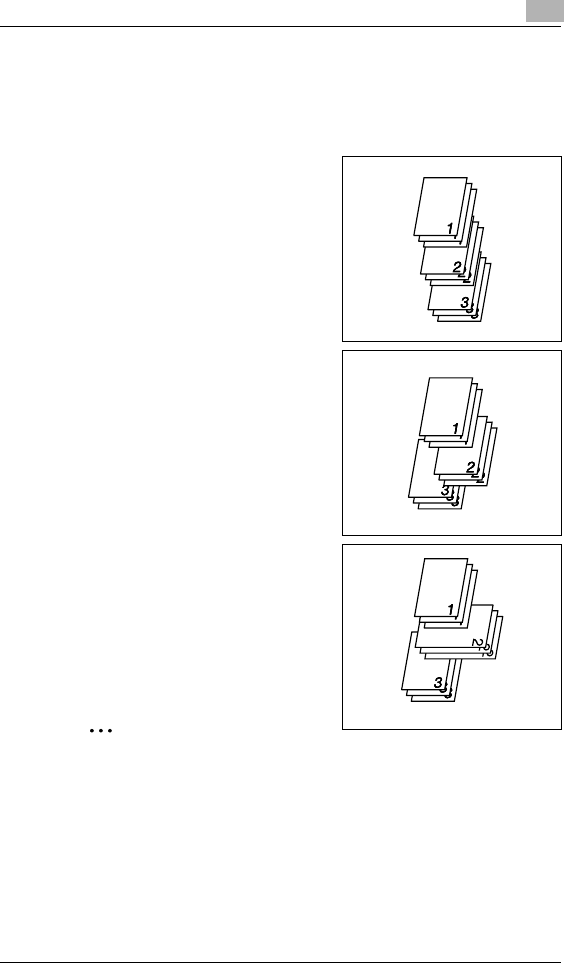
Advanced Copy Operations 5
Di152f/Di183f 5-7
Grouping
The copies are fed out automatically separated by page.
There are three ways of grouping: grouping, shifted grouping and
crisscross grouping.
GGrouping
All copies of a single page are fed
out in sets.
HThe Automatic Document Feeder
must be installed.
GShifted grouping
Sets containing all copies of a single
page are fed out in an alternating
shifted pattern.
HThe Automatic Document Feeder
and Shifting Unit must be installed.
GCrisscross grouping
Sets containing all copies of a single
page are fed out in an alternating
crisscross pattern.
HThe Automatic Document Feeder
and Paper Feed Cabinet (or
Multiple Bypass) must be installed.
Note
For crisscross grouping, paper of the same size and type must be
loaded horizontally in one paper tray and vertically in another tray.
Crisscross grouping is not possible if the Shifting Unit is installed.
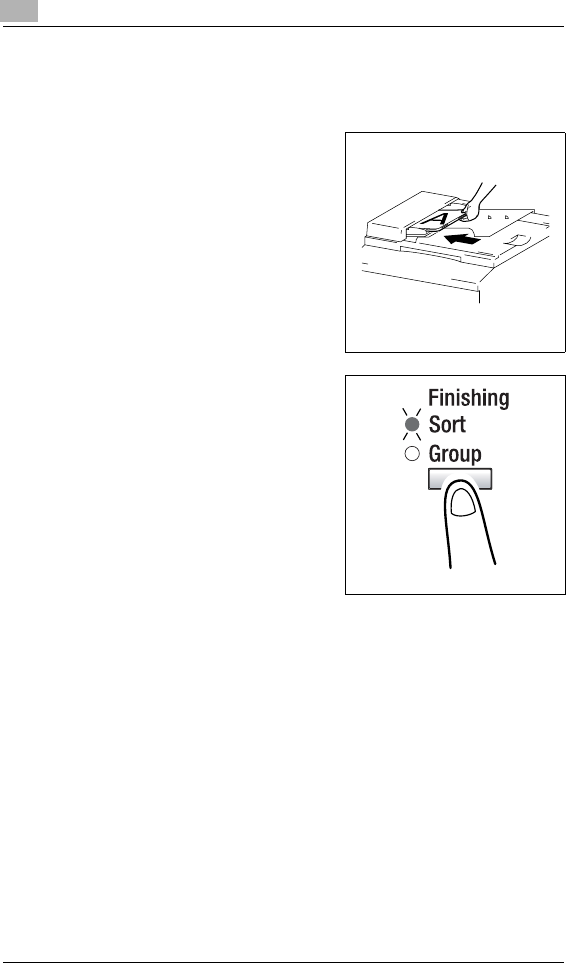
5Advanced Copy Operations
5-8 Di152f/Di183f
Specifying Finishing
To make copies using a Finishing function
1Load the document to be copied
into the Automatic Document
Feeder.
HRefer to “Loading the
Document” on page 4-1.
2Press the [Finishing] key until the
indicator for the desired Finishing
function lights up.
?Are neither the “Sort” nor the
“Group” indicators lit?
§The “Non-sort” setting is
selected.
3If necessary, specify any other copy settings.
4Using the 10-Key Pad, enter the desired number of copies, and then
press the [Start] key.
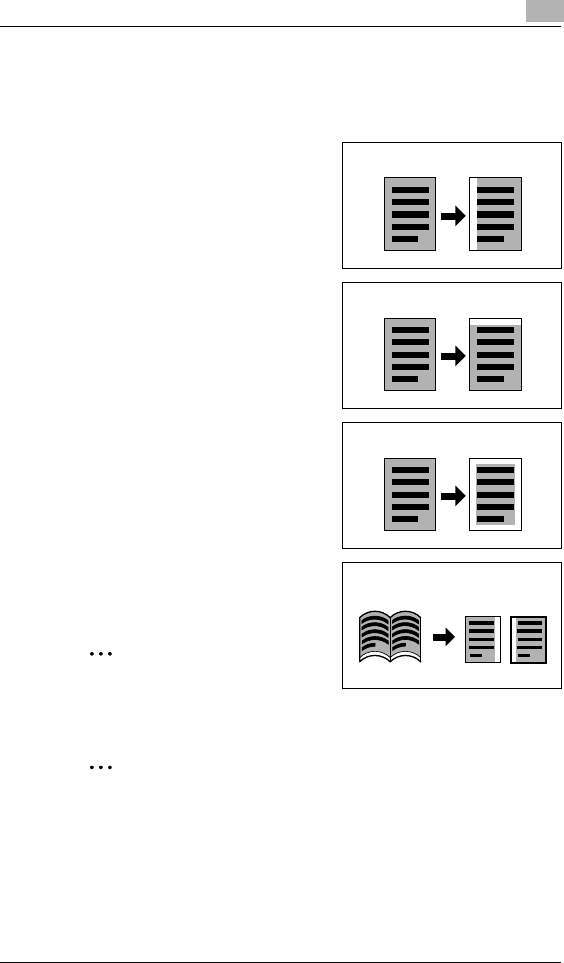
Advanced Copy Operations 5
Di152f/Di183f 5-9
5.3 Erasing Sections of Copies
Areas such as the unclean-looking frames around copies can be erased.
The “Erase” function can be set to one of four settings.
G“Left” erase setting:
The left side of the document is
erased from the copy.
G“Upper” erase setting:
The top of the document is erased
from the copy.
G“Frame” erase setting:
A frame around the document is
erased from the copy.
G“Center” erase setting:
A section along the center of the
document is erased from the copy.
Note
This setting is only available when
the “Book Separation” function is set.
Tip
If the “Book Separation” function is set, the “Frame” and the “Center”
erase settings can be combined (p. 5-3).
Documents Copies
Documents Copies
Documents Copies
Documents Copies
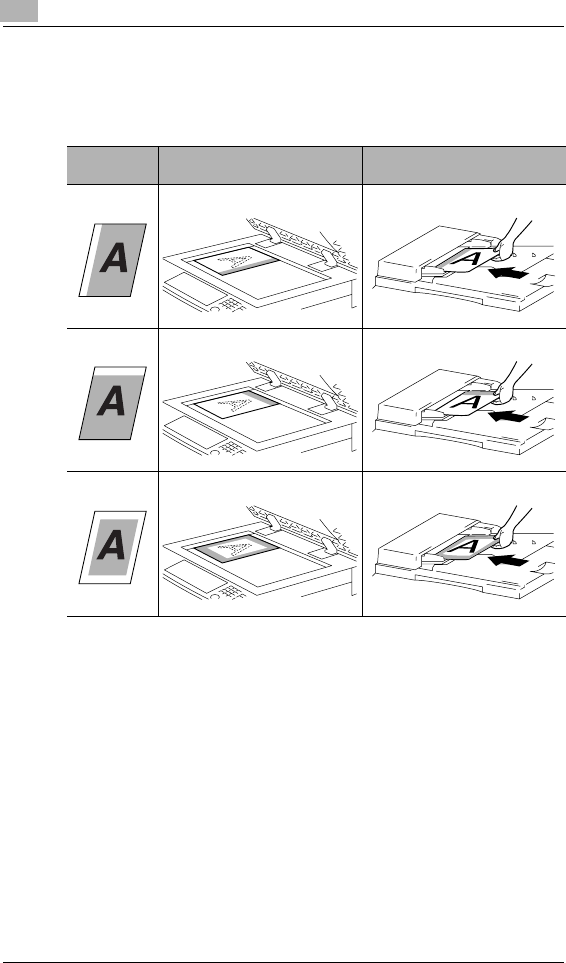
5Advanced Copy Operations
5-10 Di152f/Di183f
Precautions on the Erased Margin Location
The location of the erased area in the copy depends on how the document
is positioned.
“Erase”
setting Original Glass Automatic Document Feeder
Left
Upper
Frame
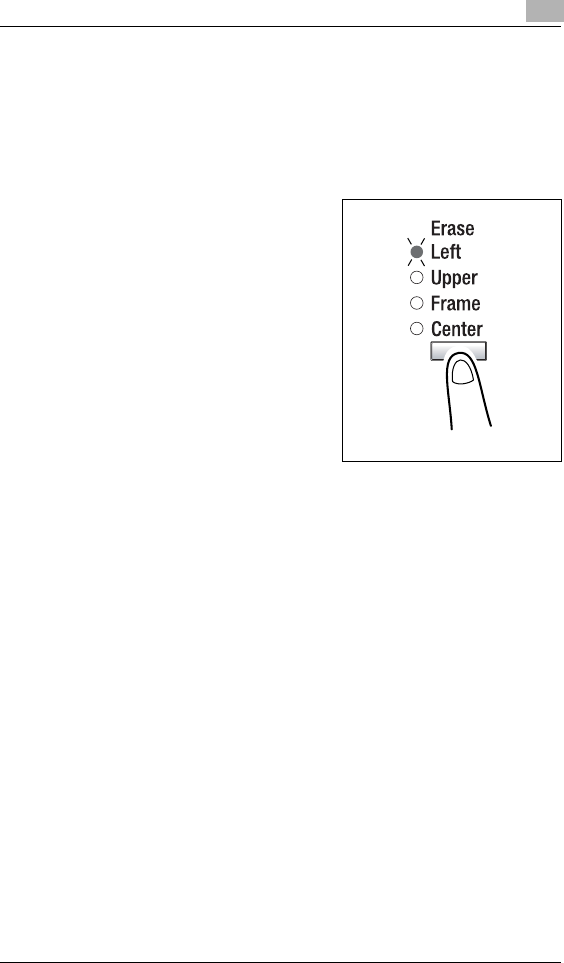
Advanced Copy Operations 5
Di152f/Di183f 5-11
Setting the “Erase” Function
To make copies using an “Erase” setting
1Load the document to be copied.
HRefer to “Loading the Document” on page 4-1.
2Press the [Erase] key until the
indicator for the desired “Erase”
setting lights up.
?Do you know how large of an
area is erased?
§The width of the erased area for
the “Left”, “Upper” and “Frame”
settings can be set between 1/4
inch (5 mm) and 3/4 inch
(20 mm), in 1 mm (Approx. 1/16
inch) increments. The default
setting is 1/2 inch (10 mm).
§The width of the erased area for
the “Center” setting is fixed at
1/2 inch (10 mm).
§The width of the erased area for the “Left”, “Upper” and “Frame”
settings can be changed using the “ERASE SETTING” function in
the Utility mode (p. 9-36).
3If necessary, specify any other copy settings.
4Using the 10-Key Pad, enter the desired number of copies, and then
press the [Start] key.
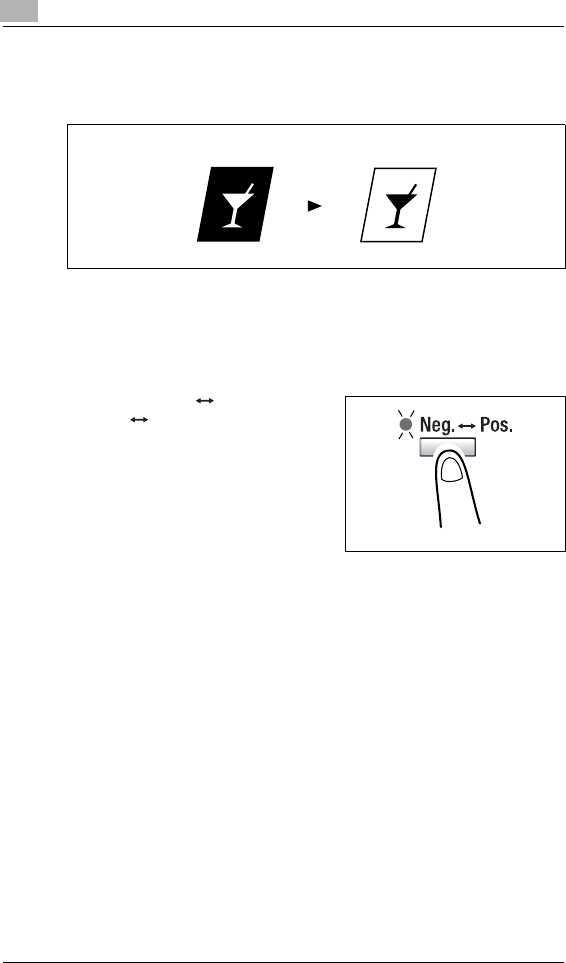
5Advanced Copy Operations
5-12 Di152f/Di183f
5.4 Negative/Positive Inverted Copying
Copies can be made with the light-colored areas of the document (media)
and the dark-colored areas of the document (text) inverted.
To make copies using the negative/positive inverted copy function
1Load the document to be copied.
HRefer to “Loading the Document” on page 4-1.
2Press the [Neg. Pos.] key until the
“Neg. Pos.” indicator lights up.
3If necessary, specify any other copy settings.
4Using the 10-Key Pad, enter the desired number of copies, and then
press the [Start] key.
Documents Copies
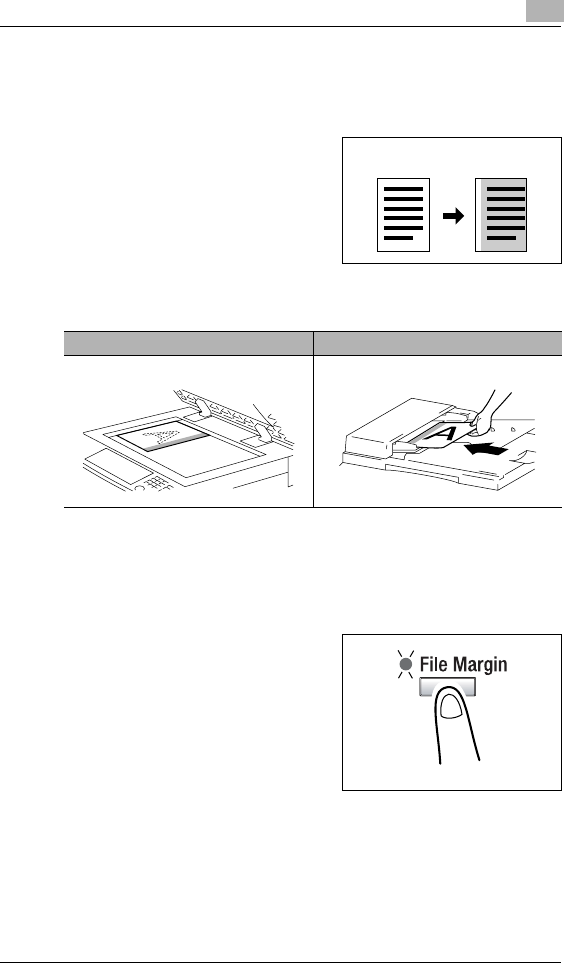
Advanced Copy Operations 5
Di152f/Di183f 5-13
5.5 Making Copies for Filing (“File Margin” function)
So that copies can easily be stored in filing binders, copies can be made
with a file margin.
Left-side binding:
Copies are printed with the contents of
the document slightly shifted to the right
in order to create a binding margin at
the left.
Precautions on the Binding Margin Location
To make copies using the “File Margin” function
1Load the document to be copied.
HRefer to “Loading the Document” on page 4-1.
2Press the [File Margin] key until the
“File Margin” indicator lights up.
?Do you know how large of a
binding margin is created?
§The width for the binding can be
set between 0 inch (0 mm) and
3/4 inch (20 mm), in 1 mm
(Approx. 1/16 inch) increments.
The default setting is 1/2 inch
(10 mm).
§The width of the binding margin can be changed using the
“MARGIN SETTING” function in the Utility mode (p. 9-36).
3If necessary, specify any other copy settings.
Documents Copies
Original Glass Automatic Document Feeder

5Advanced Copy Operations
5-14 Di152f/Di183f
4Using the 10-Key Pad, enter the desired number of copies, and then
press the [Start] key.
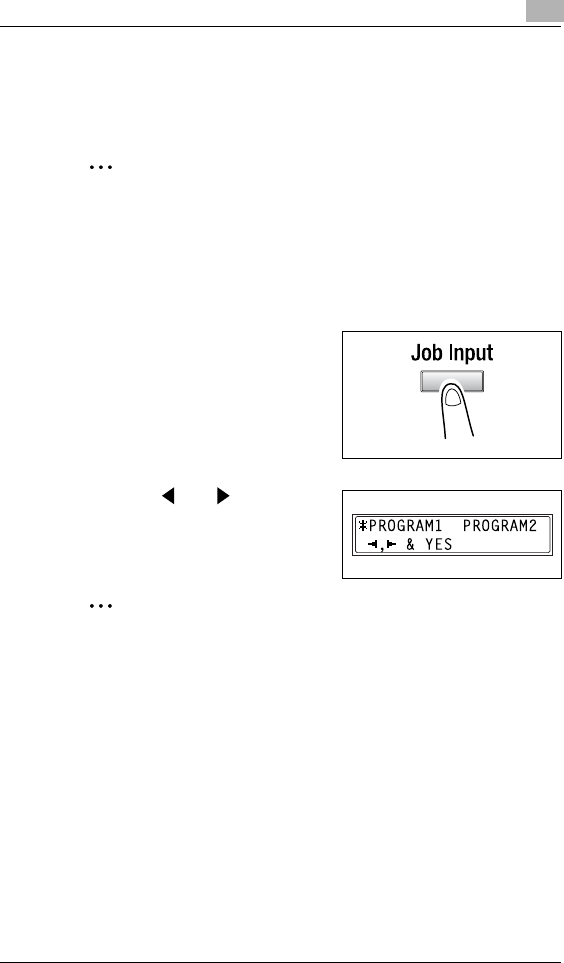
Advanced Copy Operations 5
Di152f/Di183f 5-15
5.6 Programmed Copy Jobs
Store up to two of the more frequently used copy setting programs for
immediate recall when necessary.
Note
Copy programs cannot be stored while the machine is warming up or
while a copy job is paused (Interrupt mode).
To store a copy program
1Select the copy settings to be stored as the copy program.
2Press the [Job Input] key.
3Using the and keys, select
the program number where you
wish to store the copy program, and
then press the [Yes] key.
Note
If a copy program has already been stored under the selected program
number, the previous copy settings are deleted and replaced with the
new ones.
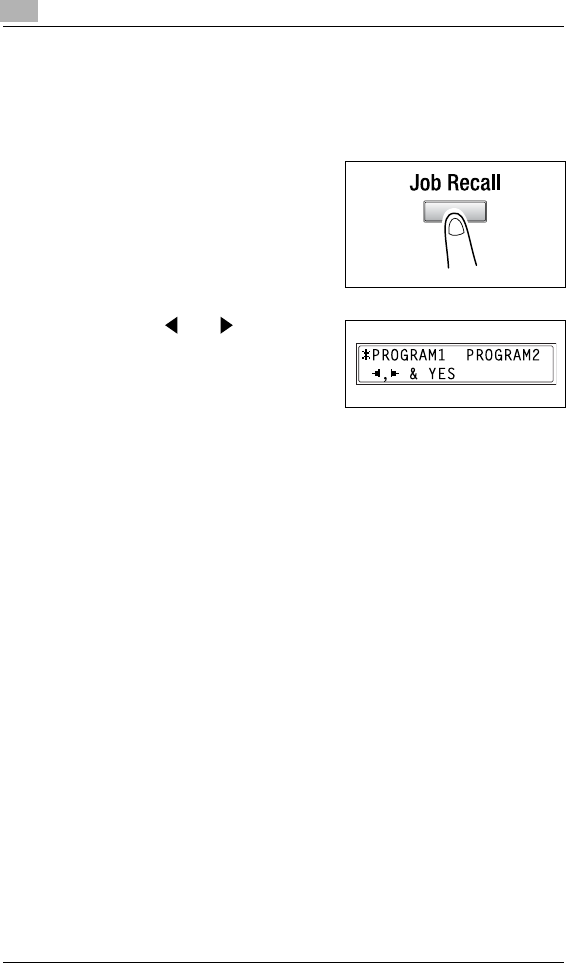
5Advanced Copy Operations
5-16 Di152f/Di183f
To recall a copy program
1Load the document to be copied.
HRefer to “Loading the Document” on page 4-1.
2Press the [Job Recall] key.
3Using the and keys, select
the program number of the copy
program that you wish to recall, and
then press the [Yes] key.
4Press the [Start] key.
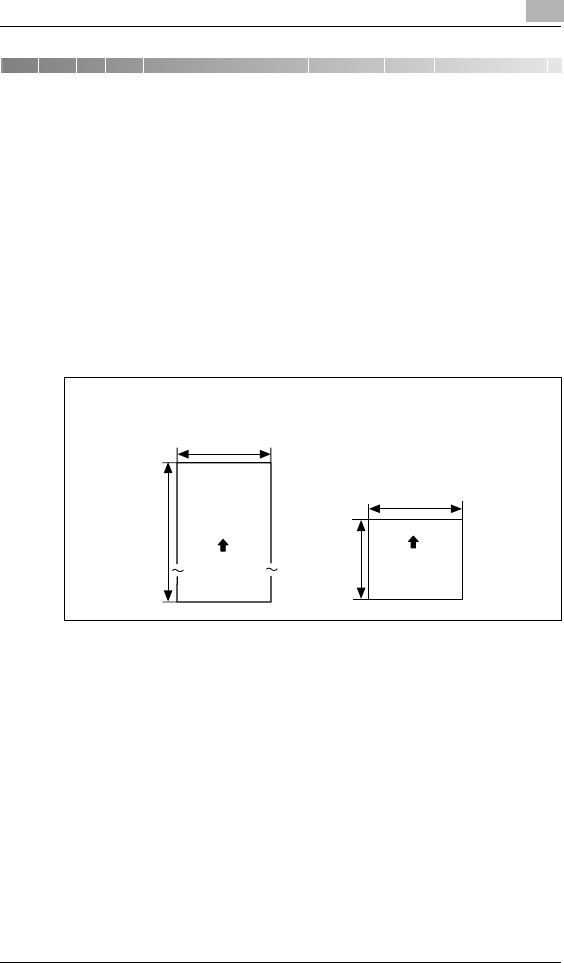
Faxing 6
Di152f/Di183f 6-1
6 Faxing
This machine is a G3 fax. Faxes can only be sent or received with this
machine if the recipient’s or sender's machine complies with the G3
standard.
6.1 Document Specifications for Transmission
Using the Automatic Document Feeder
GFed documents will be sent with a width of a Letter L-, Legal L-, or
11 ×17 L-size page (whichever is smallest, but still larger than the
document).
GNon-standard-sized documents with a size no larger than that shown
below can be fed.
GIf the length of the document exceeds 39-3/8 inch, the machine
assumes that a paper misfeed has occurred and stops scanning.
GWhen using the Super Fine setting to feed a document with a width
of an 11 × 17-size page, the document can have a length of up to
35-7/16 inch.
GWhen using the Automatic Document Feeder, as many as 50 sheets
of 11 × 17-size plain paper can be loaded.
GThe scanning area is 1/16 inch from the leading edge to 1/16 inch from
the trailing edge of the document.
8-1/4
(Sizes less than
8-1/4 inch are
scanned as 8-1/
4 inch.)
Maximum size Minimum size
39-3/8
4-3/16
11-11/16
Paper feed
direction
Paper feed
direction
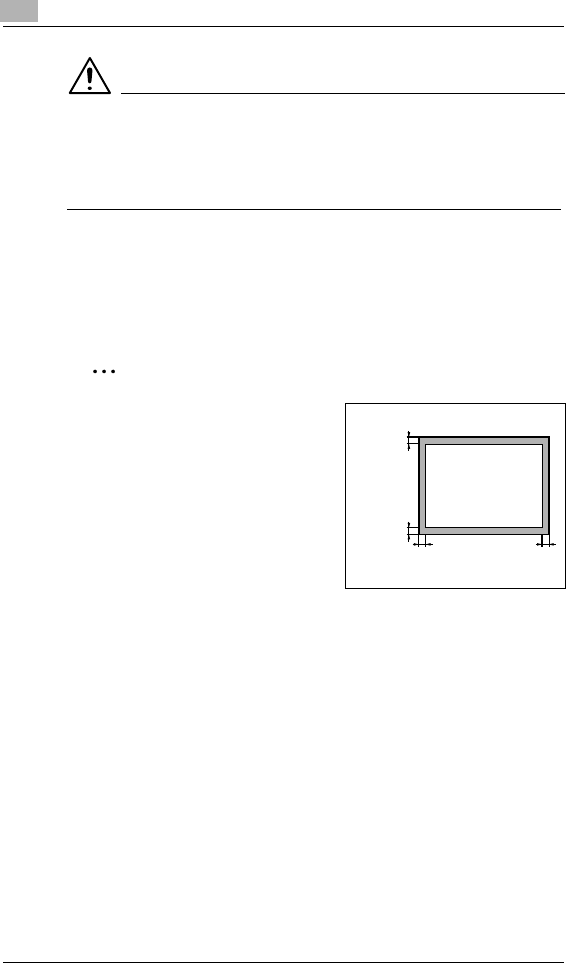
6Faxing
6-2 Di152f/Di183f
CAUTION
Documents with staples and paper clips attached may damage the
machine.
§Be sure to remove all staples and paper clips from the document
before faxing it.
Placing documents on the Original Glass
GThe fax document sizes that can be set using the Control Panel are
Letter L, Letter C, Legal L and 11 × 17 L. (p. 6-5)
This machine scans the scanning area for the document size that is
set.
CAUTION
Make sure that any ink, correction
fluid, etc. is completely dry before
faxing the document.
Any part of the document within 1/2
inch from any side of the page
cannot be scanned.
1/2 inch
1/2 inch
1/2 inch 1/2 inch
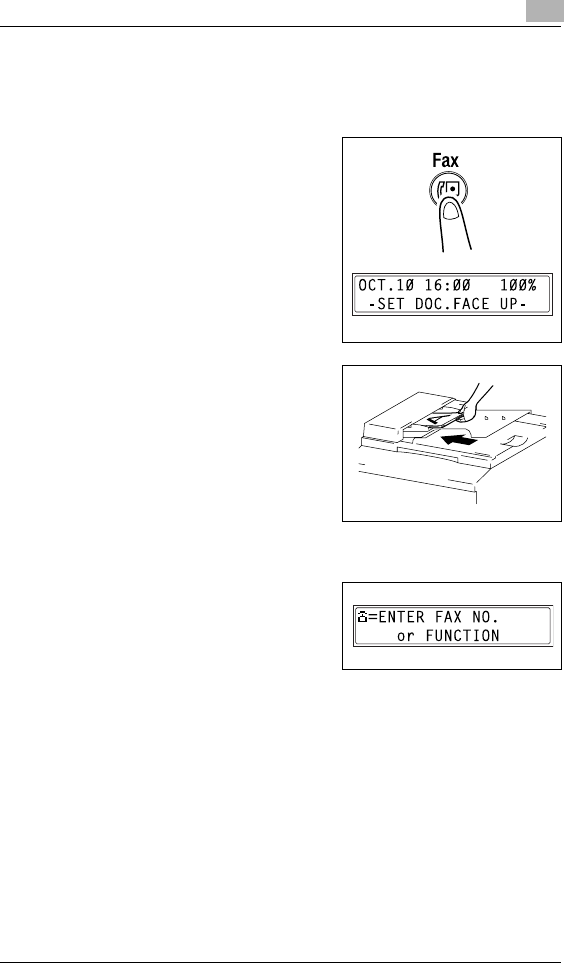
Faxing 6
Di152f/Di183f 6-3
6.2 Basic Faxing
To fax using the Automatic Document Feeder
1Press the [Fax] key.
The machine enters Fax mode, and
the fax screen appears.
2Load the document to be faxed into
the Automatic Document Feeder.
HAdjust the Document Guide
Plates to fit the size of the
document.
HLoad the document face up.
3If necessary, change the “Resolution” setting (p. 6-8).
4Using the 10-Key Pad, enter the fax
number of the recipient.
HThe fax number of a previously
programmed recipient can also
be specified. Refer to “Dialing”
on page 6-10.
5Press the [Start] key to begin scanning and sending the fax.
HTo stop the transmission, press the [Stop] key.
Once transmission is finished, a beep is sounded.
If the fax could not be sent, the transmission result report is printed
(p. 10-50).

6Faxing
6-4 Di152f/Di183f
Tip
About 390 Letter-size document pages can be scanned and stored in
the memory at one time. If the optional expansion memory (8MB
Memory for Fax) is installed, as many as 1,170 document pages can
be stored.
If an Letter-size document page is positioned crosswise, the scanned
image is rotated 90° and sent lengthwise. However, with direct
transmission and manual transmission, the image is not rotated. If the
image is not rotated, it is sent as a document with the width of an
11 ×17-size page.
To cancel the transmission:
If you wish to cancel a scanned document queued for transmission or
a fax waiting to be redialed, select “CANCEL RESERV.” from the
“FUNCTION” menu (p. 7-19).
About redialing:
While faxing, if the recipient’s fax machine is busy or does not answer,
or if for any other reason, such as a transmission error, the fax is not
sent correctly, the machine automatically redials the fax number and
tries sending the fax again. If the fax could not be sent correctly after
redialing, the transmission result report is printed.
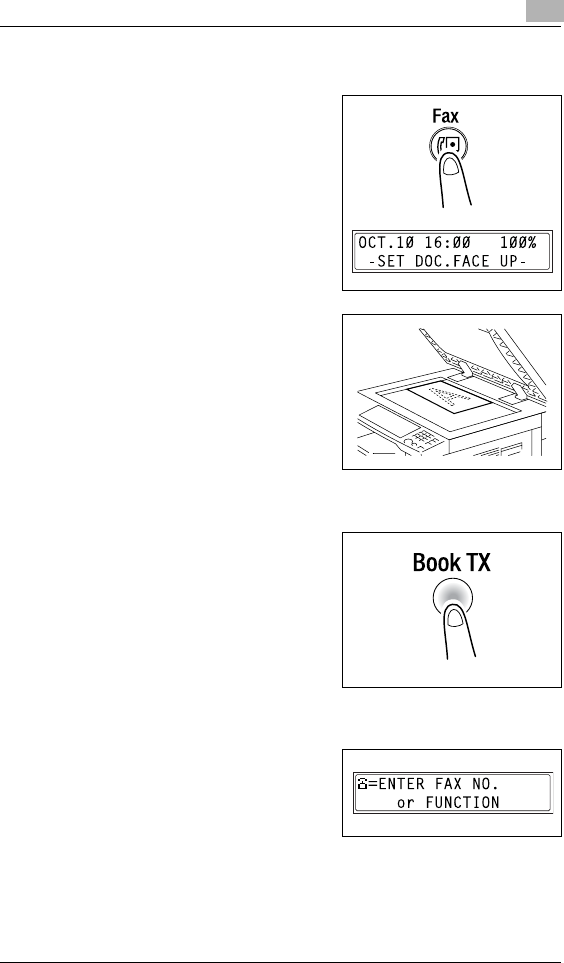
Faxing 6
Di152f/Di183f 6-5
To fax documents positioned on the Original Glass
1Press the [Fax] key.
The machine enters Fax mode, and
the fax screen appears.
2Lift open the Original Cover, and
then position the document to be
faxed on the Original Glass.
HPosition the document face
down.
HAlign the document on the
scales above and to the left of
the Original Glass.
HIf the Automatic Document
Feeder is not installed, skip to step 4.
3Press the [Book TX] key.
HEven when faxing sheet
documents positioned on the
Original Glass, the [Book TX]
key should be pressed.
4If necessary, change the “Resolution” setting (p. 6-8).
5Using the 10-Key Pad, enter the fax
number of the recipient, and then
press the [Yes] key.
HThe fax number of a previously
programmed recipient can also
be specified. Refer to “Dialing” on page 6-10.
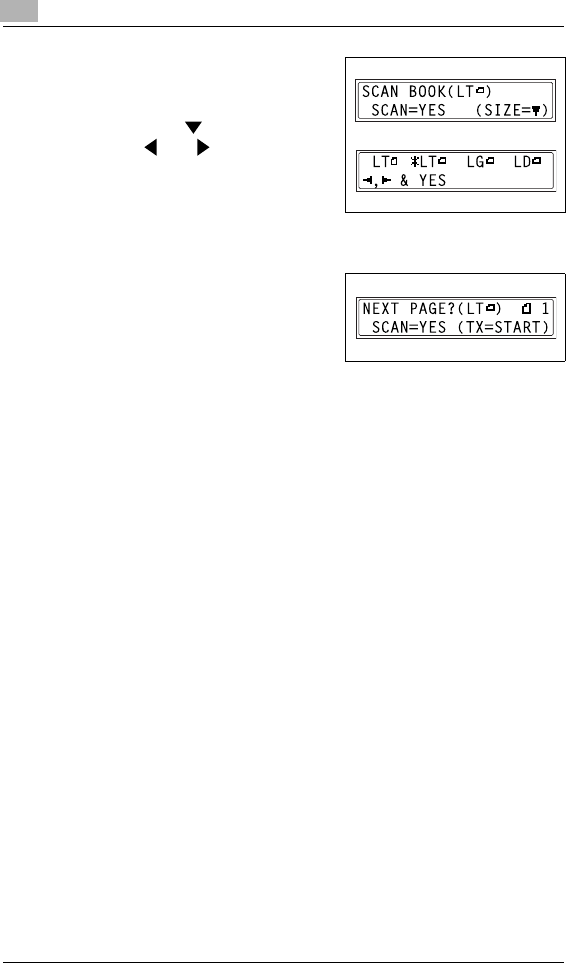
6Faxing
6-6 Di152f/Di183f
6Check that the correct document
size appears in the screen.
HTo change the document size,
press the key, and then use
the and keys to select the
desired document size in the
screen that appears.
7Press the [Yes] key to scan the page.
8If the document to be faxed contains
multiple pages, position the next
page of the document on the
Original Glass when the screen
shown at the right appears, and
then press the [Yes] key.
HRepeat step 8 until all pages of the document have been scanned.
9Press the [Start] key to begin sending the fax.
HTo stop the transmission, press the [Stop] key.
Once transmission is finished, a beep is sounded. If the fax could not
be sent, the transmission result report is printed (p. 11-3).

Faxing 6
Di152f/Di183f 6-7
Tip
About 390 Letter-size document pages can be scanned and stored in
the memory at one time. If the optional expansion memory (8MB
Memory for Fax) is installed, as many as 1,170 document pages can
be stored.
If an Letter-size document page is positioned crosswise, the scanned
image is rotated 90° and sent lengthwise.
To cancel the transmission:
If you wish to cancel a scanned document queued for transmission or
a fax waiting to be redialed, select “CANCEL RESERV.” from the
“FUNCTION” menu (p. 7-19).
About redialing:
While faxing, if the recipient’s fax machine is busy or does not answer,
or if for any other reason, such as a transmission error, the fax is not
sent correctly, the machine automatically redials the fax number and
tries sending the fax again. If the fax could not be sent correctly after
redialing, the transmission result report is printed.
If the Memory Becomes Full While Scanning Fax Documents
If the memory becomes full while scanning a document for memory
transmission, only the pages that have been scanned are sent.
With a queued transmission (a fax transmission requested while another
fax transmission job is being performed) or timer transmission, if the
memory becomes full while scanning the document, a message appears,
allowing you to select whether to send just the scanned pages or cancel
the transmission. If the transmission is cancelled, the data for the scanned
pages is deleted. After the other fax transmission or reception is finished,
check the amount of memory available, and then try sending the fax
again.
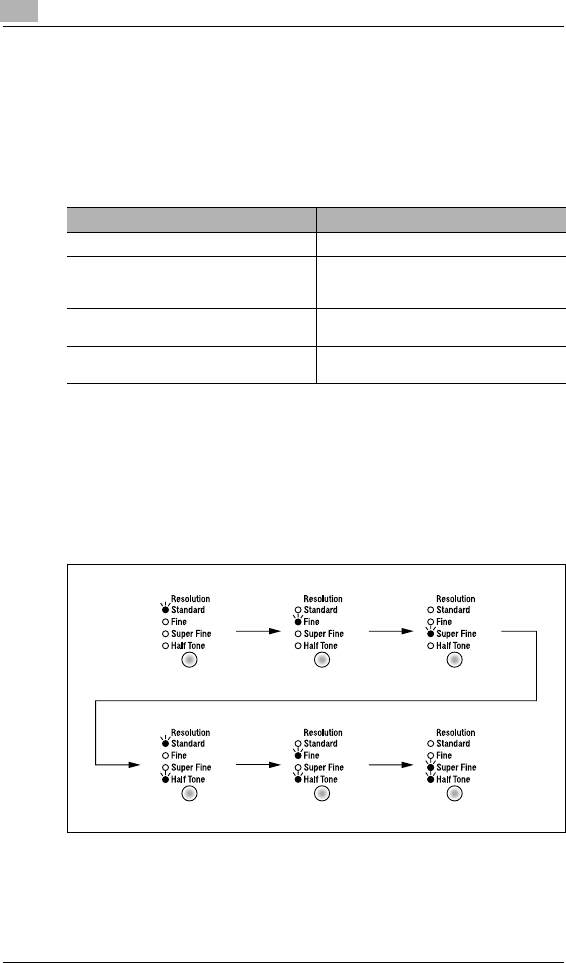
6Faxing
6-8 Di152f/Di183f
6.3 Transmission Settings
Adjusting the Fax Resolution
Selecting one of the following resolutions to match the type of document
to be faxed (documents containing a lot of small print, detailed illustrations
or photos) will produce a sharper result.
To specify the resolution
1Position the document to be faxed.
2Press the [Resolution] key until the resolution that matches the
document is selected.
HRepeatedly pressing the [Resolution] key changes the setting as
shown below.
Document type Resolution setting
Documents with normal print Standard
Documents containing small print, such as
newspapers
Documents containing detailed illustrations
Fine, Super Fine
Documents containing text and objects with
varying shades, such as photos Standard + Half Tone,
Fine + Half Tone
Documents containing objects with varying
shades, such as photos Fine + Half Tone,
Super Fine + Half Tone

Faxing 6
Di152f/Di183f 6-9
Note
Depending on the recipient’s fax machine, faxes sent with the Super
Fine or Super Fine + Half Tone setting may not be sent as specified,
and instead are sent with the Fine or Half Tone setting.
If the Half Tone or Super Fine + Half Tone setting is specified, the fax
may be sent with a decreased resolution depending on the quality of
the recipient’s fax machine or whether the document size is larger than
the paper loaded in the recipient’s fax machine.

6Faxing
6-10 Di152f/Di183f
6.4 Dialing
The recipient’s fax number can be dialed using any of the seven different
dialing methods described below.
The procedures described below assume that the fax is being sent using
the Automatic Document Feeder.
Sending international faxes:
If the country code and recipient’s fax number are entered immediately
after the prefix for making an international call, not enough time may
be allowed for making the connection, making the fax number seem
busy. If this is the case, press the [Redial/Pause] key twice before
entering the country code and fax number so that there is a pause of
about 6 seconds after the prefix for international calls is dialed. If a
connection still cannot be made, send the fax manually (p. 7-1).

Faxing 6
Di152f/Di183f 6-11
To fax by entering the fax number directly using the 10-Key Pad
1Press the [Fax] key to enter Fax mode.
2Load the document into the Automatic Document Feeder.
3If necessary, change the “Resolution” setting (p. 6-8).
4Using the 10-Key Pad, enter the fax
number of the recipient.
HF codes (sub-address and SID)
can also be entered. Refer to
“Using F codes” on page 7-25.
?Have you entered the number correctly?
§The fax number can contain a maximum of 30 digits.
§The keys that can be used to enter the fax number are: the number
keys (0 through 9), , #, -, Space, and Pause
§If the [Redial/Pause] key is pressed while entering the fax number,
a 3-second pause is added. A pause appears as “P” in the display.
§If you wish to change the fax number, press the [No] key, and then
enter the correct number.
§If the machine is connected to a PBX line and the outside line
access number has been specified in the communication settings
(p. 3-35), enter “#” to dial the outside line access number
automatically.
5Press the [Start] key to begin scanning and sending the fax.

6Faxing
6-12 Di152f/Di183f
To fax using one-touch dialing
If one-touch dial keys have already been programmed with fax numbers,
the fax number of a recipient can be specified by pressing just the
corresponding one-touch dial key.
For details on programming the one-touch dial keys, refer to “Setting Up
One-Touch Dialing (“ONE-TOUCH DIAL” function)” on page 10-3.
1Press the [Fax] key to enter Fax mode.
2Load the document into the Automatic Document Feeder.
3If necessary, change the “Resolution” setting (p. 6-8).
4Press the one-touch dial key ([01] through [27]) programmed with the
fax number that you wish to send the fax to.
The machine automatically starts
scanning the document and
sending the fax.
Tip
If the wrong one-touch dial key has been pressed, press the [Stop] key
either while dialing or sending the fax to stop the transmission.
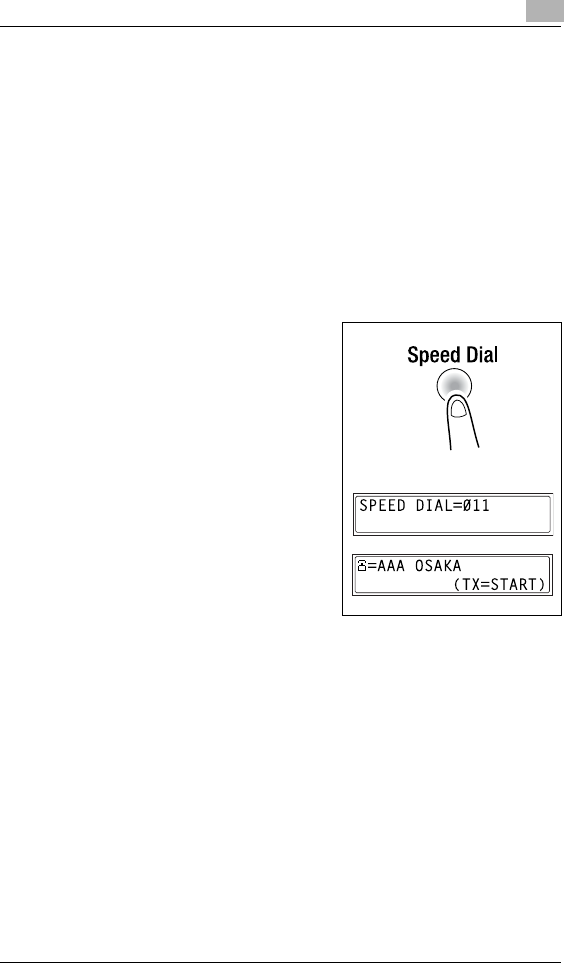
Faxing 6
Di152f/Di183f 6-13
To fax using speed dialing
If speed dial numbers have already been programmed, the fax number of
a recipient can be specified quickly by entering the corresponding speed
dial number.
For details on programming speed dial numbers, refer to “Setting Up
Speed Dialing (“SPEED DIAL” function)” on page 10-8.
1Press the [Fax] key to enter Fax mode.
2Load the document into the Automatic Document Feeder.
3If necessary, change the “Resolution” setting (p. 6-8).
4Press the [Speed Dial] key, and
then use the 10-Key Pad to enter
the 3-digit speed dial number.
?Has the wrong speed dial
number been entered?
§Press the [No] key, and then
enter the correct number.
5Press the [Start] key to begin scanning and sending the fax.
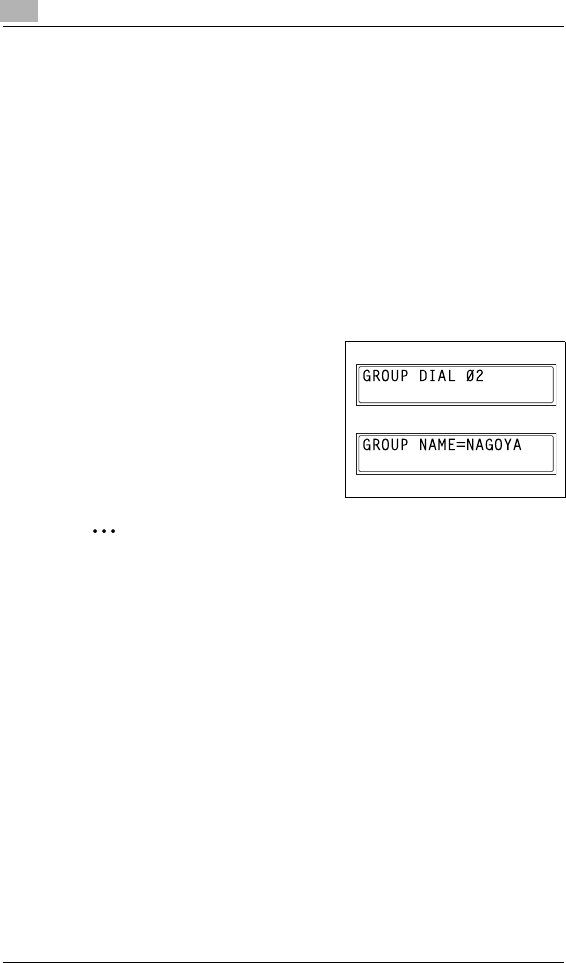
6Faxing
6-14 Di152f/Di183f
To fax using group dialing
If one-touch dial keys have already been programmed with a group of fax
numbers, the fax numbers of all recipients in the group can be specified
by pressing just the corresponding one-touch dial key.
For details on programming one-touch dial keys with a group of fax
numbers, refer to “Setting Up One-Touch Dialing (“ONE-TOUCH DIAL”
function)” on page 10-3.
1Press the [Fax] key to enter Fax mode.
2Load the document into the Automatic Document Feeder.
3If necessary, change the “Resolution” setting (p. 6-8).
4Press the one-touch dial key ([01]
through [27]) programmed with the
group of fax numbers that you wish
to send the fax to.
The machine automatically starts
scanning the document and
sending the fax.
Tip
If the wrong one-touch dial key has been pressed, press the [Stop] key
either while dialing or sending the fax to stop the transmission.

Faxing 6
Di152f/Di183f 6-15
To fax using program dialing
If one-touch dial keys have already been programmed with fax numbers
and a transmission/reception function (such as timer transmission or
polling reception), that function can be carried out by pressing just the
corresponding one-touch dial key.
For details on setting program dialing, refer to “Setting Up Program Dialing
(“PROGRAM DIAL” function)” on page 10-16.
1Press the [Fax] key to enter Fax mode.
2Load the document into the Automatic Document Feeder. (This step is
not necessary with polling reception.)
3If necessary, change the “Resolution” setting (p. 6-8). (This step is not
necessary with polling reception.)
4Press the one-touch dial key ([24]
through [27]) programmed with the
desired function.
The programmed function
automatically begins.
Tip
If the wrong one-touch dial key has been pressed, press the [Stop] key
either while dialing or sending the fax to stop the operation.
To cancel a timer transmission, select “CANCEL RESERV.” from the
“FUNCTION” menu (p. 7-19).
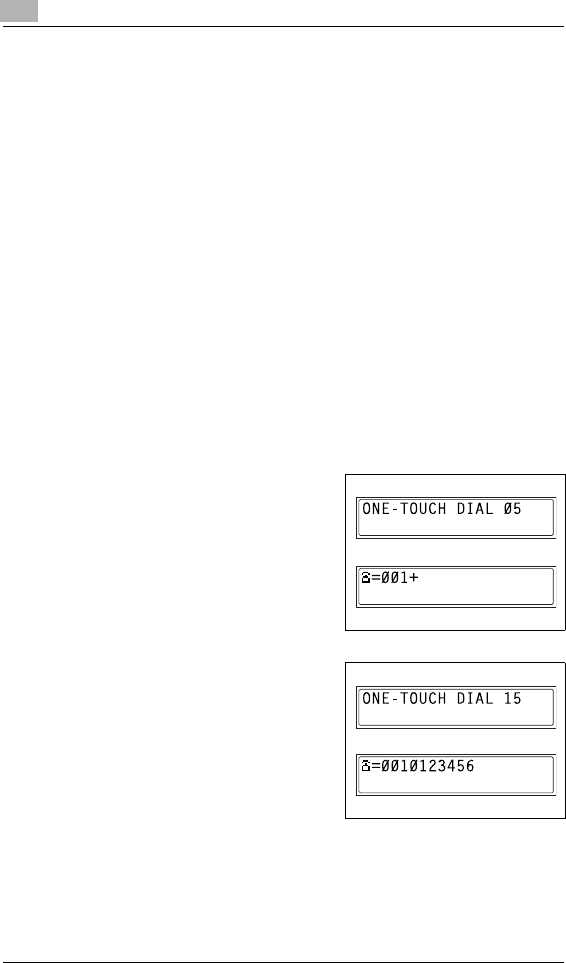
6Faxing
6-16 Di152f/Di183f
To fax using combination dialing
If one-touch dial keys or speed dial numbers have already been
programmed with special prefix numbers, a fax number can be specified
by recalling the prefix number from the one-touch dial key or speed dial
number, and combining it with the fax number of a recipient either entered
using the 10-Key Pad or recalled from a one-touch dial key or speed dial
number.
For example, if the phone number and the extension number of a recipient
are programmed in different one-touch dial keys, the fax number of the
recipient can be specified by combining the two numbers.
A maximum of 30 digits (excluding “+”) can be dialed.
For details on programming combination dialing numbers, refer to
page 10-3 and page 10-8.
1Press the [Fax] key to enter Fax mode.
2Load the document into the Automatic Document Feeder.
3If necessary, change the “Resolution” setting (p. 6-8).
4Press the one-touch dial key ([01]
through [27]) programmed with the
desired combination dialing
number.
or
Press the [Speed Dial] key, and
then use the 10-Key Pad to enter
the 3-digit speed dial number.
5Use the 10-Key Pad to enter the
remainder of the fax number, and
then press the [Start] key.
HThe remainder of the fax
number can also be specified
using the one-touch dial keys or
the speed dial numbers. If it is
specified using the one-touch
dial keys, the machine
automatically starts scanning the document and sending the fax.
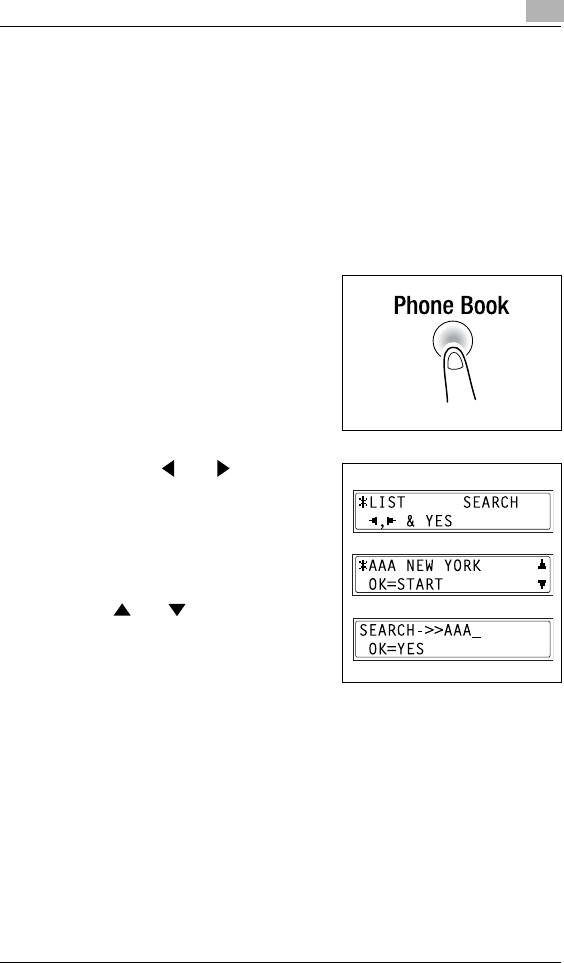
Faxing 6
Di152f/Di183f 6-17
To fax using the phone book
The phone book contains all programmed one-touch dialing and speed
dialing numbers, allowing you to search for and select the recipient that
you wish to send the fax to.
1Press the [Fax] key to enter Fax mode.
2Load the document into the Automatic Document Feeder.
3If necessary, change the “Resolution” setting (p. 6-8).
4Press the [Phone Book] key.
5Using the and keys, select
either “LIST” or “SEARCH”, and
then press the [Yes] key.
HIf “LIST” was selected:
The list of programmed one-
touch dialing and speed dialing
numbers is displayed. Using the
and keys, select the
desired recipient.
HIf “SEARCH” was selected:
A screen appears, allowing you
to enter the text to be searched
for. Search for the desired recipient by entering part (or all) of the
name programmed. For details on performing the search, refer to
“To search the phone book” on page 6-18.
6Press the [Start] key to begin scanning and sending the fax.
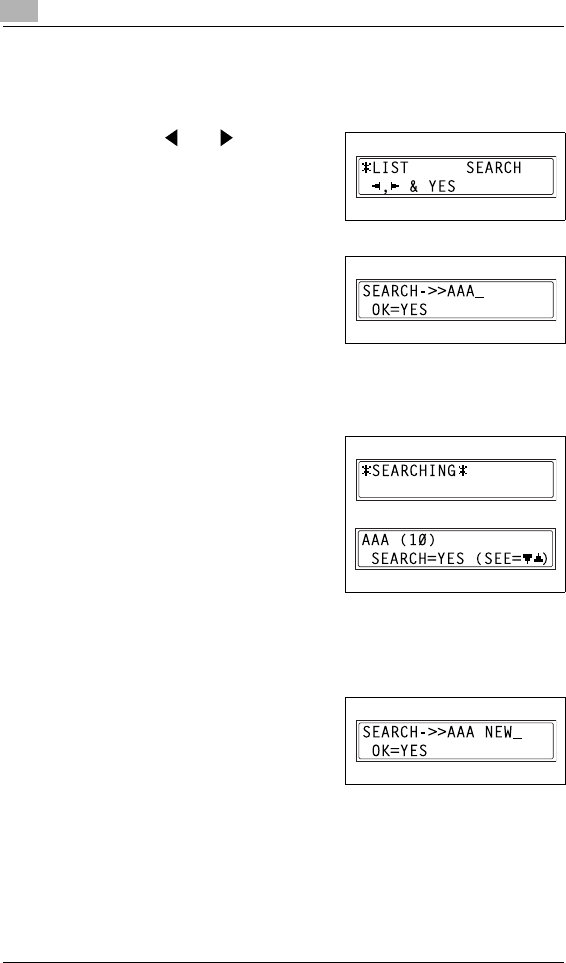
6Faxing
6-18 Di152f/Di183f
To search the phone book
1Press the [Phone Book] key.
2Using the and keys, select
“SEARCH”, and then press the
[Yes] key.
A screen appears, allowing you to
enter the text to be searched for.
3Using the one-touch dial keys, enter
the first few characters of the name
programmed for the desired
recipient.
HEnter the name programmed in
the one-touch dial key or the speed dial number. (For details on
entering text, refer to “Entering Text” on page 3-36.)
HFrom 1 to 10 characters can be entered.
4Press the [Yes] key.
The number of names beginning
with the text entered in step 3 is
displayed.
To select a recipient from the
displayed search results, skip to
step 7.
?Are there no one-touch dialing
or speed dialing numbers with
names beginning with the entered text?
§After “(0)” is displayed, the screen allowing you to enter the search
text appears.
5To narrow down the search results
even further, press the [Yes] key,
and then enter more search text.
6Press the [Yes] key.

Faxing 6
Di152f/Di183f 6-19
7Using the and keys, select
the desired recipient.
HIf the desired recipient name
does not appear in the search
results, press the [No] key to
return to the screen allowing you to enter the search text, and then
try searching for different text.
8Press the [Start] key to begin
scanning and sending the fax.
To redial the last recipient called
1Press the [Fax] key to enter Fax mode.
2Load the document into the Automatic Document Feeder.
3If necessary, change the “Resolution” setting (p. 6-8).
4Press the [Redial/Pause] key.
The fax number of the last recipient
called is displayed.
5Press the [Start] key to begin scanning and sending the fax.
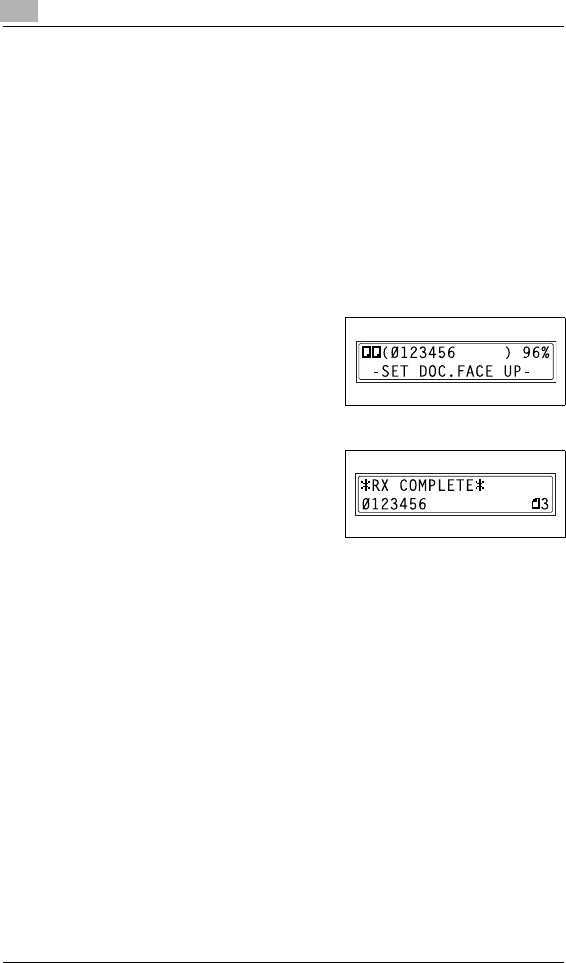
6Faxing
6-20 Di152f/Di183f
6.5 Receiving
Receiving Automatically/Manually
If the machine is set to receive faxes automatically, no further operations
are required.
If the machine is set to receive faxes manually, the telephone receiver
must be picked up in order to receive the fax.
For details on changing the reception method, refer to “To set the “RX
MODE” function” on page 10-45.
Receiving
GWhile receiving:
HThe mark indicating that a fax is
being received appears in the
display.
HOnce reception is finished, a beep is
sounded.
HFor details on checking the transmission result, refer to page 6-22.
GIf there is no more paper:
If the “AUTO SELECT” paper supply setting is selected, the paper tray
containing paper of the same size is automatically selected, and the
fax is printed. If there is no tray containing paper of the same size, the
following occurs.
HThe message “PAPER EMPTY” appears in the display.
HThe received fax is stored in the memory, and when paper of the
appropriate size is loaded, the fax is automatically printed.
HIf the entire fax does not fit in the memory, the remainder of the
document is not received.
HIf the memory becomes full, no more documents can be received.

Faxing 6
Di152f/Di183f 6-21
GPaper sizes of received faxes
HThe sizes of documents that can be received are 11 × 17 L, Letter L,
Letter C, Legal L and Invoice C.
HIf paper of the same size as the document is not loaded in a paper tray,
the fax is printed on paper of a larger size. For example, if Letter-size
paper is not loaded into a paper tray, a Letter-size received fax will be
printed on Legal- or 11 × 17-size paper. (If 11 × 17- or Legal-size paper
is not loaded into a paper tray, the fax is regarded as one compatible
with Letter-size paper.)
HReceived faxes cannot be printed on paper in the Manual Bypass
Tray.
GLong documents that are received
HIf a long document (as compared with standard sizes such as Letter
and Legal) is received, the length is automatically reduced to fit within
a single sheet of paper.
HThe length is reduced to a maximum of 70%, and then printed. If the
document does not fit within a single sheet of paper, even after
reducing it to 70%, the document is divided and printed so that the
ends overlap.
In addition, the machine can be set to divide the document without
reducing it or to discard any excess.(Refer to “To set the
“REDUCTION RX” function” on page 10-44.)
GIf the paper size units are set to “METRIC” for any paper tray, a
received document cannot be printed onto paper loaded into that tray.
(Refer to “To specify the automatic paper size detection units (“INCH/
METRIC” function)” on page 9-13.)
GIf any of the following settings are specified for the 1st Tray, a received
document cannot be printed onto paper loaded into that tray. (Refer to
“To specify the size of paper loaded into the 1st Tray (“TRAY1
PAPER” function)” on page 9-14.)
HWhen the paper type is set to “OHP” or “CARD”
HWhen the paper size is set to “SIZE INPUT”
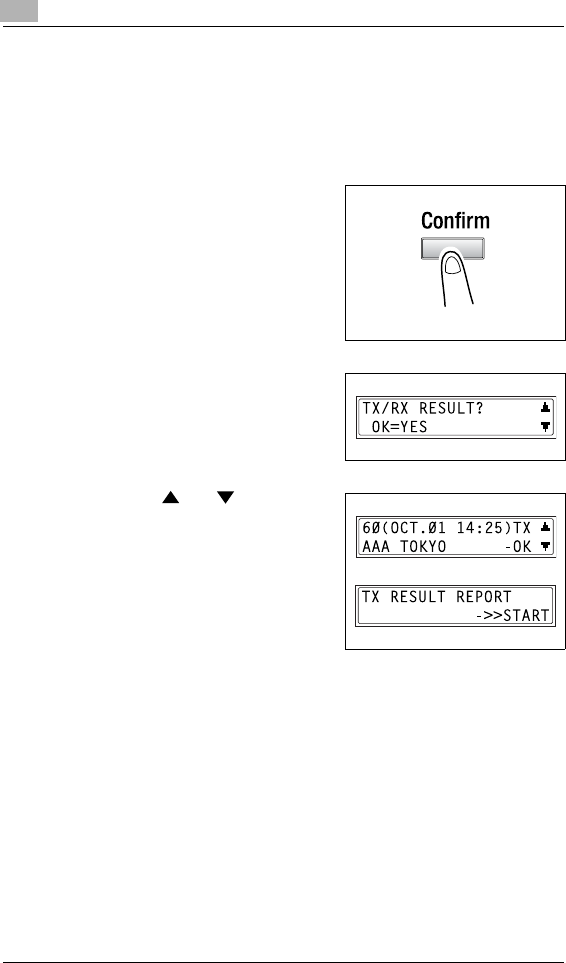
6Faxing
6-22 Di152f/Di183f
6.6 Checking Transmission Results
The transmission result information for a maximum of 60 sent and
received documents is saved.
To check the transmission result
1Press the [Confirm] key.
2Press the [Yes] key.
3Using the and keys, display
the desired transmission results to
check them.
HIn the transmission result
screen, “TX” indicates sent
faxes, and “RX” indicates
received ones.
HIf the [No] key is pressed twice
while the transmission results
are displayed, the main screen appears.
HTo print the transmission result report, press the [Start] key. After
the transmission result report is printed, the main screen appears.

Fax Transmission/Reception Methods 7
Di152f/Di183f 7-1
7 Fax Transmission/Reception Methods
7.1 Transmission Methods
Memory Transmission
With memory transmission, the document is scanned, then stored in the
memory for transmission (queued transmission).
Memory transmission is selected as the default transmission mode.
For details on sending faxes through memory transmission, refer to “Basic
Faxing” on page 6-3.
Book Transmission
Press the [Book TX] key when faxing documents (not limited to books)
positioned on the Original Glass.
For details on faxing book documents, refer to the section “To fax
documents positioned on the Original Glass” on page 6-5 of “6 Basic
Faxing”.
Manual Transmission
If the machine is connected to a telephone and the same line is used for
phoning and faxing, the document can simply be sent after talking with the
recipient over the phone.
This is useful, for example, if you wish to tell the recipient that you are
sending a fax.
Note
If the recipient’s fax machine is set to receive faxes automatically
(automatic reception), a beep is sounded without the recipient
answering the phone; however, at that time, the telephone cannot be
used for talking.
If the fax is to be sent after talking on the telephone, use the Automatic
Document Feederr.
Manual transmission is possible if a telephone (either purchased or
rented) is connected to the TEL port of this machine.
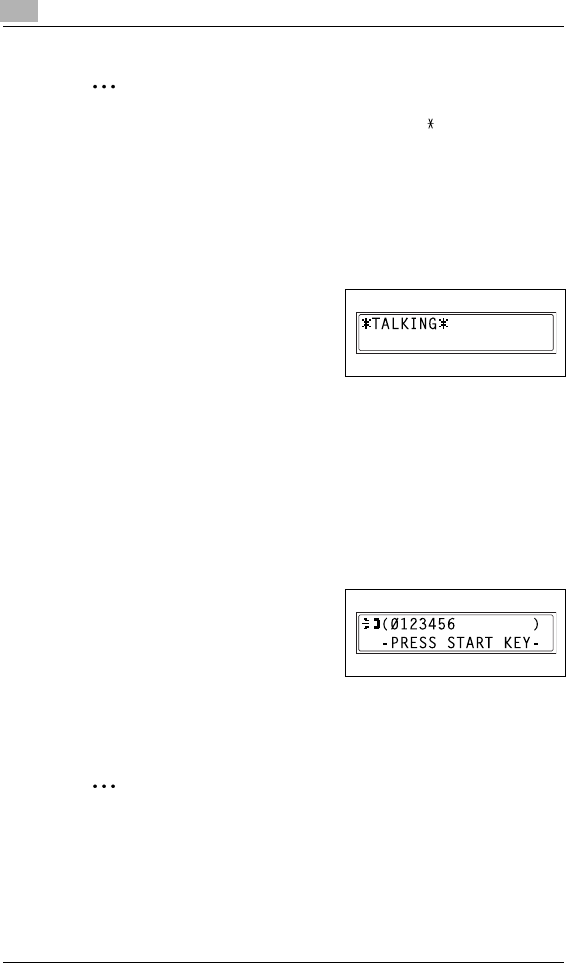
7Fax Transmission/Reception Methods
7-2 Di152f/Di183f
Tip
Even when pulse dialing is being used, entering “ ” produces signals
for tone dialing.
To send a fax manually
1Load the document into the Automatic Document Feeder.
2If necessary, change the “Resolution” setting (p. 6-8).
3Pick up the telephone receiver.
HCheck that the dial tone can be
heard.
4Specify the fax number of the recipient.
HUse the telephone to dial the fax number.
HThe fax number of the recipient can also specified using the keys
in the Control Panel of this machine (p. 6-10).
5After finishing talking on the phone, the recipient should press the
necessary key to start receiving the fax.
Once the recipient’s fax machine is ready, a beep is sounded.
6Press the [Start] key to begin
scanning and sending the fax.
7Replace the telephone receiver.
HTo stop the transmission, press the [Stop] key.
Tip
If the [Speaker] key is pressed instead of picking up the telephone
receiver, the speaker can be used for manual transmission in the
same way as described above.
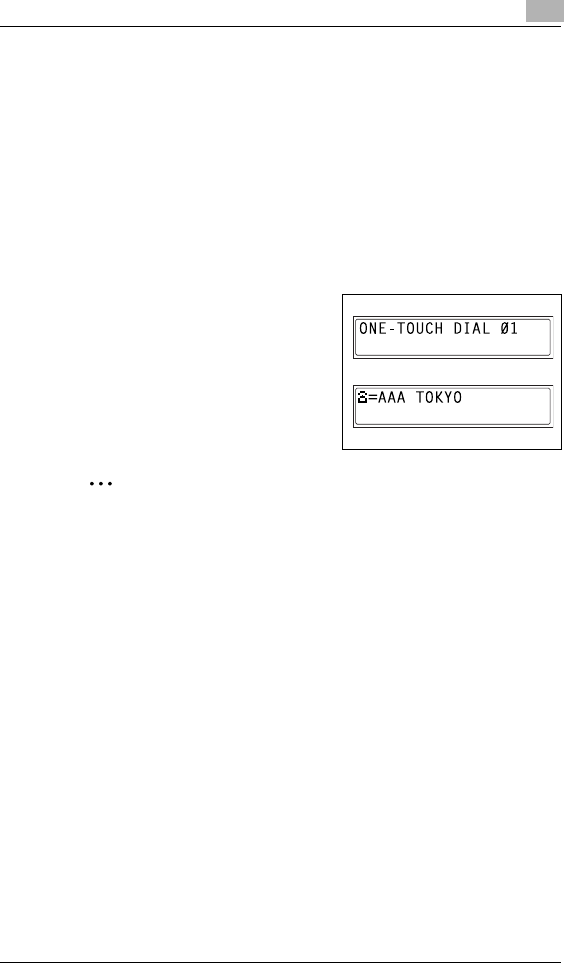
Fax Transmission/Reception Methods 7
Di152f/Di183f 7-3
Batch Transmission
Multiple documents can be stored in the memory and faxed together at a
specified time. In order to use this function, the corresponding Utility mode
function must first be used to program a one-touch dial key with the batch
transmission settings (transmission time) (p. 10-4).
To fax using batch transmission
1Load the document into the Automatic Document Feeder.
2If necessary, change the “Resolution” setting (p. 6-8).
3Press the one-touch dial key
programmed with the desired batch
transmission settings.
The machine automatically starts
scanning the document, then
automatically sends it at the
specified time.
Tip
To cancel a batch transmission, select “CANCEL RESERV.” from the
“FUNCTION” menu (p. 7-19).
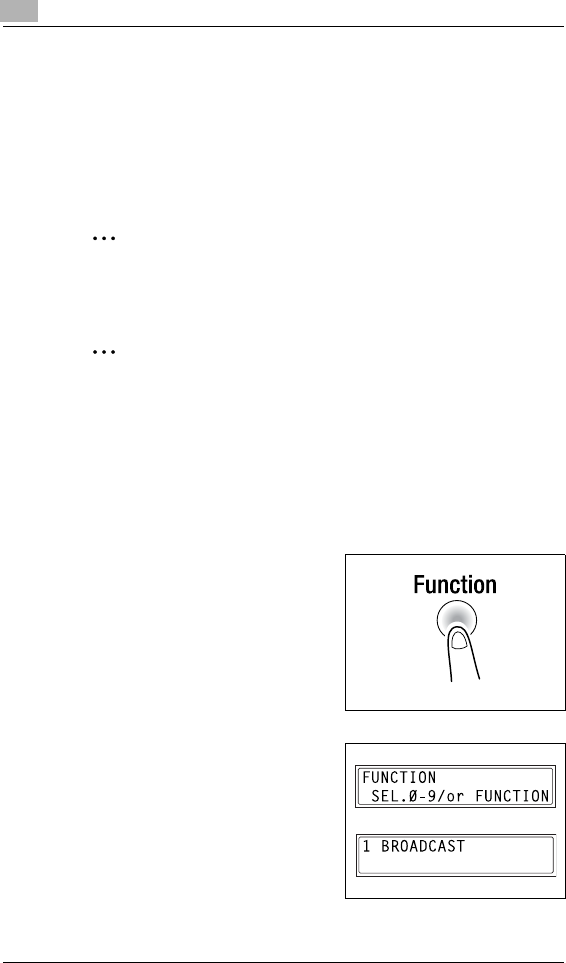
7Fax Transmission/Reception Methods
7-4 Di152f/Di183f
Broadcast Transmission
The same document can be sent to multiple recipients at one time.
A maximum of 143 recipients can be specified for the same transmission.
The recipients can be specified by using the one-touch dial keys, the
speed dial numbers or group dialing, by selecting from the phone book, or
by entering the fax number using the 10-Key Pad.
Note
A maximum of 16 recipients can be specified by entering the fax
number using the 10-Key Pad.
Tip
With the result report printed after the transmission is finished, you can
check whether the fax was sent to all recipients.
To fax using broadcast transmission
1Position the document to be faxed.
2If necessary, change the “Resolution” setting (p. 6-8).
3Press the [Function] key.
4Press the [1] key from the 10-Key
Pad.
or
Press the [Function] key once to
select “BROADCAST”, and then
press the [Yes] key.

Fax Transmission/Reception Methods 7
Di152f/Di183f 7-5
5Specify the fax number of the recipient.
Repeat the appropriate operations described below until all recipients
have been specified.
HWhen using the one-touch dial
keys:
Press the one-touch dial key
programmed with the desired
fax number.
Press the [Yes] key, and then
specify the next recipient.
HWhen using the speed dial
numbers:
Press the [Speed Dial] key, and
then use the 10-Key Pad to
enter the 3-digit speed dial
number programmed with the
desired fax number.
Press the [Yes] key, and then
specify the next recipient.
HWhen using group dialing:
Press the one-touch dial key programmed with the desired group
of fax numbers.
Press the [Yes] key, and then specify the next recipient.
HWhen selecting from the phone book:
Press the [Phone Book] key, and then select either “LIST” or
“SEARCH” to select the desired fax number. (Refer to “To fax
using the phone book” on page 6-17.)
Press the [Yes] key, and then specify the next recipient.
HWhen entering the number
using the 10-Key Pad:
Enter the fax number of the
recipient.
Press the [Yes] key, and then
specify the next recipient.
?Has the wrong fax number been specified?
§Press the [No] key to delete the current selection. (This is valid only
before the recipient is set by pressing the [Yes] key.)
6Press the [Start] key.
A message appears, allowing you to select whether or not to check the
recipients.

7Fax Transmission/Reception Methods
7-6 Di152f/Di183f
7To check the recipients, press the
[Yes] key.
HIf you do not wish to check the
recipients, skip to step 9.
8The recipients specified in step 5
are displayed in the order that they
were selected.
Check the recipient, and then press
the [Yes] key.
HTo delete the displayed
recipient, press the [No] key.
After all recipients have been
checked, “Fin.=START” appears in
the display.
9Press the [Start] key to begin scanning and sending the fax.
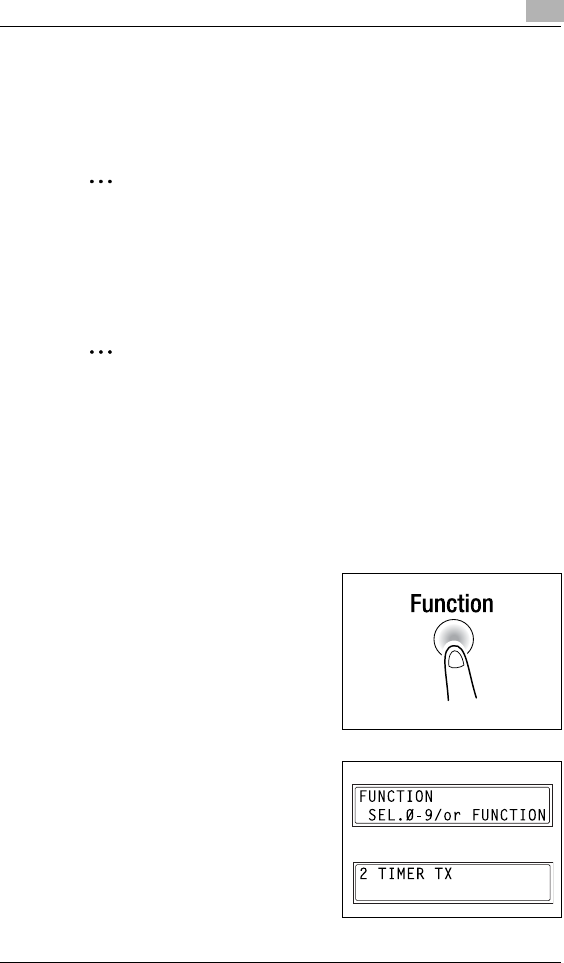
Fax Transmission/Reception Methods 7
Di152f/Di183f 7-7
Timer Transmission
A document can be scanned and stored in the memory to be sent at a
specified time. This function is convenient for sending documents with a
large number of pages at discounted calling times.
Note
The time is set for a 24-hour period.
If the machine is not programmed with the current time (p. 3-31), the
fax cannot be sent at the specified time.
A timer transmission cannot be performed at the same time as a direct
transmission.
Tip
Timer transmission can be combined with broadcast transmission,
mailbox transmission, polling reception, or relay initiation
transmission.
To fax using timer transmission
1Position the document to be faxed.
2If necessary, change the “Resolution” setting (p. 6-8).
3Press the [Function] key.
4Press the [2] key from the 10-Key
Pad.
or
Press the [Function] key twice to
select “TIMER TX”, and then press
the [Yes] key.
A screen appears, allowing you to
specify the transmission time.

7Fax Transmission/Reception Methods
7-8 Di152f/Di183f
5Using the 10-Key Pad, enter the
desired transmission time, and then
press the [Yes] key.
HIf you wish to correct the time,
press the [No] key, and then
enter the correct time.
6Specify the fax number of the
recipient.
HRefer to “Dialing” on page 6-10.
7Press the [Start] key.
The machine scans the document, then enters transmission standby
mode.
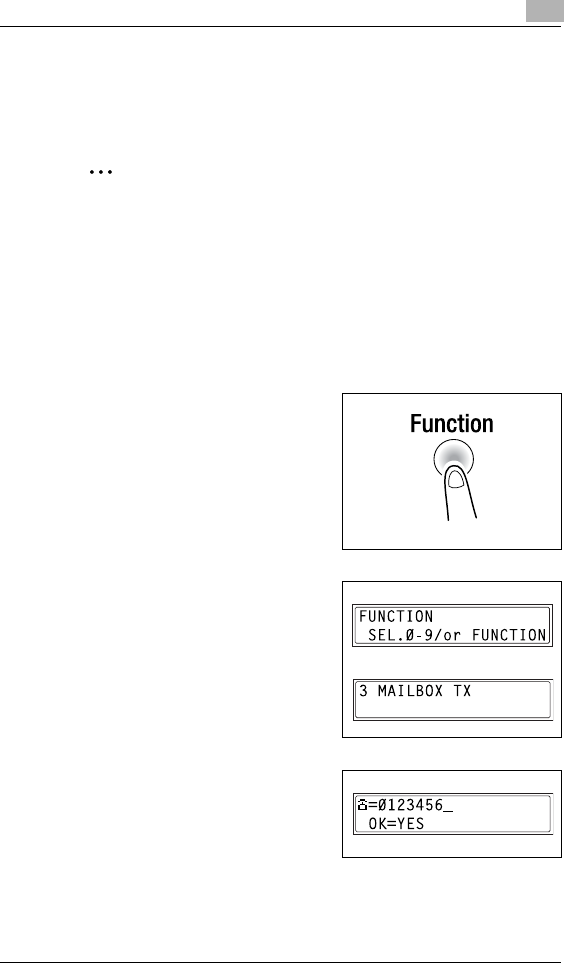
Fax Transmission/Reception Methods 7
Di152f/Di183f 7-9
Mailbox Transmission
The fax can be sent to a recipient’s mailbox.
This is perfect for sending an important document to a specific person.
Note
Mailbox transmission is compatible with F code transmission.
Machines compatible with F codes can be specified as recipients for
mailbox transmission.
To fax using mailbox transmission
1Position the document to be faxed.
2If necessary, change the “Resolution” setting (p. 6-8).
3Press the [Function] key.
4Press the [3] key from the 10-Key
Pad.
or
Press the [Function] key 3 times to
select “MAILBOX TX”, and then
press the [Yes] key.
5Specify the recipient, and then
press the [Yes] key.
HRefer to “Dialing” on page 6-10.
A screen appears, allowing you to
specify the mailbox ID.
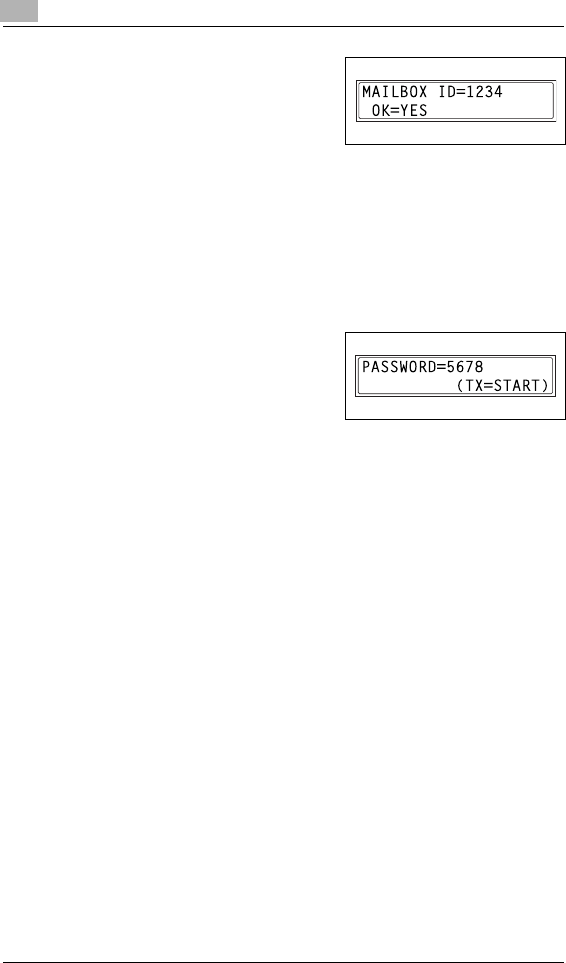
7Fax Transmission/Reception Methods
7-10 Di152f/Di183f
6Using the 10-Key Pad, enter the
mailbox ID of the recipient.
HEnter the mailbox ID (SUB) (20
digits or less) registered for the
recipient.
HIf the recipient is specified using a one-touch dial key or a speed
dial number also programmed with a sub-address, the sub-
address is displayed as the mailbox ID. If necessary, change the
mailbox ID.
HIf you wish to correct the mailbox ID, press the [No] key, and then
enter the new number.
7Press the [Yes] key.
8Using the 10-Key Pad, enter the
password.
HEnter the password (20 digits or
less) if a password has been set
for the recipient’s mailbox.
HIf you wish to correct the password, press the [No] key, and then
enter the new number.
9Press the [Start] key to begin scanning and sending the fax.
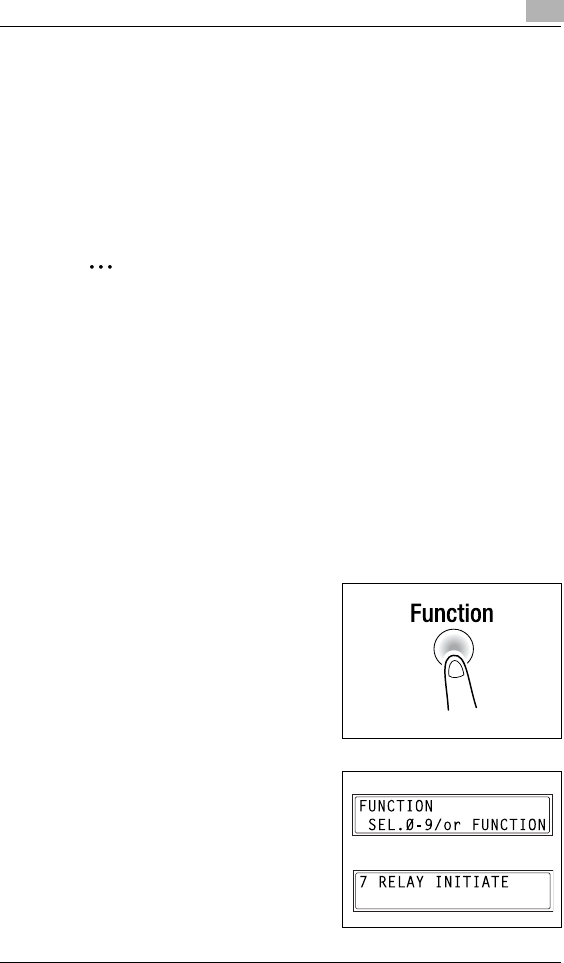
Fax Transmission/Reception Methods 7
Di152f/Di183f 7-11
Relay Initiation Transmission
Documents can be sent from this machine (transmitting station) to another
fax machine (acting as a relay station), which then sends the documents
to multiple recipients (receiving stations). By relaying the documents
through a fax machine closer to the remote recipients, the transmission
time and cost for the transmitting station are reduced.
In order to fax using relay initiation transmission, a relay box must first be
programmed at the relay station.
Note
Relay initiation transmission is compatible with F code transmission.
Only machines that are compatible with relay broadcast transmission
should be specified as relay stations. This machine can be specified
as a relay station.
Relay initiation transmission and mailbox transmission cannot be
performed at the same time.
In order to fax using relay initiation transmission, a relay box ID must
first be programmed at the relay station (p. 10-31).
To fax using relay initiation transmission
1Position the document to be faxed.
2If necessary, change the “Resolution” setting (p. 6-8).
3Press the [Function] key.
4Press the [7] key from the 10-Key
Pad.
or
Press the [Function] key 7 times to
select “RELAY INITIATE”, and then
press the [Yes] key.
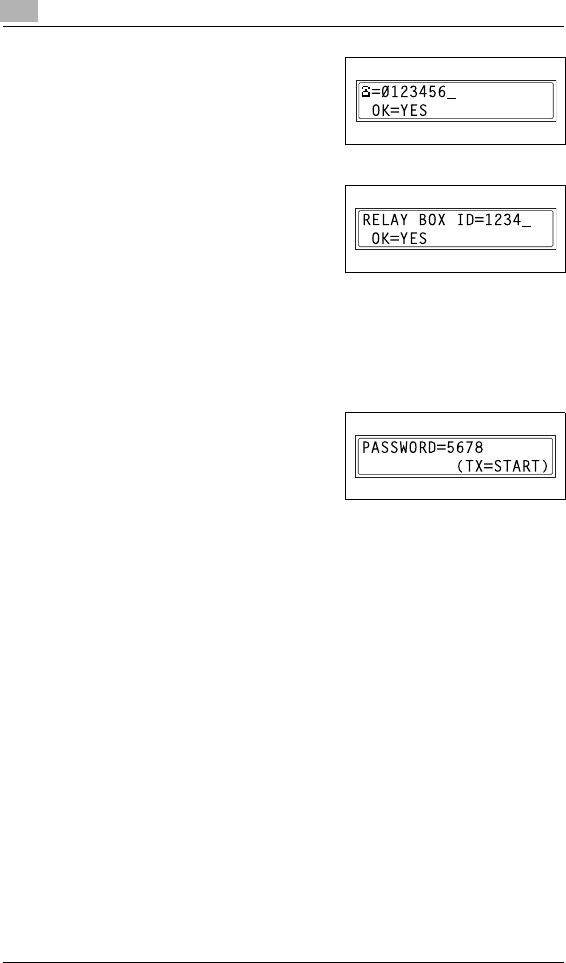
7Fax Transmission/Reception Methods
7-12 Di152f/Di183f
5Specify the relay station, and then
press the [Yes] key.
HRefer to “Dialing” on page 6-10.
A screen appears, allowing you to
specify the relay box ID.
6Using the 10-Key Pad, enter the
relay box ID.
HEnter the relay box ID (20 digits
or less) programmed at the relay
station.
HIf you wish to correct the ID, press the [No] key, and then enter the
new number.
7Press the [Yes] key.
A screen appears, allowing you to specify the password.
8Using the 10-Key Pad, enter the
password.
HEnter the password (20 digits or
less) if a password has been set
at the relay station.
HIf you wish to correct the password, press the [No] key, and then
enter the new number.
9Press the [Start] key to begin scanning and sending the fax.

Fax Transmission/Reception Methods 7
Di152f/Di183f 7-13
Relay Broadcast Transmission
If this machine is specified as a relay station, it can receive documents
sent from another fax machine (transmitting station), then send the
documents to multiple recipients (receiving stations).
In order to fax using relay broadcast transmission, a relay box must first
be programmed. A maximum of 5 relay boxes can be programmed. For
details on programming a relay box, refer to “Setting Up Relay Boxes
(“RELAY BOX” function)” on page 10-31.
Note
Relay broadcast transmission is compatible with F code transmission.
In order for the machine to function as a relay station, a 4-digit relay
box ID must first be programmed (p. 10-31).
In order to fax using relay broadcast transmission, the receiving
stations (final recipients) must be programmed in a relay box
(p. 10-31).
The document is printed at the receiving stations.
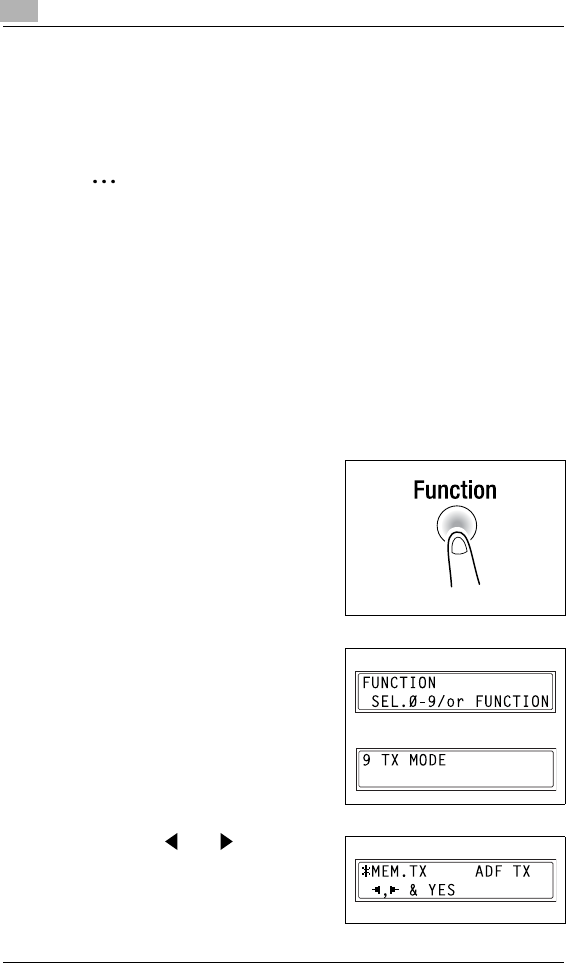
7Fax Transmission/Reception Methods
7-14 Di152f/Di183f
Direct Transmission
If direct transmission is specified, one page of the document at a time can
be scanned, according to the transmission status. This ensures that even
documents with many pages can be sent.
Note
When faxing using direct transmission, the document should be
loaded into the Automatic Document Feeder. Transmission is not
possible by positioning the document on the Original Glass.
If direct transmission is specified while a fax is being sent or received,
the transmission will be queued.
With direct transmission, multiple recipients cannot be specified.
Direct transmission and timer transmission cannot be performed at the
same time.
To fax using direct transmission
1Load the document into the Automatic Document Feeder.
2Press the [Function] key.
3Press the [9] key from the 10-Key
Pad.
or
Press the [Function] key 9 times to
select “TX MODE”, and then press
the [Yes] key.
4Using the and keys, select
“ADF TX”, and then press the [Yes]
key.

Fax Transmission/Reception Methods 7
Di152f/Di183f 7-15
5If necessary, change the “Resolution” setting (p. 6-8).
6Specify the fax number of the
recipient.
HRefer to “Dialing” on page 6-10.
7Press the [Start] key to begin scanning and sending the fax.
Note
When transmission is finished, the transmission mode returns to the
default setting.
Memory transmission is the default transmission mode. To keep the
transmission mode set to direct transmission, set Utility mode function
“DEFAULT TX” to “ADF TX” (p. 10-38).
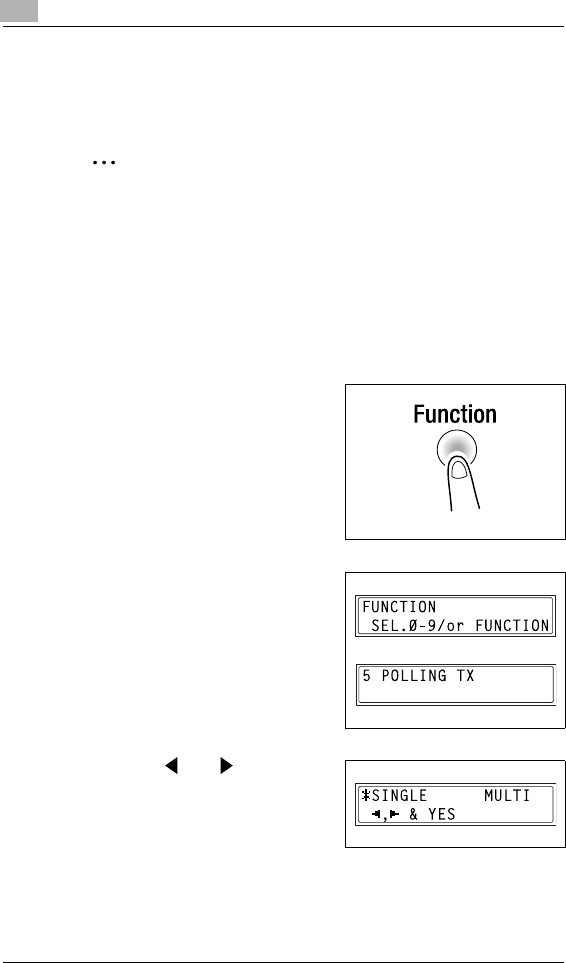
7Fax Transmission/Reception Methods
7-16 Di152f/Di183f
Polling Transmission
Documents scanned and saved in the memory can be retrieved by the
recipient.
Note
Polling transmission is compatible with F code transmission.
If the memory is full, polling transmission cannot be set.
With polling transmission, the recipient incurs the cost of the call.
To set up polling transmission
1Position the document to be faxed.
2If necessary, change the “Resolution” setting (p. 6-8).
3Press the [Function] key.
4Press the [5] key from the 10-Key
Pad.
or
Press the [Function] key 5 times to
select “POLLING TX”, and then
press the [Yes] key.
5Using the and keys, select
either “SINGLE” or “MULTI”, and
then press the [Yes] key.
HTo allow only one polling
transmission request, then
delete the document from the memory, select “SINGLE”.
HTo allow multiple polling transmission requests, select “MULTI”.
The document is stored in the memory until it has been deleted.

Fax Transmission/Reception Methods 7
Di152f/Di183f 7-17
6Using the 10-Key Pad, enter the 4-
digit polling ID, and then press the
[Yes] key.
HIf you do not wish to set a polling
ID, skip to step 8.
HThe polling ID can be set to any number between 0000 and 9999.
7Using the 10-Key Pad, enter the 4-
digit password.
HIf you do not wish to set a
password, continue with step 8.
HThe password can be set to any
number between 0000 and 9999.
8Press the [Start] key.
The machine scans the document, then enters standby mode.
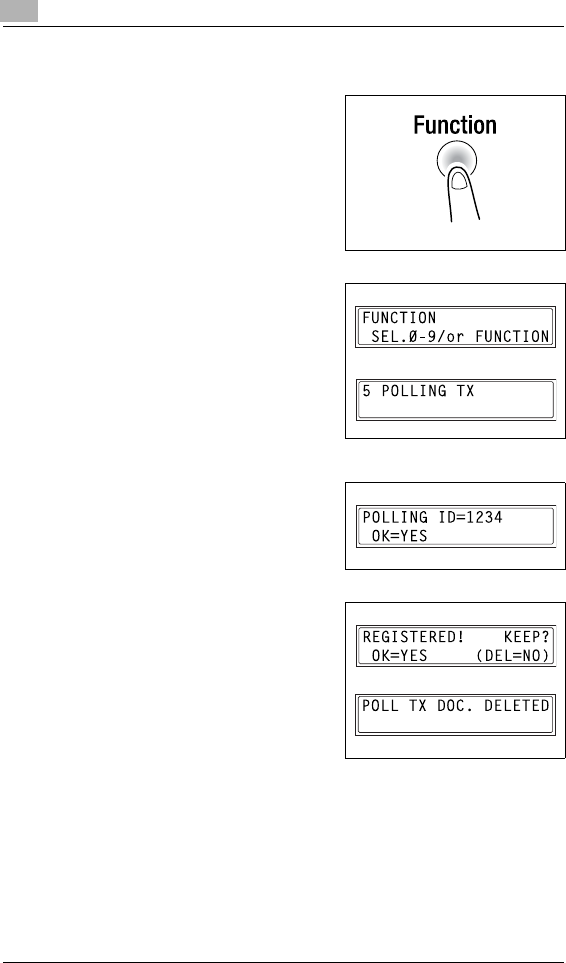
7Fax Transmission/Reception Methods
7-18 Di152f/Di183f
To delete a document from the polling transmission setup
1Press the [Function] key.
2Press the [5] key from the 10-Key
Pad.
or
Press the [Function] key 5 times to
select “POLLING TX”, and then
press the [Yes] key.
If polling transmission has been set,
a screen appears, allowing you to
specify the polling ID.
3Using the 10-Key Pad, enter the
polling ID, and then press the [Yes]
key.
4Press the [No] key to delete from
the memory the document set for
polling transmission.
HTo keep the polling transmission
setting, press the [Yes] key.
5Press the [No] key twice to return to the main screen.
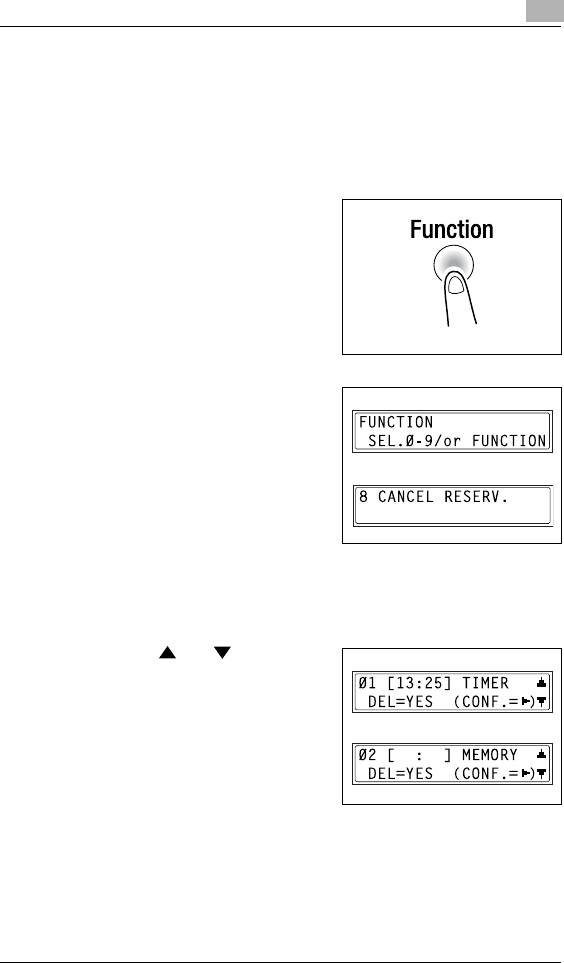
Fax Transmission/Reception Methods 7
Di152f/Di183f 7-19
Cancelling (Deleting) a Document Queued in the Memory for
Transmission
Of the documents stored in the memory and waiting to be sent, a specific
document can be selected and deleted.
To cancel a queued document
1Press the [Function] key.
2Press the [8] key from the 10-Key
Pad.
or
Press the [Function] key 8 times to
select “CANCEL RESERV.”, and
then press the [Yes] key.
The details (specified transmission
time/type of transmission) of the
jobs queued in the memory are
displayed.
?Have no jobs been queued in the memory?
§The message “NONE” appears.
3Using the and keys, select
the job to be deleted.
HThe following types of job are
displayed.
MEMORY: Memory
transmission
B-CAST: Broadcast
transmission
TIMER: Timer transmission
M.B. TX: Mailbox transmission
POLL-TX: Polling transmission
POLL-RX: Polling reception
RELAY: Relay initiation transmission or relay broadcast
transmission
FORWARD: Fax forwarding

7Fax Transmission/Reception Methods
7-20 Di152f/Di183f
HTo check the recipient of the currently displayed transmission job,
press the key. After checking, press the [Yes] key to return to
the previous screen.
4Press the [Yes] key to delete the
displayed job.
“CANCEL RESERV.” appears in the
display.
5To delete another queued job, press either the [Yes] key or the [8] key,
and then repeat steps 3 and 4.
HIf you are finished deleting jobs, press the [No] key to return to the
main screen.

Fax Transmission/Reception Methods 7
Di152f/Di183f 7-21
7.2 Reception Methods
Manual Reception
This machine normally receives faxes automatically. However, if a
telephone is connected and the same line is used for phoning and faxing,
the document can simply be received after talking with the caller over the
phone.
Note
Manual reception is possible if a telephone is connected to the TEL
port of this machine.
To receive faxes manually, use the corresponding Utility mode
function to select the manual reception mode (p. 10-42).
To receive a fax manually
1After the telephone rings, pick up the receiver to talk with the caller.
2After talking and the caller’s fax machine sounds long beeps, press the
[Start] key.
The machine starts receiving the fax.
?Were the long beeps not sounded by the caller’s fax machine?
§If the caller’s fax machine is set to send automatically, the long
beeps may not be sounded.
3If the telephone receiver is replaced, the fax reception is finished and
the machine sounds a beep.
Memory Reception
This machine automatically prints faxes that it has received. However,
when receiving confidential faxes, the received document can be stored
in the memory and printed at a specified time or when memory reception
is turned off.
Memory reception is set using the corresponding Utility mode function.
For details on changing the setting, refer to “To select the memory
reception mode (“MEMORY RX MODE” function)” on page 10-42.
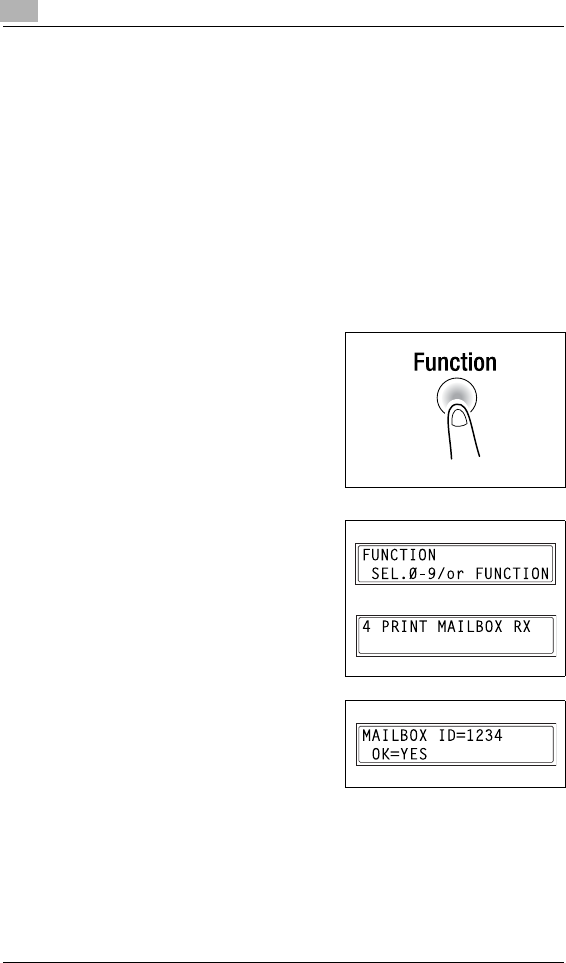
7Fax Transmission/Reception Methods
7-22 Di152f/Di183f
Mailbox Reception
If mailbox numbers and F codes (mailbox IDs and passwords) have
already been programmed on this machine, this function can be used to
receive only those faxes with an identical mailbox ID and password
specified by the caller.
Since the received fax can only be retrieved after entering the
corresponding mailbox ID, confidential faxes can safely be sent and
received.
For details on programming the mailboxes, refer to “Setting Up Mailboxes
(“MAILBOX” function)” on page 10-29.
To retrieve a document from a mailbox
1Press the [Function] key.
2Press the [4] key from the 10-Key
Pad.
or
Press the [Function] key 4 times to
select “PRINT MAILBOX RX”, and
then press the [Yes] key.
A screen appears, allowing you to
enter the mailbox ID.
3Using the 10-Key Pad, enter the 4-
digit mailbox ID, and then press the
[Yes] key.
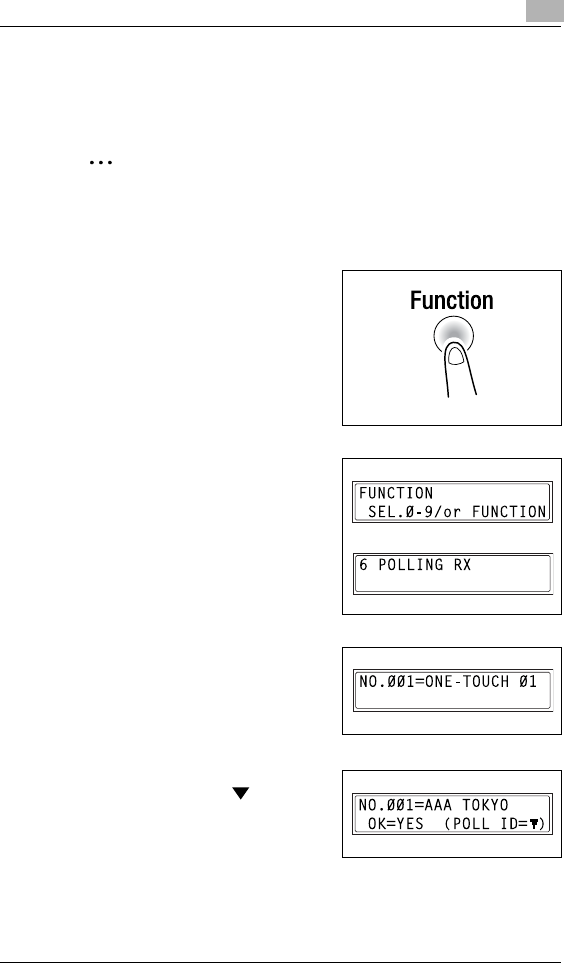
Fax Transmission/Reception Methods 7
Di152f/Di183f 7-23
Polling Reception
Using polling reception, documents set up in other fax machines can be
received.
Note
Polling reception is compatible with F code transmission.
To receive a fax using polling reception
1Press the [Function] key.
2Press the [6] key from the 10-Key
Pad.
or
Press the [Function] key 6 times to
select “POLLING RX”, and then
press the [Yes] key.
3Specify the fax number to be called,
and then press the [Yes] key.
HRefer to step 5 of “To fax using
broadcast transmission” on
page 7-4.
4To enter the polling ID and
password, press the key.
HIf there is no need to enter a
polling ID and password, skip to
step 7.
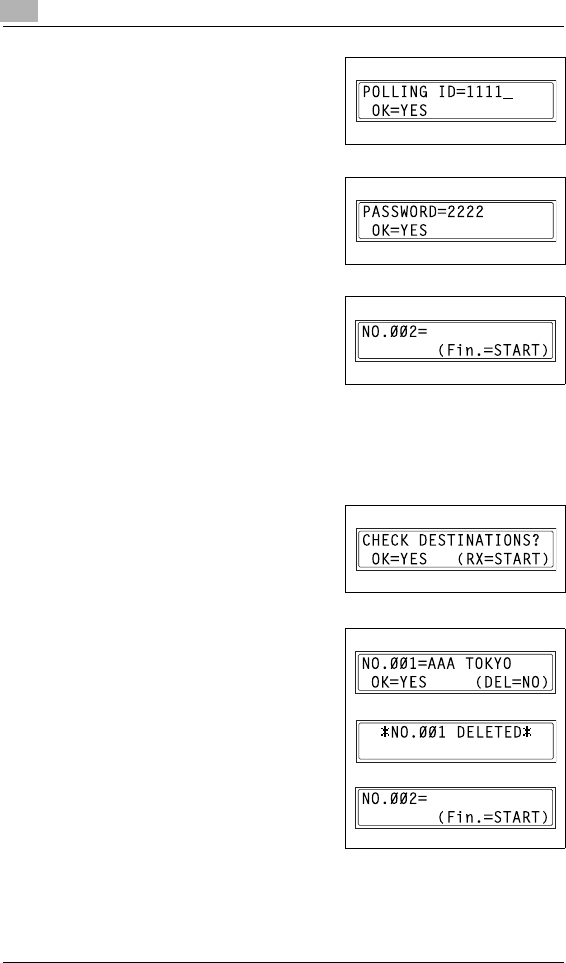
7Fax Transmission/Reception Methods
7-24 Di152f/Di183f
5Using the 10-Key Pad, enter the
polling ID (20 digits or less), and
then press the [Yes] key.
6Using the 10-Key Pad, enter the
password (20 digits or less), and
then press the [Yes] key.
7To specify multiple fax numbers,
repeat steps 3 through 6.
HIf you do not wish to specify
other fax numbers, continue
with step 8.
8Press the [Start] key.
A message appears, allowing you to select whether or not to check the
fax numbers to be called.
9To check the numbers to be called,
press the [Yes] key.
HIf you do not wish to check the
numbers to be called, skip to
step 11.
10 The fax numbers specified in step 3
are displayed in the order that they
were selected.
Check the fax numbers, and then
press the [Yes] key.
HTo delete the displayed fax
number, press the [No] key.
HAfter all fax numbers have been
checked, “Fin.=START”
appears in the display.
11 Press the [Start] key.

Fax Transmission/Reception Methods 7
Di152f/Di183f 7-25
7.3 Using F codes
This machine is compatible F code transmissions.
F codes are mailbox functions, such as “SUB” (sub-addresses), “SEP”
(selective polling), “SID” and “PWD” (passwords), regulated by the G3
standards of the ITU-T (International Telecommunication Union). Mailbox
transmission and reception is possible only with similar machines
compatible with F code transmission. Using the 10-Key Pad, the following
F codes can be set, depending on the use.
F codes
GSUB:
Specify when transmitting while using F codes.
GPASSWORD (SID):
Specify when limiting the recipient/caller with a password.
GPOLL ID (SEP):
Specify when calling another fax machine to receive a document set
up in it (polling reception).
Note
If one-touch dial keys or speed dial numbers are programmed with F
codes (sub-addresses and SID), the appropriate F code can quickly
be transmitted to the recipient/caller.
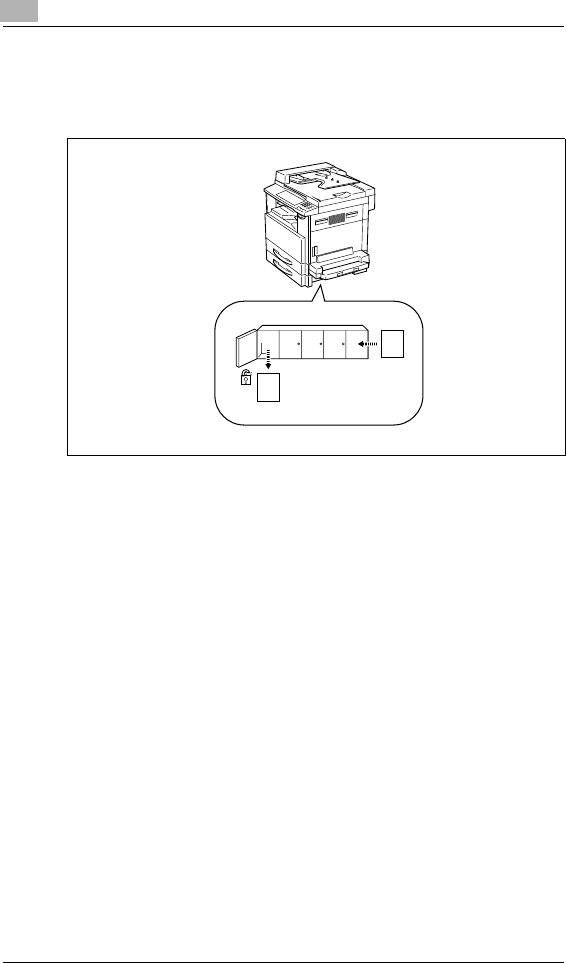
7Fax Transmission/Reception Methods
7-26 Di152f/Di183f
Using Mailboxes
Specifying mailboxes:
Mailboxes can be used if they are set up using the corresponding Utility
mode function. Refer to “Mailbox Reception” on page 7-22.
F code mailbox transmission/reception:
A maximum of 10 mailboxes can be set up. Since a mailbox ID is required
in order to retrieve documents received in the different mailboxes,
confidential faxes can safely be sent and received. Refer to “Setting Up
Mailboxes (“MAILBOX” function)” on page 10-29.
If one-touch dial keys or speed dial numbers are programmed with F
codes, the appropriate F code can quickly be transmitted. Refer to
“Mailbox Transmission” on page 7-9.
A
B
Mailbox
Mailbox ID Fax
Print
transmission
(F code)
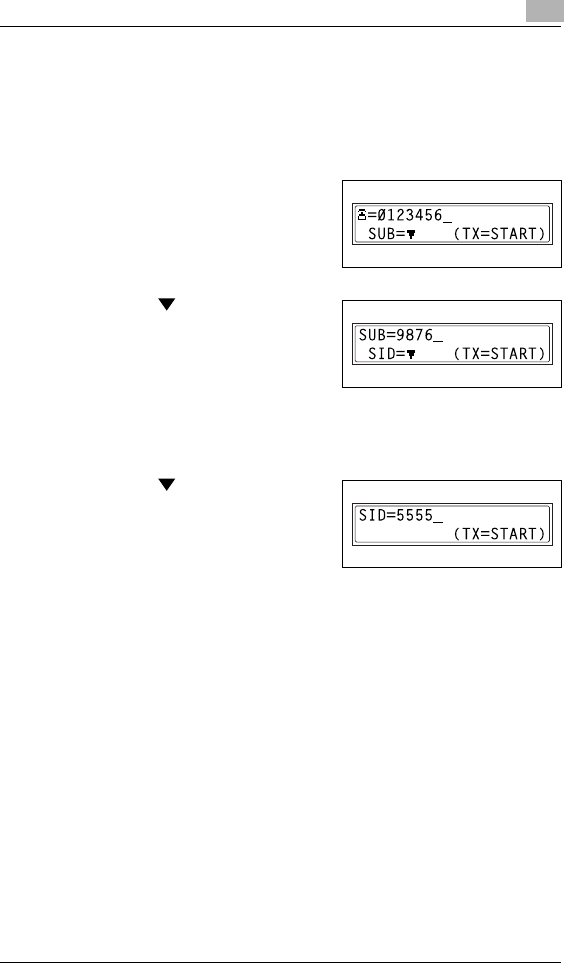
Fax Transmission/Reception Methods 7
Di152f/Di183f 7-27
Specifying F codes
When sending faxes
F codes can be specified when the 10-Key Pad is being used to enter the
fax number of a recipient while sending a fax.
1Using the 10-Key Pad, enter the fax
number of the recipient.
2Press the key, and then use the
10-Key Pad to enter the sub-
address.
HA number up to 20 digits long
can be entered for the sub-
address.
HTo enter an SID, continue with step 3.
HIf an SID will not be entered, continue with step 4.
3Press the key, and then use the
10-Key Pad to enter the SID.
HA number up to 20 digits long
can be entered for the SID.
4Press the [Start] key to begin scanning and sending the fax.
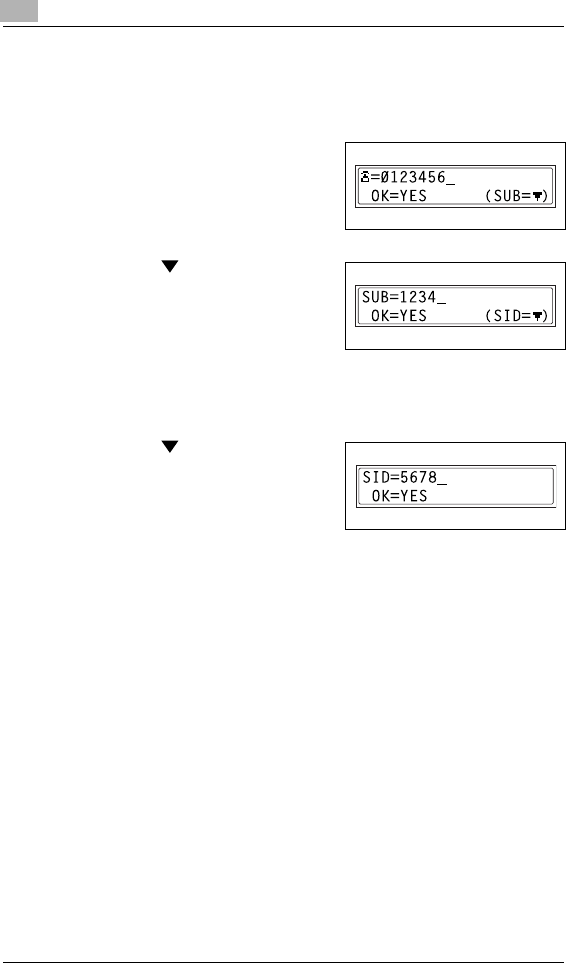
7Fax Transmission/Reception Methods
7-28 Di152f/Di183f
Programming recipients
F codes can be specified when programming one-touch dial keys or
speed dial numbers.
1Using the 10-Key Pad, enter the fax
number of the recipient.
2Press the key, and then use the
10-Key Pad to enter the sub-
address.
HA number up to 20 digits long
can be entered for the sub-
address.
HTo enter an SID, continue with step 3.
HIf an SID will not be entered, continue with step 4.
3Press the key, and then use the
10-Key Pad to enter the SID.
HA number up to 20 digits long
can be entered for the SID.
4Press the [Yes] key. Then, continue specifying other program settings.

Expanded Functions by Connecting a Computer 8
Di152f/Di183f 8-1
8 Expanded Functions by Connecting a
Computer
8.1 Setting Up for PC Faxing/PC Scanning
If commercially available LaserFAX or WinFax Pro V.10.0 is installed on
the computer, this machine can be used for PC faxing.
If used for PC faxing, this machine functions as a fax/modem. Using PC
fax software, transmission at 14400 bps between this machine and the
computer is possible. Connect the computer using a 9-pin RS232C
interface cable (purchased separately).
Modem Specifications
The protocol specifications for this machine are as follows.
GStandard: EIA-578 class 1 fax/modem (does not include data modem)
8.2 Setting Up for PC Scanning
If the enclosed TWAIN Driver is installed on the computer, this machine
can be used for PC scanning.
For PC scanning, an environment that includes the following software and
equipment is required.
GOperating system: Windows 95, Windows 98, Windows Me, Windows
NT 4.0, or Windows 2000
GTWAIN-compatible image-processing software (such as, Adobe
Photoshop)
G9-pin RS232C interface cable
For details, refer to the instruction manual included with the TWAIN Driver.

8Expanded Functions by Connecting a Computer
8-2 Di152f/Di183f

Utility Mode – Copy Functions 9
Di152f/Di183f 9-1
9 Utility Mode – Copy Functions
This chapter describes the various Utility mode functions that can be used
to set copy-related functions.
Note
Depending on the options installed, some functions may not be
available. If an unavailable functions is selected, an error message
appears.

9Utility Mode – Copy Functions
9-2 Di152f/Di183f
9.1 Specifying Machine Settings (“MACHINE
SETTING” Menu)
From the “MACHINE SETTING” menu, various functions of the machine’s
operating environment can be set.
“MACHINE SETTING” menu:
No. MACHINE SETTING Description
1 AUTO PANEL RESET This function can be used to set the length of time until the
Control Panel automatically returns to its default settings
after copying or the last operation is finished.
• The manufacturer’s default setting is 1 min.
2 ENERGY SAVE
MODE This function can be used to set the length of time until the
machine automatically enters Energy Saver mode after the
last operation is finished.
• The manufacturer’s default setting is 15 min.
3 AUTO SHUT OFF This function can be used to set the length of time until the
machine automatically turns off after the last operation is
finished.
• The manufacturer’s default setting is “OFF” (no auto
power-off).
4 DENSITY (ADF) This function can be used to set the image quality when
scanning using the Automatic Document Feeder (ADF).
Select “MODE1” when scanning normal documents (such as
documents created on a word processor), or select “MODE2”
when reproducing faint documents.
This function is only available when the Automatic Document
Feeder is installed.
• The manufacturer’s default setting is “MODE1”.
5 PRINT DENSITY The print density can be set to one of five settings.
6 LCD CONTRAST This function can be used to adjust the contrast of the Control
Panel display.
7 BUZZER VOLUME This function can be used to set the volume of alarms and the
beep sounded when a key is pressed.
• The manufacturer’s default setting is “LOW”.
8 LANGUAGE This function can be used to set the language of the display
and the printed reports.
9 INITIAL MODE This function can be used to set the mode (Copy mode or
Fax mode) that the machine starts up in or returns to after the
Control Panel is reset.
• The manufacturer’s default setting is “COPY”.
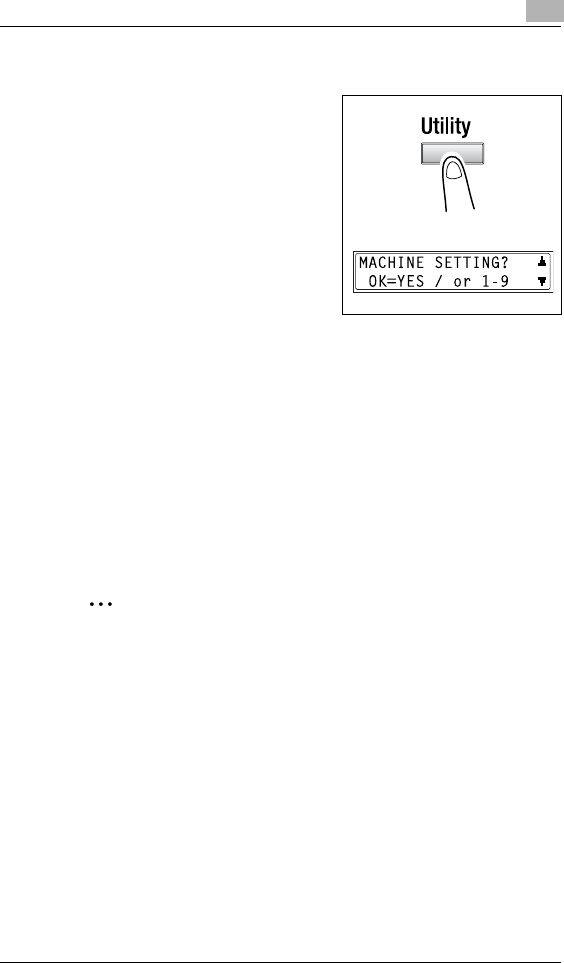
Utility Mode – Copy Functions 9
Di152f/Di183f 9-3
To select the “MACHINE SETTING” menu
1Press the [Utility] key.
“MACHINE SETTING” appears.
2From the 10-Key Pad, press the key ([1] through [9]) for the
“MACHINE SETTING” function that you wish to set.
HThe “MACHINE SETTING” functions are as follows:
1 AUTO PANEL RESET
2 ENERGY SAVE MODE
3 AUTO SHUT OFF
4 DENSITY (ADF)
5 PRINT DENSITY
6 LCD CONTRAST
7 BUZZER VOLUME
8 LANGUAGE
9 INITIAL MODE
Tip
If, at any time, you wish to quit setting a “MACHINE SETTING”
function, press the [No] key. When the message “STOP SETTING?”
appears, press the [Yes] key to quit.
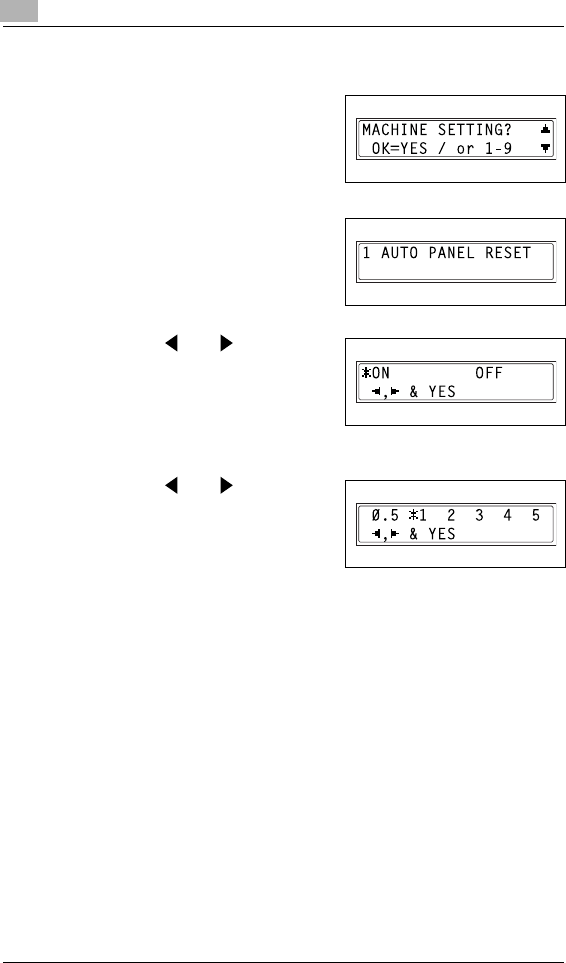
9Utility Mode – Copy Functions
9-4 Di152f/Di183f
To set the “AUTO PANEL RESET” function
1Select the “MACHINE SETTING”
menu.
HRefer to “To select the
“MACHINE SETTING” menu”
on page 9-3.
2Press the [1] key from the 10-Key
Pad to select “AUTO PANEL
RESET”.
3Using the and keys, select
either “ON” or “OFF”, and then
press the [Yes] key.
HIf “OFF” was selected, the
“MACHINE SETTING” menu
appears again.
4Using the and keys, select
“0.5”, “1”, “2”, “3”, “4” or “5”, and then
press the [Yes] key.
The “MACHINE SETTING” menu
appears again.
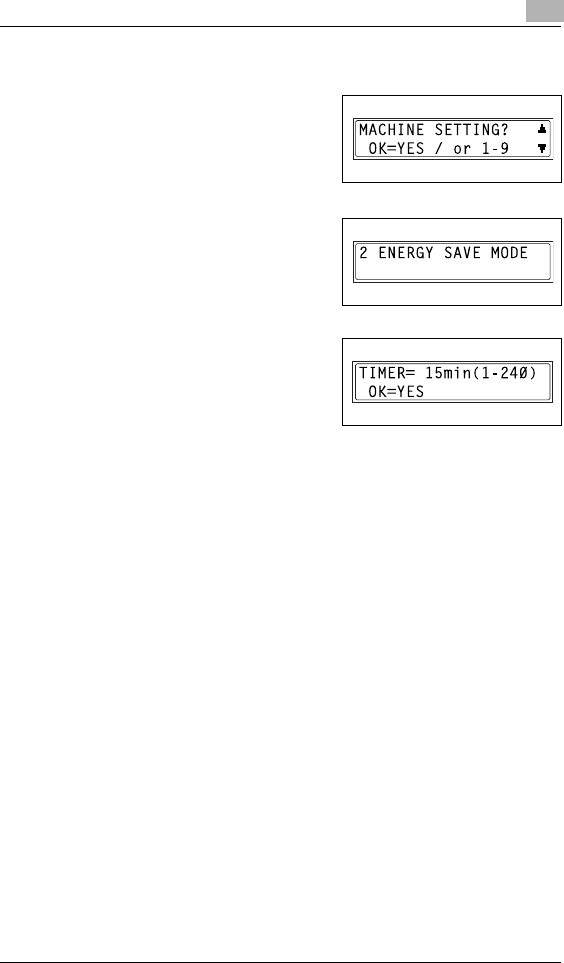
Utility Mode – Copy Functions 9
Di152f/Di183f 9-5
To set the “ENERGY SAVE MODE” (preheat mode) function
1Select the “MACHINE SETTING”
menu.
HRefer to “To select the
“MACHINE SETTING” menu”
on page 9-3.
2Press the [2] key from the 10-Key
Pad to select “ENERGY SAVE
MODE”.
3Using the 10-Key Pad, specify the
length of time the machine is idle
before it enters Energy Saver mode,
and then press the [Yes] key.
HThe timer can be set between
1 min and 240 min.
HIf you wish to correct the setting, press the [No] key, and then enter
the new number.
The “MACHINE SETTING” menu appears again.
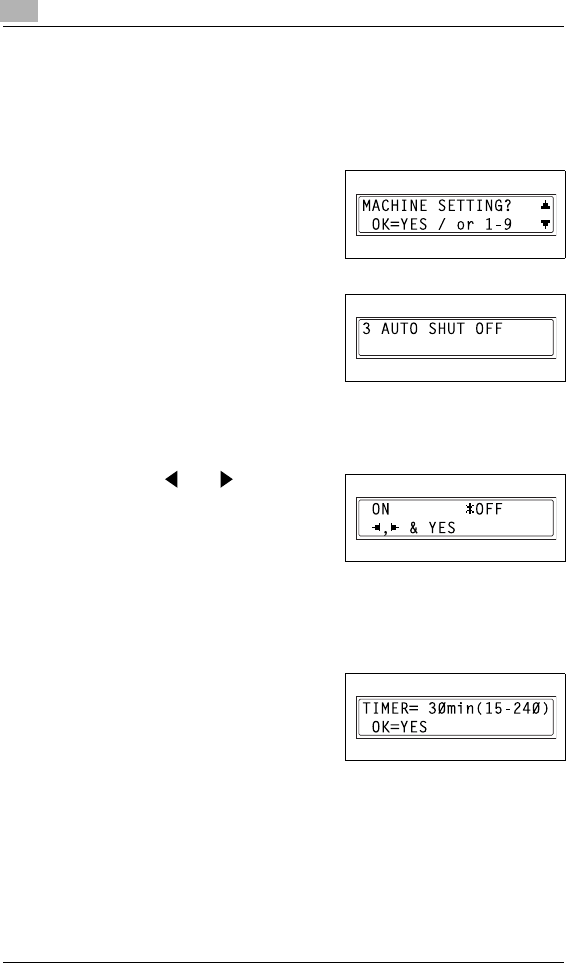
9Utility Mode – Copy Functions
9-6 Di152f/Di183f
To set the “AUTO SHUT OFF” function
Precautions for setting the “AUTO SHUT OFF” function:
Whether or not auto shut off is possible depends on the “AUTO SHUT
OFF” function in the “ADMIN. MANAGEMENT” menu.
1Select the “MACHINE SETTING”
menu.
HRefer to “To select the
“MACHINE SETTING” menu”
on page 9-3.
2Press the [3] key from the 10-Key
Pad to select “AUTO SHUT OFF”.
HIf the “AUTO SHUT OFF”
function in the “ADMIN.
MANAGEMENT” menu is set to
“ENABLE”, continue with step 3.
HIf the “AUTO SHUT OFF” function in the “ADMIN. MANAGEMENT”
menu is set to “DISABLE”, skip to step 4.
3Using the and keys, select
either “ON” or “OFF”, and then
press the [Yes] key.
HIf “ON” was selected, a screen
appears, allowing you to specify
the length of time until the machine automatically turns off.
Continue with step 4.
HIf “OFF” was selected, the “MACHINE SETTING” menu appears
again.
4Using the 10-Key Pad, specify the
length of time until the machine
automatically turns off, and then
press the [Yes] key.
HThe timer can be set between
15 min and 240 min.
HIf you wish to correct the setting, press the [No] key, and then enter
the new number.
The “MACHINE SETTING” menu appears again.
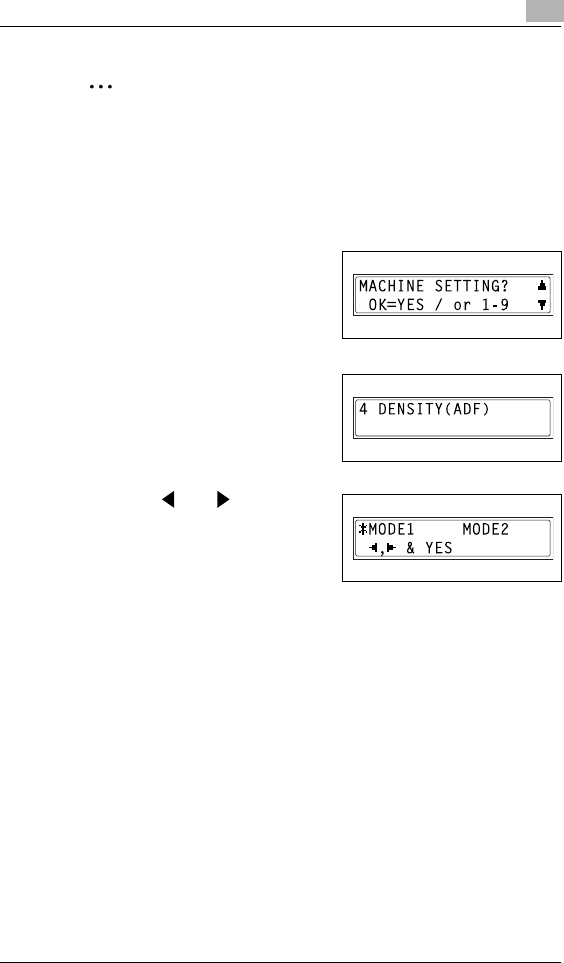
Utility Mode – Copy Functions 9
Di152f/Di183f 9-7
Note
If “AUTO SHUT OFF” is set to “ON”, the auto power off function will
operate. Once the power has been turned off, it will not be possible to
receive faxes or perform printing from the computer.
To specify the ADF (Automatic Document Feeder) scanning image
quality (“DENSITY(ADF)” function)
1Select the “MACHINE SETTING”
menu.
HRefer to “To select the
“MACHINE SETTING” menu”
on page 9-3.
2Press the [4] key from the 10-Key
Pad to select “DENSITY(ADF)”.
3Using the and keys, select
either “MODE1” or “MODE2”, and
then press the [Yes] key.
The “MACHINE SETTING” menu
appears again.
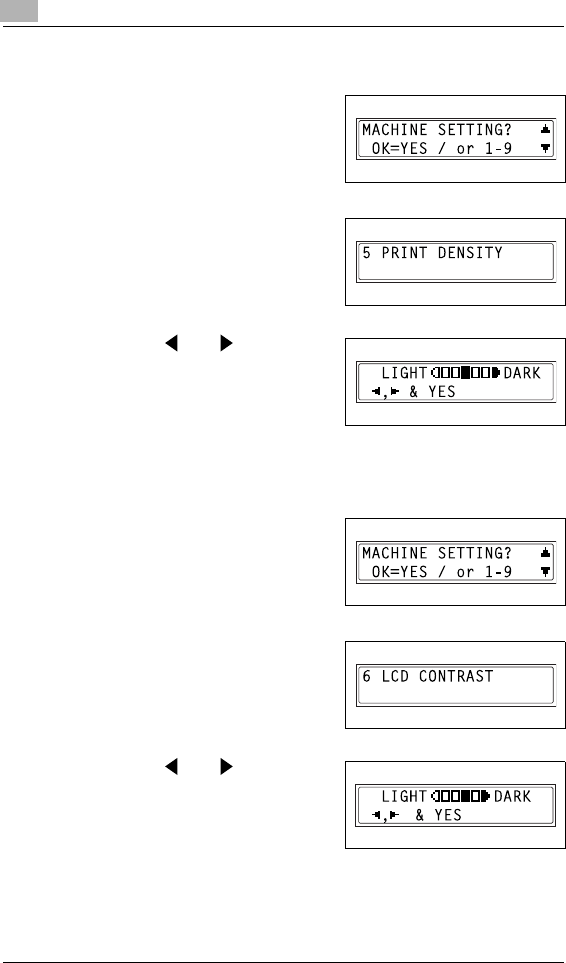
9Utility Mode – Copy Functions
9-8 Di152f/Di183f
To specify the printing density (“PRINT DENSITY” function)
1Select the “MACHINE SETTING”
menu.
HRefer to “To select the
“MACHINE SETTING” menu”
on page 9-3.
2Press the [5] key from the 10-Key
Pad to select “PRINT DENSITY”.
3Using the and keys, select
one of the five settings between
“LIGHT” and “DARK”, and then
press the [Yes] key.
The “MACHINE SETTING” menu
appears again.
To set the “LCD CONTRAST” function
1Select the “MACHINE SETTING”
menu.
HRefer to “To select the
“MACHINE SETTING” menu”
on page 9-3.
2Press the [6] key from the 10-Key
Pad to select “LCD CONTRAST”.
3Using the and keys, select
one of the four settings between
“LIGHT” and “DARK”, and then
press the [Yes] key.
The “MACHINE SETTING” menu
appears again.
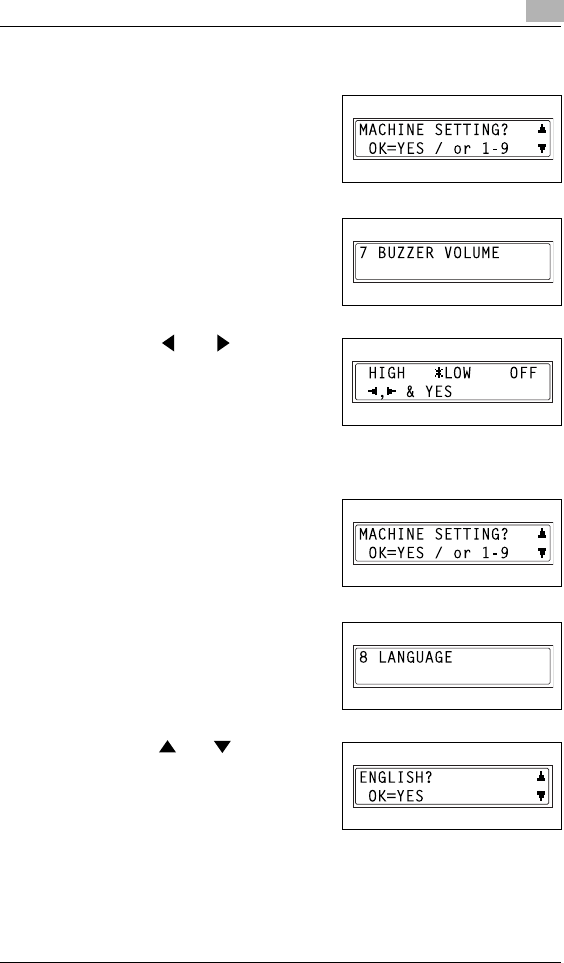
Utility Mode – Copy Functions 9
Di152f/Di183f 9-9
To set the “BUZZER VOLUME” function
1Select the “MACHINE SETTING”
menu.
HRefer to “To select the
“MACHINE SETTING” menu”
on page 9-3.
2Press the [7] key from the 10-Key
Pad to select “BUZZER VOLUME”.
3Using the and keys, select
“HIGH”, “LOW” or “OFF”, and then
press the [Yes] key.
The “MACHINE SETTING” menu
appears again.
To set the “LANGUAGE” function
1Select the “MACHINE SETTING”
menu.
HRefer to “To select the
“MACHINE SETTING” menu”
on page 9-3.
2Press the [8] key from the 10-Key
Pad to select “LANGUAGE”.
3Using the and keys, select
the desired language, and then
press the [Yes] key.
The “MACHINE SETTING” menu
appears again.
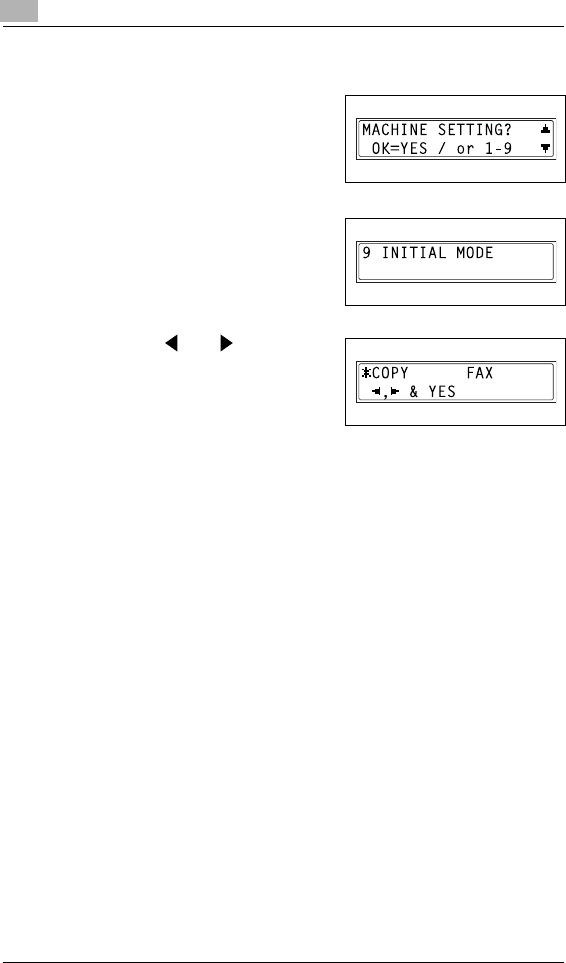
9Utility Mode – Copy Functions
9-10 Di152f/Di183f
To set the “INITIAL MODE” function
1Select the “MACHINE SETTING”
menu.
HRefer to “To select the
“MACHINE SETTING” menu”
on page 9-3.
2Press the [9] key from the 10-Key
Pad to select “INITIAL MODE”.
3Using the and keys, select
either “COPY” or “FAX”, and then
press the [Yes] key.
The “MACHINE SETTING” menu
appears again.

Utility Mode – Copy Functions 9
Di152f/Di183f 9-11
9.2 Setting Up the Paper Sources (“PAPER SOURCE
SETUP” Menu)
From the “PAPER SOURCE SETUP” menu, various functions for the
paper trays can be set.
“PAPER SOURCE SETUP” menu:
No. PAPER SOURCE
SETUP Description
1 INCH/METRIC This function can be used to set the size measurement
system for the paper loaded in each tray. It can be used to
select whether paper measured in centimeters such as A4
and B5 sizes (“METRIC”) or paper measured in inches
(“INCH”) such as Letter size is loaded. If no particular setting
is selected, the paper size is detected automatically.
• The manufacturer’s default setting is “INCH”.
2 TRAY1 PAPER This function can be used to set the type of paper (plain
paper, OHP transparencies or postcards) loaded into the 1st
Tray, and whether the size is automatically detected (AUTO)
or specified (SIZE INPUT).
• The manufacturer’s default settings are “PLAIN” and
“AUTO”.
3 AUTO SELECT Since all trays are normally available for automatic paper
selection, special paper loaded into a tray may be
automatically selected and wrongly copied onto.
For this reason, if this function is used to set the tray to
“DISABLE”, the paper in that tray will not be available for
automatic paper selection. In addition, it will not be available
for automatic paper source selection.
“ENABLE”: Paper and tray can be automatically selected.
“DISABLE” & “CONTINUOUS”: Paper cannot be
automatically selected, but tray can be automatically
selected.
“DISABLE” & “FIXED”: Paper and tray cannot be
automatically selected.
• The manufacturer’s default setting is “ENABLE”.
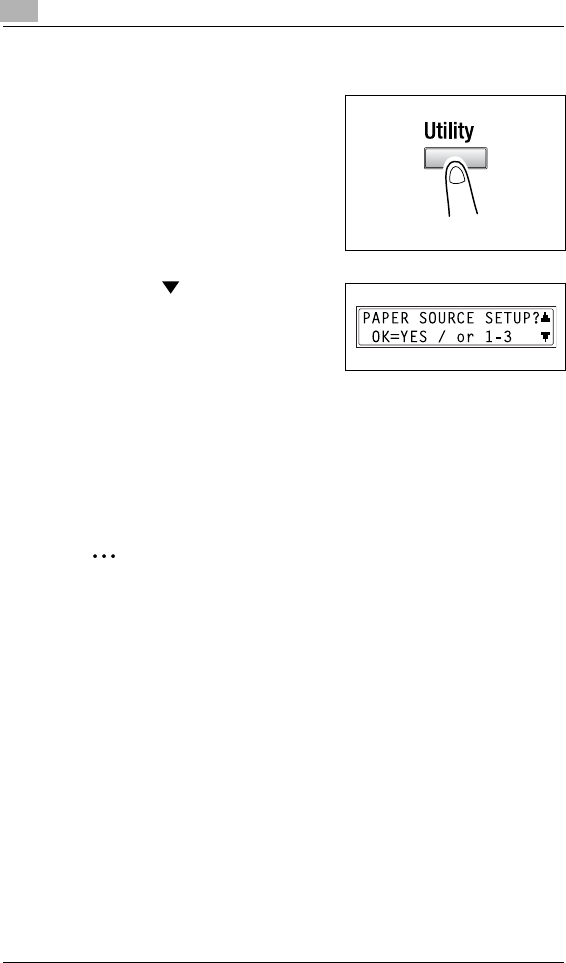
9Utility Mode – Copy Functions
9-12 Di152f/Di183f
To select the “PAPER SOURCE SETUP” menu
1Press the [Utility] key.
2Press the key once to select
“PAPER SOURCE SETUP”.
3From the 10-Key Pad, press the key ([1] through [3]) for the “PAPER
SOURCE SETUP” function that you wish to set.
HThe “PAPER SOURCE SETUP” functions are as follows:
1 INCH/METRIC
2 TRAY1 PAPER
3 AUTO SELECT
Tip
If, at any time, you wish to quit setting a “PAPER SOURCE SETTING”
function, press the [No] key. When the message “STOP SETTING?”
appears, press the [Yes] key to quit.

Utility Mode – Copy Functions 9
Di152f/Di183f 9-13
To specify the automatic paper size detection units (“INCH/METRIC”
function)
1Select the “PAPER SOURCE
SETUP” menu.
HRefer to “To select the “PAPER
SOURCE SETUP” menu” on
page 9-12.
2Press the [1] key from the 10-Key
Pad to select “INCH/METRIC”.
3Using the and keys, select a
paper tray, and then press the [Yes]
key.
4Using the and keys, select
either “METRIC” or “INCH”, and
then press the [Yes] key.
The “PAPER SOURCE SETUP”
menu appears again.
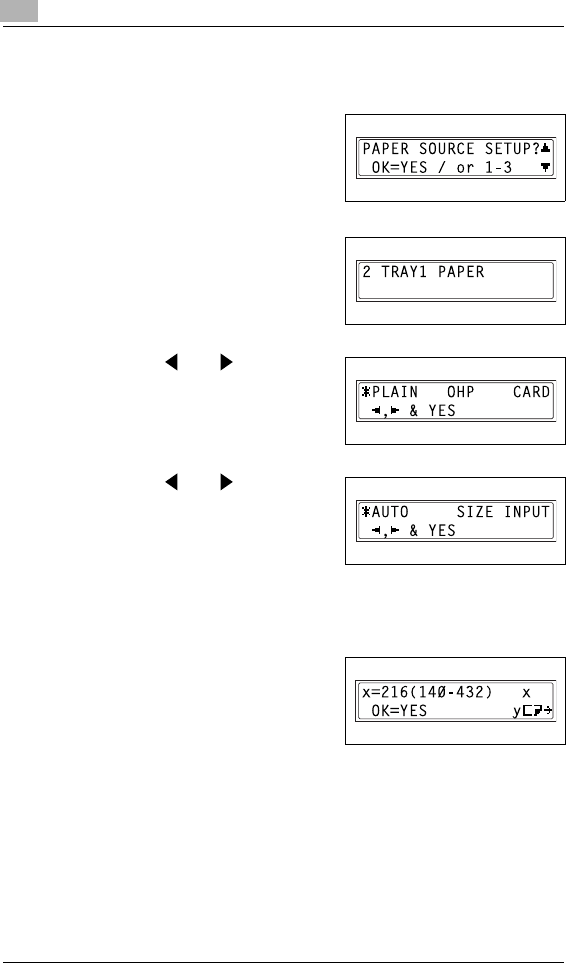
9Utility Mode – Copy Functions
9-14 Di152f/Di183f
To specify the size of paper loaded into the 1st Tray (“TRAY1
PAPER” function)
1Select the “PAPER SOURCE
SETUP” menu.
HRefer to “To select the “PAPER
SOURCE SETUP” menu” on
page 9-12.
2Press the [2] key from the 10-Key
Pad to select “TRAY1 PAPER”.
3Using the and keys, select
“PLAIN”, “OHP” or “CARD”, and
then press the [Yes] key.
4Using the and keys, select
either “AUTO” or “SIZE INPUT”, and
then press the [Yes] key.
HIf “AUTO” was selected, the
“PAPER SOURCE SETUP”
menu appears again.
HIf “SIZE INPUT” was selected, a screen appears, allowing you to
specify the paper size.
5Using the 10-Key Pad, enter the
paper length (mm), and then press
the [Yes] key.
HThe paper length can be set
between 5-1/2 inch (140 mm)
and 17 inch (432 mm).
However, when the length is set between 16-9/16 inch (421 mm)
and 17 inch (432 mm), the maximum width that can be set is
11 inch (279 mm).
HIf you wish to correct the setting, press the [No] key, and then enter
the new number.
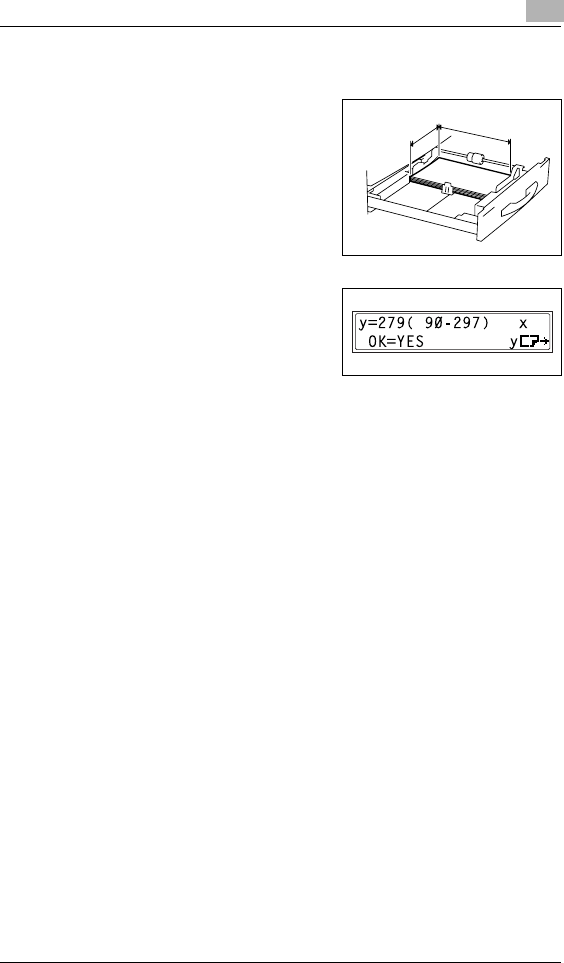
Utility Mode – Copy Functions 9
Di152f/Di183f 9-15
?Have the necessary precautions been observed when entering the
paper size?
§Refer to the diagram at the right
and be sure to specify the paper
width and length measurements
correctly.
6Using the 10-Key Pad, enter the
paper width (mm), and then press
the [Yes] key.
HThe paper width can be set
between 3-9/16 inch (90 mm)
and 11-3/4 inch (297 mm).
However, when the width is set between 11-1/16 inch (280 mm)
and 11-11/16 inch (297 mm), the maximum length that can be set
is 16-1/2 inch (420 mm).
HIf you wish to correct the setting, press the [No] key, and then enter
the new number.
The “PAPER SOURCE SETUP” menu appears again.
Width (y)
Length (x)
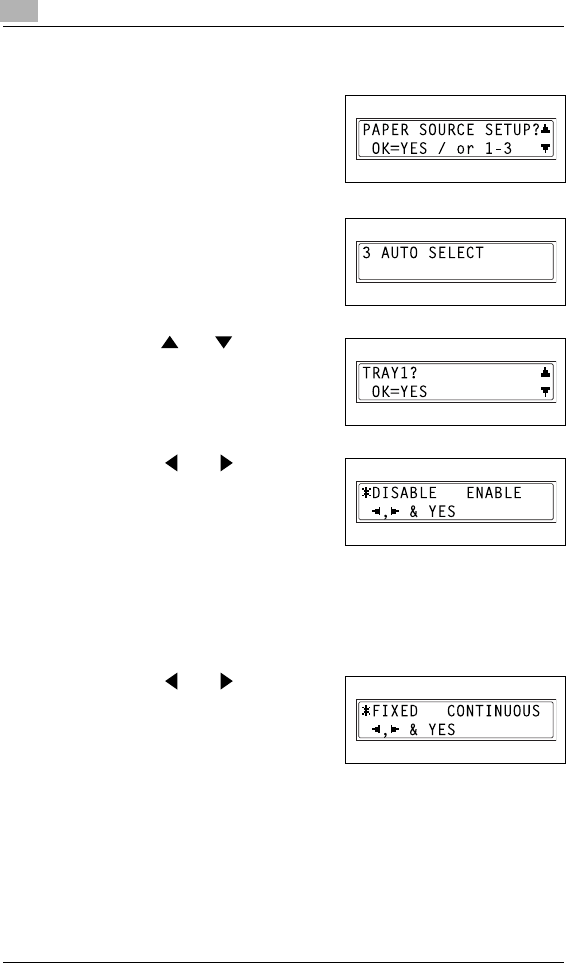
9Utility Mode – Copy Functions
9-16 Di152f/Di183f
To set the “AUTO SELECT” function
1Select the “PAPER SOURCE
SETUP” menu.
HRefer to “To select the “PAPER
SOURCE SETUP” menu” on
page 9-12.
2Press the [3] key from the 10-Key
Pad to select “AUTO SELECT”.
3Using the and keys, select a
paper tray, and then press the [Yes]
key.
4Using the and keys, select
either “DISABLE” (does not allow
automatic paper selection) or
“ENABLE” (allows automatic paper
selection), and then press the [Yes]
key.
HIf “DISABLE” was selected, a screen appears, allowing you to set
paper source switching.
HIf “ENABLE” was selected, the “PAPER SOURCE SETUP” menu
appears again.
5Using the and keys, select
either “FIXED” (does not allow
automatic paper source switching)
or “CONTINUOUS” (allows
automatic paper source switching),
and then press the [Yes] key.
The “PAPER SOURCE SETUP” menu appears again.

Utility Mode – Copy Functions 9
Di152f/Di183f 9-17
9.3 Specifying User-Managed Service Tasks (“USER
MANAGEMENT” Menu)
From the “USER MANAGEMENT” menu, certain service operations can
be performed in order to maintain the machine’s efficiency.
“USER MANAGEMENT” menu:
To perform the “DRUM DEHUMIDIFY” function
1Press the [Utility] key.
The first screen of the Utility mode
appears.
2Press the key twice to select
“USER MANAGEMENT”.
3Using the and keys, select
“DRUM DEHUMIDIFY”, and then
press the [Yes] key.
Drum drying begins, and the main
screen appears.
No. USER
MANAGEMENT Description
1 DRUM DEHUMIDIFY When the room temperature changes drastically (such as
when a heater is used in the winter) or when the machine is
used in an extremely humid location, condensation may form
on the surface of the PC drum inside the machine, resulting
in decreased print quality. If this occurs, use this function to
dry the drum and eliminate the condensation.
2TONER
REPLENISHER After many documents containing large printed areas (such
as photos) or many negative/positive-inverted copies are
printed, the print density may temporarily become too light if
toner is not automatically replenished. If this occurs, use this
function to force replenishing of the toner and immediately
return the density to its normal level.
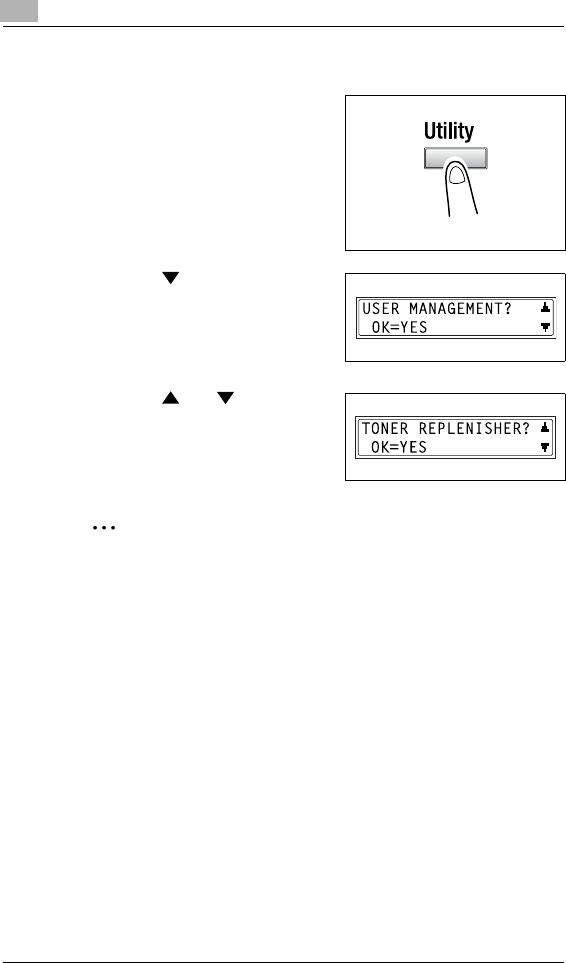
9Utility Mode – Copy Functions
9-18 Di152f/Di183f
To perform the “TONER REPLENISHER” function
1Press the [Utility] key.
The first screen of the Utility mode
appears.
2Press the key twice to select
“USER MANAGEMENT”.
3Using the and keys, select
“TONER REPLENISHER”, and
then press the [Yes] key.
Toner replenishing begins, and the
main screen appears.
Note
While the toner is being replenished, do not turn off the machine or
open the Front Cover.
If the density of the toner is suitable, do not perform the toner
replenishing operation.

Utility Mode – Copy Functions 9
Di152f/Di183f 9-19
9.4 Specifying Administrative Settings (“ADMIN.
MANAGEMENT” Menu)
From the “ADMIN. MANAGEMENT” menu, various functions for
controlling the use of the machine can be set. In order to set an “ADMIN.
MANAGEMENT” function, the administrator access number must be
entered.
“ADMIN. MANAGEMENT” menu:
Note
The registering and setup of the administrator access number should
be performed by the service representative. For details, contact the
service representative.
The administrator of this machine should be sure not to lose the
administrator access number.
No. ADMIN.
MANAGEMENT Description
1 AUTO SHUT OFF This function can be used to set whether or not the auto
power-off function is performed.
• The manufacturer’s default setting is “ENABLE”.
2 COPY TRACK A maximum of 20 accounts can be specified in order to
control the use of the machine.
• Turn on/off user management.
• Register account access numbers.
• Change/delete account access numbers.
• Display/clear the total count for a specific account.
• Print the total counts for all accounts.
• Clear the total counts for all accounts.
3 REMOTE MONITOR This function can be used to set whether or not the machine
can be accessed and the status of the machine can be
checked from the service center.
* For details, consult with the service representative.
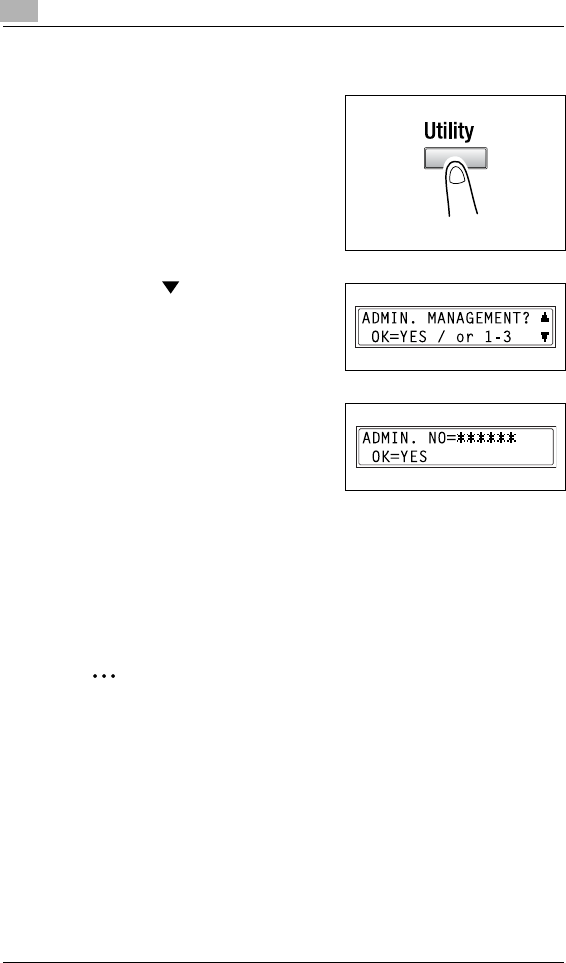
9Utility Mode – Copy Functions
9-20 Di152f/Di183f
To select the “ADMIN. MANAGEMENT” menu
1Press the [Utility] key.
2Press the key 3 times to select
“ADMIN. MANAGEMENT”, and
then press the [Yes].
3Using the 10-Key Pad, enter the 6-
digit administrator access number,
and then press the [Yes] key.
4From the 10-Key Pad, press the key ([1] through [3]) for the “ADMIN.
MANAGEMENT” function that you wish to set.
HThe “ADMIN. MANAGEMENT” functions are as follows:
1 AUTO SHUT OFF
2 COPY TRACK
3 REMOTE MONITOR
Tip
If, at any time, you wish to quit setting an “ADMIN. MANAGEMENT”
function, press the [No] key. When the message “STOP SETTING?”
appears, press the [Yes] key to quit.
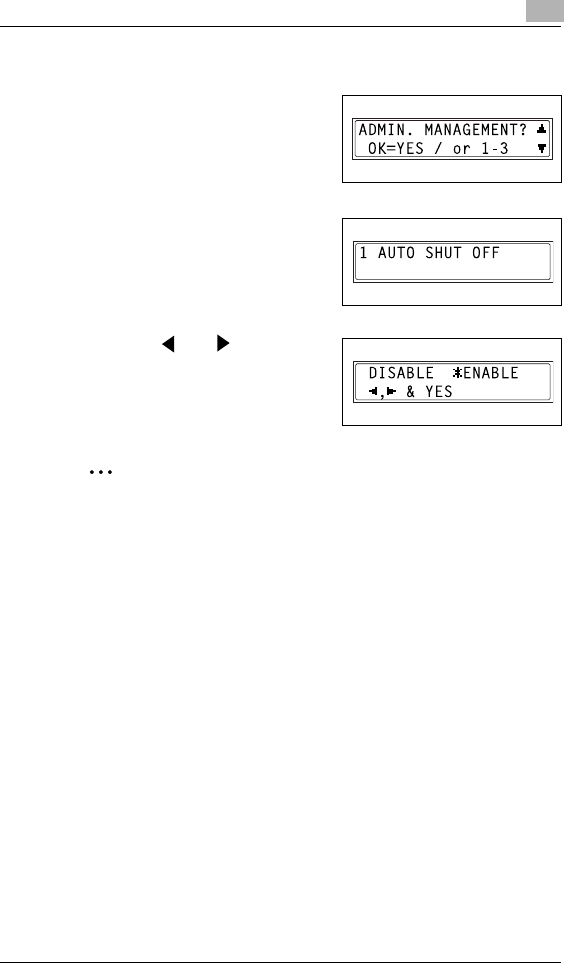
Utility Mode – Copy Functions 9
Di152f/Di183f 9-21
To set the “AUTO SHUT OFF” function
1Select the “ADMIN.
MANAGEMENT” menu.
HRefer to “To select the “ADMIN.
MANAGEMENT” menu” on
page 9-20.
2Press the [1] key from the 10-Key
Pad to select “AUTO SHUT OFF”.
3Using the and keys, select
either “DISABLE” or “ENABLE”, and
then press the [Yes] key.
The “ADMIN. MANAGEMENT”
menu appears again.
Note
If “AUTO SHUT OFF” is set to “DISABLE”, the auto power off function
will operate. Note that once the power has been turned off, it will not
be possible to receive faxes or perform printing from the computer.
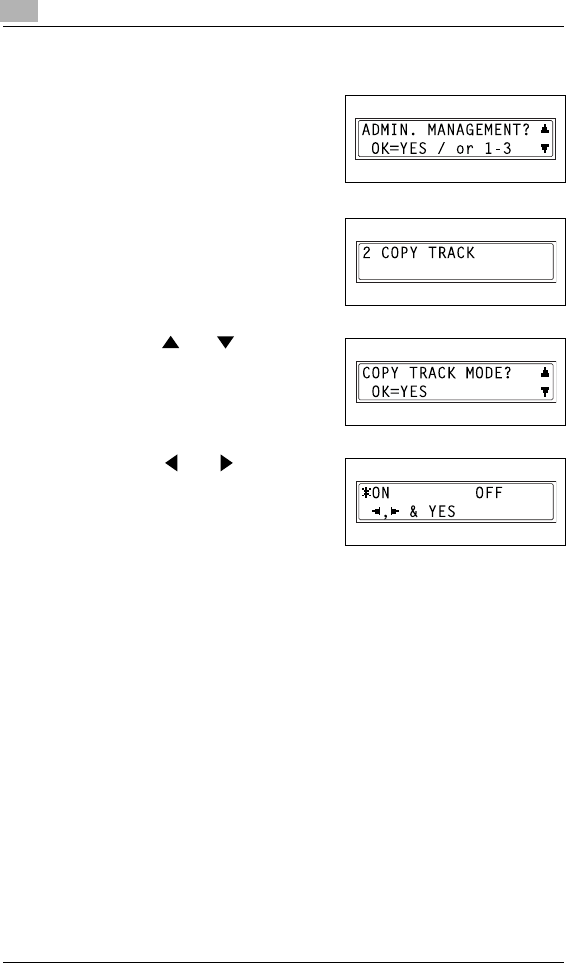
9Utility Mode – Copy Functions
9-22 Di152f/Di183f
To turn on/off user (section) management
1Select the “ADMIN.
MANAGEMENT” menu.
HRefer to “To select the “ADMIN.
MANAGEMENT” menu” on
page 9-20.
2Press the [2] key from the 10-Key
Pad to select “COPY TRACK”.
3Using the and keys, select
“COPY TRACK MODE”, and then
press the [Yes] key.
4Using the and keys, select
either “ON” or “OFF”, and then
press the [Yes] key.
The “ADMIN. MANAGEMENT”
menu appears again.
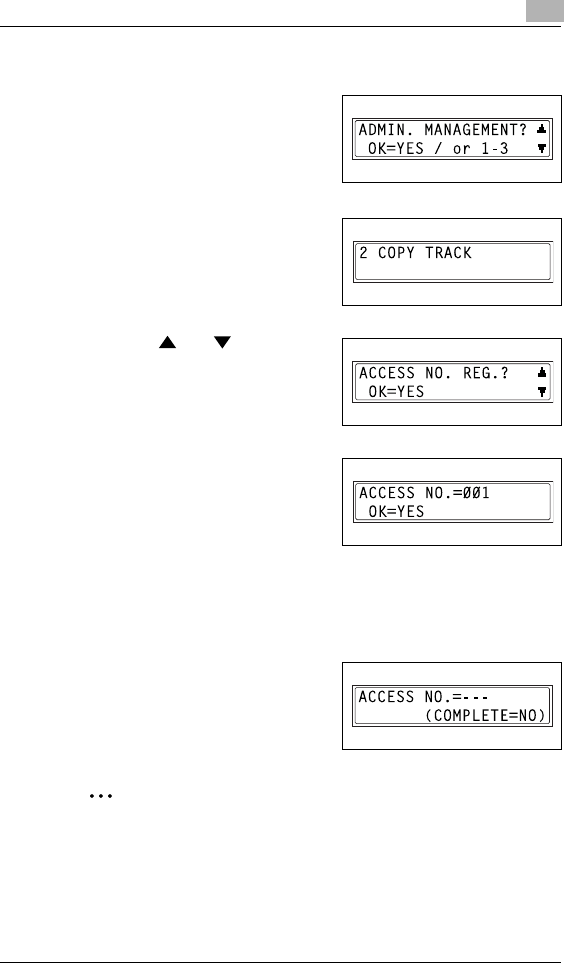
Utility Mode – Copy Functions 9
Di152f/Di183f 9-23
To register user (section) access numbers
1Select the “ADMIN.
MANAGEMENT” menu.
HRefer to “To select the “ADMIN.
MANAGEMENT” menu” on
page 9-20.
2Press the [2] key from the 10-Key
Pad to select “COPY TRACK”.
3Using the and keys, select
“ACCESS NO. REG.”, and then
press the [Yes] key.
4Using the 10-Key Pad, enter the
desired access number for the
account (section), and then press
the [Yes] key.
HEnter a 3-digit access number.
HIf you wish to correct the access number, press the [No] key, and
then use the 10-Key Pad to enter the new number.
Once the access number is registered, a screen appears, allowing you
to enter the next access number to be registered.
5When you are finished registering
access numbers, press the [No]
key.
The “ADMIN. MANAGEMENT”
menu appears again.
Note
If you try to register more than 20 access numbers, the message “UP
TO 20 SECTIONS” appears.
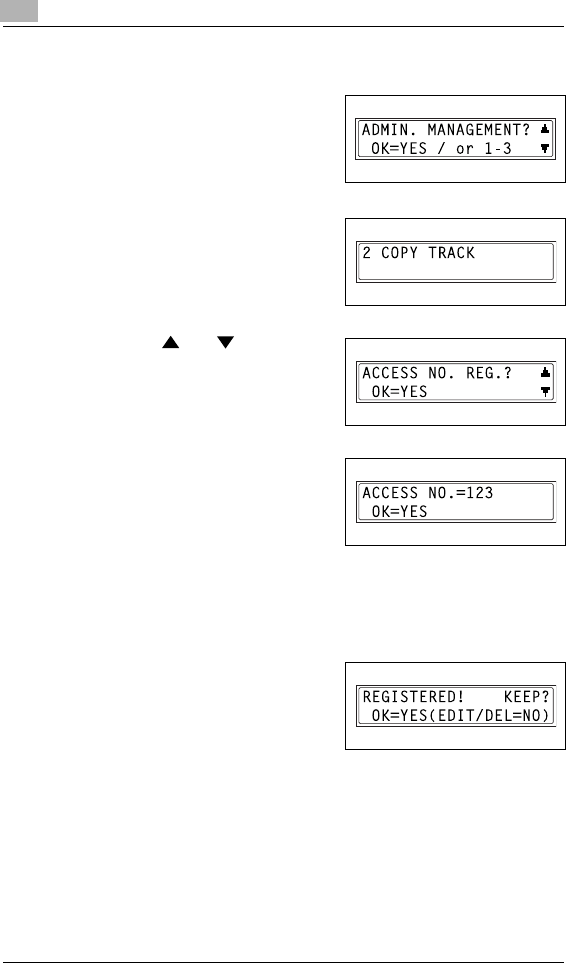
9Utility Mode – Copy Functions
9-24 Di152f/Di183f
To change/delete user (section) access numbers
1Select the “ADMIN.
MANAGEMENT” menu.
HRefer to “To select the “ADMIN.
MANAGEMENT” menu” on
page 9-20.
2Press the [2] key from the 10-Key
Pad to select “COPY TRACK”.
3Using the and keys, select
“ACCESS NO. REG.”, and then
press the [Yes] key.
4Using the 10-Key Pad, enter the
access number that you wish to
change/delete, and then press the
[Yes] key.
HEnter a 3-digit access number.
HIf you wish to correct the access number, press the [No] key, and
then enter the new number.
A confirmation message appears, asking whether or not to keep the
registered access number.
5To change/delete the access
number, press the [No] key.
HTo keep the currently registered
access number, press the [Yes]
key.
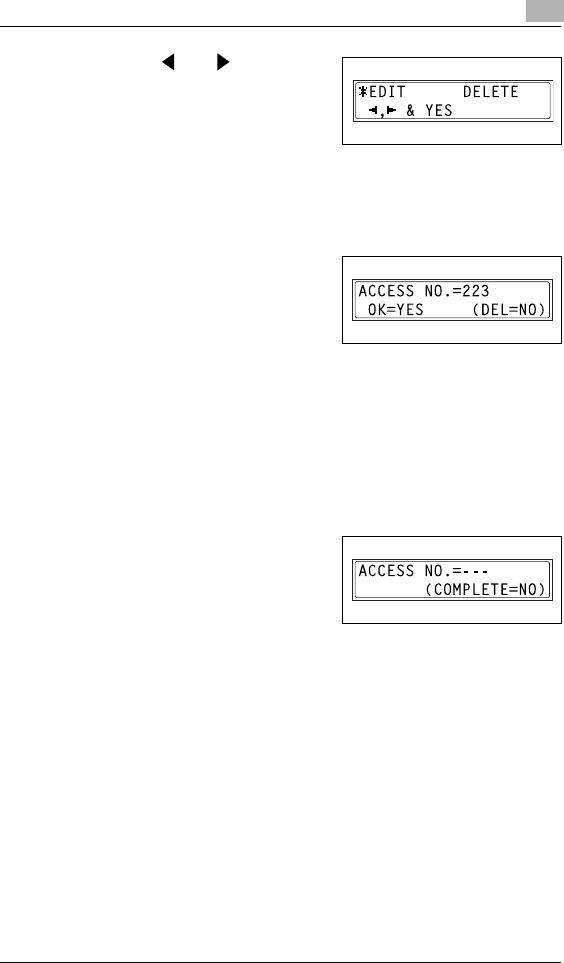
Utility Mode – Copy Functions 9
Di152f/Di183f 9-25
6Using the and keys, select
either “EDIT” or “DELETE”, and
then press the [Yes] key.
HIf “EDIT” was selected, a screen
appears, allowing you to edit the
access number. (Continue with step 7.)
HIf “DELETE” was selected, the current access number is deleted.
(The message “ACCESS NO. XXX DELETED” appears.) To
change or delete other access numbers, return to step 3.
7Use the 10-Key Pad to enter the
new number.
8Press the [Yes] key.
HIf the new access number has already been registered, the
message “ACCESS NO. IS USED” appears. Press the [No] key,
and then enter a different access number.
After the message “ACCESS NO. XXX EDITED” appears, a screen
appears, allowing you to enter the next access number to be changed/
deleted.
9When you are finished changing/
deleting access numbers, press the
[No] key.
The “ADMIN. MANAGEMENT”
menu appears again.
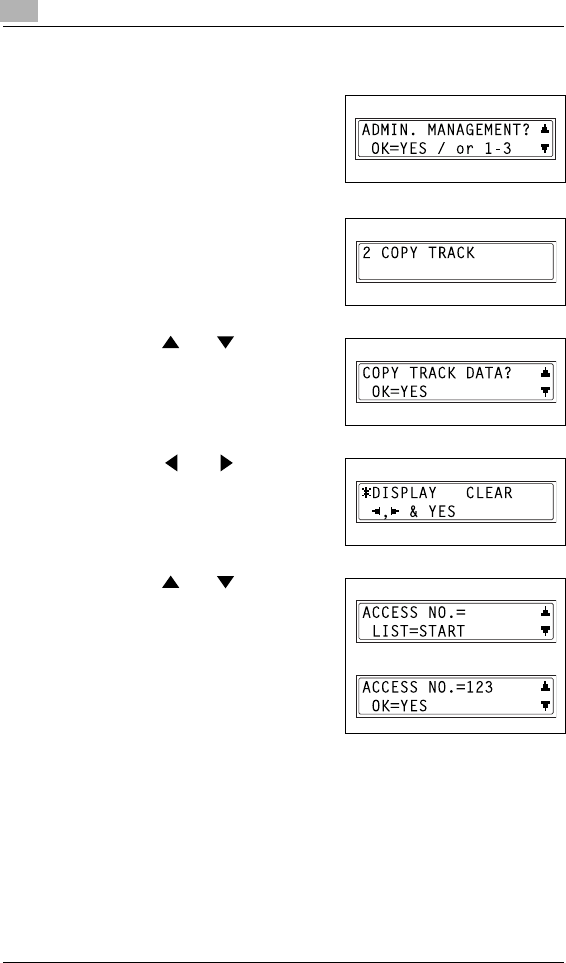
9Utility Mode – Copy Functions
9-26 Di152f/Di183f
To display/clear the total count for a specific account
1Select the “ADMIN.
MANAGEMENT” menu.
HRefer to “To select the “ADMIN.
MANAGEMENT” menu” on
page 9-20.
2Press the [2] key from the 10-Key
Pad to select “COPY TRACK”.
3Using the and keys, select
“COPY TRACK DATA”, and then
press the [Yes] key.
4Using the and keys, select
“DISPLAY”, and then press the
[Yes] key.
5Using the and keys, select
the access number for the counter
that you wish to check, and then
press the [Yes] key.
HThe desired access (section)
number can also be entered
using the 10-Key Pad.
HWhen clearing the counter for a
specific account (section), the
access (section) number for that account should be selected.
The total count for the selected account (section) is displayed.

Utility Mode – Copy Functions 9
Di152f/Di183f 9-27
6To clear the counter, press the [No]
key. (Continue with step 7.) To
finish without clearing the counter,
press the [Yes] key. The “COPY
TRACK DATA” function appears
again.
7After the counter is cleared, press
the [Yes] key.
HAfter clearing the counter, if you
wish to reset the counter to the
previous count, press the
[Interrupt] key.
The “COPY TRACK DATA” function appears again.
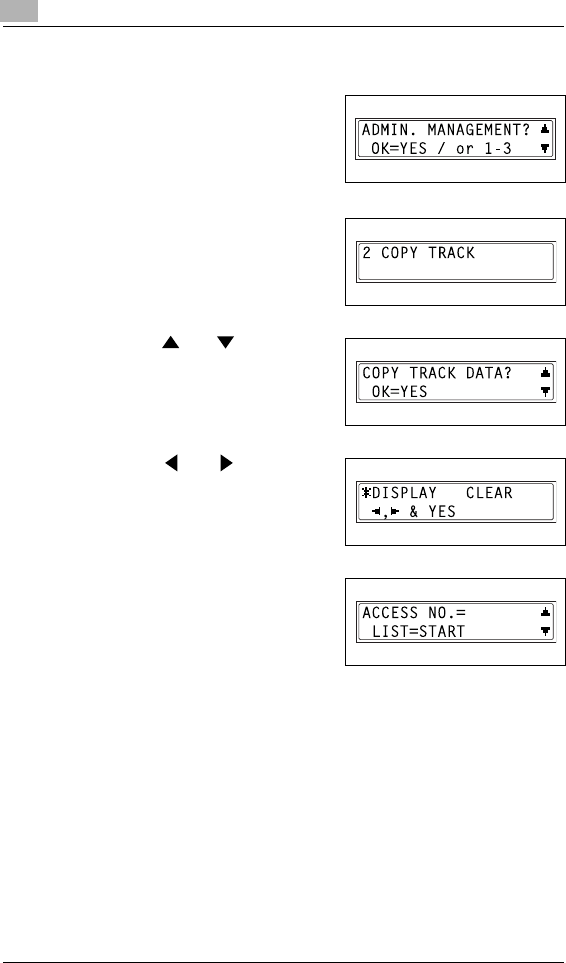
9Utility Mode – Copy Functions
9-28 Di152f/Di183f
To print the total counts for all accounts (sections)
1Select the “ADMIN.
MANAGEMENT” menu.
HRefer to “To select the “ADMIN.
MANAGEMENT” menu” on
page 9-20.
2Press the [2] key from the 10-Key
Pad to select “COPY TRACK”.
3Using the and keys, select
“COPY TRACK DATA”, and then
press the [Yes] key.
4Using the and keys, select
“DISPLAY”, and then press the
[Yes] key.
5Press the [Start] key.
The total counts for all accounts
(sections) are printed on Letter-size
paper.
After 2 seconds, the “COPY TRACK
DATA” function appears again.
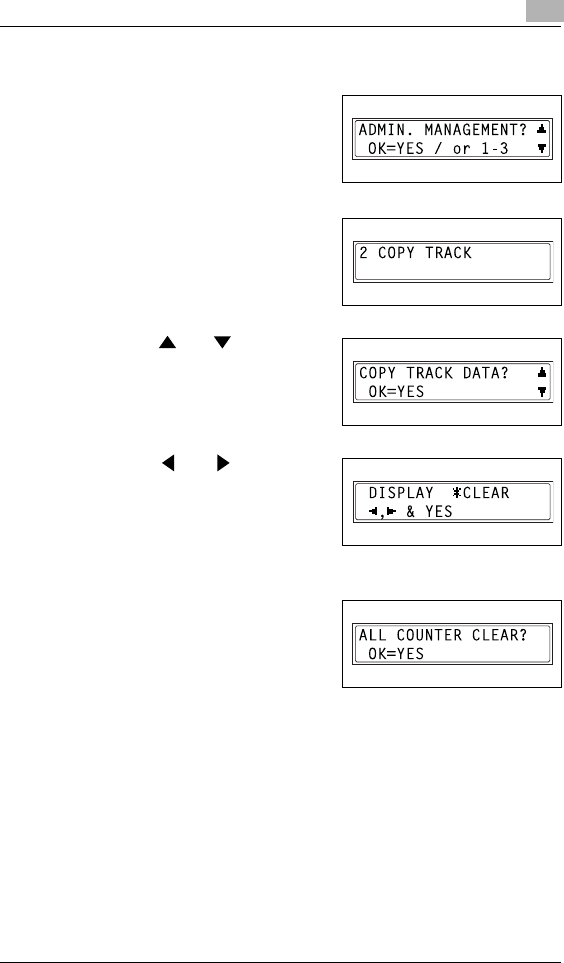
Utility Mode – Copy Functions 9
Di152f/Di183f 9-29
To clear the total counts for all accounts
1Select the “ADMIN.
MANAGEMENT” menu.
HRefer to “To select the “ADMIN.
MANAGEMENT” menu” on
page 9-20.
2Press the [2] key from the 10-Key
Pad to select “COPY TRACK”.
3Using the and keys, select
“COPY TRACK DATA”, and then
press the [Yes] key.
4Using the and keys, select
“CLEAR”, and then press the [Yes]
key.
A confirmation message appears,
asking whether or not to clear all
counters.
5Press the [Yes] key.
After the message “SECTION
COUNTER CLEARED” appears,
the “COPY TRACK DATA” function
appears again.
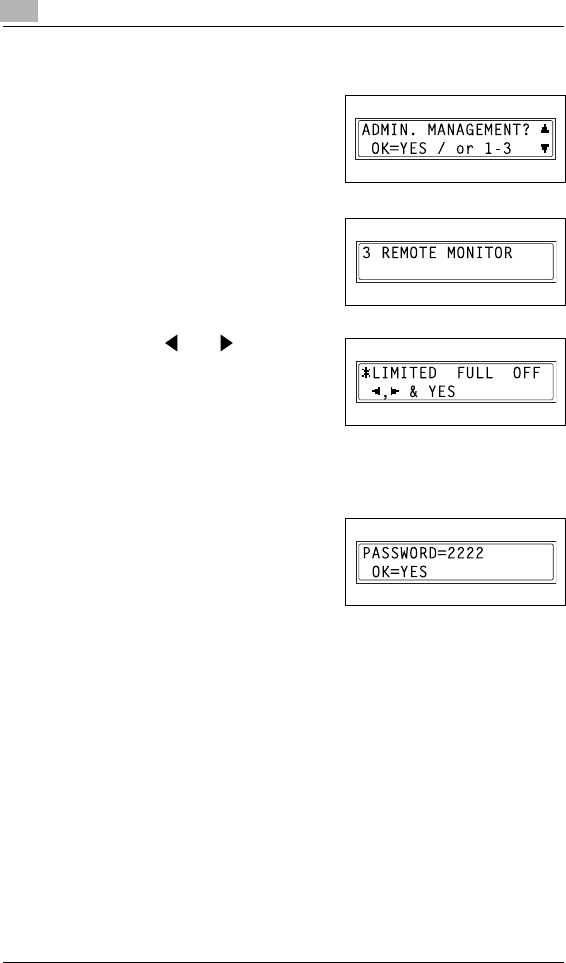
9Utility Mode – Copy Functions
9-30 Di152f/Di183f
To set the “REMOTE MONITOR” function
1Select the “ADMIN.
MANAGEMENT” menu.
HRefer to “To select the “ADMIN.
MANAGEMENT” menu” on
page 9-20.
2Press the [3] key from the 10-Key
Pad to select “REMOTE
MONITOR”.
3Using the and keys, select
“LIMITED”, “FULL” or “OFF”, and
then press the [Yes] key.
HIf “LIMITED” or “OFF” was
selected, the “ADMIN.
MANAGEMENT” menu appears again.
HIf “FULL” was selected, a screen appears, allowing you to enter the
password.
4Using the 10-Key Pad, enter the 4-
digit password, and then press the
[Yes] key.
The “ADMIN. MANAGEMENT”
menu appears again.

Utility Mode – Copy Functions 9
Di152f/Di183f 9-31
9.5 Specifying Copy Settings (“COPY SETTING 1” &
“COPY SETTING 2” Menus)
The settings that are automatically selected when the machine is turned
off or the [Panel Reset] key is pressed are called the “default settings”.
From the “COPY SETTING 1” menu, the default settings for various
functions can be specified.
“COPY SETTING 1” menu:
No. COPY SETTING 1 Description
1 PAPER PRIORITY This function can be used to specify the paper size or tray
that should be given priority when the “Auto” zoom setting is
selected.
• The manufacturer’s default setting is “Letter C”.
2 DENSITY PRIORITY This function can be used to set the density to “AUTO”,
“MANUAL” or “PHOTO” when the machine is turned off or
the [Panel Reset] key is pressed.
• The manufacturer’s default setting is “AUTO”.
3 DENSITY LEVEL(A) This function can be used to set the density level of the
“AUTO” density setting to one of the three settings between
“LIGHT” and “DARK”.
• The manufacturer’s default setting is the middle level.
4 DENSITY LEVEL(M) This function can be used to set the density level of the
manual density setting to one of the five settings between
“LIGHT” and “DARK”.
• The manufacturer’s default setting is the middle level.
5 BINDING POS. This function can be used to set whether the first page of a
book to be scanned is on the left (left-bound) or on the right
(right-bound).
• The manufacturer’s default setting is “LEFT”.
6 MARGIN SETTING This function can be used to specify between 0 inch and 3/
4 inch (20 mm), (in units of Approx. 1/16 inch (1 mm)) the
width of the binding area (margin) when copying documents
to be bound.
• The manufacturer’s default setting is 1/2 inch (10 mm).
7 ERASE SETTING This function can be used to specify between 1/4 inch (5 mm)
and 3/4 inch (20 mm), (in units of Approx. 1/16 inch (1 mm))
the width that is erased when making copies with the “Erase”
function set to “Left”, “Upper” and “Frame”.
• The manufacturer’s default setting for the “Left”, “Upper”
and “Frame” erase settings is 1/2 inch (10 mm).
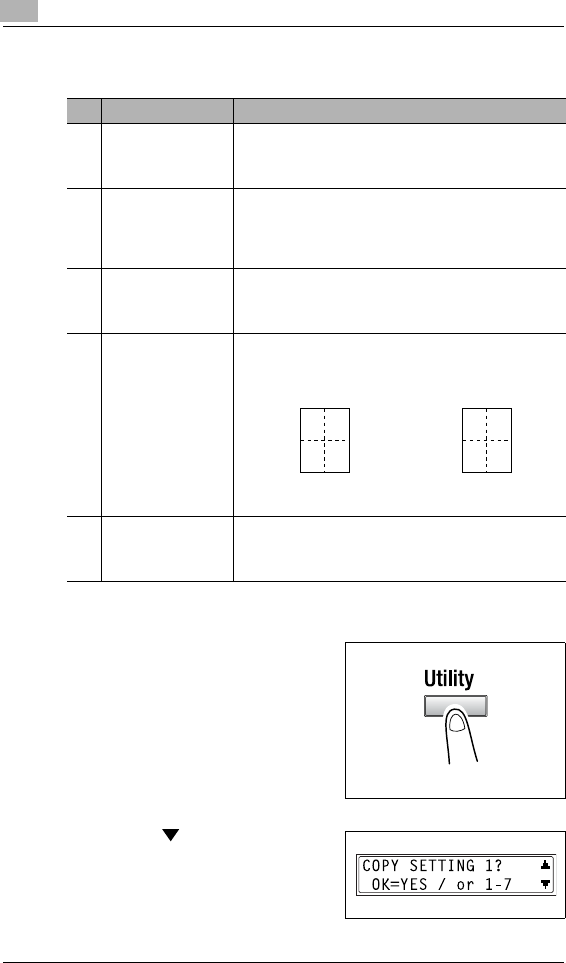
9Utility Mode – Copy Functions
9-32 Di152f/Di183f
“COPY SETTING 2” menu:
To select the “COPY SETTING 1” menu
1Press the [Utility] key.
2Press the key 4 times to select
“COPY SETTING 1”.
No. COPY SETTING 2 Description
1 MIXED ORIGINAL This function can be used to set whether or not the “Mixed
Orig.” function is selected when the machine starts up or
after the Control Panel is reset.
• The manufacturer’s default setting is “OFF”.
2 COPY PRIORITY This function can be used to set whether the automatic paper
or automatic zoom ratio setting is selected when the machine
starts up or after the Control Panel is reset.
• The manufacturer’s default setting is “AP”(auto paper
selection).
3 OUTPUT PRIORITY This function can be used to specify if the selected finishing
mode is “NON”, “SORT” or “GROUP” when the machine is
turned off or the [Panel Reset] key is pressed.
• The manufacturer’s default setting is “NON”.
4 4IN1 COPY ORDER This function can be used to select from the following for the
page order when the 4in1 copy mode is selected.
“PATTERN1” “PATTERN2”
• The manufacturer’s default setting is “PATTERN1”.
5 CRISSCROSS MODE This function can be used to set whether or not copies are
fed out in a crisscross pattern when the crisscross output
conditions are met.
• The manufacturer’s default setting is “ON”.
12
34
13
24
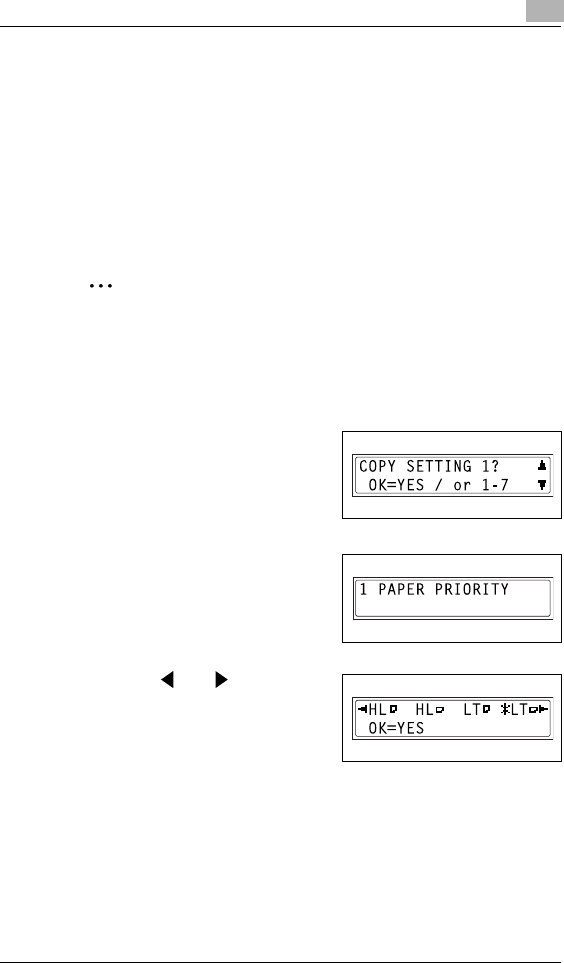
Utility Mode – Copy Functions 9
Di152f/Di183f 9-33
3From the 10-Key Pad, press the key ([1] through [7]) for the “COPY
SETTING 1” function that you wish to set.
HThe “COPY SETTING 1” functions are as follows:
1 PAPER PRIORITY
2 DENSITY PRIORITY
3 DENSITY LEVEL(A)
4 DENSITY LEVEL(M)
5 BINDING POS.
6 MARGIN SETTING
7 ERASE SETTING
Tip
If, at any time, you wish to quit setting a “COPY SETTING 1” function,
press the [No] key. When the message “STOP SETTING?” appears,
press the [Yes] key to quit.
To set the “PAPER PRIORITY” function
1Select the “COPY SETTING 1”
menu.
HRefer to “To select the “COPY
SETTING 1” menu” on
page 9-32.
2Press the [1] key from the 10-Key
Pad to select “PAPER PRIORITY”.
3Using the and keys, select a
paper size or paper tray, and then
press the [Yes] key.
HSelect from the following paper
sizes and paper trays.
A5 C, A5 L, A4 C, A4 L, A3 L, B5 C, B5 L, B4 L, Half Letter C
(Invoice C), Half Letter L (Invoice L), Letter C, Letter L, Legal L,
11 ×14, 11 ×17, FLS, 1st Tray, 2nd Tray, 3rd Tray*, 4th Tray*,
5th Tray*, Multiple Bypass Tray
*Only with Di183/Di183f
The “COPY SETTING 1” menu appears again.
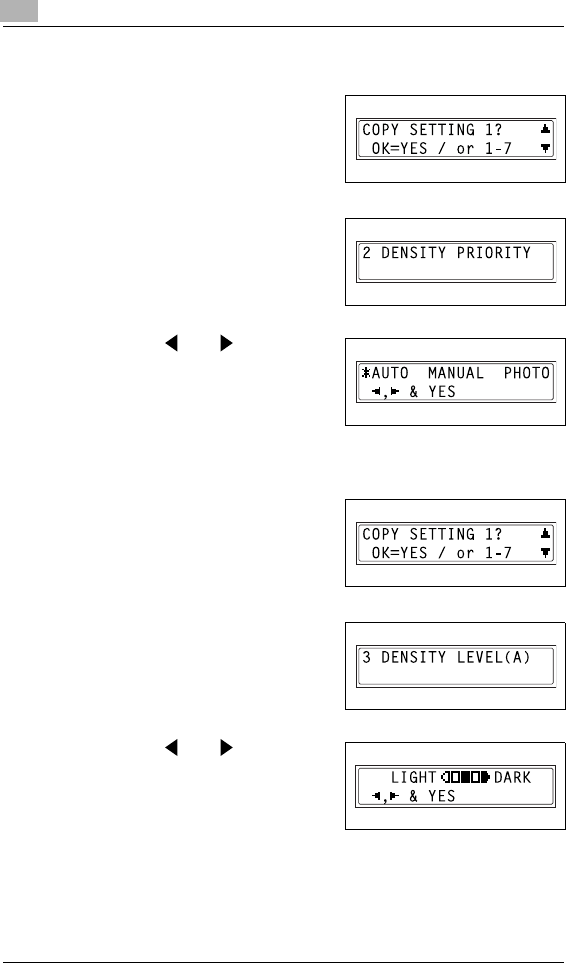
9Utility Mode – Copy Functions
9-34 Di152f/Di183f
To set the “DENSITY PRIORITY” function
1Select the “COPY SETTING 1”
menu.
HRefer to “To select the “COPY
SETTING 1” menu” on
page 9-32.
2Press the [2] key from the 10-Key
Pad to select “DENSITY
PRIORITY”.
3Using the and keys, select
“AUTO”, “MANUAL” or “PHOTO”,
and then press the [Yes] key.
The “COPY SETTING 1” menu
appears again.
To set the “AUTO” density level (“DENSITY LEVEL(A)” function)
1Select the “COPY SETTING 1”
menu.
HRefer to “To select the “COPY
SETTING 1” menu” on
page 9-32.
2Press the [3] key from the 10-Key
Pad to select “DENSITY
LEVEL(A)”.
3Using the and keys, select
one of the three settings between
“LIGHT” and “DARK”, and then
press the [Yes] key.
The “COPY SETTING 1” menu
appears again.
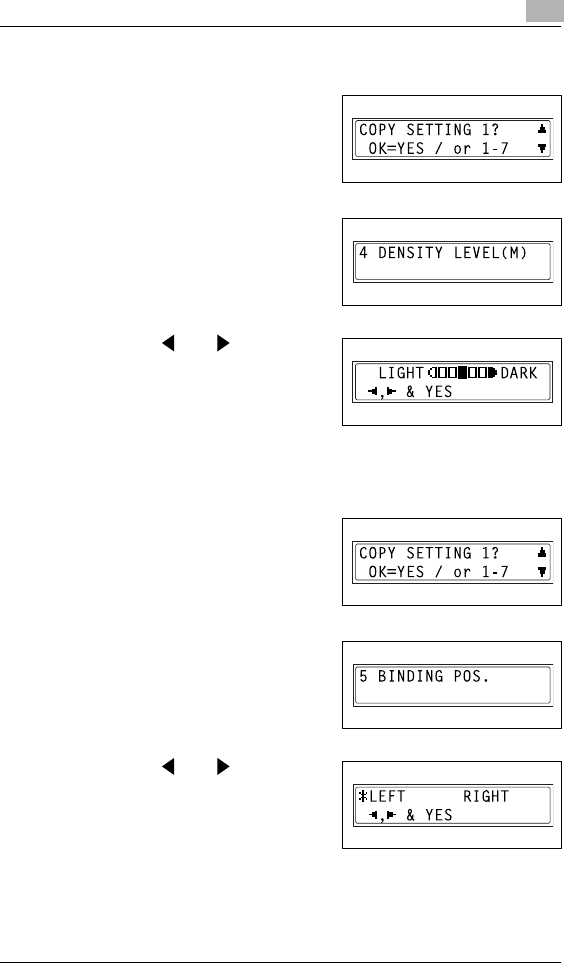
Utility Mode – Copy Functions 9
Di152f/Di183f 9-35
To set the manual density level (“DENSITY LEVEL(M)” function)
1Select the “COPY SETTING 1”
menu.
HRefer to “To select the “COPY
SETTING 1” menu” on
page 9-32.
2Press the [4] key from the 10-Key
Pad to select “DENSITY
LEVEL(M)”.
3Using the and keys, select
one of the five settings between
“LIGHT” and “DARK”, and then
press the [Yes] key.
The “COPY SETTING 1” menu
appears again.
To set the “BINDING POS.” function
1Select the “COPY SETTING 1”
menu.
HRefer to “To select the “COPY
SETTING 1” menu” on
page 9-32.
2Press the [5] key from the 10-Key
Pad to select “BINDING POS.”.
3Using the and keys, select
either “LEFT” or “RIGHT”, and then
press the [Yes] key.
The “COPY SETTING 1” menu
appears again.

9Utility Mode – Copy Functions
9-36 Di152f/Di183f
To specify the binding width (“MARGIN SETTING” function)
1Select the “COPY SETTING 1”
menu.
HRefer to “To select the “COPY
SETTING 1” menu” on
page 9-32.
2Press the [6] key from the 10-Key
Pad to select “MARGIN SETTING”.
3Using the 10-Key Pad, enter the
binding width (margin), and then
press the [Yes] key.
HThe binding width can be set
between 0 inch (0 mm) and 3/4
(20 mm).
HIf you wish to correct the setting, press the [No] key, and then enter
the new number.
The “COPY SETTING 1” menu appears again.
To specify the erased width (“ERASE SETTING” function)
1Select the “COPY SETTING 1”
menu.
HRefer to “To select the “COPY
SETTING 1” menu” on
page 9-32.
2Press the [7] key from the 10-Key
Pad to select “ERASE SETTING”.
3Using the and keys, select
“LEFT”, “UPPER” or “FRAME”, and
then press the [Yes] key.
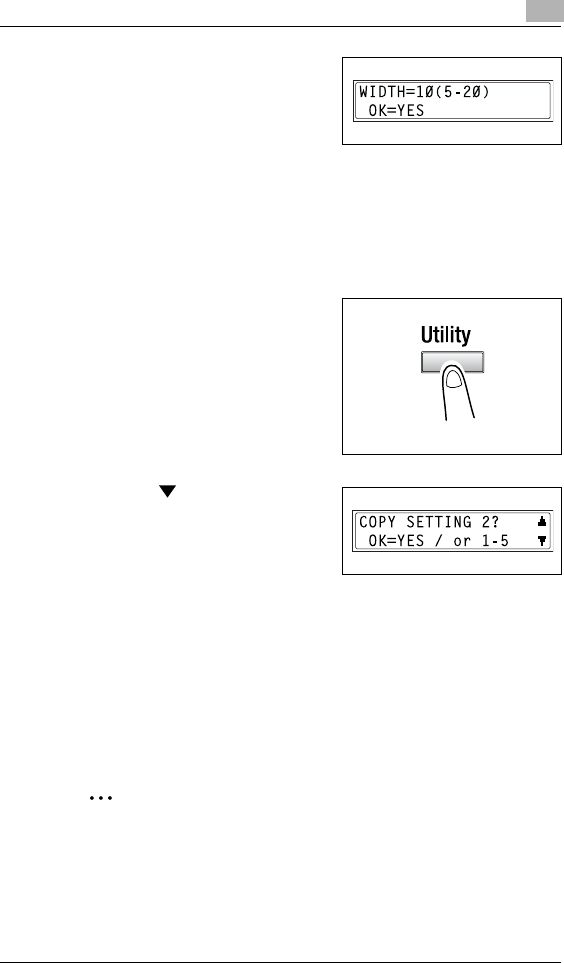
Utility Mode – Copy Functions 9
Di152f/Di183f 9-37
4Using the 10-Key Pad, enter the
width of the area to be erased, and
then press the [Yes] key.
HThe width of the area to be
erased can be set between 1/4
inch (5 mm) and 3/4 inch (20 mm).
HIf you wish to correct the setting, press the [No] key, and then enter
the new number.
The “COPY SETTING 1” menu appears again.
To select the “COPY SETTING 2” menu
1Press the [Utility] key.
2Press the key 5 times to select
“COPY SETTING 2”.
3From the 10-Key Pad, press the key ([1] through [5]) for the “COPY
SETTING 2” function that you wish to set.
HThe “COPY SETTING 2” functions are as follows:
1 MIXED ORIGINAL
2 COPY PRIORITY
3 OUTPUT PRIORITY
4 4IN1 COPY ORDER
5 CRISSCROSS MODE
Tip
If, at any time, you wish to quit setting a “COPY SETTING 2” function,
press the [No] key. When the message “STOP SETTING?” appears,
press the [Yes] key to quit.
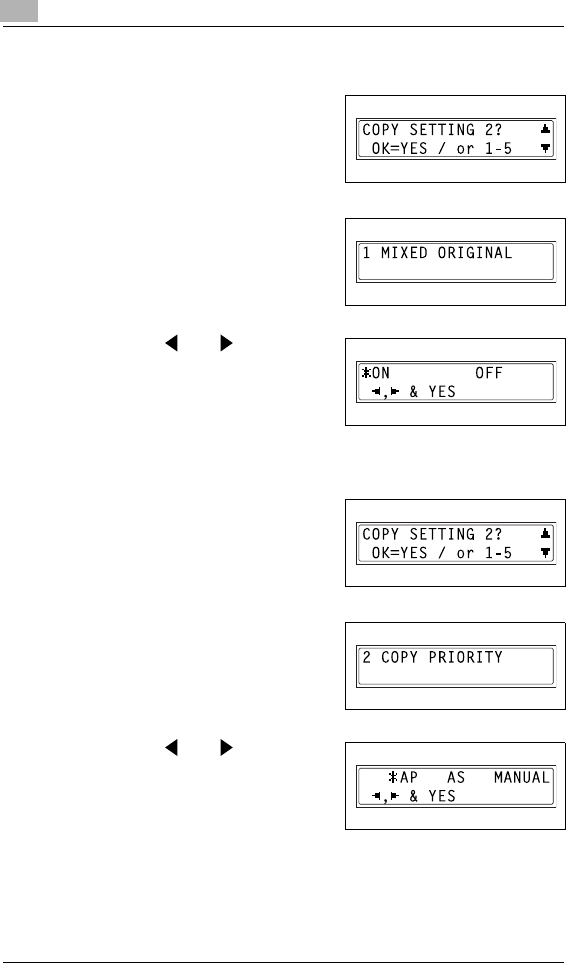
9Utility Mode – Copy Functions
9-38 Di152f/Di183f
To set the “MIXED ORIGINAL” function
1Select the “COPY SETTING 2”
menu.
HRefer to “To select the “COPY
SETTING 2” menu” on
page 9-37.
2Press the [1] key from the 10-Key
Pad to select “MIXED ORIGINAL”.
3Using the and keys, select
either “ON” or “OFF”, and then
press the [Yes] key.
The “COPY SETTING 2” menu
appears again.
To set the “COPY PRIORITY” function
1Select the “COPY SETTING 2”
menu.
HRefer to “To select the “COPY
SETTING 2” menu” on
page 9-37.
2Press the [2] key from the 10-Key
Pad to select “COPY PRIORITY”.
3Using the and keys, select
“AP” (auto paper selection), “AS”
(auto zoom ratio) or “MANUAL”, and
then press the [Yes] key.
The “COPY SETTING 2” menu
appears again.
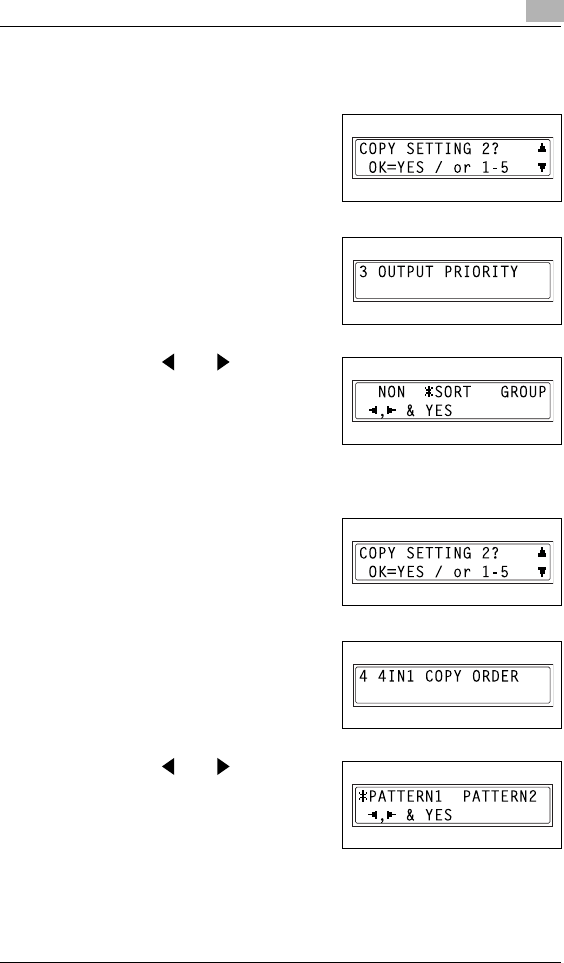
Utility Mode – Copy Functions 9
Di152f/Di183f 9-39
To specify the default finishing mode (“OUTPUT PRIORITY”
function)
1Select the “COPY SETTING 2”
menu.
HRefer to “To select the “COPY
SETTING 2” menu” on
page 9-37.
2Press the [3] key from the 10-Key
Pad to select “OUTPUT
PRIORITY”.
3Using the and keys, select
“NON”, “SORT” or “GROUP”, and
then press the [Yes] key.
The “COPY SETTING 2” menu
appears again.
To set the “4IN1 COPY ORDER” function
1Select the “COPY SETTING 2”
menu.
HRefer to “To select the “COPY
SETTING 2” menu” on
page 9-37.
2Press the [4] key from the 10-Key
Pad to select “4IN1 COPY
ORDER”.
3Using the and keys, select
either “PATTERN1” or
“PATTERN2”, and then press the
[Yes] key.
The “COPY SETTING 2” menu
appears again.
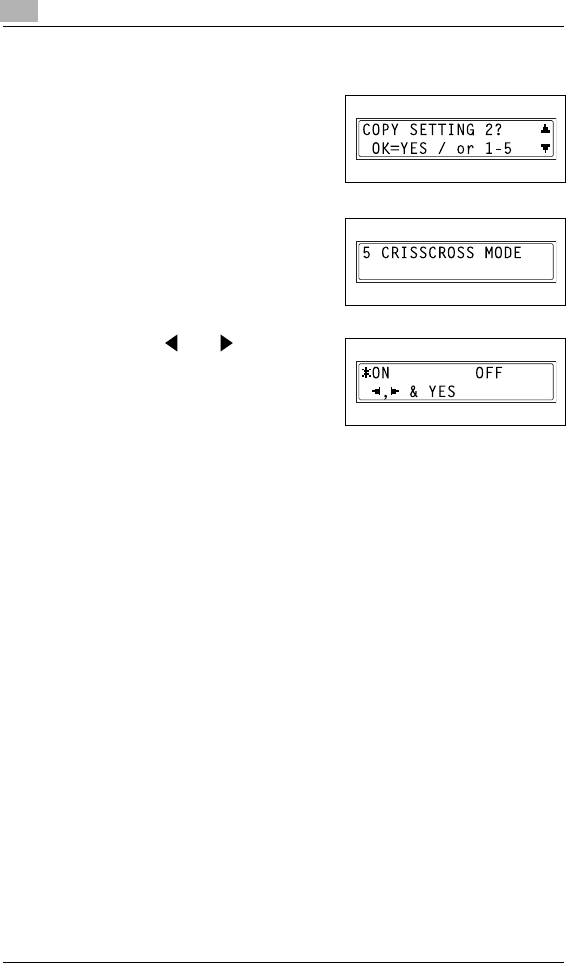
9Utility Mode – Copy Functions
9-40 Di152f/Di183f
To set the “CRISSCROSS MODE” function
1Select the “COPY SETTING 2”
menu.
HRefer to “To select the “COPY
SETTING 2” menu” on
page 9-37.
2Press the [5] key from the 10-Key
Pad to select “CRISSCROSS
MODE”.
3Using the and keys, select
either “ON” or “OFF”, and then
press the [Yes] key.
The “COPY SETTING 2” menu
appears again.

Utility Mode – Fax Functions 10
Di152f/Di183f 10-1
10 Utility Mode – Fax Functions
This chapter describes the various Utility mode functions that can be used
to set fax-related functions.
10.1 Programming Fax Settings (“FAX REGISTRATION”
Menu)
From the “FAX REGISTRATION” menu, various settings can be specified
in order to take advantage of this machine’s many fax functions.
“FAX REGISTRATION” menu:
No. FAX REGISTRATION Characteristic/Description
1 ONE-TOUCH DIAL This function can be used to program one-touch dial keys
with fax numbers, allowing the recipient to be specified easily
and accurately without the need to manually enter the
number using the 10-Key Pad.
A maximum of 27 fax numbers can be programmed. This
dialing method is convenient for programming numbers
where faxes are frequently sent to.
2 SPEED DIAL This function can be used to program speed dial numbers
with fax numbers, allowing the recipient to be specified easily
and accurately without the need to manually enter the
number using the 10-Key Pad.
A maximum of 100 fax numbers can be programmed.
3 GROUP DIAL This function can be used to program a single one-touch dial
key with a maximum of 50 different fax numbers as one
group. Programming a one-touch dial key with a group of fax
numbers is convenient when documents are frequently sent
to a set group of multiple recipients.
4 PROGRAM DIAL This function can be used to program one-touch dial keys
with fax numbers and a transmission/reception function
(such as timer transmission or polling reception), allowing
that function to be carried out by pressing just the
corresponding one-touch dial key.
5 BATCH TX This function can be used to specify the batch transmission
setting (transmission time) for a one-touch dial key
programmed with recipient fax numbers, so multiple
documents can be stored in the memory and sent out
together at the specified time.
6 MAILBOX This function can be used to specify mailbox IDs in order to
receive faxes with mailbox reception only if the mailbox ID
sent by the caller matches the mailbox ID set on this
machine.
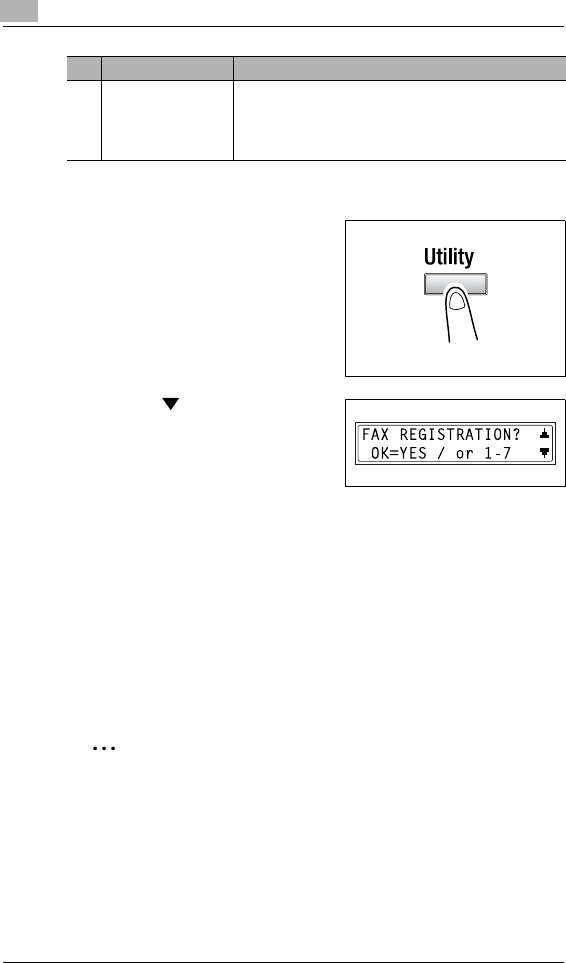
10 Utility Mode – Fax Functions
10-2 Di152f/Di183f
To select the “FAX REGISTRATION” menu
1Press the [Utility] key.
The first screen of the Utility mode
appears.
2Press the key 6 times to select
“FAX REGISTRATION”.
3From the 10-Key Pad, press the key ([1] through [7]) for the “FAX
REGISTRATION” function that you wish to set.
HThe “FAX REGISTRATION” functions are as follows:
1 ONE-TOUCH DIAL
2 SPEED DIAL
3 GROUP DIAL
4 PROGRAM DIAL
5 BATCH TX
6 MAILBOX
7 RELAY BOX
Tip
If, at any time, you wish to quit programming, changing or deleting a
“FAX REGISTRATION” function, press the [No] key. When the
message “STOP REGISTRATION?” appears, press the [Yes] key to
quit.
7 RELAY BOX This function can be used to program the relay boxes in order
for this machine (acting as a relay station) to receive a
document from another fax machine (transmitting station),
then transmit the document to multiple recipients (receiving
stations).
No. FAX REGISTRATION Characteristic/Description

Utility Mode – Fax Functions 10
Di152f/Di183f 10-3
Setting Up One-Touch Dialing (“ONE-TOUCH DIAL” function)
If the one-touch dial keys are programmed with fax numbers, the recipient
can be specified easily and accurately without the need to manually enter
the number using the 10-Key Pad.
A maximum of 27 numbers can be programmed.
A list of the information programmed in the one-touch dial keys can be
printed out. Refer to “Specifying Report Output (“REPORTING” Menu)” on
page 10-50.
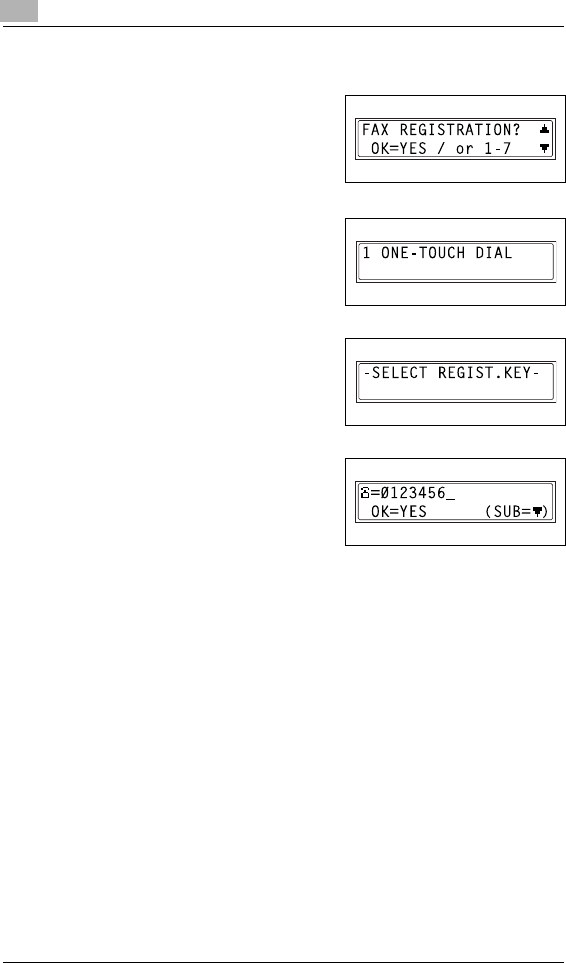
10 Utility Mode – Fax Functions
10-4 Di152f/Di183f
To program a one-touch dial key
1Select the “FAX REGISTRATION”
menu.
HRefer to “To select the “FAX
REGISTRATION” menu” on
page 10-2.
2Press the [1] key from the 10-Key
Pad to select “ONE-TOUCH DIAL”.
3Press the one-touch dial key that
you wish to program.
4Using the 10-Key Pad, enter the fax
number of the recipient.
HThe fax number can contain a
maximum of 30 digits.
For details on the characters
that can be entered, refer to p. 6-8.
HTo enter a sub-address, continue with step 5.
HIf a sub-address will not be entered, press the [Yes] key after
entering the fax number, and then skip to step 7.
HIf “+” (one-touch dial key [22]) is added after the entered number,
the programmed number can be used with combination dialing
(p. 6-16).
HIf you wish to change the fax number, press the [No] key, and then
enter the correct number.
HFor details on F codes (sub-address and SID), refer to “Using F
codes” on page 7-25.
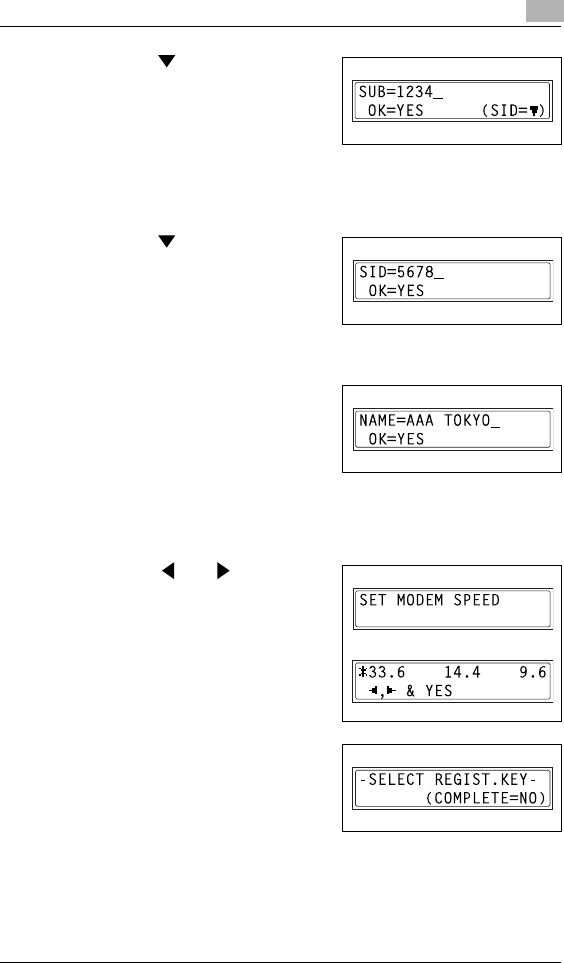
Utility Mode – Fax Functions 10
Di152f/Di183f 10-5
5Press the key, and then use the
10-Key Pad to enter the sub-
address.
HA number up to 20 digits long
can be entered for the sub-
address.
HTo enter an SID, continue with step 6.
HIf an SID will not be entered, skip to step 7.
6Press the key, and then use the
10-Key Pad to enter the SID.
HA number up to 20 digits long
can be entered for the SID.
7Press the [Yes] key.
8Enter the name of the programmed
number.
HFor details on entering text, refer
to “Entering Text” on page 3-36.
HText up to 20 characters long
can be entered for the name.
9Press the [Yes] key.
10 Using the and keys, select
the desired modem speed.
11 Press the [Yes] key.
The settings are registered. To
program another one-touch dial
key, repeat steps 3 through 11.
12 Press the [No] key to finish
programming.
The “FAX REGISTRATION” menu
appears again.
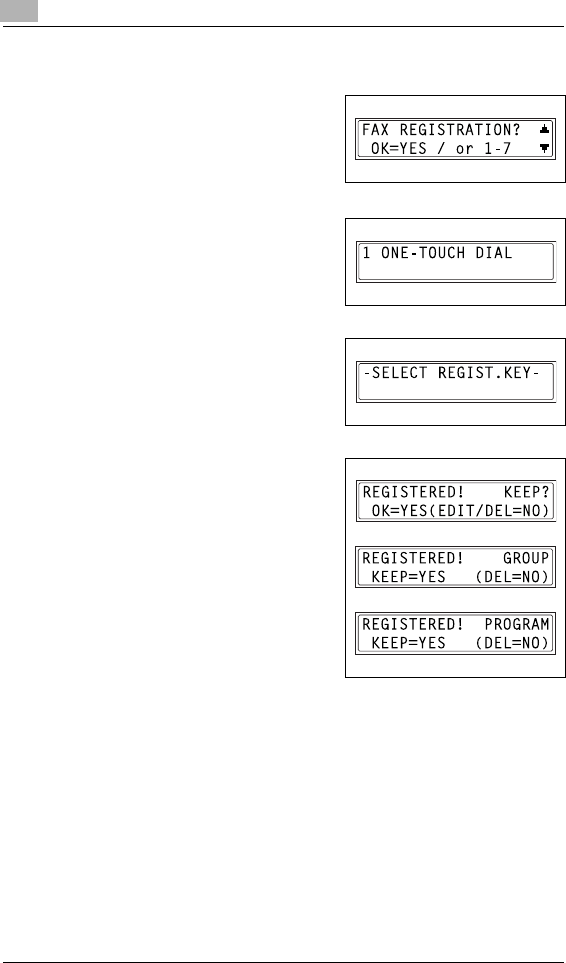
10 Utility Mode – Fax Functions
10-6 Di152f/Di183f
To change/delete a programmed one-touch dial key
1Select the “FAX REGISTRATION”
menu.
HRefer to “To select the “FAX
REGISTRATION” menu” on
page 10-2.
2Press the [1] key from the 10-Key
Pad to select “ONE-TOUCH DIAL”.
3Press the one-touch dial key that
you wish to change or delete.
4Press the [No] key.
HIf a one-touch dial key
programmed with a group of fax
numbers or a transmission/
reception function is pressed,
the message shown at the right
appears. To delete the
programmed settings, press the
[No] key. The “FAX
REGISTRATION” menu
appears again.
HTo change the group dialing or
program dialing settings, refer to page 10-13 and page 10-16.
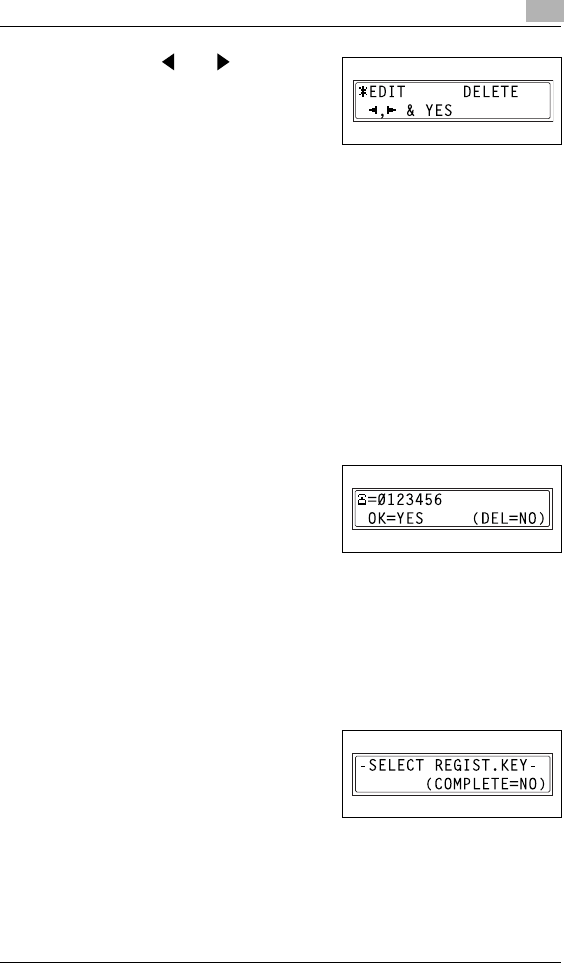
Utility Mode – Fax Functions 10
Di152f/Di183f 10-7
5Using the and keys, select
either “EDIT” or “DELETE”, and
then press the [Yes] key.
HIf “EDIT” was selected, the fax
number is displayed. (Continue
with step 6.)
HIf “DELETE” was selected, the settings programmed for the one-
touch dial key are deleted and the “FAX REGISTRATION” menu
appears again.
HIf you try to change the settings for a one-touch dial number used
in group dialing or program dialing, a confirmation message
appears, asking whether or not to change the corresponding
settings programmed in group dialing or program dialing.
If the [Yes] key is pressed, the corresponding settings
programmed in group dialing or program dialing are changed.
If the [No] key is pressed, the corresponding settings programmed
in group dialing or program dialing are deleted.
HIf a one-touch dial number used in group dialing or program dialing
is deleted, it is also deleted from the corresponding group dialing
or program dialing.
6Change the fax number, F codes
(sub-address and SID) and modem
speed as desired.
HFor details on changing the fax
number, refer to “Entering Text”
on page 3-36.
HFor details on changing the F codes (sub-address and SID) or
modem speed, refer to p. 10-4.
7When you are finished making changes, press the [Yes] key.
To change the settings of another one-touch dial key, repeat steps 3
through 7.
8Press the [No] key to return to the
“FAX REGISTRATION” menu.
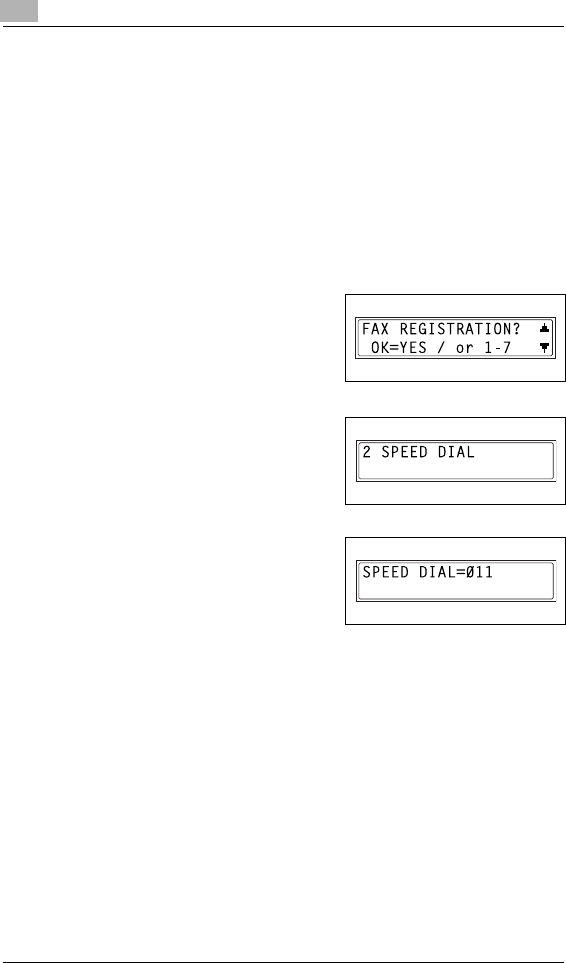
10 Utility Mode – Fax Functions
10-8 Di152f/Di183f
Setting Up Speed Dialing (“SPEED DIAL” function)
If speed dial numbers are programmed with fax numbers, the recipient
can be specified easily and accurately without the need to manually enter
the number using the 10-Key Pad.
A maximum of 100 fax numbers (001 to 100) can be programmed.
A list of the information programmed in the speed dial numbers can be
printed out. Refer to “Outputting a report/list (“PRINT REPORT” menu)” on
page 11-3.
To program a speed dial number
1Select the “FAX REGISTRATION”
menu.
HRefer to “To select the “FAX
REGISTRATION” menu” on
page 10-2.
2Press the [2] key from the 10-Key
Pad to select “SPEED DIAL”.
3Using the 10-Key Pad, enter the 3-
digit speed dial number (ex. 011)
that you wish to program.
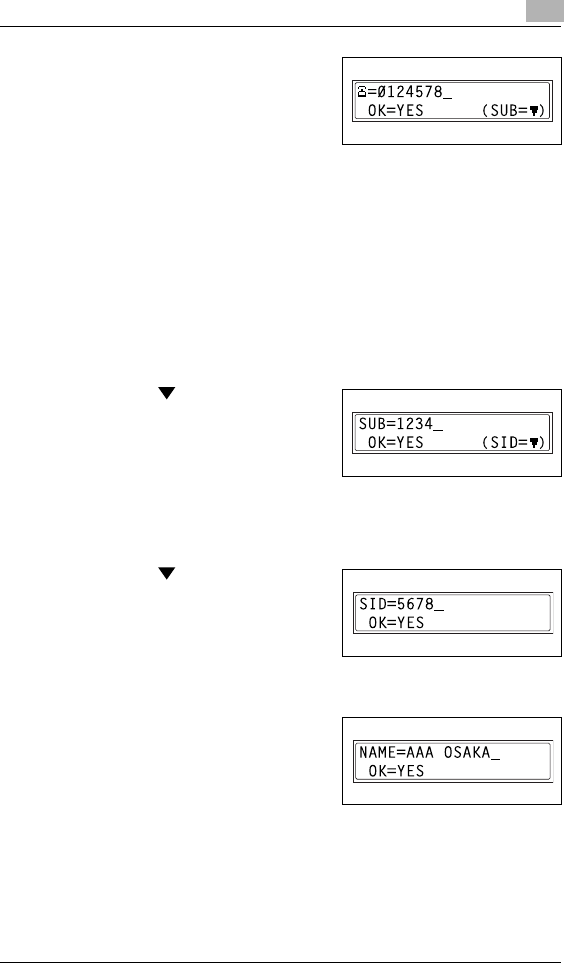
Utility Mode – Fax Functions 10
Di152f/Di183f 10-9
4Using the 10-Key Pad, enter the fax
number of the recipient.
HThe fax number can contain a
maximum of 30 digits.
For details on the characters
that can be entered, refer to p. 6-8.
HTo enter a sub-address, continue with step 5.
HIf a sub-address will not be entered, press the [Yes] key after
entering the fax number, and then skip to step 7.
HIf “+” (one-touch dial key [22]) is added after the entered number,
the programmed number can be used with combination dialing
(p. 6-16).
HIf you wish to change the fax number, press the [No] key, and then
enter the correct number.
HFor details on F codes (sub-address and SID), refer to “Using F
codes” on page 7-25.
5Press the key, and then use the
10-Key Pad to enter the sub-
address.
HA number up to 20 digits long
can be entered for the sub-
address.
HTo enter an SID, continue with step 6.
HIf an SID will not be entered, skip to step 7.
6Press the key, and then use the
10-Key Pad to enter the SID.
HA number up to 20 digits long
can be entered for the SID.
7Press the [Yes] key.
8Enter the name of the programmed
number.
HFor details on entering text, refer
to “Entering Text” on page 3-36.
HText up to 20 characters long
can be entered for the name.
9Press the [Yes] key.
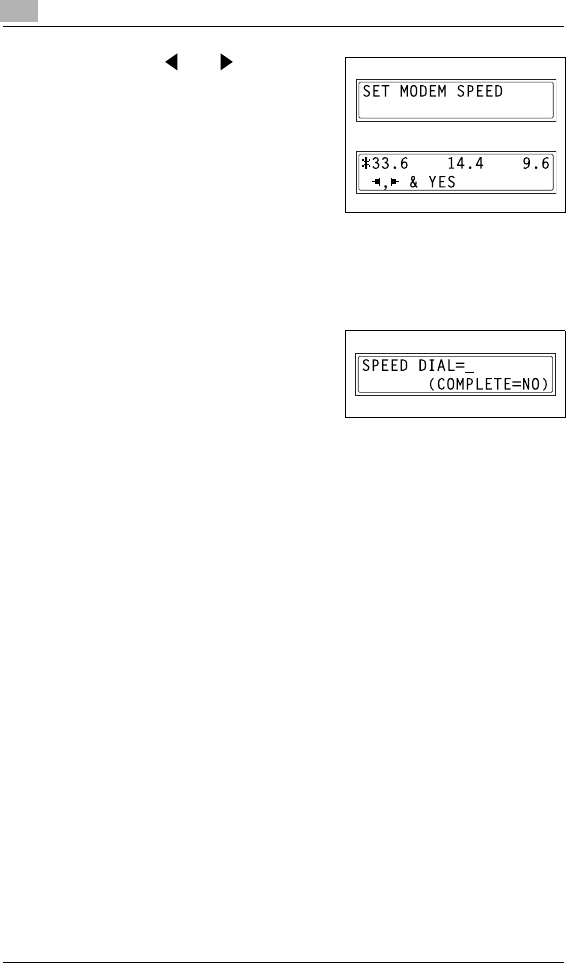
10 Utility Mode – Fax Functions
10-10 Di152f/Di183f
10 Using the and keys, select
the desired modem speed.
11 Press the [Yes] key.
The settings are registered.
To program another speed dial number, repeat steps 3 through 11.
12 Press the [No] key to finish
programming.
The “FAX REGISTRATION” menu
appears again.
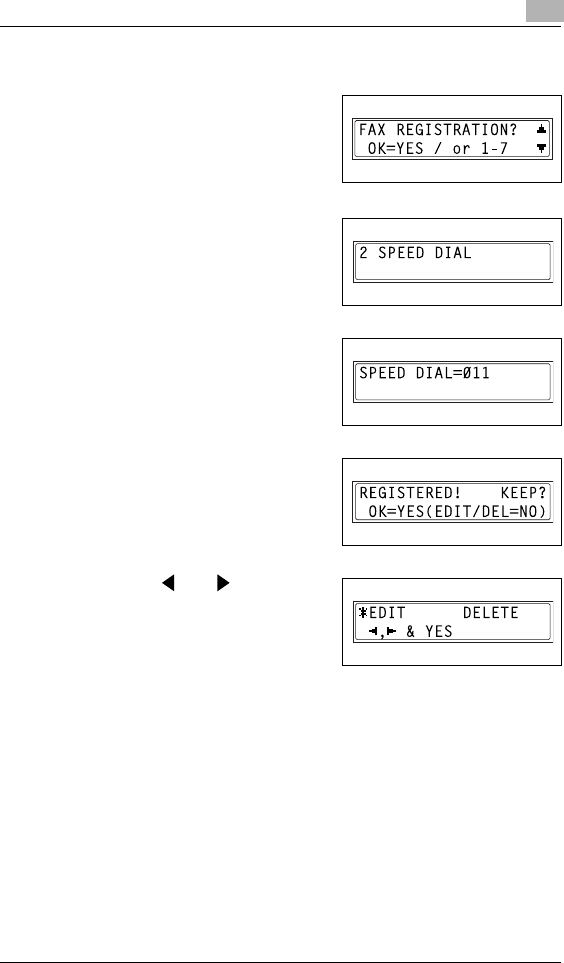
Utility Mode – Fax Functions 10
Di152f/Di183f 10-11
To change/delete a programmed speed dial number
1Select the “FAX REGISTRATION”
menu.
HRefer to “To select the “FAX
REGISTRATION” menu” on
page 10-2.
2Press the [2] key from the 10-Key
Pad to select “SPEED DIAL”.
3Using the 10-Key Pad, enter the
speed dial number that you wish to
change or delete.
4Press the [No] key.
5Using the and keys, select
either “EDIT” or “DELETE”, and
then press the [Yes] key.
HIf “EDIT” was selected, the fax
number is displayed. (Continue
with step 6.)
HIf “DELETE” was selected, the settings programmed for the speed
dial number are deleted and the “FAX REGISTRATION” menu
appears again.
HIf you try to change the settings for a speed dial number used in
group dialing or program dialing, a confirmation message appears,
asking whether or not to change the corresponding settings
programmed in group dialing or program dialing.
If the [Yes] key is pressed, the corresponding settings
programmed in group dialing or program dialing are changed.
If the [No] key is pressed, the corresponding settings programmed
in group dialing or program dialing are deleted.
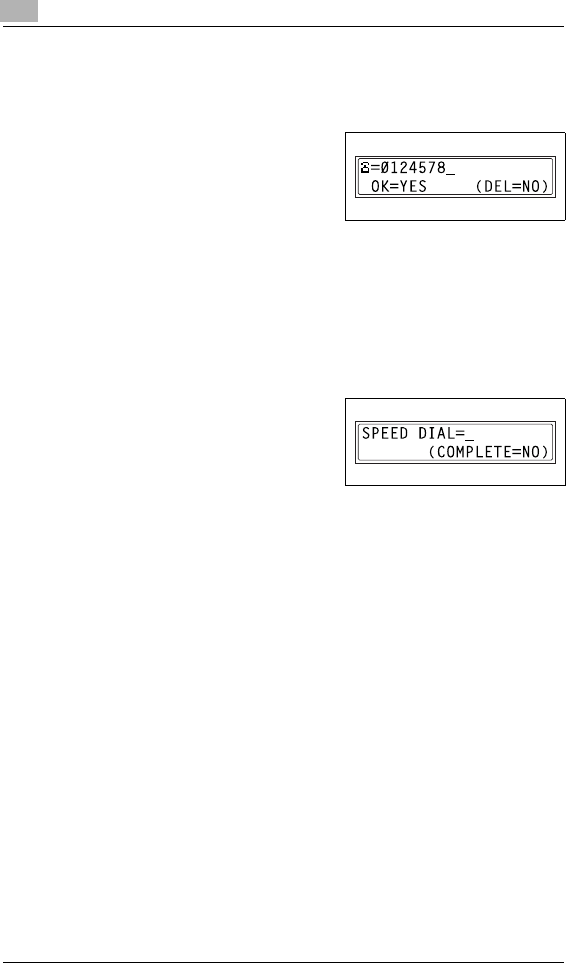
10 Utility Mode – Fax Functions
10-12 Di152f/Di183f
HIf a speed dial number used in group dialing or program dialing is
deleted, it is also deleted from the corresponding group dialing or
program dialing.
6Change the fax number, F codes
(sub-address and SID), and modem
speed as desired.
HFor details on making changes,
refer to “Entering Text” on
page 3-36.
HFor details on changing the F codes (sub-address and SID) or
modem speed, refer to p. 10-4.
7When you are finished making changes, press the [Yes] key.
HTo change the settings of another speed dial number, repeat steps
3 through 7.
8Press the [No] key to return to the
“FAX REGISTRATION” menu.
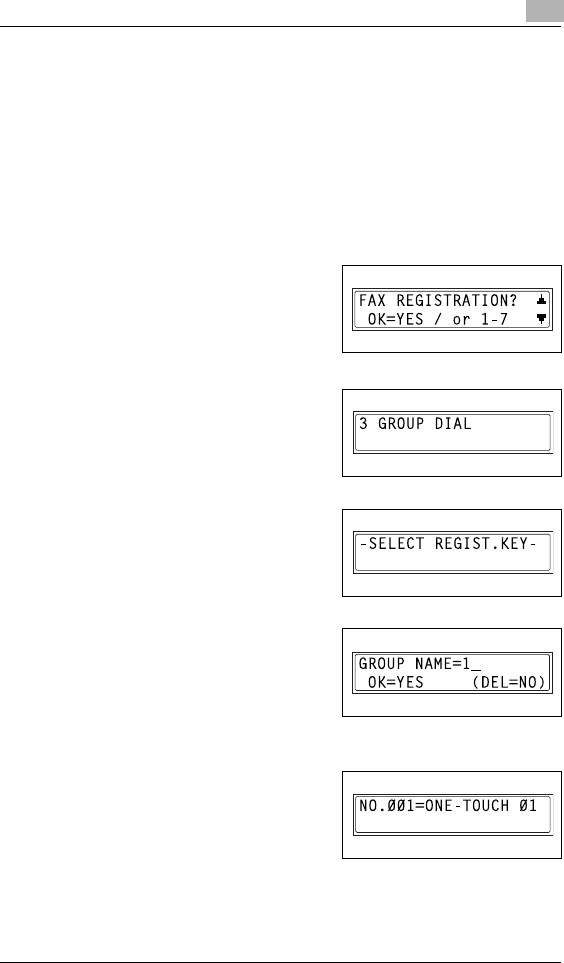
Utility Mode – Fax Functions 10
Di152f/Di183f 10-13
Setting Up Group Dialing (“GROUP DIAL” function)
A single one-touch dial key can be programmed with a maximum of 50
different fax numbers as one group. Programming a one-touch dial key
with a group of fax numbers is convenient when documents are frequently
sent to a set group of multiple recipients.
A list of the information programmed for group dialing can be printed out.
Refer to “Outputting a report/list (“PRINT REPORT” menu)” on page 11-3.
To program a group of fax numbers
1Select the “FAX REGISTRATION”
menu.
HRefer to “To select the “FAX
REGISTRATION” menu” on
page 10-2.
2Press the [3] key from the 10-Key
Pad to select “GROUP DIAL”.
3Press the one-touch dial key that
you wish to program.
4Enter the name of the group, and
then press the [Yes] key.
HFor details on entering text, refer
to “Entering Text” on page 3-36.
HText up to 20 characters long
can be entered for the name.
5By using the one-touch dial keys or
the speed dial numbers, or by
entering the fax number using the
10-Key Pad, specify the recipients.
?Do you wish to cancel the
current selection?
§Press the [No] key, and then specify the correct recipient.
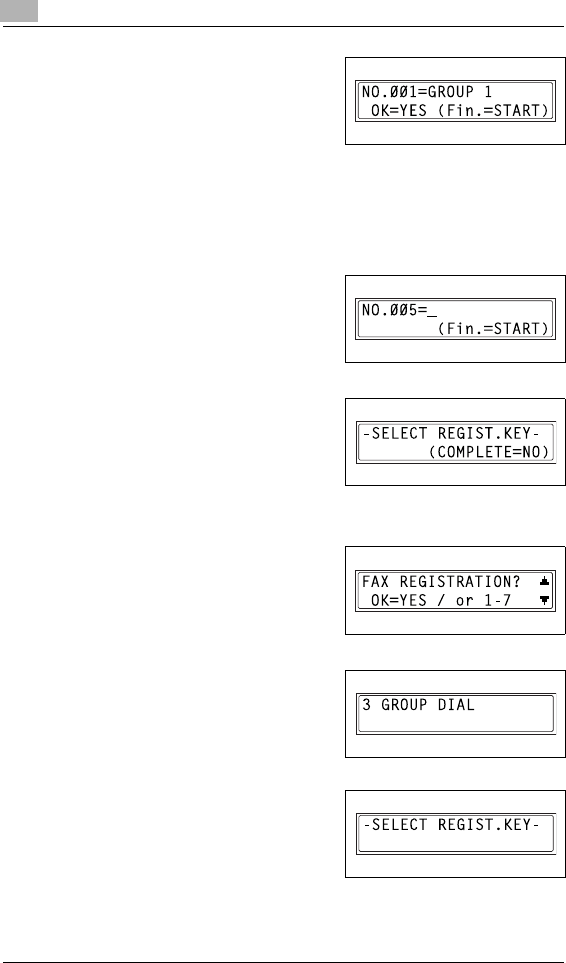
10 Utility Mode – Fax Functions
10-14 Di152f/Di183f
6Press the [Yes] key, and then
specify another recipient.
HRepeat steps 5 and 6 until all
recipients have been specified.
HA maximum of 50 different fax
numbers can be specified as one group.
HWith group dialing, a one-touch dial key programmed with a group
can be specified. In that case, the number of fax numbers
programmed in the specified one-touch dial key (group dial key) is
added.
7When you are finished specifying
recipients, press the [Start] key.
The settings are registered.
To program another group, repeat
steps 3 through 8.
8Press the [No] key to finish
programming.
The “FAX REGISTRATION” menu
appears again.
To change/delete a programmed group of fax numbers
1Select the “FAX REGISTRATION”
menu.
HRefer to “To select the “FAX
REGISTRATION” menu” on
page 10-2.
2Press the [3] key from the 10-Key
Pad to select “GROUP DIAL”.
3Press the one-touch dial key that
you wish to change or delete.
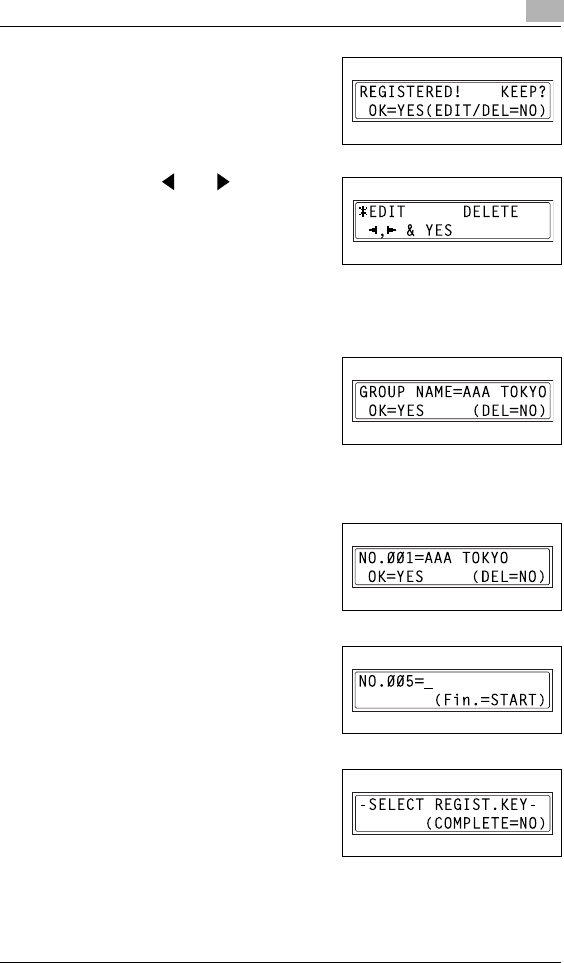
Utility Mode – Fax Functions 10
Di152f/Di183f 10-15
4Press the [No] key.
5Using the and keys, select
either “EDIT” or “DELETE”, and
then press the [Yes] key.
HIf “EDIT” was selected, the
group name is displayed.
(Continue with step 6.)
HIf “DELETE” was selected, the group dialing settings are deleted
and the “FAX REGISTRATION” menu appears again.
6If you wish to change the name of
the group, enter the new name, and
then press the [Yes] key.
HFor details on making changes,
refer to “Entering Text” on
page 3-36.
The fax numbers are displayed in the order that they were specified.
7To delete the displayed fax number,
press the [No] key.
To keep the displayed fax number,
press the [Yes] key.
The next fax number is displayed.
8When you are finished making
changes, press the [Start] key.
To change the settings of another
group of fax numbers, repeat steps
3 through 8.
9Press the [No] key to return to the
“FAX REGISTRATION” menu.
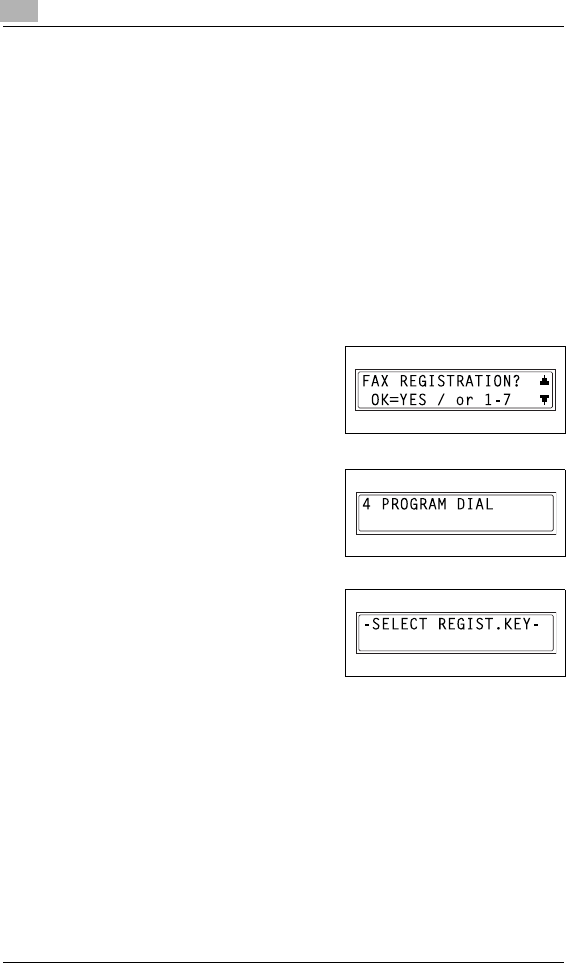
10 Utility Mode – Fax Functions
10-16 Di152f/Di183f
Setting Up Program Dialing (“PROGRAM DIAL” function)
If one-touch dial keys have been programmed with fax numbers and a
transmission/reception function, that function can be carried out by
pressing just the corresponding one-touch dial key.
Transmission/reception functions that can be programmed:
GBroadcast transmission
GTimer transmission
GMailbox transmission
GPolling reception
GRelay initiation transmission
To set program dialing
1Select the “FAX REGISTRATION”
menu.
HRefer to “To select the “FAX
REGISTRATION” menu” on
page 10-2.
2Press the [4] key from the 10-Key
Pad to select “PROGRAM DIAL”.
3Press the one-touch dial key ([24]
through [27]) programmed with the
desired function.
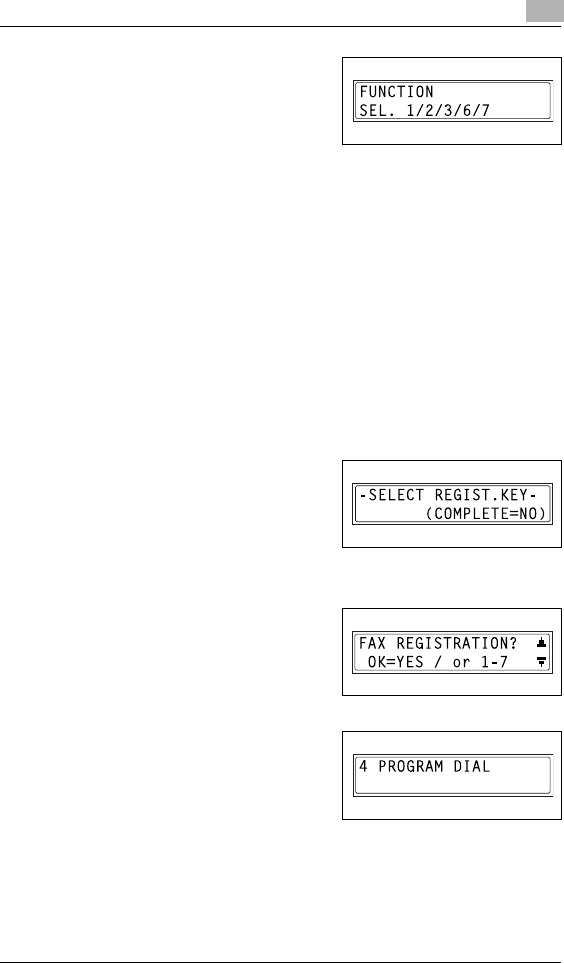
Utility Mode – Fax Functions 10
Di152f/Di183f 10-17
4From the 10-Key Pad, press the key
([1] through [3], [6] or [7]) for the
desired function.
HFunctions that can be selected:
1 BROADCAST
2 TIMER TX
3 MAILBOX TX
6 POLLING RX
7 RELAY INITIATE
5Follow the instructions for the selected function.
H“To fax using broadcast transmission” on page 7-4
H“To fax using timer transmission” on page 7-7
H“To fax using mailbox transmission” on page 7-9
H“To fax using relay initiation transmission” on page 7-11
H“To receive a fax using polling reception” on page 7-23
The settings are registered.
6To specify other program dialing settings, repeat steps 3 through 5.
7Press the [No] key to finish
programming.
The “FAX REGISTRATION” menu
appears again.
To change/delete a programmed broadcast transmission
1Select the “FAX REGISTRATION”
menu.
HRefer to “To select the “FAX
REGISTRATION” menu” on
page 10-2.
2Press the [4] key from the 10-Key
Pad to select “PROGRAM DIAL”.
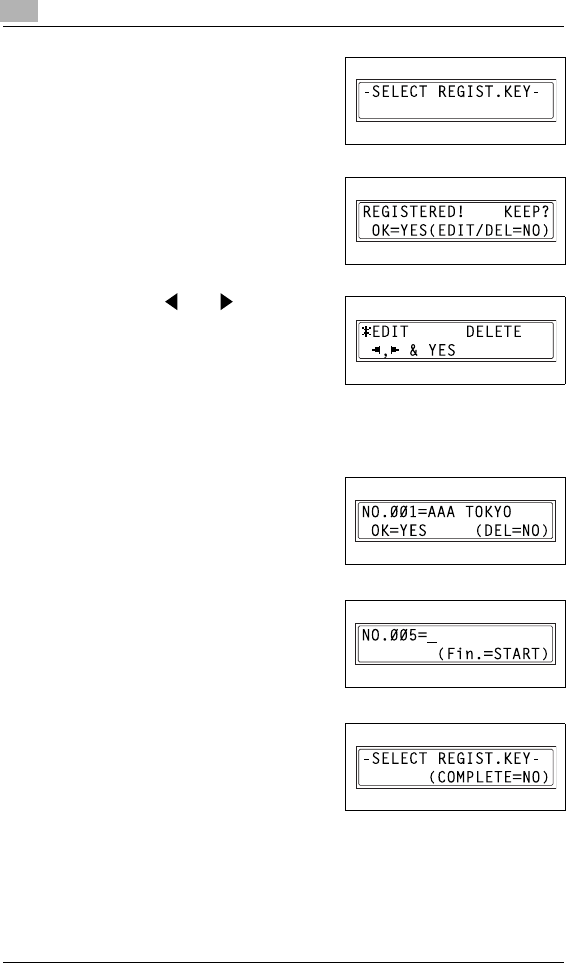
10 Utility Mode – Fax Functions
10-18 Di152f/Di183f
3Press the one-touch dial key ([24]
through [27]) programmed with the
broadcast transmission that you
wish to change or delete.
4Press the [No] key.
5Using the and keys, select
either “EDIT” or “DELETE”, and
then press the [Yes] key.
HIf “EDIT” was selected, the
specified recipients are
displayed in order. (Continue with step 6.)
HIf “DELETE” was selected, the program dialing settings are deleted
and the “FAX REGISTRATION” menu appears again.
6To delete the displayed recipient,
press the [No] key.
To keep the displayed recipient,
press the [Yes] key.
The next recipient is displayed.
7When you are finished making
changes, press the [Start] key.
HOther program dialing settings
can be programmed or
changed.
8Press the [No] key to return to the
“FAX REGISTRATION” menu.
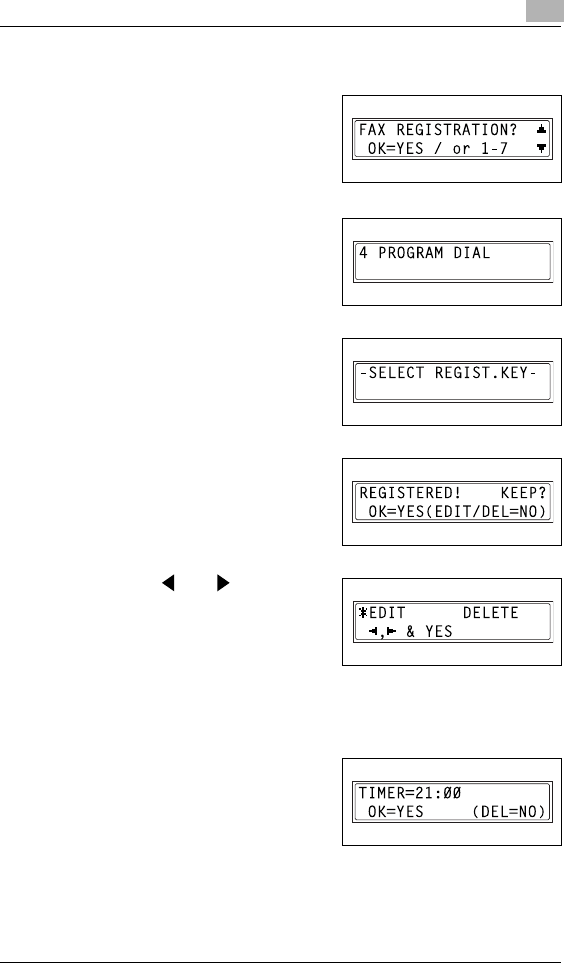
Utility Mode – Fax Functions 10
Di152f/Di183f 10-19
To change/delete a programmed timer transmission
1Select the “FAX REGISTRATION”
menu.
HRefer to “To select the “FAX
REGISTRATION” menu” on
page 10-2.
2Press the [4] key from the 10-Key
Pad to select “PROGRAM DIAL”.
3Press the one-touch dial key ([24]
through [27]) programmed with the
timer transmission that you wish to
change or delete.
4Press the [No] key.
5Using the and keys, select
either “EDIT” or “DELETE”, and
then press the [Yes] key.
HIf “EDIT” was selected, the
programmed transmission time
is displayed. (Continue with step 6.)
HIf “DELETE” was selected, the program dialing settings are deleted
and the “FAX REGISTRATION” menu appears again.
6To change the transmission time,
press the [No] key, and then use the
10-Key Pad to enter the correct
time.
If you do not wish to change the
transmission time, press the [Yes]
key.
The recipient is displayed.
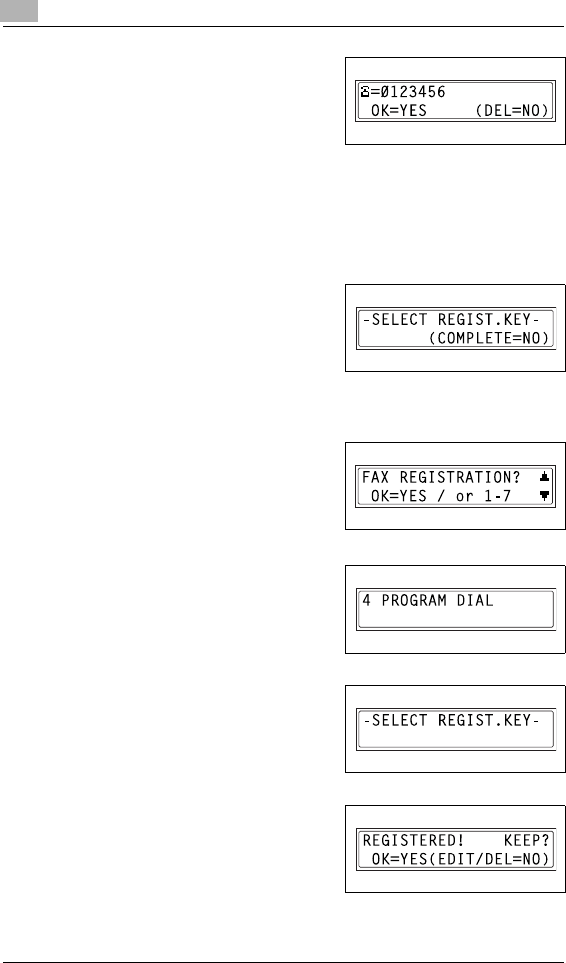
10 Utility Mode – Fax Functions
10-20 Di152f/Di183f
7To change the recipient, press the
[No] key, and then by using the one-
touch dial keys or the speed dial
numbers, or by entering the fax
number using the 10-Key Pad,
specify a different recipient.
HChange the F codes (sub-address and SID) as desired.
8Press the [Yes] key.
HOther program dialing settings can be changed.
9Press the [No] key to return to the
“FAX REGISTRATION” menu.
To change/delete a programmed mailbox transmission
1Select the “FAX REGISTRATION”
menu.
HRefer to “To select the “FAX
REGISTRATION” menu” on
page 10-2.
2Press the [4] key from the 10-Key
Pad to select “PROGRAM DIAL”.
3Press the one-touch dial key ([24]
through [27]) programmed with the
mailbox transmission that you wish
to change or delete.
4Press the [No] key.
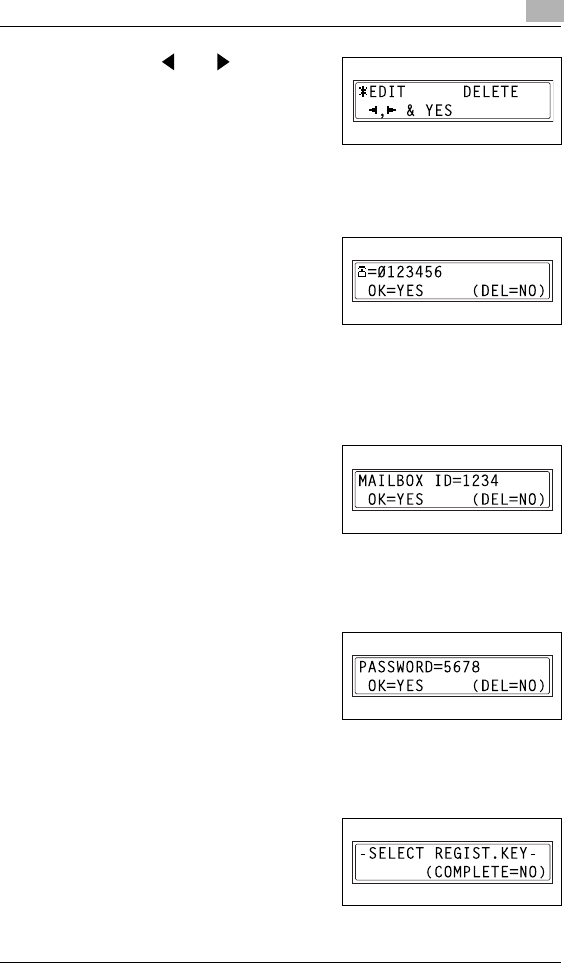
Utility Mode – Fax Functions 10
Di152f/Di183f 10-21
5Using the and keys, select
either “EDIT” or “DELETE”, and
then press the [Yes] key.
HIf “EDIT” was selected, the
specified recipient is displayed.
(Continue with step 6.)
HIf “DELETE” was selected, the program dialing settings are deleted
and the “FAX REGISTRATION” menu appears again.
6To change the recipient, press the
[No] key, and then by using the one-
touch dial keys or the speed dial
numbers, or by entering the fax
number using the 10-Key Pad,
specify a different recipient.
7Press the [Yes] key.
The mailbox ID is displayed.
8To change the mailbox ID, press the
[No] key, and then use the 10-Key
Pad to enter the new ID.
9Press the [Yes] key.
The password is displayed.
10 To change the password, press the
[No] key, and then use the 10-Key
Pad to enter the new password.
11 Press the [Yes] key.
Other program dialing settings can be changed.
12 Press the [No] key to return to the
“FAX REGISTRATION” menu.
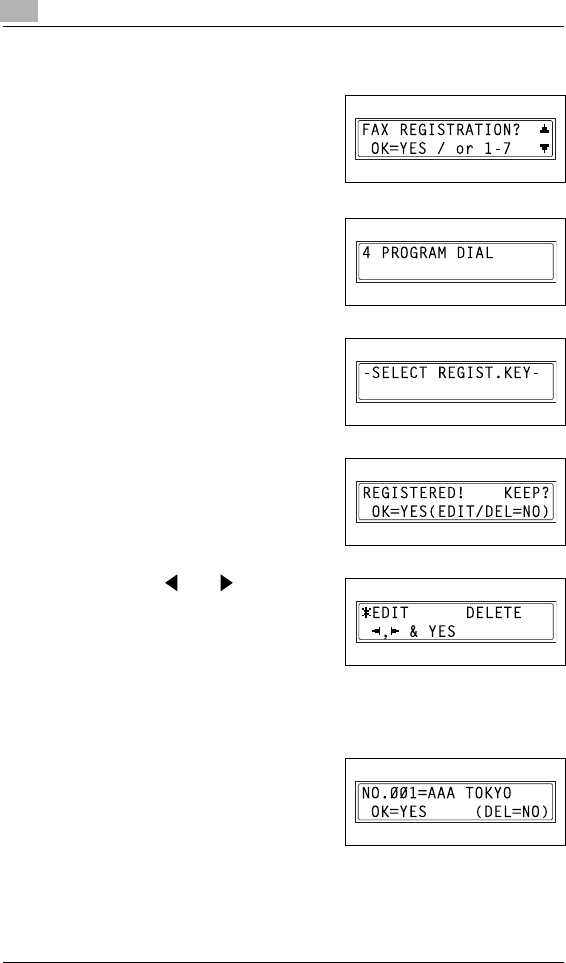
10 Utility Mode – Fax Functions
10-22 Di152f/Di183f
To change/delete a programmed polling reception
1Select the “FAX REGISTRATION”
menu.
HRefer to “To select the “FAX
REGISTRATION” menu” on
page 10-2.
2Press the [4] key from the 10-Key
Pad to select “PROGRAM DIAL”.
3Press the one-touch dial key ([24]
through [27]) programmed with the
polling reception that you wish to
change or delete.
4Press the [No] key.
5Using the and keys, select
either “EDIT” or “DELETE”, and
then press the [Yes] key.
HIf “EDIT” was selected, the
specified recipients are
displayed in order. (Continue with step 6.)
HIf “DELETE” was selected, the program dialing settings are deleted
and the “FAX REGISTRATION” menu appears again.
6To delete the displayed recipient,
press the [No] key.
To keep the displayed recipient,
press the [Yes] key.
HTo add a recipient, in the screen
containing “Fin.=START”, specify a recipient using the one-touch
dial keys or the speed dial numbers, or by entering a fax number
using the 10-Key Pad.
The next recipient is displayed.
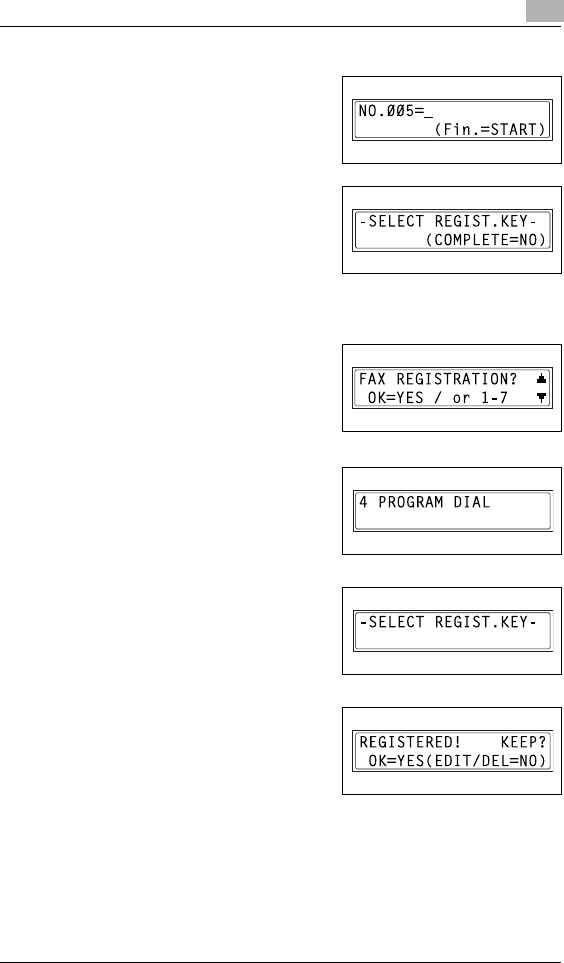
Utility Mode – Fax Functions 10
Di152f/Di183f 10-23
7When you are finished making
changes, press the [Start] key.
Other program dialing settings can
be changed.
8Press the [No] key to return to the
“FAX REGISTRATION” menu.
To change/delete a programmed relay initiation transmission
1Select the “FAX REGISTRATION”
menu.
HRefer to “To select the “FAX
REGISTRATION” menu” on
page 10-2.
2Press the [4] key from the 10-Key
Pad to select “PROGRAM DIAL”.
3Press the one-touch dial key ([24]
through [27]) programmed with the
relay initiation transmission that you
wish to change or delete.
4Press the [No] key.
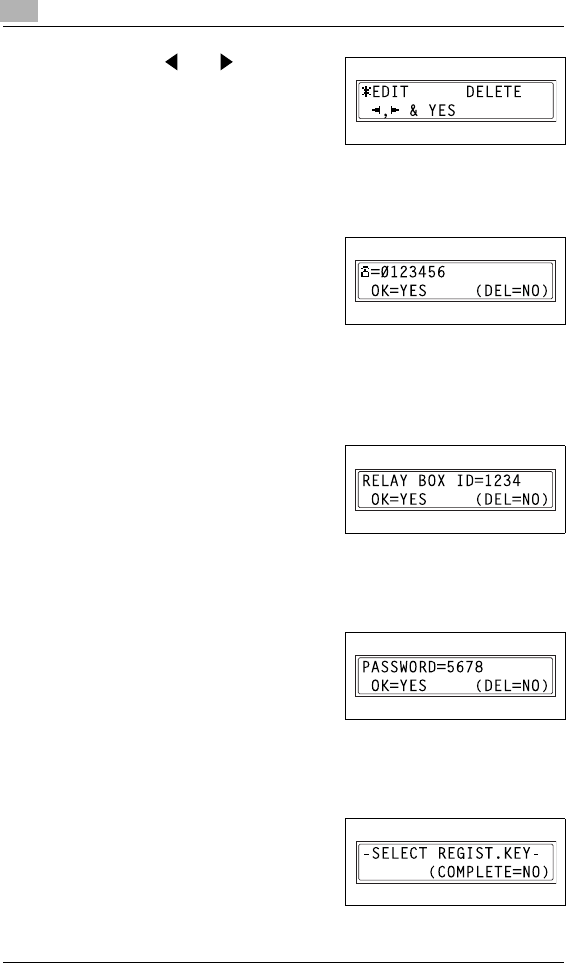
10 Utility Mode – Fax Functions
10-24 Di152f/Di183f
5Using the and keys, select
either “EDIT” or “DELETE”, and
then press the [Yes] key.
HIf “EDIT” was selected, the
specified recipient is displayed.
(Continue with step 6.)
HIf “DELETE” was selected, the program dialing settings are deleted
and the “FAX REGISTRATION” menu appears again.
6To change the recipient, press the
[No] key, and then by using the one-
touch dial keys or the speed dial
numbers, or by entering the fax
number using the 10-Key Pad,
specify a different recipient.
7Press the [Yes] key.
The relay box ID is displayed.
8To change the relay box ID, press
the [No] key, and then use the 10-
Key Pad to enter the new ID.
9Press the [Yes] key.
The password is displayed.
10 To change the password, press the
[No] key, and then use the 10-Key
Pad to enter the new password.
11 Press the [Yes] key.
Other program dialing settings can be changed.
12 Press the [No] key to return to the
“FAX REGISTRATION” menu.
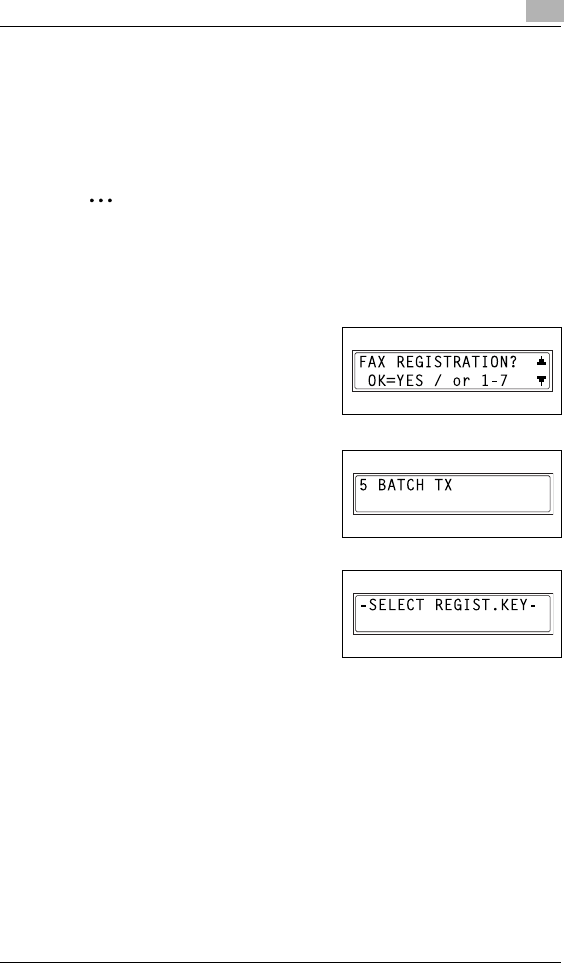
Utility Mode – Fax Functions 10
Di152f/Di183f 10-25
Setting Up Batch Transmissions (“BATCH TX” function)
If the batch transmission setting (transmission time) is specified for a one-
touch dial key programmed with recipient fax numbers, multiple
documents can be stored in the memory and sent out together at the
specified time.
Note
A one-touch dial key must first be programmed with the fax number of
the recipient for the batch transmission.
To set batch transmitting
1Select the “FAX REGISTRATION”
menu.
HRefer to “To select the “FAX
REGISTRATION” menu” on
page 10-2.
2Press the [5] key from the 10-Key
Pad to select “BATCH TX”.
3Press the one-touch dial key
programmed with the recipient that
you wish to send the batch
transmission fax to.
A screen appears, allowing you to
specify the transmission time.
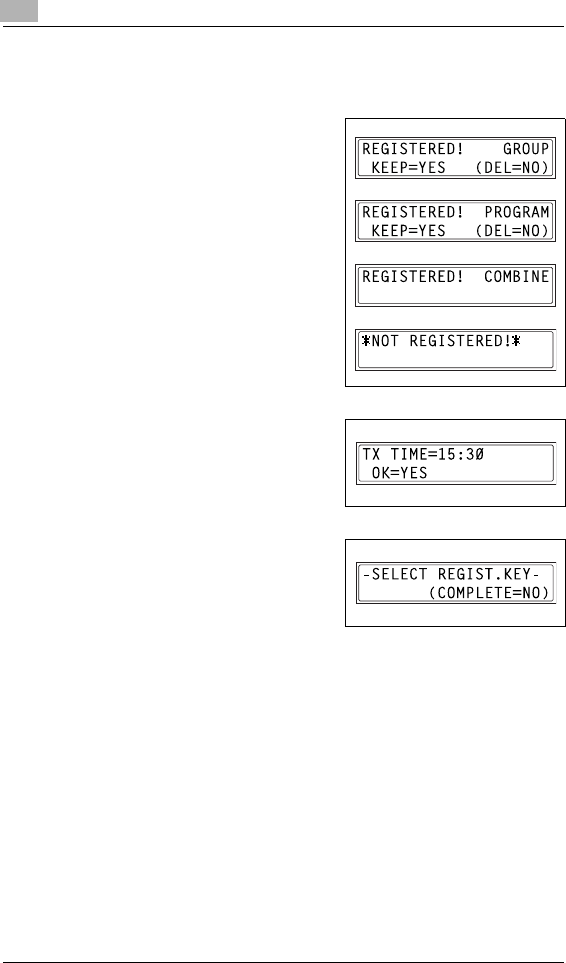
10 Utility Mode – Fax Functions
10-26 Di152f/Di183f
?Was the one-touch dial key that was pressed one programmed for
group dialing, program dialing, or combination dialing, or not
programmed at all?
§An error message appears.
4Using the 10-Key Pad, enter the
desired transmission time, and then
press the [Yes] key.
5Press the [No] key to return to the
“FAX REGISTRATION” menu.
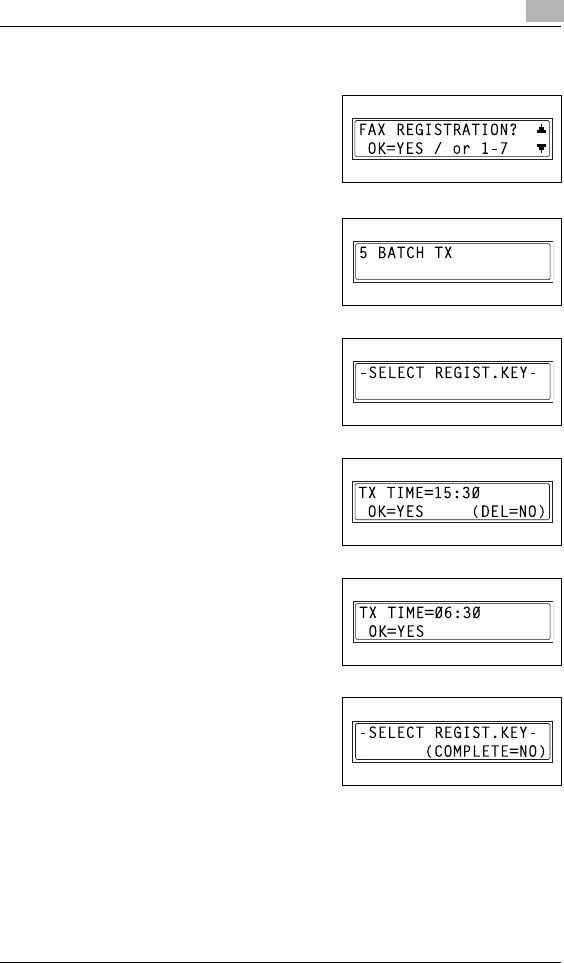
Utility Mode – Fax Functions 10
Di152f/Di183f 10-27
To change the batch transmission setting
1Select the “FAX REGISTRATION”
menu.
HRefer to “To select the “FAX
REGISTRATION” menu” on
page 10-2.
2Press the [5] key from the 10-Key
Pad to select “BATCH TX”.
3Press the one-touch dial key
programmed with the batch
transmission setting that you wish to
change.
4Press the [No] key, and then use the
10-Key Pad to enter the new
transmission time.
5When you are finished making
changes, press the [Yes] key.
6Press the [No] key to return to the
“FAX REGISTRATION” menu.

10 Utility Mode – Fax Functions
10-28 Di152f/Di183f
To delete the batch transmission setting
1Select the “FAX REGISTRATION”
menu.
HRefer to “To select the “FAX
REGISTRATION” menu” on
page 10-2.
2Press the [5] key from the 10-Key
Pad to select “BATCH TX”.
3Press the one-touch dial key
programmed with the batch
transmission setting that you wish to
delete.
4Press the [No] key.
A confirmation message appears,
asking whether or not to delete the
batch transmission setting.
5Press the [Yes] key.
The “FAX REGISTRATION” menu
appears again.
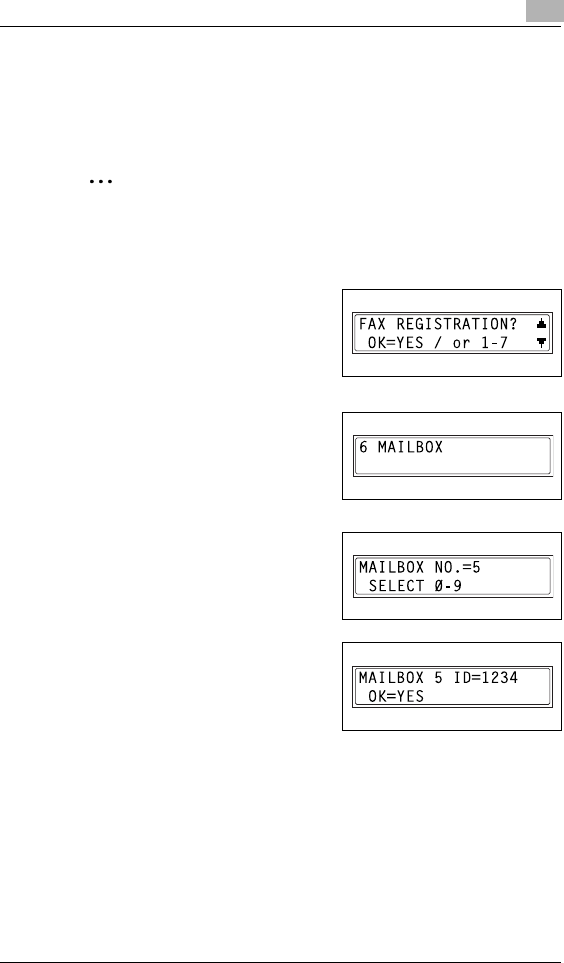
Utility Mode – Fax Functions 10
Di152f/Di183f 10-29
Setting Up Mailboxes (“MAILBOX” function)
Mailbox IDs must first be specified in order to receive faxes with mailbox
reception only if the mailbox ID sent by the caller matches the mailbox ID
set on this machine.
Note
A mailbox ID cannot be the same as a relay box ID.
To register a mailbox
1Select the “FAX REGISTRATION”
menu.
HRefer to “To select the “FAX
REGISTRATION” menu” on
page 10-2.
2Press the [6] key from the 10-Key
Pad to select “MAILBOX”.
3Using the 10-Key Pad, enter the
mailbox number.
HThe mailbox number can be set
to any number between 0 and 9.
4Using the 10-Key Pad, enter the 4-
digit mailbox ID, and then press the
[Yes] key.
HThe mailbox ID can be set to any
number between 0000 and
9999.
HIf you wish to change the mailbox ID, press the [No] key, and then
enter the new number.
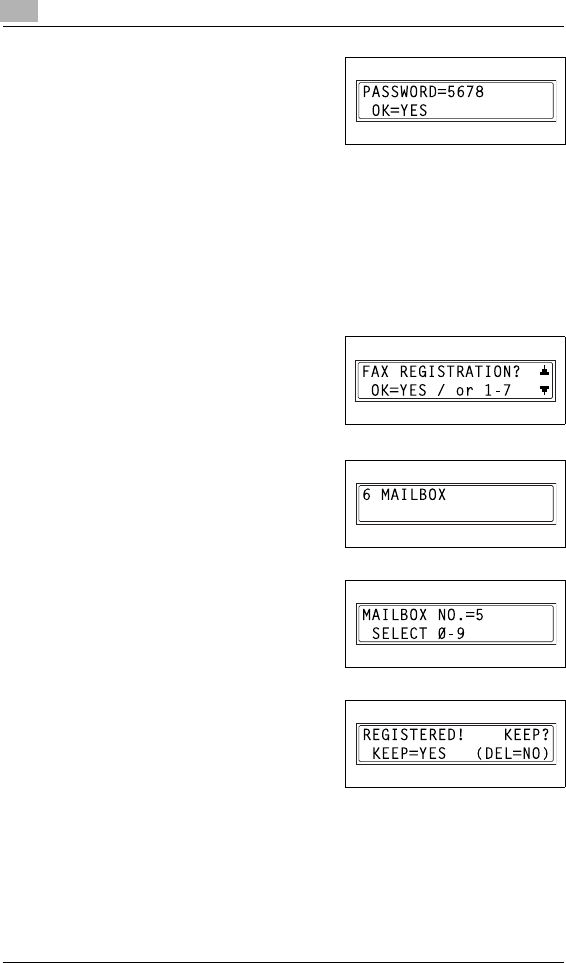
10 Utility Mode – Fax Functions
10-30 Di152f/Di183f
5Using the 10-Key Pad, enter the 4-
digit password, and then press the
[Yes] key.
HThe password can be set to any
number between 0000 and
9999.
HIf you wish to change the password, press the [No] key, and then
enter the new password.
HIf no password is to be specified, press the [Yes] key without
entering anything.
The “FAX REGISTRATION” menu appears again.
To delete a mailbox
1Select the “FAX REGISTRATION”
menu.
HRefer to “To select the “FAX
REGISTRATION” menu” on
page 10-2.
2Press the [6] key from the 10-Key
Pad to select “MAILBOX”.
3Using the 10-Key Pad, enter the
number of the mailbox that you wish
to delete.
4Press the [No] key.
A screen appears, allowing you to
enter the mailbox ID.

Utility Mode – Fax Functions 10
Di152f/Di183f 10-31
5Using the 10-Key Pad, enter the 4-
digit mailbox ID, and then press the
[Yes] key.
HIf you wish to change the ID,
press the [No] key, and then
enter the new number.
The specified mailbox is deleted.
6Press the [Panel Reset] key.
The main screen appears again.
Setting Up Relay Boxes (“RELAY BOX” function)
A relay box ID must first be set in order for this machine (acting as a relay
station) to receive a document from another fax machine (transmitting
station), then transmit the document to multiple recipients (receiving
stations).
Note
A relay box ID cannot be the same as a mailbox ID.
This machine (acting as a relay station) can be set to send back a relay
result report. The fax number of the recipient of the report (either the
transmitting station or any other recipient) must be specified using
either the one-touch dial keys or a speed dial number. Therefore,
before using this function, be sure that a one-touch dial key or a speed
dial number is programmed with the fax number of the report recipient.
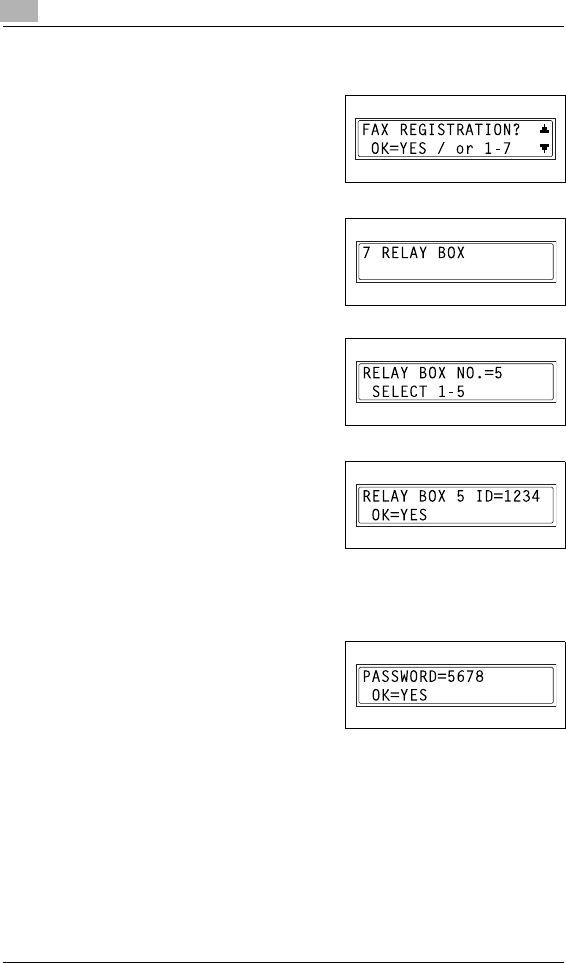
10 Utility Mode – Fax Functions
10-32 Di152f/Di183f
To program the relay box
1Select the “FAX REGISTRATION”
menu.
HRefer to “To select the “FAX
REGISTRATION” menu” on
page 10-2.
2Press the [7] key from the 10-Key
Pad to select “RELAY BOX”.
3Using the 10-Key Pad, enter the
relay box number.
HThe relay box number can be
set to any number between 1
and 5.
4Using the 10-Key Pad, enter the 4-
digit relay box ID, and then press
the [Yes] key.
HThe relay box ID can be set to
any number between 0000 and
9999.
HIf you wish to change the relay box ID, press the [No] key, and then
enter the new number.
5Using the 10-Key Pad, enter the 4-
digit password, and then press the
[Yes] key.
HThe password can be set to any
number between 0000 and
9999.
HIf you wish to change the password, press the [No] key, and then
enter the new password.
HIf no password is to be specified, press the [Yes] key without
entering anything.

Utility Mode – Fax Functions 10
Di152f/Di183f 10-33
6To send back a relay result report,
specify the recipient using either a
one-touch dial key or speed dial
number programmed with the
recipient’s fax number.
A screen appears, allowing you to
specify the receiving stations.
7Using the one-touch dial keys or the
speed dial numbers, or by entering
the fax number using the 10-Key
Pad, specify a receiving station, and
then press the [Yes] key.
HA maximum of 50 recipients can
be specified as receiving
stations. Repeat this step until
all desired receiving stations are
specified.
HTo delete the currently selected recipient, press the [No] key.
8When you are finished specifying all
receiving stations, press the [Start]
key.
The “FAX REGISTRATION” menu
appears again.
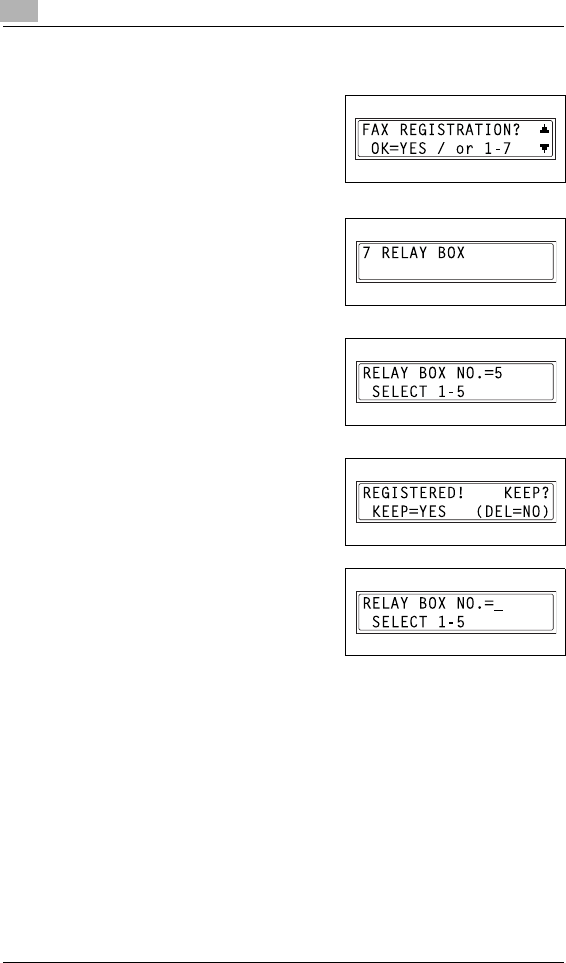
10 Utility Mode – Fax Functions
10-34 Di152f/Di183f
To delete the relay box
1Select the “FAX REGISTRATION”
menu.
HRefer to “To select the “FAX
REGISTRATION” menu” on
page 10-2.
2Press the [7] key from the 10-Key
Pad to select “RELAY BOX”.
3Using the 10-Key Pad, enter the
number of the relay box that you
wish to delete.
4Press the [No] key.
The specified relay box is deleted.
To delete another relay box, repeat
steps 3 and 4.
5Press the [Panel Reset] key.
The main screen appears again.
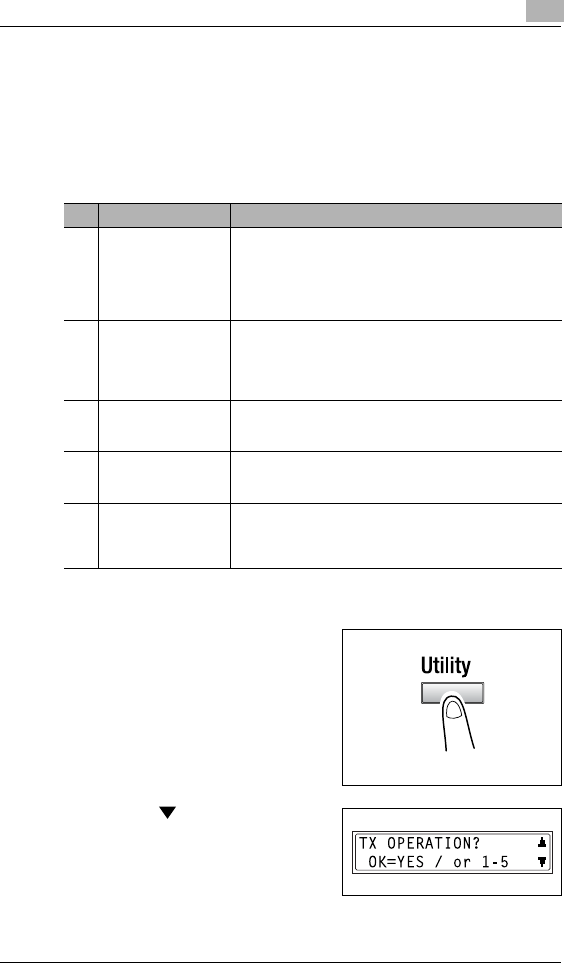
Utility Mode – Fax Functions 10
Di152f/Di183f 10-35
10.2 Specifying Transmission Settings (“TX
OPERATION” Menu)
From the “TX OPERATION” menu, various functions for sending faxes
can be set.
“TX OPERATION” menu:
To select the “TX OPERATION” menu
1Press the [Utility] key.
The first screen of the Utility mode
appears.
2Press the key 7 times to select
“TX OPERATION”.
No. TX OPERATION Characteristic/Description
1 SCAN CONTRAST This function can be used to set the default scanning
contrast level to one of five settings between “LIGHT” and
“DARK”.
For dark-colored paper (media), select a setting towards
“LIGHT”. For faint or colored text, select a setting toward
“DARK”.
2 RESOLUTION This function can be used to set the default scanning
resolution (image quality) to one of the following: “Standard”,
“Fine”, “Super Fine”, “Half Tone + Standard”, “Half Tone +
Fine” or “Half Tone + Super Fine”.
• The manufacturer’s default setting is “Standard”.
3 DEFAULT TX This function can be used to set the default transmission
mode to “MEM.TX” or “ADF TX”.
• The manufacturer’s default setting is “MEM.TX”.
4 HEADER This function cannot be set on this machine. (Printing of the
name of the transmission source on the edge of the
document transmitted is fixed by the settings.)
5 OT-DIAL IN COPY This function can be used to specify whether or not faxing is
possible by pressing a one-touch dial key while the machine
is in Copy mode.
• The manufacturer’s default setting is “DISABLE”.

10 Utility Mode – Fax Functions
10-36 Di152f/Di183f
3From the 10-Key Pad, press the key ([1] through [5]) for the “TX
OPERATION” function that you wish to set.
HThe “TX OPERATION” functions are as follows:
1 SCAN CONTRAST
2 RESOLUTION
3 DEFAULT TX
4 HEADER
5 OT-DIAL IN COPY
Tip
If, at any time, you wish to quit setting a “TX OPERATION” function,
press the [No] key. When the message “STOP SETTING?” appears,
press the [Yes] key to quit.
To specify the default scanning contrast (“SCAN CONTRAST”
function)
1Select the “TX OPERATION” menu.
HRefer to “To select the “TX
OPERATION” menu” on
page 10-35.
2Press the [1] key from the 10-Key
Pad to select “SCAN CONTRAST”.
3Using the and keys, select
one of the five settings between
“LIGHT” and “DARK”, and then
press the [Yes] key.
The “TX OPERATION” menu
appears again.
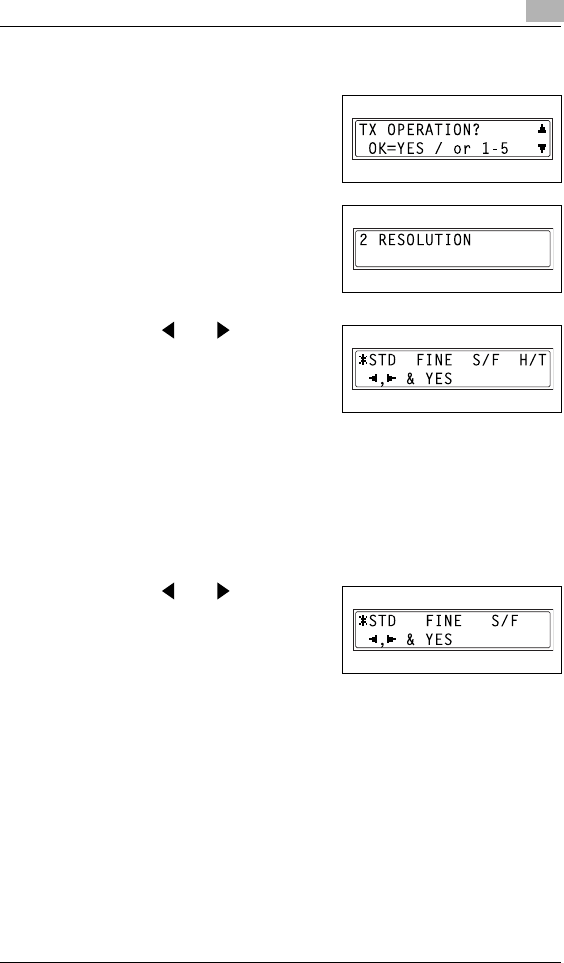
Utility Mode – Fax Functions 10
Di152f/Di183f 10-37
To specify the default resolution setting (“RESOLUTION” function)
1Select the “TX OPERATION” menu.
HRefer to “To select the “TX
OPERATION” menu” on
page 10-35.
2Press the [2] key from the 10-Key
Pad to select “RESOLUTION”.
3Using the and keys, select
the desired resolution setting, and
then press the [Yes] key.
HThe resolution settings appear
as follows.
STD: Standard
FINE: Fine
S/F: Super Fine
H/T: Half Tone
If “H/T” was selected, a screen appears, allowing you to make a
detailed setting. (Continue with step 4.) If any setting other than “H/T”
was selected, the “TX OPERATION” menu appears again.
4Using the and keys, select
the desired halftone setting, and
then press the [Yes] key.
HThe halftone settings appear as
follows.
STD: Standard
FINE: Fine
S/F: Super Fine
The “TX OPERATION” menu appears again.
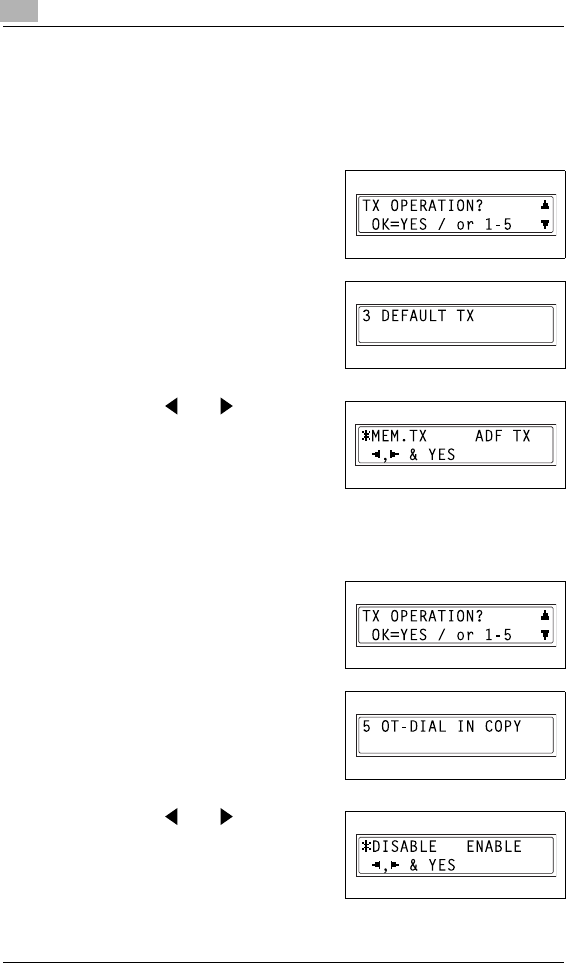
10 Utility Mode – Fax Functions
10-38 Di152f/Di183f
To set the “DEFAULT TX” function
About memory transmission:
Memory transmission is only available when the optional Automatic
Document Feeder is installed.
1Select the “TX OPERATION” menu.
HRefer to “To select the “TX
OPERATION” menu” on
page 10-35.
2Press the [3] key from the 10-Key
Pad to select “DEFAULT TX”.
3Using the and keys, select
either “MEM.TX” or “ADF TX”, and
then press the [Yes] key.
The “TX OPERATION” menu
appears again.
To specify if one-touch dialing transmission (Copy mode) is allowed
(“OT-DIAL IN COPY” function)
1Select the “TX OPERATION” menu.
HRefer to “To select the “TX
OPERATION” menu” on
page 10-35.
2Press the [5] key from the 10-Key
Pad to select “OT-DIAL IN COPY”.
3Using the and keys, select
either “DISABLE” or “ENABLE”, and
then press the [Yes] key.
The “TX OPERATION” menu
appears again.

Utility Mode – Fax Functions 10
Di152f/Di183f 10-39
10.3 Specifying Reception Settings (“RX OPERATION”
Menu)
From the “RX OPERATION” menu, various functions for receiving faxes
can be set.
“RX OPERATION” menu:
No. RX OPERATION Characteristic/Description
1 MEMORY RX MODE This function can be used to set whether to allow (“ON”)
memory reception or not (“OFF”). In cases when confidential
faxes are being received, the received document can be
stored in the memory and printed at a specified time or when
memory reception is set to “OFF”.
A password can be set to specify the starting time or ending
time of memory reception, or to cancel the function.The set
starting time and ending time are valid every day until
memory reception is turned off.
• The manufacturer’s default setting is “OFF”.
2 No. of RINGS This function can be used to set the number of rings between
1 and 16 until the call is answered.
3 REDUCTION RX This function can be used to set whether documents longer
than the paper are printed reduced (“ON”), split (“OFF”), or
discarded (“CUT”).
• The manufacturer’s default setting is “ON”.
4 RX PRINT This function can be used to set whether the fax is only
printed after all document pages have been received
(“MEMORY RX”) or printing begins as soon as the first page
of the document is received (“PRINT RX”).
• The manufacturer’s default setting is “MEMORY RX”.
5 RX MODE This function can be used to set the reception mode to
automatic reception (“AUTO RX”) or manual reception
(“MANUAL RX”).
Automatic reception: Automatically begins receiving after the
set number of rings.
Manual reception: Does not automatically receive the fax.
Reception begins after making a connection by picking up
the telephone receiver or pressing the [Speaker] key, then
pressing the [Start] key.
• The manufacturer’s default setting is “AUTO RX”.
6 FORWARD This function can be used to set whether or not the received
document is forwarded.
Forward (“ON”): The received document is forwarded to the
specified fax number or e-mail address.
Forward and print (“ON(PRINT)”): The received document is
printed by this machine at the same time that it is forwarded
to the specified fax number or e-mail address.
Do not forward (“OFF”): The document is not forwarded
• The manufacturer’s default setting is “OFF”.
* In order to forward the document to an e-mail address, the
optional Internet Fax & Network scan kit is required.

10 Utility Mode – Fax Functions
10-40 Di152f/Di183f
7 FOOTER This function can be used to set whether or not the reception
information (date received, number of pages, etc.) is printed
at the bottom of each received document.
• The manufacturer’s default setting is “OFF”.
8 SELECT TRAY This function can be used to select which paper tray can be
used to supply paper when printing received documents or
transmission reports. (A paper tray that cannot be used for
supplying paper can also be specified.)
This function is only available when an optional paper tray is
installed.
No. RX OPERATION Characteristic/Description
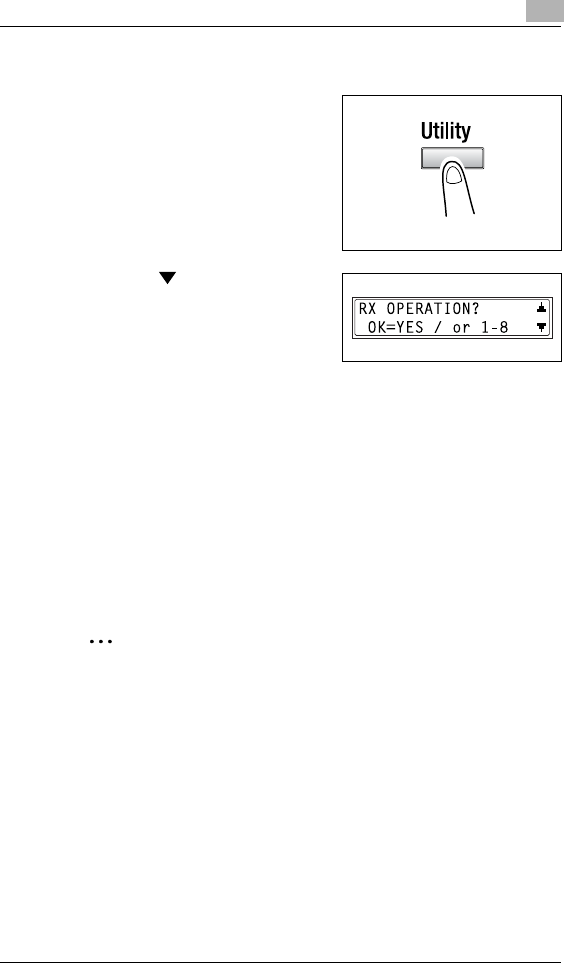
Utility Mode – Fax Functions 10
Di152f/Di183f 10-41
To select the “RX OPERATION” menu
1Press the [Utility] key.
The first screen of the Utility mode
appears.
2Press the key 8 times to select
“RX OPERATION”.
3From the 10-Key Pad, press the key ([1] through [8]) for the “RX
OPERATION” function that you wish to set.
HThe “RX OPERATION” functions are as follows:
1 MEMORY RX MODE
2 NO.of RINGS
3 REDUCTION RX
4 RX PRINT
5 RX MODE
6 FORWARD
7 FOOTER
8 SELECT TRAY
Tip
If, at any time, you wish to quit setting/changing an “RX OPERATION”
function, press the [No] key. When the message “STOP SETTING?”
appears, press the [Yes] key to quit.
To exit the “RX OPERATION” menu, press the [Panel Reset] key. The
main screen appears again.
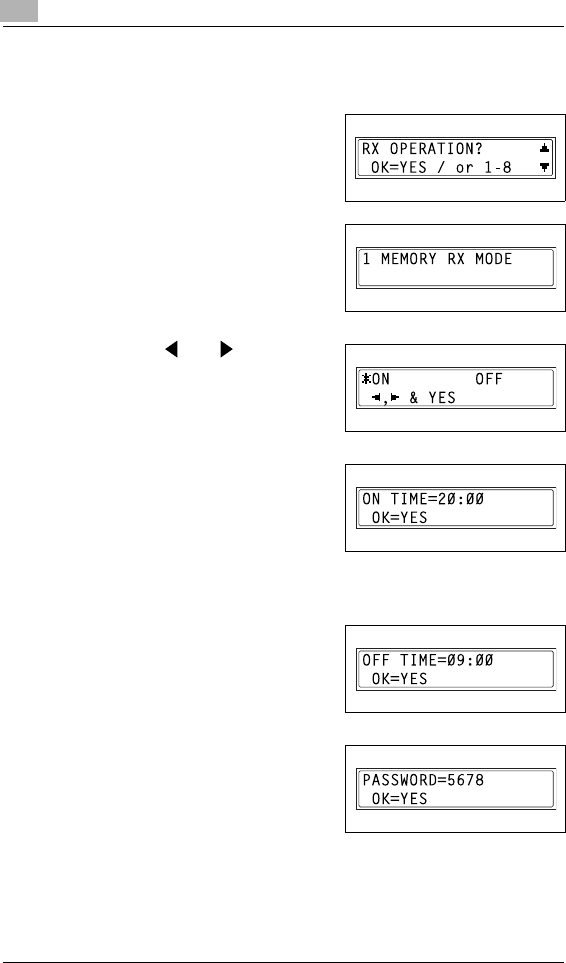
10 Utility Mode – Fax Functions
10-42 Di152f/Di183f
To select the memory reception mode (“MEMORY RX MODE”
function)
1Select the “RX OPERATION” menu.
HRefer to “To select the “RX
OPERATION” menu” on
page 10-41.
2Press the [1] key from the 10-Key
Pad to select “MEMORY RX
MODE”.
3Using the and keys, select
“ON”, and then press the [Yes] key.
4Using the 10-Key Pad, enter the
time for memory reception to begin,
and then press the [Yes] key.
HTo specify that memory
reception stays on from the time
that it is set to “ON” until it is manually cancelled, press the [Yes]
without entering a start time. (Skip to step 6.)
5Using the 10-Key Pad, enter the
time for memory reception to end,
and then press the [Yes] key.
6Using the 10-Key Pad, enter the 4-
digit password used to cancel
memory reception, and then press
the [Yes] key.
HIf no password is to be specified,
press the [Yes] key without entering anything.
The “RX OPERATION” menu appears again.
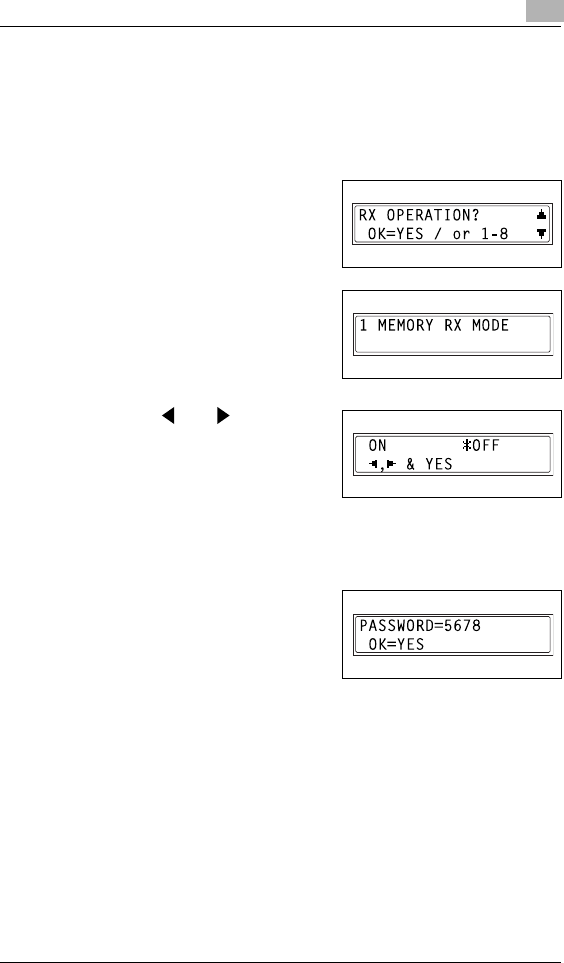
Utility Mode – Fax Functions 10
Di152f/Di183f 10-43
To cancel memory reception
Memory reception is automatically cancelled at the specified ending time,
and the received documents are printed. If no ending time has been set or
if you wish to cancel memory reception before the ending time, follow the
procedure described below.
1Select the “RX OPERATION” menu.
HRefer to “To select the “RX
OPERATION” menu” on
page 10-41.
2Press the [1] key from the 10-Key
Pad to select “MEMORY RX
MODE”.
3Using the and keys, select
“OFF”, and then press the [Yes]
key.
HIf a password was specified,
continue with step 4.
HIf a password was not specified, all received documents stored in
the memory are printed, and the “RX OPERATION” menu appears
again.
4Using the 10-Key Pad, enter the 4-
digit password, and then press the
[Yes] key.
All received documents stored in
the memory are printed, and the
“RX OPERATION” menu appears again.
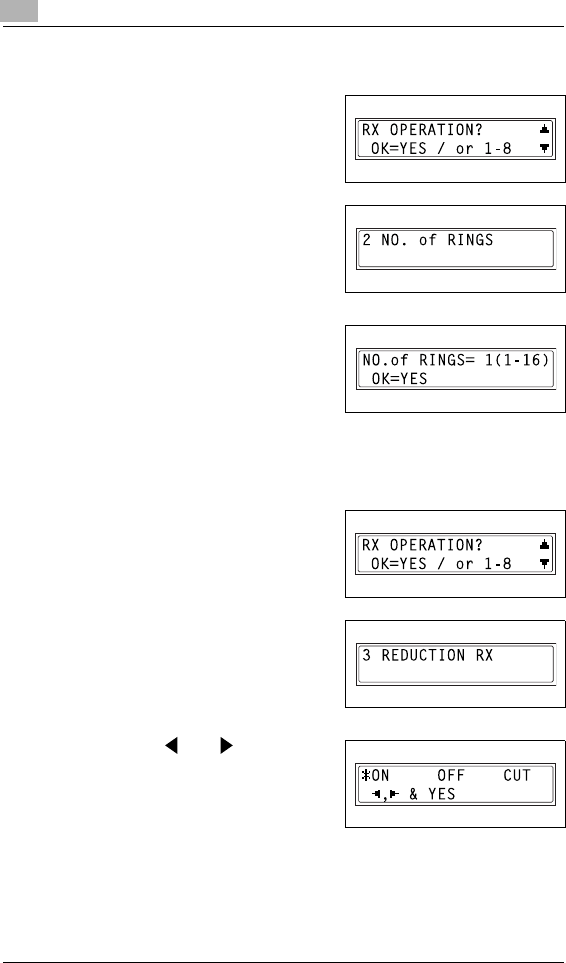
10 Utility Mode – Fax Functions
10-44 Di152f/Di183f
To set the “NO.of RINGS” function
1Select the “RX OPERATION” menu.
HRefer to “To select the “RX
OPERATION” menu” on
page 10-41.
2Press the [2] key from the 10-Key
Pad to select “NO.of RINGS”.
3Using the 10-Key Pad, enter the
desired number of rings, and then
press the [Yes] key.
HThe number of rings can be set
between 1 and 16.
The “RX OPERATION” menu appears again.
To set the “REDUCTION RX” function
1Select the “RX OPERATION” menu.
HRefer to “To select the “RX
OPERATION” menu” on
page 10-41.
2Press the [3] key from the 10-Key
Pad to select “REDUCTION RX”.
3Using the and keys, select
“ON” (print the document reduced),
“OFF” (split the printout) or “CUT”
(discard any excess), and then
press the [Yes] key.
The “RX OPERATION” menu appears again.
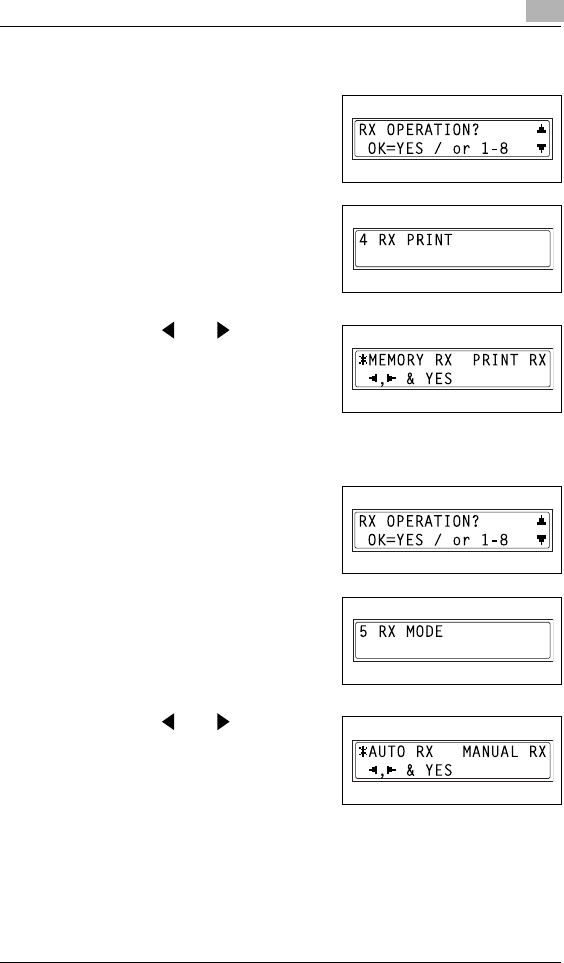
Utility Mode – Fax Functions 10
Di152f/Di183f 10-45
To set the “RX PRINT” function
1Select the “RX OPERATION” menu.
HRefer to “To select the “RX
OPERATION” menu” on
page 10-41.
2Press the [4] key from the 10-Key
Pad to select “RX PRINT”.
3Using the and keys, select
either “MEMORY RX” or “PRINT
RX”, and then press the [Yes] key.
The “RX OPERATION” menu
appears again.
To set the “RX MODE” function
1Select the “RX OPERATION” menu.
HRefer to “To select the “RX
OPERATION” menu” on
page 10-41.
2Press the [5] key from the 10-Key
Pad to select “RX MODE”.
3Using the and keys, select
either “AUTO RX” or “MANUAL
RX”, and then press the [Yes] key.
The “RX OPERATION” menu
appears again.
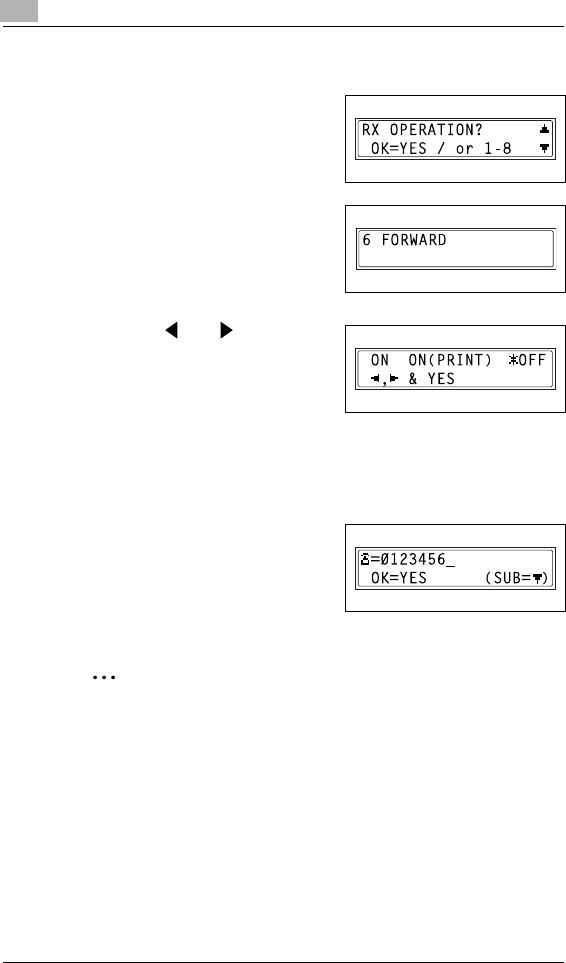
10 Utility Mode – Fax Functions
10-46 Di152f/Di183f
To set the “FORWARD” function
1Select the “RX OPERATION” menu.
HRefer to “To select the “RX
OPERATION” menu” on
page 10-41.
2Press the [6] key from the 10-Key
Pad to select “FORWARD”.
3Using the and keys, select
“ON”, “ON(PRINT)” or “OFF”, and
then press the [Yes] key.
HIf “ON” or “ON(PRINT)” was
selected, a screen appears,
allowing you to specify the forwarding location. (Continue with step
4.)
HIf “OFF” was selected, the “RX OPERATION” menu appears
again.
4Using the one-touch dial keys or the
speed dial numbers, or by entering
the fax number using the 10-Key
Pad, specify a fax number, and then
press the [Yes] key.
The “RX OPERATION” menu appears again.
Tip
An e-mail address can be specified as a forwarding location only when
the optional Internet Fax & Network scan kit is installed.
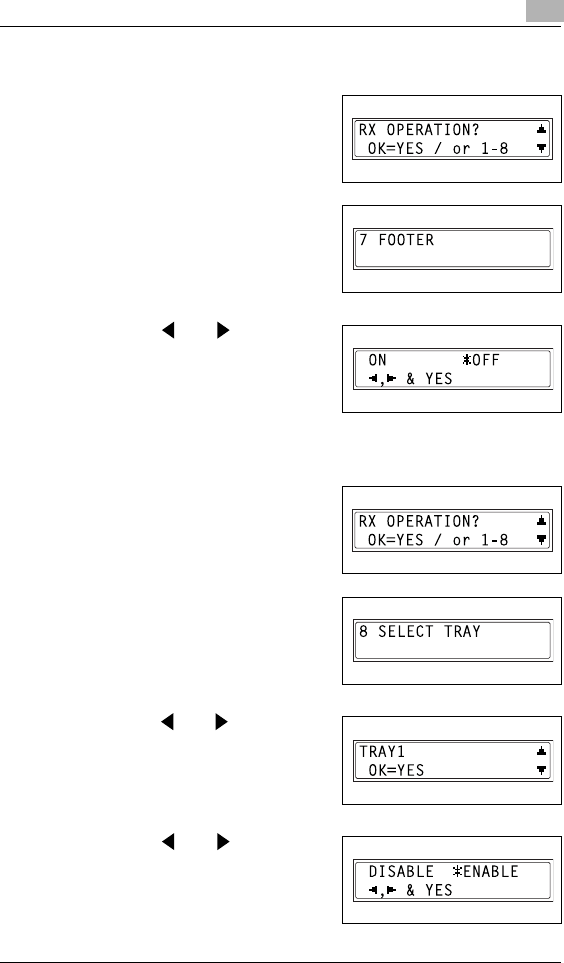
Utility Mode – Fax Functions 10
Di152f/Di183f 10-47
To set the “FOOTER” function
1Select the “RX OPERATION” menu.
HRefer to “To select the “RX
OPERATION” menu” on
page 10-41.
2Press the [7] key from the 10-Key
Pad to select “FOOTER”.
3Using the and keys, select
either “ON” or “OFF”, and then
press the [Yes] key.
The “RX OPERATION” menu
appears again.
To set the “SELECT TRAY” function
1Select the “RX OPERATION” menu.
HRefer to “To select the “RX
OPERATION” menu” on
page 10-41.
2Press the [8] key from the 10-Key
Pad to select “SELECT TRAY”.
3Using the and keys, select a
paper tray, and then press the [Yes]
key.
4Using the and keys, select
either “DISABLE” or “ENABLE”, and
then press the [Yes] key.
The “RX OPERATION” menu
appears again.

10 Utility Mode – Fax Functions
10-48 Di152f/Di183f
10.4 Specifying Communication Settings
(“COMM.SETTING” Menu)
From the “COMM.SETTING” menu, various functions are available for
specifying communication settings.
“COMM.SETTING” menu:
For details on setting the “TONE/PULSE” and “PSTN/PBX” functions,
refer to “Specifying the Phone Dialing System” on page 3-34 and
“Specifying the Phone Wiring System” on page 3-35.
No. COMM.SETTING Characteristic/Description
1 TONE/PULSE This function can be used to specify the dialing system. If this
function is not correctly set to the type of dialing system used,
faxes cannot be sent. Select the correct setting after
checking which type of dialing system is used by your
telephone line.
For details on setting this function, refer to “Specifying the
Phone Dialing System” on page 3-34.
2 LINE MONITOR This function can be used to set the volume when monitoring
communication to “HIGH”, “LOW” or “OFF”.
• The manufacturer’s default setting is “LOW”.
3 PSTN/PBX This function can be used to set whether the connected
telephone wiring is a public switched telephone network
(PSTN) or a private branch exchange (PBX).
For a PBX system, the outside line access number (or
extension number) must be specified.
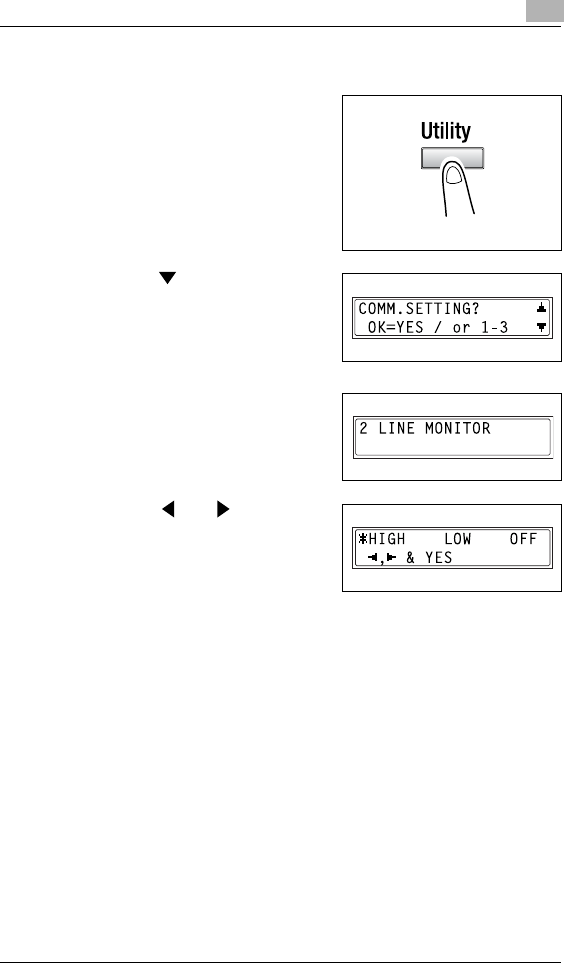
Utility Mode – Fax Functions 10
Di152f/Di183f 10-49
To set the “LINE MONITOR” function
1Press the [Utility] key.
The first screen of the Utility mode
appears.
2Press the key 9 times to select
“COMM.SETTING”.
3From the 10-Key Pad, press the [2]
key.
A screen appears, allowing you to
select the monitoring volume.
4Using the and keys, select
“HIGH”, “LOW” or “OFF”, and then
press the [Yes] key.
The “COMM.SETTING” menu
appears again.
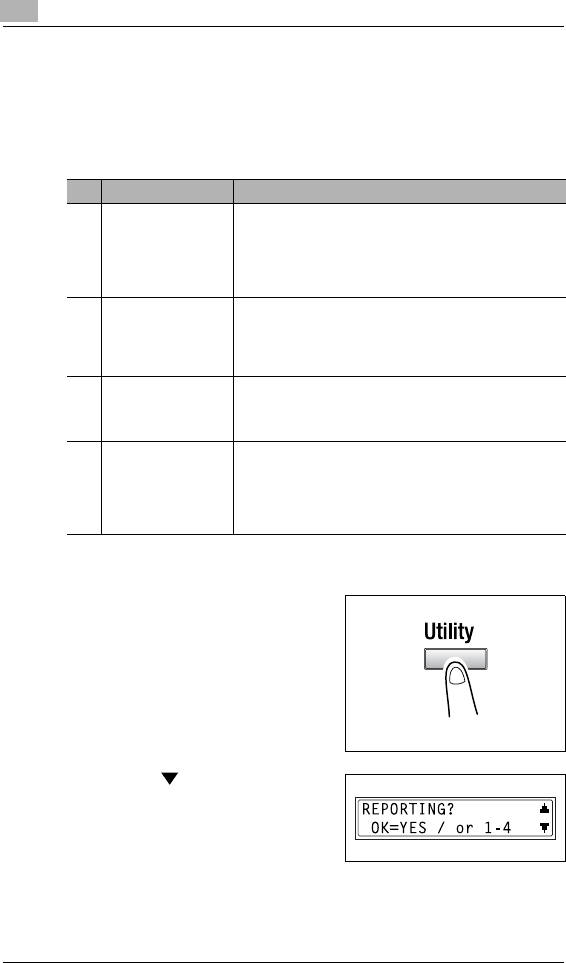
10 Utility Mode – Fax Functions
10-50 Di152f/Di183f
10.5 Specifying Report Output (“REPORTING” Menu)
From the “REPORTING” menu, various functions are available for
specifying which reports are automatically printed.
“REPORTING” menu:
To select the “REPORTING” menu
1Press the [Utility] key.
The first screen of the Utility mode
appears.
2Press the key 10 times to select
“REPORTING”.
No. REPORTING Characteristic/Description
1 ACTIVITY REPORT Every 60 transmissions/receptions, a report can be printed to
show the results of the transmissions/receptions. This
function can be used to set whether the report is printed
automatically when the 60th transmission/reception is
reached.
• The manufacturer’s default setting is “ON”.
2 RESERV.REPORT If multiple recipients are specified for transmission, such as
with broadcast transmission and polling reception, a report
can be printed to show specified settings. This function can
be used to set whether this report is printed automatically.
• The manufacturer’s default setting is “OFF”.
3 TX RESULT REPORT This function can be used to set whether the report showing
the result of a transmission is printed automatically after the
transmission is finished.
• The manufacturer’s default setting is “OFF”.
4 RX RESULT
REPORT This function can be used to set whether the report showing
the result of a reception is printed automatically after mailbox
reception is finished. (If regular reception is not finished
normally, a report will always be printed, regardless of the
selected setting.)
• The manufacturer’s default setting is “OFF”.
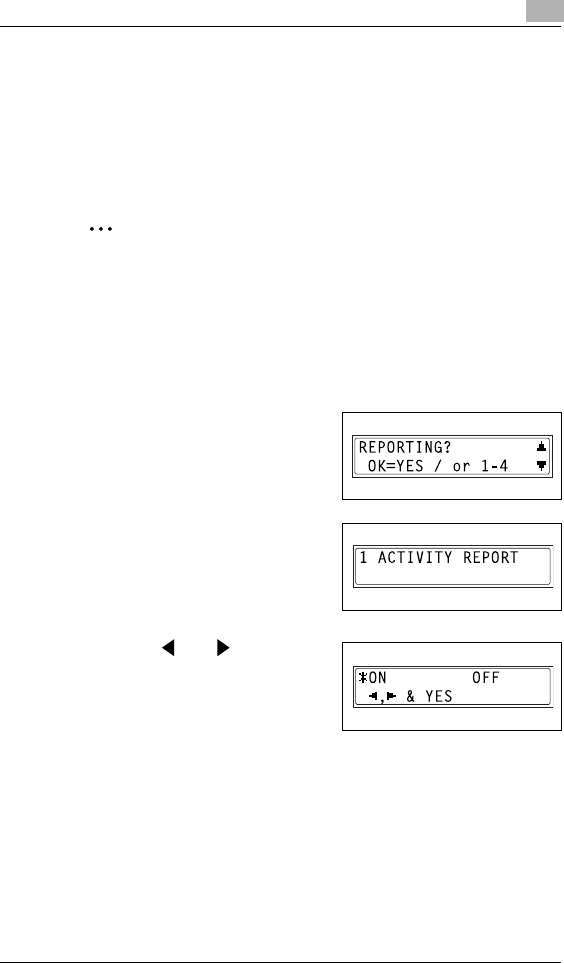
Utility Mode – Fax Functions 10
Di152f/Di183f 10-51
3From the 10-Key Pad, press the key ([1] through [4]) for the
“REPORTING” function that you wish to set.
HThe “REPORTING” functions are as follows:
1 ACTIVITY REPORT
2 RESERV.REPORT
3 TX RESULT REPORT
4 RX RESULT REPORT
Tip
If, at any time, you wish to quit setting/changing a “REPORTING”
function, press the [No] key. When the message “STOP SETTING?”
appears, press the [Yes] key to quit.
To exit the “REPORTING” menu, press the [Panel Reset] key. The
main screen appears again.
To set the “ACTIVITY REPORT” function
1Select the “REPORTING” menu.
HRefer to “To select the
“REPORTING” menu” on
page 10-50.
2Press the [1] key from the 10-Key
Pad to select “ACTIVITY REPORT”.
3Using the and keys, select
either “ON” or “OFF”, and then
press the [Yes] key.
The “REPORTING” menu appears
again.
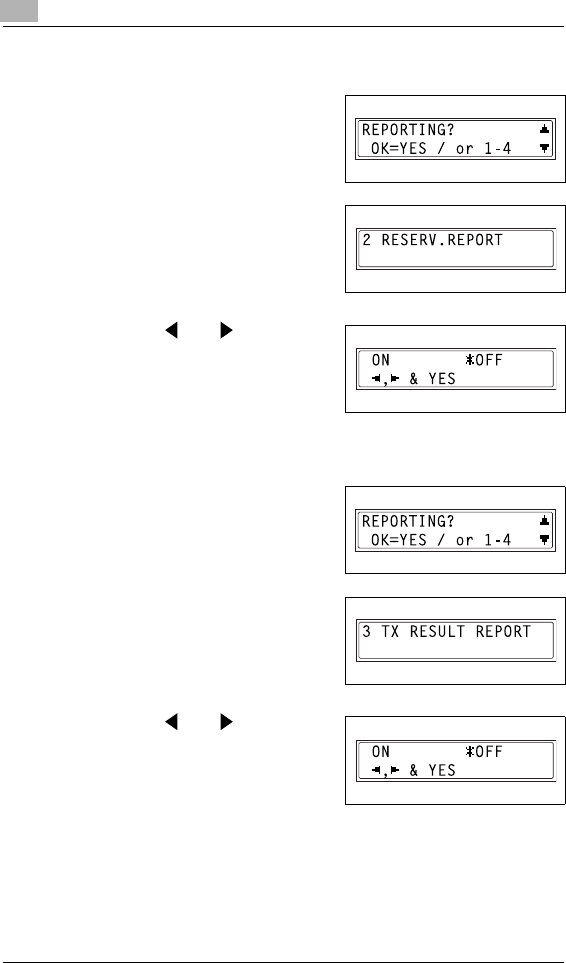
10 Utility Mode – Fax Functions
10-52 Di152f/Di183f
To set the “RESERV.REPORT” function
1Select the “REPORTING” menu.
HRefer to “To select the
“REPORTING” menu” on
page 10-50.
2Press the [2] key from the 10-Key
Pad to select “RESERV.REPORT”.
3Using the and keys, select
either “ON” or “OFF”, and then
press the [Yes] key.
The “REPORTING” menu appears
again.
To set the “TX RESULT REPORT” function
1Select the “REPORTING” menu.
HRefer to “To select the
“REPORTING” menu” on
page 10-50.
2Press the [3] key from the 10-Key
Pad to select “TX RESULT
REPORT”.
3Using the and keys, select
either “ON” or “OFF”, and then
press the [Yes] key.
The “REPORTING” menu appears
again.
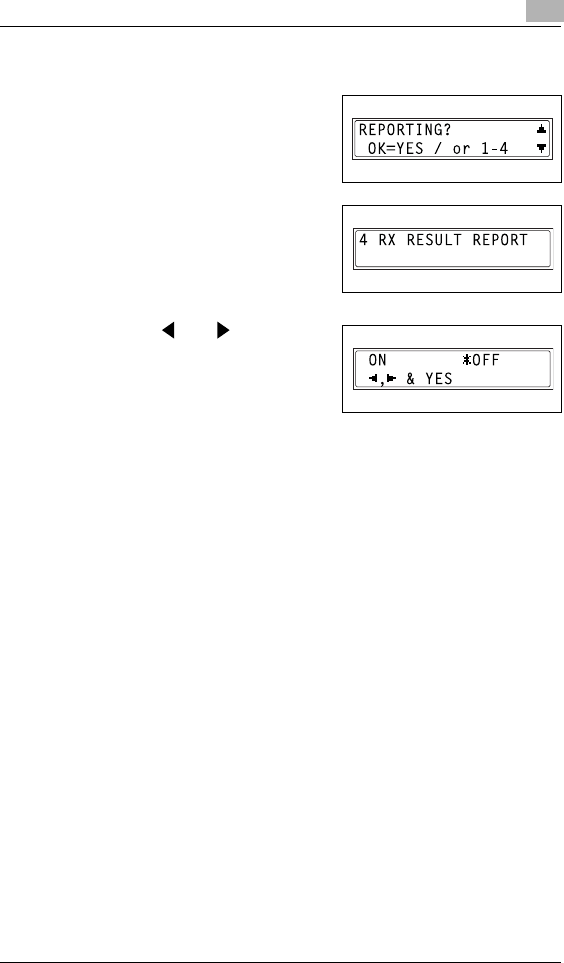
Utility Mode – Fax Functions 10
Di152f/Di183f 10-53
To set the “RX RESULT REPORT” function
1Select the “REPORTING” menu.
HRefer to “To select the
“REPORTING” menu” on
page 10-50.
2Press the [4] key from the 10-Key
Pad to select “RX RESULT
REPORT”.
3Using the and keys, select
either “ON” or “OFF”, and then
press the [Yes] key.
The “REPORTING” menu appears
again.

10 Utility Mode – Fax Functions
10-54 Di152f/Di183f

Confirmation Mode 11
Di152f/Di183f 11-1
11 Confirmation Mode
11.1 Checking Transmission Results
The transmission result information for a maximum of 60 sent and
received documents is saved. For details on checking the transmission
results, refer to “To check the transmission result” on page 6-22.
11.2 Checking the Machine’s Counters (“MACHINE
COUNTER” Menu)
The number of operations performed since this machine was installed can
be checked using the functions available when the [Confirm] key is
pressed.
Items that can be checked with “MACHINE COUNTER”:
MACHINE COUNTER Description
TOTAL COUNT This count shows the total number of prints made since this
machine was installed.
SIZE COUNT This count shows the total number of prints made for the specified
paper size. (The paper size that is counted should be set by the
service representative.)
TOTAL SCAN This count shows the total number of scans made since this
machine was installed.
TX PAGES This count shows the total number of pages faxed since this
machine was installed.
RX PAGES This count shows the total number of fax pages received since this
machine was installed.
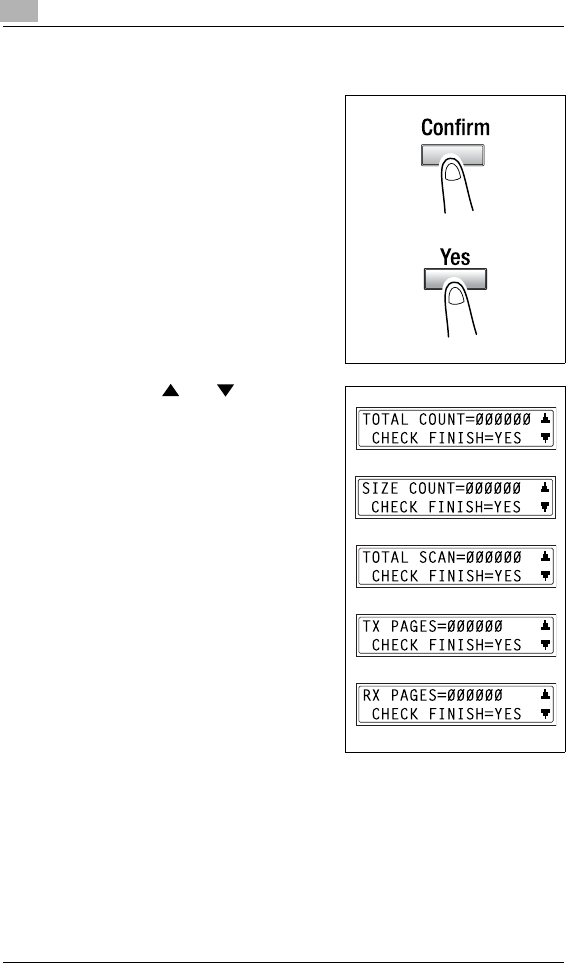
11 Confirmation Mode
11-2 Di152f/Di183f
To check the counters
1Press the [Confirm] key twice, and
then press the [Yes] key.
The “MACHINE COUNTER” menu
appears.
2Using the and keys, select
the counter that you wish to check.
3Press the [Yes] key to return to the “MACHINE COUNTER” menu.
4Press the [No] key to return to the main screen.
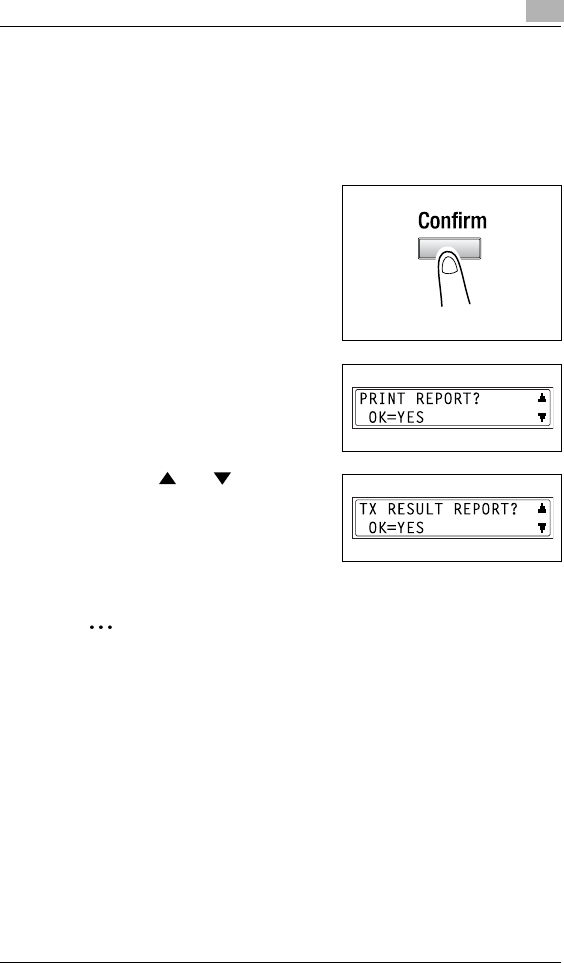
Confirmation Mode 11
Di152f/Di183f 11-3
11.3 Outputting a report/list (“PRINT REPORT” menu)
The various reports and lists of programmed settings can be printed using
the functions available when the [Confirm] key is pressed.
To output a report/list
1Press the [Confirm] key 3 times.
A confirmation message appears,
asking whether or not to print a
report.
2Press the [Yes] key.
A menu appears, showing the
reports and lists that can be printed.
3Using the and keys, select
the report/list that you wish to print,
and then press the [Yes] key.
After the specified report/list is
printed, the main screen appears
again.
Tip
The reception/transmission result reports can be checked on screen.
For details on viewing the transmission result, refer to “To check the
transmission result” on page 6-22.
The following reports and lists can be printed.
11 Confirmation Mode
11-4 Di152f/Di183f
Transmission Result Report
The document number, recipient name, date sent, starting time of
transmission, number of document pages, time required, mode, and
transmission result are printed.
Reception Result Report
The document number, caller name, date received, starting time of
reception, number of pages received, time required, mode, and reception
result are printed.
Activity Report
The operation number, document number, date of operation, starting time
of transmission/reception, type of operation (transmission or reception),
recipient/caller name, number of pages sent/received, mode, and
transmission/reception result are printed.
The machine can also be set to print this report automatically after every
60 transmissions/receptions.
SESSION FUNCTION No. DESTINATION
STATION
DATE TIME PAGE DURATION MODE RESULT
0001 TX 001 AAA NEWYORK
012345678
APR.19 18:00 010 00h02min21s G3 NG
NG PAGE:1.3.5.7
SESSION FUNCTION No. DESTINATION
STATION
DATE TIME PAGE DURATION MODE RESULT
0001 RX 001 AAA TOKYO
098765432
APR.19 18:00 001 00h02min21s ECM NG
0021:ERROR DURING RX
No. SESSION DATE TIME TX/RX DESTINATION
STATION
PAGE DURATION MODE RESULT
01 0001 APR.19 16:32 TX--- AAA NEWYORK
012345678
006 00h01min16s ECM OK
02 0002 APR.19 18:00 ---RX AAA TOKYO
098765432
001 00h02min21s ECM NG
03 0002 APR.19 18:00 ---RX AAA TOKYO
098765432
012 00h02min48s ECM OK
04 0003 APR.19 19:12 TX--- HEAD OFFICE
024682468
001 00h00min56s ECM OK
Confirmation Mode 11
Di152f/Di183f 11-5
Queued Job List
This is a list of documents stored in the memory and waiting to be sent,
and documents specified for timer transmission, batch transmission or
polling reception.
The document number, type of operation being performed, time, recipient/
caller name, and number of document pages are printed.
Queued Job Images
A reduced image of the first page of the document stored in the memory
and waiting to be sent in addition to the document number, type of
operation being performed, recipient/caller name, date, time, and number
of document pages are printed.
List of One-Touch Dial Keys
The recipients programmed in the one-touch dial keys are printed in
numerical order of the keys.
List of Speed Dial Numbers
The recipients programmed for the speed dial numbers are printed in
numerical order.
List of Programmed Keys
The group dialing and program dialing settings specified for one-touch dial
keys are printed in numerical order of the keys.
OT-NO. DESTINATION STATION DESTINATION NUMBER BATCH TIME SPEED SET DATE
OT-01 AAA NEWYORK 012345678 33.6 JAN.20.2001
OT-02 AAA TOKYO 098765432 14.4 JAN.20.2001
OT-03 HEAD OFFICE 024682468 16:00 33.6 FEB.12.2001
OT-04 NJ OFFICE 0P02345678
SUB:#1234
14.4 FEB.12.2001
SP-NO. DESTINATION STATION DESTINATION NUMBER SPEED SET DATE
SP-001 AMSTERDAM OFFICE 0P09876543 33.6 JAN.20'2001
SP-002 KOREA OFFICE 0P01357913 14.4 JAN.20'2001
SP-003 ABCDEF 024682468 33.6 FEB12'2001
SP-004 POST OFFICE 0224466880
SUB:#5678
14.4 FEB12'2001

11 Confirmation Mode
11-6 Di152f/Di183f
Relay Box List
The status and settings for the 5 relay boxes can be printed and checked.
Machine Settings List
The current machine settings are printed.
Configuration Page
This function is only available when the Printer Controller (optional) is
installed.
The list of the printer settings is printed.
PCL Font List
This function is only available when the Printer Controller (optional) is
installed.
The PCL font list is printed.
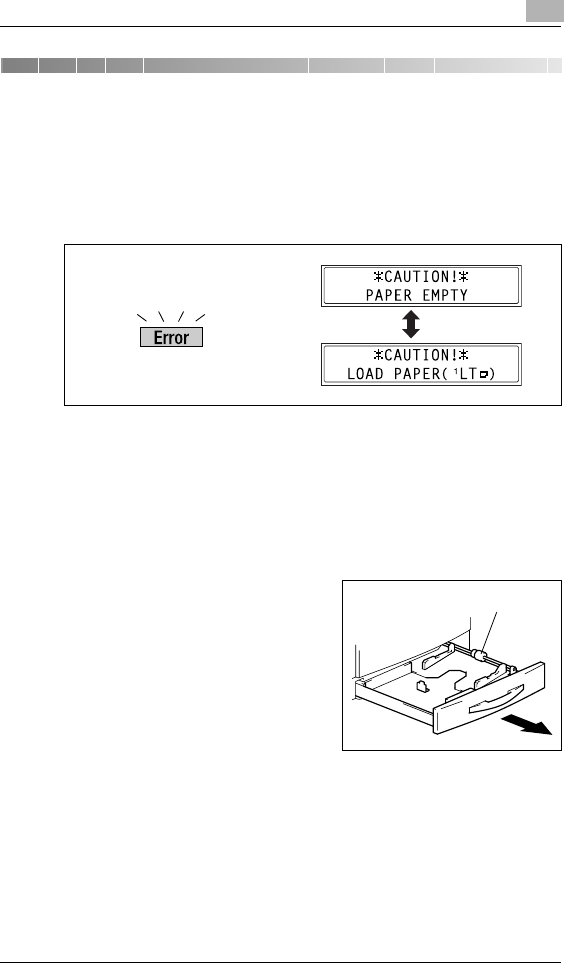
Error Messages 12
Di152f/Di183f 12-1
12 Error Messages
12.1 When the Message “LOAD PAPER” Appears
When the currently selected paper tray runs out of paper, the message
shown below appears, and copying and printing cannot be performed.
The paper source and paper size appear in the bottom line of the screen.
(For the sample message shown above, supply Letter L-size paper into
the 1st Tray.)
Check the message for the empty paper tray and the paper size, and then
load paper according to the corresponding procedure described below.
To load paper into the 1st Tray
1Pull out the 1st Tray.
?Have the necessary precautions
been observed when pulling out
the tray?
§Be careful not to touch the
surface of the Paper Take-up
Roller with your hands.
Paper Take-up Roller
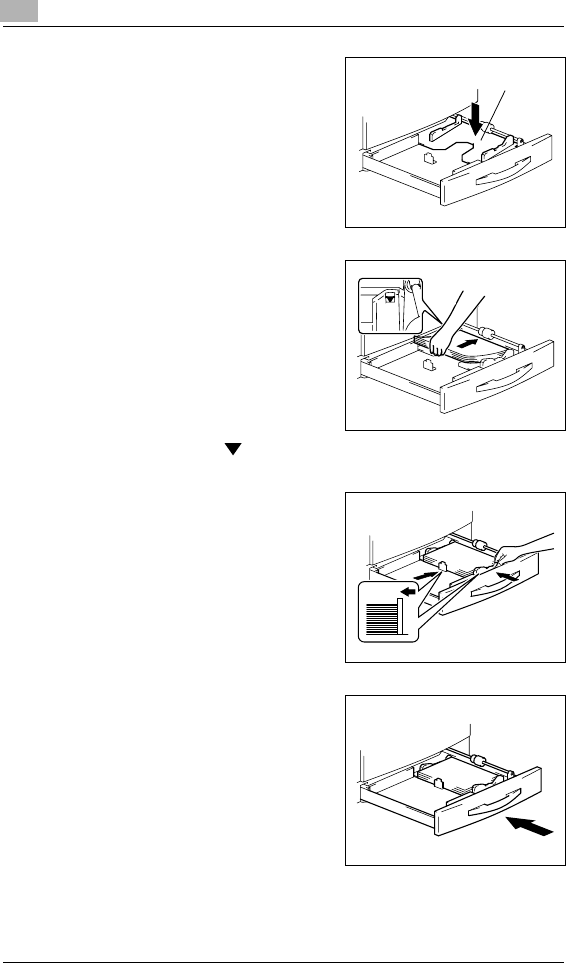
12 Error Messages
12-2 Di152f/Di183f
2Press down on the Paper-Lifting
Plate until it locks into place.
3Load the paper into the tray so that
the front side of the paper (the side
facing up when the package was
unwrapped) faces up.
?Have the necessary precautions
been observed when loading
the paper?
§Do not load so many much
paper that the top of the stack is
higher than the mark.
4Slide the paper guides against the
edges of the paper.
?Is the paper guide positioned
correctly?
§Make sure that the paper guides
are pushed up against the
edges of the paper.
5Close the paper tray.
Paper-Lifting Plate

Error Messages 12
Di152f/Di183f 12-3
To load paper into the 2nd Tray
Load paper into the 3rd, 4th and 5th paper trays using the same procedure
described below.
1Pull out the 2nd Tray.
2Press down on the Paper-Lifting
Plate until it locks into place.
3Load the paper into the tray so that
the front side of the paper (the side
facing up when the package was
unwrapped) faces up.
?Have the necessary precautions
been observed when loading
the paper?
§Do not load so many much
paper that the top of the stack is
higher than the mark.
Paper-Lifting Plate
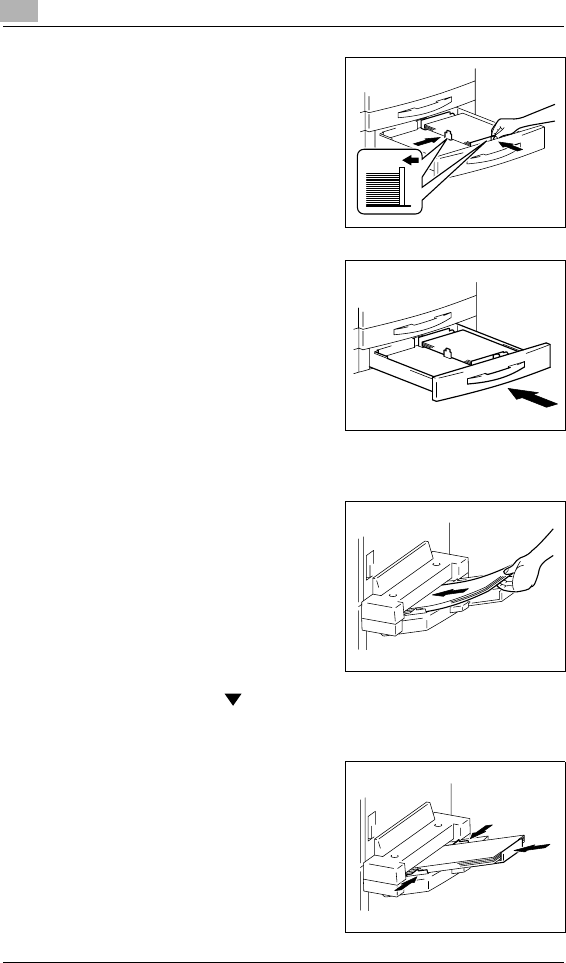
12 Error Messages
12-4 Di152f/Di183f
4Slide the paper guides against the
edges of the paper.
?Is the paper guide positioned
correctly?
§Make sure that the paper guides
are pushed up against the
edges of the paper.
5Close the paper tray.
To load paper into the Multiple Bypass Tray
1Load the paper into the Bypass
Tray.
?Have the necessary precautions
been observed when loading
the paper?
§Load the paper so that the front
side of the paper faces down.
§Do not load so many much
paper that the top of the stack is
higher than the mark.
§Make sure that the paper is not curled (rolled).
2Adjust the Bypass Tray Extender
and the paper guides to fit the size
of the paper.
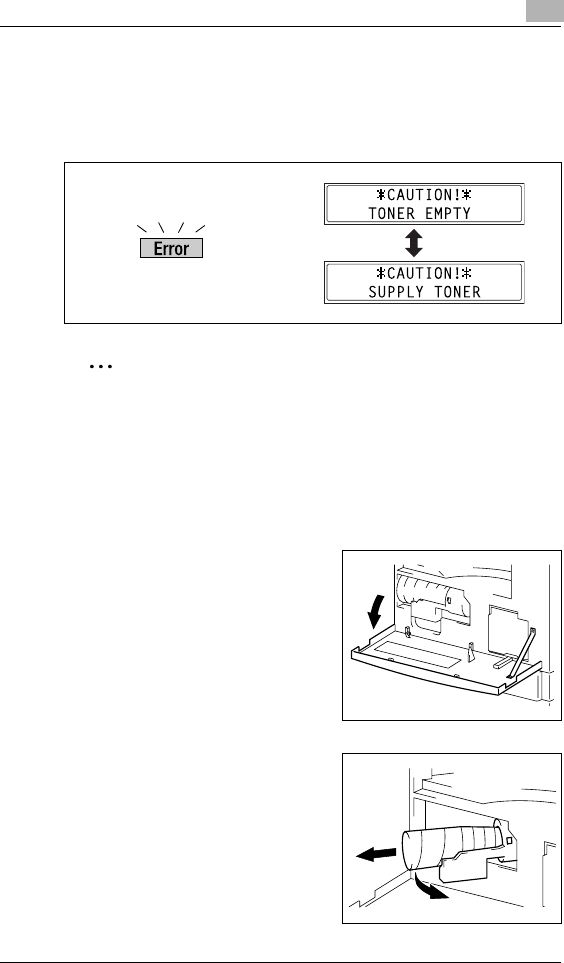
Error Messages 12
Di152f/Di183f 12-5
12.2 When the Message “TONER EMPTY” Appears
When toner is about to run out, the message shown below appears.
When this message appears, replace the toner bottle with a new one.
Note
Use only toner developed specifically for this machine. Use of any
other type of toner may cause damage to the machine. For details,
contact your service representative.
Do not throw away the used toner bottle. Instead, keep it so that it can
be collected by your service representative.
To replace the toner bottle
1Open the Front Cover.
2Swing out the Toner Bottle Holder,
and then remove the toner bottle.
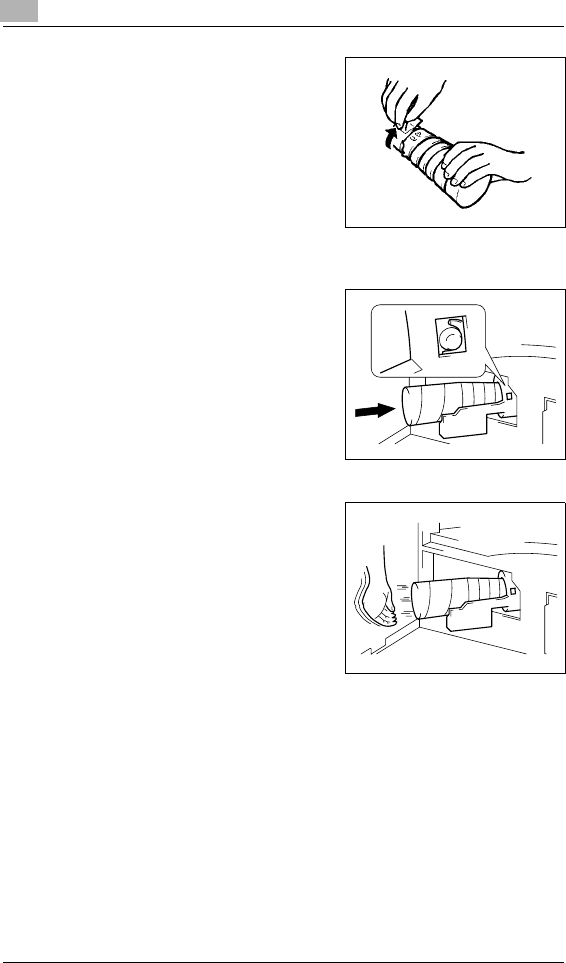
12 Error Messages
12-6 Di152f/Di183f
3Holding the sealed end of the new
toner bottle up, slowly peel off the
seal toward you.
?Have the necessary precautions
been observed when peeling off
the seal?
§Since some toner may spurt out
while the seal is being peeled
off, be sure to peel off the seal
slowly.
4With the side of the toner bottle
marked “UP” facing up, insert the
toner bottle.
?Have the necessary precautions
been observed while inserting
the toner bottle?
§As shown at the right, the tab on
the toner bottle should securely
fit into the notch in the holder.
5Lightly tap the bottom of the toner
bottle three or four times.

Error Messages 12
Di152f/Di183f 12-7
6Close the Toner Bottle Holder, and
then close the Front Cover.
When the Front Cover is closed, the
toner automatically begins refilling.
?Are copies faint immediately
after the toner bottle is
replaced?
§Perform the “TONER
REPLENISHER” function in the
Utility mode (p. 9-18).
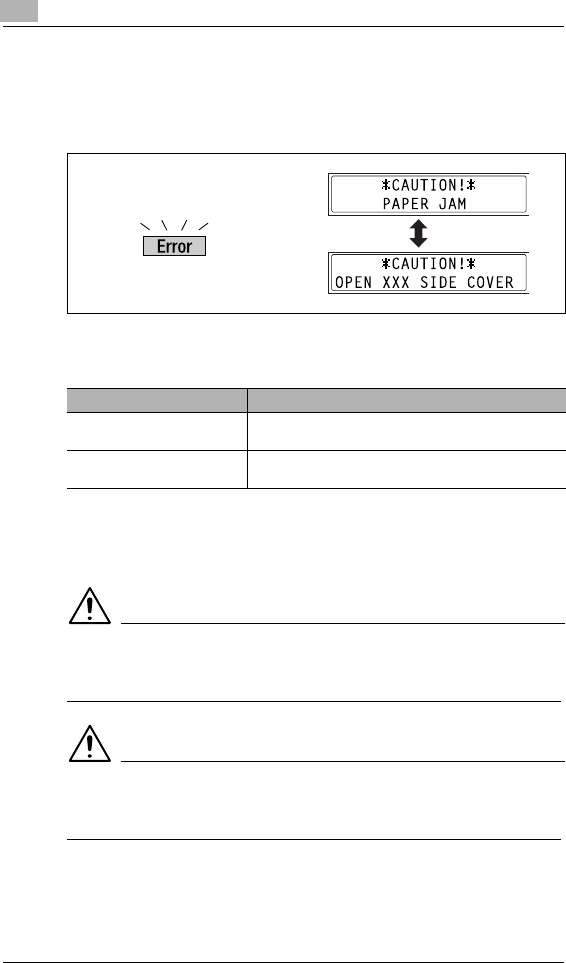
12 Error Messages
12-8 Di152f/Di183f
12.3 When the Message “PAPER JAM” Appears
If a paper misfeed occurs while copying or printing, the message shown
below appears, and copying and printing stops.
A message indicating the location of the paper misfeed appears in the
bottom line of the screen.
Follow the appropriate procedure described below to clear the misfed
paper.
To clear a paper misfeed in the main unit or 1st Tray
CAUTION
The area around the fusing unit is extremely hot.
§Touching any part other than the specified levers may result in burns.
CAUTION
There are hooks on the back of the guide plate.
§Touching any part other than the paper may result in injuries.
Message Location of the paper misfeed
OPEN 1st SIDE COVER Manual Bypass Tray (p. 12-13)
Inside the main unit or 1st Tray (p. 12-8)
OPEN 2nd (3rd/4th/5th) SIDE
COVER Paper Feed Cabinet (p. 12-12)
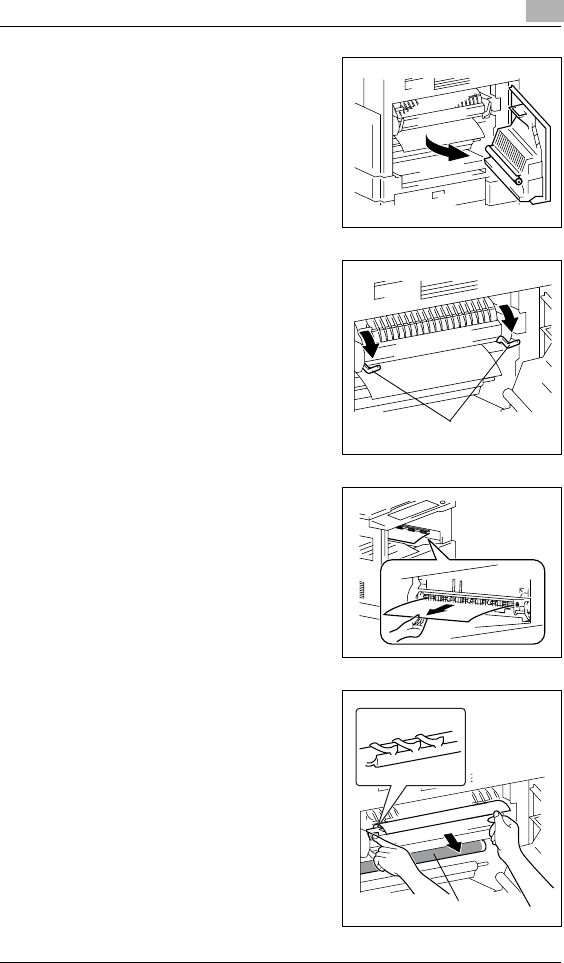
Error Messages 12
Di152f/Di183f 12-9
1Open the Side Cover of the main
unit.
2Pull down the Pressure Levers.
?Have the necessary precautions
been observed when pulling
down the Pressure Levers?
§Only hold the green part of the
Pressure Levers when pulling
them down.
3Slowly pull out the paper.
4While holding the guide plate
pressed down, slowly pull out the
paper.
?Have the necessary precautions
been observed when pressing
down the guide plate?
§Only touch the green part of the
guide plate when pressing it
down.
§Do not touch the PC Drum
(green), otherwise a malfunction
could result.
Pressure Levers
PC Drum
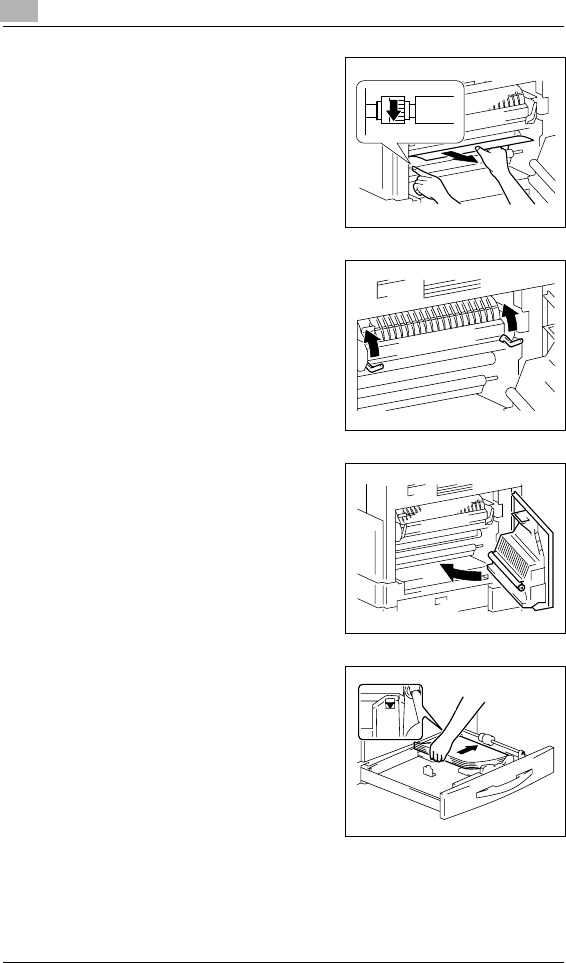
12 Error Messages
12-10 Di152f/Di183f
5While turning the knob on the roller,
slowly pull out the paper.
?Have the necessary precautions
been observed when turning the
roller?
§Only turn the green knob when
turning the roller.
6Return the Pressure Levers to their
original positions.
7Close the Side Cover of the main
unit.
8Pull out the 1st Tray, and then
remove all paper from the tray.
Load the paper into the tray again.
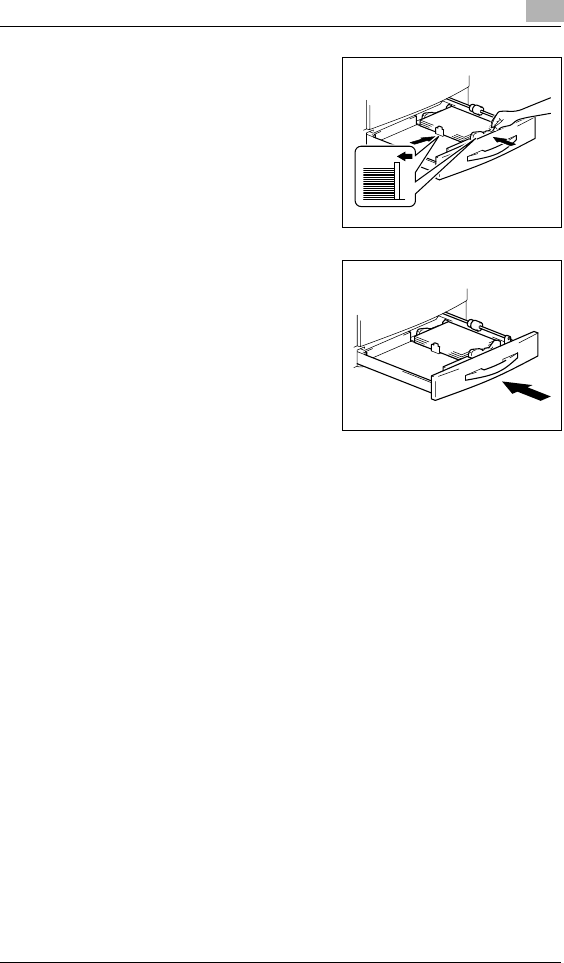
Error Messages 12
Di152f/Di183f 12-11
9Slide the paper guides against the
edges of the paper.
?Is the paper guide positioned
correctly?
§Make sure that the paper guides
are pushed up against the
edges of the paper.
10 Close the 1st Tray.

12 Error Messages
12-12 Di152f/Di183f
To clear a paper misfeed in the Paper Feed Cabinet
1Open the Side Cover of the Paper
Feed Cabinet.
2Slowly pull out the paper.
3Close the Side Cover of the Paper
Feed Cabinet.
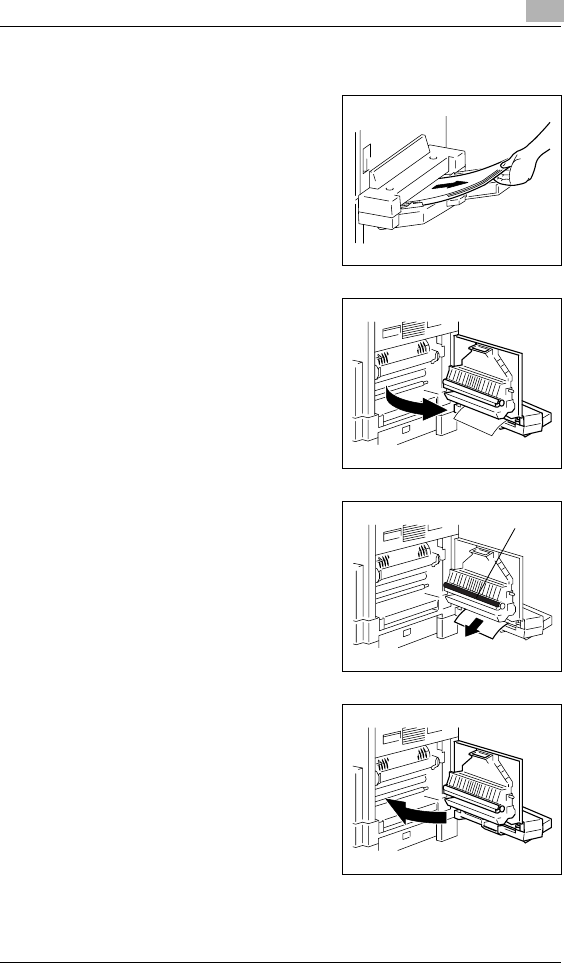
Error Messages 12
Di152f/Di183f 12-13
To clear a paper misfeed in the Multiple Bypass Tray
1Remove all paper from the tray.
2Open the Side Cover of the main
unit.
3Slowly pull out the paper.
?Have the necessary precautions
been observed when pulling out
the paper?
§Do not touch the Transfer
Roller, otherwise a malfunction
could result.
4Close the Side Cover of the main
unit.
Transfer Roller

12 Error Messages
12-14 Di152f/Di183f
5Load the paper into the Bypass Tray
again.
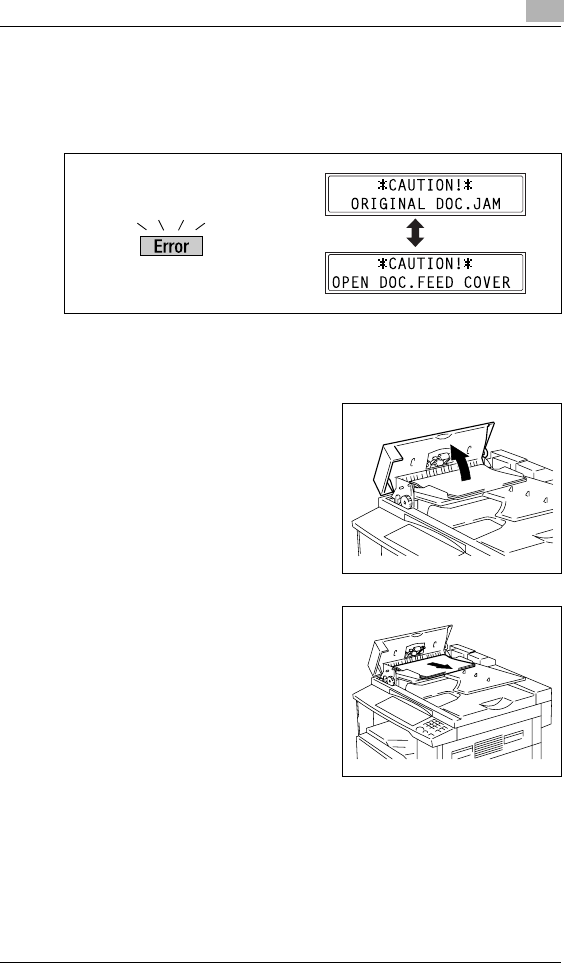
Error Messages 12
Di152f/Di183f 12-15
12.4 When the Message “ORIGINAL DOC.JAM” Appears
If a document misfeed occurs while the document is being fed, the
message shown below appears, and copying and printing stops.
Remove the misfed document according to the following procedure.
To clear a misfeed in the Automatic Document Feeder
1Open the Document Feeder Cover.
2Remove all document pages from
the Document Feeder Tray.
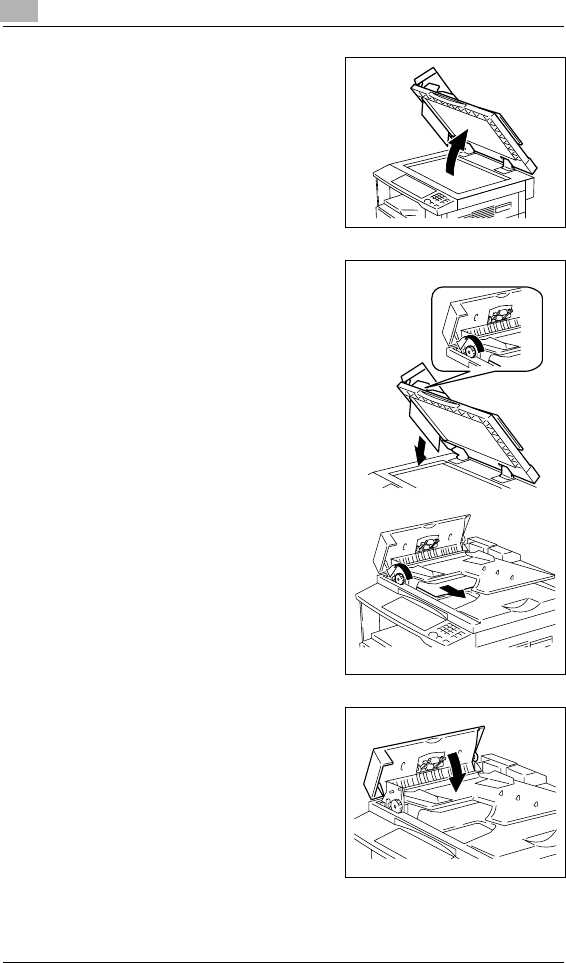
12 Error Messages
12-16 Di152f/Di183f
3Lift open the Automatic Document
Feeder.
4While turning the Document Feed
Knob in the direction of the arrow,
slowly pull out the document.
5Close the Automatic Document
Feeder and the Document Feeder
Cover.

Error Messages 12
Di152f/Di183f 12-17
6Load the documents removed in
step 2 back into the tray.
Note
If “RETURN 1 (2) ORIG. to ADF and PRESS START KEY” appears on
the display, also load the one or two document pages that caused the
paper misfeed.

12 Error Messages
12-18 Di152f/Di183f
12.5 Main Error Messages and Their Remedies
Message Cause Remedy
PAPER JAM A paper misfeed occurred in
the main unit. Open the cover at the
indicated location, and then
remove the misfed paper.
(“When the Message
“PAPER JAM” Appears” on
page 12-8)
(Flashing alternately)
OPEN XXX SIDE COVER
All misfed paper was not
removed from the main unit. Check the message in the
display for the location of the
paper misfeed, and then
remove the misfed paper.
(“When the Message
“PAPER JAM” Appears” on
page 12-8)
ORIGINAL DOC.JAM A paper misfeed occurred in
the Automatic Document
Feeder.
All misfed paper was not
removed from the Automatic
Document Feeder.
Open the Document Feeder
Cover and the Automatic
Document Feeder, and then
remove the misfed paper.
(“When the Message
“ORIGINAL DOC.JAM”
Appears” on page 12-15)
(Flashing alternately)
OPEN DOC.FEED COVER
∗REMOVE PAPER IN
BYPASS TRAY∗
Paper is loaded in the Manual
Bypass Tray. Remove the paper from the
Manual Bypass Tray.
FRONT COVER OPEN The Front Cover of the main
unit is open or not securely
closed.
Securely close the Front
Cover.
(Flashing alternately)
CLOSE FRONT COVER
DOCUMENT COVER
OPEN The Automatic Document
Feeder is lifted up (while a
document is loaded into it).
Securely close the Automatic
Document Feeder.
(Flashing alternately)
CLOSE DOCUMENT
COVER
DOC.FEED COVER OPEN The Automatic Document
Feeder Cover is open. Securely close the Document
Feeder Cover.
(Flashing alternately)
CLOSE DOC.FEED
COVER
TONER EMPTY The toner is empty. Copying
and printing cannot be
performed.
Replace the toner bottle with
a new one. (“To replace the
toner bottle” on page 12-5)
(Flashing alternately)
SUPPLY TONER
PAPER EMPTY The selected paper tray has
run out of paper.
“#” indicates the paper tray,
and “XXX” indicates the
paper size.
Load paper of the specified
size into the specified paper
tray.
(Flashing alternately)
LOAD PAPER (#XXX)
Error Messages 12
Di152f/Di183f 12-19
SET ORIGINAL TO ADF A document was not loaded
into the Automatic Document
Feeder before beginning a
copy function (such as, “2in1”
copying or “Mixed Orig.”
copying) that uses the
Automatic Document Feeder.
Otherwise, the Automatic
Document Feeder is lifted up.
Load a document into the
Automatic Document Feeder.
Securely close the Automatic
Document Feeder.
REMOVE PAPER When interrupting a copy job
to perform a different copy
operation other than the
“Book Separation” function,
the document for the
interrupted copy job was left
in the Automatic Document
Feeder.
Remove the document from
the Automatic Document
Feeder.
TEXT ×1.0 1
ä[A]ü#XXX:EMPTY (While specifying copy
settings)
The selected paper tray has
run out of paper.
“#” indicates the paper tray,
and “XXX” indicates the
paper size.
Either load paper of the
specified size into the
specified paper tray, or press
the [Paper] key and select a
different paper size.
NO SUITABLE PAPER • While copying, the size of
the paper in the selected
paper tray has changed.
• While copying documents
with mixed sizes using the
“Auto Paper” function,
paper of a suitable size
could not be found.
“#” indicates the paper
tray, and “XXX” indicates
the paper size.
Either load paper of the
specified size, or press the
[Paper] key and select a
different paper size.
(Flashing alternately)
LOAD PAPER (#XXX)
APS SIZE ERROR While copying using the
“Auto Paper” function, paper
of a suitable size could not be
found.
Either load paper of a
suitable size, or press the
[Paper] key and select a
different paper size.
AMS SIZE ERROR While copying using the
“Auto Size” function, the
combination of the document
and paper sizes caused the
zoom ratio to exceed the
range between ×0.5 and
×2.0.
Either load paper of a
suitable size, or use the
and keys to specify the
zoom ratio.
PAPER SIZE ERROR The paper loaded in the
paper tray caused a size
error.
“#” indicates the paper tray,
and “XXX” indicates the
paper size.
Pull open the paper tray with
the size error, and then close
it again.
Check if a custom paper size
has been entered, and
correct the paper size using
the appropriate Utility mode
function.
(Flashing alternately)
RESET PAPER (#XXX)
Message Cause Remedy

12 Error Messages
12-20 Di152f/Di183f
MEMORY FULL The size of the data for the
scanned image has
exceeded the capacity of the
memory.
Press the [Panel Reset] key,
or turn the machine off, then
on again. (The scanned data
should be cleared from the
memory.)
(Flashing alternately)
PRESS ANY KEY
∗PC PRINT∗
MEMORY FULL The image data received
from the computer has
exceeded the capacity of the
memory.
Press the [Panel Reset] key,
or turn the machine off, then
on again. (The received
image data should be cleared
from the memory.)
SET PLUG-IN COUNTER A counter key is not inserted. Insert the counter key.
UPPER TRAY FULL If the optional Job Tray is
installed and the paper in the
Upper Copy Tray has
reached the maximum
capacity, printing cannot
continue.
Remove all paper from the
Upper Copy Tray of the Job
Tray.
(Flashing alternately)
REMOVE PAPER
TRAY MOVEMENT
ERROR The optional Job Tray is
installed and the paper in
either the Upper Copy Tray or
the Lower Copy Tray has
reached the maximum
capacity when the machine is
turned on, when copying
begins, when receiving a fax,
or when starting to print.
Remove the paper from the
Upper Copy Tray or the
Lower Copy Tray of the Job
Tray, and then press the
[Panel Reset] key.
(Flashing alternately)
PRESS ANY KEY
LINE PROBLEM • The telephone dialing
system or telephone wiring
system are not set
correctly.
• The telephone cable is not
attached correctly.
• Check the telephone
dialing system or
telephone wiring system
and use the appropriate
Utility mode function to
make the correct settings.
• Correctly connect the
telephone cable.
(Flashing alternately)
CHECK LINE
∗COMM.ERROR∗
(####) • Communication is not
possible because of some
problem in the machine.
• Communication is not
possible because of a
problem with the recipient/
caller’s fax machine.
Check the transmission
results.
∗REDIAL ALL FAILED∗All redial attempts failed
because either the recipient’s
line is busy or there was no
answer.
Check the condition of the
recipient’s line, and then try
sending the fax again.
∗MEM.FULL/TX CANCEL∗While sending a fax, the size
of the data for the scanned
image has exceeded the
capacity of the memory.
• Retrieve all received faxes
stored in the memory.
• Send the fax by direct
transmission.
∗MEM.FULL/RX
CANCEL∗
While receiving a fax, the size
of the data for the scanned
image has exceeded the
capacity of the memory.
Retrieve all received faxes
stored in the memory.
Message Cause Remedy

Error Messages 12
Di152f/Di183f 12-21
CALL SERVICE(M1) A maintenance is due. Contact your service
representative.
CALL SERVICE(M2) The Imaging Unit should be
replaced. Contact your service
representative.
MACHINE TROUBLE Some problem occurred in
the machine. Turn the machine off, then on
again.
If the error is still displayed,
contact your service
representative.
(Flashing alternately)
(C####)
Message Cause Remedy

12 Error Messages
12-22 Di152f/Di183f
Troubleshooting 13
Di152f/Di183f 13-1
13 Troubleshooting
13.1 When Incorrect Copies Are Produced
Symptom Possible Cause Remedy
The copy is too light. The copy density is set too
light. Use the Auto/Photo key
to select a darker copy
density (p. 4-25).
The copy paper is damp. Replace the paper.
(p. 12-1)
The copy is too dark. The copy density is set too
dark. Use the Auto/Photo key
to select a lighter copy
density (p. 4-25).
The document was not
pressed close enough
against the Original Glass.
Position the document so
that it is pressed closely
against the Original Glass.
(p. 4-5)
The copy is blurry. The copy paper is damp. Replace the paper.
(p. 12-1)
The document was not
pressed close enough
against the Original Glass.
Position the document so
that it is pressed closely
against the Original Glass.
(p. 4-5)
13 Troubleshooting
13-2 Di152f/Di183f
There are streaks through the
copy.
There are specks throughout
the entire copy.
The Original Glass is dirty. Wipe the glass with a soft
dry cloth. (p. 14-9)
The document pad is dirty. Clean the document pad
with a soft cloth dampened
with a mild detergent.
(p. 14-9)
The original is highly
translucent, such as diazo
photosensitive paper or
OHP transparencies.
Place a blank sheet of
paper over the document.
(p. 4-6)
A double-sided document is
being copied. If a thin double-sided
document is being copied,
the information on the back
side may be reproduced in
the copy. Use the Auto/
Photo key to select a
lighter density for the
background. (p. 4-26)
The edge of the copy is dirty. The document pad is dirty. Clean the document pad
with a soft cloth dampened
with a mild detergent.
(p. 14-9)
The selected paper size is
larger than the document
(with a zoom setting of
×1.00).
Select a copy paper size
that is the same as the size
of the document. (p. 4-11)
Otherwise, select the “Auto
Size” function to enlarge the
copy to the selected paper
size. (p. 4-21)
The orientation of the
document is different from
the orientation of the copy
(with a zoom setting of
×1.00).
Select a copy paper size
that is the same as the size
of the document.
Otherwise, select a copy
orientation that is the same
as the orientation of the
document.
The copy was reduced to a
size smaller than the copy
(with a reduced zoom ratio).
Select a zoom ratio that
adjusts the copy size to the
size of the selected paper.
(p. 4-22)
Otherwise, select the “Auto
Size” function to reduce the
copy to the selected paper
size. (p. 4-21)
Symptom Possible Cause Remedy

Troubleshooting 13
Di152f/Di183f 13-3
The image is not aligned
properly on the paper. The document is not
positioned correctly. Correctly position the
document against the
Document Scales. (p. 4-1)
If the Automatic Document
Feeder is installed,
correctly adjust the
Document Guide Plates for
the size of the document.
(p. 4-1)
The document is not
positioned correctly in the
Automatic Document
Feeder.
Lift open the Automatic
Document Feeder, and
correctly position the
document against the
Document Scales. (p. 4-5)
The Document Guide
Plates are not slid up
against the edges of the
document.
Slide the Document Guide
Plates against the edges of
the document.
Curled paper was loaded
into the paper tray. Flatten the paper before
loading it.
Symptom Possible Cause Remedy
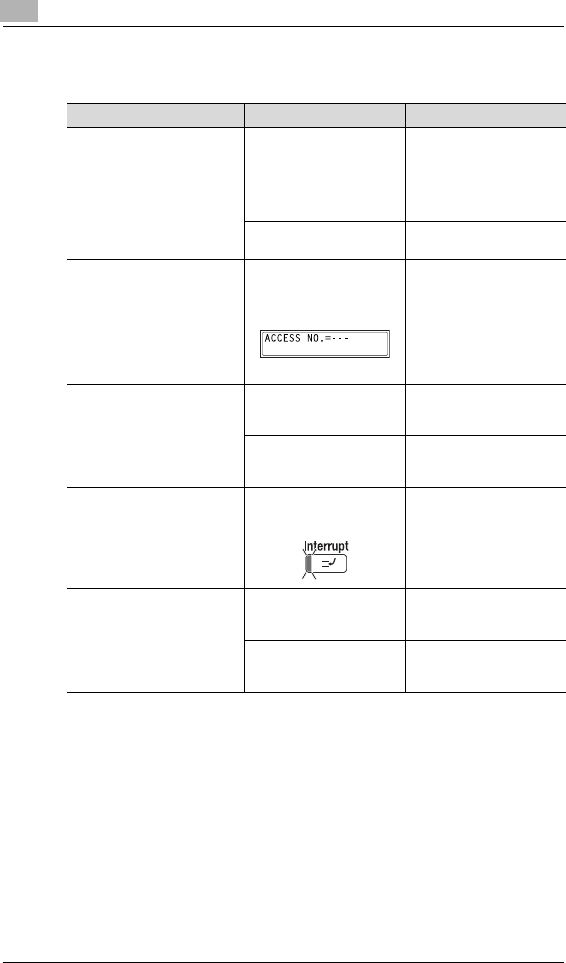
13 Troubleshooting
13-4 Di152f/Di183f
13.2 When Copying Is Not Performed Correctly
Symptom Possible Cause Remedy
Nothing appears on the
display. Only the [Start] key
indicator is lit up in green. The machine is in Energy
Saver mode (preheat
mode).
Press any key to cancel
Energy Saver mode.
(p. 3-25)
The “AUTO SHUT OFF”
function was activated. Set the Power Switch to “O”
(p. 3-28).
The [Start] key indicator is not
lit up in green. A user (section) access
number has not been
entered.
Enter the user (section)
access number according
to the instructions in “To
enter an access number” on
page 3-27
Even though the [Start] key is
pressed, no copies are made. If the “Error” indicator on the
Control Panel is lit, an error
has occurred.
Follow the instructions in
any messages that appear
on the display.
If the machine was just
turned on, it is still warming
up.
The machine takes about
30 seconds to warm up
after it is turned on.
The machine cannot be set to
Copy mode. The machine is in Interrupt
mode (the “Interrupt”
indicator is lit).
Press the [Interrupt] key to
cancel Interrupt mode.
(p. 3-26)
The machine cannot be turned
on. The power supply cord has
been unplugged from the
electrical outlet.
Plug the power supply cord
into the electrical outlet.
The breaker for the
electrical circuit has been
tripped.
Close the breaker for the
electrical circuit.

Troubleshooting 13
Di152f/Di183f 13-5
13.3 When Faxing Is Not Performed Correctly
Faxes Cannot Be Sent
Symptom Possible Cause Remedy
The document cannot be
scanned. The document is too thick. Position the document on
the Original Glass to send it.
(p. 6-5)
The document is too thin or
too small. Position the document on
the Original Glass to send it.
(p. 6-5)
The Original Glass is dirty. Wipe the glass with a soft,
dry cloth. (p. 14-9)
The document was scanned at
an angle. The document is not
positioned correctly. Adjust the Document Guide
Plates for the size of the
document. (p. 6-3)
The fax received by the
recipient is not clear. The document is not
positioned correctly. Position the document
correctly. (p. 6-3 and p. 6-5)
The Original Glass is dirty. Wipe the glass with a soft,
dry cloth. (p. 14-9)
The text in the document is
too faint. Adjust the scanning
contrast. (p. 10-36)
There is a problem with the
telephone connection or
with the recipient's fax
machine.
Check that this machine
can make clean copies. If it
can, try sending the fax
again.
The fax received by the
recipient is blank. The document was sent
with the front side facing
down (while using the
Automatic Document
Feeder).
Load the document with the
front side facing up, and
then try sending the fax
again. (p. 6-3)
Faxes cannot be sent
automatically. The fax number is wrong. Check the fax number.
A number specifically for
telephone calls is being
dialed.
Check the number.
There is a problem with the
recipient's fax machine (it is
out of paper, it is not set to
receive faxes automatically,
it is turned off, etc.).
Contact the recipient.

13 Troubleshooting
13-6 Di152f/Di183f
Faxes Cannot Be Received
Symptom Possible Cause Remedy
The received fax is not clear. Paper that does not meet
specifications has been
used.
Use paper that meets
specifications. (p. 3-39)
The paper is damp. Replace the paper.
(p. 12-1)
The toner is empty. Replace the toner bottle
with a new one. (p. 12-5)
There is a problem with the
telephone connection or
with the caller’s fax
machine.
Check that the machine can
make clean copies. If it can,
have the caller send the fax
again.
The received fax is blank. The toner is empty. Replace the toner bottle
with a new one. (p. 12-5)
The caller sent the back of
the fax pages. Contact the caller.
Faxes cannot be received
automatically. The machine is set to
receive faxes manually. Set the machine to
automatic reception.
(p. 10-45)
The memory is full. Load paper if it is empty,
and then print the faxes
stored in the memory.
Some error occurred. Follow the instructions in
any messages that appear
on the display. (p. 12-18)
Black streaks appear through
the copy. There is a problem with the
telephone connection or
with the caller’s fax
machine.
Check that the machine can
make clean copies. If it can,
have the caller send the fax
again.

Troubleshooting 13
Di152f/Di183f 13-7
Calls Cannot Be Sent
Symptom Possible Cause Remedy
Nothing can be heard from the
connected telephone. The cord from the
telephone is not connected
correctly to the main unit.
Correctly connect the
telephone cord to the main
unit.
The telephone cord from
the wall jack is not
connected correctly to the
main unit.
Correctly connect the
telephone cord from the
wall jack to the main unit.
Transmitting. Check again after the
transmission is finished.
After dialing, the ringing cannot
be heard. The telephone dialing
system is not set correctly. Correctly set the telephone
dialing system. (p. 3-34)
After the [Speaker] key is
pressed, it is difficult to hear the
recipient/caller’s voice.
The monitoring volume is
too low. Increase the monitoring
volume. (p. 10-49)
The ringing of the telephone is
too low (loud). The ringer volume of the
connected telephone is set
too low (loud).
Adjust the ringer volume of
the connected telephone.

13 Troubleshooting
13-8 Di152f/Di183f

Appendix 14
Di152f/Di183f 14-1
14 Appendix
14.1 Specifications
Main Unit Di152*/Di152f/Di183*/Di183f
* Only when Fax unit for Di183/Di152 FX-1 is installed
Specification Di152/Di152f Di183/Di183f
Type Desktop
Platen Stationary
Photo conductor OPC
Copying system Digital laser copying
Developing system MT-HG system
Fusing system Heat-roller-fixing system
Resolution 600 dpi
Document Types: Sheets, books, and other three-dimensional objects
Size: Maximum 11 × 17 L
Weight: 6-1/2 lb
Paper types Plain paper (16 lb to 24 lb), recycled paper
(16 lb to 24 lb)
Special paper: Cards (24-1/4 lb to 41-3/4 lb), OHP
transparencies, postcards, and label sheets
* Special paper can only be fed through the 1st Tray and
the Manual Bypass Tray.
Paper sizes 1st Tray:
11 × 17 L to 5-1/2 × 8-1/2
Width: 3-9/16 inch to 11-11/16 inch, length: 5-1/2 inch and
17 inch
In metric:
A3 L to A5 C, FLS (8-1/4 × 13)
Width: 3-9/16 inch to 11-11/16 inch, length: 5-1/2 inch and
17 inch
* When the length is set between 16-9/16 inch to 17 inch,
the maximum width that can be set is 11 inch.
When the width is set between 11 inch and 11-11/
16 inch, the maximum length that can be set is 16-9/16
inch.
Manual Bypass Tray:
Width: 3-9/16 inch to 11-11/16 inch, length: 5-1/2 inch to
17 inch
Paper capacity 1st Tray:
Plain or recycled paper: 250 sheets
Special paper: 20 sheets
Manual bypass tray:
Plain, recycled or special paper: 1 sheet
Warm-up time Less than 30 seconds (at room temperature (73.4°F))

14 Appendix
14-2 Di152f/Di183f
Automatic Document Feeder AF-10
First-page print time Less than 7 seconds (using the 1st Tray loaded with
Letter C)
Copy speed 9 sheets/minute (11 × 17 L)
11 sheets/minute (Legal L)
13 sheets/minute (Letter L)
15 sheets/minute (Letter C)
11 sheets/minute (11 × 17 L)
12 sheets/minute (Legal L)
15 sheets/minute (Letter L)
18 sheets/minute (Letter C)
Magnification ratios Full size: × 1.00
Enlargement ratios: × 1.21, × 1.29 and × 2.00
Reduction ratios: × 0.78, × 0.64, × 0.50
Zoom ratios: × 0.50 to × 2.00 (in 0.01 increments)
Multiple copies 1 to 99 sheets
Density control Automatic, manual and photo manual
Image loss Leading edge: 3/16 inch, Trailing edge: 3/16 inch, Rear
edge: 3/16 inch, Front edge: 3/16 inch
Power requirements AC 120 to 127 V, 9.3 A, 50/60 Hz
Power consumption Less than 1180 W
Size 23-1/4 inch (width) × 24 inch (depth) × 19-1/4 inch (height)
Weight 88 lb (including 2-1/4 lb for the Fax unit for Di183/152 FX-1)
Standard Memory Fax: 4 MB (Can be increased to a maximum of 12 MB)
Copier:32 MB (Can be increased to a maximum of 48 MB)
Memory backup battery Nickel-hydrogen battery (6 V, 280 mAh)
Specification Di152/Di152f Di183/Di183f
Specification
Document feed method Standard method: Single-sided documents
Mixed document sizes: Single-sided documents
Document type Standard method: Plain paper (13-1/4 lb to 29-1/4 lb)
Mixed document sizes: Plain paper (16 lb to 24 lb)
Document size Standard method: 11 × 17 L to 5-1/2 × 8-1/2 L
Mixed document sizes: Combination of 11 × 17 L and
Letter C, or Legal L and Letter L
Document loading capacity Maximum 50 sheets (21-1/4 lb)
Power consumption Less than 36 W
Size 23-11/16 inch (width) × 19-3/4 inch (depth) × 4-1/4 inch
(height)
Weight Less than 13-3/4 lb
Appendix 14
Di152f/Di183f 14-3
Paper Feed Cabinet PF-120
Shifting Unit OT-103
Job Tray JS-202
Specification
Paper types Plain paper (16 lb to 24 lb), recycled paper
Paper sizes 11 × 17 L to 5-1/2 × 8-1/2
In metric:
A3 L to A5 C, FLS (8-1/4 × 13)
Paper capacity 250 sheets
Power consumption Less than 9 W
Size 23-1/4 inch (width) × 22 inch (depth) × 4-1/4 inch (height)
Weight 12 lb
Specification
Shifting amount 1-1/8 inch
Paper capacity 250 sheets
Power consumption Less than 63 W
Specification
Paper types Plain paper (16 lb to 24 lb), recycled paper
Special paper: Cards (24-1/4 lb to 41-3/4 lb), OHP
transparencies, postcards, and label sheets
Paper capacity Upper Copy Tray:
Plain or recycled paper: 100 Letter-size sheets, 50 sheets
of other than Letter size (stacked up to 3/4 inch high)
Special paper: 10 sheets
Lower Copy Tray:
Plain or recycled paper: 150 Letter-size sheets, 75 sheets
of other than Letter size
Special paper: 20 sheets
Power consumption Less than 63 W

14 Appendix
14-4 Di152f/Di183f
Multiple Bypass Tray MB-5
Specification
Paper types Plain paper (16 lb to 24 lb), recycled paper
Special paper: Cards (24-1/4 lb to 41-3/4 lb), OHP
transparencies, postcards, and label sheets
Paper sizes Width: 3-9/16 inch to 11-11/16 inch; Length: 5-1/2 inch to
17 inch
Paper capacity Plain or recycled paper: 50 sheets
Special paper: 20 sheets
Power consumption Less than 9 W
Size (Maximum) 17-1/4 inch (width) × 17-1/4 inch (depth) × 5-
1/2 inch (height)
Weight 6 lb

Appendix 14
Di152f/Di183f 14-5
14.2 List of Utility/Function/Confirm Menu Commands
Utility Menu Commands
Manufacturer’s default settings appear in bold.
Menu Function Settings
1 MACHINE SETTING AUTO RESET ON (0.5/1/2/3/4/5)/OFF
ENERGY SAVE MODE TIMER=1-240 min. (Default: 15)
AUTO SHUT OFF ON (TIMER=15-240 min.)/OFF
DENSITY (ADF) MODE1/MODE2
PRINT DENSITY LIGHT to DARK (5 levels)
LCD CONTRAST LIGHT to DARK (4 levels)
BUZZER VOLUME HIGH/LOW/OFF
LANGUAGE Default: ENGLISH
INITIAL MODE COPY/FAX
2 PAPER SOURCE INCH/METRIC (For each paper tray)
INCH/METRIC
TRAY1 PAPER PLAIN/OHP/CARD
AUTO/CUSTOM
AUTO SELECT (For each paper tray)
DISABLE/ENABLE
FIXED/CONTINUE
3 USER MANAGEMENT DRUM DEHUMIDIFY —
TONER REPLENISHER —
4 ADMIN. MANAGEMENT
AUTO SHUT OFF DISABLE/ENABLE
COPY TRACK COPY TRACK MODE (ON/OFF)
ACCESS NO. REG.
COPY TRACK DATA (DISPLAY/
CLEAR)
REMOTE MONITOR LIMITED/FULL/OFF

14 Appendix
14-6 Di152f/Di183f
5 COPY SETTING 1 PAPER PRIORITY A3 L/B4 L/A4 L/B5 L/A5 L/FLS L/
A4 C/B5 C/A5 C/11 × 17 L/
11 ×14 L/LG L/LT L/HL L/LT C/
HL C/1ST/2ND/3RD*/4TH*/5TH*/
MULTI BYPASS
(* Only with Di183/Di183f)
DENSITY PRIORITY AUTO/MANUAL/PHOTO
DENSITY LEVEL(A) LIGHT to DARK (3 levels)
DENSITY LEVEL(M) LIGHT to DARK (5 levels)
BINDING POS. LEFT/RIGHT
MARGIN SETTING WIDTH=0-20 (mm)*
ERASE SETTING LEFT/UPPER/FRAME
(WIDTH=5 mm-20 mm)*
6 COPY SETTING 2 MIXED ORIGINAL ON/OFF
COPY PRIORITY AP/AS/MANUAL
OUTPUT PRIORITY NON/SORT/GROUP
4IN1 COPY ORDER PATTERN1/PATTERN2
CRISSCROSS MODE ON/OFF
7 FAX REGISTRATION ONE-TOUCH DIAL For details, refer to page 10-3.
SPEED DIAL For details, refer to page 10-8.
GROUP DIAL For details, refer to page 10-13.
PROGRAM DIAL For details, refer to page 10-16.
BATCH TX For details, refer to page 10-25.
MAILBOX For details, refer to page 10-29.
RELAY BOX For details, refer to page 10-31.
8 TX OPERATION SCAN CONTRAST LIGHT to DARK (5 levels)
RESOLUTION STD/FINE/S/F/ H/T(STD/FINE/S/F)
DEFAULT TX MEM.TX/ADF TX
HEADER (This function cannot be set.)
OT-DIAL IN COPY DISABLE/ENABLE
Menu Function Settings
Appendix 14
Di152f/Di183f 14-7
* When using the 10-Key Pad to enter a measurement, the values are entered in millimeters.
The conversion ratio is shown below.
1 inch = 25.4 mm
Function Menu Commands
9 RX OPERATION MEMORY RX MODE ON/OFF
NO.of RINGS 1-16
REDUCTION RX ON/OFF/CUT
RX PRINT MEMORY RX/PRINT RX
RX MODE AUTO RX/MANUAL RX
FORWARD ON/ON (PRINT)/OFF
FOOTER ON/OFF
SELECT TRAY (For each paper tray) DISABLE/
ENABLE
10 COMM.SETTING TONE/PULSE TONE/PULSE
LINE MONITOR HIGH/LOW/OFF
PSTN/PBX PSTN/PBX
11 REPORTING ACTIVITY REPORT ON/OFF
RESERV.REPORT ON/OFF
TX RESULT REPORT ON/OFF
RX RESULT REPORT ON/OFF
12 INITIAL USER DATA DATE For details, refer to page 3-31.
USER FAX NO. For details, refer to page 3-32.
USER NAME For details, refer to page 3-33.
Menu Function Settings
Menu Settings
1 BROADCAST Recipients
2 TIMER TX Transmission time
3 MAILBOX TX Recipient, mailbox ID and password
4 PRINT MAILBOX RX Mailbox ID
5 POLLING TX SINGLE/MULTI, polling ID and password
6 POLLING RX Caller, polling ID and password
7 RELAY INITIATE Recipient, relay box ID and password
8 CANCEL RESERV. Select job
9 TX MODE Memory transmission/direct transmission
and recipient

14 Appendix
14-8 Di152f/Di183f
Confirm Menu Commands
Menu Function
TX/RX RESULT —
TOTAL PAGE TOTAL COUNT
SIZE COUNT
TOTAL SCAN
TX PAGES
RX PAGES
PRINT REPORT TX RESULT REPORT
RX RESULT REPORT
ACTIVITY REPORT
MEMORY DATA LIST
MEMORY IMAGE LIST
ONE TOUCH LIST
SPEED DIAL LIST
KEY SETTING LIST
RELAY BOX LIST
MACHINE STATUS
CONFIGURATION PAGE
PCL FONT LIST
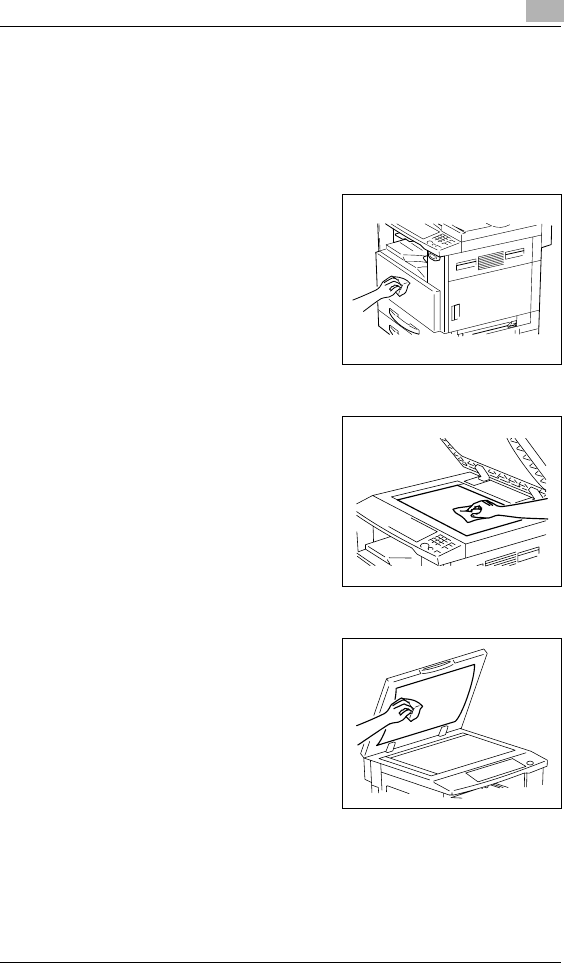
Appendix 14
Di152f/Di183f 14-9
14.3 Care of the Machine
Cleaning
Turn off the machine before cleaning it.
Housing
§Clean the surface of the housing by
wiping it with a soft cloth dampened
with a mild household detergent.
Original Glass
§Clean the Original Glass by wiping it
with a soft, dry cloth.
Document Pad
§Clean the surface of the document
pad by wiping it with a soft cloth
dampened with alcohol.

14 Appendix
14-10 Di152f/Di183f
Control Panel
§Clean the Control Panel by wiping it
with a soft, dry cloth.
CAUTION
Incorrectly cleaning the Control
Panel keys may damage them.
Never use mild household
detergent or glass cleaner to clean
the Control Panel.
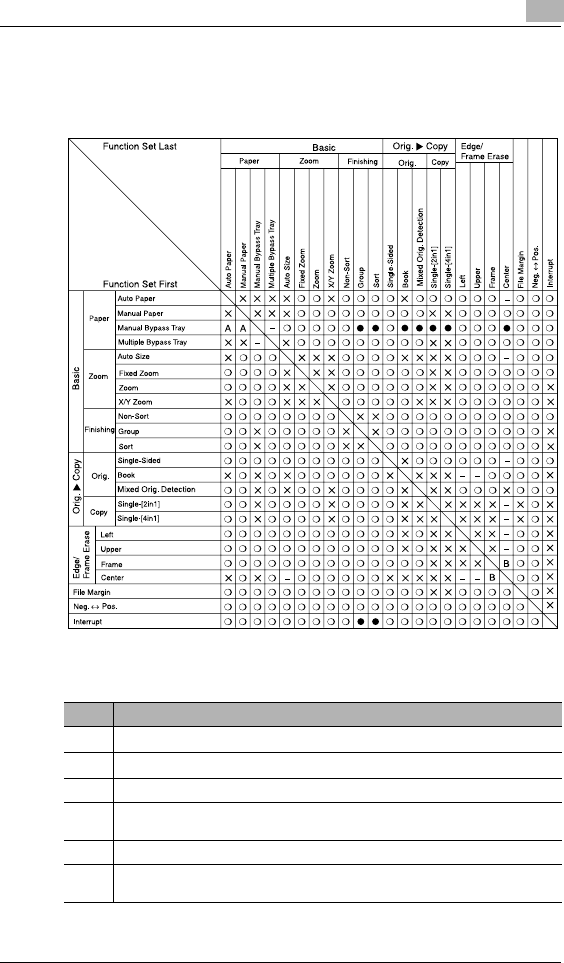
Appendix 14
Di152f/Di183f 14-11
14.4 Function Combination Table
Function Combination Table
Function combination codes
Code Description
2The functions can be combined.
●The functions cannot be combined. (The function set first takes precedence.)
× The functions cannot be combined. (The function set last takes precedence.)
A If paper is loaded into the manual bypass tray, the function set first takes
precedence.
B The functions can be combined only with the “Book Separation” function.
– There is no operation that combines the functions.
In this system, the functions cannot be combined.

14 Appendix
14-12 Di152f/Di183f
14.5 Paper Size and Zoom Ratio Tables
Copy Paper Sizes
Paper format Size (millimeters) Size (inches)
A3 297 mm × 420 mm 11-3/4 × 16-1/2
A4 210 mm × 297 mm 8-1/4 × 11-3/4
A5 148 mm × 210 mm 5-3/4 × 8-1/4
A6 105 mm × 148 mm 4-1/4 × 5-3/4
B4 257 mm × 364 mm 10 × 14-1/4
B5 182 mm × 257 mm 7-1/4 × 10
B6 128 mm × 182 mm 5 × 7-1/4
Postcard 100 mm × 148 mm 4 × 5-3/4
Paper format Size (inches) Size (millimeters)
Ledger 11 × 17 279 mm × 432 mm
11 × 14 11 × 14 279 mm × 356 mm
Computer 10-1/8 × 14 257 mm × 356 mm
10 × 14 10 × 14 254 mm × 356 mm
9-1/4 × 14 9-1/4 × 14 236 mm × 356 mm
Legal 8-1/2 × 14 216 mm × 356 mm
Foolscap Government Legal 8-1/2 × 13 216 mm × 330 mm
Foolscap 8 × 13 203 mm × 330 mm
Foolscap 8-2/3 × 13 220 mm × 330 mm
Foolscap Folio 8-1/4 × 13 210 mm × 330 mm
8-1/4 × 11-3/4 8-1/4 × 11-3/4 210 mm × 301 mm
Letter 8-1/2 × 11 216 mm × 279 mm
Government Letter 8 × 10⁻¹/2 203 mm × 267 mm
Quarto 8 × 10 203 mm × 254 mm
Statement Invoice 5-1/2 × 8-1/2 140 mm × 216 mm
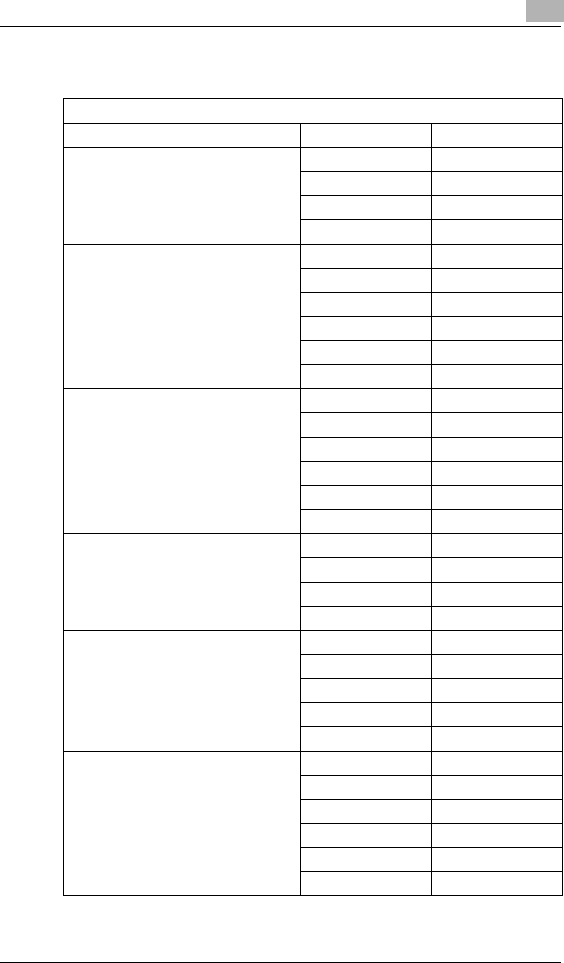
Appendix 14
Di152f/Di183f 14-13
Zoom Ratios
Metric sizes
Document size Paper size Zoom ratio
A3
297 mm × 420 mm
11-3/4 × 16-1/2
A4 × 0.70
A5 × 0.50
B4 × 0.86
B5 × 0.61
A4
210 mm × 297 mm
8-1/4 × 11-3/4
A5 × 0.70
A6 × 0.50
B5 × 0.86
B6 × 0.61
A3 × 1.41
B4 × 1.22
A5
148 mm × 210 mm
5-3/4 × 8-1/4
A6 × 0.70
B6 × 0.86
A4 × 1.41
A3 × 2.00
B4 × 1.73
B5 × 1.22
A6
105 mm × 148 mm
4-1/4 × 5-3/4
A4 × 2.00
A5 × 1.41
B5 × 1.73
B6 × 1.22
B4
257 mm × 364 mm
10 × 14-1/4
A4 × 0.81
A5 × 0.57
B5 × 0.70
B6 × 0.50
A3 × 1.15
B5
182 mm × 257 mm
7-1/4 × 10
A5 × 0.81
A6 × 0.57
B6 × 0.70
A3 × 1.63
A4 × 1.15
B4 × 1.41
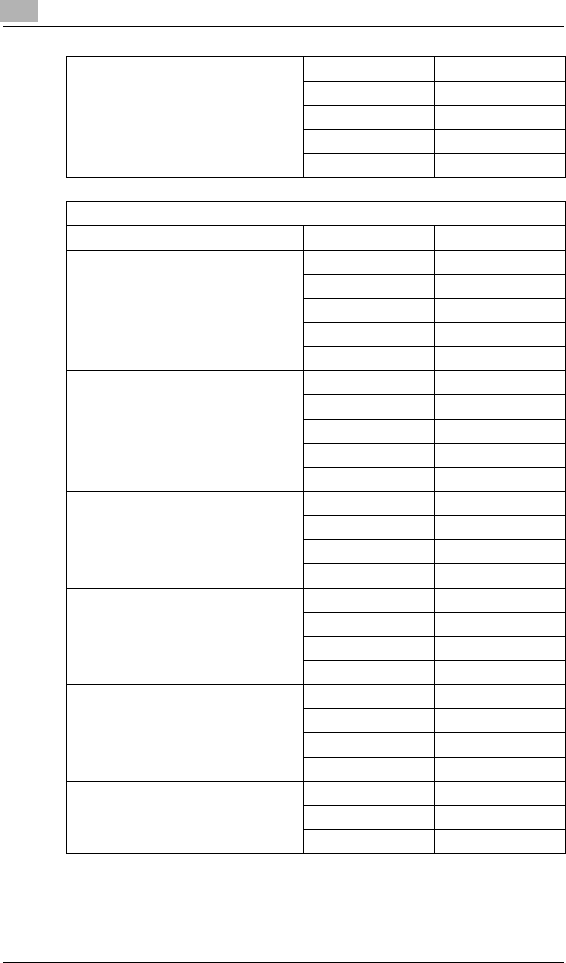
14 Appendix
14-14 Di152f/Di183f
B6
128 mm × 182 mm
5 × 7-1/4
A6 × 0.81
A4 × 1.64
A5 × 1.15
B4 × 2.00
B5 × 1.41
English sizes
Document size Paper size Zoom ratio
11 × 17
279.4 mm × 431.8 mm 11×14 × 0.82
Legal × 0.77
Foolscap × 0.75
Letter × 0.64
Invoice × 0.50
11 × 15
279.4 mm × 381 mm 11 × 14 × 0.93
Legal × 0.75
Foolscap × 0.77
Letter × 0.73
Invoice × 0.50
11 × 14
279.4 mm × 355.6 mm Legal × 0.77
Foolscap × 0.77
Letter × 0.77
Invoice × 0.50
Legal
8-1/2 × 14
215.9 mm × 355.6 mm
Foolscap × 0.92
Letter × 0.78
Invoice × 0.60
11 × 17 × 1.21
Foolscap
8-1/2 × 13
215.9 mm × 330.2 mm
Letter × 0.84
Invoice × 0.65
11 × 17 × 1.30
11 × 14 × 1.07
Letter
8-1/2 × 11
215.9 mm × 279.4 mm
Invoice × 0.64
11 × 17 × 1.29
11 × 14 × 1.27

Appendix 14
Di152f/Di183f 14-15
Zoom ratio=Paper size/Document size
1 inch = 25.4 mm
1 mm = 0.0394 inch
Invoice
5-1/2 × 8-1/2
139.7 mm × 215.9 mm
11 × 17 × 2.00
11 × 14 × 1.64
Legal × 1.54
Foolscap × 1.50
Letter × 1.29

14 Appendix
14-16 Di152f/Di183f
14.6 Power Outages
Even if a power outage occurred, transmission and reception information
are stored in the memory for about 10 hours. After 10 hours, all stored
information is lost. If a document is lost due to a power outage, a memory
clear report is automatically printed after the power is restored and the
machine is turned on.
With this report, the document number and recipient information for the
lost fax can be retrieved.
Information programmed in one-touch dial keys are not lost during a
power outage. There is no need to re-program the one-touch dial keys.
If there is a power outage or the machine is turned off, calls cannot be
made or received.
If a telephone not powered by electricity is connected to the machine, the
telephone can be used, even during a power outage.
The telephone where documents are stored for two hours cannot be used
to make or receive calls.

Appendix 14
Di152f/Di183f 14-17
14.7 Glossary
Terms and Definitions
Term Definition
Automatic redialing If a call cannot be completed, for example if the recipient's
machine is busy, the recipient is automatically called again. If a
document queued in the memory to be sent contains multiple
pages, until the time for redialing has been reached, it is
advanced in the queue and sent.
Book document A bound document such as a book or catalog.
F codes F codes are mailbox functions, such as “SUB” (sub-addresses),
“SEP” (selective polling), “SID” and “PWD” (passwords),
regulated by the G3 standards of the ITU-T (International
Telecommunication Union). Mailbox transmission/reception and
relay initiation transmission are possible only with similar
machines compatible with F code transmission.
G3 communication Communications in conformance with the G3 standard (an
international standard for facsimile communications); fax
communications via an analog line (general subscriber line).
Internet fax Faxes can be transmitted via the Internet or an Intranet instead
of through telephone lines.
Instead of a fax number, the recipient’s e-mail address is
specified and the scanned image (TIFF format) can be sent as
an e-mail message to a computer or Internet fax. In addition, e-
mail messages from computers can be received as images.
General subscriber line Analog telephone lines (public network)
JBIG coding method New method of data compression/decompression, standardized
by the Joint Bi-level Image Expert Working Group, a
subcommittee of the International Telecommunications Union
(ITU-T). Effective for transferring large amounts of data or high-
resolution image data such as halftones.
Manual reception Receiving a fax document after talking on the telephone.
Manual transmission Sending a fax document after talking on the telephone.
Memory Stores fax and copy image data. By installing expansion
memory, much more image data can be stored in the memory.
Memory reception When paper runs out or a paper misfeed occurs while receiving
a fax, the data is automatically stored in the memory and printed
out later.
Even if the paper runs out during the night or when the user is
away, the fax document can still be received.
Network scanner This is a function that allows scanned images to be sent to a
computer via a network. They can also be sent as e-mail
messages or uploaded to FTP servers.
On-hook dialing Dials without the hand set picked up. Press the [On-hook dial]
key to use this function.

14 Appendix
14-18 Di152f/Di183f
PBX Abbreviation for private branch exchange
Exchange equipment installed in a company or a plant to
connect a number of telephone sets with multiple station lines in
order to enable unrestricted communications between the
telephone sets.
Protocols The necessary rules for communication
Touch-tone signals A signal used on the telephone line; used when calling on a
push-button line or using push-button services.
By pressing the [ ] key in the 10-Key Pad, touch-tone signals
are used, even if a dial phone line is connected.
Term Definition

Index 15
Di152f/Di183f 15-1
15 Index
Numerics
1st Tray paper setting ........................................................................9-14
2in1 copying ........................................................................................5-2
4in1 copying ........................................................................................5-2
A
Access numbers ................................................................................3-26
Activity report ...................................................................................10-51
Administrative settings .......................................................................9-19
Auto panel reset ........................................................................ 3-24,9-4
Auto paper .........................................................................................4-11
Auto paper source change ................................................................3-26
Auto Select function ...........................................................................9-16
Auto shut-off .............................................................................. 3-25,9-6
Administrative setting ...................................................................9-21
Automatic Document Feeder ..................................................... 9-7,14-2
Automatic paper size detection units .................................................9-13
Automatic reception ...........................................................................6-20
B
Batch transmission ..............................................................................7-3
Setup ..........................................................................................10-25
Binding margin ...................................................................................5-13
Book separation ...................................................................................5-3
Book transmission ...............................................................................7-1
Broadcast transmission .......................................................................7-4
Buzzer volume .....................................................................................9-9
C
Cancelling queued document ............................................................7-19
Cancelling settings ............................................................................3-24
Care of the machine ..........................................................................14-9
Combination dialing ...........................................................................6-16

15 Index
15-2 Di152f/Di183f
Communication settings
Monitoring volume ..................................................................... 10-49
Components ........................................................................................ 3-8
Control Panel .................................................................................... 3-18
Access key .................................................................................. 3-27
Energy Saver key ........................................................................ 3-25
Interrupt key ................................................................................ 4-27
Panel Reset key .......................................................................... 3-24
Copy density ..................................................................................... 4-25
Setting ......................................................................................... 4-26
Copy functions
4in1 Copy Order .......................................................................... 9-39
Binding position ........................................................................... 9-35
Binding width ............................................................................... 9-36
Copy priority ................................................................................ 9-38
Crisscross output ......................................................................... 9-40
Default density level (Auto) ......................................................... 9-34
Default density level (Manual) ..................................................... 9-35
Default finishing mode ................................................................. 9-39
Default mixed originals setting .................................................... 9-38
Density priority ............................................................................. 9-34
Erased width ................................................................................ 9-36
Priority paper size or tray ............................................................ 9-33
Copy program
Recalling ...................................................................................... 5-16
Storing ......................................................................................... 5-15
Copying
Simple copying .............................................................................. 4-9
Current date and time ....................................................................... 3-31
Custom paper size ............................................................................ 4-19
D
Default settings ..........................................................................3-29,9-2
Dialing ............................................................................................... 6-10
Direct transmission ........................................................................... 7-14
Document misfeed .......................................................................... 12-15
Documents for transmission ............................................................... 6-1
Drum dehumidifying .......................................................................... 9-17

Index 15
Di152f/Di183f 15-3
E
Energy Saver mode ................................................................... 3-25,9-5
Entering text ......................................................................................3-36
Erase function ......................................................................................5-9
Error messages ...............................................................................12-18
F
F codes ..............................................................................................7-25
Fax resolution ......................................................................................6-8
Fax transmission
Basic faxing ....................................................................................6-3
Dialing ..........................................................................................6-10
Loading documents into the Automatic Document Feeder ............6-3
Positioning documents on the Original Glass ................................6-5
Finishing copies ...................................................................................5-5
Grouping ........................................................................................5-7
Sorting ............................................................................................5-6
Function combination table ..............................................................14-11
G
Group dialing .....................................................................................6-14
Setup ..........................................................................................10-13
I
Incorrect copies .................................................................................13-1
Initial mode ........................................................................................9-10
Installation site .....................................................................................2-1
Interrupting copy jobs .............................................................. 3-26,4-27
J
Job Tray .............................................................................................14-3
L
Language setting .................................................................................9-9
LCD contrast ........................................................................................9-8
Legal restrictions on copying ...............................................................2-5

15 Index
15-4 Di152f/Di183f
Loading documents ............................................................................. 4-1
Automatic Document Feeder ......................................................... 4-1
Books ............................................................................................ 4-7
Mixed sizes .................................................................................... 4-2
OHP transparencies ...................................................................... 4-6
Original Glass ................................................................................ 4-5
Translucent or transparent documents .......................................... 4-6
Loading paper ................................................................................... 12-1
1st Tray ....................................................................................... 12-1
2nd (3rd/4th/5th) Tray .................................................................. 12-3
Multiple Bypass Tray ................................................................... 12-4
M
Machine settings ................................................................................. 9-2
Mailbox reception .............................................................................. 7-22
Mailbox setup .................................................................................. 10-29
Mailbox transmission .......................................................................... 7-9
Main unit ........................................................................................... 3-10
Manual feeding ................................................................................. 4-14
Custom paper size ...................................................................... 4-19
Manual paper selection ..................................................................... 4-12
Manual reception .....................................................................6-20,7-21
Manual transmission ........................................................................... 7-1
Memory full ......................................................................................... 6-7
Memory reception ............................................................................. 7-21
Menu commands .............................................................................. 14-5
Multiple Bypass Tray ......................................................................... 14-4
N
Negative/positive inverted copying ................................................... 5-12
O
One-touch dialing .............................................................................. 6-12
Setup ........................................................................................... 10-3
Operation precautions ......................................................................... 2-3

Index 15
Di152f/Di183f 15-5
Options
Automatic Document Feeder .......................................................3-13
Job Tray .......................................................................................3-17
Multiple Bypass Tray ....................................................................3-14
Paper Feed Cabinet .....................................................................3-15
Shifting Unit ..................................................................................3-16
P
Paper Feed Cabinet ..........................................................................14-3
Paper feeding ....................................................................................1-17
Paper misfeed clearing ......................................................................12-8
Automatic Document Feeder .....................................................12-15
Main unit ......................................................................................12-8
Multiple Bypass Tray ..................................................................12-13
Paper Feed Cabinet ...................................................................12-12
Paper orientation ...............................................................................1-18
Paper size and zoom ratio tables ....................................................14-12
Paper source .....................................................................................4-11
Setup ............................................................................................9-11
Paper specifications ..........................................................................3-39
PC faxing .............................................................................................8-1
PC scanning ........................................................................................8-1
Phone book .......................................................................................6-17
Phone dialing system ........................................................................3-34
Phone wiring system .........................................................................3-35
Polling reception ................................................................................7-23
Polling transmission ...........................................................................7-16
Power outage ..................................................................................14-16
Power source .......................................................................................2-1
Power Switch .....................................................................................3-28
Preheat mode ............................................................................ 3-25,9-5
Printing ..............................................................................................3-27
Program dialing .................................................................................6-15
Setup ..........................................................................................10-16
Programming fax settings ..................................................................10-1
Q
Queued copy jobs ..............................................................................3-25
Queued jobs report ..........................................................................10-52

15 Index
15-6 Di152f/Di183f
R
Reception result report .................................................................... 10-53
Reception settings
Footer printing ........................................................................... 10-47
Forwarding setup ....................................................................... 10-46
Memory reception mode ............................................................ 10-42
Number of rings ......................................................................... 10-44
Printing mode ............................................................................ 10-45
Reception mode ........................................................................ 10-45
Reduced printing ....................................................................... 10-44
Tray selection ............................................................................ 10-47
Relay box setup .............................................................................. 10-31
Relay broadcast transmission ........................................................... 7-13
Relay initiation transmission ............................................................. 7-11
Remote monitor ................................................................................ 9-30
S
Scanning ........................................................................................... 3-27
Scanning image quality ....................................................................... 9-7
Shifting Unit ....................................................................................... 14-3
Space requirements ............................................................................ 2-2
Specifications .................................................................................... 14-1
Speed dialing .................................................................................... 6-13
Setup ........................................................................................... 10-8
T
Timer transmission .............................................................................. 7-7
Toner replenishing ...................................................................9-18,12-5
Total count ........................................................................................ 11-1
Transmission result report .............................................................. 10-52
Transmission results ......................................................................... 6-22
Transmission settings
Default transmission mode ........................................................ 10-38
Resolution ................................................................................. 10-37
Scanning contrast ...................................................................... 10-36
Turning on/off .................................................................................... 3-28

Index 15
Di152f/Di183f 15-7
U
User fax number ................................................................................3-32
User management
Administrative settings .................................................................9-22
User name .........................................................................................3-33
User-managed service tasks .............................................................9-17
Utility mode ................................................................................ 9-1,10-1
Copy Setting 1 .............................................................................9-32
Copy Setting 2 .............................................................................9-37
Z
Zoom setting ......................................................................................4-21
Auto zoom ratio ............................................................................4-21
X/Y zoom function ........................................................................4-23

15 Index
15-8 Di152f/Di183f

2001. 12 7664-4506-01
Copyright
2001 MINOLTA CO., LTD.
The information contained in this manual
is subject to change without notice to
incorporate improvements made on the
product or products the manual covers.
MINOLTA CO., LTD.
3-13, 2-chome, Azuchi-Machi, Chuo-ku, Osaka. 541-8556, Japan
