Minolta Pageworks 20 Use And Maintenance Manual User's
20 to the manual 81354fd0-9b71-4763-8993-ac56ac06961e
2015-01-05
: Minolta Minolta-Pageworks-20-Use-And-Maintenance-Manual-166938 minolta-pageworks-20-use-and-maintenance-manual-166938 minolta pdf
Open the PDF directly: View PDF ![]() .
.
Page Count: 203 [warning: Documents this large are best viewed by clicking the View PDF Link!]
USER'S MANUAL
Copyright
1997 MINOLTA CO., LTD
Printed in Japan
The information contained in this manual is
subject to change without notice to
incorporate improvements made on the
product or products the manual covers.
Minolta CO., LTD. Image Information Products Marketing Headquarters, 3-13, 2-chome, Azuchi-machi, Chuo-ku, Osaka. 541, Japan
1997. 7 0993-7701-03

For U.S.A./Canadian Users
As an ENERGY STAR Partner, Minolta
Co., Ltd has determined that this printer
meets the ENERGY STAR Guidelines for
energy efficiency.
For Other Country Users
This printer meets the *EPA’s ENERGY
STAR Guidelines for energy efficiency.
*The U.S. Environmental Protection Agency
What is an Energy Star Printer?
Energy Star Printers have a feature that allows them to automatically
“go to sleep” after a period of inactivity. This auto-feature can
reduce a Printer’s annual electricity costs by over 60 percent.
Energy.frm 1 ページ 2003年11月18日 火曜日 午前9時47分

i
Safety Information
Laser Safety
This printer is a page printer which operates by means of a laser.
There is no possibility of danger from the laser, provided the printer
is operated according to the instructions in this manual provided.
Since radiation emitted by the laser is completely confined within
protective housing, the laser beam cannot escape from the machine
during any phase of user operation.
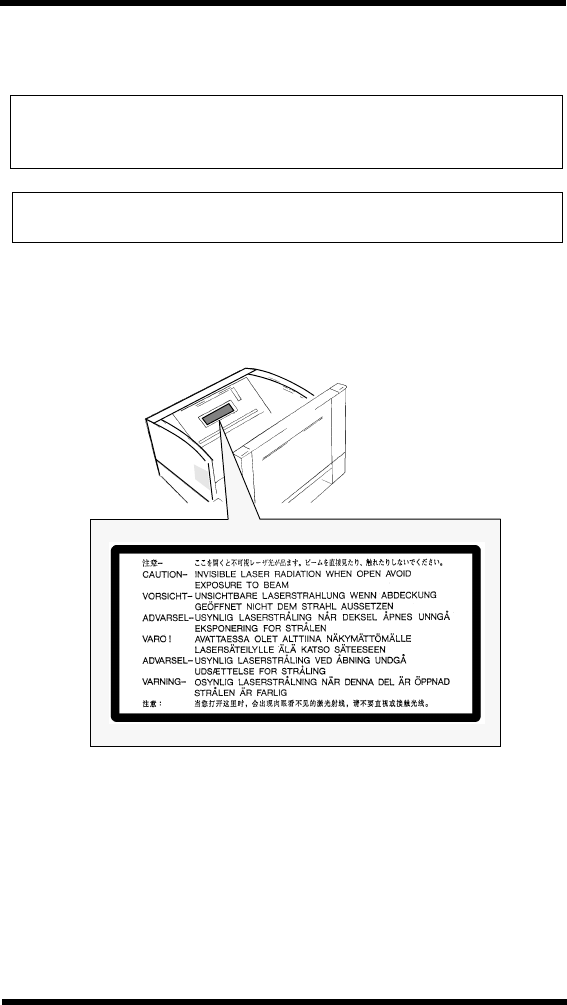
Internal Laser Radiation
Maximum Radiation Power: 8.8 x 10⁻⁴(W)
Wave Length: 770-810 (nm)
This is a Class IIIb Laser Diode Assy. that has an invisible laser
beam. The print head unit is NOT A FIELD SERVICE ITEM.
Therefore, the print head unit should not be opened under any cir-
cumstances.
For United States Users
Laser Safety
This printer is certified as a Class 1 Laser product under the U.S.
Department of Health and Human Service (DHHS) Radiation
Performance Standard according to the Radiation Control for Health
and Safety Act of 1968. This means that the printer does not produce
hazardous laser radiation.
CDRH Regulations
The Center for Devices and Radiological Health (CDRH) of the
U.S. Food and Drug Administration implemented regulations for
laser products on August 2, 1976. These regulations apply to laser
products manufactured from August 1. Compliance is mandatory for
products marketed in the United States. The label shown below indi-
cates compliance with the CDRH regulations and must be attached
to laser products marketed in the United States.
WARNING: Use of controls, adjustments or performance of pro-
cedures other than those specified in this manual may result in
hazardous radiation exposure.
Foreword
Foreword.frm i ページ 2003年11月18日 火曜日 午前9時47分

ii
For other Countries Users
WARNING: Use of controls, adjustments or performance of pro-
cedures other than those specified in this manual may result in
hazardous radiation exposure.
This is a semiconductor laser. The maximum power of the laser
diode is 8.8 x 10⁻⁴W and the wavelength is 770-810 nm.
For Denmark Users
ADVARSEL: Usynlig laserstråling ved åbning, når sikkerhedsaf-
brydere er ude af funktion. Undgå udsttelse for stråling.
Klasse 1 laser produkt der opfylder IEC825 sikkerheds kravene.
For Finland, Sweden Users
VAROITUS!: Laitteen käyttäminen muulla kuin tässä käyttöo-
hjeessa mainitulla tavalla saattaa altistaa käyttäjän turvallisuusluo-
kan 1 ylittävälle näkymättömälle lasersäteilylle.
VARNNING: Om apparaten används på annat sätt än i denna
bruksanvisning specificerats, kan använderen utsattas för osynling
laserstrålnig, som överskrider gränsen för laserklass 1.
VARO: Avattaessa ja suojalukitus ohitettaessa olet alttiina naky-
mattomalle lasersateilylle. Aja katso sateeseen.
VARNING: Osynlig laserstråining när denna del är öppnad och
spärren är urkopplad. Betrakta ej stråien.
Foreword
Foreword.frm ii ページ 2003年11月18日 火曜日 午前9時47分
iii
For Norway Users
ADVARSEL: Dersum apparatet brukes på annen måte enn spesi-
fisert i denne bruksanvisning, kan brukeren utsettes for unsynlig
laserstråling som overskrider grensen for laser klasse 1.
Dette er en halvleder laser. Maksimal effeckt til laserdiode er 8.8 x
10-4W og bolgelengde er 770-810 nm.
WARNING LABEL
Foreword
Foreword.frm iii ページ 2003年11月18日 火曜日 午前9時47分
iv
FCC/ICES (1/2)
USER INSTRUCTIONS (FOR U.S.A. Users)
FCC PART 15 - RADIO FREQUENCY DEVICE WARNING
This equipment has been tested and found to comply with the limits
for a Class B digital device, pursuant to Part 15 of the FCC Rules.
These limits are designed to provide reasonable protection against
harmful interference in a residential installation. This equipment
generates, uses and can radiate radio frequency energy and, if not
installed and used in accordance with the instructions, may cause
harmful interference to radio communications. However, there is no
guarantee that interference will not occur in a particular installation.
If this equipment does cause harmful interference to radio or
television reception, which can be determined by turning the
equipment off and on, the user is encouraged to try to correct the
interference by one or more of the following measures.
NOTE: Without Minolta Network option.
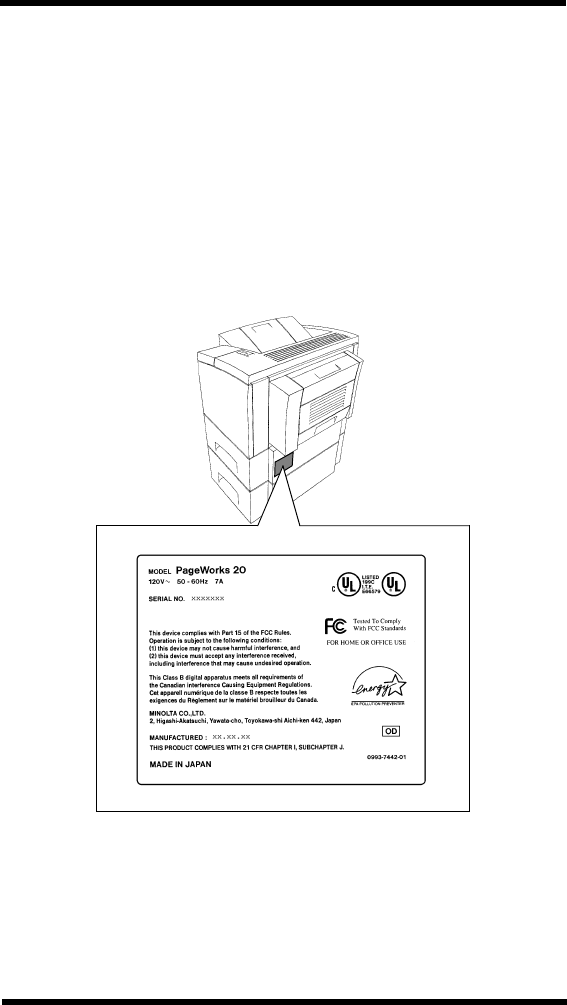
FCC: Declaration of Conformity
Product Type Laser Beam Printer
Product Name PageWorks 20
Options
Accessories Third Tray Unit, Duplex Unit
SIMM (max 64MB), DIMM,
Hard Disk (1080MB)
This device complies with Part 15 of the FCC Rules. Operation is
subject to the following conditions:
(1) this device may not cause harmful interference, and
(2) this device must accept any interference received, including
interference that may cause undesired operation.
Minolta Corporation
101 Williams Drive, Ramsey, New Jersey 07446
Telephone number: 201-825-4000
Foreword
Foreword.frm iv ページ 2003年11月18日 火曜日 午前9時47分

v
• Re-orient or relocate the receiving antenna.
• Increase the separation between the equipment and the
receiver.
• Connect the equipment to an outlet on a circuit
different from that to which the receiver is connected.
• Consult the dealer or an experienced radio/TV
technician for help.
• Any changes or modifications not expressly approved
by Minolta could void the user’s authority to operate
this equipment.
• A LAN adapter is only to be used in industrial area
including commercial areas. Use of a LAN adapter in
residential areas is forbidden.
This device must be used with shielded interface cables. The use of
non-shielded cables is likely to result in interference with radio
communications and is prohibited under the FCC rules.
The design and production of this unit conform to FCC regulations,
and any changes or modifications must be registered with the FCC
and are subject to FCC control. Any changes made by the purchaser
or user without first contacting the manufacturer will be subject to
penalty under FCC regulations.
USER INSTRUCTIONS (For Canadian Users)
INTERFERENCE-CAUSING EQUIPMENT STANDARD
(ICES-003 ISSUE 2) WARNING
This Class B digital apparatus meets all requirements of the
Canadian Interference-Causing Equipment Regulations.
Cet appil numérique de la classe B respecte toutes les
exigences du Règlement sur le matériel brouilleur du Canada.
Foreword
Foreword.frm v ページ 2003年11月18日 火曜日 午前9時47分

vi
FCC/ICES (2/2)
USER INSTRUCTIONS (FOR U.S.A. Users)
FCC PART 15-RADIO FREQUENCY DEVICE WARNING
This equipment has been tested and found to comply with the limits
for a Class A digital device, pursuant to Part 15 of the FCC Rules.
These limits are designed to provide reasonable protection against
harmful interference when the equipment is operated in a
commercial environment. This equipment generates, uses and can
radiate radio frequency energy and, if not installed and used in
accordance with the instruction manual, may cause harmful
interference to radio communications.
Operation of this equipment in a residential area is likely to cause
harmful interference in which case the user will be required to
correct the interference at his own expense.
This device must be used with shielded interface cables. The use of
non-shielded cables is likely to result in interference with radio
communications and is prohibited under the FCC rules.
The design and production of this unit conform to FCC regulations,
and any changes or modifications must be registered with the FCC
and are subject to FCC control. Any changes made by the purchaser
or user without first contacting the manufacturer will be subject to
penalty under FCC regulations.
USER INSTRUCTIONS (For Canadian Users)
INTERFERENCE-CAUSING EQUIPMENT STANDARD
(ICES-003 ISSUE 2) WARNING
NOTE: Installed Minolta Network options. When the Network
cable is attached to either of the IEEE 802.3 connectors, the
printer meets the requirements of FCC/ICES Class A.
This Class A digital apparatus meets all requirements of the
Canadian Interference-Causing Equipment Regulations.
Cet appil numérique de la classeA respecte toutes les
exigences du Règlement sur le matériel brouilleur du Canada.
Foreword
Foreword.frm vi ページ 2003年11月18日 火曜日 午前9時47分
vii
OZONE RELEASE (For all Users)
During printer operation, a small quantity of ozone is released. This
amount is not large enough to harm a person adversely. However, be
sure the room where the machine is being used has adequate venti-
lation, especially if you are printing a high volume of materials, or
if the machine is being used continuously over a long period.
WARNING LABEL
Foreword
Foreword.frm vii ページ 2003年11月18日 火曜日 午前9時47分

viii
Welcome
Thank you for selecting a Minolta PageWorks 20 Printer!
This User’s manual explains the functions of the printer and how it
operates. It also provides you with troubleshooting tips as well as
general precautions you should observe when operating the printer.
To ensure top performance and effective use of your printer, read
this manual carefully from cover to cover, and keep it on hand for
later reference.
No part of this document may be reproduced, transmitted, tran-
scribed, stored in a retrieval system, or translated into other lan-
guages without the express written prior consent from Minolta Co.,
Ltd.
The contents of this manual are subject to change without notice.
Trademark Acknowledgments
HP, LaserJet 4V and PCL are registered trademarks of Hewlett-
Packard Company.
Centronics is a registered trademark of Centronics Data Computer
Corporation.
TrueType is a registered trademark of Apple Computer Inc.
IBM is a registered trademark of International Business Machines
Corporation.
Intellifont is a trademark of Agfa Corporation.
Adobe, PostScript and the PostScript logo are trademarks of Adobe
Systems, Inc.
NetWare is a registered trademarks of Novell Inc.
Minolta is a registered trademark of Minolta Co., Ltd.
PageWorks is a trademark of Minolta in the U.S. and Canada.
Super Fine Micro-Toning and RealTone are trademarks of Minolta
Co., Ltd.
All other products or name brands are trademarks or registered
trademarks of their respective holders.
Foreword
Foreword.frm viii ページ 2003年11月18日 火曜日 午前9時47分

ix
U.S.A. Technical Support
If you continue to experience technical difficulty with the operation
of your printer product, please contact your support representative:
Toll free at 1-800-459-3250
or via our website at http://www.minoltappd.com.
Hours of operation and toll free nature of our support program is
subject to change without prior notice.
Foreword
Foreword.frm ix ページ 2003年11月18日 火曜日 午前9時47分

x
Chapter 1 Introduction
1. Printer Features.............................................1-1
2. Printer Parts and Accessories .....................1-2
3. Control Panel .................................................1-6
Layout for Control Panel ..................................1-6
Indicator Function............................................1-7
LCD Function ..................................................1-7
Key Functions..................................................1-8
Chapter 2 Setting-Up
1. Installation Precaution..................................2-1
Selecting a Location for the Printer .................2-1
Power Source ..................................................2-1
Grounding........................................................2-2
Space Requirements.......................................2-3
2. Operational Precaution..................................2-4
Operating Environment....................................2-4
Operation.........................................................2-4
Printer Supplies ...............................................2-6
3. Setting Up Your Printer.................................2-7
4. Connecting the Power Cord .........................2-9
5. Turning the Printer ON and OFF ..................2-10
Turning the Printer ON.....................................2-10
Turning the Printer OFF...................................2-10
6. Printing a Test Page ......................................2-11
Configuration Page..........................................2-12
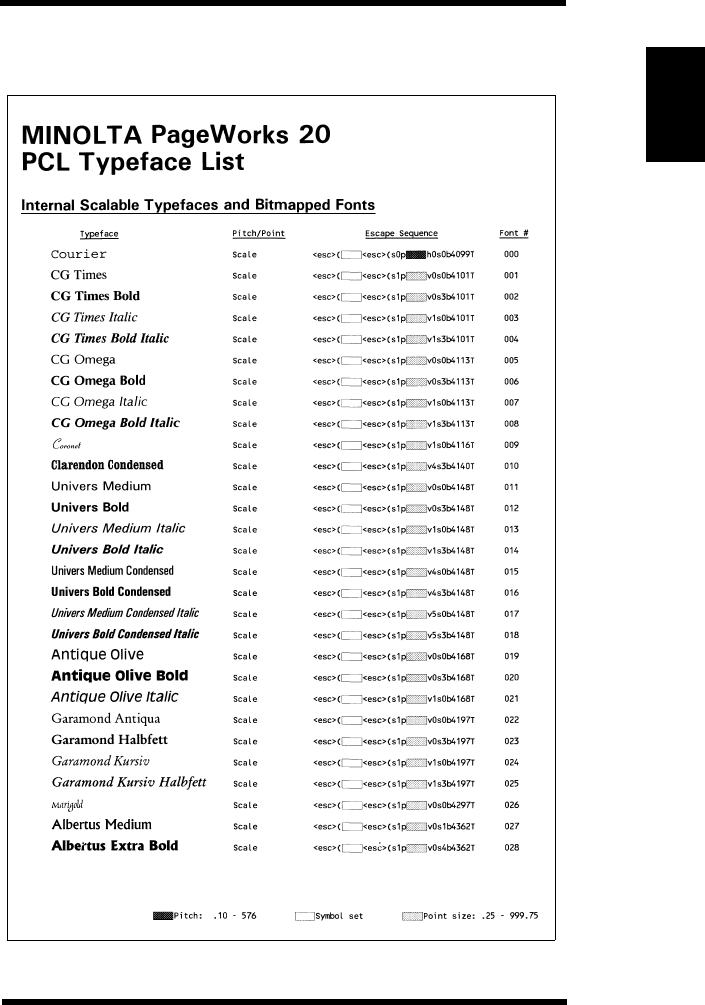
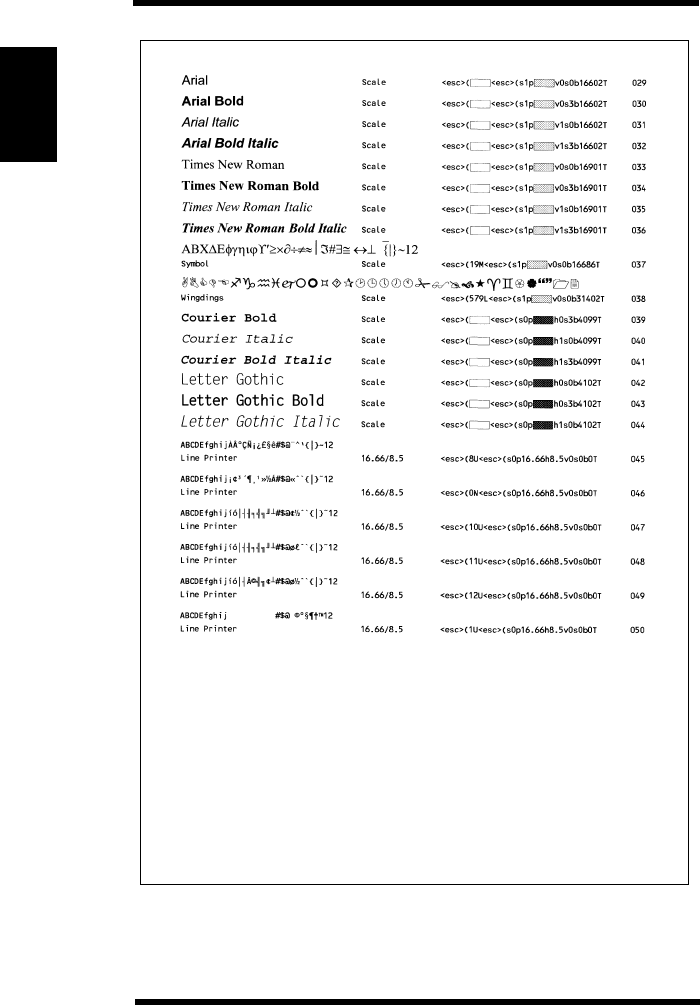
PCL Font List...................................................2-13
PCL Demo Print ..............................................2-15
Contents
Foreword.frm x ページ 2003年11月18日 火曜日 午前9時47分

xi
7. Connecting the Interface Cable ...................2-16
Interface Port...................................................2-16
8. Moving the Printer.........................................2-17
Chapter 3 Using the Printer
1. Using the Control Panel................................3-1
Basic Menu Setting Method ............................3-1
Tray 1 Paper Size Setting Method ...................3-2
Job Separation ................................................3-3
2. Understanding Printer Menus ......................3-4
Overview of Printer Menus..............................3-4
Printer Menus ..................................................3-6
(1) Print Menu ...............................................3-7
(2) PCL Menu................................................3-10
(3) PS Menu..................................................3-11
(4) System Menu...........................................3-12
(5) Parallel Menu...........................................3-14
(6) Maintenance Menu ..................................3-16
(7) Network Menu..........................................3-17
(8) Test Print..................................................3-19
3. Loading Paper................................................3-21
Supported Media.............................................3-21
Paper Type ....................................................3-21
Paper Size.....................................................3-21
Capacity ........................................................3-22
Printable Area ...............................................3-23
Page Orientation..............................................3-24
Printing on Envelopes......................................3-25
Printing on Labels............................................3-26
Contents
Foreword.frm xi ページ 2003年11月18日 火曜日 午前9時47分

xii
Printing on Thick paper ...................................3-26
Printing on Transparencies..............................3-26
Printing on Custom Paper ...............................3-26
Duplex Printing ................................................3-27
Paper Type ....................................................3-28
Paper Size.....................................................3-28
Loading Paper in Tray 1...................................3-29
Loading Paper in Tray 2...................................3-31
Loading Paper in Tray 3...................................3-33
Automatic Tray Setting.....................................3-35
Using Manual Feed .........................................3-36
Special Paper Tray Setting ..............................3-37
4. Printing...........................................................3-38
5. Understanding Fonts ....................................3-40
Fonts................................................................3-40
Scalable Fonts...............................................3-40
Bitmap Fonts.................................................3-40
Minolta Font Manager......................................3-40
Chapter 4 Maintaining Your Printer
1. Supplies for Maintenance.............................4-1
2. Replacing the Imaging Cartridge.................4-2
3. Cleaning Your Printer....................................4-4
External Cleaning............................................4-4
Internal Cleaning .............................................4-5
Chapter 5 Solving Printer Problems
1. Clearing a Paper Misfeed..............................5-1
Paper Misfeed in Tray 1 ...................................5-1
Contents
Foreword.frm xii ページ 2003年11月18日 火曜日 午前9時47分

xiii
Paper Misfeed in Tray 2 or Tray 3 ....................5-3
Paper Misfeed inside the Printer .....................5-5
Paper Misfeed in the Duplex Unit ....................5-6
2. Printing Problems..........................................5-8
3. Print Quality Problems..................................5-9
4. Understanding Printer Messages ................5-12
(1) Status Messages .......................................5-13
(2) Warning Messages ....................................5-15
(3) Caution Messages .....................................5-16
(4) Operator Call Messages ............................5-17
(5) Service Call Messages ..............................5-19
Chapter 6 Installing Options
1. Installing the Third Tray Unit .......................6-1
2. Installing the Duplex Unit .............................6-3
3. Installing the Network Card..........................6-5
4. Installing the Adobe PostScript ROM-DIMM
and Hard Disk ................................................6-7
5. Installing the SIMM........................................6-11
Chapter 7 Specifications
1. Printer.............................................................7-1
2. Third Tray Unit (Optional) .............................7-5
250-Sheet Universal Third Tray Unit................7-5
500-Sheet Third Tray Unit (Letter)...................7-6
500-Sheet Third Tray Unit (A4)........................7-7
3. Duplex Unit (Optional)...................................7-8
Contents
Foreword.frm xiii ページ 2003年11月18日 火曜日 午前9時47分

xiv
4. SIMM...............................................................7-9
5. Interface Connector and Cable ....................7-10
Appendix A
Character Sets...................................................A-1
Appendix B
Font Lists ...........................................................B-1
Index
Index ...................................................................C-1
Contents
Foreword.frm xiv ページ 2003年11月18日 火曜日 午前9時47分

1--1
Chapter 1Introduction
Chapter 1
Introduction
Intro1.frm -1 ページ 2003年11月18日 火曜日 午前9時50分

1-0
Chapter 1Introduction
Intro1.frm 0 ページ 2003年11月18日 火曜日 午前9時50分

1-1
Chapter 1Introduction
• Outstanding performance with an engine speed of 20ppm and
High Speed RISC Processor NR4645/100MHz.
• Image Quality comparable to 1200dpi with Minolta’s Super Fine
Micro-ToningTM system realizes clear and smooth text data.
• High Quality graphics and photographic images with RealTone
2400 (256 gray levels).
• Paper handling versatility comes with A3 Full-Bleed printing,
Duplexing, and GUI Driver supporting N-up Printing, etc.
• High Speed Data Transfer with IEEE1284 compliant interface and
Network Option (Ethernet).
• Easy Maintenance with All-in-one Imaging Cartridge.
• Space saving design.
• Compatible with optional Adobe PostScript Level2.
• Environmentally friendly with Toner Save Mode and Energy Star
compliance.
1. Printer Features
Intro1.frm 1 ページ 2003年11月18日 火曜日 午前9時50分
1-2
Chapter 1Introduction
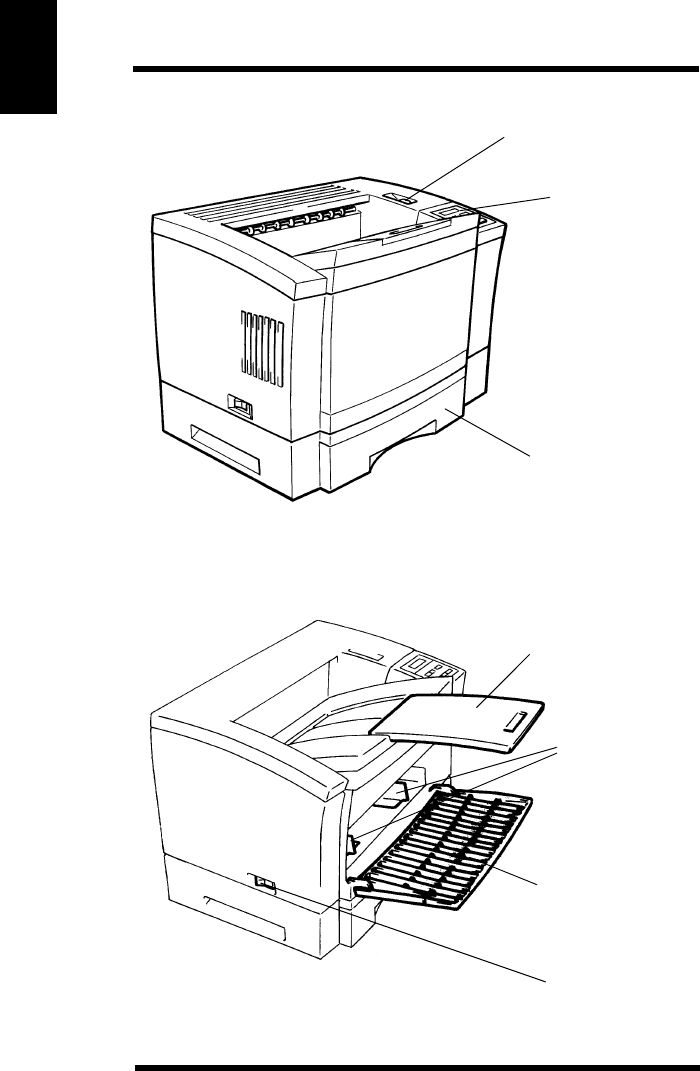
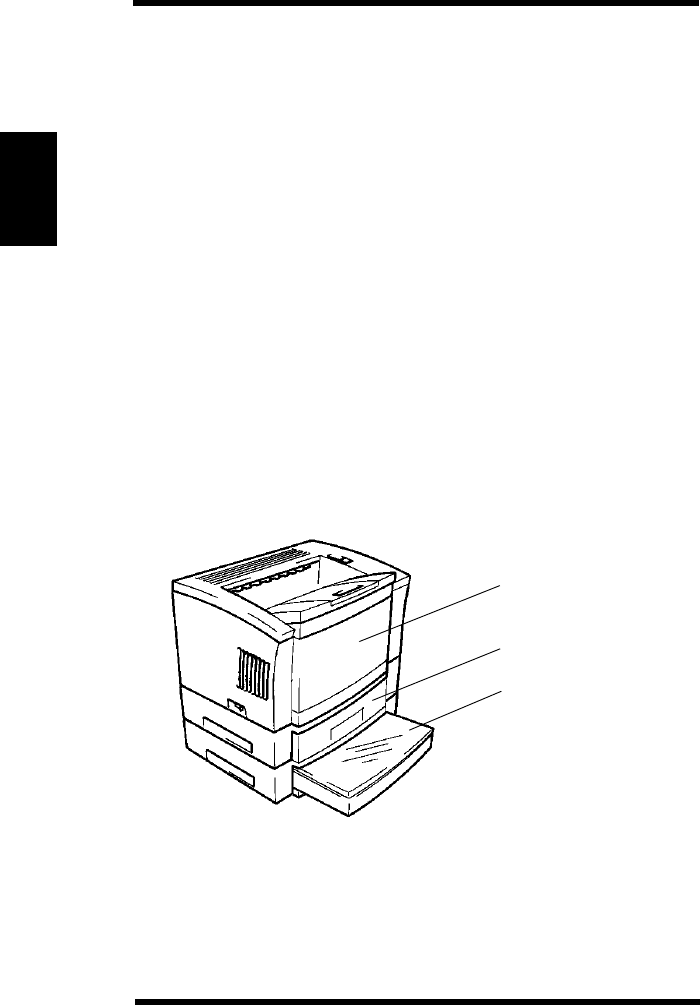
4. Paper Exit Tray
5. Paper Guide
7. Power Switch
1. Upper Cover Lock
3. Tray 2
2. Control Panel
2. Printer Parts and Accessories
Release Button
Plates
6. Tray 1
(multipurpose)
Intro1.frm 2 ページ 2003年11月18日 火曜日 午前9時50分

1-3
Chapter 1Introduction
1. Upper Cover Lock Release Button:
Press this button to open the upper cover.
2. Control Panel:
The control panel allows you to set the printing options and dis-
plays the current printer status.
3. Tray 2:
Holds up to 500 sheets of Letter size paper.
4. Paper Exit Tray:
The printed paper is fed out face down on this tray.
500 sheet capacity for printed paper.
5. Paper Guide Plates:
Slide these guides left or right according to the paper size being
fed.
6. Tray 1 (multipurpose):
150 sheet capacity for plain paper.
Use this tray for special paper.
7. Power Switch:
Turns the printer on and off.
2. Printer Parts and Accessories
Intro1.frm 3 ページ 2003年11月18日 火曜日 午前9時50分
1-4
Chapter 1Introduction
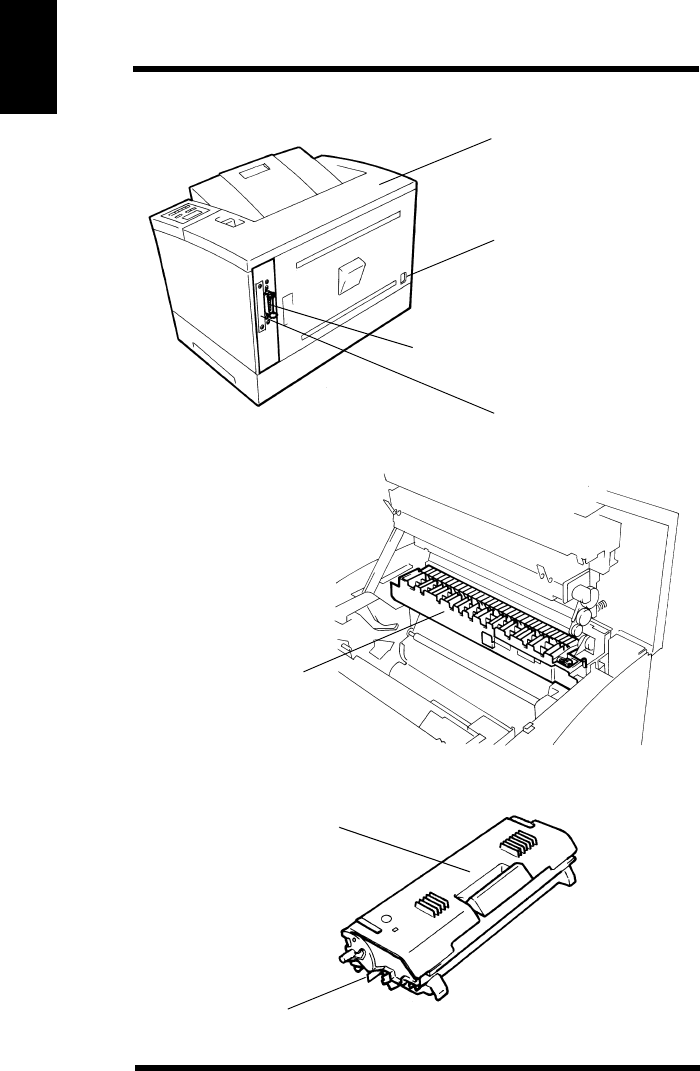
13. Imaging Cartridge
14. Sealing Tape
12. Fusing Section
10. Parallel Interface Connector
8. Upper Cover Unit
11. Network Cover
9. Power Cord Socket
2. Printer Parts and Accessories
Intro1.frm 4 ページ 2003年11月18日 火曜日 午前9時50分

1-5
Chapter 1Introduction
8. Upper Cover Unit:
Open for replacing the imaging cartridge or removing jammed
paper.
9. Power Cord Socket:
Connect the power cord to this socket.
10. Parallel Interface Connector:
Provides a parallel interface connection for the host computer.
11. Network Cover:
Remove this cover for installing the optional network card.
12. Fusing Section:
Fixes the toner image to the paper.
13. Imaging Cartridge:
It is important for forming an image.
14. Sealing Tape:
Pull out the sealing tape when installing a new imaging car-
tridge.
2. Printer Parts and Accessories
Intro1.frm 5 ページ 2003年11月18日 火曜日 午前9時50分
1-6
Chapter 1Introduction
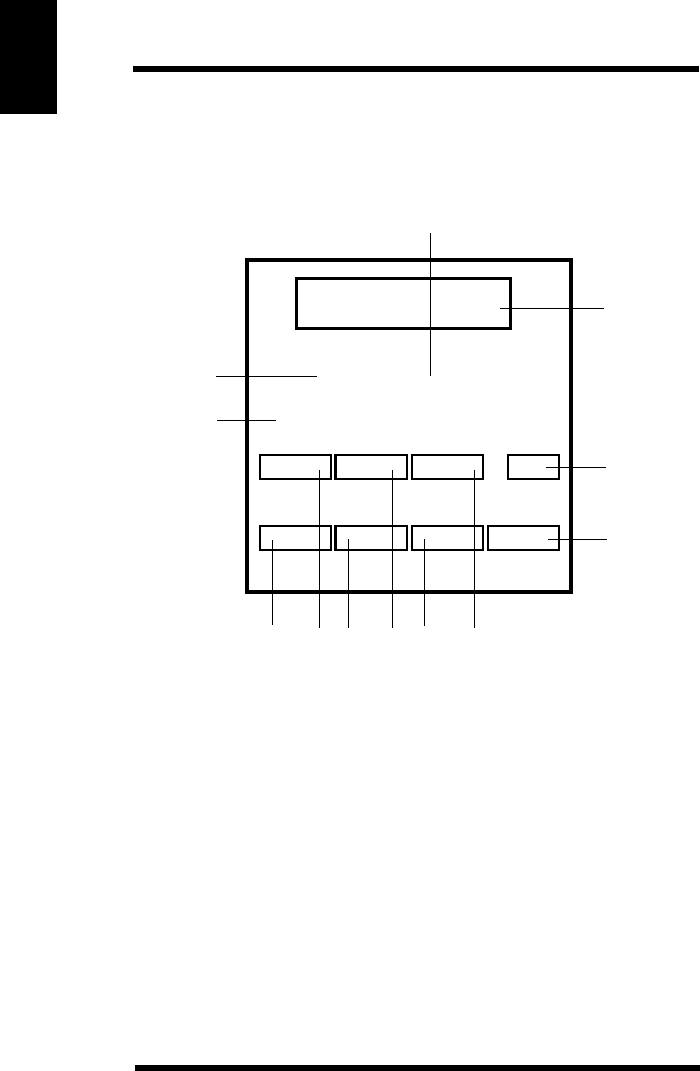
Layout for Control Panel
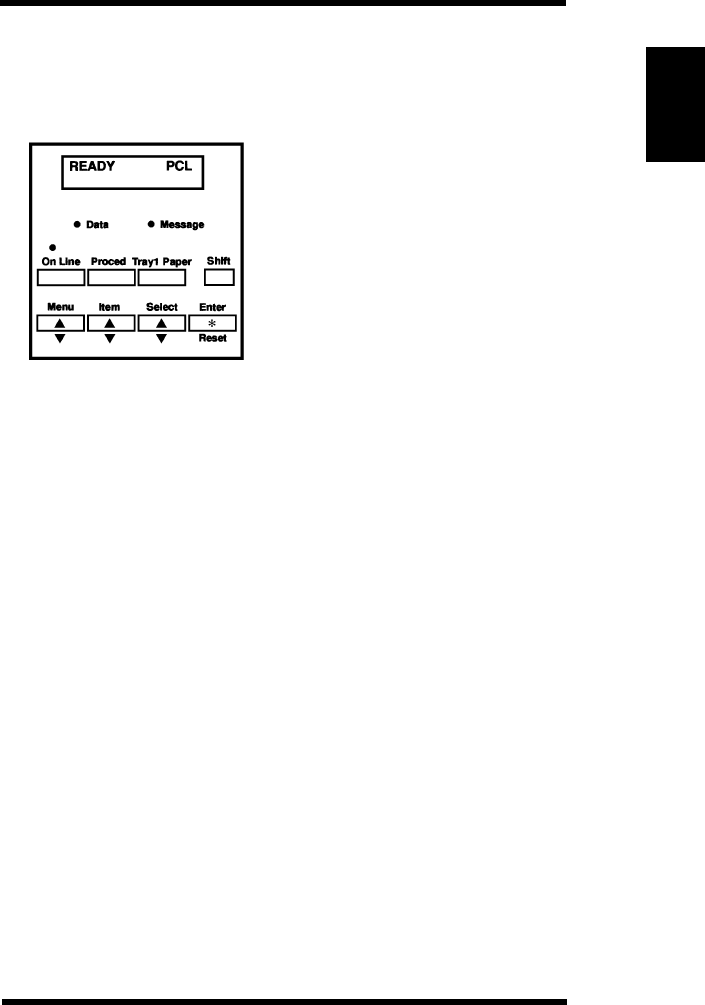
The control panel is comprised of 1 LCD (16 characters by 2 lines),
3 LEDs and 8 keys.
1. LCD
2. Data LED
3. Message LED
4. On Line LED
5. On Line key
6. Proceed key
7. Tray1 Paper key
8. Shift key
9. Menu key
10. Item key
11. Select key
12. Enter/Reset key
••
•
Data Message
▼▼▼
On Line Proceed Tray1 Paper Shift
Menu Item Select Enter
Reset
READY PCL
3
1
2
4
56
97
10 11
8
12
3. Control Panel
▼▼▼
∗
Intro1.frm 6 ページ 2003年11月18日 火曜日 午前9時50分

1-7
Chapter 1Introduction
Indicator Function
LCD Function
The LCD is composed of 16-digits and 2 lines.
First line: Displays the current printer status and selected printer
language.
Second line: Normally, nothing is displayed. However, one of the
warning messages listed below may be displayed when needed.
MAINTENANCE REQ
TRAY2 IS EMPTY
TRAY3 IS EMPTY
TONER IS LOW
TONER EMPTY
JOB SEPARATION
When an error occurs, the printer will display an error message on
the LCD. For the contents of an error message, see “Understanding
Printer Messages” page 5-12.
READY PCL
TRAY2 IS EMPTY
3. Control Panel
Indicator On Off Blinking
ONLINE
DATA
MESSAGE
The printer is ready
to receive data. The printer cannot
receive data. Going off-line.
Data is stored in the
printer memory. No data is stored in
the printer memory. The printer is
receiving data and
processing data.
No error.
Engine error.
The printer requires
service.
Recoverable error
such as paper empty,
paper misfeed, etc.
Intro1.frm 7 ページ 2003年11月18日 火曜日 午前9時50分

1-8
Chapter 1Introduction
Key Functions
On Line key
Press the On Line key to switch between on-line and off-line. The
printer should be on-line to receive data.
Proceed key
Press the Proceed key to resume printing after an interruption.
This key is pressed:
- when a paper size error (LOAD message) occurs.
See “Operator Call Message” page 5-17.
- when the Paper Size Error occurs.
See “Operator Call Message” page 5-18.
- when the Memory Overflow or Job Too Complex error occurs.
See “Caution Message” page 5-16.
Tray1 Paper key
Press the Tray1 Paper key to enter the Tray 1 paper size setting
mode. You can enter this mode only from off-line.
Shift key
While holding down the Shift key, press the Menu key. Each menu
is displayed in reverse order.
While holding down the Shift key, press the Item key. Each item is
displayed in reverse order.
While holding down the Shift key, press the Select key. Each user
selection value is displayed in reverse order.
Menu key
Press the Menu key when off-line to enter the menu mode.
Repeated key operation displays the menu group in order.
Item key
Press the Item key in the menu mode to enter the item mode.
Repeated key operation displays the items in order.
Select key
Press the Select key in the item mode or the tray 1 paper size set-
ting mode to enter the user selection mode. Repeated key opera-
tion displays the user selection values in order.
3. Control Panel
Intro1.frm 8 ページ 2003年11月18日 火曜日 午前9時50分

1-9
Chapter 1Introduction
When the Select key is pressed continuously, the numerical value
increases at high speed.
Enter/Reset key
Press the Enter/Reset key to save the settings of the user selec-
tions.
While holding down the Shift key when off-line, press the Enter/
Reset key. The job data is canceled. Returns the printer on-line
automatically after canceling the job data.
NOTE
To reset the job data, you must take the printer off-line by pressing
the On Line key while printing.
3. Control Panel
Intro1.frm 9 ページ 2003年11月18日 火曜日 午前9時50分

1-10
Chapter 1Introduction
Memo
Intro1.frm 10 ページ 2003年11月18日 火曜日 午前9時50分

2--1
Chapter 2Setting Up
Chapter 2
Setting Up
Setting2.frm -1 ページ 2003年11月18日 火曜日 午前9時52分

2-0
Chapter 2Setting Up
Setting2.frm 0 ページ 2003年11月18日 火曜日 午前9時52分

2-1
Chapter 2Setting Up
Selecting a Location for the Printer
A proper location helps to ensure that your printer provides you with
the long service life for which it is designed. Double check to make
sure that the location you select has the following characteristics.
• Choose a location that is well-ventilated.
• Make sure there is no chance of ammonia or other organic gas-
ses being generated in the area.
• The power outlet you plan to connect to for power should be
nearby and unobstructed.
• Make sure that the machine is not exposed to direct sunlight.
• Avoid areas in the direct air flow of air conditioners, heaters, or
ventilators, and areas subjected to temperature and humidity
extremes.
• Choose a firm, level surface where the printer will not be
exposed to strong vibration.
• Keep the printer away from any objects that might block its heat
vents.
• Do not locate the printer near curtains or other combustible
objects.
• Choose an area where there is no possibility of the printer being
splashed with water or other liquids.
• Make sure that the surrounding area is clean, dry, and free of
dust.
Power Source
The power source requirements for this printer are as follows.
• Power source: 120V, 50-60Hz
• Voltage fluctuation: Within ± 10%
• Frequency fluctuation: Within ± 3Hz
1. Installation Precaution
Setting2.frm 1 ページ 2003年11月18日 火曜日 午前9時52分

2-2
Chapter 2Setting Up
NOTES
• Use a power source with minimal voltage and frequency fluctu-
ation.
• Only use an outlet that is rated for the voltage capacity specified
for this printer.
• Be sure to plug the power cord all the way into the outlet. The
outlet should be located near the printer and easily accessible so
you can unplug the power cord immediately should any problem
occur.
• Make sure that the outlet is visible, and not hidden behind the
printer or any other object.
• If any other electrical equipment is plugged into the same outlet,
make sure that the capacity of the outlet is not exceeded.
• If you use an extension cord, make sure its capacity is greater
than the power consumption of the printer. Using an extension
cord with a lower capacity creates the danger of fire.
• Never use a multiple socket to connect other appliances or
machines to the same outlet being used to power the printer.
Grounding
Always ground the printer to guard against the danger of electric
shock. To ground the printer, connect the grounding wire to the
ground terminal of the electrical outlet you are plugging into or to a
grounding contact that complies with local electrical standards in
your area.
Contact your Technical Representative if you are unable to make
grounding connections yourself.
NOTE
Never connect the grounding wire to a gas pipe, the
grounding wire for a telephone, or a water pipe.
1. Installation Precaution
Setting2.frm 2 ページ 2003年11月18日 火曜日 午前9時52分

2-3
Chapter 2Setting Up
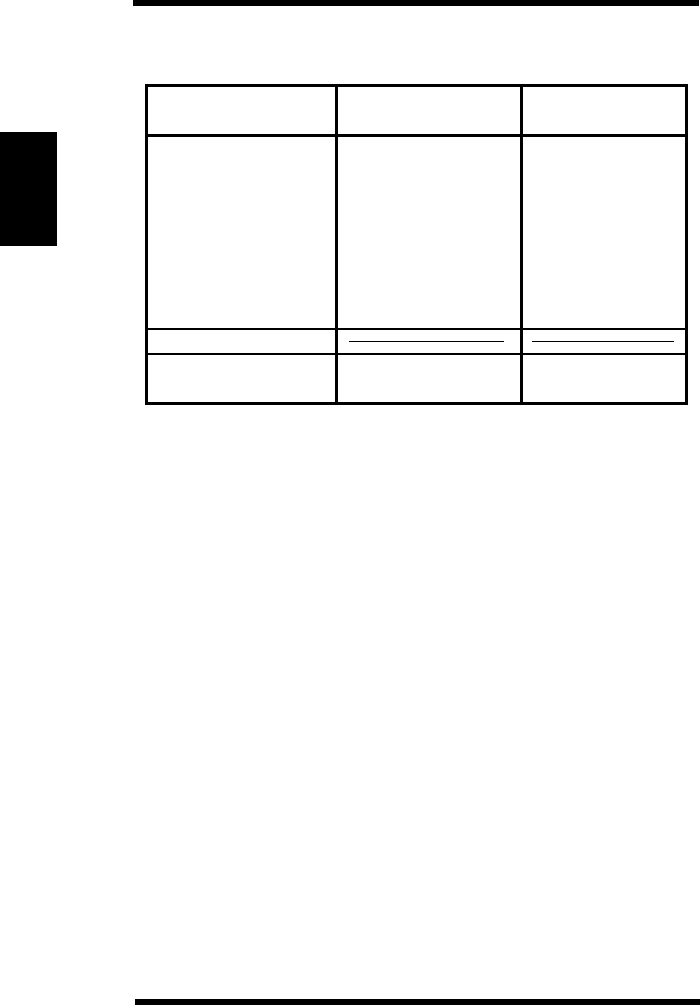
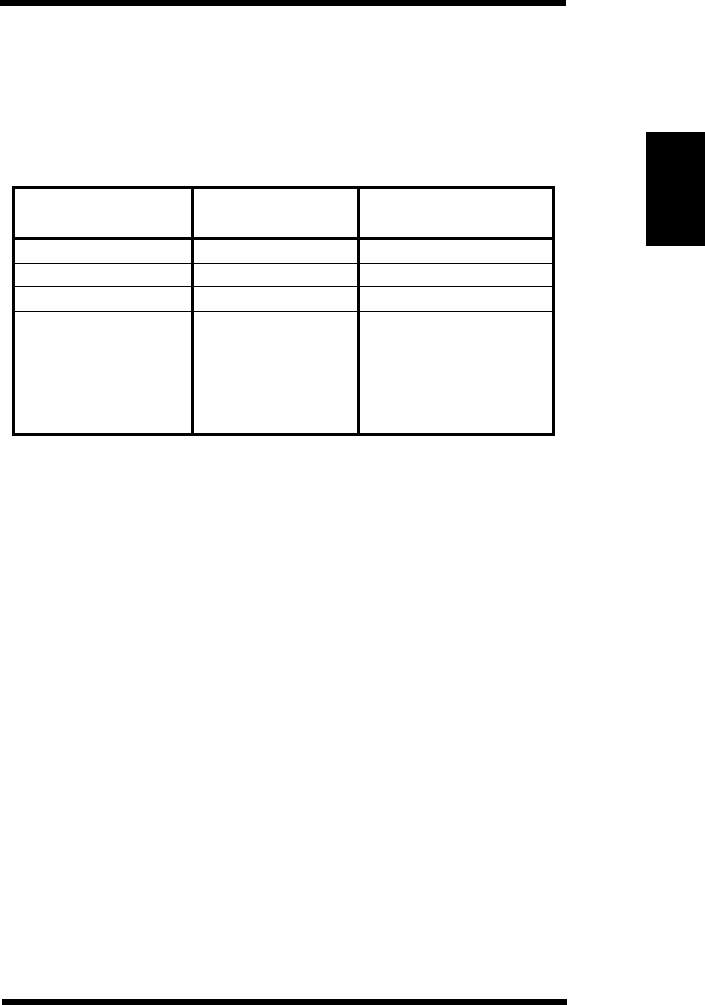
Space Requirements
To make printer operation, supply replacement and service mainte-
nance easier, the minimum installation space below is necessary.
Locate the printer in an installation site with adequate space.
Without options
Installed with full options
1. Installation Precaution
Unit: inch (mm)
Unit: inch (mm)
30.5 (774)
34.6 (880)
17.3 (440)
21.3 (541)
0.6 (15)
23.7 (603)
0.6 (15)
0.6 (15)
3.5 (90)
3.5 (90)
0.6 (15)
29.6 (753) 21.5 (545)
21.5 (545)
Setting2.frm 3 ページ 2003年11月18日 火曜日 午前9時52分
2-4
Chapter 2Setting Up
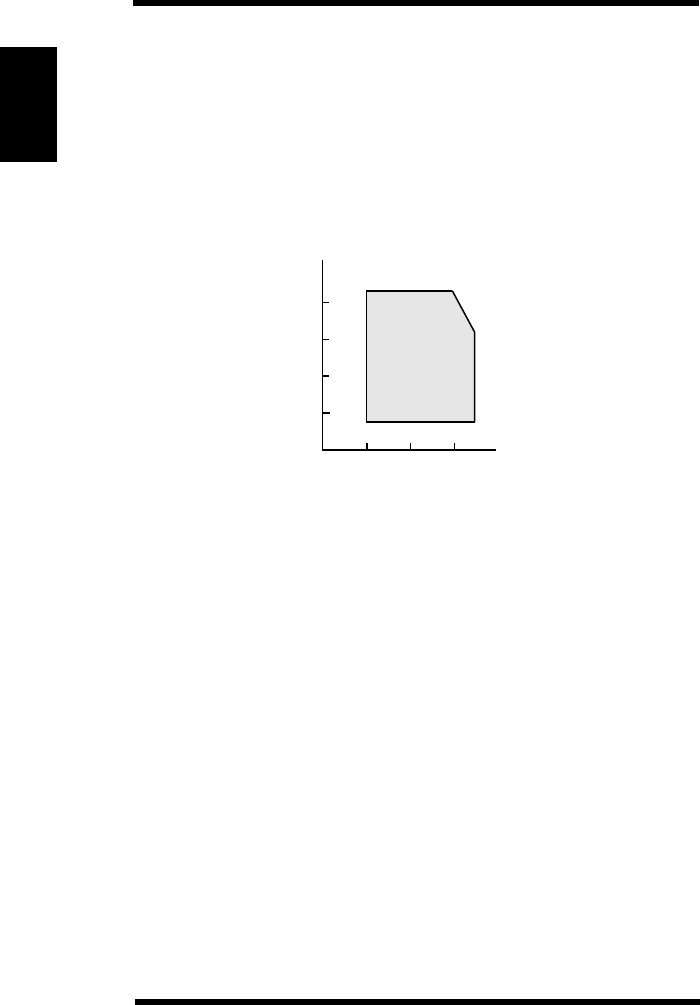
Operating Environment
The following describes the operating environment required when
using the printer.
Temperature: 50°F to 95°F (10°C to 35°C) with a fluctuation of
50°F (10°C) per hour.
Humidity: 15% to 85% RH with a fluctuation of 20% per hour.
Operation
To ensure the optimum performance of the printer, follow the pre-
cautions listed below.
• Never turn the printer off or open any of its covers while a print-
ing operation is being performed.
• Never locate any object that generates magnetic force, flamma-
ble gas, or is flammable near the printer.
• When unplugging the power cord, grasp the plug and never pull
on the cord. A damaged cord creates the danger of fire or elec-
tric shock.
• Never touch the power cord when your hands are wet. Doing so
creates the danger of electric shock.
• Always unplug the power cord before moving the printer. Fail-
ure to do so can damage the power cord, creating the danger of
fire or electric shock.
• Always unplug the power cord if you do not plan to use the
printer for a long time.
2. Operational Precaution
80
60
40
20
86
6850
Humidity (%)
Temperature (°F)
50°F
15%
85% 86°F
95°F
65%
0
Setting2.frm 4 ページ 2003年11月18日 火曜日 午前9時52分

2-5
Chapter 2Setting Up
• Never try to remove any panel or cover that is secured. The inte-
rior of the printer contains high-voltage circuitry which creates
the danger of electric shock when exposed.
• Never try to modify the printer. Doing so creates the danger of
fire or electric shock.
• Never place any heavy objects on the power cord, or pull on it or
bend it. Doing so creates the danger of fire or electric shock.
• Always make sure the printer is not setting on the electrical cord
or communications cables of any other electrical equipment.
Also make sure that cords and cables do not get into the printer’s
mechanism. Any of these conditions create the danger of mal-
function and fire.
• Always take care so that paper clips, staples, or other small
pieces of metal do not get into the printer through its vents or
other openings. Such objects create the danger of fire or electric
shock.
• Never place containers of water or any other liquid on the
printer. Liquids getting into the printer create the danger of fire
or electric shock.
• Should metal or liquid accidently get inside the printer, immedi-
ately turn it off, unplug the power cord, and contact your techni-
cal representative. Failure to take immediate action creates the
danger of fire or electric shock.
• Always turn the printer off immediately whenever it becomes
very hot, or when it emits smoke, an unusual odor, or noise.
Immediately turn off the printer, unplug it, and contact your
technical representative. Failure to take immediate action cre-
ates the danger of fire or electric shock.
NOTE
Be sure to locate the printer in a well-ventilated location.
A negligible amount of ozone is generated during normal
operation of this printer. Because of this, an unpleasant
odor may result when the printer is used for extensive
printing in a poorly ventilated area. For comfortable,
healthy, and safe operation, be sure to locate the printer in
a well-ventilated area.
2. Operational Precaution
Setting2.frm 5 ページ 2003年11月18日 火曜日 午前9時52分

2-6
Chapter 2Setting Up
Printer Supplies
Note the following precautions when handling the printer supplies
such as the imaging cartridge and paper.
• Avoid storing the supplies in the following locations.
Areas subjected to direct sunlight. Keep the imaging cartridge
away from fluorescent light as well.
Areas exposed to open flame.
Areas subjected to high humidity.
Areas subjected to large amounts of dust.
• Keep paper that has been removed from its wrapper but not yet
loaded into the printer tray in a sealed plastic bag, which is
stored in a cool, dark location.
• Use only the imaging cartridge expressly specified for this
printer.
• Keep supplies out of the reach of small children.
• Should your hands become soiled with toner, immediately wash
them with soap and water.
NOTE
Whenever you remove the imaging cartridge from the
printer, immediately cover it with a cloth to prevent light
from striking it.
2. Operational Precaution
Setting2.frm 6 ページ 2003年11月18日 火曜日 午前9時52分
2-7
Chapter 2Setting Up
Set up your printer according to the following procedure.
NOTES
- Keep all the boxes and packing materials that the printer
comes in for later use when transporting the printer.
- Since the printer weighs approximately 55.1 lbs (25 kg),
two people are required to lift it.
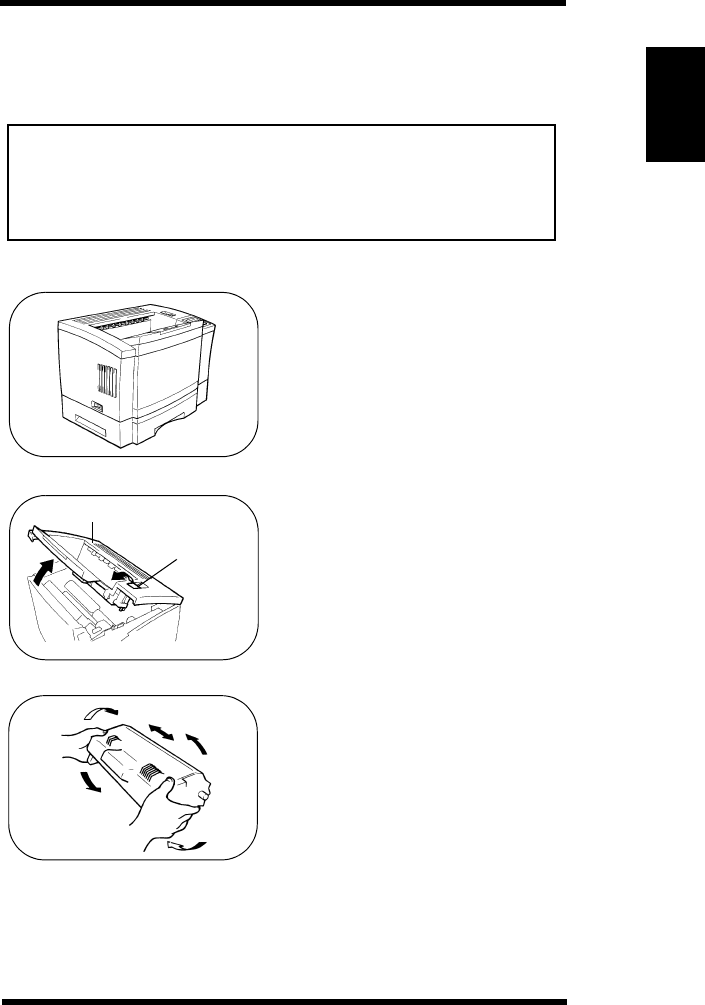
1. Place the printer in the location
you have chosen.
2. Pressing the upper cover lock
release button, open the upper
cover.
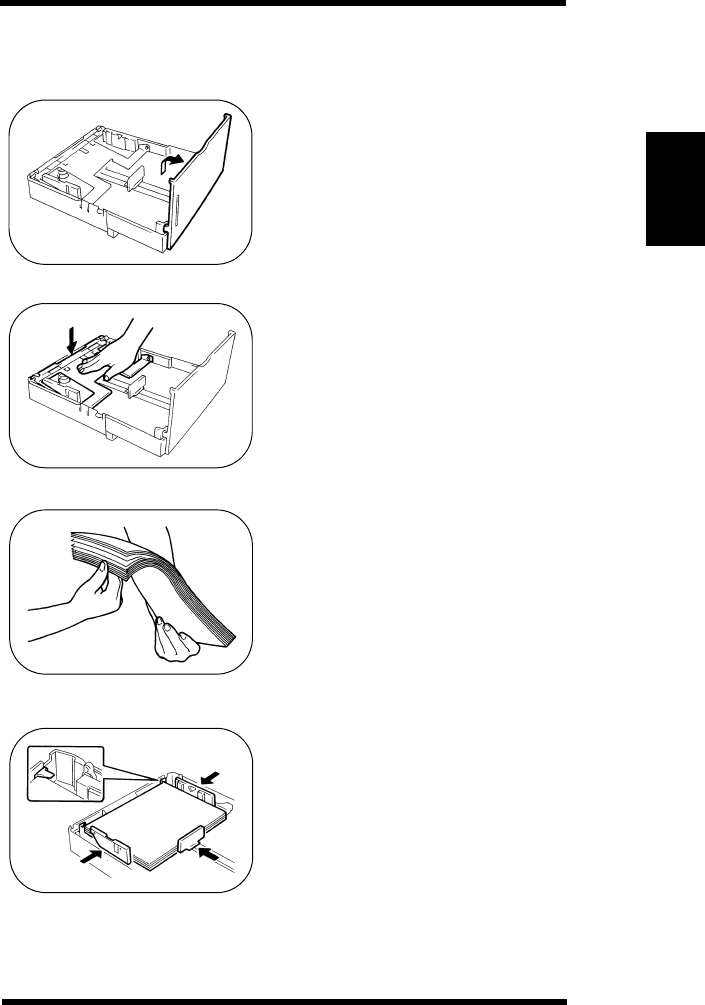
3. Take the imaging cartridge out of
the box.
Holding it with both hands, shake
it well in the direction of the
arrows.
3. Setting Up Your Printer
Upper Cover
Lock Release
Button
Upper Cover
Setting2.frm 7 ページ 2003年11月18日 火曜日 午前9時52分
2-8
Chapter 2Setting Up
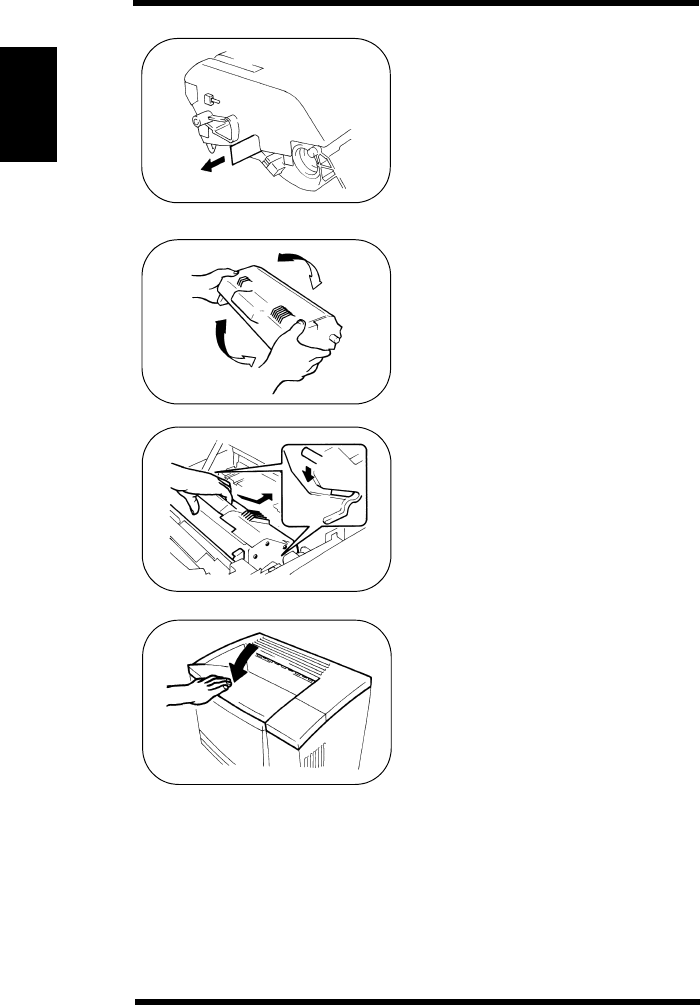
4. Pull the tab outward slowly until
the sealing tape is completely
removed.
5. Shake the imaging cartridge 4 or
5 times in the direction of the
arrows to distribute the toner
evenly.
6. Install the imaging cartridge
securely into the printer by slid-
ing the pins on each side of the
cartridge along the grooves of the
cartridge guide.
7. Close the upper cover.
3. Setting Up Your Printer
Setting2.frm 8 ページ 2003年11月18日 火曜日 午前9時52分

2-9
Chapter 2Setting Up
Connect the power cord according to the following procedure.
1. Make sure that the power switch
of the printer is placed in the ❍
(OFF) position.
2. Plug one end of the power cord
into the printer’s power cord
socket and plug the other end of
the power cord into the power
outlet.
4. Connecting the Power Cord
Setting2.frm 9 ページ 2003年11月18日 火曜日 午前9時52分

2-10
Chapter 2Setting Up
Turning the Printer ON
Press the power switch to the (ON)
position.
This printer will automatically go
into power save mode a given
period of time after the last activ-
ity.
See “System Menu” page 3-12.
When you turn the printer on, the following takes place.
1. All the LED’s light up and then go out.
2. Asterisks appears on the display from left to right.
3. The message SELF TEST appears on the display.
When the printer detects an error during an initialization or
diagnostic, an error massage appears on the display.
For details, see “Understanding Printer Messages” page 5-12.
4. The message WARMING UP appears on the display.
5. The message READY is displayed after warming up is com-
pleted.
This takes about 70 seconds. The printer is now ready to print.
Turning the Printer OFF
Make sure that the printer is nothing
operating.
Press the power switch to the ❍
(OFF) position.
5. Turning the Printer ON and OFF
NOTE
Setting2.frm 10 ページ 2003年11月18日 火曜日 午前9時52分
2-11
Chapter 2Setting Up
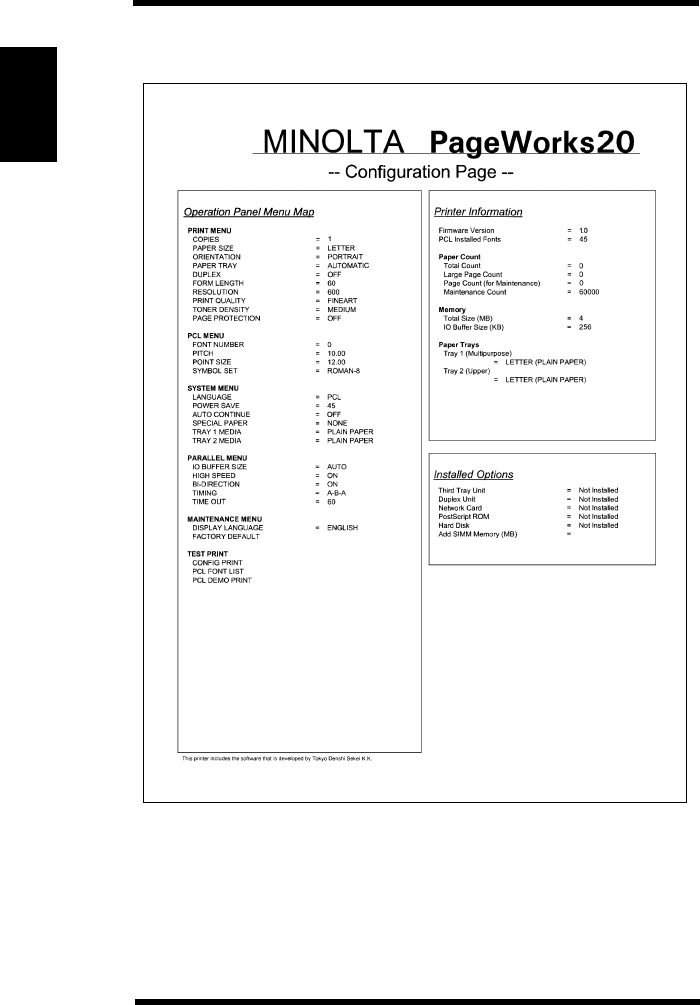
To make sure the printer works correctly before connecting the
printer to the computer, print a configuration page according to the
following procedure.
1. Load Letter paper into tray 1.
→ See “Loading Paper in Tray 1”
page 3-29.
2. Using the control panel, select
TEST PRINT from the menu
mode. Select CONFIG PRINT
from the item mode. Press the
Enter key to start printing.
→ See “Test Print” page 3-19.
3. If an error message appears, see
“Understanding Printer Mes-
sages” on page 5-12 for more
information.
6. Printing a Test Page
Setting2.frm 11 ページ 2003年11月18日 火曜日 午前9時52分
2-12
Chapter 2Setting Up
Config Print
6. Printing a Test Page
Setting2.frm 12 ページ 2003年11月18日 火曜日 午前9時52分
2-13
Chapter 2Setting Up
PCL Font List
6. Printing a Test Page
Setting2.frm 13 ページ 2003年11月18日 火曜日 午前9時52分
2-14
Chapter 2Setting Up
6. Printing a Test Page
Setting2.frm 14 ページ 2003年11月18日 火曜日 午前9時52分

2-15
Chapter 2Setting Up
PCL Demo Print
6. Printing a Test Page
Setting2.frm 15 ページ 2003年11月18日 火曜日 午前9時52分
2-16
Chapter 2Setting Up
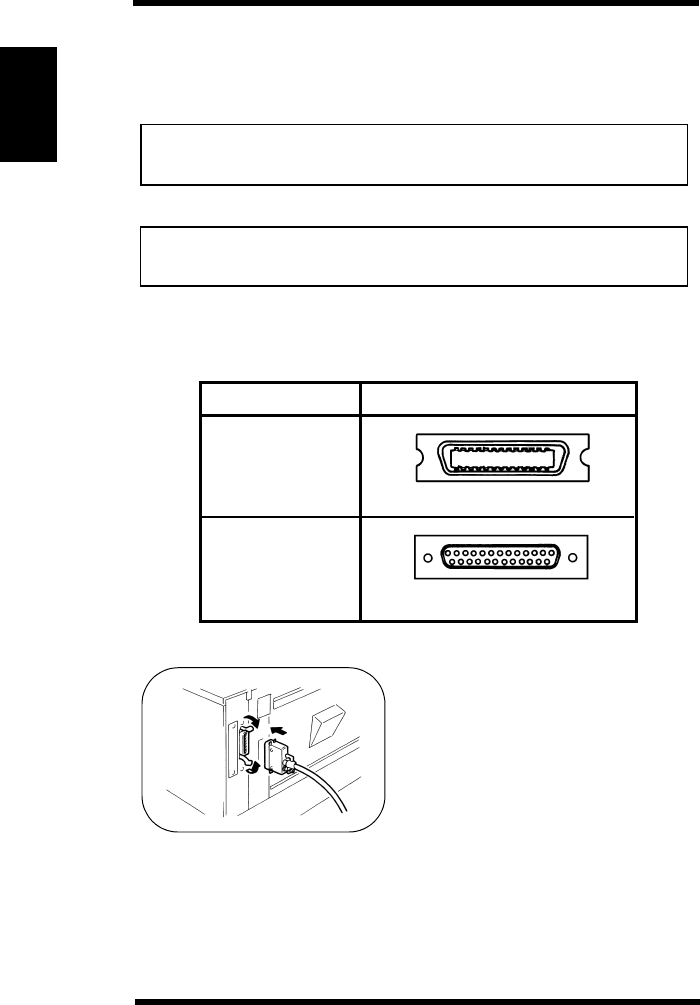
You can connect the printer to your computer using the printer’s par-
allel ports. For more information, see “Specifications” page 7-10.
IMPORTANT
You must purchase an IEEE 1284 type-B cable. If you try
to use any other cable, you may damage the printer’s port.
NOTE
Always use a shielded interface cable. Use of an
unshielded cable can result in radio interference with data.
Interface Port
1. Make sure that the power switch
of the computer and printer is
turned off.
2. Connect one end of the interface
cable to the printer port of the
computer.
3. Then connect the other end of the
interface cable to the interface
connector on the backside of the
printer.
7. Connecting the Interface Cable
PRINTER
Parallel Port
IBM PC AT or
compatible
Centronics 36-pin connector
EIA 25-pin connector
Setting2.frm 16 ページ 2003年11月18日 火曜日 午前9時52分
2-17
Chapter 2Setting Up
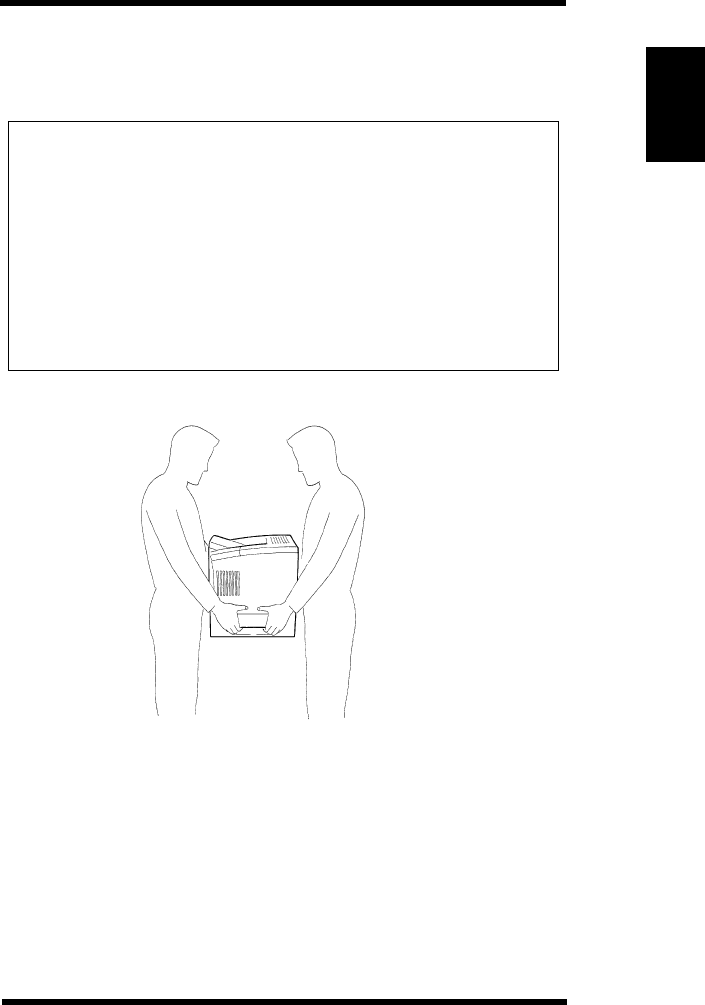
When moving the printer, follow the notes below.
NOTES
- Since the printer weighs approximately 55.1 lbs (25 kg),
two people are required to lift it.
- When transporting the printer, remove the imaging car-
tridge first.
- Whenever you remove the imaging cartridge from the
printer, immediately cover it with a cloth to prevent light
from striking it.
- When an option is installed, remove the option from the
printer and carry the printer separately.
8. Moving the Printer
Setting2.frm 17 ページ 2003年11月18日 火曜日 午前9時52分

2-18
Chapter 2Setting Up
Memo
Setting2.frm 18 ページ 2003年11月18日 火曜日 午前9時52分

3--1
Chapter 3Using Your Printer
Chapter 3
Using Your Printer
OperatW3.frm -1 ページ 2003年11月18日 火曜日 午前9時51分

3-0
Chapter 3Using Your Printer
OperatW3.frm 0 ページ 2003年11月18日 火曜日 午前9時51分

3-1
Chapter 3Using Your Printer
The control panel allows you to control most of the printing options.
If you use your software to control print jobs, you do not have to
change the control panel settings repeatedly. Any software setting
will override the control panel settings.
Use the control panel when:
• Your software does not allow you to make the user selection.
• You are making printer configuration changes which software
cannot control.
• You need to identify the fonts available in the printer’s memory.
• You need to print a test print.
• You need to switch between on-line and off-line.
Basic Menu Setting Method
1. Press the On Line key to take the printer off-line.
2. Press the Menu key as many times as necessary to select the
menu group you want to set.
3. Press the Item key as many times as necessary to select the item
you want to set.
Pressing the Menu key will return you to the menu mode.
4. Press the Select key as many times as necessary to change the
user selection.
Pressing the Menu key will return you to the menu mode.
Pressing the Item key will return you to the item mode.
5. Press the Enter key to save your selection.
An asterisk (*) appears at the right of the setting.
6. Press the On Line key to return the printer on-line.
- The printer should be off-line to select the printer menus.
- Pressing the On Line key will return the printer on-line from any
menu mode.
- When a key operation is not performed for 30 seconds or more in
any menu mode, the printer will return on-line automatically.
1. Using the Control Panel
OperatW3.frm 1 ページ 2003年11月18日 火曜日 午前9時51分
3-2
Chapter 3Using Your Printer
Tray 1 Paper Size Setting Method
You can enter the tray1 paper size setting mode only from off-line.
1. Press the On Line key to take the printer off-line.
2. Press the Tray1 Paper key to enter the tray 1 paper size setting
mode.
3. Press the Select key as many times as necessary to select the
paper size you want to specify.
4. Press the Enter key to save your selection.
An asterisk (*) appears at the right of the setting.
The printer returns on-line automatically.
The paper sizes displayed in the tray 1 paper size setting mode are
as follows.
- If the paper in tray 1 has been used up, reload the paper and the
printer resumes printing automatically.
- If you select UNIVERSAL, the printer feeds paper from tray 1 irre-
spective of the paper size setting on the computer only when you
specify tray 1 as the paper source.
- If you select JOB SEPARATION, tray 1 becomes the separator
source.
TRAY1 PAPER SIZE LETTER LETTER, LEGAL,
LEDGER, EXEC, C5,
DL, MONARC, COM10,
A4, A3, A3+, B4,
JIS B5, ISO B5,
UNIVERSAL,
JOB SEPARATION
ITEM FACTORY DEFAULT USER SELECTION
1. Using the Control Panel
OperatW3.frm 2 ページ 2003年11月18日 火曜日 午前9時51分

3-3
Chapter 3Using Your Printer
Job Separation
Your printer can insert a blank page between print jobs. This may be
helpful when there is more than one person using the printer.
1. Load the separator sheets in tray 1. You don’t need to specify
the paper size and the direction of the loaded separator sheet.
2. Press the Tray1 Paper key to enter the tray 1 paper size setting
mode.
3. Press the Select key as many times as necessary to select JOB
SEPARATION.
4. Press the Enter key to save your selection.
An asterisk (*) appears at the right of the setting.
The printer returns on-line automatically.
While the printer is READY or OFFLINE, the printer displays JOB
SEPARATION on the control panel.
- If you select JOB SEPARATION, you cannot specify tray 1 as the
paper source.
- If selecting JOB SEPARATION, the paper loaded in tray 1 is
inserted as a separator sheet between print jobs.
- If you select MANUAL FEED, you cannot specify JOB SEPARA-
TION.
- If selecting JOB SEPARATION, when the paper source is set to tray
1, tray 2 becomes the default paper source.
- When a separator sheet misfeed occurs, the printer does not per-
form jam recovery for a separator sheet.
USEFUL TIP
The printer driver for this printer can also be used to insert a blank
page between print jobs.
For details, See the Printer Driver User’s Manual.
1. Using the Control Panel
OperatW3.frm 3 ページ 2003年11月18日 火曜日 午前9時51分

3-4
Chapter 3Using Your Printer
Overview of Printer Menus
2. Understanding the Printer Menus
PRINT MENU see page 3-7
PCL MENU see page 3-10
PS MENU see page 3-11
SYSTEM MENU see page 3-12
PARALLEL MENU see page 3-14
MAINTENANCE MENU see page 3-16
NETWORK MENU see page 3-17
TEST PRINT see page 3-19
MENUS
PRINT MENU
COPIES
PAPER SIZE
ORIENTATION
PAPER TRAY
DUPLEX
FORM LENGTH
RESOLUTION
PRINT QUALITY
TONER DENSITY
PAGE PROTECTION
SYSTEM MENU
LANGUAGE
POWER SAVE
AUTO CONTINUE
SPECIAL PAPER
TRAY1 MEDIA
TRAY2 MEDIA
TRAY3 MEDIA
PCL MENU
FONT NUMBER
PITCH
POINT SIZE
SYMBOL SET
PS MENU
JAM RECOVER
NOTE
Menu items in italics appear only when
the required option is installed.
OperatW3.frm 4 ページ 2003年11月18日 火曜日 午前9時51分

3-5
Chapter 3Using Your Printer
PARALLEL MENU
IO BUFFER SIZE
HIGH SPEED
BI-DIRECTION
TIMING
ADOBE PROTOCOL
TIME OUT
MAINTENANCE MENU
DISPLAY LANGUAGE
FACTORY DEFAULT
SERVICE MESSAGE
NETWORK MENU
IP ADDRESS
SUBNET MASK
GATEWAY
NETWARE FRAME
TEST PRINT
CONFIG PRINT
PCL FONT LIST
PCL DEMO
PS CONFIG PRINT
PS FONT LIST
NETWORK CONFIG PRINT
2. Understanding the Printer Menus
OperatW3.frm 5 ページ 2003年11月18日 火曜日 午前9時51分
3-6
Chapter 3Using Your Printer
Printer Menus
The printer has six standard menus and two optional menus that
allow you to configure the printer.
Some of the items or values are displayed only when a specific
option is installed. Other items or values may only be effective for a
particular printer language. You can select these items or values at
any time, but they only affect printer function when you use the
specified printer language. The standard and optional menus are as
follows.
(1) Print Menu
(2) PCL Menu
(3) PS Menu
(4) System Menu
(5) Parallel Menu
(6) Maintenance Menu
(7) Network Menu
(8) Test Print
Tray 1
Tray 2
Tray 3
2. Understanding the Printer Menus
OperatW3.frm 6 ページ 2003年11月18日 火曜日 午前9時51分
3-7
Chapter 3Using Your Printer
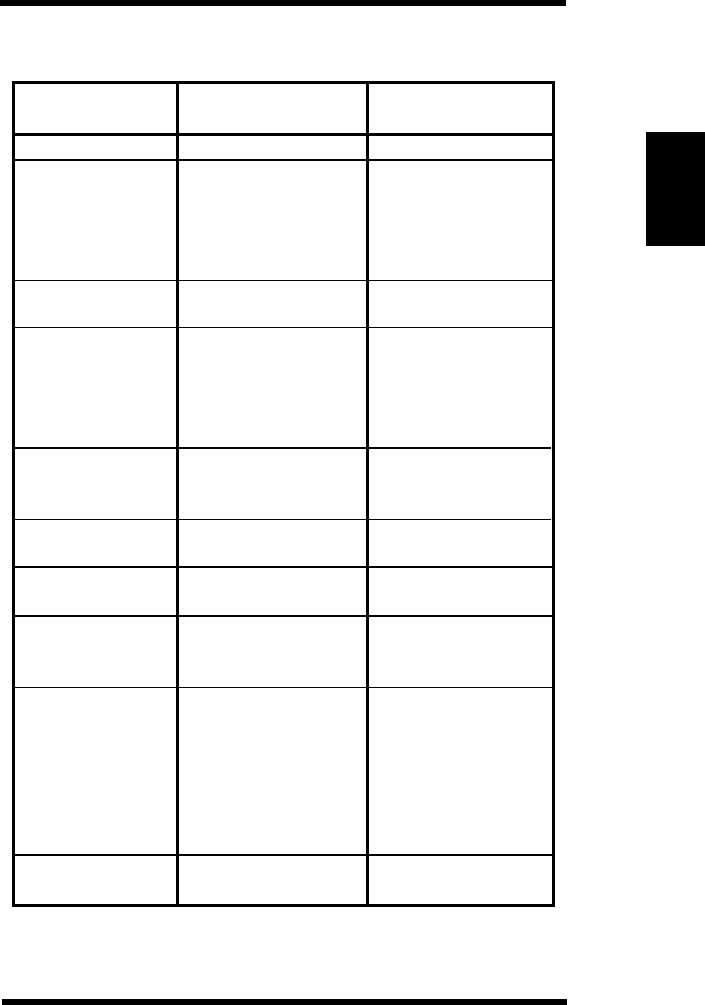
(1) Print Menu
ITEM USER SELECTION
COPIES
PAPER SIZE
ORIENTATION
PAPER TRAY
DUPLEX
FORM LENGTH
RESOLUTION
PRINT QUALITY
TONER DENSITY
PAGE
PROTECTION
1 to 999
LETTER
LEGAL
LEDGER
EXEC
A4, A3, B4, JIS B5
PORTRAIT
LANDSCAPE
TRAY 1
TRAY 2
TRAY 3
MANUAL FEED
AUTOMATIC
OFF
SHORT-EDGE BIND
LONG-EDGE BIND
5 to 128
300
600
FINEART
TONER SAVE
STANDARD
EXTRA LIGHT
LIGHT
MEDIUM LIGHT
MEDIUM
MEDIUM DARK
DARK
EXTRA DARK
OFF
ON
FACTORY DEFAULT
1
LETTER
PORTRAIT
AUTOMATIC
OFF
60
600
FINEART
MEDIUM
OFF
2. Understanding the Printer Menus
OperatW3.frm 7 ページ 2003年11月18日 火曜日 午前9時51分

3-8
Chapter 3Using Your Printer
COPIES
Specifies the number of copies you want to print.
PAPER SIZE
Specifies the paper size you want to use for printing.
ORIENTATION
Selects the direction of the print on the page.
Portrait orientation means the page is taller than it is wide when
you view the printed text upright.
Landscape orientation means the page is wider than it is tall when
you view the printed text upright.
PAPER TRAY
Specifies the paper source. If AUTOMATIC is selected, the
printer will automatically search all paper trays for the required
paper size.
For more information, see “Automatic Tray Switching” page 3-35.
DUPLEX
This item appears only when the printer is equipped with the
duplex unit.
Specifies whether to print on both sides of the paper. If you
attempt duplex printing, you can choose either short edge or long
edge.
For more information, see “Duplex Printing” page 3-27.
FORM LENGTH
Specifies the number of lines per page.
RESOLUTION
Selects 300 or 600 dpi (dots per inch) as the print resolution.
Higher resolution prints more slowly but produces higher-quality
graphics, whereas lower resolution prints faster but produces
lower-quality graphics.
PRINT QUALITY
Selects the text quality you want to use for your printed document.
STANDARD: Normal quality printing.
2. Understanding the Printer Menus
OperatW3.frm 8 ページ 2003年11月18日 火曜日 午前9時51分

3-9
Chapter 3Using Your Printer
FINEART: Smooths the jagged edges of the printed image. More
effective when printing at 600 dpi.
TONER SAVE: Toner Save allows you to use less toner when
printing.
TONER DENSITY
Selects the density of the toner applied to the page. This setting
can be fine-adjusted in 7 different steps.
PAGE PROTECTION
Page Protection allows you to make sure the entire page is pro-
cessed before it is printed. Set the setting to ON only when the
JOB TOO COMPLEX error occurs. If Page Protection is set to ON,
printing speed may be slowed.
NOTE
The settings you make in the print menu may be overridden by the
settings you make with your printer driver.
2. Understanding the Printer Menus
OperatW3.frm 9 ページ 2003年11月18日 火曜日 午前9時51分

3-10
Chapter 3Using Your Printer
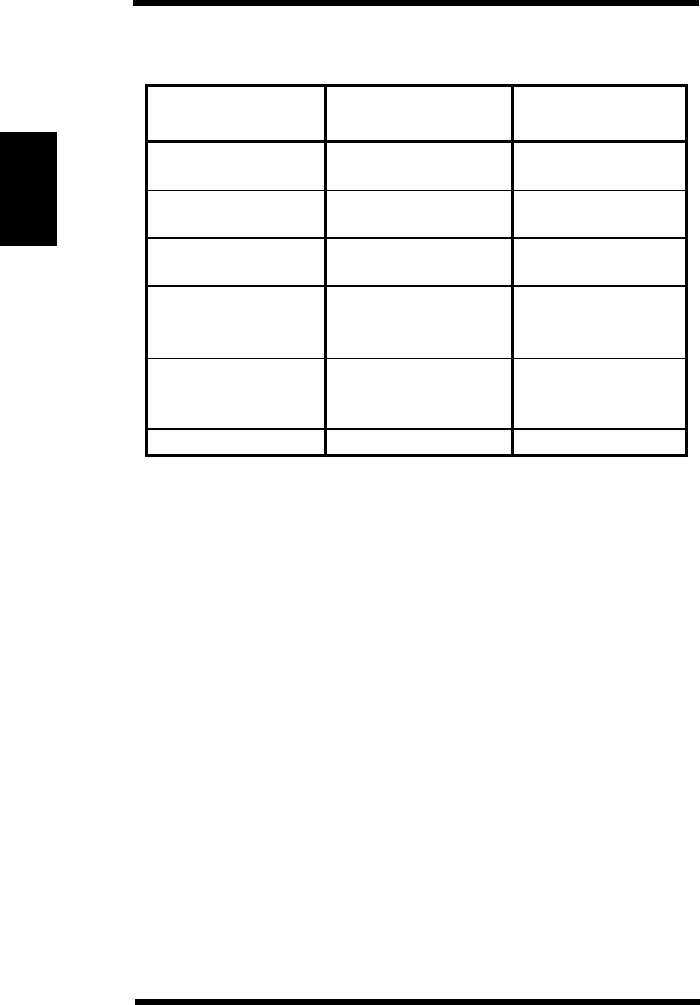
(2) PCL Menu
FONT NUMBER
Font Number is the number you use to select a font from the con-
trol panel.
PITCH
Pitch is the number of characters printed per horizontal inch. This
setting is for a mono-space scalable font.
POINT SIZE
Point Size is font height. This setting is for a proportional scalable
font.
SYMBOL SET
Symbol Set is a set of alphabetic and numeric characters, punctua-
tion, and special symbols used when printing with a selected font.
FONT NUMBER
PITCH
POINT SIZE
SYMBOL SET
0
10.00
12.00
ROMAN-8
0 to 50
0.44 to 99.99
4.00 to 999.75
ROMAN-8, ISO L1,
ISO L2, ISO L5, PC-8,
PC-8 DN, PC-850,
PC-852, PC-8 TK,
WIN L1, WIN L2,
WIN L5, DESKTOP,
PS TEXT, VN INTL,
VN US, MS PUBL,
MATH-8, PS MATH,
VN MATH, PIFONT,
LEGAL, ISO 4, ISO 6,
ISO 11, ISO 15, ISO 17,
ISO 21, ISO 60, ISO 69,
WIN 3.0, MC TEXT,
SYMBOL, WING
ITEM FACTORY DEFAULT USER SELECTION
2. Understanding the Printer Menus
OperatW3.frm 10 ページ 2003年11月18日 火曜日 午前9時51分

3-11
Chapter 3Using Your Printer
(3) PS Menu
This item appears only when PostScript is installed.
JAM RECOVER
When Jam Recover is set to OFF, the printer does not reprint a
page that has misfed.
When the Jam Recover is set to ON, the printer keeps the image
for a printed page until the printer signals that the page has suc-
cessfully exited the printer. Then the printer reprints all misfed
pages. However, printing speed may be slowed.
JAM RECOVER ON ON
OFF
ITEM FACTORY DEFAULT RANGE OF USER
SELECTION
2. Understanding the Printer Menus
OperatW3.frm 11 ページ 2003年11月18日 火曜日 午前9時51分

3-12
Chapter 3Using Your Printer
(4) System Menu
LANGUAGE
The printer language defines how the computer communicates
with the printer. If you select AUTO, the printer language will be
switched automatically. However, neither PS nor AUTO will
appear if PostScript is not installed.
POWER SAVE
The Power Save setting determines the length of time the printer
waits after the last job is printed before it goes into a reduced
power state. A value of zero means that it does not go into power
save mode. When the printer receives the next job, the power save
mode is canceled. The power save mode is also cancelled auto-
matically by pressing any key, removing and reinstalling the paper
tray, or opening and closing the upper cover.
LANGUAGE
POWER SAVE
AUTO CONTINUE
SPECIAL PAPER
TRAY 1 MEDIA
TRAY 2 MEDIA
TRAY 3 MEDIA
PCL
45
OFF
NONE
PLAIN PAPER
PLAIN PAPER
PLAIN PAPER
PCL
PS
AUTO
0 to 180
OFF
20sec, 30sec, 60sec,
90sec, 120sec
NONE
TRAY 1
TRAY 3
PLAIN PAPER
THIN PAPER
TRANSPARENCY
ENVELOPE
PLAIN PAPER
THIN PAPER
PLAIN PAPER
THIN PAPER
ITEM FACTORY DEFAULT USER SELECTION
2. Understanding the Printer Menus
OperatW3.frm 12 ページ 2003年11月18日 火曜日 午前9時51分

3-13
Chapter 3Using Your Printer
AUTO CONTINUE
When a recoverable error has occurred, set the length of time that
the printer takes to return to the on-line state automatically.
Recoverable errors: MEMORY OVERFLOW
JOB TOO COMPLEX
SPECIAL PAPER
Specifies the paper source which the special paper is loaded in.
See “Special Paper Tray Setting” page 3-37.
TRAY 1 MEDIA
Specifies the media type that is loaded in tray 1 to get the best
possible result on the paper.
PLAIN PAPER: 75 to 157 g/m2
THIN PAPER: 60 to 75 g/m2
TRANSPARENCY: Transparencies
ENVELOPE: Envelopes
TRAY 2 MEDIA
Specifies the media type that is loaded in tray 2 to get the best
possible result on the paper.
TRAY 3 MEDIA
This item appears only when the optional third tray unit is
installed. Specifies the media type that is loaded in tray 3 to get
the best possible result on the paper.
2. Understanding the Printer Menus
OperatW3.frm 13 ページ 2003年11月18日 火曜日 午前9時51分
3-14
Chapter 3Using Your Printer
(5) Parallel Menu
IO BUFFER SIZE
Selects the receiving buffer size. If AUTO is selected, the printer
automatically sets the buffer size depending on the amount of
memory carried in the printer.
HIGH SPEED
Sets whether it transfers data at high speed. Basically, you don’t
need to change the setting. However, depending on the PC you are
using, you may not be able to run at high speed. In such a case, set
the setting to OFF.
BI-DIRECTION
Sets whether to enable bi-directional communication. Basically,
you don’t need to change the setting. However, depending on the
PC you are using, it may not support bi-directional communica-
tion. In such case, set the setting to OFF after verifying the PC
specification.
IO BUFFER SIZE
HIGH SPEED
BI-DIRECTION
TIMING
ADOBE PROTOCOL
TIME OUT
AUTO
ON
ON
A-B-A
STANDARD
60
16K, 64K, 256K, 1M
AUTO
OFF
ON
OFF
ON
A-B-A
A-B
B-A
STANDARD
BINARY
TBCP
5 to 300
ITEM FACTORY DEFAULT USER SELECTION
2. Understanding the Printer Menus
OperatW3.frm 14 ページ 2003年11月18日 火曜日 午前9時51分

3-15
Chapter 3Using Your Printer
TIMING
Sets the timing of “Busy to Ack” in the communication format
between the printer and PC. Basically, you don’t need to change
the setting. However, depending on the PC you are using, it may
not be able to support a proper communication between the
printer and PC. In such a case, change the setting after verifying
the PC specification.
A-B: Ack in Busy.
A-B-A: Ack while Busy.
B-A: Ack after Busy.
ADOBE PROTOCOL
This item appears only when PostScript is installed.
Standard: Tells the driver to send data to the printer in a ASCII
format.
Binary: Tells the driver to send data to the printer in a binary for-
mat.
TBCP: This allows you to change between ASCII and binary for-
mat by a particular control code.
TIME OUT
The Time Out setting determines the time out period from the end
of the print job to the ready state. After the time out period, the
printer searches for next data from interface channel.
2. Understanding the Printer Menus
OperatW3.frm 15 ページ 2003年11月18日 火曜日 午前9時51分
3-16
Chapter 3Using Your Printer
(6) Maintenance Menu
DISPLAY LANGUAGE
The Display Language setting determines the language of the text
that appears on the control panel. The setting becomes effective
by restarting the printer after making changes.
FACTORY DEFAULT
The printer settings except the network menu and parallel menu
settings are set to the factory default values.
SERVICE MESSAGE
This item appears only when the MAINTENANCE REQ message
is displayed on the control panel. You can clear the message by
changing this setting to OFF. If the MAINTENANCE REQ mes-
sage appears, the printer is approaching the maintenance interval.
See “Maintaining Your Printer” page 4-1.
DISPLAY LANGUAGE
FACTORY DEFAULT
SERVICE MESSAGE
ENGLISH
ON
ENGLISH
DEUTSCH
FRANCAIS
ITALIANO
NEDERLANDS
DANSK
ESPAÑOL
CESKY
ON
OFF
ITEM FACTORY DEFAULT USER SELECTION
2. Understanding the Printer Menus
OperatW3.frm 16 ページ 2003年11月18日 火曜日 午前9時51分
3-17
Chapter 3Using Your Printer
(7) Network Menu
This item appears only when the optional network card is installed.
Using the software utility available with the optional network card
enables making of the settings in detail. For details, see the manual
for the network card.
IP ADDRESS
Types an IP address. This is the numerical value to distinguish all
networks utilizing the TCP/IP protocol. The value in each field
must be a number from 0 to 255.
SUBNET MASK
Types a subnet mask address. This number combined with the IP
address identifies which network your computer is on. The value
in each field must be a number from 0 to 255.
GATEWAY
Types a default gateway address. A gateway is a connection or
interchange point that connects two networks that would other-
wise be incompatible.
NETWARE FRAME
Specifies a NetWare frame type. If NetWare frame is set to
AUTO, a proper frame type is automatically selected.
IP ADDRESS
SUBNET MASK
GATEWAY
NETWARE FRAME
198, 102, 102, 254
255, 255, 255, 0
0, 0, 0, 0
AUTO
xxx, xxx, xxx, xxx
xxx, xxx, xxx, xxx
xxx, xxx, xxx, xxx
AUTO
ETHERNET 2
IEEE 802.3
IEEE 802.2
SNAP+IEEE 802.2
ITEM FACTORY
DEFAULT USER SELECTION
2. Understanding the Printer Menus
OperatW3.frm 17 ページ 2003年11月18日 火曜日 午前9時51分

3-18
Chapter 3Using Your Printer
NOTE
Any setting changes you make in the network menu becomes effec-
tive by pressing the On Line key.
CAUTION
Pressing the On Line key after making the network settings will
restart the network card immediately. The printer continues dis-
playing “READY” on the control panel while the network card is
being restarted. However, access to the network card is disabled
until the LED for the network card lights up steadily.
2. Understanding the Printer Menus
OperatW3.frm 18 ページ 2003年11月18日 火曜日 午前9時51分

3-19
Chapter 3Using Your Printer
(8) Test Print
A test print is printed out with the paper size and paper tray settings
you made in the print menu. For details, see “Print Menu” page 3-6.
1. Press the On Line key to take the printer off-line.
2. Press the Menu key as many times as necessary to select the test
print menu.
3. Press the Item key as many times as necessary to select the item
you want to print.
4. Press the Enter key to start printing.
The printer returns on-line automatically.
CONFIG PRINT
Prints the internal settings of the control panel, printer information
and installed options. Config print is printed out in the display lan-
guage you selected.
PCL FONT LIST
Prints a font list used in PCL. It includes typeface, pitch, point
size, escape sequence and font number.
PCL DEMO PRINT
Prints the demo page for PCL. PCL demo print is printed out in
the display language you selected.
CONFIG PRINT
PCL FONT LIST
PCL DEMO PRINT
PS CONFIG PRINT
PS FONT LIST
NETWORK CONFIG
PRINT
ITEM
2. Understanding the Printer Menus
OperatW3.frm 19 ページ 2003年11月18日 火曜日 午前9時51分

3-20
Chapter 3Using Your Printer
PS CONFIG PRINT
Prints various information for PS, RAM capacity and so on. PS
config print is printed out in the display language you selected.
PS FONT LIST
Prints a font sample that shows all the fonts available in PS.
NETWORK CONFIG PRINT
Prints the contents of the setting or the status of the network. If the
printer detects a network error after turning the printer on, the
printer automatically prints out a network config page. At this
time, check the contents for an error.
2. Understanding the Printer Menus
OperatW3.frm 20 ページ 2003年11月18日 火曜日 午前9時51分
3-21
Chapter 3Using Your Printer
Supported Media
Use only supported sizes or weights of paper. Do not use other
media which may not meet the media specifications for this printer.
Paper Type
• Plain paper: 60 to 90 g/m2 (16 to 24 lb)
Recycled paper: 60 to 90 g/m2 (16 to 24 lb)
• Special paper (Tray 1 only):
transparencies, labels, envelopes, letterhead,
thick paper: 91 to 157 g/m2 (24 to 41 lb)
Paper Size
*Universal size (custom size) can be set by using the printer driver.
For details, see the Printer Driver User’s Manual.
A3 (297mm x 420mm)
Super B (A3+) (328mm x 453mm)
A4 (210mm x 297mm)
B4 (257mm x 364mm)
JIS B5 (182mm x 257mm)
Letter (LTR) (8.5” x 11”)
Legal (LGL) (8.5” x 14”)
Ledger (LGR) (11” x 17”)
Executive (EXEC) (7.25” x 10.5”)
Paper Size
Paper Type
ISO B5 (176mm x 250mm)
Com-10 (4.125” x 9.5”)
C5 (162mm x 229mm)
DL (110mm x 220mm)
Monarch (3.875” x 7.5”)
Universal* (92 to 330mm x 140 to 483mm)
Plain/Recycled
paper
Special paper
3. Loading Paper
OperatW3.frm 21 ページ 2003年11月18日 火曜日 午前9時51分

3-22
Chapter 3Using Your Printer
*Tray 3: Optional 250-Sheet Universal Tray
Capacity
• Tray 1:
Plain/recycled paper: Up to 150 Sheets
Special paper:
-Thick paper, letter head, labels, envelopes: Up to 10 sheets
-Transparencies: Up to 5 sheets
• Tray 2:
Plain/recycled paper: Up to 500 sheets
• Tray 3 (optional):
Plain/recycled paper: Up to 250 sheets
A3
Super B (A3+)
A4
B4
JIS B5
Letter (LTR)
Legal (LGL)
Ledger (LGR)
Executive (EXEC)
ISO B5 (envelope)
Com-10 (envelope)
C5 (envelope)
DL (envelope)
Monarch (envelope)
Universal (custom size)
Paper Size Paper Source
Tray1 Tray 2 Tray 3*
❍
❍
❍
❍
❍
❍
❍
❍
❍
❍
❍
❍
❍
❍
❍
❍
❍
❍
❍
❍
❍
❍
❍
❍
3. Loading Paper
OperatW3.frm 22 ページ 2003年11月18日 火曜日 午前9時51分
3-23
Chapter 3Using Your Printer
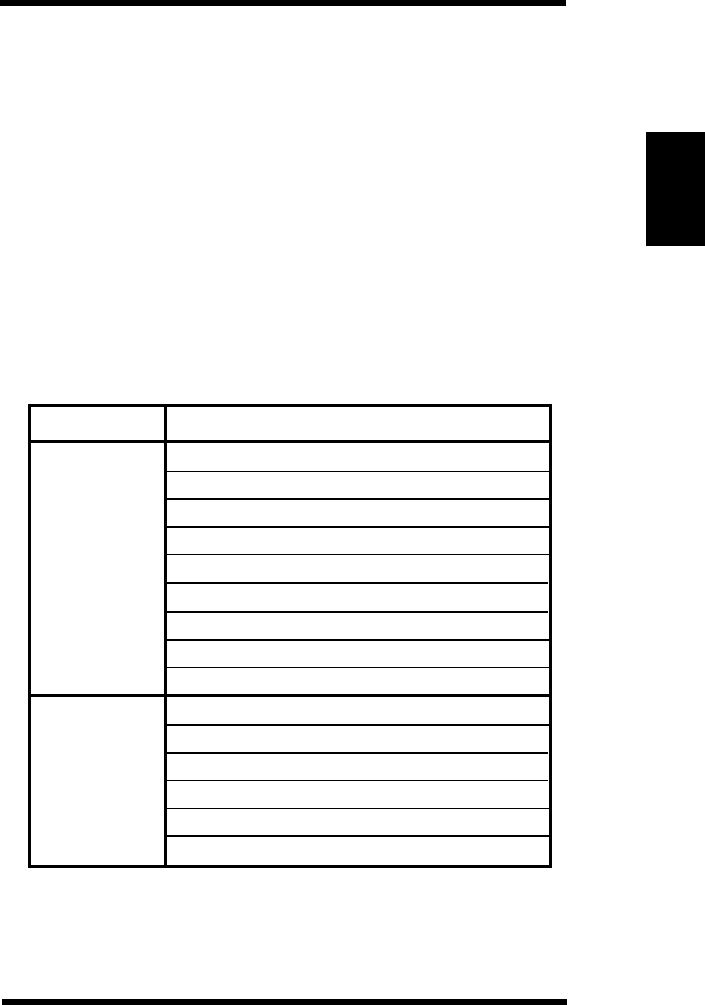
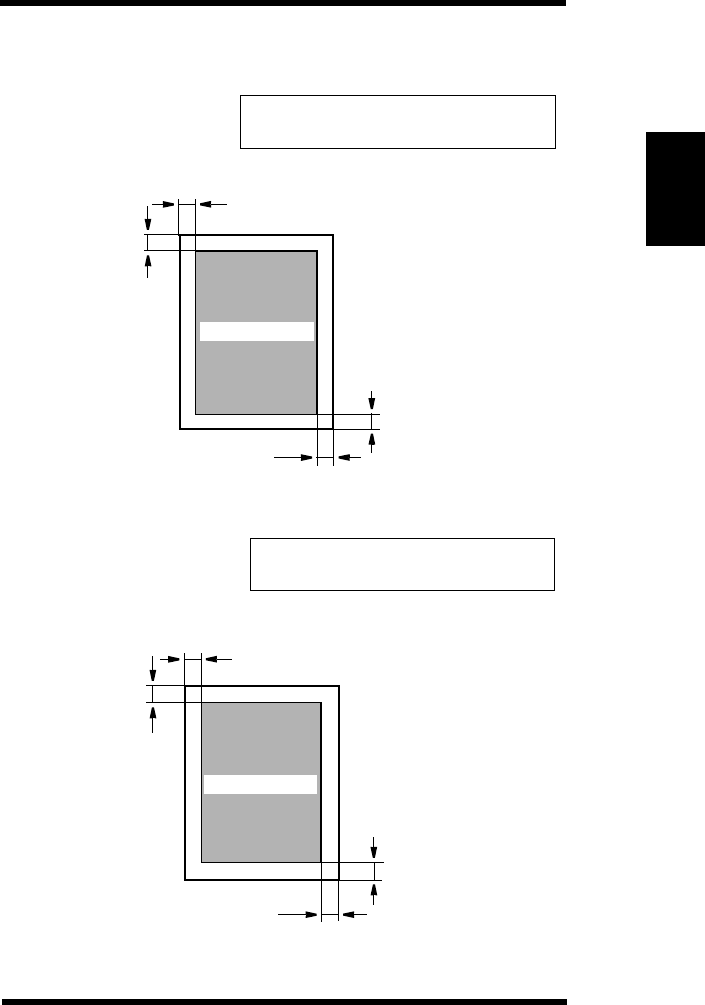
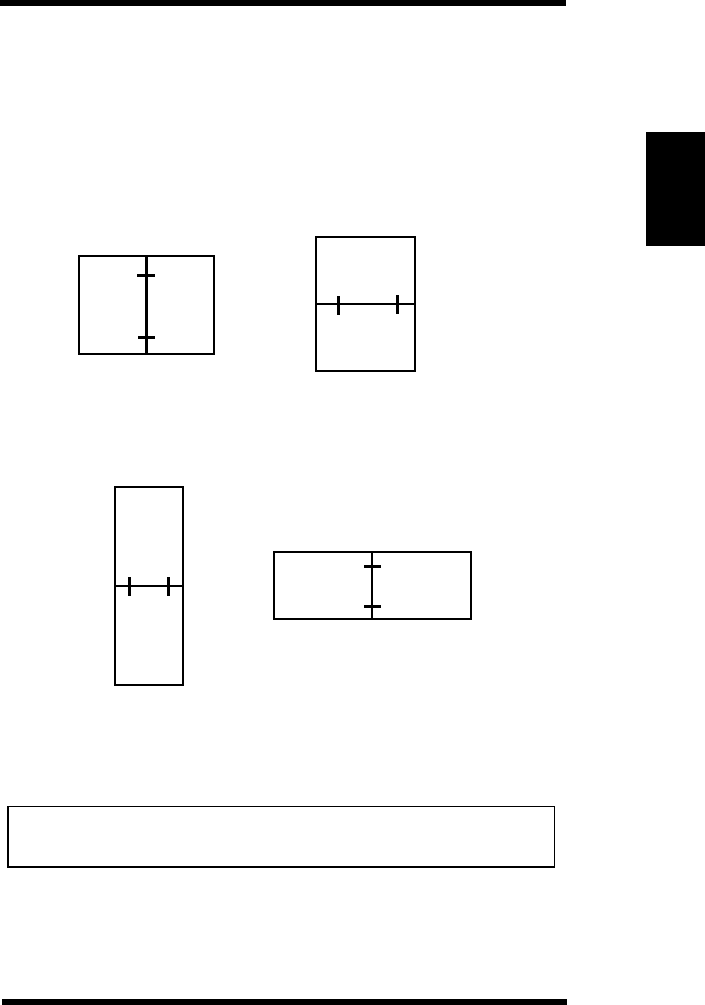
Printable Area
One-sided printing
Double-sided printing
Printable area
Printable area
5 mm (0.2 inch)
7.5 mm (0.3 inch)
7.5 mm (0.3 inch)
5 mm (0.2 inch)
7.5 mm (0.3 inch)
5 mm (0.2 inch)
5 mm (0.2 inch)
7.5 mm (0.3 inch)
Margins of 5 mm (0.2 inch) along the
four edges of the document.
Margins of 7.5 mm (0.3 inch) along
the four edges of the document.
3. Loading Paper
OperatW3.frm 23 ページ 2003年11月18日 火曜日 午前9時51分
3-24
Chapter 3Using Your Printer
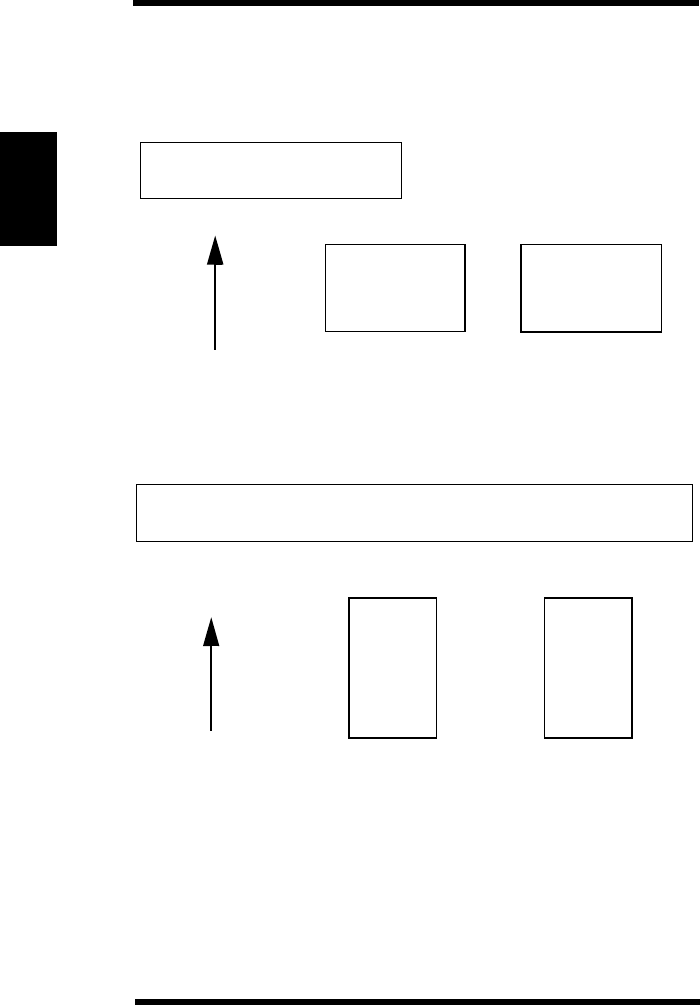
Printing Orientation
For all paper sizes, the printer prints on the paper face up from any
tray.
Paper loaded crosswise:
(A4, JIS B5, Letter)
Paper loaded lengthwise:
(A3, Super B, B4, Ledger, Legal, Executive, Envelopes, Universal)
A
A
A
The direction of
Printing at portrait
orientation Printing at landscape
orientation
Printing at portrait
orientation Printing at landscape
orientation
the paper loading
The direction of
paper loading
A
3. Loading Paper
OperatW3.frm 24 ページ 2003年11月18日 火曜日 午前9時51分

3-25
Chapter 3Using Your Printer
Printing on Envelopes
- Tray 1 only.
- The following lists the envelope sizes you can specify from the
control panel or printer driver.
ISO B5 (176mm x 250mm)
COM10 (Commercial-10) (4.125” x 9.5”)
C5 (162mm x 229mm)
DL (110mm x 220mm)
Monarch (3.875” x 7.5”)
- Select the envelope size you want to print in the tray1 paper size
setting mode.
See “Tray 1 Paper Size Setting Method” page 3-2.
- Load envelopes face up.
- The top edge of the envelopes should be loaded facing the left
paper guide plate.
- Specify envelope as the media type from the control panel.
See “Understanding the Printer Menus” page 3-11.
- Do not specify duplex printing.
Note the following points whenever printing on envelopes.
• Make sure that all edges are created sharply and that all flaps are
folded correctly.
• Do not use envelopes that are self-adhesive. Use only envelopes
that have standard adhesive that sticks after it is moistened.
• Use envelopes whose flaps run the entire length of the envelope.
Envelopes that seal at on end will not feed properly.
• Do not use envelopes that have a window. Such envelopes can
seriously damage the printer.
• Do not use envelopes that are wrinkled.
• Never use envelopes that have clasps or any other type of fastener
that can damage the printer.
• Do not store envelopes in an area that is subject to high humidity.
3. Loading Paper
OperatW3.frm 25 ページ 2003年11月18日 火曜日 午前9時51分

3-26
Chapter 3Using Your Printer
Printing on Labels
- Tray 1 only.
- Load labels face up.
- Use only labels designed for laser printers or plain paper copiers.
- Do not specify duplex printing.
Printing on Thick Paper
- Tray 1 only.
- Load thick paper face up.
- Do not specify duplex printing.
Printing on Transparencies
Be careful when you handle transparencies. Fingerprints on the sur-
face of the transparency can cause poor print quality.
- Tray 1 only.
- Use only transparencies designed for laser printers or plain paper
copiers.
- Load transparencies face up.
- Specify transparency as the media type from the control panel.
See “Understanding the Printer Menus” page 3-12.
- Do not specify duplex printing.
Printing on Custom Paper
If you cannot specify the custom paper size with your software
application, you cannot print on the custom paper.
- Tray 1 only.
- Load custom paper face up.
- Do not specify “LONG-EDGE BIND” in the duplex mode.
3. Loading Paper
OperatW3.frm 26 ページ 2003年11月18日 火曜日 午前9時51分
3-27
Chapter 3Using Your Printer
Duplex Printing
Enables printing on both sides of the paper only when the printer is
equipped with the duplex unit.
If you attempt duplex printing, you can choose either Bind Long
Edge or Bind Short Edge.
(1) Bind Long Edge
(2) Bind Short Edge
NOTE
To attempt duplex printing, you may need to add more
memory (an additional 8MB recommended).
AA
A
A
A
A
AA
Portrait Landscape
Portrait
Landscape
3. Loading Paper
OperatW3.frm 27 ページ 2003年11月18日 火曜日 午前9時51分

3-28
Chapter 3Using Your Printer
The supported paper types and sizes for duplex printing are as fol-
lows.
Paper Type
- Plain paper: 60 to 90 g/m2 (16 to 24 lb)
- Recycled paper: 60 to 90 g/m2 (16 to 24 lb)
NOTE
Do not use special paper (transparencies, labels, envelopes, let-
terhead and thick paper) for duplex printing.
Paper Size
A3, Super B, A4, B4, JIS B5, Letter, Legal, Ledger, Executive,
Custom*.
*Do not perform duplex printing for a custom size smaller than A5
size.
NOTES
- When printing for Super B size, you may need to add more mem-
ory.
- You cannot combine duplex printing for a custom size with
LONG-EDGE BIND.
Remember the following when you attempt duplex printing.
• The same size page is printed on the front and back of the paper.
• Always specify “PLAIN PAPER” for the media type setting.
See “Understanding the Printer Menus” page 3-12.
• The first page is printed out on the paper face down.
3. Loading Paper
OperatW3.frm 28 ページ 2003年11月18日 火曜日 午前9時51分
3-29
Chapter 3Using Your Printer
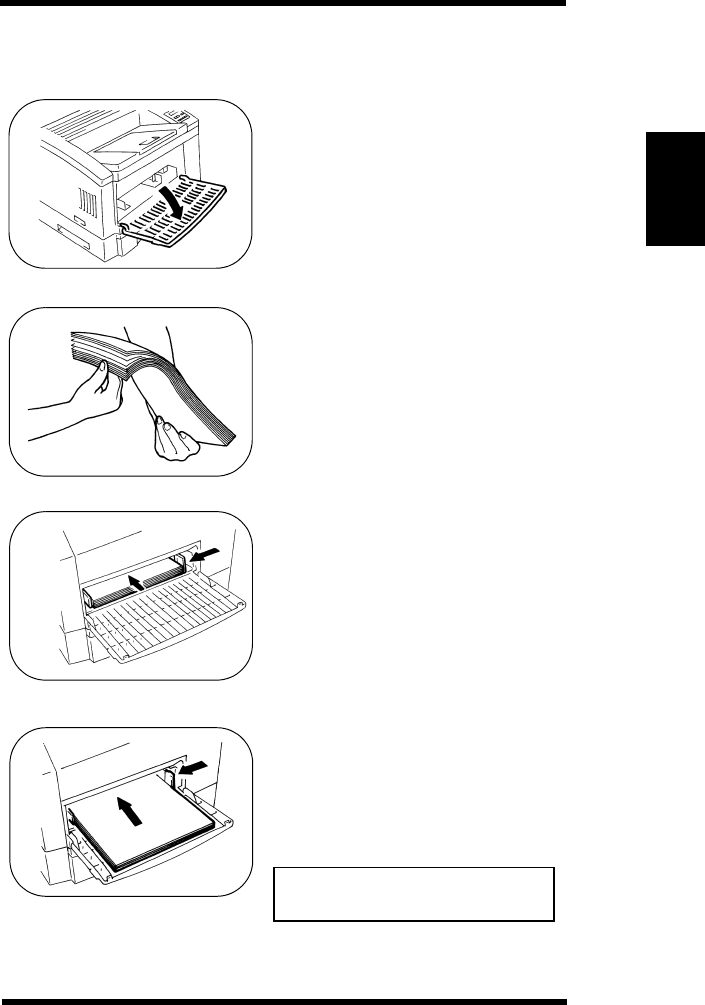
Loading Paper in Tray 1
1. Open tray 1.
2. Fan the paper thoroughly and
align the edges.
3. Adjust the paper guide plates to
fit the paper size and load paper
face up in the tray.
Load A4, JIS B5 and LTR with
the long edge toward the back of
the tray.
Load A3, A3+, B4, LGL, LGR,
EXEC, envelopes and Custom
with the short edge toward the
back of the tray.
Do not stack paper higher than
the ▼mark.
NOTE
3. Loading Paper
OperatW3.frm 29 ページ 2003年11月18日 火曜日 午前9時51分

3-30
Chapter 3Using Your Printer
4. Specify the tray 1 paper size.
→See “Tray 1 Paper Size Setting
Method” page 3-2.
5. Specify the tray 1 media type.
→See “System Menu” page 3-12.
→See “Basic Menu Setting
Method” page 3-1.
3. Loading Paper
OperatW3.frm 30 ページ 2003年11月18日 火曜日 午前9時51分

3-31
Chapter 3Using Your Printer
Loading Paper in Tray 2
1. When the paper tray is in the
printer, pull it out and remove it.
2. Press down the paper lifting plate
until it locks.
3. Fan the paper thoroughly and
align the edges.
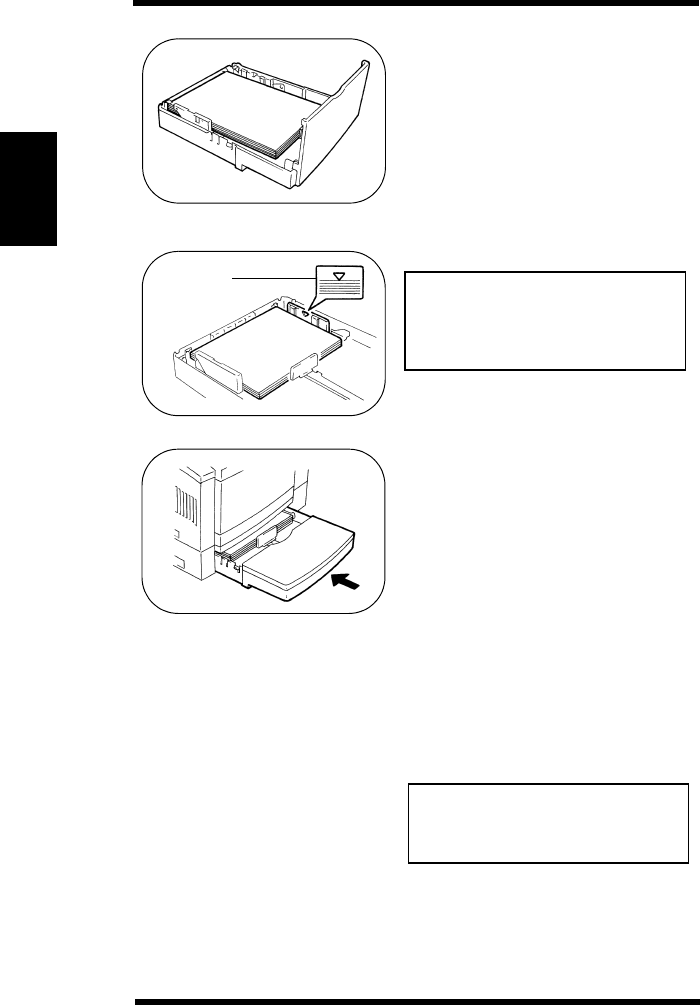
4. Load paper face up, placing it
under the two clips in the tray.
Letter size only.
Do not load paper beyond the
Max. Level Indicator.
Do not add more paper until all
sheets have been used up.
NOTES
Max. Level
Indicator
3. Loading Paper
OperatW3.frm 31 ページ 2003年11月18日 火曜日 午前9時51分
3-32
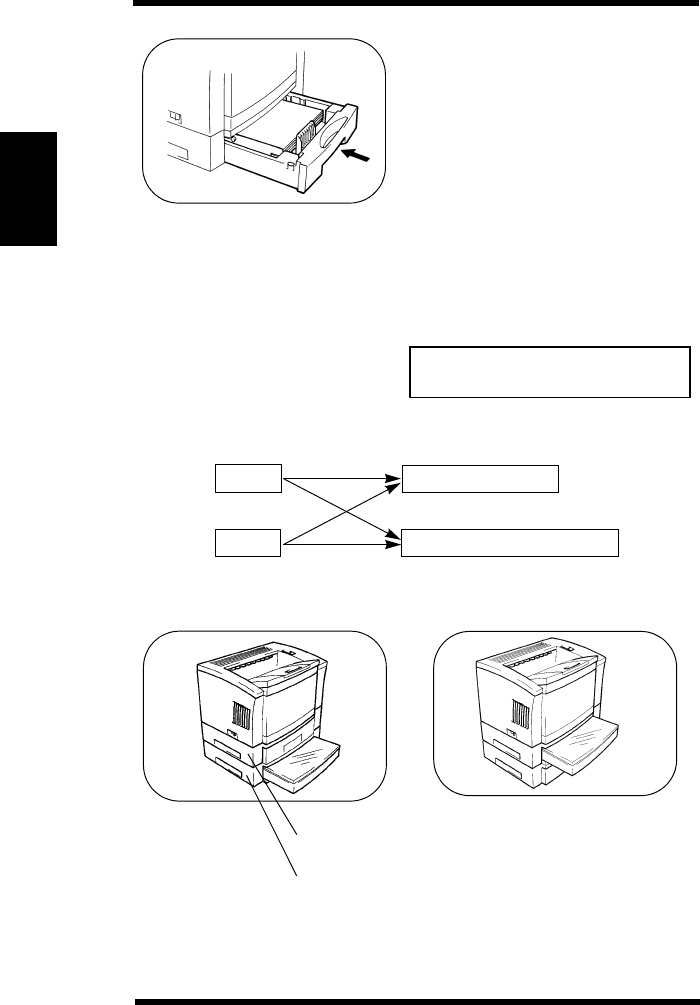
Chapter 3Using Your Printer
5. Slide the tray securely into posi-
tion.
6. Specify the tray 2 media type.
→See “System Menu” page 3-12.
→See “Basic Menu Setting
Method” page 3-1.
Tray 2 and tray 3 can be used
interchangeably.
USEFUL TIP
Tray 2
Tray 3
Second Tray Unit
Optional Third Tray Unit
Second Tray Unit
Optional Third Tray Unit
3. Loading Paper
OperatW3.frm 32 ページ 2003年11月18日 火曜日 午前9時51分
3-33
Chapter 3Using Your Printer
Loading Paper in Tray 3
1. When the paper tray is in the tray
unit, pull it out and remove it.
2. Open the paper cover.
3. Press down the paper lifting plate
until it locks.
4. Fan the paper thoroughly and
align the edges.
5. Load paper face up, placing it
under the two clips in the tray.
Adjust the paper guide plates to
fit the paper size.
Load A4, JIS B5 and LTR with
the long edge toward the back of
the tray.
3. Loading Paper
OperatW3.frm 33 ページ 2003年11月18日 火曜日 午前9時51分
3-34
Chapter 3Using Your Printer
Load A3, B4, LGL, LGR and
EXEC with the short edge toward
the back of the tray.
Do not load paper beyond the
Max. Level Indicator.
Do not add more paper until all
sheets have been used up.
6. Close the paper cover.
Slide the tray securely into posi-
tion.
7. Specify the tray 3 media type.
→See “System Menu” page 3-12.
→See “Basic Menu Setting
Method” page 3-1.
Tray 2 and tray 3 can be used
interchangeably.
See page 3-32.
Max. Level
Indicator
USEFUL TIP
NOTES
3. Loading Paper
OperatW3.frm 34 ページ 2003年11月18日 火曜日 午前9時51分

3-35
Chapter 3Using Your Printer
Automatic Tray Setting
If you select AUTOMATIC or Auto for the paper source from the
control panel or printer driver, the printer will automatically search
all paper trays for the required paper size. At this time, the paper
source is selected in the priority order of tray 2, tray 3 and tray 1.
For more information, see the Printer Driver User’s Manual.
If the tray currently selected for use runs out of paper and there is
another tray loaded with paper of the same size, the printer automat-
ically selects that tray to permit an uninterrupted print cycle. How-
ever, a tray that is designated for special paper is excluded from
automatic tray switching.
1. Press the On Line key to take the printer off-line.
2. Press the Menu key as many times as necessary to select the
print menu.
3. Press the Item key as many times as necessary to select the
paper source.
4. Press the Select key to select AUTOMATIC.
5. Press the On Line key to return the printer on-line.
USEFUL TIPS
This feature is a great advantage when you need to make a large
number of prints on the same size paper. For example, you can
make up to 1,150 prints without interruption by using tray 1, tray 2
and optional tray 3.
NOTE
If you specify JOB SEPARATION or UNIVERSAL, tray 1 will not be
selected in the automatic paper source mode.
3. Loading Paper
OperatW3.frm 35 ページ 2003年11月18日 火曜日 午前9時51分

3-36
Chapter 3Using Your Printer
Using Manual Feed
Using manual feed is useful when you temporarily want to print on
paper that is not loaded in any tray. The manual feed feature allows
you to print on custom sizes of paper, envelopes, labels and trans-
parencies.
1. Select Manual Feed as the paper source from the control panel
or printer driver.
See “Understanding the Printer Menus” page 3-7.
See the Printer Driver User’s Manual.
2. Send a print command from your computer. The control panel
displays Manual Feed and the specified paper size. The printer
goes off-line.
3. Remove any paper remaining in tray 1.
4. Adjust the paper guides to fit the specified paper size and load
paper in tray 1.
See “Loading Paper in Tray 1” page 3-29.
5. Press the On Line key to start printing.
6. If the print data is multi page, the printer makes multiple prints.
7. Reload the paper which was loaded previously in tray 1 after
printing is completed.
3. Loading Paper
OperatW3.frm 36 ページ 2003年11月18日 火曜日 午前9時51分

3-37
Chapter 3Using Your Printer
Special Paper Tray Setting
When you load special paper in the tray, it can be specified as the
special paper tray so that the other users will not use the special
paper by mistake.
1. Press the On Line key to take the printer off-line.
2. Press the Menu key as many times as necessary to select the
System menu.
3. Press the Item key as many times as necessary to select SPE-
CIAL PAPER.
4. Press the Select key to select the tray you are loading special
paper in.
5. Press the Enter key to save your selection.
An asterisk (*) appears at the right of the setting.
6. Press the On Line key to return the printer on-line.
The tray selected for the special paper mode will not be selected in
the automatic paper source mode.
NOTE
Tray 1 and tray 3 can be specified as the special paper tray.
3. Loading Paper
OperatW3.frm 37 ページ 2003年11月18日 火曜日 午前9時51分
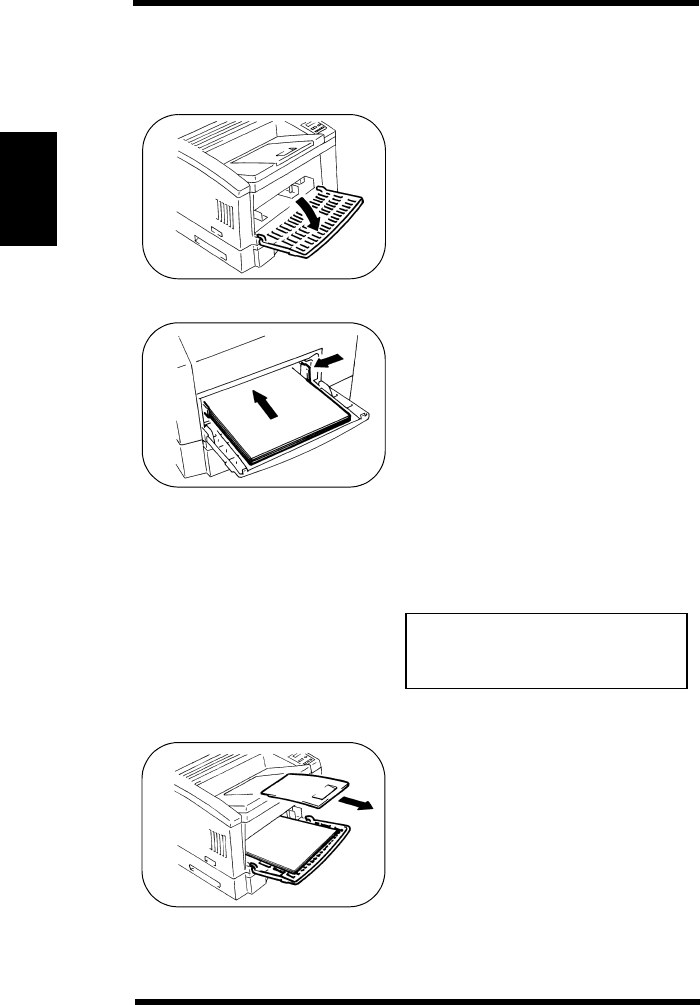
3-38
Chapter 3Using Your Printer
There are three sources to print from: tray 1, tray 2 and tray 3. Select
the printing source according to your needs.
1. Open tray 1.
2. Load paper in tray 1, tray 2 or
tray 3.
→ See “Loading Paper in Tray 1”
page 3-29.
→ See “Loading Paper in Tray 2”
page 3-31.
→ See “Loading Paper in Tray 3”
page 3-33.
If special paper is loaded, the
printer is unable to make multiple
prints.
3. Pull out the paper exit tray if the
loaded paper is larger than B4
size.
NOTE
4. Printing
OperatW3.frm 38 ページ 2003年11月18日 火曜日 午前9時51分

3-39
Chapter 3Using Your Printer
4. Send a print command from the
computer.
The printed paper is fed out face
down on the paper exit tray.
The paper exit tray can hold a
maximum of 500 sheets of paper.
Use care not to exceed this limit
when making multiple prints.
NOTES
4. Printing
OperatW3.frm 39 ページ 2003年11月18日 火曜日 午前9時51分

3-40
Chapter 3Using Your Printer
Font
A font is a specific group of characters that have common style and
size characteristics. Your printer can store a variety of different fonts
in its memory for printing. Since these fonts reside in printer mem-
ory, they are called resident fonts.
The PageWorks 20 uses two types of resident fonts: scalable fonts
and bitmap fonts. Appendix B of this User’s Manual contains a table
that shows samples of all the available resident fonts.
In addition to resident fonts, you can also download non-resident
soft fonts for printing.
Scalable Fonts
Scalable fonts (also called outline font) can be enlarged or reduced
(scaled) to suit your printing needs. There are few limitations on the
sizes that you can specify for scalable fonts.
Bitmap Fonts
A bitmap font is stored in printer memory as a set of characters and
symbols with a specific size and unique design. Each bit of the font
is precisely mapped, so this type of font cannot be scaled to different
sizes.
The PageWorks 20 maintains 10 TrueType fonts and 35 Intellifont
typefaces in memory.
Minolta Font Manager
The Minolta Font Manager has screen fonts for Windows 3.1x and
Windows 95, and contains 96 True Type fonts. They can all be dis-
played and printed as scalable fonts.
5. Understanding Fonts
OperatW3.frm 40 ページ 2003年11月18日 火曜日 午前9時51分

4--1
Chapter 4Maintaining Your Printer
Chapter 4
Maintaining Your Printer
Mainte4.frm -1 ページ 2003年11月18日 火曜日 午前9時50分

4-0
Chapter 4Maintaining Your Printer
Mainte4.frm 0 ページ 2003年11月18日 火曜日 午前9時50分

4-1
Chapter 4Maintaining Your Printer
The following table lists the approximate replacement interval for
each supplies.
* Approximate A4-size page count based on 5% coverage of toner.
If the above problems occur after showing the MAINTENANCE REQ
message, it is time to replace the supplies. Please contact your Tech-
nical Representative.
CAUTION
For proper printer operation, use only Minolta supplies.
Supply Page Count * Replacement by
Imaging Cartridge 10,000 pages User
Supply Problem Replacement by
Fusing Unit Paper misfeeds most
often in the fusing
section
Tech Rep
Image Transfer Unit Poor print quality Tech Rep
Paper Take-up Roller Paper is not fed Tech Rep
1. Supplies for Maintenance
Mainte4.frm 1 ページ 2003年11月18日 火曜日 午前9時50分
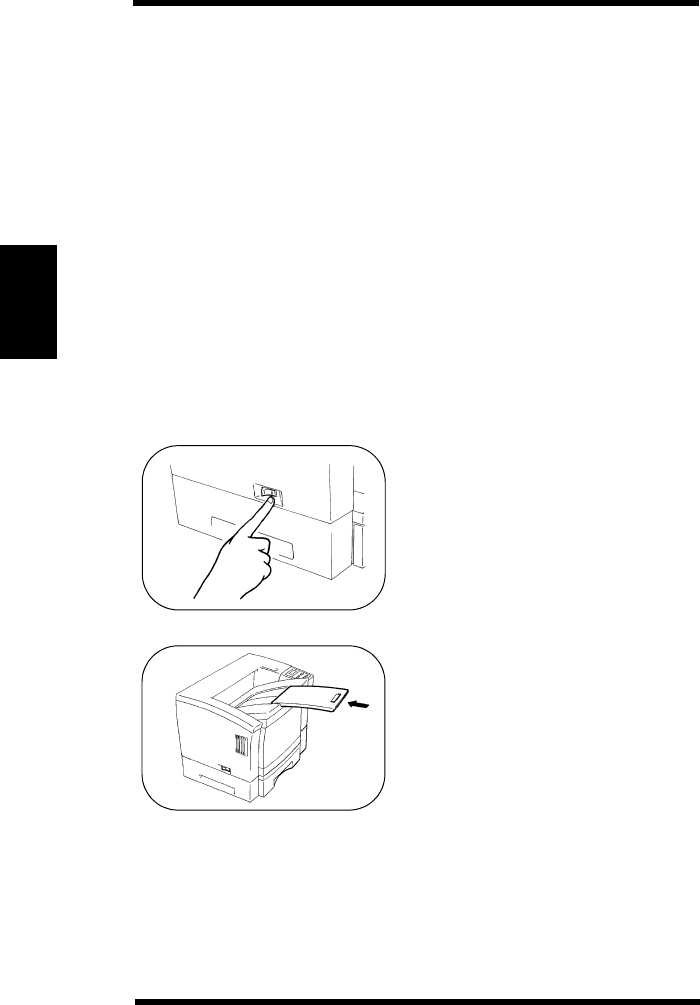
4-2
Chapter 4Maintaining Your Printer
The imaging cartridge contains the print drum and a supply of toner.
If you print typical business A4 size page with 5% coverage of
toner, the imaging cartridge lasts approximately 10,000 pages. How-
ever, the life of the imaging cartridge varies with the density of toner
for your pages.
If the TONER IS LOW message appears on the control panel, the
toner level in the imaging cartridge is getting low and print quality
will degrade. You need to get ready to replace the imaging cartridge.
To use as much of the remaining toner as possible, remove the imag-
ing cartridge, shake it 2 or 3 times and reinstall it in the printer. If
print quality is not satisfactory, you should replace the imaging car-
tridge with a new one according to the following procedure.
If the TONER EMPTY message appears on the control panel, the
toner in the imaging cartridge has run out. You must replace the
imaging cartridge with a new one immediately.
1. Turn the printer off and then dis-
connect the power cord and inter-
face cable from the printer.
2. If you have pulled out the paper
exit tray, push it into the printer
before opening the upper cover.
2. Replacing the Imaging Cartridge
Mainte4.frm 2 ページ 2003年11月18日 火曜日 午前9時50分
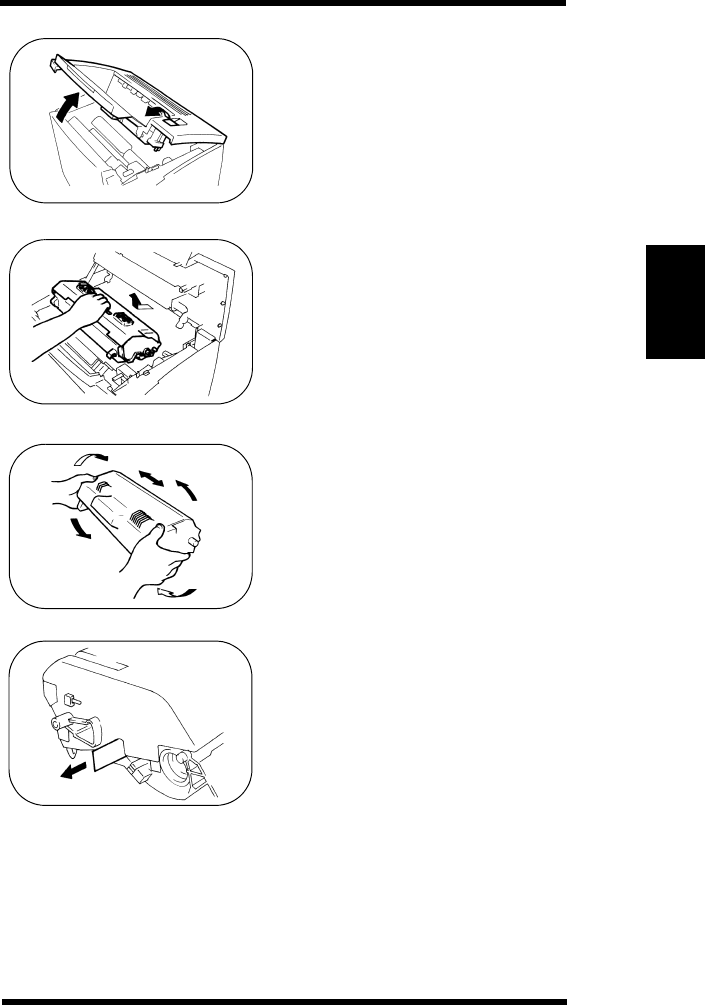
4-3
Chapter 4Maintaining Your Printer
3. Pressing the upper cover lock
release button, open the upper
cover.
4. Remove the old imaging car-
tridge from the printer.
5. Take a new imaging cartridge out
of the box.
Holding it with both hands, shake
it well in the direction of the
arrows.
6. Pull the tab outward slowly until
the sealing tape is completely
removed.
2. Replacing the imaging cartridge
Mainte4.frm 3 ページ 2003年11月18日 火曜日 午前9時50分
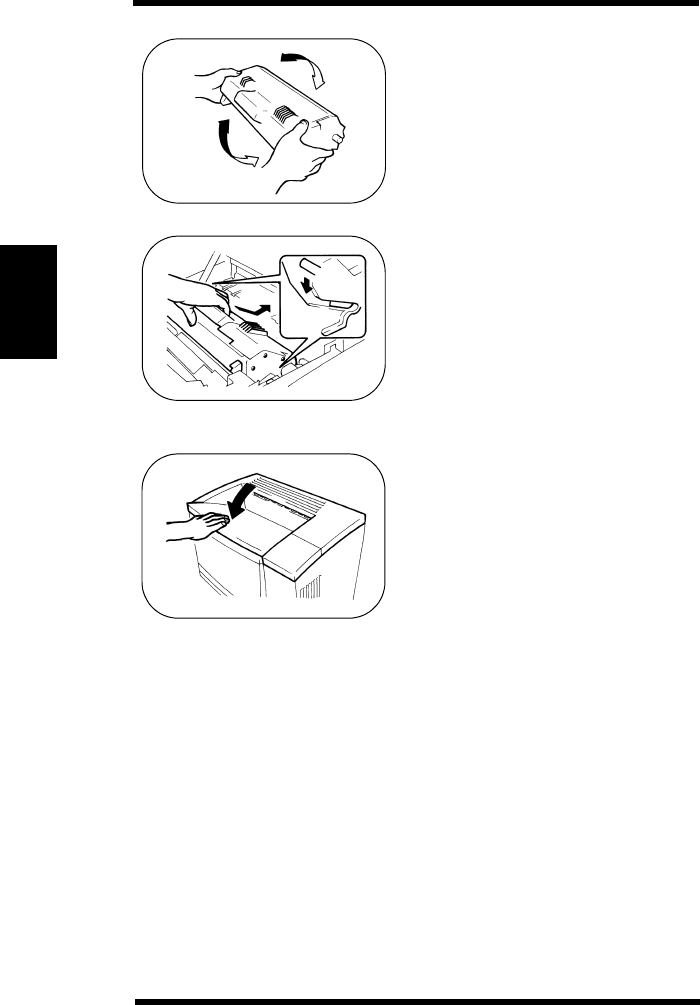
4-4
Chapter 4Maintaining Your Printer
7. Shake the imaging cartridge 4 or
5 times in the direction of the
arrows to distribute the toner
evenly.
8. Install the imaging cartridge
securely into the printer by slid-
ing the pins on each side of the
cartridge along the grooves of the
cartridge guide.
9. Close the upper cover.
2. Replacing the imaging cartridge
Mainte4.frm 4 ページ 2003年11月18日 火曜日 午前9時50分
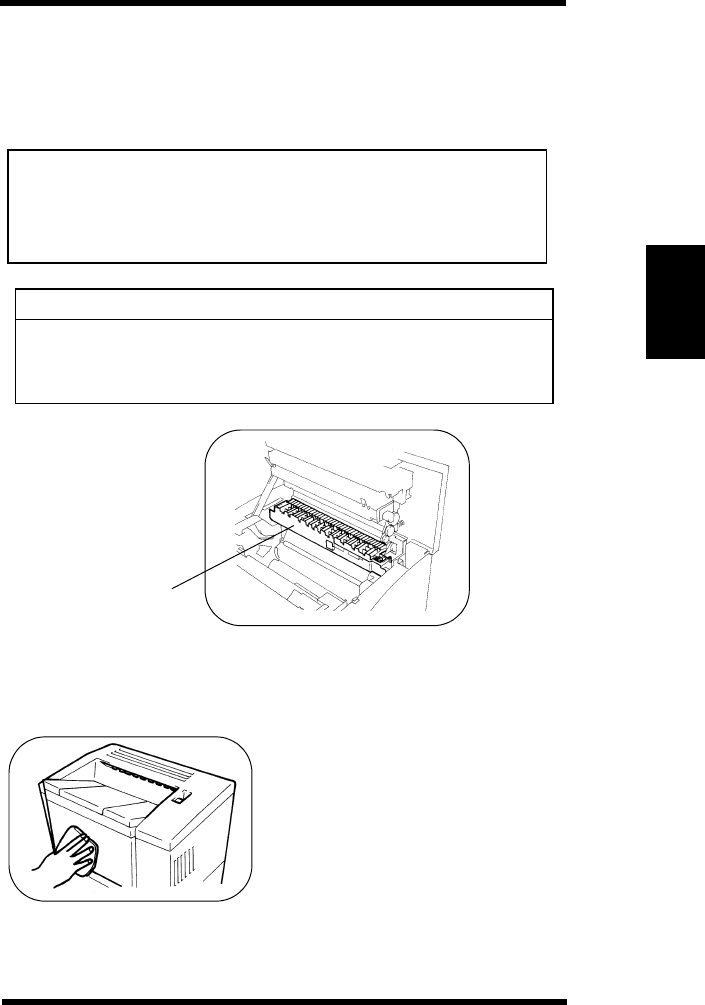
4-5
Chapter 4Maintaining Your Printer
Accumulated dust and lint on the inside and outside of the printer
impairs printer performance and print quality. Clean the printer at
regular intervals.
NOTE
Before starting the cleaning procedure, be sure to turn
the power switch off and unplug the power cord.
Use only a soft cloth. Do not use abrasives and corrosive
detergent.
The fusing section has become quite hot during
operation. Do not touch the area as it may cause
a burn.
External Cleaning
Wipe off dirt and stains around
the printer with a soft cloth damp-
ened with a mild detergent.
CAUTION
3. Cleaning Your Printer
Fusing Section
Mainte4.frm 5 ページ 2003年11月18日 火曜日 午前9時50分
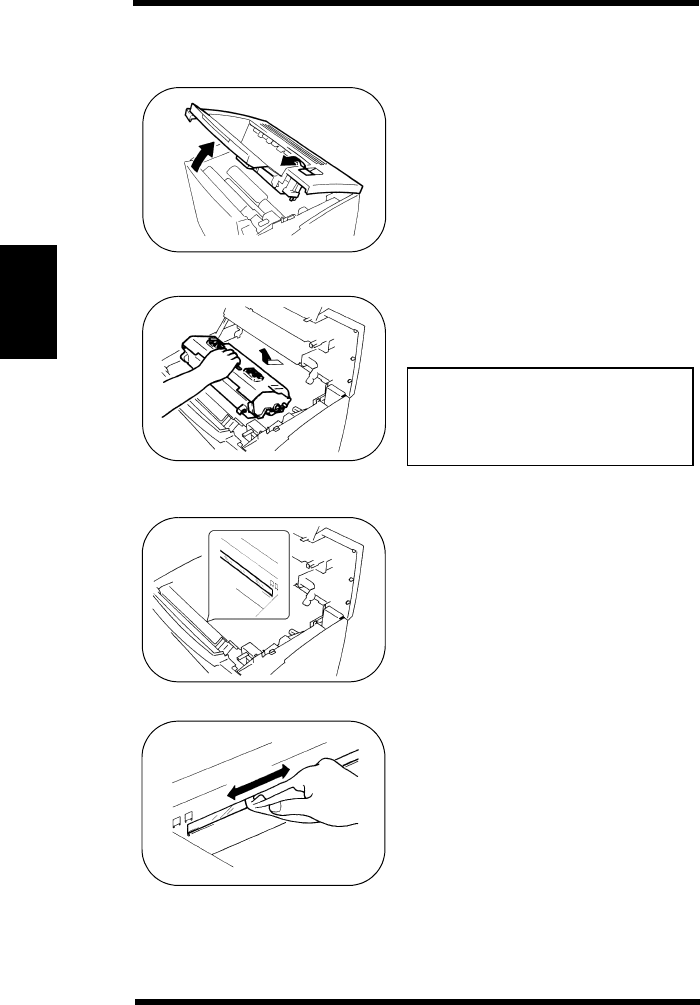
4-6
Chapter 4Maintaining Your Printer
Internal Cleaning
1. Open the upper cover.
2. Remove the imaging cartridge.
Whenever you remove the imag-
ing cartridge from the printer,
immediately cover it with a cloth
to prevent light from striking it.
3. Clean the window glass of the
print head unit using a dry soft
cloth.
3. Cleaning Your Printer
NOTE
Mainte4.frm 6 ページ 2003年11月18日 火曜日 午前9時50分

5--1
Chapter 5Solving Printer Problems
Chapter 5
Solving Printer Problems
Trouble5.frm -1 ページ 2003年11月18日 火曜日 午前9時53分

5-0
Chapter 5Solving Printer Problems
Trouble5.frm 0 ページ 2003年11月18日 火曜日 午前9時53分
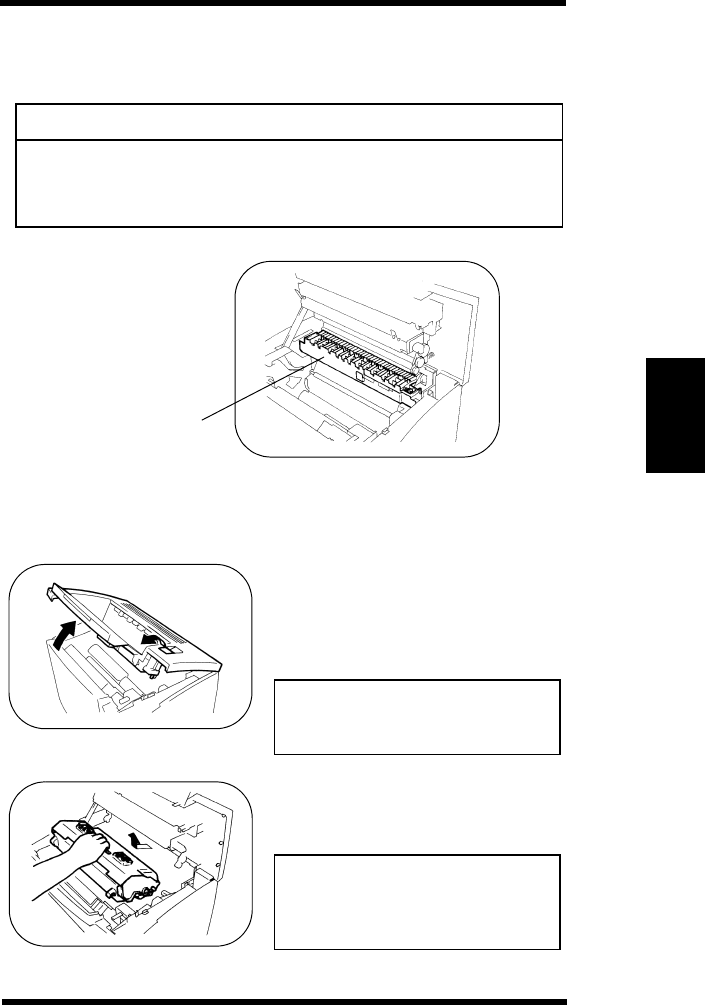
5-1
Chapter 5Solving Printer Problems
When a paper misfeed occurs in the printer, remove the misfed
paper according to the following procedures.
The fusing section has become quite hot during
operation. Do not touch the area as it may cause
a burn.
Paper Misfeed in Tray 1
1. Pressing the upper cover lock
release button, open the upper
cover.
If you have pulled out the paper
exit tray, push it into the printer
before opening the upper cover.
2. Remove the imaging cartridge.
Whenever you remove the imag-
ing cartridge from the printer,
immediately cover it with a cloth
to prevent light from striking it.
CAUTION
1. Clearing a Paper Misfeed
NOTE
NOTE
Fusing Unit
Trouble5.frm 1 ページ 2003年11月18日 火曜日 午前9時53分
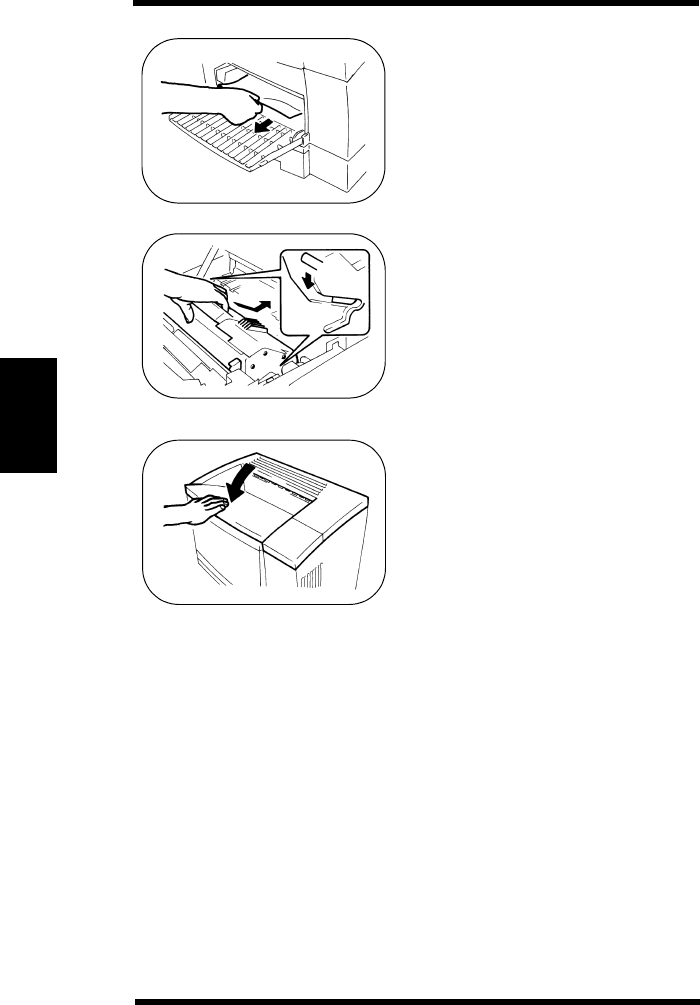
5-2
Chapter 5Solving Printer Problems
3. Pull out the misfed paper in tray 1.
4. Check that no misfed paper
remains in the printer.
Reinstall the imaging cartridge.
5. Close the upper cover.
1. Clearing a Paper Misfeed
Trouble5.frm 2 ページ 2003年11月18日 火曜日 午前9時53分
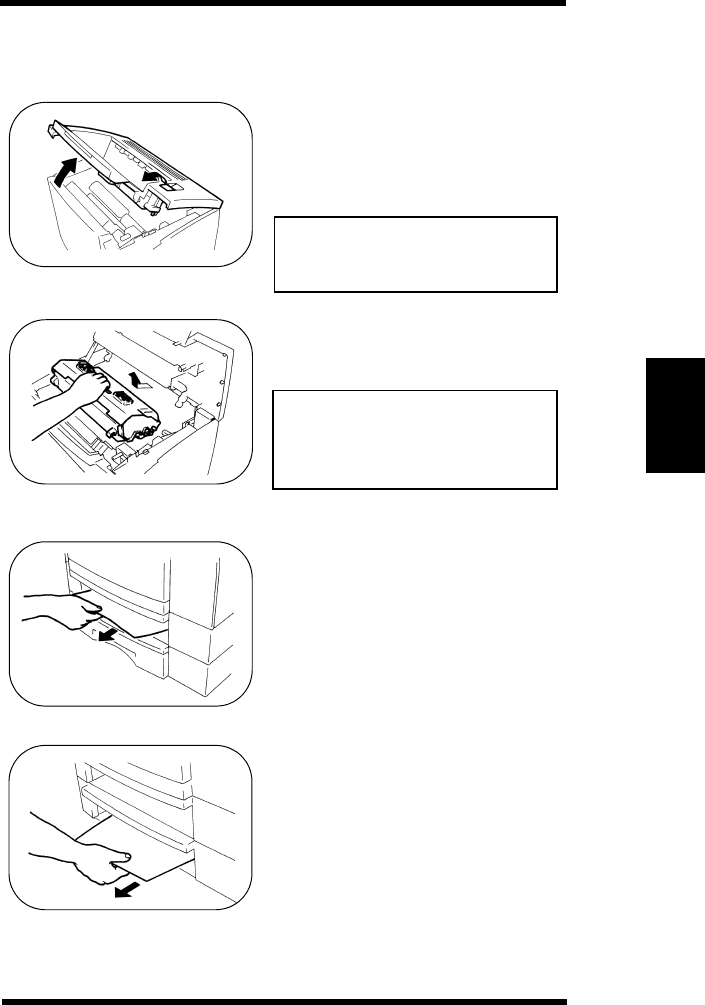
5-3
Chapter 5Solving Printer Problems
Paper Misfeed in Tray 2 or Tray 3
1. Pressing the upper cover lock
release button, open the upper
cover.
If you have pulled out the paper
exit tray, push it into the printer
before opening the upper cover.
2. Remove the imaging cartridge.
Whenever you remove the imag-
ing cartridge from the printer,
immediately cover it with a cloth
to prevent light from striking it.
3. Pull out tray 2 or tray 3, and
remove the misfed paper.
NOTE
NOTE
1. Clearing a Paper Misfeed
Trouble5.frm 3 ページ 2003年11月18日 火曜日 午前9時53分
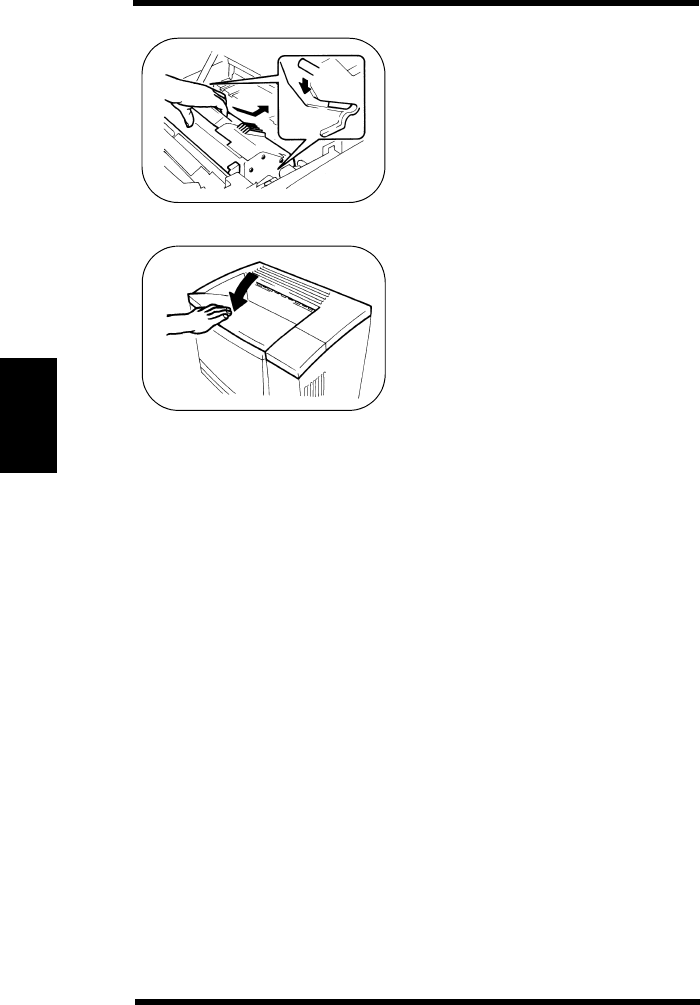
5-4
Chapter 5Solving Printer Problems
4. Check that no misfed paper
remains in the printer.
Reinstall the imaging cartridge.
5. Close the upper cover.
1. Clearing a Paper Misfeed
Trouble5.frm 4 ページ 2003年11月18日 火曜日 午前9時53分

5-5
Chapter 5Solving Printer Problems
Paper Misfeed Inside the Printer
1. Pressing the upper cover lock
release button, open the upper
cover.
If you have pulled out the paper
exit tray, push it into the printer
before opening the upper cover.
2. Remove the imaging cartridge.
Whenever you remove the imag-
ing cartridge from the printer,
immediately cover it with a cloth
to prevent light from striking it.
3. When the paper is not being fed
as far as the fusing unit, pull the
misfed paper upward and out
after opening the front transport
guide.
4. When the paper is being fed into
the fusing unit, pull the misfed
paper toward you and out.
NOTE
NOTE
1. Clearing a Paper Misfeed
Front
Transport Guide
Trouble5.frm 5 ページ 2003年11月18日 火曜日 午前9時53分
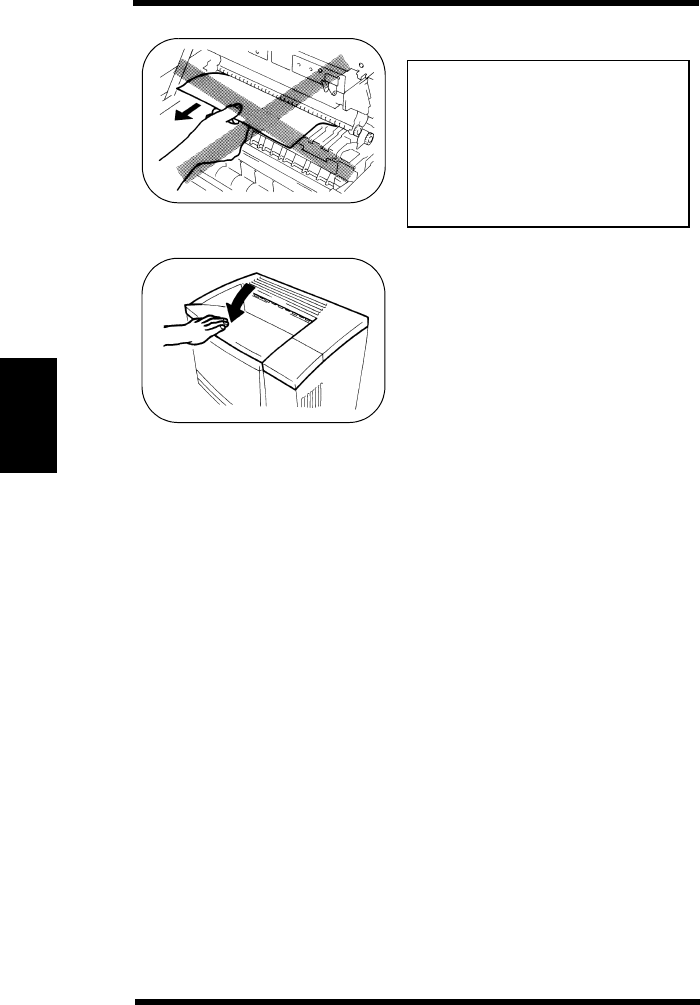
5-6
Chapter 5Solving Printer Problems
The image which was transferred
to the paper is not fixed.Be care-
ful or your hands will become
dirty.
Do not pull out the paper in the
direction (the exit side of the fus-
ing unit) of the arrow.
5. Reinstall the imaging cartridge
and close the upper cover.
NOTES
1. Clearing a Paper Misfeed
Trouble5.frm 6 ページ 2003年11月18日 火曜日 午前9時53分

5-7
Chapter 5Solving Printer Problems
Paper Misfeed in the Duplex Unit
1. Open the duplex upper cover and
pull out the misfed paper.
2. Open the duplex lower cover and
remove the misfed paper.
Lower Cover
Duplex
Upper Cover
Duplex
1. Clearing a Paper Misfeed
Trouble5.frm 7 ページ 2003年11月18日 火曜日 午前9時53分

5-8
Chapter 5Solving Printer Problems
The following provides information on most printing problems you
might encounter. If the advice provided here does not solve your
problem, contact your Technical Representative.
Symptom Cause Action
No Printing The printer is off-line. Press the On Line key
to take the printer on-
line.
The interface cable is
not securely connected
to the printer and com-
puter or defective.
Reconnect the inter-
face cable or replace
the interface cable.
You are not using the
printer driver for Page-
Works 20.
Change the default
printer setting to the
PageWorks 20.
The printer port set-
ting is incorrect. Change the setting.
There is no paper in the
specified paper source. Load paper in the spec-
ified paper source.
There is a paper mis-
feed. Remove the misfed
paper.
See page 5-1, 5-3, 5-5
or 5-7.
You are selecting Man-
ual Feed. Load the selected paper
size in the multipur-
pose tray and press the
On Line key to print.
The printer may need
service. Contact your technical
representative.
2. Printing Problems
Trouble5.frm 8 ページ 2003年11月18日 火曜日 午前9時53分
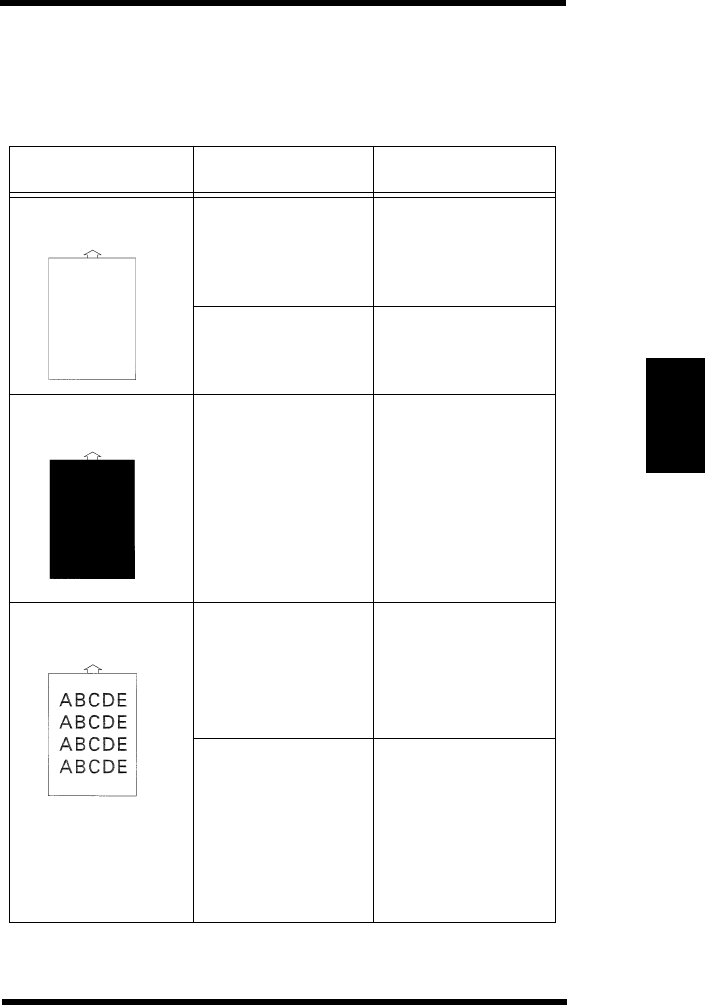
5-9
Chapter 5Solving Printer Problems
The following provides information on most print quality problems
you might encounter. If the advice provided here does not solve
your problem, contact your Technical Representative.
Symptom Cause Action
Blank pages The toner sealing
tape has not been
pulled out.
Remove the imag-
ing cartridge and
pull out the toner
sealing tape.
The imaging car-
tridge may be
defective.
Replace the imag-
ing cartridge if nec-
essary.
Black pages The imaging car-
tridge may be
defective.
Replace the imag-
ing cartridge if nec-
essary.
Print out too light The toner density
setting made with
the Device Option
dialog box may be
too light.
Change the setting.
The imaging car-
tridge may be run-
ning out of toner.
Remove the imag-
ing cartridge and
shake it several
times.
Replace the imag-
ing cartridge if nec-
essary.
3. Print Quality Problems
Trouble5.frm 9 ページ 2003年11月18日 火曜日 午前9時53分

5-10
Chapter 5Solving Printer Problems
Symptom Cause Action
Print out too dark The toner density
setting made with
the Device Option
dialog box may be
too dark.
Change the setting.
The imaging car-
tridge may be
defective.
Replace the imag-
ing cartridge if nec-
essary.
Blurred background The imaging car-
tridge may be
defective.
Replace the imag-
ing cartridge if nec-
essary.
Uneven print
density The toner may be
unevenly distrib-
uted inside the
imaging cartridge.
Remove the imag-
ing cartridge and
shake it several
times.
The imaging car-
tridge may be
defective.
Replace the imag-
ing cartridge if nec-
essary.
3. Printing Problems
Trouble5.frm 10 ページ 2003年11月18日 火曜日 午前9時53分
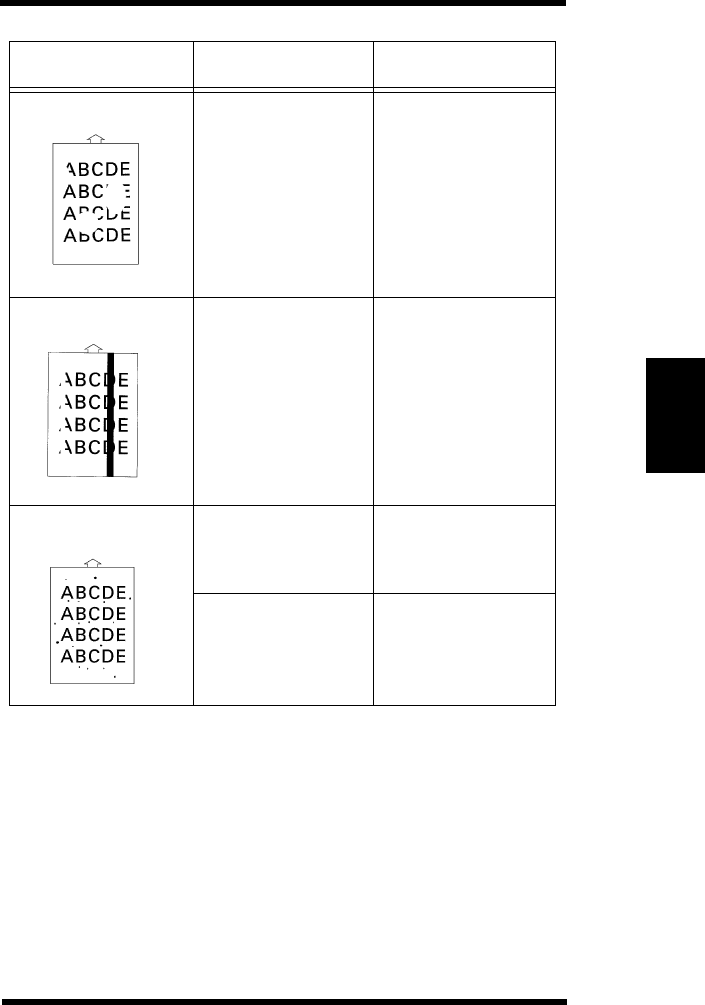
5-11
Chapter 5Solving Printer Problems
Symptom Cause Action
Irregularities The paper may
have absorbed
some moisture due
to high humidity.
Replace the paper
you are using with
dry paper.
White or black lines The imaging car-
tridge may be
defective.
Replace the imag-
ing cartridge if nec-
essary.
Toner smudges The paper you are
using is improper. Use only sup-
ported sizes or
weights of paper.
The imaging car-
tridge may be
defective.
Replace the imag-
ing cartridge if nec-
essary.
3. Printing Problems
Trouble5.frm 11 ページ 2003年11月18日 火曜日 午前9時53分

5-12
Chapter 5Solving Printer Problems
If a message appears on the control panel, refer to the following sec-
tions for the description of each message and the action to take.
(1) Status messages
Display the current printer status.
(2) Warning messages
Display a warning message.
(3) Caution messages
The message LED blinks and a caution message is displayed.
Requests you to perform a necessary task before resuming
printing.
(4) Operator call messages
The message LED blinks and an operator call message is dis-
played. The printer goes off-line and request you to perform a
necessary task before resuming printing.
(5) Service call messages
The message LED lights up and a service call message is dis-
played. If the message appears repeatedly, you need to call
your Technical Representative.
4. Understanding Printer Messages
Trouble5.frm 12 ページ 2003年11月18日 火曜日 午前9時53分
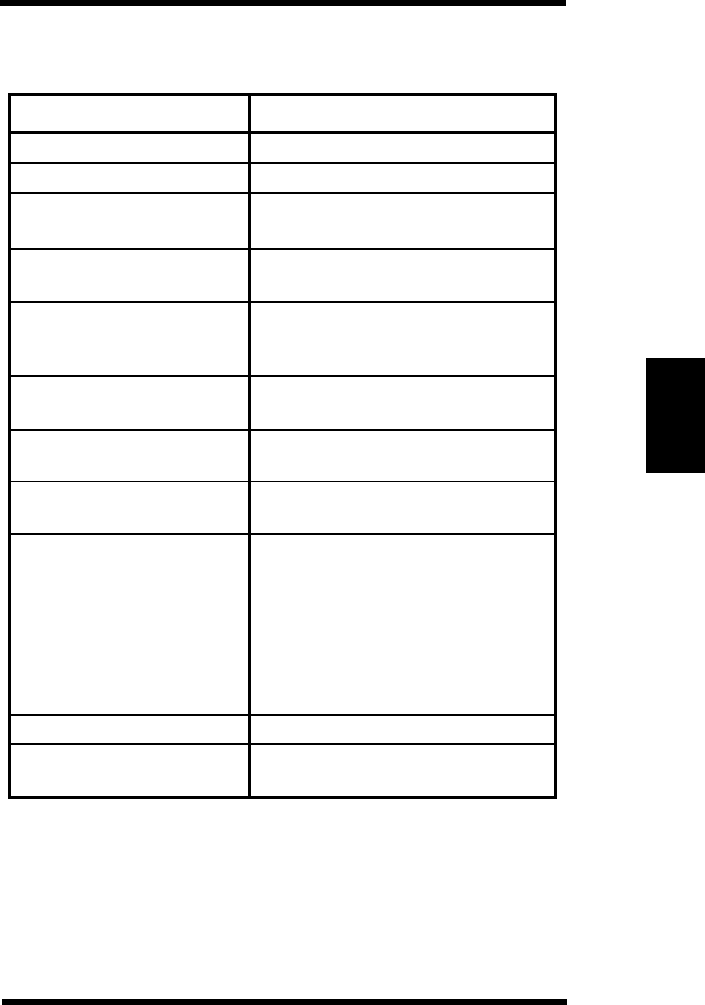
5-13
Chapter 5Solving Printer Problems
(1) Status Messages
emulation: the selected printer language.
user name: the user name (up to 8 characters). For details, see
“Printer Driver User’s Manual”.
paper: the current paper size setting.
MESSAGE DESCRIPTION
The printer is resetting. Returns the
printer on-line automatically after
resetting.
POWER SAVE The printer is in a reduced energy
consumption mode. If receiving
data, starts processing data after
warming up.
The power save mode is also can-
celed by pressing any key, removing
and reinstalling the tray, or opening
and closing the cover.
An initialization and diagnostic are
being executed.
The printer is warming up.
WARMING UP
SELF TEST
PRINT MENU
(ex. one of the printer menus) The printer is in the print menu
mode.
OFFLINE
PROCESSING (emulation)
(user name)
PRINTING (emulation)
(user name)
RESET
The printer is ready to print.
The printer is off-line.
The printer is processing data.
The printer is printing.
TRAY1 PAPER SIZE
(paper) The printer is in the tray 1 paper
size setting mode.
CONFIG PRINT
(ex. one of the test prints) The printer is printing a config print.
4. Understanding Printer Messages
READY (emulation)
Trouble5.frm 13 ページ 2003年11月18日 火曜日 午前9時53分
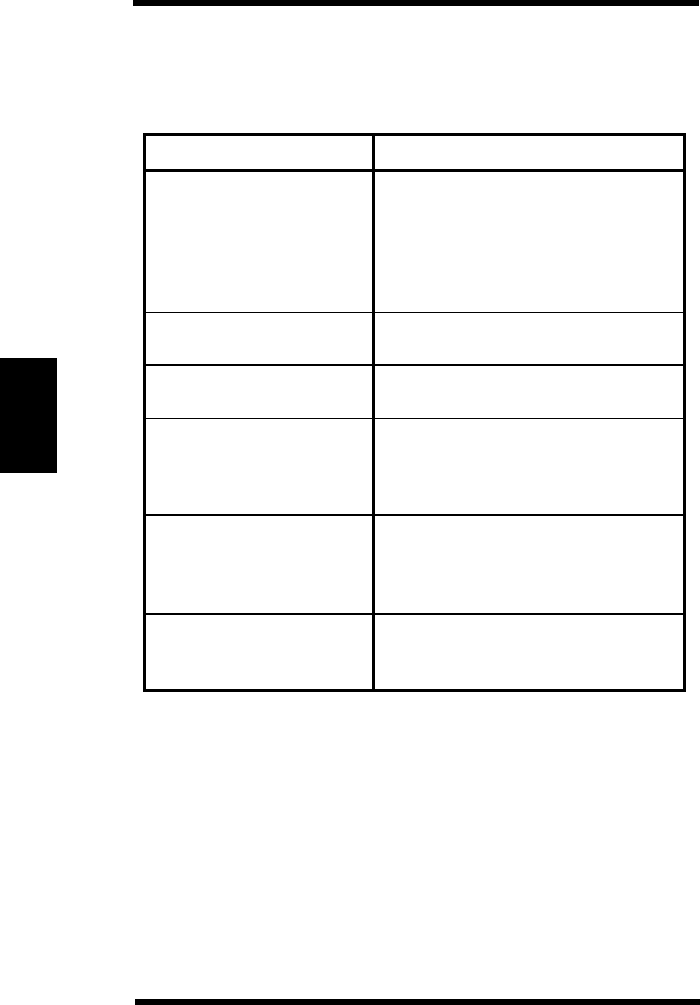
5-14
Chapter 5Solving Printer Problems
The following table lists the warning messages which are displayed
in the second line on the control panel when the printer is READY
or OFFLINE.
4. Understanding Printer Messages
MAINTENANCE REQ The printer is approaching the main-
tenance interval. You can clear this
message by changing the service
message setting to OFF.
See “Maintaining Your Printer” page
4-1.
MESSAGE DESCRIPTION & ACTION
No paper in tray 3. Load paper in
tray 3.
TRAY3 IS EMPTY
No paper in tray 2. Load paper in
tray 2.
TRAY2 IS EMPTY
The imaging cartridge is low on
toner.
See “Maintaining Your Printer” page
4-2.
TONER IS LOW
This is displayed if you select job
separation in the tray 1 paper size
setting mode.
JOB SEPARATION
TONER EMPTY The imaging cartridge is out of toner.
Replace the imaging cartridge.
See “Maintaining Your Printer” page
4-2.
Trouble5.frm 14 ページ 2003年11月18日 火曜日 午前9時53分

5-15
Chapter 5Solving Printer Problems
(2) Warning Messages
If one of the following warning messages appears, the printer con-
tinues printing without stopping. By pressing any key after complet-
ing printing, the printer returns to the ready condition. When
receiving the next job, the message is automatically cleared.
user name: the user name (up to 8 characters). For details, see
“Printer Driver User’s Manual”.
If the Image Adapt message appears, the following action is
required according to your needs.
IMAGE ADAPT:
When printing too complex bitmap data, the printer automatically
performs compression of the image data before a memory overflow
occurs. Therefore, some of the image data may deteriorate. To cor-
rect this printing problem, you need to add more memory.
4. Understanding Printer Messages
IMAGE ADAPT
(user name) The printer performed compression
of an image data.
MESSAGE DESCRIPTION
Trouble5.frm 15 ページ 2003年11月18日 火曜日 午前9時53分

5-16
Chapter 5Solving Printer Problems
(3) Caution Messages
If Auto Continue is ON, the printer returns on-line automatically
after waiting for the time specified and then resumes processing, but
some data may be lost.
If Auto Continue is OFF, the printer returns on-line after you press
the Proceed key and then resumes processing, but some data may be
lost.
user name: the user name (up to 8 characters). For details, see
“Printer Driver User’s Manual”.
If one of these messages appears, the following action is required.
MEMORY OVERFLOW:
You may need to add more memory. By printing at 300 dpi, print
quality deteriorates but the memory overflow problem is reduced.
JOB TOO COMPLEX:
If the JOB TOO COMPLEX error occurs, some print data may be
lost. In this case, set Page Protection to ON. Printing speed may be
slowed but the Job Too Complex problem is reduced. If it happens
again, you need to add more memory or reduce the print data.
MESSAGE DESCRIPTION
The data sent cannot be processed
because it is too complex.
JOB TOO COMPLEX
(user name)
The printer received more data from
the computer than it can fit into its
internal memory.
MEMORY OVERFLOW
(user name)
4. Understanding Printer Messages
Trouble5.frm 16 ページ 2003年11月18日 火曜日 午前9時53分

5-17
Chapter 5Solving Printer Problems
(4) Operator Call Messages
MANUAL FEED
(paper) (user name)
MESSAGE DESCRIPTION AND ACTION
Load the specified paper in tray 1.
Press the On Line key to print.
The correct paper has not been loaded in
tray xx.
Load the specified paper in tray xx.
If tray xx is tray 1, you need to make the
paper size setting changes in the tray 1
paper size setting mode according to your
needs, after loading the specified paper.
See page 3-2.
LOAD (tray xx)
(paper) (user name)
*Printing
LOAD (tray xx)
(paper)
*Stand-by
LOAD
(paper) (user name) Load the specified paper into any tray.
There is no specified paper in the tray
(tray xx) you specified from the control
panel.
Load the specified paper in tray xx or
make the paper size and paper tray setting
changes in the print menu at the control
panel.
See page 3-1 and 3-7.
Install tray 2 or make the paper tray setting
changes in the print menu.
LOAD TRAY 2
NO TRAY
Install tray 3 or make the paper tray setting
changes in the print menu.
LOAD TRAY 3
NO TRAY
There is no paper in all trays.
Load paper into any tray.
OUT OF PAPER
ALL TRAYS
COVER OPEN The upper cover is open. Close the upper
cover.
DUPLEX OPEN The duplex upper or lower cover is open.
Close the duplex cover.
4. Understanding Printer Messages
Trouble5.frm 17 ページ 2003年11月18日 火曜日 午前9時53分
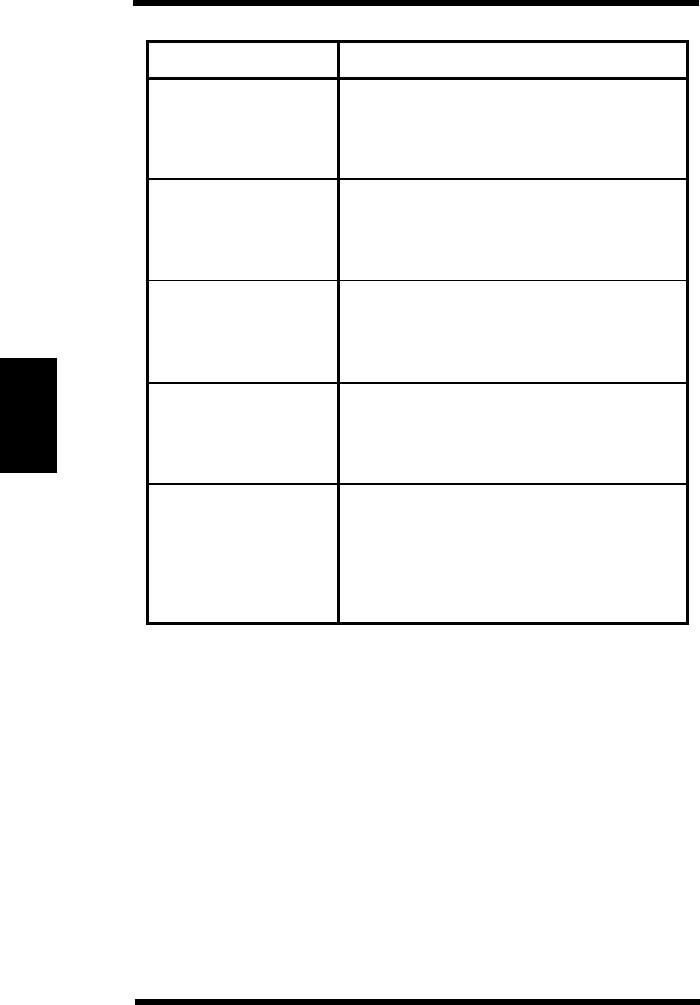
5-18
Chapter 5Solving Printer Problems
tray: the specified tray.
paper: the current paper size setting.
user name: the user name (up to 8 characters). For details, see
“Printer Driver User’s Manual”.
4. Understanding Printer Messages
MESSAGE DESCRIPTION AND ACTION
PAPER JAM1
INPUT (user name)
PAPER JAM2
DRUM (user name) The printer has detected a paper misfeed
in the drum area. Remove the misfed
paper and close the upper cover.
See page 5-5.
The printer has detected a paper misfeed
in the output area. Remove the misfed
paper and close the upper cover.
See page 5-5.
PAPER JAM3
OUTPUT (user name)
The printer has detected a paper misfeed
in the duplex unit. Remove the misfed
paper and close the duplex cover.
See page 5-7.
PAPER JAM4
DUPLEX (user name)
The printer performed printing with the
wrong size paper or fed multiple sheets.
Make sure the paper is loaded correctly in
the paper source and then press the
Proceed key, or open and close the upper
cover.
PAPER SIZE ERROR
(user name)
The printer has detected a paper misfeed
in the input area. Remove the misfed
paper and close the upper cover.
See page 5-1 or 5-3.
Trouble5.frm 18 ページ 2003年11月18日 火曜日 午前9時53分

5-19
Chapter 5Solving Printer Problems
(5) Service Call Messages
DESCRIPTION AND ACTION
ROM is faulty. Turn the printer off, then
back on. If it happens again, call your
Technical Representative.
Hard disk is defective. Turn the printer
off and call your Technical Representa-
tive.
MESSAGE
FATAL ERROR 1
ROM
PS ROM is faulty. Remove the faulty PS
ROM and try another one.
FATAL ERROR 2
PS ROM
SIMM RAM is faulty.
number: SIMM slot number.
Remove the faulty SIMM RAM and try
another one.
FATAL ERROR 3
RAM RAM is faulty. Turn the printer off, then
back on. If it happens again, call your
Technical Representative.
FATAL ERROR 4
SIMM RAM (number)
FATAL ERROR 5
EEPROM EEPROM is faulty. Turn the printer off,
then back on. If it happens again, call
your Technical Representative.
FATAL ERROR 6
HARD DISK
FATAL ERROR 8
INTERFACE (number)
FATAL ERROR 7
NETWORK BOARD Network board is defective. Turn the
printer off and call your Technical Rep-
resentative.
A communication error occurred at the
interface.
number: 1: engine.
2: network
Turn the printer off, then back on. If it
happens again, call your Technical Rep-
resentative.
FATAL ERROR 21
FUSER A fuser error. Turn the printer off and
call your Technical Representative.
4. Understanding Printer Messages
Trouble5.frm 19 ページ 2003年11月18日 火曜日 午前9時53分

5-20
Chapter 5Solving Printer Problems
DESCRIPTION AND ACTION
MESSAGE
FATAL ERROR 22
HSYNC
FATAL ERROR 23
POLYGON
FATAL ERROR 24
MOTOR
FATAL ERROR 25
FAN
A polygon motor error. Turn the printer
off and call your Technical Representa-
tive.
A main motor error. Turn the printer
off and call your Technical Representa-
tive
A fan motor error. Turn the printer off
and call your Technical Representative.
A laser diode error. Turn the printer off
and call your Technical Representative.
4. Understanding Printer Messages
Trouble5.frm 20 ページ 2003年11月18日 火曜日 午前9時53分

6--1
Chapter 6
Installing Options
Chapter 6
Installing Options
Options6.frm -1 ページ 2003年11月18日 火曜日 午前9時52分

6-0
Chapter 6
Installing Options
Options6.frm 0 ページ 2003年11月18日 火曜日 午前9時52分
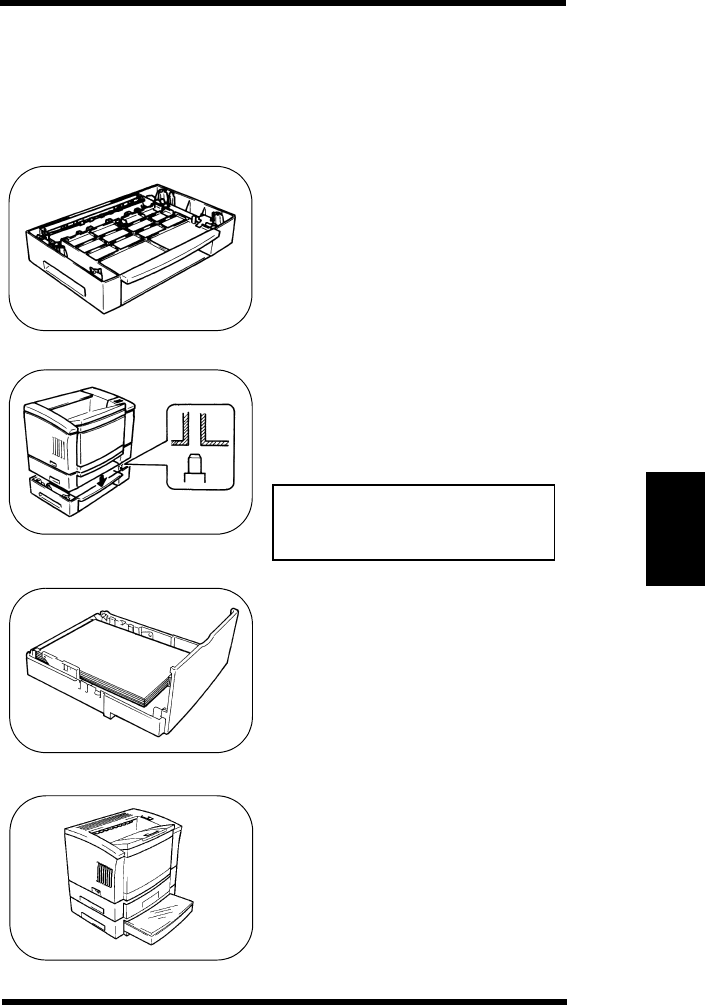
6-1
Chapter 6
Installing Options
- Take the tray unit out of the shipping box.
- Remove the plastic bag and all shipping materials.
- Turn the printer off and then disconnect the power cord and inter-
face cable from the printer.
1. Place the tray unit in the location
you have chosen.
Pull out the paper tray before-
hand.
2. Set the printer onto the third tray
unit using the coupling pins as a
guide.
Since the printer weighs approxi-
mately 55.1 lbs (25 kg), two peo-
ple are required to lift it.
3. Load paper you want to print.
→ See “Loading Paper in Tray 3”
page 3-33.
4. Slide the paper tray into the tray
unit.
1. Installing the Third Tray Unit
NOTE
Options6.frm 1 ページ 2003年11月18日 火曜日 午前9時52分

6-2
Chapter 6
Installing Options
5. Connect the power cord to the
printer and then turn the printer
on.
→ See “Connecting the power
Cord” page 2-9.
→ See “Turning the Printer ON
and OFF” page 2-10.
6. Print a config print and verify the
Third Tray Unit setting in the
Installed Options.
→ See “Test Print” page 3-19.
1. Installing the Third Tray Unit
Installed Options
Third Tray Unit = Installed
Duplex Unit = Not Installed
Network Card = Not Installed
PostScript ROM = Not Installed
Hard Disk = Not Installed
Add SIMM Memory (MB) = 0
Options6.frm 2 ページ 2003年11月18日 火曜日 午前9時52分
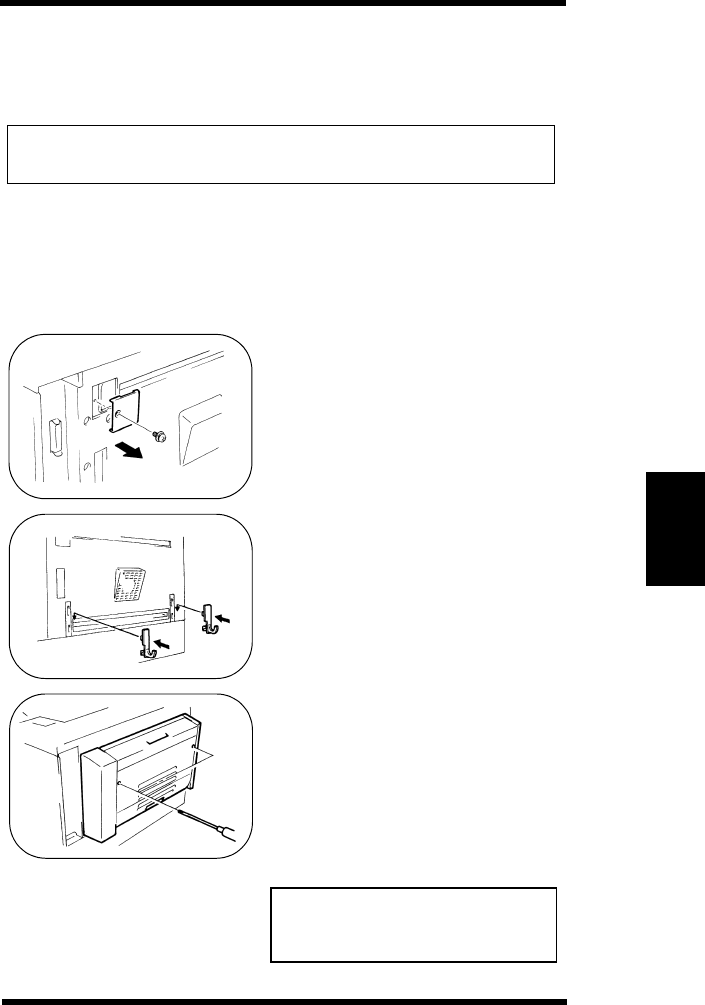
6-3
Chapter 6
Installing Options
When you want to print on both sides of the paper, the duplex unit is
necessary.
NOTE
You may need to add more memory (an additional 8MB
recommended) to print on both sides of the paper.
- Take the duplex unit out of the shipping box.
- Remove the plastic bag and all shipping materials.
- Turn the printer off and then disconnect the power cord and inter-
face cable from the printer.
1. Remove the cover on the back-
side of the printer.
(Use a plus screwdriver.)
2. Attach the two duplex brackets
(included with the duplex unit) to
the backside of the printer in the
holes provided for them.
Press down on them until you
hear a click.
3. Hook the duplex unit onto the
brackets and engage the connec-
tor and gear.
Secure it to the printer with two
screws.
(Use a plus screwdriver.)
Hold up the duplex unit with your
hand until you secure it with the
screws.
2. Installing the Duplex Unit
NOTE
Options6.frm 3 ページ 2003年11月18日 火曜日 午前9時52分

6-4
Chapter 6
Installing Options
4. Connect the power cord to the
printer and then turn the printer
on.
→ See “Connecting the power
Cord” page 2-9.
→ See “Turning the Printer ON
and OFF” page 2-10.
5. Print a config print and verify the
Duplex Unit setting in the
Installed Options.
→ See “Test Print” page 3-19.
2. Installing the Duplex Unit
Installed Options
Third Tray Unit = Not Installed
Duplex Unit = Installed
Network Card = Not Installed
PostScript ROM = Not Installed
Hard Disk = Not Installed
Add SIMM Memory (MB) = 0
Options6.frm 4 ページ 2003年11月18日 火曜日 午前9時52分

6-5
Chapter 6
Installing Options
Installing the network card enables you to connect the printer to a
local area network (LAN) using an Ethernet network.
WARNING
The network card is easily damaged by static electricity.
Touch something metal before you touch the network card.
- Take the network card out of the shipping box.
- Turn the printer off and then disconnect the power cord and inter-
face cable from the printer.
1. Loosen the two thumbscrews to
remove the network cover on the
backside of the printer.
2. Insert the network card into the
opening at the back of the printer.
The rails on the inside of the
opening guide the network card
to the connector at the back of the
opening.
Make sure it is seated firmly.
Tighten the two thumbscrews to
secure the network card in the
printer.
When transporting the printer, the
removed cover and screws are
needed. Keep them safe.
3. Installing the Network Card
NOTE
Options6.frm 5 ページ 2003年11月18日 火曜日 午前9時52分

6-6
Chapter 6
Installing Options
3. Connect the power cord to the
printer and then turn the printer
on.
→ See “Connecting the power
Cord” page 2-9.
→ See “Turning the Printer ON
and OFF” page 2-10.
4. Print a config print and verify the
Network Card setting in the
Installed Options.
→ See “Test Print” page 3-19.
3. Installing the Network Card
Installed Options
Third Tray Unit = Not Installed
Duplex Unit = Not Installed
Network Card = Installed
PostScript ROM = Not Installed
Hard Disk = Not Installed
Add SIMM Memory (MB) = 0
Options6.frm 6 ページ 2003年11月18日 火曜日 午前9時52分
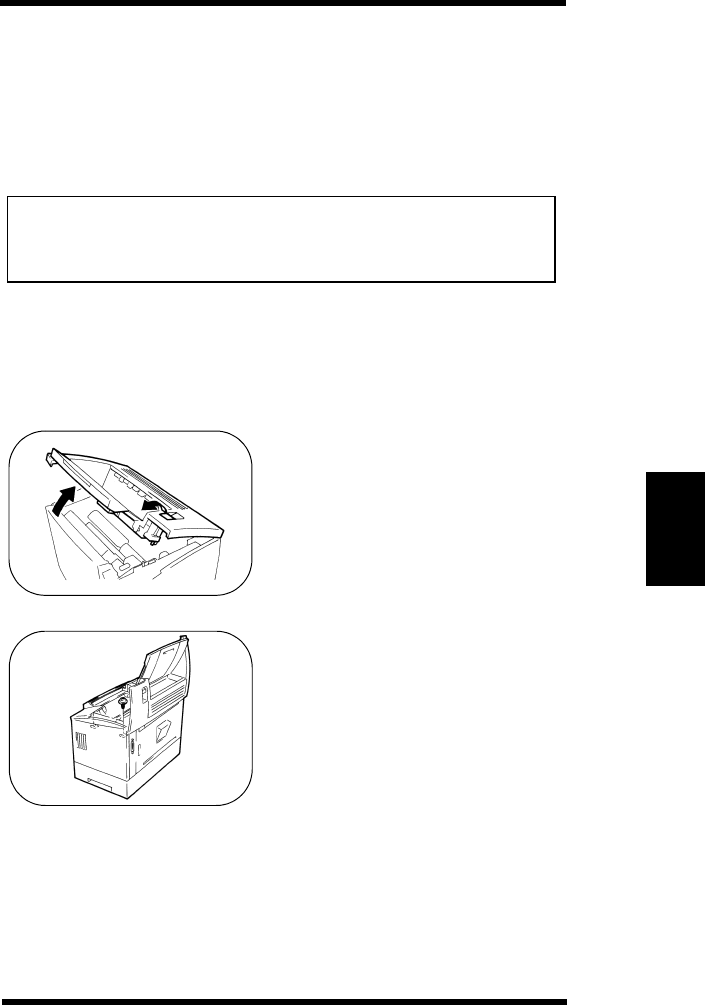
6-7
Chapter 6
Installing Options
This printer provides a socket for the installation of an Adobe Post-
Script ROM-DIMM. When installing the ROM-DIMM, the printer
can function as a PostScript printer. The Hard Disk that is installed
with the Adobe PostScript ROM-DIMM is used for downloading
available PostScript fonts.
WARNING
The Adobe PostScript ROM-DIMM is easily damaged by
static electricity. Touch something metal before you touch
the ROM-DIMM.
- Take the Adobe PostScript ROM-DIMM and Hard Disk out of the
shipping box.
- Turn the printer off and then disconnect the power cord and inter-
face cable from the printer.
1. Pressing the upper cover lock
release button, open the upper
unit.
2. Loosen two screws to remove the
right side cover.
(Use a plus screwdriver.)
4. Installing the Adobe PostScript
ROM-DIMM and Hard Disk
Options6.frm 7 ページ 2003年11月18日 火曜日 午前9時52分
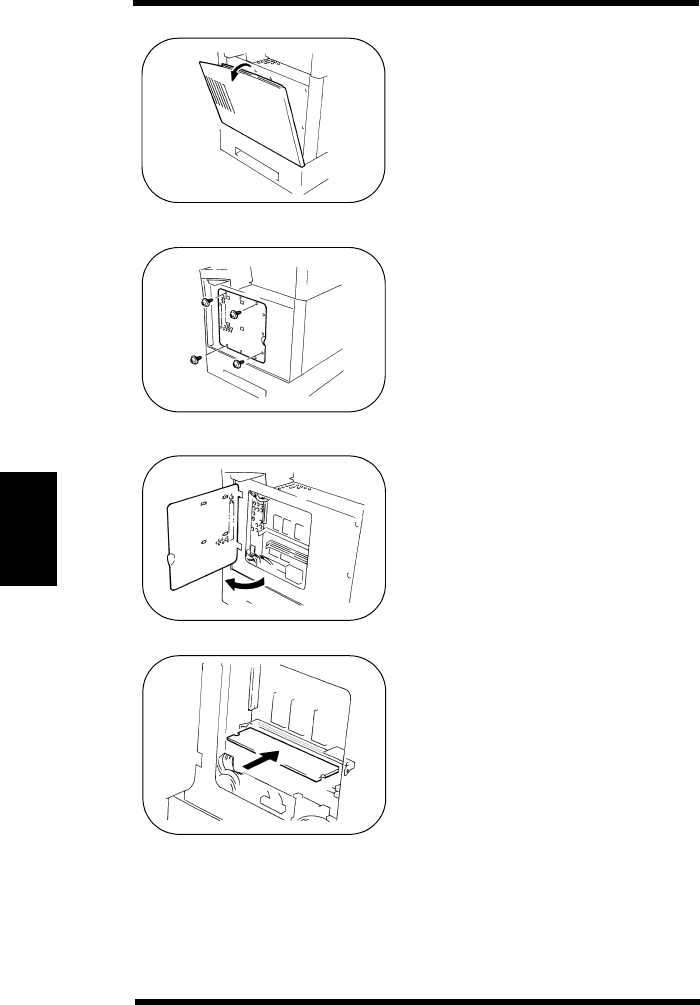
6-8
Chapter 6
Installing Options
3. Remove the right side cover.
4. Remove the four screws.
(Use a plus screwdriver.)
5. Open the metal cover.
6. Insert the DIMM all the way into
the DIMM socket at a 90 degree
angle, and push the DIMM until
it snaps into place.
4. Installing the Adobe Postscript DIMM and Hard Disk
Options6.frm 8 ページ 2003年11月18日 火曜日 午前9時52分
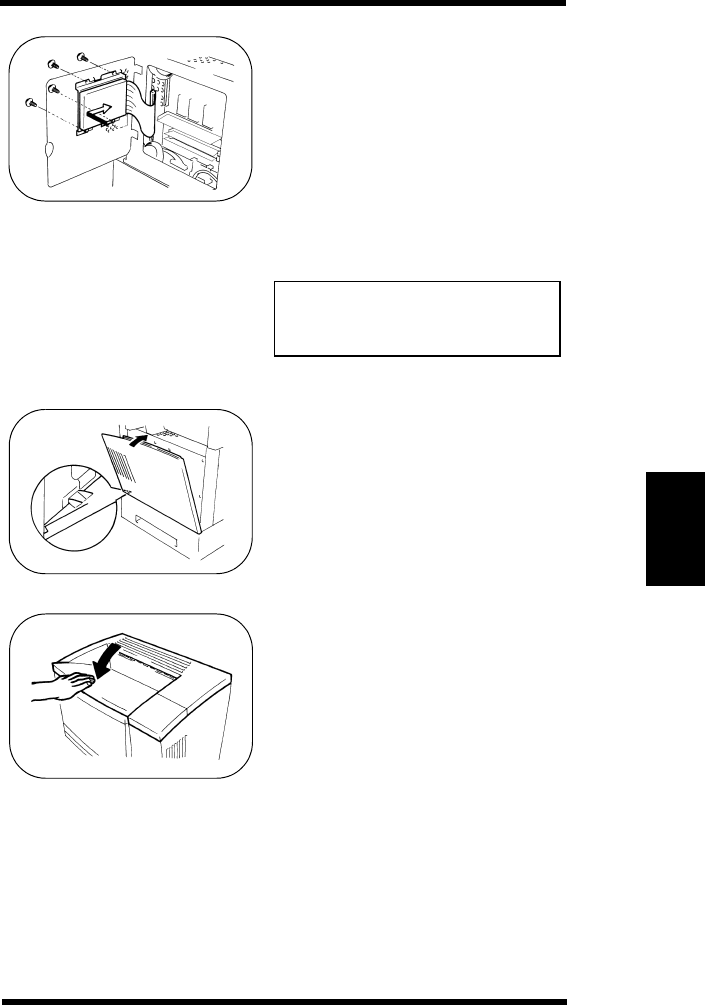
6-9
Chapter 6
Installing Options
7. Install the Hard Disk and tighten
the four screws.
(Use a plus screwdriver.)
8. Connect the Hard Disk cable to
the Hard Disk connector on the
controller board.
The Hard Disk can be installed
only when the Adobe PostScript
ROM-DIMM is installed.
9. Close the metal cover and tighten
the four screws.
Attach the right side cover.
10. Close the upper cover.
11. Connect the power cord to the
printer and then turn the printer
on.
→ See “Connecting the power
Cord” page 2-9.
→ See “Turning the Printer ON
and OFF” page 2-10.
4. Installing the Adobe Postscript DIMM and Hard Disk
NOTE
Options6.frm 9 ページ 2003年11月18日 火曜日 午前9時52分

6-10
Chapter 6
Installing Options
12. Print a config print and verify
the PostScript ROM and Hard
Disk settings in the Installed
Options.
→ See “Test Print” page 3-19.
4. Installing the Adobe Postscript DIMM and Hard Disk
Installed Options
Third Tray Unit = Not Installed
Duplex Unit = Not Installed
Network Card = Not Installed
PostScript ROM = Installed
Hard Disk = Installed
Add SIMM Memory (MB) = 0
Options6.frm 10 ページ 2003年11月18日 火曜日 午前9時52分

6-11
Chapter 6
Installing Options
You can expand printer memory by adding single in-line memory
(SIMM).
Your printer provides 4MB as standard memory and has two mem-
ory connectors into which you can install SIMMs to expand the total
memory available up to the maximum 68MB. SIMMs with 4MB,
8MB, 16MB, or 32MB of memory are available from a computer
shop.
WARNING
The SIMM is easily damaged by static electricity. Touch
something metal before you touch the SIMM.
- Take the SIMM out of the shipping box.
- Turn the printer off, and then disconnect the power cord and inter-
face cable from the printer.
1. Pressing the upper cover lock
release button, open the upper
cover.
2. Loosen two screws to remove the
right side cover.
(Use a plus screwdriver.)
5. Installing the SIMM
Options6.frm 11 ページ 2003年11月18日 火曜日 午前9時52分
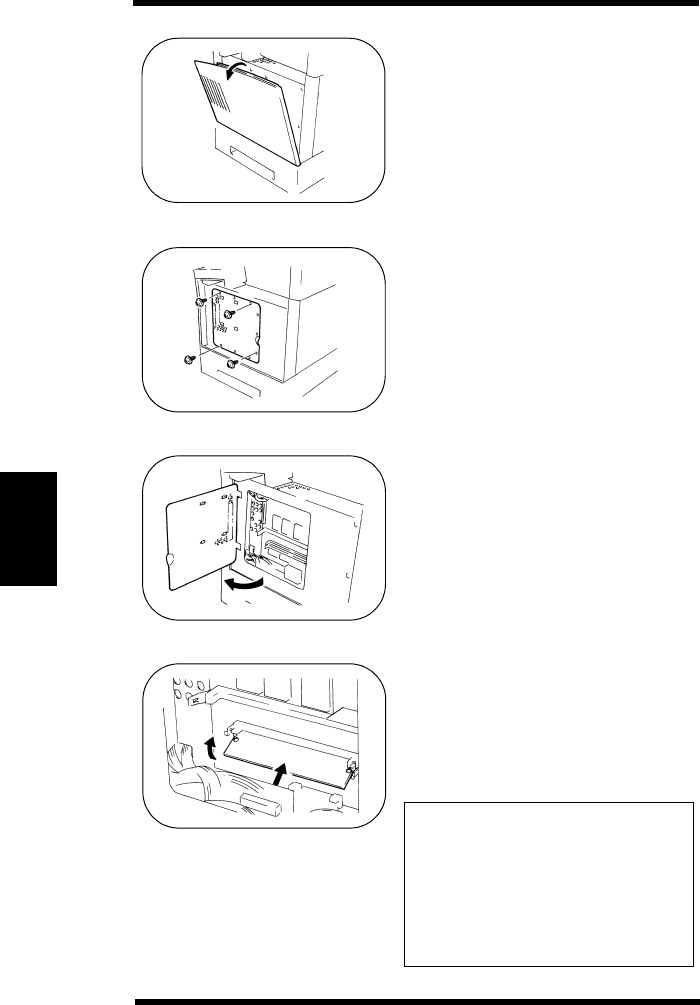
6-12
Chapter 6
Installing Options
3. Remove the right side cover.
4. Remove the four screws.
5. Open the metal cover.
6. Insert the SIMM all the way into
the upper memory connector at a
45 degree angle, and push the
SIMM up until it snaps into place.
When you install two SIMMs, the
first one must be inserted into the
upper memory connector (slot 1).
When you install two different
memory size of SIMM, install the
large size of SIMM into the upper
memory connector (slot 1).
NOTES
5. Installing the SIMM
Options6.frm 12 ページ 2003年11月18日 火曜日 午前9時52分
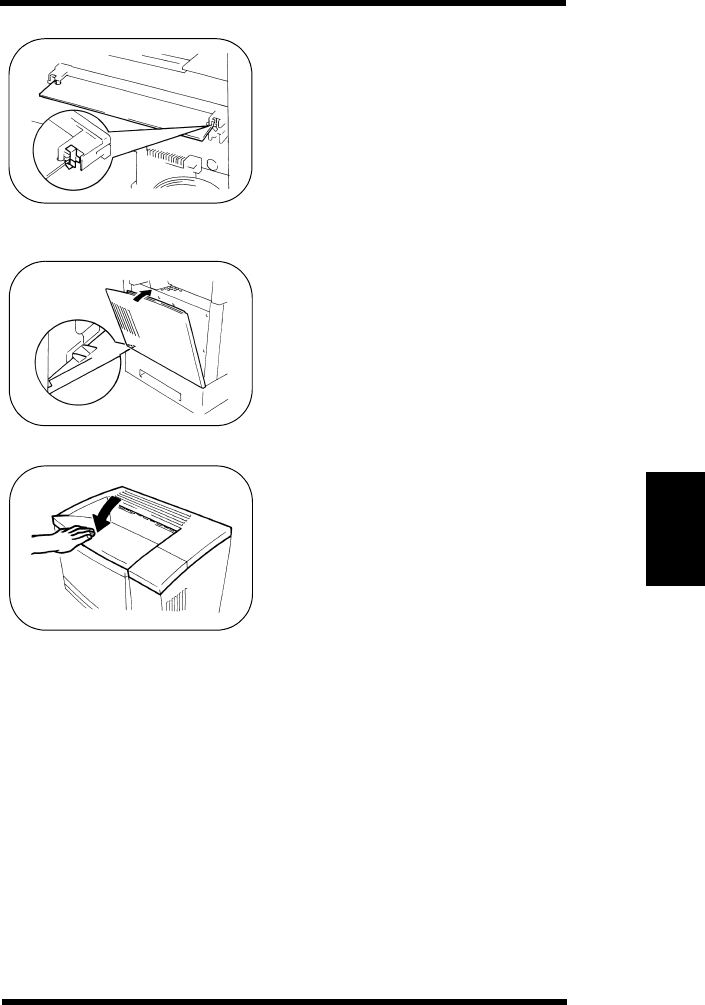
6-13
Chapter 6
Installing Options
7. Make sure both metal clips on the
connector are pushed through the
holes on the SIMM.
8. If installing a second SIMM,
repeat steps 6 to 7.
9. Close the metal cover and tighten
the four screws.
Attach the right side cover.
10. Close the upper cover.
11. Connect the power cord to the
printer and then turn the printer
on.
→ See “Connecting the power
Cord” page 2-9.
→ See “Turning the Printer ON
and OFF” page 2-10.
5. Installing the SIMM
Options6.frm 13 ページ 2003年11月18日 火曜日 午前9時52分

6-14
Chapter 6
Installing Options
12. Print a config print and check
the Add SIMM Memory in the
Installed Options.
→ See “Test Print” page 3-19.
Installed Options
Third Tray Unit = Not Installed
Duplex Unit = Not Installed
Network Card = Not Installed
PostScript ROM = Not Installed
Hard Disk = Not Installed
Add SIMM Memory (MB) = XX
5. Installing the SIMM
Options6.frm 14 ページ 2003年11月18日 火曜日 午前9時52分

7--1
Chapter 7
Specifications
Chapter 7
Specifications
Spec7.frm -1 ページ 2003年11月18日 火曜日 午前9時53分

7-0
Chapter 7Specifications
Spec7.frm 0 ページ 2003年11月18日 火曜日 午前9時53分

7-1
Chapter 7
Specifications
Name PageWorks 20
Type Desktop laser beam printer
Printing
system Minolta Super Fine Micro-ToningTM system
Exposure
system Laser diode + Polygon mirror scanning
Resolution 600 dots per inch
Printing
speed First print
One sided: within 16.0 sec. (A4C or LetterC)
Double sided: within 26.0 sec. (A4C or LetterC)
Multiple Print
One sided: 20.0 pages/min (A4C or LetterC)
Double sided: 12.5 pages/min (A4C or LetterC)
Paper feeding
system 2-way system
Tray 1 + Tray2
(3-way system: + Tray 3)
Paper type Plain paper: 60 to 90 g/m2 (16 to 24 lb)
Recycled paper: 60 to 90 g/m2 (16 to 24 lb)
Special paper:
transparencies, labels, envelopes, letterhead,
thick paper: 91 to 157 g/m2 (24 to 41 lb)
Paper size A3, Super B, A4, B4, JIS B5, ISO B5, Letter,
Legal, Ledger, Executive, C5, DL, Monarch,
Commercial-10
Tray 1:
- width 3.6 to 13.0 inches (92 to 330 mm)
- length 5.5 to 19.0 inches (140 to 483 mm)
Tray 2: Letter size only
1. Printer
Spec7.frm 1 ページ 2003年11月18日 火曜日 午前9時53分
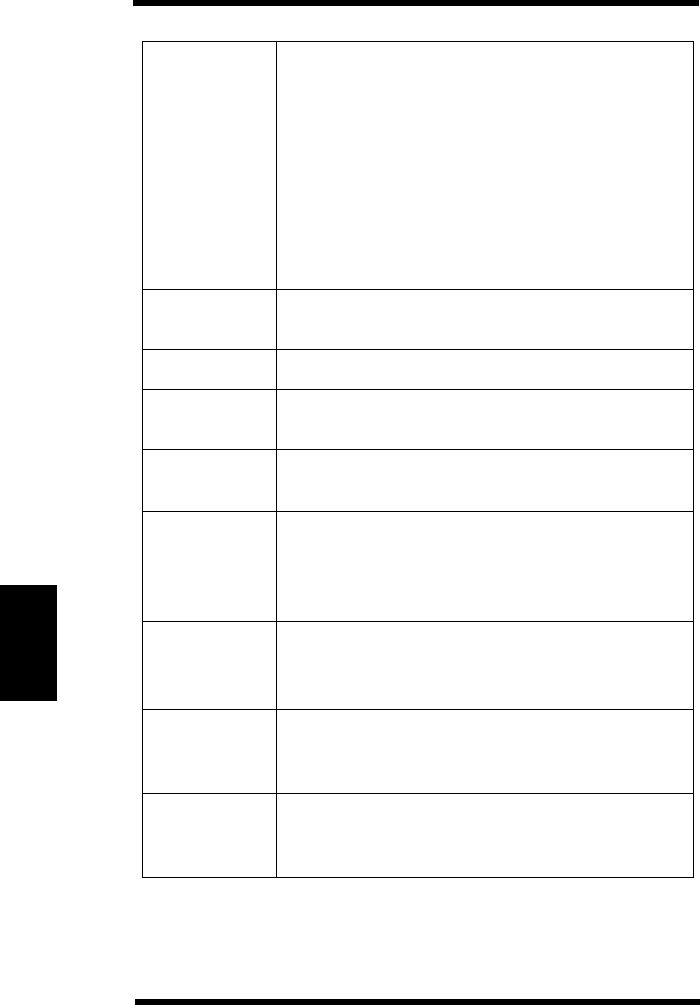
7-2
Chapter 7Specifications
Paper input Tray 1:
- Plain paper: Up to 150 sheets
- Recycled paper: Up to 150 sheets
- Special paper
Transparencies: Up to 5 sheets
Letter head, Labels, Envelopes, Thick paper:
Up to 10 sheets
Tray 2:
- Plain paper: Up to 500 sheets
- Recycled paper: Up to 500 sheets
Paper exit
system Face down exit system
Paper output 500 prints maximum
Warm-up
time Within 70sec.
during power supply at 73°F (23°C)
Acoustic
noise 53dB (A) or less (operating)
38dB (A) or less (standby)
Operating
environment Temperature 50°F to 95°F (10°C to 35°C)
with a fluctuation of 50°F (10°C) per hour.
Humidity 15% RH to 85% RH
with a fluctuation of 20% RH per hour.
Storage
environment Temperature 32°F to 95°F (0°C to 35°C)
with a fluctuation of 50°F (10°C) per hour.
Humidity 10% RH to 85% RH.
Power supply 120V, 50-60Hz
Voltage fluctuation within + 6%, -10%
Frequency fluctuation within ± 0.3Hz
Power
consumption 750W maximum
Standby (average): 200W or less
Power save (average): 45W or less
1. Printer
Spec7.frm 2 ページ 2003年11月18日 火曜日 午前9時53分

7-3
Chapter 7
Specifications
Machine life 360,000 prints or 5 years
Imaging
cartridge life 10,000 prints or more
(black-to-white ratio of 5% or less)
Dimensions 21.5 (W) x 15.1 (D) x 15.9 (H) inches
(545 x 383 x 403 mm)
Weight Printer: approximately 55.1 lbs (25 kg)
Imaging Cartridge: approximately 4.2 lbs (1.9 kg)
Interface Parallel Interface
Centronics (IEEE1284-typeB/Compatible, Nib-
ble and ECP)
Option: Ethernet (TCP/IP, IPX/SPX, EtherTalk),
EIDE
Emulations Standard: PCL5e (HP LaserJet 4V compatible)
Option: Adobe PostScript Level2
CPU NKK NR4645/100MHz
Fonts 1 bitmap font: Line Printer
35 scalable fonts: Intellifont
10 outline fonts: TrueType font
Minolta Font Manager (96 scalable fonts)
Memory
Accessories Imaging Cartridge, Letter Tray, Power Cord,
User’s Manual, Printer Driver User’s Manual,
Software Diskettes (4 pcs.)
Standard: ROM 1MB x 4
RAM 2MB x 2
(expandable up to 68MB)
Option: ROM-DIMM (1 slot)
RAM-SIMM (2 slots available)
RAM capacity: 4, 8, 16, 32MB
1. Printer
Spec7.frm 3 ページ 2003年11月18日 火曜日 午前9時53分

7-4
Chapter 7Specifications
Options 250-Sheet Universal Third Tray Unit
500-Sheet Third Tray Unit (Letter)
500-Sheet Third Tray Unit (A4)
Paper Tray
- Universal Tray
- A4 Tray
- Letter Tray
Duplex Unit
Network Card
SIMM (4MB/8MB/16MB/32MB)
Adobe Postscript Level 2 DIMM
2.5” Hard Disk Unit
1. Printer
Spec7.frm 4 ページ 2003年11月18日 火曜日 午前9時53分

7-5
Chapter 7
Specifications
Name 250-Sheet Universal Third Tray Unit
Paper feeding
system 1-way system
Paper type Plain paper: 60 to 90 g/m2 (16 to 24 lb)
Recycled paper: 60 to 90g/m2 (16 to 24 lb)
Paper size A3, A4, B4, JIS B5, Ledger, Legal, Letter,
Executive
Capacity Plain paper: Up to 250 sheets
Recycled paper: Up to 250 sheets
Operating
environment Temperature 50°F to 95°F (10°C to 35°C)
with a fluctuation of 50°F (10°C) per hour.
Humidity 15% RH to 85% RH
with a fluctuation of 20% RH per hour.
Power supply Supplied from printer
Dimensions Unit: 21.5 (W) x 14.8 (D) x 4.2 (H) inches
(545 x 377 x 106 mm)
Tray: 14.8 (W) x 18.2 (D) x 3.1 (H) inches
(375 x 462 x 79 mm)
Weight Unit: approximately 7.7 lbs (3.5 kg)
Tray: approximately 5.3 lbs (2.4 kg)
2. Third Tray Unit (optional)
Spec7.frm 5 ページ 2003年11月18日 火曜日 午前9時53分

7-6
Chapter 7Specifications
Name 500-Sheet Third Tray Unit (Letter)
Paper feeding
system 1-way system
Paper type Plain paper: 60 to 90 g/m2 (16 to 24 lb)
Recycled paper: 60 to 90g/m2 (16 to 24 lb)
Paper size Letter
Capacity Plain paper: Up to 500 sheets
Recycled paper: Up to 500 sheets
Operating
environment Temperature 50°F to 95°F (10°C to 35°C)
with a fluctuation of 50°F (10°C) per hour.
Humidity 15% RH to 85% RH
with a fluctuation of 20% RH per hour.
Power supply Supplied from printer
Dimensions Unit: 21.5 (W) x 14.8 (D) x 4.2 (H) inches
(545 x 377 x 106 mm)
Tray: 14.8 (W) x 12.6 (D) x 3.1 (H) inches
(375 x 320 x 79 mm)
Weight Unit: approximately 7.7 lbs (3.5 kg)
Tray: approximately 3.7 lbs (1.7 kg)
2. Third Tray Unit (Optional)
Spec7.frm 6 ページ 2003年11月18日 火曜日 午前9時53分

7-7
Chapter 7
Specifications
Name 500-Sheet Third Tray Unit (A4)
Paper feeding
system 1-way system
Paper type Plain paper: 60 to 90 g/m2 (16 to 24 lb)
Recycled paper: 60 to 90g/m2 (16 to 24 lb)
Paper size A4
Capacity Plain paper: Up to 500 sheets
Recycled paper: Up to 500 sheets
Operating
environment Temperature 50°F to 95°F (10°C to 35°C)
with a fluctuation of 50°F (10°C) per hour.
Humidity 15% RH to 85% RH
with a fluctuation of 20% RH per hour.
Power supply Supplied from printer
Dimensions Unit: 21.5 (W) x 14.8 (D) x 4.2 (H) inches
(545 x 377 x 106 mm)
Tray: 14.8 (W) x 12.6 (D) x 3.1 (H) inches
(375 x 320 x 79 mm)
Weight Unit: approximately 7.7 lbs (3.5 kg)
Tray: approximately 3.7 lbs (1.7 kg)
2. Third Tray Unit (Optional)
Spec7.frm 7 ページ 2003年11月18日 火曜日 午前9時53分

7-8
Chapter 7Specifications
Name Duplex Unit
Paper feeding
system 1-way system
Paper type Plain paper: 60 to 90 g/m2 (16 to 24 lb)
Recycled paper: 60 to 90 g/m2 (16 to 24 lb)
Paper size A3, Super B, A4, B4, JIS B5, Ledger, Legal,
Letter, Executive
Operating
environment Temperature 50°F to 95°F (10°C to 35°C)
with a fluctuation of 50°F (10°C) per hour.
Humidity 15% RH to 85% RH
with a fluctuation of 20% RH per hour.
Power supply Supplied from printer
Dimensions 16.7 (W) x 2.8 (D) x 9.6 (H) inches
(424 x 71 x 244 mm)
Weight Approximately 5.1 lbs (2.3 kg)
3. Duplex Unit (optional)
Spec7.frm 8 ページ 2003年11月18日 火曜日 午前9時53分

7-9
Chapter 7
Specifications
Name SIMM (single in-line memory module)
Capacity 4, 8, 16, 32MB
Parity Non-parity
Access speed 70 nsec. or faster
Number of pins 72
4. SIMM
Spec7.frm 9 ページ 2003年11月18日 火曜日 午前9時53分
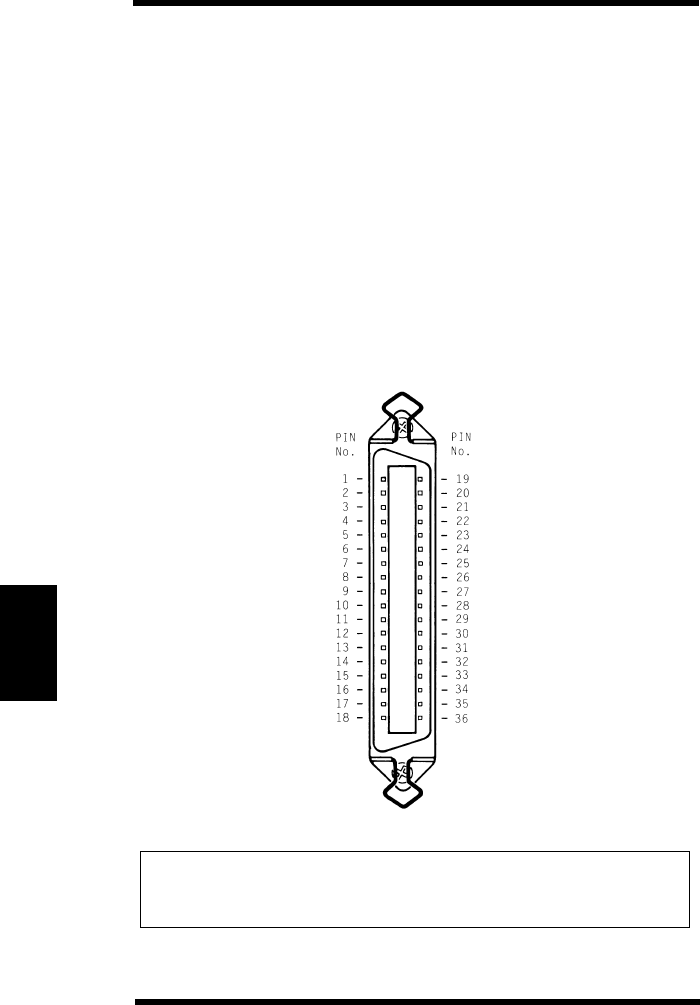
7-10
Chapter 7Specifications
Be sure to use only a parallel interface cable that meets the specifi-
cations described below.
Length:
Less than 5 feet (1.5 meters)
Connectors:
Printer: Centronics 36-pin connector
Computer: EIA 25-pin connector
Cable type:
Shielded type. Each signal and ground pair should be twisted.
IEEE 1284 type-B connector pin assignments
NOTE
Minolta does not warrant the use of any particular cable. The user
assumes all responsibility as to the quality and performance of the
cable.
5. Interface Connector and Cable
Spec7.frm 10 ページ 2003年11月18日 火曜日 午前9時53分

7-11
Chapter 7
Specifications
Pin# Compatible Nibble ECP
1nStrobe HostClk HostClk
2Data 1 (Least Significant Bit)
3Data 2
4Data 3
5Data 4
6Data 5
7Data 6
8Data 7
9Data 8 (Most Significant Bit)
10 nAck PtrClk PeriphClk
11 Busy PtrBusy PeriphAck
12 PError AckDataReq nAckReverse
13 Select Xflag Xflag
14 nAutoFd HostBusy HostAck
15 Not defined
16 Logic Gnd
17 Chassis Gnd
18 Peripheral Logic High
19 Signal Ground (nStrobe)
20 Signal Ground (Data 1)
5. Interface Connector and Cable
Spec7.frm 11 ページ 2003年11月18日 火曜日 午前9時53分
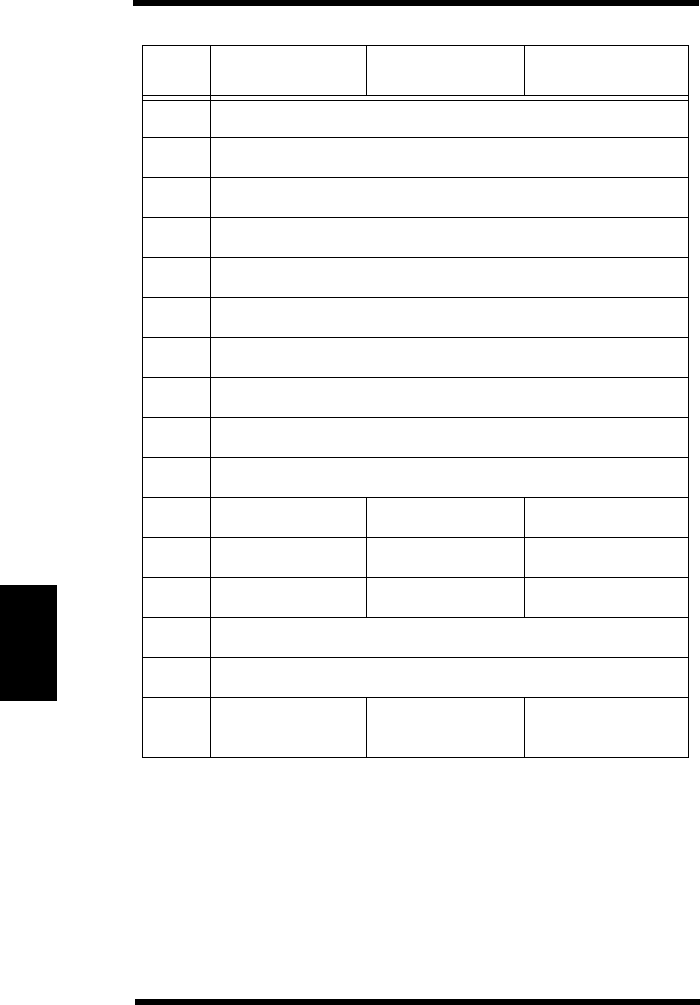
7-12
Chapter 7Specifications
Pin# Compatible Nibble ECP
21 Signal Ground (Data 2)
22 Signal Ground (Data 3)
23 Signal Ground (Data 4)
24 Signal Ground (Data 5)
25 Signal Ground (Data 6)
26 Signal Ground (Data 7)
27 Signal Ground (Data 8)
28 Signal Ground (PError, Select, nAck)
29 Signal Ground (Busy, nFault)
30 Signal Ground (nAutoFd, nSelectIn, nInt)
31 nInt nInt nReverseRequest
32 PError AckDataReq nAckReverse
33 nFault nDataAvail nPeriphRequest
34 Not defined
35 Not defined
36 NSelectIn IEEE 1284
active IEEE 1284
active
5. Interface Connector and Cable
Spec7.frm 12 ページ 2003年11月18日 火曜日 午前9時53分

A--1
Appendix-A
Character Sets
Appendix A
Character Sets
Append-A.frm -1 ページ 2003年11月18日 火曜日 午前9時46分

A-0
Character Sets Appendix-A
Append-A.frm 0 ページ 2003年11月18日 火曜日 午前9時46分

A-1
Appendix-A
Character Sets
7J Desktop
A. Character Sets
Append-A.frm 1 ページ 2003年11月18日 火曜日 午前9時46分

A-2
Character Sets Appendix-A
1E ISO4: United Kingdom
A. Character Sets
Append-A.frm 2 ページ 2003年11月18日 火曜日 午前9時46分

A-3
Appendix-A
Character Sets
0U ISO 6: ASCII
A. Character Sets
Append-A.frm 3 ページ 2003年11月18日 火曜日 午前9時46分

A-4
Character Sets Appendix-A
0S ISO 11: Swedish
A. Character Sets
Append-A.frm 4 ページ 2003年11月18日 火曜日 午前9時46分

A-5
Appendix-A
Character Sets
0I ISO 15: Italian
A. Character Sets
Append-A.frm 5 ページ 2003年11月18日 火曜日 午前9時46分

A-6
Character Sets Appendix-A
2S ISO 17: Spanish
A. Character Sets
Append-A.frm 6 ページ 2003年11月18日 火曜日 午前9時46分

A-7
Appendix-A
Character Sets
1G ISO 21: German
A. Character Sets
Append-A.frm 7 ページ 2003年11月18日 火曜日 午前9時46分

A-8
Character Sets Appendix-A
0D ISO 60: Norwegign V1
A. Character Sets
Append-A.frm 8 ページ 2003年11月18日 火曜日 午前9時46分

A-9
Appendix-A
Character Sets
1F ISO 69: French
A. Character Sets
Append-A.frm 9 ページ 2003年11月18日 火曜日 午前9時46分

A-10
Character Sets Appendix-A
0N ISO 8859/1 Latin 1
A. Character Sets
Append-A.frm 10 ページ 2003年11月18日 火曜日 午前9時46分

A-11
Appendix-A
Character Sets
2N ISO 8859/2 Latin 2
A. Character Sets
Append-A.frm 11 ページ 2003年11月18日 火曜日 午前9時46分

A-12
Character Sets Appendix-A
5N ISO 8859/9 Latin 5
A. Character Sets
Append-A.frm 12 ページ 2003年11月18日 火曜日 午前9時46分

A-13
Appendix-A
Character Sets
1U Legal
A. Character Sets
Append-A.frm 13 ページ 2003年11月18日 火曜日 午前9時46分

A-14
Character Sets Appendix-A
12J MC Text
A. Character Sets
Append-A.frm 14 ページ 2003年11月18日 火曜日 午前9時46分

A-15
Appendix-A
Character Sets
8M Math-8
A. Character Sets
Append-A.frm 15 ページ 2003年11月18日 火曜日 午前9時46分
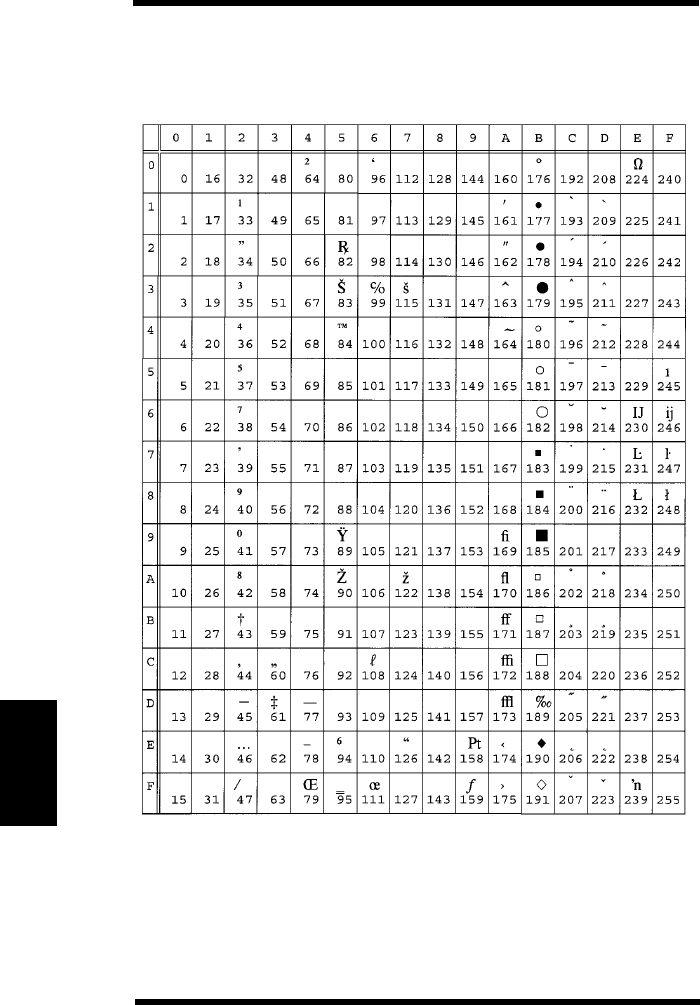
A-16
Character Sets Appendix-A
6J Microsoft Publishing
A. Character Sets
Append-A.frm 16 ページ 2003年11月18日 火曜日 午前9時46分

A-17
Appendix-A
Character Sets
10U PC-8 (Cord Page 437)
A. Character Sets
Append-A.frm 17 ページ 2003年11月18日 火曜日 午前9時46分

A-18
Character Sets Appendix-A
11U PC-8 Danish/Norwegian
A. Character Sets
Append-A.frm 18 ページ 2003年11月18日 火曜日 午前9時46分
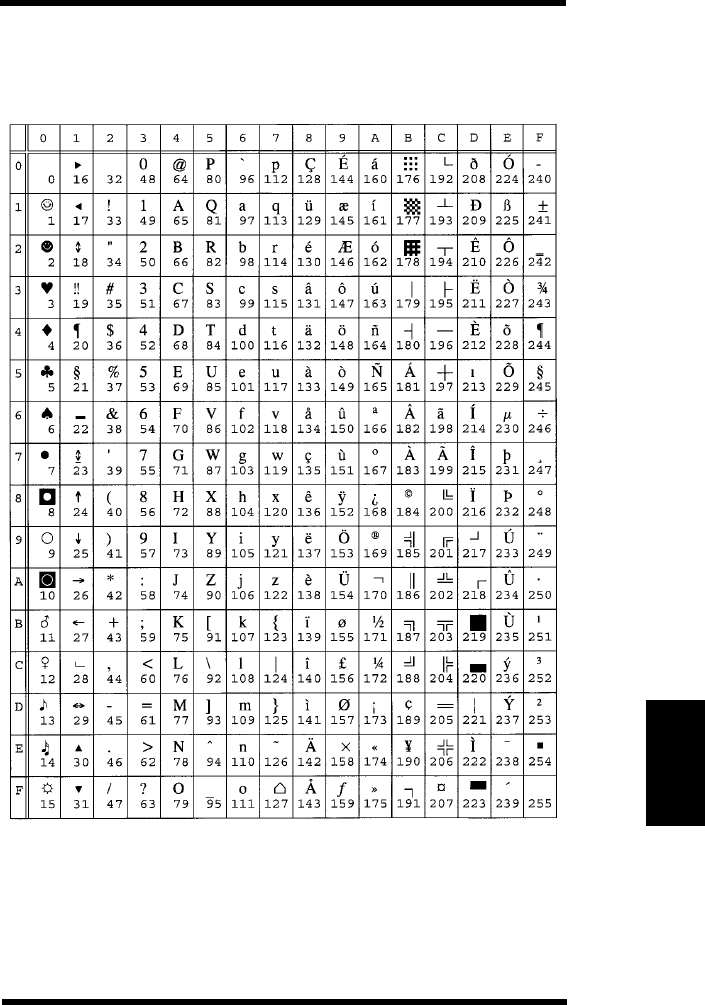
A-19
Appendix-A
Character Sets
12U PC-850 Multilingual
A. Character Sets
Append-A.frm 19 ページ 2003年11月18日 火曜日 午前9時46分
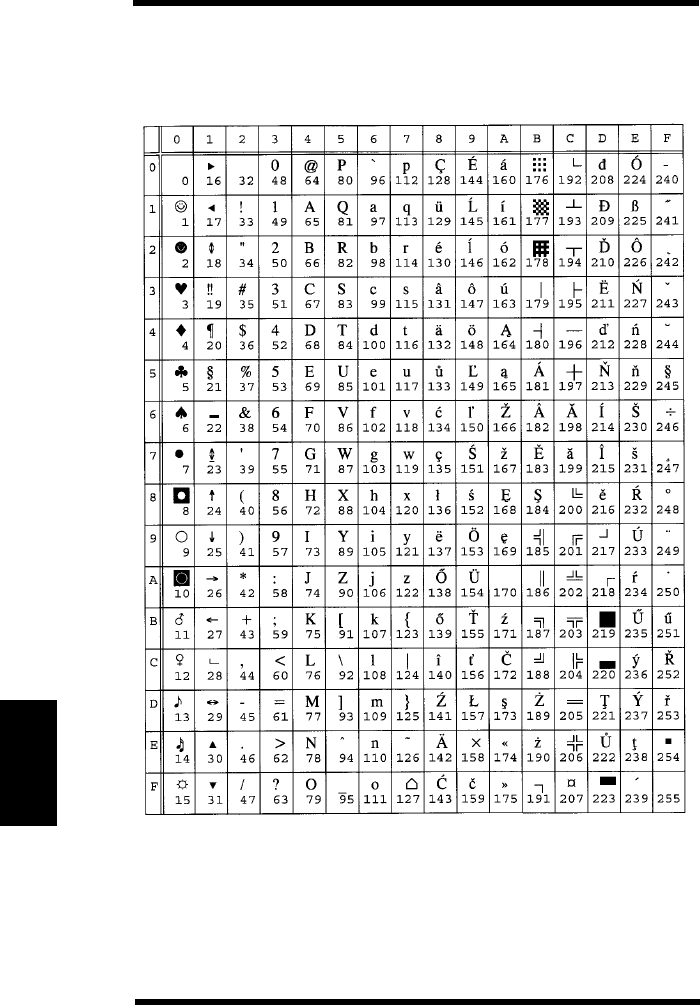
A-20
Character Sets Appendix-A
17U PC 852 Latin 2
A. Character Sets
Append-A.frm 20 ページ 2003年11月18日 火曜日 午前9時46分

A-21
Appendix-A
Character Sets
9T PC-Turkish
A. Character Sets
Append-A.frm 21 ページ 2003年11月18日 火曜日 午前9時46分

A-22
Character Sets Appendix-A
5M PS Math
A. Character Sets
Append-A.frm 22 ページ 2003年11月18日 火曜日 午前9時46分

A-23
Appendix-A
Character Sets
10J PS Text
A. Character Sets
Append-A.frm 23 ページ 2003年11月18日 火曜日 午前9時46分

A-24
Character Sets Appendix-A
15U Pi Font
A. Character Sets
Append-A.frm 24 ページ 2003年11月18日 火曜日 午前9時46分

A-25
Appendix-A
Character Sets
8U Roman-8
A. Character Sets
Append-A.frm 25 ページ 2003年11月18日 火曜日 午前9時46分

A-26
Character Sets Appendix-A
13J Ventura International
A. Character Sets
Append-A.frm 26 ページ 2003年11月18日 火曜日 午前9時46分

A-27
Appendix-A
Character Sets
6M Ventura Math
A. Character Sets
Append-A.frm 27 ページ 2003年11月18日 火曜日 午前9時46分

A-28
Character Sets Appendix-A
14J Ventura US
A. Character Sets
Append-A.frm 28 ページ 2003年11月18日 火曜日 午前9時46分

A-29
Appendix-A
Character Sets
9U Windows 3.0 Latin 1
A. Character Sets
Append-A.frm 29 ページ 2003年11月18日 火曜日 午前9時46分
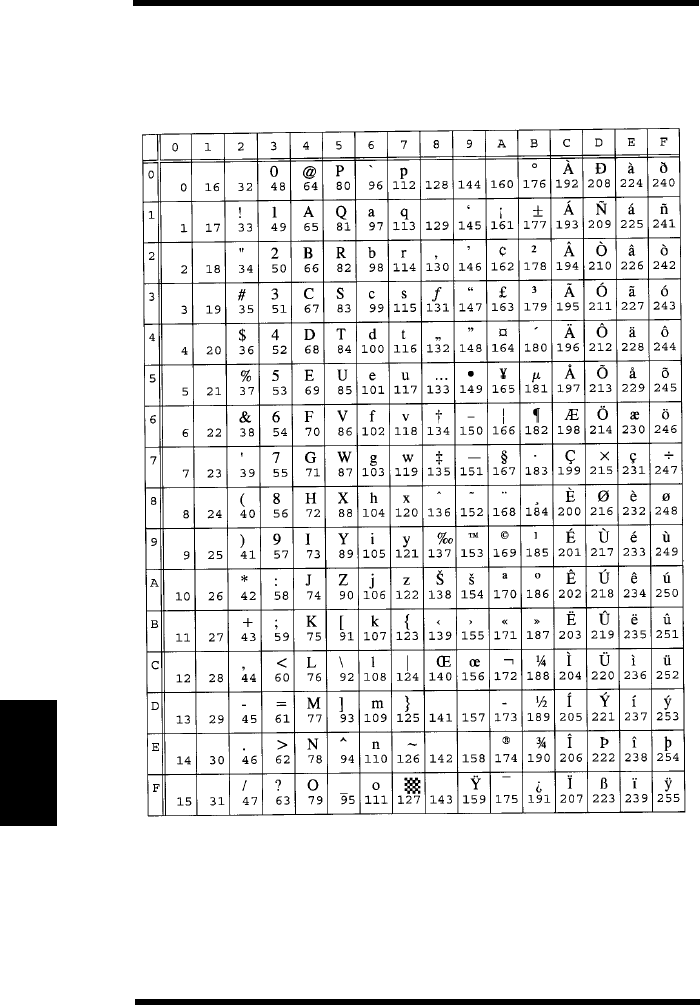
A-30
Character Sets Appendix-A
19U Windows 3.1 Latin 1
A. Character Sets
Append-A.frm 30 ページ 2003年11月18日 火曜日 午前9時46分

A-31
Appendix-A
Character Sets
9E Windows 3.1 Latin 2
A. Character Sets
Append-A.frm 31 ページ 2003年11月18日 火曜日 午前9時46分

A-32
Character Sets Appendix-A
5T Windows 3.1 Latin 5
A. Character Sets
Append-A.frm 32 ページ 2003年11月18日 火曜日 午前9時46分
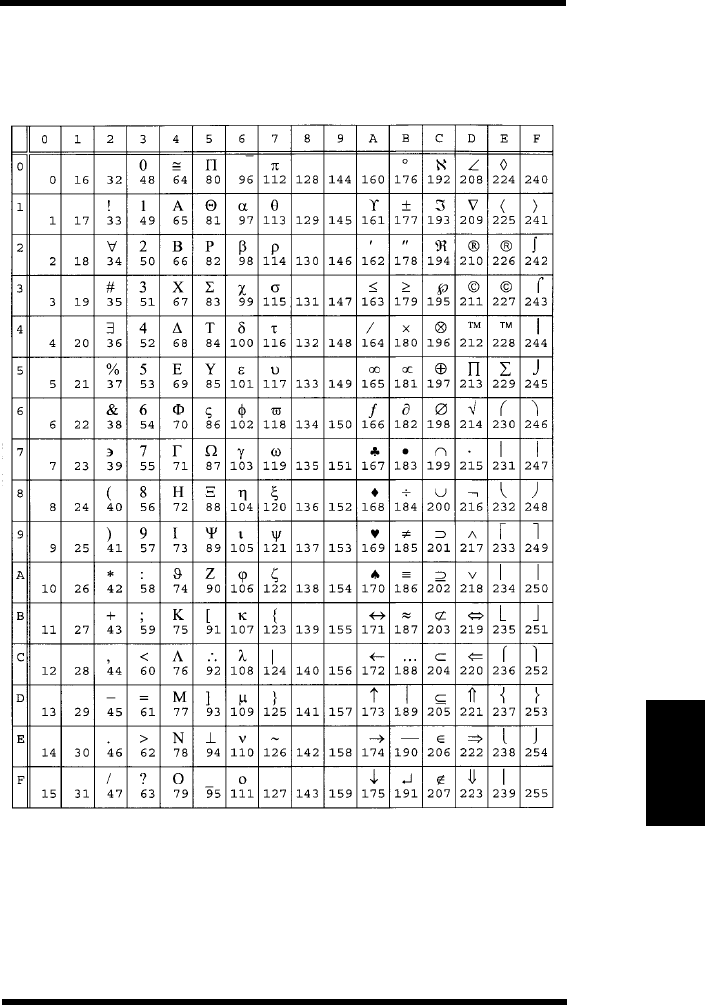
A-33
Appendix-A
Character Sets
19M Symbol
A. Character Sets
Append-A.frm 33 ページ 2003年11月18日 火曜日 午前9時46分

A-34
Character Sets Appendix-A
579L Wingdings
A. Character Sets
Append-A.frm 34 ページ 2003年11月18日 火曜日 午前9時46分

B--1
Appendix-B Font Lists
Appendix B
Font Lists
Append-B.frm -1 ページ 2003年11月18日 火曜日 午前9時47分

B-0
Appendix-B Font Lists
Append-B.frm 0 ページ 2003年11月18日 火曜日 午前9時47分
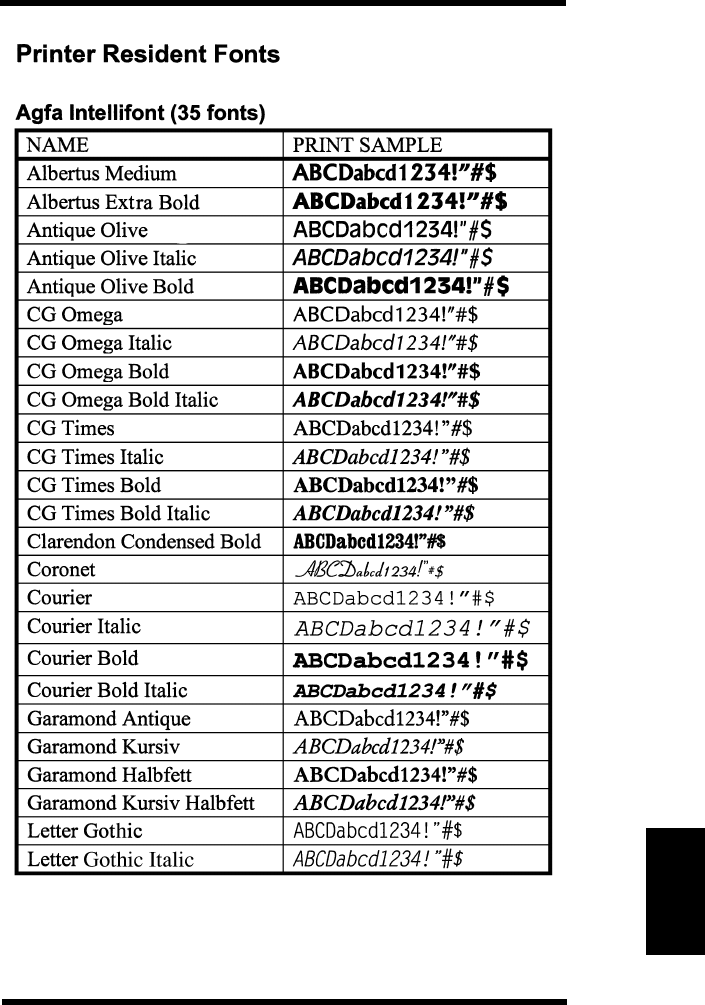
B-1
Appendix-B Font Lists
B. Font Lists
Append-B.frm 1 ページ 2003年11月18日 火曜日 午前9時47分
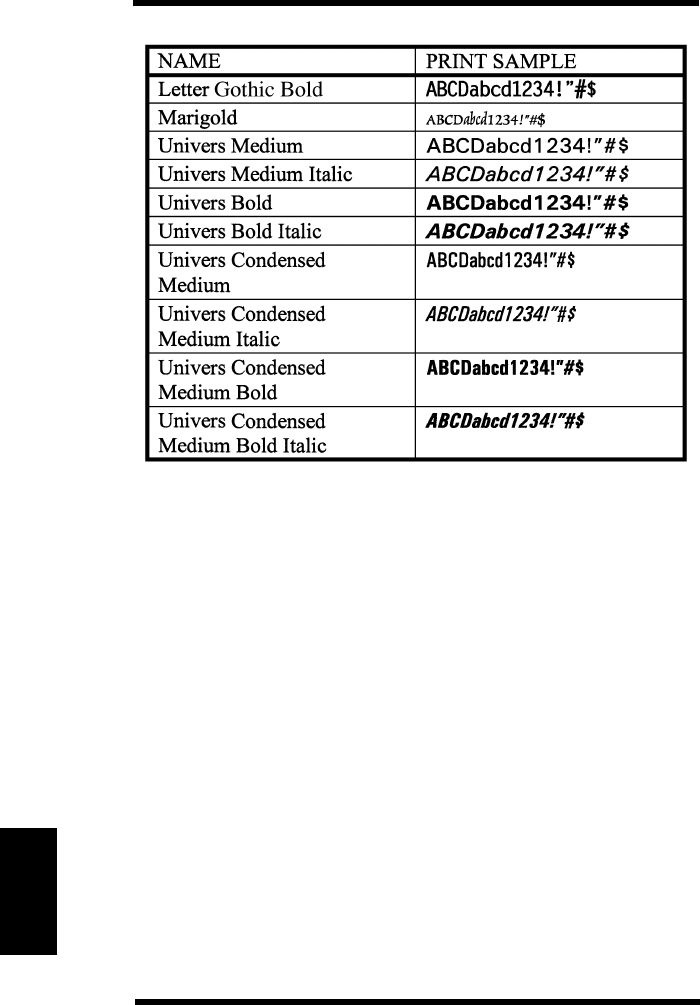
B-2
Appendix-B Font Lists
B. Font Lists
Append-B.frm 2 ページ 2003年11月18日 火曜日 午前9時47分
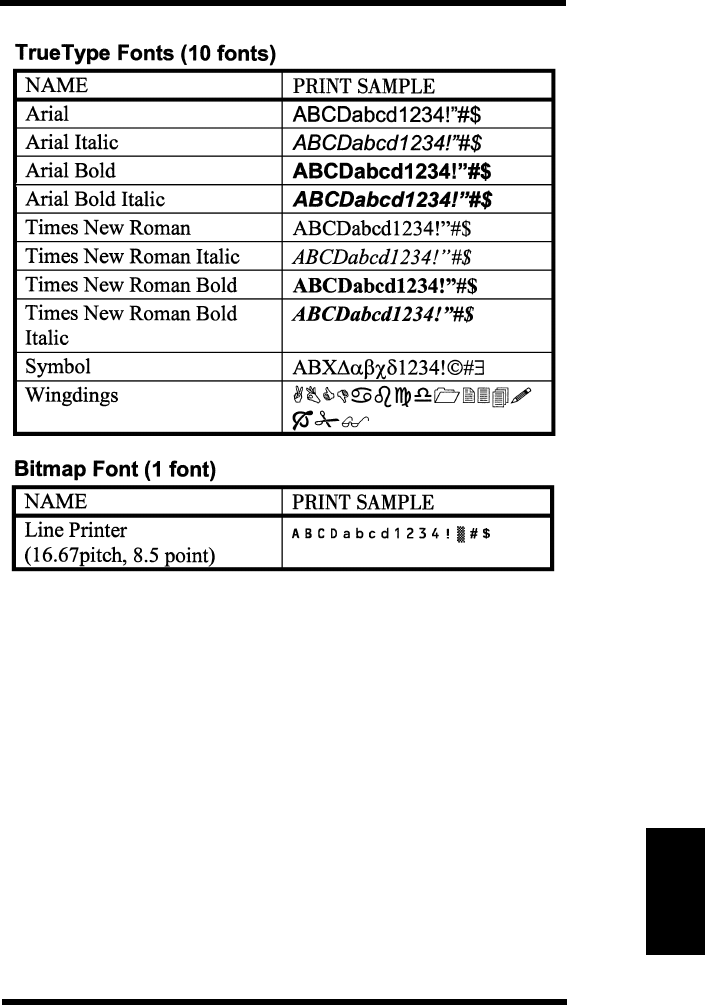
B-3
Appendix-B Font Lists
B. Font Lists
Append-B.frm 3 ページ 2003年11月18日 火曜日 午前9時47分
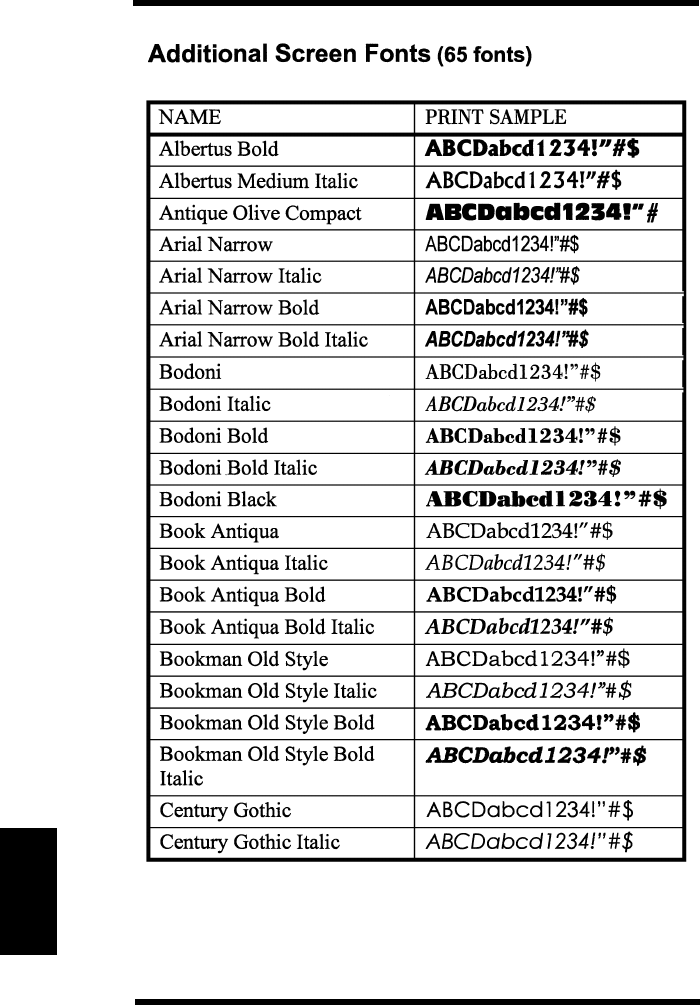
B-4
Appendix-B Font Lists
B. Font Lists
Append-B.frm 4 ページ 2003年11月18日 火曜日 午前9時47分
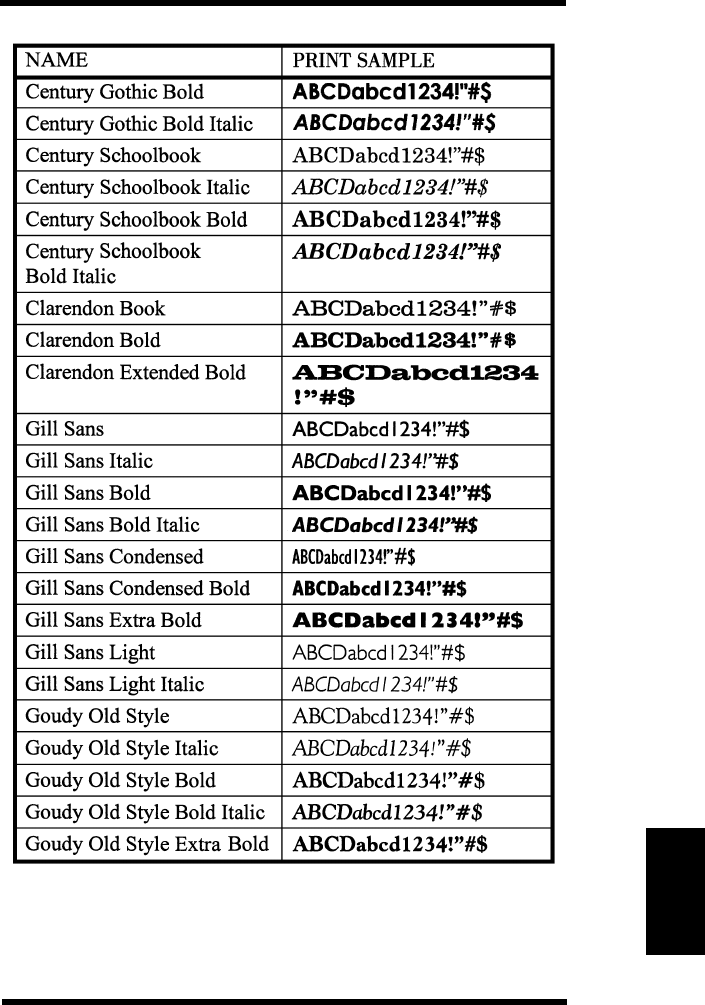
B-5
Appendix-B Font Lists
B. Font Lists
Append-B.frm 5 ページ 2003年11月18日 火曜日 午前9時47分
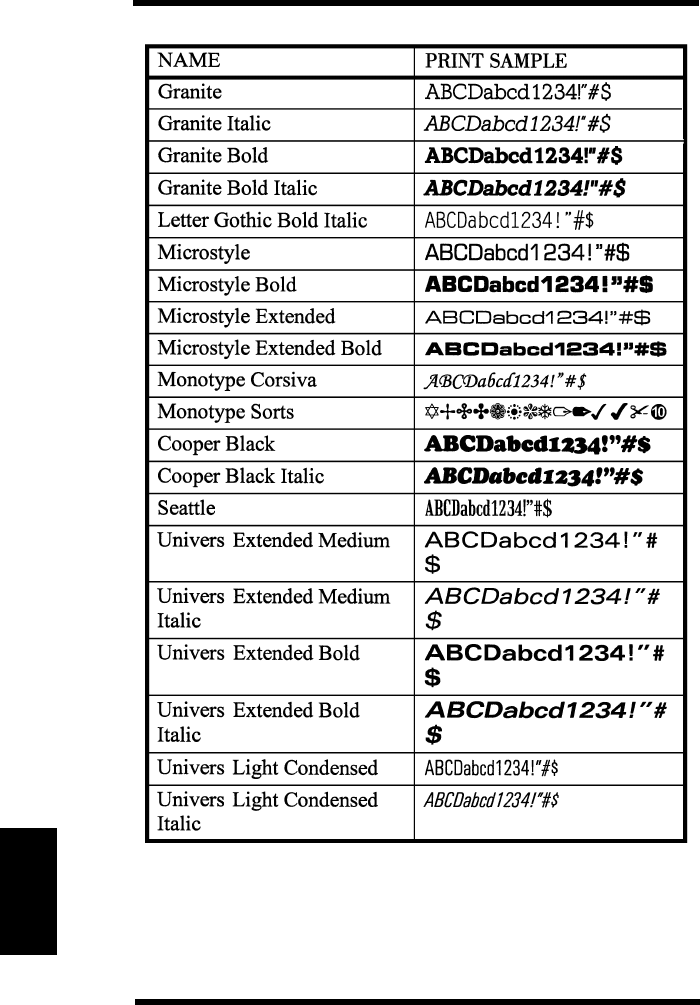
B-6
Appendix-B Font Lists
B. Font Lists
Append-B.frm 6 ページ 2003年11月18日 火曜日 午前9時47分

C--1
Index
Index
Index.frm -1 ページ 2003年11月18日 火曜日 午前9時58分

C-0
Index
Index.frm 0 ページ 2003年11月18日 火曜日 午前9時58分

C-1
Index
Index
A
A3 3-21
A4 3-21
Adobe PostScript ROM-DIMM
installing 6-7
Automatic tray setting 3-35
B4 3-21
Basic Menu Setting Method 3-1
Binary 3-14
Bind Long Edge 3-7, 3-27
Bind Short Edge 3-7, 3-27
C5 3-21
Caution Message 5-12, 5-16
MEMORY OVERFLOW 5-16
JOB TOO COMPLEX 5-16
CDRH regulations i
Centronics interface port 2-16
CESKY 3-16
Cleaning
external 4-5
internal 4-6
Com-10 3-21
Control Panel 1-6, 3-1
Custom paper
printing 3-26
Custom size 3-21
B
C
DANSK 3-16
Data LED 1-7
DEUTSCH 3-16
DL 3-21
Duplex Printing 3-27
paper type 3-28
paper size 3-28
Duplex Unit
installing 6-3
specification 7-8
ENGLISH 3-16
Enter/Reset key 1-9
Envelope 3-21
printing 3-25
ESPAÑOL 3-16
ETHERNET 2 3-17
Executive 3-21
FCC regulations iv, vi
Features 1-1
FineArt 3-9
Font 3-40
Agfa intellifont B-1
bitmap 3-40, B-3
scalable 3-40
screen B-4
D
E
F
Index.frm 1 ページ 2003年11月18日 火曜日 午前9時58分

C-2
Index
TrueType B-3
FRANCAIS 3-16
Grounding 2-2
Humidity 2-4
Hard Disk
installing 6-7
IEEE 802.2 3-17
IEEE 802.3 3-17
Imaging Cartridge 2-7
replacing 4-2
Interface Cable 2-16
connecting 2-16
specification 7-10
ISO B5 3-21
ITALIANO 3-16
Item key 1-8
JIS B5 3-21
Job Separation 3-3
G
J
H
I
Keys 1-6, 1-8
Labels 3-21
printing 3-26
Landscape orientation 3-8
Laser Safety i
LCD 1-7
Ledger 3-21
LED’s 1-6, 1-7
Legal 3-21
Letter 3-21
Loading Paper
in tray 1 3-29
in tray 2 3-31
in tray 3 3-33
Location for the Printer 2-1
Maintenance Menu 3-16
Display language 3-16
Factory default 3-16
Service message 3-16
Media 3-21
paper type 3-21
paper size 3-21
capacity 3-22
Manual Feed 3-36
Menu key 1-8
K
L
M
Index
Index.frm 2 ページ 2003年11月18日 火曜日 午前9時58分

C-3
Index
Message LED 1-7
Misfeed, paper
in tray 1 5-1
in tray 2 5-3
in tray 3 5-3
inside the printer 5-5
in the duplex unit 5-7
Monarch 3-21
NEDERLANDS 3-16
Network Card 6-5
installing 6-5
Network Config Print 3-20
Network Menu 3-17
IP address 3-17
Subnet mask 3-17
Gateway 3-17
NetWare frame 3-17
On Line key 1-8
On Line LED 1-7
Operating Environment 2-4
Operational Precaution 2-4
Ozone release vii
N
O
PCL Menu 3-10
Font number 3-10
Pitch 3-10
Point size 3-10
Symbol set 3-10
Plain paper 3-21
Portrait orientation 3-8
Power 2-1
On and OFF 2-10
Power Cord
connecting 2-9
Print Menu 3-7
Copies 3-8
Paper Size 3-8
Orientation 3-8
Paper Tray 3-8
Duplex 3-8
Form Length 3-8
Resolution 3-8
Print Quality 3-8
Toner Density 3-9
Page Protection 3-9
Print Quality Problem 5-8
Irregularities 5-11
Blank pages 5-9
Black pages 5-9
Blurred background 5-10
Print out too dark 5-10
Print out too light 5-9
Toner smudges 5-11
Uneven print quality 5-10
White or black lines 5-11
Printable Area 3-23
P
Index
Index.frm 3 ページ 2003年11月18日 火曜日 午前9時58分

C-4
Index
Printer
accessories 1-2, 7-3
Menus 3-4, 3-6
moving 2-17
specification 7-1
supplies 2-6
Printer Messages 5-12
Printing 3-38
Printing Orientation 3-24
Printing Problem 5-8
No printing 5-8
Proceed key 1-8
PS Menu 3-11
Jam Recover 3-11
Radio frequency interference iv
Recycled paper 3-21
Select key 1-8
Setting Up Your Printer 2-7
Shift key 1-8
SNAP 3-17
Space Requirements 2-3
Special paper 3-21
Special Paper tray Setting 3-37
Status Message 5-12, 5-13
READY 5-13
OFFLINE 5-13
PROCESSING 5-13
R
S
RESET 5-13
TRAY1 PAPER SIZE 3-2, 5-13
PRINT MENU 3-8, 5-13
CONFIG PRINT 3-19, 5-13
POWER SAVE 3-12, 5-13
WARMING UP 5-13
SELF TEST 5-13
MAINTENANCE REQ
3-16, 4-1, 5-14
TRAY2 IS EMPTY 5-14
TRAY3 IS EMPTY 5-14
TONER IS LOW 4-2, 5-14
TONER EMPTY 4-2, 5-14
JOB SEPARATION 3-3, 5-14
Super A3 3-21
Supplies for Maintenance 4-1
System Menu 3-12
Language 3-12
Power Save 3-13
Auto Continue 3-13
Special Paper 3-13, 3-21
Tray 1 Media 3-13
Tray 2 Media 3-13
Tray 3 Media 3-13
TBCP 3-15
Test Print 2-11, 3-19
Config Print 2-12, 3-19
PCL Font List 2-13, 3-19
PCL Demo Print 2-15, 3-19
PS Config Print 3-20
PS Font List 3-20
T
Index
Index.frm 4 ページ 2003年11月18日 火曜日 午前9時58分

C-5
Index
Network Config Print 3-20
Thick paper 3-21, 3-26
printing 3-26
Transparencies 3-21, 3-26
printing 3-26
Tray 1 paper key 1-8
Tray 1 Paper Size
Setting Method 3-2
Universal 3-21
Warning Message 5-15
IMAGE ADAPT 5-15
BI-CEN OVERFLOW 5-15
U
W
Index
Index.frm 5 ページ 2003年11月18日 火曜日 午前9時58分

C-6
Index
Memo
Index.frm 6 ページ 2003年11月18日 火曜日 午前9時58分
USER'S MANUAL
Copyright
1997 MINOLTA CO., LTD
Printed in Japan
The information contained in this manual is
subject to change without notice to
incorporate improvements made on the
product or products the manual covers.
Minolta CO., LTD. Image Information Products Marketing Headquarters, 3-13, 2-chome, Azuchi-machi, Chuo-ku, Osaka. 541, Japan
1997. 7 0993-7701-03
