Mission Assembly Lines OPTIMA-SERIES1 (MAX. 50 CHAR): PERSONAL COMPUTER User Manual
Mission Assembly Lines Co., Ltd. (MAX. 50 CHAR): PERSONAL COMPUTER Users Manual
USERS MANUAL

Computer Operation Manual
- 11 -
Service center:
Mission Assembly Line Co.,Ltd.
49 Naradhiwas Rajarakarindha Rd., Silom, Bangrak,
Bangkok 10500
Tel. 0-2235-7000 Fax. 0-2233-6000
www.mission-computer.com
If has received the accreditation on the quality system and
the environment conservation of ISO 9001 : 2000
and ISO 14001 : 1996
- 10 –
9. Change of the lithium battery on the main circuit panel must the correct method and
make sure not to put on the wrong terminals, which may cause damage.
10. Never put something to close or block the ventilation channel of the computer as it may
cause high heat and damage.
11. The use of the computer should not do anything other than specified in the manual
as it may cause damage.
12. When the computer shows an abnormal condition or requires maintenance, if the
user has no necessary skill to perform it, s/he contact the computer distributor or agent for
consultations or use the after – sales service
number 02-235-7000
Contents
Page
1. PRODUCT INFORMATION 1
2. Installation of the computer 2
Components of the computer 2
Accessories that comes in the box 3
Ports used to connect the computer with the peripherals. 4
Procedures to install the computer 5
Maintenance of the computer 7
General uses and safety precautions 9
Service centers 11

Specification
CPU : Intel Core 2 E6300 1.86 Ghz FSB 1066 Mhz LGA775
Mainboard : Asus P5L-MX
RAM : DDR2 512 MB FSB 533 Mhz
HDD : 80 GB /7200 rpm SATA
CD : Combo Drive 52X32X52X16
VGA : Intel Graphics Media Accelerator 950 Max
Sound : Azalia ADI1986A, 6-channel High-Definition Audio CODEC
LAN : Gb LAN PCIe
Power : Linkworld LPK8-300W
Case : Linkworld 437
Expansion Slot : 1 x PCI-E x16 ,1 x PCI-E x1, 2 x PCI
Back Panel I/O : 1 x PS/2 keyboard ,1 x PS/2 mouse, 1 x Parallel Port,
1 x VGA port, 4 x USB 2.0 Ports ,1 x RJ 45 Port,
1 Audio I/O
Keyboard : PS/2
Mouse : Optical PS/2
Monitor : LCD 17" Resolution:1280x1024@75Hz
OS : Windows Xp Service Pack 2
- 9 -
5. General uses and precautions for safety
1. The computer can be used in the ambient temperatures as follows.
Conditions Temperature range
Temperature 10 °C – 35 °C
Humidity 5% - 70% RH
2. Choose the appropriate position with well ventilation to prevent heat. And avoid wet
and damp places, also excessive dust and temperatures, and exposure to sunlight.
3. You should place the computer on a strong desk that is secure.
4. The computer that can adjust the voltage between 110/230 volts should be checked
for the voltage status at the point of use.
5. Wiring of the computer is designed to use with the plug and grounding only Check
the cords that connect to the plug to make sure they are in the tight and secure condition.
Because a loose connection can cause interruption or short – circuit that can derange the
computer.
6. The user should install a circuit breaker just in case of having short – circuit. And
install a grounding system that meets the standards of the country.
7. The outlets are considered to be important in breaking the circuit of the computer
operation. So you should use good quality outlets that pass the inspection of Thai Industrial
Standard Institute. You can notices the Thai Industrial Standard (TIS) logo the affixes on the
product.
8. Installation of an outlet should be made near the computer and is clearly visible.
Avoid putting something on top the cord of outlet that may cause damage.

- 8 –
3.6 Connect the cable of the computer to the power supply on the back of the
computer as in figure.6
Figure.6
3.7 After the connections in number 1-6 already, press on the
power switch in the middle to turn on the computer.
Figure 7
- 1 -
1. PRODUCT INFORMATION
NOTE: THE MANUFACTURER IS NOT RESPONSIBLE FOR ANY RADIO OR
TV INTERFERENCE CAUSED BY UNAUTHORIZED MODIFICATIONS TO
THIS EQUIPMENT. SUCH MODIFICATIONS COULD VOID THE USER'S
AUTHORITY TO OPERATE THE EQUIPMENT
FCC GUIDELINES
WARNING: This equipment has been tested and found to comply with the limits for a Class B
digital device, pursuant to part 15 of the FCC Rules. These limits are designed to provide
reasonable protection against harmful interference in a residential installation. This equipment
generates uses and can radiate radio frequency energy and, if not installed and used in
accordance with the instructions, may cause harmful interference to radio communications.
However, there is no guarantee that interference will not occur in a particular installation. If this
equipment does cause harmful interference to radio or television reception, which can be
determined by turning the equipment off and on, the user is encouraged to try to correct the
interference by one or more of the following measures:
- Reorient or relocate the receiving antenna.
- Increase the separation between the equipment and receiver.
-Connect the equipment into an outlet on a circuit different from that to which the receiver is
connected.
-Consult the dealer or an experienced radio/TV technician for help.
- 2 -
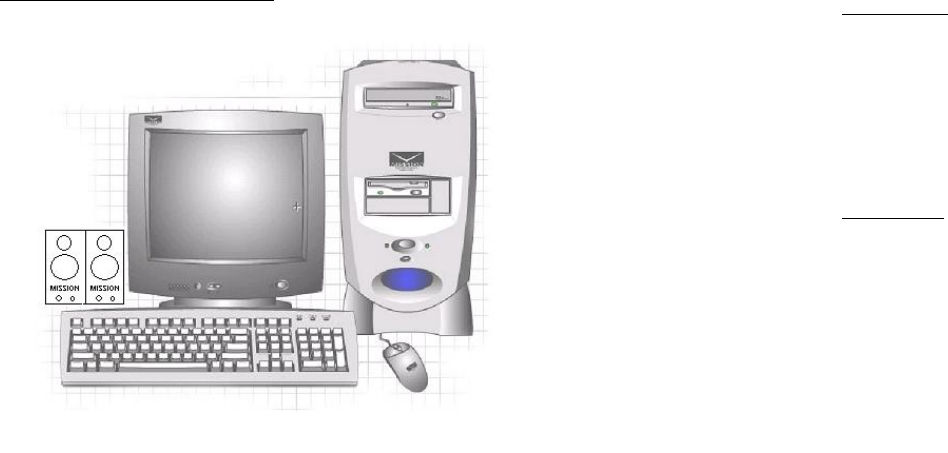
2. Installation of the computer
Components of the computer
1. computer
2. Monitor
3. keyboard
4. Mouse
5. Speaker
- 7 -
4. Maintenance of the computer
Procedures on maintenance of the computer
External cleaning
1. Before cleaning the computer externally Case, Monitor Keyboard, Mouse, Speaker the
precautions should be exercised. By removing the power – supply line each time to prevent from electrical
shock.
2. Then use a cleaning solution, available from the general stores, to wipe the computer externally.
Avoid the solutions with a mixture of thinner of concentrated alcohol of chemical that may cause damage to
the computer.
Internal cleaning
1. Before cleaning the inside of the computer, the power supply line should be removed from the
outlet each time to prevent an electrical shock.
2. Prepare the cleaning kits, including a screw driver (for opening the case cover), a vacuum
cleaner, clean cloth, brush (for dusting) , finish – cleaning solution (for wiping Floppy disk CD ), which
available at the general stores.
3. After removing the cords. Take the computer to the prepared place open the computer case,
then use the vacuum or blow out dust from the computer. For the inaccessible parts use a brush to dust out.
Use a cloth rag to clean the parts, that are inaccessible. Avoid or be careful not to allow the components and
internal cords to come loose, as they may cause possible damage.
4. After cleaning is completed, check the internal components to make sure they are in the old
condition. Then close the case to finish it.
5. Bring the cleaned computer to install in the old position, connect the signal wires to the old
positions or comply with the installation manual, then turn it on the check if it can work normally or not.
6. After the computer can be used normally, clean it using Floppy Disk, CD-Rom the cleaning
equipment prepared and comply with the manual that crones each peripheral.
7. After cleaning it you cannot use it or there is a problem, contact the service center of the
company at the telephone number 02-235-7000
Warning: You should have the service center check the battery installed on the main circuit whether or not
it has sufficient electricity for use at least once a year.
3
4
2
5
1
- 6 -
3.3 Install the monitor by using the end of the blue cord to connect the blue port
on the back of the computer as shown in figure. 3
Figure 3
3.4 Install the speaker by end of the green cord to connect the port on the back
of the computer as shown in figure. 4
Figure 4
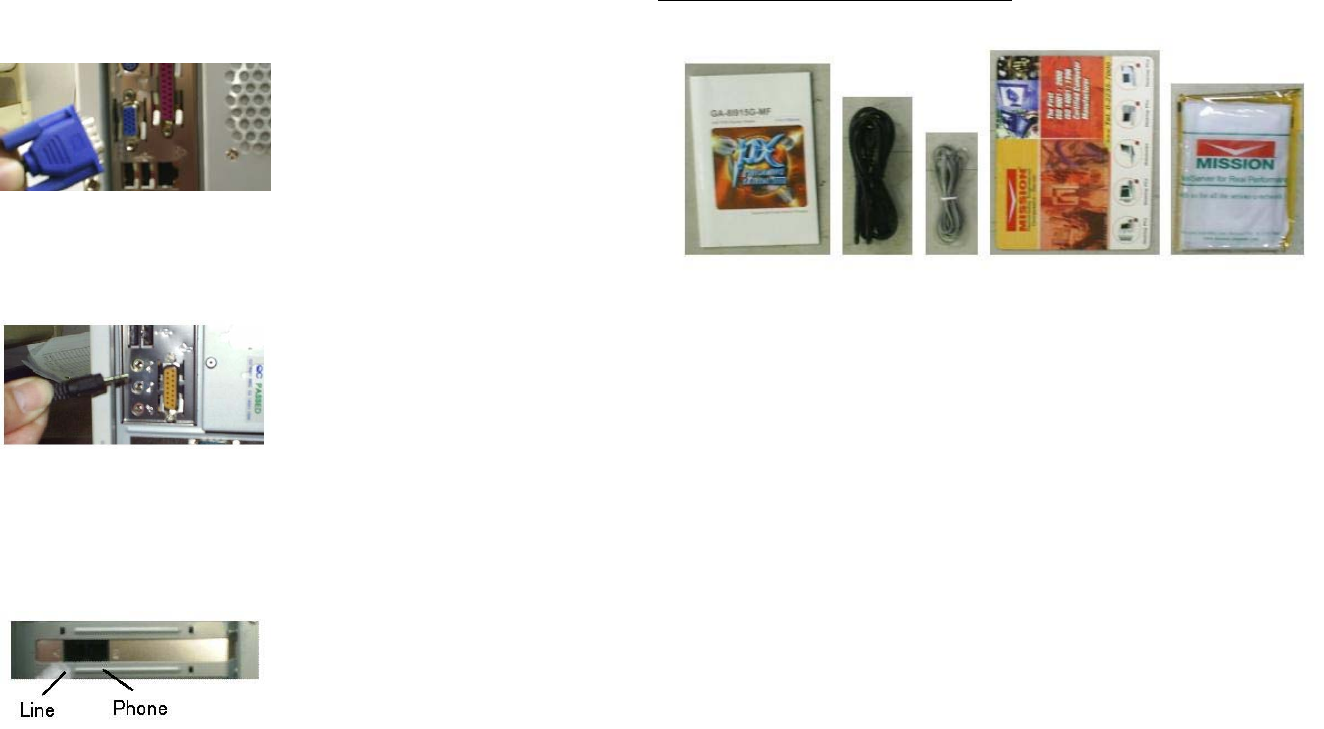
3.5 Connect the telephone line to the modem using the telephone jack to insert in
the LINE port. If you want to connect the telephone together. Use the
telephone line connects with the phone port as shown in figure. 5.
Figure 5
- 3 -
Accessories that come in the box
1. Mainboard + CD drive
2. Telephone cord
3. Electrical cords
4. Mouse pad
5. Case cover
Remark : There may be some change based on the details of each model .
1 2
3
4 5

- 4 -
Ports used to connect the computer with the peripherals.
1. Green connecting with the Mouse port.
2. Purple connecting with the Keyboard port.
3. USB ports, e.g. printer, scanner.
4. LAN port for connecting to the network
5. Serial port, e.g. external modem, printer.
6. Parallel port for connecting with the printer
7. Marine VGA port for connecting with the monitor
8. Green port connecting Speaker port
9. Sky blue line-in port used to connect the audio signal with the external source. Radio.
10. MIC (microphone) port
11. Game port used to connect with the game console,e.g. joy stick.
12. Line port to connect the telephone line for interfacing with the Internet
13. Phone port for connecting the computer to the telephone in case of not using the
Internet as in the diagram.
- 5 -
3. Steps of installation the computer
3.1 Install the mouse by using the green cord connects to the green port in the
back of the computer as shown in figure. 1
Figure 1
3.2 Install the keyboard by using the end of the purple line connects to the back
of the computer as shown in figure. 2
Figure 2
3
1
2
8
7 3
9
10
6
11
4
5
13 12