Mitac Digital Technology 2007VEN3001 Bluetooth GPS Receiver with Camera User Manual 631361 01A
Mitac International Corporation Bluetooth GPS Receiver with Camera 631361 01A
Contents
- 1. Part 1
- 2. Part 2
Part 1
Magellan® Maestro™
Reference Manual
Instructions for Operating the
Magellan Maestro 4000/4040/4050
IMPORTANT SAFETY WARNINGS
The Magellan Maestro 4000/4040/4050 is a vehicle-navigation aid designed
to assist you in arriving to your selected destinations. When using the
Magellan Maestro 4000/4040/4050, these safety rules must be followed to
prevent accidents that can result in injury or death to yourself or others:
xCalifornia law prohibits mounting any item to your windshield.
Please check with your state or local law enforcement for applicable
regulations regarding windshield mounting. Go to
www.magellanGPS.com for alternate mounting solutions.
xWhen driving, the need to view the display is minimal. Voice
prompts will guide you to your destination. The driver should enter
data or program the Magellan Maestro 4000/4040/4050 only when
the vehicle is stopped. Only a vehicle passenger should enter data or
program the Magellan Maestro 4000/4040/4050 while the vehicle is
moving.
xIt is your responsibility to comply with all traffic laws.
xEvery attempt is made to ensure that the database is accurate.
However, roadways, points of interest (POIs), and business and
service locations may change over time. The database does not
include, analyze, process, consider, or reflect any of the following:
legal restrictions (such as vehicular type, weight, height, width, load
and speed restrictions); road slope or grade; bridge height, width,
weight, or other limits; population density; neighborhood quality or
safety; availability or proximity of law enforcement, emergency
rescue, medical, or other assistance; construction work zones or
hazards; road or lane closures; road, traffic, or traffic facilities’ safety
or condition; weather conditions; pavement characteristics or
conditions; special events; traffic congestion. It is your responsibility
to disregard any unsafe, hazardous, or illegal route suggestions.
xKeep the Magellan Maestro 4000/4040/4050 safe from extreme
temperature conditions. For example, do not leave it exposed to direct
sunlight for an extended period of time.
xTake care when mounting the Magellan Maestro 4000/4040/4050 in
your vehicle, whether using the windshield mount or other mount or
accessories, that it does not obstruct the driver's view of the road,
interfere with the operation of the vehicle's safety devices such as air
bags, or present a hazard to occupants of the vehicle should the
Magellan Maestro 4000/4040/4050 be dislodged while driving. You
assume the risks associated with damage to your vehicle or vehicle
occupants as the result of your choices in mounting the Magellan
Maestro 4000/4040/4050.
xLaws in some states prohibit wearing stereo headphones while
operating a motor vehicle. Please contact your state’s Department of
Motor Vehicles for information.
xThe battery in the Magellan Maestro 4000/4040/4050 is rechargeable
and should not be removed. In the event it should need to be replaced,
please contact Magellan Technical Support.
xExtreme temperatures may cause the Magellan Maestro
4000/4040/4050 to stop working. Do not leave it exposed to extreme
heat or cold for long periods of time.
About Charging the Magellan Maestro 4000/4040/4050
xUse only the AC adapter (Phihong: PSC11R-050) approved for your
Magellan Maestro 4000/4040/4050. Use of another type of AC
adapter will result in malfunction and/or danger.
xUse only the car charger approved for / supplied with your Magellan
Maestro 4000/4040/4050. Use of another type of car charger will
result in malfunction and/or danger.
xThe Magellan Maestro 4000/4040/4050 is intended to be supplied
with a LISTED Power Unit marked with "LPS", "Limited Power
Source" and output rated + 5 V dc / 2.0 A".
xUse the USB cable approved for / supplied with your Magellan
Maestro 4000/4040/4050.
xUse the battery provided with your Magellan Maestro
4000/4040/4050 or its identical replacement approved for the
Magellan Maestro 4000/4040/4050
xFor safety reasons, the battery in your Magellan Maestro
4000/4040/4050 will stop charging when the ambient temperature is
less than 32°F (0°C) or more than 113°F (45°C)
IMPORTANT SAFETY WARNINGS
About the AC Adapter
xDo not use the adapter in a high moisture environment. Never touch
the adapter when your hands or feet are wet.
xAllow adequate ventilation around the adapter when using it to
operate the device or charging the battery. Do not cover the AC
adapter with paper or other objects that will reduce cooling. Do not
use the AC adapter while it is inside a carrying case.
xConnect the adapter to a proper power source. The voltage and
grounding requirements are found on the product case and/or
packaging.
xDo not use the adapter if the cord becomes damaged.
xDo not attempt to service the Magellan Maestro 4000/4040/4050.
There are no serviceable parts inside. Replace the Magellan Maestro
4000/4040/4050 if it is damaged or exposed to excess moisture.
About the Battery
xDo not attempt to replace the battery. Please contact Magellan
Technical Support for issues related to the battery.
xUse the charger approved for your Magellan Maestro
4000/4040/4050.
IMPORTANT INSTRUCTIONS FOR SERVICE PERSONNEL ONLY:
xCaution: Risk of explosion if battery is replaced by an incorrect type.
Dispose of used batteries according to the instruccions.
xReplace only with the same or equivalent type recommended by
Magellan.
xThe battery must be recycled or disposed of properly.
xUse the battery only in the specified equipment.
INSTRUCTION TO THE USER:
This equipment has been tested and found to comply with the limits for a
class B digital device, pursuant to part 15 of the FCC Rules. These limits are
designed to provide reasonable protection against harmful interference in a
residential installation. This equipment generates, uses and can radiate radio
frequency energy and if not installed and used in accordance with the
instructions, may cause harmful interference to radio communications.
However, there is no guarantee that interference will not occur in a
particular installation. If this equipment does cause harmful interference to
radio or television reception, which can be determined by turning the
equipment off and on, the user is encouraged to try to correct the
interference by one or more of the following measures:
xReorient or relocate the receiving antenna.
xIncrease the separation between the equipment and receiver.
xConnect the equipment into an outlet on a circuit different from that
to which the receiver is connected.
xConsult the dealer or an experienced radio/TV technician for help.
IMPORTANT SAFETY WARNINGS
Federal Communication Commission Interference Statement
This equipment has been tested and found to comply with the limits for a
Class B digital device, pursuant to Part 15 of the
FCC Rules. These limits are designed to provide reasonable protection
against harmful interference in a residential
installation. This equipment generates, uses and can radiate radio frequency
energy and, if not installed and used in
accordance with the instructions, may cause harmful interference to radio
communications. However, there is no guarantee
that interference will not occur in a particular installation. If this equipment
does cause harmful interference to radio or
television reception, which can be determined by turning the equipment off
and on, the user is encouraged to try to correct
the interference by one of the following measures:
• -Reorient or relocate the receiving antenna.
• -Increase the separation between the equipment and receiver.
• -Connect the equipment into an outlet on a circuit different from that to
which the receiver is connected.
• -Consult the dealer or an experienced radio/TV technician for help.
•
This device complies with Part 15 of the FCC Rules. Operation is subject to
the following two conditions: (1) This device
may not cause harmful interference, and (2) this device must accept any
interference received, including interference that
may cause undesired operation.
FCC Caution: Any changes or modifications not expressly approved by the
party responsible for compliance could void the
user's authority to operate this equipment.
IMPORTANT NOTE:
FCC Radiation Exposure Statement:
This equipment complies with FCC radiation exposure limits set forth for an
uncontrolled environment. End users must follow the specific operating
instructions for satisfying RF exposure compliance.

This transmitter must not be co-located or operating in conjunction with any
other antenna or transmitter.
In order to maintain compliance with FCC regulations, shielded cables must
be used with this equipment. Operation with non-approved equipment or
unshielded cables is likely to result in interference to radio and TV reception.
The user is cautioned that changes and modifications made to the equipment
without the approval of manufacturer could void the user's authority to
operate this equipment.
This Class B digital apparatus meets all requirements of the Canadian
Interference-Causing Equipment Regulations. Cet appareil numerique de la
classe B respecte toutes les exigences du Reglement sur le materiel
brouilleur du Canada.
IMPORTANT SAFETY WARNINGS
IC statement
Operation is subject to the following two conditions:
1. This device may not cause interference and
2. This device must accept any interference, including interference that
may cause undesired operation of the device.
IMPORTANT NOTE:
IC Radiation Exposure Statement:
This equipment complies with IC radiation exposure limits set forth for an
uncontrolled environment. End users must follow the specific operating
instructions for satisfying RF exposure compliance.
This transmitter must not be co-located or operating in conjunction with any
other antenna or transmitter.
© 2006 Thales Navigation, Inc. All rights reserved. The Magellan Logo,
Magellan, Magellan Maestro 4000/4040/4050, Turn it on and go, TrueView,
QuickSpell, SmartDetour, and SmartVolume are trademarks of Thales. No
part of this user manual may be reproduced or transmitted in any form or by
any means, electronic or mechanical, including photocopying and recording,
for any purpose other than the purchaser’s personal use, without the prior
written permission of Thales.
63136101 A
TABLE OF CONTENTS
...........................................................................................................................
.....................................Magellan® Maestro™ 1
Instructions for Operating the
Magellan Maestro
4000/4040/4050 ...............................................................................................
..............................................................1
About Charging the Magellan Maestro
4000/4040/4050 ...............................................................................................
................................................................... 1
IMPORTANT SAFETY
WARNINGS ....................................................................................................
...................................................1
About the AC
Adapter .............................................................................................................
............................................................................................. 2
About the
Battery ..............................................................................................................
.................................................................................................. 2
Important instructions for service personnel
only: .................................................................................................................
......................................... 2
INSTRUCTION TO THE
USER:...............................................................................................................
............................................................................. 2
Federal Communication Commission Interference
Statement ..........................................................................................................
................................... 3
IC
statement ..........................................................................................................
............................................................................................................. 4
TABLE OF
CONTENTS .....................................................................................................
...................................................................i
Chapter 1: Contact
Information ......................................................................................................
................................................1
Technical
Support .............................................................................................................
................................................................................................. 1
Warranty
Service ..............................................................................................................
.................................................................................................. 1
Customer
Service ..............................................................................................................
.................................................................................................. 1
Registration ......................................................................................................
.................................................................................................................. 1
Chapter 2: GPS
Information ......................................................................................................
......................................................2
About Satellite
Navigation ........................................................................................................
.......................................................................................... 2
How Satellite Navigation
Works ...............................................................................................................
........................................................................... 2
Line of
Sight .................................................................................................................
.................................................................................................. 2
A Word on the Safe Usage of GPS
Maps .................................................................................................................
............................................................. 3
From Source to
Destination........................................................................................................
..................................................................................... 3
Placement of Your GPS Receiver for Optimal Satellite
Reception .........................................................................................................
............................... 3
Signal Acquisition
Time .................................................................................................................
..................................................................................... 3
GPS Maps and Your
Safety ...............................................................................................................
................................................................................... 4
Chapter 3: Magellan Maestro
4000/4040/4050 ...............................................................................................
............................................5
Front
View .................................................................................................................
.......................................................................................................... 5
Rear
View .................................................................................................................
........................................................................................................... 6
Top
View .................................................................................................................
............................................................................................................ 6
Bottom
View .................................................................................................................
....................................................................................................... 7
Right Side
View .................................................................................................................
.................................................................................................. 7
Left Side
View .................................................................................................................
.................................................................................................... 8
Car
Holder ..............................................................................................................
............................................................................................................. 8
Using Removable Memory
Cards ................................................................................................................
......................................................................... 9
To Insert the Storage
Card: .................................................................................................................
............................................................................ 9
To Remove the Storage
card: ..................................................................................................................
........................................................................ 9
Chapter 4: Vehicle
Installation ........................................................................................................
.............................................10
Installing the Windshield
Mount ...............................................................................................................
........................................................................ 10
Chapter 5: Navigation Basic
Operation ..........................................................................................................
..............................12
Turning the Magellan Maestro 4000/4040/4050 On Out of the
Box ...................................................................................................................
............................. 12
Power Off versus “Sleep”
Mode.................................................................................................................
.................................................................... 12
Power
Management .....................................................................................................
................................................................................................. 12
Resetting the Magellan Maestro
4000/4040/4050 ...............................................................................................
.......................................................................... 12
Adjusting the
Volume .............................................................................................................
........................................................................................... 12
Repeating the Last
Command .........................................................................................................
................................................................................. 12
Making
Selections .........................................................................................................
.................................................................................................... 13
Inputting Text
Characters ........................................................................................................
......................................................................................... 13
Additional Characters (“More”
Button) .............................................................................................................
................................................................ 13
Numerical Characters (“123”
Button) .............................................................................................................
................................................................. 14
What Is
QuickSpell? ......................................................................................................
.................................................................................................... 14
Help with Address
Entry .................................................................................................................
................................................................................... 15
Chapter 6:
Traveling ..........................................................................................................
...........................................................16
TABLE OF CONTENTS
Guidance Information
Screens .............................................................................................................
............................................................................. 16
Map
Screen ...............................................................................................................
........................................................................................................ 17
Changing from 2D to 3D Map
View .................................................................................................................
.................................................................. 17
Changing the Map Zoom
Levels ...............................................................................................................
......................................................................... 18
Maneuver List
Screen ...............................................................................................................
......................................................................................... 18
TrueView
Screen ...............................................................................................................
................................................................................................. 19
Choosing the Route
Method .............................................................................................................
................................................................................. 20
Changing the Route
Method .............................................................................................................
................................................................................ 20
Cancelling a Planned
Route ................................................................................................................
.............................................................................. 20
Detouring from the Planned
Route ................................................................................................................
.................................................................... 21
Excluding a Maneuver in the Planned
Route ................................................................................................................
..................................................... 21
Displaying Information About Your Present
Location ...........................................................................................................
............................................. 22
Saving Your Current Location to Your Address
Book .................................................................................................................
........................................ 22
Finding POIs Along Your
Route ................................................................................................................
.......................................................................... 22
Finding a Detour Along Your
Route ................................................................................................................
................................................................... 23
Chapter 7: Selecting
Destinations ......................................................................................................
..........................................25
Destination
Screen ...............................................................................................................
............................................................................................. 25
Country Selection (Globe
Button) .............................................................................................................
......................................................................... 25
Entering and Routing to Your Home
Address ............................................................................................................
........................................................ 25
Selecting a Destination Using Select
Address ............................................................................................................
....................................................... 26
Search By
City....................................................................................................................
........................................................................................... 27
Search by Zip
Code .................................................................................................................
...................................................................................... 27
Search By
State ..................................................................................................................
.......................................................................................... 28
Previous
City....................................................................................................................
............................................................................................. 29
Selecting a Destination Using the Address
Book .................................................................................................................
.............................................. 30
Previous
Destinations ......................................................................................................
............................................................................................. 30
Saving a Previous Destination to the Address
Book .................................................................................................................
................................... 31
Deleting A Previous
Destination .......................................................................................................
.......................................................................... 32
Favorites............................................................................................................
........................................................................................................... 32
Editing a
Favorite ............................................................................................................
........................................................................................... 33
Deleting A
Favorite ............................................................................................................
......................................................................................... 33
List
Addresses .........................................................................................................
..................................................................................................... 34
Editing an
Address ............................................................................................................
......................................................................................... 34
Deleting an
Address ............................................................................................................
....................................................................................... 35
Create New
Entry .................................................................................................................
......................................................................................... 35
Search by
City ...................................................................................................................
......................................................................................... 35
Search by Zip
Code .................................................................................................................
.................................................................................... 36
Search by
State ..................................................................................................................
........................................................................................ 37
Previous
City ...................................................................................................................
........................................................................................... 38
Trip
Planner .............................................................................................................
..................................................................................................... 39
New ..................................................................................................................
.......................................................................................................... 39
Optimizing a
Trip ...................................................................................................................
..................................................................................... 41
Guide
Me ....................................................................................................................
................................................................................................ 42
Edit ...................................................................................................................
......................................................................................................... 42
Delete and
Rename ............................................................................................................
........................................................................................ 43
Selecting a Point of Interest as a
Destination .......................................................................................................
............................................................ 45
Spell
Name ................................................................................................................
................................................................................................... 46
Nearest .............................................................................................................
.......................................................................................................... 46
List By
City ...................................................................................................................
.............................................................................................. 46
Select
Category ...........................................................................................................
............................................................................................... 47
Select
Category............................................................................................................
................................................................................................. 47
Nearest .............................................................................................................
.......................................................................................................... 48
List by
City ...................................................................................................................
.............................................................................................. 48
Spell
Name ................................................................................................................
................................................................................................. 48
Cuisine
Type .................................................................................................................
.............................................................................................. 49
TABLE OF CONTENTS
Custom
POIs ..................................................................................................................
............................................................................................... 49
Selecting an Intersection as a
Destination .......................................................................................................
................................................................ 51
Search by
City....................................................................................................................
........................................................................................... 51
Search by Zip
Code .................................................................................................................
...................................................................................... 52
Search by
State...................................................................................................................
.......................................................................................... 52
Previous
City....................................................................................................................
............................................................................................. 53
Chapter 8: Navigation
Options .............................................................................................................
........................................55
Configuration ...................................................................................................
................................................................................................................. 55
POI
Selection............................................................................................................
..................................................................................................... 55
Custom
POIs ..................................................................................................................
............................................................................................... 55
Map
Options .............................................................................................................
.................................................................................................... 60
TrueView
Options .............................................................................................................
............................................................................................. 60
Select Map
Color.................................................................................................................
.......................................................................................... 60
Route
Preferences........................................................................................................
................................................................................................. 61
Detour
Options..............................................................................................................
................................................................................................ 62
Menu
Colors................................................................................................................
.................................................................................................. 63
Tone
Options..............................................................................................................
................................................................................................... 63
GPS
Options..............................................................................................................
.................................................................................................... 63
GPS
Status ................................................................................................................
................................................................................................. 63
Set GPS
Position ............................................................................................................
............................................................................................. 64
Simulator
Mode.................................................................................................................
............................................................................................ 64
Automatic
Volume..............................................................................................................
........................................................................................... 65
Backup and
Restore..............................................................................................................
........................................................................................ 65
Backup .............................................................................................................
.......................................................................................................... 65
Restore .............................................................................................................
.......................................................................................................... 65
Map
Information ......................................................................................................
..................................................................................................... 66
Trip
Computer ..........................................................................................................
......................................................................................................... 66
Current
Trip ...................................................................................................................
............................................................................................... 66
Stopping or Starting the Trip
Computer ..........................................................................................................
............................................................ 67
Saving the Current Trip
Report ...............................................................................................................
.................................................................... 67
Resetting the Trip
Computer ..........................................................................................................
............................................................................ 68
Viewing a Saved Trip
Report ...............................................................................................................
........................................................................ 68
Deleting a Trip
Report ...............................................................................................................
................................................................................. 68
Chapter 9:
Bluetooth ..........................................................................................................
..........................................................70
How to use the
Dialer ................................................................................................................
........................................................................................ 70
Introduction ......................................................................................................
............................................................................................................ 70
Main
Interface ...........................................................................................................
................................................................................................... 70
Pair
Mode ................................................................................................................
..................................................................................................... 70
The pairing window shall pop up, if it is not the first time of use, you need
to click in the main interface. .............................................................. 70
Make paring process on your mobile phone. (See the user guide of your
mobile phone.) ............................................................................................ 71
After you input the passkey in your mobile phone, there shall be a passkey
input window pop up in your Magellan Maestro. Then you need to input
the same numbers as you input to your mobile phone to this pop up
window. ............................................................................................................
.......... 71
Establish
Connection........................................................................................................
............................................................................................ 71
Connect ............................................................................................................
.......................................................................................................... 71
The other way to
connect .............................................................................................................
............................................................................... 72
Place a
call.....................................................................................................................
.............................................................................................. 75
Place a call via
Keypads ............................................................................................................
................................................................................. 76
Place a call via
Contacts ............................................................................................................
................................................................................ 76
Place a call via Call
History ..............................................................................................................
.......................................................................... 77
Place a call via
Redial ...............................................................................................................
................................................................................. 78
Dial
Fail ...................................................................................................................
................................................................................................... 79
Dial
Success .............................................................................................................
.................................................................................................. 80
Incoming
call.....................................................................................................................
........................................................................................... 81
Exit ...................................................................................................................
........................................................................................................... 83
How to Transfer files via Bluetooth wireless
technology ........................................................................................................
............................................ 84
TABLE OF CONTENTS
Tap to enter “Bluetooth Manager”
window. ............................................................................................................
..................................................... 84
There are two ways (4.2.1 and 4.2.2) to connect to the “Bluetooth File
Transfer” service of a remote device: .............................................................
85
Tap in the “Bluetooth Manager” window (Figure 4~2), the “Passkey
Request” window shall pop up as Figure 4~4. ...............................................
85
Input the passkey you set that is not more than 16 digital numbers, and then
the “Remote Device” window shall pop up as below:.......................... 86
How to use My
Shortcuts ..........................................................................................................
......................................................................................... 88
Tap in the main interface (Figure 5~1) to enter “Bluetooth Manager”
window. ..........................................................................................................
89
Tap “My Shortcuts” to explore the shortcut stored in “My
Shortcuts”. ........................................................................................................
.................. 89
How to use Active
Connections ......................................................................................................
................................................................................... 91
Tap in the main interface (Figure 6~1) to enter “Bluetooth Manager”
window. ..........................................................................................................
92
Tap in the main interface (Figure 6~1) to enter “Active Connections”
window. ..........................................................................................................
92
Choose a active connection, the shall display (Figure 6~4), and then you can
tap this button to disconnect the active connection. ....................... 92
How to use Bluetooth
Settings .............................................................................................................
............................................................................. 93
Tap in the main interface (Figure 7~1) to enter “Bluetooth Manager”
window. ..........................................................................................................
93
Tap to enter “Bluetooth Settings” window as
below: ...............................................................................................................
.................................... 94
Tap the name area, the “Device Name” change window shall pop up as
below: ......................................................................................................... 94
Input the new device name you want to change to, and tap to verify or tap to
cancel. ............................................................................................... 95
Tap in the “Bluetooth Settings” (Figure 7~3) to set the share folder you want
to use in Bluetooth file transfer. ........................................................ 95
The default share folder is “My Flash Disk”. If you have inserted a memory
card to your Magellan Maestro, there shall be a “Storage Card” directory
in the directory list. Select the folder you want to use in the Bluetooth file
transfer, and tap the “Select” button to set the share folder or tap the
“Cancel”
button to cancel the share folder
change. .............................................................................................................
.............................................................. 95
After setting the share folder, it shall back to “Bluetooth Setting” window
(Figure 7~3), tap to save your settings and go back to “Bluetooth Manager”
window (Figure
7~2)...................................................................................................................
.......................................................................................... 96
How to
Exit ...................................................................................................................
..................................................................................................... 96
Tap to power off the Bluetooth and go back the main
interface.............................................................................................................
...................... 96
Tap to exit the main interface and go back to the “Settings”
window. ............................................................................................................
............ 97
Chapter 10: System
Settings .............................................................................................................
...........................................98
Brightness ........................................................................................................
................................................................................................................ 98
Power
Management .....................................................................................................
..................................................................................................... 98
Password ..........................................................................................................
................................................................................................................ 98
Set
Password ..........................................................................................................
...................................................................................................... 98
Change
Password ..........................................................................................................
............................................................................................... 99
Delete
Password ..........................................................................................................
................................................................................................. 99
Language ..........................................................................................................
................................................................................................................ 99
Chapter 11: System
Status ................................................................................................................
.........................................100
Product
Information ......................................................................................................
.................................................................................................. 100
User
Storage .............................................................................................................
...................................................................................................... 100
Diagnostics .......................................................................................................
.............................................................................................................. 100
Audio
Test....................................................................................................................
............................................................................................... 100
Touchscreen
Test ...................................................................................................................
..................................................................................... 100
Keypad
Test ...................................................................................................................
............................................................................................. 100
Video
Test ...................................................................................................................
................................................................................................ 100
Contact
Us .....................................................................................................................
................................................................................................. 101
Chapter 12: Magellan Maestro Tools
Installation ........................................................................................................
............102
Installing the
Software ...........................................................................................................
........................................................................................ 102
Chapter 13: Magellan Maestro Music
Manager ...........................................................................................................
............103
Chapter 14: Music
Player ...............................................................................................................
.............................................104
Single Song
Play ..................................................................................................................
........................................................................................... 104
Multiple Song
Play ..................................................................................................................
........................................................................................ 104
Play...................................................................................................................
.......................................................................................................... 105
Create................................................................................................................
......................................................................................................... 105
Modify...............................................................................................................
.......................................................................................................... 105
Delete ...............................................................................................................
.......................................................................................................... 105
Rename ............................................................................................................
.......................................................................................................... 106
Play
Mode ................................................................................................................
....................................................................................................... 106
TABLE OF CONTENTS
List
Songs ................................................................................................................
....................................................................................................... 106
Equalizer ..........................................................................................................
............................................................................................................... 107
Help ..................................................................................................................
.............................................................................................................. 107
Chapter 15: Magellan Maestro Photo
Manager ...........................................................................................................
.............108
Chapter 16: Photo
Viewer ..............................................................................................................
.............................................109
View Single
Photo ................................................................................................................
........................................................................................... 109
Previous Image (left
arrow) ...............................................................................................................
......................................................................... 109
Zoom ................................................................................................................
.......................................................................................................... 109
Slideshow .........................................................................................................
......................................................................................................... 110
Pan ....................................................................................................................
........................................................................................................ 110
Rotate
Image ................................................................................................................
............................................................................................. 110
Next Image (right
arrow) ...............................................................................................................
............................................................................. 110
ESC ..................................................................................................................
.......................................................................................................... 110
Manage
Photos ...............................................................................................................
................................................................................................ 110
List
View .................................................................................................................
.................................................................................................... 110
Thumbnail ........................................................................................................
.......................................................................................................... 110
Rename ............................................................................................................
.......................................................................................................... 110
Properties .........................................................................................................
.......................................................................................................... 111
Tools ................................................................................................................
............................................................................................................... 111
Preferences........................................................................................................
......................................................................................................... 111
Delete
Files ..................................................................................................................
............................................................................................... 111
About ................................................................................................................
.......................................................................................................... 111
Chapter 17: Magellan Maestro POI
Manager ...........................................................................................................
................112
Latitude ............................................................................................................
.............................................................................................................. 112
Longitude .........................................................................................................
............................................................................................................... 112
Altitude ............................................................................................................
............................................................................................................... 113
Opening a POI
File ...................................................................................................................
....................................................................................... 113
Creating a New POI
FIle ...................................................................................................................
............................................................................... 114
Adding Individual
POI’s ................................................................................................................
.................................................................................. 114
Importing a Data
FIle ...................................................................................................................
................................................................................... 116
Appendix ..........................................................................................................
...........................................................................117
POI
Categories ........................................................................................................
........................................................................................................ 117
Specifications ...................................................................................................
.............................................................................................................. 119
PC
Requirements ...................................................................................................
......................................................................................................... 119
GPS Status
Screen ...............................................................................................................
........................................................................................... 120
GPS STATUS Screen Structure-first
page ..................................................................................................................
................................................ 120
Bad fix
code ..................................................................................................................
........................................................................................... 120
GPS STATUS Screen Structure - second
page ..................................................................................................................
......................................... 121
Typical GPS STATUS Screen
Display .............................................................................................................
............................................................. 122
Frequently Asked
Questions ..........................................................................................................
.................................................................................. 123
Chapter 1: Contact Information
If you need support for your Magellan Maestro 4000/4040/4050 and you
wish to contact Thales, please use the following information to direct your
questions/comments to the proper person.
1.1 Technical Support
If you need technical assistance or “how-to” help, or if you have a technical
question about the functionality of your Magellan product, please contact us
on the Internet at www.magellangps.com or reach us by fax or by phone.
Our Technical Support phone representatives are available Monday through
Friday, 6:00 a.m. to 5:00 p.m. PST/PDT. After hours, you may leave a
detailed voice mail message that will be returned within the next business
day.
Telephone: (866) 868-2259 or (909) 394-5000 (outside the United States)
You may also reach Technical Support by Fax: (909) 494-7777 [Attn: Tech.
Support]; or E-Mail: magellansupport@thalesnavigation.com
1.2 Warranty Service
To obtain warranty service on your Magellan Maestro 4000/4040/4050, you
must contact us for a return authorization (RA) before you ship the product.
Packages arriving at our dock without an RA will be refused.
To obtain an RA, simply contact our Technical Support group at: Telephone:
(866) 868-2259 or (909) 394-5000 (outside the United States); Fax: (909)
394-7050 [Attn: Tech. Support]; or E-Mail:
magellansupport@thalesnavigation.com
1.3 Customer Service
If you need to order accessories or obtain unlock codes, you can call our
Customer Service Department Monday through Friday, 6:00 a.m. to 5:00
p.m. PST/PDT, or visit our Web site at www.magellangps.com.
Telephone: (866) 339-0488 or (909) 394-5000 (outside the United States);
Fax: (909) 394-7078.
1.4 Registration
Please make sure to register your Magellan Maestro 4000/4040/4050 at
www.magellangps.com. By registering, you will be informed of the latest
product updates.
Chapter 2: GPS Information
2.1 About Satellite Navigation
Global satellite navigation is an exciting technology, providing enhanced
productivity and accuracy in a vast number of industries. It adds a new level
of enjoyment and safety to a wide range of navigation, sports, and
recreational activities.
A Global Navigation Satellite System (GNSS) is a network of satellites that
transmit high-frequency radio signals containing time and distance data that
can be picked up by a receiver, allowing users to pinpoint their precise
locations anywhere around the globe.
There are two Global Navigation Satellite Systems in operation: the U.S.
Global Positioning System (GPS) and the Russian GLObal NAvigation
Satellite System (GLONASS). These systems are constantly being upgraded
to meet higher standards of reliability. A third GNSS named GALILEO,
after the Italian astronomer of the early 1600s, is being developed in Europe
specifically to provide a higher standard of integrity and reliability, required
to ensure the safety of lives during transport by air, land and sea, without the
use of additional augmentation systems.
While the GPS and GLONASS satellite networks are being developed to
achieve maximum performance, Satellite-Based Augmentation Systems
(SBAS) have been established to provide improved accuracy. SBAS
provides differential signal corrections for GPS and GLONASS
transmissions with the use of ground stations and geostationary satellites in
specific regions. This is GNSS-1, the first phase in establishing the required
integrity for high-precision satellite navigation.
GNSS-2 requires the launching of new satellites into orbit and a complete
upgrade of the existing satellite systems. This second phase is already well
underway. GALILEO, scheduled to begin service in 2008, is being
developed to meet the standards of GNSS-2 for rapid and reliable, certified
precision positioning.
2.2 How Satellite Navigation Works
Global navigation satellites continuously transmit time and distance
information as they orbit Earth in a precise formation. Navigation satellite
receivers use this information to calculate an exact location through
triangulation. Every point on Earth is identified by two sets of numbers
called coordinates. These coordinates represent the exact point where a
horizontal line, known as latitude, crosses a vertical line, known as
longitude. The receiver locks on to at least three satellites and uses the
information received to determine the coordinates of the receiving device.
By comparing the time the signals were transmitted from the satellites and
the time they were recorded, the receiver calculates how far away each
satellite is. The distance of the receiver from three or more satellites reveals
its position on the surface of the planet. With these distance measurements,
the receiver might also calculate speed, bearing, trip time, distance to
destination, altitude, and more.
The satellite-navigation device may display its position as longitude/latitude,
Universal Transverse Mercator (UTM), Military Grid (MG), or simply as a
point on an electronic map. Many Thales Navigation receivers provide
comprehensive mapping data, making satellite navigation an easy tool to
enhance your recreational and industrial activities.
2.2.1 Line of Sight
Satellite-navigation receivers operate by line of sight with global-
positioning satellites. This means that at least three satellites must be in
“view” of a receiver in order to calculate longitude and latitude. A fourth
satellite must also be within line of sight to calculate altitude. On average,
eight satellites are continuously within line of sight of every position on
Earth; the more satellites in view, the more accurate the positioning.
Though the radio signals of navigation satellites will pass through clouds,
glass, plastic, and other lightweight materials, satellite-navigation receivers
will not work underground or in other enclosed spaces.
Chapter 2: GPS Information
2.3 A Word on the Safe Usage of GPS Maps
Just like paper maps, maps on GPS devices vary greatly in terms of
information included and visual presentation. Whether topographical maps,
roadmaps or marine charts, each map and the data it presents is designed for
a specific purpose. For example, marine charts will often present only a
minimal representation of roadways and are not a substitute for street maps.
Topographic maps usually provide minimal detail about bodies of water and
do not contain marine navigational markers.
Maps also vary widely in scale: the smaller the scale, the more detailed the
map. Therefore, when using GPS maps (just as with paper maps) it is
important to consider what type of map you are using in your explorations
and to use common sense.
2.3.1 From Source to Destination
Thales Navigation, maker of Magellan GPS products, is not a cartography
company. We do not create the maps that are used on our GPS devices. We
seek to acquire map data from the best public and private sources available
at the time of publication. Thales Navigation licenses* topographical maps,
roadmaps, marine charts and points of interest (POI) data from commercial
and governmental cartographic sources that provide raw map data. Thales
Navigation processes and compresses the raw data into a format that makes
it presentable and manageable to work on our GPS devices. And to ensure
that our map data is as robust as possible, data from multiple sources are
often combined to provide a better user experience for our customers. This
processing does not alter the landforms, coordinates or other spatial data that
comes in the raw data. The accuracy of the maps is fundamentally
dependent on the source data used to create them. Map data changes
frequently due to both natural and man-made causes. As a result,
governmental and commercial cartography companies must continuously
review, correct, and improve upon their map data. We release new versions
of our maps on a regular basis to reflect these changes.
After processing the data, we test the compatibility of the map with our GPS
devices to ensure that the products we release work properly on our GPS
devices. We also beta-test our products to get customer feedback prior to
release.
2.4 Placement of Your GPS Receiver for Optimal Satellite Reception
FIrstly, before considering signal reception, it is important to understand
that your GPS receiver is a sensitive piece of equipment. You should never
place it in an area of your vehicle where it may be struck by other items, or
where vibration may cause it to strike other items or parts of the vehicle.
The windshield mount included in the box allows you to place the receiver
in such a way that the antenna can receive the satellite signal through the
windshield without being obstructed by other parts of the vehicle. However,
tinted windows or other reflective coatings may interfere with reception. In
this case, it may be required to attach an external antenna (optional). An
external antenna provides faster satellite fix times and greater signal strength.
Because it is mounted outside of the vehicle, it is not affected by reflective
coatings on windows and has an unobstructed line of sight to the satellites.
Other mounting solutions are available but may require an external antenna.
External conditions also affect GPS signal reception. Although weather
conditions do not affect the signal, tall buildings and trees, driving through
canyons, wooded areas, or tunnels, and sitting in a garage or covered
parking area will affect the GPS signal. The GPS receiver constantly
monitors and updated the GPS signal status and will reacquire the signal
once it is clear of any obstructions.
2.5 Signal Acquisition Time
The first time you use your Magellan Maestro 4000/4040/4050, or if you
travel over 500 miles with it off, there may be a delay in receiving the initial
satellite fix; depending on your position and the position of the satellites,
this could take 15 minutes or more. Normal usage will receive the satellite
fix much faster, but still may take several minutes. It is important to have
your antenna rotated upward and an unobstructed view of the sky to receive
the best possible satellite signal.
Chapter 2: GPS Information
2.6 GPS Maps and Your Safety
Remember, your GPS device is an aid to navigation. It must be used with
common sense, and it is important that users interpret GPS map data with a
critical eye. Landscapes and roads change or may be impassable, trees and
tall buildings can obscure GPS signals, and your GPS device may not
always reflect the complete picture. When using GPS, you must combine the
information provided by your GPS map with your relevant local knowledge,
road signage, buoys, depth soundings and changing local conditions to
generate a complete understanding of your situation.
It is your responsibility to ensure compliance to all traffic laws, including
pedestrian observance of crosswalks, and to use good judgment while
operating the Magellan GPS receiver. Safety must be your primary concern.
The Magellan GPS receiver must not be used while engaged in any activity
requiring the user's full attention to the environment. For instance, the
Magellan Maestro 4000/4040/4050 GPS receiver should be operated only by
vehicle passengers or by the driver when the vehicle has come to a complete
stop. The driver must not attempt to view the display while driving.
Disregard any unsafe, hazardous or illegal route suggestions.
Magellan maps do not include, analyze, process, consider or reflect any of
the following: legal restrictions (such as weight, height, width, load and
speed restrictions); road slope or grade; bridge height, width, weight or other
limits; population density; neighborhood quality or safety; availability or
proximity of law enforcement, emergency rescue, medical or other
assistance; construction work zones or hazards; road, sidewalk, or waterway
closures or conditions; weather conditions; pavement characteristics or
conditions; special events; traffic congestion; time of day.
*Thales Navigation licenses map data from governmental sources such as,
but not limited to, U.S. Geological Survey (USGS), the National Oceanic
and Atmospheric Administration (NOAA-NOS) and the Canadian
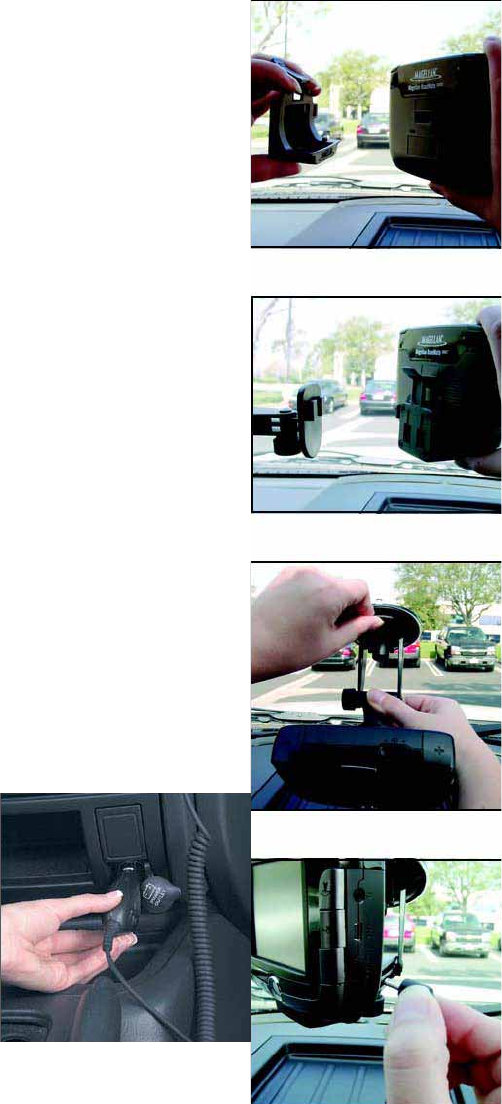
Hydrographic Service (CHS). Thales Navigation also licenses map data
from commercial cartography companies such as Navigation Technologies,
Navionics, DMTI and C-Map.
Chapter 4: Vehicle Installation
Take care when mounting the Magellan Maestro 4000/4040/4050 in your
vehicle, whether using the windshield mount or other mount, that it does not
obstruct the driver’s view of the road. Make sure that the placement of the
Magellan Maestro 4000/4040/4050 and cable does not interfere with the
operation of vehicle safety devices, such as air bags. You assume the risks
associated with damage to your vehicle or vehicle’s occupants as a result of
how you choose to mount the Magellan Maestro
4000/4040/4050.
4.1 Installing the Windshield Mount
Attach the car holder to the back of the Magellan
Maestro 4000/4040/4050. Insert the bottom of the
Magellan Maestro 4000/4040/4050 first then snap
the car holder clip at the top into place.
Slide the windshield mount onto the back of the car
holder.
Press the windshield mount to the glass and slide the
locking lever toward the glass.
Plug the power cable into the Magellan Maestro
4000/4040/4050 as shown.This step is optional but
ensures the battery remains charged.
Chapter 4: Vehicle Installation
Plug the power adapter into your vehicles cigarette
lighter or 12 volt receptacle.
Installation is complete, and you are ready to turn the
Magellan Maestro 4000/4040/4050 on and go.
Chapter 5:
Navigation Basic
Operation
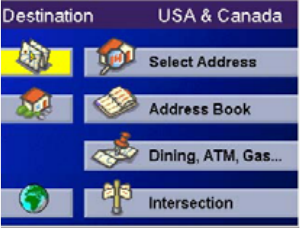
5.1 Turning the Magellan Maestro 4000/4040/4050 On Out of the Box
Press the power button for approximately ten seconds (see “Front View” on
page 5). If power is connected properly or if the battery is charged
sufficiently, the Magellan screen will appear followed by the Warning
screen. To comply with the warnings, press OK. Next, the Quick Tips
screen will appear. It is recommended to view the Quick Tips to better
familiarize yourself with the functionality of the Magellan Maestro
4000/4040/4050. Otherwise, select ESC to skip viewing the Quick Tips at
this time. By default, the navigation application will launch and the
Destination screen will appear.
5.1.1 Power Off versus “Sleep” Mode
The Magellan Maestro 4000/4040/4050 can be
put into “sleep” mode. This mode is a limited
power mode that saves battery power. When
“waking up” from sleep mode, the time to
acquire a sattelite fix is significantly shorter than
when the Magellan Maestro 4000/4040/4050 is
powered up after being completely turned off.
To enable sleep mode, press and hold the Power button for 2-3 seconds. The
display will shut off and the power indicator light will be on dimly.
To power off completely, press and hold the Power button for 10 seconds.
The Magellan Maestro will be fully shut off.
To power up the Magellan Maestro 4000/4040/4050 from sleep mode, press
and hold the power button for 2-3 seconds. The Warning screen will appear.
Select OK and you will be taken to the last screen you were viewing.
5.1.2 Power Management
The Magellan Maestro 4000/4040/4050 can be configured to automatically
go into “sleep” mode after 20 minutes of no keys or touchscreen being
pressed. Press the MENU key on the Magellan Maestro 4000/4040/4050
then, select System Settings and select Power Management. Select the
Auto Power Off time and then, select OK. For more information on Power
Management, see “Power Management” on page 98.
5.2 Resetting the Magellan Maestro 4000/4040/4050
In the event the Magellan Maestro 4000/4040/4050 should stop responding,
press RESET button. If a route was active at the time the Magellan Maestro
4000/4040/4050 was reset, powering the Magellan Maestro 4000/4040/4050
back on will prompt you to resume, or cancel the active route.
5.3 Adjusting the Volume
The VOLUME CONTROL lever is located at the top of the Magellan
Maestro 4000/4040/4050 (see “Top View” on page 6). Use the lever to set
the volume of the speaker to a desired level. The volume level indicator will
appear on screen.
5.4 Repeating the Last Command
While routing to a destination, if you missed the last verbal command, you
can repeat it by pressing the VOLUME CONTROL lever down.
Chapter 5: Navigation Basic Operation
5.5 Making Selections
The Magellan Maestro 4000/4040/4050 comes equipped with a touch screen.
To make a menu selection, or enter characters, simply touch the screen in
the location of the item you wish to select.
You can also use the NAVIGATION key (see “Front View” on page 5) to
scroll around the screen and highlight the item to select. When the desired
item is highlighted, press the ENTER key (see “Front View” on page 5) to
select the item.
5.6 Inputting Text Characters
Whenever you need to input names, street addresses, etc., the Magellan
Maestro 4000/4040/4050 will display a keyboard. Touch the letter you want
and, if you make a mistake, use the Backspace key to go back one character
at a time. The Spacebar is used to insert spaces between characters or words.
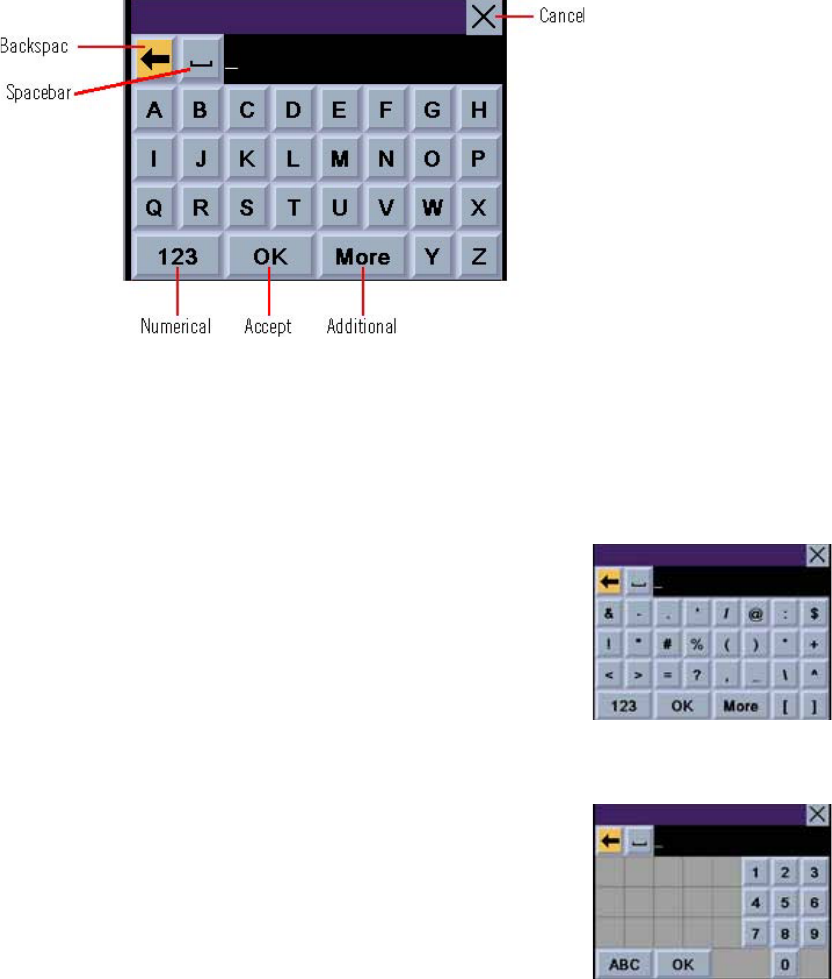
5.7 Additional Characters (“More” Button)
When you are entering characters, you may need to add punctuation or other
special characters. When available, pressing the More button brings up a
keypad with the characters shown here.
Chapter 5: Navigation Basic
Operation
5.8 Numerical Characters (“123” Button)
When available, pressing the 123 button brings up a
keypad with the numeric characters shown here.
5.9 What Is QuickSpell?
The Magellan Maestro 4000/4040/4050 uses
QuickSpell technology to provide you with the fastest
method possible to enter characters. QuickSpell
eliminates the possibility of a misspelled word or
looking for a city or street that is not in the loaded database. As you begin
entering characters, the QuickSpell feature of the Magellan Maestro
4000/4040/4050 dims out those characters which that are not available,
thereby speeding up the process of entering data.
Example:
Suppose that you need to input the name of a city--in this case, San
Francisco.
Select “S”.
Select “A”.

Select “N”.
Chapter 5: Navigation Basic
Operation
Select the spacebar.
When enough characters have been entered, the
Magellan Maestro 4000/4040/4050 will automatically
display the list of cities; or, if you feel that enough
characters have been entered, select OK.
Use the Navigation key to scroll the list up or down
and select “San Francisco, CA” from the list.
The list of items found in the database is limited to
100 items. When over 100 items have been found,
“Matches: > 100” will be displayed shown in the
bottom right corner of the display; you may need to
press the CANCEL key (see “Front View” on page 5)
and enter additional characters.
5.10 Help with Address Entry
When entering street names, please follow these
simple guidelines to help you find your selection:
xDo not enter prefixes such as “N” or “North”.
xDo not enter the street type such as “Ave.” or
“Avenue” except in some cases where the street
type is included before the street name (e.g.
“Via Calle”, “Avenue 378”, or “Rue Andre”).
xWhen entering a numbered street (e.g. “4th
Street”), use the numeric keypad to enter “4”
and go back to the alpha keypad to enter “th”.
xFor streets with multiple words such as
“Overland Heights”, you must enter the first
word. Entering the word “Heights” will not
return the desired street.
Chapter 6: Traveling
6.1 Guidance Information Screens
The Magellan Maestro 4000/4040/4050 has three screens you can use to
assist you in traveling to your destination: the Map screen, the Maneuver
List screen, and the TrueView/Split TrueView screen.
Map: When a new destination is selected and calculated, the Map screen is
displayed. This screen displays a map of your surrounding area along with
the planned route (if calculated) and information about the route. This
screen can be accessed when no route has been calculated by selecting Map
or by pressing the VIEW key (see “Front View” on page 5.) while at the
Destination screen.
Maneuver List: This screen is available only when a route has been
calculated. This screen displays a list of maneuvers to follow in order to
arrive at the destination. It can also be used exclude a maneuver and then
recalculate the route. To access the Maneuver List screen, press the VIEW
key (see “Front View” on page 5.) while viewing the Map screen.
TrueView: This screen is available only when a route has been calculated.
This screen displays the next maneuver as a 3D graphic. It will help you to
know which lane to be in and provides you with an easy-to-follow picture of
the next maneuver. To access the TrueView screen, press the VIEW key
(see “Front View” on page 5.) while viewing the Maneuver List. You can
also show the TrueView in split mode (see “TrueView Options” on page 60).
This view shows the TrueView screen on the left side and the Map on the
right side.
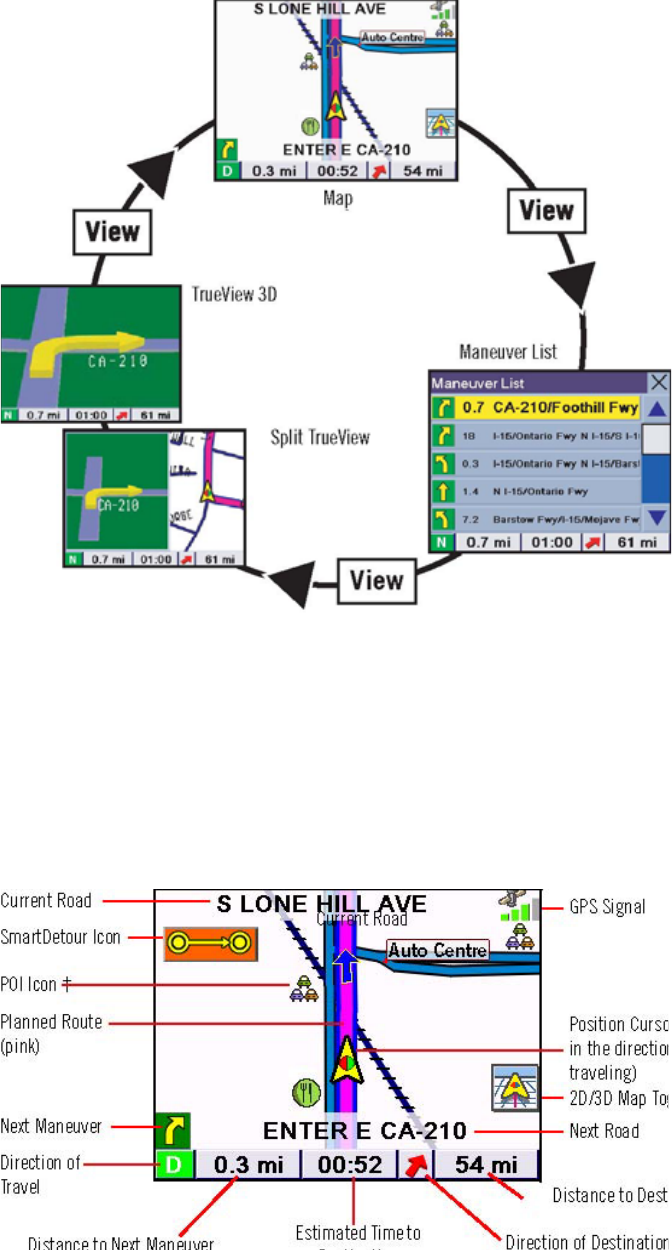
Chapter 6: Traveling
6.2 Map Screen
The Map screen is the most commonly used screen in the Magellan Maestro
4000/4040/4050 and provides you with detailed information about where
you are and where you are going.
GPS Signal
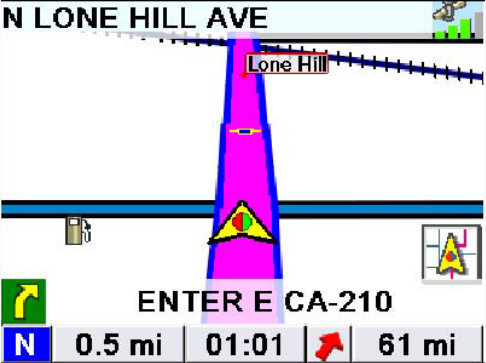
Position Cursor (points in the direction you are traveling) 2D/3D Map
Toggle
Next Road
Distance to Destination
Destination
† By touching the POI icon on the screen, you can get information and route
to it.
As you travel, the Map screen constantly updates your location and provides
you with not only a map but a visual indication of where you are on the map.
6.3 Changing from 2D to 3D Map View
The Map screen can be changed between 2D (view overhead of the position
cursor, and 3D (view overhead and slightly behind). The 3D view offers a
more realistic view showing a perspective of the roads ahead. While in 3D
Map mode, you can still touch icons on the screen to route to them while
driving, and you can zoom in and out. You cannot however, scroll the map,
and the map orientation is set at Heading Up. When in Split TrueView, the
map portion of the screen will be in 2D mode.
Chapter 6: Traveling
6.4 Changing the Map Zoom Levels
While viewing the Map screen, you can zoom in (enlarge the map) by
pressing the + (plus) key or zoom out (shrink the map) by pressing the -
(minus) key (see “Front View” on page 5.).

Note: The Zoom In and Zoom Out keys can also be used the scroll through
long lists. While viewing a list, press the Zoom Out key to scroll the list
down one page at a time and press the Zoom In key to scroll the list up one
page at a time.
6.5 Maneuver List Screen
The Maneuver List screen can be viewed only after a route has been
calculated. From the Map screen, press the VIEW key to bring up a list of
all of the maneuvers along the route. When you are done viewing the
Maneuver List screen, press the VIEW key twice to return to the Map
screen, or wait a few moments and it will return automatically.
Next Maneuver
Direction of Travel
Distance to Destination
Estimated Time
Direction of Destination
Distance to Next Maneuver
to Destination
Chapter 6: Traveling
6.6 TrueView Screen
The Magellan Maestro 4000/4040/4050 uses TrueView technology to
display a three-dimensional picture of the next maneuver. The TrueView
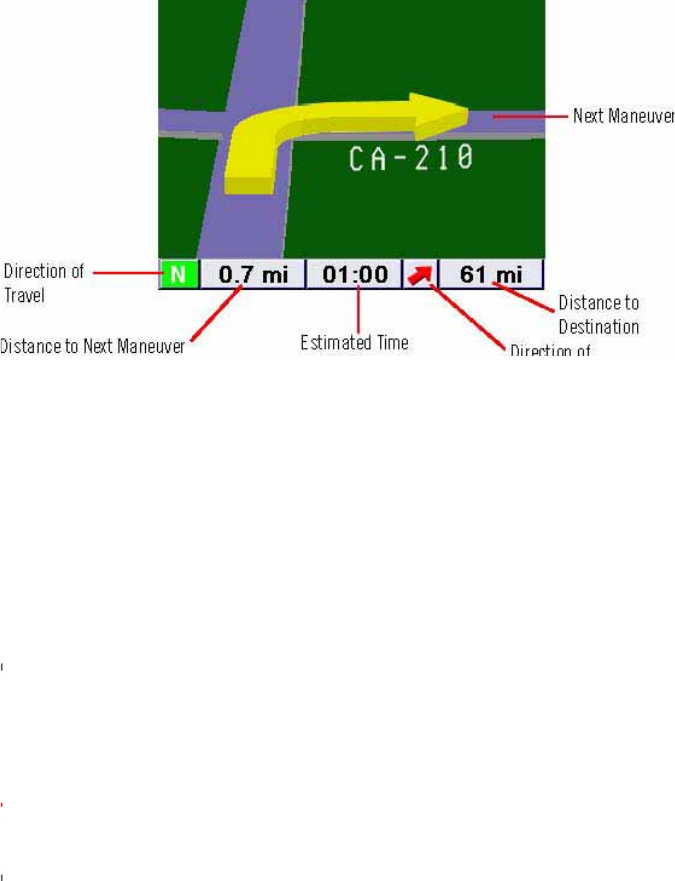
screen can be viewed only after a route has been calculated. From the Map
screen, press the VIEW key twice to view the TrueView screen.
to Destination Destination
In split mode, the left half of the screen shows TrueView, while the right
half of the screen shows the Map.
Map with Planned Route
Next Maneuver
Direction of Travel Distance to Destination Distance to Next Maneuver
Estimated Time to
Direction of Destination
Destination
Chapter 6: Traveling

6.7 Choosing the Route Method
Every route is calculated based on the Route Method criteria selected. Every
time a new destination is selected, the Magellan Maestro 4000/4040/4050
prompts you for the method that will be used to calculate the route.
Shortest Time: This selection calculates a route that should take the least
amount of time using speed limits and other information in the database.
Other factors, such as traffic conditions, cannot be used in the calculation of
shortest time.
Shortest Distance: This option calculates the route using the most direct
route to the destination. This route may not be the fastest due to lower speed
limits, left turns or other factors.
Least Use of Freeways: This selection calculates the
route avoiding freeways whenever
possible.
Most Use of Freeways: This selection calculates the
route using freeways as much as possible. This option
will use toll
roads unless specified. See “Route Preferences” on page 61.
View Destination on Map: Before you select your Route Method, you can
see where you are going. Avoid Toll Roads: Check this option to calculate
your route without using toll roads.
6.8 Changing the Route Method
While routing and viewing the Map screen, the Maneuver List screen, or the
TrueView screen, press the ESCAPE key.
Select Route, then select the new route method.
The route will be re-calculated using the new Route Method chosen and the
Map screen will be
displayed. Press the VIEW key to see the Maneuver
List with the new route.
6.9 Cancelling a Planned Route
While viewing the Map screen, the Maneuver List
screen, or the TrueView screen, press the ESCAPE
key. Select Yes to cancel the route and display the
Destination screen.

Chapter 6: Traveling
6.10 Detouring from the Planned Route
If you exit the planned route, the Magellan Maestro
4000/4040/4050 will get you back on course in one of
three ways.
1. If, while driving, you detour from the planned route, the Magellan
Maestro 4000/4040/4050 will automatically recalculate the route
based on your new vehicle position.
2. If you exit the planned route before its completion and turn off your
vehicle, the Magellan Maestro 4000/4040/4050 will switch to battery
power, unless your cigarette lighter maintains constant power. In
either situation, the Magellan Maestro 4000/4040/4050 will
automatically suspend power when enabled through customization.
While in “sleep” mode, navigation functions will be suspended and
guidance will resume when the Magellan Maestro 4000/4040/4050
wakes up.
3. If while routing, the Magellan Maestro 4000/4040/4050 fails to
respond, reset the Magellan Maestro 4000/4040/4050 as described on
page 12. The Resume Guidance screen will appear. Select Resume to
continue the route to the selected destination. Select Cancel to clear
the route and display the Destination screen.
6.11 Excluding a Maneuver in the Planned Route
While traveling or setting up your destination you may find it necessary to
exclude one of the maneuvers in the Maneuver List. This could be due to an
accident or street maintenance you want to avoid. The Magellan Maestro
4000/4040/4050 provides you with tools to select a specific maneuver,
exclude it from the planned route and reroute the trip.
Press the VIEW key to get to the Maneuver List. Select the maneuver you
wish to exclude.
The details for the maneuver are displayed. Select Exclude.
The trip will be recalculated, excluding the selected maneuver. This
calculation is done using the same Route Method that was chosen originally.
After the route is recalculated, the Map screen is displayed.

Chapter 6: Traveling
6.12 Displaying Information About Your Present
Location
Anytime that you want to view information about your
present location you can press the LOCATE key.
The first screen displays your heading and the street
you are on, the state and city you are currently
traveling in, the latitude and longitude of your present
location, a compass, and your speed.
The next screen displays the
street you are currently traveling
on, the distance to and the next
street on the map, and the
distance from and the last street
you passed.
6.13 Saving Your Current Location to Your
Address Book
While you are in the Locate screen, you can save
your current location to your Address Book.
Select the Save Location button.
The information about your location is displayed. Select Edit Name and/or
Edit Information and use the keypad to assign a name to the location and
other information about it. If the point you are saving is off-road, the nearest
road information will be used.
When you have finished, select Save. The location is
saved to your Address Book and you are returned to
the Locate screen.
6.14 Finding POIs Along Your Route
While driving along a route, if you need to find a gas station, ATM, or other
POI, the Magellan Maestro 4000/4040/4050 can find the nearest POI and
route to it. Then, when you have completed the side route, resume guidance
to your original destination.
While driving along a route, press the ENTER key.
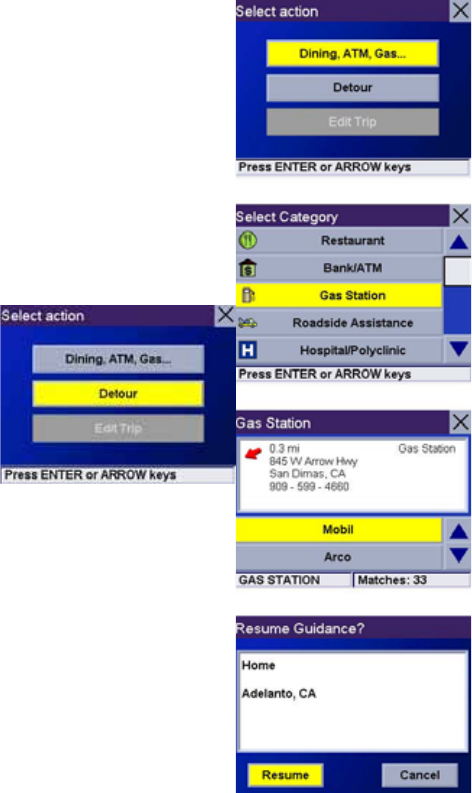
Chapter 6: Traveling
Select Dining, ATM, Gas....
Select the desired POI category.
A list of the nearest POI’s is displayed. Use the Navigation key to scroll the
list up or down (if necessary) and select the desired POI.
The Magellan Maestro 4000/4040/4050 will calculate a new route to the
selected POI from your current position. When you have arrived at the new
destination, you will be prompted to resume guidance to your original
destination. Select Resume. The Magellan Maestro 4000/4040/4050 will
calculate the route to your original destination using the Route Method
previously selected.
6.15 Finding a Detour Along Your Route
While driving along a route, if you encounter traffic,
road construction, or other situation you might need to
navigate around,
the Magellan Maestro 4000/4040/4050 can calculate
an alternate route to your destination.
While driving along a route, press the ENTER key.
Select Detour.
Chapter 6: Traveling
Select the distance of the detour.
Select 3 miles,5 miles, or 10
miles.
Or, you can enter a custom distance. Select Custom
and select the custom distance.
Enter the number of miles for your detour and then
select OK.
Select Route. The Magellan Maestro 4000/4040/4050
will recalculate the alternate route to your destination.
You can also choose to have the Magellan Maestro
4000/4040/4050 detour you around traffic automatically by enabling smart
detour. See “Detour Options” on page 62.
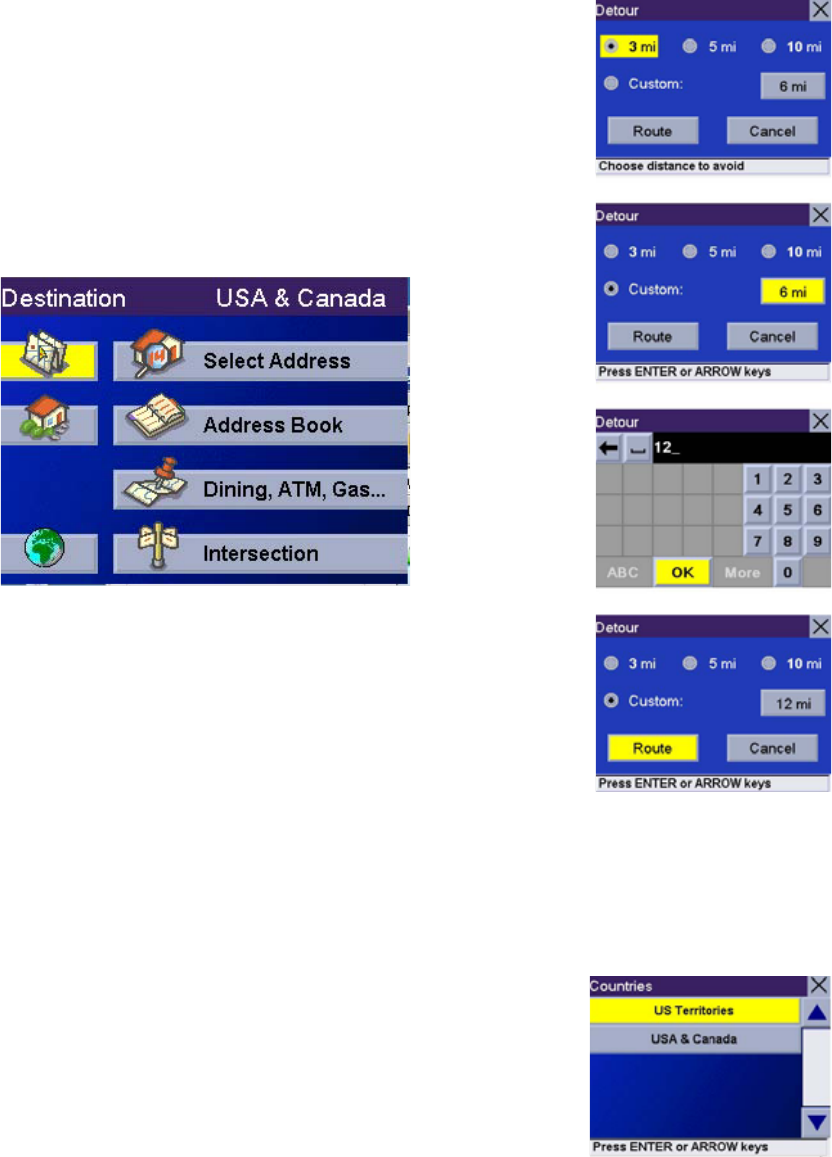
Chapter 7: Selecting Destinations
7.1 Destination Screen
Map Button
Home Button
Globe Button
Current Country for Destination Select Address
Address Book Points of Interest Intersection
7.2 Country Selection (Globe Button)
Country selection is used to help speed up searching
by narrowing down the database. Before entering a destination, make sure
you select the country where your destination is located. To select the
country, select the Globe button then, select the country you wish to search.
The current destination country is displayed at the top of the Destination
screen.
7.3 Entering and Routing to Your Home Address
The Magellan Maestro 4000/4040/4050 enables you
to enter an address to assign to your Home button.
The Home button allows you one touch access to the
address you route to most often. Select the Home
button.
If this is the first time using this button, you will be prompted to enter an
address. Select Yes.
Select either Search by City, Search by Zip Code, or Search by State. For
this example select Search by CIty.
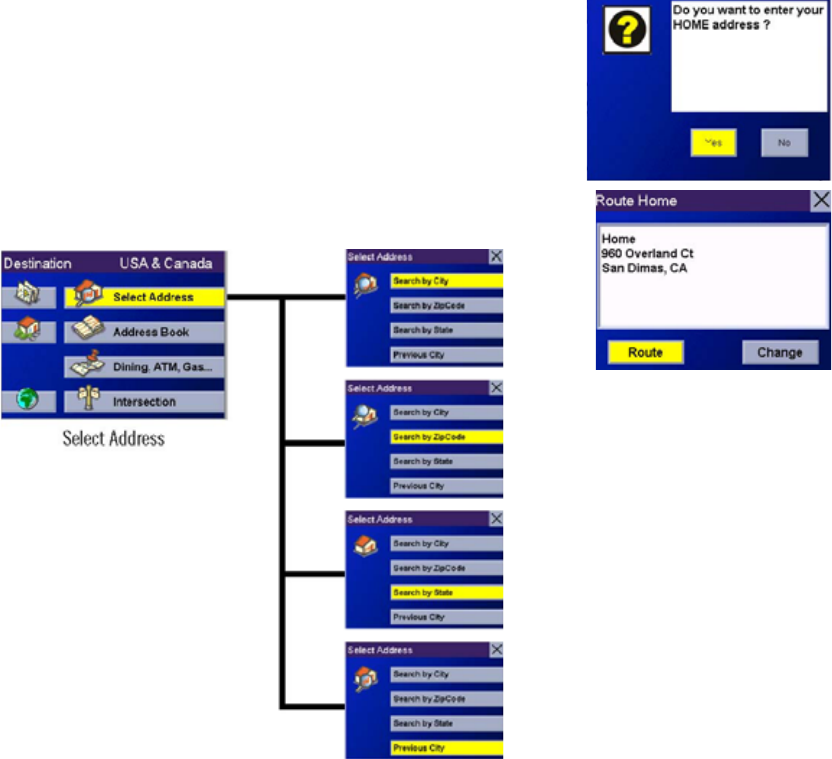
Enter the first few characters of the city name (see “Inputting Text
Characters” on page 13). Select OK. Use the Navigation key to scroll the
list up or down (if necessary) and select the desired city.
Enter the street name (see “Help with Address Entry” on page 15).
Enter the address. The acceptable range of street numbers is displayed at the
top of the screen. Enter the street number and select Done.
At this point you can choose to edit the information or, if you are finished,
select Save.
Chapter 7: Selecting Destinations
Now, when you press the Home button, you will be
prompted to either route to or change the Home
address.
7.4 Selecting a Destination Using Select Address
Search by City – page 27
Search by Zip Code – page 27
Search by State – page 28
Previous City – page 29
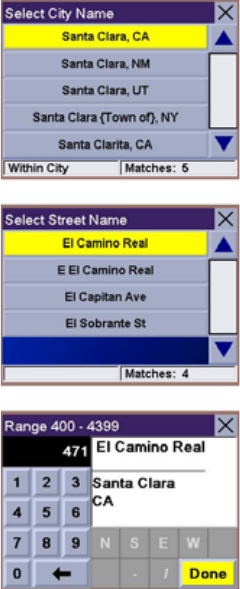
A destination can be created by entering the street address that you want to
go to. This address is not automatically added your Address Book but is
saved to your Previous Destinations list if you have routed to it. You have
four options: Search By City, Search by Zip Code, Search By State, or
Previous City. Use Search By City when you know the city that the address
can be found in. Use Search by Zip Code if you aren’t sure of how to spell
the city, but know the zip code. Use Search By State when you don’t know,
or are unsure of the city name. You will be given a listing of all of the cities
for the state you select that have the street name you are looking for. Use
Previous City to speed up your search by not having to re-enter a city you
have used before. Additionally, The Previous Cities list places your current
city at the top of the list.
Chapter 7: Selecting Destinations
7.4.1 Search By City
From the Destination screen, select Select Address and then, select Search
By City.
Enter the first few characters of the city name (see “Inputting Text
Characters” on page 13).
Select OK.
Use the Navigation key to scroll the list up or down (if necessary) and select
the desired city.
Enter the street name (see “Help with Address Entry” on page 15). Select
OK.
Use the Navigation key to scroll the list up or down (if necessary) and select
the desired street.
Enter the street address. The acceptable range of
numbers is displayed at the top of the screen. Select
Done.
Select the desired Route Method.
The Magellan Maestro 4000/4040/4050 will calculate
the route. When the calculations are complete, the
Map screen will be displayed.
7.4.2 Search by Zip Code
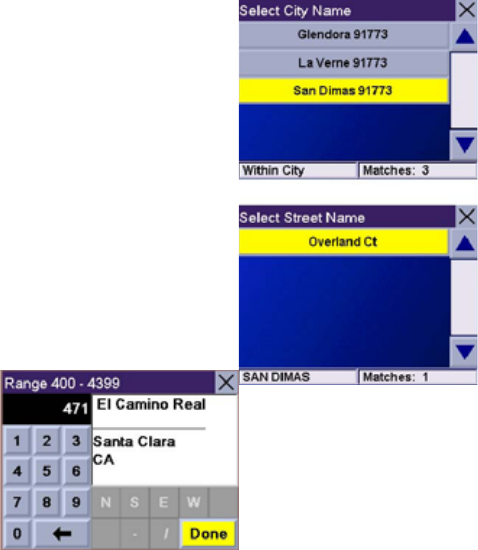
From the Destination screen, select Select Address then, select Search by
Zip Code. Enter the zip code select OK, then select the city.
Enter the street name ( see “Help with Address Entry” on page 15). Select
OK.
Use the Navigation key to scroll the list up or down (if necessary) and select
the desired street.
Chapter 7: Selecting Destinations
Enter the street address. The acceptable range of
numbers is displayed at the top of the screen. Select
Done.
Select the desired Route Method.
The Magellan Maestro 4000/4040/4050 will calculate
the route. When the calculations are complete, the
Map screen will be displayed.
7.4.3 Search By State
From the Destination screen, select Select Address
then, select Search By State.
Enter the first few characters for the state and select
OK. Select the state.
Enter the street name (see “Help with Address Entry” on page 15). Select
OK.
Use the Navigation key to scroll the list up or down (if necessary) and select
the desired street.
Select the desired city from the list. Only those cities that contain the street
name and are within the state selected are displayed.
Enter the street address. The acceptable range of numbers is displayed at the
top of the screen. Select Done.
Select the desired Route Method.
The Magellan Maestro 4000/4040/4050 will calculate the route. When the
calculations are complete, the Map screen will be displayed.
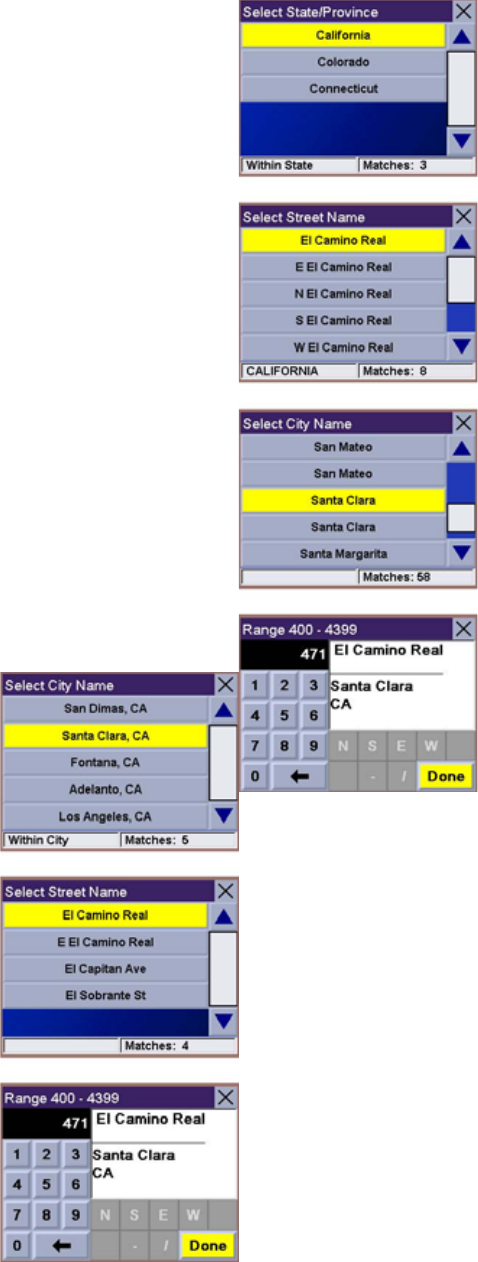
Chapter 7: Selecting Destinations
7.4.4 Previous City
From the Destination screen, select Select Address
then, select Previous City. Select the city from the list.
Enter the street name (see “Help with Address Entry”
on page 15). Select OK.
Use the Navigation key to scroll the list up or down (if
necessary) and select the desired street.
Enter the street address. The acceptable range of
numbers is displayed at the top of the screen. Select
Done.
Select the desired Route Method.
The Magellan Maestro 4000/4040/4050 will calculate
the route. When the calculations are complete, the
Map screen will be displayed.
Chapter 7: Selecting
Destinations
7.5 Selecting a Destination
Using the Address Book
Previous Destinations – page 30
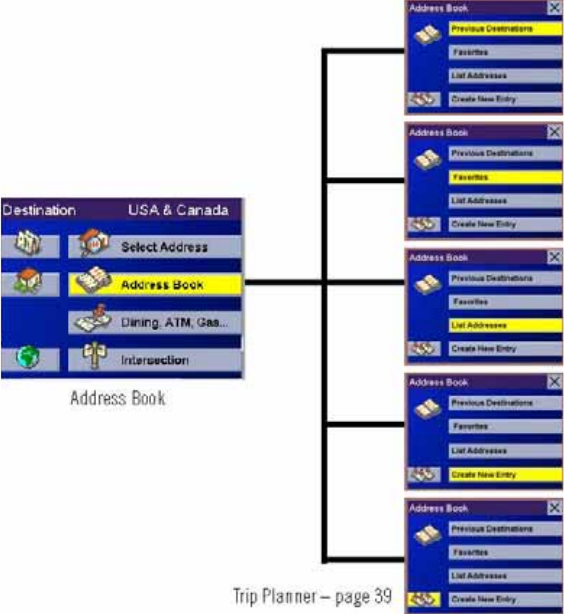
Favorites – page 32
List Addresses – page 34
Create New Entry – page 35
The Address Book can store up to 200 addresses. When you select Address
Book you are given five options: Previous Destinations lets you select from
a list of the last 50 destinations you routed to; List Addresses displays a list
of all of the addresses you have stored in your Address Book; Favorites
gives you a shortened list of entries from your Address Book marked as
Favorites; Create New Entry lets you add a new address to your Address
Book; and Trip Planner (indicated by the Trip button) lets you create a
multi-destination trip from entries.
7.5.1 Previous Destinations
From the Destination screen, select Address Book then, select Previous
Destinations.
Use the Navigation key to scroll the list up or down (if necessary) and select
the desired previous destination.
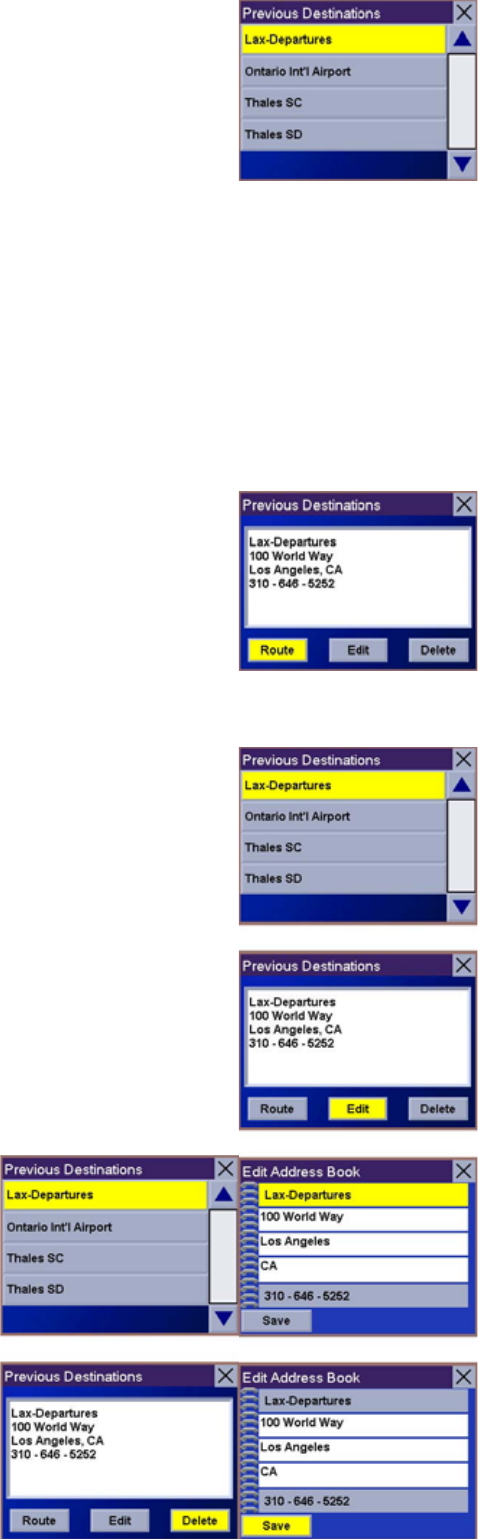
Chapter 7: Selecting Destinations
Select Route.
Select the desired Route Method.
The Magellan Maestro 4000/4040/4050 will calculate
the route. When the calculations are
complete, the Map screen will be displayed.
7.5.1.1 Saving a Previous Destination to the Address Book
From the Destination screen, select Address Book, then select Previous
Destinations.
Use the Navigation key to scroll the list up or down (if necessary) and select
the desired previous destination.
Select Edit.
The top line (Name) and the bottom line (Information)
can be edited. The address cannot be changed. Select
the line you want to modify. Use the keypad to enter
the desired text and select OK.
When you have finished making changes, select Save,
then press ESCAPE.
Chapter 7: Selecting Destinations
7.5.1.2 Deleting A Previous Destination
From the Destination screen, select Address Book
then, select Previous Destinations.
Use the Navigation key to scroll the list up or down (if
necessary) and select the desired previous destination.
Select Delete.
A dialog box will appear to confirm your selection.
Select Yes.
The Previous Destination is
deleted from the list.
7.5.2 Favorites
You can add address book
entries to your Favorites list by

selecting the Favorites box at the bottom of the Edit Address Book screen.
Only address book entries can be saved as Favorites, Previous Destinations
must be saved to the Address Book first, and can then be designated as a
favorite. The Favorites list is a shorter list of those address book entries that
you travel to often.
From the Destination screen, select Address Book, then select Favorites.
Use the Navigation key to scroll the list up or down (if necessary) and select
the destination from the list of addresses.
Select Route.
Select the desired Route Method.
The Magellan Maestro 4000/4040/4050 will calculate
the route. When the calculations are
complete, the Map screen will be displayed.
Chapter 7: Selecting Destinations
7.5.2.1 Editing a Favorite
From the Destination screen, select Address Book
then, select Favorites.
Use the Navigation key to scroll the list up or down (if necessary) and select
the desired favorite.
Select Edit.
The top line (Name) and the bottom line (Information) can be edited. The
address cannot be changed. Select the line you want to modify. Use the
keypad to enter the desired text and select OK.
When you have finished making changes, select Save
and then, press ESCAPE.
7.5.2.2 Deleting A Favorite
From the Destination screen, select Address Book
then, select Favorites.
Use the Navigation key to scroll the list up or down (if
necessary) and select the desired favorite.
Select Delete.
A dialog box will appear to confirm your selection.

Select Yes.
The entry is deleted from the list.
Chapter 7: Selecting Destinations
7.5.3 List Addresses
List Addresses shows all entries stored in your address
book. It does not include previous destinations but
does include those entries designated as Favorites.
From the Destination screen, select Address Book
then, select List Addresses.
Use the Navigation key to scroll the list up or down (if
necessary) and select the destination from the list of
addresses.
Select Route.
Select the desired Route Method.
The Magellan Maestro 4000/4040/4050 will calculate
the route. When the calculations are
complete, the Map screen will be displayed.
7.5.3.1 Editing an Address
From the Destination screen, select Address Book
then, select List Addresses.
Use the Navigation key to scroll the list up or down (if
necessary) and select the desired address.
Select Edit.
The top line (Name) and the bottom line (Information) can be edited. The
address cannot be changed. Select the line you want to modify. Use the
keypad to enter the desired text and select OK. You can also designate the
address as a favorite by checking the box at the
bottom of the screen.
When you have finished making changes, select Save
and then, press ESCAPE.
Chapter 7: Selecting Destinations
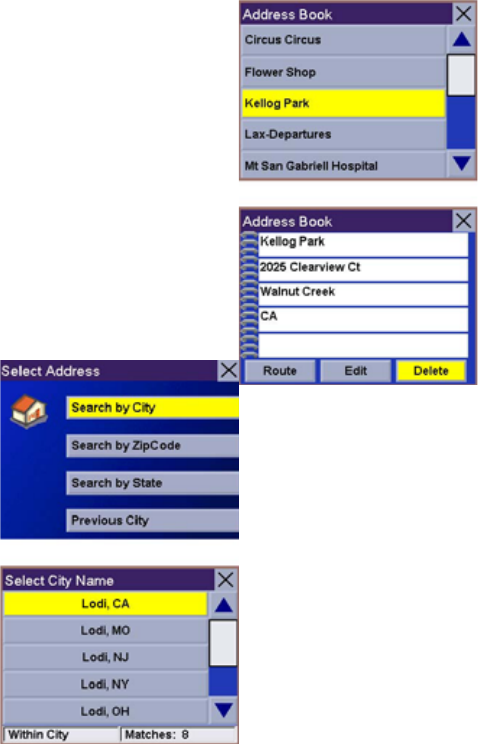
7.5.3.2 Deleting an Address
From the Destination screen, select Address Book then, select List
Addresses.
Use the Navigation key to scroll the list up or down (if necessary) and select
the desired address.
Select Delete.
A dialog box will appear to confirm your selection. Select Yes.
The address is deleted from the list and you are returned to the Address
Book screen.
7.5.4 Create New Entry
Use Create New Entry to add entries to your address
book. These entries can then be designated as
Favorites to include in the Favorites list.
7.5.4.1 Search by City
From the Destination screen, select Address Book
then, select Create New Entry. Select Search by
City.
Enter the first few characters of
the city name (see “Inputting Text Characters” on
page 13). Select OK.
Use the Navigation key to scroll the list up or down (if
necessary) and select the desired city.
Chapter 7: Selecting Destinations
Enter the street name (see “Help with Address Entry”
on page 15). Select OK.
Use the Navigation key to scroll the list up or down (if
necessary) and select the desired street.
Enter the street address. The acceptable range of numbers is displayed at the
top of the screen. Select Done.
The top line (Name) and the bottom line (Information) can be edited. The
address cannot be changed. Select the line you want to modify. Use the
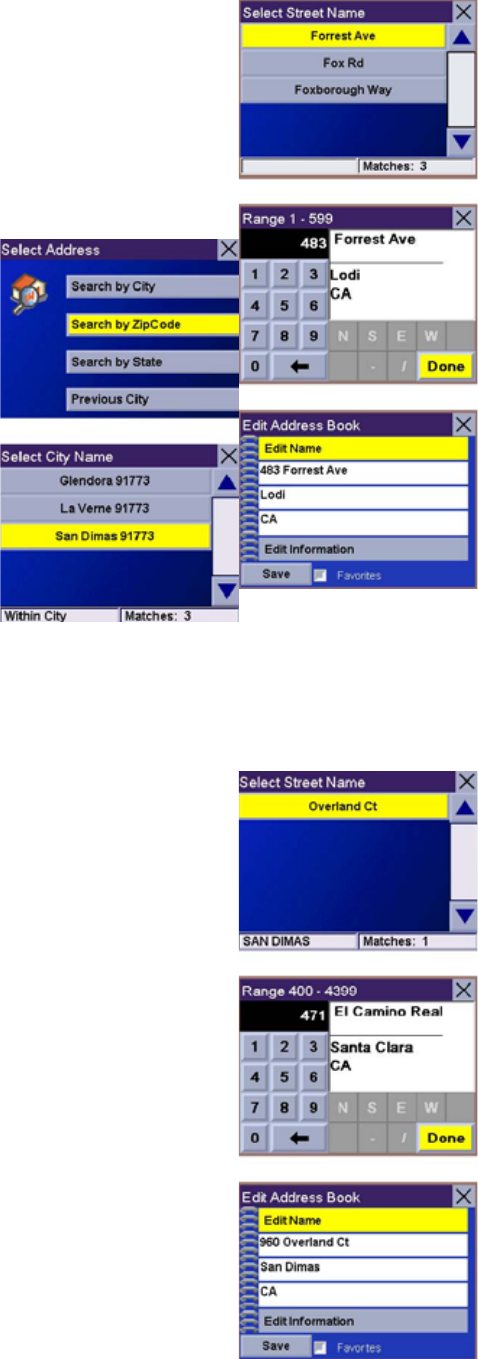
keypad to enter the desired text and select OK. You can also designate the
address as a favorite by checking the box at the bottom of the screen.
When you have finished making changes, select Save and then, press
ESCAPE.
7.5.4.2 Search by Zip Code
From the Destination screen, select Address Book
then, select Create New Entry. Select Search by Zip
Code.
Enter the zip code and select
OK, then select the city.
Chapter 7: Selecting
Destinations
Enter the street name (see “Help
with Address Entry” on page
15). Select OK.
Use the Navigation key to scroll
the list up or down (if necessary)
and select the desired street.
Enter the street address. The acceptable range of
numbers is displayed at the top of the screen. Select Done.
The top line (Name) and the bottom line (Information) can be edited. The
address cannot be changed. Select the line you want to modify. Use the
keypad to enter the desired text and select OK. You
can also designate the address as a favorite by
checking the box at the bottom of the screen.
When you have finished making changes, select Save
and then, press ESCAPE.
7.5.4.3 Search by State
From the Destination screen, select Address Book
then, select Create New Entry. Select Search by
State.
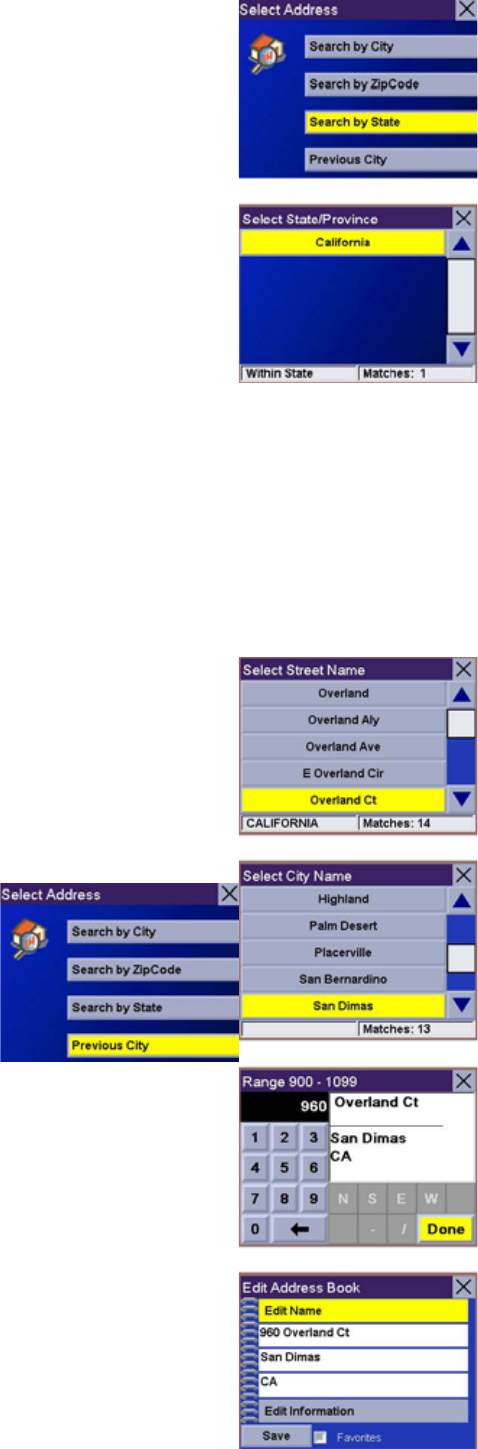
Use the keypad to enter the first few characters for the state and select OK.
Select the state.
Chapter 7: Selecting Destinations
Enter the street name (see “Help with Address Entry”
on page 15). Select OK.
Use the Navigation key to scroll the list up or down (if
necessary) and select the desired street.
Use the Navigation key to scroll the list up or down
and select the desired city. (These are all of the cities
in your loaded database that have the street name you
selected.)
Enter the street address. The acceptable range of numbers is displayed at the
top of the screen. Select Done.
The top line (Name) and the bottom line (Information) can be edited. The
address cannot be changed. Select the line you want to modify. Use the
keypad to enter the desired text and select OK. You can also designate the
address as a favorite by checking the box at the bottom of the screen.
When you have finished making changes, select Save
and then, press ESCAPE.
7.5.4.4 Previous City
From the Destination screen, select Address Book,
then select Create New Entry. Select Previous City.
Chapter 7: Selecting
Destinations
Use the Navigation key to scroll
the list up or down (if necessary)
and select the desired city.
Enter the street name (see “Help with Address Entry”
on page 15). Select OK.
Use the Navigation key to scroll the list up or down (if
necessary) and select the desired street.
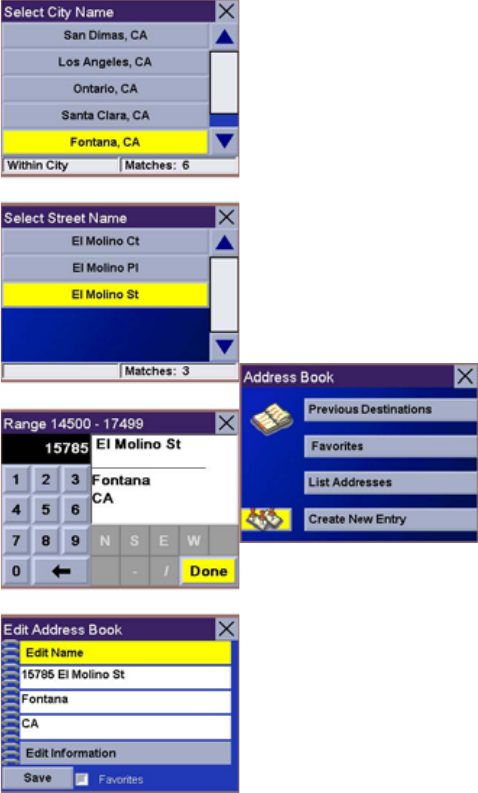
Enter the street address. The acceptable range of numbers is displayed at the
top of the screen. Select Done.
The top line (Name) and the bottom line (Information) can be edited. The
address cannot be changed. Select the line you want to modify. Use the
keypad to enter the desired text and select OK. You can also designate the
address as a favorite by checking the box at the bottom of the screen.
When you have finished making changes, select Save and then, press
ESCAPE.
7.5.5 Trip Planner
Using the Trip Planner, you can enter multiple
destinations for your “trip” and route to
each one of them in order. Additionally, using the
Trip Planner you can optimize your trip and
route to arrive at your destinations in the most
efficient manner.
7.5.5.1 New
From the Destination screen, select Address Book,
then select Trip (Trip button).
Chapter 7:
Selecting
Destinations
Select New.
Use the keypad to enter a name for the new trip and
select OK.
From the pop-up menu, select Add.
From the Select Trip Planner Address screen, select
the method for adding a destination to your trip:
Map (Map button) will add a destination by selecting a point on the map;
Select Address will add a destination by creating a new address; Address
Book will add a destination from a previous destination, Address Book, or
favorites; Dining, ATM, Gas... will add a destination from the POI database;
and Intersection will add a destination of two intersecting streets.
Continue adding destinations. When you are finished, select Save.
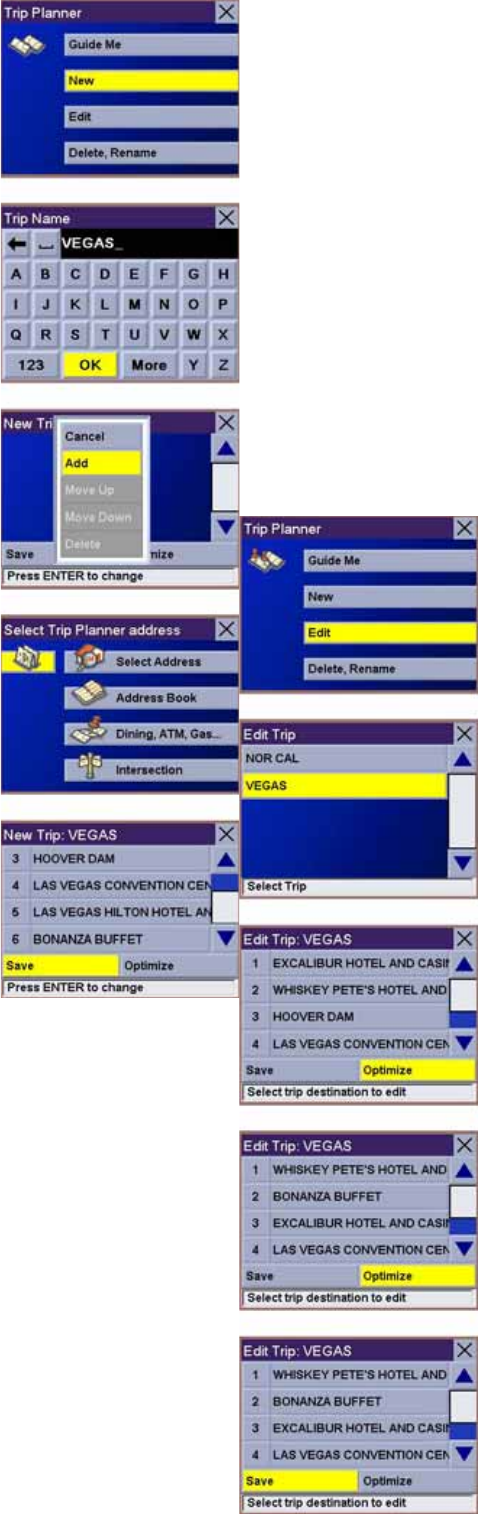
Chapter 7: Selecting
Destinations
7.5.5.2 Optimizing a Trip
With Route Optimization, you can sort the
destinations in your trip from closest to
farthest. From the Trip Planner screen, select Edit.
Select the trip to optimize.
Select Optimize.
The destinations are sorted from closest to
farthest from you current location.
Select Save.
Chapter 7:
Selecting
Destinations
7.5.5.3 Guide Me
From the Destination screen,
select Address Book. then
select the Trip (Trip button).
Select GuideMe.
Select the Trip.
Select the first destination in the
list you wish to route to.
Note: Selecting the second destination in the list
will exclude the first destination, selecting the third
destination in the list will exclude the first and
second destinations, and so on.
Select the desired Route Method.
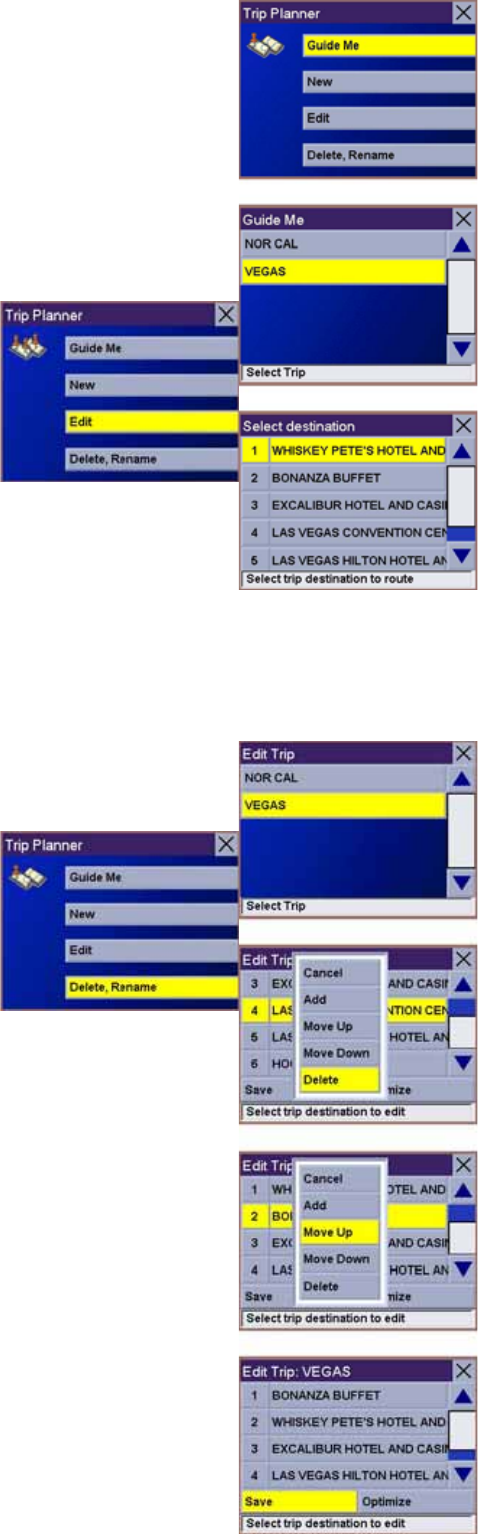
The Magellan Maestro 4000/4040/4050 will calculate
the route. When the calculations are complete, the
Map screen will be displayed.
7.5.5.4 Edit
Destinations within a trip can be moved up or down,
deleted, or added to. From the Trip Planner screen,
select Edit.
Chapter 7: Selecting
Destinations
Select the trip to edit.
Select the destination you wish
to delete, and select Delete from the pop-up menu.
Select the destination you wish to change, and select
Move Up from the pop-up menu.
When you have finished, select Save and you are returned to the Trip
Planner screen.
7.5.5.5 Delete and Rename
From the Trip Planner screen, select Delete, Rename.
Chapter 7: Selecting
Destinations
Select Delete.
Select the trip you wish to
delete.
A dialog box will appear to confirm your selection.
Select Yes.
The trip has been deleted.
Select Rename.
Select the trip to be renamed.
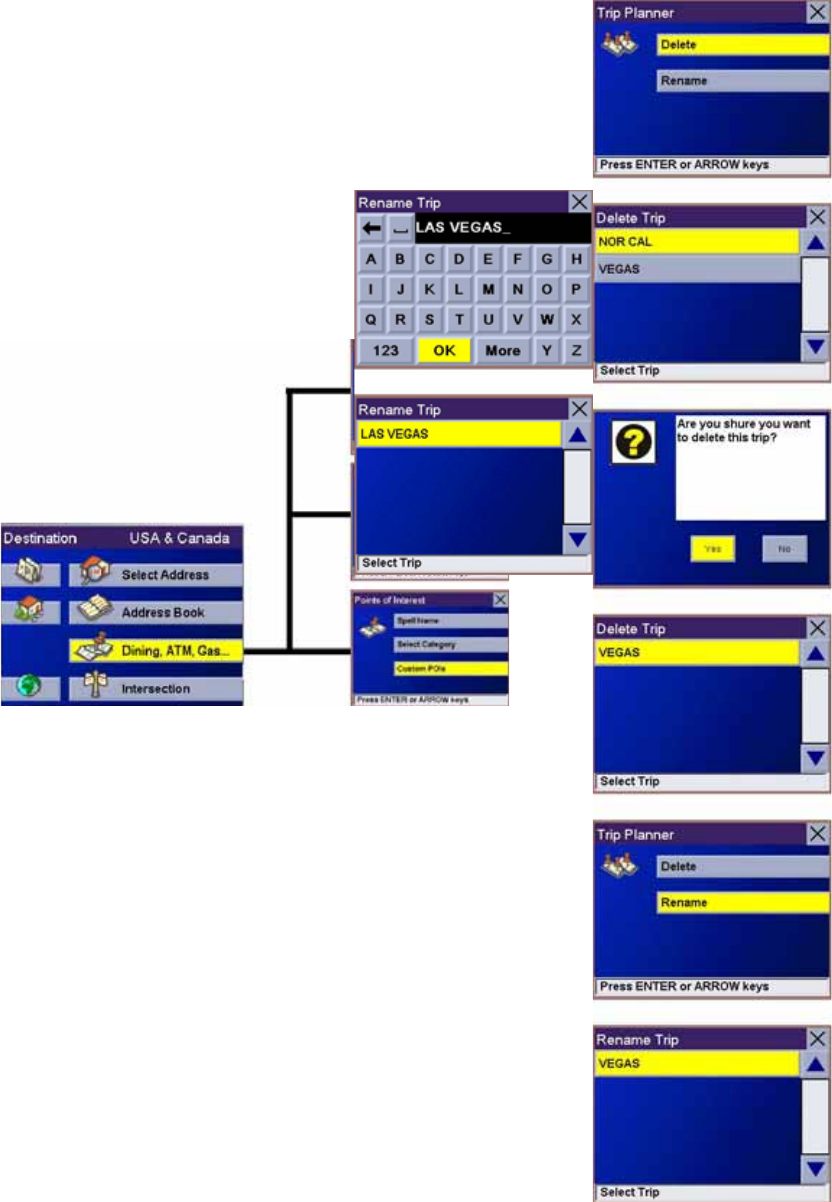
Chapter 7: Selecting Destinations
Use the backspace key to delete the old name; then,
enter the new name for the trip. When you have
finished, select OK.
The trip has been renamed.
7.6 Selecting a Point of
Interest as a Destination
Spell Name – page 46
Select Category – page 47
Custom POIs – page 49
Dining, ATM, Gas...
Points of Interest (or POIs) are commercial or
recreational locations, landmarks, or services that are
preloaded into the Magellan Maestro 4000/4040/4050
database. There are over six million POI’s in the
database, which range from restaurants, parks, gas
stations, and banks, to schools and police stations, and
more. The purpose of the POI database (accessed
through the Dining, ATM, Gas... menu option) is to
provide you with a list of popular destinations without having to enter the
address manually in order to route to them.
Chapter 7: Selecting Destinations
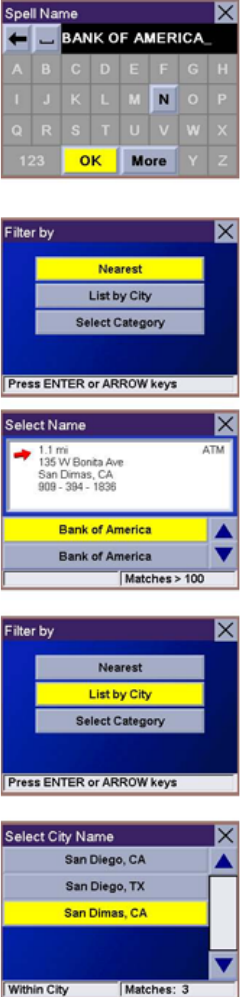
7.6.1 Spell Name
If you know the name of the POI you are looking for, find it using the Spell
Name feature.
From the Destination screen, select Dining, ATM, Gas.., then select Spell
Name.
Enter the name of the POI.
7.6.1.1 Nearest
Selecting Nearest will list the POIs matching the name you entered from
closest to farthest from your current position. Select Nearest.
Use the Navigation key to scroll the list up or down (if necessary) and select
the desired POI.
Select the desired Route Method.
The Magellan Maestro 4000/4040/4050 will calculate
the route. When the calculations are complete, the
Map screen will be displayed.
7.6.1.2 List By City
Selecting List by City will list the POIs matching the
name you entered within a selected city sorted by
distance from the city center. Select List by City.
Enter the city name (see “Help with Address Entry”
on page 15). Select OK.
Use the Navigation key to scroll the list up or down (if
necessary) and select the desired city.
Chapter 7: Selecting Destinations
Use the Navigation key to scroll the list up or down (if
necessary) and select the desired POI.
Select the desired Route Method.
The Magellan Maestro 4000/4040/4050 will calculate
the route. When the calculations are complete, the
Map screen will be displayed.
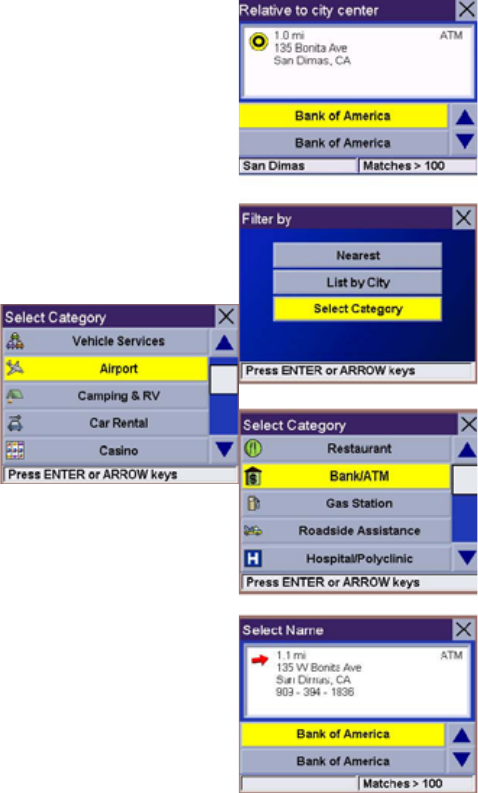
7.6.1.3 Select Category
Selecting Select Category enables you to narrow the list of POIs by
selecting the category of the name you spelled. Select Select Category.
Use the Navigation key to scroll the list up or down and select the desired
POI category.
Use the Navigation key to scroll the list up or down (if necessary) and select
the desired POI.
Select the desired Route Method.
The Magellan Maestro 4000/4040/4050 will calculate the route. When the
calculations are complete, the Map screen will be displayed.
7.6.2 Select Category
If you do not know the name of the POI you are
looking for, but know the category (restaurant, bank,
gas station, etc.), you
can find it using Select Category
From the Destination screen, select Dining, ATM,
Gas..., then select Select Category.
Select the POI category.
Chapter 7: Selecting
Destinations
7.6.2.1 Nearest
Selecting Nearest will list the
POIs in the category selected from closest to farthest
from your current position. Select Nearest.
A list of all the POI’s in the selected category nearest
to your current position is displayed. Select the POI
from the list.
Select the desired Route Method.
The Magellan Maestro 4000/4040/4050 will calculate
the route. When the calculations are complete, the Map screen will be
displayed.

7.6.2.2 List by City
Selecting List by City will list the POIs in the category selected within a
specified city. Select List by City.
Enter the name of the city you wish to search from. When you are finished,
select OK.
Use the Navigation key to scroll the list up or down (if necessary) and select
the desired city.
Use the Navigation key to scroll the list up or down (if
necessary) and select the desired POI.
Select the desired Route Method.
The Magellan Maestro 4000/4040/4050 will calculate
the route. When the calculations are complete, the
Map screen will be displayed.
7.6.2.3 Spell Name
Selecting Spell Name will list the POIs in the category
selected, matching the name you entered. Select Spell
Name.
Chapter 7: Selecting Destinations
Enter the name of the POI. When you are finished,
select OK.
Select Nearest to list the POIs matching the characters
entered that are nearest to your current position.
Select List by City to list the POIs matching the
characters entered that are nearest to a particular city.
Enter the name of the city. When you are finished,
select OK. Select the city from the list.
Use the Navigation key to scroll the list up or down (if
necessary) and select the desired POI.
Select the desired Route Method.

The Magellan Maestro 4000/4040/4050 will calculate the route. When the
calculations are complete, the Map screen will be displayed.
7.6.2.4 Cuisine Type
When selecting restaurants, you are presented with an
additional method for finding POIs. Select Cuisine
Type. Use the Navigation key to select the type of
restaurant you prefer.
Use the Navigation key to scroll the list up or down (if
necessary) and select the desired POI.
Select the desired Route Method.
The Magellan Maestro 4000/4040/4050 will calculate
the route. When the calculations are complete, the
Map screen will be displayed.
7.6.3 Custom POIs
Please refer to page 112 for information on creating
and loading Custom POIs. From the Destination
screen, select Dining, ATM, Gas..., then select
Custom POIs.
Chapter 7: Selecting Destinations
Select the category.
If the POI list has more than 15 returns, you can
further narrow the search by selecting either Nearest
or Spell Name. Select the desired POI from the list.
Select Route to go to the selected Address, or select
Cancel to return to the Select Custom POI menu.
Select the desired Route Method.
The Magellan Maestro 4000/4040/4050 willcalculate
the route.When the calculations arecomplete,the
Mapscreenwillbe displayed.
Chapter 7: Selecting Destinations

7.7 Selecting an Intersection as a Destination
Search by City – page 51
Search by Zip Code – page 52
Search by State – page 52
Previous City – page 53
An intersection of two streets can be used as a destination. The search for
the intersection can be done whether or not you know the city. If you know
the city, you can start there; if you are unsure of the city, you can start with
the state.
7.7.1 Search by City
From the Destination screen, select Intersection then, select Search by
City.
Enter the first few characters of the city name (see “Inputting Text
Characters” on
page 13). Select OK.
Use the Navigation key to scroll the list up or down (if
necessary) and select the desired city.
Enter the first street name (see “Help with Address
Entry” on page 15). Select OK.
Use the Navigation key to scroll the list up or down and select the first street
from the list.
Chapter 7: Selecting Destinations
Enter the second street name and select OK.
Use the Navigation key to scroll the list up or down (if necessary) and select
the second
street from the list.
Select the desired Route Method.
The Magellan Maestro 4000/4040/4050 will calculate the route. When the
calculations are
complete, the Map screen will be displayed.
7.7.2 Search by Zip Code
From the Destination screen, select Intersection then, select Search by Zip
Code. Enter the zip code and select OK, then select the city.
Enter the first street name (see “Help with Address Entry” on page 15).
Select OK.
Use the Navigation key to scroll the list up or down and select the first street
from the list.
Enter the second street and select OK.
Use the Navigation key to scroll the list up or down (if necessary) and select
the second
street from the list.
Select the desired Route Method.
The Magellan Maestro 4000/4040/4050 will calculate the route. When the
calculations are
complete, the Map screen will be displayed.
7.7.3 Search by State
From the Destination screen, select Intersection then, select Search by
State.
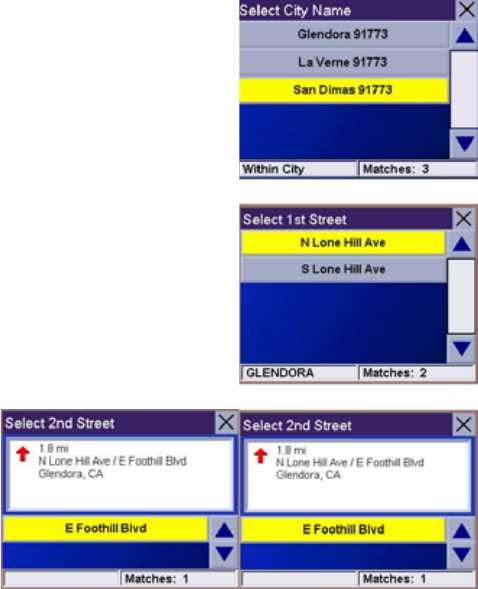
Chapter 7: Selecting Destinations
Enter the first few characters for the state and select OK.
Use the Navigation key to scroll the list up or down (if necessary) and select
the state from the list.
Enter the first street name (see “Help with Address Entry” on page 15).
Select OK.
Use the Navigation key to scroll the list up or down (if necessary) and select
the first street from the list.
Enter the second street and select OK.
Use the Navigation key to scroll the list up or down (if necessary) and select
the second
street from the list.
Select the desired Route Method.
The Magellan Maestro 4000/4040/4050 will calculate the route. When the
calculations are
complete, the Map screen will be displayed.
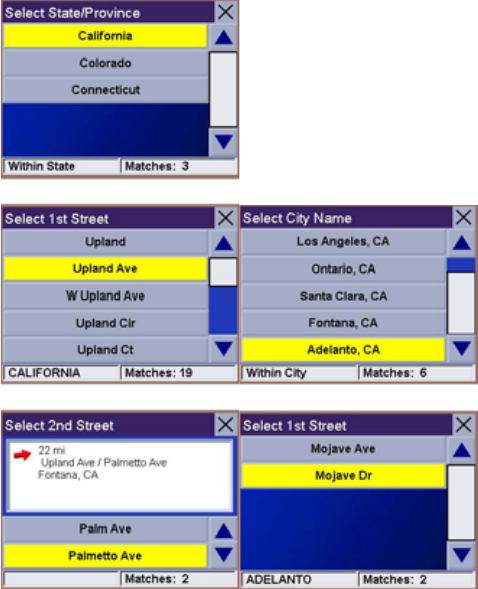
7.7.4 Previous City
From the Destination screen, select Intersection then, select Previous City.
Use the Navigation key to scroll the list up or down (if necessary) and select
the desired city.
Enter the first street name (see “Help with Address Entry” on page 15).
Select OK.
Use the Navigation key to scroll the list up or down (if necessary) and select
the first street from the list.
Chapter 7: Selecting Destinations
Enter the second street and select OK.
Use the Navigation key to scroll the list up or down (if necessary) and select
the second
street from the list.
Select the desired Route Method.
The Magellan Maestro 4000/4040/4050 will calculate the route. When the
calculations are
complete, the Map screen will be displayed.

Chapter 8: Navigation Options
Navigation Options are only available when you are in
Navigation Mode. When going to the Main Menu
from the Music Player or from the Photo Viewer, this
option will be grayed out.
To access these features, press the MENU key on the Magellan Maestro
4000/4040/4050 and select Navigation Options.
8.1 Configuration
Configuration enables you to customize the advanced
navigation features of the Magellan Maestro
4000/4040/4050. Select Configuration.
8.1.1 POI Selection
From the POI Selection menu, you can choose which
icons to display on the Map screen. We recommend
being selective about which icons you choose to
display in order to prevent your map screen from
being cluttered. For a list of POI Categories, see “POI Categories” on page
117.
Select POI Selection.
Select Mark All to display all POI icons on the Map screen.
Select Clear All if you wish not to have any POI icons displayed on the
Map screen.
You can also select individual icons to display or hide on the Map screen.
When you have
finished, select Save to save your selection and return to the Configuration
menu.
8.1.2 Custom POIs
The Custom POI menu enables you to select POIs
previously loaded into your Magellan Maestro
4000/4040/4050 using the Magellan Maestro POI
Manager software (see page 112). The following
instructions are assuming that you have loaded one or more custom POIs
into your Magellan Maestro 4000/4040/4050.
Select Custom POIs.

Chapter 8: Navigation Options
Select Select a POI File.
Use the Navigation key to scroll the list up or down (if necessary) and select
a POI file. With the file selected, you are returned to the Custom POIs menu.
Select Display Categories.
The categories you created are displayed in the same
way as the built-in POIs.
Select Mark All to display all POI icons on the Map
screen. Select Clear All if you wish not to have any
POI icons displayed on the Map screen. You can also
select individual icons to display or hide on the Map
screen.
When you have finished, select Save to return to the
Configuration menu
You can also be alerted when you approach a custom
POI. The Set Alarm function works for Custom POIs
only and only if the POI has been selected to show on
the Map screen. Select Set Alarms.
Again, you can select all, none, or individual POIs to
have an alert set. Select Mark All to set an alert for all
custom POI icons on the Map screen. Select Clear All
if you wish not to have any alerts set for custom POI
icons displayed on the Map screen. You can also
select individual categories to have an alert set.
When you have finished, select Save to return to the
Custom POIs menu.
With the POI alerts set, you can now choose at what
point you will be alerted. Select Alert Parameters.
Chapter 8: Navigation Options
Select the POI category to customize.