Mitac Digital Technology BE7928 Portable Navigator / Automotive Systems User Manual Mantas500B 0807 rev
Mitac International Corporation Portable Navigator / Automotive Systems Mantas500B 0807 rev
user manual
User’s Manual
HARMAN/BECKER AUTOMOTIVE SYSTEMS
BE 7928
Trademarks
All brand and product names are trademarks or registered trademarks of their
respective companies.
Disclaimer
Specifications and manuals are subject to change without notice. Mio Technology
assumes no liability for damage incurred directly or indirectly from errors,
omissions, or discrepancies between the device and the manuals.

i
Table of Contents
Table of Contents................................................................................... i
Precautions and Notices ..................................................................... iii
1 Getting Started................................................................................ 1
1.1
Understanding Hardware Components................................................ 1
Front Components ............................................................................... 1
Back Components................................................................................ 2
Left-Side Components ......................................................................... 3
Right-Side Components....................................................................... 3
Top Components.................................................................................. 4
Bottom Components ............................................................................ 4
1.2
Performing the Initial Start Up.............................................................. 5
1.3
Connecting to AC Power and Charging the Battery............................. 6
1.4
Using Your Device in a Vehicle............................................................ 7
Connecting the Car Charger ................................................................ 7
1.5
Operating Basics.................................................................................. 8
Turning On and Off .............................................................................. 8
Navigating on the Screen..................................................................... 8
1.6
Inserting a SD/MMC Card.................................................................... 9
1.7
Using the FM Transmitter................................................................... 10
2 Connecting a Blutooth Phone...................................................... 11
2.1
General............................................................................................... 11
Phone number download ................................................................... 11
Last mode / auto-connect phone........................................................ 11
Quick access...................................................................................... 11
2.2
Phone Main Menu .............................................................................. 12
Dial number........................................................................................ 12
Phone book ........................................................................................ 13
Connect phone................................................................................... 13
Phone / Bluetooth settings ................................................................. 14

ii
3 Troubleshooting and Maintenance.............................................. 15
3.1
Resetting Your System ...................................................................... 15
3.2
Troubleshooting ................................................................................. 15
Power Problems................................................................................. 15
Screen Problems................................................................................ 15
Connection Problems......................................................................... 16
GPS Problems.................................................................................... 16
3.3
Maintaining Your Device .................................................................... 17
4 Regulatory Information ................................................................ 19
4.1
Regulations Statements..................................................................... 19
European Notice ................................................................................ 19
4.2
FCC Notice......................................................................................... 23
4.3
Specially Notice.................................................................................. 24
4.4
Safety Precautions ............................................................................. 24
About Charging .................................................................................. 25
About the AC Adapter ........................................................................ 25
About the Battery ............................................................................... 25

iii
Precautions and Notices
For your own safety, do not operate the controls of the product while driving.
Use this product prudently. The product is intended for use solely as a
navigation aid. It is not for precise measurement of direction, distance,
location or topography.
The calculated route is for reference only. It is the user’s responsibility to
follow the traffic signs and local regulations along the roads.
When you get out of the car, do not leave your device on the dashboard
subjected to direct sunlight. Overheating of the battery can cause malfunction
and/or danger.
GPS is operated by the United States government, which is solely responsible
for the performance of GPS. Any change to the GPS system can affect the
accuracy of all GPS equipments.
GPS satellite signals cannot pass through solid materials (except glass). When
you are inside a tunnel or building, GPS positioning is not available.
A minimum of 4 GPS satellite signals is needed to determine current GPS
position. Signal reception can be affected by situations such as bad weather or
dense overhead obstacles (e.g. trees and tall buildings).
Other wireless devices in the vehicle might interfere with the reception of
satellite signals and cause the reception to be unstable.
iv
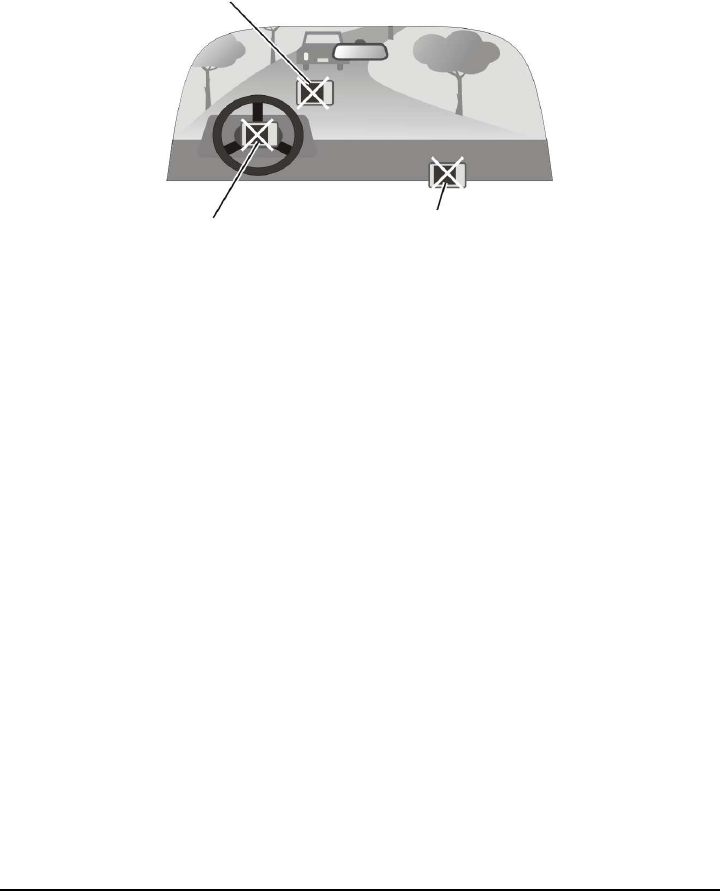
A car holder is needed when using the device in a car. Be sure that you place
the device in an appropriate place, so as not to obstruct the driver’s view, or
deployment of airbags.
Do not mount where the driver’s
field of vision is blocked. Do not place unsecured
on the dashboard.
Do not mount in front of
airbag panels. Do not mount in front of an
airbag field of deployment.
1
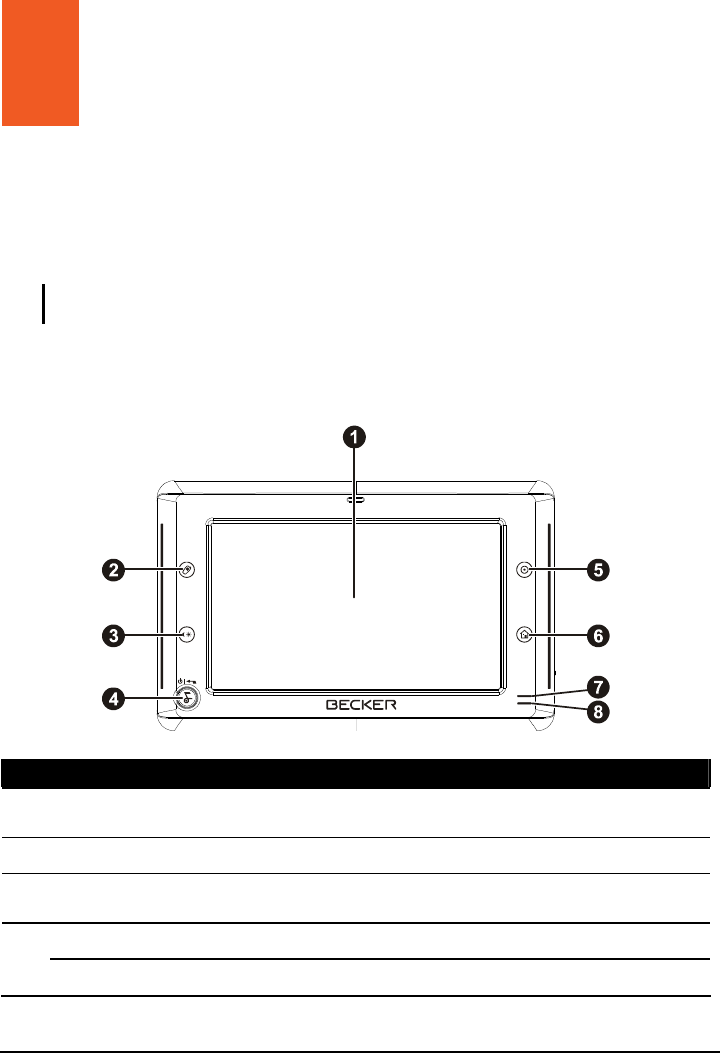
1 Getting Started
1.1 Understanding Hardware Components
NOTE: Depending upon the specific model purchased, the color of your device may not
exactly match the device shown in this manual.
Front Components
Ref
Component Description
Touch Screen Displays the output of your device. Tap the screen with your
fingertip to select menu commands or enter information.
Phone button Accepts or rejects the incoming calls.
Day/Night
button Switches between the Day view and the Night view when
using the Navigation program.
Power Button Press the button for more than 3 seconds to power on and off.
Back Button Press briefly to go back to the previous screen.
2
Home button Press to navigate to your home if you have set the home
address.
Main/Map
button Switches between the Main screen and the Map screen.
Bluetooth
Indicator Flashes in blue to indicate that Bluetooth is on.
Charge
Indicator Glows bright amber to indicate that the battery is charging,
and turns green when the battery is fully charged.
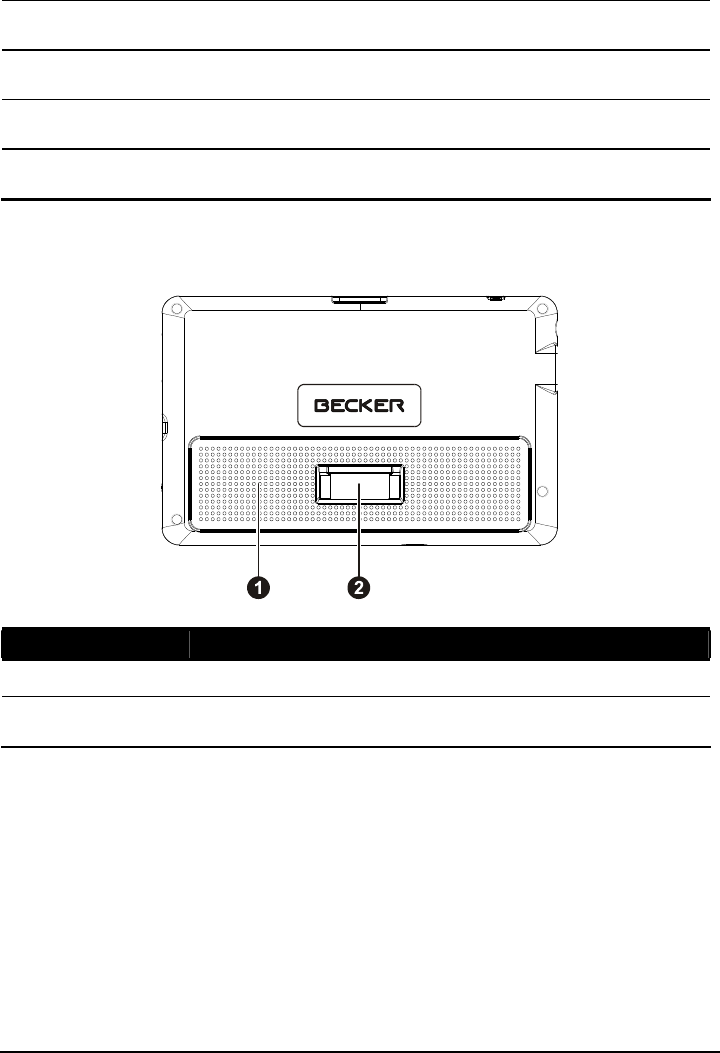
Back Components
Ref
Component
Description
Speaker Sends out music, sounds and voice.
Cradle
Connector Connects to the device cradle or TMC cradle.
3
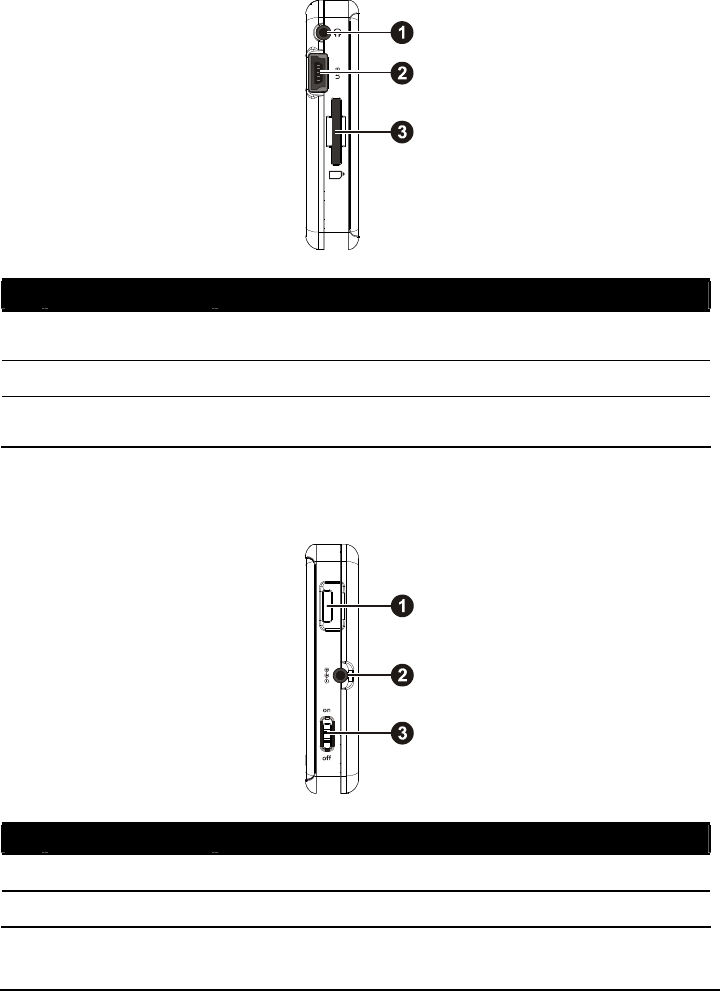
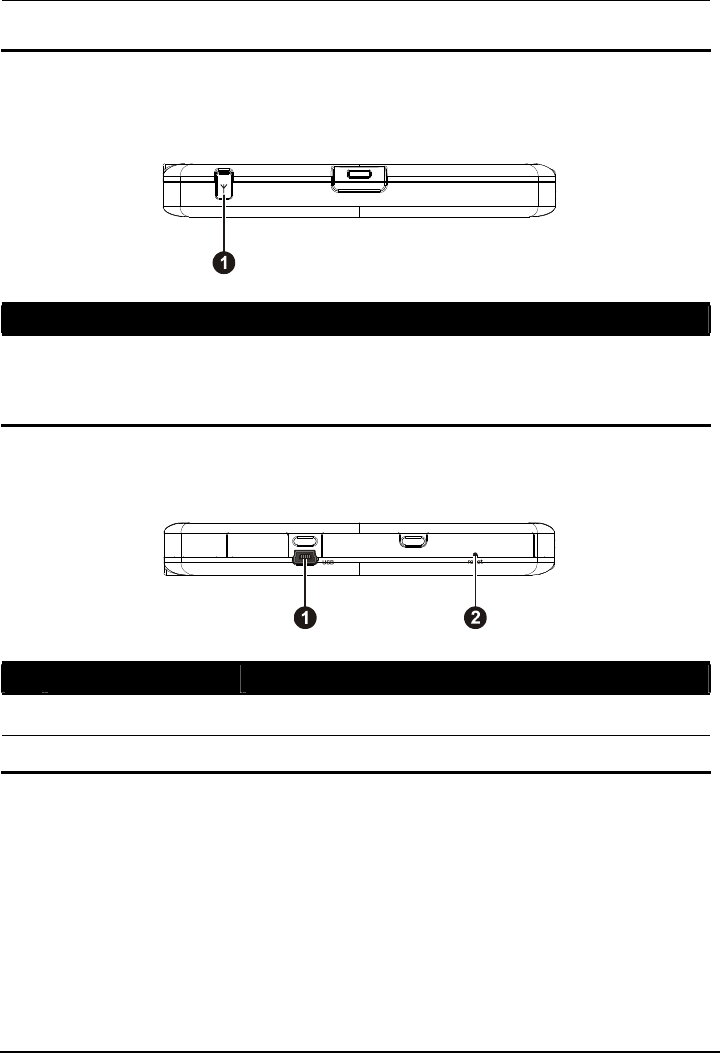
Left-Side Components
Ref
Component Description
Headphone
Connector Connects to stereo headphones.
USB Connector Connects to the USB device.
SD/MMC Slot Accepts a SD (Secure Digital) or MMC (MultiMediaCard)
card for accessing data such as MP3 music.
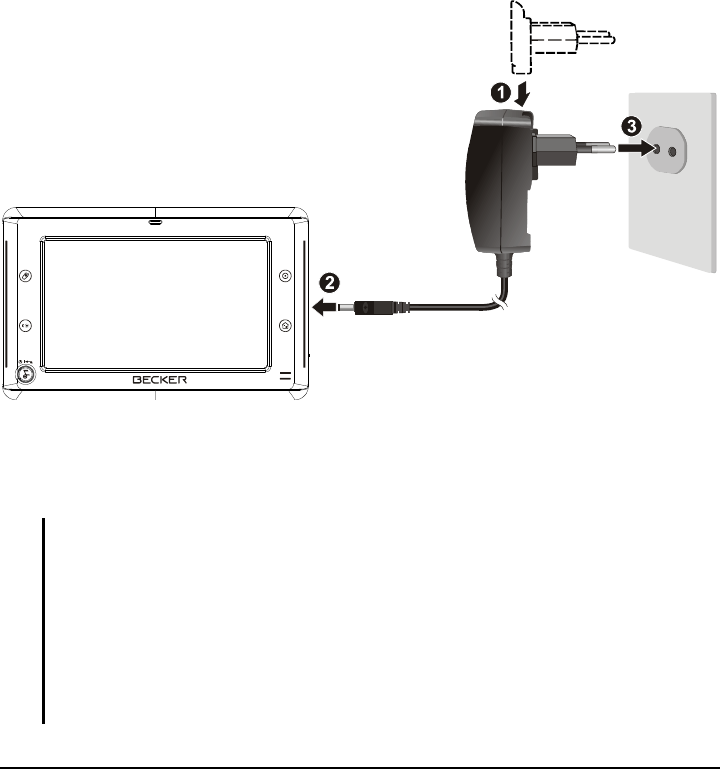
Right-Side Components
Ref
Component Description
Volume Control Adjusts the volume level of your device.
Power Connector
Connects to the AC adapter.
4
ON/OFF Switch The main power/battery cutoff switch. Please leave the
switch in the “ON” position for normal operation.
Top Components
Ref
Component Description
External GPS
Antenna
Connector
This connector (under rubber dust cover) allows use of an
optional external GPS antenna with magnetic mount, which
may be positioned on top of the car for better signal reception
in areas with poor reception.
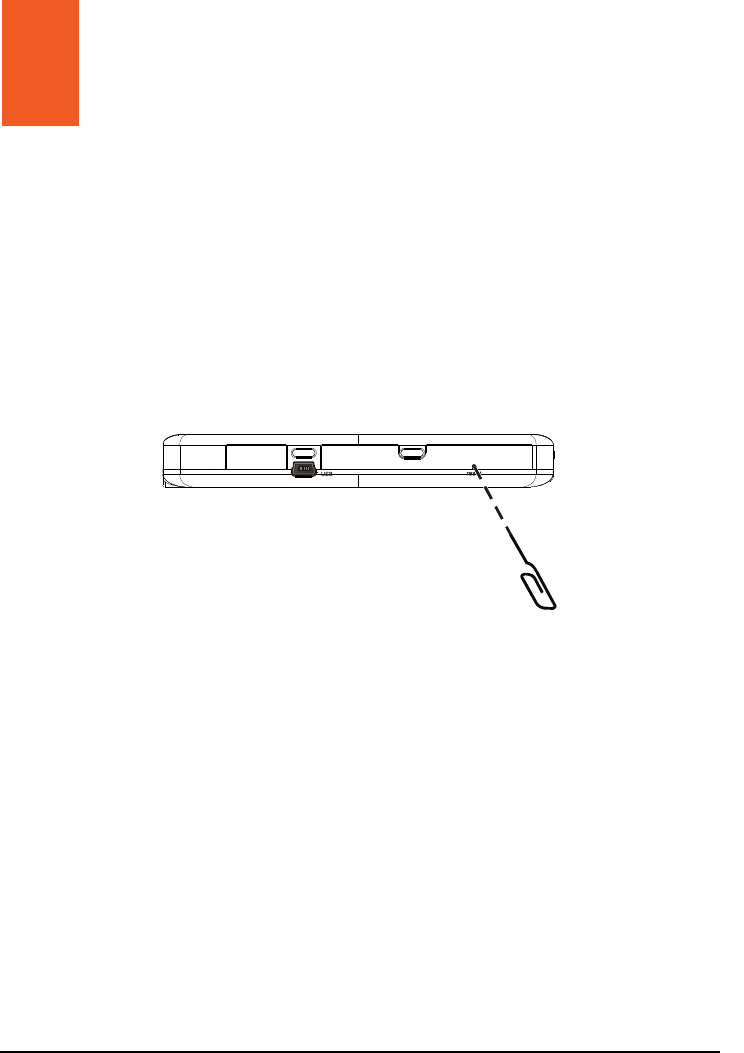
Bottom Components
Ref
Component Description
Mini-USB Connector
Connects to the USB cable.
Reset Button Restarts your device (soft reset).

5
1.2 Performing the Initial Start Up
1. Slide the ON/OFF switch to the ON position.
NOTE: For normal operation, briefly press the power button to turn
on and off your device.
2. Your device turns on. Immediately charge your device as described in the
next section.
3. The Home screen appears. You can now use your device.
6
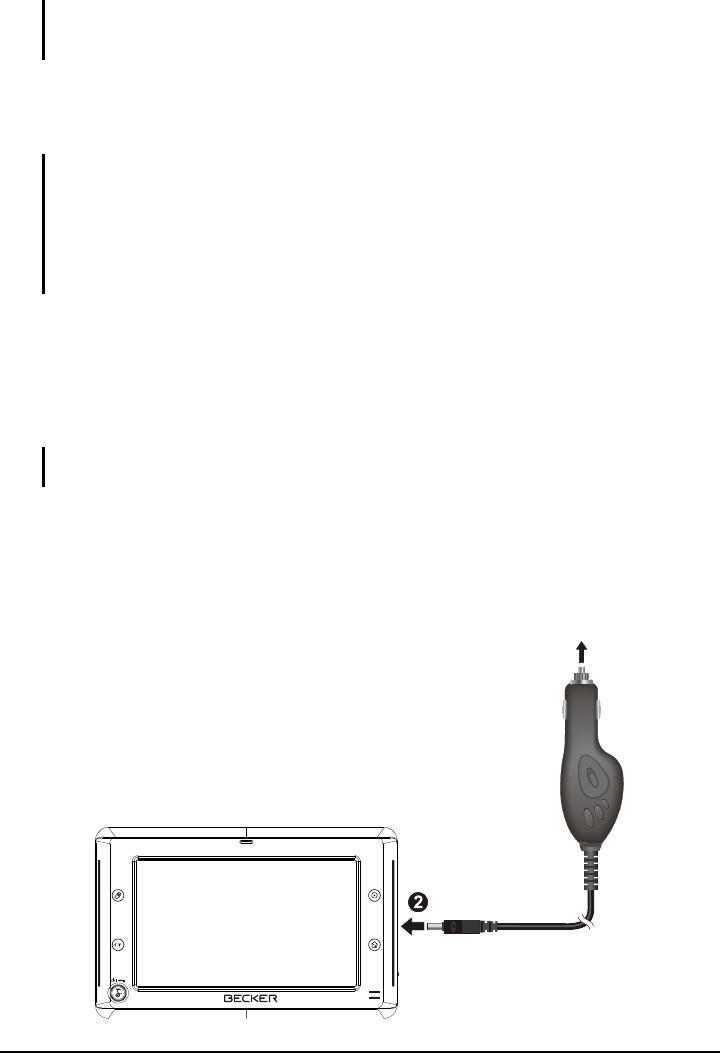
1.3 Connecting to AC Power and Charging the
Battery
When charging the battery for the very first time, you should charge it for at least
8 hours.
1. Slide and click the connector converter onto the AC adapter.
2. Connect the adapter cable to the bottom of your device.
3. Plug the AC adapter into a wall outlet.
4. The charge indicator glows amber when charging is in progress. Do not
disconnect your device from AC power until the battery is fully charged, the
charge indicator will turn green. This will take a couple of hours.
NOTE:
Do not immediately turn on your device after connecting the AC adapter to charge a
power-depleted battery. If you need to turn on the device again, wait for at least one
minute.
Depending on your region of purchase, the connector converter may not look exactly the
same as the picture shown.
CAUTION: For optimal performance of the lithium battery:
Do not charge the battery where the temperature is high (e.g. in direct sunlight).
There is no need to fully discharge the battery before charging. You can charge the battery
before it is discharged.
7
When storing the product for a long period of time, be sure to fully charge the battery at
least once every two weeks. Over discharge of the battery can affect the charging
performance.
1.4 Using Your Device in a Vehicle
CAUTION:
Select an appropriate location for mounting the device in a vehicle. Never place the device
where the driver’s field of vision is blocked. Make sure that the GPS antenna has a clear
view of the sky.
If the car’s windshield is tinted with a reflective coating, an external antenna (optional) may
be needed to route the antenna to the top of the vehicle through a window. When closing
the window, be careful not to pinch the antenna cable.
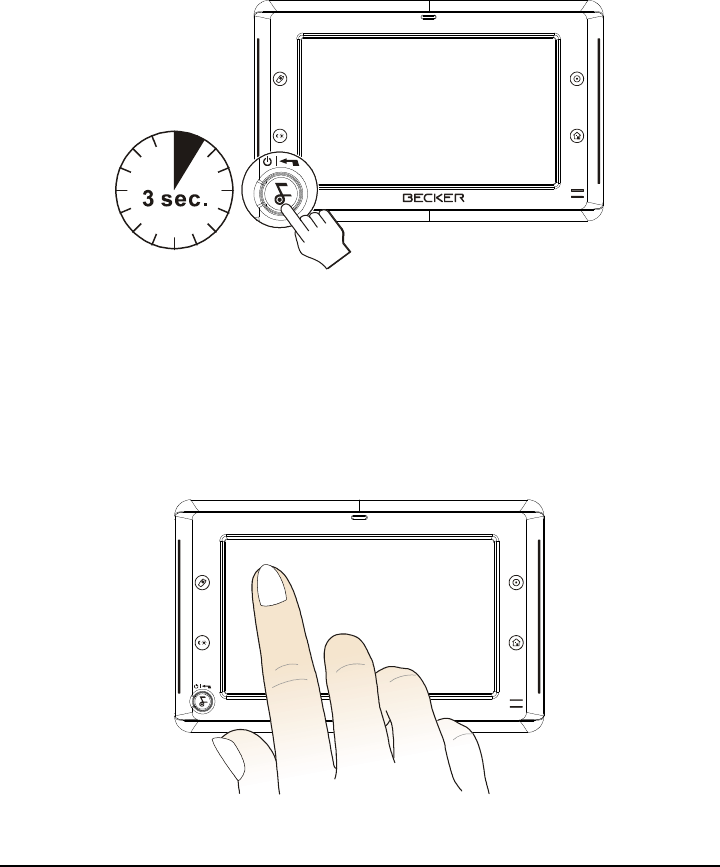
Connecting the Car Charger
The car charger supplies power to your device when you are using the device in a
car.
CAUTION: To protect your device against sudden surges in current, connect the car charger
only after the car engine has been started.
1. Connect one end of the car charger to the power connector of the cradle.
2. Connect the other end to the cigarette lighter in the car to power and charge
your device. The indicator on the car charger lights in green to indicate that
power is being supplied to your device.
8
1.5 Operating Basics
Turning On and Off
Press and hold the power button for more than 3 seconds to turn on and off your
device.
When you press the power button to turn off the unit, your device actually enters
into a suspend state and the system stops operating.
Navigating on the Screen
To operate your device, touch the screen with your fingertip. You can perform the
following actions:
9
Tap
Touch the screen once with your fingertip to open items or select onscreen
buttons or options.
Drag
Hold your fingertip on the screen and drag up/down/left/right or across the
screen.
Tap and hold
Tap and hold your fingertip until an action is complete, or a result or menu is
shown.
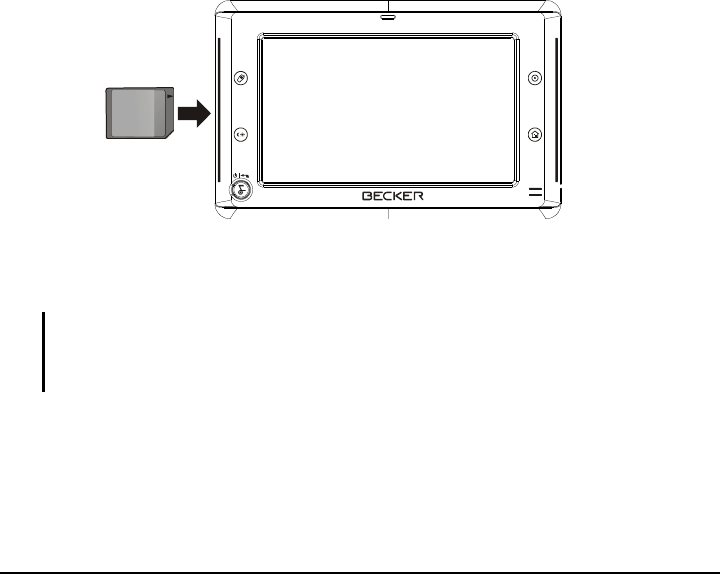
1.6 Inserting a SD/MMC Card
Your device has a SD/MMC slot where you can insert an optional Secure Digital
or MultiMediaCard storage card. It supports up to 2GB storage card.
To use a SD/MMC card, insert it into the slot, with the connector pointing to the
slot and its label facing the front of the device.
To remove a card, first make sure that no application is accessing the card, then
slightly push the top edge of the card to release it and pull it out of the slot.
NOTE:
Make sure that no foreign objects enter the slot.
Keep a SD or MMC card in a well-protected box to avoid dust and humidity when you are
not using it.

10
1.7 Using the FM Transmitter
With the built-in FM transmitter of your device, you can output the sound to an
external FM radio. For example, when running the MP3 Player program, the FM
radio in your car (instead of the speaker of your device) plays the music.
Run MP3Player.exe
Launch Navigation application->enter into setting application->enter into FM
transmitter application->launch it
Save the frequency you need, such as 88MHz
Set the FM receiver in the car as the same frequency
Tap “play”, then FM transmitter will be open and the music will be heard by
FM receiver.
Tap “pause”, the music will be paused and the FM transmitter will be close,
there will be no music in FM receiver.
Tap “stop”, the music will be paused and the FM transmitter will be close,
there will be no music in FM receiver.
Tap “exit”, the MP3 player will exit and the FM transmitter will be close,
there will be no music in FM receiver.
Note:
FM transmitter is a wireless like as Bluetooth.

11
2 Connecting a Blutooth
Phone
2.1 General
BT-phones can only be paired and connected via the device. This process cannot
be started via the BT-phone. Only one phone can be connected at the same time.
Phone number download
When a phone is connected, the phone numbers saved on that phone’s SIM-card
are downloaded to the device. If technically possible, the numbers saved in the
phone’s internal phone book should also be downloaded. If possible, the phone
numbers downloaded from the last connected phone should be saved in the
device. If the same phone is connected again, this list of numbers should be
available immediately. There should be an automatic update of the saved list
based on any changes in the external phone’s phone book/SIM-card content (e.g.
user has added phone number on his phone – add it to list).
Last mode / auto-connect phone
If the device is switched on and BT is active, the first phone from the list of paired
devices will be connected. If that phone is not available, the next phone from the
list will be tried.
Quick access
The quick access shows the list of the last calls, including protected entries. The
last called number or received call is displayed at the top of the list. Up to 50
entries can be stored.
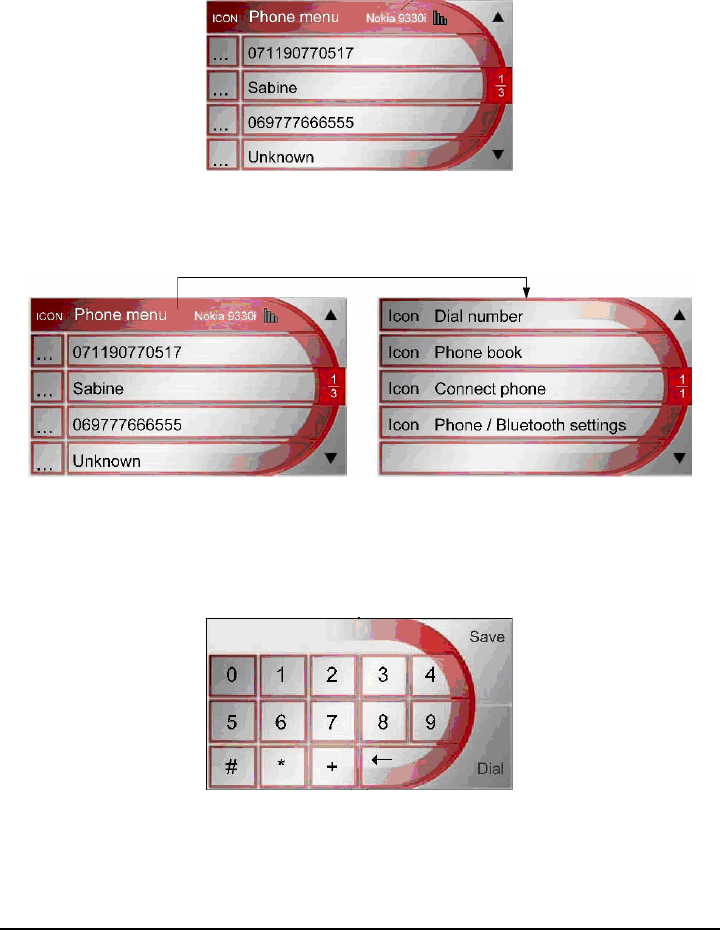
12
The quick access contains only numbers of calls that were accepted, missed or
dialled when handsfree was active. No call lists of connected BT-phones are
downloaded. If the number of a caller is nor known, “Unknown” is displayed.
Selecting an entry immediately dials that number (if a phone is ready).
2.2 Phone Main Menu
Dial number
The function allows the user to dial a number by using a keypad.
13
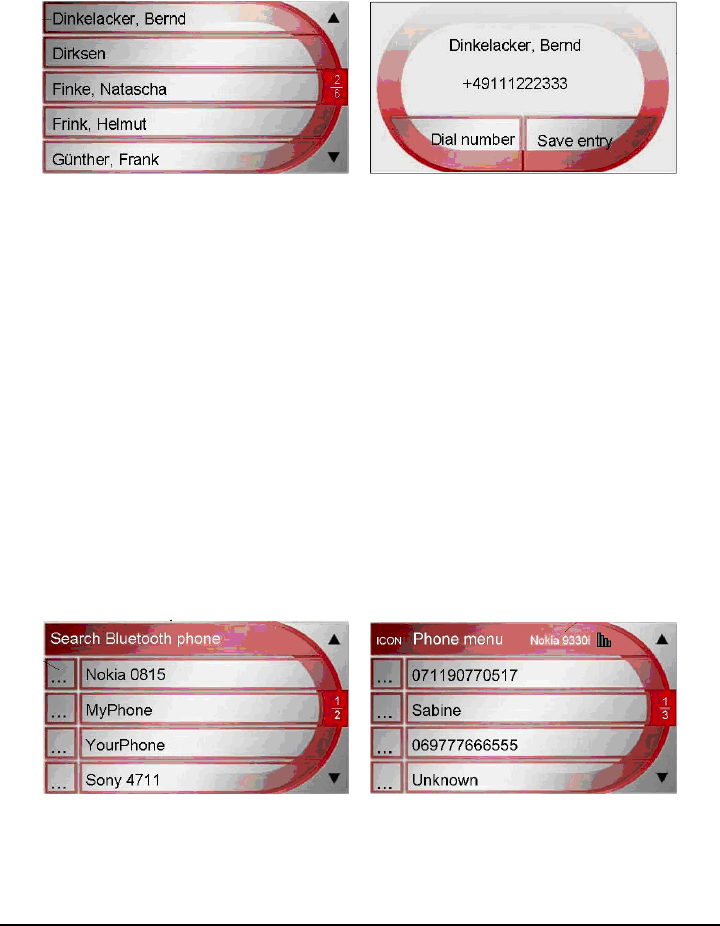
Phone book
The function allows the user to dial a number from the phone book (downloaded
SIM-card entries from BT-phone).
Connect phone
The function allows the user to search for BT-phones and to connect already
paired phones. Note that the list of phones to be displayed only contains paired
phones.
The list of paired phones is sorted like a quick access: The last connected phone is
moved to the top of the list, or, if there is already a protected phone, to the first
position in the list that is not protected. If all list positions contain protected
entries, the phone will not be included in the list of paired phones.
If BT is off when the user either tries to connects a phone or starts the phone
search, BT is automatically switched on without any feedback (provided that it
does not take long to activate BT, otherwise a waiting popup should be shown).
During the search process, all BT-devices will be shown, even if they don’t
support the handsfree profile.
14
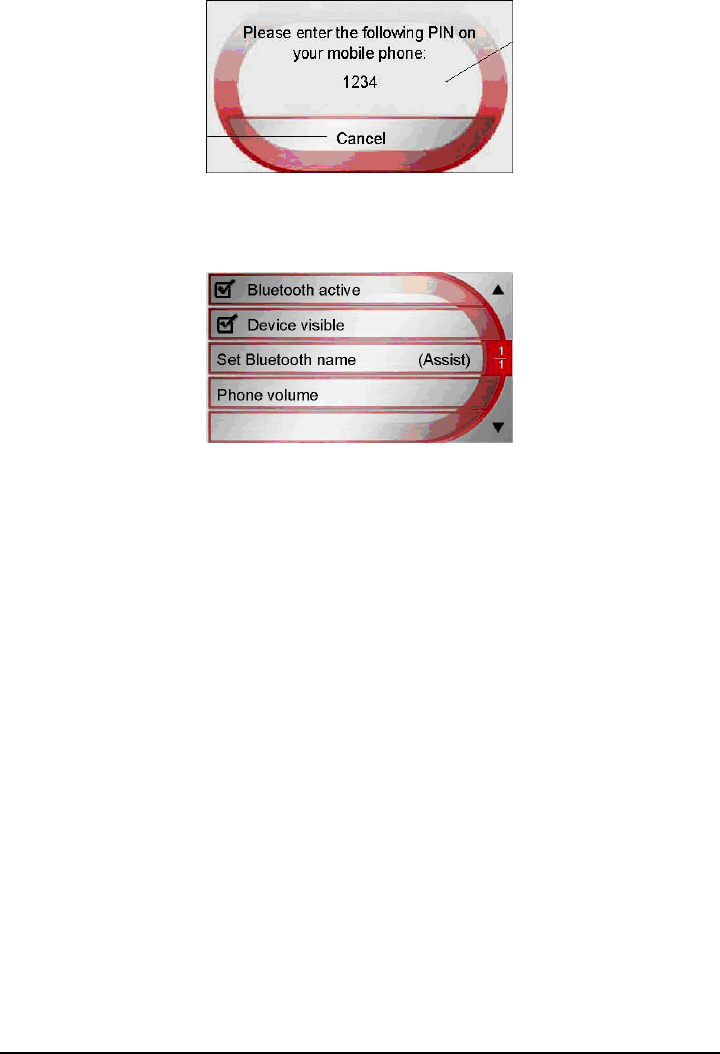
Phone / Bluetooth settings
Bluetooth active
The option allows the user to switch BT on and off. If BT is switched on,
automatic connection process is started.
Bluetooth name
The option allows the user to enter a BT name for the device.
Visibility
The option allows the user to switch the visibility of the device for other
BT-devices on and off.
Phone volume
15
3 Troubleshooting and Maintenance
3.1 Resetting Your System
Occasionally, you may need to reset your device. For example, you should reset
your system when it stops responding; or appears to be “frozen” or “locked up.”
Insert a small rod, such as a straightened paperclip, into the reset button of your
device. This is called a “soft reset.” The Home screen should appear after a soft
reset.
3.2 Troubleshooting
Power Problems
Power does not turn on when using battery power
The remaining battery power may be too low to run your device. Charge the
battery.
Screen Problems
Screen responds slowly
Make sure that your device is not running out of battery power. If the problem
still exists, reset your system.
Troubleshooting and
Maintenance

16
Screen freezes
Reset your system.
Screen is hard to read
Make sure that the backlight of the display is on.
Move to a location with more light.
Inaccurate response to taps
Recalibrate the touch screen.
Connection Problems
Cable Connection Problems
Make sure that your device and your computer are both turned on before
trying to establish a connection.
Make sure that the cable is securely plugged into the USB port on your
computer and on the device. Connect the USB cable directly to your
computer—do not run the cable through a USB hub.
Reset your device before connecting the cable. Always disconnect your
device before you restart your computer.
GPS Problems
When there are no valid signals available, consider the following:
Make sure that the device is facing a clear view of the sky.
Note that the GPS reception can be affected by:
Bad weather
Dense overhead obstacles (e.g. trees and tall buildings)
Other wireless device in the car
Reflective car window tint and heated screens.

17
3.3 Maintaining Your Device
Taking good care of your device will ensure trouble-free operation and reduce the
risk of damage to your device.
Keep your device away from excessive moisture and extreme temperatures.
Avoid exposing your device to direct sunlight or strong ultraviolet light for
extended periods of time.
Do not place anything on top of your device or drop objects on your device.
Do not drop your device or subject it to severe shock.
Do not subject your device to sudden and severe temperature changes. This
could cause moisture condensation inside the unit, which could damage your
device. In the event of moisture condensation, allow the device to dry out
completely before use.
Take care not to sit on the device. We advise not to carry the device in one’s
back pocket for that reason.
The screen surface can easily be scratched. Avoid touching it with sharp
objects. Non-adhesive generic screen protectors designed specifically for use
on portable devices with LCD panels may be used to help protect the screen
from minor scratches.
Never clean your device with it powered on. Use a soft, lint-free cloth
moistened with water to wipe the screen and the exterior of your device.
Do not use paper towels to clean the screen.
Never attempt to disassemble, repair or make any modifications to your
device. Disassembly, modification or any attempt at repair could cause
damage to your device and even bodily injury or property damage and will
void any warranty.
Do not store or carry flammable liquids, gases or explosive materials in the
same compartment as your device, its parts or accessories.

19
4 Regulatory Information
NOTE: Marking labels located on the exterior of your device indicate the regulations that
your model complies with. Please check the marking labels on your device and refer to the
corresponding statements in this chapter. Some notices apply to specific models only.
4.1 Regulations Statements
European Notice
Products with the CE marking comply with Radio & Telecommunication
Terminal Equipment Directive (R&TTE) (1999/5/EEC), the Electromagnetic
Compatibility Directive (2004/108/EC) and the Low Voltage Directive
(2006/95/EC) –issued by the Commission of the European Community.
Compliance with these directives implies conformity to the following European
Standards:
EN 301 489-1 V1.5.1: (2004-07)Electromagnetic compatibility and Radio
Spectrum Matters (ERM); ElectroMagnetic Compatibility (EMC) standard for
radio equipment and services; Part 1: Common technical requirements
EN 301 489-17 V1.2.1 (2002-08) Electromagnetic compatibility and Radio
spectrum Matters (ERM); ElectroMagnetic Compatibility (EMC) standard for
radio equipment and services; Part 17: Specific conditions for 2,4 GHz wideband
transmission systems and 5 GHz high performance RLAN equipment
EN55022: Radio disturbance characteristics
EN55024: Immunity characteristics
EN6100-3-2: Limits for harmonic current emissions
EN6100-3-3: Limitation of voltage fluctuation and flicker in low-voltage supply
system
EN60950 / IEC 60950: Product Safety
ETSI EN 301 357-2 V1.3.1 (2006-07)

20
Electromagnetic compatibility
and Radio spectrum Matters (ERM);
Cordless audio devices in the range 25 MHz to 2 000 MHz;
Part 2: Harmonized EN covering essential requirements
of article 3.2 of the R&TTE Directive
ETSI EN 301 357-1 V1.3.1 (2006-07)
Electromagnetic compatibility
and Radio spectrum Matters (ERM);
Cordless audio devices in the range 25 MHz to 2 000 MHz;
Part 1: Technical characteristics and test methods
EN50371 : (2002-03)
Generic standard to demonstrate the compliance of low power electronic and
electrical apparatus with the basic restrictions related to human exposure to
electromagnetic fields (10 MHz - 300 GHz) -- General public
EN 300 328 V1.7.1: (2006-10)
Electromagnetic compatibility and Radio spectrum Matters (ERM); Wideband
Transmission systems; Data transmission equipment operating in the 2,4 GHz
ISM band and using spread spectrum modulation techniques; Harmonized EN
covering essential requirements under article 3.2 of the R&TTE Directive
EN 301 489-9 V1.3.1: (2002-08)
Electromagnetic compatibility and Radio spectrum Matters (ERM);
ElectroMagnetic Compatibility (EMC) standard for radio equipment and services;
Part 9: Specific conditions for wireless microphones, similar Radio Frequency
(RF) audio link equipment, cordless audio and in-ear monitoring devices
This device is a 2.4 GHz wideband transmission system (transceiver), intended
for use in all EU member states and EFTA countries, except in France and Italy
where restrictive use applies.
In Italy the end-user should apply for a license at the national spectrum authorities
in order to obtain authorization to use the device for setting up outdoor radio links
and/or for supplying public access to telecommunications and/or network
services.

21
This device may not be used for setting up outdoor radio links in France and in
some areas the RF output power may be limited to 10 mW EIRP in the frequency
range of 2454 – 2483.5 MHz. For detailed information the end-user should
contact the national spectrum authority in France.
Česky
[Czech] [Jméno výrobce] tímto prohlašuje, že tento [typ zařízení] je ve
shodě se základními požadavky a dalšími příslušnými
ustanoveními směrnice 1999/5/ES.
Dansk
[Danish] Undertegnede [fabrikantens navn] erklærer herved, at følgende
udstyr [udstyrets typebetegnelse] overholder de væsentlige krav
og øvrige relevante krav i direktiv 1999/5/EF.
Deutsch
[German] Hiermit erklärt [Name des Herstellers], dass sich das Gerät
[Gerätetyp] in Übereinstimmung mit den grundlegenden
Anforderungen und den übrigen einschlägigen Bestimmungen der
Richtlinie 1999/5/EG befindet.
Eesti
[Estonian] Käesolevaga kinnitab [tootja nimi = name of manufacturer]
seadme [seadme tüüp = type of equipment] vastavust direktiivi
1999/5/EÜ põhinõuetele ja nimetatud direktiivist tulenevatele
teistele asjakohastele sätetele.
English Hereby, [name of manufacturer], declares that this [type of
equipment] is in compliance with the essential requirements and
other relevant provisions of Directive 1999/5/EC.
Español
[Spanish] Por medio de la presente [nombre del fabricante] declara que el
[clase de equipo] cumple con los requisitos esenciales y
cualesquiera otras disposiciones aplicables o exigibles de la
Directiva 1999/5/CE.
Ελληνική
[Greek]
ΜΕ ΤΗΝ ΠΑΡΟΥΣΑ [name of manufacturer] ∆ΗΛΩΝΕΙ ΟΤΙ
[type of equipment] ΣΥΜΜΟΡΦΩΝΕΤΑΙ ΠΡΟΣ ΤΙΣ
ΟΥΣΙΩ∆ΕΙΣ ΑΠΑΙΤΗΣΕΙΣ ΚΑΙ ΤΙΣ ΛΟΙΠΕΣ ΣΧΕΤΙΚΕΣ
0560!

22
∆ΙΑΤΑΞΕΙΣ ΤΗΣ Ο∆ΗΓΙΑΣ 1999/5/ΕΚ.
Français
[French] Par la présente [nom du fabricant] déclare que l'appareil [type
d'appareil] est conforme aux exigences essentielles et aux autres
dispositions pertinentes de la directive 1999/5/CE.
Italiano
[Italian] Con la presente [nome del costruttore] dichiara che questo [tipo di
apparecchio] è conforme ai requisiti essenziali ed alle altre
disposizioni pertinenti stabilite dalla direttiva 1999/5/CE.
Latviski
[Latvian] Ar šo [name of manufacturer / izgatavotāja nosaukums] deklarē,
ka [type of equipment / iekārtas tips] atbilst Direktīvas 1999/5/EK
būtiskajām prasībām un citiem ar to saistītajiem noteikumiem.
Lietuvių
[Lithuanian]
Šiuo [manufacturer name] deklaruoja, kad šis [equipment type]
atitinka esminius reikalavimus ir kitas 1999/5/EB Direktyvos
nuostatas.
Nederlands
[Dutch]
Hierbij verklaart [naam van de fabrikant] dat het toestel [type van
toestel] in overeenstemming is met de essentiële eisen en de
andere relevante bepalingen van richtlijn 1999/5/EG.
Malti
[Maltese] Hawnhekk, [isem tal-manifattur], jiddikjara li dan [il-mudel
tal-prodott] jikkonforma mal-ħtiġijiet essenzjali u ma
provvedimenti oħrajn relevanti li hemm fid-Dirrettiva 1999/5/EC.
Magyar
[Hungarian]
Alulírott, [gyártó neve] nyilatkozom, hogy a [... típus] megfelel a
vonatkozó alapvetõ követelményeknek és az 1999/5/EC irányelv
egyéb elõírásainak.
Polski
[Polish] Niniejszym [nazwa producenta] oświadcza, że [nazwa wyrobu]
jest zgodny z zasadniczymi wymogami oraz pozostałymi
stosownymi postanowieniami Dyrektywy 1999/5/EC.
Português
[Portuguese]
[Nome do fabricante] declara que este [tipo de equipamento] está
conforme com os requisitos essenciais e outras disposições da
Directiva 1999/5/CE.
Slovensko
[Slovenian]
[Ime proizvajalca] izjavlja, da je ta [tip opreme] v skladu z
bistvenimi zahtevami in ostalimi relevantnimi določili direktive
1999/5/ES.

23
Slovensky
[Slovak]
[Meno výrobcu] týmto vyhlasuje, že [typ zariadenia] spĺňa
základné požiadavky a všetky príslušné ustanovenia Smernice
1999/5/ES.
Suomi
[Finnish] [Valmistaja = manufacturer] vakuuttaa täten että [type of
equipment = laitteen tyyppimerkintä] tyyppinen laite on
direktiivin 1999/5/EY oleellisten vaatimusten ja sitä koskevien
direktiivin muiden ehtojen mukainen.
Svenska
[Swedish] Härmed intygar [företag] att denna [utrustningstyp] står I
överensstämmelse med de väsentliga egenskapskrav och övriga
relevanta bestämmelser som framgår av direktiv 1999/5/EG.
The manufacturer cannot be held responsible for modifications made by the User
and the consequences thereof, which may alter the conformity of the product with
the CE Marking.
4.2 FCC Notice
Federal Communication Commission Interference Statement
This equipment has been tested and found to comply with the limits for a
Class B digital device, pursuant to Part 15 of the FCC Rules. These limits
are designed to provide reasonable protection against harmful
interference in a residential installation. This equipment generates, uses
and can radiate radio frequency energy and, if not installed and used in
accordance with the instructions, may cause harmful interference to radio
communications. However, there is no guarantee that interference will not
occur in a particular installation. If this equipment does cause harmful
interference to radio or television reception, which can be determined by
turning the equipment off and on, the user is encouraged to try to correct
the interference by one of the following measures:
- Reorient or relocate the receiving antenna.
- Increase the separation between the equipment and receiver.
- Connect the equipment into an outlet on a circuit different from that to
which the receiver is connected.

24
- Consult the dealer or an experienced radio/TV technician for help.
FCC Caution: Any changes or modifications not expressly approved by the
party responsible for compliance could void the user's authority to operate
this equipment.
This device complies with Part 15 of the FCC Rules. Operation is subject
to the following two conditions: (1) This device may not cause harmful
interference, and (2) this device must accept any interference received,
including interference that may cause undesired operation.
IMPORTANT NOTE:
FCC Radiation Exposure Statement:
This equipment complies with FCC radiation exposure limits set forth for
an uncontrolled environment. This equipment should be installed and
operated with minimum distance 20cm between the radiator & your body.
This transmitter must not be co-located or operating in conjunction with any other
antenna or transmitter.
4.3 Specially Notice
This product only car charger connect to the car
This product can set in the car and this product already application E-mark
All test is follow E-mark standard
4.4 Safety Precautions
Prolonged listening of music in maximum volume can damage the ears.
The use of headphones other than those recommended/supplied can cause
hearing impairment due to excessive sound pressure.

25
About Charging
Use only the charger supplied with your device. Use of another type will
result in malfunction and/or danger.
This product is intended to be supplied by a LISTED Power Unit marked with
“LPS”, “Limited Power Source” and output rated + 5 V dc / 1.0 A”.
Use a specified charger approved by the manufacturer.
About the AC Adapter
Do not use the adapter in a high moisture environment. Never touch the
adapter when your hands or feet are wet.
Allow adequate ventilation around the adapter when using it to operate the
device or charge the battery. Do not cover the AC adapter with paper or other
objects that will reduce cooling. Do not use the AC adapter while it is inside a
carrying case.
Connect the adapter to a proper power source. The voltage requirements are
found on the product case and/or packaging.
Do not use the adapter if the cord becomes damaged.
Do not attempt to service the unit. There are no serviceable parts inside.
Replace the unit if it is damaged or exposed to excess moisture.
About the Battery
Use a specified battery in the equipment.
CAUTION: This unit contains a non-replaceable internal Lithium Ion battery. The battery can
burst or explode, releasing hazardous chemicals. To reduce the risk of fire or burns, do not
disassemble, crush, puncture, or dispose of in fire or water.
Important instructions (for service personnel only)
Caution: Risk of explosion if battery is replaced by an incorrect type.
Dispose of used batteries according to the instructions.
Replace only with the same or equivalent type recommended by the
manufacturer.
The battery must be recycled or disposed of properly.
Use the battery only in the specified equipment.