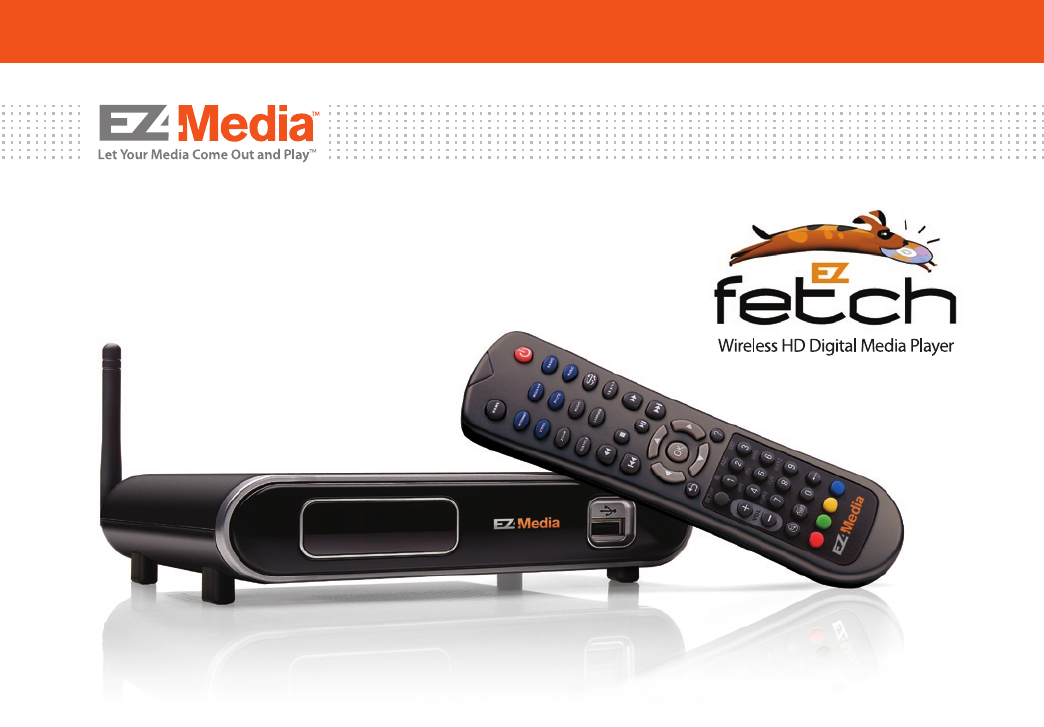
Mitac Digital Technology EZFETCH1 Wireless HD Digital Media Player User Manual
Mitac International Corporation Wireless HD Digital Media Player
user manual
Congratulations!
With EZfetch
™
, you’ll be able to enjoy all your
favorite digital pictures, music and movies
like never before as they stream over your
home network, right to your home
entertainment system.
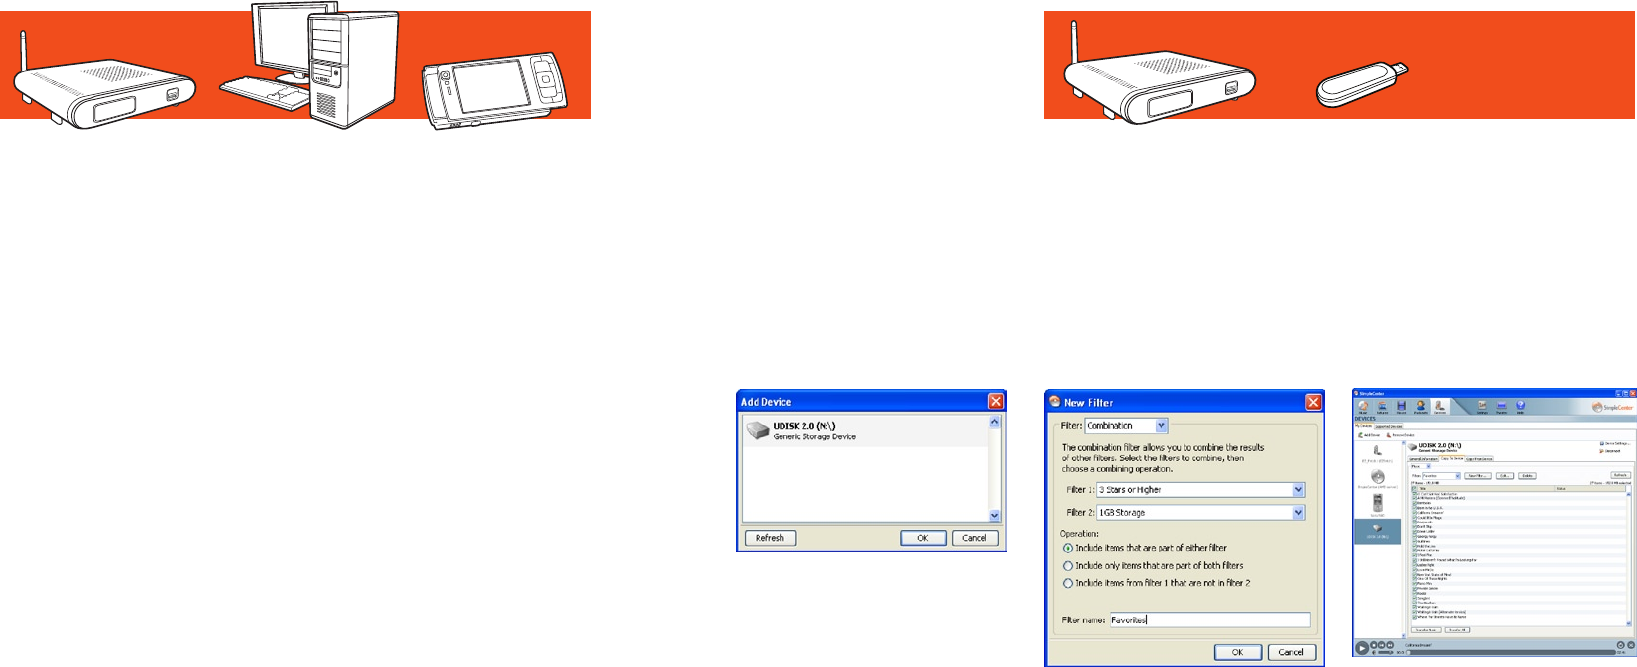
Welcome to EZfetch
EZfetch lets you access all your digital
pictures, music and movies and play them
right where you want them—on your home
entertainment system.
EZfetch can fetch pictures, music and movies
that are stored on your PC, a Wi-Fi enabled
Nokia Nseries device and any USB mass
storage device. Then EZfetch plays your
selection on your TV’s bigger screen and
your audio system’s better sound. And best
of all, EZfetch can play more picture, music
and movie formats than any other digital
media player in the world.
So get in front of your favorite TV, get family
and friends, and get comfortable. Select the
pictures you want to see, the music you want
to hear or the movie you want to watch.
Then relax and be entertained as EZfetch
streams your selection to your home
entertainment system.
This is the way your media was meant to be
experienced, and now you can have it all,
right where you want it. Let your media
come out and play, with EZfetch.
How It Works
EZfetch is the bridge that connects your
digital media les to your home entertain-
ment system. An easy software download to
your PC builds that bridge and gets your
digital devices “talking” to EZ Fetch over
your home’s network.
Pictures, music and movies stream over your
digital home network wirelessly, or with an
Ethernet cable. EZfetch receives the media
le and transcodes it, so you can view it on
your TV and hear it through your stereo
speakers.
User Guide
™
™
2 3
Table of Contents
Package Contents ........................................ 3
Install SimpleCenter Software onto your PC ................ 4
Add your Media to SimpleCenter .......................... 5
Understanding Your Home Network . . . . . . . . . . . . . . . . . . . . . 6-8
Connect EZfetch to your Home Entertainment System... 9-11
Using the Remote Control............................. 12-13
Initial Start-Up ........................................... 14
Configure EZfetch .................................... 14-15
Play your Pictures, Music Movies and Podcasts
on your Home Entertainment System.................. 16-19
Troubleshooting......................................20-21
Technical Support ....................................... 22
Supported Media Formats ............................... 22
Specifications ........................................... 22
For more technical support information, the latest user
documentation and EZfetch software updates, go to
www.ez4media.com
System Requirements
PC with:
• Microsoft® Windows® XP or Vista
• 1 GHz processor (Intel® Pentium® 4 or
equivalent is most recommended)
• 50 MB of available hard disk space
• 512 MB memory (640 MB or higher is
most recommended)
• 8 MB video memory (most
recommended)
You must have one of these
Home Network Options:
• Wireless Router or Wired Router with
Wireless Access Point
• Wired Router
• Ethernet Switch or Hub
• Wi-Fi enabled PC or laptop
Other Requirements:
• TV or monitor with either Composite
Video, S-Video or DVI-D/HDMI input
• TV or AV system with analog audio or
optical digital audio input
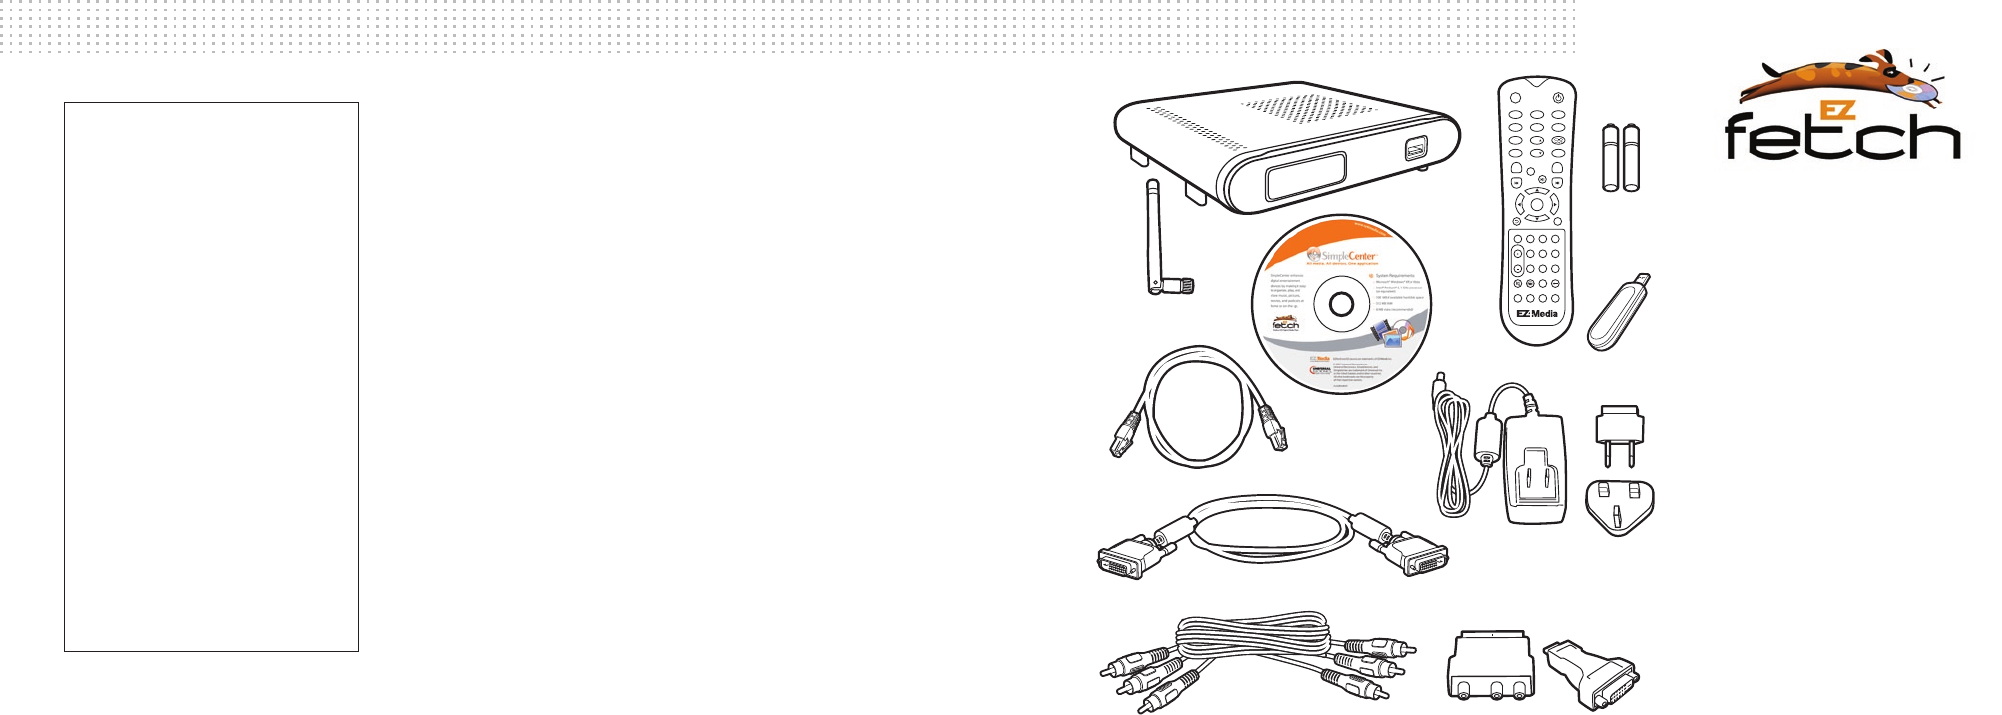
Package Contents
Please check the package contents. If any
of the items listed below are not in the
package, visit www.ez4media.com and go
to SUPPORT.
1 EZfetch Wireless HD Digital Media Player
and Antenna
2 Remote Control
3 Batteries for remote control
4 CD with SimpleCenter software
5 USB Flash Drive
6 Ethernet Cable (LAN RJ45)
7 Power supply cord with EU/USA/EK
changeable plug
8 DVI-D to DVI-D cable
9 RCA Composite Video and Left and
Right Analog Audio Cable
1 0 RCA/SCART adapter
11 DVI-D/HDMI adapter
HOME
SERVERS DEVICES SETTINGS
MOVIE PHOTO
1 2
OK
3
45 6
78 9
0
MUSIC
ZOOM PAGE
MEDIA BAR
VOL
RESET @ ABC DEF
GHI JKL MNO
PQRS TUV WXYZ
PAGE
7
<
8
VIDEO OUT
1 2 3
5
7
6
8
9
10 11
4
™
!
4 5
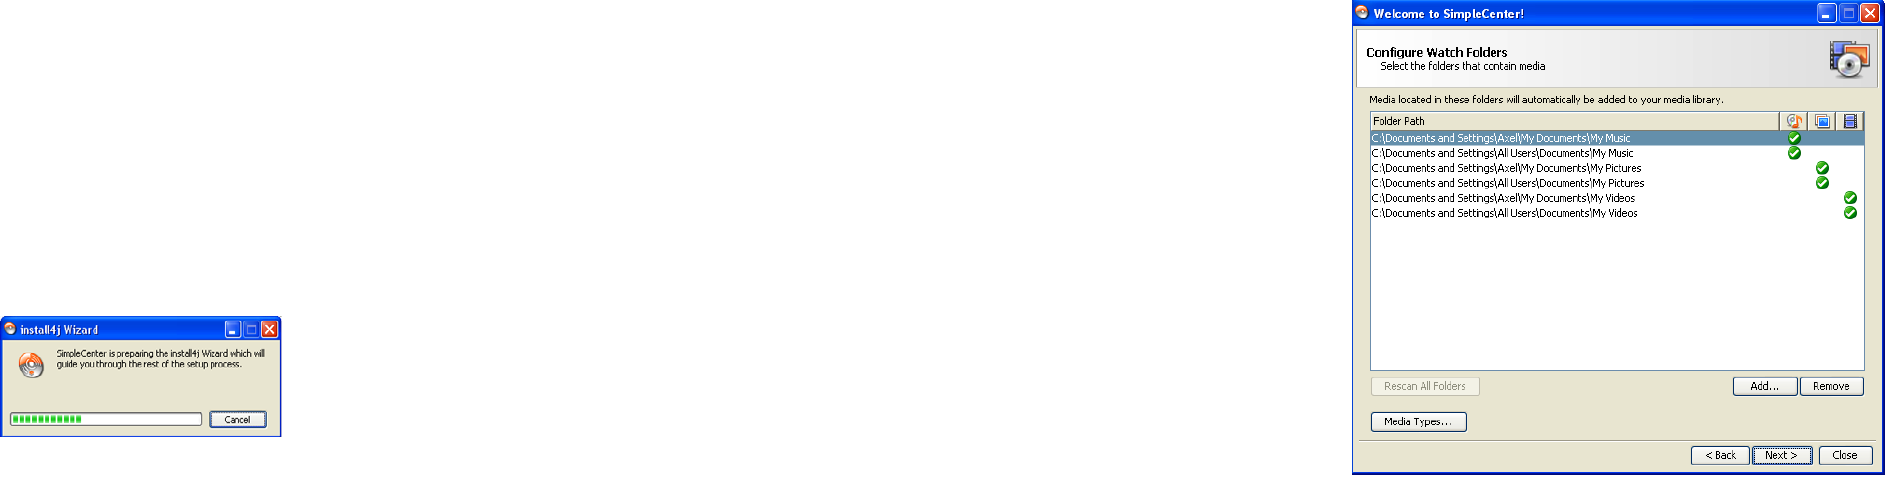
Add your Media to
SimpleCenter
When you use SimpleCenter for the rst
time, it will ask you to congure Watch
Folders that contain media. As a default,
SimpleCenter will set standard media
directories for music, pictures, and videos:
You can remove any of those directories
or add additional ones. SimpleCenter will
automatically scan these Watch Folders
and add the content to its database.
Please note that you can specify which
media type (music, photo, and movie)
should be used for each directory. This
specication avoids having cover art in a
music folder showing up as a picture in
the database view.
You can always get back to this menu by
selecting the Music, Pictures or Movies
tab located on the top menu bar and by
selecting the Add Music, Add Pictures
or Add Movies. You then can choose
Congure Watch Folders. Plus, you can
add individual media les or folders to
the database.
Choose your language and click OK.
Choose your country and click Next.
Accept the License Agreement by
clicking Next.
Additional dialog screens will follow until
SimpleCenter setup is complete. Start
SimpleCenter by clicking Finished or by
clicking the SimpleCenter icon located on
the desktop.
The rst time you run SimpleCenter,
you will be asked to register in order to
have a free 30-day trial of SimpleCenter
Premium. Some of the great features
of SimpleCenter Premium include: CD
Ripping with automatic assignment of
artist name, album name, track titles,
cover art and more; Remote Access that
lets you access your digital media from
anywhere; and Smartsync that allows you
to transfer digital media content from
your PC to your network devices and your
portable MP3 players (like PlayStation
Portable, Blackberry or Nokia Nseries) and
from your devices to your PC.
After the free 30-day trial, the
SimpleCenter Premium features will no
longer be available unless you purchase
the upgrade. You may skip the registration
by clicking Next.
Install SimpleCenter software
onto your PC
Install SimpleCenter on any PC that
contains pictures, movies, music or
podcasts that you want to use with
EZfetch to play on your TV.
Insert the SimpleCenter CD into the
CD/DVD drive of your PC. If the install
program does not start automatically,
click Windows Start > Run. In the Run
command box, type “D:\simplecenter.exe”,
where D: represents the drive letter of
your CD-ROM.
The install wizard that guides you through
the setup process will appear.

6 7
Understanding Your
Home Network
To connect EZfetch to your home
network, you will need to know if your
network is wired, wireless, or ad-hoc (no
home network but have a PC with built-in
Wi-Fi networking), and you will need to
know if your IP address is automatically
assigned or manually entered (xed). If
your network is wireless, you will also
need to know your Network Name (SSID)
and Encryption Type.
If you know this information, you may
skip to Connect EZfetch to your Home
Entertainment System. If you do not
know this information, the directions
that follow tell you how to nd out! The
directions apply to both Windows XP and
Windows Vista, but because they have
dierent operating systems, the headings
in Windows Vista will be slightly dierent.
Begin by determining your home network
conguration from the three choices, and
then follow the directions to understand
your home network settings.
I have a wired home network.
1. Conrm that your PC is connected to a router using an Ethernet networking
cable (LAN RJ45).
2. On your PC, determine if your IP Address is automatic or xed:
a. On the Windows taskbar, click the Start button, then click Control Panel.
b. Double-click the Network Connections icon.
c. If an Ethernet or wireless LAN adapter is present in your computer, you
should see an entry for Local Area Connection. Double-click that entry.
d. Select Internet Protocol (TCP/IP). Click Properties and verify that Obtain
an IP address automatically is selected as shown in the gure below.
e. If you see this setting, your IP
Address is automatic. If you do
not see this setting and you are
using specic IP addresses, your IP
Address is xed.
f. Click OK and close all windows.
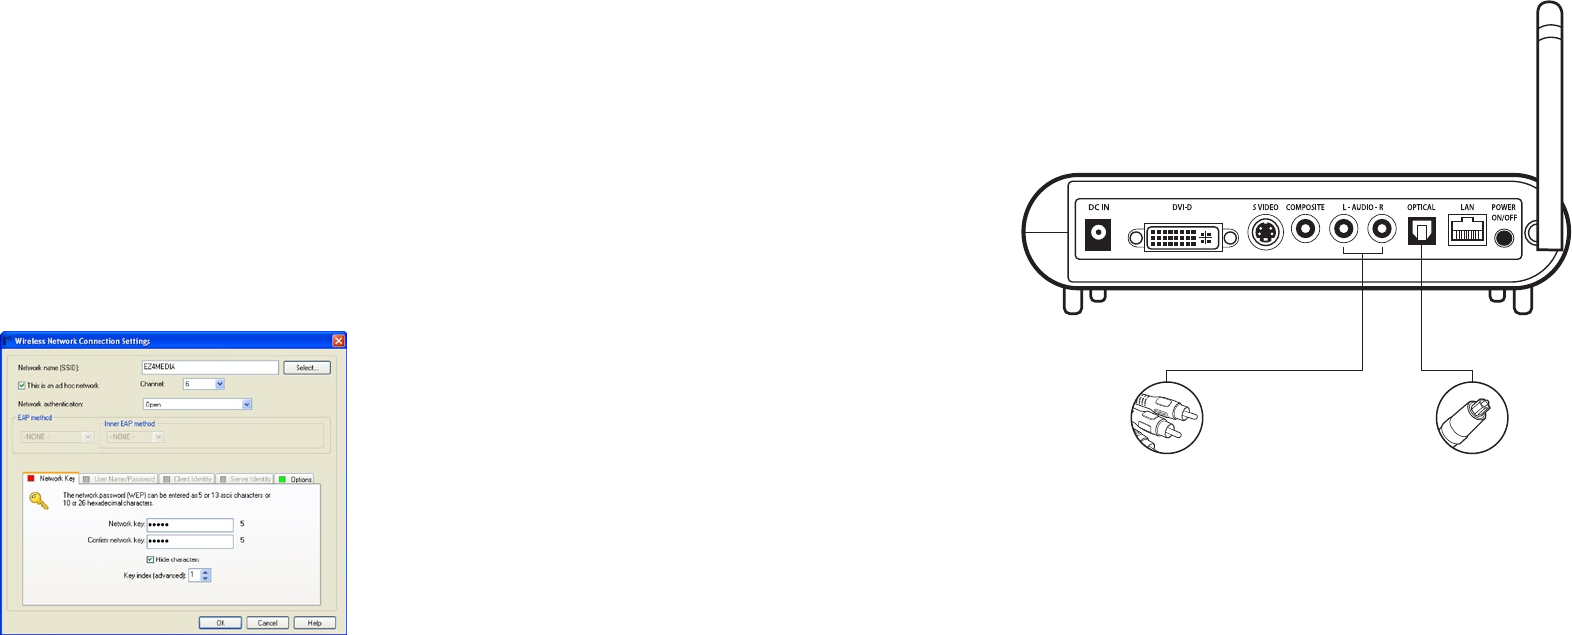
I have a wireless home network
that has a wireless router or
access point.
1. On your PC, determine if your IP
Address is automatic or xed by
following the directions in the previous
section.
2. To determine your Network Name
(SSID) and your Encryption Type, please
refer to your wireless router manual
to determine how to best access that
information.
Tip: Typically, you can access your
router settings by opening Windows
Internet Explorer and typing in the router
address, i.e. a typical router address is
http://192.168.1.1. Consult your router
manual for the correct router address.
This will open the router’s web page and
you can obtain the required information
from the status page.
3. Enable an 802.11g access point for
better performance.
Encryption Type Information and Tips:
• WPA2-PSK: best solution that provides
the highest level of security.
• WPA-PSK: older version of WPA. Only
choose this option if WPA2-PSK is
not available on your router or other
computers on your network are not
compatible with the newer standard.
• WEP–128: older security standard, less
secure than WEP.
• WEP–64: provides the least protection.
• None: There is no protection. This
mode allows anyone to connect to your
network and see your data and media
content. To protect your media les, this
mode should not be used.
• WPA: write down your home network’s
pre-shared key so you can use the
same one for EZfetch. WEP: write down
your home network’s password or
hexadecimal key so you can use the
same one for EZfetch. Typically, when
a password is entered in the Settings
section of EZfetch, a hexadecimal key
is generated automatically. However,
a hexadecimal key can also be entered
manually.
8 9
I do not have a home network, but
I have a PC/laptop with built-in
Wi-Fi networking.
1. On the Windows taskbar, click the Start
button, then click Control Panel.
2. Double-click the Network Connections
icon.
3. If a wireless LAN adapter is present
in your computer, you should see
an entry for Local Area Connection.
Double-click that entry to start the
wireless connection setup or start your
Wi-Fi utility by right-clicking the signal
strength bar on the lower right corner
of your screen.
4. Enter a network name (SSID), i.e.
EZ4Media.
5. Check the This is an ad hoc network
box.
6. Enter a password (or hexadecimal key)
for WEP encryption if protection is
desired.
7. Go back to the Network Connections
icon and click Properties.
8. Verify that Client for Microsoft
Networks and Internet Protocol (TCP/
IP) are present. If not, select Install and
add them.
9. Select Internet Protocol (TCP/IP). Click
Properties and verify that Obtain an IP
address automatically is selected.
10. Click OK and close all windows.
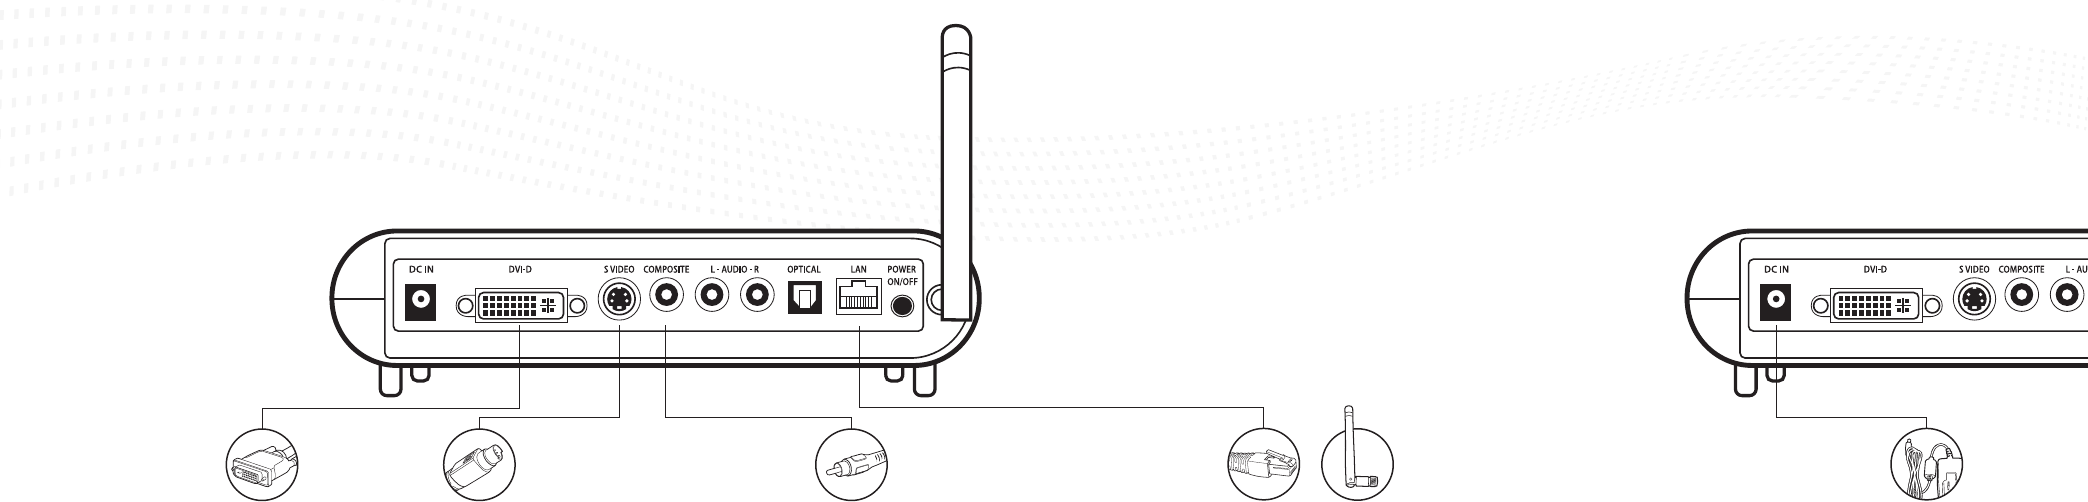
Connect EZfetch to your
Home Entertainment System
All audio, video and network connections
are located on the rear panel of EZfetch.
Analog Audio
Plug the white and red connectors of
the supplied RCA cable into the color-
matching L-AUDIO-R jacks on EZfetch.
Plug the other end of the RCA cable into
the matching jacks on your television or
audio/video system.
Digital Audio
Plug an optical audio connector into
the OPTICAL jack on EZfetch and the
matching opposite end of the cable to
the optical digital audio input of your
audio system.
Note: This cable is not supplied.
Audio Connection
EZfetch can output either analog or
digital audio. Based on the type of audio
system you have, use a standard RCA
analog audio cable or an optical digital
audio cable to connect EZfetch and your
audio system.
10 11
Wired:
Ethernet Connector (LAN RJ45)
Plug the supplied Ethernet cable into the
LAN port on EZfetch and plug the other
end into a router, hub, or switch on your
network.
Wireless: Antenna
Attach the supplied wireless antenna to
EZfetch by threading it onto the antenna
connector. Be sure the antenna is secure
and in an upright position.
Power Connection
DC Power Supply Cord
Plug the power supply cord into the DC IN
jack on EZfetch and plug the end with the
EU/USA/EK changeable plug into a power
outlet.
DVI-D/HDMI
Plug the supplied DVI-D cable into the
DVI-D input on EZfetch and the matching
opposite end of the cable into the DVI
input on your television or audio/video
system. If you want to connect to HDMI
input on your television or AV receiver,
use the supplied DVI-D/HDMI adapter.
Note: An HDMI cable does not carry an audio
signal. You will need to use analog audio or optical
audio for the system to work properly.
S-Video
Plug a standard S-Video cable into
EZfetch’s S-VIDEO jack and the matching
opposite end into your television.
Note: This cable is not supplied.
Composite Video
Plug the supplied RCA cable into EZfetch’s
yellow COMPOSITE jack and the matching
opposite end of the cable into either
your TV or your AV-receiver as auxiliary
AV input. If your TV has a SCART input
(European), use the supplied RCA/SCART
adapter.
Video Connection
EZfetch can connect to your television via
DVI-D/HDMI (digital), S-Video or composite
video. Based on the type of television
you have, select one of the three ways to
connect EZfetch and your television.
Network Connection
The connection between EZfetch and
your home network can be wired or
wireless. Select one of the two ways to
connect EZfetch to your home network.
12 13
HOME
SERVERS DEVICES SETTINGS
MOVIE PHOTO
1 2
OK
3
45 6
78 9
0
MUSIC
ZOOM PAGE
MEDIA BAR
VOL
RESET @ ABC DEF
GHI JKL MNO
PQRS TUV WXYZ
PAGE
7
<
8
VIDEO OUT
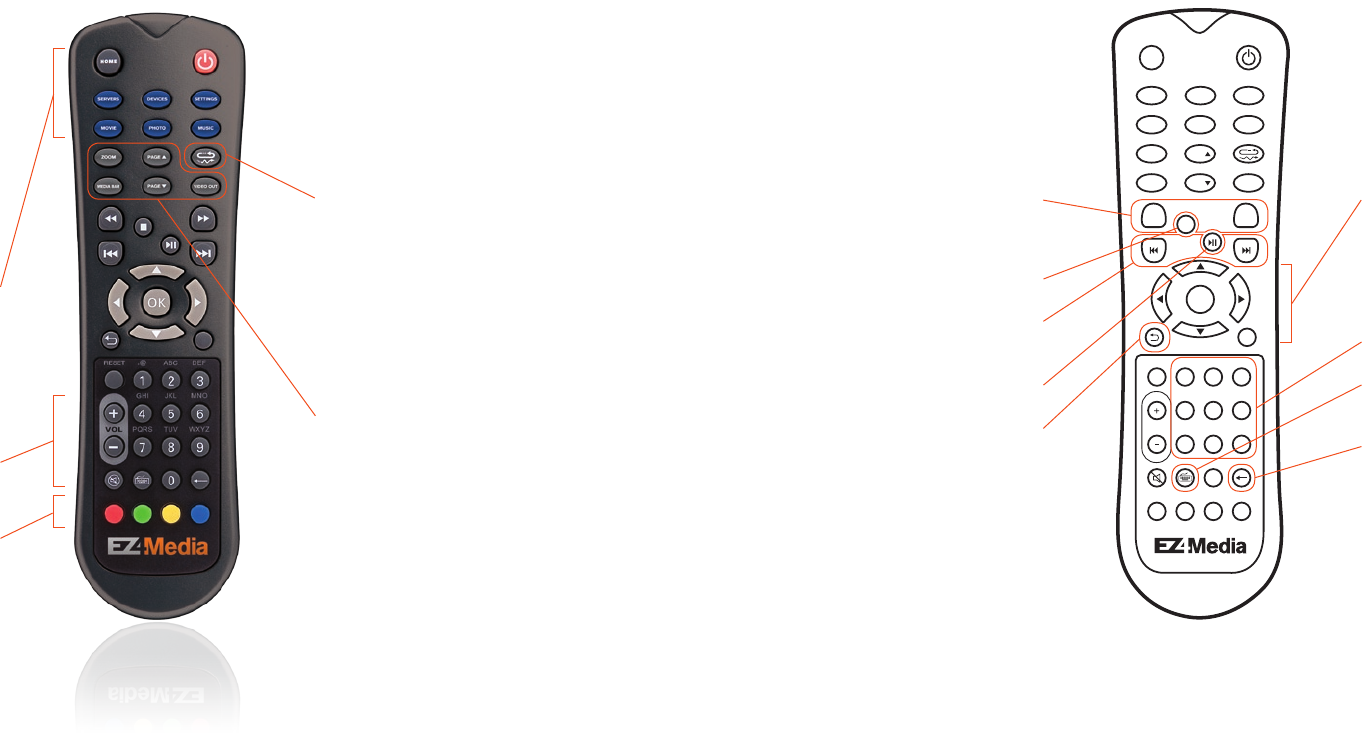
Using the Remote Control
On the back of the remote control, use the
nger tab release to remove the battery
compartment cover. Properly insert the
provided batteries and snap the battery
compartment cover back into place.
Home
Navigate to the home screen
Servers
Lists available media servers
Devices
Lists available devices
Settings
Lists network and system settings
Movie, Photo, Music
Go directly to each category
Volume
Volume adjustment
Mute
Turns o audio
Color Keys
Move directly to color-coded
sub-categories
Playback Mode
Change the playback as follows:
Repeat One
Repeat All
Shue
Repeat All-Shue
Video Out
Switches from analog video output to
DVI-D/HDMI output when pressed for 10
or more seconds during initial start up
Page up / down
Provides fast movement through a list of
items
Zoom
Zoom in on photos when in the photo
view mode. Can combine with the Menu
Navigation keys.
Media Bar
Shows/removes current
playback information
REW / FF
Hold down to adjust the Rewind
or Fast Forward speed
from 2x to 32x
Stop
Stops media playback
Previous / Next
Skip to the previous or next item
for playback
Play / Pause
Toggles between pause and play
Return
Navigate back to the previous page
Menu Navigation
Navigate menus with the left, right, up
and down keys. Select items with the
OK key.
When in the photo view mode, use
these keys to pan over a photo.
Multi-tap Input
Enter alphanumeric text
Keyboard
Brings up an on-screen keyboard
for text entry
Delete
Delete text while in text entry mode
14 15
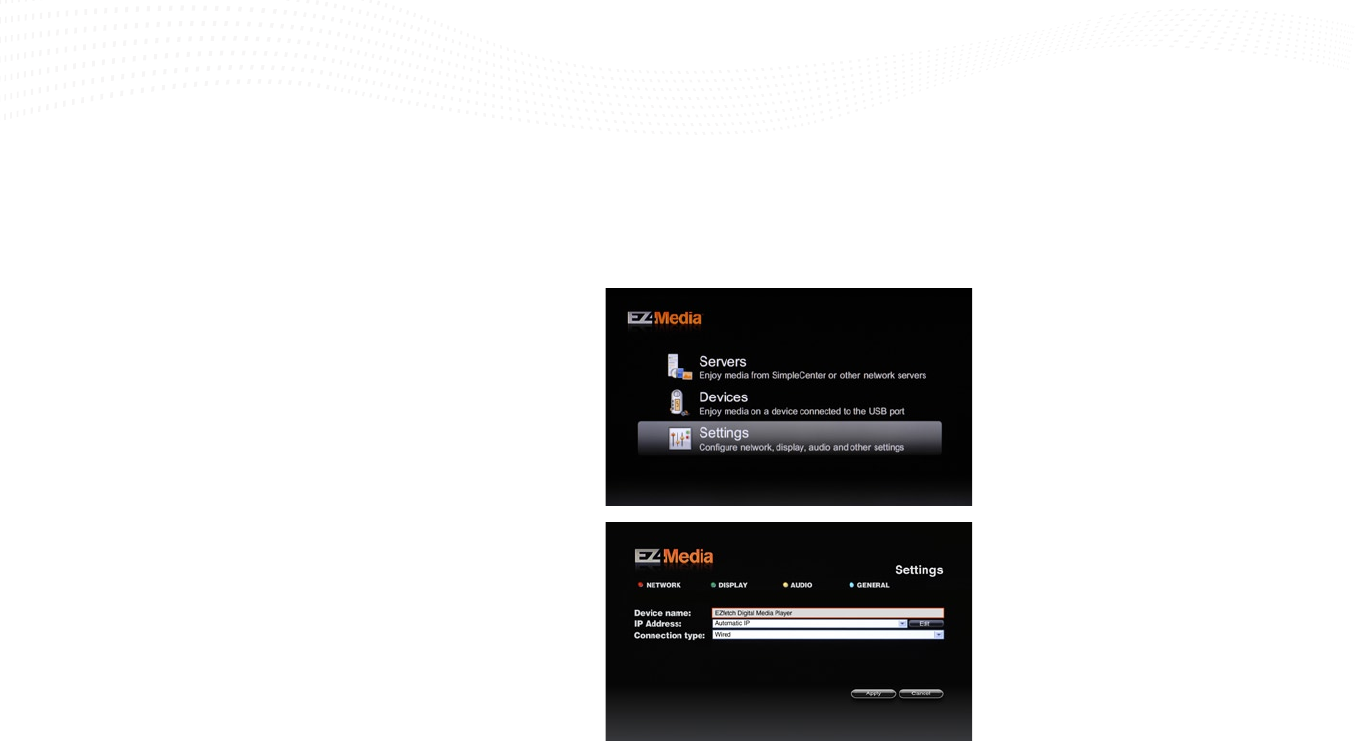
Device Name
Create a new device name or use the
default name (EZfetch Digital Media
Player) that will be used and seen on the
network by other devices, such as your
PC. Use the alphanumeric keys on the
remote control or press the Keyboard key
to bring a keyboard on-screen that you
can use with the navigation buttons.
IP Address
Choose either Automatic IP or Fixed IP
(static) that matches your home network
set-up.
Connection Type
Choose Wired or Wireless, based on the
conguration of your home network.
If your connection type is Wireless,
complete the following:
Network name
Enter your wireless network name (SSID)
or scan for available networks. Then
choose a network to be on. This could be a
wireless router, wireless access point or an
Ad-Hoc (computer to computer) network.
Encryption Type
Enter the encryption type that matches
the encryption of your home network,
then select Edit. If you don’t use
encryption in your home network, select
None. If you have WEP encryption, select
the appropriate encryption type and
select Edit. Then either enter the Password
or the Key. The Password and Key are what
you established on your home network.
If necessary, refer back to Encryption Type
Tips in the section Understanding Your
Home Network.
Network Status
Once you have entered the settings with
the Apply button on the bottom of the
screen, EZfetch will request that you
reboot. After EZfetch has rebooted, your
wireless network connection will be listed
in this area.
Display
For Video Output, chose the setting
that’s right for your television. For TV
Standard, choose the screen resolution
that is appropriate for your TV. PAL
and PAL-Widescreen apply to the
European television standard; NTSC and
NTSC-Widescreen apply to the American
television standard; and HD-720p and
HD-1080i apply to the global high-
denition standard.
Audio
The audio settings allow you to congure
the digital audio output (SP/DIF). If you
do not have digital audio, select O.
Otherwise, select between RAW, PCM
48KHz or PCM 96KHz based on the
required settings for your audio system. In
most cases, the RAW setting will work.
General
In Slideshow delay, you can set the time
photos in a slideshow appear.
The section, USB upgrade, is for
upgrading EZfetch to the latest version.
As firmware upgrades become available,
they can be obtained on the EZ4Media
website at www.ez4media.com.
When it’s time to install an upgrade,
download the upgrade (filename.mbu)
onto your computer and then copy it onto
the supplied USB Flash Drive. Insert the
USB Flash Drive into EZfetch’s USB port
and in the USB upgrade section, click
APPLY. EZfetch will look for any file with
an .mbu extension and start the upgrade
process. When the upgrade is complete,
EZfetch will automatically re-start with
the new upgraded firmware.
When installing an upgrade, make sure
there is only one upgrade file (the latest
version) on your USB Flash Drive. Remove
any previous upgrade file.
Congratulations! Your setup is complete.
Initial Start-Up
Press the black POWER ON/OFF button
located on the back panel. The system will
start up automatically.
Important: EZfetch comes with a default
analog video setting (Composite or
S-Video). If you are using the DVI-D/HDMI
(digital) setting instead of the analog
video setting, you must press the VIDEO
OUT button on the remote control for
10 seconds during start-up to switch
EZfetch from analog video output to
DVI-D/HDMI output.
Configure EZfetch
Upon the initial startup, you need
to congure EZfetch for your home
entertainment system and home network.
From the main menu, use the remote
control to select Settings by using the
navigation keys or by pressing the blue
SETTINGS key.
You can quickly move to
the Settings sub-categories
by using the Color-Coded
Fast Keys. After you make
your entries in each of the
sub-categories, click the
Apply button to activate your
settings.
Network
Congure EZfetch by using
information about your
home network. You may have
determined this information in
the Understanding Your Home
Network Settings section.
!
16 17
Play Your Pictures, Music,
Movies and Podcasts on your
Home Entertainment System
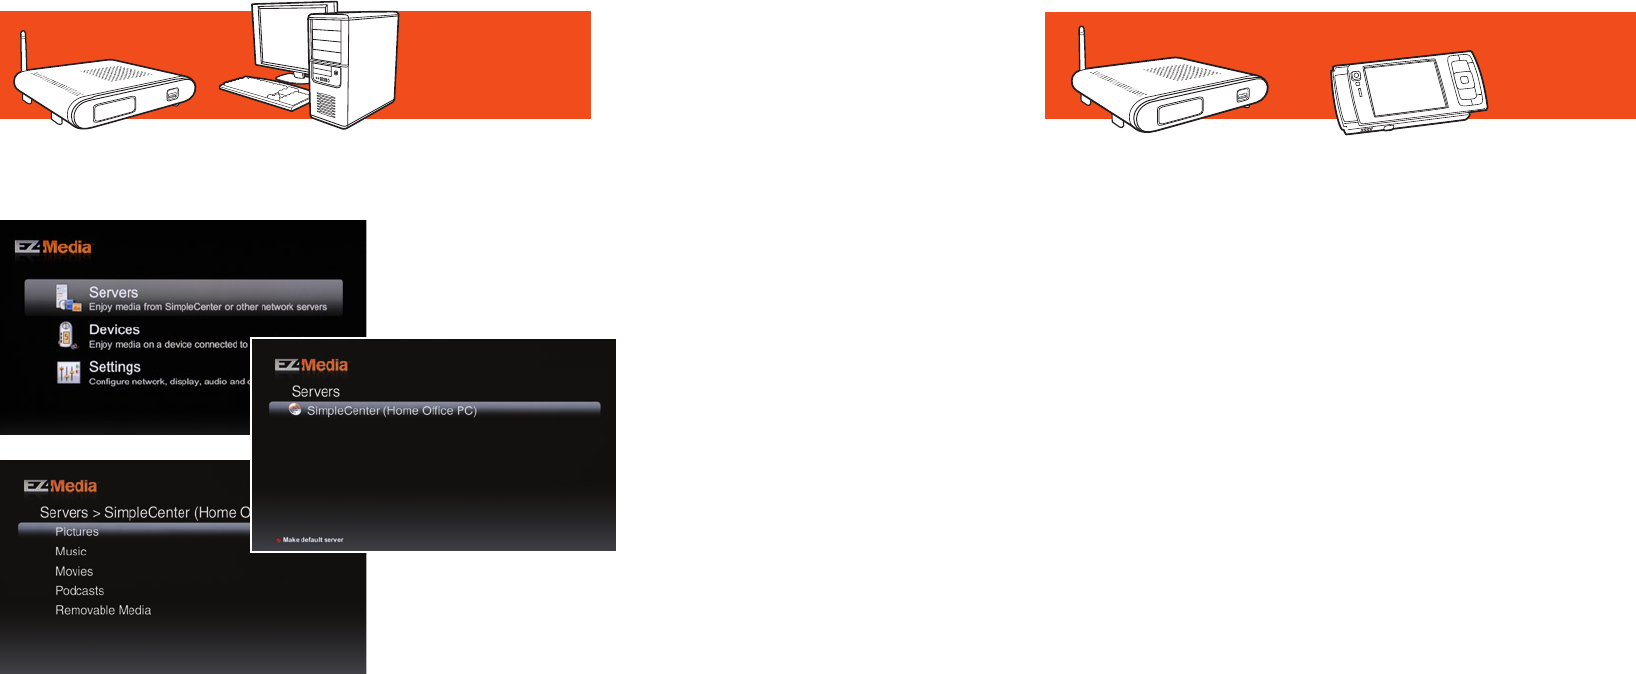
EZfetch and your PC
With SimpleCenter software running on
your PC, all your pictures, music, movies
and podcasts can stream from your PC right
to EZfetch.
1. From the main screen, use the remote
control to select Servers.
2. One or more media servers may appear
in the list. Select SimpleCenter from
the list of possible servers. You can also
make SimpleCenter the default server
by pressing the red key on the remote
control. This will enable you to directly
access your media using the Movie,
Photo and Music keys.
3. From the main menu, choose from
Pictures, Music, Movies and Podcasts
using the navigation keys on your remote
control. Then select exactly what you
want to see or hear by browsing through
the choices. Now relax and enjoy, as
EZfetch plays your selection on your
home entertainment system.
EZfetch and a Nokia Nseries
Device
An unprecedented feature of EZfetch is
that it was designed to be compatible
with Wi-Fi enabled Nokia Nseries devices.
In fact, it’s the only digital media player in
the world today that can reliably stream
digital media from a Nokia Nseries device,
directly to your home entertainment
system.
At the time of printing this User Guide,
Wi– enabled Nokia Nseries devices
included the N95, N93i, N93, N91, N82,
N81, N80i, N80 and N76.
1. Get your Nseries device and EZfetch
talking to each other by going through
Connection Manager on your Nseries
device to select your wireless network
and dene your access point.
2. Go to Home Network to choose
the home access point and turn on
Connect Sharing.
3. To look at pictures you just took or a
movie for example, select Gallery on
your Nseries device.
4. Open Images & video.
5. Find the picture you want to view or
the movie you want to see and press
Options.
6. Choose Show via home network.
7. When you’re asked to select the device,
choose EZfetch Digital Media Player
or the name you created for EZfetch.
That’s it. Your Nseries device has been
your server, and your selection plays on
the big screen of your TV.
Alternatively, you can also browse the
content on your Nokia Nseries device
by using the EZfetch remote control.
Select Servers from the main screen and
select your Nseries device from the list of
possible servers. Then navigate through
all the content on your Nseries device
and select what you want to play on your
home entertainment system. (You may
need to accept this connection on your
Nseries device).
All of this can be done without a home
network or a PC, too. With EZfetch and
your Nokia Nseries device in a wireless,
ad-hoc network, you can stream media
directly from your Nokia Nseries device
to EZfetch, and have it play on your home
entertainment system.
1
2
3
18 19
EZfetch, your PC and a Nokia
Nseries Device
In addition to playing media from
your Nseries device on your home
entertainment system, you can also use
your Nseries as a remote control to access
media from a PC that has SimpleCenter
running on it. 1. Go to Gallery.
2. Scroll to Home Network and select it.
3. Choose SimpleCenter on your PC as the
media server to access your media.
4. Browse your media library and make
your selection.
5. Choose EZfetch as the media renderer
and you’ll have your selection playing
on your entertainment system.
You can do other fun things with your
Nokia Nseries device and EZfetch too, like
share media. If EZfetch is playing a song
on your audio system that came from
your PC’s media library, and you want to
take it with you on your Nseries, just go to
Options and copy it.
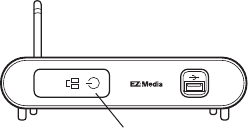
• Create a lter or combination lter to
select content in SimpleCenter and
choose a name for the lter.
• Click Transfer Music, for example, to
transfer selected music content to
the USB Flash Drive. SimpleCenter
will automatically create a directory
structure organized by Artist and then
Album so you can easily navigate the
content using EZfetch.
2. Insert the USB Flash Drive into the USB
port on the front panel of EZfetch.
3. From the main menu, use the remote
control to select Devices.
4. Select the USB device and select the
media you want to enjoy. You’ll have
your media playing without the need to
have your PC on and running.
EZfetch and a USB Flash Drive
EZfetch can play media from most USB
Flash Drives. The USB Flash Drive that’s
included with every EZfetch media player
is a perfect one to use.
1. Copy pictures, music, movies or
podcasts onto a USB Flash Drive by
simply dragging and dropping files. Or
use SimpleCenter as described below to
create an easy-to-navigate directory.
• Insert the enclosed USB Flash memory
in the USB slot of your computer.
• Select Devices in the SimpleCenter
menu bar.
• Click on Add Device and choose the USB
Flash Drive as the new device.
20 21
Troubleshooting
Follow the directions below to solve the
most common operating problems. If
you are unable to resolve the problem,
please go to the Support page at
www.ez4media.com for further assistance.
No Television Display
1. Check to see that EZfetch is plugged in.
2. Turn o EZfetch using the POWER ON/
OFF button on the back panel.
3. Conrm that EZfetch is connected to
your TV or monitor and the correct AV
input channel is selected.
4. Turn on EZfetch and check if the Power
Indicator Light is lit up. If there is no
Power Indicator Light, turn o EZfetch
using the POWER ON/OFF button on
the back panel. Wait for 30 seconds and
then turn on EZfetch. During the start-
up/loading process, press the VIDEO
OUT button on the remote control for
10 seconds.
Remote Control Does Not Work
1. Verify that you have inserted the
supplied batteries, or new batteries,
into the remote control.
2. Check to see that EZfetch is connected
to power.
3. Turn o EZfetch using the POWER ON/
OFF button on the back panel and turn
it back on again.
4. Check to see if the Power Indicator
Light is lit up. If it is not, the problem is
not with the remote control.
5. Press any button on the remote control
to verify that each button press causes
the Power Indicator Light to blink.
No Wired Network Connection
1. Verify that EZfetch is connected to
power.
2. Verify that the supplied Ethernet cable
is plugged into the LAN port on EZfetch
and that the other end is plugged into a
router or hub on your network.
3. Verify that your router is turned on.
4. Check your Network settings as
outlined in Congure EZfetch.
No Wireless Network Connection
1. Verify that EZfetch is connected to
power.
2. Verify that EZfetch’s antenna is properly
attached to the antenna connector.
3. Verify that your router is turned on.
4. Check your Network settings as
outlined in Congure EZfetch.
No Media Server Visible
1. Check to see that SimpleCenter
software is installed and running on
your PC.
2. In SimpleCenter Settings on your PC,
check to see that the Media Server is
enabled.
3. Verify that your PC is connected to your
wired or wireless home network.
For wired networks:
EZfetch is to be connected to a hub,
switch or router using a standard Ethernet
cable. If you want to connect EZfetch
directly to a PC, use a crossover Ethernet
cable (not supplied). Make sure all
Ethernet cable connections are secure
and make sure power is turned on to the
connected hub or PC.
For wireless Wi-Fi networks:
Please be aware that the wireless data
rate and throughput decreases as the
distance between the Access Point (WAP)
or Wireless Router and EZfetch increases.
Your access point or router may be too
far away from EZfetch and it may be
necessary to move them closer together.
If you are using a wireless connection
between the access point or router, and
the computer that serves the media
content, you might also need to move
them closer together too. If your access
point is congured to disable broadcast
of SSID, EZfetch will not be able to detect
the access point and you will have to
manually congure your wireless settings
as described in the Network setup.
IP Address: If EZfetch does not receive a
valid IP address, try the following: Verify
that a working DHCP server is on your
network. PCs on the network should
get IP addresses in the correct range.
If EZfetch is set to use an automatic
IP Address (DHCP) and fails to obtain
an IP Address from the DHCP server, it
will resort to an auto IP Address in the
range of 169.254.x.x. You can use a xed
(static) IP Address if there is a problem
connecting to the server.
SSID: If you are using a wireless network,
verify that EZfetch is associated with the
correct SSID. The SSID that is being used
can be displayed by following instructions
in Congure EZfetch.
Wireless Security: If you are using a
wireless network, verify that the security
settings on EZfetch match the settings on
your access point.
4. Check your network settings as
outlined in Congure EZfetch.
Status Message Display
Occasionally, EZfetch will display a status
or error message (i.e. Server has left
network). Press the OK key on the remote
control to acknowledge and remove the
message.
Power Indicator Light
22 23
Technical Support
The EZ4Media website,
www.ez4media.com, contains the latest
user documentation, software updates
and technical support information for
EZfetch and other EZ4Media products.
Supported Multimedia
Formats
For detailed information about
supported formats, go to
www.ez4media.com/downloads and
select EZfetch Supported Formats PDF.
Picture:
BMP, GIF, JPEG, PNG
Music:
AAC+, AAC-LC, LPCM, MP3, MP3Pro, WMA,
WMAPro
Movie:
DivX 3, DivX 4, DivX 5 HD,
DivX 5 SD, DivX 6 HD, DivX 6 SD,
H.264 AVC MPEG4 part 10 HD,
H.264 AVC MPEG4 part 10 SD, MPEG-1,
MPEG-2 HD, MPEG-2 SD, MPEG-2 VOB,
MPEG-4 part 2 ASP, Quicktime (3GPP),
VC-1 HD 720p, VC-1 HD 1080i, WMV 7,
WMV 8, WMV 9, WMV Pro, WMV HD 720p,
WMV HD 1080i, Xvid
Specifications
Network
Wireless: 802.11 b/g
Wired: 10/100 Mbps Ethernet
Wireless Security
Up to 128-bit WEP
WPA-PSK/WPA2-PSK Encryption
Compliancy Standards
UPnP AV v1.0
DLNA v1.5
UL, CE and FCC
USB
High-speed 2.0
Supported OS
Windows XP and Windows Vista
Connections
LAN RJ45
DVI-D (DVI-D to HDMI Adapter included)
S-Video and RCA Composite Video
RCA Left and Right Analog Audio
and S/PDIF Digital Audio
USB
Power
EU/USA/UK changeable plug
100-240AC/50-60hz
18w consumption
Approximate Physical
Specications
7.5 W x 1.5 H x 7 D inches
190.5 W x 40 H x 178 D millimeters
1lb. 3oz./.55 kg
Warranty
Complete warranty information is available at
www.ez4media.com.
Trademarks
EZfetch is a trademark of EZ4Media, Inc. Microsoft and
Windows are trademarks or registered trademarks of Microsoft
Corporation. SimpleCenter is a trademark of Universal
Electronics, Inc. Other brand and product names are registered
trademarks or trademarks of their respective holders.
Statement of Conditions
In the interest of improving internal design, operational function,
and/or reliability, EZ4Media reserves the right to make changes
to the products described in this document without notice.
EZ4Media does not assume any liability that may occur due
to the use or application of the product(s) or circuit layout(s)
described herein.
FCC Compliance
This device complies with part 15 of the FCC Rules. Operation is
subject to the following two conditions:
(1) This device may not cause harmful interference,
(2) This device must accept any interference received, including
interference that may cause undesired operation.
This equipment has been tested and found to comply with the
limits for a Class B digital device, pursuant to part 15 of the FCC
Rules. These limits are designed to provide reasonable protection
against harmful interference in a residential installation.
This equipment generates, uses and can radiate radio
frequency energy and, if not installed and used in accordance
with the instructions, may cause harmful interference to
radio communications. However, there is no guarantee that
interference will not occur in a particular installation.
If this equipment does cause harmful interference to radio or
television reception, which can be determined by turning the
equipment o and on, the user is encouraged to try to correct
the interference by one or more of the following measures:
• Reorient or relocate the receiving antenna.
• Increase the separation between the equipment and receiver.
• Connect the equipment into an outlet on a circuit dierent from
that to which the receiver is connected.
• Consult the dealer or an experienced radio/TV technician
for help.
Modications: Any changes or modications not expressly
approved by the grantee of this device could void the user’s
authority to operate the device.

Copyright © 2007 EZ4Media, Inc.
All Rights Reserved
End user license agreement for SimpleCenter and all elements, components, and features thereof, whether provided by Universal
Electronic Inc. or a third-party. Redistribution, resale, or rental not permitted.
User Guide version 1.0
www.ez4media.com